steel folding scooter & wheelchair carrier instructions ... · steel folding scooter &...
TRANSCRIPT

Steel Folding Scooter & Wheelchair Carrier Instructions for Part # SC400-V2
Page 1Rev. 091219 DiscountRamps.com • 1-888-651-3431
General Guidelines• It is the user’s responsibility to read and follow all instructions.• Keep these instructions with the product at all times and review before each use.• It is the responsibility of this product’s owner to furnish the instructions to any person that borrows
or purchases the product.• Inspect the product before use to ensure it is assembled properly and all parts are in safe working
order and free of defects.• Never modify this product in any way.• All circumstances cannot be addressed in these instructions. Please use common sense and
practice general safety measures when using this product.• Parts and/or instructions are subject to change without notice.
Safety• Follow all warnings and instructions marked on the product.• Do not occupy the mobility aid while loading the carrier.• Do not stand on the carrier.• Never exceed vehicle tongue weight rating.• Do not exceed the 500 lb carrying capacity.• Hitch adapters may affect the weight capacity of the carrier. If using a hitch adapter, always check
its limitations before use.• Always store the carrier in a safe place.• Improper use, storage, or installation of the carrier could result in death or serious injury.• Do not put the product on any kind of trailer.• NOT recommended for tow-behind trailers including 5th wheel trailers and camping trailers.• Periodically check nuts and bolts for tightness.
Tools Required• 17mm wrench• 13mm or 1/2" wrench• 19mm or 3/4" wrench
• 7/8" or 22mm wrench• Phillips screwdriver• 10mm Allen wrench (included)

Page 2Rev. 091219 DiscountRamps.com • 1-888-651-3431
Parts
Part Description QuantityA Basket and Ramp Assembly 1B Hitch Tube Assembly 1C Ramp Bracket 1D Reflector with Mounting Screw 2E 12mm Pin w/Clip 2F Double Spring Pull Pin with Handle 1G Single Spring Pull Pin with Handle 1H M14x2.0x30 Bolt 2
Part Description QuantityI M14x2.0 Nut 2J M10x1.5x30 Bolt 2K M10x1.5 Nut 2L M8x1.0x20 Carriage Bolt 2M M8x1.0 Lock Nut 2N Anti-Tilt Locking Device 1O M12x1.5x99 Pinch Bolt Assembly 1P Hitch Pin Set 1
A B
C D E
F G H J
KI
L
M
N O P
Page 3Rev. 091219 DiscountRamps.com • 1-888-651-3431
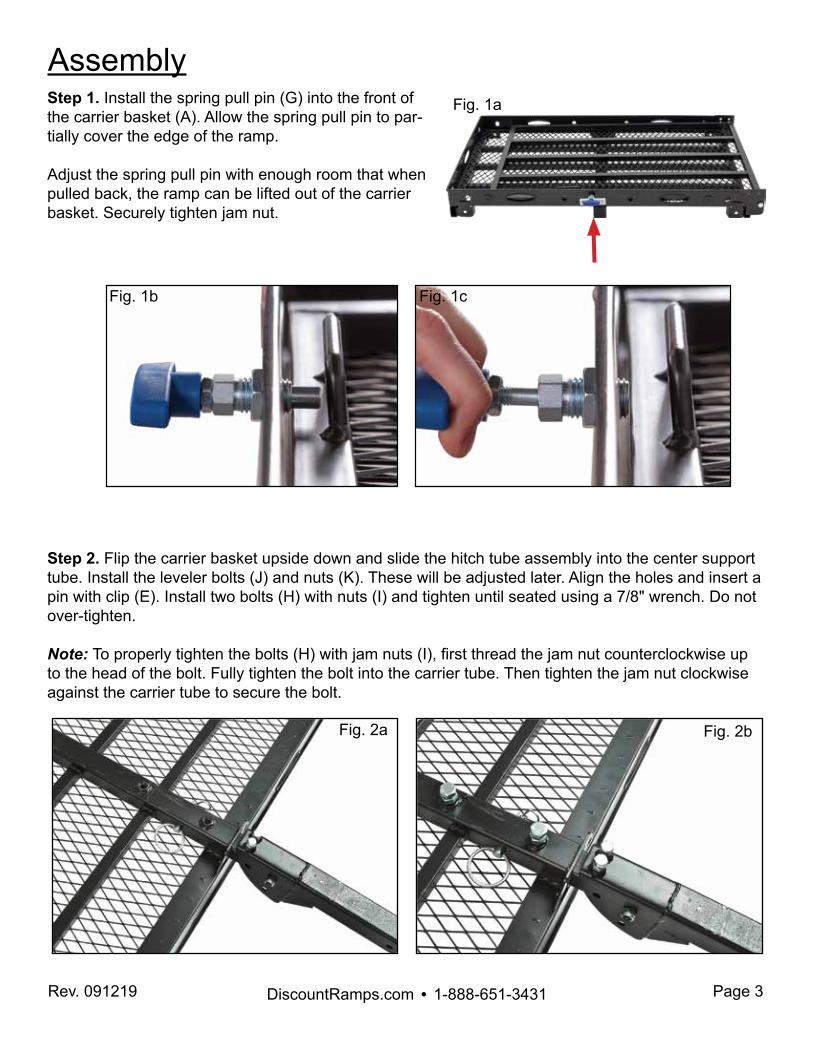
AssemblyStep 1. Install the spring pull pin (G) into the front of the carrier basket (A). Allow the spring pull pin to par-tially cover the edge of the ramp.
Adjust the spring pull pin with enough room that when pulled back, the ramp can be lifted out of the carrier basket. Securely tighten jam nut.
Step 2. Flip the carrier basket upside down and slide the hitch tube assembly into the center support tube. Install the leveler bolts (J) and nuts (K). These will be adjusted later. Align the holes and insert a pin with clip (E). Install two bolts (H) with nuts (I) and tighten until seated using a 7/8" wrench. Do not over-tighten.
Note: To properly tighten the bolts (H) with jam nuts (I), first thread the jam nut counterclockwise up to the head of the bolt. Fully tighten the bolt into the carrier tube. Then tighten the jam nut clockwise against the carrier tube to secure the bolt.
Fig. 1a
Fig. 1b Fig. 1c
Fig. 2bFig. 2a

Page 4Rev. 091219 DiscountRamps.com • 1-888-651-3431
Step 3. Flip the carrier right side up and install the ramp bracket (C) using the carriage bolts (L) and lock nuts (M) using a 13mm or 1/2" wrench. Be sure the square shoulders on the carriage bolts seat fully in the square holes on the carrier.
Note: Fully tighten the carriage bolts only after the ramp is in the upright position and the spring pins are locked into place. This will align the pins with the holes in the ramp as there is some play in the bracket that could cause misalignment if this procedure is not followed.
Step 5. Slide the anti-tilt locking device (N) onto the carrier hitch tube with the 3-bolt side facing the hitch.
Fig. 5
Fig. 4b
Fig. 4b
Step 4. Install the reflectors using a Phillips screwdriver.
Fig. 3a
Fig. 3b
Fig. 3c

Page 5Rev. 091219 DiscountRamps.com • 1-888-651-3431
Step 6a. Anti-Tilt - Preferred Option:
Slide the anti-tilt locking device (L) tight up against the hitch receiver. Insert a hitch pin (N) or pinch bolt (M) and tighten the bolts using a 17mm wrench.
When tightening the bolts, tighten one side first until the rack is level, then tighten the other bolts.
Step 6b. Pinch Bolt - 2nd Option: Insert the carrier into the hitch and install the pinch bolt assembly.
It is required to install either the included anti-tilt locking device or pinch bolt.
Fig. 6a
Fig. 6b
Fig. 7
Installation
Step 7. Securely tighten the hex head pivot bolt on the hitch tube assembly with a 10mm Allen wrench to eliminate side-to-side wobble of the hitch carrier. If the bolt is not properly tightened, it may cause the carrier to not be level.
Page 6Rev. 091219 DiscountRamps.com • 1-888-651-3431
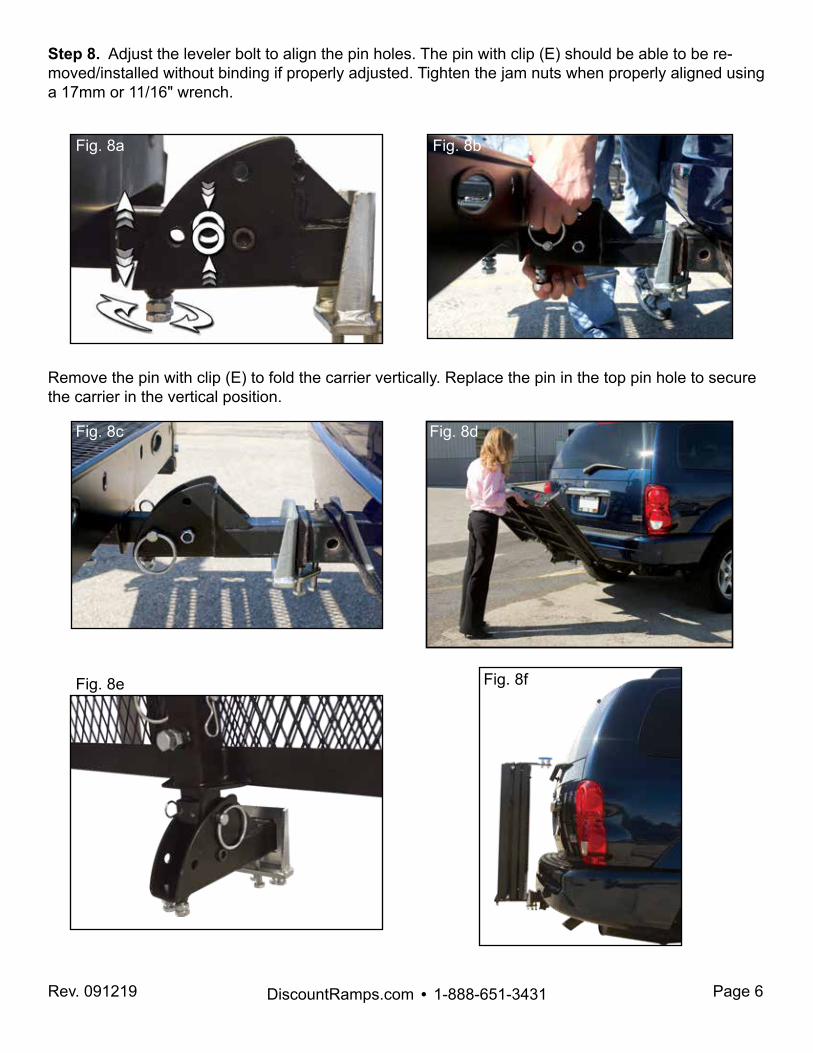
Step 8. Adjust the leveler bolt to align the pin holes. The pin with clip (E) should be able to be re-moved/installed without binding if properly adjusted. Tighten the jam nuts when properly aligned using a 17mm or 11/16" wrench.
Remove the pin with clip (E) to fold the carrier vertically. Replace the pin in the top pin hole to secure the carrier in the vertical position.
Fig. 8c Fig. 8d
Fig. 8e Fig. 8f
Fig. 8a Fig. 8b
Page 7Rev. 091219 DiscountRamps.com • 1-888-651-3431
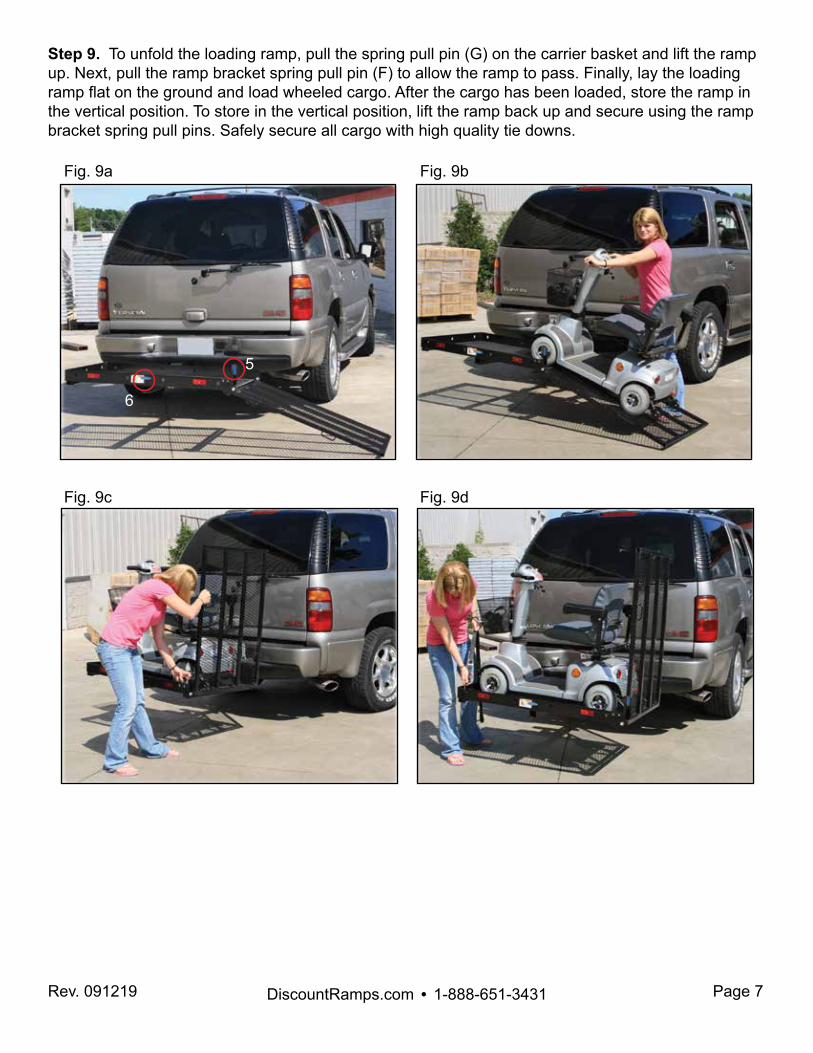
Step 9. To unfold the loading ramp, pull the spring pull pin (G) on the carrier basket and lift the ramp up. Next, pull the ramp bracket spring pull pin (F) to allow the ramp to pass. Finally, lay the loading ramp flat on the ground and load wheeled cargo. After the cargo has been loaded, store the ramp in the vertical position. To store in the vertical position, lift the ramp back up and secure using the ramp bracket spring pull pins. Safely secure all cargo with high quality tie downs.
6
5
Fig. 9a
Fig. 9c
Fig. 9b
Fig. 9d

Page 8Rev. 091219 DiscountRamps.com • 1-888-651-3431
Product Warranty and LiabilityGENERAL PRODUCT WARRANTY: Products purchased from the Authorized Dealer (original place of purchase) or Merchant (“Dealer”) will be free of defects in material and workmanship at the time of receipt, and will meet the specifications stated at the place of purchase transaction or online at the Dealer’s website, under normal use and service when correctly installed, operated and maintained. This product warranty is effective for the period of time stated below, unless otherwise stated in the product instructions or depicted in the product advertisement. All Authorized Dealer warranties are NON-TRANSFERABLE and cover only the original end purchaser. This limited warranty does not cover products purchased through non-authorized dealers. Non-authorized dealer receipts are not accepted for warranty verification.
***Warranty claims must be made directly to the original place of purchase.***
WARRANTY PERIOD: This warranty remains in force for one year from the date of the product’s accepted delivery. The Authorized Dealer offers a one year manufacturer’s warranty for most products unless otherwise specified on the product advertisement.
WARRANTY SERVICE: The Authorized Dealer will replace any defective or malfunctioning part at no charge, including payment of the shipping costs of parts or replacement product to and from the manufacturer. The purchaser is responsible for labor charges. If the product does not meet specifica-tions as depicted in the advertisement, the Authorized Dealer will refund the full purchase price of the product.
Questions regarding the warranty on a specific product and warranty claims should be directed to the Authorized Dealer with whom the purchase transaction was made.
WARRANTY LIMITATIONS: The above warranty does not apply to products that are repaired, modi-fied or altered by any party other than the Authorized Dealer; are subjected to unusual physical stress or conditions (such as overloaded ramps or corrosion), natural disaster, governmental actions, wars, strikes, labor disputes, riots, theft, vandalism, terrorism or any reason beyond reasonable control; are damaged due to improper installation, misuse, abuse, accident or negligence in use, storage, trans-portation or handling, or tampering; or to products that are considered consumable items or items requiring repair or replacement due to normal wear and tear.
Product should be inspected prior to signing for delivery. Product damage incurred during shipping, unless noted on the Bill of Lading at the time of delivery, renders this warranty void.
LIMITED LIABILITY: In no event shall THE AUTHORIZED DEALER be liable to the purchaser or any third party for any indirect, incidental, consequential, special, exemplary or punitive damages arising out of the use of the product, including, without limitation, property damage, loss of value of the prod-uct or any third party products that are used in or with the product, or loss of use of the product or any third party products that are used in or with the product.