step 1: adding alt text to images - california air … accessible pdfs from microsoft power point...
TRANSCRIPT
Making Accessible PDFs from Microsoft Power Point Documents
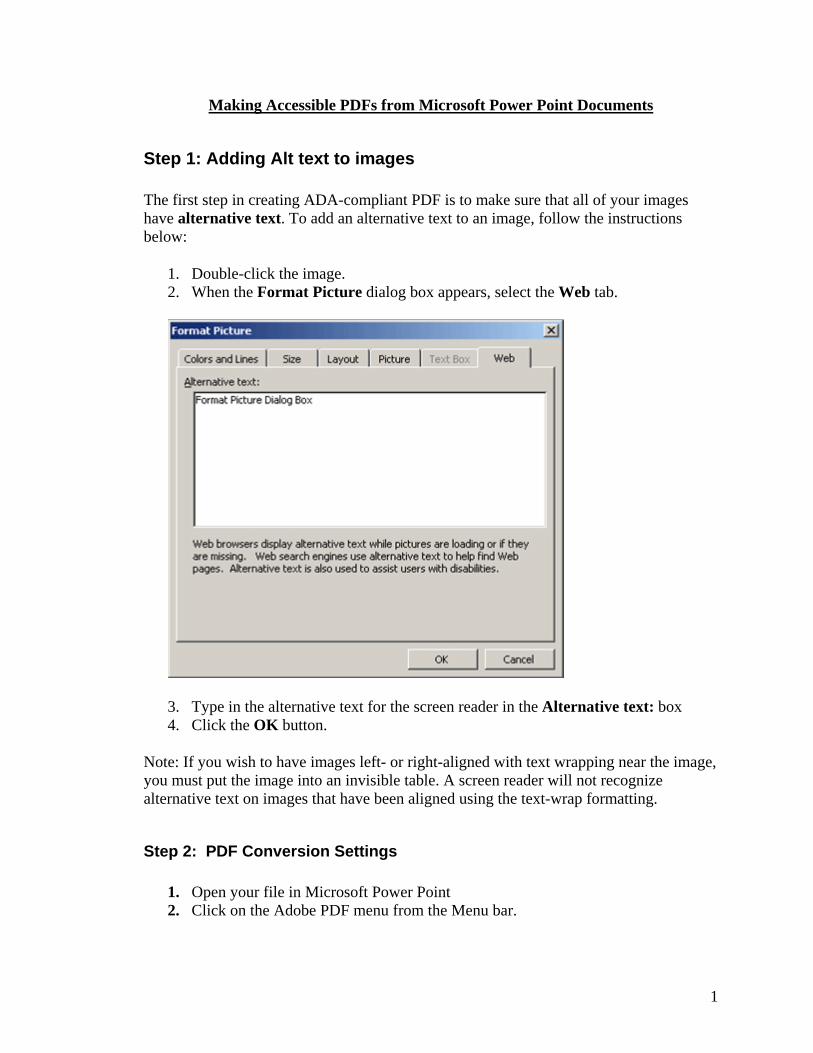
Step 1: Adding Alt text to images The first step in creating ADA-compliant PDF is to make sure that all of your images have alternative text. To add an alternative text to an image, follow the instructions below:
1. Double-click the image. 2. When the Format Picture dialog box appears, select the Web tab.
3. Type in the alternative text for the screen reader in the Alternative text: box 4. Click the OK button.
Note: If you wish to have images left- or right-aligned with text wrapping near the image, you must put the image into an invisible table. A screen reader will not recognize alternative text on images that have been aligned using the text-wrap formatting.
Step 2: PDF Conversion Settings
1. Open your file in Microsoft Power Point 2. Click on the Adobe PDF menu from the Menu bar.
1
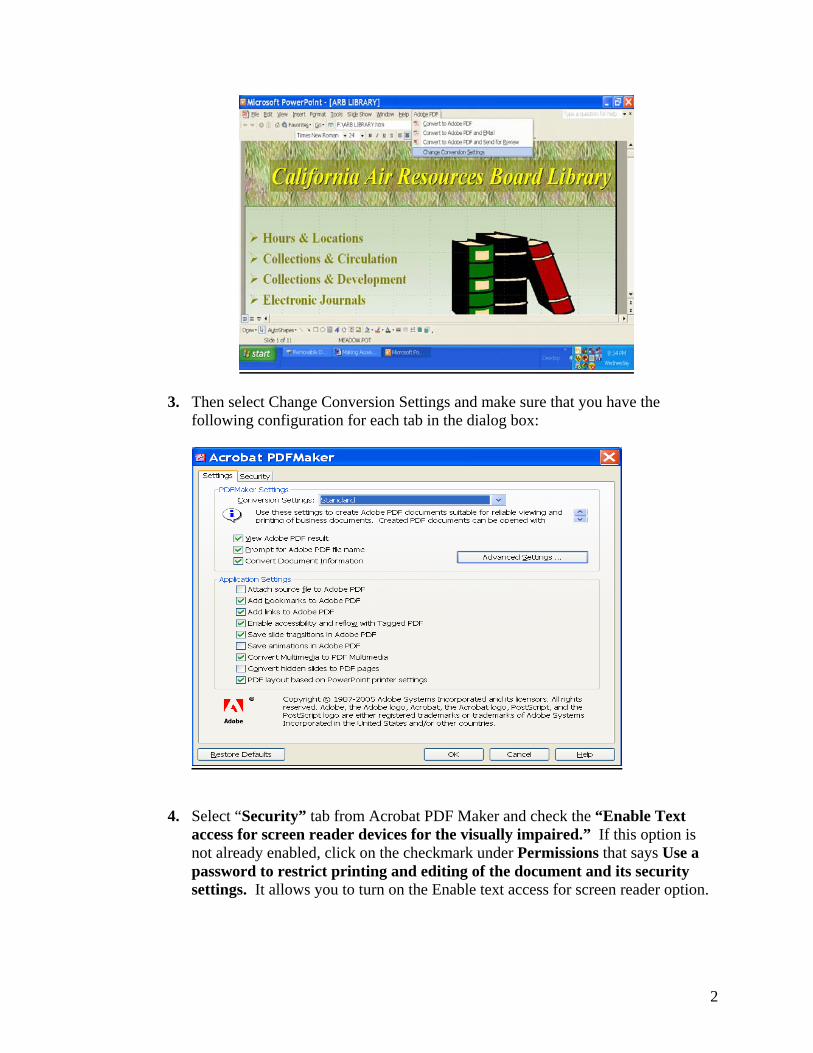
3. Then select Change Conversion Settings and make sure that you have the following configuration for each tab in the dialog box:
4. Select “Security” tab from Acrobat PDF Maker and check the “Enable Text access for screen reader devices for the visually impaired.” If this option is not already enabled, click on the checkmark under Permissions that says Use a password to restrict printing and editing of the document and its security settings. It allows you to turn on the Enable text access for screen reader option.
2
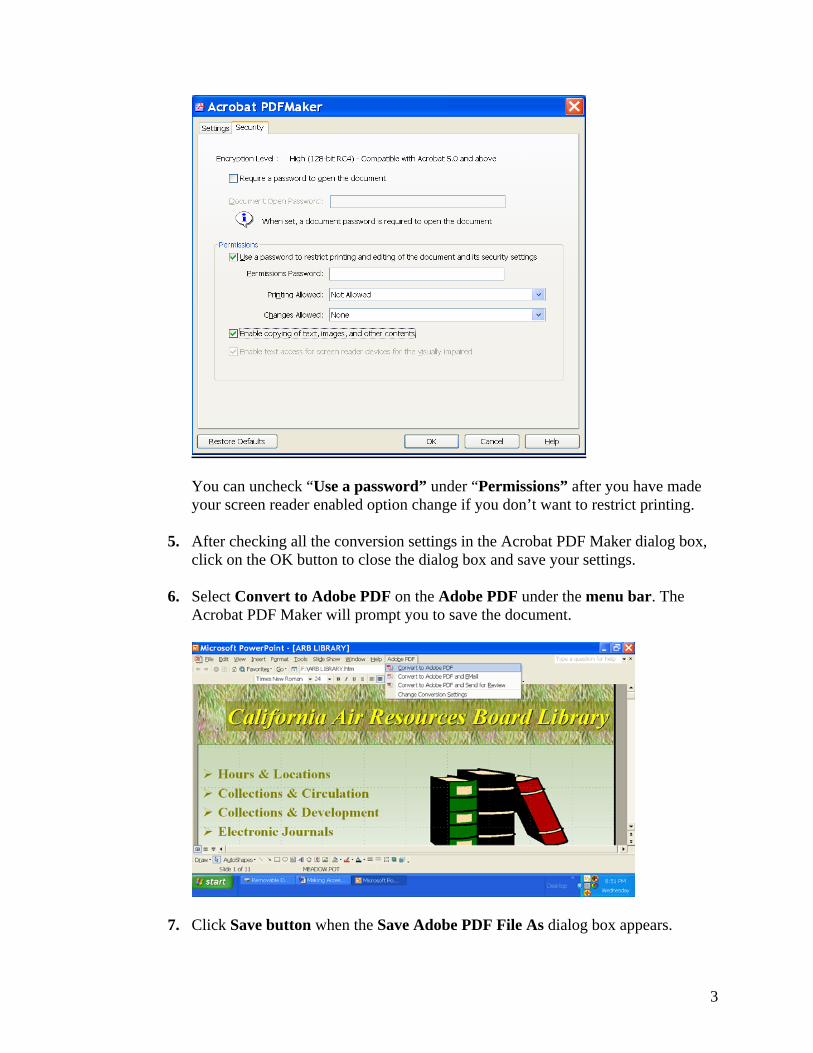
You can uncheck “Use a password” under “Permissions” after you have made your screen reader enabled option change if you don’t want to restrict printing.
5. After checking all the conversion settings in the Acrobat PDF Maker dialog box,
click on the OK button to close the dialog box and save your settings. 6. Select Convert to Adobe PDF on the Adobe PDF under the menu bar. The
Acrobat PDF Maker will prompt you to save the document.
7. Click Save button when the Save Adobe PDF File As dialog box appears.
3
Step 3: Title Tag and Meta Tags
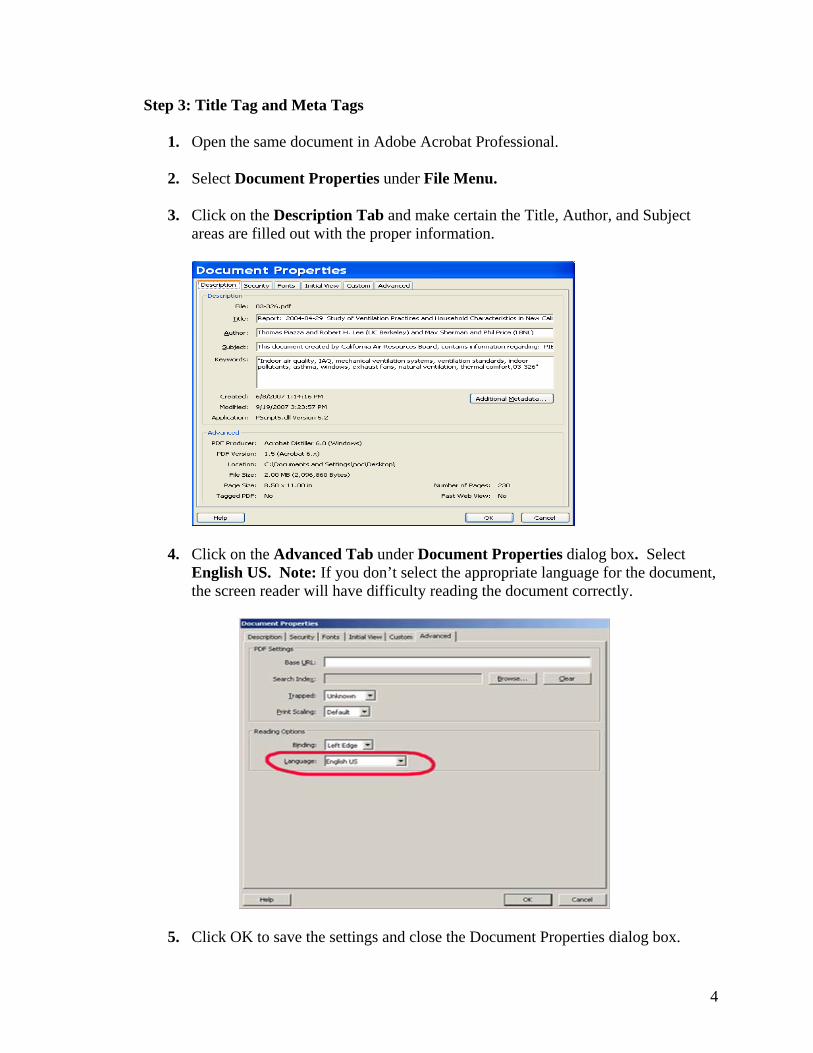
1. Open the same document in Adobe Acrobat Professional. 2. Select Document Properties under File Menu.
3. Click on the Description Tab and make certain the Title, Author, and Subject
areas are filled out with the proper information.
4. Click on the Advanced Tab under Document Properties dialog box. Select
English US. Note: If you don’t select the appropriate language for the document, the screen reader will have difficulty reading the document correctly.
5. Click OK to save the settings and close the Document Properties dialog box.
4
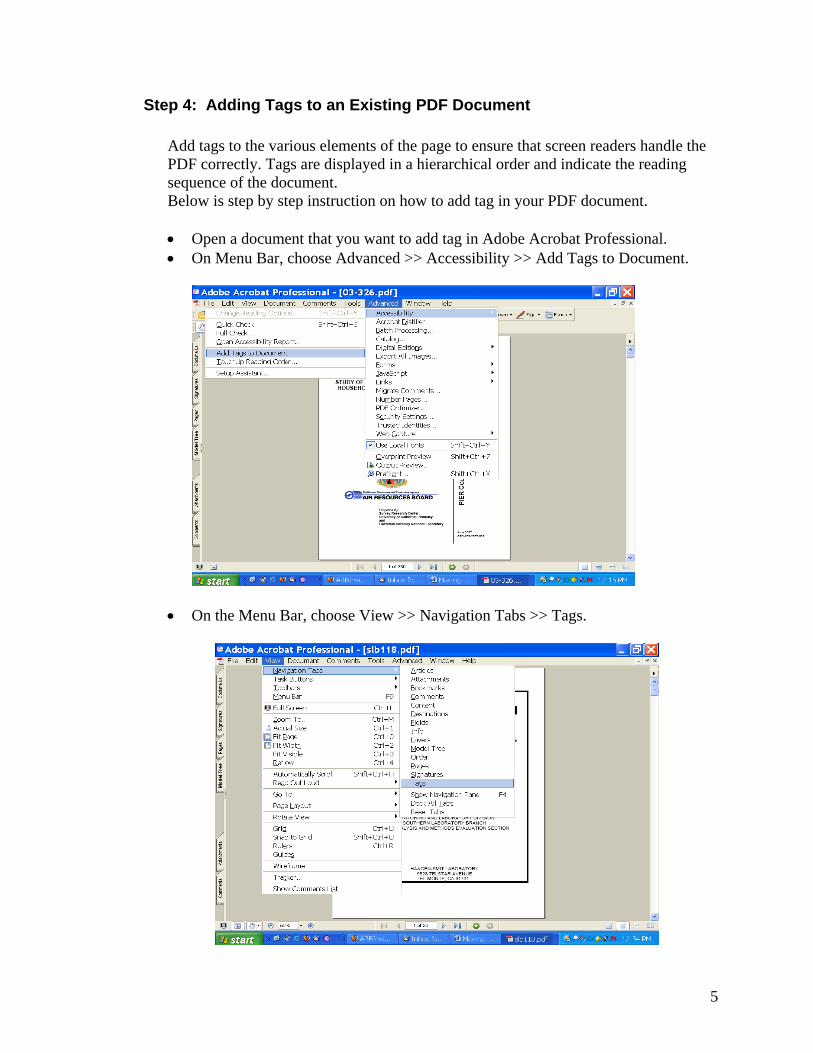
Step 4: Adding Tags to an Existing PDF Document Add tags to the various elements of the page to ensure that screen readers handle the PDF correctly. Tags are displayed in a hierarchical order and indicate the reading sequence of the document. Below is step by step instruction on how to add tag in your PDF document. • Open a document that you want to add tag in Adobe Acrobat Professional. • On Menu Bar, choose Advanced >> Accessibility >> Add Tags to Document.
• On the Menu Bar, choose View >> Navigation Tabs >> Tags.
5
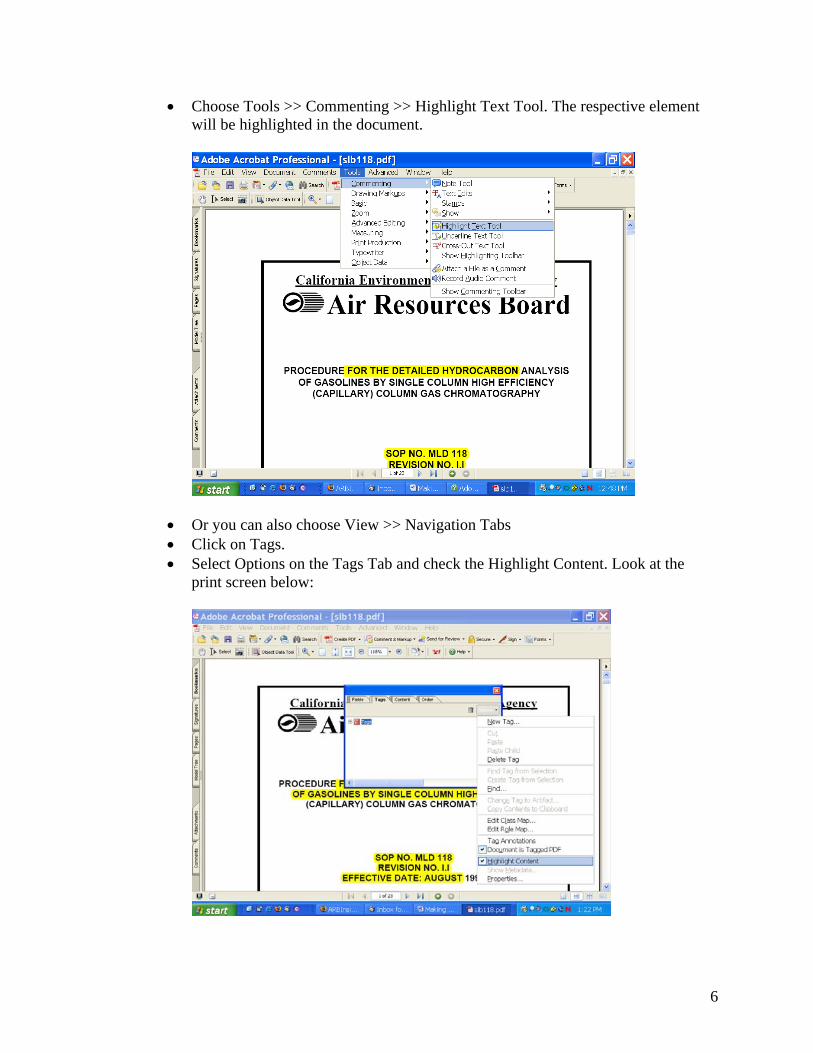
• Choose Tools >> Commenting >> Highlight Text Tool. The respective element will be highlighted in the document.
• Or you can also choose View >> Navigation Tabs • Click on Tags. • Select Options on the Tags Tab and check the Highlight Content. Look at the
print screen below:
6
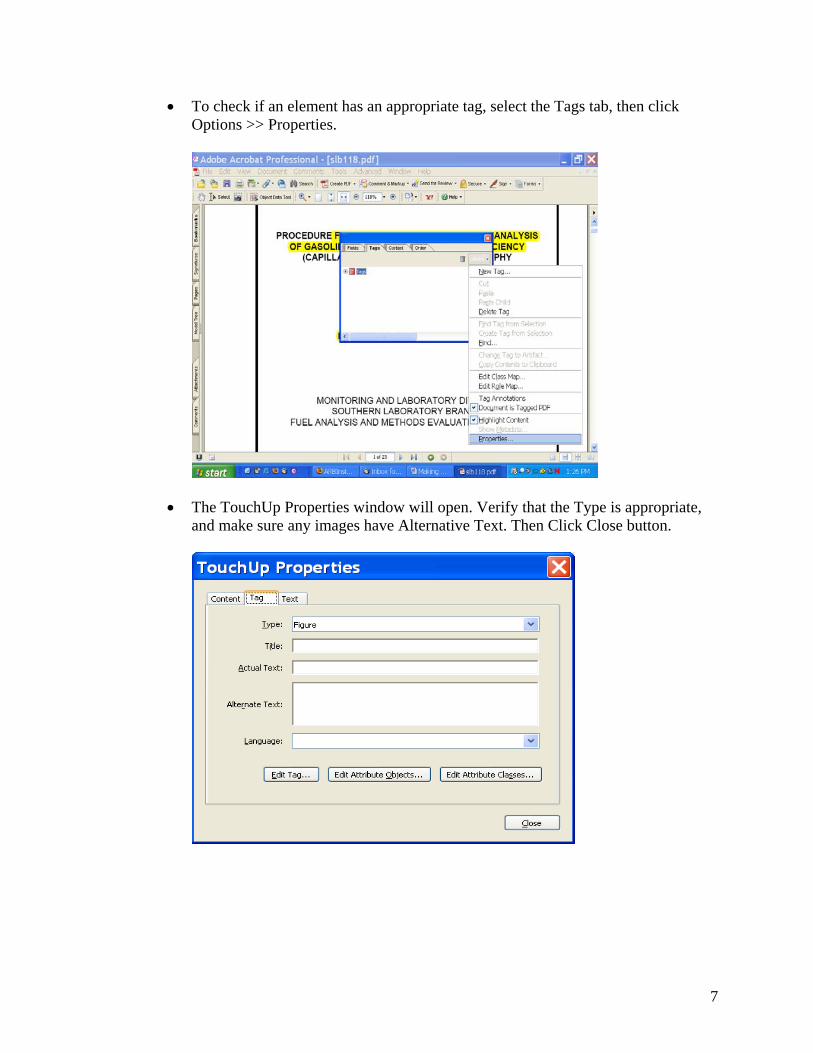
• To check if an element has an appropriate tag, select the Tags tab, then click Options >> Properties.
• The TouchUp Properties window will open. Verify that the Type is appropriate, and make sure any images have Alternative Text. Then Click Close button.
7

Step 5: Check Object Ordering
To ensure the screen readers handle the elements in the right order, please follow these steps:
• Click on the Order tab. You can move the tags or objects by clicking on the colored boxes and dragging them into place. Note: There is no Alternate Text exists on the figure.
• Tags or objects can be removed from the options menu using Cut.
8
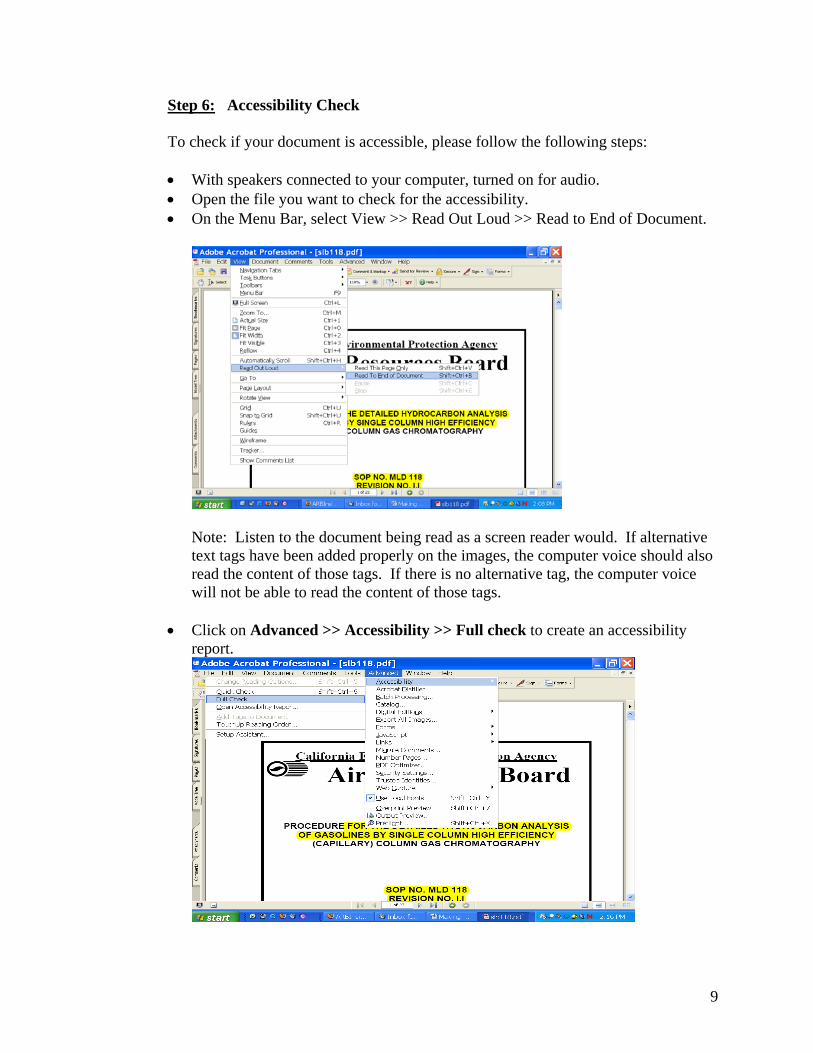
Step 6: Accessibility Check To check if your document is accessible, please follow the following steps: • With speakers connected to your computer, turned on for audio. • Open the file you want to check for the accessibility. • On the Menu Bar, select View >> Read Out Loud >> Read to End of Document.
Note: Listen to the document being read as a screen reader would. If alternative text tags have been added properly on the images, the computer voice should also read the content of those tags. If there is no alternative tag, the computer voice will not be able to read the content of those tags.
• Click on Advanced >> Accessibility >> Full check to create an accessibility report.
9
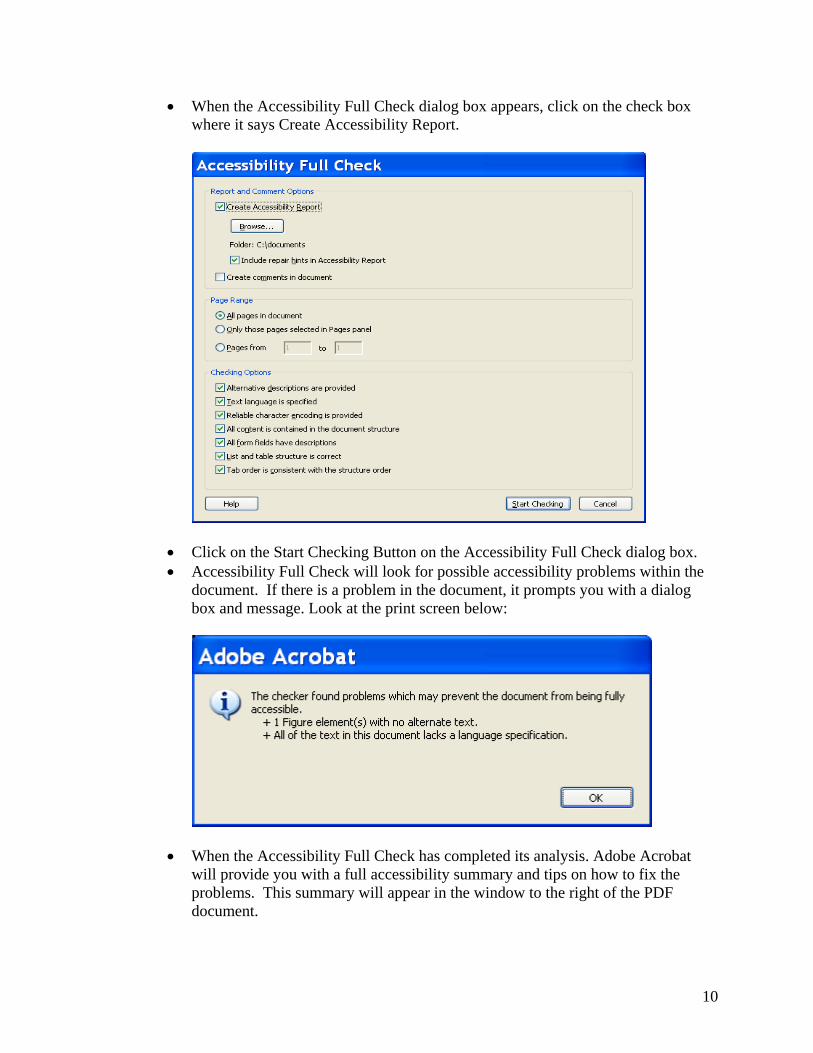
• When the Accessibility Full Check dialog box appears, click on the check box where it says Create Accessibility Report.
• Click on the Start Checking Button on the Accessibility Full Check dialog box. • Accessibility Full Check will look for possible accessibility problems within the
document. If there is a problem in the document, it prompts you with a dialog box and message. Look at the print screen below:
• When the Accessibility Full Check has completed its analysis. Adobe Acrobat
will provide you with a full accessibility summary and tips on how to fix the problems. This summary will appear in the window to the right of the PDF document.
10

• Fix the problems according to the instructions provided in Adobe Acrobat and then run the Accessibility Full Check once again.
• Continue running the Accessibility Full Check until there are no longer any
problems detected. • In certain circumstances, you may wish to fixes the original MS Word, Excel, or
Power Point and then convert it to PDF once more. Then, run the Accessibility Full Check.
• Save the PDF document once more by selecting File >> Save. Hints:
• If your Microsoft PowerPoint presentation contains audio, DON’T rely on sound alone. You can make text descriptions of the audio content available as part of the slide, in the notes pane. Making audio information available in an alternative form benefits users who don't have a sound card or who have sound turned off, or users who are deaf or hard-of-hearing.
• If your Microsoft Excel spreadsheet contains a color-coded chart legend, DON’T rely on color alone. Use additional cues, such as textual annotations, to supplement the use of color. Users may use a limited color scheme, or use a handheld computer with a monochrome display, or rely on screen review utilities, and these seldom convey information that is only represented by colors.
11