step-by-step guide: federated collaboration with...
TRANSCRIPT

Step-by-Step Guide: Federated Collaboration with Shibboleth 2.0 and SharePoint 2010 technologies
Microsoft France
Published: December 2010
Version: 1.0
Authors: Jean-Marie Thia (UPMC), Philippe Beraud (Microsoft France), Benjamin Guinebertière (Microsoft France), Stéphane Goudeau (Microsoft France)
Copyright© 2010 Microsoft Corporation. All right reserved.
AbstractThrough its native support for Claims Authentication and the WS-Federation protocol, Microsoft SharePoint 2010 allows interoperability with major IDA market solutions. Through its support for the WS-Federation and Security Assertion Markup Language (SAML) 2.0 protocols along with its ability to act as a protocol bridge, Microsoft Active Directory Federation Services 2.0 (AD FS 2.0) provides claims-based, cross-domain Web Single Sign-On (SSO) interoperability with non-Microsoft federation solutions. Internet2 Shibboleth 2, through its support for SAML 2.0, enables cross-domain federated SSO between environments that are running Microsoft and Internet2 federation infrastructures.
Building on existing documentation from both companies, this step-by-step guide walks you through the setup of a basic lab deployment of Shibboleth 2, AD FS 2.0 and SharePoint 2010 that performs cross-product, browser-based, federated collaboration. This document is intended for developers and system architects who are interested in understanding the basic modes of interoperability between Shibboleth 2, AD FS 2.0 and SharePoint 2010.

This document is provided “as-is”. Information and views expressed in this document, including URL and other Internet Web site references, may change without notice. You bear the risk of using it.
Some examples depicted herein are provided for illustration only and are fictitious. No real association or connection is intended or should be inferred.
This document does not provide you with any legal rights to any intellectual property in any Microsoft product. You may copy and use this document for your internal, reference purposes. You may modify this document for your internal, reference purposes.
© 2010 Microsoft Corporation. All rights reserved.
Microsoft, Active Directory, Internet Explorer, SQL Server, Windows, Windows PowerShell, and Windows Server are trademarks of the Microsoft group of companies. All other trademarks are property of their respective owners

Content
1 INTRODUCTION...................................................................................................................... 11.1 OBJECTIVES OF THIS GUIDE..............................................................................................11.2 ORGANIZATION OF THIS GUIDE..........................................................................................11.3 ABOUT THIS GUIDE...........................................................................................................21.4 ABOUT THE AUDIENCE......................................................................................................21.5 ABOUT THE LIVE DEMO AT THE MTC PARIS.......................................................................31.6 TERMINOLOGY USED IN THIS GUIDE...................................................................................4
2 SHIBBOLETH 2 SYSTEM........................................................................................................52.1 LOGICAL ARCHITECTURE OF THE SYSTEM COMPONENTS....................................................62.2 INTERACTION PRINCIPLES AND ASSOCIATED PROFILES.......................................................82.3 FEDERATION METADATA DEFINED....................................................................................10
3 SHAREPOINT 2010 PLATFORM...........................................................................................123.1 A BRIEF OVERVIEW OF SHAREPOINT 2010......................................................................123.2 OFFICE WEB APPS COMPANION......................................................................................133.3 OVERVIEW OF AUTHENTICATION IN SHAREPOINT 2010....................................................143.4 FEDERATED SHAREPOINT 2010 SAML-CLAIMS AUTHENTICATION WITH THE SAML 2.0 PROTOCOL................................................................................................................................ 19
4 ABOUT THE TESTING ENVIRONMENT...............................................................................234.1 PREPARE THE VIRTUAL MACHINES...................................................................................234.2 PERFORM THE PRECONFIGURATION TASKS......................................................................24
5 CONFIGURE SHIBBOLETH 2 AS A CLAIMS PROVIDER FOR AD FS 2.0.........................275.1 PREREQUISITES AND REQUIREMENTS..............................................................................275.2 INSTALL SHIBBOLETH 2..................................................................................................285.3 CONFIGURE SERVLET CONTAINER FOR SSL AND SHIBBOLETH.........................................285.4 CONFIGURE SHIBBOLETH 2............................................................................................295.5 CONFIGURE AD FS 2.0.................................................................................................435.6 TEST SHIBBOLETH AS THE IDENTITY PROVIDER AND AD FS 2.0 AS THE RELYING PARTY. .465.7 OTHER ISSUES?............................................................................................................47
6 CONFIGURE SHAREPOINT 2010 AS A RELYING PARTY FOR AD FS 2.0.......................486.1 PREREQUISITES AND REQUIREMENTS..............................................................................486.2 CONFIGURE SHAREPOINT 2010 AS RELYING PARTY IN AD FS 2.0..................................486.3 CREATE A SHAREPOINT 2010 WEB APPLICATION............................................................616.4 CREATE A TRUSTED IDENTITY PROVIDER CORRESPONDING TO THE AD FS 2.0 INSTANCE.636.5 DECLARE THE TRUSTED IDENTITY PROVIDER FOR THE WEB APPLICATION........................656.6 TEST THE WEB APPLICATION AS A CORPORATE USER.....................................................676.7 TEST THE WEB APPLICATION AS A SHIBBOLETH EXTERNAL USER......................................696.8 USE OFFICE 2010 WITH THE WEB APPLICATION A SHIBBOLETH EXTERNAL USER...............71
APPENDIX A. USE AD FS 2.0 IN THE RENATER FEDERATION.................................................81APPENDIX B. OTHER POSSIBILITIES OUTSIDE THE SCOPE OF THIS GUIDE........................84
Step-by-Step Guide: Federated Collaboration with Shibboleth 2.0 and SharePoint 2010 technologies

1 Introduction
1.1 Objectives of this guide
Through its newly introduced support for the WS-Federation protocol, the Microsoft SharePoint 2010 platform enables interoperability with Web single sign-on (SSO) and federation solutions.
With the support of both the WS-Federation and Security Assertion Markup Language (SAML) 2.0 1 protocols, Microsoft Active Directory Federation Services 2.0 (AD FS) 2.0 provides claims-based, cross-domain, Web single sign-on (SSO) interoperability with non-Microsoft federation solutions.
Furthermore, Shibboleth 2, through its support for SAML 2.0, enables cross-domain, federated SSO between environments that are running Microsoft and Shibboleth 2 federation infrastructures.
On that basis, after a short introduction of the aforementioned technologies and platforms, this guide walks you through the setup of a SharePoint 2010-based basic federated document collaboration between organizations via Shibboleth 2 and AD FS 2.0 that performs cross-product, browser-based identity federation.
In this guide, Shibboleth 2 product performs the Claims Provider/Identity Provider role (see section § 1.6 TERMINOLOGY USED IN THIS GUIDE) on top of SAML 2.0 protocol (with the SAML 2.0 HTTP POST binding) whereas AD FS 2.0 performs the Relying Party/Service Provider role vis-à-vis Shibboleth on top of SAML 2.0 protocol and the Claims Provider role vis-à-vis SharePoint 2010 on top of WS-Federation protocol and while finally SharePoint 2010 performs the Relying Party role on top of WS-Federation.
In other words, AD FS 2.0 acts as a protocol gateway between Shibboleth 2 and SharePoint 2010. In addition, this guide provides additional details in Appendix A about the steps that are necessary for/the considerations related to interoperability between AD FS 2.0 and the Education-Recherche RENATER Federation2, in which Shibboleth (1.3 and 2) software is used. We expect that interoperability with other federations in the Research and Education sector would be achieved similarly.
1.2 Organization of this guide
To cover the whole set of considerations relating to the implementation of federated collaboration with the SharePoint 2010 technologies in the context of a Shibboleth 2-based Identity Provider, this document adopts an organization according to the following themes, each of them being addressed as part of an eponymous section:
SHIBBOLETH 2 SYSTEM;
SHAREPOINT 2010 PLATFORM;
ABOUT THE TESTING ENVIRONMENT;
CONFIGURE SHIBBOLETH 2 AS A CLAIMS PROVIDER FOR AD FS 2.0;
CONFIGURE SHAREPOINT 2010 AS A RELYING PARTY FOR AD FS 2.0.
Finally, references provided in the appendixes enable to easily search the Web for additional information.
1 Security Assertion Markup Language (SAML) 2.0: http://go.microsoft.com/fwlink/?LinkId=1939962 Education-Recherche RENATER Federation: https://federation.renater.fr/
Step-by-Step Guide: Federated Collaboration with Shibboleth 2.0 and SharePoint 2010 technologies 1
1.3 About this guide
This guide has been developed in collaboration with the French University Pierre and Marie Curie (UPMC) in Paris and, more specifically Jean-Marie Thia.
More than one year ago, Jean-Marie Thia announced the release of shib4moss 1.0 (Shibboleth for SharePoint 2007). This starter kit developed in partnership with Microsoft France allows a SharePoint 2007 Web site to use the Shibboleth Service Provider (SP) software package (see Shibboleth download site3) for Microsoft Internet Information Services (IIS) as an authentication provider and Shibboleth attributes for authorization.
The project is hosted at https://sourcesup.cru.fr/projects/shib4net, the subversion repository is in the shib4moss subproject. There is also a zip file4 with the source code, help files and documentation in French and partially in English (installation documentation).
This guide, as its title indicates, aims at describing how to expose a SharePoint 2010 Web site to a Shibboleth-based federation. This time, the SharePoint application is exposed via its native federation capabilities (along with the AD FS 2.0 protocol gateway).
In many ways, this guide can be seen as the counterpart of the aforementioned shib4moss 1.0 project/starter kit for SharePoint 2010.
Building on existing documentations, this step-by-step guide walks you through the setup of a basic lab deployment of Shibboleth 2.0, SharePoint 2010, and AD FS 2.0 that performs cross-product, browser-based federated collaboration.
Microsoft has recently published, thanks to author Dave Martinez, the AD FS 2.0 STEP-BY-STEP GUIDE: FEDERATION WITH SHIBBOLETH 2 AND THE INCOMMON FEDERATION 5 in a series of step-by-step guides6 on configuring AD FS 2.0 to interoperate with partner products. This guide describes how to configure AD FS 2.0 and Shibboleth to federate using the SAML 2.0 protocol with the SAML2.0 HTTP POST binding. The current guide leverages some of the information contain in this guide.
This guide also leverages the weblog Share-n-dipity7 from the Microsoft employee Steve Peschka and the various really good posts that are published on it. Thanks again to Steve Peschka. This guide especially leverages the post CONFIGURING SHAREPOINT 2010 AND ADFS V2 END TO END 8. It also refers whenever relevant in the context to other posts from this weblog.
1.4 About the audience
(Federated) Identity (and delegation) in SharePoint 2010 technologies is a broad topic, with many facets and depths of understanding. This paper addresses this topic only from the federated collaboration perspective and from both conceptual and technical levels.
More especially, this document covers the SharePoint 2010 federated collaboration scenario in the context of Shibboleth-based federation. This scenario is covered in detail, including a configuration checklist and step by step instructions to help you successfully configure such a scenario in your environment.
3 Shibboleth download site: http://go.microsoft.com/fwlink/?LinkId=2040164 Shib4moss project package: https://sourcesup.cru.fr/frs/download.php/2625/Shib4MOSS.zip5 AD FS 2.0 STEP-BY-STEP GUIDE: FEDERATION WITH SHIBBOLETH 2 AND THE INCOMMON FEDERATION: http://go.microsoft.com/fwlink/?LinkId=2047846 AD FS 2.0 Step-by-Step and How To guides: http://technet.microsoft.com/en-us/library/dd727938(WS.10).aspx7 Weblog Share-n-dipity: http://blogs.technet.com/b/speschka/8 CONFIGURING SHAREPOINT 2010 AND ADFS V2 END TO END: http://blogs.technet.com/b/speschka/archive/2010/07/30/configuring-sharepoint-2010-and-adfs-v2-end-to-end.aspx
2 Step-by-Step Guide: Federated Collaboration with Shibboleth 2.0 and SharePoint 2010 technologies
This document is intended for developers and system architects who are interested in understanding the basic modes of interoperability between Shibboleth 2 and SharePoint 2010 and who would like to get a deeper view on ADFS 2.0 capacities.
1.5 About the live demo at the MTC Paris
Microsoft Technology Centers9 (MTC) are collaborative environments that provide access to innovative technologies and world-class expertise, enabling our customers and partners to envision, design, and deploy solutions that meet their needs.
Since 2004, MTC Paris, is part of these global centers designed to provide our customers with an actionable set of steps on how a Microsoft solution can assist them in achieving their key business objectives. Inside this facility, MTC architects and Microsoft technologies Experts, through a discovery process and scenario-based demonstrations running in MTC datacenter, play a critical role in addressing our customers’ challenges.
Interestingly enough, MTC Paris is hosting and running Microsoft France Interop Lab in order to allow customers to see and understand how Microsoft solutions and action can interoperate with other technologies or products around several topics such as : advanced Web services, PHP, Java, SAP, application lifecycle management and last but not least security & identity.
In this lab, customers and partners test multi-vendor technical configurations in order to adapt solutions to their needs in terms of operational interoperability. MTC Paris hosts more than 20 competing players’ solutions. These solutions are deployed on MTC Paris datacenter infrastructure which is built upon more than 300 servers and 200 terabytes storage. Working with many competing publishers, we facilitate the integration of heterogeneous systems. Thus interoperability becomes a guarantee of integration for our customers and enables them to create value by maximizing the investment in innovation.
In order to ensure both identity portability and security in a loosely coupled environment, it is fundamental to master the identity management part in each involved security realm for the considered scenario. As aforementioned, the Microsoft platform natively offers a series of products and technologies to sustain the notion of claim-based identity: ready to use enterprise-class Claims Provider Security Token Service (STS), Framework for building claims-aware applications and services (including authentication, access control, auditing, etc.), etc. In “real world” heterogeneous environments, these components haven’t no choice rather than being truly interoperable.
To illustrate this interoperability, the MTC Paris Security and Identity Management Interop Lab proposes a permanent dedicated platform offering multiple identity management scenarios, and more especially the one describes in this paper, i.e. the federated collaboration scenario based on SharePoint 2010, Outlook Web Access 2010/Exchange 2010 from within Shibboleth communities.
Beyond it, in terms of technology integration, it also features the Azure platform Access Control Service (ACS) 2.0.
ACS is a resource STS in the cloud to handle authentication and help with authorization). ACS directly authenticates simple clients using a symmetric key (similar to the familiar user name and password), brokers authentication for enterprise clients that use ADFS 2.0, and also offers a cloud-based identity management framework for all types of clients, applications, and services. For example it accepts security tokens from many other identity frameworks such as Facebook, Google Accounts, Windows Live ID, and others. Finally, ACS provides basic identity services for RESTful Web services.
9 Microsoft Technology Centers: http://microsoft.com/mtc
Step-by-Step Guide: Federated Collaboration with Shibboleth 2.0 and SharePoint 2010 technologies 3

1.6 Terminology used in this guide
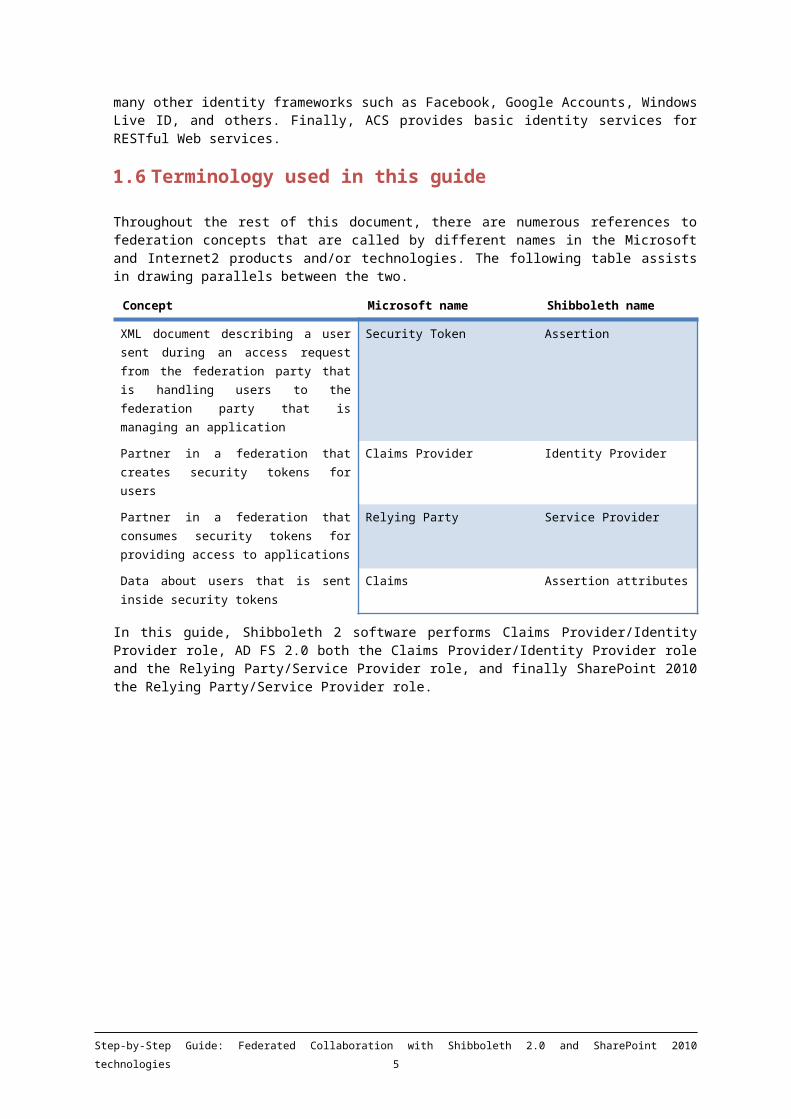
Throughout the rest of this document, there are numerous references to federation concepts that are called by different names in the Microsoft and Internet2 products and/or technologies. The following table assists in drawing parallels between the two.
Concept Microsoft name Shibboleth name
XML document describing a user sent during an access request from the federation party that is handling users to the federation party that is managing an application
Security Token Assertion
Partner in a federation that creates security tokens for users
Claims Provider Identity Provider
Partner in a federation that consumes security tokens for providing access to applications
Relying Party Service Provider
Data about users that is sent inside security tokens
Claims Assertion attributes
In this guide, Shibboleth 2 software performs Claims Provider/Identity Provider role, AD FS 2.0 both the Claims Provider/Identity Provider role and the Relying Party/Service Provider role, and finally SharePoint 2010 the Relying Party/Service Provider role.
4 Step-by-Step Guide: Federated Collaboration with Shibboleth 2.0 and SharePoint 2010 technologies

2 Shibboleth 2 System
This section quickly describes the Shibboleth system so that it is simpler to understand how SharePoint 2.0 can be exposed in a Shibboleth identity federation from a technology perspective, as well a protocol perspective with SAML 2.0.
Shibboleth (, as a reference to the Hebrew word "shibbóleth” and the related Biblical use, i.e. to discover hiding members of the opposing group,) was designed to fill higher education needs in terms of identity federation and attributes propagation for a number of partners. The Shibboleth project was initiated by the Internet2/MACE (Middleware Architecture Committee for Education)10. The project (http://shibboleth.internet2.edu) refers to both a specification and an open source project that implements them as a distributed system.
As a specification, Shibboleth is an extension of the SAML (Security Assertion Markup Language) 1.1 standard which comes from the OASIS Security Services (SAML) TC11; this technical committee defined a protocol to exchange security information in order to implement Web Single Sign-On.
SAML 1.1 standard defines 2 main components in a federated environment:
1. Service provider (SP) - The service provider, or SP as we call it in the rest of the document, provides (or does not provide) Web resources depending on the trusted user attributes it received in order to feed it access control;
2. Identity Provider (IdP) - The identity provider, or IdP as stated in the rest of the document, is in charge of authenticating users and providing attributes based on that authentication.
SAML 1.1 profiles assume the user starts with the IdP. In order to take into account scenarios where a user first connects to an SP, Shibboleth extended the SAML browser/POST and browser/Artifact profiles.
For that, Shibboleth:
1. Defines the notion of an authentication request which allows an SP to require some authentication from a browser
2. Introduces the notion of WAYF (Where Are You From?) which allows a browser to select its IdP.
In other terms, the WAYF service is an optional service that can redirect a user towards a security domain where his identity is declared as an account, and more precisely towards an IdP of this security domain.
3. Also specifies how attributes exchanges take place (this is not the case in SAML 1.1).
Beyond these elements, which are available as part of Shibboleth 1.x system as SAML 1.1 extensions, version 2.x of Shibboleth12 provides SAML 2.0 support as well backward compatibility with Shibboleth 1.x.
2.1 Logical architecture of the system components
This description of the components as well as the interaction between them is how the authors of this document see the system provided by the Internet2’s Shibboleth project.
10 Internet2/MACE (Middleware Architecture Committee for Education): http://middleware.internet2.edu/MACE11 OASIS Security Services (SAML) TC: http://www.oasis-open.org/committees/tc_home.php?wg_abbrev=security12 Shibboleth 2.0: http://shibboleth.internet2.edu/shib-v2.0.html
Step-by-Step Guide: Federated Collaboration with Shibboleth 2.0 and SharePoint 2010 technologies 5
The SHIBBOLETH ARCHITECTURE TECHNICAL OVERVIEW document, available at http://shibboleth.internet2.edu/docs/draft-mace-shibboleth-tech-overview-latest.pdf, describes the system and precisely defines the Shibboleth project terminology. While the document is about the version 1.x of Shibboleth, the main elements are still valid in the context of Shibboleth 2.x, which this guide is about.
In the context of a French speaking community, as well as for planning considerations in your specific environment, you are encouraged to read resources made available in the context of the Education & Research federation (fédération Education-Recherche13), a service provided by “GIP RENATER”. Those resources are available online at the following address: https://federation.renater.fr/. As a first step, you can read the document called FÉDÉRATION D’IDENTITÉS ET PROPAGATION D’ATTRIBUTS AVEC SHIBBOLETH (Identity federation and attributes propagation with shibboleth).
2.1.1 Service Provider (SP)
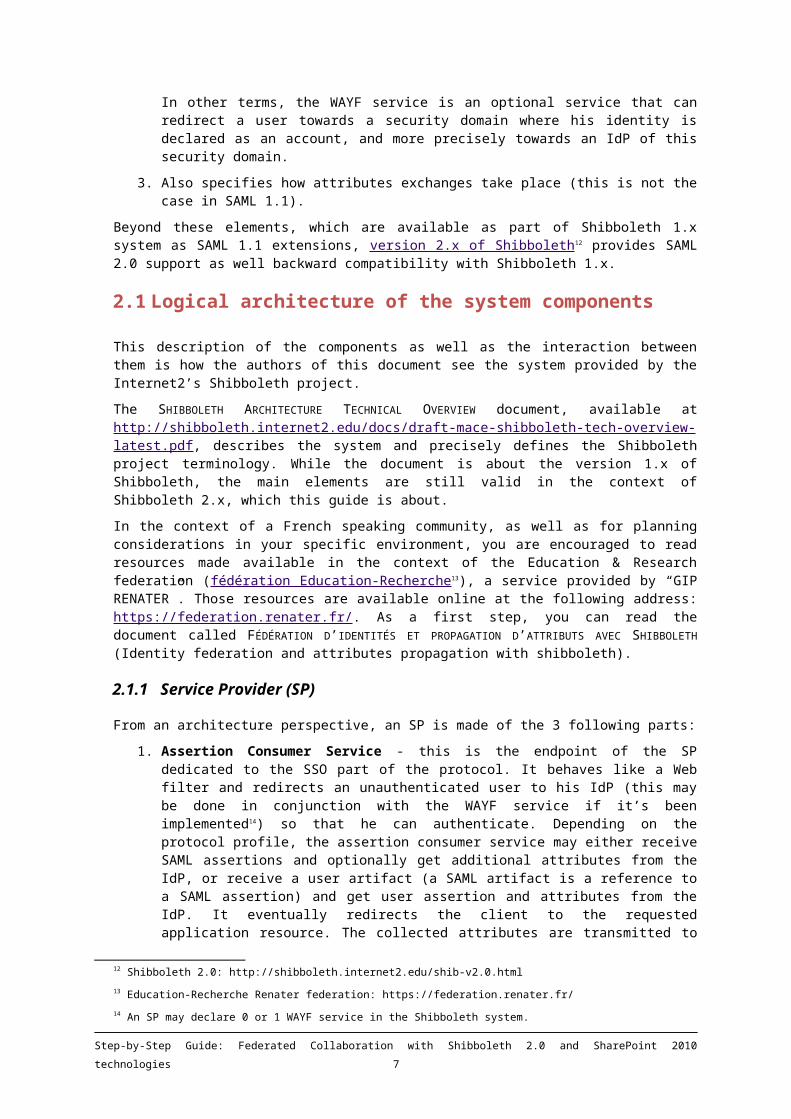
From an architecture perspective, an SP is made of the 3 following parts:
1. Assertion Consumer Service - this is the endpoint of the SP dedicated to the SSO part of the protocol. It behaves like a Web filter and redirects an unauthenticated user to his IdP (this may be done in conjunction with the WAYF service if it’s been implemented14) so that he can authenticate. Depending on the protocol profile, the assertion consumer service may either receive SAML assertions and optionally get additional attributes from the IdP, or receive a user artifact (a SAML artifact is a reference to a SAML assertion) and get user assertion and attributes from the IdP. It eventually redirects the client to the requested application resource. The collected attributes are transmitted to an access controller which decides whether or not the applicative resource may be accessed.
2. Attribute Requester - Based on a user artifact (used in some protocol profiles) this component is in charge of getting the user attributes from the IdP. This happens directly, without using the browser through redirections.
3. Access control - This component, as its name suggests it, is in charge of allowing or denying access to the applicative resource.
13 Education-Recherche Renater federation: https://federation.renater.fr/14 An SP may declare 0 or 1 WAYF service in the Shibboleth system.
6 Step-by-Step Guide: Federated Collaboration with Shibboleth 2.0 and SharePoint 2010 technologies
Identity Provider
Client
1) GET/302
Service Provider (SP)Internet2 Shibboleth 2
Assertion Consumer
Service
Attribute Requester
Access control Application Resources
2) GET/302
3) POST/302
4) GET/200
WAYF
1bis) GET/3023bis) POST/200
3ter) POST/200
2.1.2 Identity Provider (IdP)
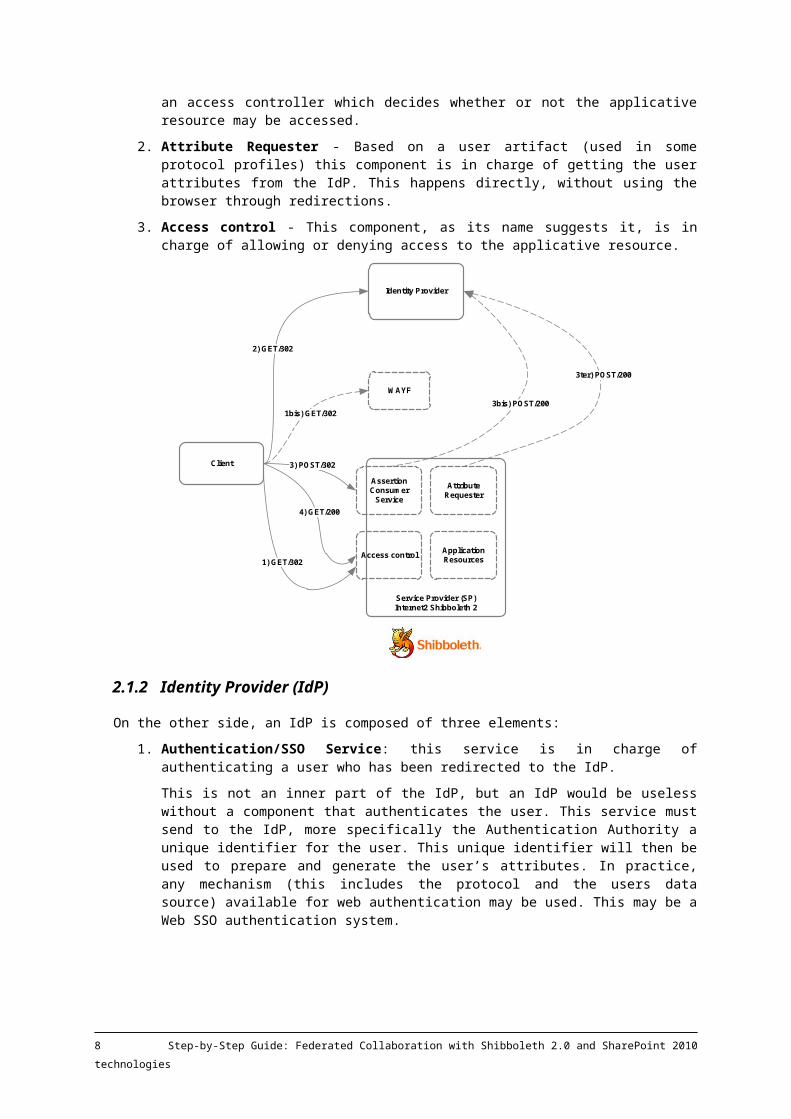
On the other side, an IdP is composed of three elements:
1. Authentication/SSO Service: this service is in charge of authenticating a user who has been redirected to the IdP.
This is not an inner part of the IdP, but an IdP would be useless without a component that authenticates the user. This service must send to the IdP, more specifically the Authentication Authority a unique identifier for the user. This unique identifier will then be used to prepare and generate the user’s attributes. In practice, any mechanism (this includes the protocol and the users data source) available for web authentication may be used. This may be a Web SSO authentication system.
Indeed, integrating with the CAS (Central Authentication Service)15 Web SSO service that was developed by Yale University is quite common among Universities in France. CAS is commonly used to only perform authentication and web single sign on. Document FÉDÉRATION D’IDENTITÉS ET PROPAGATION D’ATTRIBUTS AVEC SHIBBOLETH also describes how Shibboleth IdP and CAS Web SSO can be brought together as a consistent solution. Further details about this are outside the scope of this guide which concentrates on how SharePoint 2010 can be a SP for a Shibboleth identity federation.
2. Authentication Authority: This authority is in charge of associating the name identifier artifact (an opaque identifier) with the preceding user unique identifier ;
3. Attribute Authority: This authority is the one which responds to SP invocations through a Web service; those invocations provide a user name identifier and expect the corresponding user attributes. The relationship between a user name identifier and the user attributes is maintained by the authentication authority. Different data sources (LDAP
15 Service CAS (Client Authentication Service): http://www.yale.edu/tp/auth
Step-by-Step Guide: Federated Collaboration with Shibboleth 2.0 and SharePoint 2010 technologies 7
directory, SQL data bases, etc.) can be used as a user repository. The Shibboleth implementation is able to handle several data sources at once.
4. Artifact Resolution Service: This service responds to a SP invocations through Web services, in relationship with the translation of a user artifact into an authentication assertion.
Identity Provider (IdP)Internet2 Shibboleth 2
Client
1) GET/302
Service Provider
Authentication Authority
2) GET/302
3) POST/302
4) GET/200
1bis) GET/302
3bis) POST/200
3ter) POST/200
SSOService
Attribute Auhtority
Artifact Resolution
Service
WAYF
The Shibboleth IdP technical implementation is a Java application that requires a Java EE servlet container such as Tomcat. Apache web server may also be used in front of Tomcat.
2.2 Interaction principles and associated profiles
2.2.1 Profiles that come from SAML 1.1
In Shibboleth, like in SAML 1.1, browser/POST and browser/Artifact profiles differ from one another by the way the authentication assertion is sent.
A Shibboleth authentication assertion is a message which is encoded in a URL, then sent to the IdP authentication service (cf. section § 2.1.2 IDENTITY PROVIDER (IDP)). It contains the SP identifier (providerId), the URL of IdP’s authentication service (cf. section § THIS DESCRIPTION OF THECOMPONENTS AS WELL AS THE INTERACTION BETWEEN THEM IS HOW THE AUTHORS OF THIS DOCUMENTSEE THE SYSTEM PROVIDED BY THE INTERNET2’S SHIBBOLETH PROJECT.), the return address to the SP (target), and the epoch request issuance date.
Beyond what was described in section § 2.1.2 IDENTITY PROVIDER (IDP), Shibboleth standard precisely describes how such a request is handled.
2.2.1.1 Browser/POST profile
It extends the corresponding SAML 1.1 profile.
8 Step-by-Step Guide: Federated Collaboration with Shibboleth 2.0 and SharePoint 2010 technologies
Step(s) Flow description
1 Browser queries a page which is protected by the SP
2 SP redirects the browser to the WAYF service (with the Shibboleth authentication request parameters)
3 Browser queries the WAYF service with those parameters
4 The WAYF service sends back an HTML form (the authentication request parameters are the hidden fields inside the HTML form)
5 User selects an IdP in the list, the browser sends a GET request to the WAYF service
6 The WAYF service redirects the browser to the IdP, providing it with a URL that contains the authentication request parameters
7 The browser queries the IdP with this URL. The IdP delegates the user authentication to the authentication service
8 IdP sends an HTML form to the browser that contains the SAML response, including the authentication assertion
9 The browser sends the form to the SP, either manually (user action), either automatically (with JavaScript)
10 SP computes the authentication assertion, creates a security context and sends a SOAP SAML message to the IdP that requests user attributes
11 IdP handles this requests and sends back a SOAP response with an attributes assertion
12 SP filters the attributes, updates the security context and redirects the browser to the page that was initially requested by the browser
13 The browser requests the page
14 The SP sends back the page
2.2.1.2 Browser/Artifact profile
It extends the corresponding SAML 1.1 profile. The attributes are provided in an attributes assertion together with the authentication assertion. As these are two different assertions, two artifacts are used instead of one.
Step(s) Flow description
1 Browser queries a page which is protected by the SP
2 SP redirects the browser to the WAYF service (with the Shibboleth authentication request parameters)
3 Browser queries the WAYF service with those parameters
4 The WAYF service sends back an HTML form (the authentication request parameters are the hidden fields inside the HTML form)
5 User selects an IdP in the list, the browser sends a GET request to the WAYF service
6 The WAYF service redirects the browser to the IdP, providing it with a URL that contains the authentication request parameters
7 The browser queries the IdP with this URL. The IdP delegates the user authentication to the authentication service
8 IdP redirects the browser to the SP’s assertion consumer service. Two artifacts are appended to the redirection URL, one for authentication, the other one for attributes
9 Browser queries the SP’s assertion consumer service
10 The SP handles the request and sends to the IdP a SAML request that contains the two artifacts (as a SOAP HTTP POST request)
11 IdP responds by sending the two requested assertions back to the SP
12 SP filters the attributes, updates the security context and redirects the browser to the page that was initially requested by the browser
Step-by-Step Guide: Federated Collaboration with Shibboleth 2.0 and SharePoint 2010 technologies 9
Step(s) Flow description
13 The browser requests the page
14 The SP sends back the page
2.2.2 Defined profiles in SAML 2.0
SAML 2.0 16 defines an important number of profiles; the one we are mostly interested in is the Web Browser SSO profile.
It is similar to the initial browser/artifact and browser/POST Shibboleth profiles because the sequence starts with the SP.
The way IdP is selected (WAYF is an example) is not defined. Initial redirection from the SP to the IdP is not only possible through an HTTP redirect but also through an HTTP POST or a binding called HTTP artifact (it is based on HTTP redirects and SOAP message exchanges through HTTP).
The authentication assertion is sent either through HTTP POST, either through the HTTP Artifact binding.
2.3 Federation metadata defined
With the Shibboleth system, the different trust relationships between the members of a federation are implemented as (federation) metadata. They are the foundation of a federation trust.
In order for an SP to be recognized by an IdP federation, it must be listed in the federation metadata. Similarly, in order for an IdP to be recognized by the SP inside the federation, it must be listed in the federation metadata. A Shibboleth SP may recognize only a subset of the IdP inside the federation, by defining a white list. Besides, for local needs, an IdP and an SP may trust each other, by exchanging their metadata files.
The Shibboleth 2.x technical implementation automatically publishes its metadata at the following URL: http(s)://<fqdn serveur>/Shibboleth.sso/Metadata. This URL can be used for mutual trust relationships with an IdP or to register inside a federation.
Each provider’s metadata contains the provider’s unique identifier (entityID attribute) as a URN (Uniform Resource Name, Cf. RFC 2141 URN Syntax17), organizational and technical contact addresses, the name of the certificate this provider uses, the certificate authority URL and the attributes authority URL (for attribute requests) for an IdP, or the assertion consumer service URL (to receive attrbutes) for an SP.
Metadata also include certificate authorities (CA) which emit certificates that are trusted inside the federation.
For further information, Internet2 documentation about metadata is available in the NativeSPMetadataProvider page at https://spaces.internet2.edu/display/SHIB2/NativeSPMetadataProvider .
Those metadata are usually expressed as an XML file. In order to ensure its integrity, this file is usually digitally signed. In a production federation, recording a new provider or updating information about an existing provider goes through a process that ensures the request is valid and legitimate.
In a federation, the XML file is managed centrally and it is used by all the IdP and SP inside the federation to mutually trust themselves.
As far as the Renater federation is concerned, the test fedaration metadata are available at https://services-federation.renater.fr/metadata/renater-test-metadata.xml while the education & research federation metadata are available at https://services-federation.renater.fr/metadata/renater-metadata.xml. These URL are available in the following Renater federation Web site18.
16 Security Assertion Markup Language (SAML) 2.0: http://go.microsoft.com/fwlink/?LinkId=19399617 RFC 2141 URN syntax: http://tools.ietf.org/html/rfc214118 Renater federation metadata: https://federation.renater.fr/technique/metadata
10 Step-by-Step Guide: Federated Collaboration with Shibboleth 2.0 and SharePoint 2010 technologies

3 SharePoint 2010 Platform
This chapter briefly introduces the different products and technologies which are related to Microsoft SharePoint 2010, which constitutes the main topic of this white paper.
Beyond what will be explained here, the following guides may be read in order to evaluate SharePoint 2010 efficiently as a development platform:
MICROSOFT SHAREPOINT 2010 IT PROFESSIONAL EVALUATION GUIDE 19
SHAREPOINT 2010: PROFESSIONAL DEVELOPER EVALUATION GUIDE AND WALKTHROUGHS 20
Their goals are to help you discover the different features of SharePoint 2010.
For further information, one can go to the Microsoft SharePoint web site21.
3.1 A brief overview of SharePoint 2010
SharePoint 2010 is a Web product that helps users access their information, wherever they are. Integrated document management and list features that users already know were extended in several ways so that new usage scenarios become easy. Enhancements in the domain of data allow better list management, better validations and offer connectivity to the line of business systems.
SharePoint 2010 is a natural portal for line of business applications (LOB) data. LOB are a fundamental need for any organization; the same is true for front end systems that help accessing central LOB systems which host the core business capabilities. Traditional LOB applications usually have core business users who are well trained to use the application, and a wider set of users who only use the application occasionally. SharePoint 2010 integration with core LOB systems through BCS (Business Connectivity Services) makes SharePoint 2010 a means of choice to help access core LOB systems data.
More generally, SharePoint 2010 has six ready to use core capabilities:
1. Sites - Enables storage and retrieval of information in lists and document libraries in an easy way which is also integrated with Microsoft Office applications.
2. Communities - Helps locating and interacting with people through expertise, relationship, content tagging and rating;
3. Content - Helps managing content which can be a web page, a document or a set of documents; This includes records management for that content;
4. Search - Enables searching content from within SharePoint and outside SharePoint, including content in structured databases;
5. Insights - Leverages Microsoft Office Excel to access data and show them on a web page; data can be presented as pivot tables and key performance indicators (KPI) in order to let raw data be manageable.
6. Composites - Helps information workers create their own solutions by leveraging connectivity and usage of core platform features.
Further detailed information about those capabilities is available in the MICROSOFT SHAREPOINT 2010 IT PROFESSIONAL EVALUATION GUIDE that was mentioned above.
19 MICROSOFT SHAREPOINT 2010 IT PROFESSIONAL EVALUATION GUIDE: http://go.microsoft.com/fwlink/?linkid=16712320 SHAREPOINT 2010: PROFESSIONAL DEVELOPER EVALUATION GUIDE AND WALKTHROUGHS: http://www.microsoft.com/downloads/en/details.aspx?displaylang=en&FamilyID=cffb14e8-88a9-43bd-87aa-4792ab60d32021 Microsoft SharePoint Web site: http://SharePoint.Microsoft.com
Step-by-Step Guide: Federated Collaboration with Shibboleth 2.0 and SharePoint 2010 technologies 11

Different editions of SharePoint 2010 are available: Foundation, Standard and Enterprise. These editions can be compared in a table available on SharePoint Web Site22. Microsoft SharePoint Foundation 2010 is available from the Microsoft download center23.
In terms of configuration, such a platform requires a server environment that has the right capacities to host it. It is worth noting that SharePoint 2010 is only available as 64-bit software, and thus, a consequence is that the Windows operating system (either client or server) that hosts it must also be a 64-bit version.
The minimal system requirements for a SharePoint 2010 platform are the followings:
Microsoft Windows Server 2008 64-bit with Service Pack 2 (SP2) or above, or Windows Server 2008 R2;
-or-
Microsoft Windows Vista 64-bit with Service Pack 1 (SP1) or above, or Microsoft Windows 7 64-bit for development environments;
Microsoft SQL Server 2005 64-bit with Service Pack 2 (SP2) or above, or Microsoft SQL Server 2008 64-bit;
Microsoft .NET Framework 3.5 with Service Pack 1 (SP1) installed.
A first browser support level allows the following browsers on Windows operating system:
Windows Internet Explorer 7 32-bit;
Internet Explorer 8 32-bit;
Firefox 3.x 32-bit.
And for the second level:
Internet Explorer 7 64-bit;
Internet Explorer 8 64-bit;
Firefox 3.x (on Windows operating systems);
Safari 3.x (on Windows operating systems).
For a complete list of Hardware and software requirements, SharePoint 2010 documentation on the TechNet site has the following page: HARDWARE AND SOFTWARE REQUIREMENTS (SHAREPOINT SERVER 2010) 24.
3.2 Office Web Apps companion
Office Web Apps is the online companion to Office Word 2010, Excel 2010, PowerPoint 2010 and OneNote 2010 applications that enables users to access, slightly change or share documents from nearly anywhere.
This online companion gives more flexibility to users who can use the web browser to work on their documents. For instance, Word Web App offer high fidelity viewing of Word documents and features that enable reading, updating and sharing documents are presented in the familiar Office Ribbon. Thus, those new usages can be leveraged without having to learn new products. This is similar for other Office applications.
Enterprises who purchased Microsoft Office 2010 volume licensing can install and execute Microsoft Office Web App companion on a server that hosts Microsoft SharePoint Foundation 2010 or Microsoft SharePoint Server 2010.
22 Compare SharePoint Editions: http://sharepoint.microsoft.com/en-us/buy/Pages/Editions-Comparison.aspx23 Download Microsoft SharePoint Foundation 2010: http://www.microsoft.com/downloads/en/details.aspx?displaylang=en&FamilyID=49c79a8a-4612-4e7d-a0b4-3bb429b4659524 HARDWARE AND SOFTWARE REQUIREMENTS (SHAREPOINT SERVER 2010): http://technet.microsoft.com/en-us/library/cc262485.aspx
12 Step-by-Step Guide: Federated Collaboration with Shibboleth 2.0 and SharePoint 2010 technologies

For further information, one can read the Microsoft TechNet resource center for Microsoft Office Web Apps25, as well as blog posts from Microsoft Office Web Apps product team26.
3.3 Overview of authentication in SharePoint 2010
The complexity of managing and implementing authentication and authorization for applications as well as other resources in the enterprise makes it difficult for developers and IT professionals to fulfill their organization needs.
The SharePoint platform like most applications, whatever software foundation and technical environment they are based on, uses identities. A digital identity is, generally speaking, a set of information pieces about an entity like a user. Identity data influence applications behavior – they set what a user is allowed to do, they also control the way an application interacts with a user, for instance.
The notion of identity is essential, but working with identities has become difficult: depending on the situation and the access context that must be provided, many options around technologies (as well as standards) are available, with lots of representations (and protocols), as well as a diversity of programming models that depend on preceding elements and technical environments.
Having so many identity technologies, protocols and security token formats implies noticeable complexity and implementation costs in a specific context, without satisfying all needed access control scenarios with corresponding security requirements.
This fact, beyond default options, applies to preceding versions of SharePoint, including SharePoint 2007.
Therefore, based on so much complexity about connecting several applications, technologies and organizations, and in order to
Simplify identity and access control management, and secured collaboration within an enterprise that extended outside the firewall perimeter,
Make application developers and Chief Security Officers (CSO) lives easier,
A new approach became necessary!
SharePoint 2010 introduces significant improvements in how identity is managed in the platform.
“Stop hard-coding security into applications and stop creating operating system (OS)-level accounts on servers. Consume these as services external to the application.”
Neil MacDonald 13 April 2006
Gartner Group: Achieving agility: building blocks for a policy-driven, agile security services infrastructure
It is vitally important to understand how these changes affect solution design and platform configuration to enable federated collaboration scenarios (and beyond).
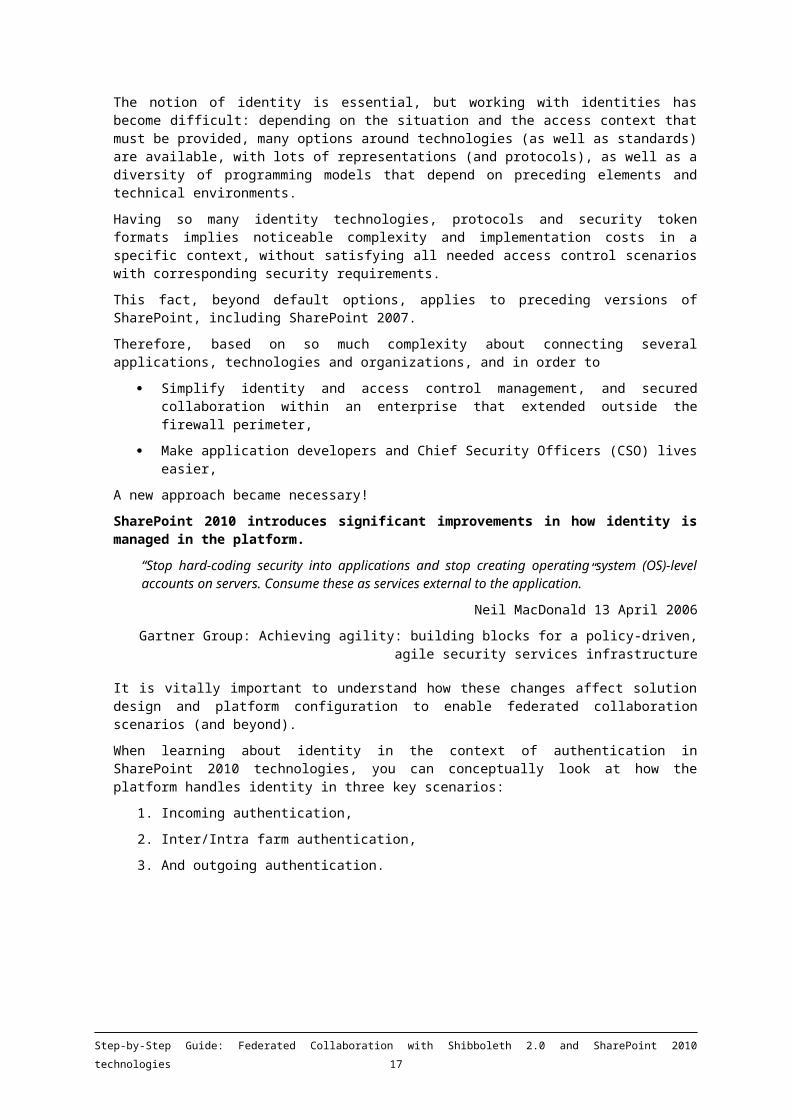
When learning about identity in the context of authentication in SharePoint 2010 technologies, you can conceptually look at how the platform handles identity in three key scenarios:
1. Incoming authentication,
2. Inter/Intra farm authentication,
3. And outgoing authentication.
25 Microsoft Office Web Apps Deployment: http://technet.microsoft.com/en-us/office/ee815687.aspx26 Microsoft Office Web Apps: http://blogs.msdn.com/officewebapps/
Step-by-Step Guide: Federated Collaboration with Shibboleth 2.0 and SharePoint 2010 technologies 13

SharePoint 2010 Farm External System
Incoming Authentication
Intra/Inter Farm Authentication
Service Applications
Microsoft SharePoint 2010
SharePoint Claims Provider
SharePoint Security Token Service (STS)
Web Front-End (WFE)
Microsoft SharePoint 2010
Windows Identity Foundation (WIF)
Windows Identity Foundation (WIF)
Windows Identity Foundation (WIF)
Trust Relationship
Outgoing Authentication
Client
Claims
Classic (Windows Integrated
Authentication)
Claims
Claims
Windows Integrated Authentication
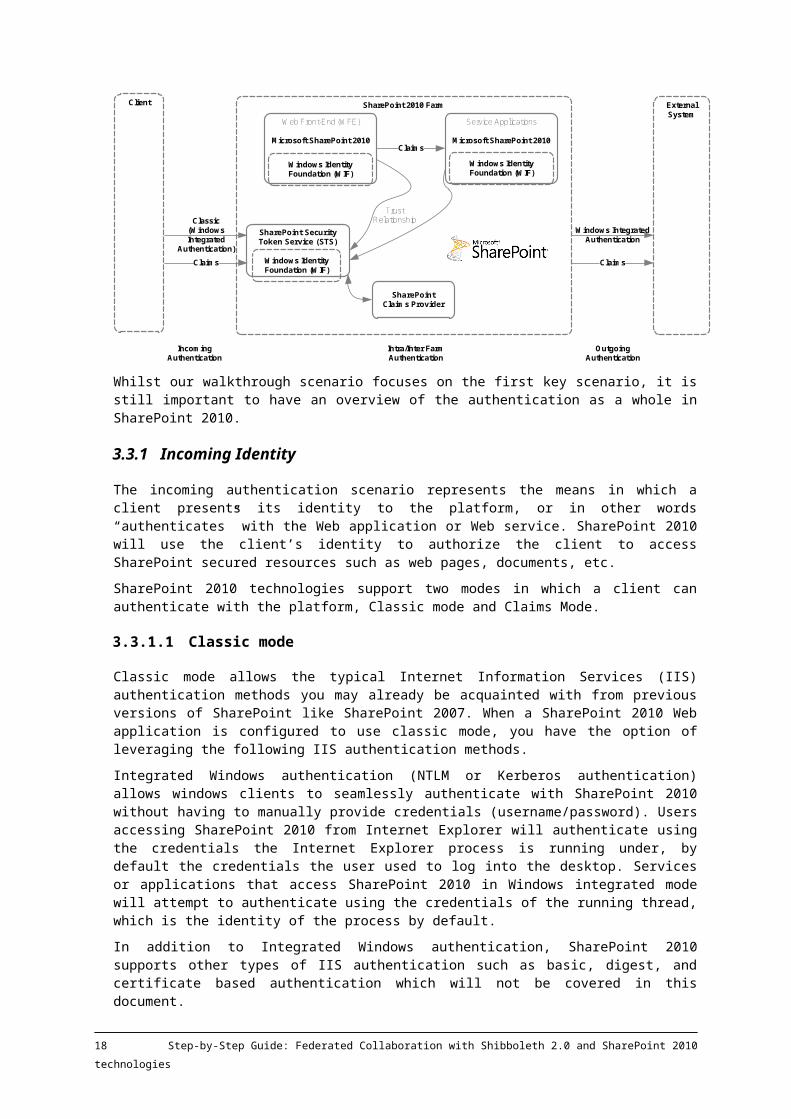
Whilst our walkthrough scenario focuses on the first key scenario, it is still important to have an overview of the authentication as a whole in SharePoint 2010.
3.3.1 Incoming Identity
The incoming authentication scenario represents the means in which a client presents its identity to the platform, or in other words “authenticates” with the Web application or Web service. SharePoint 2010 will use the client’s identity to authorize the client to access SharePoint secured resources such as web pages, documents, etc.
SharePoint 2010 technologies support two modes in which a client can authenticate with the platform, Classic mode and Claims Mode.
3.3.1.1 Classic mode
Classic mode allows the typical Internet Information Services (IIS) authentication methods you may already be acquainted with from previous versions of SharePoint like SharePoint 2007. When a SharePoint 2010 Web application is configured to use classic mode, you have the option of leveraging the following IIS authentication methods.
Integrated Windows authentication (NTLM or Kerberos authentication) allows windows clients to seamlessly authenticate with SharePoint 2010 without having to manually provide credentials (username/password). Users accessing SharePoint 2010 from Internet Explorer will authenticate using the credentials the Internet Explorer process is running under, by default the credentials the user used to log into the desktop. Services or applications that access SharePoint 2010 in Windows integrated mode will attempt to authenticate using the credentials of the running thread, which is the identity of the process by default.
In addition to Integrated Windows authentication, SharePoint 2010 supports other types of IIS authentication such as basic, digest, and certificate based authentication which will not be covered in this document.
For further understanding of how these protocols function, please see AUTHENTICATION METHODS SUPPORTED IN IIS 6.0 (IIS 6.0) 27.
3.3.1.2 Claims-based authentication
Support for Claims Authentication is a new feature in SharePoint 2010 technologies and is built on the Microsoft Windows Identity Foundation (WIF) 1.0.
WIF is a set of API for ASP.NET and WCF (Windows Communication Foundation) developers who need to design applications that consume claims and establish a trust relationship in the context of a federation.27 AUTHENTICATION METHODS SUPPORTED IN IIS 6.0 (IIS 6.0): http://go.microsoft.com/fwlink/?LinkId=196646
14 Step-by-Step Guide: Federated Collaboration with Shibboleth 2.0 and SharePoint 2010 technologies

In the context of this new approach, WIF also constitutes a hosting framework for existing applications that need a well-known security context such as Kerberos. For that, WIF can use received claims in order to create such a context and send them to the application; this is done through the WIF Claims to Windows Token Service (C2WTS).
WIF is also a base for writing custom STS.
The goal of Windows Identity Foundation (WIF) is to make claims based identities real and to provide this through technologies that are open and interoperable.Today, an application typically retrieves a single simple identity such as user name information. For more information, the application needs to query a remote repository such as a directory service or a local database.
In a claims model, SharePoint 2010 will accept one or more “claims” about an authenticating client to identify and authorize him. It can request claims it exactly needs. In practice, a claim may:
Identify a user,
Transport a group membership or a role
Transport personalization information such as the user’s name to display,
Grant or deny the right to do something like accessing a piece of information or invoke specific methods,
Restrict the right to do something like having a maximum delegation amount,
Etc.
The claims come in the form of SAML tokens and are simply “facts” about the client stated by a “trusted” authority.
If this claim came from a provider trusted by SharePoint 2010, the platform could use this information to authenticate a user and to authorize him to access SharePoint resources. A trusted provider trusted is a Security Token Services (STS).
For more information about claims authentication, see A GUIDE TO CLAIMS-BASED IDENTITY AND ACCESS CONTROL 28.
The type of claims that SharePoint 2010 technologies support for incoming authentication are:
Windows-Claims - In the windows-claims mode sign in, SharePoint 2010 will authenticated the client using standard Integrated Windows authentication (NTLM or Kerberos) then translate the resulting Windows Identity into a Claims Identity;
FBA-Claims - In FBA-claims mode, SharePoint 2010 will redirect the client to a login page hosting the standard ASP.NET login controls. The page will authenticate the client using ASP.NET membership and role providers, similar to how forms based authentication functioned in SharePoint 2007. After the identity object representing the user is created, SharePoint will then translate this identity into a claims identity object.
As previously mentioned (see section § 1.3 ABOUT THIS GUIDE), the release of starter kit shib4moss 1.0 (Shibboleth for SharePoint 2007) was announced in order to allow a SharePoint 2007 Web site to use the Shibboleth Service Provider (SP) software package (see Shibboleth download site29) for Microsoft Internet Information Services (IIS) as an authentication provider and Shibboleth attributes for authorization. This starter provides among other blocks, ASP.NET membership and role providers in order to integrate with the Shibboleth SP software package;
SAML-Claims - In SAML-Claims mode, SharePoint 2010 will accept SAML tokens from a trusted external Security Token Provider (STS). When the user attempts to login, he/she will be directed to an external claims provider (e.g. Active Directory Federation Services (AD FS) 2.0), which will authenticate the user and produce a SAML token.
SharePoint 2010 will accept and process this token, augmenting the claims and creating a claims identity object for the user.
28 A GUIDE TO CLAIMS-BASED IDENTITY AND ACCESS CONTROL: http://go.microsoft.com/fwlink/?LinkID=18791129 Shibboleth download site: http://go.microsoft.com/fwlink/?LinkId=204016
Step-by-Step Guide: Federated Collaboration with Shibboleth 2.0 and SharePoint 2010 technologies 15

All the above modes are handled and managed by a SharePoint 2010 internal STS. As far as the latter mode is concerned, this internal STS supports the WS-Fed Passive protocol30 (OASIS WS-Federation standard) for browser-based passive clients and the OASIS WS-Trust standard for smart clients.
Having SharePoint 2010 technologies supporting WS-Fed Passive protocol potentially allows interoperability with major market solutions like:
BMC Universal Identity Federator ;
CA eTrust SiteMinder Federation Security Services (6 SP5) ;
IBM Tivoli Federated Identity Manager ;
Internet2 Shibboleth System (1.3) (with extension) / Internet2 Shibboleth System31;
Microsoft Active Directory Federation Services ;
Novell Access Manager ;
Oracle Identity Federation ;
Ping Identity PingFederate Server ;
RSA Federated Identity Manager ;
Sun OpenSSO ;
symLABS Federated Identity Suite ;
Version3 Enhanced Authentication Edition.
Claims augmentation is done via the interaction with a SharePoint Claims provider.
For more information about claims-based authentication in SharePoint 2010 technologies, please refer to SHAREPOINT CLAIMS-BASED IDENTITY 32.
3.3.2 Incoming Claims Authentication and the Claims to Windows Token Service (C2WTS)
Some SharePoint 2010 service applications require the use of the WIF C2WTS service to translate claims within the farm to Windows credentials for outbound authentication.
It is important to understand that service applications that come with SharePoint Server 2010 can leverage the C2WTS service only if the incoming authentication method is either classic mode or Windows claims. Service applications accessed through web applications that leverage SAML claims or FBA claims do not use the C2WTS service, and therefore they are not able to translate claims to Windows credentials.
3.3.3 Identity within a SharePoint environment/farm
SharePoint 2010 technologies use claims authentication for intra and inter-farm communications with most SharePoint 2010 service applications and SharePoint 2010 integrated products regardless of the incoming authentication mechanism used.
This means that even in situations where classic authentication is used to authenticate with a particular Web application, SharePoint 2010 will convert the incoming identity into a claims identity to authenticate with SharePoint 2010 service applications and products that are claims-aware. By standardizing on the claims model for intra/inter farm communications, the platform can abstract itself from the incoming protocols used.
30 WEB SERVICES FEDERATION LANGUAGE (WS-FEDERATION) VERSION 1.2 : http://docs.oasis-open.org/wsfed/federation/v1.2/ws-federation.pdf31 While fully implemented/supported, the support of the WS-Fed Passive protocol isn’t widely used with Shibboleth-based communities.32 SHAREPOINT CLAIMS-BASED IDENTITY: http://go.microsoft.com/fwlink/?LinkId=196647
16 Step-by-Step Guide: Federated Collaboration with Shibboleth 2.0 and SharePoint 2010 technologies
Note:
Some SharePoint 2010 integrated products, like SQL Server Reporting Services, are not claims-aware out of box and do not leverage the intra-farm claims authentication architecture. SharePoint 2010 may also rely on classic Kerberos delegation as well as claims in other scenarios, for example when the RSS viewer Web part is configured to consume an authenticated feed. Please refer to each product or service application’s documentation to determine if it can support claims-based authentication and/or identity delegation.
3.3.4 Outbound identity
Outbound identity in SharePoint 2010 Products represents the scenarios where services within the farm need to authenticate with external line of business systems and services. Depending on the scenario, authentication can be performed in one of two basic conceptual models.
3.3.5 Trusted sub-system
In the trusted subsystem, the front end service authenticates and authorizes the client then authenticates with additional backend services without passing the client identity to the back end system. The back end system “trusts” the front end service to do authentication and authorization on its behalf. The most common way to implement this model is to leverage shared service account to authentication with the external system:
In SharePoint 2010, this model can be implemented in various ways:
Using the IIS application pool identity - usually achieved by running code in the web application which elevates permissions while making an off box call to an external system. Other methods such as using RevertToSelf can also use the application pool’s identity to authenticate with external systems;
Using a service account - typically achieved by storing application credentials in the Secure Store then using those credentials to authenticate with an external system. Other methods include storing the service account credentials in other ways such as embedded connection strings;
Anonymous Authentication - this is where the external system does not require any authentication therefore the front end SharePoint services does not have to pass any identity to the backend system.
3.3.6 Delegation
In the Delegation model, the front end service first authenticates the client then uses the client’s identity to authenticate with another backend system which performs its own authentication and authorization:
In SharePoint, this model can be implemented in various ways:
Kerberos delegation - If the client authenticates with the front end service using Kerberos authentication, Kerberos delegation can be used to pass the clients identity to the backend system.
Claims - claims authentication allows the clients claims to be passed between services as long as there is trust between the two services and both are claims aware.
Step-by-Step Guide: Federated Collaboration with Shibboleth 2.0 and SharePoint 2010 technologies 17

Note:
Currently, some out-of-the-box SharePoint 2010 service applications do not allow outbound claims authentication, but outbound claims is a platform capability which will be leveraged in the future. Further, many of the most common line-of-business systems today do not support incoming claims authentication, which means the use of outbound claims authentication may not be possible or will require additional development to work properly.
Note:
For additional information, please refer to the paper CONFIGURING KERBEROS AUTHENTICATION FOR MICROSOFT SHAREPOINT 2010 PRODUCTS 33.
3.4 Federated SharePoint 2010 SAML-Claims authentication with the SAML 2.0 protocol
Interoperability between applications in heterogeneous technological environments is a first-class dimension for organizations collaboration.
As previously mentioned, in SAM-Claims mode for browser-based scenario, the SharePoint 2010 internal STS will accept SAML tokens from a trusted external WS-Fed Passive-based Security Token Provider (STS).
Although such support is provided in Shibboleth 2, it isn’t widely implemented/supported in Shibboleth-based communities that today mostly rely on the SAML 2.0 protocol.
In such a context, the SharePoint 2010 federated collaboration scenario requires a protocol gateway for “impedance adaptation” in order to provide an end-to-end solution. This can be achieved through Microsoft Active Directory Federation Services (AD FS) 2.0.
3.4.1 AD FS 2.0 as a gateway
AD FS 2.0 is a component of the Windows (Server) platform and, as such, the right to use it is included in the associated license costs.
AD FS 2.0 is a STS that uses Active Directory Domain services as a credential store, but it can also use attributes coming from Active Directory Lightweight Directory Services (AD LDS), and other data sources.
AD FS provides final users with a rich SSO experience (on the Web among other scenarios) between applications, services, and platforms:
Within the enterprise;
Between organizations;
On the Internet and in the Cloud as the Microsoft Windows Azure platform34, the Microsoft’s Cloud services platform or the Microsoft Office 36535, the cloud versions of the Microsoft communications and collaboration products with the latest version of the desktop suite for businesses of all sizes.
It supports multiple OASIS standards: SAML 2.0, WS-Federation, WS-Trust and IMI.33 CONFIGURING KERBEROS AUTHENTICATION FOR MICROSOFT SHAREPOINT 2010 PRODUCTS: http://go.microsoft.com/fwlink/?LinkID=19660034 Microsoft Windows Azure platform: http://www.windowsazure.com/35 Microsoft Office 365: http://office365.microsoft.com/
18 Step-by-Step Guide: Federated Collaboration with Shibboleth 2.0 and SharePoint 2010 technologies
These capacities are recognized by the market. Indeed, on the occasion of the European Identity Conference (EIC) 2009, the leading European event for Identity and Access Management (IAM) and GRC (Governance, Risk Management, and Compliance), the analyst firm Kuppinger Cole conferred the European Identity Award 200936, in the category “Best innovation”, to Microsoft for the Geneva project (AD FS 2.0 & WIF 1.0), in which federation becomes part of user containers, “one of the most significant enhancements for future use and dissemination of the Identity Federation”.
On the occasion of the European Identity Conference 2010 (EIC), Kuppinger Cole conferred the European Identity Award 201037, in the category “Best Project B2C”, to the University of Washington (UW). UW was honored for its identity federation solution based on both AD FS 2.0 & WIF 1.0 in research and education which was developed together with Microsoft and is intended to form part of the “Live@Edu” initiative.
“The University of Washington is delighted to have its work with Microsoft on federation services honored by Kuppinger Cole”, said RL "Bob" Morgan, Identity Architect for UW Information Technology and Shibboleth Project core team member. “At UW, we are committed to standards-based federation to extend the value of UW identity to the services our users need. It is great to partner with Microsoft since they too are making a commitment to federation for Windows Live and Live@edu. Live@edu's support of higher-education federations including InCommon is a key differentiator. Making it all work has many challenges, but it's essential so the higher-ed community can collaborate seamlessly and securely in cloud environments.”
Nathan Dors, manager of Identity and Access Management for UW Information Technology, added that: “we agree with Microsoft on the importance of being both standards-oriented and pragmatic. Choice of federating technology is key and we appreciate Microsoft's striving to reach parity between AD FS 2.0 and Shibboleth solutions”.
AD FS 2.0 natively offers the ability of a protocol gateway by acting as a gateway between SAML 2.0 and WS-Fed Passive protocols.
Both SAML 2.0 protocol support and the ability to bridge protocols were greeted by Scott Cantor:
“As a Shibboleth and OpenSAML project developer, and a deployer of the Shibboleth software at The Ohio State University, I’m excited and gratified that Microsoft is implementing the SAML 2.0 Web SSO profile in its upcoming products. Throughout the life of the Shibboleth project, and my work on the SAML 2.0 standard, our goal has been to leverage open standards to foster broad interoperability in federated identity within the higher education community and between it and its many commercial and non-commercial partners. Microsoft is clearly one of those critical partners, and as a key technology supplier, its support for the SAML standard reflects an understanding of our community’s needs and goals, and will expand the scope and impact of our efforts.
Our users will benefit by obtaining access to the broadest potential set of federated applications and services, and our worldwide community will benefit from the opportunity to deploy Microsoft’s identity solutions with the knowledge that they will interoperate with Shibboleth. Microsoft’s willingness to listen to our requirements and suggestions demonstrates a commitment to real-world compatibility. I look forward to continuing the dialog with Microsoft as we drive further interoperability in the use of federation metadata to scale and simplify both SAML 2.0 and WS-Federation deployments.”
Vis-à-vis SAML 2.0 protocol, AD FS 2.0 more especially supports the OASIS SAML 2.0 IdP Lite and SP Lite operation modes (see OASIS CONFORMANCE REQUIREMENTS FOR THE OASIS SECURITY ASSERTION MARKUP LANGUAGE (SAML) V2.0 38) as well as the eGov SAML 2.0 Profile v1.5, first of many vertical-specific constraining profiles (General Service Administration) version 1.5 (see LIBERTY ALLIANCE EGOVERNMENT PROFILE FOR SAML 2.0 39).
36 European Identity Award 2009: http://www.id-conf.com/blog/2009/05/07/awards-for-outstanding-identity-management-projects/37 European Identity Award 2010: http://www.id-conf.com/blog/2010/05/05/outstanding-projects-and-initiatives-in-im-honored/38 CONFORMANCE REQUIREMENTS FOR THE OASIS SECURITY ASSERTION MARKUP LANGUAGE (SAML) V2.0: http://docs.oasis-open.org/security/saml/v2.0/saml-conformance-2.0-os.pdf39 LIBERTY ALLIANCE EGOVERNMENT PROFILE FOR SAML 2.0: http://www.projectliberty.org/liberty/content/download/4711/32210/file/Liberty_Alliance_eGov_Profile_1.5_Final.pdf
Step-by-Step Guide: Federated Collaboration with Shibboleth 2.0 and SharePoint 2010 technologies 19
AD FS 2.0 successfully passed the SAML 2.0 interoperability tests for these modes as described in the document LIBERTY INTEROPERABILITY TESTING PROCEDURES FOR SAML 2.0 VERSION 3.2.2 40 (see Liberty Alliance press release ENTRUST, IBM, MICROSOFT, NOVELL, PING IDENTITY, SAP AND SIEMENS PASS LIBERTY ALLIANCE SAML 2.0 INTEROPERABILITY TESTING 41).
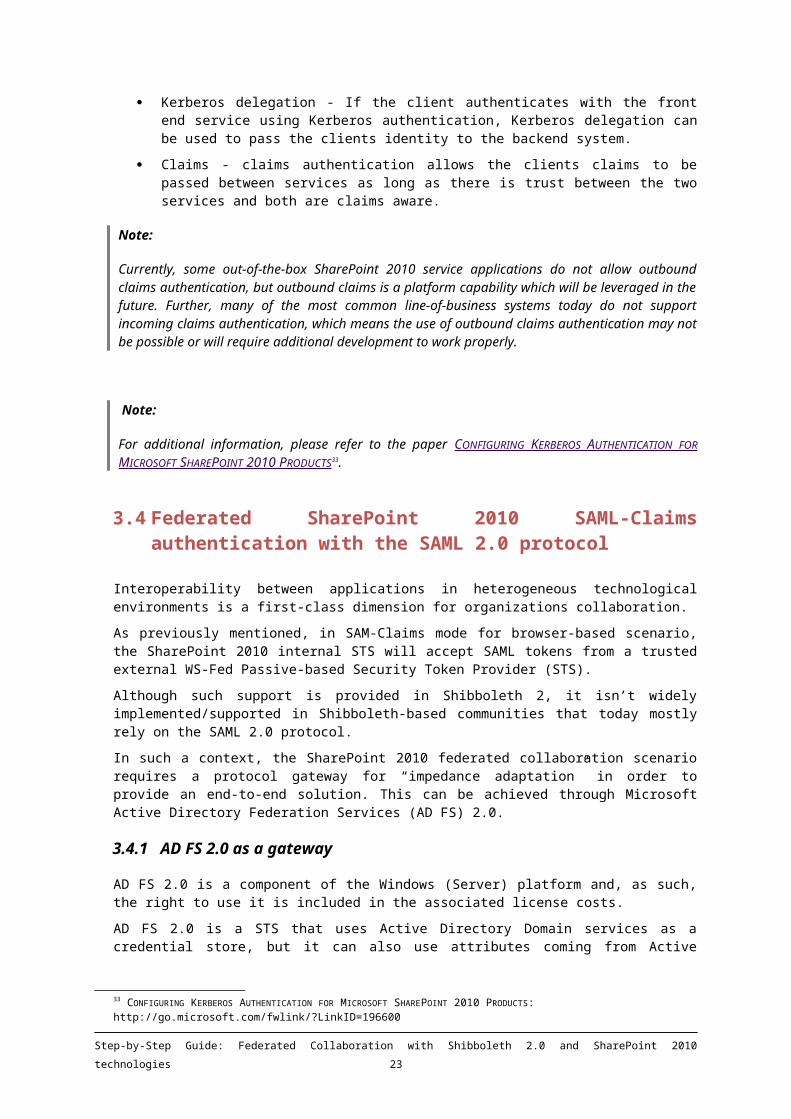
In practice, part of the conversation between SharePoint 2010 and AD FS 2.0 (in both ways) happens under WS-Fed Passive protocol, while the other part between AD FS 2.0 and Shibboleth 2 (in both ways) happens under SAML 2.0 protocol.
As a consequence of that, AD FS 2.0 is seen by the Shibboleth 2 IdP as a Shibboleth 2 SP, and it is seen by SharePoint 2010 as a trusted STS (for identity tokens) or Claims Provider (in AD FS 2.0 vocabulary).
Service Provider (SP)
Microsoft Active Directory Federation Services
(AD FS) 2.0
5
SAML 2.0 protocol
7
Identity Provider (IdP)
Internet2 Shibboleth 2
6
WAYF
3
4
Identity Repository, e.g. Active Directory Lightweight Directory Services (AD LDS)
Web Front-End (WFE)
Microsoft SharePoint 2010
Metadata-based Trust Relationship
Metadata-based Trust Relationship
Client
1
WS-Federation protocol8
2
The above figure intentionally omits all the HTTP 302 redirects to the client for the federation protocols to be simple as possible (: arrows 2, 4, 7 and 8 are HTTP 302 redirect-based.)
This capability of AD FS 2.0 is a consequence of the major announcement42 that was made by Microsoft on February 2008 about the enhancements of its products openness, interoperability, and the creation of new opportunities for developers, partners, customers and competitors.
Exchanging information between people and organizations, interoperability between applications and services have become first-class needs. Microsoft committed to interoperability a while ago, after having been exchanging with their customers about their interoperability needs and listening to them on how Microsoft products should become even more open and interoperable.
40 LIBERTY INTEROPERABILITY TESTING PROCEDURES FOR SAML 2.0 VERSION 3.2.2: http://www.projectliberty.org/liberty/content/download/4709/32204/file/Liberty_Interoperability_SAML_Test_Plan_v3.2.2%20.pdf41 Liberty Alliance press release ENTRUST, IBM, MICROSOFT, NOVELL, PING IDENTITY, SAP AND SIEMENS PASS LIBERTY ALLIANCE SAML 2.0 INTEROPERABILITY TESTING: http://www.projectliberty.org/liberty/news_events/press_releases/entrust_ibm_microsoft_novell_ping_identity_sap_and_siemens_pass_liberty_alliance_saml_2_0_interoperability_testing42 News Press Release. Microsoft Makes Strategic Changes in Technology and Business Practices to Expand Interoperability: http://www.microsoft.com/presspass/press/2008/feb08/02-21ExpandInteroperabilityPR.mspx
20 Step-by-Step Guide: Federated Collaboration with Shibboleth 2.0 and SharePoint 2010 technologies

In order to fulfill those stakes and needs, Microsoft applies four interoperability principles to their own broadly used products like Windows Server, SharePoint, etc. from now on:
1. Guarantee an open connection to these products;
2. Promote data portability;
3. Enhance industry standards support;
4. Favor exchange and collaboration in the IT industry including with the Open Source communities about interoperability and standards topics.
Of course, these principles apply to AD FS 2.0 which clearly has such goals.
Required operations to set up exchanges, redirections and interactions between Shibboleth 2 and AD FS 2.0 are explained in chapter § 5 CONFIGURE SHIBBOLETH on one hand, and those between AD FS 2.0 and SharePoint 2010 are explained in chapter § 6 CONFIGURE SHAREPOINT 2010 AS ARELYING PARTY FOR AD FS 2.0 on the other hand.
Step-by-Step Guide: Federated Collaboration with Shibboleth 2.0 and SharePoint 2010 technologies 21

4 About the testing environment
This guide assumes the pre-existence of deployments of Shibboleth 2, AD FS 2.0 and SharePoint 2010 as described in the following section.
4.1 Prepare the virtual machines
To simplify the implementation stages of installation and configuration in a testing environment, this guide is based on the definition of three machines running under Windows Server 2008 R2 as follows, including for the Shibboleth 2 system acting as an Identity Provider.
Idmgt-ip0 Idmgt-dc
Idmgt-sps
AD DS, AD CSAD FS 2.0
Microsoft SharePoint 2010
AD LDSInternet 2 Shibboleth 2
idmgt.demoidmgtext.demo
The environment used in guide is based, to do this, on the definition of three virtual machines running on top of the Microsoft Hyper-V environment onto Windows Server 2008 R2:
VM Name RAM Software installed IP configuration
IDMGT-DC 1.5 GB Operating system: Windows Server 2008 R2 EnterpriseRoles: AD DS, AD CS, (DNS)Applications: AD FS 2.0
Domain name: idmgt.demoHost name: idmgt-dc.idmgt.demoHost alias: sts.idmgt.demo
IDMGT-SPS 1.5 GB Operating system: Windows Server 2008 R2 EnterpriseApplications: Microsoft SharePoint Foundation 2010
Domain name: idmgt.demoHost name: idmgt-sps.idmgt.demo
IDMGT-IP0 1.5 GB Operating system: Windows Server 2008 R2 EnterpriseRoles: AD LDSApplications: Tomcat 6, Shibboleth 2
Domain name: idmgtext.demo43
Host name: idmgt-ip0.idmgtext.demo
The following sections describe the main steps relating to the configuration and installation of the Shibboleth 2, AD FS 2.0 and SharePoint 2010 systems and/or platforms.
To easily replicate the configuration illustrated in this guide in a testing environment:
You must follow the steps described in the two following chapters in the order in which these steps appear in order to have, at the end, hopefully a fully operational testing environment.
43 “ext” stands for external
22 Step-by-Step Guide: Federated Collaboration with Shibboleth 2.0 and SharePoint 2010 technologies

These steps assume the prior existence of the domains idmgt.demo & idmgtext.demo (as entries in the related machine hosts file).
Generally speaking, they also assume that the considered Windows Server 2008 R2 environments have all the prerequisites required to the installation of Shibboleth 2, AD FS 2.0, and SharePoint 2010 and therefore do not necessary describe the installation of these prerequisites. A dedicated section entitled PREREQUISITES AND REQUIREMENTS at the beginning of each of these two chapters briefly recap the technical expectation before addressing the steps that follow.
You can create your own virtual machines that you will configure later to perform the tasks relating to the steps outlined in the rest of this guide.
In order to do that, if you do not already have clean-installed Windows Server 2008 R2 virtual hard drive images, you can download and use the base evaluation .VHD files to build the base VMs for this lab. The files are available on the Microsoft Web site at Windows Server 2008 R2 Virtual Hard Drive Images 44.
For example, if you are creating a virtual hard drive for IDMGT-DC and also using the downloaded base .VHD image, follow the instructions provided in the download page here: Windows Server 2008 R2 Evaluation Virtual Hard Drive Images for Hyper-V (180 Days)45.
All the VM images should be configured to use a virtual private network (VPN) interface. The following procedure explains how to re-create this network in Hyper-V to support the use of the VM images in your own test lab environment.
4.2 Perform the preconfiguration tasks
Perform the prerequisite configuration steps to prepare the environment for testing:
Shibboleth 2 as a Claims Provider/Identity Provider on top of SAML 2.0 protocol (with the SAML 2.0 HTTP POST binding)/AD FS 2.0 as a Relying Party/Service Provider role vis-à-vis Shibboleth on top of SAML 2.0 protocol (see section § 5 CONFIGURE SHIBBOLETH 2 AS ACLAIMS PROVIDER FOR AD FS 2.0);
And AD FS 2.0 as a Claims Provider role vis-à-vis SharePoint 2010 on top of WS-Federation protocol/SharePoint 2010 as the Relying Party role on top of WS-Federation (see section § 6 CONFIGURE SHAREPOINT 2010 AS A RELYING PARTY FOR AD FS 2.0).
Note:
All of the actions in this section were performed while logged into Windows with administrative privileges.
4.2.1 Ensure IP Connectivity
Make sure that the Shibboleth (idmgt-ip0.idmgtext.demo), the AD FS 2.0 (sts.idmgt.demo), and the SharePoint 2010 (idmgt-sps.idmgt.demo) computers have IP connectivity between them.
4.2.2 Configure Name Resolution
In this guide, we use the hosts file on both computers to configure name resolution of the partner federation servers and SharePoint 2010 applications.
44 Windows Server 2008 R2 Virtual Hard Drive Images : http://go.microsoft.com/fwlink/?LinkId=17973445 Windows Server 2008 R2 Evaluation Virtual Hard Drive Images for Hyper-V (180 Days): http://go.microsoft.com/fwlink/?LinkId=179736).
Step-by-Step Guide: Federated Collaboration with Shibboleth 2.0 and SharePoint 2010 technologies 23

Note:
Production deployments should use Domain Name System (DNS) instead.
To configure name resolution, proceed as follow:
1. Locate the hosts file on the Shibboleth computer (idmgt-ip0.idmgtext.demo). The default location is C:\windows\system32\drivers\etc\hosts.
2. Right-click the file, and then click Open. Select Notepad to open the file.
3. Add an entry for sts.idmgt.demo and another one for idmgt-sps.idmgt.demo, for example:
192.168.1.2 sts.idmgt.demo192.168.1.3 idmgt-sps.idmgt.demo
4. If idmgt-ip0.idmgtext.demo is not a Windows domain controller, add a second entry that points to itself in the hosts file, for example:
192.168.1.1 idmgt-ip0.idmgtext.demo
5. Save and close the file.
6. Locate the hosts file on the AD FS 2.0 computer (sts.idmgt.demo), and open it with Notepad.
7. Add an entry for idmgt-ip0.idmgtext.demo and another one for idmgt-sps.idmgt.demo, for example:
192.168.1.1 idmgt-ip0.idmgtext.demo192.168.1.3 idmgt-sps.idmgt.demo
8. Save and close the file.
9. Locate the hosts file on the SharePoint 2010 computer (idmgt-sps.idmgt.demo), and open it with Notepad.
10. Add an entry for idmgt-ip0.idmgtext.demo and another one for sts.idmgt.demo, for example:
192.168.1.1 idmgt-ip0.idmgtext.demo192.168.1.2 sts.idmgt.demo
11. Save and close the file.
4.2.3 Verify Clock Synchronization
Federation events typically have a short Time to Live (TTL). To avoid errors based on time-outs, ensure that both computers have their clocks synchronized.
Note:
For information about how to synchronize a Windows Server 2008 R2 domain controller to an Internet time server, see article 816042 HOW TO CONFIGURE AN AUTHORITATIVE TIME SERVER IN WINDOWS SERVER 46.
46 Article 816042 HOW TO CONFIGURE AN AUTHORITATIVE TIME SERVER IN WINDOWS SERVER: http://go.microsoft.com/fwlink/?Link ID=60402
24 Step-by-Step Guide: Federated Collaboration with Shibboleth 2.0 and SharePoint 2010 technologies
5 Configure Shibboleth 2 as a Claims Provider for AD FS 2.0
This chapter describes the configuration steps to complete on the Shibboleth environment that will act as a Claims Provider/Identity Provider 2, as well as on the AD FS 2.0 platform, which will act conversely as Relying Party/Service Provider.
This first part of our walkthrough, as a global federated collaboration scenario, uses the SAML 2.0 POST profile.
Note:
All of the actions in this section were performed while logged into Windows with administrative privileges.
Note:
Please note that running the Shibboleth environment on a Windows system is not a requirement. There are many guides that describe the installation for a Linux system.
5.1 Prerequisites and requirements
The steps described in the following sections assume the availability of:
The IDMGT-DC (sts.idmgt.demo) (virtual) machine with ADFS 2.0 RTW47 installed and up and running at the following address: https://sts.idmgt.demo/adfs/ls/. This chapter also assumes the default AD FS identifier is used: https://sts.idmgt.demo/adfs/services/trust.
For the prerequisites for AD FS 2.0, we invite you to consult in a complementary way the guide entitled AD FS 2.0 FEDERATION WITH A WIF APPLICATION STEP-BY-STEP GUIDE 48, which can be considered as a starting point to build a Windows Server 2008 R2 instance that hosts AD FS 2.0.
The IDMGT-IP0 (idmgt-ip0.idmgtext.demo) (virtual) machine on which the Shibboleth system will be installed. Installation and deployment guides for Shibboleth are available at the Shibboleth 2 documentation home page49 Web site.
This machine must have a recent version (5 or later) of the Java runtime environment (JRE) for Windows 32-bit. This guide uses Oracle Java SE Runtime Environment (JRE) 6u2250.
Note:
Set the JAVA_HOME environment variable to the install directory for this JRE (for example, C:\Program~2\Java\jre6) before running the Shibboleth IdP installer. Do not use C:\Program Files (x86)\ but C:\Progra~2 because some software don’t support having spaces in paths
47 AD FS 2.0 RTW: http://www.microsoft.com/downloads/details.aspx?FamilyID=118c3588-9070-426a-b655-6cec0a92c10b&displaylang=en48 AD FS 2.0 Federation with a WIF Application Step-by-Step Guide: http://go.microsoft.com/fwlink/?LinkId=19399749 Shibboleth 2 documentation home page: http://go.microsoft.com/fwlink/?LinkId=20401450 Oracle JRE 6u22: http://go.microsoft.com/fwlink/?LinkId=204015
Step-by-Step Guide: Federated Collaboration with Shibboleth 2.0 and SharePoint 2010 technologies 25

JAVA_HOME= C:\Program~2\Java\jre6\
For information on the prerequisites of the Shibboleth 2 system on Linux environments as well as the installation and configuration of an Identity provider onto these environments, we invite you to visit complementarily the documentation made available by the Education-Research RENATER Federation.
5.2 Install Shibboleth 2
To install the Shibboleth 2 IdP software package onto the IDMGT-IP0 (idmgt-ip0.idmgtext.demo) machine, proceed as follow:
1. Visit the Shibboleth download site51 and download the latest IdP (Identity Provider) software package. This guide uses the Java WebApp with Ant-based Installer version 2.2.0: shibboleth-identityprovider-2.2.0-quickinstall.msi.
2. Unzip the package shibboleth-identityprovider-2.2.0-quickinstall.msi to c:\shibboleth\.
3. In an elevated command prompt, run c:\shibboleth\install.bat and accept the default values when prompted. This will install Shibboleth into the c:\opt\shibboleth-idp\ folder.
Note:
This installer automatically installs and configures Apache Tomcat52 6.0.26 for 32-bit Windows. It depends on an existing 32-bit Java JRE installation.
4. Set the TOMCAT_HOME and IDP_HOME environment variable to their install directories. If you install to default locations, the right values to set will be:
TOMCAT_HOME=c:\progra~2\apache~1\tomcat~1.0\IDP_HOME=c:\opt\shibboleth-idp\
5.3 Configure Servlet Container for SSL and Shibboleth
Unless noted otherwise, all the instructions below are executed on the IDMGT-IP0 (idmgt-ip0.idmgtext.demo) machine.
These instructions assume you are using Apache Tomcat, which should normally be the case if you’ve followed the previous instructions.
5.3.1 Create an SSL Certificate
Federation relies heavily on public key infrastructure (PKI), including Secure Sockets Layer (SSL) encryption, for trustworthy transactions. To properly use SSL security in this lab, run the following to create a Secure Sockets Layer (SSL) certificate Apache that Tomcat will use to protect your Shibboleth IdP web site:
mkdir c:\certs\%JAVA_HOME%\bin\keytool -genkey -alias tomcat -dname CN=idmgt-ip0.idmgtext.demo -keyalg RSA -keystore c:\certs\.keystore -keypass changeit -storepass changeit
5.3.2 Enable SSL in Apache Tomcat
To enable SSL in Apache Tomcat, proceed as follow:51 Shibboleth download site: http://go.microsoft.com/fwlink/?LinkId=20401652 Apache Tomcat 6.x : http://tomcat.apache.org/download-60.cgi
26 Step-by-Step Guide: Federated Collaboration with Shibboleth 2.0 and SharePoint 2010 technologies

1. Open %TOMCAT_HOME%\conf\server.xml.
2. Uncomment the SSL Connector element and add the keystoreFile and keystorePass attributes. It should look like:
<Connector port="8443" protocol="HTTP/1.1" SSLEnabled="true" maxThreads="150" scheme="https" secure="true" keystoreFile="c:\certs\.keystore" keystorePass="changeit" clientAuth="false" sslProtocol="TLS" />
5.3.3 Add Shibboleth Servlet to Apache Tomcat
To add the Shibbleth Servlet to Apache Tomcat, proceed as follow:
1. Create a file called %TOMCAT_HOME%\conf\Catalina\localhost\idp.xml with the following contents:
<Context docBase="c:/opt/shibboleth-idp/war/idp.war" privileged="true" antiResourceLocking="false" antiJARLocking="false" unpackWAR="false" swallowOutput="true" />
2. Restart the Apache Tomcat service by running the following commands:
net stop Tomcat6net start Tomcat6
You should now be able to visit https://idmgt-ip0.idmgtext.demo:8443/idp/profile/Status and see a page that says “ok”.
5.4 Configure Shibboleth 2
Unless noted otherwise, all the instructions below are executed on the IDMGT-IP0 (idmgt-ip0.idmgtext.demo) machine.
In this section, perform the prerequisite configuration steps to prepare the environment for using Shibboleth 2 as an identity provider.
5.4.1 Install AD LDS and declare it for login
By default, no LDAP (Lightweight Directory Access Protocol) repository is installed for the Shibboleth IdP.
Consequently, in order to have an LDAP repository that will provide attributes and user accounts to Shibboleth IdP, Active Directory Lightweight Directory Services (AD LDS for short) is installed.
Note:
For information about AD-LDS, please refer to the Active Directory Lightweight Directory Services documentation53 available on the Microsoft TechNet Web site.
53 Active Directory Lightweight Directory Services documentation: http://technet.microsoft.com/en-us/library/cc731868(WS.10).aspx
Step-by-Step Guide: Federated Collaboration with Shibboleth 2.0 and SharePoint 2010 technologies 27

Note:
Another LDAP repository like the OpenLDAP software54 could have been installed instead.
5.4.1.1 Install the AD LDS role and configure the instance
To both install an AD LDS role and configure the instance onto the idmgt-ip0.idmgtext.demo Windows Server 2008 R2 machine and declare it for logon for the Shibboleth IdP, proceed as follow:
1. Add the AD LDS role to the Windows instance as explained in the STEP 1: INSTALL THE AD LDS SERVER ROLE page55. This will end with the following result in the Add Roles wizard:
2. From the Server Manager console, select the Active Directory Lightweight Directory Services node in the console tree under the Roles node.
3. In the right pane, click the Click here to create an AD LDS instance link. The Active Directory Lighweight Directory Services Setup Wizard opens up.
54 OpenLDAP Software: http://www.openldap.org/55 STEP 1: INSTALL THE AD LDS SERVER ROLE page: http://technet.microsoft.com/en-us/library/cc754486(WS.10).aspx
28 Step-by-Step Guide: Federated Collaboration with Shibboleth 2.0 and SharePoint 2010 technologies
4. On the Welcome page, click the Next button.
5. On the Setup Options page, select the option A unique instance, and then click the Next button.
6. On the Instance Name page, type for example “ShibbolethDir” in the Instance name textbox and “Shibboleth Directory AD LDS instance” in the Description textbox, and then click the Next button.
Step-by-Step Guide: Federated Collaboration with Shibboleth 2.0 and SharePoint 2010 technologies 29

7. On the Ports page, keep the default port number for both LDAP and SSL, and then click the Next button.
8. On the Application Directory Partition page, select the option Yes, create an application directory partition for the Shibboleth IdP, then type for example “cn=Users,dc=IDMGT,dc=COM” in the Partition name textbox, and finally click the Next button.
9. On the File Locations page, keep the default path for both the data files and the data recovery files, and then click the Next button.
30 Step-by-Step Guide: Federated Collaboration with Shibboleth 2.0 and SharePoint 2010 technologies
10. On the Service Account Selection page, keep the default network service account, and then click the Next button.
11. On the AD LDS Administrators page, keep the default currently logged on user as the instance administrator, and then click the Next button.
12. On the Importing LDIF Files page, make sure that the LDIF files MS-InetOrgPerson.LDF and MS-User.LDF are checked, and then click the Next button.
Step-by-Step Guide: Federated Collaboration with Shibboleth 2.0 and SharePoint 2010 technologies 31

13. On the Ready to Install page, review the selections made so far, and then click the Next button to start the installation.
14. Once completed without any error, the completing page appears. Click the Finish button to complete the instance installation.
5.4.1.2 Create a Shibboleth service user
It is now time to create a user inside the LDAP directory so that the Shibboleth IdP can access AD LDS.
To create a new user in the newly installed AD LDS instance, proceed as follow:
1. From the Server Manager console, select the Active Directory Lightweight Directory Services node in the console tree under the Roles node.
32 Step-by-Step Guide: Federated Collaboration with Shibboleth 2.0 and SharePoint 2010 technologies

2. In the right pane, click the ADSI Edit link. The ADSI Edit application opens up.
3. Right-click the ADSI Edit node and select the Connect to item. The Connection Settings dialog box opens up.
4. In the Connection Point frame, select the option Select or type a Distinguished Name or Naming Context and type the partition name specified earlier during the AD LDS instance installation, for example “CN=Users,DC=IDMGT,DC=COM” in our case.
In the Computer frame, select the option Select or type a domain or server: (Server | Domain [:port]), then type “localhost:389”, and finally click the OK button to confirm the settings and close the dialog box.
5. In the ADSI Edit console, right-click the “CN=Users,DC=IDMGT,DC=COM” node, then click the New item, and then click the Object item. The Create Object dialog box opens up.
Step-by-Step Guide: Federated Collaboration with Shibboleth 2.0 and SharePoint 2010 technologies 33

6. In the Create Object dialog box, select the class User and then click the Next button.
7. In the Create Object dialog box, type for example “ShibbolethServiceAccount” for the value and then click the Next button.
8. In the Create Object dialog box, click the Finish button to create the user.
5.4.1.3 Configure the Shibboleth service user
We then have to set the “CN=ShibbolethServiceAccount” user’s password.
To set the user’s password, proceed as follow:
1. Right-click the newly created “CN=ShibbolethServiceAccount” user object and click the Reset Password item. The Reset Password dialog box opens up.
2. Specify the new password, for example MIwgsymf29, in the New password and Confirm password textboxes and then click the OK button to confirm and close the dialog box.
For the CN=ShibbolethServiceAccount user, the msDS-UserAccountDisabled attribute must be changed to false.
34 Step-by-Step Guide: Federated Collaboration with Shibboleth 2.0 and SharePoint 2010 technologies

To set this attribute, proceed as follow:
1. Right-click the “CN=ShibbolethServiceAccount” user object and click the Properties item. The properties dialog box opens up.
2. Select the msDS-UserAccountDisabled attribute in the attributes list and then click the Edit button. The Boolean Attribute Editor dialog box opens up.
3. Select the False option and then click the OK button to close the editor dialog box.
4. Similarly, set the msDS-UserDontExpirePassword attribute of the same account to true.
5. Click the OK button to close the properties dialog box.
Finally the “CN=ShibbolethServiceAccount” user must belong to the “CN=Administrators” role.
To place the service user in the Administrators role, proceed as follow:
1. Click the “CN=Roles” container in the left pane, then right-click the “CN=Administrators” object in the right pane and finally click the Properties item. The properties dialog box opens up.
2. Click the Edit button. The Multi-valued Distinguished Name With Security Principal Editor dialog box opens up.
3. Click the Add DN button. The Add Distinguished Name (DN) dialog box opens up.
Step-by-Step Guide: Federated Collaboration with Shibboleth 2.0 and SharePoint 2010 technologies 35

4. Type the DN for the service account, for example in our case “CN= ShibbolethServiceAccount,CN=Users,DC=IDMGT,DC=COM”, and then click the OK button.
5. Click the OK button to close the editor dialog box.
6. Click the OK button to close the properties dialog box.
5.4.1.4 Create and configure a test user for the Shibboleth IdP
In order to interact with the AD FS 2.0 machine in the other realm, a test user has to be created.
The required steps are similar as the one outlined in sections § 5.4.1.2 CREATE A SHIBBOLETHSERVICE USER and § 5.4.1.3 CONFIGURE THE SHIBBOLETH SERVICE USER:
Create a new object of type user, named “cc” instead of “ShibbolethServiceAccount” (“CN=cc,CN=Users,DC=IDMGT,DC=COM”);
Reset its password;
Set its msDS-UserAccountDisabled attribute to false.
You may also want to set its msDS-UserDontExpirePassword attribute to true.
Note:
This user doesn’t have to be added in any role.
The following additional attributes are set (they will eventually be transformed as claims):
Attribute name Value
department “sampleEduPersonAffiliation”
mail “[email protected]”
5.4.1.5 Modify Shibboleth configuration files
Shibboleth has a number of configuration files that need to be modified in order to have the server connect to AD LDS and emit the claims.
These configuration files are at %IDP_HOME%\conf, e.g. C:\opt\shibboleth-idp\conf.
Here are the files that need to be changed: handler.xml and login.config files.
36 Step-by-Step Guide: Federated Collaboration with Shibboleth 2.0 and SharePoint 2010 technologies
Note:
In the following configuration files excerpts, comments may be omitted
Edit the handler.xml file
For the purposes of this walkthrough, we’ll let Shibboleth authenticate users via their username/password credentials. Proceed as follow:
1. Edit %IDP_HOME%\conf\handler.xml.
2. Replace the set of LoginHandler elements with the following:
<LoginHandler xsi:type="UsernamePassword" jaasConfigurationLocation="file://C:\opt\shibboleth-idp/conf/login.config"> <AuthenticationMethod> urn:oasis:names:tc:SAML:2.0:ac:classes:PasswordProtectedTransport </AuthenticationMethod></LoginHandler>
Edit the login.config file
When omitting the comments, the file should look like this:
ShibUserPassAuth { edu.vt.middleware.ldap.jaas.LdapLoginModule required host="localhost:389" base="CN=users,DC=IDMGT,DC=COM"
ssl="false" userField="uid"
subtreeSearch="true" serviceUser="cn=ShibbolethServiceAccount,cn=Users,dc=IDMGT,dc=COM" serviceCredential="MIwgsymf29";
};
Note:
Replace MIwgsymf29 by your own password previously set in section § 5.4.1.3 CONFIGURE THESHIBBOLETH SERVICE USER for the Shibboleth service user.
5.4.2 Add the AD FS 2.0 SSL Certificate to Java’s Trusted Certificate Store
Note:
You only need to do this step if you are using a test or self-signed certificate for the AD FS SSL certificate, which is the case for this lab. The situation could be different for production deployments.
If you are using the self-signed auto-generated certificate, you will get an SSL handshake error when Shibboleth downloads AD FS’s metadata document. One way to fix this is to add this certificate to Java’s trusted certificate store.
To add the AD FS 2.0 self-signed auto-generated certificate to Java’s trusted certificate store, proceed as follow:
1. Visit https://sts.idmgt.demo/FederationMetadata/2007-06/FederationMetadata.xml with Internet Explorer.
Step-by-Step Guide: Federated Collaboration with Shibboleth 2.0 and SharePoint 2010 technologies 37

2. At the security warning, click the link to continue to the website. The Address Bar turns red to signify that the page is protected by an SSL certificate that is not trusted.
3. Click the Certificate Error message next to the Internet Explorer address bar, and then the View Certificate link. The Certificate dialog box opens up.
4. In the Certificate window, click the Details tab, and then click Copy to File to start the Certificate Export Wizard.
5. Click the Next button.
6. On the Export File Format page, leave DER encoded binary X.509 selected, and then click the Next button.
7. On the File to Export page, click the Browse button, navigate to the Windows desktop, and then type the file name “adfs-root” (leaving the type as .cer). Click the Save button.
8. Click the Next button, click the Finish button, click the OK button, and then click the OK button again.
9. Open a command prompt from Windows desktop, and then run the following commands:
%JAVA_HOME%\bin\keytool.exe -keystore %JAVA_HOME%\lib\security\cacerts -import -alias adfsroot -file adfs-root.cer -trustcacerts -storepass changeit –noprompt
5.4.3 Add the AD FS instance as a Service Provider using remote metadata
Adding a partner, using AD FS 2.0, into Shibboleth 2 is done by referencing the partner’s XML metadata document in the Shibboleth configuration. The metadata file can reside locally or it can be located at a URL.
The Shibboleth IdP does not require a scope variable in partner metadata (used for authorization purposes). Therefore, here we’ll simply point Shibboleth to the AD FS 2.0 auto-generated metadata document (, for example https://sts.idmgt.demo/FederationMetadata/2007-06/FederationMetadata.xml).
To add the AD FS instance as a new SP using metadata, proceed as follow:
1. Edit %IDP_HOME%\conf\relying-party.xml.
2. Under the MetadataProvider element with id=”ShibbolethMetadata”, add the following element:
<MetadataProvider id="URLMD" xsi:type="FileBackedHTTPMetadataProvider" xmlns="urn:mace:shibboleth:2.0:metadata" metadataURL="https://sts.idmgt.demo/FederationMetadata/2007-06/FederationMetadata.xml" backingFile="C:\opt\shibboleth-idp\metadata\adfs-metadata.xml"> <MetadataFilter xsi:type="ChainingFilter" xmlns="urn:mace:shibboleth:2.0:metadata"> <MetadataFilter xsi:type="EntityRoleWhiteList" xmlns="urn:mace:shibboleth:2.0:metadata">
38 Step-by-Step Guide: Federated Collaboration with Shibboleth 2.0 and SharePoint 2010 technologies

<RetainedRole>samlmd:SPSSODescriptor</RetainedRole> </MetadataFilter> </MetadataFilter></MetadataProvider>
3. Save and close the relying-party.xml file.
5.4.4 Add attributes to a Shibboleth generated assertion
The Shibboleth IdP software is preconfigured to include a number of assertion attributes in the SAML assertions it generates, including an example of eduPersonScopedAffiliation.
Here, we will modify the default configuration to add the mail and the eduPersonPrimaryAffiliation attributes to the collection to use in AD FS 2.0 rules set in respect to the SharePoint 2010 application. These two attributes will be further used as an E-Mail Address claim, respectively a Role claim from both an AD FS 2.0 and SharePoint 2010 perspectives.
Furthermore, for the simplicity of the walkthrough, we will not limit inclusion of these attributes to assertions that are generated for the AD FS 2.0 realm.
5.4.4.1 Edit the attribute-resolver.xml file
For the purposes of this walkthrough, proceed as follow:
1. Use Windows Explorer to navigate to the folder where the attribute-resolver.xml configuration file is located. This configuration file is at %IDP_HOME%\conf, e.g. C:\opt\shibboleth-idp\conf.
2. Right-click the attribute-resolver.xml file, and then click Edit. The document should open in Notepad.
3. Add or modify the attribute definitions to include the following XML:
<resolver:AttributeDefinition id="email" xsi:type="Simple" xmlns="urn:mace:shibboleth:2.0:resolver:ad" sourceAttributeID="mail"> <resolver:Dependency ref="ADLDS" />
<resolver:AttributeEncoder xsi:type="SAML1String" xmlns="urn:mace:shibboleth:2.0:attribute:encoder" name="urn:mace:dir:attribute-def:mail" />
<resolver:AttributeEncoder xsi:type="SAML2String" xmlns="urn:mace:shibboleth:2.0:attribute:encoder" name="urn:oid:0.9.2342.19200300.100.1.3" friendlyName="mail" /></resolver:AttributeDefinition>
<resolver:AttributeDefinition id="eduPersonPrimaryAffiliation" xsi:type="Simple" xmlns="urn:mace:shibboleth:2.0:resolver:ad" sourceAttributeID="department"> <resolver:Dependency ref="ADLDS" />
<resolver:AttributeEncoder xsi:type="SAML1String" xmlns="urn:mace:shibboleth:2.0:attribute:encoder" name="urn:mace:dir:attribute-def:eduPersonPrimaryAffiliation" />
<resolver:AttributeEncoder xsi:type="SAML2String" xmlns="urn:mace:shibboleth:2.0:attribute:encoder" name="urn:oid:1.3.6.1.4.1.5923.1.1.1.5" friendlyName="eduPersonPrimaryAffiliation" /></resolver:AttributeDefinition>
4. Add the following data connector to the previously installed AD LDS instance.
<resolver:DataConnector id="ADLDS" xsi:type="LDAPDirectory" xmlns="urn:mace:shibboleth:2.0:resolver:dc" ldapURL="ldap://localhost:389"
baseDN="cn=Users,dc=IDMGT,dc=COM"principal="cn=ShibbolethServiceAccount,cn=Users,dc=IDMGT,dc=COM"principalCredential=" MIwgsymf29">
<FilterTemplate> <![CDATA[ (uid=$requestContext.principalName) ]]> </FilterTemplate>
Step-by-Step Guide: Federated Collaboration with Shibboleth 2.0 and SharePoint 2010 technologies 39

</resolver:DataConnector>
Note:
Replace MIwgsymf29 by your own password previously set in section § 5.4.1.3 CONFIGURE THESHIBBOLETH SERVICE USER for the Shibboleth service user.
5. Save and close the attribute-resolver.xml file.
5.4.4.2 Edit the attribute-filter.xml file
For the purposes of this walkthrough, please proceed as follow:
1. Use Windows Explorer to navigate to the folder where the attribute-filter.xml configuration file is located. This configuration file is at %IDP_HOME%\conf, e.g. C:\opt\shibboleth-idp\conf.
2. Right-click the attribute-filter.xml file, and then click Edit. The document should open in Notepad.
3. Add or modify the list of attributes that will be released to include the following XML:
<AttributeFilterPolicy id="releaseToAnyone"> <PolicyRequirementRule xsi:type="basic:ANY" /> …
<AttributeRule attributeID="email"> <PermitValueRule xsi:type="basic:ANY" /> </AttributeRule> <AttributeRule attributeID="eduPersonPrimaryAffiliation"> <PermitValueRule xsi:type="basic:ANY" /> </AttributeRule></AttributeFilterPolicy>
4. Save and close the attribute-filter.xml file.
5.4.5 Complete the Shibboleth configuration
At this stage, the Shibboleth configuration is almost completed.
5.4.5.1 Edit Shibboleth’s Metadata
By default, Shibboleth assumes it is located on port 443. Since Apache Tomcat uses port 8443, you’ll need to edit your metadata document so that it is correct.
1. Use Windows Explorer to navigate to the folder where the idp-metadata.xml configuration file is located. This configuration file is at %IDP_HOME%\metadata, e.g. C:\opt\shibboleth-idp\metadata.
2. Right-click the attribute-resolver.xml file, and then click Edit. The document should open in Notepad.
3. Replace all instances of
Location="https://idmgt-ip0.idmgtext.demo/
with
Location="https://idmgt-ip0.idmgtext.demo:8443/
40 Step-by-Step Guide: Federated Collaboration with Shibboleth 2.0 and SharePoint 2010 technologies
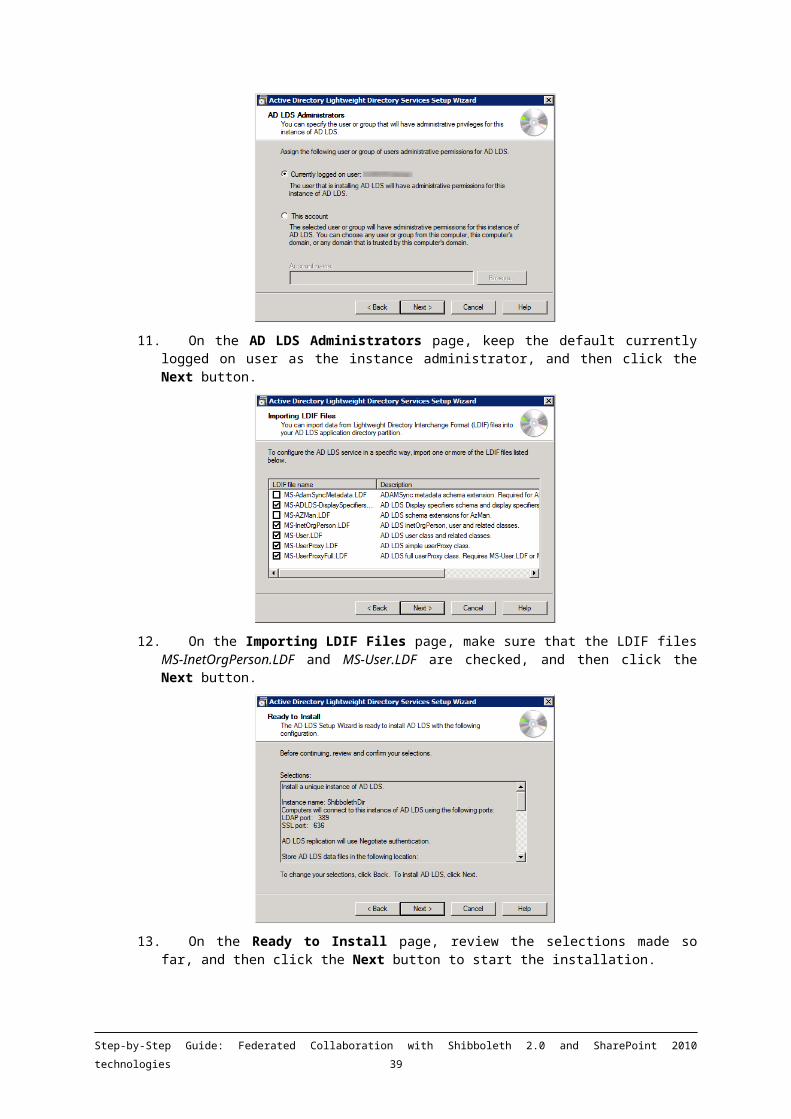
4. Save and close the idp-metadata.xml file.
5.4.5.2 Adjust the level of logging
You may want to adjust the level of logging with this configuration file.
The following settings in %IDP_HOME%\conf\logging.xml may give the right level of information:
<!-- Logs IdP, but not OpenSAML, messages --><logger name="edu.internet2.middleware.shibboleth"> <level value="WARN" /></logger>
<!-- Logs OpenSAML, but not IdP, messages --><logger name="org.opensaml"> <level value="WARN" /></logger>
<!-- Logs LDAP related messages --><logger name="edu.vt.middleware.ldap"> <level value="WARN"/></logger>
<!-- Logs inbound and outbound protocols messages at DEBUG level --><logger name="PROTOCOL_MESSAGE"> <level value="TRACE" /></logger>
<logger name="Shibboleth-Access"> <level value="ALL" /> <appender-ref ref="IDP_ACCESS" /></logger>
<logger name="Shibboleth-Audit"> <level value="ALL" /> <appender-ref ref="IDP_AUDIT" /></logger>
5.4.5.1 Restart the Apache Tomcat to take into account the updated Shibboleth configuration
To complete the Shibboleth configuration, instance, proceed as follow:
1. Click Start, click Administrative Tools, and then click Services.
2. Right-click the Apache Tomcat service, and then click Restart.
5.5 Configure AD FS 2.0
Unless noted otherwise, all the instructions below are executed on the AD FS 2.0 IDMGT-DC (idmgt-dc.idmgt.demo) machine.
Step-by-Step Guide: Federated Collaboration with Shibboleth 2.0 and SharePoint 2010 technologies 41

5.5.1 Install the Shibboleth IdP SSL certificates in the Trusted Roots Store
At this stage, we need to add the self-signed certificates being used by Apache Tomcat at idmgt-ip0.idmgtext.demo into the Trusted Roots store of the AD FS 2.0 machine.
This makes it possible for Internet Explorer to trust this Web server during HTTPS communications.
To install the Shibboleth SSL certificate, proceed as follow:
1. Visit https://idmgt-ip0.idmgtext.demo with Internet Explorer.
2. At the security warning, click the link to continue to the website. The Address Bar turns red to signify that the page is protected by an SSL certificate that is not trusted.
3. Click the Certificate Error message next to the Internet Explorer address bar, and then click the View certificates link.
4. In the Certificate window, on the General tab, click Install Certificate to start the Certificate Import Wizard.
5. Click the Next button.
6. In the Certificate Store window, click the Place all certificates in the following store option.
7. Click the Browse button, and then click the Show physical stores button.
8. In the Trusted Root Certificate Authorities folder, select Local Computer, and then click the OK button.
9. Click the Next button, click the Finish button, click the OK button, and then click the OK button.
10. Visit https://idmgt-ip0.idmgtext.demo:8443 with Internet Explorer. (Note the port number.) Use the previous process to install this SSL certificate into the local computer’s Trusted Roots store.
11. Close and then reopen Internet Explorer, and revisit both web addresses. In both cases, the address bar should remain white, signifying working SSL channels.
5.5.2 Add the Shibboleth instance as a Claims Provider using metadata
We use the metadata import capabilities of AD FS 2.0 to create the Shibboleth claims provider. The metadata includes the public key that is used to validate security tokens that Shibboleth signs.
We’ll use PowerShell to add the Shibboleth IdP to AD FS.
To add the Shibboleth instance as a claims provider, proceed as follow:
1. Open a command prompt and run the following PowerShell commands:
Add-PSSnapIn Microsoft.Adfs.PowerShell
Add-ADFSClaimsProviderTrust -Name "Shibboleth IdP" –MetadataFile https://idmgt-ip0.idmgtext.demo:8443/idp/profile/Metadata/SAML
Set-ADFSClaimsProviderTrust –TargetName "Shibboleth IdP" –SignatureAlgorithm http://www.w3.org/2000/09/xmldsig#rsa-sha1
This will create an AD FS entry for the Shibboleth IdP using its metadata.
When it signs assertions, Shibboleth uses the Secure Hash Algorithm 1 (SHA-1) for signing operations, while by default AD FS 2.0 expects partners to use SHA-256.
Consequently, for interoperability with Shibboleth, the above script specifies for AD FS 2.0 that Shibboleth will be using the SHA-1 hash algorithm for signing its responses.
42 Step-by-Step Guide: Federated Collaboration with Shibboleth 2.0 and SharePoint 2010 technologies

Note:
For more information, see the AD FS 2.0 ADMINISTRATION WITH WINDOWS POWERSHELL 56 section of the AD FS 2.0 OPERATIONS GUIDE and the AD FS 2.0 CMDLETS REFERENCE 57.
5.5.3 Edit Claim Rules for Claims Provider Trust
The following claim rule describes how data from Shibboleth is used in the security token that is sent to the AD FS 2.0.
To configure the claims for inbound receipt, proceed as follow:
1. Open the AD FS 2.0 Management console. On the Start menu, click Administrative Tools, and then click AD FS 2.0 Management.
2. After the snap-in is loaded, click on the Trust Relationships node, and then highlight Claims Provider Trusts.
3. In the AD FS 2.0 Management center pane, right-click Shibboleth IdP, and then click the Edit Claim Rules item.
4. On the Acceptance Transform Rules tab, click the Add Rule button.
5. On the Select Rule Template page, select Send Claims Using a Custom Rule, and then click the Next button.
6. On the Configure Rule page, in the Claim rule name box, type “Transform mail to E-Mail Address”.
7. In the Custom Rule window, type or copy and paste the following:
c:[Type == "urn:oid:0.9.2342.19200300.100.1.3"] => issue(Type = "http://schemas.xmlsoap.org/ws/2005/05/identity/claims/emailaddress", Issuer = c.Issuer, OriginalIssuer = c.OriginalIssuer, Value = c.Value, ValueType = c.ValueType);
8. Click the Finish button.9. On the Acceptance Transform Rules tab, click the Add Rule button.
10. On the Select Rule Template page, select Send Claims Using a Custom Rule, and then click the Next button.
11. On the Configure Rule page, in the Claim rule name box, type “Transform eduPersonPrimaryAffiliation to Role”.
12. In the Custom Rule window, type or copy and paste the following:
c:[Type == "urn:oid:1.3.6.1.4.1.5923.1.1.1.5"] => issue(Type = "http://schemas.microsoft.com/ws/2008/06/identity/claims/role", Issuer = c.Issuer, OriginalIssuer = c.OriginalIssuer, Value = c.Value, ValueType = c.ValueType);
13. Click the Finish button, and then click the OK button.
Note:
The object-identifier-style URN strings are the formal SAML 2.0 names for mail and eduPersonPrimaryAffiliation names that the Shibboleth IdP software sends by default.
56 AD FS 2.0 ADMINISTRATION WITH WINDOWS POWERSHELL: http://go.microsoft.com/fwlink/?LinkId=19400557 AD FS 2.0 CMDLETS REFERENCE: http://go.microsoft.com/fwlink/?LinkId=177389).
Step-by-Step Guide: Federated Collaboration with Shibboleth 2.0 and SharePoint 2010 technologies 43
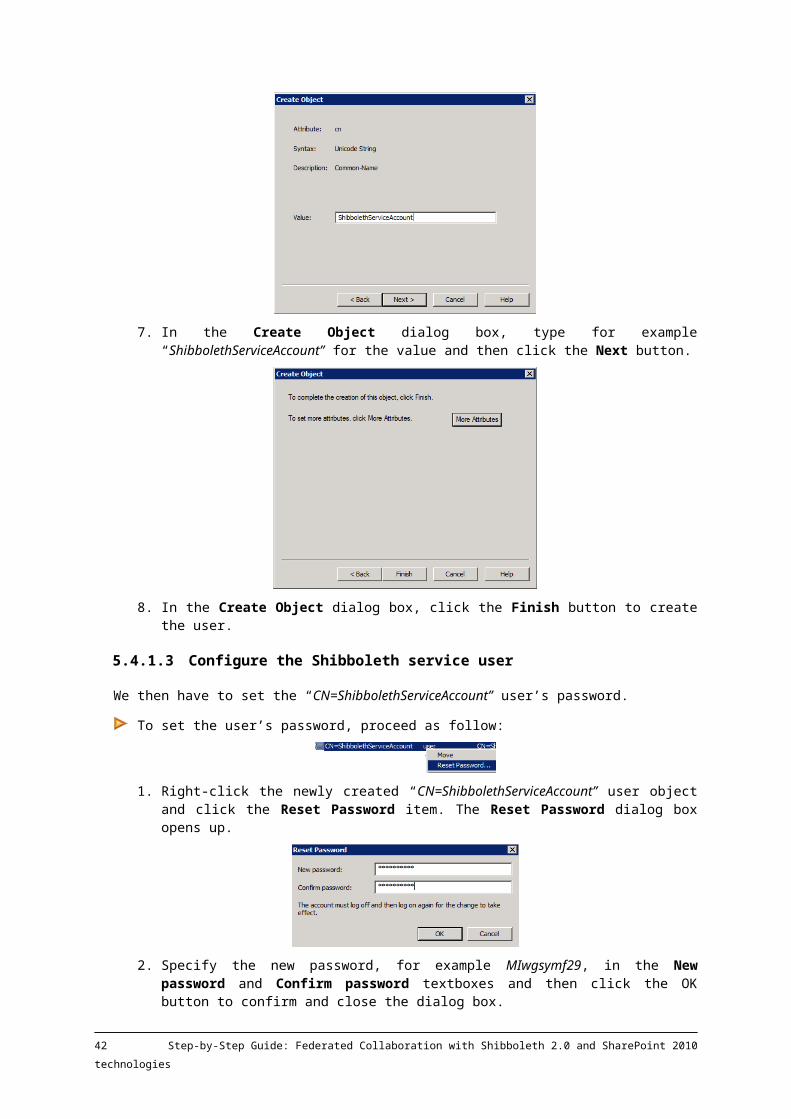
Note:
Attributes with formal names that are represented in URN strings cannot be passed untransformed to WIF-based applications like SharePoint 2010, because WIF can only understand claims using URL-style names. That is why we transform the incoming mail and eduPersonPrimaryAffiliation attributes to E-Mail Address and Role claims, instead of retaining their original claim types.
Note:
Unlike Shibboleth, when it reads inbound attributes AD FS 2.0 ignores the urn:oasis:names:tc:SAML:2.0:attrname-format:uri name format that Shibboleth uses, and it simply reads the value.
Note:
Some Shibboleth attributes like eduPersonScopedAffiliation are scoped attributes, meaning that Shibboleth (when it acts as the SP) checks the scope section of the attributes against a value that is provided in an IdP partner's metadata.
When AD FS 2.0 acts as an SP, it does not read or store the IdP partner's scope value during its metadata import. However, it is possible to use the AD FS 2.0 claim rule language to simulate the "scope check" behavior of a Shibboleth SP, as shown below in the condition part of a rule: c:[Type == "urn:oid:1.3.6.1.4.1.5923.1.1.1.9", Value =~ "^.+@<scope>"]
5.6 Test Shibboleth as the Identity Provider and AD FS 2.0 as the Relying Party
All the instructions below are executed on the AD FS 2.0 IDMGT-DC (idmgt-dc.idmgt.demo) machine.
Note:
Clear all the cookies in Internet Explorer on the AD FS 2.0 IDMGT-DC (idmgt-dc.idmgt.demo). To clear the cookies, click Tools, click Internet Options, click Delete under Browsing History, and then select cookies for deletion.
To test the federation relationship between Shibboleth and AD FS 2.0, proceed as follow:
1. Visit https://sts.idmgt.demo/adfs/ls/IdpInitiatedSignon.aspx with Internet Explorer.
2. When prompted at the AD FS 2.0 Home Realm Discovery page, choose Shibboleth IdP in the combo box, and then click the button Continuer la connexion (Continue to Sign in English).
You are redirected to Shibboleth IdP. The Shibboleth forms login page appears.
44 Step-by-Step Guide: Federated Collaboration with Shibboleth 2.0 and SharePoint 2010 technologies
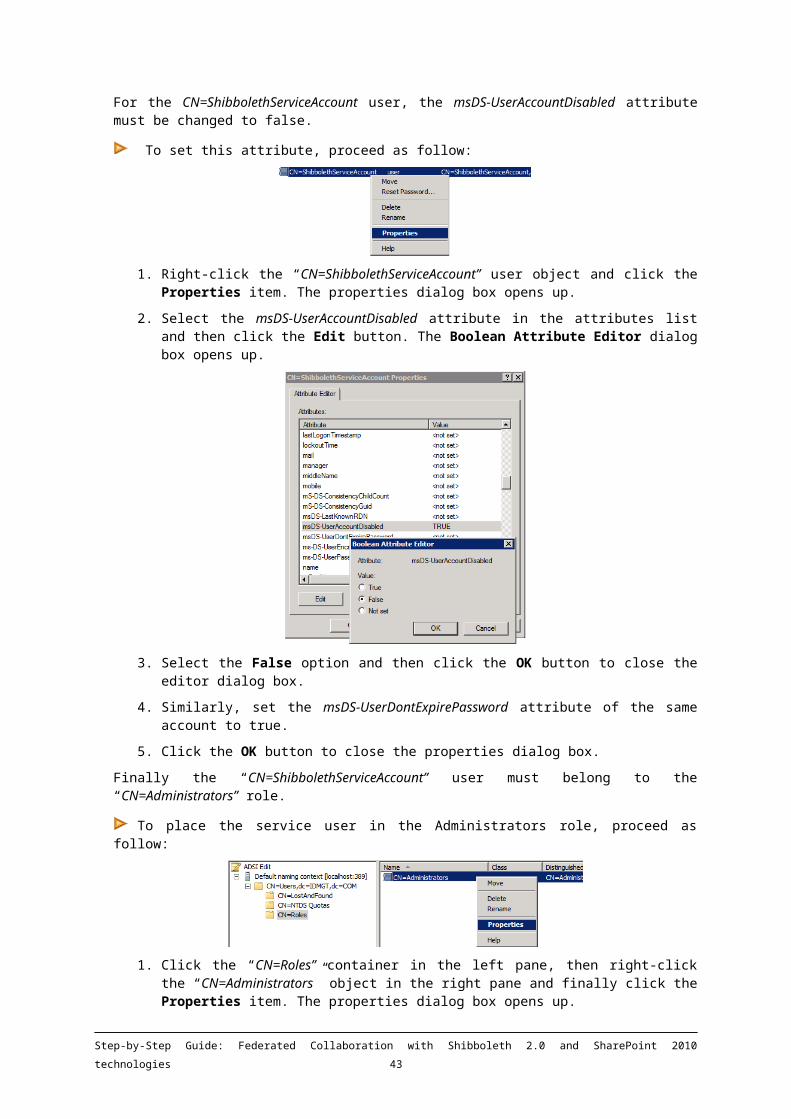
3. Log in with the user name “cc” and the password you created for the user earlier, and then click the Login button. The Shibboleth IdP will grant you access and send an encrypted token back to AD FS 2.0.
5.7 Other Issues?
If you run into issues, you may wish to check Tomcat and Shibboleth’s log files, located at:
%TOMCAT_HOME%\logs\
catalina.DATE.log
localhost.DATE.log
C:\opt\shibboleth-idp\logs\
idp-process.log
If you are still stumped, please check out the Shibboleth troubleshooting58 document at the Internet2 site.
58 Shibboleth troubleshooting information: https://spaces.internet2.edu/display/SHIB2/Troubleshooting
Step-by-Step Guide: Federated Collaboration with Shibboleth 2.0 and SharePoint 2010 technologies 45

6 Configure SharePoint 2010 as a Relying Party for AD FS 2.0
In this second part of our walkthrough, AD FS 2.0 is the Claims Provider. We need to configure AD FS 2.0 with information about our last Relying Party. In this case, SharePoint 2010 is our RP – it’s depending on AD FS 2.0 to do the authentication and provide the claims. Based on the steps outlined in the previous chapter, this task can be further delegated to the already configured Shibboleth IdP.
From the SharePoint 2010 perspective, we have to configure it to trust the Claims Provider that is sending us claims, and then we have to set up a web application and site that’s going to consume those claims: http://idmgt-sps.idmgt.demo:8082/default.aspx.
To enable an identity federation trust between AD FS 2.0 and SharePoint 2010 both AD FS 2.0 and SharePoint 2010 must undergo configuration steps. The related configuration includes manual steps from the UI and/or Windows PowerShell scripts to run.
Whether you configure either SharePoint 2010 or AD FS 2.0 first or second does not matter. The federation trust will not be complete until both are complete configured. We’ll begin by creating the relying party in AD FS 2.0.
This part of the global federated collaboration scenario uses the WS-Federation protocol.
6.1 Prerequisites and requirements
The steps described in the following sections assume the availability of:
The IDMGT-DC (sts.idmgt.demo) (virtual) machine with AD FS 2.0 installed and up and running at the following address: https://sts.idmgt.demo/adfs/ls/. This chapter also assumes the default AD FS identifier is used: https://sts.idmgt.demo/adfs/services/trust.
This should normally be the case if the steps in the preceding chapter (first part of the walkthrough) were covered.
The IDMGT-SPS (idmgt-sps.idmgt.demo) (virtual) machine with SharePoint 2010 Foundation (or Server) installed and configured, with the administration capabilities at the following address: http://idmgt-sps.idmgt.demo:2010.
A bunch of articles and posts describe the setup of such a machine. One can use instead the SharePoint Easy Setup59 Windows PowerShell scripts (see post ANNOUNCING SHAREPOINT EASY SETUP FOR DEVELOPERS 60).
6.2 Configure SharePoint 2010 as Relying Party in AD FS 2.0
Unless noted otherwise, all the instructions below are executed on the AD FS 2.0 IDMGT-DC (idmgt-dc.idmgt.demo) machine.
6.2.1 Configure SharePoint 2010 as a new Relying Party
To add SharePoint 2010 as a new relying party, proceed as follow:
1. Open the AD FS 2.0 Management console. On the Start menu, click Administrative Tools, and then click AD FS 2.0 Management.
59 SharePoint Easy Setup: http://www.microsoft.com/downloads/en/details.aspx?FamilyID=54dc2eef-e9ea-4c7b-9470-ec5cb58414de60 ANNOUNCING SHAREPOINT EASY SETUP FOR DEVELOPERS: http://blogs.msdn.com/b/cjohnson/archive/2010/10/28/announcing-sharepoint-easy-setup-for-developers.aspx
46 Step-by-Step Guide: Federated Collaboration with Shibboleth 2.0 and SharePoint 2010 technologies

2. After the snap-in is loaded, click on the Trust Relationships node, and then highlight Relying Party Trusts.
3. Right-click on Relying Party Trusts and click the Add Relying Party Trust item to start the Relying Party trust wizard. The Add Relying Party Trust Wizard opens.
4. Click the Start button to begin adding the SharePoint 2010 Web application as a Relying Party.
Step-by-Step Guide: Federated Collaboration with Shibboleth 2.0 and SharePoint 2010 technologies 47

5. On the Select Data Source page, select Enter data about the Relying party manually, and then click the Next button.
6. On the Specify Display Name page, enter a display name, for example “SharePoint” and optionally a description for the relying party, for example “This is for my SharePoint 2010 SAML claims web application”, and then click the Next button.
48 Step-by-Step Guide: Federated Collaboration with Shibboleth 2.0 and SharePoint 2010 technologies
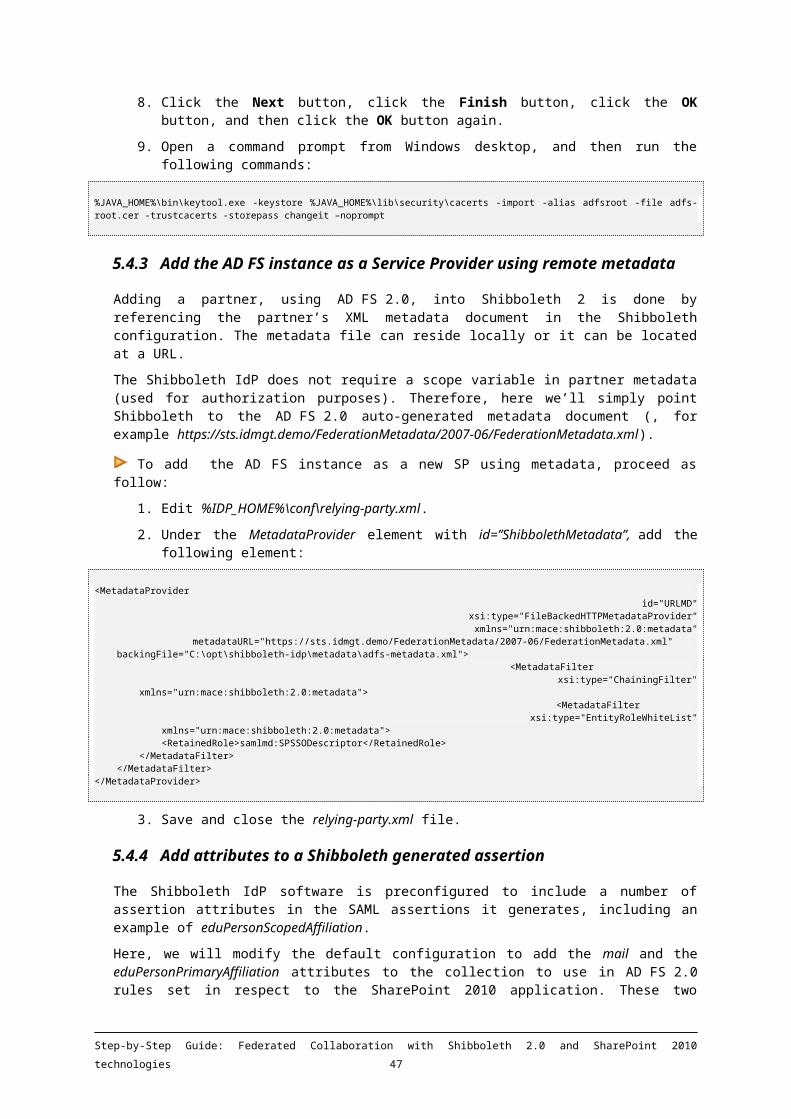
7. On the Choose Profile page select AD FS 2.0 profile and click the Next button.
8. On the Configure Certificate page, you can select a certificate to encrypt the SAML assertion itself. This isn’t done frequently because AD FS 2.0 will require our connection to SharePoint 2010 be made over SSL, so the channel the token is sent over is encrypted already. Click the Next button.
Step-by-Step Guide: Federated Collaboration with Shibboleth 2.0 and SharePoint 2010 technologies 49

9. Check the box to Enable support for the WS-Fed Passive protocol. For the protocol URL, you need to enter the URL for the SharePoint 2010 web application’s root site, and include the “_trust” subdirectory. In this guide, the URL to the SharePoint 2010 web application is https://idmgt-sps.idmgt.demo:8082, so the WS-Fed Passive protocol URL is https://idmgt-sps.idmgt.demo:8082/_trust/. After entering your URL, click the Next button.
Note:
This is the URL of the federation services endpoint in the SharePoint 2010 built in STS (SharePoint 2010 WIF integrated) of this Web Application.
10. On the Configure Identifiers page, you need to enter a realm that your Web application will pass to AD FS 2.0 when users log into the web application.
50 Step-by-Step Guide: Federated Collaboration with Shibboleth 2.0 and SharePoint 2010 technologies

The realm is generally created in the format of urn:foo:bar. The realm is associated with a web application and is how AD FS 2.0 can map the login request that’s come in to the relying party trusts it has. When used with SharePoint 2010, AD FS 2.0 sees the realm associated with the login request, it looks that up to find the relying party trust, and then after it authenticates the user it looks to that WS-Fed Passive protocol URL to know where to redirect the user afterwards.
So in this case, we’ve entered a realm of urn:sharepoint:portal. When we try navigating to the SharePoint 2010 site at https://idmgt-sps.idmgt.demo:8082, we’ll be redirected to AD FS 2.0 and we’ll configure SharePoint 2010 to use the realm urn:sharepoint:portal for that request. Once AD FS 2.0 has authenticated us it will redirect us again to https:// idmgt-sps.idmgt.demo:8082/_trust/ because that’s the passive protocol URL for that relying party. Add whatever realm you want to use here and make a note of it because you will need to enter it again when you configure SharePoint 2010. Then click the Next button.
Note:
All identifiers must be unique among relying party configurations, also the identifier must match the realm string value in the SPTrustedIdentityTokenIssuer configuration.
11. On the Choose Issuance Authorization Rules page, keep default select and click the Next button.
Step-by-Step Guide: Federated Collaboration with Shibboleth 2.0 and SharePoint 2010 technologies 51

Note:
In most cases you will want all of your users to be able to use this relying party. We’ll assume that’s the case for this scenario.
12. On the Ready to Add Trust page, review trust configuration settings. If you needed to make any other configuration changes at this time to the relying party trust you could do it here. For this scenario we don’t need to so just click the Next button to continue.
13. We’re done configuring the relying party trust but we still need to create a claim rule to tell AD FS 2.0 what claims to send back to SharePoint 2010. So leave the box checked to Open the Edit Claim Rules dialog for this relying party trust when the wizard closes and click the Close button.
52 Step-by-Step Guide: Federated Collaboration with Shibboleth 2.0 and SharePoint 2010 technologies

14. After Relying party trust is added, click the Close button and start edit claim mappings for the SharePoint 2010 Web Application Relying Party.
15. Now we are going to create a new rule, so in the Rules Editor, on the Issuance Transform Rules tab, click the Add Rule button.
For our scenario we want to send email address and the roles to which the user belongs back to SharePoint 2010.
We are going to use email address as the identifier for the person (http://schemas.xmlsoap.org/ws/2005/05/identity/claims/emailaddress), and we want all the groups or roles a user belongs to pass through in the Role claim (http://schemas.xmlsoap.org/ws/2005/05/identity/claims/role).
Step-by-Step Guide: Federated Collaboration with Shibboleth 2.0 and SharePoint 2010 technologies 53

16. For internal users, we are going to send LDAP attributes as claims because we are getting information from Active Directory in this case, meaning we will authenticate at AD FS and AD FS is going to use the corporate IDMGT Active Directory to authenticate us and determine what our attributes are. So leave the default value selected and click the Next button to continue.
17. Start out by typing in a Claim rule name; it can be whatever you want, for example “Active Directory Claims”.
18. Next, in the Attribute store drop down select Active Directory. Next, for our walkthrough, we want to send email address and the groups to which the corporate user belongs in the IDMGT domain back to SharePoint 2010.
To do the mapping, select the attribute you want from the drop down on the left side, and then select the claim that it will be sent out as in the drop down in the right pane.
In this case we want :
The E-Mail-Addresses attribute from Active Directory to be sent out in the standard E-Mail Address claim.
The groups to which a user belongs to be sent out in the standard Role claim. In this case we’ve selected Token-Groups – Unqualified Names because it sends the group name out as a simple string – the name of the group. You could send out the SID of the groups but that becomes more difficult to use when you are trying to assign a Role claim to a SharePoint group.
After you’ve finished configuring this rule as described here, click the Finish button to complete the rule.
54 Step-by-Step Guide: Federated Collaboration with Shibboleth 2.0 and SharePoint 2010 technologies
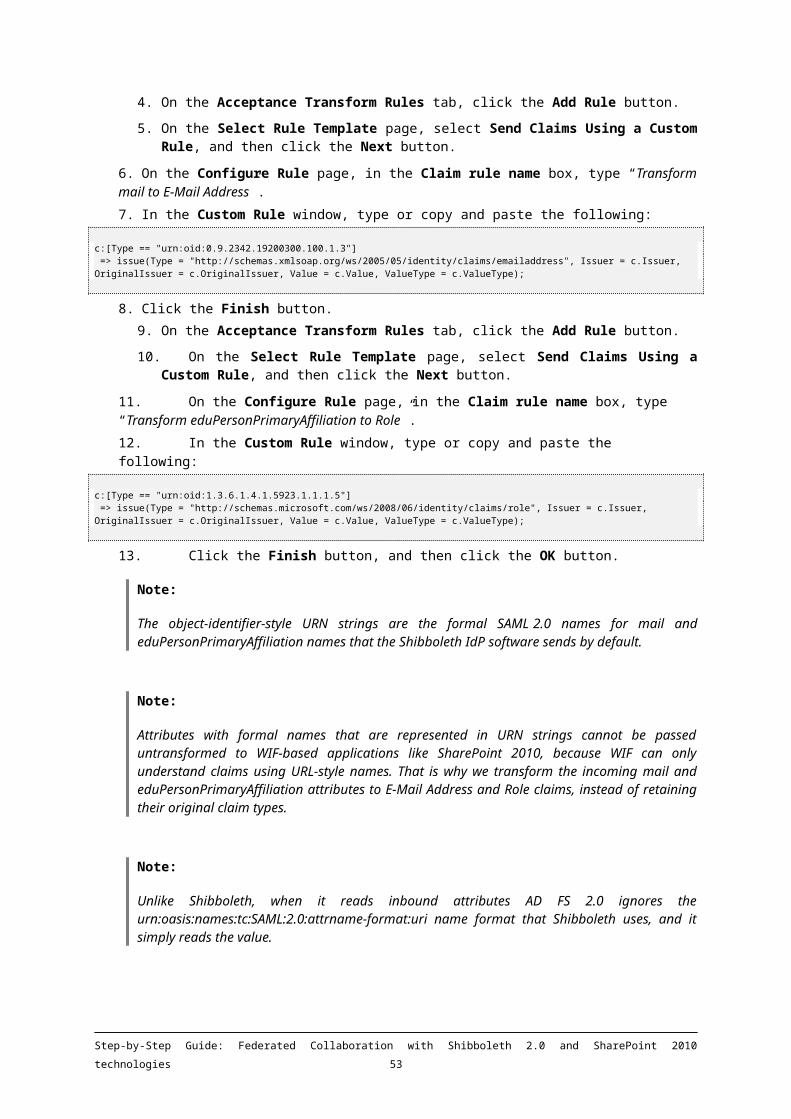
19. Now we are going to create a new rule for the external users that authenticate with the Shibboleth IdP. Indeed, for these external users, at this point, incoming claims can be received at AD FS 2.0, but rules that describe what to send to the SharePoint 2010 application have not yet been created. So, we are going to extend the existing claim rules for the SharePoint 2010 application to take into account the Shibboleth external claims provider.
Since we want to send both the E-Mail Address and the Role claims back to SharePoint 2010, we are consequently going to create two new rules, one for each of the two above claims, so in the Rules Editor, on the Issuance Transform Rules tab, click the Add Rule button.
20. In the Select Rule Template page, select Pass Through or Filter an Incoming Claim, and then click the Next button.
Step-by-Step Guide: Federated Collaboration with Shibboleth 2.0 and SharePoint 2010 technologies 55

21. On the Configuration Rule page, type the following values:
Name Value
Claim rule name “E-Mail Address Claim from Shibboleth”
Incoming claim type E-Mail Address
22. Leave the Pass through all claim values option selected, and then click the Finish button.
23. On the Issuance Transform Rules tab, click the Add Rule button.
24. On the Select Rule Template page, select Pass Through or Filter an Incoming Claim, and then click the Next button.
25. On the Configure Claim Rule page, type the following values:
Name Value
Claim rule name “Role Claim from Shibboleth”
Incoming claim type Role
26. Leave the Pass through all claim values option selected, and then click the Finish button.
27. Once all claim mappings are created click the Apply button, then the OK button to close the Edit Claim Rules for SharePoint and to complete the process of creating your relying party trust in AD FS 2.0.
From a configuration standpoint in AD FS 2.0, there’s nothing else we need to do. However there is one other thing we need to get from it. AD FS 2.0 uses a certificate to sign the tokens it sends out. This ensures the consumer of the token that it has not been tampered with since it was created. To configure SharePoint 2010 and create a SpTrustedIdentityTokenIssuer in SharePoint, we need a copy of this certificate because we’ll use it when configuring it to use AD FS 2.0 as the trusted identity provider.
56 Step-by-Step Guide: Federated Collaboration with Shibboleth 2.0 and SharePoint 2010 technologies

6.2.2 Export the AD FS token signing certificate
To get this token signing certificate from AD FS 2.0, proceed as follow :
1. In the AD FS 2.0 Management console, expand the Service node and click on the Certificates node.
2. There is a section there for Token-signing certificates. You may have one to many token-signing certificates, but there will always be ONLY one Primary token signing certificate. Click on that certificate, and then click on the View Certificate link in the right pane.
3. Now that you are viewing the certificate, click on the Details tab at the top of the dialog box.
4. Click on the Copy to File button. That will start a wizard to save a copy of the certificate to disk.
5. Click the Next button to continue.
6. You don’t need the private key, so accept the default settings and click the Next button.
Step-by-Step Guide: Federated Collaboration with Shibboleth 2.0 and SharePoint 2010 technologies 57

7. The default format is fine so click the Next button to continue.
8. Pick a location to save the certificate and click the Next button. Make sure you remember this location because you will need to copy the certificate from where you save it over to the SharePoint 2010 IDMGT-SPS (idmgt-sps.idmgt.demo) machine.
58 Step-by-Step Guide: Federated Collaboration with Shibboleth 2.0 and SharePoint 2010 technologies
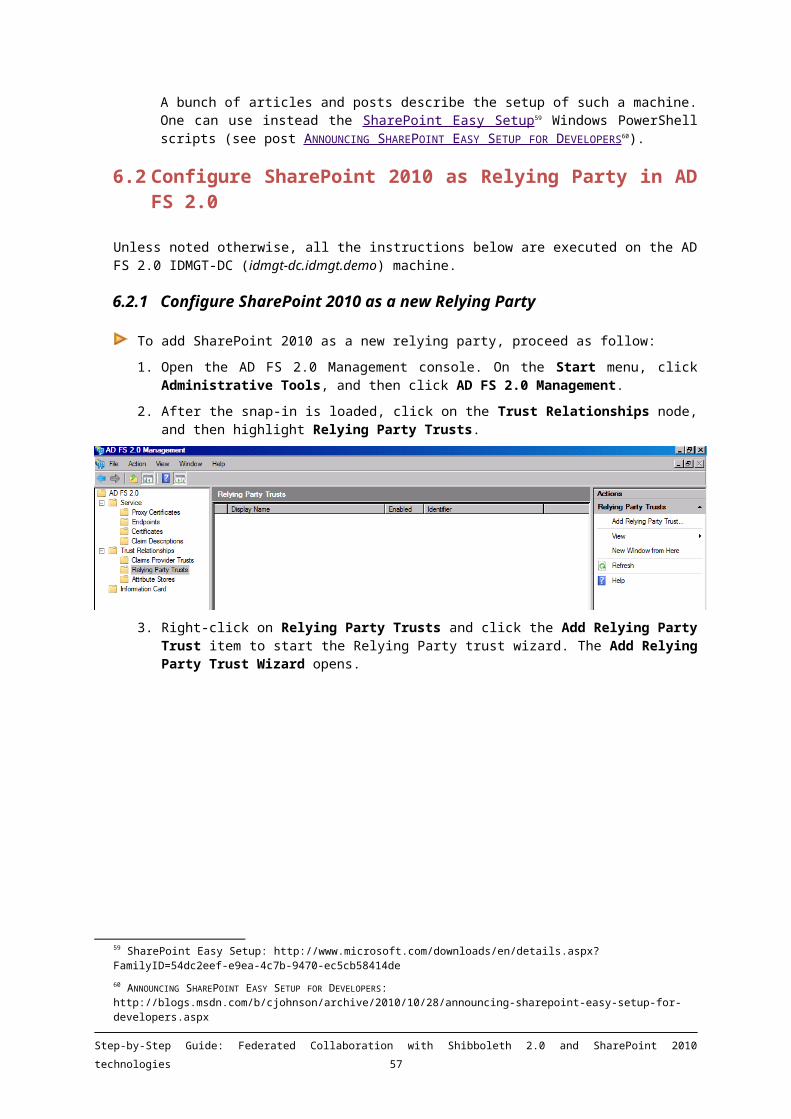
9. All the information needed to copy the certificate locally has been captured now so click the Finish button to complete the wizard and save the certificate to a local file.
10. Copy this file to the SharePoint 2010 machine, for instance under the c:\share folder and then we are finished with the AD FS 2.0 machine.
Switch over to the SharePoint 2010 machine and we will begin configuring it.
6.3 Create a SharePoint 2010 Web application
Unless noted otherwise, all the instructions below are executed on the SharePoint 2010 IDMGT-SPS (idmgt-sps.idmgt.demo) machine.
On the SharePoint 2010 machine, we need to create, at this stage, a SharePoint Web application using claims based authentication.
Since this is a more than common operation on SharePoint, we don’t want to dive into much detail on how to create such a Web application in order to keep this guide as concise as possible.
Consequently, we simply mention the key steps and outline the key screenshots for the settings for the claims based authentication.
Note:
Keep NTLM/KERBEROS[Windows Claims] Authentication, In a production deployment of SharePoint 2010 you would want 2 web applications with the default using NTLM/KERBEROS[Windows Claims] Authentication and a second using only the trusted claims identity authentication.
Step-by-Step Guide: Federated Collaboration with Shibboleth 2.0 and SharePoint 2010 technologies 59

Modify SharePoint Web Application URL (http://idmgt-sps:8082) to add FQDN (http://idmgt-sps.idmgt.demo:8082) through Alternate Access Mappings edit screen.
Once you’ve created your web application remember to go into the IIS Manager, create a domain Certificate for idmgt-sps.idmgt.demo and edit the bindings for the new virtual server so you can assign the appropriate SSL idmgt-sps.idmgt.demo certificate.
These steps are somehow outside the scope of this document, but are well-documented in many places around the Internet.
To recap, for our walkthrough then there is, at this stage, a Web application we’ve created that uses Port 8082 and SSL and the URL for that Web application is https://idmgt-sps.idmgt.demo:8082.
60 Step-by-Step Guide: Federated Collaboration with Shibboleth 2.0 and SharePoint 2010 technologies
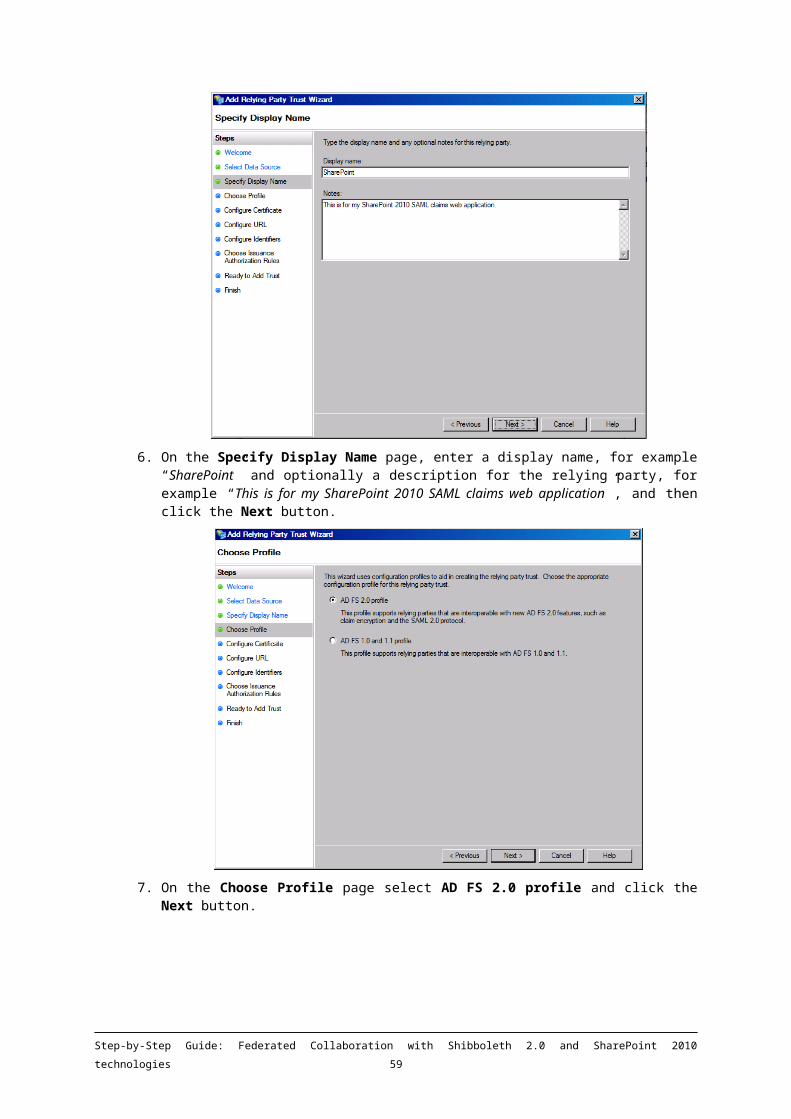
6.4 Create a Trusted Identity Provider corresponding to the AD FS 2.0 instance
All the instructions below are executed on the SharePoint 2010 IDMGT-SPS (idmgt-sps.idmgt.demo) machine.
The first thing we are now going to do on the SharePoint 2010 side is to add the token signing certificate we’ve previously copied from the AD FS 2.0 machine. Before we do that though, we need to look at the certificate.
Indeed, the token signing certificate may have one or more parent certificates in its chain. If it does, we need to add every certificate in that chain to SharePoint’s list of trusted root authorities. To figure that out, we’ll find the token signing certificate we copied over from AD FS 2.0 and double-click on it; that brings up the certificate properties window.
If you click on the Certification Path tab you can see if there are any other certificates in the chain. In our scenario, our token signing certificate DOESN’T have a parent – it is a self-signed certificate.
If the token signing certificate would have parent(s), what we need to do now, is for each certificate in the chain above our token signing certificate, we need to save a copy of each one locally. We can do that by clicking on the certificate, which enables the View Certificate button in the dialog. If we click on that it will open a separate properties dialog for that certificate.
We can then follow the same process we described earlier to save a copy of the certificate to disk:
1. Click on the Details tab,
2. Click on the Copy to File button,
3. Then save the certificate locally as a .cer file.
In our case, we simply have to consider the token signing certificate we copied from the AD FS 2.0 machine: c:\share\adfs.cer.
Now, we need to add it to our list of trusted root authorities. We’re going to do that in PowerShell with this script. All the following commands should be entered at the PowerShell Prompt with an Enter after each statement.
Note:
Windows PowerShell cmdlets available to administer security for SharePoint 2010 are detailed in the page SECURITY CMDLETS (SHAREPOINT SERVER 2010) 61.
Open PowerShell Management Console for SharePoint 2010 as an Administrator:
1. Click Start, All programs, Microsoft SharePoint 2010 Products and SharePoint Management Shell to run Windows PowerShell commands.
After PowerShell opens, run the following two commands below to get a reference to the token signing certificate copied from the AD FS 2.0 machine:
$certPath = “c:\share\adfs.cer”$cert = New-Object System.Security.Cryptography.X509Certificates.X509Certificate2("$certPath")
2. Create a new trusted root authority provider with SharePoint 2010. Run the following command:
New-SPTrustedRootAuthority -Name "IDMGT ADFS Token Signing Trusted Root Authority" -Certificate $cert
61 : http://technet.microsoft.com/en-us/library/ee890110.aspx
Step-by-Step Guide: Federated Collaboration with Shibboleth 2.0 and SharePoint 2010 technologies 61

Note:
As aforementioned, you’ll want to repeat this for each of the certificate(s) in the chain.
Also, confirm that your certificate(s) were added to the trusted root authority (by viewing the certificate(s) under General Security/Manage Trust in Central Administration. In our walkthrough, there should be one entry (“IDMGT ADFS Token Signing Trusted Root Authority”) listed in the Trust Relationships tab:
3. Create the claim mappings that SharePoint 2010 is going to use. If you recall from earlier in this document we mentioned that we were going to use the standard E-Mail Address and Role claims in SharePoint 2010.
Here’s the PowerShell that we’ll use to create those mappings:
$map1 = New-SPClaimTypeMapping -IncomingClaimType "http://schemas.xmlsoap.org/ws/2005/05/identity/claims/emailaddress" -IncomingClaimTypeDisplayName "EmailAddress" –SameAsIncoming
$map2 = New-SPClaimTypeMapping -IncomingClaimType "http://schemas.microsoft.com/ws/2008/06/identity/claims/role" -IncomingClaimTypeDisplayName "Role" –SameAsIncoming
4. Create a variable for the realm (a unique URI for your site) that we want SharePoint 2010 to use. It must match what has been configured for the site in AD FS 2.0.
For this walkthrough, this is the realm urn:sharepoint:portal. Also create another variable for the sign-in URL. This is how AD FS 2.0 knows which site to pass the claims back to. Here’s the PowerShell to create these realm and signinurl variables:
$realm = "urn:sharepoint:portal"
$signinurl = “https://sts.idmgt.demo/adfs/ls”
5. Create and configure a new SPTrustedIdentityTokenIssuer in order to configure SharePoint 2010 to accept SAML claims (WS-Fed Passive only).
This is where we tie together all of the configuration information so SharePoint 2010 knows how to connect and work with our AD FS 2.0 instance. We’ll show the PowerShell here and then explain the important parts:
$ap = New-SPTrustedIdentityTokenIssuer -Name "ADFSv2-sts.idmgt.demo" -Description "ADFSv2-sts.idmgt.demo" -realm $realm -ImportTrustCertificate $cert -ClaimsMappings $map1,$map2 -SignInUrl $signinurl -IdentifierClaim $map1.InputClaimType
62 Step-by-Step Guide: Federated Collaboration with Shibboleth 2.0 and SharePoint 2010 technologies
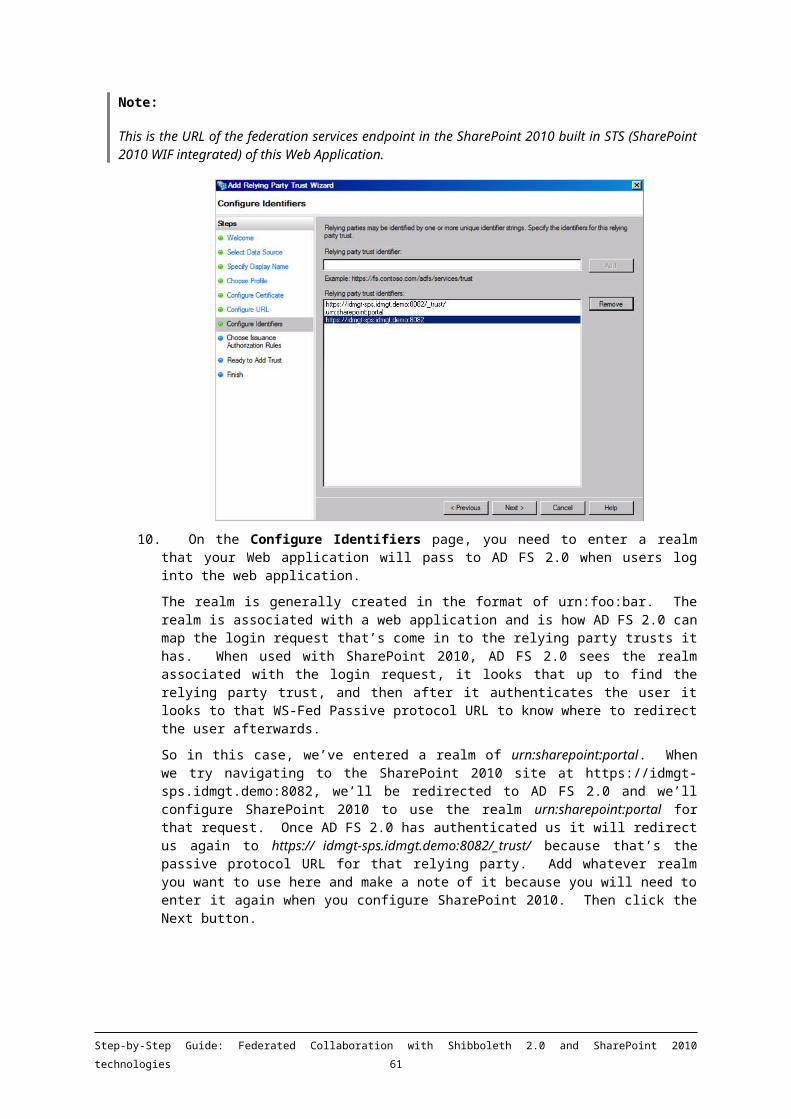
The Name attribute is what is going to show up in your web application when you configure what authentication provider it should use.
The realm attribute is where we plug in the realm that we want SharePoint to use with this trusted identity token issuer.
The ImportTrustCertificate attribute is where we pass it the token signing certificate that we copied from the AD FS 2.0 machine.
The ClaimsMappings attribute is where we tell it what the claims are that we want this trusted identity token issuer to use.
The SignInUrl is the URL that users should be redirected to in order to authenticate with our AD FS 2.0 instance. In this case we want users to further authenticate with the Shibboleth IdP, so we send them to the /adfs/ls subdirectory for home realm discovery.
Finally, the IdentifierClaim attribute tells SharePoint 2010 which of the claims is going to be THE claim that is used to identify users. In this case we’re saying the standard E-Mail Address claim is how you identify a person.
Once that last PowerShell command has executed, we have a SPTrustedIdentityTokenIssuer that can be used with our SharePoint 2010 Web application.
6. Review the SPTrustedIdentityTokenIssuer settings with the following command:
Get-SPTrustedIdentityTokenIssuer –Identity "ADFSv2-sts.idmgt.demo"
7. Close the SharePoint Management Shell.
6.5 Declare the Trusted Identity Provider for the Web application
All the instructions below are executed on the SharePoint 2010 IDMGT-SPS (idmgt-sps.idmgt.demo) machine.
To declare the Trusted Identity Provider for the web application, proceed as follow:
1. Click Start, All programs, Microsoft SharePoint 2010 Products and SharePoint 2010 Central Administration.
2. Under Application Management, then click on the Manage Web Applications link.
3. Highlight in the list the web application created earlier that’s going to use AD FS 2.0 to authenticate and click Authentication Providers in the ribbon.
4. On the Authentication Provider page, click the link in the dialog that corresponds to the appropriate zone in which you are going to use AD FS 2.0 to authenticate. This is the Default Zone in our walkthrough.
5. In the Edit Authentication page, slide down to the Claims Authentication Types section.
Step-by-Step Guide: Federated Collaboration with Shibboleth 2.0 and SharePoint 2010 technologies 63
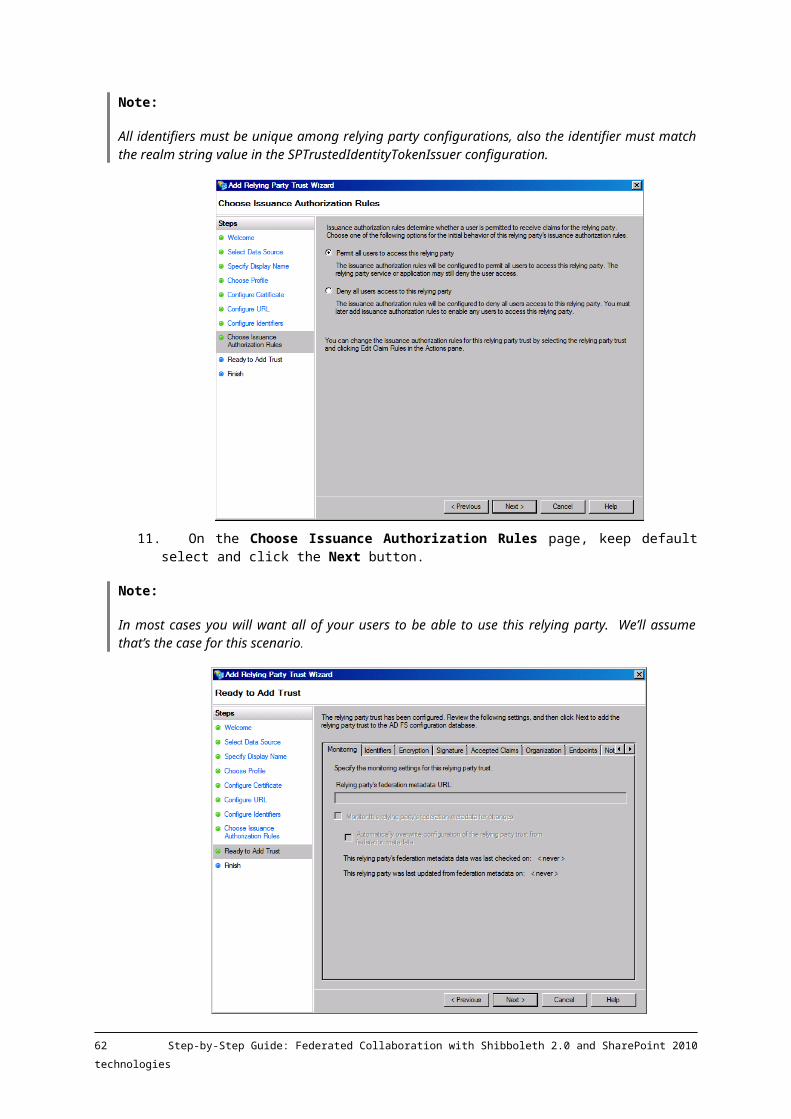
6. Select Trusted Identity Provider and then “ADFSv2-sts.idmgt.demo” in the list of trusted providers.
Note:
After we added the SPTrustedIdentityTokenIssuer, this functionality is enabled, also we can leave Windows Authentication enabled in the same zone
7. Leave Windows Authentication selected.
Note:
A great new feature in SharePoint 2010 is the ability to specify multiple authentication providers on a given zone within a web application. E.g. you can leave Windows Authentication (NTLM) checked and also check Trusted Identity Provider. Doing so will give you an option when you load the web application to choose which authentication method you want.
8. Click Save to save changes.
9. Close SharePoint 2010 Central Administration.
Now you can go and create a SharePoint 2010 site collection for the web application created above and a Site Administrator using Windows Claims authentication.
Again, describing that process step-by-step is not in scope for this document, but there is one important thing to remember when you do this. When you add the Site Collection Administrator, remember to enter the name in the format of your identity claim. For example, in this walkthrough the identity claim is the standard E-Mail Address claim.
64 Step-by-Step Guide: Federated Collaboration with Shibboleth 2.0 and SharePoint 2010 technologies

So when we added the Site Collection Administrator, the name we used was [email protected], because that’s the email address of the person we want to be the Site Collection Administrator.
6.6 Test the Web application as a Corporate User
All the instructions below are executed on the AD FS 2.0 IDMGT-DC (idmgt-dc.idmgt.demo) machine.
Note:
Clear all the cookies in Internet Explorer on the AD FS 2.0 IDMGT-DC (idmgt-dc.idmgt.demo). To clear the cookies, click Tools, click Internet Options, click Delete under Browsing History, and then select cookies for deletion.
To try and go to the SharePoint 2010 Web application as a corporate internal user, proceed as follow:
1. Visit https://idmgt-sps.idmgt.demo:8082 with Internet Explorer. You are now invited to choose which authentication method you want (from the SharePoint 2010 perspective).
2. Select “ADFSv2-sts.idmgt.demo” in the combo box to be authenticate by our AD FS 2.0 instance that is trusted as an identity provider.
The first thing that happens is a redirect to the SignInUrl for the SPTrustedIdentityTokenIssuer that’s associated with our web application. If you recall from the PowerShell that was used to create the SPTrustedIdentityTokenIssuer, that URL is https://sts.idmgt.demo/adfs/ls. So here’s what we see in the browser address bar:
You can see the URL in the browser window now points to our AD FS machine and you can see the graphic in the background behind the login dialog is for the AD FS machine.
3. Select “sts.idmgt.demo” in the combo box and click the Continuer la connexion button (Continue to Sign in English). You are now invited to enter your credentials.
Step-by-Step Guide: Federated Collaboration with Shibboleth 2.0 and SharePoint 2010 technologies 65

You may notice that we’re signing in using our Windows credentials, i.e. domain\user. The sp-admin account must have an email address, in our case: [email protected].
Remember we’re authenticating on the AD FS 2.0, not on SharePoint 2010. Indeed, SharePoint 2010 is configured to use the standard E-Mail Address claim as the identity, but what is going to happen is that we’ll authenticate over on AD FS 2.0, and then it will use the claim rule we created to pull out the email address and put them into claims that will be sent back to SharePoint 2010.
4. So then after we’ve authenticated, we’re redirected back to SharePoint 2010 at https://idmgt-sps.idmgt.demo/_trust/, as we configured in the relying party we set up in AD FS 2.0.
At that point SharePoint 2010 will complete the authentication process on its side as it takes the claims it got in the SAML token and converts it into an SPUser. Then we finally arrive at the home page for the site:
You’ll notice the login control in the upper right-hand part of the page is displaying the identity as email address, since that is the identity claim.
66 Step-by-Step Guide: Federated Collaboration with Shibboleth 2.0 and SharePoint 2010 technologies

6.7 Test the Web application as a Shibboleth external user
Let’s test now some email address not related to any corporate account. In this walkthrough, we are going to authenticate as the [email protected] user previously created on the Shibboleth side (see section § 5.4.1.4 CREATE AND CONFIGURE A TEST USER FOR THE SHIBBOLETH IDP).
This requires giving him permissions through SharePoint 2010.
From this point, all the instructions below are executed on the AD FS 2.0 IDMGT-DC (idmgt-dc.idmgt.demo) machine.
Note:
Clear all the cookies in Internet Explorer on the AD FS 2.0 IDMGT-DC (idmgt-dc.idmgt.demo). To clear the cookies, click Tools, click Internet Options, click Delete under Browsing History, and then select cookies for deletion.
To try and go to the SharePoint 2010 Web application as a Shibboleth external user, proceed as follow:
1. Visit https://idmgt-sps.idmgt.demo:8082 with Internet Explorer. You are now invited to choose which authentication method you want (from the SharePoint 2010 perspective).
2. Select “ADFSv2-sts.idmgt.demo” in the combo box to be authenticate by our AD FS 2.0 instance that is trusted as an Identity Provider.
Step-by-Step Guide: Federated Collaboration with Shibboleth 2.0 and SharePoint 2010 technologies 67
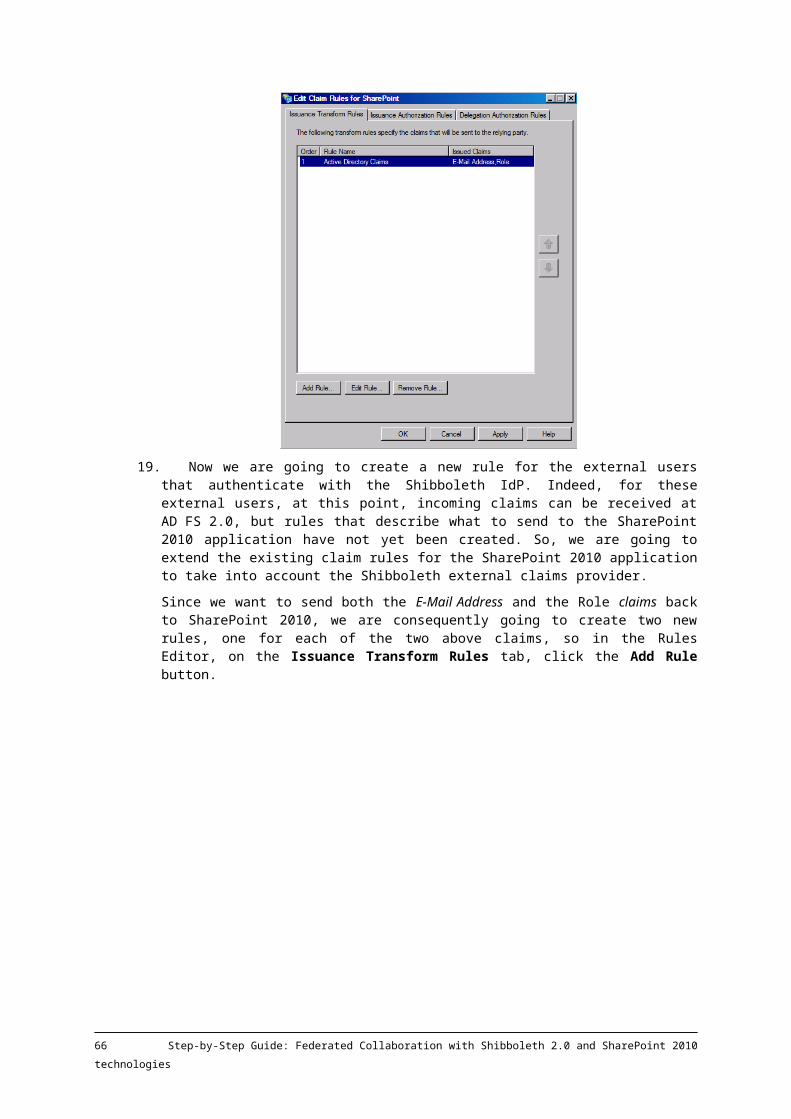
1. When prompted at the AD FS 2.0 Home Realm Discovery page, choose Shibboleth IdP in the combo box, and then click the button Continuer la connexion (Continue to Sign in English).
You are redirected to Shibboleth IdP. The Shibboleth forms login page appears.
2. Log in with the user name “cc” and the password you created for the user earlier, and then click the Login button. The Shibboleth IdP will grant you access and send an encrypted token back to AD FS 2.0, which emits in turn a token back to the SharePoint 2010 application.
And now we are using SharePoint 2010 with a [email protected] email identity.
That’s the complete end-to-end process with a little explanation on the side.
You should now be able to use it to get your SharePoint 2010 sites configured and running by these instructions in the context a Shibboleth-based federation.
As mentioned before, Office Web Apps, the online companion to Office Word 2010, Excel 2010, PowerPoint 2010 and OneNote 2010 applications, enables users to access, and slightly change documents directly from SharePoint 2010. This online companion gives more flexibility to users who can use the Web browser to work on their documents.
68 Step-by-Step Guide: Federated Collaboration with Shibboleth 2.0 and SharePoint 2010 technologies

We don’t illustrate this scenario in so far as it doesn’t introduce anything new from our identity and security perspective, considering the below established security context.
The next section rather illustrates the use of Office 2010 applications in conjunction with SharePoint 2010 sites.
Before covering this scenario, we strongly encourage you to complete this walkthrough with the reading of some of the posts of the weblog Share-n-dipity62 from the Microsoft employee Steve Peschka. As a starting point, we want to outline the following posts amongst many others of interest:
SETTING THE LOGGING TOKEN EXPIRATION CORRECTLY FOR SHAREPOINT 2010 SAML CLAIMS USERS 63.
HOW TO OVERRIDE THE DEFAULT NAME RESOLUTION AND CLAIMS PROVIDERS IN SHAREPOINT 2010 64.
REPLACING THE OUT OF BOX NAME RESOLUTION IN SHAREPOINT 2010 – PART 2 65.
MORE INFORMATION ON ADDING AND CHANGING CUSTOM CLAIMS PROVIDERS IN SHAREPOINT 2010 66.
Etc.
Thanks again Steve Peschka.
6.8 Use Office 2010 with the Web application a Shibboleth external user
From this point, all the instructions below are executed on the AD FS 2.0 IDMGT-DC (idmgt-dc.idmgt.demo) machine.
6.8.1 Add document to the Shared Documents library
This section assumes that you are currently using SharePoint 2010 with a [email protected] email identity with a valid opened Internet Explorer session.
To add, as a Shibboleth external user, a Word document to the Shared Document library of the SharePoint 2010 Web application, proceed as follow:
1. From the https://idmgt-sps.idmgt.demo:8082 /SitePages/Accueil.aspx Web site home page, click the Documents partagés link (Shared Documents in English) in the upper left corner. You are now redirected the Shared Documents library.
62 Weblog Share-n-dipity: http://blogs.technet.com/b/speschka/63 SETTING THE LOGGING TOKEN EXPIRATION CORRECTLY FOR SHAREPOINT 2010 SAML CLAIMS USERS: http://blogs.technet.com/b/speschka/archive/2010/08/09/setting-the-login-token-expiration-correctly-for-sharepoint-2010-saml-claims-users.aspx64 HOW TO OVERRIDE THE DEFAULT NAME RESOLUTION AND CLAIMS PROVIDERS IN SHAREPOINT 2010: http://blogs.technet.com/b/speschka/archive/2010/04/28/how-to-override-the-default-name-resolution-and-claims-provider-in-sharepoint-2010.aspx65 REPLACING THE OUT OF BOX NAME RESOLUTION IN SHAREPOINT 2010 – PART 2: http://blogs.technet.com/b/speschka/archive/2010/05/25/replacing-the-out-of-box-name-resolution-in-sharepoint-2010-part-2.aspx66 MORE INFORMATION ON ADDING AND CHANGING CUSTOM CLAIMS PROVIDERS IN SHAREPOINT 2010: http://blogs.technet.com/b/speschka/archive/2010/06/02/more-information-on-adding-and-changing-custom-claims-providers-in-sharepoint-2010.aspx
Step-by-Step Guide: Federated Collaboration with Shibboleth 2.0 and SharePoint 2010 technologies 69
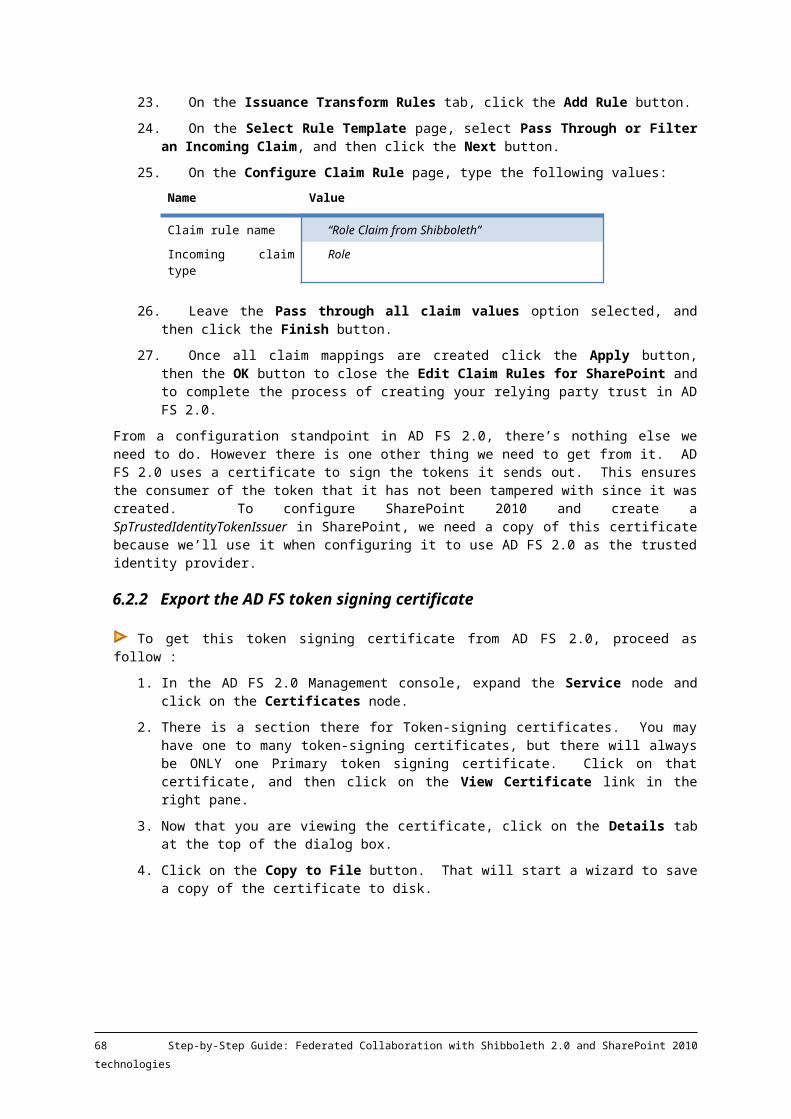
2. Click the Ajouter un document link (Add a document in English).
3. In the SharePoint dialog box Télécharger un document (Download a document in English), specify a Word document, for example “Lorem.docx”, and click the OK button.
The document now belongs to the library.
4. Repeat the steps 2 and 3 to add an Excel spreadsheet, for example “LoremSpreadSheet.xlsx”.
6.8.2 Open a document from a Document library
This section assumes that you are still using the same session with SharePoint 2010 as the one used in the previous section.
70 Step-by-Step Guide: Federated Collaboration with Shibboleth 2.0 and SharePoint 2010 technologies
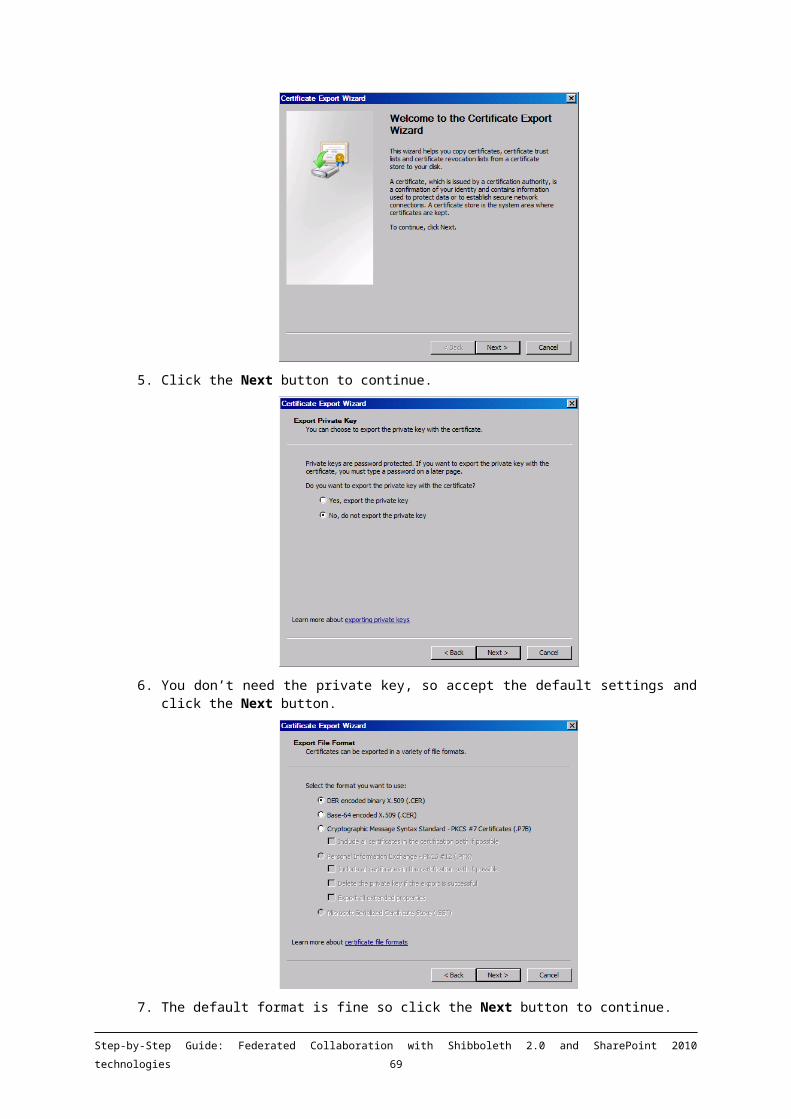
To open, as a Shibboleth external user, a Word document from the Shared Document library of the SharePoint 2010 Web application, proceed as follow:
1. From the https://idmgt-sps.idmgt.demo:8082/Documents partages page, double click the Word document, for example “Lorem.docx”. The Open Document dialog box pops up.
2. Click the OK button to confirm. Office Word 2010 starts.
The document transparently opens. You are now able to work with the document with Office Word 2010.
Step-by-Step Guide: Federated Collaboration with Shibboleth 2.0 and SharePoint 2010 technologies 71
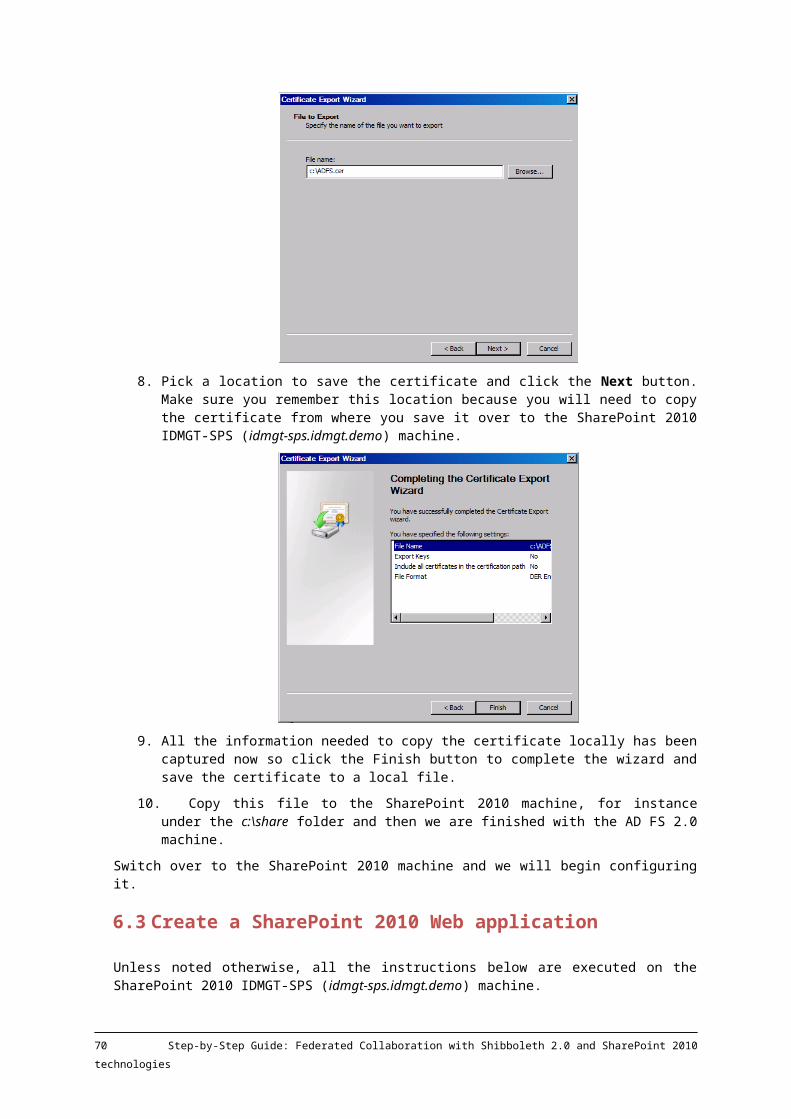
3. Close the Office Word 2010 application.
6.8.3 Open a document stored in SharePoint 2010 from Office Word 2010
To open from within Office 2010 Word, as a Shibboleth external user, a Word document from the Shared Document library of the SharePoint 2010 Web application, proceed as follow:
1. Launch the Office Word 2010 application.
2. From the File tab in the Ribbon, click the Open button.
The Open dialog box opens.
3. In the File name textbox, type the address of the SharePoint Web application, for example https://idmgt-sps.idmgt.demo:8082 and click the Open button. A https://idmgt-sps.idmgt.demo dialog box opens.
3. You are now invited to choose which authentication method you want (from the SharePoint 2010 perspective).
72 Step-by-Step Guide: Federated Collaboration with Shibboleth 2.0 and SharePoint 2010 technologies
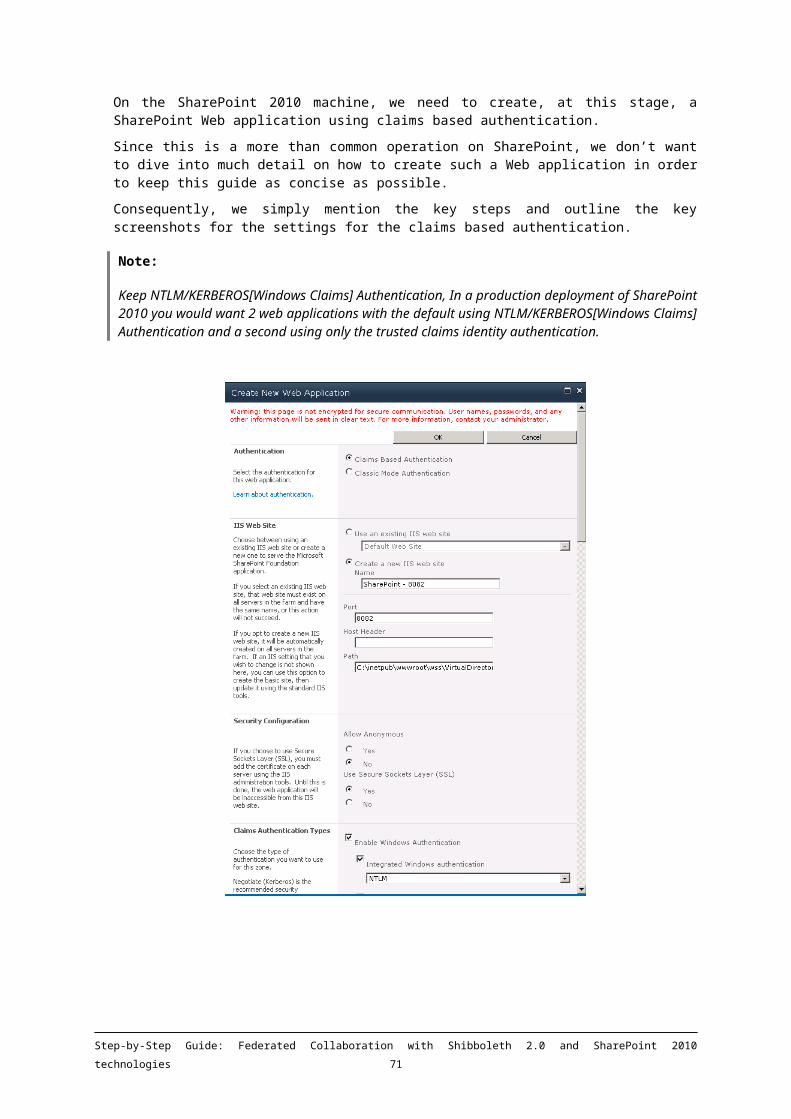
4. As already done before, select “ADFSv2-sts.idmgt.demo” in the combo box to be authenticate by our AD FS 2.0 instance that is trusted as an Identity Provider.
3. When prompted at the AD FS 2.0 Home Realm Discovery page within the dialog box, choose Shibboleth IdP in the combo box, and then click the button Continuer la connexion (Continue to Sign in English).
You are redirected to Shibboleth IdP. The Shibboleth forms login page appears within the dialog box.
Step-by-Step Guide: Federated Collaboration with Shibboleth 2.0 and SharePoint 2010 technologies 73

4. Log in with the user name “cc” and the password you created for the user earlier, and then click the Login button. The Shibboleth IdP will grant you access and send an encrypted token back to AD FS 2.0, which emits in turn a token back to the SharePoint 2010 application.
And now we are authenticated in SharePoint 2010 with a [email protected] email identity.
4. Back in the Open dialog, double click the Documents partagés link (Shared Documents in English) in the upper left corner. You are now redirected the Shared Documents library from with the Open dialog.
74 Step-by-Step Guide: Federated Collaboration with Shibboleth 2.0 and SharePoint 2010 technologies
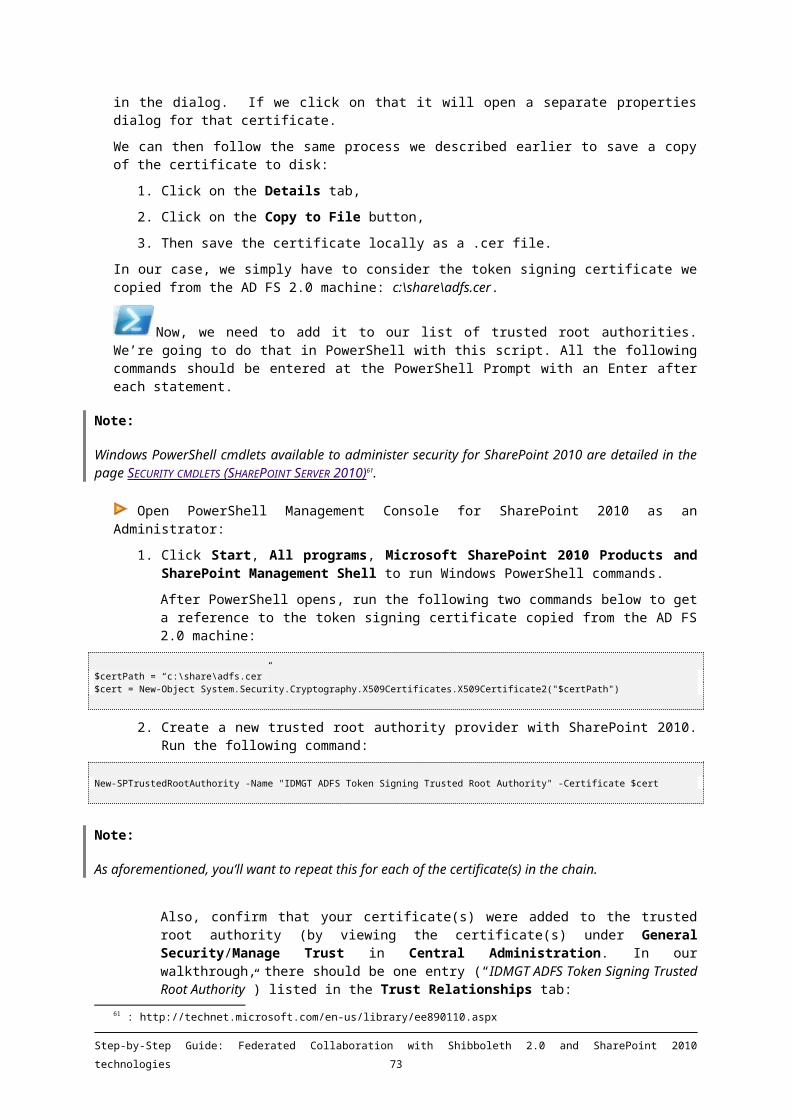
5. Once again, select the Word document, for example “Lorem.docx” and then click the Open button.
The document transparently opens. You are now able to work with the document with Office Word 2010.
1. Close the Office Word 2010 application.
6.8.4 Open a spreadsheet stored in SharePoint 2010 from Office Excel 2010
In order to demonstrate that the integration depicted for Office Word 2010 is not specifically limited to the Office Word 2010 application, this section illustrates the same scenario as the one outlined in the previous section, but, this time, with the Office Excel 2010. Again, the same scenario could have been demonstrated with the Office PowerPoint 2010.
Step-by-Step Guide: Federated Collaboration with Shibboleth 2.0 and SharePoint 2010 technologies 75
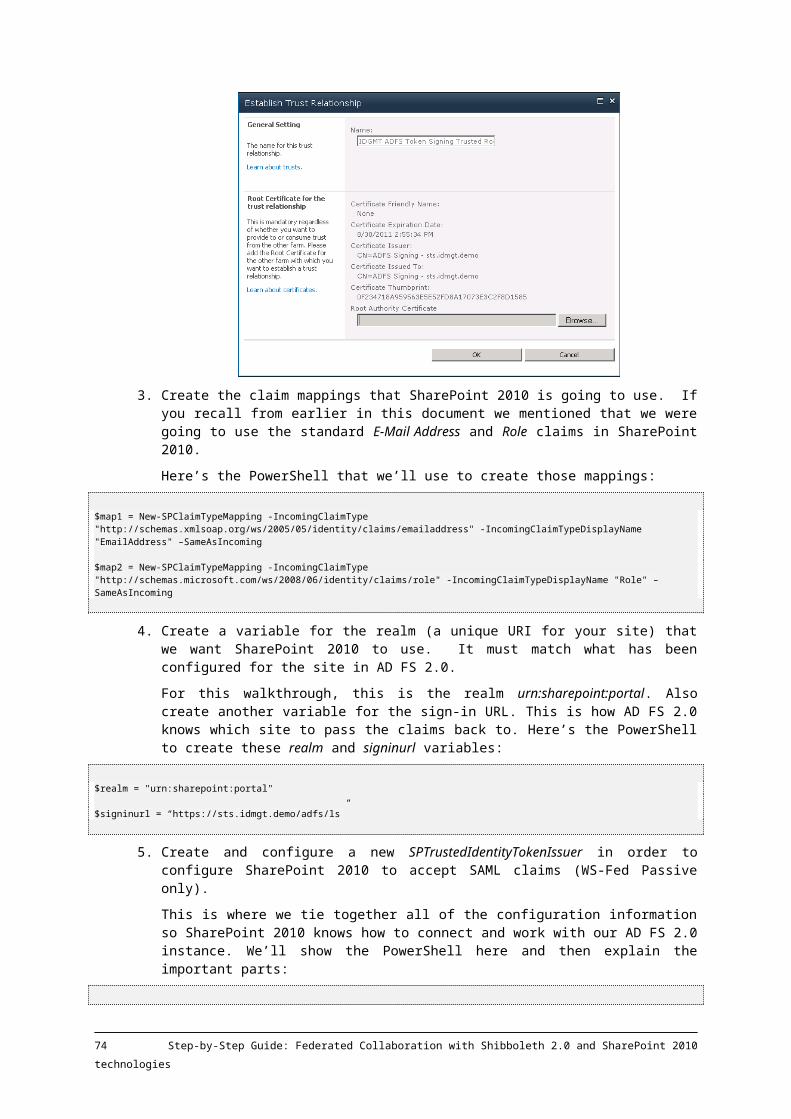
To open from within Office 2010 Excel, as a Shibboleth external user, a spreadsheet from the Shared Document library of the SharePoint 2010 Web application, proceed as follow:
1. Launch the Office Excel 2010 application.
2. From the File tab in the Ribbon, click the Open button. The Open dialog box opens.
3. In the File name textbox, type the address of the SharePoint Web application, for example https://idmgt-sps.idmgt.demo:8082 and click the Open button. A https://idmgt-sps.idmgt.demo dialog box opens.
5. You are now invited to choose which authentication method you want (from the SharePoint 2010 perspective).
6. As already done before, select “ADFSv2-sts.idmgt.demo” in the combo box to be authenticate by our AD FS 2.0 instance that is trusted as an Identity Provider.
5. When prompted at the AD FS 2.0 Home Realm Discovery page, choose Shibboleth IdP in the combo box, and then click the button Continuer la connexion (Continue to Sign in English). You are redirected to Shibboleth IdP.
76 Step-by-Step Guide: Federated Collaboration with Shibboleth 2.0 and SharePoint 2010 technologies

6. Log in with the user name “cc” and the password you created for the user earlier, and then click the Login button. The Shibboleth IdP will grant you access and send an encrypted token back to AD FS 2.0, which emits in turn a token back to the SharePoint 2010 application.
We are now authenticated in SharePoint 2010 with a [email protected] email identity.
4. Back in the Open dialog, double click the Documents partagés link (Shared Documents in English) in the upper left corner. You are now redirected the Shared Documents library from with the Open dialog.
5. Once again, select the Excel spreadsheet, for example “LoremSpreadSheet.xlsx” and then click the Open button. You are now able to work with the spreadsheet with Office Excel 2010.
Step-by-Step Guide: Federated Collaboration with Shibboleth 2.0 and SharePoint 2010 technologies 77
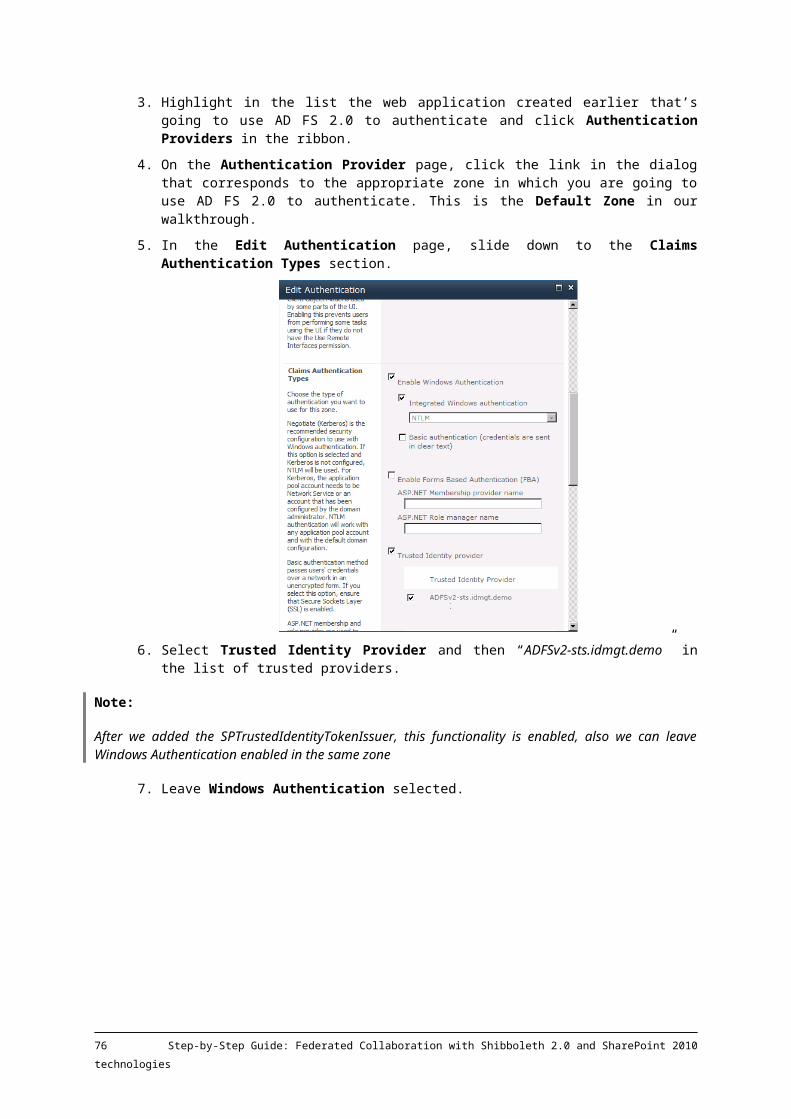
6. Close the Office Excel 2010 application.
78 Step-by-Step Guide: Federated Collaboration with Shibboleth 2.0 and SharePoint 2010 technologies
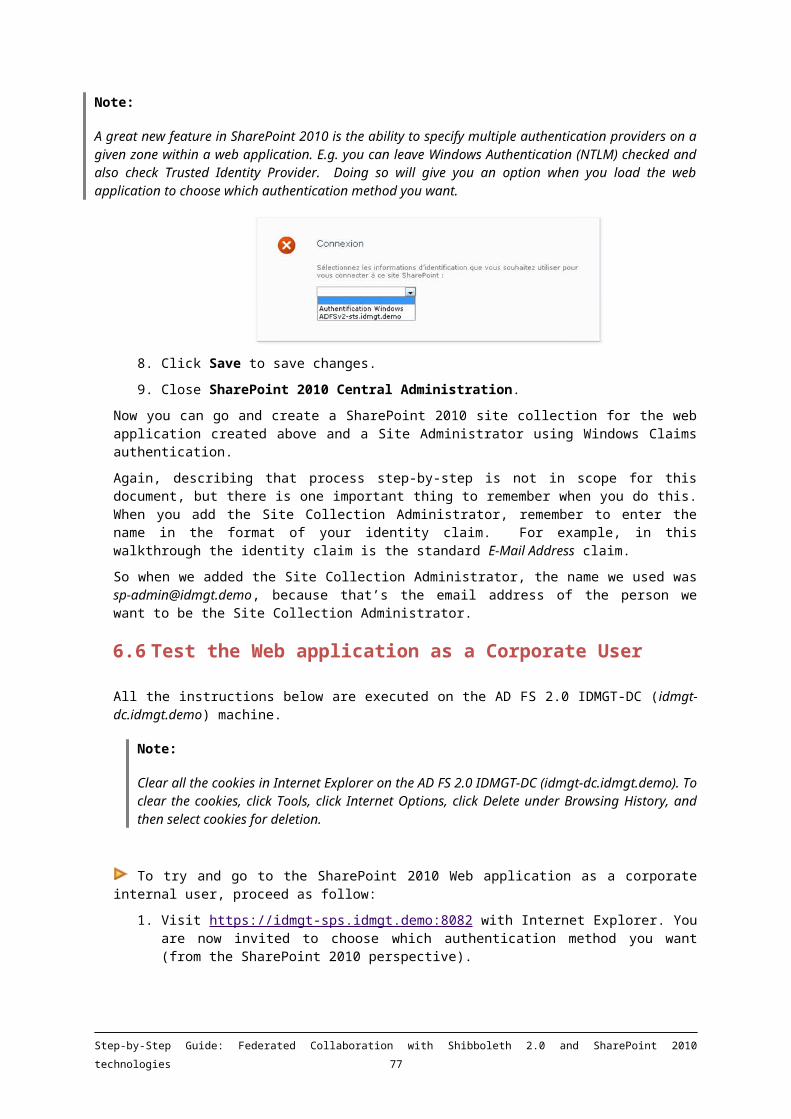
Appendix A. Use AD FS 2.0 in the RENATER Federation
In addition to the configuration steps provided earlier in this document, the following is a list of additional considerations for organizations using AD FS 2.0 for participation in the Education-Recherche RENATER Federation67.
In the context of this federation, the federation testing metadata are accessible at https://services-federation.renater.fr/metadata/renater-test-metadata.xml while the one related to the Éducation-Recherche federation are located at https://services-federation.renater.fr/metadata/renater-metadata.xml. All the associated information is grouped at the Renater federation web site68.
Topic Areas Issue Description Workarounds
Metadata The RENATER metadata file includes multiple federation entities (EntityDescriptors), but AD FS 2.0 cannot import metadata files that include more than one EntityDescriptor.
Open-source solution (FEMMA) discussed below.
Metadata, Certificates
RENATER EntityDescriptor elements sometimes contain more than one encryption certificate, but AD FS 2.0 fails to import entities that include more than one encryption certificate.
No product-based workaround. Organizations using AD FS 2.0 can add these organizations manually, ignoring all but one encryption certificate. Organizations publishing metadata through RENATER can improve AD FS 2.0 interoperability by publishing only one encryption certificate per entity.
Metadata, Certificates
The RENATER metadata file includes instances where multiple EntityDescriptors share a single certificate, but AD FS 2.0 fails to import any entities that present a certificate already in the database.
No product-based workaround. Organizations publishing metadata through RENATER can improve AD FS 2.0 interoperability by using unique certificates per entity. The same certificate can be used for signing and encryption.
MACE-Dir Profiles support
The RENATER testing federation includes a support for the MACE-Dir SAML Attribute Profiles69, in which a Name ID is provided in an XML-based eduPersonTargetedID attribute statement. In accordance to interoperability profiles like INTEROPERABLE SAML 2.0 WEB BROWSER SSO DEPLOYMENT PROFILE , AD FS 2.070 doesn’t support non-string attribute values.
No product-based workaround.
67 Education-Recherche RENATER Federation: https://federation.renater.fr/68 RENATER federation metadata: https://federation.renater.fr/technique/metadata 69 MACE-DIR SAML ATTRIBUTE PROFILES: http://middleware.internet2.edu/dir
70 INTEROPERABLE SAML 2.0 WEB BROWSER SSO DEPLOYMENT PROFILE, AD FS 2.0: http://saml2int.org/profile/current
Step-by-Step Guide: Federated Collaboration with Shibboleth 2.0 and SharePoint 2010 technologies 79
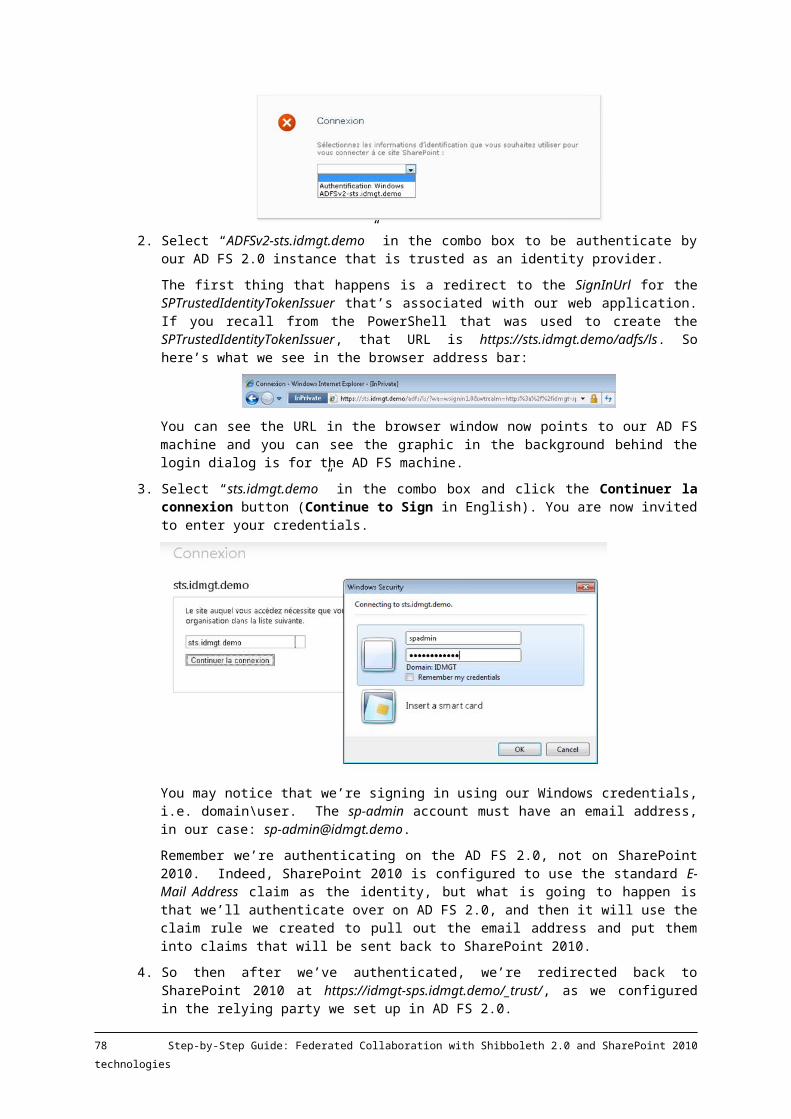
Parse metadata with FEMMA
The open source FEMMA (FEderation Metadata Manager for ADFS71) project on SourceForge, written by Cristian Mezzetti of the University of Bologna, is a Python script that parses Shibboleth federation metadata XML content and creates (a) a pool of metadata files (one for each partner entity) and (b) a Windows PowerShell command-line interface script that automatically imports the entities into AD FS 2.0.
In addition, FEMMA includes templates for automatically importing claim rules into newly created partner entities.
Note:
FEMMA is a tool that is independent and separate from both AD FS 2.0 and Shibboleth. Microsoft, Internet2, and RENATER neither developed this tool nor endorse it through its reference in this whitepaper.
Note:
Larger files like the Education-Recherche RENATER metadata file may take a long time to process, because Windows PowerShell will encounter numerous exceptions during the import related to the second and third (certificate-related) issues in the previous table.
FEMMA includes a blacklist capability for optionally excluding entities from the generated Windows PowerShell script, which can improve performance.
Install FEMMA on the AD FS 2.0 (shib.adatum.com) machine:
To install FEMMA on the AD FS 2.0 machine, proceed as follow:
1. Download Python 2.5 72.
2. Install Python.
3. Download lxml73.
4. Place the lxml install file in the Python folder (C:\Python25\).
5. Install lxml.
6. Download FEMMA.
7. Unzip FEMMA.
Use FEMMA to Import IdPs
As of writing, FEMMA, in its current form, i.e. version 0.4.1, unfortunately only imports and configures SPSSODescriptors in SAML 2.0 metadata files. The support for IDPSSODescriptors is expected to be part of the next version 0.5.
71 FEDERATION METADATA MANAGER FOR ADFS: http://sourceforge.net/projects/femma/files/72 Python 2.5: http://go.microsoft.com/fwlink/?LinkId=20417073 Lxml: http://go.microsoft.com/fwlink/?LinkId=204171
80 Step-by-Step Guide: Federated Collaboration with Shibboleth 2.0 and SharePoint 2010 technologies
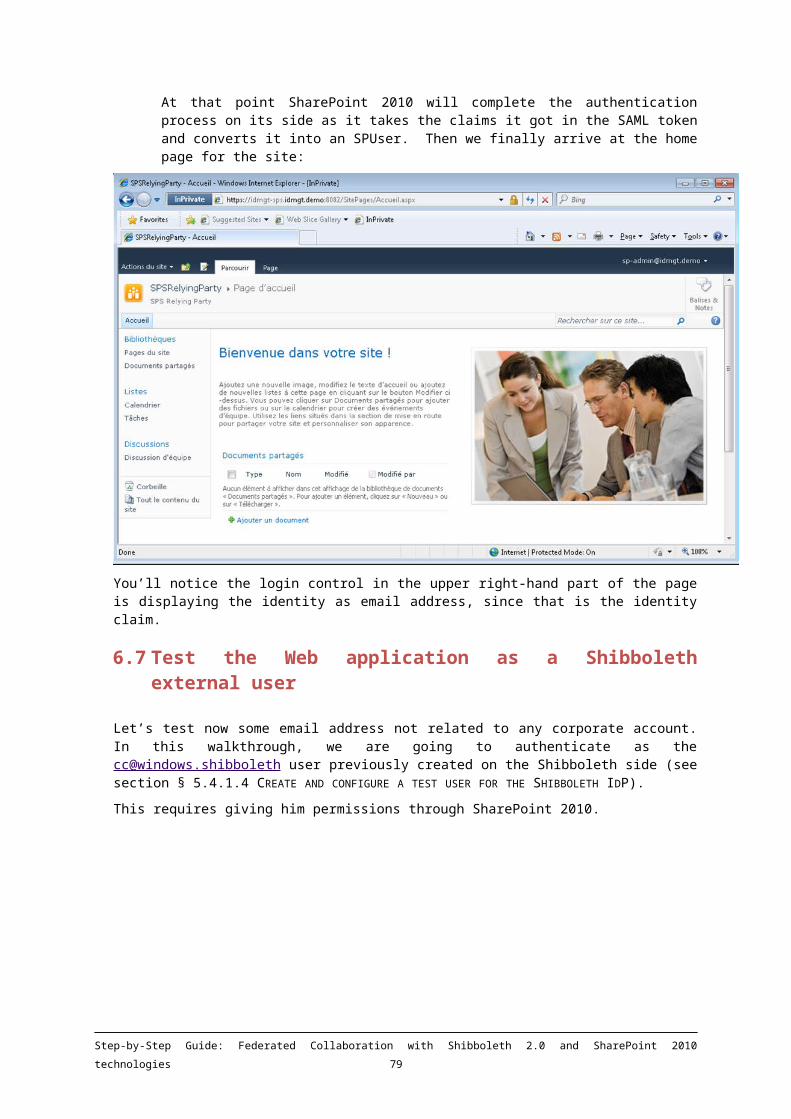
In the context of this guide, those interested in importing IDPSSODescriptors can use the edited Python script and template files available in the guide AD FS 2.0 STEP-BY-STEP GUIDE: FEDERATION WITH SHIBBOLETH 2 AND THE INCOMMON FEDERATION 74. As mentioned in the introduction (see section § 1.3 ABOUT THIS GUIDE), this guide describes how to configure AD FS 2.0 and Shibboleth to federate using the SAML 2.0 protocol.
74 AD FS 2.0 STEP-BY-STEP GUIDE: FEDERATION WITH SHIBBOLETH 2 AND THE INCOMMON FEDERATION: http://go.microsoft.com/fwlink/?LinkId=204784
Step-by-Step Guide: Federated Collaboration with Shibboleth 2.0 and SharePoint 2010 technologies 81

Appendix B. Other possibilities outside the scope of this guide
The purpose of this section is to highlight other possibilities that are outside the scope of this document but are available to architects when they deploy federation between Shibboleth 2 and AD FS 2.0.
WS-Federation support
AD FS 2.0 also supports the WS-Federation protocol for Web-based federation and SSO. The Shibboleth 2 likewise supports WS-Federation.
For information about how to deploy a test lab between Shibboleth and AD FS using WS-Federation, see the legacy ADFS STEP-BY-STEP GUIDE: FEDERATION WITH SHIBBOLETH FEDERATION SERVICES 75. While this document was written using older versions of AD FS and Shibboleth, the content in this document can be extrapolated to current versions.
With the use of the WS-Federation, one should note that a trust can be established directly between Shibboleth 2 and SharePoint 2010 (and more specifically the SharePoint 2010 Security Token Service (STS) exposed on the Web Front-End). This said having AD FS 2.0 playing the role of a Federation Server for the organization that exposes the SharePoint 2010 resource eases the exposition of additional relying party applications like Outlook Web Access (OWA) 2010.
Certification authority–issued, token-signing certificates
For security reasons, production federation deployments require the use of digitally signed security tokens. This guide uses self-signed, private key certificates, which are generated from inside the Shibboleth 2, AD FS 2.0 and SharePoint 2010 products, for signing security tokens.
As an alternative, organizations can choose to use a private key certificate issued by a certification authority (CA) for security-token signing. The primary benefit of using certificates that are issued by a CA for token-signing is the ability to check for possible certificate revocation against the certificate revocation list (CRL) from the issuing CA when acting as a Relying Party or Service Provider.
Shibboleth 2 does not perform CRL checking. Instead, it uses continuously refreshing/expiring metadata to manage the replacement and discontinuation of support for a given certificate. In AD FS 2.0, CRL checking is enabled by default for all Claims Provider trusts. This has implications in federation deployments between Shibboleth (acting as an Identity Provider/Claims Provider) and AD FS 2.0 (acting as a Service Provider/Relying Party) as considered in this guide:
If the signing private key that Shibboleth 2 uses includes a CRL Distribution Point (CDP) extension, that location must be accessible by the AD FS 2.0 Federation Server, or CRL checking fails, resulting in a failed access attempt. CDP extensions are added by default to certificates that are issued by Active Directory Certificate Services (AD CS) in Windows Server 2008 R2.
If the signing private key does not include a CDP extension, no CRL checking is performed by AD FS 2.0.
You can turn off CRL checking for a specific Claims Provider trust by using the Windows PowerShell command-line and scripting environment.
75 ADFS STEP-BY-STEP GUIDE: FEDERATION WITH SHIBBOLETH FEDERATION SERVICES: http://go.microsoft.com/fwlink/?LinkId=204190
82 Step-by-Step Guide: Federated Collaboration with Shibboleth 2.0 and SharePoint 2010 technologies

Note:
For more information, see the AD FS 2.0 ADMINISTRATION WITH WINDOWS POWERSHELL 76 section of the AD FS 2.0 OPERATIONS GUIDE and the AD FS 2.0 CMDLETS REFERENCE 77.
Federated single logout
AD FS 2.0 includes support for federated single logout. Federated single logout makes it possible for a user to log out completely from their IdP Shibboleth 2 federation server, as well as any relying party applications that are federated through a particular browser session. Federated logout seeks to improve security by leaving no sessions open for misuse, hijacking, or other malicious actions.
SAML 2.0 artifact profile
Both AD FS 2.0 and Shibboleth support the SAML 2.0 HTTP artifact binding as part of their support for the SAML 2.0 protocol. The artifact profile differs in approach from the HTTP POST profile, and it may be preferred in some situations.
Handling name qualifiers in AD FS 2.0
In AD FS 2.0, the consumption of name qualifiers for use with Name ID elements is done using the custom-developed claim rules.
When it acts as a Relying Party/Service Provider token service, AD FS 2.0 can use custom claim rules (like the one below) to read and use name qualifier variables. This rule passes inbound Name IDs to the application, retaining their original format but changing the value to include the NameQualifier and SPNameQualifier values in the output string.
c:[Type == "http://schemas.xmlsoap.org/ws/2005/05/identity/claims/nameidentifier"] => issue(Type = c.Type, Properties["http://schemas.xmlsoap.org/ws/2005/05/identity/claimproperties/format"] = c.Properties["http://schemas.xmlsoap.org/ws/2005/05/identity/claimproperties/format"], Value = c.Properties["http://schemas.xmlsoap.org/ws/2005/05/identity/claimproperties/namequalifier"] + "!" + c.Properties["http://schemas.xmlsoap.org/ws/2005/05/identity/claimproperties/spnamequalifier"] + "!" + c.Value);
Note:
This script works only when the Name ID is sent in the Subject element of the XML assertion. In cases in which a Name ID is provided in an AttributeStatement (for example, as the value of an eduPersonTargetedID attribute), the Name ID value (that is, the opaque identifier) is usable, but the name qualifiers cannot be appended to the value, as shown above.
76 AD FS 2.0 ADMINISTRATION WITH WINDOWS POWERSHELL: http://go.microsoft.com/fwlink/?LinkId=19400577 AD FS 2.0 CMDLETS REFERENCE: http://go.microsoft.com/fwlink/?LinkId=177389).
Step-by-Step Guide: Federated Collaboration with Shibboleth 2.0 and SharePoint 2010 technologies 83