step by step guide for online filing of · web viewstep by step guide for online filing of...
TRANSCRIPT

Step by step guide for online filing of IPR.1. Open the url https://sparrow-irs.eoffice.gov.in/ in Mozilla browser. The software runs smoothly on Mozilla browser and thus it is recommended to install Mozilla browser.
On opening the url, the "SPARROW - Read Me" window (given below) will open which shows the information about the e-signing facility in the SPARROW.

2. The read me window will have two buttons namely Close and Continue marked in blue, you can click any of the two buttons they will be doing the same function. On clicking any of the above two buttons, the user will be directed to the login screen of the SPARROW.

3. The "Smart Performance Appraisal Report Recording Online Window" screen will open up which is essentially a login screen for SPARROW. The screen will have three fields "Username", "Password" and "Captcha".
The username will be the NIC email id and only the name before "@" should be entered. For example if your NIC email is [email protected] or [email protected], then, the user id will be anish.upadhyay.
The password for the application will be same as your NIC email ID password.
4. The Captcha as given in the box should be entered then click the "Login" button. It would open a POP UP Window to verify and update the Adhaar number.

5. The officer has to enter Adhaar number and press Verify and update button. On pressing, an OTP number will be generated and sent to the registered mobile. Once this OTP number is fed, the Adhaar number will get verified and a green colour tick mark will come where redcross is there. This Adhaar verification window will not pop-up, once the Adhaar has been verified.
After verifying the Adhaar, the software would automatically move to next screen. By default, the SPARROW window will open up as shown in the next page.

6. Click on the Declaration for IPR tab in blue colour under the IPR tab. The following screen will appear.
7. Select the date from the drop down box provided in front of “Select Statement as on Date” for which IPR has to be filled. On selecting the date, the following window will appear which will contain three tabs “Fill New Declaration”, “Copy Data From Previous Year Declaration’’ and “NIL Declaration’’. The officer for the first time has to select Fill New Declaration or NIL Declaration as the case may be because there is no data of previous year saved in the software as of now. Let us take both these case one by one.

8. Click “Fill New Declaration” tab and two radio buttons will appear namely "Fill Electronic Form" and "Upload Physically Signed Form". The officer now has two options to fill new declaration. It can be either filled online by clicking over Fill Electronic Form radio button or the officer can fill the IPR manually, sign it and upload the scanned copy by clicking Upload Physically Signed Form radio button.

9. Case1: Upload Physically Signed Form In case an officer wants to file manual return and then upload the same then after clicking Upload Physically Signed Form radio button, the following screen will appear as shown below.

Click on Browse and upload the scanned copy of the form. The form must be in pdf format. The officer can also upload scanned copy of the reference documents required, if any, with the IPR. On clicking Submit button, a window asking OTP will appear in which you have to fill the OTP which will be received in your mobile linked with Aadhaar card. Once OTP is submitted, a confirmation window will pop up as shown below asking to check whether all details are correctly filled because the IPR return cannot be edited further, once it is submitted.
Click Ok and another confirmation message will pop up as shown in the screen below.

Click OK and a message will pop up for Successful Submission to confirm that return has been filed and a unique application no. will be generated as shown in the screen below:
10. Case 2: Fill Electronic Form Click on the Fill Electronic Form radio button and a message will pop up asking to save the work as draft as shown below.

Click OK. Saving the work as draft is useful if the officer wants to edit/ amend some data and submit it later and also saves the data in case of sudden power shut down.
After clicking OK button the following screen of IPR form will appear which is to be filled by the officer. The form contains column no.1 to column no. 8 as shown in the following screenshots:

Click on add “+” button in green colour provided at the bottom of every form to add more form. By clicking “+” entire form from Column 1 to Column 8 will appear again.

After filling the complete return click “Save As Draft” if you wish to edit it later or click “Submit Application”. On clicking Submit button, a window asking OTP will appear in which you have to fill the OTP which will be received in your mobile linked with Adhaar card. Once OTP is submitted, a confirmation window will pop up as shown below asking to check whether all details are correctly filled because the IPR return cannot be edited further, once it is submitted.
Click OK if you want to submit. The following message of submitted successfully along with the Application no. will appear.

11. If the officer clicks on Save as Draft, the following screen will appear mentioning Application drafted successfully.

The saved draft of the IPR can be further edited next time the officer clicks over “Declaration of IPR’’ again. The following screen will appear.
The officer can download soft copy of the IPR filled by clicking Preview button provided at the right hand top corner of the form as down arrow in green colour. The copy in pdf format will appear as shown in the screen below.

12. Viewing the filled IPR:The officer can view his IPR return by Login in clicking Declaration for IPR Select date. The following screen will appear. Click on View Uploaded Form.
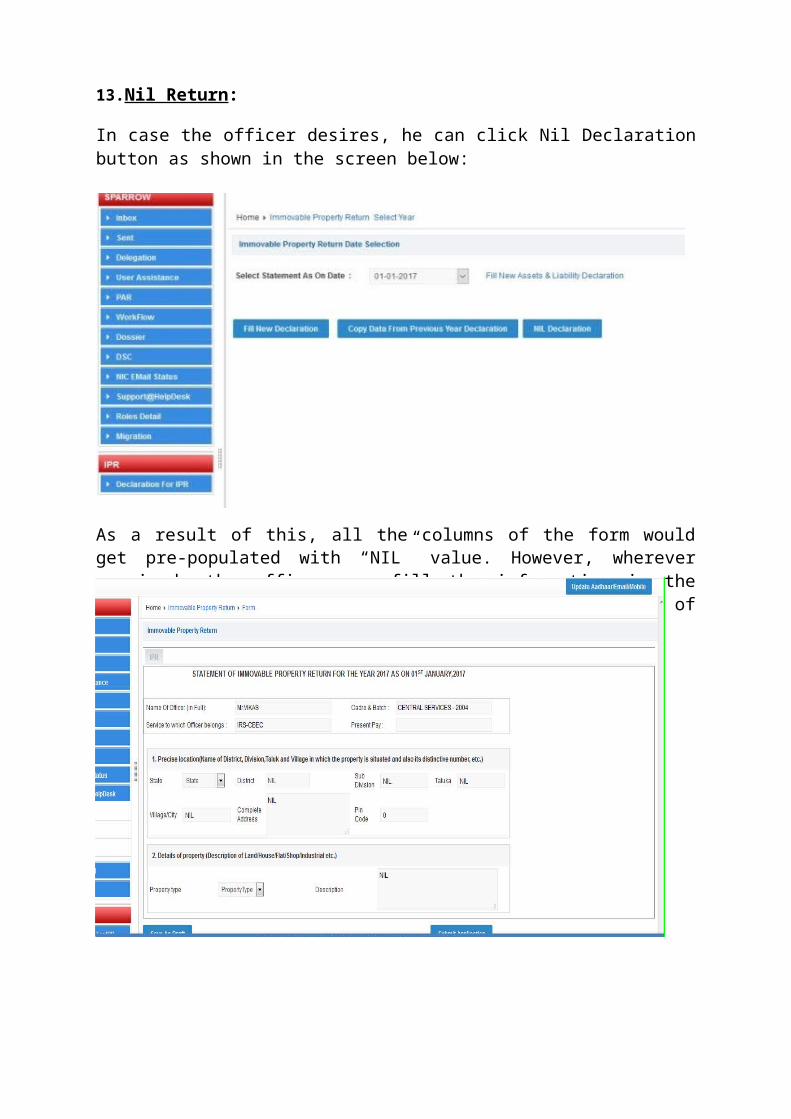
13.Nil Return:
In case the officer desires, he can click Nil Declaration button as shown in the screen below:

As a result of this, all the columns of the form would get pre-populated with “NIL” value. However, wherever required, the officer can fill the information in the desired columns. The screen shots of all the columns of the form pre-populated with “NIL” value is shown below:

Click on Submit Application. On clicking Submit button, a window asking OTP will appear in which you have to fill the OTP which will be received in your mobile linked with Adhaar card. A confirmation message will pop up as shown below.
Click OK. Again a confirmation message will pop up as shown in the screen below.
Click OK. The following message of successful submission along with the Application No. will appear.
*****