step-by-step guide to setup an ibm websphere portal and ... · this guide was written using linux...
TRANSCRIPT

Step-by-Step guide to setup an IBM WebSphere Portal and IBM Web Content Manager V8.5 Cluster From Zero to Hero (Part 2.)

Summary STEP-BY-STEP GUIDE TO SETUP AN IBM WEBSPHERE PORTAL AND IBM WEB CONTENT MANAGER V8.5 CLUSTER FROM ZERO TO HERO (PART 2.) .....................................................................................................................................1
SUMMARY .....................................................................................................................................................................2
ABSTRACT .....................................................................................................................................................................3 WINDOWS/UNIX DIFFERENCES ..........................................................................................................................................3 HOSTNAMES USED IN THIS GUIDE.......................................................................................................................................3 CLUSTER CONCEPTS ........................................................................................................................................................4
MAIN GUIDE ..................................................................................................................................................................5
PREPARE SECONDARY NODE ..............................................................................................................................................5 Pre check ...............................................................................................................................................................5 Create Additional Cluster Node ..............................................................................................................................7
Install IBM Installation manager: .................................................................................................................................................. 7 Install WebSphere Portal............................................................................................................................................................. 10 Federated Additional Cluster Member ....................................................................................................................................... 19
Install profile templates. ........................................................................................................................................................ 23 PreSet the database drivers on the additional node. ........................................................................................................... 24 Verify Time Set ....................................................................................................................................................................... 24 Create Secondary Profile ....................................................................................................................................................... 24 Federated Secondary Node ................................................................................................................................................... 25 AddSecondaryNode ............................................................................................................................................................... 26
CONFIGURING THE WEB SERVER .......................................................................................................................................28 Install IBM HTTP Server .......................................................................................................................................28 Configure Virtual-Host .........................................................................................................................................31 Define WebServer into WebSphere ICS .................................................................................................................33
AUTHOR: ......................................................................................................................................................................36

Abstract This guide want to explain how install, configure, and building an IBM WebSphere Portal v8.5
cluster using:
IBM WebSphere Application Server
Red Hat Enterprise Linux 6.0 update 3
DB2 10.5
Active Directory 2012 R2 mixed mode
IBM HTTP Server 8.0
Windows/Unix Differences This guide was written using Linux as the base operating system, however the steps/concepts listed
in this guide are independent of operating system.
The only significant difference is that for Windows, you must use the batch file commands instead
of the UNIX shell commands listed in this guide.
For example:
UNIX: ./startServer.sh WebSphere_Portal
Windows: startServer.bat WebSphere_Portal
Or
UNIX: ./ConfigEngine.sh cluster-node-config-cluster-setup
Windows: ConfigEngine.bat cluster-node-config-cluster-setup
Hostnames Used in this Guide To avoid confusion with my own hostnames, I've replaced each instance of the hostnames of my
servers with a sample value that corresponds to the server it belongs to so that it may be easier to
understand which server I'm referring to in my examples.
I use the following values:
Primary Node : first.ondemand.com
Secondary Node: second.ondemand.com
DMGR: dmgr.ondemand.com
Database Server: dbstore.ondemand.com
LDAP Server: ldap.ondemand.com IBM HTTP Server: portal.ondemand.com

Cluster Concepts Server - A Java Virtual Machine (JVM) that manages user applications (such as WebSphere Portal
and Web Content Management).
Node - A logical grouping of one or more application servers. A node does not necessarily mean
a single physical server.
Cell - A logical grouping of one more nodes.
Cluster - A logical grouping of one or more servers across one or more nodes. The servers are
managed together and participate in workload management. Servers in a cluster share
resources, such as applications. Multiple clusters can exist in a single cell, but a single
cluster cannot exist across multiple cells.
Figure 1 – WebSphere Portal cluster with two nodes, each with three cluster members.

Main Guide
Prepare Secondary Node
Pre check
Verify have more then 5GB on temporary directory /tmp
Open terminal and verify if your system is reachable using fully qualified hostname
[root@serv01 /]# ping first.ondemand.com
In the same terminal, execute
[root@serv01 /]# ping localhost
To verify the “localhost” network settings are configured properly on your machine.
Linux/UNIX environments only.
If in your environment do not use IPV6 verify that is disable in each machine.
In the same terminal, execute
[root@serv01 /]# cat /etc/sysconfig/network
And verify if your NETWORKING_IPV6 is set to “no”
Ensure have sufficient file open limit, is set to 10240 or higher.
ulimit -n 10240
Web Content Manager only: Complete the following steps to remove any file size limits: Use the
ulimit -f command to set the maximum size of files that can be created.
Following library is needed during installation process, if you do not configure X environment
verify you can use export display to use each wizard, in this guide I use this method to execute
installation.
gtk2-2.18.9-6.el6.x86_64.rpm
glib2-2.22.5-6.el6.x86_64.rpm
libXtst-1.0.99.2-3.el6.x86_64.rpm
compat-libstdc++-33-3.2.3-69.el6.x86_64.rpm
openmotif22-2.2.3-19.el6.x86_64.rpm
pam-1.1.1-10.el6.x86_64.rpm
libXp-1.0.0-15.1.el6.x86_64.rpm
libXmu-1.0.5-1.el6.x86_64.rpm
kernel-headers-2.6.18-238.19.1.el5.x86_64.rpm
compat-glibc-headers-2.3.4-2.26.x86_64.rpm
compat-glibc-2.3.4-2.26.x86_64.rpm
libgtk-x11-2.0.so.0
libgtk-x11-2.0.so.0

libcanberra-gtk-module.so
glibc-2.12-1.47.el6.i686.rpm
compat-libstdc++-33-3.2.3-69.el6.x86_64.rpm
compat-libstdc++-33-3.2.3-69.el6.i686.rpm
yum search -1.0.0-15.1.el6.i686.rpm
libXp-1.0.0-15.1.el6.x86_64.rpm
openmotif-2.3.3-4.el6.i686.rpm
xterm
xkeyboard-config
tigervnc-server-1.0.90-0.17.20110314svn4359.el6.x86_64.rpm
xorg-x11-twm-1.0.3-5.1.el6.x86_64.rpm
xorg-x11-font*

Create Additional Cluster Node
Connect to secondary server and
Install IBM Installation manager:
From shared disc where you have already expand all packages needed to execute installation, move
where you have expand WSP_Server_8.5_Setup.zip and find following path
<expandHome>/SETUP/IIM/Linnux_x86_64
and run ./install
following screen appear to you:
Click next.
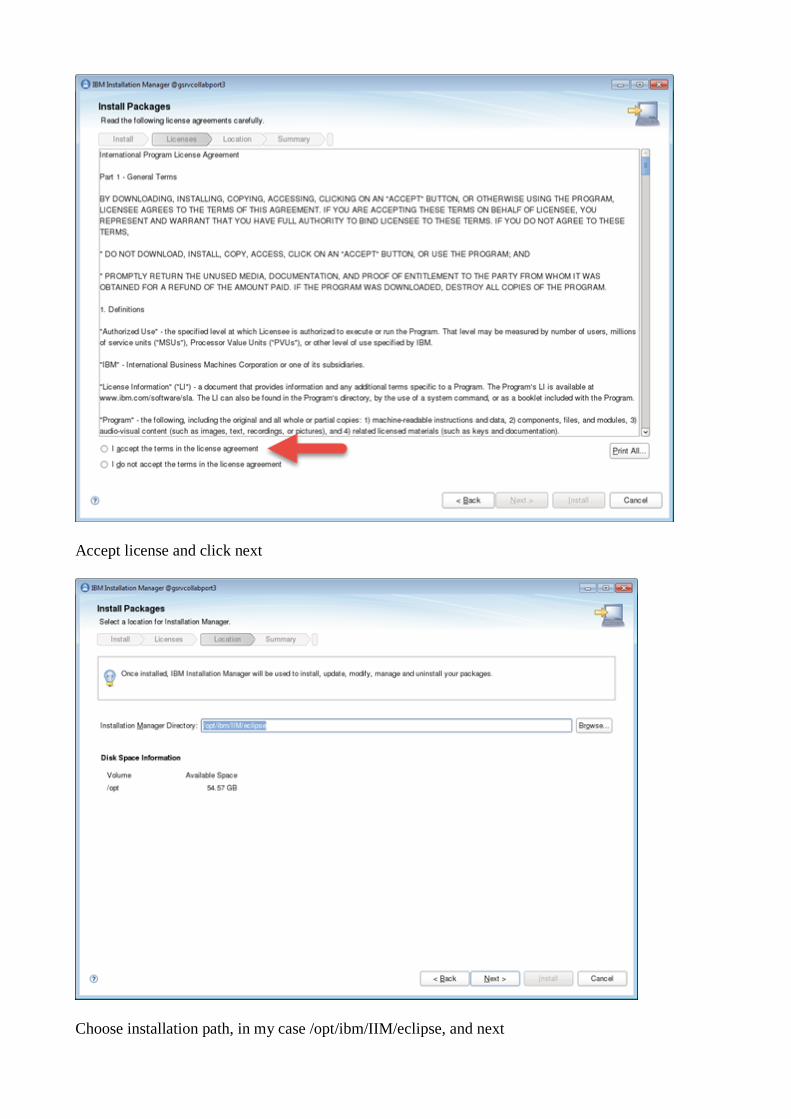
Accept license and click next
Choose installation path, in my case /opt/ibm/IIM/eclipse, and next
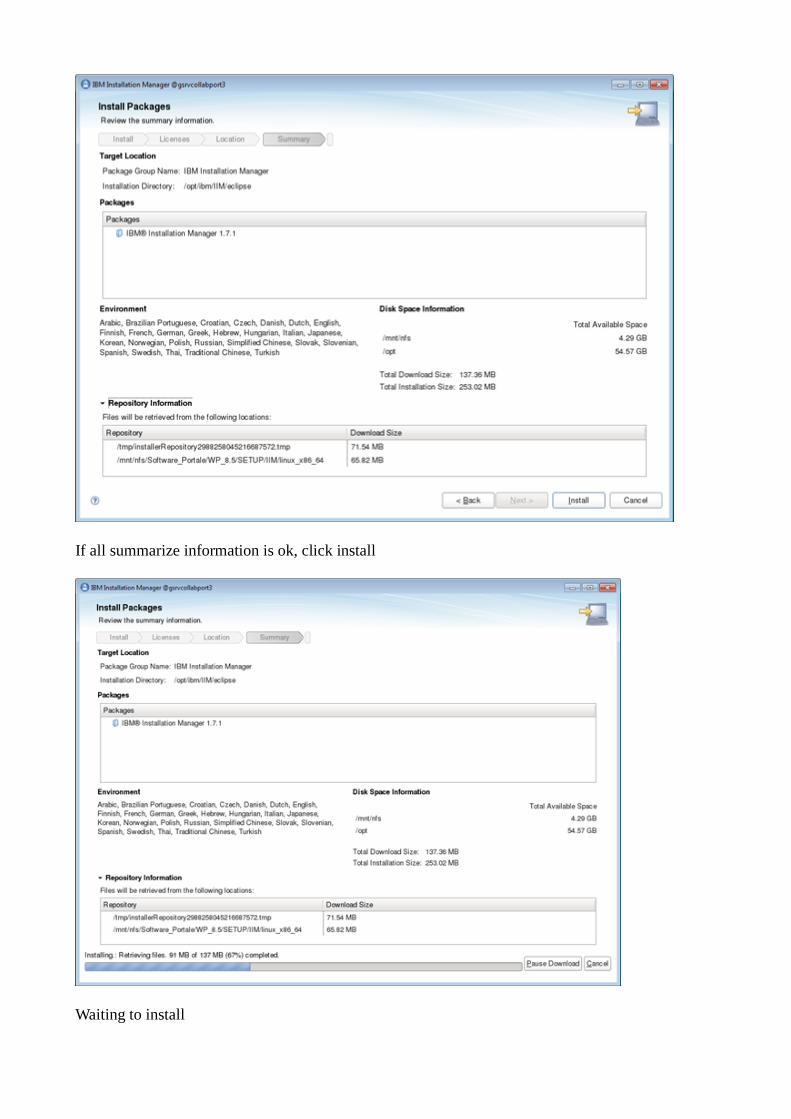
If all summarize information is ok, click install
Waiting to install
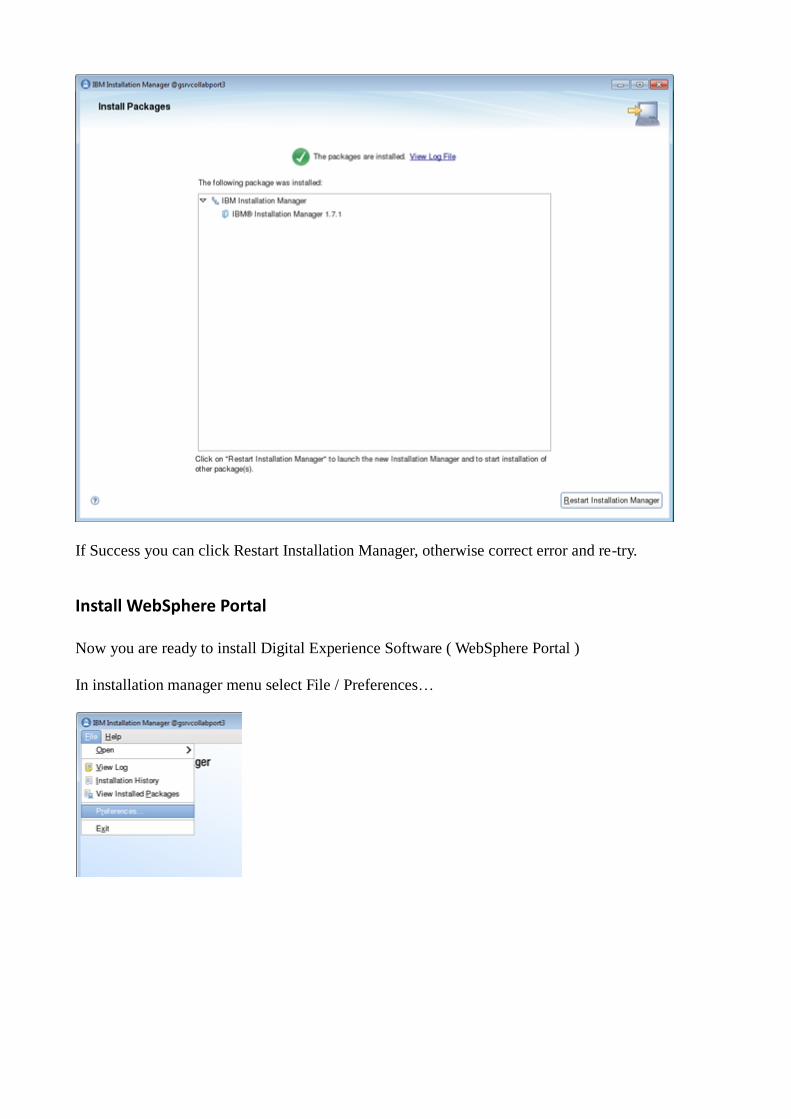
If Success you can click Restart Installation Manager, otherwise correct error and re-try.
Install WebSphere Portal
Now you are ready to install Digital Experience Software ( WebSphere Portal )
In installation manager menu select File / Preferences…
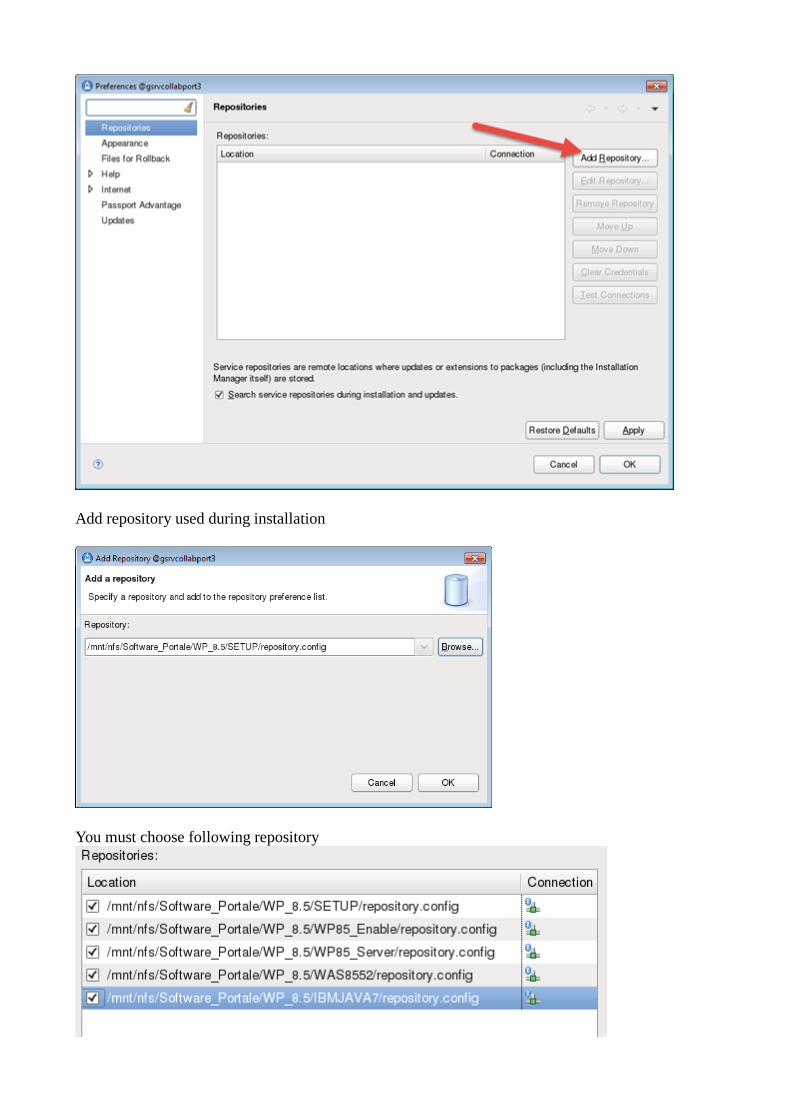
Add repository used during installation
You must choose following repository

Click Apply and OK
Now click Install

Select all Packages and Next
Select all Packages and Next

Accept license and Next
Choose your IMShared directory, in my case /opt/ibm/IIM/IMShared and Next

Choose your WebSphere Application Server install path, in my case
/opt/ibm/WebSphere/AppServer
Choose your WebSphere Portal Server install path, in my case /opt/ibm/WebSphere/PortalServer
and Next

If needed choose your language, otherwise Next
Verify that “Portal Server Profile” will be deselected, and Next

Choose your WebSphere Administrator credential, this credential will be stored in Internal
Repository and MUST be unique when you add your LDAP configuration, in my case I use
waslocal / passw0rd
Set Hostname, this name will be solved during your digit. Set Node name and Cell Name,
In my case I choose as Node name : WpNd02 and for Cell name: WpCe02, this cell name will be
updated when node will be federated to DMGR.

Choose your WebSphere Portal Administrator credential, this credential will be stored in Internal
Repository and MUST be unique when you add your LDAP configuration, to simplify your work I
can suggestion to use same user you choose as WebSphere Administartor,
in my case I use
Waslocal / passw0rd
Optional: If you select the Advanced Configuration radio button at the top of this screen (not
shown), you can also set the Context Root, Default Home, Personalized Home, starting Port
range, Profile Name, and Profile Path. For this guide, these were all left as the defaults but you
are welcome to configure these as you see fit.
If all summarize data is OK, you can click Install
And wait to complete

if all activities are successful you will get the following screen, it will take enough time, if you see
the bar stops do not worry to be patient.
Now choose “None”, and Finish
Federated Additional Cluster Member
Now we must federate new node in our cell.
Use the Configuration Wizard to generate script to define additional cluster node.
Connect to http://localhost:10200/ibm/wizard , start it if stopped.
Authenticate using waslocal

Choose Set Up a cluster
and choose “Create an Additional Cluster Node”
Select default for your script environment and next (right blue arrow)

In our case choose “On Remote Server” and next
Specify parameter, in my case
CellName: WpCe02
NodeName: WpNd02
WasHome: /opt/ibm/WebSphere/AppServer
PortalHost: portal8502.xxxxxxxxxxxxx
WpsHome: /opt/ibm/WebSphere/PortalServer
and Next
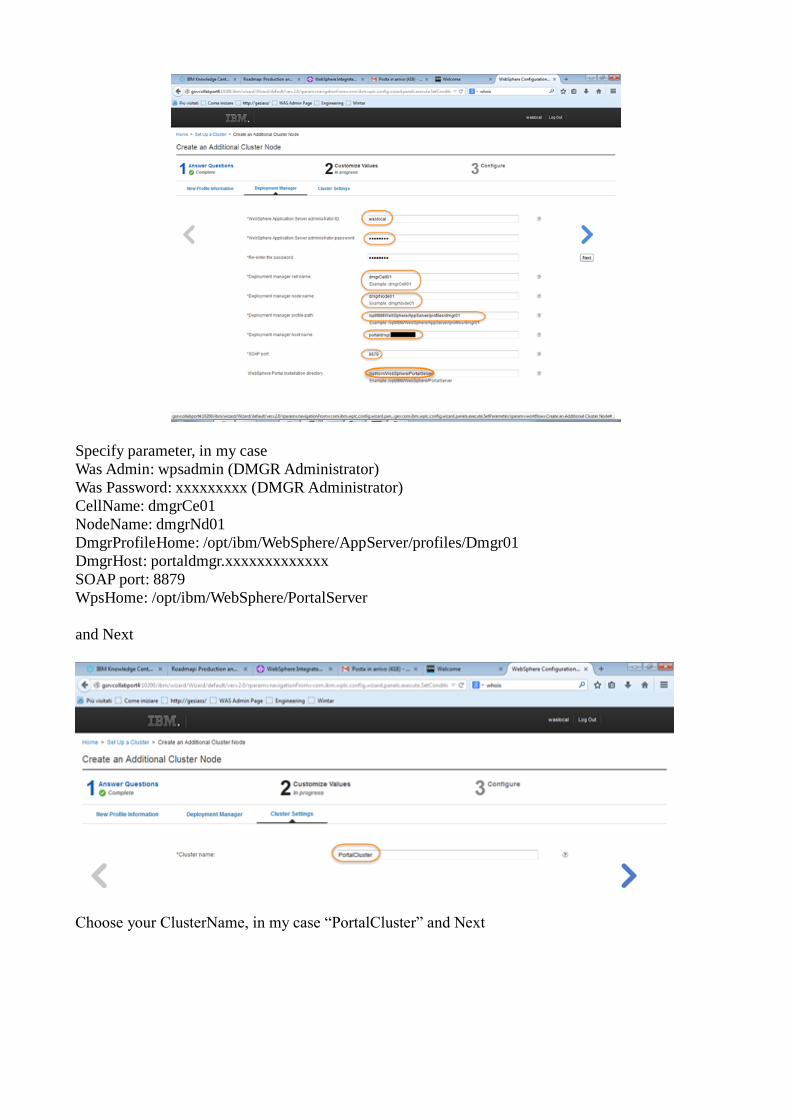
Specify parameter, in my case
Was Admin: wpsadmin (DMGR Administrator)
Was Password: xxxxxxxxx (DMGR Administrator)
CellName: dmgrCe01
NodeName: dmgrNd01
DmgrProfileHome: /opt/ibm/WebSphere/AppServer/profiles/Dmgr01
DmgrHost: portaldmgr.xxxxxxxxxxxxx
SOAP port: 8879
WpsHome: /opt/ibm/WebSphere/PortalServer
and Next
Choose your ClusterName, in my case “PortalCluster” and Next
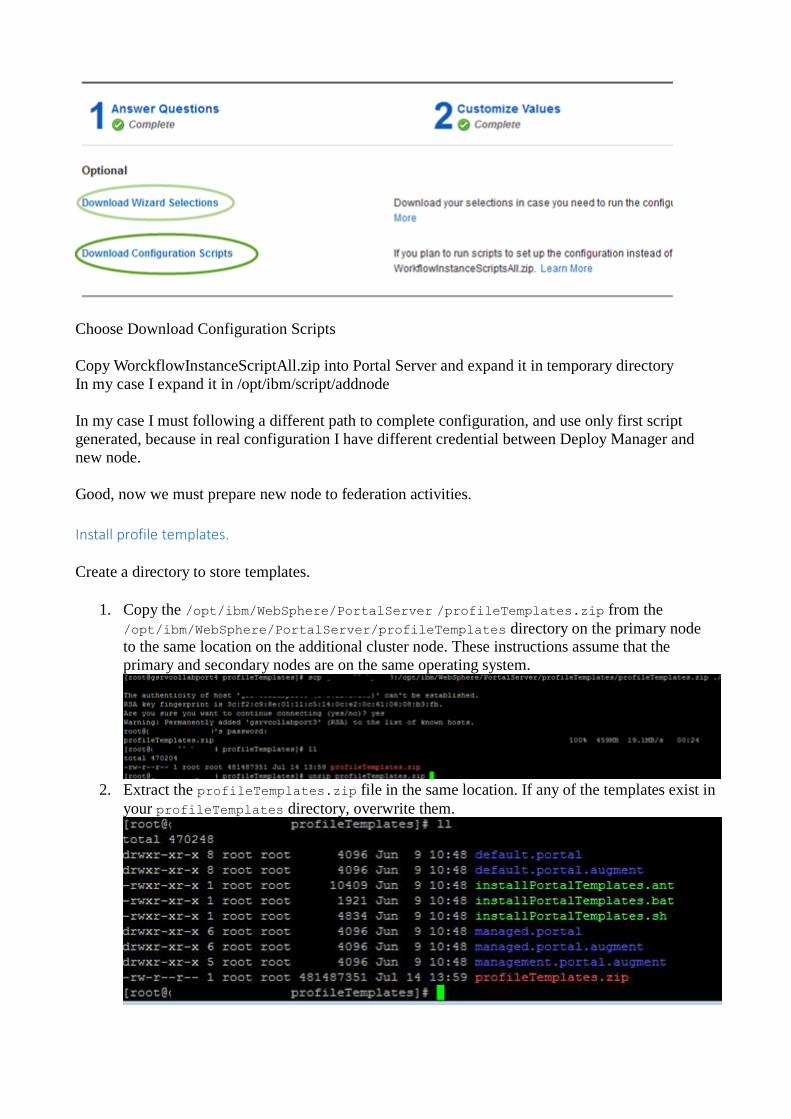
Choose Download Configuration Scripts
Copy WorckflowInstanceScriptAll.zip into Portal Server and expand it in temporary directory
In my case I expand it in /opt/ibm/script/addnode
In my case I must following a different path to complete configuration, and use only first script
generated, because in real configuration I have different credential between Deploy Manager and
new node.
Good, now we must prepare new node to federation activities.
Install profile templates.
Create a directory to store templates.
1. Copy the /opt/ibm/WebSphere/PortalServer /profileTemplates.zip from the
/opt/ibm/WebSphere/PortalServer/profileTemplates directory on the primary node to the same location on the additional cluster node. These instructions assume that the
primary and secondary nodes are on the same operating system.
2. Extract the profileTemplates.zip file in the same location. If any of the templates exist in
your profileTemplates directory, overwrite them.

3. Run the installPortalTemplates script from the newly created profileTemplates
directory to install the copied profile template. This script updates and registers the profile
templates with the Profile Management Tool if it exists on your server.
installPortalTemplates.sh /opt/ibm/WebSphere/AppServer
PreSet the database drivers on the additional node. You must copy the drivers to the same directory path on the additional node. To find the location of
your database driver JAR files, see the examples for your_database.DbLibrary property in the
wkplc_dbtype.properties file at:
${WasUserHome}/ConfigEngine/properties/wkplc_dbtype.properties
You must copy the drivers to the same directory path on the additional node. To find the location of
your database driver JAR files, see the examples for your_database.DbLibrary property in the
wkplc_dbtype.properties file at:
${WasUserHome}/ConfigEngine/properties/wkplc_dbtype.properties
In our, case “/opt/ibm/jdbc”
Verify Time Set For the deployment manager and each portal node to be in the cluster, verify that the system clocks
are within 5 minutes of each other, or the addNode command fails.
Create Secondary Profile If all ready, you can run first script to create secondary portal profile.
Run ./CreateSecondaryNodeProfile.sh from /opt/ibm/script/addnode/scripts
This task will be silent for some minutes, at the end write if success or not, you must wait until it
finish.
Now we must continue manually, suing following command.

Federated Secondary Node Now we proceed to federate new node into our cell, to doing you must run following command
./addNode.sh dmgr_hostname dmgr_port
-username was_admin_user
-password was_admin_password
The variables are defined as:
dmgr_hostname is the TCP/IP host name of the Deployment Manager server
dmgr_port is the SOAP port number of the Deployment Manager server
was_admin_user and was_admin_password are the user ID and password for the
Deployment Manager administrator
If the WebSphere Application Server administrator user ID and password are different from the
Deployment Manager values, add the following parameters to the addNode task: -localusername local_was_admin_user -localpassword local_was_admin_password
In our case:
./addNode.sh portaldmgr.xxxxxxxx 8879 –username xxxxxx –password xxxxxx –localusername
waslocal –localpassword xxxxxxxx
Warning: If the addNode task fails for any reason, you must complete the following steps before
you rerun the task:
a. Remove the node if the AddNode task succeeded in creating the node. b. If the items exist, log on to the deployment manager and complete the following steps:
i. Remove the WebSphere_Portal server definition.
ii. Remove the WebSphere Portal JDBC Provider.

AddSecondaryNode
This step create a secondary JVM and add it to your cluster, and synchronize all configuration from
DMGR.
Before execute, you must ensure that the following parameters are set correctly in the
wkplc.properties file:
Note: You can add these parameters (particularly passwords) directly to any task. However, you
might want to temporarily add them to the properties file. You can then remove them when you are
finished to keep your environment secure.
a. Set WasSoapPort to the port used to connect remotely to the deployment manager.
b. Set WasRemoteHostName to the full host name of the server that is used to remotely
connect to the deployment manager.
c. Change ServerName to WebSphere_Portal_2
d. Verify that WasUserid is set to your Deployment Manager administrator user ID.
e. Verify that WasPassword is set to your Deployment Manager administrator password.
f. Verify that PortalAdminPwd is set to your WebSphere Portal administrator password.
g. Verify that ClusterName is set, with the same value you have in PrimaryNode
h. Verify that PrimaryNode is set to false.
Now you can run last step:
./ConfigEngine.sh cluster-node-config-cluster-setup
If you check in your ICS you find following configuration:
Cluster Topology
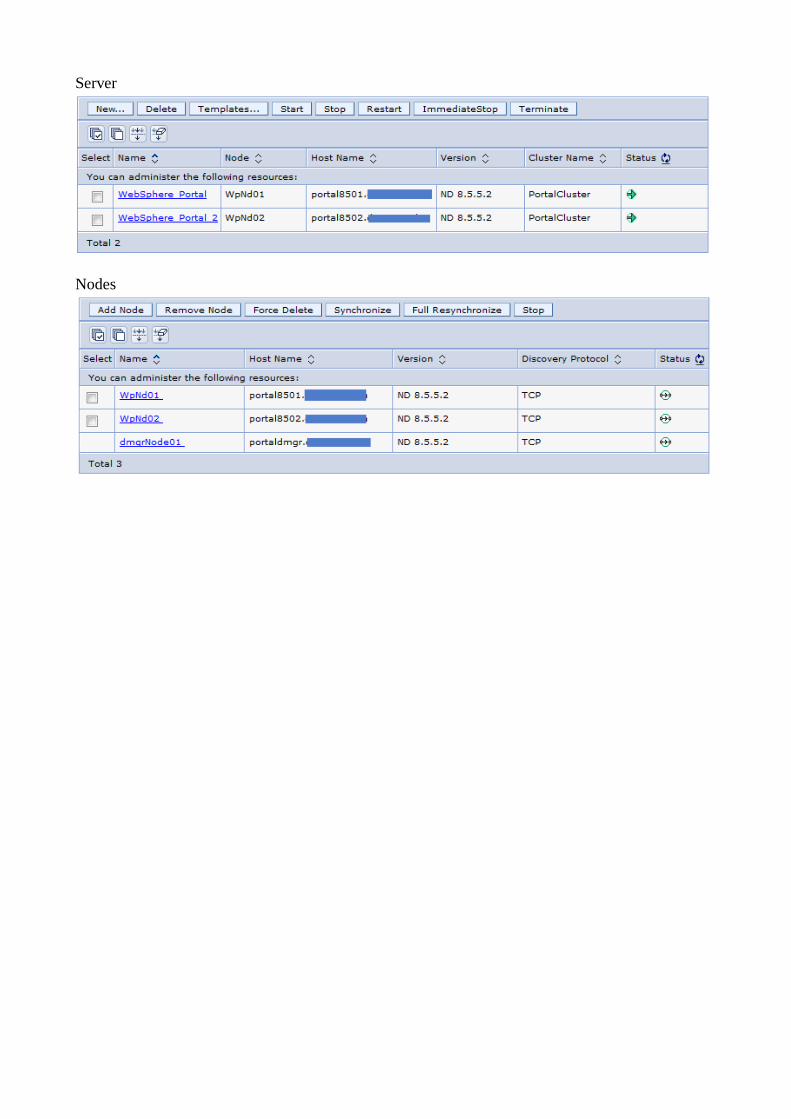
Server
Nodes

Configuring the web server To enable communication between the web server and WebSphere Application Server, a web server
plug-in is required. The web server plug-in determines whether a request is handled by the web
server or by the application server. The plug-in can be installed into a web server that is located
either on the same server as WebSphere Application Server or on a separate server. The web server
plug-in uses an XML configuration file (plugin-cfg.xml) that contains settings that describe how to
handle and pass on requests to the WebSphere Application Server made accessible through the plug-
in.
Install IBM HTTP Server
To install IBM Http Server, you can apply next step:
Open IBM Installation Manager and add new repository:
Apply, Ok, Install
Select appropriate product,
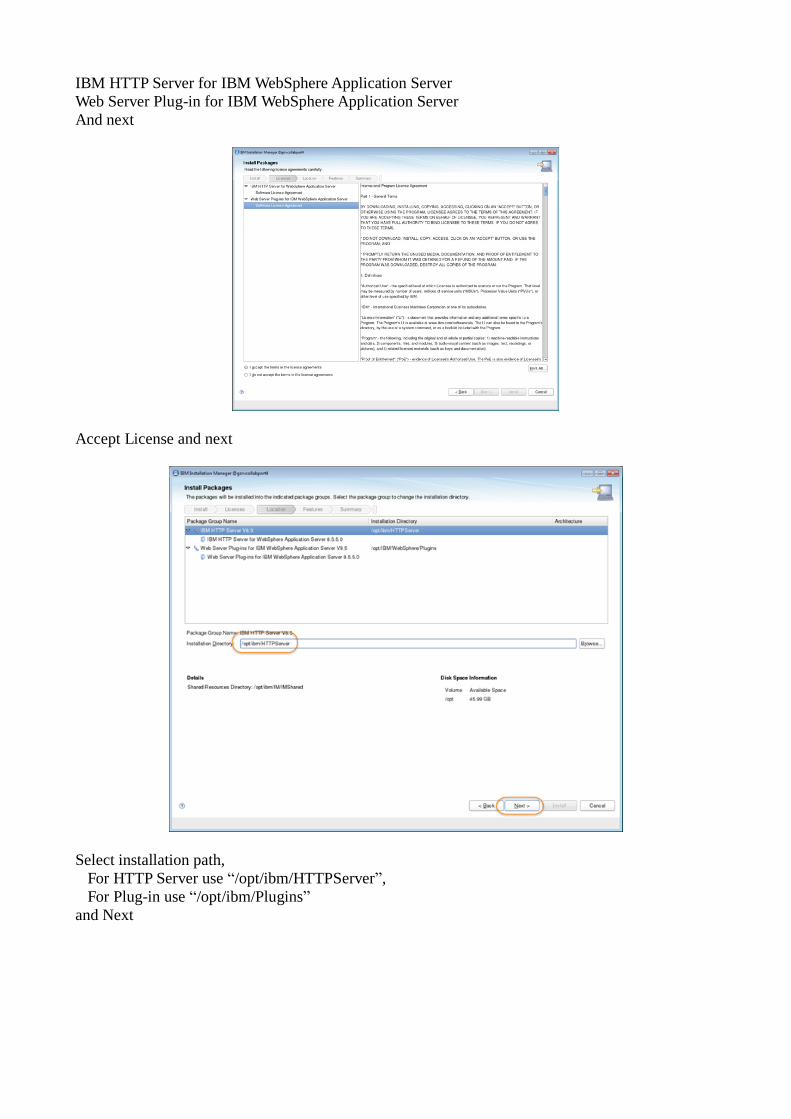
IBM HTTP Server for IBM WebSphere Application Server
Web Server Plug-in for IBM WebSphere Application Server
And next
Accept License and next
Select installation path,
For HTTP Server use “/opt/ibm/HTTPServer”,
For Plug-in use “/opt/ibm/Plugins”
and Next
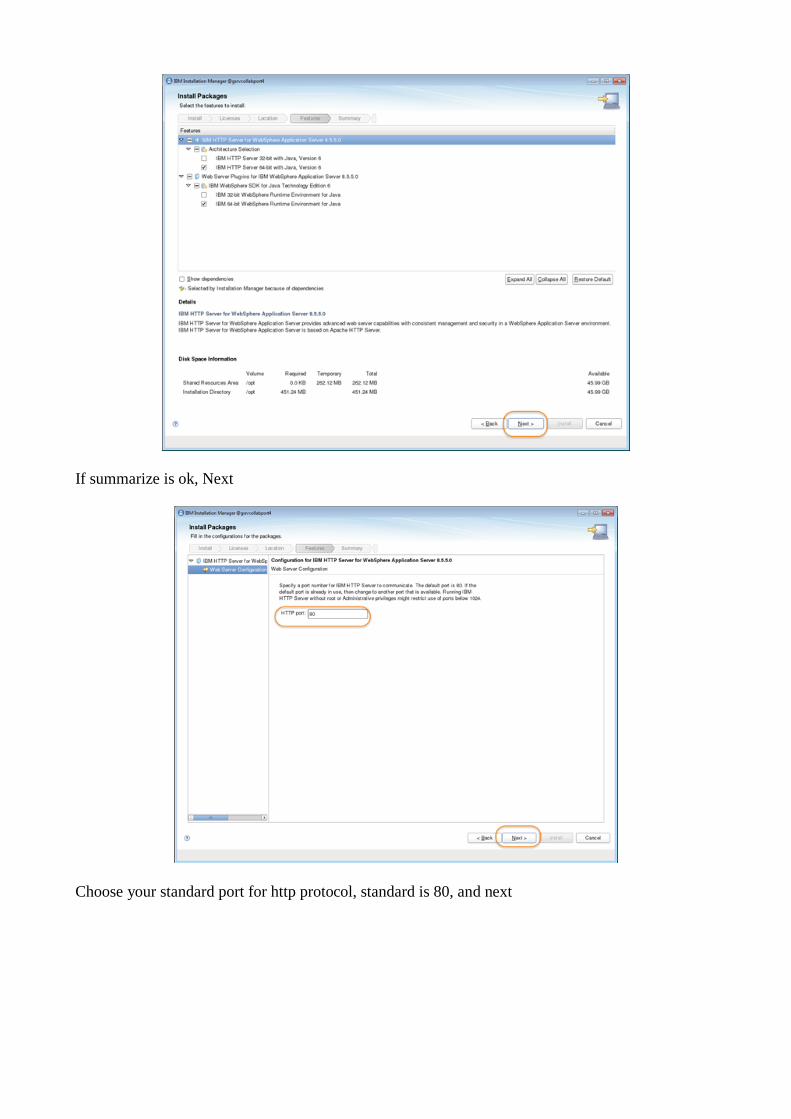
If summarize is ok, Next
Choose your standard port for http protocol, standard is 80, and next

Install, and wait until finish.
Finish and exit
Configure Virtual-Host
Now configure your virtual server and propagate plugin.
Create in your installation path, definition for your Virtual Host, and include it in httpd.conf
configuration file.
In our case:
I create a specific directory:
<httpHome>/conf/vh , where I put my virtual host configuration file
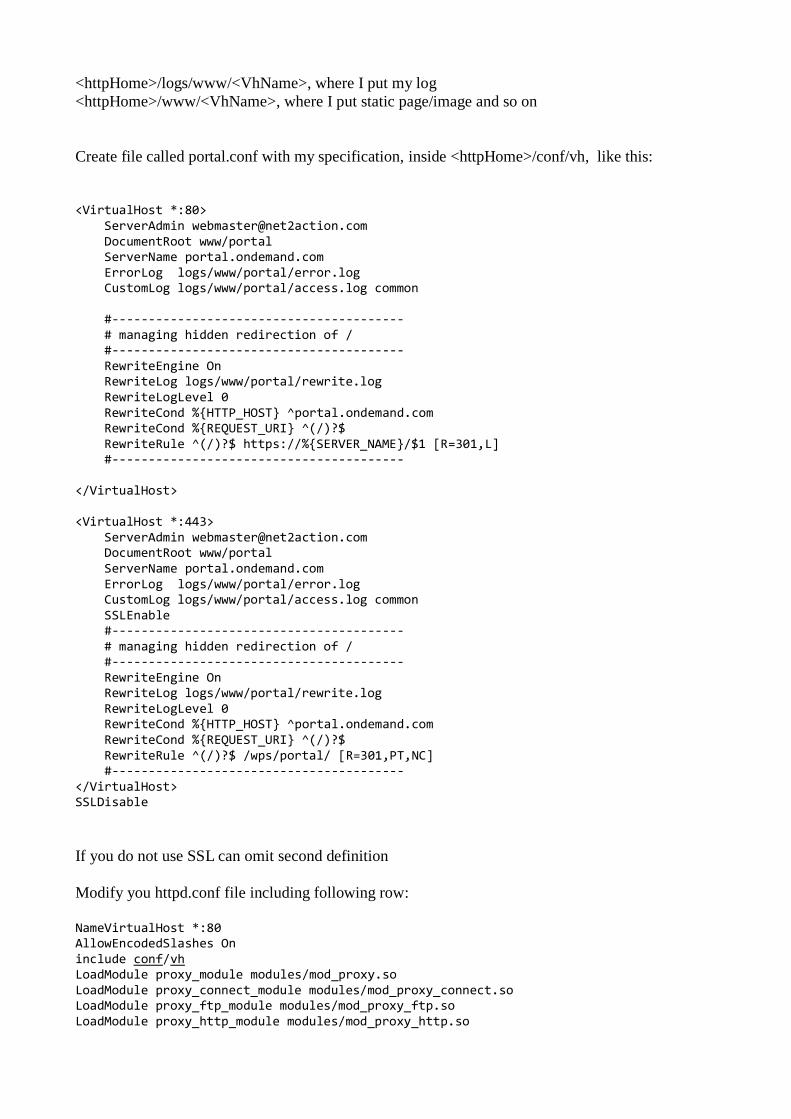
<httpHome>/logs/www/<VhName>, where I put my log
<httpHome>/www/<VhName>, where I put static page/image and so on
Create file called portal.conf with my specification, inside <httpHome>/conf/vh, like this:
<VirtualHost *:80> ServerAdmin [email protected] DocumentRoot www/portal ServerName portal.ondemand.com ErrorLog logs/www/portal/error.log CustomLog logs/www/portal/access.log common #---------------------------------------- # managing hidden redirection of / #---------------------------------------- RewriteEngine On RewriteLog logs/www/portal/rewrite.log RewriteLogLevel 0 RewriteCond %{HTTP_HOST} ^portal.ondemand.com RewriteCond %{REQUEST_URI} ^(/)?$ RewriteRule ^(/)?$ https://%{SERVER_NAME}/$1 [R=301,L] #---------------------------------------- </VirtualHost> <VirtualHost *:443> ServerAdmin [email protected] DocumentRoot www/portal ServerName portal.ondemand.com ErrorLog logs/www/portal/error.log CustomLog logs/www/portal/access.log common SSLEnable #---------------------------------------- # managing hidden redirection of / #---------------------------------------- RewriteEngine On RewriteLog logs/www/portal/rewrite.log RewriteLogLevel 0 RewriteCond %{HTTP_HOST} ^portal.ondemand.com RewriteCond %{REQUEST_URI} ^(/)?$ RewriteRule ^(/)?$ /wps/portal/ [R=301,PT,NC] #---------------------------------------- </VirtualHost> SSLDisable
If you do not use SSL can omit second definition
Modify you httpd.conf file including following row:
NameVirtualHost *:80 AllowEncodedSlashes On include conf/vh LoadModule proxy_module modules/mod_proxy.so LoadModule proxy_connect_module modules/mod_proxy_connect.so LoadModule proxy_ftp_module modules/mod_proxy_ftp.so LoadModule proxy_http_module modules/mod_proxy_http.so
LoadModule rewrite_module modules/mod_rewrite.so LoadModule was_ap22_module /opt/ibm/Plugins/bin/64bits/mod_was_ap22_http.so WebSpherePluginConfig /opt/ibm/Plugins/config/WebServer1/plugin-online-cfg.xml # # ---------------------------------------------------------
Note: I use plugin-online-cfg.xml to protect accidentally propagation of Plugin.
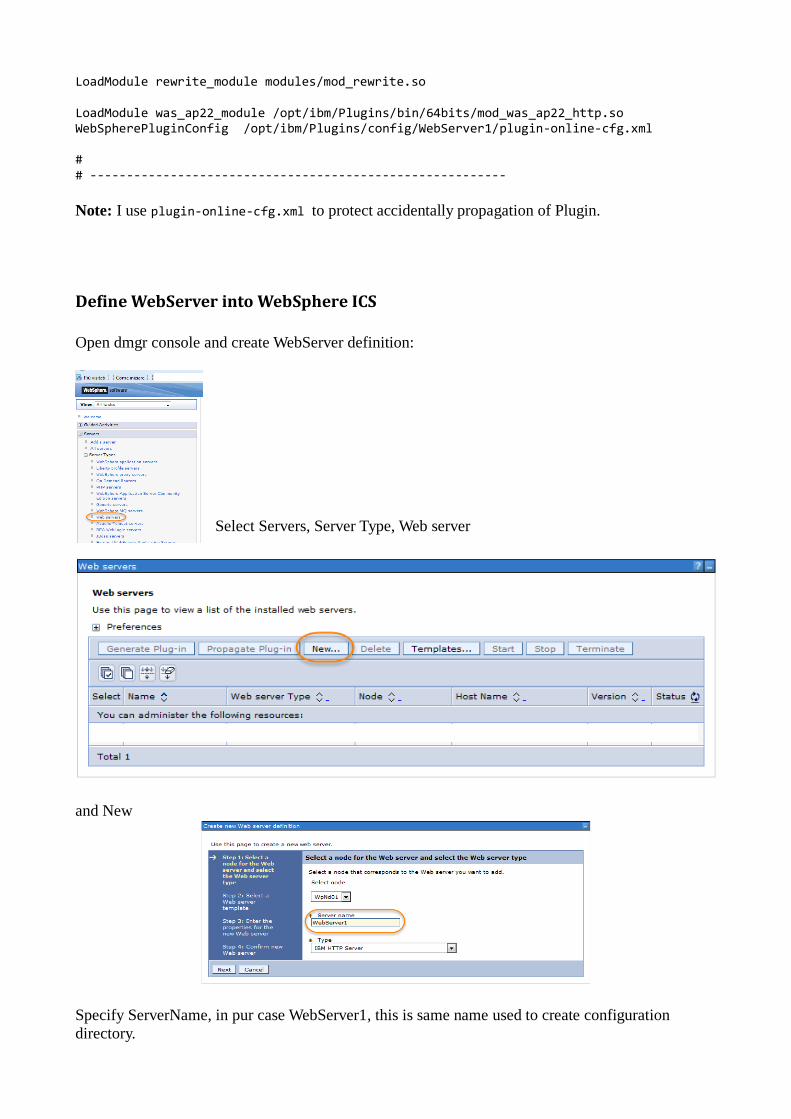
Define WebServer into WebSphere ICS
Open dmgr console and create WebServer definition:
Select Servers, Server Type, Web server
and New
Specify ServerName, in pur case WebServer1, this is same name used to create configuration
directory.
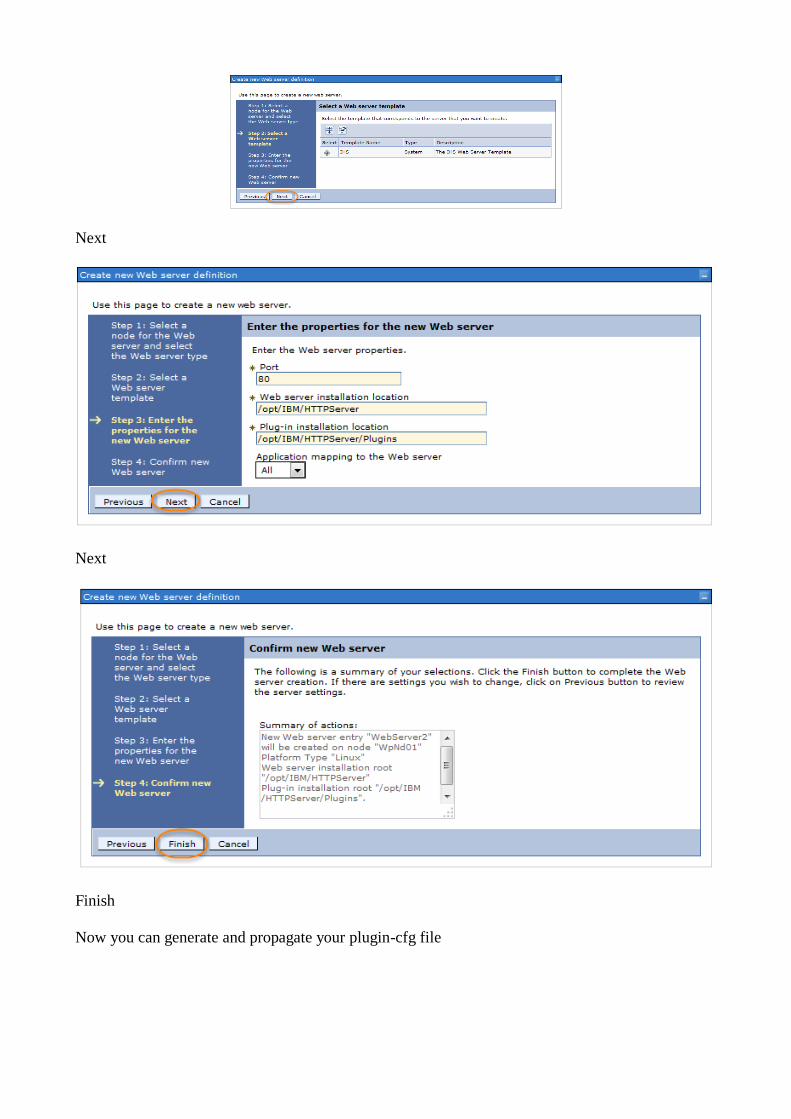
Next
Next
Finish
Now you can generate and propagate your plugin-cfg file

Select WebServer and Generate Plugin, if ok you receive next message
Now select Web Server and click Propagate Plug-in
If ok,
Verify configuration using following command:
<httpHome>/bin/apachectl –S
If OK, you can restart your HTTP Server,
<httpHome>/bin/apachectl –k graceful
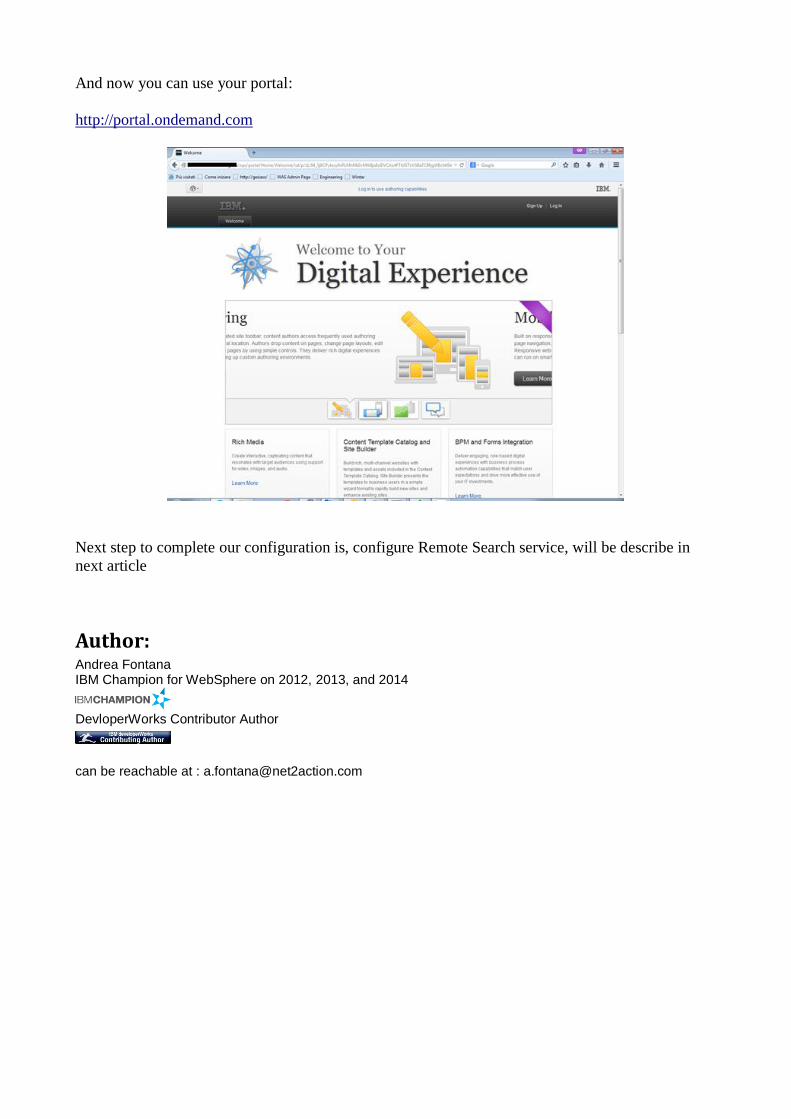
And now you can use your portal:
http://portal.ondemand.com
Next step to complete our configuration is, configure Remote Search service, will be describe in
next article
Author: Andrea Fontana IBM Champion for WebSphere on 2012, 2013, and 2014
DevloperWorks Contributor Author
can be reachable at : [email protected]