step-by-step user guide. system requirements windows 95 or higher microsoft internet explorer 4.x,...
Post on 21-Dec-2015
219 views
TRANSCRIPT

Step-by-Step User Guide

System requirements
• Windows 95 or higher• Microsoft Internet Explorer 4.x, 5.x, and 6.x• Netscape 4.7x• JavaScript and cookies enabled• 56K Internet connection or higher recommended• Also supports: Mac OS 9.x or later, Solaris 7 or 8, Linux 6.x or
7.x, and Palm V or VII

Roles in a meetingHost
Coordinates the meeting
• Schedule and start the meeting
• Designate the presenter
• Assign host role to another participant
• Control access to the meeting
• End the meeting
PresenterDelivers the meeting
• Share applications, web browsers, desktops
• Allow participants to have remote control
• Create and save polling questions
• Conduct the file transfer
• Send live video with webcam
• Grant privileges to participants
• Save chat to a file
Participant Attends the meeting
• Join the meeting
• Annotate if given the ability to do so
• Take remote control

• Go to www.meetingcenter.net and click on ‘Host a Meeting’
• Enter your User Name (same as your InterCall Owner Number) and your Password
• Once inside your account, you can schedule a meeting, view and edit scheduled meetings, conduct instant meetings, and set preferences
1
Access your account

1Schedule a meeting
• Access your account and click on ‘Schedule a Meeting’ in the left-hand navigation bar
• Enter the topic of your meeting
• Set a password for your meeting (optional)
• Select the date and time along with the time zone and estimated duration of your meeting
• Scroll down

Schedule a meeting• Select the ‘Require attendee
registration’ box if you’d like to gather information about your participants prior to the meeting
• Invite participants by entering their email addresses one-by-one or from an address book
• Enter the approximate number of meeting participants – the maximum is 500 participants per meeting
• Scroll down
2

Schedule a meeting3
• View your Meeting Options – all options are defaulted ‘on’
• Click on ‘Create Message or Greeting’ if you’d like to create a message that will appear when participants join the meeting
• The Agenda box gives you a place to store helpful information, such as your audio dial-in information
• When finished, click ‘Schedule’
The ‘Create a Message or Greeting’ link is another great place to include your audio dial-in information for easy reference
TIP:

Schedule a meeting4
• You and your participants will automatically receive an email with all the details required to join the web portion of the conference
• Be sure to provide participants with details of the audio portion of your conference
To add audio information to invitation, send the invite to yourself and forward on to participants using your email system.
TIP:

• Access your account and click on ‘My Meetings’
• From here you can:
• View a calendar of scheduled meetings
• Modify a scheduled meeting
• View an attendee registration list
• Start a scheduled meeting
• Cancel a scheduled meeting
My Meetings

View a scheduled meeting
• Access your account and click on ‘My Meetings’
• Click on the arrows to view all of your scheduled meetings week-by-week

Modify a scheduled meeting
• Access your account and click on ‘My Meetings’
• Click on the meeting you want to edit
• Click on the ‘Edit’ button
• Make changes to your meeting then scroll to the bottom and click the ‘Update’ button

View attendee registration
• Access your account and click on ‘My Meetings’
• Click on meeting that requires attendee registration
• Click on the ‘Attendees’ button
1

View attendee registration
• View your registered attendees
• Click the ‘Accept’ button to send a registrant an email with meeting details
• Click the ‘Reject’ button to prevent a registrant from receiving meeting details
• Click on the ‘Details’ button to view information about registrants
2
TIP: Details about registrants can be exported into Excel

Cancel a scheduled meeting
• Access your account and click on ‘My Meetings’
• Click on meeting that you want to cancel
• Scroll down and click the ‘Delete’ button
• In the pop-up box, select whether or not you want to automatically notify participants

Start a scheduled meeting - host
Option 1
• Access your account and click on ‘My Meetings’
• Click ‘Start Now’ next to the meeting you want to begin

Start a scheduled meeting - hostOption 2
• Click on the link in the email that was automatically sent to you and all participants upon scheduling the meeting
While entering the meeting, write down the Meeting Number and Host Key for future reference
TIP:
If you would rather use your personal or company address book, simply send the invite to yourself. From there, you can make additions or changes and send the invite using your own email system
TIP:

Start an instant meeting - host
• Access your account and click on ‘Instant Meeting
• Enter the topic and password (optional) and click on the ‘Start Meeting’ button
• An instant meeting will begin
You will need to give participants Meeting number verbally over teleconference if not sending invite.
TIP:

Join a meeting - participantsOption 1
• Go to www.meetingcenter.net and click on “Attend a meeting”
• Enter the Meeting Number and password (if applicable) that was given to you by the Host

Join a meeting - participantsOption 2
• Click on the link in the email that was sent to you by the Host

Basic navigation tools
Drop Down Menu
Thumbnail ViewAllows the presenter to view miniature images of each page in a shared document, presentation, or whiteboard
Arrow KeysAllows the presenter to display the next slide or return to the previous slide
Laser PointerSimulates a laser pointer by displaying a red dot on everyone’s screen
ZoomEnlarges a portion of a slide or document
Full ScreenEnlarges an entire slide to fill participants’ computer screens
Synchronize ViewsAllows participants to see the zoomed view on the presenters screen

Attendee privileges• Start and meeting and click on
the ‘Participant’ drop-down menu
• Scroll down and select ‘Attendee Privileges’
• By clicking on the check boxes, functionality in turned off/on for all participants
• Click the ‘Assign’ button to save changesParticipants need a sound card and recording hardware (Dynametric Box) to record a presentation
TIP:

Share a presentation or document
• During the meeting, click on the ‘Share’ drop-down menu
• Scroll down and select ‘Presentation or Document’
1

Share a presentation or document2
• The ‘Share Presentation or Document’ dialogue box will appear
• You will be able to browse your hard drive from here
• Select the document or presentation you want to share
• Click ‘Open’
• Your document or presentation will appear on your participants computer screens

Basic annotation toolsArrow PointerDisplays an arrow on everyone’s screen
MarkerHighlight, strike or annotate anything on the screen
Color PaletteChanges the color of text or marker annotations
TextWrite directly on top of a presentation or document
EraserRemoves arrow, marker and text annotations

Share an application
• During the meeting, click on the ‘View’ drop-down menu
• Scroll down and select ‘Applications’
1

Share an application2
• A dialogue box will appear
• Select the application you want to share
• Click ‘Share’
• Your application will appear on your participants computer screens
• Any additional content will appear as a waffle screen

Share your desktop
• During the meeting, click on the ‘View’ drop-down menu
• Scroll down and select ‘Desktop’
• Click ‘OK’ on the pop-up box
1

• A message will appear saying “You are now sharing your desktop”
• Participants will see your entire desktop
2
Share your desktop

End sharing• Click the ‘Sharing’
drop-down menu on the upper right-hand corner of the screen
• Scroll down and select ‘Stop application sharing’
• Sharing will stop and your participants will see your presentation slides

Web browse• During a meeting, click on the
‘Share’ drop-down menu
• Scroll down and select ‘Web Browser’
• Enter a url in address box to tour the web
• Participants will automatically view your navigation on the web, but can’t tour on their own

End web browse• Click the ‘Sharing’
drop-down menu on the upper right-hand corner of the screen
• Scroll down and select ‘Stop Web Browser Sharing’
• Web browse will stop and your participants will see your presentation slides

Web content• During a meeting, click on the
‘Share’ drop-down menu
• Scroll down and select ‘Web Content’
• Enter a url in address box that pops onto your screen and click ‘OK’
• Participant’s web browsers will automatically open up to the url you selected
• Participants can then navigate on their own

End web content
• Click anywhere on the meeting window
• Participants will see your presentation slides
NOTE: All web browsers will remain open unless they are individually closed

Chat• Type a Chat message in the
text box
• In the ‘Send to’ drop-down menu, select who should receive the Chat message and click the ‘Send’ button
• The message will appear in the Chat box
• You will have the option to save chat messages to your hard drive at the end of your meeting
The host or presenter may limit or disable the Chat function
TIP:

Prepare a polling question• Start a meeting
• Click on the ‘Polling’ tab
• Click the ‘Question’ button
• In the box that appears, type in in your question and press the enter key
• Click on the ‘Answer’ button
• In the box that appears, type in the answer to your polling question and press the enter key

Edit/delete a polling question or answer
• Start a meeting
• Click on the ‘Polling’ tab
• To delete a question or answer, click on the item you wish to delete then click on the ‘Delete’ button
• To edit a question or answer, double-click on the item you wish to edit
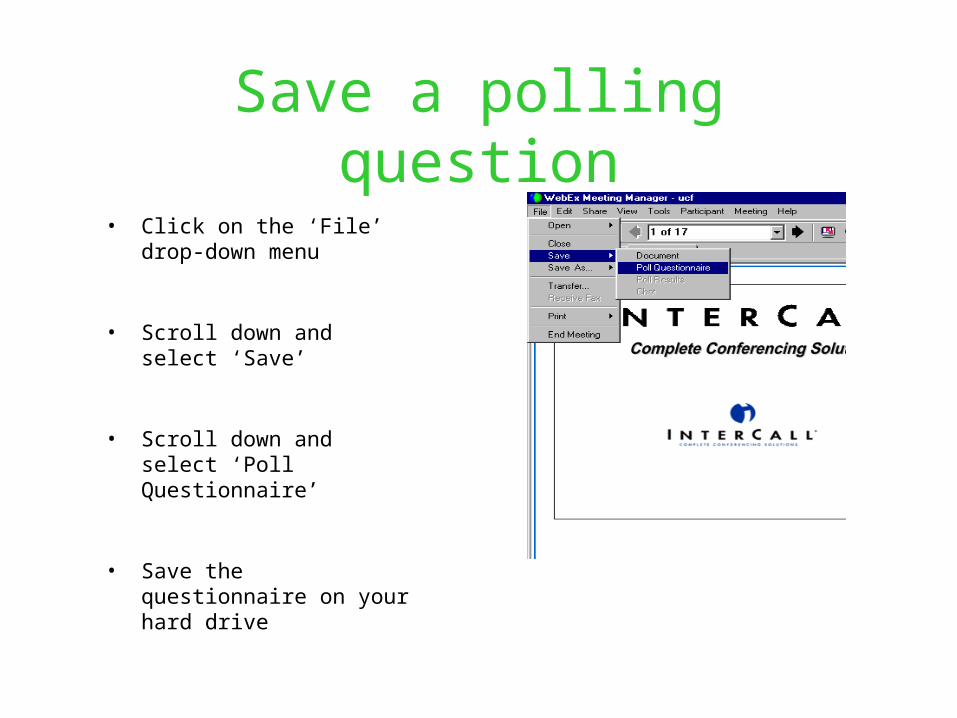
Save a polling question
• Click on the ‘File’ drop-down menu
• Scroll down and select ‘Save’
• Scroll down and select ‘Poll Questionnaire’
• Save the questionnaire on your hard drive

Conduct a poll• Start a meeting
• Click on the ‘File’ drop-down menu
• Scroll down and select ‘Open’
• Scroll down and select ‘Poll Questionnaire’
• Find the questionnaire on your hard drive and click the ‘Open’ button
1

Conduct a poll• Once the polling questions are
open, click the ‘Open Poll’ button
• Wait for participants to respond, then click the ‘Close Poll’ button
• Share responses with participants by clicking on the ‘Share Results’ check box
• You will have the option to save polling results to your hard drive at the end of your meeting
2
You can save the Polling Questionnaire to use again during future meetings
TIP:

Video• Connect a basic
webcam to your computer
• Start your meeting
• Turn on the webcam
• Participants will see your image on the right side of their meeting window
TIP: It is not recommended to leave the webcam running during your entire meeting

File transfer
• During your meeting, click on the ‘File’ drop-down menu
• Scroll down and select ‘Transfer’

File transfer• When the File Transfer
window will pops up, click the ‘Open’ button
• Search your hard drive for the file you wish to publish and click on the ‘Open’ button
• When your file appears in the File Transfer window, it published to all participants

End a meeting
• Click on the ‘File’ drop-down menu
• Scroll down and select ‘End Meeting’
• Click on the ‘Yes’ button in the pop up box

Help
Help www.meetingcenter.net
Technical Support 800-508-8758 or 706-634-4551
Training 877-563-3845