step into flash mx -...
TRANSCRIPT
1
Find all the best Macromedia Flash MX titles at www.peachpit.com/flashbooklet
Step into Flash MXCreated by Derek Franklin
Author of twoMacromedia Press books:
Macromedia Flash MXActionScripting: AdvancedTraining from the Source
Macromedia Flash MX CreativeWeb Animation and Interactivity
IntroductionWith the release of Macromedia Flash MX, the program that began asmerely one tool in the Web designer’s arsenal has become the arsenal.Developers are now using Flash for everything from creating interactiveanimations to designing entire Web sites to developing interactive Webapplications, such as front ends for shrink-wrapped software and TV orvideo game interfaces.
What’s the big attraction? It’s simple: Macromedia Flash provides aricher user experience and is easier to work with than HTML-producedWeb pages.
According to Macromedia, the usability enhancements in MacromediaFlash MX mean that pages and applications designed entirely in Flash loadfaster, work more reliably, and make it easier for customers to transactbusiness. And many of the more than 1 million professionals who use Flashtend to agree.
The main problem with Web applications developed with HTML is thatthey’re very linear in nature. Site visitors have to jump from screen toscreen just to perform even rudimentary tasks. Take shopping sites, forexample. Shoppers typically spend more time waiting for pages to load thanactually shopping.
Not so with Macromedia Flash MX. At a Flash MX-designed shopping site,users can sign in and begin shopping from the same screen. They canbrowse the catalog without loading new pages, and shopping becomesinteractive–with the shopper simply dragging and dropping items into a cart.
2
Find all the best Macromedia Flash MX titles at www.peachpit.com/flashbooklet
As anyone who’s shopped, made travel reservations, or filled out formson the Web knows, these changes significantly reduce the hassleinvolved in any of these operations.
As cool as this sounds, the icing on the cake is that Macromedia Flash iseasy to learn and use. Flash provides a wide range of tools that enableyou to produce professional-looking designs without learning new skillsor techniques.
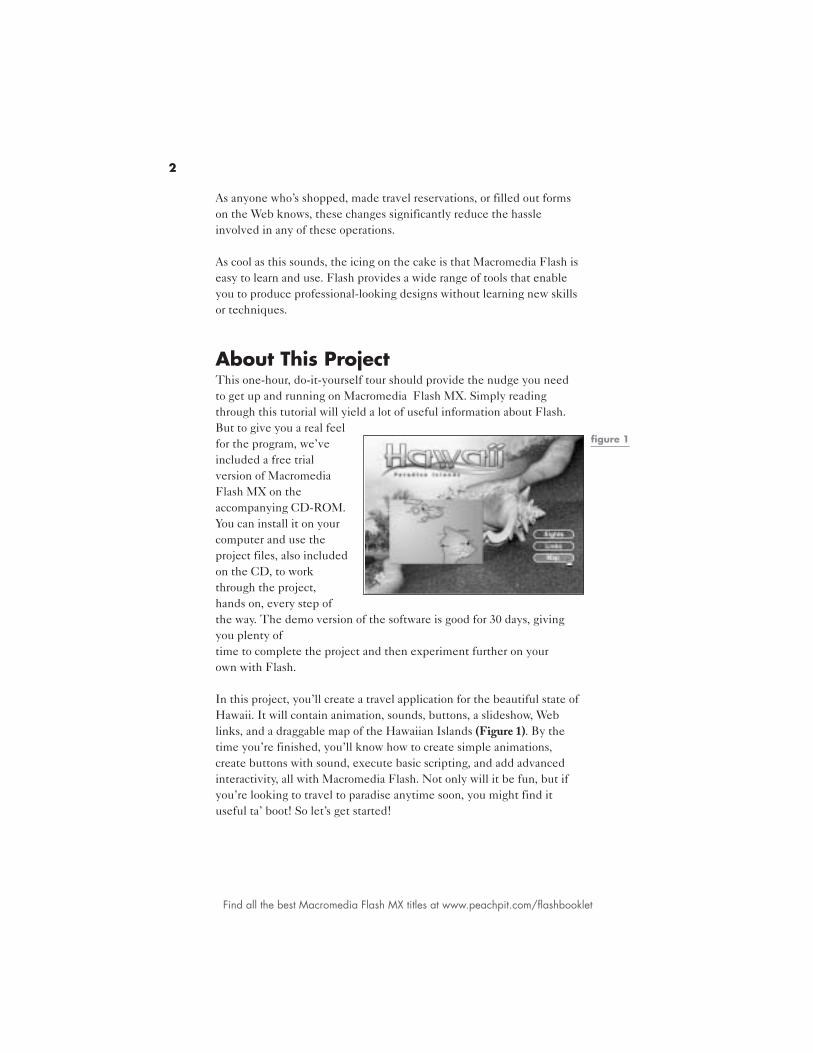
About This ProjectThis one-hour, do-it-yourself tour should provide the nudge you needto get up and running on Macromedia Flash MX. Simply readingthrough this tutorial will yield a lot of useful information about Flash.But to give you a real feelfor the program, we’veincluded a free trialversion of MacromediaFlash MX on theaccompanying CD-ROM.You can install it on yourcomputer and use theproject files, also includedon the CD, to workthrough the project,hands on, every step ofthe way. The demo version of the software is good for 30 days, givingyou plenty oftime to complete the project and then experiment further on yourown with Flash.
In this project, you’ll create a travel application for the beautiful state ofHawaii. It will contain animation, sounds, buttons, a slideshow, Weblinks, and a draggable map of the Hawaiian Islands (Figure 1). By thetime you’re finished, you’ll know how to create simple animations,create buttons with sound, execute basic scripting, and add advancedinteractivity, all with Macromedia Flash. Not only will it be fun, but ifyou’re looking to travel to paradise anytime soon, you might find ituseful ta’ boot! So let’s get started!
figure 1
3
Find all the best Macromedia Flash MX titles at www.peachpit.com/flashbooklet
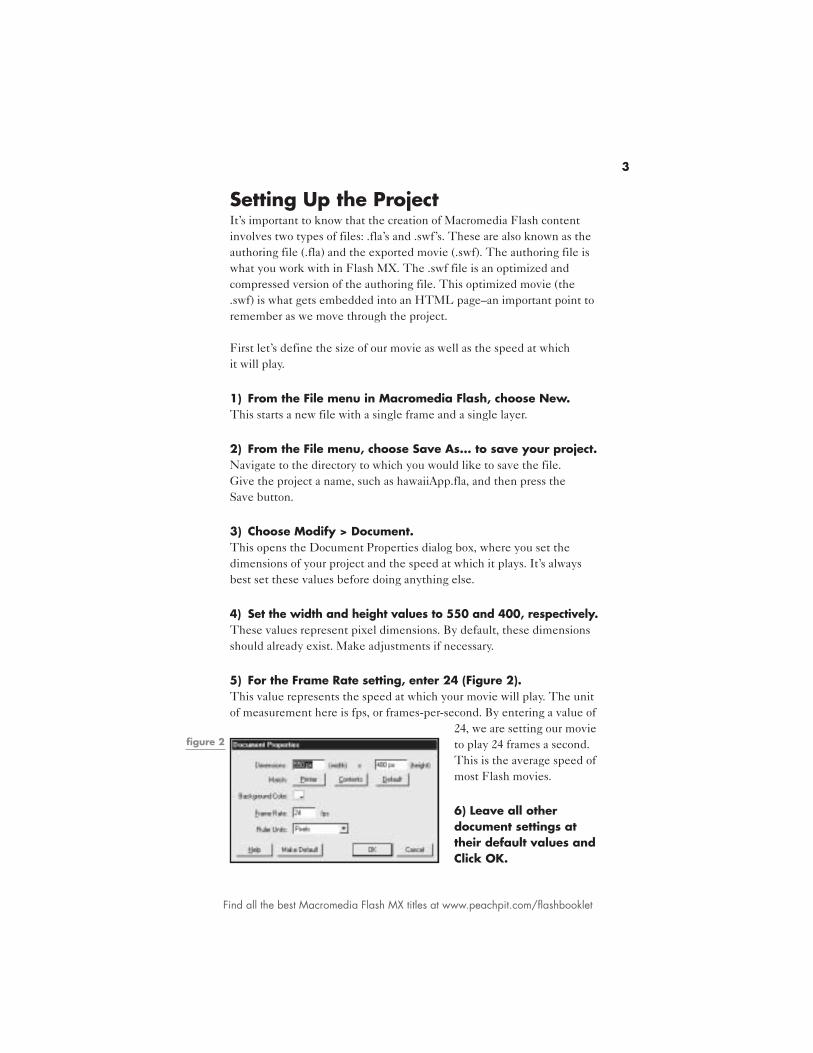
Setting Up the ProjectIt’s important to know that the creation of Macromedia Flash contentinvolves two types of files: .fla’s and .swf’s. These are also known as theauthoring file (.fla) and the exported movie (.swf). The authoring file iswhat you work with in Flash MX. The .swf file is an optimized andcompressed version of the authoring file. This optimized movie (the.swf) is what gets embedded into an HTML page–an important point toremember as we move through the project.
First let’s define the size of our movie as well as the speed at whichit will play.
1) From the File menu in Macromedia Flash, choose New.This starts a new file with a single frame and a single layer.
2) From the File menu, choose Save As... to save your project.Navigate to the directory to which you would like to save the file.Give the project a name, such as hawaiiApp.fla, and then press theSave button.
3) Choose Modify > Document.This opens the Document Properties dialog box, where you set thedimensions of your project and the speed at which it plays. It’s alwaysbest set these values before doing anything else.
4) Set the width and height values to 550 and 400, respectively.These values represent pixel dimensions. By default, these dimensionsshould already exist. Make adjustments if necessary.
5) For the Frame Rate setting, enter 24 (Figure 2).This value represents the speed at which your movie will play. The unitof measurement here is fps, or frames-per-second. By entering a value of
24, we are setting our movieto play 24 frames a second.This is the average speed ofmost Flash movies.
6) Leave all otherdocument settings attheir default values andClick OK.
figure 2
4
Find all the best Macromedia Flash MX titles at www.peachpit.com/flashbooklet
Importing Our Initial Bitmap ImagesNow that our project settings have been set, its time to start some of thefun stuff. At the top of Macromedia Flash MX’s interface, you will see ahorizontal area that represents your movie’s timeline. The timelinecontains frames and layers.
Frames are used to create animation, play sounds, and run scripts atspecific points in time. They are also used to create the pages of yourproject. The division of frames is indicated by the small squares yousee on the timeline.
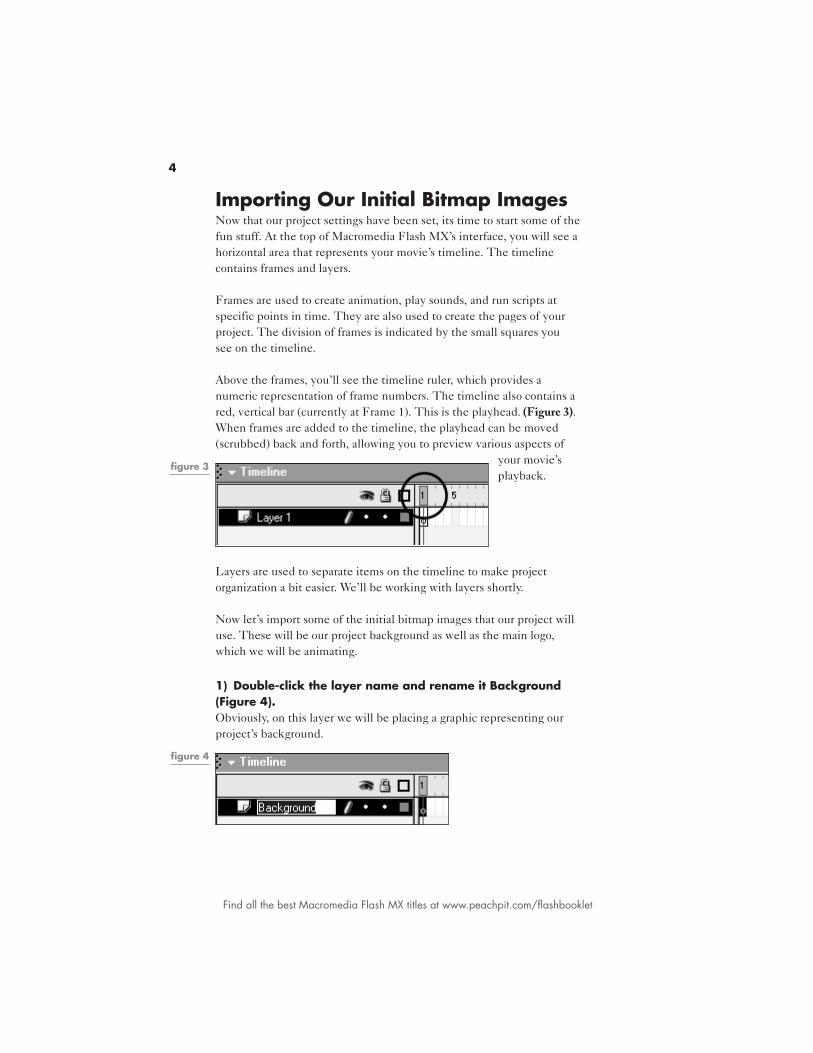
Above the frames, you’ll see the timeline ruler, which provides anumeric representation of frame numbers. The timeline also contains ared, vertical bar (currently at Frame 1). This is the playhead. (Figure 3).When frames are added to the timeline, the playhead can be moved(scrubbed) back and forth, allowing you to preview various aspects of
your movie’splayback.
Layers are used to separate items on the timeline to make projectorganization a bit easier. We’ll be working with layers shortly.
Now let’s import some of the initial bitmap images that our project willuse. These will be our project background as well as the main logo,which we will be animating.
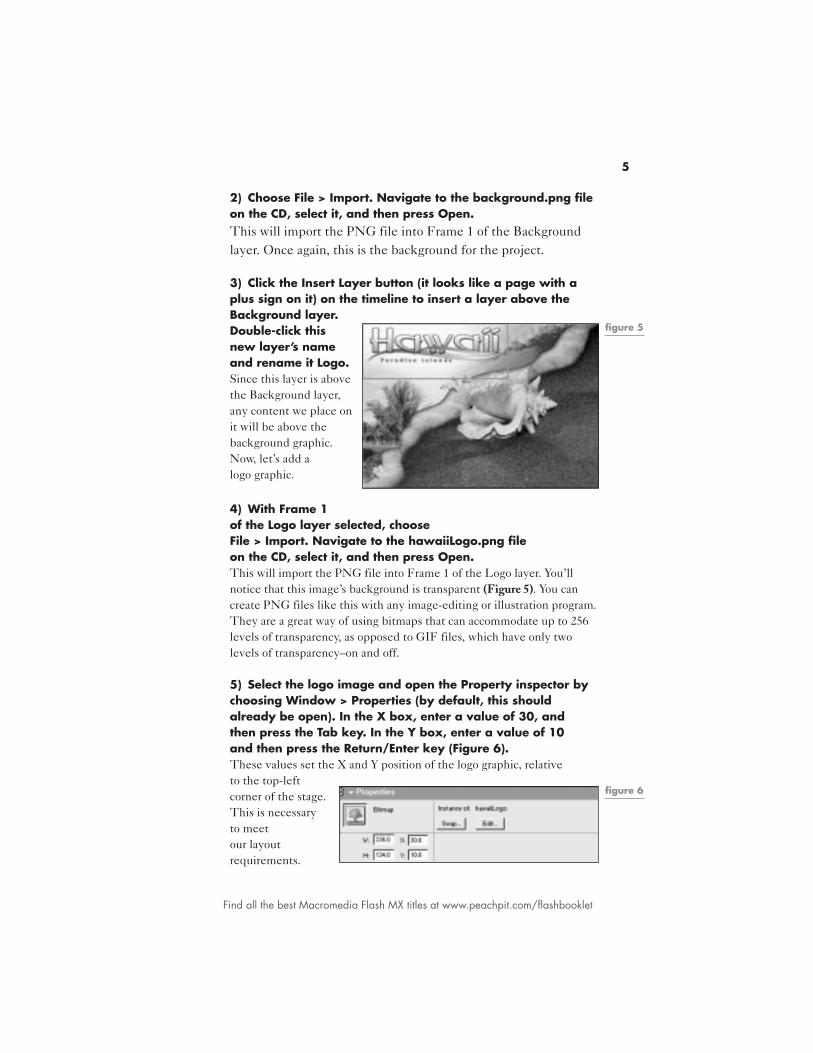
1) Double-click the layer name and rename it Background(Figure 4).Obviously, on this layer we will be placing a graphic representing ourproject’s background.
figure 3
figure 4
5
Find all the best Macromedia Flash MX titles at www.peachpit.com/flashbooklet
2) Choose File > Import. Navigate to the background.png fileon the CD, select it, and then press Open.This will import the PNG file into Frame 1 of the Backgroundlayer. Once again, this is the background for the project.
3) Click the Insert Layer button (it looks like a page with aplus sign on it) on the timeline to insert a layer above theBackground layer.Double-click thisnew layer’s nameand rename it Logo.Since this layer is abovethe Background layer,any content we place onit will be above thebackground graphic.Now, let’s add alogo graphic.
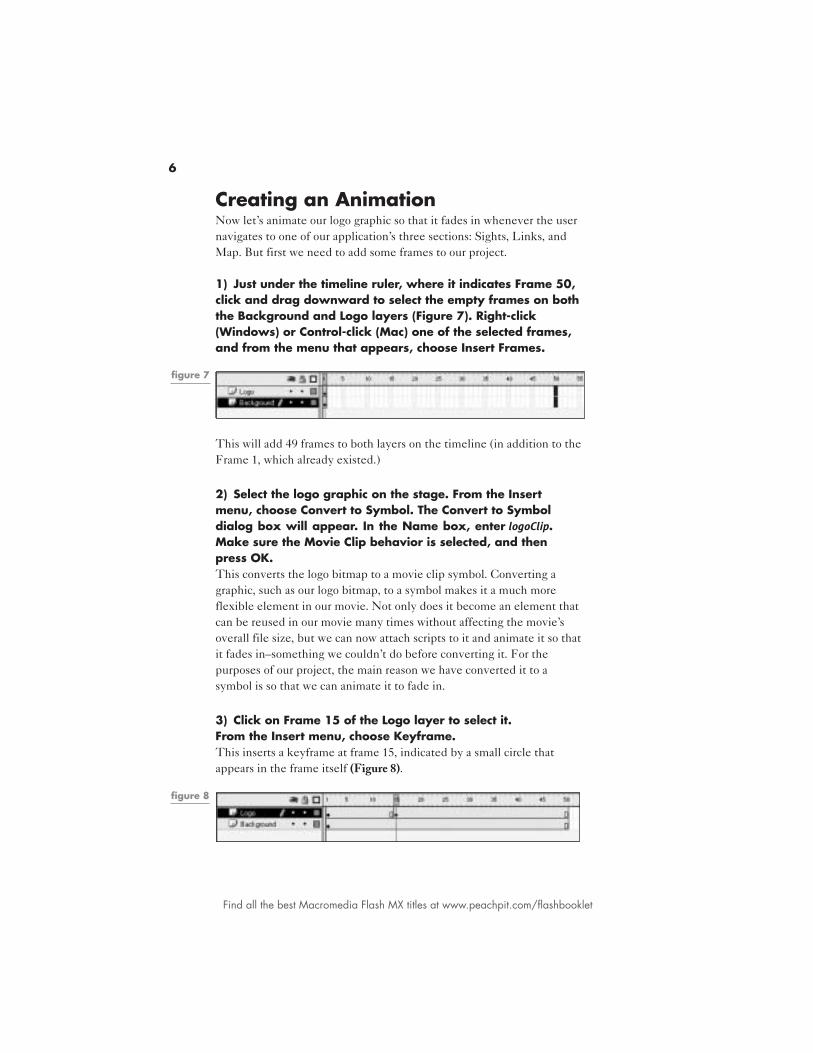
4) With Frame 1of the Logo layer selected, chooseFile > Import. Navigate to the hawaiiLogo.png fileon the CD, select it, and then press Open.This will import the PNG file into Frame 1 of the Logo layer. You’llnotice that this image’s background is transparent (Figure 5). You cancreate PNG files like this with any image-editing or illustration program.They are a great way of using bitmaps that can accommodate up to 256levels of transparency, as opposed to GIF files, which have only twolevels of transparency–on and off.
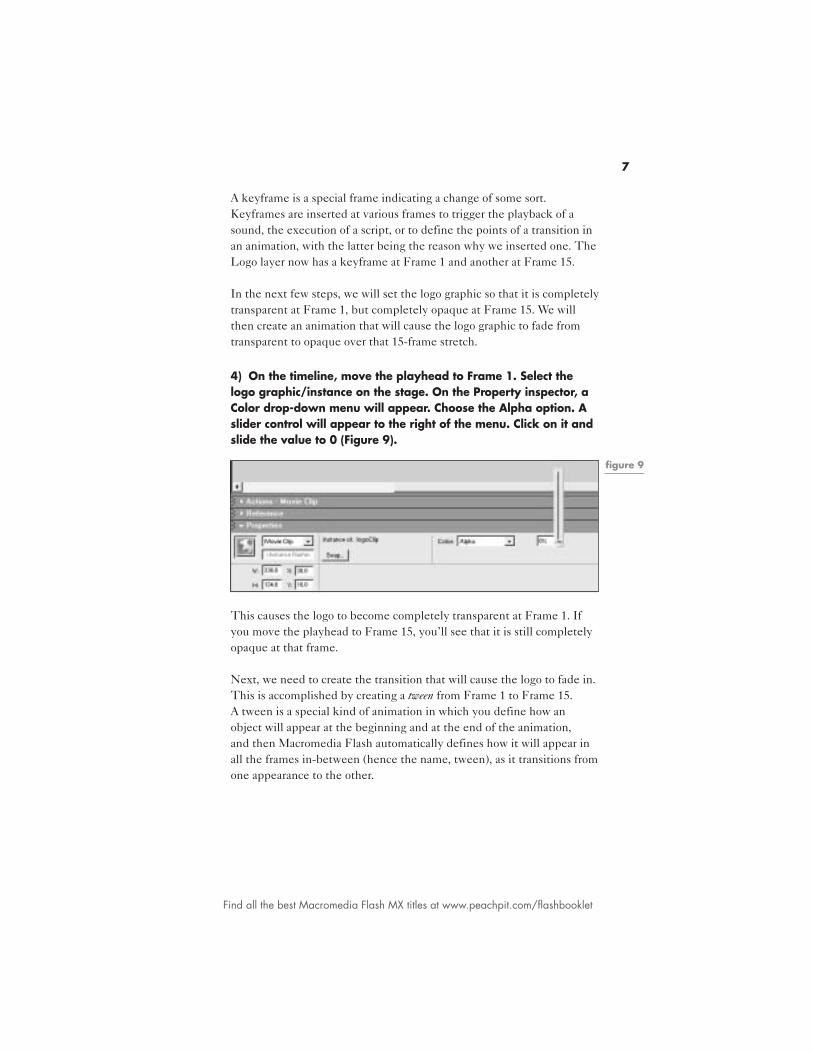
5) Select the logo image and open the Property inspector bychoosing Window > Properties (by default, this shouldalready be open). In the X box, enter a value of 30, andthen press the Tab key. In the Y box, enter a value of 10and then press the Return/Enter key (Figure 6).These values set the X and Y position of the logo graphic, relativeto the top-leftcorner of the stage.This is necessaryto meetour layoutrequirements.
figure 5
figure 6
6
Find all the best Macromedia Flash MX titles at www.peachpit.com/flashbooklet
Creating an AnimationNow let’s animate our logo graphic so that it fades in whenever the usernavigates to one of our application’s three sections: Sights, Links, andMap. But first we need to add some frames to our project.
1) Just under the timeline ruler, where it indicates Frame 50,click and drag downward to select the empty frames on boththe Background and Logo layers (Figure 7). Right-click(Windows) or Control-click (Mac) one of the selected frames,and from the menu that appears, choose Insert Frames.
This will add 49 frames to both layers on the timeline (in addition to theFrame 1, which already existed.)
2) Select the logo graphic on the stage. From the Insertmenu, choose Convert to Symbol. The Convert to Symboldialog box will appear. In the Name box, enter logoClip.Make sure the Movie Clip behavior is selected, and thenpress OK.This converts the logo bitmap to a movie clip symbol. Converting agraphic, such as our logo bitmap, to a symbol makes it a much moreflexible element in our movie. Not only does it become an element thatcan be reused in our movie many times without affecting the movie’soverall file size, but we can now attach scripts to it and animate it so thatit fades in–something we couldn’t do before converting it. For thepurposes of our project, the main reason we have converted it to asymbol is so that we can animate it to fade in.
3) Click on Frame 15 of the Logo layer to select it.From the Insert menu, choose Keyframe.This inserts a keyframe at frame 15, indicated by a small circle thatappears in the frame itself (Figure 8).
figure 7
figure 8
7
Find all the best Macromedia Flash MX titles at www.peachpit.com/flashbooklet
A keyframe is a special frame indicating a change of some sort.Keyframes are inserted at various frames to trigger the playback of asound, the execution of a script, or to define the points of a transition inan animation, with the latter being the reason why we inserted one. TheLogo layer now has a keyframe at Frame 1 and another at Frame 15.
In the next few steps, we will set the logo graphic so that it is completelytransparent at Frame 1, but completely opaque at Frame 15. We willthen create an animation that will cause the logo graphic to fade fromtransparent to opaque over that 15-frame stretch.
4) On the timeline, move the playhead to Frame 1. Select thelogo graphic/instance on the stage. On the Property inspector, aColor drop-down menu will appear. Choose the Alpha option. Aslider control will appear to the right of the menu. Click on it andslide the value to 0 (Figure 9).
This causes the logo to become completely transparent at Frame 1. Ifyou move the playhead to Frame 15, you’ll see that it is still completelyopaque at that frame.
Next, we need to create the transition that will cause the logo to fade in.This is accomplished by creating a tween from Frame 1 to Frame 15.A tween is a special kind of animation in which you define how anobject will appear at the beginning and at the end of the animation,and then Macromedia Flash automatically defines how it will appear inall the frames in-between (hence the name, tween), as it transitions fromone appearance to the other.
figure 9
8
Find all the best Macromedia Flash MX titles at www.peachpit.com/flashbooklet
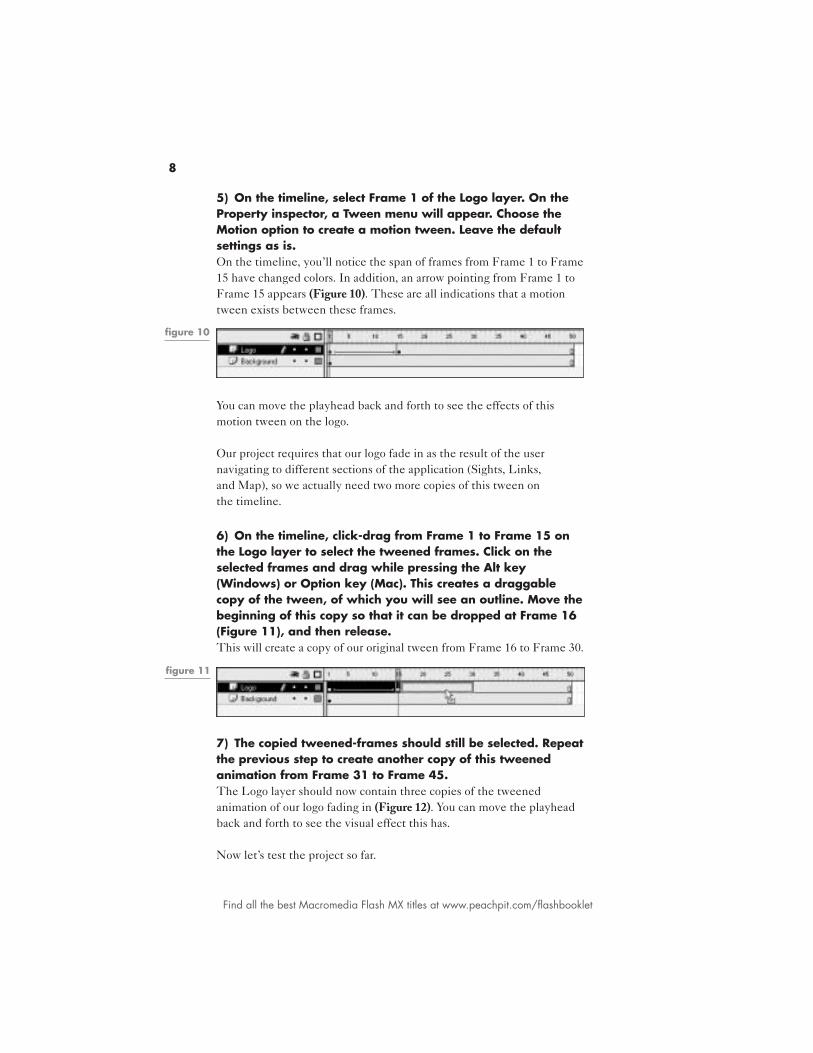
5) On the timeline, select Frame 1 of the Logo layer. On theProperty inspector, a Tween menu will appear. Choose theMotion option to create a motion tween. Leave the defaultsettings as is.On the timeline, you’ll notice the span of frames from Frame 1 to Frame15 have changed colors. In addition, an arrow pointing from Frame 1 toFrame 15 appears (Figure 10). These are all indications that a motiontween exists between these frames.
You can move the playhead back and forth to see the effects of thismotion tween on the logo.
Our project requires that our logo fade in as the result of the usernavigating to different sections of the application (Sights, Links,and Map), so we actually need two more copies of this tween onthe timeline.
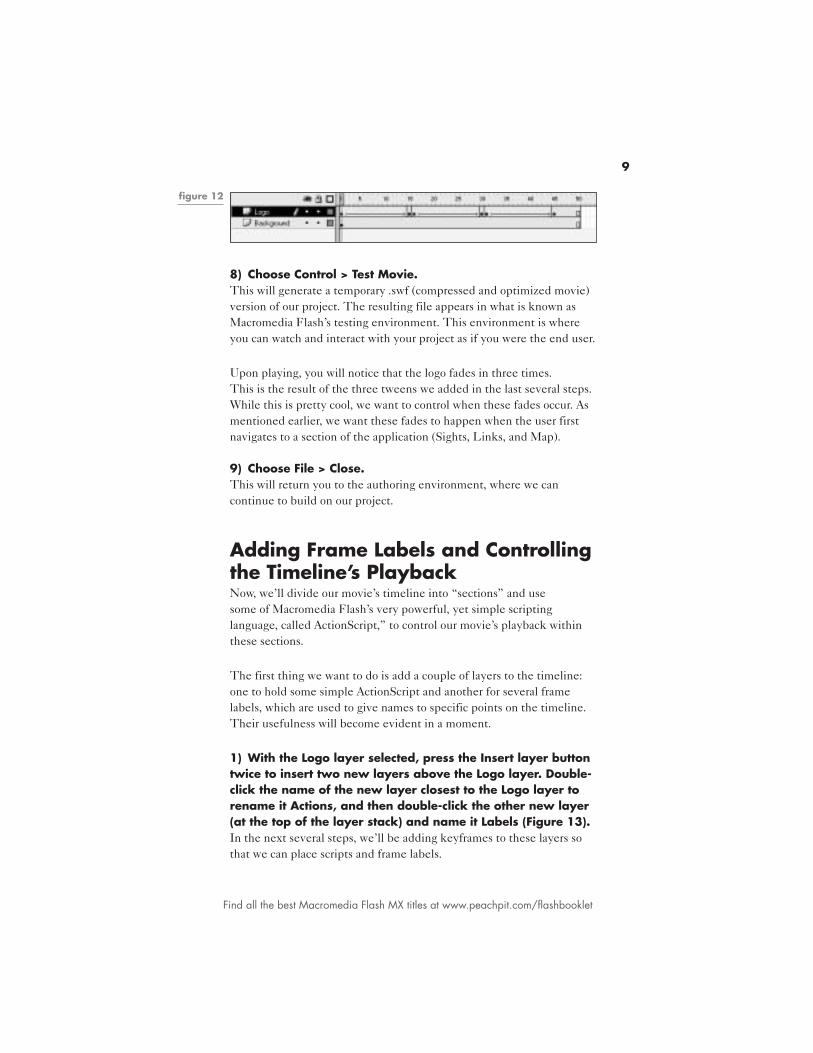
6) On the timeline, click-drag from Frame 1 to Frame 15 onthe Logo layer to select the tweened frames. Click on theselected frames and drag while pressing the Alt key(Windows) or Option key (Mac). This creates a draggablecopy of the tween, of which you will see an outline. Move thebeginning of this copy so that it can be dropped at Frame 16(Figure 11), and then release.This will create a copy of our original tween from Frame 16 to Frame 30.
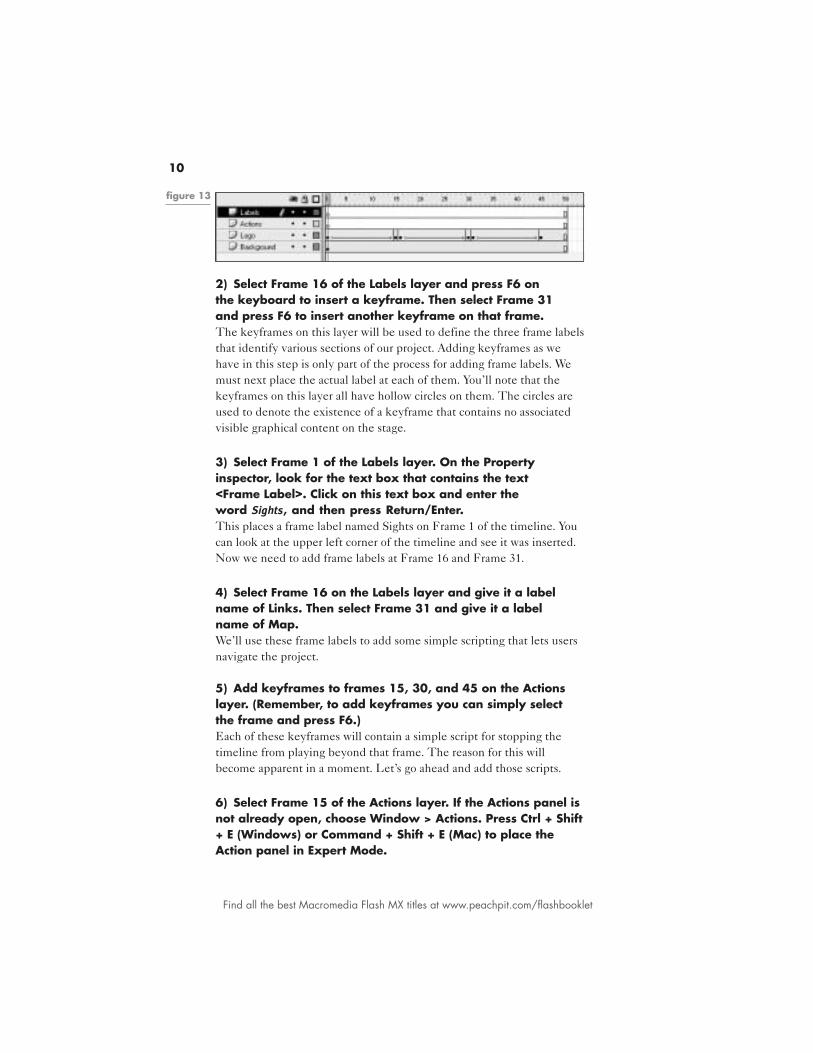
7) The copied tweened-frames should still be selected. Repeatthe previous step to create another copy of this tweenedanimation from Frame 31 to Frame 45.The Logo layer should now contain three copies of the tweenedanimation of our logo fading in (Figure 12). You can move the playheadback and forth to see the visual effect this has.
Now let’s test the project so far.
figure 10
figure 11
9
Find all the best Macromedia Flash MX titles at www.peachpit.com/flashbooklet
8) Choose Control > Test Movie.This will generate a temporary .swf (compressed and optimized movie)version of our project. The resulting file appears in what is known asMacromedia Flash’s testing environment. This environment is whereyou can watch and interact with your project as if you were the end user.
Upon playing, you will notice that the logo fades in three times.This is the result of the three tweens we added in the last several steps.While this is pretty cool, we want to control when these fades occur. Asmentioned earlier, we want these fades to happen when the user firstnavigates to a section of the application (Sights, Links, and Map).
9) Choose File > Close.This will return you to the authoring environment, where we cancontinue to build on our project.
Adding Frame Labels and Controllingthe Timeline’s PlaybackNow, we’ll divide our movie’s timeline into “sections” and usesome of Macromedia Flash’s very powerful, yet simple scriptinglanguage, called ActionScript,” to control our movie’s playback withinthese sections.
The first thing we want to do is add a couple of layers to the timeline:one to hold some simple ActionScript and another for several framelabels, which are used to give names to specific points on the timeline.Their usefulness will become evident in a moment.
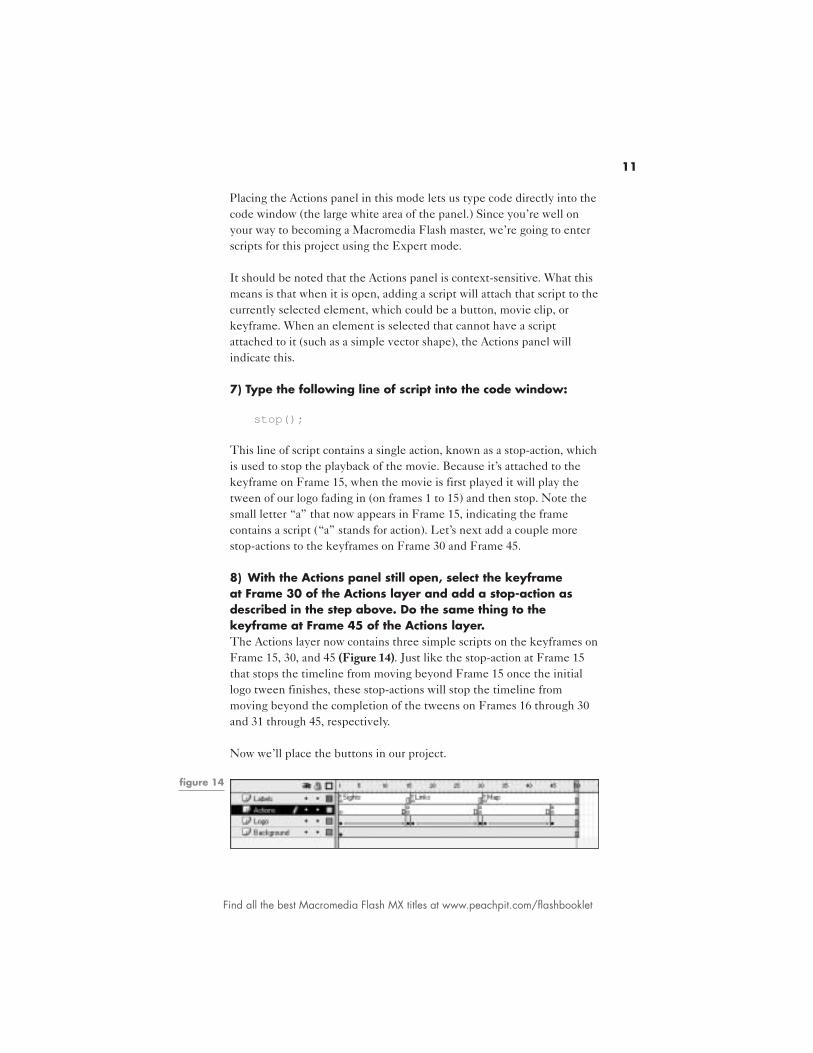
1) With the Logo layer selected, press the Insert layer buttontwice to insert two new layers above the Logo layer. Double-click the name of the new layer closest to the Logo layer torename it Actions, and then double-click the other new layer(at the top of the layer stack) and name it Labels (Figure 13).In the next several steps, we’ll be adding keyframes to these layers sothat we can place scripts and frame labels.
figure 12
10
Find all the best Macromedia Flash MX titles at www.peachpit.com/flashbooklet
2) Select Frame 16 of the Labels layer and press F6 onthe keyboard to insert a keyframe. Then select Frame 31and press F6 to insert another keyframe on that frame.The keyframes on this layer will be used to define the three frame labelsthat identify various sections of our project. Adding keyframes as wehave in this step is only part of the process for adding frame labels. Wemust next place the actual label at each of them. You’ll note that thekeyframes on this layer all have hollow circles on them. The circles areused to denote the existence of a keyframe that contains no associatedvisible graphical content on the stage.
3) Select Frame 1 of the Labels layer. On the Propertyinspector, look for the text box that contains the text<Frame Label>. Click on this text box and enter theword Sights, and then press Return/Enter.This places a frame label named Sights on Frame 1 of the timeline. Youcan look at the upper left corner of the timeline and see it was inserted.Now we need to add frame labels at Frame 16 and Frame 31.
4) Select Frame 16 on the Labels layer and give it a labelname of Links. Then select Frame 31 and give it a labelname of Map.We’ll use these frame labels to add some simple scripting that lets usersnavigate the project.
5) Add keyframes to frames 15, 30, and 45 on the Actionslayer. (Remember, to add keyframes you can simply selectthe frame and press F6.)Each of these keyframes will contain a simple script for stopping thetimeline from playing beyond that frame. The reason for this willbecome apparent in a moment. Let’s go ahead and add those scripts.
6) Select Frame 15 of the Actions layer. If the Actions panel isnot already open, choose Window > Actions. Press Ctrl + Shift+ E (Windows) or Command + Shift + E (Mac) to place theAction panel in Expert Mode.
figure 13
11
Find all the best Macromedia Flash MX titles at www.peachpit.com/flashbooklet
Placing the Actions panel in this mode lets us type code directly into thecode window (the large white area of the panel.) Since you’re well onyour way to becoming a Macromedia Flash master, we’re going to enterscripts for this project using the Expert mode.
It should be noted that the Actions panel is context-sensitive. What thismeans is that when it is open, adding a script will attach that script to thecurrently selected element, which could be a button, movie clip, orkeyframe. When an element is selected that cannot have a scriptattached to it (such as a simple vector shape), the Actions panel willindicate this.
7) Type the following line of script into the code window:
stop();
This line of script contains a single action, known as a stop-action, whichis used to stop the playback of the movie. Because it’s attached to thekeyframe on Frame 15, when the movie is first played it will play thetween of our logo fading in (on frames 1 to 15) and then stop. Note thesmall letter “a” that now appears in Frame 15, indicating the framecontains a script (“a” stands for action). Let’s next add a couple morestop-actions to the keyframes on Frame 30 and Frame 45.
8) With the Actions panel still open, select the keyframeat Frame 30 of the Actions layer and add a stop-action asdescribed in the step above. Do the same thing to thekeyframe at Frame 45 of the Actions layer.The Actions layer now contains three simple scripts on the keyframes onFrame 15, 30, and 45 (Figure 14). Just like the stop-action at Frame 15that stops the timeline from moving beyond Frame 15 once the initiallogo tween finishes, these stop-actions will stop the timeline frommoving beyond the completion of the tweens on Frames 16 through 30and 31 through 45, respectively.
Now we’ll place the buttons in our project.
figure 14

12
Find all the best Macromedia Flash MX titles at www.peachpit.com/flashbooklet
Creating ButtonsOur project requires three navigational buttons for moving between theframe label “sections” we created in the previous section. The look ofthe buttons will change as the user moves the mouse over them. We’llbe using guidelines and a grid for drawing our buttons precisely.
1) Click on the Background layer’s name to select that layer.Press the Insert Layer button to insert a new layer above theBackground layer. Double-click the new layer’s name torename it Buttons.To create a button, Macromedia Flash lets you select somethingcurrently on the stage and convert it to a button, or you can create anempty button and then fill it with content. We’re going to take the latterapproach.
2) From the Insert menu, choose Create New Symbol. TheNew Symbol dialog box will appear. Give this new symbol aname of Button, select the Button behavior option, and thenclick OK.Just like the logo graphic we converted to a movie clip symbol, what weare about to create is a button symbol. A symbol is a master element thatis created once, but numerous “instances” of that element can be usedin your project without adding any additional file size to your movie.Thus, we’ll define the look of our button once, but will be able to useinstances of this same button in more than one way in our movie.
Immediately upon clicking OK, you probably noticed that the look ofthe authoring environment changed. The stage is now blank and thetimeline now contains a single layer with four special frames (Figure15). What you are looking at now is actually our button’s timeline. Allsymbol types (including movie clips and buttons) have their own uniquetimeline and their own stage for placing graphical content.
The four frames on the button’s timeline are used for defining how thebutton will look at its up (no user interaction), over (user moves theirmouse over the button), and down (user presses the button) states.
figure 15
13
Find all the best Macromedia Flash MX titles at www.peachpit.com/flashbooklet
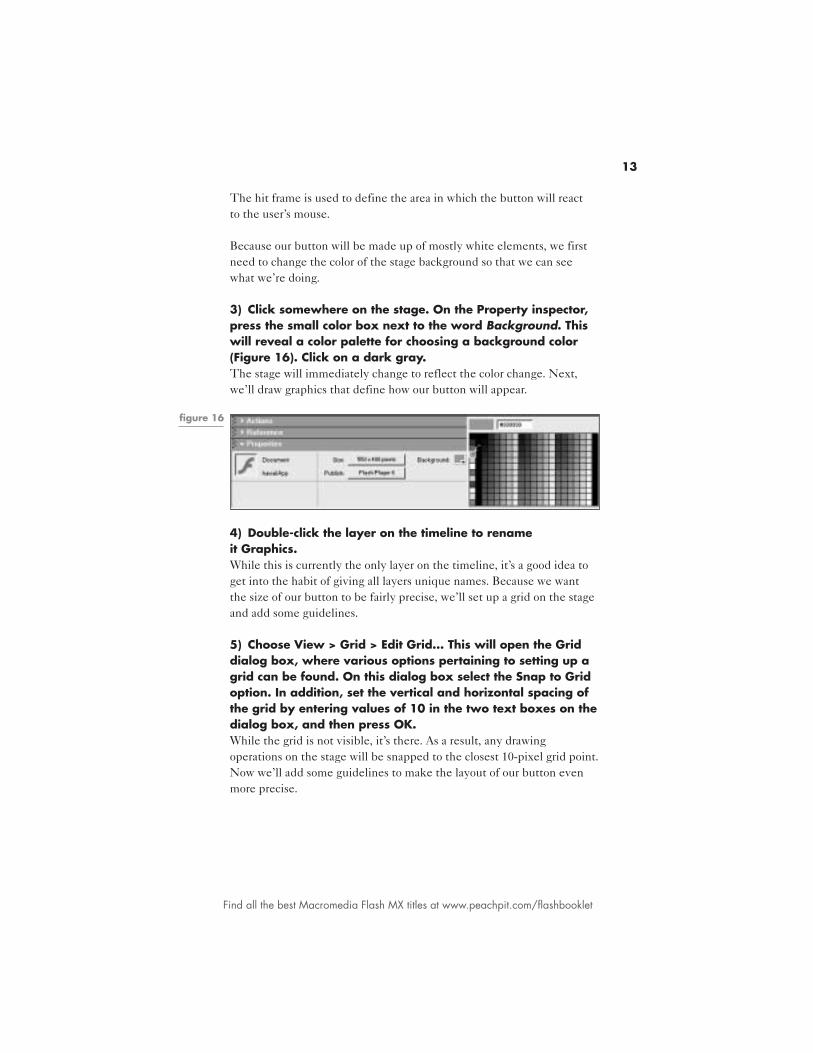
The hit frame is used to define the area in which the button will reactto the user’s mouse.
Because our button will be made up of mostly white elements, we firstneed to change the color of the stage background so that we can seewhat we’re doing.
3) Click somewhere on the stage. On the Property inspector,press the small color box next to the word Background. Thiswill reveal a color palette for choosing a background color(Figure 16). Click on a dark gray.The stage will immediately change to reflect the color change. Next,we’ll draw graphics that define how our button will appear.
4) Double-click the layer on the timeline to renameit Graphics.While this is currently the only layer on the timeline, it’s a good idea toget into the habit of giving all layers unique names. Because we wantthe size of our button to be fairly precise, we’ll set up a grid on the stageand add some guidelines.
5) Choose View > Grid > Edit Grid... This will open the Griddialog box, where various options pertaining to setting up agrid can be found. On this dialog box select the Snap to Gridoption. In addition, set the vertical and horizontal spacing ofthe grid by entering values of 10 in the two text boxes on thedialog box, and then press OK.While the grid is not visible, it’s there. As a result, any drawingoperations on the stage will be snapped to the closest 10-pixel grid point.Now we’ll add some guidelines to make the layout of our button evenmore precise.
figure 16
14
Find all the best Macromedia Flash MX titles at www.peachpit.com/flashbooklet
6) From the View menu, choose Rulers.A vertical and horizontal ruler will appear on the top and left sides ofthe stage area. The displaying of the rulers is necessary so that we canplace guidelines.
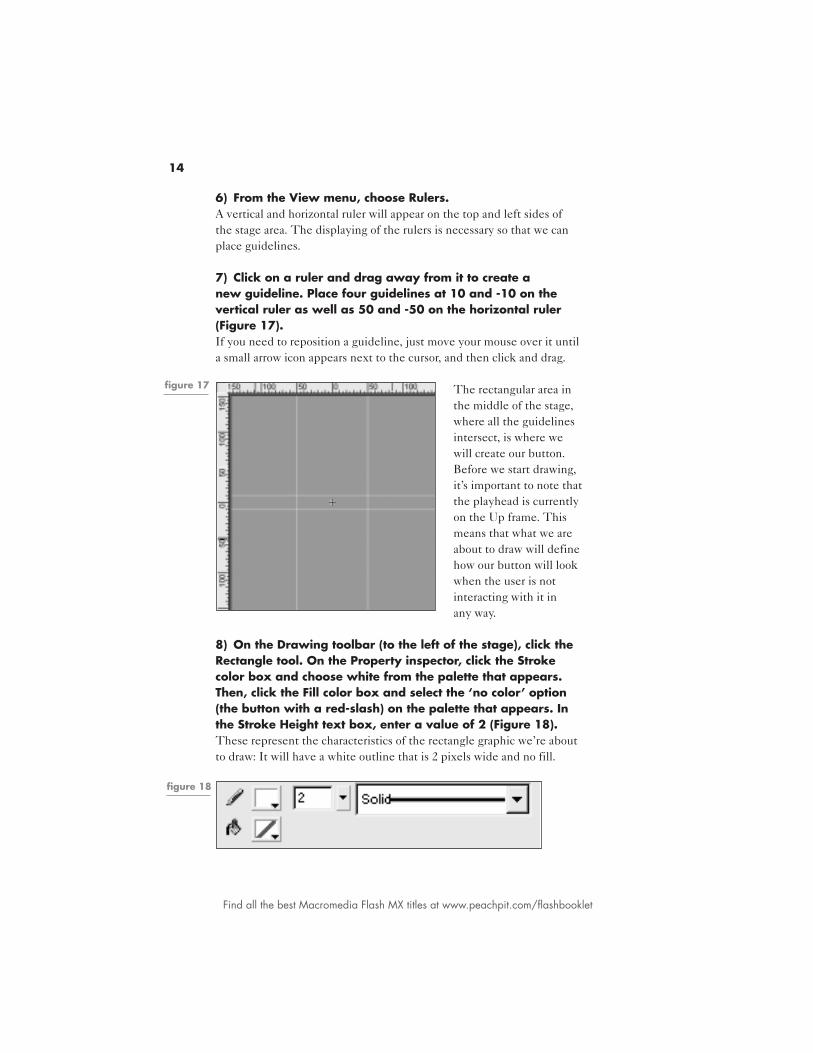
7) Click on a ruler and drag away from it to create anew guideline. Place four guidelines at 10 and -10 on thevertical ruler as well as 50 and -50 on the horizontal ruler(Figure 17).If you need to reposition a guideline, just move your mouse over it untila small arrow icon appears next to the cursor, and then click and drag.
The rectangular area inthe middle of the stage,where all the guidelinesintersect, is where wewill create our button.Before we start drawing,it’s important to note thatthe playhead is currentlyon the Up frame. Thismeans that what we areabout to draw will definehow our button will lookwhen the user is notinteracting with it inany way.
8) On the Drawing toolbar (to the left of the stage), click theRectangle tool. On the Property inspector, click the Strokecolor box and choose white from the palette that appears.Then, click the Fill color box and select the ‘no color’ option(the button with a red-slash) on the palette that appears. Inthe Stroke Height text box, enter a value of 2 (Figure 18).These represent the characteristics of the rectangle graphic we’re aboutto draw: It will have a white outline that is 2 pixels wide and no fill.
figure 18
figure 17
15
Find all the best Macromedia Flash MX titles at www.peachpit.com/flashbooklet
9) Move your mouse onto the stage, until it becomes acrosshair. Click and drag from the top-left corner of therectangular area created by the intersecting guidelines to thebottom-right corner of the same area. Before releasing themouse, press and hold the Down arrow on the keyboard.This will round the corners of the rectangle. Once roundedcompletely, release the mouse.A rectangle with round corners will appear in the middle of the stage.Pressing the up and down arrows on the keyboard while drawing arectangular shape lets you control the radius of the corners.
Now let’s define how the button will look at its Over state.
10) Select the Over frame on the timeline, and then press F6to insert a keyframe.Remember that keyframes are for defining changes. Because the Overstate of our button behaves differently than the Up state, a keyframe onthe Over frame is required. Without this keyframe, the Up and Overstates would look the same. On the stage you’ll notice that the contentfor the Over state currently appears the same as the content for the Upstate. We’re going to change this by adding a transparent white fill to theshape on the Over state.
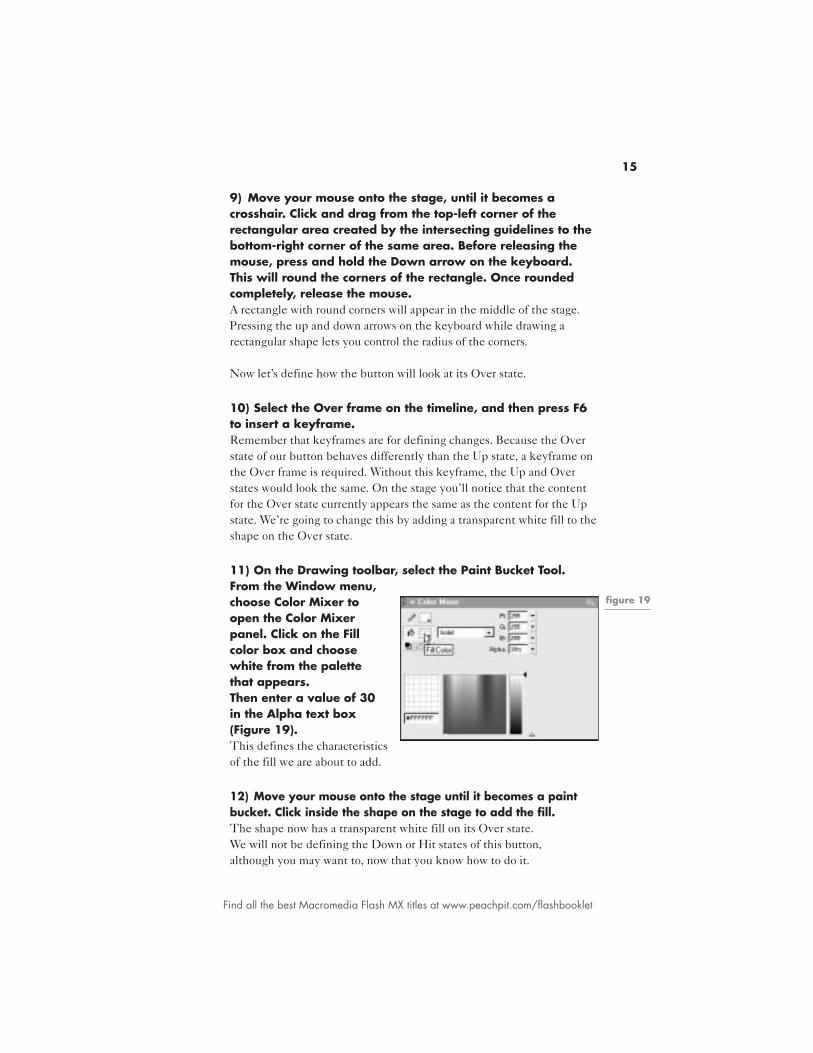
11) On the Drawing toolbar, select the Paint Bucket Tool.From the Window menu,choose Color Mixer toopen the Color Mixerpanel. Click on the Fillcolor box and choosewhite from the palettethat appears.Then enter a value of 30in the Alpha text box(Figure 19).This defines the characteristicsof the fill we are about to add.
12) Move your mouse onto the stage until it becomes a paintbucket. Click inside the shape on the stage to add the fill.The shape now has a transparent white fill on its Over state.We will not be defining the Down or Hit states of this button,although you may want to, now that you know how to do it.
figure 19
16
Find all the best Macromedia Flash MX titles at www.peachpit.com/flashbooklet
Adding Sound to a ButtonNow let’s add a simple sound to the button that will play on its Overstate (when the user mouses over it).
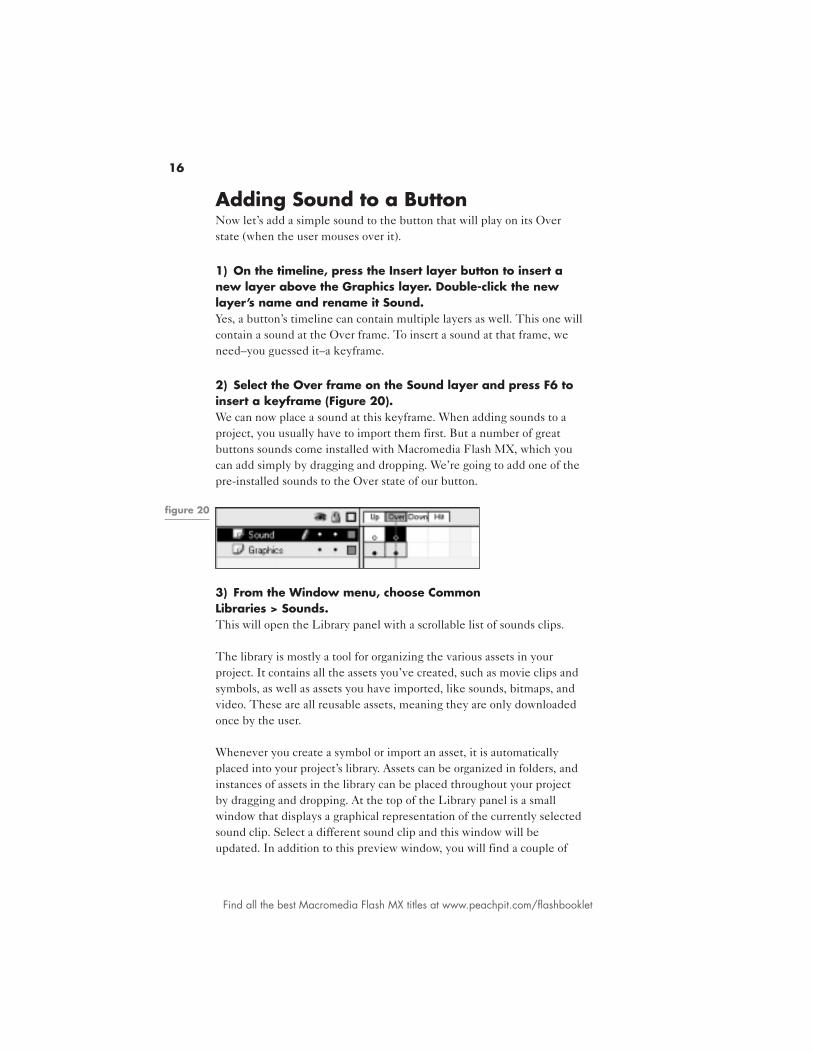
1) On the timeline, press the Insert layer button to insert anew layer above the Graphics layer. Double-click the newlayer’s name and rename it Sound.Yes, a button’s timeline can contain multiple layers as well. This one willcontain a sound at the Over frame. To insert a sound at that frame, weneed–you guessed it–a keyframe.
2) Select the Over frame on the Sound layer and press F6 toinsert a keyframe (Figure 20).We can now place a sound at this keyframe. When adding sounds to aproject, you usually have to import them first. But a number of greatbuttons sounds come installed with Macromedia Flash MX, which youcan add simply by dragging and dropping. We’re going to add one of thepre-installed sounds to the Over state of our button.
3) From the Window menu, choose CommonLibraries > Sounds.This will open the Library panel with a scrollable list of sounds clips.
The library is mostly a tool for organizing the various assets in yourproject. It contains all the assets you’ve created, such as movie clips andsymbols, as well as assets you have imported, like sounds, bitmaps, andvideo. These are all reusable assets, meaning they are only downloadedonce by the user.
Whenever you create a symbol or import an asset, it is automaticallyplaced into your project’s library. Assets can be organized in folders, andinstances of assets in the library can be placed throughout your projectby dragging and dropping. At the top of the Library panel is a smallwindow that displays a graphical representation of the currently selectedsound clip. Select a different sound clip and this window will beupdated. In addition to this preview window, you will find a couple of
figure 20
17
Find all the best Macromedia Flash MX titles at www.peachpit.com/flashbooklet
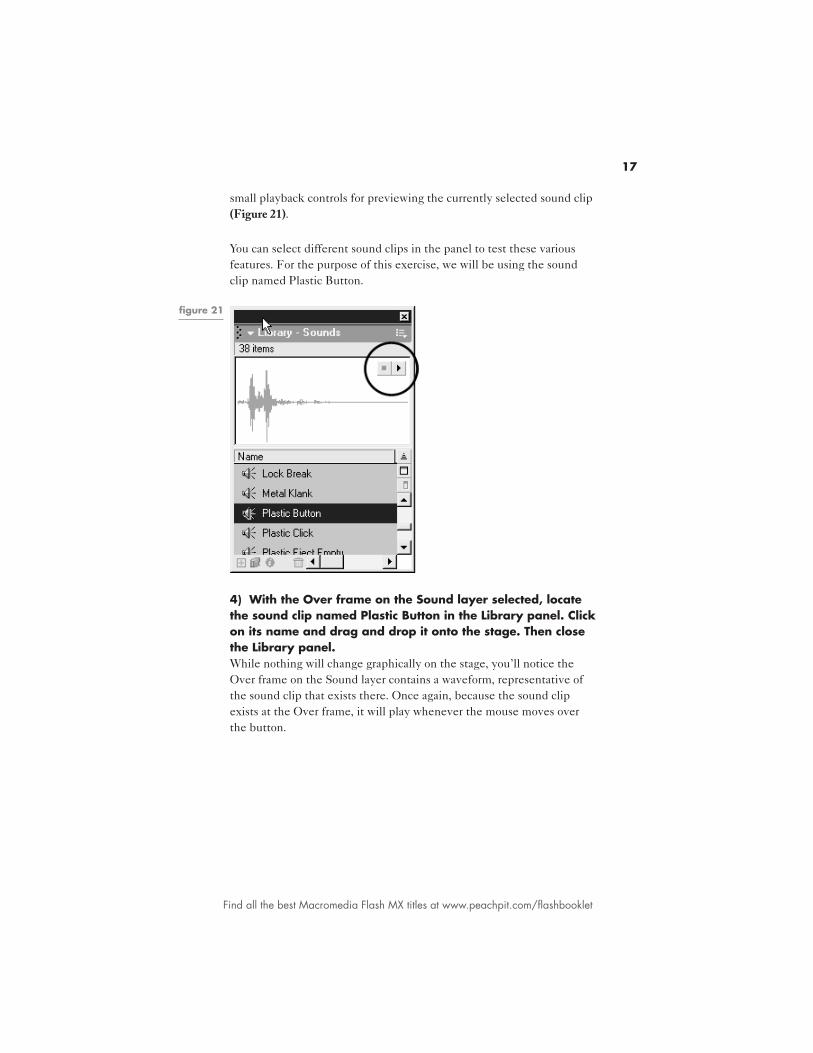
small playback controls for previewing the currently selected sound clip(Figure 21).
You can select different sound clips in the panel to test these variousfeatures. For the purpose of this exercise, we will be using the soundclip named Plastic Button.
4) With the Over frame on the Sound layer selected, locatethe sound clip named Plastic Button in the Library panel. Clickon its name and drag and drop it onto the stage. Then closethe Library panel.While nothing will change graphically on the stage, you’ll notice theOver frame on the Sound layer contains a waveform, representative ofthe sound clip that exists there. Once again, because the sound clipexists at the Over frame, it will play whenever the mouse moves overthe button.
figure 21
18
Find all the best Macromedia Flash MX titles at www.peachpit.com/flashbooklet
Adding ButtonsIts time to return to our project’s main timeline to add some instancesof the button we just created.
1) From the Edit menu, choose Edit Document.This will return the authoring environment to the main timeline.Now we’ll add some instances of the button to the Buttons layer onthe main timeline.
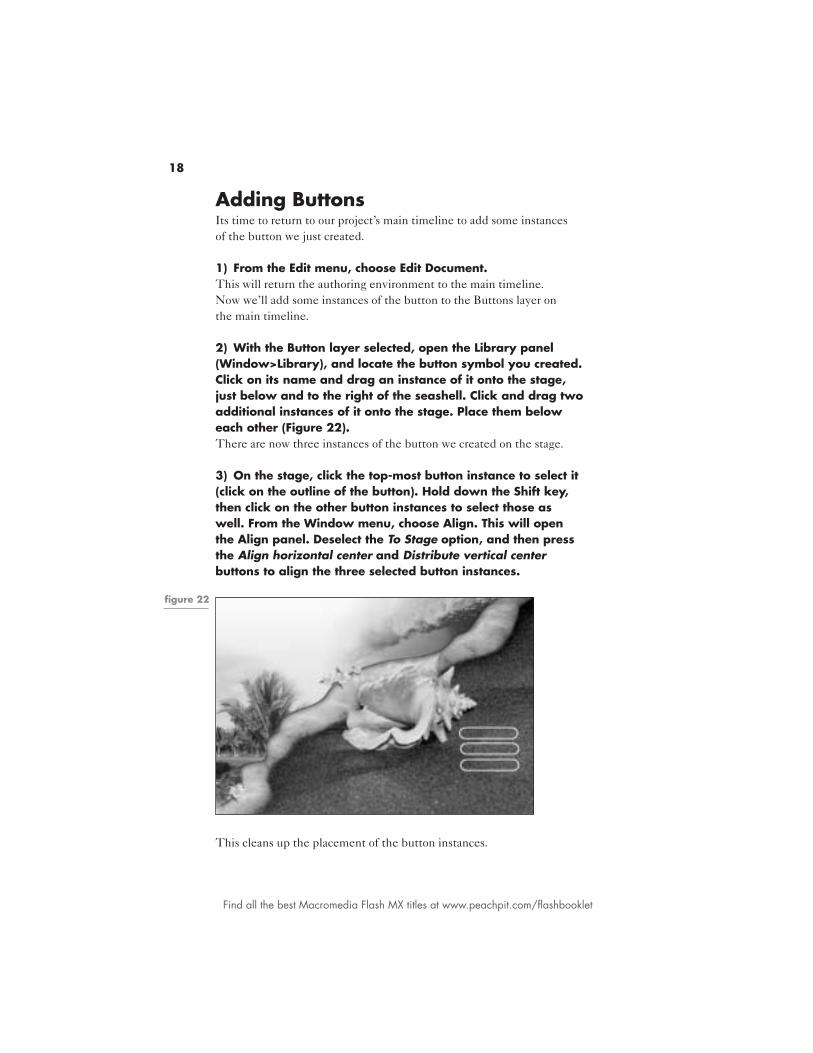
2) With the Button layer selected, open the Library panel(Window>Library), and locate the button symbol you created.Click on its name and drag an instance of it onto the stage,just below and to the right of the seashell. Click and drag twoadditional instances of it onto the stage. Place them beloweach other (Figure 22).There are now three instances of the button we created on the stage.
3) On the stage, click the top-most button instance to select it(click on the outline of the button). Hold down the Shift key,then click on the other button instances to select those aswell. From the Window menu, choose Align. This will openthe Align panel. Deselect the To Stage option, and then pressthe Align horizontal center and Distribute vertical centerbuttons to align the three selected button instances.
This cleans up the placement of the button instances.
figure 22
19
Find all the best Macromedia Flash MX titles at www.peachpit.com/flashbooklet
Scripting Our ButtonsNext we’ll add some script to each button instance so that we can usethem to navigate between the frame labels we set up earlier.
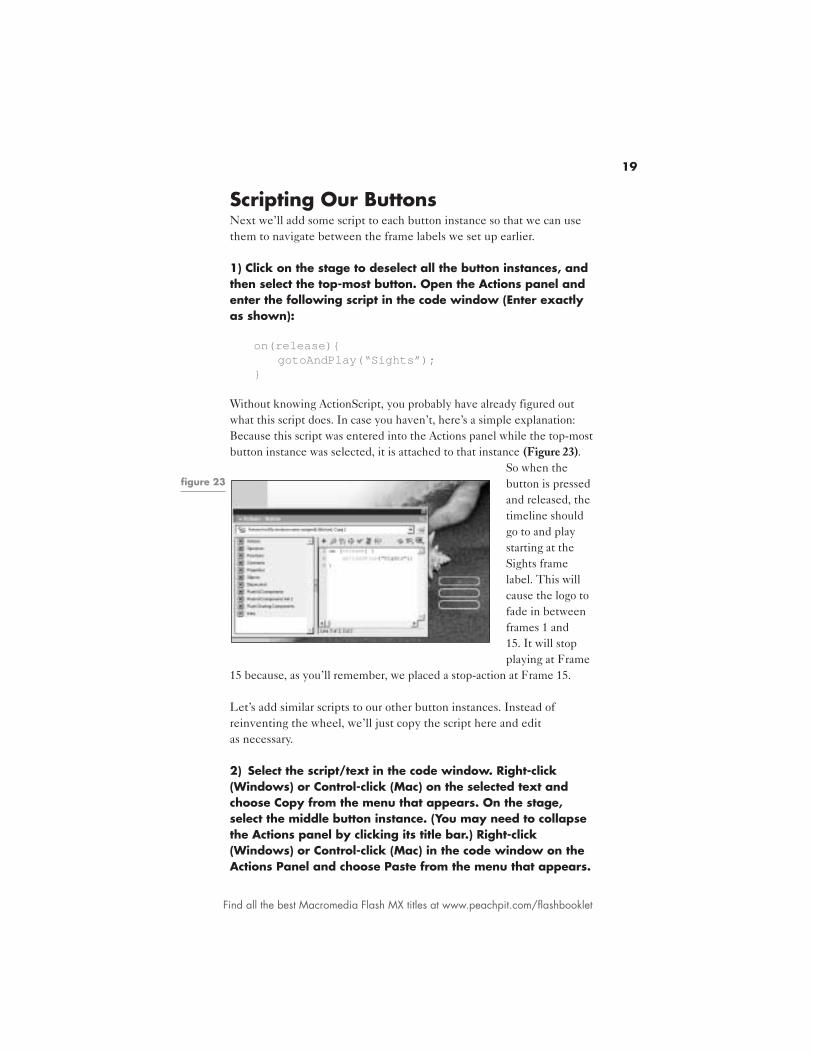
1) Click on the stage to deselect all the button instances, andthen select the top-most button. Open the Actions panel andenter the following script in the code window (Enter exactlyas shown):
on(release){gotoAndPlay(“Sights”);
}
Without knowing ActionScript, you probably have already figured outwhat this script does. In case you haven’t, here’s a simple explanation:Because this script was entered into the Actions panel while the top-mostbutton instance was selected, it is attached to that instance (Figure 23).
So when thebutton is pressedand released, thetimeline shouldgo to and playstarting at theSights framelabel. This willcause the logo tofade in betweenframes 1 and15. It will stopplaying at Frame
15 because, as you’ll remember, we placed a stop-action at Frame 15.
Let’s add similar scripts to our other button instances. Instead ofreinventing the wheel, we’ll just copy the script here and editas necessary.
2) Select the script/text in the code window. Right-click(Windows) or Control-click (Mac) on the selected text andchoose Copy from the menu that appears. On the stage,select the middle button instance. (You may need to collapsethe Actions panel by clicking its title bar.) Right-click(Windows) or Control-click (Mac) in the code window on theActions Panel and choose Paste from the menu that appears.
figure 23
20
Find all the best Macromedia Flash MX titles at www.peachpit.com/flashbooklet
This pastes the previously copied script. Because the middle buttoninstance is currently selected, the script we just pasted is attached to it.This script is an exact copy of the script on the top button instance. Weneed to modify it just a bit so that the middle button instance will go toand play the movie from the Links frame label.
3) In the gotoAndPlay() action, replace the word Sights withthe word Links.The middle button is now set up to go to and play the movie from theLinks frame label when it is pressed and released. This will also causeour logo to fade in between frames 16 and 30. It will stop playing atFrame 30 because, as you’ll remember, we placed a stop-action atFrame 30.
Lets set up our last button instance.
4) Repeat steps 2 and 3 to paste the script on the bottom-most button instance. Once pasted, edit the gotoAndPlay()action by replacing the word Sights with the word Map.All three button instances should now have scripts attached to them fornavigating the movie. We will test this shortly.
Using the Text tool to Add Textto the ButtonsNext, we need to add some text on top of our button instances toidentify their navigation points.
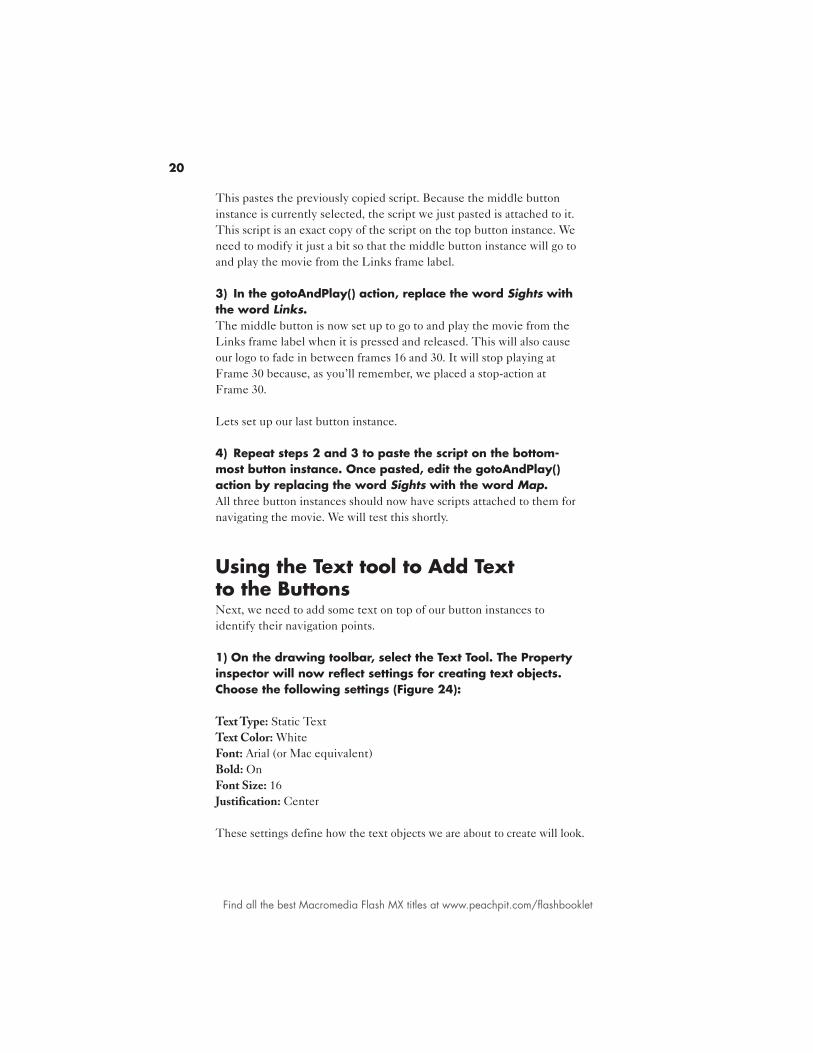
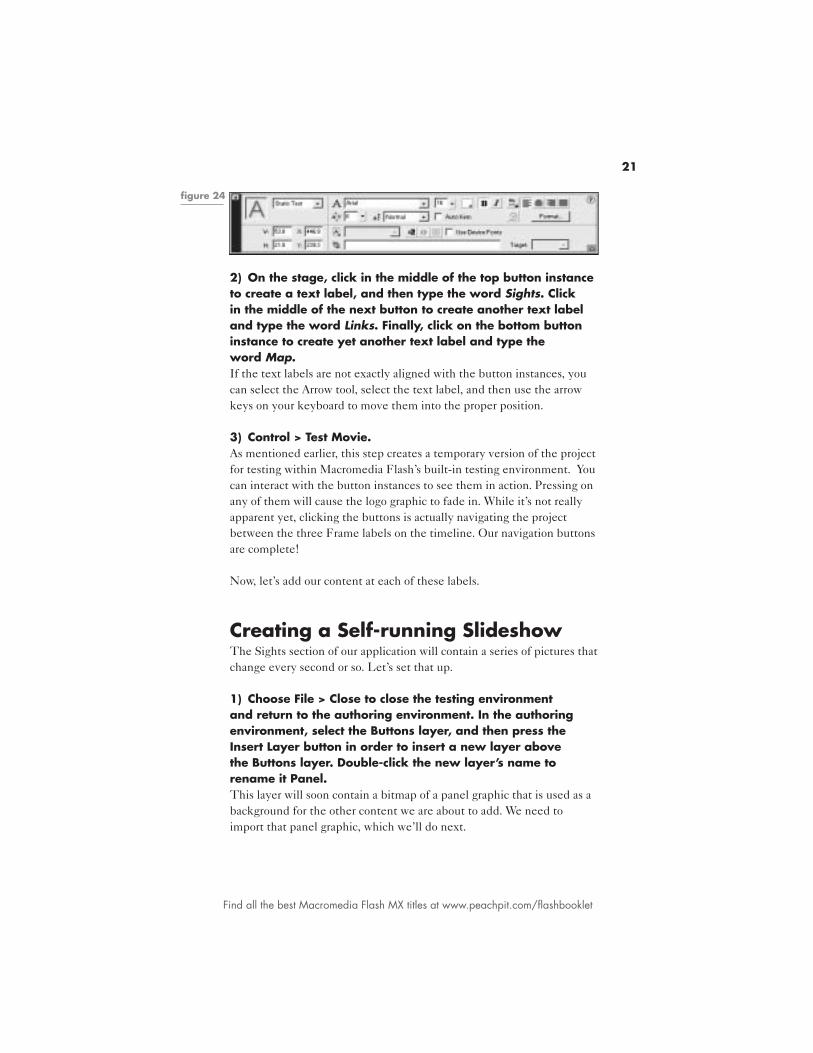
1) On the drawing toolbar, select the Text Tool. The Propertyinspector will now reflect settings for creating text objects.Choose the following settings (Figure 24):
Text Type: Static TextText Color: WhiteFont: Arial (or Mac equivalent)Bold: OnFont Size: 16Justification: Center
These settings define how the text objects we are about to create will look.
21
Find all the best Macromedia Flash MX titles at www.peachpit.com/flashbooklet
2) On the stage, click in the middle of the top button instanceto create a text label, and then type the word Sights. Clickin the middle of the next button to create another text labeland type the word Links. Finally, click on the bottom buttoninstance to create yet another text label and type theword Map.If the text labels are not exactly aligned with the button instances, youcan select the Arrow tool, select the text label, and then use the arrowkeys on your keyboard to move them into the proper position.
3) Control > Test Movie.As mentioned earlier, this step creates a temporary version of the projectfor testing within Macromedia Flash’s built-in testing environment. Youcan interact with the button instances to see them in action. Pressing onany of them will cause the logo graphic to fade in. While it’s not reallyapparent yet, clicking the buttons is actually navigating the projectbetween the three Frame labels on the timeline. Our navigation buttonsare complete!
Now, let’s add our content at each of these labels.
Creating a Self-running SlideshowThe Sights section of our application will contain a series of pictures thatchange every second or so. Let’s set that up.
1) Choose File > Close to close the testing environmentand return to the authoring environment. In the authoringenvironment, select the Buttons layer, and then press theInsert Layer button in order to insert a new layer abovethe Buttons layer. Double-click the new layer’s name torename it Panel.This layer will soon contain a bitmap of a panel graphic that is used as abackground for the other content we are about to add. We need toimport that panel graphic, which we’ll do next.
figure 24
22
Find all the best Macromedia Flash MX titles at www.peachpit.com/flashbooklet
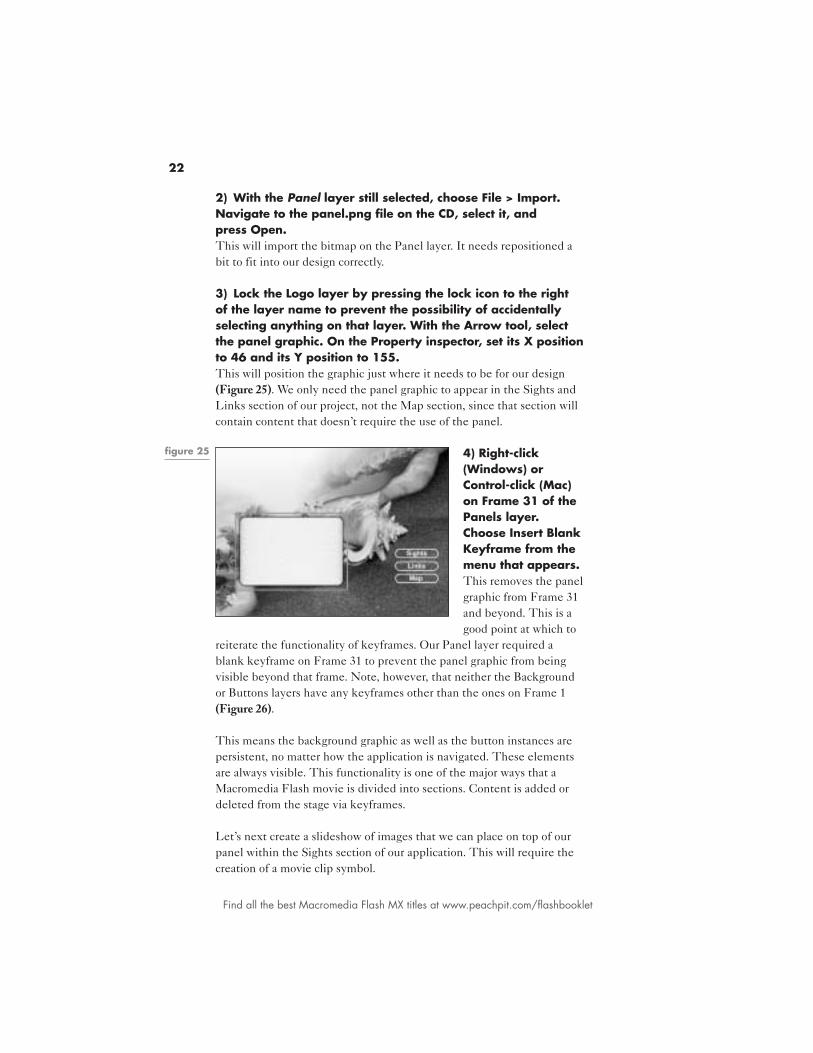
2) With the Panel layer still selected, choose File > Import.Navigate to the panel.png file on the CD, select it, andpress Open.This will import the bitmap on the Panel layer. It needs repositioned abit to fit into our design correctly.
3) Lock the Logo layer by pressing the lock icon to the rightof the layer name to prevent the possibility of accidentallyselecting anything on that layer. With the Arrow tool, selectthe panel graphic. On the Property inspector, set its X positionto 46 and its Y position to 155.This will position the graphic just where it needs to be for our design(Figure 25). We only need the panel graphic to appear in the Sights andLinks section of our project, not the Map section, since that section willcontain content that doesn’t require the use of the panel.
4) Right-click(Windows) orControl-click (Mac)on Frame 31 of thePanels layer.Choose Insert BlankKeyframe from themenu that appears.This removes the panelgraphic from Frame 31and beyond. This is agood point at which to
reiterate the functionality of keyframes. Our Panel layer required ablank keyframe on Frame 31 to prevent the panel graphic from beingvisible beyond that frame. Note, however, that neither the Backgroundor Buttons layers have any keyframes other than the ones on Frame 1(Figure 26).
This means the background graphic as well as the button instances arepersistent, no matter how the application is navigated. These elementsare always visible. This functionality is one of the major ways that aMacromedia Flash movie is divided into sections. Content is added ordeleted from the stage via keyframes.
Let’s next create a slideshow of images that we can place on top of ourpanel within the Sights section of our application. This will require thecreation of a movie clip symbol.
figure 25
23
Find all the best Macromedia Flash MX titles at www.peachpit.com/flashbooklet
5) Choose Insert > New Symbol. This will open the New Symboldialog box. Name the new symbol Slides and select the Movie Clipbehavior option, and then click OK.Now the new movie clip’s timeline and stage will appear in theauthoring environment. Both are blank–we still have to put contentinto the clip.
6) Double-click on the default layer’s name to renameit Images.We will be adding our slideshow images to this layer.
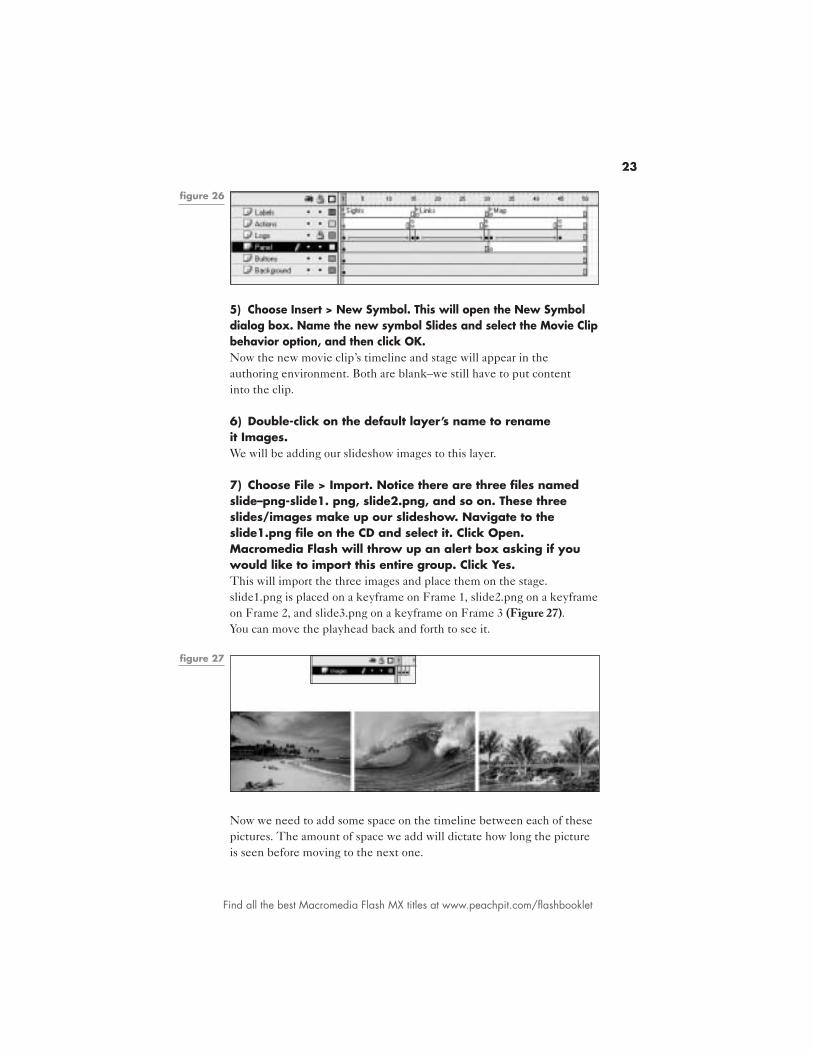
7) Choose File > Import. Notice there are three files namedslide–png-slide1. png, slide2.png, and so on. These threeslides/images make up our slideshow. Navigate to theslide1.png file on the CD and select it. Click Open.Macromedia Flash will throw up an alert box asking if youwould like to import this entire group. Click Yes.This will import the three images and place them on the stage.slide1.png is placed on a keyframe on Frame 1, slide2.png on a keyframeon Frame 2, and slide3.png on a keyframe on Frame 3 (Figure 27).You can move the playhead back and forth to see it.
Now we need to add some space on the timeline between each of thesepictures. The amount of space we add will dictate how long the pictureis seen before moving to the next one.
figure 26
figure 27
24
Find all the best Macromedia Flash MX titles at www.peachpit.com/flashbooklet
8) Select the empty frame at Frame 90 and then press F5 onthe keyboard.This will add 89 frames to the layer, giving us some room to maneuverthe keyframes on Frames 1, 2, and 3.
9) Click on the keyframe on Frame 3 to select it. Click on itagain and drag it to Frame 60.This moves the keyframe that was formally at Frame 3 over to Frame 60.
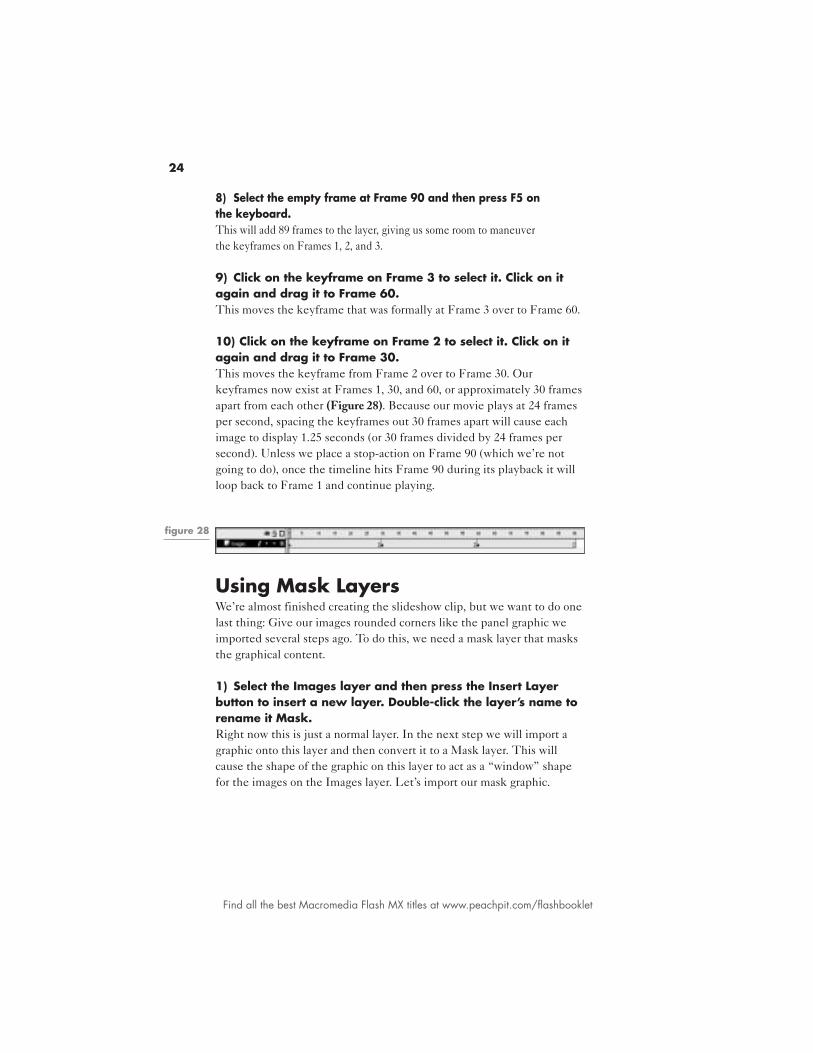
10) Click on the keyframe on Frame 2 to select it. Click on itagain and drag it to Frame 30.This moves the keyframe from Frame 2 over to Frame 30. Ourkeyframes now exist at Frames 1, 30, and 60, or approximately 30 framesapart from each other (Figure 28). Because our movie plays at 24 framesper second, spacing the keyframes out 30 frames apart will cause eachimage to display 1.25 seconds (or 30 frames divided by 24 frames persecond). Unless we place a stop-action on Frame 90 (which we’re notgoing to do), once the timeline hits Frame 90 during its playback it willloop back to Frame 1 and continue playing.
Using Mask LayersWe’re almost finished creating the slideshow clip, but we want to do onelast thing: Give our images rounded corners like the panel graphic weimported several steps ago. To do this, we need a mask layer that masksthe graphical content.
1) Select the Images layer and then press the Insert Layerbutton to insert a new layer. Double-click the layer’s name torename it Mask.Right now this is just a normal layer. In the next step we will import agraphic onto this layer and then convert it to a Mask layer. This willcause the shape of the graphic on this layer to act as a “window” shapefor the images on the Images layer. Let’s import our mask graphic.
figure 28
25
Find all the best Macromedia Flash MX titles at www.peachpit.com/flashbooklet
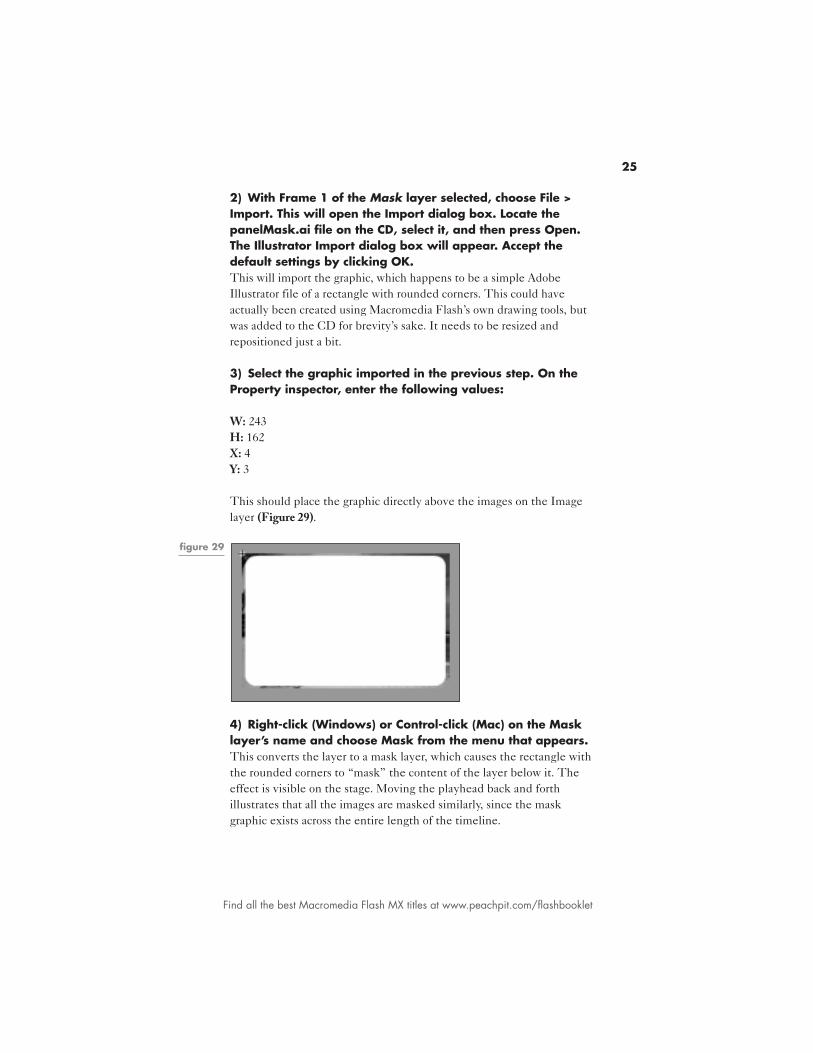
2) With Frame 1 of the Mask layer selected, choose File >Import. This will open the Import dialog box. Locate thepanelMask.ai file on the CD, select it, and then press Open.The Illustrator Import dialog box will appear. Accept thedefault settings by clicking OK.This will import the graphic, which happens to be a simple AdobeIllustrator file of a rectangle with rounded corners. This could haveactually been created using Macromedia Flash’s own drawing tools, butwas added to the CD for brevity’s sake. It needs to be resized andrepositioned just a bit.
3) Select the graphic imported in the previous step. On theProperty inspector, enter the following values:
W: 243H: 162X: 4Y: 3
This should place the graphic directly above the images on the Imagelayer (Figure 29).
4) Right-click (Windows) or Control-click (Mac) on the Masklayer’s name and choose Mask from the menu that appears.This converts the layer to a mask layer, which causes the rectangle withthe rounded corners to “mask” the content of the layer below it. Theeffect is visible on the stage. Moving the playhead back and forthillustrates that all the images are masked similarly, since the maskgraphic exists across the entire length of the timeline.
figure 29

26
Find all the best Macromedia Flash MX titles at www.peachpit.com/flashbooklet
Placing Our Slideshow ClipWe’re finished creating our slideshow movie clip symbol, so let’s returnto the main timeline and add an instance of this clip to it.
1) On the breadcrumb navigation bar, press either the Backbutton or the text that reads Scene 1 (Figure 30).This will return you to the main timeline.
2) With the Panel layer selected, press the Insert Layer buttonto insert a new layer above the Panel layer. Double-click thenew layer’s name to rename it Slides.Obviously, this layer will contain an instance of our Slides symbol.Let’s add that.
3) If the Library panel isn’t already open, open it bychoosing Window > Library. Find the Slides symbol and dragan instance of it onto the stage, just above the panel. Withthe instance selected, you can position it precisely using thearrow keys on your keyboard so that it appears directlyover the panel graphic (Figure 31).
When placing a movie clip instance on the main timeline, only the firstframe of that clip is visible. Other frames (such as those that make upour slideshow) will not be seen until the movie is either tested or
exported asa SWF.
Our slidesshould only bevisible within theSights section ofour application,so let’s take careof that next.
figure 30
figure 31
27
Find all the best Macromedia Flash MX titles at www.peachpit.com/flashbooklet
4) Select Frame 16 on the Slides layer, and then chooseInsert > Blank Keyframe.Doing this will remove the slides clip from Frame 16 and beyond, whereit shouldn’t be visible. You can move the playhead back and forth to seethe effect this action has on the content on the stage.
Let’s now create the content for the Links section of our application.
Creating HyperlinksHyperlinks to sites on the Web play an important role in most applica-tions today, including ours. Let’s add some links to the Links section ofour application.
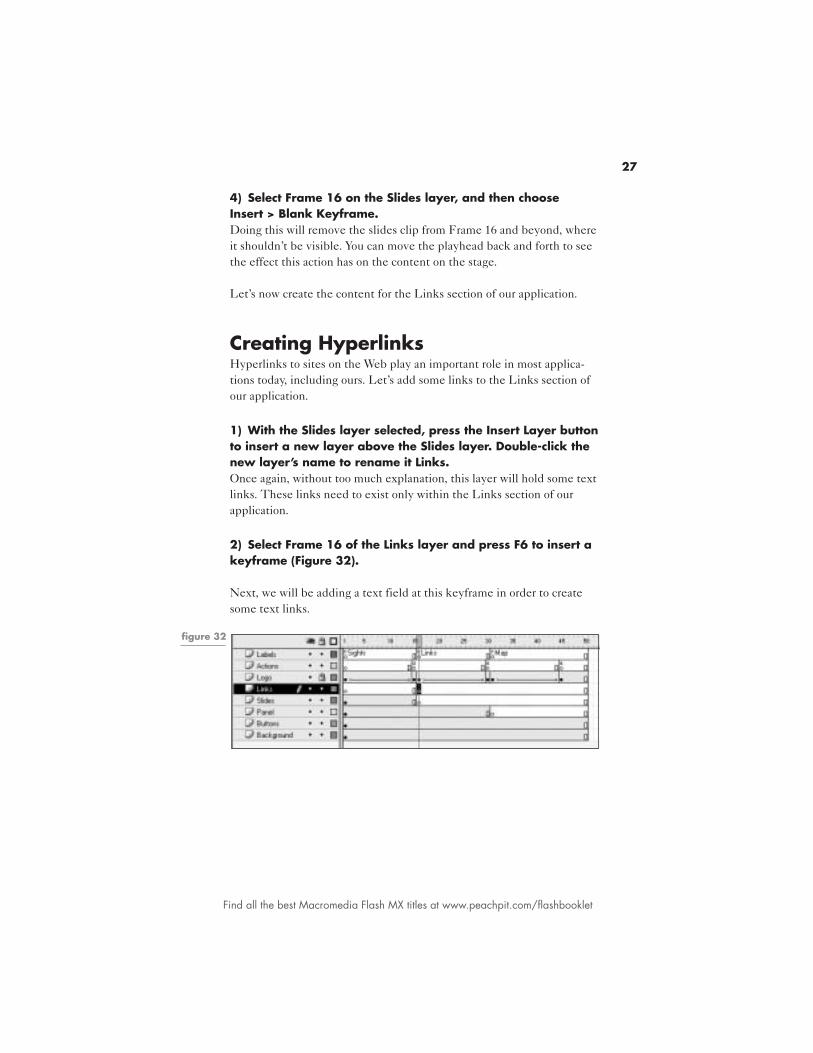
1) With the Slides layer selected, press the Insert Layer buttonto insert a new layer above the Slides layer. Double-click thenew layer’s name to rename it Links.Once again, without too much explanation, this layer will hold some textlinks. These links need to exist only within the Links section of ourapplication.
2) Select Frame 16 of the Links layer and press F6 to insert akeyframe (Figure 32).
Next, we will be adding a text field at this keyframe in order to createsome text links.
figure 32
28
Find all the best Macromedia Flash MX titles at www.peachpit.com/flashbooklet
3) With the keyframe on Frame 16 of the Links layer selected,select the Text Tool. On the Property inspector, choose thefollowing settings:
Text Type: Static TextText Color: BlueFont: Arial (or Mac equivalent)Bold: OffFont Size: 20Justification: Left
These settings define how the text object we are about to create will look.
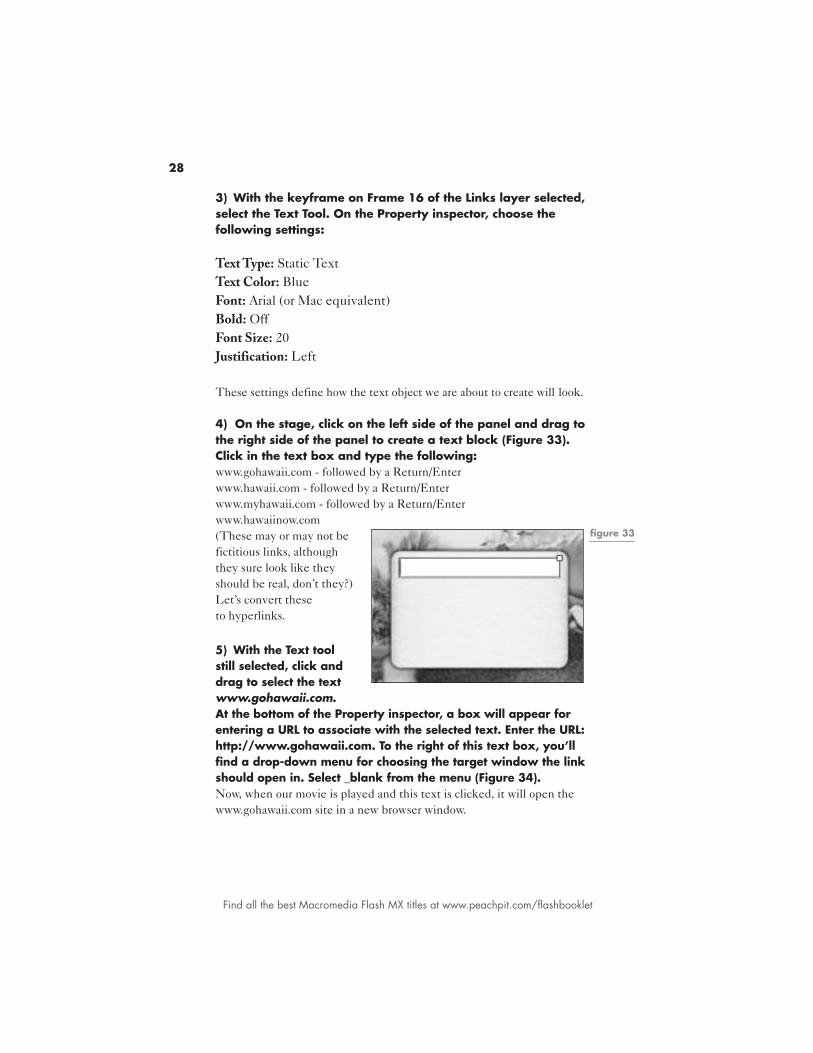
4) On the stage, click on the left side of the panel and drag tothe right side of the panel to create a text block (Figure 33).Click in the text box and type the following:www.gohawaii.com - followed by a Return/Enterwww.hawaii.com - followed by a Return/Enterwww.myhawaii.com - followed by a Return/Enterwww.hawaiinow.com(These may or may not befictitious links, althoughthey sure look like theyshould be real, don’t they?)Let’s convert theseto hyperlinks.
5) With the Text toolstill selected, click anddrag to select the textwww.gohawaii.com.At the bottom of the Property inspector, a box will appear forentering a URL to associate with the selected text. Enter the URL:http://www.gohawaii.com. To the right of this text box, you’llfind a drop-down menu for choosing the target window the linkshould open in. Select _blank from the menu (Figure 34).Now, when our movie is played and this text is clicked, it will open thewww.gohawaii.com site in a new browser window.
figure 33
29
Find all the best Macromedia Flash MX titles at www.peachpit.com/flashbooklet
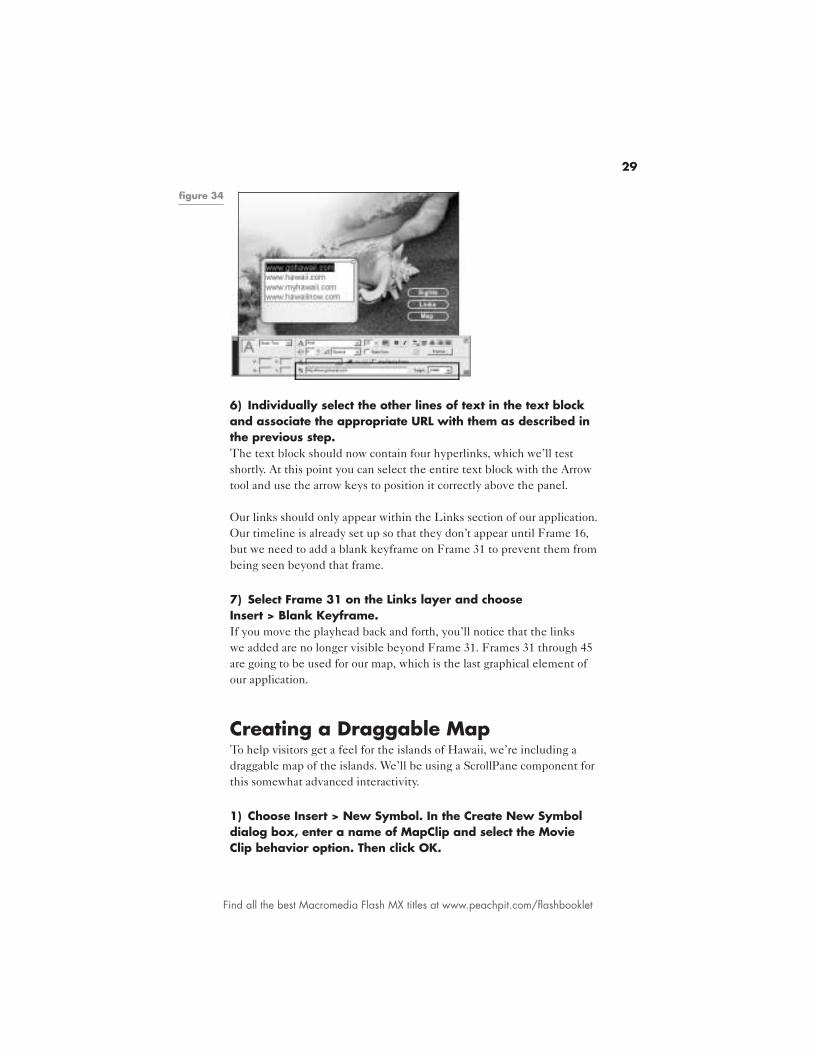
6) Individually select the other lines of text in the text blockand associate the appropriate URL with them as described inthe previous step.The text block should now contain four hyperlinks, which we’ll testshortly. At this point you can select the entire text block with the Arrowtool and use the arrow keys to position it correctly above the panel.
Our links should only appear within the Links section of our application.Our timeline is already set up so that they don’t appear until Frame 16,but we need to add a blank keyframe on Frame 31 to prevent them frombeing seen beyond that frame.
7) Select Frame 31 on the Links layer and chooseInsert > Blank Keyframe.If you move the playhead back and forth, you’ll notice that the linkswe added are no longer visible beyond Frame 31. Frames 31 through 45are going to be used for our map, which is the last graphical element ofour application.
Creating a Draggable MapTo help visitors get a feel for the islands of Hawaii, we’re including adraggable map of the islands. We’ll be using a ScrollPane component forthis somewhat advanced interactivity.
1) Choose Insert > New Symbol. In the Create New Symboldialog box, enter a name of MapClip and select the MovieClip behavior option. Then click OK.
figure 34
30
Find all the best Macromedia Flash MX titles at www.peachpit.com/flashbooklet
This will open our new symbol’s timeline. Let’s import our map graphiconto this timeline.
2) From the File menu, choose Import. This will open theImport dialog box. Locate the map.png file on the CD, selectit, and then press Open.This will import that graphic onto the stage. As you’ll notice, thisgraphic is quite large. That’s OK–soon it will be placed inside aScrollPane component, which is a small window that larger content canbe placed within and dragged around. But before we can place it there,we need to identify our map symbol in the library, using what is knownas an identifier name.
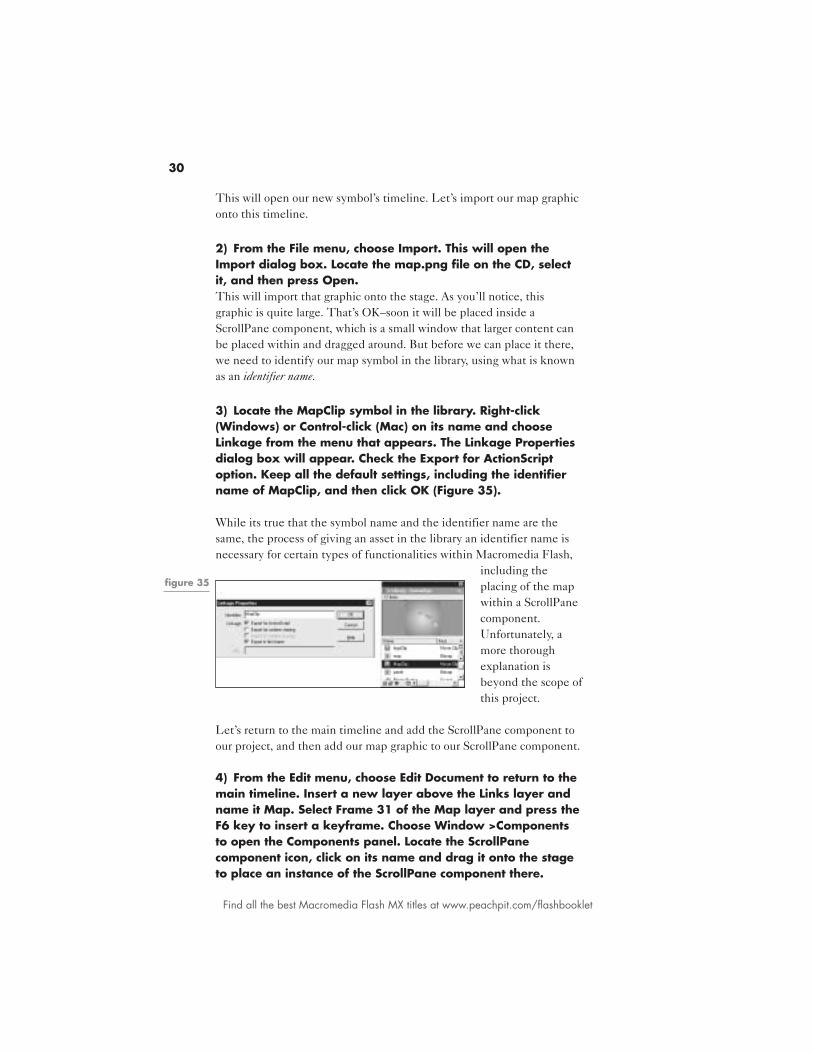
3) Locate the MapClip symbol in the library. Right-click(Windows) or Control-click (Mac) on its name and chooseLinkage from the menu that appears. The Linkage Propertiesdialog box will appear. Check the Export for ActionScriptoption. Keep all the default settings, including the identifiername of MapClip, and then click OK (Figure 35).
While its true that the symbol name and the identifier name are thesame, the process of giving an asset in the library an identifier name isnecessary for certain types of functionalities within Macromedia Flash,
including theplacing of the mapwithin a ScrollPanecomponent.Unfortunately, amore thoroughexplanation isbeyond the scope ofthis project.
Let’s return to the main timeline and add the ScrollPane component toour project, and then add our map graphic to our ScrollPane component.
4) From the Edit menu, choose Edit Document to return to themain timeline. Insert a new layer above the Links layer andname it Map. Select Frame 31 of the Map layer and press theF6 key to insert a keyframe. Choose Window >Componentsto open the Components panel. Locate the ScrollPanecomponent icon, click on its name and drag it onto the stageto place an instance of the ScrollPane component there.
figure 35
31
Find all the best Macromedia Flash MX titles at www.peachpit.com/flashbooklet
Because we placed this component on a keyframe on Frame 31, it willonly appear in our project from that frame forward. You’ll remember thatFrame 31 and beyond represents the Map section of our application.Components are special movie elements that allow you to easily addadvanced interactivity to a project.
Component instances are placed in a project (as the ScrollPane compo-nent we’ve added), a few parameter values adjusted, and in no time youcan add drop-down menus, checkboxes, draggable windows and more toyour movie. Macromedia Flash MX includes several useful components,but additional ones can be downloaded from Macromedia as well asother third-party developers.
Initially, the component instance we’ve added to our project is empty,the wrong size, and in the wrong place on the stage. Let’s remedy thoseissues. First we’ll resize and reposition it.
5) Select the component instance and enter the followingvalues on the Property inspector:
W: 234H: 162X: 62Y: 163
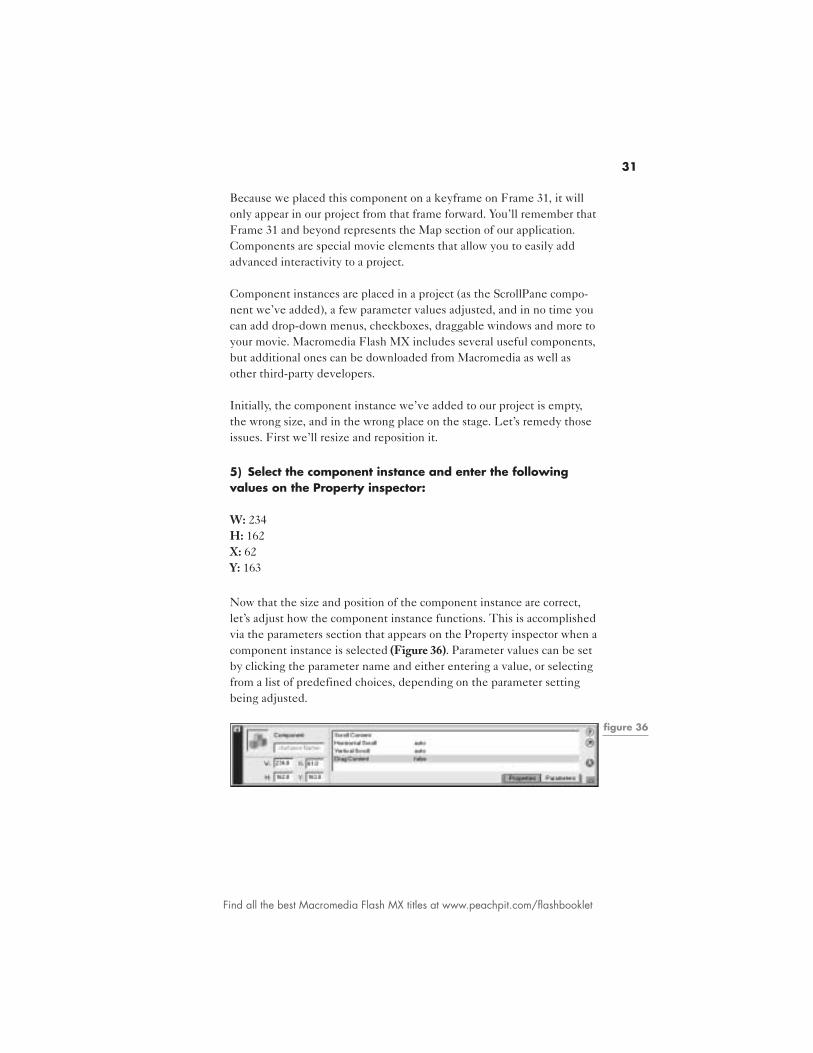
Now that the size and position of the component instance are correct,let’s adjust how the component instance functions. This is accomplishedvia the parameters section that appears on the Property inspector when acomponent instance is selected (Figure 36). Parameter values can be setby clicking the parameter name and either entering a value, or selectingfrom a list of predefined choices, depending on the parameter settingbeing adjusted.
figure 36

32
Find all the best Macromedia Flash MX titles at www.peachpit.com/flashbooklet
6. Give the selected component instance the following values:
Scroll Content: MapClipHorizontal Scroll: falseVertical Scroll: falseDrag Content: true
The Scroll Content parameter is used to specify the name of the asset inthe library that should be placed inside the component. You’ll rememberthat MapClip is the identifier name we gave to the MapClip symbolearlier, so the content of that symbol will be placed inside the compo-nent. The next two parameter settings–horizontal scroll and verticalscroll–let you choose whether you want scrollbars to appear attached tothe component. If set to true, these scrollbars would let users scroll thecontent within the pane. Here we’ve set them to false, so they are notvisible. Instead, the last parameter setting, Drag Content, is set to true.This will enable the content within the pane to be clicked and draggedaround, eliminating the need for scrollbars. We will not be able to seeand interact with the content in this window until the movie is tested orexported as a SWF.
7. Choose Control > Test Movie.In the testing environment, interact with the application: Press thebuttons, click on the links, and click and drag the map around. If allwent well, you should have before you a fully functioning MacromediaFlash MX project that you created from scratch.
Take a deep breath, and collapse if you feel the need, or give yourself amighty pat on the back. As you’ve figured out, this isn’t rocket science.If it were, I’d still be staring at the screen in the same way I was when Istarted using Macromedia Flash several years ago.
Only the BeginningWhile we’ve covered a lot of ground with this project, what you’veaccomplished is really the just tip of the iceberg of what’s possible.Macromedia Flash MX is fun, easy to use, and on top of that, everyoneelse is doing it! So don’t let this be the end of your Flash MX journey.Think of all the cool content you can create with this kind of power atyour fingertips–everything from Web sites, custom MP3 players, andpresentations, to games and handheld computer applications. Myonly caveat is that if you think you already have too many vices,stay away from Flash MX–it’s terribly addictive!