stimulus response testing for iht systems with msa 142 ... · msa software with virtual library...
TRANSCRIPT

International Health Technologies Advancing the Practice of Integrative Medicine
Stimulus Response Testing with MSA Software © 2012-2018 MedProducts, LLC, All Rights Reserved Page i
Stimulus Response Testing For IHT Systems with
MSA 142 Software Date: April 2018
Notices © 2018 International Health Technologies, Inc. (also referred to herein as International Health Technologies and IHT). Printed in the U.S.A. Any other products mentioned are either trademarks or registered trademarks of their respective owners.
All rights reserved. No part of this publication may be reproduced, photocopied, sorted on a retrieval system or transmitted without the express prior written consent of International Health Technologies.
Disclaimer and Limitation of Liability International Health Technologies Inc. makes no representations, guarantees or warranties with respect to the contents or use of this manual and/or IHT Devices, and specifically disclaims any express or implied warranties or guarantees regarding benefits. International Health Technologies reserves the right to make changes to any and all parts of this manual and/or systems without notice. International Health Technologies Devices do not diagnose or treat. They are to be used solely as galvanic skin response (GSR) devices.

International Health Technologies Advancing the Practice of Integrative Medicine
Stimulus Response Testing with MSA Software © 2012-2018 MedProducts, LLC, All Rights Reserved Page ii
Table of Contents STIMULUS RESPONSE TESTING INTRODUCTION .............................................................................. 1
TRANSITIONING FROM BIOREP TO VIRTUAL LIBRARY ................................................................................................2
TEST PLATE INTRODUCTION .....................................................................................................................................3
VIRTUAL LIBRARY INTRODUCTION ............................................................................................................................3
OPERATING WITH A TEST PLATE ................................................................................................... 4
TEST PLATE OVERVIEW ...........................................................................................................................................4
USING A TEST PLATE WITH A VANTAGE ....................................................................................................................4
USING A TEST PLATE WITH AN MSA PROFESSIONAL ................................................................................................4
TEST PLATE INSTRUCTIONS .....................................................................................................................................5
VIRTUAL LIBRARY SETTINGS ........................................................................................................ 8
ACCESSING THE MSA SETTINGS SCREEN .................................................................................................................8
TOLERANCES ..........................................................................................................................................................8
BOX CONTROLS ......................................................................................................................................................8
OPTIONS .................................................................................................................................................................9
VIRTUAL LIBRARY NAVIGATION ................................................................................................... 10
TOGGLING THE VIRTUAL LIBRARY ......................................................................................................................... 10
OPENING AND CLOSING A FOLDER ........................................................................................................................ 10
TREE VIEW ........................................................................................................................................................... 10
FULL COLLAPSE ................................................................................................................................................... 11
FINDING A MANUFACTURER .................................................................................................................................. 11
PRODUCT DESCRIPTIONS ...................................................................................................................................... 11
INFORMATIONAL LISTS .......................................................................................................................................... 11
ADD ITEM TO CURRENT HOLD ............................................................................................................................... 12
SRT PROTOCOL SELECTION ................................................................................................................................. 12
SIGNAL OUTPUT DISPLAY ..................................................................................................................................... 12
EXPORT HOLD ...................................................................................................................................................... 12
TESTS 12
SEARCHING FOR ITEMS ............................................................................................................... 13
PERFORMING A SEARCH ........................................................................................................................................ 13
LOCATE THE SEARCH ITEM IN THE VIRTUAL LIBRARY ............................................................................................. 13
EXIT A SEARCH ..................................................................................................................................................... 13
MORE ITEM INFORMATION ........................................................................................................... 14
DISCONTINUED ITEM ............................................................................................................................................. 14
INFORMATION ITEM ............................................................................................................................................... 14
DESCRIPTION TAB ............................................................................................................................................... 14
NOTES TAB .......................................................................................................................................................... 14
MANUFACTURER TAB ........................................................................................................................................... 14
PERFORMING POSITIVE STIMULUS RESPONSE TESTING (SRT+) .................................................... 15
PREPARATION OVERVIEW FOR SRT (+) TESTING .................................................................................................... 15
ORDER MAX VALUES ............................................................................................................................................ 16
Q CHART ............................................................................................................................................................. 16

International Health Technologies Advancing the Practice of Integrative Medicine
Stimulus Response Testing with MSA Software © 2012-2018 MedProducts, LLC, All Rights Reserved Page iii
SCANNING ................................................................................................................................. 17
SCANNING OCCURS AT THE TREE LEVEL HIGHLIGHTED ............................................................................................ 17
FIND A MANUFACTURER THAT PRODUCES A POSITIVE RESPONSE. ........................................................................... 17
FIND THE SPECIFIC CATEGORY WITHIN MANUFACTURER THAT PRODUCES A POSITIVE RESPONSE. ............................. 18
PERFORMING A MANUAL SRT (+) HOLD TEST ........................................................................................................ 19
DELETING A PRODUCT FROM THE SRT (+) HOLD .................................................................................................... 19
CHECKING OTHER Q CHART IDENTIFIED ACUPOINTS .............................................................................................. 19
POST READINGS ........................................................................................................................ 20
SWITCHING TO THE POST READINGS MODE: ........................................................................................................... 20
PERFORMING NEGATIVE STIMULUS RESPONSE TESTING (SRT-) ................................................... 21
PREPARATION OVERVIEW FOR SRT (-) TESTING..................................................................................................... 21
ORDER MAX VALUES ............................................................................................................................................ 22
GLOBAL ACUPOINTS ............................................................................................................................................ 22
FOOD RELATED ACUPOINTS .................................................................................................................................. 22
SWITCH TO SRT (-) MODE .................................................................................................................................... 22
SETTING SIGNAL OUTPUT AND AUTO ADVANCE ..................................................................................................... 23
LOCATE INFORMATIONAL ITEMS TO TEST ............................................................................................................... 23
PERFORMING A MANUAL SRT(-) TEST .................................................................................................................. 23
PERFORMING AN AUTOMATED SRT (-) TEST .......................................................................................................... 24
SETTING DILUTION, RATE, QUANTITY AND DURATION VALUES ....................................................... 24
MANUAL SETTING OF DILUTION, RATE, QUANTITY AND DURATION .......................................................................... 24
AUTOMATED SETTING OF DILUTION, RATE, QUANTITY AND DURATION .................................................................... 25
SCAN DILUTION TESTING ....................................................................................................................................... 25
BLOCK DILUTION TESTING..................................................................................................................................... 26
BLOCK QUANTITIES TESTING ................................................................................................................................. 26
BLOCK RATES TESTING ........................................................................................................................................ 27
BLOCK DURATION TESTING ................................................................................................................................... 27
HOLD REPORTS ......................................................................................................................... 28
HOLD – READING REPORT ..................................................................................................................................... 28
HOLD – ITEM REPORT AND HOLD – INFORMATION REPORT ...................................................................................... 28
REPORT OPTIONS ................................................................................................................................................. 28
HOLD LABELS ........................................................................................................................... 29
HOLD – LABEL REPORT WITH A LABEL PRINTER ..................................................................................................... 29
HOLD – LABEL REPORT WITH A CLASSIC PRINTER .................................................................................................. 29
HOLD – LABEL REPORT WITH A SPECIALIZED PRINTER ............................................................................................ 30
SELECTING A SPECIAL LABEL FONT ....................................................................................................................... 30
CREATING CUSTOM LIBRARIES ................................................................................................... 31
CUSTOM LIBRARY INTRODUCTION ......................................................................................................................... 31
STARTING THE CUSTOM LIBRARY EDITOR .............................................................................................................. 31
BUILDING A LIBRARY ............................................................................................................................................ 31
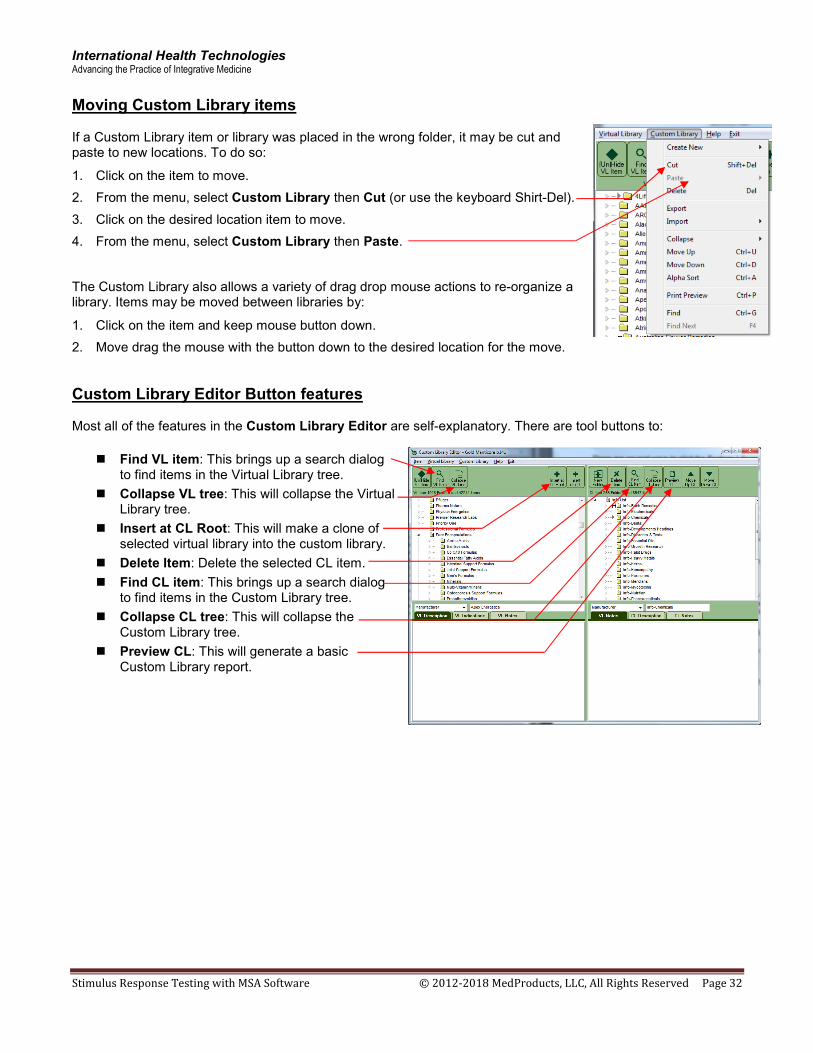
MOVING CUSTOM LIBRARY ITEMS .......................................................................................................................... 32
CUSTOM LIBRARY EDITOR BUTTON FEATURES ...................................................................................................... 32
FINDING THINGS .................................................................................................................................................... 33
USING FOUND FOUND THINGS ................................................................................................................................ 34
SORTING THE CUSTOM LIBRARY ........................................................................................................................... 34
EXPORTING AND IMPORTING CUSTOM LIBRARY FILES ............................................................................................. 35
HIDING AND UN-HIDING ITEMS IN VIRTUAL LIBRARY ............................................................................................... 35
International Health Technologies Advancing the Practice of Integrative Medicine
Stimulus Response Testing with MSA Software © 2012-2018 MedProducts, LLC, All Rights Reserved Page 1
Stimulus Response Testing Introduction Stimulus Response Testing refers to the process of obtaining base point readings during a client visit, then exposing that client to a modality treatment, product, substance or radio frequency to determine whether that “stimulus” creates a negative, positive or neutral response to the client’s Base AcuPoint readings. The practitioner then introduces additional variables into the testing process to see if a change occurs. A typical significant change would be a 10 increase or decrease in the max reading from those recorded in the client’s Base AcuPoint readings. The new adjusted values become the client’s Post AcuPoint readings. The concepts used in Stimulus Response Testing may be applied to both the use of a Test Plate and testing with the Virtual Library. These methods are very different in terms of technical application of skill and equipment use. The following differentiates required and optional equipment, as well as software requirements. These options will be discussed. Test Plate Equipment and Software:
� Test plate. � Test vials, products or items from suppliers. � Brass handmass and/or test vial end cap. � Epic® stylus or AcuPoint II probe. � MSA Software (standard with purchase).
Virtual Library Equipment and Software:
� Brass handmass. � Standard or AcuPoint II probe. � Epic® stylus or AcuPoint II probe. � MSA Software (standard with purchase). � Focus frequency device.
There are two approaches to testing of AcuPoints for stimulus changes: Positive Stimulus Response Testing SRT (+):
� Goal: Find positive responses while testing an out-of-range AcuPoint. � Initially identify a weak or stressed AcuPoint. (An AcuPoint with a reading far from 50.) � The desired result is finding products or items that will give positively results. (New reading is near 50.)
Negative Stimulus Response Testing SRT (-):
� Goal: Find negative responses while testing balanced AcuPoints. � Initially identify a “near normal” base line AcuPoint. (An AcuPoint with a reading near 50.) � The desired result is finding products or items that create imbalance. (New reading is far from 50.)
When performing these procedures, the products or items may be tested in a number of ways:
� Determine response to a single remedy or product. � Place burden with multiple products. � Find synergies among 2 or more products. � Determine response to any substance or item. � Determine a usage process.

International Health Technologies Advancing the Practice of Integrative Medicine
Stimulus Response Testing with MSA Software © 2012-2018 MedProducts, LLC, All Rights Reserved Page 2
Transitioning from BioRep to Virtual Library The decision to add Stimulus Response Testing to an existing BioRep is a practitioner’s choice based on experience, clinical knowledge and the patient needs. There may be times that a patient has not completely responded to the recommended BioRep protocol and more in-depth information is desired. If so, these techniques may provide another layer to the approach. Since Stimulus Response Testing requires more in-depth practitioner knowledge of functional organ systems and products/remedies, many practitioners use a BioRep chart on the client to gather ideas. The concepts of BioRep analysis and Stimulus Response Testing are very different. Many new practitioners will attempt to verify the efficacy of products selected from a BioRep chart using Stimulus Response Testing. This is not recommended, as Stimulus Response Testing is more subtle when trying to select between two or more similar products. An understanding of Meridians and associated organ systems is critical as a point of reference for testing when using Stimulus Response Testing. Knowing the AcuPoints points and point abbreviations will make the transition easier. Reference the meridian formula chart to make connections between individual AcuPoints and Organ Systems in the BioRep chart.

International Health Technologies Advancing the Practice of Integrative Medicine
Stimulus Response Testing with MSA Software © 2012-2018 MedProducts, LLC, All Rights Reserved Page 3
Test Plate Introduction Many practitioners choose to use the test plate and test vial accessories to perform Stimulus Response Testing for either positive or negative Stimulus Response Testing. Since use of a test plate is a manual process of pulling and placing real products or test vials onto the plate, it does not provide the benefit of computerized processes or reports. One must be physically organized while testing a variety of items to separate the positive results for later use. The practitioner must possess solid product knowledge of the products in order to know what may elicit a positive response. If testing for a negative response, the practitioner must have a variety of available test substances, like foods, chemicals, additives, etc. available to place on the test plate.
Virtual Library Introduction The Virtual Library is a signal library database that contains representative codes for a large assortment of products and items that might be used to affect a client’s meridians. The MSA software, which accesses the Virtual Library database, acts is an optimal solution for practitioners who want to perform more traditional Galvanic Skin Response (GSR) Testing techniques without needing to store thousands of test plate items. The MSA software with Virtual Library database is a fee-based program. The Virtual Library contains:
� Over 50,000 individual frequencies, logically arranged and digitally stored in the a database.
� Over 140 different product companies and informational category libraries.
The MSA software with Virtual Library database technology:
� Provides a digital means of measuring a bio-electrical change to a stimulus.
� Tracks results for a variety of clinic and client reports.
The Virtual Library organization:
� The Virtual Library folders are listed in alphabetical order by product company or item category
� Each specific company may organize their sub folders differently.
� After all product companies, there are numerous information folders.
The Virtual Library frequencies:
� The digitally stored signals can be transmitted as frequencies with the IHT equipment.
� These frequencies extend 3-5 feet from the antenna housed in the system.
� Each frequency is a unique signature.

International Health Technologies Advancing the Practice of Integrative Medicine
Stimulus Response Testing with MSA Software © 2012-2018 MedProducts, LLC, All Rights Reserved Page 4
Operating with a Test Plate
Test Plate Overview The built-in test plate of the MSA Professional equipment and the auxiliary test plate of the BioScan/Vantage system both contain notched areas to hold classic test vials and a small dish-like area for larger items. When the lid of the MSA Professional equipment is closed, this surface may also be used as a large test plate. The tester should never place papers, pens or other items on the plate during the base point or stimulus response testing process, as these items will be considered an additional variable and readings may be affected.
Using a Test Plate with a Vantage
1. Plug the 3-pin connector of the test plate cord into an available handmass port on the Vantage.
2. Plug the small end of the test plate cord into either the right or left test plate port of the test plate.
3. (Optional) Additional test plates can be connected together using a test plate patch cord.
Using a Test Plate with an MSA Professional
1. Roll the test plate forward and down onto the table surface. The test plate must be fully lowered for the MSA Professional to power on. To prevent impeding operation of the test plate, do not place any items within six inches in front of the unit.
2. The large lid that encloses the battery and internal component area may also be used as a test plate. Please ensure any cables connected to the internal ports are routed through a cable slot before lowering the large lid. Once the large lid is fully lowered, it will automatically snap into place via the black slider latch. Again, do not place any items on the surface unless they are being tested.
Handmass Ports
Test Plate Cable Slots
Plate Patch Cord Test Plate Test Plate
International Health Technologies Advancing the Practice of Integrative Medicine
Stimulus Response Testing with MSA Software © 2012-2018 MedProducts, LLC, All Rights Reserved Page 5
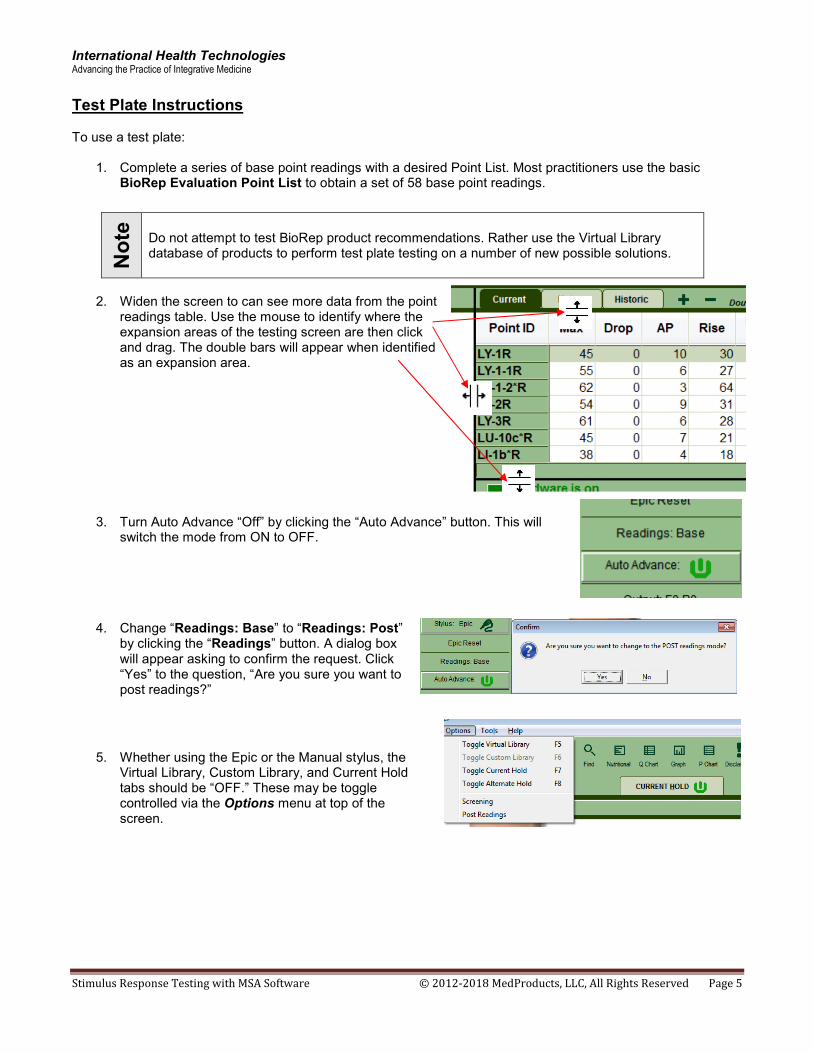
Test Plate Instructions To use a test plate:
1. Complete a series of base point readings with a desired Point List. Most practitioners use the basic BioRep Evaluation Point List to obtain a set of 58 base point readings.
No
te
Do not attempt to test BioRep product recommendations. Rather use the Virtual Library database of products to perform test plate testing on a number of new possible solutions.
2. Widen the screen to can see more data from the point
readings table. Use the mouse to identify where the expansion areas of the testing screen are then click and drag. The double bars will appear when identified as an expansion area.
3. Turn Auto Advance “Off” by clicking the “Auto Advance” button. This will
switch the mode from ON to OFF.
4. Change “Readings: Base” to “Readings: Post” by clicking the “Readings” button. A dialog box will appear asking to confirm the request. Click “Yes” to the question, “Are you sure you want to post readings?”
5. Whether using the Epic or the Manual stylus, the Virtual Library, Custom Library, and Current Hold tabs should be “OFF.” These may be toggle controlled via the Options menu at top of the screen.

International Health Technologies Advancing the Practice of Integrative Medicine
Stimulus Response Testing with MSA Software © 2012-2018 MedProducts, LLC, All Rights Reserved Page 6
6. Determine the SRT testing protocol by selecting an appropriate base point reading:
a) Use Positive Stimulus Response Testing SRT (+) when looking for a positive response. Start with an AcuPoint that has deviated greatly from normal (50), either a low or high max value reading.
b) Use Negative Stimulus Response Testing SRT (-) when looking for a negative response. Start with an AcuPoint as close to optimal electrical conductance (50) as possible.
7. Organize the Max point values from low to high by clicking the word Max once. This will allow viewing and assessment of the lowest readings to highest readings. Clicking Max a second time will organize the readings from high to low. (The other grid column headers do other similar sorts based on the grid column title name.)
8. Next, select the Q-Chart icon from the icon navigation bar.
9. Determine which point to use for testing from either the Max point values or the Q-Chart. Click the Point ID on the Point Readings Table or click the Q-Chart on the desired point so the software knows where to test.
10. Plug in the Vantage Test Plate or flip down the Pro Test Plate into the “ON” position.
11. Select targeted products or items from a test vial collection. Organize these items so they are within reach and can be moved on and off the test plate with ease.
No
te
Test vial collections that lay flat in a display case and are typically evaluated in order. A test vial accessory may be useful. The test vial accessory threads into the end of the handmass and the patient touches the handmass to each vial in order.
12. Move product(s) or item(s) onto the test plate, and test
the selected AcuPoint to determine whether the measurement changed in a negative, positive or neutral way. A significant change will be at least (+/-) 10 point difference between the Base Max and the Post Max values.
No
te
The Q-Chart will prioritize the raw data points just obtained according to Voll’s Priority of Readings and the dominant meridian systems of AL, NE and TW (see the Q-Chart explanation in the Software – Reports section). If a limited number of base point readings were obtained, the Q-Chart may not provide 10 least best points.

International Health Technologies Advancing the Practice of Integrative Medicine
Stimulus Response Testing with MSA Software © 2012-2018 MedProducts, LLC, All Rights Reserved Page 7
13. The software will only maintain one AcuPoint reading at a time, therefore all previous product or item tests will be overwritten. It is important to make piles for “yes”, “no” and “maybe”. Product specific reports are not available in test plate/test vial mode; however, the following scratchpad may be used to maintain a record of products tested and results.
Patient Name: ________________________________ Date: ___________________ AcuPoint Name: ______________________________ Max value _______________ YES MAYBE NO
Product Max Product Max Product
14. Once arriving at a single product or item solution, then stop testing, orL
15. Having arrived at a number of possible solutions, continue testing multiple products in synergy to see if two or more products have a better response.
No
te The Test Plate process may be used in conjunction with the Virtual Library. This is most
beneficial when the Virtual Library is missing a product line and it is desired to check the patient’s response to a product from this missing line in addition to other items selected from the Virtual Library.

International Health Technologies Advancing the Practice of Integrative Medicine
Stimulus Response Testing with MSA Software © 2012-2018 MedProducts, LLC, All Rights Reserved Page 8
Virtual Library Settings In addition to the MSA settings discussed in the Operator’s Manual for Basic point testing applications, there are a number of specific settings for Virtual Library use. This section will highlight the options specifically for Stimulus Response Testing. Access to the MSA settings is the same as Basic point testing.
Accessing the MSA Settings screen
1. From the menu, select Tools / Settings.
2. The Settings screen will appear.
3. Each tab in the Settings screen provides entry fields or drop down menus to customize the system. The tabs that contain Stimulus Response settings are within the Tolerances, Box Controls and Options tabs.
Tolerances The Tolerances tab holds thresholds for both SRT (+) and SRT (-) which are displayed next to Point Readings thresholds. Most adjustments to tolerance settings are not required unless made by experienced practitioners, however, the most common adjustments made to the stressed and weakened thresholds as some protocol use slightly different stressed and weakened thresholds.
The variability of testing results may be impacted by changes to these settings. It is strongly suggested that one does not establish different parameters for any of these functions without having an understanding of the changes that will be made.
Box Controls Each single frequency requires a small amount of time to transmit. An excessive number of frequencies can take enough time to cause some question in readings that are taken with the SRT functions. The hardware memory is only capable of holding and transmitting 500 simultaneous frequencies so this is the maximum allowed.
The Transmit Governor limits the number of frequencies allowed simultaneously during the scanning process. To set the Transmit Governor just click the slide bar and move it to the selected number. The manufacturer setting is 250 frequencies. There is normally a screen warning that can be turned on or off if the Transmit Governor is exceeded.
The Block Size is used when doing Block testing in SRT (+). This function groups the selected items in the pre-determined block size until the list is exhausted. Select any size from 1 to 15, however, the manufacturer setting is a block size of 5. Just click the slide bar and move it to the selected number. Many practitioners prefer the Block option because it limits the number of frequencies being tested at one time.
The Transmit Via option directs the frequencies of the Virtual Library to the built-in antenna, the Focus Frequency accessory or both. If a practitioner purchases a Focus, they may place the Focus device directly on the patient and eliminate the use of the antenna.

International Health Technologies Advancing the Practice of Integrative Medicine
Stimulus Response Testing with MSA Software © 2012-2018 MedProducts, LLC, All Rights Reserved Page 9
Options The Default SRT (-) Hold and Default SRT (+) Hold allows the practitioner to select an alternate hold of their choice when using the Virtual Library. Any customized holds areas will appear in the drop down list. Some protocols use custom hold areas for SRT (-) and SRT (+). The Default SRT (-) Dilution and Default SRT (+) Dilution allows the practitioner to select the dilution that is automatically selected when switching between SRT (-) and SRT (+) modes. Some protocols use custom hold areas for SRT (-) and SRT (+). With the Extended Test Time feature is activated, AcuPoint testing continues beyond the preset sustain timeout period. So readings that have ended in a black completion marker will continue as long as pressure is applied to the AcuPoint. The reading will continue until pressure is released. Some protocols use this time extension. With the Do not scan for items already in Hold feature activated a single item will not be found and added to the hold multiple times. However, some protocols allow single item duplication and allow a single item in a hold multiple times and if you are using such a protocol then switch this off. With the Allow old visit editing feature activated an old visit can be editing any time later. Beginning users should switch this off as old visit editing and can lead to visit data loss as the data is overwritten. However, some protocols require old visit editing.

International Health Technologies Advancing the Practice of Integrative Medicine
Stimulus Response Testing with MSA Software © 2012-2018 MedProducts, LLC, All Rights Reserved Page 10
Virtual Library Navigation
Toggling the Virtual Library To turn the Virtual Library ON, click the menu Options and then Toggle Virtual Library This will engage the Virtual Library, similar steps can be used to toggle the Custom Library (if a custom library has been created, please see related section below) and the Current Hold. Click the Virtual Library tab, and the Virtual Library tree will come into view.
� Libraries are listed in the Virtual Library in alphabetical order by manufacturer.
� Each library folder represents a different manufacturer.
� Informational library folders are listed after the product company folders. They contain various groupings of items or substances, for example, heavy metals.
Opening and Closing a Folder There are different ways to open and close folders in the Virtual Library:
� Single-click to the right of a folder to open it. Single-click to close the folder.
� On the keyboard, press the (Right Arrow) key to open a folder. Press the (Left Arrow) key to close a folder.
When navigating to nearby items, the keyboard is a more efficient navigation tool than the clicking action of the mouse.
Tree view Items appear in the Virtual Library in what is called a “tree view” or “cascading outline.” This format will be familiar to those who have used the Windows Explorer program.
� Some Manufacturer’s folders contain Categories and Subcategories. These are represented by folder icons.
� Individual Products are inside folders are represented by a blue bottle known as the Item icon.
Wa
rnin
g Double-clicking a folder or item will automatically insert the contents into the Current Hold. This is a challenge for some people learning to navigate the Virtual Library because they are accustomed to Microsoft Windows navigation and double-clicking to open folders.

International Health Technologies Advancing the Practice of Integrative Medicine
Stimulus Response Testing with MSA Software © 2012-2018 MedProducts, LLC, All Rights Reserved Page 11
Full collapse The Full Collapse command quickly closes all open Virtual Library folders.
� Click the Full Collapse icon on the tool bar, or
� Or use the menu Navigate and then Full Collapse.
Finding a Manufacturer To find a product manufacturer, use the scroll bar to the right of the alphabetical manufacturer listing. However, with over 140 product companies, this method could take some time. To jump quickly to a certain manufacturer, while navigating the tree, keyboard type the first letter of the company’s name and tree will jump to that letter. Then scroll until the proper listing is located.
Product Descriptions Many of the products in the Virtual Library contain Item Descriptions. These are located in the window beneath the Virtual Library alphabetical listing in the Item Desc. Tab. Each time an item in the Virtual Library is highlighted, a description for it will appear in this window. Many companies have not provided detailed Item Descriptions for their product line. If this information was provided to IHT then the description is included. Please encourage your favorite companies to update their Virtual Library with new products and updated descriptions. We desire this information from our Virtual Library sponsors at least once per year.
Informational Lists At the end of the Manufacturer list is a group of folders that begin with the word “Info.” Some of these Info categories contain signals representing generic products (not manufacturer specific). Others contain signals representing different substances like foods, weeds, animal hair and pesticides. The items in these Info folders can be used in the same manner as the items in the manufacturer folders, but since they are generic signals, there is no manufacturer name associated with these signals. Informational file folders are often used in SRT(-) protocols. Additionally, many of the homeopathic folders are used to test possible causes to determine further testing direction. Item Descriptions are available in a number of the Info file folders.
International Health Technologies Advancing the Practice of Integrative Medicine
Stimulus Response Testing with MSA Software © 2012-2018 MedProducts, LLC, All Rights Reserved Page 12
Add Item to Current Hold
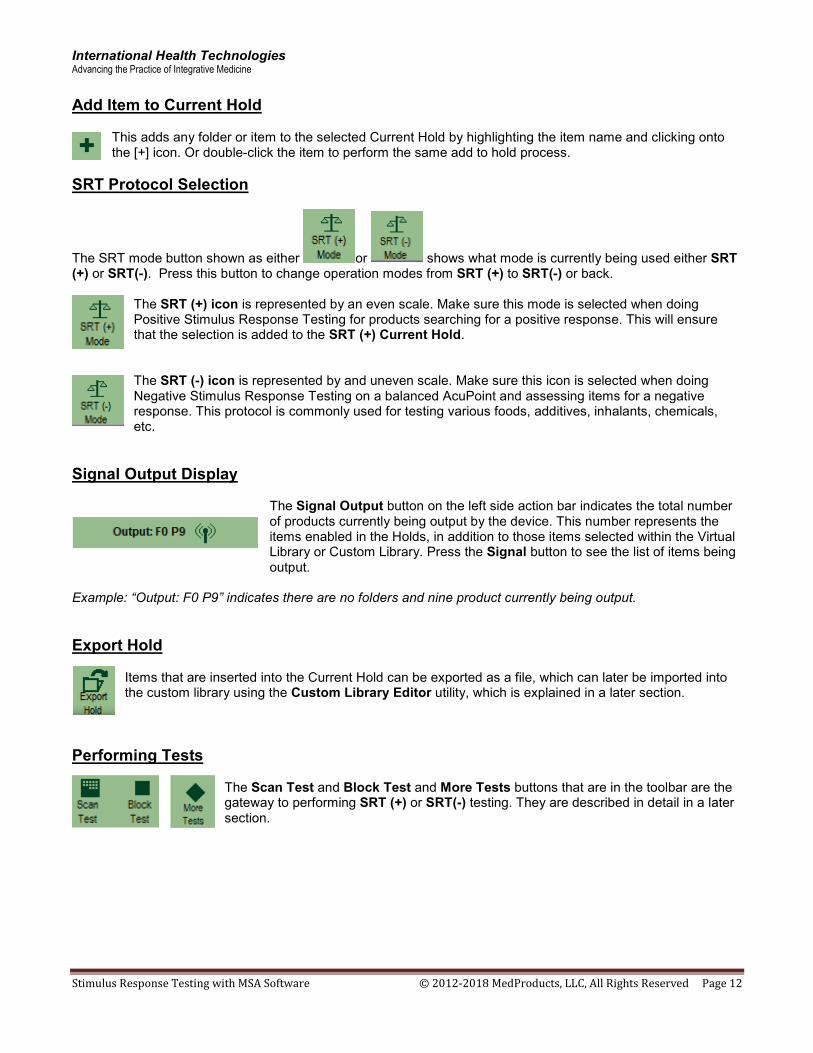
This adds any folder or item to the selected Current Hold by highlighting the item name and clicking onto the [+] icon. Or double-click the item to perform the same add to hold process.
SRT Protocol Selection
The SRT mode button shown as either or shows what mode is currently being used either SRT (+) or SRT(-). Press this button to change operation modes from SRT (+) to SRT(-) or back.
The SRT (+) icon is represented by an even scale. Make sure this mode is selected when doing Positive Stimulus Response Testing for products searching for a positive response. This will ensure that the selection is added to the SRT (+) Current Hold.
The SRT (-) icon is represented by and uneven scale. Make sure this icon is selected when doing Negative Stimulus Response Testing on a balanced AcuPoint and assessing items for a negative response. This protocol is commonly used for testing various foods, additives, inhalants, chemicals, etc.
Signal Output Display
The Signal Output button on the left side action bar indicates the total number of products currently being output by the device. This number represents the items enabled in the Holds, in addition to those items selected within the Virtual Library or Custom Library. Press the Signal button to see the list of items being output.
Example: “Output: F0 P9” indicates there are no folders and nine product currently being output.
Export Hold Items that are inserted into the Current Hold can be exported as a file, which can later be imported into the custom library using the Custom Library Editor utility, which is explained in a later section.
Performing Tests The Scan Test and Block Test and More Tests buttons that are in the toolbar are the gateway to performing SRT (+) or SRT(-) testing. They are described in detail in a later section.

International Health Technologies Advancing the Practice of Integrative Medicine
Stimulus Response Testing with MSA Software © 2012-2018 MedProducts, LLC, All Rights Reserved Page 13
Searching for items The most effective way to locate products or informational files in the Virtual Library is to use the Find item feature. This allows searching the Virtual Library for products related to a specific ingredient. Press the Find item button to get to the Find Item dialog window.
Performing a search 1. Click the Find button in the toolbar. (Alternatively, from the menu system click
Navigate then click Find.)
2. The Find Item dialog window will appear.
3. Type the keyword(s) to search for in the Text to Find field. It may be helpful to use a partial word. Example: “arthr” to find products for arthritis. But spelling is important.
4. Select the area of the Virtual Library in which to search in the Search In field:
Item Name Search the names of products or items in the Virtual Library.
Item Description Search the Description field for all products in the Virtual Library. However, not all products have a description.
Item Notes Search the customized notes entered about specific products.
Item Indications Search indications for symptoms. Again, not all products have a indications. Example: Type “headache” in the Text to Find field. Select “Item Name” in the Search In field. 5. Select Search Where options. To search through everything select Full library or select Current library to
limit the search to the current selected folder.
6. Select Search Options. To find the highest possible matches in the Virtual Library, select Partial Match.
7. Normally discontinued and hidden items are skipped in searching as there will be trouble obtaining these items or they do not exist. Check Discontinued and Hidden to search with them anyway.
8. Click the Find button.
9. The system searches the Virtual Library and pulls up a list of all products or items that match the search criteria. The list temporarily replaces the Virtual Library tree. The items are sorted by manufacturer name and listed alphabetically.
10. Add or test items found.
Locate the Search Item in the Virtual Library Highlight the item on the Find list. Click “Ctrl + G” simultaneously on the keyboard or click Navigate in the Menu bar, then click Go to.
Exit a search When done with the find list either press the Esc key in the upper left-hand corner of the keyboard or re-press the Virtual Library tab to return to the Virtual Library tree.

International Health Technologies Advancing the Practice of Integrative Medicine
Stimulus Response Testing with MSA Software © 2012-2018 MedProducts, LLC, All Rights Reserved Page 14
More Item Information To access additional information about a Product or Manufacturer, follow these steps.
1. Highlight the item in the Virtual Library.
2. Press the F2 key on the keyboard, or click View > Item Information. The Item Information box will appear. This box includes the following components.
Discontinued item If the Discontinued box is checked, it means either the manufacturer has gone out of business, or they no longer make this product.
Information Item If the Information item box is checked, it means that the item highlighted is not an actual product. It is a signal representing a general substance like foods, weeds, animal hair, etc. These items are found in the Info categories at the end of the Virtual Library.
Description Tab This is the same information that appears in the Item Desc. tab when a product is highlighted in the Virtual Library.
Notes Tab The Notes Tab is a place for the practitioner or technician to enter customized notes regarding a product. For example, if a particular product is generally used for specific conditions with success, then make a note of the specific conditions, uses, doses and durations that have worked well. By entering such notes, one might later search this field for key words, speeding up research time.
Manufacturer Tab To obtain contact information for a Manufacturer, click the Manufacturer tab.

International Health Technologies Advancing the Practice of Integrative Medicine
Stimulus Response Testing with MSA Software © 2012-2018 MedProducts, LLC, All Rights Reserved Page 15
Performing Positive Stimulus Response Testing (SRT+) Here is the basic cycle for performing Positive Stimulus Response Testing (SRT+) with a client:
Preparation overview for SRT (+) Testing 1. Prepare a New Client and perform a New Visit.
2. Perform Base Point AcuPoint readings from the desired Point List.
3. Switch from “Readings:Base” to “Readings:Post” to protect the original readings.
4. Order the Max readings in ascending or descending order to better understand the patient’s range of readings.
5. Bring up the Q-Chart and evaluate the top 10 Point priorities.
6. Select the most important Meridian to test based on an evaluation of the point readings, history, symptoms, etc.
7. Click onto the Virtual Library tab and toggle to SRT (+) mode. This will ensure that the tested items will be sent to the proper Current Hold.
8. Begin the SRT (+) Protocol screening.
Stimulus Response
Testing (SRT+)
cycle
1. Set up a Client Profile
2. Start a New Visit
3. Take ‘Base’ Acupoint Readings
8. Take Post Readings (optional)
7. Check other meridians (optional)
6. Place product(s) in SRT (+) Hold
9. Print reports
4. Select AcuPoint to test from Max Values
or the Q-Chart
10. Review test results with client
5. Find product(s) with a positive response
A few weeks later

International Health Technologies Advancing the Practice of Integrative Medicine
Stimulus Response Testing with MSA Software © 2012-2018 MedProducts, LLC, All Rights Reserved Page 16
Order Max Values Click once onto the word Max on the Point Readings grid header to order on Max values from low to high readings. Clicking a second time will order them from high to low. Assess the importance of these meridian points to determine a point priority. Use Voll’s Priority of Readings theory to determine in one of these base point readings will be used in SRT testing (see Reading Type Chart below). Remember that SRT (+) testing looks for a “balancing” or “positive” response to a frequency from an “out-of-balance” meridian system.
Q Chart Click the Q-Chart button on the toolbar to identify AcuPoints to Test. The Q-Chart will appear. The Q-Chart feature selects the AcuPoints according to the theories of Dr. Reinhold Voll and Dr. Constantine Hering. Based on Voll’s research, the readings will appear on the Q-Chart in the order below. The Q-Chart also provides greatest priority to the Allergy (AL), Nervous (NE) and Triple Warmer (TW) Meridian systems.
The Q-Chart screen is moveable via a mouse click and drag action. So move it to a spot on the screen where it does not hinder the view of the testing graph, point readings table or graphic on the point location. Simply click the Q-Chart (with the left mouse button) on the blue title bar and drag it to a new location. Releasing the mouse button will drop the Q-Chart into the new location.
No
te If the client has fewer than 10
AcuPoints that meet the “least best” criteria, there will be fewer than 10 AcuPoints listed on the Q Chart.
Reading Type Range Color Used on Q-Chart
Indicator Drop ≥ 3 Black
Weakened < 47 Max Red
Stressed > 55 Max Yellow

International Health Technologies Advancing the Practice of Integrative Medicine
Stimulus Response Testing with MSA Software © 2012-2018 MedProducts, LLC, All Rights Reserved Page 17
Scanning It is important to understand the difference between testing and scanning. Testing is the process of selecting an item in the Virtual Library (either a manufacturer, or a category within a manufacturer, or a single product), then test the AcuPoint. Evaluate what effect the highlighted item has on the AcuPoint, whether it is a single product or a folder. Scanning involves selecting an item in the Virtual Library and using the Scan or Block buttons. The system evaluates every item at the same tree level (same left alignment) as the highlighted item. The scan evaluates all the items at once, in groups where the list continues to narrow until a single balancing item is found. This chart illustrates the difference between the two methods:
Scanning occurs at the tree level highlighted Items in the Virtual Library are arranged in a tree view. The dotted lines show how the items are connected. Example: The manufacturer folder for Metagenics is open. The
Digestive & Enzyme Formulas folder is highlighted. If this folder is highlighted when scanning is initiated then the signal output used is not the contents of the Digestive & Enzyme Formulas folder, but for every category folder in the Metagenics line.
Find a manufacturer that produces a positive response. 1. Select the AcuPoint in the Q-Chart to test for a positive response, click the Virtual Library tab. Do not retest
the point while in the Point Reading tab.
2. Highlight a desired manufacturer name and test the AcuPoint to see the effect that this manufacturer’s products may have for the client. Repeat this process until a manufacturer is found that has a positive response on the AcuPoint.
3. When a manufacturer is located, that has a positive response, open the manufacturer’s folder using the � arrow key on the keyboard.
Highlight Testing Scanning
Manufacturer Signals representing the
Manufacturer’s products are output
Signals representing each Manufacturer is output
Category Signals representing the
Category is output
A signal representing all Categories at the same tree
level is output
Product A signal representing the
Product is output
A signal representing all Products at the same tree
level is output
No
te
The MSA system will scan at the tree level highlighted.

International Health Technologies Advancing the Practice of Integrative Medicine
Stimulus Response Testing with MSA Software © 2012-2018 MedProducts, LLC, All Rights Reserved Page 18
Find the specific category within manufacturer that produces a positive response. 1. With the Manufacturer folder open, highlight any category folder or item within the Manufacturer. Use the up
� and down � arrow keys on the keyboard to navigate.
2. Press the Scan Test button in the toolbar to activate a Scan. All the folders with the same left level will be in the Scan.
3. A Scan grid will appear on the screen. The number of squares in the grid corresponds to the number of category folders or product items being scanned. Colored squares are performing signal output and backgrounds colored squares are not being signal output.
4. Take an AcuPoint reading.
a) Listen to the sound while taking a reading.
b) Hold the probe on the AcuPoint until the first beep is heard.
c) This will change the grid map automatically depending on the positive or negative effect of the reading.
d) A new set of boxes is highlighted.
e) Do not let go of the client’s hand or re-wet the probe between tests. Just raise the probe tip off the skin momentarily and then begin the next test.
5. Repeat Step 4 until all boxes have been scan evaluated.
6. At the end of the Scan procedure:
If the scan was successful3 If the scan was unsuccessful3
A text box will appear with the name of a category or a product item.
Click Yes to continue the scan.
A text box will appear stating that no item was found. Either:
If this was a
category then move on to
Step 8.
OR
If this was a product item then
move on to Step 9.
Go back to Step 1. Select a new Manufacturer, and start over.
OR Click No, and redo the scan. Move to
Step 7.
7. To re-do a Scan:
a) Click the No button in the message box at the end of the Scan.
b) Press the Backspace key on the keyboard a few times until the Scan squares are back to the starting look of step 3. These Backspace actions un-do the decision steps made by the Scan process.
c) Repeat steps 4 to 6.
8. If the scan successfully finds a category level then:
a) The category level should be the selected element in the Library tree.
b) Open the successful category by pressing the � arrow key.
c) Repeat steps 2 – 6 until a single Product item is found that brings the AcuPoint to a positive response. For manufacturers with very large product lines, there may be sub-category levels within category levels, and this scan process may be repeated a few times before reaching a Product level.
9. If the scan successfully finds a product item, then click the Insert & Return button in the dialog. The product item should be the selected element in the Library tree and it is ready for the next process of inserting it into the SRT (+) Hold.

International Health Technologies Advancing the Practice of Integrative Medicine
Stimulus Response Testing with MSA Software © 2012-2018 MedProducts, LLC, All Rights Reserved Page 19
Performing a Manual SRT (+) Hold test Once a product is found, then that product item should be copied into the SRT (+) Hold.
1. Clicking individual library items will allow singular tests on the item is selected or highlighted in the Virtual Library.
2. If desirable results are made then use the Add [+] button on the tool bar to add the item to the hold. Alternatively, do a mouse double-click on the item to perform the same insert into current hold action.
3. Click the Current Hold tab to see that the product is stored now in the SRT (+) Hold.
Deleting a product from the SRT (+) Hold An undesired product can be deleted by:
1. Click the Current Hold tab.
2. Select the item to delete from the hold grid.
3. Press the Delete [ - ] button on the tool bar.
4. The item will be deleted from the SRT (+) Hold.
Checking other Q Chart identified AcuPoints So far products have been found that have a positive effect on the first point on the Q Chart. Continue this process with the second point in the Q Chart. Often, the same product item will have a positive effect on more than one AcuPoint.
1. With the first product item selected in the SRT (+) Hold, the signal for that product is being output.
2. Select the next AcuPoint to balance from the Q Chart list. Click the Point ID in the Q Chart to activate the point.
3. Click the Point Reading tab to see the image location of the AcuPoint. Click the SRT (+) Hold in the Current Hold tab, where the product is stored.
4. Perform a new test of the AcuPoint.
5. Determine if the current SRT (+) Hold items have a positive effect on this AcuPoint.
If the reading is within the green
zone:
The current SRT (+) Hold product items are having a positive effect on this AcuPoint meridian as well.
If the reading is outside of
the green zone:
Go through the Scanning Products in SRT (+) process again on this AcuPoint to find a product item remedy related to this AcuPoint.
6. Repeat this process until all ten AcuPoints are addressed in the Q Chart.

International Health Technologies Advancing the Practice of Integrative Medicine
Stimulus Response Testing with MSA Software © 2012-2018 MedProducts, LLC, All Rights Reserved Page 20
Post Readings The second set of readings are referred to as Post Readings. Although this is not necessary, many practitioners take Post Readings because it can aid in client compliance. Some choose not to take Post Readings due to the extra visit time involved. Post Readings can be taken once the client’s Base Readings are recorded and the Stimulus Response Testing process has revealed positive product item responses. Any products identified during the visit were stored in the SRT (+) Hold. Now, with the signal of those products being output, take a second set of readings to show the cumulative effect the frequencies from the selected products will have on all the meridians.
Switching to the Post Readings mode: To switching to the Post Readings mode use the menu and click Options / Post Readings or press the Readings button at the left side button bar of the screen. A dialog will question this mode change as correct. The text in the Readings button will change from Base to Post to identify the new mode. In Post Readings mode, click the Point Readings tab. Now, take readings AcuPoints and the numbers will be stored under the Post Reading headings: Post Max, Post Drop and Post Rise. It is recommended that Post Readings be taken only on the AcuPoints previously used in the SRT (+) testing. As these readings are taken, they will be recorded in the area to the right of the Base Readings into the Post Max, Post Drop, and related columns. Print a Point Readings – Compare Visits report, with the Base and Post Readings selected to show the client a before-and-after effect. It illustrates the various point readings and their color value (red, green or yellow) and the after effect which brings them all into a green reading. This demonstrates the positive effect that the selected products will have on their meridians.

International Health Technologies Advancing the Practice of Integrative Medicine
Stimulus Response Testing with MSA Software © 2012-2018 MedProducts, LLC, All Rights Reserved Page 21
Performing Negative Stimulus Response Testing (SRT-) Here is the basic cycle for performing Stimulus Response (SRT-) Negative or Sensitivity Protocol with a client:
Preparation overview for SRT (-) Testing
1. Prepare a New Client and perform a New Visit.
2. Perform Base Point AcuPoint readings from the desired Point List.
3. Switch from “Readings:Base” to “Readings:Post” to protect the original readings.
4. Order Max readings in ascending or descending order to better understand the patient’s range of readings. Identify an AcuPoint as close to 50 as possible.
5. Evaluate global testing points and determine if they will be used in testing.
6. Select the most important AcuPoint Meridian to test, based on an evaluation of the point readings, history, symptoms, etc.
7. Click onto the Virtual Library Tab and toggle into SRT (-) mode. This ensures that items will be sent to the proper Current Hold.
8. Begin SRT (-) Protocol screening.
Negative or Sensitivity Protocol SRT (-)
cycle
6. Select the items with most out-of-range
readings
4. Switch to SRT (-) mode.
7. Switch back to SRT (+) mode.
9. Print Reports & Discuss with Client.
8. Find products with a positive response.
1. Set up a Client Profile.
2. Create a New Visit Record.
A few weeks later
3. Take Base Point Readings & Choose Balanced AcuPoint.
5. Test individual items against AcuPoint.

International Health Technologies Advancing the Practice of Integrative Medicine
Stimulus Response Testing with MSA Software © 2012-2018 MedProducts, LLC, All Rights Reserved Page 22
Order Max Values Click once onto the word “Max” on the Point Readings grid and order by Max reading values in ascending order. Scroll through the Point IDs and identify specific points that provide nearly “balanced” readings. Readings as close to 50 as possible are balanced. Assess the importance of these meridian AcuPoints to determine a point priority for SRT (-) testing.
Global AcuPoints The following points are commonly used in SRT (-) testing when a more specific point is not available or the selected point has become non-responsive in the testing process.
� AL-1 (Allergy Meridian Measurement Point) – Often used for food and chemical sensitivities.
� AL-1b* (Allergy Control Measurement Point) – Often used for general or environmental sensitivities.
� OR-1b* (Organic Degeneration of the Entire Body) – Used to verify all other AcuPoints. � NE-1b* (Peripheral and Central Nervous System) – Voll nerve degeneration AcuPoint.
Food related AcuPoints As secondary options, especially as it relates to digestive concerns or food-related SRT (-) testing, the following points are quite useful:
� LI - 1b* (Large Intestine Control Measurement Point) � SI- 1b* (Small Intestine Control Measurement Point)
Switch to SRT (-) Mode Click the SRT button to switch between SRT (+) mode and SRT (-) mode. Make sure the system is in SRT (-) mode. Two things occur while in SRT (-) mode:
a) The Master Dilution in the upper-left corner of the screen will change from Manufacturer to Stress Test or to whatever the default dilution is configured to in the MSA Settings screen.
b) The green bar on the reading graph will widen. The upper end of the bar moves from 55 to 60, making the normal reference default setting for SRT (-) readings to be between a 45 and 60. This broadens the range and maintains a focus on frequencies that are further from norm.
No
te
These AcuPoints may also be useful in SRT (+) testing.
No
te A practitioner may customize the normal reference range in SRT(-) mode to meet the needs of
their testing protocol. The suggested default range is a 15 point difference between 45 and 60. These settings can be changed via the menu Tools / Settings and then they are available on the Tolerance tab.

International Health Technologies Advancing the Practice of Integrative Medicine
Stimulus Response Testing with MSA Software © 2012-2018 MedProducts, LLC, All Rights Reserved Page 23
Setting Signal Output and Auto Advance When performing Negative Stimulus Response Testing SRT(-), the Signal Output for the Current Hold must be OFF and Auto Advance must be ON. The red symbol on the Current Hold tab indicates that its signal output is off, while the green symbol indicates that its signal output is occurring.
1. Toggle the Current Hold signal output ON or OFF (red) by pressing the F7 key on the keyboard.
2. Make sure Auto Advance is turned ON (green). Either use the menu Navigate / Auto Advance or click the Auto Advance button on the left side button bar.
Locate Informational Items to test
1. Click the Virtual Library tab. Type the letter “i” on the keyboard to jump to the Informational folders.
2. Select substance folder to test against the selected AcuPoint.
3. When selecting an item from the list, the antenna begins to output a signal representing that item. If the client has a negative response to the frequency that is being output, then the reading will be imbalanced. That is it will go from being near 50 to a value oddly higher or lower.
Performing a Manual SRT(-) Test To test the informational folders items on a one at a time basis, follow these steps:
1. Select an item inside the informational folder and test the AcuPoint to see the effect of that item on the AcuPoint.
2. Use the Up � and Down � keys on the keyboard to move up and down on the list to select further items to test.
3. With Auto Advance ON, after each reading is taken, the system will automatically advance to the next informational item in the list.
4. After taking a reading, the item tested and the data from the reading are automatically inserted into SRT (-) Hold.
Tip
A useful folder is “Info - Sensitivity Screenings by Groups”. This main folder contains categories for both Foods and Environmental. Browse these folders to find additives, grains, grasses, trees, dairy, etc.
No
te
Be selective about the items to test. It is recommended not test the client with more than 150 items in one session. It becomes painful for the client to continue to test on the same point, and as the point becomes irritated, and the readings are less reliable.

International Health Technologies Advancing the Practice of Integrative Medicine
Stimulus Response Testing with MSA Software © 2012-2018 MedProducts, LLC, All Rights Reserved Page 24
Performing an automated SRT (-) Test To test the informational folder items in an automated style within a Block Test screen, follow these steps:
1. Select an individual item inside of an informational folder.
2. Click the Block Test button.
3. The Block screen will appear. Begin taking readings.
4. After each reading is taken, the system will advance to the next item on the list
5. Once all items have been tested, the Block screen will disappear and all items will be inserted into the SRT (-) Hold.
6. At any time, press the Cancel button and a dialog will ask about inserting the already tested items into SRT (-) Hold.
Setting Dilution, Rate, Quantity and Duration values The product items that were found via SRT (+) Protocol screening and that were inserted in the SRT (+) Hold have already been determined to be useful via the SRT (+) Protocol screening system. These product items can be further examined to determine their optimal Dilution, Rate, Quantity and Duration values via a similar scanning system. Or these values can be manually set to what the practitioner or technician feels to be best. These features are only available for product items held within the hold grid on the Current Hold Tab.
Manual Setting of Dilution, Rate, Quantity and Duration To manually set Dilution, Rate, Quantity and Duration values for a product item within the Hold grid do the following:
1. Select the product item within the Hold grid.
2. Press the RIGHT mouse button on the selected the product item. A pop up menu appears with four choices.
1. Select Set Dilution to set the Dilution value. Select Set Rate to set the Rate value. Select Set Quantity to set the Quantity value. Select Set Duration to set the Duration value.
2. The item get the value becomes part of the product item in the hold grid.
No
te The setting of Dilution, Rate, Quantity and
Duration values is completely optional. It adds some detail value on reports for the client as to what is expected of them in use the product item.
No
te
This process may also be used to set values on a range of product items. A range of items can be selected by selecting the first item with a mouse click and then holding down either the Shift or Alt key on the board before selecting the next item. The Alt key performs single addition of each item selected. The Shift key performs range selection of all items between the two selected.
No
te The manual setting of Dilution,
Rate, Quantity and Duration values should be used over the use of the automated setting method.
International Health Technologies Advancing the Practice of Integrative Medicine
Stimulus Response Testing with MSA Software © 2012-2018 MedProducts, LLC, All Rights Reserved Page 25
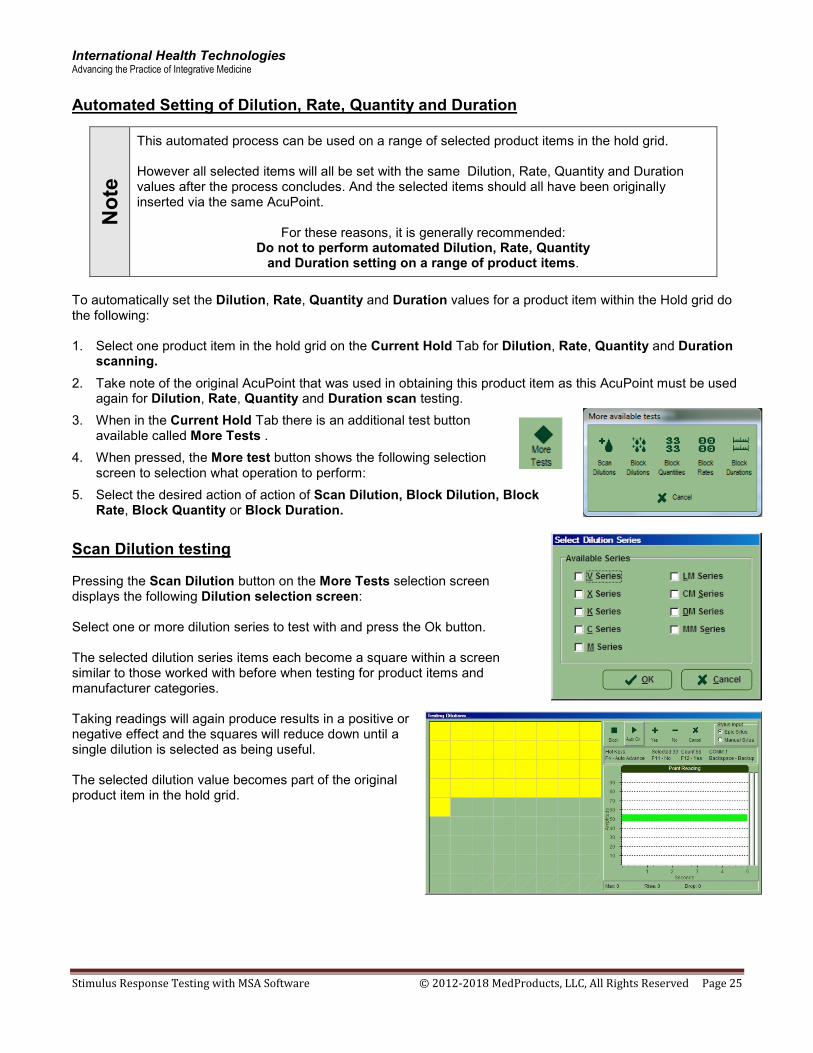
Automated Setting of Dilution, Rate, Quantity and Duration
To automatically set the Dilution, Rate, Quantity and Duration values for a product item within the Hold grid do the following: 1. Select one product item in the hold grid on the Current Hold Tab for Dilution, Rate, Quantity and Duration
scanning.
2. Take note of the original AcuPoint that was used in obtaining this product item as this AcuPoint must be used again for Dilution, Rate, Quantity and Duration scan testing.
3. When in the Current Hold Tab there is an additional test button available called More Tests .
4. When pressed, the More test button shows the following selection screen to selection what operation to perform:
5. Select the desired action of action of Scan Dilution, Block Dilution, Block Rate, Block Quantity or Block Duration.
Scan Dilution testing Pressing the Scan Dilution button on the More Tests selection screen displays the following Dilution selection screen: Select one or more dilution series to test with and press the Ok button. The selected dilution series items each become a square within a screen similar to those worked with before when testing for product items and manufacturer categories. Taking readings will again produce results in a positive or negative effect and the squares will reduce down until a single dilution is selected as being useful. The selected dilution value becomes part of the original product item in the hold grid.
No
te
This automated process can be used on a range of selected product items in the hold grid. However all selected items will all be set with the same Dilution, Rate, Quantity and Duration values after the process concludes. And the selected items should all have been originally inserted via the same AcuPoint.
For these reasons, it is generally recommended: Do not to perform automated Dilution, Rate, Quantity
and Duration setting on a range of product items.
International Health Technologies Advancing the Practice of Integrative Medicine
Stimulus Response Testing with MSA Software © 2012-2018 MedProducts, LLC, All Rights Reserved Page 26
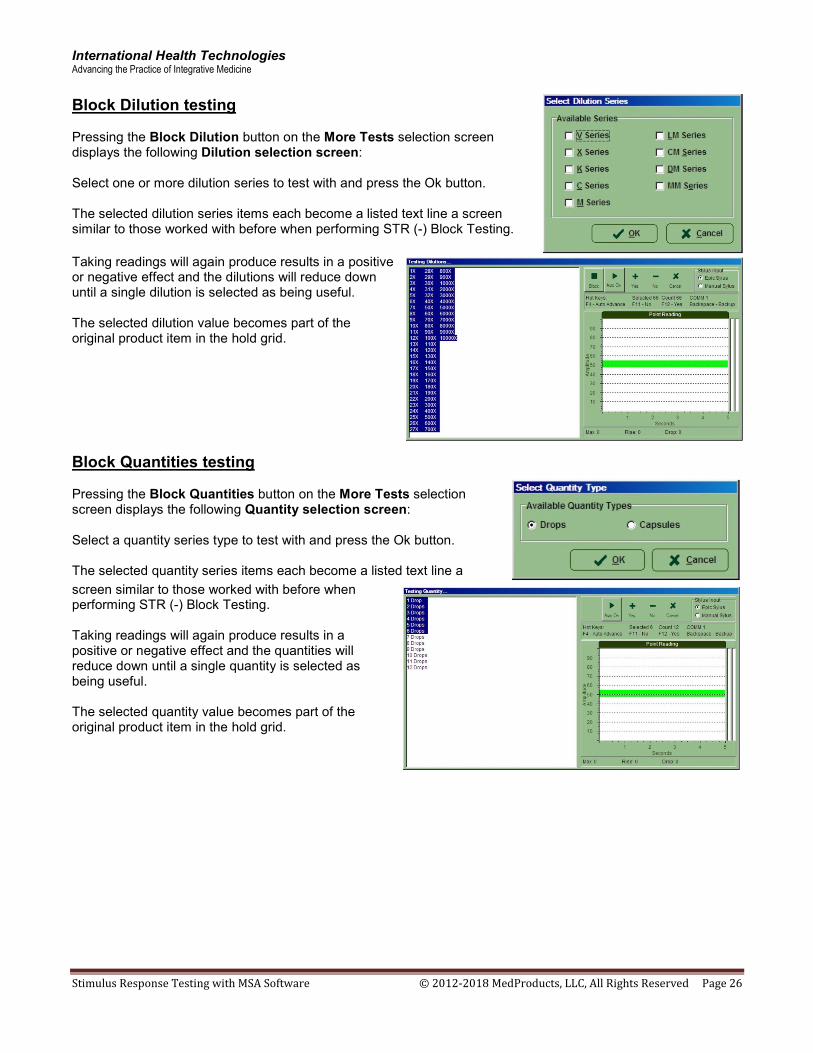
Block Dilution testing Pressing the Block Dilution button on the More Tests selection screen displays the following Dilution selection screen: Select one or more dilution series to test with and press the Ok button. The selected dilution series items each become a listed text line a screen similar to those worked with before when performing STR (-) Block Testing.
Taking readings will again produce results in a positive or negative effect and the dilutions will reduce down until a single dilution is selected as being useful. The selected dilution value becomes part of the original product item in the hold grid.
Block Quantities testing Pressing the Block Quantities button on the More Tests selection screen displays the following Quantity selection screen: Select a quantity series type to test with and press the Ok button. The selected quantity series items each become a listed text line a
screen similar to those worked with before when performing STR (-) Block Testing. Taking readings will again produce results in a positive or negative effect and the quantities will reduce down until a single quantity is selected as being useful. The selected quantity value becomes part of the original product item in the hold grid.

International Health Technologies Advancing the Practice of Integrative Medicine
Stimulus Response Testing with MSA Software © 2012-2018 MedProducts, LLC, All Rights Reserved Page 27
Block Rates testing Pressing the Block Rates button on the More Tests selection screen displays the following style Block Rates screen: The rates each become a listed text line a screen similar to those worked with before when performing STR (-) Block Testing. Taking readings will again produce results in a positive or negative effect and the rates will reduce down until a single rate is selected as being useful. The selected rate value becomes part of the original product item in the hold grid.
Block Duration testing Pressing the Block Duration button on the More Tests selection screen displays the following style Block Duration screen: The durations each become a listed text line a screen similar to those worked with before when performing STR (-) Block Testing. Taking readings will again produce results in a positive or negative effect and the rates will reduce down until a single duration is selected as being useful. The selected duration value becomes part of the original product item in the hold grid.

International Health Technologies Advancing the Practice of Integrative Medicine
Stimulus Response Testing with MSA Software © 2012-2018 MedProducts, LLC, All Rights Reserved Page 28
Hold Reports To print or preview a report of the contents of the various Holds, perform these steps:
1. Click the Perform Reports button in the tool bar.
2. Check the desired reports and options.
3. Press the Print or Preview buttons.
Hold – Reading report This report will display each product item in the selected Hold with a mini Max reading bar showing the Max reading that the product item was recorded with it.
Hold – Item report and Hold – Information report These reports prints out the Item Information for any product items in the selected Hold, including data such as item name, manufacturer, description and any notes that the practitioner added in the item notes tab. Remember, not all products or items have descriptions.
Report Options These reports have a similar option set. There is a checkbox to report on All holds, or select a hold area from the drop down list. Other option available:
� Tagged Items Only. This will only report on items that are currently checked for signal output.
� VL Grouping. This will group Hold items by their Virtual Library folder.
� Select Print Order By Options:
� Select Order How Options:
Testing Prints items in the order in which they were inserted into the Sensitivity Hold
Alphabetical Lists items in alphabetical order.
Drop Value Lists items according to the Drop value.
Maximum Value
Lists items according to the Max reading value.
Ascending Lists items from smallest to largest, based on criteria selected above.
Descending Lists items from largest to smallest, based on criteria selected above.
International Health Technologies Advancing the Practice of Integrative Medicine
Stimulus Response Testing with MSA Software © 2012-2018 MedProducts, LLC, All Rights Reserved Page 29
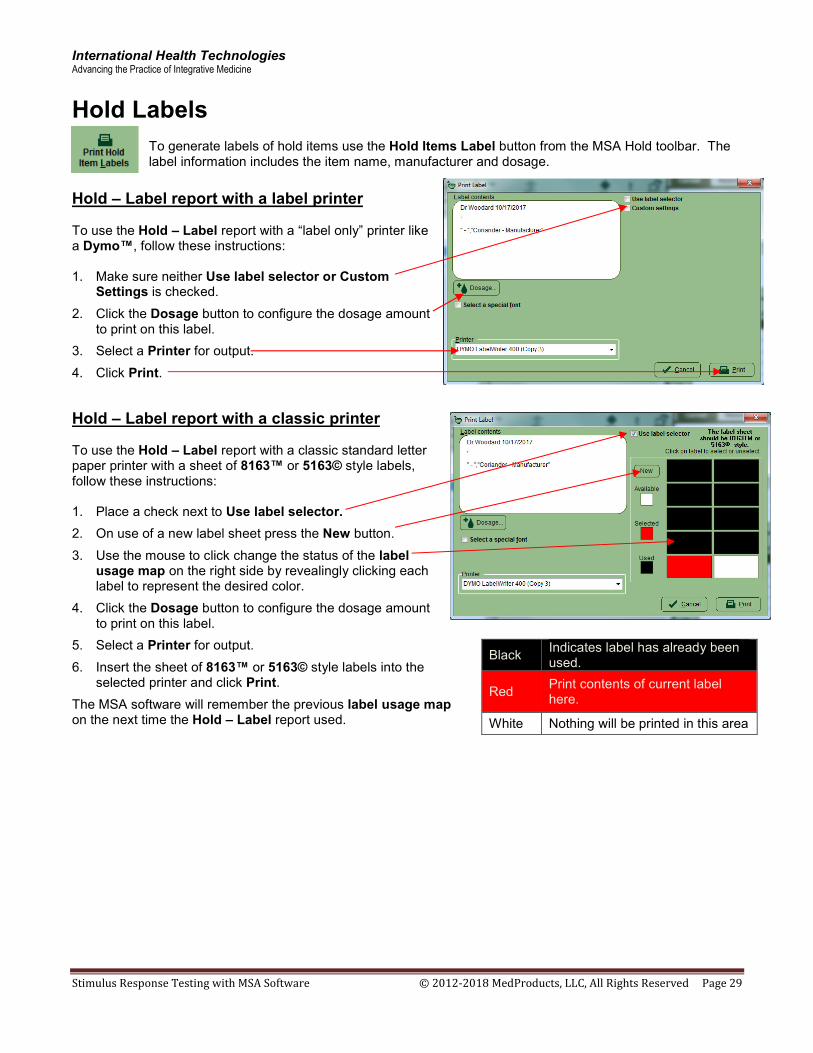
Hold Labels To generate labels of hold items use the Hold Items Label button from the MSA Hold toolbar. The label information includes the item name, manufacturer and dosage.
Hold – Label report with a label printer To use the Hold – Label report with a “label only” printer like a Dymo™, follow these instructions: 1. Make sure neither Use label selector or Custom
Settings is checked.
2. Click the Dosage button to configure the dosage amount to print on this label.
3. Select a Printer for output.
4. Click Print.
Hold – Label report with a classic printer To use the Hold – Label report with a classic standard letter paper printer with a sheet of 8163™ or 5163© style labels, follow these instructions: 1. Place a check next to Use label selector.
2. On use of a new label sheet press the New button.
3. Use the mouse to click change the status of the label usage map on the right side by revealingly clicking each label to represent the desired color.
4. Click the Dosage button to configure the dosage amount to print on this label.
5. Select a Printer for output.
6. Insert the sheet of 8163™ or 5163© style labels into the selected printer and click Print.
The MSA software will remember the previous label usage map on the next time the Hold – Label report used.
Black Indicates label has already been used.
Red Print contents of current label here.
White Nothing will be printed in this area

International Health Technologies Advancing the Practice of Integrative Medicine
Stimulus Response Testing with MSA Software © 2012-2018 MedProducts, LLC, All Rights Reserved Page 30
Hold – Label report with a specialized printer In an extreme case if the last two methods are not suitable, such as with a Zebra™ label printer then a custom label printer can be used as follows: 1. Make sure Use label selector is NOT checked.
2. Checking the Custom settings check box.
3. Select the Top and Left pixel corner offset.
4. Select a Rotate Label angle.
5. Click the Dosage button to configure the dosage amount to print on this label.
6. Select a Printer for output.
7. Click Print.
Selecting a special label font Labels can use a custom set font. Place a checkmark on the option Select a special font. Then click the Font selector drop-down arrow and select the desired font type from the list.
Tip
There are many free fonts websites on the internet to add interesting new fonts to your Windows.
No
te
If a special font is not selected, the default font used will be Arial.

International Health Technologies Advancing the Practice of Integrative Medicine
Stimulus Response Testing with MSA Software © 2012-2018 MedProducts, LLC, All Rights Reserved Page 31
Creating Custom Libraries Custom Library Introduction A Custom Library is a group of items reorganized from the Virtual Library. A Custom Library gives easier access for regularly used items. Anything that is already in the Virtual Library can be copied into a Custom Library. When the MSA software is first installed on the computer, it will not contain any Custom Libraries. However the system has the capability of holding as many Custom Libraries as desired.
A Custom Library is a valuable time saving tool. If there are products or Information Items in the Virtual Library that are used on a regular basis, then instead of searching for these items in the Virtual Library each time they are needed, copy them to new Custom Libraries. This makes testing more efficient.
Create a Custom Library for:
� Specific products that you want to organize into one or more easy to find files.
� The most common environmental allergens that are in your specific geographic location.
� Categories of homeopathic remedies that are used for specific conditions.
Starting the Custom Library Editor There are several ways to start the Custom Library Editor. 1. Open the desktop folder called MSA and double click the Custom
Library Editor application. 2. Or from the Windows Start Button � All Programs � MSA �
Custom Library Editor. The Custom Library Editor will start and the main Custom Library Editor screen will appear. This system will allow for full entry and editing privileges and the data entered will be shared with the main MSA software. The Custom Library Editor shows two library trees. Beneath each tree is detail on the currently selected item.
Building a Library The Custom Library Editor software has a Virtual Library tree on the left and a Custom Library tree on the right. In general to start building a Custom Library:
1. Start by making a new Custom Library folder with the New Folder button. Type a name for the folder like “My special testing stuff”
2. Then items can be selected from the Virtual Library tree on the left half.
3. Then with the Insert into CL button, insert the item into the currently selected Custom Library folder on the right half.
4. Items may also be drag dropped from the VL to the CL.
No
te
If the MSA program is open at the time as the Custom Library Editor program, then the MSA program must be closed and reopened it for the changes to take effect.
International Health Technologies Advancing the Practice of Integrative Medicine
Stimulus Response Testing with MSA Software © 2012-2018 MedProducts, LLC, All Rights Reserved Page 32
Moving Custom Library items If a Custom Library item or library was placed in the wrong folder, it may be cut and paste to new locations. To do so:
1. Click on the item to move.
2. From the menu, select Custom Library then Cut (or use the keyboard Shirt-Del).
3. Click on the desired location item to move.
4. From the menu, select Custom Library then Paste.
The Custom Library also allows a variety of drag drop mouse actions to re-organize a library. Items may be moved between libraries by:
1. Click on the item and keep mouse button down.
2. Move drag the mouse with the button down to the desired location for the move.
Custom Library Editor Button features Most all of the features in the Custom Library Editor are self-explanatory. There are tool buttons to:
� Find VL item: This brings up a search dialog to find items in the Virtual Library tree.
� Collapse VL tree: This will collapse the Virtual Library tree.
� Insert at CL Root: This will make a clone of selected virtual library into the custom library.
� Delete Item: Delete the selected CL item.
� Find CL item: This brings up a search dialog to find items in the Custom Library tree.
� Collapse CL tree: This will collapse the Custom Library tree.
� Preview CL: This will generate a basic Custom Library report.

International Health Technologies Advancing the Practice of Integrative Medicine
Stimulus Response Testing with MSA Software © 2012-2018 MedProducts, LLC, All Rights Reserved Page 33
Finding things There are two find item buttons in the Custom Library Editor on both the VL and CL tool button areas 1. Click the Find button in the toolbar. (Alternatively,
from the menu system click Item then click Find.)
2. The Find Item dialog window will appear.
3. Type the keyword(s) to search for in the Text to Find field. It may be helpful to use a partial word. Example: “arthr” to find products for arthritis. But spelling is important.
4. Select the area of the Library in which to search in the Search In field:
Item Name Search the names of products or items in the Virtual Library.
Item Description Search the Description field for all products in the Virtual Library. However, not all products have a description.
Item Notes Search the customized notes entered about specific products.
Item Indications Search indications for symptoms. Again, not all products have a indications. Example: Type “acid” in the Text to Find field. Select “Item Name” in the Search In field. 5. Select Search Where options. To search through everything select Full Virtual library or select Full
Custom library. Select Current VL folder or select Current CL folder to limit the search to the current selected folder.
6. Select Search Options. To find the highest possible matches in the Virtual Library, select Partial Match.
7. Normally discontinued and hidden items are skipped in searching as there will be trouble obtaining these items or they do not exist. Check Discontinued and Hidden to search with them anyway.
8. Click the Find button.
9. The system searches the Library and pulls up a list of all products or items that match the search criteria. The list of found items temporarily replaces the Library details area. The items are sorted by manufacturer name and listed alphabetically. Below left is a VL find. Below right is a CL Find.
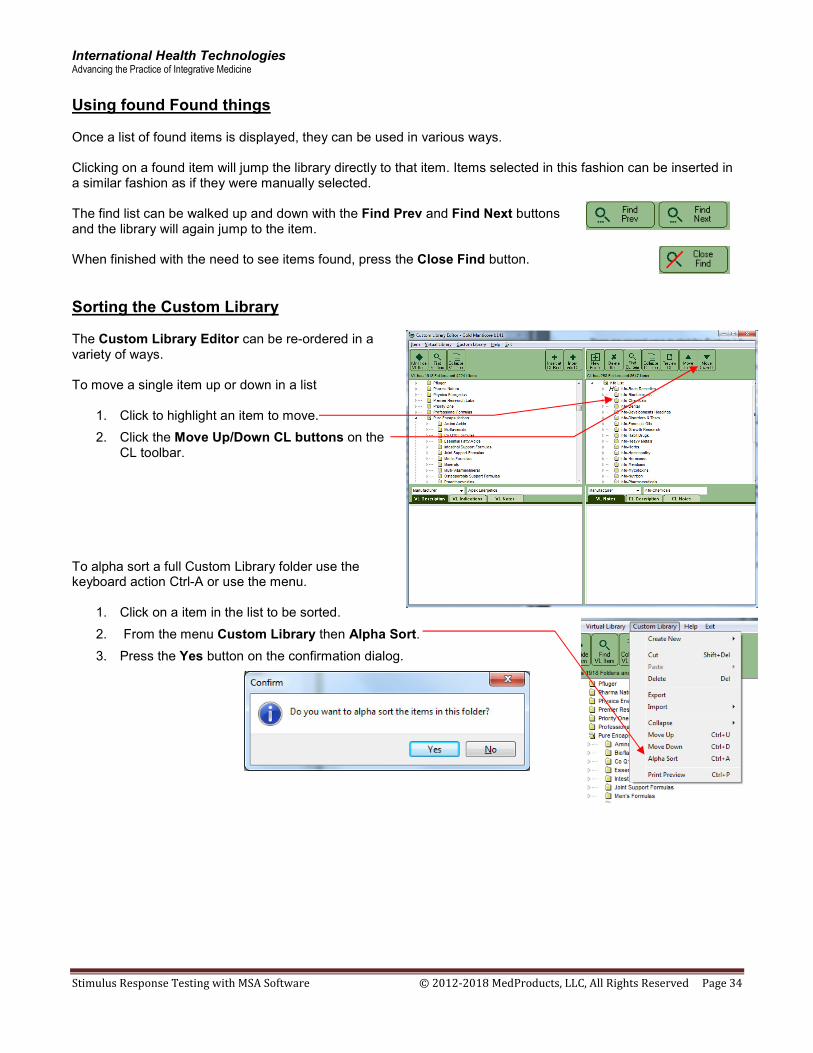
International Health Technologies Advancing the Practice of Integrative Medicine
Stimulus Response Testing with MSA Software © 2012-2018 MedProducts, LLC, All Rights Reserved Page 34
Using found Found things Once a list of found items is displayed, they can be used in various ways. Clicking on a found item will jump the library directly to that item. Items selected in this fashion can be inserted in a similar fashion as if they were manually selected. The find list can be walked up and down with the Find Prev and Find Next buttons and the library will again jump to the item. When finished with the need to see items found, press the Close Find button.
Sorting the Custom Library The Custom Library Editor can be re-ordered in a variety of ways. To move a single item up or down in a list
1. Click to highlight an item to move.
2. Click the Move Up/Down CL buttons on the CL toolbar.
To alpha sort a full Custom Library folder use the keyboard action Ctrl-A or use the menu.
1. Click on a item in the list to be sorted.
2. From the menu Custom Library then Alpha Sort.
3. Press the Yes button on the confirmation dialog.

International Health Technologies Advancing the Practice of Integrative Medicine
Stimulus Response Testing with MSA Software © 2012-2018 MedProducts, LLC, All Rights Reserved Page 35
Exporting and Importing Custom Library files It may be desirable to move a Custom Library to a format that can be transported. The Custom Library Editor can import and export a propiatary .CLB file.
� A .CLB file custom library export files may be exchanged between practitioners.
� The main MSA program has a feature that builds a .CLB file custom library export files based on the items in a hold.
To create a .CLB, click the menu Custom Library / Export to export the currently selected folder of the Custom Library tree. A previously created .CLB file can be imported in with the menu Custom Library / Import to insert into currently selected folder of the Custom Library tree.
Hiding and Un-Hiding Items in Virtual Library The Custom Library Editor can do some basic control on the items that appear in the Virtual Library within MSA. There are over 100 manufacturers found in the MSA Virtual Library, representing approximately more than 50,000 products. Maybe a few too many? Individual products, categories, items and folders in the Virtual Library can be hidden so they will not appear in the Virtual Library. This is helpful for practitioners who do not use certain lines of products or who wish to limit the library.
1. Click highlight a VL item or folder to hide.
2. Click the Hide/Unhide VL Item button in the toolbar. This will unhide an item previously hidden by mistake.
3. Items that are hidden have an H symbol in the Custom Library Editor. However, they are not visible in the main MSA program.