stm32 ecosystem workshop -...
TRANSCRIPT
STM32 Ecosystem workshopT.O.M.A.S Team

Goal of this part
Practice a bit with STMStudio – monitoring variables and creating
expressions
Practice a bit with printf implementation using SWO channel and STLink
Utility application
Practice a bit with printf implementation using USART and any terminal
application
2

In our next task we will use a PC applications to monitor data sent by
Nucleo board over STLink v2.1:
- asynchronously using USART2 interface -> monitor on any terminal
application
- synchronously, using SWO interface -> monitor on STLink Utility
application
3

Complementary debug toolsUsing printf() over SWO and USART2 to send data via USB to PC
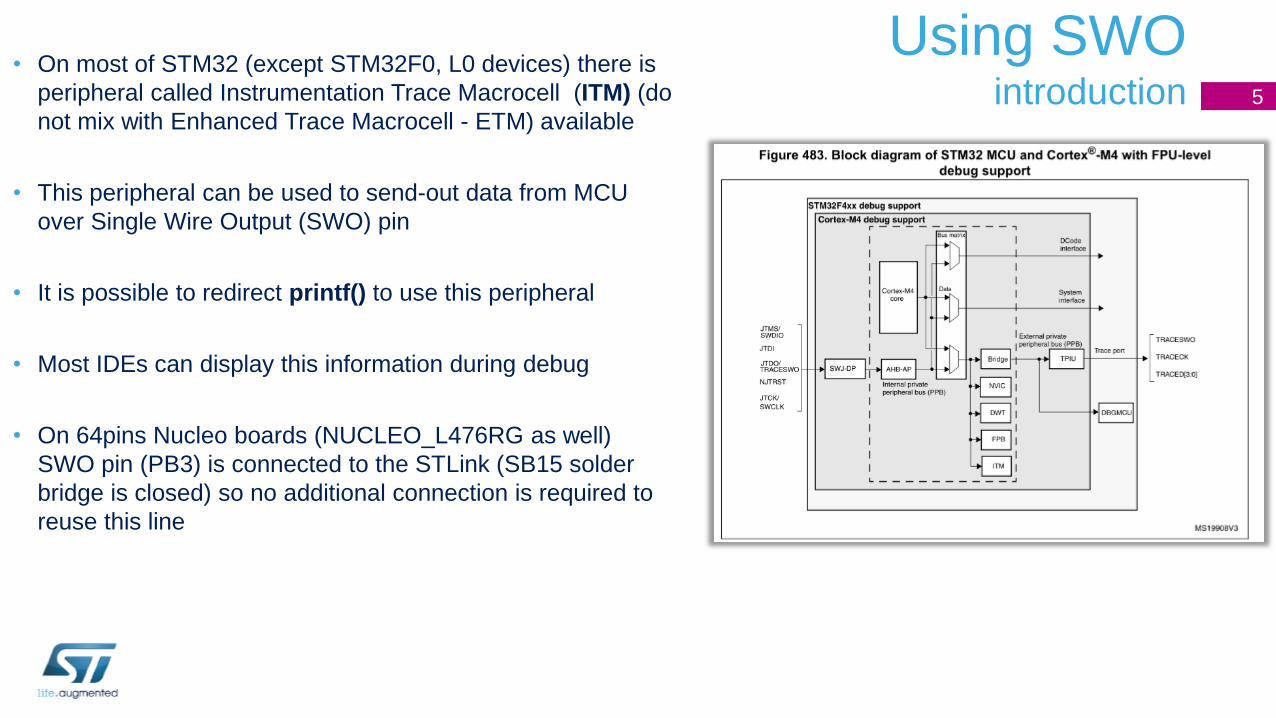
Using SWOintroduction
• On most of STM32 (except STM32F0, L0 devices) there is
peripheral called Instrumentation Trace Macrocell (ITM) (do
not mix with Enhanced Trace Macrocell - ETM) available
• This peripheral can be used to send-out data from MCU
over Single Wire Output (SWO) pin
• It is possible to redirect printf() to use this peripheral
• Most IDEs can display this information during debug
• On 64pins Nucleo boards (NUCLEO_L476RG as well)
SWO pin (PB3) is connected to the STLink (SB15 solder
bridge is closed) so no additional connection is required to
reuse this line
5

Concept of the systemsending measured data over SWO and USART2 via STLink 6
dacbuf
32
adcbuf
1
DAC
CH1
ADC1
CH6
PA4
PA1
jumper
connection
DMA1
Channel 3
DMA1
Channel 1
Tim2 trigger
(TRGO,
Update)
Tim2 trigger
(OC2)
Buffers in
Flash, SRAM
TIM2
HSI*PLL
80MHz
STM32L476RGT6
Hardware
overview
TIM2ITM 80MHz
STLink
inte
rna
l
co
nn
ec
tio
ns
USB
• Use the project from previous part
(L4_DAC_ADC.ioc)
• Enable SWO line with debug interface
(PB3 pin)
• Enable USART2 in asynchronous
mode: 115200bps, 8bit data, no parity,
1bit stop
• Modify printf() to use SWO or USART2
as an output channels
• Configure user button (PC13) to
start/stop Timer2
• Configure ADC transfer complete
callback to send adcbuf[0] using printf
DMA
Irq
PC13 User
button (BLUE)
DMA
Irq
EXTI13
Irq
Start/Stop
Start/Stop
PC
USART2
115200/8/1/no
Send

Adding SWO, EXTI13 and USART2STM32CubeMX – Pinout tab
1. Open L4_DAC_ADC.ioc project in STM32CubeMX
• Menu File Open Project
2. In STM32CubeMX, pinout tab enable SWO pin
• Select SYS Debug Trace Asynchronous Sw
3. Click left button on mouse over PC13 pin and select GPIO_EXTI13 mode
7
4. Select USART2 in asynchronous mode
• Select USART2->Mode: Asynchronous

Configure USART2 and EXTI13STM32CubeMX – Configuration tab
• Configure USART2 parameters:
• 115200 bps / 8 bit data / 1 bit stop / no parity / no HW control
8
• Enable EXTI line[15:10] within NVIC
configuration

• Generate the code with added new features
• Perform further processing in SW4STM32 (L4_DAC_ADC project)
9
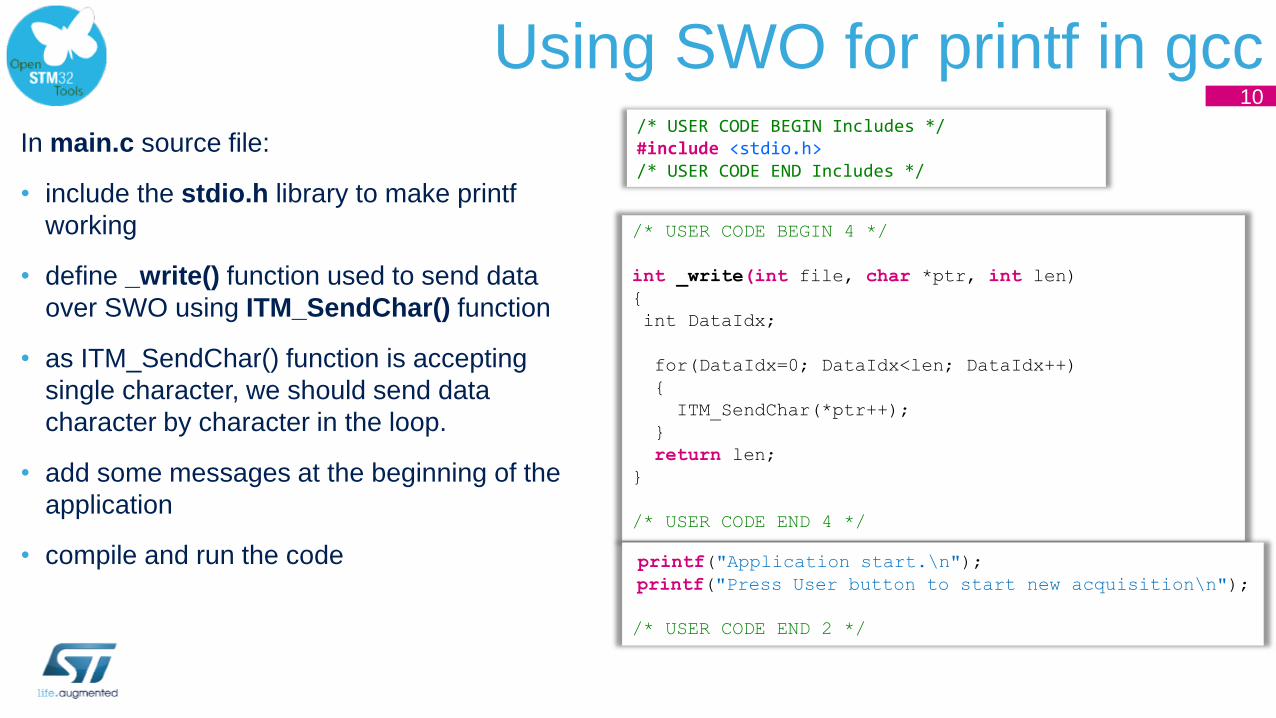
Using SWO for printf in gcc
In main.c source file:
• include the stdio.h library to make printf
working
• define _write() function used to send data
over SWO using ITM_SendChar() function
• as ITM_SendChar() function is accepting
single character, we should send data
character by character in the loop.
• add some messages at the beginning of the
application
• compile and run the code
/* USER CODE BEGIN Includes */#include <stdio.h>/* USER CODE END Includes */
/* USER CODE BEGIN 4 */
int _write(int file, char *ptr, int len)
{
int DataIdx;
for(DataIdx=0; DataIdx<len; DataIdx++)
{
ITM_SendChar(*ptr++);
}
return len;
}
/* USER CODE END 4 */
10
printf("Application start.\n");
printf("Press User button to start new acquisition\n");
/* USER CODE END 2 */
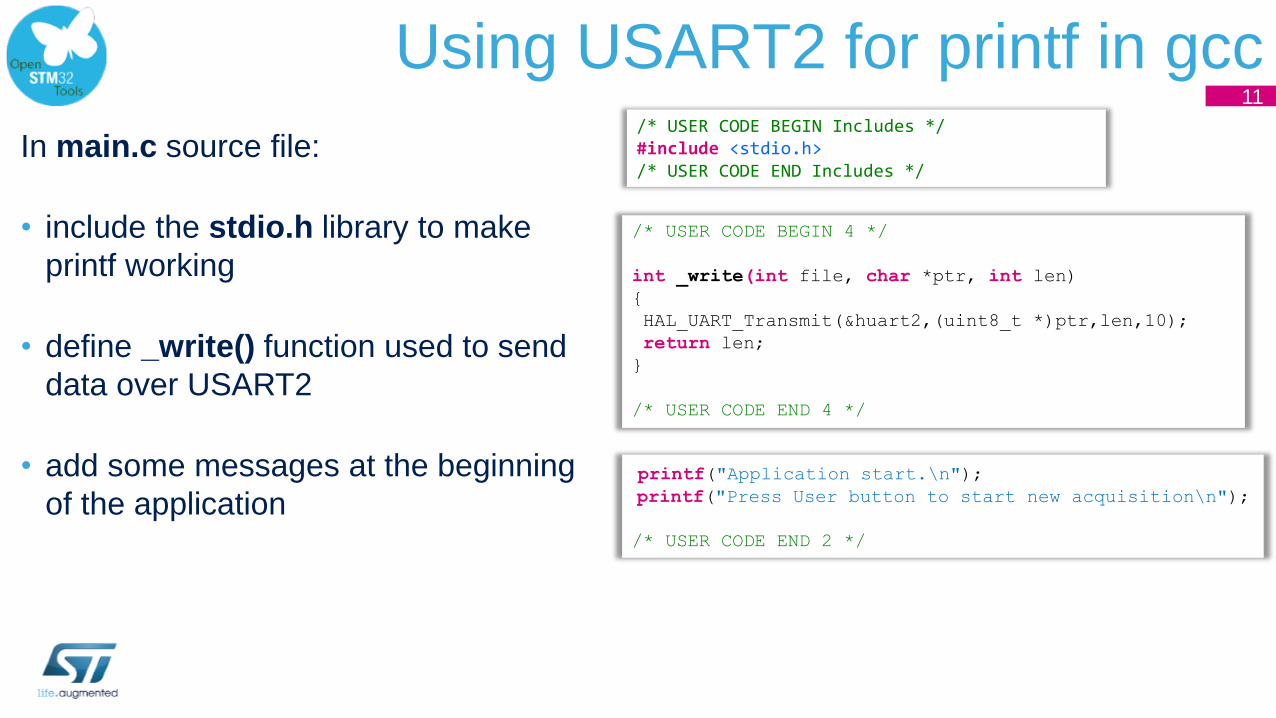
Using USART2 for printf in gcc
In main.c source file:
• include the stdio.h library to make
printf working
• define _write() function used to send
data over USART2
• add some messages at the beginning
of the application
/* USER CODE BEGIN Includes */#include <stdio.h>/* USER CODE END Includes */
/* USER CODE BEGIN 4 */
int _write(int file, char *ptr, int len)
{
HAL_UART_Transmit(&huart2,(uint8_t *)ptr,len,10);
return len;
}
/* USER CODE END 4 */
11
printf("Application start.\n");
printf("Press User button to start new acquisition\n");
/* USER CODE END 2 */

Sending ADC results over printf
/* USER CODE BEGIN 4 */
void HAL_GPIO_EXTI_Callback(uint16_t GPIO_Pin)
{
if(GPIO_PIN_13==GPIO_Pin)
{
if(0==flag)
{
HAL_TIM_OC_Stop(&htim2,TIM_CHANNEL_2);
printf("Acquisition stopped\n");
printf("Press button to START a new one\n");
flag=1;
}
else
{
printf("Acquisition started\n");
printf("Press button to STOP it\n");
flag=0;
HAL_TIM_OC_Start(&htim2,TIM_CHANNEL_2);
}
}
}
12
void HAL_ADC_ConvCpltCallback(ADC_HandleTypeDef* hadc)
{
printf("%d\n",adcbuf[0]);
}
/* USER CODE END 4 */
• In main.c source file (inside USER CODE
section) implement own EXTI13 and ADC
conversion complete callbacks:
• First one to control start/stop acquisition
• Second one for sending adcbuf[] using printf() once
acquisition is stopped
volatile uint8_t flag=1;
/* USER CODE END PV */
Additionally we should not start Timer2 at the
beginning (USER CODE 2 section, before
while(1) loop)

13
Analize the data from ADCdata sent over USART2
• Open serial terminal selecting COM port assigned to Virtual
COMP Port (VCP) implemented in STLink, using the
configuration:
• 115200pbs / 8 data bits / 1 STOP bit / NO parity / NO HW flow control
• Reset the board, now you should see “Application start”
message in terminal window
• Follow the instructions in the terminal window (User button is
the blue one on Nucleo board)
• Using copy&paste mechanism copy data to clipboard and
then paste them into the spread sheet application (i.e. Excel)
• Display the waveform
0
1000
2000
3000
4000
5000
1 3 5 7 9 11 13 15 17 19 21 23 25 27 29 31
Chart Title
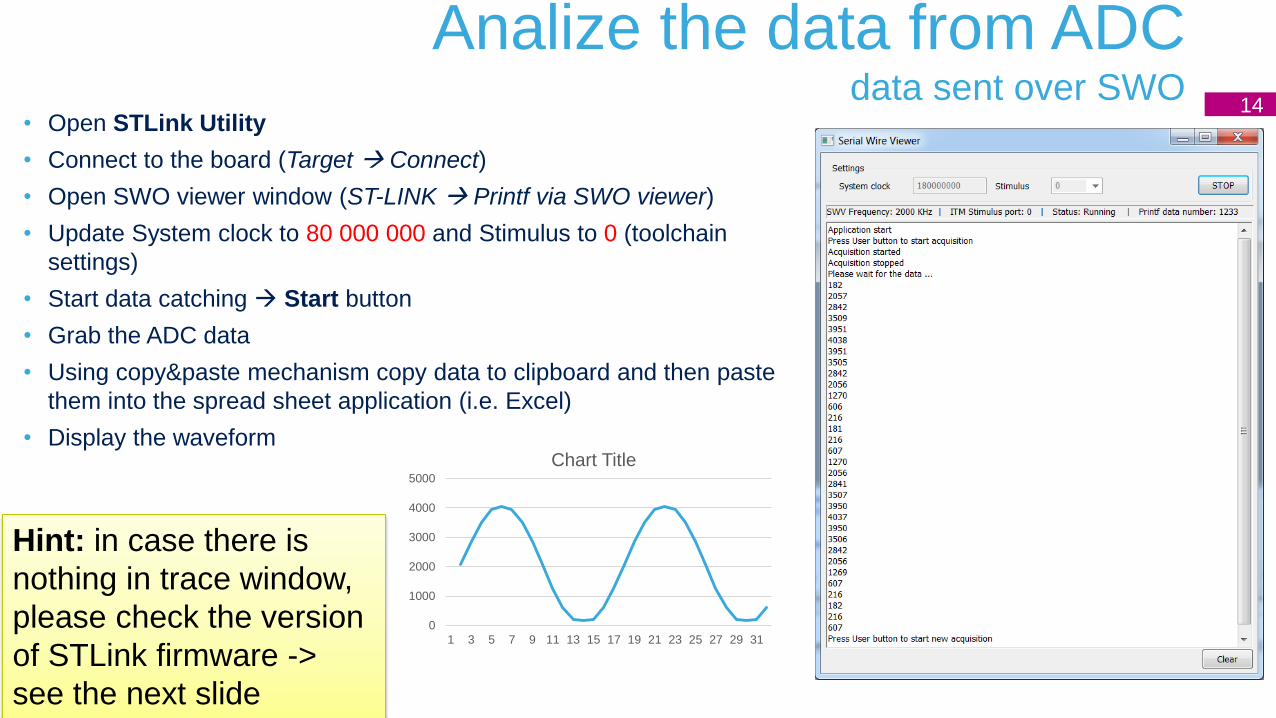
14• Open STLink Utility
• Connect to the board (Target Connect)
• Open SWO viewer window (ST-LINK Printf via SWO viewer)
• Update System clock to 80 000 000 and Stimulus to 0 (toolchain
settings)
• Start data catching Start button
• Grab the ADC data
• Using copy&paste mechanism copy data to clipboard and then paste
them into the spread sheet application (i.e. Excel)
• Display the waveform
0
1000
2000
3000
4000
5000
1 3 5 7 9 11 13 15 17 19 21 23 25 27 29 31
Chart Title
Hint: in case there is
nothing in trace window,
please check the version
of STLink firmware ->
see the next slide
Analize the data from ADCdata sent over SWO

15
SWO viewer in STLink UtilityNo data in trace window – upgrade of the driver
In case there is no data in trace window, it is highly probable that
the STLink software on Nucleo board is not up-to-date
• To update this software, please follow the below procedure:
• Select ST-LINK->Firmware update
• Press Device Connect button on “ST-Link Upgrade”
window
• After a while there will be information about firmware
version on STLink and the current one
• In case the current one has higher number, please upgrade
STLink by pressing Yes >>>> button
• After completion of the operation message window will
appear
• We can close “ST-Link Upgrade” window and continue
operations on upgraded board.

What have we learnt
Practice a bit with STMStudio – monitoring variables and creating
expressions
Practice a bit with printf implementation using SWO channel and STLink
Utility application
Practice a bit with printf implementation using USART and any terminal
application
16