storagezones controller 3 - citrix.com · if storagezones controller cannot ... over https to...
TRANSCRIPT

© 1999-2017 Citrix Systems, Inc. All rights reserved. p.1https://docs.citrix.com
StorageZones Controller 3.3
Mar 09, 2016
For a link to documentation for the most current release, see StorageZones Controller.
To download the latest version, see https://www.citrix.com/downloads/sharefile/. Sign in to your Citrix account to access
all application downloads.

© 1999-2017 Citrix Systems, Inc. All rights reserved. p.2https://docs.citrix.com
What's new in StorageZones Controller 3.3
Apr 06, 2015
StorageZones Controller 3.3 introduces these new features:
View Only Sharing, Web App Previews and Thumbnails. ShareFile now allows you to combine the StorageZones
Controller and Office Web App Server onto a single external address using NetScaler content switching policies. This
feature allows you to remove the download option when sharing f iles, preview on-premise f iles and their thumbnails on
the Web App, disable the Download, Print and Copy operations within the web browser's Document Viewer, and prevent
users from downloading or sharing f iles stored in a folder.
Note: You can upgrade to StorageZones Controller 3.3 from version 3.0.1 or later. If your current StorageZones Controller
version is 3.0.0 or earlier, you must upgrade to StorageZones Controller 3.0.1 before upgrading to 3.3. For details, see
Upgrade.
Known issues in release 3.3
General
By design, configuration changes to a StorageZones Controller are not propagated to other Controllers in the same
StorageZone. After any configuration change, be sure to restart the IIS server on the primary and secondary servers and
then log into the configuration page on each server.
Use of Microsoft Azure or Amazon S3 storage with StorageZones Controller requires DNS connectivity between that
storage and your temporary CIFS storage. If StorageZones Controller cannot contact those providers, you may
experience upload or download failures. [#SFSZP-361]
For allowed and denied paths, long-form URL paths to SharePoint folders are not always enforced. Use the short form
instead. [#25318]
Example short URL path:
https://sharepoint2013.sfonprem.com/sites/QATest/_layouts/15/start.aspx#/Doc%20Library%201/Folder one/
In the long version of that same URL, Folder one is expanded to Forms/AllItems.aspx?RootFolder=%xxx.
SharePoint documents are truncated if StorageZones Controller and SharePoint share the same XenServer host and the
network adapter setting Large Send Offload is enabled on the SharePoint server. To work around this issue, disable
Large Send Offload on the SharePoint server or disable Large Receive Offload on the StorageZones Controller server.
[#17103]
If your StorageZones Controller is behind a proxy server configured with Basic or Windows Challenge/Response (NTLM)
authentication, you cannot set up Azure storage for your ShareFile StorageZone data. To use Azure storage for
StorageZone data, configure the proxy server for Anonymous authentication. [#105283]
The ShareFileURL registry entry is not updated after you change your ShareFile subdomain. To work around this issue,
update the value of the following ShareFileURL entries on each StorageZones Controller server: [#102158]
HKEY_LOCAL_MACHINE\SOFTWARE\Wow6432Node\Citrix\StorageCenter\ShareFileURL
HKEY_LOCAL_MACHINE\SOFTWARE\Wow6432Node\Citrix\StorageZone\ShareFileURL

© 1999-2017 Citrix Systems, Inc. All rights reserved. p.3https://docs.citrix.com
System requirements
Mar 13, 2017
StorageZones Controller
A dedicated physical or virtual machine with 2 CPUs and 4 GB RAM
Windows Server 2012 R2 (Datacenter, Standard, or Essentials)
or
Windows Server 2008 R2, 64-bit edition, SP1 (Datacenter, Standard, or Essentials)
For standard StorageZones:
Use a publicly-resolvable Internet hostname (not an IP address).
Enable SSL for communications with ShareFile.
The SSL certificate on the StorageZones Controller must be trusted by user devices and ShareFile web servers.
If you use SSL directly with IIS, refer to http://support.microsoft.com/kb/298805 for information about configuring
SSL.
Allow inbound TCP requests on port 443 through the Windows f irewall.
Allow outbound TCP requests to the ShareFile control plane on port 443 through the Windows f irewall.
ShareFile.com control plane IP range: 173.199.5.0 - 173.199.5.255.
ShareFile.eu control plane IP range: 78.108.127.0 - 78.108.127.255.
Allow outbound TCP requests to *.sf-api.com or *.sf-api.eu on port 443 through the Windows f irewall.
For restricted StorageZones:
Use an internal or external hostname.
Enable SSL for communications with ShareFile.
If you use an internal hostname, you can use a private certificate. The certificate must be trusted by user devices.
If you use an external hostname, the SSL certificate on the StorageZones Controller must be trusted by user devices
and ShareFile web servers.
Provide outbound HTTP access from StorageZones Controller to one of the following service bus URIs:
ShareFile.com accounts: sf-zk-email-use.servicebus.windows.net
ShareFile.eu accounts: sf-zk-email-euw.servicebus.windows.net
Be sure to arrange network dependencies with your networking team.
For the server health check used only for StorageZones for ShareFile Data: Open port 80 on the localhost.
For a high availability production environment:
A minimum of two servers with StorageZones Controller installed.
If you are not using DMZ proxy servers, install an SSL certif icate on the IIS service.
For information about supported certificates, see the certificate requirements for standard and restricted zones
above.
For a DMZ proxy deployment:
One or more DMZ proxy servers, such as Citrix NetScaler VPX instances
For a DMZ proxy server that terminates the client connection and uses HTTP, install an SSL certif icate on the proxy
© 1999-2017 Citrix Systems, Inc. All rights reserved. p.4https://docs.citrix.com
server.
If communications between the DMZ proxy server and the StorageZones Controller are secure, you can use HTTP.
However, HTTPS is recommended as a best practice. If you use HTTPS, you can use a private (Enterprise) certificate
on the StorageZones Controller if it is trusted by the DMZ proxy. The external address exposed by the DMZ proxy
must use a commercially trusted certificate. For information about supported certificates, see the certificate
requirements for standard and restricted zones above.
Other requirements
The StorageZones Controller installer requires administrative privileges.
For remote administration of StorageZones Controller, use a remoting protocol, such as RDP or Citrix ICA, to connect to
the server and then open the StorageZones Controller console.
If you use User Management Tool to provision user accounts, User Management Tool 1.7.3 is required for restricted
zones.
Supported third-party storage systems
Amazon Simple Storage Service (Amazon S3)
Microsoft Azure
Supported Data Loss Prevention solutions
StorageZones Controller integrates with any ICAP-compliant DLP solution, including:
Symantec Data Loss Prevention
McAfee DLP Prevent
Websense TRITON AP-DATA
RSA Data Loss Prevention
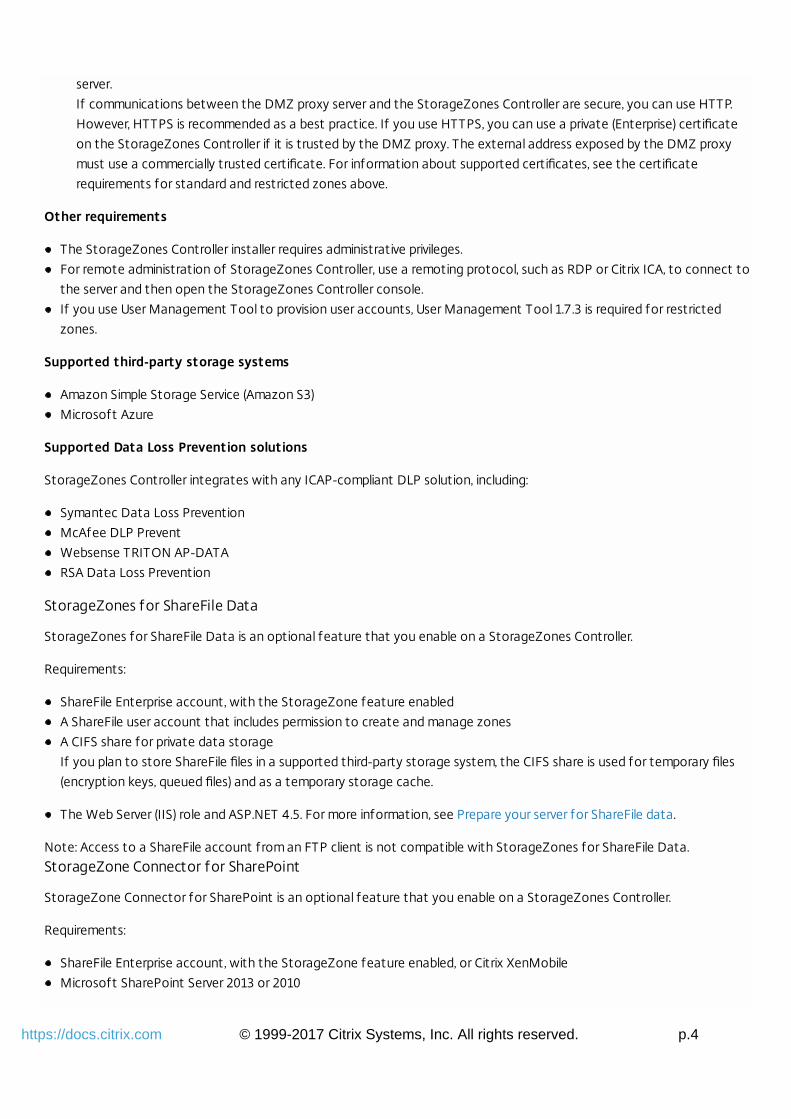
StorageZones for ShareFile Data
StorageZones for ShareFile Data is an optional feature that you enable on a StorageZones Controller.
Requirements:
ShareFile Enterprise account, with the StorageZone feature enabled
A ShareFile user account that includes permission to create and manage zones
A CIFS share for private data storage
If you plan to store ShareFile files in a supported third-party storage system, the CIFS share is used for temporary files
(encryption keys, queued files) and as a temporary storage cache.
The Web Server (IIS) role and ASP.NET 4.5. For more information, see Prepare your server for ShareFile data.
Note: Access to a ShareFile account from an FTP client is not compatible with StorageZones for ShareFile Data.
StorageZone Connector for SharePoint
StorageZone Connector for SharePoint is an optional feature that you enable on a StorageZones Controller.
Requirements:
ShareFile Enterprise account, with the StorageZone feature enabled, or Citrix XenMobile
Microsoft SharePoint Server 2013 or 2010

© 1999-2017 Citrix Systems, Inc. All rights reserved. p.5https://docs.citrix.com
The StorageZones Controller server must be a domain member, in the same forest as the SharePoint server.
The Web Server (IIS) role and ASP.NET 4.5. For more information, see Prepare your server for ShareFile data.
SharePoint policies:
The default maximum upload f ile size for a Web application in SharePoint 2013 is 250 MB and in SharePoint 2010 is 50
MB. To change the default: In SharePoint Central Administration, go to the Web Application General Settings page
and change the Maximum Upload Size. The upload f ile size limit for SharePoint is 2 GB.
ShareFile clients always attempt to check in a major version (publish) of a f ile. However, SharePoint policies determine
whether a f ile is checked in as a major or minor version.
The SharePoint View-Only permission does not enable a user to download f iles. To read a f ile from a ShareFile client,
a SharePoint user must have Read permission.
User devices: For the latest information about user device support for StorageZone Connectors, refer to the ShareFile
Knowledge Base.
StorageZone Connector for SharePoint authentication
After authenticating the user, the StorageZones Controller server makes connections to the SharePoint server on the
authenticated user’s behalf and responds to authentication challenges presented by the SharePoint server. StorageZone
Connector for SharePoint supports the following authentication methods on the SharePoint server.
Basic
Requires that you add <add key="CacheCredentials" value="1" /> to
C:\inetpub\wwwroot\Citrix\StorageCenter\sp\AppSettingsRelease.config.
Negotiate (Kerberos)
Windows Challenge/Response (NTLM)
ShareFile mobile clients use Basic authentication over HTTPS to authenticate to the StorageZones Controller or DMZ
proxy. Single sign-on to SharePoint is governed by the authentication requirements set on the SharePoint server. To use
Kerberos or NTLM authentication on the SharePoint server: Configure the domain controller to trust the StorageZones
Controller for delegation.
If your SharePoint server is configured for Kerberos authentication: Configure a service principal name (SPN) for the named
user service accounts for the SharePoint server application pool. For more information, refer to "Configure trust for
delegation for Web parts" in http://support.microsoft.com/kb/832769.
For deployments with NetScaler, it is possible to terminate Basic authentication at the NetScaler and then perform other
types of authentication to the StorageZones Controller.
The following table indicates the supported scenarios when NetScaler is configured for Basic authentication.
Authentication method on StorageZones Controller Authentication method on SharePoint server
Basic Negotiate (Kerberos) NTLM
Basic Yes (1) Yes Yes
Negotiate (Kerberos) No Yes (2) No
NTLM No Yes No

© 1999-2017 Citrix Systems, Inc. All rights reserved. p.6https://docs.citrix.com
(1) Requires that you add <add key="CacheCredentials" value="1" /> to
C:\inetpub\wwwroot\Citrix\StorageCenter\sp\AppSettingsRelease.config.(2) To provide users with a single sign-on experience, configure the Connector for NTLM authentication.
Authentication method on StorageZones Controller Authentication method on SharePoint server
Basic Negotiate (Kerberos) NTLM
The following diagram summarizes the supported combinations of authentication types based on whether the user
authenticates at NetScaler.
StorageZone Connector for Network File Shares
StorageZone Connector for Network File Shares is an optional feature that you enable on a StorageZones Controller.
Requirements:
ShareFile Enterprise or Citrix XenMobile account
The StorageZone Connector server must be a domain member, in the same forest as the network f ile servers.
The Web Server (IIS) role and ASP.NET 4.5. For more information, see Prepare your server for ShareFile data.
User devices: For the latest information about user device support for StorageZone Connectors, refer to the ShareFile
Knowledge Base.
Connector for Network File Shares authentication
After authenticating the user, the StorageZones Controller server makes connections to the network file server on the
authenticated user’s behalf and responds to authentication challenges presented by the file server. StorageZone
Connector for Network File Shares supports the following authentication methods on the file server.
Negotiate (Kerberos)
Windows Challenge/Response (NTLM)
To use Kerberos or NTLM authentication on the StorageZones Controller: Configure the domain controller to trust the
StorageZones Controller for delegation.
For deployments with NetScaler: To provide users with a single sign-on experience when NetScaler is configured for Basic

© 1999-2017 Citrix Systems, Inc. All rights reserved. p.7https://docs.citrix.com
authentication, configure the Connector for both Negotiate (Kerberos) and NTLM authentication.
PowerShell scripts and commands
The StorageZones Controller installation includes several PowerShell scripts and commands, located in
C:\inetpub\wwwroot\Citrix\StorageCenter\Tools\.
Run the scripts in the 32-bit (x86) version of PowerShell.
For best results, upgrade to PowerShell 4.0, included with Windows Management Framework 4.0.
PowerShell 2.0 causes significant problems due to compatibility issues with .NET Framework 4.
Client requirements for restricted StorageZones
The ShareFile web application supports restricted StorageZones from the following web browsers:
Internet Explorer 11
To enable access from the ShareFile web application to folders and connectors in restricted zones:
1. Open Internet Explorer, go to Internet Options, click the Security tab, and then click Trusted Sites.
2. Click Sites and then add your subdomain and the external StorageZones Controller address.
3. Click Close and then click Custom Level.
4. For Miscellaneous > Access data sources across domains, select Enable.
5. For User Authentication > Logon, select Prompt for user name and password.
Chrome
Firefox
Safari
WorxWeb
To support restricted StorageZones, ShareFile clients must be upgraded to the following versions or later:
ShareFile Sync for Windows 3.1
ShareFile Outlook Plugin 3.2.2
ShareFile for iOS 3.3
ShareFile for Android 3.4
ShareFile for Windows Phone 2.3.10
These ShareFile clients and tools are not supported for use with restricted StorageZones as of the publication date of this
article:
Note: For the latest information about ShareFile client capabilities, see the ShareFile support site or contact your ShareFilesupport representative.
Off-domain use of ShareFile Desktop Sync for Windows 3.1 and ShareFile Outlook Plug-in
The clients must be on a domain-joined Windows desktop that is in the same Active Directory forest as the
StorageZones Controller server. Clients can use NTLM or Kerberos for silent authentication to a restricted zone.
On-Demand Sync for Windows
Sync for Mac
ShareFile Enterprise Sync Manager
WorxMail for iOS
ShareFile Desktop Widget
ShareFile for BlackBerry

© 1999-2017 Citrix Systems, Inc. All rights reserved. p.8https://docs.citrix.com
Sharefile mobile website
The following alternative account access methods are not supported for use with restricted StorageZones:
FTP
Powershell
ShareFile Command Line Interface (SFCLI)
HTTPS API (V1)
WebDav
SMTP
ImportantShareFile does not officially support and does not recommend utilizing DFS replication as it has been known to cause locking
failures for larger files. If DFS replication must be used, please use separate backup solutions during off-peak hours when the zone
is not actively in use.

© 1999-2017 Citrix Systems, Inc. All rights reserved. p.9https://docs.citrix.com
About ShareFile StorageZones Controller
Apr 10 , 2015
ShareFile is a file sharing service that enables users to easily and securely exchange documents. ShareFile Enterprise provides
enterprise-class service and includes StorageZones Controller and the User Management Tool.
ShareFile StorageZones Controller extends the ShareFile Software as a Service (SaaS) cloud storage by providing your
ShareFile account with private data storage, referred to as StorageZones for ShareFile Data. Managing your own data
storage enables you to meet regulatory compliance requirements and to locate the storage close to users for optimized
performance.
You can use the ShareFile-managed cloud storage by itself or in combination with storage that you maintain, called
StorageZones for ShareFile Data. The StorageZones that you maintain can reside in your on-premises single-tenant
storage system or in supported third-party cloud storage, such as Amazon S3 or Windows Azure.
StorageZones Controller also provides users with secure access to SharePoint sites and network file shares through
StorageZone Connectors. Connected file shares can include the same network home drives used in Citrix XenDesktop or
XenApp environments. StorageZone Connectors enable you to provide secure mobile access to data residing behind your
corporate firewall without the need to migrate data to the cloud.
StorageZone Connectors enables ShareFile client users to browse, upload, or download documents. For documents stored
in SharePoint, mobile users can download, check out, edit, and check in Microsoft Office documents and annotate Adobe
PDF documents. The mobile content editor integrated with ShareFile provides mobile users with a secure, rich editing
experience, even when working offline.
Quick links to topic sections:
Components
Data storage
User authentication
Standard and restricted StorageZones
Components
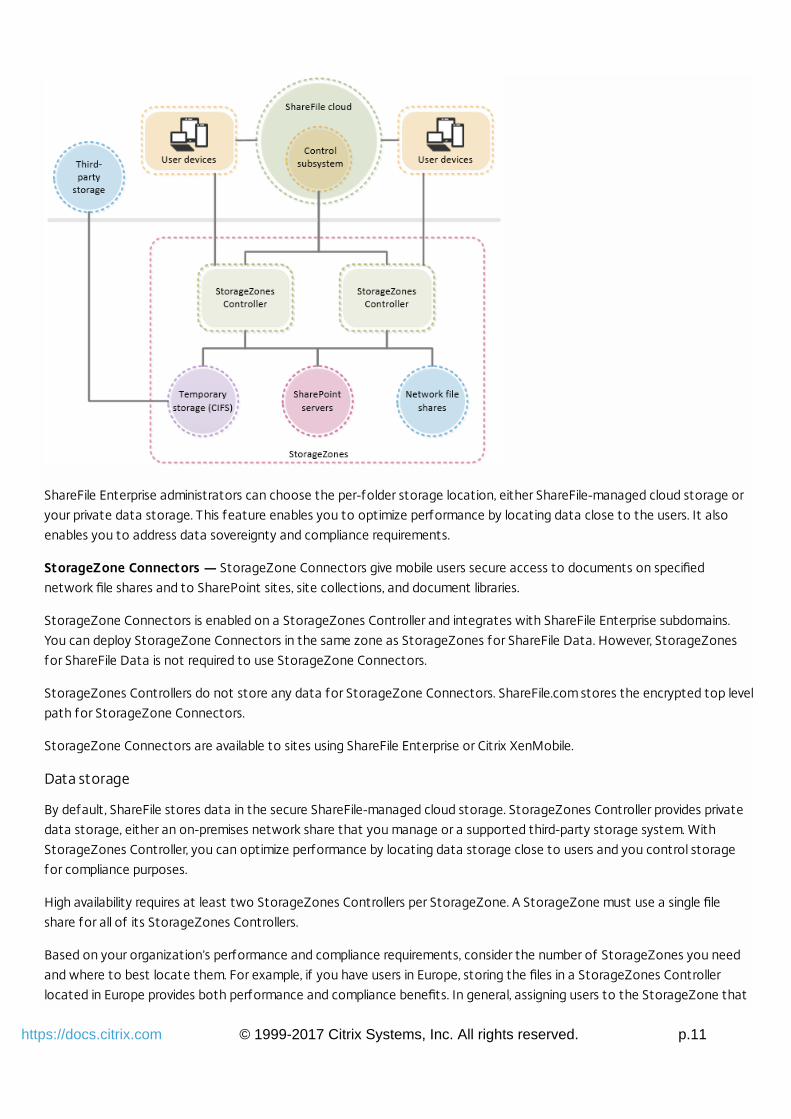
The following diagram shows the key components in a high-availability deployment.

© 1999-2017 Citrix Systems, Inc. All rights reserved. p.10https://docs.citrix.com
The components are:
ShareFile control subsystem — Maintained in Citrix Online data centers, the ShareFile control subsystem handles a variety
of operations not related to file contents and performs StorageZones health checks.
StorageZones Controller — StorageZones Controller can host a private ShareFile storage subsystem for your data.
StorageZones Controller has a Web service that handles all HTTPS operations from end users and the ShareFile control
subsystem.
StorageZones for ShareFile Data — This feature provides private data storage: You can store data in an on-premises
network file share that you manage or in a supported third-party storage system. Either storage option requires a network
share for your private data such as encryption keys, queued files, and other temporary items. If you use third-party storage,
the network share is used for your private data storage. Each StorageZones Controller in a StorageZone must use the
same network share.
This figure shows the key components when third-party storage is used.
© 1999-2017 Citrix Systems, Inc. All rights reserved. p.11https://docs.citrix.com
ShareFile Enterprise administrators can choose the per-folder storage location, either ShareFile-managed cloud storage or
your private data storage. This feature enables you to optimize performance by locating data close to the users. It also
enables you to address data sovereignty and compliance requirements.
StorageZone Connectors — StorageZone Connectors give mobile users secure access to documents on specified
network file shares and to SharePoint sites, site collections, and document libraries.
StorageZone Connectors is enabled on a StorageZones Controller and integrates with ShareFile Enterprise subdomains.
You can deploy StorageZone Connectors in the same zone as StorageZones for ShareFile Data. However, StorageZones
for ShareFile Data is not required to use StorageZone Connectors.
StorageZones Controllers do not store any data for StorageZone Connectors. ShareFile.com stores the encrypted top level
path for StorageZone Connectors.
StorageZone Connectors are available to sites using ShareFile Enterprise or Citrix XenMobile.
Data storage
By default, ShareFile stores data in the secure ShareFile-managed cloud storage. StorageZones Controller provides private
data storage, either an on-premises network share that you manage or a supported third-party storage system. With
StorageZones Controller, you can optimize performance by locating data storage close to users and you control storage
for compliance purposes.
High availability requires at least two StorageZones Controllers per StorageZone. A StorageZone must use a single file
share for all of its StorageZones Controllers.
Based on your organization’s performance and compliance requirements, consider the number of StorageZones you need
and where to best locate them. For example, if you have users in Europe, storing the files in a StorageZones Controller
located in Europe provides both performance and compliance benefits. In general, assigning users to the StorageZone that

© 1999-2017 Citrix Systems, Inc. All rights reserved. p.12https://docs.citrix.com
is closest to them geographically is the best practice for optimizing performance.
Data storage security considerations
In an enterprise environment where the network share for a StorageZone is already secured by third-party tools, we
recommend that you do not encrypt the f iles on the share. Although this additional security is offered as an option for
maximum security when required, encrypting f iles on the share will make the disk unreadable by third-party tools such as
antivirus scanners and f iler tools, including data deduplication tools. ShareFile uses a f ile encryption key to confirm the
validity of download requests and encrypt the storage.
Place the StorageZones Controllers inside the network, with DMZ tools protecting them.
For maximum security, use Citrix NetScaler or NetScaler VPX.
Use SSL-encrypted connections to ensure the security of information transmitted between your users and
StorageZones. If you are not using DMZ proxy servers, install an SSL certif icate on the IIS service of all StorageZones
Controllers. For a DMZ proxy server that terminates the client connection and uses HTTP, install an SSL certif icate on
the proxy server. Public certif icates are required for standard zones or for restricted zones that have an external
hostname.
To control connections to ShareFile, IP whitelisting is not a recommended security practice because connections
originate from a number of servers in the ShareFile-managed cloud storage, as well as from each individual user device. IP
blacklisting, however, is an effective network-level control if your site needs additional security.
Security best practices
Your organization may need to meet specific security standards to satisfy regulatory requirements. This topic does not
cover this subject, because such security standards change over time. For up-to-date information on security standards and
Citrix products, consult http://www.citrix.com/security/, or contact your Citrix representative.
Security best practices:
Keep all computers in your environment up to date with security patches.
Protect all computers in your environment with antivirus software.
Protect all computers in your environment with perimeter f irewalls, including at enclave boundaries as appropriate.
Install a personal f irewall on all computers in your environment.
Secure and encrypt all network communications according to your security policy. You can secure all communication
between Microsoft Windows computers using IPsec. Refer to your operating system documentation for information.
Grant users only the capabilities they require.
User authentication
The authentication method configured for your ShareFile Enterprise account is used to authenticate users accessing data
stored in your StorageZones and on network files shares or SharePoint servers made available through StorageZone
Connectors.
If a user needs to use different credentials to access connected files, the user must log out of ShareFile and then log on
using the alternate credentials.
ShareFile recommends that you integrate your ShareFile account with third-party authentication, such as Active Directory
(AD), using one of the following methods.
Integrate ShareFile with Citrix XenMobile. The recommended best practice is to integrate ShareFile with Citrix
XenMobile Advanced Edition or XenMobile Enterprise Edition, a simpler alternative to configuring Security Assertion
© 1999-2017 Citrix Systems, Inc. All rights reserved. p.13https://docs.citrix.com
Markup Language (SAML)-based federation. When ShareFile is used with those XenMobile editions, XenMobile provides
ShareFile with single sign-on authentication of Worx Mobile App users, AD-based user account provisioning, and
comprehensive access control policies. The XenMobile console enables you to perform ShareFile configuration and to
monitor service levels and license usage.
For more information, refer to the XenMobile documentation.
Conf igure ShareFile to communicate with a SAML-based federation tool running in your network. This
configuration provides ShareFile users with single sign-on authentication when they log on to ShareFile using their AD
credentials. User logon requests are redirected to AD. You can use the same SAML Identity Provider (IdP) that you use
for other web applications.
ShareFile supports the following SAML IdPs:
XenMobile
Microsoft Active Directory Federation Services (ADFS)
Ping Federate
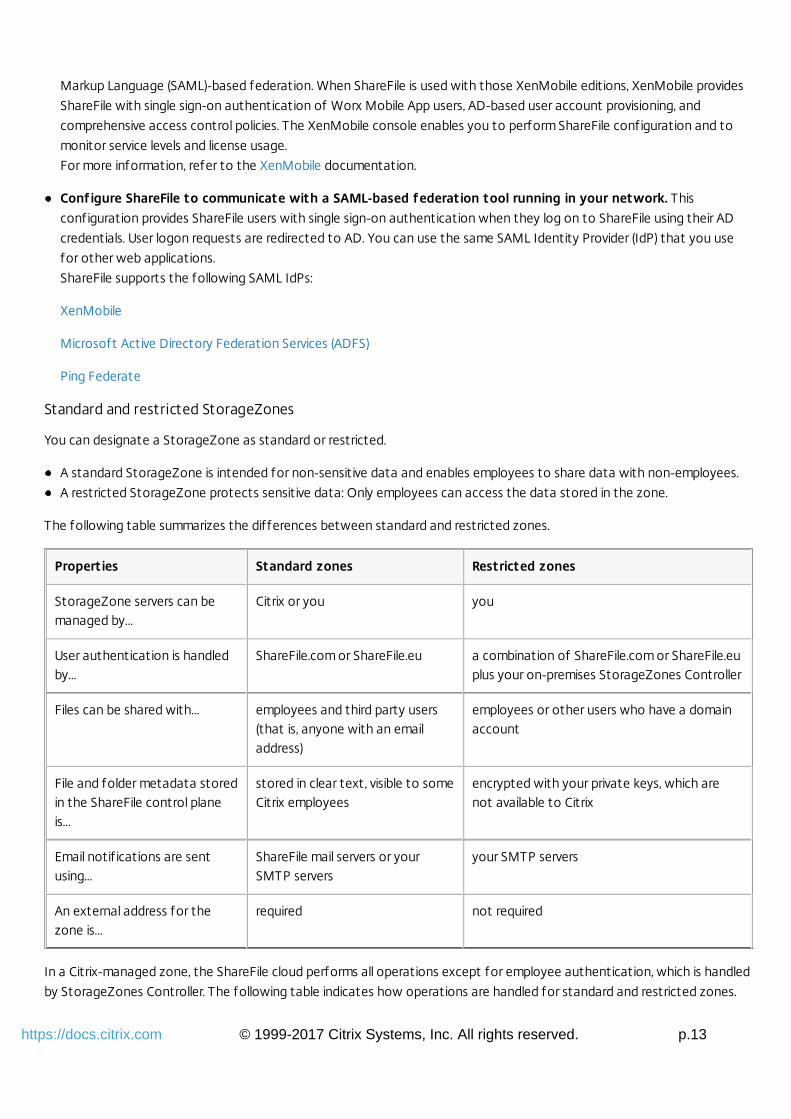
Standard and restricted StorageZones
You can designate a StorageZone as standard or restricted.
A standard StorageZone is intended for non-sensitive data and enables employees to share data with non-employees.
A restricted StorageZone protects sensitive data: Only employees can access the data stored in the zone.
The following table summarizes the differences between standard and restricted zones.
Properties Standard zones Restricted zones
StorageZone servers can bemanaged by…
Citrix or you you
User authentication is handledby…
ShareFile.com or ShareFile.eu a combination of ShareFile.com or ShareFile.euplus your on-premises StorageZones Controller
Files can be shared with… employees and third party users(that is, anyone with an emailaddress)
employees or other users who have a domainaccount
File and folder metadata storedin the ShareFile control planeis…
stored in clear text, visible to someCitrix employees
encrypted with your private keys, which arenot available to Citrix
Email notif ications are sentusing…
ShareFile mail servers or yourSMTP servers
your SMTP servers
An external address for thezone is…
required not required
In a Citrix-managed zone, the ShareFile cloud performs all operations except for employee authentication, which is handled
by StorageZones Controller. The following table indicates how operations are handled for standard and restricted zones.

© 1999-2017 Citrix Systems, Inc. All rights reserved. p.14https://docs.citrix.com
Standard zone Operation Restricted zone
Cloud Controller Cloud Controller
Website maintenance and updates
Client and application updates
Employee authentication
File storage and encryption
File metadata
Upload and download authorization
Email notif ications (SMTP)
Third-party user authentication No third-party access
Folder permissions
ShareFile supports a mix of standard and restricted zones within an account. You can create multiple restricted zones, each
with their own unique authentication requirements. For example, if users in Domain A should not be allowed to share files
with users in Domain B, install a separate restricted zone for each domain.
The rest of this section describes the workflow in ShareFile-managed, standard, and restricted zones.
ShareFile-managed StorageZones
When a ShareFile client interacts with a ShareFile-managed zone, all requests and traffic go through the ShareFile cloud
and all of your ShareFile data is stored in the ShareFile cloud.
The following diagram summarizes the workflow for ShareFile-managed cloud storage.

© 1999-2017 Citrix Systems, Inc. All rights reserved. p.15https://docs.citrix.com
Standard StorageZones
When a ShareFile client interacts with a standard zone, ShareFile handles user log on requests and then authorization
occurs between the ShareFile cloud and StorageZones Controller. A StorageZones Controller that hosts standard zones
must have an external address and external SSL certificate. The StorageZone SSL certificate must be trusted by user
devices and ShareFile web servers.
The ShareFile client interacts with StorageZones Controller during file upload or download operations. The controller stores
files in the storage location defined for the zone and sends unencrypted metadata to the ShareFile cloud.
Users can share files that reside in standard zones with anyone who has an email address.
When users share or download files from a standard zone, ShareFile uses ShareFile SMTP servers to send email
notifications.
The following diagram summarizes the workflow for a standard zone.

© 1999-2017 Citrix Systems, Inc. All rights reserved. p.16https://docs.citrix.com
Restricted StorageZones
When a ShareFile client interacts with a restricted zone, ShareFile handles user log on requests. Authorization occurs
between the StorageZones Controller and ShareFile client instead of between StorageZones Controller and the ShareFile
cloud.
As a result, a StorageZones Controller that hosts restricted zones can reside behind your firewall and does not require an
external address or external SSL certificate. The SSL certificate on the StorageZones Controller must be trusted by user
devices. When StorageZones Controller is configured with an internal address, users must connect to your company
network or a VPN to access documents in a restricted zone.
Access to data stored in a restricted zone has these authentication requirements:
In addition to logging on to ShareFile, users must authenticate separately to the StorageZones Controller to access
documents stored in a restricted zone. Directory lookup ensures that the same user logs on to ShareFile and the zone.
This extra authentication requirement limits sharing so that documents can only be shared with users who have access
to the StorageZones Controller, who authenticate using enterprise credentials, and who have permission to view the
documents. Users cannot anonymously share files that are stored in a restricted zone.
Access to encryption keys and metadata also requires enterprise authentication to StorageZones Controller.
The controller uses an authenticated proxy service to read and store encrypted data in the ShareFile cloud and to
exchange unencrypted metadata with ShareFile clients. StorageZones Controller encrypts your metadata with an
encryption key that is unique to your organization and not available to Citrix. As a result, no one outside of your
organization can see folder or file names in restricted zones.
When users share or download files from a restricted zone, your SMTP servers send the email notifications.
The following diagram summarizes the workflow for a restricted zone.

© 1999-2017 Citrix Systems, Inc. All rights reserved. p.17https://docs.citrix.com
© 1999-2017 Citrix Systems, Inc. All rights reserved. p.18https://docs.citrix.com
Architecture overview
Apr 10 , 2015
This section provides an overview to deploying StorageZones Controller for proof-of-concept evaluations or high-
availability production environments. High-availability deployment is shown both with and without a DMZ proxy such as
Citrix NetScaler.
To evaluate a deployment with multiple StorageZones Controllers, follow the guidelines for a high availability deployment.
Each of the deployment scenarios require a ShareFile Enterprise account. By default, ShareFile stores data in the secure
ShareFile-managed cloud. To use private data storage, either an on-premises network share or a supported third-party
storage system, configure StorageZones for ShareFile Data.
To securely deliver data to users from network file shares or SharePoint document libraries, configure StorageZone
Connectors.
Quick links to topic sections:
StorageZones Controller proof of concept deployment
StorageZones Controller high availability deployment
StorageZones Controller DMZ proxy deployment
StorageZones Controller proof of concept deployment
Caution: A proof-of-concept deployment is intended for evaluation purposes only and should not be used for critical datastorage.A proof-of-concept deployment uses a single StorageZones Controller. The example deployment discussed in this section
has both StorageZones for ShareFile Data and StorageZone Connectors enabled.
To evaluate a single StorageZones Controller, you can optionally store data in a folder (such as C:\ZoneFiles) on the hard
drive of the StorageZones Controller instead of on a separate network share. All other system requirements apply to an
evaluation deployment.
While you can use a mix of standard and restricted zones within your account, you must deploy separate StorageZones
Controllers for standard zones (accessible to employees and non-employees) and restricted zones (accessible to employees
only). After you configure a StorageZones Controller, you cannot change its zone type.
You can create multiple restricted zones, each with their own authentication requirements. For example, if users in Domain
A should not be allowed to share files with users in Domain B, install a separate restricted zone for each domain.
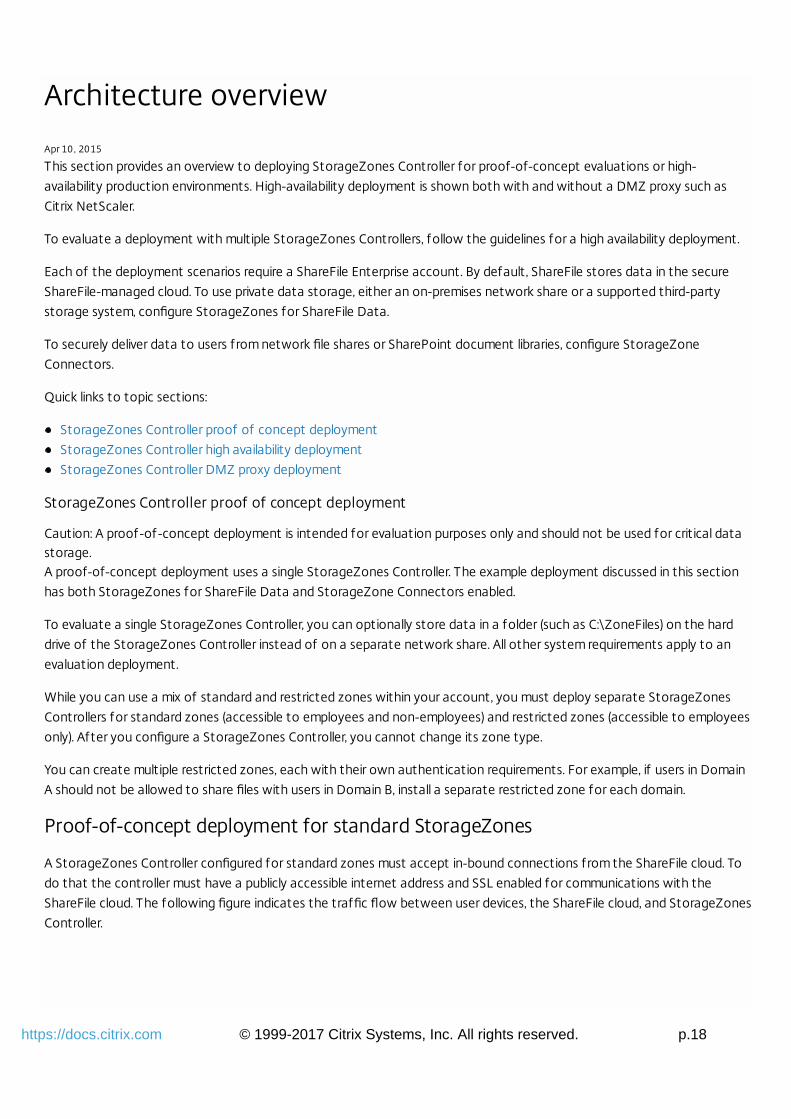
Proof-of-concept deployment for standard StorageZones
A StorageZones Controller configured for standard zones must accept in-bound connections from the ShareFile cloud. To
do that the controller must have a publicly accessible internet address and SSL enabled for communications with the
ShareFile cloud. The following figure indicates the traffic flow between user devices, the ShareFile cloud, and StorageZones
Controller.

© 1999-2017 Citrix Systems, Inc. All rights reserved. p.19https://docs.citrix.com
In this scenario, one firewall stands between the Internet and the secure network. StorageZones Controller resides inside
the firewall to control access. User connections to ShareFile must traverse the firewall and use the SSL protocol on port
443 to establish this connection. To support this connectivity, you must open port 443 on the firewall and install a public
SSL certificate on the IIS service of the StorageZones Controller.
Proof-of-concept deployment for restricted StorageZones
A StorageZones Controller configured for restricted zones does not need to accept in-bound connections from the
ShareFile cloud: You can configure it with an internal address. The following figure indicates the traffic flow between user
devices, the ShareFile cloud, and StorageZones Controller.
In this scenario, one firewall stands between the Internet and the secure network. StorageZones Controller resides inside
the firewall to control access. User connections to ShareFile must traverse the firewall and use the SSL protocol on port
443 to establish this connection. To support this connectivity, you must open port 443 on the firewall and install an SSL
certificate, which can be private, on the IIS service of the StorageZones Controller.
For restricted zones, StorageZones Controller sends email notifications from your local SMTP server instead of from
ShareFile.
StorageZones Controller high availability deployment
For a production deployment of ShareFile with high-availability, the recommended best practice is to install at least two
StorageZones Controllers. When you install the first controller, you create a StorageZone. When you install the other
controllers, you join them to the same zone. StorageZones Controllers that belong to the same zone must use the same
file share for storage.
In a high availability deployment the secondary servers are independent, fully functioning StorageZones Controllers. The

© 1999-2017 Citrix Systems, Inc. All rights reserved. p.20https://docs.citrix.com
StorageZones control subsystem randomly chooses a StorageZones Controller for operations. If the primary server goes
offline, you can easily promote a secondary server to primary. You can also demote a server from primary to secondary.
While you can use a mix of standard and restricted zones within your account, you must deploy separate StorageZones
Controllers for standard zones (accessible to employees and non-employees) and restricted zones (accessible to employees
only). After you configure a StorageZones Controller, you cannot change its zone type.
You can create multiple restricted zones, each with their own authentication requirements. For example, if users in Domain
A should not be allowed to share files with users in Domain B, install a separate restricted zone for each domain.
High availability deployment for standard zones
StorageZones Controllers configured for standard StorageZones must accept in-bound connections from the ShareFile
cloud. To do that each controller must have a publicly accessible internet address and SSL enabled for communications with
the ShareFile cloud. You can configure multiple external public addresses, each associated with a different StorageZones
Controller. The following figure shows a high availability deployment for standard StorageZones.
In this scenario, one firewall stands between the Internet and the secure network. The StorageZones Controllers reside
inside the firewall to control access. User connections to ShareFile must traverse the firewall and use the SSL protocol on
port 443 to establish this connection. To support this connectivity, you must open port 443 on the firewall and install a
public SSL certificate on the IIS service of all StorageZones Controllers.
High availability deployment for restricted zones
StorageZones Controllers configured for restricted zones do not need to accept in-bound connections from the ShareFile
cloud: You can configure each one with an internal address. The following figure shows a high availability deployment for
restricted zones.
© 1999-2017 Citrix Systems, Inc. All rights reserved. p.21https://docs.citrix.com
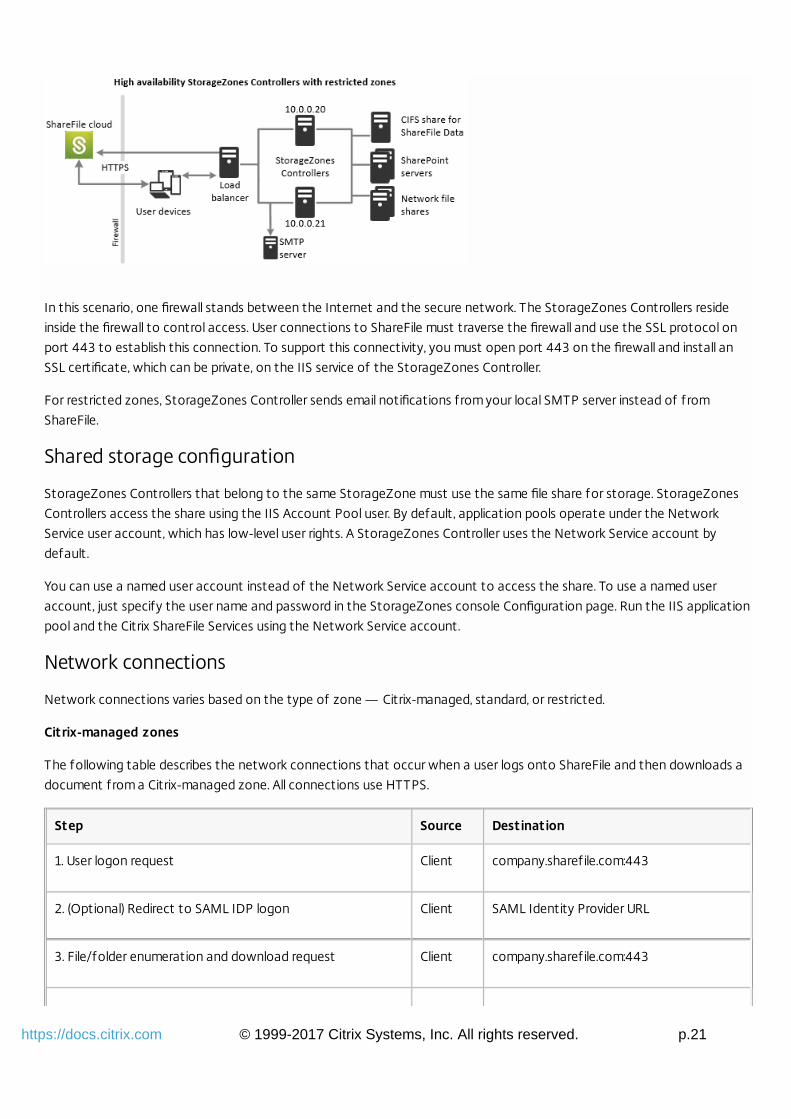
In this scenario, one firewall stands between the Internet and the secure network. The StorageZones Controllers reside
inside the firewall to control access. User connections to ShareFile must traverse the firewall and use the SSL protocol on
port 443 to establish this connection. To support this connectivity, you must open port 443 on the firewall and install an
SSL certificate, which can be private, on the IIS service of the StorageZones Controller.
For restricted zones, StorageZones Controller sends email notifications from your local SMTP server instead of from
ShareFile.
Shared storage configuration
StorageZones Controllers that belong to the same StorageZone must use the same file share for storage. StorageZones
Controllers access the share using the IIS Account Pool user. By default, application pools operate under the Network
Service user account, which has low-level user rights. A StorageZones Controller uses the Network Service account by
default.
You can use a named user account instead of the Network Service account to access the share. To use a named user
account, just specify the user name and password in the StorageZones console Configuration page. Run the IIS application
pool and the Citrix ShareFile Services using the Network Service account.
Network connections
Network connections varies based on the type of zone — Citrix-managed, standard, or restricted.
Citrix-managed zones
The following table describes the network connections that occur when a user logs onto ShareFile and then downloads a
document from a Citrix-managed zone. All connections use HTTPS.
Step Source Destination
1. User logon request Client company.sharefile.com:443
2. (Optional) Redirect to SAML IDP logon Client SAML Identity Provider URL
3. File/folder enumeration and download request Client company.sharefile.com:443

© 1999-2017 Citrix Systems, Inc. All rights reserved. p.22https://docs.citrix.com
4. File download Client storage-location.sharefile.com:443Step Source Destination
Standard StorageZones
The following table describes the network connections that occur when a user logs onto ShareFile and then downloads a
document from a standard StorageZone. All connections use HTTPS.
Step Source Destination
1. User logon request Client company.sharefile.com
2. (Optional) If using ADFS, redirect to SAML IDP logon Client SAML Identity Provider URL
3. File/folder enumeration and download request Client company.sharefile.com
4. File download authorization company.sharefile.com szc.company.com
5. File download Client szc.company.com
Restricted zones
The following table describes the network connections that occur when a user logs onto ShareFile and then downloads a
document from a restricted zone. All connections use HTTPS.
Step Source Destination
1. User logon request Client company.sharefile.com
2. If using ADFS, redirect to SAML IDP logon Client SAML Identity Provider URL
3. File/folder enumeration and download request Client szc.company.com
4. File download authorization and get encrypted metadata szc.company.com company.sharefile.com
5. File download Client szc.company.com
StorageZones Controller DMZ proxy deployment
A demilitarized zone (DMZ) provides an extra layer of security for the internal network. A DMZ proxy, such as Citrix
NetScaler VPX, is an optional component used to:
Ensure all requests to a StorageZones Controller originate from the ShareFile cloud, so that only approved traff ic
reaches the StorageZones Controllers.

© 1999-2017 Citrix Systems, Inc. All rights reserved. p.23https://docs.citrix.com
StorageZones Controller has a validate operation that checks for valid URI signatures for all incoming messages. The
DMZ component is responsible for validating signatures before forwarding messages.
Load balance requests to StorageZones Controllers using real-time status indicators.
Operations can be load-balanced to StorageZones Controllers if they all can access the same files.
Offload SSL from StorageZones Controllers.
Ensure requests for f iles on SharePoint or network drives are authenticated before passing through the DMZ.
You must use separate deployments for standard StorageZones (accessible to employees and non-employees) and
restricted StorageZones (accessible to employees only).
NetScaler and StorageZones Controller deployment
Deployment for standard StorageZones
StorageZones Controllers configured for standard zones must accept in-bound connections from the ShareFile cloud. To
do that the NetScaler must have a publicly accessible internet address and SSL enabled for communications with the
ShareFile cloud. The following figure shows a NetScaler and StorageZones Controller deployment for standard zones.
In this scenario, two firewalls stand between the Internet and the secure network. StorageZones Controllers reside in the
internal network. User connections to ShareFile must traverse the first firewall and use the SSL protocol on port 443 to
establish this connection. To support this connectivity, you must open port 443 on the firewall and install a public SSL
certificate on the IIS service of the DMZ proxy servers (if they terminate the user connection).
Deployment for restricted StorageZones
The following figure shows a high availability deployment for restricted zones.

© 1999-2017 Citrix Systems, Inc. All rights reserved. p.24https://docs.citrix.com
For restricted zones, StorageZones Controller sends email notifications from your local SMTP server instead of from
ShareFile.
Network connections for standard zones
The following diagram and table describe the network connections that occur when a user logs onto ShareFile and then
downloads a document from a standard zone deployed behind NetScaler. In this case, the account uses Active Directory
Federation Services (ADFS) for SAML logon.
Authentication traffic is handled in the DMZ by an ADFS proxy server that communicates with an ADFS server on the
trusted network. File activity is accessed via NetScaler in the DMZ, which terminates SSL, authenticates user requests and
then accesses the StorageZones Controller in the trusted network on behalf of authenticated users. The NetScaler
external address for ShareFile is accessed using the Internet FQDN szc.company.com.
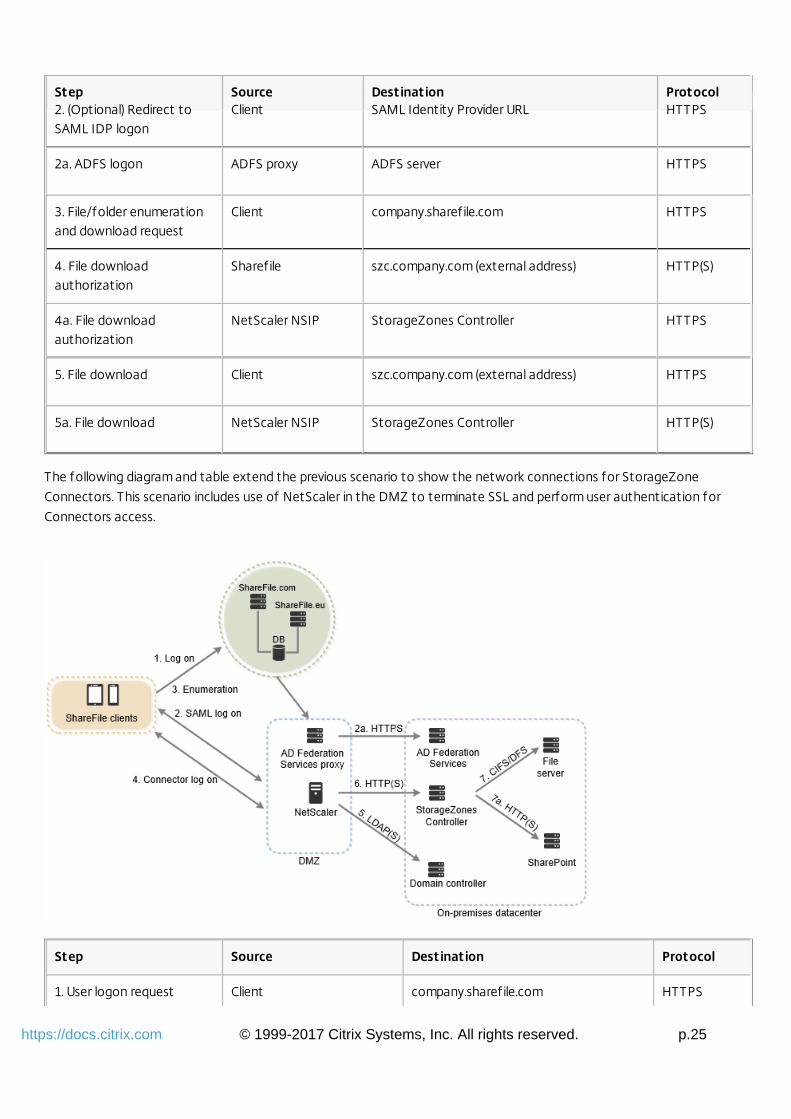
Step Source Destination Protocol
1. User logon request Client company.sharefile.com HTTPS
© 1999-2017 Citrix Systems, Inc. All rights reserved. p.25https://docs.citrix.com
2. (Optional) Redirect toSAML IDP logon
Client SAML Identity Provider URL HTTPS
2a. ADFS logon ADFS proxy ADFS server HTTPS
3. File/folder enumerationand download request
Client company.sharefile.com HTTPS
4. File downloadauthorization
Sharefile szc.company.com (external address) HTTP(S)
4a. File downloadauthorization
NetScaler NSIP StorageZones Controller HTTPS
5. File download Client szc.company.com (external address) HTTPS
5a. File download NetScaler NSIP StorageZones Controller HTTP(S)
Step Source Destination Protocol
The following diagram and table extend the previous scenario to show the network connections for StorageZone
Connectors. This scenario includes use of NetScaler in the DMZ to terminate SSL and perform user authentication for
Connectors access.
Step Source Destination Protocol
1. User logon request Client company.sharefile.com HTTPS

© 1999-2017 Citrix Systems, Inc. All rights reserved. p.26https://docs.citrix.com
2. (Optional) Redirect toSAML IDP logon
Client SAML Identity Provider URL HTTPS
2a. ADFS logon ADFS proxy ADFS server HTTPS
3. Top-level Connectorenumeration
Client company.sharefile.com HTTPS
4. User logon toStorageZones Controllerserver
Client szc.company.com (external address) HTTPS
5. User authentication NetScaler NSIP AD Domain Controller LDAP(S)
6. File/folder enumerationand upload/downloadrequests
NetScaler NSIP StorageZones Controller HTTP(S)
7. Network shareenumeration andupload/download
StorageZones Controller File server CIFS or DFS
7a. SharePointenumeration andupload/download
StorageZones Controller SharePoint HTTP(S)
Step Source Destination Protocol
The following diagram summarizes the supported combinations of authentication types based on whether the user
authenticates at NetScaler.

© 1999-2017 Citrix Systems, Inc. All rights reserved. p.27https://docs.citrix.com
Network connections for restricted zones
The following diagram and table describe the network connections that occur when a user logs onto ShareFile and then
uploads a document to a restricted zone. In this case, the account uses Active Directory Federation Services (ADFS) for
SAML logon. Authentication traffic is handled by an ADFS proxy server that communicates with an ADFS server on the
trusted network.
Step Source Destination Protocol
1. ShareFile client orbrowser opens connection
Client company.sharefile.com or company.sharefile.eu HTTPS
2. (Optional) Redirect toSAML IDP logon
Client SAML Identity Provider URL HTTPS
3. ShareFile redirects userto StorageZones Controller
Client company.sharefile.com or company.sharefile.eu HTTPS
4. Client submits Windowscredentials toStorageZones Controller
Client StorageZones Controller HTTPS
5. StorageZones Controllerverif ies credentials andgrants client access
StorageZones Controller Domain controller Kerberos
6. Client uploads a f ile to Client StorageZones Controller HTTPS

© 1999-2017 Citrix Systems, Inc. All rights reserved. p.28https://docs.citrix.com
StorageZones Controller
7. File is written to thestorage repository for therestricted zone
StorageZones Controller Local storage CIFS
8. StorageZones Controllerencrypts f ile metadata andsends it to ShareFile
StorageZones Controller company.sharefile.com or company.sharefile.eu HTTPS
Step Source Destination Protocol

© 1999-2017 Citrix Systems, Inc. All rights reserved. p.29https://docs.citrix.com
Upgrade
Mar 29, 2015
When you upgrade a StorageZones Controller to version 3, that controller will continue to use standard zones. You cannot
upgrade a standard zone to a restricted zone.
To replace a standard zone with a restricted zone, you must install a new StorageZones Controller and configure a
restricted zone.
Important: Be sure to read the known issues for a release before starting an upgrade.
To upgrade to StorageZones Controller 3.2 from StorageZones Controller 3.1 or 3.0.1
You can directly upgrade from StorageZones Controller 3.1 or 3.0.1 to StorageZones Controller 3.2, as described in the
following steps.
If you are using StorageZones Controller 2.x, you must first upgrade to version 3.0.1, as described in To upgrade to
StorageZones Controller 3.0.1 from 2.x. To upgrade versions older than 2.x, please contact ShareFile Support.
1. From the ShareFile download page at http://www.citrix.com/downloads/sharefile.html, log on and download the latest
StorageZones Controller 3.2 installer.
Note: Installing StorageZones Controller changes the Default Web Site on the server to the installation path of the
controller.
2. On the server where you want to upgrade the primary StorageZones Controller:
1. Run StorageCenter.msi to start the ShareFile StorageZones Controller Setup wizard.
2. Respond to the prompts.
When the installation completes, the wizard displays the message “Completed Citrix ShareFile StorageZones
Controller Setup Wizard.”
3. Click Finish.
The StorageZones Controller console opens.
Important: If you plan to clone the StorageZones Controller, do not proceed with configuration. Capture the disk
image and then configure each StorageZones Controller.
To return to the StorageZones Controller console at any time, open http://localhost/configservice/login.aspx or start
the configuration tool from the Start menu.
After you click Finish or return to the StorageZones Controller console, the Logon page opens.
4. To change any of the displayed information, click Modify, make your changes, and then click Save.
3. Verify the registry settings on the primary StorageZones Controller:
Not all upgrade paths add the registry settings needed to increase the number of files per zone. To enable that feature,
verify that the settings are included in the registry. For details, see Increase the number of files per zone.
4. On each secondary StorageZones Controller:
1. Run StorageCenter.msi to start the ShareFile StorageZones Controller Setup wizard.
2. Respond to the prompts and then click Finish.
The StorageZones Controller console Logon page opens.
3. Log on. To change any of the displayed information, click Modify, make your changes, and then click Save.
© 1999-2017 Citrix Systems, Inc. All rights reserved. p.30https://docs.citrix.com
5. Restart the IIS server of all zone members.
To upgrade to StorageZones Controller 3.0.1 from 2.x
These steps upgrade standard zones created by prior versions of StorageZones Controller. To use restricted zones, install a
new StorageZones Controller.
1. Back up your primary StorageZones Controller, as described in Back up a primary StorageZones Controller configuration.
2. From the ShareFile download page at http://www.citrix.com/downloads/sharefile.html, log on and download the latest
StorageZones Controller 3 installer.
Note: Installing StorageZones Controller changes the Default Web Site on the server to the installation path of the
controller.
3. On the server where you want to upgrade the primary StorageZones Controller:
1. Run StorageCenter.msi to start the ShareFile StorageZones Controller Setup wizard.
2. Respond to the prompts.
When the installation completes, the wizard displays the message “Completed Citrix ShareFile StorageZones
Controller Setup Wizard.”
3. Click Finish.
The StorageZones Controller console opens.
Important: If you plan to clone the StorageZones Controller, do not proceed with configuration. Capture the disk
image and then configure each StorageZones Controller.
To return to the StorageZones Controller console at any time, open http://localhost/configservice/login.aspx or start
the configuration tool from the Start menu.
After you click Finish or return to the StorageZones Controller console, the Logon page opens.
4. To change any of the displayed information, click Modify, make your changes, and then click Save.
4. Verify the registry settings on the primary StorageZones Controller:
Not all upgrade paths add the registry settings needed to increase the number of files per zone. To enable that feature,
verify that the settings are included in the registry. For details, see Increase the number of files per zone.
5. On each secondary StorageZones Controller:
1. Run StorageCenter.msi to start the ShareFile StorageZones Controller Setup wizard.
2. Respond to the prompts and then click Finish.
The StorageZones Controller console Logon page opens.
3. Log on. To change any of the displayed information, click Modify, make your changes, and then click Save.
6. Restart the IIS server of all zone members.
7. To upgrade to StorageZones Controller 3.2, see To upgrade to StorageZones Controller 3.2 from StorageZones
Controller 3.1 or 3.0.1, earlier in this article.
Important: If you are upgrading to StorageZones Controller 3.0.1 from a version prior to 2.2.3 and previously customized theProducerTimer or DeleteTimer settings, please contact ShareFile Support for help with configuring theProducerTimerInterval and DeleteTimerInterval settings in FileDeleteService.exe.config.

© 1999-2017 Citrix Systems, Inc. All rights reserved. p.31https://docs.citrix.com
Install
Apr 10 , 2015
Complete the following tasks, in the order presented, to install and set up StorageZones Controller, StorageZones for
ShareFile Data, and StorageZone Connectors.
1. Configure NetScaler for StorageZones Controller
You can use NetScaler as a DMZ proxy for StorageZones Controller.
2. Create a network share for private data storage
StorageZones for ShareFile Data requires a network share for your private data, even if you store ShareFile files in a
supported third-party storage system.
3. Install an SSL certif icate
A StorageZones Controller that hosts standard zones requires an SSL certificate. A StorageZones Controller that hosts
restricted zones and uses an internal address, does not require an SSL certificate.
4. Prepare your server for ShareFile data
IIS and ASP.NET setup is required for StorageZones for ShareFile data and for StorageZone Connectors.
5. Install StorageZones Controller and create a StorageZone
6. Verify your StorageZones Controller setup
7. Change the default zone for user accounts
By default, existing and newly provisioned user accounts use the ShareFile-managed cloud storage as the default zone.
8. Specify a proxy server for StorageZones
The StorageZones Controllers console enables you to specify a proxy server for StorageZones Controllers. You can also
specify a proxy server using other methods.
9. Configure the domain controller to trust the StorageZones Controller for delegation
Configure the domain controller to support NTLM or Kerberos authentication on network shares or SharePoint sites.
10. Join a secondary StorageZones Controller to a StorageZone
To configure a StorageZone for high availability, connect at least two StorageZones Controllers to it.
For a demonstration of configuring StorageZones Controller with Microsoft Azure Storage, watch the following video.

© 1999-2017 Citrix Systems, Inc. All rights reserved. p.32https://docs.citrix.com
For a demonstration of configuring ShareFile Enterprise to use a Microsoft Azure StorageZone, watch the following video.

© 1999-2017 Citrix Systems, Inc. All rights reserved. p.33https://docs.citrix.com
Configure NetScaler for StorageZones Controller
Mar 29, 2015
NetScaler, version 10.1 build 120.1316.e and above, includes a wizard that prompts you for basic information about your StorageZones Controller environment and then
generates a configuration that:
Load balances traff ic across StorageZones Controllers
Provides user authentication for StorageZone Connectors
Validates URI signatures for ShareFile uploads and downloads
Terminates SSL connections at the NetScaler appliance
The diagram shows these NetScaler components created by the configuration:
NetScaler content switching virtual server — Sends user requests for data from ShareFile and from StorageZone Connectors to the appropriate NetScaler load
balancing virtual server.
NetScaler load balancing virtual server — Load balances the traff ic for your StorageZones Controllers and also handles the following:
For requests for data from your private data storage, a load balancing virtual server performs hash validation, to ensure valid URI signatures are present on
incoming requests.
For requests for data from StorageZone Connectors, a load balancing virtual server performs user authentication. It stops a user request at the NetScaler,
authenticates the user, and then performs single sign-on of the user to StorageZones Controller.
Although authentication to NetScaler is optional, it is a recommended best practice.
To support restricted zones or web access to Connectors, you must perform additional NetScaler configuration after you complete the wizard. The configuration
ensures that ShareFile clients send credentials only when logged on to a trusted ShareFile domain. To support web access to Connectors, you also add a path
(/ProxyService) to the content switching policy used for traffic to /cifs and /sp.
Quick links to topic sections:
Prerequisites
Configure NetScaler for StorageZones Controllers
Configure NetScaler for restricted zones or web access to Connectors
Create a monitor for the StorageZones Controller service
Verify the NetScaler configuration
View the throughput of ShareFile requests through NetScaler
Note: To set up NetScaler versions prior to 10.1 build 120.1316.e, see Configure NetScaler manually.The Set up NetScaler for ShareFile wizard does not handle the configuration required to use XenMobile as a SAML identity provider for ShareFile. For more
information, see Configure ShareFile Single Sign-On with XenMobile 10.
Prerequisites
A working NetScaler configuration
Security certif icate: If one is not already available in NetScaler, the wizard enables you to install one on the content switching virtual server.
Information about your Active Directory configuration:
IP address and port of your Active Directory server
Active Directory domain name
LDAP Base DN where users are stored
Account name and password for an administrator account that has permissions to communicate with Active Directory

© 1999-2017 Citrix Systems, Inc. All rights reserved. p.34https://docs.citrix.com
Configure NetScaler for StorageZones Controllers
The following steps describe how to use the NetScaler for ShareFile wizard.
1. Log on to the NetScaler appliance and, on the Configuration tab, navigate to Traff ic Management > Load Balancing.
2. Under Citrix ShareFile, click Set up NetScaler for ShareFile.
You can also access the wizard as follows: Under Mobility, click Configure XenMobile, ShareFile, and NetScaler Gateway.
3. Supply the information requested in the wizard.
Option Description
Name A display name for the content switching virtual server.
IP Address The external (public or DMZ) IP address to be used for the content switching virtual server. If you use a DMZ IP address, you must
define a Network Address Translation (NAT) mapping from your external f irewall address to this DMZ IP address.
ShareFile Data This option is enabled, indicating that you will use the NetScaler connection for StorageZones for ShareFile Data.
StorageZone Connectorsfor Network FileShares/SharePoint
If you use Connectors and you want to perform user authentication at the NetScaler, select the check box.
Certif icate Choose a certif icate or install one for the content switching virtual server. If you choose to install a certif icate, you are prompted
to upload the certif icate and private key. For standard zones or for restricted zones with an external hostname, certif icates must
be publicly trusted and not self-signed.
StorageZones ControllerIP Address
The internal IP addresses for one or more StorageZones Controller servers. These IP addresses define the StorageZones
Controller servers as entities inside of NetScaler. If you already added the servers to NetScaler, click Add From Existing and select
the servers.
To use NetScaler for load balancing, enter an internal IP address for each StorageZones Controller server. To use NetScaler only
for SSL and authentication, enter just one IP address.
Port and Protocol The port and protocol used for communication from the NetScaler to StorageZones Controllers.
AAA VServer IP Address An unused internal IP address for the Authentication, Authorization, and Auditing (AAA) virtual server. NetScaler creates this virtual
server for its own use. The server does not require outside access.
LDAP Server IP Addressand Port
The IP address and port of your Active Directory server. If you already added an LDAP server to NetScaler, click the Choose LDAP
tab and choose the server.
Time out The maximum number of seconds that the NetScaler waits for a response from the LDAP server. Defaults to 3 seconds. The
minimum value is 1 second.
Single Sign-on Domain The Active Directory domain name.
Base DN (location ofusers)
The LDAP Base Distinguished Name (DN) where users are stored. Specify the DN using the general form: CN=Users,dc=domain,
dc=Net
Administrator Bind DNand Password
An administrator account that has permissions to communicate with Active Directory.
Logon Name An LDAP attribute, used by NetScaler to determine whether users log on with their user name or email address. Defaults to
sAMAccountName, which enables users to log on with their user names. To require users to enter their email address to log on,
change this f ield to userPrincipalName.
Configure NetScaler for restricted zones or web access to Connectors
To support restricted zones or web access to StorageZone Connectors, you must perform additional NetScaler configuration after you complete the NetScaler for
ShareFile wizard.
Create and configure a third NetScaler load-balancing virtual server, used to ensure that ShareFile clients send credentials only when logged on to a trusted
ShareFile domain.
StorageZones Controller uses the Cross-Origin Resource Sharing (CORS) standard to provide the necessary security for requests to restricted zones and from the
ShareFile web interface to StorageZone Connectors. CORS uses HTTP headers to allow the client and server to know enough about each other to determine if a

© 1999-2017 Citrix Systems, Inc. All rights reserved. p.35https://docs.citrix.com
request or response should succeed.
As described in the following steps, you will configure the additional virtual server to allow anonymous access from clients for the HTTP OPTIONS verb. The
OPTIONS request passes through to StorageZones Controller without being authenticated and without HTTPS callouts to validate the signature. The CORS
preflight check validates domain trust before sending credentials.
An understanding of CORS is not needed to perform the configuration. However, for more information about CORS, see http://enable-cors.org/.
Use of Internet Explorer for web access to connectors in restricted zones requires Internet Explorer configuration. For details, see Client requirements for restricted
StorageZones.
To support web access to StorageZone Connectors, add a path (/ProxyService) to the content switching policy used for traff ic to /cifs and /sp.
The additional configuration provides the NetScaler components shown in the following diagram.
Perform the following steps in NetScaler after you complete the NetScaler for ShareFile wizard.
1. Create a third load-balancing virtual server:
1. Navigate to Traff ic Management > Load Balancing > Virtual Servers.
2. Click Add.
3. Specify the following values:
Option Value
Name A policy name, such as SF_ZONE_OPTIONS
Protocol SSL
IP Address Type Non Addressable
4. Click through to create the virtual server.
5. To bind the same services to it as the load-balancing virtual servers created by the wizard: In the Load Balancing Virtual Server screen, across from Service, click >
and then click Save.
6. Add a certif icate to the virtual server.
2. Create a policy for the virtual server you just added:
1. Navigate to Traff ic Management > Content Switching > Policies.
2. In the details pane, click Add and then specify the following values:
Option Value
Name A name for the content switching action, such as OPTIONS
Target LB Virtual Server The virtual server added in Step 1
© 1999-2017 Citrix Systems, Inc. All rights reserved. p.36https://docs.citrix.com
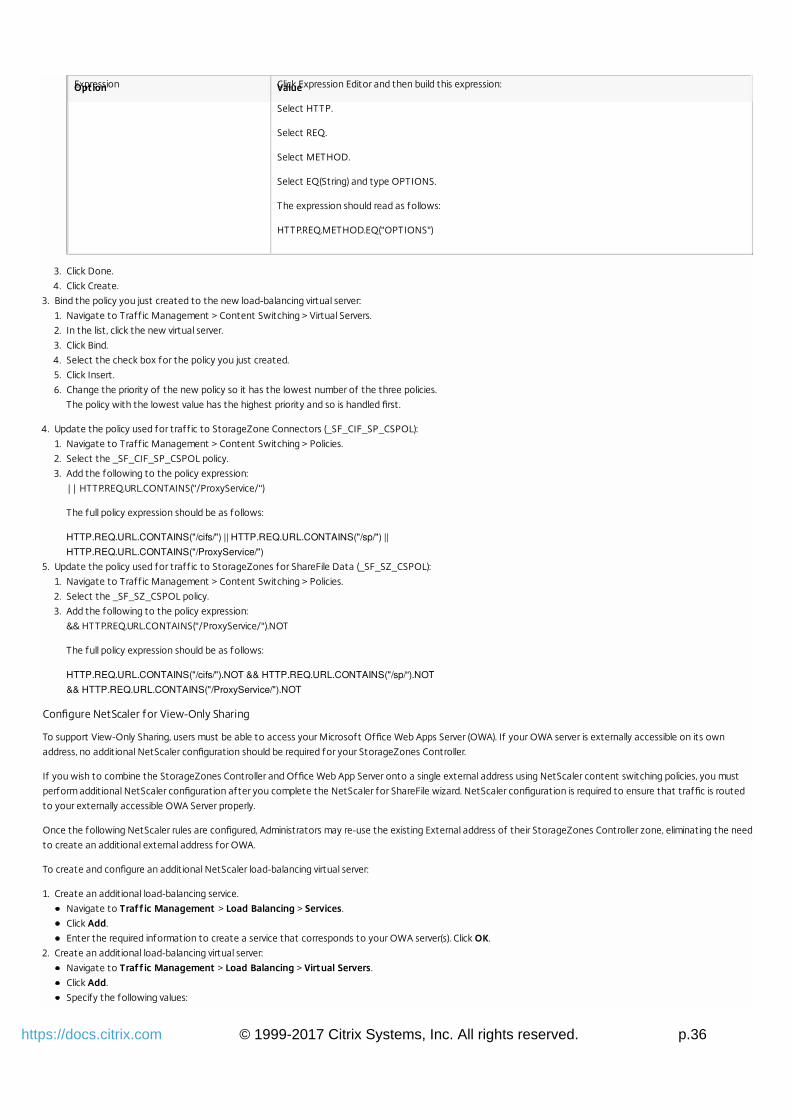
Expression Click Expression Editor and then build this expression:
Select HTTP.
Select REQ.
Select METHOD.
Select EQ(String) and type OPTIONS.
The expression should read as follows:
HTTP.REQ.METHOD.EQ("OPTIONS")
Option Value
3. Click Done.
4. Click Create.
3. Bind the policy you just created to the new load-balancing virtual server:
1. Navigate to Traff ic Management > Content Switching > Virtual Servers.
2. In the list, click the new virtual server.
3. Click Bind.
4. Select the check box for the policy you just created.
5. Click Insert.
6. Change the priority of the new policy so it has the lowest number of the three policies.
The policy with the lowest value has the highest priority and so is handled first.
4. Update the policy used for traff ic to StorageZone Connectors (_SF_CIF_SP_CSPOL):
1. Navigate to Traff ic Management > Content Switching > Policies.
2. Select the _SF_CIF_SP_CSPOL policy.
3. Add the following to the policy expression:
|| HTTP.REQ.URL.CONTAINS("/ProxyService/")
The full policy expression should be as follows:
HTTP.REQ.URL.CONTAINS("/cifs/") || HTTP.REQ.URL.CONTAINS("/sp/") ||
HTTP.REQ.URL.CONTAINS("/ProxyService/")
5. Update the policy used for traff ic to StorageZones for ShareFile Data (_SF_SZ_CSPOL):
1. Navigate to Traff ic Management > Content Switching > Policies.
2. Select the _SF_SZ_CSPOL policy.
3. Add the following to the policy expression:
&& HTTP.REQ.URL.CONTAINS("/ProxyService/").NOT
The full policy expression should be as follows:
HTTP.REQ.URL.CONTAINS("/cifs/").NOT && HTTP.REQ.URL.CONTAINS("/sp/“).NOT
&& HTTP.REQ.URL.CONTAINS("/ProxyService/").NOT
Configure NetScaler for View-Only Sharing
To support View-Only Sharing, users must be able to access your Microsoft Office Web Apps Server (OWA). If your OWA server is externally accessible on its own
address, no additional NetScaler configuration should be required for your StorageZones Controller.
If you wish to combine the StorageZones Controller and Office Web App Server onto a single external address using NetScaler content switching policies, you must
perform additional NetScaler configuration after you complete the NetScaler for ShareFile wizard. NetScaler configuration is required to ensure that traffic is routed
to your externally accessible OWA Server properly.
Once the following NetScaler rules are configured, Administrators may re-use the existing External address of their StorageZones Controller zone, eliminating the need
to create an additional external address for OWA.
To create and configure an additional NetScaler load-balancing virtual server:
1. Create an additional load-balancing service.
Navigate to Traff ic Management > Load Balancing > Services.
Click Add.
Enter the required information to create a service that corresponds to your OWA server(s). Click OK.
2. Create an additional load-balancing virtual server:
Navigate to Traff ic Management > Load Balancing > Virtual Servers.
Click Add.
Specify the following values:

© 1999-2017 Citrix Systems, Inc. All rights reserved. p.37https://docs.citrix.com
Option Value
Name A policy name, such as SF_OWA_vServer
Protocol SSL
IP Address Type Non Addressable
Click through to create the virtual server.
To bind the virtual server to the OWA service you created in the previous step, click Load Balancing Virtual Service Binding > Select Service. Click the checkbox
beside the service you created in the previous step.
Click Select .
Click Bind.
3. Create a new policy used to route traff ic to your OWA server.
Navigate to Traff ic Management > Content Switching > Policies.
Select Add.
Name the policy.
Add the following expression:
HTTP.REQ.URL.CONTAINS("/hosting/discovery")|| HTTP.REQ.URL.CONTAINS("/x/")|| HTTP.REQ.URL.CONTAINS("/wv/")|| HTTP.REQ.URL.CONTAINS("/p/")
The full policy expression should be as follows:
HTTP.REQ.URL.CONTAINS("/hosting/discovery") || HTTP.REQ.URL.CONTAINS("/x/") || HTTP.REQ.URL.CONTAINS("/wv/") ||
HTTP.REQ.URL.CONTAINS("/p/") ||
4. Update the priority of the new policy within the load-balancing virtual
Navigate to Traff ic Management > Content Switching > Virtual Servers.
Click the load-balancing virtual server, then select Content Switching Policies.
Change the priority of the policies so that the (Example) "_SF_OWA" policy is third in priority.
Priority Policy Name
90 SF_ZK_OPTIONS
95 _SF_CIF_SP_SPOL
99 _SF_OWA
100 _SF_SZ_CSPOL
Click Close. Click Done
Create a monitor for the StorageZones Controller service
By default, NetScaler pings the StorageZones Controller server to determine if it is online. However, even if the controller is online, it might not be able to send
heartbeat messages to the ShareFile web site. In that case, NetScaler will send traffic to StorageZones Controller although it is not communicating with ShareFile.
To verify StorageZones Controller outbound connectivity to ShareFile, you can create a monitor that checks heartbeat.aspx and bind it to the NetScaler service for
each StorageZones Controller.
add lb monitor SZC_Heartbeat HTTP-ECV -send "GET /heartbeat.aspx" -recv "***ONLINE***” -secure YES bind service StorageZone_Svc -monitorName SZC_Heartbeat
StorageZone_Svc is the NetScaler service that corresponds to a StorageZones Controller. That service name is automatically created by the NetScaler for ShareFile
wizard. The service name includes the IP address of the controller, such as _SF_SVC_ip-address.
-secure YES is required if the service is listening on port 443.
Verify the NetScaler configuration
After you complete the wizard, go to Traffic Management > Load Balancing > Virtual Servers to view the status of the load balancing virtual servers created by the
wizard.

© 1999-2017 Citrix Systems, Inc. All rights reserved. p.38https://docs.citrix.com
View the throughput of ShareFile requests through NetScaler
1. Go to Traff ic Management > Load Balancing.
2. Under Mobility, click Configure XenMobile, ShareFile, and NetScaler Gateway. The throughput is shown under ShareFile LB.
You can also edit or remove the configuration generated by the wizard by clicking the links on that page.

© 1999-2017 Citrix Systems, Inc. All rights reserved. p.39https://docs.citrix.com
Configure NetScaler manually
Apr 10 , 2015
As of version 10.1 build 120.1316, NetScaler includes a wizard that configures the settings needed for StorageZonesController data and connectors. To configure earlier versions of NetScaler for StorageZones Controller, we recommendthat you watch the following video and use the information in this section to supplement the video instructions.
The steps in this section describe the NetScaler settings needed for StorageZones Controller. All links are for the NetScaler
10.1 documentation. Similar topics are available for earlier versions of NetScaler.
To check for valid URI signatures on all incoming messages
1. Create an HTTP callout named sf_callout:
1. In the Configure HTTP Callout dialog box, click Virtual Server or IP Address and specify the address.
2. Under Request to send to the server, click Attribute-based and then click Configure Request Attributes.
3. Select Get Method.
4. In Host Expression enter the virtual server IP address or the host IP address for any of the StorageZone Controllers.
5. In URL Stem Expression enter:
"/validate.ashx?RequestURI=" + HTTP.REQ.URL.BEFORE_STR("&h").HTTP_URL_SAFE.B64ENCODE + "&h="+
HTTP.REQ.URL.QUERY.VALUE("h")
6. Click OK and then return to the Configure HTTP Callout dialog box.
7. Under Server Response, choose a Return Type of Bool.
8. In Expression to extract data from the response enter:
HTTP.RES.STATUS.EQ(200).NOT
9. Click Create.
For more information, refer to HTTP Callouts in the NetScaler documentation.
2. Follow the preceding steps to configure an HTTP callout named sf_callout_y. Use the same settings except for the
expression:
In URL Stem Expression enter:
"/validate.ashx?RequestURI=" + HTTP.REQ.URL.HTTP_URL_SAFE.B64ENCODE + "&h="
3. Configure a responder policy:
1. In the Configure Responder Policy dialog box: For Action, choose Drop.
2. In Expression, enter:

© 1999-2017 Citrix Systems, Inc. All rights reserved. p.40https://docs.citrix.com
http.REQ.URL.CONTAINS("&h=") && http.req.url.contains("/crossdomain.xml").not &&
http.req.url.contains("/validate.ashx?requri").not && SYS.HTTP_CALLOUT(sf_callout) ||
http.REQ.URL.CONTAINS("&h=").NOT && http.req.url.contains("/crossdomain.xml").not &&
http.req.url.contains("/validate.ashx?requri").not && SYS.HTTP_CALLOUT(sf_callout_y)
For more information, refer to Responder in the NetScaler documentation.
4. Bind the responder policy to the load balancer virtual server and configure SSL session-based persistence.
To load balance
1. Configure token-based load balancing.
Use the rule expression: “http.REQ.URL.QUERY.VALUE("uploadid")”
Token-based load balancing is required for StorageZones Controllers in a high availability deployment. Round-robin load
balancing will result in intermittent download or upload failures because a client request for an upload or download can
get directed to a StorageZones Controller other than the one that received the authorization request from
ShareFile.com.
2. Configure NetScaler to terminate SSL connections.
For information, refer to Configuring SSL Offloading and its subtopics in the NetScaler documentation.
To configure content switching and authentication for Connectors
1. Enable content switching, as described in Enabling Content Switching in the NetScaler documentation.
2. Create a content switching policy for user requests for ShareFile data from your on-premises StorageZone:
1. In the Configure Content Switching Policy dialog box: Enter a Name for the content switching policy. These steps use
the name Data_Requests.
2. Enter the Expression:
HTTP.REQ.HOSTNAME.CONTAINS("StorageZonesControllerHostName") &&
HTTP.REQ.URL.CONTAINS("/cifs/").NOT && HTTP.REQ.URL.CONTAINS("/sp/").NOT
3. Click OK.
For more information, refer to Content Switching in the NetScaler documentation.
3. Create a content switching policy for user requests for data accessed from StorageZone Connectors.
1. In the Configure Content Switching Policy dialog box: Specify a Name for the content switching policy. These steps
use the name Connector_Requests.
2. Enter the Expression:
HTTP.REQ.HOSTNAME.CONTAINS("StorageZonesControllerFQDN") && (HTTP.REQ.URL.CONTAINS("/cifs/") ||
HTTP.REQ.URL.CONTAINS("/sp/"))
Be sure to replace "StorageZonesControllerFQDN" with the FQDN of your controller.
3. Click OK.
4. Create a content switching virtual server.
5. Set the content switching policy targets:
In the Configure Virtual Server (Content Switching) dialog box: For the Data_Requests policy, specify the load
balancer virtual server for StorageZones for ShareFile data.
This load balancer virtual server is the one to which you bound the responder policy in Step 4 of— To check for valid URI signatures on all incoming messages and to load balance
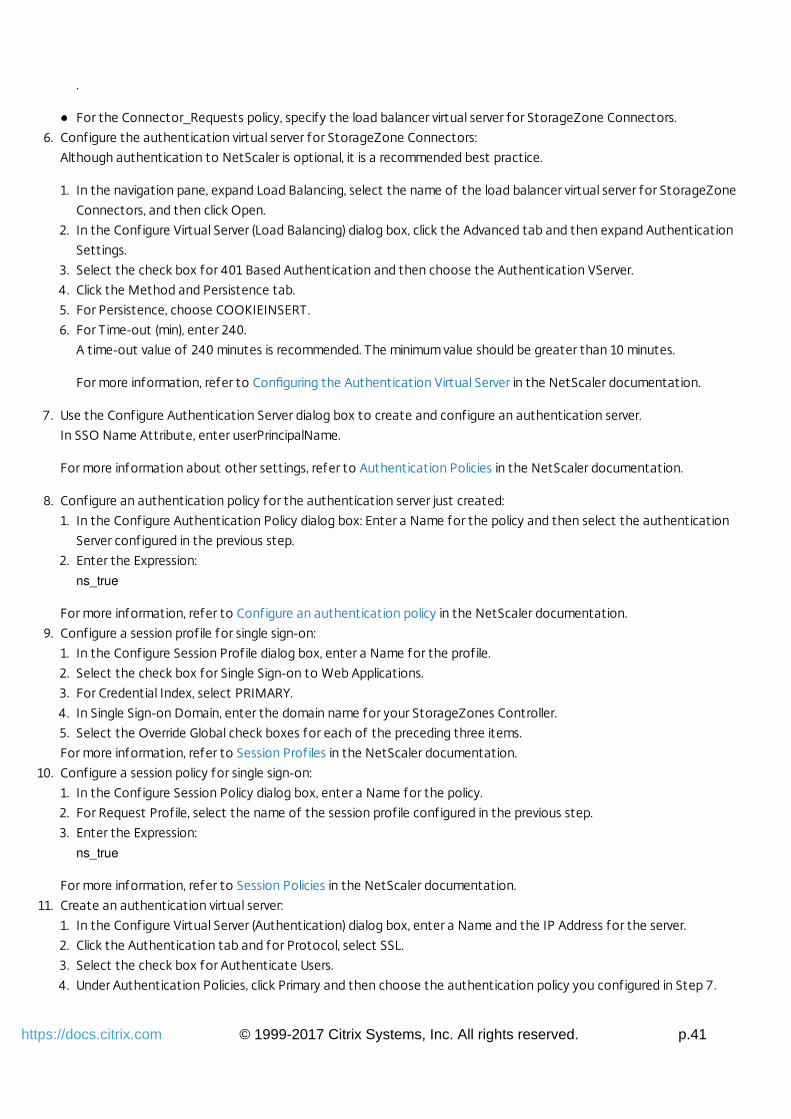
© 1999-2017 Citrix Systems, Inc. All rights reserved. p.41https://docs.citrix.com
.
For the Connector_Requests policy, specify the load balancer virtual server for StorageZone Connectors.
6. Configure the authentication virtual server for StorageZone Connectors:
Although authentication to NetScaler is optional, it is a recommended best practice.
1. In the navigation pane, expand Load Balancing, select the name of the load balancer virtual server for StorageZone
Connectors, and then click Open.
2. In the Configure Virtual Server (Load Balancing) dialog box, click the Advanced tab and then expand Authentication
Settings.
3. Select the check box for 401 Based Authentication and then choose the Authentication VServer.
4. Click the Method and Persistence tab.
5. For Persistence, choose COOKIEINSERT.
6. For T ime-out (min), enter 240.
A time-out value of 240 minutes is recommended. The minimum value should be greater than 10 minutes.
For more information, refer to Configuring the Authentication Virtual Server in the NetScaler documentation.
7. Use the Configure Authentication Server dialog box to create and configure an authentication server.
In SSO Name Attribute, enter userPrincipalName.
For more information about other settings, refer to Authentication Policies in the NetScaler documentation.
8. Configure an authentication policy for the authentication server just created:
1. In the Configure Authentication Policy dialog box: Enter a Name for the policy and then select the authentication
Server configured in the previous step.
2. Enter the Expression:
ns_true
For more information, refer to Configure an authentication policy in the NetScaler documentation.
9. Configure a session profile for single sign-on:
1. In the Configure Session Profile dialog box, enter a Name for the profile.
2. Select the check box for Single Sign-on to Web Applications.
3. For Credential Index, select PRIMARY.
4. In Single Sign-on Domain, enter the domain name for your StorageZones Controller.
5. Select the Override Global check boxes for each of the preceding three items.
For more information, refer to Session Profiles in the NetScaler documentation.
10. Configure a session policy for single sign-on:
1. In the Configure Session Policy dialog box, enter a Name for the policy.
2. For Request Profile, select the name of the session profile configured in the previous step.
3. Enter the Expression:
ns_true
For more information, refer to Session Policies in the NetScaler documentation.
11. Create an authentication virtual server:
1. In the Configure Virtual Server (Authentication) dialog box, enter a Name and the IP Address for the server.
2. Click the Authentication tab and for Protocol, select SSL.
3. Select the check box for Authenticate Users.
4. Under Authentication Policies, click Primary and then choose the authentication policy you configured in Step 7.

© 1999-2017 Citrix Systems, Inc. All rights reserved. p.42https://docs.citrix.com
5. Click the Policies tab, click Session, and then choose the session policy you configured in Step 9.
For more information, refer to Configuring the Authentication Virtual Server in the NetScaler documentation.

© 1999-2017 Citrix Systems, Inc. All rights reserved. p.43https://docs.citrix.com
Create a network share for private data storage
Mar 19, 2015
StorageZones for ShareFile Data requires a network share for your private data. When multiple StorageZones Controllers
are configured for high availability and load balancing within a zone, all Controllers access the same shared location for
private data.
Even if you store ShareFile files in a supported third-party storage system, StorageZones Controller requires a network
share for encryption keys, queued files, other temporary items, and a storage cache for file uploads to or downloads from
that storage system. For more information about the storage cache, see Customize storage cache operations.
StorageZones Controllers access a network share using the IIS Account Pool user. By default, application pools operate
under the Network Service user account, which has low-level user rights. StorageZones Controller uses the Network Service
account by default. You can use a named user account instead of the Network Service account to access the share.
However, you should run the IIS application pool and the Citrix ShareFile Services using the Network Service account.
1. If you want to use a named user account instead of the Network Service account to access the share, create a named
user account in Active Directory. We will refer to that named user account as the ShareFile Service account.
Note: When you configure StorageZones Controller, you will specify the Network Share User Name and Network Share
Password, which are the credentials for the account you will use to access the share, either the ShareFile Service
account or the Network Service account.
2. Connect to the server that will host the network share and create a folder for your ShareFile private data.
3. Right-click the folder and choose Share with specif ic people....
4. Add the account you will use to access the share (Network Service account or ShareFile Service account) and change
the Permission Level to Read/Write.
5. Click Share and then click Done.
6. Right-click the folder and choose Properties.
7. On the Security tab, verify that the account you will use to access the share (Network Service account or ShareFile
Service account) has Full Access permissions.
Increase the number of files per zone
By default, a StorageZones Controller configured to use a CIFS share stores all zone files in a single folder. As a result, the
maximum number of files supported for a zone is limited by the maximum number of files per folder supported by your
storage array.
You can configure StorageZones Controller to divide the persistent storage layout. This increases the maximum number of
files per zone for some types of storage arrays from less than a half million to ten million or more. If you need even more
capacity, you can change the default.
To enable StorageZones Controller to store files in multiple folders
Caution: Editing the Registry incorrectly can cause serious problems that may require you to reinstall your operating system.Citrix cannot guarantee that problems resulting from the incorrect use of Registry Editor can be solved. Use Registry Editorat your own risk. Be sure to back up the registry before you edit it.On all StorageZones Controllers in the zone, update the value of the registry key
HKLM\Software\Wow6432Node\Citrix\StorageZone\PathSelection from 0 to 1. If a StorageZones Controller registry does
not include that key after an upgrade, add it.

© 1999-2017 Citrix Systems, Inc. All rights reserved. p.44https://docs.citrix.com
Restart IIS on the StorageZones Controllers when you are finished editing the registry.
To increase the maximum number of folders
By default, divided storage layout has 256 top-level folders, each of which contains 256 folders. That configuration is
represented in the primary StorageZones Controller registry key HKLM\Software\Wow6432Node\Citrix\StorageZone:
PathSelectionParams=2,2. The first value constrains the number of top-level folders to "16 to the power of 2" or 256. The
second value also constrains the number of child folders of the top-level folders to 256.
Using that same formula (16 to the power of N) you can determine the appropriate values for your site. For example,
PathSelectionParams=3,4,4,4 constrains the number of top-level folders to 4096 (16 to the power of 3). The second value
constrains the child folders of the top-level folders to 65536 (16 to the power of 4). The third value constrains the child
folders of the second-level folders to 65536, and so on.
Restart IIS on the primary and secondary StorageZones Controllers if you are finished editing the registry.
To remove empty folders
When StorageZones Controller stores files in multiple folders, file deletion can result in empty folders. By default,
StorageZones Controller removes empty folders. The file delete service will delete empty folders, starting at the bottom of
the tree and continuing up until it reaches a non-empty folder.
However, some upgrade paths might not update your settings. After an upgrade, verify that the following key appears in
C:\inetpub\wwwroot\Citrix\StorageCenter\SCFileCleanSvc\FileDeleteService.exe.config:
<add key="DeleteEmptyFoldersAfterFileDeletion” value=“1”/>
If you need to add the key, restart the File Delete Service when you are finished.

© 1999-2017 Citrix Systems, Inc. All rights reserved. p.45https://docs.citrix.com
Install an SSL certificate
Dec 18 , 2014
If you do not use a wildcard certificate, you must create a Certificate Signing Request (CSR) for the StorageZones
Controller server and submit your request to a Certificate Authority (CA). For help, refer to the documentation for your CA.
Follow these steps to install a certificate.
1. On the StorageZones Controller server, open MMC and then choose File > Add/Remove Snap-in.
2. Select Certif icates and then click Add.
3. Select Computer Account, click Next, click Finish, and then click OK.
4. In the MMC console, expand Certif icates > Personal.
5. Right-click Certif icates, choose All Tasks > Import, and then click Next.
6. Click Browse and then from the f ile extension drop-down, choose Personal Information Exchange.
7. Browse to the certif icate location and then click Open.
8. Click Next, enter the Password associated with your private key, click Next twice, and then click Finish.
9. When the message Import was Successful appears, click OK.
For a public certificate, make sure that the domain it is issued to resolves to the local IP address of StorageZones
Controller. To do that, update the hosts file on the StorageZones Controller to map the domain associated with the
certificate to the StorageZones Controller IP address. If the two addresses do not resolve, users will not be able to upload
files from StorageZones Controller.

© 1999-2017 Citrix Systems, Inc. All rights reserved. p.46https://docs.citrix.com
Prepare your server for ShareFile data
Apr 14 , 2015
The IIS and ASP.NET setup described in this section is required for StorageZones for ShareFile data and for StorageZone
Connectors. These instructions are based on Windows Server 2012. The instructions for Windows Server 2008 are provided
in the earlier documentation for StorageZones Controller.
To enable the Web Server (IIS) role and the ASP.NET role service
1. On the server where you will install StorageZones Controller, log on with an account that has local administrator
privileges.
2. Open the Server Manager console Dashboard and then click Manage > Add Roles and Features to open the Add Roles
and Features Wizard.
3. In the Add Roles and Features Wizard, click Next.
4. On the Select installation type page, click Role-based or feature-based installation and then click Next.

© 1999-2017 Citrix Systems, Inc. All rights reserved. p.47https://docs.citrix.com
5. On the Select destination server page, choose your server from the server pool and then click Next.

© 1999-2017 Citrix Systems, Inc. All rights reserved. p.48https://docs.citrix.com
6. On the Select server roles page, select the Web Server (IIS) check box and then click Next.
7. Click Add Features to add the features required for IIS.

© 1999-2017 Citrix Systems, Inc. All rights reserved. p.49https://docs.citrix.com
8. Click Add Features.

© 1999-2017 Citrix Systems, Inc. All rights reserved. p.50https://docs.citrix.com
The Select features page appears. The required settings are shown in the following screen.
9. On the Web Server Role (IIS) page, click Next.
10. On the Select role services page, select the Basic Authentication and Windows Authentication check boxes, and then
click Next.
Windows Authentication enables Kerberos or Windows Challenge/Response (NTLM) authentication to a restricted zone.
Domain-joined clients can authenticate silently when Kerberos or NTLM is used.
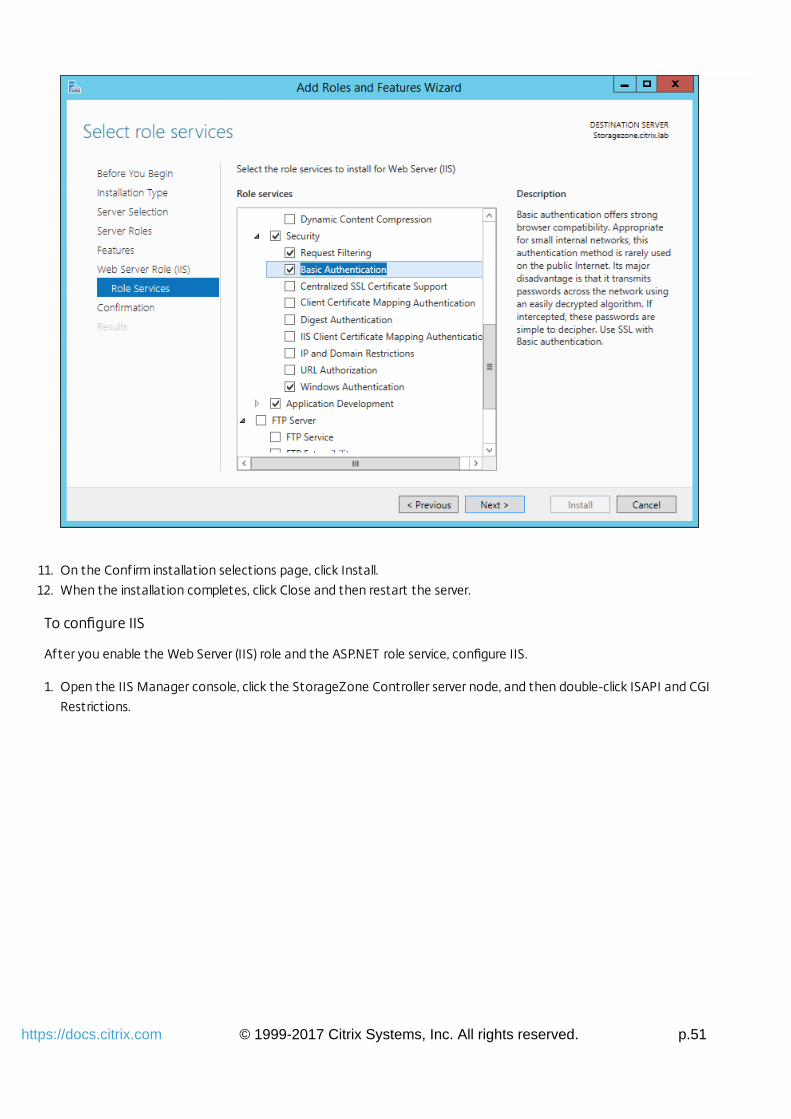
© 1999-2017 Citrix Systems, Inc. All rights reserved. p.51https://docs.citrix.com
11. On the Confirm installation selections page, click Install.
12. When the installation completes, click Close and then restart the server.
To configure IIS
After you enable the Web Server (IIS) role and the ASP.NET role service, configure IIS.
1. Open the IIS Manager console, click the StorageZone Controller server node, and then double-click ISAPI and CGI
Restrictions.

© 1999-2017 Citrix Systems, Inc. All rights reserved. p.52https://docs.citrix.com
2. Set each ASP.NET entry to Allowed.
3. Verify that a domain server or public certif icate is installed on the server: In the IIS Manager console, click the
StorageZone Controller server node, and then double-click Server Certif icates.

© 1999-2017 Citrix Systems, Inc. All rights reserved. p.53https://docs.citrix.com
If there is no certificate associated with a public Certificate Authority, install a certificate on the server before
proceeding. For more information, see Install an SSL certificate.
Note: If you are using a NetScaler Gateway or similar appliance with StorageZones Controller, you can use a domain
server certif icate. All Internet traff ic for standard zones must be handled using a public certif icate.
4. In the IIS Manager console, click Default Web Site and then click Bindings.
5. Click Add and configure the site binding as follows:
Type is https.
IP address is All Unassigned.
Port is 443.
SSL certif icate is your installed certif icate.
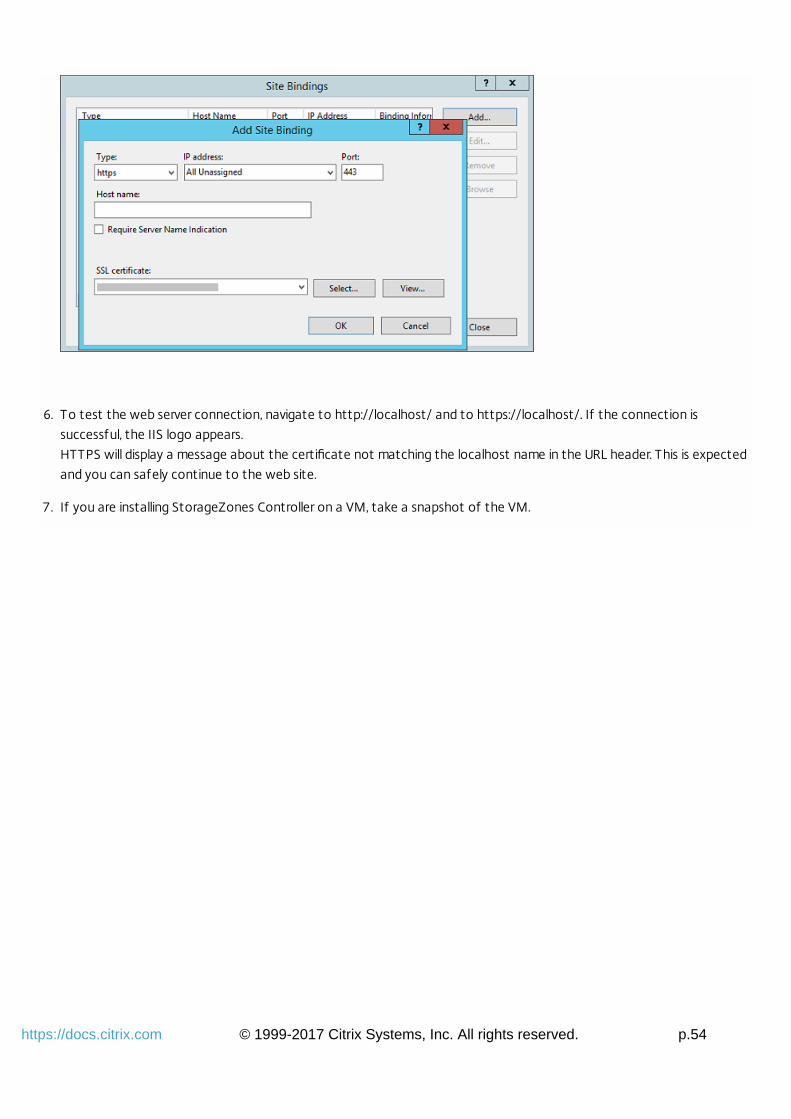
© 1999-2017 Citrix Systems, Inc. All rights reserved. p.54https://docs.citrix.com
6. To test the web server connection, navigate to http://localhost/ and to https://localhost/. If the connection is
successful, the IIS logo appears.
HTTPS will display a message about the certificate not matching the localhost name in the URL header. This is expected
and you can safely continue to the web site.
7. If you are installing StorageZones Controller on a VM, take a snapshot of the VM.

© 1999-2017 Citrix Systems, Inc. All rights reserved. p.55https://docs.citrix.com
Install StorageZones Controller and create aStorageZone
Mar 29, 2015
Important: Verify that your environment meets the system requirements before you start the installation.When you install a StorageZones Controller, you either create a zone and configure a primary StorageZones Controller or
join secondary StorageZones Controllers to a zone.
While configuring a primary StorageZones Controller, you can enable either or both of these features:
StorageZones for ShareFile Data, to specify private data storage, either a private network share or a supported third-
party storage system.
StorageZone Connectors, to give users access to documents on SharePoint sites or specif ied network f ile shares.
The following steps describe how to install StorageZones Controller, configure authentication for the IIS default web site,
create a zone, and enable features.
1. Download and install the StorageZones Controller software:
1. From the ShareFile download page at http://www.citrix.com/downloads/sharefile.html, log on and download the
latest StorageZones Controller installer.
Note: Installing StorageZones Controller changes the Default Web Site on the server to the installation path of the
controller.
2. On the server where you want to install StorageZones Controller, run StorageCenter.msi.
The ShareFile StorageZones Controller Setup wizard starts.
3. Respond to the prompts. When installation is complete, clear the check box for Launch StorageZones Controller
Configuration Page and then click Finish.
4. Restart the StorageZones Controller.
2. To test that the installation was successful, navigate to http://localhost/. If the installation is successful, the ShareFile
logo appears.
If the ShareFile logo does not appear, clear the browser cache and try again.
3. After the ShareFile logo appears, configure authentication for the IIS default web site:
1. Open the IIS Manager console, navigate to Default Web Site, and under IIS double-click Authentication.
2. Right-click Basic Authentication and select Enabled.
Important: If you plan to clone the StorageZones Controller, capture the disk image before you proceed with
configuring the StorageZones Controller.
4. To use an S3-compatible storage provider with ShareFile, perform the following steps before creating or configuring a
StorageZone.
1. Open Windows Registry Editor (Run > regedit.exe).
2. Find the HKEY_LOCAL_MACHINE\SOFTWARE\Wow6432Node\Citrix\StorageCenter registry key.
3. Create a new REG_SZ value under this key:
Value name: S3EndpointAddressValue type: REG_SZValue data: Enter the HTTPS URL that corresponds to your S3-compatible storage endpoint.
4. If the storage provider supports only path-style container access (see

© 1999-2017 Citrix Systems, Inc. All rights reserved. p.56https://docs.citrix.com
http://docs.aws.amazon.com/AmazonS3/latest/dev/VirtualHosting.html), create another value under this key.
Value name: S3ForcePathStyleValue type: REG_SZValue data: true
5. Restart the StorageZones Controller application pool (StorageCenterAppPool).
6. Gather the following information from your S3-compatible storage system:
The name of an S3 bucket to use for ShareFile dataAccess key ID
Access key ID
Secret access key
7. Continue with the following steps to create a new StorageZone and choose Amazon S3 as the persistent storage
location. StorageZone Controller will use the custom endpoint address you entered instead of the actual Amazon S3
service. When configuring the S3 details, choose the bucket name you created above.
5. Navigate to the StorageZones Controller console: Open http://localhost/configservice/login.aspx or start the
configuration tool from the Start screen or menu. For information about using the Start screen shortcut in Windows 8,
refer to Manage StorageZones Controllers.
6. In the StorageZones Controller Logon page, enter the email address, password, and subdomain, such as ShareFile.com or
ShareFile.eu, for your ShareFile account and then click Log On.
7. To set up your primary StorageZones Controller, click Create new Zone and provide the zone information:
Option Description
Zone A name that appears in the ShareFile Administrator console.
PrimaryZoneController
Defaults to http://localhost/ConfigService. If you use SSL, change http to https. Keep in mind that
ShareFile supports only valid, trusted public SSL certif icates for standard zones. If you have problems
configuring a secondary StorageZone host, ensure that you can resolve the ConfigService URL in a
local browser on that server, with no SSL errors.
localhost resolves to the server IP address. You can specify a server name instead (such as
https://servername.subdomain.com/ConfigService). The server name must be resolvable by a secondary
StorageZones Controller server.
Hostname A unique identif ier for your StorageZones Controller.
ShareFile recommends that you use the server hostname as the identifier. This should be a friendly
name and not the FQDN. This name appears in the ShareFile Administrator console.
ExternalAddress
The FQDN for this StorageZones Controller. If this StorageZones Controller will be used for standard
zones, the URL must be accessible from the Internet. For use with restricted zones, you can specify an
internal address instead. If you are using a load balancer, enter its address.
When you submit the page, ShareFile validates the address.
8. To specify private data storage:
1. Select the check box for Enable StorageZones for ShareFile Data.
2. To configure a restricted zone, select the Create a restricted zone check box.
To configure a standard zone, clear the check box.

© 1999-2017 Citrix Systems, Inc. All rights reserved. p.57https://docs.citrix.com
Note: After you configure a StorageZones Controller, you cannot change its zone type.
3. If you selected Create a restricted zone and your user accounts are in a different, trusted Active Directory domain,
select User accounts are in a trusted Active Directory domain and then enter the service account credentials for the
Active Directory domain.
StorageZones Controller uses the service account credentials to connect to the trusted Active Directory domain
server for email address lookup.
4. Choose a Storage Repository.
For information about the storage repository settings and additional configuration required for restricted zones, see
Configure StorageZones for ShareFile Data, in this section.
9. If you do not want to enable StorageZone Connectors:
1. Click Register to register StorageZones Controller with ShareFile.
2. Continue with Step 10.
10. If you are using S3-compatible storage, create these additional registry entries after the StorageZone registers:
1. Open Windows Registry Editor (Run > regedit.exe).
2. Find the HKEY_LOCAL_MACHINE\SOFTWARE\Wow6432Node\Citrix\StorageZone\CloudStorageUploaderConfig
registry key.
3. Create a new REG_SZ value under this key:
Value name: S3EndpointAddressValue type: REG_SZValue data: Enter the HTTPS URL that corresponds to your S3-compatible storage endpoint.
4. If the storage provider supports only path-style container access (see
http://docs.aws.amazon.com/AmazonS3/latest/dev/VirtualHosting.html), create another value under this key.
Value name: S3ForcePathStyleValue type: REG_SZValue data: true
5. Restart the StorageZones Controller application pool (StorageCenterAppPool).
11. To enable StorageZone Connectors:
1. Select the check box for each connector type you want to use: Enable StorageZone Connector for Network File
Shares and Enable StorageZone Connector for SharePoint.
For information about the connector settings, see Configure StorageZone Connectors, in this section.
2. Click Register. Your StorageZones Controller information appears.
3. If you specif ied Allowed Paths or Denied Paths for StorageZone Connectors, restart the IIS server.
Enabling the Connectors creates the IIS apps "cifs" (Connector for Network File Shares) and "sp" (Connector for
SharePoint).
12. To configure secondary StorageZones Controllers, refer to Manage StorageZones Controllers.
Important: A StorageZones Controller is installed on your local site and you are responsible for backing it up. To protectyour deployment, you should take a snapshot of the StorageZones Controller server, back up the StorageZones Controllerconfiguration, and prepare StorageZones Controller for disaster recovery.
Configure StorageZones for ShareFile Data
Note: StorageZones for ShareFile Data is available for XenMobile Enterprise Edition and is not available for otherXenMobile editions.You can configure StorageZones for ShareFile Data from the StorageZones Controller wizard when you create a
StorageZone or from the StorageZones Controller console. Use the ShareFile Data tab to configure settings for private

© 1999-2017 Citrix Systems, Inc. All rights reserved. p.58https://docs.citrix.com
network shares or supported third-party storage systems.
For restricted StorageZones, you must also configure your local SMTP server settings because email notifications are sent
from your local SMTP server instead of from ShareFile.
Network share settings
Option Description
Storage Repository Choose Local network share. After you create the zone, you cannot change the StorageRepository option. For example, to switch from a local network share to third-party storage,you must create a new zone.
Network ShareLocation
The UNC path to the network share you will use for private data storage and for data such asencryption keys, queued f iles, and other temporary items. Specify the path in the form\\server\share.StorageZones Controllers belonging to the same StorageZone must use the same file share for
storage.
Caution: StorageZones Controller will overwrite any data in this path with a proprietary storageformat. Never specify a path to a location with f ile data. Reserve this storage location forStorageZones for ShareFile Data only.StorageZones Controllers access the share using the IIS Account Pool user. By default,
application pools operate under the Network Service user account, which has low-level user
rights. A StorageZones Controller uses the Network Service account by default.
The Network Service account must have full access to this storage location.
Network ShareUsername andNetwork SharePassword
The credentials for the UNC path of your network share location.To use a named user account instead of the Network Service account to access the share,
specify those credentials. You can continue to run the IIS application pool and the Citrix
ShareFile Services using the Network Service account.
Enable Encryption Select the check box only if you want to encrypt the f ile content stored on your f ile share. Inan enterprise environment where the network share is inside your network and already securedby third-party tools, we recommend that you do not encrypt the f iles on the share.This setting does not relate to metadata. Metadata is not encrypted for standard zones.
StorageZones Controller always encrypts metadata for restricted zones.
Although this additional security is offered as an option for maximum security when required,
encrypting files on the share will make the disk unreadable by third-party tools such as antivirus
scanners and filer tools, including data deduplication tools. ShareFile uses a file encryption key
to confirm the validity of download requests and encrypt the storage.
Passphrase A phrase used to protect your f ile encryption key. Be sure to archive the passphrase andencryption key in a secure location.You must use the same passphrase for each StorageZones Controller in a zone. The passphrase
is not the same as your account password and cannot be recovered if lost. If you lose the

© 1999-2017 Citrix Systems, Inc. All rights reserved. p.59https://docs.citrix.com
passphrase, you cannot reinstall StorageZones, join additional StorageZones Controllers to the
StorageZone, or recover the StorageZone if the server fails.
Note: The encryption key appears in the root of the shared storage path. Losing theencryption key f ile, SCKeys.txt, immediately breaks access to all StorageZone f iles. Be sure toback up the encryption key f ile as part of your normal datacenter procedures.
Option Description
Shared Cache Configuration settings
Option Description
Shared cachelocation
The path to a network share that will contain your storage cache and data such as encryptionkeys, queued f iles, and other temporary items. Specify the path in the form \\server\share.StorageZones Controllers belonging to the same StorageZone must use the same file share for
storage.
Caution: StorageZones Controller will overwrite any data in this path with a proprietary storageformat. Never specify a path to a location with f ile data. Reserve this storage location forStorageZones for ShareFile Data only.The Network Service account (or the account the Citrix ShareFile Management Service is
configured to run as) must have full access to this storage location.
Shared cache Logonand Shared cachePassword
The credentials for the UNC path of your shared cache location.
Enable Encryption Select the check box to encrypt the f iles stored in your shared cache.
Windows Azure storage container settings
Option Description
Storage Repository Choose Azure storage container. After you create the zone, you cannot change the StorageRepository option. For example, to switch from a local network share to Azure-based storage,you must create a new zone.
Account Name The name of your Azure storage account. These names are always lower case.
Access Key The primary or secondary access key for your Azure storage. Copy the key from the ManageAccess Keys screen of the Windows Azure Management Portal.
Validate Click the button to validate the Azure access key. You cannot proceed with configuration untilthe validation is completed and the Container Name drop-down menu includes all availablecontainers for the specif ied account.
Container Name Select the Azure container to use for all StorageZones Controllers in this StorageZone. This listis empty until your Azure access key is validated.

© 1999-2017 Citrix Systems, Inc. All rights reserved. p.60https://docs.citrix.com
Amazon S3 storage bucket settings
Option Description
Storage Repository Choose Amazon S3 storage bucket. After you create the zone, you cannot change theStorage Repository option. For example, to switch from a local network share to Amazon S3storage, you must create a new zone.
Access Key Id The access key ID for your Amazon S3 storage.
Secret Access Key The secret access key for your Amazon S3 storage.
Validate Click the button to validate the Amazon S3 secret access key. You cannot proceed withconfiguration until the validation is completed and the Bucket Name drop-down menu includesall available buckets for the specif ied account.
Bucket Name Select the Amazon S3 bucket to use for all StorageZones Controllers in this StorageZone. Thislist is empty until your Amazon S3 secret access key is validated.
SMTP settings
Option Description
SMTP server addressand SMTP portnumber
Your local SMTP server hostname and port.
Use SSL Select the check box to connect to the SMTP server over a secure connection.
Username andPassword
The username and password for your local SMTP server.
Authentication mode The Default authentication mode uses the most secure method available to connect fromStorageZones Controller to the SMTP server.
Sender address The email address that appears in the From field.
Configure StorageZone Connectors
StorageZone Connectors give users access to documents on SharePoint sites or specified network file shares. You do not
have to enable StorageZones for ShareFile Data to use StorageZone Connectors.
Note: StorageZones for ShareFile Data and the StorageZones Connectors features can share a zone. However,StorageZones Controller keeps the data and access rules for the two data types separate.You can configure StorageZone Connectors when you create a zone using the StorageZones Controller wizard or from the
StorageZones Controller console.
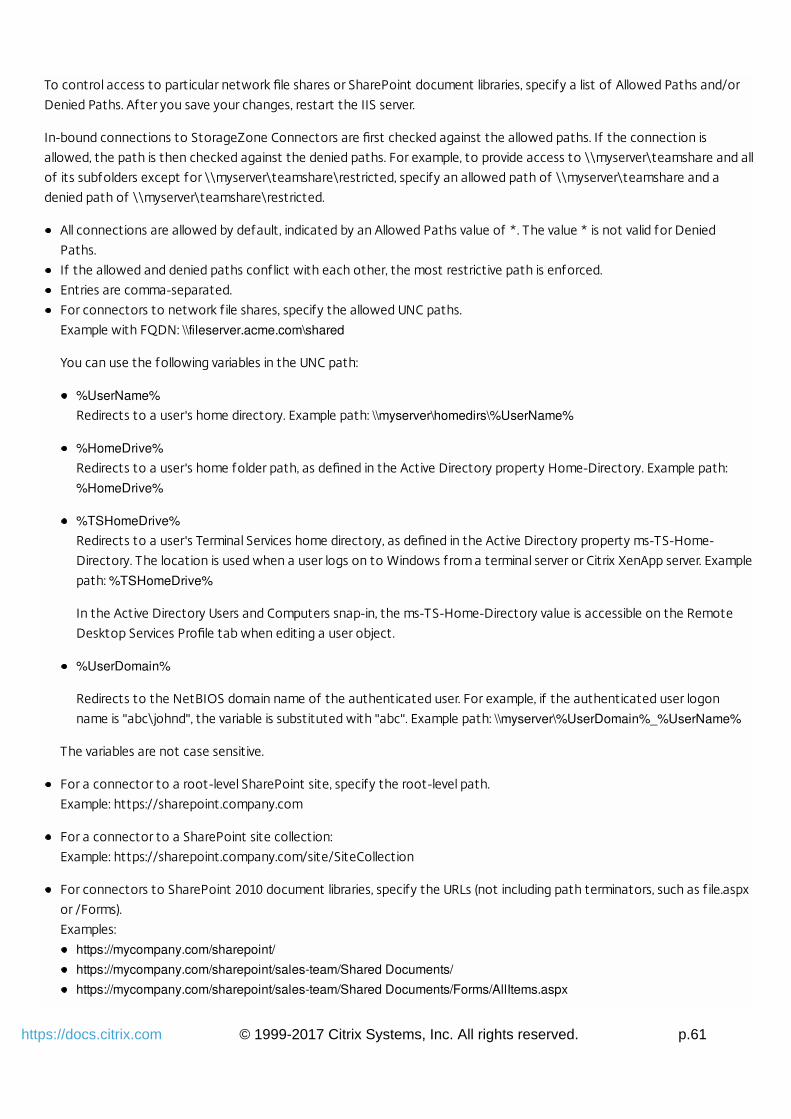
© 1999-2017 Citrix Systems, Inc. All rights reserved. p.61https://docs.citrix.com
To control access to particular network file shares or SharePoint document libraries, specify a list of Allowed Paths and/or
Denied Paths. After you save your changes, restart the IIS server.
In-bound connections to StorageZone Connectors are first checked against the allowed paths. If the connection is
allowed, the path is then checked against the denied paths. For example, to provide access to \\myserver\teamshare and all
of its subfolders except for \\myserver\teamshare\restricted, specify an allowed path of \\myserver\teamshare and a
denied path of \\myserver\teamshare\restricted.
All connections are allowed by default, indicated by an Allowed Paths value of *. The value * is not valid for Denied
Paths.
If the allowed and denied paths conflict with each other, the most restrictive path is enforced.
Entries are comma-separated.
For connectors to network f ile shares, specify the allowed UNC paths.
Example with FQDN: \\fileserver.acme.com\shared
You can use the following variables in the UNC path:
%UserName%
Redirects to a user's home directory. Example path: \\myserver\homedirs\%UserName%
%HomeDrive%
Redirects to a user's home folder path, as defined in the Active Directory property Home-Directory. Example path:
%HomeDrive%
%TSHomeDrive%
Redirects to a user's Terminal Services home directory, as defined in the Active Directory property ms-TS-Home-
Directory. The location is used when a user logs on to Windows from a terminal server or Citrix XenApp server. Example
path: %TSHomeDrive%
In the Active Directory Users and Computers snap-in, the ms-TS-Home-Directory value is accessible on the Remote
Desktop Services Profile tab when editing a user object.
%UserDomain%
Redirects to the NetBIOS domain name of the authenticated user. For example, if the authenticated user logon
name is "abc\johnd", the variable is substituted with "abc". Example path: \\myserver\%UserDomain%_%UserName%
The variables are not case sensitive.
For a connector to a root-level SharePoint site, specify the root-level path.
Example: https://sharepoint.company.com
For a connector to a SharePoint site collection:
Example: https://sharepoint.company.com/site/SiteCollection
For connectors to SharePoint 2010 document libraries, specify the URLs (not including path terminators, such as f ile.aspx
or /Forms).
Examples:
https://mycompany.com/sharepoint/
https://mycompany.com/sharepoint/sales-team/Shared Documents/
https://mycompany.com/sharepoint/sales-team/Shared Documents/Forms/AllItems.aspx
© 1999-2017 Citrix Systems, Inc. All rights reserved. p.62https://docs.citrix.com
The default SharePoint 2013 URL (when Minimal Download Strategy is enabled) is in the form:
https://sharepoint.company.com/_layouts/15/start.aspx#/Shared%20Documents/.
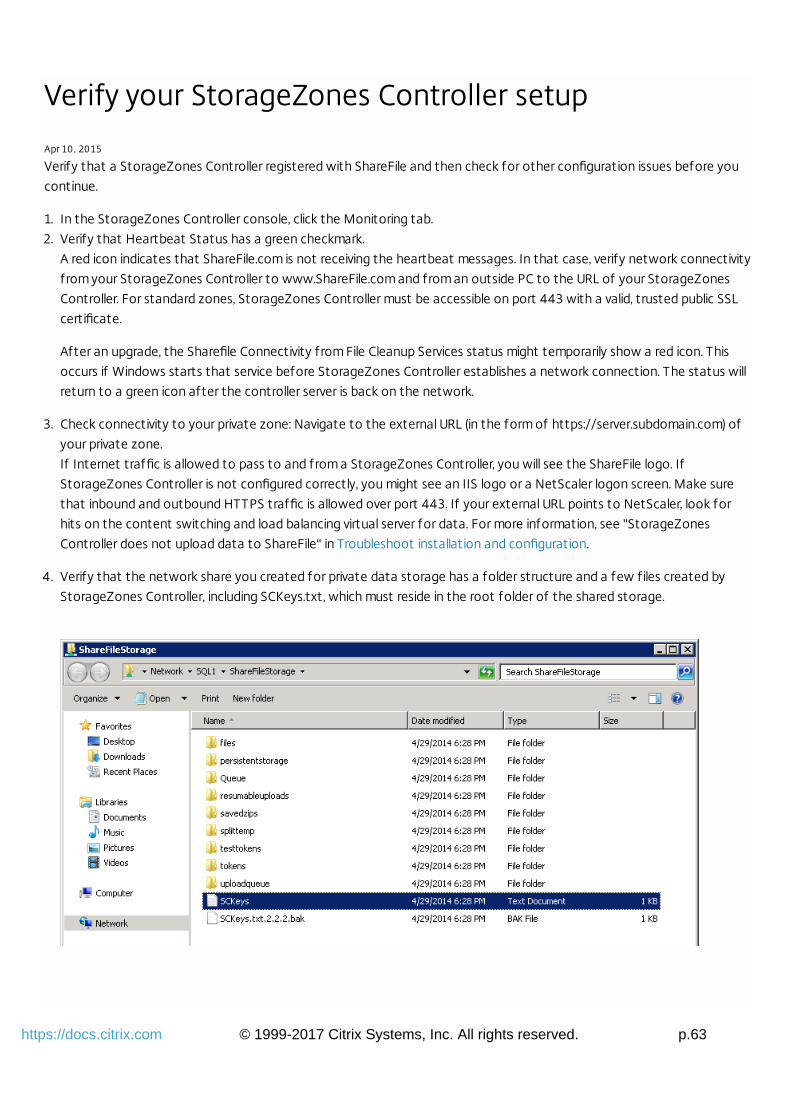
© 1999-2017 Citrix Systems, Inc. All rights reserved. p.63https://docs.citrix.com
Verify your StorageZones Controller setup
Apr 10 , 2015
Verify that a StorageZones Controller registered with ShareFile and then check for other configuration issues before you
continue.
1. In the StorageZones Controller console, click the Monitoring tab.
2. Verify that Heartbeat Status has a green checkmark.
A red icon indicates that ShareFile.com is not receiving the heartbeat messages. In that case, verify network connectivity
from your StorageZones Controller to www.ShareFile.com and from an outside PC to the URL of your StorageZones
Controller. For standard zones, StorageZones Controller must be accessible on port 443 with a valid, trusted public SSL
certificate.
After an upgrade, the Sharefile Connectivity from File Cleanup Services status might temporarily show a red icon. This
occurs if Windows starts that service before StorageZones Controller establishes a network connection. The status will
return to a green icon after the controller server is back on the network.
3. Check connectivity to your private zone: Navigate to the external URL (in the form of https://server.subdomain.com) of
your private zone.
If Internet traffic is allowed to pass to and from a StorageZones Controller, you will see the ShareFile logo. If
StorageZones Controller is not configured correctly, you might see an IIS logo or a NetScaler logon screen. Make sure
that inbound and outbound HTTPS traffic is allowed over port 443. If your external URL points to NetScaler, look for
hits on the content switching and load balancing virtual server for data. For more information, see "StorageZones
Controller does not upload data to ShareFile" in Troubleshoot installation and configuration.
4. Verify that the network share you created for private data storage has a folder structure and a few files created by
StorageZones Controller, including SCKeys.txt, which must reside in the root folder of the shared storage.

© 1999-2017 Citrix Systems, Inc. All rights reserved. p.64https://docs.citrix.com
SCKeys.txt is created when StorageZones Controller is installed, provided there are no credential or access rights issues.
If SCKeys.txt is not present, verify the access control lists on your file share and then reinstall StorageZones Controller.
5. Check the status of StorageZone Connectors from the ShareFile interface:
1. Log on to your ShareFile Enterprise account, navigate to Admin > Storage Zones, and verify that the Health column
includes a green check mark.
2. Click the site name and verify that the Heartbeat message indicates that the StorageZones Controller is responding.
6. Test a f ile upload: Log on to the ShareFile web interface, create a shared folder assigned to the zone you just
configured, upload a f ile to that folder, and then verify that the f ile appears in the folder.

© 1999-2017 Citrix Systems, Inc. All rights reserved. p.65https://docs.citrix.com
Change the default zone for user accounts
Oct 28 , 2014
By default, existing and newly provisioned user accounts use the ShareFile-managed cloud storage as the default zone.
Change the default zone as follows:
To specify the default zone for user accounts provisioned from AD, open the User Management Tool and click the
options icon.
To select a zone for root-level folders, open the ShareFile administrator console and go to Manage Users. (Requires
membership in the super user group.)
To change the default zone for an individual user, open the ShareFile administrator console and go to Manage Users.
(Requires membership in the super user group.) You can also create and manage zone permissions on the Manage Users
page.

© 1999-2017 Citrix Systems, Inc. All rights reserved. p.66https://docs.citrix.com
Specify a proxy server for StorageZones
Jan 23, 2015
The StorageZones Controllers console enables you to specify a proxy server for StorageZones Controllers. You can also
specify a proxy server using other methods.
Primary and secondary StorageZones Controllers communicate with each other using HTTP. If all HTTP traffic is configured
to go through an outbound proxy server that does not support connections back to an internal server, you must configure
both the primary and secondary StorageZones Controllers to bypass the proxy server so they can communicate with each
other, as described in the following steps.
Important: The bypass list settings appear only for the latest StorageZones Controller release. If you are usingStorageZones Controller 2.2 through 2.2.2, you must manually add a bypass list to Web.config for each secondary server, asdescribed in Web.config.1. In the StorageZones Controller console (http://localhost/configservice/login.aspx), click the Networking tab.
2. Select the Enable Proxy check box and enter the proxy server Address and Port.
3. Select an Authentication Mode and specify your Windows account designated for ShareFile proxy access.
4. If your site proxies all outbound HTTP traff ic and a zone has multiple StorageZones Controllers, configure bypass
settings:
If all StorageZones Controller traff ic is on the same subnet, select the Bypass proxy… check box so the controllers
can communicate with each other.
If the StorageZones Controllers are on different subnets, enter the primary StorageZones Controller hostname or IP
address in Bypass Address.
5. Restart the IIS server of all zone members.

© 1999-2017 Citrix Systems, Inc. All rights reserved. p.67https://docs.citrix.com
Configure the domain controller to trust theStorageZones Controller for delegation
Jun 20 , 2014
Note: This section applies only to StorageZone Connectors.To support NTLM or Kerberos authentication on network shares or SharePoint sites, configure the domain controller, as
follows.
1. On the domain controller for the StorageZones domain, click Start > Administrative Tools > Active Directory Users and
Computers.
2. Expand domain, and expand the Computers folder.
3. In the right pane, right-click the StorageZones Controller name, select Properties, and then click the Delegation tab.
4. For Kerberos, select Trust this computer for delegation to specif ied services only.
5. For NTLM:
1. Select Trust this computer for delegation to specif ied services only and Use any authentication protocol. Click OK.
2. Click the Add button. In the Add Services dialog box, click Users or Computers and then browse to or type the
hostname for the network share or SharePoint server. Click OK.
If you have multiple file servers or SharePoint servers, add a service for each.
3. In the Available Services list, select the services used: cifs (for Connector for Network File Shares) and http (for

© 1999-2017 Citrix Systems, Inc. All rights reserved. p.68https://docs.citrix.com
Connector for SharePoint). Click OK.

© 1999-2017 Citrix Systems, Inc. All rights reserved. p.69https://docs.citrix.com
Configure StorageZones Controller for Web AppPreviews, Thumbnails and View-Only Sharing
Oct 22, 2015
To support in-browser document preview, thumbnails and View-Only sharing of data stored in customer-managed
StorageZones, configure the StorageZones controller as follows:
1. In the StorageZones Controller console, click the ShareFile Data tab.
2. In the Local Network Share Conf iguration section, enable Conf igure off ice web apps previews.
3. Enter the external URL of your Microsoft Office Web Apps (OWA) server.
1. Users must download and configure the OWA server software via their Microsoft Office MSDN subscription.
4. Verify that the OWA URL is externally accessible.
5. In the StorageZones Controller Console, click the Monitoring tab.
6. Verify that OWA Server Connectivity has a green checkmark.
RequirementsConfigure Clock Synchronization
Verify that the Time on your StorageZones Controller is synced with time.windows.com or another NTP server.
Click here for information on configuring clock synchronization.
Modifying the OWA URAL or Disabling Previews
Either of the above actions requires that the IIS service be restarted for each Primary and Secondary controller.
On-Premise File Preview Rendering
On-premise f ile previews are rendered by your on-premise Microsoft Office Web Apps (OWA) Server.
When previewing f iles stored on a Citrix-managed StorageZone, previews will be rendered by Citrix-managed or
Microsoft-managed OWA servers.
LimitationsThe following Zone types do not support in-browser previewing:
Restricted StorageZones
Connectors
For information on how to configure your NetScaler for View-Only Sharing, see Configure NetScaler for StorageZonesController. Time to Live (TTL) LimitTime to Live (TTL) limit for your f ile when viewing is approximately 4 hours. After previewing a f ile for that amount of time,the document preview is canceled and the user must click the magnifying glass or the shared f ile URL again to start a newpreview session. To modify the TTL limit, you must edit the AppSettingsRelease.config f ile as follows:
Navigate to C:\inetpub\wwwroot\Citrix\StorageCenter\Wopiserver

© 1999-2017 Citrix Systems, Inc. All rights reserved. p.70https://docs.citrix.com
Open the AppSettingsRelease.config f ile for editing
Locate the following string and modify the value as needed.
<add key="WopiRequestExpiryTimeInMins" value="240"/><!-- TTL set to 4 hours -->
Restart IIS
Repeat the above steps for each server in the Zone.

© 1999-2017 Citrix Systems, Inc. All rights reserved. p.71https://docs.citrix.com
Manage StorageZones Controllers
Mar 14 , 2015
After you install your primary and any secondary StorageZones Controllers, use the following procedures to manage the
controllers and prepare them for disaster recovery.
Join a secondary StorageZones Controller to a StorageZone
Change the address or passphrase of a primary StorageZones Controller
Demote and promote StorageZones Controllers
Disable, delete, or redeploy a StorageZones Controller
Transfer f iles to a new network share
Back up a primary StorageZones Controller configuration
Recover a primary StorageZones Controller configuration
Replace a primary StorageZones Controller
Prepare StorageZones Controller for f ile recovery
Recover f iles and folders from your ShareFile Data backup
Reconcile the ShareFile cloud with a StorageZone
Configure antivirus scans of uploaded f iles
To open the StorageZones Controller console, go to http://localhost/configservice/login.aspx or start the configuration
tool from the Start menu.
Note: Windows 8 users. If the message "This app can't open" appears when you select the StorageZones Controllerconfiguration icon in the Windows 8 Metro interface on Windows Server 2012 R2, the built-in administrator account mightnot have the correct permissions. To open the configuration console, use any of these methods:
Start the configuration tool from your browser.
Log on as a custom local administrator.
Log on as a domain user administrator.
Change the built-in administrator account as follows: In Local Policies/Security Options, enable "User Account Control:
Admin Approval Mode for the Built-in Administrator account" and then restart your computer.

© 1999-2017 Citrix Systems, Inc. All rights reserved. p.72https://docs.citrix.com
Join a secondary StorageZones Controller to aStorageZone
Mar 25, 2015
To configure a StorageZone for high availability, connect at least two StorageZones Controllers to it. To do that, you first
install a primary StorageZones Controller and create a zone (as described in Install StorageZones Controller and create a
StorageZone). Then, you install StorageZones Controller on a second server and join that controller to the same zone.
StorageZones Controllers belonging to the same zone must use the same file share for storage.
In a high availability deployment the secondary servers are independent, fully functioning StorageZones Controllers. The
StorageZones control subsystem randomly chooses a StorageZones Controller for operations. If the primary server goes
offline, you can easily promote a secondary server to primary. You can also demote a server from primary to secondary.
1. Open a Web browser on the server to be a secondary StorageZones Controller, open
http://localhost/configservice/login.aspx and log on.
2. Click Join existing Zone and select the StorageZone.
3. Enter the requested information and then click Register.
For Primary Zone Controller, you can enter just the hostname or IP address, and ShareFile will fill in the full URL. To test a
URL, enter it into the browser's address field. If the URL is correct, a ShareFile banner page appears. For standard zones:
If the URL is incorrect and you specified https, verify that you are using valid, trusted public SSL certificates.
4. If you are using a proxy server for the primary StorageZones Controller, specify the proxy server for the secondary
controller, as described in Specify a proxy server for StorageZones.
5. Restart the IIS server of all zone members.
A secondary StorageZones Controller inherits the configuration of the primary controller during startup.

© 1999-2017 Citrix Systems, Inc. All rights reserved. p.73https://docs.citrix.com
Change the address or passphrase of a primaryStorageZones Controller
Jan 14 , 2014
To specify a different external or local address for a primary StorageZones Controller
You can change the external address of a primary StorageZones Controller by using this procedure or other server
management tools.
1. In the ShareFile web interface, click Admin and then click StorageZones.
2. Click the zone name and then click the primary StorageZones Controller hostname.
3. Specify the new External Address or Local Address and then click Save Changes.
4. Restart the IIS server of all zone members.
To change the passphrase of a primary StorageZones Controller
1. Open the StorageZones Configuration page: http://localhost/configservice/login.aspx.
2. Click Modify.
3. Specify a Passphrase to be used to protect your f ile encryption key. Be sure to archive the passphrase and encryption
key in a secure location.
The passphrase is not the same as your account password and cannot be recovered if lost. If you lose the passphrase,
you cannot reinstall StorageZones, join additional StorageZones Controllers to the StorageZone, or recover the
StorageZone if the server fails.
Note: The encryption key appears in the root of the shared storage path. Losing the encryption key f ile immediately
breaks access to all StorageZone f iles.
4. If you changed the passphrase on the primary server: Log on to the StorageZones Configuration page for each of the
other members and enter the passphrase when prompted.
You must use the same passphrase for each StorageZones Controller in a zone.
5. Restart the IIS server of all zone members.

© 1999-2017 Citrix Systems, Inc. All rights reserved. p.74https://docs.citrix.com
Demote and promote StorageZones Controllers
Feb 06, 2014
In a high availability deployment the secondary servers are independent, fully functioning StorageZones Controllers. To
maintain or replace a primary StorageZones Controller, demote it first and then promote a secondary controller. If the
primary server goes offline, you can promote a secondary server to primary.
Caution: Editing the registry incorrectly can cause serious problems that may require you to reinstall your operating system.Citrix cannot guarantee that problems resulting from the incorrect use of Registry Editor can be solved. Use Registry Editorat your own risk. Be sure to back up the registry before you edit it.1. To demote a primary StorageZones Controller:
1. Locate the Registry key: HKEY_LOCAL_MACHINE\SOFTWARE\Wow6432Node\Citrix\StorageCenter
2. Set isPrimaryConfigServer to false.
3. Set PrimaryConfigServiceUrl to the URL of the server that will be the new primary StorageZones Controller, using the
form http://ipAddress_or_hostname/ConfigService/.
4. Restart the IIS server of all zone members.
2. To promote a secondary StorageZones Controller:
1. Locate the Registry key: HKEY_LOCAL_MACHINE\SOFTWARE\Wow6432Node\Citrix\StorageCenter
2. Set isPrimaryConfigServer to true.
3. Set PrimaryConfigServiceUrl to http://localhost/ConfigService/.
4. Restart the IIS server of all zone members.

© 1999-2017 Citrix Systems, Inc. All rights reserved. p.75https://docs.citrix.com
Disable, delete, or redeploy a StorageZones Controller
Jan 14 , 2014
To disable a StorageZones Controller
Note: Use this procedure if each StorageZones Controller has a different external address. Disable a controller from theNetScaler interface if you use the same external address for all StorageZones Controllers.Disable a StorageZones Controller before taking the server off-line for maintenance.
1. In the ShareFile web interface, click Admin and then click StorageZones.
2. Click the zone name and then click the StorageZones Controller hostname.
3. Clear the Enabled check box and then click Save Changes.
4. Restart the IIS server of all zone members.
To delete a StorageZones Controller
Deleting a StorageZones Controller does not delete the data or SCKeys.txt. If you are deleting a primary StorageZones
Controller, demote it before continuing.
1. In the ShareFile web interface, click Admin and then click StorageZones.
2. Click the zone name and then click the StorageZones Controller hostname.
3. Click Delete.
4. Restart the IIS server of all zone members.
To redeploy a StorageZones Controller
No information is lost when you redeploy a StorageZones Controller.
1. Uninstall StorageZones from the server.
2. In the ShareFile web interface, click Admin > StorageZones, and then select your zone. Do not delete the zone.
3. Select the StorageZones Controller and delete it.
4. Install StorageZones. Do not register it yet.
5. Run the StorageZones Controller configuration wizard to join the StorageZones Controller to a zone and complete the
registration.
6. Restart the IIS server of all zone members.

© 1999-2017 Citrix Systems, Inc. All rights reserved. p.76https://docs.citrix.com
Transfer files to a new network share
Nov 10 , 2014
Before setting up a new network share for private data storage, review these requirements:
StorageZones Controllers belonging to the same StorageZone must use the same file share for storage.
StorageZones Controllers access the share using the IIS Account Pool user. By default, application pools operate under
the Network Service user account, which has low-level user rights. A StorageZones Controller uses the Network Service
account by default.
The Network Service account must have full access to this storage location.
1. Copy the entire directory structure including SCkeys.txt to the new server.
2. Open the StorageZones Configuration page: http://localhost/configservice/login.aspx.
3. Click Modify.
4. In Storage Location, enter the UNC path to your network share, in the form \\server\share and then click Save.
Caution: StorageZones Controller will overwrite any data in this path with a proprietary storage format. Never specify a
path to a location with f ile data. Reserve this storage location for StorageZones for ShareFile Data only.
5. If the credentials for the UNC path of your new network share location differ from the previous one, specify the
Storage Logon and Storage Password.
6. Restart the IIS server of all zone members.
7. Log in to the configuration page of all zone members.
© 1999-2017 Citrix Systems, Inc. All rights reserved. p.77https://docs.citrix.com
Back up a primary StorageZones Controllerconfiguration
Jan 09, 2015
A StorageZones Controller is installed on your local site and you are responsible for backing it up. To fully protect your
deployment, you should take a snapshot of the StorageZones Controller server, back up your configuration, and Prepare
StorageZones Controller for file recovery.
It is critical that you back up your configuration as described in this topic. For example, if you do not have a back up and
someone accidentally deletes a zone, you cannot recover the folders and files in that zone.
Important: Be sure to use PowerShell 4.0 for this procedure. For more information about PowerShell requirements, refer to— PowerShell scripts and commands
in StorageZones Controller system requirements.The StorageZones Controller installer includes a PowerShell module with commands that back up and restore a primary
StorageZones Controller configuration settings. Your backup will include configuration information for zones,
StorageZones for ShareFile Data, StorageZone Connector for SharePoint, and StorageZone Connector for Network File
Shares.
The backup and restore commands require that you run the 32-bit version of PowerShell under the same user context as
StorageZones Controller. To set the user context, use the tool PSExec. That tool is available for download from
http://technet.microsoft.com/en-us/sysinternals/bb897553.
Note: These steps do not apply to a secondary StorageZones Controller. To recover a secondary StorageZones Controller,reinstall StorageZones Controller on the server and then join the server to the primary StorageZones Controller.1. The PowerShell script used in this procedure is unsigned, so you might need to change your PowerShell execution policy.
1. Determine if your PowerShell execution policy allows you to run local, unsigned scripts: PS C:\>Get-ExecutionPolicy
For example, a policy of RemoteSigned, Unrestricted, or Bypass allows you to run unsigned scripts.
2. To change your PowerShell execution policy: PS C:\>Set-ExecutionPolicy RemoteSigned
2. Set the user context for this PowerShell session. In a command window, run one of the following commands.
If using the default Network Service account:
PsExec.exe -i -u "NT AUTHORITY\NetworkService" C:\Windows\SysWOW64\WindowsPowerShell\v1.0\powershell
If using a named user for the StorageZones Controller application pool:
PsExec.exe -i -u "domain\username" C:\Windows\SysWOW64\WindowsPowerShell\v1.0\powershell
A PowerShell window opens.
3. From the PowerShell prompt, import the module ConfigBR.dll: Import-Module
"C:\inetpub\wwwroot\Citrix\StorageCenter\Tools\SfConfigBR\ConfigBR.dll"
You must import the module each time you open a new PowerShell window.
4. From the PowerShell prompt, run the Get-SfConfig command: Get-SfConfig -PrimaryZoneController "server" -Passphrase
"passphrase" -FilePath "fullpath"
For example:
Get-SfConfig -PrimaryZoneController "https://myserver.domain.com/ConfigService/" -Passphrase "mypassphrase" -
FilePath "c:\szc-backup.bak"

© 1999-2017 Citrix Systems, Inc. All rights reserved. p.78https://docs.citrix.com
Command parameters:
Parameter Description Examples
"server" The primary StorageZones Controller server
name or IP address. It can be in any of the
following forms shown under Examples and
must include the trailing slash.
Connect to a local server:
"http://localhost/ConfigService/"
Connect to a remote server:
"http[s]://myservername.domain.com/ConfigService/"
Connect to a remote server if DNS issues prevent
connection to a server name:
"http[s]://10.40.37.5/ConfigService/"
"passphrase" The passphrase specif ied for StorageZones
Controller.
"MyPassphrase"
"fullpath" A location to save the backup f ile. "c:\szc-backup.bak"
The Get-SfConfig command creates the backup f ile.
To restore a primary StorageZones Controller configuration, refer to Recover a primary StorageZones Controller
configuration.

© 1999-2017 Citrix Systems, Inc. All rights reserved. p.79https://docs.citrix.com
Recover a primary StorageZones Controllerconfiguration
Mar 24 , 2015
StorageZones Controller provides these options for disaster recovery when a primary StorageZones Controller is deleted or
becomes unusable:
If a secondary StorageZones Controller is available, promote the secondary controller to a primary one.
If a secondary StorageZones Controller is not available and you backed up your primary StorageZones Controller
configuration (as described in Back up a primary StorageZones Controller configuration), recover the primary
StorageZones Controller from the backup f ile.
If you do not have a backup of your primary StorageZones Controller configuration and all of your StorageZones
Controllers are accidentally deleted or become unusable, only a partial recovery is possible. You can recover zones and
the configuration for StorageZones for ShareFile Data, but not StorageZone Connectors.
Important: Be sure to use PowerShell 4.0 for this procedure. For more information about PowerShell requirements, refer to— PowerShell scripts and commands
in StorageZones Controller system requirements.
To recover a primary StorageZones Controller from a backup file
Note: These steps apply only to a primary StorageZones Controller. To recover a secondary StorageZones Controller,reinstall StorageZones Controller on the server and then join the server to the primary StorageZones Controller.1. The PowerShell script used in this procedure is unsigned, so you might need to change your PowerShell execution policy.
1. Determine if your PowerShell execution policy allows you to run local, unsigned scripts: PS C:\>Get-ExecutionPolicy
For example, a policy of RemoteSigned, Unrestricted, or Bypass allows you to run unsigned scripts.
2. To change your PowerShell execution policy: PS C:\>Set-ExecutionPolicy RemoteSigned
2. Set the user context for this PowerShell session. In a command window, run one of the following commands.
Note: Download PsExec.exe from http://technet.microsoft.com/en-us/sysinternals/bb897553.aspx and follow the
installation instructions on that page.
If using the default Network Service account:
PsExec.exe -i -u "NT AUTHORITY\NetworkService" C:\Windows\SysWOW64\WindowsPowerShell\v1.0\powershell
If using a named user for the StorageZones Controller application pool:
PsExec.exe -i -u "domain\username" C:\Windows\SysWOW64\WindowsPowerShell\v1.0\powershell
A PowerShell window opens.
3. From the PowerShell prompt, import the module ConfigBR.dll: Import-Module
"C:\inetpub\wwwroot\Citrix\StorageCenter\Tools\SfConfigBR\ConfigBR.dll"
You must import the module each time you open a new PowerShell window.
4. From the PowerShell prompt, run the Set-SfConfig command: Set-SfConfig -PrimaryZoneController "server" -Passphrase
"passphrase" -FilePath "fullpath"
where:
server is the primary StorageZones Controller server name or IP address. It can be in any of the following forms and
must include the trailing slash.
http://localhost/ConfigService/

© 1999-2017 Citrix Systems, Inc. All rights reserved. p.80https://docs.citrix.com
servername/ or serverip/ (if you use http)
http[s]://servername.domain.com/ConfigService/
http[s]://serverip/ConfigService/
passphrase is the one specif ied for StorageZones Controller.
fullpath is the backup f ile location and name. For example, c:\szc-backup.bak.
To recover a primary StorageZones Controller without a backup file
If you do not have a backup file, you can recover zones and the configuration for StorageZones for ShareFile Data, but not
StorageZone Connectors.
1. Set the user context for this PowerShell session. In a command window, run one of the following commands.
If using the default Network Service account:
PsExec.exe -i -u "NT AUTHORITY\NetworkService" C:\Windows\SysWOW64\WindowsPowerShell\v1.0\powershell
If using a named user for the StorageZones Controller application pool:
PsExec.exe -i -u "domain\username" C:\Windows\SysWOW64\WindowsPowerShell\v1.0\powershell
A PowerShell window opens.
2. From the PowerShell prompt, import the module ConfigBR.dll: Import-Module
"C:\inetpub\wwwroot\Citrix\StorageCenter\Tools\SfConfigBR\ConfigBR.dll"
You must import the module each time you open a new PowerShell window.
3. From the PowerShell prompt, run the Join-SfConfig command:
Important: The Join-SfConfig command currently does not work with Azure or Amazon S3 storage. Please contact
ShareFile support if you need to use this command.
Join-SfConfig -ShareFileUserName "ShareFileUserName" -ShareFilePassword "ShareFilePassword" -subdomain
"subdomain.sharefile.com" -ZoneId "ZoneId" -SCID "StorageCenterId" -Passphrase "passphrase" [-StorageZoneLocation
"StorageZoneLocation"] [-StorageUsername "StorageUserName"] [-Storagepass "StoragePassword"] [-
AzureAccountName "StorageAccount"] [-AzureSecretKey "PrimaryOrSecondaryAccessKey"] [-AzureContainerName
"Container"] [-S3AccessKey "S3AccessKey"] [-S3SecretKey "S3SecretKey"] [-S3ContainerName "S3ContainerName"] [-
S3EndpointAddress "S3EndpointAddress"] [-S3ForcePathStyle]
where:
ZoneID can be obtained as follows:
1. In the ShareFile web interface, click Admin > StorageZones, right-click the site name, and then choose Properties.
The address displayed ends with the zone ID that looks like this: zae4fb8c-8520-478f-8f87-aa589a8fd181.
2. Copy and paste that ID into the Join-SfConfig command.
StorageCenterId can be obtained as follows:
1. In the ShareFile web interface, click Admin > StorageZones, click the site name, right-click the hostname, and then
choose Properties.
The address displayed ends with the storage ID that looks like this: scd344cf-8043-4ce2-974b-8f9cd83e2978.
2. Copy and paste that ID into the Join-SfConfig command.
StorageZoneLocation is needed only if StorageZones for ShareFile Data is enabled for the zone.
StorageUsername and StoragePassword are needed only if StorageZones for ShareFile Data is enabled for the zone
© 1999-2017 Citrix Systems, Inc. All rights reserved. p.81https://docs.citrix.com
and your storage location requires authentication.
AzureAccountName, AzureAccessKey, and AzureContainerName are needed only if StorageZones for ShareFile Data
is stored in a Windows Azure storage container.
4. To recover StorageZone Connectors, use the StorageZones Controller console
(http://localhost/configservice/login.aspx) to enable and configure Connectors.

© 1999-2017 Citrix Systems, Inc. All rights reserved. p.82https://docs.citrix.com
Replace a primary StorageZones Controller
Jul 01, 2014
To replace a primary StorageZones Controller with one that is in a different location, such as on a different domain, use the
backup and restore procedures. The following steps ensure that your configuration settings and all of your data is
transferred.
1. Create a backup f ile for your existing StorageZones Controller configuration. Refer to Back up a primary StorageZones
Controller configuration.
2. Install, but do not configure, a StorageZones Controller in the new network location.
3. Import the backed up configuration onto the new controller. Refer to Recover a primary StorageZones Controller
configuration.
4. Copy your data to the new network share, log on to the Configuration console for the new StorageZones Controller,
and enter the new storage path information. Refer to Transfer f iles to a new network share.
5. In the new StorageZones Controller Configuration console, update the external URL of the controller. Refer to Change
the address or passphrase of a primary StorageZones Controller.
© 1999-2017 Citrix Systems, Inc. All rights reserved. p.83https://docs.citrix.com
Prepare StorageZones Controller for file recovery
Mar 09, 2016
How you prepare for file recovery depends on where your data is stored:
A supported third-party storage system — If you use a third-party storage system with StorageZones Controller,
your third-party storage is redundant and a local backup is not required. However, be aware that a ShareFile user who
deletes a f ile has the ability to recover the f ile from the Recycle Bin for a brief period. A f ile cannot be recovered from
the ShareFile Recycle Bin after 45 days. After the recovery period, the f ile is removed from the zone and therefore from
the redundant third-party storage. If that recovery time is not adequate, consider one of these solutions:
Increase the amount of time that a f ile remains in the ShareFile recycle bin. To do that, change the value of the
Period setting in C:\inetpub\wwwroot\Citrix\StorageCenter\SCFileCleanSvc\FileDeleteService.exe.config. For more
information, refer to Customize storage cache operations. Keep in mind that increasing the retention time also
increases the amount of third-party storage needed.
Create a local back up your StorageZone f iles every seven days and determine the appropriate retention policy for
the backups.
On-premises storage — If you use a locally-maintained share for private data storage, you are responsible for backing
up your on-premises StorageZones Controller local f ile storage and registry entries. ShareFile archives the corresponding
file metadata that resides in the ShareFile cloud for 3 years.
Important: To protect against data loss, it is critical that you take a snapshot of your StorageZones Controller server,
back up its configuration, and back up your local f ile storage.
After you prepare your StorageZones Controller for file recovery as described in this topic, you can use the ShareFile
Administrator console to:
Browse your StorageZones for ShareFile Data records for a particular date and time and then tag any f iles and folders
that you want to restore. ShareFile adds the tagged items to a recovery queue. You then run a recovery script to restore
the f iles from your backup to the persistent storage location.
For more information, refer to Recover files and folders from your ShareFile Data backup.
Reconcile the metadata stored on the ShareFile cloud with your on-premises storage when you cannot recover data
from your on-premises storage. The ShareFile reconcile feature permanently removes from the ShareFile cloud the
metadata for f iles that are no longer in a StorageZone on a specif ied date and time.
For more information, refer to Reconcile the ShareFile cloud with a StorageZone
Prerequisites
Windows Server 2012 R2 or Windows Server 2008 R2
Windows PowerShell (32-bit and 64-bit versions) must support .NET 4 runtime assemblies
For more information, refer to "PowerShell scripts and commands" in StorageZones Controller system requirements.
PsExec.exe
PsExec enables you to launch PowerShell using the network service account. You can also use PsExec to schedule
recovery tasks.
Download PsExec.exe from http://technet.microsoft.com/en-us/sysinternals/bb897553.aspx and follow the installation
instructions on that page.

© 1999-2017 Citrix Systems, Inc. All rights reserved. p.84https://docs.citrix.com
In this section
Summary of f iles used for disaster recovery
To set up the backup folder
To create a disaster recovery queue
To customize the recovery PowerShell script for your location
To create and schedule a task for recovery
To test the recovery process
Related PowerShell commands
Summary of files used for disaster recovery
The following files, located in C:\inetpub\wwwroot\Citrix\StorageCenter\Tools\Disaster Recovery, are used for disaster
recovery.
File name Description
DoRecovery.ps1 PowerShell script executed by Windows Task Scheduler to handle the recovery process. This f ilestores the f ile backup and storage locations.
Recovery.psm1 PowerShell module that handles the recovery queue operations.
recovery.log Log f ile that stores the output of a recovery process.
recoveryerror.log Log f ile that stores the errors in the recovery process.
LitJson.dll A .Net library to handle conversions from and to JSON (JavaScript Object Notation) strings.
To set up the backup folder
On the backup server, create the folder where you will back up the persistentstorage folder.
The StorageZones for ShareFile Data file backup should follow the same layout as the StorageZones Controller persistent
storage.
If your backup location does not follow the same layout as the StorageZones Controller persistent storage, you must
perform an additional step during the recovery process to copy files from the backup location to the location that you
specify in the Recovery PowerShell script.
Storage layout Backup layout
\\PrimaryStorageIP \StorageLocation \persistentstorage \sf-us-1 \a024f83e-b147-437e-9f28-e7d03634af42 \fi3d85dc_1d6c_49b0_8faa_1f36ef3d83b5 \fi7d5cbb_93c8_43f0_a664_74f27e72bc83
\\BackupStorageIP \BackupLocation \persistentstorage \sf-us-1 \a024f83e-b147-437e-9f28-e7d03634af42 \fi3d85dc_1d6c_49b0_8faa_1f36ef3d83b5 \fi7d5cbb_93c8_43f0_a664_74f27e72bc83

© 1999-2017 Citrix Systems, Inc. All rights reserved. p.85https://docs.citrix.com
\fi47cd7e_64c4_47be_beb7_1207c93c1270 \fi47cd7e_64c4_47be_beb7_1207c93c1270Storage layout Backup layout
Important: The ShareFile recovery feature does not automatically back up your persistent storage location. You areresponsible for choosing a backup utility and running it every 1 to 7 days.
To create a disaster recovery queue
This one-time setup is required. The following command examples use the default StorageZones Controller installation
folder.
1. On the StorageZones Controller, run PowerShell as an administrator.
For help, refer to Starting Windows PowerShell on Windows Server.
2. The PowerShell script used in this procedure is unsigned, so you might need to change your PowerShell execution policy.
1. Determine if your PowerShell execution policy allows you to run local, unsigned scripts: PS C:\>Get-ExecutionPolicy
For example, a policy of RemoteSigned, Unrestricted, or Bypass allows you to run unsigned scripts.
2. To change your PowerShell execution policy: PS C:\>Set-ExecutionPolicy RemoteSigned
3. To verify that PowerShell has the correct CLRVersion, type:
$psversiontable
The value for CLRVersion must be 4.0 or higher to enable PowerShell to load .NET assemblies in scripts. If it is not,
change it for both Windows PowerShell 32-bit and 64-bit versions as follows:
1. Run NotePad as an administrator.
2. Create a f ile with the following content.
<?xml version="1.0"?>
<configuration>
<startup useLegacyV2RuntimeActivationPolicy="true">
<supportedRuntime version="v4.0.30319"/>
<supportedRuntime version="v2.0.50727"/>
</startup>
</configuration>
3. Choose File > Save As, name the f ile powershell.exe.config, and save it to the following locations:
C:\Windows\System32\WindowsPowerShell\v1.0
C:\Windows\SysWOW64\WindowsPowerShell\v1.0
4. Close the PowerShell window, open a new one as administrator, and type $psversiontable to verify that the
CLRVersion is correct.
4. Close the PowerShell window and launch PowerShell using PsExec.exe as follows:
1. Open a Command Prompt window as administrator.
2. Navigate to the location of PsExec.exe and enter:
PsExec.exe -i -u "NT AUTHORITY\NetworkService" C:\Windows\SysWOW64\WindowsPowerShell\v1.0\powershell
3. Click Agree to accept the PsExec.exe license agreement.
5. Navigate to the Disaster Recovery tools folder in the StorageZones Controller installation folder:
cd 'C:\inetpub\wwwroot\Citrix\StorageCenter\Tools\Disaster Recovery'
6. Import the Recovery.psm1 module:
Import-Module .\Recovery.psm1
© 1999-2017 Citrix Systems, Inc. All rights reserved. p.86https://docs.citrix.com
7. To create the recovery queue, enter: New-SCQueue -name recovery -operation recovery
The output of that command includes the name of the queue created. For example: Queue 92736b5d-1cff-4760-92c8-
d8b04dc92cb2 created
To view the new folder, open a file browser and navigate to:
\\server\Primary Storage Location\Queue. You will see the Queue folder, such as 92736b5d-1cff-4760-92c8-d8b04dc92cb2.
8. Customize the recovery PowerShell script for your location, as described in the next section.
To customize the recovery PowerShell script for your location
The DoRecovery.ps1 PowerShell script is executed by the task scheduler to handle the recovery process. This file includes
the file backup and storage locations which you must specify for your site.
1. On the StorageZones Controller, navigate to the recovery PowerShell script:
C:\inetpub\wwwroot\Citrix\StorageCenter\Tools\Disaster Recovery\DoRecovery.ps1
2. Edit the script as follows:
1. Set the $backupRoot parameter to point to the UNC path of your backup location. For example: $backupRoot =
"\\10.10.10.11\BackupLocation\persistentstorage"
2. Set the $storageRoot parameter to point to the UNC path of your StorageZones Controller persistent storage. For
example: $storageRoot = "\\10.10.10.10\StorageLocation\persistentstorage"
To create and schedule a task for recovery
1. Start Windows Task Scheduler and in the Actions pane click Create Task.
2. On the General tab:
1. Provide a meaningful Name for the task.
2. Under Security options, click Change User or Group, and specify the user to run the task, either Network Service or a
named user that has write permissions to the storage location.
3. From the Configure for menu, select the operating system of the server where the task will be run.
3. To create a trigger: On the Triggers tab, click New. Then, for Begin the task, choose On a schedule and specify a
schedule.
4. To create an action: On the Actions tab, click New.
1. For Action, choose Start a program and specify the full path to the program. For example:
C:\Windows\System32\cmd.exe.
For Add arguments enter: /c "c:\windows\syswow64\WindowsPowerShell\v1.0\PowerShell.exe -File .\DoRecovery.ps1"
>> .\recovery.log 2>>.\recoveryerror.log
2. For Start in, specify the Disaster Recovery folder in the StorageZones Controller installation location. For example:
c:\inetpub\wwwroot\Citrix\StorageCenter\Tools\Disaster Recovery
To test the recovery process
1. Create a test f ile and upload it to ShareFile.
2. After a hour or so, verify that the f ile appears in persistent storage (in the path specif ied for $backupRoot).
3. Delete the f ile from ShareFile: In the ShareFile administrator tool, click Recycle Bin, select the f ile, and then click Delete
Permanently.
4. Delete the f ile from the persistent storage.
This step recreates the action that ShareFile would perform 7 days after the file is deleted.
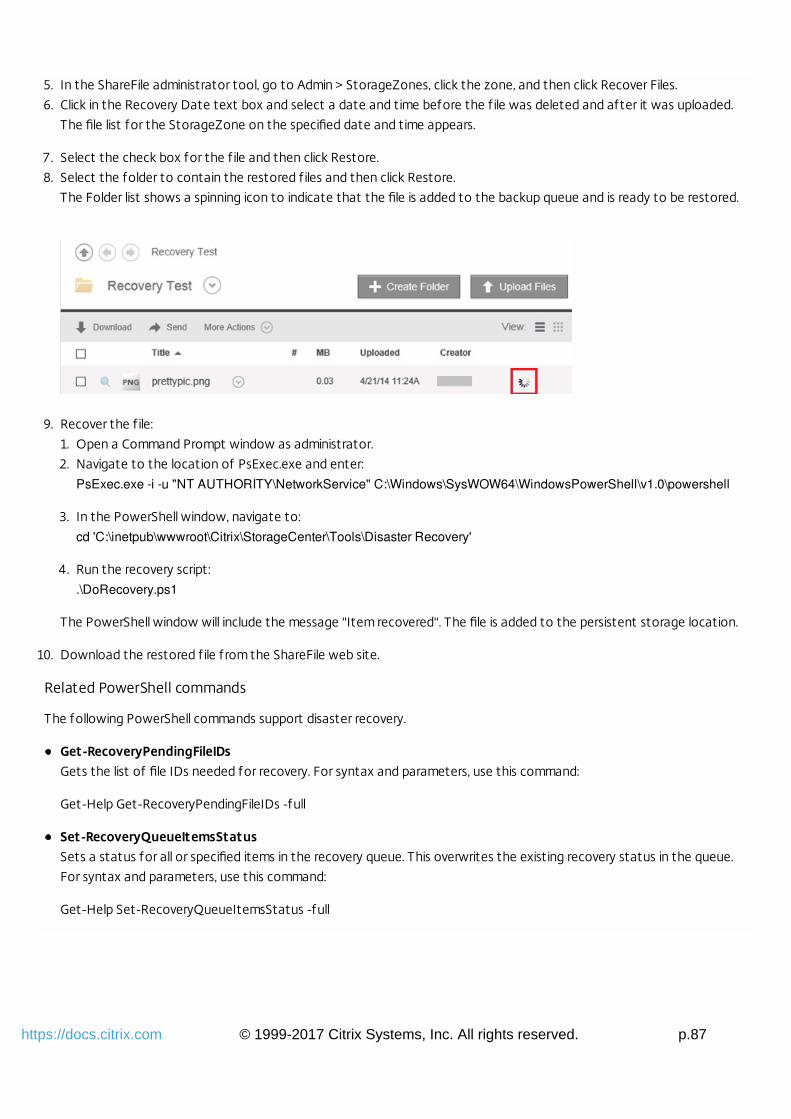
© 1999-2017 Citrix Systems, Inc. All rights reserved. p.87https://docs.citrix.com
5. In the ShareFile administrator tool, go to Admin > StorageZones, click the zone, and then click Recover Files.
6. Click in the Recovery Date text box and select a date and time before the f ile was deleted and after it was uploaded.
The file list for the StorageZone on the specified date and time appears.
7. Select the check box for the f ile and then click Restore.
8. Select the folder to contain the restored f iles and then click Restore.
The Folder list shows a spinning icon to indicate that the file is added to the backup queue and is ready to be restored.
9. Recover the f ile:
1. Open a Command Prompt window as administrator.
2. Navigate to the location of PsExec.exe and enter:
PsExec.exe -i -u "NT AUTHORITY\NetworkService" C:\Windows\SysWOW64\WindowsPowerShell\v1.0\powershell
3. In the PowerShell window, navigate to:
cd 'C:\inetpub\wwwroot\Citrix\StorageCenter\Tools\Disaster Recovery'
4. Run the recovery script:
.\DoRecovery.ps1
The PowerShell window will include the message "Item recovered". The file is added to the persistent storage location.
10. Download the restored f ile from the ShareFile web site.
Related PowerShell commands
The following PowerShell commands support disaster recovery.
Get-RecoveryPendingFileIDsGets the list of file IDs needed for recovery. For syntax and parameters, use this command:
Get-Help Get-RecoveryPendingFileIDs -full
Set-RecoveryQueueItemsStatusSets a status for all or specified items in the recovery queue. This overwrites the existing recovery status in the queue.
For syntax and parameters, use this command:
Get-Help Set-RecoveryQueueItemsStatus -full

© 1999-2017 Citrix Systems, Inc. All rights reserved. p.88https://docs.citrix.com
Recover files and folders from your ShareFile Databackup
Jan 13, 2015
The ShareFile Administrator console enables you to browse your StorageZones for ShareFile Data records for a particulardate and time and tag any f iles and folders that you want to restore. ShareFile adds the tagged items to a recovery queue.You can then run the provided script to restore the f iles from a backup to the storage location.Important: Be sure to use PowerShell 4.0 for this procedure. For more information about PowerShell requirements, refer to— PowerShell scripts and commands
in StorageZones Controller system requirements.Prerequisites
Complete the setup and testing described in Prepare StorageZones Controller for f ile recovery. The setup includes
instructions for creating a folder to contain the recovered f iles.
1. In the ShareFile web interface, click Admin and then click StorageZones.
2. Click the zone name and then click Recover Files.
3. Click in the Recovery Date text box and select a date and time.
The file list for the StorageZone on the specified date and time appears.
4. Select the check box for each f ile to restore and then click Restore.
5. Select the folder to contain the restored f iles and then click Restore.
The Folder list shows a spinning icon to indicate that the recovery is in process.
6. If your backup location does not follow the same layout as the StorageZone persistent storage, copy the f iles from the
backup location to the location you specif ied when editing DoRecovery.ps1.
7. The DoRecovery.ps1 PowerShell script is unsigned, so you might need to change your PowerShell execution policy for
this procedure.
1. Determine if your PowerShell execution policy allows you to run local, unsigned scripts. In a PowerShell window: Get-
ExecutionPolicy
For example, a policy of RemoteSigned, Unrestricted, or Bypass allows you to run unsigned scripts.
2. To change your PowerShell execution policy: Set-ExecutionPolicy RemoteSigned
8. Set the user context for this PowerShell session. In a command window, run one of the following commands.
If using the default Network Service account:
PsExec.exe -i -u "NT AUTHORITY\NetworkService" C:\Windows\SysWOW64\WindowsPowerShell\v1.0\powershell
If using a named user for the StorageZones Controller application pool:
PsExec.exe -i -u "domain\username" C:\Windows\SysWOW64\WindowsPowerShell\v1.0\powershell
A PowerShell window opens.
9. Recover the f ile:
1. Open a Command Prompt window as administrator.
2. Navigate to the location of PsExec.exe and enter:
PsExec.exe -i -u "NT AUTHORITY\NetworkService" C:\Windows\SysWOW64\WindowsPowerShell\v1.0\powershell
3. In the PowerShell window, navigate to:
cd 'C:\inetpub\wwwroot\Citrix\StorageCenter\Tools\Disaster Recovery'
© 1999-2017 Citrix Systems, Inc. All rights reserved. p.89https://docs.citrix.com
4. Run the recovery script:
.\DoRecovery.ps1
The PowerShell window will include the message "Item recovered". Recovered files are copied from the backup to the
persistent storage location. After you refresh the console, the spinning icons disappear from the ShareFile web interface
for files successfully recovered.
If a file that is deleted from the ShareFile web application has not yet been deleted by the StorageZones Controller
delete service, the file is still in the persistent storage location. In that case, file recovery is immediate and a spinning icon
does not appear in the ShareFile web interface.
If you cannot recover a file, refer to the help file provided in the Disaster Recovery folder.

© 1999-2017 Citrix Systems, Inc. All rights reserved. p.90https://docs.citrix.com
Reconcile the ShareFile cloud with a StorageZone
Oct 25, 2013
A problem, such as a disk failure, that causes data loss in your local storage results in an inconsistent state between yourlocal storage and the metadata stored in the ShareFile cloud. You can automatically reconcile those differences so thatmetadata for f iles no longer in your StorageZone on a specif ied date and time are permanently removed from the ShareFilecloud.Caution: Perform a reconcile only if you have irrecoverable data loss in your local f ile storage. A reconcile permanentlyerases the metadata from the ShareFile cloud for any f iles that are not found in your local f ile storage as of the date andtime that you specify.1. Click Admin and then click StorageZones.
2. Click the zone name and then click Reconcile Files.
3. Click in the Reconcile Date text box and select a date and time.
4. Click Reconcile. A confirmation dialog box appears.

© 1999-2017 Citrix Systems, Inc. All rights reserved. p.91https://docs.citrix.com
Configure antivirus scans of uploaded files
Jan 13, 2015
StorageZones Controller installation includes several f iles that support antivirus scans. The f iles are installed by default inC:\inetpub\wwwroot\Citrix\StorageCenter\Tools\SFAntiVirus.After you customize the configuration file and use Windows Task Scheduler to schedule the scans, as described in the
following steps, each file upload request causes StorageZones Controller to queue the file for an antivirus scan. If issues are
reported for a scanned file, the Folders view includes a warning icon for the file. If a user tries to download the file, a
warning message appears.
The antivirus scan does not remove the file.
Prerequisite
If you will run virus scans (SFAntiVirus.exe) on the StorageZones Controller, make sure encryption is disabled on the
controller: On the StorageZones console Configuration page, verify that the Enable Encryption check box is cleared.
To prepare the configuration for your location
1. To run virus scans on a server other than the StorageZones Controller:
1. Copy the folder C:\inetpub\wwwroot\Citrix\StorageCenter\Tools\SFAntiVirus to the other server.
2. On the StorageZones Controller, open C:\inetpub\wwwroot\Citrix\StorageCenter\AppSettingsRelease.config and
set QueueSDKRestricted to 0: <add key="QueueSDKRestricted" value="0" />
2. On the server where you will run virus scans, edit SFAntiVirus.exe.config with the values for your StorageZones Controller
configuration:
1. Specify your site information for the following keys: ShareFileUrl, ZoneName, and StorageLocation.
2. For QueueSdkUrl: If you will run virus scans on a server other than the StorageZones Controller, replace localhost with
the server DNS name.
3. For CommandFile: Specify the full path to the anti-virus software. That software must reside on the same server as
the ShareFile antivirus folder.
4. For CommandOptions and return codes: The command line settings provided in the configuration f ile are an example.
Provide the appropriate settings for your anti-virus software and environment.
5. For ScanFileTimeout: Larger f iles can take longer to scan. Tune this setting according to the f ile sizes expected in
your storage.
6. For EnableLogging: By default, the ShareFile antivirus log f ile is created where virus scans are run.
3. In a command line window, run the following command to set up virus scans:
SFAntiVirus.exe -register SFusername SFpassword
To create and schedule a task for virus scans
1. Start Windows Task Scheduler and in the Actions pane click Create Task.
2. On the General tab:
1. Provide a meaningful Name for the task.
2. Under Security options, click Change User or Group, and specify a Windows user to run the task. The user must have
full access permission on the storage location.
3. Select Run whether user is logged on or not. Leave the Do not store password check box cleared.
4. Select Run with highest privileges.
5. From the Configure for menu, select the operating system of the server where the task will be run.

© 1999-2017 Citrix Systems, Inc. All rights reserved. p.92https://docs.citrix.com
3. To create a trigger: On the Triggers tab, click New. Then, for Begin the task, choose On a schedule and specify a
schedule.
4. To create an action: On the Actions tab, click New.
1. For Action, choose Start a program and specify the full path to the program. For example:
C:\inetpub\wwwroot\Citrix\StorageCenter\Tools\SFAntiVirus\SFAntiVirus.exe
2. For Start in, specify the location of SFAntiVirus.exe: c:\inetpub\wwwroot\Citrix\StorageCenter\Tools\SFAntiVirus
5. On the Settings tab, for If the task is already running, then the following rule applies, choose Do not start a new
instance.

© 1999-2017 Citrix Systems, Inc. All rights reserved. p.93https://docs.citrix.com
Manage StorageZones for ShareFile Data
Apr 10 , 2015
You can use StorageZones for ShareFile Data with or instead of the ShareFile-managed cloud.
Quick links to topic sections:
Move home folders and File Boxes between zones
Create a folder in a StorageZone
Rename or delete a StorageZone
Customize storage cache operations
Move home folders and File Boxes between zones
Use these steps to move home folders and File Boxes from the ShareFile-managed cloud storage to a private zone or
between private zones. Alternatively, use the ShareFile User Management Tool to migrate users between zones. For details,
see ShareFile User Management Tool.
1. Click Home and then navigate to the folder.
2. In the right navigation pane, click Edit Folder Options.
3. From the StorageZone menu, select a zone and then click Save.
4. Restart the IIS server of all zone members.
Create a folder in a StorageZone
1. Click Home and then click Folders.
2. On the Folder tab, click Add Folder.
3. Specify folder information as usual and, for Storage Site, select the StorageZone where you want this folder and its
contents to be stored. Click Create Folder.
4. Configure the folder as usual. When you create a folder, you can choose whether to use the ShareFile-managed cloud
storage or your local StorageZone.
5. Restart the IIS server of all zone members.
Rename or delete a StorageZone
Important: Before deleting a StorageZone, back it up. Deleting a zone erases all f iles and folders in that zone and youcannot undo the operation.1. Click Admin and then click StorageZones.
2. Click the zone name.
To rename the zone: Click Edit Zone, type a new name, and then click Save Changes.
To delete the zone: Click the zone name and then click Delete Zone.
3. Restart the IIS server of all zone members.
Customize storage cache operations
ShareFile user requests for file uploads, downloads, and deletions are handled by StorageZones Controller, which then
communicates with the connected storage. For example, if the connected storage is a supported third-party storage
system and a ShareFile user uploads a file, the ShareFile client sends the file to the persistent storage cache. StorageZones
Controller then uploads the file to the third-party storage system.

© 1999-2017 Citrix Systems, Inc. All rights reserved. p.94https://docs.citrix.com
StorageZones Controller manages the persistent storage cache using configurable settings in
C:\inetpub\wwwroot\Citrix\StorageCenter\SCFileCleanSvc\FileDeleteService.exe.config. The settings that are specific to a
supported third-party storage system are noted in this discussion.
For uploaded files:
StorageZones Controller places uploaded f iles in a persistent storage cache (the PersistentStorage folder).
The following settings control the timing of delete service operations:
MinDeletionAge specif ies the minimum time span between when a f ile was last accessed and when it can be deleted.
Defaults to 1 day. Minimum setting is 8 hours.
OffPeakTimeOfDayStart and OffPeakTimeOfDayEnd specify the start and stop times for f ile deletion. Defaults to 2
a.m. and 4 a.m.
ProducerTimerInterval and DeleteTimerInterval control the frequency of delete service operations. Please contact
support if the default values (1 day) are not appropriate for your site.
The delete services also manages folders that contain temporary items such as encryption keys and queued f iles. The
delete service removes those items 24 hours after they are created.
For supported third-party storage systems only:
The delete service determines whether a f ile in the storage cache has a corresponding blob in the supported third-
party storage.
By default, every 10 seconds (CheckSizeThreasholdTimer) the delete service determines if the storage cache has
exceeded a disk threshold of 10 GB (DiskSpaceDropoutThresholdGB). If the threshold is exceeded, the delete service
removes f iles that have not been accessed in the past hour (CacheCleanupFileThreasholdPeriodUnExpected). When
the delete service runs as the result of normal scheduling (and not because the disk size reached the threshold), the
service deletes f iles that have not been accessed in the past 24 hours (CacheCleanupFileThresholdPeriodNormal) if
the blob is in supported third-party storage. If the blob is not in the third-party storage, the f ile remains in the storage
cache.
For downloaded files:
When StorageZones Controller receives a download request, it downloads the f ile from the persistent storage cache if
the f ile is there. If the f ile is not in that cache, the controller downloads the f ile from the third-party storage system to
the persistent storage cache. The delete service removes f iles that have not been accessed for the past 24 hours
(CacheCleanupFileThresholdPeriodNormal).
For deleted files:
The delete service gets from the ShareFile application a list of f iles that were deleted 7 days ago (Period).
The delete service then removes the corresponding f iles from the storage location or the corresponding objects from
the third-party storage.

© 1999-2017 Citrix Systems, Inc. All rights reserved. p.95https://docs.citrix.com
Create and manage StorageZone Connectors
Feb 18 , 2016
StorageZone Connectors provide access to documents and folders in:
SharePoint sites, site collections, and document libraries
Network f ile shares
Users with permission to view a connected resource can browse connected SharePoint sites, SharePoint libraries, and
network file shares from the ShareFile web interface and ShareFile clients.
By default, connector browsing is disabled for the ShareFile web interface. To enable connector browsing, contact
ShareFile Support.
StorageZone Connectors do not support document sharing or folder sync across devices.
To grant permissions to create StorageZone Connectors
Use the Manage Users page to set permissions that enable Administrators and employee users to create connectors, as
follows:
Administrators: Create and manage Connectors. Enables administrators to use the ShareFile administrator console to
create and manage connectors and to use a supported ShareFile client to create connectors.
Employee users: Create SharePoint Connectors; Create Network Share Connectors. Enables users of supported ShareFile
clients to enter the URL of a SharePoint library or network f ile share and create a connector to it.
To create a StorageZone Connector for SharePoint
Pre-requisite
If you are using StorageZones for ShareFile Data, create the zone to be used for the connector.
The following steps describe how to create a StorageZone Connector from the ShareFile web interface. ShareFile users
can also create a connector from supported devices by typing the URL of the SharePoint site.
1. Log on to your ShareFile account as an administrator, click the Connectors tab, and then click Create Connector.
2. From the Type menu, choose SharePoint.
3. If you are using StorageZones for ShareFile Data, choose a Zone for the connector.
The zone for a connector must either be in the same domain as the SharePoint server or must have a trust relationship
with it. If you have SharePoint servers in multiple domains and cannot configure trusts between the domains, create a
StorageZones Controller for each domain.
4. For Site, specify the URL of a SharePoint root-level site, site collection, or document library, in the following forms.
Example connection to a SharePoint root-level site: https://sharepoint.company.com
A connection to a root-level site gives users access to all sites (but not site collections) and document libraries under
the root-level. ShareFile hides SharePoint system folders from users.
Example connection to a SharePoint site collection: https://sharepoint.company.com/site/SiteCollection
A connection to a site collection gives users access to all subsites within that collection.
Example connection to a SharePoint 2010 document library:

© 1999-2017 Citrix Systems, Inc. All rights reserved. p.96https://docs.citrix.com
https://mycompany.com/sharepoint/
https://mycompany.com/sharepoint/sales-team/Shared Documents/
https://mycompany.com/sharepoint/sales-team/Shared Documents/Forms/AllItems.aspx
Example connection to a SharePoint 2013 document library:
The default SharePoint 2013 URL (when Minimal Download Strategy is enabled) is in the form:
https://sharepoint.company.com/_layouts/15/start.aspx#/Shared%20Documents/.
Example connection that redirects to the NetBIOS name of an authenticated user:
Use the variable %UserDomain% to substitute the logon name of the authenticated user with the NetBIOS name of
that user. The new variable enables you to create a site-level connector to a URL such as
https://example.com/%UserDomain%_%UserName%/Documents.
5. Type a user-friendly Name for the connector.
The name is used to identify the SharePoint site to users. The name should be brief so it displays well on mobile devices
with small screens.
6. Click Add Connector. The View/Edit Folder Access dialog box appears.
7. To make connectors visible to others: In View/Edit Folder Access, add users and distribution groups and then click Save
Changes.
This step determines only whether a connector is visible to users. StorageZone Connectors inherits access permissions
from the SharePoint server.
To create a StorageZone Connector for network file shares
Pre-requisite
If you are using StorageZones for ShareFile Data, create the zone to be used for the connector.
The following steps describe how to create a connector from the ShareFile Web interface. ShareFile users can also create
a connector from supported devices by typing the path of a file share.
1. Log on to your ShareFile account as an administrator, click the Connectors tab, and then click Create Connector.
2. From the Type menu, choose File Share.
3. If you are using StorageZones for ShareFile Data, choose a Zone for the connector.
The zone for a connector must either be in the same domain as the file share or must have a trust relationship with it. If
you have file shares in multiple domains and cannot configure trusts between the domains, create a StorageZones
Controller for each domain.
4. For Path, type the UNC path.
Example with FQDN: \\fileserver.acme.com\shared
You can use the following variables in the UNC path:
%UserName%
Redirects to a user's home directory. Example path: \\myserver\homedirs\%UserName%
%HomeDrive%
Redirects to a user's home folder path, as defined in the Active Directory property Home-Directory. Example path:
%HomeDrive%
%TSHomeDrive%

© 1999-2017 Citrix Systems, Inc. All rights reserved. p.97https://docs.citrix.com
Redirects to a user's Terminal Services home directory, as defined in the Active Directory property ms-TS-Home-
Directory. The location is used when a user logs on to Windows from a terminal server or Citrix XenApp server. Example
path: %TSHomeDrive%
In the Active Directory Users and Computers snap-in, the ms-TS-Home-Directory value is accessible on the Remote
Desktop Services Profile tab when editing a user object.
%UserDomain%
Redirects to the NetBIOS domain name of the authenticated user. For example, if the authenticated user logon
name is "abc\johnd", the variable is substituted with "abc". Example path: \\myserver\%UserDomain%_%UserName%
The variables are not case sensitive.
Important: Do not create a connector to the ShareFile Data storage location. Depending on user permissions, doing so
can enable users to remove all ShareFile Data.
5. Type a user-friendly Name for the connector.
The name is used to identify the file share to users. The name should be brief so it displays well on mobile devices with
small screens.
6. Click Add Connector. The View/Edit Folder Access dialog box appears.
7. To make connectors visible to others: In View/Edit Folder Access, add users and distribution groups and then click Save
Changes.
This step determines only whether a connector is visible to users. StorageZone Connectors inherits access permissions
from the network share. Permissions for read/write access are determined by the security settings of the network share
and are also affected by the ShareFile plan.
To change this setting later, click the Connectors tab and then click Edit/View Access for the connector you want to
update.
To change a connector name
A connector name is used to identify a SharePoint site or network file share to users.
1. Log on to your ShareFile account as an administrator and then click the Connectors tab.
2. In the Title column, click the connector name.
3. Type a user-friendly Name for the connector and then click Save.
To delete a connector
Deleting a connector does not remove data from SharePoint or a network file share.
1. Log on to your ShareFile account as an administrator and then click the Connectors tab.
2. Select the check box for the connector, click Delete, and then click OK.

© 1999-2017 Citrix Systems, Inc. All rights reserved. p.98https://docs.citrix.com
Data Loss Prevention
Jun 23, 2015
Data Loss Prevention (DLP) features in ShareFile let you restrict access and sharing based on the content found within a
file.
You can scan the documents uploaded to your StorageZone using any third-party DLP security suite that supports ICAP, a
standard network protocol for inline content scanning. Then you adjust the sharing and access privileges based on the
results of the DLP scan and your preferences for how strictly you want to control access.
Supported DLP systems
StorageZones Controller uses the ICAP protocol to interact with third-party DLP solutions. Using ShareFile with an existing
DLP solution requires no changes to existing policies or servers, though you may want to dedicate ICAP servers for
processing ShareFile data if you expect the load to be significant.
Popular ICAP-compliant DLP solutions include:
Symantec Data Loss Prevention
McAfee DLP Prevent
Websense TRITON AP-DATA
RSA Data Loss Prevention
Because ShareFile leverages your existing DLP security suite, you can maintain a single point of policy management for data
inspection and security alerts. If you already use one of the solutions mentioned above for scanning outgoing e-mail
attachments or web traffic for sensitive data, you can point the ShareFile StorageZones Controller to the same server.
Enable Data Loss Prevention
To enable DLP for ShareFile and StorageZones Controller, perform the following three actions:
1. Enable DLP capabilities on your ShareFile account.
2. Enable DLP on your StorageZones Controller server.
3. Configure the allowed actions for each f ile classif ication.
These actions are described in detail in the following sections.
Enable DLP capabilit ies on your ShareFile account
Send an email to [email protected] to request or confirm that your ShareFile subdomain is enabled for DLP. For some
accounts, enabling DLP may also require enabling a newer end user experience for the ShareFile web site. After your
account is enabled for DLP, you can proceed with enabling DLP on your StorageZones Controller server.
Enable DLP on your StorageZones Controller server
Use the following steps to configure DLP settings on your StorageZones Controller deployment:
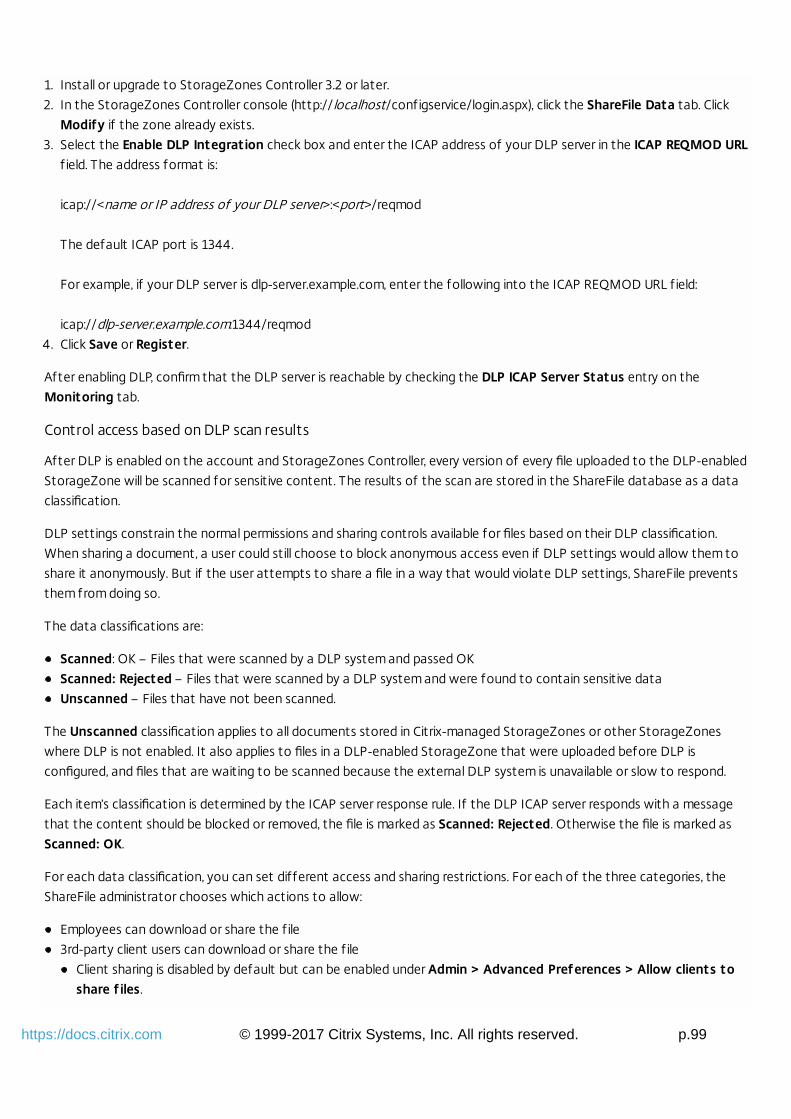
© 1999-2017 Citrix Systems, Inc. All rights reserved. p.99https://docs.citrix.com
1. Install or upgrade to StorageZones Controller 3.2 or later.
2. In the StorageZones Controller console (http://localhost/configservice/login.aspx), click the ShareFile Data tab. Click
Modify if the zone already exists.
3. Select the Enable DLP Integration check box and enter the ICAP address of your DLP server in the ICAP REQMOD URLf ield. The address format is:
icap://<name or IP address of your DLP server>:<port>/reqmod
The default ICAP port is 1344.
For example, if your DLP server is dlp-server.example.com, enter the following into the ICAP REQMOD URL f ield:
icap://dlp-server.example.com:1344/reqmod
4. Click Save or Register.
After enabling DLP, confirm that the DLP server is reachable by checking the DLP ICAP Server Status entry on the
Monitoring tab.
Control access based on DLP scan results
After DLP is enabled on the account and StorageZones Controller, every version of every file uploaded to the DLP-enabled
StorageZone will be scanned for sensitive content. The results of the scan are stored in the ShareFile database as a data
classification.
DLP settings constrain the normal permissions and sharing controls available for files based on their DLP classification.
When sharing a document, a user could still choose to block anonymous access even if DLP settings would allow them to
share it anonymously. But if the user attempts to share a file in a way that would violate DLP settings, ShareFile prevents
them from doing so.
The data classifications are:
Scanned: OK – Files that were scanned by a DLP system and passed OK
Scanned: Rejected – Files that were scanned by a DLP system and were found to contain sensitive data
Unscanned – Files that have not been scanned.
The Unscanned classification applies to all documents stored in Citrix-managed StorageZones or other StorageZones
where DLP is not enabled. It also applies to files in a DLP-enabled StorageZone that were uploaded before DLP is
configured, and files that are waiting to be scanned because the external DLP system is unavailable or slow to respond.
Each item’s classification is determined by the ICAP server response rule. If the DLP ICAP server responds with a message
that the content should be blocked or removed, the file is marked as Scanned: Rejected. Otherwise the file is marked as
Scanned: OK.
For each data classification, you can set different access and sharing restrictions. For each of the three categories, the
ShareFile administrator chooses which actions to allow:
Employees can download or share the f ile
3rd-party client users can download or share the f ile
Client sharing is disabled by default but can be enabled under Admin > Advanced Preferences > Allow clients toshare f iles.
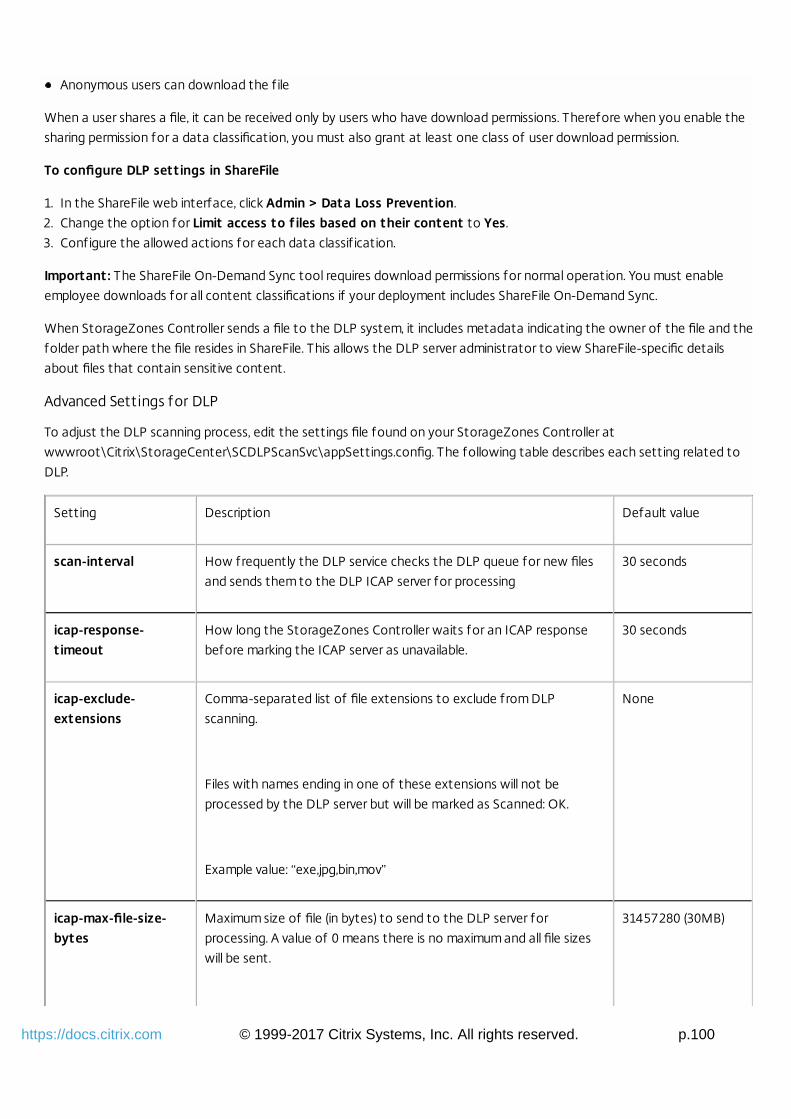
© 1999-2017 Citrix Systems, Inc. All rights reserved. p.100https://docs.citrix.com
Anonymous users can download the f ile
When a user shares a file, it can be received only by users who have download permissions. Therefore when you enable the
sharing permission for a data classification, you must also grant at least one class of user download permission.
To configure DLP settings in ShareFile
1. In the ShareFile web interface, click Admin > Data Loss Prevention.
2. Change the option for Limit access to f iles based on their content to Yes.
3. Configure the allowed actions for each data classif ication.
Important: The ShareFile On-Demand Sync tool requires download permissions for normal operation. You must enable
employee downloads for all content classifications if your deployment includes ShareFile On-Demand Sync.
When StorageZones Controller sends a file to the DLP system, it includes metadata indicating the owner of the file and the
folder path where the file resides in ShareFile. This allows the DLP server administrator to view ShareFile-specific details
about files that contain sensitive content.
Advanced Settings for DLP
To adjust the DLP scanning process, edit the settings file found on your StorageZones Controller at
wwwroot\Citrix\StorageCenter\SCDLPScanSvc\appSettings.config. The following table describes each setting related to
DLP.
Setting Description Default value
scan-interval How frequently the DLP service checks the DLP queue for new files
and sends them to the DLP ICAP server for processing
30 seconds
icap-response-timeout
How long the StorageZones Controller waits for an ICAP response
before marking the ICAP server as unavailable.
30 seconds
icap-exclude-extensions
Comma-separated list of file extensions to exclude from DLP
scanning.
Files with names ending in one of these extensions will not be
processed by the DLP server but will be marked as Scanned: OK.
Example value: “exe,jpg,bin,mov”
None
icap-max-file-size-bytes
Maximum size of file (in bytes) to send to the DLP server for
processing. A value of 0 means there is no maximum and all file sizes
will be sent.
31457280 (30MB)

© 1999-2017 Citrix Systems, Inc. All rights reserved. p.101https://docs.citrix.com
When configured with a non-zero value, files larger than the
configured size will not be processed by the DLP server but will be
marked as Scanned: OK.
max-queue-items-to-process
The maximum number of queued items to scan per each scan-interval
iteration.
Decrease this value to mitigate the impact on your DLP server when
a large number of files is added to the StorageZone.
512
max-queue-processing-threads
Maximum number of concurrent processor threads to use for draining
the DLP scan queue. Set this value based on the maximum number of
simultaneous connections allowed to your ICAP server. It should be
within reasonable limits to avoid blocking other network services that
use the same ICAP server.
4

© 1999-2017 Citrix Systems, Inc. All rights reserved. p.102https://docs.citrix.com
Monitor
Mar 19, 2015
StorageZones Controller and the ShareFile administrator interface include several resources to help you monitor StorageZones
Controller activity and troubleshoot issues:
General component status – The Monitoring tab on the StorageZones Controller console provides component status to
help you start the troubleshooting process. Status is provided for items such as access permissions, service status, and
Heartbeat Status, which indicates the StorageZones Controller outbound connectivity to the ShareFile control plane.
StorageZones Controller sends updates to the ShareFile web application every 5 minutes. If the ShareFile web application
does not receive an update within 10 minutes, it marks the StorageZones Controller as offline.
For items on the Monitoring tab that appear in red, review the log files for detailed information.
Be aware that the Monitoring tab does not indicate whether a StorageZone is working in terms of connectivity, including
whether the ShareFile control plane can reach the external StorageZones URL, or whether a client is able to reach the zone.
StorageZones Controller server information – For information about the storage use, network use, and f ile activity of the

© 1999-2017 Citrix Systems, Inc. All rights reserved. p.103https://docs.citrix.com
server: From the ShareFile interface, log on to your ShareFile Enterprise account, go to Admin > StorageZones, click the
StorageZone, and then click a StorageZones Controller host name.
Zone information – For information about the storage use, network use, and f ile activity for a zone: From the ShareFile
interface, log on to your ShareFile Enterprise account, go to Admin > StorageZones, and click a zone name.

© 1999-2017 Citrix Systems, Inc. All rights reserved. p.104https://docs.citrix.com
StorageZones Controller health status – To determine whether ShareFile.com is receiving heartbeat messages from the
StorageZones Controllers joined to the zone, view the Health status: From the ShareFile interface, log on to your ShareFile
Enterprise account, go to Admin > StorageZones, verify that the Health column has a green check mark, and then click the
site name to verify that the Heartbeat message indicates that the StorageZones Controller is responding.
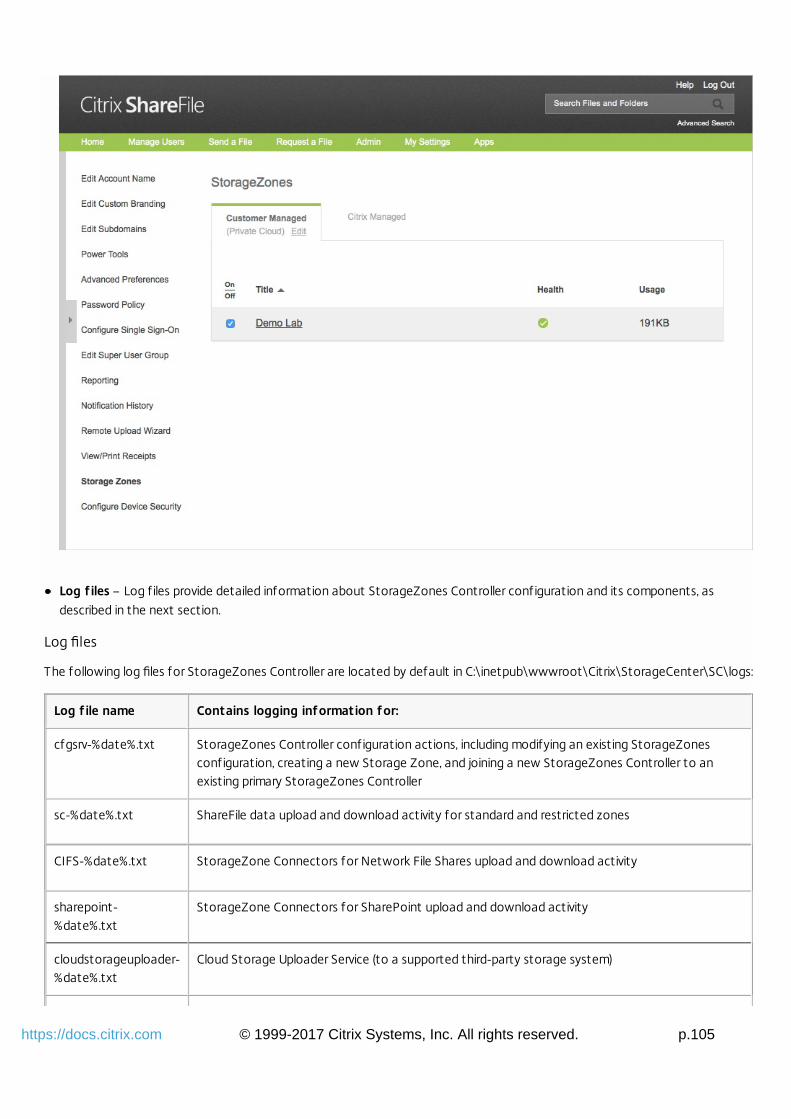
© 1999-2017 Citrix Systems, Inc. All rights reserved. p.105https://docs.citrix.com
Log f iles – Log f iles provide detailed information about StorageZones Controller configuration and its components, as
described in the next section.
Log files
The following log files for StorageZones Controller are located by default in C:\inetpub\wwwroot\Citrix\StorageCenter\SC\logs:
Log f ile name Contains logging information for:
cfgsrv-%date%.txt StorageZones Controller configuration actions, including modifying an existing StorageZonesconfiguration, creating a new Storage Zone, and joining a new StorageZones Controller to anexisting primary StorageZones Controller
sc-%date%.txt ShareFile data upload and download activity for standard and restricted zones
CIFS-%date%.txt StorageZone Connectors for Network File Shares upload and download activity
sharepoint-%date%.txt
StorageZone Connectors for SharePoint upload and download activity
cloudstorageuploader-%date%.txt
Cloud Storage Uploader Service (to a supported third-party storage system)

© 1999-2017 Citrix Systems, Inc. All rights reserved. p.106https://docs.citrix.com
copy-%date%.txt ShareFile Copy Service
delete--%date%.txt ShareFile Cleanup Service, for the persistent storage cache
s3uploader--%date%.txt
ShareFile Management Service; includes heartbeat status messages
zkemail--%date%.txt Email traff ic sent to your SMTP server (for email notif ications in restricted zones)
Log f ile name Contains logging information for:
Extended logging is available for each of the following components. This is useful when you need to provide detailed
information to support.
Component Location of AppSettingsRelease.conf ig
ShareFile Data C:\inetpub\wwwroot\Citrix\StorageCenter
StorageZone Connectors for Network File Shares C:\inetpub\wwwroot\Citrix\StorageCenter\cifs
StorageZone Connectors for SharePoint C:\inetpub\wwwroot\Citrix\StorageCenter\sp
To enable extended logging
The following steps enable extended logging for all StorageZones Controller components and services:
1. On the StorageZones Controller server, open IIS.
2. Navigate to Default Web Site and then open Application Settings.
3. Change the value for enable-extended-logging from 0 to 1.
4. Restart the Citrix ShareFile Management Service.
5. After you have resolved the issue, we recommend that you turn off extended logging to reduce the amount of logging.
To enable extended logging for a particular component, edit its AppSettingsRelease.config file: Change the value of <add
key="enable-extended-logging" value="0" /> from 0 to 1.
You can also check IIS logs to determine if traffic is reaching StorageZones Controller. IIS logs show all incoming requests. IIS
logs for StorageZones Controller are in c:\inetpub\logs\LogFiles\W3SVC1.
To enable extended IIS logging, see http://support.microsoft.com/kb/313437.
Test upload latency
StorageZones Controller includes a web page that helps you troubleshoot potential latency issues. The page provides the
elapsed time and rate for a specified file upload. The time and rate values are provided for the upload to StorageZones
Controller and for the upload to the storage cache. The test does not upload file metadata or change the uploaded file.
This feature is off by default. To enable it, add the key <add key="EnableTestUploadPage" value="1" /> to
C:\inetpub\wwwroot\Citrix\StorageCenter\AppSettingsRelease.config.

© 1999-2017 Citrix Systems, Inc. All rights reserved. p.107https://docs.citrix.com
To open the page, navigate to https://externalFQDN/UploadTest.aspx, where externalFQDN is the fully-qualified domain name
of the StorageZones Controller. After you specify a file to download, the time and rate data appears. If you need help
interpreting the data, contact your support representative.
If you are using NetScaler with HTTP callouts enabled for StorageZones, traffic to the upload test page will be blocked. Citrix
recommends that you perform the latency test from your internal network and bypass the NetScaler by using a StorageZones
Controller server address instead of the external zone address.
Troubleshoot installation and configuration
Issue Description and resolution
“HTTP Error 404- File orDirectory notfound” appearsduringStorageZonesControllerconfiguration
The message typically results from an issue with IIS or ASP.NET. Make sure that the IIS role is enabled onthe Windows installation and that the ASP.NET feature is enabled on IIS. For more information, seePrepare your server for ShareFile data.
“HTTP Error404.2 – NotFound” appearswhen browsinglocalhost on theStorageZonesController
The message indicates that ISAPI and CGI restrictions for ASP.NET are not set to Allowed. For moreinformation, see Prepare your server for ShareFile data.
“HTTP Error 413– Request entitytoo large”appears after anupload attempt
The message can appear on a network trace after a failed upload attempt to a StorageZone and canresult from a client certif icate setting in IIS. To work around this issue:1. On the StorageZones Controller server, open IIS.
2. Navigate to Default Web Site and then open SSL Settings.
3. For Client certif icates select Ignore.
4. Restart the Citrix ShareFile Management Service.
For more information, see
http://www.microsoft.com/technet/prodtechnol/WindowsServer2003/Library/IIS/7e0d74d3-ca01-
4d36-8ac7-6b2ca03fd383.mspx?mfr=true.
IIS errors occurduringStorageZonesControllerconfiguration
IIS errors typically indicate that ASP.NET is not fully configured.Verify in the IIS Manager, under ISAPI and CGI Restrictions, that Restriction is set to Allowed for all of
the ASP.NET listings.
Verify that ASP.NET is registered in IIS: In IIS Manager, under Application Pools, verify that there are
ASP.NET listings.
To manually register ASP.NET, see the command lines following this table.
If you continue to have issues, review your IIS and ASP.NET setup. For more information, see Prepare
your server for ShareFile data.

© 1999-2017 Citrix Systems, Inc. All rights reserved. p.108https://docs.citrix.com
“Failed to SaveStorage CenterBinding” appearsduringStorageZonesControllerconfiguration
The message indicates a permissions problem on the IIS Account Pool user. By default, application poolsoperate under the Network Service user account. StorageZones Controller uses the Network Serviceaccount by default. If you use a named user account instead of the Network Service account, thenamed user account must have full access to the network share used for private data storage.
“Access denied”appears duringzoneconfiguration
The message can occur if the ShareFile account you are logged on as does not have permission tocreate and manage zones. Use the ShareFile administrator console to set that permission.
Outboundrequests areblocked
When outbound requests are blocked, the cfgsrv log includes System.Net.WebException: The remote
server returned an error: (403) Forbidden. This issue is likely due to the proxy server blocking outbound
requests. Verify that your f irewall meets the requirements specif ied in StorageZones Controller systemrequirements.
“Unable toconnect toremote server”appears whenyou log on toStorageZonesController
The message typically indicates a proxy issue. Make sure that your proxy settings are configured, asdescribed in Specify a proxy server for StorageZones.If the proxy settings are correct, verify that:
You can log into your ShareFile account from StorageZones Controller.
You have administrator-level permissions to configure StorageZones Controller.
Port 443 is open on the external f irewall.
The foldernamedShareFileStorageon your networkshare does notincludeSCKeys.txt afteryou enable andconfigureStorageZonesfor ShareFileData
StorageZones Controller creates SCKeys.txt during installation unless the account you used to installStorageZones Controller is not in the access control list. Update the access control list and reinstallStorageZones Controller.
File uploads to ashared folder failafter you createa zone
This issue indicates a problem with your internal DNS. You must have both an internal and external DNSrecord for the StorageZones Controller FQDN unless the zone is a restricted StorageZone.
On theMonitoring tab,the HeartbeatStatus is red
A red icon indicates that StorageZones Controller isn’t able to send heartbeat messages to the ShareFileweb site.
Check if the icons for other components are red. If so, refer to the logs for more information.
If the s3uploader log shows a failure to send the heartbeat, the StorageZones Controller server might
not be able to contact the ShareFile web site unless it goes through a proxy server. To specify a proxy
server for StorageZones Controller, open the controller console and go to the Networking tab.
If the StorageZones Controller server cannot access the ShareFile web site using a network service
Issue Description and resolution

© 1999-2017 Citrix Systems, Inc. All rights reserved. p.109https://docs.citrix.com
user, either allow the network service user to access the ShareFile web site or set up a Windows user
account with outbound access to the proxy server.
A StorageZonedoes not appearin the ShareFileadministratorinterface
This issue can indicate a problem with the external address or f irewall.First verify in the StorageZones Controller console that the External Address does not include the port.
If it does, remove the port and then restart the controller.
If the External Address does not include the port, make sure that your Windows firewall is configured
correctly. By default, Windows firewall settings allow outbound traffic for the ShareFile services on port
443. StorageZones Controller requires that setting. Verify that Windows firewall allows outbound traffic
on port 443 for the following processes:
C:\inetpub\wwwroot\Citrix\StorageCenter\SCFileCleanSvc\FileDeleteService.exe
C:\inetpub\wwwroot\Citrix\StorageCenter\SCFileCopySvc\FileCopyService.exe
C:\inetpub\wwwroot\Citrix\StorageCenter\s3uploader\S3UploaderService.exe
C:\inetpub\wwwroot\Citrix\StorageCenter\CloudStorageUploaderSvc\CloudStorageUploaderService.exe
C:\inetpub\wwwroot\Citrix\StorageCenter\SCProxyEmailSvc\ProxyEmailService.exe
StorageZonesController doesnot upload datato ShareFile
In the NetScaler console, right-click the load balancing virtual server for statistics, to verify whether
traff ic is reaching NetScaler from the ShareFile control plane, StorageZones Controller, and ShareFile
clients. When you upload a f ile and the virtual server shows an increase in hits, then the traff ic is
passing through NetScaler.
Verify the traffic for every point of the NetScaler connection:
Content switching virtual server
Load balancing virtual servers for Connectors and for ShareFile data
HTTP callouts bound to one of the two virtual servers
Responder policy bound to the ShareFile data virtual server
Connectors virtual server binding to AAA
Test uploads for ShareFile data:
1. Unbind the responder policy in the load balancing virtual server for ShareFile data. (The responder
policy drops incoming traff ic that is not signed by the ShareFile control plane.)
2. From a web browser, type the external FQDN of StorageZones Controller. If there is connectivity,
the ShareFile logo appears.
3. From a web browser, type the URL for a connector.
Test accessibility of StorageZone Connectors:
If the following URLs are successful, you will be prompted for credentials even if the back-end server is
down. Or, if you are logged on as a user, you will get an API response.
https://szc-address/cifs/v3/Items/ByPath?path=\\path
https://szc-address/sp/v3/Items/ByPath?path=http://sharepoint-server
The API response is in this form:
{“Name”:"ConnectorName",“FileName”:"FileName",
“CreationDate”:"date",“ProgenyEditDate”:"date",
“IsHidden”:false,“Path”:"“,"StreamID”:"id",
Issue Description and resolution

© 1999-2017 Citrix Systems, Inc. All rights reserved. p.110https://docs.citrix.com
“odata.metadata”:"https://szc-address/cifs/v3/$metadata#
Items/ShareFile.Api.Models.Folder@Element",“Id”:"id"}
Other examples:
https://szc-address/cifs/v3/getItems(itemID)
https://szc-address/sp/v3/getItems(itemID)
For iOS:
https://szc-address/cifs/v3/Items/(connector-folder-ID)?
$select=Name,FileName,CreationDate,ProgenyEditDate...
Test devices from the external network. Device connectivity issues can result from DNS setup. You
must have an external DNS record and you might also need an internal DNS record for the external
StorageZones FQDN.
If you are having trouble with a particular device only, test that device. For more information, see “A
mobile device won’t connect to a connector” in the table in "Troubleshoot ShareFile clients and web
app", next.
The ShareFileConnectivityfrom FileCleanup Servicesstatus is a redicon after youupgradeStorageZonesController
A red icon occurs if Windows starts the File Cleanup Service before StorageZones Controller establishesa network connection. The status will return to a green icon after the controller server is back on thenetwork.
“Path exceedsmax length(1024)” appearsduring connectorcreation
The message can occur if the external address configured for StorageZones Controller points to theShareFile web site instead of the StorageZones Controller server FQDN.
“Invalid name”appears whenconfiguring anewStorageZonesController afterdeleting an oldone
The message can occur if entities related to the old StorageZones Controller still exist. To resolve thisissue:1. Uninstall the new StorageZones Controller.
2. Delete the shared network folder.
3. Delete the folder c:\inetpub\wwwroot\Citrix.
4. Open regedit and delete this key: HKLM/Software/Wow6432Note/Citrix.
5. Install and configure a new StorageZones Controller. If the issue persists, contact your support
representative.
Issue Description and resolution
To manually register ASP.NET
cd /d C:\Windows\Microsoft.NET\Framework\v4.0.30319 iisreset /stop aspnet_regiis -i iisreset /start %systemroot%\system32\inetsrv\appcmd set config /section:isapiCgiRestriction /[path='%windir%\Microsoft.NET\Framework\v4.0.30319\aspnet_isapi.dll'].allowed:True

© 1999-2017 Citrix Systems, Inc. All rights reserved. p.111https://docs.citrix.com
%systemroot%\system32\inetsrv\appcmd set config /section:isapiCgiRestriction /[path='%windir%\Microsoft.NET\Framework64\v4.0.30319\aspnet_isapi.dll'].allowed:True
Troubleshoot ShareFile clients and web app
A mobile device won’tconnect to a connector
Verify connectivity. Many connectivity issues are covered in the preceding table.
Make sure that StorageZones Controller is on-line.
Upload a f ile to the zone. If the upload works, the issue is specif ic to connectors.
Try to connect from the mobile device using both the cellular and company network.
Check that the SharePoint server or f ile server is available.
“HTTP Error 401 –Unauthorized” appearswhen trying to access aconnector
Any of the following issues can prevent a user from accessing a connector from ShareFileclients or the ShareFile web app:
Incorrect configuration of IIS: Verify that the Web Services (IIS) role has Basic
Authentication and Windows Authentication enabled. If those options are not listed
under Security, use Server Manager to install them and then restart IIS.
Incorrect user permissions: Verify that the AD user has access to the share. From Server
Manager, go to Share and Storage Management, and add the user or change the user
permissions as needed.
A problem with NetScaler AAA group access. For troubleshooting information, see
http://support.citrix.com/article/CTX126589.
“HTTP Error 403 –Forbidden” appears whenconnecting to a SharePointsite
This message occurs if the SharePoint server is configured for Basic authentication butStorageZones Controller is not configured to cache credentials. To resolve this issue, add<add key="CacheCredentials" value="1" /> to
C:\inetpub\wwwroot\Citrix\StorageCenter\sp\AppSettingsRelease.config.
“HTTP Error 503 – Serviceunavailable” appears whenmobile apps try to access aConnector
Connectors are sending a response but are unable to handle the HTTP request. This canoccur if content switching policies, load balancing VIPs, or the responder policy are incorrectlyconfigured or bound on the NetScaler. To resolve this issue, review the NetScalerconfiguration for ShareFile and correct the configuration.

© 1999-2017 Citrix Systems, Inc. All rights reserved. p.112https://docs.citrix.com
Reference: StorageZones Controller configuration files
Mar 30 , 2015
This reference provides an overview to the StorageZones Controller configuration files:
AppSettingsRelease.config
FileDeleteService.exe.config
SFAntiVirus.exe.config
Web.config
The StorageZones Controller installer creates those files. Changes you make in the StorageZones Controller console are
saved to the files.
To use or configure certain features, you must manually add or update some settings in the configuration files. This
reference lists those settings and provides links to related information.
AppSettingsRelease.config
AppSettingsRelease.config files are contained in the following folders in the StorageZones Controller installation path
(C:\inetpub\wwwroot\Citrix\):
StorageCenter
Defines global settings for StorageZones Controller.
StorageCenter\cifs
Defines settings for StorageZone Connectors for Network File Shares.
StorageCenter\sp
Defines settings for StorageZone Connectors for SharePoint.
Before editing an AppSettingsRelease.config file, verify that you are working in the correct location. The following table
includes only the settings that might require manual intervention to enable certain features.
For details about DLP settings, see Data Loss Prevention.
Setting Description
<add
key="RenameFileOnUploadConflict"
value="0"/>
After an upgrade, this setting might require manual intervention.
This setting controls what happens when a user attempts to upload a file that is
locked by another user. When the value is "0", the upload attempt is denied.
When the value is "1", a copy of the file is created with "- Copy(1)" appended to
the name.
Add the key to the <appSettings> section of the AppSettingsRelease.config file
in C:\inetpub\wwwroot\Citrix\StorageCenter\cifs and
C:\inetpub\wwwroot\Citrix\StorageCenter\sp.
<add key="CacheCredentials" To use StorageZone Connectors for SharePoint with a SharePoint server that is

© 1999-2017 Citrix Systems, Inc. All rights reserved. p.113https://docs.citrix.com
value="1" /> configured for Basic authentication, add the CacheCredentials key to:
C:\inetpub\wwwroot\Citrix\StorageCenter\sp\AppSettingsRelease.config
For more information, see— StorageZone Connector for SharePoint
in StorageZones Controller system requirements.
<add key="QueueSDKRestricted"
value="0" />
To run antivirus scans on a server other than the StorageZones Controller, set
the QueueSDKRestricted key to "0" in:
C:\inetpub\wwwroot\Citrix\StorageCenter\sp\AppSettingsRelease.config
For more information, see Configure antivirus scans of uploaded files.
<add key="EnableTestUploadPage"
value="1" />
To enable a page that displays upload performance for a specified file, add the
EnableTestUploadPage key to:
C:\inetpub\wwwroot\Citrix\StorageCenter\AppSettingsRelease.config
For more information, see Increase the number of files per zone.
Setting Description
FileDeleteService.exe.config
FileDeleteService.exe.config provides controls used by StorageZones Controller to manage the persistent storage cache.
This configuration file is located in:
C:\inetpub\wwwroot\Citrix\StorageCenter\SCFileCleanSvc
For more information, see Customize storage cache operations.
SFAntiVirus.exe.config
SFAntiVirus.exe.config provides the scanner software with information about your StorageZones Controller configuration,
the location of the scanner software, and various command options. This configuration file is located in:
C:\inetpub\wwwroot\Citrix\StorageCenter\Tools\SFAntiVirus
For more information, see Configure antivirus scans of uploaded files.
Web.config
In general, C:\inetpub\wwwroot\Citrix\StorageCenter\ConfigService\Web.config contains controls that typically should not
be changed. You will, however, need to update it if you are using older StorageZones Controllers with a proxy server.
For StorageZones Controller 2.2 through 2.2.2 only: If a zone has multiple StorageZones Controllers and all HTTPtraff ic uses a proxy server, you must add a bypass list to Web.config for each secondary server.Note: As of release 2.2.3, the bypass setting is included in the Network page of the StorageZones Controllers console.1. Open the f ile in a text editor and locate the <system.net> section. Here is a sample of that section after a proxy server is
configured:
<system.net>

© 1999-2017 Citrix Systems, Inc. All rights reserved. p.114https://docs.citrix.com
<defaultProxy enabled="true">
<proxy proxyaddress="http://192.0.2.0:3128" />
</defaultProxy>
</system.net>
</configuration>
2. Add a bypass list to that section, as shown:
<system.net>
<defaultProxy enabled="true">
<proxy proxyaddress="http://192.0.2.0:3128" />
<bypasslist> <add address="primaryServer" /> </bypasslist>
</defaultProxy>
</system.net>
</configuration>
The primaryServer is either an IP address or hostname (servername.subdomain.com).
If you later change the primary StorageZones Controller IP address or hostname, you must update that information in
ConfigService\Web.config for each secondary server.
3. Restart the IIS server of all zone members.