strong and simple - fine woodworking · their wooden joinery, yet they typically build toolboxes of...
TRANSCRIPT

F I N E w o o d w o r k I N g58 Photos: Jonathan Binzen; drawings: dan Thornton
COPYRIGHT 2016 by The Taunton Press, Inc. Copying and distribution of this article is not permitted.
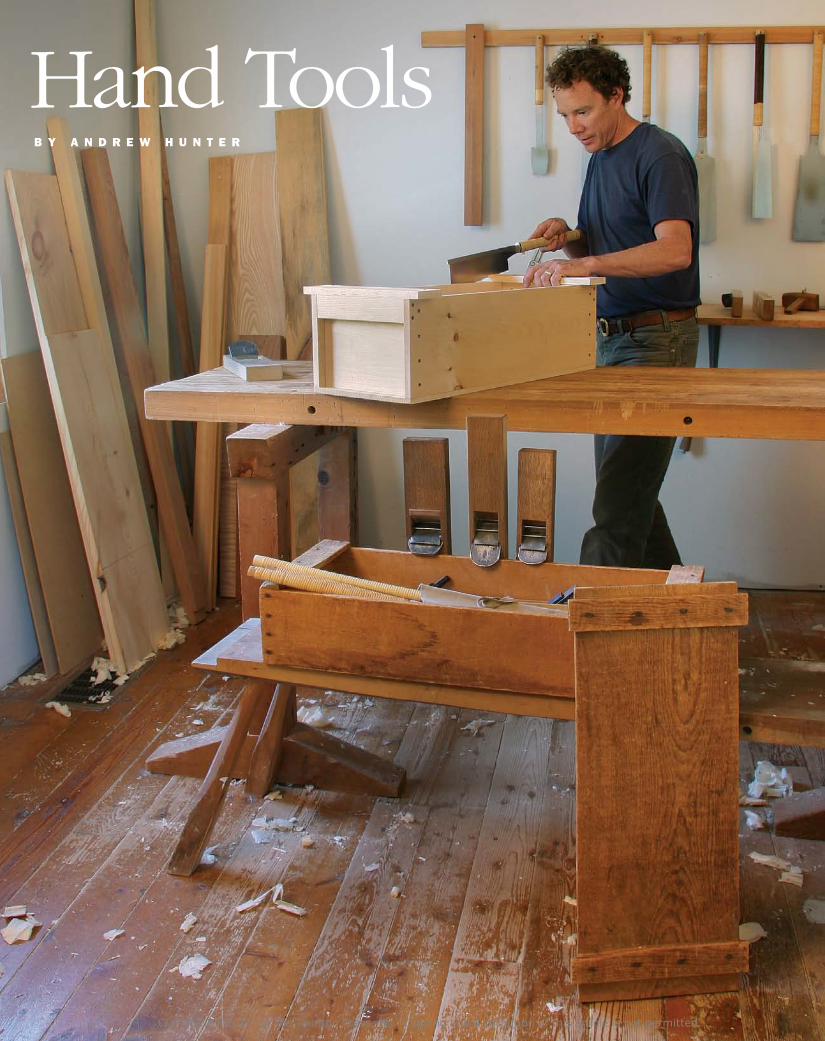
Hand-Built Home for Hand ToolsCut nails and a clever lid clinch a traditional Japanese toolbox B y A n d r e w H u n t e r
Lay out and cut out. Hunter rough-cut all the parts but the handles from a 12-ft.-long white pine 1x12.
Flatten, then thickness. You can flatten and thickness the parts by hand, as Hunter does, or by machine.
Clean up and crosscut. After thicknessing the sides and jointing their edges, saw the ends square and true the cut with a handplane.
PreP the Parts
Lid board, 1⁄2 in. thick by 913⁄16 in. wide by 231⁄4 in. longBatten, 5⁄8 in thick by 21⁄4 in.
wide by 111⁄8 in. long
Clout cut nails, 11⁄2 in. long, clenched on underside of lid
5⁄8 in.
Cap board, 5⁄8 in. thick by 3 in. wide by 111⁄8 in. long
Box cut nails, 2 in. long
Bottom, 1⁄2 in. thick by 111⁄8 in. wide by 28 in. long
Side, 5⁄8 in. thick by 8 in. wide by 28 in. longFlat-head screws,
#8, 11⁄4 in. long
End, 5⁄8 in. thick by 8 in. wide by 101⁄8 in. long
Handle, 7⁄8 in. thick by 2 in. wide by 97⁄8 in. long
Batten overhang, both sides, 5⁄8 in.
Cut nails into handle, 11⁄4 in. long
13⁄8 in.
Bevel bottom edge of handle 10° or so.
Dado,1⁄8 in. deep, inset 7⁄8 in. from edge
Japanese carpenters are renowned for the sophistication of their wooden joinery, yet they typically build toolboxes of the simplest sort. A traditional Japanese toolbox, butt-joined
or dadoed and nailed together, speaks of utility and practicality. It is durable, stackable, and eminently portable.
Although I favor utilitarian toolboxes, I relate to the impulse to make a special project out of creating a home for beloved tools—that’s why I build my boxes with hand tools. I still look with pride
at the resaw marks on the underside of the lid on my original toolbox, made when I was just starting out and absorbing all I could from Toshio odate’s book, Japanese Woodworking Tools: Their Tradition, Spirit and Use (The Taunton Press, 1984). I used odate’s toolbox as a model for my own. The sliding lid provides a strong, satisfying closure, and when removed, is a convenient place to lay out tools for the work at hand. And the inset ends of the box make for stronger joints while also providing handholds.
STRONG AND SIMPLE
1. Pivot the lid into place. 2. Slide it closed.
COPYRIGHT 2016 by The Taunton Press, Inc. Copying and distribution of this article is not permitted.
Hand-Built Home for Hand ToolsCut nails and a clever lid clinch a traditional Japanese toolbox B y A n d r e w H u n t e r
F I N E w o o d w o r k I N g60
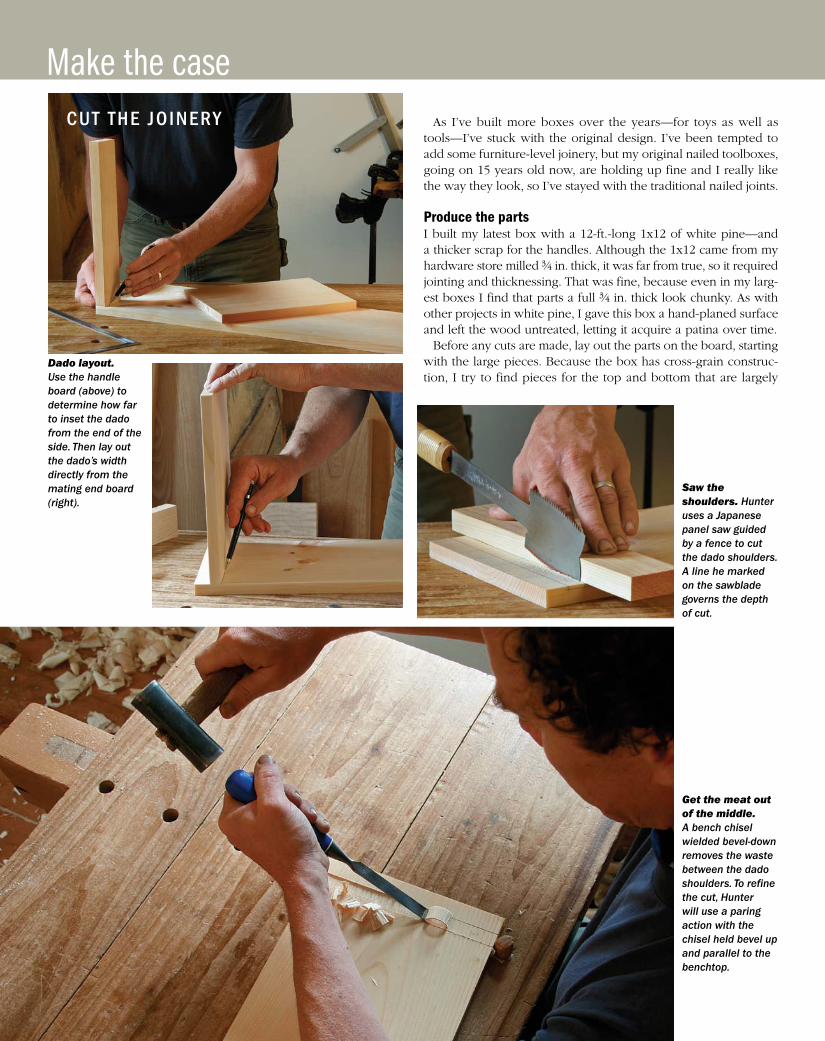
Dado layout. Use the handle board (above) to determine how far to inset the dado from the end of the side. Then lay out the dado’s width directly from the mating end board (right).
Saw the shoulders. Hunter uses a Japanese panel saw guided by a fence to cut the dado shoulders. A line he marked on the sawblade governs the depth of cut.
Get the meat out of the middle. A bench chisel wielded bevel-down removes the waste between the dado shoulders. To refine the cut, Hunter will use a paring action with the chisel held bevel up and parallel to the benchtop.
cut the joinery As I’ve built more boxes over the years—for toys as well as tools—I’ve stuck with the original design. I’ve been tempted to add some furniture-level joinery, but my original nailed toolboxes, going on 15 years old now, are holding up fine and I really like the way they look, so I’ve stayed with the traditional nailed joints.
Produce the partsI built my latest box with a 12-ft.-long 1x12 of white pine—and a thicker scrap for the handles. Although the 1x12 came from my hardware store milled 3⁄4 in. thick, it was far from true, so it required jointing and thicknessing. That was fine, because even in my larg-est boxes I find that parts a full 3⁄4 in. thick look chunky. As with other projects in white pine, I gave this box a hand-planed surface and left the wood untreated, letting it acquire a patina over time.
Before any cuts are made, lay out the parts on the board, starting with the large pieces. Because the box has cross-grain construc-tion, I try to find pieces for the top and bottom that are largely
Make the case

N o v E m B E r / d E c E m B E r 2 0 1 6 61www.finewoodworking.com
COPYRIGHT 2016 by The Taunton Press, Inc. Copying and distribution of this article is not permitted.
Bottom’s up. After trimming the bottom board flush to the outside of the box, drill clearance holes and countersinks, and attach it with screws.
Cut nails get pilot holes. Pre-drill for the nails using a bit whose diameter matches the thickness (not the full taper) of the cut nails.
The bottom squares up the box. After jointing one long edge of the bottom and cutting one end of it square, clamp it in place to help align the box parts for nailing.
Careful with the cut nails. To prevent splitting the top board, turn the cut nail so its taper lines up with the long grain.
quartersawn. I also save the outer, clear, radial sections of the board for narrower parts like the lid battens.
Next rough-cut the parts and mill them to thickness. To see how I do this by hand, check out my article “Prep rough lumber with hand tools” (Handwork, FWW #239). with the parts milled, cut the sides and ends to size. From there, cut parts as needed during the project, taking measurements directly from the box.
Cut the dadoeswith the sides and end pieces ready, locate the dadoes in the sides that will receive the end boards. The amount the dado is inset
from the end of the side board is determined by the thickness of the handle. mark this distance and then, with all the parts labeled, use the end boards to lay out the width of their mating dadoes.
I use a Japanese panel saw, or azebiki, to cut the kerfs that define the dado. clear the waste between the kerfs with a chisel or a specialty plane. Now you’re ready to nail the sides together.
Nails and screwsPre-drill for the nails, choosing a bit sized to the thickness of the cut nails (not to their width, which tapers), and drill only through the piece the nail enters first. To help align and stabilize the parts
nail the assembly
add the bottom
F I N E w o o d w o r k I N g62COPYRIGHT 2016 by The Taunton Press, Inc. Copying and distribution of this article is not permitted.
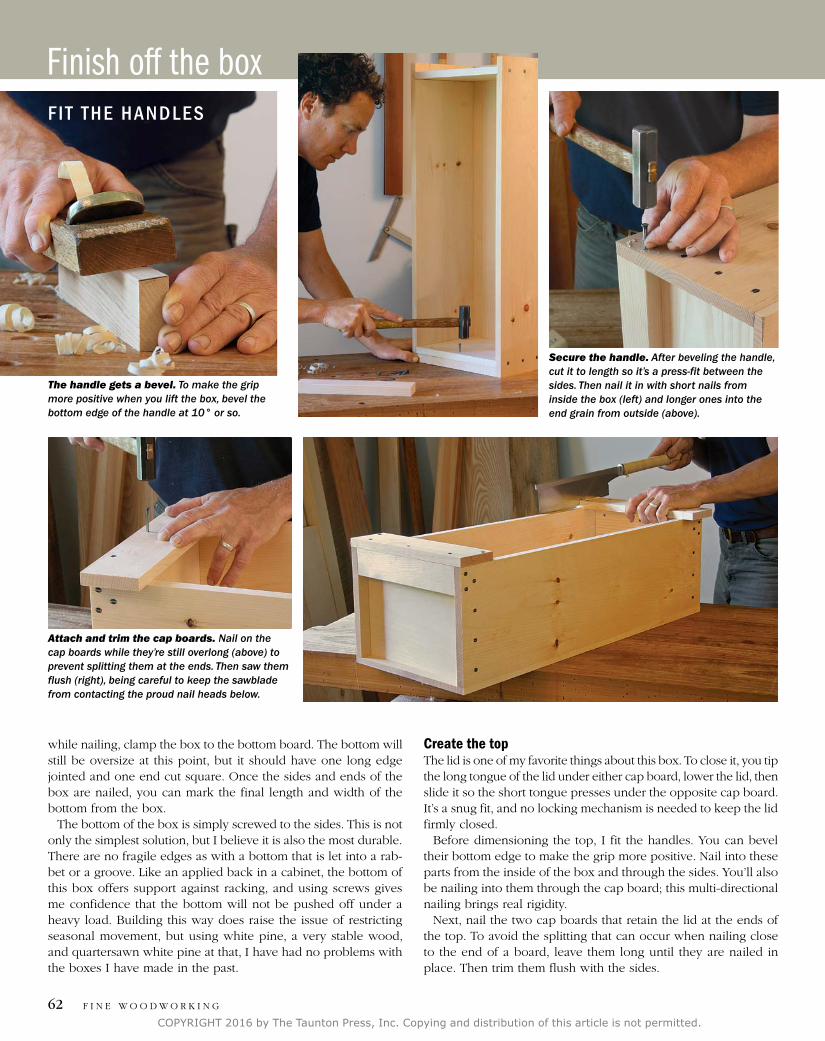
Attach and trim the cap boards. Nail on the cap boards while they’re still overlong (above) to prevent splitting them at the ends. Then saw them flush (right), being careful to keep the sawblade from contacting the proud nail heads below.
while nailing, clamp the box to the bottom board. The bottom will still be oversize at this point, but it should have one long edge jointed and one end cut square. once the sides and ends of the box are nailed, you can mark the final length and width of the bottom from the box.
The bottom of the box is simply screwed to the sides. This is not only the simplest solution, but I believe it is also the most durable. There are no fragile edges as with a bottom that is let into a rab-bet or a groove. Like an applied back in a cabinet, the bottom of this box offers support against racking, and using screws gives me confidence that the bottom will not be pushed off under a heavy load. Building this way does raise the issue of restricting seasonal movement, but using white pine, a very stable wood, and quartersawn white pine at that, I have had no problems with the boxes I have made in the past.
Create the topThe lid is one of my favorite things about this box. To close it, you tip the long tongue of the lid under either cap board, lower the lid, then slide it so the short tongue presses under the opposite cap board. It’s a snug fit, and no locking mechanism is needed to keep the lid firmly closed.
Before dimensioning the top, I fit the handles. You can bevel their bottom edge to make the grip more positive. Nail into these parts from the inside of the box and through the sides. You’ll also be nailing into them through the cap board; this multi-directional nailing brings real rigidity.
Next, nail the two cap boards that retain the lid at the ends of the top. To avoid the splitting that can occur when nailing close to the end of a board, leave them long until they are nailed in place. Then trim them flush with the sides.
The handle gets a bevel. To make the grip more positive when you lift the box, bevel the bottom edge of the handle at 10° or so.
Secure the handle. After beveling the handle, cut it to length so it’s a press-fit between the sides. Then nail it in with short nails from inside the box (left) and longer ones into the end grain from outside (above).
Finish off the boxf it the handles
N o v E m B E r / d E c E m B E r 2 0 1 6 63COPYRIGHT 2016 by The Taunton Press, Inc. Copying and distribution of this article is not permitted.
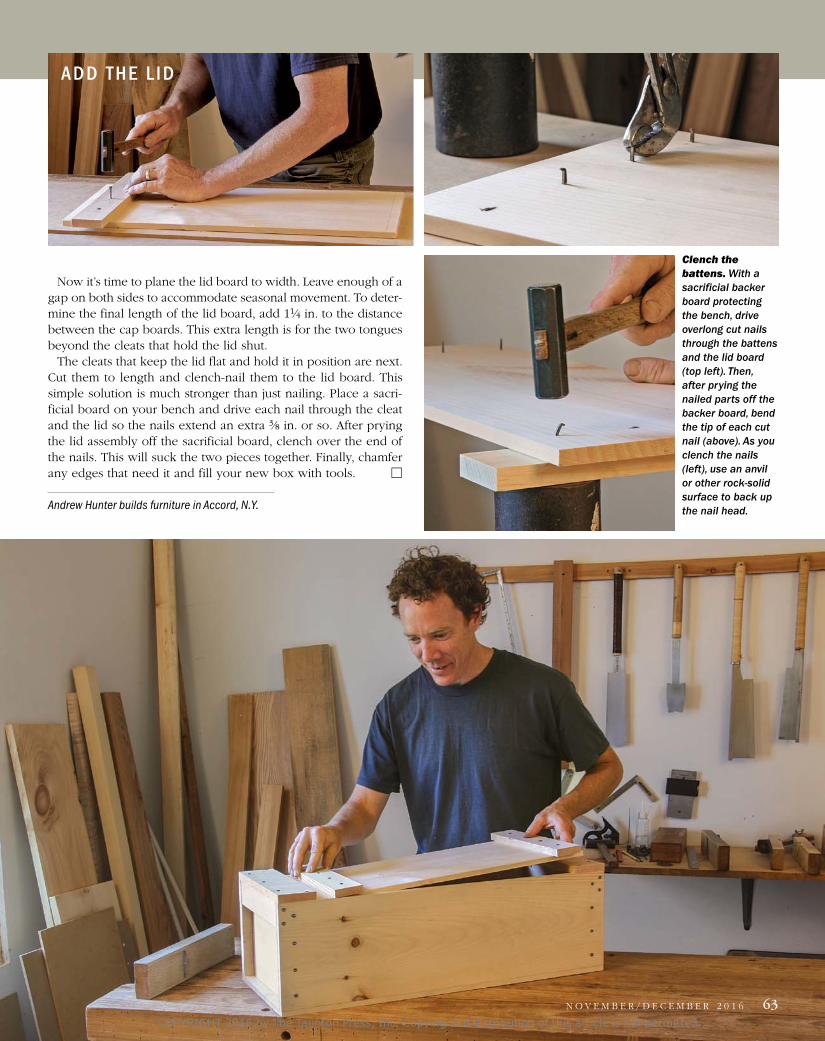
Clench the battens. With a sacrificial backer board protecting the bench, drive overlong cut nails through the battens and the lid board (top left). Then, after prying the nailed parts off the backer board, bend the tip of each cut nail (above). As you clench the nails (left), use an anvil or other rock-solid surface to back up the nail head.
Now it’s time to plane the lid board to width. Leave enough of a gap on both sides to accommodate seasonal movement. To deter-mine the final length of the lid board, add 11⁄4 in. to the distance between the cap boards. This extra length is for the two tongues beyond the cleats that hold the lid shut.
The cleats that keep the lid flat and hold it in position are next. cut them to length and clench-nail them to the lid board. This simple solution is much stronger than just nailing. Place a sacri-ficial board on your bench and drive each nail through the cleat and the lid so the nails extend an extra 3⁄8 in. or so. After prying the lid assembly off the sacrificial board, clench over the end of the nails. This will suck the two pieces together. Finally, chamfer any edges that need it and fill your new box with tools. □
Andrew Hunter builds furniture in Accord, N.Y.
add the l id