strumming school - chapter 2 download - guitar … (simple time) there are three beats to the bar,...
TRANSCRIPT

Video Reference: Chapter 2 - "TimeSignatures"
Time Signatures
We aren't going to play any 4/4 time signatures because you already know this style. Let's try someothers.
These may not be the most 'fun' or 'challenging' exercises, but you need to know all of this beforewe move into Reggae and other strumming lessons for these time signatures. All of theseexercises are performed at 120 bpm. Since the chords are easy, you should be able to play thesewith no problem.
Remember that 4/4 time is considered 'common time' and 'simple time'. Here is an example of theother time signature definitions.
Simple Time - Like 4/4, this also includes 2/4 and 3/4.
Compound Time - The simple times can be grouped into triplets, or groups of three. This is acompound time signature. The 6/8 could be called 6/4 if you were playing quarter notes, but we'replaying eighth notes, so it's 6/8. This is the same for 9/8 as being 9/4 if played using quarter notes.This ALSO applies to 12/8, where it would be called 12/4 if we were playing quarter notes. EASY!
Asymmetric Time - Time signatures with beats not being divisible by two or three are calledasymmetric time signatures. which are composed of five or seven beats. This includes eleven andthirteenth beats as well. The accents are important, as they show the beat arrangement.
I allow the beat to run a while so that you can hear the idea. I then play along. I HIGHLY recommenddoing this until you are comfortable. Don't worry so much with the accents right now. Just count inyour head according to groupings of each value.
In each exercise, I say "Think..." What I mean by this is that if you are confused with actuallyCOUNTING the notes out, you can simplify it by just counting each beat. When you get down to the3, 6, 9, 11 I'll explain further.
Exercises
2/4 (Simple Time)There are two beats to the bar, with all the beats being quarter notes.
(Think 1, 2 - Each beat gets a 1 and then a 2 and repeats)
3/26/2010 Strumming School - Chapter 2 Download
guitaralliance.com/…/chapter2.htm 1/26PDF created with pdfFactory trial version www.pdffactory.com

3/4 (Simple Time)There are three beats to the bar, with all the beats being quarter notes.
(Think 1, 2, 3 and change to the next chord)
6/8 (Compound Time)There are six beats to the bar, with all beats being eighth notes.
(Think 1, 2, 3 - 1, 2, 3 which is two groupings of three, or 2x3. That = 6!)
3/26/2010 Strumming School - Chapter 2 Download
guitaralliance.com/…/chapter2.htm 2/26PDF created with pdfFactory trial version www.pdffactory.com

9/8 (Compound Time)There are nine beats to the bar, with all beats being eighth notes.
(Think 1, 2, 3 - 1, 2, 3 - 1, 2, 3 which is three groupings of three. or 3x3. That = 9!)
12/8 (Compound Time)There are twelve beats to the bar, with all beats being eighth notes.
Think 1, 2, 3 - 1, 2, 3, - 1, 2, 3 - 1, 2, 3 which equals four groups of three, or 4x3. That =12!)
5/4 (Asymmetric Time)
3/26/2010 Strumming School - Chapter 2 Download
guitaralliance.com/…/chapter2.htm 3/26PDF created with pdfFactory trial version www.pdffactory.com

There are five beats to the bar, with all beats being quarter notes. There are accents as followed:
Measure 1 - accents on 1 and 4Measure 2 - accents on 1 and 4Measure 3 - accents on 1 and 3Measure 4 - accents on 1 and 3
(Think 1, 2, 3, 4, 5. This one is tricky because it makes you feel out of time. Just count 1-5 to make it easier. Switch even if you don't feel like you want to!)
7/8 (Asymmetric Time)There are seven beats to this bar, with all beats being eighth notes. There are accents as followed:
Measure 1 - accents on 1 and 4Measure 2 - accents on 1 and 4Measure 3 - accents on 1 and 5Measure 4 - accents on 1, 3, and 6
(Think 1, 2, 3, 4, 5, 6, 7. This one also makes you feel out of time.Just count 1-7 and switch no matter how you feel about it.)
3/26/2010 Strumming School - Chapter 2 Download
guitaralliance.com/…/chapter2.htm 4/26PDF created with pdfFactory trial version www.pdffactory.com

Video Reference: Chapter 2 - "BarreChords"
11/8 (Asymmetric Time)There are eleven beats to this bar, with all the beats being eighth notes. The accents are asfollowed:
Measure 1 - accents on 1, 4, 7, and 10Measure 2 - accents on 1 and 7
(Think 3, 6, 9, 11. REAALLLLYYY confusing. Just do it!)
I love thinking it this way, because you just shorthand the beats instead of counting too high.
Just don't think of the first two beats, and think only of the 3rd time you play each beat.This may confuse some of you that are used to conventional methods, but it has always worked for me. All odd numbers, all between three.
Introduction To Barre Chords
You cannot play every chord in the guitar's open position. For example, you can only play 5major chords in the open position (C,A,G,E,D).
What if you wanted to play an F or B chord? How about an F# or Gb chord for that matter? Youcan't do it without using a barred chord. There are 12 possible major chords and without barrechords you can only play 5 of them. It's the same thing with minor chords.
Barre Chords Move!
One of the great attributes of the guitar is that a guitarist can "carry" chord patterns up and downthe fretboard to create new chords. Many of these moveable chords are performed by creatingwhat is called a Barre with one finger. A barre chord is where we take a basic chord pattern and"move" it up the neck of the guitar to create different chords.
3/26/2010 Strumming School - Chapter 2 Download
guitaralliance.com/…/chapter2.htm 5/26PDF created with pdfFactory trial version www.pdffactory.com

For example, let's take the E chord pattern:
To move the chord pattern up the neck, we create a barre with our 1st finger. This barre, in a way,replaces the nut of your guitar. The notes that were played open to produce the E chord will now befingered with the barre that you create with your 1st finger.
If we were to move the entire pattern up one fret it would look like this:
It's the same pattern, butnow that we have moved thepattern up one fret, it's nolonger an E chord. Now it'san F chord.
The reason we know that it'san F chord is because ofthe root note. The root noteof the chord will be thelowest note.
In the E chord, the root notewas the low E string playedopen. Now that we havemoved the chord shape up
3/26/2010 Strumming School - Chapter 2 Download
guitaralliance.com/…/chapter2.htm 6/26PDF created with pdfFactory trial version www.pdffactory.com
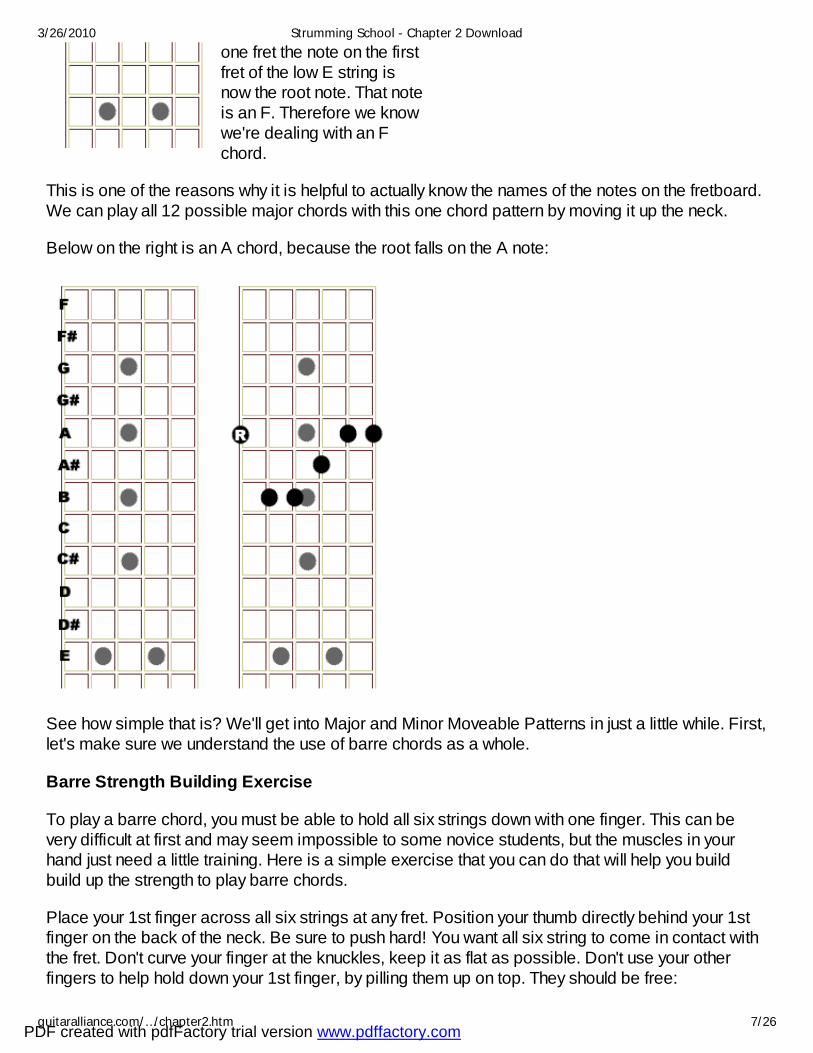
one fret the note on the firstfret of the low E string isnow the root note. That noteis an F. Therefore we knowwe're dealing with an Fchord.
This is one of the reasons why it is helpful to actually know the names of the notes on the fretboard.We can play all 12 possible major chords with this one chord pattern by moving it up the neck.
Below on the right is an A chord, because the root falls on the A note:
See how simple that is? We'll get into Major and Minor Moveable Patterns in just a little while. First,let's make sure we understand the use of barre chords as a whole.
Barre Strength Building Exercise
To play a barre chord, you must be able to hold all six strings down with one finger. This can bevery difficult at first and may seem impossible to some novice students, but the muscles in yourhand just need a little training. Here is a simple exercise that you can do that will help you buildbuild up the strength to play barre chords.
Place your 1st finger across all six strings at any fret. Position your thumb directly behind your 1stfinger on the back of the neck. Be sure to push hard! You want all six string to come in contact withthe fret. Don't curve your finger at the knuckles, keep it as flat as possible. Don't use your otherfingers to help hold down your 1st finger, by pilling them up on top. They should be free:
3/26/2010 Strumming School - Chapter 2 Download
guitaralliance.com/…/chapter2.htm 7/26PDF created with pdfFactory trial version www.pdffactory.com

While holding this barre strum all six strings a few times, then move the barre up one fret and struma few more times. Continue to work your way up the fretboard and back down again strumming afew times at each fret.
Your hands are going to be cramping quite a bit, but that's exactly what we want. Like they alwayssay in the gym: no pain, no gain. Perform this exercise daily until you get to the point where thereare no muted strings or buzzing and your hand doesn't hurt as much.
The E Style Barre ChordWhat To Do:
Create a barre with your first finger on any fret. Pretend your finger is the nut of the guitar. Now useyour remaining 3 fingers to play an E chord like in the Major chord below. The fingering is a little bitdifferent, but the form is the same.
E Major Open E Major Barred
E Barred
Notice that there isn't too much difference in the two. We still have the same pattern position forboth chords, but as shown earlier, we've moved the pattern up one fret and changed the fingerposition. You've still got the notes on the A, D, and G string being played, but this time it's up onefret. Instead of playing the open strings, we barre all of them with our 1st finger, placed along all sixstrings. Since you are pressing down on the A, D, and G string, the strings will ring out with those
3/26/2010 Strumming School - Chapter 2 Download
guitaralliance.com/…/chapter2.htm 8/26PDF created with pdfFactory trial version www.pdffactory.com

notes instead of the barred 1st finger behind them.
(For example: Since you have pressed down on the 2nd and 3rd frets, they will ring out instead ofthe first fret notes because they come in front of your 1st finger, which is barred on the first fret.)
Fret/Chord Chart
Depending on the fret, your 1st finger barres determines what chord you are playing. For example,in an open E chord the open E string is the root. The E chord barre on the 1st fret is an F chord andso on. This is where learning the names of the frets comes in handy!
Fret 1 2 3 4 5 6 7 8 9 10 11 12
Chord F F#/Gb G G#/Ab A A#/Bb B C C#/Db D D#/Eb E
Other E Style Barre Chords
Not only can you take the E Major chord up the fretboard using a barre, but you can also use theopen E minor, 7th, and minor 7th (m7). The same fret/chord chart below applies!
3/26/2010 Strumming School - Chapter 2 Download
guitaralliance.com/…/chapter2.htm 9/26PDF created with pdfFactory trial version www.pdffactory.com

Fret 1 2 3 4 5 6 7 8 9 10 11 12
Chord F F#/Gb G G#/Ab A A#/Bb B C C#/Db D D#/Eb E
The Em Style Barre Chord
E Minor Open E Minor Barred
Fret/Chord ChartYou can determine the name of the chord when the root (lowest) note is played on the frets in thechart below.
Fret 1 2 3 4 5 6 7 8 9 10 11 12
Chord F F#/Gb G G#/Ab A A#/Bb B C C#/Db D D#/Eb E
Alternate FingeringHere is a poplular alternative way of playing the E minor style barre chord. It's the same form withthe exception of the missing notes on the 5th and 6th strings. It is used a lot because it's an easerfingering than the full barre chord. Since we're just omiting 2 notes we don't need a new fret/chordchart, because this pattern is still basically the same.
3/26/2010 Strumming School - Chapter 2 Download
guitaralliance.com/…/chapter2.htm 10/26PDF created with pdfFactory trial version www.pdffactory.com

The A Style Barre ChordYou'll want to create a barre with your first finger except you will not include the Low E string.Instead we're using the A string as our root.
A Major OpenA Major Barred
Fret/Chord ChartYou can determine the name of the chord when the root (lowest) note is played on the frets in thechart below.
Fret 1 2 3 4 5 6 7 8 9 10 11 12
Chord A#/Bb B C C#/Db D D#/Eb E F F#/Gb G G#/Ab A
Alternate FingeringHere is a popular alternative way of playing the A style barre chord. It's the same form with theexception of the missing note on the 5th string. It used a lot because it's an easer fingering than the
3/26/2010 Strumming School - Chapter 2 Download
guitaralliance.com/…/chapter2.htm 11/26PDF created with pdfFactory trial version www.pdffactory.com

full barre chord.
Note: In addition to using only your 3rd finger in the alternate fingerings shown above, you can alsouse only your 4th finger as well.
A Minor Style Barre Chords
A Minor Open A Minor Barred
Fret/Chord ChartYou can determine the name of the chord when the root (lowest) note is played on the frets in thechart below.
Fret 1 2 3 4 5 6 7 8 9 10 11 12
Chord A#/Bb B C C#/Db D D#/Eb E F F#/Gb G G#/Ab A
Alternate Fingering
3/26/2010 Strumming School - Chapter 2 Download
guitaralliance.com/…/chapter2.htm 12/26PDF created with pdfFactory trial version www.pdffactory.com

Here is a popular alternative way of playing the A minor style barre chord. It's the same form withthe exception of the missing note on the 5th string. It is used a lot because it's an easer fingeringthan the full barre chord.
Other A Style Barre Chords
Fret 1 2 3 4 5 6 7 8 9 10 11 12
3/26/2010 Strumming School - Chapter 2 Download
guitaralliance.com/…/chapter2.htm 13/26PDF created with pdfFactory trial version www.pdffactory.com

Video Reference: Chapter 2 - "Power Chords vs. BarreChords"
Chord A#/Bb B C C#/Db D D#/Eb E F F#/Gb G G#/Ab A
Having Trouble With Barre Chords?Try using your thumb!
This tutorial is available on the Strumming School DVD under this chapter.
Power Chords vs. Barre Chords
We all know that they are different, but which one do you play in a given piece? Well, the optionsare left quite open, but many times it actually depends on personal ability. While power chords areMUCH easier to play than many barre chord formations, the power chord tends to muddy up apassage and doesn't offer a bright consistent tone. This is the main reason that power chords areused in heavier music. As you know, power chords are most frequently used with distortion, but thatisn't always the case.
In this series, we are going to alternate between power chords and barre chords, allowing you tohear the difference between the two. This should be a simple run of power/barre chords, so even ifyou haven't mastered difficult barre chords, this exercise should work just fine for you.
Exercises
In this power chord exercise, the first bar is all quarter notes. All you have to do is play them as yousee them. The second bar is using eighth notes. The '5' notes that each chord is a power chord.The '5' notes that that in addition to the root, you are also using the 5th.
3/26/2010 Strumming School - Chapter 2 Download
guitaralliance.com/…/chapter2.htm 14/26PDF created with pdfFactory trial version www.pdffactory.com

2.Now we start introducing some barre chords instead of the power chords.
3/26/2010 Strumming School - Chapter 2 Download
guitaralliance.com/…/chapter2.htm 15/26PDF created with pdfFactory trial version www.pdffactory.com

3.In this exercise, the first bar is all power chords using quarter notes on the A string instead of the Estring this time. The second bar uses eighth notes.
3/26/2010 Strumming School - Chapter 2 Download
guitaralliance.com/…/chapter2.htm 16/26PDF created with pdfFactory trial version www.pdffactory.com

4.Now we play barre chords instead of power chords using the same format as above:
3/26/2010 Strumming School - Chapter 2 Download
guitaralliance.com/…/chapter2.htm 17/26PDF created with pdfFactory trial version www.pdffactory.com

Video Reference: Chapter 2 - "ChordVoicings"
As you can see, there is quite a difference between hearing the sound of the power chord vs. thebarre chord. Most often you'll find barre chords for acoustic as power chords don't provide the fulltonal quality that most acoustic guitarists need.
Chord Voicings
Choosing the Best Voicing
Although you can use any of these voicings in any situation, we are going to take the followingchords and supply you with 4 voicings of these chords so that you can 'plug-and-play' them whenwe get heavy into the strumming exercises.
Here are 4 voicings for the CAGED chords, both major and minor. Since we've already at leastread about the CAGED chords, we can try to apply them using a chord voicing.
Chord Voicing - The notes that make up a chord are referred to as voicings.
Voicing 1: This is the most common upper position voicing. It's also the most appropriate forstrumming.
3/26/2010 Strumming School - Chapter 2 Download
guitaralliance.com/…/chapter2.htm 18/26PDF created with pdfFactory trial version www.pdffactory.com

Voicing 2: This diagram always gives you a convenient 'all-purpose' voicing, usable in most anymusical setting.
Voicing 3: Here you'll find another 'all-purpose' voicing, but this voicing is often a broken set form. Abroken set chord contains a lower 'bass' note and two or three notes on higher strings with at leastone interior string omitted. It functions best in a jazz or blues setting as a nice 'comping' (short foraccompaniment) chord.
Voicing 4: Closed voicings or adjacent set chords are used for the fourth group. These oftenappear 'up the neck' and are of great use in jazz, blues, and rock. Although a thinner, less 'full'sound is produced, due to the lack of a lower bass note, it may be more desirable when trying tooffset another guitarist or in complement to the bass player.
Here are the voicings below. The voicings are in order from 1 - 4, as seen in this example:
Notice that the 1st voicing is the most common voicing you've seen, as well as possibly voicing 2.Also note that each 4-set voicing is the same chord, only played in different areas on the guitar.
Voicings
C/Cm
The 4th voicing of the C chord is much like the third. The 1st voicing of the Cm chord is much like the 2nd.
3/26/2010 Strumming School - Chapter 2 Download
guitaralliance.com/…/chapter2.htm 19/26PDF created with pdfFactory trial version www.pdffactory.com

A/Am
None of the A chord voicings are very similiar. Neither are the Am voicings. You can really switch these up!
G/Gm
The same applies here. Lots of options!
E/Em
3/26/2010 Strumming School - Chapter 2 Download
guitaralliance.com/…/chapter2.htm 20/26PDF created with pdfFactory trial version www.pdffactory.com

Again, lots of options!
D/Dm
The D 3rd and 4th voicings are similiar. The Dm 3rd and 4th voicings are also similiar.
As you can see, all of these chord voicings cover the CAGED chords we've worked with so far.
Using Other Voicings
Notice that I just called them 'voices' instead of 'voicings.' Though the technical term IS voicings, Ilike saying voices because to me it really grabs the definition of the topic. Just like when singing,every voice is a little different. That's what is happening here. All of the chords I present to you arestandard options in standard tuning. I'll even include some common alternate tuning chord voicings,which is probably something you haven't seen frequently.
Though this isn't actually an exercise, you can most definitely think of all the information on thispage AS exercises, mainly because many of the chord voicings you see below may not be familiarto you. Many of them weren't to me, which is the main reason I've included this topic of discussionhere while we're still in the early phases of the course.
I am presenting you with all the Major and Minor Chord Voicings (for the most part) that can beplayed on guitar, as well as some that cannot be played AS A CHORD. However, the beauty oflearning these voicings in their different positions is that they will be very helpful in learning to
3/26/2010 Strumming School - Chapter 2 Download
guitaralliance.com/…/chapter2.htm 21/26PDF created with pdfFactory trial version www.pdffactory.com

accompany with a fellow guitarist, or when playing along with the jam tracks I provide. First I'd liketo touch base on the formalities of chord voicings:
Chord Voicings
Any chord voicing will sound complete if it contains the third and seventh of the chord (what areknown as "guide tones.") These two tones, when combined with the root, will define the basicquality of the chord as major, minor, or dominant. Colorful upper structures, such as the 6th (alsoreferred to as the 13th) or 9th, may be added to fill out the voicing.
In this lesson we'll look at using the major scale and its scale tones in different positions to buildchords around those initial shapes.
The Major Scale
Here is the major scale in 8 different positions.
So what makes it a "scale"? - one word - intervals.
Intervals are the spaces/gaps between each note in a scale, the separation of tones across ascale.
Let's recap specifically for the major scale how intervals work (though you should already know this)...
The major scale starts with note number 1 (the root note) and continues in intervals up to note 7.The intervals are as follows...
W = whole step (or 2 fret interval)H = half step (or 1 fret interval)
So if you were to play the major scale starting on the open bottom E string and played out theintervals on just that one string, this is how they would appear ("1" being the open, unfrettedstring)...
3/26/2010 Strumming School - Chapter 2 Download
guitaralliance.com/…/chapter2.htm 22/26PDF created with pdfFactory trial version www.pdffactory.com

Therefore this would be the E major scale, since the root (1) note lies on the the note E.
Once we get to note 7, the next note is the octave - the same as the root or note 1, but higher. Thescale cycle begins again.
It's that typical "do-re-mi" scale we're all familiar with and it's where chords and other scales arebuilt in relation to. So when we talk about a flat 5th (symbolised as "b5") in a chord or scale, wereally mean "the 5th tone of the major scale flattened one half step from its original position".
That's an important point actually - when we flatten a note half a step (1 fret) the symbol to representthis is a b (e.g. flatten the 9th and you get b9)
If you sharpen (move up one half step/fret) a note you get the # symbol (e.g. sharpen the 5th andyou get #5)
Now, it's necessary to use more than one string most of the time. So you have to transfer thesescale intervals across the 6 strings of your guitar.
Major Scale In Use
The most commonly used (and seen) "boxed" scale pattern for the major scale is...
Remember, 1, the first note of the scale is the root note, so if you started the scale at fret 3 on thelow E string, the 1st note would be G so it would be the G major scale.
You should learn that major scale pattern above to start with and learn the visual relationships andintervals between the notes.
For example:
1. the second occurrence (octave) of the root note appears on the D string two frets above the 1stroot note2. the third occurrence (even higher octave) of the root note appears on the high E string on thesame fret as the 1st root note!3. the second occurrence (octave) of the 5th appears on the B string two frets below the 1stoccurrence of the 5th note.4. the 3rd appears one fret left of the lowest root note on the A string AND a higher 3rd (octave)appears one fret left of the root's octave on the G string.
See if there are any other visual relationships you can pick out.
3/26/2010 Strumming School - Chapter 2 Download
guitaralliance.com/…/chapter2.htm 23/26PDF created with pdfFactory trial version www.pdffactory.com

See if there are any other visual relationships you can pick out.
Now try out these chord positions below...
Other major scale shapes/positionsRemember: these are all exactly the same major scale as above, with exactly the same intervals,they just use different areas of your guitar's fretboard and make use of different strings for differentnotes as a result.
They can be seen as formed around various chord shapes (e.g. D shape barre, C shape barreetc.)
1 = root note for whatever key you're playing in (you can shift these shapes up and down thefretboard depending on the chord/key you're playing around.
So above we learned the E string root - "boxed" major scale...
E string root - descending
Used to construct chords around the G shape.
E string root - ascending
Used to construct chords areound the E shape.
A string root - boxed
Used to construct chords around A shape. So this time, same scale, same intervals but startingwith the root on the A string.
3/26/2010 Strumming School - Chapter 2 Download
guitaralliance.com/…/chapter2.htm 24/26PDF created with pdfFactory trial version www.pdffactory.com

A string root - descending
Used to construct chords around the C shape.
A string root - ascending
Used to construct chords around the A shape.
D string root - boxed
Used to construct chords around the D shape. Again, same scale and intervals but starting on theD string (where even higher voiced, 4 string chords can be built from)...
3/26/2010 Strumming School - Chapter 2 Download
guitaralliance.com/…/chapter2.htm 25/26PDF created with pdfFactory trial version www.pdffactory.com

D string root - descending
Can be used for constructing higher voiced, 4 string chords which have a D string root.
When you build a chord from a scale, you get a chord shape.
This is where the E, A, C, D and G chord shapes come from, and you can use the assigned scaleshapes above to construct chords around these positions which in turn gives you several differentchord voicings to experiment with.
The same "shape" technique can be applied to other scales as and when you come to them.
3/26/2010 Strumming School - Chapter 2 Download
guitaralliance.com/…/chapter2.htm 26/26PDF created with pdfFactory trial version www.pdffactory.com