sts owners manual -frameless - no brakes (2) owners manual.pdf2 smart transport solutions quality...
TRANSCRIPT

www.smarttransportsolutions.com
A Leader in Trailer Innovation
OWNER’S MANUAL Enclosed is operator’s instructions and warranty information for your new STS Trailer.
Please read them carefully before operating.
Congratulations on your purchase of a new STS Trailer. We are confident that you
will be completely satisfied for years to come with the quality and versatility of your STS Trailer. We have paid special attention to all the details that make your investment choice a step above the others, to ensure this satisfaction. We do however suggest that you read this manual completely and follow all recommendations made, to ensure that the excellence of your STS Trailer will last for many years.
We at STS take pride in our products and our ability to continue to provide you, the customer, with a quality recreational trailer, which meets and exceeds your expectations. Product and Specifications subject to change without notice.

2
SSmmaarrtt TTrraannssppoorrtt SSoolluuttiioonnss QQuuaalliittyy PPoolliiccyy
It is STS’s policy to bring to market the highest quality, most cost effective product that will meet or exceed our customer’s needs. STS believes the key to achieving this policy is happy, healthy and well trained employees. Proper training and fair treatment of our employees will be reflected in the product we produce and the services we provide our customers. STS has a mission to provide best in class products of unequalled value that are highly engineered, innovative, durable and of the highest quality available in the market. Through the application of Ingenuity and Lean Principles STS products will set the standard for their industry.
SMART Transport Solutions is a subsidiary of Karavan Trailers, Inc. established to accelerate the advancement of International patent based Poly Trail and Trail Crate products in the U.S. and Canadian markets. Our relationship with Karavan Trailers allows STS to draw upon the infra-structure, processes and state of the art Manufacturing techniques developed over 20 years of business. Through the exclusive licensing of Intellectual property rights and a strategic collaboration alliance with the innovator, STS brings to bear 40 years of design development and innovation.

3
TTaabbllee ooff CCoonntteennttss
IItteemm PPaaggee BBrraakkeess 44
RReeppoorrttiinngg SSaaffeettyy DDeeffeeccttss 44
AAxxlleess,, HHuubbss,, BBeeaarriinnggss && SSuurree LLuubbee SSyysstteemm 44
LLiigghhttiinngg aanndd WWiirriinngg 88
LLooaadd ccaarrrryyiinngg ccaappaacciittyy 99
CChhaannggiinngg TTiirree,, SSaaffeettyy CChhaaiinnss,, TTiiee DDoowwnnss 1111
TTiirree pprreessssuurree 1111
TTiirree SSaaffeettyy IInnffoo 1133
TTiirree WWaarrrraannttyy ((LLooaaddssttaarr)) ((CCaarrlliissllee)) 2222
TToowwiinngg yyoouurr TTrraaiilleerr,, TTrraaiilleerr JJaacckk 2233
TToonngguuee WWeeiigghhtt 2266
CCoouupplleerr UUssee;; MMaaiinntteennaannccee,, IInnssttaallllaattiioonn,, SSeerrvviiccee IInnffoorrmmaattiioonn ((FFuullttoonn)) 2277
WWhheeeell SSiizzee,, TTrraaiilleerr WWaarrrraannttyy 2299
RReeggiissttrraattiioonn 3311
IImmppoorrttaanntt Read this manual carefully with special attention directed towards all WARNING, CAUTION and IMPORTANT information specially marked. Because of the continual improvements being made in our line, STS, Inc., reserves the right to add or discontinue models at any time or to change design and specifications without notice and incurring obligations. All specifications contained herein were in effect at the time this manual was printed. Trailer laws covering such things as brakes, licenses, etc., will vary from state to state. Be sure that your trailer is in full compliance with your state laws. Your trailer dealer usually can help you in this regard. If not, contact your nearest state motor vehicle department office for full information. The key to carefree trailering is a proper matching of the trailer to your needs. A proper match is one in which the total weight and size of the load you intend to haul falls under the capabilities that your trailer was designed and built to handle.
NNoottee
All references to the left or right are made when standing behind the trailer, facing the trailer.
4
BRAKES
In most states, trailers with a Gross Vehicle Weight Rating of 3,000 pounds or more, are required by law to have brakes on all wheels. Upon special request, you can order axles with brake flanges to be able to install brakes. Brakes are becoming more of a necessity especially since the introduction of the smaller car.
Most trailer brakes are designed to operate automatically when the towing brakes are applied. When the towing vehicle slows down or stops, the forward momentum of the trailer against the ball hitch applies pressure to the master cylinder in the trailer coupler. This pressure activates the trailer brakes through a hydraulic brake system. CAUTION: Weight equalizing or sway control devices inhibit the performance of surge brake actuators and must not be used. Air shocks on the rear axle of the tow vehicle offer a good means of leveling the vehicle and trailer when necessary.
Reporting Safety Defects
If you believe that your vehicle has a defect that could cause a crash or could cause injury or death, you should immediately inform the National Highway Traffic Safety Administration (NHTSA) in addition to notifying Smart Transport Solutions. If NHTSA receives similar complaints, it may open an investigation, and if it finds that a safety defect exists in a group of vehicles, it may order a recall and remedy campaign. However, NHTSA cannot become involved in individual problems between you, your dealer, or Smart Transport Solutions. To contact NHTSA, you may either call the Vehicle Safety hotline toll-free at 1-800-327-4236 (TTY: 1-800-424-9153), to http://www.safecar.gov; or write to: Administrator
NHTSA 400 7th Street SW Washington, DC 20590
You can also obtain other information about motor vehicle safety from http://safecar.gov.
AAxxllee,, HHuubbss,, BBeeaarriinnggss Your 5’x8’ STS Trailer (LC-2200-56T, SCU-2200-56T, SCU-2200-56R) is manufactured with a state of the art Torsion Axle System with the latest in Automotive Technology advances. It is designed for maintenance free usage with corrosion resistant components. Your 6’x10’ STS Trailer (SCU-2290-R-72) utilizes a Sure Lube System covered later in this manual.
AAddvvaannttaaggeess ooff tthhee SSTTSS SSyysstteemm Your STS trailer comes with a Torsion axle as a Standard Feature. Many of the trailers in the market come with a leaf spring axle as standard. The STS system is designed to be car friendly for the growing range of applications and will provide you with a smooth towing experience. With the corrosion resistant features you avoid the common rust bleeding issues that typically appear on springs over time. The 5’x8’ model (LC-2200-56T, SCU-2200-56T, SCU-2200-56R) utilizes a waterproof, long life bearing system, like the Automotive Industry. Because of the design, you the customer have a worry free, service free system. Maintenance – Automotive technology, life and quality. If you have a 6’x10’ model (SCU-2290-R-72) Trailer, the axle employs a Sure Lube System. With proper usage within designed capacities your system will function and maintain its appearance for years to come.
5
MMaaiinntteennaannccee ooff SSTTSS SSyysstteemm With the care that STS has put into equipping your trailer with a premium axle system there is no regular maintenance required on the 5’x8’ (LC-2200-56T, SCU-2200-56T, SCU-2200-56R) Trailer. For the 6’x10’ (SCU-2290-R-72) Trailer guidelines for maintenance of the Sure Lube System must be followed. We do recommend for the best sustained appearance, that you give your trailer the same regular cleaning care you would your car or boat. To insure the long-life of your torsion axle system, the axle manufacturer specifies the following guidelines to the customer: 1). Keep the maximum static load below the rated capacity, Do not overload the axle
2). Do not use wheels other than the size and style provided with your trailer. (Any deviation may cause harm to the bearing system) 3). Check the axle for sideways bearing play every 3,000 miles of operation, by checking whether the wheels have sideways play when the trailer is hitched up.
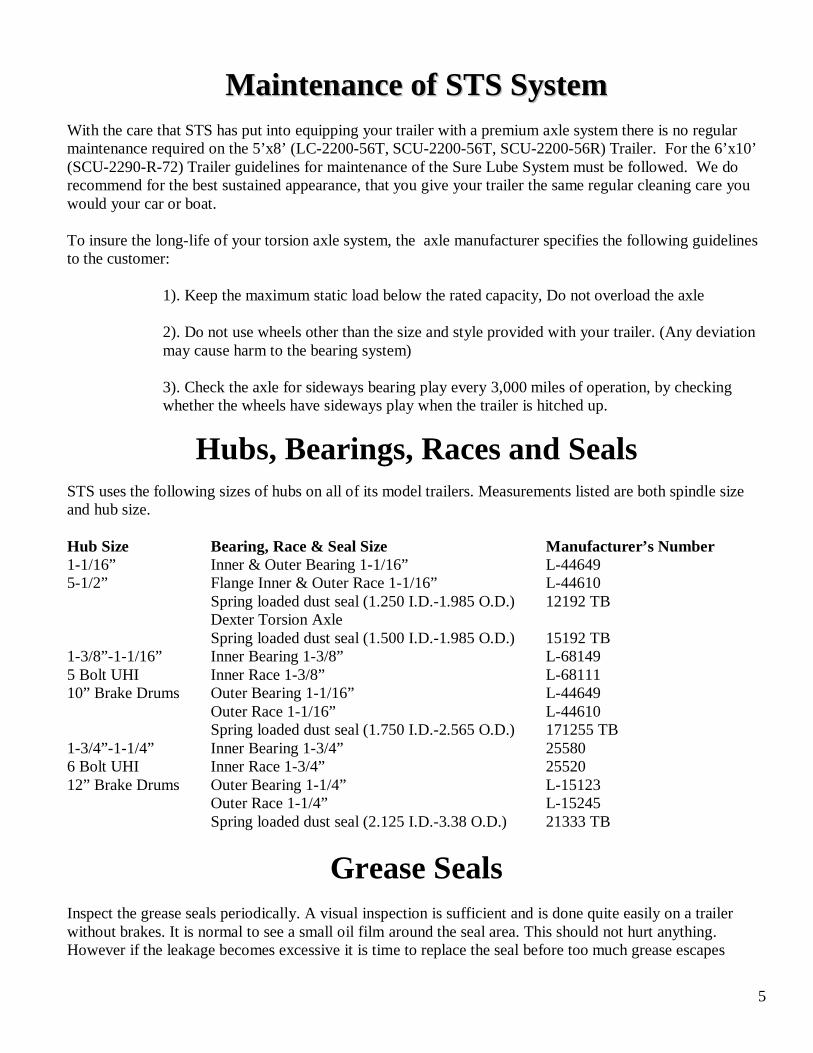
Hubs, Bearings, Races and Seals STS uses the following sizes of hubs on all of its model trailers. Measurements listed are both spindle size and hub size. Hub Size Bearing, Race & Seal Size Manufacturer’s Number 1-1/16” Inner & Outer Bearing 1-1/16” L-44649 5-1/2” Flange Inner & Outer Race 1-1/16” L-44610
Spring loaded dust seal (1.250 I.D.-1.985 O.D.) 12192 TB Dexter Torsion Axle Spring loaded dust seal (1.500 I.D.-1.985 O.D.) 15192 TB
1-3/8”-1-1/16” Inner Bearing 1-3/8” L-68149 5 Bolt UHI Inner Race 1-3/8” L-68111 10” Brake Drums Outer Bearing 1-1/16” L-44649
Outer Race 1-1/16” L-44610 Spring loaded dust seal (1.750 I.D.-2.565 O.D.) 171255 TB
1-3/4”-1-1/4” Inner Bearing 1-3/4” 25580 6 Bolt UHI Inner Race 1-3/4” 25520 12” Brake Drums Outer Bearing 1-1/4” L-15123
Outer Race 1-1/4” L-15245 Spring loaded dust seal (2.125 I.D.-3.38 O.D.) 21333 TB
Grease Seals Inspect the grease seals periodically. A visual inspection is sufficient and is done quite easily on a trailer without brakes. It is normal to see a small oil film around the seal area. This should not hurt anything. However if the leakage becomes excessive it is time to replace the seal before too much grease escapes

6
causing bearing failure. Replacement of the seal requires removing the complete hub assembly from the spindle. On axles with brakes you must remove the complete brake drum assembly to inspect the seals. It is very important that you check the seals on brake axles periodically to make sure they are not leaking. Leaking seals allow the grease to get on the brake linings thus causing grabby brakes. Eventually the brake linings will become saturated with grease and will have to be replaced.
STS’s Sure Lube System On the 6’x10’ (SCU-3500-72) Trailer, STS uses a Sure Lube system on its axles. This system is a well accepted benefit for trailering. Under the rubber dust cap there is a grease zerk. The grease zerk presses into the hole that goes all the way through the center of the spindle and comes out by the back bearing. At that point it greases the back bearing and fills the inside of the hub. It then greases your front bearing. When you see grease come out by the castle nut, your hub and bearing are full.
Advantages of the Sure Lube System
1. You can grease the bearings without taking the hubs off. 2. You can change the grease in your hub and bearings by rotating the hub slowly while putting grease in until you see new grease come out. 3. You can check your hub & grease at any time. 4. You can grease your bearing at any time on long trips.
Maintenance of Sure Lube 1. Once or twice a year (depending on usage) jack your trailer up one wheel at a time. Hold the wheel with both hands and try to rock to check for play in the bearing. If you have play then you need to adjust your castle nut (see bearing adjustment). 2. When greasing bearings look at the old grease when it comes out. If you see small silver like filings it may indicate a problem with your bearings. They should be replaced immediately. 3. It is important to use a pin the same size as the hole to make your Sure Lube system work properly.
When to Check Trailers often sit idle for extended periods of time so it is a good idea to check all of these before any use. Bearings rechecked and repacked before storage and after immersion in salt water will last longer. Check the lubricant level when the hub is warm. On boat trailers, we suggest that you check just prior to launching to be sure the hub is full of grease when the axle is submerged.
Recommended Lubricant

7
Chevron RPM Automotive LC #2 Grease is installed at the factory. Any good marine grade water-resistant grease is recommended. Different types of grease shouldn’t be mixed.
Bearing Repacking Ideally, one would not have to be concerned about wheel bearings in that you would not have to get them submerged in the water when loading and unloading. This is not the case in some instances so therefore preventative maintenance is required. Because of the various types of ways in which people use a trailer it becomes difficult to say every 500 miles repack your bearings of after backing in the water 10 times repack your bearings. Neither of the above can apply. About the only thing that applies is good common sense. Note the following: 1. When water gets in the bearings and is on the steel itself it will rust. So the most important part is get a good grade of wheel bearing grease that will not break down when water is mixed with it. 2. Pack the bearings by forcing the grease into all the small cavities in the bearings. Fill the cavity in the hub with grease. 3. Make sure the grease seals are in usable condition. 4. Keep the bearings and grease free of any dirt or foreign matter. 5. The wheel bearings should be repacked anytime during the year that you plan on storing the trailer for a period of time. 6. The more often you back your trailer in the water, the more chance you stand of getting water in the bearings. You should definitely be packing your bearings more often (at least twice during the season) if this is the situation. 7. Towing a trailer numerous miles has its good points and bad points. Long towings may warm the hub and grease up enough to remove any water it may have collected. However should you then back the warm hubs into the water just after a long tow they will take on water through condensation. It is therefore important that you let them cool before backing into the water. 8. Be sure the bearings are adjusted properly not too tight, or too loose. See Bearing Adjustment. Check the grease in your hubs once a year. In most instances, if a good quality lubricant is used and the lubricant levels are maintained, it may not be necessary to repack the bearings. However, should the grease appear to be contaminated or broken down, remove all of the old grease from the bearings and hubs and completely repack. Remove the rear bearing will most likely cause damage to the rear seal. A new one should be installed when reassembling.
Bearing Adjustment The wheel bearings have been preadjusted at the factory. To maximize bearing life, however, we suggest that you check the bearing adjustment after the first 50 miles of use, then every time the bearings are repacked. Bearing adjustment can be checked by jacking up one side of the trailer. Grip the edge of the wheel and see if you can rock it or move it. If you have movement remove the dust cap and the cotter key. While rotating wheel tighten the spindle nut to a recommended 20 inch-pounds of torque if your trailer has 1-1/16" - 1-1/16" bearings or 30 inch-pounds if your trailer has 1-3/8" - 1-1/16" bearings. Do not over tighten. Look for the hole in the spindle through the slots in the spindle nut. If you can see any part of the hole through the slot in the nut turn the nut counterclockwise until the next slot in the nut lines up with the cross hole. Insert cotter key or new L pin.

8
If you cannot see any portion of the hole in the spindle through the slots in the nut, turn the nut counterclockwise until the hole lines up with the first slot available in the nut. Insert cotter key or L pin. This adjustment will give you from one-thousandths to ten thousandths end play, which is in tolerance for proper adjustment. Check wheel again for the movement. If no movement, spin wheel. Wheel should turn easily and have no end play (lateral movement). Bend ends of cotter key or L pin to keep it from coming off. A large cotter pin must be used to fill the hole for the sure lube system to work properly. Position dust cover. Tap lightly on edges to start cover. Then using a screwdriver and alternating sides as you work around the dust cover, tap screwdriver with hammer until the dust cover is completely into the hub and the flange on the dust cover is tight against the hub face. Repeat on other wheels.
LLiigghhttiinngg && WWiirriinngg DDiiaaggrraamm && CCoolloorr CCooddee Make sure that all trailer lights are in proper working order.
Yellow Wire – Left Stop & Turn Green Wire – Right Stop & Turn Brown Wire – Taillights, Rear Marker Lights, Front & Rear Side Lights White Wire – Ground State and Federal regulations require all types of trailers to be equipped with tail, stop, turn and side marker lights. Trailers over 80 inches wide must have clearance and identification lights. All the necessary lights are supplied by us, the manufacturer, however it is the owner’s responsibility to maintain them in good operating condition at all times.
TTrroouubblleesshhoooottiinngg aanndd MMaaiinntteennaannccee The STS electrical system is quite trouble-free especially with the use of the automotive type wire harness that we use. All connections are plug –in connections. The lights are all plug, waterproof, rubber flush mount products. These features eliminate shorts in the system due to bad or corroded connections. Your STS trailer harness is also installed with the best available harness protection in the market.

9
We suggest however that you use the following precautions for trouble-free trailering: 1. Check all lights for proper operations before use. 2. Make sure your towing vehicle’s electrical system is sufficient to handle the extra load required to power your trailer lights. Check with your local automotive dealer for specifications and any options available to increase the electrical capacity. 3. Do not make alterations to your trailer electrical system. Alteration of your trailer can result in damage to your trailer’s essential safety system and become a safety hazard. 4. In event of a system malfunction the following are items to check before consulting a dealer for service:
A). Make sure no plug connections have not been inadvertently disconnected during use B). Check to insure none of the lights have been damaged in operation. C). In the areas the wiring harness is exposed, check to insure wires have not been cut during use. D). If you harness has a ground wire to the rear bumper, check that the ground screw is tight.
LLooaadd--CCaarrrryyiinngg CCaappaacciittyy The serial tag will show the Gross Vehicle Weight Rating (GVWR) which is the load-carrying capacity plus the weight of the trailer itself. NOTE: This trailer is equipped to meet applicable Federal safety standards. Check local and state requirements regarding brakes and any additional equipment that may be required. Any modifications or additions including load equalizing hitches, without written factory consent; usage in an abnormal manner including overloading voids all manufacturers’ warranties and liability.
MFD BY/FABRIQUE PAR: SMART TRANSPORT SOLUTIONS, INC DATE: DEC 2005 MADE IN THE U.S.A.
GVWR/PNBV 950 KG ( 2090 LB) TIRE/PNEU GVWR/PNBV 950 KG (2090 LB) 5.30 X 12C MAXIMUM LOAD 750 KG (1675 LB) 551 KPA (80 PSI) COLD CARRYING CAPACITY THIS VEHICLE CONFORMS TO ALL APPLICABLE U.S. FEDERAL MOTOR VEHICLE SAFETY STANDARDS (FMVSS) IN EFFECT ON THE DATE OF MANUFACTURE SHOWN ABOVE. THIS VEHICLE CONFORMS TO ALL APPLICABLE STANDARDS PRESCRIBED UNDER THE CANADIAN MOTOR VEHICLE SAFETY REGULATIONS IN EFFECT ON THE DATE OF MANUFACTURE SHOWN ABOVE. / CE VEHICULE EST CONFORME A TOUTES LES NORMES QUI LUI SONT APPLICABLES EN VERTU DU REGLEMENT SUR LA SECURITE DES VEHICULES AUTOMOBILES DU CANADA EN VIGUER A LA DATE DE SA FABRICATION. TYPE: Utility Trailer HD-2200-56
RReeccoommmmeennddeedd TToorrqquuiinngg PPrroocceedduurree ffoorr MMoouunnttiinngg WWhheeeellss
WARNING: Maintain proper torque on lug nuts or
Wheel bolts. Failure to do so may result In serious injury or property damage.

10
1. After dismounting old wheel, remove all dirt, rust, grease and oil from stud threads. Do not lubricate threads. 2. Position wheel on trailer. Inspect to insure full contact between mounting surface (seat pads) of wheel and mounting surface of hub or brake drum. 3. Start wheel nuts on studs. 4. Finger tighten top nut, then rotate wheel so that the number 2 nut is at top and finger tighten. Finger tighten remaining nuts in numerical (crisscross) order; always tighten nuts in top position. 5. Repeat Step 4, rotating wheel and finger tightening nuts until all nuts are snug. 6. Tighten nuts in same fashion as described in Steps 4 and 5. Nuts should be torqued to 85-90 ft. lbs. Retorque nuts after 25 miles of driving and every 100 miles until torque remains constant. 7. After wheels (with tires) have been mounted, visually inspect to insure noninterference with body or other component parts. Be sure to inspect wheels in all possible positions (extreme turns, etc). NOTE: Check the fit of your lug wrench, an oversize wrench results in mutilated lug nuts.
CChhaannggiinngg TTiirree It is desirable that you carry a jack that will work on your trailer in the event that you have a flat tire. A small board or block can also be very beneficial in the event you are jacking on soft dirt or hot asphalt. The jack (depending on style) may be placed under the side frame in back of the wheel or also under the axles.
SSaaffeettyy CChhaaiinnss
CCAAUUTTIIOONN:: AAvvooiidd sshhaarrpp ttuurrnnss.. TThhiiss ccoouulldd bbeenndd,,
ccrreeaattee eexxttrreemmee ssttrreessss oorr ffrraaccttuurree eeiitthheerr tthhee ccoouupplleerr oorr tthhee ttrraaiilleerr ttoonngguuee..
The safety chains on your unit are an added insurance that it will not become detached from the towing vehicle. Your trailer hitch on the towing vehicle should have two holes or rings for fastening the safety chains, preferably one on each side of ball hitch. It is strongly recommended that you crisscross the chains under the tongue, the chain on the left side of the trailer attached to hole or ring on the right side of the ball hitch, and vice versa. This prevents the trailer tongue from dropping to the road should the coupler or ball

11
hitch fail. The chains should be rigged as tight as possible with just enough slack to allow tight turns to be made. This can be accomplished by twisting the chain hook in a clockwise or counterclockwise direction thus twisting the link spacings and making the chain shorter. Also by keeping your chains as short as possible you prevent them from dragging on the road and wearing the chain links. NOTE: If for any reason you find it necessary to replace a safety chain, do not use or substitute any lighter weight chain than supplied with your trailer. All chain attachments such as hooks, s-hooks, etc. must be equally as strong as the chain itself.
Trailer Class Trailer Weight
GVWR in Pounds Minimum Braking Strength in Pounds
II 1,000 to 3,500 3,500 III 3,500 to 5,000 5,000 IV 5,000 to 7,600 7,600 V 7,600 to 16,200 16,200
TTiiee DDoowwnnss It is very important that your recreational vehicle is supported properly by the trailer. It is also important that your recreational vehicle stays positioned on the trailer while towing. This is accomplished by securing your load to the trailer by some type of tie down. Contact your local dealer for STS designed Tie Down that easily attaches, by nut & bolt, to the many profiles provided in the extrusion panels in your STS Trailer. The STS design provides you the ultimate flexibility in tie down locations.
TTiirreess && TTiirree PPrreessssuurree The most common cause of trailer tire trouble is under-inflation. It is important therefore that you always maintain full air pressure, as indicated by the tire manufacturer on the tire’s sidewalls or on the trailer manufacturer’s certification label.

12
Always check air pressure when the tires are cold, before you’ve moved the trailer. Tires heat up and the air pressure increases after traveling only a short distance. When your trailer tires become worn or damaged, replace them promptly with the same type, size and capacity (not necessarily the same brand) as the original tires. For example: some trailers are not designed for use with radial tires. If the original tires on your trailer were not radials, do not replace them with radials (radials can be used as long as they have the proper carrying capacity). For safety and convenience, it is recommended that you always carry a spare wheel and tire. Check your state laws in regards to spare wheels, most states require you to carry a spare at all times. Most tire manufacturers have the air pressure molded on the tire sidewall. Listed below are the tire sizes with their respective carrying capacities and tire pressures.
BBiiaass--PPllyy TTiirreess
Tire Size Load Range Ply Rating Max Load lbs. Inflation P.S.I. Cold
5.30 x 12 C 6 1045 80 ST 175/180D-13 B 4 1100 35 ST 175/80D-13 C 6 1360 50 ST205/75D-14 B 4 1430 35 ST205/75D-14 C 6 1760 50
CCaauuttiioonn
DDeeaalleerr//CCuussttoommeerr RReessppoonnssiibbiilliittyy
●● TToorrqquuee aallll lluugg nnuuttss ttoo 8855 fftt.. llbbss.. bbeeffoorree uussiinngg ttrraaiilleerr ●● RReettoorrqquuee aallll lluugg nnuuttss ttoo 8855 fftt.. llbbss.. aafftteerr ffiirrsstt 2255 mmiilleess,, tthheenn eevveerryy 110000 mmiilleess uunnttiill ttoorrqquuee rreemmaaiinnss ccoonnssttaanntt.. SSTTSS wwiillll nnoott bbee rreessppoonnssiibbllee ffoorr lloossss oorr ddaammaaggee dduuee ttoo lloooossee wwhheeeellss!!

1. TIRE SAFETY INFORMATION This portion of the User’s Manual contains tire safety information as required by 49 CFR 575.6 Section 2.1 contains “Steps for Determining Correct Load limit – Trailer”. Section 2.2 contains “Steps for Determining Correct Load Limit – Tow Vehicle”. Section 2.3 contains a Glossary of Tire Terminology, including “cold inflation pressure”, “maximum inflation pressure”, “recommended inflation pressure”, and other non-technical terms. Section 2.4 contains information from the NHTSA brochure entitled “Tire Safety – Everything Rides On It”. This brochure, as well as the preceding subsections, describes the following items;
· Tire labeling, including a description and explanation of each marking on the tires, and information about the DOT Tire identification Number (TIN).
· Recommended tire inflation pressure, including a description and explanation of: A. Cold inflation pressure. B. Vehicle Placard and location on the
vehicle. C. Adverse safety consequences of under
inflation (including tire failure). D. Measuring and adjusting air pressure
for proper inflation. · Tire Care, including maintenance and
safety practices. · Vehicle load limits, including a description
and explanation of the following items: A. Locating and understanding the load
limit information, total load capacity, and cargo capacity.
B. Calculating total and cargo capacities with varying seating configurations including quantitative examples showing / illustrating how the vehicles cargo and luggage capacity decreases as combined number and size of occupants’ increases. This item is also discussed in Section 3.
C. Determining compatibility of tire and vehicle load capabilities.
D. Adverse safety consequences of overloading on handling and stopping on tires.
1.1 STEPS FOR DETERMING CORRECT LOAD LIMIT – TRAILER
Determining the load limits of a trailer includes more than understanding the load limits of the tires alone. On all trailers there is a Federal certification/VIN label that is located on the forward half of the left (road) side of the unit. This certification/VIIN label will indicate the trailer’s Gross Vehicle Weight Rating (GVWR). This Is the most weight the fully loaded trailer can weigh. It will also provide the Gross Axle Weight Rating (GAWR). This is the most a particular axle can weigh. If there are multiple axles, the GAWR of each axle will be provided. If your trailer has a GVWR of 10,000 pounds or less, there is a vehicle placard located in the same location as the certification label described above. This placard provides tire and loading information. In addition, this placard will show a statement regarding maximum cargo capacity. Cargo can be added to the trailer, up to the maximum weight specified on the placard. The combined weight of the cargo is provided as a single number. In any case, remember: the total weight of a fully loaded trailer can not exceed the stated GVWR. For trailers with living quarters installed, the weight of water and propane also need to be considered. The weight of fully filled propane containers is considered part of the weight of the trailer before it is loaded with cargo, and is not considered part of the disposable cargo load. Water however, is a disposable cargo weight and treated as such. If there is a fresh water storage tank of 100 gallons, this tank when filled would weigh about 800 pounds. If more cargo is being transported, water can be off-loaded to keep the total amount of cargo added to the vehicle within the limits of the GVWR so as not to overload the vehicle. Understanding this flexibility will allow you, the owner, to make choices that fit your travel needs. When loading your cargo, be sure it is distributed evenly to prevent overloading front to back and side to side. Heavy items should be placed low and as close to the axle as positions as reasonable. Too many items on one side may overload a tire. The best way to know the actual weight of the vehicle is to weigh it at a public scale. Talk to your dealer to discuss the weighing methods needed to capture the various weights related to the trailer. This would include the weight empty or unloaded, weights per axle, wheel, hitch or king-pin, and total weight. Excessive loads and/or underinflation cause tire overloading and, as a result, abnormal tire flexing occurs. This situation can generate an excessive amount of heat within the tire. Excessive heat may lead to tire failure. It is the air pressure that enables a tire to support the load, so proper inflation is critical. The proper air pressure may be found on the certification/VIN label and/or on the Tire Placard. This value should never exceed the maximum cold inflation pressure stamped on the tire.

14
1.1.1 TRAILERS 10,000 POUNDS GVWR OR LESS
Tire and Loading Information
Placard – Figure 1-1 1. Locate the statement, “The weight of cargo
should never exceed XXXkg or XXXlbs.”, on your vehicle’s placard. See figure 1-1.
2. This figure equals the available amount of cargo and luggage load capacity.
3. Determine the combined weight of luggage and cargo being loaded on the vehicle. That weight may not safely exceed the available cargo and luggage load capacity.
The trailer’s placard refers to the Tire Information Placard attached adjacent to or near the trailer’s VIN (Certification) label at the left front of the trailer. 1.1.2. TRAILERS OVER 10,000 POUNDS GVWR
(NOTE: THESE TRAILERS ARE NOT REQUIRED TO HAVAE A TIRE INFORMATION PLACARD ON THE VEHICLE)
1. Determine the empty weight of your trailer by weighing the trailer using a public scale or other means. This step does not have to be repeated.
2. Locate the GVWR (Gross Vehicle Weight Rating) of the trailer on your trailer’s VIN (Certification) label.
3. Subtract the empty weight of your trailer from the GVWR STATED ON THE vin LABEL. That weight is the maximum available cargo capacity of the trailer and may not be safely exceeded.
1.2 STEPS FOR DETERMINING CORRECT
LOAD LIMIT – TOW VEHICLE 1. Locate the statement, “The combined weight of
occupants and cargo should never exceed XXXlbs.,” on your vehicle’s placard.
2. Determine the combined weight of the driver and
passengers who will be riding in your vehicle. 3. Subtract the combined weight of the driver and
passengers from XXX kilograms or XXX pounds. 4. The resulting figure equals the available amount of
cargo and luggage capacity. For example, if the “XXX” amount equals 1400 lbs. and there will be five 150 lb. passengers in your vehicle, the amount
of available cargo and luggage capacity is 650 lbs. (1400-750(5x150)=650lbs.)
5. Determine the combined weight of luggage and
cargo being loaded on the vehicle. That weight may not safely exceed the available cargo and luggage capacity calculated in Step #4.
6. If your vehicle will be towing a trailer, load from your trailer will be transferred to your vehicle. Consult the tow vehicle’s manual to determine how this weight transfer reduces the available cargo and luggage capacity of your vehicle.
1.2 GLOSSARY OF TIRE TERMINOLOGY Accessory weight The combined weight (in excess of those standard items which may be replaced) of automatic transmission, power steering, power brakes, power windows, power seats, radio and heater, to the extent that these items are available as factory-installed equipment (whether installed or not). Bead The part of the tire that is made of steel wires, wrapped or reinforced by ply cords and that is shaped to fit the rim. Bead separation This is the breakdown of the bond between components in the bead. Bias ply tire A pneumatic tire in which the ply cords that extend to the beads are laid at alternate angles substantially less than 90 degrees to the centerline of the tread. Carcass The tire structure, except tread and sidewall rubber which, when inflated, bears the load. Chunking The breaking away of pieces of the tread or sidewall. Cold inflation pressure The pressure in the tire before you drive. Cord The strands forming the plies in the tire. Cord separation The parting of cords from adjacent rubber compounds. Cracking Any parting within the tread, sidewall, or inner liner of the tire extending to cord material. CT A pneumatic tire with an inverted flange tire and rim system in which the rim is designed with rim flanges pointed radially inward and the tire is designed to fit on the underside of the rim in a manner that encloses the rim flanges inside the air cavity of the tire.
15
Curb weight The weight of a motor vehicle with standard equipment including the maximum capacity of fuel, oil, and coolant, and, if so equipped, air conditioning and additional weight optional engine. Extra load tire A tire designed to operate at higher loads and at higher inflation pressures than the corresponding standard tire. Groove The space between two adjacent tread ribs. Gross Axle Weight Rating The maximum weight that any axle can support, as published on the Certification / VIN label on the front left side of the trailer. Actual weight determined by weighing each axle on a public scale, with the trailer attached to the towing vehicle. Gross Vehicle Weight Rating The maximum weight of the fully loaded trailer, as published on the Certification / VIN label. Actual weight determined by weighing trailer on a public scale, without being attached to the towing vehicle. Hitch Weight The downward force exerted on the hitch ball by the trailer coupler. Innerliner The layer(s) forming the inside surface of a tubeless tire that contains the inflating medium within the tire. Innerliner separation The parting of the innerliner from cord material in the carcass. Intended outboard sidewall The sidewall that contains a white-wall, bears white lettering or bears manufacturer, brand, and/or model name molding that is higher or deeper than the same molding on the other sidewall of an asymmetrical tire that has a particular side that must always face outward when mounted on a vehicle. Light truck (LT) tire A tire designated by its manufacturer as primarily intended for use on lightweight trucks or multipurpose passenger vehicles. Load rating The maximum load that a tire is rated to carry for a given inflation pressure. Maximum load rating The load rating for a tire at the maximum permissible inflation pressure for that tire. Maximum permissible inflation pressure The maximum cold inflation pressure to which a tire may be inflated.
Maximum loaded vehicle weight The sum of curb weight, accessory weight, vehicle capacity weight, and production options weight. Measuring rim The rim on which a tire is fitted for physical dimension requirements. Pin Weight The downward force applied to the 5th wheel or gooseneck ball, by the trailer kingpin or gooseneck coupler. Non-pneumatic rim A mechanical device which, when a non-pneumatic tire assembly incorporates a wheel, supports the tire, and attaches, either integrally or separably, to the wheel center member and upon which the tire is attached. Non-pneumatic spare tire assembly A non-pneumatic tire assembly intended for temporary use in place of one of the pneumatic tires and rims that are fitted to a passenger car in compliance with the requirements of this standard. Non-pneumatic tire A mechanical device which transmits, either directly or through a wheel or wheel center member, the vertical load and tractive forces from the roadway to the vehicle, generates the tractive forces that provide the directional control of the vehicle and does not rely on the containment of any gas or fluid for providing those functions. Non-pneumatic tire assembly A non-pneumatic tire, alone or in combination with a wheel or wheel center member, which can be mounted on a vehicle. Non-pneumatic occupant weight This means 68 kilograms (150 lbs.) times the number of occupants specified in the second column of Table I of 49 CFR 571.110. Occupant distribution The distribution of occupants in a vehicle as specified in the third column of Table I of 49 CFR 571.110. Open splice Any parting at any junction of tread, sidewall, or innerliner that extends to cord material. Outer diameter The overall diameter of an inflated new tire. Overall width The linear distance between the exteriors of the sidewalls of an inflated tire, including elevations due to labeling, decorations, or protective bands or ribs. Ply A layer of rubber-coated parallel cords.

16
Ply separation A parting of rubber compound between adjacent plies. Pneumatic tire A mechanical device made of rubber, chemicals, fabric and steel or other materials, that, when mounted on an automotive wheel, provides the traction and contains the gas or fluid that sustains the load. Production options weight The combined weight of those installed regular production options weighing over 2.3 kilograms (5 lbs.) in excess of those standard items which they replace, not previously considered in curb weight or accessory weight, including heavy duty brakes, ride levelers, roof rack, heavy duty battery, and special trim. Radial ply tire A pneumatic tire in which the ply cords that extend to the beads are laid at substantially 90 degrees to the centerline of the tread. Recommended inflation pressure This is the inflation pressure provided by the vehicle manufacturer on the Tire Information label and on the Certification / VIN tag. Reinforced tire A tire designed to operate at higher loads and at higher inflation pressures than the corresponding standard tire. Rim A metal support for a tire or a tire and tube assembly upon which the tire beads are seated. Rim diameter This means the nominal diameter of the bead seat. Rim size designation This means the rim diameter and width. Rim type designation This means the industry of manufacturer’s designation for a rim by style or code. Rim width This means the nominal distance between rim flanges. Section width The linear distance between the exteriors of the sidewalls of an inflated tire, excluding elevations due to labeling, decoration, or protective bands. Sidewall That portion of a tire between the tread and bead. Sidewall separation The parting of the rubber compound from the cord material in the sidewall.
Special Trailer (ST) tire The “ST” is an indication the tire is for trailer use only. Test rim The rim on which a tire is fitted for testing, and may be any rim listed as appropriate for use with that tire. Tread That portion of a tire that comes into contact with the road. Tread rib A tread section running circumferentially around a tire. Tread separation Pulling away of the tread from the tire carcass. Treadwear indicators (TWI) The projections within the principal grooves designed to give a visual indication of the degrees of wear of the tread. Vehicle capacity weight The rated cargo and luggage load plus 68 kilograms (150 lbs.). Vehicle maximum load on the tire The load on an individual tire that is determined by distributing to each axle its share of the maximum loaded vehicle weight and dividing by two. Vehicle normal load on the tire The load on an individual tire that is determined by distributing to each axle its share of the curb weight, accessory weight, and normal occupant weight (distributed in accordance with Table I of CRF 49 571.110) and dividing by 2. Weather side The surface area of the rim not covered by the inflated tire. Wheel center member In the case of a non-pneumatic tire assembly incorporating a wheel, a mechanical device with attaches, either integrally or separably, to the non-pneumatic rim and provides the connection between the non-pneumatic rim and the vehicle; or, in the case of a non-pneumatic tire assembly not incorporating a wheel, a mechanical device which attaches, either integrally or separably, to the non-pneumatic tire and provides the connection between the tire and the vehicle. Wheel-holding fixture The fixture used to hold the wheel and tire assembly securely during testing. 1.4 TIRE SAFETY – EVERYTHING RIDES ON IT The National Traffic Safety Administration (NHTSA) has published a brochure (DOT HS 809 361) that discusses all aspects of Tire Safety, as required by CFR 575.6. This brochure is reproduced in part below. It can be obtained and
17
downloaded from NHTSA, free of charge, from the following web site: http://www.nhtsa.dot.gov/cars/rules/TireSafety/ridesonit/tires.index.html Studies of tire safety show that maintaining proper tire pressure, observing tire and vehicle load limits (not carrying more weight in your vehicle than your tires or vehicle can safely handle), avoiding road hazards, and inspecting tires for cuts, slashes, and other irregularities are the most important things you can do to avoid tire failure, such as tread separation or blowout and flat tires. These actions, along with other care and maintenance activities, can also:
· Improve vehicle handling · Help protect you and others from avoidable
breakdowns and accidents · Improve fuel economy · Increase the life of your tires
This booklet presents a comprehensive overview of tire safety, including information on the following topics:
· Basic tire maintenance · Uniform Tire Quality Grading System · Fundamental characteristics of tires · Tire safety tips
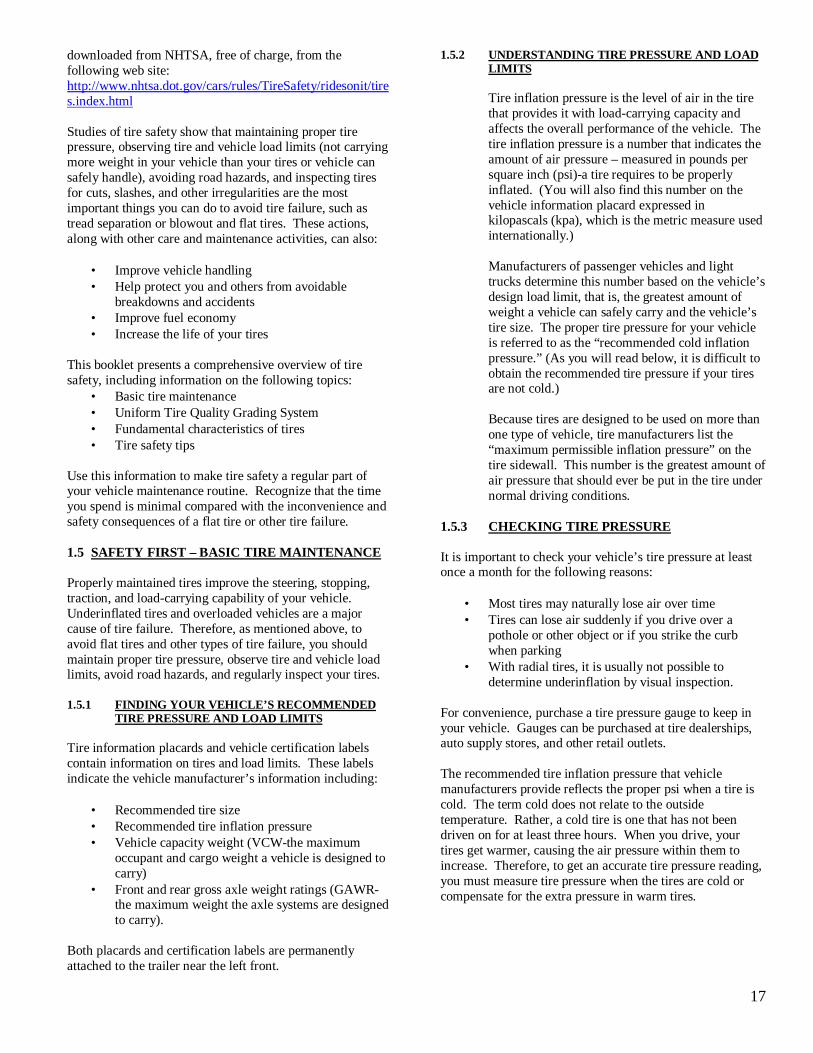
Use this information to make tire safety a regular part of your vehicle maintenance routine. Recognize that the time you spend is minimal compared with the inconvenience and safety consequences of a flat tire or other tire failure. 1.5 SAFETY FIRST – BASIC TIRE MAINTENANCE Properly maintained tires improve the steering, stopping, traction, and load-carrying capability of your vehicle. Underinflated tires and overloaded vehicles are a major cause of tire failure. Therefore, as mentioned above, to avoid flat tires and other types of tire failure, you should maintain proper tire pressure, observe tire and vehicle load limits, avoid road hazards, and regularly inspect your tires. 1.5.1 FINDING YOUR VEHICLE’S RECOMMENDED
TIRE PRESSURE AND LOAD LIMITS Tire information placards and vehicle certification labels contain information on tires and load limits. These labels indicate the vehicle manufacturer’s information including:
· Recommended tire size · Recommended tire inflation pressure · Vehicle capacity weight (VCW-the maximum
occupant and cargo weight a vehicle is designed to carry)
· Front and rear gross axle weight ratings (GAWR-the maximum weight the axle systems are designed to carry).
Both placards and certification labels are permanently attached to the trailer near the left front.
1.5.2 UNDERSTANDING TIRE PRESSURE AND LOAD LIMITS Tire inflation pressure is the level of air in the tire that provides it with load-carrying capacity and affects the overall performance of the vehicle. The tire inflation pressure is a number that indicates the amount of air pressure – measured in pounds per square inch (psi)-a tire requires to be properly inflated. (You will also find this number on the vehicle information placard expressed in kilopascals (kpa), which is the metric measure used internationally.) Manufacturers of passenger vehicles and light trucks determine this number based on the vehicle’s design load limit, that is, the greatest amount of weight a vehicle can safely carry and the vehicle’s tire size. The proper tire pressure for your vehicle is referred to as the “recommended cold inflation pressure.” (As you will read below, it is difficult to obtain the recommended tire pressure if your tires are not cold.) Because tires are designed to be used on more than one type of vehicle, tire manufacturers list the “maximum permissible inflation pressure” on the tire sidewall. This number is the greatest amount of air pressure that should ever be put in the tire under normal driving conditions.
1.5.3 CHECKING TIRE PRESSURE It is important to check your vehicle’s tire pressure at least once a month for the following reasons:
· Most tires may naturally lose air over time · Tires can lose air suddenly if you drive over a
pothole or other object or if you strike the curb when parking
· With radial tires, it is usually not possible to determine underinflation by visual inspection.
For convenience, purchase a tire pressure gauge to keep in your vehicle. Gauges can be purchased at tire dealerships, auto supply stores, and other retail outlets. The recommended tire inflation pressure that vehicle manufacturers provide reflects the proper psi when a tire is cold. The term cold does not relate to the outside temperature. Rather, a cold tire is one that has not been driven on for at least three hours. When you drive, your tires get warmer, causing the air pressure within them to increase. Therefore, to get an accurate tire pressure reading, you must measure tire pressure when the tires are cold or compensate for the extra pressure in warm tires.

18
1.5.4 STEPS FOR MAINTAINING PROPER TIRE PRESSURE
· Step 1: Locate the recommended tire pressure on
the vehicle’s tire information placard, certification label, or in the owner’s manual.
· Step 2: Record the tire pressure of all tires. · Step 3: If the tire pressure is too high in any of the
tires, slowly release air by gently pressing on the tire valve stem with the edge of your tire gauge until you get to the correct pressure.
· Step 4: If the tire pressure is too low, note the difference between the measured tire pressure and the correct tire pressure. These “missing” pounds of pressure are what you will need to add.
· Step 5: At a service station, add the missing pounds of air pressure to each tire that is underinflated.
· Step 6: Check all the tires to make sure they have the same air pressure (except in cases in which the front and rear tires are supposed to have different amounts of pressure).
If you have been driving your vehicle and think that a tire is underinflated, fill it to the recommended cold inflation pressure indicated on your vehicle’s tire information placard or certification label. While your tire may still be slightly underinflated due to the extra pounds of pressure in the warm tire, it is safer to drive with air pressure that is slightly lower than the vehicle manufacturer’s recommended cold inflation pressure than to drive with a significantly underinflated tire. Since this is a temporary fix, don’t forget to recheck and adjust the tire’s pressure when you can obtain a cold reading. 1.5.5 TIRE SIZE In tire safety, purchase new tires that are the same size as the vehicle’s original tires or another size recommended by the manufacturer. Look at the tire information placard, the owner’s manual, or the sidewall of the tire you are replacing to find this information. If you have any doubt about the correct size to choose, consult with the tire dealer. 1.5.6 TIRE TREAD The tire tread provides the gripping action and traction that prevent your vehicle from slipping or sliding, especially when the road is wet or icy. In general, tires and not safe and should be replaced when the tread is worn down to 1/16 of an inch. Tires have built-in treadwear indicators that let you know when it is time to replace your tires. These indicators are raised sections spaced intermittently in the bottom of the tread grooves. When they appear “even” with the outside of the tread, it is time to replace your tires. Another method for checking tread depth is to place a penny in the tread with Lincoln’s head upside down and facing you. If you can see the top of Lincoln’s head, you are ready for new tires.
1.5.7 TIRE BALANCE AND WHEEL ALIGNMENT To avoid vibration or shaking of the vehicle when a tire rotates, the tire must be properly balanced. This balance is achieved by positioning weights on the wheel to counterbalance heavy spots on the wheel-and-tire assembly. A wheel alignment adjusts the angles of the wheels so that they are positioned correctly relative to the vehicle’s frame. This adjustment maximizes the life of your tires. These adjustments require special equipment and should be performed by a qualified technician. 1.5.8 TIRE REPAIR The proper repair of a punctured tire requires a plug for the hole and a patch for the area inside the tire that surrounds the puncture hole. Punctures through the tread can be repaired if they are not too large, but punctures to the sidewall should not be repaired. Tires must be removed from the rim to be properly inspected before being plugged and patched. 1.5.9 TIRE FUNDAMENTALS Federal law requires tire manufacturers to place standardized information on the sidewall of all tires. This information identifies and describes the fundamental characteristics of the tire and also provides a tire identification number for safety standard certification and in case of a recall. 1.5.9.1 INFORMATION ON PASSENGER VEHICLE
TIRES
P The “P” indicates the tire is for passenger vehicles. Next number This three-digit number gives the width in millimeters of the tire from sidewall edge to sidewall edge. In general, the larger the number, the wider the tire. R The “R” stands for radial. Radial ply construction of tires has been the industry standard for the past 20 years.

19
Next number This two-digit number is the wheel or rim diameter in inches. If you change your wheel size, you will have to purchase new tires to match the new wheel diameter. Next number This two- or three-digit number is the tire’s load index. It is a measurement of how much weight each tire can support. You may find this information in your owner’s manual. If not, contact a local tire dealer. Note: You may not find this information on all tires because it is not required by law. M+S The “M+S” or “M/S” indicates that the tire has some mud and snow capability. Most radial tires have these markings; hence, they have some mud and snow capability. Speed Rating The speed rating denotes the speed at which a tire is designed to be driven for extended periods of time. The ratings range from 99 miles per hour (mph) to 186 mph. These ratings are listed below. Note: You may not find this information on all tires because it is not required by law.
Letter Rating Speed Rating Q 99 R 106 S 112 T 118 U 124 H 130 V 149 W 168* Y 186*
* For tires with a maximum speed capability over 149 mph, tire manufactures sometimes use the letters ZR. For those with a maximum speed capability over 186 mph, tire manufacturers always use the letters ZR. U.S. DOT Tire Identification Number This begins with the letters “DOT” and indicates that the tire meets all federal standards. The next two numbers or letters are the plant code where it was manufactured, and the last four numbers represent the week and year the tire was built. For example, the numbers 3179 means the 31st week of 1997. The other numbers are marketing codes used at the manufacturer’s discretion. This information is used to contact consumers if a tire defect requires a recall. Tire Ply Composition and Materials Used The number of plies indicates the number of layers of rubber-coated fabric in the tire. In general, the greater the number of plies, the more weight a tire can support. Tire manufacturers also must indicate the materials in the tire, which include steel, nylon, polyester, and others.
Maximum Load Rating This number indicates the maximum load in kilograms and pounds that can be carried by the tire. Maximum Permissible Inflation Pressure This number is the greatest amount of air pressure that should ever be put in the tire under normal driving conditions. 1.5.9.2. UTQGS INFORMATION Treadwear Number This number indicates the tire’s wear rate. The higher the treadwear number is, the longer it should take for the tread to wear down. For example, a tire graded 400 should last twice as long as a tire graded 200. Traction letter This letter indicates a tire’s ability to stop on wet pavement. A higher graded tire should allow you to stop your car on wet roads in a shorter distance than a tire with a lower grade. Traction is graded from highest to lowest as “AA”, “A”, “B”, and “C”. Temperature Letter This letter indicates a tire’s resistance to heat. The temperature grade is for a tire that is inflated properly and not overloaded. Excessive speed, underinflation or excessive loading, either separately or in combination, can cause heat build-up and possible tire failure. From highest to lowest, a tire’s resistance to heat is graded as “A”, “B”, or “C”.

20
1.5.9.3. ADDITIONAL INFORMATION ON LIGHT TRUCK TIRES
Please refer to the following diagram.
Tires for light trucks have other markings besides those found on the sidewalls of passenger tires. LT The “LT” indicates the tire is for light trucks or trailers. ST An “ST” is an indication the tire is for trailer use only. Max. Load Dual kg (lbs) at kPa (psi) Cold This information indicates the maximum load and tire pressure when the tire is used as a dual, that is, when four tires are put on each rear axle (a total of six or more tires on the vehicle). Max Load Single kg (lbs) at kPa (psi) Cold This information indicates the maximum load and tire pressure when the tire is used as a single. Load Range This information identifies the tire’s load-carrying capabilities and its inflation limits. 1.6. TIRE SAFETY TIPS Preventing Tire Damage
· Slow down if you have to go over a pothole or other object in the road.
· Do not run over curbs or other foreign objects in the roadway,and try not to strike the curb when parking.
Tire Safety Checklist
· Check tire pressure regularly (at least once a month), including the spare.
· Inspect tires for uneven wear patterns on the tread, cracks, foreign objects, or other signs of wear or trauma.
· Remove bits of glass and foreign objects wedged in the tread.
· Make sure your tire valves have valve caps. · Check tire pressure before going on a long trip. · Do not overload your vehicle. Check the Tire
Information and Loading Placard or User’s Manual for the maximum recommended load for the vehicle.

LIMITED WARRANTY HIGHWAY/NON-HIGHWAY TIRE & WHEEL WARRANTY Carlisle Tire & Wheel Company (“Carlisle”) warrants, subject to the terms, conditions and limitations stated herein, tires & wheels to be free from defects in materials and workmanship. Carlisle’s liability for tires and wheels shall be limited to replacement of any defective tire or wheel plus any applicable taxes.
Carlisle’s Warranty 1. The Carlisle Tire & Wheel Warranty (“Warranty”) applies only to the original purchaser for two years from the date of purchase. a) The warranty period for the coating of the wheel is ninety (90) days from the date of purchase. 2. The Warranty is void if the tire or wheel fails due to damage from improper inflation pressures, exceeding the maximum speed limit, or overloading the tire beyond the maximum load capacity stated on the sidewall. 3. The Warranty does not cover incidental or consequential damages including, but not limited to, lost time, inconvenience, loss of vehicle use, cost of towing or transportation, related property damage or consequential damages of any type or nature. 4. The Warranty does not cover mounting and balancing charges. 5. The Warranty is void if a covered tire is worn past 3/32 of tread depth at any point on the tread contact surface. 6. The Warranty does not apply to the following: a) repaired tubes, tires or wheels b) tires or wheels used in racing and competition c) tires or wheels subjected to road hazards, overloading, under inflation, improper mounting, fitment to incorrect rim, purposeful abuse or chemical contamination. d) tires or wheels which have been patched, unplugged or repaired or into which liquid balancers or sealants have been introduced 3) cosmetic irregularities 7. Carlisle makes no expressed claims of expected tire wear. Variables that affect tire wear are driving conditions, load and tire inflation pressure. To obtain warranty adjustments or warranty information contact your Carlisle dealer or Carlisle’s Product Services Department at 1-800-260-7959 or fax to 1-800-352-0075. Claims must be made within 30 days of discovery of irregularity. Carlisle reserves the right to inspect all products before making adjustments. THERE ARE NO WARRANTIES EITHER EXPRESSED OR IMPLIED, INCLUDING THE IMPLIED WARRANTIES OF MERCFHANTABILITY AND FITNESS FOR A PARTICULAR PURPOSE, WHICH EXTEND BEYOND THE DESCRIPTION O N THE FACE HEREOF. CARLISLE SHALL NOT BE LIABLE FOR ANY INCIDENTAL OR CONSEQUENTIAL DAMAGES. NO REPRESENTATIVE OF CARLISLE TIRE & WHEEL COMPANY HAS AUTHORITY TO MAKE ANY REPRESENTATIONS OR PROMISES EXCEPT AS STATED HEREIN. Some states do not permit limitations on the period of time an implied warranty lasts and do not permit the exclusion of limitation of incidental or consequential damages, thereof, the above limitations or exclusions may not apply. This warranty provides specified legal rights. Other rights may vary from state/province to state/province. NOTE: All specifications subject to change without notice. Carlisle Tire & Wheel Company 25 Windham Boulevard Aiken, South Carolina 29805 Rev.4/01
THE LOADSTAR WORRY FREE WARRANTY
FOR HIGH SPEED TRAILER TIRES
Eligibility You are eligible for the benefits of this policy if you are the owner and original consumer of new LOADSTAR tires, bearing dept. of Transportation prescribed tire identification numbers, only on the vehicle on which they were originally installed according to the vehicle manufacturer’s or LOADSTAR recommendations. What is Warranted and for How Long Your tires are warranted against failures due to defective materials and workmanship. (A) Tires are eligible for warranty if presented not more tan four years past manufacturing date and has a minimum of 2/32” tread remaining. (B) Free Replacement For (Bias or Bial/Belted) High Speed Trailer Tires. If a LOADSTAR tire fails due to defective materials or workmanship during the first 10% of tread wear, or the first year, the tire will be replaced with a new comparable LOADSTAR tire without charge. (C) Tread wear Prorated Replacement. Tires not qualifying for free replacement will be replaced with a new, comparable tire based upon the percentage of tread that has been worn. The price you pay will equal the percentage of original, usable tread worn, multiplied by our then current “Predeterminable Adjustment Price”. Owner pays mounting charge. Definition of Comparable Tire A “comparable” new LOADSTAR tire may either be the same line of tire, or, in the event the disabled tire is out of production or unavailable, the same basic or equal construction and quality with different sidewall or tread wear configuration. If a higher priced tire is accepted as replacement, the difference in price will be paid by the owner. Computing Tread wear Tread ware is computed as a percentage of the original, usable tread. The original, usable tread does not include the last 2/32nd inch of tread depth. What is Not Covered By The Warranty
· Failure due to fire, accident, malicious mischief, improper inflation, improper use, running flat, overloading or road hazards. Examples of road hazards include nails, glass and other foreign objects and natural and man-made defects or obstacles such as excavations, construction, potholes and chuckholes. Damages caused by road hazards include cuts snags, punctures, scuffs, carcass bruises and impact breaks.
· Premature or irregular wear due to improper inflation or alignment or balance.
· Tires presented by other than the original consumer.
· Tires with weather cracking which were purchased more than (4) four years prior to presentation for adjustment. If you have no proof of purchase date, tires manufactured (4) four years prior to presentation are not covered.

22
· Loss of time, inconvenience, loss of use of the vehicle, costs of towing or transportation, or consequential damages of any type or nature.
· Any implied warranty, including merchantability or fitness, is limited to the duration of this written warranty or (4) four years, whichever is less.
· Balancing or mounting charges.
¯ NOTE: This limited warranty is the entire warranty given by LOADSTAR and LOADSTAR’s complete obligation is as set forth herein. No one has authority to imply, suggest, agree, represent, warrant or promise contrary to the terms hereof.
Owner’s Obligation You must present the tire to any LOADSTAR Tire Distributor or participating dealer in the U.S.A. To obtain no charge adjustment for tires, you must present proof of purchase date (such as trailer dealer or tire retailer invoice). You are responsible for payment of all taxes, as well as retailer charges for services that you request but are not covered by the warranty. This warranty gives you specific legal rights and you may also have other rights which vary from state to state. NOTE: Some states do not allow the exclusion or limitation of incidental or consequential damage or how long an implied warranty lasts, so the limitations or exclusion may not apply to you. Adjustment Procedures Unserviceable LOADSTAR tires adjustable under the terms of this policy should be returned to a LOADSTAR tire Distributor. 1.) Check National Distributor Directory for the nearest LOADSTAR Tire Distributor. Call the nearest distributor. They will tell you where the nearest dealer would be located. 2.) Call 1-(800)-225-4714, 9AM-5PM weekdays for the nearest distributor. If There is No LOADSTAR Tire Dealer Available 1.) Purchase a tire of like quality and price. 2.) Return the LOADSTAR tire to the nearest distribution center, UPS, collect. 3.) IMPORTANT – You Must include the following: A.) Invoice for replacement B.) Original invoice C.) Current information
Name: __________________________________________ Address: ________________________________________ Phone Number: __________________________________ Date Tire Removed: _______________________________ Reason Removed: ________________________________ Trailer Make: Model: Year: 4.) Fill out this information and tape securely to the tire along with a mailing label addressed to the distributor. 5.) When the LOADSTAR Distributor receives the tire he will examine it, adjust it under the terms of the LOADSTAR warranty and send you a complete explanation and check (if applicable). Important Safety Information Any tire, no matter how well constructed, may fail due to improper maintenance or service factors, creating a risk of property damage and serious or fatal injury. For your safety, comply with the following: 1.) Check air pressure monthly when tires are “cold”. Use an accurate tire air pressure gauge. Do not reduce pressure when tires are hot. Proper inflation is essential. Under inflation produces flexing of sidewalls, and builds up heat to the point that premature tire failure may occur. Over inflation can cause the tire to be more susceptible to impact damage. 2.) Never overload your tires. The maximum load capacity and maximum inflation pressure are molded into the sidewall of your tire. Overloading builds up excessive heat and can lead to early tire failure. 3.) Avoid damaging objects (chuckholes, glass, rocks, curbs, etc.) which may cause internal tire damage. Continued use of a tire that has suffered internal damage, which may not be visible externally, can lead to dangerous tire failure. Determination of internal damage will require dismounting of the tire and examination by trained tire personnel. 4.) Property damage and serious or fatal injury can also result from the following causes:
· Improper tire mounting and inflation procedures may cause the tire beads to break with explosive force during installation of the tire on the rim. Tire and rim must match in size. Rim parts must match by manufacturer’s design. Clean rim. Lubricate rim and beads. Do not exceed the maximum recommended pressure to seat the beads. ONLY SPECIALLY TRAINED PERSONS SHOULD MOUNT TIRES.
· Use of worn out tires (less than 2/32nd” remaining tread depth) increases the probability of tire failure.
· Excessive speed creates heat buildup in a tire, leading to possible tire failure.

TToowwiinngg YYoouurr TTrraaiilleerr CCaauuttiioonn!!
CChheecckk tthhee ffoolllloowwiinngg iitteemmss eeaacchh ttiimmee bbeeffoorree ttoowwiinngg ttrraaiilleerr..
11.. BBee ssuurree aallll ppaarrttss,, bboollttss aanndd nnuuttss aarree ttiigghhtt.. 66.. BBee ssuurree aallll lliigghhttss aarree ooppeerraattiinngg.. 22.. SSeeccuurree llooaadd ttoo ttrraaiilleerr wwiitthh BBIIAA aapppprroovveedd ttiiee ddoowwnnss..
77.. CCoouupplliinngg bbaallll –– mmaakkee ssuurree yyoouu aarree uussiinngg tthhee ssiizzee mmaarrkkeedd oonn tthhee ttrraaiilleerr ccoouupplliinngg aanndd ccoouupplliinngg mmuusstt bbee sseeccuurreellyy llaattcchheedd ttoo tthhee bbaallll..
33.. CChheecckk ttiirree pprreessssuurree wwhheenn ttiirree iiss ccoolldd.. 88.. CCrroossss ssaaffeettyy cchhaaiinnss uunnddeerr ttoonngguuee aanndd sseeccuurree ttoo ttoowwiinngg vveehhiiccllee..
44.. DDoo nnoott eexxcceeeedd ttrraaiilleerr ccaappaacciittyy.. 99.. CChheecckk yyoouurr mmiirrrroorr ppoossiittiioonniinngg ffoorr ttrraaiilleerr vviissiibbiilliittyy.. 55.. CChheecckk tthhaatt tthhee BBeedd LLoocckkiinngg PPiinn iiss iinn PPllaaccee.. RReemmeemmbbeerr ttoo aallllooww ggrreeaatteerr ddiissttaannccee ffoorr
aacccceelleerraattiioonn,, bbrraakkiinngg aanndd ppaassssiinngg WW// yyoouurr ttrraaiilleerr..
FULTON
Trailer Jack Owner’s Manual WARNING
· Read and understand all instructions before installing and/or using product. NEVER allow anyone unfamiliar with the operating instructions to use this product.
· Read and understand all instructions provided by the manufacturer of the product(s) that this jack will be installed on.
· Installation of these Fulton jacks must conform to the following mounting instructions only.
· Fulton is not responsible for accidents, occurrences, injuries and losses to or of any person or property wherever which arises as a result of Purchaser’s alterations, modifications, assembly, reassembly, or installation of this product.
· When cranking jack or coupling trailer, secure trailer from rolling.
· These jacks are designed for vertical loading, excessive side forces must be avoided.
· Refer to product to obtain rated capacity. If uncertain contact Fulton Performance Products.
· These jacks are designed for mounting to square or rectangular trailers only. These jacks are not intended for mounting to trailers with round tongues.
· Assure the correct mounting hole pattern is for your trailer tongue size. The gap between the mounting bolts and the trailer tongue is not to exceed 1/16”.
· In both the vertical and horizontal positions, the plunger must be positioned in the detent hole in the mounting bracket.
· When manually moving trailer over rough or unpaved surfaces, crank to lowest practical position to minimize bending stress on jack.
· Operator use caution never to position any part of your body under any portion of the jack or the load being supported. Disregard could cause property damage and/or serious bodily injury.
· Inspect snap ring groove and remove any coating or foreign material from the groove before inserting snap ring. Make sure snap ring is properly seated in the groove before each use.
Performance Products

24
· Make certain that the plunger pin is properly locked into the detent hole in the mounting bracket before raising or lowering the trailer tongue.
· Do not attempt to weld “bolt-on” brackets or straps to the trailer. These items are zinc plated and will emit toxic fumes when welded. Special brackets are available for “weld-on” applications.
· Failure to follow these warnings and instructions may result in property damage and/or serious bodily injury.
MOUNTING INSTRUCTIONS Before mounting your trailer jack, check for interference from recessed ball mounts, trailer coupler, hitch or hitch plates and/or vehicle bumper. Rotate the jack handle to check that the swing is not obstructed. If the jack is of the swing-away or swivel design, check the unit in both vertical and horizontal positions. When the swing-away jack is in the horizontal or storage position, there should not be any interference from structural members of the trailer or trailer coupler. On all jacks check that proper ground clearance has been achieved and will not contact the towing vehicle when in a tight turn. If the jack is not installed correctly, any interference (steep inclines, angled turns etc.) may cause non-repairable damage to the jack and/or trailer. After installation is complete, check that jack operation has not been impaired in any way. Bolt-On Mounting Instructions Fig 1 – (Illustration shown is for a 3” or 4” high trailer frame. If trailer has a 5” frame, mount bracket rotated 90 degrees). 1) Place the jack against the trailer tongue and position the mounting straps (A) on the opposite side of the tongue. Place the straps so the flat side is against the tongue. Make sure the holes in the bracket and straps are in line. 2) Insert the four bolts (B) through the bracket and straps (two bolts on the top of the tongue and two below the tongue.) Position the jack so the at the top bolts rest directly on the top of the tongue and the bottom bolts are as close to the tongue as possible. The gap between the mounting bolts and the trailer tongue is not to exceed 1/16”. 3) Secure with locknuts ©. Torque the nuts to 25 ft-lbs. 4) Check for clearance of handle swing, trailer light cables, and coupler clearance. Weld-On Mounting Instructions Fig 2 – (Bracket shown is a snap ring style. Bolt-thru style will be orientated and welded the same). 1) All welding operations must be performed by an AWS certified welder. 2) Place the weld-on mounting plate, Item #27 or #44, against the trailer tongue with the flange locating against the bottom and weld as shown in Fig 2, using four 1” long, 3/16” fillet welds. 3) Snap Ring Style – Assemble the jack to the mounting plate by placing the jack over the grooved extruded opening on the mounting plate. Fasten by placing the snap ring into the groove. Make certain that the snap ring is properly seated in the groove. 4) Bolt-thru Style – Assemble the jack to the mounting plate by placing the jack into the recessed opening on the mounting plate. Insert the bushing, Item #41, through the jack mounting bracket and tighten the locknut, Item #42, until there is no movement in the bushing. 5) Check for clearance of handle swing, trailer light cables, and coupler.

25
ASSEMBLY INSTRUCTIONS
Handle Assembly – Fig 3 – Place one spacer over the 3/8” x 4.25” bolt. Lightly grease split tube spacer, then place the bolt and tube spacer assembly through the split tube spacer. Then place the bolt and spacers through the roller. Insert the bolt through the handle. Install the 3/8” locknut onto the bolt and tighten. Adjust the nut so that the bolt no longer turns freely. A minimum of two full bolt threads must be visibly extended through the nut. Caster wheel Assembly – Grease the outside of the wheel spacer, Item #19, using a standard automotive grease, and insert it into the wheel, Item #18. Place the wheel and spacer into the yoke and align the holes in the wheel with the holes in the yoke. Insert the 1/2” x 3” bolt, Item #20, through both sides of the yoke. Make sure the threads of the bolt are to the outside of the yoke when the yoke hangs down in the trailering position. Install the 1/2” locknut, Item #21, and tighten until yoke is just tight enough against the metal spacer to keep the spacer from rotating. Do not over-tighten, this can cause spacer deformation and binding of the wheel. The wheel must still spin freely.
OPERATING INSTRUCTIONS
Rotate the jack handle clockwise to raise, or counter-clockwise to lower the jack. NOTE: If the caster wheel does not have ground contact, it is necessary to keep the caster from rotating when cranking the jack handle. SWING-AWAY SWIVEL JACK OPERATION This style jack is designed to be swiveled into a horizontal or storage position (see Fig. 4) . In both the vertical and horizontal positions, the plunger must be securely in position in the mating hole in the mounting bracket. To place the jack into the horizontal position allow about 2” of ground clearance beneath the footplate or caster wheel. Pull the plunger pin out of the opening and swivel the jack. Rotate either left or right until the plunger pin snaps into the proper mounting bracket hole. NOTE: To avoid damaging the handle while trailering in the horizontal position, secure the handle to the jack with a bungee cord or a rope. To return jack to the vertical position, pull the plunger pin out of the hole and rotate to the vertical or lifting position. At this point, the jack can be pulled or pushed until the plunger pin snaps into the mating hole in the mounting bracket.
MAINTENANCE
The internal gearing and bearing of the jack must be kept lubricated. Using a needle nose applicator, pump a small amount of automotive grease through the lubrication opening. The lubrication opening can be found on the side of the jack tube, right above the support plate (see Fig.5). Rotate the jack handle to distribute the grease evenly. Lightly grease the inner tube of the jack using the same type of grease. A light weight oil must be applied to the handle unit at both sides of the tube. The axle bolt and nut assembly of the caster wheel must also be lubricated with the same light weight oil.
HOW TO ORDER PARTS Always replace broken, bent or worn parts before using this product. Use only Fulton
Performance Products’ parts, or parts of equal quality for repair. Replacement parts are available through Fulton performance Products’ Customer Service Dept., 715-693-1700. Please specify product model number, name of parts, and part number.

26
Fulton products are warranted to the original consumer purchaser to be free from defects in material and workmanship under normal use and service, ordinary wear and tear expected, for a period of three (3) years from date of purchase as shown on customer’s receipt. This warranty
shall not apply to any defects caused by: (I) physical abuse of goods or any components or acts of vandalism by any persons other than Fulton, it’s employees, agents or subcontractors; (II) alterations, modifications, additions, or repairs made during the applicable warranty period by
anyone other than Fulton employees, agents or subcontractors; (III) improper installation or use contrary to Fulton’s instruction; or (IV) accidents or damage resulting from fire, water, wind, hail, lightning, electrical surge or failure, earthquake, theft or similar causes or contributed
to by the negligence of Fulton or it’s employees, agents, or subcontractors.
FULTON Performance Products
WARNING: Fishtailing caused from improper tongue weight on the tow vehicle hitch ball can
cause loss of control of the tow vehicle and result in serious injury or property damage.
WWeeiigghhtt DDiissttrriibbuuttiioonn
EEssttaabblliisshhiinngg aa ttrraaiilleerr wwiitthh tthhee pprrooppeerr GGVVWWRR iiss vveerryy iimmppoorrttaanntt.. BBuutt oonnccee tthhaatt hhaass bbeeeenn eessttaabblliisshheedd aanndd yyoouu hhaavvee tthhee llooaadd oonn tthhee ttrraaiilleerr iitt iiss eeqquuaallllyy iimmppoorrttaanntt tthhaatt yyoouu hhaavvee tthhee pprrooppeerr ddiissttrriibbuuttiioonn ooff tthhee wweeiigghhtt oonn tthhee ttrraaiilleerr.. BByy tthhaatt wwee mmeeaann yyoouu sshhoouulldd hhaavvee 55 ttoo 1100%% ooff tthhee ttoottaall wweeiigghhtt ooff yyoouurr llooaaddeedd ttrraaiilleerr oonn tthhee hhiittcchh ccoouupplleerr wwhhiicchh iiss ccaalllleedd ttoonngguuee wweeiigghhtt.. TThhiiss sshhoouulldd bbee cchheecckkeedd wwhheenn tthhee ttoonngguuee iiss ppaarraalllleell ttoo tthhee ggrroouunndd.. AA bbaatthhrroooomm ssccaallee ccaann bbee ssuueedd ttoo ddeetteerrmmiinnee tthhiiss,, oorr ggoo ttoo aa ttrruucckk ssccaallee.. EEXXAAMMPPLLEE:: TThhee ggrroossss vveehhiiccllee wweeiigghhtt ooff ttrraaiilleerr aanndd llooaadd iiss 22,,000000 ppoouunnddss.. TThhee ttoonngguuee wweeiigghhtt sshhoouulldd nnoott bbee lleessss tthhaann 110000 ppoouunnddss nnoorr mmoorree tthhaann 220000 ppoouunnddss.. TToooo lliigghhtt ooff ttoonngguuee wweeiigghhtt ccaann ccaauussee tthhee ttrraaiilleerr ttoo ““ffiisshhttaaiill”” ((sswwaayy ffrroomm ssiiddee ttoo ssiiddee)) aass yyoouu ttrraavveell ddoowwnn tthhee hhiigghhwwaayy.. TThhiiss ccrreeaatteess eexxcceessssiivvee ssttrraaiinnss oonn tthhee ttoowwiinngg vveehhiiccllee,, hhiittcchh aanndd aallssoo tthhee ttrraaiilleerr iittsseellff.. IItt ccaann vveerryy eeaassiillyy ccaauussee aann aacccciiddeenntt.. TToo aaddjjuusstt ffoorr ttoooo lliigghhtt ttoonngguuee wweeiigghhtt tthhee aaxxllee//aaxxlleess mmuusstt bbee mmoovveedd bbaacckkwwaarrdd oonn tthhee ttrraaiilleerr aalllloowwiinngg mmoorree wweeiigghhtt ttoo bbee ccaarrrriieedd oonn tthhee ttoonngguuee.. TThhiiss iiss aaccccoommpplliisshheedd bbyy lloooosseenniinngg tthhee UU--bboollttss oonn mmoosstt mmooddeellss.. AAddjjuussttmmeennttss sshhoouulldd bbee mmaaddee uunnttiill tthhee ttoonngguuee wweeiigghhtt ffaallllss wwiitthhiinn tthhee 55 ttoo 1100%% rreeccoommmmeennddeedd rraannggee.. IIff oonnllyy aa sslliigghhtt wweeiigghhtt aaddjjuussttmmeenntt iiss rreeqquuiirreedd iitt’’ss ppoossssiibbllee yyoouu mmaayy bbee aabbllee ttoo mmoovvee ggeeaarr ttoo ccoommppeennssaattee tthhee ddiiffffeerreennccee.. SSoommee ttoowwiinngg vveehhiicclleess rreeqquuiirree lleessss ttoonngguuee wweeiigghhtt tthhaann ootthheerrss.. TThhee 55 ttoo 1100%% gguuiiddee lliinneess wwiillll hhoolldd qquuiittee ttrruuee ttoo ffoorrmm uunnttiill yyoouu ggeett iinnttoo llaarrggeerr ssiizzee llooaaddss aannyywwhheerree ffrroomm 44,,000000 ppoouunnddss oonn uupp.. AAtt tthhiiss ppooiinntt iitt bbeeccoommeess nneecceessssaarryy ttoo ssttrriikkee aa hhaappppyy mmeeddiiuumm ooff ssuuffffiicciieenntt ttoonngguuee wweeiigghhtt ttoo ttooww pprrooppeerrllyy aanndd yyeett nnoott ttoooo mmuucchh ttoonngguuee wweeiigghhtt aass ttoo ccrreeaattee uunndduuee ssttrreessss oonn tthhee ttoowwiinngg vveehhiiccllee,, hhiittcchh aanndd hhiittcchh ccoouupplleerr.. CChheecckk hhiittcchh rraattiinngg ttoo bbee ssuurree ooff iitt’’ss ccaappaacciittyy oorr wwhheenn bbuuyyiinngg aa hhiittcchh mmaakkee ssuurree iitt wwiillll ccaarrrryy tthhee llooaadd.. TThhee wweeiigghhtt--ddiissttrriibbuuttiioonn hhiittcchh mmaayy bbee rreeccoommmmeennddeedd ttoo yyoouu bbyy tthhee ddeeaalleerr ffoorr hheeaavviieerr uunniittss.. IIff tthhiiss ttyyppee ssyysstteemm iiss iinnssttaalllleedd aallll rreessppoonnssiibbiilliittiieess wwiillll bbeeccoommee tthhoossee ooff tthhee oowwnneerr ooff tthhee uunniitt,, nnoott tthhoossee ooff SSTTSS TTrraaiilleerrss,, IInncc.. LLiisstteedd aarree sseevveerraall iitteemmss yyoouu mmuusstt ccoonnssiiddeerr sshhoouulldd yyoouu iinnssttaallll tthhiiss ttyyppee ssyysstteemm.. FFiirrsstt ooffff,, mmaakkee ssuurree tthheeyy aarree iinnssttaalllleedd pprrooppeerrllyy.. CCaarree sshhoouulldd bbee uusseedd ssoo tthhaatt tthheeyy aarree nnoott oovveerrllooaaddeedd ttoo tthhee ppooiinntt tthhee uunndduuee ssttrraaiinn iiss aapppplliieedd ttoo bbootthh tthhee ttrraaiilleerr aanndd ttoowwiinngg vveehhiiccllee.. TThhiiss ttyyppee ssyysstteemm ddaammppeennss tthhee aaccttiioonn ooff tthhee ssuurrggee hhyyddrraauulliicc bbrraakkee ssyysstteemmss tthhuuss ccaauussiinngg tthhee bbrraakkeess eeiitthheerr nnoott ttoo bbee aapppplliieedd aass ssoooonn aass ppoossssiibbllee oorr mmaayy ccaauussee tthheemm ttoo bbee ppaarrttiiaallllyy aapppplliieedd aatt aallll ttiimmeess eessppeecciiaallllyy wwhheenn bbeeiinngg ttoowweedd.. TThhiiss lleeaaddss ttoo oovveerrhheeaatteedd bbrraakkeess pplluuss eexxcceessssiivvee bbrraakkee sshhooee wweeaarr.. IItt mmaayy aallssoo lleeaadd ttoo bbeeaarriinngg ffaaiilluurreess bbeeccaauussee tthhee hheeaatt bbuuiilldd uupp wwiillll ddiissiinntteeggrraattee tthhee ggrreeaassee iinn tthhee bbeeaarriinnggss..
LIMITED WARRANTY
50 Indianhead Dr., P.O. Box 8 Mosinee, WI 54455-0008 800/604-9466 715/693-1700 FAX 715/693-1799 www.fultonperformance.com [email protected]

27

28

29
WWhheeeell SSiizzee
SSTTSS uusseess ddiiffffeerreenntt wwhheeeell ssiizzeess oonn iittss ttrraaiilleerr lliinnee aass lliisstteedd iinn tthhee cchhaarrtt bbeellooww.. SSppaarree wwhheeeellss mmaayy bbee ppuurrcchhaasseedd ffrroomm aa SSTTSS ddeeaalleerr oorr eellssee aann aauuttoommoottiivvee ssuuppppllyy hhoouussee wwiitthh tthhee ggiivveenn iinnffoorrmmaattiioonn.. RReeaadd tthhee nnuummbbeerrss ffrroomm tthhee ttiirree aanndd ccoouunntt lluugg bboollttss ttoo ddeetteerrmmiinnee rriimm ssiizzee.. RRiimm SSiizzee ((iinncchheess NNoo.. ooff SSttuuddss BBoolltt CCiirrccllee DDiiaammeetteerr
((iinncchheess)) CCoommmmoonn AAuuttoommoottiivvee RRiimm
88 55 44--11//22 FFoorrdd,, CChhrryysslleerr 1100 55 44--11//22 FFoorrdd,, CChhrryysslleerr 1122 55 44--11//22 FFoorrdd,, CChhrryysslleerr 1133 55 44--11//22 FFoorrdd,, CChhrryysslleerr 1144 55 44--11//22 FFoorrdd,, CChhrryysslleerr 1155 55 && 66 55--11//22 FFoorrdd,, CChhrryysslleerr 1166 66 FFoorrdd,, CChhrryysslleerr 1166..55 xx 88 55 44--11//22 FFoorrdd,, CChhrryysslleerr
TTRRAAIILLEERR WWAARRRRAANNTTYY LLIIMMIITTEEDD WWAARRRRAANNTTYY PPRREE DDEELLIIVVEERRYY SSEERRVVIICCEE DDaammaaggee ttoo aannyy ttrraaiilleerr ccoommppoonneennttss mmaayy ooccccuurr dduurriinngg ttrraannssppoorrttiinngg ttoo tthhee ddeeaalleerr.. NNoorrmmaallllyy,, aannyy ddeeffeecctt oorr ddaammaaggee ooccccuurrrriinngg dduurriinngg aasssseemmbbllyy oorr iinn llooaaddiinngg iiss ddeetteecctteedd aanndd ccoorrrreecctteedd aatt tthhee ffaaccttoorryy dduurriinngg tthhee iinnssppeeccttiioonn pprroocceessss.. TThhee ddeeaalleerr wwiillll rreeppaaiirr aannyy uunnccoorrrreecctteedd ffaaccttoorryy ddeeffeeccttss oorr ttrraannssiitt ddaammaaggee bbeeffoorree tthhee ttrraaiilleerr iiss ddeelliivveerreedd ttoo yyoouu.. TThhiiss wwaarrrraannttyy ddooeess nnoott ccoovveerr aalltteerraattiioonn ooff tthhee ttrraaiilleerr,, oorr ffaaiilluurree ccaauusseedd bbyy ssuucchh aalltteerraattiioonn.. SSTTSS TTrraaiilleerrss aanndd DDiissttrriibbuuttoorr//DDeeaalleerrss rreesseerrvvee tthhee rriigghhtt ttoo mmaakkee ttrraaiilleerr mmooddiiffiiccaattiioonnss oorr cchhaannggeess aatt aannyyttiimmee wwiitthhoouutt iinnccuurrrriinngg aannyy oobblliiggaattiioonn ttoo mmaakkee tthhee ssaammee cchhaannggeess oonn ttrraaiilleerrss pprreevviioouussllyy bbuuiilltt aanndd//oorr ssoolldd bbyy tthheemm.. WWAARRRRAANNTTYY PPRREE--AAUUTTHHOORRIIZZAATTIIOONN AAllll wwaarrrraannttyy rreettuurrnnss mmuusstt bbee aapppprroovveedd bbyy SSTTSS’’ss ccuussttoommeerr sseerrvviiccee rreepprreesseennttaattiivvee.. OOnnllyy oorriiggiinnaall pprroodduuccttiioonn ppaarrttss iinnssttaalllleedd bbyy SSTTSS TTrraaiilleerrss wwiillll bbee aacccceepptteedd ffoorr wwaarrrraannttyy ccoonnssiiddeerraattiioonn.. AAnnyy ppaarrttss rreettuurrnneedd ootthheerr tthhaann ppaarrttss uusseedd iinn SSTTSS pprroodduuccttiioonn wwiillll bbee rreettuurrnneedd ttoo ccuussttoommeerr aatt ccuussttoommeerr’’ss eexxppeennssee.. WWAARRRRAANNTTYY SSTTSS wwaarrrraannttss eeaacchh nneeww SSTTSS ttrraaiilleerr ttoo bbee ffrreeee ffrroomm ddeeffeeccttss iinn mmaatteerriiaallss aanndd wwoorrkkmmaannsshhiipp ffoorr aa ppeerriioodd ooff ffiivvee ((55)) yyeeaarrss ffrroomm ddaattee ooff ppuurrcchhaassee.. SSTTSS sshhaallll rreeppaaiirr oorr rreeppllaaccee,, wwiitthhoouutt cchhaarrggee,, aannyy ppaarrttss ffoouunndd ttoo bbee ddeeffeeccttiivvee uuppoonn eexxaammiinnaattiioonn bbeeccaauussee ooff iimmppeerrffeecctt wwoorrkkmmaannsshhiipp oorr mmaatteerriiaallss,, wwiitthhiinn aa rreeaassoonnaabbllee ttiimmee aafftteerr tthhee ttrraaiilleerr iiss rreettuurrnneedd aatt PPuurrcchhaasseerr’’ss eexxppeennssee ttoo aannyy SSTTSS aauutthhoorriizzeedd ddiissttrriibbuuttoorr oorr ddeeaalleerr.. SSUUBBSSEEQQUUEENNTT BBUUYYEERR//OOWWNNEERR TThhee SSTTSS TTrraaiilleerr wwaarrrraannttyy iiss oonnllyy eexxtteennddeedd ttoo tthhee ffiirrsstt bbuuyyeerr//oowwnneerr ooff tthhee ttrraaiilleerr.. TThhiiss iiss ddeeffiinneedd aass tthhee ffiirrsstt lleeggaall oowwnneerr ooff tthhee SSTTSS TTrraaiilleerr ootthheerr tthhaann aann aauutthhoorriizzeedd ddiissttrriibbuuttoorr oorr ddeeaalleerr wwhhoo hhaass bbrroouugghhtt tthhee ttrraaiilleerr ffrroomm SSTTSS ffoorr rreessaallee ttoo tthhee ppuubblliicc.. WWHHAATT IISS NNOOTT CCOOVVEERREEDD PPrroovviissiioonnss ooff tthhiiss wwaarrrraannttyy sshhaallll nnoott aappppllyy ttoo aannyy pprroodduucctt wwhhiicchh iiss ffoouunndd ttoo hhaavvee bbeeeenn mmooddiiffiieedd oorr aalltteerreedd iinn aannyy wwaayy:: nnoorr sshhaallll tthhee wwaarrrraannttyy aappppllyy ttoo aannyy ddeeffeecctt ooff mmaallffuunnccttiioonn wwhhiicchh wwaass ccaauusseedd bbyy ddaammaaggee,, uunnrreeaassoonnaabbllee uussee,, oorr ffaaiilluurree ttoo pprroovviiddee rreeaassoonnaabbllee aanndd nneecceessssaarryy mmaaiinntteennaannccee.. TThhee wwaarrrraannttyy wwiillll nnoott ccoovveerr ddaammaaggee ccaauusseedd bbyy oovveerrllooaaddiinngg tthhee ttrraaiilleerr bbeeyyoonndd tthhee ssttaatteedd ccaappaacciittiieess oorr tthhee uussee ooff iimmpprrooppeerrllyy iinnssttaalllleedd wweeiigghhtt ddiissttrriibbuuttiioonn hhiittcchheess iinn ccoonnjjuunnccttiioonn wwiitthh hhyyddrraauulliicc ssuurrggee bbrraakkeess.. DDuuee ttoo tthhee

30
hhiigghhllyy ccoorrrroossiivvee ccoonnddiittiioonnss aa ttrraaiilleerr mmaayy bbee eexxppoosseedd ttoo,, rruusstt ffoorrmmaattiioonn iiss nnoott ccoovveerreedd.. TThhee wwaarrrraannttyy ddooeess nnoott ccoovveerr wwiinncchheess,, lliigghhttss,, ccoouupplleerrss,, bbrraakkeess,, ttoonngguuee jjaacckkss,, aaxxlleess,, sspprriinnggss,, ttiirreess oorr wwhheeeellss,, aass tthheessee iitteemmss aarree wwaarrrraanntteedd sseeppaarraatteellyy bbyy tthheeiirr mmaannuuffaaccttuurreerr.. OOTTHHEERR LLIIMMIITTAATTIIOONNSS RRaacceess,, bbeeaarriinnggss aanndd sseeaallss aarree ccoovveerreedd ffoorr 9900 ddaayyss ffrroomm tthhee ddaattee ooff ppuurrcchhaassee.. AAnnyy iimmpplliieedd wwaarrrraannttiieess,, oobblliiggaattiioonnss oorr lliiaabbiilliittiieess,, iinncclluuddiinngg bbuutt nnoott lliimmiitteedd ttoo,, aannyy iimmpplliieedd wwaarrrraannttyy ooff mmeerrcchhaannttaabbiilliittyy,, sshhaallll bbee lliimmiitteedd iinn dduurraattiioonn ttoo tthhee ffiivvee--yyeeaarr dduurraattiioonn ooff tthhee wwrriitttteenn lliimmiitteedd wwaarrrraannttyy.. TThhee uussee ooff aannyy uunniitt aass ppaarrtt ooff aa rreennttaall fflleeeett,, oorr uussee ffoorr ccoommmmeerrcciiaall ppuurrppoosseess vvooiiddss tthhiiss wwaarrrraannttyy.. TThhee ffoolllloowwiinngg aarree eexxcclluussiioonnss oorr tthhee SSTTSS wwaarrrraannttyy:: LLoossss ooff ttiimmee,, iinnccoonnvveenniieennccee,, ttoowwiinngg cchhaarrggeess,, ttrraavveell eexxppeennsseess,, llooddggiinngg,, tteelleepphhoonnee,, ggaass,, lloossss oorr ddaammaaggee ttoo ppeerrssoonnaall pprrooppeerrttyy oorr lloossss ooff wwaaggeess.. TThhiiss wwaarrrraannttyy iiss iinntteennddeedd ttoo ccoommppllyy wwiitthh tthhee ““MMaaggnnuussssoonn--MMoossss WWaarrrraannttyy FFeeddeerraall TTrraaddee CCoommmmiissssiioonn IImmpprroovveemmeenntt AAcctt”” aanndd aannyy pprroovviissiioonnss ooff tthhiiss wwaarrrraannttyy oorr aaccttiioonnss ttaakkeenn bbyy SSTTSS ppuurrssuuaanntt ttoo tthhiiss wwaarrrraannttyy sshhaallll bbee ccoonnssttrruueedd aaccccoorrddiinnggllyy.. SSTTSS sshhaallll nnoott bbee lliiaabbllee ffoorr aannyy iinncciiddeennttaall oorr ccoonnsseeqquueennttiiaall ddaammaaggeess ffoorr bbrreeaacchh ooff tthhiiss oorr aannyy wwaarrrraannttyy eexxpprreessss oorr iimmpplliieedd.. YYOOUURR LLEEGGAALL RRIIGGHHTTSS UUNNDDEERR SSTTSS’’SS LLIIMMIITTEEDD WWAARRRRAANNTTIIEESS AAllll SSTTSS lliimmiitteedd wwaarrrraannttiieess aarree tthhee oonnllyy eexxpprreesssseedd wwrriitttteenn wwaarrrraannttiieess mmaaddee bbyy SSTTSS aapppplliiccaabbllee ttoo SSTTSS TTrraaiilleerrss.. TThheessee lliimmiitteedd wwaarrrraannttiieess ggiivvee yyoouu ssppeecciiffiicc lleeggaall rriigghhttss aanndd yyoouu mmaayy aallssoo hhaavvee ootthheerr rriigghhttss wwhhiicchh wwiillll vvaarryy ffrroomm ssttaattee ttoo ssttaattee.. DDeeppeennddiinngg oonn tthhee ssttaattee iinn wwhhiicchh yyoouurr ttrraaiilleerr iiss rreeggiisstteerreedd yyoouu mmaayy hhaavvee ssoommee iimmpplliieedd wwaarrrraannttiieess.. TThheessee iimmpplliieedd wwaarrrraannttiieess aarree lliimmiitteedd,, ttoo tthhee eexxtteenntt aalllloowweedd bbyy llaaww,, ffoorr tthhee ttiimmee ppeerriioodd ccoovveerreedd bbyy SSTTSS TTrraaiilleerr’’ss wwrriitttteenn wwaarrrraannttiieess.. SSoommee ssttaatteess ddoo nnoott aallllooww lliimmiittaattiioonnss oonn hhooww lloonngg aann iimmpplliieedd wwaarrrraannttyy llaassttss,, ssoo tthhee aabboovvee lliimmiittaattiioonnss mmaayy nnoott aappppllyy ttoo yyoouu..
WWAARRRRAANNTTYY IINNFFOORRMMAATTIIOONN IIff yyoouu eexxppeerriieennccee aannyy ddiiffffiiccuullttiieess oorr ddeeffeeccttss wwiitthh ppaarrttss ooff tthhee ttrraaiilleerr pplleeaassee llooookk ffoorr tthhee mmaannuuffaaccttuurreerrss nnaammee oonn tthhee ppaarrtt aanndd ccoonnttaacctt tthheemm ddiirreeccttllyy.. TThhee ffoolllloowwiinngg iiss aa lliisstt ooff SSTTSS’’ss ccuurrrreenntt vveennddoorrss ffrroomm wwhhoomm ppaarrttss aarree ppuurrcchhaasseedd.. VVeennddoorr PPhhoonnee ## PPaarrtt OOppttrroonniiccss 880000--336644--55448833 LLiigghhttss CCeeqquueenntt TTrraaiilleerr PPrroodduuccttss 771155--669933--11770000 LLiigghhttss,, WWiirree HHaarrnneessss AAccttuuaattoorrss,,
BBrraakkeess,, CCoouupplleerrss,, WWiinncchheess,, JJaacckkss TTiiee DDoowwnn EEnnggiinneeeerriinngg 880000--224411--11880066 AAccttuuaattoorr,, HHuubbss UUFFPP 880000--885544--11990055 HHuubbss,, BBrraakkee DDrruummss,, AAccttuuaattoorrss,,
DDiisscc BBrraakkeess SSSSTT BBeeaarriinngg 551133--558833--55550000 BBeeaarriinnggss && SSeeaallss AAttwwoooodd MMoobbiillee 881155--887777--77446611 AAccttuuaattoorrss,, BBrraakkeess RRoocckkwweellll AAmmeerriiccaann 880000--440000--33226677 SSpprriinnggss GGlloobbaall AAddvvaannttaaggee 771155--885555--77770022 SSaaffeettyy CChhaaiinnss SSMMAARRTT TTrraannssppoorrtt SSoolluuttiioonnss 992200--992288--44110000 TToorrssiioonn AAxxlleess CCaarrlliissllee 880000--226600--77995599 TTiirreess KKeennddaa 880000--222255--44771144 TTiirreess NNaannkkaanngg 880000--222277--88992255 TTiirreess UUllttrraa--TTrraacc 880000--442288--11554411 TTiirreess

31
IMPORTANT: Federal law requires the recording of this information. (Please Print) Dealer Name: Address: City: State, Zip Code: Date of Sale: Model Number: Vehicle Identification No: Customer Name: Address: City: State, Zip Code:
Owner Protection Service
I, ______________________________________________ (Purchaser of Trailer) Certify that I have received the maintenance and operating list of the above STS Trailer. Retain This Part For Your Records IMPORTANT: Federal law requires the recording of this information. (Please Print) Dealer Name: Address: City: State, Zip Code: Date of Sale: Model Number: Vehicle Identification No: Customer Name: Address: City: State, Zip Code:
Owner Protection Service
I, ______________________________________________ (Purchaser of Trailer) Certify that I have received the maintenance and operating list of the above STS Trailer. Tear Off and Mail to, STS Trailers, Inc. PO Box 127, Fox Lake WI 53933

32
SMART Transport Solutions Trailers, Inc. 100 Karavan Drive Fox Lake, WI 53933
Affix First Class Stamp Here

33

34

35