student financial's step-by-step...
TRANSCRIPT

Last Updated: 6/25/2012
Student Financials
Quick Reference Guide
Student Financials Quick Reference Guide
i
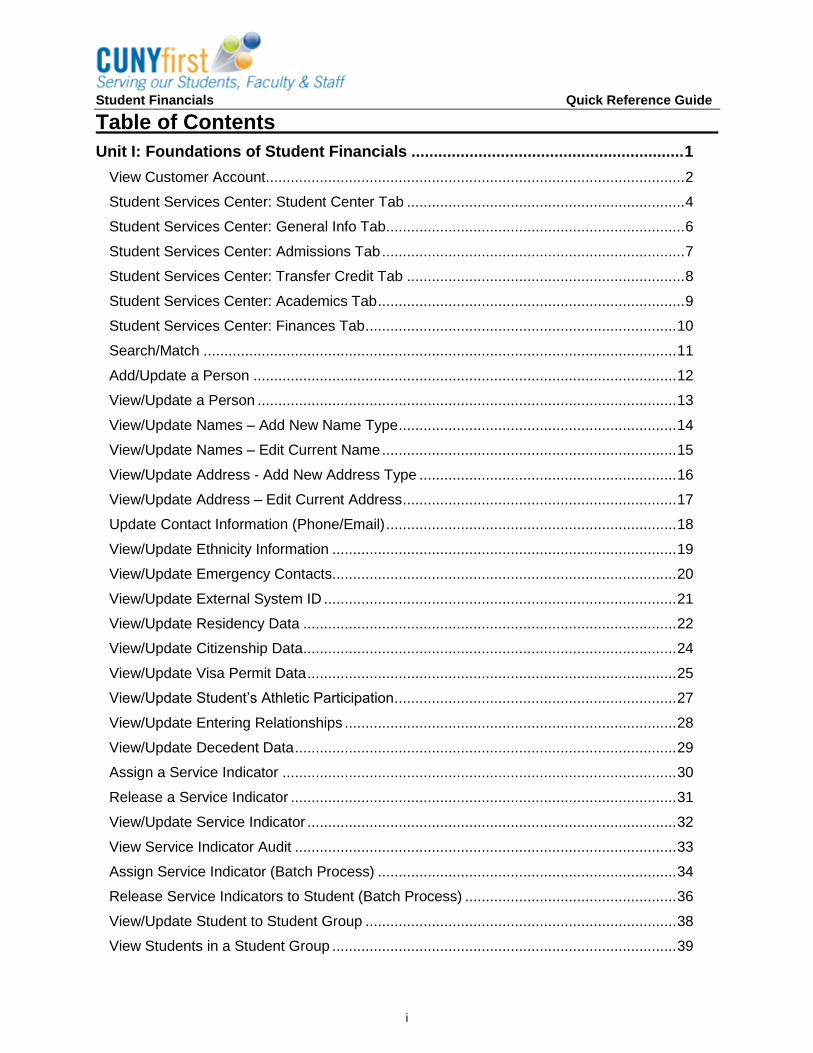
Table of Contents
Unit I: Foundations of Student Financials ............................................................. 1
View Customer Account ..................................................................................................... 2
Student Services Center: Student Center Tab ................................................................... 4
Student Services Center: General Info Tab ........................................................................ 6
Student Services Center: Admissions Tab ......................................................................... 7
Student Services Center: Transfer Credit Tab ................................................................... 8
Student Services Center: Academics Tab .......................................................................... 9
Student Services Center: Finances Tab ........................................................................... 10
Search/Match .................................................................................................................. 11
Add/Update a Person ...................................................................................................... 12
View/Update a Person ..................................................................................................... 13
View/Update Names – Add New Name Type ................................................................... 14
View/Update Names – Edit Current Name ....................................................................... 15
View/Update Address - Add New Address Type .............................................................. 16
View/Update Address – Edit Current Address .................................................................. 17
Update Contact Information (Phone/Email) ...................................................................... 18
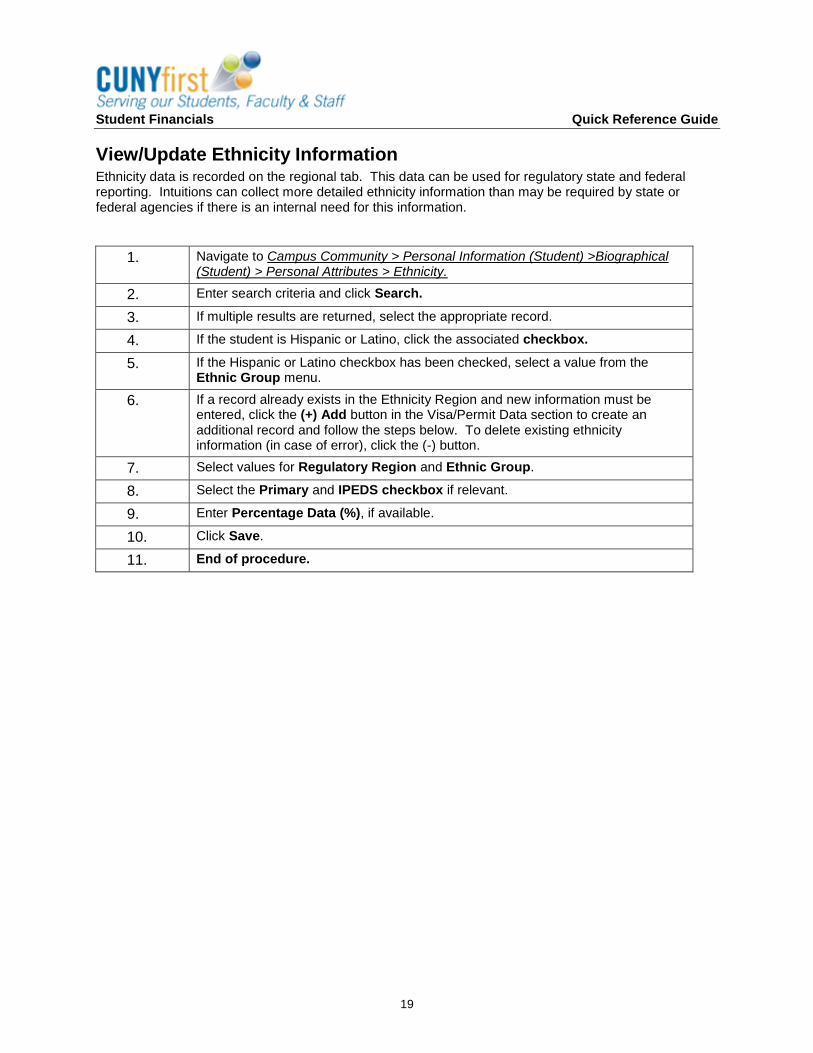
View/Update Ethnicity Information ................................................................................... 19
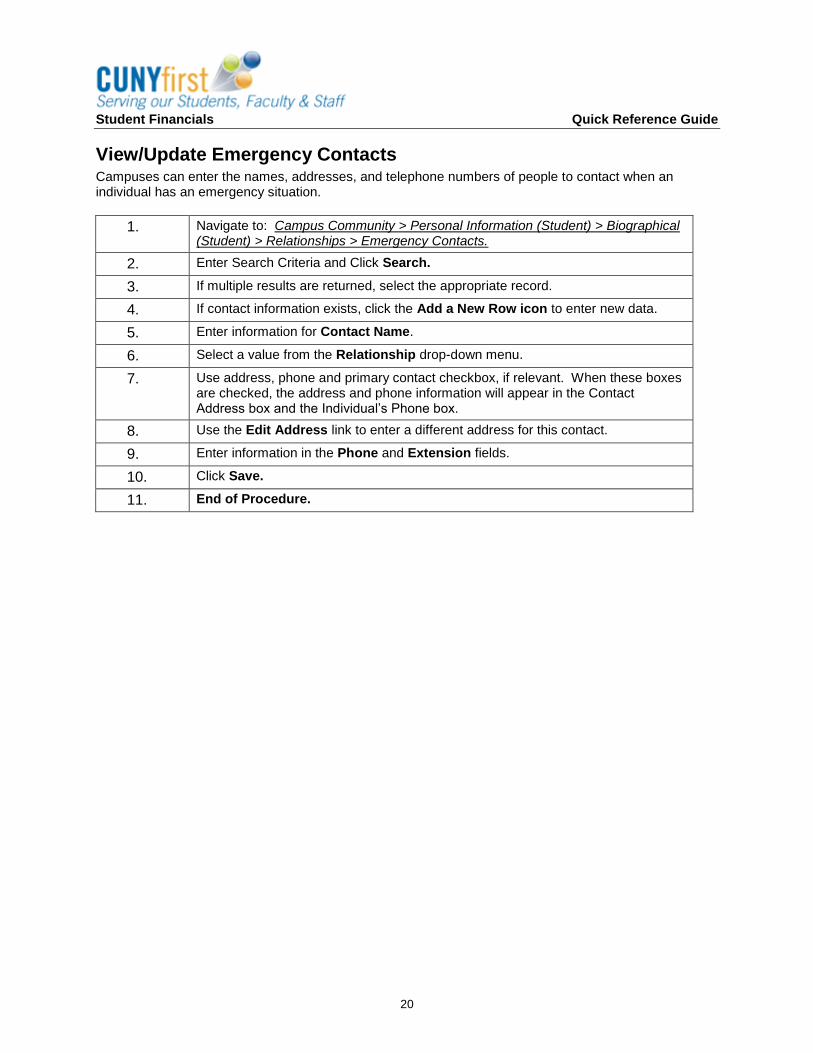
View/Update Emergency Contacts................................................................................... 20
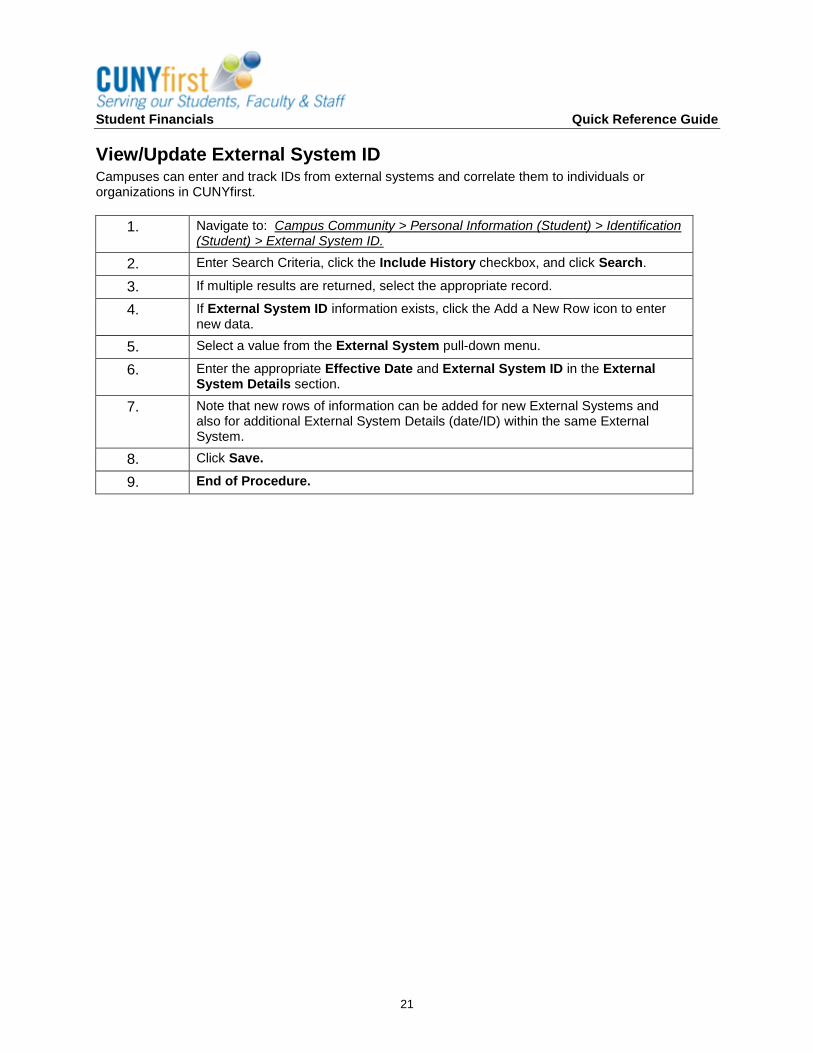
View/Update External System ID ..................................................................................... 21
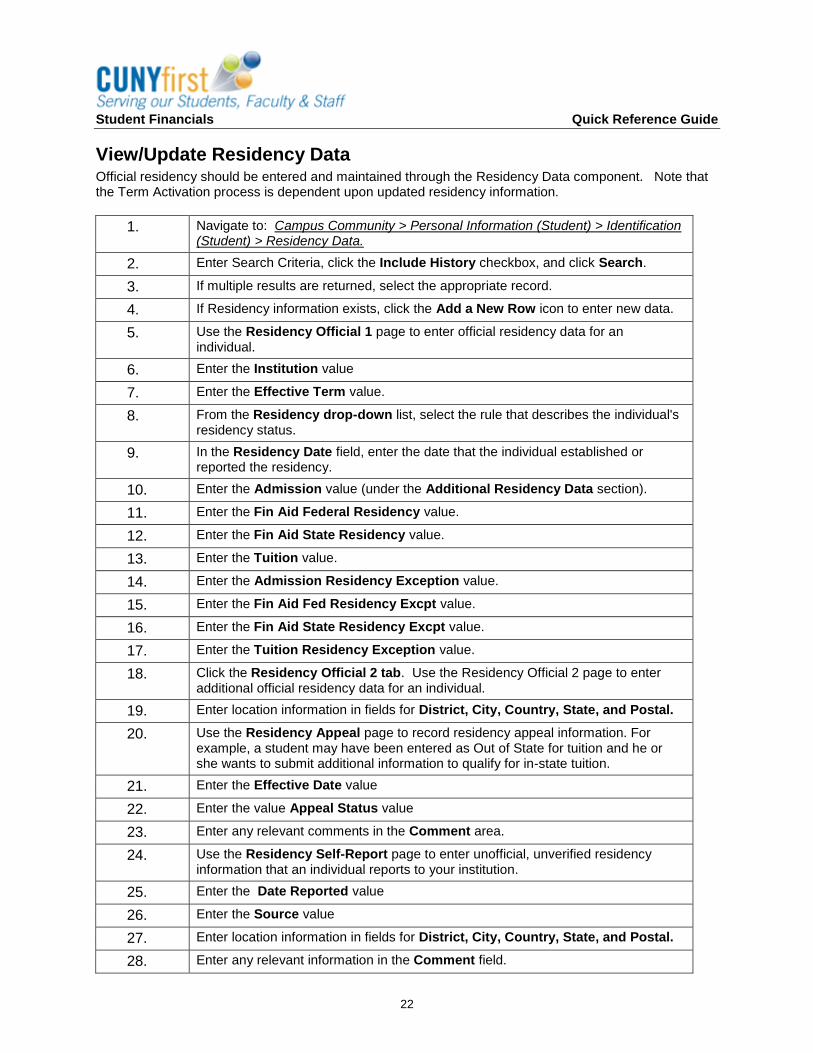
View/Update Residency Data .......................................................................................... 22
View/Update Citizenship Data .......................................................................................... 24
View/Update Visa Permit Data ......................................................................................... 25
View/Update Student’s Athletic Participation .................................................................... 27
View/Update Entering Relationships ................................................................................ 28
View/Update Decedent Data ............................................................................................ 29
Assign a Service Indicator ............................................................................................... 30
Release a Service Indicator ............................................................................................. 31
View/Update Service Indicator ......................................................................................... 32
View Service Indicator Audit ............................................................................................ 33
Assign Service Indicator (Batch Process) ........................................................................ 34
Release Service Indicators to Student (Batch Process) ................................................... 36
View/Update Student to Student Group ........................................................................... 38
View Students in a Student Group ................................................................................... 39
Student Financials Quick Reference Guide
ii
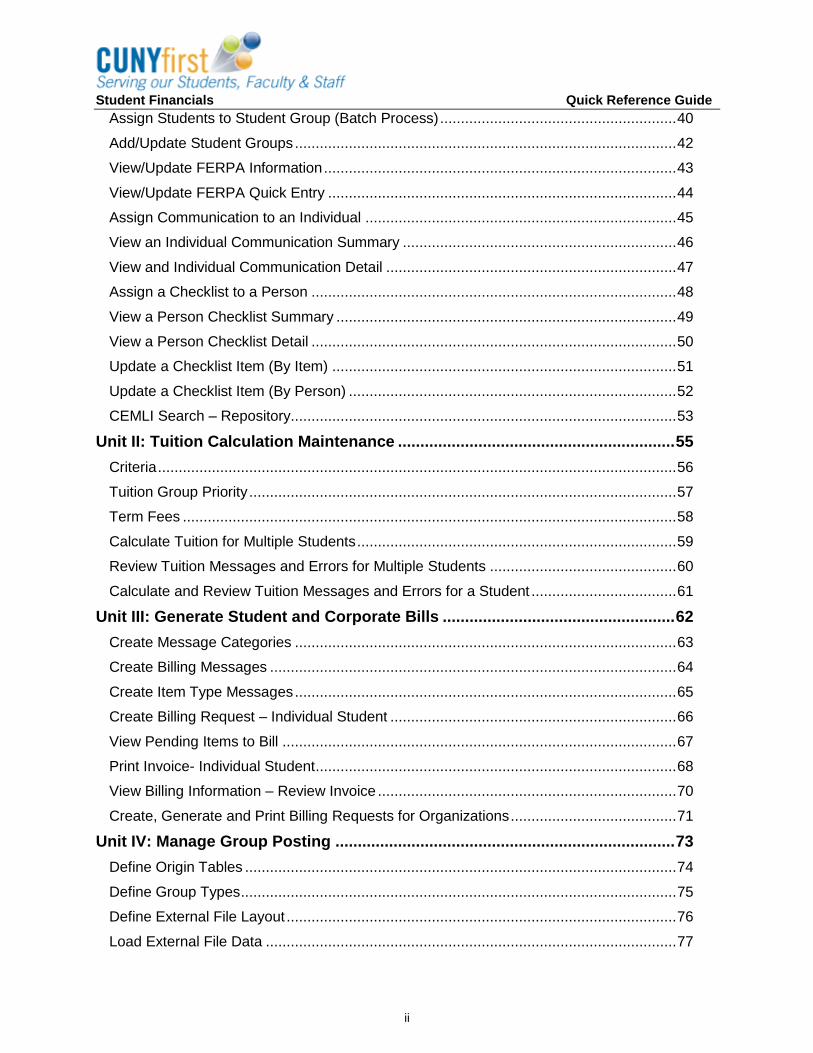
Assign Students to Student Group (Batch Process) ......................................................... 40
Add/Update Student Groups ............................................................................................ 42
View/Update FERPA Information ..................................................................................... 43
View/Update FERPA Quick Entry .................................................................................... 44
Assign Communication to an Individual ........................................................................... 45
View an Individual Communication Summary .................................................................. 46
View and Individual Communication Detail ...................................................................... 47
Assign a Checklist to a Person ........................................................................................ 48
View a Person Checklist Summary .................................................................................. 49
View a Person Checklist Detail ........................................................................................ 50
Update a Checklist Item (By Item) ................................................................................... 51
Update a Checklist Item (By Person) ............................................................................... 52
CEMLI Search – Repository............................................................................................. 53
Unit II: Tuition Calculation Maintenance .............................................................. 55
Criteria ............................................................................................................................. 56
Tuition Group Priority ....................................................................................................... 57
Term Fees ....................................................................................................................... 58
Calculate Tuition for Multiple Students ............................................................................. 59
Review Tuition Messages and Errors for Multiple Students ............................................. 60
Calculate and Review Tuition Messages and Errors for a Student ................................... 61
Unit III: Generate Student and Corporate Bills .................................................... 62
Create Message Categories ............................................................................................ 63
Create Billing Messages .................................................................................................. 64
Create Item Type Messages ............................................................................................ 65
Create Billing Request – Individual Student ..................................................................... 66
View Pending Items to Bill ............................................................................................... 67
Print Invoice- Individual Student ....................................................................................... 68
View Billing Information – Review Invoice ........................................................................ 70
Create, Generate and Print Billing Requests for Organizations ........................................ 71
Unit IV: Manage Group Posting ............................................................................ 73
Define Origin Tables ........................................................................................................ 74
Define Group Types ......................................................................................................... 75
Define External File Layout .............................................................................................. 76
Load External File Data ................................................................................................... 77

Student Financials Quick Reference Guide
iii
Create Group Data Entries .............................................................................................. 78
Correct Transactions – Group Post .................................................................................. 80
Post Transactions – Group Post ...................................................................................... 81
Group Posting – Review Transactions ............................................................................. 82
Group Posting – Review Suspended Transactions .......................................................... 83
Reverse Group Posting .................................................................................................... 84
Unit V: Waivers ....................................................................................................... 85
Create Waivers ................................................................................................................ 86
Attach Waivers to Tuition Group for Term Fees ............................................................... 87
Assign Waiver to an Individual Student ............................................................................ 88
Add/Update Student Address – County Chargeback ....................................................... 89
Assign Waiver for County Chargeback ............................................................................ 90
Monitor County Chargeback ............................................................................................ 91
Bill Individual Counties ..................................................................................................... 92
Unit VI: Refunds ..................................................................................................... 93
Run Refunding Process (Report Mode Only) ................................................................... 94
Run the Student Receivables Report (R-063) .................................................................. 95
Run Refunding Process (Production Mode) ..................................................................... 96
Processing Campus Based Refunds ................................................................................ 97
Creating Student Refunds ................................................................................................ 98
Student Bank Account & Direct Deposit (First-Time Election) .......................................... 99
Update a Direct Deposit Election ................................................................................... 100
Revoke Direct Deposit ................................................................................................... 101
Inactivate Bank Account ................................................................................................ 102
Unit VII: Payment Plans ....................................................................................... 103
Create Payment Plan – Sallie Mae ................................................................................ 104
View Payment Plan – Sallie Mae ................................................................................... 105
Process Inbound Sallie Mae Interface ............................................................................ 106
Sallie Mae Suspense File I-709 ..................................................................................... 108
Modify Payment Plan – Sallie Mae................................................................................. 109
Copy Payment Plan – Sallie Mae ................................................................................... 110
Recalculate Payment Plan – Sallie Mae ........................................................................ 111
Link Student to Payment Plan ........................................................................................ 112
Set up Personal Deferment Contract ............................................................................. 113
Student Financials Quick Reference Guide
iv
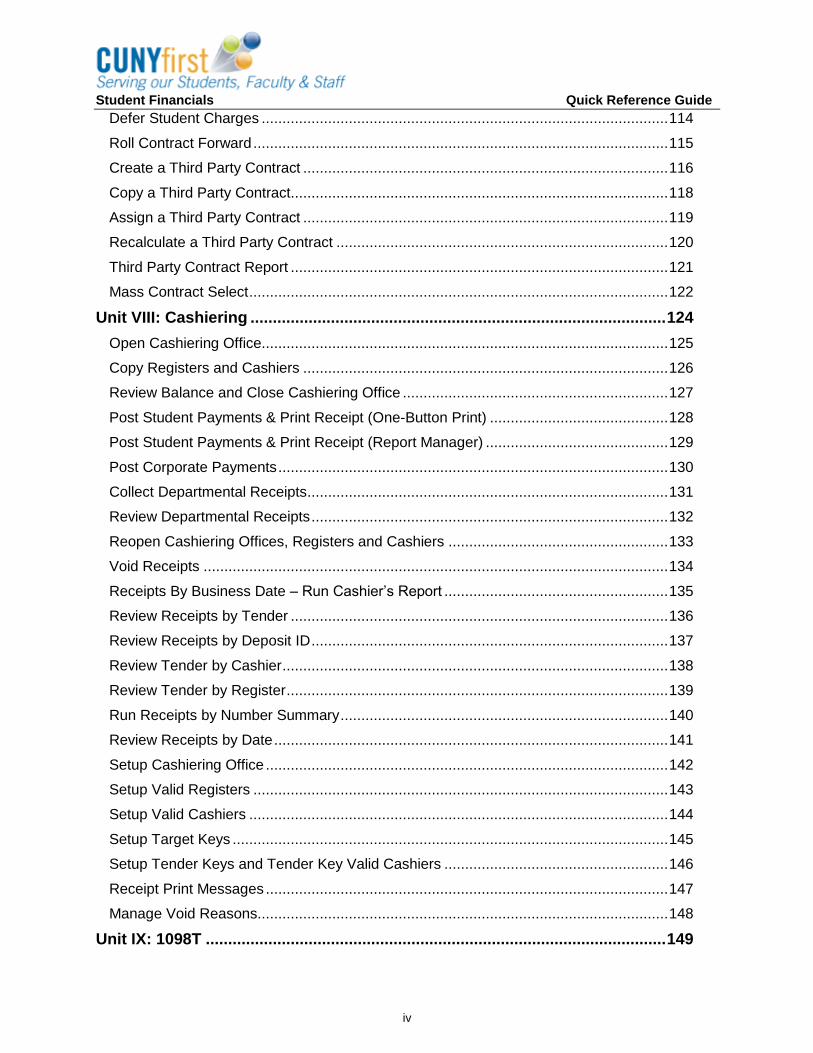
Defer Student Charges .................................................................................................. 114
Roll Contract Forward .................................................................................................... 115
Create a Third Party Contract ........................................................................................ 116
Copy a Third Party Contract........................................................................................... 118
Assign a Third Party Contract ........................................................................................ 119
Recalculate a Third Party Contract ................................................................................ 120
Third Party Contract Report ........................................................................................... 121
Mass Contract Select ..................................................................................................... 122
Unit VIII: Cashiering ............................................................................................. 124
Open Cashiering Office .................................................................................................. 125
Copy Registers and Cashiers ........................................................................................ 126
Review Balance and Close Cashiering Office ................................................................ 127
Post Student Payments & Print Receipt (One-Button Print) ........................................... 128
Post Student Payments & Print Receipt (Report Manager) ............................................ 129
Post Corporate Payments .............................................................................................. 130
Collect Departmental Receipts ....................................................................................... 131
Review Departmental Receipts ...................................................................................... 132
Reopen Cashiering Offices, Registers and Cashiers ..................................................... 133
Void Receipts ................................................................................................................ 134
Receipts By Business Date – Run Cashier’s Report ...................................................... 135
Review Receipts by Tender ........................................................................................... 136
Review Receipts by Deposit ID ...................................................................................... 137
Review Tender by Cashier ............................................................................................. 138
Review Tender by Register ............................................................................................ 139
Run Receipts by Number Summary ............................................................................... 140
Review Receipts by Date ............................................................................................... 141
Setup Cashiering Office ................................................................................................. 142
Setup Valid Registers .................................................................................................... 143
Setup Valid Cashiers ..................................................................................................... 144
Setup Target Keys ......................................................................................................... 145
Setup Tender Keys and Tender Key Valid Cashiers ...................................................... 146
Receipt Print Messages ................................................................................................. 147
Manage Void Reasons................................................................................................... 148
Unit IX: 1098T ....................................................................................................... 149
Student Financials Quick Reference Guide
v
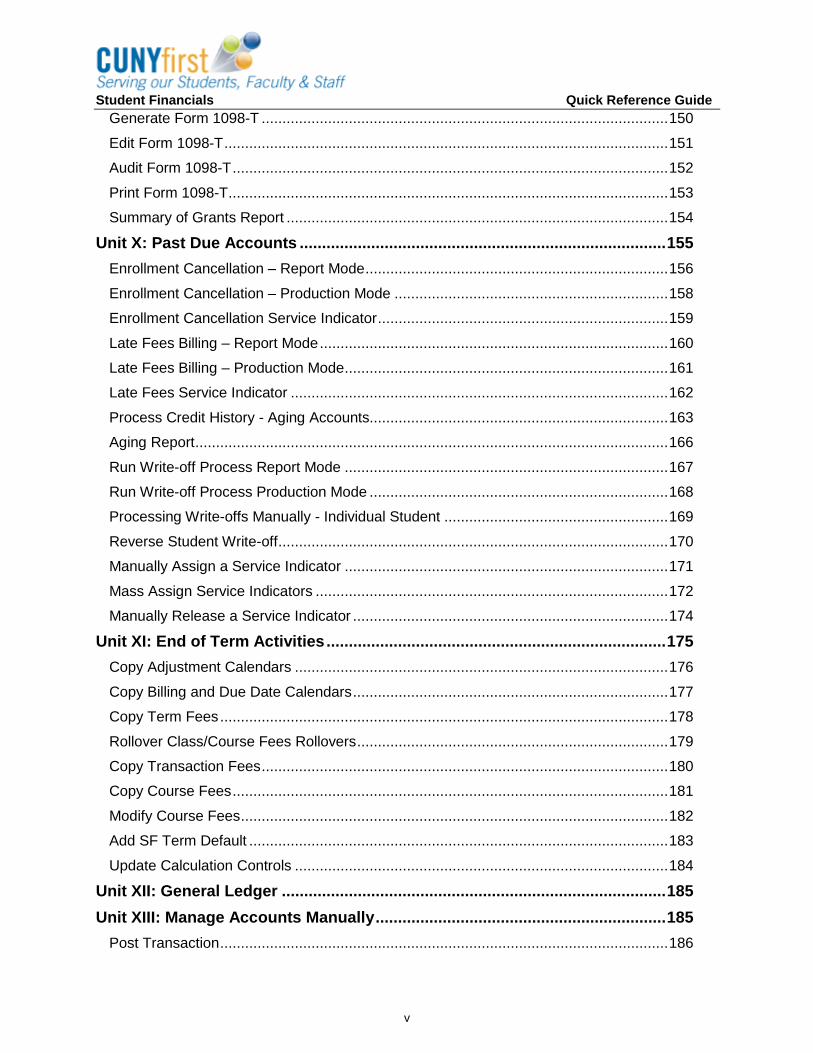
Generate Form 1098-T .................................................................................................. 150
Edit Form 1098-T ........................................................................................................... 151
Audit Form 1098-T ......................................................................................................... 152
Print Form 1098-T .......................................................................................................... 153
Summary of Grants Report ............................................................................................ 154
Unit X: Past Due Accounts .................................................................................. 155
Enrollment Cancellation – Report Mode ......................................................................... 156
Enrollment Cancellation – Production Mode .................................................................. 158
Enrollment Cancellation Service Indicator ...................................................................... 159
Late Fees Billing – Report Mode .................................................................................... 160
Late Fees Billing – Production Mode .............................................................................. 161
Late Fees Service Indicator ........................................................................................... 162
Process Credit History - Aging Accounts........................................................................ 163
Aging Report .................................................................................................................. 166
Run Write-off Process Report Mode .............................................................................. 167
Run Write-off Process Production Mode ........................................................................ 168
Processing Write-offs Manually - Individual Student ...................................................... 169
Reverse Student Write-off .............................................................................................. 170
Manually Assign a Service Indicator .............................................................................. 171
Mass Assign Service Indicators ..................................................................................... 172
Manually Release a Service Indicator ............................................................................ 174
Unit XI: End of Term Activities ............................................................................ 175
Copy Adjustment Calendars .......................................................................................... 176
Copy Billing and Due Date Calendars ............................................................................ 177
Copy Term Fees ............................................................................................................ 178
Rollover Class/Course Fees Rollovers ........................................................................... 179
Copy Transaction Fees .................................................................................................. 180
Copy Course Fees ......................................................................................................... 181
Modify Course Fees ....................................................................................................... 182
Add SF Term Default ..................................................................................................... 183
Update Calculation Controls .......................................................................................... 184
Unit XII: General Ledger ...................................................................................... 185
Unit XIII: Manage Accounts Manually ................................................................. 185
Post Transaction ............................................................................................................ 186
Student Financials Quick Reference Guide
vi
Reverse Payment .......................................................................................................... 187
Reverse Charge............................................................................................................. 188
Create Business Unit Messages .................................................................................... 189
Create Aging Set Message ............................................................................................ 190
Create Customer Message ............................................................................................ 191
Create Corporate Message ............................................................................................ 192
Create Billing Standard Request .................................................................................... 193
Review EFL and Create Group Data Entries .................................................................. 194
Review Student Receipts ............................................................................................... 195
Cancel and Review Bills ................................................................................................ 196
Review and Print Bill Requests for Students .................................................................. 197
Viewing Payments by Invoice Information Individual ...................................................... 198
Viewing Payments by Invoice Information Organization ................................................. 199
Post Student Write-off .................................................................................................... 200
Daily Activity Report ....................................................................................................... 201
Daily Posting Report ...................................................................................................... 202
Account Audit Statement Report .................................................................................... 203
Tuition Group ................................................................................................................. 204
Minimum/Maximum Fees ............................................................................................... 206

Student Financials Quick Reference Guide
1
Unit I: Foundations of Student Financials
Student Financials Quick Reference Guide
2
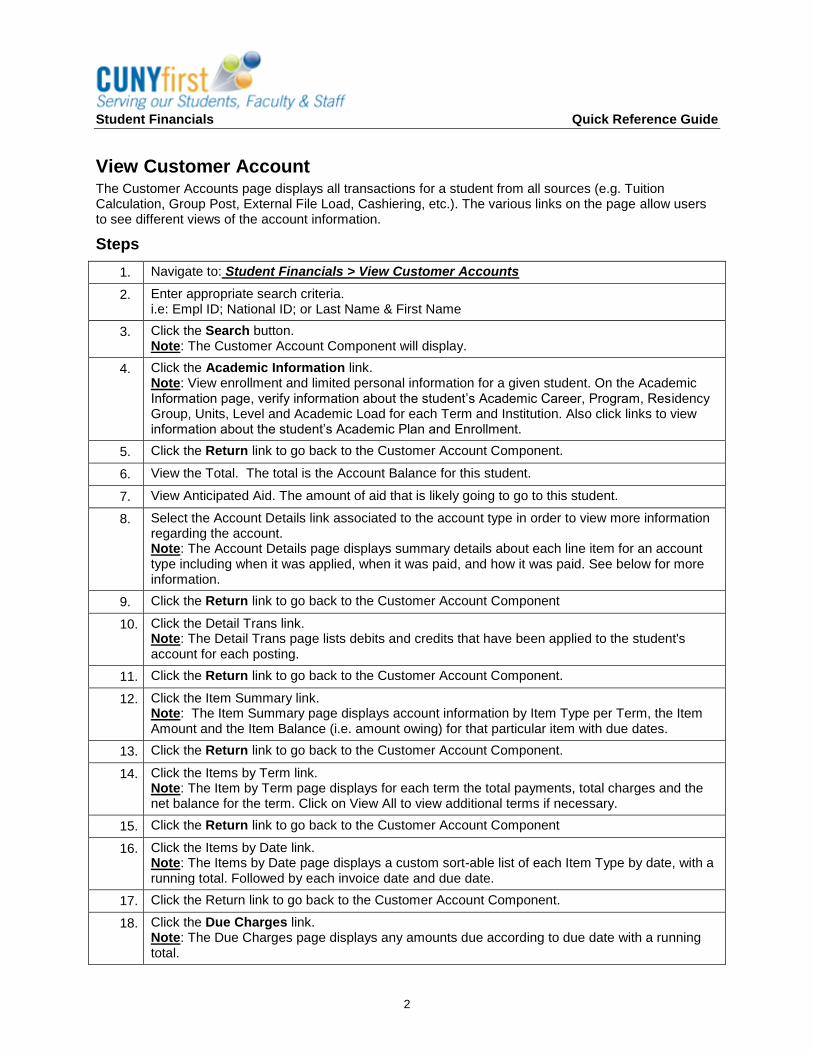
View Customer Account The Customer Accounts page displays all transactions for a student from all sources (e.g. Tuition Calculation, Group Post, External File Load, Cashiering, etc.). The various links on the page allow users to see different views of the account information.
Steps
1. Navigate to: Student Financials > View Customer Accounts
2. Enter appropriate search criteria. i.e: Empl ID; National ID; or Last Name & First Name
3. Click the Search button. Note: The Customer Account Component will display.
4. Click the Academic Information link. Note: View enrollment and limited personal information for a given student. On the Academic Information page, verify information about the student’s Academic Career, Program, Residency Group, Units, Level and Academic Load for each Term and Institution. Also click links to view information about the student’s Academic Plan and Enrollment.
5. Click the Return link to go back to the Customer Account Component.
6. View the Total. The total is the Account Balance for this student.
7. View Anticipated Aid. The amount of aid that is likely going to go to this student.
8. Select the Account Details link associated to the account type in order to view more information regarding the account. Note: The Account Details page displays summary details about each line item for an account type including when it was applied, when it was paid, and how it was paid. See below for more information.
9. Click the Return link to go back to the Customer Account Component
10. Click the Detail Trans link. Note: The Detail Trans page lists debits and credits that have been applied to the student's account for each posting.
11. Click the Return link to go back to the Customer Account Component.
12. Click the Item Summary link. Note: The Item Summary page displays account information by Item Type per Term, the Item Amount and the Item Balance (i.e. amount owing) for that particular item with due dates.
13. Click the Return link to go back to the Customer Account Component.
14. Click the Items by Term link. Note: The Item by Term page displays for each term the total payments, total charges and the net balance for the term. Click on View All to view additional terms if necessary.
15. Click the Return link to go back to the Customer Account Component
16. Click the Items by Date link. Note: The Items by Date page displays a custom sort-able list of each Item Type by date, with a running total. Followed by each invoice date and due date.
17. Click the Return link to go back to the Customer Account Component.
18. Click the Due Charges link. Note: The Due Charges page displays any amounts due according to due date with a running total.

Student Financials Quick Reference Guide
3
19. Click the Return link to go back to the Customer Account Component.
20. Click the Payment Plans link. Note: The Payment Plan page displays any payment plans the student might have. This list is both payment plans and third party contracts linked to the students’ accounts.
21. Click the Return link to go back to the Customer Account Component.
22. End of Procedure.
Student Financials Quick Reference Guide
4
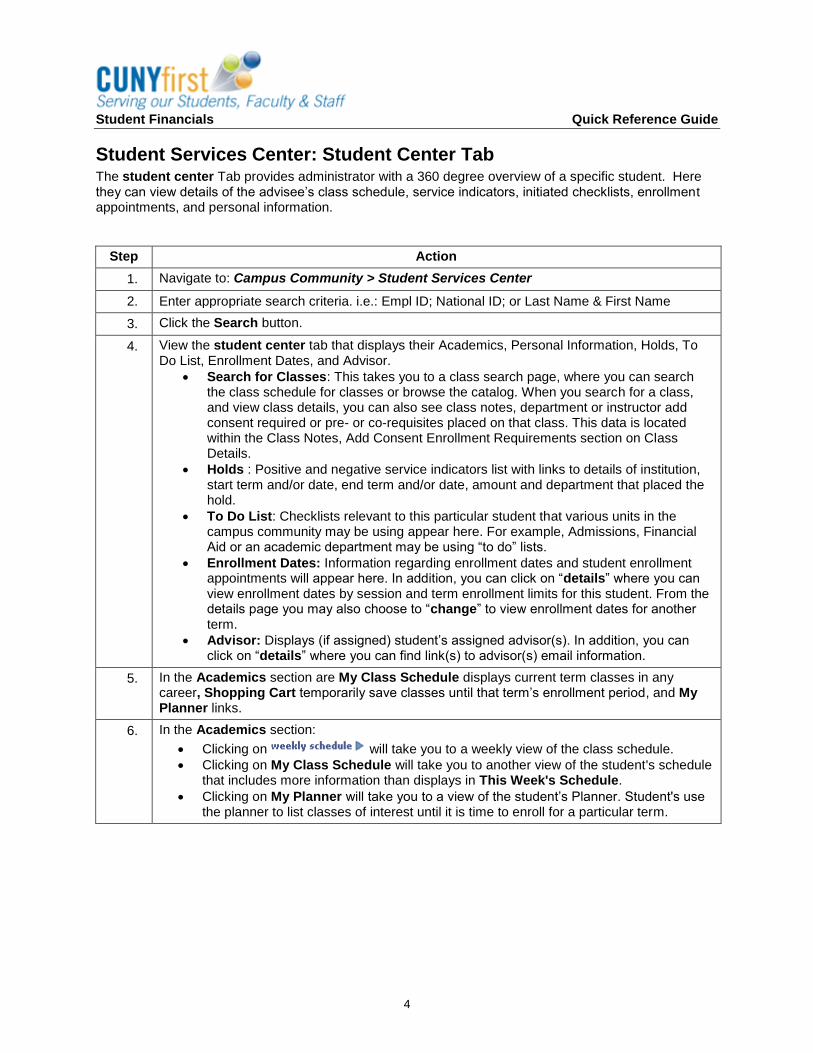
Student Services Center: Student Center Tab The student center Tab provides administrator with a 360 degree overview of a specific student. Here they can view details of the advisee’s class schedule, service indicators, initiated checklists, enrollment appointments, and personal information.
Step Action
1. Navigate to: Campus Community > Student Services Center
2. Enter appropriate search criteria. i.e.: Empl ID; National ID; or Last Name & First Name
3. Click the Search button.
4. View the student center tab that displays their Academics, Personal Information, Holds, To Do List, Enrollment Dates, and Advisor.
Search for Classes: This takes you to a class search page, where you can search the class schedule for classes or browse the catalog. When you search for a class, and view class details, you can also see class notes, department or instructor add consent required or pre- or co-requisites placed on that class. This data is located within the Class Notes, Add Consent Enrollment Requirements section on Class Details.
Holds : Positive and negative service indicators list with links to details of institution, start term and/or date, end term and/or date, amount and department that placed the hold.
To Do List: Checklists relevant to this particular student that various units in the campus community may be using appear here. For example, Admissions, Financial Aid or an academic department may be using “to do” lists.
Enrollment Dates: Information regarding enrollment dates and student enrollment appointments will appear here. In addition, you can click on “details” where you can view enrollment dates by session and term enrollment limits for this student. From the details page you may also choose to “change” to view enrollment dates for another term.
Advisor: Displays (if assigned) student’s assigned advisor(s). In addition, you can click on “details” where you can find link(s) to advisor(s) email information.
5. In the Academics section are My Class Schedule displays current term classes in any career, Shopping Cart temporarily save classes until that term’s enrollment period, and My Planner links.
6. In the Academics section:
Clicking on will take you to a weekly view of the class schedule.
Clicking on My Class Schedule will take you to another view of the student's schedule that includes more information than displays in This Week's Schedule.
Clicking on My Planner will take you to a view of the student’s Planner. Student's use the planner to list classes of interest until it is time to enroll for a particular term.
Student Financials Quick Reference Guide
5
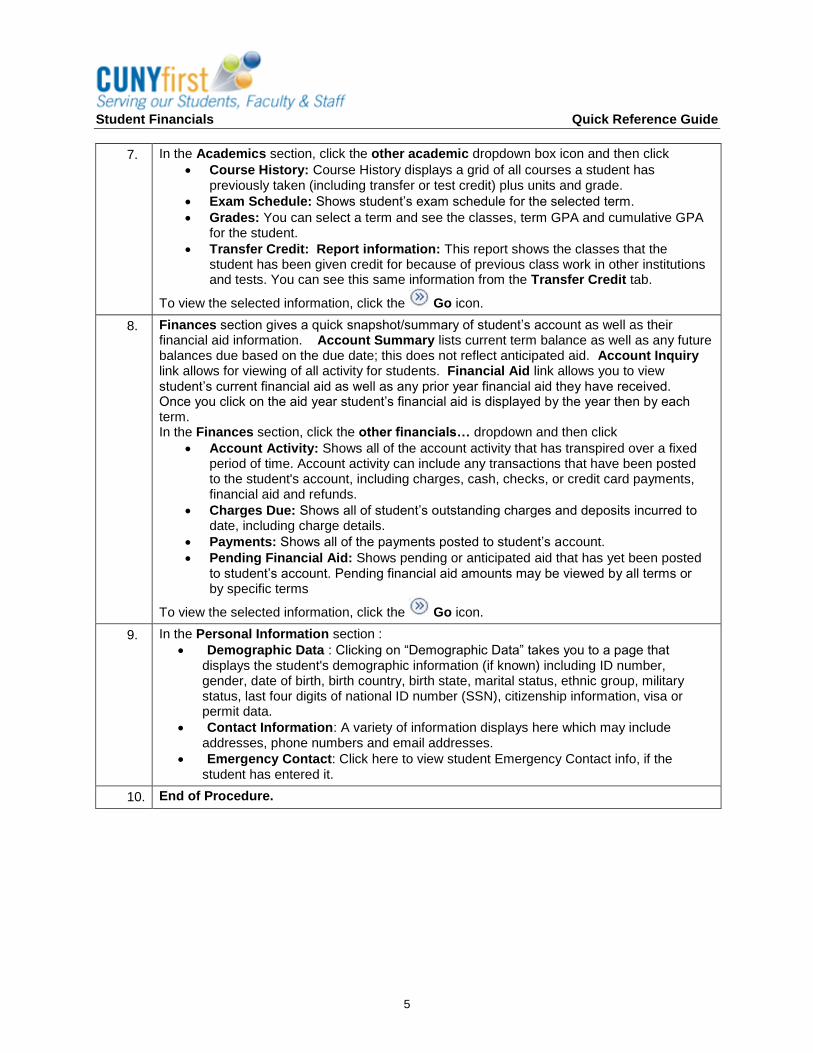
7. In the Academics section, click the other academic dropdown box icon and then click
Course History: Course History displays a grid of all courses a student has previously taken (including transfer or test credit) plus units and grade.
Exam Schedule: Shows student’s exam schedule for the selected term.
Grades: You can select a term and see the classes, term GPA and cumulative GPA for the student.
Transfer Credit: Report information: This report shows the classes that the student has been given credit for because of previous class work in other institutions and tests. You can see this same information from the Transfer Credit tab.
To view the selected information, click the Go icon.
8. Finances section gives a quick snapshot/summary of student’s account as well as their financial aid information. Account Summary lists current term balance as well as any future balances due based on the due date; this does not reflect anticipated aid. Account Inquiry link allows for viewing of all activity for students. Financial Aid link allows you to view student’s current financial aid as well as any prior year financial aid they have received. Once you click on the aid year student’s financial aid is displayed by the year then by each term. In the Finances section, click the other financials… dropdown and then click
Account Activity: Shows all of the account activity that has transpired over a fixed period of time. Account activity can include any transactions that have been posted to the student's account, including charges, cash, checks, or credit card payments, financial aid and refunds.
Charges Due: Shows all of student’s outstanding charges and deposits incurred to date, including charge details.
Payments: Shows all of the payments posted to student’s account.
Pending Financial Aid: Shows pending or anticipated aid that has yet been posted to student’s account. Pending financial aid amounts may be viewed by all terms or by specific terms
To view the selected information, click the Go icon.
9. In the Personal Information section :
Demographic Data : Clicking on “Demographic Data” takes you to a page that displays the student's demographic information (if known) including ID number, gender, date of birth, birth country, birth state, marital status, ethnic group, military status, last four digits of national ID number (SSN), citizenship information, visa or permit data.
Contact Information: A variety of information displays here which may include addresses, phone numbers and email addresses.
Emergency Contact: Click here to view student Emergency Contact info, if the student has entered it.
10. End of Procedure.
Student Financials Quick Reference Guide
6
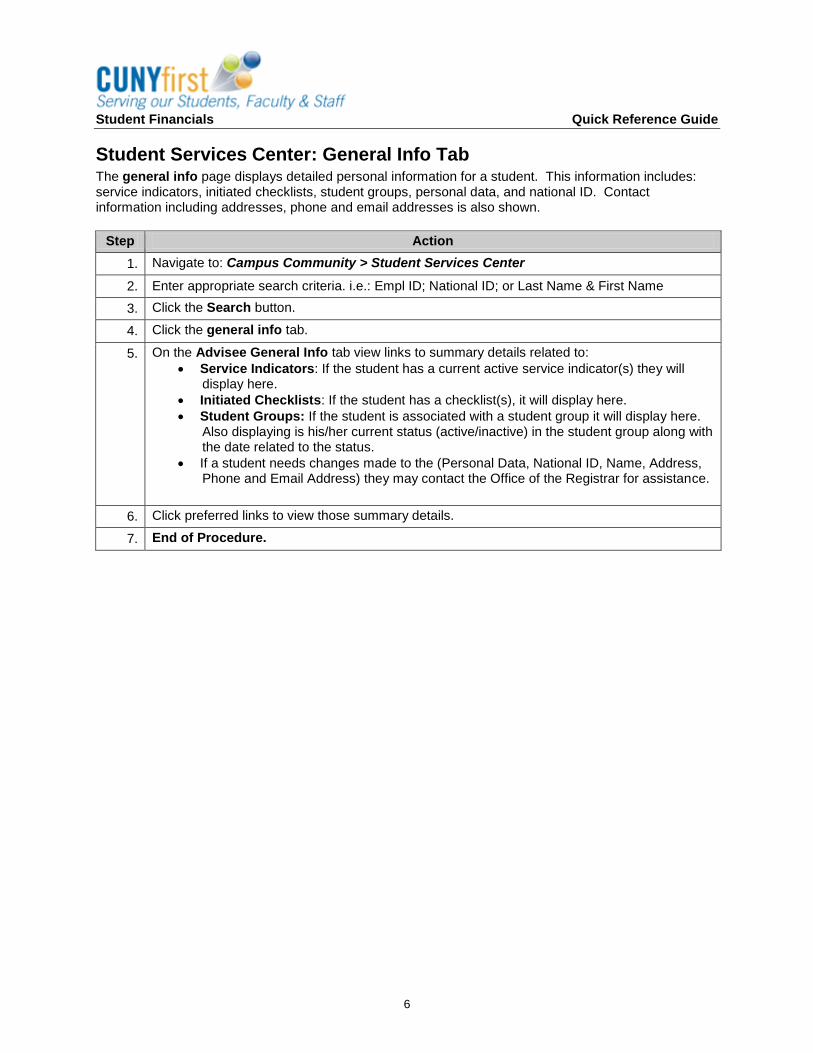
Student Services Center: General Info Tab The general info page displays detailed personal information for a student. This information includes: service indicators, initiated checklists, student groups, personal data, and national ID. Contact information including addresses, phone and email addresses is also shown.
Step Action
1. Navigate to: Campus Community > Student Services Center
2. Enter appropriate search criteria. i.e.: Empl ID; National ID; or Last Name & First Name
3. Click the Search button.
4. Click the general info tab.
5. On the Advisee General Info tab view links to summary details related to:
Service Indicators: If the student has a current active service indicator(s) they will display here.
Initiated Checklists: If the student has a checklist(s), it will display here.
Student Groups: If the student is associated with a student group it will display here. Also displaying is his/her current status (active/inactive) in the student group along with the date related to the status.
If a student needs changes made to the (Personal Data, National ID, Name, Address, Phone and Email Address) they may contact the Office of the Registrar for assistance.
6. Click preferred links to view those summary details.
7. End of Procedure.
Student Financials Quick Reference Guide
7
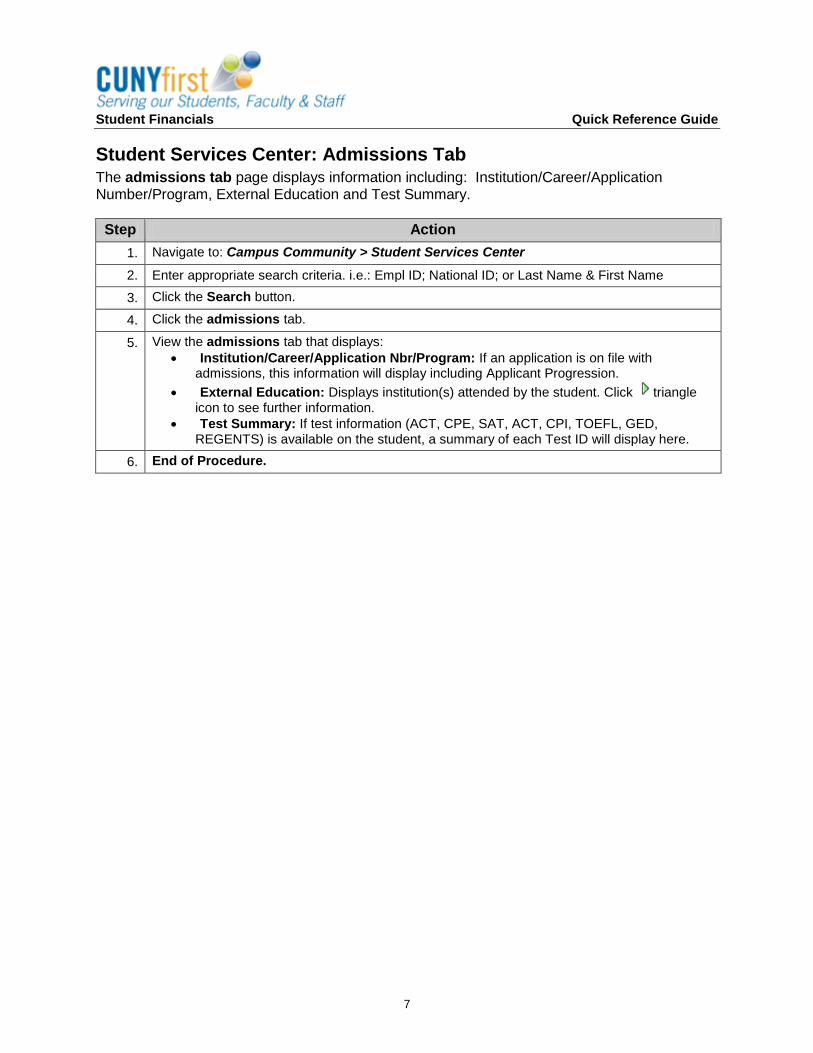
Student Services Center: Admissions Tab The admissions tab page displays information including: Institution/Career/Application Number/Program, External Education and Test Summary.
Step Action
1. Navigate to: Campus Community > Student Services Center
2. Enter appropriate search criteria. i.e.: Empl ID; National ID; or Last Name & First Name
3. Click the Search button.
4. Click the admissions tab.
5. View the admissions tab that displays:
Institution/Career/Application Nbr/Program: If an application is on file with admissions, this information will display including Applicant Progression.
External Education: Displays institution(s) attended by the student. Click triangle icon to see further information.
Test Summary: If test information (ACT, CPE, SAT, ACT, CPI, TOEFL, GED, REGENTS) is available on the student, a summary of each Test ID will display here.
6. End of Procedure.
Student Financials Quick Reference Guide
8
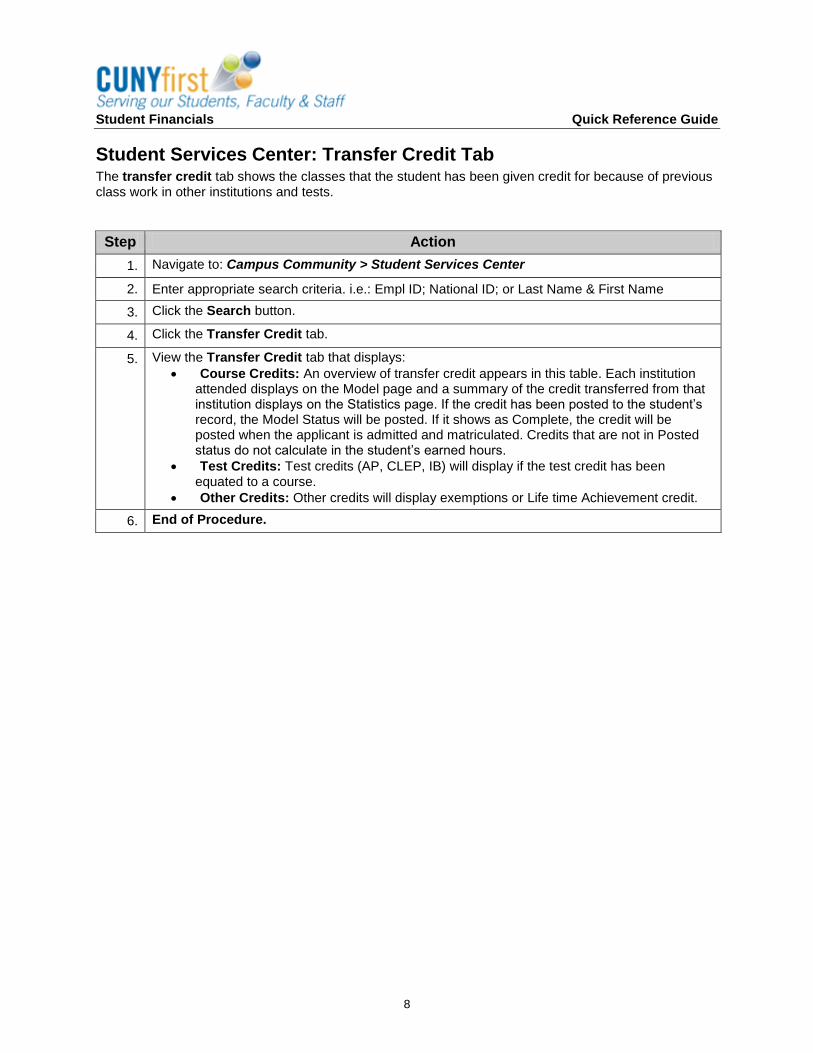
Student Services Center: Transfer Credit Tab The transfer credit tab shows the classes that the student has been given credit for because of previous class work in other institutions and tests.
Step Action
1. Navigate to: Campus Community > Student Services Center
2. Enter appropriate search criteria. i.e.: Empl ID; National ID; or Last Name & First Name
3. Click the Search button.
4. Click the Transfer Credit tab.
5. View the Transfer Credit tab that displays:
Course Credits: An overview of transfer credit appears in this table. Each institution attended displays on the Model page and a summary of the credit transferred from that institution displays on the Statistics page. If the credit has been posted to the student’s record, the Model Status will be posted. If it shows as Complete, the credit will be posted when the applicant is admitted and matriculated. Credits that are not in Posted status do not calculate in the student’s earned hours.
Test Credits: Test credits (AP, CLEP, IB) will display if the test credit has been equated to a course.
Other Credits: Other credits will display exemptions or Life time Achievement credit.
6. End of Procedure.
Student Financials Quick Reference Guide
9
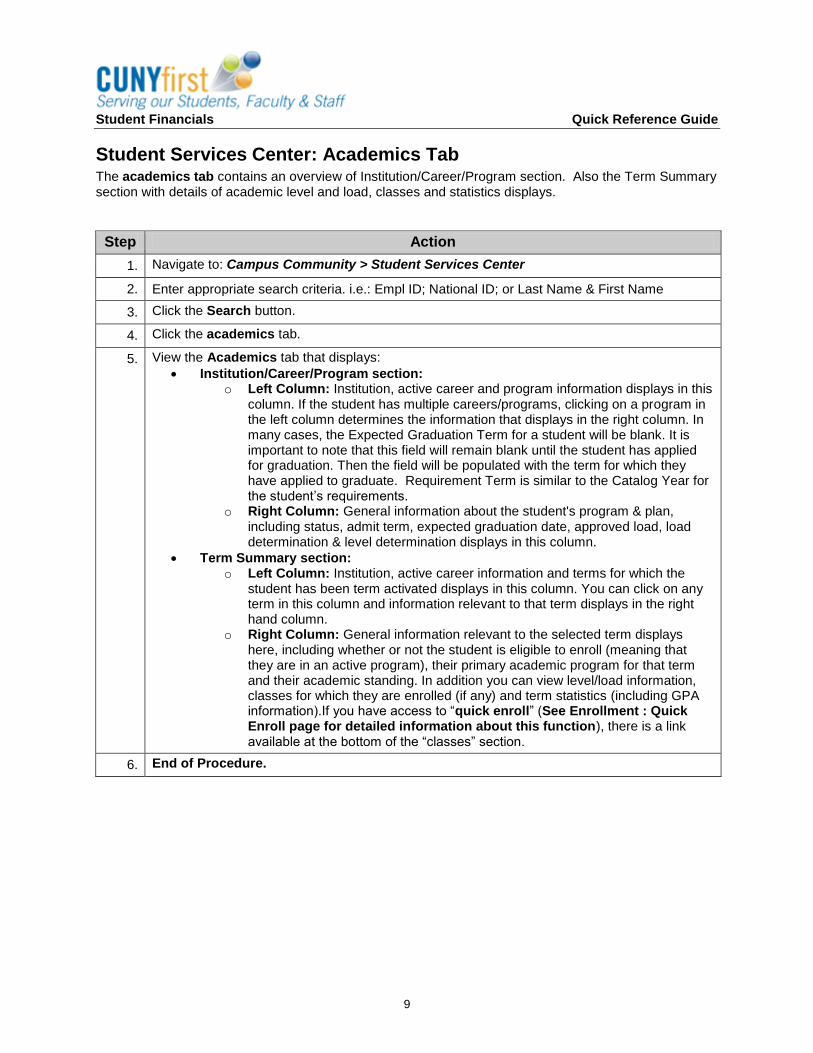
Student Services Center: Academics Tab The academics tab contains an overview of Institution/Career/Program section. Also the Term Summary section with details of academic level and load, classes and statistics displays.
Step Action
1. Navigate to: Campus Community > Student Services Center
2. Enter appropriate search criteria. i.e.: Empl ID; National ID; or Last Name & First Name
3. Click the Search button.
4. Click the academics tab.
5. View the Academics tab that displays:
Institution/Career/Program section: o Left Column: Institution, active career and program information displays in this
column. If the student has multiple careers/programs, clicking on a program in the left column determines the information that displays in the right column. In many cases, the Expected Graduation Term for a student will be blank. It is important to note that this field will remain blank until the student has applied for graduation. Then the field will be populated with the term for which they have applied to graduate. Requirement Term is similar to the Catalog Year for the student’s requirements.
o Right Column: General information about the student's program & plan, including status, admit term, expected graduation date, approved load, load determination & level determination displays in this column.
Term Summary section: o Left Column: Institution, active career information and terms for which the
student has been term activated displays in this column. You can click on any term in this column and information relevant to that term displays in the right hand column.
o Right Column: General information relevant to the selected term displays here, including whether or not the student is eligible to enroll (meaning that they are in an active program), their primary academic program for that term and their academic standing. In addition you can view level/load information, classes for which they are enrolled (if any) and term statistics (including GPA information).If you have access to “quick enroll” (See Enrollment : Quick Enroll page for detailed information about this function), there is a link available at the bottom of the “classes” section.
6. End of Procedure.

Student Financials Quick Reference Guide
10
Student Services Center: Finances Tab The Student Services Center Finances Tab provides administrators with an overview of a specific student’s financial information with easy access to financial transactions.
Step Action
1. Navigate to: Campus Community > Student Services Center
2. Enter appropriate search criteria. i.e.: Empl ID; National ID; or Last Name & First Name
3. Click the Search button.
4. Click the finances tab.
5. View the finances tab that displays:
Tuition Calculation Summary: o Left Column: Institution, active career and program information displays in this
column. If the student has multiple careers/programs, clicking on a program in the left column determines the information that displays in the right column.
o Right Column: General information about the student's finances, including Last Date/Time Tuition was Calculated, Primary Program, Tuition Group, Total Tuition and Fees and Total Waiver displays in this column.
Term Summary section: o Left Column: Campus/Institution displays in this column. o Right Column: Detailed information about student’s finances, including
Account Total Balance, Deposit Due, Anticipated Aid, 1098-T data form, Detailed Due Charges, Refunds, Refundable Credits, Bills, Payment Plans and Credit History and Collection displays in this column.
6. End of Procedure.
Student Financials Quick Reference Guide
11
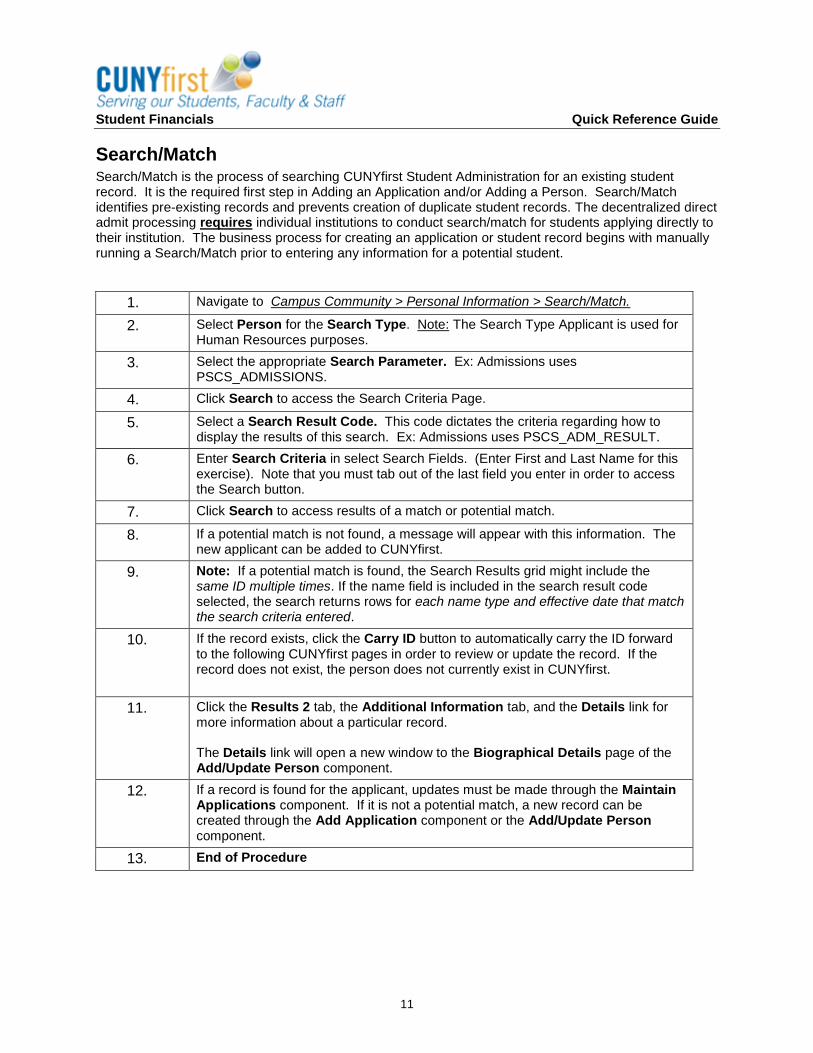
Search/Match Search/Match is the process of searching CUNYfirst Student Administration for an existing student record. It is the required first step in Adding an Application and/or Adding a Person. Search/Match identifies pre-existing records and prevents creation of duplicate student records. The decentralized direct admit processing requires individual institutions to conduct search/match for students applying directly to their institution. The business process for creating an application or student record begins with manually running a Search/Match prior to entering any information for a potential student.
1. Navigate to Campus Community > Personal Information > Search/Match.
2. Select Person for the Search Type. Note: The Search Type Applicant is used for Human Resources purposes.
3. Select the appropriate Search Parameter. Ex: Admissions uses PSCS_ADMISSIONS.
4. Click Search to access the Search Criteria Page.
5. Select a Search Result Code. This code dictates the criteria regarding how to display the results of this search. Ex: Admissions uses PSCS_ADM_RESULT.
6. Enter Search Criteria in select Search Fields. (Enter First and Last Name for this exercise). Note that you must tab out of the last field you enter in order to access the Search button.
7. Click Search to access results of a match or potential match.
8. If a potential match is not found, a message will appear with this information. The new applicant can be added to CUNYfirst.
9. Note: If a potential match is found, the Search Results grid might include the same ID multiple times. If the name field is included in the search result code selected, the search returns rows for each name type and effective date that match the search criteria entered.
10. If the record exists, click the Carry ID button to automatically carry the ID forward to the following CUNYfirst pages in order to review or update the record. If the record does not exist, the person does not currently exist in CUNYfirst.
11. Click the Results 2 tab, the Additional Information tab, and the Details link for more information about a particular record. The Details link will open a new window to the Biographical Details page of the Add/Update Person component.
12. If a record is found for the applicant, updates must be made through the Maintain Applications component. If it is not a potential match, a new record can be created through the Add Application component or the Add/Update Person component.
13. End of Procedure
Student Financials Quick Reference Guide
12
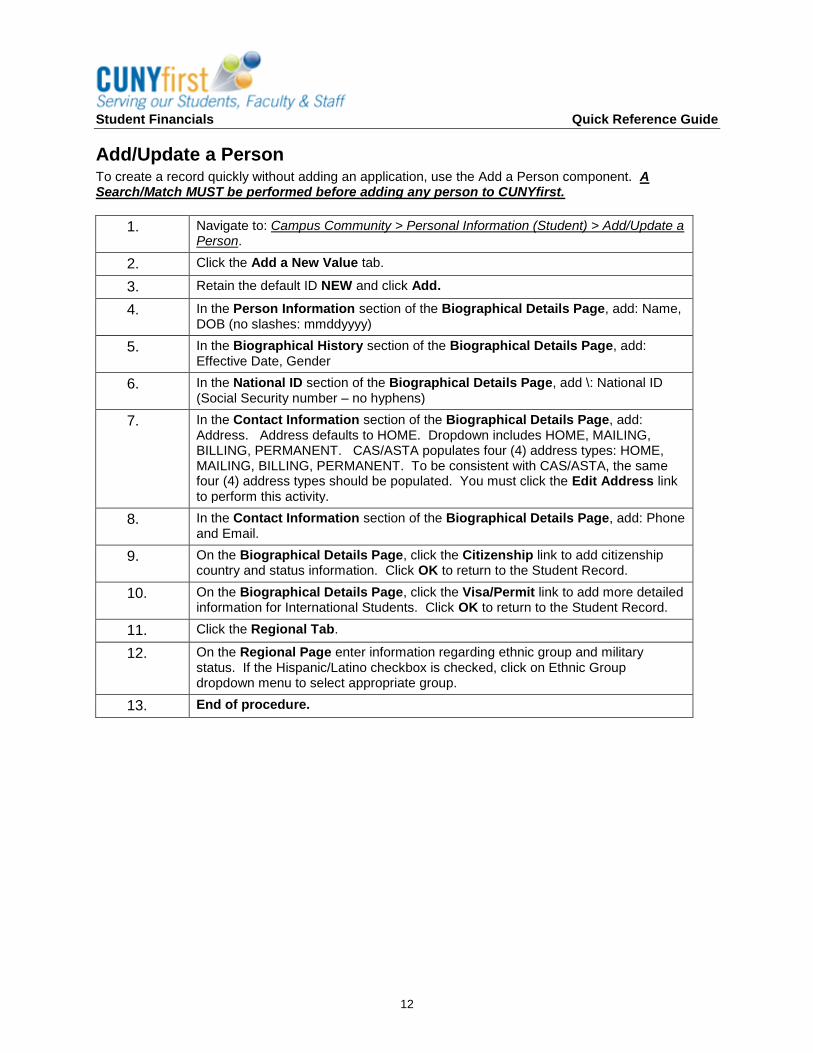
Add/Update a Person To create a record quickly without adding an application, use the Add a Person component. A Search/Match MUST be performed before adding any person to CUNYfirst.
1. Navigate to: Campus Community > Personal Information (Student) > Add/Update a Person.
2. Click the Add a New Value tab.
3. Retain the default ID NEW and click Add.
4. In the Person Information section of the Biographical Details Page, add: Name, DOB (no slashes: mmddyyyy)
5. In the Biographical History section of the Biographical Details Page, add: Effective Date, Gender
6. In the National ID section of the Biographical Details Page, add \: National ID (Social Security number – no hyphens)
7. In the Contact Information section of the Biographical Details Page, add: Address. Address defaults to HOME. Dropdown includes HOME, MAILING, BILLING, PERMANENT. CAS/ASTA populates four (4) address types: HOME, MAILING, BILLING, PERMANENT. To be consistent with CAS/ASTA, the same four (4) address types should be populated. You must click the Edit Address link to perform this activity.
8. In the Contact Information section of the Biographical Details Page, add: Phone and Email.
9. On the Biographical Details Page, click the Citizenship link to add citizenship country and status information. Click OK to return to the Student Record.
10. On the Biographical Details Page, click the Visa/Permit link to add more detailed information for International Students. Click OK to return to the Student Record.
11. Click the Regional Tab.
12. On the Regional Page enter information regarding ethnic group and military status. If the Hispanic/Latino checkbox is checked, click on Ethnic Group dropdown menu to select appropriate group.
13. End of procedure.
Student Financials Quick Reference Guide
13
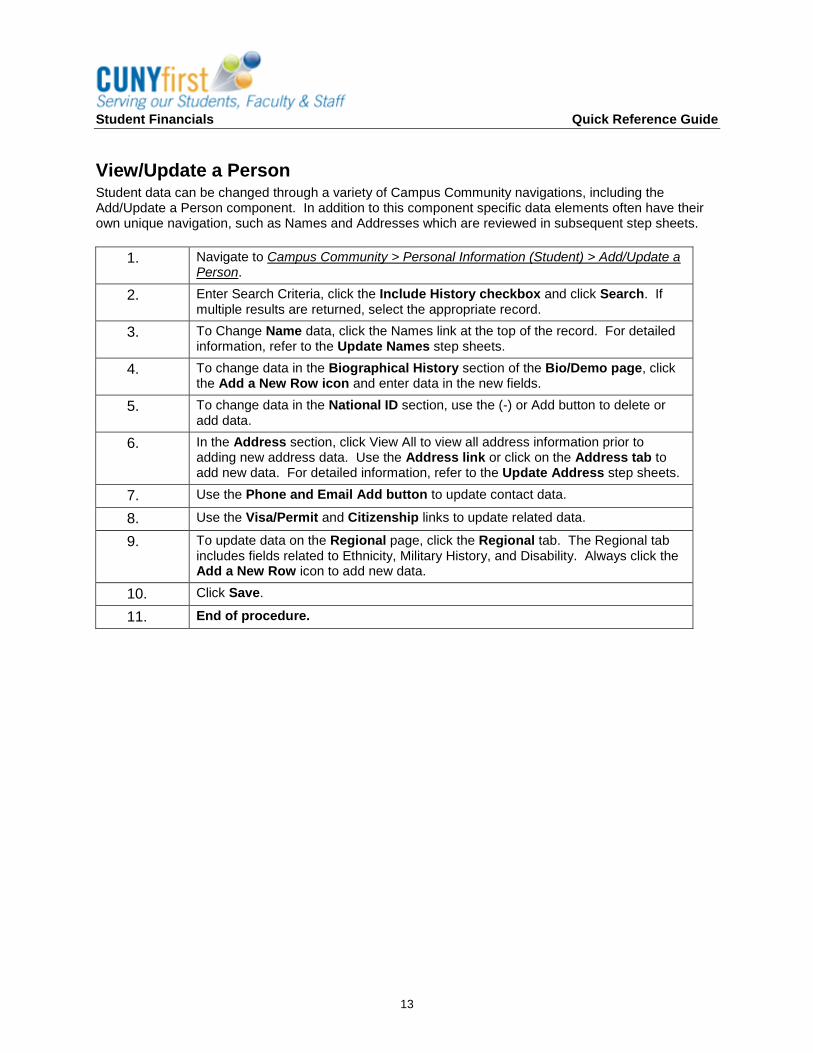
View/Update a Person Student data can be changed through a variety of Campus Community navigations, including the Add/Update a Person component. In addition to this component specific data elements often have their own unique navigation, such as Names and Addresses which are reviewed in subsequent step sheets.
1. Navigate to Campus Community > Personal Information (Student) > Add/Update a Person.
2. Enter Search Criteria, click the Include History checkbox and click Search. If multiple results are returned, select the appropriate record.
3. To Change Name data, click the Names link at the top of the record. For detailed information, refer to the Update Names step sheets.
4. To change data in the Biographical History section of the Bio/Demo page, click the Add a New Row icon and enter data in the new fields.
5. To change data in the National ID section, use the (-) or Add button to delete or add data.
6. In the Address section, click View All to view all address information prior to adding new address data. Use the Address link or click on the Address tab to add new data. For detailed information, refer to the Update Address step sheets.
7. Use the Phone and Email Add button to update contact data.
8. Use the Visa/Permit and Citizenship links to update related data.
9. To update data on the Regional page, click the Regional tab. The Regional tab includes fields related to Ethnicity, Military History, and Disability. Always click the Add a New Row icon to add new data.
10. Click Save.
11. End of procedure.
Student Financials Quick Reference Guide
14
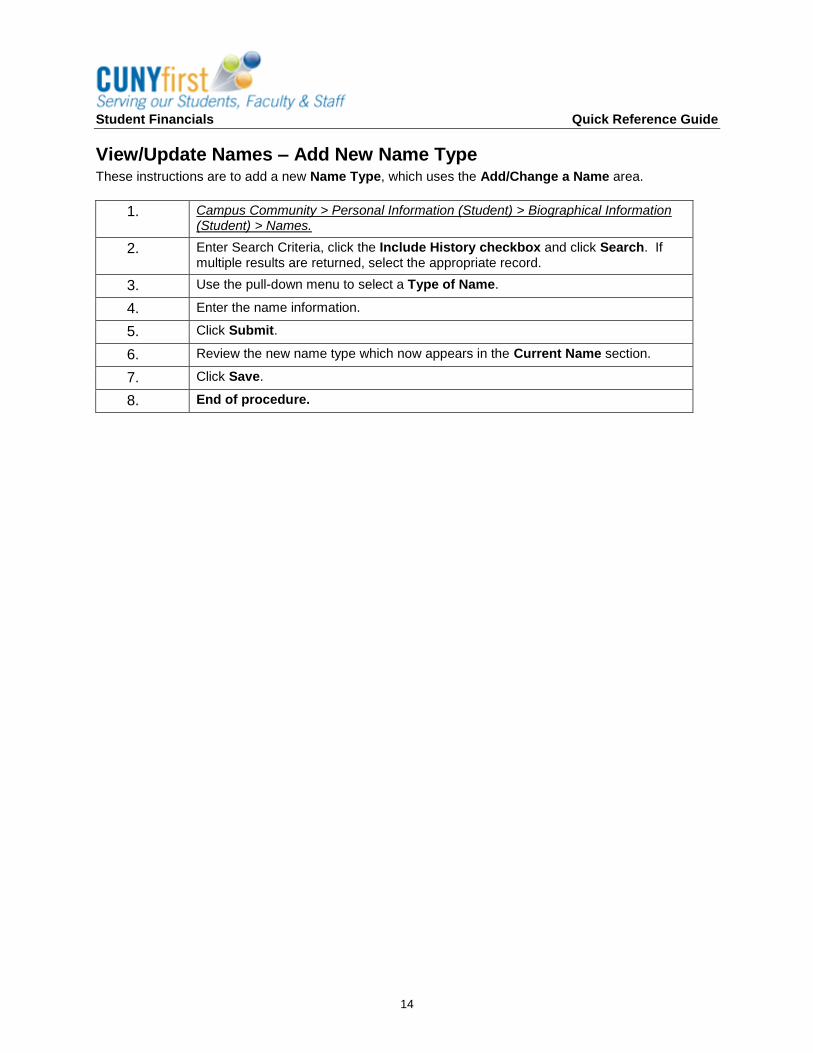
View/Update Names – Add New Name Type These instructions are to add a new Name Type, which uses the Add/Change a Name area.
1. Campus Community > Personal Information (Student) > Biographical Information (Student) > Names.
2. Enter Search Criteria, click the Include History checkbox and click Search. If multiple results are returned, select the appropriate record.
3. Use the pull-down menu to select a Type of Name.
4. Enter the name information.
5. Click Submit.
6. Review the new name type which now appears in the Current Name section.
7. Click Save.
8. End of procedure.
Student Financials Quick Reference Guide
15
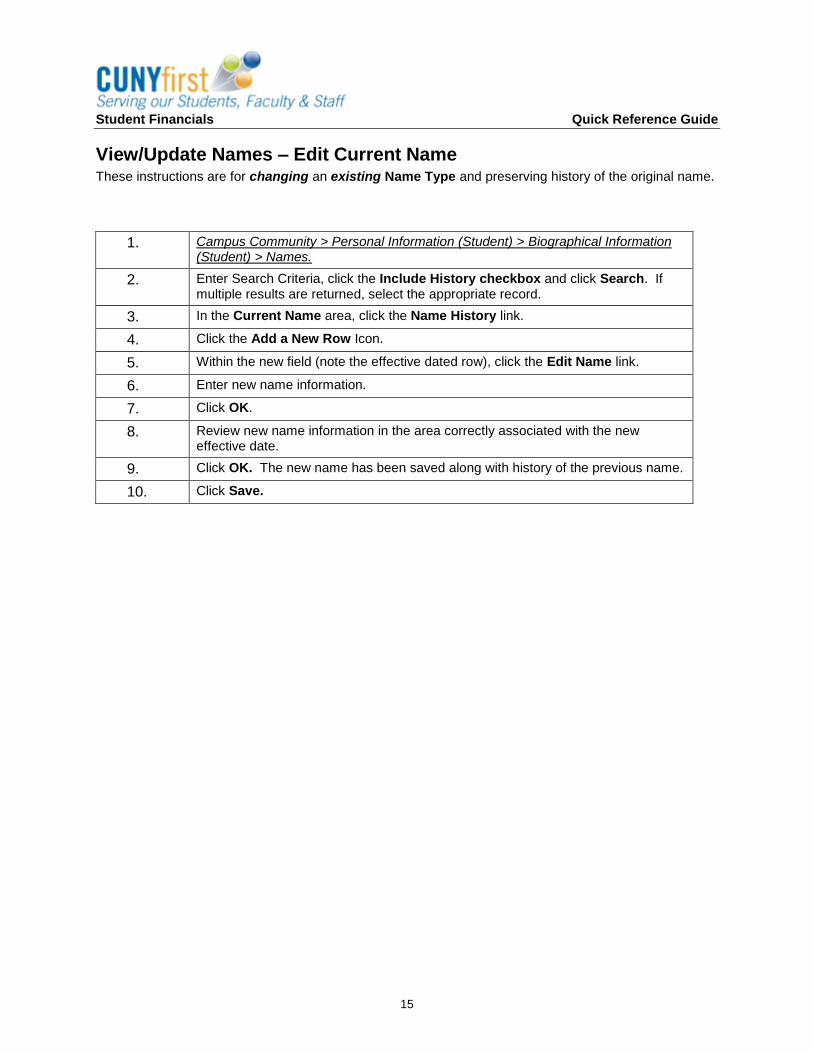
View/Update Names – Edit Current Name These instructions are for changing an existing Name Type and preserving history of the original name.
1. Campus Community > Personal Information (Student) > Biographical Information (Student) > Names.
2. Enter Search Criteria, click the Include History checkbox and click Search. If multiple results are returned, select the appropriate record.
3. In the Current Name area, click the Name History link.
4. Click the Add a New Row Icon.
5. Within the new field (note the effective dated row), click the Edit Name link.
6. Enter new name information.
7. Click OK.
8. Review new name information in the area correctly associated with the new effective date.
9. Click OK. The new name has been saved along with history of the previous name.
10. Click Save.
Student Financials Quick Reference Guide
16
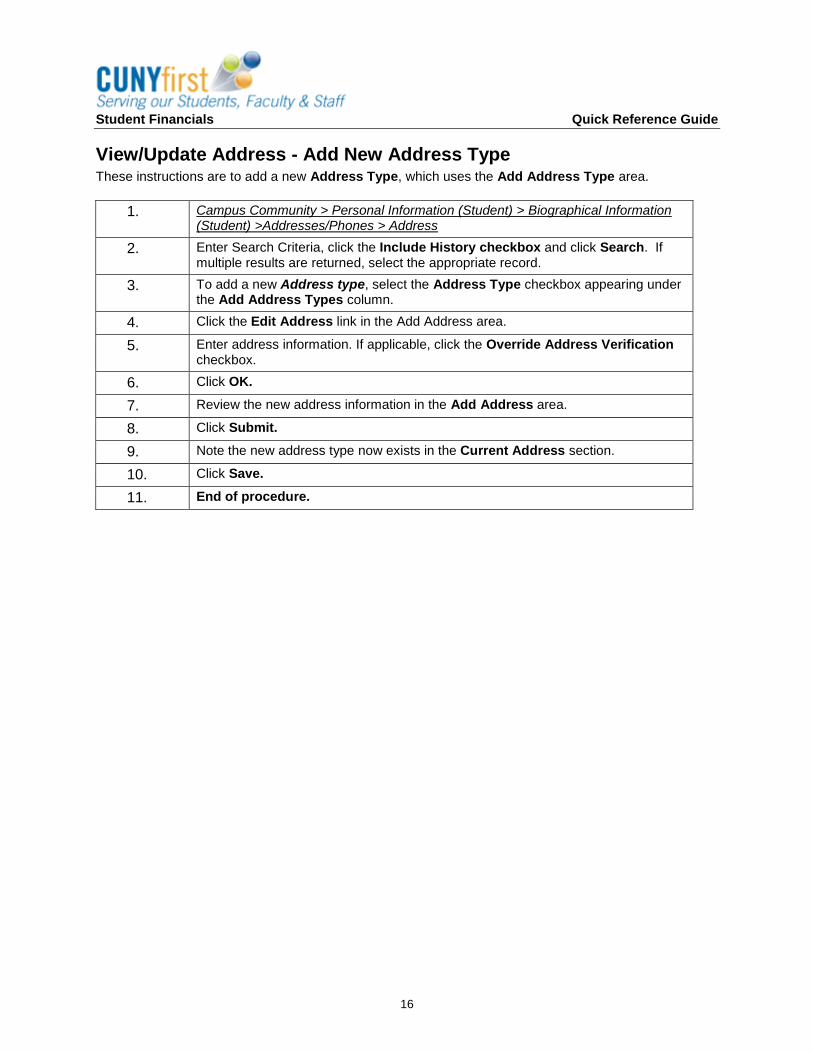
View/Update Address - Add New Address Type These instructions are to add a new Address Type, which uses the Add Address Type area.
1. Campus Community > Personal Information (Student) > Biographical Information (Student) >Addresses/Phones > Address
2. Enter Search Criteria, click the Include History checkbox and click Search. If multiple results are returned, select the appropriate record.
3. To add a new Address type, select the Address Type checkbox appearing under the Add Address Types column.
4. Click the Edit Address link in the Add Address area.
5. Enter address information. If applicable, click the Override Address Verification checkbox.
6. Click OK.
7. Review the new address information in the Add Address area.
8. Click Submit.
9. Note the new address type now exists in the Current Address section.
10. Click Save.
11. End of procedure.
Student Financials Quick Reference Guide
17
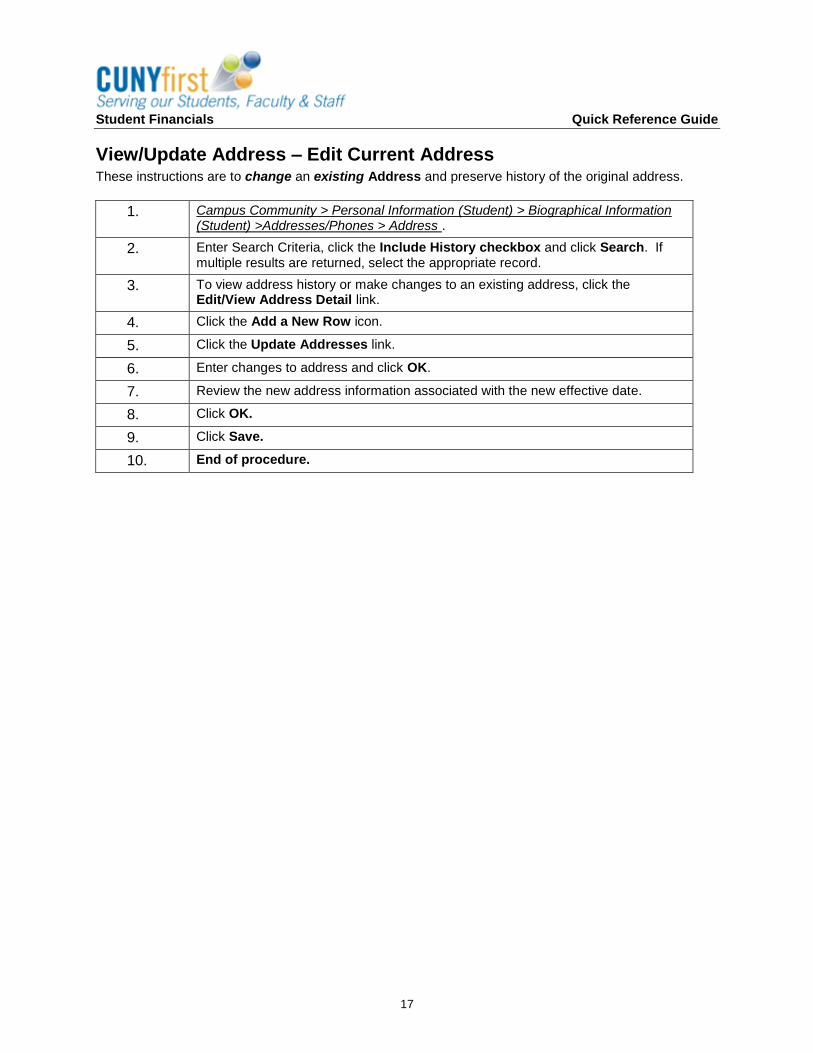
View/Update Address – Edit Current Address These instructions are to change an existing Address and preserve history of the original address.
1. Campus Community > Personal Information (Student) > Biographical Information (Student) >Addresses/Phones > Address .
2. Enter Search Criteria, click the Include History checkbox and click Search. If multiple results are returned, select the appropriate record.
3. To view address history or make changes to an existing address, click the Edit/View Address Detail link.
4. Click the Add a New Row icon.
5. Click the Update Addresses link.
6. Enter changes to address and click OK.
7. Review the new address information associated with the new effective date.
8. Click OK.
9. Click Save.
10. End of procedure.
Student Financials Quick Reference Guide
18
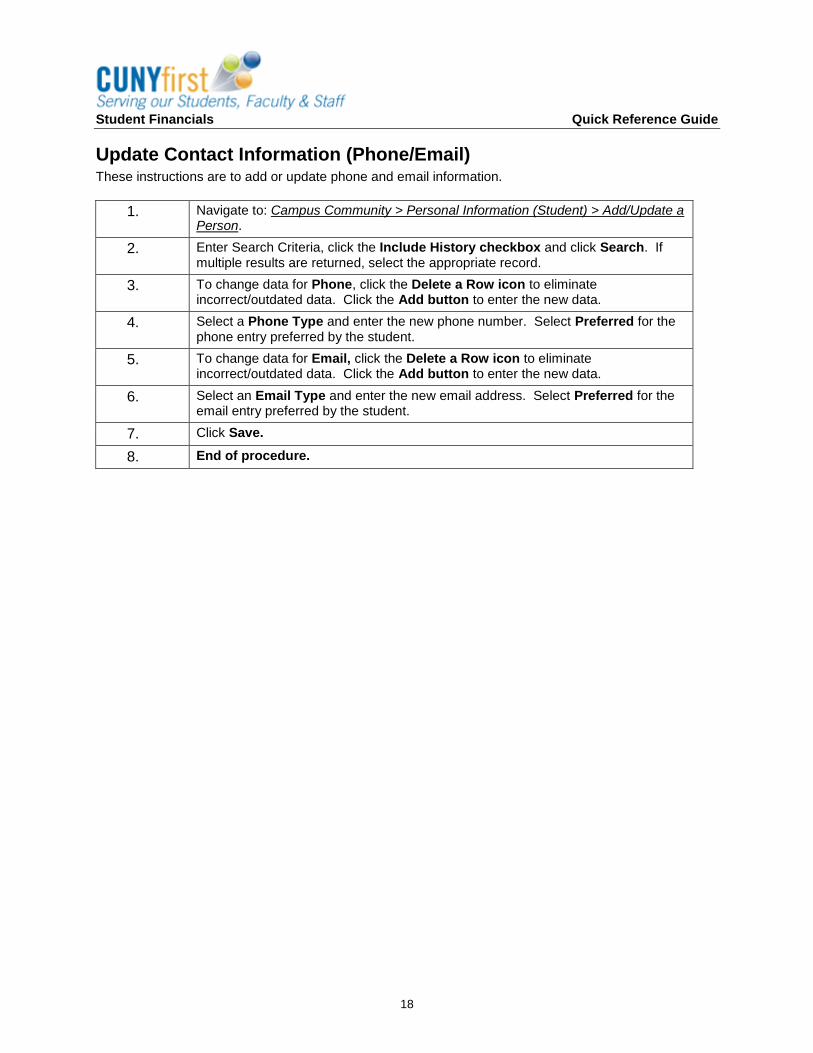
Update Contact Information (Phone/Email) These instructions are to add or update phone and email information.
1. Navigate to: Campus Community > Personal Information (Student) > Add/Update a Person.
2. Enter Search Criteria, click the Include History checkbox and click Search. If multiple results are returned, select the appropriate record.
3. To change data for Phone, click the Delete a Row icon to eliminate incorrect/outdated data. Click the Add button to enter the new data.
4. Select a Phone Type and enter the new phone number. Select Preferred for the phone entry preferred by the student.
5. To change data for Email, click the Delete a Row icon to eliminate incorrect/outdated data. Click the Add button to enter the new data.
6. Select an Email Type and enter the new email address. Select Preferred for the email entry preferred by the student.
7. Click Save.
8. End of procedure.
Student Financials Quick Reference Guide
19
View/Update Ethnicity Information Ethnicity data is recorded on the regional tab. This data can be used for regulatory state and federal reporting. Intuitions can collect more detailed ethnicity information than may be required by state or federal agencies if there is an internal need for this information.
1. Navigate to Campus Community > Personal Information (Student) >Biographical (Student) > Personal Attributes > Ethnicity.
2. Enter search criteria and click Search.
3. If multiple results are returned, select the appropriate record.
4. If the student is Hispanic or Latino, click the associated checkbox.
5. If the Hispanic or Latino checkbox has been checked, select a value from the Ethnic Group menu.
6. If a record already exists in the Ethnicity Region and new information must be entered, click the (+) Add button in the Visa/Permit Data section to create an additional record and follow the steps below. To delete existing ethnicity information (in case of error), click the (-) button.
7. Select values for Regulatory Region and Ethnic Group.
8. Select the Primary and IPEDS checkbox if relevant.
9. Enter Percentage Data (%), if available.
10. Click Save.
11. End of procedure.
Student Financials Quick Reference Guide
20
View/Update Emergency Contacts Campuses can enter the names, addresses, and telephone numbers of people to contact when an individual has an emergency situation.
1. Navigate to: Campus Community > Personal Information (Student) > Biographical (Student) > Relationships > Emergency Contacts.
2. Enter Search Criteria and Click Search.
3. If multiple results are returned, select the appropriate record.
4. If contact information exists, click the Add a New Row icon to enter new data.
5. Enter information for Contact Name.
6. Select a value from the Relationship drop-down menu.
7. Use address, phone and primary contact checkbox, if relevant. When these boxes are checked, the address and phone information will appear in the Contact Address box and the Individual’s Phone box.
8. Use the Edit Address link to enter a different address for this contact.
9. Enter information in the Phone and Extension fields.
10. Click Save.
11. End of Procedure.
Student Financials Quick Reference Guide
21
View/Update External System ID Campuses can enter and track IDs from external systems and correlate them to individuals or organizations in CUNYfirst.
1. Navigate to: Campus Community > Personal Information (Student) > Identification (Student) > External System ID.
2. Enter Search Criteria, click the Include History checkbox, and click Search.
3. If multiple results are returned, select the appropriate record.
4. If External System ID information exists, click the Add a New Row icon to enter new data.
5. Select a value from the External System pull-down menu.
6. Enter the appropriate Effective Date and External System ID in the External System Details section.
7. Note that new rows of information can be added for new External Systems and also for additional External System Details (date/ID) within the same External System.
8. Click Save.
9. End of Procedure.
Student Financials Quick Reference Guide
22
View/Update Residency Data Official residency should be entered and maintained through the Residency Data component. Note that the Term Activation process is dependent upon updated residency information.
1. Navigate to: Campus Community > Personal Information (Student) > Identification (Student) > Residency Data.
2. Enter Search Criteria, click the Include History checkbox, and click Search.
3. If multiple results are returned, select the appropriate record.
4. If Residency information exists, click the Add a New Row icon to enter new data.
5. Use the Residency Official 1 page to enter official residency data for an individual.
6. Enter the Institution value
7. Enter the Effective Term value.
8. From the Residency drop-down list, select the rule that describes the individual's residency status.
9. In the Residency Date field, enter the date that the individual established or reported the residency.
10. Enter the Admission value (under the Additional Residency Data section).
11. Enter the Fin Aid Federal Residency value.
12. Enter the Fin Aid State Residency value.
13. Enter the Tuition value.
14. Enter the Admission Residency Exception value.
15. Enter the Fin Aid Fed Residency Excpt value.
16. Enter the Fin Aid State Residency Excpt value.
17. Enter the Tuition Residency Exception value.
18. Click the Residency Official 2 tab. Use the Residency Official 2 page to enter additional official residency data for an individual.
19. Enter location information in fields for District, City, Country, State, and Postal.
20. Use the Residency Appeal page to record residency appeal information. For example, a student may have been entered as Out of State for tuition and he or she wants to submit additional information to qualify for in-state tuition.
21. Enter the Effective Date value
22. Enter the value Appeal Status value
23. Enter any relevant comments in the Comment area.
24. Use the Residency Self-Report page to enter unofficial, unverified residency information that an individual reports to your institution.
25. Enter the Date Reported value
26. Enter the Source value
27. Enter location information in fields for District, City, Country, State, and Postal.
28. Enter any relevant information in the Comment field.

Student Financials Quick Reference Guide
23
29. Click the Save button.
30. End of Procedure.
Student Financials Quick Reference Guide
24
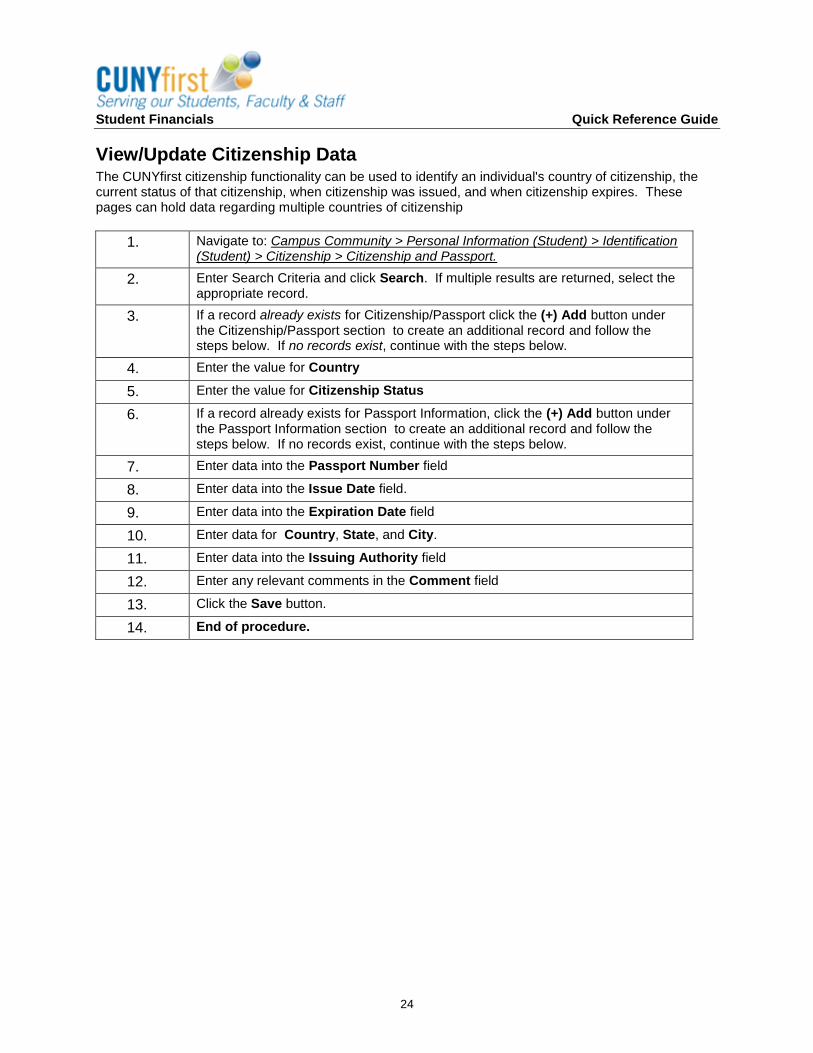
View/Update Citizenship Data The CUNYfirst citizenship functionality can be used to identify an individual's country of citizenship, the current status of that citizenship, when citizenship was issued, and when citizenship expires. These pages can hold data regarding multiple countries of citizenship
1. Navigate to: Campus Community > Personal Information (Student) > Identification (Student) > Citizenship > Citizenship and Passport.
2. Enter Search Criteria and click Search. If multiple results are returned, select the appropriate record.
3. If a record already exists for Citizenship/Passport click the (+) Add button under the Citizenship/Passport section to create an additional record and follow the steps below. If no records exist, continue with the steps below.
4. Enter the value for Country
5. Enter the value for Citizenship Status
6. If a record already exists for Passport Information, click the (+) Add button under the Passport Information section to create an additional record and follow the steps below. If no records exist, continue with the steps below.
7. Enter data into the Passport Number field
8. Enter data into the Issue Date field.
9. Enter data into the Expiration Date field
10. Enter data for Country, State, and City.
11. Enter data into the Issuing Authority field
12. Enter any relevant comments in the Comment field
13. Click the Save button.
14. End of procedure.
Student Financials Quick Reference Guide
25
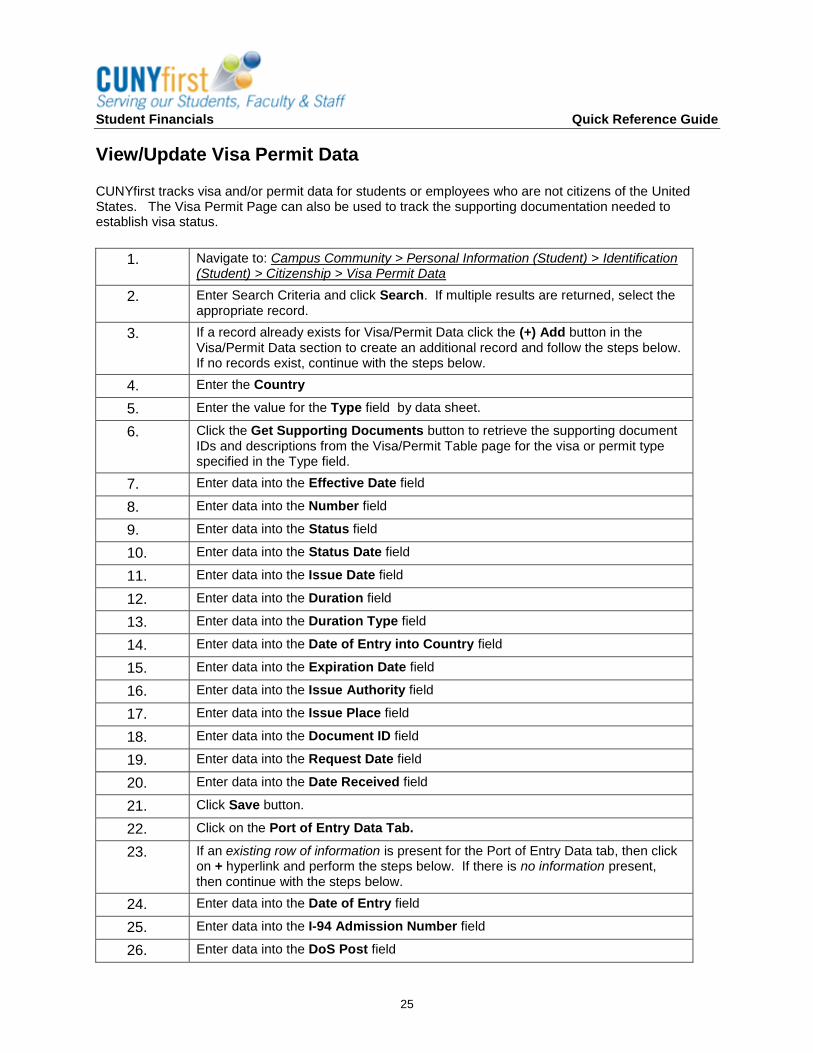
View/Update Visa Permit Data
CUNYfirst tracks visa and/or permit data for students or employees who are not citizens of the United States. The Visa Permit Page can also be used to track the supporting documentation needed to establish visa status.
1. Navigate to: Campus Community > Personal Information (Student) > Identification (Student) > Citizenship > Visa Permit Data
2. Enter Search Criteria and click Search. If multiple results are returned, select the appropriate record.
3. If a record already exists for Visa/Permit Data click the (+) Add button in the Visa/Permit Data section to create an additional record and follow the steps below. If no records exist, continue with the steps below.
4. Enter the Country
5. Enter the value for the Type field by data sheet.
6. Click the Get Supporting Documents button to retrieve the supporting document IDs and descriptions from the Visa/Permit Table page for the visa or permit type specified in the Type field.
7. Enter data into the Effective Date field
8. Enter data into the Number field
9. Enter data into the Status field
10. Enter data into the Status Date field
11. Enter data into the Issue Date field
12. Enter data into the Duration field
13. Enter data into the Duration Type field
14. Enter data into the Date of Entry into Country field
15. Enter data into the Expiration Date field
16. Enter data into the Issue Authority field
17. Enter data into the Issue Place field
18. Enter data into the Document ID field
19. Enter data into the Request Date field
20. Enter data into the Date Received field
21. Click Save button.
22. Click on the Port of Entry Data Tab.
23. If an existing row of information is present for the Port of Entry Data tab, then click on + hyperlink and perform the steps below. If there is no information present, then continue with the steps below.
24. Enter data into the Date of Entry field
25. Enter data into the I-94 Admission Number field
26. Enter data into the DoS Post field
Student Financials Quick Reference Guide
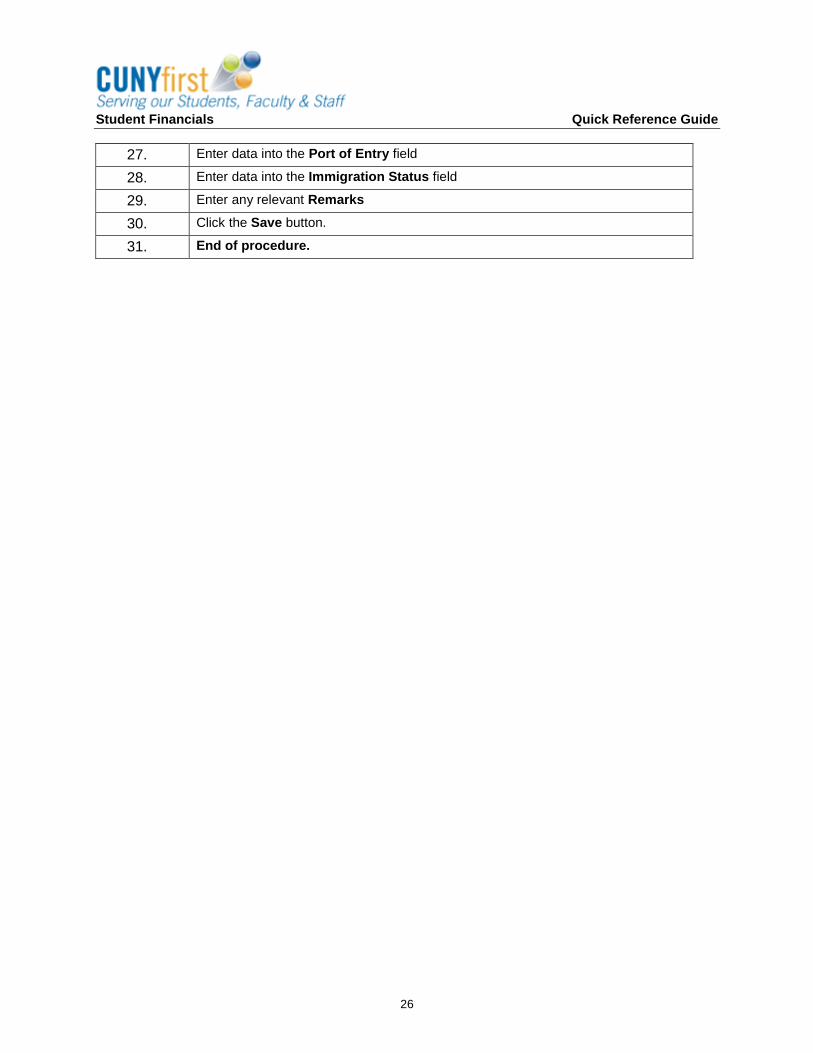
26
27. Enter data into the Port of Entry field
28. Enter data into the Immigration Status field
29. Enter any relevant Remarks
30. Click the Save button.
31. End of procedure.
Student Financials Quick Reference Guide
27
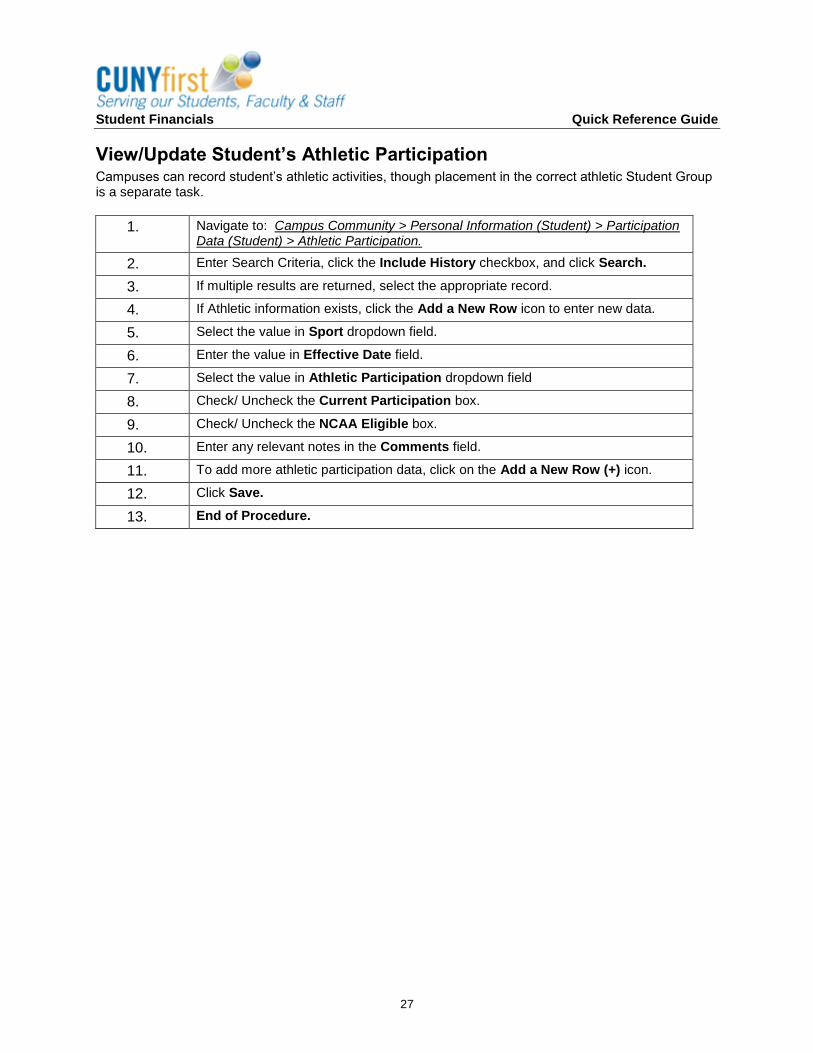
View/Update Student’s Athletic Participation Campuses can record student’s athletic activities, though placement in the correct athletic Student Group is a separate task.
1. Navigate to: Campus Community > Personal Information (Student) > Participation Data (Student) > Athletic Participation.
2. Enter Search Criteria, click the Include History checkbox, and click Search.
3. If multiple results are returned, select the appropriate record.
4. If Athletic information exists, click the Add a New Row icon to enter new data.
5. Select the value in Sport dropdown field.
6. Enter the value in Effective Date field.
7. Select the value in Athletic Participation dropdown field
8. Check/ Uncheck the Current Participation box.
9. Check/ Uncheck the NCAA Eligible box.
10. Enter any relevant notes in the Comments field.
11. To add more athletic participation data, click on the Add a New Row (+) icon.
12. Click Save.
13. End of Procedure.
Student Financials Quick Reference Guide
28
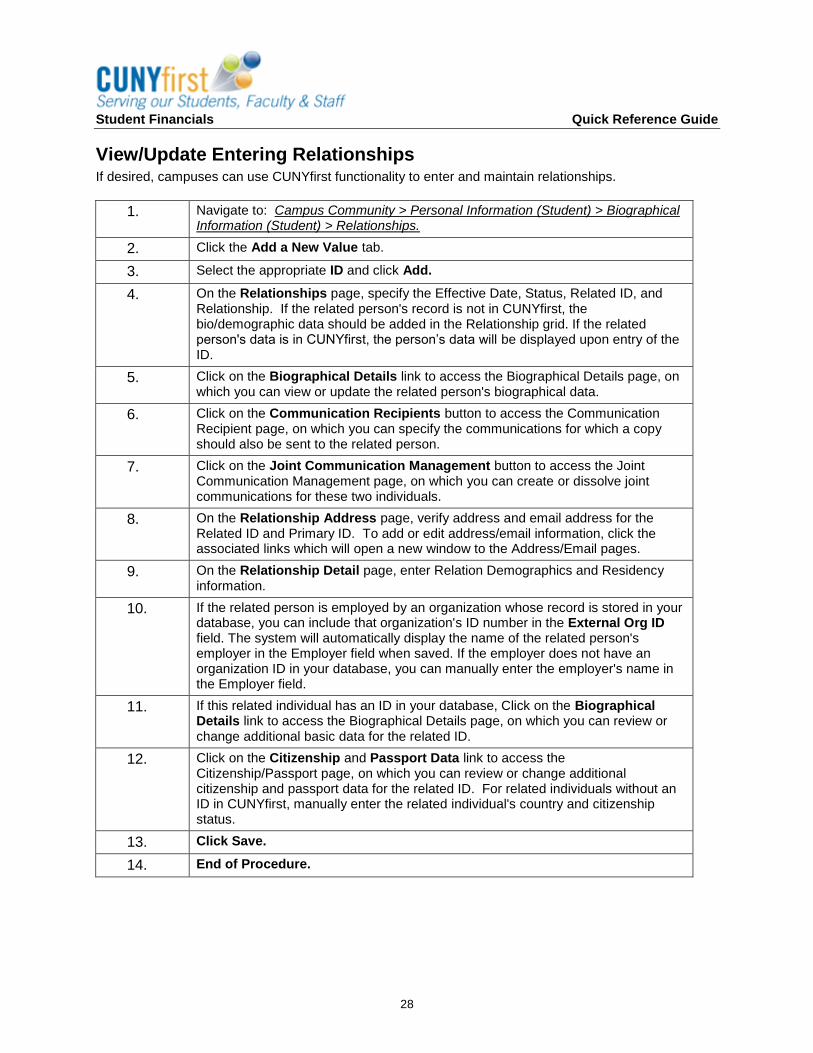
View/Update Entering Relationships If desired, campuses can use CUNYfirst functionality to enter and maintain relationships.
1. Navigate to: Campus Community > Personal Information (Student) > Biographical Information (Student) > Relationships.
2. Click the Add a New Value tab.
3. Select the appropriate ID and click Add.
4. On the Relationships page, specify the Effective Date, Status, Related ID, and Relationship. If the related person's record is not in CUNYfirst, the bio/demographic data should be added in the Relationship grid. If the related person's data is in CUNYfirst, the person’s data will be displayed upon entry of the ID.
5. Click on the Biographical Details link to access the Biographical Details page, on which you can view or update the related person's biographical data.
6. Click on the Communication Recipients button to access the Communication Recipient page, on which you can specify the communications for which a copy should also be sent to the related person.
7. Click on the Joint Communication Management button to access the Joint Communication Management page, on which you can create or dissolve joint communications for these two individuals.
8. On the Relationship Address page, verify address and email address for the Related ID and Primary ID. To add or edit address/email information, click the associated links which will open a new window to the Address/Email pages.
9. On the Relationship Detail page, enter Relation Demographics and Residency information.
10. If the related person is employed by an organization whose record is stored in your database, you can include that organization's ID number in the External Org ID field. The system will automatically display the name of the related person's employer in the Employer field when saved. If the employer does not have an organization ID in your database, you can manually enter the employer's name in the Employer field.
11. If this related individual has an ID in your database, Click on the Biographical Details link to access the Biographical Details page, on which you can review or change additional basic data for the related ID.
12. Click on the Citizenship and Passport Data link to access the Citizenship/Passport page, on which you can review or change additional citizenship and passport data for the related ID. For related individuals without an ID in CUNYfirst, manually enter the related individual's country and citizenship status.
13. Click Save.
14. End of Procedure.
Student Financials Quick Reference Guide
29
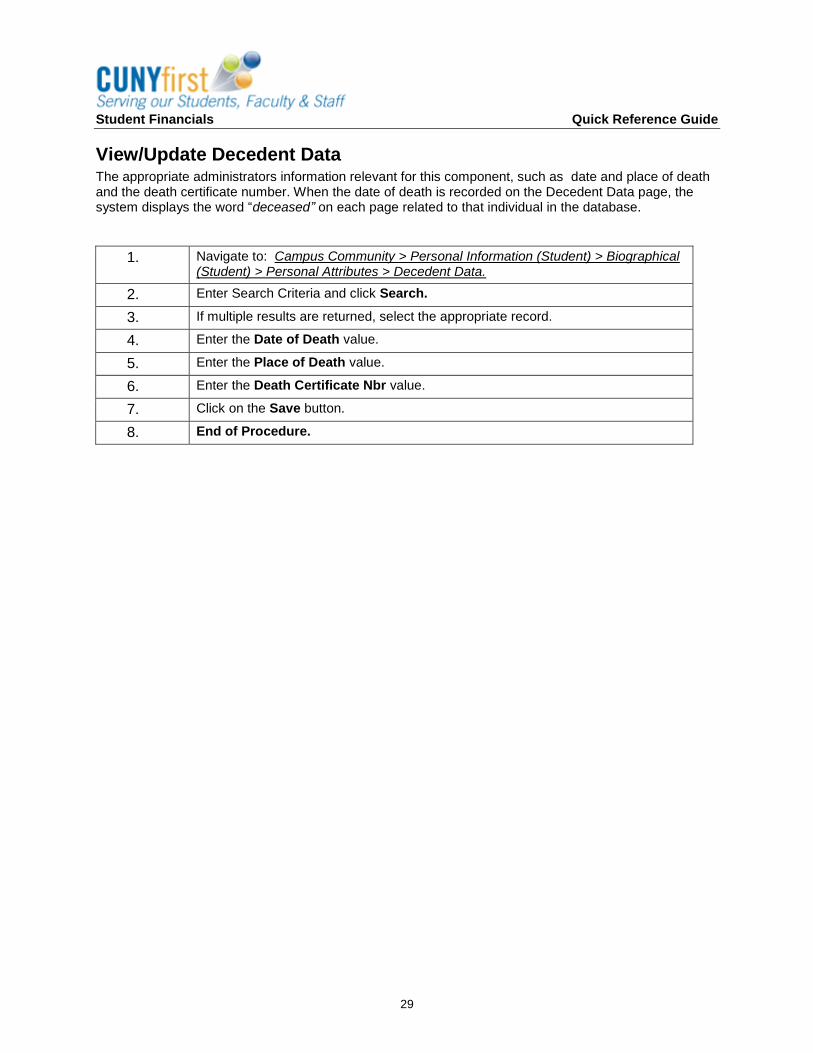
View/Update Decedent Data The appropriate administrators information relevant for this component, such as date and place of death and the death certificate number. When the date of death is recorded on the Decedent Data page, the system displays the word “deceased” on each page related to that individual in the database.
1. Navigate to: Campus Community > Personal Information (Student) > Biographical (Student) > Personal Attributes > Decedent Data.
2. Enter Search Criteria and click Search.
3. If multiple results are returned, select the appropriate record.
4. Enter the Date of Death value.
5. Enter the Place of Death value.
6. Enter the Death Certificate Nbr value.
7. Click on the Save button.
8. End of Procedure.
Student Financials Quick Reference Guide
30
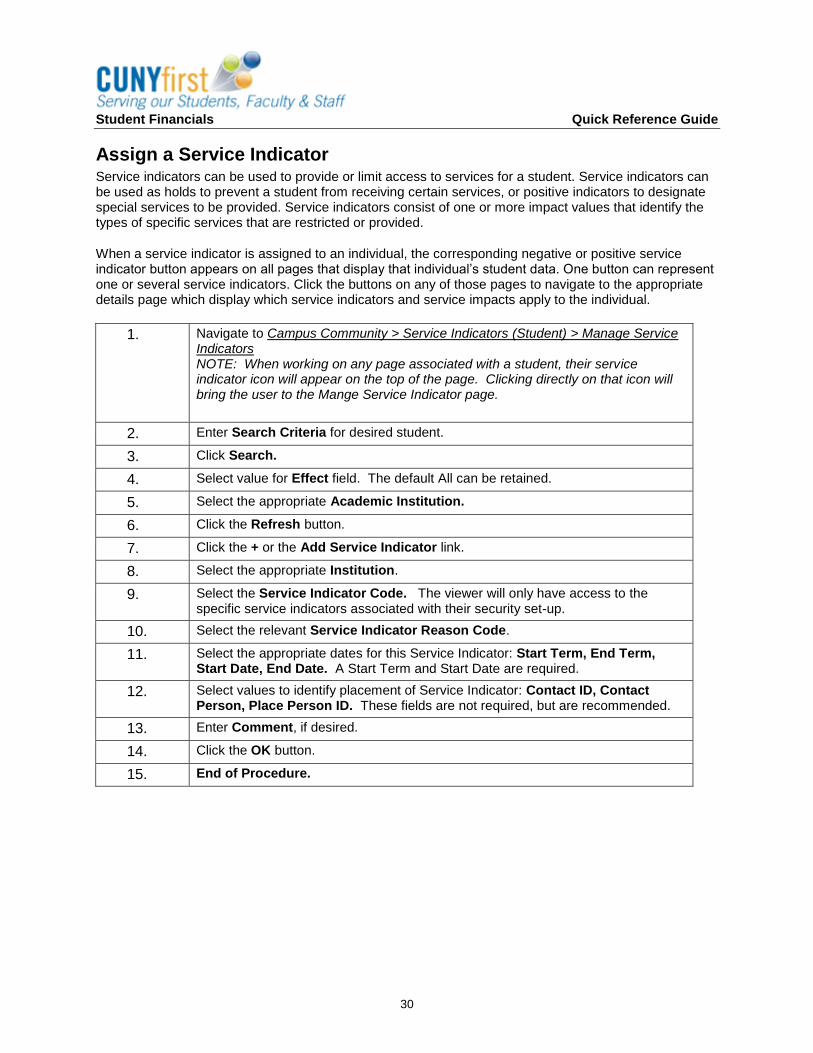
Assign a Service Indicator Service indicators can be used to provide or limit access to services for a student. Service indicators can be used as holds to prevent a student from receiving certain services, or positive indicators to designate special services to be provided. Service indicators consist of one or more impact values that identify the types of specific services that are restricted or provided.
When a service indicator is assigned to an individual, the corresponding negative or positive service indicator button appears on all pages that display that individual’s student data. One button can represent one or several service indicators. Click the buttons on any of those pages to navigate to the appropriate details page which display which service indicators and service impacts apply to the individual.
1. Navigate to Campus Community > Service Indicators (Student) > Manage Service Indicators NOTE: When working on any page associated with a student, their service indicator icon will appear on the top of the page. Clicking directly on that icon will bring the user to the Mange Service Indicator page.
2. Enter Search Criteria for desired student.
3. Click Search.
4. Select value for Effect field. The default All can be retained.
5. Select the appropriate Academic Institution.
6. Click the Refresh button.
7. Click the + or the Add Service Indicator link.
8. Select the appropriate Institution.
9. Select the Service Indicator Code. The viewer will only have access to the specific service indicators associated with their security set-up.
10. Select the relevant Service Indicator Reason Code.
11. Select the appropriate dates for this Service Indicator: Start Term, End Term, Start Date, End Date. A Start Term and Start Date are required.
12. Select values to identify placement of Service Indicator: Contact ID, Contact Person, Place Person ID. These fields are not required, but are recommended.
13. Enter Comment, if desired.
14. Click the OK button.
15. End of Procedure.
Student Financials Quick Reference Guide
31
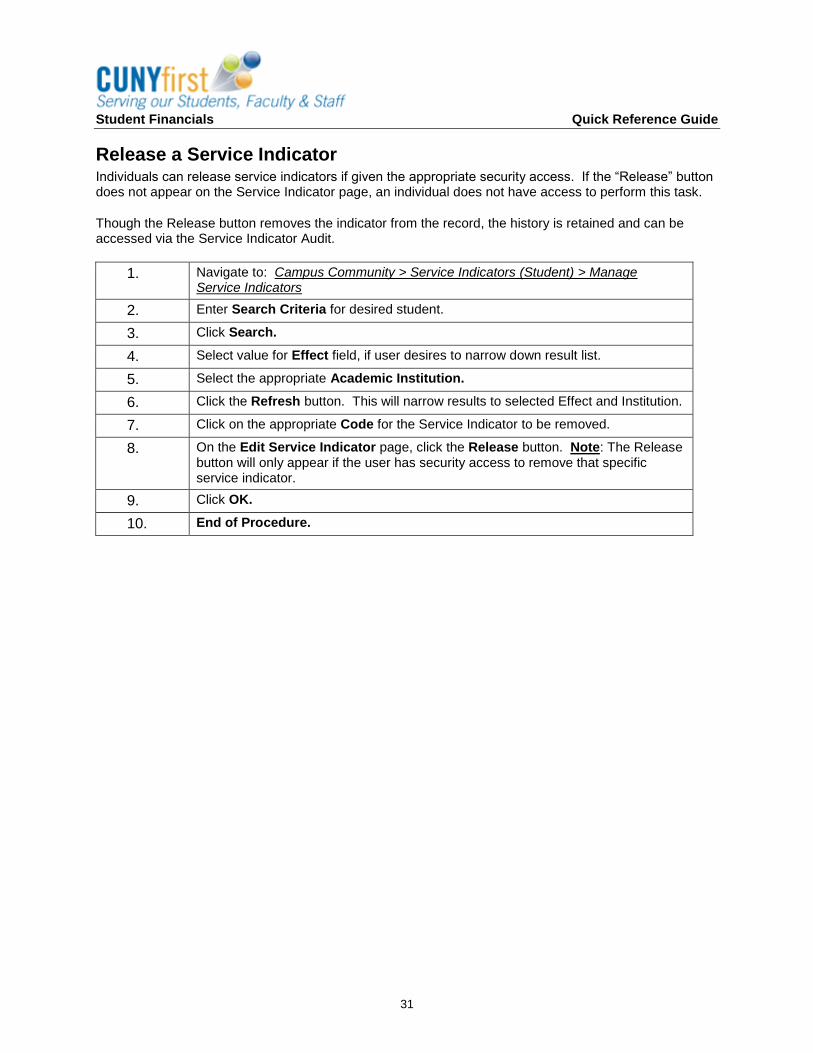
Release a Service Indicator Individuals can release service indicators if given the appropriate security access. If the “Release” button does not appear on the Service Indicator page, an individual does not have access to perform this task.
Though the Release button removes the indicator from the record, the history is retained and can be accessed via the Service Indicator Audit.
1. Navigate to: Campus Community > Service Indicators (Student) > Manage Service Indicators
2. Enter Search Criteria for desired student.
3. Click Search.
4. Select value for Effect field, if user desires to narrow down result list.
5. Select the appropriate Academic Institution.
6. Click the Refresh button. This will narrow results to selected Effect and Institution.
7. Click on the appropriate Code for the Service Indicator to be removed.
8. On the Edit Service Indicator page, click the Release button. Note: The Release button will only appear if the user has security access to remove that specific service indicator.
9. Click OK.
10. End of Procedure.
Student Financials Quick Reference Guide
32
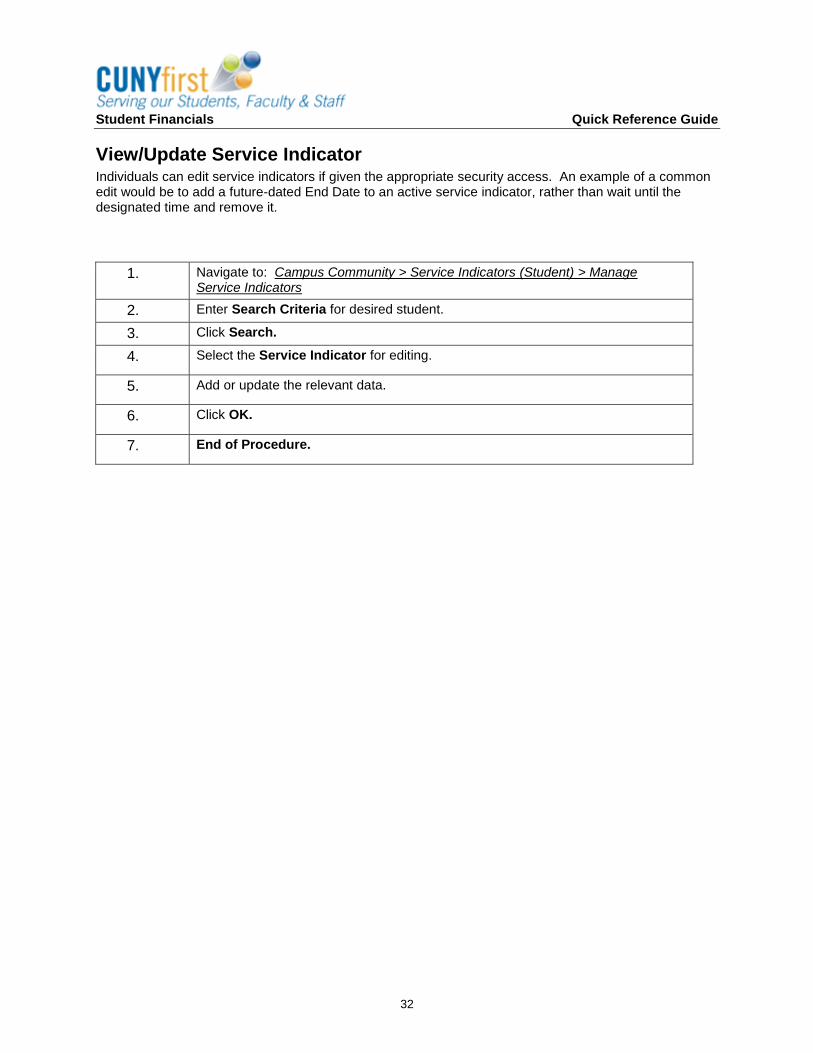
View/Update Service Indicator Individuals can edit service indicators if given the appropriate security access. An example of a common edit would be to add a future-dated End Date to an active service indicator, rather than wait until the designated time and remove it.
1. Navigate to: Campus Community > Service Indicators (Student) > Manage Service Indicators
2. Enter Search Criteria for desired student.
3. Click Search.
4. Select the Service Indicator for editing.
5. Add or update the relevant data.
6. Click OK.
7. End of Procedure.
Student Financials Quick Reference Guide
33
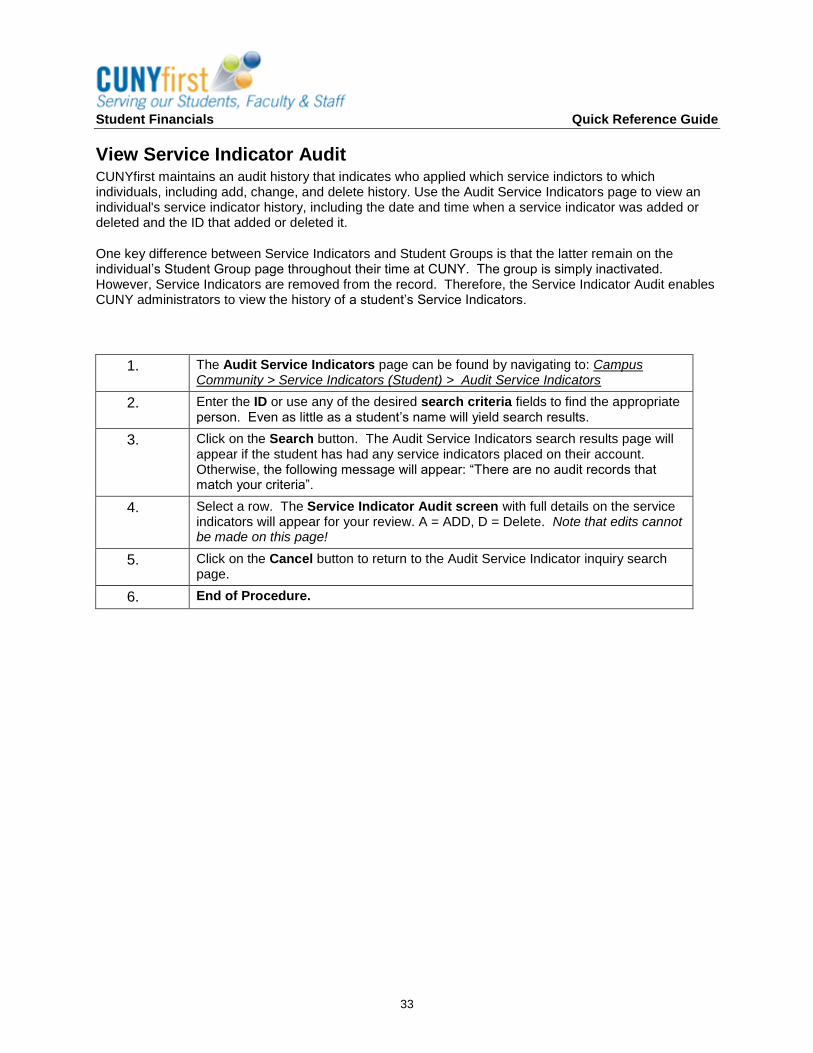
View Service Indicator Audit CUNYfirst maintains an audit history that indicates who applied which service indictors to which individuals, including add, change, and delete history. Use the Audit Service Indicators page to view an individual's service indicator history, including the date and time when a service indicator was added or deleted and the ID that added or deleted it.
One key difference between Service Indicators and Student Groups is that the latter remain on the individual’s Student Group page throughout their time at CUNY. The group is simply inactivated. However, Service Indicators are removed from the record. Therefore, the Service Indicator Audit enables CUNY administrators to view the history of a student’s Service Indicators.
1. The Audit Service Indicators page can be found by navigating to: Campus Community > Service Indicators (Student) > Audit Service Indicators
2. Enter the ID or use any of the desired search criteria fields to find the appropriate person. Even as little as a student’s name will yield search results.
3. Click on the Search button. The Audit Service Indicators search results page will appear if the student has had any service indicators placed on their account. Otherwise, the following message will appear: “There are no audit records that match your criteria”.
4. Select a row. The Service Indicator Audit screen with full details on the service indicators will appear for your review. A = ADD, D = Delete. Note that edits cannot be made on this page!
5. Click on the Cancel button to return to the Audit Service Indicator inquiry search page.
6. End of Procedure.
Student Financials Quick Reference Guide
34
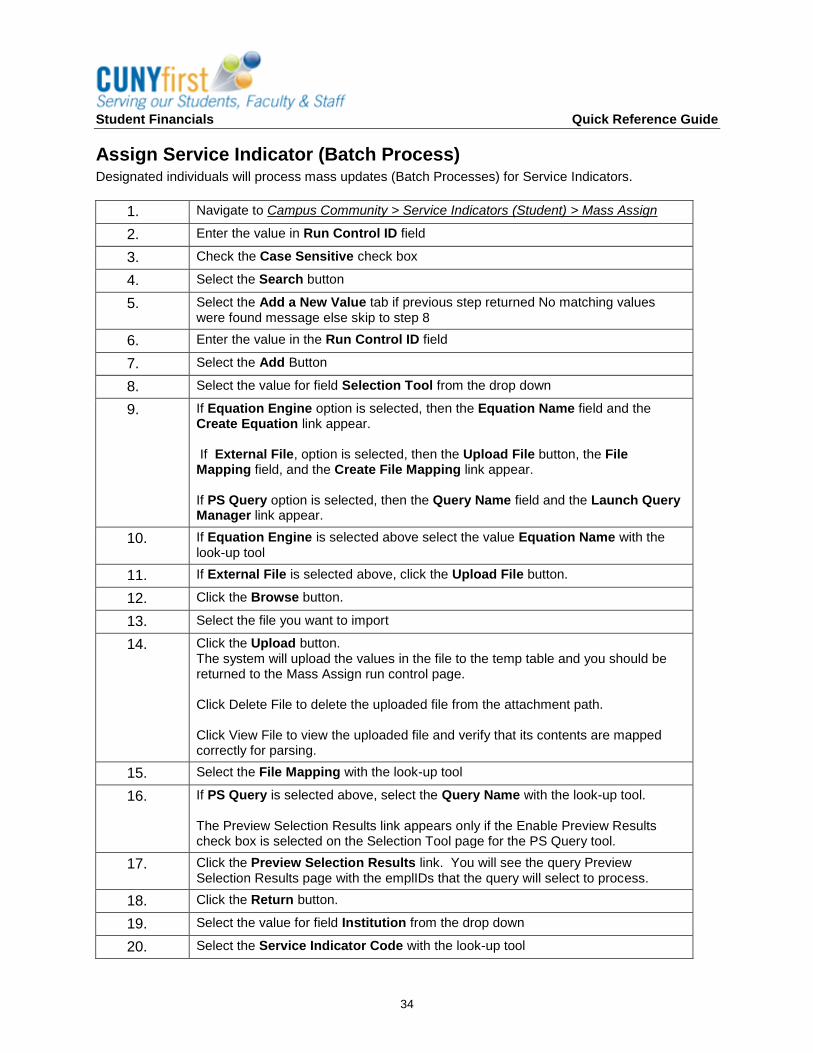
Assign Service Indicator (Batch Process) Designated individuals will process mass updates (Batch Processes) for Service Indicators.
1. Navigate to Campus Community > Service Indicators (Student) > Mass Assign
2. Enter the value in Run Control ID field
3. Check the Case Sensitive check box
4. Select the Search button
5. Select the Add a New Value tab if previous step returned No matching values were found message else skip to step 8
6. Enter the value in the Run Control ID field
7. Select the Add Button
8. Select the value for field Selection Tool from the drop down
9. If Equation Engine option is selected, then the Equation Name field and the Create Equation link appear. If External File, option is selected, then the Upload File button, the File Mapping field, and the Create File Mapping link appear. If PS Query option is selected, then the Query Name field and the Launch Query Manager link appear.
10. If Equation Engine is selected above select the value Equation Name with the look-up tool
11. If External File is selected above, click the Upload File button.
12. Click the Browse button.
13. Select the file you want to import
14. Click the Upload button. The system will upload the values in the file to the temp table and you should be returned to the Mass Assign run control page. Click Delete File to delete the uploaded file from the attachment path. Click View File to view the uploaded file and verify that its contents are mapped correctly for parsing.
15. Select the File Mapping with the look-up tool
16. If PS Query is selected above, select the Query Name with the look-up tool. The Preview Selection Results link appears only if the Enable Preview Results check box is selected on the Selection Tool page for the PS Query tool.
17. Click the Preview Selection Results link. You will see the query Preview Selection Results page with the emplIDs that the query will select to process.
18. Click the Return button.
19. Select the value for field Institution from the drop down
20. Select the Service Indicator Code with the look-up tool
Student Financials Quick Reference Guide
35
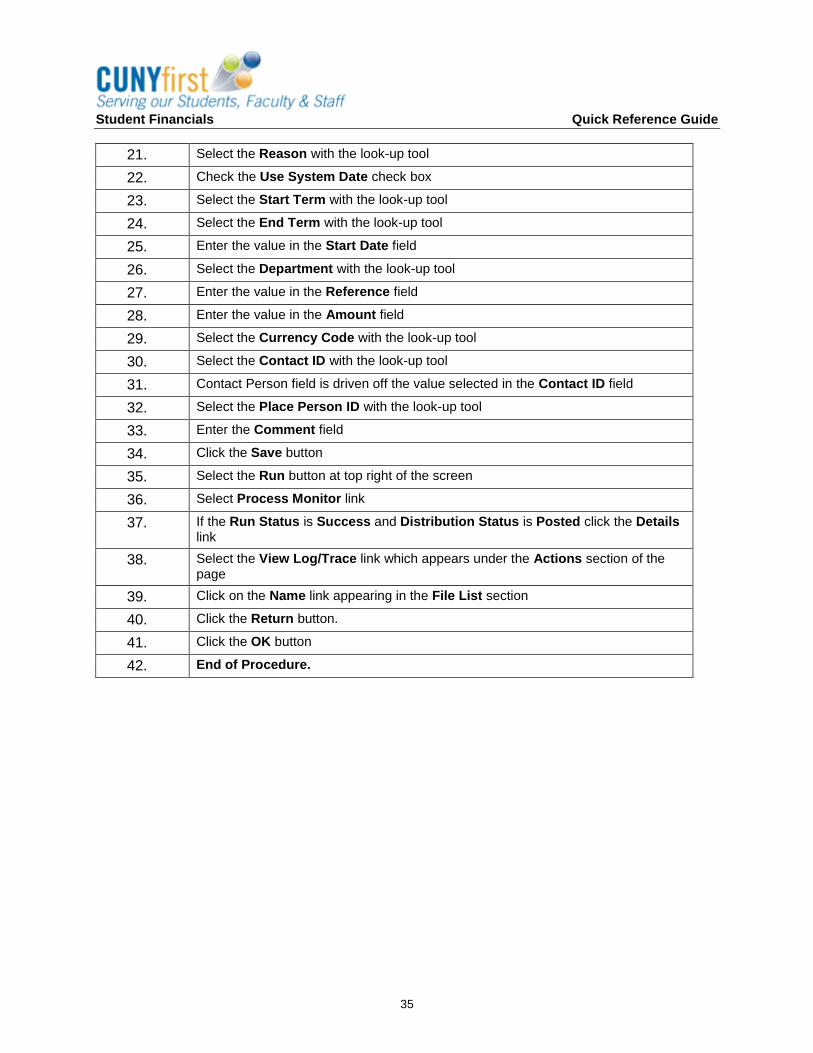
21. Select the Reason with the look-up tool
22. Check the Use System Date check box
23. Select the Start Term with the look-up tool
24. Select the End Term with the look-up tool
25. Enter the value in the Start Date field
26. Select the Department with the look-up tool
27. Enter the value in the Reference field
28. Enter the value in the Amount field
29. Select the Currency Code with the look-up tool
30. Select the Contact ID with the look-up tool
31. Contact Person field is driven off the value selected in the Contact ID field
32. Select the Place Person ID with the look-up tool
33. Enter the Comment field
34. Click the Save button
35. Select the Run button at top right of the screen
36. Select Process Monitor link
37. If the Run Status is Success and Distribution Status is Posted click the Details link
38. Select the View Log/Trace link which appears under the Actions section of the page
39. Click on the Name link appearing in the File List section
40. Click the Return button.
41. Click the OK button
42. End of Procedure.
Student Financials Quick Reference Guide
36
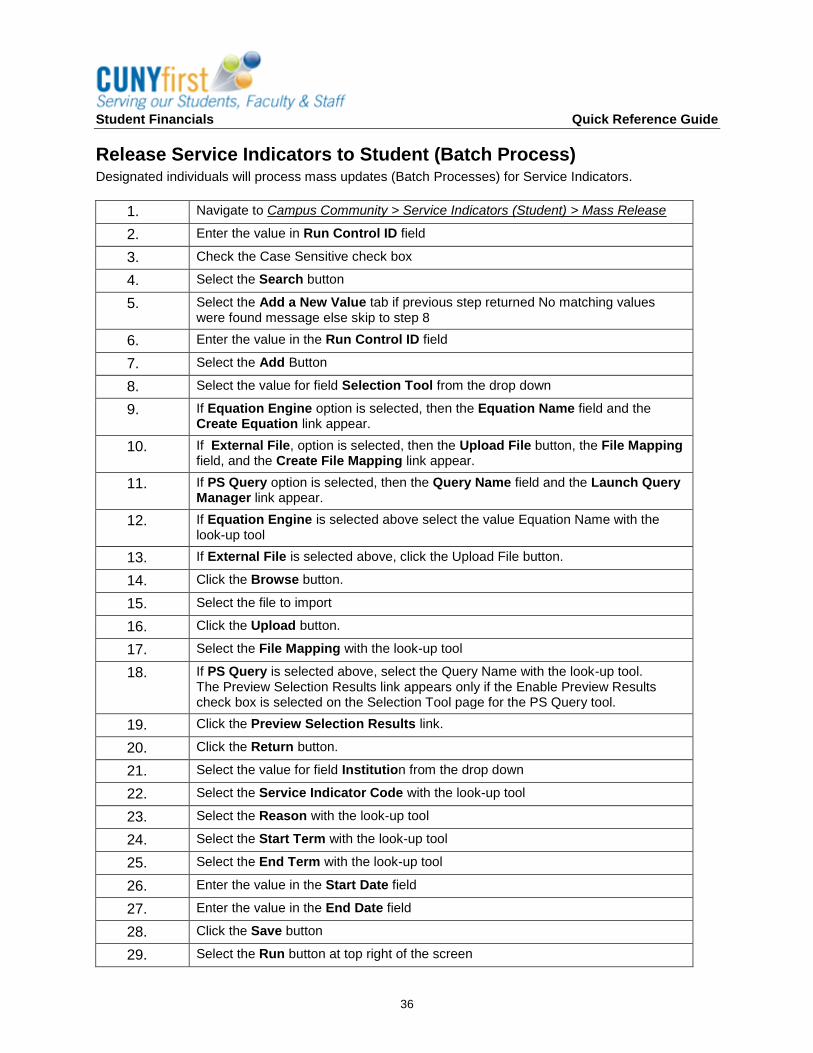
Release Service Indicators to Student (Batch Process) Designated individuals will process mass updates (Batch Processes) for Service Indicators.
1. Navigate to Campus Community > Service Indicators (Student) > Mass Release
2. Enter the value in Run Control ID field
3. Check the Case Sensitive check box
4. Select the Search button
5. Select the Add a New Value tab if previous step returned No matching values were found message else skip to step 8
6. Enter the value in the Run Control ID field
7. Select the Add Button
8. Select the value for field Selection Tool from the drop down
9. If Equation Engine option is selected, then the Equation Name field and the Create Equation link appear.
10. If External File, option is selected, then the Upload File button, the File Mapping field, and the Create File Mapping link appear.
11. If PS Query option is selected, then the Query Name field and the Launch Query Manager link appear.
12. If Equation Engine is selected above select the value Equation Name with the look-up tool
13. If External File is selected above, click the Upload File button.
14. Click the Browse button.
15. Select the file to import
16. Click the Upload button.
17. Select the File Mapping with the look-up tool
18. If PS Query is selected above, select the Query Name with the look-up tool. The Preview Selection Results link appears only if the Enable Preview Results check box is selected on the Selection Tool page for the PS Query tool.
19. Click the Preview Selection Results link.
20. Click the Return button.
21. Select the value for field Institution from the drop down
22. Select the Service Indicator Code with the look-up tool
23. Select the Reason with the look-up tool
24. Select the Start Term with the look-up tool
25. Select the End Term with the look-up tool
26. Enter the value in the Start Date field
27. Enter the value in the End Date field
28. Click the Save button
29. Select the Run button at top right of the screen
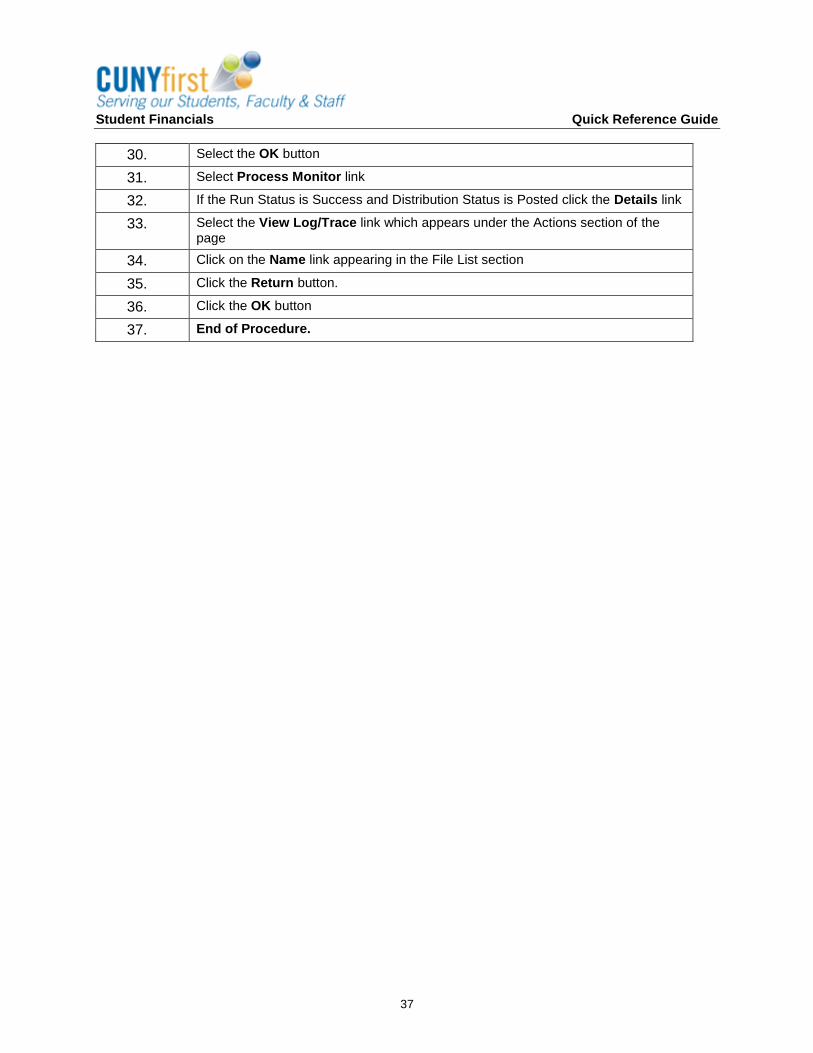
Student Financials Quick Reference Guide
37
30. Select the OK button
31. Select Process Monitor link
32. If the Run Status is Success and Distribution Status is Posted click the Details link
33. Select the View Log/Trace link which appears under the Actions section of the page
34. Click on the Name link appearing in the File List section
35. Click the Return button.
36. Click the OK button
37. End of Procedure.
Student Financials Quick Reference Guide
38
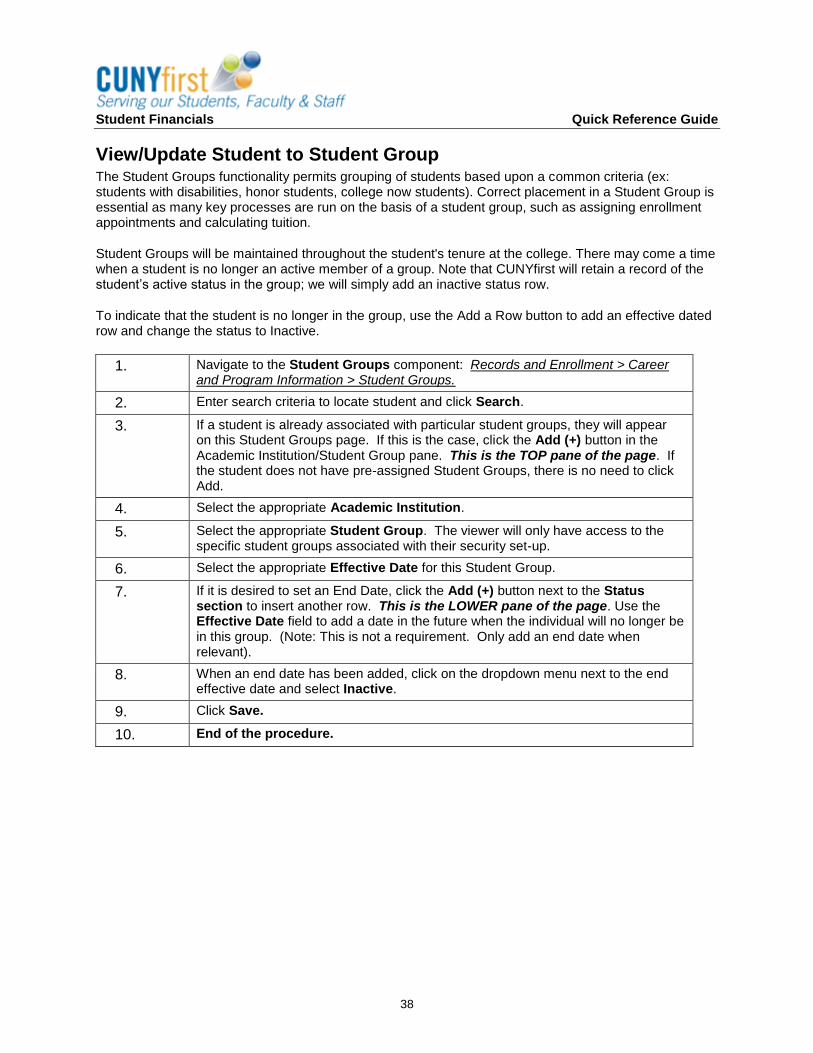
View/Update Student to Student Group The Student Groups functionality permits grouping of students based upon a common criteria (ex: students with disabilities, honor students, college now students). Correct placement in a Student Group is essential as many key processes are run on the basis of a student group, such as assigning enrollment appointments and calculating tuition.
Student Groups will be maintained throughout the student's tenure at the college. There may come a time when a student is no longer an active member of a group. Note that CUNYfirst will retain a record of the student’s active status in the group; we will simply add an inactive status row.
To indicate that the student is no longer in the group, use the Add a Row button to add an effective dated row and change the status to Inactive.
1. Navigate to the Student Groups component: Records and Enrollment > Career and Program Information > Student Groups.
2. Enter search criteria to locate student and click Search.
3. If a student is already associated with particular student groups, they will appear on this Student Groups page. If this is the case, click the Add (+) button in the Academic Institution/Student Group pane. This is the TOP pane of the page. If the student does not have pre-assigned Student Groups, there is no need to click Add.
4. Select the appropriate Academic Institution.
5. Select the appropriate Student Group. The viewer will only have access to the specific student groups associated with their security set-up.
6. Select the appropriate Effective Date for this Student Group.
7. If it is desired to set an End Date, click the Add (+) button next to the Status section to insert another row. This is the LOWER pane of the page. Use the Effective Date field to add a date in the future when the individual will no longer be in this group. (Note: This is not a requirement. Only add an end date when relevant).
8. When an end date has been added, click on the dropdown menu next to the end effective date and select Inactive.
9. Click Save.
10. End of the procedure.
Student Financials Quick Reference Guide
39
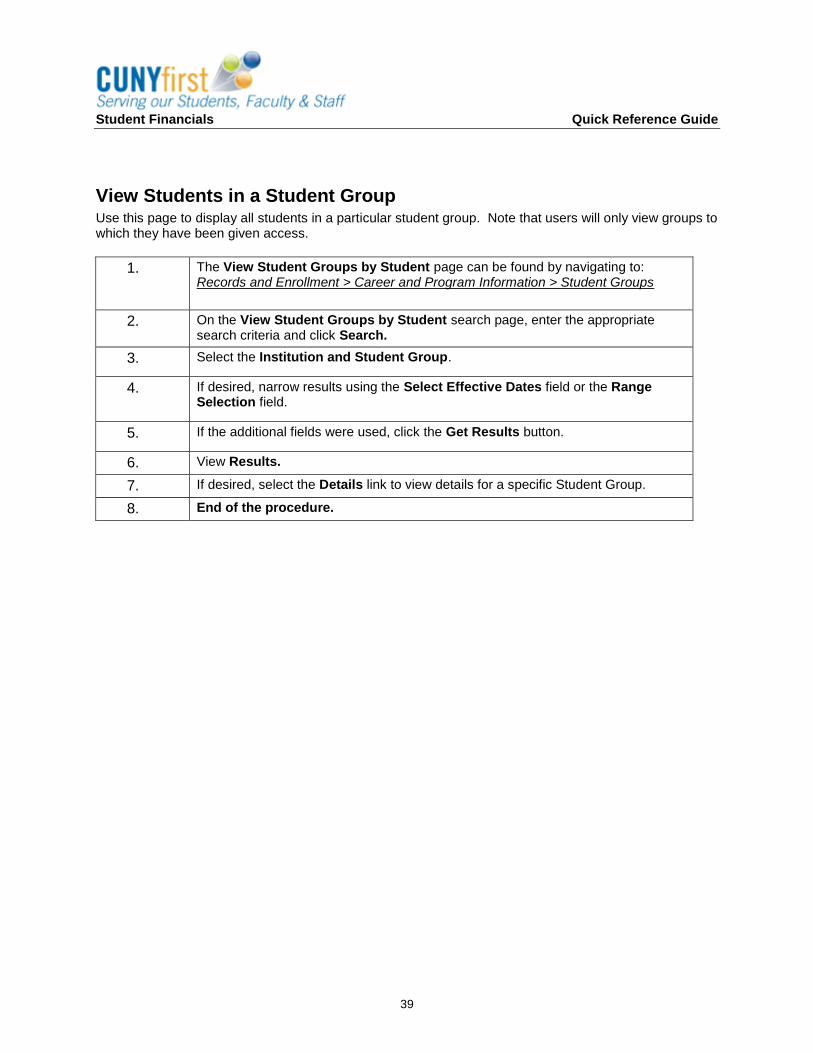
View Students in a Student Group Use this page to display all students in a particular student group. Note that users will only view groups to which they have been given access.
1. The View Student Groups by Student page can be found by navigating to: Records and Enrollment > Career and Program Information > Student Groups
2. On the View Student Groups by Student search page, enter the appropriate search criteria and click Search.
3. Select the Institution and Student Group.
4. If desired, narrow results using the Select Effective Dates field or the Range Selection field.
5. If the additional fields were used, click the Get Results button.
6. View Results.
7. If desired, select the Details link to view details for a specific Student Group.
8. End of the procedure.
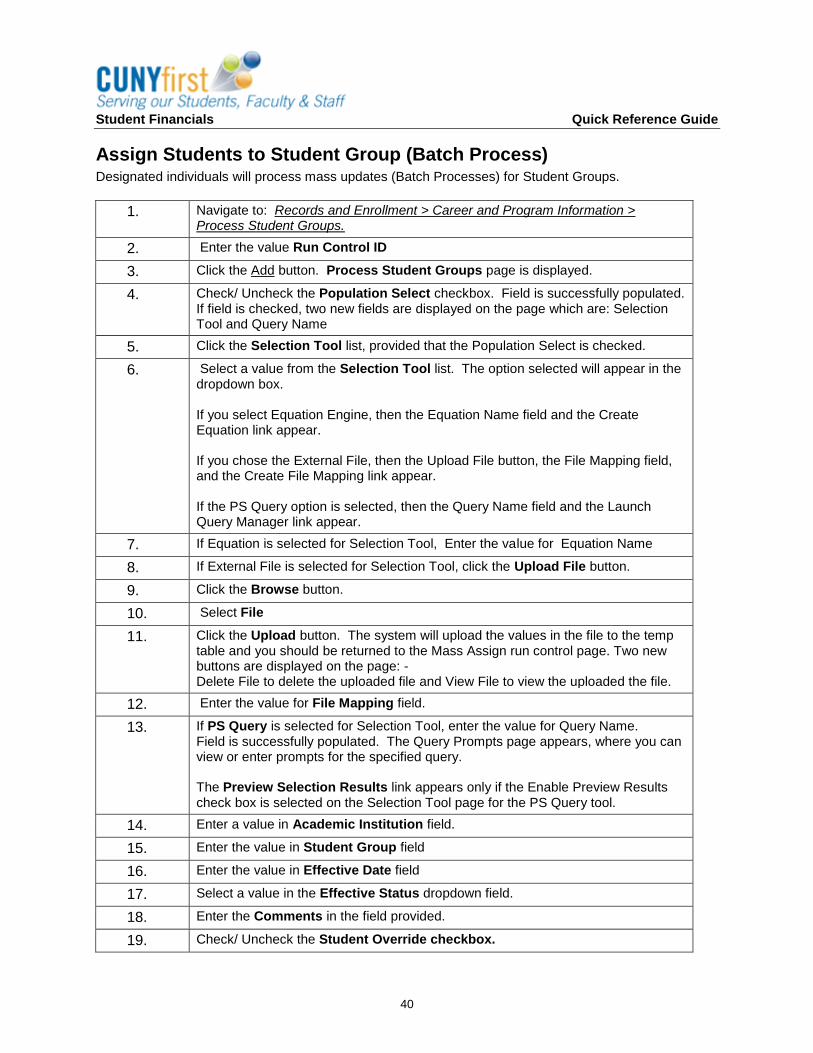
Student Financials Quick Reference Guide
40
Assign Students to Student Group (Batch Process) Designated individuals will process mass updates (Batch Processes) for Student Groups.
1. Navigate to: Records and Enrollment > Career and Program Information > Process Student Groups.
2. Enter the value Run Control ID
3. Click the Add button. Process Student Groups page is displayed.
4. Check/ Uncheck the Population Select checkbox. Field is successfully populated. If field is checked, two new fields are displayed on the page which are: Selection Tool and Query Name
5. Click the Selection Tool list, provided that the Population Select is checked.
6. Select a value from the Selection Tool list. The option selected will appear in the dropdown box. If you select Equation Engine, then the Equation Name field and the Create Equation link appear. If you chose the External File, then the Upload File button, the File Mapping field, and the Create File Mapping link appear. If the PS Query option is selected, then the Query Name field and the Launch Query Manager link appear.
7. If Equation is selected for Selection Tool, Enter the value for Equation Name
8. If External File is selected for Selection Tool, click the Upload File button.
9. Click the Browse button.
10. Select File
11. Click the Upload button. The system will upload the values in the file to the temp table and you should be returned to the Mass Assign run control page. Two new buttons are displayed on the page: - Delete File to delete the uploaded file and View File to view the uploaded the file.
12. Enter the value for File Mapping field.
13. If PS Query is selected for Selection Tool, enter the value for Query Name. Field is successfully populated. The Query Prompts page appears, where you can view or enter prompts for the specified query. The Preview Selection Results link appears only if the Enable Preview Results check box is selected on the Selection Tool page for the PS Query tool.
14. Enter a value in Academic Institution field.
15. Enter the value in Student Group field
16. Enter the value in Effective Date field
17. Select a value in the Effective Status dropdown field.
18. Enter the Comments in the field provided.
19. Check/ Uncheck the Student Override checkbox.
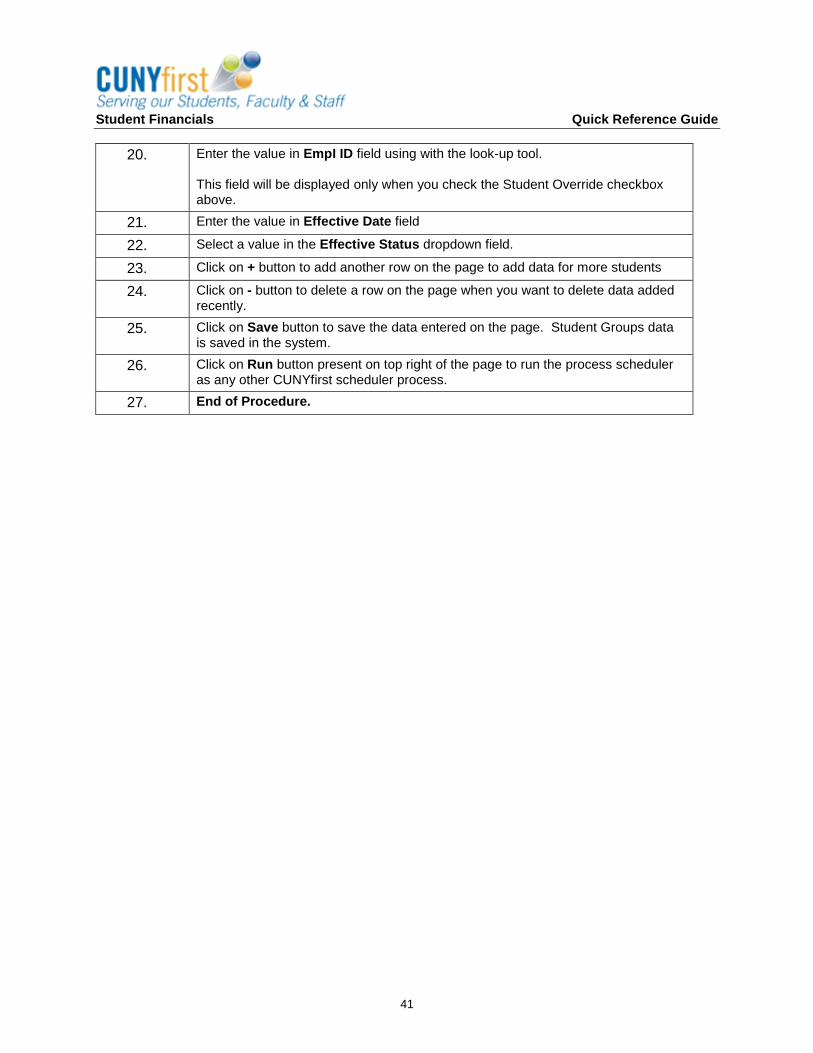
Student Financials Quick Reference Guide
41
20. Enter the value in EmpI ID field using with the look-up tool. This field will be displayed only when you check the Student Override checkbox above.
21. Enter the value in Effective Date field
22. Select a value in the Effective Status dropdown field.
23. Click on + button to add another row on the page to add data for more students
24. Click on - button to delete a row on the page when you want to delete data added recently.
25. Click on Save button to save the data entered on the page. Student Groups data is saved in the system.
26. Click on Run button present on top right of the page to run the process scheduler as any other CUNYfirst scheduler process.
27. End of Procedure.
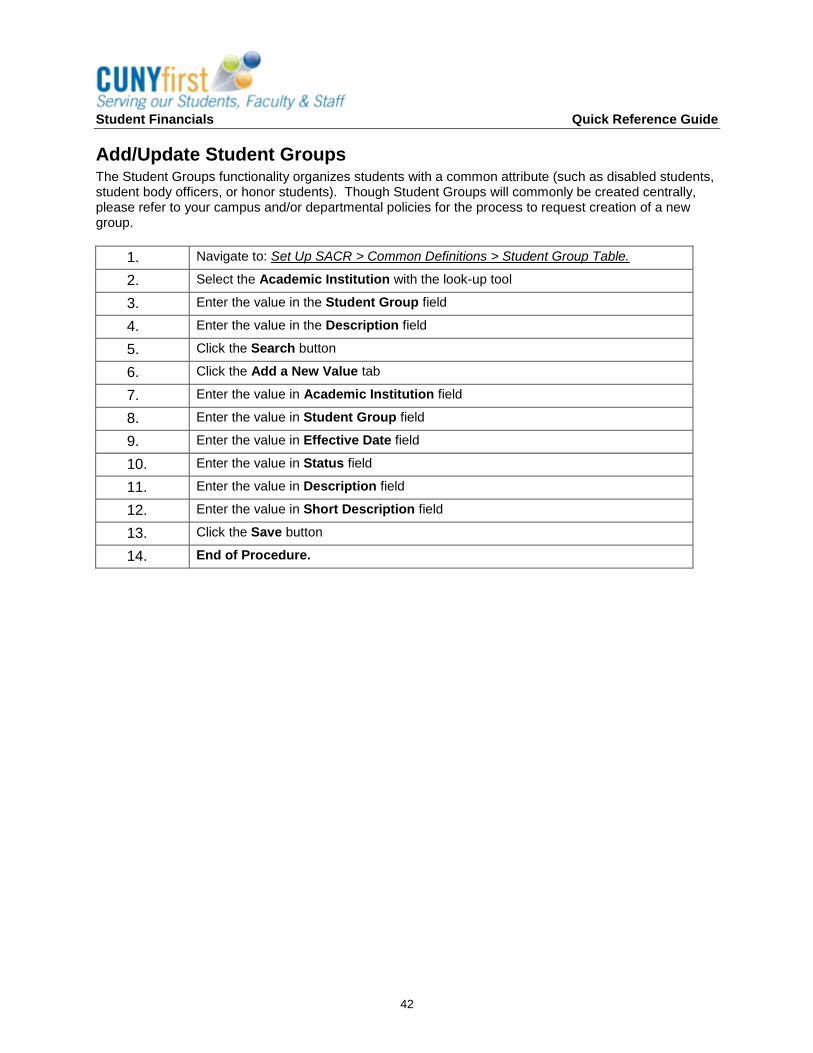
Student Financials Quick Reference Guide
42
Add/Update Student Groups The Student Groups functionality organizes students with a common attribute (such as disabled students, student body officers, or honor students). Though Student Groups will commonly be created centrally, please refer to your campus and/or departmental policies for the process to request creation of a new group.
1. Navigate to: Set Up SACR > Common Definitions > Student Group Table.
2. Select the Academic Institution with the look-up tool
3. Enter the value in the Student Group field
4. Enter the value in the Description field
5. Click the Search button
6. Click the Add a New Value tab
7. Enter the value in Academic Institution field
8. Enter the value in Student Group field
9. Enter the value in Effective Date field
10. Enter the value in Status field
11. Enter the value in Description field
12. Enter the value in Short Description field
13. Click the Save button
14. End of Procedure.

Student Financials Quick Reference Guide
43
View/Update FERPA Information When students exercise rights under FERPA, they identify personal information that they do not want the institution to release. FERPA control must be applied to identify this information and prohibit the release of restricted information. Students have the option of permitting the release any of the restricted information to specific internal publications.
Under FERPA, students can prohibit the release of directory data about themselves. With the CUNYfirst FERPA functionality, students can restrict data but they can also grant permission to release some or all of that restricted data for inclusion in specific internal publications.
When FERPA control is applied to restrict data for a student, CUNYfirst attaches a FERPA window shade privacy button to that student’s records. The FERPA privacy button can be clicked on a student’s page to quickly determine the information that is legally available to others at the institution or to third-party vendors. This information can also be accessed through the FERPA Display inquiry pages.
1. Navigate to: Campus Community > Personal Information (Student) > Biographical (Student) > Student FERPA > FERPA.
2. Enter search criteria and click Search.
3. If no FERPA information has been created, click the FERPA checkbox. If information exists, click the Add a New Row (+) icon next to the Record (Table) Name field.
4. Select a value for the Record (table) Name. (Photo, email, name, etc.)
5. Select a value for the Field Name. (Selections dependent upon Record Name selection)
6. CUNY is not using the Restriction Exceptions at this time.
7. To enter additional field names for a Record, click the Add a New Row (+) icon associated with Field Name.
8. To enter an additional Record Name, click the Add a New Row (+) icon associated with Record (Table) Name.
9. Click Save.
10. End of Procedure.
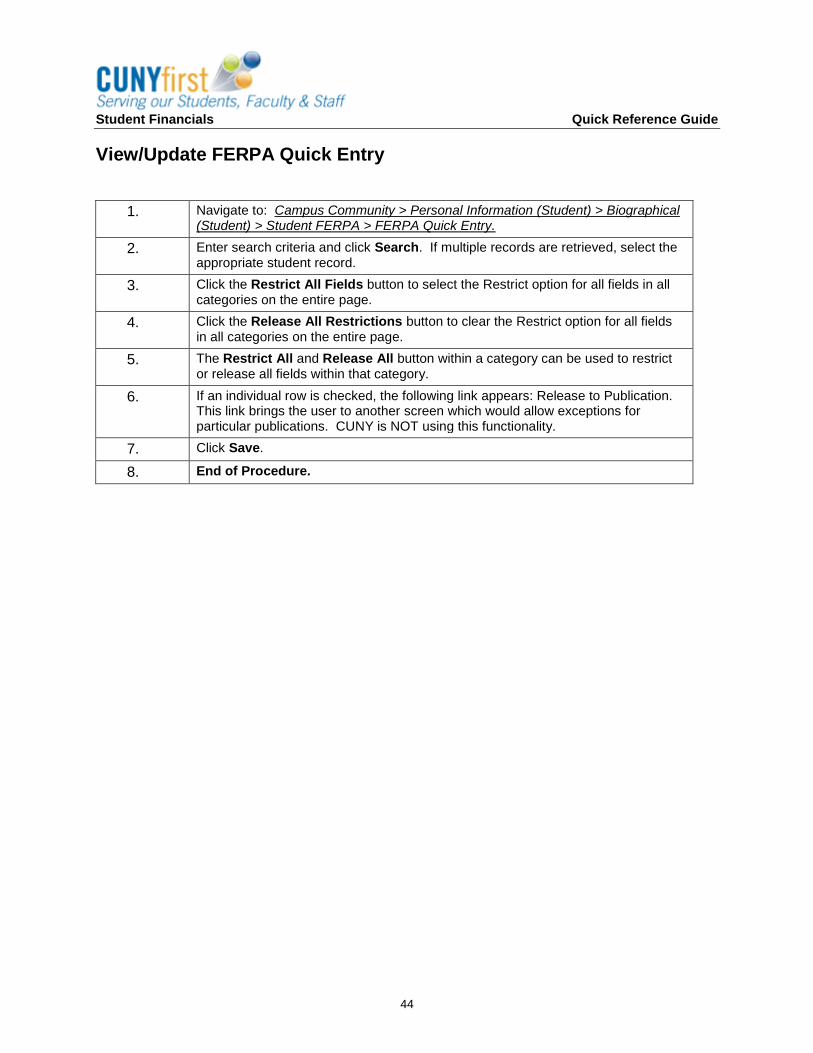
Student Financials Quick Reference Guide
44
View/Update FERPA Quick Entry
1. Navigate to: Campus Community > Personal Information (Student) > Biographical (Student) > Student FERPA > FERPA Quick Entry.
2. Enter search criteria and click Search. If multiple records are retrieved, select the appropriate student record.
3. Click the Restrict All Fields button to select the Restrict option for all fields in all categories on the entire page.
4. Click the Release All Restrictions button to clear the Restrict option for all fields in all categories on the entire page.
5. The Restrict All and Release All button within a category can be used to restrict or release all fields within that category.
6. If an individual row is checked, the following link appears: Release to Publication. This link brings the user to another screen which would allow exceptions for particular publications. CUNY is NOT using this functionality.
7. Click Save.
8. End of Procedure.
Student Financials Quick Reference Guide
45
Assign Communication to an Individual The Communications Management page permits review or creation of communications for the individual or organization. Communications include letters, phone calls, meetings, emails, and faxes. This component enables CUNY to track and analyze contacts with students, staff, constituents, and organizations inside and outside the institution.
Communications can be assigned to individuals manually, or via the 3C engine to automatically assign communications to individuals based on defined rules and conditions.
The form of communication can be noted (phone, letter, email, in-person meeting, etc.) If the communication is a letter or an email, the variable data and enclosures that should be included can be managed. Comments can also be entered that are or are not included in the text.
Please note that updates will be made to each area of the 3 C’s as CUNY continues to make decisions regarding use and management of this functionality.
1.
Navigate to the Person Communication page: Campus Community > Communications > Communications Management.
2. Click the Add a New Value tab.
3. Enter the desired information into the ID field and click the Add button.
4. Use the Person Communication page to assign communications to individuals.
5. End of the procedure.
Student Financials Quick Reference Guide
46
View an Individual Communication Summary Review communication information for an individual on this page. A summary of communications can be viewed, or details of the communication assignments.
A summary of communications can be retrieved for an individual to determine if a specific communication was sent, if it included enclosures, and if it was a joint communication. The 3C groups that have security access to categories of communications can be viewed as well, along with details of the communication assignments.
1. The Communication Summary page can be found by navigating to: Campus Community > Communication > Communication Summary
2. Enter the desired information into the ID field.
3. Click the Search button
4. Use the Communication Summary page to search for and review a summary of communications to or from an individual.
5. End of the procedure.
Student Financials Quick Reference Guide
47
View and Individual Communication Detail A communication can be opened in a view-only format to review detailed information.
1. The Communication Detail page can be found by navigating to: Campus Community > Communication > Communication Detail
2. Enter the desired information into the ID field.
3. Click the Search button.
4. Use the Communication Detail page to view details of a communication assigned to an individual. This page is identical to the Person Communication page, except that all the fields are view-only and cannot be edited.
5. End of the procedure.
Student Financials Quick Reference Guide
48
Assign a Checklist to a Person Checklists can be assigned to individuals or groups of individuals. For each checklist item assigned, responsible individuals can be specified. A due date for the overall checklist can be included with the same or different due dates for each item on the checklist.
In addition to assigning checklists manually, the 3C engine can to automatically assign checklists based on defined rules and conditions. The Population Selection feature or the Mass Change process can be used to select a group of IDs.
A checklist can be manually assigned to an individual using the Checklist Management pages.
1. The Checklist Management 1 and 2 pages can be found by navigating to: Campus Community > Checklists > Checklist Management - Person
2. Follow the navigation above and click the Add a New Value tab.
3. Enter the desired information into the ID field.
4. Click the Add button.
5. Use the Checklist Management 1 page to assign a checklist to an individual. Use the Checklist Management 2 page to view or assign all or some of the checklist items to the individual and identify who is responsible for each item.
6. End of Procedure.
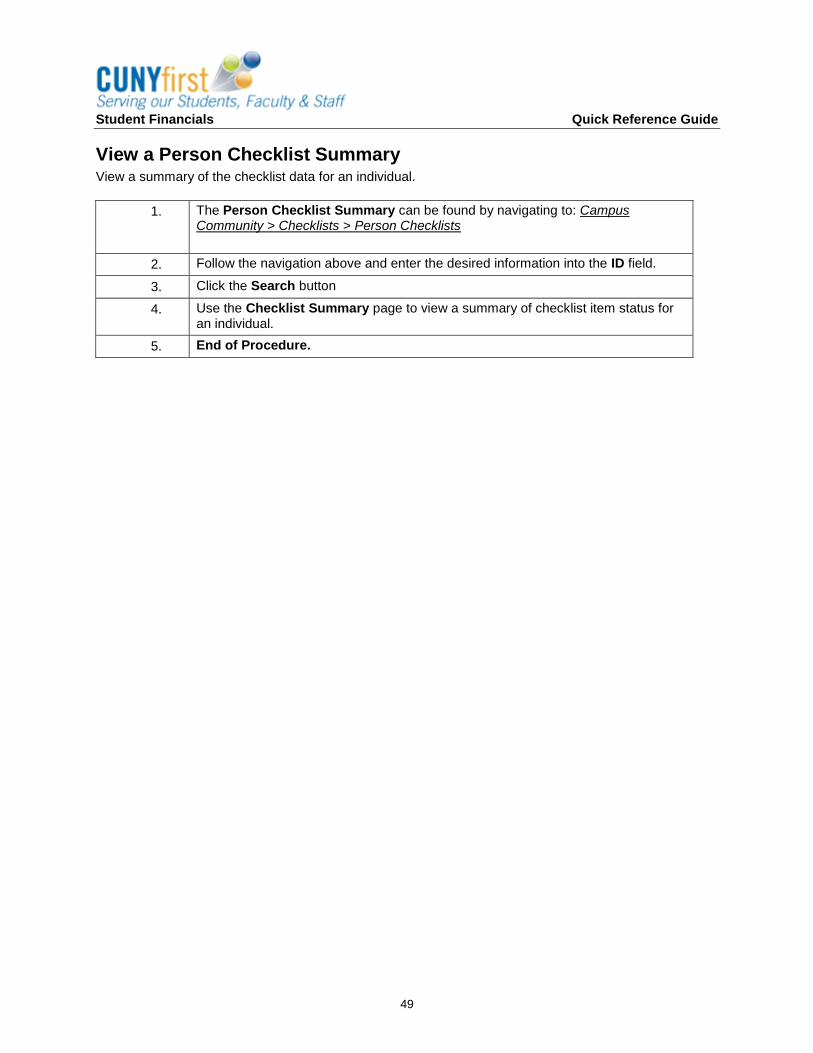
Student Financials Quick Reference Guide
49
View a Person Checklist Summary View a summary of the checklist data for an individual.
1. The Person Checklist Summary can be found by navigating to: Campus Community > Checklists > Person Checklists
2. Follow the navigation above and enter the desired information into the ID field.
3. Click the Search button
4. Use the Checklist Summary page to view a summary of checklist item status for an individual.
5. End of Procedure.
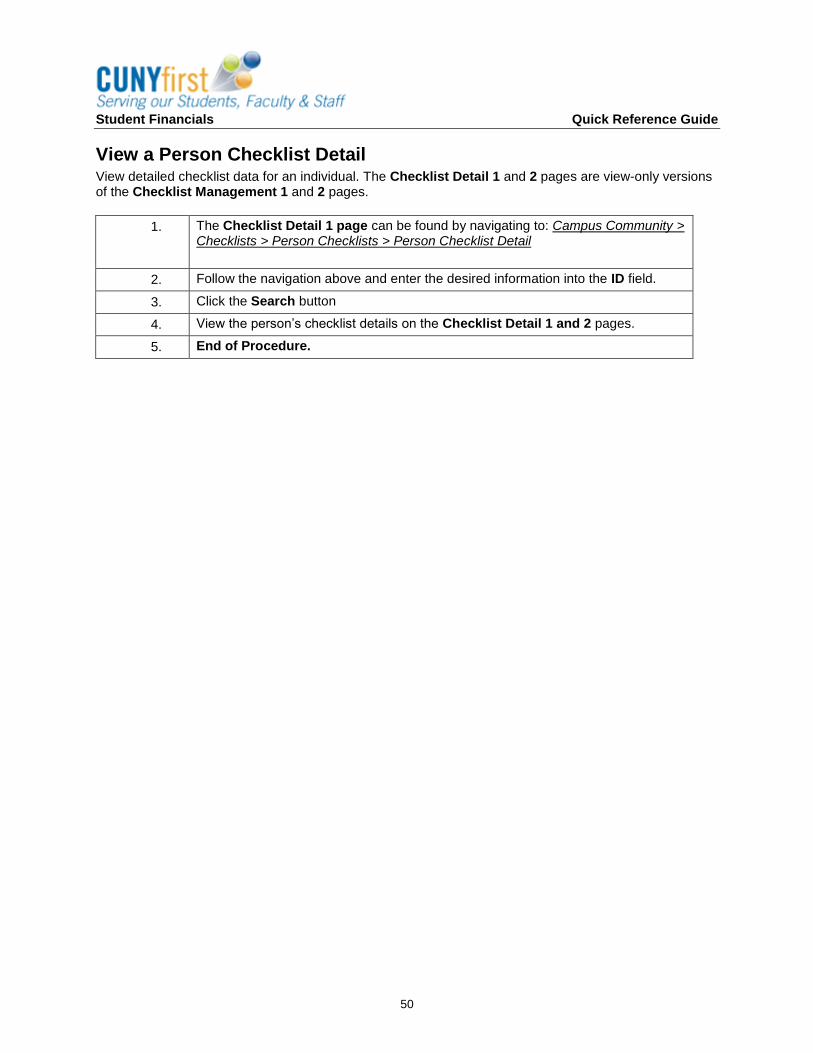
Student Financials Quick Reference Guide
50
View a Person Checklist Detail View detailed checklist data for an individual. The Checklist Detail 1 and 2 pages are view-only versions of the Checklist Management 1 and 2 pages.
1. The Checklist Detail 1 page can be found by navigating to: Campus Community > Checklists > Person Checklists > Person Checklist Detail
2. Follow the navigation above and enter the desired information into the ID field.
3. Click the Search button
4. View the person’s checklist details on the Checklist Detail 1 and 2 pages.
5. End of Procedure.
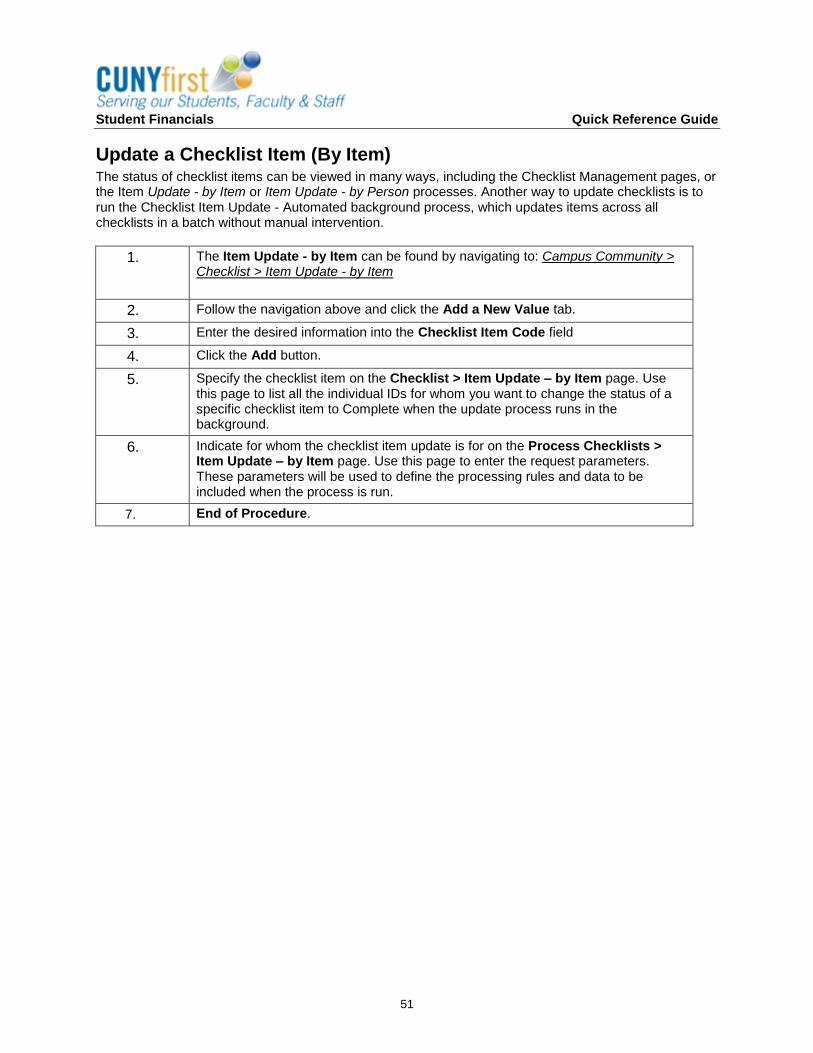
Student Financials Quick Reference Guide
51
Update a Checklist Item (By Item) The status of checklist items can be viewed in many ways, including the Checklist Management pages, or the Item Update - by Item or Item Update - by Person processes. Another way to update checklists is to run the Checklist Item Update - Automated background process, which updates items across all checklists in a batch without manual intervention.
1. The Item Update - by Item can be found by navigating to: Campus Community > Checklist > Item Update - by Item
2. Follow the navigation above and click the Add a New Value tab.
3. Enter the desired information into the Checklist Item Code field
4. Click the Add button.
5. Specify the checklist item on the Checklist > Item Update – by Item page. Use this page to list all the individual IDs for whom you want to change the status of a specific checklist item to Complete when the update process runs in the background.
6. Indicate for whom the checklist item update is for on the Process Checklists > Item Update – by Item page. Use this page to enter the request parameters. These parameters will be used to define the processing rules and data to be included when the process is run.
7. End of Procedure.
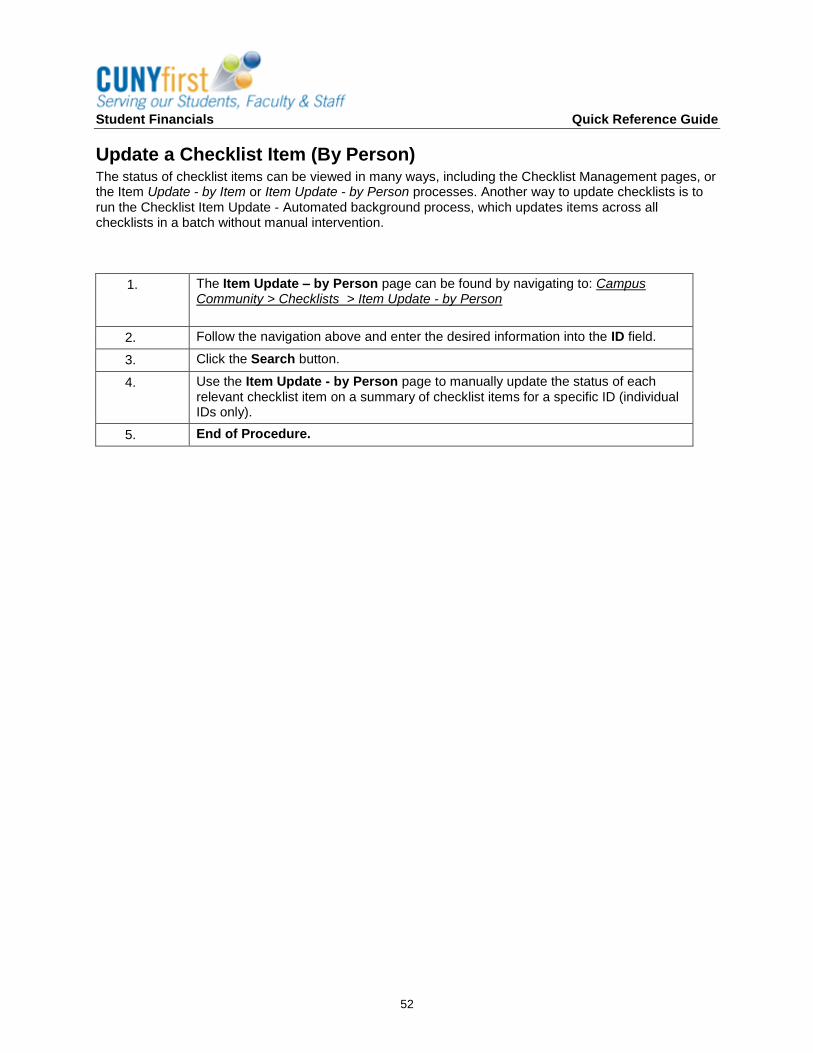
Student Financials Quick Reference Guide
52
Update a Checklist Item (By Person) The status of checklist items can be viewed in many ways, including the Checklist Management pages, or the Item Update - by Item or Item Update - by Person processes. Another way to update checklists is to run the Checklist Item Update - Automated background process, which updates items across all checklists in a batch without manual intervention.
1. The Item Update – by Person page can be found by navigating to: Campus Community > Checklists > Item Update - by Person
2. Follow the navigation above and enter the desired information into the ID field.
3. Click the Search button.
4. Use the Item Update - by Person page to manually update the status of each relevant checklist item on a summary of checklist items for a specific ID (individual IDs only).
5. End of Procedure.
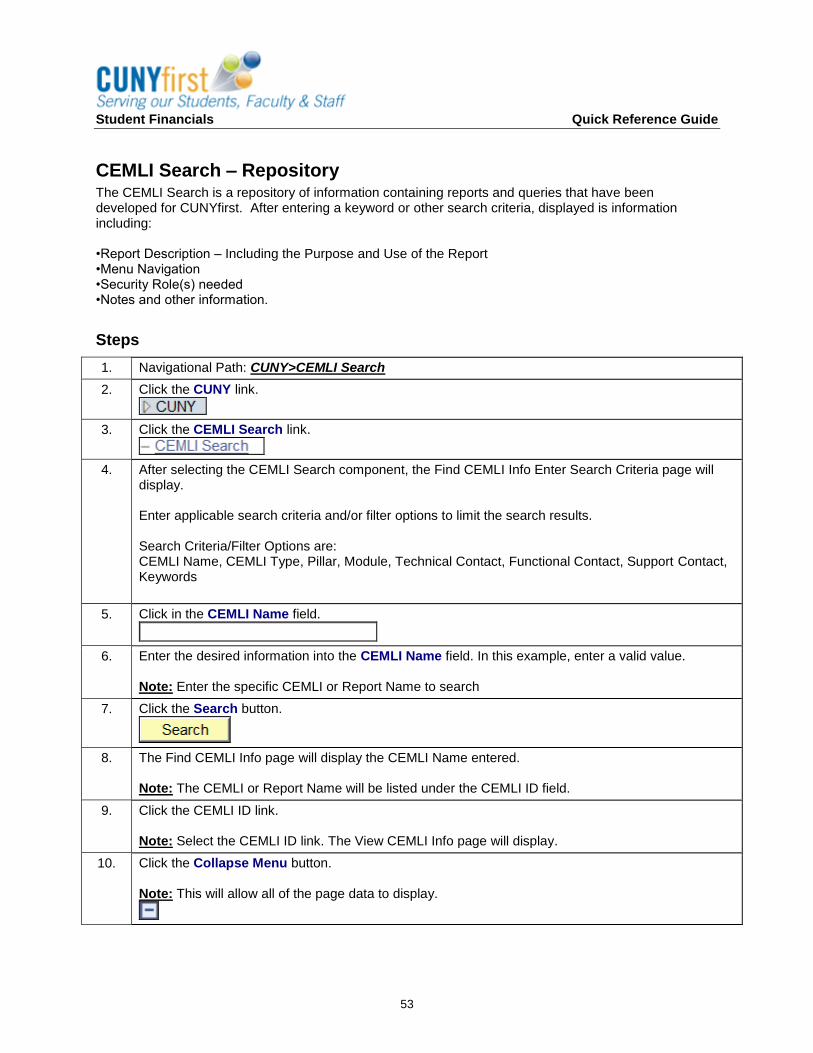
Student Financials Quick Reference Guide
53
CEMLI Search – Repository The CEMLI Search is a repository of information containing reports and queries that have been developed for CUNYfirst. After entering a keyword or other search criteria, displayed is information including: •Report Description – Including the Purpose and Use of the Report •Menu Navigation •Security Role(s) needed •Notes and other information.
Steps
1. Navigational Path: CUNY>CEMLI Search
2. Click the CUNY link.
3. Click the CEMLI Search link.
4. After selecting the CEMLI Search component, the Find CEMLI Info Enter Search Criteria page will display. Enter applicable search criteria and/or filter options to limit the search results. Search Criteria/Filter Options are: CEMLI Name, CEMLI Type, Pillar, Module, Technical Contact, Functional Contact, Support Contact, Keywords
5. Click in the CEMLI Name field.
6. Enter the desired information into the CEMLI Name field. In this example, enter a valid value. Note: Enter the specific CEMLI or Report Name to search
7. Click the Search button.
8. The Find CEMLI Info page will display the CEMLI Name entered. Note: The CEMLI or Report Name will be listed under the CEMLI ID field.
9. Click the CEMLI ID link. Note: Select the CEMLI ID link. The View CEMLI Info page will display.
10. Click the Collapse Menu button. Note: This will allow all of the page data to display.
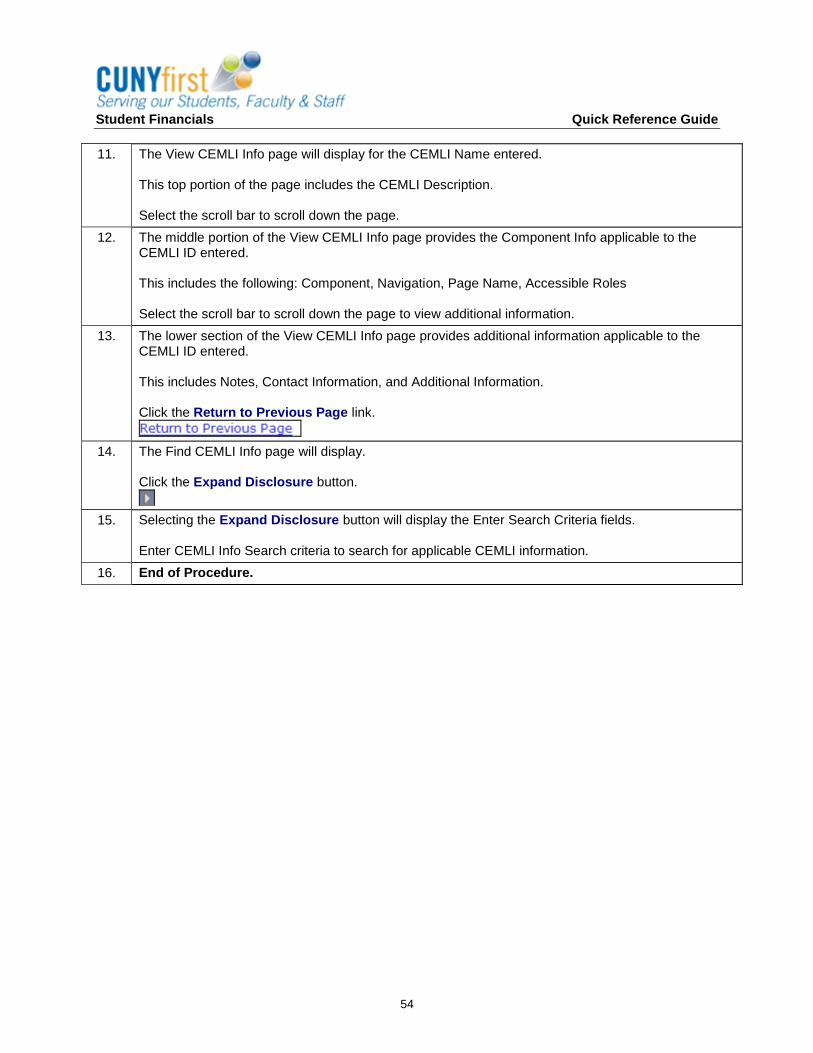
Student Financials Quick Reference Guide
54
11. The View CEMLI Info page will display for the CEMLI Name entered. This top portion of the page includes the CEMLI Description. Select the scroll bar to scroll down the page.
12. The middle portion of the View CEMLI Info page provides the Component Info applicable to the CEMLI ID entered. This includes the following: Component, Navigation, Page Name, Accessible Roles Select the scroll bar to scroll down the page to view additional information.
13. The lower section of the View CEMLI Info page provides additional information applicable to the CEMLI ID entered. This includes Notes, Contact Information, and Additional Information. Click the Return to Previous Page link.
14. The Find CEMLI Info page will display. Click the Expand Disclosure button.
15. Selecting the Expand Disclosure button will display the Enter Search Criteria fields. Enter CEMLI Info Search criteria to search for applicable CEMLI information.
16. End of Procedure.

Student Financials Quick Reference Guide
55
Unit II: Tuition Calculation Maintenance
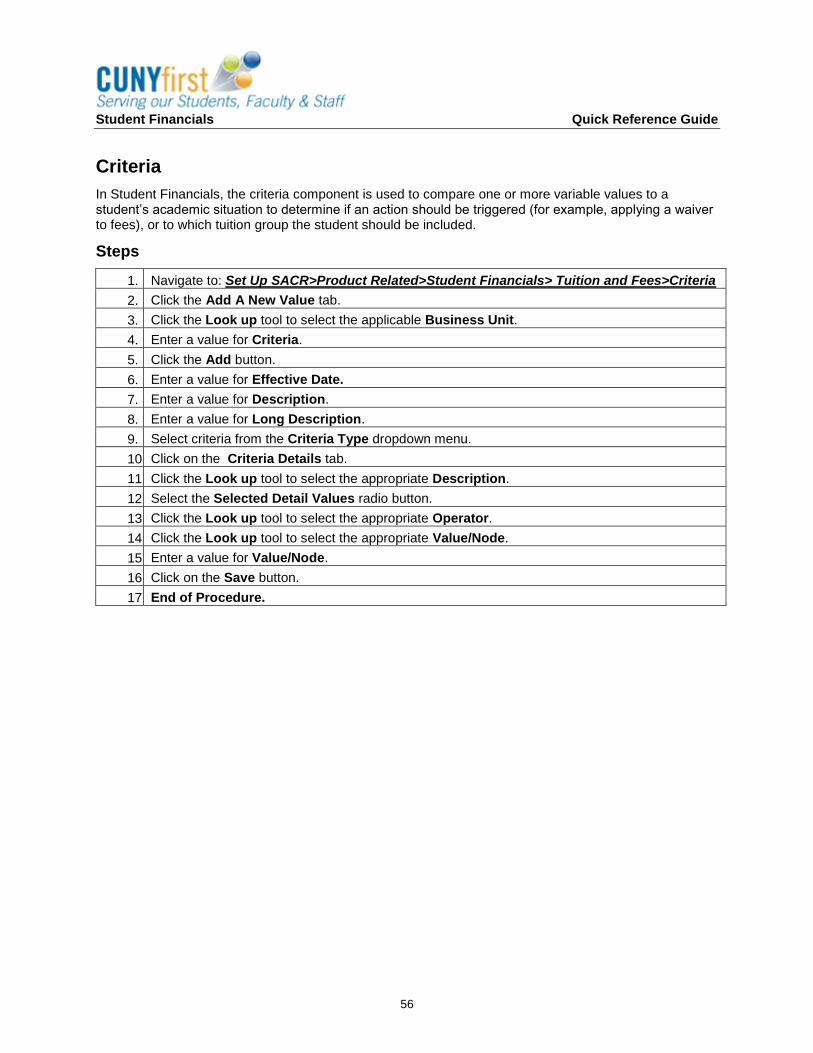
Student Financials Quick Reference Guide
56
Criteria
In Student Financials, the criteria component is used to compare one or more variable values to a student’s academic situation to determine if an action should be triggered (for example, applying a waiver to fees), or to which tuition group the student should be included.
Steps
1. Navigate to: Set Up SACR>Product Related>Student Financials> Tuition and Fees>Criteria
2. Click the Add A New Value tab.
3. Click the Look up tool to select the applicable Business Unit.
4. Enter a value for Criteria.
5. Click the Add button.
6. Enter a value for Effective Date.
7. Enter a value for Description.
8. Enter a value for Long Description.
9. Select criteria from the Criteria Type dropdown menu.
10. Click on the Criteria Details tab.
11. Click the Look up tool to select the appropriate Description.
12. Select the Selected Detail Values radio button.
13. Click the Look up tool to select the appropriate Operator.
14. Click the Look up tool to select the appropriate Value/Node.
15. Enter a value for Value/Node.
16. Click on the Save button.
17. End of Procedure.
Student Financials Quick Reference Guide
57
Tuition Group Priority The Tuition Group Priority page lists all tuition groups that are defined for the institution, provides a description of the tuition groups, and displays the tuition group priority. The tuition group priority page is used to confirm that potentially competing tuition group definitions have the correct priority ratings.
Steps
1. Navigate to: Setup SACR > Product Related > Student Financials > Tuition and Fees > Tuition Group Priority
2. Enter the Business Unit.
3. Click the Search button.
4. View the list of Tuition Groups and the Priority associated to the group.
5. End of Procedure.
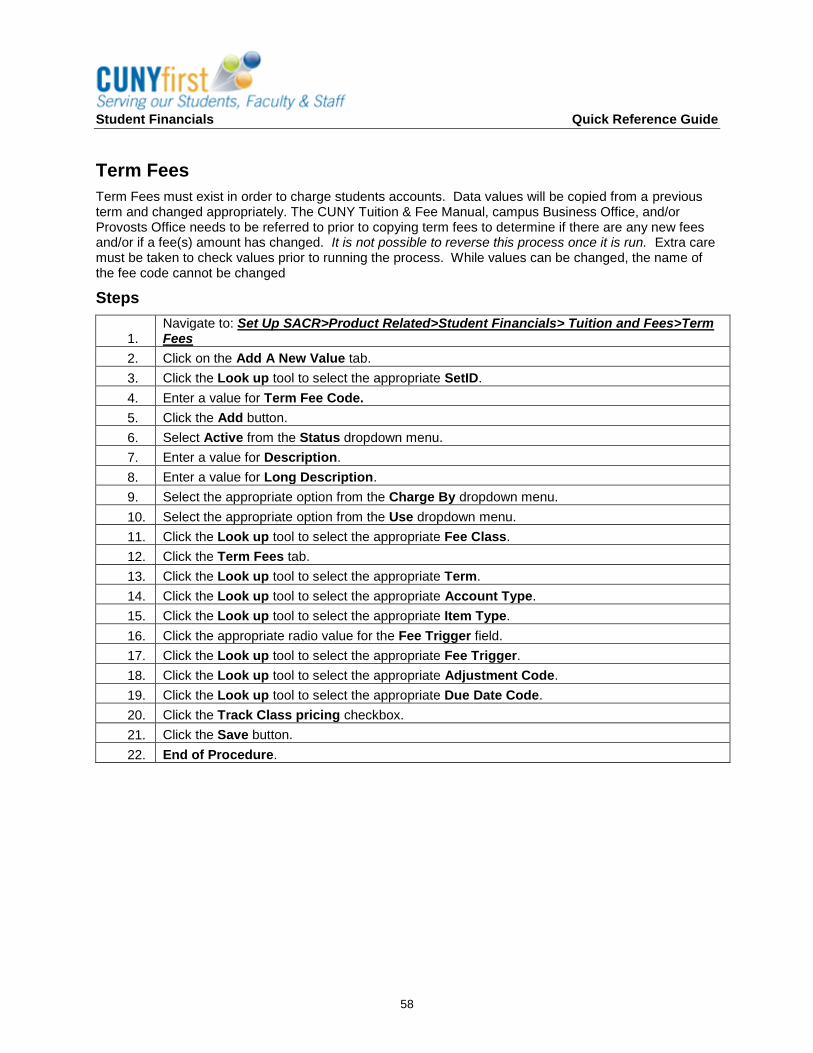
Student Financials Quick Reference Guide
58
Term Fees
Term Fees must exist in order to charge students accounts. Data values will be copied from a previous term and changed appropriately. The CUNY Tuition & Fee Manual, campus Business Office, and/or Provosts Office needs to be referred to prior to copying term fees to determine if there are any new fees and/or if a fee(s) amount has changed. It is not possible to reverse this process once it is run. Extra care must be taken to check values prior to running the process. While values can be changed, the name of the fee code cannot be changed
Steps
1. Navigate to: Set Up SACR>Product Related>Student Financials> Tuition and Fees>Term Fees
2. Click on the Add A New Value tab.
3. Click the Look up tool to select the appropriate SetID.
4. Enter a value for Term Fee Code.
5. Click the Add button.
6. Select Active from the Status dropdown menu.
7. Enter a value for Description.
8. Enter a value for Long Description.
9. Select the appropriate option from the Charge By dropdown menu.
10. Select the appropriate option from the Use dropdown menu.
11. Click the Look up tool to select the appropriate Fee Class.
12. Click the Term Fees tab.
13. Click the Look up tool to select the appropriate Term.
14. Click the Look up tool to select the appropriate Account Type.
15. Click the Look up tool to select the appropriate Item Type.
16. Click the appropriate radio value for the Fee Trigger field.
17. Click the Look up tool to select the appropriate Fee Trigger.
18. Click the Look up tool to select the appropriate Adjustment Code.
19. Click the Look up tool to select the appropriate Due Date Code.
20. Click the Track Class pricing checkbox.
21. Click the Save button.
22. End of Procedure.
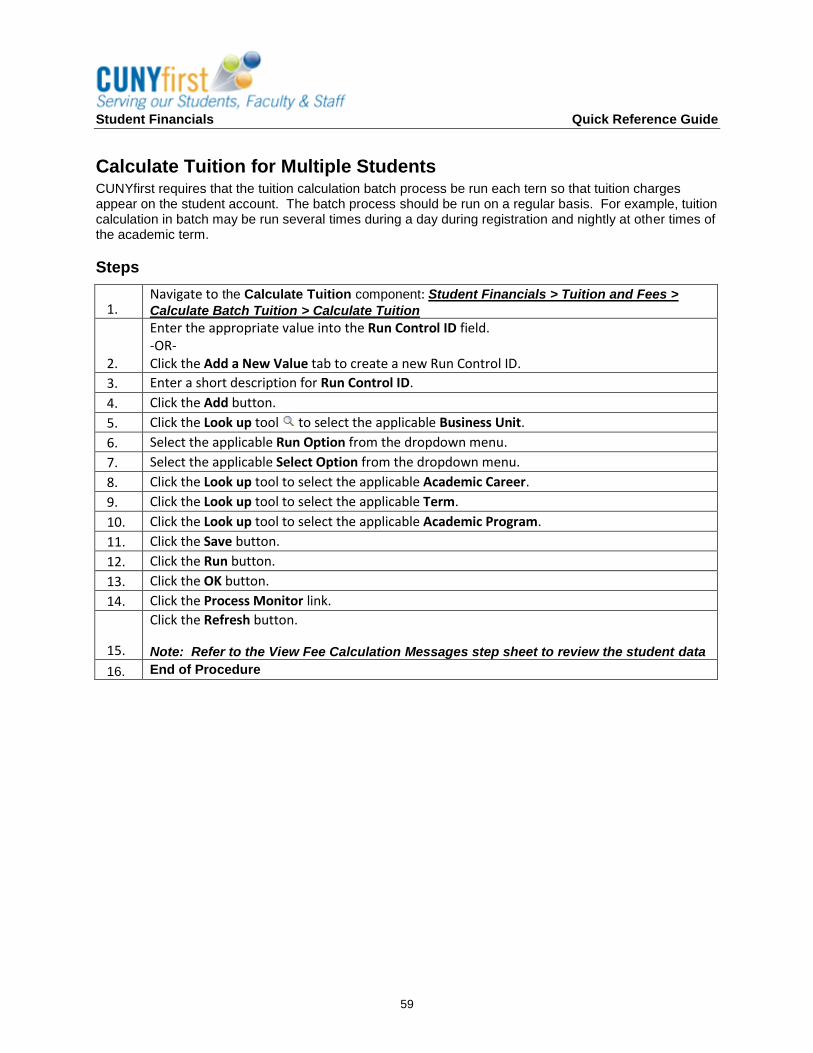
Student Financials Quick Reference Guide
59
Calculate Tuition for Multiple Students CUNYfirst requires that the tuition calculation batch process be run each tern so that tuition charges appear on the student account. The batch process should be run on a regular basis. For example, tuition calculation in batch may be run several times during a day during registration and nightly at other times of the academic term.
Steps
1. Navigate to the Calculate Tuition component: Student Financials > Tuition and Fees >
Calculate Batch Tuition > Calculate Tuition
2.
Enter the appropriate value into the Run Control ID field. -OR- Click the Add a New Value tab to create a new Run Control ID.
3. Enter a short description for Run Control ID.
4. Click the Add button.
5. Click the Look up tool to select the applicable Business Unit.
6. Select the applicable Run Option from the dropdown menu.
7. Select the applicable Select Option from the dropdown menu.
8. Click the Look up tool to select the applicable Academic Career.
9. Click the Look up tool to select the applicable Term.
10. Click the Look up tool to select the applicable Academic Program.
11. Click the Save button.
12. Click the Run button.
13. Click the OK button.
14. Click the Process Monitor link.
15.
Click the Refresh button. Note: Refer to the View Fee Calculation Messages step sheet to review the student data
16. End of Procedure
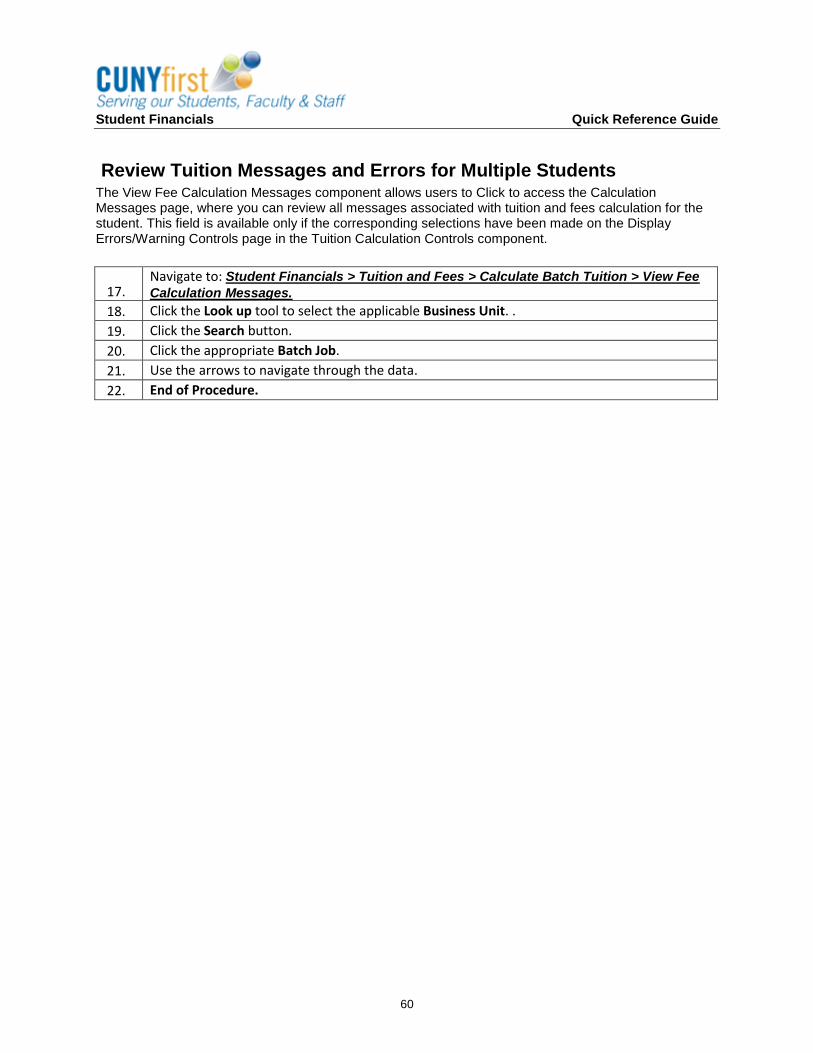
Student Financials Quick Reference Guide
60
Review Tuition Messages and Errors for Multiple Students The View Fee Calculation Messages component allows users to Click to access the Calculation Messages page, where you can review all messages associated with tuition and fees calculation for the student. This field is available only if the corresponding selections have been made on the Display Errors/Warning Controls page in the Tuition Calculation Controls component.
17. Navigate to: Student Financials > Tuition and Fees > Calculate Batch Tuition > View Fee
Calculation Messages.
18. Click the Look up tool to select the applicable Business Unit. .
19. Click the Search button.
20. Click the appropriate Batch Job.
21. Use the arrows to navigate through the data.
22. End of Procedure.
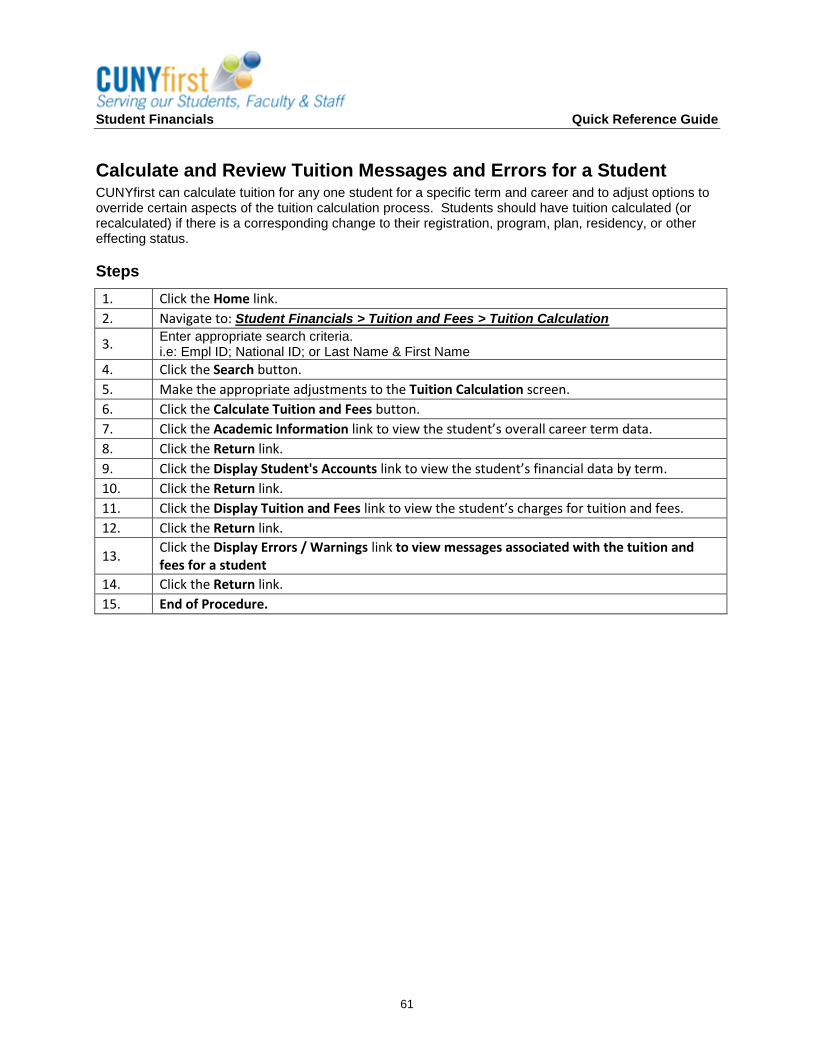
Student Financials Quick Reference Guide
61
Calculate and Review Tuition Messages and Errors for a Student CUNYfirst can calculate tuition for any one student for a specific term and career and to adjust options to override certain aspects of the tuition calculation process. Students should have tuition calculated (or recalculated) if there is a corresponding change to their registration, program, plan, residency, or other effecting status.
Steps
1. Click the Home link.
2. Navigate to: Student Financials > Tuition and Fees > Tuition Calculation
3. Enter appropriate search criteria. i.e: Empl ID; National ID; or Last Name & First Name
4. Click the Search button.
5. Make the appropriate adjustments to the Tuition Calculation screen.
6. Click the Calculate Tuition and Fees button.
7. Click the Academic Information link to view the student’s overall career term data.
8. Click the Return link.
9. Click the Display Student's Accounts link to view the student’s financial data by term.
10. Click the Return link.
11. Click the Display Tuition and Fees link to view the student’s charges for tuition and fees.
12. Click the Return link.
13. Click the Display Errors / Warnings link to view messages associated with the tuition and fees for a student
14. Click the Return link.
15. End of Procedure.

Student Financials Quick Reference Guide
62
Unit III: Generate Student and Corporate Bills
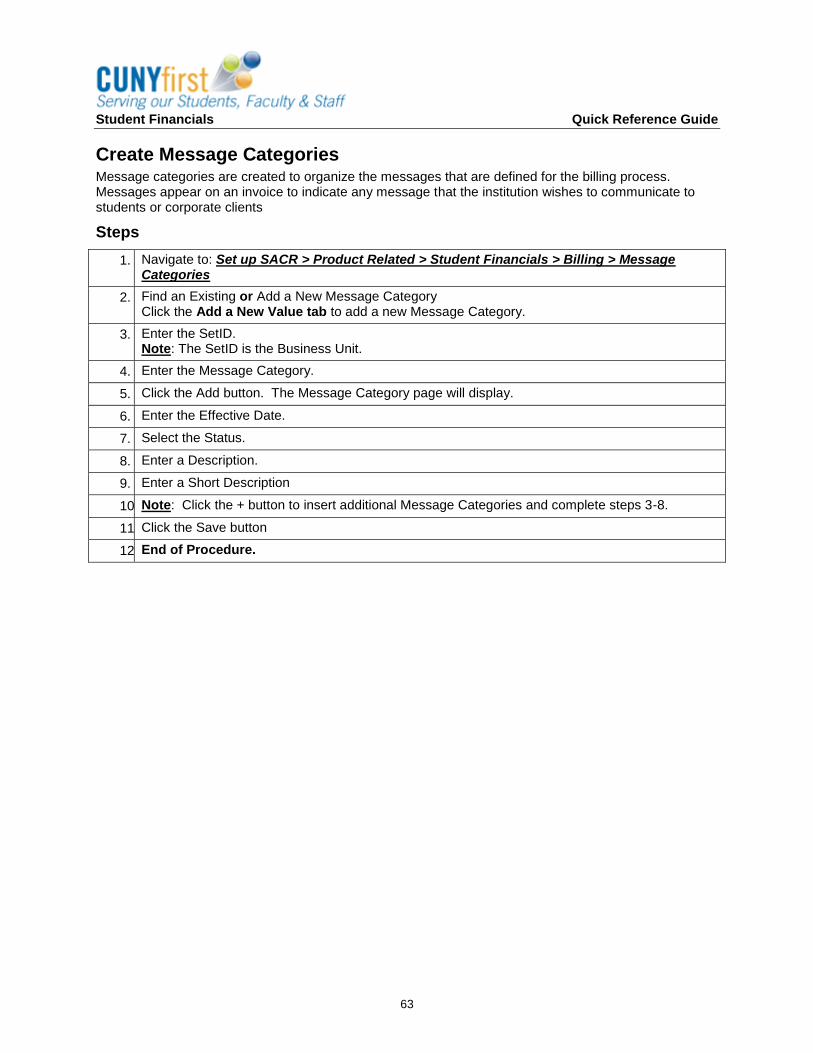
Student Financials Quick Reference Guide
63
Create Message Categories Message categories are created to organize the messages that are defined for the billing process. Messages appear on an invoice to indicate any message that the institution wishes to communicate to students or corporate clients
Steps
1. Navigate to: Set up SACR > Product Related > Student Financials > Billing > Message Categories
2. Find an Existing or Add a New Message Category Click the Add a New Value tab to add a new Message Category.
3. Enter the SetID. Note: The SetID is the Business Unit.
4. Enter the Message Category.
5. Click the Add button. The Message Category page will display.
6. Enter the Effective Date.
7. Select the Status.
8. Enter a Description.
9. Enter a Short Description
10. Note: Click the + button to insert additional Message Categories and complete steps 3-8.
11. Click the Save button
12. End of Procedure.
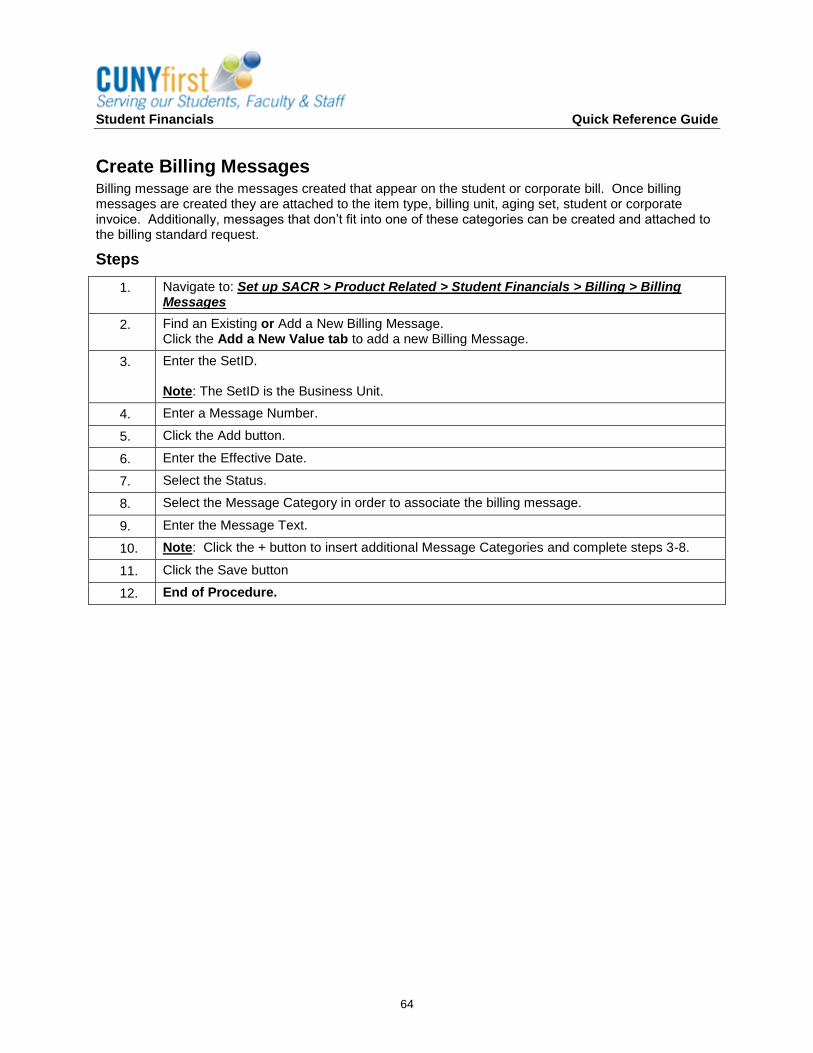
Student Financials Quick Reference Guide
64
Create Billing Messages Billing message are the messages created that appear on the student or corporate bill. Once billing messages are created they are attached to the item type, billing unit, aging set, student or corporate invoice. Additionally, messages that don’t fit into one of these categories can be created and attached to the billing standard request.
Steps
1. Navigate to: Set up SACR > Product Related > Student Financials > Billing > Billing Messages
2. Find an Existing or Add a New Billing Message. Click the Add a New Value tab to add a new Billing Message.
3. Enter the SetID. Note: The SetID is the Business Unit.
4. Enter a Message Number.
5. Click the Add button.
6. Enter the Effective Date.
7. Select the Status.
8. Select the Message Category in order to associate the billing message.
9. Enter the Message Text.
10. Note: Click the + button to insert additional Message Categories and complete steps 3-8.
11. Click the Save button
12. End of Procedure.
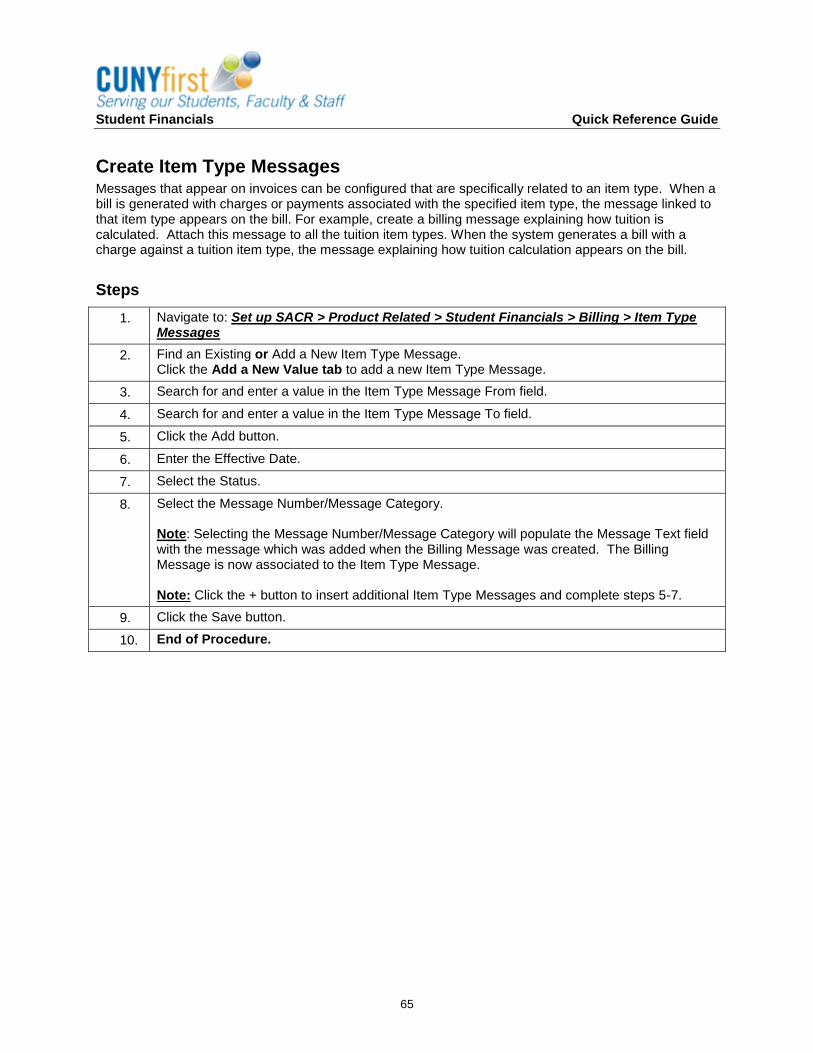
Student Financials Quick Reference Guide
65
Create Item Type Messages Messages that appear on invoices can be configured that are specifically related to an item type. When a bill is generated with charges or payments associated with the specified item type, the message linked to that item type appears on the bill. For example, create a billing message explaining how tuition is calculated. Attach this message to all the tuition item types. When the system generates a bill with a charge against a tuition item type, the message explaining how tuition calculation appears on the bill.
Steps
1. Navigate to: Set up SACR > Product Related > Student Financials > Billing > Item Type Messages
2. Find an Existing or Add a New Item Type Message. Click the Add a New Value tab to add a new Item Type Message.
3. Search for and enter a value in the Item Type Message From field.
4. Search for and enter a value in the Item Type Message To field.
5. Click the Add button.
6. Enter the Effective Date.
7. Select the Status.
8. Select the Message Number/Message Category. Note: Selecting the Message Number/Message Category will populate the Message Text field with the message which was added when the Billing Message was created. The Billing Message is now associated to the Item Type Message. Note: Click the + button to insert additional Item Type Messages and complete steps 5-7.
9. Click the Save button.
10. End of Procedure.
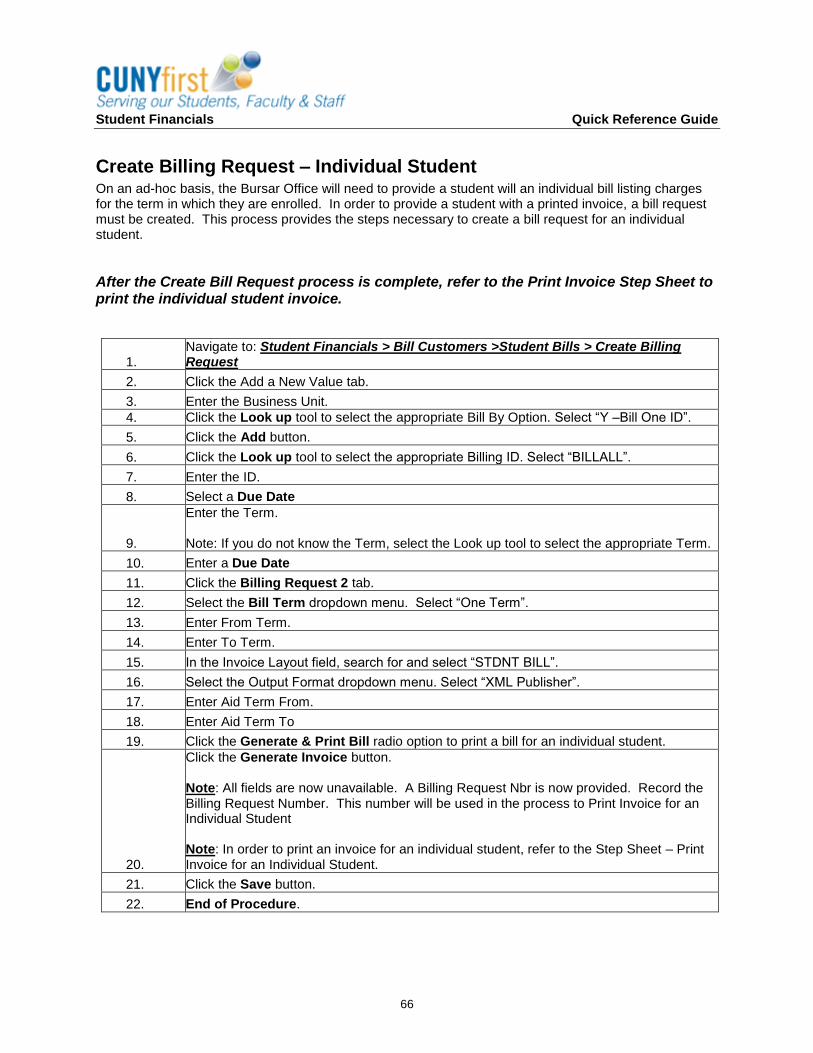
Student Financials Quick Reference Guide
66
Create Billing Request – Individual Student On an ad-hoc basis, the Bursar Office will need to provide a student will an individual bill listing charges for the term in which they are enrolled. In order to provide a student with a printed invoice, a bill request must be created. This process provides the steps necessary to create a bill request for an individual student.
After the Create Bill Request process is complete, refer to the Print Invoice Step Sheet to print the individual student invoice.
1. Navigate to: Student Financials > Bill Customers >Student Bills > Create Billing Request
2. Click the Add a New Value tab.
3. Enter the Business Unit.
4. Click the Look up tool to select the appropriate Bill By Option. Select “Y –Bill One ID”.
5. Click the Add button.
6. Click the Look up tool to select the appropriate Billing ID. Select “BILLALL”.
7. Enter the ID.
8. Select a Due Date
9.
Enter the Term. Note: If you do not know the Term, select the Look up tool to select the appropriate Term.
10. Enter a Due Date
11. Click the Billing Request 2 tab.
12. Select the Bill Term dropdown menu. Select “One Term”.
13. Enter From Term.
14. Enter To Term.
15. In the Invoice Layout field, search for and select “STDNT BILL”.
16. Select the Output Format dropdown menu. Select “XML Publisher”.
17. Enter Aid Term From.
18. Enter Aid Term To
19. Click the Generate & Print Bill radio option to print a bill for an individual student.
20.
Click the Generate Invoice button. Note: All fields are now unavailable. A Billing Request Nbr is now provided. Record the Billing Request Number. This number will be used in the process to Print Invoice for an Individual Student Note: In order to print an invoice for an individual student, refer to the Step Sheet – Print Invoice for an Individual Student.
21. Click the Save button.
22. End of Procedure.
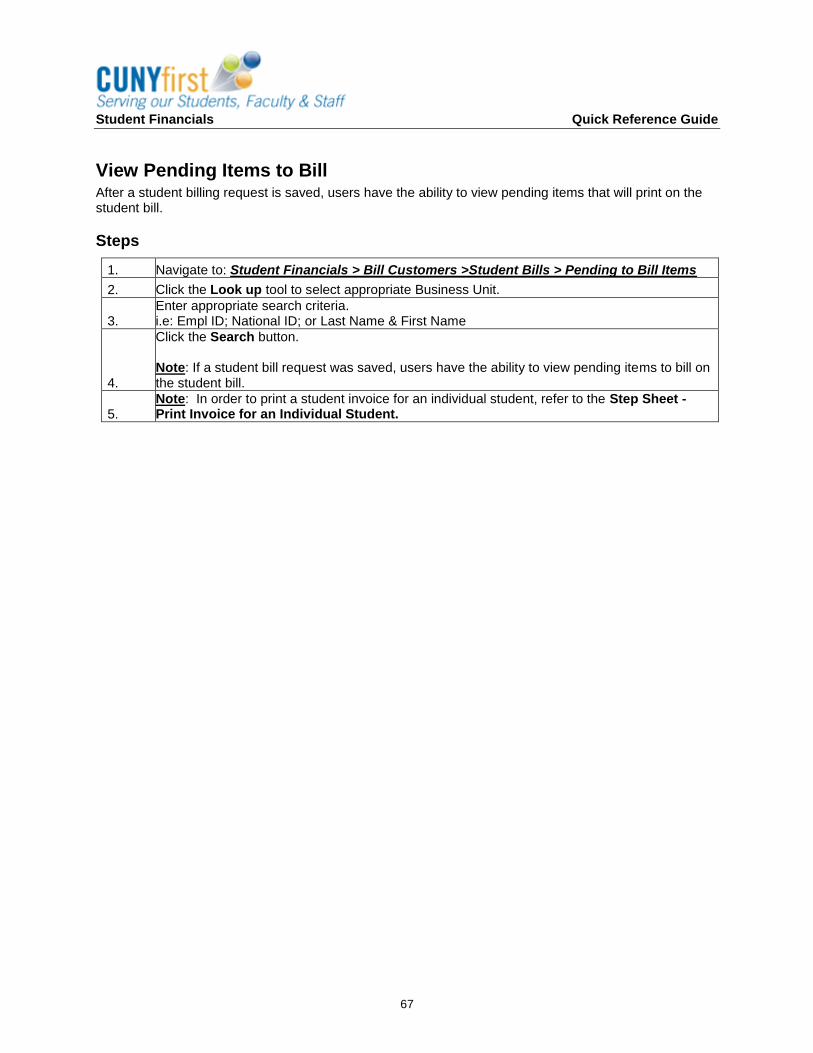
Student Financials Quick Reference Guide
67
View Pending Items to Bill After a student billing request is saved, users have the ability to view pending items that will print on the student bill.
Steps
1. Navigate to: Student Financials > Bill Customers >Student Bills > Pending to Bill Items
2. Click the Look up tool to select appropriate Business Unit.
3. Enter appropriate search criteria. i.e: Empl ID; National ID; or Last Name & First Name
4.
Click the Search button. Note: If a student bill request was saved, users have the ability to view pending items to bill on the student bill.
5. Note: In order to print a student invoice for an individual student, refer to the Step Sheet - Print Invoice for an Individual Student.
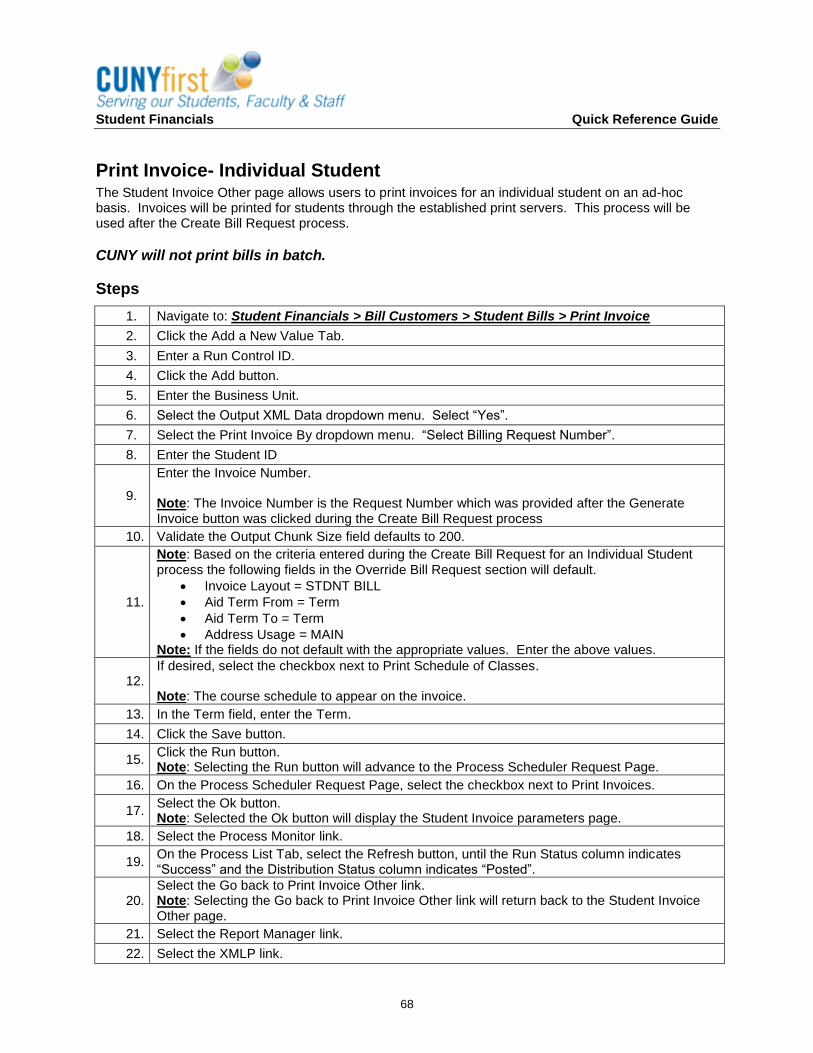
Student Financials Quick Reference Guide
68
Print Invoice- Individual Student The Student Invoice Other page allows users to print invoices for an individual student on an ad-hoc basis. Invoices will be printed for students through the established print servers. This process will be used after the Create Bill Request process.
CUNY will not print bills in batch.
Steps
1. Navigate to: Student Financials > Bill Customers > Student Bills > Print Invoice
2. Click the Add a New Value Tab.
3. Enter a Run Control ID.
4. Click the Add button.
5. Enter the Business Unit.
6. Select the Output XML Data dropdown menu. Select “Yes”.
7. Select the Print Invoice By dropdown menu. “Select Billing Request Number”.
8. Enter the Student ID
9.
Enter the Invoice Number. Note: The Invoice Number is the Request Number which was provided after the Generate Invoice button was clicked during the Create Bill Request process
10. Validate the Output Chunk Size field defaults to 200.
11.
Note: Based on the criteria entered during the Create Bill Request for an Individual Student process the following fields in the Override Bill Request section will default.
Invoice Layout = STDNT BILL
Aid Term From = Term
Aid Term To = Term
Address Usage = MAIN Note: If the fields do not default with the appropriate values. Enter the above values.
12. If desired, select the checkbox next to Print Schedule of Classes. Note: The course schedule to appear on the invoice.
13. In the Term field, enter the Term.
14. Click the Save button.
15. Click the Run button. Note: Selecting the Run button will advance to the Process Scheduler Request Page.
16. On the Process Scheduler Request Page, select the checkbox next to Print Invoices.
17. Select the Ok button. Note: Selected the Ok button will display the Student Invoice parameters page.
18. Select the Process Monitor link.
19. On the Process List Tab, select the Refresh button, until the Run Status column indicates “Success” and the Distribution Status column indicates “Posted”.
20. Select the Go back to Print Invoice Other link. Note: Selecting the Go back to Print Invoice Other link will return back to the Student Invoice Other page.
21. Select the Report Manager link.
22. Select the XMLP link.

Student Financials Quick Reference Guide
69
23. Open the PDF file. The PDF file is the Student Invoice. Note: The title of the PDF will be CU_M090PDF. This is the student invoice.
24. End of Procedure.

Student Financials Quick Reference Guide
70
View Billing Information – Review Invoice CUNYfirst has the functionality to view itemized billing information for charges on a student’s record.
Steps
1. Navigate to: Student Financials > Bill Customers > Student Bills > Review Invoice
2.
Click the Clear button NOTE: By default the User ID field is populated with the operator’s user name which must be cleared produce valid results.
3. Click the Look up tool to select the applicable Business Unit.
4. Click the Look up tool next to EmpID to enter appropriate search criteria. i.e: Empl ID; National ID; or Last Name & First Name
5. Click the Search button.
6. Select the appropriate record from the list.
7. Click the Return to Invoice Info link.
8. Click the Bill Detail tab.
9. Click the Bill Messages tab.
10. Click the Return to Search button, if necessary.
11. End of Procedure.
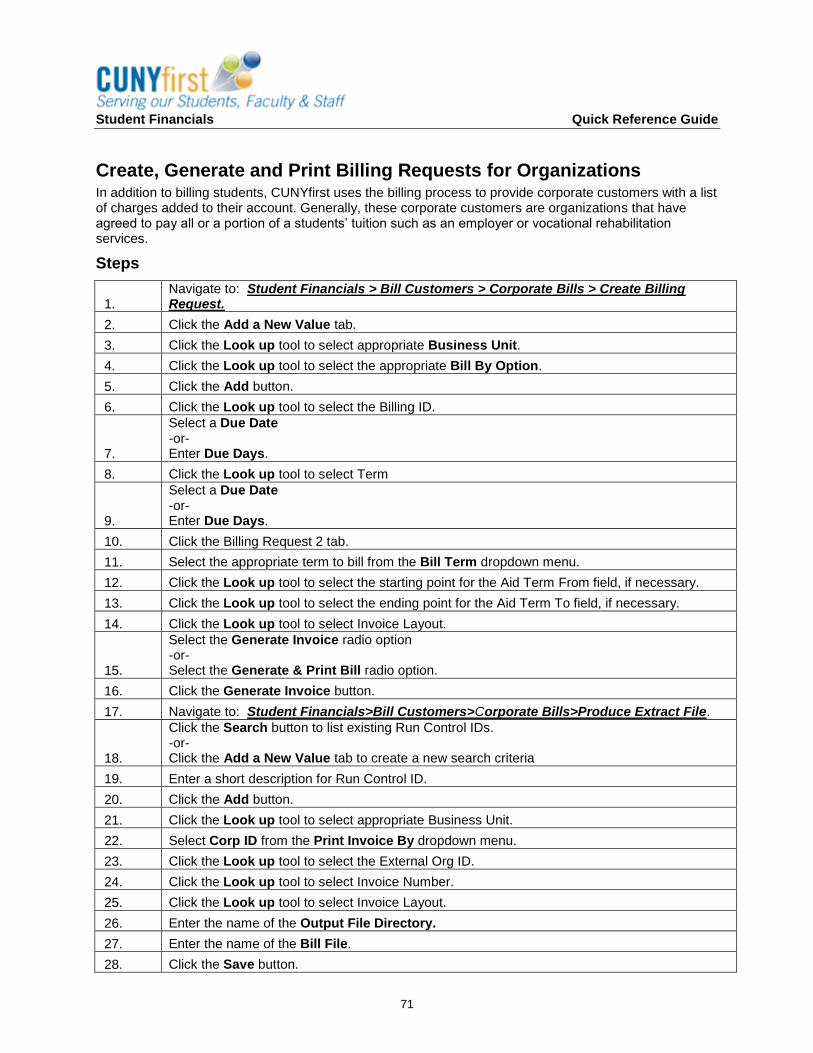
Student Financials Quick Reference Guide
71
Create, Generate and Print Billing Requests for Organizations In addition to billing students, CUNYfirst uses the billing process to provide corporate customers with a list of charges added to their account. Generally, these corporate customers are organizations that have agreed to pay all or a portion of a students’ tuition such as an employer or vocational rehabilitation services.
Steps
1. Navigate to: Student Financials > Bill Customers > Corporate Bills > Create Billing Request.
2. Click the Add a New Value tab.
3. Click the Look up tool to select appropriate Business Unit.
4. Click the Look up tool to select the appropriate Bill By Option.
5. Click the Add button.
6. Click the Look up tool to select the Billing ID.
7.
Select a Due Date -or- Enter Due Days.
8. Click the Look up tool to select Term
9.
Select a Due Date -or- Enter Due Days.
10. Click the Billing Request 2 tab.
11. Select the appropriate term to bill from the Bill Term dropdown menu.
12. Click the Look up tool to select the starting point for the Aid Term From field, if necessary.
13. Click the Look up tool to select the ending point for the Aid Term To field, if necessary.
14. Click the Look up tool to select Invoice Layout.
15.
Select the Generate Invoice radio option -or- Select the Generate & Print Bill radio option.
16. Click the Generate Invoice button.
17. Navigate to: Student Financials>Bill Customers>Corporate Bills>Produce Extract File.
18.
Click the Search button to list existing Run Control IDs. -or- Click the Add a New Value tab to create a new search criteria
19. Enter a short description for Run Control ID.
20. Click the Add button.
21. Click the Look up tool to select appropriate Business Unit.
22. Select Corp ID from the Print Invoice By dropdown menu.
23. Click the Look up tool to select the External Org ID.
24. Click the Look up tool to select Invoice Number.
25. Click the Look up tool to select Invoice Layout.
26. Enter the name of the Output File Directory.
27. Enter the name of the Bill File.
28. Click the Save button.
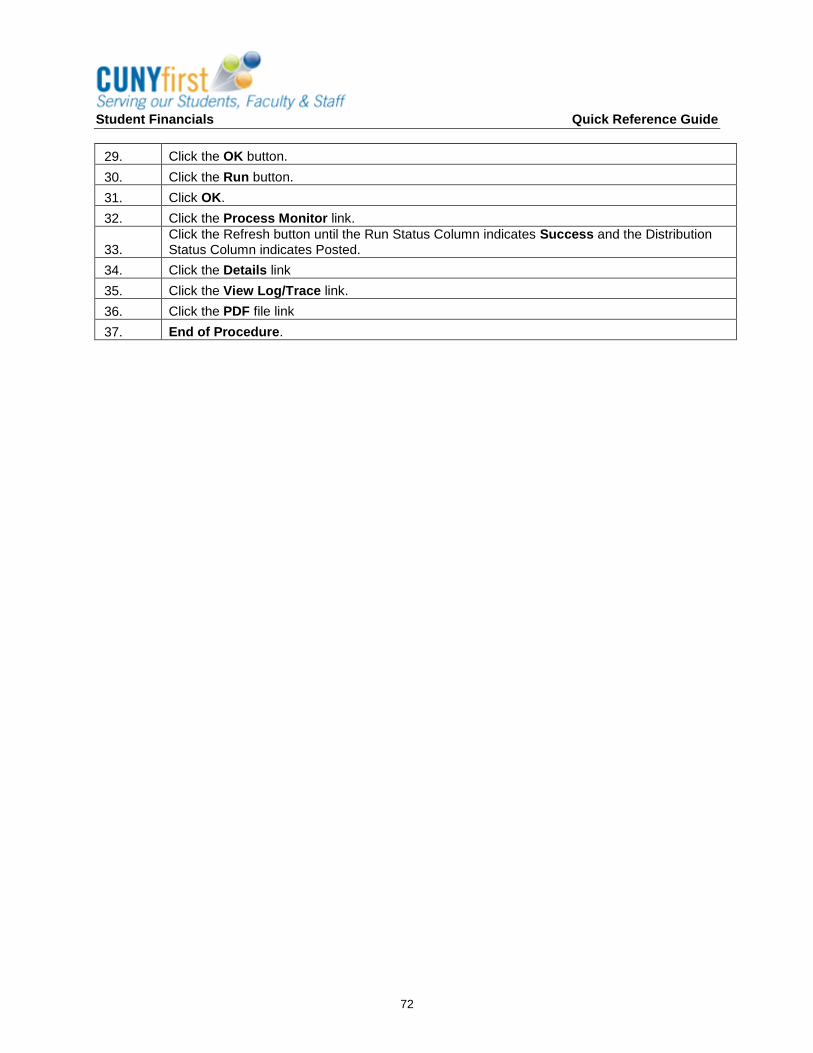
Student Financials Quick Reference Guide
72
29. Click the OK button.
30. Click the Run button.
31. Click OK.
32. Click the Process Monitor link.
33. Click the Refresh button until the Run Status Column indicates Success and the Distribution Status Column indicates Posted.
34. Click the Details link
35. Click the View Log/Trace link.
36. Click the PDF file link
37. End of Procedure.

Student Financials Quick Reference Guide
73
Unit IV: Manage Group Posting
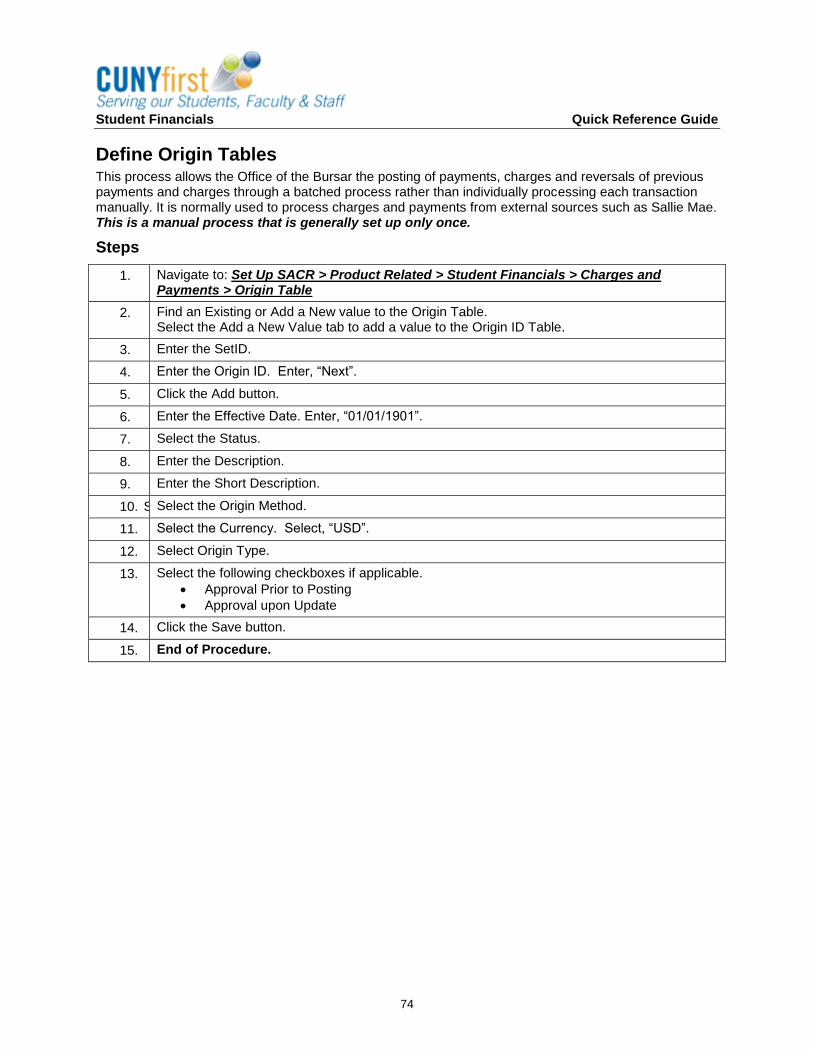
Student Financials Quick Reference Guide
74
Define Origin Tables This process allows the Office of the Bursar the posting of payments, charges and reversals of previous payments and charges through a batched process rather than individually processing each transaction manually. It is normally used to process charges and payments from external sources such as Sallie Mae. This is a manual process that is generally set up only once.
Steps
1. Navigate to: Set Up SACR > Product Related > Student Financials > Charges and Payments > Origin Table
2. Find an Existing or Add a New value to the Origin Table. Select the Add a New Value tab to add a value to the Origin ID Table.
3. Enter the SetID.
4. Enter the Origin ID. Enter, “Next”.
5. Click the Add button.
6. Enter the Effective Date. Enter, “01/01/1901”.
7. Select the Status.
8. Enter the Description.
9. Enter the Short Description.
10. S Select the Origin Method.
11. Select the Currency. Select, “USD”.
12. Select Origin Type.
13. Select the following checkboxes if applicable.
Approval Prior to Posting
Approval upon Update
14. Click the Save button.
15. End of Procedure.
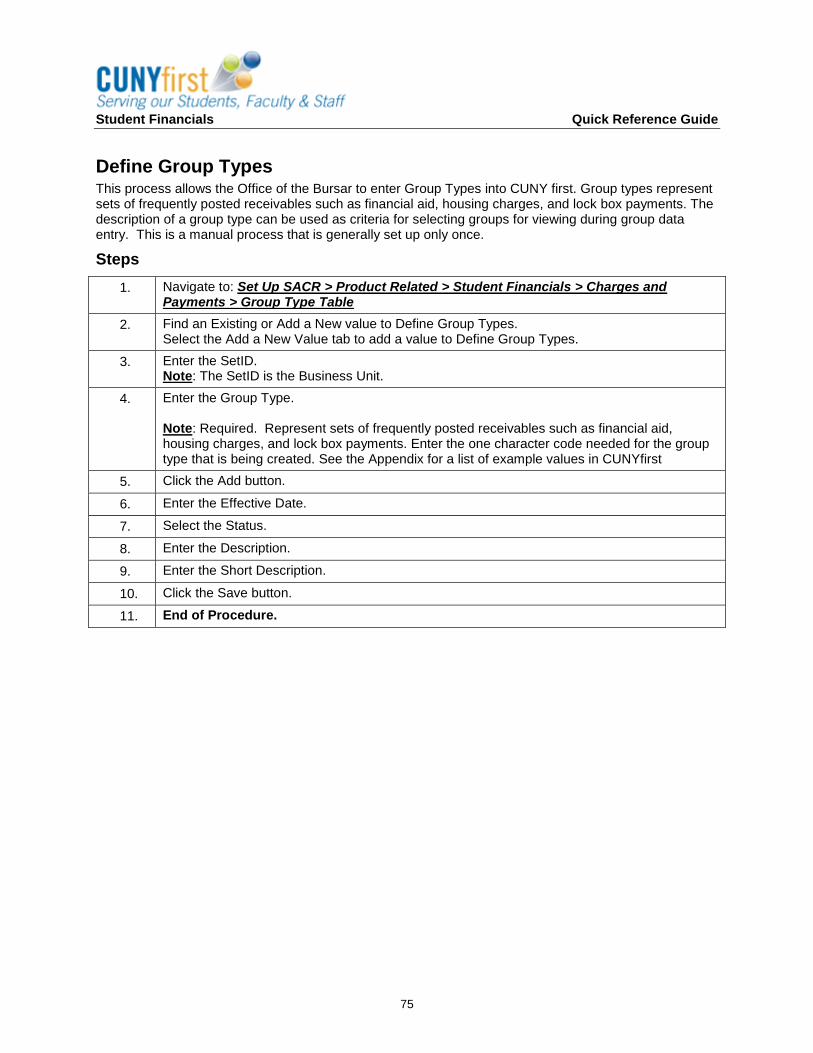
Student Financials Quick Reference Guide
75
Define Group Types This process allows the Office of the Bursar to enter Group Types into CUNY first. Group types represent sets of frequently posted receivables such as financial aid, housing charges, and lock box payments. The description of a group type can be used as criteria for selecting groups for viewing during group data entry. This is a manual process that is generally set up only once.
Steps
1. Navigate to: Set Up SACR > Product Related > Student Financials > Charges and Payments > Group Type Table
2. Find an Existing or Add a New value to Define Group Types. Select the Add a New Value tab to add a value to Define Group Types.
3. Enter the SetID. Note: The SetID is the Business Unit.
4. Enter the Group Type. Note: Required. Represent sets of frequently posted receivables such as financial aid, housing charges, and lock box payments. Enter the one character code needed for the group type that is being created. See the Appendix for a list of example values in CUNYfirst
5. Click the Add button.
6. Enter the Effective Date.
7. Select the Status.
8. Enter the Description.
9. Enter the Short Description.
10. Click the Save button.
11. End of Procedure.
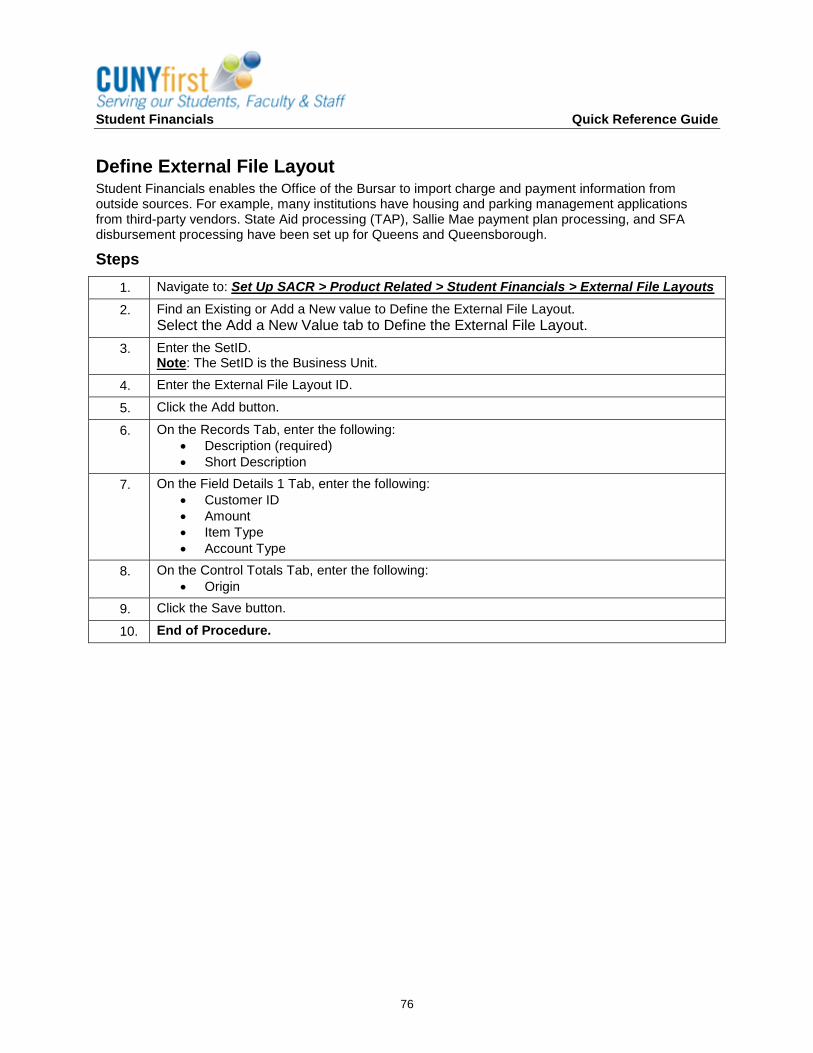
Student Financials Quick Reference Guide
76
Define External File Layout Student Financials enables the Office of the Bursar to import charge and payment information from outside sources. For example, many institutions have housing and parking management applications from third-party vendors. State Aid processing (TAP), Sallie Mae payment plan processing, and SFA disbursement processing have been set up for Queens and Queensborough.
Steps
1. Navigate to: Set Up SACR > Product Related > Student Financials > External File Layouts
2. Find an Existing or Add a New value to Define the External File Layout.
Select the Add a New Value tab to Define the External File Layout.
3. Enter the SetID. Note: The SetID is the Business Unit.
4. Enter the External File Layout ID.
5. Click the Add button.
6. On the Records Tab, enter the following:
Description (required)
Short Description
7. On the Field Details 1 Tab, enter the following:
Customer ID
Amount
Item Type
Account Type
8. On the Control Totals Tab, enter the following:
Origin
9. Click the Save button.
10. End of Procedure.
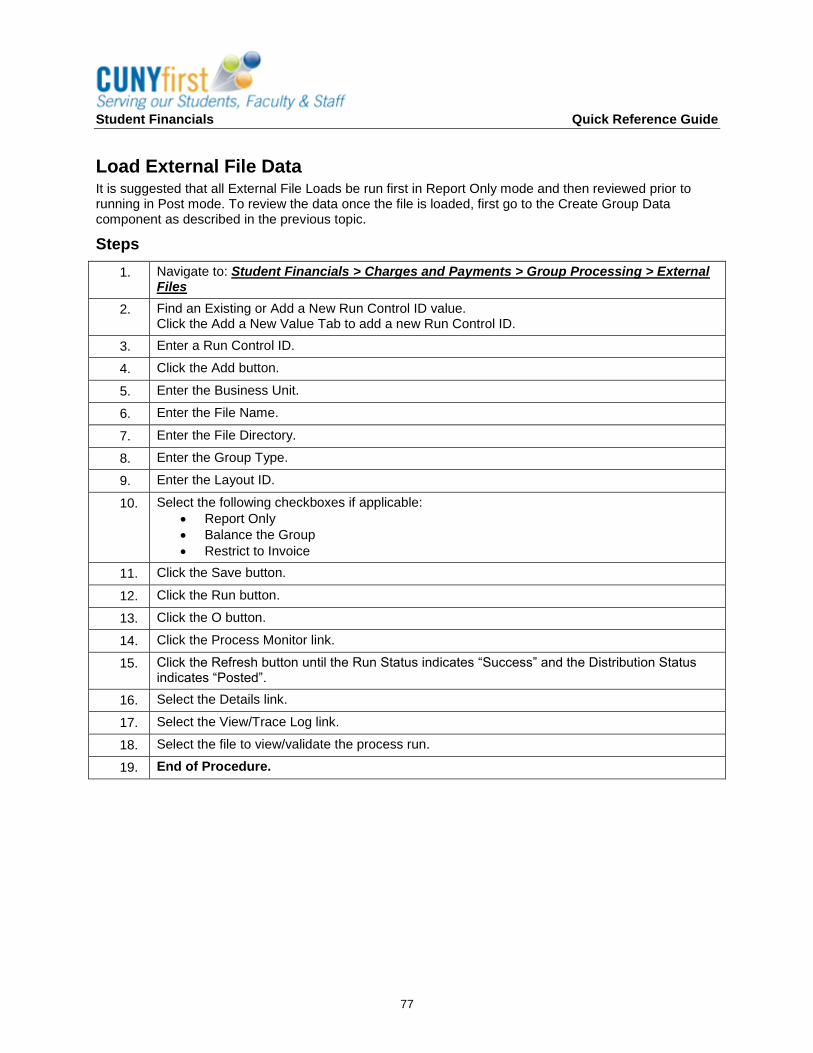
Student Financials Quick Reference Guide
77
Load External File Data It is suggested that all External File Loads be run first in Report Only mode and then reviewed prior to running in Post mode. To review the data once the file is loaded, first go to the Create Group Data component as described in the previous topic.
Steps
1. Navigate to: Student Financials > Charges and Payments > Group Processing > External Files
2. Find an Existing or Add a New Run Control ID value. Click the Add a New Value Tab to add a new Run Control ID.
3. Enter a Run Control ID.
4. Click the Add button.
5. Enter the Business Unit.
6. Enter the File Name.
7. Enter the File Directory.
8. Enter the Group Type.
9. Enter the Layout ID.
10. Select the following checkboxes if applicable:
Report Only
Balance the Group
Restrict to Invoice
11. Click the Save button.
12. Click the Run button.
13. Click the O button.
14. Click the Process Monitor link.
15. Click the Refresh button until the Run Status indicates “Success” and the Distribution Status indicates “Posted”.
16. Select the Details link.
17. Select the View/Trace Log link.
18. Select the file to view/validate the process run.
19. End of Procedure.
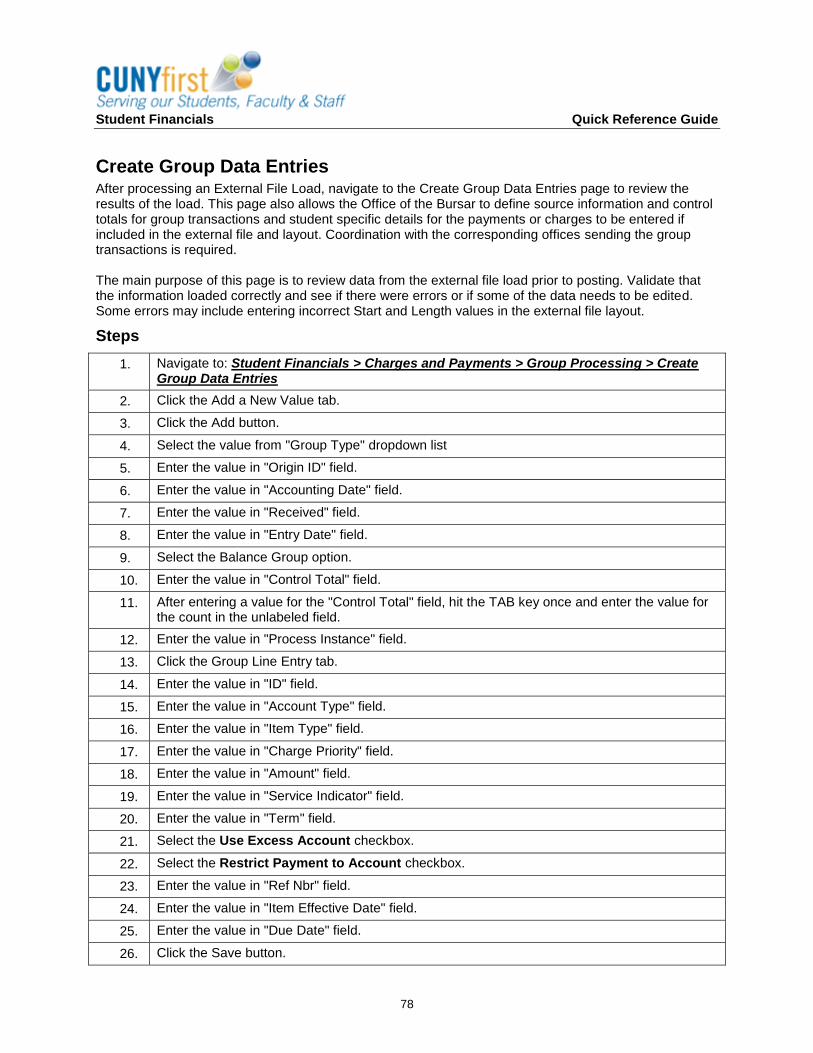
Student Financials Quick Reference Guide
78
Create Group Data Entries After processing an External File Load, navigate to the Create Group Data Entries page to review the results of the load. This page also allows the Office of the Bursar to define source information and control totals for group transactions and student specific details for the payments or charges to be entered if included in the external file and layout. Coordination with the corresponding offices sending the group transactions is required. The main purpose of this page is to review data from the external file load prior to posting. Validate that the information loaded correctly and see if there were errors or if some of the data needs to be edited. Some errors may include entering incorrect Start and Length values in the external file layout.
Steps
1. Navigate to: Student Financials > Charges and Payments > Group Processing > Create Group Data Entries
2. Click the Add a New Value tab.
3. Click the Add button.
4. Select the value from "Group Type" dropdown list
5. Enter the value in "Origin ID" field.
6. Enter the value in "Accounting Date" field.
7. Enter the value in "Received" field.
8. Enter the value in "Entry Date" field.
9. Select the Balance Group option.
10. Enter the value in "Control Total" field.
11. After entering a value for the "Control Total" field, hit the TAB key once and enter the value for the count in the unlabeled field.
12. Enter the value in "Process Instance" field.
13. Click the Group Line Entry tab.
14. Enter the value in "ID" field.
15. Enter the value in "Account Type" field.
16. Enter the value in "Item Type" field.
17. Enter the value in "Charge Priority" field.
18. Enter the value in "Amount" field.
19. Enter the value in "Service Indicator" field.
20. Enter the value in "Term" field.
21. Select the Use Excess Account checkbox.
22. Select the Restrict Payment to Account checkbox.
23. Enter the value in "Ref Nbr" field.
24. Enter the value in "Item Effective Date" field.
25. Enter the value in "Due Date" field.
26. Click the Save button.
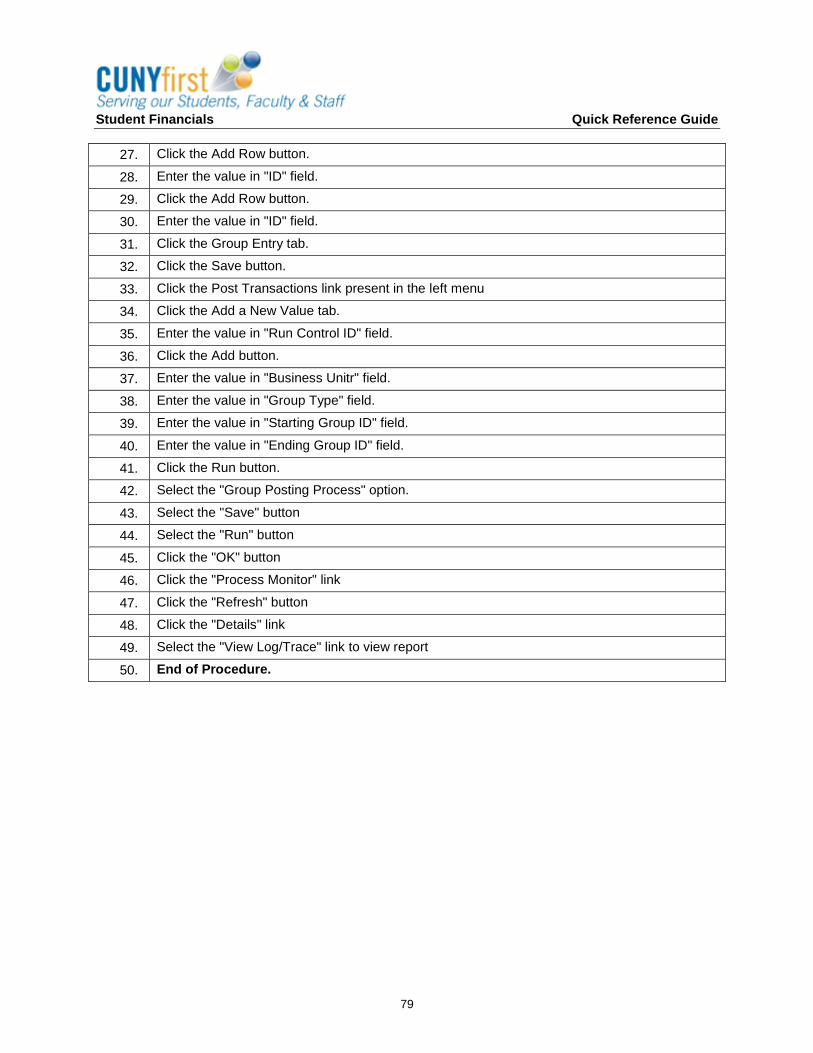
Student Financials Quick Reference Guide
79
27. Click the Add Row button.
28. Enter the value in "ID" field.
29. Click the Add Row button.
30. Enter the value in "ID" field.
31. Click the Group Entry tab.
32. Click the Save button.
33. Click the Post Transactions link present in the left menu
34. Click the Add a New Value tab.
35. Enter the value in "Run Control ID" field.
36. Click the Add button.
37. Enter the value in "Business Unitr" field.
38. Enter the value in "Group Type" field.
39. Enter the value in "Starting Group ID" field.
40. Enter the value in "Ending Group ID" field.
41. Click the Run button.
42. Select the "Group Posting Process" option.
43. Select the "Save" button
44. Select the "Run" button
45. Click the "OK" button
46. Click the "Process Monitor" link
47. Click the "Refresh" button
48. Click the "Details" link
49. Select the "View Log/Trace" link to view report
50. End of Procedure.
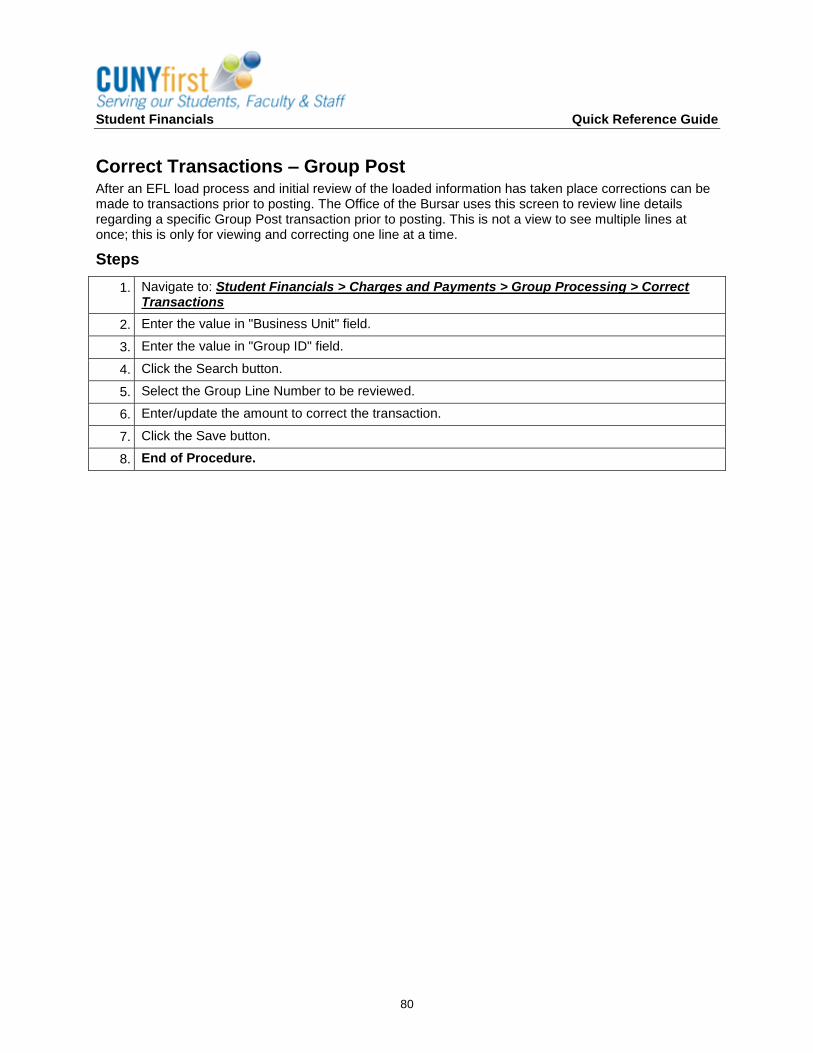
Student Financials Quick Reference Guide
80
Correct Transactions – Group Post After an EFL load process and initial review of the loaded information has taken place corrections can be made to transactions prior to posting. The Office of the Bursar uses this screen to review line details regarding a specific Group Post transaction prior to posting. This is not a view to see multiple lines at once; this is only for viewing and correcting one line at a time.
Steps
1. Navigate to: Student Financials > Charges and Payments > Group Processing > Correct Transactions
2. Enter the value in "Business Unit" field.
3. Enter the value in "Group ID" field.
4. Click the Search button.
5. Select the Group Line Number to be reviewed.
6. Enter/update the amount to correct the transaction.
7. Click the Save button.
8. End of Procedure.
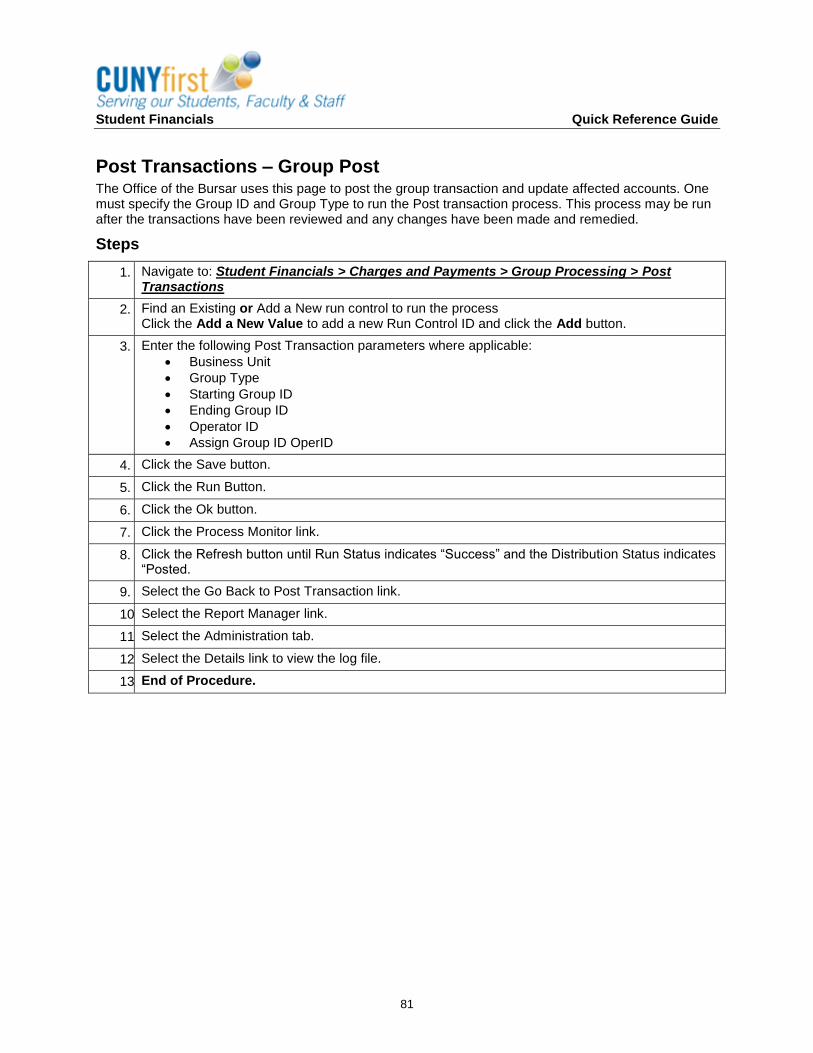
Student Financials Quick Reference Guide
81
Post Transactions – Group Post The Office of the Bursar uses this page to post the group transaction and update affected accounts. One must specify the Group ID and Group Type to run the Post transaction process. This process may be run after the transactions have been reviewed and any changes have been made and remedied.
Steps
1. Navigate to: Student Financials > Charges and Payments > Group Processing > Post Transactions
2. Find an Existing or Add a New run control to run the process Click the Add a New Value to add a new Run Control ID and click the Add button.
3. Enter the following Post Transaction parameters where applicable:
Business Unit
Group Type
Starting Group ID
Ending Group ID
Operator ID
Assign Group ID OperID
4. Click the Save button.
5. Click the Run Button.
6. Click the Ok button.
7. Click the Process Monitor link.
8. Click the Refresh button until Run Status indicates “Success” and the Distribution Status indicates “Posted.
9. Select the Go Back to Post Transaction link.
10. Select the Report Manager link.
11. Select the Administration tab.
12. Select the Details link to view the log file.
13. End of Procedure.
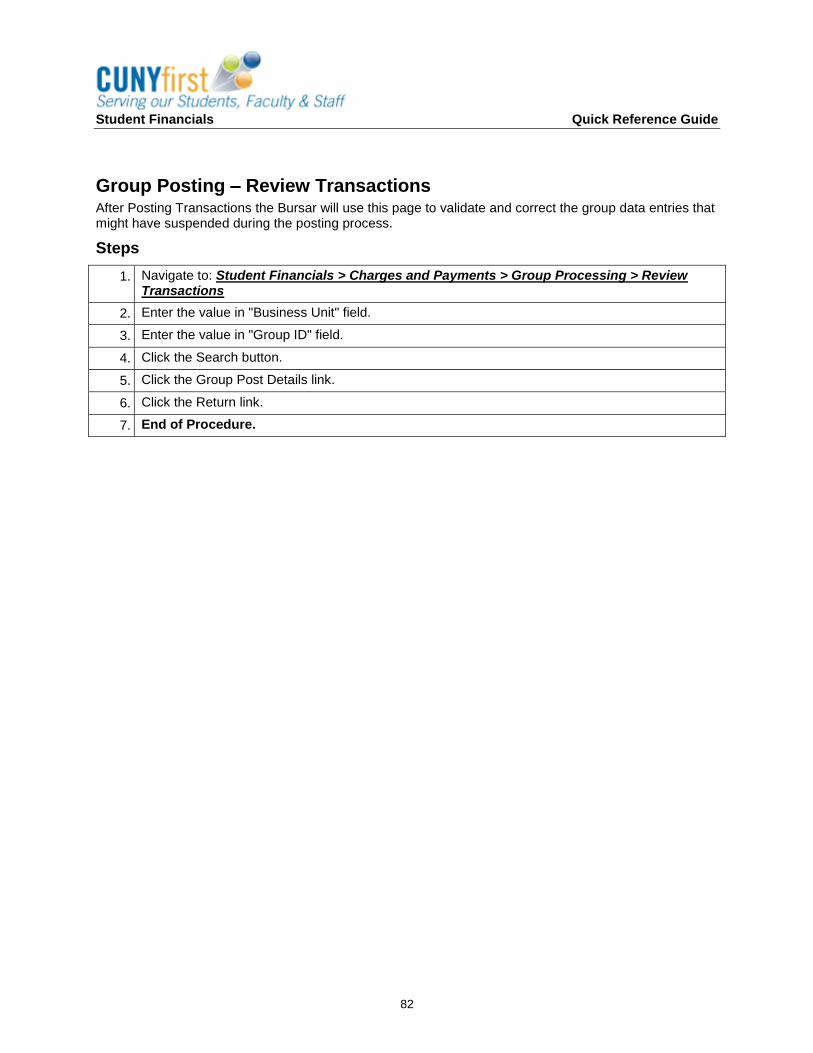
Student Financials Quick Reference Guide
82
Group Posting – Review Transactions After Posting Transactions the Bursar will use this page to validate and correct the group data entries that might have suspended during the posting process.
Steps
1. Navigate to: Student Financials > Charges and Payments > Group Processing > Review Transactions
2. Enter the value in "Business Unit" field.
3. Enter the value in "Group ID" field.
4. Click the Search button.
5. Click the Group Post Details link.
6. Click the Return link.
7. End of Procedure.
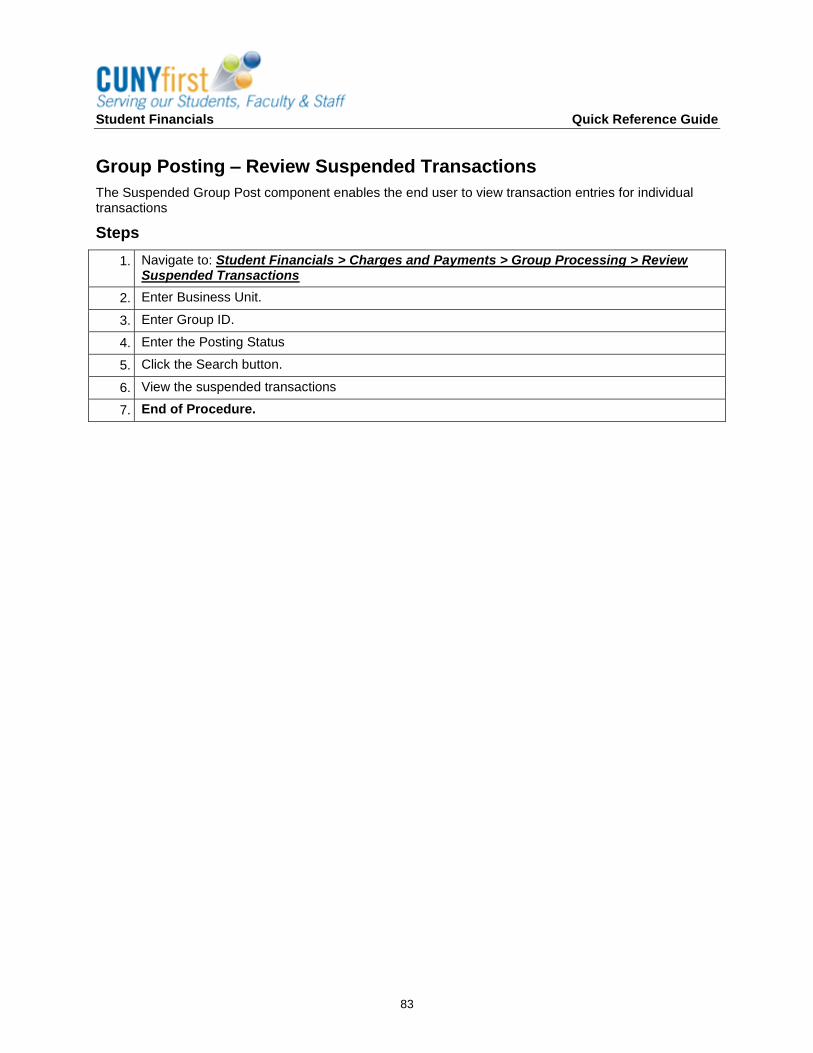
Student Financials Quick Reference Guide
83
Group Posting – Review Suspended Transactions
The Suspended Group Post component enables the end user to view transaction entries for individual transactions
Steps
1. Navigate to: Student Financials > Charges and Payments > Group Processing > Review Suspended Transactions
2. Enter Business Unit.
3. Enter Group ID.
4. Enter the Posting Status
5. Click the Search button.
6. View the suspended transactions
7. End of Procedure.
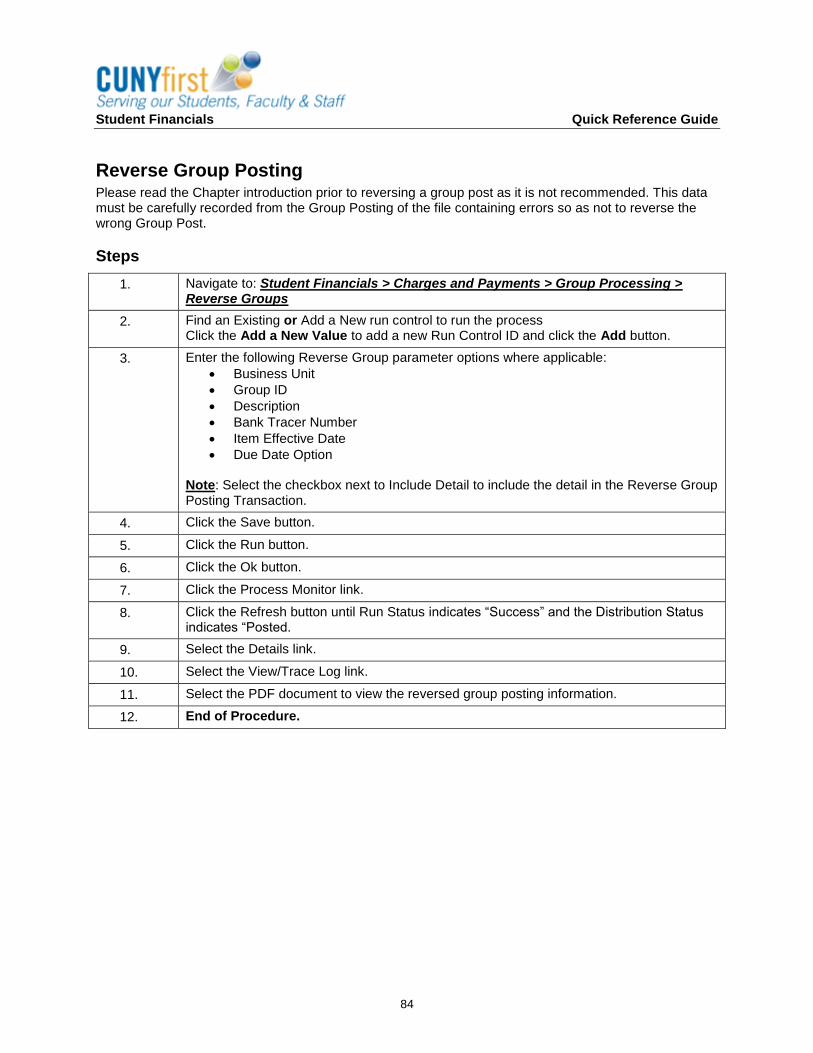
Student Financials Quick Reference Guide
84
Reverse Group Posting Please read the Chapter introduction prior to reversing a group post as it is not recommended. This data must be carefully recorded from the Group Posting of the file containing errors so as not to reverse the wrong Group Post.
Steps
1. Navigate to: Student Financials > Charges and Payments > Group Processing > Reverse Groups
2. Find an Existing or Add a New run control to run the process Click the Add a New Value to add a new Run Control ID and click the Add button.
3. Enter the following Reverse Group parameter options where applicable:
Business Unit
Group ID
Description
Bank Tracer Number
Item Effective Date
Due Date Option Note: Select the checkbox next to Include Detail to include the detail in the Reverse Group Posting Transaction.
4. Click the Save button.
5. Click the Run button.
6. Click the Ok button.
7. Click the Process Monitor link.
8. Click the Refresh button until Run Status indicates “Success” and the Distribution Status indicates “Posted.
9. Select the Details link.
10. Select the View/Trace Log link.
11. Select the PDF document to view the reversed group posting information.
12. End of Procedure.

Student Financials Quick Reference Guide
85
Unit V: Waivers
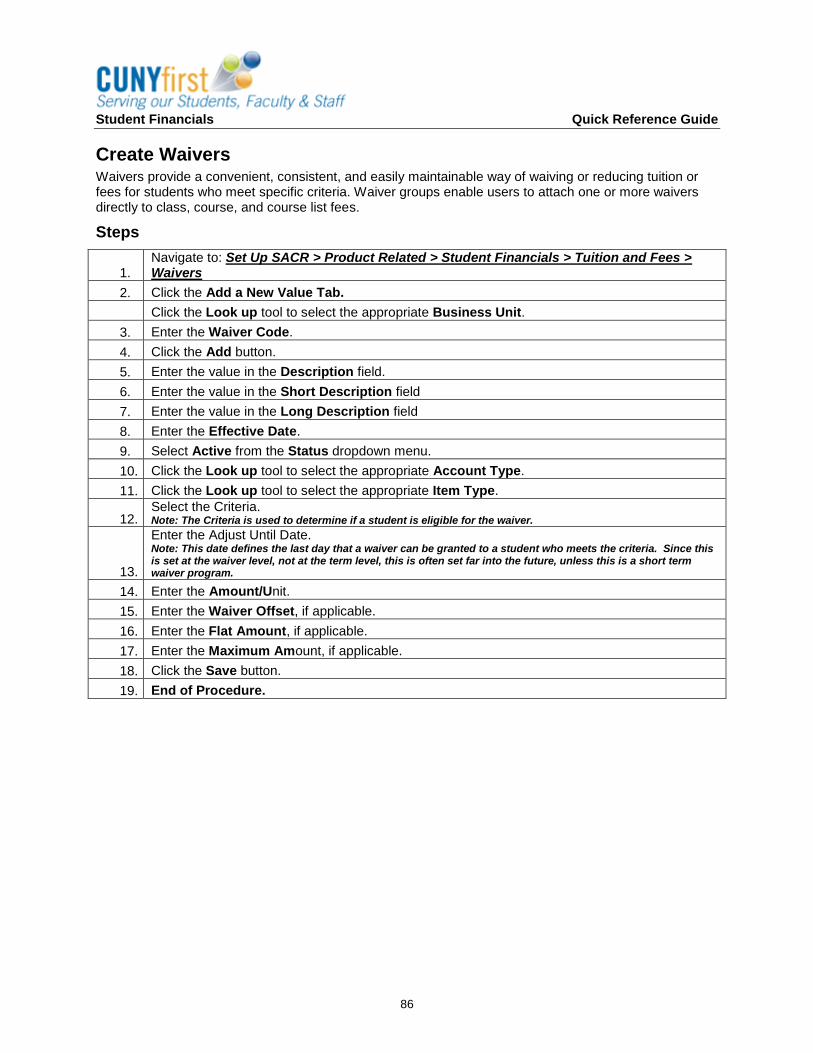
Student Financials Quick Reference Guide
86
Create Waivers Waivers provide a convenient, consistent, and easily maintainable way of waiving or reducing tuition or fees for students who meet specific criteria. Waiver groups enable users to attach one or more waivers directly to class, course, and course list fees.
Steps
1. Navigate to: Set Up SACR > Product Related > Student Financials > Tuition and Fees > Waivers
2. Click the Add a New Value Tab.
Click the Look up tool to select the appropriate Business Unit.
3. Enter the Waiver Code.
4. Click the Add button.
5. Enter the value in the Description field.
6. Enter the value in the Short Description field
7. Enter the value in the Long Description field
8. Enter the Effective Date.
9. Select Active from the Status dropdown menu.
10. Click the Look up tool to select the appropriate Account Type.
11. Click the Look up tool to select the appropriate Item Type.
12. Select the Criteria. Note: The Criteria is used to determine if a student is eligible for the waiver.
13.
Enter the Adjust Until Date. Note: This date defines the last day that a waiver can be granted to a student who meets the criteria. Since this is set at the waiver level, not at the term level, this is often set far into the future, unless this is a short term waiver program.
14. Enter the Amount/Unit.
15. Enter the Waiver Offset, if applicable.
16. Enter the Flat Amount, if applicable.
17. Enter the Maximum Amount, if applicable.
18. Click the Save button.
19. End of Procedure.
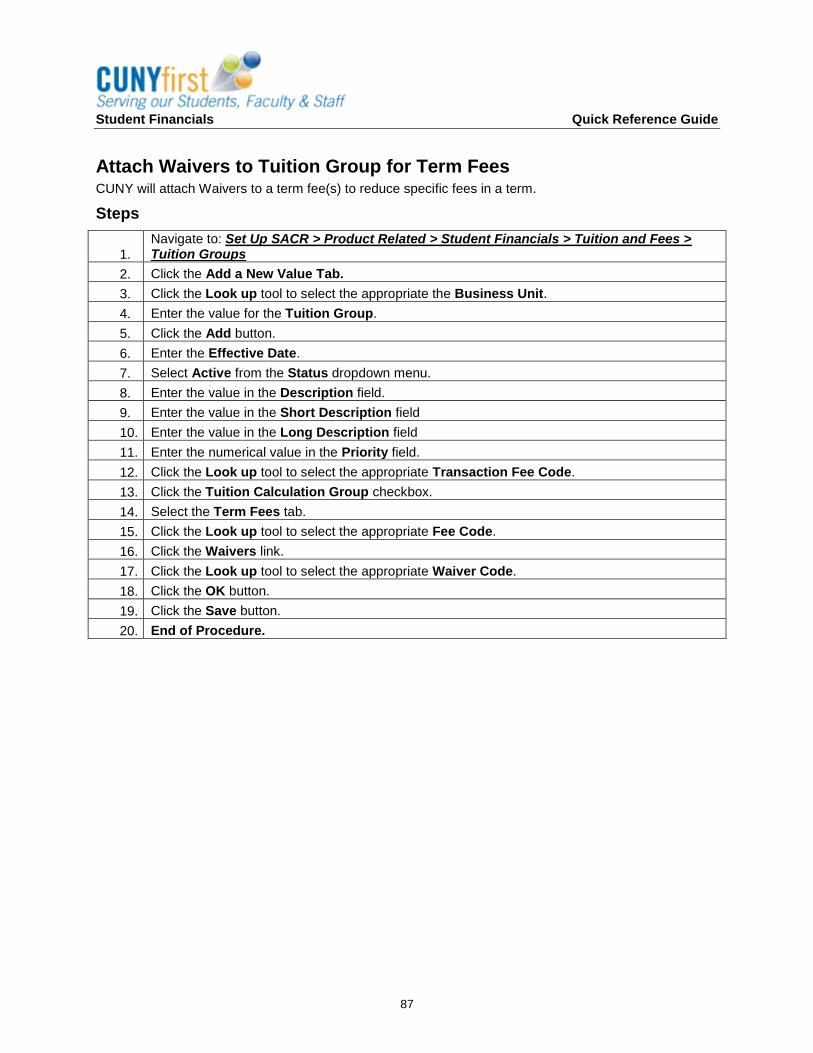
Student Financials Quick Reference Guide
87
Attach Waivers to Tuition Group for Term Fees CUNY will attach Waivers to a term fee(s) to reduce specific fees in a term.
Steps
1. Navigate to: Set Up SACR > Product Related > Student Financials > Tuition and Fees > Tuition Groups
2. Click the Add a New Value Tab.
3. Click the Look up tool to select the appropriate the Business Unit.
4. Enter the value for the Tuition Group.
5. Click the Add button.
6. Enter the Effective Date.
7. Select Active from the Status dropdown menu.
8. Enter the value in the Description field.
9. Enter the value in the Short Description field
10. Enter the value in the Long Description field
11. Enter the numerical value in the Priority field.
12. Click the Look up tool to select the appropriate Transaction Fee Code.
13. Click the Tuition Calculation Group checkbox.
14. Select the Term Fees tab.
15. Click the Look up tool to select the appropriate Fee Code.
16. Click the Waivers link.
17. Click the Look up tool to select the appropriate Waiver Code.
18. Click the OK button.
19. Click the Save button.
20. End of Procedure.
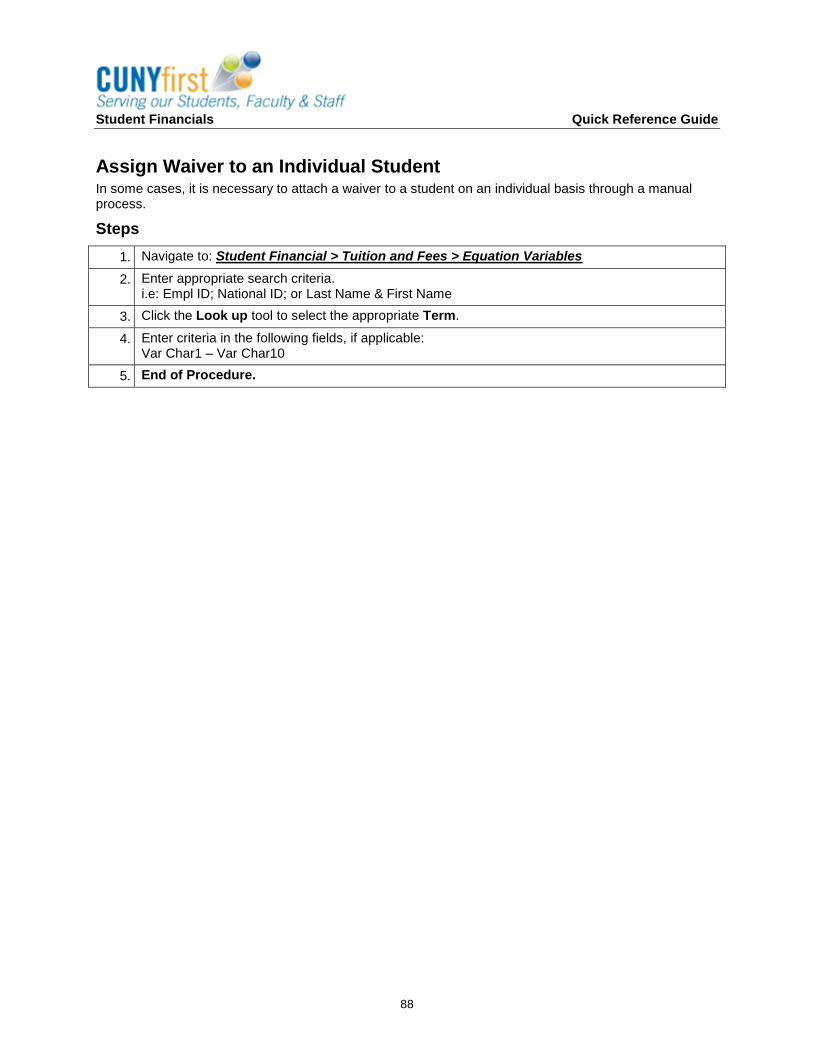
Student Financials Quick Reference Guide
88
Assign Waiver to an Individual Student In some cases, it is necessary to attach a waiver to a student on an individual basis through a manual process.
Steps
1. Navigate to: Student Financial > Tuition and Fees > Equation Variables
2. Enter appropriate search criteria. i.e: Empl ID; National ID; or Last Name & First Name
3. Click the Look up tool to select the appropriate Term.
4. Enter criteria in the following fields, if applicable: Var Char1 – Var Char10
5. End of Procedure.
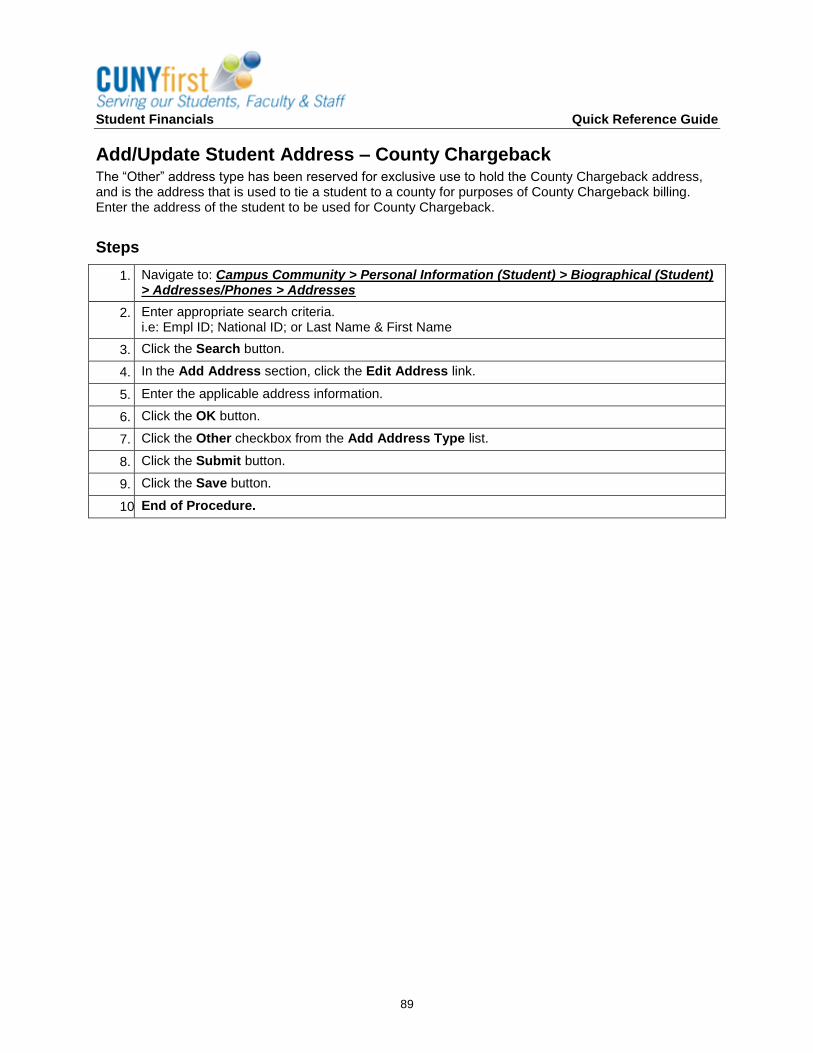
Student Financials Quick Reference Guide
89
Add/Update Student Address – County Chargeback The “Other” address type has been reserved for exclusive use to hold the County Chargeback address, and is the address that is used to tie a student to a county for purposes of County Chargeback billing. Enter the address of the student to be used for County Chargeback.
Steps
1. Navigate to: Campus Community > Personal Information (Student) > Biographical (Student) > Addresses/Phones > Addresses
2. Enter appropriate search criteria. i.e: Empl ID; National ID; or Last Name & First Name
3. Click the Search button.
4. In the Add Address section, click the Edit Address link.
5. Enter the applicable address information.
6. Click the OK button.
7. Click the Other checkbox from the Add Address Type list.
8. Click the Submit button.
9. Click the Save button.
10. End of Procedure.
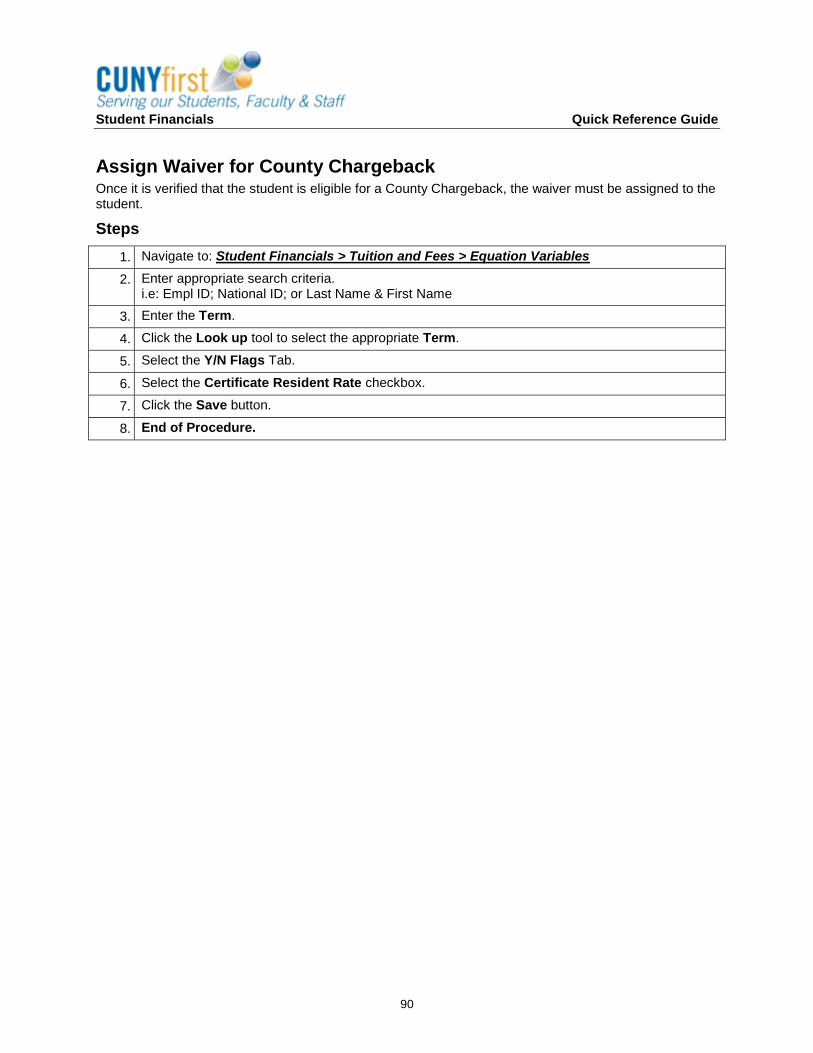
Student Financials Quick Reference Guide
90
Assign Waiver for County Chargeback Once it is verified that the student is eligible for a County Chargeback, the waiver must be assigned to the student.
Steps
1. Navigate to: Student Financials > Tuition and Fees > Equation Variables
2. Enter appropriate search criteria. i.e: Empl ID; National ID; or Last Name & First Name
3. Enter the Term.
4. Click the Look up tool to select the appropriate Term.
5. Select the Y/N Flags Tab.
6. Select the Certificate Resident Rate checkbox.
7. Click the Save button.
8. End of Procedure.
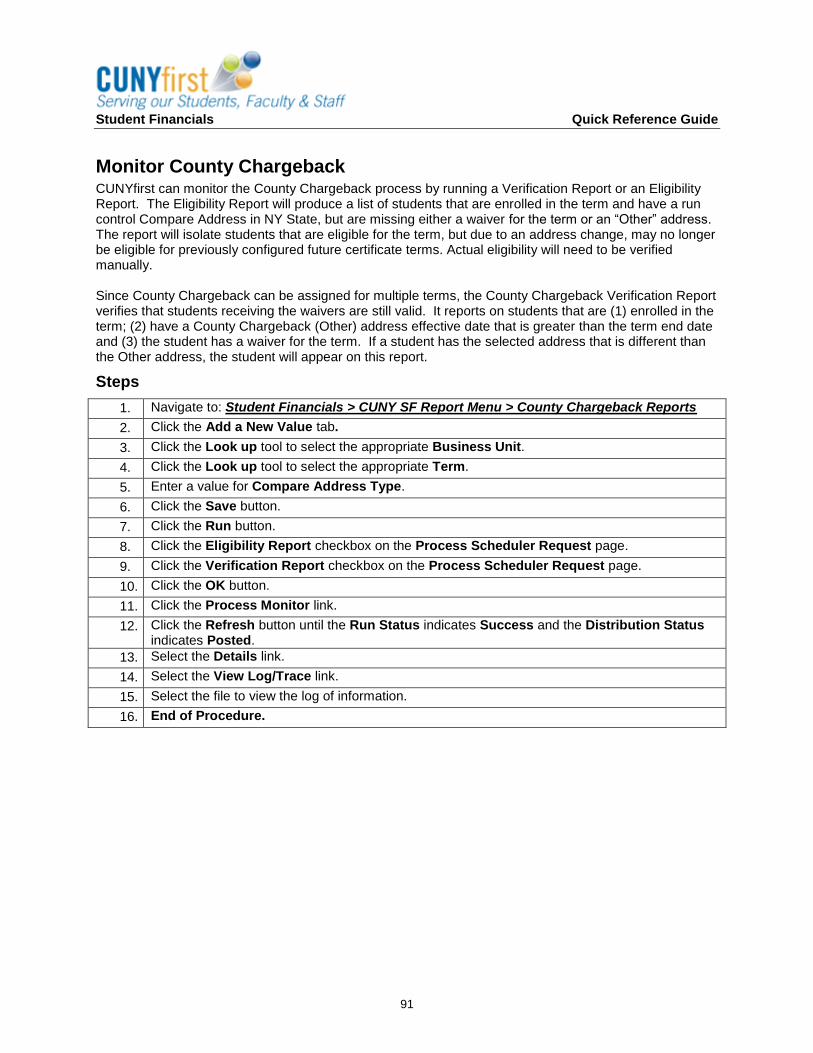
Student Financials Quick Reference Guide
91
Monitor County Chargeback CUNYfirst can monitor the County Chargeback process by running a Verification Report or an Eligibility Report. The Eligibility Report will produce a list of students that are enrolled in the term and have a run control Compare Address in NY State, but are missing either a waiver for the term or an “Other” address. The report will isolate students that are eligible for the term, but due to an address change, may no longer be eligible for previously configured future certificate terms. Actual eligibility will need to be verified manually. Since County Chargeback can be assigned for multiple terms, the County Chargeback Verification Report verifies that students receiving the waivers are still valid. It reports on students that are (1) enrolled in the term; (2) have a County Chargeback (Other) address effective date that is greater than the term end date and (3) the student has a waiver for the term. If a student has the selected address that is different than the Other address, the student will appear on this report.
Steps
1. Navigate to: Student Financials > CUNY SF Report Menu > County Chargeback Reports
2. Click the Add a New Value tab.
3. Click the Look up tool to select the appropriate Business Unit.
4. Click the Look up tool to select the appropriate Term.
5. Enter a value for Compare Address Type.
6. Click the Save button.
7. Click the Run button.
8. Click the Eligibility Report checkbox on the Process Scheduler Request page.
9. Click the Verification Report checkbox on the Process Scheduler Request page.
10. Click the OK button.
11. Click the Process Monitor link.
12. Click the Refresh button until the Run Status indicates Success and the Distribution Status indicates Posted.
13. Select the Details link.
14. Select the View Log/Trace link.
15. Select the file to view the log of information.
16. End of Procedure.
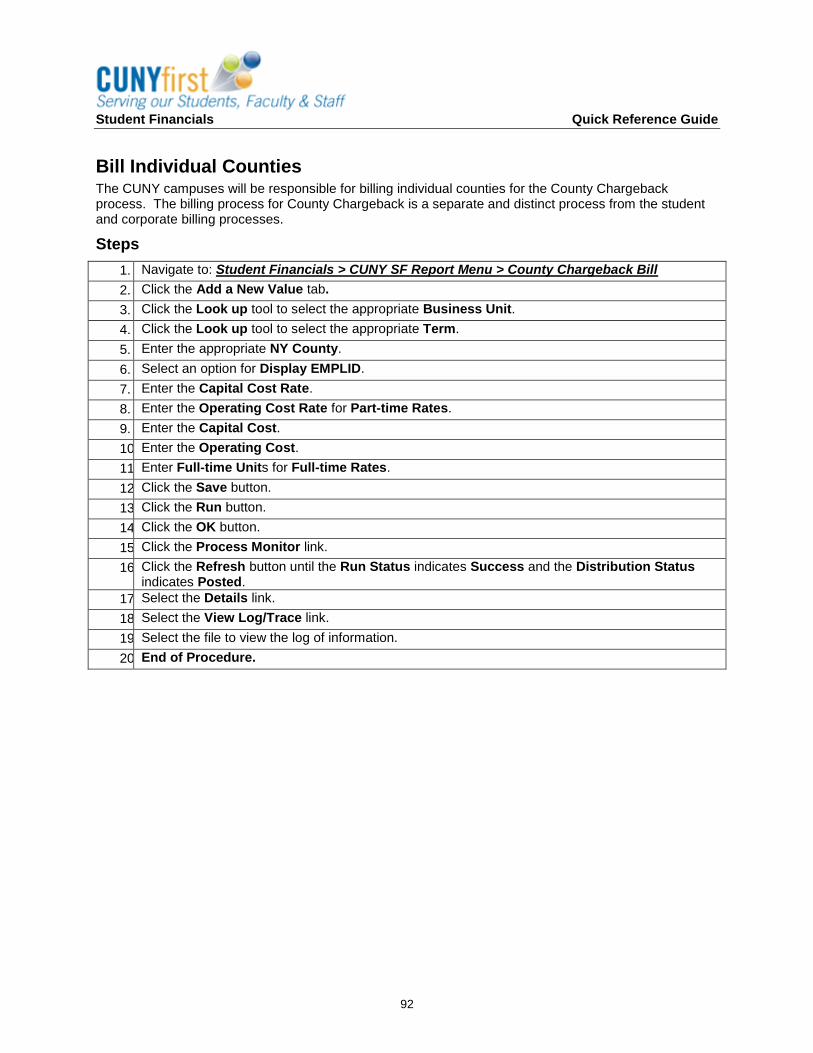
Student Financials Quick Reference Guide
92
Bill Individual Counties The CUNY campuses will be responsible for billing individual counties for the County Chargeback process. The billing process for County Chargeback is a separate and distinct process from the student and corporate billing processes.
Steps
1. Navigate to: Student Financials > CUNY SF Report Menu > County Chargeback Bill
2. Click the Add a New Value tab.
3. Click the Look up tool to select the appropriate Business Unit.
4. Click the Look up tool to select the appropriate Term.
5. Enter the appropriate NY County.
6. Select an option for Display EMPLID.
7. Enter the Capital Cost Rate.
8. Enter the Operating Cost Rate for Part-time Rates.
9. Enter the Capital Cost.
10. Enter the Operating Cost.
11. Enter Full-time Units for Full-time Rates.
12. Click the Save button.
13. Click the Run button.
14. Click the OK button.
15. Click the Process Monitor link.
16. Click the Refresh button until the Run Status indicates Success and the Distribution Status indicates Posted.
17. Select the Details link.
18. Select the View Log/Trace link.
19. Select the file to view the log of information.
20. End of Procedure.

Student Financials Quick Reference Guide
93
Unit VI: Refunds
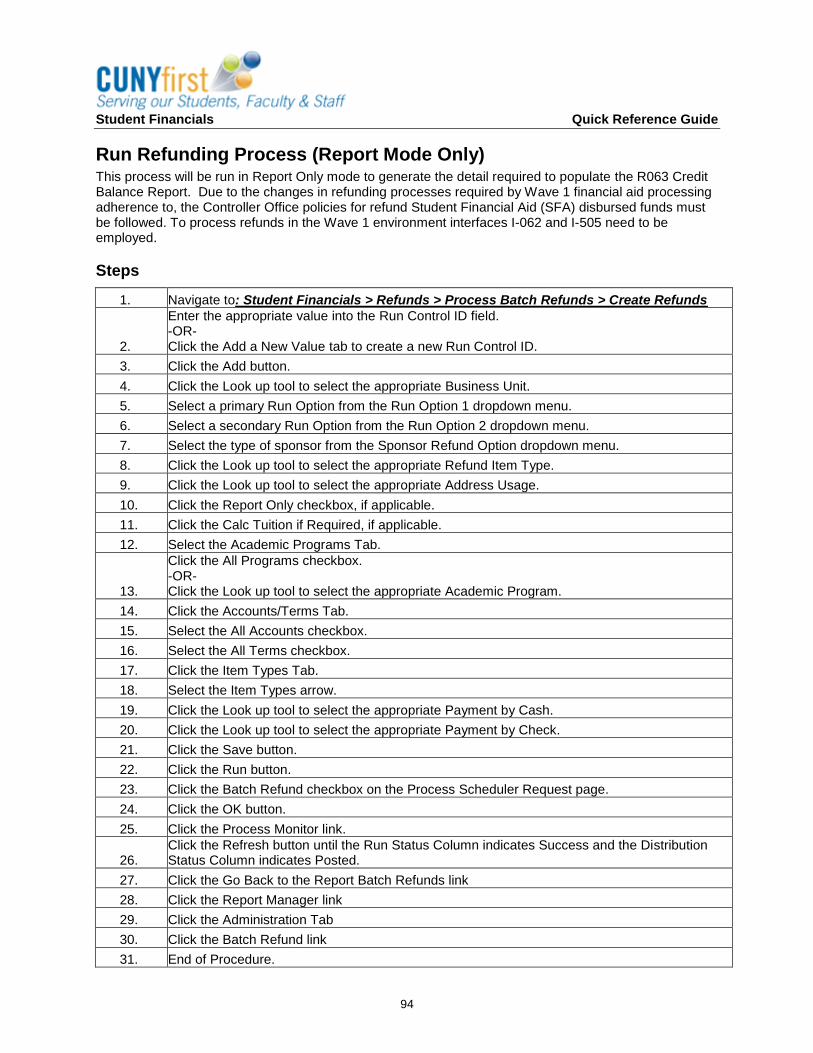
Student Financials Quick Reference Guide
94
Run Refunding Process (Report Mode Only) This process will be run in Report Only mode to generate the detail required to populate the R063 Credit Balance Report. Due to the changes in refunding processes required by Wave 1 financial aid processing adherence to, the Controller Office policies for refund Student Financial Aid (SFA) disbursed funds must be followed. To process refunds in the Wave 1 environment interfaces I-062 and I-505 need to be employed.
Steps
1. Navigate to: Student Financials > Refunds > Process Batch Refunds > Create Refunds
2.
Enter the appropriate value into the Run Control ID field. -OR- Click the Add a New Value tab to create a new Run Control ID.
3. Click the Add button.
4. Click the Look up tool to select the appropriate Business Unit.
5. Select a primary Run Option from the Run Option 1 dropdown menu.
6. Select a secondary Run Option from the Run Option 2 dropdown menu.
7. Select the type of sponsor from the Sponsor Refund Option dropdown menu.
8. Click the Look up tool to select the appropriate Refund Item Type.
9. Click the Look up tool to select the appropriate Address Usage.
10. Click the Report Only checkbox, if applicable.
11. Click the Calc Tuition if Required, if applicable.
12. Select the Academic Programs Tab.
13.
Click the All Programs checkbox. -OR- Click the Look up tool to select the appropriate Academic Program.
14. Click the Accounts/Terms Tab.
15. Select the All Accounts checkbox.
16. Select the All Terms checkbox.
17. Click the Item Types Tab.
18. Select the Item Types arrow.
19. Click the Look up tool to select the appropriate Payment by Cash.
20. Click the Look up tool to select the appropriate Payment by Check.
21. Click the Save button.
22. Click the Run button.
23. Click the Batch Refund checkbox on the Process Scheduler Request page.
24. Click the OK button.
25. Click the Process Monitor link.
26. Click the Refresh button until the Run Status Column indicates Success and the Distribution Status Column indicates Posted.
27. Click the Go Back to the Report Batch Refunds link
28. Click the Report Manager link
29. Click the Administration Tab
30. Click the Batch Refund link
31. End of Procedure.
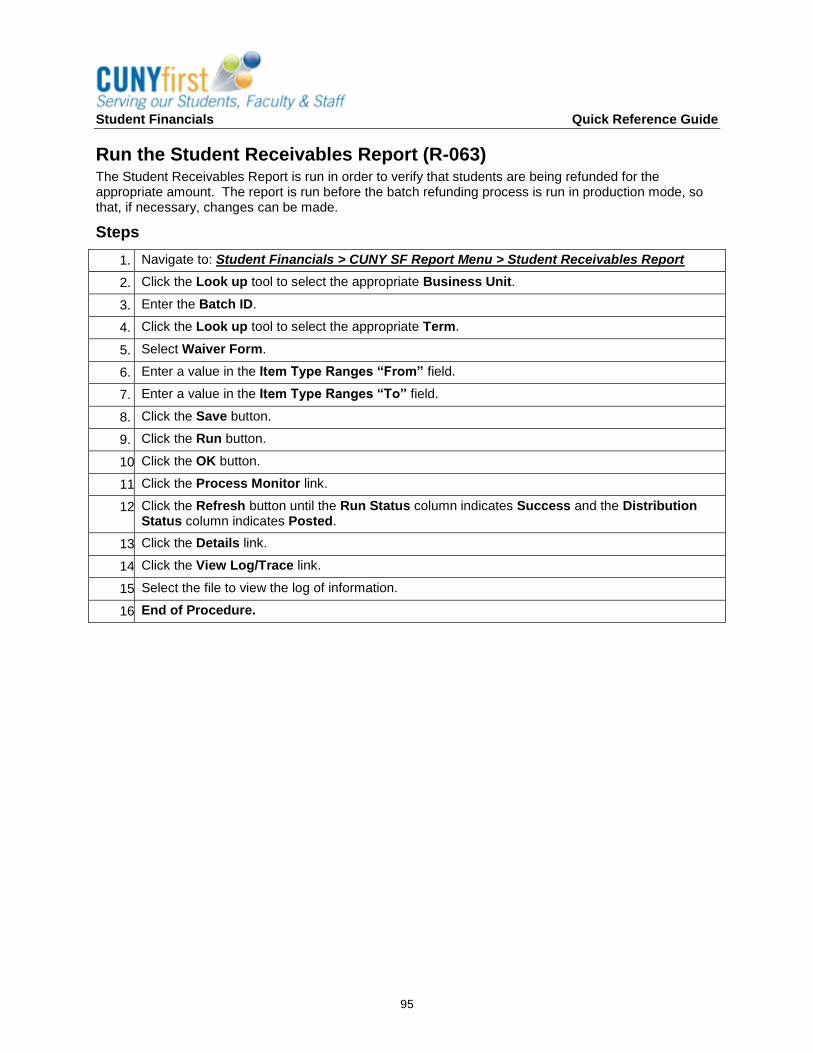
Student Financials Quick Reference Guide
95
Run the Student Receivables Report (R-063) The Student Receivables Report is run in order to verify that students are being refunded for the appropriate amount. The report is run before the batch refunding process is run in production mode, so that, if necessary, changes can be made.
Steps
1. Navigate to: Student Financials > CUNY SF Report Menu > Student Receivables Report
2. Click the Look up tool to select the appropriate Business Unit.
3. Enter the Batch ID.
4. Click the Look up tool to select the appropriate Term.
5. Select Waiver Form.
6. Enter a value in the Item Type Ranges “From” field.
7. Enter a value in the Item Type Ranges “To” field.
8. Click the Save button.
9. Click the Run button.
10. Click the OK button.
11. Click the Process Monitor link.
12. Click the Refresh button until the Run Status column indicates Success and the Distribution Status column indicates Posted.
13. Click the Details link.
14. Click the View Log/Trace link.
15. Select the file to view the log of information.
16. End of Procedure.
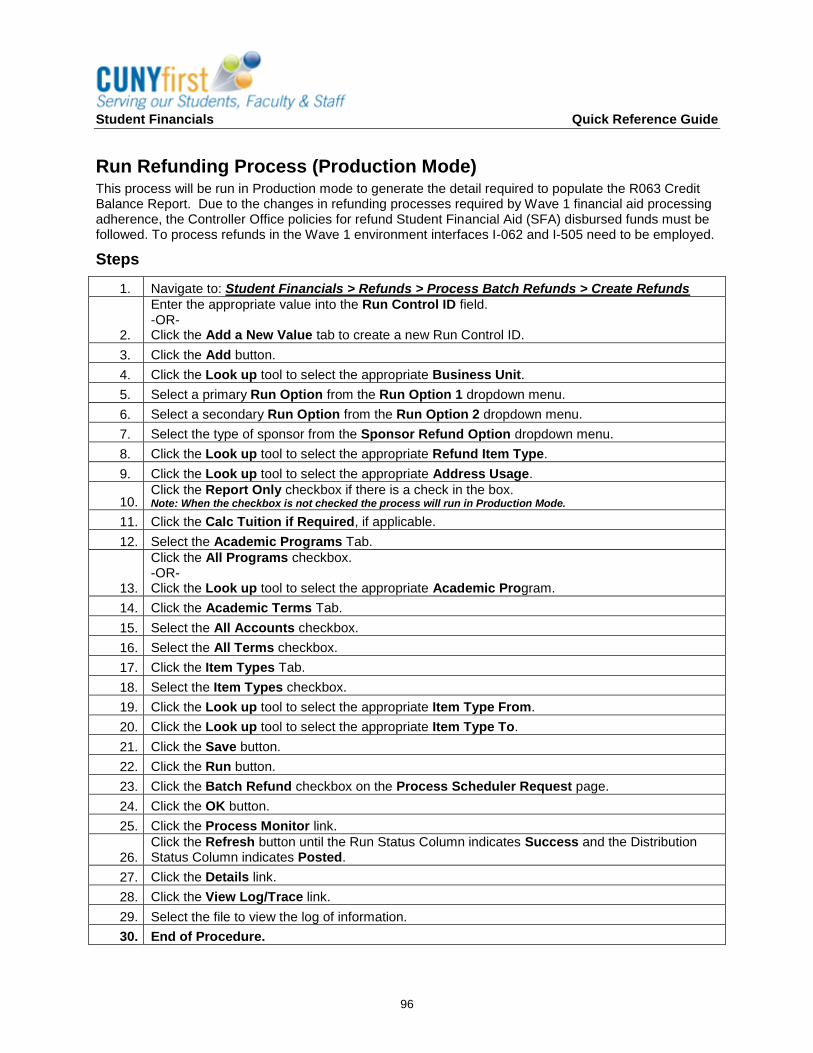
Student Financials Quick Reference Guide
96
Run Refunding Process (Production Mode) This process will be run in Production mode to generate the detail required to populate the R063 Credit Balance Report. Due to the changes in refunding processes required by Wave 1 financial aid processing adherence, the Controller Office policies for refund Student Financial Aid (SFA) disbursed funds must be followed. To process refunds in the Wave 1 environment interfaces I-062 and I-505 need to be employed.
Steps
1. Navigate to: Student Financials > Refunds > Process Batch Refunds > Create Refunds
2.
Enter the appropriate value into the Run Control ID field. -OR- Click the Add a New Value tab to create a new Run Control ID.
3. Click the Add button.
4. Click the Look up tool to select the appropriate Business Unit.
5. Select a primary Run Option from the Run Option 1 dropdown menu.
6. Select a secondary Run Option from the Run Option 2 dropdown menu.
7. Select the type of sponsor from the Sponsor Refund Option dropdown menu.
8. Click the Look up tool to select the appropriate Refund Item Type.
9. Click the Look up tool to select the appropriate Address Usage.
10. Click the Report Only checkbox if there is a check in the box. Note: When the checkbox is not checked the process will run in Production Mode.
11. Click the Calc Tuition if Required, if applicable.
12. Select the Academic Programs Tab.
13.
Click the All Programs checkbox. -OR- Click the Look up tool to select the appropriate Academic Program.
14. Click the Academic Terms Tab.
15. Select the All Accounts checkbox.
16. Select the All Terms checkbox.
17. Click the Item Types Tab.
18. Select the Item Types checkbox.
19. Click the Look up tool to select the appropriate Item Type From.
20. Click the Look up tool to select the appropriate Item Type To.
21. Click the Save button.
22. Click the Run button.
23. Click the Batch Refund checkbox on the Process Scheduler Request page.
24. Click the OK button.
25. Click the Process Monitor link.
26. Click the Refresh button until the Run Status Column indicates Success and the Distribution Status Column indicates Posted.
27. Click the Details link.
28. Click the View Log/Trace link.
29. Select the file to view the log of information.
30. End of Procedure.
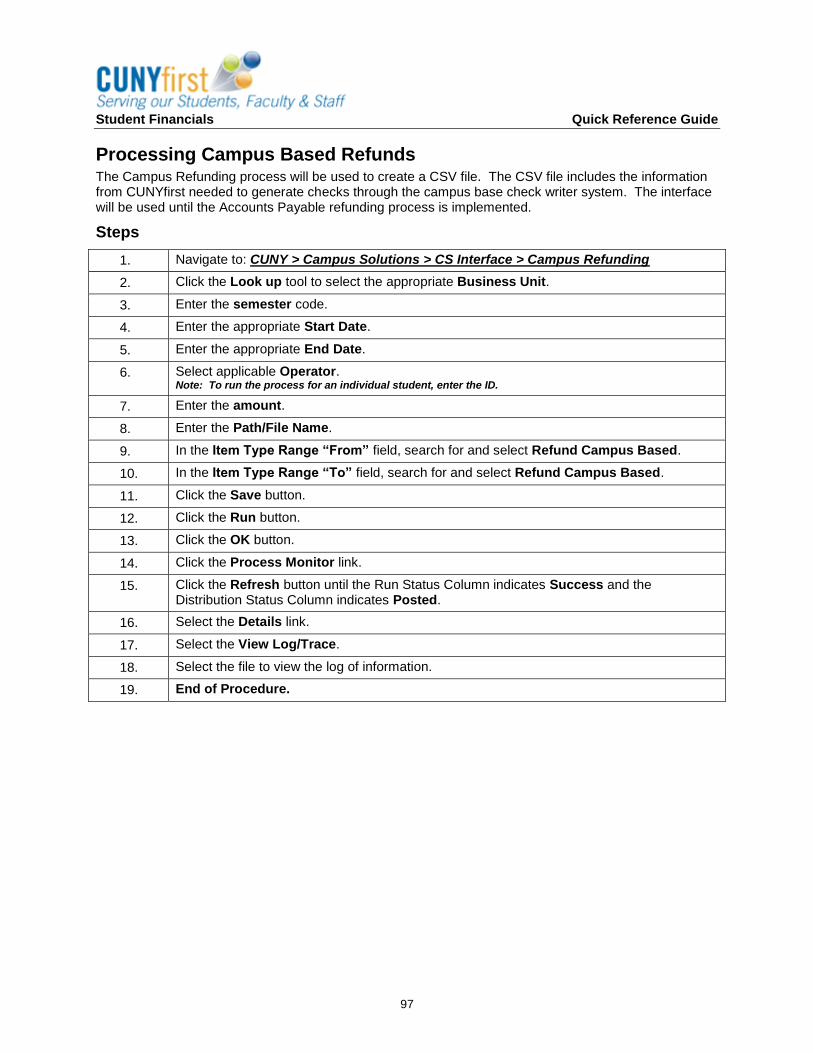
Student Financials Quick Reference Guide
97
Processing Campus Based Refunds The Campus Refunding process will be used to create a CSV file. The CSV file includes the information from CUNYfirst needed to generate checks through the campus base check writer system. The interface will be used until the Accounts Payable refunding process is implemented.
Steps
1. Navigate to: CUNY > Campus Solutions > CS Interface > Campus Refunding
2. Click the Look up tool to select the appropriate Business Unit.
3. Enter the semester code.
4. Enter the appropriate Start Date.
5. Enter the appropriate End Date.
6. Select applicable Operator. Note: To run the process for an individual student, enter the ID.
7. Enter the amount.
8. Enter the Path/File Name.
9. In the Item Type Range “From” field, search for and select Refund Campus Based.
10. In the Item Type Range “To” field, search for and select Refund Campus Based.
11. Click the Save button.
12. Click the Run button.
13. Click the OK button.
14. Click the Process Monitor link.
15. Click the Refresh button until the Run Status Column indicates Success and the Distribution Status Column indicates Posted.
16. Select the Details link.
17. Select the View Log/Trace.
18. Select the file to view the log of information.
19. End of Procedure.
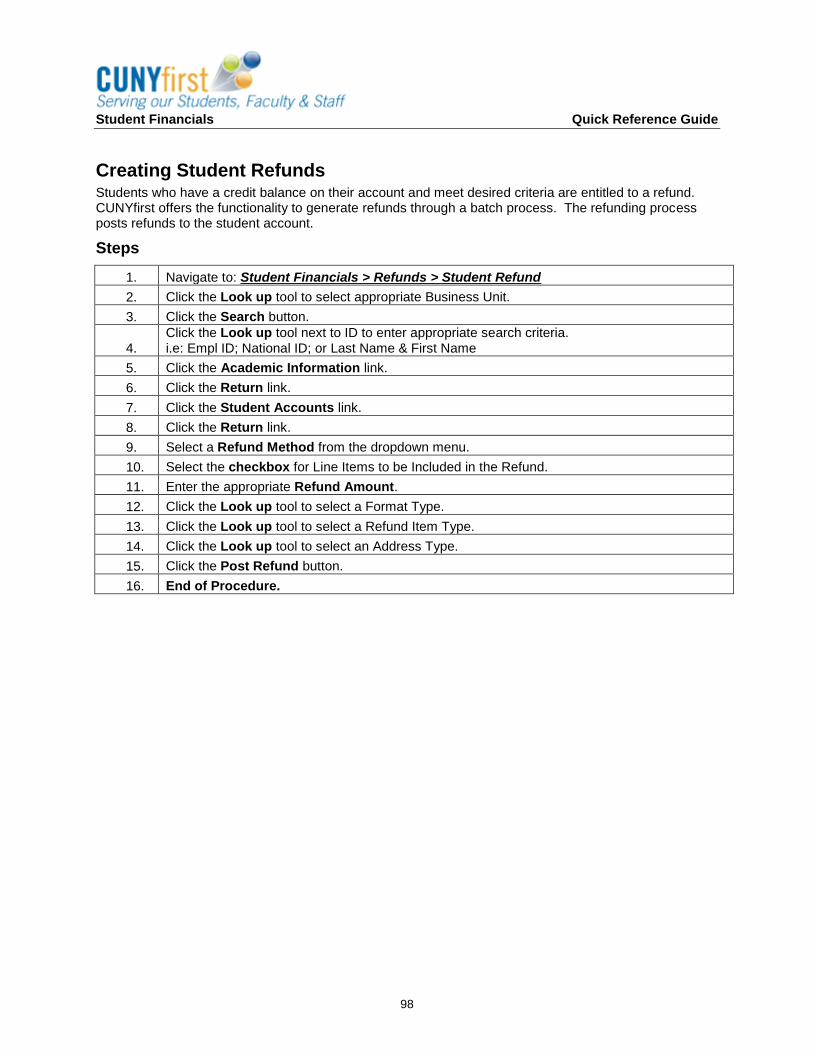
Student Financials Quick Reference Guide
98
Creating Student Refunds Students who have a credit balance on their account and meet desired criteria are entitled to a refund. CUNYfirst offers the functionality to generate refunds through a batch process. The refunding process posts refunds to the student account.
Steps
1. Navigate to: Student Financials > Refunds > Student Refund
2. Click the Look up tool to select appropriate Business Unit.
3. Click the Search button.
4. Click the Look up tool next to ID to enter appropriate search criteria. i.e: Empl ID; National ID; or Last Name & First Name
5. Click the Academic Information link.
6. Click the Return link.
7. Click the Student Accounts link.
8. Click the Return link.
9. Select a Refund Method from the dropdown menu.
10. Select the checkbox for Line Items to be Included in the Refund.
11. Enter the appropriate Refund Amount.
12. Click the Look up tool to select a Format Type.
13. Click the Look up tool to select a Refund Item Type.
14. Click the Look up tool to select an Address Type.
15. Click the Post Refund button.
16. End of Procedure.
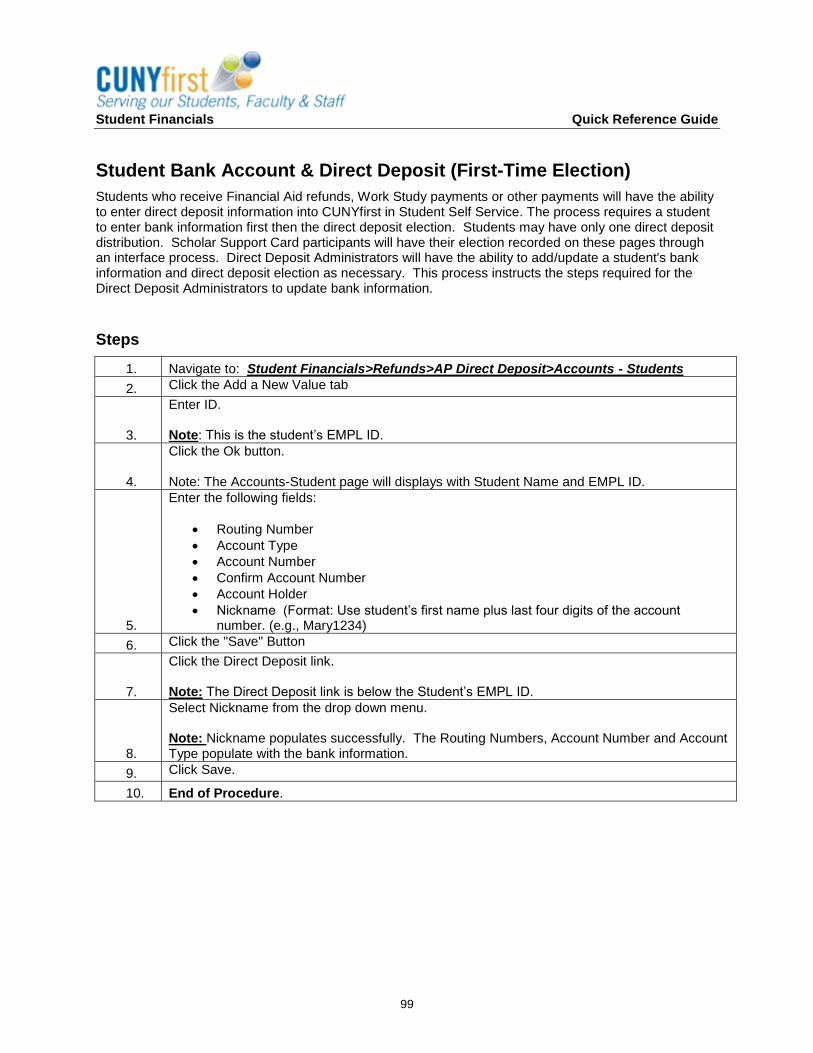
Student Financials Quick Reference Guide
99
Student Bank Account & Direct Deposit (First-Time Election)
Students who receive Financial Aid refunds, Work Study payments or other payments will have the ability to enter direct deposit information into CUNYfirst in Student Self Service. The process requires a student to enter bank information first then the direct deposit election. Students may have only one direct deposit distribution. Scholar Support Card participants will have their election recorded on these pages through an interface process. Direct Deposit Administrators will have the ability to add/update a student's bank information and direct deposit election as necessary. This process instructs the steps required for the Direct Deposit Administrators to update bank information.
Steps
1. Navigate to: Student Financials>Refunds>AP Direct Deposit>Accounts - Students
2. Click the Add a New Value tab
3.
Enter ID. Note: This is the student’s EMPL ID.
4.
Click the Ok button. Note: The Accounts-Student page will displays with Student Name and EMPL ID.
5.
Enter the following fields:
Routing Number
Account Type
Account Number
Confirm Account Number
Account Holder
Nickname (Format: Use student’s first name plus last four digits of the account number. (e.g., Mary1234)
6. Click the "Save" Button
7.
Click the Direct Deposit link. Note: The Direct Deposit link is below the Student’s EMPL ID.
8.
Select Nickname from the drop down menu. Note: Nickname populates successfully. The Routing Numbers, Account Number and Account Type populate with the bank information.
9. Click Save.
10. End of Procedure.
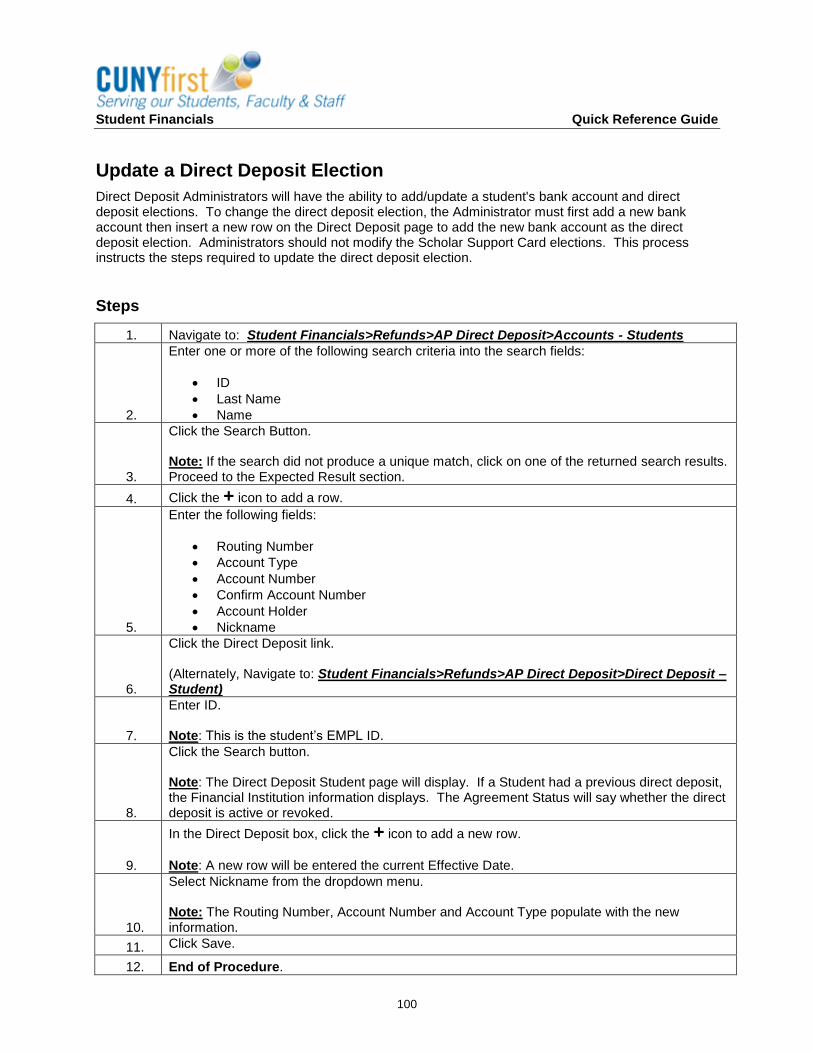
Student Financials Quick Reference Guide
100
Update a Direct Deposit Election
Direct Deposit Administrators will have the ability to add/update a student's bank account and direct deposit elections. To change the direct deposit election, the Administrator must first add a new bank account then insert a new row on the Direct Deposit page to add the new bank account as the direct deposit election. Administrators should not modify the Scholar Support Card elections. This process instructs the steps required to update the direct deposit election.
Steps
1. Navigate to: Student Financials>Refunds>AP Direct Deposit>Accounts - Students
2.
Enter one or more of the following search criteria into the search fields:
ID
Last Name
Name
3.
Click the Search Button. Note: If the search did not produce a unique match, click on one of the returned search results. Proceed to the Expected Result section.
4. Click the + icon to add a row.
5.
Enter the following fields:
Routing Number
Account Type
Account Number
Confirm Account Number
Account Holder
Nickname
6.
Click the Direct Deposit link. (Alternately, Navigate to: Student Financials>Refunds>AP Direct Deposit>Direct Deposit – Student)
7.
Enter ID. Note: This is the student’s EMPL ID.
8.
Click the Search button. Note: The Direct Deposit Student page will display. If a Student had a previous direct deposit, the Financial Institution information displays. The Agreement Status will say whether the direct deposit is active or revoked.
9.
In the Direct Deposit box, click the + icon to add a new row.
Note: A new row will be entered the current Effective Date.
10.
Select Nickname from the dropdown menu. Note: The Routing Number, Account Number and Account Type populate with the new information.
11. Click Save.
12. End of Procedure.

Student Financials Quick Reference Guide
101
Revoke Direct Deposit
Direct Deposit Administrators will have the ability to terminate a student's direct deposit election. This process instructs the steps required to revoke a student's direct deposit election.
Steps
1. Navigate to: Student Financials>Refunds>AP Direct Deposit>Revoke Direct Deposit
2.
Enter ID. Note: This is the student’s EMPL ID.
3.
Click the Search button. Note: The Direct Deposit Revocation page displays with the following information:
Agreement Number - Number field is populated.
Agreement Date - populated with date.
Agreement Text
Revoke Consent - Check box is unchecked.
Date Revoked - Date is not populated.
By - Populated with original user's id. Note: The Agreement Number and Date were assigned during the conversion process or when the student was enrolled in direct deposit. The Agreement Text is the text that the system displays when a student enrolls in direct deposit.
4. Check the Revoke Consent check box.
5. Click Save
6. End of Procedure.
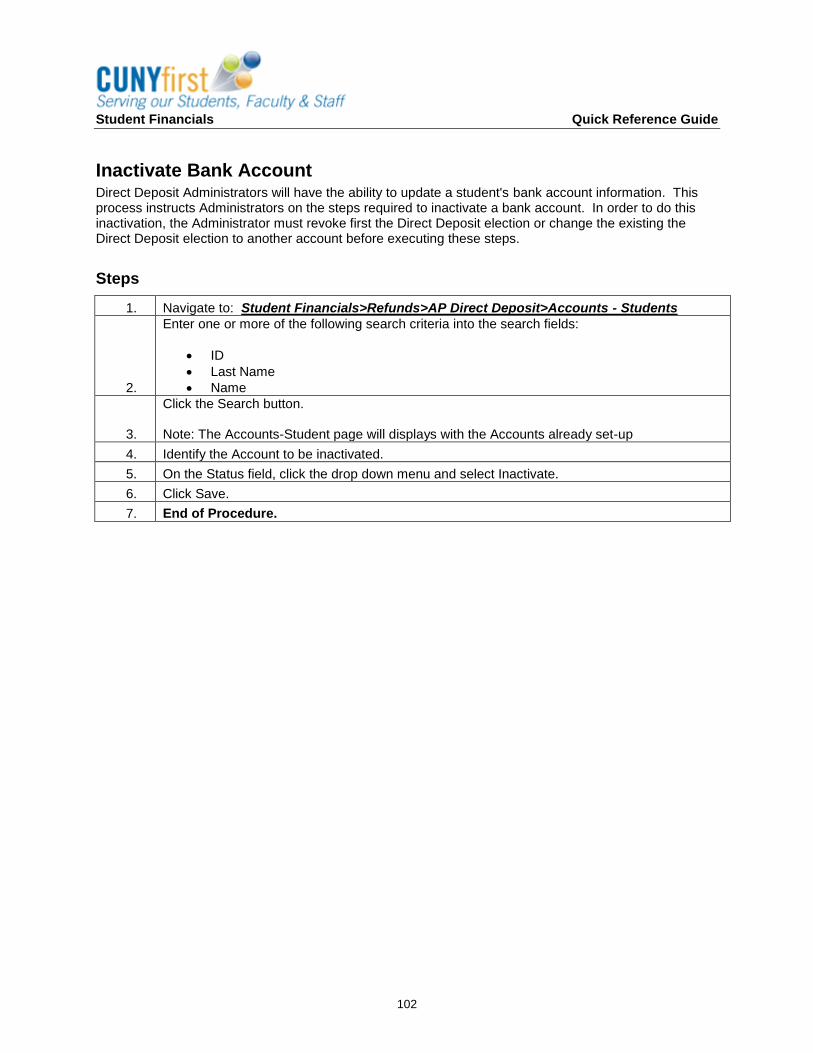
Student Financials Quick Reference Guide
102
Inactivate Bank Account Direct Deposit Administrators will have the ability to update a student's bank account information. This process instructs Administrators on the steps required to inactivate a bank account. In order to do this inactivation, the Administrator must revoke first the Direct Deposit election or change the existing the Direct Deposit election to another account before executing these steps.
Steps
1. Navigate to: Student Financials>Refunds>AP Direct Deposit>Accounts - Students
2.
Enter one or more of the following search criteria into the search fields:
ID
Last Name
Name
3.
Click the Search button. Note: The Accounts-Student page will displays with the Accounts already set-up
4. Identify the Account to be inactivated.
5. On the Status field, click the drop down menu and select Inactivate.
6. Click Save.
7. End of Procedure.

Student Financials Quick Reference Guide
103
Unit VII: Payment Plans
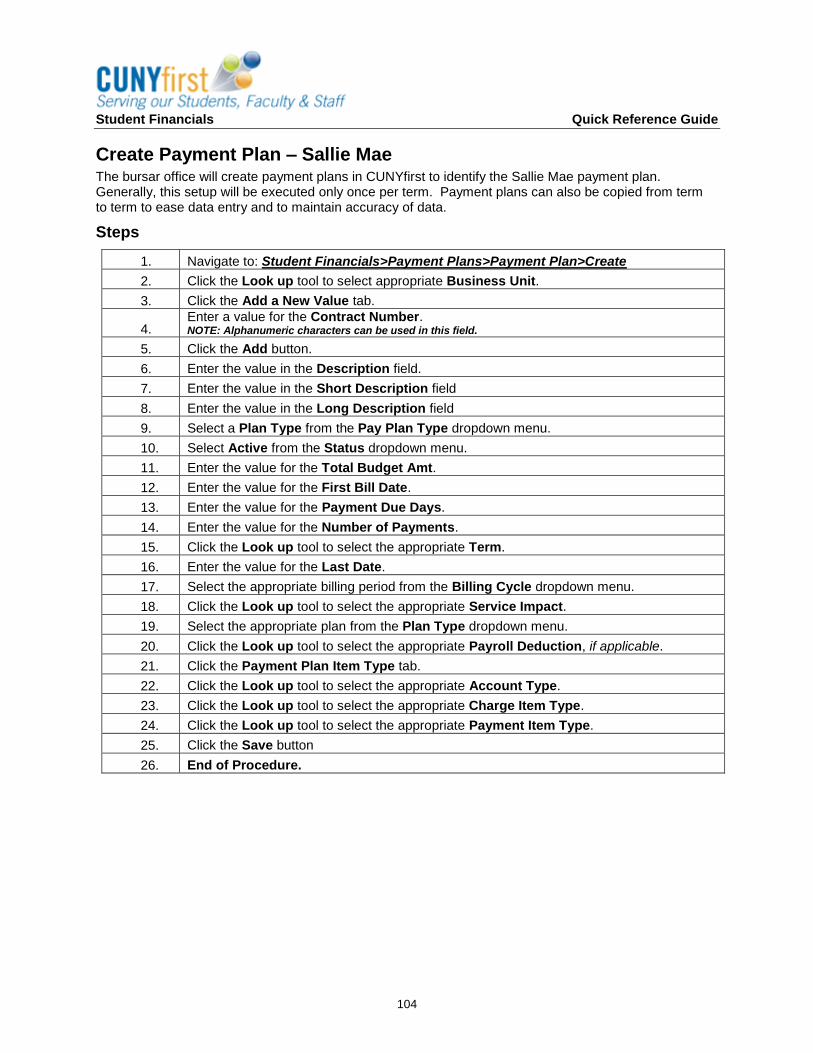
Student Financials Quick Reference Guide
104
Create Payment Plan – Sallie Mae The bursar office will create payment plans in CUNYfirst to identify the Sallie Mae payment plan. Generally, this setup will be executed only once per term. Payment plans can also be copied from term to term to ease data entry and to maintain accuracy of data.
Steps
1. Navigate to: Student Financials>Payment Plans>Payment Plan>Create
2. Click the Look up tool to select appropriate Business Unit.
3. Click the Add a New Value tab.
4. Enter a value for the Contract Number. NOTE: Alphanumeric characters can be used in this field.
5. Click the Add button.
6. Enter the value in the Description field.
7. Enter the value in the Short Description field
8. Enter the value in the Long Description field
9. Select a Plan Type from the Pay Plan Type dropdown menu.
10. Select Active from the Status dropdown menu.
11. Enter the value for the Total Budget Amt.
12. Enter the value for the First Bill Date.
13. Enter the value for the Payment Due Days.
14. Enter the value for the Number of Payments.
15. Click the Look up tool to select the appropriate Term.
16. Enter the value for the Last Date.
17. Select the appropriate billing period from the Billing Cycle dropdown menu.
18. Click the Look up tool to select the appropriate Service Impact.
19. Select the appropriate plan from the Plan Type dropdown menu.
20. Click the Look up tool to select the appropriate Payroll Deduction, if applicable.
21. Click the Payment Plan Item Type tab.
22. Click the Look up tool to select the appropriate Account Type.
23. Click the Look up tool to select the appropriate Charge Item Type.
24. Click the Look up tool to select the appropriate Payment Item Type.
25. Click the Save button
26. End of Procedure.
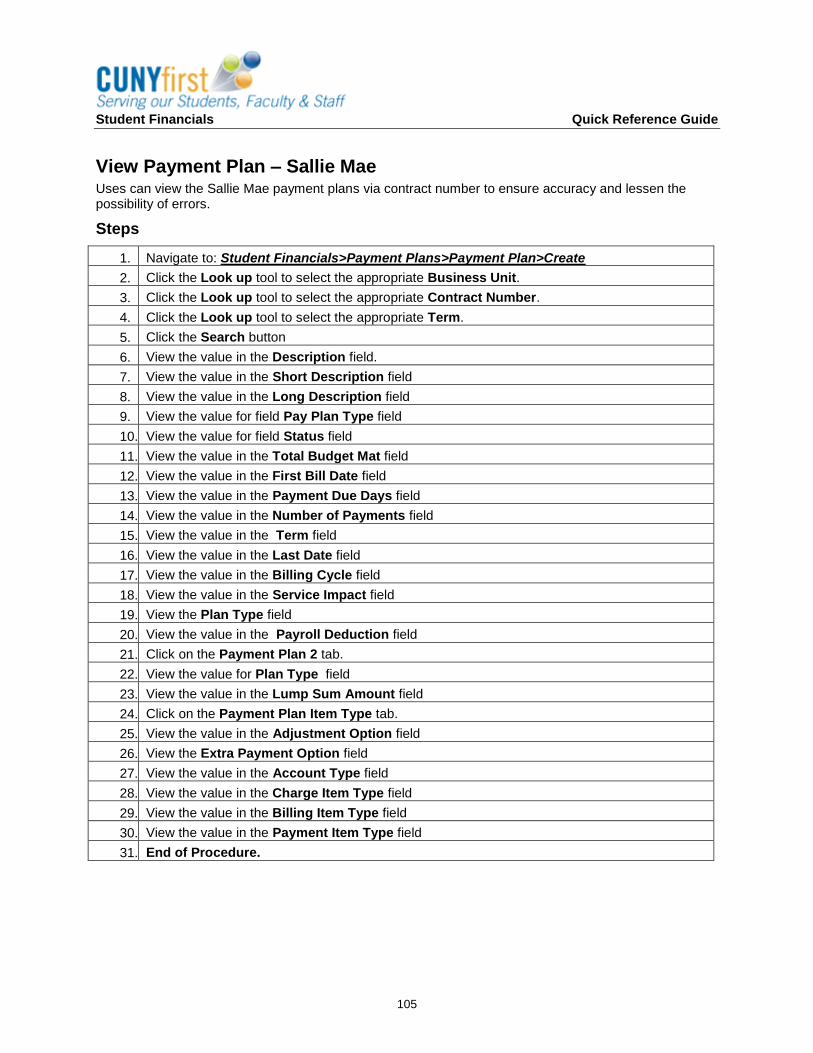
Student Financials Quick Reference Guide
105
View Payment Plan – Sallie Mae Uses can view the Sallie Mae payment plans via contract number to ensure accuracy and lessen the possibility of errors.
Steps
1. Navigate to: Student Financials>Payment Plans>Payment Plan>Create
2. Click the Look up tool to select the appropriate Business Unit.
3. Click the Look up tool to select the appropriate Contract Number.
4. Click the Look up tool to select the appropriate Term.
5. Click the Search button
6. View the value in the Description field.
7. View the value in the Short Description field
8. View the value in the Long Description field
9. View the value for field Pay Plan Type field
10. View the value for field Status field
11. View the value in the Total Budget Mat field
12. View the value in the First Bill Date field
13. View the value in the Payment Due Days field
14. View the value in the Number of Payments field
15. View the value in the Term field
16. View the value in the Last Date field
17. View the value in the Billing Cycle field
18. View the value in the Service Impact field
19. View the Plan Type field
20. View the value in the Payroll Deduction field
21. Click on the Payment Plan 2 tab.
22. View the value for Plan Type field
23. View the value in the Lump Sum Amount field
24. Click on the Payment Plan Item Type tab.
25. View the value in the Adjustment Option field
26. View the Extra Payment Option field
27. View the value in the Account Type field
28. View the value in the Charge Item Type field
29. View the value in the Billing Item Type field
30. View the value in the Payment Item Type field
31. End of Procedure.
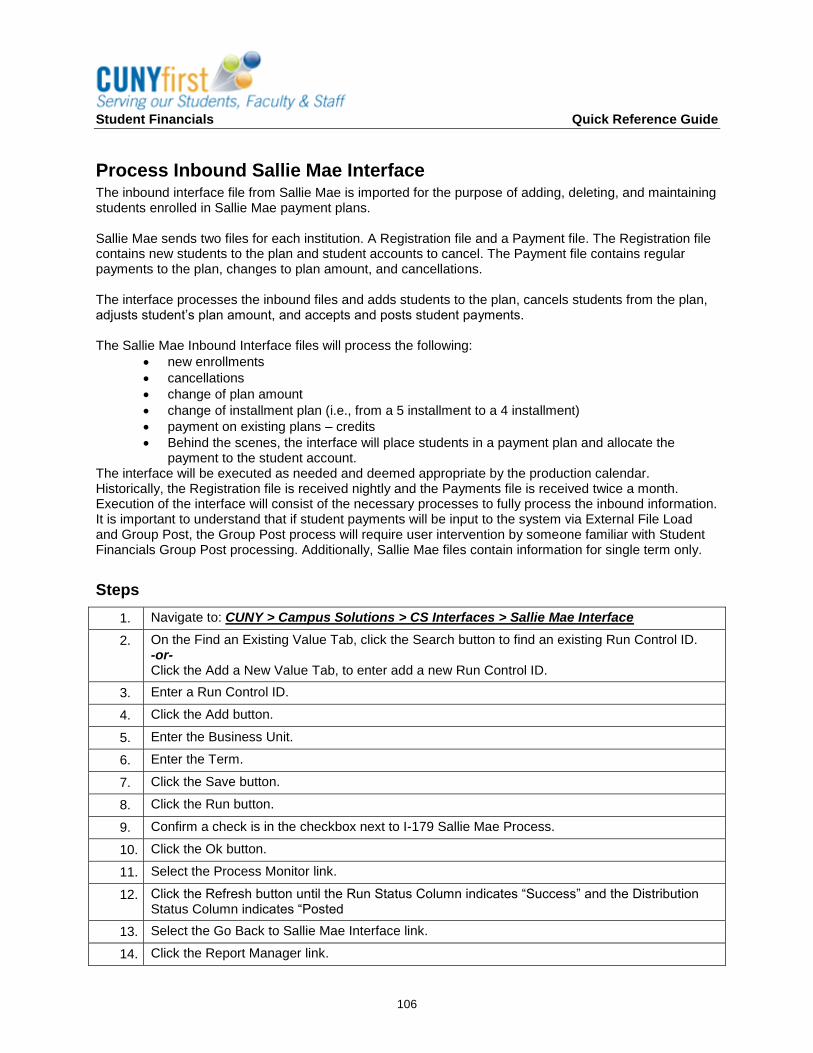
Student Financials Quick Reference Guide
106
Process Inbound Sallie Mae Interface The inbound interface file from Sallie Mae is imported for the purpose of adding, deleting, and maintaining students enrolled in Sallie Mae payment plans. Sallie Mae sends two files for each institution. A Registration file and a Payment file. The Registration file contains new students to the plan and student accounts to cancel. The Payment file contains regular payments to the plan, changes to plan amount, and cancellations. The interface processes the inbound files and adds students to the plan, cancels students from the plan, adjusts student’s plan amount, and accepts and posts student payments. The Sallie Mae Inbound Interface files will process the following:
new enrollments
cancellations
change of plan amount
change of installment plan (i.e., from a 5 installment to a 4 installment)
payment on existing plans – credits
Behind the scenes, the interface will place students in a payment plan and allocate the payment to the student account.
The interface will be executed as needed and deemed appropriate by the production calendar. Historically, the Registration file is received nightly and the Payments file is received twice a month. Execution of the interface will consist of the necessary processes to fully process the inbound information. It is important to understand that if student payments will be input to the system via External File Load and Group Post, the Group Post process will require user intervention by someone familiar with Student Financials Group Post processing. Additionally, Sallie Mae files contain information for single term only.
Steps
1. Navigate to: CUNY > Campus Solutions > CS Interfaces > Sallie Mae Interface
2. On the Find an Existing Value Tab, click the Search button to find an existing Run Control ID. -or- Click the Add a New Value Tab, to enter add a new Run Control ID.
3. Enter a Run Control ID.
4. Click the Add button.
5. Enter the Business Unit.
6. Enter the Term.
7. Click the Save button.
8. Click the Run button.
9. Confirm a check is in the checkbox next to I-179 Sallie Mae Process.
10. Click the Ok button.
11. Select the Process Monitor link.
12. Click the Refresh button until the Run Status Column indicates “Success” and the Distribution Status Column indicates “Posted
13. Select the Go Back to Sallie Mae Interface link.
14. Click the Report Manager link.

Student Financials Quick Reference Guide
107
15. Click the Administration Tab.
16. Click the Details link associated to the Report Description based on the process run.
17. In the File List area, select the applicable files to view.
18. End of Procedure.
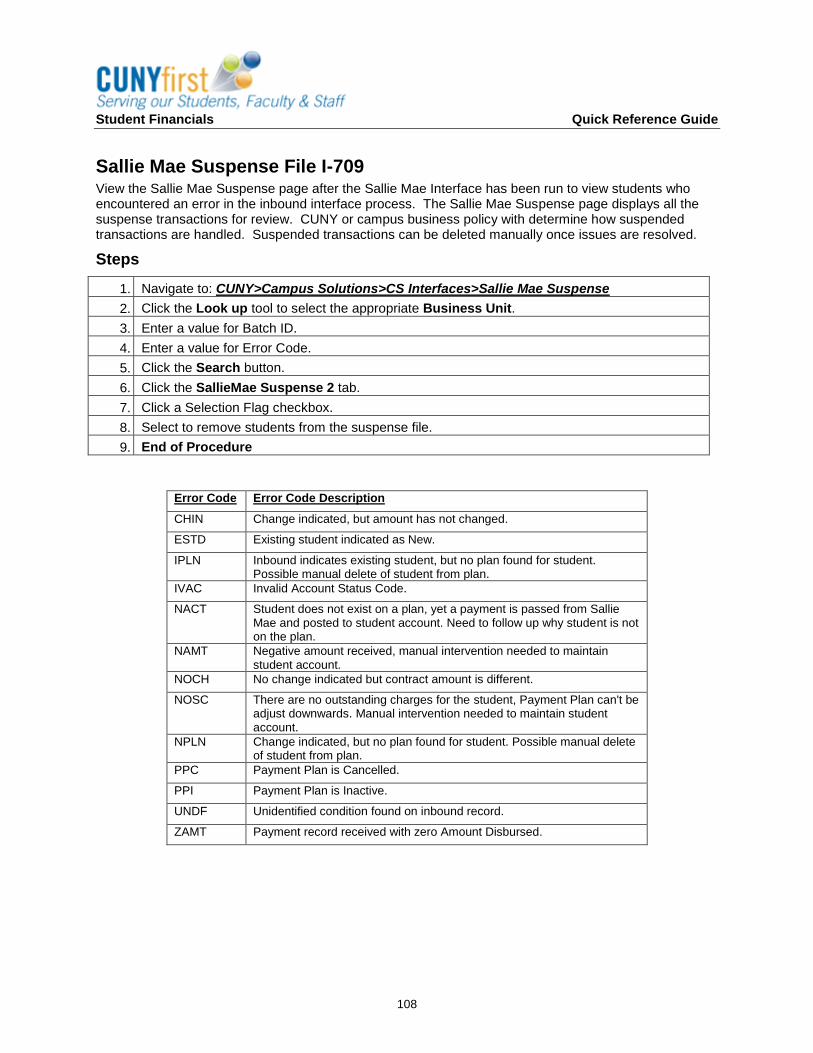
Student Financials Quick Reference Guide
108
Sallie Mae Suspense File I-709 View the Sallie Mae Suspense page after the Sallie Mae Interface has been run to view students who encountered an error in the inbound interface process. The Sallie Mae Suspense page displays all the suspense transactions for review. CUNY or campus business policy with determine how suspended transactions are handled. Suspended transactions can be deleted manually once issues are resolved.
Steps
1. Navigate to: CUNY>Campus Solutions>CS Interfaces>Sallie Mae Suspense
2. Click the Look up tool to select the appropriate Business Unit.
3. Enter a value for Batch ID.
4. Enter a value for Error Code.
5. Click the Search button.
6. Click the SallieMae Suspense 2 tab.
7. Click a Selection Flag checkbox.
8. Select to remove students from the suspense file.
9. End of Procedure
Error Code Error Code Description
CHIN Change indicated, but amount has not changed.
ESTD Existing student indicated as New.
IPLN Inbound indicates existing student, but no plan found for student. Possible manual delete of student from plan.
IVAC Invalid Account Status Code.
NACT Student does not exist on a plan, yet a payment is passed from Sallie Mae and posted to student account. Need to follow up why student is not on the plan.
NAMT Negative amount received, manual intervention needed to maintain student account.
NOCH No change indicated but contract amount is different.
NOSC There are no outstanding charges for the student, Payment Plan can't be adjust downwards. Manual intervention needed to maintain student account.
NPLN Change indicated, but no plan found for student. Possible manual delete of student from plan.
PPC Payment Plan is Cancelled.
PPI Payment Plan is Inactive.
UNDF Unidentified condition found on inbound record.
ZAMT Payment record received with zero Amount Disbursed.
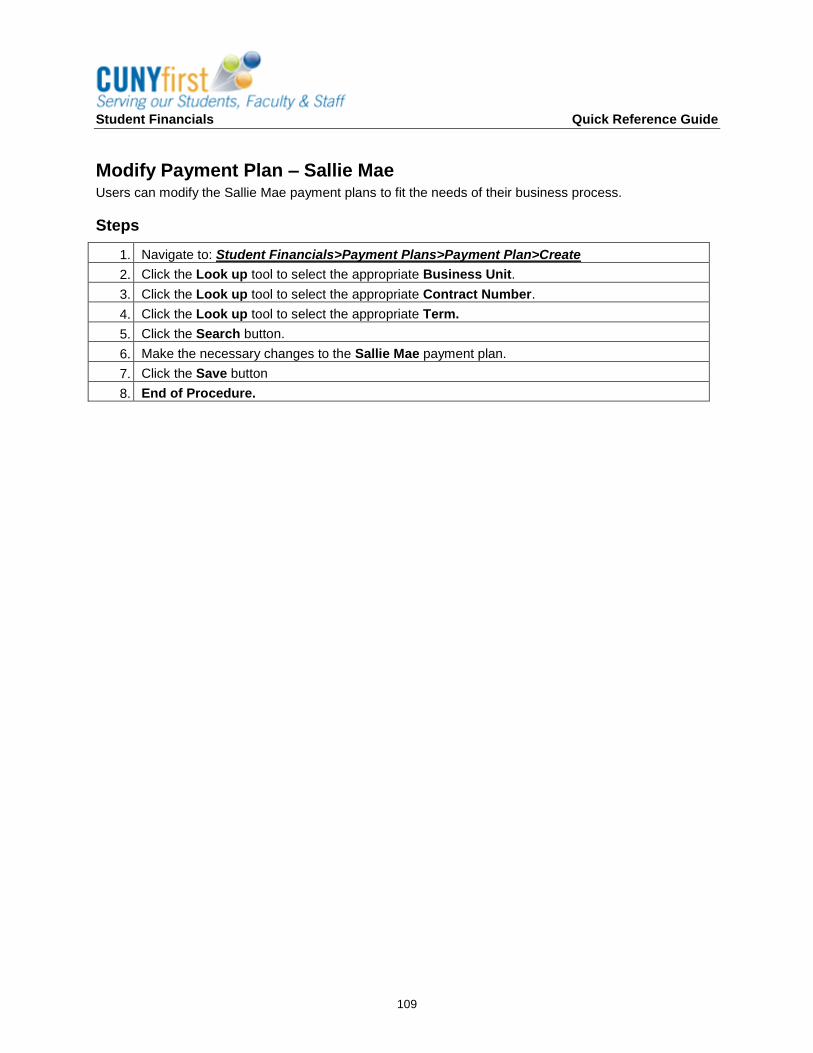
Student Financials Quick Reference Guide
109
Modify Payment Plan – Sallie Mae Users can modify the Sallie Mae payment plans to fit the needs of their business process.
Steps
1. Navigate to: Student Financials>Payment Plans>Payment Plan>Create
2. Click the Look up tool to select the appropriate Business Unit.
3. Click the Look up tool to select the appropriate Contract Number.
4. Click the Look up tool to select the appropriate Term.
5. Click the Search button.
6. Make the necessary changes to the Sallie Mae payment plan.
7. Click the Save button
8. End of Procedure.
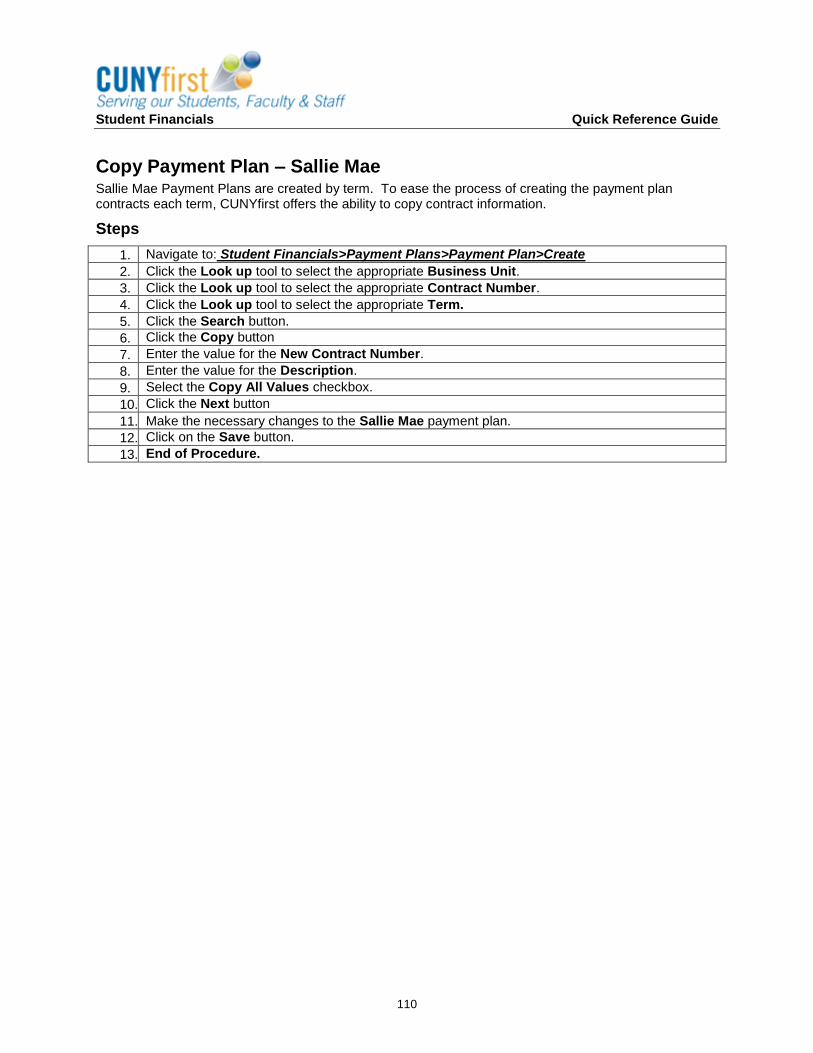
Student Financials Quick Reference Guide
110
Copy Payment Plan – Sallie Mae Sallie Mae Payment Plans are created by term. To ease the process of creating the payment plan contracts each term, CUNYfirst offers the ability to copy contract information.
Steps
1. Navigate to: Student Financials>Payment Plans>Payment Plan>Create
2. Click the Look up tool to select the appropriate Business Unit.
3. Click the Look up tool to select the appropriate Contract Number.
4. Click the Look up tool to select the appropriate Term.
5. Click the Search button.
6. Click the Copy button
7. Enter the value for the New Contract Number.
8. Enter the value for the Description.
9. Select the Copy All Values checkbox.
10. Click the Next button
11. Make the necessary changes to the Sallie Mae payment plan.
12. Click on the Save button.
13. End of Procedure.
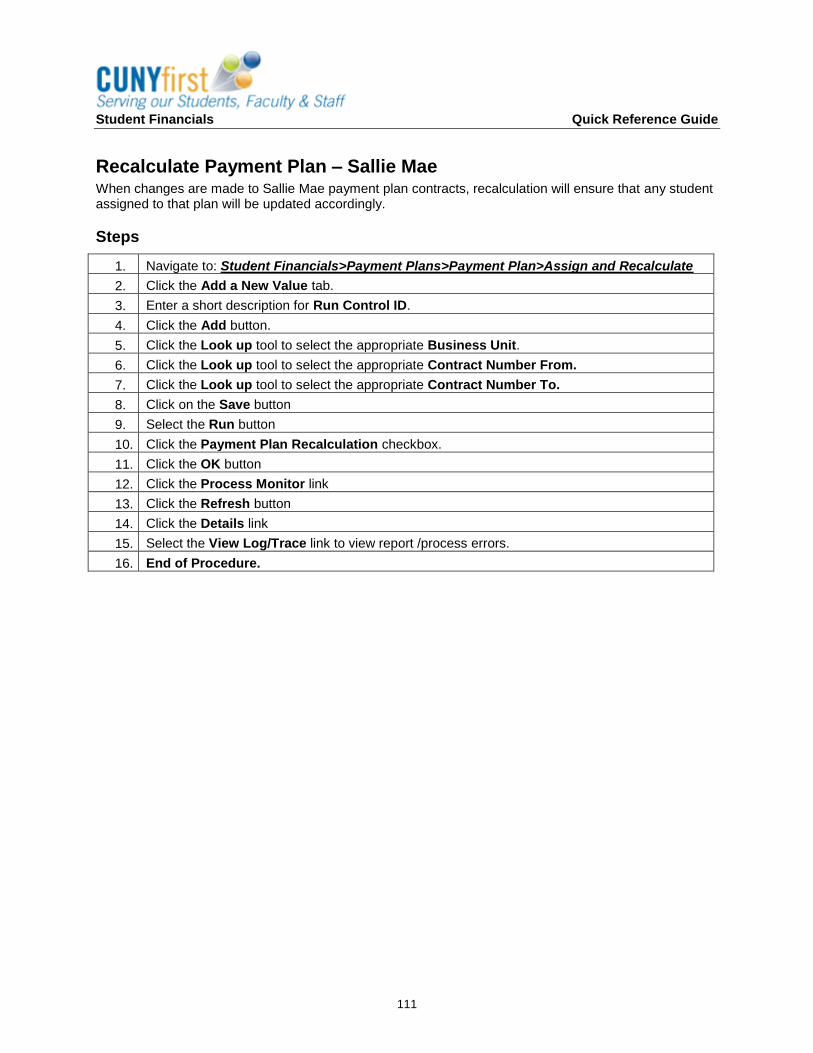
Student Financials Quick Reference Guide
111
Recalculate Payment Plan – Sallie Mae When changes are made to Sallie Mae payment plan contracts, recalculation will ensure that any student assigned to that plan will be updated accordingly.
Steps
1. Navigate to: Student Financials>Payment Plans>Payment Plan>Assign and Recalculate
2. Click the Add a New Value tab.
3. Enter a short description for Run Control ID.
4. Click the Add button.
5. Click the Look up tool to select the appropriate Business Unit.
6. Click the Look up tool to select the appropriate Contract Number From.
7. Click the Look up tool to select the appropriate Contract Number To.
8. Click on the Save button
9. Select the Run button
10. Click the Payment Plan Recalculation checkbox.
11. Click the OK button
12. Click the Process Monitor link
13. Click the Refresh button
14. Click the Details link
15. Select the View Log/Trace link to view report /process errors.
16. End of Procedure.
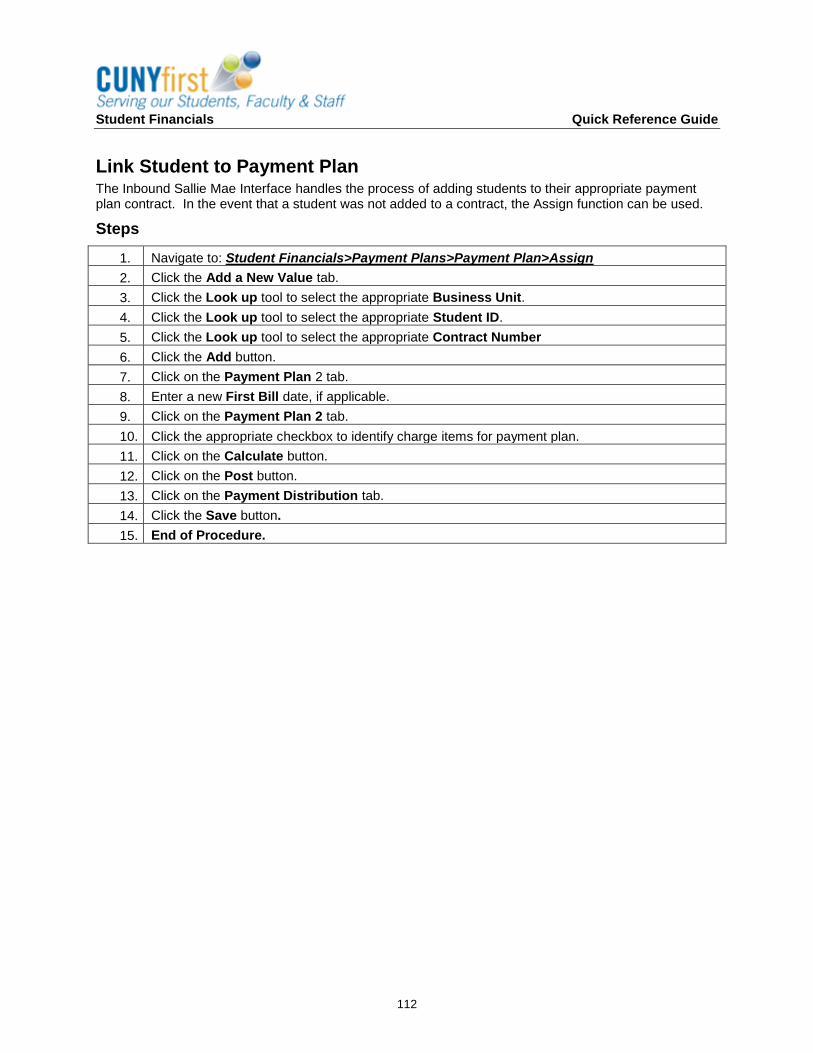
Student Financials Quick Reference Guide
112
Link Student to Payment Plan The Inbound Sallie Mae Interface handles the process of adding students to their appropriate payment plan contract. In the event that a student was not added to a contract, the Assign function can be used.
Steps
1. Navigate to: Student Financials>Payment Plans>Payment Plan>Assign
2. Click the Add a New Value tab.
3. Click the Look up tool to select the appropriate Business Unit.
4. Click the Look up tool to select the appropriate Student ID.
5. Click the Look up tool to select the appropriate Contract Number
6. Click the Add button.
7. Click on the Payment Plan 2 tab.
8. Enter a new First Bill date, if applicable.
9. Click on the Payment Plan 2 tab.
10. Click the appropriate checkbox to identify charge items for payment plan.
11. Click on the Calculate button.
12. Click on the Post button.
13. Click on the Payment Distribution tab.
14. Click the Save button.
15. End of Procedure.
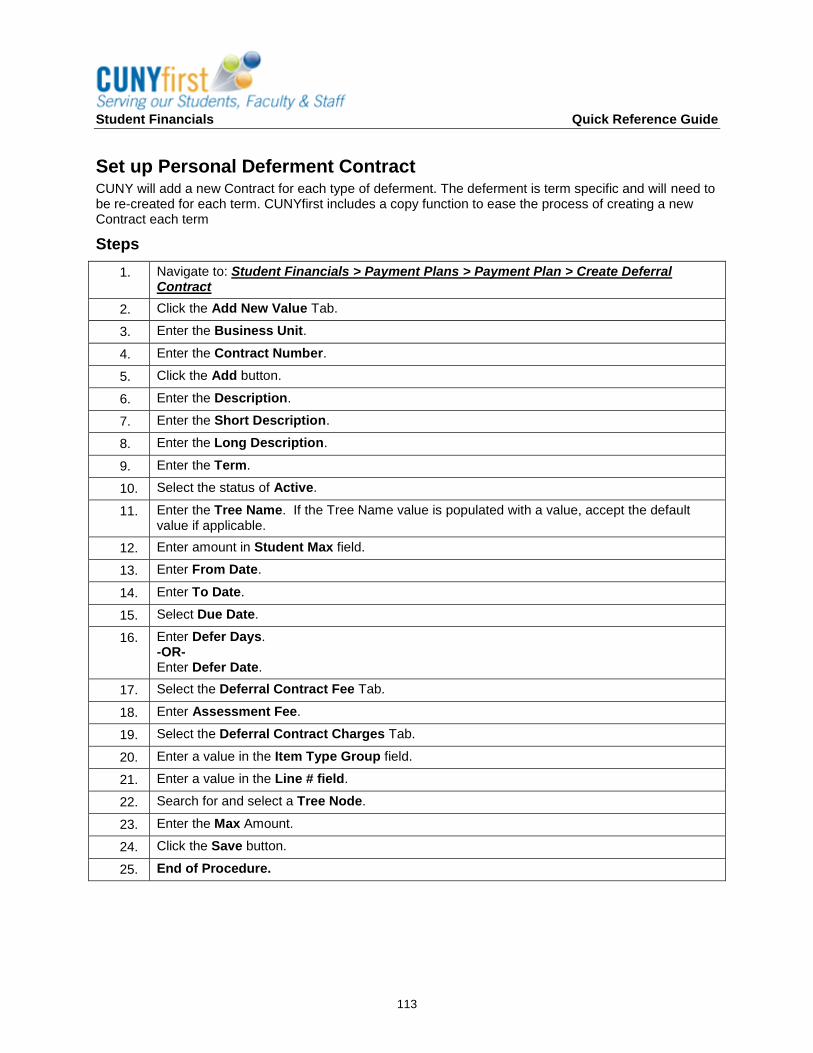
Student Financials Quick Reference Guide
113
Set up Personal Deferment Contract CUNY will add a new Contract for each type of deferment. The deferment is term specific and will need to be re-created for each term. CUNYfirst includes a copy function to ease the process of creating a new Contract each term
Steps
1. Navigate to: Student Financials > Payment Plans > Payment Plan > Create Deferral Contract
2. Click the Add New Value Tab.
3. Enter the Business Unit.
4. Enter the Contract Number.
5. Click the Add button.
6. Enter the Description.
7. Enter the Short Description.
8. Enter the Long Description.
9. Enter the Term.
10. Select the status of Active.
11. Enter the Tree Name. If the Tree Name value is populated with a value, accept the default value if applicable.
12. Enter amount in Student Max field.
13. Enter From Date.
14. Enter To Date.
15. Select Due Date.
16. Enter Defer Days. -OR- Enter Defer Date.
17. Select the Deferral Contract Fee Tab.
18. Enter Assessment Fee.
19. Select the Deferral Contract Charges Tab.
20. Enter a value in the Item Type Group field.
21. Enter a value in the Line # field.
22. Search for and select a Tree Node.
23. Enter the Max Amount.
24. Click the Save button.
25. End of Procedure.
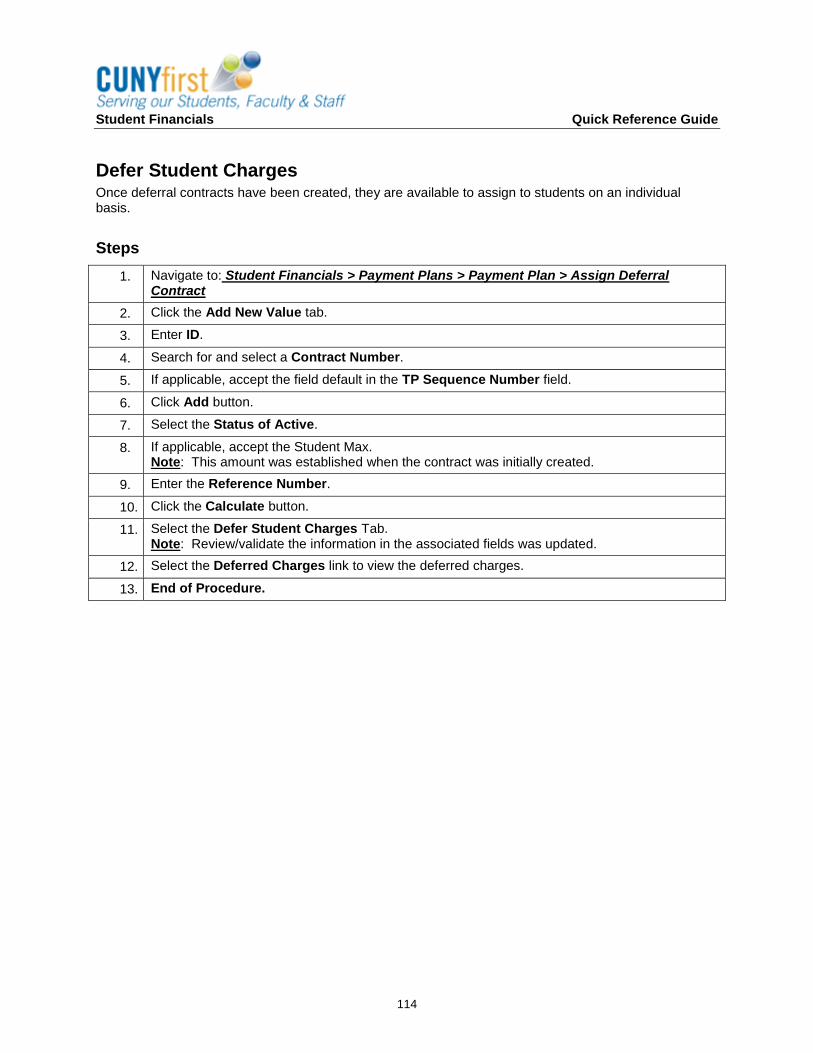
Student Financials Quick Reference Guide
114
Defer Student Charges Once deferral contracts have been created, they are available to assign to students on an individual basis.
Steps
1. Navigate to: Student Financials > Payment Plans > Payment Plan > Assign Deferral Contract
2. Click the Add New Value tab.
3. Enter ID.
4. Search for and select a Contract Number.
5. If applicable, accept the field default in the TP Sequence Number field.
6. Click Add button.
7. Select the Status of Active.
8. If applicable, accept the Student Max. Note: This amount was established when the contract was initially created.
9. Enter the Reference Number.
10. Click the Calculate button.
11. Select the Defer Student Charges Tab. Note: Review/validate the information in the associated fields was updated.
12. Select the Deferred Charges link to view the deferred charges.
13. End of Procedure.
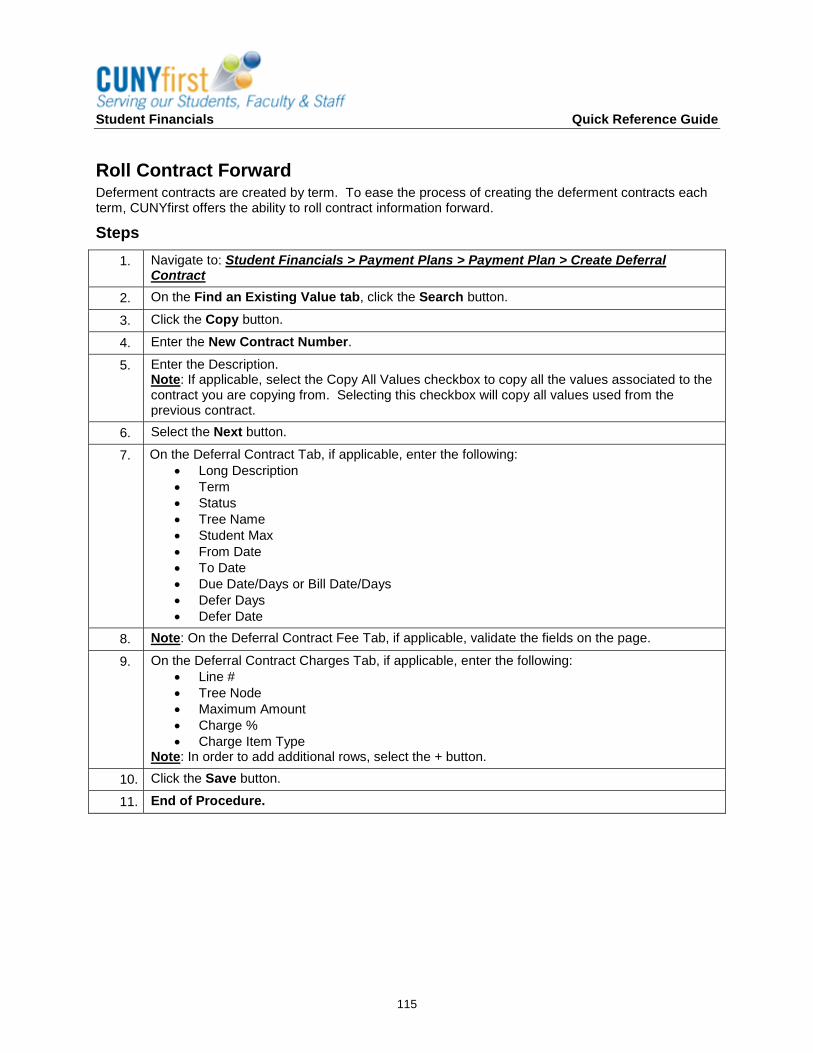
Student Financials Quick Reference Guide
115
Roll Contract Forward Deferment contracts are created by term. To ease the process of creating the deferment contracts each term, CUNYfirst offers the ability to roll contract information forward.
Steps
1. Navigate to: Student Financials > Payment Plans > Payment Plan > Create Deferral Contract
2. On the Find an Existing Value tab, click the Search button.
3. Click the Copy button.
4. Enter the New Contract Number.
5. Enter the Description. Note: If applicable, select the Copy All Values checkbox to copy all the values associated to the contract you are copying from. Selecting this checkbox will copy all values used from the previous contract.
6. Select the Next button.
7. On the Deferral Contract Tab, if applicable, enter the following:
Long Description
Term
Status
Tree Name
Student Max
From Date
To Date
Due Date/Days or Bill Date/Days
Defer Days
Defer Date
8. Note: On the Deferral Contract Fee Tab, if applicable, validate the fields on the page.
9. On the Deferral Contract Charges Tab, if applicable, enter the following:
Line #
Tree Node
Maximum Amount
Charge %
Charge Item Type Note: In order to add additional rows, select the + button.
10. Click the Save button.
11. End of Procedure.
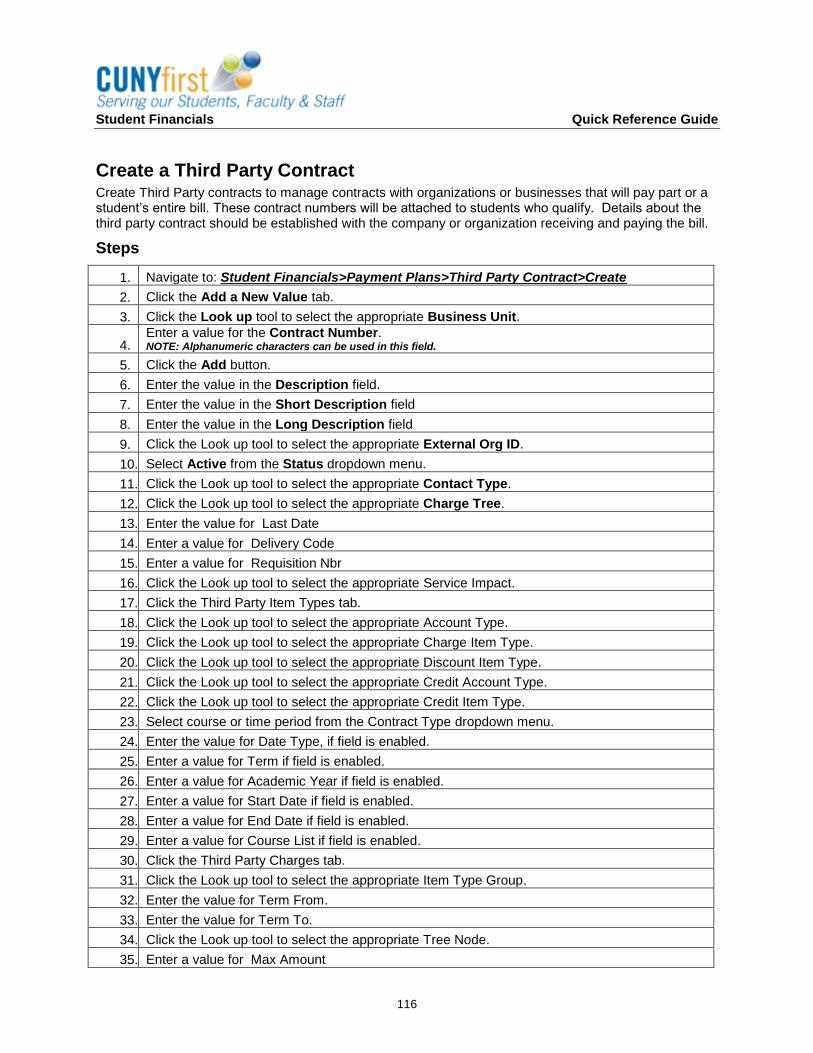
Student Financials Quick Reference Guide
116
Create a Third Party Contract Create Third Party contracts to manage contracts with organizations or businesses that will pay part or a student’s entire bill. These contract numbers will be attached to students who qualify. Details about the third party contract should be established with the company or organization receiving and paying the bill.
Steps
1. Navigate to: Student Financials>Payment Plans>Third Party Contract>Create
2. Click the Add a New Value tab.
3. Click the Look up tool to select the appropriate Business Unit.
4. Enter a value for the Contract Number. NOTE: Alphanumeric characters can be used in this field.
5. Click the Add button.
6. Enter the value in the Description field.
7. Enter the value in the Short Description field
8. Enter the value in the Long Description field
9. Click the Look up tool to select the appropriate External Org ID.
10. Select Active from the Status dropdown menu.
11. Click the Look up tool to select the appropriate Contact Type.
12. Click the Look up tool to select the appropriate Charge Tree.
13. Enter the value for Last Date
14. Enter a value for Delivery Code
15. Enter a value for Requisition Nbr
16. Click the Look up tool to select the appropriate Service Impact.
17. Click the Third Party Item Types tab.
18. Click the Look up tool to select the appropriate Account Type.
19. Click the Look up tool to select the appropriate Charge Item Type.
20. Click the Look up tool to select the appropriate Discount Item Type.
21. Click the Look up tool to select the appropriate Credit Account Type.
22. Click the Look up tool to select the appropriate Credit Item Type.
23. Select course or time period from the Contract Type dropdown menu.
24. Enter the value for Date Type, if field is enabled.
25. Enter a value for Term if field is enabled.
26. Enter a value for Academic Year if field is enabled.
27. Enter a value for Start Date if field is enabled.
28. Enter a value for End Date if field is enabled.
29. Enter a value for Course List if field is enabled.
30. Click the Third Party Charges tab.
31. Click the Look up tool to select the appropriate Item Type Group.
32. Enter the value for Term From.
33. Enter the value for Term To.
34. Click the Look up tool to select the appropriate Tree Node.
35. Enter a value for Max Amount
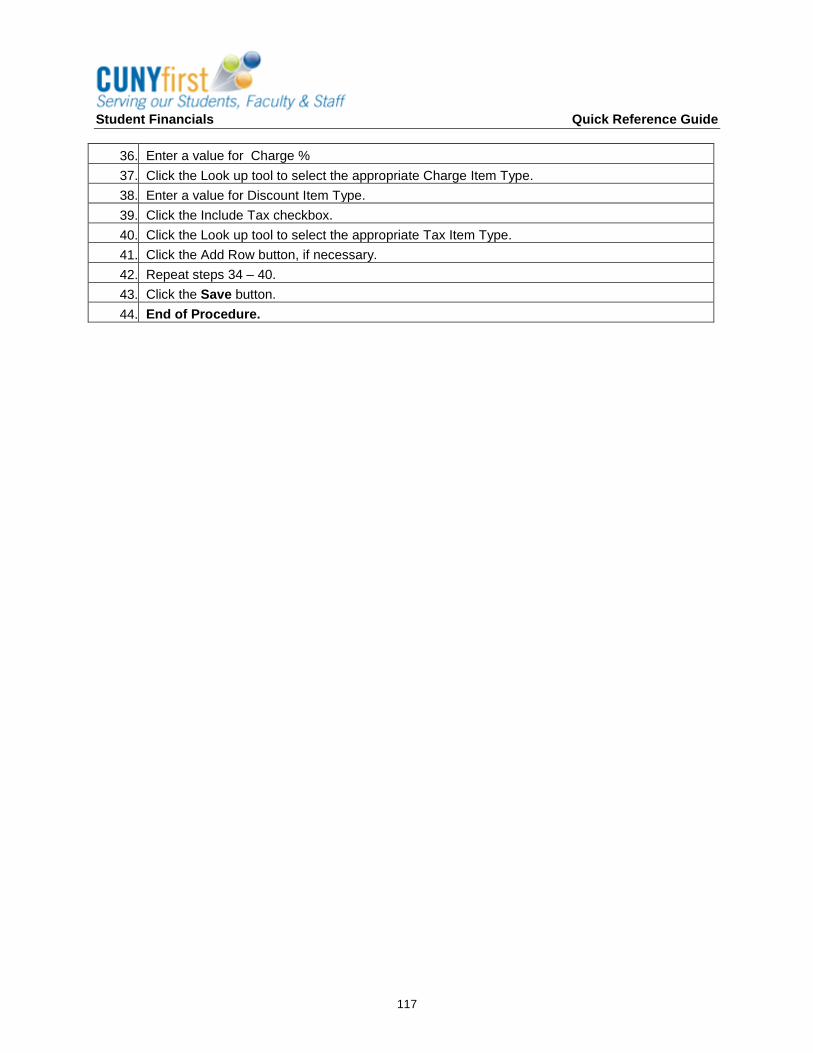
Student Financials Quick Reference Guide
117
36. Enter a value for Charge %
37. Click the Look up tool to select the appropriate Charge Item Type.
38. Enter a value for Discount Item Type.
39. Click the Include Tax checkbox.
40. Click the Look up tool to select the appropriate Tax Item Type.
41. Click the Add Row button, if necessary.
42. Repeat steps 34 – 40.
43. Click the Save button.
44. End of Procedure.
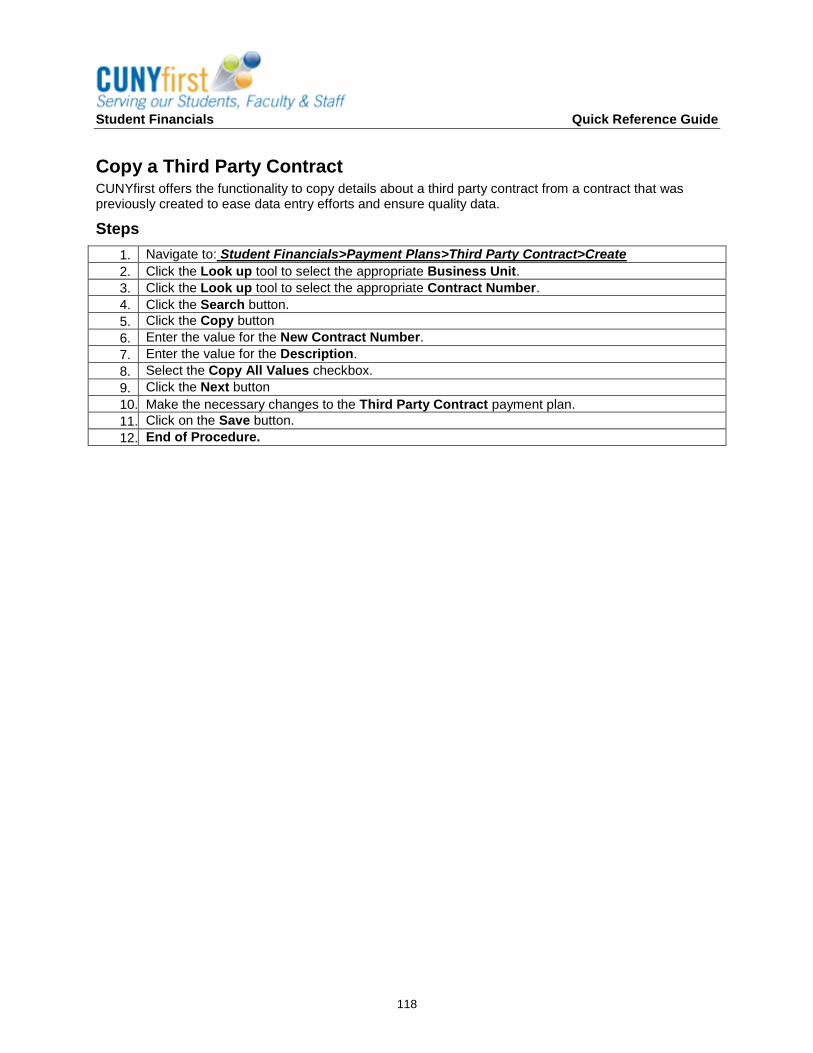
Student Financials Quick Reference Guide
118
Copy a Third Party Contract CUNYfirst offers the functionality to copy details about a third party contract from a contract that was previously created to ease data entry efforts and ensure quality data.
Steps
1. Navigate to: Student Financials>Payment Plans>Third Party Contract>Create
2. Click the Look up tool to select the appropriate Business Unit.
3. Click the Look up tool to select the appropriate Contract Number.
4. Click the Search button.
5. Click the Copy button
6. Enter the value for the New Contract Number.
7. Enter the value for the Description.
8. Select the Copy All Values checkbox.
9. Click the Next button
10. Make the necessary changes to the Third Party Contract payment plan.
11. Click on the Save button.
12. End of Procedure.

Student Financials Quick Reference Guide
119
Assign a Third Party Contract Once third party contracts are created, the contracts can be assigned to individual students or in a group.
Steps
1. Navigate to: Student Financials>Payment Plans>Third Party Contract>Assign
2. Click the Look up tool to select the appropriate Business Unit.
3. Click the Look up tool to select the appropriate Contract Number.
4. Enter appropriate search criteria. i.e: Empl ID; National ID; or Last Name & First Name
5. Enter the value for Student Max.
6. Select the value from the Status dropdown menu.
7. Enter the value for Priority
8. Enter a value for Reference Number.
9. Enter a value for Course List.
10. Click the Post button.
11. End of Procedure.
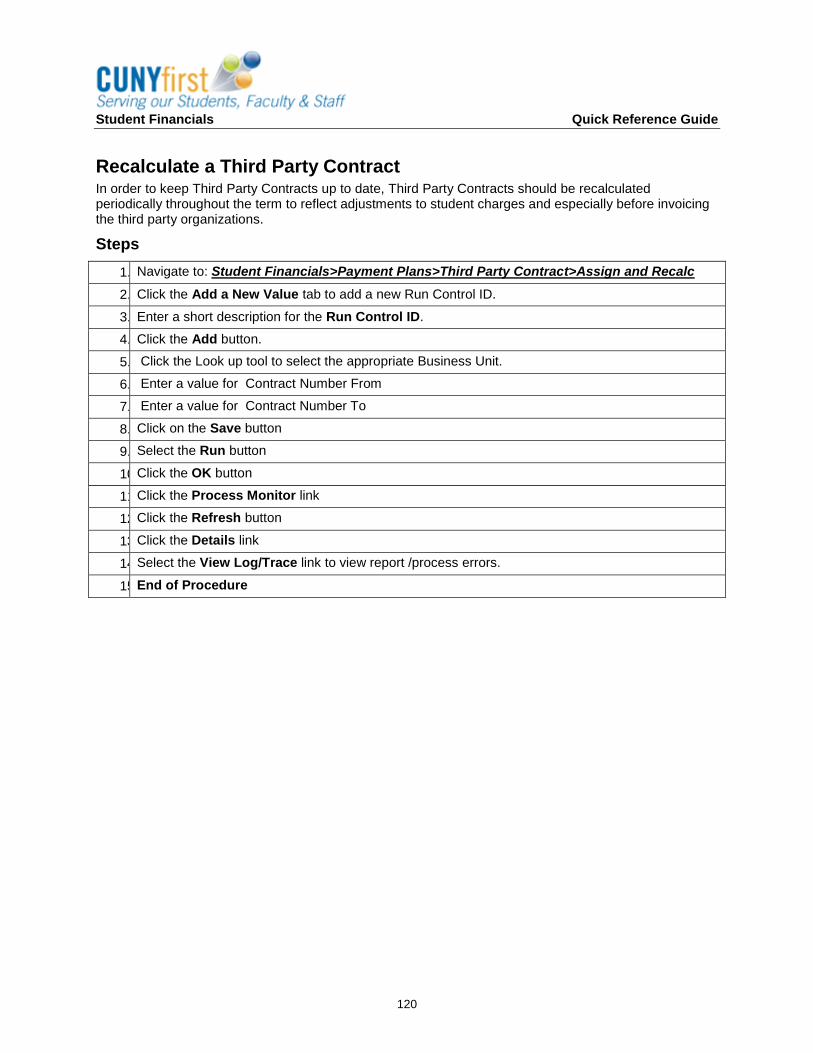
Student Financials Quick Reference Guide
120
Recalculate a Third Party Contract In order to keep Third Party Contracts up to date, Third Party Contracts should be recalculated periodically throughout the term to reflect adjustments to student charges and especially before invoicing the third party organizations.
Steps
1. Navigate to: Student Financials>Payment Plans>Third Party Contract>Assign and Recalc
2. Click the Add a New Value tab to add a new Run Control ID.
3. Enter a short description for the Run Control ID.
4. Click the Add button.
5. Click the Look up tool to select the appropriate Business Unit.
6. Enter a value for Contract Number From
7. Enter a value for Contract Number To
8. Click on the Save button
9. Select the Run button
10. Click the OK button
11. Click the Process Monitor link
12. Click the Refresh button
13. Click the Details link
14. Select the View Log/Trace link to view report /process errors.
15. End of Procedure
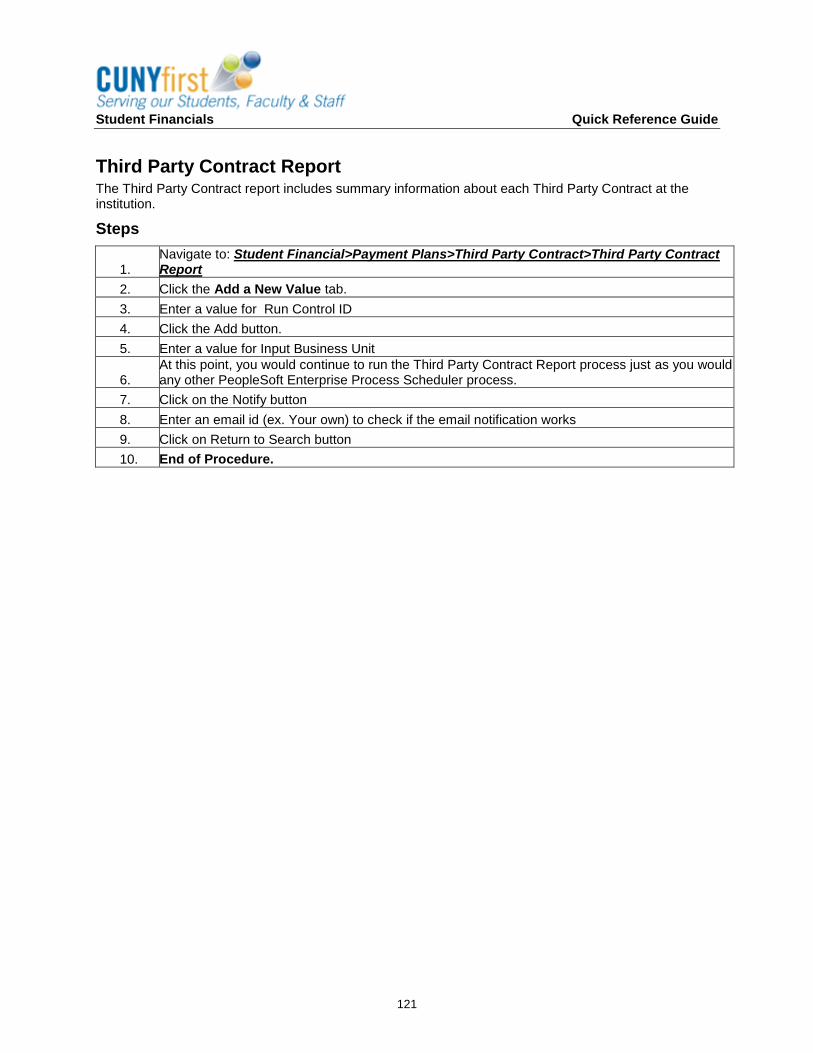
Student Financials Quick Reference Guide
121
Third Party Contract Report The Third Party Contract report includes summary information about each Third Party Contract at the institution.
Steps
1. Navigate to: Student Financial>Payment Plans>Third Party Contract>Third Party Contract Report
2. Click the Add a New Value tab.
3. Enter a value for Run Control ID
4. Click the Add button.
5. Enter a value for Input Business Unit
6. At this point, you would continue to run the Third Party Contract Report process just as you would any other PeopleSoft Enterprise Process Scheduler process.
7. Click on the Notify button
8. Enter an email id (ex. Your own) to check if the email notification works
9. Click on Return to Search button
10. End of Procedure.
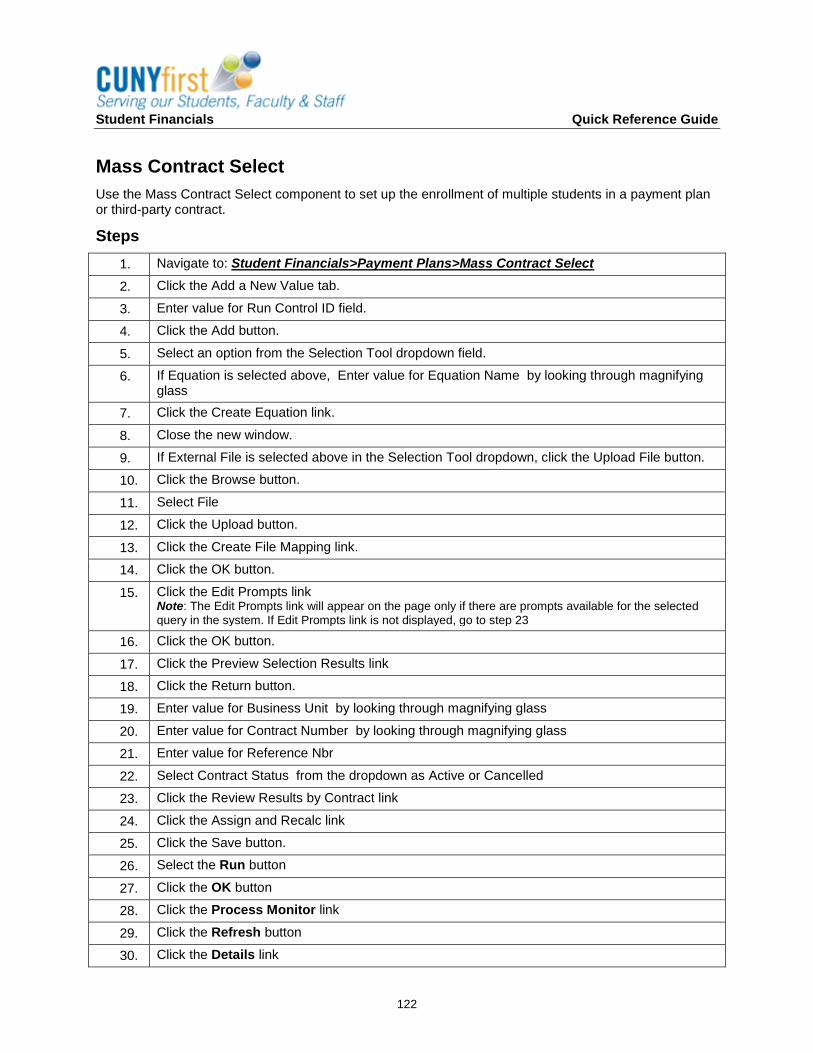
Student Financials Quick Reference Guide
122
Mass Contract Select
Use the Mass Contract Select component to set up the enrollment of multiple students in a payment plan or third-party contract.
Steps
1. Navigate to: Student Financials>Payment Plans>Mass Contract Select
2. Click the Add a New Value tab.
3. Enter value for Run Control ID field.
4. Click the Add button.
5. Select an option from the Selection Tool dropdown field.
6. If Equation is selected above, Enter value for Equation Name by looking through magnifying glass
7. Click the Create Equation link.
8. Close the new window.
9. If External File is selected above in the Selection Tool dropdown, click the Upload File button.
10. Click the Browse button.
11. Select File
12. Click the Upload button.
13. Click the Create File Mapping link.
14. Click the OK button.
15. Click the Edit Prompts link Note: The Edit Prompts link will appear on the page only if there are prompts available for the selected
query in the system. If Edit Prompts link is not displayed, go to step 23
16. Click the OK button.
17. Click the Preview Selection Results link
18. Click the Return button.
19. Enter value for Business Unit by looking through magnifying glass
20. Enter value for Contract Number by looking through magnifying glass
21. Enter value for Reference Nbr
22. Select Contract Status from the dropdown as Active or Cancelled
23. Click the Review Results by Contract link
24. Click the Assign and Recalc link
25. Click the Save button.
26. Select the Run button
27. Click the OK button
28. Click the Process Monitor link
29. Click the Refresh button
30. Click the Details link

Student Financials Quick Reference Guide
123
31. Select the View Log/Trace link to view report /process errors.
32. End of Procedure.

Student Financials Quick Reference Guide
124
Unit VIII: Cashiering
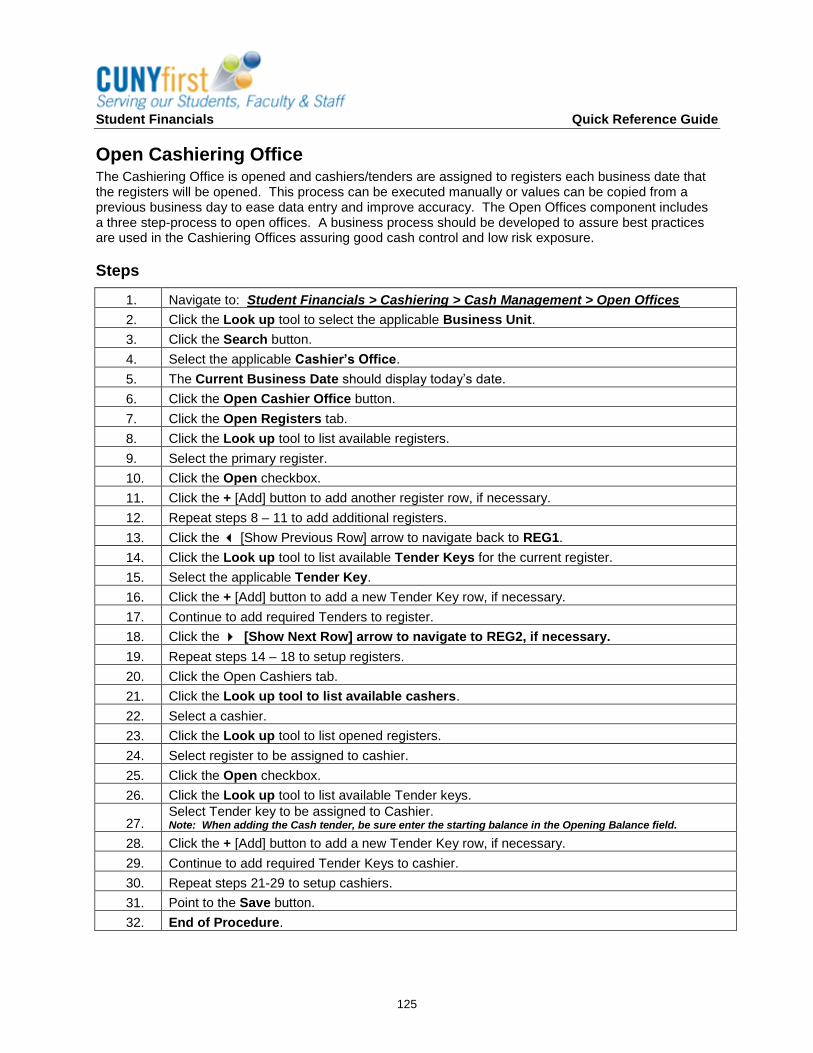
Student Financials Quick Reference Guide
125
Open Cashiering Office The Cashiering Office is opened and cashiers/tenders are assigned to registers each business date that the registers will be opened. This process can be executed manually or values can be copied from a previous business day to ease data entry and improve accuracy. The Open Offices component includes a three step-process to open offices. A business process should be developed to assure best practices are used in the Cashiering Offices assuring good cash control and low risk exposure.
Steps
1. Navigate to: Student Financials > Cashiering > Cash Management > Open Offices
2. Click the Look up tool to select the applicable Business Unit.
3. Click the Search button.
4. Select the applicable Cashier’s Office.
5. The Current Business Date should display today’s date.
6. Click the Open Cashier Office button.
7. Click the Open Registers tab.
8. Click the Look up tool to list available registers.
9. Select the primary register.
10. Click the Open checkbox.
11. Click the + [Add] button to add another register row, if necessary.
12. Repeat steps 8 – 11 to add additional registers.
13. Click the [Show Previous Row] arrow to navigate back to REG1.
14. Click the Look up tool to list available Tender Keys for the current register.
15. Select the applicable Tender Key.
16. Click the + [Add] button to add a new Tender Key row, if necessary.
17. Continue to add required Tenders to register.
18. Click the [Show Next Row] arrow to navigate to REG2, if necessary.
19. Repeat steps 14 – 18 to setup registers.
20. Click the Open Cashiers tab.
21. Click the Look up tool to list available cashers.
22. Select a cashier.
23. Click the Look up tool to list opened registers.
24. Select register to be assigned to cashier.
25. Click the Open checkbox.
26. Click the Look up tool to list available Tender keys.
27. Select Tender key to be assigned to Cashier. Note: When adding the Cash tender, be sure enter the starting balance in the Opening Balance field.
28. Click the + [Add] button to add a new Tender Key row, if necessary.
29. Continue to add required Tender Keys to cashier.
30. Repeat steps 21-29 to setup cashiers.
31. Point to the Save button.
32. End of Procedure.
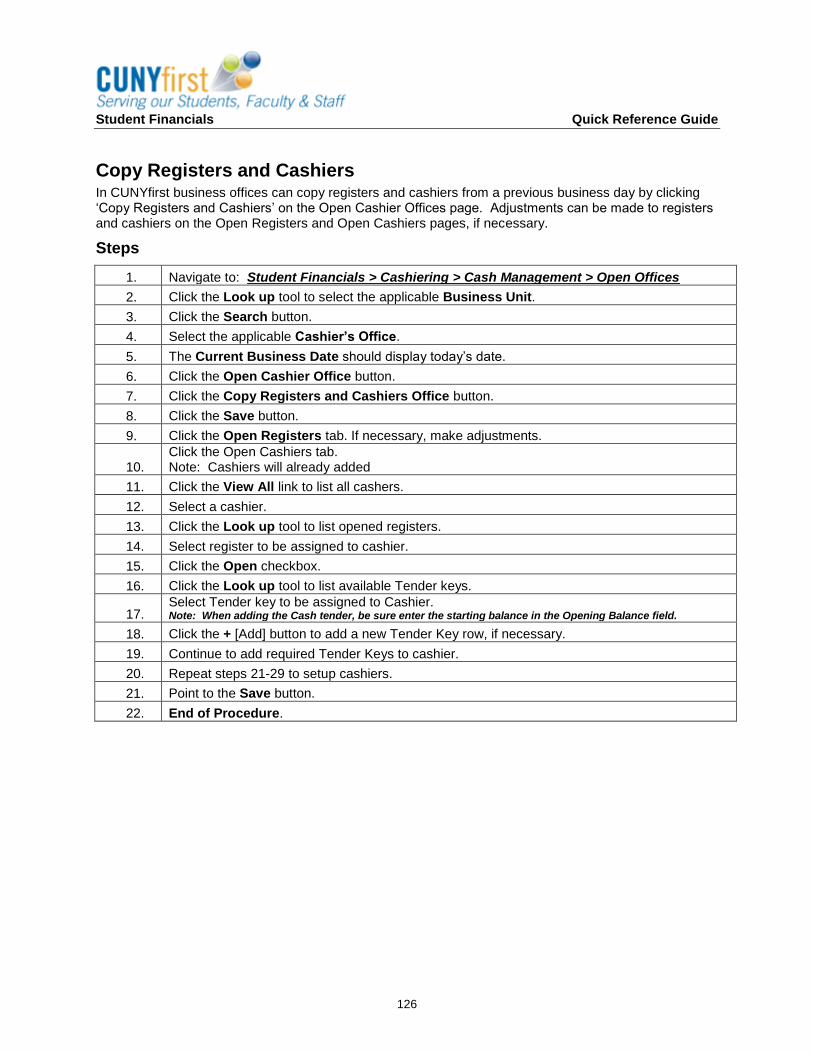
Student Financials Quick Reference Guide
126
Copy Registers and Cashiers In CUNYfirst business offices can copy registers and cashiers from a previous business day by clicking ‘Copy Registers and Cashiers’ on the Open Cashier Offices page. Adjustments can be made to registers and cashiers on the Open Registers and Open Cashiers pages, if necessary.
Steps
1. Navigate to: Student Financials > Cashiering > Cash Management > Open Offices
2. Click the Look up tool to select the applicable Business Unit.
3. Click the Search button.
4. Select the applicable Cashier’s Office.
5. The Current Business Date should display today’s date.
6. Click the Open Cashier Office button.
7. Click the Copy Registers and Cashiers Office button.
8. Click the Save button.
9. Click the Open Registers tab. If necessary, make adjustments.
10. Click the Open Cashiers tab. Note: Cashiers will already added
11. Click the View All link to list all cashers.
12. Select a cashier.
13. Click the Look up tool to list opened registers.
14. Select register to be assigned to cashier.
15. Click the Open checkbox.
16. Click the Look up tool to list available Tender keys.
17. Select Tender key to be assigned to Cashier. Note: When adding the Cash tender, be sure enter the starting balance in the Opening Balance field.
18. Click the + [Add] button to add a new Tender Key row, if necessary.
19. Continue to add required Tender Keys to cashier.
20. Repeat steps 21-29 to setup cashiers.
21. Point to the Save button.
22. End of Procedure.
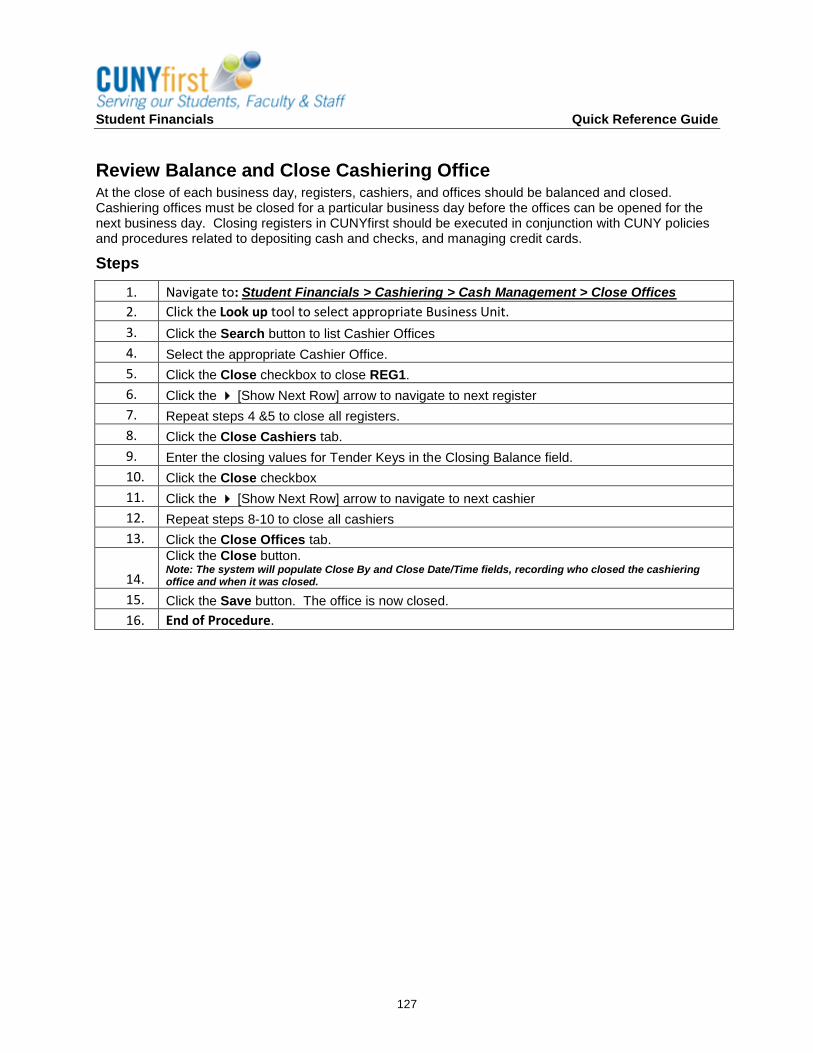
Student Financials Quick Reference Guide
127
Review Balance and Close Cashiering Office At the close of each business day, registers, cashiers, and offices should be balanced and closed. Cashiering offices must be closed for a particular business day before the offices can be opened for the next business day. Closing registers in CUNYfirst should be executed in conjunction with CUNY policies and procedures related to depositing cash and checks, and managing credit cards.
Steps
1. Navigate to: Student Financials > Cashiering > Cash Management > Close Offices
2. Click the Look up tool to select appropriate Business Unit.
3. Click the Search button to list Cashier Offices
4. Select the appropriate Cashier Office.
5. Click the Close checkbox to close REG1.
6. Click the [Show Next Row] arrow to navigate to next register
7. Repeat steps 4 &5 to close all registers.
8. Click the Close Cashiers tab.
9. Enter the closing values for Tender Keys in the Closing Balance field.
10. Click the Close checkbox
11. Click the [Show Next Row] arrow to navigate to next cashier
12. Repeat steps 8-10 to close all cashiers
13. Click the Close Offices tab.
14.
Click the Close button. Note: The system will populate Close By and Close Date/Time fields, recording who closed the cashiering office and when it was closed.
15. Click the Save button. The office is now closed.
16. End of Procedure.
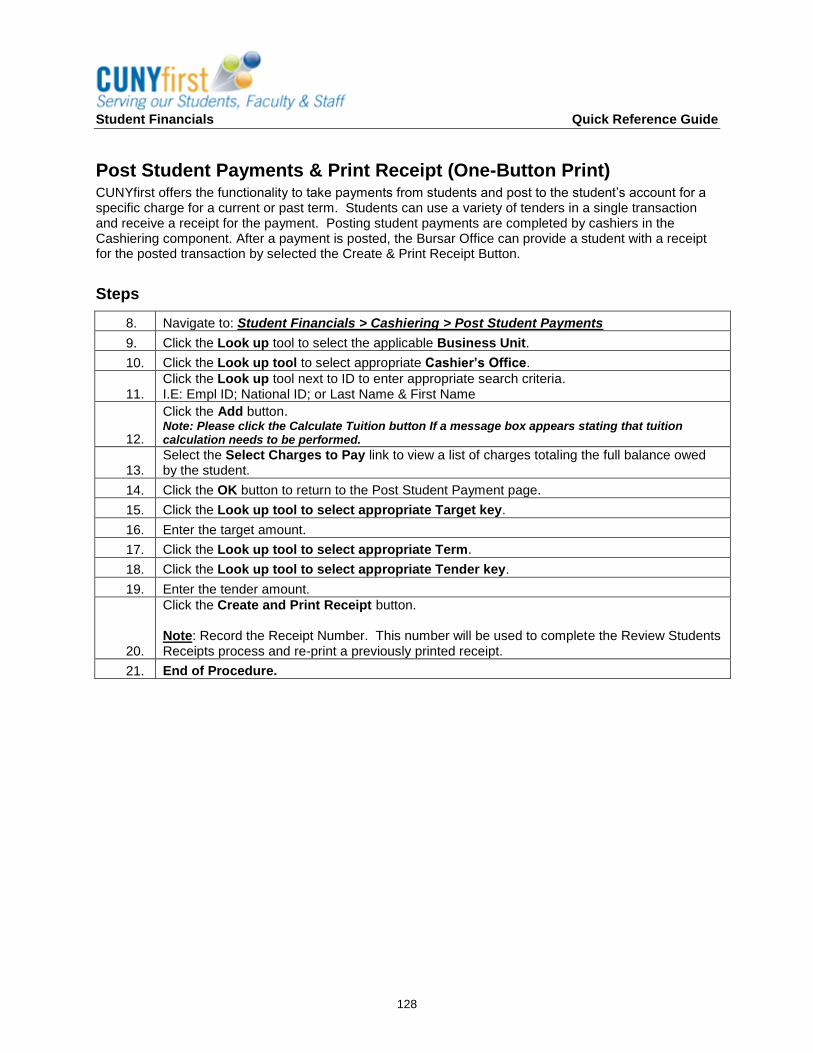
Student Financials Quick Reference Guide
128
Post Student Payments & Print Receipt (One-Button Print) CUNYfirst offers the functionality to take payments from students and post to the student’s account for a specific charge for a current or past term. Students can use a variety of tenders in a single transaction and receive a receipt for the payment. Posting student payments are completed by cashiers in the Cashiering component. After a payment is posted, the Bursar Office can provide a student with a receipt for the posted transaction by selected the Create & Print Receipt Button.
Steps
8. Navigate to: Student Financials > Cashiering > Post Student Payments
9. Click the Look up tool to select the applicable Business Unit.
10. Click the Look up tool to select appropriate Cashier’s Office.
11. Click the Look up tool next to ID to enter appropriate search criteria. I.E: Empl ID; National ID; or Last Name & First Name
12.
Click the Add button. Note: Please click the Calculate Tuition button If a message box appears stating that tuition calculation needs to be performed.
13. Select the Select Charges to Pay link to view a list of charges totaling the full balance owed by the student.
14. Click the OK button to return to the Post Student Payment page.
15. Click the Look up tool to select appropriate Target key.
16. Enter the target amount.
17. Click the Look up tool to select appropriate Term.
18. Click the Look up tool to select appropriate Tender key.
19. Enter the tender amount.
20.
Click the Create and Print Receipt button. Note: Record the Receipt Number. This number will be used to complete the Review Students Receipts process and re-print a previously printed receipt.
21. End of Procedure.
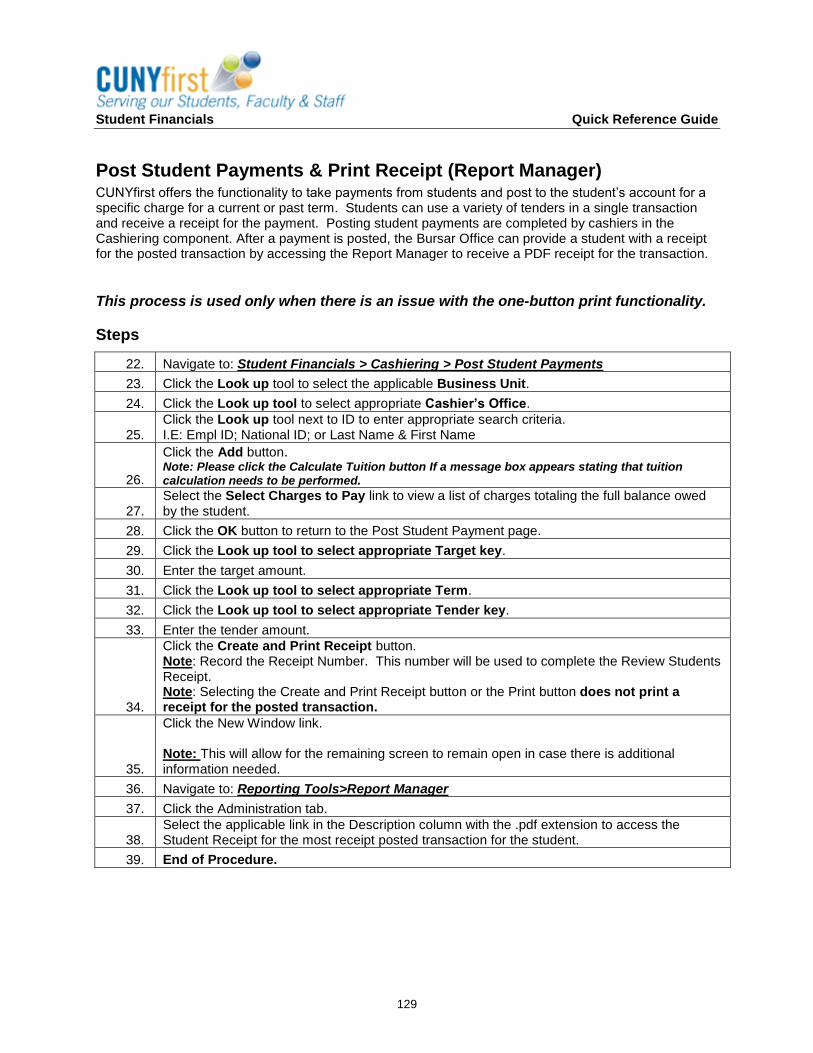
Student Financials Quick Reference Guide
129
Post Student Payments & Print Receipt (Report Manager) CUNYfirst offers the functionality to take payments from students and post to the student’s account for a specific charge for a current or past term. Students can use a variety of tenders in a single transaction and receive a receipt for the payment. Posting student payments are completed by cashiers in the Cashiering component. After a payment is posted, the Bursar Office can provide a student with a receipt for the posted transaction by accessing the Report Manager to receive a PDF receipt for the transaction.
This process is used only when there is an issue with the one-button print functionality.
Steps
22. Navigate to: Student Financials > Cashiering > Post Student Payments
23. Click the Look up tool to select the applicable Business Unit.
24. Click the Look up tool to select appropriate Cashier’s Office.
25. Click the Look up tool next to ID to enter appropriate search criteria. I.E: Empl ID; National ID; or Last Name & First Name
26.
Click the Add button. Note: Please click the Calculate Tuition button If a message box appears stating that tuition calculation needs to be performed.
27. Select the Select Charges to Pay link to view a list of charges totaling the full balance owed by the student.
28. Click the OK button to return to the Post Student Payment page.
29. Click the Look up tool to select appropriate Target key.
30. Enter the target amount.
31. Click the Look up tool to select appropriate Term.
32. Click the Look up tool to select appropriate Tender key.
33. Enter the tender amount.
34.
Click the Create and Print Receipt button. Note: Record the Receipt Number. This number will be used to complete the Review Students Receipt. Note: Selecting the Create and Print Receipt button or the Print button does not print a receipt for the posted transaction.
35.
Click the New Window link. Note: This will allow for the remaining screen to remain open in case there is additional information needed.
36. Navigate to: Reporting Tools>Report Manager
37. Click the Administration tab.
38. Select the applicable link in the Description column with the .pdf extension to access the Student Receipt for the most receipt posted transaction for the student.
39. End of Procedure.
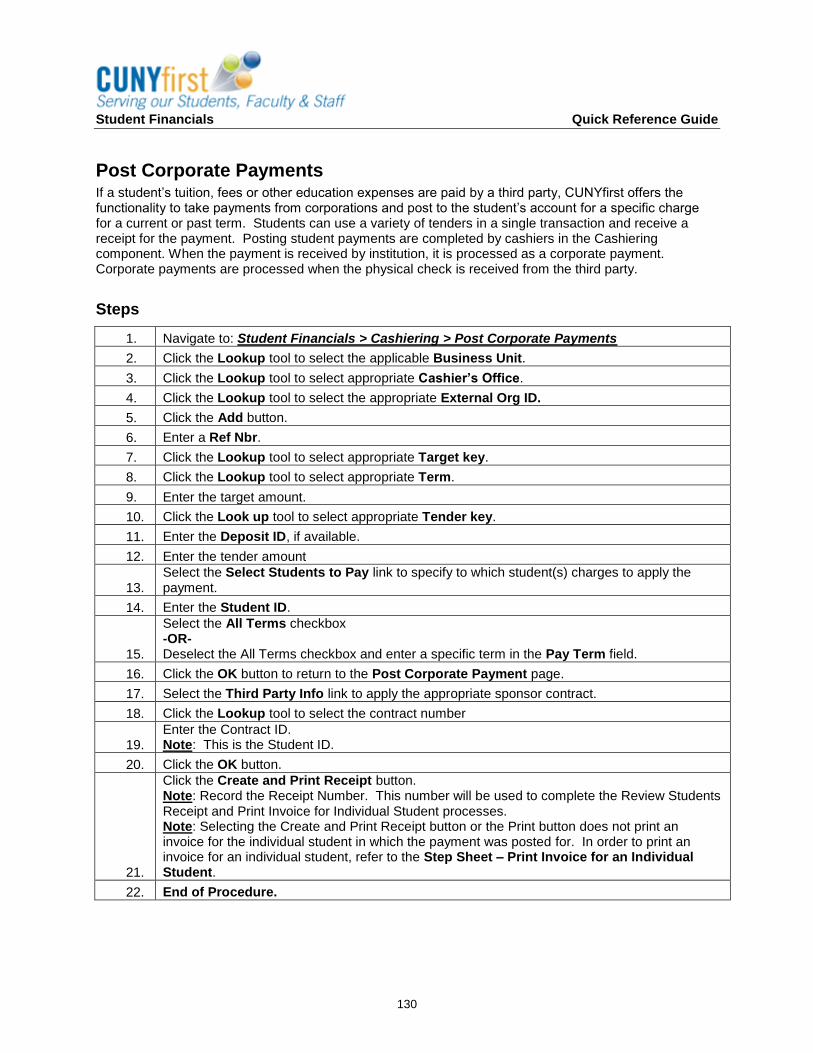
Student Financials Quick Reference Guide
130
Post Corporate Payments If a student’s tuition, fees or other education expenses are paid by a third party, CUNYfirst offers the functionality to take payments from corporations and post to the student’s account for a specific charge for a current or past term. Students can use a variety of tenders in a single transaction and receive a receipt for the payment. Posting student payments are completed by cashiers in the Cashiering component. When the payment is received by institution, it is processed as a corporate payment. Corporate payments are processed when the physical check is received from the third party.
Steps
1. Navigate to: Student Financials > Cashiering > Post Corporate Payments
2. Click the Lookup tool to select the applicable Business Unit.
3. Click the Lookup tool to select appropriate Cashier’s Office.
4. Click the Lookup tool to select the appropriate External Org ID.
5. Click the Add button.
6. Enter a Ref Nbr.
7. Click the Lookup tool to select appropriate Target key.
8. Click the Lookup tool to select appropriate Term.
9. Enter the target amount.
10. Click the Look up tool to select appropriate Tender key.
11. Enter the Deposit ID, if available.
12. Enter the tender amount
13. Select the Select Students to Pay link to specify to which student(s) charges to apply the payment.
14. Enter the Student ID.
15.
Select the All Terms checkbox -OR- Deselect the All Terms checkbox and enter a specific term in the Pay Term field.
16. Click the OK button to return to the Post Corporate Payment page.
17. Select the Third Party Info link to apply the appropriate sponsor contract.
18. Click the Lookup tool to select the contract number
19. Enter the Contract ID. Note: This is the Student ID.
20. Click the OK button.
21.
Click the Create and Print Receipt button. Note: Record the Receipt Number. This number will be used to complete the Review Students Receipt and Print Invoice for Individual Student processes. Note: Selecting the Create and Print Receipt button or the Print button does not print an invoice for the individual student in which the payment was posted for. In order to print an invoice for an individual student, refer to the Step Sheet – Print Invoice for an Individual Student.
22. End of Procedure.
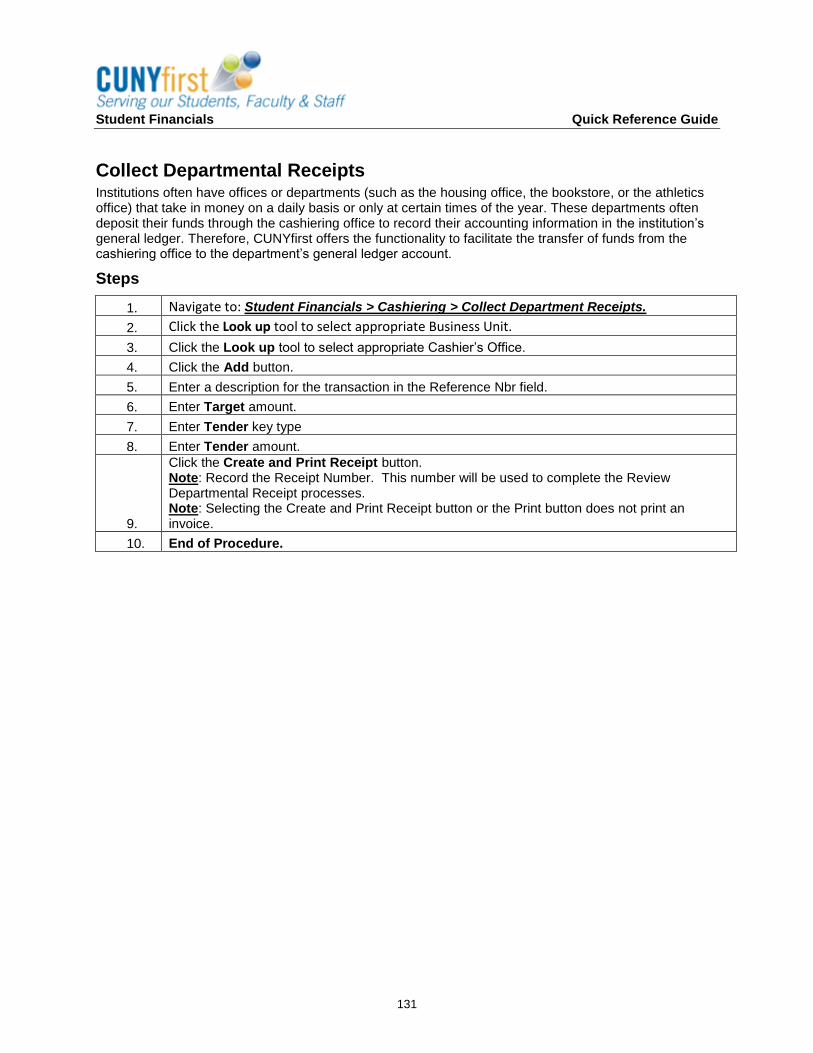
Student Financials Quick Reference Guide
131
Collect Departmental Receipts Institutions often have offices or departments (such as the housing office, the bookstore, or the athletics office) that take in money on a daily basis or only at certain times of the year. These departments often deposit their funds through the cashiering office to record their accounting information in the institution’s general ledger. Therefore, CUNYfirst offers the functionality to facilitate the transfer of funds from the cashiering office to the department’s general ledger account.
Steps
1. Navigate to: Student Financials > Cashiering > Collect Department Receipts.
2. Click the Look up tool to select appropriate Business Unit.
3. Click the Look up tool to select appropriate Cashier’s Office.
4. Click the Add button.
5. Enter a description for the transaction in the Reference Nbr field.
6. Enter Target amount.
7. Enter Tender key type
8. Enter Tender amount.
9.
Click the Create and Print Receipt button. Note: Record the Receipt Number. This number will be used to complete the Review Departmental Receipt processes. Note: Selecting the Create and Print Receipt button or the Print button does not print an invoice.
10. End of Procedure.
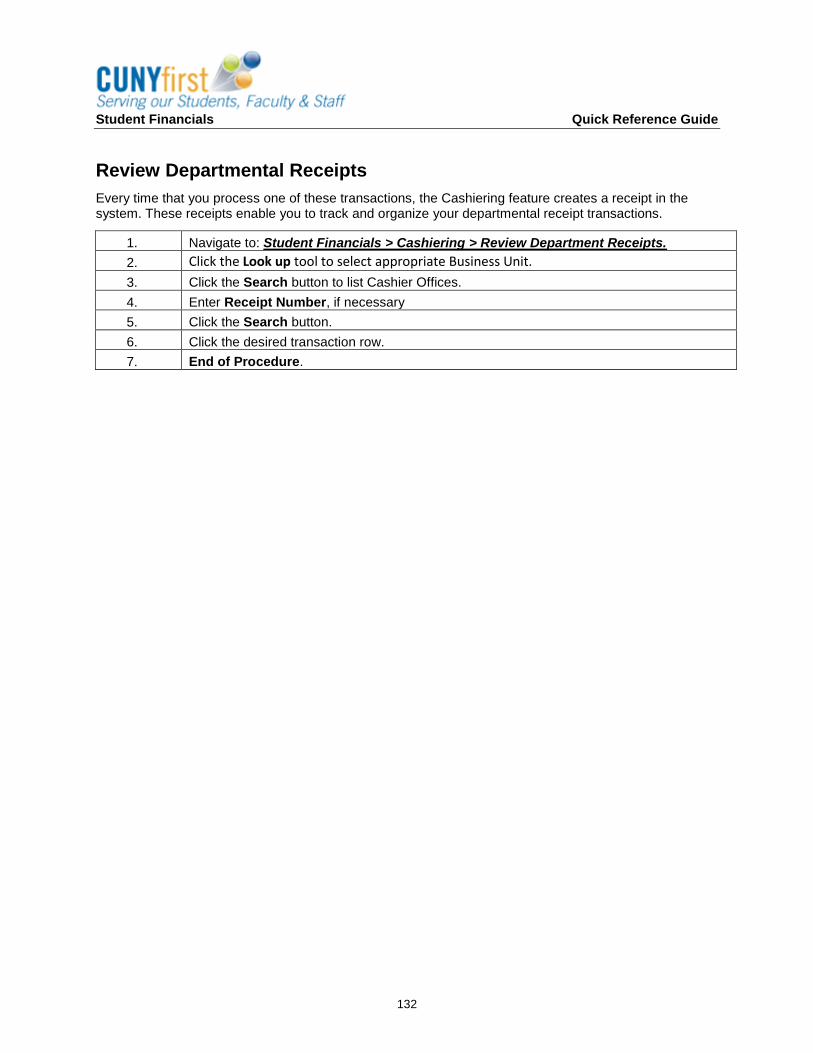
Student Financials Quick Reference Guide
132
Review Departmental Receipts
Every time that you process one of these transactions, the Cashiering feature creates a receipt in the system. These receipts enable you to track and organize your departmental receipt transactions.
1. Navigate to: Student Financials > Cashiering > Review Department Receipts.
2. Click the Look up tool to select appropriate Business Unit.
3. Click the Search button to list Cashier Offices.
4. Enter Receipt Number, if necessary
5. Click the Search button.
6. Click the desired transaction row.
7. End of Procedure.
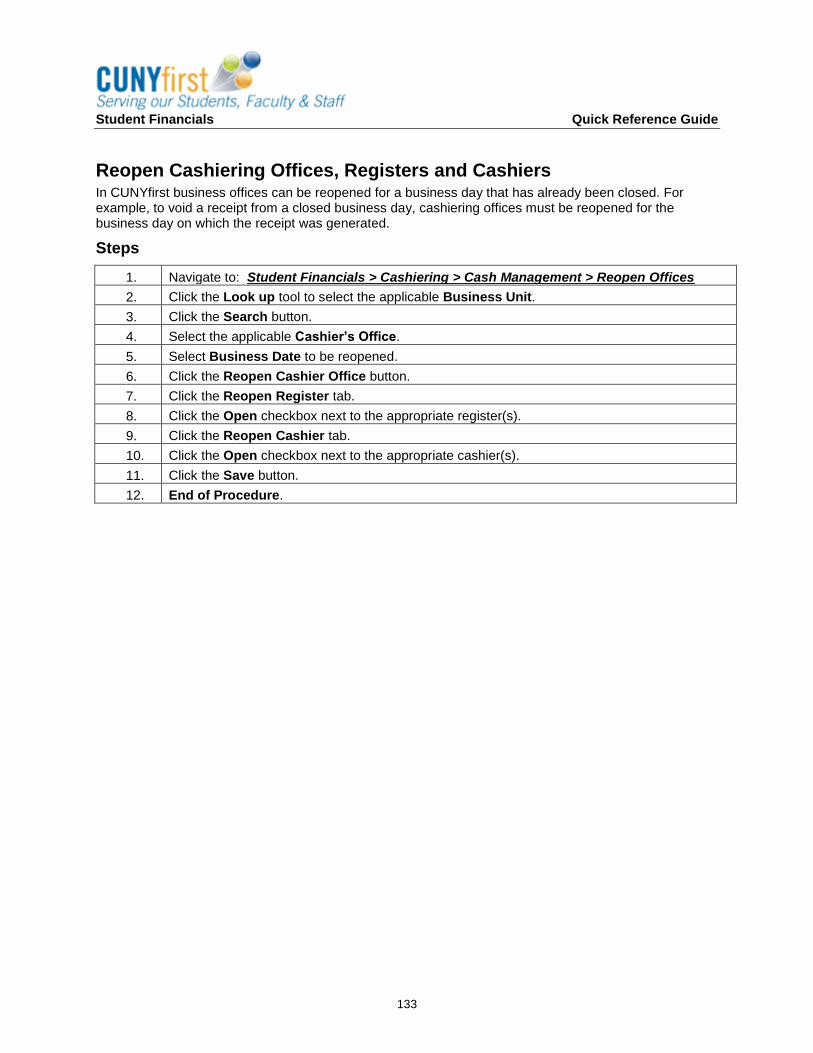
Student Financials Quick Reference Guide
133
Reopen Cashiering Offices, Registers and Cashiers In CUNYfirst business offices can be reopened for a business day that has already been closed. For example, to void a receipt from a closed business day, cashiering offices must be reopened for the business day on which the receipt was generated.
Steps
1. Navigate to: Student Financials > Cashiering > Cash Management > Reopen Offices
2. Click the Look up tool to select the applicable Business Unit.
3. Click the Search button.
4. Select the applicable Cashier’s Office.
5. Select Business Date to be reopened.
6. Click the Reopen Cashier Office button.
7. Click the Reopen Register tab.
8. Click the Open checkbox next to the appropriate register(s).
9. Click the Reopen Cashier tab.
10. Click the Open checkbox next to the appropriate cashier(s).
11. Click the Save button.
12. End of Procedure.
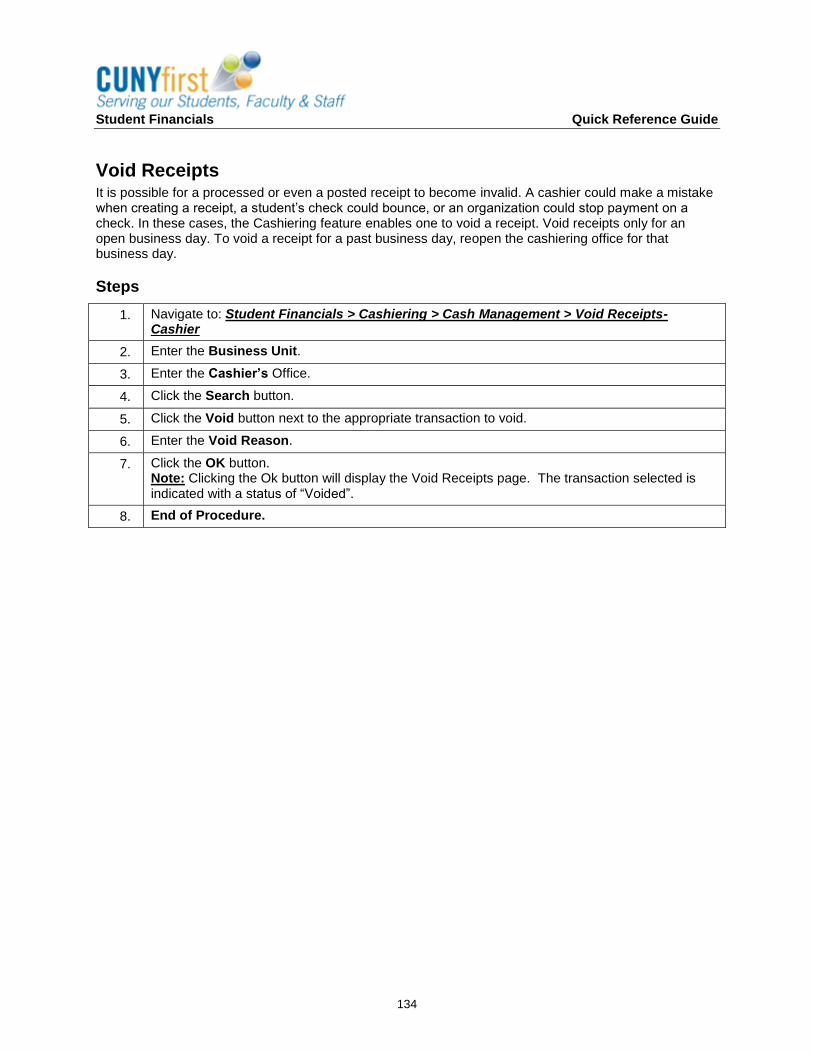
Student Financials Quick Reference Guide
134
Void Receipts It is possible for a processed or even a posted receipt to become invalid. A cashier could make a mistake when creating a receipt, a student’s check could bounce, or an organization could stop payment on a check. In these cases, the Cashiering feature enables one to void a receipt. Void receipts only for an open business day. To void a receipt for a past business day, reopen the cashiering office for that business day.
Steps
1. Navigate to: Student Financials > Cashiering > Cash Management > Void Receipts- Cashier
2. Enter the Business Unit.
3. Enter the Cashier’s Office.
4. Click the Search button.
5. Click the Void button next to the appropriate transaction to void.
6. Enter the Void Reason.
7. Click the OK button. Note: Clicking the Ok button will display the Void Receipts page. The transaction selected is indicated with a status of “Voided”.
8. End of Procedure.
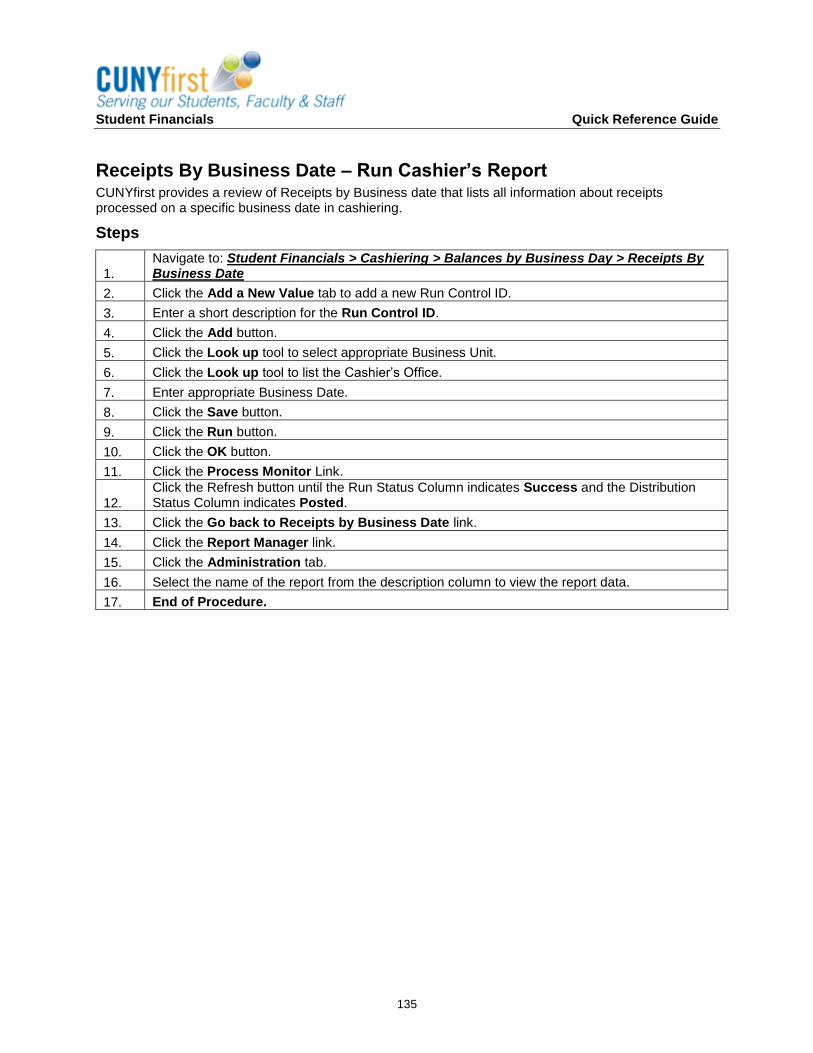
Student Financials Quick Reference Guide
135
Receipts By Business Date – Run Cashier’s Report CUNYfirst provides a review of Receipts by Business date that lists all information about receipts processed on a specific business date in cashiering.
Steps
1. Navigate to: Student Financials > Cashiering > Balances by Business Day > Receipts By Business Date
2. Click the Add a New Value tab to add a new Run Control ID.
3. Enter a short description for the Run Control ID.
4. Click the Add button.
5. Click the Look up tool to select appropriate Business Unit.
6. Click the Look up tool to list the Cashier’s Office.
7. Enter appropriate Business Date.
8. Click the Save button.
9. Click the Run button.
10. Click the OK button.
11. Click the Process Monitor Link.
12.
Click the Refresh button until the Run Status Column indicates Success and the Distribution Status Column indicates Posted.
13. Click the Go back to Receipts by Business Date link.
14. Click the Report Manager link.
15. Click the Administration tab.
16. Select the name of the report from the description column to view the report data.
17. End of Procedure.
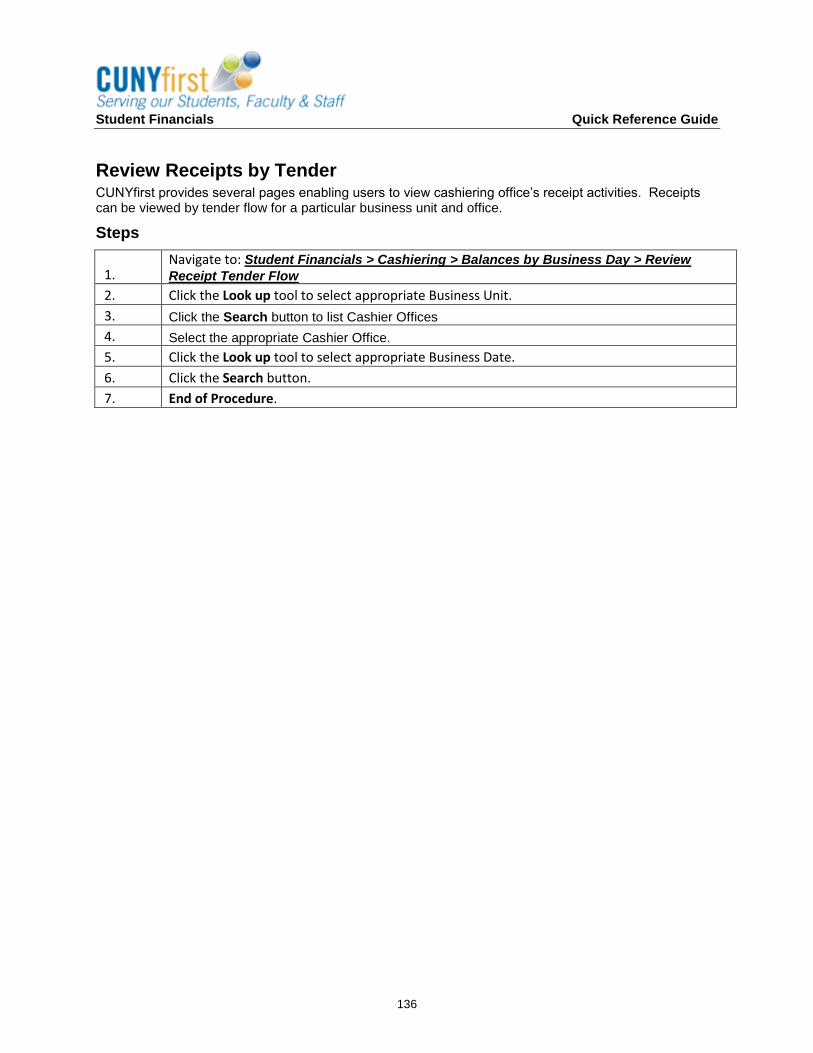
Student Financials Quick Reference Guide
136
Review Receipts by Tender CUNYfirst provides several pages enabling users to view cashiering office’s receipt activities. Receipts can be viewed by tender flow for a particular business unit and office.
Steps
1. Navigate to: Student Financials > Cashiering > Balances by Business Day > Review
Receipt Tender Flow
2. Click the Look up tool to select appropriate Business Unit.
3. Click the Search button to list Cashier Offices
4. Select the appropriate Cashier Office.
5. Click the Look up tool to select appropriate Business Date.
6. Click the Search button.
7. End of Procedure.

Student Financials Quick Reference Guide
137
Review Receipts by Deposit ID CUNYfirst offers the ability to run a report to review totals by a Deposit ID. When cashiers open the register, a Deposit ID is entered on the Open Cashiers page.
Steps
1. Navigate to: Student Financials > Cashiering > Balances by Business Day > Review
Totals By Deposit ID
2. Click the Look up tool to select appropriate Business Unit.
3. Click the Search button to list Cashier Offices
4. Select the appropriate Cashier Office.
5. Enter the Deposit ID.
6. Click the Search button.
7. View the results
8. End of Procedure.
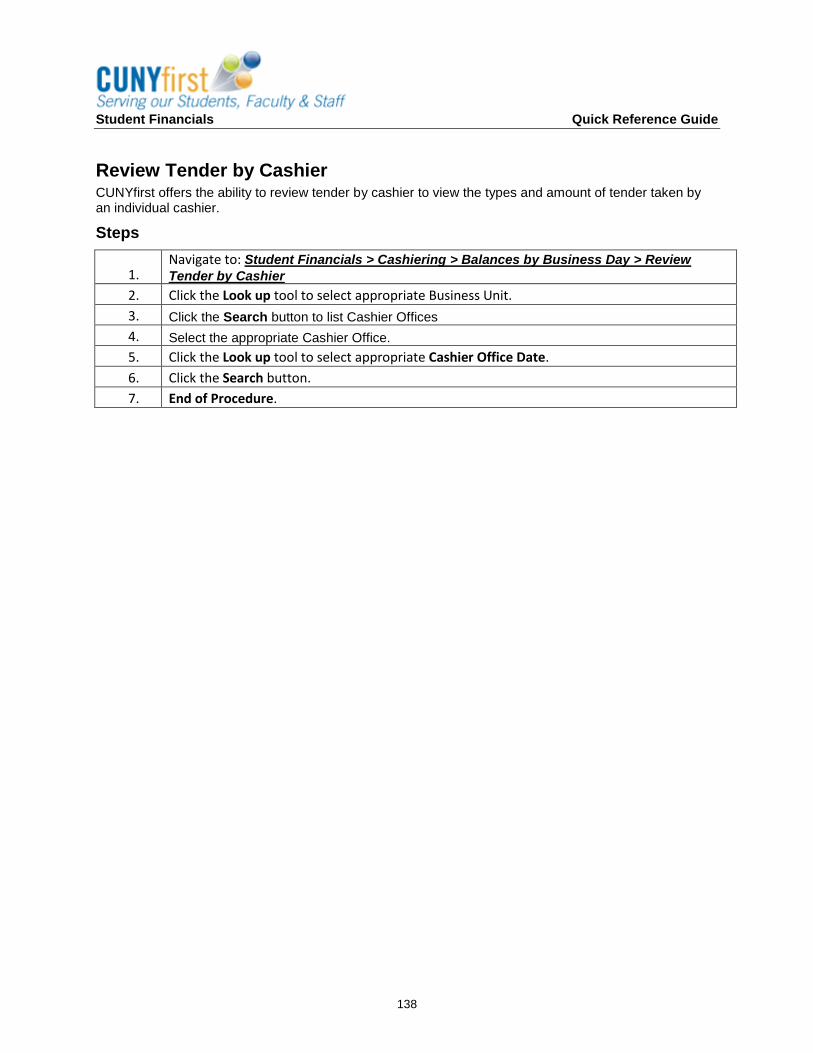
Student Financials Quick Reference Guide
138
Review Tender by Cashier CUNYfirst offers the ability to review tender by cashier to view the types and amount of tender taken by an individual cashier.
Steps
1. Navigate to: Student Financials > Cashiering > Balances by Business Day > Review
Tender by Cashier
2. Click the Look up tool to select appropriate Business Unit.
3. Click the Search button to list Cashier Offices
4. Select the appropriate Cashier Office.
5. Click the Look up tool to select appropriate Cashier Office Date.
6. Click the Search button.
7. End of Procedure.

Student Financials Quick Reference Guide
139
Review Tender by Register Similar to the Review Tender by Cashier, CUNYfirst offers the ability to review tender by a single register for a specific business date.
Steps
1. Navigate to: Student Financials > Cashiering > Balances by Business Day > Review
Tender by Register
2. Click the Look up tool to select appropriate Business Unit.
3. Click the Search button to list Cashier Offices
4. Select the appropriate Cashier Office.
5. Click the Look up tool to select appropriate Cashier Office Date.
6. Click the Search button.
7. End of Procedure.
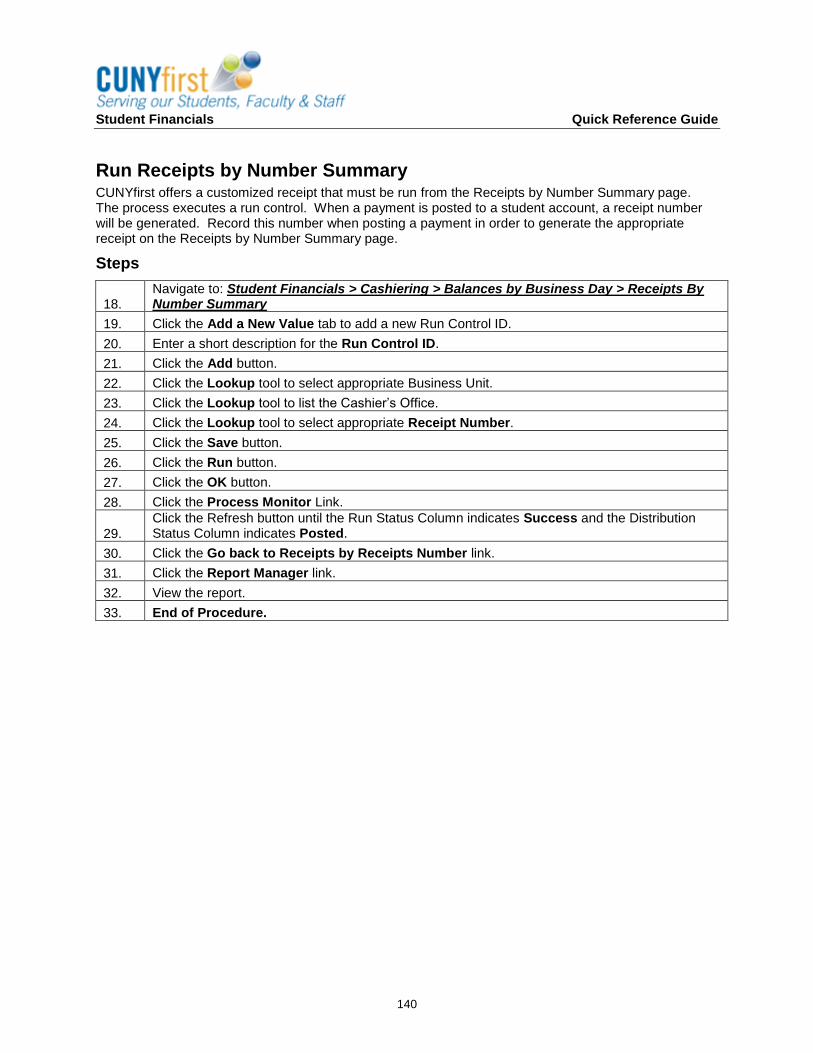
Student Financials Quick Reference Guide
140
Run Receipts by Number Summary CUNYfirst offers a customized receipt that must be run from the Receipts by Number Summary page. The process executes a run control. When a payment is posted to a student account, a receipt number will be generated. Record this number when posting a payment in order to generate the appropriate receipt on the Receipts by Number Summary page.
Steps
18. Navigate to: Student Financials > Cashiering > Balances by Business Day > Receipts By Number Summary
19. Click the Add a New Value tab to add a new Run Control ID.
20. Enter a short description for the Run Control ID.
21. Click the Add button.
22. Click the Lookup tool to select appropriate Business Unit.
23. Click the Lookup tool to list the Cashier’s Office.
24. Click the Lookup tool to select appropriate Receipt Number.
25. Click the Save button.
26. Click the Run button.
27. Click the OK button.
28. Click the Process Monitor Link.
29.
Click the Refresh button until the Run Status Column indicates Success and the Distribution Status Column indicates Posted.
30. Click the Go back to Receipts by Receipts Number link.
31. Click the Report Manager link.
32. View the report.
33. End of Procedure.
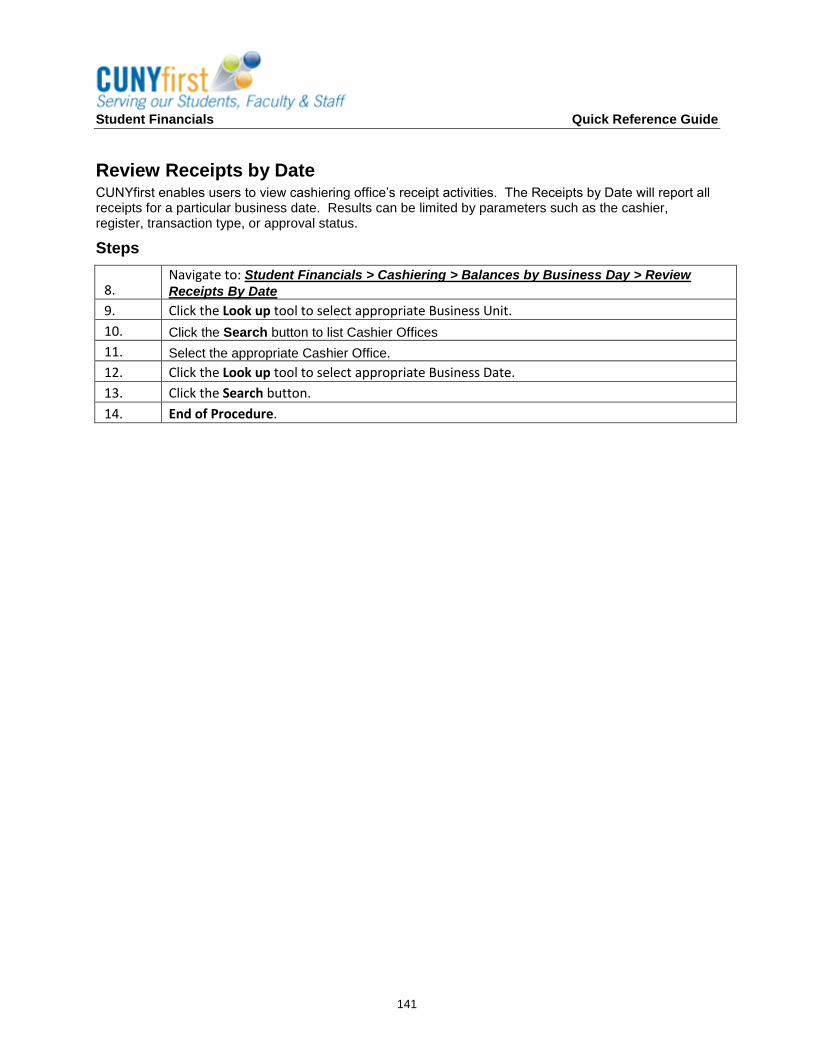
Student Financials Quick Reference Guide
141
Review Receipts by Date CUNYfirst enables users to view cashiering office’s receipt activities. The Receipts by Date will report all receipts for a particular business date. Results can be limited by parameters such as the cashier, register, transaction type, or approval status.
Steps
8. Navigate to: Student Financials > Cashiering > Balances by Business Day > Review
Receipts By Date
9. Click the Look up tool to select appropriate Business Unit.
10. Click the Search button to list Cashier Offices
11. Select the appropriate Cashier Office.
12. Click the Look up tool to select appropriate Business Date.
13. Click the Search button.
14. End of Procedure.
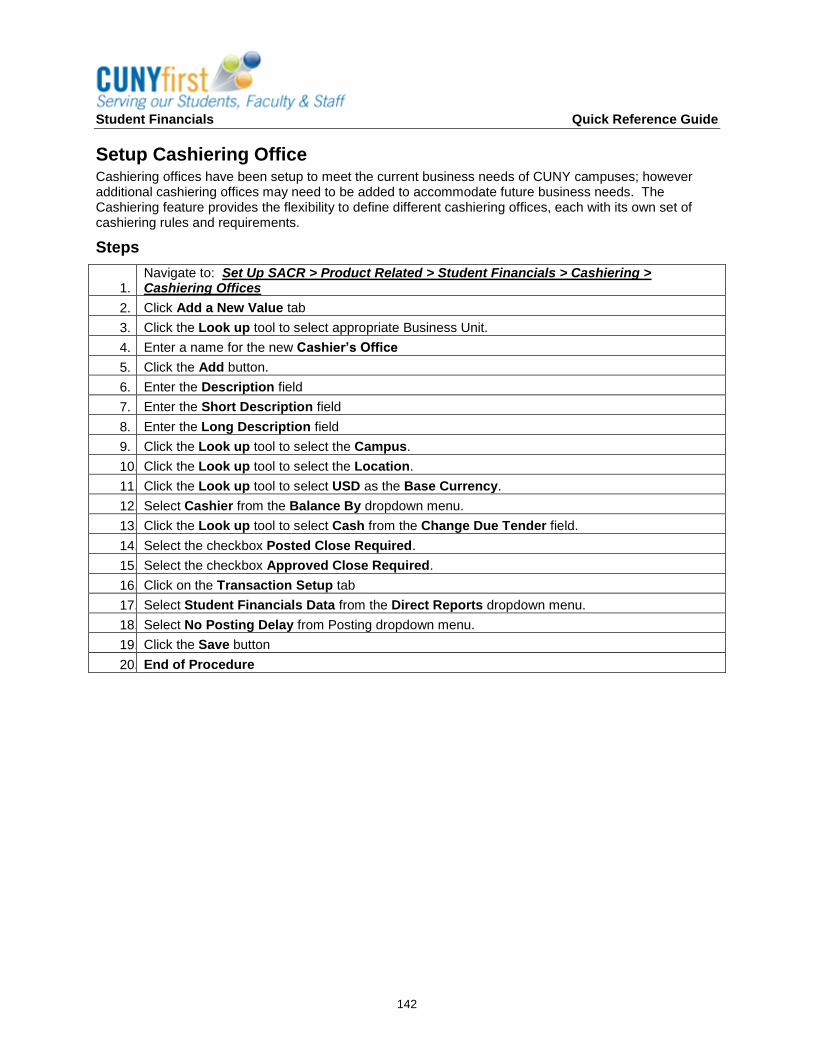
Student Financials Quick Reference Guide
142
Setup Cashiering Office Cashiering offices have been setup to meet the current business needs of CUNY campuses; however additional cashiering offices may need to be added to accommodate future business needs. The Cashiering feature provides the flexibility to define different cashiering offices, each with its own set of cashiering rules and requirements.
Steps
1. Navigate to: Set Up SACR > Product Related > Student Financials > Cashiering > Cashiering Offices
2. Click Add a New Value tab
3. Click the Look up tool to select appropriate Business Unit.
4. Enter a name for the new Cashier’s Office
5. Click the Add button.
6. Enter the Description field
7. Enter the Short Description field
8. Enter the Long Description field
9. Click the Look up tool to select the Campus.
10. Click the Look up tool to select the Location.
11. Click the Look up tool to select USD as the Base Currency.
12. Select Cashier from the Balance By dropdown menu.
13. Click the Look up tool to select Cash from the Change Due Tender field.
14. Select the checkbox Posted Close Required.
15. Select the checkbox Approved Close Required.
16. Click on the Transaction Setup tab
17. Select Student Financials Data from the Direct Reports dropdown menu.
18. Select No Posting Delay from Posting dropdown menu.
19. Click the Save button
20. End of Procedure
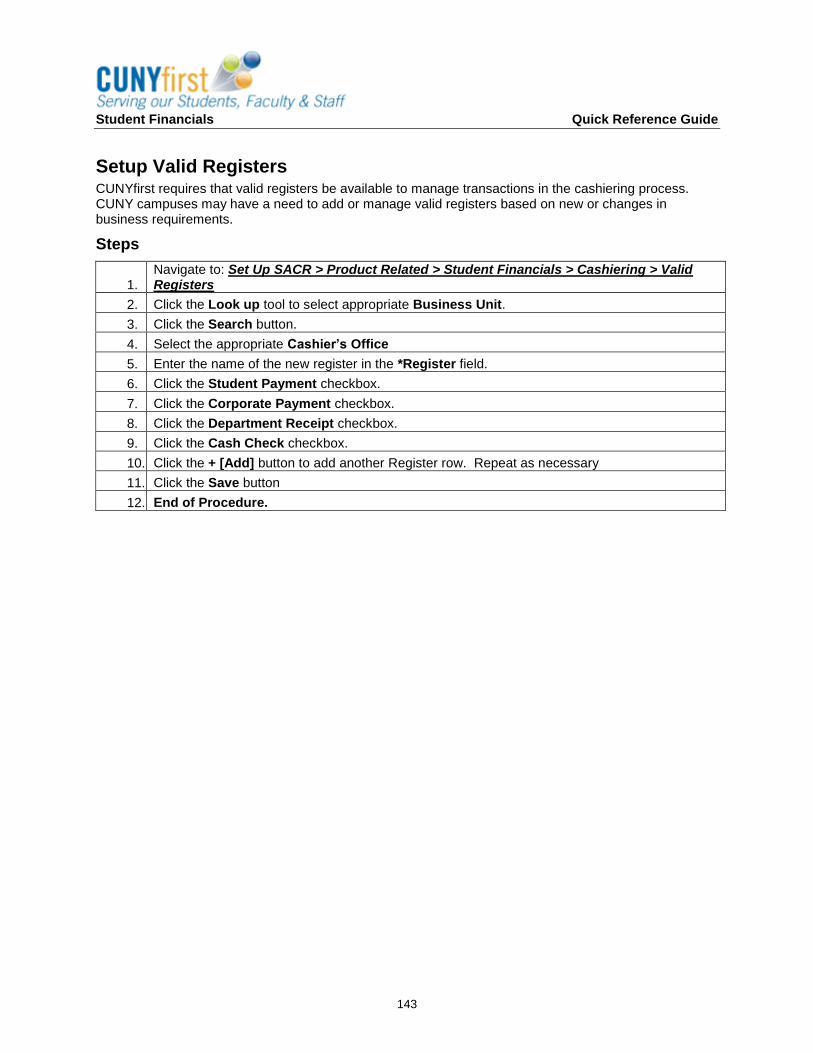
Student Financials Quick Reference Guide
143
Setup Valid Registers CUNYfirst requires that valid registers be available to manage transactions in the cashiering process. CUNY campuses may have a need to add or manage valid registers based on new or changes in business requirements.
Steps
1. Navigate to: Set Up SACR > Product Related > Student Financials > Cashiering > Valid Registers
2. Click the Look up tool to select appropriate Business Unit.
3. Click the Search button.
4. Select the appropriate Cashier’s Office
5. Enter the name of the new register in the *Register field.
6. Click the Student Payment checkbox.
7. Click the Corporate Payment checkbox.
8. Click the Department Receipt checkbox.
9. Click the Cash Check checkbox.
10. Click the + [Add] button to add another Register row. Repeat as necessary
11. Click the Save button
12. End of Procedure.
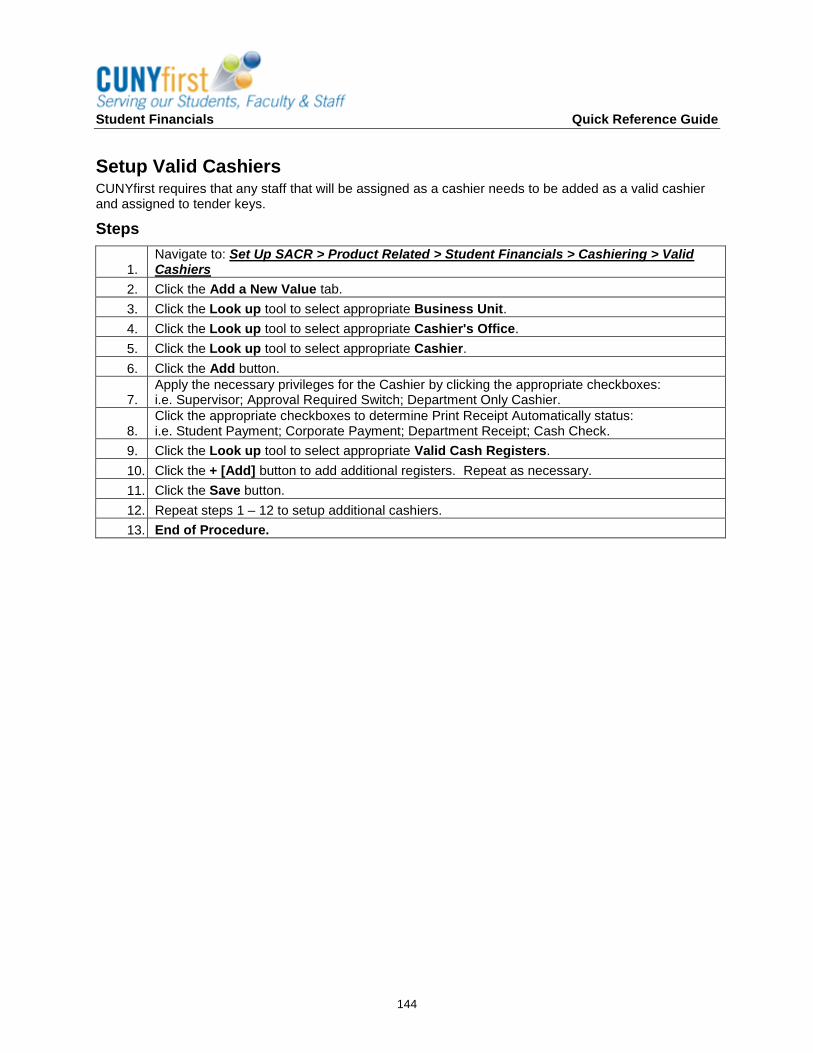
Student Financials Quick Reference Guide
144
Setup Valid Cashiers CUNYfirst requires that any staff that will be assigned as a cashier needs to be added as a valid cashier and assigned to tender keys.
Steps
1. Navigate to: Set Up SACR > Product Related > Student Financials > Cashiering > Valid Cashiers
2. Click the Add a New Value tab.
3. Click the Look up tool to select appropriate Business Unit.
4. Click the Look up tool to select appropriate Cashier's Office.
5. Click the Look up tool to select appropriate Cashier.
6. Click the Add button.
7. Apply the necessary privileges for the Cashier by clicking the appropriate checkboxes: i.e. Supervisor; Approval Required Switch; Department Only Cashier.
8. Click the appropriate checkboxes to determine Print Receipt Automatically status: i.e. Student Payment; Corporate Payment; Department Receipt; Cash Check.
9. Click the Look up tool to select appropriate Valid Cash Registers.
10. Click the + [Add] button to add additional registers. Repeat as necessary.
11. Click the Save button.
12. Repeat steps 1 – 12 to setup additional cashiers.
13. End of Procedure.
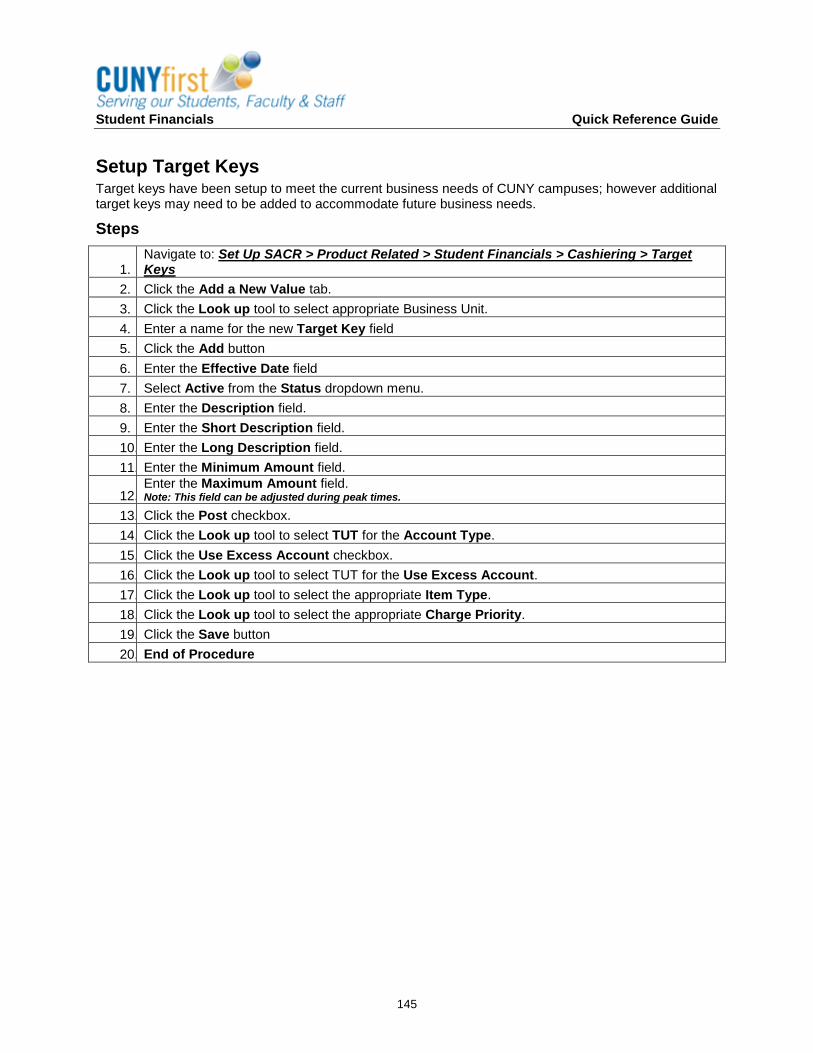
Student Financials Quick Reference Guide
145
Setup Target Keys Target keys have been setup to meet the current business needs of CUNY campuses; however additional target keys may need to be added to accommodate future business needs.
Steps
1. Navigate to: Set Up SACR > Product Related > Student Financials > Cashiering > Target Keys
2. Click the Add a New Value tab.
3. Click the Look up tool to select appropriate Business Unit.
4. Enter a name for the new Target Key field
5. Click the Add button
6. Enter the Effective Date field
7. Select Active from the Status dropdown menu.
8. Enter the Description field.
9. Enter the Short Description field.
10. Enter the Long Description field.
11. Enter the Minimum Amount field.
12. Enter the Maximum Amount field. Note: This field can be adjusted during peak times.
13. Click the Post checkbox.
14. Click the Look up tool to select TUT for the Account Type.
15. Click the Use Excess Account checkbox.
16. Click the Look up tool to select TUT for the Use Excess Account.
17. Click the Look up tool to select the appropriate Item Type.
18. Click the Look up tool to select the appropriate Charge Priority.
19. Click the Save button
20. End of Procedure
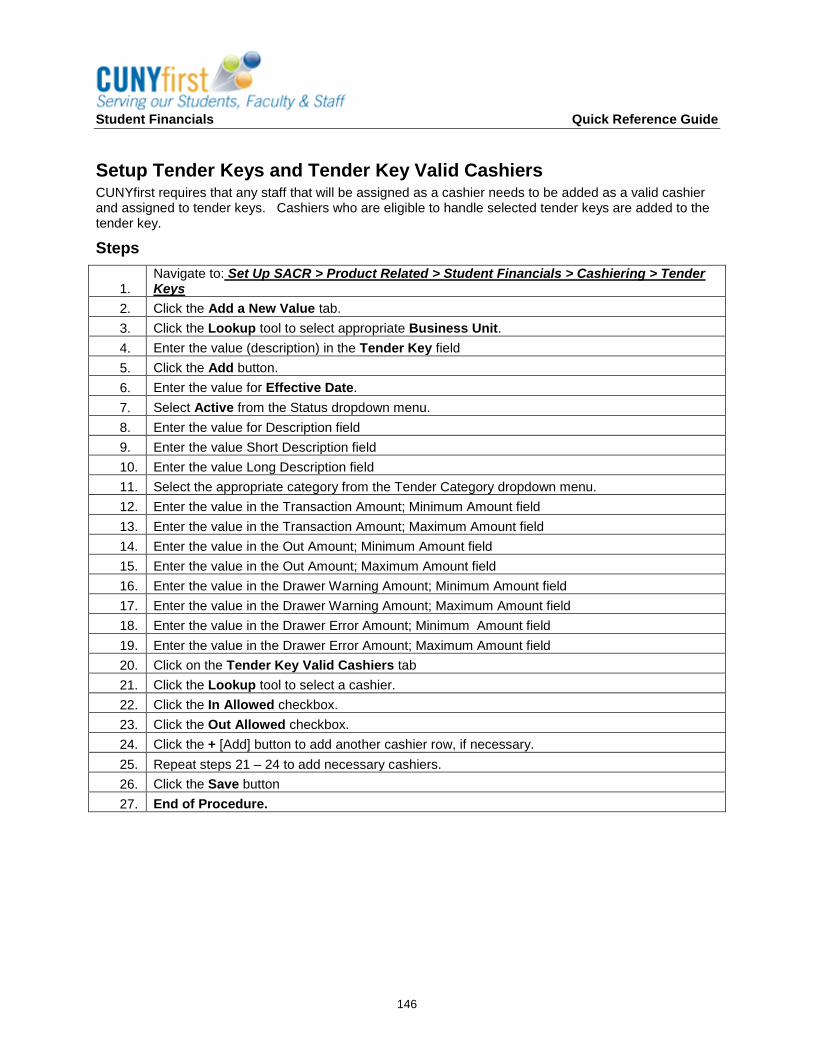
Student Financials Quick Reference Guide
146
Setup Tender Keys and Tender Key Valid Cashiers CUNYfirst requires that any staff that will be assigned as a cashier needs to be added as a valid cashier and assigned to tender keys. Cashiers who are eligible to handle selected tender keys are added to the tender key.
Steps
1. Navigate to: Set Up SACR > Product Related > Student Financials > Cashiering > Tender Keys
2. Click the Add a New Value tab.
3. Click the Lookup tool to select appropriate Business Unit.
4. Enter the value (description) in the Tender Key field
5. Click the Add button.
6. Enter the value for Effective Date.
7. Select Active from the Status dropdown menu.
8. Enter the value for Description field
9. Enter the value Short Description field
10. Enter the value Long Description field
11. Select the appropriate category from the Tender Category dropdown menu.
12. Enter the value in the Transaction Amount; Minimum Amount field
13. Enter the value in the Transaction Amount; Maximum Amount field
14. Enter the value in the Out Amount; Minimum Amount field
15. Enter the value in the Out Amount; Maximum Amount field
16. Enter the value in the Drawer Warning Amount; Minimum Amount field
17. Enter the value in the Drawer Warning Amount; Maximum Amount field
18. Enter the value in the Drawer Error Amount; Minimum Amount field
19. Enter the value in the Drawer Error Amount; Maximum Amount field
20. Click on the Tender Key Valid Cashiers tab
21. Click the Lookup tool to select a cashier.
22. Click the In Allowed checkbox.
23. Click the Out Allowed checkbox.
24. Click the + [Add] button to add another cashier row, if necessary.
25. Repeat steps 21 – 24 to add necessary cashiers.
26. Click the Save button
27. End of Procedure.

Student Financials Quick Reference Guide
147
Receipt Print Messages CUNYfirst offers the ability to add and edit messages that appear on receipts based on certain criteria. Receipt messages are linked to cashiering offices, target keys, and tender keys.
Steps
1. Navigate to: Set Up SACR > Product Related > Student Financials > Cashiering > Receipt Print Messages
2. Click the Lookup tool to select appropriate Business Unit.
3. Click the Search button.
4. Select the appropriate Cashier’s Office.
5. Select the Cashier Office Message tab.
6. Enter the Effective date.
7. Select Active from the Status dropdown menu.
8. Enter the message that will appear on all receipts printed by this cashier’s office.
9. Enter an optional, more detailed message.
10. Click the Target Messages tab.
11. Click the Lookup tool to select the appropriate Target.
12. Enter the message that will appear on all receipts associated with the target key.
13. Enter an optional, more detailed message.
14. Click the Tender Messages tab.
15. Click the Lookup tool to select the appropriate Tender.
16. Enter the message that will appear on all receipts associated with the tender key.
17. Enter an optional, more detailed message.
18. Click the Save button.
19. End of Procedure.
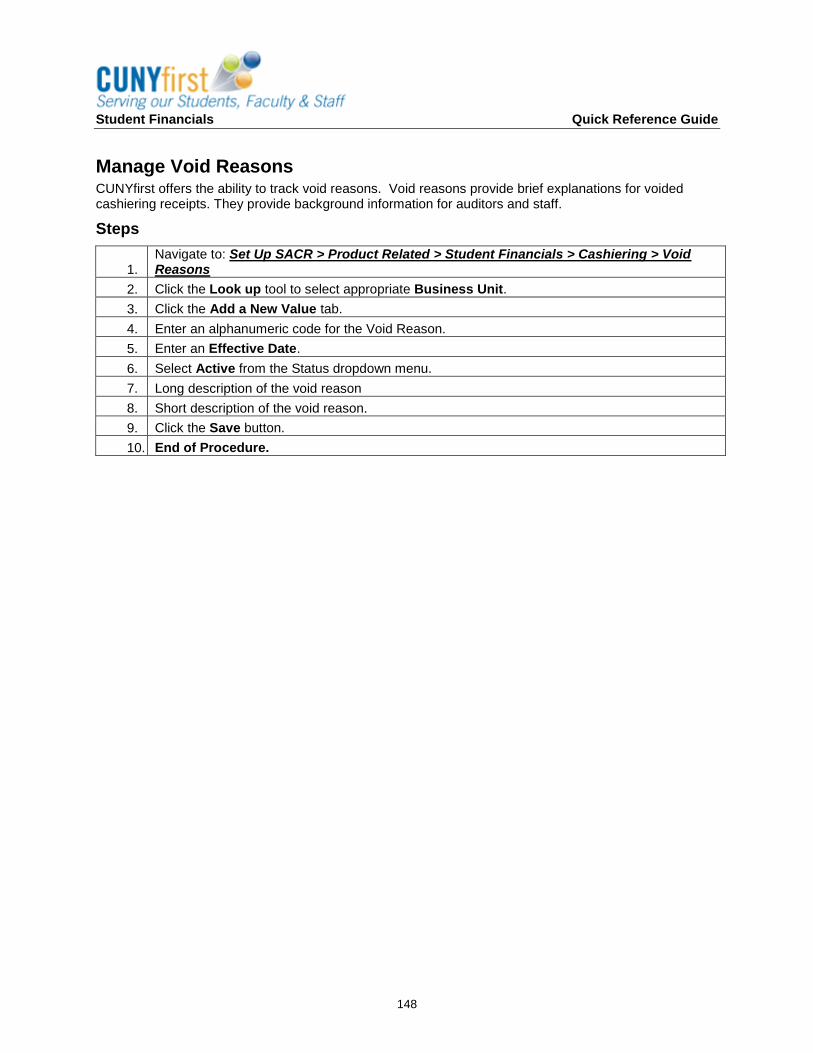
Student Financials Quick Reference Guide
148
Manage Void Reasons CUNYfirst offers the ability to track void reasons. Void reasons provide brief explanations for voided cashiering receipts. They provide background information for auditors and staff.
Steps
1. Navigate to: Set Up SACR > Product Related > Student Financials > Cashiering > Void Reasons
2. Click the Look up tool to select appropriate Business Unit.
3. Click the Add a New Value tab.
4. Enter an alphanumeric code for the Void Reason.
5. Enter an Effective Date.
6. Select Active from the Status dropdown menu.
7. Long description of the void reason
8. Short description of the void reason.
9. Click the Save button.
10. End of Procedure.

Student Financials Quick Reference Guide
149
Unit IX: 1098T

Student Financials Quick Reference Guide
150
Generate Form 1098-T The Generate 1098-T process generates a 1098-T for a population of students for a year.
Steps
1. Navigate to: Student Financials > Taxes > Generate 1098-T
2. Click the Add a New Value tab.
3. Enter the value in Run Control ID field.
4. Click the Add button.
5. Enter the value in Federal TIN field.
6. Enter the value in Calendar Year field.
7. Select the Student Override option.
8. Select the appropriate options in Bypass Validation Edits section.
9. Enter the value in ID field.
10. Enter the value in National ID field.
11. Select the Force 1098-T option.
12.
Click the Add Row button. [this is the + sign button] to add an additional ID, National ID and Force 1098-T option. Follow steps 12 through 14 else continue to the next step.
13. Click the Save button.
14. Select the Run button
15. Click the OK button
16. Click the Process Monitor link
17. Click the Refresh button
18. Click the Details link
19. Select the View Log/Trace link to view report
20. End of Procedure.
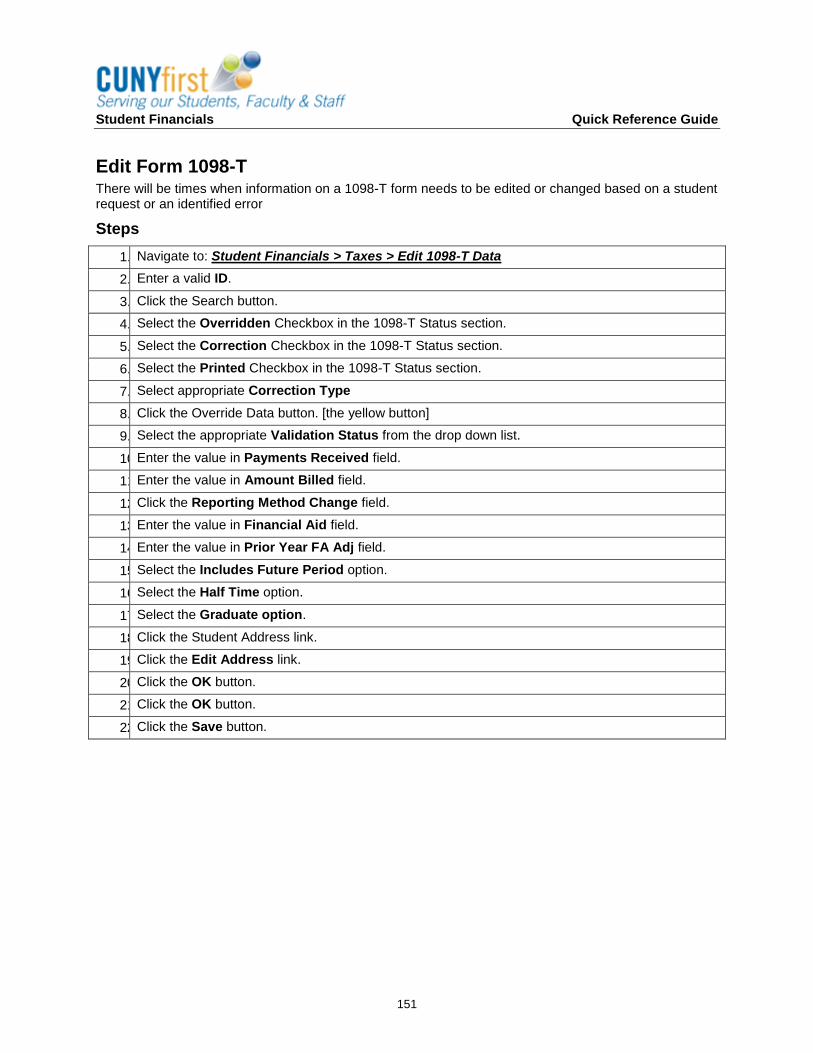
Student Financials Quick Reference Guide
151
Edit Form 1098-T There will be times when information on a 1098-T form needs to be edited or changed based on a student request or an identified error
Steps
1. Navigate to: Student Financials > Taxes > Edit 1098-T Data
2. Enter a valid ID.
3. Click the Search button.
4. Select the Overridden Checkbox in the 1098-T Status section.
5. Select the Correction Checkbox in the 1098-T Status section.
6. Select the Printed Checkbox in the 1098-T Status section.
7. Select appropriate Correction Type
8. Click the Override Data button. [the yellow button]
9. Select the appropriate Validation Status from the drop down list.
10. Enter the value in Payments Received field.
11. Enter the value in Amount Billed field.
12. Click the Reporting Method Change field.
13. Enter the value in Financial Aid field.
14. Enter the value in Prior Year FA Adj field.
15. Select the Includes Future Period option.
16. Select the Half Time option.
17. Select the Graduate option.
18. Click the Student Address link.
19. Click the Edit Address link.
20. Click the OK button.
21. Click the OK button.
22. Click the Save button.
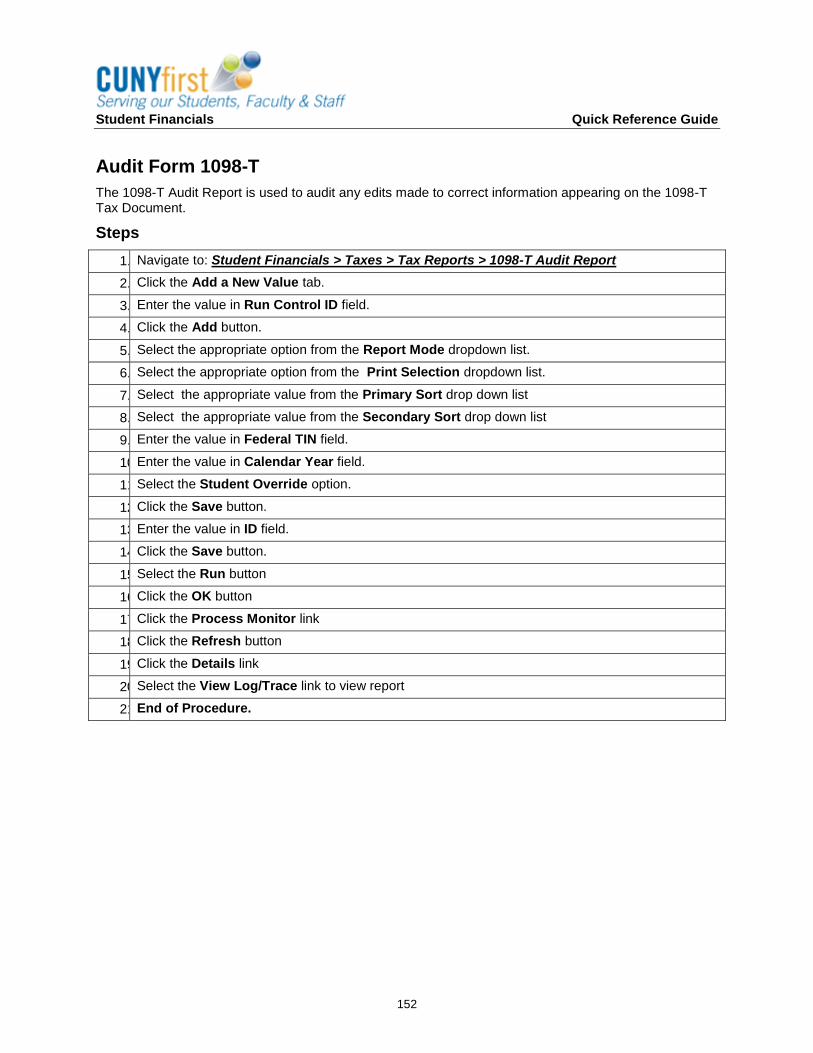
Student Financials Quick Reference Guide
152
Audit Form 1098-T
The 1098-T Audit Report is used to audit any edits made to correct information appearing on the 1098-T Tax Document.
Steps
1. Navigate to: Student Financials > Taxes > Tax Reports > 1098-T Audit Report
2. Click the Add a New Value tab.
3. Enter the value in Run Control ID field.
4. Click the Add button.
5. Select the appropriate option from the Report Mode dropdown list.
6. Select the appropriate option from the Print Selection dropdown list.
7. Select the appropriate value from the Primary Sort drop down list
8. Select the appropriate value from the Secondary Sort drop down list
9. Enter the value in Federal TIN field.
10. Enter the value in Calendar Year field.
11. Select the Student Override option.
12. Click the Save button.
13. Enter the value in ID field.
14. Click the Save button.
15. Select the Run button
16. Click the OK button
17. Click the Process Monitor link
18. Click the Refresh button
19. Click the Details link
20. Select the View Log/Trace link to view report
21. End of Procedure.
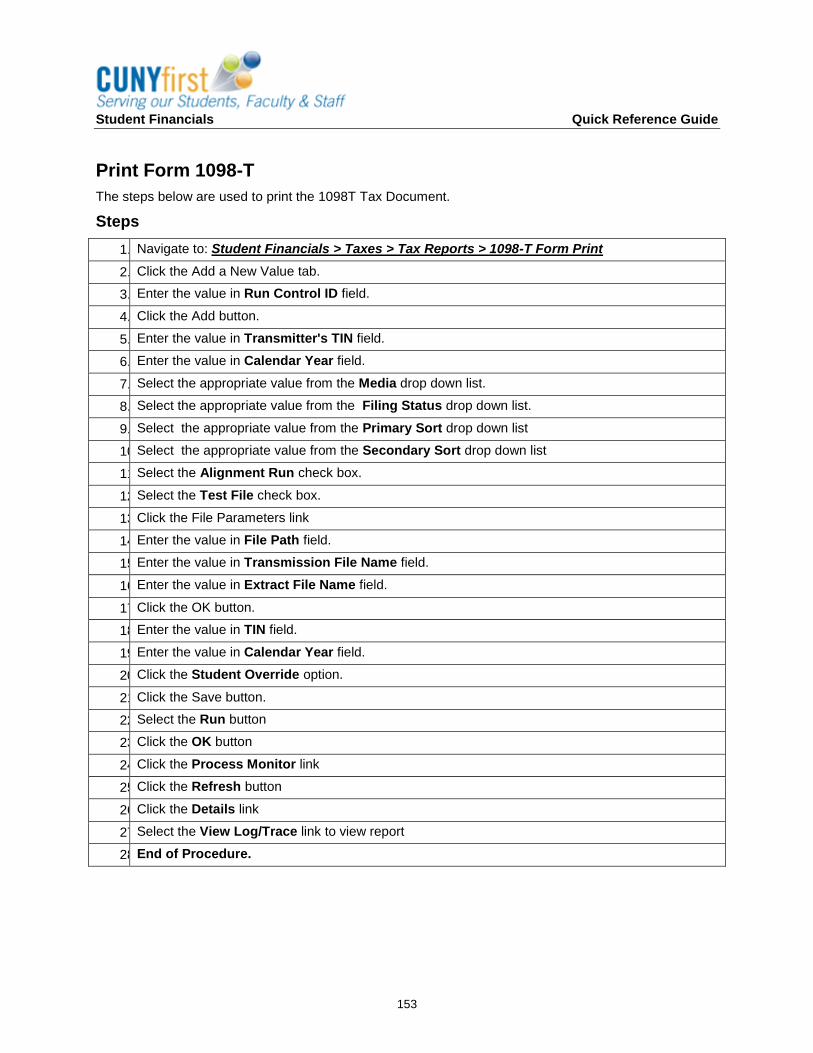
Student Financials Quick Reference Guide
153
Print Form 1098-T
The steps below are used to print the 1098T Tax Document.
Steps
1. Navigate to: Student Financials > Taxes > Tax Reports > 1098-T Form Print
2. Click the Add a New Value tab.
3. Enter the value in Run Control ID field.
4. Click the Add button.
5. Enter the value in Transmitter's TIN field.
6. Enter the value in Calendar Year field.
7. Select the appropriate value from the Media drop down list.
8. Select the appropriate value from the Filing Status drop down list.
9. Select the appropriate value from the Primary Sort drop down list
10. Select the appropriate value from the Secondary Sort drop down list
11. Select the Alignment Run check box.
12. Select the Test File check box.
13. Click the File Parameters link
14. Enter the value in File Path field.
15. Enter the value in Transmission File Name field.
16. Enter the value in Extract File Name field.
17. Click the OK button.
18. Enter the value in TIN field.
19. Enter the value in Calendar Year field.
20. Click the Student Override option.
21. Click the Save button.
22. Select the Run button
23. Click the OK button
24. Click the Process Monitor link
25. Click the Refresh button
26. Click the Details link
27. Select the View Log/Trace link to view report
28. End of Procedure.
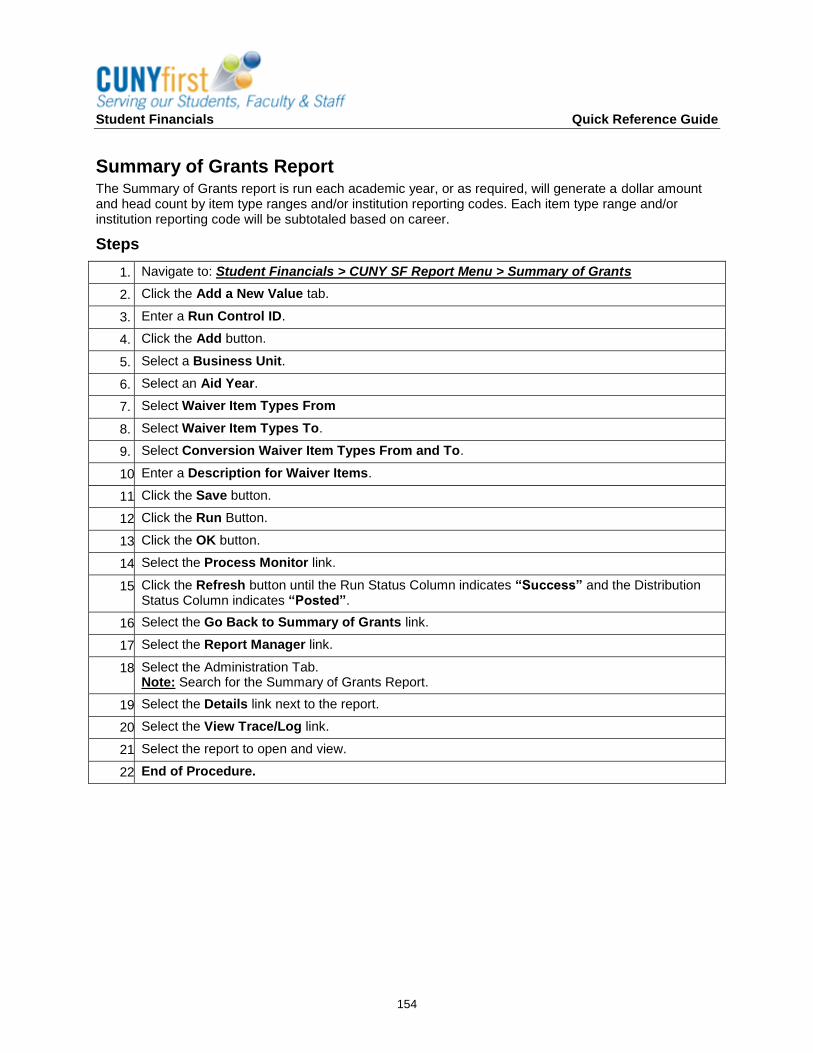
Student Financials Quick Reference Guide
154
Summary of Grants Report The Summary of Grants report is run each academic year, or as required, will generate a dollar amount and head count by item type ranges and/or institution reporting codes. Each item type range and/or institution reporting code will be subtotaled based on career.
Steps
1. Navigate to: Student Financials > CUNY SF Report Menu > Summary of Grants
2. Click the Add a New Value tab.
3. Enter a Run Control ID.
4. Click the Add button.
5. Select a Business Unit.
6. Select an Aid Year.
7. Select Waiver Item Types From
8. Select Waiver Item Types To.
9. Select Conversion Waiver Item Types From and To.
10. Enter a Description for Waiver Items.
11. Click the Save button.
12. Click the Run Button.
13. Click the OK button.
14. Select the Process Monitor link.
15. Click the Refresh button until the Run Status Column indicates “Success” and the Distribution Status Column indicates “Posted”.
16. Select the Go Back to Summary of Grants link.
17. Select the Report Manager link.
18. Select the Administration Tab. Note: Search for the Summary of Grants Report.
19. Select the Details link next to the report.
20. Select the View Trace/Log link.
21. Select the report to open and view.
22. End of Procedure.

Student Financials Quick Reference Guide
155
Unit X: Past Due Accounts
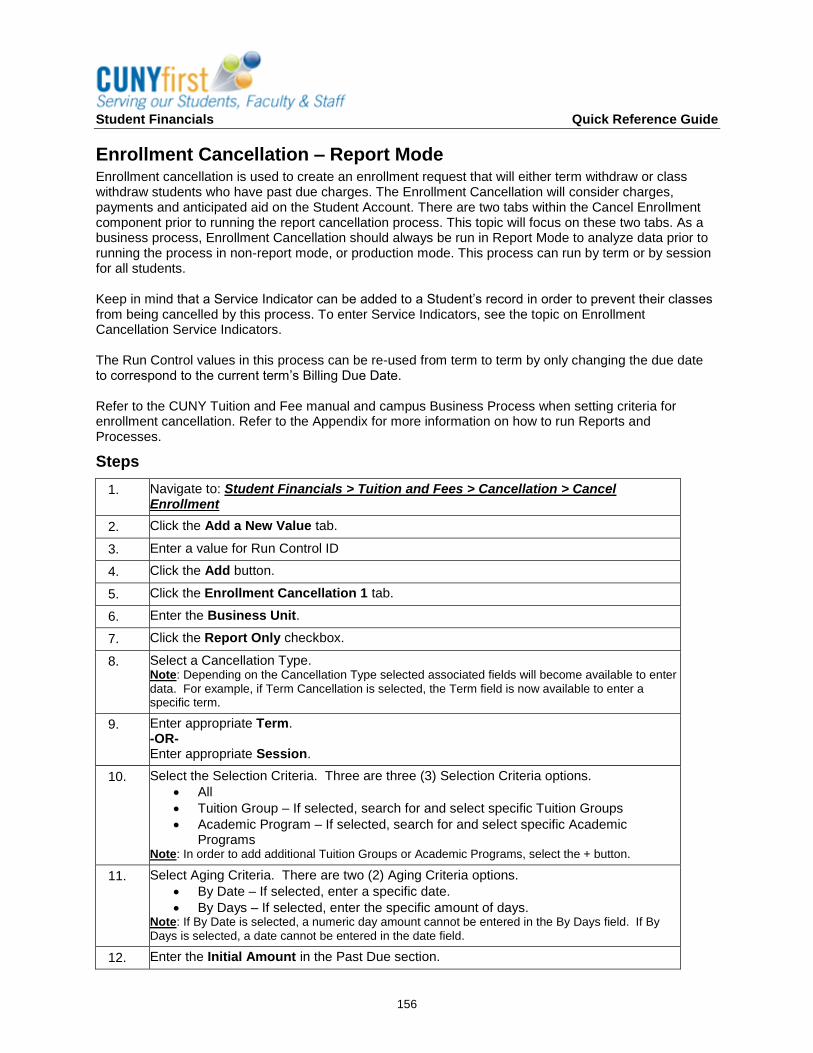
Student Financials Quick Reference Guide
156
Enrollment Cancellation – Report Mode Enrollment cancellation is used to create an enrollment request that will either term withdraw or class withdraw students who have past due charges. The Enrollment Cancellation will consider charges, payments and anticipated aid on the Student Account. There are two tabs within the Cancel Enrollment component prior to running the report cancellation process. This topic will focus on these two tabs. As a business process, Enrollment Cancellation should always be run in Report Mode to analyze data prior to running the process in non-report mode, or production mode. This process can run by term or by session for all students. Keep in mind that a Service Indicator can be added to a Student’s record in order to prevent their classes from being cancelled by this process. To enter Service Indicators, see the topic on Enrollment Cancellation Service Indicators. The Run Control values in this process can be re-used from term to term by only changing the due date to correspond to the current term’s Billing Due Date. Refer to the CUNY Tuition and Fee manual and campus Business Process when setting criteria for enrollment cancellation. Refer to the Appendix for more information on how to run Reports and Processes.
Steps
1. Navigate to: Student Financials > Tuition and Fees > Cancellation > Cancel Enrollment
2. Click the Add a New Value tab.
3. Enter a value for Run Control ID
4. Click the Add button.
5. Click the Enrollment Cancellation 1 tab.
6. Enter the Business Unit.
7. Click the Report Only checkbox.
8. Select a Cancellation Type. Note: Depending on the Cancellation Type selected associated fields will become available to enter
data. For example, if Term Cancellation is selected, the Term field is now available to enter a specific term.
9. Enter appropriate Term. -OR- Enter appropriate Session.
10. Select the Selection Criteria. Three are three (3) Selection Criteria options.
All
Tuition Group – If selected, search for and select specific Tuition Groups
Academic Program – If selected, search for and select specific Academic Programs
Note: In order to add additional Tuition Groups or Academic Programs, select the + button.
11. Select Aging Criteria. There are two (2) Aging Criteria options.
By Date – If selected, enter a specific date.
By Days – If selected, enter the specific amount of days. Note: If By Date is selected, a numeric day amount cannot be entered in the By Days field. If By
Days is selected, a date cannot be entered in the date field.
12. Enter the Initial Amount in the Past Due section.
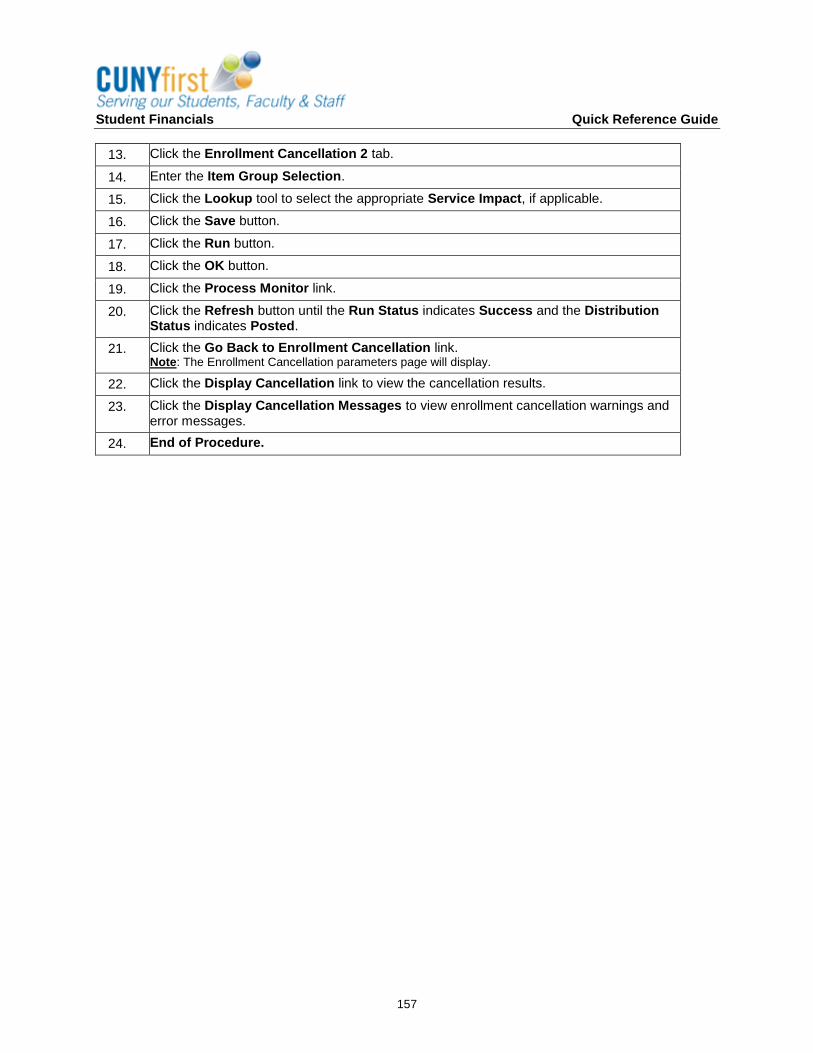
Student Financials Quick Reference Guide
157
13. Click the Enrollment Cancellation 2 tab.
14. Enter the Item Group Selection.
15. Click the Lookup tool to select the appropriate Service Impact, if applicable.
16. Click the Save button.
17. Click the Run button.
18. Click the OK button.
19. Click the Process Monitor link.
20. Click the Refresh button until the Run Status indicates Success and the Distribution Status indicates Posted.
21. Click the Go Back to Enrollment Cancellation link. Note: The Enrollment Cancellation parameters page will display.
22. Click the Display Cancellation link to view the cancellation results.
23. Click the Display Cancellation Messages to view enrollment cancellation warnings and error messages.
24. End of Procedure.
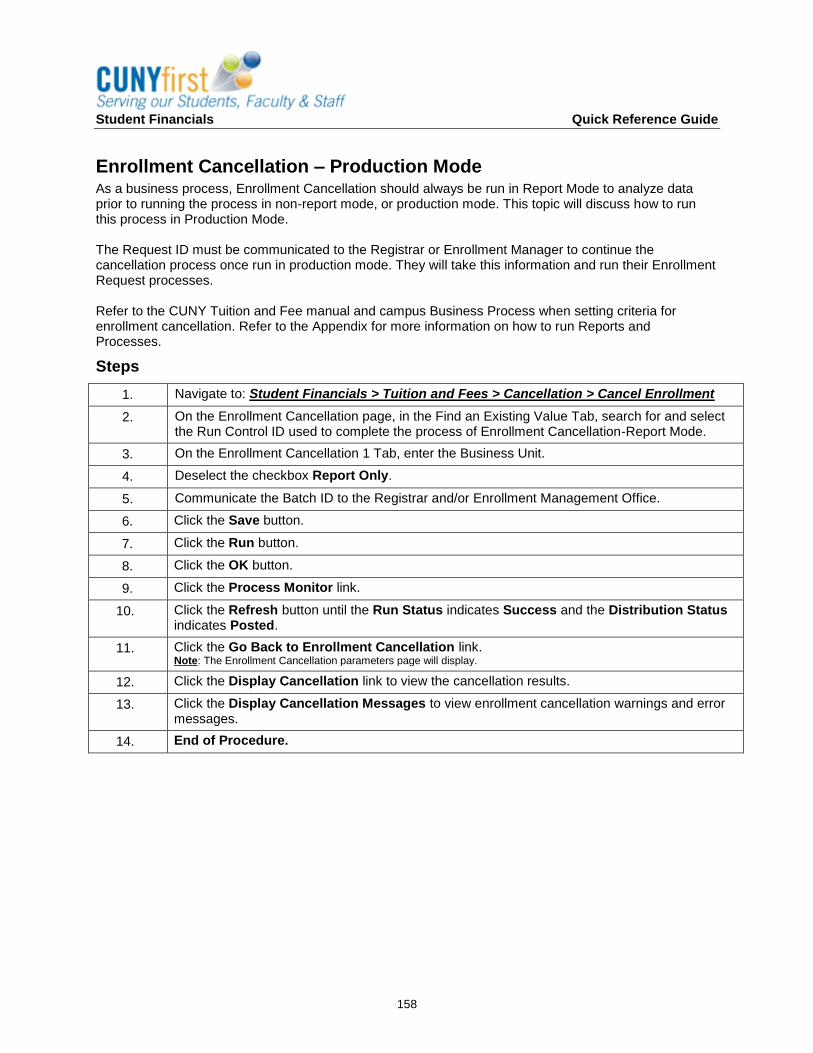
Student Financials Quick Reference Guide
158
Enrollment Cancellation – Production Mode As a business process, Enrollment Cancellation should always be run in Report Mode to analyze data prior to running the process in non-report mode, or production mode. This topic will discuss how to run this process in Production Mode. The Request ID must be communicated to the Registrar or Enrollment Manager to continue the cancellation process once run in production mode. They will take this information and run their Enrollment Request processes. Refer to the CUNY Tuition and Fee manual and campus Business Process when setting criteria for enrollment cancellation. Refer to the Appendix for more information on how to run Reports and Processes.
Steps
1. Navigate to: Student Financials > Tuition and Fees > Cancellation > Cancel Enrollment
2. On the Enrollment Cancellation page, in the Find an Existing Value Tab, search for and select the Run Control ID used to complete the process of Enrollment Cancellation-Report Mode.
3. On the Enrollment Cancellation 1 Tab, enter the Business Unit.
4. Deselect the checkbox Report Only.
5. Communicate the Batch ID to the Registrar and/or Enrollment Management Office.
6. Click the Save button.
7. Click the Run button.
8. Click the OK button.
9. Click the Process Monitor link.
10. Click the Refresh button until the Run Status indicates Success and the Distribution Status indicates Posted.
11. Click the Go Back to Enrollment Cancellation link. Note: The Enrollment Cancellation parameters page will display.
12. Click the Display Cancellation link to view the cancellation results.
13. Click the Display Cancellation Messages to view enrollment cancellation warnings and error messages.
14. End of Procedure.
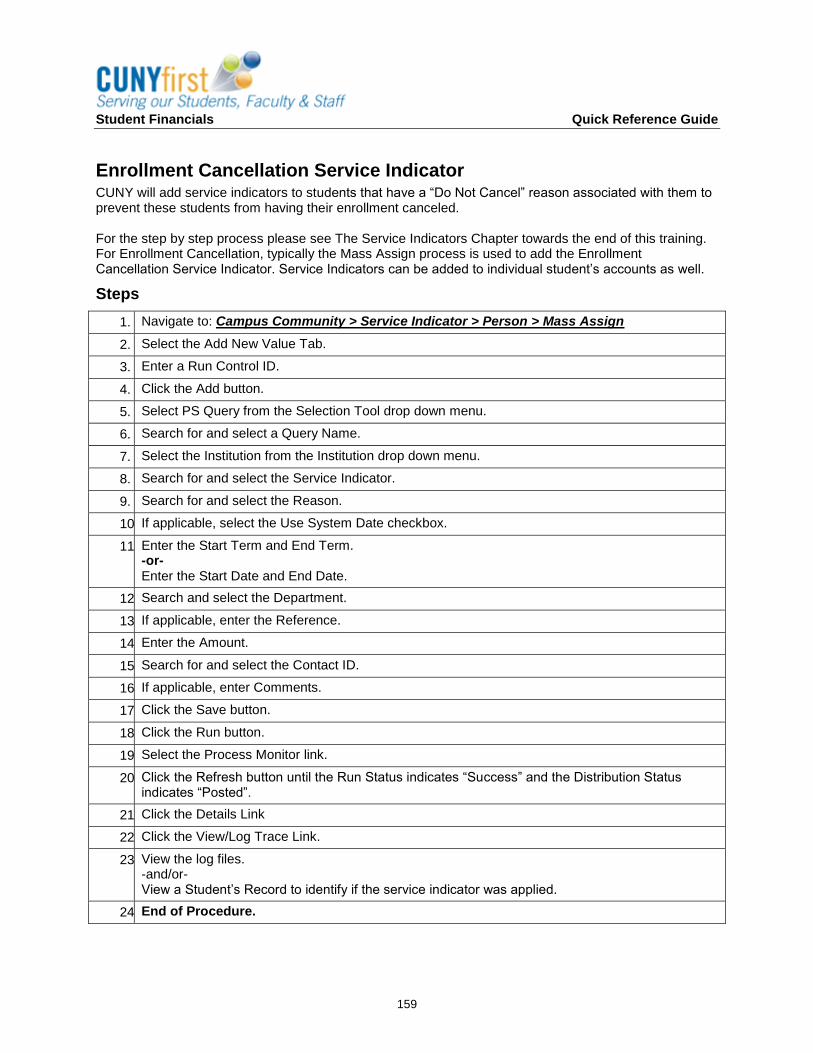
Student Financials Quick Reference Guide
159
Enrollment Cancellation Service Indicator CUNY will add service indicators to students that have a “Do Not Cancel” reason associated with them to prevent these students from having their enrollment canceled. For the step by step process please see The Service Indicators Chapter towards the end of this training. For Enrollment Cancellation, typically the Mass Assign process is used to add the Enrollment Cancellation Service Indicator. Service Indicators can be added to individual student’s accounts as well.
Steps
1. Navigate to: Campus Community > Service Indicator > Person > Mass Assign
2. Select the Add New Value Tab.
3. Enter a Run Control ID.
4. Click the Add button.
5. Select PS Query from the Selection Tool drop down menu.
6. Search for and select a Query Name.
7. Select the Institution from the Institution drop down menu.
8. Search for and select the Service Indicator.
9. Search for and select the Reason.
10. If applicable, select the Use System Date checkbox.
11. Enter the Start Term and End Term. -or- Enter the Start Date and End Date.
12. Search and select the Department.
13. If applicable, enter the Reference.
14. Enter the Amount.
15. Search for and select the Contact ID.
16. If applicable, enter Comments.
17. Click the Save button.
18. Click the Run button.
19. Select the Process Monitor link.
20. Click the Refresh button until the Run Status indicates “Success” and the Distribution Status indicates “Posted”.
21. Click the Details Link
22. Click the View/Log Trace Link.
23. View the log files. -and/or- View a Student’s Record to identify if the service indicator was applied.
24. End of Procedure.
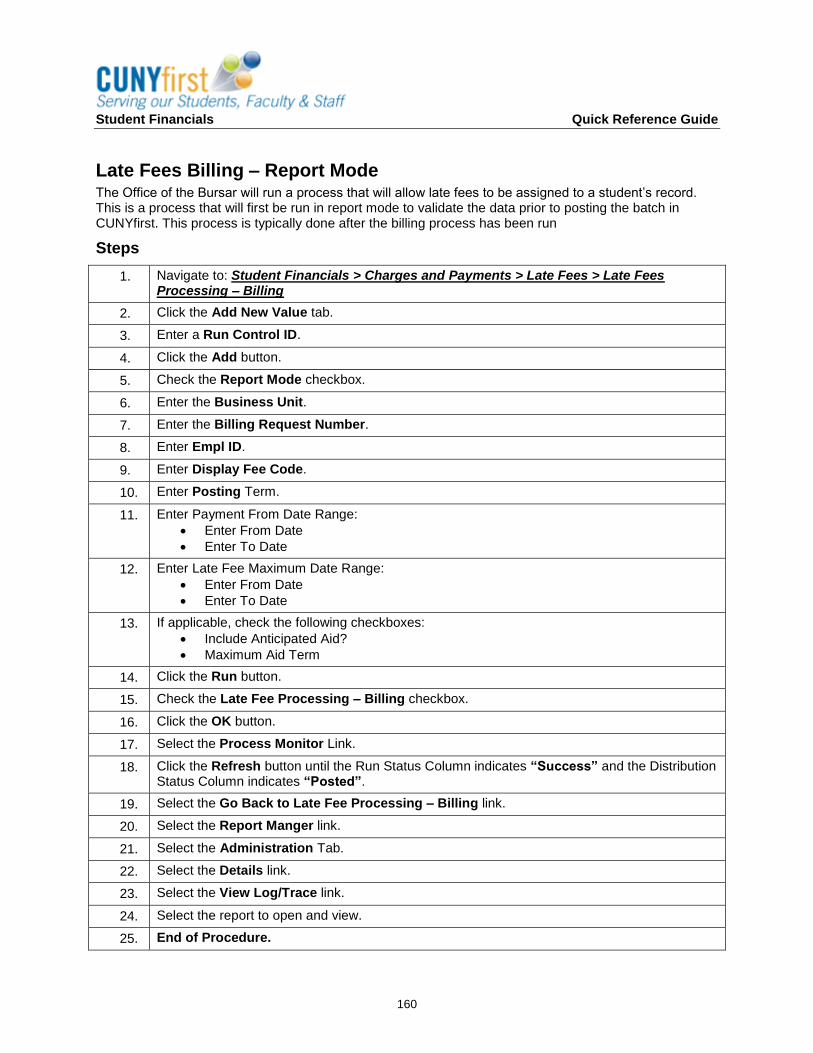
Student Financials Quick Reference Guide
160
Late Fees Billing – Report Mode The Office of the Bursar will run a process that will allow late fees to be assigned to a student’s record. This is a process that will first be run in report mode to validate the data prior to posting the batch in CUNYfirst. This process is typically done after the billing process has been run
Steps
1. Navigate to: Student Financials > Charges and Payments > Late Fees > Late Fees Processing – Billing
2. Click the Add New Value tab.
3. Enter a Run Control ID.
4. Click the Add button.
5. Check the Report Mode checkbox.
6. Enter the Business Unit.
7. Enter the Billing Request Number.
8. Enter Empl ID.
9. Enter Display Fee Code.
10. Enter Posting Term.
11. Enter Payment From Date Range:
Enter From Date
Enter To Date
12. Enter Late Fee Maximum Date Range:
Enter From Date
Enter To Date
13. If applicable, check the following checkboxes:
Include Anticipated Aid?
Maximum Aid Term
14. Click the Run button.
15. Check the Late Fee Processing – Billing checkbox.
16. Click the OK button.
17. Select the Process Monitor Link.
18. Click the Refresh button until the Run Status Column indicates “Success” and the Distribution Status Column indicates “Posted”.
19. Select the Go Back to Late Fee Processing – Billing link.
20. Select the Report Manger link.
21. Select the Administration Tab.
22. Select the Details link.
23. Select the View Log/Trace link.
24. Select the report to open and view.
25. End of Procedure.

Student Financials Quick Reference Guide
161
Late Fees Billing – Production Mode The Office of the Bursar will run a process that will allow late fees to be assigned to a student’s record. This is a process that will run after the report mode to post these late fees in batch to the student’s records.
Steps
1. Navigate to: Student Financials > Charges and Payments > Late Fees > Late Fees Processing - Billing
2. On the Find an Existing Value Tab, click the Search button.
3. Select the Run Control ID created to run the Late Fee Billing Process in Report Mode. Note: This will display the Late Fee Billing Parameters page. The criteria entered during the report mode process will populate in the fields on the parameters page.
4. Uncheck the checkbox next to Report Mode. Note: Unchecking this box will allow for processing in Production Mode. Running this process in Production Mode will assign the late fees to the student‘s record.
5. Click the Save button.
6. Click the Run button.
7. Check the Late Fee Processing – Billing checkbox.
8. Click the OK button.
9. Select the Process Monitor Link.
10. Click the Refresh button until the Run Status Column indicates “Success” and the Distribution Status Column indicates “Posted”. Note: Running the process to success in Production Mode will assign a late fee to the student’s record. Note: In order to determine errors in this process, follow steps 11-15.
11. Select the Go Back to Late Fee Processing – Billing link.
12. Select the Report Manger link.
13. Select the Administration Tab.
14. Select the Details link.
15. Select the View Log/Trace link. Note: Select the applicable file to view errors encountered during the process.
16. Select the applicable file to open and view.
17. End of Procedure.
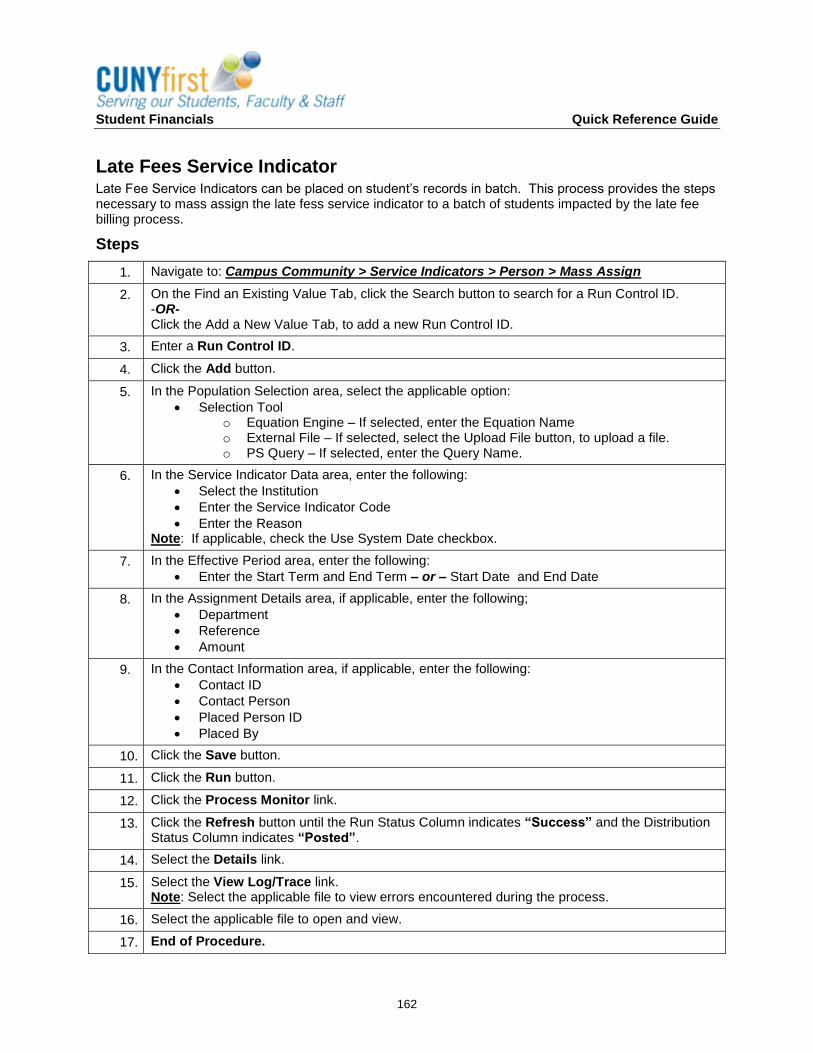
Student Financials Quick Reference Guide
162
Late Fees Service Indicator Late Fee Service Indicators can be placed on student’s records in batch. This process provides the steps necessary to mass assign the late fess service indicator to a batch of students impacted by the late fee billing process.
Steps
1. Navigate to: Campus Community > Service Indicators > Person > Mass Assign
2. On the Find an Existing Value Tab, click the Search button to search for a Run Control ID. -OR- Click the Add a New Value Tab, to add a new Run Control ID.
3. Enter a Run Control ID.
4. Click the Add button.
5. In the Population Selection area, select the applicable option:
Selection Tool o Equation Engine – If selected, enter the Equation Name o External File – If selected, select the Upload File button, to upload a file. o PS Query – If selected, enter the Query Name.
6. In the Service Indicator Data area, enter the following:
Select the Institution
Enter the Service Indicator Code
Enter the Reason Note: If applicable, check the Use System Date checkbox.
7. In the Effective Period area, enter the following:
Enter the Start Term and End Term – or – Start Date and End Date
8. In the Assignment Details area, if applicable, enter the following;
Department
Reference
Amount
9. In the Contact Information area, if applicable, enter the following:
Contact ID
Contact Person
Placed Person ID
Placed By
10. Click the Save button.
11. Click the Run button.
12. Click the Process Monitor link.
13. Click the Refresh button until the Run Status Column indicates “Success” and the Distribution Status Column indicates “Posted”.
14. Select the Details link.
15. Select the View Log/Trace link. Note: Select the applicable file to view errors encountered during the process.
16. Select the applicable file to open and view.
17. End of Procedure.
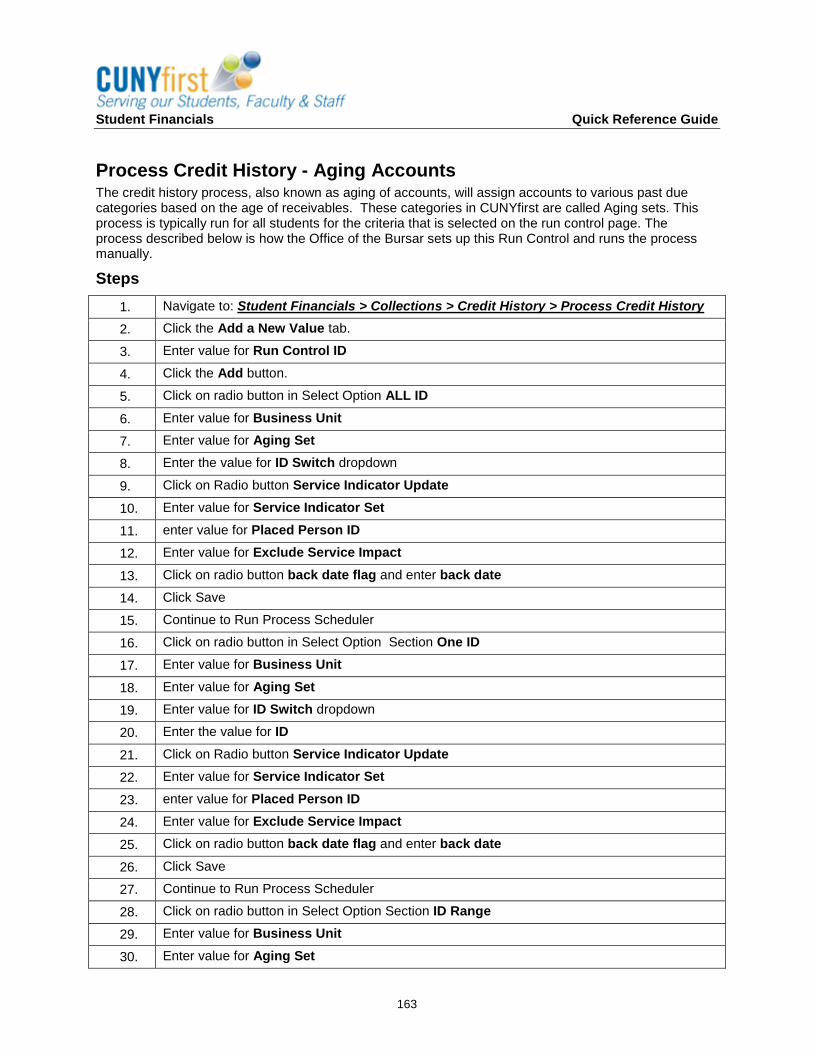
Student Financials Quick Reference Guide
163
Process Credit History - Aging Accounts The credit history process, also known as aging of accounts, will assign accounts to various past due categories based on the age of receivables. These categories in CUNYfirst are called Aging sets. This process is typically run for all students for the criteria that is selected on the run control page. The process described below is how the Office of the Bursar sets up this Run Control and runs the process manually.
Steps
1. Navigate to: Student Financials > Collections > Credit History > Process Credit History
2. Click the Add a New Value tab.
3. Enter value for Run Control ID
4. Click the Add button.
5. Click on radio button in Select Option ALL ID
6. Enter value for Business Unit
7. Enter value for Aging Set
8. Enter the value for ID Switch dropdown
9. Click on Radio button Service Indicator Update
10. Enter value for Service Indicator Set
11. enter value for Placed Person ID
12. Enter value for Exclude Service Impact
13. Click on radio button back date flag and enter back date
14. Click Save
15. Continue to Run Process Scheduler
16. Click on radio button in Select Option Section One ID
17. Enter value for Business Unit
18. Enter value for Aging Set
19. Enter value for ID Switch dropdown
20. Enter the value for ID
21. Click on Radio button Service Indicator Update
22. Enter value for Service Indicator Set
23. enter value for Placed Person ID
24. Enter value for Exclude Service Impact
25. Click on radio button back date flag and enter back date
26. Click Save
27. Continue to Run Process Scheduler
28. Click on radio button in Select Option Section ID Range
29. Enter value for Business Unit
30. Enter value for Aging Set
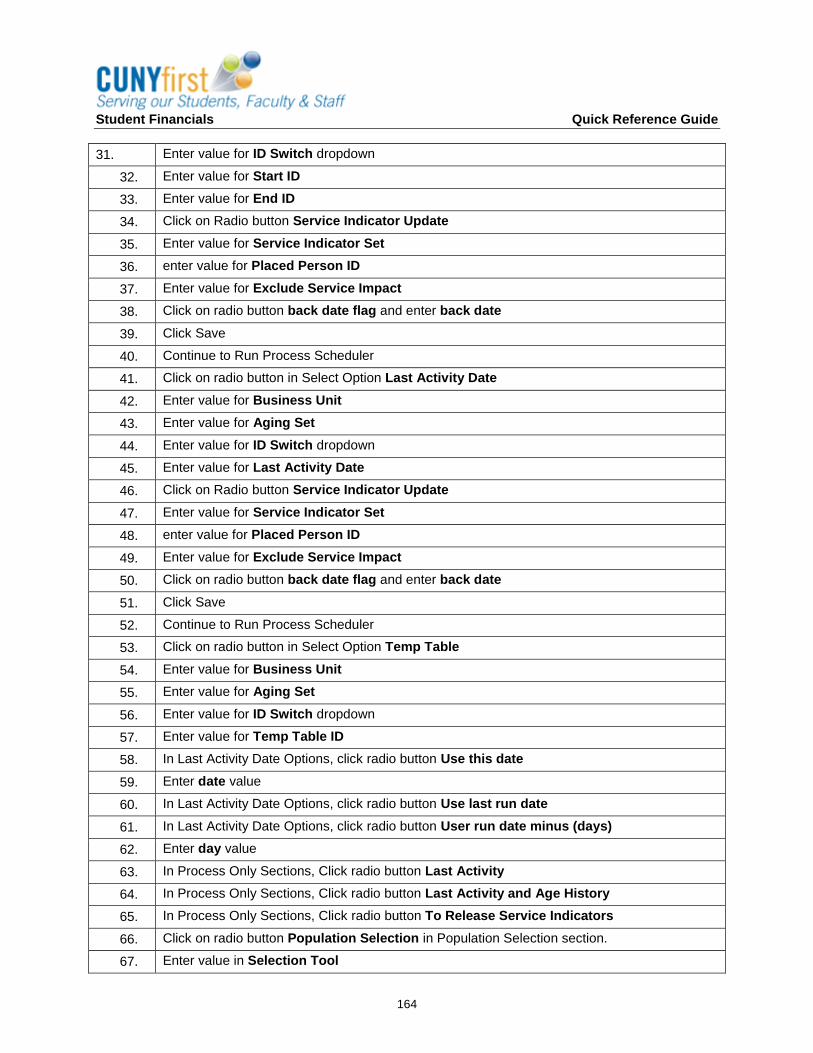
Student Financials Quick Reference Guide
164
31. Enter value for ID Switch dropdown
32. Enter value for Start ID
33. Enter value for End ID
34. Click on Radio button Service Indicator Update
35. Enter value for Service Indicator Set
36. enter value for Placed Person ID
37. Enter value for Exclude Service Impact
38. Click on radio button back date flag and enter back date
39. Click Save
40. Continue to Run Process Scheduler
41. Click on radio button in Select Option Last Activity Date
42. Enter value for Business Unit
43. Enter value for Aging Set
44. Enter value for ID Switch dropdown
45. Enter value for Last Activity Date
46. Click on Radio button Service Indicator Update
47. Enter value for Service Indicator Set
48. enter value for Placed Person ID
49. Enter value for Exclude Service Impact
50. Click on radio button back date flag and enter back date
51. Click Save
52. Continue to Run Process Scheduler
53. Click on radio button in Select Option Temp Table
54. Enter value for Business Unit
55. Enter value for Aging Set
56. Enter value for ID Switch dropdown
57. Enter value for Temp Table ID
58. In Last Activity Date Options, click radio button Use this date
59. Enter date value
60. In Last Activity Date Options, click radio button Use last run date
61. In Last Activity Date Options, click radio button User run date minus (days)
62. Enter day value
63. In Process Only Sections, Click radio button Last Activity
64. In Process Only Sections, Click radio button Last Activity and Age History
65. In Process Only Sections, Click radio button To Release Service Indicators
66. Click on radio button Population Selection in Population Selection section.
67. Enter value in Selection Tool
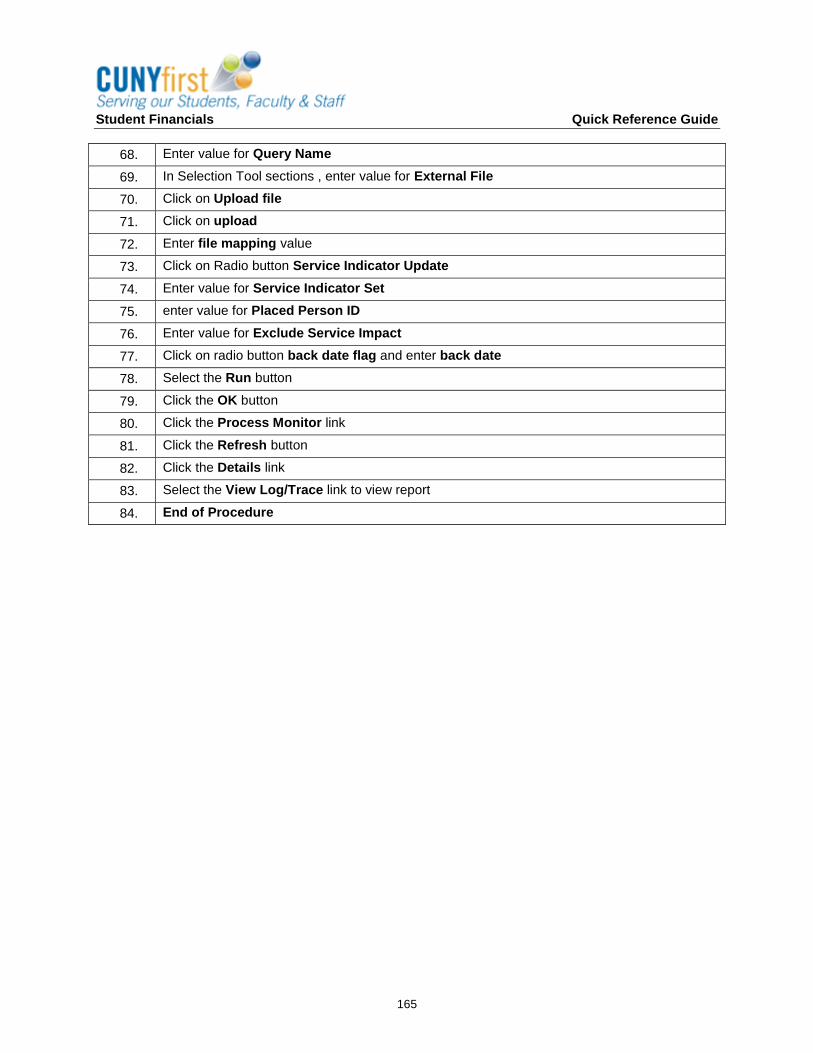
Student Financials Quick Reference Guide
165
68. Enter value for Query Name
69. In Selection Tool sections , enter value for External File
70. Click on Upload file
71. Click on upload
72. Enter file mapping value
73. Click on Radio button Service Indicator Update
74. Enter value for Service Indicator Set
75. enter value for Placed Person ID
76. Enter value for Exclude Service Impact
77. Click on radio button back date flag and enter back date
78. Select the Run button
79. Click the OK button
80. Click the Process Monitor link
81. Click the Refresh button
82. Click the Details link
83. Select the View Log/Trace link to view report
84. End of Procedure
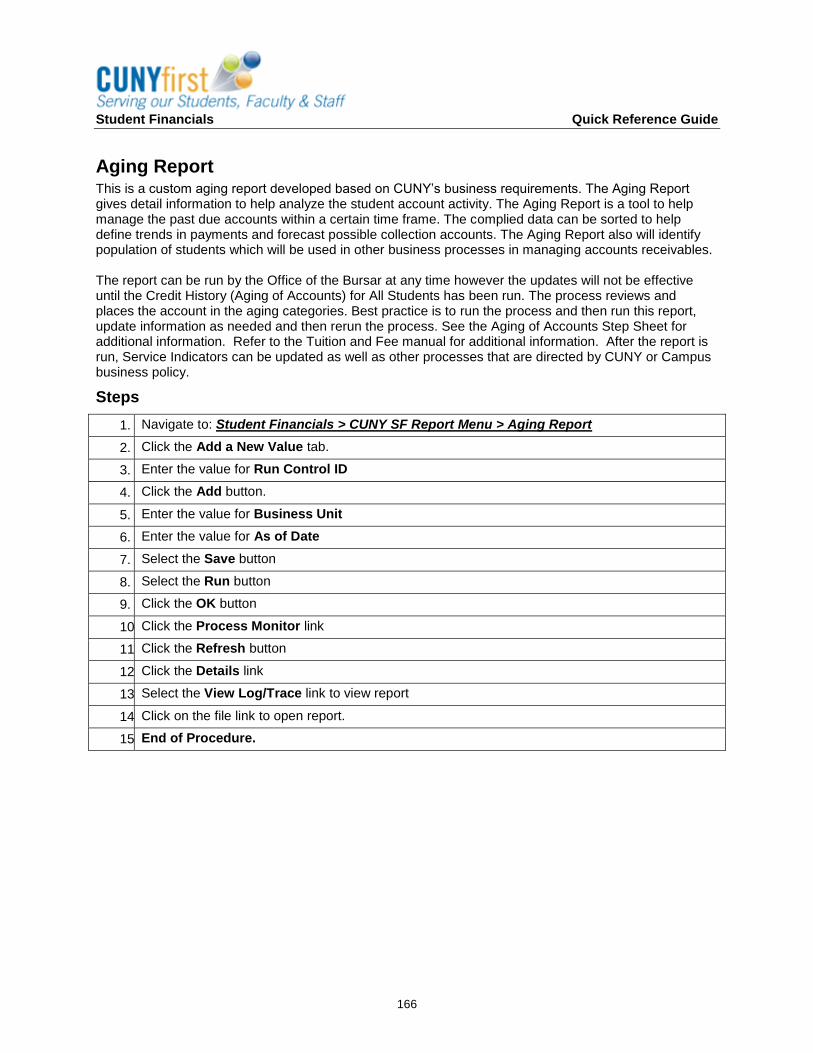
Student Financials Quick Reference Guide
166
Aging Report This is a custom aging report developed based on CUNY’s business requirements. The Aging Report gives detail information to help analyze the student account activity. The Aging Report is a tool to help manage the past due accounts within a certain time frame. The complied data can be sorted to help define trends in payments and forecast possible collection accounts. The Aging Report also will identify population of students which will be used in other business processes in managing accounts receivables. The report can be run by the Office of the Bursar at any time however the updates will not be effective until the Credit History (Aging of Accounts) for All Students has been run. The process reviews and places the account in the aging categories. Best practice is to run the process and then run this report, update information as needed and then rerun the process. See the Aging of Accounts Step Sheet for additional information. Refer to the Tuition and Fee manual for additional information. After the report is run, Service Indicators can be updated as well as other processes that are directed by CUNY or Campus business policy.
Steps
1. Navigate to: Student Financials > CUNY SF Report Menu > Aging Report
2. Click the Add a New Value tab.
3. Enter the value for Run Control ID
4. Click the Add button.
5. Enter the value for Business Unit
6. Enter the value for As of Date
7. Select the Save button
8. Select the Run button
9. Click the OK button
10. Click the Process Monitor link
11. Click the Refresh button
12. Click the Details link
13. Select the View Log/Trace link to view report
14. Click on the file link to open report.
15. End of Procedure.
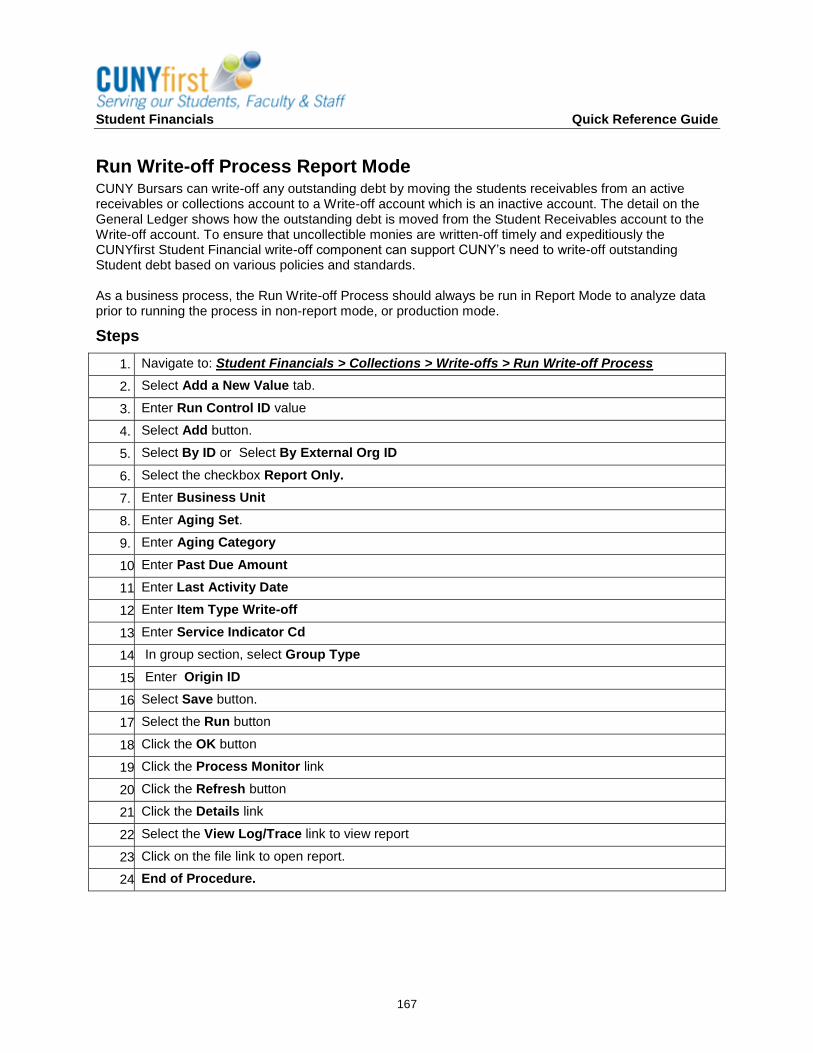
Student Financials Quick Reference Guide
167
Run Write-off Process Report Mode CUNY Bursars can write-off any outstanding debt by moving the students receivables from an active receivables or collections account to a Write-off account which is an inactive account. The detail on the General Ledger shows how the outstanding debt is moved from the Student Receivables account to the Write-off account. To ensure that uncollectible monies are written-off timely and expeditiously the CUNYfirst Student Financial write-off component can support CUNY’s need to write-off outstanding Student debt based on various policies and standards. As a business process, the Run Write-off Process should always be run in Report Mode to analyze data prior to running the process in non-report mode, or production mode.
Steps
1. Navigate to: Student Financials > Collections > Write-offs > Run Write-off Process
2. Select Add a New Value tab.
3. Enter Run Control ID value
4. Select Add button.
5. Select By ID or Select By External Org ID
6. Select the checkbox Report Only.
7. Enter Business Unit
8. Enter Aging Set.
9. Enter Aging Category
10. Enter Past Due Amount
11. Enter Last Activity Date
12. Enter Item Type Write-off
13. Enter Service Indicator Cd
14. In group section, select Group Type
15. Enter Origin ID
16. Select Save button.
17. Select the Run button
18. Click the OK button
19. Click the Process Monitor link
20. Click the Refresh button
21. Click the Details link
22. Select the View Log/Trace link to view report
23. Click on the file link to open report.
24. End of Procedure.

Student Financials Quick Reference Guide
168
Run Write-off Process Production Mode CUNY Bursars can write-off any outstanding debt by moving the students receivables from an active receivables or collections account to a Write-off account which is an inactive account. The detail on the General Ledger shows how the outstanding debt is moved from the Student Receivables account to the Write-off account. To ensure that uncollectible monies are written-off timely and expeditiously the CUNYfirst Student Financial write-off component can support CUNY’s need to write-off outstanding Student debt based on various policies and standards.
Steps
1. Navigate to: Student Financials > Collections > Write-offs > Run Write-off Process
2. Search for and select the Run Control ID used to complete the process of Run Write-off Process-Report Mode.
3. Select By ID or Select By External Org ID
4. Deselect the Report Only checkbox, if it is checked
5. Enter Business Unit
6. Enter Aging Set.
7. Enter Aging Category
8. Enter Past Due Amount
9. Enter Last Activity Date
10. Enter Item Type Write-off
11. Enter Service Indicator Cd
12. In group section, select Group Type
13. Enter Origin ID
14. Select Save button.
15. Select the Run button
16. Click the OK button
17. Click the Process Monitor link
18. Click the Refresh button
19. Click the Details link
20. Select the View Log/Trace link to view report
21. Click on the file link to open report.
22. End of Procedure.
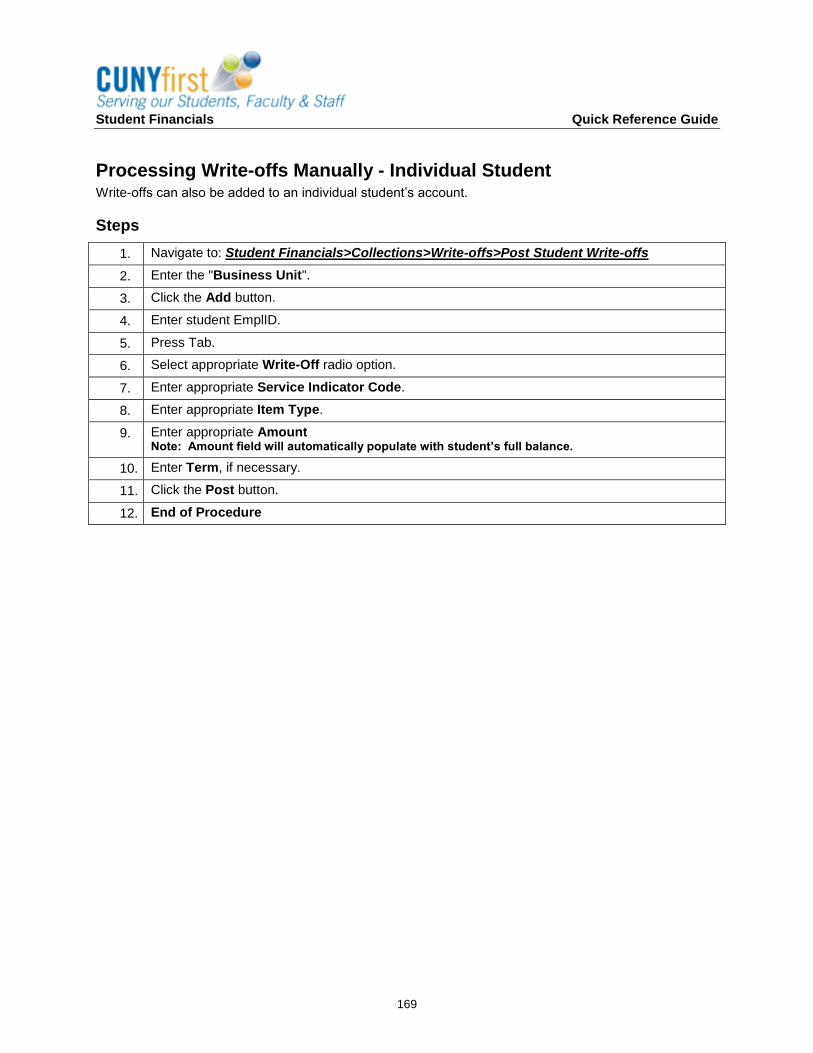
Student Financials Quick Reference Guide
169
Processing Write-offs Manually - Individual Student Write-offs can also be added to an individual student’s account.
Steps
1. Navigate to: Student Financials>Collections>Write-offs>Post Student Write-offs
2. Enter the "Business Unit".
3. Click the Add button.
4. Enter student EmplID.
5. Press Tab.
6. Select appropriate Write-Off radio option.
7. Enter appropriate Service Indicator Code.
8. Enter appropriate Item Type.
9. Enter appropriate Amount Note: Amount field will automatically populate with student’s full balance.
10. Enter Term, if necessary.
11. Click the Post button.
12. End of Procedure

Student Financials Quick Reference Guide
170
Reverse Student Write-off Reversing a student write-off is possible in CUNYfirst. Use caution when reversing anything from CUNYfirst. Bursars or their designees will enter information into the Search Page and click the reverse button next to the row that needs to be reversed.
Steps
1. Navigate to: Student Financials > Collections > Write-offs > Reverse Student Write-off
2. Enter Business Unit
3. Click Search button
4. Enter ID
5. Click Search button
6. Click Write off Detail link.
7. Click Return link.
8. Click Reverse button.
9. Click OK button.
10. Click Student Accounts link.
11. Click Items by Date link.
12. Click Return link.
13. Click Return link.
14. End of Procedure.
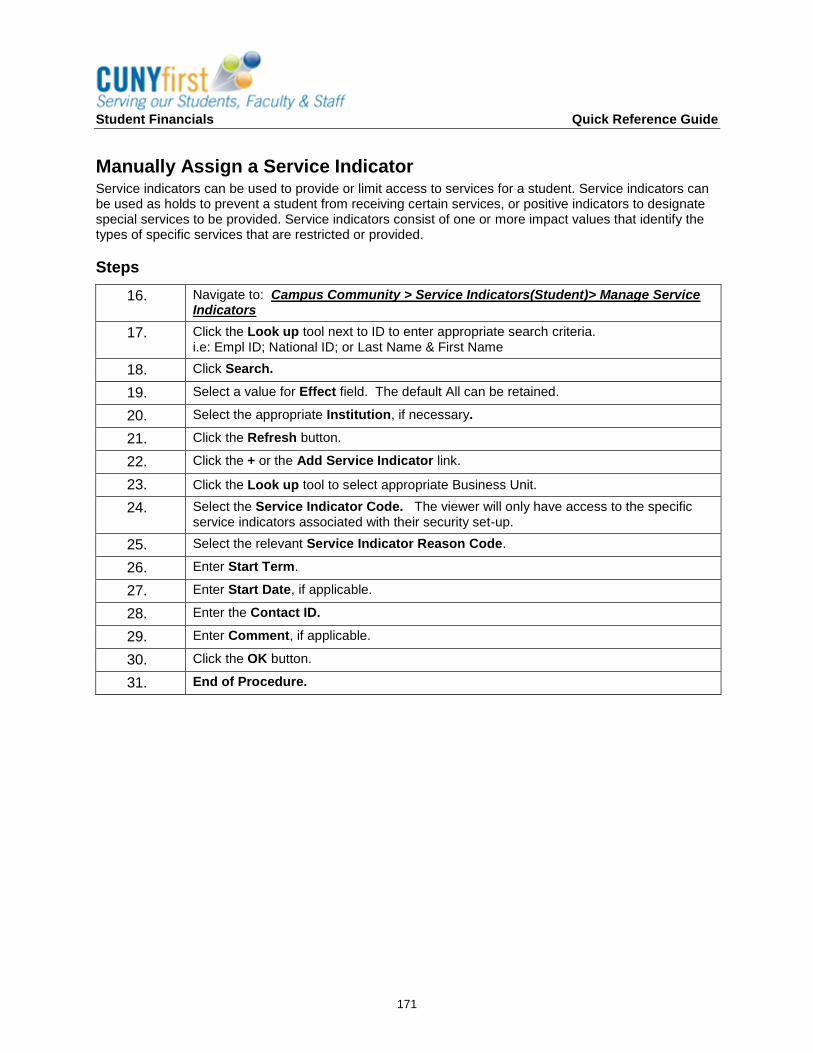
Student Financials Quick Reference Guide
171
Manually Assign a Service Indicator Service indicators can be used to provide or limit access to services for a student. Service indicators can be used as holds to prevent a student from receiving certain services, or positive indicators to designate special services to be provided. Service indicators consist of one or more impact values that identify the types of specific services that are restricted or provided.
Steps
16. Navigate to: Campus Community > Service Indicators(Student)> Manage Service Indicators
17. Click the Look up tool next to ID to enter appropriate search criteria. i.e: Empl ID; National ID; or Last Name & First Name
18. Click Search.
19. Select a value for Effect field. The default All can be retained.
20. Select the appropriate Institution, if necessary.
21. Click the Refresh button.
22. Click the + or the Add Service Indicator link.
23. Click the Look up tool to select appropriate Business Unit.
24. Select the Service Indicator Code. The viewer will only have access to the specific service indicators associated with their security set-up.
25. Select the relevant Service Indicator Reason Code.
26. Enter Start Term.
27. Enter Start Date, if applicable.
28. Enter the Contact ID.
29. Enter Comment, if applicable.
30. Click the OK button.
31. End of Procedure.
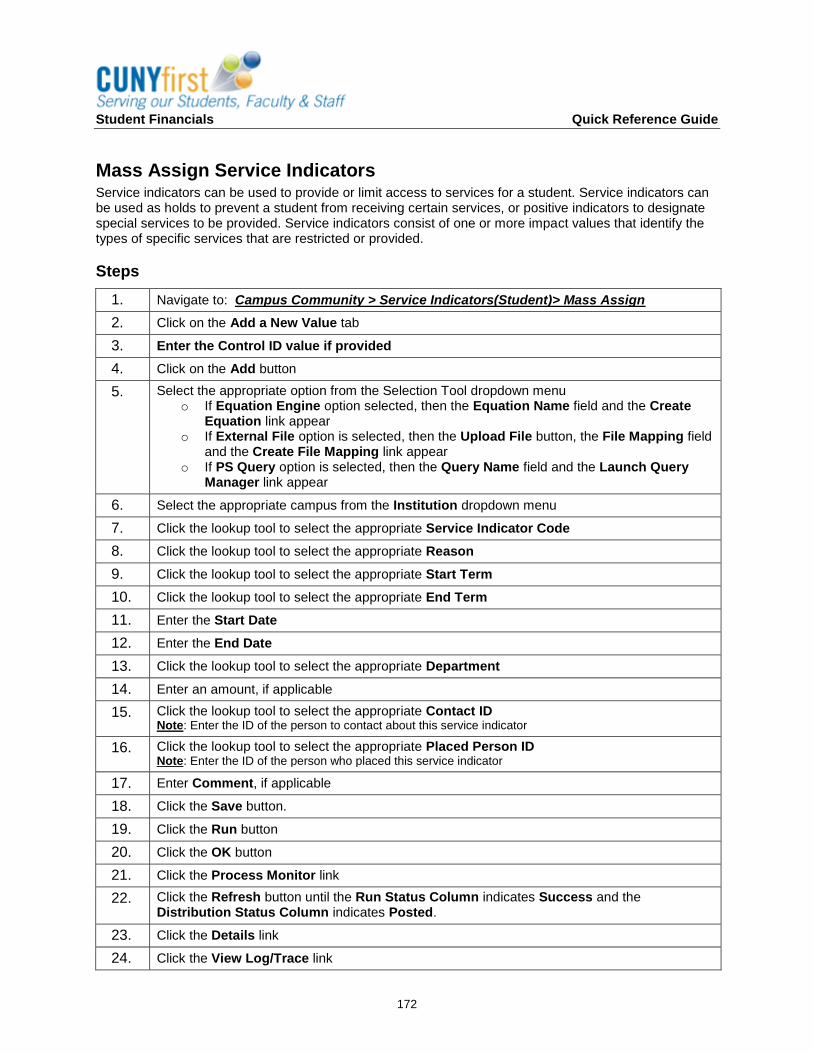
Student Financials Quick Reference Guide
172
Mass Assign Service Indicators Service indicators can be used to provide or limit access to services for a student. Service indicators can be used as holds to prevent a student from receiving certain services, or positive indicators to designate special services to be provided. Service indicators consist of one or more impact values that identify the types of specific services that are restricted or provided.
Steps
1. Navigate to: Campus Community > Service Indicators(Student)> Mass Assign
2. Click on the Add a New Value tab
3. Enter the Control ID value if provided
4. Click on the Add button
5. Select the appropriate option from the Selection Tool dropdown menu o If Equation Engine option selected, then the Equation Name field and the Create
Equation link appear o If External File option is selected, then the Upload File button, the File Mapping field
and the Create File Mapping link appear o If PS Query option is selected, then the Query Name field and the Launch Query
Manager link appear
6. Select the appropriate campus from the Institution dropdown menu
7. Click the lookup tool to select the appropriate Service Indicator Code
8. Click the lookup tool to select the appropriate Reason
9. Click the lookup tool to select the appropriate Start Term
10. Click the lookup tool to select the appropriate End Term
11. Enter the Start Date
12. Enter the End Date
13. Click the lookup tool to select the appropriate Department
14. Enter an amount, if applicable
15. Click the lookup tool to select the appropriate Contact ID Note: Enter the ID of the person to contact about this service indicator
16. Click the lookup tool to select the appropriate Placed Person ID Note: Enter the ID of the person who placed this service indicator
17. Enter Comment, if applicable
18. Click the Save button.
19. Click the Run button
20. Click the OK button
21. Click the Process Monitor link
22. Click the Refresh button until the Run Status Column indicates Success and the Distribution Status Column indicates Posted.
23. Click the Details link
24. Click the View Log/Trace link

Student Financials Quick Reference Guide
173
25. Click the Name link
26. End of Procedure
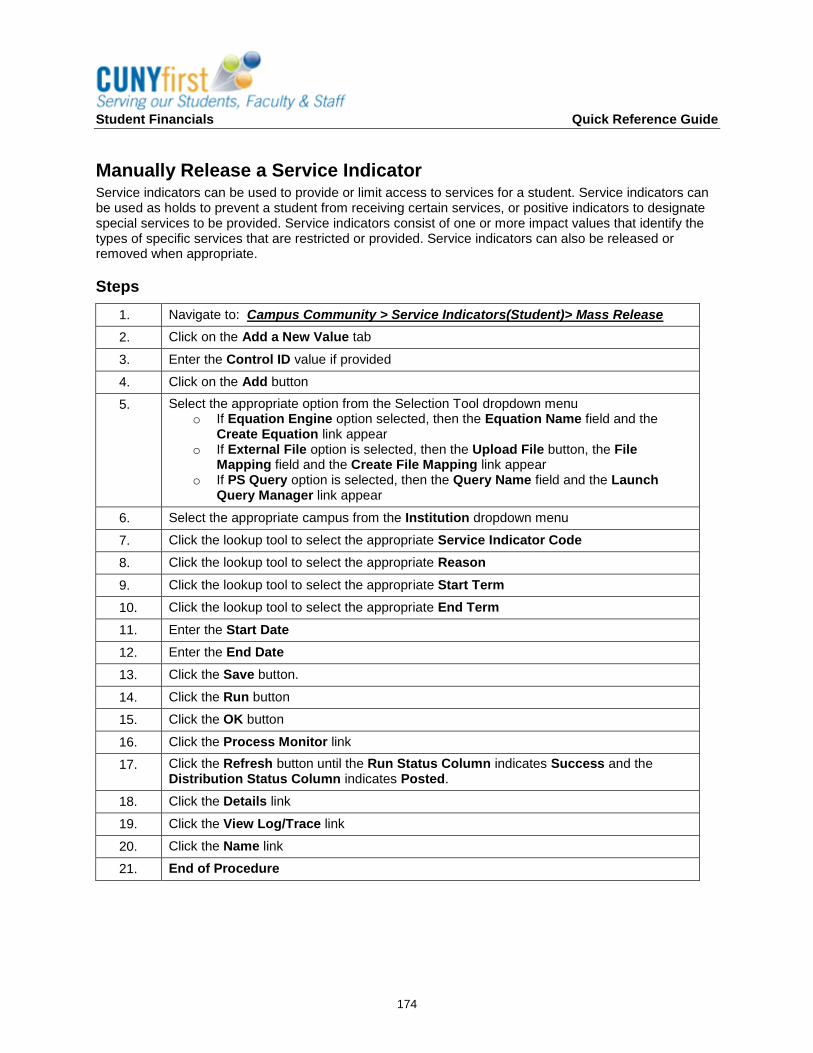
Student Financials Quick Reference Guide
174
Manually Release a Service Indicator Service indicators can be used to provide or limit access to services for a student. Service indicators can be used as holds to prevent a student from receiving certain services, or positive indicators to designate special services to be provided. Service indicators consist of one or more impact values that identify the types of specific services that are restricted or provided. Service indicators can also be released or removed when appropriate.
Steps
1. Navigate to: Campus Community > Service Indicators(Student)> Mass Release
2. Click on the Add a New Value tab
3. Enter the Control ID value if provided
4. Click on the Add button
5. Select the appropriate option from the Selection Tool dropdown menu o If Equation Engine option selected, then the Equation Name field and the
Create Equation link appear o If External File option is selected, then the Upload File button, the File
Mapping field and the Create File Mapping link appear o If PS Query option is selected, then the Query Name field and the Launch
Query Manager link appear
6. Select the appropriate campus from the Institution dropdown menu
7. Click the lookup tool to select the appropriate Service Indicator Code
8. Click the lookup tool to select the appropriate Reason
9. Click the lookup tool to select the appropriate Start Term
10. Click the lookup tool to select the appropriate End Term
11. Enter the Start Date
12. Enter the End Date
13. Click the Save button.
14. Click the Run button
15. Click the OK button
16. Click the Process Monitor link
17. Click the Refresh button until the Run Status Column indicates Success and the Distribution Status Column indicates Posted.
18. Click the Details link
19. Click the View Log/Trace link
20. Click the Name link
21. End of Procedure

Student Financials Quick Reference Guide
175
Unit XI: End of Term Activities
Student Financials Quick Reference Guide
176
Copy Adjustment Calendars Adjustment calendars define the refund schedules that are applied to members of a tuition group (group of students who are assessed the same tuition and fees). These calendars govern how the system adjusts term and class level fees when a student withdraws or drops a class. CUNYfirst uses the number of days a term or class has been in session to determine the percentage of refund due.
Steps
1. Navigate to: Set up SACR>Product Related>Student Financials>Tuition and Fees> Adjustment Calendars
2. Enter the "SetID".
3. Click the Search button.
4. Select the appropriate Adjustment Code.
5. Click the Copy Adjustment Calendar button.
6. Enter appropriate From Term.
7. Enter appropriate Session.
8. Enter appropriate To Term.
9. Enter appropriate Session.
10. Click the OK button.
11. Make the necessary changes
12. Click the Save button.
13. End of Procedure
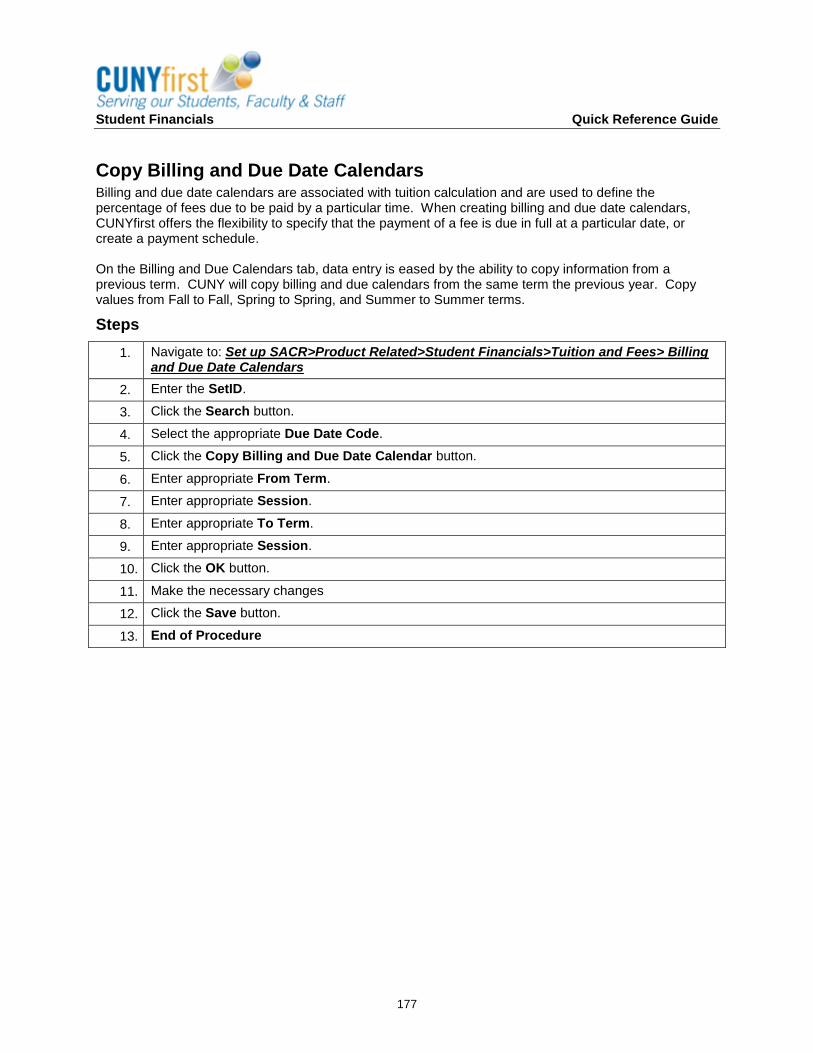
Student Financials Quick Reference Guide
177
Copy Billing and Due Date Calendars Billing and due date calendars are associated with tuition calculation and are used to define the percentage of fees due to be paid by a particular time. When creating billing and due date calendars, CUNYfirst offers the flexibility to specify that the payment of a fee is due in full at a particular date, or create a payment schedule. On the Billing and Due Calendars tab, data entry is eased by the ability to copy information from a previous term. CUNY will copy billing and due calendars from the same term the previous year. Copy values from Fall to Fall, Spring to Spring, and Summer to Summer terms.
Steps
1. Navigate to: Set up SACR>Product Related>Student Financials>Tuition and Fees> Billing and Due Date Calendars
2. Enter the SetID.
3. Click the Search button.
4. Select the appropriate Due Date Code.
5. Click the Copy Billing and Due Date Calendar button.
6. Enter appropriate From Term.
7. Enter appropriate Session.
8. Enter appropriate To Term.
9. Enter appropriate Session.
10. Click the OK button.
11. Make the necessary changes
12. Click the Save button.
13. End of Procedure
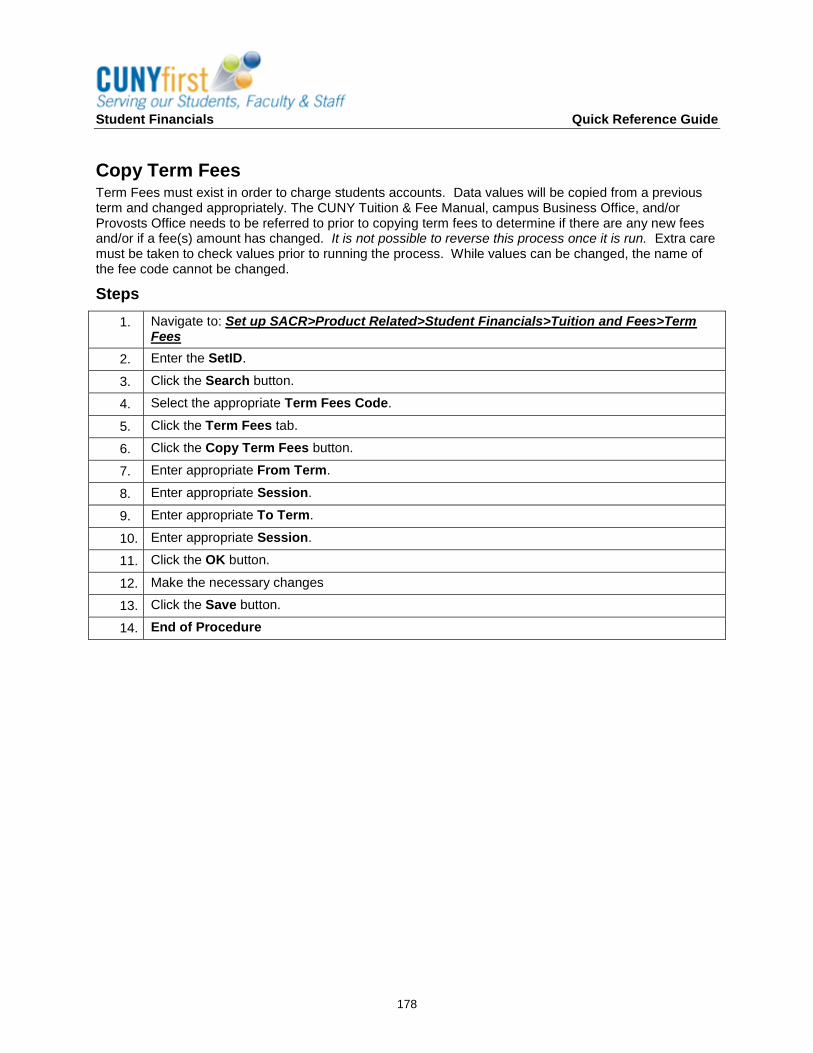
Student Financials Quick Reference Guide
178
Copy Term Fees Term Fees must exist in order to charge students accounts. Data values will be copied from a previous term and changed appropriately. The CUNY Tuition & Fee Manual, campus Business Office, and/or Provosts Office needs to be referred to prior to copying term fees to determine if there are any new fees and/or if a fee(s) amount has changed. It is not possible to reverse this process once it is run. Extra care must be taken to check values prior to running the process. While values can be changed, the name of the fee code cannot be changed.
Steps
1. Navigate to: Set up SACR>Product Related>Student Financials>Tuition and Fees>Term Fees
2. Enter the SetID.
3. Click the Search button.
4. Select the appropriate Term Fees Code.
5. Click the Term Fees tab.
6. Click the Copy Term Fees button.
7. Enter appropriate From Term.
8. Enter appropriate Session.
9. Enter appropriate To Term.
10. Enter appropriate Session.
11. Click the OK button.
12. Make the necessary changes
13. Click the Save button.
14. End of Procedure
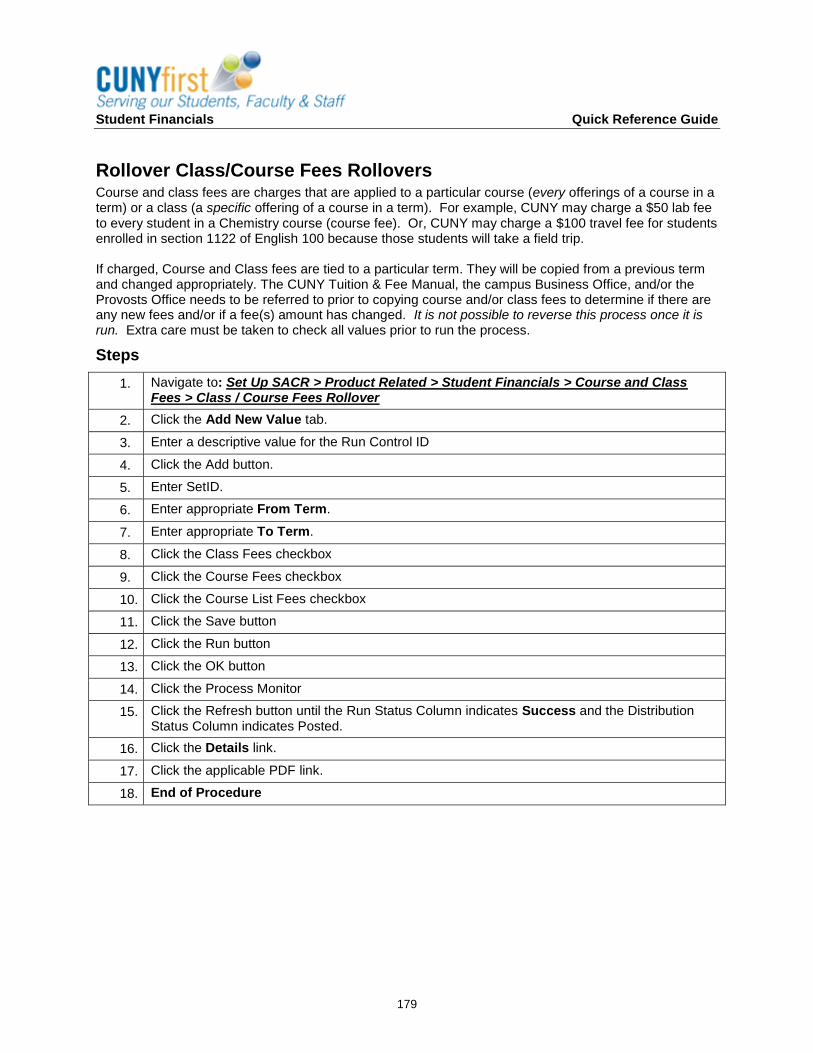
Student Financials Quick Reference Guide
179
Rollover Class/Course Fees Rollovers Course and class fees are charges that are applied to a particular course (every offerings of a course in a term) or a class (a specific offering of a course in a term). For example, CUNY may charge a $50 lab fee to every student in a Chemistry course (course fee). Or, CUNY may charge a $100 travel fee for students enrolled in section 1122 of English 100 because those students will take a field trip. If charged, Course and Class fees are tied to a particular term. They will be copied from a previous term and changed appropriately. The CUNY Tuition & Fee Manual, the campus Business Office, and/or the Provosts Office needs to be referred to prior to copying course and/or class fees to determine if there are any new fees and/or if a fee(s) amount has changed. It is not possible to reverse this process once it is run. Extra care must be taken to check all values prior to run the process.
Steps
1. Navigate to: Set Up SACR > Product Related > Student Financials > Course and Class Fees > Class / Course Fees Rollover
2. Click the Add New Value tab.
3. Enter a descriptive value for the Run Control ID
4. Click the Add button.
5. Enter SetID.
6. Enter appropriate From Term.
7. Enter appropriate To Term.
8. Click the Class Fees checkbox
9. Click the Course Fees checkbox
10. Click the Course List Fees checkbox
11. Click the Save button
12. Click the Run button
13. Click the OK button
14. Click the Process Monitor
15. Click the Refresh button until the Run Status Column indicates Success and the Distribution Status Column indicates Posted.
16. Click the Details link.
17. Click the applicable PDF link.
18. End of Procedure
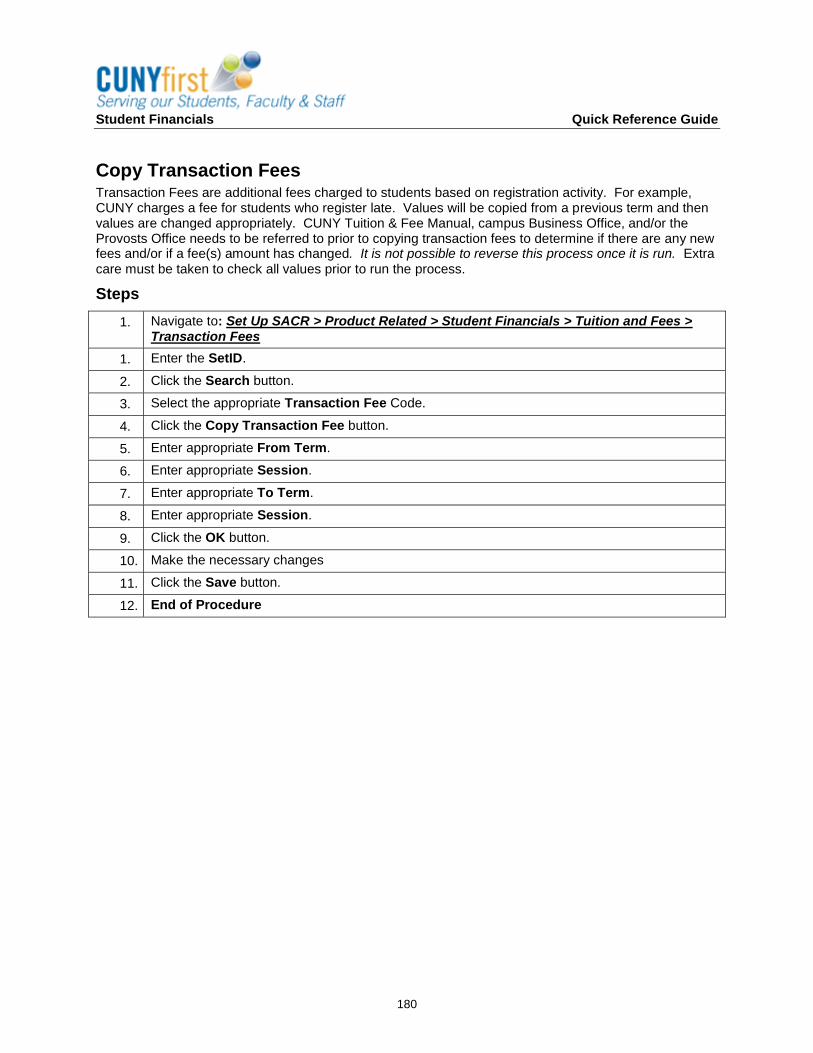
Student Financials Quick Reference Guide
180
Copy Transaction Fees Transaction Fees are additional fees charged to students based on registration activity. For example, CUNY charges a fee for students who register late. Values will be copied from a previous term and then values are changed appropriately. CUNY Tuition & Fee Manual, campus Business Office, and/or the Provosts Office needs to be referred to prior to copying transaction fees to determine if there are any new fees and/or if a fee(s) amount has changed. It is not possible to reverse this process once it is run. Extra care must be taken to check all values prior to run the process.
Steps
1. Navigate to: Set Up SACR > Product Related > Student Financials > Tuition and Fees > Transaction Fees
1. Enter the SetID.
2. Click the Search button.
3. Select the appropriate Transaction Fee Code.
4. Click the Copy Transaction Fee button.
5. Enter appropriate From Term.
6. Enter appropriate Session.
7. Enter appropriate To Term.
8. Enter appropriate Session.
9. Click the OK button.
10. Make the necessary changes
11. Click the Save button.
12. End of Procedure
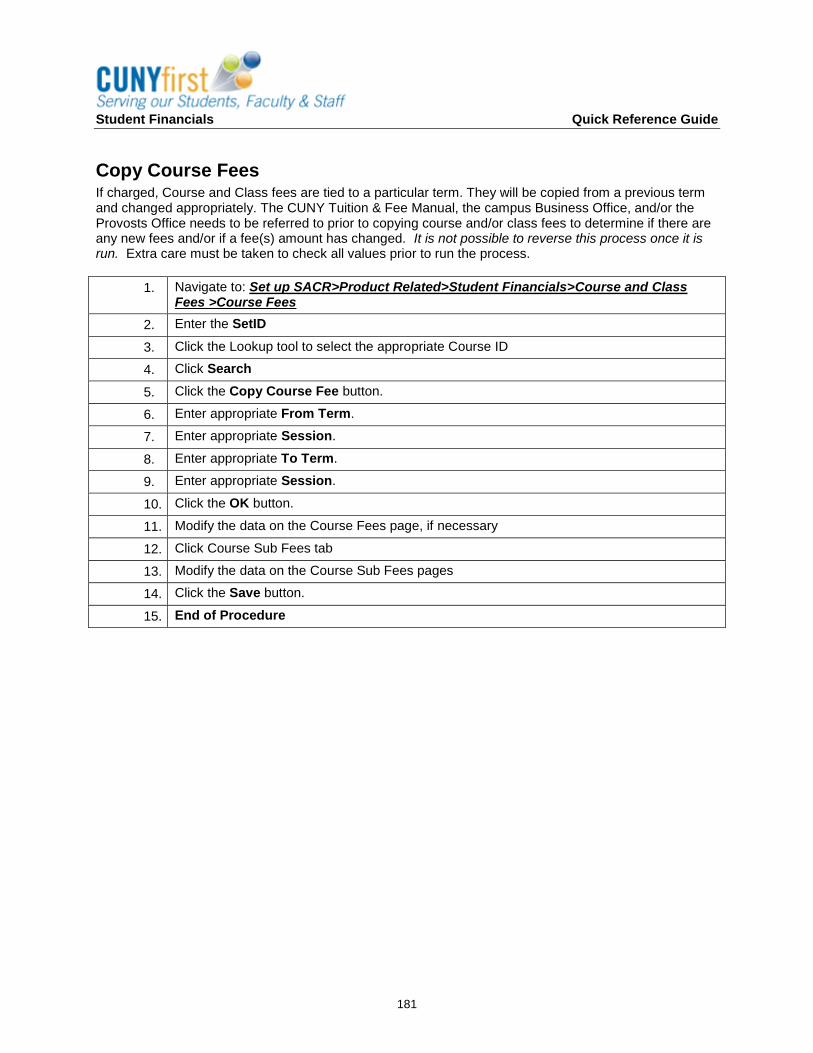
Student Financials Quick Reference Guide
181
Copy Course Fees If charged, Course and Class fees are tied to a particular term. They will be copied from a previous term and changed appropriately. The CUNY Tuition & Fee Manual, the campus Business Office, and/or the Provosts Office needs to be referred to prior to copying course and/or class fees to determine if there are any new fees and/or if a fee(s) amount has changed. It is not possible to reverse this process once it is run. Extra care must be taken to check all values prior to run the process.
1. Navigate to: Set up SACR>Product Related>Student Financials>Course and Class Fees >Course Fees
2. Enter the SetID
3. Click the Lookup tool to select the appropriate Course ID
4. Click Search
5. Click the Copy Course Fee button.
6. Enter appropriate From Term.
7. Enter appropriate Session.
8. Enter appropriate To Term.
9. Enter appropriate Session.
10. Click the OK button.
11. Modify the data on the Course Fees page, if necessary
12. Click Course Sub Fees tab
13. Modify the data on the Course Sub Fees pages
14. Click the Save button.
15. End of Procedure
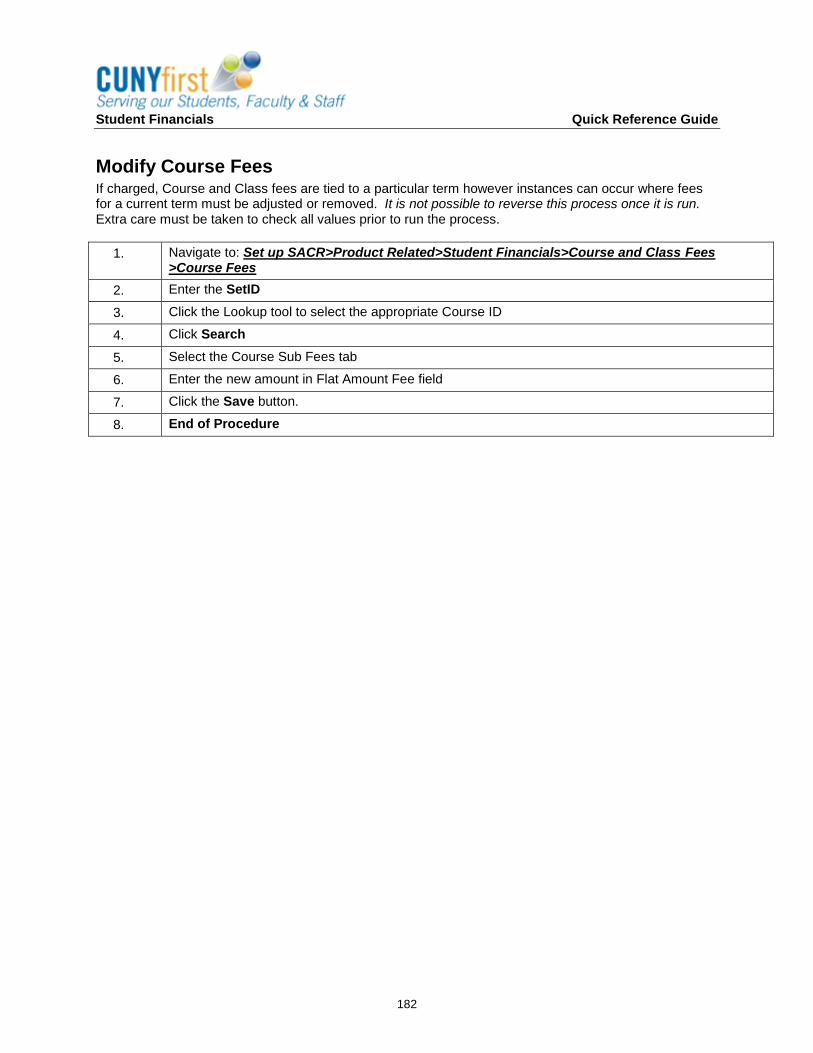
Student Financials Quick Reference Guide
182
Modify Course Fees If charged, Course and Class fees are tied to a particular term however instances can occur where fees for a current term must be adjusted or removed. It is not possible to reverse this process once it is run. Extra care must be taken to check all values prior to run the process.
1. Navigate to: Set up SACR>Product Related>Student Financials>Course and Class Fees >Course Fees
2. Enter the SetID
3. Click the Lookup tool to select the appropriate Course ID
4. Click Search
5. Select the Course Sub Fees tab
6. Enter the new amount in Flat Amount Fee field
7. Click the Save button.
8. End of Procedure
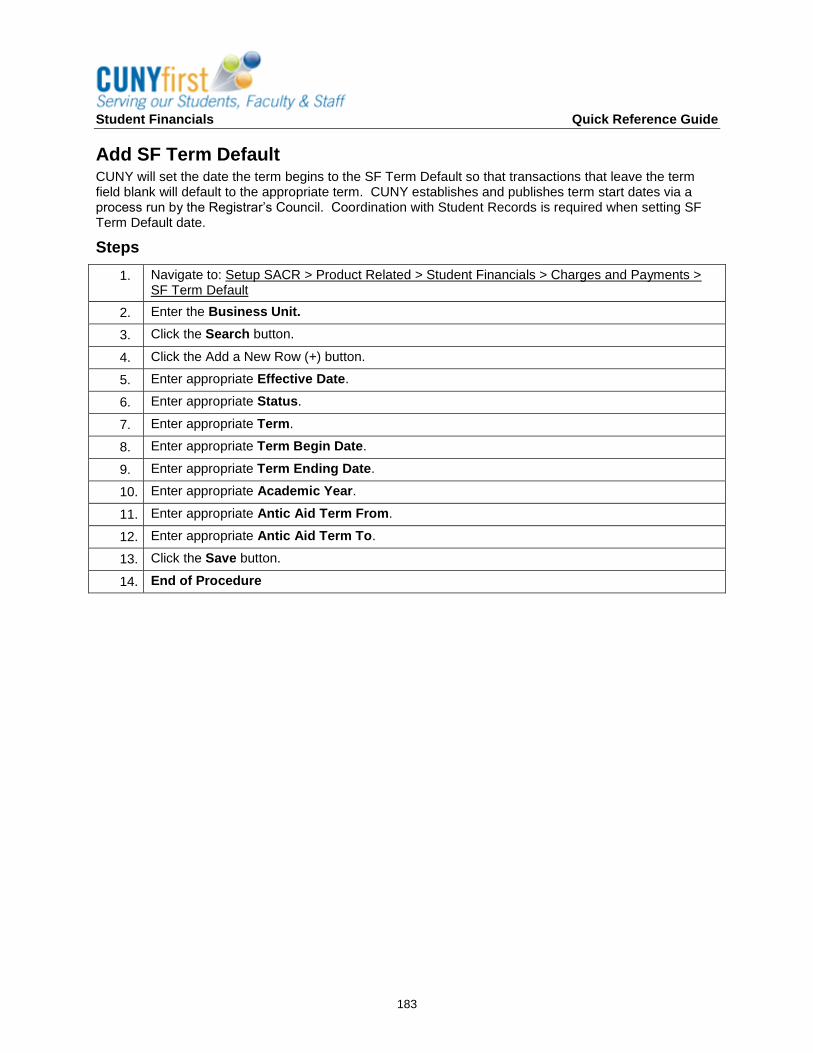
Student Financials Quick Reference Guide
183
Add SF Term Default CUNY will set the date the term begins to the SF Term Default so that transactions that leave the term field blank will default to the appropriate term. CUNY establishes and publishes term start dates via a process run by the Registrar’s Council. Coordination with Student Records is required when setting SF Term Default date.
Steps
1. Navigate to: Setup SACR > Product Related > Student Financials > Charges and Payments > SF Term Default
2. Enter the Business Unit.
3. Click the Search button.
4. Click the Add a New Row (+) button.
5. Enter appropriate Effective Date.
6. Enter appropriate Status.
7. Enter appropriate Term.
8. Enter appropriate Term Begin Date.
9. Enter appropriate Term Ending Date.
10. Enter appropriate Academic Year.
11. Enter appropriate Antic Aid Term From.
12. Enter appropriate Antic Aid Term To.
13. Click the Save button.
14. End of Procedure

Student Financials Quick Reference Guide
184
Update Calculation Controls Tuition calculation controls determine the academic careers that are eligible for tuition and fee calculation for each term. Tuition calculation controls must be set up in accordance with the CUNY Tuition and Fee Manual.
Steps
1. Navigate to: Set Up SACR > Product Related > Student Financials > Tuition and Fees > Tuition Calculation Controls
2. Enter the SetID.
3. Click the Search button.
4. Verify academic career.
5. Click the Add a New Row (+) button to the Term Row section.
6. Enter the appropriate Term.
7. Enter the appropriate Term Wash Period.
8. Enter the appropriate Transaction Wash Period.
9. Click the Auto Calculate Tuition checkbox, if necessary..
10. Click the Auto Calculate Waivers checkbox, if necessary..
11. Click the Auto Calculate Self Service checkbox, if necessary.
12. Select the appropriate session.
13. Click the Save button.
14. End of Procedure

Student Financials Quick Reference Guide
185
Unit XII: General Ledger
Unit XIII: Manage Accounts Manually
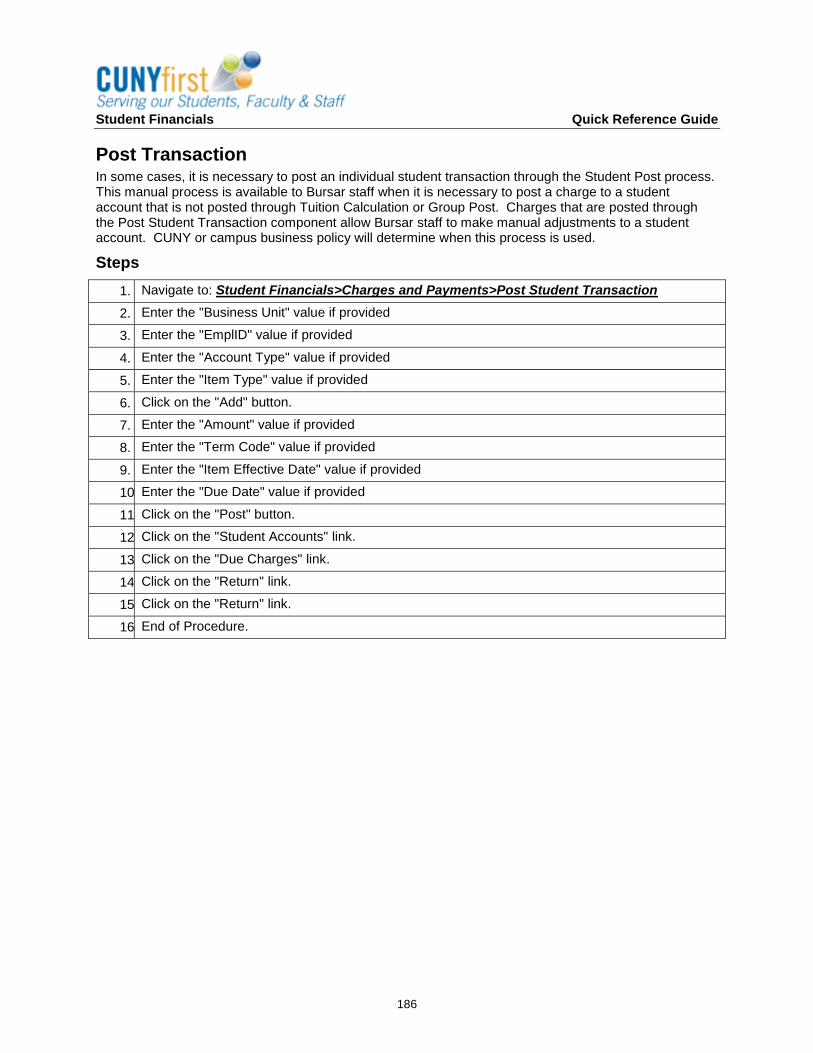
Student Financials Quick Reference Guide
186
Post Transaction In some cases, it is necessary to post an individual student transaction through the Student Post process. This manual process is available to Bursar staff when it is necessary to post a charge to a student account that is not posted through Tuition Calculation or Group Post. Charges that are posted through the Post Student Transaction component allow Bursar staff to make manual adjustments to a student account. CUNY or campus business policy will determine when this process is used.
Steps
1. Navigate to: Student Financials>Charges and Payments>Post Student Transaction
2. Enter the "Business Unit" value if provided
3. Enter the "EmplID" value if provided
4. Enter the "Account Type" value if provided
5. Enter the "Item Type" value if provided
6. Click on the "Add" button.
7. Enter the "Amount" value if provided
8. Enter the "Term Code" value if provided
9. Enter the "Item Effective Date" value if provided
10. Enter the "Due Date" value if provided
11. Click on the "Post" button.
12. Click on the "Student Accounts" link.
13. Click on the "Due Charges" link.
14. Click on the "Return" link.
15. Click on the "Return" link.
16. End of Procedure.
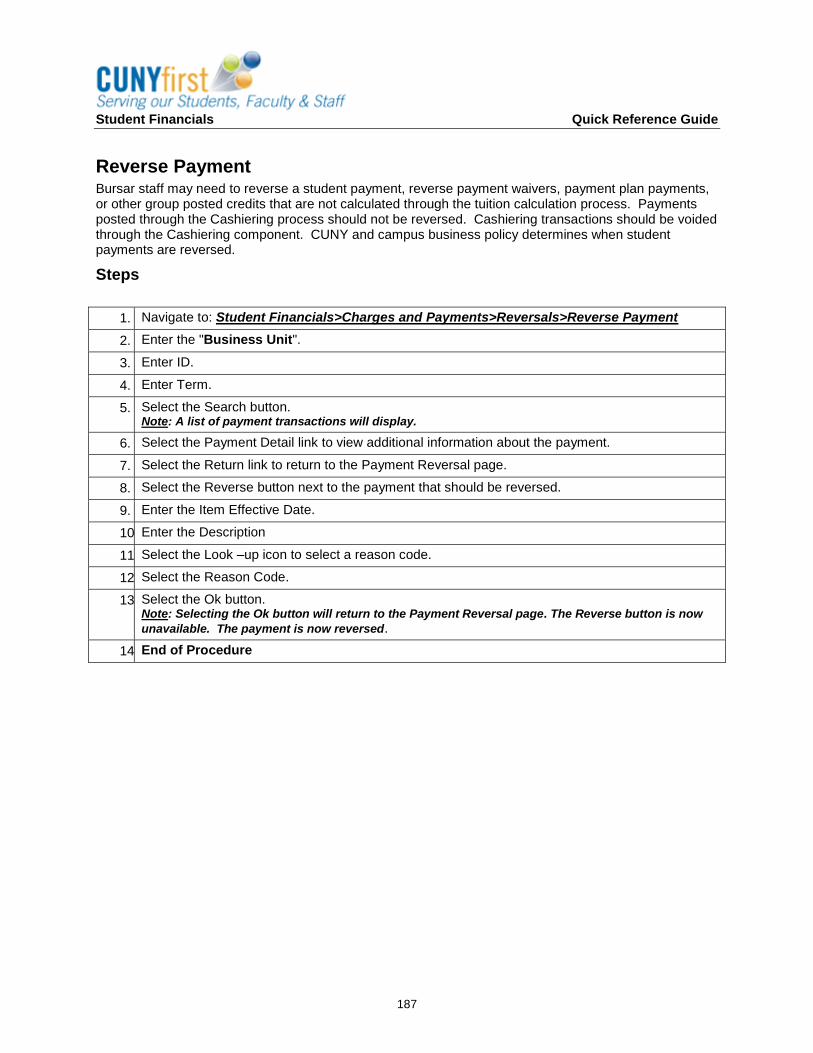
Student Financials Quick Reference Guide
187
Reverse Payment Bursar staff may need to reverse a student payment, reverse payment waivers, payment plan payments, or other group posted credits that are not calculated through the tuition calculation process. Payments posted through the Cashiering process should not be reversed. Cashiering transactions should be voided through the Cashiering component. CUNY and campus business policy determines when student payments are reversed.
Steps
1. Navigate to: Student Financials>Charges and Payments>Reversals>Reverse Payment
2. Enter the "Business Unit".
3. Enter ID.
4. Enter Term.
5. Select the Search button. Note: A list of payment transactions will display.
6. Select the Payment Detail link to view additional information about the payment.
7. Select the Return link to return to the Payment Reversal page.
8. Select the Reverse button next to the payment that should be reversed.
9. Enter the Item Effective Date.
10. Enter the Description
11. Select the Look –up icon to select a reason code.
12. Select the Reason Code.
13. Select the Ok button. Note: Selecting the Ok button will return to the Payment Reversal page. The Reverse button is now
unavailable. The payment is now reversed.
14. End of Procedure
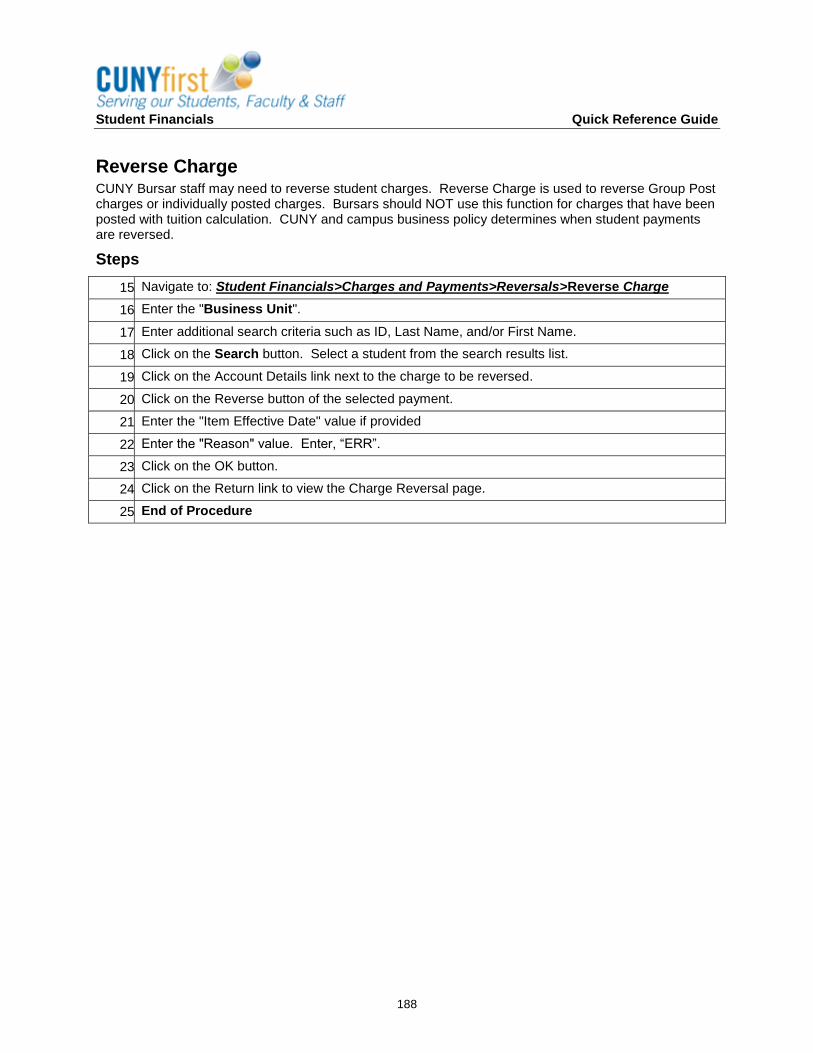
Student Financials Quick Reference Guide
188
Reverse Charge CUNY Bursar staff may need to reverse student charges. Reverse Charge is used to reverse Group Post charges or individually posted charges. Bursars should NOT use this function for charges that have been posted with tuition calculation. CUNY and campus business policy determines when student payments are reversed.
Steps
15. Navigate to: Student Financials>Charges and Payments>Reversals>Reverse Charge
16. Enter the "Business Unit".
17. Enter additional search criteria such as ID, Last Name, and/or First Name.
18. Click on the Search button. Select a student from the search results list.
19. Click on the Account Details link next to the charge to be reversed.
20. Click on the Reverse button of the selected payment.
21. Enter the "Item Effective Date" value if provided
22. Enter the "Reason" value. Enter, “ERR”.
23. Click on the OK button.
24. Click on the Return link to view the Charge Reversal page.
25. End of Procedure
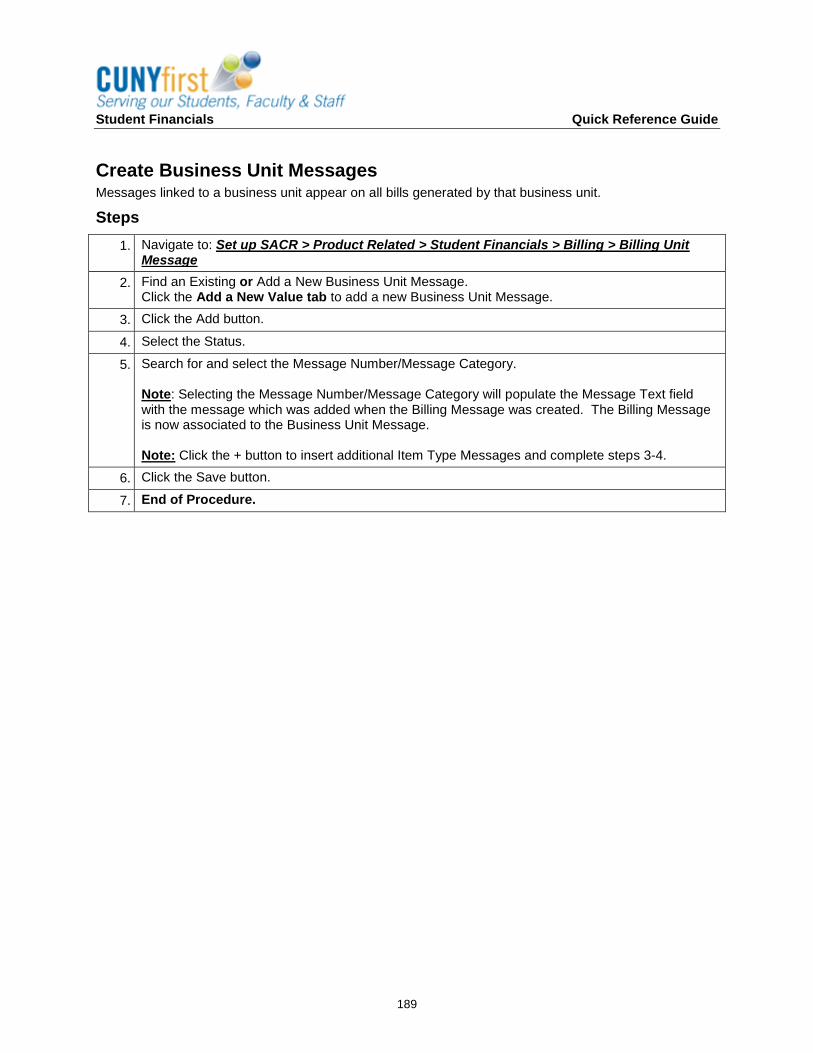
Student Financials Quick Reference Guide
189
Create Business Unit Messages Messages linked to a business unit appear on all bills generated by that business unit.
Steps
1. Navigate to: Set up SACR > Product Related > Student Financials > Billing > Billing Unit Message
2. Find an Existing or Add a New Business Unit Message. Click the Add a New Value tab to add a new Business Unit Message.
3. Click the Add button.
4. Select the Status.
5. Search for and select the Message Number/Message Category. Note: Selecting the Message Number/Message Category will populate the Message Text field with the message which was added when the Billing Message was created. The Billing Message is now associated to the Business Unit Message. Note: Click the + button to insert additional Item Type Messages and complete steps 3-4.
6. Click the Save button.
7. End of Procedure.
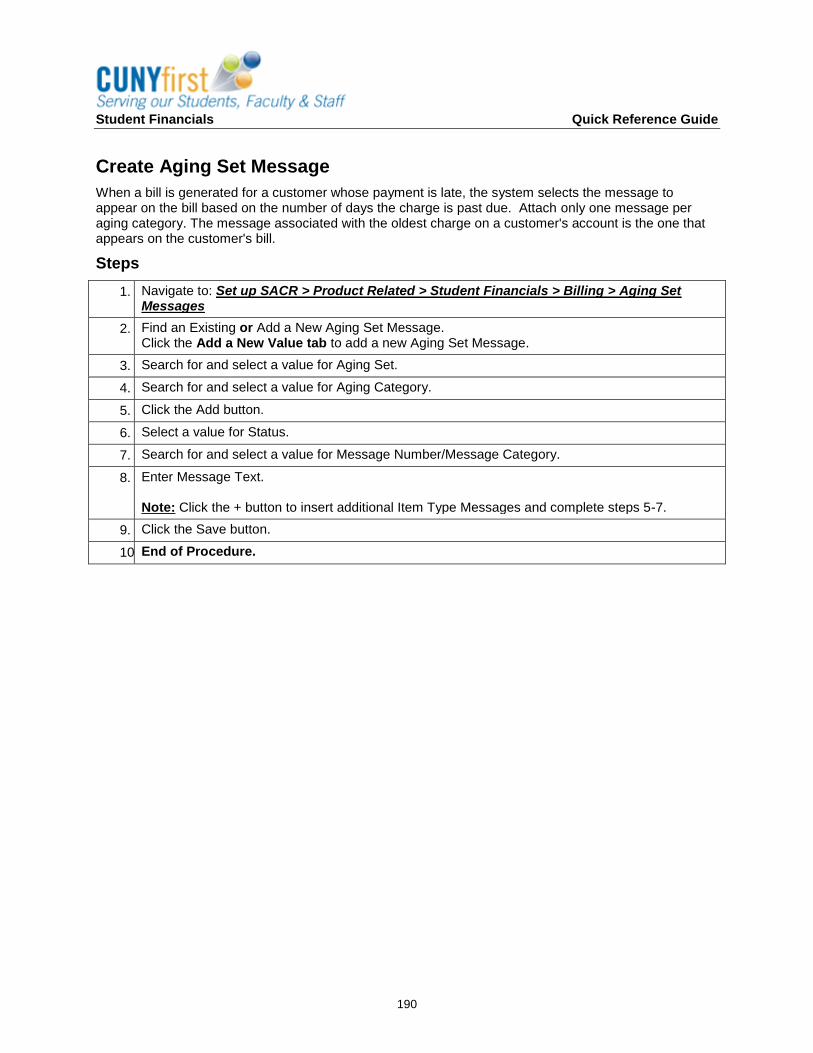
Student Financials Quick Reference Guide
190
Create Aging Set Message
When a bill is generated for a customer whose payment is late, the system selects the message to appear on the bill based on the number of days the charge is past due. Attach only one message per aging category. The message associated with the oldest charge on a customer's account is the one that appears on the customer's bill.
Steps
1. Navigate to: Set up SACR > Product Related > Student Financials > Billing > Aging Set Messages
2. Find an Existing or Add a New Aging Set Message. Click the Add a New Value tab to add a new Aging Set Message.
3. Search for and select a value for Aging Set.
4. Search for and select a value for Aging Category.
5. Click the Add button.
6. Select a value for Status.
7. Search for and select a value for Message Number/Message Category.
8. Enter Message Text. Note: Click the + button to insert additional Item Type Messages and complete steps 5-7.
9. Click the Save button.
10. End of Procedure.
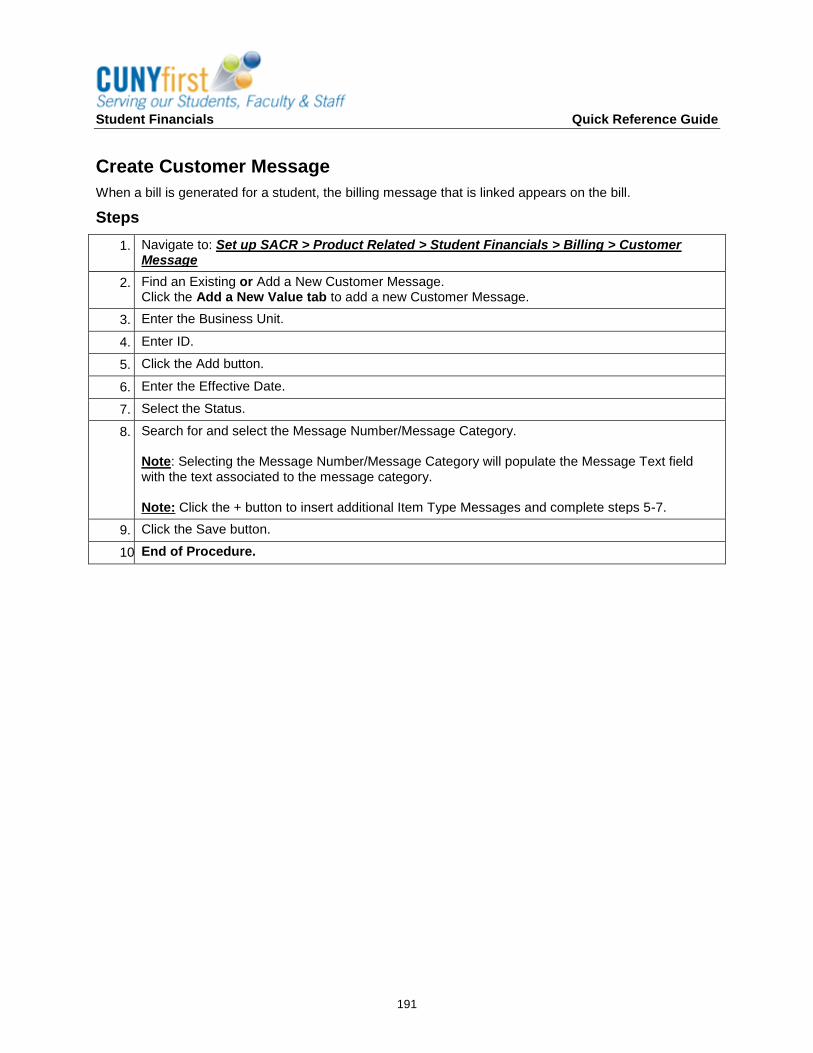
Student Financials Quick Reference Guide
191
Create Customer Message
When a bill is generated for a student, the billing message that is linked appears on the bill.
Steps
1. Navigate to: Set up SACR > Product Related > Student Financials > Billing > Customer Message
2. Find an Existing or Add a New Customer Message. Click the Add a New Value tab to add a new Customer Message.
3. Enter the Business Unit.
4. Enter ID.
5. Click the Add button.
6. Enter the Effective Date.
7. Select the Status.
8. Search for and select the Message Number/Message Category. Note: Selecting the Message Number/Message Category will populate the Message Text field with the text associated to the message category. Note: Click the + button to insert additional Item Type Messages and complete steps 5-7.
9. Click the Save button.
10. End of Procedure.
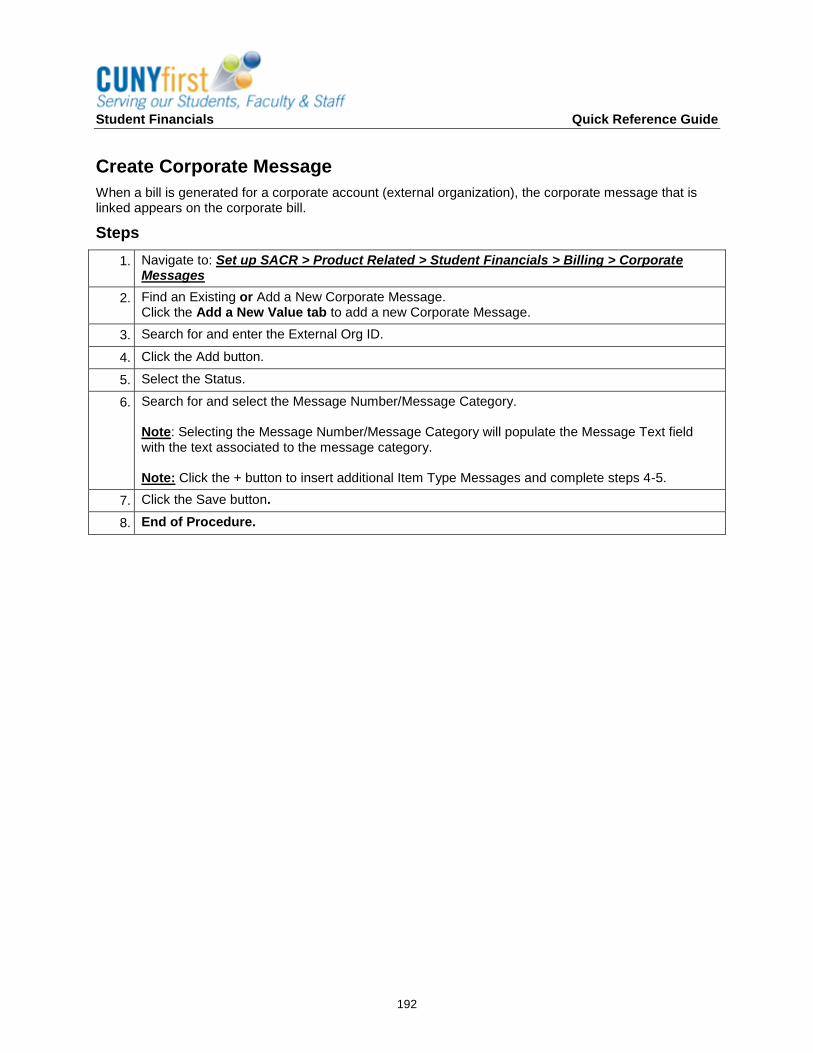
Student Financials Quick Reference Guide
192
Create Corporate Message
When a bill is generated for a corporate account (external organization), the corporate message that is linked appears on the corporate bill.
Steps
1. Navigate to: Set up SACR > Product Related > Student Financials > Billing > Corporate Messages
2. Find an Existing or Add a New Corporate Message. Click the Add a New Value tab to add a new Corporate Message.
3. Search for and enter the External Org ID.
4. Click the Add button.
5. Select the Status.
6. Search for and select the Message Number/Message Category. Note: Selecting the Message Number/Message Category will populate the Message Text field with the text associated to the message category. Note: Click the + button to insert additional Item Type Messages and complete steps 4-5.
7. Click the Save button.
8. End of Procedure.
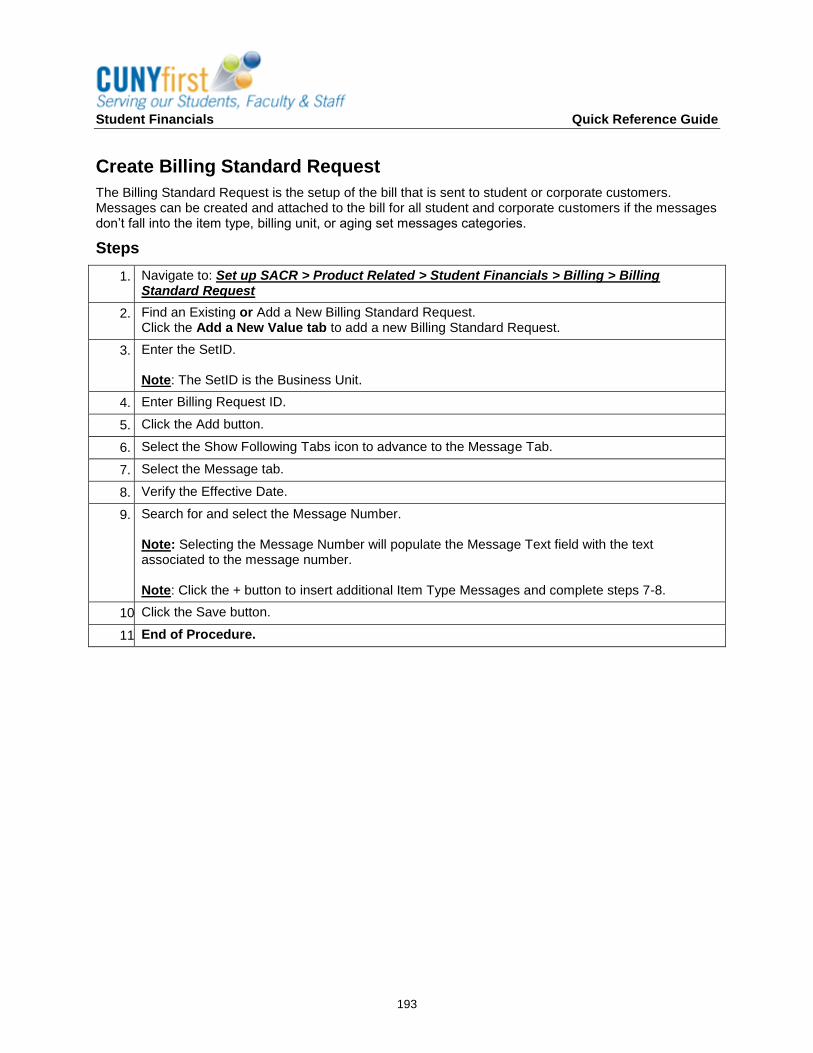
Student Financials Quick Reference Guide
193
Create Billing Standard Request
The Billing Standard Request is the setup of the bill that is sent to student or corporate customers. Messages can be created and attached to the bill for all student and corporate customers if the messages don’t fall into the item type, billing unit, or aging set messages categories.
Steps
1. Navigate to: Set up SACR > Product Related > Student Financials > Billing > Billing Standard Request
2. Find an Existing or Add a New Billing Standard Request. Click the Add a New Value tab to add a new Billing Standard Request.
3. Enter the SetID. Note: The SetID is the Business Unit.
4. Enter Billing Request ID.
5. Click the Add button.
6. Select the Show Following Tabs icon to advance to the Message Tab.
7. Select the Message tab.
8. Verify the Effective Date.
9. Search for and select the Message Number. Note: Selecting the Message Number will populate the Message Text field with the text associated to the message number. Note: Click the + button to insert additional Item Type Messages and complete steps 7-8.
10. Click the Save button.
11. End of Procedure.
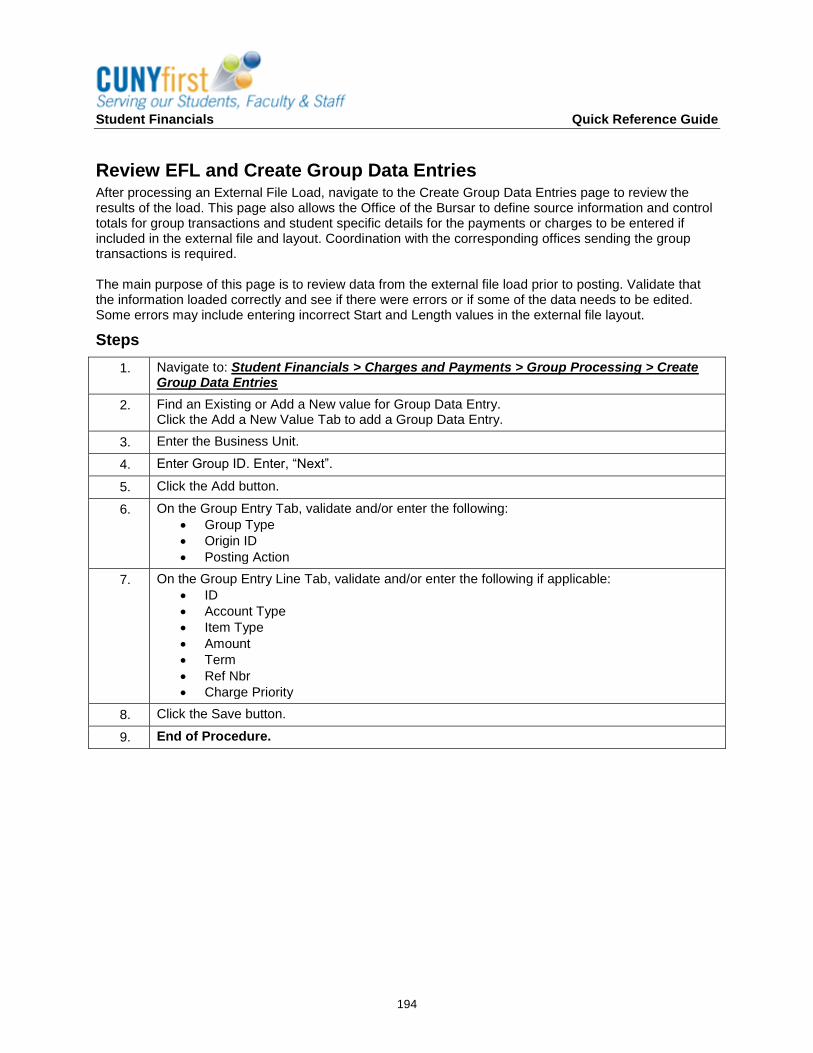
Student Financials Quick Reference Guide
194
Review EFL and Create Group Data Entries After processing an External File Load, navigate to the Create Group Data Entries page to review the results of the load. This page also allows the Office of the Bursar to define source information and control totals for group transactions and student specific details for the payments or charges to be entered if included in the external file and layout. Coordination with the corresponding offices sending the group transactions is required. The main purpose of this page is to review data from the external file load prior to posting. Validate that the information loaded correctly and see if there were errors or if some of the data needs to be edited. Some errors may include entering incorrect Start and Length values in the external file layout.
Steps
1. Navigate to: Student Financials > Charges and Payments > Group Processing > Create Group Data Entries
2. Find an Existing or Add a New value for Group Data Entry. Click the Add a New Value Tab to add a Group Data Entry.
3. Enter the Business Unit.
4. Enter Group ID. Enter, “Next”.
5. Click the Add button.
6. On the Group Entry Tab, validate and/or enter the following:
Group Type
Origin ID
Posting Action
7. On the Group Entry Line Tab, validate and/or enter the following if applicable:
ID
Account Type
Item Type
Amount
Term
Ref Nbr
Charge Priority
8. Click the Save button.
9. End of Procedure.
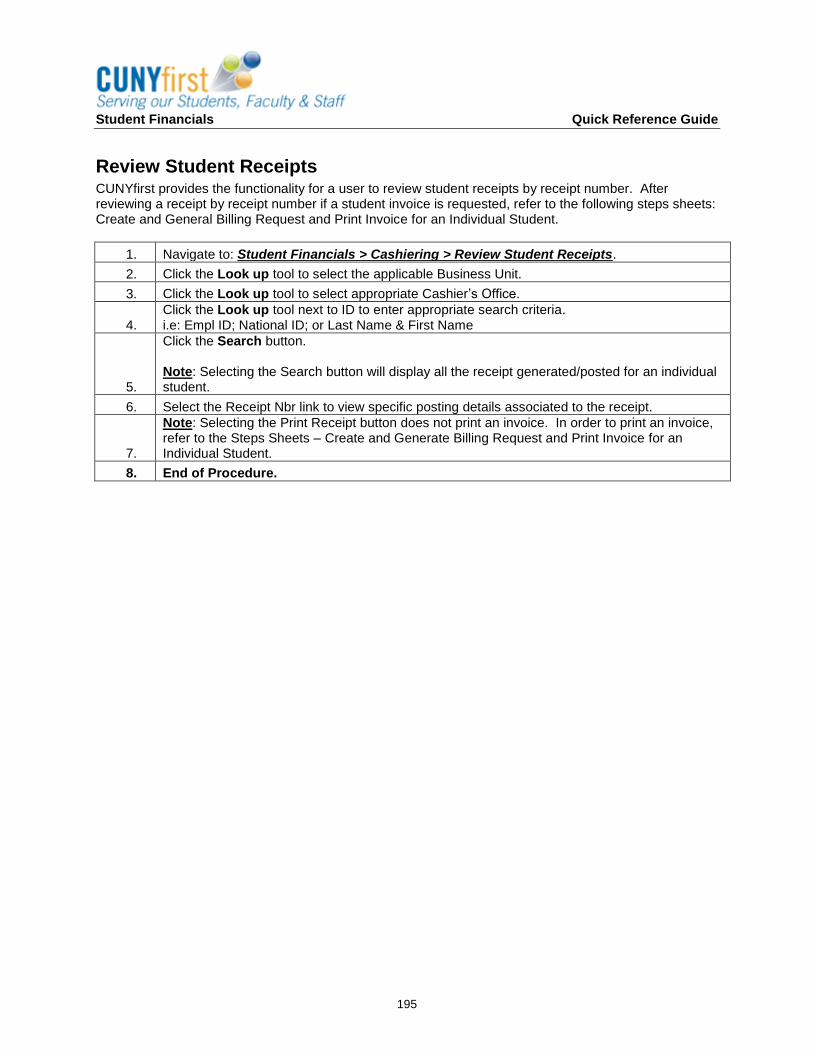
Student Financials Quick Reference Guide
195
Review Student Receipts CUNYfirst provides the functionality for a user to review student receipts by receipt number. After reviewing a receipt by receipt number if a student invoice is requested, refer to the following steps sheets: Create and General Billing Request and Print Invoice for an Individual Student.
1. Navigate to: Student Financials > Cashiering > Review Student Receipts.
2. Click the Look up tool to select the applicable Business Unit.
3. Click the Look up tool to select appropriate Cashier’s Office.
4. Click the Look up tool next to ID to enter appropriate search criteria. i.e: Empl ID; National ID; or Last Name & First Name
5.
Click the Search button. Note: Selecting the Search button will display all the receipt generated/posted for an individual student.
6. Select the Receipt Nbr link to view specific posting details associated to the receipt.
7.
Note: Selecting the Print Receipt button does not print an invoice. In order to print an invoice, refer to the Steps Sheets – Create and Generate Billing Request and Print Invoice for an Individual Student.
8. End of Procedure.
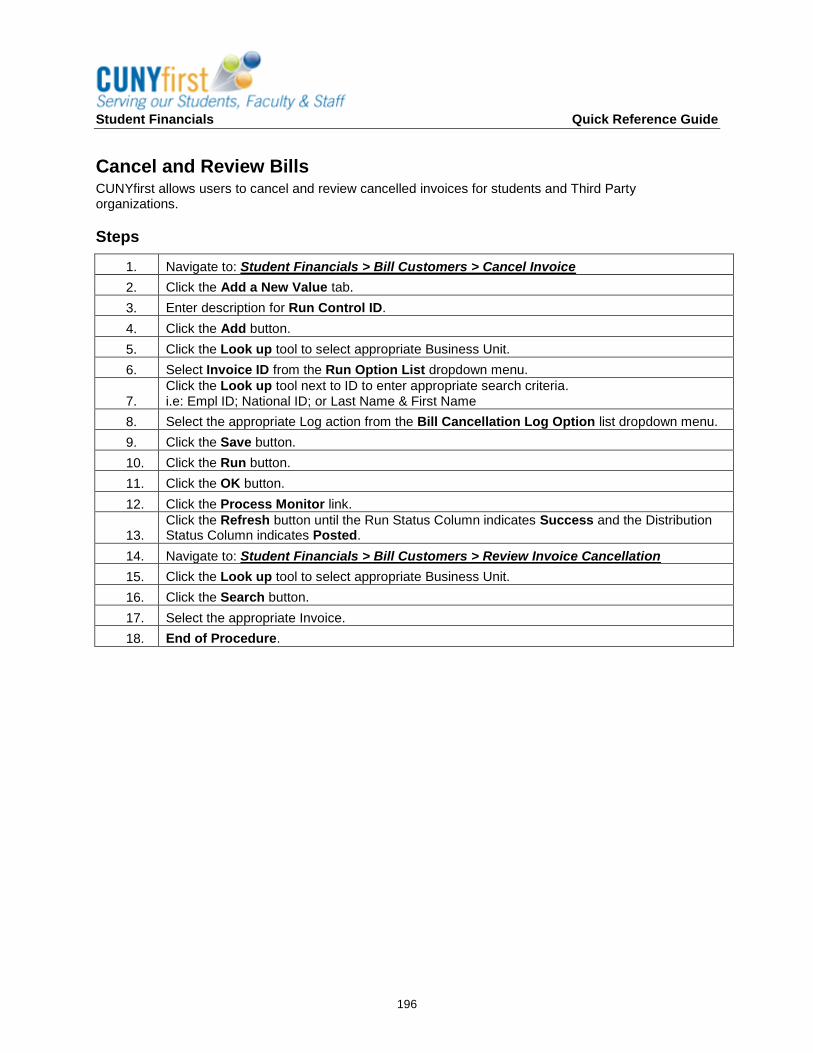
Student Financials Quick Reference Guide
196
Cancel and Review Bills CUNYfirst allows users to cancel and review cancelled invoices for students and Third Party organizations.
Steps
1. Navigate to: Student Financials > Bill Customers > Cancel Invoice
2. Click the Add a New Value tab.
3. Enter description for Run Control ID.
4. Click the Add button.
5. Click the Look up tool to select appropriate Business Unit.
6. Select Invoice ID from the Run Option List dropdown menu.
7. Click the Look up tool next to ID to enter appropriate search criteria. i.e: Empl ID; National ID; or Last Name & First Name
8. Select the appropriate Log action from the Bill Cancellation Log Option list dropdown menu.
9. Click the Save button.
10. Click the Run button.
11. Click the OK button.
12. Click the Process Monitor link.
13. Click the Refresh button until the Run Status Column indicates Success and the Distribution Status Column indicates Posted.
14. Navigate to: Student Financials > Bill Customers > Review Invoice Cancellation
15. Click the Look up tool to select appropriate Business Unit.
16. Click the Search button.
17. Select the appropriate Invoice.
18. End of Procedure.
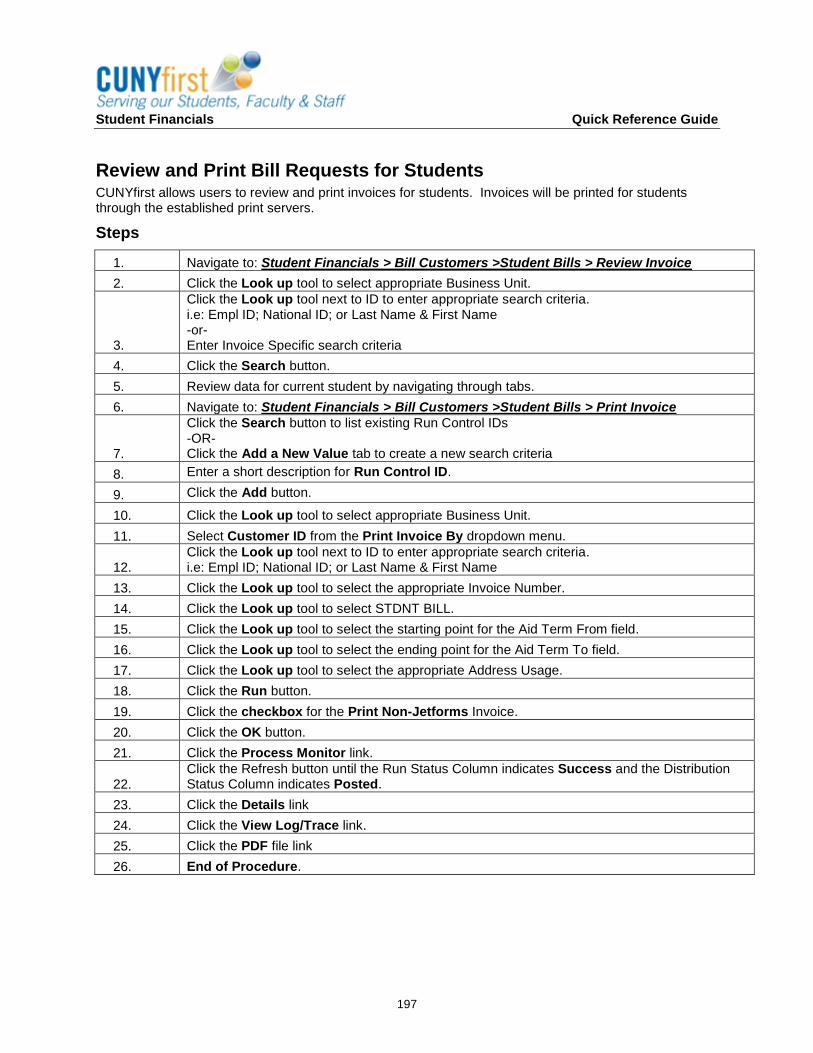
Student Financials Quick Reference Guide
197
Review and Print Bill Requests for Students CUNYfirst allows users to review and print invoices for students. Invoices will be printed for students through the established print servers.
Steps
1. Navigate to: Student Financials > Bill Customers >Student Bills > Review Invoice
2. Click the Look up tool to select appropriate Business Unit.
3.
Click the Look up tool next to ID to enter appropriate search criteria. i.e: Empl ID; National ID; or Last Name & First Name -or- Enter Invoice Specific search criteria
4. Click the Search button.
5. Review data for current student by navigating through tabs.
6. Navigate to: Student Financials > Bill Customers >Student Bills > Print Invoice
7.
Click the Search button to list existing Run Control IDs -OR- Click the Add a New Value tab to create a new search criteria
8. Enter a short description for Run Control ID.
9. Click the Add button.
10. Click the Look up tool to select appropriate Business Unit.
11. Select Customer ID from the Print Invoice By dropdown menu.
12. Click the Look up tool next to ID to enter appropriate search criteria. i.e: Empl ID; National ID; or Last Name & First Name
13. Click the Look up tool to select the appropriate Invoice Number.
14. Click the Look up tool to select STDNT BILL.
15. Click the Look up tool to select the starting point for the Aid Term From field.
16. Click the Look up tool to select the ending point for the Aid Term To field.
17. Click the Look up tool to select the appropriate Address Usage.
18. Click the Run button.
19. Click the checkbox for the Print Non-Jetforms Invoice.
20. Click the OK button.
21. Click the Process Monitor link.
22. Click the Refresh button until the Run Status Column indicates Success and the Distribution Status Column indicates Posted.
23. Click the Details link
24. Click the View Log/Trace link.
25. Click the PDF file link
26. End of Procedure.

Student Financials Quick Reference Guide
198
Viewing Payments by Invoice Information Individual CUNYfirst offers the functionality to view the payment history for students made during their career at CUNY.
Steps
1. Navigate to: Student Financials>Charges and Payments>Payment by Invoice>View Items by Invoice
2. Click the Look up tool to select appropriate Business Unit.
3. Click the Look up tool next to ID to enter appropriate search criteria. i.e: Empl ID; National ID; or Last Name & First Name
4. Click the Search button.
5. Click the Student Accounts link.
6. End of Procedure.
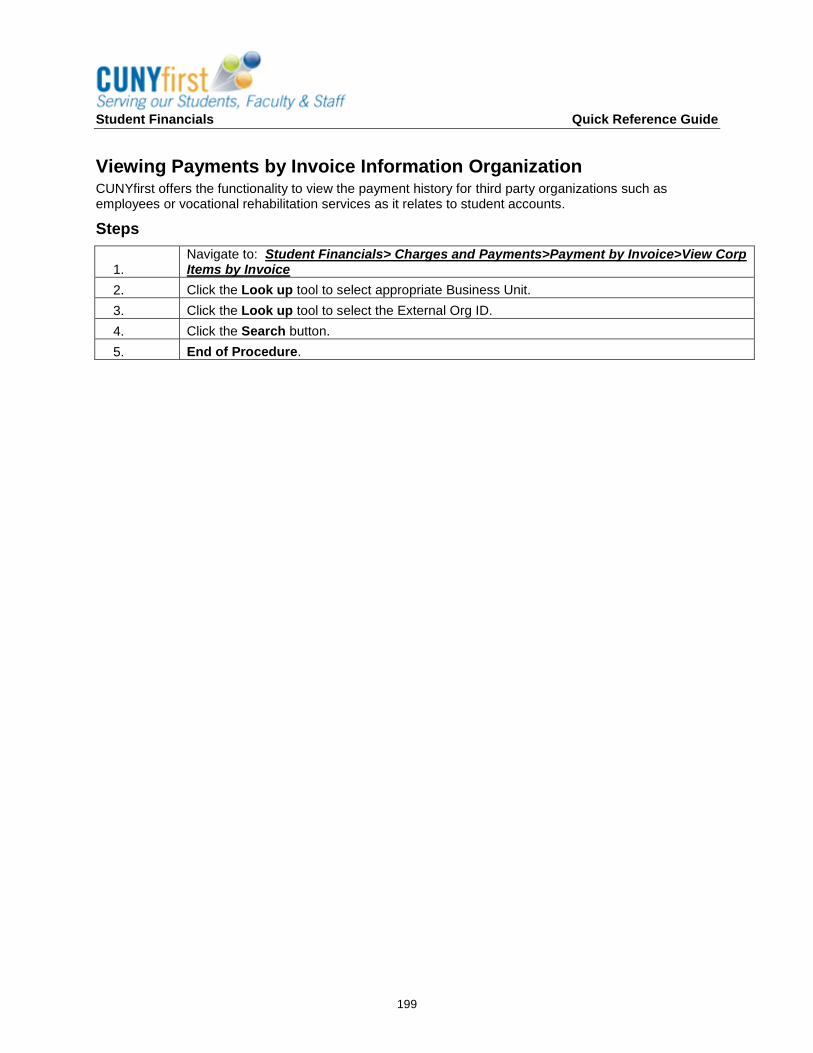
Student Financials Quick Reference Guide
199
Viewing Payments by Invoice Information Organization CUNYfirst offers the functionality to view the payment history for third party organizations such as employees or vocational rehabilitation services as it relates to student accounts.
Steps
1. Navigate to: Student Financials> Charges and Payments>Payment by Invoice>View Corp Items by Invoice
2. Click the Look up tool to select appropriate Business Unit.
3. Click the Look up tool to select the External Org ID.
4. Click the Search button.
5. End of Procedure.
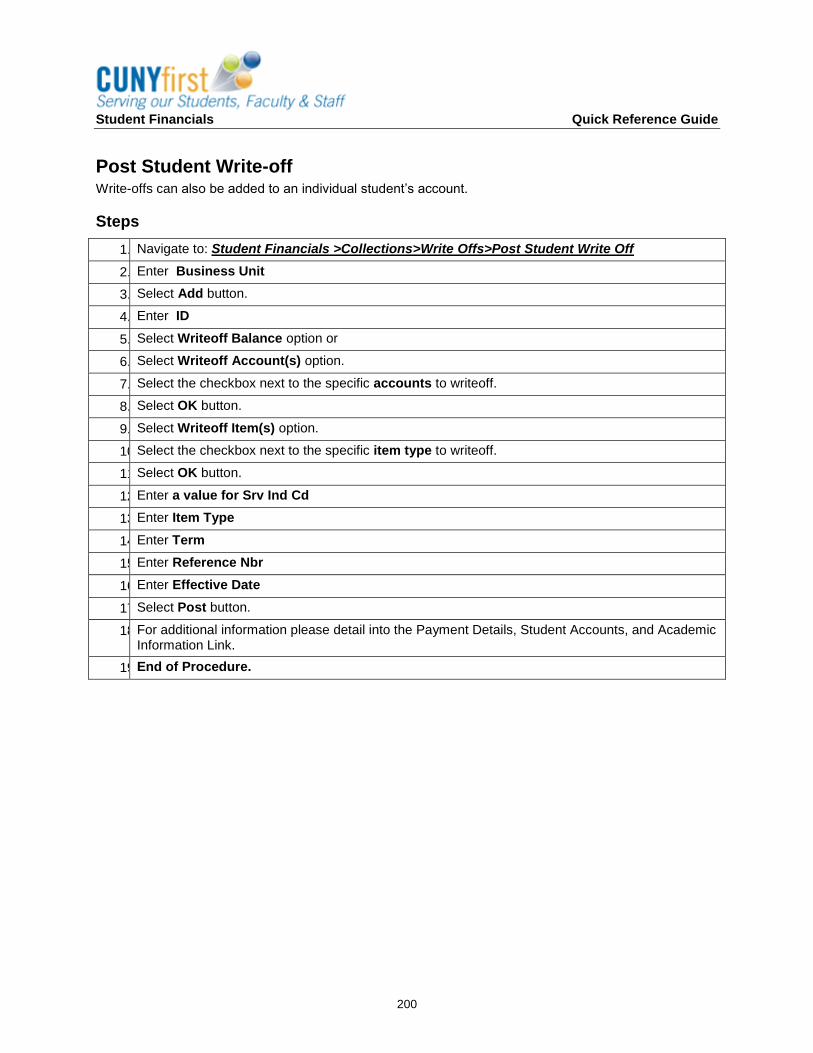
Student Financials Quick Reference Guide
200
Post Student Write-off Write-offs can also be added to an individual student’s account.
Steps
1. Navigate to: Student Financials >Collections>Write Offs>Post Student Write Off
2. Enter Business Unit
3. Select Add button.
4. Enter ID
5. Select Writeoff Balance option or
6. Select Writeoff Account(s) option.
7. Select the checkbox next to the specific accounts to writeoff.
8. Select OK button.
9. Select Writeoff Item(s) option.
10. Select the checkbox next to the specific item type to writeoff.
11. Select OK button.
12. Enter a value for Srv Ind Cd
13. Enter Item Type
14. Enter Term
15. Enter Reference Nbr
16. Enter Effective Date
17. Select Post button.
18. For additional information please detail into the Payment Details, Student Accounts, and Academic Information Link.
19. End of Procedure.
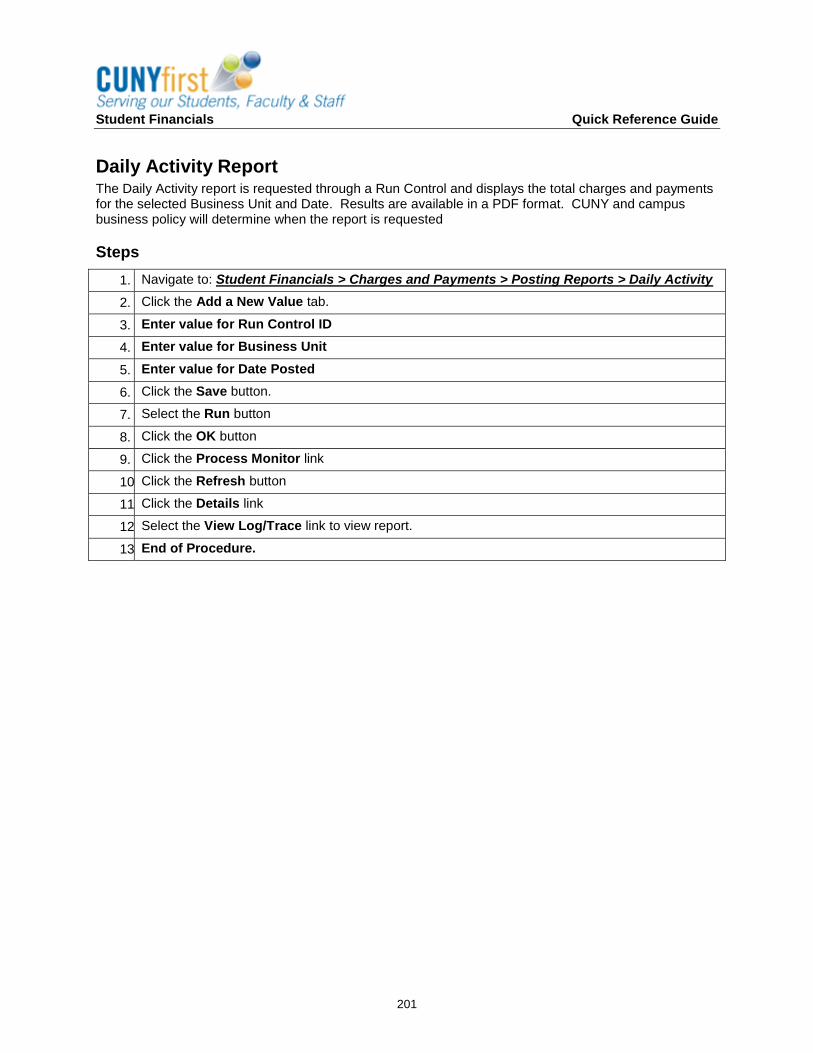
Student Financials Quick Reference Guide
201
Daily Activity Report The Daily Activity report is requested through a Run Control and displays the total charges and payments for the selected Business Unit and Date. Results are available in a PDF format. CUNY and campus business policy will determine when the report is requested
Steps
1. Navigate to: Student Financials > Charges and Payments > Posting Reports > Daily Activity
2. Click the Add a New Value tab.
3. Enter value for Run Control ID
4. Enter value for Business Unit
5. Enter value for Date Posted
6. Click the Save button.
7. Select the Run button
8. Click the OK button
9. Click the Process Monitor link
10. Click the Refresh button
11. Click the Details link
12. Select the View Log/Trace link to view report.
13. End of Procedure.
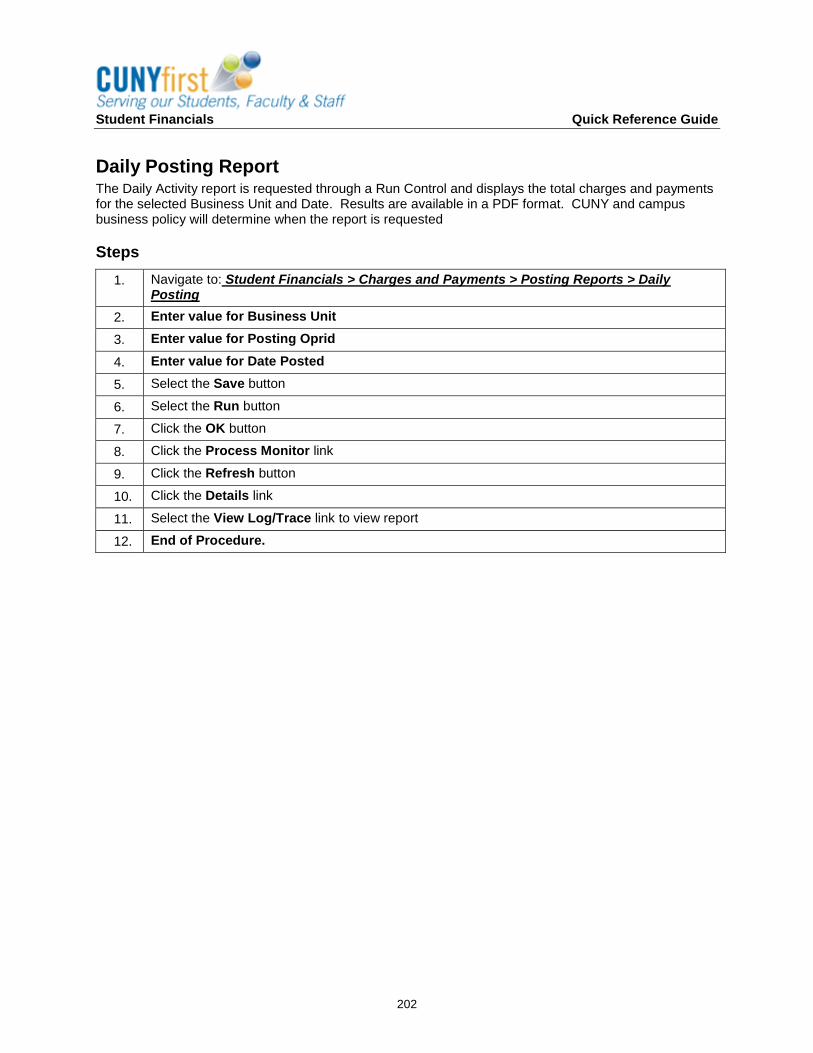
Student Financials Quick Reference Guide
202
Daily Posting Report The Daily Activity report is requested through a Run Control and displays the total charges and payments for the selected Business Unit and Date. Results are available in a PDF format. CUNY and campus business policy will determine when the report is requested
Steps
1. Navigate to: Student Financials > Charges and Payments > Posting Reports > Daily Posting
2. Enter value for Business Unit
3. Enter value for Posting Oprid
4. Enter value for Date Posted
5. Select the Save button
6. Select the Run button
7. Click the OK button
8. Click the Process Monitor link
9. Click the Refresh button
10. Click the Details link
11. Select the View Log/Trace link to view report
12. End of Procedure.
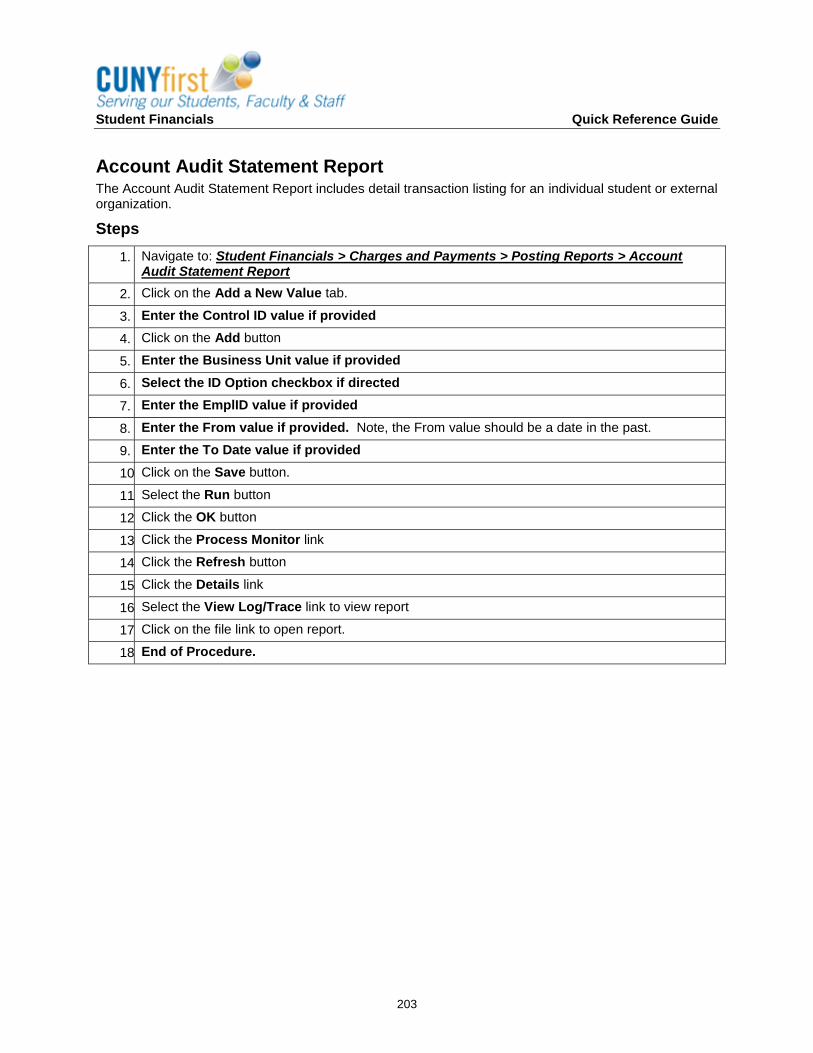
Student Financials Quick Reference Guide
203
Account Audit Statement Report The Account Audit Statement Report includes detail transaction listing for an individual student or external organization.
Steps
1. Navigate to: Student Financials > Charges and Payments > Posting Reports > Account Audit Statement Report
2. Click on the Add a New Value tab.
3. Enter the Control ID value if provided
4. Click on the Add button
5. Enter the Business Unit value if provided
6. Select the ID Option checkbox if directed
7. Enter the EmplID value if provided
8. Enter the From value if provided. Note, the From value should be a date in the past.
9. Enter the To Date value if provided
10. Click on the Save button.
11. Select the Run button
12. Click the OK button
13. Click the Process Monitor link
14. Click the Refresh button
15. Click the Details link
16. Select the View Log/Trace link to view report
17. Click on the file link to open report.
18. End of Procedure.
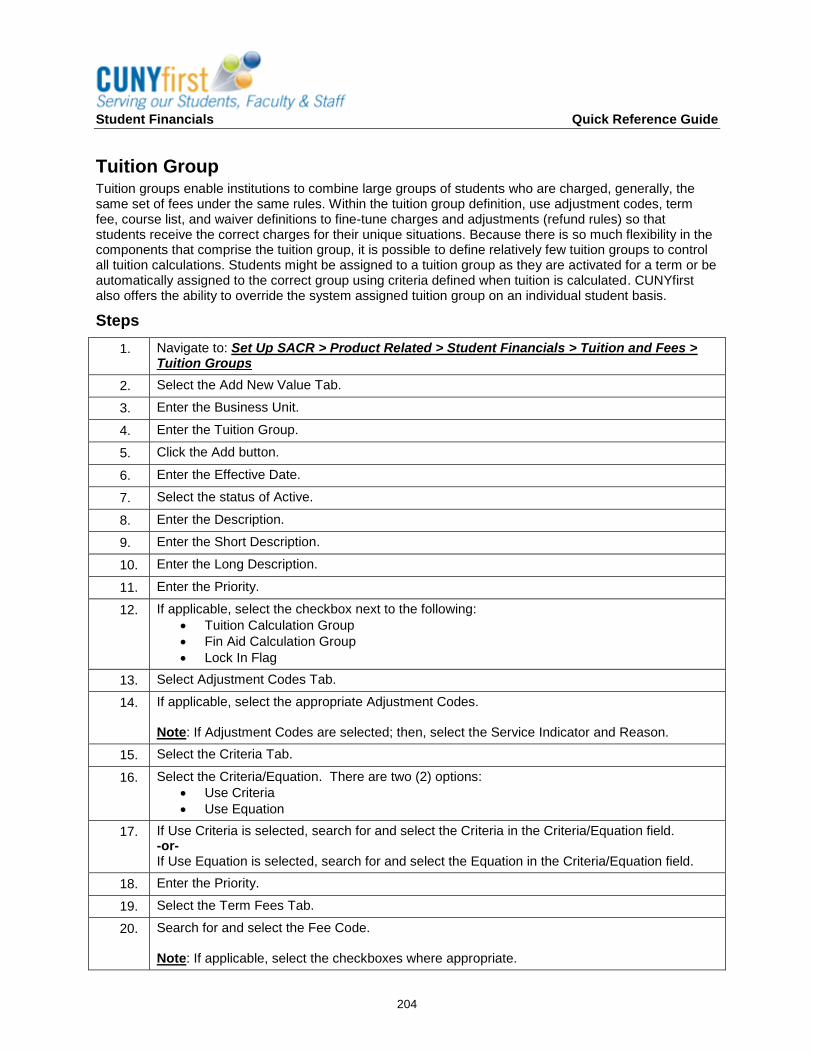
Student Financials Quick Reference Guide
204
Tuition Group Tuition groups enable institutions to combine large groups of students who are charged, generally, the same set of fees under the same rules. Within the tuition group definition, use adjustment codes, term fee, course list, and waiver definitions to fine-tune charges and adjustments (refund rules) so that students receive the correct charges for their unique situations. Because there is so much flexibility in the components that comprise the tuition group, it is possible to define relatively few tuition groups to control all tuition calculations. Students might be assigned to a tuition group as they are activated for a term or be automatically assigned to the correct group using criteria defined when tuition is calculated. CUNYfirst also offers the ability to override the system assigned tuition group on an individual student basis.
Steps
1. Navigate to: Set Up SACR > Product Related > Student Financials > Tuition and Fees > Tuition Groups
2. Select the Add New Value Tab.
3. Enter the Business Unit.
4. Enter the Tuition Group.
5. Click the Add button.
6. Enter the Effective Date.
7. Select the status of Active.
8. Enter the Description.
9. Enter the Short Description.
10. Enter the Long Description.
11. Enter the Priority.
12. If applicable, select the checkbox next to the following:
Tuition Calculation Group
Fin Aid Calculation Group
Lock In Flag
13. Select Adjustment Codes Tab.
14. If applicable, select the appropriate Adjustment Codes. Note: If Adjustment Codes are selected; then, select the Service Indicator and Reason.
15. Select the Criteria Tab.
16. Select the Criteria/Equation. There are two (2) options:
Use Criteria
Use Equation
17. If Use Criteria is selected, search for and select the Criteria in the Criteria/Equation field. -or- If Use Equation is selected, search for and select the Equation in the Criteria/Equation field.
18. Enter the Priority.
19. Select the Term Fees Tab.
20. Search for and select the Fee Code. Note: If applicable, select the checkboxes where appropriate.
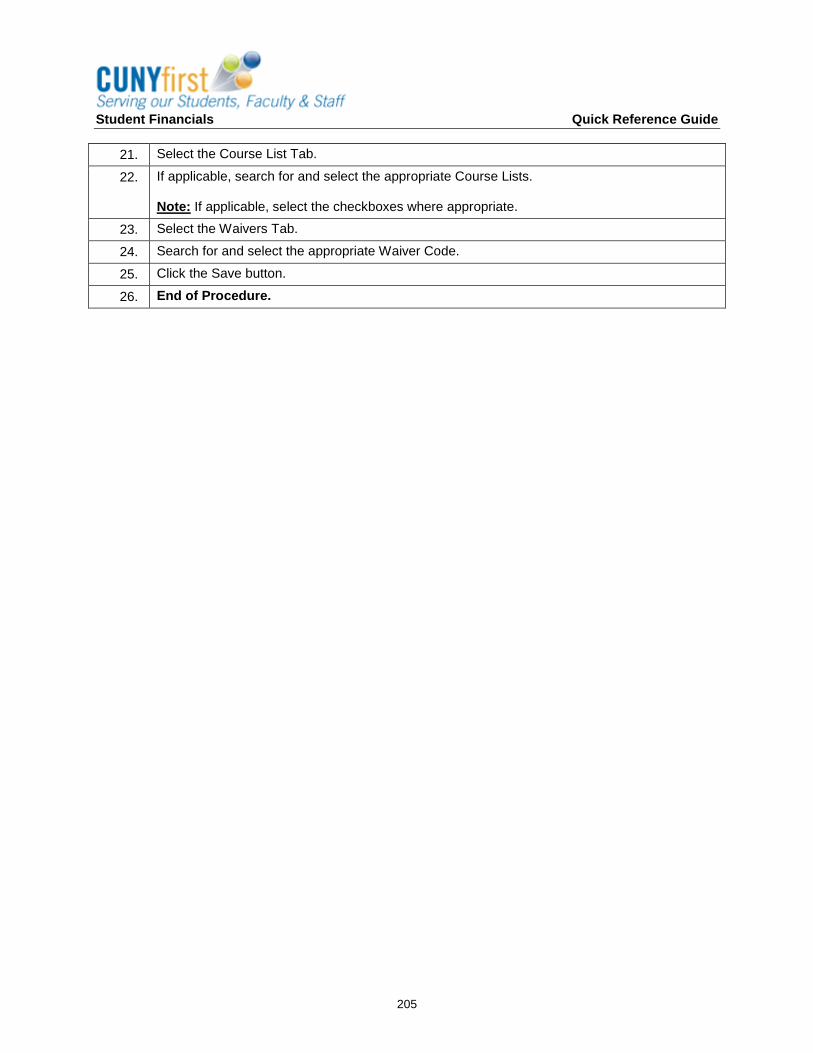
Student Financials Quick Reference Guide
205
21. Select the Course List Tab.
22. If applicable, search for and select the appropriate Course Lists. Note: If applicable, select the checkboxes where appropriate.
23. Select the Waivers Tab.
24. Search for and select the appropriate Waiver Code.
25. Click the Save button.
26. End of Procedure.
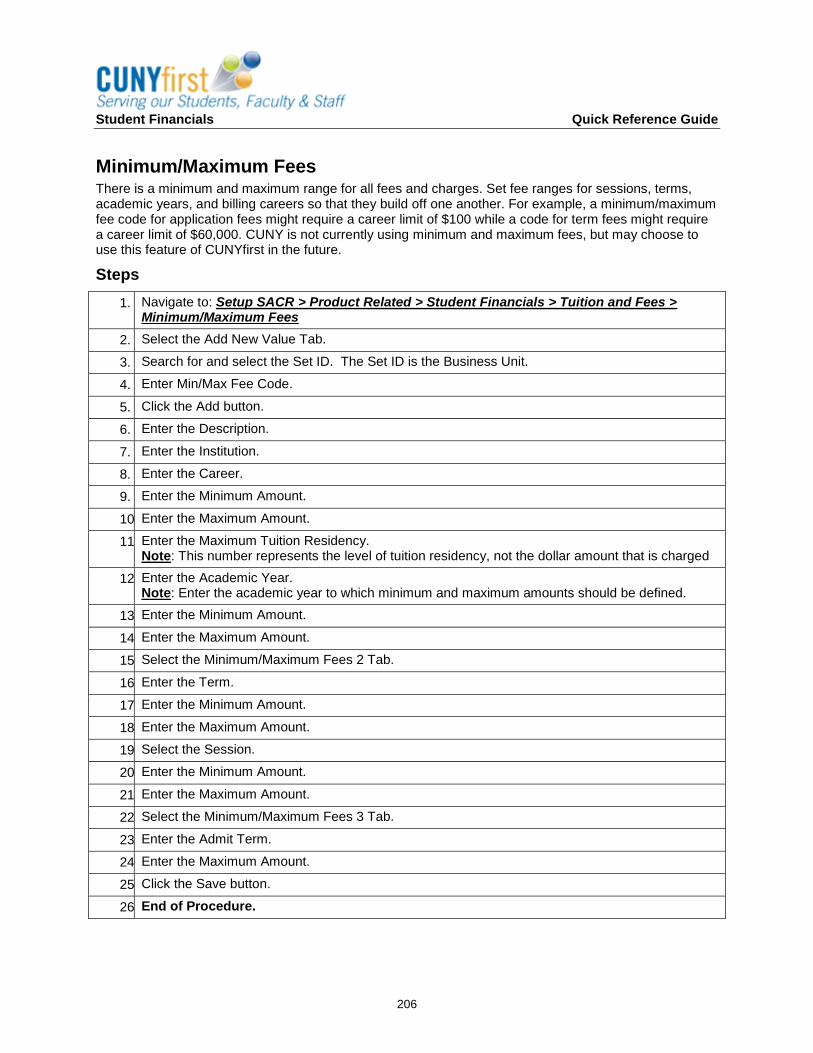
Student Financials Quick Reference Guide
206
Minimum/Maximum Fees There is a minimum and maximum range for all fees and charges. Set fee ranges for sessions, terms, academic years, and billing careers so that they build off one another. For example, a minimum/maximum fee code for application fees might require a career limit of $100 while a code for term fees might require a career limit of $60,000. CUNY is not currently using minimum and maximum fees, but may choose to use this feature of CUNYfirst in the future.
Steps
1. Navigate to: Setup SACR > Product Related > Student Financials > Tuition and Fees > Minimum/Maximum Fees
2. Select the Add New Value Tab.
3. Search for and select the Set ID. The Set ID is the Business Unit.
4. Enter Min/Max Fee Code.
5. Click the Add button.
6. Enter the Description.
7. Enter the Institution.
8. Enter the Career.
9. Enter the Minimum Amount.
10. Enter the Maximum Amount.
11. Enter the Maximum Tuition Residency. Note: This number represents the level of tuition residency, not the dollar amount that is charged
12. Enter the Academic Year. Note: Enter the academic year to which minimum and maximum amounts should be defined.
13. Enter the Minimum Amount.
14. Enter the Maximum Amount.
15. Select the Minimum/Maximum Fees 2 Tab.
16. Enter the Term.
17. Enter the Minimum Amount.
18. Enter the Maximum Amount.
19. Select the Session.
20. Enter the Minimum Amount.
21. Enter the Maximum Amount.
22. Select the Minimum/Maximum Fees 3 Tab.
23. Enter the Admit Term.
24. Enter the Maximum Amount.
25. Click the Save button.
26. End of Procedure.