student – submit 3-months notice - university of...
TRANSCRIPT

Student – Submit 3-months Notice
1. Login from umisisweb
1. Login using your userid and password.
2. Under the ‘Postgraduate’ tab, click on the ‘Research’ icon as in Figure 1.1.
Figure 1.1
3. Under ‘Research’, click on ‘Thesis’ as in Figure 1.2.
Figure 1.2
4. You will be directed to the Candidature Requirements Checklist page.

2. Requirements Checklist
1. To submit your thesis title, you must complete the below Candidature Requirement Checklist as shown in the below screen(Figure 2.1)
Figure 2.1
2. Initial requirement checklist’s are automatically verified by the system and displayed the verified
symbol in tick icon ( ) for each checklist.

3. Click on “Add Seminar Presentation” button to fulfill the Seminar presentation requirement checklist. A popup page will be displayed as in the below screen(Figure 2.2).
Figure 2.2
Seminar Presentation:
Add Seminar:
3.1. Select session, semester, seminar date & document.
3.2. The system allows more than one file to upload by selecting files one by one.
3.3. Please make sure that file type should be pdf, doc, docx and file size should be less than or equal to 10 MB.
3.4. Click “Back” button to redirect to list page.
3.5. Click “Reset” button to reset the form.
3.6. Click “Save” button to save the information and the popup window will be closed.
3.7. Click “Close” button to close the popup window.
3.8. Click the button “Add Seminar Presentation” in the requirement checklist window or click on “Add” button in the seminar list page to add more than one seminar presentation information.
3.9. Once the seminar item(s) are added, the count will be displayed in the requirement checklist screen as shown in the screen (Figure 2.2.1).

Figure 2.2.1
Seminar List:
3.10. To view the added seminar presentation(s) click on the count of seminar presentation in the requirement checklist page. A popup will be opened and the details will be displayed as in the below screen (Figure 2.2.2).
3.11. Click “Close” button to close the popup window.
Figure 2.2.2
Seminar Update:
3.12. Click on “Edit” to modify each seminar information. The edit screen will be displayed as shown in the below screen(Figure 2.2.3)

Figure 2.2.3
3.13. Change the previously entered seminar information.
3.14. Click “Back” button to redirect to list page.
3.15. Click “Reset” button to reset the form.
3.16. Click “Save” button to save the changes to seminar information.
3.17. Click “Close” button to close the popup window.
Seminar Delete:
3.18. Check the checkbox against each seminar presentation which you want to delete from the list and click “Delete” button to delete the respective seminar presentation.(Figure 2.2.4)
3.19. Use heading row check box to check / uncheck all items.
3.20. Click “Close” button to close the popup window.
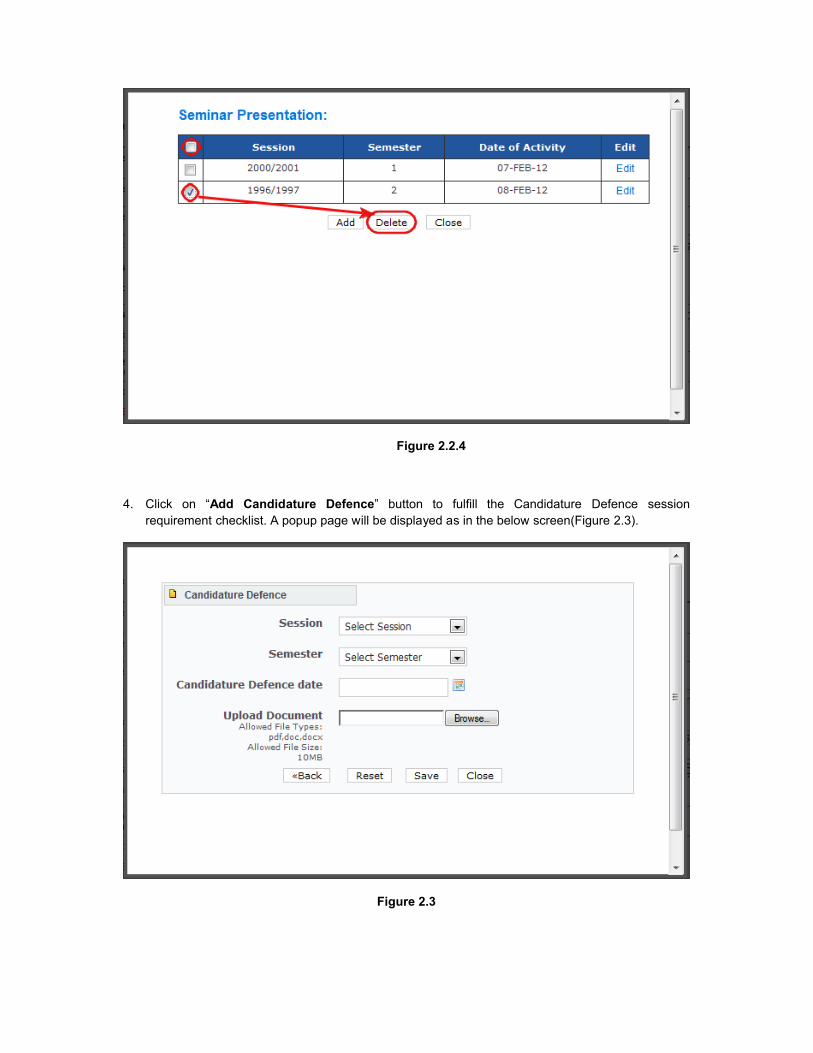
Figure 2.2.4
4. Click on “Add Candidature Defence” button to fulfill the Candidature Defence session requirement checklist. A popup page will be displayed as in the below screen(Figure 2.3).
Figure 2.3
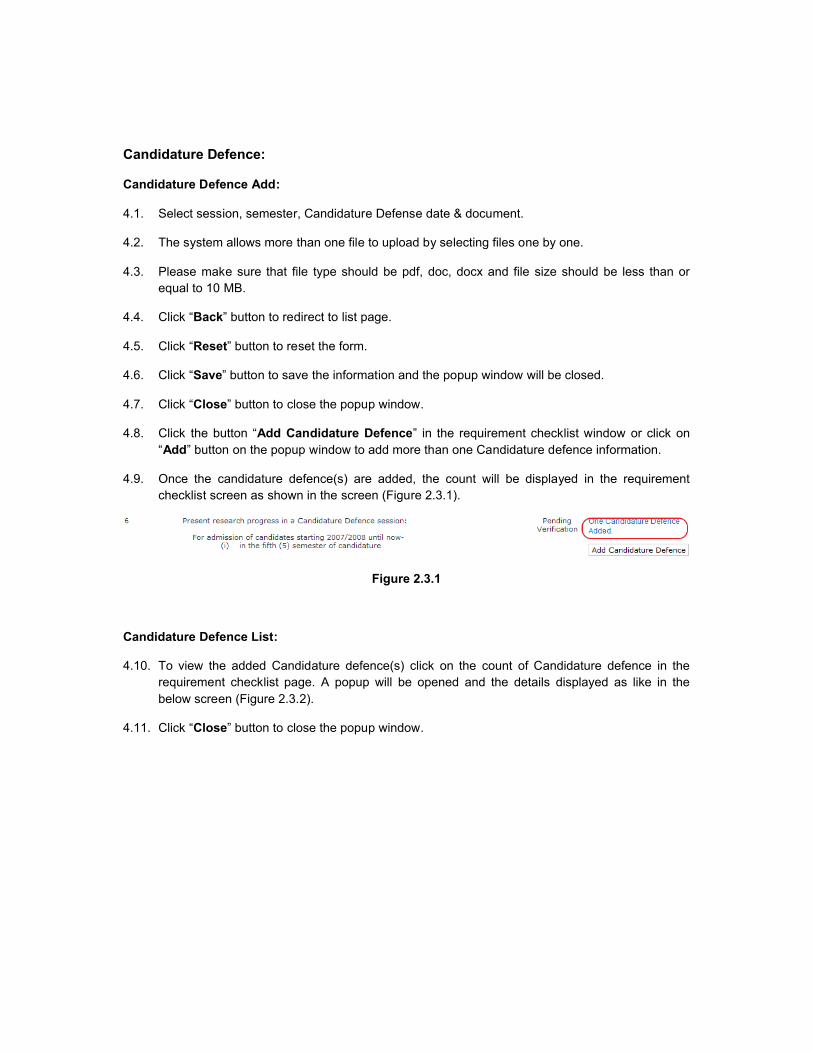
Candidature Defence:
Candidature Defence Add:
4.1. Select session, semester, Candidature Defense date & document.
4.2. The system allows more than one file to upload by selecting files one by one.
4.3. Please make sure that file type should be pdf, doc, docx and file size should be less than or equal to 10 MB.
4.4. Click “Back” button to redirect to list page.
4.5. Click “Reset” button to reset the form.
4.6. Click “Save” button to save the information and the popup window will be closed.
4.7. Click “Close” button to close the popup window.
4.8. Click the button “Add Candidature Defence” in the requirement checklist window or click on “Add” button on the popup window to add more than one Candidature defence information.
4.9. Once the candidature defence(s) are added, the count will be displayed in the requirement checklist screen as shown in the screen (Figure 2.3.1).
Figure 2.3.1
Candidature Defence List:
4.10. To view the added Candidature defence(s) click on the count of Candidature defence in the requirement checklist page. A popup will be opened and the details displayed as like in the below screen (Figure 2.3.2).
4.11. Click “Close” button to close the popup window.

Figure 2.3.2
Candidature Defence Update:
4.12. Click on “Edit” to modify each Candidature Defence information. The edit screen will be displayed as shown in the below screen(Figure 2.3.3)
Figure 2.3.3
4.13. Change the previous Candidature Defence information.
4.14. Click “Back” button to redirect to list page.
4.15. Click “Reset” button to reset the form.
4.16. Click “Save” button to modify the candidature defence information.
4.17. Click “Close” button to close the popup window.
Candidature Defence Delete:
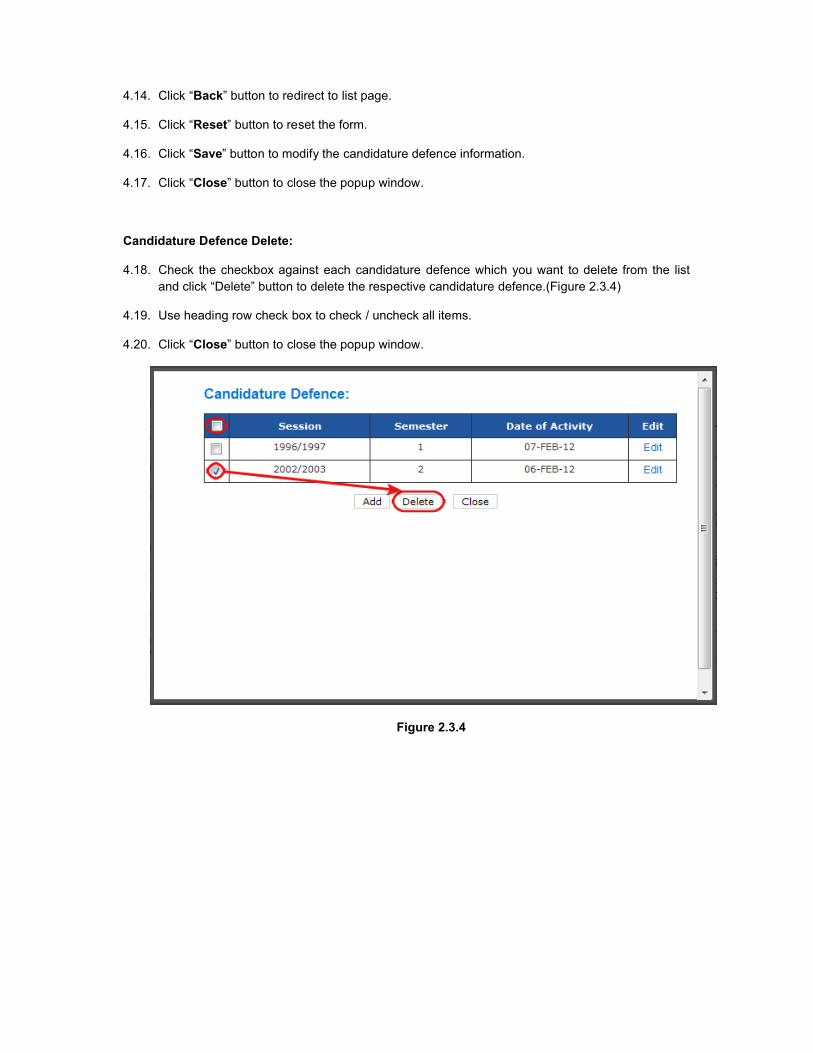
4.18. Check the checkbox against each candidature defence which you want to delete from the list and click “Delete” button to delete the respective candidature defence.(Figure 2.3.4)
4.19. Use heading row check box to check / uncheck all items.
4.20. Click “Close” button to close the popup window.
Figure 2.3.4

5. Click on “Add Publication” button to complete the PUBLICATION requirement checklist. A popup page will be displayed as in the below screen (Figure 2.4).
Figure 2.4
Publication:
Publication Add:
5.1. Enter article title.
5.2. Select Journal Title.
5.3. Select the status whether the publication submitted or accepted.
5.4. Select Date Accepted / Submitted.
5.5. Browse the article file and select to upload.
5.6. The system allows more than one file to upload by selecting files one by one.
5.7. Please make sure that file type should be pdf, doc, docx and file size should be less than or equal to 10 MB.
5.8. Click “Back” button to redirect to list page.
5.9. Click “Reset” button to reset the form.
5.10. Click “Save” button to save the information and the popup window will be closed.
5.11. Click “Close” button to close the popup window.
5.12. Click the button “Add Publication” in the requirement checklist window or click on “Add” button in the popup window to add more than one publication information.

5.13. Once the publication(s) are added, the count will be displayed in the requirement checklist screen as shown in the screen (Figure 2.4.1).
Figure 2.4.1
Publication List:
5.14. To view the added Publication(s) click on the count of Publication in the requirement checklist page. A popup will be opened and the details will be displayed as below screen(Figure 5.4.2).
5.15. Click “Close” button to close the popup window.
Figure 2.4.2
Publication Update:
5.16. Click on “Edit” to modify each publication. The edit screen will be displayed as shown in the below screen (Figure 2.4.3).

Figure 2.4.3
5.21. Change the information whatever in the candidature defence information.
5.22. Click “Back” button to redirect to list page
5.23. Click “Reset” button to reset the form.
5.24. Click “Save” button to modify the candidature defence information.
5.25. Click “Close” button to close the popup window.
Publication Delete:
5.26. Check the checkbox against each publication which are you want to delete from the list and click “Delete” button to delete the respective publication.(Figure 2.4.4)
5.27. Use heading row check box to check / uncheck all items.

Figure 2.4.4
6. Check the Confirmation of Supervisor(s).
7. If the Supervisor(s) information is not correct, the system will produce the message “PLEASE CONTACT THE FACULTY REGARDING YOUR SUPERVISOR(S) INFORMATION” and won’tallow to proceed next(Figure 7.1).
Figure 7.1
8. If the Supervisor(s) information is correct, the system will produce the message “You are not allowed to submit the title of your thesis. Please contact your faculty for further information.” With “Proceed to Next” button at the bottom of the requirement checklist form(Figure 8.1).
Figure 8.1
9. Click “Proceed to Next” button to submit the thsis title.
3. Thesis Title Submission
1. Thesis title submission screen as follows(Figure 3.1),
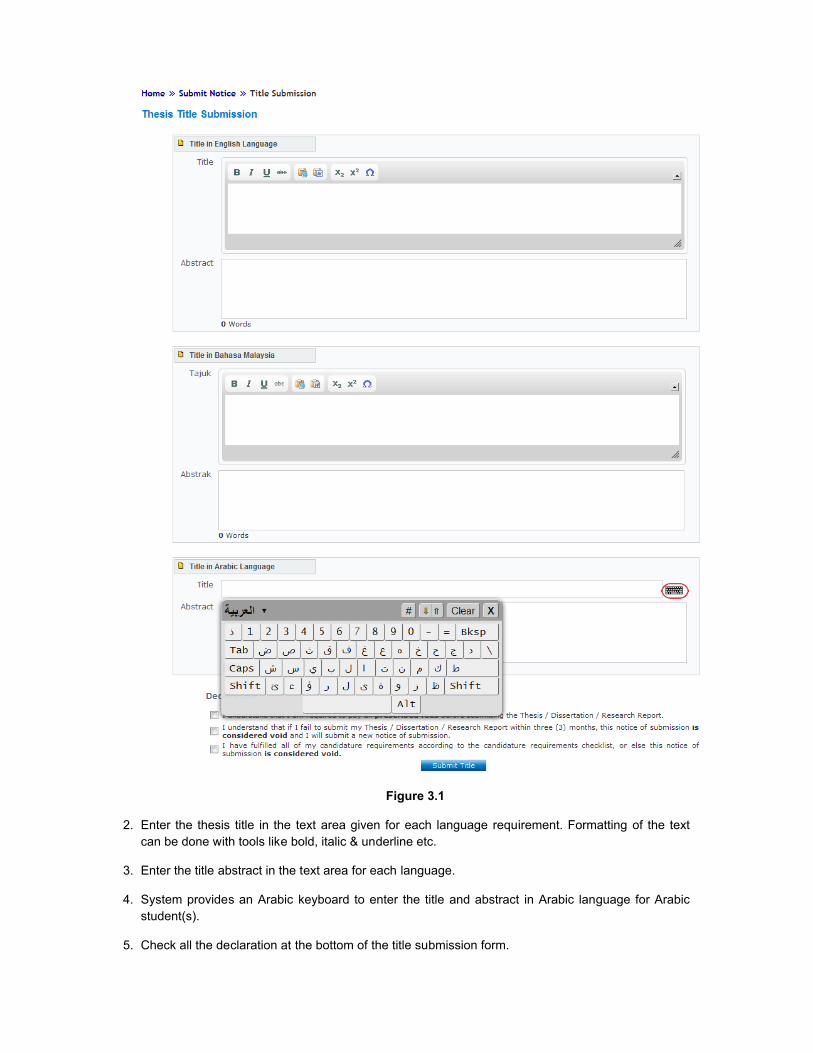
Figure 3.1
2. Enter the thesis title in the text area given for each language requirement. Formatting of the text can be done with tools like bold, italic & underline etc.
3. Enter the title abstract in the text area for each language.
4. System provides an Arabic keyboard to enter the title and abstract in Arabic language for Arabicstudent(s).
5. Check all the declaration at the bottom of the title submission form.
6. Click on “Submit Title” button to submit the thesis title.
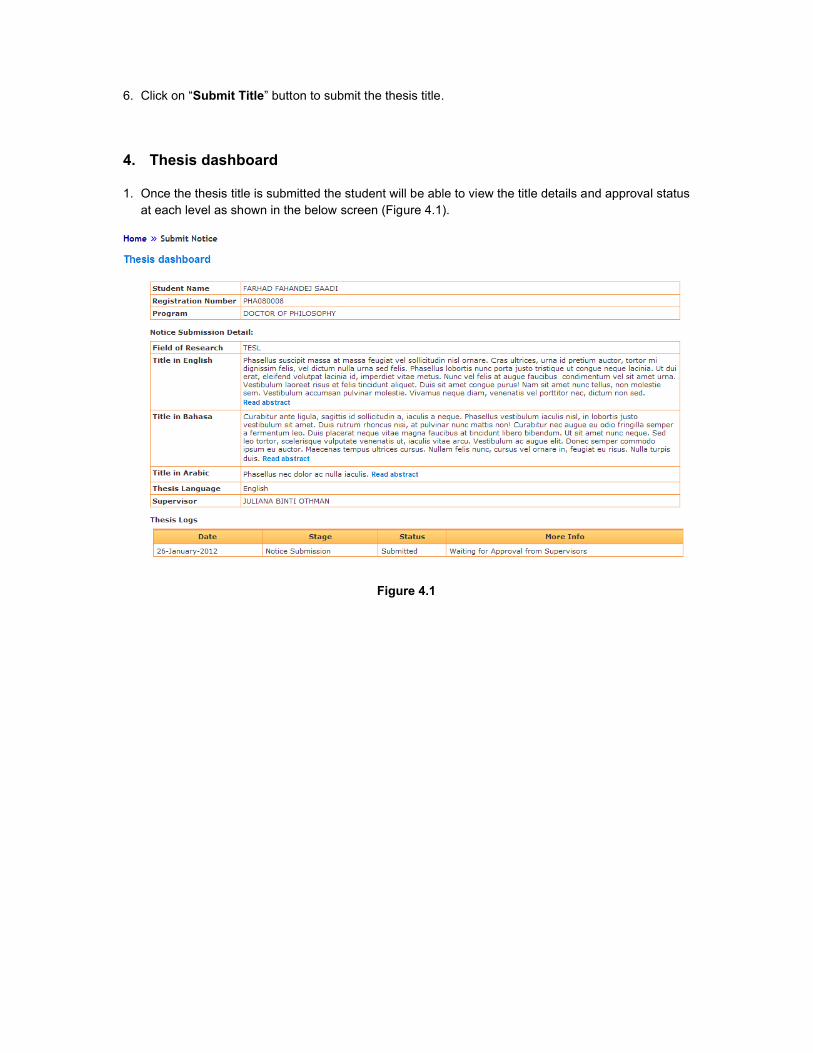
4. Thesis dashboard
1. Once the thesis title is submitted the student will be able to view the title details and approval status at each level as shown in the below screen (Figure 4.1).
Figure 4.1