student user guide for odysseyware
TRANSCRIPT

Odysseyware®v2.51
Student User GuideReleased 10/2019
Odysseyware® v2.51 Student User GuideReleased 10/2019
©2019 Odysseyware®, an Edgenuity® company. All rights reserved.
Confidential and proprietary. This document contains information that shall not be disclosed to third parties without writtenconsent. This document shall not be duplicated, used or disclosed, in whole or in part, for any purpose other than to evaluatethe information herein.
Other trademarks notice and attribution
Ownership of other trademarks used in this documentation set are as follows:
l Excel is a registered trademark of Microsoft Corporation.
l AZURE and Office 365 are trademarks of Microsoft Corporation.
l iPad is a registered trademark of Apple Inc.
l Firefox is a registered trademark of the Mozilla Foundation.
l Chrome is a trademark of Google Inc.
Odysseyware®
300 N. McKemy Avenue
Chandler, AZ 85226
Helpful resources
Technical Support
Phone - Toll Free: 877.251.6662
Days/Time - Monday - Friday 7 am - 11 pm (CT) and Saturday - Sunday 1 pm - 7pm (CT)
Go to: http://www.odysseyware.com/support
Email: [email protected]
Odysseyware Knowledgebase
l Go directly to the Odysseyware Training Resources Knowledgebase page at: https://www.odysseyware.com/training-resources. The Knowledgebase page has a Search feature where you type a keyword to access resources containing thatkeyword. Or, use the navigational links to access user guides, videos, and other helpful resources related to the selectedlink.
Odysseyware® v2.51 Student User Guide

Contents
What's new in this release of Odysseyware® v2.51 3
Welcome to Odysseyware® 5About this guide 5
Let's get started 5
Logging in 6
Logging out 7
Learn about the top toolbar and buttons 7
View and open your current assignments 11Request to unblock assignments 13
View your courses and current progress on your Learner Dashboard 15See details about your courses' progress on your Learner Dashboard 15
Message a teacher for help with a course 18
What you can see and do for units in your assigned courses 19
What you can see and do for assignments in your assigned courses 21
What happens when a course term ends? 24
Open and work on your lessons 27Lesson nav bar information and tools 27
Lesson contents and tools 27
Work on lessons 28
Message your teacher for help with assignment questions 29
Hear pronunciation of vocabulary words 30
View transcripts of multimedia in lessons 31
Use the vocabulary and spelling activities 31
How to use the Vocab Arcade activities 32
View reference information about assignments 33
Select a voice to speak the assignment text 33
Translate assignment text into a different language 34
Write and read notes for assignments 37
Print assignment contents and notes 39
Answer assignment questions and view your results 41Answer questions and turn in assignment for grading 41
Review results of answered questions 43
Work on foreign language courses 45
Question types 46
Matching questions 46
Multiple Choice 46
Odysseyware® v2.51 Student User Guide 1

Multiple Select 46
Fill in the Blank / Unordered 47
Text Multiple Choice 47
True and False 47
Graphic Multiple Choice 47
Layered Text Boxes 48
Drag And Drop 48
Open and work on projects and essays 49Open and work on projects or essays 49
Upload files for essay questions and projects 50
Use theWriter tools to check your written text for essays and projects 52
Writer Spelling errors options and Grammar suggestions 53
Grammar suggestions 54
What the Overall Score elements mean 56
Prepare for and take quizzes and tests 59Review your completed assignments before beginning quizzes or tests 59
Open quizzes or tests and answer the questions 61
Request unlock of quizzes or tests 62
Review results of quizzes and tests 63
Communicate with your teachers using internal messaging 65Messaging system features and tools 65
Read messages 66
Filter your messages list 67
Write messages to your teachers 67
Reply to messages 68
View your sent messages 69
Archive messages 70
View archived messages 70
Forward messages 71
Access helpful resources 73
Index 77
2 Odysseyware® v2.51 Student User Guide

What's new in this release of Odysseyware® v2.51
Odysseyware v2.51 contains an improvement for Students when uploading files for a project and essay questions.
Improvement: The .png file type is now allowed for uploading files when completing projects and essayquestions.To better support students, the .png file type was added to the list of acceptable file formats to upload for projects and essayquestions. We received many requests for this feature because .png files are the default file type for many screenshot programson devices.
Odysseyware® v2.51 Student User Guide 3

THIS PAGE INTENTIONALLY LEFT BLANK

Welcome to Odysseyware®
Welcome, Student!
Odysseyware is a web-based learning environment featuring media-rich, online curriculum for grades 3 through 12. Thispremiere online learning experience allows you to:
l Easily access your assignments in the order assigned.
l See how you are doing in all your assigned courses and where you might need help.
l Prepare for quizzes and tests and see your results.
l Get help when necessary.
l Actively send messages to and receive messages from your teachers.
About this guideThis guide is for Odysseyware students and it explains:
l How to log in and out of Odysseyware.
l About the top toolbar and buttons you use to get to your assignments and courses.
l What you see when you open a Lesson and how to use the student tools.
l How to answer questions in Lesson and Projects and view your results.
l How to prepare for Quizzes and Tests and view your assessment results.
l How to view details about your current progress in your courses, such as the number of assignments remaining and howmany assignments you need to complete a day to stay on track.
l How to use the internal messaging system to communicate with your teachers.
l Resources available to students.
Let's get startedYour school should have provided you with a URL which allows you access to Odysseyware. When you enter the URL in asupported browser, a Login page appears, possibly looking like the example below.
Note: The Login page shown here is an example Odysseyware school. Your school may have acustomized Login page.
Odysseyware® v2.51 Student User Guide 5

Logging inHow you log in depends on whether or not your school has enabled Single Sign-On (SSO) functionality with Odysseyware.Simply put, SSO is a process where a user enters one name and password (credentials) to access multiple applications, such ashow you can use your Google credentials to log in to other web applications. SSO is also available through Partner Integrationcontracts, such as Clever™ and ClassLink®.
l For schools without enabled SSO functionality. Example A Login box appears. This means you should have received ausername and password from your school.
l For schools with enabled SSO functionality, the Example B Login box appears. You will use your username andpassword for your school's Identity Provider (IDP), such as Google or Microsoft® AZURE™, to log in.
Note: For schools using SSO with Clever or ClassLink, you log into the Clever or ClassLink applicationfirst, then from your portal or dashboard, you click the icon to open Odysseyware. If you are associatedto multiple Odysseyware schools, you can select which one to use.
To log in:
l If your school has not enabled Single Sign-On (SSO), enter the Username and Password your school provided you, andthen click the READY, SET, LEARN button. You are immediately logged in to Odysseyware.
l If your school has enabled SSO, click the Sign In With [AZURE][Google][Other IDP] button, then enter your credentialsfor your school's site. You are immediately logged in to Odysseyware.
6 Odysseyware® v2.51 Student User Guide
Logging in

Note: If your login was not successful, and depending on whether or not your school has enabled SSOfunctionality, you may see a message letting you know that your account may be disabled, or that wecouldn't find you in the system. If you see a message and cannot log in, contact your school'sadministrator. For some types of login issues, your school's Admin may receive a System Supportmessage in their Odysseyware Inbox notifying of user login issues.
Logging outWe recommend that all users log out of the application before closing the browser tab so that all connections are satisfactorilyclosed and logout times can accurately be recorded. This is important because several student activity reports use students'login and logout times for attendance reporting.
l Click the Sign Out button located in the upper right of the application.
Note: For schools using SSO, when you click the Sign Out button, you are only logged off ofOdysseyware. You are still logged into your organizational account or partner integration application.
Learn about the top toolbar and buttonsAfter you log in, and you have watched or skipped the video introduction, you see the Learn > Assignments page. This page isalso known as your "Home page".
Let's take a quick look at the toolbars and features on this page. The Learn > Assignments page contents are explained later inthe guide. At the top of the application is an identification bar (id bar) and a toolbar as shown in the example below.
This id bar and toolbar are visible from every page while you are logged in so that you can easily move to other places in theapplication. You see:
l Your school name in the upper left and you might see your school logo. Some schools may have customized colors andlogos.
l Your name in the upper right. If you see a drop-down arrow next to your name, this means you have the "ChangePassword*" permission. You can click the drop-down arrow to enter, confirm, and save a new password.
Note: If your school has Single Sign-On (SSO) functionality, the Change Password feature is hiddenbecause with Single Sign-On, you use your school credentials to log in and do not have to set apassword in Odysseyware.
Odysseyware® v2.51 Student User Guide 7
Logging out

Buttons on the toolbar (identified in the example above) let you access other features.
Item Button Description
A Learn Click it to open your Assignments page. The Assignments page shows all the assignments you should beworking on first for all your courses See "View and open your current assignments" on page 11.
While on the Assignments page, you can click the Courses tab to see detailed information about yourcourses, units and assignments. See "View your courses and current progress on your LearnerDashboard" on page 15.
B Message Click it to go to your messaging Inbox so that you can send messages to and read messages from yourteachers. A red circle beside theMessage button tells you the number of unread messages in yourInbox. See "Communicate with your teachers using internal messaging" on page 65.
C Help Click it to access helpful information, including the Technical Support details and App Info details youmay need to provide to Tech Support. You see an FAQ page that may answer some question for youabout using Odysseyware. Two other helpful tools are theWhat's New page and the Resources page.Click those tabs to see what is available to provide support and guidance. See "Access helpfulresources" on page 73.
D Sign Out Click it to log off and close the application. This is important so that your time in the application isaccurately recorded.
When you click the Learn button on the top toolbar, a main navigation bar (navbar) appears with two important tabs:
l Assignments tab – Click this tab to see and open the assignments you should be working on for each assigned course.See "View and open your current assignments" on page 11.
l Courses tab – Click this tab to see all your courses on a "Learner Dashboard" where your progress in each course isdisplayed and you can quickly "jump into" the units and assignments for each course. See "View your courses andcurrent progress on your Learner Dashboard" on page 15.
8 Odysseyware® v2.51 Student User Guide
Learn about the top toolbar and buttons

Tip: You also use the Courses tab to open completed assignments so that you can review your workbefore starting quizzes and tests. See "Review your completed assignments before beginning quizzes ortests" on page 59.
Odysseyware® v2.51 Student User Guide 9
Learn about the top toolbar and buttons

THIS PAGE INTENTIONALLY LEFT BLANK

View and open your current assignments
Your Learn > Assignments page is the default page that you see after logging in and closing the video.
The Assignments page shows you all of your courses (subjects) and the assignments you have in "Assigned" status for the firstunit in each course. As you successfully work on and submit an "Assigned" assignment, the next "Assigned" assignment for theunit appears in this list. You will only be able to work on assignments that have been made available to you by your teacher. Tolearn more about courses and units, see "View your courses and current progress on your Learner Dashboard" on page 15.
Tip: Project assignments in a unit are automatically set to "Assigned" so that you can work on theprojects at any time. To learn more, see "Open and work on projects and essays" on page 49.
Odysseyware® v2.51 Student User Guide 11

The Assignments page details and tools, identified above, let you open an assignment to work on it, quickly know if anassignment is overdue, and if an assignment has been blocked by your teacher. You also see your score if you attempted theassignment before, but did not pass it.
Item Info/Feature Description
A Course name The gray bar shows the course name.
B Due Due date for the assignment. If the assignment is past the due date, you see an Overduenotification in a different color.
C Assignment symbol Assignment type symbol. See "Assignment type symbols" below.
l Hover over the symbol to see the Start Date and Teacher's name.
D Assignment title Title of the assignment.
E Score Assignment score if you have attempted the assignment at least once already. If youhaven't attempted the assignment, no score appears.
F Status Status of the assignment. Typically, it will show a Status of Assigned .
G Go To arrow Click the arrow (or anywhere in the assignment bar) to open an assignment and startworking on it.
H Assignment Blockedsymbol
Indicates the assignment cannot be started until you message your teacher to unblock it.See "Request to unblock assignments" on the facing page.
Assignment type symbolsOdysseyware uses symbols for each assignment type within an assignment unit so that you can easily identify the type ofassignment.
Symbol Assignmenttype Symbol Assignment type Symbol Assignment
type
Alternatetest (Pre-test)
Quiz Alternatequiz
Lesson Reference, such as a Course Overview, Glossary andCredits. Typically, Reference assignments are Assigned bydefault, but do not have a Due Date.
Alternatesemestertest
12 Odysseyware® v2.51 Student User Guide
View and open your current assignments

Symbol Assignmenttype Symbol Assignment type Symbol Assignment
type
Project Test (or Unit Test) Alternatefinal test
Final exam(test)
Semester exam (test) Review
Request to unblock assignments
You may see an Assignment Blocked symbol instead of the Go To arrow when you want to open an assignment. TheAssignment Blocked symbol appears if your school has set options to block students' progress in lessons, quizzes, or tests. Or,your teacher may have set an assignment into a Blocked state because she wants to be notified when you start the assignment.The Assignment Blocked symbol indicates you cannot proceed until the teacher has unblocked the assignment.
1. To request that your teacher unblock the assignment, click the Assignment Blocked symbol.
2. Click theMessage Teacher button.
3. On the confirmation message, clickOK.
Odysseyware® v2.51 Student User Guide 13
Request to unblock assignments
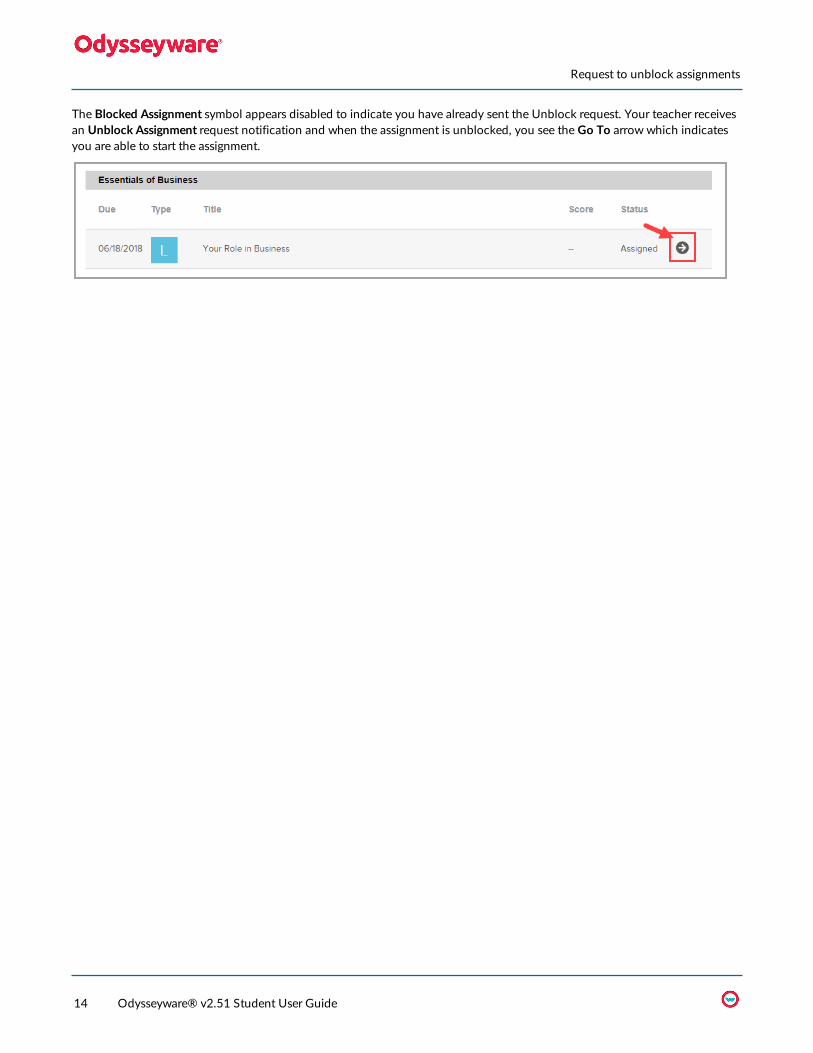
The Blocked Assignment symbol appears disabled to indicate you have already sent the Unblock request. Your teacher receivesan Unblock Assignment request notification and when the assignment is unblocked, you see the Go To arrow which indicatesyou are able to start the assignment.
14 Odysseyware® v2.51 Student User Guide
Request to unblock assignments
View your courses and current progress on your Learner Dashboard
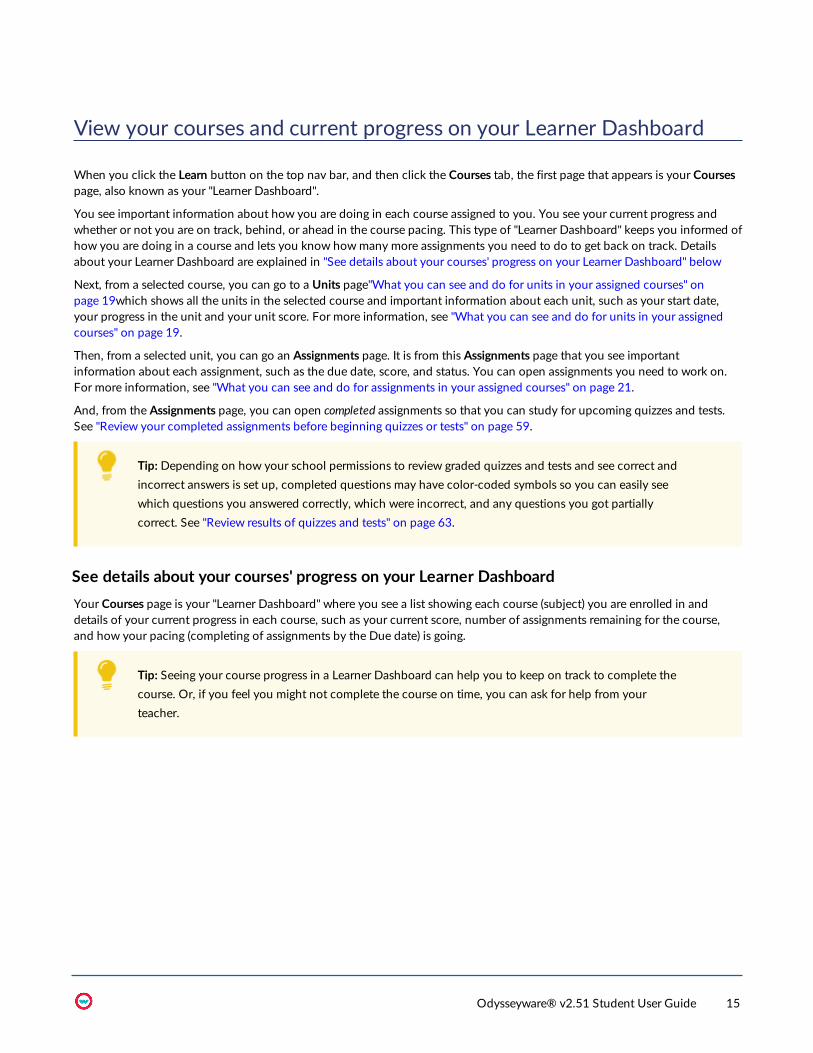
When you click the Learn button on the top nav bar, and then click the Courses tab, the first page that appears is your Coursespage, also known as your "Learner Dashboard".
You see important information about how you are doing in each course assigned to you. You see your current progress andwhether or not you are on track, behind, or ahead in the course pacing. This type of "Learner Dashboard" keeps you informed ofhow you are doing in a course and lets you know howmany more assignments you need to do to get back on track. Detailsabout your Learner Dashboard are explained in "See details about your courses' progress on your Learner Dashboard" below
Next, from a selected course, you can go to a Units page"What you can see and do for units in your assigned courses" onpage 19which shows all the units in the selected course and important information about each unit, such as your start date,your progress in the unit and your unit score. For more information, see "What you can see and do for units in your assignedcourses" on page 19.
Then, from a selected unit, you can go an Assignments page. It is from this Assignments page that you see importantinformation about each assignment, such as the due date, score, and status. You can open assignments you need to work on.For more information, see "What you can see and do for assignments in your assigned courses" on page 21.
And, from the Assignments page, you can open completed assignments so that you can study for upcoming quizzes and tests.See "Review your completed assignments before beginning quizzes or tests" on page 59.
Tip: Depending on how your school permissions to review graded quizzes and tests and see correct andincorrect answers is set up, completed questions may have color-coded symbols so you can easily seewhich questions you answered correctly, which were incorrect, and any questions you got partiallycorrect. See "Review results of quizzes and tests" on page 63.
See details about your courses' progress on your Learner DashboardYour Courses page is your "Learner Dashboard" where you see a list showing each course (subject) you are enrolled in anddetails of your current progress in each course, such as your current score, number of assignments remaining for the course,and how your pacing (completing of assignments by the Due date) is going.
Tip: Seeing your course progress in a Learner Dashboard can help you to keep on track to complete thecourse. Or, if you feel you might not complete the course on time, you can ask for help from yourteacher.
Odysseyware® v2.51 Student User Guide 15

This table explains the important details identified in the above sample "Learner Dashboard".
Item Feature Description
A Title Course title. May include the course year, state identifier, and course code.
B Current Score Your current score in the course based on assignments you have turned in andhave been graded.
Note: For example, on the current date, you havecompleted two lessons in the first unit. Your grades onthe two completed lessons are 80% and 90%. So, yourcurrent score would calculate to: 80 + 90 = 170. Now,divide 170 by 2 (lessons) so 170/2 = 85%.
C Score to Date Your score to date in the course based on completed assignments (those thathave been graded and turned in and are awaiting teacher action) and overdueassignments which are counted as zero percent (0%).
16 Odysseyware® v2.51 Student User Guide
See details about your courses' progress on your Learner Dashboard

Item Feature Description
Note: For example, on the current date, you should havecompleted four lessons in the first unit. You havecompleted two lessons and two lessons are overdue.Your grades on the two completed lessons are 80% and90%. So, your score to date would calculate to: 80 + 90= 170. Now, divide 170 by 4 (lessons) so 170/4 = 42.5%.
D Progress Your progress in the course indicated by a progress bar and percent complete.
Note: For a standard enrollment, course progress iscalculated based on the number of graded assignmentsdivided by the total number of assignments in the course.Skipped assignments and units do not count in the total.For example, you have two graded assignments and thetotal number of assignments in the course is 50. Yourcourse progress is: 2/50 = .04%. For a CRx enrollment,overall progress is an average of the individual unitprogress.
E Pacing Indicates whether you are ahead, on track, or behind in the course. If ahead andbehind, the number of assignments appears in a colored indicator.
Green with number - Indicates the number of assignments you are ahead ofthe pacing.
Red with number - Indicates the number of assignments you are behind inpacing.
Gray with checkmark - Indicates you are on track.
F Start Date Date you started working on the course.
G Last Completion Date you last completed an assignment in the course.
H Teacher Shows the name of the primary teacher for the course.
I Message tool Let's you easily write a message to your teacher. Maybe you need help. See "Mes-sage a teacher for help with a course" on the next page.
J Assignments Remaining The first number is the assignments remaining in the course and the second num-ber is the total number of assignments in the course.
Odysseyware® v2.51 Student User Guide 17
See details about your courses' progress on your Learner Dashboard

Item Feature Description
K Assignments /day Number of assignments you must work daily to complete the course by the termend date assigned by your teacher or Admin.
L Days Remaining Number of working schooldays left in the course until the term end date. Thisnumber counts down to 0 which indicates that the course term end date haspassed. To learn what happens next, see "What happens when a course termends?" on page 24.
Helpful course toolsSeveral helpful tools are available on your Courses page, Learner Dashboard.
Tool Description
Info tool Hover over the tool to see the explanation of how the Current Score and Score to Dateare calculated.
Forward arrow Click the arrow to go to the units in the course. To learn more, see "What you can see anddo for units in your assigned courses" on the facing page.
Message a teacher for help with a course
If you need help with a course, maybe you are behind with your assignments, or you noticed that an assignment in the courseneeds final teacher grading, you can easily send your teacher a message.
1. On the toolbar, click Courses.
All of your assigned courses appear on the page.
2. For a course, click theMessage tool located next to the Teacher's name.
3. In theWhat do you need help with text box, type your message. As you start typing, the Send button becomes active.
18 Odysseyware® v2.51 Student User Guide
Message a teacher for help with a course

4. When finished with your message, click Send.
AMessage Sent indicator appears at the bottom of the message, and then the message box disappears.
5. If your school allows student messaging, other than asking for help with assignments or messaging with courses, click theMessage button on the top toolbar to see the sent message in the Sent box. See "Communicate with your teachers usinginternal messaging" on page 65.
6. When your teacher responds to the message, you see a red indicator on theMessage button. Click theMessage buttonto see your teacher's response.
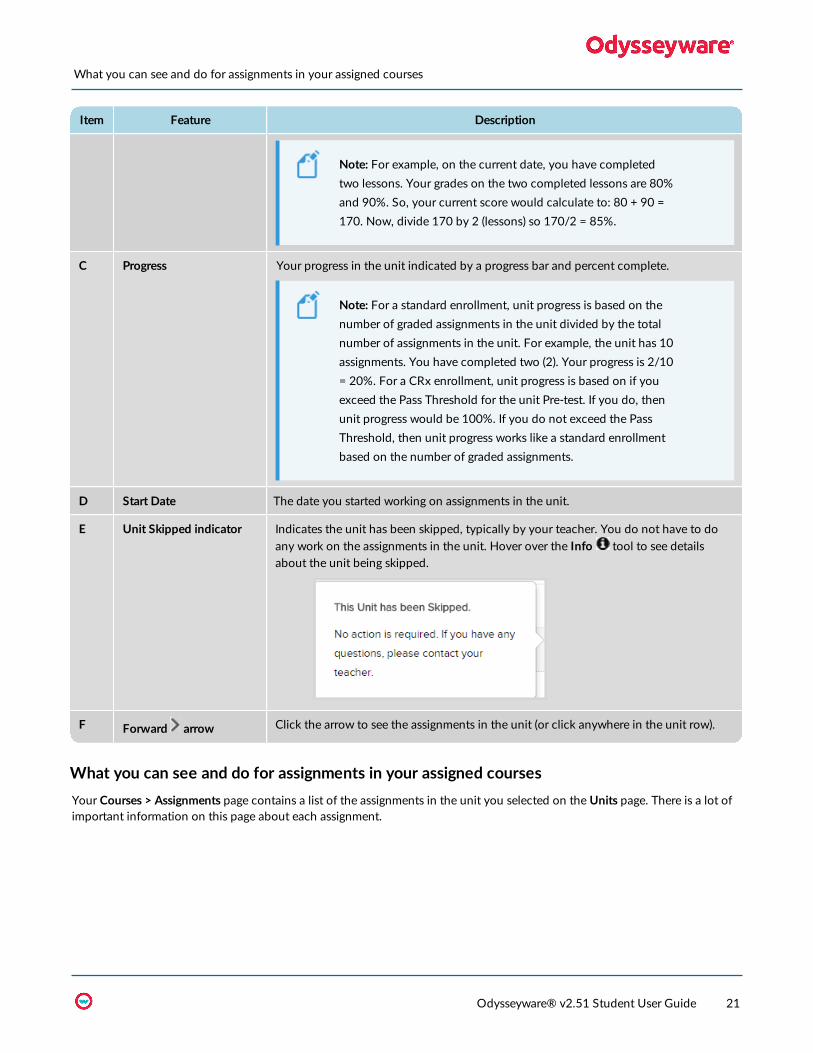
What you can see and do for units in your assigned coursesYour Courses >Units page lists each unit in the course you selected on the Courses page. You see important details about eachunit, including your unit score, progress, start date, and more.
Tip: To go back to your Courses page, select the left-facing arrow at top of the page.
Odysseyware® v2.51 Student User Guide 19
What you can see and do for units in your assigned courses

Units features, identified above, include:
Item Feature Description
A Title Unit number and title.
B Score Your current score in the unit.
20 Odysseyware® v2.51 Student User Guide
What you can see and do for units in your assigned courses
Item Feature Description
Note: For example, on the current date, you have completedtwo lessons. Your grades on the two completed lessons are 80%and 90%. So, your current score would calculate to: 80 + 90 =170. Now, divide 170 by 2 (lessons) so 170/2 = 85%.
C Progress Your progress in the unit indicated by a progress bar and percent complete.
Note: For a standard enrollment, unit progress is based on thenumber of graded assignments in the unit divided by the totalnumber of assignments in the unit. For example, the unit has 10assignments. You have completed two (2). Your progress is 2/10= 20%. For a CRx enrollment, unit progress is based on if youexceed the Pass Threshold for the unit Pre-test. If you do, thenunit progress would be 100%. If you do not exceed the PassThreshold, then unit progress works like a standard enrollmentbased on the number of graded assignments.
D Start Date The date you started working on assignments in the unit.
E Unit Skipped indicator Indicates the unit has been skipped, typically by your teacher. You do not have to doany work on the assignments in the unit. Hover over the Info tool to see detailsabout the unit being skipped.
F Forward arrow Click the arrow to see the assignments in the unit (or click anywhere in the unit row).
What you can see and do for assignments in your assigned coursesYour Courses > Assignments page contains a list of the assignments in the unit you selected on theUnits page. There is a lot ofimportant information on this page about each assignment.
Odysseyware® v2.51 Student User Guide 21
What you can see and do for assignments in your assigned courses

Assignments features, identified above, include:
Item Feature Description
A Due Due date for the assignment. This column may also show an "Overdue" indicator if theassignment is past due.
B Type
22 Odysseyware® v2.51 Student User Guide
What you can see and do for assignments in your assigned courses

Item Feature Description
Assignment type symbol to indicate the type of assignment. See "Assignment typesymbols" on page 12.
l Hover over the symbol to see the type of assignment as well as the Start Date andTeacher. If you haven't started the assignment, you do not see a date.
C Title Assignment number and title.
D Submitted Date Date you submitted the assignment for grading. If you haven't worked the assignment,this column shows two -- symbols.
E Graded Date Date the assignment was graded either by the system or by your teacher if Teacheraction was required. If you haven't worked the assignment, this column shows two -- sym-bols.
F Score Your current score for the assignment. This score may be the score before your teachercompleted grading. If you see the warning symbol indicator next to the score as shownbelow, that means your score may change once the teacher has completed grading theassignment.
Tip: Go back to the Courses page, and for the course, click theMessage tool next to the teacher's name to send a messagethat you are waiting for a grade! See "Message a teacher for helpwith a course" on page 18.
G Status Status of the assignment. Assignment status can be:
l Assigned - You must do this assignment.
l Not Started - Assignment is not Assigned to you just yet.
l Completed - Assignment is done by you but needs Teacher action.
Odysseyware® v2.51 Student User Guide 23
What you can see and do for assignments in your assigned courses

Item Feature Description
l Graded - Assignment is done and graded.
H Go To arrow Click the arrow to open an assignment and start work. Or, for a completed assignment:
l For a completed lesson or project, you can review it before taking a quiz or test.See "Review your completed assignments before beginning quizzes or tests" onpage 59.
l For a completed quiz or test, you may be able to view your results. See "Reviewresults of quizzes and tests" on page 63.
Tip: You can only open your current assignments and alreadycompleted assignments. You see all assignment titles. You justcannot open all of them.
I Assignment Blockedsymbol
If the assignment is blocked by your teacher, you must request that your teacherunblock the assignment so that you can continue work. See "Request to unblockassignments" on page 13.
What happens when a course term ends?Each of your assigned courses has a term end date. The term end date was set by your teacher when he enrolled you in thecourse. You do not see this term end date, but you do see theDays Remaining number for the course on your LearnerDashboard (Courses page). This Days Remaining number indicates the number of schooldays remaining to work all assignmentsbased on the course term end date.
Tip: TheDays Remaining number does not include days that your school has decided are non-workingschooldays, such as most Saturdays and Sundays.
When theDays Remaining number shows 0, this means that the course term end date has passed. When you were enrolled inthe courses, your teacher had the option to allow you to continue working on assignments past the term end date or to blockyou from working on assignments past the term end date.
24 Odysseyware® v2.51 Student User Guide
What happens when a course term ends?

l If your progress was not blocked, you can continue working on assignments. When you open the next assignment, youare able to start working on it and submit it for grading.
l If your progress was blocked, when you tried to open the next assignment in the course, you see this alert.
l To continue working, you can click theMessage Teacher button which alerts your teacher about the term end andthat your progress is blocked. When the next alert appears, clickOK to continue.
Odysseyware® v2.51 Student User Guide 25
What happens when a course term ends?

THIS PAGE INTENTIONALLY LEFT BLANK
Open and work on your lessons
As mentioned earlier in this guide, you have two ways to open an assignment once you click the Learn button:
l On the Assignments page, click the Go To arrow or click anywhere in the assignment bar.
l Click Courses, and then click the right-arrows to move down into a course, then a unit, and then the assignment.
In this section, we'll be looking at the information you need and tools for working on a lesson.
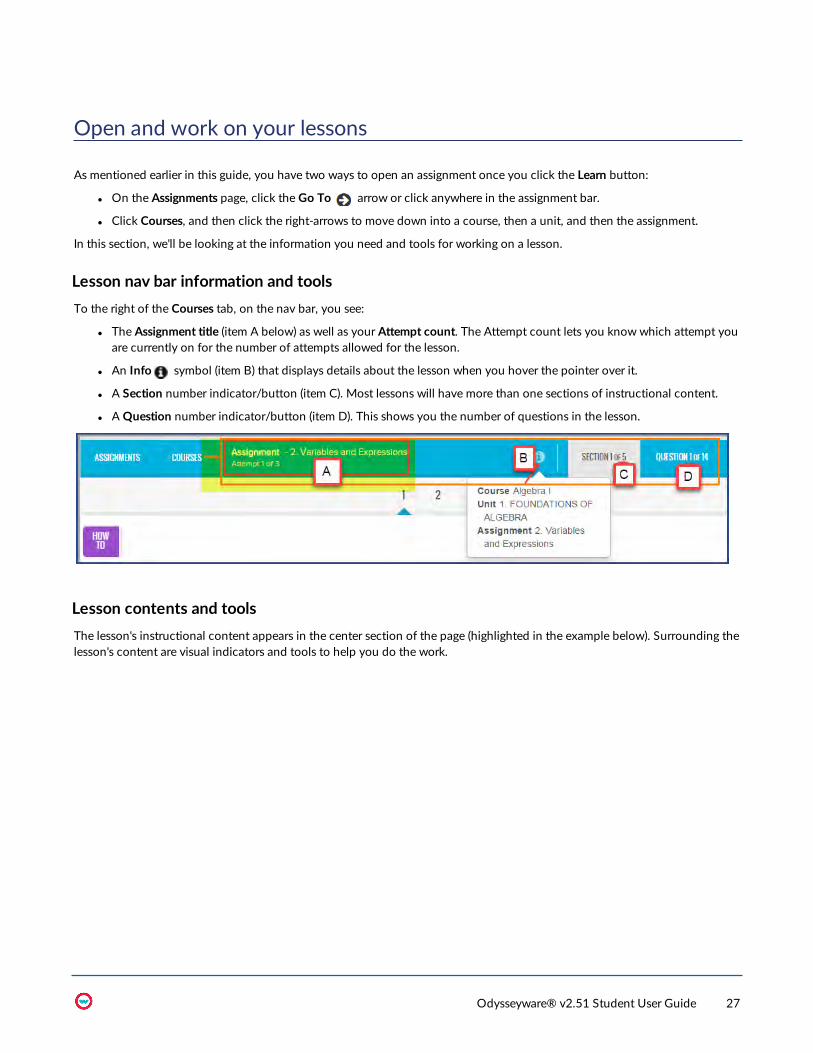
Lesson nav bar information and toolsTo the right of the Courses tab, on the nav bar, you see:
l The Assignment title (item A below) as well as your Attempt count. The Attempt count lets you knowwhich attempt youare currently on for the number of attempts allowed for the lesson.
l An Info symbol (item B) that displays details about the lesson when you hover the pointer over it.
l A Section number indicator/button (item C). Most lessons will have more than one sections of instructional content.
l AQuestion number indicator/button (item D). This shows you the number of questions in the lesson.
Lesson contents and toolsThe lesson's instructional content appears in the center section of the page (highlighted in the example below). Surrounding thelesson's content are visual indicators and tools to help you do the work.
Odysseyware® v2.51 Student User Guide 27
Because you may have several attempts allowed for a lesson, use these helpful steps to assist you in completing your work.
Work on lessonsLesson content and tools identified on the example above are explained in the following steps.
To work on a lesson:
28 Odysseyware® v2.51 Student User Guide
Work on lessons

1. Read all sections of the lesson, view the videos, slide shows, and listen to the audio clips.
2. To move to the next section, click the Read Next Section button (item A) or click the section numbers at the top of thepage.
3. Read and listen to the pronunciation of any vocabulary words (item B). See "Hear pronunciation of vocabulary words" onthe next page.
4. Use the Vocab Arcade (item C) activities to practice spelling the vocabulary and test your memory on the definitions. See"Use the vocabulary and spelling activities" on page 31.
5. Use the lesson tools:
l To print this assignment, with or without your notes and the teacher's notes, click the Print tool (item D). See "Printassignment contents and notes" on page 39.
l To see more information about assignment text, highlight the text, and then click the Reference tool (item E). See"View reference information about assignments" on page 33.
l To translate assignment text to another language and hear an audio version of the translated text, highlight the textyou want to translate, then click the Translate tool (item F) and select a language. See "Translate assignment text intoa different language" on page 34.
l To hear an audio version of assignment text, highlight the text you want to hear, then click the Speak as tool (itemG). See "Select a voice to speak the assignment text" on page 33.
6. Use theNotes feature (item H) to write a note to yourself or to your teacher about the lesson. Or, there might be a notefrom your teacher to read. See "Write and read notes for assignments" on page 37.
7. When ready to answer the lesson's questions, click theWork on Questions button (item I) and answer each question. See"Answer assignment questions and view your results" on page 41.
Tip: Questions are set up so that you know the section to help you find the answer.
a. Click Next Question or the question number at the top to move to the next question.
b. If you need assistance with a question, click the Ask For Help button to send a message to your teacher. See"Message your teacher for help with assignment questions" below.
c. Click the section button at top of screen to return to the lesson.
d. Click the Turn It In button when finished with all questions in all sections, or to leave the lesson without completingit, on the main nav bar, click Assignments or Courses.
Message your teacher for help with assignment questions
While you are working on an assignment's questions, you can click the Ask For Help tool to send a message toyour teacher. Your teacher receives the message and can respond to it. When your teacher responds, you are notified of thenewmessage.
To send a an assignment question help message and read your teacher's response:
1. Open an assignment, and then click theWork on Questions button.
2. Click the Ask For Help tool.
3. In theWhat do you need help with page, in theWrite message text box, type your message. As you start typing, theSend button becomes active.
Odysseyware® v2.51 Student User Guide 29
Message your teacher for help with assignment questions

4. When finished with your message, click Send.
A Sent indicator next to the Ask for Help tool lets you know that the message has been sent to your teacher.
5. To close the help requested page, click the Ask For Help tool again.
The sent message appears in the Sent box of your messages. See "Communicate with your teachers using internalmessaging" on page 65.
When the teacher responds, you are notified of a newmessage. TheMessage button on the top nav bar has a red
indicator. Or, if you open the assignment, the Ask For Help tool has a red New indicator.
l To view the message, click theMessage button, and then click the message to read your teacher's response.
Or
If you are working on the questions for the assignment, click theNew indicator. The message opens so that you can readyour teacher's response. Click the Ask For Help button again to close the message.
Hear pronunciation of vocabulary wordsFor assignments with vocabulary words, you can hear a voice do the pronunciation of the words. The computer or device youare using needs to have audio capability, such as speakers, for you to hear the voice.
1. Click the Play tool located to the left of the vocabulary word. You should hear a voice pronounce the word.
30 Odysseyware® v2.51 Student User Guide
Hear pronunciation of vocabulary words
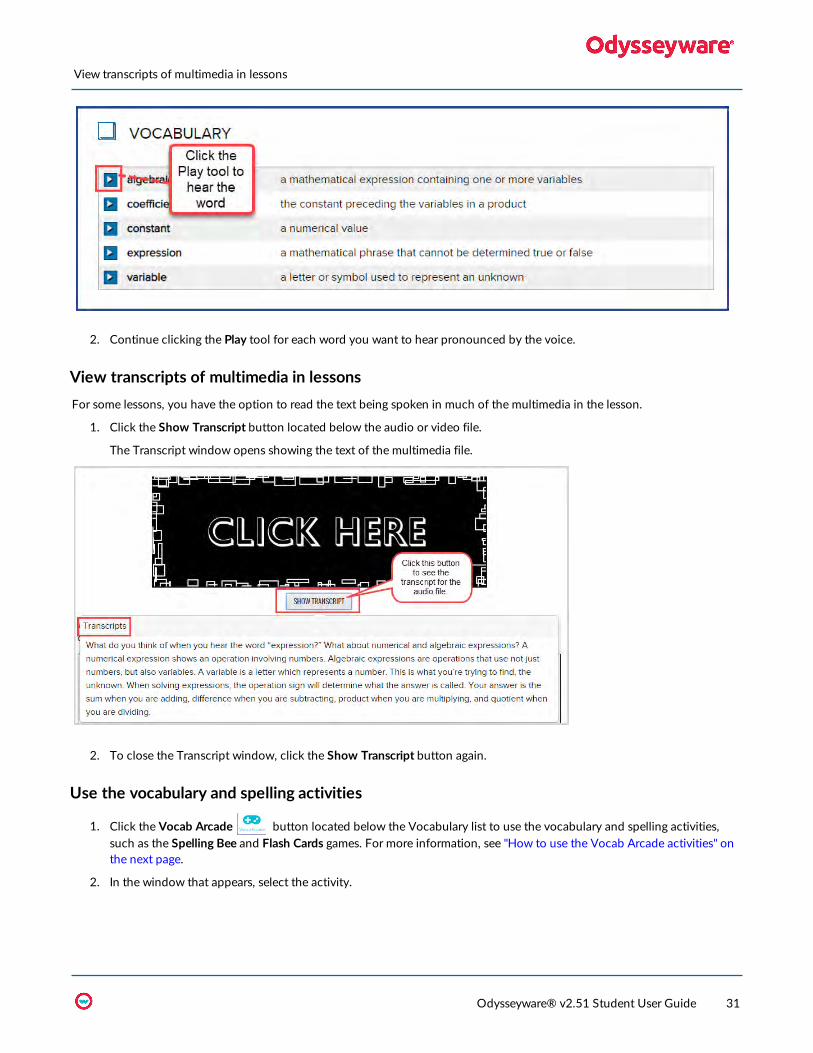
2. Continue clicking the Play tool for each word you want to hear pronounced by the voice.
View transcripts of multimedia in lessonsFor some lessons, you have the option to read the text being spoken in much of the multimedia in the lesson.
1. Click the Show Transcript button located below the audio or video file.
The Transcript window opens showing the text of the multimedia file.
2. To close the Transcript window, click the Show Transcript button again.
Use the vocabulary and spelling activities
1. Click the Vocab Arcade button located below the Vocabulary list to use the vocabulary and spelling activities,such as the Spelling Bee and Flash Cards games. For more information, see "How to use the Vocab Arcade activities" onthe next page.
2. In the window that appears, select the activity.
Odysseyware® v2.51 Student User Guide 31
View transcripts of multimedia in lessons

3. Click the Close [X] button when you are done and ready to return to your lesson.
How to use the Vocab Arcade activities
Use the Vocab Arcade activities to help you practice and learn.
Test your memory using the Flash Cards game
Use the Flash Cards game to test your memory. All flash card games work the same way no matter the type of lesson, such as amath lesson or spelling lesson.
1. Click theDraw pile in the top left corner, then click the card when you are ready to check your answer.
2. Click Discard, if you are done with the card or Return to put it back in the Draw pile.
3. If the Flash Card game has a Print link, click the Print Flash Cards link to open a printable version of the Flash Cards inyour browser. Then, click the Click Here to Print Flash Cards link to open the printer window for your browser. Print asyou normally would from your printer.
4. Click the Close X when you are finished practicing.
Both of the Geography games and the Times Tables, along with the Vocab Arcade - Flash Cards inside your lessons work thisway. For theWorld Capitals flash cards, you are asked to pick the area of the world.
32 Odysseyware® v2.51 Student User Guide
How to use the Vocab Arcade activities

Practice your vocabulary words using the Spelling Bee game
The Spelling Bee game is available in many lessons. You open it from the Vocab Arcade button.
To play the Spelling Bee:
1. Click Vocab Arcade, and then click the Spelling Bee icon.
Your lesson becomes inactive so that you cannot see the vocabulary words.
2. Click anywhere on the screen to begin, and then choose a bee.
3. Listen to the pronunciation, and then type the word.
4. Click Enterwhen you are done typing.
5. Once you have correctly spelled all of the words (or are done playing), click the Close X at the top of the window. Yourlesson becomes active again and you can see the vocabulary words.
View reference information about assignmentsFor some assignments, you may be able to see additional reference information.
1. Highlight the text, and then click the Reference tool.
2. If reference information is available it appears in a separate, small window.
3. To close the Reference window, click the Reference tool again.
Select a voice to speak the assignment textIf desired, and your computer has audio features, such as speakers, you can highlight assignment text and select a voice tospeak the selected assignment text.
1. Highlight the text you want to hear, and then click the Speak as tool.
Odysseyware® v2.51 Student User Guide 33
View reference information about assignments
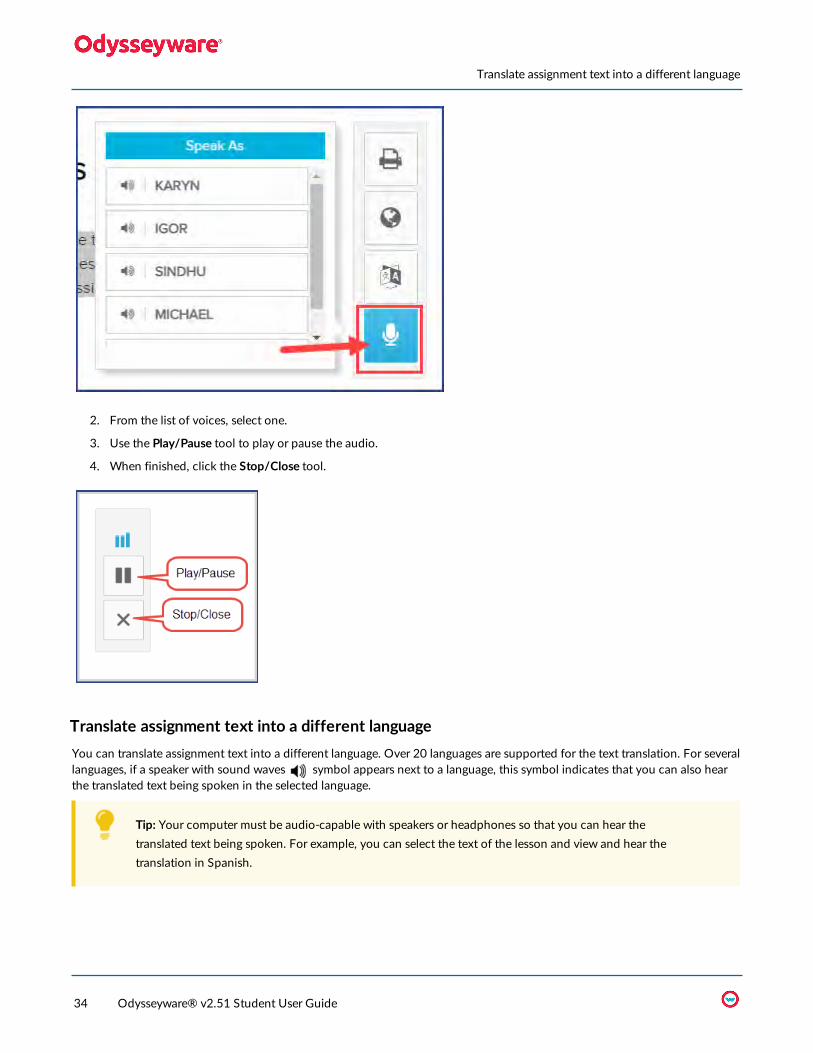
2. From the list of voices, select one.
3. Use the Play/Pause tool to play or pause the audio.
4. When finished, click the Stop/Close tool.
Translate assignment text into a different languageYou can translate assignment text into a different language. Over 20 languages are supported for the text translation. For severallanguages, if a speaker with sound waves symbol appears next to a language, this symbol indicates that you can also hearthe translated text being spoken in the selected language.
Tip: Your computer must be audio-capable with speakers or headphones so that you can hear thetranslated text being spoken. For example, you can select the text of the lesson and view and hear thetranslation in Spanish.
34 Odysseyware® v2.51 Student User Guide
Translate assignment text into a different language
Note: Translated text is limited to 1000 characters at a time. If you highlight more than 1000 characters,a message appears stating that your request has been restricted to the first 1000 characters. For somelanguages to translate correctly, your computer's browser must have the fonts installed to support thetranslated text. For example, for Burmese, depending on your browser, you may need to download andinstall the Zawgyi-One Burmese Unicode font. The speaker with sound waves symbol may appear abit different depending on the installed fonts and browser.
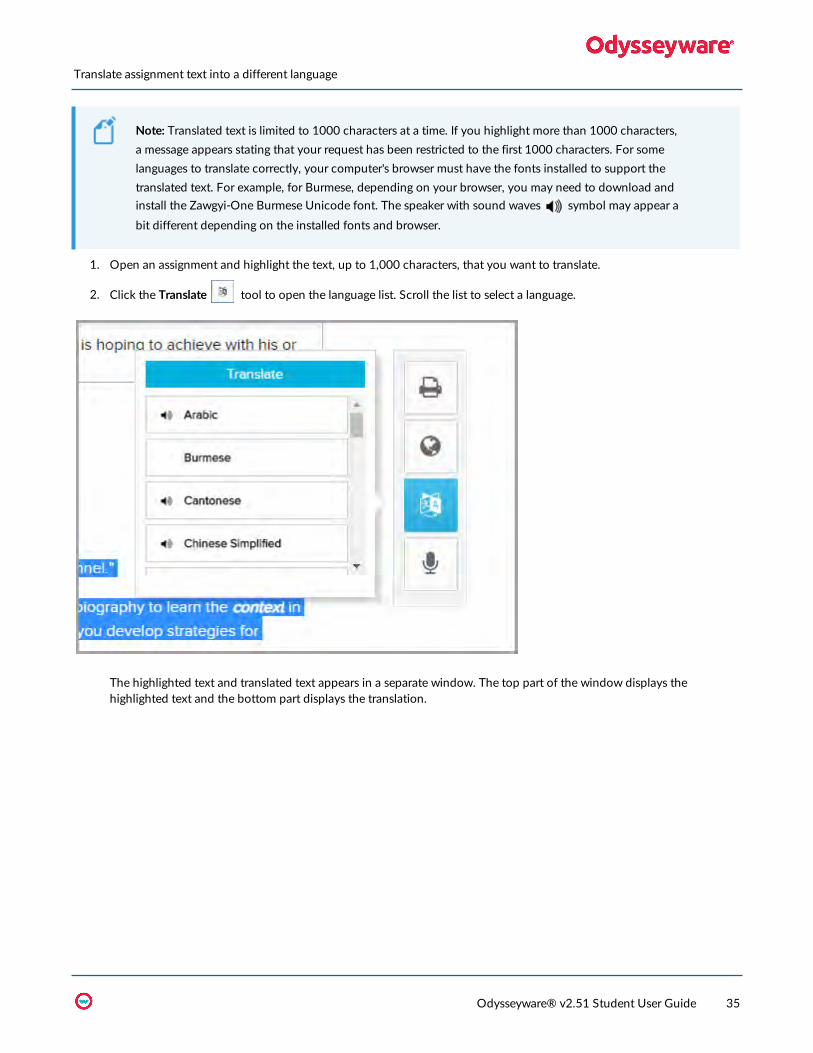
1. Open an assignment and highlight the text, up to 1,000 characters, that you want to translate.
2. Click the Translate tool to open the language list. Scroll the list to select a language.
The highlighted text and translated text appears in a separate window. The top part of the window displays thehighlighted text and the bottom part displays the translation.
Odysseyware® v2.51 Student User Guide 35
Translate assignment text into a different language

3. If necessary, use the window scroll bars to see the translated text.
4. To listen to an audio version of the translated text being spoken, click the Play tool located at the bottom left of thetranslated text window.
Note: For several languages, the audio translation feature does not apply. Those languages that haveaudio translation are identified with a speaker with sound waves symbol.
The example below shows the Spanish translation of the selected text as the audio plays. The words are highlighted andthe current word being spoken is in bold text.
36 Odysseyware® v2.51 Student User Guide
Translate assignment text into a different language

5. To stop the audio player, click the Stop tool.
6. You can continue selecting languages from the list and listening to the audio versions of the translated text.
7. To close the translation window, click the Close [X].
8. To exit the translation tool, click the Translate tool again.
Write and read notes for assignmentsYou may be able to enter notes while you are working on lessons and projects. The Notes area is to the left of the lessoncontent. You can create multiple notes for each assignment. You are able to enter up to 1000 characters for each note. A goodidea is to save a blank note as a tab to remind you of an important part of the lesson you need to study. Your teacher may leavenotes for you to read for the assignment as well.
l Click theHow To button to see an explanation of how to enter and save notes in your lesson.
To add a note to an assignment:
Odysseyware® v2.51 Student User Guide 37
Write and read notes for assignments

1. Under theHow To button, move the cursor down until you see a blank gray box as shown here.
2. Click the gray box to enter your note.
You can choose to color-code your notes.
3. Click Save to save your note. Each note you enter appears as a note button below theHow To button as shown in thisexample.
To read an assignment note from your teacher:
1. If you see a Teacher Note button below theHow To button, click it to read the note from the teacher.
38 Odysseyware® v2.51 Student User Guide
Write and read notes for assignments
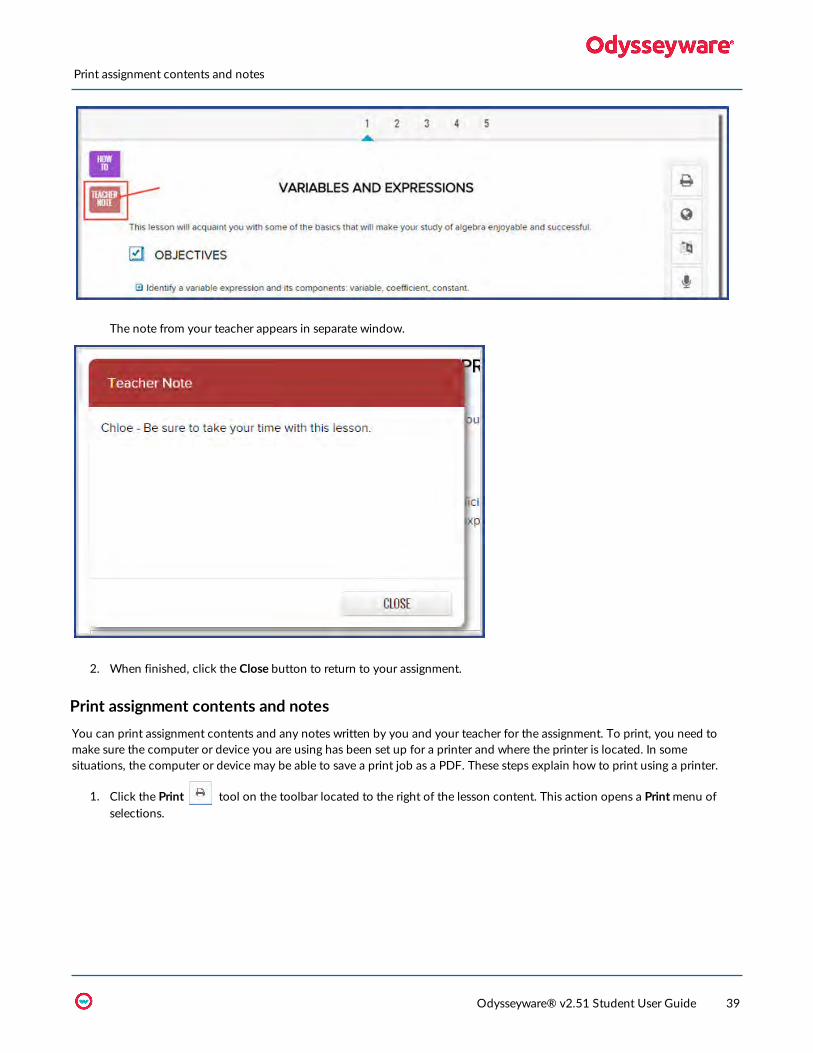
The note from your teacher appears in separate window.
2. When finished, click the Close button to return to your assignment.
Print assignment contents and notesYou can print assignment contents and any notes written by you and your teacher for the assignment. To print, you need tomake sure the computer or device you are using has been set up for a printer and where the printer is located. In somesituations, the computer or device may be able to save a print job as a PDF. These steps explain how to print using a printer.
1. Click the Print tool on the toolbar located to the right of the lesson content. This action opens a Printmenu ofselections.
Odysseyware® v2.51 Student User Guide 39
Print assignment contents and notes

2. From the menu, select an option.
Depending on your choice, the content opens in a separate browser window.
3. Right-click and select Print, or press Ctrl + p to open the browser's Print function and preview what the content will looklike when printed. See the example below for printing using the Google Chrome browser.
4. Click Print.
40 Odysseyware® v2.51 Student User Guide
Print assignment contents and notes

Answer assignment questions and view your results
When you click theWork On Questions button in an assignment, you see a page similar to the one below. Question numbersare displayed below the main nav bar. An arrow indicates which question is currently displayed.
A variety of question types are used in your assignments. Many question types are set up to be automatically graded by thesystem, but some require your teacher to grade them. For more information about the question types and how to completethem, see "Question types" on page 46.
Note: Some lessons may have questions that require an essay as the answer. For more informationabout completing work on essays, see "Open and work on projects and essays" on page 49.
You can return to the lesson content at any time by clicking the Section tab on the main nav bar.
Answer questions and turn in assignment for gradingThe process to answer questions and turn in the assignment for grading is fairly easy. You can answer the questions innumerical order or you can choose to answer any question. For foreign language courses, such as French, see "Work on foreignlanguage courses" on page 45, to learn how to enter foreign characters in your answer.
Odysseyware® v2.51 Student User Guide 41

1. Enter your answer, and then click theNext Question button. This action saves your answer and advances to the nextquestion. When that next question is associated with a new section, the Section indicator on the main nav bar changesso that you know the section that contains the answer.
Additionally, a Read Next Section button appears beside theNext Question button.
2. Click Read Next Section to read the next section so that you can answer questions associated with that section. Or, clickNext Question to proceed to the next question.
3. If you have difficulty answering a question, click the Ask For Help button below each question. Sendyour teacher a message about the issue you are having. Be aware, though, this problem is graded as a zero until it isanswered; and it is included in your overall score!
When you get to the final question, theNext Question button is replaced by the Submit Answer button. The SubmitAnswer button means you are ready to submit your answers to be graded. If you want to take another look at youranswers, you can. Just don't click the Submit Answer button until you are ready.
4. When you are ready to submit your answers for grading, click the Submit Answer button. You are asked if you want toturn in the assignment for grading.
l Click Yes, Please to submit it.
l Click No, Thank You to review your answers before submitting the lesson.
You can also click the Turn It In button at any time you are ready to submit the lesson for grading. Just be aware thatany questions you did not answer will be counted as zero.
42 Odysseyware® v2.51 Student User Guide
Answer questions and turn in assignment for grading

Unless the assignment contains a question requiring teacher grading, your score is displayed when you submit thelesson.
5. If your grade was a passing grade based on the threshold set, click Keep Going to go to the next assignment in the unit,or click Assignments to return to your Assignments page to work on another assignment.
Tip: If you did not achieve a passing grade on the assignment, you might have the option to attempt thequestions again. If additional attempts are indicated, and the Try Again button is active (available), clickit to return to the assignment.
Review results of answered questionsDepending on how your school permission to see correct and incorrect answers is set up, you may be able to review the resultsof answered questions.
1. Click the Learn button on the main nav bar, and then click the Courses button in the function toolbar.
2. For the course, click theNext arrow to proceed to theUnits page.
3. For the unit, click theNext arrow to proceed to the Assignments page.
4. For the graded assignment, click the Go To arrow.
Odysseyware® v2.51 Student User Guide 43
Review results of answered questions

5. On the main nav bar, click theQuestion button.
Below the main nav bar, completed questions have color-coded symbols so you can see which questions you answeredcorrectly, which were incorrect, and any questions you got partially correct.
l Green check mark indicates the answer to this question is correct.
l Red X tells you the answer is incorrect or your teacher has not graded it yet.
l Gold line tells you the answer was partially correct.
l Gray arrowmeans the question was skipped by your teacher.
Questions that required teacher grading will not show any results until the teacher has manually graded it.
If your school has set up the permission, you may also see the answer key for completed assignments.
6. To see the answer key, click the Show Answers button.
The correct answer for each question is highlighted as shown in the example and the button/tool changes to HideAnswers.
44 Odysseyware® v2.51 Student User Guide
Review results of answered questions

7. Continue selecting questions to view the answers.
8. To hide the answer key, click theHide Answers button.
Work on foreign language coursesForeign language courses use characters you don’t see on your keyboard. The table below shows you how to get the charactersyou need to complete your foreign language assignments.
Tip: Print this page and keep it by your keyboard until you learn the codes.
l To use the characters, press the left ALT key and hold it down while you type the keys on theNumber Pad of yourkeyboard to get the character in the left-hand column. You see the character when you release the ALT key.
l Using a laptop - Hold down the Fn and ALT keys and type the numbers.
Tip: Some characters have more than one number code. You can use either number.
Character ALT Key +Number Character ALT Key +
Number
á 160 or 0225 Ñ 165 or 0209
é 130 or 0233 ñ 164 or 0241
í 161 or 0237 Ü 154 or 0220
ó 162 or 0243 ü 129 or 0525
ú 163 or 0250 Ú 0218
Á 0193 Ó 0211
É 0201 ¡ 173 or 0161
Í 0205 ¼ 172
Odysseyware® v2.51 Student User Guide 45
Work on foreign language courses

Character ALT Key +Number Character ALT Key +
Number
¿ 168 or 0191 ½ 171
º 167
Question typesA variety of question types are used in your lessons, quizzes, and tests. Many question types are set up to be automaticallygraded by the system, but some, such as essay types, require your teacher to grade them. This section explains the questiontypes that can be automatically graded by the system.
Matching questions
In matching questions, you are given two columns of related information; for example, words in one column and definitions inthe other. One column has empty boxes in front of each item, the other column has numbers. You place the number of an itemin the box next to the corresponding item in the other column.
Multiple Choice
Multiple choice questions can have one or more choices per question. Click the radio button next to your answer choice. Makesure you have read the question or instructions carefully.
Multiple Select
Multiple select questions offer a number of choices per question. Click the check box next to each answer you believe to becorrect. The question will often tell you howmany correct choices there are.
46 Odysseyware® v2.51 Student User Guide
Question types

Fill in the Blank / Unordered
You are given a sentence with one or more words missing. You must select the correct word or words and type them into thefield provided. All of the answers can be found in the text. Make sure you pay attention to capitalization, punctuation andspacing in your answers.
Text Multiple Choice
In all text multiple choice questions, the answer box is highlighted in blue. Click the arrow beside the blue box and select theanswer you believe is correct. Make sure it displays in the answer field.
True and False
True and False questions are one way of verifying that you have grasped the factual concepts present in the material. Select theradio button next to your choice.
GraphicMultiple Choice
Graphic Multiple Choice questions work like Text Multiple Choice questions except you see a series of images instead of words.Click through each one until you find the correct image. You may cycle through them multiple times. The one you display whenyou submit the assignment is the one that is graded.
Odysseyware® v2.51 Student User Guide 47
Fill in the Blank / Unordered

Layered Text Boxes
Layered Text questions are much like Fill-in-the-Blank questions. Simply enter your answer in the green text box and tab to thenext green text box. You most often see them in math problems, where tabbing to the next text box you should fill in, is helpful.
Drag And Drop
This type of question is used to label graphics or set up math equations. You click the item in the list below the graphic to selectit, then holding your mouse button down, drag the item to the location where it is to be placed, and release your mouse button.To move an item already in place to another spot, just click and drag it from one location to the other. If you want to clear anitem you have already placed, drag it to the Start Over trash can. You can also click the trash can to clear all of the items youalready placed. To clear only one item, drag the new item over the one you want to replace.
48 Odysseyware® v2.51 Student User Guide
Layered Text Boxes

Open and work on projects and essays
For projects and essays, you are expected to develop a theme in paragraph or essay format. You should demonstrate mastery ofthe concept by stating a theme and appropriate supporting reasons. Projects typically have longer due dates than lessons, soyou can save any work and go back later to finish your effort, and then turn it in for grading.
Any time you do a project or essay, unless your teacher has instructed you to use a specific application, the assignment can becreated using other external applications, such as Microsoft® Office applications, Notepad, Wordpad, and other spreadsheets,videos, and audio files. Once you create your file, you can upload the file to Odysseyware. See "Upload files for essay questionsand projects" on the next page.
If the essay or paragraph requires 125 words or more, and theWriter tools are available to you, you can use theseWriter toolsto check your work. See "Use theWriter tools to check your written text for essays and projects" on page 52.
Note:Writer tools will not work for files you have uploaded. If you want to useWriter to check yourwork on an essay or paragraph, copy the text from the external application, and then paste the text intothe text box.
Open and work on projects or essaysYou open a project assignment the same way that you open a lesson assignment. For an essay, typically, an essay may be foundin a lesson assignment as a requirement to answer a question.
1. To open a project assignment, on the Learn > Assignments page, click the Project assignment bar or click the Go To
arrow. A project is easy to identify because it has the symbol and may include the word "Project" in the assignmenttitle.
Or, if the essay is in a Lesson, open the Lesson.
2. For a project (or essay), read the assignment directions, guidelines, and requirements. You can use the student tools to:
l Hear assignment text read out loud. See "Select a voice to speak the assignment text" on page 33.
l View and hear translation of assignment text in a different language. See "Translate assignment text into a differentlanguage" on page 34.
l If available, view reference information for the assignment. See "View reference information about assignments" onpage 33.
l Write a note to your teacher or read a note your teacher may have written to you (if there is one) for the assignment.See "Write and read notes for assignments" on page 37.
l Print the assignment text and any notes. See "Print assignment contents and notes" on page 39.
Odysseyware® v2.51 Student User Guide 49
3. When you are ready to work on the project or essay, click theWork On Questions button.
4. You can enter the project or essay answer text into the provided text box, or you can upload a file that contains yourproject work or essay answer. See "Upload files for essay questions and projects" below.
5. If available, use theWriter tools to check your spelling, grammar, and scoring elements in your work. See "Use theWritertools to check your written text for essays and projects" on page 52.
6. For a project, to have your teacher review a draft of your work, click the Submit Answer button. If a message appearsasking if you want to turn the assignment in, click No. The draft work is saved. You can message your teacher to reviewyour work. Just click the Ask For Help button and write a quick message. See "Message your teacher forhelp with assignment questions" on page 29.
7. When you feel the project or essay is complete and ready for grading by your teacher, click the Turn It In button.
Upload files for essay questions and projectsYou can upload files for your completed work on an essay question or project assignment. Several external applications havesupported file types which can be easily uploaded. The accepted file size to upload is limited to 10 MB and allowed file typesare:
File type External application
.csv Text-based application, such as Wordpad or Notepad or Microsoft Excel lets you save files as .csvtypes
.doc or .docx Microsoft Word
.pdf Adobe Reader
.xls or .xlsx Microsoft Excel
.txt Text-based application, such as Wordpad or Notepad
.rtf Microsoft Word
.ppt or .pptx Microsoft PowerPoint
.odf, odt,, .ods, or
.odpOpen Office
.mdb Microsoft Access
.accdb Microsoft Access
.pub Microsoft Publisher
.jpg, .jpeg. .png Image applications
Note: Uploaded assignment files cannot be examined byWriter. However, if you have an external filethat contains the paragraph or essay, you can copy the text and paste it into theWriter text box. Writerwill then examine the assignment for spelling and grammar.
You can upload the file so that your teacher can upload and open it to grade your work. If you have uploaded the file in error,you can delete it before submitting the assignment for grading.
1. To upload a file while working on the project or essay, click the Choose a file button.
50 Odysseyware® v2.51 Student User Guide
Upload files for essay questions and projects

2. Click theUpload button to upload the file.
l If the file format type was an acceptable format and uploaded successfully, a confirmation message briefly appears. ADelete red X now appears next to the file name.
l If you uploaded a file type in error, a message appears. ClickOK. Change the file format type to an acceptable formattype and upload again.
Odysseyware® v2.51 Student User Guide 51
Upload files for essay questions and projects

l To remove the uploaded file, click the red X.
Use the Writer tools to check your written text for essays and projectsYou can use theWriter tools to check your spelling and grammar in your written text for essay questions and projects. Writerhas two types of tools: Spelling and Grammar and Scoringwhich are set by your school. The Scoring tools are available whenan assignment has a defined target word count and/or target grade level added by the curriculum author who created theassignment.
Note: If theWriter toolbar looks like the example below, this means only the spelling and grammar toolswill work.
If theWriter toolbar looks like this, you get to see theWord Count and Scoring tools as well. This meansthe assignment has a defined target word count and target grade level.
1. Enter the written text for your essay question or project in the text area, just below theWriter toolbar. Or, if you have anexternal file that contains the essay or project text, open the file, copy the text to the clipboard, and paste it (using CTRL+ v) into the text area.
Note:Writer tools will not work for files you have uploaded and attached to the essay question orproject. If you want to useWriter to check your work on an essay or paragraph, copy the text from theexternal application's file, and then paste the text into the text box.
2. Click the Refresh tool to save your work and display theWord Count and theOverall Score indicator.
Tip: Refreshing your work does NOT submit the assignment for grading, but it does display spellingerrors (in red text) and grammar suggestions (in blue text). Refreshing also saves your work.
3. If spelling and grammar suggestions appear, to see the available options, right-click the red or blue text. See "WriterSpelling errors options and Grammar suggestions" on the facing page.
4. To see the additional Overall Score indicators for Grade Level, Readability, Topic Agreement, and Writing (if available forthe assignment), click the small arrow to the right ofOverall Score indicator bar as shown in this example. Only theavailable indicators appear. See "What the Overall Score elements mean" on page 56.
52 Odysseyware® v2.51 Student User Guide
Use theWriter tools to check your written text for essays and projects

You can see if you are writing to the expected grade level and if the essay is readable. You can also see if what has beenwritten is in agreement with the topic assigned and if the overall writing structure is appropriate to your grade level.
5. If desired, edit your work and click the Refresh tool again as often as needed.
Each time you click the Refresh tool, you can see if there has been any improvement in your scores based on youredits. You can do this as many times as necessary.
Tip: To get feedback from the teacher while the assignment is in progress, you can click the SubmitAnswer button (but not turn the assignment in just yet), and then click the Ask For Help button to askthe teacher to review what you have written before submitting it for a final score.
6. When the assignment is finished and ready to be graded by your teacher, click the Turn It In button.
Writer Spelling errors options and Grammar suggestions
You are presented with several options for both spelling errors and grammar suggestions. It is suggested that you should addressall of the spelling errors and grammar suggestions before turning the assignment in.
Spelling errors options
Spelling errors appear in-line as red text.
1. Right-click the red text to see a list of suggested alternatives, such as suggested spellings of the word, and the option toignore the suggestion as shown in this example.
Odysseyware® v2.51 Student User Guide 53
Writer Spelling errors options and Grammar suggestions

Spelling options are:
l Paste - Pastes text you enter or have copied to your clipboard in the text box to replace the word.
l Spelling - provides suggested words to replace the misspelled word. Select the word from the suggested list.
l Ignore and Ignore All - Keeps the word as spelled, removes the red in-line from the text, and does not check theword again when the Refresh tool, is clicked unless another misspelled word is found.
2. To close the list, select an option from the list.
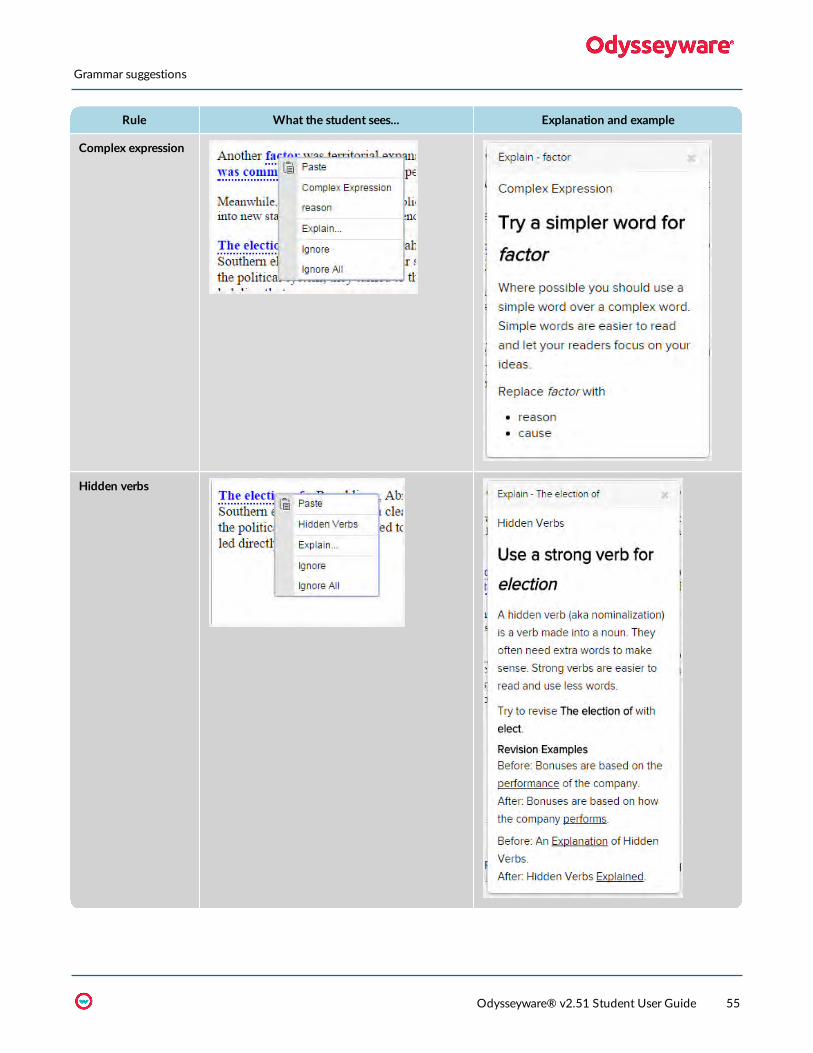
Grammar suggestions
Several grammar suggestions are available based on rules of complexity, hidden verbs, and passive voice. Grammar suggestionsappears in-line as blue text.
1. Right-click a blue grammar suggestion to display the grammar rule.
2. Select the Explain option for the rule to see an explanation of the rule and an example of a correction appears as shownin the following table.
54 Odysseyware® v2.51 Student User Guide
Grammar suggestions
Rule What the student sees... Explanation and example
Complex expression
Hidden verbs
Odysseyware® v2.51 Student User Guide 55
Grammar suggestions

Rule What the student sees... Explanation and example
Passive voice
The Paste, Ignore, and Ignore All options work the same way as the Spelling options as described in "Spelling errorsoptions" on page 53.
3. To close the list, select an option from the list.
What the Overall Score elements mean
Several scoring elements are used in calculating the Overall Score: Grade Level, Readability, Topic Agreement, andWriting.These scoring elements are represented as graphical, colored indicators to the student (and teacher).
56 Odysseyware® v2.51 Student User Guide
What the Overall Score elements mean

Element Description
GradeLevel
The Actual grade level is calculated by measuring average sentence length (number of words in the sentence)and average number of syllables per word to produce a score that roughly equates to a US grade level. TheTarget Grade Level is defined in the assignment, but is not visible to you.
The color and position of the Grade Level arrow indicates the difference of the Actual Grade Level to theTarget Grade Level:
l Super green arrow [ ] pointing upwards means the Actual Grade Level is at least Two grade levelsabove the Target Grade Level.
l Green arrow [ ] pointing upwards means the Actual Grade Level is above the Target Grade Level.
l Yellow arrow [ ] pointing upwards means the Actual Grade Level is at the Target Grade Level.
l Red arrow [ ] pointing downwards means the Actual Grade Level is below the Target Grade Level.
Readability Calculated by measuring how easy a text is to read using factors such as sentence length and number ofsyllables per word and assigning numbers to the factors. The weighted ratios of these numbers are combinedand then reduced to a single number in a 0.0 - 100.0 scale, with 100.0 being the highest possible readabilityscore.
Colors in a progress bar meter are used to indicate the readability of the assignment based on the Readabilityscore:
l Green indicates the score is between 65 to 100. This means the content is very easy to read andunderstand, average sentence < 15 words long, and the average word is two syllables or less.
l Yellow indicates the score is between 30 to 64. This means the content is a little hard to read andunderstand, average sentence = 25 words long, and the average word is two syllables or more.
l Red indicates the score is below 30. This means the content is very hard to read and understand,average sentence is > 30 words long, and the average word has more than two syllables.
TopicAgreement
Checks your writing assignment against the Topic Word List to compare words, word stems, and wordsynonyms used in the essay. As each word, stem, and synonym is found, it is "checked off" the Topic Word listas found. If 3 of 4 words are found in the Topic Word List, the Topic Agreement score would be 75%. You maynot see a topic word list. Not all assignments have them.
The color and progress bar meter indicate the score level.
l Green indicates the score is between 75 and 100.
l Yellow indicates the score is between 50 to 74.
Odysseyware® v2.51 Student User Guide 57
What the Overall Score elements mean

Element Description
l Orange indicates the score is between 25 to 49.
l Red indicates the score is between 0 to 24.
Writing Calculated using the Readability metric and the Actual Grade Level metric.
The color and progress bar meter indicate the score level.
l Green indicates the score is between 75 and 100.
l Yellow indicates the score is between 50 to 74.
l Orange indicates the score is between 25 to 49.
l Red indicates the score is between 0 to 24.
OverallScore
Computed as the average of theWriting Score plus a Spelling score that is not visible to you. If you correct allperceived spelling errors (those indicated by the red text), typically the Spelling score would be 100. If you donot correct perceived spelling errors, the Spelling score drops in value from 100.
The color and progress bar meter indicate the score level.
l Green indicates the Overall score is 75 to 100.
l Yellow indicates the Overall score is 50 to 74.
l Orange indicates the Overall score is 25 to 49.
l Red indicates the Overall score is 0 to 24.
58 Odysseyware® v2.51 Student User Guide
What the Overall Score elements mean
Prepare for and take quizzes and tests
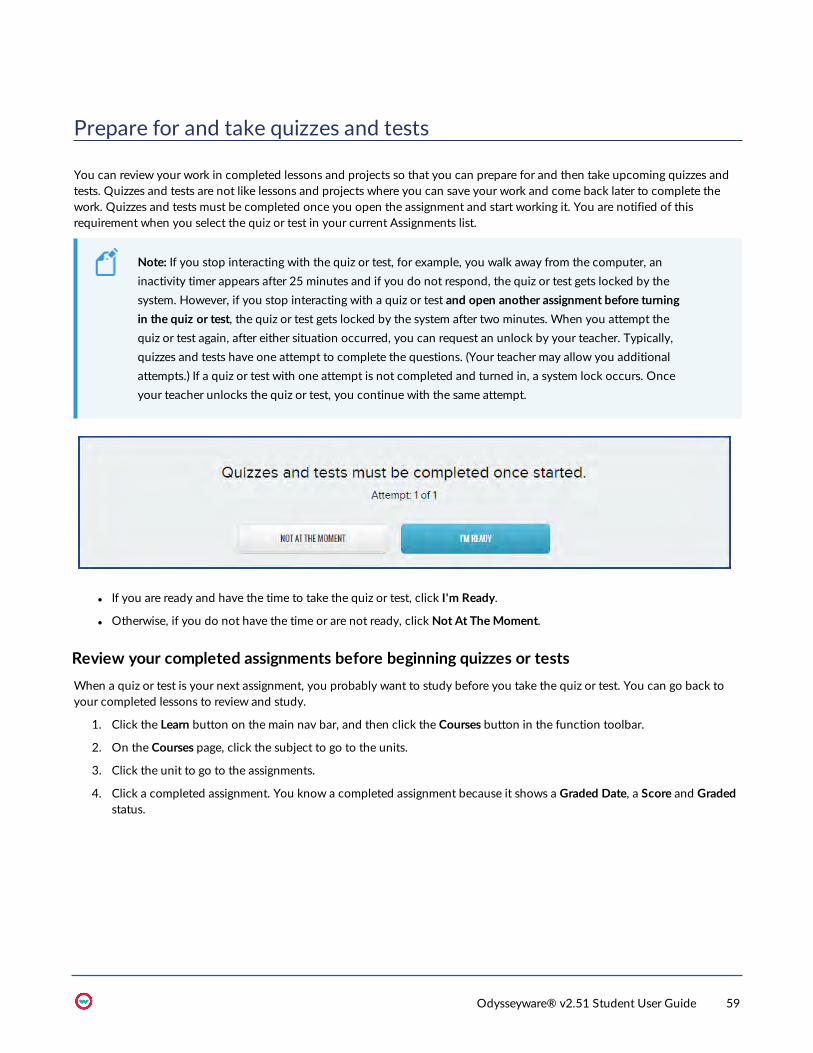
You can review your work in completed lessons and projects so that you can prepare for and then take upcoming quizzes andtests. Quizzes and tests are not like lessons and projects where you can save your work and come back later to complete thework. Quizzes and tests must be completed once you open the assignment and start working it. You are notified of thisrequirement when you select the quiz or test in your current Assignments list.
Note: If you stop interacting with the quiz or test, for example, you walk away from the computer, aninactivity timer appears after 25 minutes and if you do not respond, the quiz or test gets locked by thesystem. However, if you stop interacting with a quiz or test and open another assignment before turningin the quiz or test, the quiz or test gets locked by the system after two minutes. When you attempt thequiz or test again, after either situation occurred, you can request an unlock by your teacher. Typically,quizzes and tests have one attempt to complete the questions. (Your teacher may allow you additionalattempts.) If a quiz or test with one attempt is not completed and turned in, a system lock occurs. Onceyour teacher unlocks the quiz or test, you continue with the same attempt.
l If you are ready and have the time to take the quiz or test, click I'm Ready.
l Otherwise, if you do not have the time or are not ready, click Not At TheMoment.
Review your completed assignments before beginning quizzes or testsWhen a quiz or test is your next assignment, you probably want to study before you take the quiz or test. You can go back toyour completed lessons to review and study.
1. Click the Learn button on the main nav bar, and then click the Courses button in the function toolbar.
2. On the Courses page, click the subject to go to the units.
3. Click the unit to go to the assignments.
4. Click a completed assignment. You know a completed assignment because it shows a Graded Date, a Score and Gradedstatus.
Odysseyware® v2.51 Student User Guide 59

5. You see the lesson material. To review the questions, on the functional toolbar, click theQuestion button.
Below the main nav bar, completed questions have color-coded symbols so you can see which questions you answeredcorrectly, which were incorrect, and any questions you got partially correct.
l Green check mark indicates the answer to this question is correct.
l Red X tells you the answer is incorrect or your teacher has not graded it yet.
l Gold line tells you the answer was partially correct.
l Gray arrowmeans the question was skipped by your teacher.
If your school has allowed it, you may also see the answer key for completed assignments.
6. To see the answer key, click the Show Answers button.
The correct answer for each question is highlighted as shown in the example and the button/tool changes to HideAnswers.
60 Odysseyware® v2.51 Student User Guide
Review your completed assignments before beginning quizzes or tests

7. Continue selecting questions to view the answers.
8. To hide the answer key, click theHide Answers button.
9. To also help you study, you can print the lesson material and make a study guide. See "Print assignment contents andnotes" on page 39.
10. To review another completed lesson in the course, on the toolbar, click the Courses button, and then click the Backarrow (located at the top) to see all the assignments. Click the completed assignment, and then click theQuestionbutton.
Or, if you are ready, take the quiz or test. See "Open quizzes or tests and answer the questions" below.
Open quizzes or tests and answer the questionsWhen you open a quiz or test, it may have an introduction page that explains something about the quiz or test.
1. Click Learn, and on your Assignments page, click the Go To arrow for the quiz or test.
A message appears stating that quizzes and tests must be completed once started. IMPORTANT: Be sure to take notice of thenumber of attempts you have for the quiz or test.
Odysseyware® v2.51 Student User Guide 61
Open quizzes or tests and answer the questions

Note: If you have already attempted the quiz or test, maybe you accidentally logged off during taking itor did not finish it, you are informed that the quiz or test is locked. See "Request unlock of quizzes ortests" below.
2. If you feel you are ready to complete the quiz or test in one sitting, click the I'm Ready button to open the quiz or test.Or, if you feel that you need to study for the quiz or test, click theNot At TheMoment button.
3. Once opened, click theWork On Questions button.
You answer quiz or test questions just like you did with lesson questions. For more information, see "Answer assignmentquestions and view your results" on page 41.
4. To move to the next question, click theQuestion number at the top, or click theNext Question button.
5. When you are finished, click the Turn It In button so that the quiz or test can be graded.
6. You have several options for what to do next:
l To keep working on other assignments, go to your Assignments page.
l If your school allows you to view your quiz or test results, click the Learn > Courses tab and drill into the unit andassignment. See "Review results of quizzes and tests" on the facing page.
l If you are done with your work, click Sign Out.
Request unlock of quizzes or testsIf a quiz or test has already been attempted by you or requires that the teacher unlock it before you start, you may see anotification like the one below.
1. To request that the teacher unlock the quiz, and you are ready to take the quiz or test once unlocked, click the Requestto Unlock button. If you are NOT ready to take the quiz or test and do not need it unlocked at this time, click I'm NotReady.
Note: If you click the "Turn It In" button, any questions you answered are graded and that is your gradefor the quiz or test. If you haven't answered any questions, you get a 0% grade. If you did not meet thepass threshold and you have additional attempts, you can take the quiz or test again.
62 Odysseyware® v2.51 Student User Guide
Request unlock of quizzes or tests

2. If you requested the unlock, you then get this confirmation message. ClickOK to close the message and return to yourAssignments page.
3. When the teacher has unlocked the quiz or test, you can successfully open it. See "Open quizzes or tests and answer thequestions" on page 61.
Review results of quizzes and testsIf the school allows you to review your graded quizzes and tests, you can see your results. Colored symbols next to the questionnumber indicate an outcome status for the question, such as, a red X indicates you incorrectly answered the question.
1. Click the Learn button on the main nav bar, and then click the Courses button in the function toolbar.
2. For the course, click theNext arrow to proceed to theUnits page.
3. For the unit, click theNext arrow to proceed to the Assignments page.
4. For the graded quiz or test, click the Go To arrow.
5. On the main nav bar, click theQuestion button.
Below the main nav bar, completed questions have color-coded symbols so you can see which questions you answeredcorrectly, which were incorrect, and any questions you got partially correct.
Odysseyware® v2.51 Student User Guide 63
Review results of quizzes and tests

l Green check mark indicates the answer to this question is correct.
l Red X tells you the answer is incorrect or your teacher has not graded it yet.
l Gold line tells you the answer was partially correct.
l Gray arrowmeans the question was skipped by your teacher.
If your school has allowed it, you may also see the answer key for completed quiz and test questions.
6. To see the answer key, click the Show Answers button.
The correct answer for each question is highlighted as shown in the example and the button/tool changes to HideAnswers.
7. Continue selecting questions to view the answers.
8. To hide the answer key, click theHide Answers button.
64 Odysseyware® v2.51 Student User Guide
Review results of quizzes and tests

Communicate with your teachers using internal messaging
The application has an internal messaging system so that you can communicate with your teachers:
l To ask for help while you are working on questions for an assignment. See "Message your teacher for help withassignment questions" on page 29.
l To ask for help while you are viewing your Courses page, maybe you need assistance from your teacher to help you stayon track with your assignments. See "Message a teacher for help with a course" on page 18.
l If you also have permission to send person-to-person messages to your teachers, you can write a message to your teacherto set up a time to review your work or maybe to schedule a conference. See "Write messages to your teachers" onpage 67.
You see aMessage button on the toolbar at the top of each page so that you can see the messages from your schooladmins and your teachers. If you also have permission to sendmessages to your teachers, other than asking for help, when youclick theMessage button, you see the Compose tool on theMessages toolbar.
When you click theMessages button, you see your most recent received items at the top.
Messaging system features and toolsThe Messaging system has features and tools to help you view and manage your messages.
Odysseyware® v2.51 Student User Guide 65
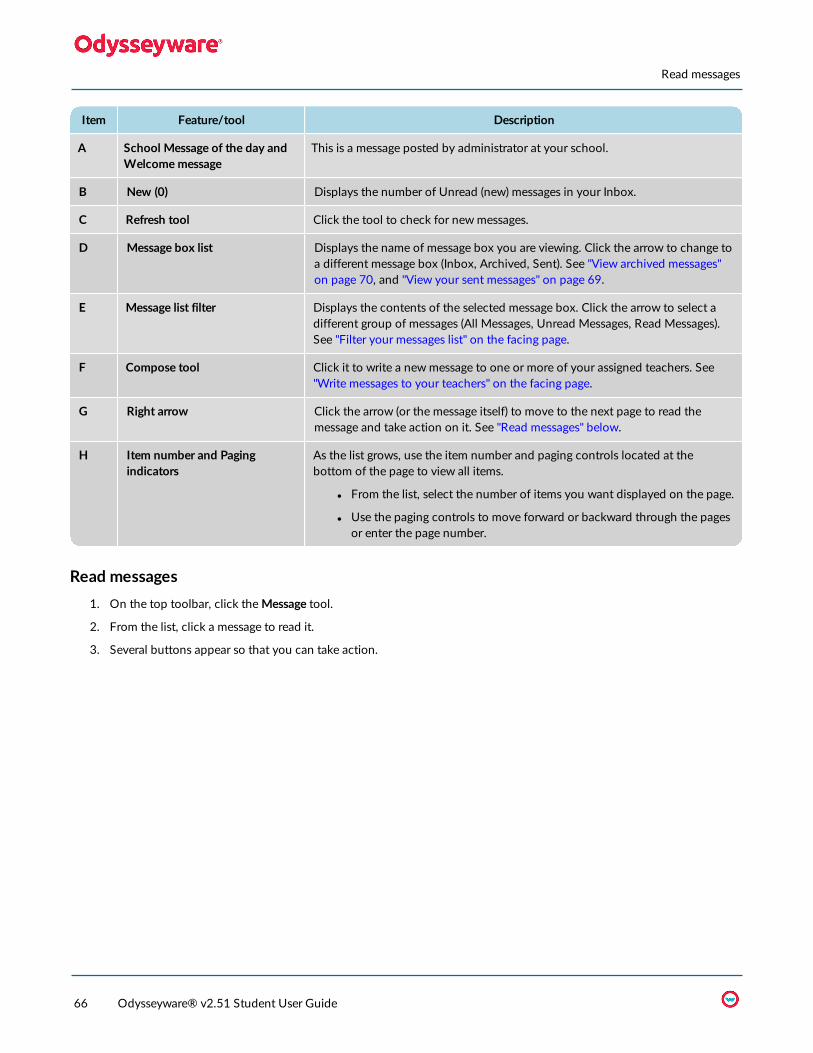
Item Feature/tool Description
A School Message of the day andWelcomemessage
This is a message posted by administrator at your school.
B New (0) Displays the number of Unread (new) messages in your Inbox.
C Refresh tool Click the tool to check for newmessages.
D Message box list Displays the name of message box you are viewing. Click the arrow to change toa different message box (Inbox, Archived, Sent). See "View archived messages"on page 70, and "View your sent messages" on page 69.
E Message list filter Displays the contents of the selected message box. Click the arrow to select adifferent group of messages (All Messages, Unread Messages, Read Messages).See "Filter your messages list" on the facing page.
F Compose tool Click it to write a newmessage to one or more of your assigned teachers. See"Write messages to your teachers" on the facing page.
G Right arrow Click the arrow (or the message itself) to move to the next page to read themessage and take action on it. See "Read messages" below.
H Item number and Pagingindicators
As the list grows, use the item number and paging controls located at thebottom of the page to view all items.
l From the list, select the number of items you want displayed on the page.
l Use the paging controls to move forward or backward through the pagesor enter the page number.
Read messages1. On the top toolbar, click theMessage tool.
2. From the list, click a message to read it.
3. Several buttons appear so that you can take action.
66 Odysseyware® v2.51 Student User Guide
Read messages

l Click Forward to send the entire message to other teachers. See "Forward messages" on page 71.
l Click Reply to write and send a reply to the message. See "Reply to messages" on the next page.
l Click Archive to remove the message from the Inbox list and file it away to the Archived list. See "Archive messages" onpage 70.
Filter your messages listYou can filter your Inbox to only see unread or read messages. By default, you see All Messages; this means both read andunread in the order of the date and time received.
l To see only unread messages, from the All Messages drop down, select Unread Messages.
l To see only read messages, from the All Messages drop down, select Read Messages.
Write messages to your teachersAs stated previously, if you have permission to send messages to your teachers, you will see the Compose tool on theMessagestoolbar.
Tip: You can also message your teachers to ask for help from your Courses page and also while workingon your assignments.
1. On theMessages toolbar, click Compose.
Odysseyware® v2.51 Student User Guide 67
Filter your messages list
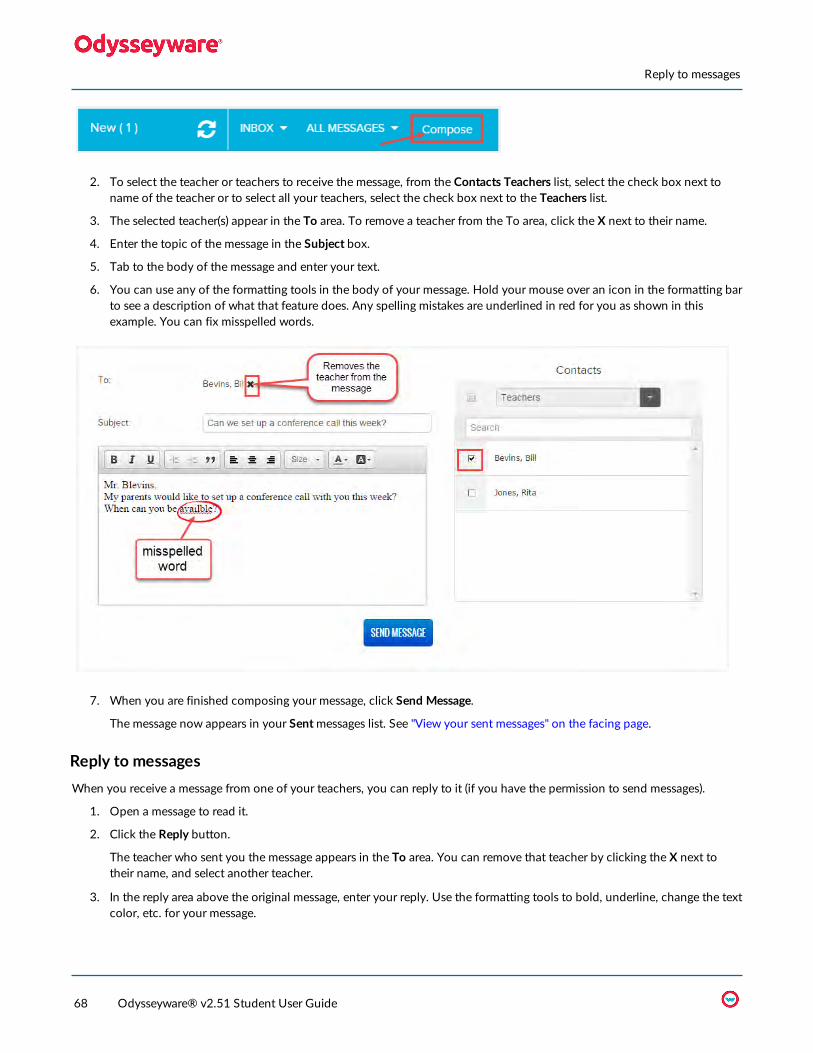
2. To select the teacher or teachers to receive the message, from the Contacts Teachers list, select the check box next toname of the teacher or to select all your teachers, select the check box next to the Teachers list.
3. The selected teacher(s) appear in the To area. To remove a teacher from the To area, click the X next to their name.
4. Enter the topic of the message in the Subject box.
5. Tab to the body of the message and enter your text.
6. You can use any of the formatting tools in the body of your message. Hold your mouse over an icon in the formatting barto see a description of what that feature does. Any spelling mistakes are underlined in red for you as shown in thisexample. You can fix misspelled words.
7. When you are finished composing your message, click Send Message.
The message now appears in your Sentmessages list. See "View your sent messages" on the facing page.
Reply to messagesWhen you receive a message from one of your teachers, you can reply to it (if you have the permission to send messages).
1. Open a message to read it.
2. Click the Reply button.
The teacher who sent you the message appears in the To area. You can remove that teacher by clicking the X next totheir name, and select another teacher.
3. In the reply area above the original message, enter your reply. Use the formatting tools to bold, underline, change the textcolor, etc. for your message.
68 Odysseyware® v2.51 Student User Guide
Reply to messages

4. When finished, click Send Message.
The message now appears in your Sent messages list. See "View your sent messages" below.
View your sent messagesYour Sentmessages list contains all the messages you sent to your teachers, including those messages sent while working on anassignment and asking for help (see "Message your teacher for help with assignment questions" on page 29) and while viewingyour Courses page and messaging for help (see "Message a teacher for help with a course" on page 18).
1. From the Inbox drop down, select Sent.
Your Sentmessages list contains all sent messages in order of the date and time sent, with the most recent ones at thetop.
2. To read a sent message, click it.
Tip:While viewing a sent message, you can forward it to another teacher. See "Forward messages" onpage 71.
3. To close the message and return to your Messages page, click the left-facing arrow on the View toolbar.
Odysseyware® v2.51 Student User Guide 69
View your sent messages
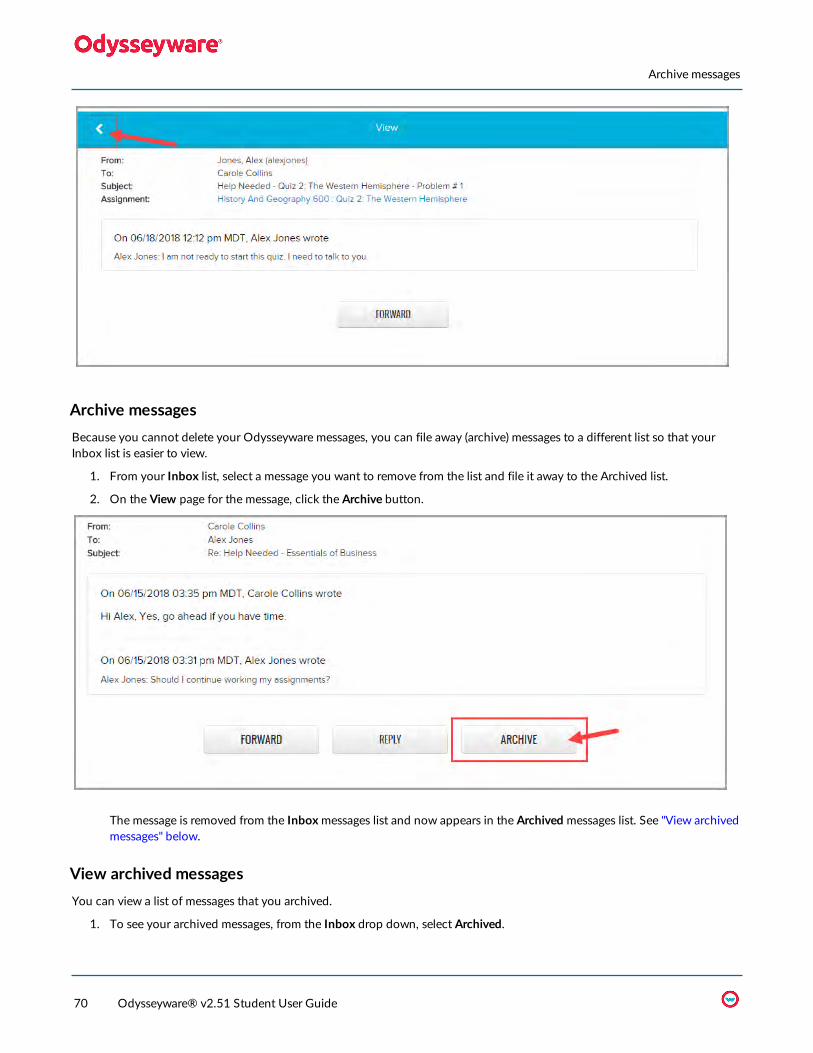
Archive messagesBecause you cannot delete your Odysseyware messages, you can file away (archive) messages to a different list so that yourInbox list is easier to view.
1. From your Inbox list, select a message you want to remove from the list and file it away to the Archived list.
2. On the View page for the message, click the Archive button.
The message is removed from the Inboxmessages list and now appears in the Archived messages list. See "View archivedmessages" below.
View archived messagesYou can view a list of messages that you archived.
1. To see your archived messages, from the Inbox drop down, select Archived.
70 Odysseyware® v2.51 Student User Guide
Archive messages

2. To go back to your Inbox, from the Archived drop down, select Inbox.
Forward messagesYou can forward received and sent messages to other teachers. While you are reading a message, if the Forward button appears,you can forward that message to another teacher.
1. From either the Inbox list or Sent list, click a message to read it.
2. Click the Forward button.
3. From the Contacts Teachers list, select one or more teachers by clicking the check box next to their name (A), or to selectall teachers for the message, click the check box (B) next to the Teachers list.
4. To let the teacher(s) knowwhy you are forwarding the message to them, enter an explanation (C).
5. Click Send Message (D).
The message now appears in your Sentmessages box. See "View your sent messages" on page 69.
Odysseyware® v2.51 Student User Guide 71
Forward messages

THIS PAGE INTENTIONALLY LEFT BLANK
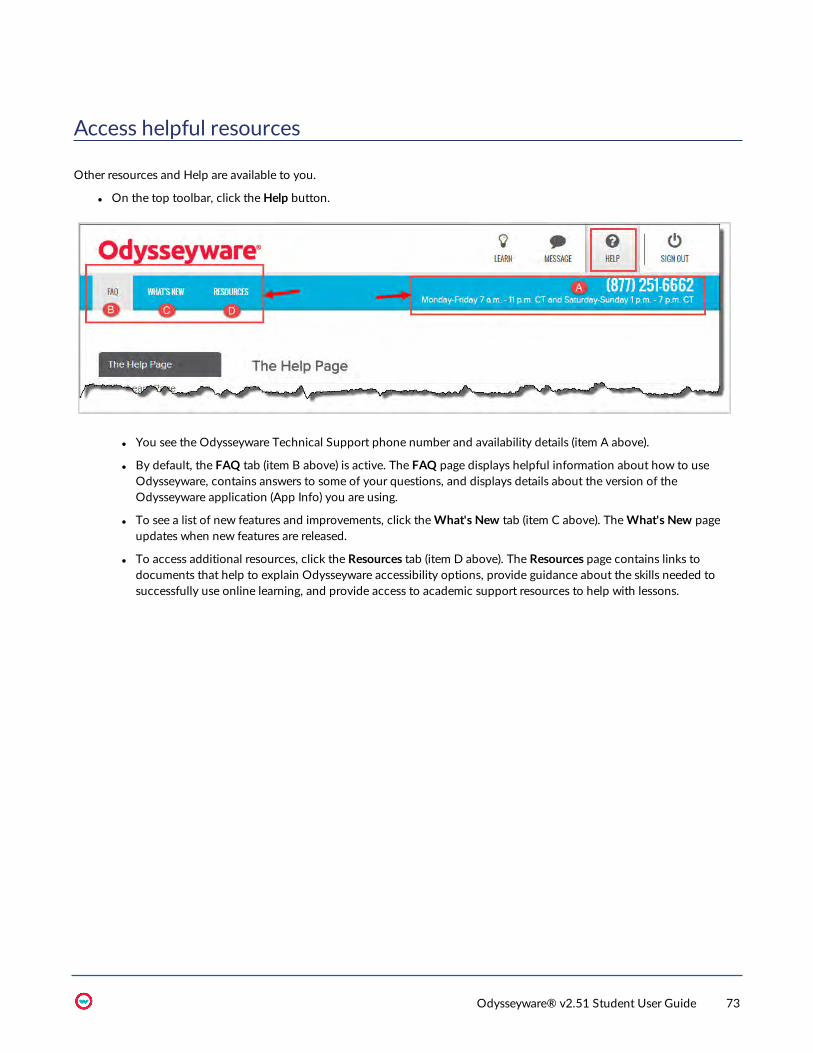
Access helpful resources
Other resources and Help are available to you.
l On the top toolbar, click theHelp button.
l You see the Odysseyware Technical Support phone number and availability details (item A above).
l By default, the FAQ tab (item B above) is active. The FAQ page displays helpful information about how to useOdysseyware, contains answers to some of your questions, and displays details about the version of theOdysseyware application (App Info) you are using.
l To see a list of new features and improvements, click theWhat's New tab (item C above). TheWhat's New pageupdates when new features are released.
l To access additional resources, click the Resources tab (item D above). The Resources page contains links todocuments that help to explain Odysseyware accessibility options, provide guidance about the skills needed tosuccessfully use online learning, and provide access to academic support resources to help with lessons.
Odysseyware® v2.51 Student User Guide 73

l To access a copy of the Student User Guide or the Student Quick Start Guide:
l Go directly to the Odysseyware Training Resources Knowledgebase page at:https://www.odysseyware.com/training-resources. The Knowledgebase page has a Search feature where youtype a keyword to access resources containing that keyword. Or, use the navigational links to access user guides,videos, and other helpful resources related to the selected link.
74 Odysseyware® v2.51 Student User Guide
Access helpful resources

Odysseyware® v2.51 Student User Guide 75
Access helpful resources

THIS PAGE INTENTIONALLY LEFT BLANK

Index
A
access user guides 74addingnotes to assignments 37
answer keyviewing 44
answeringquestions 41for quizzes and tests 61
App Info details 73archivingmessages 70
Ask For Help button 29, 42, 50Assignment Blocked indicator 24assignment help-needed messages 29assignment textlistening to 33
assignment type symbols 12assignmentscompletedreviewing 59, 64
contentsprinting 39
due date 22graded date 23listening to 33noteswriting and reading 37
opening 11reading reference information 33score 23status 23submitted date 23textviewing and hearing translation of 34
viewing 11viewing details of 21
Assignments /day, course 18Assignments page 11, 21Assignments Remaining, course 17assignments, blocked 24Attempt count 27
C
Change Password permission 7Choose a file button 50completed workreviewing 59
completingessays 49projects 49
coursesasking for help 18assignments remaining count 17assignments to work each day to stay on track 18current score 16days remaining 18foreign languagekeyboard characters 45
last completion date 17message tool 17pacing 17progress 17score to date 16start date 17viewing details of 15
CoursesMessage button 18
Courses page 15Current Score, course 16
D
Days Remaining, course 18Due, assignment 22
E
essayscompleting 49uploading files 50using Writer tools 52
F
FAQ page 73filesuploading 50
Flash Cards 31-32foreign language courseskeyboard characters 45
forwardingmessages 71
G
Grade Level, Writer 57Graded Date, assignment 23
H
Help 73App Info details 73FAQ page 73Resources page 73
Odysseyware® v2.51 Student User Guide 77
help request – quizzes
Technical Support contact information 73What's New page 73
help request 18Hide Answers button 45, 61, 64How To button, notes 37
K
keyboard charactersforeign language courses 45
Knowledgebase 1, 74
L
Last Completion, course 17Learner Dashboard 15lessonsnotesprinting 39writing and reading 37
questionsasking for help 29reviewing results 44, 60, 63
textviewing and hearing translation of 34
transcriptsviewing 31
vocabulary wordshearing pronunciation of 30
listening toaudio of assignment text 33
logging in 6logging out 8
M
Message Teacher button 13Message tool, course 17messagesarchivedviewing 70
archiving 70forwarding 71readviewing 67
replying to 68sending 67sent viewing 69unreadviewing 67
viewing 65Messages toolbar 65
multimediatranscriptsviewing 31
N
Next Question button 42, 62notesadding 37reading 38writing and reading 37
O
openingassignments 11projects 49
Other resources 73Overall Score, Writer 58
P
Pacing, course 17passwordschanging 7
printingassignment contents 39lesson notes 39
Progress, course 17Progress, units 21projectscompleting 49opening 49uploading files 50using Writer tools 52
Q
question types 46questionsanswering 41resultsreviewing 44, 60, 63
viewing and hearing translated text 34viewing answers 44
quizzesquestionsanswering 61
requesting unlock by teacher 62resultsreviewing 64
reviewing completed work 59studying for 59
78 Odysseyware® v2.51 Student User Guide

Read Next Section button – Writer
R
Read Next Section button 42Readability, Writer 57readingreference information 33teacher notes 38
Reference tool 33Refresh tool, Writer 52replyingto messages 68
requestingassignment help from teachers 29help from teachers 18test or quiz unlock by teacher 62
Resources page 73reviewinganswersquizzes 64tests 64
completed work 59resultsquestions 44, 60, 63
S
Score to Date, course 16Score, assignment 23Score, unit 20sendingmessages 67
Show Answers button 44, 60, 64Show Transcript button 31signing out 8Single Sign-On (SSO) schoolsdifferences 7logging in 6
Spelling Bee 31, 33Start Date, course 17Start Date, unit 21Status, assignment 23Submit Answer button 42, 50Submitted Date, assignment 23symbolsassignment type 12
T
Technical Support contact information 73testsanswer keyreviewing 64
questionsanswering 61
reviewing answers 64requesting unlock by teacher 62reviewing completed work 59studying for 59
text-to-speechvoices 33
text-to-speech translation 34Topic Agreement metric, Writer 57transcripts 31translatingtextin assignments 34
Turn It In button 29, 42, 50, 62
U
Unit Skipped indicator 21unitsprogress 21score 20skipped indicator 21start date 21viewing details of 19
Units page 19Unlock Test request 62uploadingfiles 50
V
viewinganswers 44archived messages 70assignments 11assignments details 21courses details 15messages 65read messages 67sent messages 69transcripts of multimedia 31units details 19unread messages 67
Vocab Arcade 31vocabulary activities 31vocabulary wordshearing pronunciation of 30
W
What's New page 73Work On Questions button 29, 41, 50, 62Writer 52grammar suggestions 54
Odysseyware® v2.51 Student User Guide 79

Writing (scoring), Writer –Writing (scoring), Writer
projects and essayschecking work 52
Refresh tool 52scoring elements 56Grade Level 57Overall Score 58Readability 57Topic Agreement 57Writing 58
spelling errors options 53Writing (scoring), Writer 58
80 Odysseyware® v2.51 Student User Guide