styles sample - millersvilledhutchens/cs101/labs/... · sample chapter 4 advanced formatting...
TRANSCRIPT

SAMPLE
Chapter 4 Advanced Formatting Features 135
Styles
Documents contain elements such as headings and body text. The main paragraphs in a document are body text. Headings are titles that are often bold and in a larger and different font than body text. These elements are set apart by their fonts, sizes, colors, and paragraph formats. Rather than apply each of these formats separately, a style can be used. A style is a named set of formats. With one click, multiple formats can be applied to selected text. Word includes styles, also called Quick Styles, to format body text (“Normal” style), different levels of headings, and other elements such as quotes:
Normal style is automatically applied to paragraphs in a new document. To apply a different style, click in a paragraph or select multiple paragraphs
body text, headings
Key ConceptsFormatting with styles and themesDividing a document into sections and columnsUsing tablesCreate a table of contentsInserting SmartArt graphicsHyphenating a documentCreating brochures and newslettersAdding citations and a bibliographyUsing text boxesQuick Tables (Exercise 8)
Practice Data FilesVOLCANOES, TUTORING, SPACE TRANSMISSIONS Exercise Data FilesELEMENTS, SATURN, HONORS HANDOUT
Quick Styles
TIP Some features of Word use styles to differentiate between text. For example, a table of contents is automatically generated based on heading styles.
TIP Styles makes it easy to have a consistent look throughout a document.
Chapter 4Advanced Formatting Features
SAMPLE
136 Chapter 4 Advanced Formatting Features
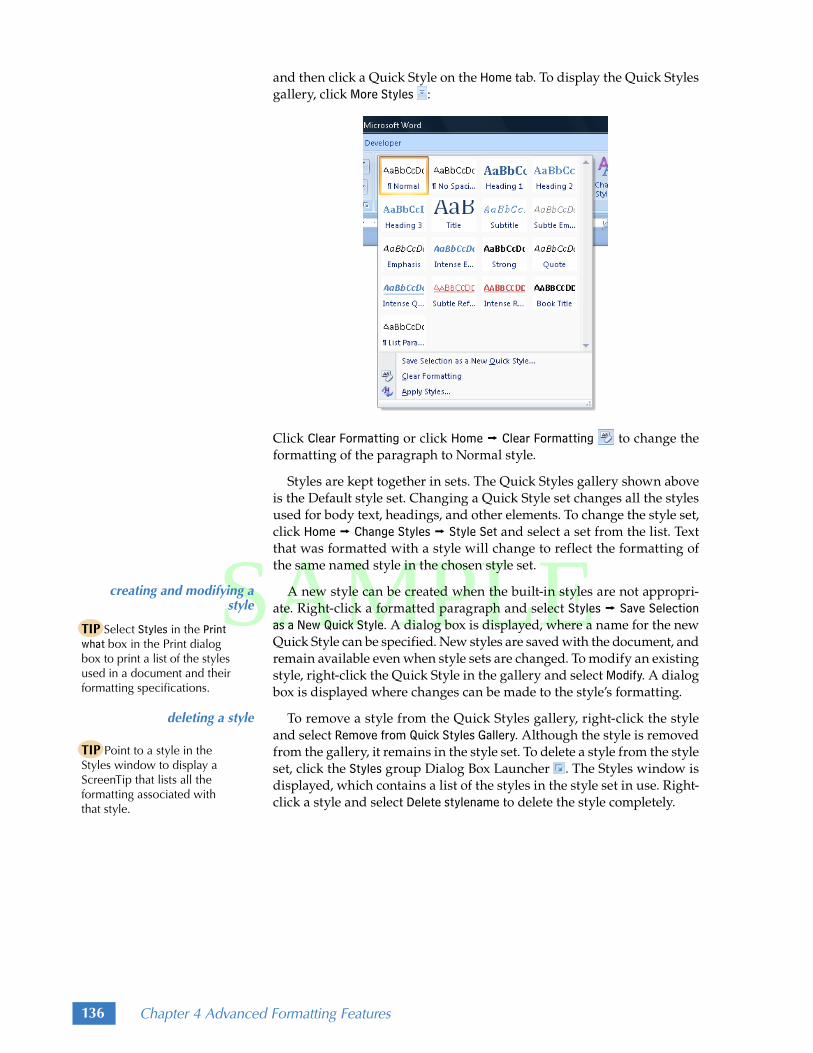
and then click a Quick Style on the Home tab. To display the Quick Styles gallery, click More Styles :
Click Clear Formatting or click Home j Clear Formatting to change the formatting of the paragraph to Normal style.
Styles are kept together in sets. The Quick Styles gallery shown above is the Default style set. Changing a Quick Style set changes all the styles used for body text, headings, and other elements. To change the style set, click Home j Change Styles j Style Set and select a set from the list. Text that was formatted with a style will change to reflect the formatting of the same named style in the chosen style set.
A new style can be created when the built-in styles are not appropri-ate. Right-click a formatted paragraph and select Styles j Save Selection as a New Quick Style. A dialog box is displayed, where a name for the new Quick Style can be specified. New styles are saved with the document, and remain available even when style sets are changed. To modify an existing style, right-click the Quick Style in the gallery and select Modify. A dialog box is displayed where changes can be made to the style’s formatting.
To remove a style from the Quick Styles gallery, right-click the style and select Remove from Quick Styles Gallery. Although the style is removed from the gallery, it remains in the style set. To delete a style from the style set, click the Styles group Dialog Box Launcher . The Styles window is displayed, which contains a list of the styles in the style set in use. Right-click a style and select Delete stylename to delete the style completely.
creating and modifying a style
deleting a style
TIP Select Styles in the Print what box in the Print dialog box to print a list of the styles used in a document and their formatting specifications.
TIP Point to a style in the Styles window to display a ScreenTip that lists all the formatting associated with that style.

SAMPLE
Chapter 4 Advanced Formatting Features 137
Practice: VOLCANOES – part 1 of 4
!! START WORD AND OPEN VOLCANOESa. Open VOLCANOES, which is a Word data file for this text, and display formatting
marks if they are not already displayed.
b. At the bottom of page 1, replace Name with your first name and last name.
@@ APPLY STYLESa. At the top of page 2, place the insertion point in the “Introduction” heading.
b. Click Home j Heading 1. The Heading 1 style is now applied to the “Introduction” heading:
c. Below the “Introduction” paragraph on page 1, place the insertion point in the “Volcano Facts” heading.
d. Click Home j Heading 1.
e. Scroll to the end of the document and apply the Heading 1 style to the “Conclusion” heading.
## APPLY STYLES TO THE OTHER HEADINGSa. Scroll to the middle of page 2 and place the insertion point in the “Stages of Volcanic
Activity” heading.
b. Click Home j Heading 2.
c. Scroll through the rest of the document and apply the Heading 2 style to the “Types of Volcanoes” and “Types of Lava Rocks” headings.
d. Scroll to the top of page 1 and place the insertion point in the “Volcanoes” title.
e. Click Home j More Styles . A gallery of Quick Styles is displayed.
f. Click Title.
g. At the bottom of page 1, apply the No Spacing style to the three paragraphs that begin with “By…” and end with “…2009.”
$$ APPLY AND MODIFY A STYLEa. Scroll to the middle of page 2 and place the insertion point in the “Eruption Stage”
heading.
b. Click Home j Heading 3 style.
c. Scroll through the rest of the document and apply the Heading 3 style to the “Cooling and Inactive Stage,” “Cinder Cones,” “Shield Volcanoes,” “Composite Volcanoes,” “Basalt,” “Obsidian,” and “Andesite” headings.
d. On the Home tab, right-click the Heading 3 style and select Modify from the menu. A dialog box is displayed.
e. Click Italic and then select OK. All of the text formatted with the Heading 3 style is now italic.
%% SAVE THE MODIFIED VOLCANOES

SAMPLE
138 Chapter 4 Advanced Formatting Features
Creating Tables
A table consists of rows and columns of cells, which can contain text and graphics. The intersection of a row and column is called a cell. Cells can have borders, which make the information easier to read:
The table above has four columns and three rows. Rows are horizontal and columns are vertical. For example the first row contains titles, and the last column contains the “Atomic Mass” title and the mass amounts.
To create an empty table, click Insert j Table and move the pointer over the grid to select the number of cells for the table:
Click the grid to create a table at the insertion point and then type text into the individual cells:
Click a cell to place the insertion point in that cell. Press the Tab key to move from cell to cell. The arrow keys can also be used to move the inser-tion point to another cell. Press Enter to create a new paragraph within the cell instead of moving to another cell.
rowcolumn
cell
create an empty table
entering text into cells
Alternative Click Insert j Table j Insert Table to display a dialog box with options for creating a table.

SAMPLE
Chapter 4 Advanced Formatting Features 139
To create a table from text that is separated by tabs, select the text and then click Insert j Table j Convert Text to Table. A dialog box is displayed, with options already selected for the number of rows in the table (one per paragraph selected) and the number of columns. Select OK to change the text and tabs into a table with text in the cells.
To convert a table to text, select the table and then click Format j Convert to Text. A dialog box is displayed, with options for how the text will be separated. Select OK to create the table.
Formatting Cell Contents
Cells can be selected individually, by row, by column, or by table, and then formatting applied:
• Point to the left edge of a cell, the pointer changes to , and then click to select the cell’s contents.
• Point to the left of a row, the pointer changes to , and then click to select the row. Drag to select multiple rows.
• Point to the top of a column, the pointer changes to , and then click to select the column. Drag to select multiple columns.
• Click in the upper-left corner of a table to select the table. A selected table can be formatted and also cut, copied, and pasted.
Formats such as fonts and font styles on the Home tab can be applied to the contents of selected cells. Some formats affect the row height. For example, formatting text in a larger font size increases the row height.
Apply additional formatting to cell contents using options on the Layout tab:
• Change the alignment of cell contents from left, center, or right, and from top, center, and bottom of the cell using the align cell contents buttons.
• Click Layout j Text Direction to rotate the text in the cell. Continue clicking Layout j Text Direction to cycle through all directions.
• Click Layout j Cell Margins to display a dialog box with options for changing the distance from the cell contents to the edges of the cell.
converting a table to text
converting text to a table
selecting cells
formatting cells
Alternative Click Layout j Select to display commands for selecting the table, column, row, or cell that contains the insertion point.

SAMPLE
140 Chapter 4 Advanced Formatting Features
Formatting a Table
When a table is created, Word automatically adjusts the column widths to be equal so that the table fills the space between the left and right mar-gins. The column and row borders are called boundaries and are used to change the width of a column or the height of a row:
• Point to the right boundary, the pointer changes to , and then drag the boundary to change the column’s width.
• Point to the bottom boundary of a row, the pointer changes to , and then drag to change the row’s height.
• Double-click a boundary to change the height or width just enough to display the data entirely.
After creating a table, a row or column may need to be added. Place the insertion point in a cell and click Layout j Insert Above to add a row above the selected row. Likewise, click Layout j Insert Below to add a row below, or Insert Left or Insert Right to add a column to the left or right of the inser-tion point. Delete a row, column, or entire table using Layout j Delete.
A table can be formatted with cell borders and shading to make the table easier to read and to call attention to specific cells. For example, tables are often formatted with shading in every other row, which makes it easier to read the contents of a row. To change the cell borders, click in Design j Borders and select a format from the displayed list. To change the shading, click Design j Shading and select the shading. Borders and shading formats are applied to the selected row, column, or table.
Word includes styles for formatting the borders and shading in tables. To remove all formatting and just have plain borders, click the first table style, Table Grid, on the Design tab:
To access additional styles other than those displayed, click More Table Styles next to the table styles to display the entire gallery.
column width and row height
adding and deleting rows and columns
table styles
TIP The Design and Layout tabs are available when a table, row, or column is selected, or when the insertion point is in a cell.
TIP The name of a table style appears when the pointer is paused on the style.

SAMPLE
Chapter 4 Advanced Formatting Features 141
Sorting and Calculating Data in Tables
The contents of the rows in a table can be sorted based on a column. To sort an entire table, select the table and then click Layout j Sort. A dialog box is displayed with options that affect which column to base the sort on and how to sort the data. Ascending (low to high) or Descending (high to low) changes the order based on the text, number, or date.
Calculations can be performed in columns or rows that contain num-bers. For example, the total calories in this table are calculated in the bottom-right cell:
To perform a calculation in the cell that contains the insertion point, click Layout j Formula. A dialog box is displayed with = SUM(ABOVE) in the Formula box. The formula will vary depending on where the numbers to calculate are. =SUM(ABOVE) indicates the numbers in the column above will be added and the total will be displayed. =SUM(LEFT) indicates the numbers in the same row and to the left of the cell will be added. Select a different function, such as AVERAGE, in the Paste function list. An equals sign must always be included at the beginning of the function. Select OK to perform the calculation.
Once any data has changed in cells, right-click the cell that contains the calculation and select Update Field to recalculate the amount.
Practice: VOLCANOES – part 2 of 4Word should already be started with VOLCANOES open from the last practice.
!! INSERT A TABLEa. In the middle of page 2, place the insertion point in the blank paragraph after the
sentence that ends “…the last eruption:” Display formatting marks if necessary.
b. Click Insert j Table. A grid is displayed.
c. Move the pointer over the grid until three columns and four rows are selected (a 3x4 table) and then click. The table is inserted into the document.
@@ ENTER DATAa. Click the first cell of the first row to place the insertion point, if it is not already
there.
TIP To sort a single column, select the column before clicking Layout j Sort and then select the Sort column only check box.
TIP Ascending order is also called alphabetical order when the data is text and chronological order when the data is times or dates.
SAMPLE
142 Chapter 4 Advanced Formatting Features
b. Type Name and then press the Tab key. The insertion point is now in the second cell of the first row.
c. Type Country and then press the Tab key.
d. Type Last Eruption and then press the Tab key. The insertion point is now in the first cell of the second row.
e. Enter the remaining data so that your table looks similar to:
## FORMAT THE DATAa. Point to the top of the third column until the pointer changes to and then click.
The third column is selected.
b. Click Layout j Align Top Right . The data is right aligned.
c. Point to the left of the first row until the pointer changes to and then click. The first row is selected.
d. Use the Home tab to format the row as 14 point and bold. The row height increases with the larger font size.
e. Click anywhere to remove the selection.
$$ FORMAT THE TABLEa. Point to the boundary between the “Name” column and the “Country” column
until the pointer changes to .
b. Drag the boundary to the left until the “Name” column is just slightly wider than the data. Word automatically changes the column width of the “Country” column so that the table still fills the space between the left and right margin.
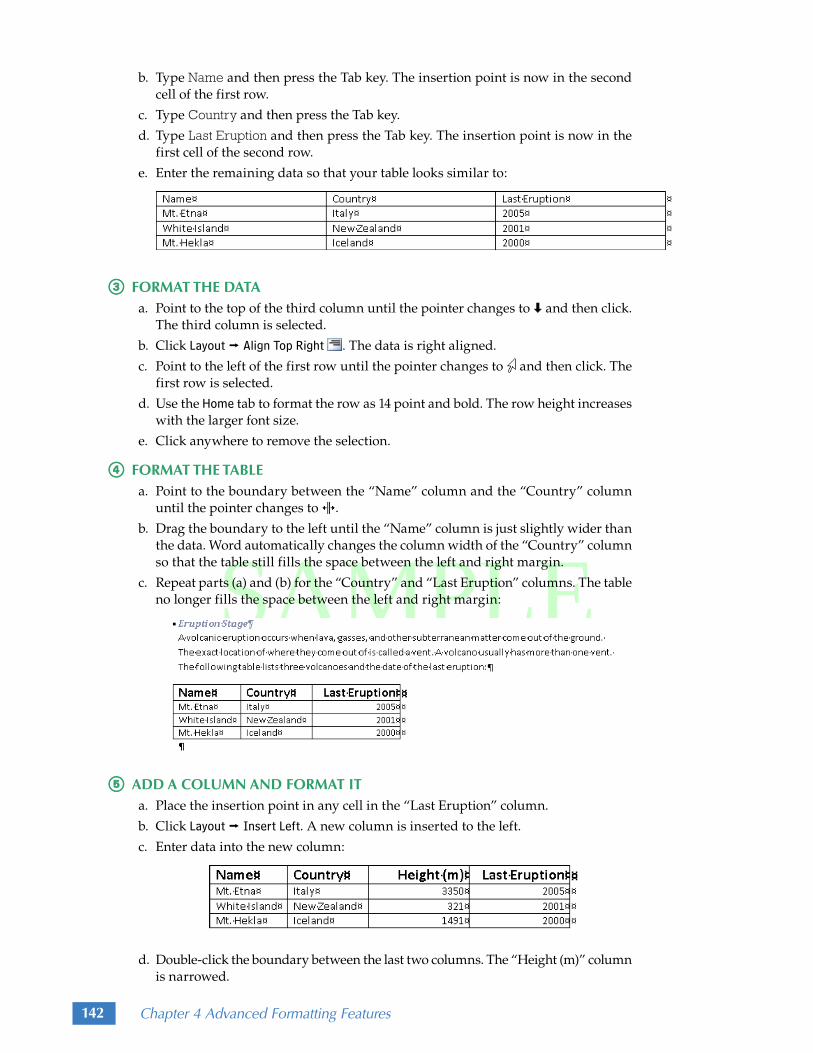
c. Repeat parts (a) and (b) for the “Country” and “Last Eruption” columns. The table no longer fills the space between the left and right margin:
%% ADD A COLUMN AND FORMAT ITa. Place the insertion point in any cell in the “Last Eruption” column.
b. Click Layout j Insert Left. A new column is inserted to the left.
c. Enter data into the new column:
d. Double-click the boundary between the last two columns. The “Height (m)” column is narrowed.

SAMPLE
Chapter 4 Advanced Formatting Features 143
^̂ FORMAT A TABLE WITH BORDERS AND SHADINGa. Point to the left of the first row until the pointer changes to and then click. The
first row is selected.
b. Click Design j Borders j Top Border. The top border formatting for this row is deselected, and the row no longer has a top border.
c. With the top row still selected, click Design j Shading and click the green in the top row of Theme colors. The first row is shaded green.
&& ADD A ROW AND CALCULATE DATAa. Place the insertion point in any cell in the last row.
b. Click Layout j Insert Below. A new row is added to the bottom of the table.
c. In the last cell in the “Country” column, type: Average:
d. Format the text Average: as bold.
e. Place the insertion point in the text Average: and click Layout j Align Top Right . The text is right aligned.
f. Place the insertion point in the last cell in the “Height (m)” column.
g. Click Layout j Formula. A dialog box is displayed and the Formula box may already contain =SUM(ABOVE).
1. Press the Backspace key until SUM(ABOVE) is deleted, but do not delete the equals sign =.
2. In the Paste function list select AVERAGE. The formula is placed in the Formula box.
3. In the formula, between the parentheses type ABOVE so that the formula calculates the numbers in the column above it. Your dialog box should look similar to:
4. Select OK. The calculation is performed and the cell displays the average height of the volcanoes, 1720.67.
Check — Your table should look similar to:
** FORMAT A TABLE WITH A STYLEa. Scroll to the top of page 3, to the table that contains information about volcano
types.
b. Place the insertion point in any cell in the table.
SAMPLE
144 Chapter 4 Advanced Formatting Features
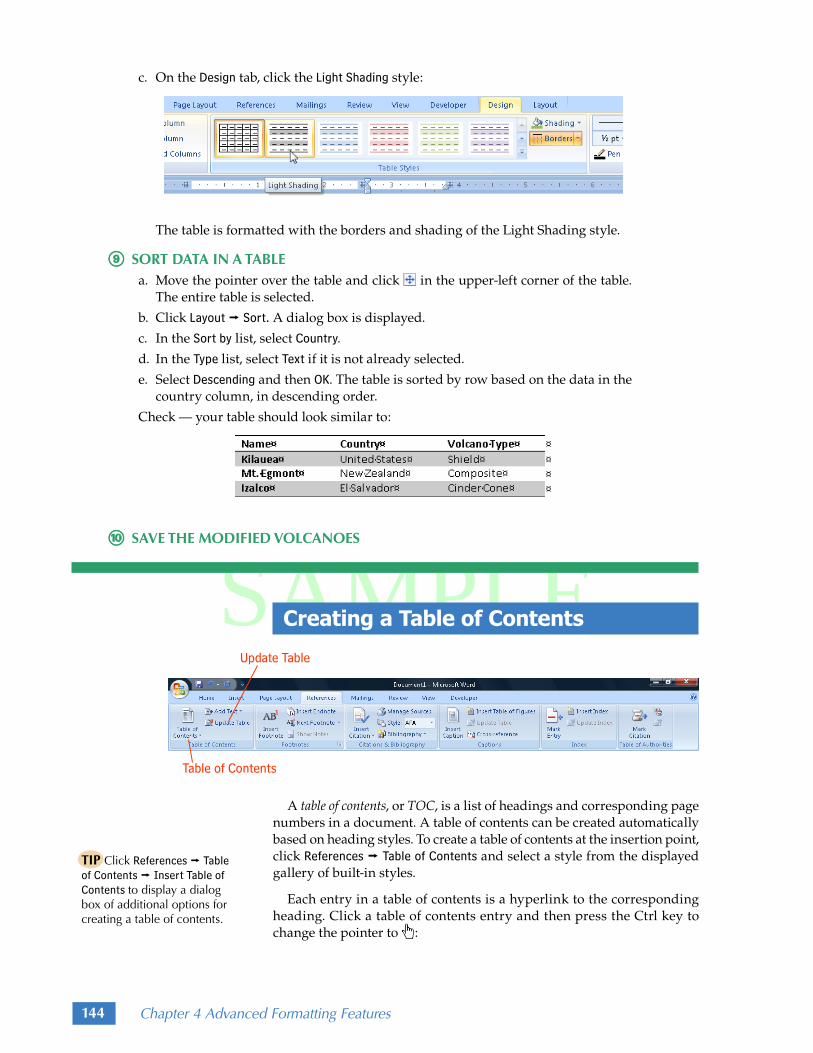
c. On the Design tab, click the Light Shading style:
The table is formatted with the borders and shading of the Light Shading style.
(( SORT DATA IN A TABLEa. Move the pointer over the table and click in the upper-left corner of the table.
The entire table is selected.
b. Click Layout j Sort. A dialog box is displayed.
c. In the Sort by list, select Country.
d. In the Type list, select Text if it is not already selected.
e. Select Descending and then OK. The table is sorted by row based on the data in the country column, in descending order.
Check — your table should look similar to:
)) SAVE THE MODIFIED VOLCANOES
Creating a Table of Contents
A table of contents, or TOC, is a list of headings and corresponding page numbers in a document. A table of contents can be created automatically based on heading styles. To create a table of contents at the insertion point, click References j Table of Contents and select a style from the displayed gallery of built-in styles.
Each entry in a table of contents is a hyperlink to the corresponding heading. Click a table of contents entry and then press the Ctrl key to change the pointer to :
TIP Click References j Table of Contents j Insert Table of Contents to display a dialog box of additional options for creating a table of contents.
SAMPLE
Chapter 4 Advanced Formatting Features 145
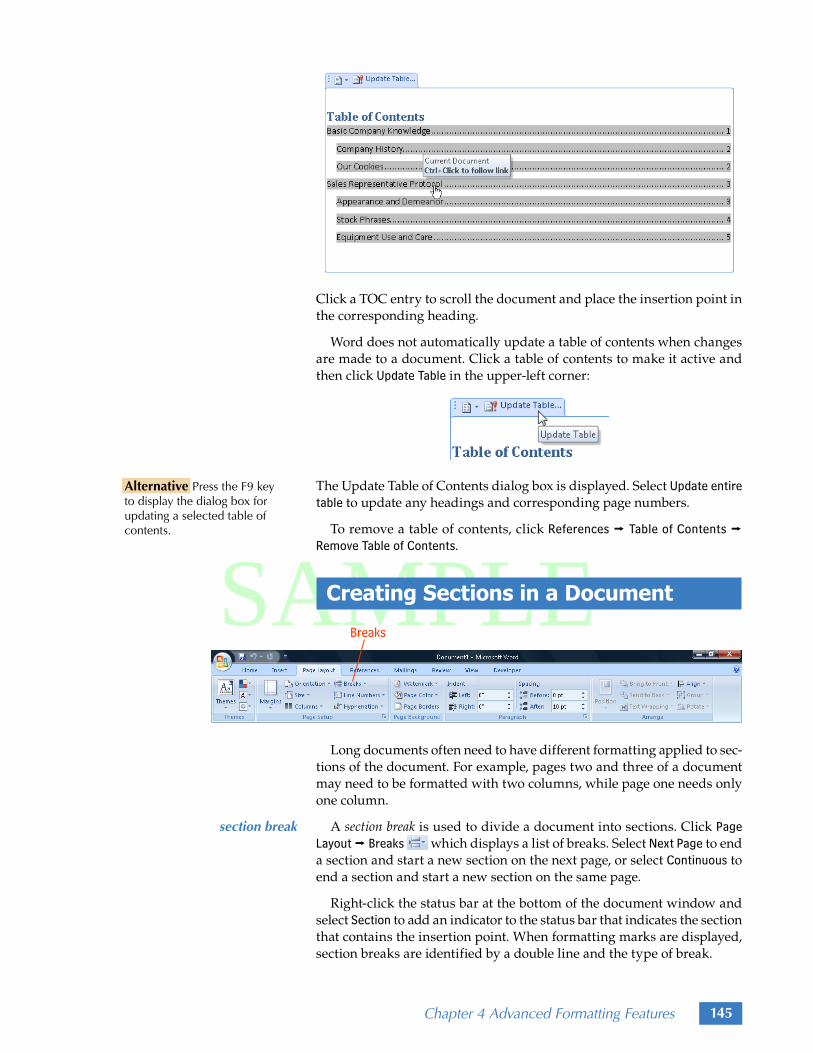
Click a TOC entry to scroll the document and place the insertion point in the corresponding heading.
Word does not automatically update a table of contents when changes are made to a document. Click a table of contents to make it active and then click Update Table in the upper-left corner:
The Update Table of Contents dialog box is displayed. Select Update entire table to update any headings and corresponding page numbers.
To remove a table of contents, click References j Table of Contents j Remove Table of Contents.
Creating Sections in a Document
Long documents often need to have different formatting applied to sec-tions of the document. For example, pages two and three of a document may need to be formatted with two columns, while page one needs only one column.
A section break is used to divide a document into sections. Click Page Layout j Breaks which displays a list of breaks. Select Next Page to end a section and start a new section on the next page, or select Continuous to end a section and start a new section on the same page.
Right-click the status bar at the bottom of the document window and select Section to add an indicator to the status bar that indicates the section that contains the insertion point. When formatting marks are displayed, section breaks are identified by a double line and the type of break.
section break
Alternative Press the F9 key to display the dialog box for updating a selected table of contents.

SAMPLE
146 Chapter 4 Advanced Formatting Features
Page formats, such as margins, are applied to only the current section by default. To apply a page format to the Whole document, use the Apply to list in the Page Setup dialog box.
To delete a section break, place the insertion point to the left of the break and press the Delete key.
Section Headers and Footers
A document divided into sections can have different headers and footers in each section. For example, in a report, the page numbers in the footer should start on the first page of the body of the report, not the title page.
By default, each section header and footer contains the same text as the previous section, as noted with the Same as Previous tab:
To create a different header or footer in a section, place the insertion point in the header and then click Design j Link to Previous so that it is no longer selected. The text in the header area can then be changed and will appear on all pages in that section.
Different page numbering may be required for different parts of a docu-ment. Front matter is information that comes before the body of a report, such as the title page and table of contents, which are often numbered with small Roman numerals (i, ii, iii, and so on). The body of a report contains the information being presented and is usually numbered with Arabic numerals (1, 2, 3, and so on) starting at 1. To format different page numbers, click Design j Page Number j Format Page Numbers to display a dialog box. Select a format in the Number format list. Page numbering can be started at a different number by selecting Start at and then typing the new number.
Number FormatsFormat Type1, 2, 3, … Arabic- 1 -, - 2 -, - 3 -,… Arabica, b, c, … lettersA, B, C, … lettersi, ii, iii, … RomanI, II, III,… Roman
Page X of XOptions for including the total number of pages are available if the section has more than one page.
deleting a section break
front matter
body

SAMPLE
Chapter 4 Advanced Formatting Features 147
Hyphenating a Document
Hyphenating a document is a process that divides words, if necessary, at the end of lines with a hyphen (-) so that part of a word wraps to the next line. Hyphenation can smooth out very ragged right edges in left-aligned text and can lessen the space between words in justified text. To automatically hyphenate a document, click Page Layout j Hyphenation
j Automatic. Select Manual to display each word as it is selected for hyphenation.
Practice: VOLCANOES – part 3 of 4Word should already be started with VOLCANOES open from the last practice.
!! INSERT A TABLE OF CONTENTSa. Scroll to the top of page 2 and place the insertion point in the blank paragraph
above the “Introduction” heading.
b. Click References j Table of Contents. A gallery of styles is displayed.
c. Click Automatic Table 2. A table of contents is created at the insertion point.
@@ USE A HYPERLINK IN THE TABLE OF CONTENTSa. Click an entry in the table of contents to make the table active.
b. Click “Obsidian” in the table of contents.
c. Hold down the Ctrl key until the pointer changes to and then click the Obsidian entry. The document is scrolled to the Obsidian heading, and the insertion point is placed in the heading.
## INSERT A SECTION BREAKa. Scroll to page 2, below the table of contents, and place the insertion point to the left
of the “I” at the beginning of the “Introduction” heading.
b. Click Page Layout j Breaks j Next Page. A section break is inserted between pages 2 and 3 and the main text of the report is moved to page 3.
c. If the status bar does not display “Section: 2,“ right-click the status bar and select Section and then click anywhere in the document. “Section: 2” is displayed because the insertion point is in section 2.
$$ ADD A HEADER AND FOOTERa. At the top of page 2, click the table of contents. The table of contents is selected, a
blue tab is displayed, and the status bar displays “Section: 1.”
b. Click Insert j Page Number j Bottom of Page j Plain Number 2. A footer is created with a centered page number.
c. Click Design j Go To Header. The insertion point is moved to the header.
d. Type your first and last names.

SAMPLE
148 Chapter 4 Advanced Formatting Features
%% FORMAT THE PAGE NUMBERS IN EACH SECTIONa. Click Design j Different First Page. The header and footer are removed from the title
page of the document.
b. Click Design j Go To Footer. The insertion point is moved to the footer of section 1.
c. Click Design j Page Number j Format Page Numbers. A dialog box is displayed.
1. In the Number format list, select i, ii, iii, ....
2. Select OK. The dialog box is removed. Scroll to the bottom of the table of contents page. The page number in the footer is “ii” because it is the second page in the document.
d. Click Design j Close Header and Footer. The header and footer are dimmed.
^̂ FORMAT THE PAGE NUMBER IN THE FOOTER OF SECTION 2a. Scroll through the document to view the dimmed footer text. Note that the page
numbers in the footer in section 2 need to be formatted to start numbering at 1.
b. On any page in section 2, double-click the footer.
c. Click Design j Link to Previous to deselect it. The footer in section 2 can now be formatted differently than the footer in section 1.
d. Click Design j Page Number j Format Page Numbers. A dialog box is displayed.
1. Select the options as shown:
2. Select OK. The dialog box is removed and the page number is formatted as Arabic numerals starting with number 1.
e. Click Design j Close Header and Footer. The header and footer are dimmed.
&& HYPHENATE THE DOCUMENT AND UPDATE THE TABLE OF CONTENTSa Click Page Layout j Hyphenation j Automatic. Word hyphenates the document.
Scroll through the document and look for hyphenated words.
b. Scroll to the table of contents.
c. Click the table of contents to select it.
d. In the upper-left corner of the table of contents, click Update Table. A dialog box is displayed.
e. Select Update entire table and then OK. The table of contents now shows the correct page numbers.
** SAVE THE MODIFIED VOLCANOES

SAMPLE
Chapter 4 Advanced Formatting Features 149
Using Outline View
To display a document in Outline view, click View j Outline. Outline view displays the organization of a document.
Print Layout view Outline view
In Outline view, styles are used to determine heading levels and body text. Paragraphs are indented according to their levels, for example the Heading 1 style is at a higher level than Heading 2. In the example shown above, “Our Solar System” is in the Heading 1 style and “Planets” is Heading 2 style. Paragraphs with the Normal style are the lowest level.
A document can be edited by topic in Outline view using options on the Outlining tab:
• Click Promote or Demote to apply the next higher or lower level style, respectively.
• Click Demote to Body Text to apply the Normal style, or Promote to Heading 1 to apply the Heading 1 style.

SAMPLE
150 Chapter 4 Advanced Formatting Features
selecting and moving a topic
• Click Move Up or Move Down to move the paragraph before or after the preceding paragraph, respectively.
• Click Expand or Collapse to display or hide the text under the heading containing the insertion point, respectively.
• Use Show Levels to display different heading levels. Body text is only displayed when Show All Levels is selected.
Icons next to text in the document in Outline view indicate levels:
Body text
Headings followed by a paragraph with a lower level
Headings followed by a paragraph with the same level
Entire topics can be selected by clicking next to a heading, which selects that heading and the text under it. Click Outlining j Move Up or Outlining j Move Down or drag to move a selected topic. Click Outlining j Close Outline View to display the document in Print Layout view.
Citing Sources and Creating a Bibliography
A bibliography is a list of the sources cited and consulted in preparation of a document. A bibliography is usually on a separate page at the end of a document and is sometimes titled “Works Cited.” Within a document, citations are used to refer to bibliography entries:
This citation refers to the Brooks bibliography entry
Word maintains a Master List of sources for all documents. To add a new source or manage existing sources, click References j Manage Sources. A dialog box is displayed:
bibliography
adding and managing sources
citations
TIP Refer to Chapter 1 for information on searching the Web.

SAMPLE
Chapter 4 Advanced Formatting Features 151
Select New to add information for a source. Sources can be copied to or deleted from the Current List, which affect the open document. Sources are added automatically to the Current List when a source is cited in the document. Deleting a source from the current list does not remove it from the Master List.
To create a citation, place the insertion point where the citation should appear. Click References j Insert Citation. All sources in the Current List are displayed. Click a source to create the citation. To add page numbers, click the citation, which turns blue and displays . Click and then select Edit Citation. A dialog box is displayed with options for adding page numbers and other modifications.
To create a citation before adding the source to Word, click References j Insert Citation j Add New Placeholder. Type a name for the placeholder in the dialog box and select OK. A citation is added. A source placeholder also appears in the Source Manager dialog box with a question mark next to it, and can be edited later to include complete information for the source.
To edit the source for a citation, click the citation, then click and select Edit Source, which displays the source information in a dialog box. All citations that use the same source are updated.
To create a bibliography, click References j Bibliography and click a format for the bibliography. A bibliography is created at the insertion point using all sources in the Current List. The bibliography is automatically updated when any changes are made to the sources in the Current List.
Word formats citations and bibliographies based on the selected bib-liography style. To choose a bibliography style, use the Style list on the References tab. The list includes the commonly used MLA and APA styles.
creating a citation
editing a source for a citation
creating a bibliography
TIP When adding information for a source, select Show All Bibliography Fields check box for additional fields.
TIP MLA stands for Modern Language Association and APA stands for American Psychological Association.
SAMPLE
152 Chapter 4 Advanced Formatting Features
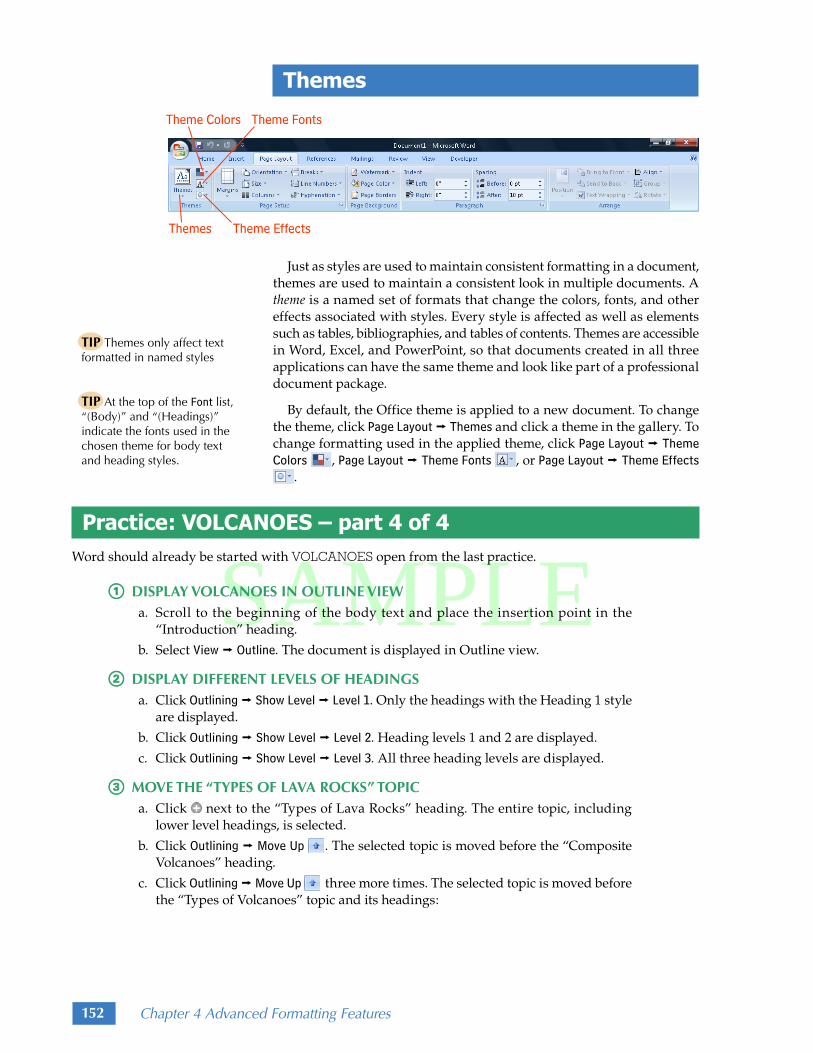
Themes
Just as styles are used to maintain consistent formatting in a document, themes are used to maintain a consistent look in multiple documents. A theme is a named set of formats that change the colors, fonts, and other effects associated with styles. Every style is affected as well as elements such as tables, bibliographies, and tables of contents. Themes are accessible in Word, Excel, and PowerPoint, so that documents created in all three applications can have the same theme and look like part of a professional document package.
By default, the Office theme is applied to a new document. To change the theme, click Page Layout j Themes and click a theme in the gallery. To change formatting used in the applied theme, click Page Layout j Theme Colors , Page Layout j Theme Fonts , or Page Layout j Theme Effects
.
Practice: VOLCANOES – part 4 of 4Word should already be started with VOLCANOES open from the last practice.
!! DISPLAY VOLCANOES IN OUTLINE VIEWa. Scroll to the beginning of the body text and place the insertion point in the
“Introduction” heading.
b. Select View j Outline. The document is displayed in Outline view.
@@ DISPLAY DIFFERENT LEVELS OF HEADINGSa. Click Outlining j Show Level j Level 1. Only the headings with the Heading 1 style
are displayed.
b. Click Outlining j Show Level j Level 2. Heading levels 1 and 2 are displayed.
c. Click Outlining j Show Level j Level 3. All three heading levels are displayed.
## MOVE THE “TYPES OF LAVA ROCKS” TOPICa. Click next to the “Types of Lava Rocks” heading. The entire topic, including
lower level headings, is selected.
b. Click Outlining j Move Up . The selected topic is moved before the “Composite Volcanoes” heading.
c. Click Outlining j Move Up three more times. The selected topic is moved before the “Types of Volcanoes” topic and its headings:
TIP At the top of the Font list, “(Body)” and “(Headings)” indicate the fonts used in the chosen theme for body text and heading styles.
TIP Themes only affect text formatted in named styles

SAMPLE
Chapter 4 Advanced Formatting Features 153
d. Click Outlining j Show Level j All Levels. Note that the text under each heading also moved.
e. Click Outlining j Show Level j Level 3.
f. Click Outlining j Close Outline View. The document is again displayed in Print Layout view.
$$ INSERT A CITATION USING A PLACEHOLDERa. Scroll to the middle of page 4 to the “Cinder Cones” heading and place the inser-
tion point after the period at the end of the sentence “Cinder cone volcanoes are formed from explosive eruptions.”
b. Click References j Insert Citation j Add New Placeholder. A dialog box is displayed.
c. Type Jensen and select OK. A placeholder is created for the citation:
%% ADD AND MANAGE SOURCESa. Click References j Manage Sources. A dialog box is displayed. Note the “Jensen”
source from the placeholder just created, which appears in the Current List with a question mark next to it.
b. In the Current List, click “Jensen” and then select Edit. A dialog box is displayed. Set the options as shown:
c. Select OK. The source is added to the Master List and Current List.

SAMPLE
154 Chapter 4 Advanced Formatting Features
d. Select New. A dialog box is displayed. Set the options as shown:
e. Select OK. The source is added to the Master List and Current List.
f. Select New. A dialog box is displayed. Set the options as shown:
g. Select OK. The source is added to the Master List and Current List.
h. Click Close. The Source Manager dialog box is closed and the document is displayed with the Jensen citation active.
^̂ EDIT A CITATION AND CHANGE THE STYLEa. Click in the Jensen citation and select Edit Citation. A dialog box is displayed.
b. In the Pages box type 34 and select OK. The page number is added.
c. Click References j Style j APA if it is not already selected. The styles set by the American Psychological Association for use in research papers are followed to format the citation.
d. Click References j Style j MLA. The styles set by the Modern Language Association for use in research papers are followed to format the citation. Note the differences in the citation in the document.
&& INSERT CITATIONS USING EXISTING SOURCESa. Scroll down to the “Composite Volcanoes” heading and place the insertion point
after the period at the end of the paragraph which ends “…several kilometers.”
b. Click References j Insert Citation and then select the “Castillo, Hannah” source from the list. The citation is entered.

SAMPLE
Chapter 4 Advanced Formatting Features 155
c. Click the citation to make it active, and then click and select Edit Citation. A dialog box is displayed.
d. In the Pages box type 120-125 and select OK. Page numbers are added.
e. Scroll up to the “Basalt” heading and place the insertion point after the period at the end of the paragraph which ends “…silica, or aluminum.”
f. Insert a citation for “Mitchell, Tyrone L.”
g. Edit the citation to reference page 62.
** INSERT A BIBLIOGRAPHYa. Scroll to the end of the document and place the insertion point in the blank para-
graph below the “Conclusion” heading.
b. Click Page Layout j Breaks j Next Page in the list. A section break is inserted.
c. Click References j Bibliography j Bibliography. A bibliography is created at the insertion point. Scroll up if necessary to view the bibliography.
(( CHANGE THE THEMEa. Click Page Layout j Themes j Apex. The theme is changed from the Office theme to
the Apex theme. Scroll through the document and note how the styles and elements have changed, which affects the look and the pagination of the document.
b. Click Page Layout j Themes j Equity. The theme is changed again.
c. Click Page Layout j Theme Colors j Urban. The color scheme of the theme is changed but the fonts remain the same.
)) UPDATE THE TOC AND FORMAT PAGE NUMBERSa. Scroll to the second page of the document and click the table of contents to select
it.
b. In the upper-left corner of the table of contents, click Update Table. A dialog box is displayed.
c. Select Update entire table and then OK. The table of contents is updated. Note that the page number for the bibliography restarted at number 1.
d. Scroll to the footer on the bibliography page and double-click the footer.
e. Click Design j Page Number j Format Page Numbers. A dialog box is displayed.
1. Select the Continue from previous section option and then select OK. The number in the footer changes to 3.
f. Click Design j Close Header and Footer. The header and footer are dimmed.
g. Scroll to the table of contents and update it again. The bibliography page number is now correct.
11 SAVE, PRINT, AND CLOSE THE MODIFIED VOLCANOES

SAMPLE
156 Chapter 4 Advanced Formatting Features
Creating SmartArt Graphics
SmartArt graphics are diagrams that show relationships between ele-ments and are used to illustrate information. Elements may be people, tasks, goals, statistics, or similar information. In a SmartArt graphic, elements are represented by shapes. To create a SmartArt graphic at the insertion point, click Insert j SmartArt which displays a dialog box:
Select a layout type to limit the displayed layouts to that type. Click a layout to view a preview and description. Select OK to place a SmartArt graphic at the insertion point. The Text pane is displayed. Type text in the Text pane or directly into the [Text] placeholders in the graphic. Use arrow keys in the Text pane to move between items, or create a new item by pressing the Enter key.
When creating a SmartArt graphic, consider the information that will be included and what message should be conveyed by the graphic:
• List layouts show non-sequential information.
• Process layouts illustrate steps in a timeline or a process.
• Cycle layouts illustrate steps in an ongoing process.
• Hierarchy layouts are used for decision trees or organization charts.
• Relationship layouts illustrate connections between elements or to a central element.
• Matrix layouts show separate parts relating to a each other or a to a whole.
• Pyramid layouts shows relationships in proportion to each other.
choosing a layout
TIP To make a Venn diagram, which shows overlapping relationships, use a Relationship layout.
TIP To display the Text pane, click Design j Text Pane or click on the selected SmartArt graphic.

SAMPLE
Chapter 4 Advanced Formatting Features 157
Formatting a SmartArt Graphic
A SmartArt graphic can be formatted and edited in many ways. The font, size, and font style of selected text is formatted using the Mini toolbar or options on the Home tab. To add additional shapes or items to a SmartArt graphic, click Design j Add Bullet or Design j Add Shape. Click Design j Right to Left to change the arrangement of shapes to a mirror image. To move a selected shape up or down a level, click Design j Promote or Design j Demote .
To change the size of a shape, select the shape to display handles. Point to a corner handle, which changes the pointer to , and then drag to size the shape. Hold down the Shift key while dragging to proportionately size the shape. To change a shape, right-click the selected shape and select Change Shape in the displayed menu. To change the size of the entire SmartArt graphic, drag a resize handle in a corner of the graphic:
The look of a SmartArt graphic can be changed by applying styles, changing colors of the shapes, and changing the layout. To apply a style, click a SmartArt style on the Design tab. To change the colors of the shapes, click Design j Change Colors and then click a color combination in the dis-played gallery. Themes affect the color combinations and styles applied to SmartArt graphics. Changing the theme changes the available color combinations and styles and the effects of the shapes.
Shapes and text can be formatted using options on the Format tab:
• Click Shape Fill , Shape Outline , Text Fill , or Text Outline to change the fill and outline of shapes and text. Shape Styles and Text Styles apply several formats at once.
• Click Shape Effects or Text Effects to change the look of shapes and text:
sizing and changing shapes
formatting text and shapes
changing the look
TIP Shapes can be sized using Format j Smaller and Format j Larger or changed using Format j Change Shape .
TIP A flowchart can be created using a Vertical Bending Process layout, and then changing the shapes as needed for flowchart items.

SAMPLE
158 Chapter 4 Advanced Formatting Features
Layouts of the same layout type can be selected on the Design tab. To change the layout to a different layout type, click More Layouts and then select More Layouts to display the Choose a SmartArt Graphic dialog box.
Click Design j Reset Graphic to reverse the edits made to a SmartArt graphic.
Formatting a Document in Columns
Columns are commonly used in newspapers, magazines, and other long publications to make lines of text easier to read. Columns are also used to format documents such as brochures. Click Page Layout j Columns and then select an option to format the document into columns. Click Page Layout j Columns j More Columns to display a dialog box with additional options:
• Change the number of columns in the Presets options or type a number in the Number of columns box.
• To add a line between columns select the Line between check box.
• Change column widths in the Width and Spacing options.
changing layouts
resetting a graphic

SAMPLE
Chapter 4 Advanced Formatting Features 159
To control the flow of text between columns, place a column break where a column of text should end. Text after a column break is moved to the next column. To insert a column break at the insertion point, select Page Layout j Breaks j Column.
Creating a Brochure Brochures are often used as advertising or as informative publications. A brochure is typically a single sheet of paper, printed on both sides, and folded two or three times to create a smaller publication that can be handed out, mailed, or placed in a strategic location where interested people can pick one up.
One common brochure layout is a two-fold brochure, which has six panels of information:
Templates can be used to create brochures that already have graphics and formatting. To create a brochure from scratch, a two-page document is set up in landscape orientation with all margins 0.5" and three equal columns 1" apart. Click Page Layout j Orientation j Landscape to change the orientation of the page. Column breaks are used to start a new column, and a next page section break is used at the bottom of the “FRONT” panel (above) to start the second page.
Text and graphics are added to the document and formatted with the purpose and the audience of the brochure in mind. The purpose of the brochure is the goal, for example to inform people about preparing taxes properly or to encourage people to hire you for your services. The audience of the brochure are the people that will read it.
The text and graphics in a brochure are restricted to narrow columns, and the design should consider the column width:
• Use left alignment for paragraphs of text. Headings are usually left aligned or centered.
• A font size of 8 to 12 point is best for paragraphs of text.
• Graphics should be appropriate for the purpose and audience.
adding a column break
two-fold brochure
purpose
audience
TIP Landscape orientation means the paper is printed across the widest part, and Portrait orientation is when the paper is printed across the narrowest part.

SAMPLE
160 Chapter 4 Advanced Formatting Features
When the brochure is finished, print a copy, fold it, and review it thor-oughly before printing copies to distribute. If a printer does not have the capability to print both sides of the paper, print one side then put the paper back in the printer and print the other side. The Word document can also be brought to a printing company for professional printing on a variety of paper, and most companies have folding and mailing services.
Practice: TUTORING
!! OPEN TUTORING AND APPLY PAGE FORMATTINGa. Open TUTORING, which is a Word data file for this text, and display formatting
marks if they are not already displayed.
b. Click Page Layout j Orientation j Landscape. The document is formatted in landscape orientation.
c. Click Page Layout j Margins j Narrow. The margins are all 0.5".
@@ INSERT A PYRAMID DIAGRAMa. At the bottom of the first page, place the insertion point in the blank paragraph
below the words “Get to the TOP!”
b. Click Insert j SmartArt. A dialog box is displayed.
1. In the layout types, click Pyramid.
2. Click the Basic Pyramid .
3. Select OK. A SmartArt graphic is created.
c. Click in the top [Text] placeholder and type: "A" students
d. Click in the middle [Text] placeholder and type: "B" students
e. In the bottom placeholder type: "C" students
f. Click anywhere in the SmartArt graphic except on text or a shape. The SmartArt graphic is selected, and none of the shapes or text objects are selected.
g. Drag a corner handle until the SmartArt graphic is half as tall and less than half as wide.
h. Click outside the SmartArt graphic. The graphic is no longer selected:
## FORMAT THE DOCUMENT WITH COLUMNSa. Scroll to the top of page 1 and place the insertion point in the first paragraph.
b. Click Page Layout j Columns j Two. The document is formatted in two columns.
printing a brochure

SAMPLE
Chapter 4 Advanced Formatting Features 161
c. Click Page Layout j Columns j More Columns. A dialog box is displayed.
d. Change the Presets to Three and the Spacing to 1". When the spacing is changed, the Width may automatically adjust:
e. Select OK. The document is now set up for a brochure.
$$ FORMAT TEXTa. At the top of page 1, place the insertion point in the text “Your Report Card could
look like:” and click Home j Heading 1. The Heading 1 style is applied.
b. Place the insertion point to the left of “Your” in “Your Report Card could look like:” and press Enter three times. The text is moved down.
c. Place the insertion point in the blank paragraph below the report card table.
d. Select Page Layout j Breaks j Column. A column break is inserted and the text below the break is moved to the next column, which is the middle column:
e. Place the insertion point at the top of the middle column and press Enter until the name and address are moved down near the middle of the column.
f. Place the insertion point in the blank paragraph below the phone number in the middle column.
g. Select Page Layout j Breaks j Column. A column break is inserted and the text below the break is moved to the next column.
h. Apply the Title style to the “Karen’s Tutoring Service” paragraphs.
i. Place the insertion point to the left of “Karen’s “ in “Karen’s Tutoring Service” and press Enter until “Karen’s Tutoring Service” is near the middle of the column.
SAMPLE
162 Chapter 4 Advanced Formatting Features
%% FORMAT THE SECOND PAGE OF THE BROCHUREa. Place the insertion point in the blank paragraph below the “Karen’s Tutoring
Service” paragraphs.
b. Select Page Layout j Breaks j Column. A column break is inserted and text is moved to the next page.
c. In the first column on page 2, apply the Heading 1 style to the “Karen Can Help You Get to the TOP!” paragraphs.
d. Place the insertion point to the right of the “!” in “Get to the TOP!” and press Enter three times. The SmartArt graphic is moved down.
e. Below the SmartArt graphic, place the insertion point to the left of “Services.”
f. Select Page Layout j Breaks j Column. A column break is inserted.
g. At the bottom on the middle column, below the table, place the insertion point to the left of “About Your Tutor.”
h. Select Page Layout j Breaks j Column. A column break is inserted.
i. Apply the Heading 2 style to “Services” at the top of the middle column and “About Your Tutor” at the top of the last column.
j. In the last column, apply the Heading 1 style to the text “Karen can help you succeed!”
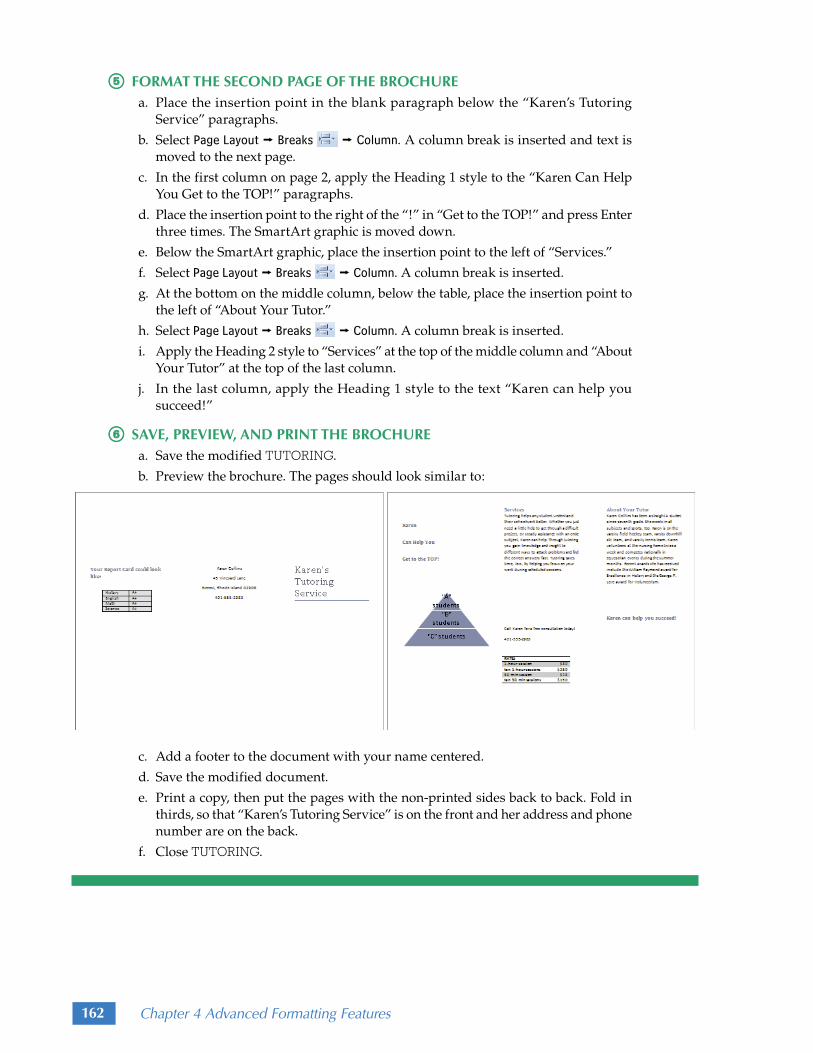
^̂ SAVE, PREVIEW, AND PRINT THE BROCHUREa. Save the modified TUTORING.
b. Preview the brochure. The pages should look similar to:
c. Add a footer to the document with your name centered.
d. Save the modified document.
e. Print a copy, then put the pages with the non-printed sides back to back. Fold in thirds, so that “Karen’s Tutoring Service” is on the front and her address and phone number are on the back.
f. Close TUTORING.

SAMPLE
Chapter 4 Advanced Formatting Features 163
Creating a Hyperlink to a Heading
A hyperlink can be used to quickly scroll to a heading. For example, entries in a table of contents are hyperlinks to headings in the same docu-ment, but are not blue and underlined. To create a hyperlink from selected text to a heading, click Insert j Hyperlink. The Insert Hyperlink dialog box includes the Place in This Document options for inserting a hyperlink to a heading. Click a heading in the dialog box to select the destination for the hyperlink.
Once a hyperlink is created, point to the hyperlink, press the Ctrl key to change the pointer to and click to follow the link. To remove a hyperlink, right-click the link and select Remove Hyperlink from the menu.
Creating and Formatting Text Boxes
Text boxes are objects that can be moved and sized like a graphic but contain text. To create a text box, click Insert j Text Box and select a style from the displayed gallery of built-in styles. The first choice in the gallery is Simple Text Box style, which creates a text box similar to:
Type text to replace the placeholder text. The text can be formatted using tabs on the Ribbon just like any other text.
TIP In the Insert Hyperlink dialog box, change text in the Text to display box to affect what the hyperlink looks like in the document.

SAMPLE
164 Chapter 4 Advanced Formatting Features
When a text box is selected, the Format tab is displayed on the Ribbon:
• Click Shape Fill or Shape Outline to format the fill and outline of the text box.
• Click Change Shape to change the shape of the text box.
• Change the size of the text box by dragging a handle or using Shape Height and Shape Width for precise sizing.
To position the text box on a page, move the pointer to the text box border and click to select the object:
Drag the text box border to position it on the page. Click Format j Position and select a position to quickly line the text box up with text on the page. Use options in Format j Text Wrapping to adjust the wrap if necessary.
Creating a Newsletter Companies, clubs, and organizations often produce newsletters to inform their employees or members of upcoming events and issues.
Newsletters have several common elements. Most newsletters have a headline, byline, and body text for each article, a nameplate, a table of contents, and a masthead. The nameplate is the area at the top of the first page that contains the title and date of the publication. The table of contents is usually on the first page. The masthead is an area that includes the publisher’s contact information and reprint policy. The masthead is typically placed on the second page.
Newsletters are usually formatted in two or three columns with page numbers in a header or footer. Page numbers typically are not included on the first and last page.
To create a newsletter in Word, use sections to allow for different page formats such as columns. The first page can be divided into sections with the nameplate in one section, articles in another section, and the table of contents in a text box. Additional sections can be added as needed for different page formats:
Photocopiers that Staple
Instead of printing many copies of a document that has several pages, and then stapling each copy, print one copy and use a photocopy machine that has a staple feature. Many copies can be made and they will all be stapled in the upper-left corner. The copy machine may also have a double-sided fea-ture, which uses less paper by printing on both sides.
positioning a text box
Alternative Click the Text Box Styles group Dialog Box Launcher to display options for formatting a text box.

SAMPLE
Chapter 4 Advanced Formatting Features 165
Most print shops will accept Word files and print large numbers of copies using a digital system or a printing press. PDF files are better for submitting to a print shop, because the fonts and graphics are automati-cally included in the file.
The printed newsletter can be bound in many ways. The most simple binding is to print the newsletter using both sides of the paper and then staple the pages together in the upper-left corner. If the newsletter is printed at a printing company, the pages may be printed on 11" x 17" paper and folded in half to create 8.5" x 11" pages, and no staple is necessary.
Traditionally, newsletters are published by distributing printed copies by mail to the recipients. An alternative method of distributing is to e-mail a file to the recipients, who can print the document as needed or just read it on the screen. When distributing in this manner, hyperlinks are helpful to the reader to quickly display other areas in the document. PDF files are better for e-mailing to recipients as well, because the document will look the same for everyone. A Word document may look different if the recipi-ent does not have all the fonts or has different printer drivers installed.
Practice: SPACE TRANSMISSIONS
!! OPEN SPACE TRANSMISSIONS Open SPACE TRANSMISSIONS, which is a Word data file for this text, and display
formatting marks if they are not already displayed.
@@ CREATE THE TITLE AREA AND FORMAT SECTION 2 IN TWO COLUMNSa. Near the top of page 1, place the insertion point to the left of the “M” at the begin-
ning of “March” in the “March Meeting” heading.
b. Click Page Layout j Breaks j Continuous. A section break is inserted. Section 1 is now the title area of the newsletter.
c. Check that the insertion point is in section 2 of the document.
d. Click Page Layout j Columns j Two. Section 2 is formatted into two columns.
printing a newsletter
distributing a newsletter
binding a newsletter
TIP PDF files are discussed in Chapter 1.

SAMPLE
166 Chapter 4 Advanced Formatting Features
e. Place the insertion point in the “March Meeting” heading, and change Page Layout j Spacing j Before to 0.
f. At the bottom of the first column, place the insertion point to the left of the “P” in the “President’s Letter” heading.
g. Change Page Layout j Spacing j Before to 0.
h. With the insertion point still in the “President’s Letter” heading, click Page Layout j Breaks j Column. The heading is moved to the top of the second column.
## FORMAT THE REMAINING PAGES IN THREE COLUMNSa. At the bottom of page 1, place the insertion point to the left of the “H” in the
“Humans in Space” heading.
b. Click Page Layout j Breaks j Next Page. The text is moved to page 2.
c. With the insertion point still in the “Humans in Space” heading, change Page Layout j Spacing j Before to 0.
d. Click Page Layout j Columns j Three. The text is formatted in three columns.
$$ CREATE AND FORMAT A TEXT BOXa. At the bottom of page 1, place the insertion point after “Lopez” in the text “President
M. Lopez.”
b. Click Insert j Text Box j Simple Text Box. A text box is created.
c. Type the following text, with a single tab between headings and page numbers:
d. Click Format j Shadow Effects j Shadow Style 5. The last Drop Shadow effect is applied.
e. Format “In This Issue” in the Heading 1 style.
f. Format the three paragraphs below the “In This Issue” heading in the No Spacing style.
g. Format the three paragraphs below the “In This Issue” heading with a right-aligned tab stop at 2".
h. Move the pointer to the text box border and drag the text box down so that the end of the President’s Message is completely displayed:

SAMPLE
Chapter 4 Advanced Formatting Features 167
%% CREATE A HYPERLINK TO A HEADINGa. In the President’s Message on page 1, select “recruitment techniques:”
b. Click Insert j Hyperlink. A dialog box is displayed.
1. Select Place in This Document to display those options and then click “Recruitment Techniques” in the Headings:
2. Select OK. The words “recruitment techniques” are now a hyperlink and are blue and underlined.
c. Point to the hyperlink, hold down the Ctrl key until the pointer changes to and then click. The document is scrolled to the Recruitment Techniques article on page 2, and the insertion point is placed in the heading.
^̂ SAVE THE MODIFIED SPACE TRANSMISSIONSa. Create a footer with your name left aligned.
b. Save the modified SPACE TRANSMISSIONS.
&& PRINT AND THEN CLOSE SPACE TRANSMISSIONS
** QUIT WORD

SAMPLE
168 Chapter 4 Advanced Formatting Features
Chapter Summary This chapter discussed formatting documents using styles, themes, columns, sections, and other features typically found in long documents. Creating tables, SmartArt graphics, brochures, and newsletters were also introduced.
A style is a named set of formats. Styles are applied using the Quick Styles gallery on the Home tab.
A table consists of rows and columns of cells, and is created using the Insert tab. Text is entered in a cell and can be formatted. Using the Design and Layout tabs, rows or columns can be selected and then formatted, deleted, or added. The contents of the rows in a table can be sorted, and numbers in adjacent cells can be used in calculations.
A table of contents, or TOC, is based on heading styles applied to text and is created using the References tab. A TOC is updated by clicking Update Table in the tab at the top of the TOC.
A document is divided into sections by inserting section breaks using the Page Layout tab. Sections can have different headers and footers. Different page numbering can be applied to each section.
A document is hyphenated using the Page Layout tab, which improves the look and flow of text.
Outline view is displayed using the View tab and shows the organization of a document. In Outline view, Word uses styles to determine heading levels and body text. The Outlining tab is used to edit the outline by topic.
A bibliography is a list of sources. The entries in the list of sources are called citations. Citation is also used to describe the notation within a document that refers to a source listed in the bibliography. Using the References tab, citations can be added and a bibliography can be automati-cally created.
Themes are named sets of formats that change the colors, fonts, and other effects associated with styles. Text styles, table styles, footers, and TOCs are all affected by changing the theme using the Page Layout tab.
Using the Insert tab, SmartArt graphics can be created for diagrams and organization charts. SmartArt graphics can be modified in many ways using the Design and Format tabs.
A document or a section can be formatted in columns using the Page Layout tab.
A document can include a hyperlink to text that has a heading style applied to it using the Insert tab. A hyperlink in a Word document is for-matted as blue and underlined.
A text box is used to place text on a page and move it like an object. Text boxes are created and formatted using the Insert and Format tabs.
Brochures and newsletters can be created in Word using many of the formatting techniques covered in this chapter, including sections, col-umns, and text boxes.
SAMPLE
Chapter 4 Advanced Formatting Features 169
Vocabulary
Audience The people that read the publication.
Bibliography A list of sources.
Body The information presented in a report.
Body text The main paragraphs in a document.
Boundary The lines separating rows and columns in a table.
Brochure A single sheet of paper with information on both sides and folded two or three times to create a smaller publication.
Cell The intersection of a row and column in a table.
Citation An entry in the list of sources. Also the notation within a document that refers to a source listed in the bibliography.
Column Vertical cells in a table.
Column break Used to end a column of text. Text after the break is moved into the next column.
Elements Parts of a diagram.
Front matter Content at the beginning of a report.
Headings Titles that are often bold and in a larger and different font than the body text.
Hyphenating A process that divides a word, when necessary, at the end of a line with a hyphen (-) so part of the word wraps to the next line.
Masthead An area in a newsletter, typically placed on the second page, that includes the publisher’s contact information and reprint policy.
Nameplate The area at the top of the first page of a newsletter that contains the title and date of the publication.
Outline view Displays the organization of a document.
Purpose The goal of a publication.
Quick Styles Styles included in Word to format text.
Row Horizontal cells in a table.
Section break Divides a document into sections.
SmartArt graphics Diagrams showing relation-ships between elements, which are used to illustrate information in documents.
Style A named set of formats.
Table of contents A list of headings and correspond-ing page numbers.
Text box An object that contains text but can be moved and sized like a graphic.
Theme Named set of formats that changes colors, fonts, and other effects associated with styles.
Title area A section at the top of a newsletter that contains information about the publication.
TOC See Table of contents.
Two-fold brochure A brochure layout that has six panels of information.
Word Commands
Add Bullet Adds a bullet to a SmartArt graphic. Found on the Design tab.
Add New Placeholder Displays a dialog box used to add a placeholder for a citation if the source does not yet exist in the list of sources. Found in References j Insert Citation.
Add Shape Adds a bullet to a SmartArt graphic. Found on the Design tab.
Automatic Hyphenates a document automatically. Found in Page Layout j Hyphenation .
Bibliography Displays a gallery used to insert a bib-liography. Found on the References tab.
Borders Displays options used to change the cell borders. Found on the Design tab.
Breaks Displays a list of breaks to insert at the insertion point. Found on the Page Layout tab.

SAMPLE
170 Chapter 4 Advanced Formatting Features
Cell Margins Displays a dialog box used to change the distance from the cell contents to the edges of the cell. Found on the Layout tab.
Change Colors Displays a gallery of color combina-tions used to change the colors of a SmartArt graphic. Found on the Design tab.
Change Shape Displays other shapes for a text box. Found in the menu displayed by right-clicking a shape in a SmartArt graphic.
Clear Formatting Changes the formatting of the paragraph to Normal style. Found on the Home tab or by clicking More Styles on the Home tab.
Close Outline View Displays the document in Print Layout view. Found on the Outlining tab.
Collapse Hides the body text under the head-ing containing the insertion point. Found on the Outlining tab.
Columns Displays options for formatting a document in columns. Found on the Page Layout tab.
Convert to Text Displays a dialog box for converting the selected table to text. Found on the Format tab.
Convert Text to Table Creates a table from selected text that is separated by tabs. Found in Insert j Table.
Delete Displays options for removing cells, columns, rows, or an entire table. Found on the Layout tab.
Delete stylename Delete a style completely from a document. Found in the menu displayed by right-clicking a style in the Styles window
Demote Applies the next lower level style to the paragraph containing the insertion point. Found on the Outlining tab.
Demote Moves a selected shape down a level in a SmartArt graphic. Found on the Design tab.
Demote to Body Text Applies the Normal style to the paragraph containing the insertion point. Found on the Outlining tab.
Edit Citation Displays a dialog box used to add page numbers and make changes to a citation. Found in the menu displayed by clicking in a citation.
Expand Displays the body text under the head-ing containing the insertion point. Found on the Outlining tab.
Format Page Numbers Displays a dialog box used to change the formatting of page numbers. Found in Design j Page Number.
Formula Displays a dialog box used to add a for-mula in a cell that calculates numbers in adjacent cells. Found on the Layout tab.
Hyperlink Displays a dialog box used to insert a hyperlink. Found on the Insert tab.
Hyphenation Displays options for hyphenating a document. Found on the Page Layout tab.
Insert Citation Displays a list of sources to choose from to add a citation at the insertion point. Found on the References tab.
Insert Above Adds a row above the selected row in a table. Found on the Layout tab.
Insert Below Adds a row below the selected row in a table. Found on the Layout tab.
Insert Left Adds a column to the left of the selected column in a table. Found on the Layout tab.
Insert Right Adds a column to the right of the selected column in a table. Found on the Layout tab.
Landscape Changes the orientation of a document to print across the widest part of the paper. Found in Page Layout j Orientation.
Link to Previous Selected to have the same header or footer as the previous section. Found on the Design tab.
Manage Sources Displays a dialog box used to add, change, or move sources. Found on the References tab.
More Columns Displays a dialog box used to format columns in a document. Found in Page Layout j Columns.
Move Down Moves the paragraph containing the insertion point to after the preceding paragraph. Found on the Outlining tab.
Move Up Moves the paragraph containing the insertion point to before the preceding paragraph. Found on the Outlining tab.
Outline Displays a document in Outline view. Found on the View tab.
Position Displays options used to line up a selected text box with a portion of the page. Found on the Format tab.
Promote Applies the next higher level style to the paragraph containing the insertion point. Found on the Outlining tab.

SAMPLE
Chapter 4 Advanced Formatting Features 171
Promote Moves a selected shape up a level in a SmartArt graphic. Found on the Design tab.
Promote to Heading 1 Applies the Heading 1 style to the paragraph containing the insertion point. Found on the Outlining tab.
Remove from Quick Styles Gallery Removes a style from the gallery. Found in the menu displayed by right-clicking a style in the gallery.
Remove Table of Contents Deletes a table of contents. Found in References j Table of Contents.
Reset Graphic Reverses most edits made to a SmartArt graphic. Found on the Design tab.
Right to Left Changes the arrangement of shapes in a SmartArt graphic to a mirror image. Found on the Design tab.
Save Selection as a New Quick Style Displays a dialog box used to save the selected formatting as a new style. Found in the Styles submenu displayed by right-clicking a selected paragraph.
Shading Displays options used to change the cell shading. Found on the Design tab.
Shape Effects Displays options for changing the look of a selected object in a SmartArt graphic. Found on the Format tab.
Shape Fill Displays options for changing the fill of a selected object in a SmartArt graphic. Found on the Format tab.
Shape Height Used to precisely size the height of a text box. Found on the Format tab.
Shape Outline Displays options for changing the outline of a selected object in a SmartArt graphic. Found on the Format tab.
Shape Width Used to precisely size the width of a text box. Found on the Format tab.
Show Levels Changes which heading levels are displayed. Found on the Outlining tab.
SmartArt Displays a dialog box used to add a dia-gram or organization chart to a document. Found on the Insert tab.
Sort Displays a dialog box used to sort the contents of a table. Found on the Layout tab.
Style Set Displays a list of style sets. Found in Home j Change Styles.
Table Displays a grid used to create a table. Found on the Insert tab.
Table of Contents Displays a gallery used to insert a table of contents. Found on the References tab.
Text Box Creates an object that contains text but can be moved and sized like a graphic. Found on the Insert tab.
Text Direction Rotates the text in the cell. Found on the Layout tab.
Text Effects Displays options for changing the look of selected text in a SmartArt graphic. Found on the Format tab.
Text Fill Displays options for changing the fill of selected text in a SmartArt graphic. Found on the Format tab.
Text Outline Displays options for changing the outline of selected text in a SmartArt graphic. Found on the Format tab.
Text Wrapping Used to adjust the wrap of text around a text box border to position it on the page. Found on the Format tab.
Theme Colors Displays a gallery used to change the color scheme of the theme. Found on the Page Layout tab.
Theme Effects Displays a gallery used to change the effects used in the theme. Found on the Page Layout tab.
Theme Fonts Displays a gallery used to change the fonts used in the theme. Found on the Page Layout tab.
Themes Displays a gallery used to change the theme. Found on the Page Layout tab.

SAMPLE
172 Chapter 4 Advanced Formatting Features
Review Questions
1. a) What is a style? b) Describe the differences between body text
and headings.
2. a) What formatting does the Normal style apply to a paragraph?
b) What formatting does the Heading 1 style apply to a paragraph?
3. List the steps required to create a new style named Caption, based on the Normal style, that center aligns a paragraph.
4. What is a cell?
5. How is a table with four rows and two columns created?
6. a) How is a row selected? b) How is a column selected?
7. a) What is a boundary? b) What happens when the boundary of a
column is double-clicked?
8. How is a row deleted from a table?
9. List the steps required to apply a yellow shading to the top row of a table.
10. a) How can all the numbers in a column be summed in the last cell of the column?
b) If a number changes, how can the sum be updated?
11. a) What is a TOC? b) How is a table of contents created? c) How is a table of contents updated?
12. How can an entry in the table of contents be used to display the corresponding heading?
13. a) How is a document divided into sections? b) List the steps required to insert a Next Page
section break at the insertion point.
14. List the steps required to have Cats in the header on page 2 of a document, Dogs in the header on page 3, and no header on the first page.
15. a) How can the page number in a footer be formatted as capital Roman numerals?
b) List the steps required to start page number-ing at 1 on the third page of a document.
16. List the step required to have Word automati-cally hyphenate the open document.
17. a) What does Outline view display? b) How do you display the open document in
Outline view?
18. List the steps required to select a topic in Outline view and move it to after the topic below it.
19. a) What is a bibliography? b) What do citations refer to? c) What does a “Works Cited” list contain?
20. Describe a situation when a placeholder would be used in a citation.
21. a) What is a theme? b) What does a theme affect in a document? c) Does a new, blank document have a theme
applied to it? If so, which one? If not, why?
22. a) What is a SmartArt graphic? b) What is an element?
23. a) List the steps required to insert a SmartArt graphic at the insertion point.
b) Describe three ways to change the look of a SmartArt graphic.
24. List the step required to format a document in three columns.
25. Describe how to set up a two-fold brochure in Word.
26. Find an example of a two-fold brochure and describe the purpose and audience of the brochure.
27. Why would text be formatted as a hyperlink to a heading in the same document? Give an example.
28. a) Describe a document that would include text boxes.
b) Explain two advantages of using a text box.

SAMPLE
Chapter 4 Advanced Formatting Features 173
29. a) What is a nameplate and where is it positioned in a newsletter?
b) What is a masthead and where is it positioned in a newsletter?
c) Why is a newsletter created in Word divided into sections?
30. Find a newsletter and describe the binding and methods of distribution for the newsletter.
True/False
31. a) The body text in a document consists of the main paragraphs.
b) A new style can be created if the built-in styles are not appropriate.
c) Columns are horizontal. d) Pressing Enter in a table cell moves the
insertion point to another cell. e) Formatting the text in a table cell in a larger
font increases the row height. f) When a table is created, all of the column
widths are equal. g) The formula =AVERAGE(ABOVE) calculates
the average of all the numbers entered in the table cells.
h) Each entry in a table of contents created by Word is a hyperlink to a Web site that contains more information about the topic.
i) Word automatically updates a table of contents when changes are made to a document.
j) A document can only have one section. k) A document that is divided into sections can
have different headers and footers in each section.
l) Hyphenation is a process that divides words.
m) By default, the Metro theme is applied to a document.
n) A SmartArt graphic with a hierarchy layout is used to create an organization chart.
o) A font size of 14 is best for paragraphs of text in a brochure.

SAMPLE
174 Chapter 4 Advanced Formatting Features
Exercises
Exercise 1 ———————————————————— ELEMENTSThe ELEMENTS document contains information on elements and chemical formulas. Open ELEMENTS, which is a Word data file for this text, and complete the following steps:
a) Insert a table with three columns and four rows (a 3 x 4 table) in the blank paragraph below the “Alkali Metals” heading.
b) Enter the following data into the table starting in the first cell:
Element Symbol Atomic NumberLithium Li 3 Sodium Na 11 Potassium K 19
c) Insert a table with three columns and five rows (a 3 x 5 table) in the blank paragraph below the “Nonmetals” heading.
d) Enter the following data into the table starting in the first cell:
Element Symbol Atomic NumberCarbon C 6Nitrogen N 7Oxygen O 8Fluorine F 9
e) Insert a table with three columns and four rows (a 3 x 4 table) in the blank paragraph below the “Noble Gases” heading.
f) Enter the following data into the table starting in the first cell:
Element Symbol Atomic NumberHelium He 2Neon Ne 10Argon Ar 18
g) Bold and increase the size of the text in the first row of all the tables.
h) Decrease the width of the columns in each table appropriately.
i) Apply the Heading 1 style to the “Elements” heading and the Heading 2 style to the “Alkali Metals,” “Nonmetals,” and “Noble Gases” headings.
j) Create a footer with your name right aligned.
k) Save the modified ELEMENTS and print a copy of the document in Outline view with the first and second level headings displayed.
l) Print a copy in Print Layout view.
SAMPLE
Chapter 4 Advanced Formatting Features 175
Exercise 2 —————————————————————— SATURNThe SATURN document contains a report on the planet Saturn. Open SATURN, which is a Word data file for this text, and complete the following steps:
a) Have Word hyphenate the document automatically.
b) On page 1, apply the Title style to “Saturn” and the No Spacing style to the “Report by Name Prof. Gemini PH104 Fall 2009” paragraphs. Replace Name with your name.
c) Apply the Heading 1 style to the “Introduction,” “Around Saturn,” ”Missions,” and “Summary” headings.
d) Apply the Heading 2 style to the “Moons,” “Rings,” “Pioneer 11,” “Voyagers 1 and 2,” and “Cassini-Huygens” headings.
e) Apply the Heading 3 style to each moon and to the “Main Rings” and “Lesser Rings” headings.
f) Use Outline view to move the topic “Moons” (including the headings and text below it) to after the “Rings” heading and text.
g) Insert a page break in the blank paragraph below “PH104 Fall 2009” on page 1.
h) At the top of page 2 insert a table of contents in the built-in Automatic Table 2 style.
i) Place the insertion point to the left of the “I” in the “Introduction” heading and insert a Next Page section break.
i) In section 1, create a footer with your name followed by a space and a page number in the i, ii, iii, ... format. No footer should appear on the first page.
j) Format the page number of the footer in section 2 to be in the 1, 2, 3, … format and start at 1.
k) Scroll through the document and check the pagination, adding any page breaks as necessary to help the look of the document.
l) Update the table of contents to reflect the new page numbering.
m) Save the modified SATURN and print a copy.
Exercise 3 —————————————————— Take-Out Menu In a new document create a take-out menu in the form of a two-fold brochure for a restaurant. Your brochure should contain the following:
• The name of the restaurant
• At least one SmartArt graphic
• At least one table
• Your name
Check the document on screen and correct any errors and misspellings. Save the document naming it Take-Out Menu and print a copy. Assemble the brochure and fold it properly.
SAMPLE
176 Chapter 4 Advanced Formatting Features
Exercise 4 ————————————————————— Hierarchy Ask a parent or another adult for information about the company they work for. Discuss the company organization, also called the hierarchy. Take notes about the hierarchy.
a) Use a SmartArt graphic to create an organization chart that illustrates the hierarchy in the company that you discussed with the parent or other adult.
b) Create a footer with your name.
c) Save the document naming it Hierarchy and print a copy.
d) Take the printout to the parent or adult and ask them to assess it for accuracy.
e) Make any changes to the document, and print a new copy.
Exercise 5 —————————————————— Charity BrochureIdentify a local charity and meet with an adult at that charity. Offer to create a brochure that focuses on one aspect of their choice about the charity. Discuss the purpose and audience of the brochure, the contents, and how the brochure will be printed. Ask the adult to e-mail content and a logo to you.
a) In Word, create a brochure for the charity. Copy and paste text and graphics from the e-mail into the brochure. Format the brochure appropriately.
b) Check the document on screen and correct any errors and misspellings.
c) Save the document naming it Charity Brochure and print a copy.
d) Take the printout to the adult and ask them to assess it. Discuss any changes for the brochure with the adult.
e) Make any changes to the document, and print a new copy.
Exercise 6 ———————————————— HONORS HANDOUTThe HONORS HANDOUT document contains information on different honors clubs at Ivy University. Open HONORS HANDOUT, which is a Word data file for this text, and complete the following steps:
a) Insert a table with four columns and four rows (a 4 x 4 table) in the blank paragraph after the last sentence under the “Fraternities” heading on page 3.
b) Enter the following data into the table starting in the first cell, using Insert j Symbol to insert the Greek letters into the table:
Name Greek Letters College MembersDelta Epsilon Phi ΔΣΦ Business 45Lambda Pi Sigma ΛΠΣ Liberal Arts 56Xi Psi Zeta ΞΨΖ Engineering 34
c) Apply the Light List - Accent 1 table style to the table:
d) Decrease the width of the columns appropriately.
SAMPLE
Chapter 4 Advanced Formatting Features 177
e) Apply the Heading 1 style to the “Honors Program,” “Honors Societies,” and “Honors Classes” headings.
f) Apply the Heading 2 style to the “Clubs” and “Fraternities” headings.
g) Apply the Heading 3 style to the following headings:
Business Honors Society Delta Epsilon PhiHonors Computer Club Lambda Pi SigmaScience Club of Honors Xi Psi Zeta
h) Above the “Honors Program” heading at the top of page 2 insert a table of contents in the built-in Automatic Table 1 style.
i) Insert a Next Page section break after the table of contents you just inserted.
j) In section 1 create a footer with your name left aligned followed by a space and a page number in the i, ii, iii, ... format. No footer should appear on the first page in section 1.
k) Format the page number of the footer in section 2 to be in the 1, 2, 3, … format and start at 1.
l) Scroll through the document and check the pagination, adding any page breaks as necessary to help the look of the document.
m) Update the table of contents to reflect the new page numbering.
n) Save the modified HONORS HANDOUT and print a copy.
Exercise 7 —————————————————— Favorite RecipeRecipes in a cookbook often appear with elaborate formatting. In a new document enter your favorite recipe. Format the document into three continuous sections as follows:
Section 1: include the name of the recipe, your name, and a clip art graphicSection 2: list the ingredients for the recipe and format the section in two columnsSection 3: a numbered list of the recipe steps in one column
Save the document naming it Favorite Recipe and print a copy.
Exercise 8 ———————————————————— Next MonthWord includes preformatted tables called Quick Tables. The Quick Tables gallery includes several one-month calendar styles.
a) Create a new document and then click Insert j Table j Quick Tables. The gallery of Quick Tables is displayed. Click one of the Calendar styles. A table formatted as a one-month calendar is inserted.
b) Change the name and the dates in the calendar to be an accurate calendar for next month. For example, if today is October 23rd, modify the calendar to be November. Be sure to check the dates and edit them appropriately so that they are accurate.
c) Create footer with your name.
d) Save the modified Next Month and print a copy.
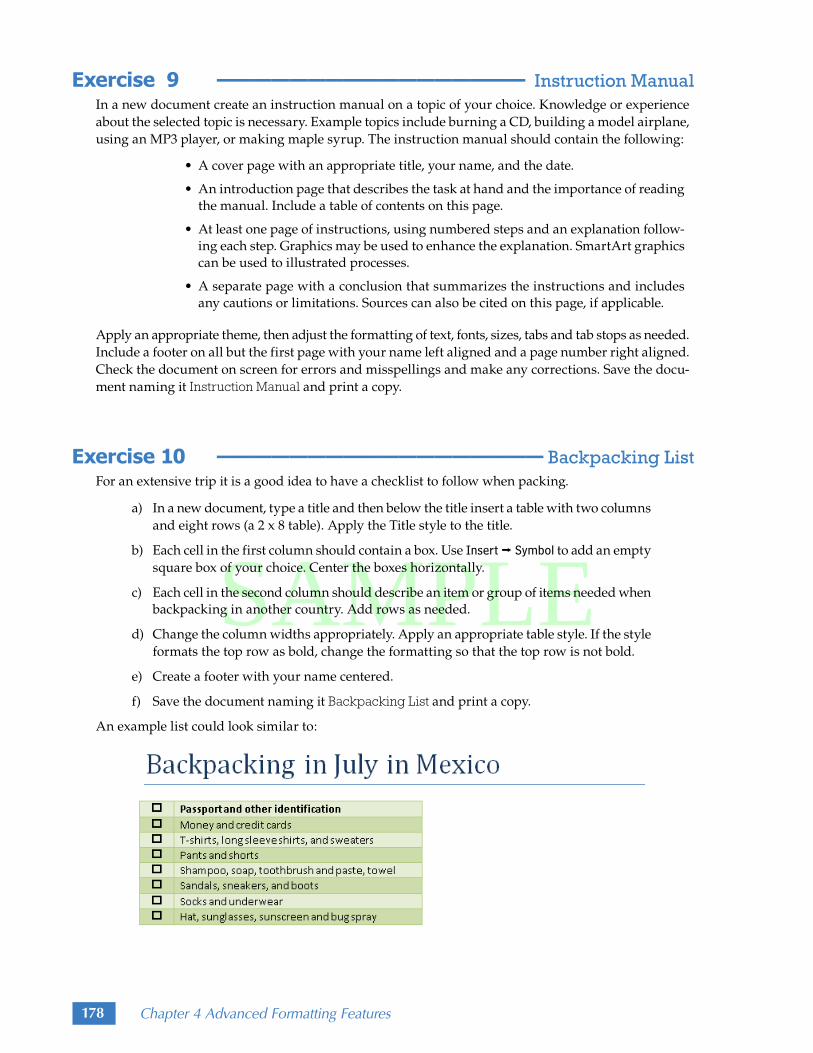
SAMPLE
178 Chapter 4 Advanced Formatting Features
Exercise 9 ————————————————— Instruction ManualIn a new document create an instruction manual on a topic of your choice. Knowledge or experience about the selected topic is necessary. Example topics include burning a CD, building a model airplane, using an MP3 player, or making maple syrup. The instruction manual should contain the following:
• A cover page with an appropriate title, your name, and the date.
• An introduction page that describes the task at hand and the importance of reading the manual. Include a table of contents on this page.
• At least one page of instructions, using numbered steps and an explanation follow-ing each step. Graphics may be used to enhance the explanation. SmartArt graphics can be used to illustrated processes.
• A separate page with a conclusion that summarizes the instructions and includes any cautions or limitations. Sources can also be cited on this page, if applicable.
Apply an appropriate theme, then adjust the formatting of text, fonts, sizes, tabs and tab stops as needed. Include a footer on all but the first page with your name left aligned and a page number right aligned. Check the document on screen for errors and misspellings and make any corrections. Save the docu-ment naming it Instruction Manual and print a copy.
Exercise 10 —————————————————— Backpacking ListFor an extensive trip it is a good idea to have a checklist to follow when packing.
a) In a new document, type a title and then below the title insert a table with two columns and eight rows (a 2 x 8 table). Apply the Title style to the title.
b) Each cell in the first column should contain a box. Use Insert j Symbol to add an empty square box of your choice. Center the boxes horizontally.
c) Each cell in the second column should describe an item or group of items needed when backpacking in another country. Add rows as needed.
d) Change the column widths appropriately. Apply an appropriate table style. If the style formats the top row as bold, change the formatting so that the top row is not bold.
e) Create a footer with your name centered.
f) Save the document naming it Backpacking List and print a copy.
An example list could look similar to:

SAMPLE
Chapter 4 Advanced Formatting Features 179
Exercise 11 ————————————————Technology ResearchResearch a technology topic of your choice using at least three sources on the Internet. Sample topics are cellular phone features, web browsers, MP3 players, GPS systems, satellite radio, or hybrid cars. Write a report based on the information you found. The report should include a title page, a table of contents, the body of the report, citations, and a bibliography. Include at least two hyperlinks, and create and use at least one style. Save the report naming it Technology Research and print a copy.
Exercise 12 ————————————————————— NewsletterIn a new document create a newsletter on any topic. Save the document naming it Newsletter and print a copy when complete. Be sure to check the document on screen for errors and misspellings and make any corrections. Your newsletter should contain the following:
• At least two pages, formatted in two columns per page.• At least four different stories with heading and bylines.• At least two advertisements.• At least one numbered or bulleted list.• A nameplate and a masthead.• A footer with a centered page number.• At least one table of data.• At least one text box.• At least one footnote.• At least two clip art pictures.
Page one of an example newsletter could look similar to:
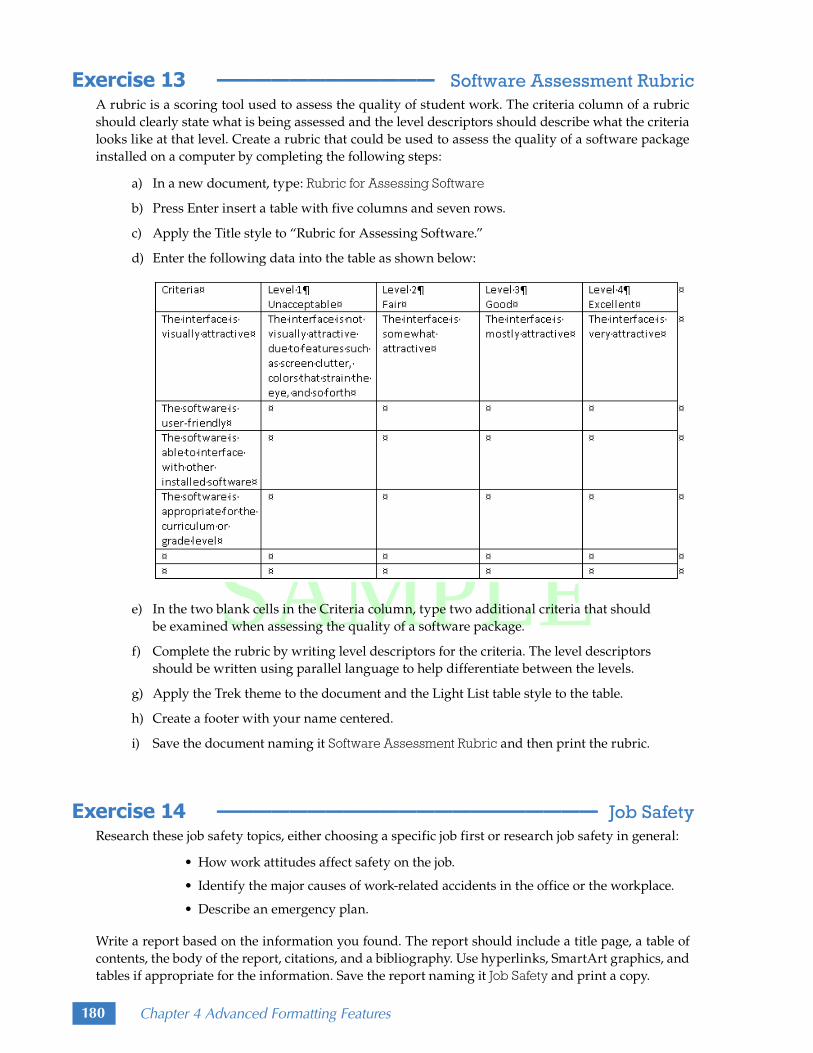
SAMPLE
180 Chapter 4 Advanced Formatting Features
Exercise 13 ———————————— Software Assessment RubricA rubric is a scoring tool used to assess the quality of student work. The criteria column of a rubric should clearly state what is being assessed and the level descriptors should describe what the criteria looks like at that level. Create a rubric that could be used to assess the quality of a software package installed on a computer by completing the following steps:
a) In a new document, type: Rubric for Assessing Software
b) Press Enter insert a table with five columns and seven rows.
c) Apply the Title style to “Rubric for Assessing Software.”
d) Enter the following data into the table as shown below:
e) In the two blank cells in the Criteria column, type two additional criteria that should be examined when assessing the quality of a software package.
f) Complete the rubric by writing level descriptors for the criteria. The level descriptors should be written using parallel language to help differentiate between the levels.
g) Apply the Trek theme to the document and the Light List table style to the table.
h) Create a footer with your name centered.
i) Save the document naming it Software Assessment Rubric and then print the rubric.
Exercise 14 ————————————————————— Job SafetyResearch these job safety topics, either choosing a specific job first or research job safety in general:
• How work attitudes affect safety on the job.
• Identify the major causes of work-related accidents in the office or the workplace.
• Describe an emergency plan.
Write a report based on the information you found. The report should include a title page, a table of contents, the body of the report, citations, and a bibliography. Use hyperlinks, SmartArt graphics, and tables if appropriate for the information. Save the report naming it Job Safety and print a copy.

SAMPLE
Chapter 4 Advanced Formatting Features 181
Exercise 15 ————————————————— Terrapin ResearchDiamondback terrapins are turtles that live along the eastern and southern coastlines of the United States. They are the only turtle in the United States that live in brackish water. Around the year 1900 the turtle was almost extinct, but the population is larger now.
a) Use a library or the Internet to research the diamondback terrapin. During your research, find the answers to these questions:
• What does a diamondback terrapin look like? Describe its size and features.
• What is brackish water and where is it found? Describe the turtle’s habitat.
• Why was the turtle population drastically reduced in the late 1800s and early 1900s? What is the population like now? Describe the population fluctuations and their causes.
• Is the turtle safe now? Describe current threats to the population.
b) Write a report based on the information you find. The report should include:
• title page
• table of contents
• body of report with an introduction at the beginning and a summary at the end
• citations and a complete bibliography
c) Save the document naming it Terrapin Research and print a copy.
Exercise 16 ————————— Organizations Brochure, OB RubricIdentify four student organizations at your school that are in some way related to career and technol-ogy topics. Gather information about the organizations to include in a single brochure that focuses on student career and technology organizations. Try to obtain any logos and photos from each organiza-tion. The purpose of the brochure is to raise awareness about those organizations. The audience of the brochure is anyone associated with your school, including teachers, students, and parents.
a) In Word, create a brochure that includes the following features:
• An appropriate title and your name.
• The contact information for each organization.
• Any logos or photos for each organization.
• The goals and objectives of each organization.
• Opportunities available to students through each organization, including conferences, activities, and awards.
• Text that explains how the organizations are integral parts of career and technology courses.
• Text that explains how participation in career and technology organizations can promote lifelong responsibility for community service and professional development.
b) Format the brochure appropriately.

SAMPLE
182 Chapter 4 Advanced Formatting Features
c) Save the document naming it Organizations Brochure and print a copy.
d) A rubric is used to assess the quality of a document. Tables are useful for formatting rubrics. To help format a table, cells can be merged or split apart. To merge cells into one cell, select the cells and then click Layout j Merge Cells. To split a selected cell into more cells, click Layout j Split Cells.
In a new document create a table with 6 columns and 8 rows (a 6 x 8 table). Merge cells as necessary to create the table layout as indicated below, and then type the following text. Replace Name with your name and format the text and alignments as shown:
e) Save the document naming it OB Rubric and print a copy.
f) Exchange printed brochures and rubrics with a classmate. Peer-edit your classmate’s brochure using their rubric, and exchange rubrics back. Based on the assessment by your peer of your brochure, should any changes be made to the brochure?
g) Make any changes to the brochure, and print a new copy.
Exercise 17 öö ————————————————— Hawaiian Islands The Hawaiian Islands document modified in Chapter 3, Exercise 7 contains tab-delimited data that would be better viewed in a table. Open Hawaiian Islands and complete the following steps:
a) Select all of the paragraphs that are arranged in columns and then click Insert j Table j Convert Text to Table. A dialog box is displayed, with options already selected for the number of rows in the table (one per paragraph selected) and the number of columns. Select OK to change the text and tabs into a table with text in the cells.
b) Format the “Area (m)” and Peak Height (km) columns as right aligned and change columns widths appropriately.
c) Add a row to the bottom of the table. In the new last row, add text and format it as shown:
d) In the bottom row, add formulas that calculate the average area and the average peak height.
e) Save the modified Hawaiian Islands and print a copy.
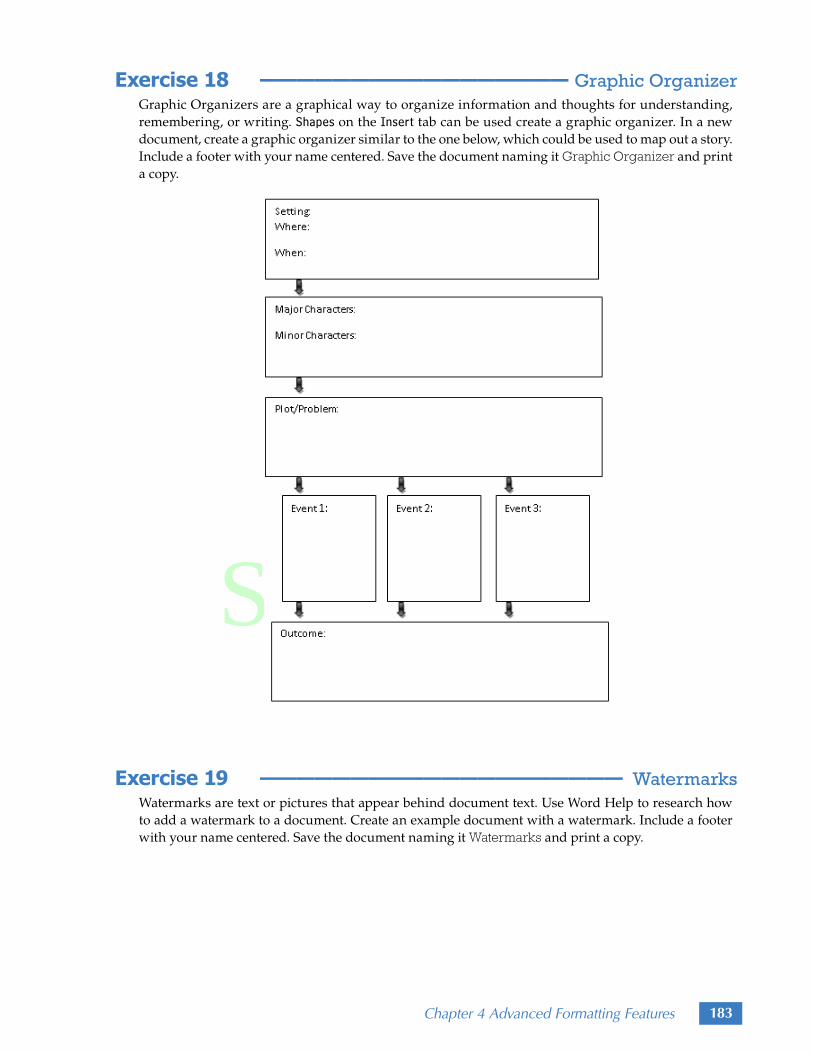
SAMPLE
Chapter 4 Advanced Formatting Features 183
Exercise 18 ————————————————— Graphic Organizer Graphic Organizers are a graphical way to organize information and thoughts for understanding, remembering, or writing. Shapes on the Insert tab can be used create a graphic organizer. In a new document, create a graphic organizer similar to the one below, which could be used to map out a story. Include a footer with your name centered. Save the document naming it Graphic Organizer and print a copy.
Exercise 19 ———————————————————— WatermarksWatermarks are text or pictures that appear behind document text. Use Word Help to research how to add a watermark to a document. Create an example document with a watermark. Include a footer with your name centered. Save the document naming it Watermarks and print a copy.