subject: 9.1 voucher workflow training page 1 of 18 in ... invoice receipt date and invoice date...
TRANSCRIPT
SUBJECT: 9.1 Voucher Workflow Training Page 1 of 18
Voucher Workflow Training for 9.1 Upgrade 11/19/2012
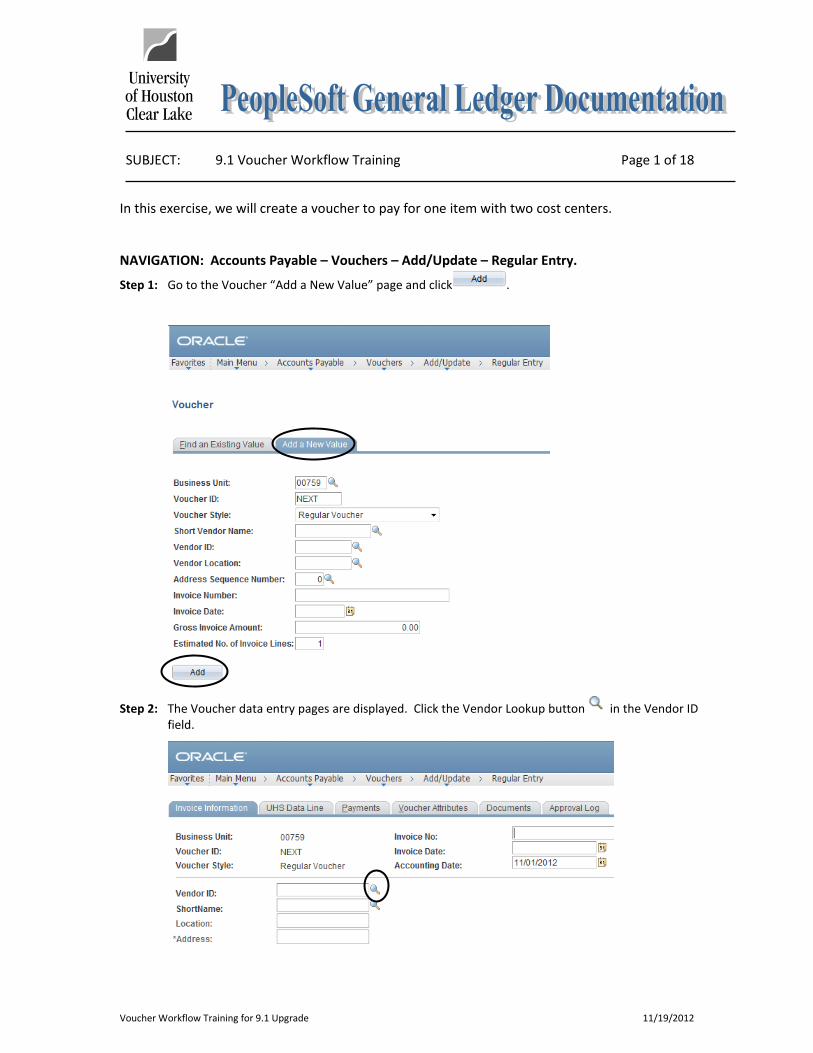
In this exercise, we will create a voucher to pay for one item with two cost centers. NAVIGATION: Accounts Payable – Vouchers – Add/Update – Regular Entry.
Step 1: Go to the Voucher “Add a New Value” page and click .
Step 2: The Voucher data entry pages are displayed. Click the Vendor Lookup button in the Vendor ID field.
SUBJECT: 9.1 Voucher Workflow Training Page 2 of 18
Voucher Workflow Training for 9.1 Upgrade 11/19/2012
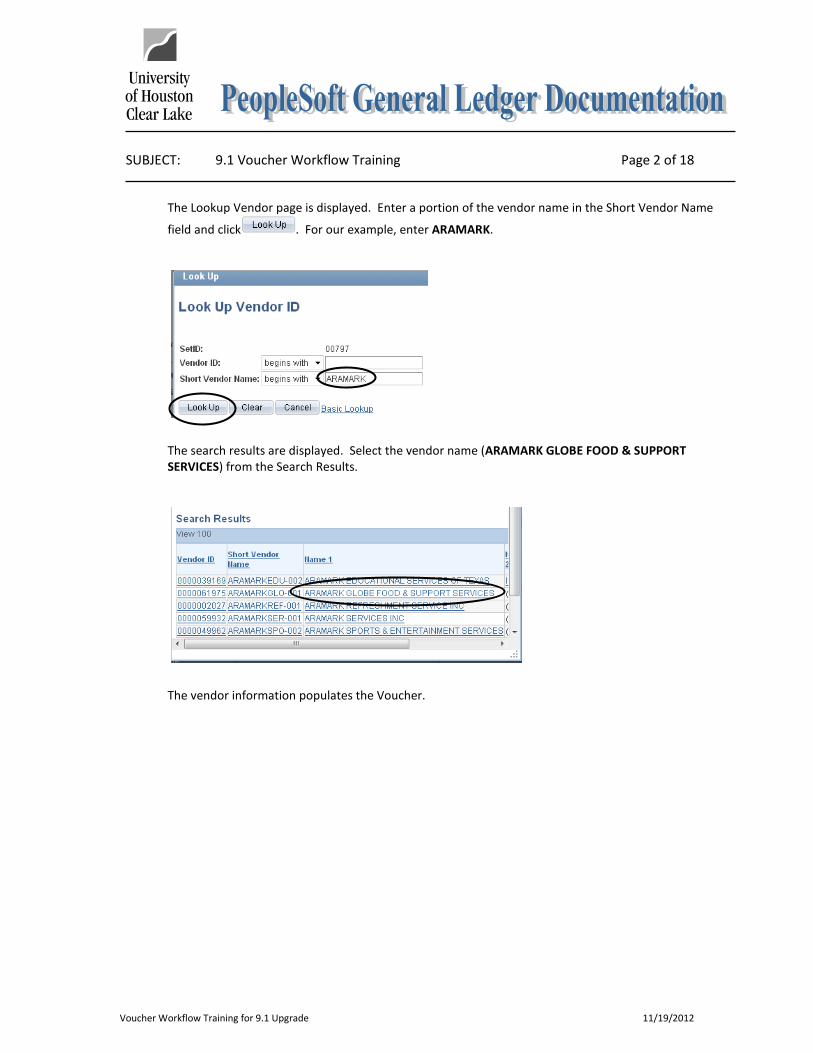
The Lookup Vendor page is displayed. Enter a portion of the vendor name in the Short Vendor Name
field and click . For our example, enter ARAMARK.
The search results are displayed. Select the vendor name (ARAMARK GLOBE FOOD & SUPPORT SERVICES) from the Search Results.
The vendor information populates the Voucher.

SUBJECT: 9.1 Voucher Workflow Training Page 3 of 18
Voucher Workflow Training for 9.1 Upgrade 11/19/2012
Step 3: Click on the Payment tab. Under Payment Options, check the Method of Payment. If the Method of Payment is ACH, it is a direct deposit vendor and the Payment Address is not to be changed. You can return to the Invoice page.
If the Method of Payment is CHK, it is a vendor that is paid by check and the Payment Address must be checked. For our example, the value is CHK so we will check the Payment Address.
SUBJECT: 9.1 Voucher Workflow Training Page 4 of 18
Voucher Workflow Training for 9.1 Upgrade 11/19/2012
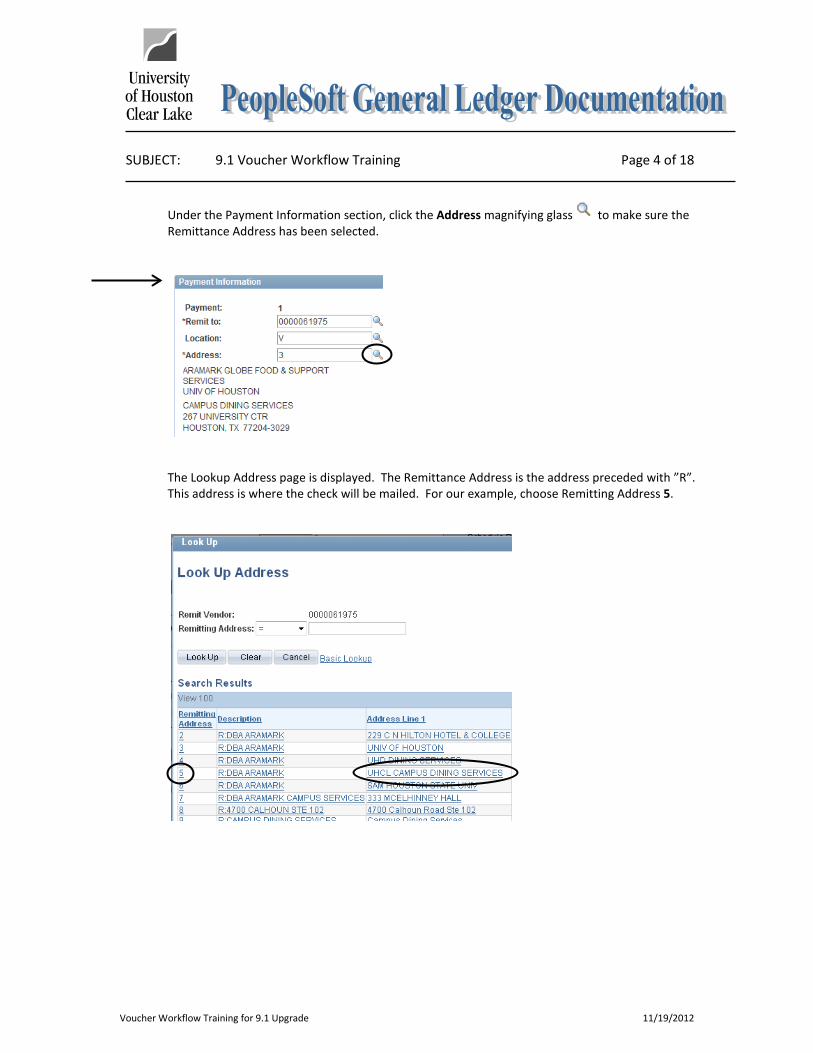
Under the Payment Information section, click the Address magnifying glass to make sure the Remittance Address has been selected.
The Lookup Address page is displayed. The Remittance Address is the address preceded with ”R”. This address is where the check will be mailed. For our example, choose Remitting Address 5.

SUBJECT: 9.1 Voucher Workflow Training Page 5 of 18
Voucher Workflow Training for 9.1 Upgrade 11/19/2012
Step 4: Click on the Invoice Information tab and enter the Invoice Number from the Invoice if you have one. The invoice number must be a unique because PeopleSoft edits to make sure the same invoice number is not paid twice. If the voucher is for an employee reimbursement, enter REIMB + EMPLOYEE INITIALS + DATE for the invoice number. You can also add additional information that might be helpful to you. For our example, enter anything you would like. Click the “Calc Basis Date” hyperlink.
Step 5: The Date Calculation page is displayed. Enter all four dates. For our example, enter today’s date in the Invoice Receipt Date and Invoice Date fields and yesterday’s date in the Goods Receipt and Acceptance Date fields. TIP: Click the Calendar lookup button next to the date field to choose your dates.
SUBJECT: 9.1 Voucher Workflow Training Page 6 of 18
Voucher Workflow Training for 9.1 Upgrade 11/19/2012
All four of these dates are required. There are instances where all four dates could be the same such as an employee reimbursement for a business meal.
• Invoice Receipt Date. This date is when the university received the invoice. It is important to date stamp the invoice when it comes into your office.
• Invoice Date. The invoice date is the date printed on the invoice.
• Goods Receipt Date. The Goods Receipt Date is the date the items were received.
• Acceptance Date. This date must be the same as the Goods Receipt Date.
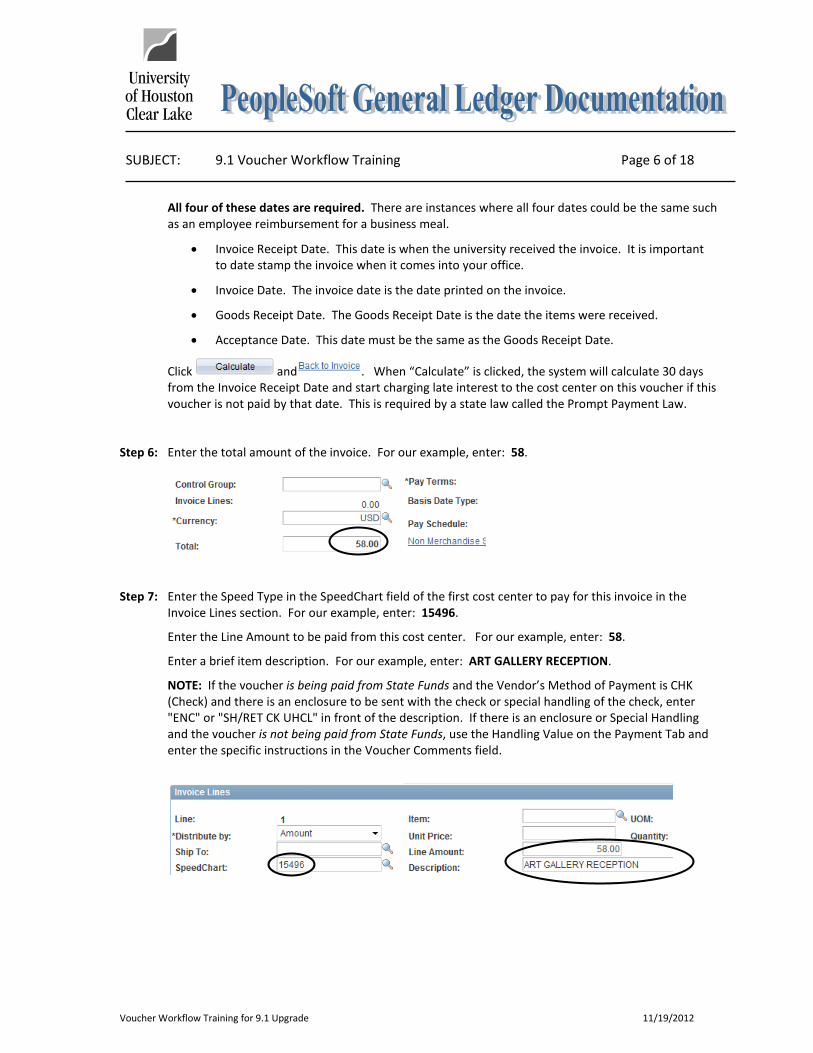
Click and . When “Calculate” is clicked, the system will calculate 30 days from the Invoice Receipt Date and start charging late interest to the cost center on this voucher if this voucher is not paid by that date. This is required by a state law called the Prompt Payment Law.
Step 6: Enter the total amount of the invoice. For our example, enter: 58.
Step 7: Enter the Speed Type in the SpeedChart field of the first cost center to pay for this invoice in the Invoice Lines section. For our example, enter: 15496.
Enter the Line Amount to be paid from this cost center. For our example, enter: 58.
Enter a brief item description. For our example, enter: ART GALLERY RECEPTION.
NOTE: If the voucher is being paid from State Funds and the Vendor’s Method of Payment is CHK (Check) and there is an enclosure to be sent with the check or special handling of the check, enter "ENC" or "SH/RET CK UHCL" in front of the description. If there is an enclosure or Special Handling and the voucher is not being paid from State Funds, use the Handling Value on the Payment Tab and enter the specific instructions in the Voucher Comments field.
SUBJECT: 9.1 Voucher Workflow Training Page 7 of 18
Voucher Workflow Training for 9.1 Upgrade 11/19/2012
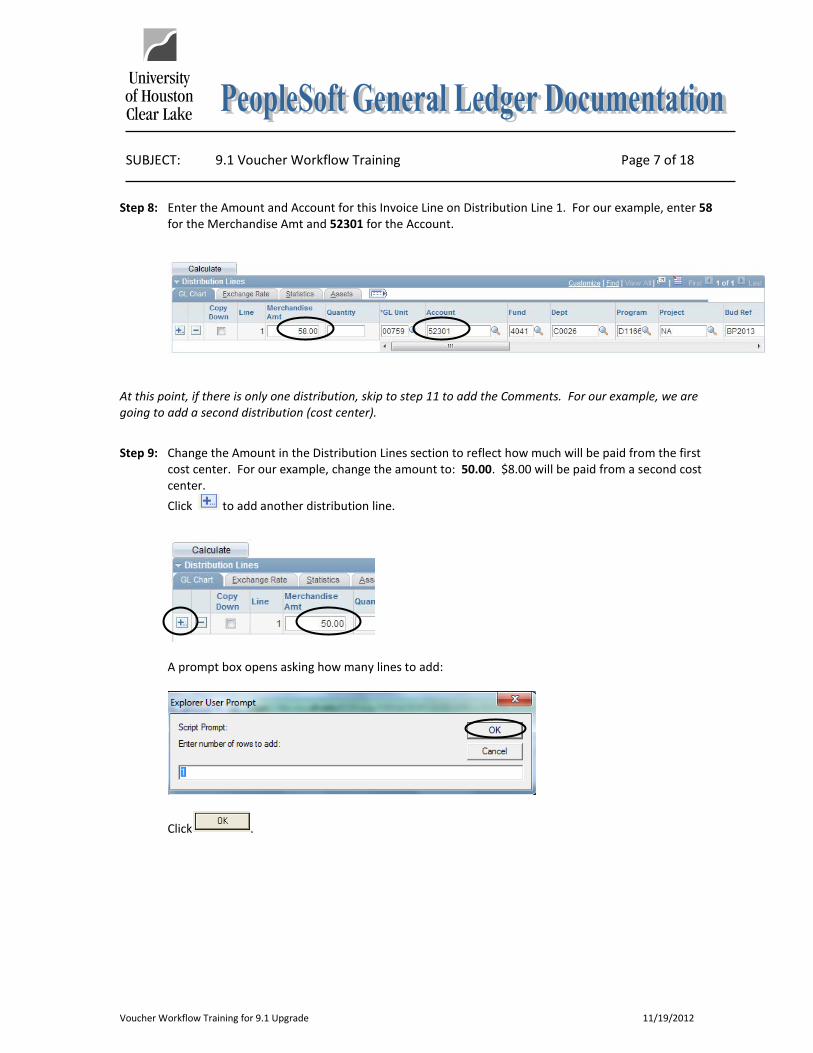
Step 8: Enter the Amount and Account for this Invoice Line on Distribution Line 1. For our example, enter 58 for the Merchandise Amt and 52301 for the Account.
At this point, if there is only one distribution, skip to step 11 to add the Comments. For our example, we are going to add a second distribution (cost center).
Step 9: Change the Amount in the Distribution Lines section to reflect how much will be paid from the first
cost center. For our example, change the amount to: 50.00. $8.00 will be paid from a second cost center. Click to add another distribution line.
A prompt box opens asking how many lines to add:
Click .

SUBJECT: 9.1 Voucher Workflow Training Page 8 of 18
Voucher Workflow Training for 9.1 Upgrade 11/19/2012
Step 10: The Amount field for distribution line 2 automatically calculates to make sure the amounts for lines 1 and 2 add up to the total in the Line Amount field. Enter the second distribution (cost center) and account on the second line. For our example, the Account will stay the same but the cost center will change. Enter: 52301 for the Account and 4041-C0026-D1163-NA for the cost center.
Step 11: Scroll up and click the hyperlink to enter the Purpose or Justification for the expense. This is required.
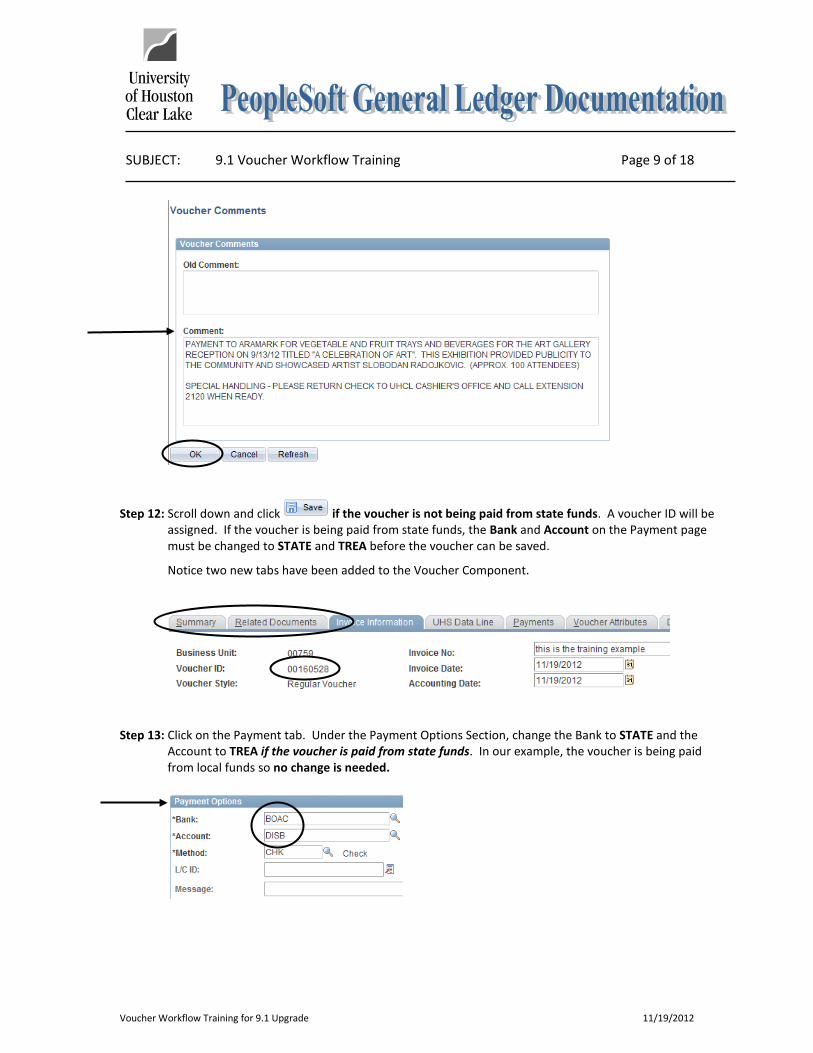
The Voucher Comments page is displayed. Enter the Purpose of Justification for the expenditure. THIS IS REQUIRED. This needs to include the WHO, WHAT, WHEN, WHERE, WHY and the benefit to UHCL or the business purpose.
If the voucher is for a Membership or a Subscription, list the beginning and ending dates.
Enter special instructions for vouchers that have Enclosures or Special Handling that are not paid from State Funds. For this example, enter: PAYMENT TO ARAMARK FOR VEGETABLE AND FRUIT TRAYS AND BEVERAGES FOR THE ART GALLERY RECEPTION ON 9/13/12 TITLED “A CELEBRATION OF ART”. THIS EXHIBITION PROVIDED PUBLICITY TO THE COMMUNITY AND SHOWCASED ARTIST SLOBODAN RADOJKOVIC. (APPROX. 100 ATTENDEES) SPECIAL HANDLING – PLEASE RETURN CHECK TO UHCL CASHIER'S OFFICE AND CALL EXTENSION 2120 WHEN READY. This field is unlimited in size.
Click to return to the Invoice Information page.
SUBJECT: 9.1 Voucher Workflow Training Page 9 of 18
Voucher Workflow Training for 9.1 Upgrade 11/19/2012
Step 12: Scroll down and click if the voucher is not being paid from state funds. A voucher ID will be assigned. If the voucher is being paid from state funds, the Bank and Account on the Payment page must be changed to STATE and TREA before the voucher can be saved.
Notice two new tabs have been added to the Voucher Component.
Step 13: Click on the Payment tab. Under the Payment Options Section, change the Bank to STATE and the Account to TREA if the voucher is paid from state funds. In our example, the voucher is being paid from local funds so no change is needed.

SUBJECT: 9.1 Voucher Workflow Training Page 10 of 18
Voucher Workflow Training for 9.1 Upgrade 11/19/2012
Step 14: Under the Payment Options section, select the Handling drop down arrow for choice on special handling of the payment.
The values for Handling are displayed. If a different Handling value is not chosen, BasicPmt defaults into the field. The choices are:
a. BasicPmt – for Basic Payment. This value is the default if no choice is made. b. Enclosure – typical enclosures would be registration information, a stub for a subscription, or
membership information. c. HighDollar – not used d. SpecHndlng – for Special Handling. This would be used if special handling is required for the
check such as the check being delivered back to the Cashiers Office instead of being mailed to the vendor.
e. StudRefund – for student refunds. This is used by the Student Financial system.
For our example, choose: SpecHndlng for Special Handling.
Step 15: Under the Payment Information section, click the hyperlink to check that the vendor setup is correct. Employee Reimbursements only should be set up to refuse late interest charges.
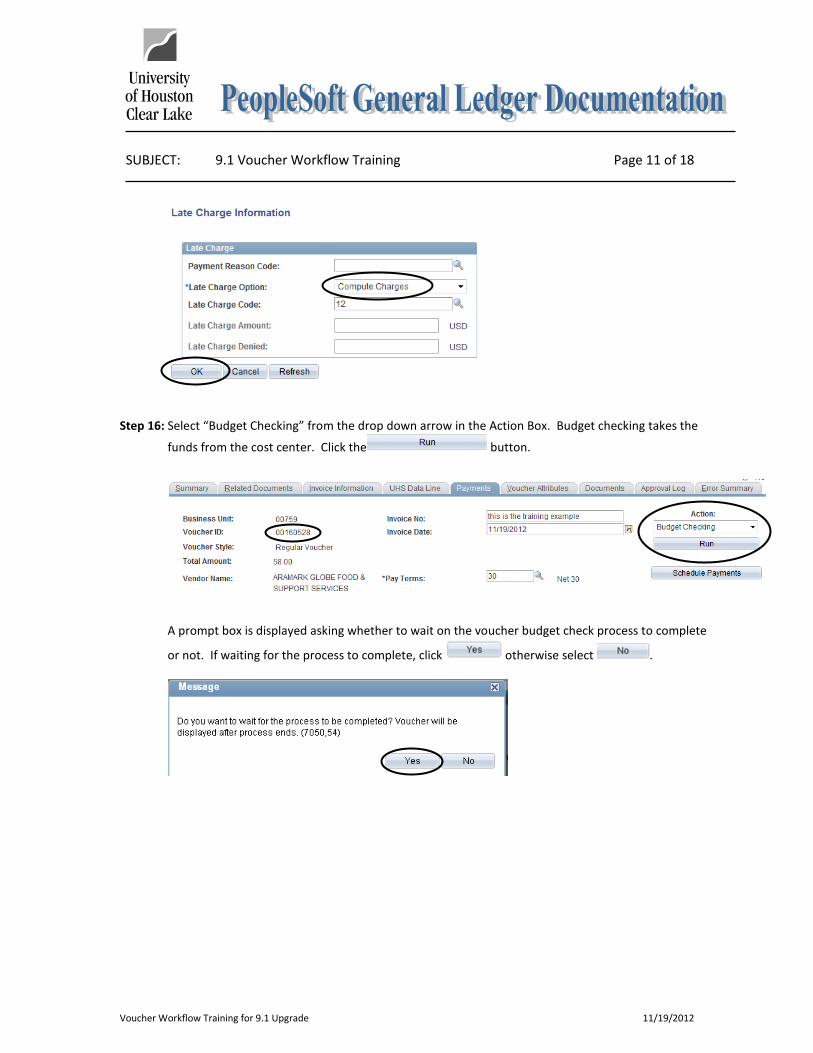
The Late Charge Information page is displayed. The Late Charge Option should be set to “NOT APPLICABLE” for employee reimbursements only. NOTE: Vouchers for Fund 5xxx cost centers will
automatically refuse late interest. Click to return to the Payment tab.
Click .
SUBJECT: 9.1 Voucher Workflow Training Page 11 of 18
Voucher Workflow Training for 9.1 Upgrade 11/19/2012
Step 16: Select “Budget Checking” from the drop down arrow in the Action Box. Budget checking takes the
funds from the cost center. Click the button.
A prompt box is displayed asking whether to wait on the voucher budget check process to complete
or not. If waiting for the process to complete, click otherwise select .

SUBJECT: 9.1 Voucher Workflow Training Page 12 of 18
Voucher Workflow Training for 9.1 Upgrade 11/19/2012
Step 17: Click the Summary tab. The Budget Status must be “Valid” before the voucher can be entered into workflow. If the Budget Status is “Error”, contact your Business Coordinator for resolution.
SUBJECT: 9.1 Voucher Workflow Training Page 13 of 18
Voucher Workflow Training for 9.1 Upgrade 11/19/2012
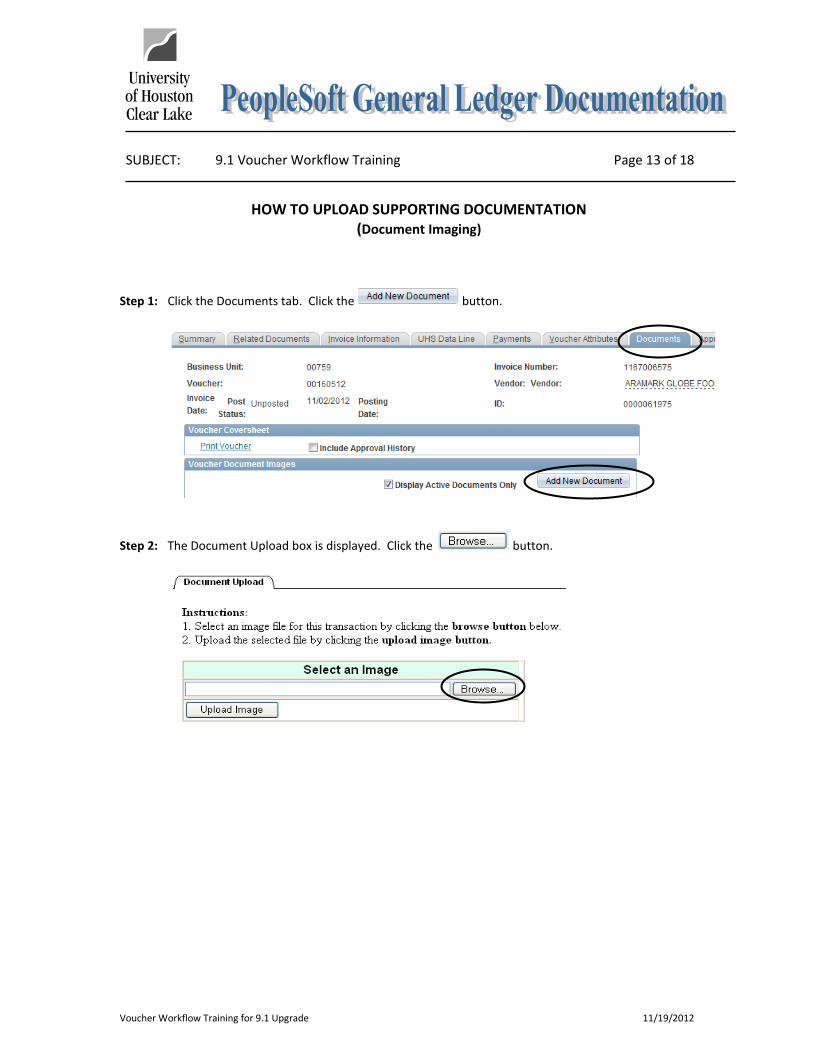
HOW TO UPLOAD SUPPORTING DOCUMENTATION (Document Imaging)
Step 1: Click the Documents tab. Click the button.
Step 2: The Document Upload box is displayed. Click the button.

SUBJECT: 9.1 Voucher Workflow Training Page 14 of 18
Voucher Workflow Training for 9.1 Upgrade 11/19/2012
Step 3: The "Choose File" dialogue box is displayed. Navigate to where the supporting documentation is
saved and select it. Click .
The file name of the supporting documentation is placed in the "Select an Image" section of the
Document Upload box. Click and the supporting documentation will be attached to the voucher.
NOTE: Always open the attachment to make sure it is viewable. This is the image the auditors will examine when they are performing an audit. Also make sure the document is oriented correctly so it is readable.
SUBJECT: 9.1 Voucher Workflow Training Page 15 of 18
Voucher Workflow Training for 9.1 Upgrade 11/19/2012
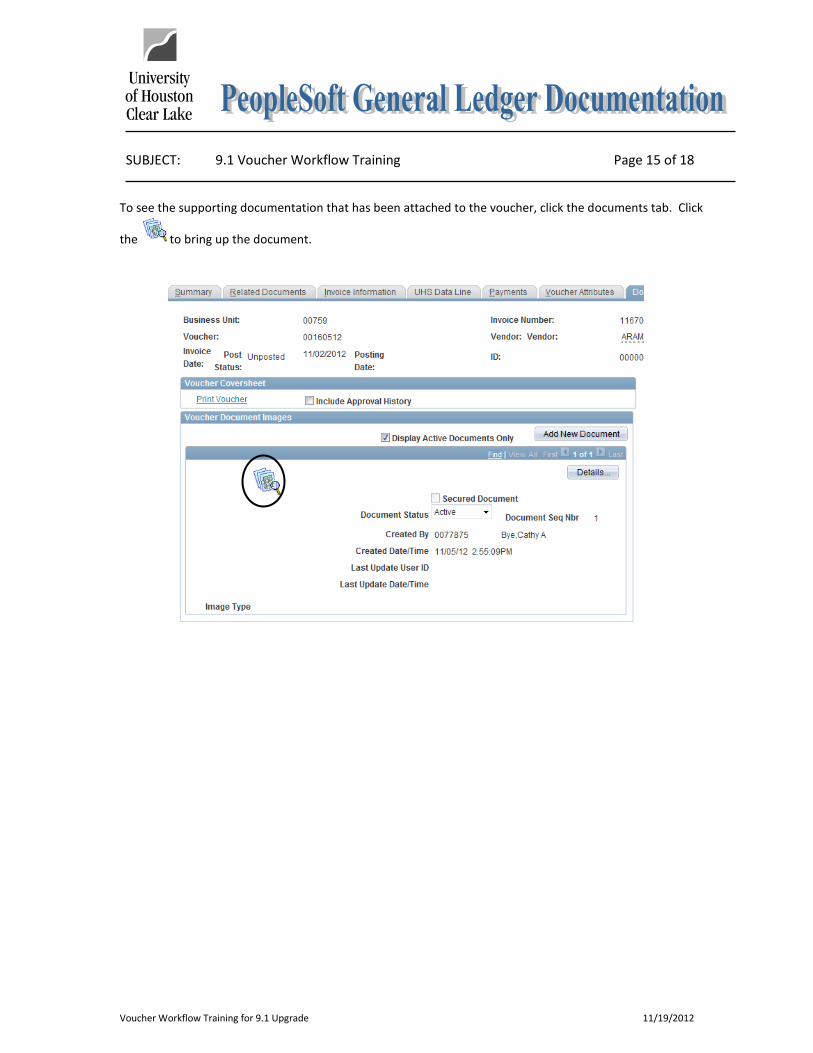
To see the supporting documentation that has been attached to the voucher, click the documents tab. Click
the to bring up the document.
SUBJECT: 9.1 Voucher Workflow Training Page 16 of 18
Voucher Workflow Training for 9.1 Upgrade 11/19/2012
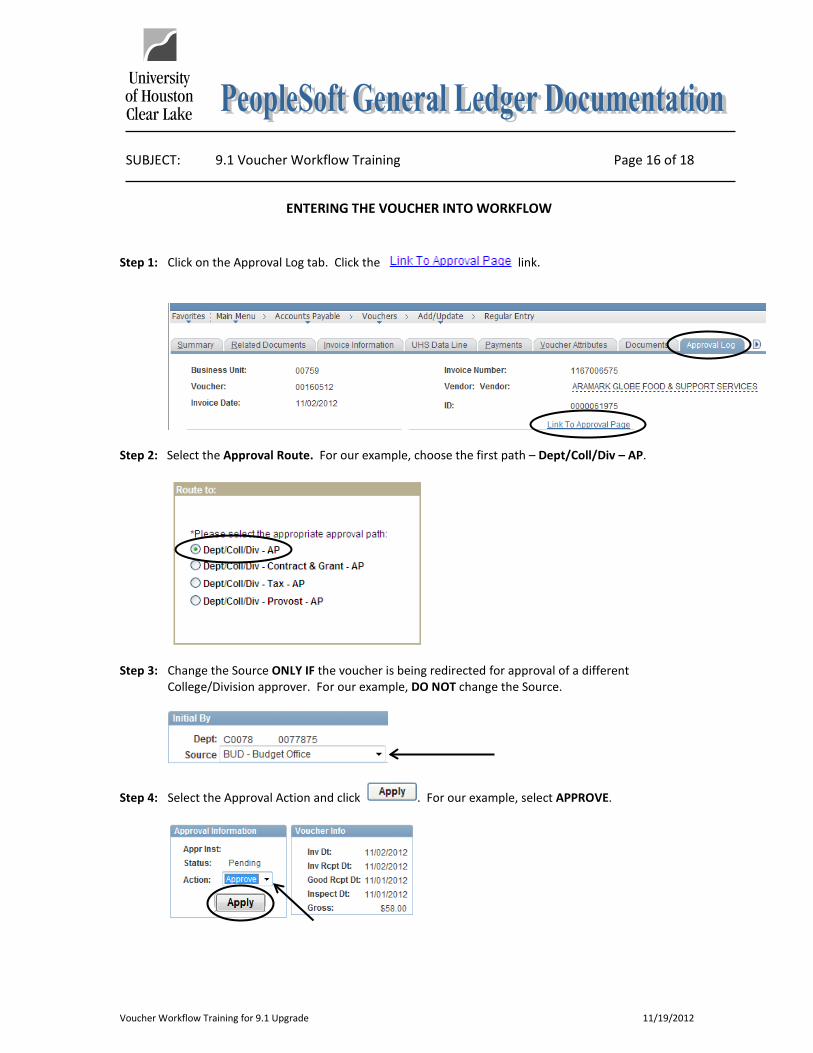
ENTERING THE VOUCHER INTO WORKFLOW Step 1: Click on the Approval Log tab. Click the link.
Step 2: Select the Approval Route. For our example, choose the first path – Dept/Coll/Div – AP.
Step 3: Change the Source ONLY IF the voucher is being redirected for approval of a different
College/Division approver. For our example, DO NOT change the Source.
Step 4: Select the Approval Action and click . For our example, select APPROVE.

SUBJECT: 9.1 Voucher Workflow Training Page 17 of 18
Voucher Workflow Training for 9.1 Upgrade 11/19/2012
Step 5: The system displays the following message indicating the voucher needs to be approved by the next
approver. Click on .
Step 6: The voucher now is in workflow. The Comment History and Approval Log sections show your
name/user id indicating the voucher was submitted into workflow by you.
NOTE: If your voucher is denied because the cost center and/or account need to be changed, you must make the change and re-budget check the voucher. Once you have a “Valid” Budget Status, enter the voucher into workflow again.

SUBJECT: 9.1 Voucher Workflow Training Page 18 of 18
Voucher Workflow Training for 9.1 Upgrade 11/19/2012
HOW TO PLACE THE PAYABLE WORKLIST ON THE HOME PAGE
Step 1: Go to your Home Page from any page by click the link at the top right of the page. Click on the link in the upper left corner of the Home Page.
Step 2: The system displays the Personalize Content Page. Place a checkmark for Payable Worklist and click
.
Now the Voucher Worklist Pagelet is setup on the Home Page.