subject: installing dry freight side skirts - utm.com . service bulletin no. sb-19-004 issue date:...
TRANSCRIPT

SB-19-004
SERVICE BULLETIN NO. SB-19-004 Issue date: March 9, 2011 SUBJECT: Installing Dry Freight Side Skirts
Please reference the attached document for information regarding the installation of Utility
Side Skirts (USS-160) on Dry Freight Trailers.
Any questions regarding this service bulletin should be directed to Utility’s Field Service Department at 800-423-6591. Field Service Department
UTILITY TRAILER MANUFACTURING COMPANY

Utility Trailer Manufacturing Company
USS-160 Utility Side Skirt InstallationOn a Dry Freight
Date 4/23/10

General Skirt Layout
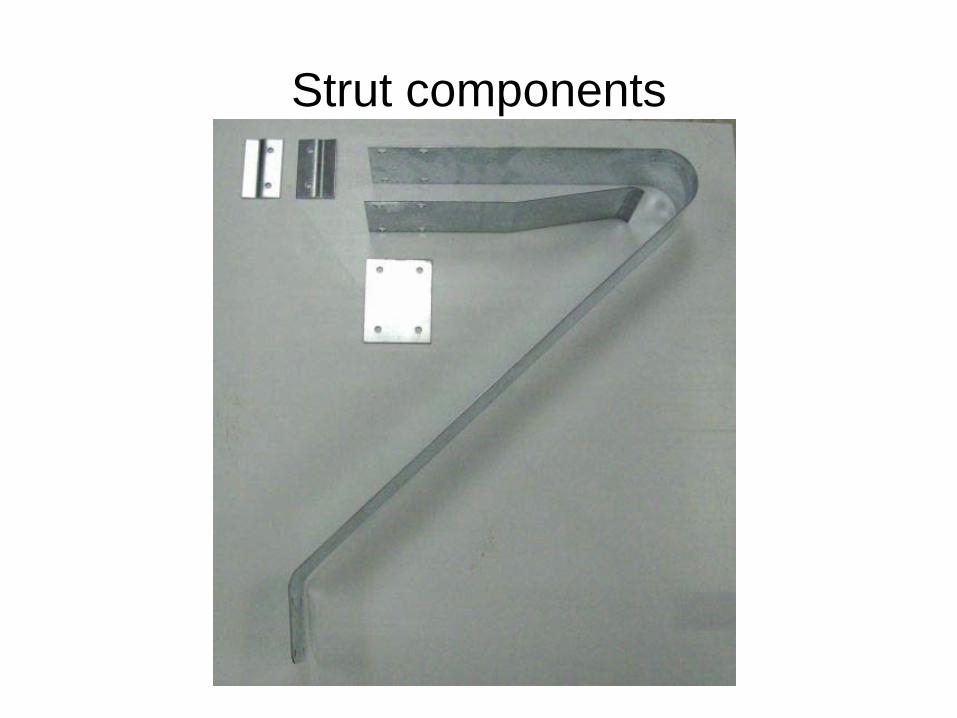
Strut components

Pre-assemble the strut componentsBottom View
Top side of the strut shown. Leave one bolt and nut out. This allows for the bracket to pivot for attachment to the cross bars. Pre-assemble all struts prior to assembly to trailer.

Pre-assemble the angle mounting platesTop side of the angle mounting bracket shown. Leave out the nuts and bolts on the outside. This allows for the brackets to pivot for attachment. Pre-assemble all the angle mounting brackets before assembly to trailer.

Attach strut subassemblies to the trailerIdentify the crossbars where struts are to be installed on the trailer. Rotate the mounting clips to engage the crossbar, insert additional nuts and bolts and hand tighten only. Hang struts for entire trailer and slide towards center.

Leave the strut loose for positioningSnug tighten nuts and bolts so strut will slide but not fall off prior to locating the side skirt subassembly.

Attach angle mounting plates to the trailerIdentify the crossbars where angle mounting plates are to be installed on the trailer. Rotate the mounting clips to engage the crossbar, tighten nuts and bolts for a snug fit where parts will slide but not fall off. Hang angle mounting plates for the entire trailer and slide towards center to clear skirt.
Need t replace this picture with one of the angle mounting plate installation.

Struts and angle mounting brackets on trailer

Apply barrier tape to the skirt mounting angle
Protection between the dissimilar metals

Clamp the skirt in placePosition the forward edge of the skirt at the rear edge of the leg wingplate with the face of the skirt flush with the wingplate face. Locate the rear edge of the skirt flush with the bottom rail. Position so top edge of the skirt is as straight as possible.
Front viewView from the Rear

Clamp the skirt to the cross membersToggle clamp in about (4) places. Place clamps on c-bars that do not have struts or angle clamp assemblies.

Attach the brackets from the skirt mounting angle to the cross members
Slide the angle mounting brackets onto the angle. Snug tighten, line drill through mounting angle, insert additional nuts and bolts and snug tighten. Verify that top edge of the skirt is straight and tighten all nuts and bolts.

Wing plate angle mounting
Apply barrier tape to the side of the angle that will mount against the wing plate.
Clamp the mounting angle to the wing plate. Drill through the lower pre-punched hole in the angle to the wingplate. Attach the angle to the wingplate using (1) ¼” aluminum pop rivet.

Wing plate angle mounting exteriorUse the pre-punched holes in the mounting angle to back drill (3) .257 diameter holes through the side skirt. Attach the angle to the side skirt using (3) ¼” aluminum pop rivets.

Wing plate view from the rear
Angle is attached to the wing plate with one aluminum pop rivet and to the skirt with (3) aluminum pop rivets

Hang drill template from the cross member to locate screw holes in the
skirtNOTE: After drilling the first hole. Stick an awl in the drilled hole, this holds the template in place while drilling the remaining holes

Remove the plastic protective layer

Assembling the Lower StrutInstall bolts in skirt backup plate and through skirt and lower strut. Tighten the nuts while holding the head of the screw. Note that the plate with the patent pending decal goes on the second strut from the rear on each side.

Final skirt positioningPosition the struts (in or out) so that the bottom edge of the skirt is as straight as possible. Tighten all strut nuts and bolts.

Drill a hole for the mid turn harness

Grommet the harness hole
Mount the center marker light bracket and light.

Finished product backside

Finished Product Outside
Refer to side skirt fabrication presentation for skirt fabrication details
Note: Patent PendingDecal Location