subject outline tool help...mathtype and chemtype content may not save in chrome. firefox...
TRANSCRIPT
1
SUBJECT OUTLINE TOOL HELP
Contents Introduction ........................................................................................................................................................................ 4
Known Issues & Troubleshooting ....................................................................................................................................... 6
Subject Outlines and Copyright .......................................................................................................................................... 7
Tool Overview ..................................................................................................................................................................... 8
Workflow ......................................................................................................................................................................... 8
Timeline & Actual Dates .................................................................................................................................................. 9
Templates ...................................................................................................................................................................... 10
Roles & Permissions ...................................................................................................................................................... 11
Staff Notifications ......................................................................................................................................................... 12
Student Notifications .................................................................................................................................................... 12
Dashboards ....................................................................................................................................................................... 14
Creating an Outline ........................................................................................................................................................... 21
Creating a new Outline ................................................................................................................................................. 21
Cloning an Outline ......................................................................................................................................................... 21
Clone ‘Autotext Refresh’ Prompt .................................................................................................................................. 21
Clone ‘QA Exemption’ ................................................................................................................................................... 22
Author & QA Officer Basics ............................................................................................................................................... 23
Left hand menu ............................................................................................................................................................. 23
Floating toolbar ............................................................................................................................................................. 24
Section Filter ................................................................................................................................................................. 24
Preview Options ............................................................................................................................................................ 24
Roles & Clone Details .................................................................................................................................................... 25
Multi Session Subjects .................................................................................................................................................. 25
Tools & Settings ............................................................................................................................................................ 26
Commenting .................................................................................................................................................................. 27
Section Help .................................................................................................................................................................. 27
Author & QA Officer Editing .............................................................................................................................................. 28
Using the Editor............................................................................................................................................................. 28
Working with Tables ..................................................................................................................................................... 29
Saving your Outline ....................................................................................................................................................... 32
Using SOT functionality to author Assessment Items ................................................................................................... 33
2
Reusing Assessment Items ............................................................................................................................................ 39
Reusing Section Content ............................................................................................................................................... 39
Autotext Refresh ........................................................................................................................................................... 40
PDF Section Options ...................................................................................................................................................... 40
Compliance Check ......................................................................................................................................................... 40
Data Refresh .................................................................................................................................................................. 41
Managing Roles & Permissions ..................................................................................................................................... 41
Concurrent editing – resolving conflicting content ...................................................................................................... 41
Submitting for QA ......................................................................................................................................................... 42
Clone QA exemption ..................................................................................................................................................... 42
Submitting for Revision ................................................................................................................................................. 42
Submitting for Publication ............................................................................................................................................ 43
Student ‘Site Map’ View.................................................................................................................................................... 44
Varying an Outline ............................................................................................................................................................ 45
Subject Summary .............................................................................................................................................................. 46
Subject Code & Name ................................................................................................................................................... 46
Session .......................................................................................................................................................................... 46
Teaching Faculty ............................................................................................................................................................ 46
Teaching School ............................................................................................................................................................ 46
Study Mode ................................................................................................................................................................... 46
Credit Points .................................................................................................................................................................. 46
Welcome & Acknowledgement of Country .................................................................................................................. 46
Subject Coordinator .......................................................................................................................................................... 46
Title ............................................................................................................................................................................... 46
Full name ....................................................................................................................................................................... 46
Email .............................................................................................................................................................................. 47
Phone ............................................................................................................................................................................ 47
Mobile ........................................................................................................................................................................... 47
Campus .......................................................................................................................................................................... 47
Building/room number ................................................................................................................................................. 48
Consultation procedures ............................................................................................................................................... 48
Subject Overview .............................................................................................................................................................. 48
Abstract ......................................................................................................................................................................... 48
Learning outcomes ........................................................................................................................................................ 48
Subject content ............................................................................................................................................................. 48

3
Key subjects .................................................................................................................................................................. 49
Prerequisite subject/s ................................................................................................................................................... 49
Assumed knowledge ..................................................................................................................................................... 49
Subject Schedule & Delivery ............................................................................................................................................. 49
Prescribed text .............................................................................................................................................................. 49
Class/tutorial times and location .................................................................................................................................. 49
Schedule ........................................................................................................................................................................ 50
Learning materials ......................................................................................................................................................... 50
Learning, teaching and support strategies ................................................................................................................... 50
Workplace learning ....................................................................................................................................................... 53
Clinical requirements .................................................................................................................................................... 53
Residential school & Residential school program ......................................................................................................... 53
Recommended student time commitment .................................................................................................................. 53
Assessment Items ............................................................................................................................................................. 54
Essential requirements to pass this subject .................................................................................................................. 54
Items – Assessment summary table ............................................................................................................................. 54
Assessment Items ......................................................................................................................................................... 54
Exam Items .................................................................................................................................................................... 65
Assessment Information ................................................................................................................................................... 74
Academic Integrity ........................................................................................................................................................ 74
Referencing ................................................................................................................................................................... 74
How to submit your assessment items ......................................................................................................................... 74
Extensions ..................................................................................................................................................................... 75
How to apply for special consideration ........................................................................................................................ 75
Penalties for late submission ........................................................................................................................................ 75
Resubmission ................................................................................................................................................................ 76
Additional assessment and examinations ..................................................................................................................... 76
Feedback processes ...................................................................................................................................................... 76
Assessment return ........................................................................................................................................................ 76
Student Feedback & Learning Analytics............................................................................................................................ 77
Evaluation of subjects ................................................................................................................................................... 77
Changes and actions based on student feedback ......................................................................................................... 77
Learning analytics .......................................................................................................................................................... 77
Services & Support ............................................................................................................................................................ 77
Student Portal (no header) ........................................................................................................................................... 77

4
Develop your study skills............................................................................................................................................... 77
Library services .............................................................................................................................................................. 77
CSU Policies & Regulations ............................................................................................................................................... 78
CSU Policies & Regulations (no header) ........................................................................................................................ 78
Subject outline as a reference document ..................................................................................................................... 78
School of Policing Academic Advice and Review Policies (Policing only) ..................................................................... 78
CSU policies relevant to subject study (Policing only) .................................................................................................. 78
Glossary ............................................................................................................................................................................. 79
FAQ .................................................................................................................................................................................... 82
APPENDIX A: Suggested text for Workplace Learning subjects ........................................................................................ 84
Introduction The Subject Outline Tool (SOT) was created to achieve the following objectives:
Compliance Outlines must comply with Academic Senate Regulations including the Subject Outline Policy Consistency Provides a uniform development and QA approach for academics and output for students Accessibility CSU has an obligation to ensure that all students can access Outlines for their enrolled subjects Integration Uses authoritative subject data then delivers Subject Outlines seamlessly into Interact2 subject sites Usability Improved user interface for both academics and students Visibility Prominent, modern display to students The SOT enables drafting, quality assuring and publication of Subject Outlines for all offerings which are active on the Subject Availability List (SAL) (also see Offering types excluded from the SOT). It features:
Population of the Subject Coordinator (SC), Nominal SC (NSC) and QA Officer (QAO) roles from ACSES
A standardised, lean, subject- and cohort-specific template
Automated inclusion of data from other CSU systems
Automated inclusion of approved ‘fixed autotext’ (content that cannot be edited)
Automated inclusion of standard ‘editable autotext’ (default ‘best fit’ content that can be edited)
Whole Outline cloning to support reuse of the authored content from another Outline
Quality control (QC) function to assist compliance with policy; and ensure complete and valid content
Quality assurance (QA) work flow and functions to support production of high quality Outlines
Variations work flow and functions to support policy on varying a published Outline
A search function for all staff to access Outlines published from the SOT
A portable and printable version of Outlines (PDF format)
An Interact2 custom ‘sorry page’ when an Outline is either not yet published or undergoing a variation
An automated Announcement upon re-publication of a varied Outline including a list of the sections that were
varied
What’s different to the Mandatory Subject Information (MSI) Tool? Ability to add any staff member to an Outline as a ‘Support Author’ to collaboratively assist drafting
Ability to add HOS delegates and/or Acting HOS into a ‘Support HOS’ role to assist with HOS tasks
Ability to manage the permissions of QAOs; and your Head of School and their delegates (edit or comment only)
Tracking dashboard for Heads of School and their delegates in the School’s ‘Support HOS’ role
QA exemption for Outlines cloned from a QA approved Outline for the same subject code and session

5
Concurrent editing including section content conflict resolution (all can edit – no need to change Author)
Contact detail flexibility for Subject Coordinator’s via the SOT ‘SC Profile’
Subject Coordinator ‘To be advised’ option to accommodate staff preparing an Outline for an incoming SC
Ability to generate the desired view of an Outline by section type via a Section filter
Improved options for displaying sections on new or landscape pages in the PDF version
Improved preview options – student view, SOT view, PDF preview
Ability to select the subject Learning Outcome/s assessed by each Assessment Item
Ability to select the Graduate Learning Outcome/s an Assessment Item contributes to
A history log for ease of tracking an Outline’s development
Improved WYSIWYG editor for staff
Improved inline help
Improved commenting
Ability to export comments to a csv file
Inclusion of multi session subject (MSS) information for an Outline
Modern ‘page tree’ and ‘floating toolbar’ user interface for staff
Modern ‘site map’ user interface for students
GLO badge display to students (if applicable)
Mobile responsiveness for staff down to small screens and students down to smartphones
Improved browser compatibility – Chrome (recommended) + Firefox (recommended for STEM formula)
Improved reporting
Self-serve point-in-time reporting for HOS and DLT report owners
Self-serve point-in-time template and GLO reports for all staff
Improved Superuser user interface
6
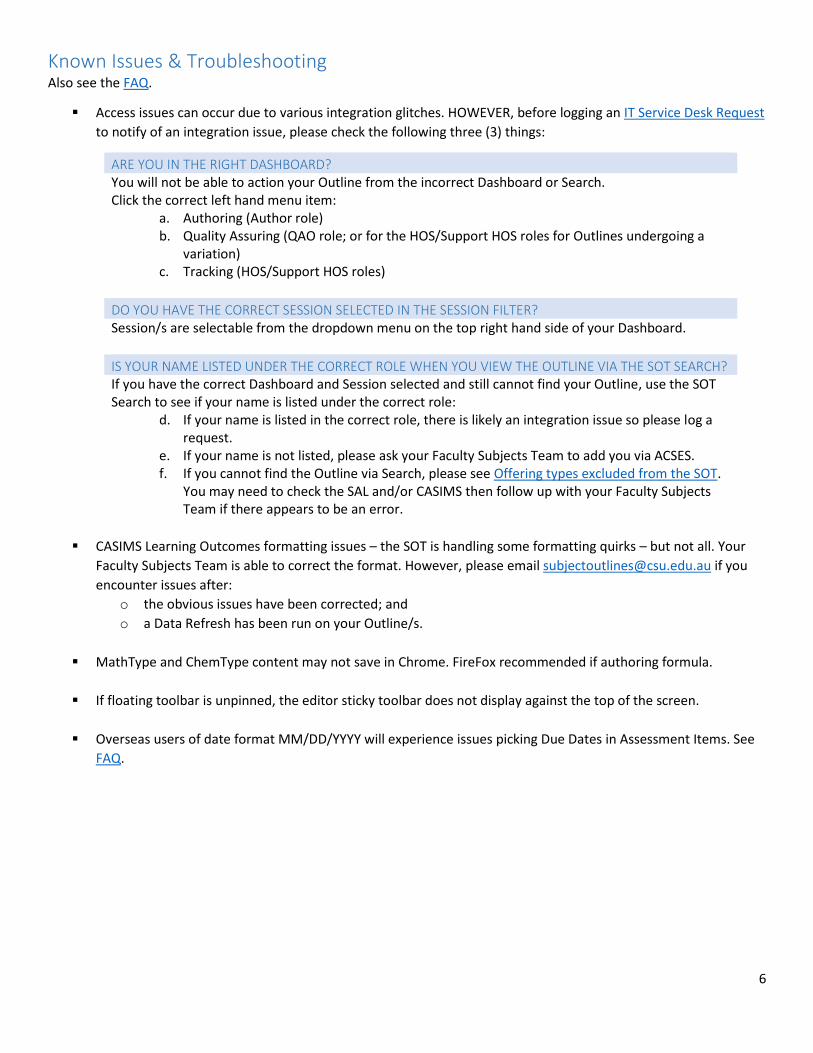
Known Issues & Troubleshooting Also see the FAQ.
Access issues can occur due to various integration glitches. HOWEVER, before logging an IT Service Desk Request
to notify of an integration issue, please check the following three (3) things:
ARE YOU IN THE RIGHT DASHBOARD? You will not be able to action your Outline from the incorrect Dashboard or Search. Click the correct left hand menu item:
a. Authoring (Author role) b. Quality Assuring (QAO role; or for the HOS/Support HOS roles for Outlines undergoing a
variation) c. Tracking (HOS/Support HOS roles)
DO YOU HAVE THE CORRECT SESSION SELECTED IN THE SESSION FILTER? Session/s are selectable from the dropdown menu on the top right hand side of your Dashboard.
IS YOUR NAME LISTED UNDER THE CORRECT ROLE WHEN YOU VIEW THE OUTLINE VIA THE SOT SEARCH? If you have the correct Dashboard and Session selected and still cannot find your Outline, use the SOT Search to see if your name is listed under the correct role:
d. If your name is listed in the correct role, there is likely an integration issue so please log a request.
e. If your name is not listed, please ask your Faculty Subjects Team to add you via ACSES. f. If you cannot find the Outline via Search, please see Offering types excluded from the SOT.
You may need to check the SAL and/or CASIMS then follow up with your Faculty Subjects Team if there appears to be an error.
CASIMS Learning Outcomes formatting issues – the SOT is handling some formatting quirks – but not all. Your
Faculty Subjects Team is able to correct the format. However, please email [email protected] if you
encounter issues after:
o the obvious issues have been corrected; and
o a Data Refresh has been run on your Outline/s.
MathType and ChemType content may not save in Chrome. FireFox recommended if authoring formula.
If floating toolbar is unpinned, the editor sticky toolbar does not display against the top of the screen.
Overseas users of date format MM/DD/YYYY will experience issues picking Due Dates in Assessment Items. See
FAQ.
7
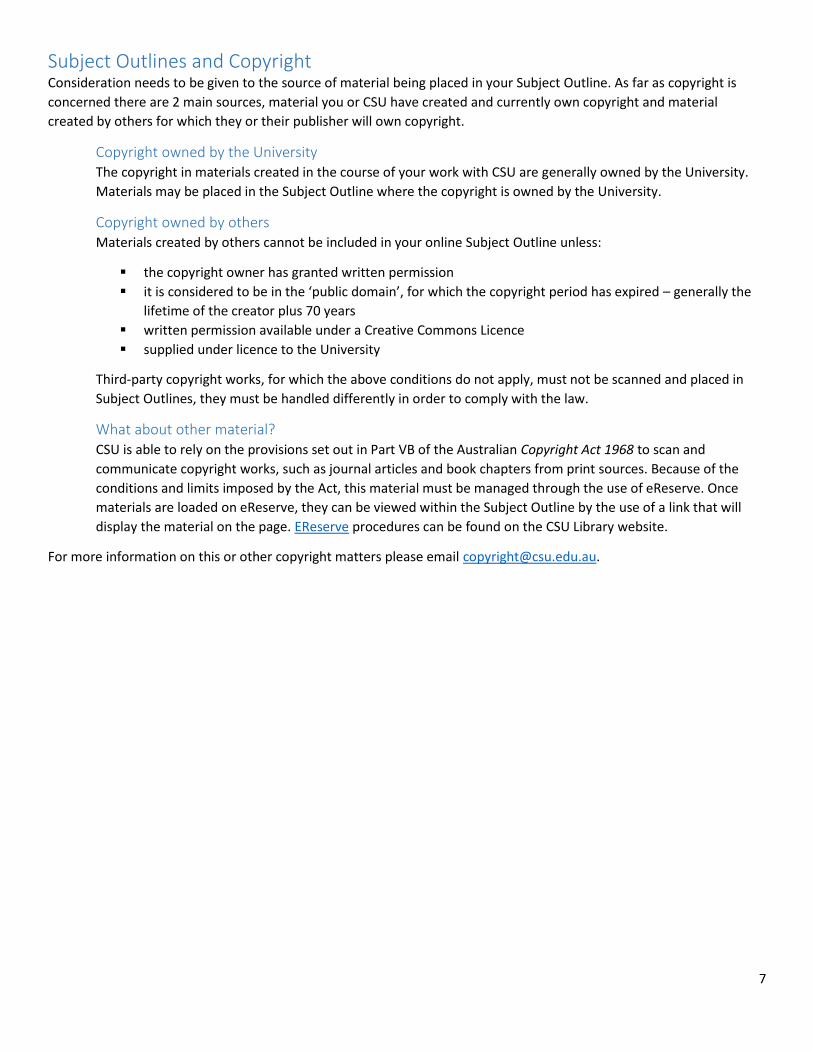
Subject Outlines and Copyright Consideration needs to be given to the source of material being placed in your Subject Outline. As far as copyright is
concerned there are 2 main sources, material you or CSU have created and currently own copyright and material
created by others for which they or their publisher will own copyright.
Copyright owned by the University
The copyright in materials created in the course of your work with CSU are generally owned by the University.
Materials may be placed in the Subject Outline where the copyright is owned by the University.
Copyright owned by others
Materials created by others cannot be included in your online Subject Outline unless:
the copyright owner has granted written permission
it is considered to be in the ‘public domain’, for which the copyright period has expired – generally the
lifetime of the creator plus 70 years
written permission available under a Creative Commons Licence
supplied under licence to the University
Third-party copyright works, for which the above conditions do not apply, must not be scanned and placed in
Subject Outlines, they must be handled differently in order to comply with the law.
What about other material?
CSU is able to rely on the provisions set out in Part VB of the Australian Copyright Act 1968 to scan and
communicate copyright works, such as journal articles and book chapters from print sources. Because of the
conditions and limits imposed by the Act, this material must be managed through the use of eReserve. Once
materials are loaded on eReserve, they can be viewed within the Subject Outline by the use of a link that will
display the material on the page. EReserve procedures can be found on the CSU Library website.
For more information on this or other copyright matters please email [email protected].

8
Tool Overview Workflow There are various paths an Outline can take through to publication.
MAIN WORKFLOW
Most Outlines will pass through five (5) main statuses.
CLONE QA EXEMPTION
A cloned Outline is exempt from QA if it has been cloned from a QA approved Outline of the same subject code and
session; and has not been edited since it was cloned.
REVISION REQUIRED
An Outline may be sent back from QA for revision one or multiple times.
PRE-APPROVED QA
An Outline can be published by the Author if the QAO pre-approves revisions.
VARIATION WORKFLOW
Published Outlines may need to be varied. The HOS is required to QA unless the variation is exempt from QA.
Note that variations can also be returned to Author/s for revision.
(e.g. Version 1) (e.g. Version 2)(HOS & Support HOS QA via QA Dashboard)
VARIATION QA EXEMPTION
Variations may be exempt from QA if only certain sections are edited.

9
Timeline & Actual Dates Outlines become available for creation fourteen (14) weeks prior to CSU Principal Dates session start. This timeline
provides twelve (12) weeks for authoring and quality assuring to meet the publication deadline two (2) weeks prior to
session.
TIP Use timeanddate.com’s Date Calculator to add to or subtract days/weeks/months from a date.
Session Outlines Available Outline Publication Due Session Start
201860 16 April 2018 25 June 2018 9 July 2018
201890 6 August 2018 29 October 2018 12 November 2018
201930 26 November 2018 18 February 2019 4 March 2019
201960 8 April 2019 1 July 2019 15 July 2019
201875 4 June 2018 13 August 2018 27 August 2018
201915 22 October 2018 31 December 2018 14 January 2019
201945 4 March 2019 13 May 2019 27 May 2019
201975 10 June 2019 19 August 2019 2 September 2019
TIP Due to early release of offerings for the Academic Support Unit (ASU), non-ASU staff may see their offerings
listed earlier than expected. However, these offerings cannot have Outlines created until 14 weeks prior to
session. Keep reading to learn more about the ASU.
ACADEMIC SUPPORT UNIT TIMELINE
The Academic Support Unit (ASU comprising Study Link; and Diploma of General Studies) operate on a different timeline
due to their deviation from CSU Principal Dates. The ASU timeline (tabled below) provides a shorter period for authoring
and quality assuring of Outlines.
TIP Study Link use all sessions except 90; and the Diploma of General Studies only uses session 30 and 75.
Session Outlines Available Outline Publication Due Outline Development Time
30 Start Session minus 21 weeks Study Link - Start Session minus 19 weeks DipGenStud – Start Session minus 3 weeks
Study Link – 2 weeks DipGenStud – 18 weeks
60 Start Session minus 21 weeks Start Session minus 19 weeks Study Link – 2 weeks
90 – – –
15 Start Session minus 16 weeks Start Session Minus 12 weeks Study Link – 4 weeks
45 Start Session minus 20 weeks Start Session minus 16 weeks Study Link – 4 weeks
75 Start Session minus 16 weeks Study Link - Start Session Minus 12 weeks DipGenStud – Start Session minus 8 weeks
Study Link – 4 weeks DipGenStud – 8 weeks
STUDY LINK ACTUAL DATES
Session Outlines Available Outline Publication Due Study Link Session Start
201930 8 October 2018 22 October 2018 5 November 2018
201960 18 February 2019 4 March 2019 18 March 2019
201990 – – –
201915 24 September 2018 22 October 2018 5 November 2018
201945 7 January 2019 4 February 2019 18 February 2019
201975 13 May 2019 10 June 2019 24 June 2019
202015 23 September 2019 21 October 2019 4 November 2019

10
Templates The SOT utilises 'templates' to provide every Outline with a standard structure, i.e. the same logical groupings of
information within each Subject Outline for all subjects taught by CSU. There are four (5) sections types within an
Outline:
SC Profile Data The SOT’s ‘SC Profile’ enables certain Subject Coordinator details to be provided for display in
Outlines. For some fields, the SC Profile data will display in Outlines instead of drawing
Enterprise Data from the CSU authoritative source. Learn more: SC Profile
Fixed Enterprise Data Non-editable information drawn in from the CSU authoritative source, e.g. subject and SC data
Editable Autotext Editable information which has been deemed as a 'best fit' for most subjects and is therefore
provided automatically to assist authoring
Fixed Autotext Non-editable information included according to CSU or School policy
Editable Sections which must be authored
Note that a small amount of inherent differences across Faculties, Schools and study modes have been accommodated.
The minor differences across the templates lie within the sections and the 'autotext' content which populates certain
sections, i.e. some templates contain sections which other templates do not; autotext within a section may differ across
templates due to Faculty, School or study mode contexts.
With respect to the transition to the SOT from MSI, an overview of the initial SOT template used for 201845 is available.
It indicates the changes that were made to the template when moving from the MSI tool; and includes autotexts. Note
that the SOT template has been further developed since this initial template.
Template Report
A ‘Template Report’ is available to all staff via the SOT ‘Reports’ dashboard. Select a session, a template; and optionally
select Teaching AOU/s to generate an overview of an SOT template. You can opt to include the default Fixed/Editable
Autotexts in your report. The report can be exported to a comma separated values (CSV) file by clicking the ‘Export CSV’
button.
TIP Select the template that is not specifically for Study Link
Submit a template change proposal COMING SOON – a template change process is currently being developed. It will allow a change to be proposed,
considered and implemented (if approved). In the meantime, please email all proposals to [email protected].

11
Roles & Permissions CSU Roles used by the SOT
CSU Role Role Source SOT Role (annotation)
Subject Coordinator ACSES* Author (SC)
Nominal Subject Outline Author ACSES* Author (NSC)
Subject Outline QA Officer ACSES* QA Officer (QA)
Head of School Alesco (HR) Head of School (HOS) * Faculty Subjects Teams administer the Academic Course and Subject Entry System (ACSES) roles for active SAL offerings
TIP Subject Coordinators become an SOT ‘Author (SC)’. They do not need to also be a Nominal SO Author.
SOT Support Roles Support Author (S)
SC and NSC type SOT Authors can use the ‘Manage Roles & Permissions’ function in the ‘Edit Outline’ screen
Tools & Setting menu to add any staff member into a ‘Support Author’ role to collaborate on the Outline.
Support Authors have full Author permissions except they cannot add other Support Authors. Support Authors
are annotated (S).
TIP If staff already have an ACSES role for the Outline, they will not appear in the list for adding as a
Support Author.
Support HOS (HOS-S)
The HOS can use the ‘Manage Support HOS’ function in the Home left hand nav menu to add any staff member
into a ‘Support HOS’ role to assist with SOT HOS tasks. Support HOS have full HOS permissions including the
ability to add other Support HOS; and generate reports. Support HOS are annotated (HOS-S).
SOT Permissions SC and NSC type Authors can use the ‘Manage Roles & Permissions’ function in the ‘Edit Outline’ screen Tools &
Setting menu to specify whether the Outline’s QAO/HOS/Support HOS roles have ‘Edit’ or ‘Comment only’
permissions. Learn more: Managing Roles & Permissions
ACSES email notifications for null roles The Academic Course and Subject Entry System (ACSES) supports timely role population for Outline
development, by providing a ‘Manage No-Role Notifications’ function. Staff can set their desired timing for email
notification of offerings with null Subject Coordinator/Instructor or QA Officer roles.
Find out more: ACSES Help - Manage No-Role Notifications

12
Staff Notifications Email notifications to staff with responsibilities for an Outline are sent when the Outline changes status, that is:
QA Officer/s are emailed when an Author submits the Outline for QA
Author/s are emailed when a QA Officer applies a QA outcome
o Submit for Publication
o Revision Required
o Revision Required – Pre-approved QA
If QAOs have edit permissions and updated the Outline during QA, the section/s they changed will be listed in
the email. This applies to varied Outlines that are quality assured (and possibly edited) by the HOS/Support HOS.
Head of School and any Support HOS are emailed when a Published Outline has been varied and is not exempt
from QA. All varied Outlines that are not QA exempt must be quality assured by the HOS.
Learn more: Varying an Outline
EXAMPLE ’Awaiting QA’ staff email notification
Student Notifications OUTLINE IS NOT YET PUBLISHED
A ‘sorry page’ is displayed to students if the i2 subject site is open but an Outline not yet published.
Continued over page…
13
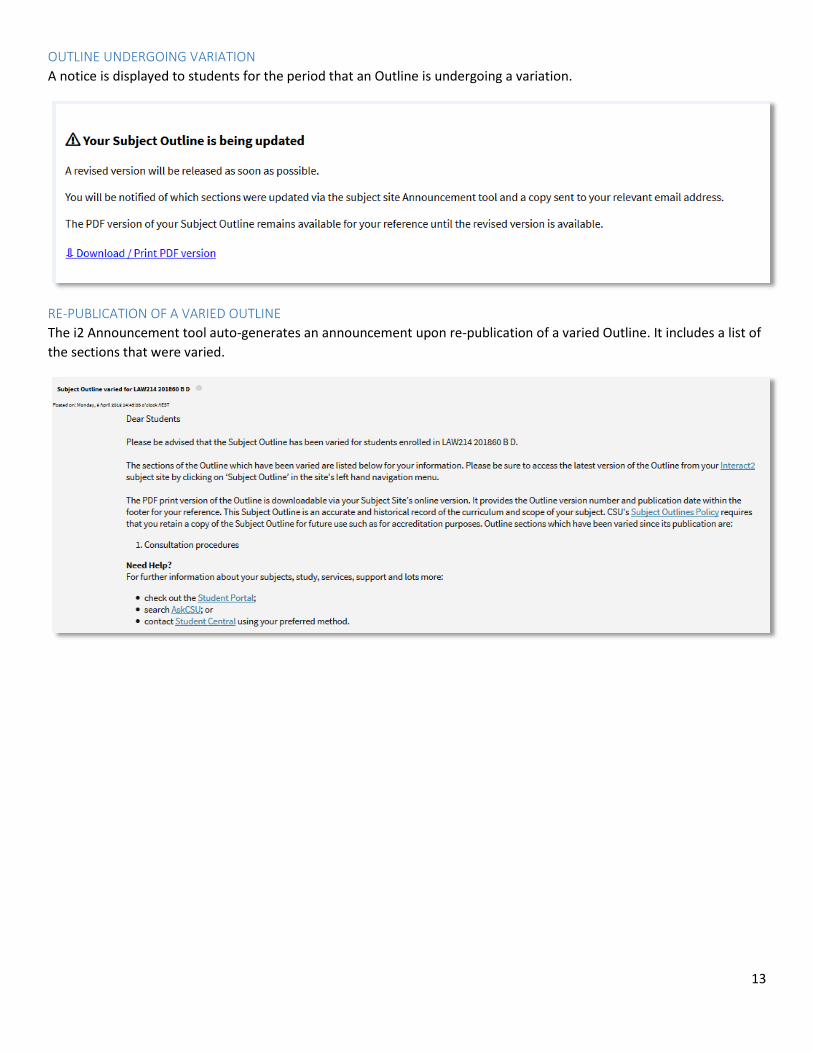
OUTLINE UNDERGOING VARIATION
A notice is displayed to students for the period that an Outline is undergoing a variation.
RE-PUBLICATION OF A VARIED OUTLINE
The i2 Announcement tool auto-generates an announcement upon re-publication of a varied Outline. It includes a list of
the sections that were varied.

14
Dashboards The SOT has (3) main dashboard areas:
Authoring
Quality Assuring
Tracking – only visible to HOS and Support HOS
The SOT’s Home left hand navigation menu also provides access to:
SC Profile – visible to all staff; however, only applicable to Subject Coordinators (SCs)
Manage Support HOS – only visible to HOS and Support HOS
Reports – staff access to a subset of reports; plus reports for HOS/Support HOS and Reporting users only
Search
All dashboards provide:
Publication countdown banner – countdown commences 70 days prior to publication deadline
Session filtering – on one or multiple sessions (deselect all to default to all sessions in your list)
Status count and filtering tiles – click the status tile to apply or remove the status filter
Outline Preview – via the hyperlinked ‘Subject offering’ column
Lists staff in the Author and QAO roles
History Log – via the hyperlinked ‘Last action date’
Actions relevant to your role and the Outline’s status
Column sorting
Options to show 5/10/25/50/100 Outlines per page
Paging – including a count of Outlines in your list
Countdown banner Outlines are due for publication 2 weeks prior to Session Start. Countdown commences 70 days prior to the publication
deadline (i.e. 84 days prior to Session Start). The banner provides the countdown; or notice that Outlines are now due;
for each session selected in the Dashboard Session Filter.
The banner will no longer display when all Outlines for the selected session/s have a status of Published.
Countdown banner In this example, both 201875 and 201890 are selected in the Dashboard Session Filter

15
Offering types excluded from the SOT You will not see offerings on your Dashboard which are:
for a subject code that has a CASIMS tag of ‘Interact -- No Subject Outline’ -OR-
a multi-session subject (MSS) that does not have a cohort commencing in that session (see SAL+) -OR-
Inactive on the Subject Availability Listing (see SAL+). Also see Inactive Status Chip below.
CASIMS TAG – ‘NO SUBJECT OUTLINE’
If all offerings for a subject code do not require an Outline and therefore should be omitted from the SOT, the
‘No Subject Outline’ tag can be maintained by the Subject Manager, Faculty Administration Manager and Faculty
Executive Officer positions in your Faculty. Any issues with tag updates should go to [email protected].
CASIMS Subject Profile Applied Tags
TIP If a ‘No Subject Outline’ CASIMS tag is removed, you must log a DIT Service Desk Request to force the
addition of subject offerings to the SOT (adding the tag should cause the offerings to automatically
disappear from the SOT).
INACTIVE STATUS CHIP
Authors/QAOs/HOS will see an offering with an INACTIVE status chip if it became Inactive on the SAL after an
Outline was created for it. Also, reports will indicate its Inactive status.
Outlines are retained in case they are useful for cloning or reusing Assessment Items or section content. Authors
can delete Outlines with an Inactive status chip if they are no longer useful. Once deleted, the offering will
disappear from the Authoring/QA/Tracking dashboards and reports.
Actions available on an Outline based on its status and your role and permissions
Status Applicable Role/s Available Actions
Not Yet Created Authors – SC + NSC Create
Draft Authors – SC, NSC + S Edit + Delete
Revision Required Authors – SC, NSC + S Edit + Delete
Revision Required – Pre-approved QA Authors – SC, NSC + S Edit + Delete
Variation Authors – SC, NSC + S Edit
Awaiting QA Version 1 QA Officer/s QA*
Awaiting QA Version ≥2 HOS + Support HOS QA*
Awaiting Publication N/A N/A
Published Authors – SC, NSC + S Vary
Inactive (any status) Authors – SC, NSC + S Delete
* Can edit via the QA Outline screen if SC/NSC Author has granted edit permissions. Otherwise, can comment only.
Authoring When a session is loaded into the SOT, offerings appear in the Authoring dashboard for the Subject Coordinator (SC) and
Nominal Subject Coordinators (NSC) assigned to the offering in ACSES. Support Authors will see the offering if an SC/NSC
has added them to a created Outline. Learn more: Creating an Outline
Note that ‘Delete’ is only available on Outlines that have:
never obtained QA approval, as indicated by the QA Officer submitting the Outline for publication. Thereafter,
the Outline can only be varied. It cannot be deleted unless it becomes Inactive on the SAL.
16
become Inactive after an Outline has been created. Learn more: Inactive Status Chip
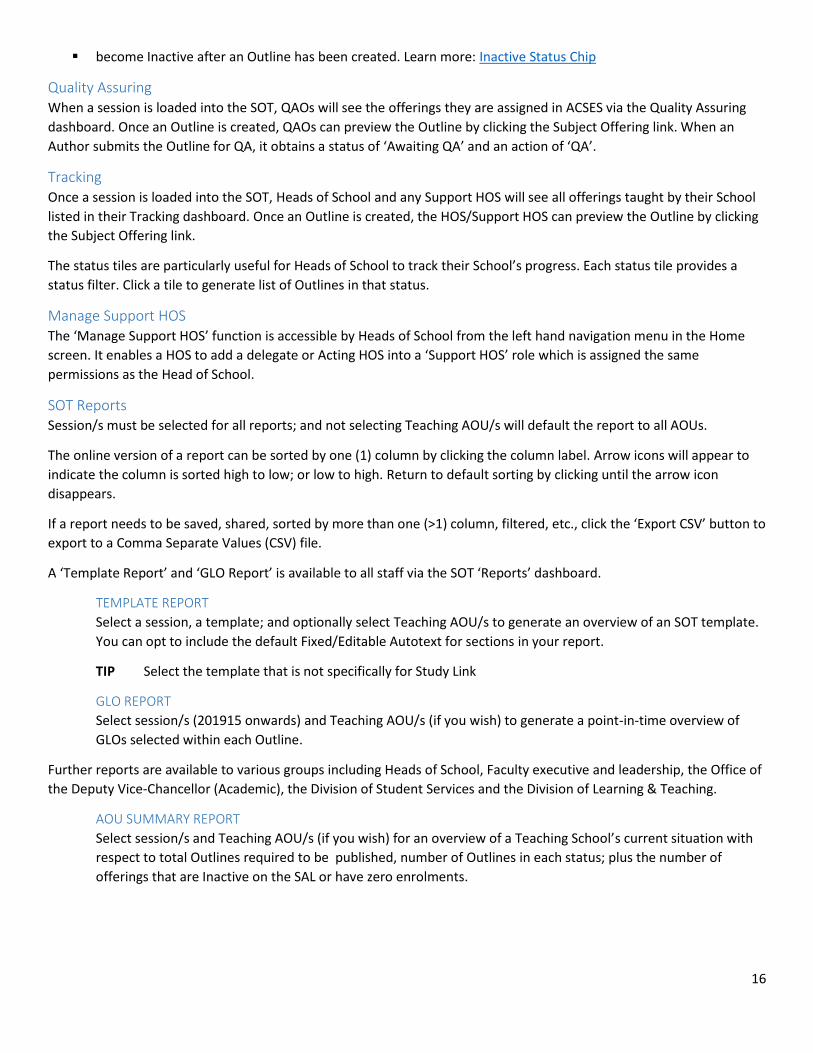
Quality Assuring When a session is loaded into the SOT, QAOs will see the offerings they are assigned in ACSES via the Quality Assuring
dashboard. Once an Outline is created, QAOs can preview the Outline by clicking the Subject Offering link. When an
Author submits the Outline for QA, it obtains a status of ‘Awaiting QA’ and an action of ‘QA’.
Tracking Once a session is loaded into the SOT, Heads of School and any Support HOS will see all offerings taught by their School
listed in their Tracking dashboard. Once an Outline is created, the HOS/Support HOS can preview the Outline by clicking
the Subject Offering link.
The status tiles are particularly useful for Heads of School to track their School’s progress. Each status tile provides a
status filter. Click a tile to generate list of Outlines in that status.
Manage Support HOS The ‘Manage Support HOS’ function is accessible by Heads of School from the left hand navigation menu in the Home
screen. It enables a HOS to add a delegate or Acting HOS into a ‘Support HOS’ role which is assigned the same
permissions as the Head of School.
SOT Reports Session/s must be selected for all reports; and not selecting Teaching AOU/s will default the report to all AOUs.
The online version of a report can be sorted by one (1) column by clicking the column label. Arrow icons will appear to
indicate the column is sorted high to low; or low to high. Return to default sorting by clicking until the arrow icon
disappears.
If a report needs to be saved, shared, sorted by more than one (>1) column, filtered, etc., click the ‘Export CSV’ button to
export to a Comma Separate Values (CSV) file.
A ‘Template Report’ and ‘GLO Report’ is available to all staff via the SOT ‘Reports’ dashboard.
TEMPLATE REPORT
Select a session, a template; and optionally select Teaching AOU/s to generate an overview of an SOT template.
You can opt to include the default Fixed/Editable Autotext for sections in your report.
TIP Select the template that is not specifically for Study Link
GLO REPORT
Select session/s (201915 onwards) and Teaching AOU/s (if you wish) to generate a point-in-time overview of
GLOs selected within each Outline.
Further reports are available to various groups including Heads of School, Faculty executive and leadership, the Office of
the Deputy Vice-Chancellor (Academic), the Division of Student Services and the Division of Learning & Teaching.
AOU SUMMARY REPORT
Select session/s and Teaching AOU/s (if you wish) for an overview of a Teaching School’s current situation with
respect to total Outlines required to be published, number of Outlines in each status; plus the number of
offerings that are Inactive on the SAL or have zero enrolments.

17
OUTLINE LEVEL DETAILED REPORT
Select session/s and Teaching AOU/s (if you wish) for an overview of each Outline: subject short name, Teaching
AOU name and code, Faculty, Author (SC), Outline and SAL statuses, first/last publication dates, the published
Outline’s version number, last activity date and the number of enrolled students.
GLO EXTENDED REPORT
Select session/s and Teaching AOU/s (if you wish) to generate a point-in-time overview of GLOs selected within
each Outline; plus detailed information about each Outline: subject short name, Teaching AOU code, Outline
status, first/last publication dates and the published Outline’s version number.
Search STAFF A search function is available to all current staff to preview all created Outlines. Outlines with a status of ‘Not Yet Created’ will appear in Search Results but will not be linked to a preview. You are able to search by Subject Code, Session Code, Campus, Study Mode, Teaching School, Author and/or Outline Status. Search results can be sorted by several columns.
ONLY SHARE PUBLISHED OUTLINES WITH STUDENTS If a student requests a copy of an Outline, please ensure that you provide a recently PUBLISHED Outline.
Outlines under development must not be circulated outside of staff. NOTE: Published Outlines only become available to students via Search from Start Session Minus 14 Days. See below.
CURRENT STUDENTS Current students can search Outlines and preview all published Outlines from 14 days prior to session start (regardless of whether the subject commences early due to an approved session variation). The intention is to provide current students who are not enrolled in a subject access to the full Subject Outline to support enrolment decisions.
Student users of Search are provided the same ‘Student View’ of the Outline that is delivered to enrolled students in their i2 subject site. Search parameters and search result columns differ slightly to support student needs.
Currently, there is an access point for students from each subject page of the CSU Handbook. Further student access points will be implemented in the near future.
See screenshots of the student Search parameters and Search Results over page…

18
Student Search Parameters
Student Search Search Results

19
SC Profile The SC Profile function allows staff to maintain certain details about themselves for inclusion in Outlines for which they
are the Subject Coordinator.
TITLE If a Title selection is not made, the SC’s Outlines will not display a title. Applies from 201890.
FIRST NAME If the SC’s ‘Preferred Name’ that has been provided to the Division of Human Resources (stored
in Alesco) is not appropriate for display in Subject Outlines, a first name should be provided here
for display in the SC’s Outlines. If a first name is not provided, the ‘Preferred Name’ stored in
Alesco will display in Outlines. Applies from 201890.
EMAIL If the SC’s email that has been provided to the Division of Human Resources (stored in Alesco) is
not appropriate for display in Subject Outlines, an email should be provided here for display in
the SC’s Outlines. If an email is not provided, the email stored in Alesco will display in Outlines.
In most cases, this is the CSU provide email address that uses the structure
<username>@csu.edu.au. Applies from 201860.
MOBILE If a mobile phone number is not provided, the SC’s Outlines will not display a mobile number.
Applies from 201890.
PHONE If populated, this Phone number will override Communications Directory ‘Phone’.
HIDE PHONE If a Mobile is provided via the SOT Profile, a ‘Hide Phone – include Mobile only’ option is
available to hide the ‘Phone’ field from all the SC’s Outlines, i.e. hides ‘Phone’ regardless of
whether it is populated with the SC Profile or Communications Directory ‘Phone’.

20
TIP An Outline will pass a Compliance Check if either a Phone or Mobile number is included in the Outline.
Only one (1) phone number type must be provided to comply with the Subject Outline Policy. You may
provide both phone number types if you wish.
REFRESHING YOUR OUTLINES WITH SC PROFILE DETAILS
‘Run Data Refresh’ is available to users who have edit permissions on an Outline from the Tools & Settings area
of the left hand menu. Once the SC has added/updated their SC Profile details, run the Data Refresh. A pop up
will confirm which field/s were refreshed. Click OK on the results pop up, then check the details are displaying
under the Subject Coordinator grouping as expected.

21
Creating an Outline Creating a new Outline A ‘new’ Outline will provide Author/s with a default template for the offering. Editable sections in the default
template will be null; or contain effective Editable Autotext that can be updated at the Author’s discretion. All
fixed subject information and fixed autotext will be displayed in a non-editable state.
Cloning an Outline A cloned Outline will provide Author/s with a template for the offering with all editable sections pre-populated
with the authored content from the Outline it was cloned from. Editable autotext may have been updated or
overwritten by the Author/s of the Outline it was cloned from. All fixed subject information and fixed autotext
will be displayed in a non-editable state.
TIP MSI Outlines from 201730 onwards are available for cloning into the new system
The Create Outline screen provides option to create from new; or to search for and select an Outline to clone.
Select ‘Create a new outline’ to start drafting with a default
template. On creation, editable sections in the default template will be null; or contain effective Editable Autotext that can be
updated at the Author’s discretion.
Select ‘Clone from an existing outline’ then select an outline to clone from. On creation, editable sections will be populated with
content from the cloned outline.
You may wish to select an outline to clone from by clicking the ‘Clone’
button in the ‘Suggested’ list.
To search for the outline you wish to clone, start typing its offering
details. Click on the outline within the dropdown menu to select it.
Outlines that were published in the old MSI tool display an MSI chip
Clone ‘Autotext Refresh’ Prompt Once a clone has been created, the SOT checks whether the cloned Outline’s Editable Autotext sections contain
the default Autotext that is effective for the session. If the content does not match the default effective Autotext
not, the Author will be presented with a pop up advising that new Editable Autotext is available for certain
sections. The Author must click through each section to review and select to keep either the cloned content or
refresh the section with the default effective Autotext.
22
Once a selection has been made for each section, the Author can click ‘OK, save selected content’.
If ‘Cancel, do not refresh’ is clicked, the Outline will retain all cloned content.
All Editable Autotext sections provide an ‘Autotext Refresh’ option that can be used at any time during Outline
development – this prompt simply provides Authors with advice that new Autotext is available and the
opportunity refresh the Outline on creation.
Clone ‘QA Exemption’ A cloned Outline may be exempt from QA if it was cloned from an Outline which:
is for the same subject code
is for the same session code; and
has been QA Approved (i.e. submitted for publication at least once); and
has not been edited since it was cloned
The SOT will determine whether this criteria has been met once the Author clicks ‘Submit for QA’.

23
Author & QA Officer Basics Left hand menu The left hand menu provides access to various tools and settings; as well as navigation to groupings, sections and
Assessment Items; plus an indicator of the number of comments on a grouping or section.
The menu can be shown using the right double-arrow on the Menu bar; and re-shown using the left double-arrow on
the floating toolbar. Use the up/down arrows to expand/collapse the menu.
Comment chip indicates the number of comments added to the whole grouping or per section
Hide menu
Arrows expand/collapse
Tools & Settings menu
Outline navigation
24
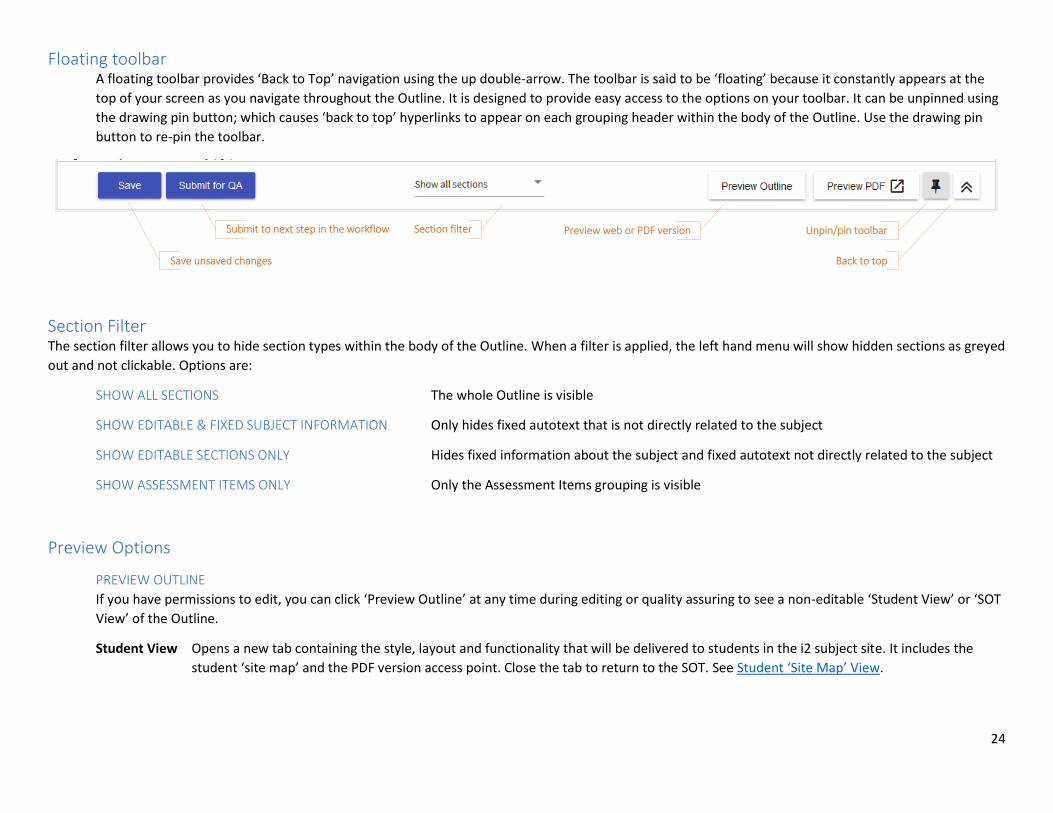
Floating toolbar A floating toolbar provides ‘Back to Top’ navigation using the up double-arrow. The toolbar is said to be ‘floating’ because it constantly appears at the
top of your screen as you navigate throughout the Outline. It is designed to provide easy access to the options on your toolbar. It can be unpinned using
the drawing pin button; which causes ‘back to top’ hyperlinks to appear on each grouping header within the body of the Outline. Use the drawing pin
button to re-pin the toolbar.
Unpin/pin toolbar
Back to top
Preview web or PDF versionSection filterSubmit to next step in the workflow
Save unsaved changes
Section Filter The section filter allows you to hide section types within the body of the Outline. When a filter is applied, the left hand menu will show hidden sections as greyed
out and not clickable. Options are:
SHOW ALL SECTIONS The whole Outline is visible
SHOW EDITABLE & FIXED SUBJECT INFORMATION Only hides fixed autotext that is not directly related to the subject
SHOW EDITABLE SECTIONS ONLY Hides fixed information about the subject and fixed autotext not directly related to the subject
SHOW ASSESSMENT ITEMS ONLY Only the Assessment Items grouping is visible
Preview Options
PREVIEW OUTLINE
If you have permissions to edit, you can click ‘Preview Outline’ at any time during editing or quality assuring to see a non-editable ‘Student View’ or ‘SOT
View’ of the Outline.
Student View Opens a new tab containing the style, layout and functionality that will be delivered to students in the i2 subject site. It includes the
student ‘site map’ and the PDF version access point. Close the tab to return to the SOT. See Student ‘Site Map’ View.

25
SOT View Opens the Outline in the SOT’s ‘Preview Outline’ screen intended to provide a non-editable view
of the Outline content as it currently stands. This is the default view provided to QAOs and the
HOS who do not have edit permissions on the Outline; and to staff using the SOT Search. If you
have edit permissions, click the ‘Edit Outline’ or ‘QA Outline’ button to return to the respective
screen.
PREVIEW PDF
All users can click ‘Preview PDF’ to open the PDF version of the Outline in a new tab. It provides the student eye
view of the PDF version as it currently stands. The PDF has an automatically generated Table of Contents; and
will display a ‘draft’ watermark until it is published to students.
TIP Be sure to enable pop ups for the SOT in your browser. If you don’t, your PDF Preview will be blocked!
TIP The PDF displays the full URL for all hyperlinks. This is because the PDF serves as the printable version
required by the Subject Outline Policy. Once printed, the student requires display of the full URL.
Roles & Clone Details The Edit, QA and Preview screens list the staff in the Author and QAO roles for the Outline.
If your Outline was cloned from a QA approved Outline of the same session, details of the Outline that was ‘Cloned from’
will also display. This information is also entered into the History Log. As per standard functionality, any sections that are
edited after the Outline is cloned will be listed in the History Log. Given the Outline was cloned from a QA approved
Outline, then QAOs are encouraged to make use of this information by directing their QA effort to sections that have
been edited since the Outline was created by cloning.
Jane Morris (QA)Lucy Webster (QA)
EXAMPLE ’Cloned from’ information in the Edit Outline screen for
an Outline cloned from a QA Approved Outline for the same session
Multi Session Subjects For multi session subjects (MSS), an Outline must be published every time a new cohort commences the subject. The
Outline for the cohort’s ‘start session’ must provide all subject information and assessment items the entire MSS.
Offerings for an MSS that do not have a commencing cohort will not appear in the SOT. See Offering types excluded
from the SOT.
An MSS is defined as 1 subject that is taught over >1 session. A 2-session ‘year-long subject’ is an example of an MSS;
however, some MSS are taught over >2 sessions. The SAL+ shows a Duration of >1 for an MSS. The ‘Manage MSS’ pop up
provides detail of the offering’s Teaching and Intake Patterns; as well as the path that each cohort takes through the
offering. That path is tracked using a unique Cohort ID (aka Teaching Cohort Identifier [TCID]).
SAL+ details are replicated in the SOT for clarity as to which cohort the Outline is intended and which sessions the cohort
will enrol in to complete the subject.

26
The MSS Cohort ID and start/end sessions are displayed atop the Outline
Click ‘Show more details’ to pop up further Multi Session Subject details.
In this example, a new cohort commences each 30 and 60 session (Intake Pattern); and
each cohort will be taught in both 30 and 60 sessions (Teaching Pattern)
for 8 to 12 sessions (Duration – Maximum Duration).
Tools & Settings Export Comments Click the option in an Outline’s Tools & Settings menu to generate a point-in-time Comma Separated Values (CSV) file of
all comments, replies and comment deletions on the Outline.
All staff have access to this function when using the Preview Outline screen via the SOT Search.
History Log A History Log for the Outline is available from the Dashboard as well as the left hand menu of the Edit, QA and Preview
screens. It is automatically generated from all actions taken on the Outline including:
Status changes, i.e. created, deleted, awaiting QA, published, etc
Cloning information including whether the ‘cloned from’ Outline was QA approved
Section updates
Adding and removing Support Authors
Changing permissions of QAOs, HOS and Support HOS
Decisions to keep due dates outside of session; or during the revision week prior to the formal exam period

27
See example History Log over page…
EXAMPLE History Log entry for an Outline cloned from a QA Approved Outline for the same session
Version History Once an Outline has been published, any updates made to an Outline are classed as a ‘variation’. Therefore, the Outline
is versioned for the University’s and students’ records management. All superseded versions are available in PDF from
the Tools & Settings area of the left hand menu.
Access to Supporting Systems For ease of access to systems which may be required during the development of an Outline, the ‘Open Supporting
Systems’ menu item in the Tools & Settings area opens several CSU systems in a new tab.
Complete Moderation COMING SOON From 201945, pre-delivery moderation must be carried out within Outlines.
Commenting All Authors, QAOs, the Head of School and Support HOS users are able to comment on a section of an Outline. To the left
of a section header, a ‘comment bubble’ button can be clicked to display the section’s comment box. Only one (1)
section comment box can be shown at one time. The left hand menu will hide when a comment box is shown; and show
when the comment box is closed by clicking the cross (X) symbol in the box’s top right hand corner.
Comments will be stamped with the commenter’s name and role; and the date and time of adding the comment. You
can reply to a comment; or add a new comment to the section. All comments can be edited or deleted.
TIP Click the ‘Save’ button to add comment buttons on a newly added Assessment Item.
TIP Comments are available from the Edit Outline screen for Authors; and the QA Outline screen for QAOs. The
Preview Outline screen does not provide access to comments.
Section Help Inline help has been added to most sections of an Outline. Click on the question mark icon against a section. If inline
help is provided, a blue panel with provide brief help; and a ‘More help’ link to the temporary SOT Help page. Once the
final SOT Help website has been built, ‘More help’ will open the comprehensive help page that is dedicated to that
section.
If inline help has not yet been provided, the question mark ‘Help’ icon will open the temporary SOT Help page. The
webpage holds this Help document, a Quick Start Guide, supporting artefacts and numerous video guides.
You will note that some sections have additional help text (adjacent the Help button). In future, this will link directly to
specific help content. In the interim, they also link to the DLT SOT webpage.

28
Author & QA Officer Editing Using the Editor The SOT uses the Froala rich text WYSIWYG editor. It provides all the basic functions of Microsoft Word while
maintaining the styles required for seamless Outline delivery in Interact2 subject sites. It features:
Floating menu bar
Predefined content styles including APA reference format (see screenshot below)
Bold / italics / underline
Subscript / superscript
Alignment – left, right, centre, justify
Ordered / Unordered lists
Increase / decrease indent
Full screen mode
Easy copy/paste from MS Word and MS Excel without losing formatting
Quick Insert for images, videos, tables, lists and horizontal lines
Insert link
Insert image – drag and drop the image; or click to browse
Insert video
Insert table – see Working with Tables for a summary of functionality; plus tips and tricks
Special characters
MathType and ChemType functions
‘Select all’ button
Cell Formatting – clears formatting
Help – keyboard shortcut cheat sheet
Code view
Undo / redo
Insert PDF landscape page:
o select the content you want to display on a landscape oriented page in the PDF version
o click the ‘Insert PDF Landscape Page’ button (horizontal line with arrow heads)
o a red box will appear around the content to indicate which content has been selected for landscape
orientation
o click Preview PDF to check your content displays as intended
TIP If instead you need the whole section displayed on a landscape page, choose the section-level
landscape button option from the ‘PDF section options’.
Insert PDF Landscape Page
Style options includingAPA reference

29
Working with Tables Tables are commonly used in the ‘Schedule’ section as well as marking rubrics in the ‘Marking criteria and standards’
section of each Assessment Item. It is important to ensure your tables display as expected within both the online and
PDF versions of the Outline. Below is a summary of SOT tables functionality; plus handy tips and tricks.
Insert a new table Use the ‘Insert Table’ button on the editor menu or via the ‘Quick Insert’ menu that appears as a circle with a blue plus
icon to the left of your cursor whenever a new line is started. Select the number of rows and columns you’d like and click
to add. The maximum insert-able size is 15 x 15; however, more rows and/or columns can be added via the table menu
pop up once you have created your initial table.
Menu and Quick Insert options for inserting a new table
Paste a table from another source Use keyboard shortcut Ctrl + V to paste your table into the SOT editor.
TIP See Complex & Problematic Tables.
TIP The editor’s Code View option is available if you are comfortable using it to remove problematic code.
TIP If you require assistance with your pasted table, including using Code View, raise an SRS request.
Table Pop Up Menu Click on the table to display the pop up menu. The following options are available:
1. Add header row
Click to add a header row atop the table. Header rows have grey shading and bold, centred text.
Click again to remove the header row.
Where a table spans >1 page of the PDF, header rows will repeat on each page.
2. Remove table
Click to delete the whole table.
If deleted in error, use the Undo button or keyboard shortcut Ctrl + Z before clicking Save.

30
3. Insert / delete row
Click then select to insert a row above or below the cell you have clicked; or delete the row you have clicked.
4. Insert / delete column
Click then select to insert a column to the left or right of the cell you have clicked; or delete the column you have
clicked.
5. Table Style – Width to 100%
Click to set the table width to 100% in the online and PDF versions.
Hover on the table or column edge to drag it to the desired width.
6. Merge or split cells
Highlight the cells you wish to merge; or click the cell you would like to split, then select the relevant option
from the menu.
7. Cell background colour
Click in the cell then select the grey shade you wish to apply; or click the eraser icon to remove any existing
shade.
8. Vertical alignment
Click in the cell then select either top, middle or bottom alignment.
9. Horizontal alignment
Click in the cell then select either left, centre, right or justified alignment.
10. Show/hide cell borders
Click in the cell then select the relevant option to show/hide all/top/right/left/bottom cell borders.
IMPORTANT: Cell walls are treated as double-walled. That is, the cell wall you wish to hide –AND– and its
adjacent cell wall must be removed to hide the border. For example, to remove a left cell border:
a. Click in the cell and select ‘hide left border’
b. Click in the cell to the left of that cell and select ‘hide right border’
TIP Use a selected cell’s blue highlight to quickly determine which borders are shown/hidden. When you
click in a cell, all ‘shown’ cell borders highlight with a blue border. The blue border disappears from the
top/right/left/bottom when a cell border is hidden.
See over page for a screenshot of the table pop up menu…
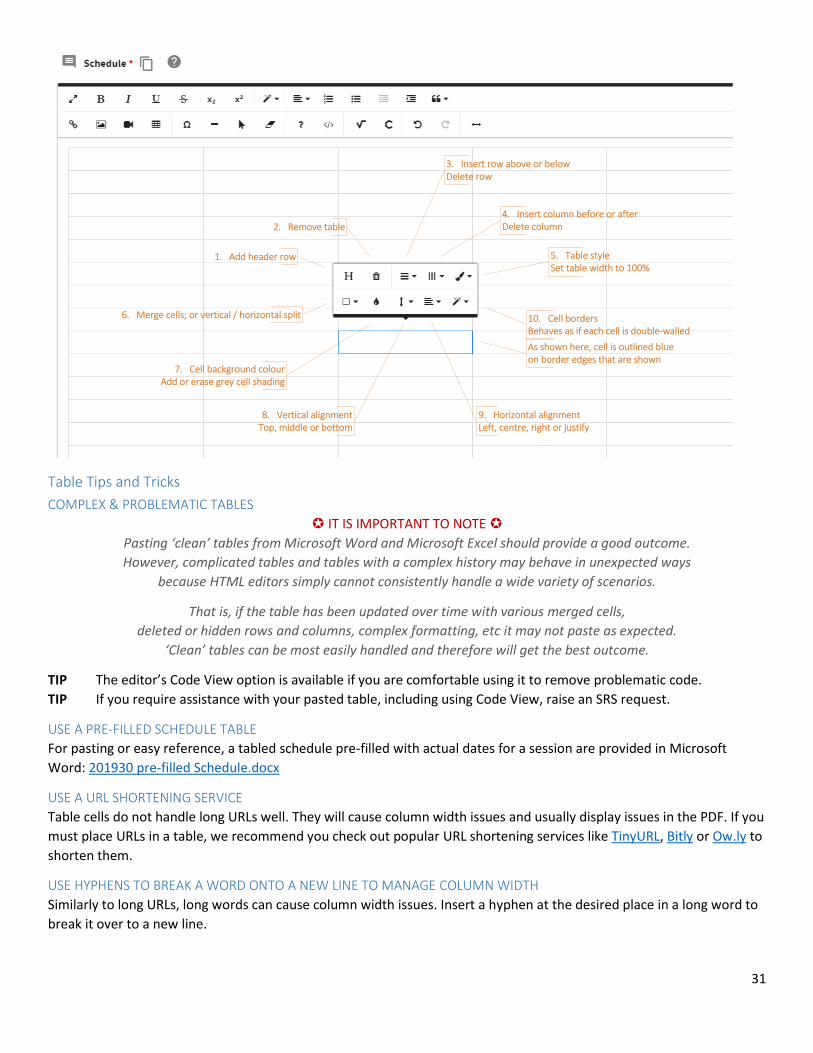
31
1. Add header row
6. Merge cells; or vertical / horizontal split
2. Remove table
7. Cell background colourAdd or erase grey cell shading
8. Vertical alignmentTop, middle or bottom
9. Horizontal alignmentLeft, centre, right or justify
10. Cell bordersBehaves as if each cell is double-walled
5. Table styleSet table width to 100%
4. Insert column before or afterDelete column
3. Insert row above or belowDelete row
As shown here, cell is outlined blue on border edges that are shown
Table Tips and Tricks
COMPLEX & PROBLEMATIC TABLES
IT IS IMPORTANT TO NOTE
Pasting ‘clean’ tables from Microsoft Word and Microsoft Excel should provide a good outcome.
However, complicated tables and tables with a complex history may behave in unexpected ways
because HTML editors simply cannot consistently handle a wide variety of scenarios.
That is, if the table has been updated over time with various merged cells,
deleted or hidden rows and columns, complex formatting, etc it may not paste as expected.
‘Clean’ tables can be most easily handled and therefore will get the best outcome.
TIP The editor’s Code View option is available if you are comfortable using it to remove problematic code.
TIP If you require assistance with your pasted table, including using Code View, raise an SRS request.
USE A PRE-FILLED SCHEDULE TABLE
For pasting or easy reference, a tabled schedule pre-filled with actual dates for a session are provided in Microsoft
Word: 201930 pre-filled Schedule.docx
USE A URL SHORTENING SERVICE
Table cells do not handle long URLs well. They will cause column width issues and usually display issues in the PDF. If you
must place URLs in a table, we recommend you check out popular URL shortening services like TinyURL, Bitly or Ow.ly to
shorten them.
USE HYPHENS TO BREAK A WORD ONTO A NEW LINE TO MANAGE COLUMN WIDTH
Similarly to long URLs, long words can cause column width issues. Insert a hyphen at the desired place in a long word to
break it over to a new line.

32
Saving your Outline You are encouraged to regularly click the ‘Save’ button on your Outline’s floating toolbar. Various actions such as ‘PDF
Preview’, ‘Run Compliance Check’ and submitting to the next step in the workflow will also save any unsaved changes.
Unsaved Changes Prompt
If you leave the screen while you have unsaved changes, a pop up will prompt you to choose whether to return
the screen to click ‘Save’ or to leave the screen causing unsaved changes to be lost. The prompt will vary
depending on whether you leave the page by clicking ‘Home’, your browser ‘Back’ button or closing your
tab/browser.
SOT Time Outs If a time out occurs, a pop up notification will display. You must follow these steps so you do not lose any
unsaved work. The steps should cause your original tab to no longer be timed-out and therefore successfully
save your work.
1. On the Time Out pop up, click the link to open the Subject Outline Tool in a new tab
2. Leave your original timed-out tab open
3. In the new tab, log in to the Subject Outline Tool
4. Close the Time Out pop up in your original tab and click ‘Save’
5. Close the new tab you used to log in

33
Using SOT functionality to author Assessment Items Information on using SOT functionality to author Assessment Items is provided here. Please refer to the dedicated help
for each Assessment Item section for comprehensive information on how to author a high quality Assessment Item.
Assessment Item Types You are able to add two (2) different assessment items to an Outline. They are:
Assessment item
Exam item
The different fields and sections of each item are tabled below. Mandatory fields are marked with a red asterisk*.
ASSESSMENT ITEM EXAM ITEM
Assessment Item number (automatically generated whole number)
Title*
Marking scheme*
Value % –OR— Satisfactory/Unsatisfactory
Due date –OR— Variable date* Due date –OR— To be advised* –AND— ‘Centrally administered exam’ checkbox
Length* Duration*
Submission Methods *
N/A – submission not required/applicable Select submission method
- EASTS - Post - Hand delivered - Alternative submission method
I2 Activity - Interact2 Test - Interact2 Self and Peer Assessment - Interact2 Discussion Board - Interact2 Blog - Interact2 Journal - Interact2 Wiki
Submission Methods *
N/A – submission not required/applicable Select submission method
- EASTS - Post - Hand delivered - Alternative submission method
Task* Requirements*
Rationale
Part 1 Select the appropriate stem text + map Learning Outcome/s –OR— select ‘hurdle’ autotext*
Part 2 Editable field for further explain the rationale Part 3 Select the appropriate Graduate Learning Outcome/s – optional; not required for all assessment tasks
Marking criteria and standards* Marking criteria and standards
Requirements Material provided by the university*
Presentation Material provided by the student*
- Sample exam paper

34
Compliance Checking for Submission Methods and Process Details Submission method/s must be selected for each Assessment and Exam Item. Of course, physical submission of an item
does not always apply. Thus an ‘N/A – submission not required/applicable’ is available on both Assessment and Exam
Items. Interact2 activity types can also be selected on Assessment Items – but not Exam Items.
Given a submission method of online (EASTS), post, hand delivery or alternative submission method are selected in any
Assessment or Exam Item, the correlating submission method process under the Assessment Information grouping
becomes mandatory. That is, if the method is relevant to the student, a description of the submission process must be
provided. The Compliance Check will detect the submission method/s applicable to all Assessment Items and will fail the
Compliance Check if the correlating process section is null. Any submission method processes that are not selected
within Assessment or Exam Items remain optional and will pass the Compliance Check if left null.
Assessment Item 2Submission methods
Assessment Item 1Submission methods
Assessment Item 3Submission methods
Method selected in Assessment Items 1 & 2* MANDATORY *
Method selected in Assessment Item 2* MANDATORY *
Method selected in Assessment Item 1* MANDATORY *
Method not selected in any Assessment ItemOPTIONAL
EXAMPLE Submission Method selections cause related submission method process sections to become mandatory
35
Compliance Checking for ‘Assessment return’ For Outlines for 201875 and beyond, if all Assessments Items for an Outline have either:
a) a submission method of ‘N/A not required/applicable’; or
b) a submission method of an i2 Activity; or
c) marked as 'Not returned' (in the Return date field)
then the 'Assessment return' section under the Assessment Information grouping is optional. Therefore it can be left
null; and if left null it will pass the Compliance Check and will be omitted from the version delivered to students.
If one (1) or more items is returned to students, the ‘Assessment return’ section is mandatory and cannot be left null. If
left null, it will fail the Compliance Check.
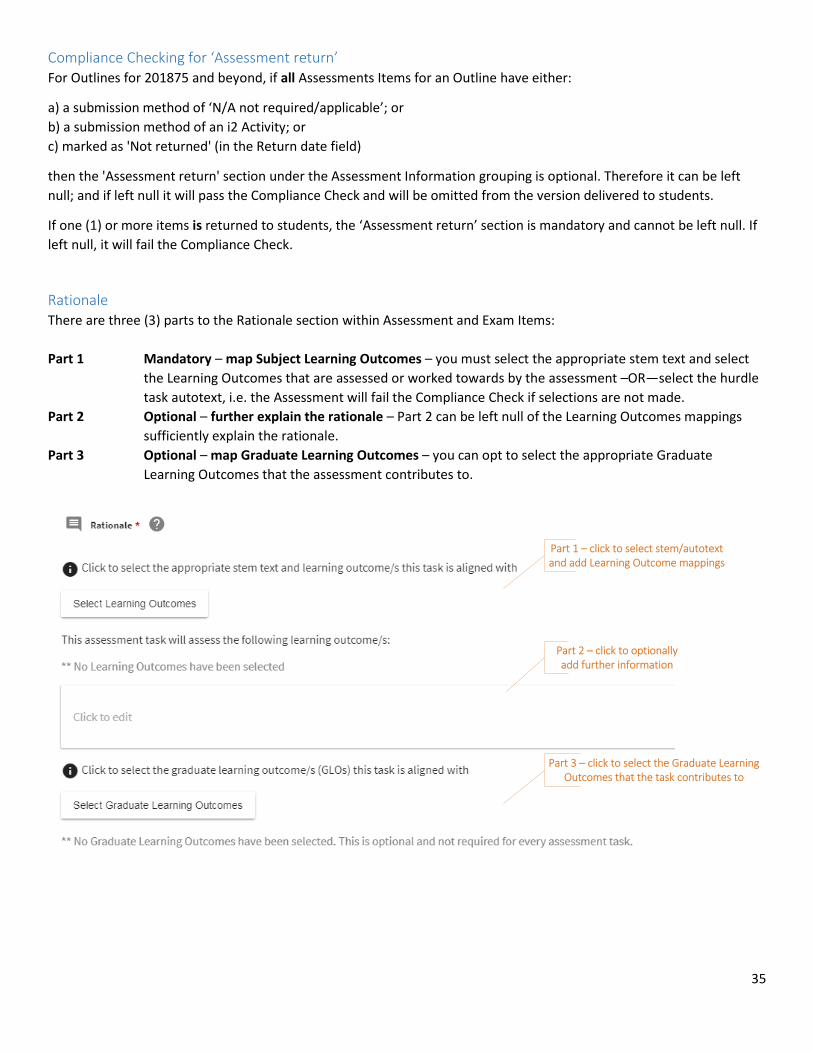
Rationale There are three (3) parts to the Rationale section within Assessment and Exam Items:
Part 1 Mandatory – map Subject Learning Outcomes – you must select the appropriate stem text and select
the Learning Outcomes that are assessed or worked towards by the assessment –OR—select the hurdle
task autotext, i.e. the Assessment will fail the Compliance Check if selections are not made.
Part 2 Optional – further explain the rationale – Part 2 can be left null of the Learning Outcomes mappings
sufficiently explain the rationale.
Part 3 Optional – map Graduate Learning Outcomes – you can opt to select the appropriate Graduate
Learning Outcomes that the assessment contributes to.
Part 1 – click to select stem/autotext and add Learning Outcome mappings
Part 2 – click to optionally add further information
Part 3 – click to select the Graduate Learning Outcomes that the task contributes to

36
SELECTING STEM TEXT & SUBJECT LEARNING OUTCOMES
Go to the Rationale section of an Assessment Item, and click the ‘Select Learning Outcomes’ button to trigger the
Learning Outcome (LO) selection pop up. Firstly, select the appropriate stem text from three (3) options:
Assesses This assessment task will assess the following learning outcome/s:
Works towards This assessment task will work towards assessing the following learning outcome/s:
Hurdle autotext This assessment task does not directly assess a specific learning outcome but is a requirement
for passing the subject.
Options 1 and 2 require at least one (1) LO to be selected. Select the appropriate LO/s then click OK. The main screen
will display the selected stem text followed by the selected LO as they will be presented to students.
The third stem text option is ‘hurdle task’ autotext. As per the nature of a hurdle task, it does not require any LOs to be
selected for the item and therefore LO checkboxes will not be enabled for selection. Click OK to return to the main
screen where the hurdle text will display as it will be presented to students.
Select a stem text or hurdle autotext from the dropdown
Select Learning Outcomes; or click ‘Select All’ if appropriate
EXAMPLE The ‘Select Learning Outcomes’ pop up for selecting stem text and mapping Learning Outcomes

37
COMPLIANCE CHECK – STEM TEXT & MAPPING LEARNING OUTCOMES
The SOT’s Compliance Check will uphold the following logic:
Each Assessment/Exam Item must be mapped to at least one (1) Learning Outcome (LO) UNLESS the hurdle
stem text is selected for the item
All LOs must be mapped to at least one (1) Assessment/Exam Item, i.e. all LOs must be assessed
EXAMPLE Below depicts compliant Assessment Items because Assessment Item 1 is a hurdle task; and all other
Assessment Items are mapped to at least one (1) Learning Outcome. However, the Outline is non-
compliant since Learning Outcome 5 has not been mapped to any Assessment Item.
Assessment Item 2‘Works towards’ Stem Text
This assessment task will work towards assessing the following
learning outcome/s:
Learning Outcome 1
Learning Outcome 2
Learning Outcome 3
Learning Outcome 4
Learning Outcome 5
Learning Outcome 6
Assessment Item 1‘Hurdle’ Autotext
This assessment task does not directly assess a specific learning outcome but is a requirement for
passing the subject.
Assessment Item 4‘Assesses’ Stem Text
This assessment task will assess the following learning outcome/s:
Assessment Item 3‘Assesses’ Stem Text
This assessment task will assess the following learning outcome/s:
Learning Outcome 1
Learning Outcome 2
Learning Outcome 3
Learning Outcome 4
Learning Outcome 5
Learning Outcome 6
Learning Outcome 1
Learning Outcome 2
Learning Outcome 3
Learning Outcome 4
Learning Outcome 5
Learning Outcome 6
Learning Outcome 1
Learning Outcome 2
Learning Outcome 3
Learning Outcome 4
Learning Outcome 5
Learning Outcome 6
SELECTING GRADUATE LEARNING OUTCOMES
Part 3 enables selection of the Graduate Learning Outcomes (GLOs) that the assessment contributes to. This is optional
and not required for all assessment tasks. For more information, visit Teaching at CSU - GLOs, the GLO Interact2
site (self-enrol) or the Graduate Attributes Policy.
Go to the Rationale section of an Assessment Item, and click the Select Graduate Learning Outcomes button to trigger
the Graduate Learning Outcome (LO) selection pop up. CSU has nine (9) GLO areas; each with three (3) expanded GLO
categories of:
Skill
Knowledge
Application
Multiple expanded GLOs can be selected; however, it is not expected that a subject would contribute to more than three
to five (3-5) GLOs. Please make selections in consultation with your Course Director and the Graduate Attributes Policy.
Part 2 of the Rationale can be used to further describe the purpose for the GLOs and how they may develop through
student actions.
See over page for a screenshot of the ‘Select Graduate Learning Outcomes’ pop up…

38
‘Select Graduate Learning Outcomes’ for an Assessment Item
Once your selections are made, click OK to close the GLO pop up. Selected GLOs will be listed under the following stem
text which includes a hyperlink to the Student Portal GLO page:
This task also contributes to the assessment of the following CSU Graduate Learning Outcome/s:
Badges for selected GLO areas will also display on a ribbon area underneath the ‘site map’ that is delivered to students
in their i2 site. The selected expanded categories are represented by the ‘slices’ highlighted on each badge. That is:
Knowledge – mortar board icon
Skill – tools icon
Application – cogs icon

39
Use the ‘Student View’ option under the Preview Outline menu to see the badge display.
Reusing Assessment Items The ‘Reuse assessment items’ button adjacent the ‘Add assessment’ and ‘Add exam’ buttons provides the ability to
search, preview and add one/multiple/all Assessment Item from another Outline.
1. Click the ‘Reuse assessment items’ button to trigger the ‘Reuse Assessment Items’ pop up
2. Start typing the Outline name in the Search field to trigger the search results dropdown, e.g. ACC110 201860 B D
3. When you see your desired Outline, click on it to display its Assessment Item/s
4. If you wish, click ‘Preview Outline’ to open the Outline in a new tab. Close the preview tab or click back to your
main tab to return to the Reuse Assessment Items pop up
5. To search for a different Outline, click the cross (X) button on the right hand side of the Search field to clear your
search and start typing another Outline name
6. Once you have found your desired Outline, select the checkbox of each item you wish to add to your Outline
7. Use the buttons to confirm or cancel the reuse of the selected item/s
8. If confirmed, the selected item/s will be added to your Outline using the next available Item Number.
TIP Re-order Assessment Items by dragging and dropping the item rows on the Items table.
TIP Learning Outcomes failed Compliance Check? If the Learning Outcomes have had editorial or substantial
changes since the session of the Outline you cloned from –OR– if you Data Refreshed to update the Outline with
CASIMS Learning Outcomes edits, then Learning Outcomes mappings must be re-done. When you click the
‘Select Learning Outcomes’ button you will see the selections are null and must be re-selected.
Reusing Section Content You are able to search for an Outline, preview the Outline and select to add its section content to your Outline.
1. Click on the double-page icon (highlighted yellow in screenshot below) on editable sections to initiate the
Section Reuse pop up.
2. Start typing the Outline name in the Search field to trigger the search results dropdown, e.g. ACC110 201860 B D
3. When you see your desired Outline, click on it to display its sections available for content reuse (if a matching
section is found, it will be selected by default)
4. If you wish, click ‘Preview Outline’ to open the Outline in a new tab. Close the preview tab or click back to your
main tab to return to the Section Reuse pop up
5. To search for a different Outline, click the cross (X) button on the right hand side of the Search field to clear your
search and start typing another Outline name
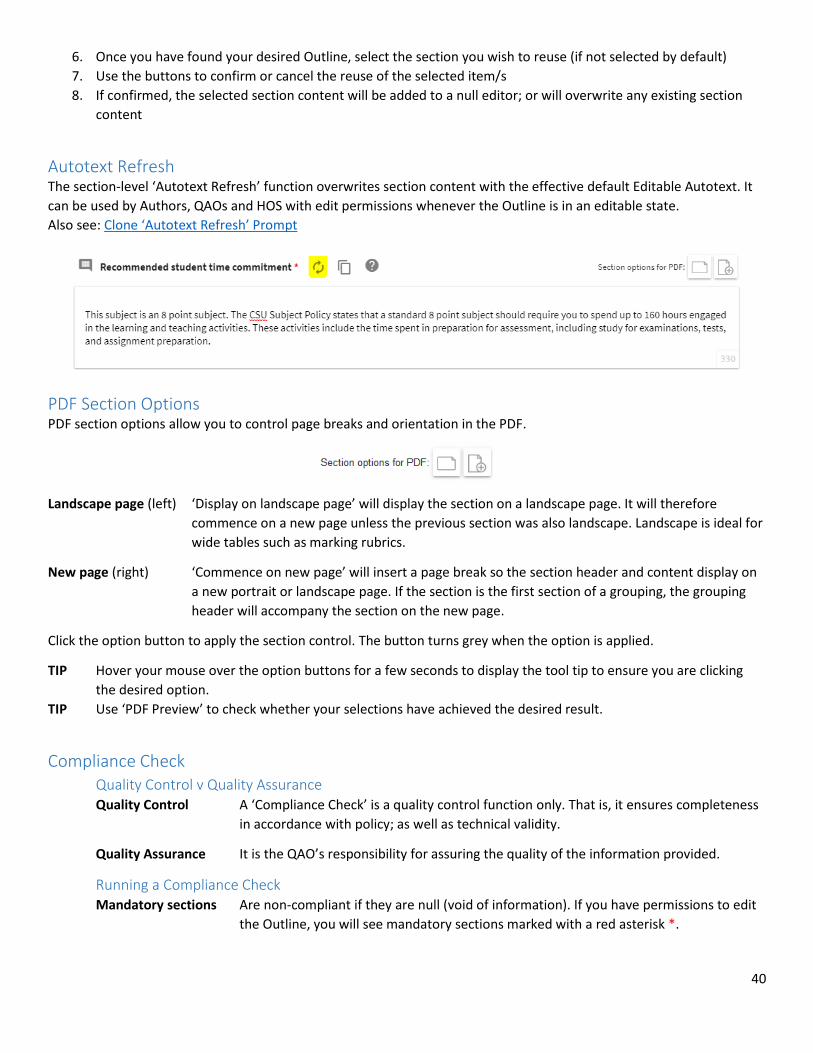
40
6. Once you have found your desired Outline, select the section you wish to reuse (if not selected by default)
7. Use the buttons to confirm or cancel the reuse of the selected item/s
8. If confirmed, the selected section content will be added to a null editor; or will overwrite any existing section
content
Autotext Refresh The section-level ‘Autotext Refresh’ function overwrites section content with the effective default Editable Autotext. It
can be used by Authors, QAOs and HOS with edit permissions whenever the Outline is in an editable state.
Also see: Clone ‘Autotext Refresh’ Prompt
PDF Section Options PDF section options allow you to control page breaks and orientation in the PDF.
Landscape page (left) ‘Display on landscape page’ will display the section on a landscape page. It will therefore
commence on a new page unless the previous section was also landscape. Landscape is ideal for
wide tables such as marking rubrics.
New page (right) ‘Commence on new page’ will insert a page break so the section header and content display on
a new portrait or landscape page. If the section is the first section of a grouping, the grouping
header will accompany the section on the new page.
Click the option button to apply the section control. The button turns grey when the option is applied.
TIP Hover your mouse over the option buttons for a few seconds to display the tool tip to ensure you are clicking
the desired option.
TIP Use ‘PDF Preview’ to check whether your selections have achieved the desired result.
Compliance Check Quality Control v Quality Assurance Quality Control A ‘Compliance Check’ is a quality control function only. That is, it ensures completeness
in accordance with policy; as well as technical validity.
Quality Assurance It is the QAO’s responsibility for assuring the quality of the information provided.
Running a Compliance Check Mandatory sections Are non-compliant if they are null (void of information). If you have permissions to edit
the Outline, you will see mandatory sections marked with a red asterisk *.
41
Optional sections The Subject Outline Policy requires information to be provided within optional sections
if relevant to the learning and teaching of the subject. If left null, this section will not
display in the final version of the Outline.
TIP Use the Section Filter to show only sections which are editable.
‘Run Compliance Check’ is available to users with edit permissions from the Tools & Settings area of the left
hand menu. It can be run at any time during development of the Outline; and will run automatically when the
Outline is submitted for QA or for publication. The result displays in a pop up. Any non-compliance issues must
be resolved before the Outline can be submitted to the next step in the workflow.
Data Refresh A ‘Data Refresh’ is a process which ensures that an Outline is populated with effective subject data, SC Profile
information and Fixed Autotext. If data or Fixed Autotext is amended after the Outline has been created, the system will
refresh the Outline with the updated information.
‘Run Data Refresh’ is available to users who have edit permissions on an Outline from the ‘Tools & Settings’ area of the
left hand menu. It can be run at any time during development of the Outline. A Data Refresh will occur automatically
when an Outline is submitted for QA, revisions or for publication. Results of the Data Refresh process display in a pop up
for your information only.
Managing Roles & Permissions For SCs and NSCs, a ‘Manager Roles & Permissions’ menu item is available from the ‘Edit Outline’ screen. It allows them
to add any current staff member into a ‘Support Author’ role to collaborate on the Outline; and specify the QAO/s and
HOS permissions.
Support Author Permissions Support Authors can edit and delete/re-create the Outline; as well as comment and submit the Outline to
the next step in the workflow
Support Authors cannot add other Support Authors; or change QAO or HOS permissions
HOS & QAO Group Permissions Your HOS can add staff into a ‘Support HOS’ role which is assigned the same permissions as your HOS
The selected permission applies to all staff in the QAO or HOS role
‘Edit’ allows staff in the HOS/QAO group to edit and delete/re-create the Outline; as well as comment and
apply a QA outcome while it has an ‘Awaiting QA’ status
‘Comment only’ allows commenting and application of a QA outcome; but excludes all edit/delete/re-create
permissions
Concurrent editing – resolving conflicting content If there are multiple Authors on an Outline, they all hold edit permissions. If more than one (1) Author is editing the
same section at the same time, the SOT will save the content of the Author who clicks ‘Save’ first. Once the other Author
clicks Save, the SOT saves all non-conflicting sections then asks the Author which content they wish to keep.
The pop up displays each Author’s content side by side. You must review the content and select which to keep. Once a
selection is made, the ‘OK’ button becomes enabled to save your selection. If there are multiple conflicting sections, you
must make a selection for all sections before the ‘OK’ button becomes enabled for saving your selections.

42
If you cancel and return to the Outline, your content will not be lost. If you wish, you are able to review and update your
content further before clicking Save again. The pop up will continue to display until all conflicts have been resolved.
Submitting for QA Once an Outline is deemed ready for QA, an Author must ‘Submit for QA’ on the floating toolbar. Various technical
checks are performed and pop ups will inform you if there are any issues that must be resolved before submission can
occur, e.g. content is invalid and/or non-compliant.
If the Outline is able to be submitted for QA, you are able to confirm this action. Or cancel this action to resume editing.
Clone QA exemption A cloned Outline may be exempt from QA if it was cloned from an Outline which:
is for the same session; and
has been QA Approved (at least once); and
has not been edited since it was cloned
The SOT will determine whether this criteria has been met once an Author clicks ‘Submit for QA’.
Submitting for Revision Once quality assurance has been performed and it has been determined that revisions are required, the QAO is able to
click ‘Finished QA’ on the floating toolbar to display the QA outcome options; then select ‘Submit for revision’.
Pre-approved QA Alternatively, QAOs are able to pre-approve the QA on the revisions that will be made by the Author/s by
selecting ‘Revision required – pre-approved QA’ from the ‘Finished QA’ options. This will allow an Author to
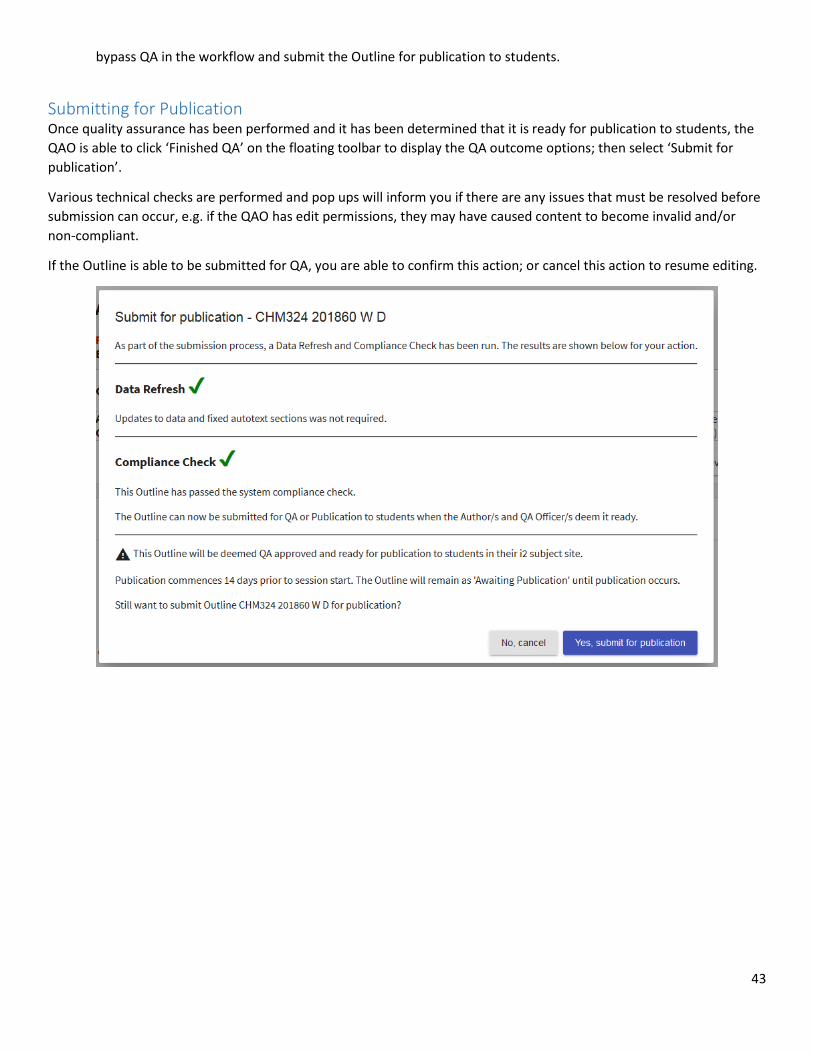
43
bypass QA in the workflow and submit the Outline for publication to students.
Submitting for Publication Once quality assurance has been performed and it has been determined that it is ready for publication to students, the
QAO is able to click ‘Finished QA’ on the floating toolbar to display the QA outcome options; then select ‘Submit for
publication’.
Various technical checks are performed and pop ups will inform you if there are any issues that must be resolved before
submission can occur, e.g. if the QAO has edit permissions, they may have caused content to become invalid and/or
non-compliant.
If the Outline is able to be submitted for QA, you are able to confirm this action; or cancel this action to resume editing.

44
Student ‘Site Map’ View Outlines published from the SOT will continue to be delivered to students in the Interact2 subject site’s ‘Subject Outline’ tool. It has a fresh, new look and
modern ‘site map’ that sits at the top of the Subject Outline. It displays a subset of Outline sections and provides navigation to those sections. ‘Back to top’ links
throughout the body of the Outline enables students to jump back to the top for further exploration via the site map.
45
Varying an Outline The 'Vary' functionality supports the Subject Outline Policy and process required to vary an Outline. A ‘variation’ is
defined as an Outline that is edited after QA approval. That is, a QA Officer has submitted it for publication and
therefore has a status of ‘Published’.
There are many sections which are exempt from QA if they are varied following QA approval.
Learn more: QA Exemption on Varied Outlines
Head of School Consultation & Approval The Subject Outline Policy states that Outline variations must not disadvantage students and thus requires
Heads of School (HOS) to approve them. If a section that is not exempt from QA requires variation, it is
suggested that you consult your HOS prior to initiating the variations process in the SOT to ensure they intend to
approve the proposed changes. It is also wise to discuss turnaround times with your HOS to ensure student
access to the varied Outline is expedient.
Initiating a Variation Once the HOS has indicated a variation may progress, a variation should be initiated within the SOT. From the
Authoring dashboard, the action of ‘Vary’ can be clicked by an Author. After the Vary action is confirmed:
the Outline obtains a status of ‘Variation’
the Outline opens in the Edit Outline screen (all usual Edit Outline screen functionality applies)
the new version number of the Outline is displayed in the Edit screen and the footer of the PDF
the superseded version is available from the ‘Version History’ in the Tools & Settings menu
Once ‘Submit for QA' is confirmed, the HOS and any Support HOS are able to QA the Outline from their Quality
Assuring dashboard.
The HOS and any Support HOS will receive an email notifying them that the varied Outline is available for QA.
QA Exemption on Varied Outlines The following sections are exempt from QA if varied after the Outline has been published to students:
Any sections that are updated via a ‘Data Refresh’ process, e.g.:
- Subject data
- Subject Coordinator name and contact details; including SC Profile information
- All Fixed Autotext sections
Consultation procedures
46
Subject Summary Subject Code & Name Banner data Subject Code drawn from Banner
CASIMS data Subject Name drawn from CASIMS
Session Banner data Drawn from the Subject Availability Listing (SAL+)
Teaching Faculty Banner data Drawn from the Subject Availability Listing (SAL+)
Not used by StudyLink (SSS coded subjects)
Teaching School Banner data Drawn from the Subject Availability Listing (SAL+)
Study Mode Banner data Drawn from the Subject Availability Listing (SAL+)
Credit Points
Banner data Drawn from the Subject Availability Listing (SAL+)
Not used by StudyLink (SSS coded subjects)
Welcome & Acknowledgement of Country Fixed Autotext Welcome to a new session of study at Charles Sturt University. Please refer to the
University’s Acknowledgement of Country.
Subject Coordinator Title
SC Profile Drawn from the ‘Title’ selected in the SC Profile function available from the Subject Outline Tool
Dashboard area. If a title is not selected, the SC’s name will display without a prefixed title.
Applies to Outlines from 201890. Learn more: SC Profile
Full name ACSES data The Academic Course and Subject Entry System (ACSES) is referenced to determine an offering’s
Subject Coordinator.
SC Profile –AND/OR– Alesco data
First Name If the Subject Coordinator’s SC Profile ‘First Name’ is populated, it will be used in
Outlines. If a First Name is not provided, the Subject Coordinator’s ‘Preferred
Name’ is drawn from the Division of Human Resources system, Alesco. SC Profile
‘First Name’ applies to Outlines from 201890.
Last Name The Subject Coordinator’s last name is always drawn from the Division of
Human Resources system, Alesco.
If ACSES does not provide a Subject Coordinator, ‘To be advised’ will display. The Outline will pass the
Compliance Check with a ‘To be advised’ Subject Coordinator and it is able to be published to students. All

47
contact detail fields will not display in the student view. When the Subject Coordinator is populated in ACSES,
their name and contact details can be refreshed into the Outline using the ‘Run Data Refresh’ function available
from the Tools & Settings menu. A Data Refresh will also occur automatically when submitting the Outline to
another step in the workflow.
‘To be advised’ option In situations where the person in the Subject Coordinator role is preparing the Outline for an incoming Subject
Coordinator, a ‘To Be Advised’ checkbox is available on the Subject Coordinator grouping. The Outline will pass
the Compliance Check with a ‘To be advised’ Subject Coordinator and it is able to be published to students.
Once the incoming Subject Coordinator is placed into ACSES, a Published Outline must be varied so a Data
Refresh can be performed to pull in the new Subject Coordinator’s name and contact details.
TIP Click ‘Run Data Refresh’ in the Tools & Setting menu to refresh the Outline after either ticking or un-
ticking the ‘To be advised’ option.
TIP If only QA Exempt sections are edited and/or refreshed during an Outline Variation, the Outline can be
submitted for Publication by an Author without requiring the Head of School to QA the variations.
Learn more: QA Exemption on Varied Outlines
Email SC Profile Drawn from the email provided in the SC Profile function available from the Subject Outline Tool
Dashboard area. Applies to Outlines from 201860. Learn more: SC Profile
—OR—
Alesco data If an email address is not provided in the SC Profile, it is drawn from enterprise data that is
maintained in the Division of Human Resources system, Alesco.
TIP If an SC has added/updated their email in the SOT SC Profile or HR’s Alesco, a Data Refresh must be run
to update an Outline. ‘Run Data Refresh’ is available to users who have edit permissions on an Outline
from the Tools & Settings area of the left hand menu. A pop up will confirm which field/s were
refreshed. Click OK on the results pop up, then check the details are displaying under the Subject
Coordinator grouping as expected.
Phone Communications Directory data Phone is drawn from the Communications Directory.
Not used by StudyLink (SSS coded subjects).
To request updates to your phone number, contact the IT Service Desk.
Mobile SC Profile Drawn from the ‘Mobile’ provided in the SC Profile function available from the Subject Outline
Tool Dashboard area. If a mobile number is not provided, the mobile field will not display in the
SC’s Outlines. Applies to Outlines from 201890. Learn more: SC Profile
Campus Communications Directory data Phone is drawn from the Communications Directory.
Not used by StudyLink (SSS coded subjects).
To request updates to your campus, contact the IT Service Desk.

48
Building/room number Communications Directory data Building/room number is drawn from the Communications Directory.
Not used by StudyLink (SSS coded subjects)
Use the Communications Directory Self Service page to update your Location Information. Updated Building and
Room details can be pulled in the Outline using the ‘Run Data Refresh’ function available from the Tools &
Settings menu. A Data Refresh will also occur automatically when submitting the Outline to another step in the
workflow.
Consultation procedures Mandatory Non-compliant if left null.
Cloned Outlines Information provided in the Outline that was cloned from can be edited as appropriate
in the clone.
New Outlines Editable Autotext which can be edited or overwritten as appropriate:
Your subject coordinator will be available for consultation. You will be informed of the
consultation procedures via your Interact2 subject site; as well as the names, contact
details and consultation procedures for any other staff teaching the subject.
Please include the Subject Coordinator's preferred mode of consultation. Address the student directly in your
writing and ensure the overall tone is professional, but friendly and approachable. Do not make statements
about being difficult to contact.
An example of typical wording might be:
Email is the best way to contact me. Please send a brief message regarding the issue and include the
subject name and code in your email. It really helps to know which class you belong to before I respond
to your query. If you prefer to phone me that is fine, but please leave a message if I am not there at the
time - I will give you a call back as soon as I can.
Subject Overview Abstract CASIMS data The subject code’s Abstract is drawn from CASIMS. It cannot be edited – it must be updated in
CASIMS if required.
Learning outcomes PART A Fixed Stem Text On successful completion of this subject, you should:
PART B CASIMS data Learning objectives are drawn from CASIMS, suffixed to the Fixed Stem Text and
displayed as per CASIMS formatting. Cannot be edited – if required, editorial
changes can be made in CASIMS by your Faculty Subjects Team. If display issues
persist, please log a DLT SRS request.
Subject content Optional Can be authored if appropriate. If left null, it will pass the Compliance Check and drop out of the
web and PDF versions for students.
If your Schedule provides students with all information on content/topics/modules, there is no need to duplicate
it here. Provide pertinent information not included in the Schedule.

49
TIP See suggested text for the ‘Subject content’ section for Workplace Learning subjects
Key subjects Fixed Autotext Passing a key subject is one of the indicators of satisfactory academic progress through
your course. You must pass the key subjects in your course at no more than two
attempts. The first time you fail a key subject you will be at risk of exclusion; if you fail a
second time you will be excluded from the course.
The Academic Progress Policy sets out the requirements and procedures for satisfactory
academic progress, for the exclusion of students who fail to progress satisfactorily and
for the termination of enrolment for students who fail to complete in the maximum
allowed time.
Not used by StudyLink (SSS coded subjects).
Prerequisite subject/s CASIMS data The subject code’s Pre-requisites is drawn from CASIMS. It cannot be edited – it must be
updated in CASIMS if required. If CASIMS states ‘Nil’ or is null, this section will not be included in
the Outline. Applies to Outlines from 201890 onwards.
Assumed knowledge CASIMS data The subject code’s Assumed Knowledge is drawn from CASIMS. It cannot be edited – it must be
updated in CASIMS if required. If CASIMS states ‘Nil’ or is null, this section will not be included in
the Outline.
Subject Schedule & Delivery Prescribed text StudyLink SSS coded subjects do not use this section.
PART A Fixed Autotext The textbooks required for each of your enrolled subjects can also be found via the
Student Portal Textbooks page.
PART B Mandatory You must provide textbooks details; or state there is no prescribed text for the subject.
The APA Referencing style can be applied by highlighting your textbook details then selecting
the ‘APA reference’ option from the ‘Style’ button on the editor menu.
Class/tutorial times and location Fixed Autotext based on the study mode of the offering.
Distance Education / Online Your class times can be found at Timetable @ CSU, noting that a timetable may not
apply to this online offering. Find out how to use Timetable @ CSU via the Student
Portal Class Timetable page.
Internal / On Campus Your class times can be found at Timetable @ CSU. Find out how to use Timetable @
CSU via the Student Portal Class Timetable page.
Fixed Autotext Excepted Users School of Policing – mandatory – must author details
Division of Learning & Teaching – do not use this section

50
StudyLink SSS coded subjects – do not use this section
Schedule Cloned Outlines Content from the Outline that was cloned from will display and can be edited if necessary. Be
sure to update all dates if you did not clone from an Outline for the same session.
New Outlines Outlines created from new will provide a blank editor.
Using a template to updating the schedule
Schedule templates contain the correct number of weeks for the session, mid-session breaks, a revision week, the
formal end of session exam period and any Public Holidays. You can complete the table then paste it into the Schedule
section; or simply use it to reference key dates for the session.
201930 Schedule Template
201930-Schedule-Te
mplate.docx
TIP If your schedule provides information about the subject content/topics/modules, you may not need to
provide any further information in the ‘Subject content’ section.
TIP If your schedule would present better on a landscape page in the PDF version, click ‘Display on
landscape page’ on the ‘Section options for PDF’ buttons (left button).
Example Schedule Template The pre-populated Schedule template provides the correct rows, dates, etc
Learning materials Fixed Autotext Details of learning materials that support your success in this subject can be found in the
Interact2 Subject Site.
Learning, teaching and support strategies Mandatory Non-compliant if left null.
51
In this section, define how you have integrated blended learning strategies into your teaching, e.g. interactive
online material, forum, the i2 learning platform, problem based learning, peer-to-peer, group work etc. In this
section, you can outline:
1. The educational technology and online learning spaces used in the subject;
2. How you will use them to facilitate student learning; and
3. Your expectations of how students will engage their learning through their participation in and contribution
to these collaborative spaces.
Please ensure that the terms you use are consistent with those used in other documents and environments, e.g.
Discussions or Discussion Boards rather than Forums; Subject Outlines rather than MSI.
Online cohorts In this section you need to outline what the student needs to do in this subject, what you will be doing during
the session with respect to online activities/interaction, how you expect your students to engage with and
contribute to their learning through the use of collaborative tools (discussion boards, blogs, wiki’s etc), and how
you will establish whether they have engaged and what you will do if they have not.
Examples of text for online cohorts:
All of your subject materials are available on the Interact2 site under the Topics link in the left hand side
menu. I suggest that for each topic you read the learning outcomes carefully, read the overview, have a quick
skim of the text and then watch the interactive tutorial. Once you have got a feel for what the topic is about
try and make a good set of notes under each of the topic review questions in that topic. You can do this by
watching the tutorial and consulting the text again in a more considered way. These questions have been
designed to give you focus in the topic, so it really helps to prepare a useful set of answers to them. Once
you feel ready you can test yourself by taking the online quiz in the topic – there are no marks recorded and
you can do each quiz as many times as you like.
In this subject there are also lots of opportunities for you to engage with me, with your peers and with the
subject. I will be holding 5 online meetings throughout the session where we can discuss content issues and
assessment items, details of times and dates will be posted on the Interact site. In addition I will regularly
post a personal blog relating current financial issues to the subject content.
As part of your assessment in this subject you are required to work in a group to prepare and lead the
discussion for 1 week around the Connection to Industry item in each Topic. You will post your analysis to the
Group Discussion Board and then, along with your other group members, be responsible for facilitating the
discussion around your post. In the other weeks of the session, you are expected to contribute to the
discussion that is led by another group, by responding to their analysis.
It is helpful to have a small task to complete early in the session, so that you have a focus in the subject from
the very first day, and so I have set a short written task in week 3, as part of your assessment. This task will
also provide you with some feedback on how you might be able to improve what you do in your study. If you
don’t attempt the task, I may contact you by phone or email to have a chat about study and if there are any
issues that I can help with.
On campus classes: You will need to outline what the expectations are regarding classes, tutorials and how they use the Interact
site.
Example of text for internal cohorts:
In this subject we will meet for a 2 hour workshop where we will discuss that week’s topic. Before you come
to class you need to have looked at the online tutorial in the Interact site and read the text so that you can

52
contribute to the class and derive more meaning from the activities that we will do in class. We will spend
class time working through the topic questions, discussing them and preparing responses. In addition we will
use video, games and case studies to enhance understanding of certain topic areas.
53
Workplace learning Optional Can be authored if appropriate. If left null, it will pass the Compliance Check and drop out of the
web and PDF versions for students.
This section is not used for offerings taught by the Faculty of Business, Justice and Behavioural Sciences; School
of Computing and Mathematics; School of Accounting and Finance; School of Management and Marketing;
School of Policing Studies; and the Division of Learning and Teaching.
Clinical requirements Optional Can be authored if appropriate. If left null, it will pass the Compliance Check and drop out of the
web and PDF versions for students.
Detail specific requirements for placement in the subject, e.g. number of clinical hours required.
This section is not used for offerings taught by the Faculty of Business, Justice and Behavioural Sciences; School
of Computing and Mathematics; School of Accounting and Finance; School of Management and Marketing;
School of Education; School of Teacher Education; School of Indigenous Australian Studies; School of
Information Studies; School of Policing Studies; and the Division of Learning and Teaching.
Residential school & Residential school program Banner data If the Residential School data in Banner indicates there is a Residential School for the subject (R
or O indicators), Fixed Autotext will display; followed by a mandatory ‘Residential school
program’ editable section.
Mandatory If the Residential School data in Banner indicates there is a Residential School for the subject (R
or O indicators), the ‘Residential school program’ editable section must be authored. The
‘Residential school program’ section header will not display in the student view of the Outline,
i.e. it will directly follow the Fixed Autotext.
Fixed Autotext This subject has a residential school. Further information about residential schools can
be found in the Student Portal.
TIP If a Banner Res School indicator must be changed from a particular session, the Outline/s for that
session must not be created until Banner has been updated. The correct template sections cannot be
re-generated from a Data Refresh if the indicator changes after the Outline has been created. It is
suggested that if an Outline has been created and it contains information that cannot be cloned/reused
from another Outline/source, that you save a copy of the PDF before deleting the Outline. Content from
the PDF can then be pasted into the newly created Outline that reflects the updated Banner Res School
indicator.
Recommended student time commitment Cloned Outlines Information provided in the Outline that was cloned from can be edited if necessary in
the clone.
New Outlines Editable Autotext
This subject is an 8 point subject. The CSU Subject Policy states that a standard 8 point
subject should require you to spend up to 160 hours engaged in the learning and
teaching activities. These activities include the time spent in preparation for assessment,
including study for examinations, tests, and assignment preparation.
You are able to edit or overwrite the default Autotext and add details regarding the weekly suggested work
schedule as a guide for students in terms of expected time commitment. If it is more appropriate for your

54
subject, you may detail a breakdown of hours over the session. The total hours allocated to tasks must be within
the Academic Senate workload policy (140-160 hours in total for an 8 point subject).
Assessment Items Essential requirements to pass this subject
Mandatory This section is editable and should include all information about what a student must do to pass
the subject including any mandatory assessment tasks.
Items – Assessment summary table The ‘Items’ (aka Assessment Summary) is automatically generated by the Assessment Items for the Outline.
Item numbers Numbers are auto-applied when Items are cloned; or as items are added.
Re-ordering Drag and drop the item row on the Items table to re-order and update Item
Numbers.
Navigation The hyperlinked Title of each Assessment Item can be used to navigate to the Item during
Outline development. Alternatively, click the Item tabs that display horizontally below the Items
table to show the Item.
Footnotes Footnotes relating to the Due date and Return date table columns are as follows:
Due date* Due date is the last date for assessment items to be received at the University
Return date** Applies only to assessment items submitted by the due date
Assessment Items Summary information
ITEM NUMBER Auto-generated on clone or using the next whole number on adding the Item
TITLE
Mandatory Must be authored using a plain text field limited to 50 characters including spaces.
Titles must be unique
Titles may also be used by other CSU systems and processes, e.g. EASTS, grading, etc. To prevent
downstream system errors, an Outline will fail the Compliance Check if an Outline does not have unique
Titles for Assessment Items. That is, there cannot be 2 or more items entitled "Essay" or "Exam". A
unique identifier must be added, e.g. Essay on Indigenous Health Issues or Mid-session Exam.
Examples of Titles
Use a descriptive title so that students are clear from the beginning what the end product of their task
will be. If you use the term Assessment 1 but the item number is 2 it can be confusing so it's best to
avoid these nondescript titles.
When giving your assessment a title, think about how it will look in the summary table. Use familiar
terms. For instance, if the task requires short answer responses, call it this; if it requires a blog post or
discussion forum, then name the task to correspond with the format. This helps students to become
familiar with university language and expectations, and they can access support on the different
assessment types by searching for the appropriate term.
Example titles that identify the task type:
Action plan

55
Clinical exam
Essay
Laboratory report
Literature review
Mathematical calculations
Online quiz
Oral presentation
Research proposal
Reflective journal
Survey design
Teaching plan
Example titles that also identify the topic with the task:
Arthropod Collection
Diverse Placement Report and Timesheet
Essay on Indigenous Health Issues
Literature Review: Eucalyptus Ecology
Manual Accounting Assignment
Parent Tutor Program
Plagiarism Quiz
Photo voice
Webpage: communication development in childhood
Clinical skill development portfolio
Reflection portfolio
MARKING SCHEME
Mandatory Value must be selected + a percentage value entered
–OR—
Satisfactory/Unsatisfactory must be selected
Compliance Check 1. Outlines can contain a mix of percentage values and SY/US Marking schemes
2. If an Outline contains any Items with a percentage value; the total value of all Assessment Items for
the Outline must equal 100%
3. An Outline can have all Assessment Items with a Marking scheme of SY/US
Assessment tasks can be marked using either a numerical value or a satisfactory (SY)/unsatisfactory (US)
grading scale. If a numerical value (percentage) is selected, then standards of performance should be
developed along the University’s grading system of HD-PS. SY/US should be used in cases when there is
no numeric value ascribed to the assessment.
You will need to think carefully about the overall subject pass requirements for assessment tasks graded
as SY/US. For example, if a student is marked as unsatisfactory can they pass the subject? If not, then
the assessment task can be very ‘high-stakes’ compared with an assessment task valued at 10% where
students can still pass the subject without passing that particular assessment task. You will need to
include all pass requirements in the relevant section of the subject outline and make clear the
consequences of an US grade.
56
DUE DATE
Mandatory Due date must be selected from the date picker
–OR—
‘Variable date’ checkbox must be selected
It is important to consider whether you need to include an early low-stakes assessment task in your
subject. The Assessment Principles Policy suggests that wherever possible, early low-stakes assessment
tasks will be provided in first year undergraduate subjects within the first four weeks. You should set the
due date for these tasks before Week 4–5 (Census date) so there is plenty of time to provide feedback
to students on their progress and achievement, and to identify those students in need of extra support.
This page on designing first year assessment may help you. This page on early low stakes assessment can
also guide your thinking about early tasks.
Due date outside the subject offering teaching session
For example, an approved session date variation or a year-long / multi session subject
In some circumstances, a due date outside the offering teaching session will need to be selected. In this
case, upon entering the date you will be prompted you to confirm your Due date selection. If indeed you
had intended to select a date outside of the teaching session for the offering, simply confirm you wish to
keep your selection. If not, return to the date picker to change the date. A decision to keep a Due Date
outside of session will be added to the History Log.
Due date within the last week of teaching
I.e. within the week prior to the session’s final examination period
As per Section 3 of the Examination Administration Policy, in subjects with a final examination, Subject
Convenors may not schedule an examination or assessment worth 20% or more during the week prior to
the formal examination period (except with approval of the Executive Dean or their delegate). In
addition, Section 13 (111) of the Assessment Policy - Coursework Subjects states that where an
assessment is directly relevant to an examination, assessments that have been submitted by the due
date shall normally be returned to students at least one week before the examination is held.
Upon entering a date within the last week of teaching, you will be prompted you to either confirm your
Due date selection; indicate there is no final exam; or return to the date picker to change the date. A
decision to keep a Due date within the last week of teaching; or an indication that there is no final exam;
will be added to the History Log.
Variable date
Variable date should be selected for an ongoing assessment item such as Laboratory reports, tutorial
presentations or Forum participation. Variable dates must then be described within the Task section of
the assessment, e.g. during your Week 8 tutorial, once a week, etc.
RETURN DATE
Mandatory An auto-calculated Return Date will display
–OR—
‘Not returned’ checkbox must be selected
Fixed AutoText If a Due Date is selected from the date picker, as per University procedures, the
Return Date will be auto-calculated fifteen (15) business days from the selected
Due Date and displayed to students.
TIP If the Return date is later than you expected, it is because the Return
date calculation excludes all Public Holidays as per records maintained
57
by the Division of Human Resources. As such, there are Public Holidays,
that don’t apply to you, that will not be counted as a business day.
If the assessment will not be returned to students, select ‘Not returned’. This
will display to students rather than a return date.
LENGTH
Optional If left null, this section will not display in the final version of the Outline.
This field is limited to 50 characters including spaces.
Provide the length requirement for the assessment item or state if the length of the assessment is not
applicable, such as for laboratory reports. Length of an assessment task is very important. It provides an
indication of the depth of response required. Ensure that this is the overall word length of the
assessment item and make some comment about whether you see this as a maximum, minimum or
target for this assessment. Indicate whether this length includes the reference list as well. Also include
word length for separate parts if appropriate.
Examples of Length:
2000 words ± 10% (Essay)
50 multiple choice questions (Online test)
Approx. 300 words per question (Short answer questions)
15 minutes (Presentation)
No more than 10 pages (Report)
SUBMISSION METHODS
Mandatory Select ‘N/A - submission not required/applicable’
–OR—
Select ‘Select submission method/s’ plus at least one (1) method
–OR—
Select ‘Select Interact2 Activity’ plus one (1) activity
If you have an assessment task separated into parts that are due on different dates, it is ideal to have
them as individual assessment items so they can be set up with separate submission options (eg. an
EASTS submission and Grade Centre option for each part of the assessment).
N/A – submission not required or applicable
Select for assessments such as practicum where participation is mandatory but the report is submitted
by the practicum supervisor via another medium.
Submission methods options
EASTS (ONLINE)
EASTS will be selected by default for Assessment Items (it is not the default for Exam Items). An
EASTS record will be created for the item based on this method being selected.
Compliance Check If EASTS is selected for one (1) or more Assessment/Exam Items, the
section ‘Online submission process’ under the Assessment Information
grouping becomes mandatory. Detailed information about the
submission process must be provided. The section will be non-compliant
if left null.

58
POST
Select if submission via the post is available for the assessment.
Compliance Check If Post is selected for one (1) or more Assessment/Exam Items, the
section ‘Postal submission process’ under the Assessment Information
grouping becomes mandatory. Detailed information about the
submission process must be provided. The section will be non-compliant
if left null.
HAND DELIVERED
Select if hand delivery is available for the assessment.
Compliance Check If Hand delivery is selected for one (1) or more Assessment/Exam Items,
the section ‘Hand delivery submission process’ under the Assessment
Information grouping becomes mandatory. Detailed information about
the submission process must be provided. The section will be non-
compliant if left null.
ALTERNATIVE SUBMISSION METHOD
Select if an alternative submission method is available for the assessment.
Compliance Check If Alternative submission method is selected for one (1) or more
Assessment/Exam Items, the section ‘Alternative submission method
process’ under the Assessment Information grouping becomes
mandatory. Detailed information about the submission process must be
provided. The section will be non-compliant if left null.
Interact2 Activities Select for assessments that use an Interact2 activity tool. Your selection will add the activity tool to the
Interact2 subject site. Options are:
Interact2 Test
Interact2 Self and Peer Assessment
Interact2 Discussion Board
Interact2 Blog
Interact2 Journal
Interact2 Wiki
Task Mandatory Non-compliant if left null
This is a critical part of the Subject Outline, where you explain what is required of the student. You
should aim to have all the details in the Subject Outline because it is important for students to be able to
make decisions on their ability to complete the tasks in the subject when they first enrol. Here are a
number of important details that you should consider putting in the task description:
1. Ensure that your opening sentences clearly outline what the students will have to produce as an end
result, then describe what and how they have to produce it. This, in combination with a descriptive
title, goes a long way towards clear communication for students.
2. Make sure that your language is clear and concise and that you address the student directly. Please
reflect on your clarity of expression, and maybe have a colleague, an Assessment and Quality Leader

59
or an Educational Designer read through it to give you feedback on how clearly you have described
the task.
3. Ensure that you use the correct terminology for the task. For example, do not say essay if what you
require is a report. You might like to use the following documents to ensure that you are using the
correct terminology for your task. These links can also be provided to students to ensure a shared
understanding.
http://student.csu.edu.au/__data/assets/pdf_file/0007/830347/Comparing-Assessment-Tasks.pdf
http://student.csu.edu.au/__data/assets/pdf_file/0007/463381/Common-Instruction-Words.pdf
4. Explain in detail what the students need to do and think about in the assessment. For first year
subjects in particular, it is useful to provide scaffolding as to what you require. This may take the
form of headings, with explanations of each section. Provide any relevant supporting materials
students may need to complete this task. There are many resources available at
http://student.csu.edu.au/study. If you require something more specific that doesn’t exist, talk to
the ALLaN Team about developing something that will meet your needs.
5. If you have particular requirements in relation to content and structure, please explain these. For
example, a business report will differ to a scientific report in the preferred use of Appendices. If the
task has separate sections, indicate how many words are expected in each section.
6. Include the referencing requirements for the task, or if referencing is not required it is still useful to
say so. You may like to include your expectations on the sources of information that are appropriate
(e.g. text books, or peer-reviewed scientific literature) as well as some guide as to the number of
references to include. You will need to clearly state the style of referencing that students should
adhere to (e.g. APA 6th or a discipline specific style). You may also provide a link to the referencing
guide. Alternatively, use either the Presentation or Requirements section of an Assessment Item to
state the required referencing style and link to the detail of the method on the i2 subject site or
other online source. For example: APA referencing style:
http://student.csu.edu.au/__data/assets/pdf_file/0011/294977/APAReferencingSummary2013.pdf.
7. Any variable dates should be detailed here or within another appropriate section within the
Assessment Item.
Special Characters
The editor provides ChemType and MathType options. Latex can be pasted directly into the editor.
In cases where it is not possible or practicable to provide assessment task details within the assessment
section of the Subject Outline Tool (e.g. when statistical or other symbols cannot be reliably presented
by the editor or an image), it has been agreed that assessment task details can be provided in a PDF
document stored in the Resources tool of the relevant CSU Interact subject site. This is conditional upon
a direct hyperlink being provided to that resource, and the necessary information about tasks such as
due date, task value, task type, a description of the task, etc being provided in the Subject Outline Tool
(SOT) as these are needed for EASTS and Gradebook, and to meet current policy. This option could also
be suitable for other items not suited to publishing via the SOT. This is not to be considered a way to
avoid using the SOT as mandatory items must remain in the Subject Outline.
Rationale There are three (3) parts to the Rationale section within Assessment and Exam Items:
Part 1 Mandatory – map Subject Learning Outcomes – you must select the appropriate stem
text and select the Learning Outcomes that are assessed or worked towards by the

60
assessment –OR—select the hurdle task autotext, i.e. the Assessment will fail the
Compliance Check if selections are not made.
Part 2 Optional – further explain the rationale – you can opt to use the editor to further
explain the rationale, i.e. Part 2 can be left null of the Learning Outcomes mappings
sufficiently explain the rationale. If left null, this section will not display in the final
version of the Outline.
Part 3 Optional – map Graduate Learning Outcomes – you can opt to select the appropriate
Graduate Learning Outcomes (GLOs) that the assessment contributes to.
Compliance Check For more information on using the SOT to author your Rationale and meeting
compliance, refer to Authoring Assessment - Rationale.
The rationale is where you have the opportunity to show the links between the assessment task and the
Learning Outcomes; and describe the purpose of the task. Mapping Learning Outcome/s makes this
explicit. The mapped Learning Outcomes are then used as a base to develop your criteria. Also see
Selecting Stem Text & Mapping Learning Outcomes and Compliance Check – Stem Text & Mapping
Learning Outcomes.
Part 2 (optional) can be used to further explain the purpose of the task, identify the skills and knowledge
students will develop, how the task will help them in subsequent tasks (if applicable), or the application
of the task to real world problems or professional work. You may wish to explain the relationship of the
assessment task to modules, weekly topics, timing within the session, residential school, or other
assessment tasks. If Graduate Learning Outcomes or Graduate Attributes are being assessed in this task,
then include a description and purpose for those as well, such as for life-long learning.
Part 2 example Rationales:
1. This task is designed to assist you develop your skills in critical thinking through discussion of the
principles covered in the topics in this subject as well as develop your writing skills for
communication.
2. This task is designed to assist you develop your skills in academic writing while further developing
your financial skills.
3. When feeding animals, knowledge of both the requirements of the animals and the nutrient
composition of feeds is required. This report is designed to assess your ability to discuss the results
obtained from provided values and make decisions about their accuracy for use in a formulation. It
will also assess your ability to calculate energy and protein requirements for growing lambs and how
well you can develop a suitable feedlotting ration.
If Graduate Learning Outcomes (GLOs) are being assessed in the task, you can click the Select Graduate
Learning Outcomes button to choose any appropriate outcome/s. This is optional and not required for
all assessment tasks. Also see Selecting Graduate Learning Outcomes.
CSU has nine (9) GLO areas; each with three (3) expanded GLO categories of:
Knowledge – mortar board icon Skill – tools icon Application – cogs icon
Multiple expanded GLOs can be selected; however, it is not expected that a subject would contribute to
more than three to five (3-5) GLOs. Please make selections in consultation with your Course Director.

61
Part 2 of the Rationale can be used to further describe the purpose for the GLOs and how they may
develop through student actions.
Once your selections are made, click OK to close the GLO pop up. Selected GLOs will be listed under the
following stem text which includes a hyperlink to the Student Portal GLO page:
This task also contributes to the assessment of the following CSU Graduate Learning Outcome/s:
Badges for selected GLO areas will also display on a ribbon area underneath the ‘site map’ that is
delivered to students in their i2 site. The selected expanded categories are represented by the ‘slices’
highlighted on each badge.
Use the ‘Student View’ option under the Preview Outline menu to see the badge display.
For more information, visit Teaching at CSU - GLOs, the GLO Interact2 site (self-enrol) or the Graduate
Attributes Policy. Information for students can be found on the Student Portal GLO page.
Marking criteria and standards Mandatory Non-compliant if left null.
When you develop your marking criteria, you need to include all of the elements for criterion-
referenced, standards-based assessment. Here are the essential elements:
1. Criteria are aligned with the Learning Outcomes being assessed in the task. Use similar wording to
the Learning Outcome so students can clearly see the links. Additional criteria can be included to
assess other elements of the task that you value.
2. Standards are developed across HD-PS for assessments with a numerical value, and for both
satisfactory and unsatisfactory levels for assessments with no value.
3. Performance descriptors are written for each standard.
4. Referencing requirements are stated in the criteria and standards.

62
In this section refer to the marking criteria, not marking rubric or rubric as many students do not know the meaning of this term. Remember to
include all of your expectations and requirements in the marking criteria in clear, unambiguous terminology, and outline the standard expected.
Marking criteria should not only relate to whether the task has been answered correctly, but also how the response has been presented in terms
of language and style. If you require fluent use of English and grammar, this should be included in the criteria.
MARKING CRITERIA FORMATS
Marking criteria and standards can be presented in different formats. A set of criteria and standards can be presented in either list or table
format; or a combination. Formats are presented with examples below.
Table format
The most common format is a table where criteria aligned to learning outcomes are defined in the first column and the standards related to the
criteria are on the right for each passing grade. A fail grade column is not required but some lecturers like to add it and it can be very helpful for
the student to know what constitutes a Fail. It may also be mandated by your School or Faculty.
Criteria HD DI CR PS
Identification and
explanation of issue
related assessment
and/or intervention
considerations for a client
Answer identifies and
evaluates all core and
some additional
considerations for entry-
level assessment and/or
intervention with the
client, including
identification,
documentation, and
integration of assessment
and/or intervention data.
Answer identifies and
analyses all core and some
additional considerations
for entry-level assessment
and/or intervention with
the client, including
identification,
documentation, and
integration of assessment
and/or intervention data.
Answer identifies and
discusses all core
considerations required
for entry-level assessment
and/or intervention with
the client, including
identification,
documentation, and
integration of assessment
and/or intervention data.
Answer identifies and
explains all core
considerations required
for entry-level assessment
and/or intervention with
the client, including
identification,
documentation, and
integration of assessment
and/or intervention data.
See List Format over page…

63
List format
A list format can also be used where criteria are listed at the top and a set of standards grouped under the grade heading. The criteria are
required to be defined and not just the standards under each heading. See the Assessment Principles Policy for further information in the
Section 2 - GLOSSARY for a definition of criteria and standards.
Criteria
Follows established criteria for the role of the mediator in the introduction to a mediation session
Uses effective communication skills to explain the mediation process
Adheres to practice standards & ethical obligations
HD standard
Introduces the mediator, clearly identifies and welcomes the parties, sets boundaries and expectations, covers all the essential
criteria to explain the mediation process in a manner that demonstrates in-depth knowledge of the set readings and provides
evidence of further research, displays a calm, confident and purposeful manner
Speaks clearly, displays confidence and self-awareness in posture, gestures, eye contact and vocal expressiveness, uses coherent,
well-formed, grammatically correct sentences, uses neutral, non-judgemental and inclusive language that is appropriate to the
audience
Demonstrates extensive knowledge of practice standards and ethical obligations and transmits that in a transparent way to the
parties.
D standard
Introduces the mediator, identifies and welcomes the parties, covers all the essential criteria to explain the mediation process in a
manner that incorporates the major elements of the set readings, displays a calm, confident and purposeful manner
Speaks clearly, displays confidence in posture, gestures, eye contact and vocal expressiveness, uses well-formed, grammatically
correct sentences, uses neutral, non-judgemental language
Demonstrates thorough knowledge of practice standards and ethical obligations.
CR standard
Introduces the mediator, identifies the parties, covers all the essential criteria to explain the mediation process in a manner that
incorporates elements of the set readings, displays a calm, confident, purposeful manner
Speaks clearly, displays confidence in posture, gestures, eye contact and vocal expressiveness, uses grammatically correct sentences
Demonstrates knowledge of practice standards and ethical obligations
PS standard
Introduces the mediator, identifies the parties, explains the mediation process in a straightforward manner that demonstrates an
awareness of the set readings
Speaks clearly
Covers at a minimum confidentiality, impartiality and voluntariness of the mediation process
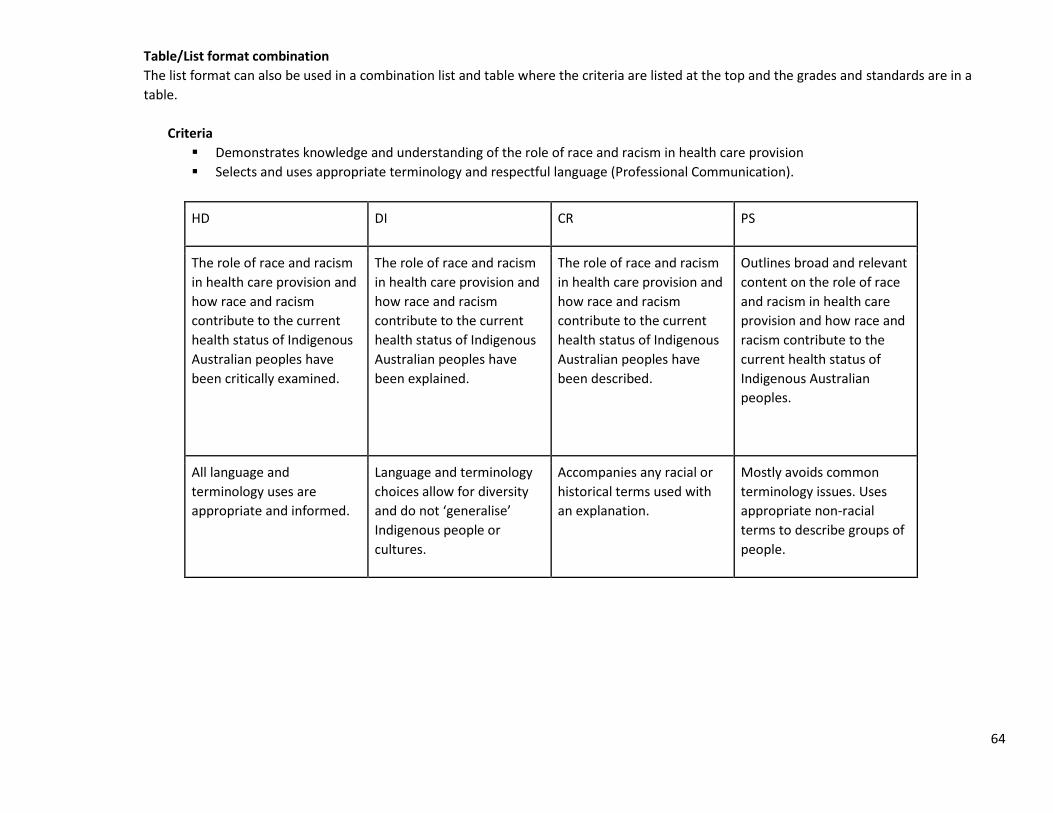
64
Table/List format combination
The list format can also be used in a combination list and table where the criteria are listed at the top and the grades and standards are in a
table.
Criteria
Demonstrates knowledge and understanding of the role of race and racism in health care provision
Selects and uses appropriate terminology and respectful language (Professional Communication).
HD DI CR PS
The role of race and racism
in health care provision and
how race and racism
contribute to the current
health status of Indigenous
Australian peoples have
been critically examined.
The role of race and racism
in health care provision and
how race and racism
contribute to the current
health status of Indigenous
Australian peoples have
been explained.
The role of race and racism
in health care provision and
how race and racism
contribute to the current
health status of Indigenous
Australian peoples have
been described.
Outlines broad and relevant
content on the role of race
and racism in health care
provision and how race and
racism contribute to the
current health status of
Indigenous Australian
peoples.
All language and
terminology uses are
appropriate and informed.
Language and terminology
choices allow for diversity
and do not ‘generalise’
Indigenous people or
cultures.
Accompanies any racial or
historical terms used with
an explanation.
Mostly avoids common
terminology issues. Uses
appropriate non-racial
terms to describe groups of
people.
65
Presentation Optional If left null, this section will not display in the final version of the Outline.
Can be used to include details not covered in the task description that specifically relate to presentation
such as document format (e.g. Word doc, PDF), cover sheets, font size, layout, etc.
Either the Task, Presentation or Requirements section of an Assessment Item can be used to state the
required referencing style and link to the detail of the method on the i2 subject site or other online
source. You can refer students to the ART tool at https://apps.csu.edu.au/reftool/apa-6.
Examples of Presentation:
Assessment tasks should be submitted on EASTS as a Microsoft Word document. Do not submit as a PDF
document.
The first page should contain your name, student number, subject code, word count and due date.
Please use 12 point font and avoid the use of fancy templates with added colour or graphics.
Lines should be double spaced.
The assessment tasks should be within +/- 10% of the word limit. The word count is taken from the
first word to the last word and includes quotes. Quotes must comprise less than 10% of the total
word count.
Proof-read your work so that it is free of spelling, grammar and punctuation mistakes. Use language
that is appropriate to academic and professional tasks. Ensure you use respectful and appropriate
terminology. For assistance, see Learning Skills: http://www.csu.edu.au/division/studserv/learning
Your reference list should contain all source documents that you refer to, quote or paraphrase from.
It must conform to the APA referencing style:
http://student.csu.edu.au/__data/assets/pdf_file/0011/294977/APAReferencingSummary2013.pdf
Requirements Optional If left null, this section will not display in the final version of the Outline.
Can be used to provide any other details regarding the requirements for the assessment. Include details
such as Interact2 activity requirements, pass requirements, or dress requirements for work placement
or laboratory-based assessments.
Either the Task, Presentation or Requirements section of an Assessment Item can be used to state the
required referencing style and link to the detail of the method on the i2 subject site or other online
source. For example: APA referencing style:
http://student.csu.edu.au/__data/assets/pdf_file/0011/294977/APAReferencingSummary2013.pdf; or
refer students to the ART tool at https://apps.csu.edu.au/reftool/apa-6.
Exam Items Summary information
ITEM NUMBER Auto-generated on clone or using the next whole number on adding the Item
TITLE
Mandatory Must be authored using a plain text field limited to 50 characters including spaces.
Titles must be unique
Titles may also be used by other CSU systems and processes, e.g. EASTS, grading, etc. To prevent
downstream system errors, an Outline will fail the Compliance Check if an Outline does not have unique

66
Titles for Assessment Items. That is, there cannot be 2 or more items entitled "Essay" or "Exam". A
unique identifier must be added, e.g. Essay on Indigenous Health Issues or Mid-session Exam.
Examples of Titles
Use a descriptive title so that students are clear from the beginning what the end product of their task
will be. If you use the term Assessment 1 but the item number is 2 it can be confusing so it's best to
avoid these nondescript titles.
When giving your assessment a title, think about how it will look in the summary table. Use familiar
terms. For instance, if the task requires short answer responses, call it this; if it requires a blog post or
discussion forum, then name the task to correspond with the format. This helps students to become
familiar with university language and expectations, and they can access support on the different
assessment types by searching for the appropriate term.
Example titles that identify the task type:
Action plan
Clinical exam
Essay
Laboratory report
Literature review
Mathematical calculations
Online quiz
Oral presentation
Research proposal
Reflective journal
Survey design
Teaching plan
Examples titles that also identify the topic with the task:
Arthropod Collection
Diverse Placement Report and Timesheet
Essay on Indigenous Health Issues
Literature Review: Eucalyptus Ecology
Manual Accounting Assignment
Parent Tutor Program
Plagiarism Quiz
Photo voice
Webpage: communication development in childhood
Clinical skill development portfolio
Reflection portfolio
MARKING SCHEME
Mandatory Value must be selected + a percentage value entered
–OR—
Satisfactory/Unsatisfactory must be selected
Compliance Check 1. Outlines can contain a mix of percentage values and SY/US Marking schemes
67
2. If an Outline contains any Items with a percentage value; the total value of all Assessment Items for
the Outline must equal 100%
3. An Outline can have all Assessment Items with a Marking scheme of SY/US
Assessment tasks can be marked using either a numerical value or a satisfactory (SY)/unsatisfactory (US)
grading scale. If a numerical value (percentage) is selected, then standards of performance should be
developed along the University’s grading system of HD-PS. SY/US should be used in cases when there is
no numeric value ascribed to the assessment.
You will need to think carefully about the overall subject pass requirements for assessment tasks graded
as SY/US. For example, if a student is marked as unsatisfactory can they pass the subject? If not, then
the assessment task can be very ‘high-stakes’ compared with an assessment task valued at 10% where
students can still pass the subject without passing that particular assessment task. You will need to
include all pass requirements in the relevant section of the subject outline and make clear the
consequences of an US grade.
DUE DATE
Mandatory Due date must be selected from the date picker
–OR—
‘To be advised’ checkbox must be selected
‘To be advised’ option Should be selected when the date is not yet known; or for an end-of-session
exam that is centrally administered by the Exams Office in Division of Student
Administration. The ‘Requirements’ section of an Exam Item should explain how
the student will be informed of the exam date, time and location.
Centrally Administered Exam option
Exam Items contain an option to indicate that the exam is centrally administered by
DSA. If selected, the Due Date option of ‘To be advised’ is auto-selected and a Fixed
Autotext will display to students against the Due Date field. The Autotext includes
hyperlinks to the exam timetable and the Student Portal exams page.
Applies to templates from 201930.
The autotext displays against the Due Date so students can click through to the Student
Portal.

68
Due Date outside the subject offering teaching session (e.g. year long / multi session subjects)
In some circumstances, a due date outside the offering teaching session will need to be selected. For
example, an Outline is created for Session 1 of a year long subject; however, due dates need to be
selected for assessments due during Session 2 of the year long subject. In this case, upon entering the
date the system will prompt you to confirm your due date selection. If indeed you had intended to
select a date outside of the teaching session of the offering, simply confirm you wish to keep your
selection. If not, return to the date picker to change the date.
RETURN DATE
Mandatory An auto-calculated Return Date will display
–OR—
‘Not returned’ checkbox must be selected
Fixed AutoText If a Due Date is selected from the date picker, as per University procedures, the
Return Date will be auto-calculated fifteen (15) business days from the selected
Due Date and displayed to students.
If the assessment will not be returned to students, select ‘Not returned’. This
will display to students rather than a return date.
DURATION
Mandatory Non-compliant if left null.
This field is limited to 50 characters including spaces. Example: 3 hours plus 10 minutes reading time.
SUBMISSION METHODS
Mandatory Select ‘N/A - submission not required/applicable’
–OR—
Select ‘Select submission method/s’ plus at least one (1) method
If you have an assessment task separated into parts that are due on different dates, it is ideal to have
them as individual assessment items so they can be set up with separate submission options (eg. an
EASTS submission and Grade Centre option for each part of the assessment).
N/A – submission not required or applicable
The default selection for an 'exam' type Assessment Item is ‘N/A - submission not required/applicable’.
This is because typically exam scripts are handed in on completion, e.g. end-of-session exams are
returned to the University through the Examinations Office.
Submission methods options
EASTS (ONLINE)
An EASTS record will be created for the item based on this method being selected.
Compliance Check If EASTS is selected for one (1) or more Assessment/Exam Items, the
section ‘Online submission process’ under the Assessment Information
grouping becomes mandatory. Detailed information about the
submission process must be provided. The section will be non-compliant
if left null.
POST
Select if submission via the post is available for the assessment.

69
Compliance Check If Post is selected for one (1) or more Assessment/Exam Items, the
section ‘Postal submission process’ under the Assessment Information
grouping becomes mandatory. Detailed information about the
submission process must be provided. The section will be non-compliant
if left null.
HAND DELIVERED
Select if hand delivery is available for the assessment.
Compliance Check If Hand delivery is selected for one (1) or more Assessment/Exam Items,
the section ‘Hand delivery submission process’ under the Assessment
Information grouping becomes mandatory. Detailed information about
the submission process must be provided. The section will be non-
compliant if left null.
ALTERNATIVE SUBMISSION METHOD
Select if an alternative submission method is available for the assessment.
Compliance Check If Alternative submission method is selected for one (1) or more
Assessment/Exam Items, the section ‘Alternative submission method
process’ under the Assessment Information grouping becomes
mandatory. Detailed information about the submission process must be
provided. The section will be non-compliant if left null.
Requirements Mandatory Non-compliant if left null.
Please provide details regarding the requirements for the exam. For example, advice regarding:
the type of answers required, e.g. Part A multiple choice, Part B short answer, Part C essay, etc.
which components must be attempted, e.g. answer all questions in Part A, answer three of the five
questions in Part B, etc.
which part/s of the subject the exam is going to cover, e.g. the final examination will cover the
entire subject, the exam will test your understanding of topics 3 and 4, examinable material will
come from the prescribed textbooks and required readings, the exam will mainly cover the lectures
and tutorials from the Residential School, etc.
Rationale There are three (3) parts to the Rationale section within Assessment and Exam Items:
Part 1 Mandatory – map Subject Learning Outcomes – you must select the appropriate stem
text and select the Learning Outcomes that are assessed or worked towards by the
assessment –OR—select the hurdle task autotext, i.e. the Assessment will fail the
Compliance Check if selections are not made.
Part 2 Optional – further explain the rationale – you can opt to use the editor to further
explain the rationale, i.e. Part 2 can be left null of the Learning Outcomes mappings
sufficiently explain the rationale. If left null, this section will not display in the final
version of the Outline.
Part 3 Optional – map Graduate Learning Outcomes – you can opt to select the appropriate
Graduate Learning Outcomes (GLOs) that the assessment contributes to.

70
Compliance Check For more information on using the SOT to author your Rationale and meeting
compliance, refer to Authoring Assessment - Rationale.
The rationale is where you have the opportunity to show the links between the assessment task and the
Learning Outcomes; and describe the purpose of the task. Mapping Learning Outcome/s makes this
explicit. The mapped Learning Outcomes are then used as a base to develop your criteria.
Part B (optional) can be used to further explain the purpose of the task, identify the skills and knowledge
students will develop, how the task will help them in subsequent tasks (if applicable), or the application
of the task to real world problems or professional work. You may wish to explain the relationship of the
assessment task to modules, weekly topics, timing within the session, residential school, or other
assessment tasks. If Graduate Learning Outcomes or Graduate Attributes are being assessed in this task,
then include a description and purpose for those as well, such as for life-long learning.
Part B example Rationales:
4. This task is designed to assist you develop your skills in critical thinking through discussion of the
principles covered in the topics in this subject as well as develop your writing skills for
communication.
5. This task is designed to assist you develop your skills in academic writing while further developing
your financial skills.
6. When feeding animals, knowledge of both the requirements of the animals and the nutrient
composition of feeds is required. This report is designed to assess your ability to discuss the results
obtained from provided values and make decisions about their accuracy for use in a formulation. It
will also assess your ability to calculate energy and protein requirements for growing lambs and how
well you can develop a suitable feedlotting ration.
If Graduate Learning Outcomes (GLOs) are being assessed in the task, you can click the Select Graduate
Learning Outcomes button to choose any appropriate outcome/s. CSU has nine (9) GLO areas; each with
three (3) expanded GLO categories of:
Skill
Knowledge
Application
Multiple expanded GLOs can be selected; however, it is not expected that a subject would contribute to
more than three to five (3-5) GLOs. Please make selections in consultation with your Course Director and
the Graduate Attributes Policy. Part 2 of the Rationale can be used to further describe the purpose for
the GLOs and how they may develop through student actions.
For more information, visit Teaching at CSU - GLOs or the GLO Interact2 site (self-enrol).
Also see Using SOT functionality to author Assessment Items.
Marking criteria and standards Optional If left null, this section will not display in the final version of the Outline.
While marking criteria and standards of performance for exams is optional, it is advisable to provide
information to students about what you expect from their responses to exam questions. When you
develop the information explain what skills and knowledge are expected in the exam, the quality of the
answers and the topics to be covered so students are aware of what the requirements are.

71
Please refer to the information on developing criteria and standards for exams on the DSL Assessment
and Moderation pages. The following templates may also assist in developing simple rubrics for your
exams if you choose to create one.
See examples of marking criteria and standards for exams over page…
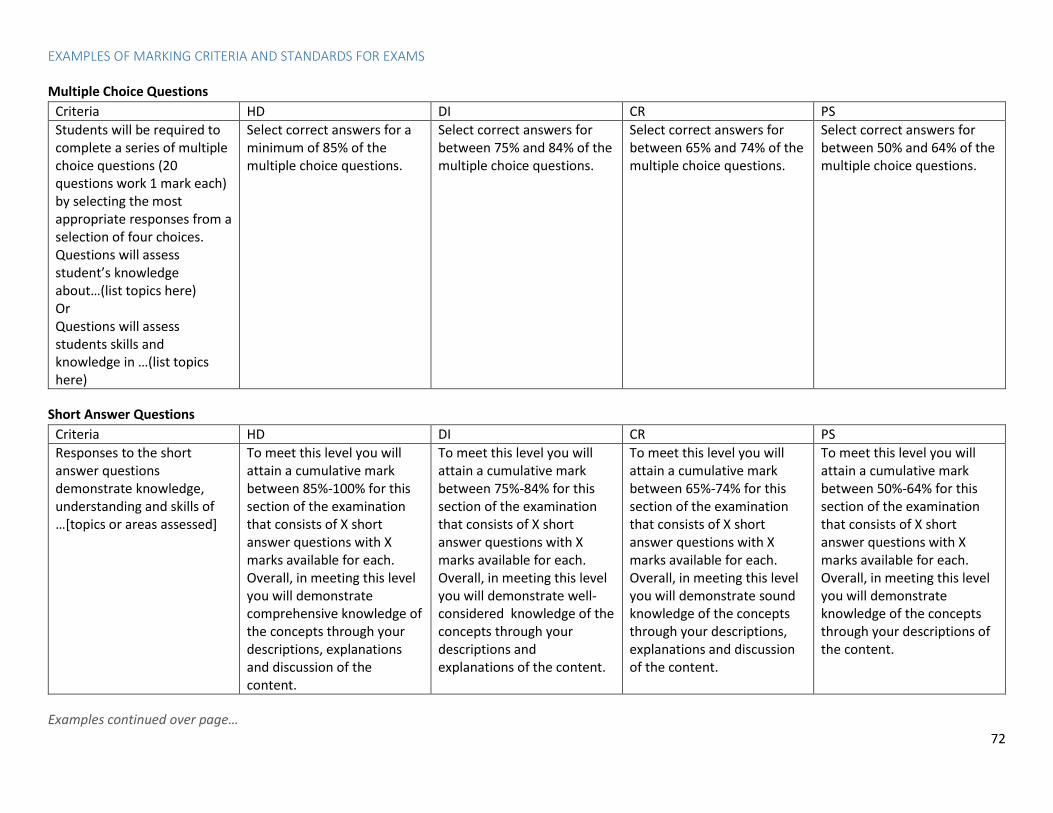
72
EXAMPLES OF MARKING CRITERIA AND STANDARDS FOR EXAMS
Multiple Choice Questions
Criteria HD DI CR PS
Students will be required to complete a series of multiple choice questions (20 questions work 1 mark each) by selecting the most appropriate responses from a selection of four choices. Questions will assess student’s knowledge about…(list topics here) Or Questions will assess students skills and knowledge in …(list topics here)
Select correct answers for a minimum of 85% of the multiple choice questions.
Select correct answers for between 75% and 84% of the multiple choice questions.
Select correct answers for between 65% and 74% of the multiple choice questions.
Select correct answers for between 50% and 64% of the multiple choice questions.
Short Answer Questions
Criteria HD DI CR PS
Responses to the short answer questions demonstrate knowledge, understanding and skills of …[topics or areas assessed]
To meet this level you will attain a cumulative mark between 85%-100% for this section of the examination that consists of X short answer questions with X marks available for each. Overall, in meeting this level you will demonstrate comprehensive knowledge of the concepts through your descriptions, explanations and discussion of the content.
To meet this level you will attain a cumulative mark between 75%-84% for this section of the examination that consists of X short answer questions with X marks available for each. Overall, in meeting this level you will demonstrate well-considered knowledge of the concepts through your descriptions and explanations of the content.
To meet this level you will attain a cumulative mark between 65%-74% for this section of the examination that consists of X short answer questions with X marks available for each. Overall, in meeting this level you will demonstrate sound knowledge of the concepts through your descriptions, explanations and discussion of the content.
To meet this level you will attain a cumulative mark between 50%-64% for this section of the examination that consists of X short answer questions with X marks available for each. Overall, in meeting this level you will demonstrate knowledge of the concepts through your descriptions of the content.
Examples continued over page…

73
Long Answer Questions
Criteria HD DI CR PS
Responses to the long answer questions demonstrate knowledge and understanding of …[topics/concepts drawing on skills in graphs, tables and images to illustrate and communicate knowledge]
To meet this level you will attain a cumulative mark between 85%-100% for this section of the examination that consists of X long answer questions with X marks available for each. Overall, in meeting this level you will demonstrate comprehensive knowledge of the concepts through your descriptions, explanations and discussion of the content. Graphs, tables and images will be correctly and clearly labelled and explanations will link to the diagrams as needed.
To meet this level you will attain a cumulative mark between 75%-84% for this section of the examination that consists of X long answer questions with X marks available for each. Overall, in meeting this level you will demonstrate well-considered knowledge of the concepts through your descriptions and explanations of the content. Graphs, tables and images will be correctly and clearly labelled and explanations will link to the diagrams as needed.
To meet this level you will attain a cumulative mark between 65%-74% for this section of the examination that consists of X long answer questions with X marks available for each. Overall, in meeting this level you will demonstrate sound knowledge of the concepts through your descriptions and explanations of the content. Graphs, tables and images will be labelled and descriptions will link to the diagrams as needed.
To meet this level you will attain a cumulative mark between 50%-64% for this section of the examination that consists of X long answer questions with X marks available for each. Overall, in meeting this level you will demonstrate knowledge of the concepts through your descriptions and explanations of the content. Graphs, tables and images will be labelled.
Material provided by the university Mandatory Non-compliant if left null.
Please state the materials that will be provided by the University for the exam. This can be the same details provided on the exam cover sheet.
Examples of materials provided by the University:
1 x 12 page answer booklet
1 x general purpose answer sheet (GPAS)
Material provided by the student Mandatory Non-compliant if left null.
Please clearly state the materials that must be provided by the student, e.g. writing materials, scientific calculator, textbook, other equipment etc.
Examples of materials that must be provided by the student

74
Writing implements (i.e. 2B pencil/eraser, pens), battery operated, non-programmable calculator with no
printer, 2015 or 2016 CA ANZ Financial Reporting Handbook (bound version only - loose leaf version not
permitted, unmarked except for highlighting, underlining or tagging) may be taken into the examination
room. Writing is strictly allowed only on the tags, and must be limited to caption such as 'AASB 3 paragraph
32' or 'Business Combinations'.
Non-programmable calculator, blue pen, 2B pencil, eraser, pencil sharpener.
Sample exam paper Optional If left null, this section will not display in the final version of the Outline.
You can opt to paste a URL/link to the subject’s sample exam paper. The URL will be provided to students via the
hyperlink in the following Fixed Autotext:
You are encouraged to complete this subject's sample exam in preparation for the end-of-session exam.
Assessment Information Academic Integrity Fixed Autotext Academic integrity means acting with honesty, fairness and responsibility, and involves
observing and maintaining ethical standards in all aspects of academic work. This subject
assumes that you understand what constitutes plagiarism, cheating and collusion. If you are a
new student we expect you to complete the modules called Academic Integrity at CSU.
CSU treats plagiarism seriously. We may use Turnitin to check your submitted work for
plagiarism. You can use Turnitin to check for plagiarism in your assessments before submission.
Referencing Fixed Autotext Referencing is an important component of academic work. All assessment tasks should be
appropriately referenced. The specific details of the referencing requirements are included in
each assessment task description. Get referencing style guides and help to use for your
assessments.
How to submit your assessment items Online submission process Editable Autotext Access EASTS (Electronic Assignment Submission Tracking System) to submit assessment
tasks online. Be sure to read the submission guidelines prior to commencing a task;
including file types the system will accept, file name and formatting requirements, etc. A
comprehensive user guide, FAQs and system support are also available.
Mandatory/optional Mandatory if selected as a Submission Method in one (1) or more Assessment Items. If
the method is not selected in any Assessment, it is optional and can be left null. If not
null, it will display to students.
Postal submission process Mandatory/optional Mandatory if selected as a Submission Method in one (1) or more Assessment Items. If
the method is not selected in any Assessment, it is optional and can be left null. If not
null, it will display to students.
75
Hand delivered submission process Mandatory/optional Mandatory if selected as a Submission Method in one (1) or more Assessment Items. If
the method is not selected in any Assessment, it is optional and can be left null. If not
null, it will display to students.
Alternative submission Process Mandatory/optional Mandatory if selected as a Submission Method in one (1) or more Assessment Items. If
the method is not selected in any Assessment, it is optional and can be left null. If not
null, it will display to students.
Extensions Cloned Outlines Information provided in the Outline that was cloned from can be edited if necessary in
the clone.
New Outlines Editable Autotext
Assessments should be received by the University no later than the due date. You are
requested to do all in your power to meet assessment deadlines.
If you experience misadventure or extenuating circumstances of a minor nature and
need a short extension you should contact your Subject Coordinator.
If you experience misadventure or extenuating circumstances and require a longer
extension you need to apply for Special Consideration.
Late assessments, without having an extension granted, may be returned with no marks
awarded.
How to apply for special consideration Fixed Autotext Academic regulations provide for special consideration to be given if you suffer
misadventure or extenuating circumstances during the session (including the
examination period) which prevents you from meeting acceptable standards or
deadlines. Find the form on the Student Portal Special Consideration, Academic
Advice and Appeals page.
Penalties for late submission Mandatory Non-compliant if left null.
Cloned Outlines Information provided in the Outline that was cloned from can be edited as appropriate
in the clone.
New Outlines A blank section will be provided.
Excepted Users
The Academic Organisational Units (AOUs) listed below will be provided with Editable
Autotext which can be edited or overwritten as appropriate.
EDITABLE AUTOTEXT FOR AOU CODES 200, 215, 216, 217 & 218
Editable Autotext The penalty for late submission of an assessment task (without obtaining the Subject
Coordinator's approval for an extension) will be:
10% deduction per day, including weekends, of the maximum marks allocated for the
assessment task, i.e. 1 day late 10% deduction, or 2 days late 20% deduction.

76
An example of the calculation would be:
Maximum marks allocated = 20
Penalty for one day late = 2 marks (so, a score of 18/20 becomes 16/20 and a score of
12/20 becomes 10/20).
If an assessment is due on a Friday but is not submitted until the following Tuesday,
then the penalty will be four days (40% deduction or 8 marks in the example above).
Submissions more than 10 days late will be acknowledged as received but will not be
marked.
EDITABLE AUTOTEXT FOR DIVISION OF LEARNING & TEACHING (800)
Editable Autotext Assessment items submitted more than one (1) week late will not be accepted unless
valid grounds can be established and relevant documentation provided. Only original
documentation will be considered. However, this process is not a guaranteed
acceptance for late or extended submission of assessments.
Any student submitting late assessment items without valid grounds may be assessed as
not meeting requirements and an unsatisfactory grade will be awarded in the subject.
Assessments received more than two weeks after their due dates, without an extension
having been granted, will be returned with no marks awarded.
Resubmission Mandatory Non-compliant if left null.
Cloned Outlines Content from the Outline that was cloned from can be edited as appropriate.
New Outlines A blank section will be provided.
Excepted Users
The Academic Organisational Units (AOUs) AOU CODES 200, 215, 216, 217 & 218 will be
provided with Editable Autotext which can be edited or overwritten as appropriate.
EDITABLE AUTOTEXT FOR AOU CODES 200, 215, 216, 217 & 218
Editable Autotext Under normal circumstances resubmission of assessment items will not be accepted for
any of the assessments required in this subject.
Additional assessment and examinations Optional Can be authored if appropriate. If left null, it will pass the Compliance Check and drop
out of the web and PDF versions for students.
Feedback processes Mandatory Non-compliant if left null.
Assessment return Mandatory Non-compliant if left null.
Editable Autotext You should normally expect your marked assessment to be returned to you within 15
working days of the due date, if your assessment was submitted on time. If you
submitted your assessment on time but not received it back by the return date, you
77
should make enquiries in the first instance to the subject coordinator.
Student Feedback & Learning Analytics Evaluation of subjects Fixed Autotext CSU values constructive feedback and relies on high response rates to Subject
Experience Surveys (SES) to enhance teaching. Responses are fed back anonymously to
Subject Coordinators and Heads of Schools to form the basis for subject enhancement
and recognition of excellence in teaching. Schools report on their evaluation data;
highlighting good practice and documenting how problems have been addressed. You
can view a summary of survey results via the Student Portal SES Results page.
We strongly encourage you to complete your online Subject Experience Surveys. You
will be provided with links to your surveys via email when they open three [3] weeks
before the end of session.
Changes and actions based on student feedback Mandatory Non-compliant if left null.
Learning analytics PART A Fixed Autotext Learning Analytics refers to the collection and analysis of student data for the
purpose of improving learning and teaching. It enables the University to
personalise the support we provide our students. All Learning Analytics activities
will take place in accordance with the CSU Learning Analytics Code of Practice.
For more information, please visit CSU’s Learning Analytics website.
PART B Optional Can be edited, overwritten or deleted. If left null, it will pass the Compliance Check.
If the Outline is cloned, the section will be populated with content from the Outline it
was cloned from.
If created new, it will contain Editable Autotext:
Data about your activity in the Interact2 site and other learning technologies for
this subject will be recorded and can be reviewed by teaching staff to inform
their communication, support and teaching practices.
Services & Support Student Portal (no header) Fixed Autotext Your Student Portal tells you can how you can seek services and support. These include
study, admin, residential, library, careers, financial, and personal support.
Develop your study skills Fixed Autotext Develop your study skills with our free study services. We have services online, on
campus and near you. These services can help you develop your English language,
literacy, and numeracy.
Library services Fixed Autotext CSU Library provides access to the eBooks, journal articles, books, and multimedia
resources needed for your studies and assessments. Get the most out of these
resources by contacting Library staff either online or in person, or make use of the many
Library Resource Guides, videos and online workshops available.

78
CSU Policies & Regulations CSU Policies & Regulations (no header) Fixed Autotext This subject outline should be read in conjunction with all academic policies and
regulations, e.g. Student Academic Misconduct Policy, Assessment Policy – Coursework
Subjects, Assessment Principles Policy, Special Consideration Policy, Academic Progress
Policy, Academic Communication with Students Policy, Student Charter, etc.
Please refer to the collated list of policies and regulations relevant to studying your
subject(s) which includes links to the CSU Policy Library – the sole authoritative source
of official academic and administrative policies, procedures, guidelines, rules and
regulations of the University.
Subject outline as a reference document Fixed Autotext This Subject Outline is an accurate and historical record of the curriculum and scope of
your subject. CSU's Subject Outlines Policy requires that you retain a copy of the Subject
Outline for future use such as for accreditation purposes.
School of Policing Academic Advice and Review Policies (Policing only) Fixed Autotext Specified by the School of Policing.
CSU policies relevant to subject study (Policing only) Fixed Autotext This subject outline should be read in conjunction with all academic policies and
regulations, e.g. Student Academic Misconduct Policy, Assessment Policy – Coursework
Subjects, Assessment Principles Policy, Special Consideration Policy, Academic Progress
Policy, Academic Communication with Students Policy, Student Charter, etc.
Please refer to the collated list of policies and regulations relevant to studying your
subject(s) which includes links to the CSU Policy Library – the sole authoritative source
of official academic and administrative policies, procedures, guidelines, rules and
regulations of the University.

79
Glossary Author Once a staff member is populated into either the Subject Coordinator (SC) or Nominal Subject Coordinator (NSC) role via
ACSES, they become an Author of the Outline. The Outline will appear in their Authoring Dashboard. SCs and NSCs can
also add any staff member into the Support Author role via the ‘Manage Roles & Permissions’ function. It can be found
in the left hand menu under Tools & Settings in the Edit Outline or Preview Outline screens.
Autotext Autotext is content that automatically displays in the section of an Outline. Autotext can be editable or non-editable.
Fixed Autotext has been included according to CSU or School policy and cannot be edited. From time to time,
'owners' of the Autotext may need to update the content - therefore a Data Refresh will draw in the latest
information as approved for inclusion by the Autotext 'owner'. For example, Senate may amend Academic
Regulations, support services may need to update their contact details or service information, etc.
Editable Autotext is text which has been deemed as a 'best fit' for most subjects and is therefore provided
automatically to assist authoring. However, it is treated by the tool as if the Author inputted the content. Thus
the content can be edited by the Author to suit the subject context. Content will be cloned as part of the Outline
cloning process. Editable Autotext can be reverted to the default Autotext whenever the Outline is in an editable
state using the section’s ‘Autotext Refresh’ function.
Autotext Refresh The section-level ‘Autotext Refresh’ function overwrites section content with the effective default Editable Autotext. It
can be used by Authors, QAOs and HOS with edit permissions whenever the Outline is in an editable state.
Clone ‘Autotext Refresh’ Prompt For cloning, Editable Autotext is treated as authored content, i.e. the section content is simply copied to the cloned
Outline as if the Author has created the content from scratch. However, if the cloned content does not match the
effective default Editable Autotext, on creation of the clone the Author is prompted to select whether they wish to keep
the cloned content or refresh the section/s with the new effective Editable Autotext. A refresh will overwrite any
existing content.
Compliance Check A Compliance Check is a quality control function to assist the Author in checking that information is contained within all
mandatory components of the Subject Outline prior to the quality assurance process whereby a QA Officer checks the
quality of the information provided. Mandatory sections are marked with a red asterisk* within the Edit and QA screens.
Data Refresh A Data Refresh updates the display of:
Enterprise Data within the Outline once it has been added or modified within its source system; and
Fixed Autotext displayed within the Outline if it has required an update in the Outline template.
Once the Data Refresh process has completed, a pop-up will display the list of sections which encountered an update
due to the refresh.
Enterprise Data Enterprise data refers to University information that is stored within its authoritative database and used by more than
one (>1) other system. Therefore it is of value to the Enterprise as a whole.

80
The Subject Outline Tool draws enterprise data from its authoritative source for display within an Outline. As a result
this information cannot be edited within the Subject Outline Tool - it must be changed within the source via the system's
change procedures then a Data Refresh performed on the Outline to draw the latest data in for display.
'Help' question mark buttons can be found against each Outline section. Clicking on the Help icon to learn more about
the source of the section data (or for editable sections, how to author quality information for the section).
Mandatory Sections Mandatory sections are intended to hold information that is mandated for inclusion in all CSU Subject Outlines by the
Academic Senate’s Subject Outline Policy, e.g. Consultation procedures, Schedule; and Rationale and Marking criteria
and standards for all assessment items.
Mandatory sections cannot be null. If left null, they will fail the system 'Compliance Check'. The ‘Compliance Check’ is
the Quality Control check built into the Subject Outline Tool which precedes the QA Officer’s quality assurance on the
Outline.
If you have edit permissions on an Outline (as an Author or QA Officer), you can identify editable mandatory sections by
a red asterisk * displaying against the section header. Further, use the Section Filter to display on editable sections of
the Outline.
Optional Sections Optional sections refers to information which must be included in the Subject Outline IF it is relevant to the subject
offering. Optional sections will be removed from the final Subject Outline if not used, i.e. void of information. The
'Preview Outline’ and 'PDF Preview' functions demonstrate the final Subject Outline by removing unused optional
sections.
Optional sections can be easily identified within the Edit screen - they are editable sections which do not display a red
asterisk *.
TIP All submission method process sections (online, post, hand, alternative) are not marked with a red asterisk
because they will only become mandatory if the method is selected in one (1) or more Assessment Item.
Learn more: Compliance Checking for Submission Methods and Process Details
TIP The ‘Assessment return’ section is not marked with a red asterisk because they will only become mandatory if
there is one (1) or more Assessment Item that will be returned to students.
Learn more: Compliance Checking for ‘Assessment return’
Quality Assurance (QA) The Subject Outline Tool provides a quality assurance (QA) workflow and utilises the QA Officer (QAO) role. The tool
does not define quality – but provides workflow and functionality to assist/enable/support QA:
QAOs can apply a QA outcome of:
- Submit for Publication (QA Approved)
- Submit for Revision
- Submit for Revision (pre-approved QA)
A commenting function on all editable sections for collaboration among Authors and QAOs.
SC and NSC Authors can specify whether QAOs have edit permissions; or can only comment.
Your Head of School quality assures Outlines that have been varied since publication to students.
Also see Quality Control v Quality Assurance.
Quality Assurance (QA) Exemption An Outline is exempt from QA if it is cloned and meets specific criteria. See Clone QA Exemption. QA exemption can also
apply to varied Outlines. If only certain sections have been varied, it does not have to be submitted to the Head of
School for QA prior to re-publication to students. See QA Exemption on Varied Outlines.

81
Quality Assurance Officer (QA Officer / QAO) The quality assurance (QA) workflow of the Subject Outline Tool utilises the ‘QA Officer’ [QAO] role. QAOs are assigned
to offerings in ACSES by the Faculty Subjects Team. QAOs are responsible for assuring the quality of the information
provided in the Outline and are able to apply a QA outcome. Learn more: Quality Assurance (QA)
Academic Course and Subject Entry System (ACSES) The Academic Course and Subject Entry System (ACSES) specifies an offering’s Subject Coordinator (SC). The SC is
populated into the Author role in the SOT. Authors have permissions to create and edit an Outline; and submit the final
draft for QA. The following ACSES roles are also populated into SOT roles:
Nominal Subject Coordinator - person/s responsible for authoring the Outline on behalf of the Subject
Coordinator; or collaborating on the Outline with the SC and any Support Authors
QA Officer - person/s responsible for assuring the quality of an Outline
Academic Senate mandates there must be one definitive Coordinator for each cohort; however, the Nominal SC and QA
Officer roles allow multiple staff to be added. As such, a 'Bulk add' feature has also been added to ACSES. Staff who
regularly perform these processes across the School can be added via this feature rather than added for each cohort.
Please note that adding a staff member via the bulk add feature will essentially give them the permissions to create and
author an Outline for any subject; or perform QA on all Outlines for the school. Therefore, to avoid clashes of
responsibilities within the School, please ensure that staff who are added via the bulk add feature are made well aware
of the specific tasks they are required to perform for each subject.
Subject Availability List (SAL) The Subject Availability Listing (SAL) is the authoritative source of offerings of a subject. Offerings with an active status
are available for student enrolment and therefore populated into the Subject Outline Tool for development of a Subject
Outline. The SAL is maintained by Schools and managed by Student Administration.
1 SAL Active Offering = 1 Outline
Only one (1) Outline can be created for each active subject offering on the SAL.
You will not see an offering in your Dashboard if it is an offering for a:
multi-session subject (MSS) that does not have a commencing cohort for that session; -OR-
subject code that has a CASIMS tag of ‘No Subject Outline’.
Subject Coordinator (SC) The Subject Coordinator (SC) for an offering is specified by the Faculty Subjects Team in the Academic Course and
Subject Entry System (ACSES). This SC is placed into the Outline’s Author role in the Subject Outline Tool. The SC has full
permissions on an Outline to create, edit and submit the final draft for quality assurance. Their name and contact details
will populate the 'Subject Coordinator' grouping of the Subject Outline; and their consultation procedures must be
authored. It is important to note:
The SC can use the SOT SC Profile function to provide the first name and various contact details they want
displayed in their Outlines. Otherwise, their ‘preferred’ or standard name’ will be drawn from HR’s Alesco.
Contact HR if a preferred name requires maintenance.
If a temporary SC is preparing the Outline for an incoming SC, tick the To be advised option in the Outline to
remove the name and contact details of the temporary SC.
Given HR records and/or the SC Profile have been updated, or the ‘To be advised’ option is ticked/unticked, a
Data Refresh must be run on the Outline to update the information in the Outline.
Delegates of an SC can be specified via ACSES’s Nominal Subject Coordinator role; or the SOT’s Support Author role.

82
Support Author (S) Subject Coordinators and Nominal Subject Coordinators can add any active staff member as a ‘Support Author’ using the
‘Manage Roles & Permissions’ function for an Outline (under the Tools & Settings menu). Added Support Authors will be
listed as an ‘S’ type Author in the SOT. They have full edit permissions to collaborate on the Outline. Support Authors
can also be removed from the Outline via the ‘Manage Roles & Permissions’ function.
Variation If an Outline must be changed after it has been QA approved, the Outline variation workflow is triggered.
FAQ Why can’t I see a particular offering in my Dashboard? You will not see an offering in your Dashboard if you have not been added into an ACSES or SOT role for the offering; or
for offerings which are:
for a subject code that has a CASIMS tag of ‘Interact -- No Subject Outline’ -OR-
a multi-session subject (MSS) that does not have a cohort commencing in that session (see SAL+) -OR-
Inactive on the Subject Availability Listing (see SAL+). Also see Inactive Status Chip.
TIP If a ‘No Subject Outline’ CASIMS tag is removed, you must log a DIT Service Desk Request to force the addition of
subject offerings to the SOT (adding the tag should cause the offerings to automatically disappear from the SOT).
Why won’t the PDF open? Check you have enabled pop ups for the SOT on your browser. If they’re disabled, the PDF will be blocked.
Why do the full URLs display in the PDF for all my hyperlinks? The PDF displays the full URL for all hyperlinks. This is because the PDF serves as the printable version required by the
Subject Outline Policy. Once printed, the student requires display of the full URL.
Why can’t I clone my 2016 MSI Outlines into the SOT? The SOT supports cloning back to the MSI template that commenced 201730. For pre-201730 Outlines, copying/pasting
is much easier within the new SOT editor if you wish to manually transfer your content. If you’d like help to transfer your
content, raise an SRS request. For immediate support, phone an ESC on 34274 (external 02 6933 4274).
Why doesn’t an optional section that is null still display in the preview and PDF version? If the editor is null, it will display grey ‘Click to edit’ default text. If you cannot see the default text (see yellow
highlighted text below), activate the editor to remove any spaces that still exist.
How do I make my table header row repeat on each page of the PDF? In some cases, tables that have been cloned or pasted into the SOT editor will be detected as a header row and
therefore will repeat on each page of the PDF that the table spans. If not:
1. Click on your table to trigger the table options pop up
2. Click the ‘H’ option
3. A new row with grey shading will be added at the top of the table
83
4. Add labels to the new header row
5. Click anywhere on the old header row; then select ‘Delete row’ from the table row menu
Where can I find video guides and other useful artefacts? Please find all SOT Help and resources on the interim Subject Outline help website.
How do I hide table cell borders? The function that can show/hide table cell borders treats borders as if they are double-walled – so the cell wall and its
adjacent cell wall must be removed to hide the border. For example, to remove a left cell border:
1. Click in the cell and select ‘hide left border’
2. Click in the cell to the left of that cell and select ‘hide right border’
How do I set Due Dates when using the SOT from an overseas location? If your device is set to a date format of MM-DD-YYYY (month then day) this causes a problem because the SOT uses
Australian date format of DD-MM-YYYY (day then month).
The problem occurs when the Due Date date picker opens and tries to load the current date. It confuses the day/date
with the month and cannot load. For example, if the current date is 17th May, the date picker attempts to set the 17th
month.
Remedy this by changing your date / region settings to Australia; then re-opening the SOT.

84
APPENDIX A: Suggested text for Workplace Learning subjects
Subject content Workplace learning is a mandatory and assessable component of this subject. You will undertake [insert relevant
amount of WPL] [weeks/days choose appropriate option] of workplace learning in a real workplace setting. During this
time you will gain hands-on experience while supervised and guided by experienced practitioners and develop your
ability to integrate theoretical knowledge with contemporary practice.
Schedule Workplace learning in this subject will be undertaken for [insert relevant amount of WPL] [weeks/days choose
appropriate option].
As workplace learning is an assessable component of this subject students must undertake their workplace learning
during an appropriate time frame or be deemed to fail the assessment and consequently the subject.
Workplace Learning Workplace learning is an assessable component of this subject and it is necessary to attend and be deemed competent
in the workplace learning component in order to pass the subject.
Student preparation for workplace learning
To be eligible to undertake workplace learning students must complete and submit all pre-placement documentation
and requirements. If these requirements are not met within the specific timeframe the student will not be allocated a
workplace learning placement and in cases of self-selection the placement will not be approved, resulting in failure of
the workplace learning component and failure of the subject. These pre-placement requirements are in place to ensure
the safety of students, supervisors, the University and the community. They are a requirement of both the University
and other external regulatory bodies.
Costs and funding support for attending workplace learning
The costs for attending workplace learning are solely the responsibility of the student. You should expect to pay for
accommodation at the placement site, travel to and from the placement site, as well as food and living expenses.
Scholarships are available to assist you to meet the costs of attending placement.
Workplace learning special consideration requests
Students who suffer misadventure or are affected by extenuating circumstances which prevents them from meeting
acceptable standards or deadlines, including undertaking workplace learning placements at the time or place allocated,
may apply for special consideration. Circumstances that fit misadventure and extenuating circumstances are clearly
outlined in the Special Consideration Policy. Students whose circumstances fit misadventure and/or extenuating
circumstances, should discuss their individual circumstances with the subject co-ordinator in the first instance and lodge
their special consideration request online as early as practicable. Students should note that a successful special
consideration request that allows for change of the geographical location or placement dates without failing the subject,
does not guarantee that an alternative placement will be able to be sourced within the original time frame. The
provision of alternate placements is dependent on placement availability and therefore may delay course progression
and ultimately graduation.
Essential requirements to pass this subject Workplace learning is an assessable component of this subject and it is necessary to attend placement and attain a
satisfactory or passing grade in the placement component in order to pass this subject.

85
A fail grade will be awarded for the workplace learning component of this subject if:
1. a student has not completed pre placement requirements within the agreed time frame, in this case the student
will not be allocated a placement; and/or
2. the placement is not attempted at the scheduled time and place without an approved special consideration
request; and/or
3. the pass requirements of the placement are not met; and/or
4. a student displays unprofessional behaviour while on placement including, but not limited to breach of
confidentiality, acting or communicating with others in ways that are unethical, inappropriate use of social
media, dangerous or unacceptable by the normal standards of the profession, incompetence which places the
student, colleagues and clients at risk of harm, demonstrating inappropriate occupational health and safety
standards, non-attendance without explanation and/or due cause, continual lateness, lack of preparation, not
abiding by site processes and procedures, not following directives of workplace learning supervisors,
undertaking illegal acts, abuse or untimely use of alcohol or non-prescription drugs and expressing attitudes or
demonstrating behaviours which may harm the reputation of the workplace, the profession and/or the
University; and/or
5. a student is withdrawn from placement for unsafe or unprofessional performance.
Please note it is the student’s sole responsibility to ensure he or she is compliant with all mandatory workplace learning
requirements. Students who fail to provide confirmation of compliance with pre placement requirements by the
compliance deadline will be ineligible for placement and a Fail (FL) grade will be awarded for the subject. Failure to meet
professional standards while on placement may result in a student being immediately withdrawn from a placement and
being at risk of exclusion from the course.
CSU Policies and Regulations
[In future, this will be Fixed Autotext for subjects tagged in CASIMS as >75% WPL]
This subject outline should be read in conjunction with all academic policies and regulations, e.g. Workplace Learning
Policy, Workplace Learning for Students with a Disability Policy (Planning Guidelines), Academic Progress Policy,
Academic Communication with Students Policy, Academic Integrity Policy, Assessment Policy – Coursework Subjects,
Balancing Work and Study with Family and Caring Responsibilities Policy, Special Consideration Policy, Student Academic
Misconduct Policy, and Student General Misconduct Rule.