success in numeracy education sine years 5 to 8 (pilot...
TRANSCRIPT
1
Success in Numeracy Education SINE Years 5 to 8 (pilot program)
Measurement Tasks
for
Primary Schools
Dr Kay Owens Charles Sturt University, Dubbo NSW
April 2003, Revised October 2004
© Catholic Education Commission of Victoria, 2003
2
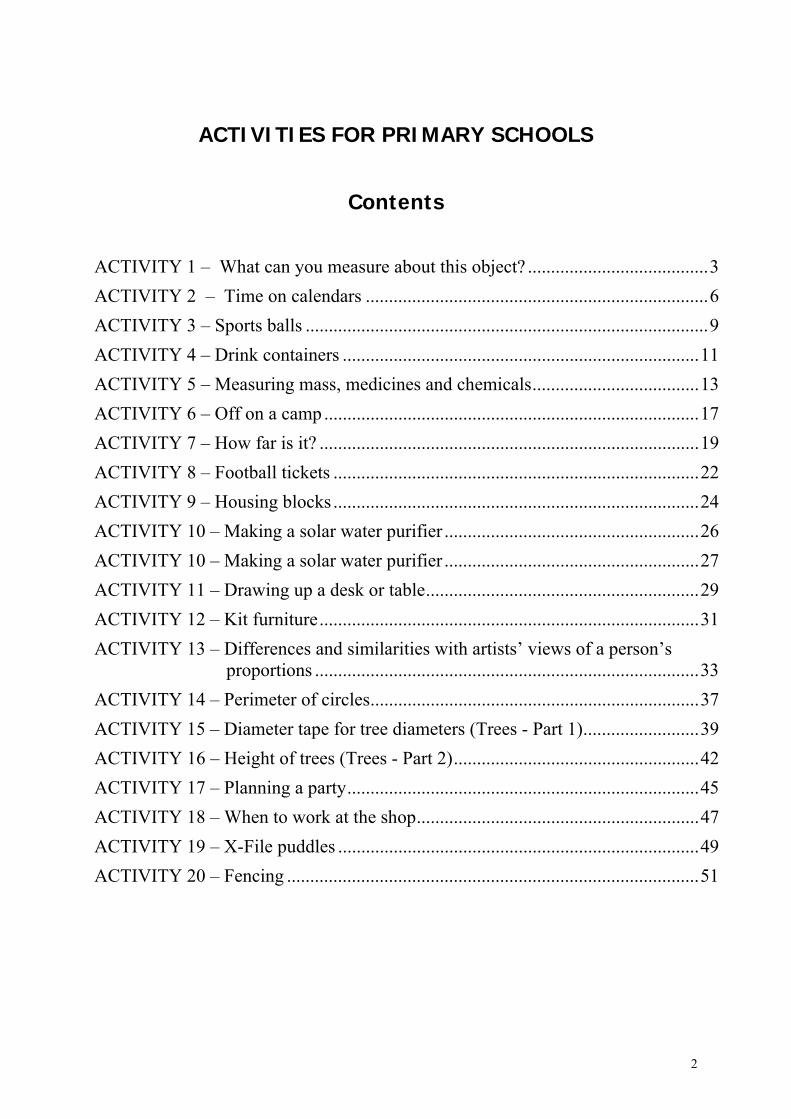
ACTIVITIES FOR PRIMARY SCHOOLS
Contents
ACTIVITY 1 – What can you measure about this object? .......................................3 ACTIVITY 2 – Time on calendars ..........................................................................6 ACTIVITY 3 – Sports balls .......................................................................................9 ACTIVITY 4 – Drink containers .............................................................................11 ACTIVITY 5 – Measuring mass, medicines and chemicals....................................13 ACTIVITY 6 – Off on a camp .................................................................................17 ACTIVITY 7 – How far is it? ..................................................................................19 ACTIVITY 8 – Football tickets ...............................................................................22 ACTIVITY 9 – Housing blocks ...............................................................................24 ACTIVITY 10 – Making a solar water purifier .......................................................26 ACTIVITY 10 – Making a solar water purifier .......................................................27 ACTIVITY 11 – Drawing up a desk or table...........................................................29 ACTIVITY 12 – Kit furniture..................................................................................31 ACTIVITY 13 – Differences and similarities with artists’ views of a person’s
proportions ...................................................................................33 ACTIVITY 14 – Perimeter of circles.......................................................................37 ACTIVITY 15 – Diameter tape for tree diameters (Trees - Part 1).........................39 ACTIVITY 16 – Height of trees (Trees - Part 2).....................................................42 ACTIVITY 17 – Planning a party............................................................................45 ACTIVITY 18 – When to work at the shop.............................................................47 ACTIVITY 19 – X-File puddles ..............................................................................49 ACTIVITY 20 – Fencing .........................................................................................51
3
ACTIVITY 1 – What can you measure about this object? MEASUREMENT IDEA: Objects have many different attributes that can be measured. Each is measured a different way and with different kinds of units
PURPOSE: Students can distinguish between the different attributes and know what units and instruments can be used. Students realise that length, for example, can be about straight lines, joined lines, oblique lines, and curved lines. They know that length can be referred to as length, height, width, distance, perimeter, etc. GROUP: Small groups YEAR LEVEL: 3 to 8 EQUIPMENT NEEDED: The teacher ensures students can find objects like pencil cases, boxes, and three-dimensional mathematics equipment for students to select an object to measure. Recording paper. Questions on an OHT to be revealed, used, asterisked as needed. OHT pen. A tape measure, grid paper, small blocks for mass, weighing scales, measuring cylinder as prompts for measuring, bucket, sand, gladwrap, modelling clay, string. TASK Each small group of 3-4 students selects an object in the room and discusses what attributes (e.g. about the parts) can be measured. Students will record what attributes the object has and use a sketch of their object in their report. There will be a class discussion and then a second period of group discussion. They will then be deciding what instrument they might use to measure that attribute and what units they will use. Encourage them to record the information in table form. After about 10 minutes, gain feedback from the groups about what they are thinking of measuring about their object. Ask the following questions or give them on the overhead and asterisk those that are to be addressed by the groups as they continue their discussions. At the end of the lesson, the class make a summary under the headings Attribute Parts Measuring
instrument Units Alternative ways
Length a) b) c) d) Area a) b) etc HINTS FOR TEACHERS If students suggest volume and the object cannot be wet, they could either make a model with modelling clay or wrap under supervision thoroughly in glad wrap and displace in sand. If students select objects like chairs make sure they look at distance between legs as another type of length. This task might take several sessions to complete. Stories like Goldilocks and the Three Bears or Big Friendly Giant might be used to introduce the subject. QUESTIONS TO ASK STUDENTS WHILE THEY WORK About length
• What parts of the object have length? • What could you measure and why? • Were any of the lengths for the object non-straight or a combination of straight lines? Does
this line have a name?

4
• What other kinds of lengths are on the object? Other attributes
• What other attributes can you measure for the object? • Can you see everything that can be measured?
Instruments
• What instruments can you use to measure each of the attributes? • Is there more than one instrument that could be used? • Is there a different method?
Units
• What units do you use to measure each of the attributes? • Which units are most suitable for your object? Why?
TEACHERS SHOULD LOOK FOR:
• Adequate understanding of the meaning of an attribute, especially of length • Students who can clearly define key words • Reasonable suggestions for units • Range of measurement contexts • Accurate descriptions for a procedure such as by displacement of sand/water for volume • Appropriate choice of measuring tools
STATEMENTS Measuring and Estimating 3.3 Estimate and accurately measure length, mass, volume and temperature using formal units and standard units 3.5 Use appropriate instruments to measure physical quantities 4.1 Choose attributes and standard units appropriate to the task 4.4 Use measuring instruments, reading simple scales and measuring accurately to the nearest marked gradation, taking into account the degree of exactness required 5.2 Select, use and adapt instruments to measure length, mass, capacity, volume, angle and temperature.

5
SUGGESTED STUDENT SHEET
What to measure about an object
This activity requires an object and measuring equipment and recording paper.
You will
• Find an object to measure.
• Measure different things for this object.
• Make a report to show what you can measure.
1. What can you measure about this object?
2. Are there various lengths you could measure? What are they?
3. What equipment will you use to measure the lengths?
4. What units will you use to measure the lengths?
5. You should sketch the object and draw the lines you are measuring.
6. Measure the various attributes of the object.
7. Are there other things about the object that can be measured? For example, mass?
8. What will you use to measure these other things? What units will be needed?
9. Measure these other things. If you do not have the equipment, explain how you could do it.
10. How will you set out your report? Could you use a table?
11. How could you compare your object with other objects?
around
length
height
6
ACTIVITY 2 – Time on calendars MEASUREMENT IDEA: Recording devises can be used to keep track of time and other measures
PURPOSE: This activity provides a good mathematical task to link into the study of other cultures such as those on Bali. It also links substrands on number with time.
GROUP: Pairs LEVEL: 5 to 7 EQUIPMENT NEEDED: A copy of a Bali calendar. Ordinary calendars covering the current month and future months for each pair. Students will work with their ordinary calendar. Some students may need coloured pencils or calculators. TASK In Bali, the calendar marks certain days as the end of a cycle. The Christian community has a cycle of 7 days. The seventh day is a special day. The Muslims have a cycle of 3 days and the Hindus have a cycle of 5 days. Starting today, how many days until Christians and Muslims celebrate together? How many days until all groups celebrate the same holy day? The Bali community sets these days aside as public holidays. If today is a holiday, what will be the date for the next holiday.
Extensions: Plan a calendar for your own community or for an imaginary community consisting of a number of different groups of people who celebrate on different cycles.
Mark the end of each moon cycle of 28 days on your calendar. HINTS FOR TEACHERS Multiplication can be used to find out the number of days for which 7 and 3 and 5 occur together. Students can mark each 7 day and each 3 days and each 5 days on the calendar with coloured pencils but this will go on for four months. It is easier to take away 30 or 31 days to find the date. Aboriginal communities do not emphasise regular periods or cycles but relate time to important everyday events like winds and plant or animal cycles. The circular calendars are representations of an oral tradition. However, they can be used to find dates on yearly calendars. Consider how many weeks each section might take. QUESTIONS TO ASK STUDENTS WHILE THEY WORK
• Are there any patterns emerging on the 7 day calendar? • What is special about the number on which all three holy days will fall? • Can you calculate that number? • Can you use shortcuts to find it on the seven day calendar?
TEACHERS SHOULD LOOK FOR
• Ability to use a calendar • Application of multiplication skills • Recognition of patterns • Familiarity with number of days in different months • Interest in cultures of their own community and of others
STATEMENTS Time 4.1 Use and construct timetables and use and analyse calendars 5.1 Measure, estimate and calculate time and duration of time

7
RESOURCES A copy of a Bali calendar Diagrams of Aboriginal calendars can be found in: Harris, P. (1991). Mathematics in a cultural context, p. 61. Deakin University Press. Cover of Australian Mathematics Teacher 1988. SUGGESTED STUDENT SHEET
Calendar from Bali
This activity requires an ordinary calendar and recording paper.
1. Write down the multiples of 7 and the multiples of 3. Which number is a multiple of both 7 and 3?
2. In Australia, we have 7 days in a week. In Bali, the Christian community also has a cycle of 7 days. The 7th day is a holy day.
Other communities have different cycles. The Muslims have a cycle of 3 days and the Hindus have a cycle of 5 days.
The Bali calendar marks the days that end the cycles for the three groups.
Starting today, how many days until the seven-day and three-day groups celebrate the same holy day?
3. How many days until all three groups celebrate on the same day?
4. The Bali community sets these days aside as official holidays.
5. Pretend that today is a special holiday. Use an ordinary calendar and work out the date of the next holiday.

8

9
ACTIVITY 3 – Sports balls MEASUREMENT IDEA: Volume and mass are different attributes of an object.
PURPOSE: Students need to compare objects on two different attributes to realise they are different. Hefting (lifting objects in each hand) and then using scales helps them to gain a sense of mass. Unlike length and area, mass cannot be seen. While students can see volume or capacity, they often need to use a method such as the displacement of water to appreciate differences in volumes of objects, especially round ones. GROUP: Small groups LEVEL: 5 to 7 EQUIPMENT NEEDED: Many different balls such as golf ball, squash ball, table tennis ball, cricket ball, tennis ball, tenpin bowling ball, soccer ball, AFL ball, NRL ball. Scales, tape measures, buckets and small containers of water with trays to catch displaced water. Measuring cylinders or jugs to measure the overflow. (Some equipment is designed to measure the overflow into a second chamber so there is less chance of mess.) TASK Students explore the differences in the sports balls. They keep a table about the sports balls. Students will put a selection of sports balls in order from smallest to largest in mass. They might need to work with just three balls at first. Students heft the sports balls and reorder if necessary. They estimate the mass of each sport ball to the nearest 100 g. Weigh some of the balls and readjust the estimates for mass. Put this information in a table. You will have about 5 columns. Students find the volume or capacity of the sports balls by placing the balls in a container of water and measuring the amount of overflow. They add this information to the table. Students estimate the diameters and circumferences of the balls. They add these to the table. And check the accuracy of their measurements by finding the circumference divided by the diameter. What should this value be? Students take the mass of some of the balls and estimate the density of these. Calculate the density by using the formula density = mass/volume. Explain the effect of different densities on the balls’ masses and volumes. QUESTIONS TO ASK WHILE STUDENTS ARE WORKING
• What affects the mass of a ball? • Is mass the same as volume? • What do we call the ratio of the diameter to the circumference of a circle? • Is this special? Does it happen for other shapes? • What is being measured by the displacement? Can mass be measured this way? • What do we call a formula like that for density?
TEACHERS SHOULD LOOK FOR
• Understanding of the difference between mass and volume • Understanding of the idea of ratio and rates • Understanding the idea of obtaining volume by displacement
STATEMENTS Measuring and Estimating 4.4 Use measuring instruments, reading simple scales and measuring accurately to the nearest marked gradation, taking into account the degree of exactness required

10
5.2 Select, use and adapt instruments to measure length, mass, capacity, volume, angle and temperature. Using relationships 4.3 Investigate and compare the volume and mass of objects 5.2 Develop and use rules to calculate perimeters of polygons and circles etc 5.3 Calculate and use rates SUGGESTED STUDENT SHEET
Sports Balls
This activity requires • balls of different shapes and sizes used for sports, • a bucket of water and tray for overflow water and smaller containers for smaller balls • a measuring jug • scales • tape measures • string • recording paper or computer spreadsheet
1. Decide how to keep a record about the sports balls. One way is a table with a column for the name, then for mass, volume, diameter and circumference. Five columns all together. Prepare the recording sheet.
2. Select one person to handle the selection of balls while the group suggests the order from smallest to largest in mass. Start with just three balls at first. Share why you make the suggestions.
3. Now check. Heft the sports balls, that is lift them up in your hands, and reorder if necessary.
4. Then estimate the mass of each sport ball to the nearest 100 g. Weigh some of the balls and readjust the estimates for mass. Put this information in the table.
5. Find the volume or capacity of the sports balls by placing the balls in a container of water and measuring the amount of overflow. Add this information to the table.
6. Estimate the diameter of the balls and the circumference of the circular balls. Add these to the table. Check the accuracy of your measures by finding the circumference divided by the diameter. What should this value be?
7. Take the mass of some of the balls and estimate the density of these.
8. Calculate the density by using the formula density = mass/volume.
9. Explain the effect of different densities on the balls’ masses and volumes.
11
ACTIVITY 4 – Drink containers MEASUREMENT IDEA: Units of capacity
PURPOSE: Students estimate relative capacities and become familiar with amounts given in millilitres. This activity integrates the measurement and number substrand on fractions. GROUP: Small groups LEVEL: 5 to 7 EQUIPMENT NEEDED: empty small commercial drink bottle marked where the original content came to or when measured to the amount it is supposed to hold, small and large cups, smaller and larger containers, drink can, water. Cover up the number of millilitres marked on the outside for the start of the task. PRE-ACTIVITY: Students estimate how much of a container, the water in a smaller container will fill. They should make use of fractions to describe the amount. Use containers with straight sides and sloping sides and different shapes just for interest. TASK Take the bottle as one unit. There should be smaller and larger containers. How many bottles will fit into the other containers? Record the estimates. Groups discuss their estimates and various methods of determining the relative capacities. They can then mentally calculate and write a report. Extension: Use containers for tinned food, jams or washing powders for a similar activity. HINTS FOR TEACHERS Many students will know the number of millilitres in common containers. They can use these if they know. The cover up of millilitres can be temporary but it can be permanent with the teacher holding a set of containers with uncovered millilitres. Containers used for the one kind of drink can make the task more interesting. Cardboard cartons, with edges sticky taped, hold water too. QUESTIONS TO ASK STUDENTS WHILE THEY WORK
• How do you do your estimates? • Are any shapes deceptive? • How might you check capacity of each container?
TEACHERS SHOULD LOOK FOR
• Visualising capacities and volumes in different shapes • Understanding of a capacity unit • Able to work with fractions in the context of capacity or volume
STATEMENTS Measuring and estimating 4.2 Make judgments about the relative size of objects based on comparison to known benchmarks or standard units 5.3 Use judgments of the size of metric units to make and refine estimates of quantities

12
SUGGESTED STUDENT SHEET
DRINK CONTAINERS
This task requires a small bottle, containers that are smaller and larger than this bottle.
1. Take the small bottle and fill it with water to the mark. Estimate how much of the bottle will fill the smaller containers. Estimate how many bottles will fit into the other containers? Record your estimates.
2. Discuss your estimates with the rest of the group. Discuss various methods of working out the fractions.
3. Check by pouring into each container.
4. If we take the small bottle as the unit. You might record your findings in a table like this:
¼ ½ ¾ 1 2 3
5. Estimate the number of millilitres in each container if you have not done so
already.
6. Now check your fractions by reading and using the number of millilitres in the containers. Mentally work out how correct you were.
(If you cannot do this mentally, use another calculation method.)
7. Write a report on how you estimated the capacities and how you calculated the fractions.
13
ACTIVITY 5 – Measuring mass, medicines and chemicals MEASUREMENT IDEA: Reading scales on different instruments
PURPOSE: Students need to read scales with calibrations that are marked and unmarked. Students need to realise that accuracy can be very important especially for nurses giving medicines in hospital or their parents giving them medicine at home or farmers using poisons.
GROUP: Individual LEVEL: 5 to 7 EQUIPMENT NEEDED: Bathroom scales (6 if possible), single arm scales (if possible). Small containers, coloured water and measuring instruments used at home for measuring medicines or at school for science. Worksheet on scales. Small bottles such as empty medicine bottles. In addition, use copies of the worksheets and real medical, veterinary or science syringes without needles The worksheet is not marked but teachers can make several copies and mark it for different amounts before photocopying for the class.
Pre-activity also requires marking pens, clear straight edged jars with lids and tapered transparent or translucent cups, coloured water or sand, trays to catch spillage, spoons, and small containers like film holders. Kitchen scales and at least 2 kilograms of play dough and vegetables. Visit a centre where they weigh babies or food e.g. Victoria markets. Extension activity requires some recipes, preferably those that can be made and eaten. PRE-TASK ACTIVITY Count in 5s, 10s, 0.1, 0.2, 0.5 using a number line to illustrate the skip counting. Make a capacity measuring instrument by using straight edged glass jars. Take a smaller container like the lid and fill with water. Pour this into the glass jar and mark the level it has reached as 1 lid. Keep filling with the lid and marking off each lid. Then use some tapered cups for the same activity and compare the similarities and differences. The volume of some small containers can be estimated and checked in terms of lid fulls and spoon fulls. Using kitchen scales, students can use a large quantity of play doh and work out how much will make half a kilogram, one kilogram and two kilograms, adding small amounts to make it correct (like the butcher or green grocer weighing out meat or fruit.) TASK In the hospital, there are a number of different machines for weighing different people like babies and adults. Watch the scales change as you add, say school bags to the scales. Below are some diagrams of weighing machines. From the diagrams, what are the masses of the people on the weighing machines? Different syringes are used for different volumes of medicines. Scientists need to measure small amounts and use different types of instruments too. A second photocopy can be given with the syringes marked. How much fluid is in each syringe? Students can compare answers with their partner and discuss difficulties. Students select small containers and estimate how much they might hold in teaspoons and millilitres (mL) Students might work out how many days the fluid would last if one teaspoon is needed every four hours. Extension activities can involve cooking recipes with cups, grams and mL. For example, a nice recipe for a salad dressing and some lettuce or dip with carrot sticks to go with it or a satay sauce with cooked chicken pieces on toothpicks that can be dipped in it and eaten. HINTS FOR TEACHERS Some teachers are concerned about the use of syringes because of their links to illegal drug use. They may wish to use only the cylinder worksheet for volume. However, students should also be aware that

14
there are important and legal uses of syringes for delivering medicine in hospitals or under a doctor’s supervision. QUESTIONS TO ASK STUDENTS WHILE THEY WORK
• If the measuring instrument for fluids is marked off in 5 mL, how many marks for 30 mL? • If the measuring instrument is marked off in 0.2 mL, how many marks for 1 mL? • Why does the thin section of the tapered medicine cup have a bigger height for 5 mL, than
the wider section? • What does that tell you about the length measures needed to calculate volumes?
TEACHERS SHOULD LOOK FOR
• Reading different scales • Recognition of volume as an area times a height • Estimating in grams and millilitres • Working with decimal fractions
STATEMENTS Measuring and estimating 4.4 Use measuring instruments, reading simple scales and measuring accurately to the nearest marked gradation, taking into account the degree of exactness required. 5.3 Use judgments of the size of metric units to make and refine estimates of quantities.
15
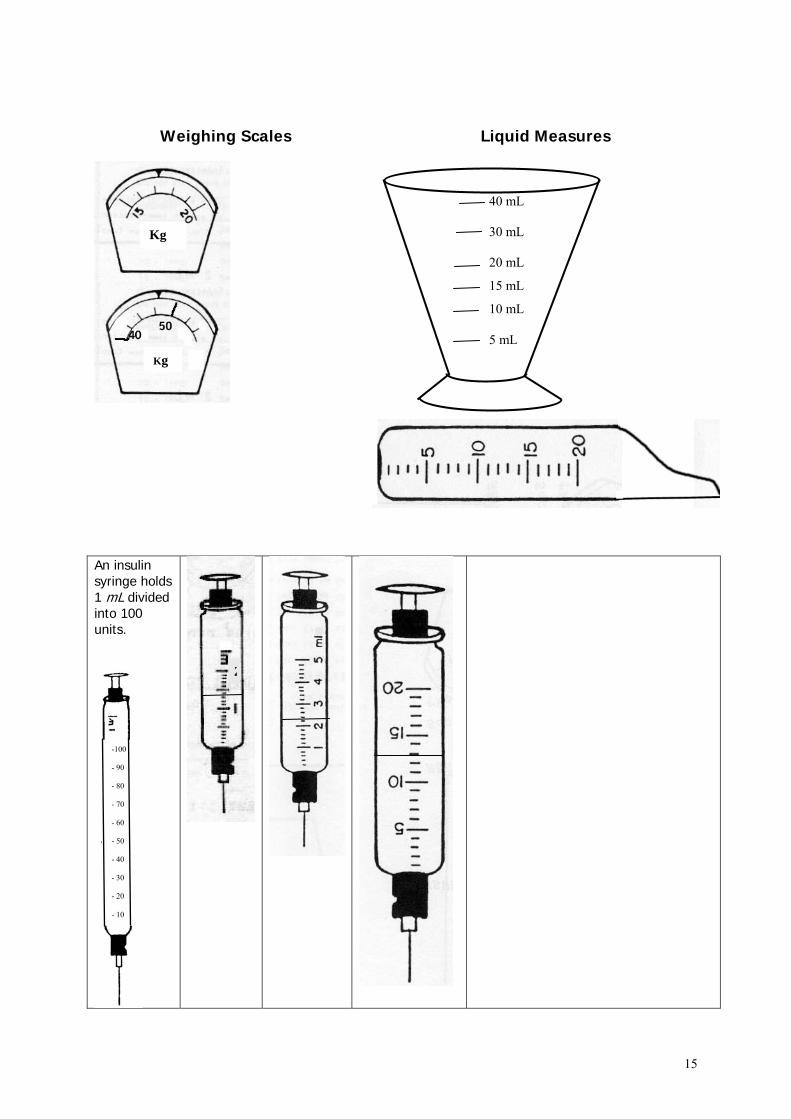
Weighing Scales Liquid Measures
An insulin syringe holds 1 mL divided into 100 units.
Kg Kg
Kg
40 mL 30 mL 20 mL
15 mL
10 mL 5 mL
2
-100 - 90 - 80 - 70 - 60 - 50 - 40 - 30 - 20 - 10

16
SUGGESTED STUDENT SHEET
Measuring mass, medicines, chemicals – reading scales
For this activity, you need to watch how people use scales at the markets or shops, and possibly in hospitals or veterinary clinics. This task requires bathroom scales, medicine cups and spoons, small containers, empty medicine bottles, objects to weigh and sheets illustrating measurement instruments. In the hospital, there are a number of different machines for weighing different people like babies and adults. Baby scales weigh in kilograms and parts of kilograms. 1. The scales at the markets or shops could be watched and you can record how
the calibrations are marked.
2. Use the bathroom scales. Place different objects on the scales slowly and watch the dial move. The scales change as you add, say school bags to the scales. Record whether the dial is going clockwise (right) or anticlockwise (left). Record what the calibrations are representing.
3. Look at the diagrams of instruments for weighing. Read off the mass in kilograms. Who might be being weighed (a man, baby, child, teenager)?
Scientists need to measure small amounts and use different types of instruments too. In the hospital, different syringes are used for different medicines.
4. Use some measuring cylinders, cough mixture spoons and measuring cups to partially fill and read off the amounts.
5. On the worksheet with the liquid measures, record what the amounts are and discuss the calibrations (marks between numbers).
6. Select small containers and estimate how much they might hold in teaspoons and millilitres (mL). Check. Record how you are making estimates and reading the calibrations.
7. How much is 1 teaspoon in millilitres? Select some empty medicine bottles and work out how many days the fluid would last if one teaspoon is needed every four hours.
8. If 30 mL is given six hourly, how long would the bottle last?
17
ACTIVITY 6 – Off on a camp MEASUREMENT IDEAS: Recognising the use of instruments and calculating the differences in measures of mass and time
PURPOSE: Students can experience different masses and become relatively capable with masses, adding on in kilograms and in hours and minutes
GROUP: Small groups LEVEL: 6 to 8 EQUIPMENT NEEDED: A pack and bathroom scales. Kitchen scales to weigh smaller items. Typical items for camping and going on an overnight bivouac e.g. sleeping bag, jumper, shirt, jeans, sports shoes, hat, sunscreen and other toiletries, spare underclothes, camera. Clocks. PRE-ACTIVITIES: Students discuss the fun of camping. They can discuss how they have to look after their needs like sleeping, eating, cooking and hygiene. They discuss how they need to be prepared and how they need to take just the minimum. The students can make a list of sensible items. You can also talk about how to pack by bringing in the items and these can be used for the next activity (plus more just for contrast of what is really necessary). This activity links to Human Society and Its Environment. TASK Students will discuss going on a camp and the need to weigh their luggage and work out the times for leaving and returning. Extension: Work out the total class mass of packs and bags. QUESTIONS TO ASK STUDENTS WHILE THEY WORK
• How can we weigh the pack? • If you weigh 75kg with the full pack on your back and you weigh 57kg without it, how heavy
is your pack? Will you have to take something out? If so, what? • How can you keep a record of what you need, its mass and the total mass? • If you use the spreadsheet, how is it best to record the mass of items less than a kilogram?
HINT FOR TEACHERS A set of smaller scales like kitchen scales could also be used to weigh individual items It helps if the bag overhangs the scales so they need to pick the bag up to weigh it properly. Adding from the current time up to 12 and then to the time you need is a sure way of working with time. You can use local transport and times to suit your school. Students could use Excel to record what they are taking and its mass. They can then sum, deduct items and add items as necessary. Use the ∑ icon to sum the items. Students might need to record masses as decimal fractions of a kilogram. Students might be able to weigh luggage at home too. A similar but harder task is found in the secondary pack – Off on a holiday. TEACHERS SHOULD LOOK FOR
• Using the 24 hour clock • Adding and subtracting times using hours and minutes • Mental calculation of masses with one or two digit additions and subtractions. • Estimating in kilograms • Using available information
STATEMENTS Measuring and estimating 4.2 Make judgments about the relative size of objects based on comparison to known benchmarks or standard units

18
4.4 Use measuring instruments, reading simple scales and measuring accurately to the nearest marked gradation, taking into account the degree of exactness required 5.3 Use judgements of the size of metric units to make and refine estimates of quantities Time 4.3 Tell the time accurately using analogue clocks and digital clocks 5.3 Measure, estimate and calculate time and duration of time SUGGESTED STUDENT SHEET
Going Camping You need bathroom scales, kitchen scales, your hiking pack and what you might take to camp, paper or computer for recording; calendar
THE PACK You are off on a five day camp. One night during camp, you are going on a hike and staying out overnight. You need to make sure your hiking pack is not too heavy. Your hiking pack needs to weigh less than 8 kg. You can take one other small bag to camp. This is not taken out overnight.
1. How might you check the mass of each bag?
2. One way is to weigh yourself and then hold onto the bag and weigh again. What will you do then?
3. Try out various items and estimate how much they might weigh and then pack up an overnight pack. Weigh it and adjust as necessary. How heavy is your other bag?
4. Write out or record on a spreadsheet of what you might carry in the pack and in the other bag. Estimate their masses. Record on paper or in a word document how you estimated the mass of different items. Now weigh them and record this. Use the ∑ icon to sum up your items. Now adjust so your items come to less than 8 kg. Record how you adjusted your pack items.
TIME FOR TRAVELLING 5. When will you need to get up? Work backwards. Your bus is leaving the school at 08:00. It
will take your family 10 minutes to drive to school and 40 minutes to have breakfast and get ready (having nearly packed your pack and bag the previous day).
6. The bus trip takes 6 hours because you are visiting some places on the way. When will you arrive at camp using the 12 hour clock and 24 hour clock?
7. When you return, you will arrive back at school at 17:30. What time is that on a 12 hour clock?
8. Make a timetable of these times for your parents. For example, date, when to get up, when to be at school, when you arrive at the camp site, date for return trip, when you will arrive home.

19
ACTIVITY 7 – How far is it? MATHEMATICAL IDEA: Large lengths and informal composite units
PURPOSE: Students will consider different ways of measuring, discuss average stretch, use informal composite units, use problem solving strategies like simplifying the task, using themselves as models and sketches. They will pose problems and solve them. These activities integrate with the number strand. GROUP: Small groups LEVEL: 6 to 8 EQUIPMENT NEEDED: Encyclopaedia (i.e., electronic) or atlas, calculators, globe, string, tape measures, stop watches, balls TASK Preliminary activities assist students by
• Making a good estimate of an arm span for a person. They discuss how they might get a good measure and calculate a good estimate of an average arm span to use in the next question.
• Students use the atlas, encyclopaedia or other means to find out how far it is around a great circle of the earth such as the equator.
Students will solve the following problems:
• If there were 20 million people in Australia and they all joined hands with outstretched hands, approximately how long would the line be?
• How far is this in kilometres? Would this line of people stretch around the earth at the equator?
• The Swedish people have a special unit called a mile which is equal to 10 kilometres. How many Swedish miles around the world at the equator or on a great circle?
• If you gave a ball to the first person in the line to pass on to the next person, how many days would it take to pass on the ball to the last person in the line?
• If you needed to count all the people in Australia, how long would it take you? What short cuts would you use?
HINTS FOR TEACHERS
Students could measure the arm span for at least three people and take the middle score or average score.
They could guess how far the class will stretch and then go outside and try it.
Students need to look at the globe and may need to use string to see how the different circles parallel to the equator vary in length.
The great circle of the earth is 40 008 km (World Book) but this is an opportunity for students to find out this information on the computer or in a book.
Students will be encouraged to pose problems by trying to decide how to count the people. They are likely to realise that small numbers take less time to say than big numbers. For example, they might decide to say all the numbers, or group and tally groups and so they only have to count up to 100 each time.
Calculators may be necessary, especially for finding the average arm span of a group of people but these questions allow students to use and develop place value knowledge.
They can also calculate times for say 10 or 20 people simplifying the questions and using informal composite units.

20
Students will need to consider carefully about operations (e.g. subtracting to compare 20 arm spans to earth, dividing for Swedish miles, multiplying for time but dividing if using a group of people (composite unit) into 20 million. QUESTIONS TO ASK STUDENTS WHILE THEY WORK During the preliminary activities, ask
• If we are all different, what would be a good measure to represent each of us? How will we work this out? Can you do this for your small group? How could you get the class total or average?
• How far is it at the equator between two longitudes? How many longitudes and so how far all together?
• Is it the same on all the horizontal circles around the earth? During the main problems, ask
• How many place value columns do you have? • What units are you using? Would it be easy to change units before we start? • What will be the length for a hundred people? • How many hundred people do you have? • Will the length be shorter or greater than the earth’s great circle?
• How will you find out how long it takes to pass a ball? Is this calculation like the length of the arm span? Could we take a shortcut?
• How will you decide on the length of time to count people? How will this calculation vary using different shortcuts or strategies?
TEACHERS SHOULD LOOK FOR • Ability to notice different lengths in the horizontal circles around the earth • A good sense of place value for determining the larger lengths and value of using alternative
units for large distances • Selecting to use multiplication, division, and averages for various questions • Posing questions to simplify the task
STATEMENTS Time 4.2 Estimate, measure and calculate time elapsed (duration) 5.1 Measure, estimate and calculate time and duration of time. Measuring and estimating 5.1 Recognise and select appropriate metric units and levels of accuracy for measuring quantities and rates 5.3 Use judgments of the size of metric units to make and refine estimates of quantities Using relationships 5.3 Calculate and use rates

21
SUGGESTED STUDENT SHEET
How far is it?
Problem 1: If there were 20 million people in Australia and they all joined hands with outstretched arms, approximately how long would the line be?
Hints: You need to estimate and work out how long an average arm span might be. How might you do that?
Try simplifying your problems
Estimate how far 20 million people might stretch. (You could first estimate how far the class stretches and try it).
How far is this in kilometres? Calculate the distance, may be in a couple of calculations. Convert at some stage to kilometres but be careful about where you have your decimal point. Problem 2: Would this line of people stretch around the earth?
Hints: Find out how far it is around the world using a library search (electronic or in books).
What operation will you do to find out how many people are needed? You might like to draw a sketch to help you. Problem 3: The Swedish people have a special unit called a mile which is equal to 10 kilometres. How many Swedish miles around the world on a great circle?
Hint: The sketch will help you with the idea of a Swedish mile being 10 kilometres. Problem 4: If you gave a ball to the first person in the line of 20 million to pass on to the next person, how many days would it take to pass on the ball to the last person in the line?
Hint: Model a simpler problem first. Problem 5: If you needed to count all the people in Australia, how long would it take?
Hint: What do you have to decide to do this?
Write a report about your findings. Include the methods of problem solving that you used to do these problems.

22
ACTIVITY 8 – Football tickets MATHEMATICAL IDEAS: Making distinctions between the attributes that can be measured
PURPOSE: Students will make accurate measures. Students can distinguish between length and area and mass. These activities integrate with the number strand.
GROUP: Small groups LEVEL: 6 to 8 EQUIPMENT NEEDED: Calculators, photocopies of football or other ticket, A4 paper and scissors TASK Students will solve the following problems.
At an AFL football match, 48 650 people attended. Each person was given a ticket measuring 12 cm by 6 cm. Draw the ticket. (You might like to cut this out to use with a group of students for understanding the next few problems.)
If the tickets were laid end on end, how long would the line of tickets be?
How many square centimetres of paper would be used to make the tickets?
How could the tickets be laid out on A4 paper?
If the ticket’s length and breadth were halved (now 3 cm by 6 cm), how much would be saved on the cost of the paper?
If the paper for the tickets was 0.08 of a centimetre thick, and the tickets were stacked on top of each other, how high would the pile of tickets be?
If each ticket had a mass of 0.4 gram, how heavy would the tickets be all together?
HINTS FOR TEACHERS A3 paper is double A4. A2 is double A3 and A1 is double A2. Students might need to use tickets to work out how to do these questions. QUESTIONS TO ASK STUDENTS WHILE THEY WORK
• Estimate how long, how much space, how high or how heavy the tickets will be before calculating.
• How much longer if you had another 1 000 tickets? • What happens to the area when the tickets are rearranged? • How can you take shortcuts in working out how best to lay the tickets on the A1 paper? • Does the mass get used to find length or area? Why?
TEACHERS SHOULD LOOK FOR
• Having the different attributes indicated by different units and the related units (e.g. mass by grams and kilograms)
• A sense of place value when calculating sizes • Explanations of efficient methods when calculating or arranging areas.
STATEMENTS Measuring and estimating 5.1 Recognise and select appropriate metric units and levels of accuracy for measuring quantities and rates 5.3 Use judgments of the size of metric units to make and refine estimates of quantities Using relationships 4.1 Investigate the relationship between area and perimeter and calculate area of a polygon 5.1 Obtain areas by counting squares in order to develop new rules for the area of regular shapes

23
SUGGESTED STUDENT SHEET
Football Tickets
1. At an AFL football match, 48 650 people attended. Each person was given a ticket measuring 12 cm by 6 cm. Draw the ticket.
2. If the tickets were laid end on end, how long would the line of tickets be?
3. How many square centimetres of paper would be used to make the tickets?
4. How could they be laid out on A4 paper?
Suppose you are responsible for making the tickets and distributing them. You might need to solve the following problems so you have an idea of piles of tickets and how heavy they might be.
5. If the paper for the tickets was 0.08 of a centimetre thick, and the tickets were stacked on top of each other, how high would the pile of tickets be?
6. If each ticket had a mass of 0.4 gram, how heavy would the tickets be all together?
7. If the ticket’s length and breadth were halved (now 3 cm by 6 cm), how much would be saved on the cost of the paper?
8. Write up a brief report for the football club committee on your findings.

24
ACTIVITY 9 – Housing blocks MATHEMATICAL IDEAS: Relative sizes and area conservation
PURPOSE: Students can see different rectangular areas and sketch diagrams and consider their different areas. GROUP: Pairs LEVEL: 5 to 8 EQUIPMENT NEEDED: Calculators, rulers, paper and pencils for drawing TASK Students will consider different ways of organising rectangular house blocks and their driveway access. They can also consider house blocks of different shapes. The problems are put into a real life context. HINTS FOR TEACHERS Figure 3 and 4 can use Pythagoras’ theorem for students working at Level 5. QUESTIONS TO ASK STUDENTS WHILE THEY WORK
• What are the social implications of such decisions? • How narrow can the driveway be and still be safe? • Is there an even more efficient method? Why? • What did you consider in deciding on the best way to place blocks? • How did you work out if triangular block areas were satisfactory? • Do you need to know the length of the oblique road? If so, how will you find it out?
TEACHERS SHOULD LOOK FOR
• Visualising areas and recognising relative differences (if any) between different arrangements • Understanding that scale drawings or Pythagoras’ theorem can give unknown lengths if there
are right-angled triangles. STATEMENTS Using relationships 4.1 Measure and compare the perimeter and area of regular and irregular polygons 5.1 Recognise and select appropriate metric units and levels of accuracy for measuring quantities and rates Source: Henry, M. & McAuliffe, R. (c. 2000) Mathstralia, for Australian Association of Mathematics Teachers, Adelaide.

25
SUGGESTED STUDENT SHEET
House Blocks
You will need calculators, rulers, paper and pencils for drawing, scissors Many of the streets in our suburbs are organised with house blocks on each side (Figure 1).
In Christchurch, New Zealand, there are some areas where one street serves as access to two housing blocks. The driveway for the one at the back of the block is through the land of the one at the front of the block (Figure 2).
1. The common house block and road organisation is shown in Figure 1. Is this the most efficient way of using land for housing?
2. Compare this with Figure 2. What do you think?
Figure 1 Figure 2
3. What if house blocks shared the driveway as shown in Figure 3?
4. Write a report which investigates the possibilities mentioned and others. You should include estimates of widths of driveways and roads.
Figure 3
R O A D
R O A D
R O A D
R O A D
ROAD ROAD
ROAD

26
The block of land shown in Figure 4 below is to be developed with house blocks of 1 000 m2.
5. What would be the most efficient way of organising the blocks?
SCHOOL
R O A D
R O A D
R O A D
400 m
1 200 m
900 m
Figure 4

27
ACTIVITY 10 – Making a solar water purifier MEASUREMENT IDEAS: Measurements are used in investigating, making and designing
PURPOSE: This is a useful activity for integrating science, human society and its environment and mathematics. Students will take some time to collect results. They may need to measure when designing their own purifier and when drawing for their reports. GROUP: Small groups LEVEL: 5 to 7 EQUIPMENT NEEDED: small stones, crockery cup or glass, large container (preferably glass) per group, measuring cylinder, thermometer, plastic food wrap, masking tape (if using non-glass container), muddy water or salty water, sunny day PRE-ACTIVITY Create a model of the water cycle by condensing steam on the underside of a container with iceblocks and discuss what is happening. TASK Put the muddy water into the container with the cup in the centre. Make the solar water purifier by placing the plastic wrap across the container with the stones to weigh down the centre above the cup. The container needs to be airtight by making sure the wrap is clinging to the glass or using masking tape. Record times and volumes. Draw your water purifier and explain its working and how you improved it. Design a portable water purifier. Make it and describe the process. Extension What Australian towns use water purifying systems to convert salty bore water to fresh water? How big are they? Do they work on the same principle? HINTS FOR TEACHERS Cooper Pedy had a salty bore water which was desalinised by using a similar system. Muddy water should be free of chemicals. QUESTIONS TO ASK STUDENTS WHILE THEY WORK
• Vary the amount of slope for the cling wrap. Does it effect the amount of water that is collected?
• Is a bigger container better? • How can you make a portable version? What do you need? Will all plastic work? What else
can be used? • How does the purifier work? • When might it be useful?
EXTENSION Make a stream table by filling a large metal or plastic tray with different types of soil and pouring water gently onto one corner or in the middle. Students should consider the angles of the soil, the resulting angles of the stream flow, time for flow to reach the bottom. TEACHERS SHOULD LOOK FOR
• Reading of volume in the measuring cylinder • Reading the thermometer • Using measurement, folding capabilities of materials, or linkages to design a portable purifier.
STATEMENTS Measuring and estimating 3.4 Demonstrate understanding of the concept of angle 4.4 Use measuring instruments, reading simple scales and measuring accurately to the nearest marked gradation, taking into account the degree of exactness required.

28
Source of idea: MacLennan, G, & Buddle, G. (1992). Generate, create, investigate 3, Jacaranda Press. SUGGESTED STUDENT SHEET
Designing a Water Purifier
You are going to make a water purifier and then design one. You will need a large container, cling wrap, possibly masking tape depending on seal, small stones and a cup. You will need some non-chemical muddy water.
1. Put the muddy water into the container with the cup in the centre.
2. Make the solar water purifier by placing the plastic wrap across the container with the stones to weigh down the centre above the cup. The container needs to be airtight by making sure the wrap is clinging to the glass or using masking tape.
3. Record times and volumes taken to make some clean water.
4. Try to improve it by changing, for example, the slope of the wrap.
5. Draw your water purifier and explain its working and how you improved it.
6. Design a portable water purifier. Make it and describe how it works.

29
ACTIVITY 11 – Drawing up a desk or table MEASUREMENT IDEA: Measurements are used to make comparisons. Ratios are used for relative size.
PURPOSE: This activity provides a realistic opportunity for students to measure and draw lengths. They will see the connection between centimetres and millimetres in practice. It integrates the number strand by giving a good sense of comparative numbers when making a map or scale drawing. Students should develop the shortcut for getting the perimeter of a rectangle as equal to the sum of twice the lengths and breadths. GROUP: Small groups LEVEL: 6 to 10
EQUIPMENT NEEDED: Tape measures, calculators, set squares or grid paper, rulers, paper for drawing. TASK Give each small group the following problem. “Your school’s general assistant is a good carpenter. Carpenters like to work in mm. She wants to build a table similar to the one in your classroom. You need to draw up some plans and give her sufficient measurements so she can make a good replica.” Each group can discuss how they will go about this task and then the groups can share. A summary of processes may include the following:
• Decide what measurements need to be taken. • Draw up a sketch on paper • Measure each required length and record on the sketch. • Plan to make a scale drawing. Decide how long 100 mm will be on paper using a sensible
ratio. • Lengths can be converted and then an accurate diagram drawn to represent the table.
The carpenter needs to put a trim around the edge of the tabletop. How long does it have to be? Can you work out a way of calculating this length without measuring all four sides? She also needs to buy material to make a cloth cover. The material comes in 1.2 m widths. Will this be wide enough for some overhang of about 10 cm on the edge. If not what will she have to do? How much does she need to buy? HINTS FOR TEACHERS The school desk is ideal if it is not too complicated. Otherwise the teacher’s table might be easier. Use cm tape measures (not inches) with mm marked. Otherwise you will need to spend time on how to use the correct side of the tape. A related but harder task is Kit Furniture. QUESTIONS TO ASK STUDENTS WHILE THEY WORK
• Why did you select to measure that length? • Why did you select that ratio? • Did you use informal units to give a rough estimate of the size? • Why might units other than mm be reasonable to use? When might you need to be more
accurate and use mm. • In words, what might be a general rule for calculating the perimeter of a rectangle? Will this
work for all rectangles? Why? What shorthand symbols might we use for this rule?

30
TEACHERS SHOULD LOOK FOR • Estimates of lengths • Use of measuring instruments including the starting point for measuring, the reading of mm
and cm • Estimates for calculations and knowledge of appropriate use of multiplication and division • Devising that the perimeter of a rectangle is twice the sum of the length and the width. • Working with lengths when areas are covered in practice. • Ability to imagine and add 10cm to both sides of the width for deciding on the cloth.
STATEMENTS Measuring and estimating 4.4 Use measuring instruments, reading simple scales and measuring accurately to the nearest marked gradation, taking into account the degree of exactness required 5.1 Recognise and select appropriate metric units and levels of accuracy for measuring quantities and rates Using relationships 4.1 Measure and compare the perimeter and area of regular and irregular polygons. 5.2 Develop and use rules to calculate perimeter of polygons and circles, areas of shapes based on triangles, rectangles and circles, and volumes and surface areas of rectangular prisms. 5.3 Calculate and use rates. SUGGESTED STUDENT SHEET
Drawing Your Desk You will need long rulers or tape measures, recording paper, and maybe a calculator.
1. Your school’s general assistant is a good carpenter. Carpenters like to work in mm. She wants to build a table similar to the one in your classroom. You need to draw up some plans and give her sufficient measurements so she can make a good replica.
2. Discuss in your group how you will go about this task and then share with the other groups. A summary of processes may include the following: • what measurements need to be taken. • a sketch on paper • measure of each required length recorded on the sketch.
3. Plan to make a scale drawing. Decide how long 100 mm will be on paper using a sensible ratio.
4. Lengths can be converted and then an accurate diagram drawn to represent the table.
5. The carpenter needs to put a trim around the edge of the tabletop. How long does it have to be? Can you work out a way of calculating this length without measuring all four sides?
6. She also needs to buy material to make a cloth cover. The material comes in 1.2 m widths. Will this be wide enough for some overhang of about 10 cm off the edge of the table. If not what will she do? How much does she need to buy?
7. Present your diagrams neatly and suggestions on cloth.

31
ACTIVITY 12 – Kit furniture MEASUREMENT IDEA: Measurements are used to make comparisons. Ratios are used for relative size.
PURPOSE: Students need to make some realistic decisions where measurements can be used to calculate and inform the decision making.
GROUP: Small groups LEVEL: 6 to 10
EQUIPMENT NEEDED: Tape measures, calculators, rulers, paper for drawing, sticky tape to make a model desk, scissors, screws and fittings commonly used for chipwood furniture kits (students could find out these in the hardware shop and find out the cost in advance). They might price the drill bit needed to make the holes for these fittings. TASK The teacher sets up the scenario. “You have seen a nice sleek desk in kit form at the local shops but it costs $125. It has a simple top and two side boards with a back board joining top and sides that comes half way down. The dimensions on the kit box say 800 by 600 by 680 and it looks like the 800 is the length of the desk. The kit is made from laminated board which the local hardware shop sells for $110 per 2 800 mm long sheets of 600 mm wide. Could you save money by making it yourself? Estimate the number of screws you will need and list the equipment if you have to make it. The kit gives all the fittings and all you need is a screwdriver and hammer. Should you make the desk with the help of an adult or buy the kit?” As a class, discuss some of the issues that are involved when deciding whether to make it yourself, hire labour to make it, or buy a kit. As a class, discuss what other things are ready made or in kit form that can be purchased or made at home. Which ones are cheaper to make yourself? Why? QUESTIONS TO ASK STUDENTS WHILE THEY WORK
• If you brought the material, how would you work out how to cut it? Draw up sketches to illustrate.
• Would it help to make a model? • What things do you need to take into consideration in making the desk yourself? • What things do you need to take into consideration when making, say, sandwiches?
TEACHERS SHOULD LOOK FOR
• Appreciation of the use of millimetres in the measurements • Use of labels on drawings used to figure out how the wood can be used • Consideration of order of activities and need for equipment • Recognition of the risks involved in making a desk from scratch for the first time and how
these risks are minimised STATEMENTS Measuring and estimating 4.1 Choose attributes and standard units appropriate to the task 4.2 Make judgments about the relative size of objects based on comparison to known benchmarks or standard units 4.3 Draw and construct objects using accurate measurements 5.3 Use judgements of the size of metric units to make and refine estimates of quantities Using relationships 4.2 Investigate the relationship between area and perimeter and calculate area of a polygon

32
SUGGESTED STUDENT SHEET
Kit Furniture
THE SHOP KIT
You have seen a nice sleek desk in kit form at the local shops but it costs $125. It is a simple top and two side boards with a back board joining top and sides that comes half way down. The dimensions on the kit box says 800 by 600 by 680 and it looks like the 800 is the length of the desk.
1. What are the units for these measurements?
2. Decide on the height of the desk. (What is comfortable to sit at 600 or 680?)
3. Write the measurements on the picture of the desk. How high might the back board be?
WHAT IF YOU MAKE IT YOURSELF?
The material is laminated board with a nice finish. The local hardware shop sells this same material for $110 per 3 200 mm long sheets of 600 mm wide.
4. Decide on the scale needed and draw this board on a piece of paper.
5. How will you cut out the pieces for the desk’s top, sides and back?
6. Will one sheet of wood be enough? Explain how you decided this.
Estimate the number of screws you will need and the equipment if you have to make it. The kit gives all the fittings and all you need is a screwdriver and hammer. Should you make the desk with the help of an adult or buy the kit?
7. How many screws will you need? What will be the cost of buying these?
8. On cost alone, is it worth making the desk yourself? Share your ideas with the rest of the class.
9. Discuss with your group and then your class what else you have to consider in making your own furniture (e.g. cost of mistakes).
10. Discuss with your class what else comes in kit form and how much you might save. You might like to cost the making of some kit foods.
33
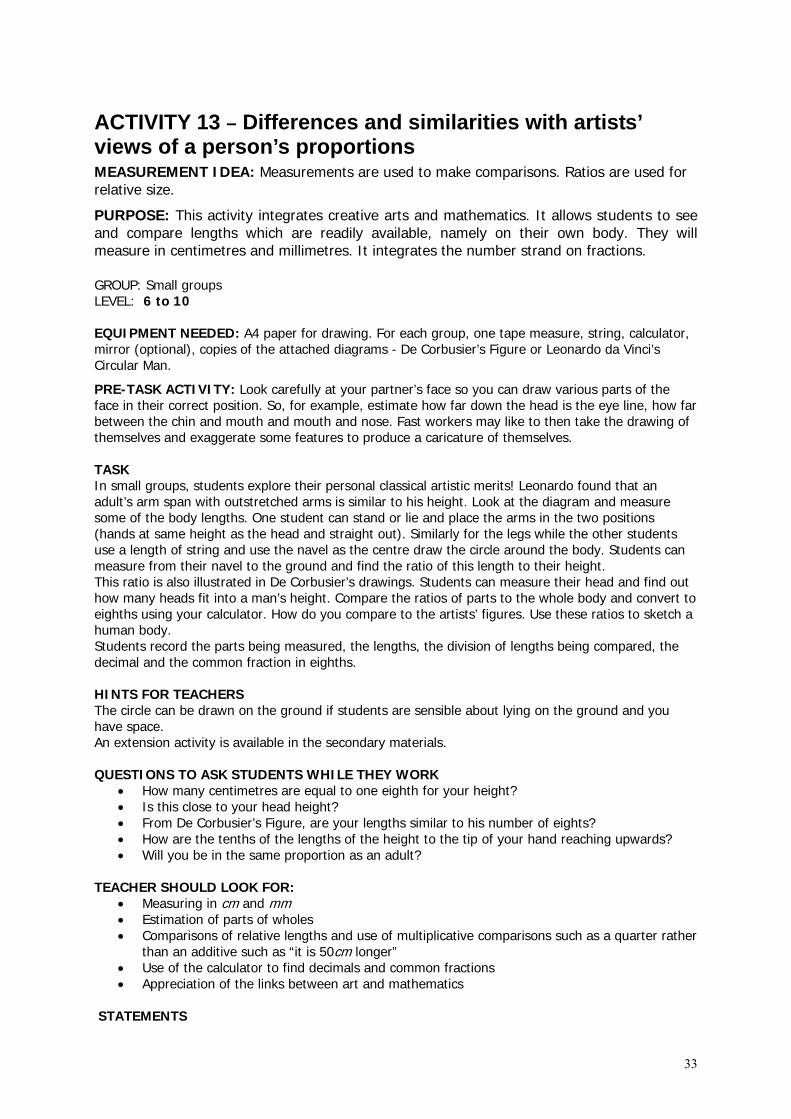
ACTIVITY 13 – Differences and similarities with artists’ views of a person’s proportions MEASUREMENT IDEA: Measurements are used to make comparisons. Ratios are used for relative size.
PURPOSE: This activity integrates creative arts and mathematics. It allows students to see and compare lengths which are readily available, namely on their own body. They will measure in centimetres and millimetres. It integrates the number strand on fractions. GROUP: Small groups LEVEL: 6 to 10 EQUIPMENT NEEDED: A4 paper for drawing. For each group, one tape measure, string, calculator, mirror (optional), copies of the attached diagrams - De Corbusier’s Figure or Leonardo da Vinci’s Circular Man.
PRE-TASK ACTIVITY: Look carefully at your partner’s face so you can draw various parts of the face in their correct position. So, for example, estimate how far down the head is the eye line, how far between the chin and mouth and mouth and nose. Fast workers may like to then take the drawing of themselves and exaggerate some features to produce a caricature of themselves. TASK In small groups, students explore their personal classical artistic merits! Leonardo found that an adult’s arm span with outstretched arms is similar to his height. Look at the diagram and measure some of the body lengths. One student can stand or lie and place the arms in the two positions (hands at same height as the head and straight out). Similarly for the legs while the other students use a length of string and use the navel as the centre draw the circle around the body. Students can measure from their navel to the ground and find the ratio of this length to their height. This ratio is also illustrated in De Corbusier’s drawings. Students can measure their head and find out how many heads fit into a man’s height. Compare the ratios of parts to the whole body and convert to eighths using your calculator. How do you compare to the artists’ figures. Use these ratios to sketch a human body. Students record the parts being measured, the lengths, the division of lengths being compared, the decimal and the common fraction in eighths. HINTS FOR TEACHERS The circle can be drawn on the ground if students are sensible about lying on the ground and you have space. An extension activity is available in the secondary materials. QUESTIONS TO ASK STUDENTS WHILE THEY WORK
• How many centimetres are equal to one eighth for your height? • Is this close to your head height? • From De Corbusier’s Figure, are your lengths similar to his number of eights? • How are the tenths of the lengths of the height to the tip of your hand reaching upwards? • Will you be in the same proportion as an adult?
TEACHER SHOULD LOOK FOR:
• Measuring in cm and mm • Estimation of parts of wholes • Comparisons of relative lengths and use of multiplicative comparisons such as a quarter rather
than an additive such as “it is 50cm longer” • Use of the calculator to find decimals and common fractions • Appreciation of the links between art and mathematics
STATEMENTS

34
Measuring and estimating 4.1 Choose attributes and standard units appropriate to the task 5.1 Recognise and select appropriate metric units and levels of accuracy for measuring quantities and rates 5.3 Use judgments of the size of metric units to make and refine estimates of quantities Using relationships 5.3 Measuring and finding ratios. SUGGESTED STUDENT SHEET
Artists Drawing People
You will need • A4 paper for drawing. • String • One tape measure per group. • Copies of the attached diagrams. De Corbusier’s Figure or Leonardo da Vinci’s Circular Man. • Calculators. • Mirrors (optional).
In this activity, you will explore your personal classical artistic merits! You will develop your drawing skills! Attached are art works by two famous artists from the 15th and 20th century.
1. Leonardo da Vinci found that an adult’s arm span with outstretched arms is similar to another body length. Look at the diagram and measure some of the body lengths. Which ones might be the same?
2. Check with your own arm span and height.
3. What shape did da Vinci put in the diagram to show this? Why?
4. One student can lie on the ground or stand with legs apart against a wall and place the arms so the hands are at the same height as the head. The other students use a length of string and use the navel as the centre draw the circle like da Vinci’s. Did you make arcs of the circle? (If the student is standing, you have to imagine the circle going into the ground and you may not be able to reach up high enough.)
5. Students, standing straight, can measure from their navel to the ground and compare this length to their height by making a fraction. Is it close to five eights as a decimal fraction?
This comparison is also illustrated in De Corbusier’s drawings.
6. Measure your head and find out how many heads fit into your height.
7. Compare the parts to the whole body. Are they close to the eighths suggested by De Corbusier.
8. How do you compare to the artists’ figures? Are you a classic artist’s shape?
9. Use these comparisons to sketch a human body like De Corbusier.
10. Record the comparison of lengths and express the ratios as decimal and common fraction. For example, head = 20 = 1 = 0.125
height 160 8
Extension: Use the computer to find out more about da Vinci and De Corbusier and their drawings. Where did they live? What else are they famous for?

35
Based on two of De Corbusier’s paintings

36

37
ACTIVITY 14 – Perimeter of circles MEASUREMENT IDEA: Curved lines have length. The perimeter or circumference of a circle is related to the diameter of the circle. The pattern linking circumference and diameter is a ratio. It gives a rule for calculating circumferences as about 3 multiplied by the diameter.
PURPOSE: Students measure and look for a pattern linking numbers to make a rule for calculating measurements. This pattern is that the circumference is about three times the diameter. Students can find a more precise number.
GROUP: Small groups LEVEL: 6 to 10
EQUIPMENT NEEDED: Different sized circles such as lids and wheels which can be rolled along a line or wrapped with string or a tape measure, place for a line to be drawn if lids and wheels are going to be rolled, spreadsheet on a computer or paper for recording TASK Students will use the equipment to find out how far it is around the circles. They can do this by marking a point on the circle, placing this point on the start of the line and rolling it until this point comes back to the start. Otherwise students can use the string and measure the length of string. Alternatively, they can measure with a tape measure being sure that they start at zero or calculate the length. Students need to be able to make a large selection of lids or circles. They need to measure the diameter too and record this in a way, e.g. a table, where they might see a pattern between the numbers. On a spreadsheet students can estimate it as 3 and check. They might then try 3.1 etc to get a more accurate answer. HINTS FOR TEACHERS A collection of lids and other circular objects is needed. If these are unavailable, the circle cut into segments and then laid out a bit like a rectangle could be used to compare radius and circumference. The attached diagrams can be enlarged on a photocopier to different sizes. The diameter of circles can also be found by drawing around the circular lid or wheel on paper and folding the circle in half. QUESTIONS TO ASK STUDENTS WHILE THEY WORK
• What do you have to be careful about when you are measuring the circumference? • What do you have to decide so you can measure across the circle? How will you do that so it
is at the widest part? • What do you notice about the size of the circumference as the diameter increases? • How can you record what you are doing so you can see a pattern if there is one? • What do you think you have to multiply the diameter by to get the circumference?
TEACHERS SHOULD LOOK FOR
• Correct use of tape measure, marks on circle for start and finish of the length if rolled, careful use of string if it used to find the length
• Using two diameters or a sliding diameter to find the greatest length across the circle. • Recognition that the circumference is about three times bigger than the diameter. • Attempts to get a more precise number for multiplying the diameter.
STATEMENTS Measuring and estimating 4.4 Use measuring instruments, reading simple scales and measuring accurately to the nearest marked gradation, taking into account the degree of exactness required Using relationships 4.1 Measure and compare the perimeter and area of regular and irregular polygons 5.2 Develop and use rules to calculate perimeters of polygons and circles, etc 5.3 Calculate and use rates

38
SUGGESTED STUDENT SHEET
Perimeters of Circles
You will need: • Different sized circles such as lids and wheels which can be rolled along a line or wrapped with
string or a tape measures, • Place for a line to be drawn if lids and wheels are going to be rolled, • Spreadsheet on a computer or paper for recording You are going to find out how far it is around different circles. You will also find the distance across the middle (called the diameter). Then these two lengths will be compared to find a fascinating fact that happens for the different circles, no matter how big. 1. Take a selection of lids and wheels for your group. The distance around the circle can be found in
different ways. (a) Draw a straight line with a ruler with a starting mark. Mark a point on the circle, placing this
point on the start of the line and roll it until this point comes back to the line. Measure the length of the line.
(b) Wrap the string exactly once around the circle and note the ends. Measure the length of string, or
(c) Measure with a tape measure being sure that you start at zero or calculate the length from two lines on the tape measure that mark the ends of the perimeter
2. Measure the diameter too by measuring the longest line across the circle. To be more accurate, draw around the circle onto paper and fold the circle in half. The fold is a diameter.
3. Record your measurements in a way, e.g. a table, where you might see a pattern between the numbers for the diameter and circumference.
4. What is the whole number that links the length of the diameter and the length of the circumference? Is it by multiplying or by adding? (it is close to a whole number, that is 1, 2, 3, 4, 5, or 6)
5. On a spreadsheet you can use your estimate and check. You might then try a slightly bigger or smaller number in your formula to get a more accurate answer. For example, if you multiplied the diameters by 3 at first but the results were a little small, then try 3.1
6. Write a sentence that summarises your findings.
If the top half of this circle in Figure 1 was cut and opened out, it would look like the “teeth” pointing down in Figure 2. The bottom half would look like the “teeth” pointing up in Figure 2.
7. Where is the circumference now? Measure it and check it is roughly 3 times the diameter.
Figure 1 Figure 2

39
ACTIVITY 15 – Diameter tape for tree diameters (Trees - Part 1) MEASUREMENT IDEA: Measurements are used to make comparisons. Fractions (ratios) are used for relative size.
PURPOSE: Students make their own rulers using an informal unit and compare circular and straight lengths. They look for a pattern linking the numbers and develop their own formula. They use a ready reckoner with another unit marked on their ruler. GROUP: Small groups LEVEL: 5 to 8 EQUIPMENT NEEDED: For each group, tens sticks from the base 10 materials (longs) or Cuisenaire set; a plastic, cloth or paper strip at least 3 metres long; 2 coloured pens for marking the tape, recording sheet. TASK Students make a tape measure on which the length of the stick is the unit. Students prepare their recording sheet. A 3 metre tape will have 30 marks labelled 1 to 30. Students move around the school grounds or a nearby park and estimate and measure the diameter and circumference of trees. They should estimate three trees first before measuring. They continue to estimate and check if their estimates are getting better. They can consider the approximate relationship between the diameters (looking straight at the tree) and the circumferences. On a spreadsheet the students enter their diameters and circumferences for the various trees. They try to find a good ratio between them. They use this in a formula for the spreadsheet. Having found this, they then write the diameters against the marks on their tape measure with another coloured pen. Then this is a ready reckoner or diameter tape measure. Now they use their tape for getting the diameters of trees by wrapping the tape around the circumferences but reading off the diameter. See the Figure of the tree on the next page. HINTS FOR TEACHERS The tape measure becomes a ready-reckoner. The relationship that they find will be close to 3 as it is really π. They might get a closer number like 3.1 or 3.15 by trying these on the spreadsheet. When they initially measure the diameters, they need to keep a straight tape across the front of the tree. Metre sticks can be used to line up the diameter of the tree as in the Figure. Make sure your pens write clearly on the strip they are going to use (paper, cloth or plastic strips such as used for binding up cartons). The tens stick is a decimetre. QUESTIONS TO ASK STUDENTS WHILE THEY WORK
• Estimate how many marks will you have on your tape if you are going to go to the end of your strip?
• What numbers will you write against each marking? The first one? • How are you estimating the diameters and the circumferences? • What will we put on our table for recording before going out to the trees? Discuss number of
columns and their size. • How might we use the spreadsheet to get a relationship? • What equation did you come up with? • Use another pen to mark the tape with diameters. • How does it work to use this tape to measure the diameters?
TEACHERS SHOULD LOOK FOR
• Understanding of units • Finding relationships based on data • Using relationships to make measures

40
STATEMENTS Measuring and estimating 4.4 Use measuring instruments, reading simple scales and measuring accurately to the nearest marked gradation, taking into account the degree of exactness required 5.2 Select, use and adapt instruments to measure length, mass, capacity, volume, angle and temperature 5.3 Use judgments of the size of metric units to make and refine estimates of quantities Using relationships 5.2 Develop and use rules to calculate perimeters of polygons and circles, etc 5.3 Calculate and use rates
diameter
circumference

41
SUGGESTED STUDENT SHEET
Diameter Tapes
Equipment for this activity includes: • Tens stick from the base 10 materials (longs) or Cuisenaire set; • a plastic, cloth or paper strip at least 3 metres long; • 2 coloured pens for marking the tape for each group; • recording paper on which a table can be prepared for tree, diameter and circumference. 1. Take the plastic, cloth or paper strip to make a tape measure. Use the tens stick (long) as a unit to
mark off units on the tape. Mark the calibrations as 1, 2, 3 to 30.
2. Move around the school grounds or a nearby park and estimate the diameters and circumferences of at least three trees. Take this measure at one metre above the ground.
3. Then measure these with your tape measure. To measure the diameter, you need to keep the tape straight and you could use the metre rulers or other sticks to line up the edge of the tree to the tape. Record your findings.
4. Continue to estimate in groups and check if your estimates are improving.
5. What can you notice about the diameters and the circumferences?
Extension: 6. On a spreadsheet, enter your findings for the various trees. Use the relationship between diameter
and circumference to work out a multiplication link between the diameters and circumferences. Check on the spreadsheet. Try to improve the number for multiplying.
7. Use this information to find the diameters of trees with circumferences of 1, 2, 3 etc up to 30. Write these on your tapes at the existing marks. For example, next to 1 you write 3.1; next to 2 you write 6.3. This gives you a tape that will tell you the tree’s diameter when you wrap it around the tree.
8. Now use your tape for getting the diameters of trees by wrapping the tape around the circumference but reading off the diameter.
9. Write a letter to the council about your new tape measure and the trees in your playground.
42
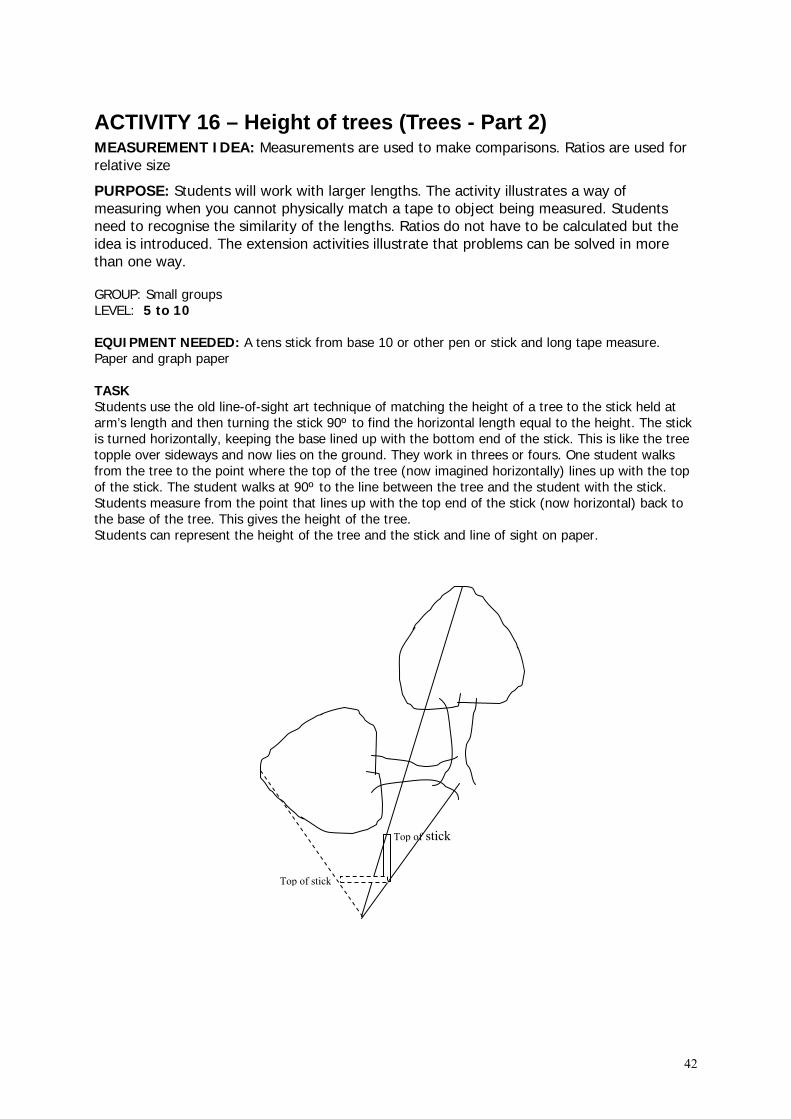
ACTIVITY 16 – Height of trees (Trees - Part 2) MEASUREMENT IDEA: Measurements are used to make comparisons. Ratios are used for relative size
PURPOSE: Students will work with larger lengths. The activity illustrates a way of measuring when you cannot physically match a tape to object being measured. Students need to recognise the similarity of the lengths. Ratios do not have to be calculated but the idea is introduced. The extension activities illustrate that problems can be solved in more than one way. GROUP: Small groups LEVEL: 5 to 10 EQUIPMENT NEEDED: A tens stick from base 10 or other pen or stick and long tape measure. Paper and graph paper TASK Students use the old line-of-sight art technique of matching the height of a tree to the stick held at arm’s length and then turning the stick 90º to find the horizontal length equal to the height. The stick is turned horizontally, keeping the base lined up with the bottom end of the stick. This is like the tree topple over sideways and now lies on the ground. They work in threes or fours. One student walks from the tree to the point where the top of the tree (now imagined horizontally) lines up with the top of the stick. The student walks at 90º to the line between the tree and the student with the stick. Students measure from the point that lines up with the top end of the stick (now horizontal) back to the base of the tree. This gives the height of the tree. Students can represent the height of the tree and the stick and line of sight on paper.
Top of stick
Top of stick

43
Extension: Students require rulers as well as the long tape measures. Students can use similar triangles to find the height from a scale drawing of a tree. They can use one of two methods. (a) They can line up the top of the ruler with the tree. By lying on the ground or looking between their legs, students can line up the top of the ruler with the top of a tree. They also measure the distance from the eye to the base of the ruler and to the base of the tree. (b) They can use shadows and measure the lengths of the shadows of the tree and of the ruler (a metre ruler is better this time). Students should draw up similar triangles and show their measurements. Students then use these drawings to calculate the height of the tree. Students might use graph paper or the ratio of sides of similar triangles to find the height. HINTS TO TEACHERS In the extension, the height of a person rather than the 1 metre ruler can be used to make the small similar triangle. Checking results can be done by one of the alternative methods. Using shadows allows students to have separate triangles and this might be easier for students. Students can first overlay a number of similar triangles to get an idea of what they are drawing and a sense of why the heights can be found out from the grid. Triangles in the tangram set, the attribute block set, and other available materials can be used but also teachers can simply cut some out. If several long tape measures are not available, then students can pace out the height and later work out how long their pace is and calculate the height in metres. QUESTIONS TO ASK WHILE STUDENTS WORK
• Can you draw a sketch of the tree and where you expect the top of the tree would land if it fell over sideways?
• How can we get a line of sight of the bottom of the stick to the bottom of the tree and from the top of the stick to the top of the tree?
• What lengths can you measure? What can’t you measure? In the extension, ask
• What scale do you use on the paper if our measured lengths include 30 cm and 30 m? • Can you work this out or check it another way?
TEACHERS SHOULD LOOK FOR
• Careful reading of the rulers and grid paper • Decision of what scale to use when drawing a sketch • Checking of results using other information • Being able to select the measures for getting a ratio and being able to use multiplicative
thinking to estimate the answer STATEMENTS Measuring and estimating 4.2 Make judgments about the relative size of objects based on comparisons to known benchmarks or standard units 4.3 Draw and construct object using accurate measurements 5.1 Recognise and select appropriate metric units and levels of accuracy for measuring quantities and rates Using relationships 4.1 Measure and compare the perimeter and areas of regular and irregular polygons 5.3 Calculate and use rates A third activity on shade in the playground is included in the secondary pack.

44
SUGGESTED STUDENT SHEET
Tree Heights Equipment for this activity includes:
• A stick (e.g. base 10 long), pen or ruler • Recording paper • A long tape measure.
You are going to use an artist’s technique for finding the height of trees.
1. Select a tree and estimate the height of the tree.
2. Now walk to or away from the tree so that your stick held at arm’s length in front of you lines up with the base and top of the tree.
3. Turn your stick 90º so it is horizontal. Keep one end of the stick on the base and tell one of your group to walk away from the tree until he/she lines up with the top of the stick.
4. Measure with the long tape measure or pace out the height of the tree as represented by the horizontal distance.
5. Draw the stick and the height of the tree and lines of sight onto paper.
The extension would produce a diagram like this.
Tree
arm
stick
Tree top if on the ground
stick top when horizontal

45
ACTIVITY 17 – Planning a party MEASUREMENT IDEAS: Recording devices can be used to keep track of time and other measures
PURPOSE: Students will calculate volumes of different containers and work out a time schedule. GROUP: Groups of 5 or 6 LEVEL: 6 to 10 EQUIPMENT NEEDED: Calculators, recording sheets, items like coke bottles and cups, crisps and a dish, recipe book, computers and spreadsheets could be used TASK The groups plan a party for their class. As a group they decide what decisions have to be made. A brainstorm is a good idea at this stage to start this planning. Groups may decide to work out their budget using a spreadsheet with columns for cost of items, number of people each item would feed, total cost per item and overall total cost. With a spreadsheet, they can adjust to keep within their budget. They might estimate how many lots of a kind of food might be needed. How many people would prefer coke instead of lemon soda? Or pizza instead of pasta, or ice-cream instead of cake? Costs involved in making items also need to be worked out. The order in which different activities have to be done is also important. Students plan days as well as shorter periods of times as the party draws closer in time. HINTS FOR TEACHERS Alternatively they might plan a food stall in which they prepare the food for one lunch hour. Be prepared to rearrange times for other subjects while you prepare for it. A stove may be needed. Teachers should have some pricelists for food items ready for them to use e.g. large coke bottle, cost of pizza base, tomato paste, and cheese, cost of large crisps. QUESTIONS TO ASK WHILE STUDENTS WORK
• What needs to be done? • How many people will be involved? • How long do various activities take? • Can some things be done earlier than others? • How will you keep track of your decisions? • How will you record what you have considered? • How will you keep track of who is involved and activities as they are completed? • What mathematics are you using to do that? • How does the spreadsheet help you to use try and modify methods?
TEACHERS SHOULD LOOK FOR
• Estimates of times for various activities • Application of number operations as appropriate • Modification of spreadsheet calculations as required • Realistic estimates of quantities that are needed • Volume of drinks or area of pizza calculations necessary to decide costs and consumption • Realistic preparation times • Careful allocation of times on the last day for when activities have to be completed
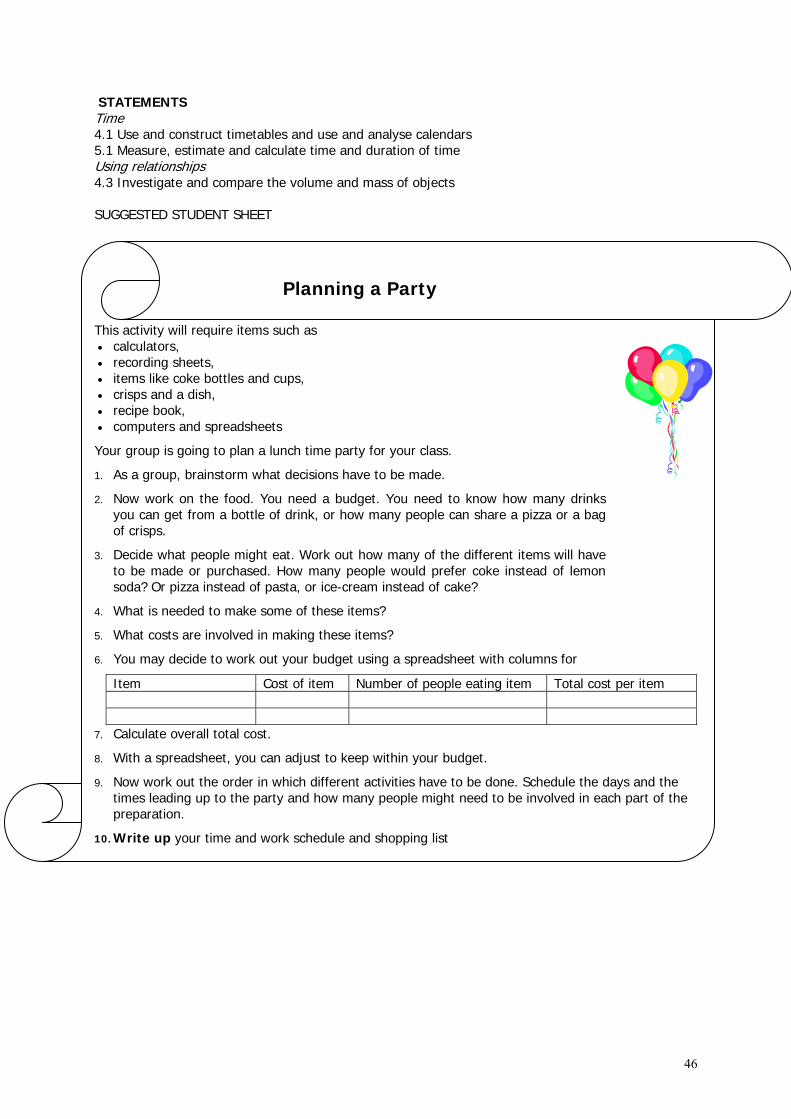
46
STATEMENTS Time 4.1 Use and construct timetables and use and analyse calendars 5.1 Measure, estimate and calculate time and duration of time Using relationships 4.3 Investigate and compare the volume and mass of objects SUGGESTED STUDENT SHEET
Planning a Party
This activity will require items such as • calculators, • recording sheets, • items like coke bottles and cups, • crisps and a dish, • recipe book, • computers and spreadsheets
Your group is going to plan a lunch time party for your class.
1. As a group, brainstorm what decisions have to be made.
2. Now work on the food. You need a budget. You need to know how many drinks you can get from a bottle of drink, or how many people can share a pizza or a bag of crisps.
3. Decide what people might eat. Work out how many of the different items will have to be made or purchased. How many people would prefer coke instead of lemon soda? Or pizza instead of pasta, or ice-cream instead of cake?
4. What is needed to make some of these items?
5. What costs are involved in making these items?
6. You may decide to work out your budget using a spreadsheet with columns for
Item Cost of item Number of people eating item Total cost per item
7. Calculate overall total cost.
8. With a spreadsheet, you can adjust to keep within your budget.
9. Now work out the order in which different activities have to be done. Schedule the days and the times leading up to the party and how many people might need to be involved in each part of the preparation.
10. Write up your time and work schedule and shopping list

47
ACTIVITY 18 – When to work at the shop MEASUREMENT IDEAS: Rates affect time relationships
PURPOSE: Students can calculate times and link it to money earned. This activity integrates the money and decimal fractions. GROUP: Pairs LEVEL: 4 to 6 YEAR LEVEL: 6 to 10 EQUIPMENT NEEDED: Recording paper TASK The teacher sets the scenario of an older brother working. “David works at the local shop. He can work on Saturdays at normal rate or at time and a half on Sundays. He earns $11 per hour at the normal rate. He is wondering if he can fit in the football match starting at 2pm on Sunday and start work at 8am on Sunday instead of working for 8 hours on Saturday. If he can fit it in, how long would he have between work and the match? What time must he finish work in order to collect his mates and get there? What other reasons might he have for not working on Sunday?” QUESTIONS TO ASK WHILE STUDENTS WORK
• What approach will you take to get started with this problem? • What is a suitable unit? • How can you calculate the comparative hours?
TEACHERS SHOULD LOOK FOR
• Knowledge of everyday rates • Intuitive realisation that if the pay rate is higher, the number of hours can be less • Try and modify approach is used if an equation for calculating the hours cannot be set up by
the students. STATEMENTS Time 4.3 Tell the time accurately using analogue clocks and digital clocks Using relationships 5.3 Calculate and use rates

48
SUGGESTED STUDENT SHEET
When to Work David works at the local shop He works on Saturdays for the normal rate of $11 per hour. However, on Sundays he can earn his usual money plus half as much again per hour.
1. How much would he earn for 8 hours on Saturday?
2. How much for four hours on Sunday?
3. How much for six hours on Sunday?
4. Does he have to work more or less on Sunday to make the same amount of money as on Saturday?
5. How many hours does he have to work on Sunday to make the same amount of money as 8 hours on Saturday?
He is wondering if he can start work at 8am on Sunday and make the football match starting at 2pm on Sunday instead of working for 8 hours on Saturday.
6. Do you think he can fit it in?
7. What might be a problem? Would he have time to get there? Would he have time to pick up his mates on the way?
8. Role play what you would say to your friend, David, about his best option.

49
ACTIVITY 19 – X-File puddles MEASUREMENT IDEAS: Areas and scales
PURPOSE: Students can see areas that are not rectangular and compare them with rectangular areas. They need to convert to scale drawings of areas. GROUP: Small groups LEVEL: 6 to 8 EQUIPMENT NEEDED: A litre of water per group, tape measure for each group, flat playground space, 1cm grid paper, pencils and erasers. Students need to know their own mass. TASK Find a level area of concrete or bitumen and carefully pour out 1 litre of water to form a puddle. Sketch the shape of the puddle. Measure the dimensions of the smallest rectangle that could surround the puddle. On 1cm graph paper, make a scale drawing of the surrounding rectangle. Sketch the shape of the puddle inside the rectangle. Approximate the area of the puddle formed by the litre of water (use the method of counting squares).
According to biologists about 80% of the human body is made up of water. One litre of water weighs one kilogram. Calculate the number of litres of water in your body. Use this result together with that for the 1 litre to find the area of the puddle you would make! Go outside and mark a rectangle that has the same area as the puddle you would make. Using a scale of 1cm = 1m , draw a rectangle that has the same area as the puddle that you would make. Write a brief report of what this rectangle represents and how it was found. QUESTIONS TO ASK WHILE STUDENTS WORK
• How might you use the grid of the graph sheet to help you sketch the puddle? • How do you get the area of an odd shape? • What do you know about a mL of water and its mass? • How might that apply to working out your water volume? • Estimate how big the area might be for your puddle based on the ratio of the two volumes • How might you compare the puddle for yourself and the rectangle that encloses it?
TEACHERS SHOULD LOOK FOR
• Understanding of an area unit • Ability to use grids efficiently to find area of unusual shapes • Understanding of ratio for comparing different sizes • Understanding of a scale for a map by applying to the graphing exercise
STATEMENTS Using relationships 4.1 Investigate the relationship between area and perimeter and calculate area of a polygon 5.1 Obtain areas by counting squares in order to develop new rules for the area of regular shapes 5.3 Calculate and use rates Measuring and estimating 4.3 Draw and construct objects using accurate measurements

50
5.3 Use judgments of the size of metric units to make and refine estimates of quantities Source: Swan, L. & Nelson, N. Measuring Up, Activity sheet for Inservice Day. SUGGESTED STUDENT SHEET
X-File Puddles
Equipment needed:
1. a litre of water per group, 2. tape measure for each group, 3. flat playground space, 4. 1 cm grid paper, 5. paper, pencils and erasers.
Students need to know their own mass.
1. Find a level area of concrete or bitumen and carefully pour out 1 litre of water to form a puddle.
2. Sketch the shape of the puddle.
3. Measure the dimensions of the smallest rectangle that could surround the puddle.
4. On 1 cm graph paper, make a scale drawing of the surrounding rectangle using a scale of 1 cm
represents 1m.
5. Sketch the shape of the puddle inside the rectangle.
6. Approximate the area of the puddle formed by the litre of water (use the method of counting squares).
7. According to biologists about 80% of the human body is made up of water. You should know your weight or mass. What is 80% of your mass?
This is the amount of water in your body in kilograms. One litre of water weighs one kilogram.
8. Based on the area of the 1 litre puddle, what size puddle would you make!
9. Go outside and mark a rectangle that has the same area as the puddle you would make.
10. Using a scale of 1 cm = 1 m,, draw a rectangle that has the same area as the puddle that you would make.
11. Write a brief report of what this rectangle represents and how it was found.
51
ACTIVITY 20 – Fencing MEASUREMENT IDEAS: Perimeters can be different but areas stay the same and vice versa.
PURPOSE: Using concrete materials and drawings can help to illustrate how the perimeters can be changed in shape enclosing a different area. GROUP: Small groups LEVEL: 6 to 9 EQUIPMENT NEEDED: 30 matchsticks, A3 paper with grids the same as match lengths, coloured pencils, rulers, per group TASK Use the scenario. “Uncle Joe wants to make a fence with 30 lengths of fencing. How can he do this and get the largest yard?” Students use 30 sticks to make rectangles of different sizes. They can work out the areas by using the pencils to make grids in their trials. As they work, they record their findings. They can then go on to looking at other different shapes and note that the changes in areas. QUESTIONS TO ASK STUDENTS WHILE THEY WORK
• How can you decide how many sticks or lengths of fencing to put on the sides? • What might you do to change the rectangle? • How can you record what you are doing so you can see a pattern if there is one? • What shape do you think might be best? • Do you think you could try a shape that is not rectangular? • How will you find out its area? (by now the students might have grids on their paper to use
for counting areas?) TEACHERS SHOULD LOOK FOR
• Using the fact that the opposite sides are equal so the perimeter is double the sum of the length and width
• Drawing grids for areas or using these to calculate area units • Using a product of length multiplied by breadth with understanding • Predicting that the narrow rectangle will have a smaller area • Posing their own questions like using other shapes, thinking about which shape would have
the biggest area, thinking about putting the fence against an existing wall • Using properties of other shapes, e.g. regular hexagon is made up of 6 equal equilateral
triangles so they can find the area of one triangle by counting squares (or halving the enclosing rectangle) and multiplying by 6
STATEMENTS Using relationships 4.2 Investigate the relationship between area and perimeter and calculate area of a polygon 5.1 Obtain areas by counting squares in order to develop new rules for the area of regular shapes 5.2 Develop and use rules to calculate perimeters of polygons and circles, areas of shapes based on triangles, rectangles and circles etc

52
SUGGESTED STUDENT SHEET
Making Fences
For this activity, you will need: • 30 matchsticks, • A3 paper with grids the same as match lengths, • coloured pencils, • rulers
Uncle Joe wants to make a fence with 30 lengths of fencing. How can he do this and get the largest yard?
1. Put the A3 paper on the desk to work on. Use 30 matchsticks to make a rectangle.
2. What is its area? Use a coloured pencil to draw this rectangle on the grid.
3. Try making other rectangles of different sizes. Try to work systematically using the coloured pencils to mark out each rectangle (the colours help you as you overlap rectangles). Work out the areas for each of the rectangles. Keep records of what you find for rectangles of different lengths.
4. Record your findings. Look at them to decide what might be the best solution
5. Try other shapes. Again calculate areas and keep records.
6. As you change the number of sides, what is happening to the areas?
7. Write a letter to Uncle Joe about your findings.