successfactors learning guide for learning administrators
TRANSCRIPT

SuccessFactors Learning guide for Learning
Administrators
Issued by UCT Human Resources August 2021

SuccessFactors Learning guide for Learning Administrators
August 2021 Page 2
Contents: SuccessFactors Learning guide for Learning Administrators
Logging in to SuccessFactors via a browser ................................................................................ 4
Creating a new item ................................................................................................................... 6
Items: Working with the agenda template ............................................................................... 14
Items: Working with libraries ................................................................................................... 20
Items: Working with categories ............................................................................................... 23
Items: Working with surveys .................................................................................................... 25
Items: Working with prerequisites ........................................................................................... 30
Items: Creating a survey ........................................................................................................... 33
Viewing submitted survey data ................................................................................................ 42
Items: Viewing class requests .................................................................................................. 46
Creating an instructor .............................................................................................................. 47
Adding an authorised instructor to an item ............................................................................. 50
Searching for an item ............................................................................................................... 53
Searching for an item using a saved search .............................................................................. 56
Using search filters for security domain and/or UCT area ........................................................ 59
Creating a class ........................................................................................................................ 62
Searching for a class ................................................................................................................. 69
Searching for a class using a saved search ................................................................................ 72
Registering or waitlisting learners for a class ........................................................................... 76
Managing class registrations .................................................................................................... 79
Viewing class registration form information ............................................................................ 82
Viewing and printing a class roster .......................................................................................... 83
Creating a block booking / seat reservation ............................................................................. 85
Removing a block booking / seat reservation ........................................................................... 89
Changing a class instructor ....................................................................................................... 91

SuccessFactors Learning guide for Learning Administrators
August 2021 Page 3
Contents: SuccessFactors Learning guide for Learning Administrators Recording learning after a completed class .............................................................................. 95
Cancelling a class ..................................................................................................................... 99
Closing a class ........................................................................................................................ 102
Assigning an item to a learner ................................................................................................ 105
Removing an assigned item from a learner ............................................................................ 110
Running reports ..................................................................................................................... 113
SuccessFactors Learning guide for Learning Administrators
August 2021 Page 4
Logging in to SuccessFactors via a browser
Background and benefits SuccessFactors Learning offers a centralised booking and administration system for courses offered by UCT training providers. The online platform provides a one-stop shop to find, book and manage development activities. Staff members can access the platform on any internet-connected device (including smart phones and tablets) using their existing UCT login details. Time-consuming manual booking processes are replaced by automated processes with easy workflow for manager approval. Records of completed courses are consolidated and centrally stored, adding to a staff member’s training history.
Support If you are unable to access SuccessFactors or are experiencing other technical difficulties, please contact the ICTS Helpdesk via email at [email protected] or on extension 4500. Procedure
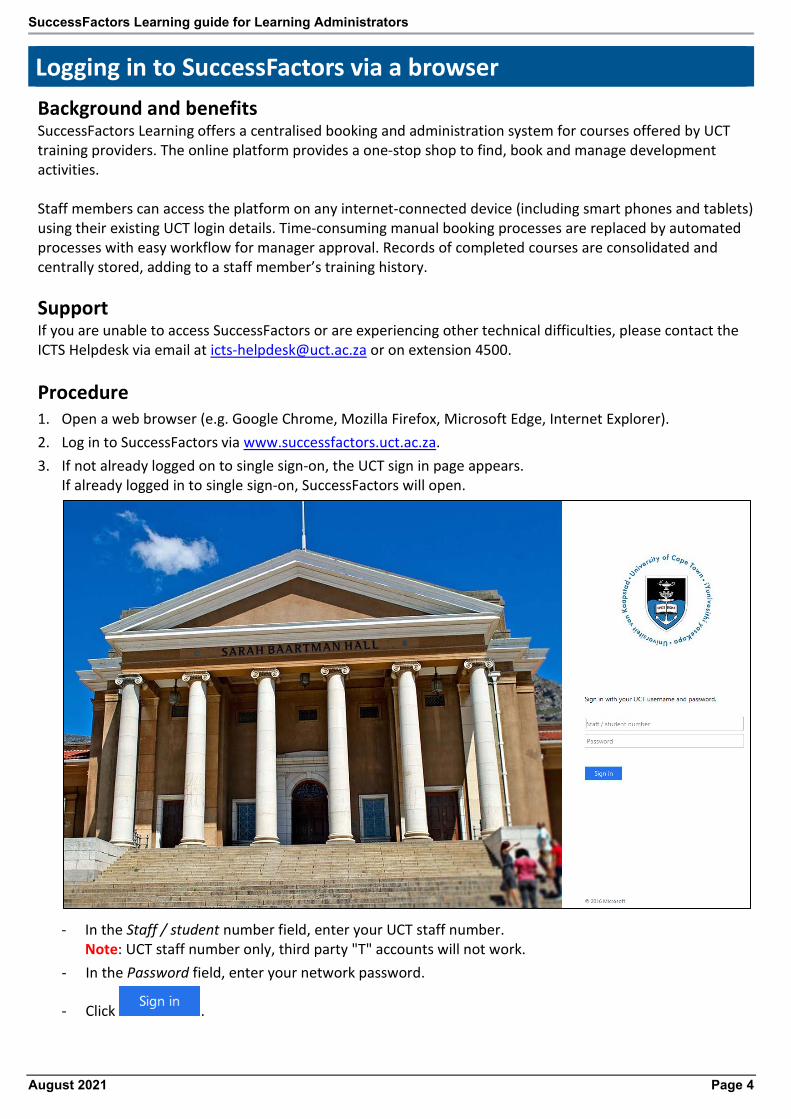
1. Open a web browser (e.g. Google Chrome, Mozilla Firefox, Microsoft Edge, Internet Explorer). 2. Log in to SuccessFactors via www.successfactors.uct.ac.za. 3. If not already logged on to single sign-on, the UCT sign in page appears.
If already logged in to single sign-on, SuccessFactors will open.
- In the Staff / student number field, enter your UCT staff number.
Note: UCT staff number only, third party "T" accounts will not work. - In the Password field, enter your network password.
- Click .

SuccessFactors Learning guide for Learning Administrators
August 2021 Page 5
Logging in to SuccessFactors via a browser (continued) 4. The Home page appears.
- Click the Learning Administration tile.
5. The Learning Administration page appears.
- Click Recents to show items (e.g. courses, workshops) and classes you’ve recently accessed.

SuccessFactors Learning guide for Learning Administrators
August 2021 Page 6
Creating a new item
Background An item is a term used to describe a training offering e.g. course, workshop, information session. A class is the scheduled date and time when the training offering will occur, learners can enrol on a class. Items are the main building blocks of the SuccessFactors Learning system and have associated attributes that are set up or selected by the Learning Administrator. Procedure
1. Log in to SuccessFactors and access the Learning Administration page.
- In the Menu, choose Learning Activities > Items.
2. The Items page appears.
- Click .

SuccessFactors Learning guide for Learning Administrators
August 2021 Page 7
Creating a new item (continued) 3. The New Item page appears.
- Click Enter Full Screen to hide the left-hand menu. Click Exit Full Screen to show the menu.
In the Course Information section: (consult the Learning Administrator – Item Fields Guide for more detail on the available selections)
- Select the appropriate Item Classification e.g. Instructor-Led.
- Ensure the Locale is English United Kingdom.
- Select the appropriate Item Type based on your requirements e.g. Course, Workshop, Information Session.
- Ensure Auto Generate ID is selected to automatically generate the item identity number.
In the Instructor Led Course section (this section only appears for items classified as Instructor-Led): (consult the Learning Administrator – Item Fields Guide for more detail on the available selections)
- Enter the Number of Days.
- Enter the Hours per Day.

SuccessFactors Learning guide for Learning Administrators
August 2021 Page 8
Creating a new item (continued) In the Couse Overview section: (consult the Learning Administrator – Item Fields Guide for more detail on the available selections)
- Enter an appropriate Title for your item.
- Enter the total number of hours in the Duration field. If multiple days, add up the hours.
- Select the Delivery Method e.g. Classroom (ILT), Virtual/Webinar (VIRT_WEB).
- Select the Source e.g. Internal (INT).
- If applicable, enter Credit Hours, Contact Hours or CPD (Continuing Professional Development) Points.
- Enter an appropriate Description. Formatting options for this text (e.g. bulleted lists) will be available after the item is saved.
- In the Contact’s Email field, enter the relevant contact person’s email address (or learning hub generic email address).

SuccessFactors Learning guide for Learning Administrators
August 2021 Page 9
Creating a new item (continued) In the Access Settings section:
(consult the Learning Administrator – Item Fields Guide for more detail on the available selections)
- Security Domain: If this field is set to PUBLIC, any UCT Learning Administrator can manage the learning
item. To change the security domain:
• Click .
• The Security Domains dialogue box appears.
• Click to display a list of available security domains.
• Select the area of the university responsible for the learning item.
- If the item should be hidden from learners, click the Status button to make the item inactive.
In the Registration Settings section:
(consult the Learning Administrator – Item Fields Guide for more detail on the available selections)
- Enter the Minimum Enrolments and Maximum Enrolments to set the number of learners per class.
- To restrict learners from registering again for a course (item), enter the specified period in the Prevent Multiple Class Registration Interval field. E.g. 365 days for a 1-year restriction. Note: Learners must be cancelled from classes they didn’t attend otherwise they will be unable to move to a different class for the same course if there is a registration interval. A learner, manager or Learning Administrator can cancel the registration.
- If learners can register themselves for a class, ensure Users can Self-Register is selected.
- If managers can register team members for a class, ensure Manager can Register Others is selected.
- If learners can submit a request for a class (indicating the date by when they would like to have completed the class and possibly a preferred location), ensure User can Request a Class is selected.
- If SuccessFactors should automatically add learners to classes when space is available, select Yes for Auto Enrol from Waitlist. If this option is set to No, the Learning Administrator will have to manually move learners from the waitlist into a class.
- If learners can add themselves to a waitlist when a class is full (maximum enrolments reached), ensure User can Waitlist is selected.

SuccessFactors Learning guide for Learning Administrators
August 2021 Page 10
Creating a new item (continued) In the Online Settings section:
- The Unregistered User can Access Online Content default setting is off, preventing unregistered
learners from accessing the learning item’s online content, change the setting if appropriate.
In the Approval Process section:
- By default, the option for manager approval is set to No.
- If the manager must approve learner registrations for a scheduled class: • Select Yes in the Approval Required field. • Select Manager Approval in the Approval Process field.
In the Withdrawal Approval Process section:
- By default, the option for manager approval on withdrawal is set to No. - If the manager must approve learner withdrawals from a scheduled class:
• Select Yes in the Approval Required to Withdraw field. • Select Manager Approval in the Withdrawal Approval Process field.
In the Course Ratings section:
- The User can Rate option allows learners who have completed a class to rate the learning item (e.g.
course, workshop, information session) out of 5 stars. These ratings will be displayed in the course library. The default setting is off, change if appropriate.
- The Include User Ratings from Previous Revision option will include user ratings of previous versions when calculating all user ratings. If the item has significant revisions, this option is not recommended and should be set to No to aid the comparison of user ratings for each version.

SuccessFactors Learning guide for Learning Administrators
August 2021 Page 11
Creating a new item (continued) In the Assignments section:
- The Initial Basis, Initial Number, Initial Period and Initial Required Date Basis fields are used to set a
due-by-date rule for the item e.g. the learner will have 1 year from date of item assignment to complete the item before it becomes overdue. Consult the Learning Administrator – Item Fields Guide for assistance with using these fields.
- The Retraining Basis, Retraining Number and Retraining Period fields are used to set up a retraining period rule for the item e.g. item must be completed on an annual basis. Consult the Learning Administrator – Item Fields Guide for assistance with using these fields.
- Select the appropriate Assignment Type e.g. Optional (OPT), Compliance (COMP). Consult the Learning Administrator – Item Fields Guide for assistance with using this field.
In the Completion section:
- Do not change the Auto Record Competency Rating on Item Completion, User can Add to Learning
History and Manager can Add to Learning History fields as these are not in use at UCT.
- Select a certificate in the Certificate Template field e.g. UCT certificate of attendance, UCT certificate of completion. Note: The UCT certificate of completion should be used when the learner completes a task/s such as a test, presentation, submission of work.
In the Version Details section:
- Do not change any fields as these are auto generated by SuccessFactors.

SuccessFactors Learning guide for Learning Administrators
August 2021 Page 12
Creating a new item (continued) In the Custom Fields section:
- All fields in this section are mandatory (indicated on screen by a red asterisk) and must be completed.
Consult the Learning Administrator – Item Fields Guide for assistance with selections.
- Click . A message indicates that the changes were saved. 4. If the item is instructor-led, the Agenda Template page appears.
- To change the agenda template, see: Working with the agenda template. This includes setting patterns
for classes that run on non-consecutive days.

SuccessFactors Learning guide for Learning Administrators
August 2021 Page 13
Creating a new item (continued) 5. Navigate through the new item using the features mentioned below.
- To hide the item header details, click Collapse Header.
- To pin the item header details (always displayed, even when scrolling down the page), click Pin header on press.
- The item menu appears below the item header, providing shortcuts to the pages that can be used when setting up the item. The arrow at the far right displays a dropdown list version of the menu.
- Click to review or change item settings and details.
- Refer to the table below for additional settings to consider for the new learning item:
If … Then…
the learning item should appear in the course library
The learning item must be associated with a library. A library is a set of learning items grouped for a specific audience (e.g. all staff, all line managers). See: Working with libraries
the learning item should be included in one or more categories in the course library
The learning item must be associated with one of the predefined categories. A category is a group of related learning items in the course library e.g. communication courses, institutional knowledge courses, information technology courses. See: Working with categories
there is a need to collect feedback (e.g. course evaluations) for the learning item
The learning item must be linked to a new or existing survey. Surveys are used to gather learner (and manager) feedback on completed training sessions and are linked to the item. See: Working with surveys
there is another learning item that is a prerequisite for the current item
Link all items (courses) that must be completed before a learner can register on the current learning item. See: Working with prerequisites
there are preferred or authorised instructors for the learning item
The instructor(s) must be connected to the item. See: Adding an authorised instructor to an item

SuccessFactors Learning guide for Learning Administrators
August 2021 Page 14
Items: Working with the agenda template
Background The agenda template is used for instructor-led learning items, to determine the number of days and timeslots for scheduled classes.
Procedure 1. Log in to SuccessFactors and access the Learning Administration page. 2. Search for the appropriate learning item.
- In the item menu, click . 3. The Agenda Template page appears.
- There are a number of options when working with the Agenda Template:
Adding a new day (includes setting a pattern for items with non-consecutive days)
Splitting a day into multiple sessions
Copying a day
Changing a day
Deleting a day

SuccessFactors Learning guide for Learning Administrators
August 2021 Page 15
Items: Working with the agenda template (continued) Adding a new day
- Click Add Time Slot.
- The Add Time Slot dialogue box appears.
- Enter the Day number for your item. The Day field determines the pattern of your classes. When the
class is created at a later stage, the day pattern is applied from the chosen start date.
Example: A class pattern of 3 consecutive days will be set up with Day 1, Day 2 and Day 3.
Example: A class pattern of 3 days but a day apart will be set up with Day 1, Day 3 and Day 5.

SuccessFactors Learning guide for Learning Administrators
August 2021 Page 16
Items: Working with the agenda template (continued) Example: A class pattern of once a week on the same day for 3 weeks will be set up with Day 1, Day 8 and Day 15.
- If applicable, enter a Description for the day.
- Enter the Duration of the day in hours. E.g. 7.50 or 8 hours for a full day, 3.50 or 4 hours for a half-day. When later creating the class, the start and end time for the half day can be changed to reflect when in the day the half-day session occurs.
- Click . A message indicates that the changes were saved.
- Repeat the steps above to add any additional days to the Agenda Template.

SuccessFactors Learning guide for Learning Administrators
August 2021 Page 17
Items: Working with the agenda template (continued) Splitting a day into multiple sessions
Some days may require multiple sessions due to a venue or instructor change during the day.
- Click Add Time Slot.
- The Add Time Slot dialogue box appears.
- Enter the Day number e.g. 2 for the second day of the class.
- If applicable, enter a Description to identify the session.
- Enter the Duration of the session in hours e.g. 3.5 hours.
- If the session requires a delayed start after a previous session, enter the number of hours in the Delay Start field. E.g. A 1 hour delay start for the afternoon session allows for a lunch break between morning and afternoon sessions.
- Click . A message indicates that the changes were saved.
- Repeat the steps above to create any additional sessions for the day, ensuring that you use the same Day number (e.g. 2) to indicate that the sessions occur on the same day.

SuccessFactors Learning guide for Learning Administrators
August 2021 Page 18
Items: Working with the agenda template (continued) Copying a day
This procedure will create duplicate consecutive days. If a more complex day pattern is required, see: Adding a new day.
- Click More alongside the appropriate day and choose Copy Time Slots from the dropdown menu. - The Copy Time Slots for the Selected Day dialogue box appears.
- Enter the Number of Times to Copy. E.g. 3 will create three copies of the selected day.
- Click . A message indicates that the changes were saved. - The Agenda Template page reappears, displaying the new, copied days.

SuccessFactors Learning guide for Learning Administrators
August 2021 Page 19
Items: Working with the agenda template (continued) Changing a day
- Click Edit.
- Make the necessary changes to any of the available fields e.g. enter a description below the day,
change the hours in the Duration column, enter a Delay Start for multiple sessions.
- Click . A message indicates the changes were saved.
Deleting a day
- Select the check box alongside the day number and click Remove. A message indicates that the entity was removed.

SuccessFactors Learning guide for Learning Administrators
August 2021 Page 20
Items: Working with libraries
Background
Libraries are a set of learning items (e.g. courses, workshops) grouped for a specific audience. Learners see what appears to be a single library of items but may be viewing items from multiple libraries based on their role. For example, a learner who is a line manager would see items from the All UCT Staff library as well as the All Line Managers library.
Procedure 1. Log in to SuccessFactors and access the Learning Administration page. 2. Search for the appropriate learning item.
- In the item menu, click . 3. The Libraries page appears. To change an existing library association, skip to step 6.
- Click Add Libraries.
4. The Libraries dialogue box appears.
- Click to display all available libraries.

SuccessFactors Learning guide for Learning Administrators
August 2021 Page 21
Items: Working with libraries (continued) 5. The Libraries - Add Item to Libraries dialogue box appears.
- Choose one or more libraries by selecting both check boxes in the Add Classes and Add columns
alongside the appropriate library name. Selecting the Add Classes check box ensures that any classes connected to this item will automatically appear in the library. Note: If choosing the PUBLIC library, no other library should be selected as the PUBLIC library ensures the item is visible to all UCT staff.
- Click . 6. The Libraries page appears, displaying the current library associations.
- To remove a library association, select the check box alongside the library name and click Remove. A message indicates that the row was removed.
- The Highlight fields can be used to add a tag to learning items indicating that an item is new, revised or featured. This tag will show in the item information when a learner searches in the course library and the learning item will appear in the Featured tile on the My Learning page. To add Highlight information, click Edit.
SuccessFactors Learning guide for Learning Administrators
August 2021 Page 22
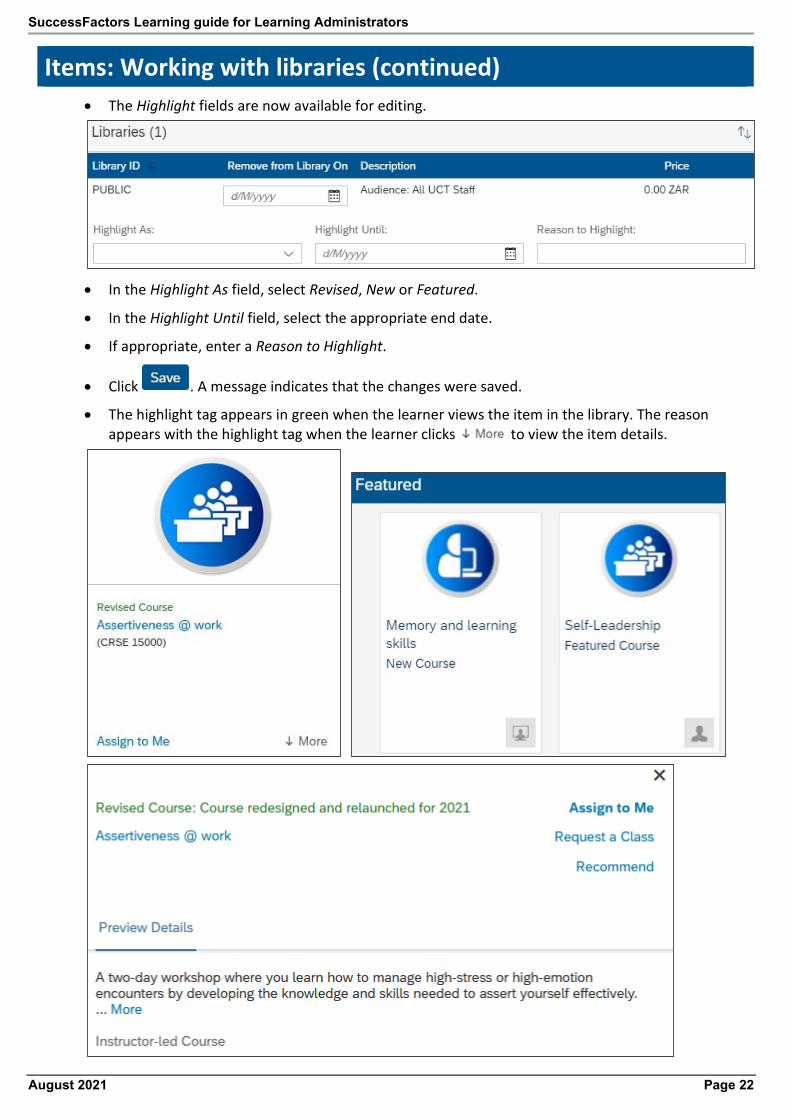
Items: Working with libraries (continued) • The Highlight fields are now available for editing.
• In the Highlight As field, select Revised, New or Featured.
• In the Highlight Until field, select the appropriate end date.
• If appropriate, enter a Reason to Highlight.
• Click . A message indicates that the changes were saved.
• The highlight tag appears in green when the learner views the item in the library. The reason appears with the highlight tag when the learner clicks to view the item details.

SuccessFactors Learning guide for Learning Administrators
August 2021 Page 23
Items: Working with categories
Background A category is a group of related learning items in the course library e.g. communication courses, institutional knowledge courses, information technology courses.
Procedure 1. Log in to SuccessFactors and access the Learning Administration page. 2. Search for the appropriate learning item.
- In the item menu, click . 3. The Categories page appears. To change an existing category, skip to step 5.
- Click Add Categories.

SuccessFactors Learning guide for Learning Administrators
August 2021 Page 24
Items: Working with categories (continued) 4. The Categories dialogue box appears.
- To view more categories, either change the number of Records per Page using the dropdown arrow or
click .
- Choose the category (or categories) by selecting the appropriate check box in the Add column. The categories listed here are seen by the learner when they view the course library.
- Click . 5. The Categories page appears, displaying the current categories.
- To add additional categories, click Add Categories and repeat step 4 above.
- To remove a category, select the check box alongside the category name and click Remove. A message indicates that the row was removed.

SuccessFactors Learning guide for Learning Administrators
August 2021 Page 25
Items: Working with surveys
Background Surveys are used to gather learner (and manager) feedback on completed training sessions and are linked to the item. To create a new survey (course feedback survey or follow-up survey), see: Creating a survey.
Procedure 1. Log in to SuccessFactors and access the Learning Administration page. 2. Search for the appropriate learning item.
- In the item menu, click . 3. The Surveys page appears.
Adding a course feedback survey (see page 27 for adding a follow-up survey) A course feedback survey is sent to the learner once they’ve completed the course, allowing for feedback on their experience in the course.
- In the Course Feedback Survey section, click alongside the Survey field.

SuccessFactors Learning guide for Learning Administrators
August 2021 Page 26
Items: Working with surveys (continued) - The Surveys dialogue box appears.
- Click to display all course feedback surveys available to you.
- The Surveys dialogue box reappears, displaying the course feedback surveys.
- Click alongside the appropriate survey.

SuccessFactors Learning guide for Learning Administrators
August 2021 Page 27
Items: Working with surveys (continued) - The Surveys page reappears, displaying the selected survey name in the Course Feedback Survey
section.
- Click at the bottom of the page to save the survey choice and to pull through any additional survey settings.
- If applicable, enter or change the number of days the learner has to complete the survey in the Days to
Complete field.
- If applicable, change the selection in the Required for Item Completion field. If this check box is selected, the item/course will only appear in the learner’s Learning History after they submit the survey.
- Click .
Adding a follow-up survey A follow up survey is sent to the learner (and/or their manager) a while after completing the course, allowing for feedback on changes in behaviour.
- In the Follow Up Survey section, click alongside the Survey field.

SuccessFactors Learning guide for Learning Administrators
August 2021 Page 28
Items: Working with surveys (continued) - The Surveys dialogue box appears.
- Click to display all follow up surveys available to you.
- The Surveys dialogue box reappears, displaying the follow up surveys
- Click alongside the appropriate survey.

SuccessFactors Learning guide for Learning Administrators
August 2021 Page 29
Items: Working with surveys (continued) - The Surveys page reappears, displaying the selected survey name in the Follow-up Survey section.
- Click to save the survey choice and to pull through any additional survey settings.
- If applicable, change any of the survey options. For more information on follow up survey options, see
page 41.
- Click .

SuccessFactors Learning guide for Learning Administrators
August 2021 Page 30
Items: Working with prerequisites
Background A prerequisite is a learning item (course) that a learner must complete before they can register for this item.
Procedure 1. Log in to SuccessFactors and access the Learning Administration page. 2. Search for the appropriate learning item.
- In the item menu, click .
3. The Prerequisites page appears. To change existing prerequisites, skip to step 9.
- Click Create Group.
4. The Create Group dialogue box appears. All items (courses) in a prerequisite group must be completed before the learner can register on the current item. If there are multiple tracks the learner could take to complete the prerequisite, then each set of items is placed in a group.
- Enter the Title for the new prerequisite group.
- Click .

SuccessFactors Learning guide for Learning Administrators
August 2021 Page 31
Items: Working with prerequisites (continued) 5. The Prerequisites page reappears, displaying the new group.
- Click Add items/curricula next to the Type column to choose an existing learning item(s) to add to
the group. 6. The Add Prerequisites dialogue box appears.
- To find the item(s), enter part of the item title in the Keyword field or leave the field blank to see a full
list of all available learning items.
- Click . 7. The Add a Prerequisite Item to the Item section appears.
- To view more search results, either change the number of Records per Page using the dropdown arrow
or click . - Choose the learning item(s) by selecting the appropriate check box in the Add column.
- Click .

SuccessFactors Learning guide for Learning Administrators
August 2021 Page 32
Items: Working with prerequisites (continued) 8. The Prerequisites page reappears, displaying the prerequisite group and the learning items within the
group.
- Click . A message indicates that the changes were saved.
- To add additional prerequisite groups, click Create Group and repeat from step 4 above.
- To remove a learning item or prerequisite group, select the check box alongside the item or group and click Remove. A message indicates that the entity was removed.
- To change prerequisite group names, click Edit. Make the necessary changes and click . A message indicates the changes were saved.
- View the learning item in the course library to see how the prerequisites display for the learner.

SuccessFactors Learning guide for Learning Administrators
August 2021 Page 33
Items: Creating a survey
Background Surveys are used to gather learner (and manager) feedback on completed training sessions and are linked to the item. To link an existing survey to a learning item, see: Items: Working with surveys.
Procedure 1. Log in to SuccessFactors and access the Learning Administration page.
- In the Menu, choose Content > Surveys.
2. The Surveys page appears.
- Click .

SuccessFactors Learning guide for Learning Administrators
August 2021 Page 34
Items: Creating a survey (continued) 3. The Add New dialogue box appears.
- Enter the Survey ID e.g. Course_Feedback_HR, Follow_Up_HR.
- Enter the full Name of the survey.
- Select the Survey Type i.e. Course Feedback or Follow-up Survey.
• Course Feedback is a user satisfaction survey to hear from the learner about their experience in the course.
• Follow-up Survey asks observers to comment on changes in behaviour after the learner completes a course, whether the learner is applying the new knowledge or skill.
- If applicable, enter a Description and Comments.
- If applicable, change the Security Domain to the area of the university responsible for the survey. If this field is set to PUBLIC, all Learning Administrators could edit and use the survey.
• To change the Security Domain, click .
• The Security Domains dialogue box appears.
• Click to display the list of available domains.
• Select the area of the university responsible for the survey.
- Click .

SuccessFactors Learning guide for Learning Administrators
August 2021 Page 35
Items: Creating a survey (continued) 4. The Surveys page reappears, displaying the Summary tab.
- Click the tab.
5. The Surveys page reappears, displaying the Questions tab.
- Enter an introduction in the Survey Instructions field.

SuccessFactors Learning guide for Learning Administrators
August 2021 Page 36
Items: Creating a survey (continued) - If the survey should be divided into pages (e.g. page 1 covers feedback on the course, page 2 covers
feedback on the instructor), click Add Page to create as many pages as required. Click Remove Page to remove any unnecessary pages.
- If applicable, select the Resource Type for each page e.g. on page 2 select primary instructor as the
Resource Type if the questions on the page relate to the instructor.
- Enter the page Title e.g. Evaluate the course, Feedback on the course, About the course, About the instructor.
- If applicable, enter Instructions for each page.
- Click Add Question to create as many questions as required for each page.

SuccessFactors Learning guide for Learning Administrators
August 2021 Page 37
Items: Creating a survey (continued) 6. A blank line appears for each question added to a page.
- Click Remove Question to remove any unnecessary question lines.
- Enter the question wording in the first available text box.
- Select the Question Type.
• If Rating Scale question type, select the appropriate Rating Scale. Note: The rating scales can be viewed when the survey is previewed.
• If Multiple Choice question type, enter the answer choices by clicking Add Answer. Learners will be able to select more than one answer to the question.
• If One Choice question type, enter the answer choices by clicking Add Answer. Learners will only be able to select one answer to the question.
• If Open Ended question type, the learner will be provided with space to enter their answer to the question.
- Use the Move Question Up and Move Question Down buttons to re-order questions as required.
- Use the Move Question button to move the selected question to another page in the survey.
- Use the Move Page Up and Move Page Down buttons to re-order pages.
- Click .
- Click and choose .

SuccessFactors Learning guide for Learning Administrators
August 2021 Page 38
Items: Creating a survey (continued) 7. The Survey dialogue box appears, displaying the preview of the draft survey.
Note: The setting to allow learners to add a comment for every question is available in the Options tab, covered later in this guide.
- If the survey has multiple pages, click to view the additional pages.
- After reviewing the survey, click .
SuccessFactors Learning guide for Learning Administrators
August 2021 Page 39
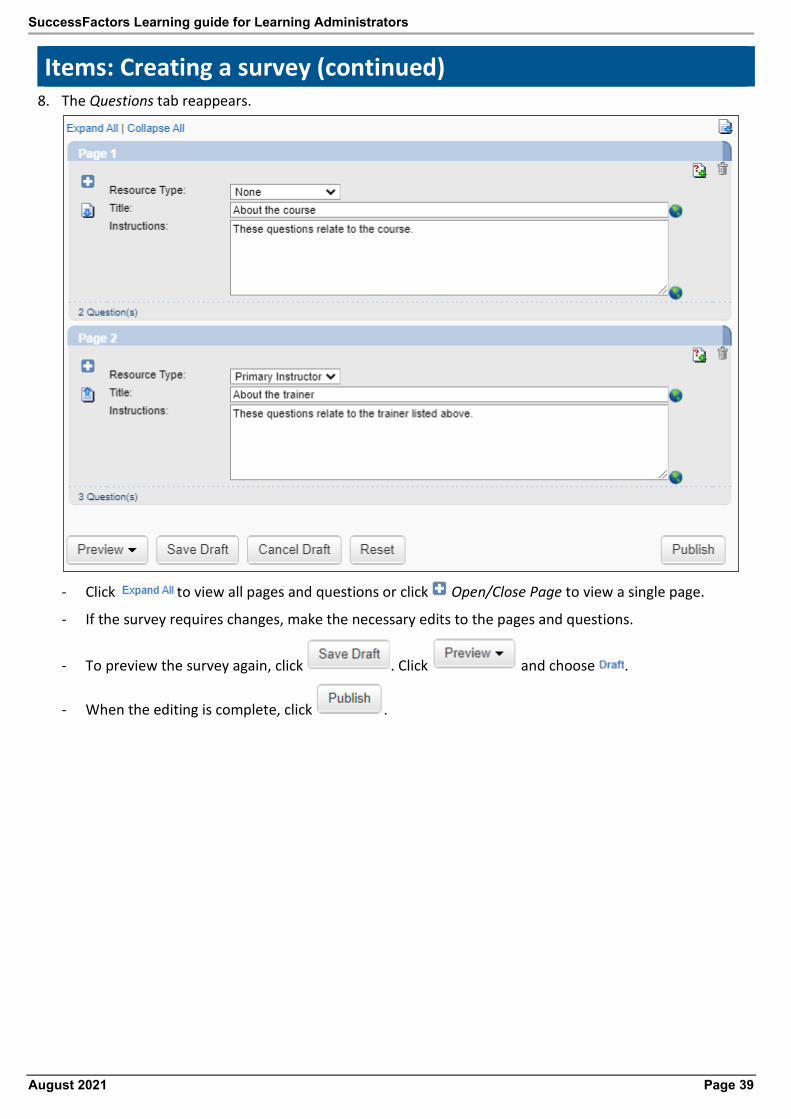
Items: Creating a survey (continued) 8. The Questions tab reappears.
- Click to view all pages and questions or click Open/Close Page to view a single page.
- If the survey requires changes, make the necessary edits to the pages and questions.
- To preview the survey again, click . Click and choose .
- When the editing is complete, click .

SuccessFactors Learning guide for Learning Administrators
August 2021 Page 40
Items: Creating a survey (continued) 9. The Questions tab reappears.
- Click the tab.
10. The Options tab appears, displaying either the options for a course feedback survey or the options for a follow up survey depending on the type of survey created. Course feedback survey options (see next page for follow up survey options)
- By default, the survey is anonymous, change this option if applicable.
- If the learner must complete the survey before the item/course is deemed complete, ensure Required for Item Completion is selected. The item/course will only appear in the learner’s Learning History after they submit the survey.
- To specify the time in which the learner must complete the survey, enter the appropriate number in the Days to Complete field e.g. 7 for 1 week, 14 for 2 weeks.
- Select the appropriate option for Include Comments Field for each Question.
- Click to save and refresh the page.
- To view the final survey, return to the tab and click . The survey is now ready to be linked to new or existing learning items, see: Working with surveys.

SuccessFactors Learning guide for Learning Administrators
August 2021 Page 41
Items: Creating a survey (continued) Follow up survey options
- In the Post Evaluation section, enter the number of Days from Item Completion e.g. 30, 60.
SuccessFactors will automatically assign the follow up survey to the employee and/or manager when it reaches the specified number of days after learners completed the class.
- To specify the time in which the learner and/or manager must complete the survey, enter the appropriate number in the Days to Complete field e.g. 7 for 1 week, 14 for 2 weeks.
- In the Participants section, make appropriate selections to decide who receives a copy of the survey. Note: If the survey is going to both the learner and their manager, consider the wording of the survey questions to ensure they can be understood and answered from both perspectives.
- In the Required for completion by section, make appropriate selections to decide who is required to complete the survey. Ensure that any roles selected here are also selected in the Participants section, i.e. if the manager is required to complete the survey they must also be chosen as a participant.
- Select the appropriate option for Include Comments Field for each Question.
- Click to save and refresh the page.
- To view the final survey, return to the tab and click . The survey is now ready to be linked to new or existing learning items, see: Working with surveys.

SuccessFactors Learning guide for Learning Administrators
August 2021 Page 42
Viewing submitted survey data
Procedure 1. Log in to SuccessFactors and access the Learning Administration page.
- In the Menu, choose Content > Surveys.
2. The Surveys page appears.
- Click to display all surveys you have authorisations to use.

SuccessFactors Learning guide for Learning Administrators
August 2021 Page 43
Viewing submitted survey data (continued) 3. The search results appear at the bottom of the Surveys page.
- Click alongside the appropriate survey.
4. The Surveys page reappears, displaying the selected survey.
- Click the tab.

SuccessFactors Learning guide for Learning Administrators
August 2021 Page 44
Viewing submitted survey data (continued) 5. The Item Usage tab appears.
- For each learning item the table shows the number of learners assigned the survey, the number who
completed the survey and the percentage of assigned surveys completed. If a survey includes rating scale questions that use the same rating scale, the mean score of all ratings will be displayed.
- Click . 6. The Reports page appears in a new browser tab.

SuccessFactors Learning guide for Learning Administrators
August 2021 Page 45
Viewing submitted survey data (continued) - When the report has successfully run, it will replace the Reports page.
- The report can be printed to PDF or copied and pasted into a Microsoft Word document using Ctrl+A
on your keyboard to select everything and then pasting into the document using Ctrl+V on your keyboard.
- When finished reviewing the statistics, close the new browser tab to return to the Surveys page.

SuccessFactors Learning guide for Learning Administrators
August 2021 Page 46
Items: Viewing class requests
Background If the learning item has been set up to allow requests, learners can submit a request for a new class. This may occur if they are unable to attend any of the existing scheduled classes.
Procedure 1. Log in to SuccessFactors and access the Learning Administration page. 2. Search for the appropriate learning item.
- In the item menu, click .
3. The Class Requests page appears, displaying any requests in the Update the Requests for the Item section.
- Click to display any comments the learner may have included.
- To remove old requests, select the appropriate check box in the Select column and click .

SuccessFactors Learning guide for Learning Administrators
August 2021 Page 47
Creating an instructor
Background An instructor is first added to the pool of instructors and then later connected to a scheduled class or item.
Procedure 1. Log in to SuccessFactors and access the Learning Administration page.
- In the Menu, choose People > Instructors.
2. The Instructors page appears.
- Click .

SuccessFactors Learning guide for Learning Administrators
August 2021 Page 48
Creating an instructor (continued) 3. The Add New dialogue box appears.
- In the Instructor ID field enter the staff number (including leading zero) e.g. 01234567 or if an external
instructor in the format Ext_<capital initial><surname starting with a capital letter> e.g. Ext_BDlamini.
- In the Company field, enter University of Cape Town or if an external instructor, the company name.
- In the Role field, select UCT Instructor Role.
- In the Organisation field, click to search for the staff member’s UCT organisational unit. If an external instructor, leave this field blank.
- In the Time Zone field, select South Africa Standard Time (Africa/Johannesburg).
- Enter the instructor’s Email Address.
- In the Related User field, enter the staff number (including leading zero). If an external instructor, leave this field blank.
- Click .

SuccessFactors Learning guide for Learning Administrators
August 2021 Page 49
Creating an instructor (continued) 4. The Instructors page reappears, displaying the new instructor’s information.
- If the Last Name and First Name fields have not defaulted, enter the applicable information.
- Click .

SuccessFactors Learning guide for Learning Administrators
August 2021 Page 50
Adding an authorised instructor to an item
Background Adding authorised instructors to an item will limit the choice of instructor when creating a class for that item. The instructor must be created and part of the instructor pool, see: Creating an instructor.
Procedure
1. Log in to SuccessFactors and access the Learning Administration page.
2. Search for the appropriate learning item.
- In the item menu, click .
3. The Instructors page appears.
- In the Add an Authorised Instructor to an item section, click .

SuccessFactors Learning guide for Learning Administrators
August 2021 Page 51
Adding an authorised instructor to an item (continued) 4. The Search Instructors page appears.
- Click . 5. The Instructors page appears, listing all instructors.
- If there are more than 10 results, either change the number of Records per Page using the dropdown
arrow or click to view additional results.
- Select the check box in the Select column for one or more instructors.
- Click .

SuccessFactors Learning guide for Learning Administrators
August 2021 Page 52
Adding an authorised instructor to an item (continued) 6. The Instructors page reappears, listing the new instructor(s) in the Update the Authorised instructors for
the item section.
- In the Edit the Item section, select the Check Instructor Authorisation check box. This ensures that
classes for this item will only be able to use the authorised instructors.
- Click in the Edit the Item section

SuccessFactors Learning guide for Learning Administrators
August 2021 Page 53
Searching for an item
Procedure
1. Log in to SuccessFactors and access the Learning Administration page.
- Choose Learning Activities > Items. Note: Items you’ve recently accessed can be found in Recents.
2. The Items page appears. If you have previously saved a search, see: Searching for an item using a saved search.
- To find your item(s), enter search criteria in any of the available fields e.g. Item Title.
- To add additional search fields (e.g. Security Domains, UCT area that created the item), click alongside Add/Remove Criteria.
• In the dialogue box, select the applicable fields using the check boxes and click .
- The Security Domains or UCT area that created the item fields can be used to find the items for your area but will only work if the learning item was linked to a security domain or UCT area. See: Using item search filters for security domain and/or UCT area.

SuccessFactors Learning guide for Learning Administrators
August 2021 Page 54
Searching for an item (continued) - If the item you’re searching for is not currently active, ensure you make the appropriate selection for
Item Status.
- Click . Note: If no search criteria were entered, all active items that you have authorisation to view will appear in the search results.
3. The search results appear at the bottom of the Items page.
- To view more search results, either change the number of Records per Page using the dropdown arrow
or click .
- The search results can be exported to an Excel spreadsheet, providing a useful overview of the selected items. Click to download a .csv file.
- To save the search to use again, click .
• The Saved Searches page appears.
• Enter the Saved Search ID name e.g. Staff_Learning_Centre_Area, HR_Security_Domain.
• Enter a Description e.g. Active learning items in the Staff Learning Centre area.
• Click .
- Select the appropriate item to open by clicking the hyperlink in the Item column.

SuccessFactors Learning guide for Learning Administrators
August 2021 Page 55
Searching for an item (continued) 4. The Item Details page appears.
- To select a different item from the previous search results, click .

SuccessFactors Learning guide for Learning Administrators
August 2021 Page 56
Searching for an item using a saved search
Procedure
1. Log in to SuccessFactors and access the Learning Administration page.
- Choose Learning Activities > Items. Note: Items you’ve recently accessed can be found in Recents.
2. The Items page appears.
- Click alongside Saved Searches.

SuccessFactors Learning guide for Learning Administrators
August 2021 Page 57
Searching for an item using a saved search (continued) 3. A dialogue box appears, displaying all your previously saved searches.
- Select the appropriate search by clicking the hyperlink in the Name column.
4. The Items page reappears, displaying the name and description of the selected search at the top of the page. The selection criteria and/or filters from the saved search will appear on the page.
- Click .

SuccessFactors Learning guide for Learning Administrators
August 2021 Page 58
Searching for an item using a saved search (continued) 5. The search results appear at the bottom of the Items page.
- To view more search results, either change the number of Records per Page using the dropdown arrow
or click .
- The search results can be exported to an Excel spreadsheet, providing a useful overview of the selected items. Click to download a .csv file.
- Select the appropriate item by clicking the hyperlink in the Item column. 6. The Item Search page appears, displaying the selected item.
- To select a different item from the previous search results, click .

SuccessFactors Learning guide for Learning Administrators
August 2021 Page 59
Using search filters for security domain and/or UCT area
Background When searching for an item, the security domain and UCT area can be used to find all learning items for an area or section.
Procedure
1. Log in to SuccessFactors and access the Learning Administration page.
- Choose Learning Activities > Items.
2. The Items page appears.
- Add the Security Domains and UCT area that created the item fields. See step 2 of Searching for an item.
Filter by security domain (see page 61 to filter by UCT area that created the item)
- Click alongside the Security Domains field to select a domain for the filter.

SuccessFactors Learning guide for Learning Administrators
August 2021 Page 60
Using search filters for security domain and/or UCT area (cont) - The Create Filter dialogue box appears.
- Click . - The Create Filter dialogue box reappears, displaying all the security domains you have authorisation to
use.
- Select the appropriate domain (e.g. Human Resources) using the check box in the Top Level Only
column.
- Click .
- A filter message briefly appears in the top right of the dialogue box, indicating that a filter has been selected.
- Click in the top right.
- The Items page reappears with the selected filter applied.

SuccessFactors Learning guide for Learning Administrators
August 2021 Page 61
Using search filters for security domain and/or UCT area (cont) Filter by UCT area that created the item
- Click alongside the UCT area that created the Item field to select a UCT area for the filter.
- The Items dialogue box appears, displaying all available UCT areas.
- To view more UCT areas, either change the number of Records per Page using the dropdown arrow or
click .
- Choose the area by selecting the appropriate check box in the Select column.
- Click .
- A filter message briefly appears in the top right of the dialogue box, indicating that a filter has been selected.
- Click in the top right.
- The Items page reappears with the selected filter applied.
3. Continue with step 2 of Searching for an item.

SuccessFactors Learning guide for Learning Administrators
August 2021 Page 62
Creating a class
Background Classes are used to schedule a learning item to take place at a specific time and with specific resources (e.g. venue, instructor).
Procedure 1. Log in to SuccessFactors and access the Learning Administration page. 2. Search for the appropriate learning item.
- In the Actions menu (top right), choose Schedule.
3. The Schedule dialogue box appears.
In the Summary Information section:
- Ensure that the correct item is selected.
- If applicable, enter a Description for the class e.g. February 2021. The text entered here will appear when the learner views the item’s available classes as seen in the screenshot below.

SuccessFactors Learning guide for Learning Administrators
August 2021 Page 63
Creating a class (continued) In the Class Information section:
- If applicable, select the appropriate Facility.
- If applicable, select the appropriate Primary Location.
- Click to select the appropriate Start Date for the class using the calendar tool.
- In the Start Time field, enter the class start time in the required format e.g. 09:00 AM.
- Click to review the date/s and times for the class. Any venue clashes with other classes are identified by a warning sign, scroll down to the Resources section to view details of the clash.
- The Resources section will list classes scheduled in the same location, if no location usage information
appears, there are no classes scheduled at a similar time in the same primary location.
- If required, make the necessary adjustments to the Start date, Facility or Primary Location selections
to resolve any clashes.

SuccessFactors Learning guide for Learning Administrators
August 2021 Page 64
Creating a class (continued) In the Resources section:
- Click to select the Primary Instructor.
• The Instructors dialogue box appears. To view more instructors, either change the number of Records per Page using the dropdown arrow or click .
• Click alongside the appropriate instructor.
- In the Resource Usage View field, select Primary Instructor to display current classes the instructor is assigned to. If there are clashes, these are identified by a warning sign. If required, make the necessary adjustments to your selections to correct any clashes.
In the Special Request Custom Fields section:
This section is used to add extra fields to the registration form e.g. dietary requirements, fund, cost centre.
- Click Custom Columns and choose .

SuccessFactors Learning guide for Learning Administrators
August 2021 Page 65
Creating a class (continued) - The Custom Fields dialogue box appears.
- Click .
- The Custom Fields dialogue box reappears, displaying the list of available options.
- Choose the additional fields to add to the registration form by selecting the appropriate options in the
Add column.
- Click .
SuccessFactors Learning guide for Learning Administrators
August 2021 Page 66
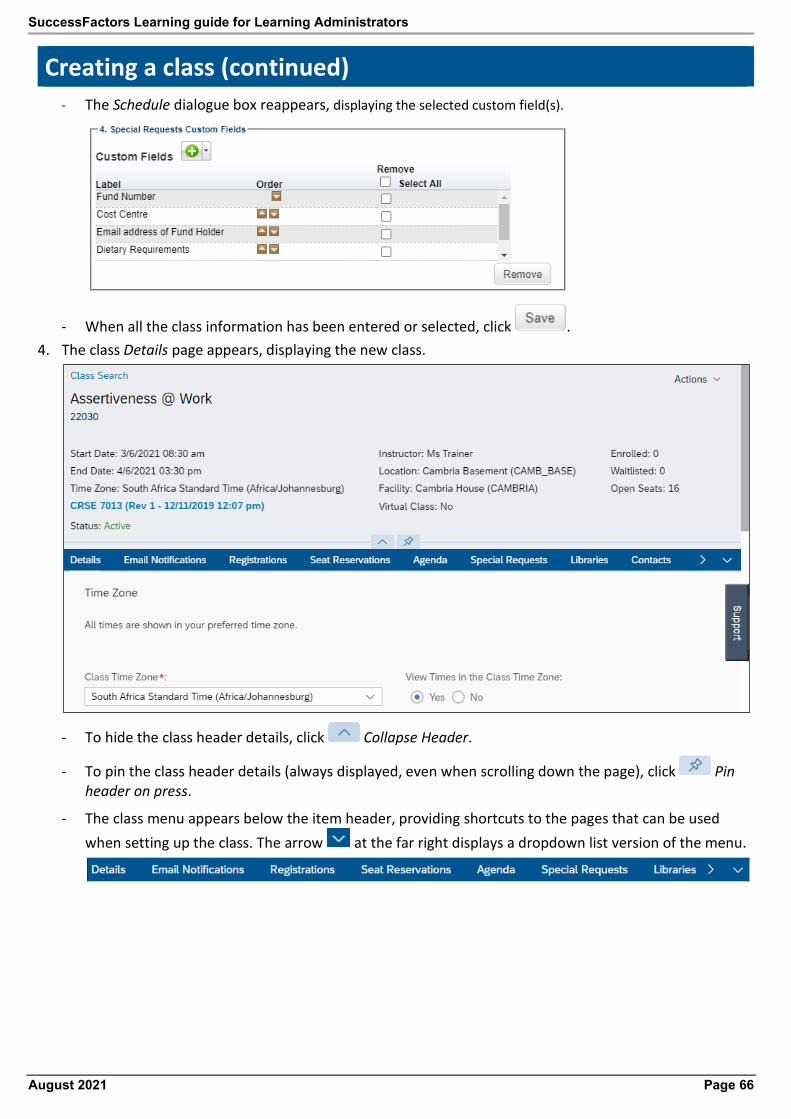
Creating a class (continued) - The Schedule dialogue box reappears, displaying the selected custom field(s).
- When all the class information has been entered or selected, click . 4. The class Details page appears, displaying the new class.
- To hide the class header details, click Collapse Header.
- To pin the class header details (always displayed, even when scrolling down the page), click Pin header on press.
- The class menu appears below the item header, providing shortcuts to the pages that can be used when setting up the class. The arrow at the far right displays a dropdown list version of the menu.

SuccessFactors Learning guide for Learning Administrators
August 2021 Page 67
Creating a class (continued) In the General section:
- Enter the Contact Name and Contact Email Address for the class.
- If applicable, enter Registration Close Date, Registration Close Time, Last Date to Withdraw and
Withdraw End Time e.g. stopping registrations and withdrawals two days before the class can assist in determining final numbers for catering.
In the Registration Settings section:
- Review and make any required changes.

SuccessFactors Learning guide for Learning Administrators
August 2021 Page 68
Creating a class (continued) In the Approval Process section:
- Review and make any required changes.
In the Completion section:
- The Certificate Template is inherited from the item, change if required.
Note: The UCT certificate of completion should be used when the learner completes a task/s such as a test, presentation, submission of work.
- If the Auto Record Competency Rating on Item Completion, User can Add to Learning History and Manager can Add to Learning History fields appear, do not change these as they are not in use at UCT.
- Click . A message indicates that the changes were saved.
- To view the parent item for this class, click the item hyperlink in the class header e.g. CRSE 7013 (Rev 1 – 12/11/2019 12:07 pm)
- Once the Item Details page appears, click for an overview of all future classes for the selected
item.

SuccessFactors Learning guide for Learning Administrators
August 2021 Page 69
Searching for a class
Background This procedure is useful for locating past classes or to provide an overview of all classes in an area of the University. For future classes related to a specific item, it may be best to open the item and view the Classes page. See Searching for an item.
Procedure 1. Log in to SuccessFactors and access the Learning Administration page.
- Choose Learning Activities > Classes. Note: Classes you’ve recently accessed can be found in Recents.
2. The Classes page appears. If you have previously saved a search, see: Searching for a class using a saved search.
- Enter search criteria in any of the available fields e.g. Title.
- If searching for a class in the past, change the date in the Start Date After field.

SuccessFactors Learning guide for Learning Administrators
August 2021 Page 70
Searching for a class (continued) - If the class you’re searching for is not active, ensure you make the appropriate selection in the Status
field. Note: An inactive class is accessible to Learning Administrators but can’t be seen by learners.
- To add additional search fields (e.g. Security Domains, Primary Location, Primary Instructor), click alongside Add/Remove Criteria.
• In the Search Criteria dialogue box, select the applicable fields using the check boxes and click
.
- The Security Domains field can be used to find the classes for your domain but only if the class was linked to a security domain (if the item has a security domain, the class will inherit the same domain).
- Click . Note: If no search criteria were entered, all future active classes that you have authorisation to view will appear in the search results.
3. The search results appear at the bottom of the Classes page.
- To view more search results, either change the number of Records per Page using the dropdown arrow
or click .
- The search results can be exported to an Excel spreadsheet, providing a useful overview of the selected classes. Click to download a .csv file.
- Click the tab to see classes listed by month.

SuccessFactors Learning guide for Learning Administrators
August 2021 Page 71
Searching for a class (continued)
- To save the search to use again, click . Note: The search will be saved with the current date in the Start Date After field, this may need to be changed each time you run the saved search.
• The Saved Searches page appears.
• Enter the Saved Search ID name e.g. HR_Domain_Classes.
• Enter a Description e.g. Active classes in the HR security domain.
• Click .
- In the Grid View tab, select the appropriate class by clicking the hyperlink in the Class ID column. If using the Calendar View tab, click the appropriate class ID hyperlink in the calendar.
4. The class Details page appears.
- To select a different class from the previous search results, click .

SuccessFactors Learning guide for Learning Administrators
August 2021 Page 72
Searching for a class using a saved search
Procedure
1. Log in to SuccessFactors and access the Learning Administration page.
- Choose Learning Activities > Classes. Note: Classes you’ve recently accessed can be found in Recents.
2. The Classes page appears.
- Click alongside Saved Searches.
SuccessFactors Learning guide for Learning Administrators
August 2021 Page 73
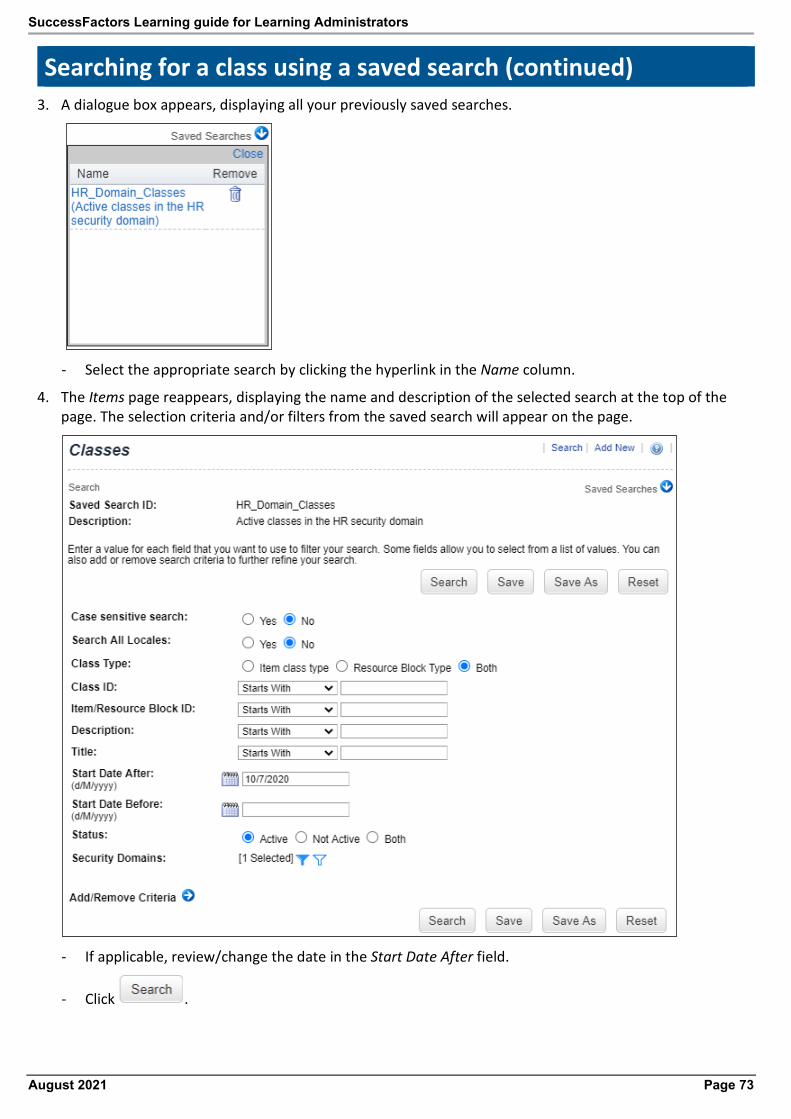
Searching for a class using a saved search (continued) 3. A dialogue box appears, displaying all your previously saved searches.
- Select the appropriate search by clicking the hyperlink in the Name column.
4. The Items page reappears, displaying the name and description of the selected search at the top of the page. The selection criteria and/or filters from the saved search will appear on the page.
- If applicable, review/change the date in the Start Date After field.
- Click .

SuccessFactors Learning guide for Learning Administrators
August 2021 Page 74
Searching for a class using a saved search (continued) 7. The search results appear at the bottom of the Classes page.
- To view more search results, either change the number of Records per Page using the dropdown arrow
or click .
- The search results can be exported to an Excel spreadsheet, providing a useful overview of the selected classes. Click to download a .csv file.
- Click the tab to see classes listed by month.
- In the Grid View tab, select the appropriate class by clicking the hyperlink in the Class ID column. If using the Calendar View tab, click the appropriate class ID hyperlink in the calendar.

SuccessFactors Learning guide for Learning Administrators
August 2021 Page 75
Searching for a class using a saved search (continued) 8. The class Details page appears.
- To select a different class from the previous search results, click .

SuccessFactors Learning guide for Learning Administrators
August 2021 Page 76
Registering or waitlisting learners for a class
Procedure 1. Log in to SuccessFactors and access the Learning Administration page. 2. Search for the appropriate class.
- In the class menu, click .
3. The Registrations page appears.
- Click .
SuccessFactors Learning guide for Learning Administrators
August 2021 Page 77
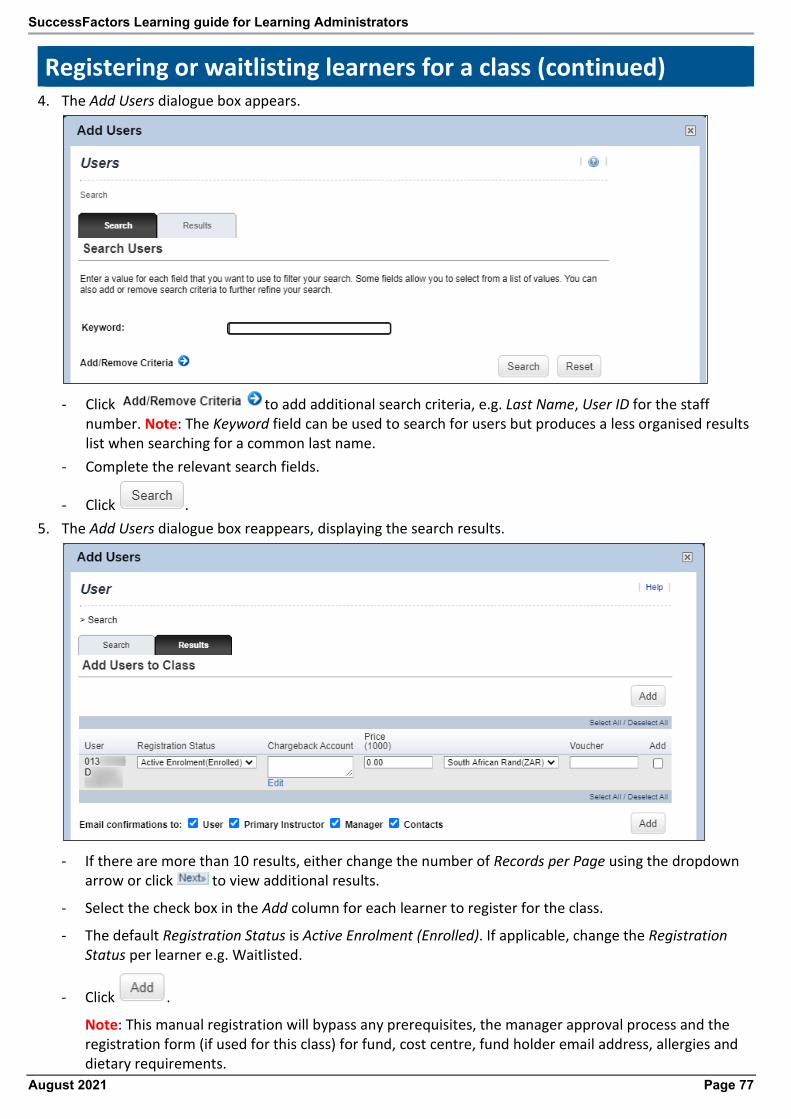
Registering or waitlisting learners for a class (continued) 4. The Add Users dialogue box appears.
- Click to add additional search criteria, e.g. Last Name, User ID for the staff
number. Note: The Keyword field can be used to search for users but produces a less organised results list when searching for a common last name.
- Complete the relevant search fields.
- Click . 5. The Add Users dialogue box reappears, displaying the search results.
- If there are more than 10 results, either change the number of Records per Page using the dropdown
arrow or click to view additional results.
- Select the check box in the Add column for each learner to register for the class.
- The default Registration Status is Active Enrolment (Enrolled). If applicable, change the Registration Status per learner e.g. Waitlisted.
- Click .
Note: This manual registration will bypass any prerequisites, the manager approval process and the registration form (if used for this class) for fund, cost centre, fund holder email address, allergies and dietary requirements.

SuccessFactors Learning guide for Learning Administrators
August 2021 Page 78
Registering or waitlisting learners for a class (continued) - If the maximum registration for the class has been exceeded, a warning message appears.
Click to proceed with the registration. If the learner’s registration status wasn’t changed to Waitlisted on the previous page, the maximum registration is increased.
- If the learner doesn’t meet the prerequisites of the class, a warning message appears.
Click to proceed with the registration and bypass the prerequisite.
- If adding a learner to the waitlist before the class is full, a warning message appears.
Click to proceed with the registration.
- If the end date for registration changes has passed, a warning message appears.
Click to proceed with the registration. 6. The Registrations page reappears, displaying the new registrations in either the Active Enrolment or
Waitlisted sections.

SuccessFactors Learning guide for Learning Administrators
August 2021 Page 79
Managing class registrations
Procedure 1. Log in to SuccessFactors and access the Learning Administration page. 2. Search for the appropriate class.
- In the class menu, click .

SuccessFactors Learning guide for Learning Administrators
August 2021 Page 80
Managing class registrations (continued) 3. The Registrations page appears.
- Learners will appear in one of the registration groupings i.e. Active Enrolment, Cancelled, Pending
(awaiting manager approval) or Waitlisted.
- To delete a registration, click More and choose Remove. If the class settings allow auto enrolling from the waitlist, SuccessFactors will automatically move a learner from the waitlist to take the place of the deleted registration. Note: This deletion will not be recorded as a cancellation.

SuccessFactors Learning guide for Learning Administrators
August 2021 Page 81
Managing class registrations (continued) - To change a registration, click More and choose Edit.
• The Edit Registration dialogue box appears.
• In the Status field, select the appropriate status from the dropdown list i.e. Cancelled or Waitlisted.
• If changing the Status to cancelled, select the appropriate Withdrawal Reason.
• Click . Note: If there are warning messages regarding prerequisites or maximum registrations, indicate if you wish to proceed with the registration change.
• The Registrations page reappears, a message indicates that the status of the learner has changed. Note: If a registration was cancelled and the class settings allow auto enrolling from the waitlist, SuccessFactors will automatically move a learner from the waitlist to take the place of the cancelled registration.

SuccessFactors Learning guide for Learning Administrators
August 2021 Page 82
Viewing class registration form information
Background This procedure is used to display the UCT custom registration fields (i.e. fund number, cost centre, email address of fund holder, dietary requirements or food allergies) completed by the learner when registering for the class. If the class registration form didn’t include any UCT custom fields, there will be no information to display.
Procedure 1. Log in to SuccessFactors and access the Learning Administration page. 2. Search for the appropriate class.
- In the class menu, click . 3. The Special Requests page appears.
- Any learners with pending, waitlisted or cancelled registrations will also appear in the list.
- Any learner registrations added by the Learning Administrator will not have registration form information as the manual registration process bypasses the completion of the registration form.
SuccessFactors Learning guide for Learning Administrators
August 2021 Page 83
Viewing and printing a class roster
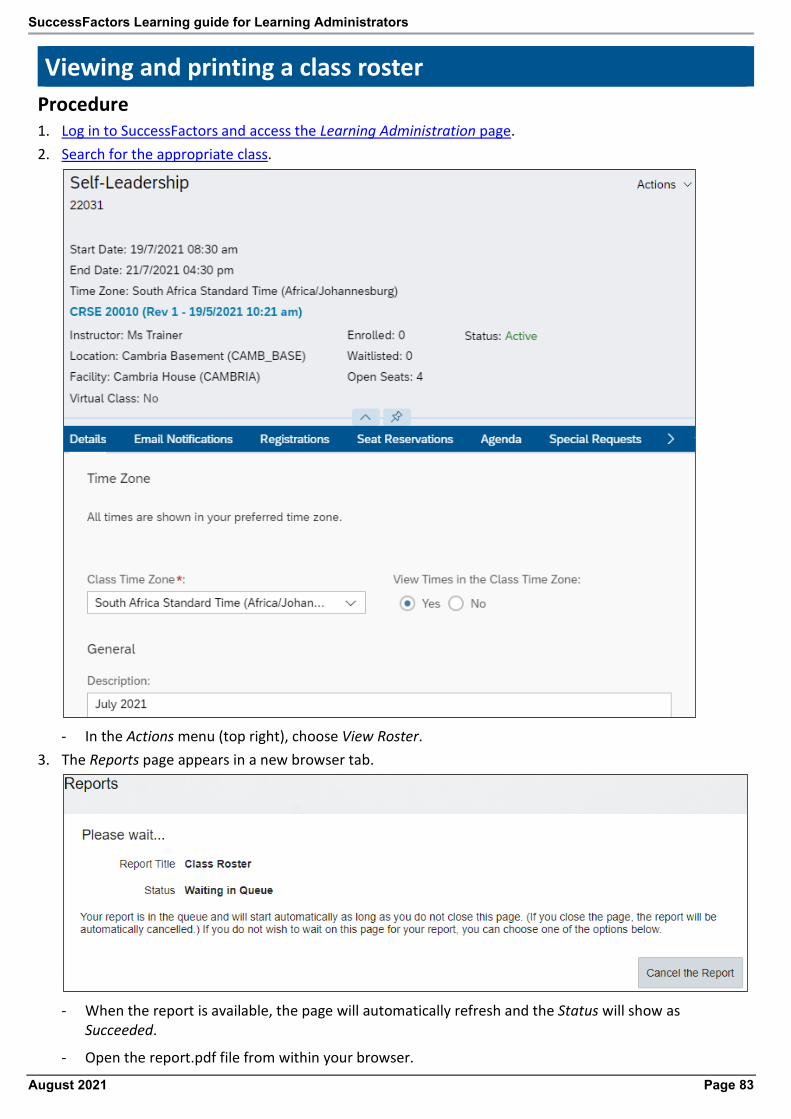
Procedure 1. Log in to SuccessFactors and access the Learning Administration page. 2. Search for the appropriate class.
- In the Actions menu (top right), choose View Roster.
3. The Reports page appears in a new browser tab.
- When the report is available, the page will automatically refresh and the Status will show as
Succeeded.
- Open the report.pdf file from within your browser.

SuccessFactors Learning guide for Learning Administrators
August 2021 Page 84
Viewing and printing a class roster (continued) 4. The Class Roster opens in a new browser tab.
- Print or download the PDF file as required.
- Close the additional browser tabs until the class Details page reappears.

SuccessFactors Learning guide for Learning Administrators
August 2021 Page 85
Creating a block booking / seat reservation
Background A seat reservation is a space reserved for un-named learners from a specific organisational unit.
Procedure 1. Log in to SuccessFactors and access the Learning Administration page. 2. Search for the appropriate class.
- In the class menu, click .
3. The Seat Reservations page appears.
- Click Add.

SuccessFactors Learning guide for Learning Administrators
August 2021 Page 86
Creating a block booking / seat reservation (continued) 4. The Reserve Seats dialogue box appears.
- In the Organisation field, click .
5. The Organisations dialogue box appears.
- For Description, change the search from Starts With to Contains. This expands the search to look for
the search term anywhere in the organisational unit description text.
- In the Description field, enter part of the organisational unit name e.g. Law.
- Click .

SuccessFactors Learning guide for Learning Administrators
August 2021 Page 87
Creating a block booking / seat reservation (continued) - The search results appear in the Organisations dialogue box.
- To view more search results, either change the number of Records per Page using the dropdown arrow
or click .
- Click alongside the appropriate organisational unit. 6. The Reserve Seats dialogue box reappears, displaying the selected organisational unit.
- If applicable, change the number of Reserved Seats.
- Click .

SuccessFactors Learning guide for Learning Administrators
August 2021 Page 88
Creating a block booking / seat reservation (continued) 7. The Seat Reservations page reappears, displaying the new seat reservation.
- To make changes to the reservation or add Comments (e.g. contact person or email address), click
Edit. When changes are complete, click .
- Seat reservations and registrations are combined when viewing total enrolments for a class (e.g. 2 seat reservations plus 2 registrations equals 4 enrolments of the maximum 10 below).

SuccessFactors Learning guide for Learning Administrators
August 2021 Page 89
Removing a block booking / seat reservation
Procedure 1. Log in to SuccessFactors and access the Learning Administration page. 2. Search for the appropriate class.
- In the class menu, click .
3. The Seat Reservations page appears.
- Select the seat reservation to remove by clicking the check box in the applicable row.
Note: Using the check box to the left of User Group ID will select all seat reservations.
- Click Remove.
- The Class Refund for Reserved Seats dialogue box appears.
- Click .

SuccessFactors Learning guide for Learning Administrators
August 2021 Page 90
Removing a block booking / seat reservation (continued) 4. The Seat Reservations page reappears, a message indicates that the entity was removed.

SuccessFactors Learning guide for Learning Administrators
August 2021 Page 91
Changing a class instructor
Procedure 1. Log in to SuccessFactors and access the Learning Administration page. 2. Search for the appropriate class.
- In the class menu, click .
3. The Agenda page appears.
- Click More alongside the first day and choose Edit Time Slot.

SuccessFactors Learning guide for Learning Administrators
August 2021 Page 92
Changing a class instructor (continued) 4. The Edit Time Slot dialogue box appears.
- In the Resources section, click the arrow alongside Add Location and choose Add Instructor.

SuccessFactors Learning guide for Learning Administrators
August 2021 Page 93
Changing a class instructor (continued) 5. The Instructors dialogue box appears, listing all instructors.
- If there are more than 10 results, either change the number of Records per Page using the dropdown
arrow or click to view additional results.
- Select the new instructor using the check box.
- Click . 6. The Edit Time Slot dialogue box reappears, with the new instructor added to the Resources section.
- Set the new instructor as the Primary instructor using the radio button.
- Delete the previous instructor by selecting the Delete check box.
- Click .

SuccessFactors Learning guide for Learning Administrators
August 2021 Page 94
Changing a class instructor (continued) 7. The Agenda page reappears, a message indicates the changes were saved.
- To change the instructor for any additional time slots, repeat from step 3.

SuccessFactors Learning guide for Learning Administrators
August 2021 Page 95
Recording learning after a completed class
Procedure 1. Log in to SuccessFactors and access the Learning Administration page. 2. Search for the appropriate class.
- In the Actions menu (top right), choose Add to Learning History.

SuccessFactors Learning guide for Learning Administrators
August 2021 Page 96
Recording learning after a completed class (continued) 3. The Add to Learning History dialogue box appears, listing all registered learners for the class.
- If any learners should be removed (and therefore not have the learning recorded), select the
appropriate checkbox in the Remove column and click .
- To proceed with recording the learning for the listed learners, click . 4. The Add to Learning History dialogue box reappears, allowing for capture of event information.
- Either select an option for all learners in the Apply Default Status field and click or select a Status for each learner in the Status column.
- Click .

SuccessFactors Learning guide for Learning Administrators
August 2021 Page 97
Recording learning after a completed class (continued) 5. The Add to Learning History dialogue box reappears, displaying financial information.
- Click . 6. The Add to Learning History dialogue box reappears, displaying the list of selected learners and their
status.
- Click .

SuccessFactors Learning guide for Learning Administrators
August 2021 Page 98
Recording learning after a completed class (continued) 7. A system dialogue box appears.
- Click . 8. The Add to Learning History dialogue box reappears, indicating that the learning history record has been
successfully added for the selected learners.
- If applicable, click to view, print or download the certificate. Note: If the item requires completion of a course feedback survey, the learner’s certificates will not be generated until they complete the survey.
- Click Close Add to Learning History Popup. 9. The Registrations page reappears.
- If the learner’s status has changed, it will appear in the Status column. If the Status column is blank,
either there is no recorded learning for the learner or they are required to complete a survey before the class will be added to their learning history.
SuccessFactors Learning guide for Learning Administrators
August 2021 Page 99
Cancelling a class
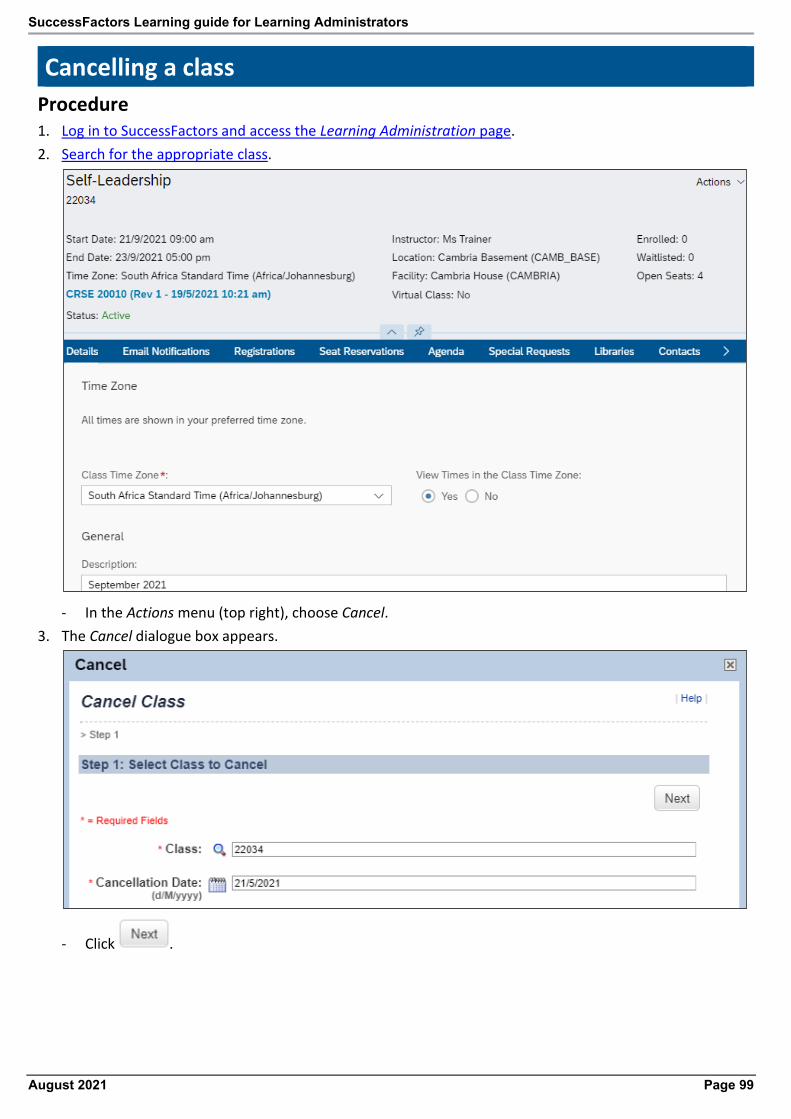
Procedure 1. Log in to SuccessFactors and access the Learning Administration page. 2. Search for the appropriate class.
- In the Actions menu (top right), choose Cancel.
3. The Cancel dialogue box appears.
- Click .

SuccessFactors Learning guide for Learning Administrators
August 2021 Page 100
Cancelling a class (continued) 4. The Cancel dialogue box reappears, displaying realised costs.
- Click . 5. The Cancel dialogue box reappears, displaying post cancellation action settings
- Select the appropriate checkboxes e.g. Add enrolled, waitlisted and pending Users to the request list
for this item will add learners from this class to the item request list so you can keep them in mind when scheduling a new class.
- Click .

SuccessFactors Learning guide for Learning Administrators
August 2021 Page 101
Cancelling a class (continued) 6. The Cancel dialogue box reappears, displaying confirmation information.
- Click . 7. The Cancel dialogue box reappears, indicating that the class has been successfully cancelled.
- Click to return to the class Details page.

SuccessFactors Learning guide for Learning Administrators
August 2021 Page 102
Closing a class
Before you begin Learning history must be recorded for all learners who attended the class. See: Recording learning after a completed class. All registrations should be reviewed and anyone who didn’t attend should be marked as cancelled. See: Managing class registrations. Once a class is closed, no new registrations can be added.
Procedure 1. Log in to SuccessFactors and access the Learning Administration page. 2. Search for the appropriate class.
- In the Actions menu (top right), choose Close.
3. The Close dialogue box appears.
- Click .

SuccessFactors Learning guide for Learning Administrators
August 2021 Page 103
Closing a class (continued) 4. The Close dialogue box reappears, displaying cost information.
- If any learners don’t have the class recorded in their learning history, a warning message appears at
the top of the Close dialogue box. See: Recording learning after a completed class.
- Click . 5. The Close dialogue box reappears, displaying the class to be closed.
- Click .

SuccessFactors Learning guide for Learning Administrators
August 2021 Page 104
Closing a class (continued) 6. The Close dialogue box reappears, confirming the class has been successfully closed.
- Click to return to the class Details page.

SuccessFactors Learning guide for Learning Administrators
August 2021 Page 105
Assigning an item to a learner
Background Learners should find items (courses) in the course library and assign to themselves, with the selected item appearing on their My Learning page. If the learner is unable to assign an item to themselves, a Learning Administrator can directly assign an item to one or more learners. If a group of learners no longer requires the assignment, the Learning Administrator must access each learner individually to remove the assignment. See: Removing an assigned item from a learner.
Procedure 1. Log in to SuccessFactors and access the Learning Administration page. 2. Search for the appropriate learning item.
- In the Actions menu (top right), choose Assign.
3. The Assign dialogue box appears.
- In the Add Users section, click .

SuccessFactors Learning guide for Learning Administrators
August 2021 Page 106
Assigning an item to a learner (continued) 4. The Assign dialogue box refreshes, displaying the Search Users page.
- Click to add additional search criteria, e.g. Last Name, User ID for the staff number. Note: The Keyword field can be used to search for users but produces a less organised results list when searching for a common last name.
- Complete the relevant search fields e.g. Keyword, Last Name.
- Click . 5. The Assign dialogue box refreshes, displaying the search results.
- If there are more than 10 results, either change the number of Records per Page using the dropdown
arrow or click to view additional results. - Select the check box in the Add column to assign the item to each learner.
- Click .

SuccessFactors Learning guide for Learning Administrators
August 2021 Page 107
Assigning an item to a learner (continued) 6. The Assign dialogue box refreshes, displaying the selected users/learner(s).
- To add another learner, repeat from step 3.
- When all learners have been added, click . 7. The Assign dialogue box refreshes, displaying the item details.
- Click .

SuccessFactors Learning guide for Learning Administrators
August 2021 Page 108
Assigning an item to a learner (continued) 8. The Assign dialogue box refreshes, displaying the selected item with assignment type choice.
- Select the appropriate Assign. Type e.g. Optional (OPT). Consult the Learning Administrator – Item
Fields Guide for assistance with using this field.
- Click . 9. The Assign dialogue box refreshes, displaying the selected learner(s), the selected item and the selected
assignment type.
- If applicable, enter the Required Date.
- Click .

SuccessFactors Learning guide for Learning Administrators
August 2021 Page 109
Assigning an item to a learner (continued) 10. The Assign dialogue box refreshes, confirming the item was added to the selected learners.
- Click . 11. The selected item will appear in the learner’s My Learning Assignments.

SuccessFactors Learning guide for Learning Administrators
August 2021 Page 110
Removing an assigned item from a learner
Background This procedure is used to remove an assigned item previously assigned to the learner by a Learning Administrator.
Procedure 1. Log in to SuccessFactors and access the Learning Administration page.
- In the Menu, choose People > Users.
2. The Users page appears.
- Enter the learner’s Last Name or User ID (staff number).
- Click .

SuccessFactors Learning guide for Learning Administrators
August 2021 Page 111
Removing an assigned item from a learner (continued) 3. The search results appear at the bottom of the Users page.
- In the User ID column, select the learner by clicking the appropriate staff number.
4. The User Details page appears.
- In the menu, click .

SuccessFactors Learning guide for Learning Administrators
August 2021 Page 112
Removing an assigned item from a learner (continued) 5. The Assigned Items page appears, displaying items that the learner has not completed.
- Items assigned by a Learning Administrator will have Directly Assigned in the Origin column. - To remove a learning assignment, click More and choose Remove.
6. The Assigned Items page reappears, a message indicates 1 row was removed.

SuccessFactors Learning guide for Learning Administrators
August 2021 Page 113
Running reports
Background This procedure contains general guidelines for running reports. For advice on the best reports to meet your needs, please contact the Staff Learning Centre.
Procedure 1. Log in to SuccessFactors and access the Learning Administration page.
- In the Menu, choose Reports.
2. The Reports page appears.
- If applicable, limit the number of reports displayed by selecting User Management and Learning in the
Report Category section on the left. Ensure the Publication Status is set to Published and the Application is set to Admin.

SuccessFactors Learning guide for Learning Administrators
August 2021 Page 114
Running reports (continued) - Locate the required report in the list. - If applicable, click to view the list of reports.
- Select the applicable report by clicking the report name. Most reports have two types, the first (e.g.
Learning Calendar) displays as HTML in the web browser or produces an Adobe PDF file download. The second type of report with (CSV) produces a .CSV (Comma separated Values) file download that can be opened in Microsoft Excel.
3. The Run page for the selected report appears.
- If applicable, change the Report Format e.g. PDF. - Enter or select appropriate criteria depending on the selected report e.g. Date Range From, Date
Range To, Primary Location, Instructor, Sort By.
- Click .

SuccessFactors Learning guide for Learning Administrators
August 2021 Page 115
Running reports (continued) 4. A new browser tab is opened, the report may take a little while to run.
- When the report has run, it will either appear directly in the browser or as a file download. - When finished viewing or downloading the report, close the browser tab to return to Learning
Administration. - In Learning Administration, click to return to the full list of reports.