sun glassfish enterprise server v2.1.1 administration guide
TRANSCRIPT
Sun GlassFish Enterprise Serverv2.1.1 Administration Guide
Sun Microsystems, Inc.4150 Network CircleSanta Clara, CA 95054U.S.A.
Part No: 821–0185October 2009

Copyright 2009 Sun Microsystems, Inc. 4150 Network Circle, Santa Clara, CA 95054 U.S.A. All rights reserved.
Sun Microsystems, Inc. has intellectual property rights relating to technology embodied in the product that is described in this document. In particular, and withoutlimitation, these intellectual property rights may include one or more U.S. patents or pending patent applications in the U.S. and in other countries.
U.S. Government Rights – Commercial software. Government users are subject to the Sun Microsystems, Inc. standard license agreement and applicable provisionsof the FAR and its supplements.
This distribution may include materials developed by third parties.
Parts of the product may be derived from Berkeley BSD systems, licensed from the University of California. UNIX is a registered trademark in the U.S. and othercountries, exclusively licensed through X/Open Company, Ltd.
Sun, Sun Microsystems, the Sun logo, the Solaris logo, the Java Coffee Cup logo, docs.sun.com, Java, and Solaris are trademarks or registered trademarks of SunMicrosystems, Inc. or its subsidiaries in the U.S. and other countries. All SPARC trademarks are used under license and are trademarks or registered trademarks ofSPARC International, Inc. in the U.S. and other countries. Products bearing SPARC trademarks are based upon an architecture developed by Sun Microsystems, Inc.
The OPEN LOOK and SunTM Graphical User Interface was developed by Sun Microsystems, Inc. for its users and licensees. Sun acknowledges the pioneering effortsof Xerox in researching and developing the concept of visual or graphical user interfaces for the computer industry. Sun holds a non-exclusive license from Xerox tothe Xerox Graphical User Interface, which license also covers Sun's licensees who implement OPEN LOOK GUIs and otherwise comply with Sun's written licenseagreements.
Products covered by and information contained in this publication are controlled by U.S. Export Control laws and may be subject to the export or import laws inother countries. Nuclear, missile, chemical or biological weapons or nuclear maritime end uses or end users, whether direct or indirect, are strictly prohibited. Exportor reexport to countries subject to U.S. embargo or to entities identified on U.S. export exclusion lists, including, but not limited to, the denied persons and speciallydesignated nationals lists is strictly prohibited.
DOCUMENTATION IS PROVIDED “AS IS” AND ALL EXPRESS OR IMPLIED CONDITIONS, REPRESENTATIONS AND WARRANTIES, INCLUDING ANYIMPLIED WARRANTY OF MERCHANTABILITY, FITNESS FOR A PARTICULAR PURPOSE OR NON-INFRINGEMENT, ARE DISCLAIMED, EXCEPT TOTHE EXTENT THAT SUCH DISCLAIMERS ARE HELD TO BE LEGALLY INVALID.
Copyright 2009 Sun Microsystems, Inc. 4150 Network Circle, Santa Clara, CA 95054 U.S.A. Tous droits réservés.
Sun Microsystems, Inc. détient les droits de propriété intellectuelle relatifs à la technologie incorporée dans le produit qui est décrit dans ce document. En particulier,et ce sans limitation, ces droits de propriété intellectuelle peuvent inclure un ou plusieurs brevets américains ou des applications de brevet en attente aux Etats-Uniset dans d'autres pays.
Cette distribution peut comprendre des composants développés par des tierces personnes.
Certaines composants de ce produit peuvent être dérivées du logiciel Berkeley BSD, licenciés par l'Université de Californie. UNIX est une marque déposée auxEtats-Unis et dans d'autres pays; elle est licenciée exclusivement par X/Open Company, Ltd.
Sun, Sun Microsystems, le logo Sun, le logo Solaris, le logo Java Coffee Cup, docs.sun.com, Java et Solaris sont des marques de fabrique ou des marques déposées deSun Microsystems, Inc., ou ses filiales, aux Etats-Unis et dans d'autres pays. Toutes les marques SPARC sont utilisées sous licence et sont des marques de fabrique oudes marques déposées de SPARC International, Inc. aux Etats-Unis et dans d'autres pays. Les produits portant les marques SPARC sont basés sur une architecturedéveloppée par Sun Microsystems, Inc.
L'interface d'utilisation graphique OPEN LOOK et Sun a été développée par Sun Microsystems, Inc. pour ses utilisateurs et licenciés. Sun reconnaît les efforts depionniers de Xerox pour la recherche et le développement du concept des interfaces d'utilisation visuelle ou graphique pour l'industrie de l'informatique. Sun détientune licence non exclusive de Xerox sur l'interface d'utilisation graphique Xerox, cette licence couvrant également les licenciés de Sun qui mettent en place l'interfaced'utilisation graphique OPEN LOOK et qui, en outre, se conforment aux licences écrites de Sun.
Les produits qui font l'objet de cette publication et les informations qu'il contient sont régis par la legislation américaine en matière de contrôle des exportations etpeuvent être soumis au droit d'autres pays dans le domaine des exportations et importations. Les utilisations finales, ou utilisateurs finaux, pour des armes nucléaires,des missiles, des armes chimiques ou biologiques ou pour le nucléaire maritime, directement ou indirectement, sont strictement interdites. Les exportations ouréexportations vers des pays sous embargo des Etats-Unis, ou vers des entités figurant sur les listes d'exclusion d'exportation américaines, y compris, mais de manièrenon exclusive, la liste de personnes qui font objet d'un ordre de ne pas participer, d'une façon directe ou indirecte, aux exportations des produits ou des services quisont régis par la legislation américaine en matière de contrôle des exportations et la liste de ressortissants spécifiquement designés, sont rigoureusement interdites.
LA DOCUMENTATION EST FOURNIE "EN L'ETAT" ET TOUTES AUTRES CONDITIONS, DECLARATIONS ET GARANTIES EXPRESSES OU TACITESSONT FORMELLEMENT EXCLUES, DANS LA MESURE AUTORISEE PAR LA LOI APPLICABLE, Y COMPRIS NOTAMMENT TOUTE GARANTIEIMPLICITE RELATIVE A LA QUALITE MARCHANDE, A L'APTITUDE A UNE UTILISATION PARTICULIERE OU A L'ABSENCE DE CONTREFACON.
091101@22749

Contents
Preface ...................................................................................................................................................19
1 Enterprise Server Overview ...............................................................................................................23Enterprise Server Overview and Concepts ....................................................................................... 23
Enterprise Server Overview ........................................................................................................ 23Tools for Administration ............................................................................................................ 24
Enterprise Server Concepts ................................................................................................................ 26Domain ......................................................................................................................................... 26Domain Administration Server (DAS) ..................................................................................... 26Usage Profiles ............................................................................................................................... 27Cluster ........................................................................................................................................... 28Node Agent ................................................................................................................................... 28Server Instance ............................................................................................................................. 29
Basic Enterprise Server Commands .................................................................................................. 31Creating a Domain ....................................................................................................................... 31Deleting a Domain ....................................................................................................................... 32Listing Domains ........................................................................................................................... 32Starting the Domain .................................................................................................................... 32Starting the Default Domain on Windows ............................................................................... 33Stopping the Domain .................................................................................................................. 33Stopping the Default Domain on Windows ............................................................................. 33Restarting the Domain ................................................................................................................ 33Creating a Cluster ........................................................................................................................ 33Starting a Cluster .......................................................................................................................... 34Stopping a Cluster ........................................................................................................................ 34Creating a Node Agent ................................................................................................................ 34Starting a Node Agent .................................................................................................................. 34Stopping a Node Agent ................................................................................................................ 35
3

Starting an Instance ..................................................................................................................... 35Stopping an Instance ................................................................................................................... 35Restarting an Instance ................................................................................................................. 35Recreating the Domain Administration Server ........................................................................ 36
2 Java Business Integration ..................................................................................................................39JBI Environment .................................................................................................................................. 39
JBI Components ........................................................................................................................... 39Service Assemblies ....................................................................................................................... 41Shared Libraries ........................................................................................................................... 42JBI Descriptors ............................................................................................................................. 42
3 JDBC Resources ....................................................................................................................................43JDBC Resources ................................................................................................................................... 43JDBC Connection Pools ..................................................................................................................... 44How JDBC Resources and Connection Pools Work Together ...................................................... 44Setting Up Database Access ................................................................................................................ 45Working with JDBC Connection Pools ............................................................................................ 46
Creating a JDBC Connection Pool ............................................................................................. 46Editing a JDBC Connection Pool ............................................................................................... 48Editing JDBC Connection Pool Advanced Attributes ............................................................. 50
Configurations for Specific JDBC Drivers ........................................................................................ 52Java DB Type 4 Driver ................................................................................................................. 53Sun GlassFish JDBC Driver for DB2 Databases ....................................................................... 54Sun GlassFish JDBC Driver for Oracle 8.1.7 and 9.x Databases ............................................. 54Sun GlassFish JDBC Driver for Microsoft SQL Server Databases ......................................... 55Sun GlassFish JDBC Driver for Sybase Databases ................................................................... 55IBM DB2 8.1 Type 2 Driver ........................................................................................................ 56JConnect Type 4 Driver for Sybase ASE 12.5 Databases ......................................................... 56MySQL Type 4 Driver .................................................................................................................. 57Inet Oraxo JDBC Driver for Oracle 8.1.7 and 9.x Databases .................................................. 57Inet Merlia JDBC Driver for Microsoft SQL Server Databases .............................................. 58Inet Sybelux JDBC Driver for Sybase Databases ...................................................................... 59Oracle Thin Type 4 Driver for Oracle 8.1.7 and 9.x Databases ............................................... 59OCI Oracle Type 2 Driver for Oracle 8.1.7 and 9.x Databases ............................................... 60
Contents
Sun GlassFish Enterprise Server v2.1.1 Administration Guide • October 20094

IBM Informix Type 4 Driver ...................................................................................................... 61CloudScape 5.1 Type 4 Driver .................................................................................................... 61
4 Configuring Java Message Service Resources ................................................................................ 63JMS Resources ...................................................................................................................................... 63The Relationship Between JMS Resources and Connector Resources ......................................... 64JMS Connection Factories .................................................................................................................. 65JMS Destination Resources ................................................................................................................ 65JMS Physical Destinations .................................................................................................................. 65Configuring JMS Provider Properties ............................................................................................... 66
Accessing Remote Servers ........................................................................................................... 67Foreign JMS Providers ........................................................................................................................ 67
Configuring the Generic Resource Adapter for JMS ............................................................... 67Resource Adapter Properties ...................................................................................................... 68ManagedConnectionFactory Properties .................................................................................. 70Administered Object Resource Properties ................................................................................ 71Activation Spec Properties .......................................................................................................... 71
5 Configuring JavaMail Resources .......................................................................................................75Creating a JavaMail Session ................................................................................................................ 75
6 JNDI Resources .....................................................................................................................................77Java EE Naming Services .................................................................................................................... 77Naming References and Binding Information ................................................................................. 78Using Custom Resources .................................................................................................................... 79Using External JNDI Repositories and Resources ........................................................................... 79
7 Connector Resources ..........................................................................................................................81An Overview of Connectors ............................................................................................................... 81Managing Connector Connection Pools .......................................................................................... 82
▼ To Create a Connector Connection Pool .................................................................................. 82▼ To Edit a Connector Connection Pool ...................................................................................... 83▼ To Edit Connector Connection Pool Advanced Attributes .................................................... 85▼ To Edit Connection Pool Properties .......................................................................................... 87
Contents
5
Managing Security Maps ............................................................................................................. 87▼ To Delete a Connector Connection Pool .................................................................................. 87▼ To Set Up EIS Access ................................................................................................................... 88
Managing Connector Resources ....................................................................................................... 88▼ To Create a Connector Resource ............................................................................................... 88▼ To Edit a Connector Resource .................................................................................................... 89▼ To Delete a Connector Resource ................................................................................................ 89▼ To Configure the Connector Service ......................................................................................... 90
Managing Administered Object Resources ...................................................................................... 90▼ To Create an Administered Object Resource ........................................................................... 91▼ To Edit an Administered Object Resource ............................................................................... 92▼ To Delete an Administered Object Resource ........................................................................... 92
8 SIP, Web, and EJB Containers ............................................................................................................. 93The SIP Servlet Container .................................................................................................................. 93
Editing the Properties of the SIP Container .............................................................................. 94The Web Container ............................................................................................................................. 95The EJB Container .............................................................................................................................. 95
9 Configuring Security ...........................................................................................................................97Understanding Application and System Security ............................................................................ 97Tools for Managing Security .............................................................................................................. 98Managing Security of Passwords ....................................................................................................... 99
Encrypting a Password in the domain.xml File ........................................................................ 99Protecting Files with Encoded Passwords ............................................................................... 100Changing the Master Password ................................................................................................ 100Working with the Master Password and Keystores ............................................................... 101Changing the Admin Password ................................................................................................ 101
About Authentication and Authorization ...................................................................................... 102Authenticating Entities ............................................................................................................. 102Authorizing Users ...................................................................................................................... 103Specifying JACC Providers ....................................................................................................... 103Auditing Authentication and Authorization Decisions ........................................................ 103Configuring Message Security .................................................................................................. 104
Understanding Users, Groups, Roles, and Realms ........................................................................ 104
Contents
Sun GlassFish Enterprise Server v2.1.1 Administration Guide • October 20096

Users ............................................................................................................................................ 105Groups ......................................................................................................................................... 105Roles ............................................................................................................................................ 106Realms ......................................................................................................................................... 106
Introduction to Certificates and SSL ............................................................................................... 108About Digital Certificates ......................................................................................................... 108About Secure Sockets Layer ...................................................................................................... 109
About Firewalls .................................................................................................................................. 111About Certificate Files ....................................................................................................................... 111
Changing the Location of Certificate Files .............................................................................. 112Using Java Secure Socket Extension (JSSE) Tools ......................................................................... 112
Using the keytool Utility ........................................................................................................... 112Generating a Certificate Using the keytool Utility ............................................................... 114Signing a Digital Certificate Using the keytool Utility ......................................................... 115Deleting a Certificate Using the keytool Utility .................................................................... 115
Using Network Security Services (NSS) Tools ............................................................................... 116Using the certutil Utility ....................................................................................................... 117Importing and Exporting Certificates Using the pk12util Utility ...................................... 118Adding and Deleting PKCS11 Modules using modutil ........................................................ 119
Using Hardware Crypto Accelerator With Enterprise Server ..................................................... 120About Configuring Hardware Crypto Accelerators .............................................................. 120Configuring PKCS#11 Tokens ................................................................................................. 121Passing Additional Passwords for a PKCS#11 Crypto Device .............................................. 122Managing Keys And Certificates .............................................................................................. 123Configuring J2SE 5.0 PKCS#11 Providers .............................................................................. 125
10 Configuring Message Security ........................................................................................................127Overview of Message Security .......................................................................................................... 127Understanding Message Security in the Enterprise Server .......................................................... 128
Assigning Message Security Responsibilities .......................................................................... 128About Security Tokens and Security Mechanisms ................................................................. 129Glossary of Message Security Terminology ............................................................................ 131
Securing a Web Service ..................................................................................................................... 132Configuring Application-Specific Web Services Security ..................................................... 133
Securing the Sample Application ..................................................................................................... 133
Contents
7
Configuring the Enterprise Server for Message Security .............................................................. 133Actions of Request and Response Policy Configurations ...................................................... 134Configuring Other Security Facilities ...................................................................................... 135Configuring a JCE Provider ...................................................................................................... 135
Message Security Setup ..................................................................................................................... 137Enabling Providers for Message Security ................................................................................ 137Configuring the Message Security Provider ........................................................................... 138Creating a Message Security Provider ..................................................................................... 139Enabling Message Security for Application Clients ............................................................... 139Setting the Request and Response Policy for the Application Client Configuration ......... 139Further Information .................................................................................................................. 140
11 Configuring the Diagnostic Service ................................................................................................141What is the Diagnostic Framework? ............................................................................................... 141Diagnostic Service Framework ........................................................................................................ 141
Generating a Diagnostic Report ............................................................................................... 142
12 Transactions ...................................................................................................................................... 143About Transactions ........................................................................................................................... 143
What is a Transaction? .............................................................................................................. 143Transactions in Java EE Technology ....................................................................................... 144Workarounds for Specific Databases ....................................................................................... 145
Admin Console Tasks for Transactions ......................................................................................... 145Configuring Transactions ......................................................................................................... 145
13 Configuring the HTTP Service .........................................................................................................149Virtual Servers ................................................................................................................................... 149HTTP Listeners .................................................................................................................................. 150
14 Managing Web Services ...................................................................................................................153Overview of Web Services ................................................................................................................ 153
Web Services Standards ............................................................................................................ 154Java EE Web Service Standards ................................................................................................ 154
Deploying and Testing Web Services .............................................................................................. 155
Contents
Sun GlassFish Enterprise Server v2.1.1 Administration Guide • October 20098

Deploying Web Services ............................................................................................................ 155Viewing Deployed Web Services ............................................................................................. 156Testing Web Services ................................................................................................................. 156Web Services Security ................................................................................................................ 156
Using Web Services Registries ......................................................................................................... 156Adding a Registry ....................................................................................................................... 157Publishing a Web Service to a Registry .................................................................................... 157
Transforming Messages with XSLT Filters ..................................................................................... 158Monitoring Web Services ................................................................................................................. 158
Viewing Web Service Statistics ................................................................................................. 159Monitoring Web Service Messages .......................................................................................... 159
15 Configuring the Object Request Broker ........................................................................................ 161An Overview of the Object Request Broker ................................................................................... 161
CORBA ........................................................................................................................................ 161What is the ORB? ....................................................................................................................... 162IIOP Listeners ............................................................................................................................. 162
Configuring the ORB ........................................................................................................................ 162Managing IIOP Listeners .................................................................................................................. 162
16 Thread Pools .......................................................................................................................................163Working with Thread Pools ............................................................................................................. 164
17 Configuring Logging .........................................................................................................................165About Logging ................................................................................................................................... 165
Log Records ................................................................................................................................ 165Module Log Levels ..................................................................................................................... 166
Configuring Logging ......................................................................................................................... 167Configuring General Logging Settings .................................................................................... 167Configuring Log Levels ............................................................................................................. 167Viewing Server Logs .................................................................................................................. 168
18 Monitoring Components and Services ..........................................................................................171About Monitoring ............................................................................................................................. 171
Contents
9

Monitoring in the Enterprise Server ........................................................................................ 171Overview of Monitoring ........................................................................................................... 172The Tree Structure of Monitorable Objects ............................................................................ 172Statistics for Monitored Components and Services ............................................................... 175
Enabling and Disabling Monitoring ............................................................................................... 190Configuring Monitoring Levels Using the Admin Console ................................................. 191
▼ To Configure Monitoring Levels Using asadmin .................................................................. 191Viewing Monitoring Data ................................................................................................................ 192
Viewing Monitoring Data in the Admin Console .................................................................. 192Viewing Monitoring Data With the asadmin Tool ................................................................ 192
Using JConsole .................................................................................................................................. 208Securing JConsole to Application Server Connection ........................................................... 209Prerequisites for Connecting JConsole to Application Server ............................................. 210
▼ Connecting JConsole to Application Server ........................................................................... 210▼ Connecting JConsole Securely to Application Server ........................................................... 211
19 Configuring Management Rules .....................................................................................................213About Management Rules ................................................................................................................ 213Configuring Management Rules ..................................................................................................... 214
20 Java Virtual Machine and Advanced Settings .............................................................................. 217Tuning the JVM Settings .................................................................................................................. 217Configuring Advanced Settings ....................................................................................................... 218
A Automatically Restarting a Domain or Node Agent .................................................................... 219Restarting Automatically on Solaris 10 ........................................................................................... 219Restarting Automatically Using inittab on Solaris 9 and Linux Platforms ................................. 221Restarting Automatically on the Microsoft Windows Platform .................................................. 221
Creating a Windows Service ..................................................................................................... 221Preventing the Service From Shutting Down When a User Logs Out ................................. 223
Security for Automatic Restarts ....................................................................................................... 223
B Dotted Name Attributes for domain.xml ...................................................................................... 225Top Level Elements ........................................................................................................................... 225
Contents
Sun GlassFish Enterprise Server v2.1.1 Administration Guide • October 200910

Elements Not Aliased ........................................................................................................................ 227
C The asadminUtility ............................................................................................................................229The asadmin Utility ........................................................................................................................... 230Common Options for Remote Commands ................................................................................... 232The Multimode Command .............................................................................................................. 233The Get, Set, and List Commands ................................................................................................... 234Server Lifecycle Commands ............................................................................................................. 235List and Status Commands ............................................................................................................... 236Deployment Commands .................................................................................................................. 237Version Commands .......................................................................................................................... 238Message Queue Administration Commands ................................................................................. 238Resource Management Commands ................................................................................................ 239Configuration Commands ............................................................................................................... 241
HTTP and IIOP Listener Commands ..................................................................................... 241Lifecycle and Audit Module Commands ................................................................................ 241Profiler and SSL Commands ..................................................................................................... 242JVM Options and Virtual Server Commands ........................................................................ 242Threadpool and Auth-Realm Commands .............................................................................. 243Transaction and Timer Commands ........................................................................................ 243Registry Commands .................................................................................................................. 244
User Management Commands ........................................................................................................ 244Rules and Monitoring Commands .................................................................................................. 245Database Commands ........................................................................................................................ 245Diagnostic and Logging Commands .............................................................................................. 246Web Service Commands .................................................................................................................. 246Security Service Commands ............................................................................................................ 247Password Commands ....................................................................................................................... 248Verify Command ............................................................................................................................... 249Custom MBean Commands ............................................................................................................ 249Service Command ............................................................................................................................. 249Property Command .......................................................................................................................... 250
Index ................................................................................................................................................... 251
Contents
11

12

Figures
FIGURE 1–1 Enterprise Server Instance ........................................................................................ 29FIGURE 9–1 Role Mapping ........................................................................................................... 105
13

14

Tables
TABLE 1–1 Features Available for Each Profile .......................................................................... 28TABLE 1–2 Enterprise Server Listeners that Use Ports ............................................................. 30TABLE 6–1 JNDI Lookups and Their Associated References ................................................... 79TABLE 9–1 Enterprise Server Authentication Methods .......................................................... 102TABLE 10–1 Message protection policy to WS-Security SOAP message security operation
mapping ................................................................................................................... 134TABLE 18–1 EJB Statistics ............................................................................................................. 176TABLE 18–2 EJB Method Statistics .............................................................................................. 177TABLE 18–3 EJB Pool Statistics .................................................................................................... 177TABLE 18–4 EJB Cache Statistics ................................................................................................. 178TABLE 18–5 Timer Statistics ........................................................................................................ 178TABLE 18–6 Web Container (Servlet) Statistics ........................................................................ 179TABLE 18–7 Web Container (Web Module) Statistics ............................................................. 179TABLE 18–8 HTTP Service Statistics (Developer Profile) ........................................................ 180TABLE 18–9 JDBC Connection Pool Statistics ........................................................................... 182TABLE 18–10 Connector Connection Pool Statistics .................................................................. 183TABLE 18–11 Connector Work Management Statistics ............................................................. 184TABLE 18–12 Connection Manager (in an ORB) Statistics ........................................................ 184TABLE 18–13 Thread Pool Statistics .............................................................................................. 185TABLE 18–14 Transaction Service Statistics ................................................................................. 185TABLE 18–15 JVM Statistics ........................................................................................................... 186TABLE 18–16 JVM Statistics for Java SE- Class Loading ............................................................. 186TABLE 18–17 JVM Statistics for Java SE- Compilation ............................................................... 187TABLE 18–18 JVM Statistics for Java SE- Garbage Collection ................................................... 187TABLE 18–19 JVM Statistics for Java SE- Memory ...................................................................... 187TABLE 18–20 JVM Statistics for Java SE - Operating System ..................................................... 188TABLE 18–21 JVM Statistics for Java SE - Runtime ..................................................................... 188TABLE 18–22 JVM Statistics for Java SE - Thread Info ............................................................... 189TABLE 18–23 JVM Statistics for Java SE - Threads ...................................................................... 190
15
TABLE 18–24 Top Level .................................................................................................................. 202TABLE 18–25 Applications Level ................................................................................................... 202TABLE 18–26 Applications - Enterprise Applications and Standalone Modules ..................... 203TABLE 18–27 HTTP-Service Level ................................................................................................ 206TABLE 18–28 Thread-Pools Level .................................................................................................. 206TABLE 18–29 Resources Level ........................................................................................................ 207TABLE 18–30 Transaction-Service Level ...................................................................................... 207TABLE 18–31 ORB Level ................................................................................................................. 207TABLE 18–32 JVM Level ................................................................................................................. 208TABLE C–1 Remote Commands Required Options ................................................................ 232TABLE C–2 Server Lifecycle Commands ................................................................................... 235TABLE C–3 List and Status Commands ..................................................................................... 236TABLE C–4 Deployment Commands ........................................................................................ 237TABLE C–5 Version Commands ................................................................................................ 238TABLE C–6 Message Queue Commands ................................................................................... 238TABLE C–7 Resource Management Commands ...................................................................... 239TABLE C–8 IIOP Listener Commands ...................................................................................... 241TABLE C–9 Lifecycle Module Commands ................................................................................ 242TABLE C–10 Profiler and SSL Commands .................................................................................. 242TABLE C–11 JVM Options and Virtual Server Commands ...................................................... 243TABLE C–12 Threadpool and Auth-Realm Commands ........................................................... 243TABLE C–13 Transaction Commands ......................................................................................... 244TABLE C–14 Transaction Commands ......................................................................................... 244TABLE C–15 User Management Commands .............................................................................. 244TABLE C–16 Rules and Monitoring Commands ........................................................................ 245TABLE C–17 Database Commands .............................................................................................. 246TABLE C–18 Diagnostic and Logging Commands .................................................................... 246TABLE C–19 Web Service Commands ........................................................................................ 246TABLE C–20 Security Commands ................................................................................................ 247TABLE C–21 Password Commands ............................................................................................. 248TABLE C–22 Verify Command ..................................................................................................... 249TABLE C–23 Custom MBean Commands .................................................................................. 249TABLE C–24 Service Command ................................................................................................... 249TABLE C–25 Property Command ................................................................................................ 250
Tables
Sun GlassFish Enterprise Server v2.1.1 Administration Guide • October 200916

Examples
EXAMPLE 18–1 Applications Node Tree Structure ......................................................................... 173EXAMPLE 18–2 HTTP Service Schematic (Developer Profile Version) ....................................... 173EXAMPLE 18–3 HTTP Service Schematic (Cluster and Enterprise Profile Version) .................. 174EXAMPLE 18–4 Resources Schematic ............................................................................................... 174EXAMPLE 18–5 Connector Service Schematic ................................................................................ 174EXAMPLE 18–6 JMS Service Schematic ............................................................................................ 175EXAMPLE 18–7 ORB Schematic ........................................................................................................ 175EXAMPLE 18–8 Thread Pool Schematic ........................................................................................... 175EXAMPLE C–1 Passwordfile contents .............................................................................................. 231
17

18

Preface
The Administration guide describes the administrative tasks of the Enterprise Server.
This preface contains information about and conventions for the entire Sun GlassFishTM
Enterprise Server documentation set.
Sun GlassFish Enterprise Server Documentation SetTABLE P–1 Books in the Enterprise Server Documentation Set
Book Title Description
Documentation Center Enterprise Server documentation topics organized by task and subject.
Release Notes Late-breaking information about the software and the documentation. Includes acomprehensive, table-based summary of the supported hardware, operating system, JavaTM
Development Kit (JDKTM), and database drivers.
Quick Start Guide How to get started with the Enterprise Server product.
Installation Guide Installing the software and its components.
Application Deployment Guide Deployment of applications and application components to the Enterprise Server. Includesinformation about deployment descriptors.
Developer’s Guide Creating and implementing Java Platform, Enterprise Edition (Java EE platform) applicationsintended to run on the Enterprise Server that follow the open Java standards model for JavaEE components and APIs. Includes information about developer tools, security, debugging,and creating lifecycle modules.
Java EE 5 Tutorial Using Java EE 5 platform technologies and APIs to develop Java EE applications.
Java WSIT Tutorial Developing web applications using the Web Service Interoperability Technologies (WSIT).Describes how, when, and why to use the WSIT technologies and the features and optionsthat each technology supports.
Administration Guide System administration for the Enterprise Server, including configuration, monitoring,security, resource management, and web services management.
19
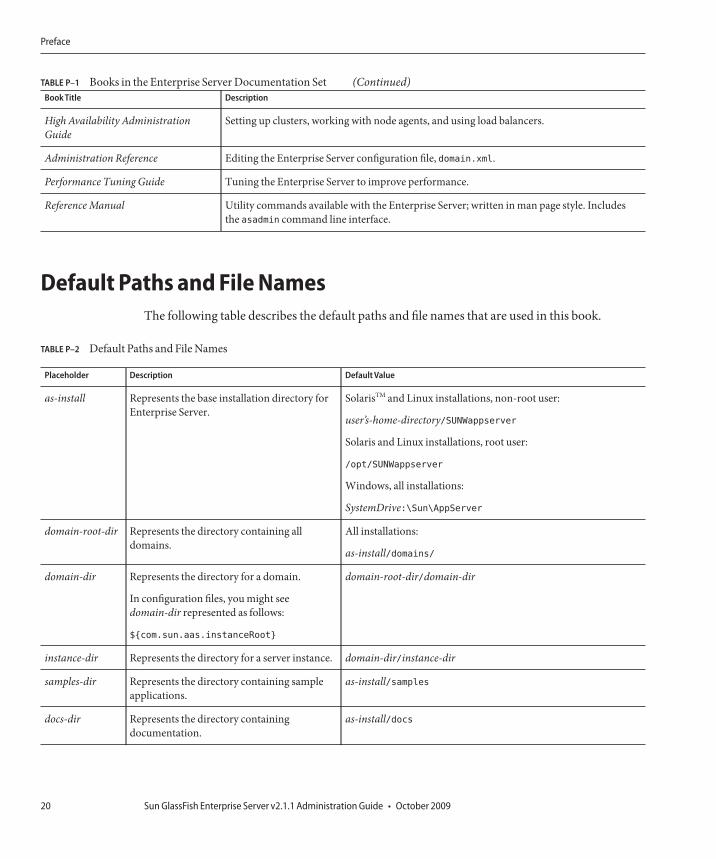
TABLE P–1 Books in the Enterprise Server Documentation Set (Continued)Book Title Description
High Availability AdministrationGuide
Setting up clusters, working with node agents, and using load balancers.
Administration Reference Editing the Enterprise Server configuration file, domain.xml.
Performance Tuning Guide Tuning the Enterprise Server to improve performance.
Reference Manual Utility commands available with the Enterprise Server; written in man page style. Includesthe asadmin command line interface.
Default Paths and File NamesThe following table describes the default paths and file names that are used in this book.
TABLE P–2 Default Paths and File Names
Placeholder Description Default Value
as-install Represents the base installation directory forEnterprise Server.
SolarisTM and Linux installations, non-root user:
user’s-home-directory/SUNWappserver
Solaris and Linux installations, root user:
/opt/SUNWappserver
Windows, all installations:
SystemDrive:\Sun\AppServer
domain-root-dir Represents the directory containing alldomains.
All installations:
as-install/domains/
domain-dir Represents the directory for a domain.
In configuration files, you might seedomain-dir represented as follows:
${com.sun.aas.instanceRoot}
domain-root-dir/domain-dir
instance-dir Represents the directory for a server instance. domain-dir/instance-dir
samples-dir Represents the directory containing sampleapplications.
as-install/samples
docs-dir Represents the directory containingdocumentation.
as-install/docs
Preface
Sun GlassFish Enterprise Server v2.1.1 Administration Guide • October 200920
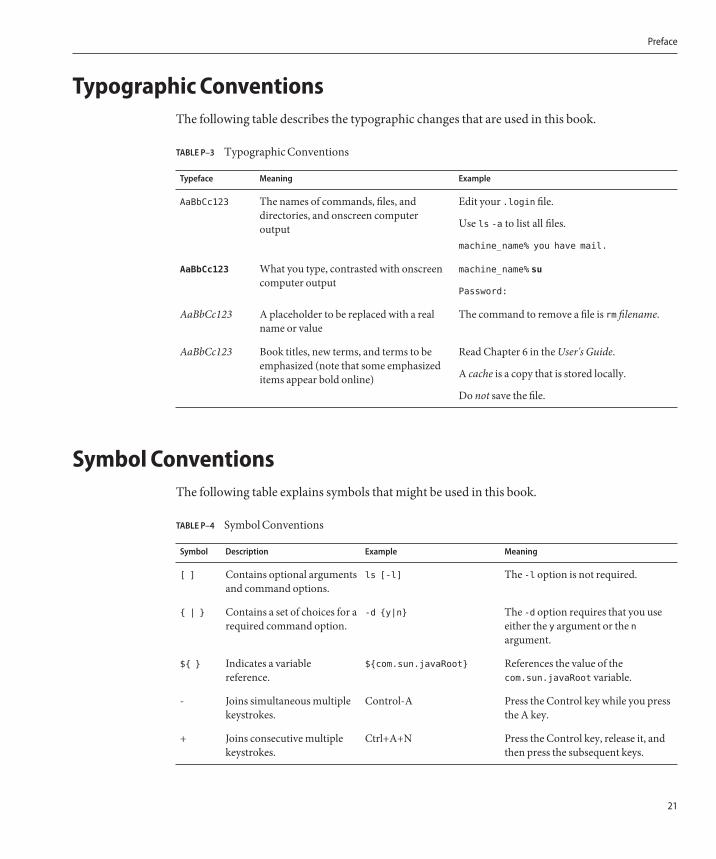
Typographic ConventionsThe following table describes the typographic changes that are used in this book.
TABLE P–3 Typographic Conventions
Typeface Meaning Example
AaBbCc123 The names of commands, files, anddirectories, and onscreen computeroutput
Edit your .login file.
Use ls -a to list all files.
machine_name% you have mail.
AaBbCc123 What you type, contrasted with onscreencomputer output
machine_name% su
Password:
AaBbCc123 A placeholder to be replaced with a realname or value
The command to remove a file is rm filename.
AaBbCc123 Book titles, new terms, and terms to beemphasized (note that some emphasizeditems appear bold online)
Read Chapter 6 in the User's Guide.
A cache is a copy that is stored locally.
Do not save the file.
Symbol ConventionsThe following table explains symbols that might be used in this book.
TABLE P–4 Symbol Conventions
Symbol Description Example Meaning
[ ] Contains optional argumentsand command options.
ls [-l] The -l option is not required.
{ | } Contains a set of choices for arequired command option.
-d {y|n} The -d option requires that you useeither the y argument or the nargument.
${ } Indicates a variablereference.
${com.sun.javaRoot} References the value of thecom.sun.javaRoot variable.
- Joins simultaneous multiplekeystrokes.
Control-A Press the Control key while you pressthe A key.
+ Joins consecutive multiplekeystrokes.
Ctrl+A+N Press the Control key, release it, andthen press the subsequent keys.
Preface
21

TABLE P–4 Symbol Conventions (Continued)Symbol Description Example Meaning
→ Indicates menu itemselection in a graphical userinterface.
File → New → Templates From the File menu, choose New.From the New submenu, chooseTemplates.
Documentation, Support, and TrainingThe Sun web site provides information about the following additional resources:
■ Documentation (http://www.sun.com/documentation/)■ Support (http://www.sun.com/support/)■ Training (http://www.sun.com/training/)
Third-Party Web Site ReferencesThird-party URLs are referenced in this document and provide additional, related information.
Note – Sun is not responsible for the availability of third-party web sites mentioned in thisdocument. Sun does not endorse and is not responsible or liable for any content, advertising,products, or other materials that are available on or through such sites or resources. Sun will notbe responsible or liable for any actual or alleged damage or loss caused or alleged to be caused byor in connection with use of or reliance on any such content, goods, or services that are availableon or through such sites or resources.
Sun Welcomes Your CommentsSun is interested in improving its documentation and welcomes your comments andsuggestions.
To share your comments, go to http://docs.sun.com and click Feedback. In the online form,provide the document title and part number. The part number is a seven-digit or nine-digitnumber that can be found on the title page of the book or at the top of the document.
Preface
Sun GlassFish Enterprise Server v2.1.1 Administration Guide • October 200922
Enterprise Server Overview
Sun GlassFish Enterprise Server administration includes many tasks such as deployingapplications, creating and configuring domains, server instances and resources; controlling(starting and stopping) domains and server instances, managing profiles and clusters,monitoring and managing performance, and diagnosing and troubleshooting problems.
Enterprise Server provides a Java EE compatible server for the development and deployment ofJava EE applications and Java Web Services. Key features include scalable transactionmanagement, container-managed persistence runtime, performant web services, clustering,high availability, security, and integration capabilities.
Enterprise Server Overview and ConceptsThis section contains the following topics:
■ “Enterprise Server Overview” on page 23■ “Tools for Administration” on page 24
Enterprise Server OverviewYou can configure and monitor Enterprise Server instances and clusters securely and remotely,from a web-based central administration console. The command line interface (CLI) can beused to script and automate processes. A stable JMX API is made available to programmaticallymonitor the server, query configuration and change configuration data. Monitoring issupported through JMX and SNMP interfaces. Monitoring level may be varied dynamicallyfrom OFF to LOW and high, changing the amount of information that is collected.
You can configure and optimize Enterprise Server for a particular type of use by specifying theappropriate profile when you create the application server domain.
1C H A P T E R 1
23
Enterprise Server includes the Metro web services stack (http://metro.dev.java.net). Metroimplements important WS-* standards and WS-I standardized interoperability profiles inorder to assure interoperability between Java and .NET web services.
Enterprise Server includes the implementation of Java Business Integration (JBI) specifications.JBI is a Java standard for structuring business systems according to a Service-OrientedArchitecture (SOA).
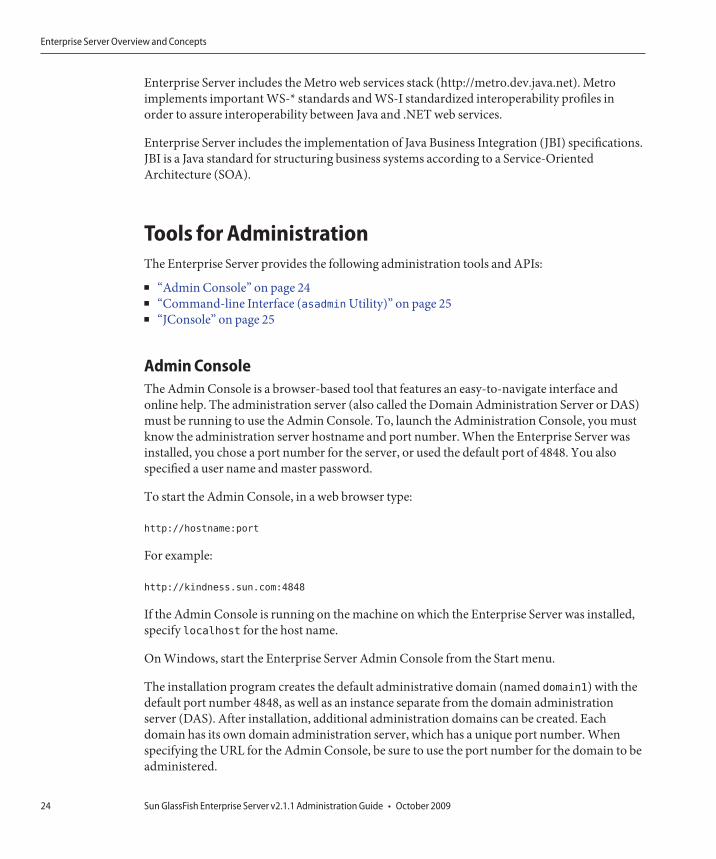
Tools for AdministrationThe Enterprise Server provides the following administration tools and APIs:
■ “Admin Console” on page 24■ “Command-line Interface (asadmin Utility)” on page 25■ “JConsole” on page 25
Admin ConsoleThe Admin Console is a browser-based tool that features an easy-to-navigate interface andonline help. The administration server (also called the Domain Administration Server or DAS)must be running to use the Admin Console. To, launch the Administration Console, you mustknow the administration server hostname and port number. When the Enterprise Server wasinstalled, you chose a port number for the server, or used the default port of 4848. You alsospecified a user name and master password.
To start the Admin Console, in a web browser type:
http://hostname:port
For example:
http://kindness.sun.com:4848
If the Admin Console is running on the machine on which the Enterprise Server was installed,specify localhost for the host name.
On Windows, start the Enterprise Server Admin Console from the Start menu.
The installation program creates the default administrative domain (named domain1) with thedefault port number 4848, as well as an instance separate from the domain administrationserver (DAS). After installation, additional administration domains can be created. Eachdomain has its own domain administration server, which has a unique port number. Whenspecifying the URL for the Admin Console, be sure to use the port number for the domain to beadministered.
Enterprise Server Overview and Concepts
Sun GlassFish Enterprise Server v2.1.1 Administration Guide • October 200924

If your configuration includes remote server instances, create node agents to manage andfacilitate remote server instances. It is the responsibility of the node agent to create, start, stop,and delete a server instance. Use the command line interface (CLI) commands to set up nodeagents.
Command-line Interface (asadminUtility)The asadmin utility is a command-line interface for the Sun GlassFish Enterprise Server. Usethe asadmin utility and the commands associated with it to perform the same set ofadministrative tasks offered by the Admin Console. The default installation root directory onSolaris is /opt/SUNWappserver.
To start the asadmin utility, go to the as-install/bin directory and enter:
$ ./asadmin
To list the commands available within asadmin:
asadmin> help
It is also possible to issue an asadmin command at the shell’s command prompt:
$ asadmin help
To view a command’s syntax and examples, type help followed by the command name. Forexample:
asadmin> help create-jdbc-resource
The asadmin help information for a given command displays the UNIX man page of thecommand. These man pages are also available in HTML and PDF format in the Sun GlassFishEnterprise Server 2.1.1 Reference Manual.
JConsoleJConsole is used to monitor the Sun GlassFish Enterprise Server. You can use either theJConsole remote tab, or the advanced tab to connect to the Enterprise Server.
■ Remote Tab: identify the username, password, administration server host, and JMS portnumber (8686 by default), and select Connect.
■ Advanced Tab: identify the JMXServiceURL asservice:jmx:rmi:///jndi/rmi://host:jms-port/jmxrmi and select Connect. TheJMXServerURL is printed in the server.log file as well as output in the command window ofthe domain creation command.
Enterprise Server Overview and Concepts
Chapter 1 • Enterprise Server Overview 25

Enterprise Server ConceptsThe Enterprise Server consists of one or more domains. A domain is an administrativeboundary or context. Each domain has an administration server (also called DomainAdministration Server or DAS) associated with it and consists of zero or more standaloneinstances and/or clusters. Each cluster has one or more homogeneous server instances. A serverinstance is a single Java Virtual Machine (JVM) that runs the Application Server on a singlephysical machine. Server instances (whether standalone or clustered) in a domain can run ondifferent physical hosts.
This section contains the following topics:■ “Domain” on page 26■ “Domain Administration Server (DAS)” on page 26■ “Usage Profiles” on page 27■ “Cluster” on page 28■ “Node Agent” on page 28■ “Server Instance” on page 29
DomainA domain is a group of instances that are administered together. However, an application serverinstance can belong to just one domain. In addition to the administration boundary, a domainprovides the basic security structure whereby different administrators can administer specificgroups (domains) of application server instances. By grouping the server instances into separatedomains, different organizations and administrators can share a single Enterprise Serverinstallation. Each domain has its own configuration, log files, and application deployment areasthat are independent of other domains. If the configuration is changed for one domain, theconfigurations of other domains are not affected.
The Sun GlassFish Enterprise Server installer creates the default administrative domain (nameddomain1). It also creates an associated domain administration server (named server). Youmust provide the administration server port number. The default administration server port is4848. The installer also queries for the administration username and master password. Afterinstallation, additional administration domains can be created.
Domain Administration Server (DAS)Each domain has its own Domain Administration Server (DAS) with a unique port number.The Admin Console communicates with a specific DAS to administer the associated domain.Each Admin Console session allows you to configure and manage the specific domain.
The Domain Administration Server (DAS), is a specially-designated application server instancethat hosts the administrative applications. The DAS authenticates the administrator, acceptsrequests from administration tools, and communicates with server instances in the domain to
Enterprise Server Concepts
Sun GlassFish Enterprise Server v2.1.1 Administration Guide • October 200926

carry out the requests. The DAS is sometimes referred to as the admin server or default server. Itis referred to as the default server because it is the only server instance that gets created on SunGlassFish Enterprise Server installation and can be used for deployments. The DAS is simply aserver instance with additional administration capabilities.
Each Admin Console session allows you to configure and manage a single domain. If youcreated multiple domains, you must start an additional Admin Console session to manage theother domains. When specifying the URL for the Admin Console, be sure to use the portnumber of the DAS associated with the domain to be administered.
Usage ProfilesEvery administrative domain is associated with a usage profile, which identifies the capabilitiesof that domain. Enterprise Server provides the following profiles:
■ Developer: Use this profile if you are running your domain in a development environmentand if your applications do not need the NSS keystore or clustering features, such as loadbalancing, and session persistence.
■ Cluster: Use this profile if you need to create clusters but do not require the high-availabilitydatabase (HADB) or the NSS keystore.
Note – In the cluster and developer profile, the DAS is set to be in non-secure mode, bydefault. While running asadmin commands, use --secure=false, wherever required. Donot use this flag if you have made changes to set DAS to secure mode.
■ Enterprise:: Use this profile if you need HADB and NSS. This profile is usable only if youinstall HADB and NSS separately or if you install Enterprise Server as part of enterpriseofferings, such as Java Enterprise System (JES). For information on how you can use theenterprise profile with Enterprise Server, see Using the Enterprise Profile
The domain provides a preconfigured runtime for the user applications. Usage profilesfacilitates the distinction between the Application Server binaries and the runtimeconfiguration. Profiles enable you to use the same installation of Enterprise Server to createdifferent domains with profiles that suit specific needs. For example, a developer may want touse the Enterprise Server to get to know the latest Java EE specifications. This developer doesnot need stringent security settings. Another user who wants to deploy applications in aproduction environment needs an inherently secure environment.
Table 1–1 lists the features available with each profile:
Enterprise Server Concepts
Chapter 1 • Enterprise Server Overview 27
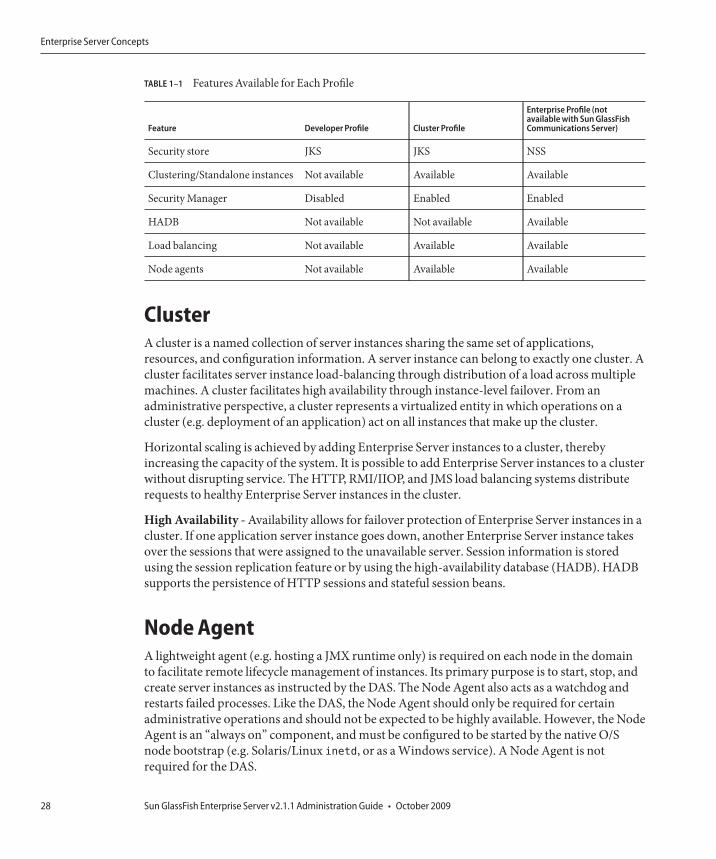
TABLE 1–1 Features Available for Each Profile
Feature Developer Profile Cluster Profile
Enterprise Profile (notavailable with Sun GlassFishCommunications Server)
Security store JKS JKS NSS
Clustering/Standalone instances Not available Available Available
Security Manager Disabled Enabled Enabled
HADB Not available Not available Available
Load balancing Not available Available Available
Node agents Not available Available Available
ClusterA cluster is a named collection of server instances sharing the same set of applications,resources, and configuration information. A server instance can belong to exactly one cluster. Acluster facilitates server instance load-balancing through distribution of a load across multiplemachines. A cluster facilitates high availability through instance-level failover. From anadministrative perspective, a cluster represents a virtualized entity in which operations on acluster (e.g. deployment of an application) act on all instances that make up the cluster.
Horizontal scaling is achieved by adding Enterprise Server instances to a cluster, therebyincreasing the capacity of the system. It is possible to add Enterprise Server instances to a clusterwithout disrupting service. The HTTP, RMI/IIOP, and JMS load balancing systems distributerequests to healthy Enterprise Server instances in the cluster.
High Availability - Availability allows for failover protection of Enterprise Server instances in acluster. If one application server instance goes down, another Enterprise Server instance takesover the sessions that were assigned to the unavailable server. Session information is storedusing the session replication feature or by using the high-availability database (HADB). HADBsupports the persistence of HTTP sessions and stateful session beans.
Node AgentA lightweight agent (e.g. hosting a JMX runtime only) is required on each node in the domainto facilitate remote lifecycle management of instances. Its primary purpose is to start, stop, andcreate server instances as instructed by the DAS. The Node Agent also acts as a watchdog andrestarts failed processes. Like the DAS, the Node Agent should only be required for certainadministrative operations and should not be expected to be highly available. However, the NodeAgent is an “always on” component, and must be configured to be started by the native O/Snode bootstrap (e.g. Solaris/Linux inetd, or as a Windows service). A Node Agent is notrequired for the DAS.
Enterprise Server Concepts
Sun GlassFish Enterprise Server v2.1.1 Administration Guide • October 200928

Server InstanceThe server instance is a single Java EE compatible Java Virtual Machine hosting an EnterpriseServer on a single node. Each server instance has a unique name in the domain. A clusteredserver instance is a member of a cluster and receives all of its applications, resources, andconfiguration from its parent cluster; ensuring that all instances in the cluster arehomogeneous. An unclustered server instance does not belong to a cluster and as such has anindependent set of applications, resources, and configuration. The following figure shows anapplication server instance in detail. The application server instance is a building block in theclustering, load balancing, and session persistence features of the Enterprise Server.
The Sun GlassFish Enterprise Server creates one application server instance, called server, atthe time of installation. For many users, one application server instance meets their needs.However, depending upon your environment, you might want to create one or more additionalapplication server instances. For example, in a development environment you can use differentapplication server instances to test different Enterprise Server configurations, or to compareand test different application deployments. Because you can easily add or delete an applicationserver instance, you can use them to create temporary sandbox area for experimentationpurposes.
In addition, for each application server instance, you can also create virtual servers. Within asingle installed application server instance you can offer companies or individuals domain
FIGURE 1–1 Enterprise Server Instance
Enterprise Server Concepts
Chapter 1 • Enterprise Server Overview 29
names, IP Addresses, and some administration capabilities. For the users, it is almost as if theyhave their own web server, without the hardware and basic server maintenance. These virtualservers do not span application server instances. For more information about virtual servers,see Chapter 13, “Configuring the HTTP Service.”
In operational deployments, for many purposes you can use virtual servers instead of multipleapplication server instances. However, if virtual servers do not meet your needs, you can alsouse multiple application server instances. On stopping, application server instance stopsaccepting new connections, then waits for all outstanding connections to complete. If yourmachine crashes or is taken offline, the server quits and any requests it was servicing may belost.
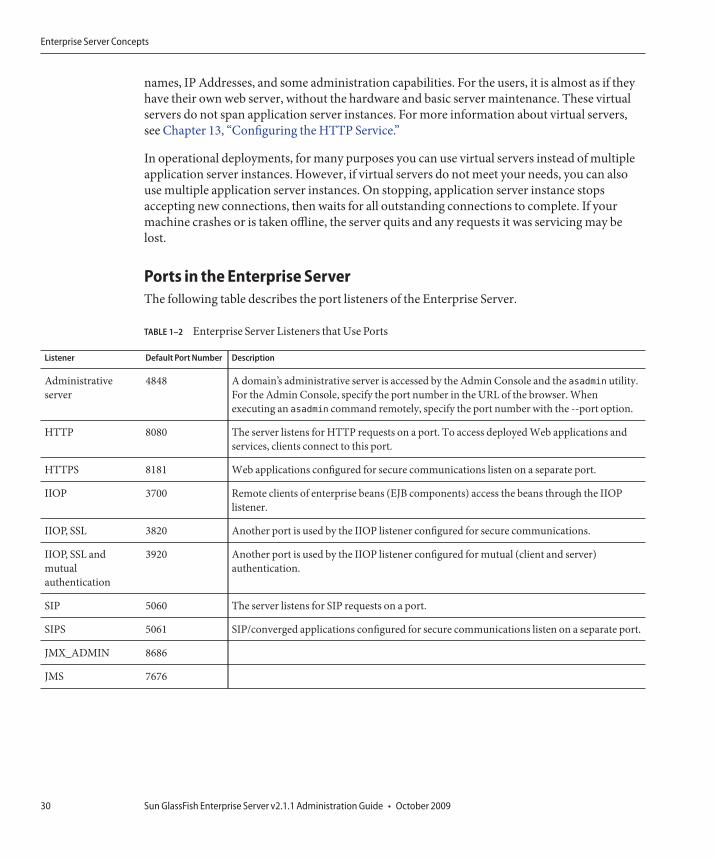
Ports in the Enterprise ServerThe following table describes the port listeners of the Enterprise Server.
TABLE 1–2 Enterprise Server Listeners that Use Ports
Listener Default Port Number Description
Administrativeserver
4848 A domain’s administrative server is accessed by the Admin Console and the asadmin utility.For the Admin Console, specify the port number in the URL of the browser. Whenexecuting an asadmin command remotely, specify the port number with the --port option.
HTTP 8080 The server listens for HTTP requests on a port. To access deployed Web applications andservices, clients connect to this port.
HTTPS 8181 Web applications configured for secure communications listen on a separate port.
IIOP 3700 Remote clients of enterprise beans (EJB components) access the beans through the IIOPlistener.
IIOP, SSL 3820 Another port is used by the IIOP listener configured for secure communications.
IIOP, SSL andmutualauthentication
3920 Another port is used by the IIOP listener configured for mutual (client and server)authentication.
SIP 5060 The server listens for SIP requests on a port.
SIPS 5061 SIP/converged applications configured for secure communications listen on a separate port.
JMX_ADMIN 8686
JMS 7676
Enterprise Server Concepts
Sun GlassFish Enterprise Server v2.1.1 Administration Guide • October 200930

Basic Enterprise Server CommandsAdministration of the Enterprise Server includes tasks such as creation, configuration, controland management of domains, clusters, node agents, and server instances. This section containsthe following topics:
■ “Creating a Domain” on page 31■ “Deleting a Domain” on page 32■ “Listing Domains” on page 32■ “Starting the Domain” on page 32■ “Starting the Default Domain on Windows” on page 33■ “Stopping the Domain” on page 33■ “Stopping the Default Domain on Windows” on page 33■ “Restarting the Domain” on page 33■ “Creating a Cluster” on page 33■ “Starting a Cluster” on page 34■ “Stopping a Cluster” on page 34■ “Creating a Node Agent” on page 34■ “Starting a Node Agent” on page 34■ “Stopping a Node Agent” on page 35■ “Starting an Instance” on page 35■ “Stopping an Instance” on page 35■ “Restarting an Instance” on page 35■ “Recreating the Domain Administration Server” on page 36
Creating a DomainDomains are created using the create-domain command. The following example commandcreates a domain named mydomain. The administration server listens on port 5000 and theadministrative user name is admin. The command prompts for the administrative and masterpasswords.
$ asadmin create-domain --adminport 5000 --adminuser admin mydomain
To start the Admin Console for mydomain domain, in a browser, enter the following URL:
http://hostname:5000
In Enterprise Server 9.1, every domain has a profile associated with it. For information onprofiles, see “Usage Profiles” on page 27. You can choose the profile of a domain only duringcreation. Use the --profile option with the create-domain command to specify a profile forthe domain. If you do not use the --profile option to explicitly specify a profile, the defaultprofile is associated with the domain. The AS_ADMIN_PROFILE variable in the asadminenv.conffile defines the default profile.
Basic Enterprise Server Commands
Chapter 1 • Enterprise Server Overview 31

Caution – Do not create an enterprise domain unless you have HADB and the Network SecurityServices (NSS) keystore. You will not be able to start an enterprise domain unless you haveHADB and NSS.
For the preceding create-domain example, the domain’s log files, configuration files, anddeployed applications now reside in the following directory:
domain-root-dir/mydomain
To create the domain’s directory in another location, specify the --domaindir option. For thefull syntax of the command, type asadmin help create-domain or the create-domain(1).
Deleting a DomainDomains are deleted using the asadmin delete-domain command. Only the operating systemuser (or root) who can administer the domain can execute this command successfully. To deletea domain named mydomain, for example, type the following command:
$ asadmin delete-domain mydomain
Listing DomainsThe domains created on a machine can be found using the asadmin list-domains command.To list the domains in the default domain-root-dir directory, type this command:
$ asadmin list-domains
To list domains that were created in other directories, specify the --domaindir option.
Starting the DomainWhen starting a domain, the administration server and application server instance are started.Once the application server instance is started it runs constantly, listening for and acceptingrequests. Each domain must be started separately.
To start a domain, type the asadmin start-domain command and specify the domain name.For example, to start the default domain (domain1), type the following:
$ asadmin start-domain --user admin domain1
If there is only one domain, omit the domain name. For the full command syntax, type asadminhelp start-domain. If the password data is omitted, you are prompted to supply it.
Basic Enterprise Server Commands
Sun GlassFish Enterprise Server v2.1.1 Administration Guide • October 200932

Starting the Default Domain on WindowsFrom the Windows Start Menu, select Programs -> Sun Microsystems -> Enterprise Server ->Start Admin Server.
Stopping the DomainStopping a domain shuts down its administration server and application server instance. Whenstopping a domain, the server instance stops accepting new connections and then waits for alloutstanding connections to complete. This process takes a few seconds because the serverinstance must complete its shutdown process. While the domain is stopped, the Admin Consoleor most asadmin commands cannot be used.
To stop a domain, type the asadmin stop-domain command and specify the domain name. Forexample, to stop the default domain (domain1), type the following:
$ asadmin stop-domain domain1
If there is only one domain, then the domain name is optional. For the full syntax, type asadminhelp stop-domain.
Consult the Admin Console online help to stop the domain through the Admin Console.
Stopping the Default Domain on WindowsFrom the Start menu select Programs -> Sun Microsystems -> Enterprise Server-> Stop AdminServer.
Restarting the DomainRestarting the server is the same as restarting the domain. To restart the domain or server, stopand start the domain.
Creating a ClusterA cluster is created using the create-cluster command. The following example creates acluster named mycluster. The administration server host is myhost, the server port is 1234, andthe administrative username is admin. The command prompts for the administrativepasswords.
$ asadmin create-cluster --host myhost --port 1234 --user admin mycluster
Basic Enterprise Server Commands
Chapter 1 • Enterprise Server Overview 33

For the full syntax, type asadmin help create-cluster.
Starting a ClusterA cluster is started using the start-cluster command. The following example starts thecluster named mycluster. The command prompts for the administrative passwords.
$ asadmin start-cluster --host myhost --port 1234 --user admin mycluster
For the full syntax, type asadmin help start-cluster.
Stopping a ClusterA cluster is stopped using the stop-cluster command. The following example stops the clusternamed mycluster. The command prompts for the administrative passwords.
$ asadmin stop-cluster --host myhost --port 1234 --user admin mycluster
myhost is the administrative server host, 1234 is the administrative port, admin is theadministrative username.
For the full syntax, type asadmin help stop-cluster. When a cluster is stopped, all the serverinstances in the cluster get stopped. A cluster without instances cannot be stopped.
Creating a Node AgentA node agent is created using the create-node-agent command. The following examplecreates node agent named mynodeagent. The administration server host is myhost, theadministration server port is 1234, and the administrative username is admin. The commandnormally prompts for the administrative passwords; however, if the --savemasterpasswordoption is not specified or false, the command does not prompt for the administrativepasswords.
$ asadmin create-node-agent --host myhost --port 1234 --user admin mynodeagent
For the full syntax, type asadmin help create-node-agent.
Starting a Node AgentA node agent is started using the start-node-agent command and specifying the node agentname. For example, to start the node agent mynodeagent, type the following:
$ asadmin start-node-agent --user admin mynodeagent
Basic Enterprise Server Commands
Sun GlassFish Enterprise Server v2.1.1 Administration Guide • October 200934

For the full syntax, type asadmin help start-node-agent.
Stopping a Node AgentA node agent is stopped using the stop-node-agent command and specifying the node agentname. For example, to stop the node agent mynodeagent, type the following:
$ asadmin stop-node-agent mynodeagent
For the full syntax, type asadmin help stop-node-agent.
Starting an InstanceA server instance is started using the start-instance command. The following example startsthe server instance named myinstance. The command prompts for the administrativepasswords.
$ asadmin start-instance --host myhost --port 1234 --user admin myinstance
The administrative server host is myhost, the administrative port is 1234, the administrativeusername is admin. The server instance myinstance can be clustered or standalone.
For the full syntax, type asadmin help start-instance.
Stopping an InstanceA server instance is started using the stop-instance command. The following example stopsthe server instance named myinstance. The command prompts for the administrativepasswords.
$ asadmin stop-instance --host myhost --port 1234 --user admin myinstance
The administrative server host is myhost, the administrative port is 1234, the administrativeusername is admin. The server instance myinstance can be clustered or standalone.
For the full syntax, type asadmin help stop-instance.
Restarting an InstanceTo restart server instance, stop and start the instance.
Basic Enterprise Server Commands
Chapter 1 • Enterprise Server Overview 35

Recreating the Domain Administration ServerFor mirroring purposes, and to provide a working copy of the Domain Administration Server(DAS), you must have:■ One machine (machine1) that contains the original DAS.■ A second machine (machine2) that contains a cluster with server instances running
applications and catering to clients. The cluster is configured using the DAS on the firstmachine.
■ A third backup machine (machine3) where the DAS needs to be recreated in case the firstmachine crashes.
Note – You must maintain a backup of the DAS from the first machine. Use asadminbackup-domain to backup the current domain.
▼ To migrate the DASThe following steps are required to migrate the Domain Administration Server from the firstmachine (machine1) to the third machine (machine3).
Install the application server on the third machine just as it is installed on the first machine.This is required so that the DAS can be properly restored on the third machine and there are nopath conflicts.
a. Install the application server administration package using the command-line (interactive)mode. To activate the interactive command-line mode, invoke the installation programusing the console option:./bundle-filename -console
You must have root permission to install using the command-line interface.
b. Deselect the option to install default domain.Restoration of backed up domains is only supported on two machines with samearchitecture and exactly the same installation paths (use same as-install anddomain-root-dir on both machines).
Copy the backup ZIP file from the first machine into the domain-root-dir on the third machine.You can also FTP the file.
Execute asadmin restore-domain command to restore the ZIP file onto the third machine:asadmin restore-domain --filename domain-root-dir/sjsas_backup_v00001.zip domain1
You can backup any domain. However, while recreating the domain, the domain name shouldbe same as the original.
1
2
3
Basic Enterprise Server Commands
Sun GlassFish Enterprise Server v2.1.1 Administration Guide • October 200936

Change domain-root-dir/domain1/generated/tmp directory permissions on the third machineto match the permissions of the same directory on first machine.The default permissions of this directory are: ?drwx------? (or 700).
For example:
chmod 700 domain-root-dir/domain1/generated/tmp
The example above assumes you are backing up domain1. If you are backing up a domain byanother name, you should replace domain1 above with the name of the domain being backedup.
Change the host values for the properties in the domain.xmlfile for the third machine:
Update the domain-root-dir/domain1/config/domain.xml on the third machine.For example, search for machine1 and replace it with machine3. So, you can change:<jmx-connector><property name=client-hostname value=machine1/>...
to:
<jmx-connector><property name=client-hostname value=machine3/>...
Change:<jms-service... host=machine1.../>
to:
<jms-service... host=machine3.../>
Start the restored domain on machine3:asadmin start-domain --user admin-user --password admin-password domain1
Change the DAS host values for properties under node agent on machine2.
Change agent.das.hostproperty value inas-install/nodeagents/nodeagent/agent/config/das.properties on machine2.
Restart the node agent on machine2.
Note – Start the cluster instances using the asadmin start-instance command to allow themto synchronize with the restored domain.
4
5
6
7
8
9
10
11
Basic Enterprise Server Commands
Chapter 1 • Enterprise Server Overview 37

38

Java Business Integration
Java Business Integration (JBI) is an implementation of the JSR 208 specification(http://www.jcp.org/en/jsr/detail?id=208) for Java Business Integration, a standarddeveloped under the Java Community Process (JCP) as an approach to implementing aservice-oriented architecture (SOA).
JBI defines an environment for plug-in components that interact using a services model baseddirectly on Web Services Description Language (WSDL) 2.0. The plug-in components functionas service providers, service consumers, or both.
For detailed information on managing the key components of the JBI runtime environment andtheir lifecycle states, see the Admin Console Online Help. For information about using the JBIcommands, see Sun GlassFish Enterprise Server 2.1.1 Reference Manual.
JBI EnvironmentThe key components of the JBI environment are covered in the following sections.
■ “JBI Components” on page 39■ “Service Assemblies” on page 41■ “Shared Libraries” on page 42■ “JBI Descriptors” on page 42
JBI Components
Service EnginesService Engines are components that provide local services (that is, services within the JBIenvironment) and consume local or remote services.
2C H A P T E R 2
39
Binding ComponentsBinding Components are proxies for consumers or providers that are outside the JBIenvironment. Binding components typically are based on a standard communications protocol,such as FTP, JMS, or SMTP, or a call to an external service, such as SAP or WebSphere MQ.
JBI components have the following lifecyle states:
■ Started■ Stopped■ Shutdown
The JBI Runtime persists the life cycle states of JBI Components. When the server shuts downand then restarts, JBI Components revert to their state at the time the Enterprise Server shutdown.
Note – The JBI runtime attempts to revert to the "desired" state of a JBI component. Forexample, suppose you tried to start a JBI component but it did not start due to an error in thecomponent. If you restart the Enterprise Server, the JBI runtime attempts to start thecomponent again.
You can do the following operations on the JBI components. For detailed steps, log on to theAdmin Console, navigate to the JBI node, click Components and then click Online Help.
■ View JBI components by their specific lifestyle states.■ Install JBI components.■ Uninstall JBI components.■ Manage the lifecycle states of the JBI Components.■ View the general properties of a JBI Component.■ View the configuration information for a JBI Component.■ View the descriptor for a JBI Component.■ Manage JBI Component Loggers.
JBI Component LoggersUsing the Admin Console, you can manage the log levels for JBI Components. Some JBIComponents provide several loggers while other components might not provide any. However,there will always be a logger level displayed for the entire component. But the logger levelsetting will only have an effect if a component implements its loggers based on the default name.The provider of a JBI Component might provide additional documentation on specifyinglogging levels.
JBI Environment
Sun GlassFish Enterprise Server v2.1.1 Administration Guide • October 200940

Note – The logging levels for JBI Components are often inherited from a parent logger such asthe JBI logger. To view and set parent logging levels, in the Admin Console, select CommonTasks and then Application Server. Then, in the Enterprise Server panel, select Logging andthen Log Levels. Look for the drop-down list for the JBI module to view and set the parent JBIlogging level.
Service AssembliesA Service Assembly is a collection of Service Units that provision target components thattogether provide or consume specific services for an application. Service Assemblies aretypically created in a development tools environment, such as that provided by NetBeansEnterprise Pack.
A Service Assembly has the following lifecyle states:
■ Started■ Shutdown■ Stopped
The JBI Runtime persists the lifecycle states of Service Assemblies. When the Enterprise Servershuts down and then restarts, Service Assemblies revert to their state at the time the EnterpriseServer shut down.
Note – The JBI runtime attempts to revert to the "desired" state of a Service Assembly. Forexample, suppose you tried to start a Service Assembly but it did not start due to an error in theService Assembly. If you restart the Application Server, the JBI runtime attempts to start theService Assembly again.
You can do the following operations on Service Assemblies. For detailed steps, log on to theAdmin Console, navigate to the JBI node, click Service Assemblies and then click Online Help.
■ View all the Service Assemblies, with support for sorting and for filtering by lifecycle state.■ Deploy a Service Assembly.■ Undeploy a Service Assembly.■ Manage the lifecyle of a Service Assembly.■ View the general properties of a Service Assembly.■ View the descriptor for a Service Assembly.
JBI Environment
Chapter 2 • Java Business Integration 41
Shared LibrariesA Shared Library provides Java classes that are not private to a single component and is typicallyshared by more than one JBI Component. For example, the Java EE Service Engine requires theWSDL Shared Library.
You can do the following operations on Shared Libraries. For detailed steps, log on to theAdmin Console, navigate to the JBI node, click Shared Libraries and then click Online Help.
■ View all Shared Libraries.■ Install Shared Libraries.■ View General Properties of a Shared Library.■ View the descriptor for a Shared Library.■ Uninstall a Shared Library.
JBI DescriptorsThe descriptor file (jbi.xml) for Service Assemblies, JBI Components, and Shared Librariesprovides the following information:
■ Service Assemblies: Lists the Service Units contained in the Service Assembly and the targetfor each Service Unit. Some Service Units may also show information on connectionendpoints.
■ JBI Components: Lists the type of the JBI Component (Binding Component or ServiceEngine), a description of the component, information about relevant classpaths for thecomponent, and the name of any Shared Library upon which it depends.
■ Shared Libraries: Lists the name of the shared library, and the names of the archive files(.jar files) or class file subdirectories it contains.
JBI Environment
Sun GlassFish Enterprise Server v2.1.1 Administration Guide • October 200942
JDBC Resources
This chapter explains how to configure JDBC resources, which are required by applications thataccess databases. This chapter contains the following sections:
■ “JDBC Resources” on page 43■ “JDBC Connection Pools” on page 44■ “How JDBC Resources and Connection Pools Work Together” on page 44■ “Setting Up Database Access” on page 45■ “Working with JDBC Connection Pools” on page 46■ “Configurations for Specific JDBC Drivers” on page 52
JDBC ResourcesTo store, organize, and retrieve data, most applications use relational databases. Java EEapplications access relational databases through the JDBC API.
A JDBC resource (data source) provides applications with a means of connecting to a database.Typically, the administrator creates a JDBC resource for each database accessed by theapplications deployed in a domain. (However, more than one JDBC resource can be created fora database.)
To create a JDBC resource, specify a unique JNDI name that identifies the resource. (See thesection JNDI Names and Resources.) Expect to find the JNDI name of a JDBC resource injava:comp/env/jdbc subcontext. For example, the JNDI name for the resource of a payrolldatabase could be java:comp/env/jdbc/payrolldb. Because all resource JNDI names are inthe java:comp/env subcontext, when specifying the JNDI name of a JDBC resource in theAdmin Console, enter only jdbc/name. For example, for a payroll database specifyjdbc/payrolldb.
A JDBC resource (data source) provides applications with a means of connecting to a database.
Before creating a JDBC resource, first create a JDBC connection pool.
3C H A P T E R 3
43

When creating a JDBC resource, you must identify:
1. The JNDI Name. By convention, the name begins with the jdbc/ string. For example:jdbc/payrolldb. Don’t forget the forward slash.
2. Select a connection pool to be associated with the new JDBC resource.3. Specify the settings for the resource.4. Identify the targets (clusters and standalone server instance) on which the resource is
available.
JDBC Connection PoolsTo create a JDBC resource, specify the connection pool with which it is associated. MultipleJDBC resources can specify a single connection pool.
A JDBC connection pool is a group of reusable connections for a particular database. Becausecreating each new physical connection is time consuming, the server maintains a pool ofavailable connections to increase performance. When an application requests a connection, itobtains one from the pool. When an application closes a connection, the connection is returnedto the pool.
The properties of connection pools can vary with different database vendors. Some commonproperties are the database’s name (URL), user name, and password.
See Also:
■ “JDBC Resources” on page 43■ “How JDBC Resources and Connection Pools Work Together” on page 44■ “Editing a JDBC Connection Pool” on page 48
How JDBC Resources and Connection Pools Work TogetherTo store, organize, and retrieve data, most applications use relational databases. Java EEapplications access relational databases through the JDBC API. Before an application can accessa database, it must get a connection.
At runtime, here’s what happens when an application connects to a database:
1. The application gets the JDBC resource (data source) associated with the database bymaking a call through the JNDI API.Given the resource’s JNDI name, the naming and directory service locates the JDBCresource. Each JDBC resource specifies a connection pool.
2. Via the JDBC resource, the application gets a database connection.
JDBC Connection Pools
Sun GlassFish Enterprise Server v2.1.1 Administration Guide • October 200944

Behind the scenes, the application server retrieves a physical connection from theconnection pool that corresponds to the database. The pool defines connection attributessuch as the database name (URL), user name, and password.
3. Now that it is connected to the database, the application can read, modify, and add data tothe database.The applications access the database by making calls to the JDBC API. The JDBC drivertranslates the application’s JDBC calls into the protocol of the database server.
4. When it is finished accessing the database, the application closes the connection.The application server returns the connection to the connection pool. Once it’s back in thepool, the connection is available for the next application.
Setting Up Database AccessTo set up a database access:
1. Install a supported database product.For a list of database products supported by the Enterprise Server, see the Release Notes.
2. Install a JDBC driver for the database product.3. Make the driver’s JAR file accessible to the domain’s server instance.4. Create the database.
Usually, the application provider delivers scripts for creating and populating the database.5. Create a connection pool for the database.6. Create a JDBC resource that points to the connection pool.
Now to integrate the JDBC driver into an administrative domain, do either of the following:
1. Make the driver accessible to the common class loader.Copy the driver’s JAR and ZIP files into the domain-dir/lib directory or copy its class filesinto the domain-dir/lib/ext directory.
2. Restart the domain.3. Identify the fully-qualified path name for the driver's JAR file.
Setting Up Database Access
Chapter 3 • JDBC Resources 45

Working with JDBC Connection PoolsA JDBC connection pool is a group of reusable connections for a particular database. Whencreating the pool with the Admin Console, the Administrator is actually defining the aspects ofa connection to a specific database.
Before creating the pool, you must first install and integrate the JDBC driver. When buildingthe Create Connection Pool pages, certain data specific to the JDBC driver and the databasevendor must be entered. Before proceeding, gather the following information:■ Database vendor name■ Resource type, such as javax.sql.DataSource (local transactions only)
javax.sql.XADataSource (global transactions)■ Data source class name■ Required properties, such as the database name (URL), user name, and password
Creating a JDBC Connection PoolYou can use the Admin Console for creating the JDBC connection pool.
▼ Creating a JDBC Connection Pool and JDBC Resource Using the AdminConsole
Copy the JDBC driver for database connectivity to as-install/domains/domain_name/lib/ext.Alternatively, add the path to the JDBC driver to classpath-prefix and restart the server.
In the Admin Console, click Create JDBC Connection Pool in the Common Tasks page.
Provide a name for the connection pool, select the resource type, select the database vendor.Click Next.
The Admin Console lists the default pool settings and the properties of datasource classprovided by the vendor.
Click the Ping button to test the JDBC connection pool.
In the left-hand pane of the Admin Console, click Resources > JDBC Resources.
Click New.
In the New JDBC Resource page, provide the JNDI name for the resource and the JDBCcomnnection pool with which the JDBC resource needs to be associated.
1
2
3
4
5
6
7
8
Working with JDBC Connection Pools
Sun GlassFish Enterprise Server v2.1.1 Administration Guide • October 200946

Click OK.
▼ Creating a JDBC Connection Pool and JDBC Resource Using the CLI
Use the asadmin create-jdbc-connection-pool command to create a JDBC connection pool.
Sample command to create a JDBC connection pool:
asadmin create-jdbc-connection-pool --datasourceclassname
oracle.jdbc.pool.OracleDataSource --restype javax.sql.DataSource --property
user=dbuser:password=dbpassword:url="jdbc:oracle\:thin\:@localhost\:1521\:ORCL"myjdbc_oracle-pool
Use the asadmin create-jdbc-resource command to create a JDBC resource assicated withthis connection pool.
Sample command to create a JDBC resource:
asadmin create-jdbc-connection-pool --connectionpoolid myjdbc_oracle-pool
jdbc/oracle-resource
Test the connection settings are correct by pinging the connection pool using the asadminping-connection-pool command.
asadmin ping-connection-pool myjdbc_oracle-pool
To edit JDBC connection pool properties, use the asadmin list, get, and set commands.
Sample list command to list a JDBC connection pool:
asadmin list myjdbc_oracle-pool
The sample output of this command:
domain.resources.jdbc-connection-pool.oracle-pool
Sample get command to list all properties of a JDBC connection pool:
asadmin list myjdbc_oracle-pool
Sample get command to get all properties of a JDBC connection pool:
asadmin get domain.resources.jdbc-connection-pool.myjdbc_oracle-pool
Sample get command to set a properties of a JDBC connection pool:
asadmin set
domain.resources.jdbc-connection-pool.myjdbc_oracle-pool.steady-pool-size=20
9
1
2
3
4
Working with JDBC Connection Pools
Chapter 3 • JDBC Resources 47

Editing a JDBC Connection PoolThe Edit JDBC Connection Pool page provides the means to change all of the settings for anexisting pool except its name.
1. Change general settings.
The values of the general settings depend on the specific JDBC driver that is installed. Thesesettings are the names of classes or interfaces in the Java programming language.
Parameter Description
DataSource Class Name The vendor-specific class name that implements the DataSource and / orXADataSource APIs. This class is in the JDBC driver.
Resource Type Choices include javax.sql.DataSource (local transactions only),javax.sql.XADataSource (global transactions), andjava.sql.ConnectionPoolDataSource (local transactions, possibleperformance improvements).
2. Change pool settings.
A set of physical database connections reside in the pool. When an application requests aconnection, the connection is removed from the pool, and when the application releases theconnection, it is returned to the pool.
Parameter Description
Initial and Minimum Pool Size The minimum number of connections in the pool. This value alsodetermines the number of connections placed in the pool when the pool isfirst created.
Maximum Pool Size The maximum number of connections in the pool.
Pool Resize Quantity When the pool scales up and scales down towards the maximum andminimum pool sizes respectively, it is resized in batches. This valuedetermines the number of connections in the batch. Making this value toolarge delays connection creation and recycling; making it too small will beless efficient.
Idle Timeout The maximum time in seconds that a connection can remain idle in thepool. After this time expires, the connection is removed from the pool.
Max Wait Time The amount of time the application requesting a connection will wait beforegetting a connection timeout. Because the default wait time is long, theapplication might appear to hang indefinitely.
3. Change connection validation settings.
Working with JDBC Connection Pools
Sun GlassFish Enterprise Server v2.1.1 Administration Guide • October 200948
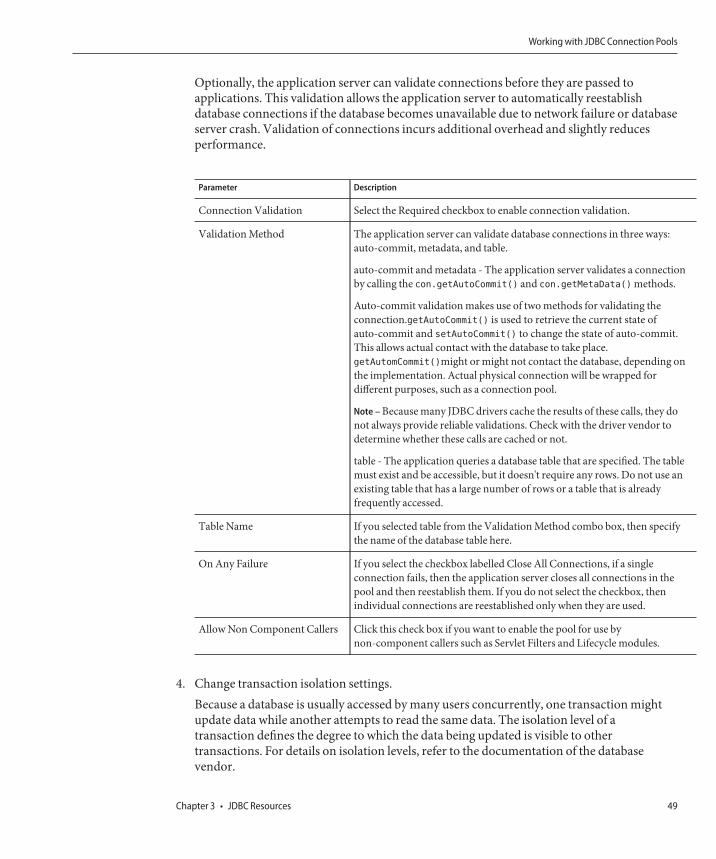
Optionally, the application server can validate connections before they are passed toapplications. This validation allows the application server to automatically reestablishdatabase connections if the database becomes unavailable due to network failure or databaseserver crash. Validation of connections incurs additional overhead and slightly reducesperformance.
Parameter Description
Connection Validation Select the Required checkbox to enable connection validation.
Validation Method The application server can validate database connections in three ways:auto-commit, metadata, and table.
auto-commit and metadata - The application server validates a connectionby calling the con.getAutoCommit() and con.getMetaData() methods.
Auto-commit validation makes use of two methods for validating theconnection.getAutoCommit() is used to retrieve the current state ofauto-commit and setAutoCommit() to change the state of auto-commit.This allows actual contact with the database to take place.getAutomCommit()might or might not contact the database, depending onthe implementation. Actual physical connection will be wrapped fordifferent purposes, such as a connection pool.
Note – Because many JDBC drivers cache the results of these calls, they donot always provide reliable validations. Check with the driver vendor todetermine whether these calls are cached or not.
table - The application queries a database table that are specified. The tablemust exist and be accessible, but it doesn't require any rows. Do not use anexisting table that has a large number of rows or a table that is alreadyfrequently accessed.
Table Name If you selected table from the Validation Method combo box, then specifythe name of the database table here.
On Any Failure If you select the checkbox labelled Close All Connections, if a singleconnection fails, then the application server closes all connections in thepool and then reestablish them. If you do not select the checkbox, thenindividual connections are reestablished only when they are used.
Allow Non Component Callers Click this check box if you want to enable the pool for use bynon-component callers such as Servlet Filters and Lifecycle modules.
4. Change transaction isolation settings.Because a database is usually accessed by many users concurrently, one transaction mightupdate data while another attempts to read the same data. The isolation level of atransaction defines the degree to which the data being updated is visible to othertransactions. For details on isolation levels, refer to the documentation of the databasevendor.
Working with JDBC Connection Pools
Chapter 3 • JDBC Resources 49
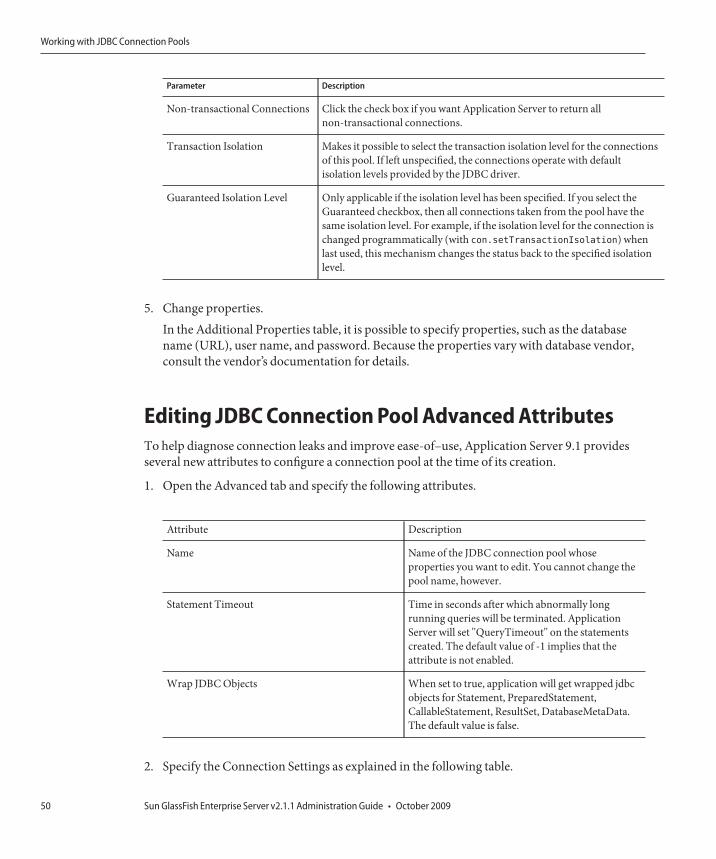
Parameter Description
Non-transactional Connections Click the check box if you want Application Server to return allnon-transactional connections.
Transaction Isolation Makes it possible to select the transaction isolation level for the connectionsof this pool. If left unspecified, the connections operate with defaultisolation levels provided by the JDBC driver.
Guaranteed Isolation Level Only applicable if the isolation level has been specified. If you select theGuaranteed checkbox, then all connections taken from the pool have thesame isolation level. For example, if the isolation level for the connection ischanged programmatically (with con.setTransactionIsolation) whenlast used, this mechanism changes the status back to the specified isolationlevel.
5. Change properties.In the Additional Properties table, it is possible to specify properties, such as the databasename (URL), user name, and password. Because the properties vary with database vendor,consult the vendor’s documentation for details.
Editing JDBC Connection Pool Advanced AttributesTo help diagnose connection leaks and improve ease-of–use, Application Server 9.1 providesseveral new attributes to configure a connection pool at the time of its creation.
1. Open the Advanced tab and specify the following attributes.
Attribute Description
Name Name of the JDBC connection pool whoseproperties you want to edit. You cannot change thepool name, however.
Statement Timeout Time in seconds after which abnormally longrunning queries will be terminated. ApplicationServer will set "QueryTimeout" on the statementscreated. The default value of -1 implies that theattribute is not enabled.
Wrap JDBC Objects When set to true, application will get wrapped jdbcobjects for Statement, PreparedStatement,CallableStatement, ResultSet, DatabaseMetaData.The default value is false.
2. Specify the Connection Settings as explained in the following table.
Working with JDBC Connection Pools
Sun GlassFish Enterprise Server v2.1.1 Administration Guide • October 200950

Attribute Description
Validate Atmost Once Amount of time, in seconds, after which aconnection is validated at most once. This will helpreduce the number of validation requests by aconnection. The default value 0 implies thatconnection validation is not enabled.
Leak Timeout Amount of time, in seconds, to trace connectionleaks in a connection pool. The default value 0means that connection leak tracing is disabled. Ifconnection leak tracing is enabled, you can getstatistics on the number of connection leaks in theMonitoring Resources tab. To view this tab, go toApplication Server > Monitoring > Resources.
Leak Reclaim If this option is enabled, leaked connections will berestored to the pool after leak connection tracing iscomplete.
Creation Retry Attempts Number of attempts that will be made if there is afailure in creating a new connection. The defaultvalue of 0 implies that no attempts will be made tocreate the connection again.
Retry Interval Specify the interval, in seconds, between twoattempts to create a connection. The default value is10 seconds. This attribute is used only if the value ofCreation Retry Attempts is greater than 0.
Lazy Connection Enlistment Enable this option to enlist a resource to thetransaction only when it is actually used in amethod.
Lazy Association Connections are lazily associated when an operationis performed on them. Also, they are disassociatedwhen the transaction is completed and a componentmethod ends, which helps reuse of the physicalconnections. Default value is false.
Associate with Thread Enable this option to associate a connection with thethread such that when the same thread is in need ofa connection, it can reuse the connection alreadyassociated with that thread, thereby not incurringthe overhead of getting a connection from the pool.Default value is false.
Working with JDBC Connection Pools
Chapter 3 • JDBC Resources 51
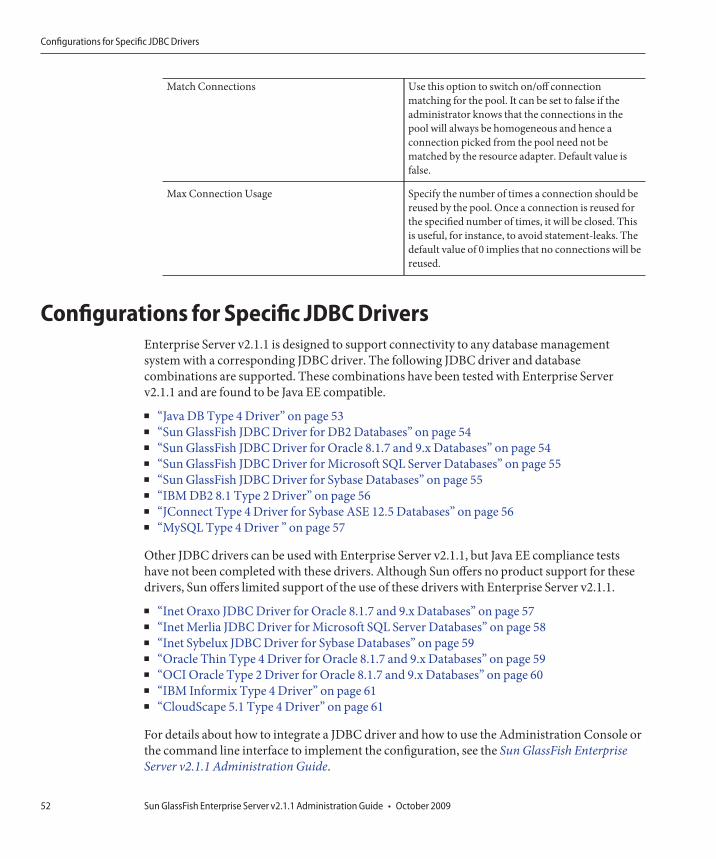
Match Connections Use this option to switch on/off connectionmatching for the pool. It can be set to false if theadministrator knows that the connections in thepool will always be homogeneous and hence aconnection picked from the pool need not bematched by the resource adapter. Default value isfalse.
Max Connection Usage Specify the number of times a connection should bereused by the pool. Once a connection is reused forthe specified number of times, it will be closed. Thisis useful, for instance, to avoid statement-leaks. Thedefault value of 0 implies that no connections will bereused.
Configurations for Specific JDBC DriversEnterprise Server v2.1.1 is designed to support connectivity to any database managementsystem with a corresponding JDBC driver. The following JDBC driver and databasecombinations are supported. These combinations have been tested with Enterprise Serverv2.1.1 and are found to be Java EE compatible.
■ “Java DB Type 4 Driver” on page 53■ “Sun GlassFish JDBC Driver for DB2 Databases” on page 54■ “Sun GlassFish JDBC Driver for Oracle 8.1.7 and 9.x Databases” on page 54■ “Sun GlassFish JDBC Driver for Microsoft SQL Server Databases” on page 55■ “Sun GlassFish JDBC Driver for Sybase Databases” on page 55■ “IBM DB2 8.1 Type 2 Driver” on page 56■ “JConnect Type 4 Driver for Sybase ASE 12.5 Databases” on page 56■ “MySQL Type 4 Driver ” on page 57
Other JDBC drivers can be used with Enterprise Server v2.1.1, but Java EE compliance testshave not been completed with these drivers. Although Sun offers no product support for thesedrivers, Sun offers limited support of the use of these drivers with Enterprise Server v2.1.1.
■ “Inet Oraxo JDBC Driver for Oracle 8.1.7 and 9.x Databases” on page 57■ “Inet Merlia JDBC Driver for Microsoft SQL Server Databases” on page 58■ “Inet Sybelux JDBC Driver for Sybase Databases” on page 59■ “Oracle Thin Type 4 Driver for Oracle 8.1.7 and 9.x Databases” on page 59■ “OCI Oracle Type 2 Driver for Oracle 8.1.7 and 9.x Databases” on page 60■ “IBM Informix Type 4 Driver” on page 61■ “CloudScape 5.1 Type 4 Driver” on page 61
For details about how to integrate a JDBC driver and how to use the Administration Console orthe command line interface to implement the configuration, see the Sun GlassFish EnterpriseServer v2.1.1 Administration Guide.
Configurations for Specific JDBC Drivers
Sun GlassFish Enterprise Server v2.1.1 Administration Guide • October 200952
Note – An Oracle database user running the capture-schema command needs ANALYZE ANYTABLE privileges if that user does not own the schema. These privileges are granted to the userby the database administrator. For information about capture-schema, see Sun GlassFishEnterprise Server 2.1.1 Reference Manual.
Java DB Type 4 DriverThe Java DB JDBC driver is included with the Enterprise Server by default, except for the Solarisbundled installation, which does not include Java DB. Therefore, unless you have the Solarisbundled installation, you do not need to integrate this JDBC driver with the Enterprise Server.
The JAR file for the Java DB driver is derbyclient.jar.
Configure the connection pool using the following settings:
■ Name: Use this name when you configure the JDBC resource later.■ Resource Type: Specify the appropriate value.■ Database Vendor: Java DB
■ DataSource Classname: Specify one of the following:
org.apache.derby.jdbc.ClientDataSource
org.apache.derby.jdbc.ClientXADataSource
■ Properties:■ user - Specify the database user.
This is only necessary if Java DB is configured to use authentication. Java DB does notuse authentication by default. When the user is provided, it is the name of the schemawhere the tables reside.
■ password - Specify the database password.
This is only necessary if Java DB is configured to use authentication.■ databaseName - Specify the name of the database.■ serverName - Specify the host name or IP address of the database server.■ portNumber - Specify the port number of the database server if it is different from the
default.■ URL: jdbc:javadb://serverName:portNumber/databaseName;create=true
Include the ;create=true part only if you want the database to be created if it does not exist.
Configurations for Specific JDBC Drivers
Chapter 3 • JDBC Resources 53

Sun GlassFish JDBC Driver for DB2 DatabasesThe JAR files for this driver are smbase.jar, smdb2.jar, and smutil.jar. Configure theconnection pool using the following settings:
■ Name: Use this name when you configure the JDBC resource later.■ Resource Type: Specify the appropriate value.■ Database Vendor: DB2■ DataSource Classname: com.sun.sql.jdbcx.db2.DB2DataSource■ Properties:
■ serverName - Specify the host name or IP address of the database server.■ portNumber - Specify the port number of the database server.■ databaseName - Set as appropriate.■ user - Set as appropriate.■ password - Set as appropriate.
■ URL: jdbc:sun:db2://serverName:portNumber;databaseName=databaseName
Sun GlassFish JDBC Driver for Oracle 8.1.7 and 9.xDatabasesThe JAR files for this driver are smbase.jar, smoracle.jar, and smutil.jar. Configure theconnection pool using the following settings:
■ Name: Use this name when you configure the JDBC resource later.■ Resource Type: Specify the appropriate value.■ Database Vendor: Oracle■ DataSource Classname: com.sun.sql.jdbcx.oracle.OracleDataSource■ Properties:
■ serverName - Specify the host name or IP address of the database server.■ portNumber - Specify the port number of the database server.■ SID - Set as appropriate.■ user - Set as appropriate.■ password - Set as appropriate.
■ URL: jdbc:sun:oracle://serverName[:portNumber][;SID=databaseName]
Configurations for Specific JDBC Drivers
Sun GlassFish Enterprise Server v2.1.1 Administration Guide • October 200954

Sun GlassFish JDBC Driver for Microsoft SQL ServerDatabasesThe JAR files for this driver are smbase.jar, smsqlserver.jar, and smutil.jar. Configure theconnection pool using the following settings:
■ Name: Use this name when you configure the JDBC resource later.■ Resource Type: Specify the appropriate value.■ Database Vendor: mssql■ DataSource Classname: com.sun.sql.jdbcx.sqlserver.SQLServerDataSource■ Properties:
■ serverName - Specify the host name or IP address and the port of the database server.■ portNumber - Specify the port number of the database server.■ user - Set as appropriate.■ password - Set as appropriate.■ selectMethod - Set to cursor.
■ URL: jdbc:sun:sqlserver://serverName[:portNumber]
Sun GlassFish JDBC Driver for Sybase DatabasesThe JAR files for this driver are smbase.jar, smsybase.jar, and smutil.jar. Configure theconnection pool using the following settings:
■ Name: Use this name when you configure the JDBC resource later.■ Resource Type: Specify the appropriate value.■ Database Vendor: Sybase■ DataSource Classname: com.sun.sql.jdbcx.sybase.SybaseDataSource■ Properties:
■ serverName - Specify the host name or IP address of the database server.■ portNumber - Specify the port number of the database server.■ databaseName - Set as appropriate. This is optional.■ user - Set as appropriate.■ password - Set as appropriate.
■ URL: jdbc:sun:sybase://serverName[:portNumber]
Configurations for Specific JDBC Drivers
Chapter 3 • JDBC Resources 55
IBM DB2 8.1 Type 2 DriverThe JAR files for the DB2 driver are db2jcc.jar, db2jcc_license_cu.jar, and db2java.zip.Set environment variables as follows:
LD_LIBRARY_PATH=/usr/db2user/sqllib/lib:${Java EE.home}/lib
DB2DIR=/opt/IBM/db2/V8.1
DB2INSTANCE=db2user
INSTHOME=/usr/db2user
VWSPATH=/usr/db2user/sqllib
THREADS_FLAG=native
Configure the connection pool using the following settings:
■ Name: Use this name when you configure the JDBC resource later.■ Resource Type: Specify the appropriate value.■ Database Vendor: DB2■ DataSource Classname: com.ibm.db2.jcc.DB2SimpleDataSource■ Properties:
■ user - Set as appropriate.■ password - Set as appropriate.■ databaseName - Set as appropriate.■ driverType - Set to 2.■ deferPrepares - Set to false.
JConnect Type 4 Driver for Sybase ASE 12.5 DatabasesThe JAR file for the Sybase driver is jconn2.jar. Configure the connection pool using thefollowing settings:
■ Name: Use this name when you configure the JDBC resource later.■ Resource Type: Specify the appropriate value.■ Database Vendor: Sybase■ DataSource Classname:Specify one of the following:
com.sybase.jdbc2.jdbc.SybDataSource
com.sybase.jdbc2.jdbc.SybXADataSource
■ Properties:■ serverName - Specify the host name or IP address of the database server.■ portNumber - Specify the port number of the database server.■ user - Set as appropriate.
Configurations for Specific JDBC Drivers
Sun GlassFish Enterprise Server v2.1.1 Administration Guide • October 200956

■ password - Set as appropriate.■ databaseName - Set as appropriate. Do not specify the complete URL, only the database
name.■ BE_AS_JDBC_COMPLIANT_AS_POSSIBLE - Set to true.■ FAKE_METADATA - Set to true.
MySQL Type 4 DriverThe JAR file for the MySQL driver is mysql-connector-java-version-bin-g.jar, for example,mysql-connector-java-5.0.5-bin-g.jar. Configure the connection pool using the followingsettings:
■ Name: Use this name when you configure the JDBC resource later.■ Resource Type: Specify the appropriate value.■ Database Vendor: mysql■ DataSource Classname: Specify one of the following:
com.mysql.jdbc.jdbc2.optional.MysqlDataSource
■ Properties:■ serverName - Specify the host name or IP address of the database server.■ port - Specify the port number of the database server.■ user - Set as appropriate.■ password - Set as appropriate.■ databaseName - Set as appropriate.■ URL - If you are using global transactions, you can set this property instead of
serverName, port, and databaseName.
jdbc:mysql://host:port/database
Inet Oraxo JDBC Driver for Oracle 8.1.7 and 9.xDatabasesThe JAR file for the Inet Oracle driver is Oranxo.jar. Configure the connection pool using thefollowing settings:
■ Name: Use this name when you configure the JDBC resource later.■ Resource Type: Specify the appropriate value.■ Database Vendor: Oracle
Configurations for Specific JDBC Drivers
Chapter 3 • JDBC Resources 57

■ DataSource Classname: com.inet.ora.OraDataSource■ Properties:
■ user - Specify the database user.■ password - Specify the database password.■ serviceName - Specify the URL of the database. The syntax is as follows:
jdbc:inetora:server:port:dbname
For example:
jdbc:inetora:localhost:1521:payrolldb
In this example,localhost is the host name of the machine running the Oracle server,1521 is the Oracle server’s port number, and payrolldb is the SID of the database. Formore information about the syntax of the database URL, see the Oracle documentation.
■ serverName - Specify the host name or IP address of the database server.■ port - Specify the port number of the database server.■ streamstolob - If the size of BLOB or CLOB data types exceeds 4 KB and this driver is
used for CMP, this property must be set to true.■ xa-driver-does-not-support-non-tx-operations - Set to the value true. Optional:
only needed if both non-XA and XA connections are retrieved from the sameconnection pool. Might degrade performance.As an alternative to setting this property, you can create two connection pools, one fornon-XA connections and one for XA connections.
Inet Merlia JDBC Driver for Microsoft SQL ServerDatabasesThe JAR file for the Inet Microsoft SQL Server driver is Merlia.jar. Configure the connectionpool using the following settings:■ Name: Use this name when you configure the JDBC resource later.■ Resource Type: Specify the appropriate value.■ Database Vendor: mssql■ DataSource Classname: com.inet.tds.TdsDataSource■ Properties:
■ serverName - Specify the host name or IP address and the port of the database server.■ port - Specify the port number of the database server.■ user - Set as appropriate.
Configurations for Specific JDBC Drivers
Sun GlassFish Enterprise Server v2.1.1 Administration Guide • October 200958
■ password - Set as appropriate.
Inet Sybelux JDBC Driver for Sybase DatabasesThe JAR file for the Inet Sybase driver is Sybelux.jar. Configure the connection pool using thefollowing settings:
■ Name: Use this name when you configure the JDBC resource later.■ Resource Type: Specify the appropriate value.■ Database Vendor: Sybase■ DataSource Classname: com.inet.syb.SybDataSource■ Properties:
■ serverName - Specify the host name or IP address of the database server.■ portNumber - Specify the port number of the database server.■ user - Set as appropriate.■ password - Set as appropriate.■ databaseName - Set as appropriate. Do not specify the complete URL, only the database
name.
Oracle Thin Type 4 Driver for Oracle 8.1.7 and 9.xDatabasesThe JAR file for the Oracle driver is ojdbc14.jar. Configure the connection pool using thefollowing settings:
■ Name: Use this name when you configure the JDBC resource later.■ Resource Type: Specify the appropriate value.■ Database Vendor: Oracle■ DataSource Classname:Specify one of the following:
oracle.jdbc.pool.OracleDataSource
oracle.jdbc.xa.client.OracleXADataSource
■ Properties:■ user - Set as appropriate.■ password - Set as appropriate.■ URL - Specify the complete database URL using the following syntax:
jdbc:oracle:thin:[user/password]@host[:port]/service
Configurations for Specific JDBC Drivers
Chapter 3 • JDBC Resources 59
For example:
jdbc:oracle:thin:@localhost:1521:customer_db
■ xa-driver-does-not-support-non-tx-operations - Set to the value true. Optional:only needed if both non-XA and XA connections are retrieved from the sameconnection pool. Might degrade performance.As an alternative to setting this property, you can create two connection pools, one fornon-XA connections and one for XA connections.
Note – You must set the oracle-xa-recovery-workaround property in the TransactionService for recovery of global transactions to work correctly. For details, see “Workaroundsfor Specific Databases” on page 145.
When using this driver, it is not possible to insert more than 2000 bytes of data into acolumn. To circumvent this problem, use the OCI driver (JDBC type 2).
OCI Oracle Type 2 Driver for Oracle 8.1.7 and 9.xDatabasesThe JAR file for the OCI Oracle driver is ojdbc14.jar. Make sure that the shared library isavailable through LD_LIBRARY_PATH and that the ORACLE_HOME property is set.Configure the connection pool using the following settings:
■ Name: Use this name when you configure the JDBC resource later.■ Resource Type: Specify the appropriate value.■ Database Vendor: Oracle■ DataSource Classname:Specify one of the following:
oracle.jdbc.pool.OracleDataSource
oracle.jdbc.xa.client.OracleXADataSource
■ Properties:■ user - Set as appropriate.■ password - Set as appropriate.■ URL - Specify the complete database URL using the following syntax:
jdbc:oracle:oci:[user/password]@host[:port]/service
For example:
jdbc:oracle:oci:@localhost:1521:customer_db
Configurations for Specific JDBC Drivers
Sun GlassFish Enterprise Server v2.1.1 Administration Guide • October 200960
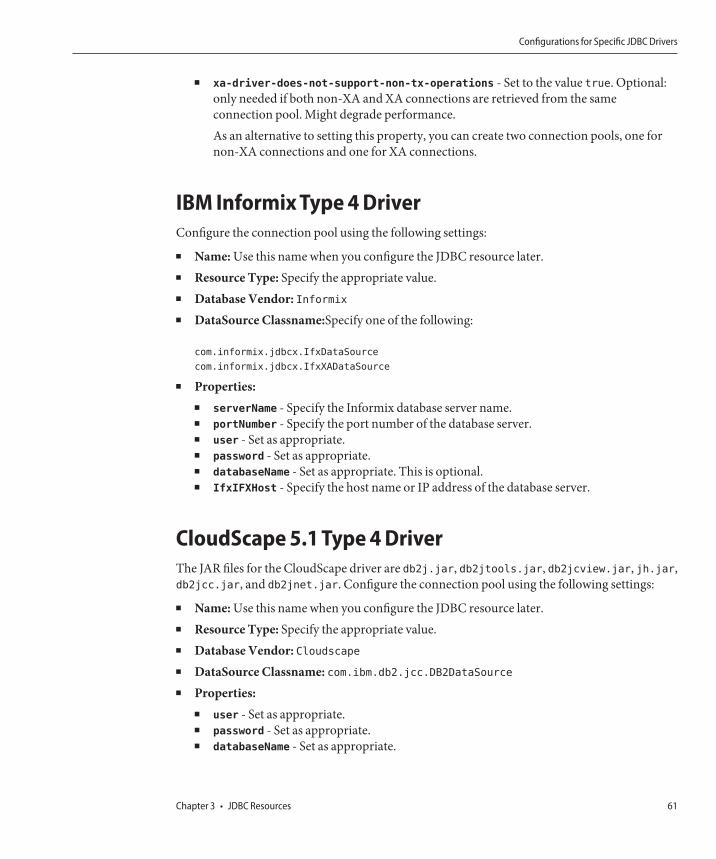
■ xa-driver-does-not-support-non-tx-operations - Set to the value true. Optional:only needed if both non-XA and XA connections are retrieved from the sameconnection pool. Might degrade performance.As an alternative to setting this property, you can create two connection pools, one fornon-XA connections and one for XA connections.
IBM Informix Type 4 DriverConfigure the connection pool using the following settings:
■ Name: Use this name when you configure the JDBC resource later.■ Resource Type: Specify the appropriate value.■ Database Vendor: Informix■ DataSource Classname:Specify one of the following:
com.informix.jdbcx.IfxDataSource
com.informix.jdbcx.IfxXADataSource
■ Properties:■ serverName - Specify the Informix database server name.■ portNumber - Specify the port number of the database server.■ user - Set as appropriate.■ password - Set as appropriate.■ databaseName - Set as appropriate. This is optional.■ IfxIFXHost - Specify the host name or IP address of the database server.
CloudScape 5.1 Type 4 DriverThe JAR files for the CloudScape driver are db2j.jar, db2jtools.jar, db2jcview.jar, jh.jar,db2jcc.jar, and db2jnet.jar. Configure the connection pool using the following settings:
■ Name: Use this name when you configure the JDBC resource later.■ Resource Type: Specify the appropriate value.■ Database Vendor: Cloudscape■ DataSource Classname: com.ibm.db2.jcc.DB2DataSource■ Properties:
■ user - Set as appropriate.■ password - Set as appropriate.■ databaseName - Set as appropriate.
Configurations for Specific JDBC Drivers
Chapter 3 • JDBC Resources 61

62

Configuring Java Message Service Resources
The Enterprise Server implements the Java Message Service (JMS) API by integrating theMessage Queue software into the Enterprise Server. For basic JMS API administration tasks, usethe Enterprise Server Admin Console. For advanced tasks, including administering a MessageQueue cluster, use the tools provided in the MQ-as-install/imq/bin directory. For details aboutadministering Message Queue, see the Message Queue Administration Guide.
This chapter describes how to configure resources for applications that use the Java MessageService (JMS) API. It contains the following sections:
JMS ResourcesThe Java Message Service (JMS) API uses two kinds of administered objects:■ Connection factories, objects that allow an application to create other JMS objects
programmatically■ Destinations, which serve as the repositories for messages
These objects are created administratively, and how they are created is specific to eachimplementation of JMS. In the Enterprise Server, perform the following tasks:■ Create a connection factory by creating a connection factory resource■ Create a destination by creating two objects:
■ A physical destination■ A destination resource that refers to the physical destination
JMS applications use the JNDI API to access the connection factory and destination resources.A JMS application normally uses at least one connection factory and at least one destination. Tolearn what resources to create, study the application or consult with the application developer.
There are three types of connection factories:
■ QueueConnectionFactory objects, used for point-to-point communication
4C H A P T E R 4
63

■ TopicConnectionFactory objects, used for publish-subscribe communication■ ConnectionFactory objects, which can be used for both point-to-point and
publish-subscribe communications; these are recommended for new applications
There are two kinds of destinations:
■ Queue objects, used for point-to-point communication■ Topic objects, used for publish-subscribe communication
The chapters on JMS in the Java EE 5 Tutorial provide details on these two types ofcommunication and other aspects of JMS (see http://java.sun.com/javaee/5/docs/tutorial/doc/index.html).
The order in which the resources are created does not matter.
For a Java EE application, specify connection factory and destination resources in theEnterprise Server deployment descriptors as follows:
■ Specify a connection factory JNDI name in a resource-ref or anmdb-connection-factory element.
■ Specify a destination resource JNDI name in the ejb element for a message-driven bean andin the message-destination element.
■ Specify a physical destination name in a message-destination-link element, within eithera message-driven element of an enterprise bean deployment descriptor or amessage-destination-ref element. In addition, specify it in the message-destinationelement. (The message-destination-ref element replaces the resource-env-refelement, which is deprecated in new applications.) In the message-destination element ofan Enterprise Server deployment descriptor, link the physical destination name with thedestination resource name.
The Relationship Between JMS Resources and ConnectorResources
The Enterprise Server implements JMS by using a system resource adapter named jmsra. Whena user creates JMS resources, the Enterprise Server automatically creates connector resourcesthat appear under the Connectors node in the Admin Console’s tree view.
For each JMS connection factory that a user creates, the Enterprise Server creates a connectorconnection pool and connector resource. For each JMS destination a user creates, theEnterprise Server creates an admin object resource. When the user deletes the JMS resources,the Enterprise Server automatically deletes the connector resources.
It is possible to create connector resources for the JMS system resource adapter by using theConnectors node of the Admin Console instead of the JMS Resources node. See Chapter 7,“Connector Resources,” for details.
The Relationship Between JMS Resources and Connector Resources
Sun GlassFish Enterprise Server v2.1.1 Administration Guide • October 200964

JMS Connection FactoriesJMS connection factories are objects that allow an application to create other JMS objectsprogrammatically. These administered objects implement the ConnectionFactory,QueueConnectionFactory, and TopicConnectionFactory interfaces. Using the EnterpriseServer Admin Console, you can create, edit, or delete a JMS Connection Factory. The creationof a new JMS connection factory also creates a connector connection pool for the factory and aconnector resource.
To manage JMS connection factories using the command-line utility, usecreate-jms-resource, list-jms-resources, or delete-jms-resource command.
JMS Destination ResourcesJMS destinations serve as the repositories for messages. Using the Admin Console, you cancreate, modify or delete JMS Destination Resources. To create a new JMS Destination Resource,select Resources >JMS Resources >Destination Resources. In the Destination Resources page,you can specify the following:
■ JNDI Name for the resource. It is a recommended practice to use the naming subcontextprefix jms/ for JMS resources. For example: jms/Queue.
■ The resource type, which can be javax.jms. Topic or javax.jms.Queue.■ Additional properties for the destination resource. For more details about all these settings
and the additional properties, refer to the Admin Console Online Help.
To manage JMS destinations using the command-line utility, use create-jms-resource, ordelete-jms-resource command.
Tip – To specify the addresslist property (in the formathost:mqport,host2:mqport,host3:mqport) for asadmin create-jms-resource command,escape the : by using \\. For example, host1\\:mqport,host2\\:mqport,host3\\:mpqport.
For more information on using escape characters, see the asadmin(8) man page.
JMS Physical DestinationsFor production purposes, always create physical destinations. During the development andtesting phase, however, this step is not required. The first time that an application accesses adestination resource, Message Queue automatically creates the physical destination specified bythe Name property of the destination resource. The physical destination is temporary andexpires after a period specified by a Message Queue configuration property.
JMS Physical Destinations
Chapter 4 • Configuring Java Message Service Resources 65

To create a physical destination from the Admin Console, select Configuration > Java MessageService > Physical Destinations. In the Create Physical Destinations page, specify a name for thephysical destination and choose the type of destination, which can be topic or queue. For moredetails about the fields and properties in the Physical Destinations page, refer the AdminConsole Online Help.
To manage JMS physical destinations using the command-line utility, use create-jmsdest,flush-jmsdest, or delete-jmsdest command.
Configuring JMS Provider PropertiesUse the JMS Service page in the Admin Console to configure properties to be used by all JMSconnections. In the Admin Console, select Configurations >Java Message Service. In the JMSService page, you can control the following general JMS settings.
■ Select Startup Timeout interval, which indicates the time that Enterprise Server waits for theJMS service to start before aborting the startup.
■ Select JMS Service type, which decides whether you manage a JMS Service on a local or aremote host.
■ Specify Start Arguments to customize the JMS service startup.■ Select Reconnect checkbox to specify whether the JMS service attempts to reconnect to a
message server (or the list of addresses in the AddressList) when a connection is lost.■ Specify Reconnect Interval in terms of number of seconds. This applies for attempts on each
address in the AddressList and for successive addresses in the list. If it is too short, this timeinterval does not give a broker time to recover. If it is too long, the reconnect mightrepresent an unacceptable delay.
■ Specify the number of reconnect attempts. In the field, type the number of attempts toconnect (or reconnect) for each address in the AddressList before the client runtime triesthe next address in the list.
■ Choose the default JMS host.■ In the Address List Behavior drop-down list, choose whether connection attempts are in the
order of addresses in the AddressList (priority) or in a random order (random).■ In the Address List Iterations field, type the number of times the JMS service iterates
through the AddressList in an effort to establish (or reestablish) a connection.■ In the MQ Scheme and MQ Service fields, type the Message Queue address scheme name
and the Message Queue connection service name if a non-default scheme or service is to beused.
Values of all these properties can be updated at run time too. However, only those connectionfactories that are created after the properties are updated, will get the updated values. Theexisting connection factories will continue to have the original property values.
Configuring JMS Provider Properties
Sun GlassFish Enterprise Server v2.1.1 Administration Guide • October 200966

To manage JMS providers using the command-line utility, use the set or jms-ping commands.
Accessing Remote ServersChanging the provider and host to a remote system causes all JMS applications to run on theremote server. To use both the local server and one or more remote servers, create a connectionfactory resource with the AddressList property to create connections that access remote servers.
Foreign JMS ProvidersGeneric Resource Adapter 1.5 for JMS is a Java EE Connector 1.5 resource adapter that canwrap the JMS client library of external JMS providers such as IBM Websphere MQ, Tibco EMS,and Sonic MQ among others, and thus integrate any JMS provider with a Java EE applicationserver. The adapter is a.rar archive that can be deployed and configured using a EnterpriseServer administration tools.
Configuring the Generic Resource Adapter for JMSEnterprise Server's administration tools can be used to deploy and configure the genericresource adapter for JMS. This section explains how to configure Generic Resource Adapter forJMS with Enterprise Server.
Overall, the Resource Adapter can be configured to indicate whether the JMS provider supportsXA or not. It is also possible to indicate what mode of integration is possible with the JMSprovider. Two modes of integration are supported by the resource adapter. The first one usesJNDI as the means of integration. In this case, administered objects are set up in the JMSprovider's JNDI tree and will be looked up for use by the generic resource adapter. If that modeis not suitable for integration, it is also possible to use the Java reflection of JMS administeredobject javabean classes as the mode of integration.
You can use the Admin Console or the command-line to configure the resource adapter. This isnot different from configuring any other resource adapter.
Configuring the Generic Resource AdapterPrior to deploying the resource adapter, JMS client libraries should be made available to theEnterprise Server. For some JMS providers, client libraries may also include native libraries. Insuch cases, these native libraries should also be made available to the JVM(s).
1. Deploy the generic resource adapter the same way you would deploy a connector module.2. Create a connector connection pool.3. Create a connector resource.
Foreign JMS Providers
Chapter 4 • Configuring Java Message Service Resources 67
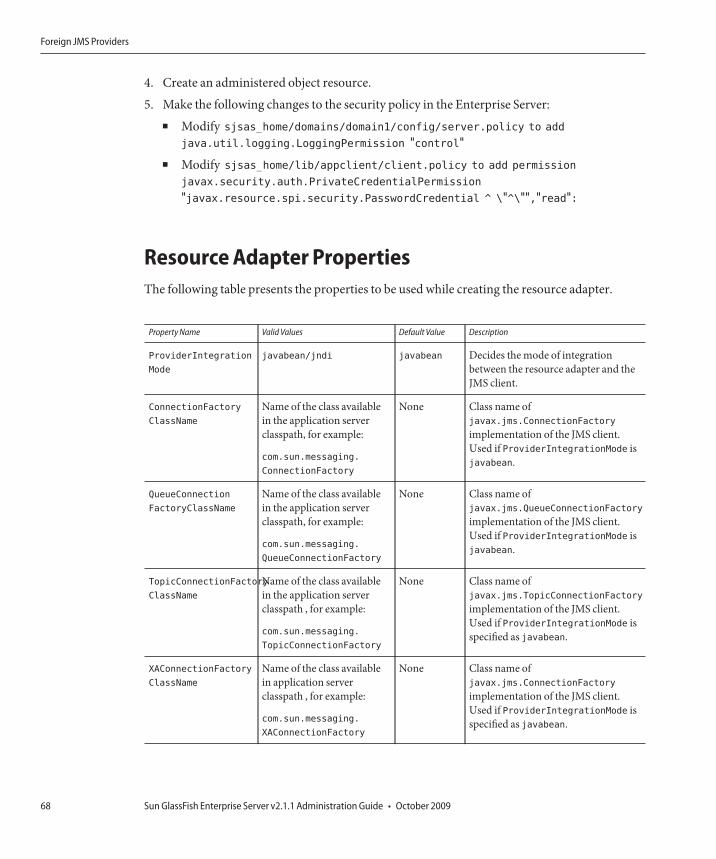
4. Create an administered object resource.
5. Make the following changes to the security policy in the Enterprise Server:■ Modify sjsas_home/domains/domain1/config/server.policy to add
java.util.logging.LoggingPermission "control"
■ Modify sjsas_home/lib/appclient/client.policy to add permission
javax.security.auth.PrivateCredentialPermission
"javax.resource.spi.security.PasswordCredential ^ \"^\"","read":
Resource Adapter PropertiesThe following table presents the properties to be used while creating the resource adapter.
Property Name Valid Values Default Value Description
ProviderIntegration
Mode
javabean/jndi javabean Decides the mode of integrationbetween the resource adapter and theJMS client.
ConnectionFactory
ClassName
Name of the class availablein the application serverclasspath, for example:
com.sun.messaging.
ConnectionFactory
None Class name ofjavax.jms.ConnectionFactory
implementation of the JMS client.Used if ProviderIntegrationMode isjavabean.
QueueConnection
FactoryClassName
Name of the class availablein the application serverclasspath, for example:
com.sun.messaging.
QueueConnectionFactory
None Class name ofjavax.jms.QueueConnectionFactory
implementation of the JMS client.Used if ProviderIntegrationMode isjavabean.
TopicConnectionFactory
ClassName
Name of the class availablein the application serverclasspath , for example:
com.sun.messaging.
TopicConnectionFactory
None Class name ofjavax.jms.TopicConnectionFactory
implementation of the JMS client.Used if ProviderIntegrationMode isspecified as javabean.
XAConnectionFactory
ClassName
Name of the class availablein application serverclasspath , for example:
com.sun.messaging.
XAConnectionFactory
None Class name ofjavax.jms.ConnectionFactory
implementation of the JMS client.Used if ProviderIntegrationMode isspecified as javabean.
Foreign JMS Providers
Sun GlassFish Enterprise Server v2.1.1 Administration Guide • October 200968

Property Name Valid Values Default Value Description
XAQueueConnection
FactoryClassName
Name of the class availablein application serverclasspath , for example:
com.sun.messaging.
XAQueueConnectionFactory
None Class name of javax.jms.XAQueueConnectionFactory
implementation of the JMS client.Used if ProviderIntegrationMode isspecified as javabean.
XATopicConnection
FactoryClassName
Name of the class availablein application serverclasspath , for example:
com.sun.messaging.
XATopicConnectionFactory
None Class name of javax.jms.XATopicConnectionFactory
implementation of the JMS client.Used if ProviderIntegrationMode isjavabean.
TopicClassName Name of the class availablein application serverclasspath , for example:
com.sun.messaging.Topic
None Class Name of javax.jms.Topicimplementation of the JMS client.Used if ProviderIntegrationMode isjavabean.
QueueClassName Name of the class availablein application serverclasspath , for example:
com.sun.messaging.Queue
None Class Name of javax.jms.Queueimplementation of the JMS client.Used if ProviderIntegrationMode isspecified as a javabean.
SupportsXA True/false FALSE Specifies whether the JMS clientsupports XA or not.
ConnectionFactory
Properties
Name value pairs separatedby comma
None Specifies the javabean propertynames and values of theConnectionFactory of the JMS client.Required only ifProviderIntegrationMode isjavabean.
JndiProperties Name value pairs separatedby comma
None Specifies the JNDI provider propertiesto be used for connecting to the JMSprovider's JNDI. Used only ifProviderIntegrationMode is jndi.
CommonSetter
MethodName
Method name None Specifies the common setter methodname that some JMS vendors use toset the properties on theiradministered objects. Used only ifProviderIntegrationMode isjavabean. In the case of Sun JavaSystem Message Queue, this propertyis named setProperty.
Foreign JMS Providers
Chapter 4 • Configuring Java Message Service Resources 69
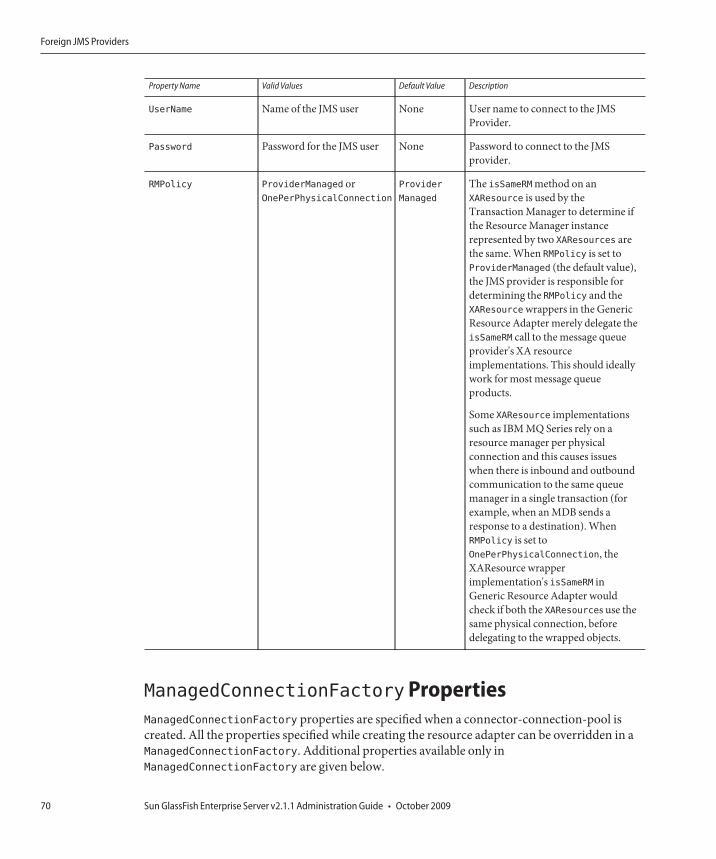
Property Name Valid Values Default Value Description
UserName Name of the JMS user None User name to connect to the JMSProvider.
Password Password for the JMS user None Password to connect to the JMSprovider.
RMPolicy ProviderManaged orOnePerPhysicalConnection
Provider
Managed
The isSameRM method on anXAResource is used by theTransaction Manager to determine ifthe Resource Manager instancerepresented by two XAResources arethe same. When RMPolicy is set toProviderManaged (the default value),the JMS provider is responsible fordetermining the RMPolicy and theXAResource wrappers in the GenericResource Adapter merely delegate theisSameRM call to the message queueprovider's XA resourceimplementations. This should ideallywork for most message queueproducts.
Some XAResource implementationssuch as IBM MQ Series rely on aresource manager per physicalconnection and this causes issueswhen there is inbound and outboundcommunication to the same queuemanager in a single transaction (forexample, when an MDB sends aresponse to a destination). WhenRMPolicy is set toOnePerPhysicalConnection, theXAResource wrapperimplementation's isSameRM inGeneric Resource Adapter wouldcheck if both the XAResources use thesame physical connection, beforedelegating to the wrapped objects.
ManagedConnectionFactoryPropertiesManagedConnectionFactory properties are specified when a connector-connection-pool iscreated. All the properties specified while creating the resource adapter can be overridden in aManagedConnectionFactory. Additional properties available only inManagedConnectionFactory are given below.
Foreign JMS Providers
Sun GlassFish Enterprise Server v2.1.1 Administration Guide • October 200970

Property Name Valid Value Default Value Description
ClientId A valid client ID None ClientID as specified by JMS 1.1specification.
ConnectionFactory
JndiName
JNDI Name None JNDI name of the connection factorybound in the JNDI tree of the JMSprovider. The administrator shouldprovide all connection factory properties(except clientID) in the JMS provideritself. This property name will be used onlyif ProviderIntegratinMode is jndi.
ConnectionValidation
Enabled
true/false FALSE If set to true, the resource adapter will usean exception listener to catch anyconnection exception and will send aCONNECTION_ERROR_OCCURED event toapplication server.
Administered Object Resource PropertiesProperties in this section are specified when an administered object resource is created. All theresource adapter properties can be overridden in an administered resource object. Additionalproperties available only in the administered object resource are given below.
Property Name Valid Value Default Value Description
DestinationJndiName JNDI Name None JNDI name of the destination bound inthe JNDI tree of the JMS provider. TheAdministrator should provide allproperties in the JMS provider itself.This property name will be used only ifProviderIntegrationMode is jndi.
DestinationProperties Name value pairsseparated by comma
None Specifies the javabean property namesand values of the destination of the JMSclient. Required only ifProviderIntegrationMode isjavabean.
Activation Spec PropertiesProperties in this section are specified in the Sun-specific deployment descriptor of MDB asactivation-config-properties. All the resource adapter properties can be overridden in anActivation Spec. Additional properties available only in ActivationSpec are given below.
Foreign JMS Providers
Chapter 4 • Configuring Java Message Service Resources 71

Property Name Valid Value Default Value Description
MaxPoolSize An integer 8 Maximum size of server session poolinternally created by the resourceadapter for achieving concurrentmessage delivery. This should be equalto the maximum pool size of MDBobjects.
MaxWaitTime An integer 3 The resource adapter will wait for thetime in seconds specified by thisproperty to obtain a server sessionfrom its internal pool. If this limit isexceeded, message delivery will fail.
Subscription
Durability
Durable or Non-Durable Non-Durable SubscriptionDurability as specifiedby JMS 1.1 specification.
SubscriptionName None SubscriptionName as specified byJMS 1.1 specification.
MessageSelector A valid message selector None MessageSelector as specified by JMS1.1 specification.
ClientID A valid client ID None ClientID as specified by JMS 1.1specification.
ConnectionFactory
JndiName
A valid JNDI Name None JNDI name of connection factorycreated in JMS provider. Thisconnection factory will be used byresource adapter to create aconnection to receive messages. Usedonly if ProviderIntegrationMode isconfigured as jndi.
DestinationJndiName A valid JNDI Name None JNDI name of destination created inJMS provider. This destination will beused by resource adapter to create aconnection to receive messages from.Used only ifProviderIntegrationMode isconfigured as jndi.
DestinationType javax.jms.Queue orjavax.jms.Topic
Null Type of the destination the MDB willlisten to.
Destination
Properties
Name-value pairs separatedby comma
None Specifies the javabean propertynames and values of the destination ofthe JMS client. Required only ifProviderIntegrationMode isjavabean.
Foreign JMS Providers
Sun GlassFish Enterprise Server v2.1.1 Administration Guide • October 200972

Property Name Valid Value Default Value Description
RedeliveryAttempts integer Number of times a message will bedelivered if a message causes aruntime exception in the MDB.
RedeliveryInterval time in seconds Interval between repeated deliveries, ifa message causes a runtime exceptionin the MDB.
SendBadMessages
ToDMD
true/false False Indicates whether the resourceadapter should send the messages to adead message destination, if thenumber of delivery attempts isexceeded.
DeadMessage
Destination
JndiName
a valid JNDI name. None JNDI name of the destination createdin the JMS provider. This is the targetdestination for dead messages. This isused only ifProviderIntegrationMode is jndi.
DeadMessage
Destination
ClassName
class name of destinationobject.
None Used if ProviderIntegrationMode isjavabean.
DeadMessage
Destination
Properties
Name Value Pairsseparated by comma
None Specifies the javabean propertynames and values of the destination ofthe JMS client. This is required only ifProviderIntegrationMode isjavabean.
ReconnectAttempts integer Number of times a reconnect will beattempted in case exception listenercatches an error on connection.
ReconnectInterval time in seconds Interval between reconnects.
Foreign JMS Providers
Chapter 4 • Configuring Java Message Service Resources 73

74
Configuring JavaMail Resources
The Enterprise Server includes the JavaMail API. The JavaMail API is a set of abstract APIs thatmodel a mail system. The API provides a platform-independent and protocol-independentframework to build mail and messaging applications. The JavaMail API provides facilities forreading and sending electronic messages. Service providers implement particular protocols.Using the JavaMail API you can add email capabilities to your applications. JavaMail providesaccess from Java applications to Internet Message Access Protocol (IMAP) and Simple MailTransfer Protocol (SMTP) capable mail servers on your network or the Internet. It does notprovide mail server functionality; you must have access to a mail server to use JavaMail.
The JavaMail API is implemented as a Java platform optional package and is also available aspart of the J2EE platform.
The Enterprise Server includes the JavaMail API along with JavaMail service providers thatallow an application component to send email notifications over the Internet and to read emailfrom IMAP and POP3 mail servers.
To learn more about the JavaMail API, consult the JavaMail web site at http://java.sun.com/products/javamail/.
This section contains the following topic:
Creating a JavaMail SessionTo configure JavaMail for use in Enterprise Server, create a Mail Session in the Enterprise ServerAdmin Console. This allows server-side components and applications to access JavaMailservices with JNDI, using the Session properties you assign for them. When creating a MailSession, you can designate the mail hosts, transport and store protocols, and the default mailuser in the Admin Console so that components that use JavaMail do not have to set theseproperties. Applications that are heavy email users benefit because the Application Servercreates a single Session object and makes it available via JNDI to any component that needs it.
5C H A P T E R 5
75
To create a JavaMail session using the Admin Console, select Resources —> JavaMail Sessions.Specify the JavaMail settings as follows:
■ JNDI Name: The unique name for the mail session. Use the naming sub-context prefix mail/for JavaMail resources. For example: mail/MySession.
■ Mail Host: The host name of the default mail server. The connect methods of the Store andTransport objects use this value if a protocol-specific host property is not supplied. Thename must be resolvable to an actual host name.
■ Default User: The user name to provide when connecting to a mail server. The connectmethods of the Store and Transport objects use this value if a protocol-specific usernameproperty is not supplied.
■ Default Return Address: The email address of the default user, in the form:[email protected].
■ Description: Provide a descriptive statement for the component.■ Session: Deselect the Enabled checkbox if you do not want to enable the mail session at this
time.
Additionally, define the following Advanced settings only if the mail provider has beenre-configured to use a non-default store or transport protocol:
■ Store Protocol: Defines the Store object communication method to be used. By default, theStore Protocol is imap.
■ Store Protocol Class: Provides the Store communication method class that implements thedesired Store protocol. By default, the Store Protocol Class iscom.sun.mail.imap.IMAPStore.
■ Transport Protocol: Identifies the transport communication method. By default, theTransport Protocol is smtp.
■ Transport Protocol Class: Defines the communication method for the transport class. Bydefault, the Transport Protocol Class is com.sun.mail.smtp.SMTPTransport.
■ Debug: Select this checkbox to enable extra debugging output, including a protocol trace,for this mail session. If the JavaMail log level is set to FINE or finer, the debugging output isgenerated and is included in the system log file.
■ Additional Properties: Create properties required by applications, such as aprotocol-specific host or username property. Ensure that every property name you definestart with a mail- prefix. If the name of the property does not start withmail-, the propertyis ignored.
Creating a JavaMail Session
Sun GlassFish Enterprise Server v2.1.1 Administration Guide • October 200976
JNDI Resources
The Java Naming and Directory Interface (JNDI) is an application programming interface(API) for accessing different kinds of naming and directory services. Java EE components locateobjects by invoking the JNDI lookup method.
JNDI is the acronym for the Java Naming and Directory Interface API. By making calls to thisAPI, applications locate resources and other program objects. A resource is a program objectthat provides connections to systems, such as database servers and messaging systems. (A JDBCresource is sometimes referred to as a data source.) Each resource object is identified by aunique, people-friendly name, called the JNDI name. A resource object and its JNDI name arebound together by the naming and directory service, which is included with the EnterpriseServer. To create a new resource, a new name-object binding is entered into the JNDI.
This section covers the following topics:■ “Java EE Naming Services” on page 77■ “Naming References and Binding Information” on page 78■ “Using Custom Resources” on page 79■ “Using External JNDI Repositories and Resources” on page 79
Java EE Naming ServicesA JNDI name is a people-friendly name for an object. These names are bound to their objects bythe naming and directory service that is provided by a Java EE server. Because Java EEcomponents access this service through the JNDI API, the object usually uses its JNDI name.When it starts up, the Enterprise Server reads information from the configuration file andautomatically adds JNDI database names to the name space.
Java EE application clients, enterprise beans, and web components are required to have accessto a JNDI naming environment.
The application component's naming environment is a mechanism that allows customizationof the application component's business logic during deployment or assembly. Use of the
6C H A P T E R 6
77
application component's environment allows the application component to be customizedwithout the need to access or change the application component's source code.
A Java EE container implements the application component's environment, and provides it tothe application component instance as a JNDI naming context. The application component'senvironment is used as follows:
■ The application component's business methods access the environment using the JNDIinterfaces. The application component provider declares in the deployment descriptor allthe environment entries that the application component expects to be provided in itsenvironment at runtime.
■ The container provides an implementation of the JNDI naming context that stores theapplication component environment. The container also provides the tools that allow thedeployer to create and manage the environment of each application component.
■ A deployer uses the tools provided by the container to initialize the environment entries thatare declared in the application component's deployment descriptor. The deployer sets andmodifies the values of the environment entries.
■ The container makes the environment naming context available to the applicationcomponent instances at runtime. The application component's instances use the JNDIinterfaces to obtain the values of the environment entries.
Each application component defines its own set of environment entries. All instances of anapplication component within the same container share the same environment entries.Application component instances are not allowed to modify the environment at runtime.
Naming References and Binding InformationA resource reference is an element in a deployment descriptor that identifies the component’scoded name for the resource. More specifically, the coded name references a connection factoryfor the resource. In the example given in the following section, the resource reference name isjdbc/SavingsAccountDB.
The JNDI name of a resource and the name of the resource reference are not the same. Thisapproach to naming requires that you map the two names before deployment, but it alsodecouples components from resources. Because of this de-coupling, if at a later time thecomponent needs to access a different resource, the name does not need to change. Thisflexibility also makes it easier for you to assemble J2EE applications from preexistingcomponents.
The following table lists JNDI lookups and their associated references for the J2EE resourcesused by the Enterprise Server.
Naming References and Binding Information
Sun GlassFish Enterprise Server v2.1.1 Administration Guide • October 200978

TABLE 6–1 JNDI Lookups and Their Associated References
JNDI Lookup Name Associated Reference
java:comp/env Application environment entries
java:comp/env/jdbc JDBC DataSource resource manager connection factories
java:comp/env/ejb EJB References
java:comp/UserTransaction UserTransaction references
java:comp/env/mail JavaMail Session Connection Factories
java:comp/env/url URL Connection Factories
java:comp/env/jms JMS Connection Factories and Destinations
java:comp/ORB ORB instance shared across application components
Using Custom ResourcesA custom resource accesses a local JNDI repository and an external resource accesses anexternal JNDI repository. Both types of resources need user-specified factory class elements,JNDI name attributes, etc. In this section, we will discuss how to configure JNDI connectionfactory resources, for J2EE resources, and how to access these resources.
Within the Enterprise Server, you can create, delete, and list resources, as well aslist-jndi-entries.
Using External JNDI Repositories and ResourcesOften applications running on the Enterprise Server require access to resources stored in anexternal JNDI repository. For example, generic Java objects could be stored in an LDAP serveras per the Java schema. External JNDI resource elements let users configure such externalresource repositories. The external JNDI factory must implementjavax.naming.spi.InitialContextFactory interface.
An example of the use of an external JNDI resource is:
<resources>
<!-- external-jndi-resource element specifies how to access J2EE resources
-- stored in an external JNDI repository. The following example
-- illustrates how to access a java object stored in LDAP.
-- factory-class element specifies the JNDI InitialContext factory that
-- needs to be used to access the resource factory. property element
-- corresponds to the environment applicable to the external JNDI context
Using External JNDI Repositories and Resources
Chapter 6 • JNDI Resources 79

-- and jndi-lookup-name refers to the JNDI name to lookup to fetch the
-- designated (in this case the java) object.
-->
<external-jndi-resource jndi-name="test/myBean"jndi-lookup-name="cn=myBean"res-type="test.myBean"factory-class="com.sun.jndi.ldap.LdapCtxFactory">
<property name="PROVIDER-URL" value="ldap://ldapserver:389/o=myObjects" />
<property name="SECURITY_AUTHENTICATION" value="simple" />
<property name="SECURITY_PRINCIPAL", value="cn=joeSmith, o=Engineering" />
<property name="SECURITY_CREDENTIALS" value="changeit" />
</external-jndi-resource>
</resources>
Using External JNDI Repositories and Resources
Sun GlassFish Enterprise Server v2.1.1 Administration Guide • October 200980

Connector Resources
This chapter explains how to configure connectors, which are used to access enterpriseinformation systems (EISs). This chapter contains the following sections:
■ “An Overview of Connectors” on page 81■ “Managing Connector Connection Pools” on page 82■ “Managing Connector Resources” on page 88■ “Managing Administered Object Resources” on page 90
An Overview of ConnectorsAlso called a resource adapter, a connector module is a Java EE component that enablesapplications to interact with enterprise information systems (EISs). EIS software includesvarious types of systems: enterprise resource planning (ERP), mainframe transactionprocessing, and non-relational databases, among others. Like other Java EE modules, to install aconnector module you deploy it.
A connector connection pool is a group of reusable connections for a particular EIS. To create aconnector connection pool, specify the connector module (resource adapter) that is associatedwith the pool.
A connector resource is a program object that provides an application with a connection to anEIS. To create a connector resource, specify its JNDI name and its associated connection pool.Multiple connector resources can specify a single connection pool. The application locates theresource by looking up its JNDI name. (For more information on JNDI, see the section JNDINames and Resources.) The JNDI name of a connector resource for an EIS is usually in thejava:comp/env/eis-specific subcontext.
The Enterprise Server implements JMS by using a connector module (resource adapter). See thesection, The Relationship Between JMS Resources and Connector Resources.
7C H A P T E R 7
81
Managing Connector Connection Pools■ “To Create a Connector Connection Pool” on page 82■ “To Edit a Connector Connection Pool” on page 83■ “To Edit Connector Connection Pool Advanced Attributes” on page 85■ “To Edit Connection Pool Properties” on page 87
▼ To Create a Connector Connection PoolBefore creating the pool, deploy the connector module (resource adapter) associated with thepool. The values that are specified for the new pool depend on the connector module that isdeployed.
In the tree component, expand the Resource node and then the Connectors node. Select theConnector Connection Pools node. On the Connector Connection Pools page, click New.
On the first Create Connector Connection Pool page, specify the following settings:
a. In the Name field, enter a logical name for the pool.
Specify this name when creating a connector resource.
b. Select an entry from the Resource Adapter combo box.
The combo box displays a list of deployed resource adapters (connector modules).
Select a value from the Connection Definition combo box.
The choices in the combo box depend on the resource adapter you selected. The ConnectionDefinition attribute identifies a resource adapter's connection-definition element inthera.xml file.
Click Next.
On the next Create Connector Connection Pool page, perform these tasks:
a. In the General Settings section verify that the values are correct.
b. For the fields in the Pool Settings section, the default values can be retained.
These settings can be changed at a later time. See “To Edit a Connector Connection Pool” onpage 83.
Before You Begin
1
2
3
4
5
Managing Connector Connection Pools
Sun GlassFish Enterprise Server v2.1.1 Administration Guide • October 200982

c. In the Additional Properties table, add any required properties.In the previous Create Connector Connection Pool page, you selected a class in theConnection Definition combo box. If this class is in the server’s classpath, then theAdditional Properties table displays default properties.
Click Finish.
Equivalent asadmin command
create-connector-connection-pool
▼ To Edit a Connector Connection PoolIn the tree component, expand the Resources node and then the Connectors node. Expand theConnector Connection Pools node and select the connector connection pool you want to edit.
On the Edit Connector Connection Pool page, you can change the settings of this connectionpool. (Optional) Under General Settings, modify the description for the connection pool.
Under Pool Settings, you can specify the parameter values as explained in the following table.
Parameter Description
Initial and Minimum Pool Size The minimum number of connections in the pool.This value also determines the number of connectionsplaced in the pool when the pool is first created orwhen application server starts.
Maximum Pool Size The maximum number of connections in the pool.
Pool Resize Quantity When the pool scales up and scales down towards themaximum and minimum pool size respectively, it isresized in batches. This value determines the numberof connections in the batch. Making this value toolarge will delay connection creation and recycling;making it too small will make it less efficient.
Idle Timeout The maximum time in seconds that a connection canremain idle in the pool. After this time expires, theconnection is removed from the pool.
Max Wait Time The amount of time the application requesting aconnection will wait before getting a connectiontimeout.
6
More Information
1
2
3
Managing Connector Connection Pools
Chapter 7 • Connector Resources 83

On Any Failure If you select the checkbox labelled Close AllConnections, if a single connection fails, then theapplication server will close all connections in thepool and then reestablish them. If you do not selectthe checkbox, then individual connections will bereestablished only when they are used.
Transaction Support Use the Transaction Support list to select the type oftransaction support for the connection pool. Thechosen transaction support overrides the transactionsupport attribute in the resource adapter associatedwith this connection pool in a downward compatibleway. In other words, it can support a lower transactionlevel than that specified in the resource adapter or thesame transaction level as that specified in resourceadapter, but it cannot specify a higher level. Thetransaction support options include the following.The None selection from the Transaction Supportmenu indicates that the resource adapter does notsupport resource manager local or JTA transactionsand does not implement XAResource orLocalTransaction interfaces. For JAXR resourceadapters, you need to choose None from theTransaction Support menu. JAXR resource adaptersdo not support local or JTA transactions. Localtransaction support means that the resource adaptersupports local transactions by implementing theLocalTransaction interface. Local transactions aremanaged internal to a resource manager and involveno external transaction managers. XA transactionsupport means that the resource adapter supportsresource manager local and JTA transactions byimplementing the LocalTransaction andXAResourceinterfaces. XA transactions are controlledand coordinated by a transaction manager external toa resource manager. Local transactions are managedinternal to a resource manager and involve noexternal transaction managers.
Connection Validation Select the Required checkbox to enable connectionvalidation.
Click Save.
Click Load Defaults if you want to restore the default values of all the settings.
4
5
Managing Connector Connection Pools
Sun GlassFish Enterprise Server v2.1.1 Administration Guide • October 200984

Using the asadmin commands to change connection pool properties.
You can use the asadmin get and set commands to view and change the values of theconnection pool properties.
To list all the connector connection pools in the server:
asadmin list domain.resources.connector-connection-pool.*
To view the properties of the connector connection pool, you can use the following command:
asadmin get domain.resources.connector-connection-pool.conectionpoolname.*
To set a property of the connector connection pool, you can use the following command:
asadmin setdomain.resources.connector-connection-pool.conectionpoolname.pool-resize-quantity=3
▼ To Edit Connector Connection Pool AdvancedAttributes
Use the Advanced tab to edit the advanced attributes for a connector connection pool.
Parameter Description
Validate Atmost Once Amount of time, in seconds, after which a connection is validated at most once.This will help reduce the number of validation requests by a connection. Thedefault value 0 implies that connection validation is not enabled.
Leak Timeout Amount of time, in seconds, to trace connection leaks in a connection pool. Thedefault value 0 means that connection leak tracing is disabled. If connection leaktracing is enabled, you can get statistics on the number of connection leaks in theMonitoring Resources tab. To view this tab, go to Application Server > Monitoring> Resources.
Leak Reclaim If this option is enabled, leaked connections will be restored to the pool after leakconnection tracing is complete.
Creation Retry Attempts Number of attempts that will be made if there is a failure in creating a newconnection. The default value of 0 implies that no attempts will be made to createthe connection again.
Retry Interval Specify the interval, in seconds, between two attempts to create a connection. Thedefault value is 10 seconds. This attribute is used only if the value of CreationRetry Attempts is greater than 0.
More Information
1
Managing Connector Connection Pools
Chapter 7 • Connector Resources 85

Lazy Association Connections are lazily associated when an operation is performed on them. Also,they are disassociated when the transaction is completed and a componentmethod ends, which helps reuse of the physical connections. Default value is false.
Lazy ConnectionEnlistment
Enable this option to enlist a resource to the transaction only when it is actuallyused in a method.
Associate with Thread Enable this option to associate a connection with the thread such that when thesame thread is in need of a connection, it can reuse the connection alreadyassociated with it, thereby not incurring the overhead of getting a connection fromthe pool. Default value is false.
Match Connections Use this option to switch on/off connection matching for the pool. It can be set tofalse if the administrator knows that the connections in the pool will always behomogeneous and hence a connection picked from the pool need not be matchedby the resource adapter. Default value is false.
Max Connection Usage Specify the number of times a connection should be reused by the pool. Once aconnection is reused for the specified number of times, it will be closed. This isuseful, for instance, to avoid statement-leaks. The default value of 0 implies thatthis attribute is not enabled.
Click Save for the changes to take effect.
Click Load Defaults if you want to restore the default values of all the settings.
Using the asadmin commands to change connection pool properties.
You can use the asadmin get and set commands to view and change the values of theconnection pool properties.
To list all the connector connection pools in the server:
asadmin list domain.resources.connector-connection-pool.*
To view the properties of the connector connection pool, you can use the following command:
asadmin get domain.resources.connector-connection-pool.conectionpoolname.*
To set a property of the connector connection pool, you can use the following command:
asadmin setdomain.resources.connector-connection-pool.conectionpoolname.validate-atmost-once-period-in-seconds=3
2
3
More Information
Managing Connector Connection Pools
Sun GlassFish Enterprise Server v2.1.1 Administration Guide • October 200986
▼ To Edit Connection Pool PropertiesUse the Additional Properties tab to modify the properties of an existing pool.The properties specified depend on the resource adapter used by this pool. The name-valuepairs specified by the deployer using this table can be used to override the default values for theproperties defined by the resource-adapter vendor.
Click Save for the changes to take effect.
Managing Security MapsYou can create, edit, and delete security maps associated with connector connection pools.
▼ To create security maps for connector connection pools
In the Edit Connector Connection Pool page, click the Security Maps tabbed pane.
Click New to create a new security map.
In the New Security Map page, provide a name for the security map, a user name, and password.
Click OK.
▼ To Edit Security Maps for Connector Connection Pools
In the Edit Connector Connection Pool page, click the Security Maps tabbed pane.
From the list of security maps, click the name of the security map that you want to edit.
Modify the values as desired, and click Save.
▼ To Delete a Connector Connection PoolIn the tree component, expand the Resources node and then the Connectors node.
Select the Connector Connection Pools node.
On the Connector Connection Pools page, select the checkbox for the pool to be deleted.
Click Delete.
1
2
1
2
3
4
1
2
3
1
2
3
4
Managing Connector Connection Pools
Chapter 7 • Connector Resources 87

Equivalent asadmin command
delete-connector-connection-pool
▼ To Set Up EIS AccessDeploy (install) a connector.
Create a connection pool for the connector.
Create a connector resource that is associated with the connection pool.
Managing Connector Resources■ “To Create a Connector Resource” on page 88■ “To Edit a Connector Resource” on page 89■ “To Delete a Connector Resource” on page 89■ “To Configure the Connector Service” on page 90
▼ To Create a Connector ResourceA connector resource (data source) provides applications with a connection to an EIS.
Before creating a connector resource, first create a connector connection pool.
In the tree component, expand the Resources node and then the Connectors node.
Expand the Connector Resources node.
On the Connector Resources page, click New.
On the Create Connector Resources page, specify the resource’s settings:
a. In the JNDI Name field, type a unique name, for example: eis/myERP.
b. From the Pool Name combo box, choose the connection pool to which the new connectorresource belongs.
c. To change the resource to be unavailable, deselect the Status checkbox.By default, the resource is available (enabled) when it is created.
More Information
1
2
3
Before You Begin
1
2
3
4
Managing Connector Resources
Sun GlassFish Enterprise Server v2.1.1 Administration Guide • October 200988
d. Do one of the following:
■ If you are using the cluster profile, you will see the Targets section of the page. in theTargets section of the page, select the domain, cluster, or server instances where theconnector resource will reside, from the Available field and click Add. If you do not wantto deploy the connector resource to one of the domains, clusters, or server instanceslisted in the Selected field, select it from the field and click Remove.
■ If you are running a domain with developer profile, skip to step 5.
Click OK.
Equivalent asadmin command
create-connector-resource
▼ To Edit a Connector ResourceIn the tree component, expand the Resources node and then the Connectors node.
Expand the Connector Resources node.
Select the node for the connector resource that you want to edit. On the Edit ConnectorResources page, you can change the settings of this connection.
Do one of the following:
■ If you are using the cluster profile or enterprise profile, you will see the Targets tabbed pane.On the Targets tabbed pane, you can enable or disable the connector resource on individualtargets. You can change the targets on which the connector resource is deployed by clickingManage Targets.
■ If you are using developer profile, skip to next step.
Click Save to apply the edits.
▼ To Delete a Connector ResourceIn the tree component, expand the Resources node and then the Connectors node.
Select the Connector Resources node.
5
More Information
1
2
3
4
5
1
2
Managing Connector Resources
Chapter 7 • Connector Resources 89

On the Connector Resources page, select the checkbox for the resource to be deleted.
Click Delete.
Equivalent asadmin command
delete-connector-resource
▼ To Configure the Connector ServiceUse the Connector Service screen to configure the connector container for all resource adaptersdeployed to this cluster or server instance.
Select Configurations from the tree.
If you are using the cluster profile, select the instance to configure:
■ To configure a particular instance, select the instance’s config node. For example, for thedefault instance, server, select the server-config node.
■ To configure the default settings for future instances that use a copy of default-config, selectthe default-config node.
Select the Connector Service node.
Specify the shutdown timeout in seconds in the Shutdown Timeout field.Enter an integer representing the number of seconds that the application server waits to allowthe ResourceAdapter.stop method of the connector module’s instance to complete. Resourceadapters that take longer than the specified shutdown timeout are ignored by the applicationserver and the shutdown procedure continues. The default shutdown timeout is 30 seconds.Click Load Defaults to select the default shutdown timeout for the resource adapters deployedto this cluster or server instance.
Managing Administered Object ResourcesPackaged within a resource adapter (connector module), an administered object providesspecialized functionality for an application. For example, an administered object might provideaccess to a parser that is specific to the resource adapter and its associated EIS. The object can beadministered; that is, it can be configured by an administrator. To configure the object, addname-value property pairs in the Create or Edit Admin Object Resource pages. When creatingan administered object resource, associate the administered object to a JNDI name.
3
4
More Information
1
2
3
4
Managing Administered Object Resources
Sun GlassFish Enterprise Server v2.1.1 Administration Guide • October 200990

To create, edit, and delete Connector Connection Pools, click Resources —> AdministeredObject Resources in the Admin Console. Consult the Admin Console Online Help for detailedinstructions on managing connector connection pools.
■ “To Create an Administered Object Resource” on page 91■ “To Edit an Administered Object Resource” on page 92■ “To Delete an Administered Object Resource” on page 92
▼ To Create an Administered Object ResourcePackaged within a resource adapter (connector module), an administered object providesspecialized functionality for an application. For example, an administered object might provideaccess to a parser that is specific to the resource adapter and its associated EIS. The object can beadministered; that is, it can be configured by an administrator. To configure the object, addname-value property pairs in the Create or Edit Admin Object Resource pages. When creatingan administered object resource, associate the administered object to a JNDI name.
The Enterprise Server implements JMS by using resource adapter. For each JMS destinationcreated, the Enterprise Server automatically creates an administered object resource.
In the tree component, expand the Resources node and then the Connectors node.
Expand the Admin Object Resources node.
On the Admin Object Resources page, click New.
On the Admin Object Resources page, specify the following settings:
a. In the JNDI Name field, type a unique name that identifies the resource.
b. In the Resource Type field, enter the Java type for the resource.
c. From the Resource Adapter combo box, select the resource adapter that contains theadministered object.
d. Select or deselect the Status checkbox to enable or disable the resource.
e. To configure the administered object with name-value property pairs, click Add Property.
f. If you are using cluster profile, in the Targets section of the page, select the domain, cluster,or server instances where the administered object will reside, from the Available field andclick Add.To undeploy the administered object to one of the domains, clusters, or server instanceslisted in the Selected field, select it from the field and click Remove.
1
2
3
4
Managing Administered Object Resources
Chapter 7 • Connector Resources 91
g. Click Finish.
Equivalent asadmin command
create-admin-object
▼ To Edit an Administered Object ResourceIn the tree component, expand the Resource node and then the Connectors node.
Expand the Administered Object Resources node.
Select the node for the administered object resource to be edited.
On the Edit Administered Object Resources page, modify values specified in Creating anAdministered Object Resource.
If you are using cluster profile, on the Targets tabbed pane, edit the targets on which theadministered object is deployed by clicking Manage Targets.
Click Save to apply the edits.
▼ To Delete an Administered Object ResourceIn the tree component, expand the Resources node and then the Connectors node.
Select the Administered Object Resources node.
On the Administered Object Resources page, select the checkbox for the resource to be deleted.
Click Delete.
Equivalent asadmin command
delete-admin-object
More Information
1
2
3
4
5
6
1
2
3
4
More Information
Managing Administered Object Resources
Sun GlassFish Enterprise Server v2.1.1 Administration Guide • October 200992

SIP, Web, and EJB Containers
Containers provide runtime support for application components. Application components usethe protocols and methods of the container to access other application components and servicesprovided by the server. The Enterprise Server provides an application client container, anapplet container, a Web container, and an EJB container. For a diagram that shows thecontainers, see the section “Enterprise Server Overview” on page 23.
This chapter describes the following containers:
■ “The SIP Servlet Container” on page 93■ “The Web Container” on page 95■ “The EJB Container” on page 95
The SIP Servlet ContainerEnterprise Server provides the SIP Servlet container that hosts SIP-compliant applications.Features of this container include the following:
■ Provides a network end point to listen to SIP requests.■ Provides an environment to host and manage the lifecycle of SIP Servlets.■ Decides what applications to host in which order.■ Supports the Secure SIP protocol, SIPS over the transport layer protocol TLS.■ Uses Grizzly NIO framework for server side socket listeners.■ Implements Digest Authentication for security.■ Supports Call Flow. Call Flow is the feature that allows application developers and
Application Server administrators to monitor the behavior of the deployed applications.
8C H A P T E R 8
93

Editing the Properties of the SIP ContainerTo view SIP container settings on the default domain, use the following asadmin command:
get server.sip-container.*
Typical output is as follows:
server.sip-container.external-address =
server.sip-container.external-sip-port = 5060
server.sip-container.external-sips-port = 5061p
By default, the external address is empty. The SIP Container has a heuristic that tries to find asuitable address by examining all network interfaces on the machine. In a cluster setup, it ismandatory to change the external address .External SIP and SIPS port settings of the SIPcontainer are overridden by the external SIP and SIPS port settings of the SIP listener.
To change the port settings of the SIP container, use the following asadmin command:
set server.sip-container.external-sip-port=5065
The sub-elements of the SIP container are session-managerand session-properties.store-properties, manager-properties are sub-elements of session-manager.
To change the properties of the SIP container using the Admin Console, select theConfiguration node, select the configuration name, and the SIP Container node. Use theGeneral, Session Timeout, SIP Container Manager, or SIP Container Store tabs to view andchange SIP container properties.
You can use the following CLI commands to list and view the sub-elements and attributes of theSIP container.
To view the sub-elements of the SIP container, use the following command: listserver.sip-container.*
To view the attributes of the SIP container, use the following command: getserver.sip-container.*
Editing SIP Container Session PropertiesTo view the attributes of the SIP container session properties, use the following command: getserver.sip-container.session-config.session-properties.*
To set the attributes of the SIP container session properties, use the get and set commands:
get server.sip-container.session-config.session-properties.*
set
server.sip-container.session-config.session-properties.timeout-in-seconds=0
The SIP Servlet Container
Sun GlassFish Enterprise Server v2.1.1 Administration Guide • October 200994
Editing SIP Container Session Manager PropertiesTo view the sub-elements of the SIP container session manager properties, use the followingcommand: list server.sip-container.session-config.session-manager.*
The two sub-elements are store-properties, manager-properties.
To view the attributes of store-properties, use the following command: getserver.sip-container.session-config.session-manager.store-properties.*
To view the attributes of manager-properties, use the following command: getserver.sip-container.session-config.session-manager.manager-properties.*
To set the attributes of the SIP container session manager properties, use the get and set
commands:
get
server.sip-container.session-manager.manager-properties.reap-interval-in-seconds
set
server.sip-container.session-manager.manager-properties.reap-interval-in-seconds=2
For a complete list of SIP container properties, see the TBDlink,
The Web ContainerThe Web Container is a J2EE container that hosts web applications. The web container extendsthe web server functionality by providing developers the environment to run servlets andJavaServer Pages (JSP files).
The EJB ContainerEnterprise beans (EJB components) are Java programming language server components thatcontain business logic. The EJB container provides local and remote access to enterprise beans.
There are three types of enterprise beans: session beans, entity beans, and message-drivenbeans. Session beans represent transient objects and processes and typically are used by a singleclient. Entity beans represent persistent data, typically maintained in a database.Message-driven beans are used to pass messages asynchronously to application modules andservices.
The container is responsible for creating the enterprise bean, binding the enterprise bean to thenaming service so other application components can access the enterprise bean, ensuring onlyauthorized clients have access to the enterprise bean’s methods, saving the bean’s state topersistent storage, caching the state of the bean, and activating or passivating the bean whennecessary.
The EJB Container
Chapter 8 • SIP, Web, and EJB Containers 95

96

Configuring Security
Security is about protecting data: how to prevent unauthorized access or damage to it in storageor transit. The Enterprise Server; has a dynamic, extensible security architecture based on theJava EE standard. Built in security features include cryptography, authentication andauthorization, and public key infrastructure. The Enterprise Server is built on the Java securitymodel, which uses a sandbox where applications can run safely, without potential risk tosystems or users. The following topics are discussed:
■ “Understanding Application and System Security” on page 97■ “Tools for Managing Security” on page 98■ “Managing Security of Passwords” on page 99■ “About Authentication and Authorization” on page 102■ “Understanding Users, Groups, Roles, and Realms” on page 104■ “Introduction to Certificates and SSL” on page 108■ “About Firewalls” on page 111■ “About Certificate Files” on page 111■ “Using Java Secure Socket Extension (JSSE) Tools” on page 112■ “Using Network Security Services (NSS) Tools” on page 116■ “Using Hardware Crypto Accelerator With Enterprise Server” on page 120
Understanding Application and System SecurityBroadly, there are two kinds of application security:
■ In programmatic security, application code written by the developer handles security chores.As an administrator, you don't have any control over this mechanism. Generally,programmatic security is discouraged since it hard-codes security configurations in theapplication instead of managing it through the Java EE containers.
9C H A P T E R 9
97

■ In declarative security, the container (the Enterprise Server) handles security through anapplication's deployment descriptors. You can control declarative security by editingdeployment descriptors directly or with a tool such as deploytool. Because deploymentdescriptors can change after an application is developed, declarative security allows formore flexibility.
In addition to application security, there is also system security, which affects all the applicationson an Enterprise Server system.
Programmatic security is controlled by the application developer, so this document does notdiscuss it; declarative security is somewhat less so, and this document touches on itoccasionally. This document is intended primarily for system administrators, and so focuses onsystem security.
Tools for Managing SecurityThe Enterprise Server provides the following tools for managing security:■ Admin Console, a browser-based tool used to configure security for the entire server, to
manage users, groups, and realms, and to perform other system-wide security tasks. For ageneral introduction to the Admin Console, see “Tools for Administration” on page 24. Foran overview of the security tasks consult the Admin Console online help.
■ asadmin, a command-line tool that performs many of the same tasks as the Admin Console.You may be able to do some things with asadmin that you cannot do with Admin Console.You perform asadmin commands from either a command prompt or from a script, toautomate repetitive tasks. For a general introduction to asadmin, see “Tools forAdministration” on page 24.
The Java Platform, Standard Edition (Java SE) provides two tools for managing security:
■ keytool, a command-line utility for managing digital certificates and key pairs. Usekeytool to manage users in the certificate realm.
■ policytool, a graphical utility for managing system-wide Java security policies. As anadministrator, you will rarely need to use policytool.
For more information on using keytool, policytool, and other Java security tools, see JDKTools and Utilities at http://java.sun.com/j2se/1.5.0/docs/tooldocs/#security.
In the Enterprise Profile, two other tools that implement Network Security Services (NSS) areavailable for managing security. For more information on NSS, go to http://
www.mozilla.org/projects/security/pki/nss/. The tools for managing security include thefollowing:
■ certutil, a command-line utility for managing certificates and key databases.■ pk12util, a command-line utility used to import and export keys and certificates between
the certificate/key databases and files in PKCS12 format.
Tools for Managing Security
Sun GlassFish Enterprise Server v2.1.1 Administration Guide • October 200998
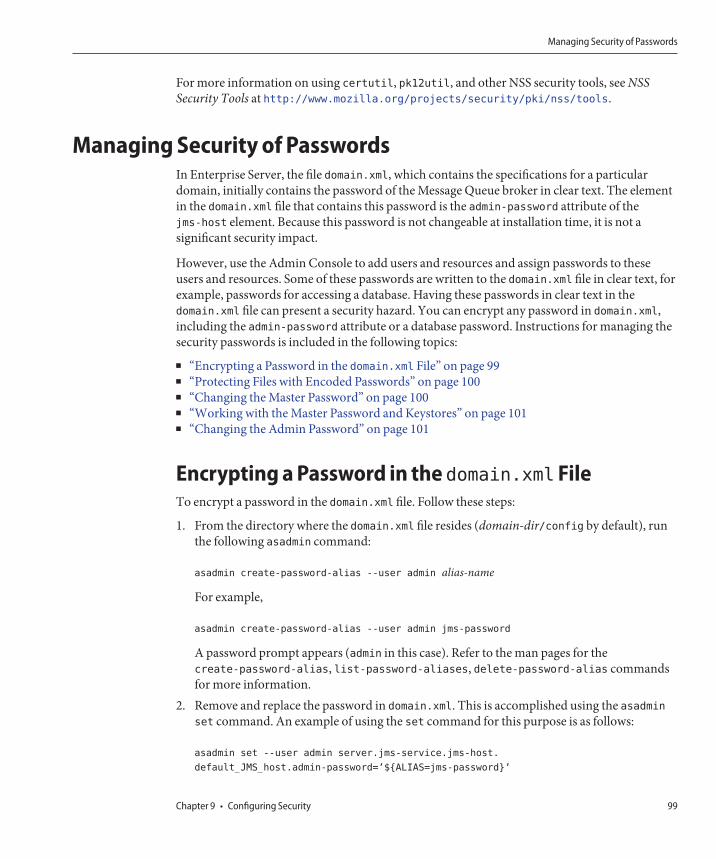
For more information on using certutil, pk12util, and other NSS security tools, see NSSSecurity Tools at http://www.mozilla.org/projects/security/pki/nss/tools.
Managing Security of PasswordsIn Enterprise Server, the file domain.xml, which contains the specifications for a particulardomain, initially contains the password of the Message Queue broker in clear text. The elementin the domain.xml file that contains this password is the admin-password attribute of thejms-host element. Because this password is not changeable at installation time, it is not asignificant security impact.
However, use the Admin Console to add users and resources and assign passwords to theseusers and resources. Some of these passwords are written to the domain.xml file in clear text, forexample, passwords for accessing a database. Having these passwords in clear text in thedomain.xml file can present a security hazard. You can encrypt any password in domain.xml,including the admin-password attribute or a database password. Instructions for managing thesecurity passwords is included in the following topics:
■ “Encrypting a Password in the domain.xml File” on page 99■ “Protecting Files with Encoded Passwords” on page 100■ “Changing the Master Password” on page 100■ “Working with the Master Password and Keystores” on page 101■ “Changing the Admin Password” on page 101
Encrypting a Password in the domain.xml FileTo encrypt a password in the domain.xml file. Follow these steps:
1. From the directory where the domain.xml file resides (domain-dir/config by default), runthe following asadmin command:
asadmin create-password-alias --user admin alias-name
For example,
asadmin create-password-alias --user admin jms-password
A password prompt appears (admin in this case). Refer to the man pages for thecreate-password-alias, list-password-aliases, delete-password-alias commandsfor more information.
2. Remove and replace the password in domain.xml. This is accomplished using the asadminset command. An example of using the set command for this purpose is as follows:
asadmin set --user admin server.jms-service.jms-host.
default_JMS_host.admin-password=’${ALIAS=jms-password}’
Managing Security of Passwords
Chapter 9 • Configuring Security 99

Note – Enclose the alias password in single quotes as shown in the example.
3. Restart the Enterprise Server for the relevant domain.
Protecting Files with Encoded PasswordsSome files contain encoded passwords that need protecting using file system permissions. Thesefiles include the following:
■ domain-dir/master-password
This file contains the encoded master password and should be protected with file systempermissions 600.
■ Any password file created to pass as an argument using the --passwordfile argument toasadmin should be protected with file system permissions 600.
Changing the Master PasswordThe master password (MP) is an overall shared password. It is never used for authenticationand is never transmitted over the network. This password is the central point for overallsecurity; the user can choose to enter it manually when required, or obscure it in a file. It is themost sensitive piece of data in the system. The user can force prompting for the masterpassword by removing this file. When the master password is changed, it is re-saved in themaster-password keystore, which is a Java JCEKS type keystore.
To change the master password, follow these steps:
1. Stop the Enterprise Server for the domain. Use the asadmin change-master-passwordcommand, which prompts for the old and new passwords, then re-encrypts all dependentitems. For example:
asadmin change-master-password>
Please enter the master password>
Please enter the new master password>
Please enter the the new master password again>
2. Restart the Enterprise Server.
Managing Security of Passwords
Sun GlassFish Enterprise Server v2.1.1 Administration Guide • October 2009100

Caution – At this point in time, server instances that are running must not be started andrunning server instances must not be restarted until the SMP on their corresponding nodeagent has been changed. If a server instance is restarted before changing its SMP, it will fail tocome up.
3. Stop each node agent and its related servers one at a time. Run the asadminchange-master-password command again, and then restart the node agent and its relatedservers.
4. Continue with the next node agent until all node agents have been addressed. In this way, arolling change is accomplished.
Working with the Master Password and KeystoresThe master password is the password for the secure keystore . When a new application serverdomain is created, a new self-signed certificate is generated and stored in the relevant keystore,which is locked using the master password. If the master password is not the default, thestart-domain command prompts you for the master password. Once the correct masterpassword is entered, the domain starts.
When a node agent associated with the domain is created, the node agent synchronizes the datawith domain. While doing so, the keystore is also synchronized. Any server instance controlledby this node agent needs to open the keystore. Since the store is essentially identical to the storethat was created by the domain creation process, it can only be opened by an identical masterpassword. But the master password itself is never synchronized, meaning it is not transmitted tothe node agent during the synchronization, but needs to be available with the node agentlocally. This is why creation and/or starting of a node agent prompts you for the masterpassword and you need to enter the same password that you entered while creating/starting thedomain. If the master password is changed for a domain, you will have to perform the same stepto change it at every node agent that is associated with this domain.
Changing the Admin PasswordEncrypting the admin password is discussed in “Managing Security of Passwords” on page 99.Encrypting the admin password is strongly encouraged. If you want to change the adminpassword before encrypting it, use the change-admin-password command.
Consult the Admin Console online help for instructions on changing the admin password usingthe Admin Console.
Managing Security of Passwords
Chapter 9 • Configuring Security 101
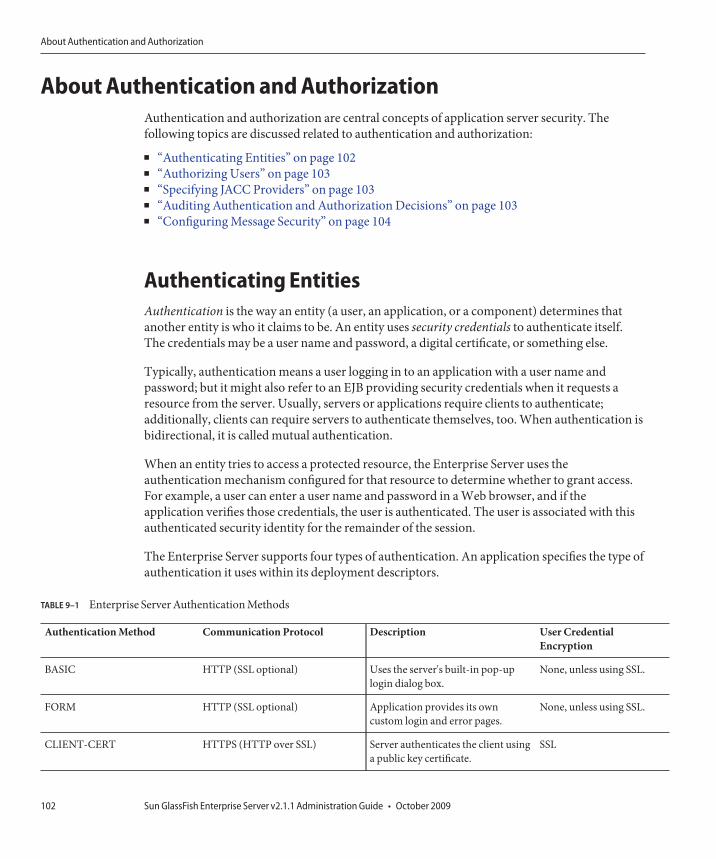
About Authentication and AuthorizationAuthentication and authorization are central concepts of application server security. Thefollowing topics are discussed related to authentication and authorization:
■ “Authenticating Entities” on page 102■ “Authorizing Users” on page 103■ “Specifying JACC Providers” on page 103■ “Auditing Authentication and Authorization Decisions” on page 103■ “Configuring Message Security” on page 104
Authenticating EntitiesAuthentication is the way an entity (a user, an application, or a component) determines thatanother entity is who it claims to be. An entity uses security credentials to authenticate itself.The credentials may be a user name and password, a digital certificate, or something else.
Typically, authentication means a user logging in to an application with a user name andpassword; but it might also refer to an EJB providing security credentials when it requests aresource from the server. Usually, servers or applications require clients to authenticate;additionally, clients can require servers to authenticate themselves, too. When authentication isbidirectional, it is called mutual authentication.
When an entity tries to access a protected resource, the Enterprise Server uses theauthentication mechanism configured for that resource to determine whether to grant access.For example, a user can enter a user name and password in a Web browser, and if theapplication verifies those credentials, the user is authenticated. The user is associated with thisauthenticated security identity for the remainder of the session.
The Enterprise Server supports four types of authentication. An application specifies the type ofauthentication it uses within its deployment descriptors.
TABLE 9–1 Enterprise Server Authentication Methods
Authentication Method Communication Protocol Description User CredentialEncryption
BASIC HTTP (SSL optional) Uses the server's built-in pop-uplogin dialog box.
None, unless using SSL.
FORM HTTP (SSL optional) Application provides its owncustom login and error pages.
None, unless using SSL.
CLIENT-CERT HTTPS (HTTP over SSL) Server authenticates the client usinga public key certificate.
SSL
About Authentication and Authorization
Sun GlassFish Enterprise Server v2.1.1 Administration Guide • October 2009102
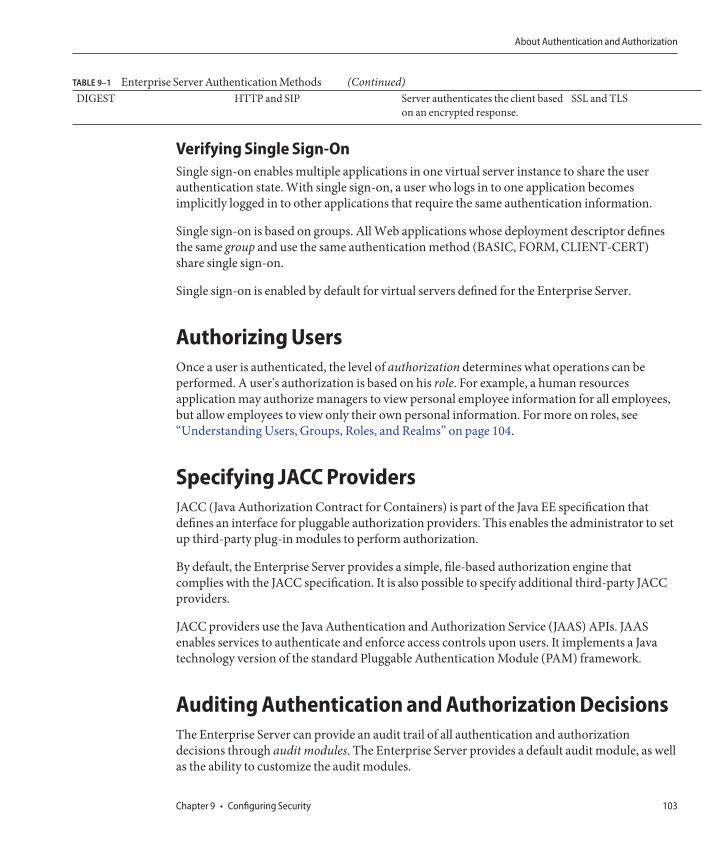
TABLE 9–1 Enterprise Server Authentication Methods (Continued)DIGEST HTTP and SIP Server authenticates the client based
on an encrypted response.SSL and TLS
Verifying Single Sign-OnSingle sign-on enables multiple applications in one virtual server instance to share the userauthentication state. With single sign-on, a user who logs in to one application becomesimplicitly logged in to other applications that require the same authentication information.
Single sign-on is based on groups. All Web applications whose deployment descriptor definesthe same group and use the same authentication method (BASIC, FORM, CLIENT-CERT)share single sign-on.
Single sign-on is enabled by default for virtual servers defined for the Enterprise Server.
Authorizing UsersOnce a user is authenticated, the level of authorization determines what operations can beperformed. A user's authorization is based on his role. For example, a human resourcesapplication may authorize managers to view personal employee information for all employees,but allow employees to view only their own personal information. For more on roles, see“Understanding Users, Groups, Roles, and Realms” on page 104.
Specifying JACC ProvidersJACC (Java Authorization Contract for Containers) is part of the Java EE specification thatdefines an interface for pluggable authorization providers. This enables the administrator to setup third-party plug-in modules to perform authorization.
By default, the Enterprise Server provides a simple, file-based authorization engine thatcomplies with the JACC specification. It is also possible to specify additional third-party JACCproviders.
JACC providers use the Java Authentication and Authorization Service (JAAS) APIs. JAASenables services to authenticate and enforce access controls upon users. It implements a Javatechnology version of the standard Pluggable Authentication Module (PAM) framework.
Auditing Authentication and Authorization DecisionsThe Enterprise Server can provide an audit trail of all authentication and authorizationdecisions through audit modules. The Enterprise Server provides a default audit module, as wellas the ability to customize the audit modules.
About Authentication and Authorization
Chapter 9 • Configuring Security 103

Configuring Message SecurityMessage Security enables a server to perform end-to-end authentication of web serviceinvocations and responses at the message layer. The Enterprise Server implements messagesecurity using message security providers on the SOAP layer. The message security providersprovide information such as the type of authentication that is required for the request andresponse messages. The types of authentication that are supported include the following:
■ Sender authentication, including username-password authentication.■ Content authentication, including XML Digital Signatures.
Two message security providers are included with this release. The message security providerscan be configured for authentication for the SOAP layer. The providers that can be configuredinclude ClientProvider and ServerProvider.
Support for message layer security is integrated into the Enterprise Server and its clientcontainers in the form of (pluggable) authentication modules. By default, message layer securityis disabled on the Enterprise Server.
Message level security can be configured for the entire Enterprise Server or for specificapplications or methods. Configuring message security at the Enterprise Server level isdiscussed in Chapter 10, “Configuring Message Security.” Configuring message security at theapplication level is discussed in the Developer's Guide.
Understanding Users, Groups, Roles, and RealmsThe Enterprise Server enforces its authentication and authorization policies upon the followingentities:
■ “Users” on page 105: An individual identity defined in the Enterprise Server. In general, a useris a person, a software component such as an enterprise bean, or even a service. A user whohas been authenticated is sometimes called a principal. Users are sometimes referred to assubjects.
■ “Groups” on page 105: A set of users defined in the Enterprise Server, classified by commontraits.
■ “Roles” on page 106: A named authorization level defined by an application. A role can becompared to a key that opens a lock. Many people might have a copy of the key. The lockdoesn't care who seeks access, only that the right key is used.
■ “Realms” on page 106: A repository containing user and group information and theirassociated security credentials. A realm is also called a security policy domain.
Understanding Users, Groups, Roles, and Realms
Sun GlassFish Enterprise Server v2.1.1 Administration Guide • October 2009104

Note – Users and groups are designated for the entire Enterprise Server, whereas eachapplication defines its own roles. When the application is being packaged and deployed, theapplication specifies mappings between users/groups and roles, as illustrated in the followingfigure.
UsersA user is an individual (or application program) identity that has been defined in the EnterpriseServer. A user can be associated with a group. The Enterprise Server authentication service cangovern users in multiple realms.
GroupsA Java EE group (or simply group) is a category of users classified by common traits, such as jobtitle or customer profile. For example, users of an e-commerce application might belong to thecustomer group, but the big spenders would belong to the preferred group. Categorizing usersinto groups makes it easier to control the access of large numbers of users.
FIGURE 9–1 Role Mapping
Understanding Users, Groups, Roles, and Realms
Chapter 9 • Configuring Security 105

RolesA role defines which applications and what parts of each application users can access and whatthey can do. In other words, roles determine users' authorization levels.
For example, in a personnel application all employees might have access to phone numbers andemail addresses, but only managers would have access to salary information. The applicationmight define at least two roles: employee and manager; only users in the manager role areallowed to view salary information.
A role is different from a user group in that a role defines a function in an application, while agroup is a set of users who are related in some way. For example, in the personnel applicationthere might be groups such as full-time, part-time, and on-leave, but users in all thesegroups would still be in the employee role.
Roles are defined in application deployment descriptors. In contrast, groups are defined for anentire server and realm. The application developer or deployer maps roles to one or moregroups for each application in its deployment descriptor.
RealmsA realm, also called a security policy domain or security domain, is a scope over which the serverdefines and enforces a common security policy. In practical terms, a realm is a repository wherethe server stores user and group information.
The Enterprise Server comes preconfigured with three realms: file (the initial default realm),certificate, and admin-realm. It is possible to also set up ldap, JDBC, solaris, or customrealms. Applications can specify the realm to use in their deployment descriptor. If they do notspecify a realm, the Enterprise Server uses its default realm.
In the file realm, the server stores user credentials locally in a file named keyfile. You can usethe Admin Console to manage users in the file realm.
In the certificate realm, the server stores user credentials in a certificate database. Whenusing the certificate realm, the server uses certificates with the HTTPS protocol toauthenticate Web clients. For more information about certificates, see “Introduction toCertificates and SSL” on page 108.
The admin-realm is also a FileRealm and stores administrator user credentials locally in a filenamed admin-keyfile. Use the Admin Console to manage users in this realm in the same wayyou manage users in the file realm.
In the ldap realm the server gets user credentials from a Lightweight Directory Access Protocol(LDAP) server such as the Directory Server. LDAP is a protocol for enabling anyone to locateorganizations, individuals, and other resources such as files and devices in a network, whetheron the public Internet or on a corporate intranet. Consult your LDAP server documentation forinformation on managing users and groups in the ldap realm.
Understanding Users, Groups, Roles, and Realms
Sun GlassFish Enterprise Server v2.1.1 Administration Guide • October 2009106
In the JDBC realm, the server gets user credentials from a database. The Enterprise Server usesthe database information and the enabled JDBC realm option in the configuration file. Fordigest authentication, a JDBC realm should be created with jdbcDigestRealm as the JAAScontext.
In the solaris realm the server gets user credentials from the Solaris operating system. Thisrealm is supported on the Solaris 9 OS and later. Consult your Solaris documentation forinformation on managing users and groups in the solaris realm.
A custom realm is any other repository of user credentials, such as a relational database orthird-party component. For more information, see the Admin Console online help.
▼ To Configure a JDBCRealm for a Web, EJB ApplicationThe Enterprise Server enables you to specify a user's credentials in the JDBC realm instead of inthe connection pool. Using the JDBC realm instead of the connection pool prevents otherapplications from browsing the database tables for the user's credentials. A user's credentials arethe user's name and password.
Note – By default, storage of passwords as clear text is not supported in the JDBC realm. Undernormal circumstances, passwords should not be stored as clear text.
Create the database tables in which to store the users' credentials for the realm.How to create the database tables depends on the database that you are using.
Add the users' credentials to the database tables that you created in Step 1.How to add users' credentials to the database tables depends on the database that you are using.
Create a JDBC realm.Use the Admin Console GUI for this purpose. For instructions for creating a JDBC realm, see theonline help for the Admin Console GUI.
Specify the realm that you created in Step 3 as the realm for the application.To specify the realm, modify the appropriate deployment descriptor for your application:
■ For an enterprise application in an Enterprise Archive (EAR) file, modify thesun-application.xml file.
■ For a web application in a Web Application Archive (WAR) file, modify the web.xmlfile.
■ For an enterprise bean in an EJB JAR file, modify the sun-ejb-jar.xml file.
For more information about how to specify a realm, see “How to Set a Realm for an Applicationor Module” in Sun GlassFish Enterprise Server v2.1.1 Developer’s Guide.
1
2
3
4
Understanding Users, Groups, Roles, and Realms
Chapter 9 • Configuring Security 107

Assign a security role to users in the realm.To assign a security role to a user, add a security-role-mapping element to the deploymentdescriptor that you modified in Step 4.
The following example shows a security-role-mapping element that assigns the security roleEmployee to user Calvin.<security-role-mapping>
<role-name>Employee</role-name>
<principal-name>Calvin</principal-name>
</security-role-mapping>
Introduction to Certificates and SSLThe following topics are discussed in this section:
■ “About Digital Certificates” on page 108■ “About Secure Sockets Layer” on page 109
About Digital CertificatesDigital certificates (or simply certificates) are electronic files that uniquely identify people andresources on the Internet. Certificates also enable secure, confidential communication betweentwo entities.
There are different kinds of certificates, such as personal certificates, used by individuals, andserver certificates, used to establish secure sessions between the server and clients throughsecure sockets layer (SSL) technology. For more information on SSL, see “About Secure SocketsLayer” on page 109.
Certificates are based on public key cryptography, which uses pairs of digital keys (very longnumbers) to encrypt, or encode, information so it can be read only by its intended recipient. Therecipient then decrypts (decodes) the information to read it.
A key pair contains a public key and a private key. The owner distributes the public key andmakes it available to anyone. But the owner never distributes the private key; it is always keptsecret. Because the keys are mathematically related, data encrypted with one key can bedecrypted only with the other key in the pair.
A certificate is like a passport: it identifies the holder and provides other important information.Certificates are issued by a trusted third party called a Certification Authority (CA). The CA isanalogous to passport office: it validates the certificate holder's identity and signs the certificateso that it cannot be forged or tampered with. Once a CA has signed a certificate, the holder canpresent it as proof of identity and to establish encrypted, confidential communications.
5
Introduction to Certificates and SSL
Sun GlassFish Enterprise Server v2.1.1 Administration Guide • October 2009108

Most importantly, a certificate binds the owner's public key to the owner's identity. Like apassport binds a photograph to personal information about its holder, a certificate binds apublic key to information about its owner.
In addition to the public key, a certificate typically includes information such as:■ The name of the holder and other identification, such as the URL of the Web server using
the certificate, or an individual's email address.■ The name of the CA that issued the certificate.■ An expiration date.
Digital Certificates are governed by the technical specifications of the X.509 format. To verifythe identity of a user in the certificate realm, the authentication service verifies an X.509certificate, using the common name field of the X.509 certificate as the principal name.
About Certificate ChainsWeb browsers are preconfigured with a set of root CA certificates that the browserautomatically trusts. Any certificates from elsewhere must come with a certificate chain to verifytheir validity. A certificate chain is series of certificates issued by successive CA certificates,eventually ending in a root CA certificate.
When a certificate is first generated, it is a self-signed certificate. A self-signed certificate is onefor which the issuer (signer) is the same as the subject (the entity whose public key is beingauthenticated by the certificate). When the owner sends a certificate signing request (CSR) to aCA, then imports the response, the self-signed certificate is replaced by a chain of certificates. Atthe bottom of the chain is the certificate (reply) issued by the CA authenticating the subject'spublic key. The next certificate in the chain is one that authenticates the CA's public key.Usually, this is a self-signed certificate (that is, a certificate from the CA authenticating its ownpublic key) and the last certificate in the chain.
In other cases, the CA can return a chain of certificates. In this case, the bottom certificate in thechain is the same (a certificate signed by the CA, authenticating the public key of the key entry),but the second certificate in the chain is a certificate signed by a different CA, authenticating thepublic key of the CA to which you sent the CSR. Then, the next certificate in the chain is acertificate authenticating the second CA's key, and so on, until a self-signed root certificate isreached. Each certificate in the chain (after the first) thus authenticates the public key of thesigner of the previous certificate in the chain.
About Secure Sockets LayerSecure Sockets Layer (SSL) is the most popular standard for securing Internet communicationsand transactions. Web applications use HTTPS (HTTP over SSL), which uses digital certificatesto ensure secure, confidential communications between server and clients. In an SSLconnection, both the client and the server encrypt data before sending it, then decrypt it uponreceipt.
Introduction to Certificates and SSL
Chapter 9 • Configuring Security 109
When a Web browser (client) wants to connect to a secure site, an SSL handshake happens:■ The browser sends a message over the network requesting a secure session (typically, by
requesting a URL that begins with https instead of http).■ The server responds by sending its certificate (including its public key).■ The browser verifies that the server's certificate is valid and is signed by a CA whose
certificate is in the browser's database (and who is trusted). It also verifies that the CAcertificate has not expired.
■ If the certificate is valid, the browser generates a one time, unique session key and encrypts itwith the server's public key. The browser then sends the encrypted session key to the serverso that they both have a copy.
■ The server decrypts the message using its private key and recovers the session key.
After the handshake, the client has verified the identity of the Web site, and only the client andthe Web server have a copy of the session key. From this point forward, the client and the serveruse the session key to encrypt all their communications with each other. Thus, theircommunications are ensured to be secure.
The newest version of the SSL standard is called TLS (Transport Layer Security). The EnterpriseServer supports the Secure Sockets Layer (SSL) 3.0 and the Transport Layer Security (TLS) 1.0encryption protocols.
To use SSL, the Enterprise Server must have a certificate for each external interface, or IPaddress, that accepts secure connections. The HTTPS service of most Web servers will not rununless a digital certificate has been installed. Use the procedure described in “Generating aCertificate Using the keytool Utility” on page 114 to set up a digital certificate that your Webserver can use for SSL.
About CiphersA cipher is a cryptographic algorithm used for encryption or decryption. SSL and TLS protocolssupport a variety of ciphers used to authenticate the server and client to each other, transmitcertificates, and establish session keys.
Some ciphers are stronger and more secure than others. Clients and servers can supportdifferent cipher suites. Choose ciphers from the SSL3 and TLS protocols. During a secureconnection, the client and the server agree to use the strongest cipher they both have enabled forcommunication, so it is usually sufficient to enable all ciphers.
Using Name-based Virtual HostsUsing name-based virtual hosts for a secure application can be problematic. This is a designlimitation of the SSL protocol itself. The SSL handshake, where the client browser accepts theserver certificate, must occur before the HTTP request is accessed. As a result, the requestinformation containing the virtual host name cannot be determined prior to authentication,and it is therefore not possible to assign multiple certificates to a single IP address.
Introduction to Certificates and SSL
Sun GlassFish Enterprise Server v2.1.1 Administration Guide • October 2009110

If all virtual hosts on a single IP address need to authenticate against the same certificate, theaddition of multiple virtual hosts probably will not interfere with normal SSL operations on theserver. Be aware, however, that most browsers will compare the server's domain name againstthe domain name listed in the certificate, if any (applicable primarily to official, CA-signedcertificates). If the domain names do not match, these browsers display a warning. In general,only address-based virtual hosts are commonly used with SSL in a production environment.
About FirewallsA firewall controls the flow of data between two or more networks, and manages the linksbetween the networks. A firewall can consist of both hardware and software elements. Thissection describes some common firewall architectures and their configuration. The informationhere pertains primarily to the Enterprise Server. For details about a specific firewall technology,refer to the documentation from your firewall vendor.
In general, configure the firewalls so that clients can access the necessary TCP/IP ports. Forexample, if the HTTP listener is operating on port 8080, configure the firewall to allow HTTPrequests on port 8080 only. Likewise, if HTTPS requests are setup for port 8181, you mustconfigure the firewalls to allow HTTPS requests on port 8181.
If direct Remote Method Invocations over Internet Inter-ORB Protocol (RMI-IIOP) accessfrom the Internet to EJB modules are required, open the RMI-IIOP listener port as well, but thisis strongly discouraged because it creates security risks.
In double firewall architecture, you must configure the outer firewall to allow for HTTP andHTTPS transactions. You must configure the inner firewall to allow the HTTP server plug-in tocommunicate with the Enterprise Server behind the firewall.
About Certificate FilesInstallation of the Enterprise Server generates a digital certificate in JSSE (Java Secure SocketExtension) or NSS (Network Security Services) format suitable for internal testing. By default,the Enterprise Server stores its certificate information in a certificate database in thedomain-dir/config directory:■ Keystore file, key3.db, contains the Enterprise Server's certificate, including its private key.
The keystore file is protected with a password. Change the password using the asadminchange-master-password command.Each keystore entry has a unique alias. After installation, the Enterprise Server keystore hasa single entry with alias s1as.
■ Truststore file, cert8.db, contains the Enterprise Server's trusted certificates, includingpublic keys for other entities. For a trusted certificate, the server has confirmed that thepublic key in the certificate belongs to the certificate's owner. Trusted certificates generallyinclude those of certification authorities (CAs).
About Certificate Files
Chapter 9 • Configuring Security 111

In the Developer Profile, on the server side, the Enterprise Server uses the JSSE format,which uses keytool to manage certificates and key stores. In the Clusters and EnterpriseProfile, on the server side, the Enterprise Server uses NSS, which uses certutil to managethe NSS database which stores private keys and certificates. In both profiles, the client side(appclient or stand-alone), uses the JSSE format.By default, the Enterprise Server is configured with a keystore and truststore that will workwith the example applications and for development purposes. For production purposes, youmay wish to change the certificate alias, add other certificates to the truststore, or change thename and/or location of the keystore and truststore files.
Changing the Location of Certificate FilesThe keystore and truststore files provided for development are stored in the domain-dir/configdirectory.
Use the Admin Console to add or modify the value field for the new location of the certificatefiles.
-Dcom.sun.appserv.nss.db=${com.sun.aas.instanceRoot}/NSS-database-directory
where NSS-database-directory is the location of the NSS database.
Using Java Secure Socket Extension (JSSE) ToolsUse keytool to set up and work with JSSE (Java Secure Socket Extension) digital certificates. Inthe Developer Profile, the Enterprise Server uses the JSSE format on the server side to managecertificates and key stores. In all the profiles, the client side (appclient or stand-alone) uses theJSSE format.
The J2SE SDK ships with keytool, which enables the administrator to administerpublic/private key pairs and associated certificates. It also enables users to cache the public keys(in the form of certificates) of their communicating peers.
To run keytool, the shell environment must be configured so that the J2SE /bin directory is inthe path, or the full path to the tool must be present on the command line. For moreinformation on keytool, see the keytool documentation at http://java.sun.com/j2se/1.5.0/docs/tooldocs/solaris/keytool.html.
Using the keytool UtilityThe following examples demonstrate usage related to certificate handling using JSSE tools:
Using Java Secure Socket Extension (JSSE) Tools
Sun GlassFish Enterprise Server v2.1.1 Administration Guide • October 2009112
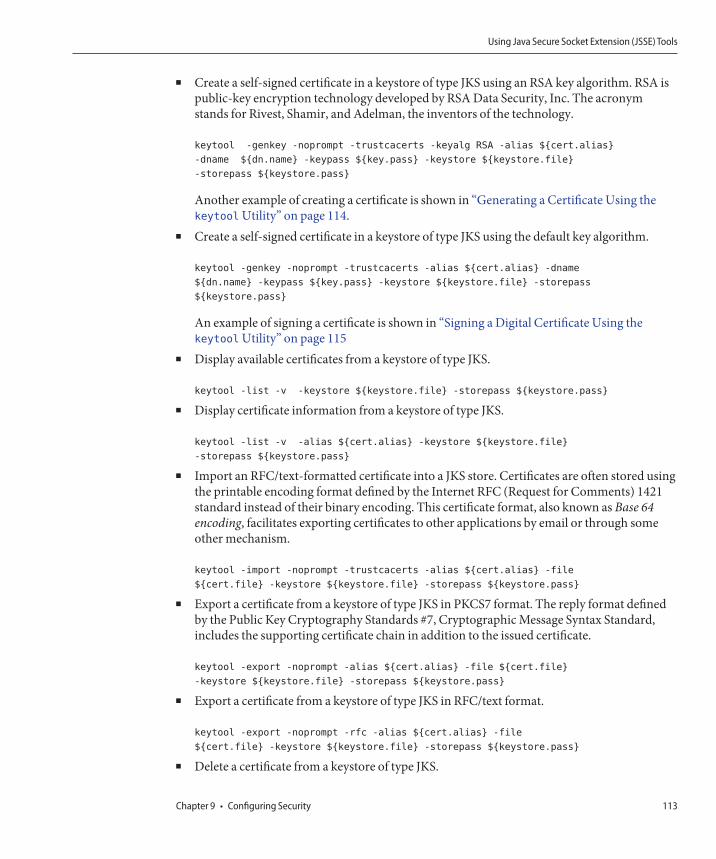
■ Create a self-signed certificate in a keystore of type JKS using an RSA key algorithm. RSA ispublic-key encryption technology developed by RSA Data Security, Inc. The acronymstands for Rivest, Shamir, and Adelman, the inventors of the technology.
keytool -genkey -noprompt -trustcacerts -keyalg RSA -alias ${cert.alias}
-dname ${dn.name} -keypass ${key.pass} -keystore ${keystore.file}
-storepass ${keystore.pass}
Another example of creating a certificate is shown in “Generating a Certificate Using thekeytool Utility” on page 114.
■ Create a self-signed certificate in a keystore of type JKS using the default key algorithm.
keytool -genkey -noprompt -trustcacerts -alias ${cert.alias} -dname
${dn.name} -keypass ${key.pass} -keystore ${keystore.file} -storepass
${keystore.pass}
An example of signing a certificate is shown in “Signing a Digital Certificate Using thekeytool Utility” on page 115
■ Display available certificates from a keystore of type JKS.
keytool -list -v -keystore ${keystore.file} -storepass ${keystore.pass}
■ Display certificate information from a keystore of type JKS.
keytool -list -v -alias ${cert.alias} -keystore ${keystore.file}
-storepass ${keystore.pass}
■ Import an RFC/text-formatted certificate into a JKS store. Certificates are often stored usingthe printable encoding format defined by the Internet RFC (Request for Comments) 1421standard instead of their binary encoding. This certificate format, also known as Base 64encoding, facilitates exporting certificates to other applications by email or through someother mechanism.
keytool -import -noprompt -trustcacerts -alias ${cert.alias} -file
${cert.file} -keystore ${keystore.file} -storepass ${keystore.pass}
■ Export a certificate from a keystore of type JKS in PKCS7 format. The reply format definedby the Public Key Cryptography Standards #7, Cryptographic Message Syntax Standard,includes the supporting certificate chain in addition to the issued certificate.
keytool -export -noprompt -alias ${cert.alias} -file ${cert.file}
-keystore ${keystore.file} -storepass ${keystore.pass}
■ Export a certificate from a keystore of type JKS in RFC/text format.
keytool -export -noprompt -rfc -alias ${cert.alias} -file
${cert.file} -keystore ${keystore.file} -storepass ${keystore.pass}
■ Delete a certificate from a keystore of type JKS.
Using Java Secure Socket Extension (JSSE) Tools
Chapter 9 • Configuring Security 113
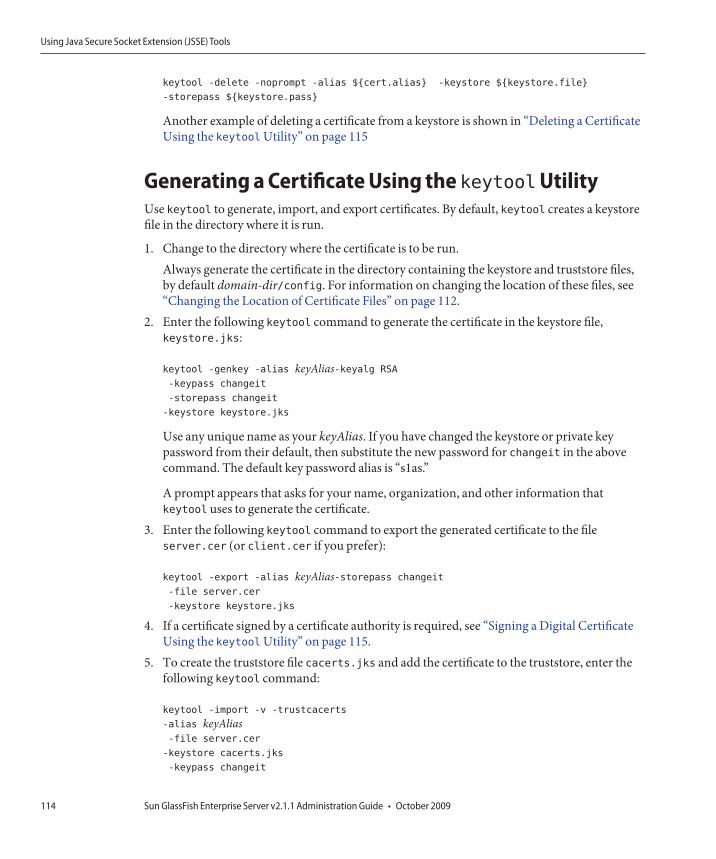
keytool -delete -noprompt -alias ${cert.alias} -keystore ${keystore.file}
-storepass ${keystore.pass}
Another example of deleting a certificate from a keystore is shown in “Deleting a CertificateUsing the keytool Utility” on page 115
Generating a Certificate Using the keytoolUtilityUse keytool to generate, import, and export certificates. By default, keytool creates a keystorefile in the directory where it is run.
1. Change to the directory where the certificate is to be run.Always generate the certificate in the directory containing the keystore and truststore files,by default domain-dir/config. For information on changing the location of these files, see“Changing the Location of Certificate Files” on page 112.
2. Enter the following keytool command to generate the certificate in the keystore file,keystore.jks:
keytool -genkey -alias keyAlias-keyalg RSA
-keypass changeit
-storepass changeit
-keystore keystore.jks
Use any unique name as your keyAlias. If you have changed the keystore or private keypassword from their default, then substitute the new password for changeit in the abovecommand. The default key password alias is “s1as.”
A prompt appears that asks for your name, organization, and other information thatkeytool uses to generate the certificate.
3. Enter the following keytool command to export the generated certificate to the fileserver.cer (or client.cer if you prefer):
keytool -export -alias keyAlias-storepass changeit
-file server.cer
-keystore keystore.jks
4. If a certificate signed by a certificate authority is required, see “Signing a Digital CertificateUsing the keytool Utility” on page 115.
5. To create the truststore file cacerts.jks and add the certificate to the truststore, enter thefollowing keytool command:
keytool -import -v -trustcacerts
-alias keyAlias-file server.cer
-keystore cacerts.jks
-keypass changeit
Using Java Secure Socket Extension (JSSE) Tools
Sun GlassFish Enterprise Server v2.1.1 Administration Guide • October 2009114

6. If you have changed the keystore or private key password from their default, then substitutethe new password for changeit in the above command.The tool displays information about the certificate and prompts whether you want to trustthe certificate.
7. Type yes, then press Enter.Then keytool displays something like this:
Certificate was added to keystore
[Saving cacerts.jks]
8. Restart the Enterprise Server.
Signing a Digital Certificate Using the keytoolUtilityAfter creating a digital certificate, the owner must sign it to prevent forgery. E-commerce sites,or those for which authentication of identity is important can purchase a certificate from awell-known Certificate Authority (CA). If authentication is not a concern, for example if privatesecure communications is all that is required, save the time and expense involved in obtaining aCA certificate and use a self-signed certificate.
1. Follow the instructions on the CA's Web site for generating certificate key pairs.2. Download the generated certificate key pair.
Save the certificate in the directory containing the keystore and truststore files, by defaultdomain-dir/config directory. See “Changing the Location of Certificate Files” on page 112.
3. In your shell, change to the directory containing the certificate.4. Use keytool to import the certificate into the local keystore and, if necessary, the local
truststore.
keytool -import -v -trustcacerts
-alias keyAlias-file server.cer
-keystore cacerts.jks
-keypass changeit
-storepass changeit
If the keystore or private key password is not the default password, then substitute the newpassword for changeit in the above command.
5. Restart the Enterprise Server.
Deleting a Certificate Using the keytoolUtilityTo delete an existing certificate, use the keytool -delete command, for example:
Using Java Secure Socket Extension (JSSE) Tools
Chapter 9 • Configuring Security 115

keytool -delete
-alias keyAlias-keystore keystore-name-storepass password
Using Network Security Services (NSS) ToolsIn the Clusters and Enterprise Profile, use Network Security Services (NSS) digital certificateson the server-side to manage the database that stores private keys and certificates. For the clientside (appclient or stand-alone), use the JSSE format as discussed in “Using Java Secure SocketExtension (JSSE) Tools” on page 112.
The tools for managing security with Network Security Services (NSS) include the following:
■ certutil, a command-line utility for managing certificates and key databases. Someexamples using the certutil utility are shown in “Using the certutil Utility” on page 117.
■ pk12util, a command-line utility used to import and export keys and certificates betweenthe certificate/key databases and files in PKCS12 format. Some examples using the pk12utilutility are shown in “Importing and Exporting Certificates Using the pk12util Utility” onpage 118.
■ modutil, a command-line utility for managing PKCS #11 module information withinsecmod.db files or within hardware tokens. Some examples using the modutil utility areshown in “Adding and Deleting PKCS11 Modules using modutil” on page 119.
The tools are located in the as-install/lib/ directory. The following environment variables areused to point to the location of the NSS security tools:
■ LD_LIBRARY_PATH =${as-install}/lib■ ${os.nss.path}
In the examples, the certificate common name (CN) is the name of the client or server. The CNis also used during SSL handshake for comparing the certificate name and the host name fromwhich it originates. If the certificate name and the host name do not match, warnings orexceptions are generated during SSL handshake. In some examples, the certificate commonname CN=localhost is used for convenience so that all users can use that certificate instead ofcreating a new one with their real host name.
The examples in the following sections demonstrate usage related to certificate handling usingNSS tools:
■ “Using the certutil Utility” on page 117■ “Importing and Exporting Certificates Using the pk12util Utility” on page 118■ “Adding and Deleting PKCS11 Modules using modutil” on page 119
Using Network Security Services (NSS) Tools
Sun GlassFish Enterprise Server v2.1.1 Administration Guide • October 2009116
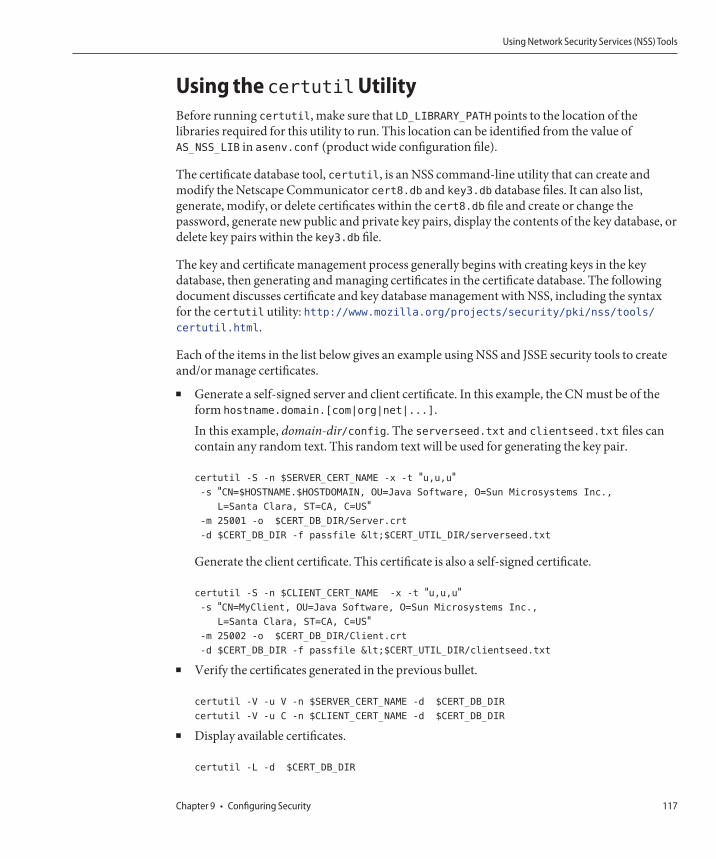
Using the certutilUtilityBefore running certutil, make sure that LD_LIBRARY_PATH points to the location of thelibraries required for this utility to run. This location can be identified from the value ofAS_NSS_LIB in asenv.conf (product wide configuration file).
The certificate database tool, certutil, is an NSS command-line utility that can create andmodify the Netscape Communicator cert8.db and key3.db database files. It can also list,generate, modify, or delete certificates within the cert8.db file and create or change thepassword, generate new public and private key pairs, display the contents of the key database, ordelete key pairs within the key3.db file.
The key and certificate management process generally begins with creating keys in the keydatabase, then generating and managing certificates in the certificate database. The followingdocument discusses certificate and key database management with NSS, including the syntaxfor the certutil utility: http://www.mozilla.org/projects/security/pki/nss/tools/certutil.html.
Each of the items in the list below gives an example using NSS and JSSE security tools to createand/or manage certificates.■ Generate a self-signed server and client certificate. In this example, the CN must be of the
form hostname.domain.[com|org|net|...].In this example, domain-dir/config. The serverseed.txt and clientseed.txt files cancontain any random text. This random text will be used for generating the key pair.
certutil -S -n $SERVER_CERT_NAME -x -t "u,u,u"-s "CN=$HOSTNAME.$HOSTDOMAIN, OU=Java Software, O=Sun Microsystems Inc.,
L=Santa Clara, ST=CA, C=US"-m 25001 -o $CERT_DB_DIR/Server.crt
-d $CERT_DB_DIR -f passfile <$CERT_UTIL_DIR/serverseed.txt
Generate the client certificate. This certificate is also a self-signed certificate.
certutil -S -n $CLIENT_CERT_NAME -x -t "u,u,u"-s "CN=MyClient, OU=Java Software, O=Sun Microsystems Inc.,
L=Santa Clara, ST=CA, C=US"-m 25002 -o $CERT_DB_DIR/Client.crt
-d $CERT_DB_DIR -f passfile <$CERT_UTIL_DIR/clientseed.txt
■ Verify the certificates generated in the previous bullet.
certutil -V -u V -n $SERVER_CERT_NAME -d $CERT_DB_DIR
certutil -V -u C -n $CLIENT_CERT_NAME -d $CERT_DB_DIR
■ Display available certificates.
certutil -L -d $CERT_DB_DIR
Using Network Security Services (NSS) Tools
Chapter 9 • Configuring Security 117

■ Import an RFC text-formatted certificate into an NSS certificate database.
certutil -A -a -n ${cert.nickname} -t ${cert.trust.options}
-f ${pass.file} -i ${cert.rfc.file}
-d ${admin.domain.dir}/${admin.domain}/config
■ Export a certificate from an NSS certificate database in RFC format.
certutil -L -a -n ${cert.nickname} -f ${pass.file}
-d ${admin.domain.dir}/${admin.domain}/config > cert.rfc
■ Delete a certificate from an NSS certificate database.
certutil -D -n ${cert.nickname} -f ${pass.file}
-d ${admin.domain.dir}/${admin.domain}/config
■ Move a certificate from an NSS database to JKS format
certutil -L -a -n ${cert.nickname}
-d ${admin.domain.dir}/${admin.domain}/config > cert.rfc
keytool -import -noprompt -trustcacerts -keystore ${keystore.file}
-storepass ${keystore.pass} -alias ${cert.alias} -file cert.rfc
Importing and Exporting Certificates Using thepk12utilUtilityThe command-line utility used to import and export keys and certificates between thecertificate/key databases and files in PKCS12 format is pk12util. PKCS12 is Public-KeyCryptography Standards (PKCS) #12, Personal Information Exchange Syntax Standard. Moredescription of the pk12util utility can be read at http://www.mozilla.org/projects/security/pki/nss/tools/pk12util.html.■ Import a PKCS12-formatted certificate into an NSS certificate database.
pk12util -i ${cert.pkcs12.file} -k ${certdb.pass.file}
-w ${cert.pass.file} -d ${admin.domain.dir}/${admin.domain}/config
■ Import a PKCS12-formatted certificate into an NSS certificate database token module.
pk12util -i ${cert.pkcs12.file} -h ${token.name} -k ${certdb.pass.file}
-w ${cert.pass.file} -d ${admin.domain.dir}/${admin.domain}/config
■ Export a certificate from an NSS certificate database in PKCS12 format.
pk12util -o -n ${cert.nickname} -k ${pass.file} -w${cert.pass.file}
-d ${admin.domain.dir}/${admin.domain}/config
■ Export a certificate from an NSS certificate database token module in PKCS12 format(useful for hardware accelerator configuration).
Using Network Security Services (NSS) Tools
Sun GlassFish Enterprise Server v2.1.1 Administration Guide • October 2009118

pk12util -o -n ${cert.nickname} -h ${token.name} -k ${pass.file}
-w ${cert.pass.file} -d ${admin.domain.dir}/${admin.domain}/config
■ Convert a PKCS12 certificate into JKS format (requires a Java source):
<target name="convert-pkcs12-to-jks" depends="init-common"><delete file="${jks.file}" failonerror="false"/><java classname="com.sun.enterprise.security.KeyTool">
<arg line="-pkcs12"/><arg line="-pkcsFile ${pkcs12.file}"/><arg line="-pkcsKeyStorePass ${pkcs12.pass}"/><arg line="-pkcsKeyPass ${pkcs12.pass}"/><arg line="-jksFile ${jks.file}"/><arg line="-jksKeyStorePass ${jks.pass}"/><classpath>
<pathelement path="${s1as.classpath}"/><pathelement path="${env.JAVA_HOME}/jre/lib/jsse.jar"/>
</classpath>
</java>
</target>
Adding and Deleting PKCS11 Modules using modutil
The Security Module Database Tool, modutil, is a command-line utility for managing PKCS #11(Cryptographic Token Interface Standard) module information within secmod.db files orwithin hardware tokens. You can use the tool to add and delete PKCS #11 modules, changepasswords, set defaults, list module contents, enable or disable slots, enable or disableFIPS-140-1 compliance, and assign default providers for cryptographic operations. This toolcan also create key3.db, cert7.db, and secmod.db security database files. For moreinformation on this tool, see http://www.mozilla.org/projects/security/pki/nss/tools/modutil.html.
■ Add a new PKCS11 module or token.
modutil -add ${token.module.name} -nocertdb -force -mechanisms RSA:DSA:RC4:DES
-libfile ${SCA.lib.path} -dbdir ${admin.domain.dir}/${admin.domain}/config
■ Delete a PKCS11 module from an NSS store.
modutil -delete ${token.module.name} -nocertdb -force -mechanisms RSA:DSA:RC4:DES
-libfile ${SCA.lib.path} -dbdir ${admin.domain.dir}/${admin.domain}/config
■ List available token modules in an NSS store.
modutil -list -dbdir ${admin.domain.dir}/${admin.domain}/config
Using Network Security Services (NSS) Tools
Chapter 9 • Configuring Security 119

Using Hardware Crypto Accelerator With Enterprise ServerYou can use hardware accelerator tokens to improve the cryptographic performance and tofurnish a secure key storage facility. Additionally, you can provide end users with mobile securekey storage through smart cards.
Sun Java System Application Server supports the use of PKCS#11 tokens for SSL or TLScommunications and Network Security Services (NSS) tools for managing keys and PKCS#11tokens. This section describes how Enterprise Server provides that support and walks youthrough the procedures for the related configurations.
J2SE 5.0 PKCS#11 providers can be easily integrated with the Enterprise Server runtime.Through these providers, you can use hardware accelerators and other PKCS#11 tokens inEnterprise Server to achieve fast performance and to protect the private key inherent in SSL orTLS communications.
This section contains the following topics:
■ “About Configuring Hardware Crypto Accelerators” on page 120■ “Configuring PKCS#11 Tokens” on page 121■ “Managing Keys And Certificates” on page 123■ “Configuring J2SE 5.0 PKCS#11 Providers” on page 125
About Configuring Hardware Crypto AcceleratorsSun GlassFish Enterprise Server has been tested with Sun Crypto Accelerator 1000 (SCA-1000)and SCA-4000.
Enterprise Server can communicate with PKCS#11 tokens. Packaged with Enterprise Server arean NSS PKCS#11 token library (for the NSS Internal PKCS#11 Module, commonly known asthe NSS soft token) and NSS command-line management tools. For more details, see “UsingNetwork Security Services (NSS) Tools” on page 116.
Use the NSS tools to create keys and certificates on PKCS#11 tokens and J2SE PKCS#11providers to access token keys and certificates at runtime. A PKCS#11 provider is acryptographic service provider that acts as a wrapper around a native PKCS#11 library. APKCS#11 token generally refers to all the hardware and software tokens with a native PKCS#11interface. A hardware token is a PKCS#11 token implemented in physical devices, such ashardware accelerators and smart cards. A software token is a PKCS#11 token implementedentirely in software.
Note – If you run Enterprise Server on the J2SE 1.4.x platform, only one PKCS#11 token, the NSSsoft token, is supported.
Using Hardware Crypto Accelerator With Enterprise Server
Sun GlassFish Enterprise Server v2.1.1 Administration Guide • October 2009120
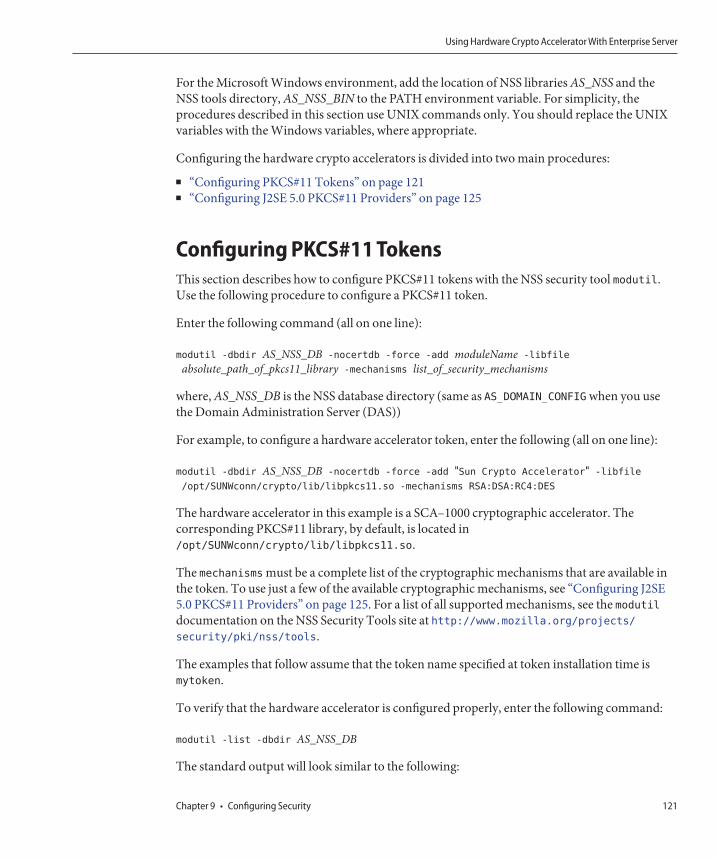
For the Microsoft Windows environment, add the location of NSS libraries AS_NSS and theNSS tools directory, AS_NSS_BIN to the PATH environment variable. For simplicity, theprocedures described in this section use UNIX commands only. You should replace the UNIXvariables with the Windows variables, where appropriate.
Configuring the hardware crypto accelerators is divided into two main procedures:
■ “Configuring PKCS#11 Tokens” on page 121■ “Configuring J2SE 5.0 PKCS#11 Providers” on page 125
Configuring PKCS#11 TokensThis section describes how to configure PKCS#11 tokens with the NSS security tool modutil.Use the following procedure to configure a PKCS#11 token.
Enter the following command (all on one line):
modutil -dbdir AS_NSS_DB -nocertdb -force -add moduleName -libfile
absolute_path_of_pkcs11_library -mechanisms list_of_security_mechanisms
where, AS_NSS_DB is the NSS database directory (same as AS_DOMAIN_CONFIG when you usethe Domain Administration Server (DAS))
For example, to configure a hardware accelerator token, enter the following (all on one line):
modutil -dbdir AS_NSS_DB -nocertdb -force -add "Sun Crypto Accelerator" -libfile
/opt/SUNWconn/crypto/lib/libpkcs11.so -mechanisms RSA:DSA:RC4:DES
The hardware accelerator in this example is a SCA–1000 cryptographic accelerator. Thecorresponding PKCS#11 library, by default, is located in/opt/SUNWconn/crypto/lib/libpkcs11.so.
The mechanisms must be a complete list of the cryptographic mechanisms that are available inthe token. To use just a few of the available cryptographic mechanisms, see “Configuring J2SE5.0 PKCS#11 Providers” on page 125. For a list of all supported mechanisms, see the modutildocumentation on the NSS Security Tools site at http://www.mozilla.org/projects/security/pki/nss/tools.
The examples that follow assume that the token name specified at token installation time ismytoken.
To verify that the hardware accelerator is configured properly, enter the following command:
modutil -list -dbdir AS_NSS_DB
The standard output will look similar to the following:
Using Hardware Crypto Accelerator With Enterprise Server
Chapter 9 • Configuring Security 121

Using database directory /var/opt/SUNWappserver/domains/domain1/config ...
Listing of PKCS#11 Modules
-----------------------------------------------------------
1. NSS Internal PKCS#11 Module
slots: 2 slots attached
status: loaded
slot: NSS Internal Cryptographic Services
token: NSS Generic Crypto Services
slot: NSS User Private Key and Certificate Services
token: NSS Certificate DB
2. Sun Crypto Accelerator
library name: /opt/SUNWconn/crypto/lib/libpkcs11.so
slots: 1 slot attached
status: loaded
slot: Sun Crypto Accelerator:mytoken
token: mytoken
-----------------------------------------------------------
Passing Additional Passwords for a PKCS#11 CryptoDeviceFor standard parameters, you can create a password alias in the password file. For example, youcan create a password alias for the admin password as follows:
AS_ADMIN_PASSWORD=${ALIAS=adminpassword}
To pass in additional (non-standard) passwords, you need to create an entry in the passwordfile and use the create-password-alias command for that entry.
For a PKCS#11 crypto-device that works with GlassFish, add an entry, as follows, to theGlassFish password file.
AS_ADMIN_<tokenname>=<password>
Then create a password alias. For example, if you are using the Sun Metaslot device withGlassFish, the asadmin start-domain command would prompt for password as follows:
asadmin start-domain Starting Domain domain1, please wait.
Default Log location is /opt/glassfish/domains/domain1/logs/server.log.
Please enter password for NSS slot Sun Metaslot>
Using Hardware Crypto Accelerator With Enterprise Server
Sun GlassFish Enterprise Server v2.1.1 Administration Guide • October 2009122

To pass this non-standard password as an additional password, do the following:
1. Add an entry to the GlassFish password file (specified by the --passwordfile option) asfollows:
AS_ADMIN_Sun\Metaslot=sunmetaslotpassword
2. Create the password alias as follows:
asadmin> create-password-alias --user admin --passwordfile mypwdfile abc123
3. Replace the password in the GlassFish password file with the alias password as follows:
AS_ADMIN_Sun\Metaslot=${ALIAS=abc123}
Managing Keys And CertificatesThis section describes a few common procedures for creating and managing keys andcertificates using certutil and pk12util. For details on certutil and pk12util, see “UsingNetwork Security Services (NSS) Tools” on page 116 and documentation on the NSS SecurityTools site at http://www.mozilla.org/projects/security/pki/nss/tools.
Note – By configuring a PKCS#11 provider in the java.security properties file (located in theJAVA_HOME/jre/lib/security directory of the Java runtime), you can also use the J2SEkeytool utility to manage keys and certificates. For details on using keytool, and Java PKCS#11Reference Guide at http://java.sun.com/j2se/1.5.0/docs/guide/security/p11guide.html.
This section describes the following topics:
■ “Listing Keys and Certificates ” on page 123■ “Working With Private Keys and Certificates” on page 124
Listing Keys and Certificates■ To list the keys and certificates in the configured PKCS#11 tokens, run the following
command:
certutil -L -d AS_NSS_DB [-h tokenname]
For example, to list the contents of the default NSS soft token, type:
certutil -L -d AS_NSS_DB
The standard output will be similar to the following:
Using Hardware Crypto Accelerator With Enterprise Server
Chapter 9 • Configuring Security 123

verisignc1g1 T,c,c
verisignc1g2 T,c,c
verisignc1g3 T,c,c
verisignc2g3 T,c,c
verisignsecureserver T,c,c
verisignc2g1 T,c,c
verisignc2g2 T,c,c
verisignc3g1 T,c,c
verisignc3g2 T,c,c
verisignc3g3 T,c,c
s1as u,u,u
The output displays the name of the token in the left column and a set of three trustattributes in the right column. For Enterprise Server certificates, it is usually T,c,c. Unlikethe J2SE java.security.KeyStore API, which contains only one level of trust, the NSStechnology contains several levels of trust. Enterprise Server is primarily interested in thefirst trust attribute, which describes how this token uses SSL. For this attribute:
T indicates that the Certificate Authority (CA) is trusted for issuing client certificates.u indicates that you can use the certificates (and keys) for authentication or signing.The attribute combination of u,u,u indicates that a private key exists in the database.
■ To list the contents of the hardware token, mytoken, run the following command:
certutil -L -d AS_NSS_DB -h mytoken
You will be prompted for the password for the hardware token. The standard output issimilar to the following:
Enter Password or Pin for "mytoken":mytoken:Server-Cert 	u,u,u
Working With Private Keys and CertificatesUse certutil to create self-signed certificates and to import or export certificates. To import orexport private keys, use the pk12util utility. For more details, see “Using Network SecurityServices (NSS) Tools” on page 116
Caution – In Enterprise Server, do not modify the NSS password directly with the NSS toolscertutil and modutil. If you do so, security data in Enterprise Server might be corrupted.
Using Hardware Crypto Accelerator With Enterprise Server
Sun GlassFish Enterprise Server v2.1.1 Administration Guide • October 2009124

Configuring J2SE 5.0 PKCS#11 ProvidersEnterprise Server relies on J2SE PKCS#11 providers to access keys and certificates that arelocated in PKCS#11 tokens at runtime. By default, Enterprise Server configures a J2SE PKCS#11provider for the NSS soft token. This section describes how to override the defaultconfiguration for the J2SE PKCS#11 provider.
In Enterprise Server, the following default PKCS#11 configuration parameters are generated foreach PKCS#11 token.■ Configuration for the default NSS soft token:
name=internal
library=${com.sun.enterprise.nss.softokenLib}
nssArgs="configdir=’${com.sun.appserv.nss.db}’certPrefix=’’ keyPrefix=’’ secmod=’secmod.db’"slot=2
omitInitialize = true
■ Configuration for the SCA 1000 hardware accelerator:
name=HW1000
library=/opt/SUNWconn/crypto/lib/libpkcs11.so
slotListIndex=0
omitInitialize=true
These configurations conform to the syntax described in the Java PKCS#11 Reference Guide.
Note – The name parameter has no requirements other than that it must be unique. Certainolder versions of J2SE 5.0 support alphanumeric characters only.
You can override the default configuration parameters by creating a custom configuration file.For example, you can explicitly disable the RSA Cipher and RSA Key Pair Generator inSCA–1000. For details on disabling the RSA Cipher and RSA Key Pair Generator, seehttp://www.mozilla.org/projects/security/pki/nss/tools.
To create a custom configuration file:
1. Create a configuration file called as-install/mypkcs11.cfg with the following code and savethe file.
name=HW1000
library=/opt/SUNWconn/crypto/lib/libpkcs11.so
slotListIndex=0
disabledMechanisms = {
	CKM_RSA_PKCS
	CKM_RSA_PKCS_KEY_PAIR_GEN
Using Hardware Crypto Accelerator With Enterprise Server
Chapter 9 • Configuring Security 125

}
omitInitialize=true
2. Update the NSS database, if necessary. In this case, update the NSS database so that it willdisable RSA.Run the following command :
modutil -undefault "Sun Crypto Accelerator" -dbdir AS_NSS_DB -mechanisms RSA
The name of the algorithm on the mechanisms list differs from the one in the defaultconfiguration. For a list of valid mechanisms in NSS, see the modutil documentation on theNSS Security Tools site at http://www.mozilla.org/projects/security/pki/nss/tools.
3. Update the server with this change by adding a property in the appropriate location, asfollows:
<property name="mytoken" value="&InstallDir;/mypkcs11.cfg"/>
The location for the property could be one of the following:■ If the provider is for a DAS or server instance, add the property under the associated
<security-service>.■ If the provider is for a node agent, add the property under the associated
<node-agent> element in the domain.xml file.4. Restart the Enterprise Server.
The customized configurations will be in effect after the restart.
Using Hardware Crypto Accelerator With Enterprise Server
Sun GlassFish Enterprise Server v2.1.1 Administration Guide • October 2009126
Configuring Message Security
Some of the material in this chapter assumes a basic understanding of security and web servicesconcepts. This chapter describes the configuration of message layer security for web services inthe Enterprise Server. This chapter contains the following topics:
■ “Overview of Message Security” on page 127■ “Understanding Message Security in the Enterprise Server” on page 128■ “Securing a Web Service” on page 132■ “Securing the Sample Application” on page 133■ “Configuring the Enterprise Server for Message Security” on page 133■ “Message Security Setup” on page 137
Overview of Message SecurityIn message security, security information is inserted into messages so that it travels through thenetworking layers and arrives with the message at the message destination(s). Message securitydiffers from transport layer security (which is discussed in the Security chapter of the Java EE5.0 Tutorial) in that message security can be used to decouple message protection from messagetransport so that messages remain protected after transmission.
Web Services Security: SOAP Message Security (WS-Security) is an international standard forinteroperable Web Services Security that was developed in OASIS by a collaboration of all themajor providers of web services technology (including Sun Microsystems). WS-Security is amessage security mechanism that uses XML Encryption and XML Digital Signature to secureweb services messages sent over SOAP. The WS-Security specification defines the use of varioussecurity tokens including X.509 certificates, SAML assertions, and username/password tokensto authenticate and encrypt SOAP web services messages.
The WS-Security specification can be viewed at http://docs.oasis-open.org/wss/2004/01/oasis-200401-wss-soap-message-security-1.0.pdf.
10C H A P T E R 1 0
127

Understanding Message Security in the Enterprise ServerThe Enterprise Server offers integrated support for the WS-Security standard in its web servicesclient and server-side containers. This functionality is integrated such that web services securityis enforced by the containers of the Enterprise Server on behalf of applications, and such that itcan be applied to protect any web service application without requiring changes to theimplementation of the application. The Enterprise Server achieves this effect by providingfacilities to bind SOAP layer message security providers and message protection policies tocontainers and to applications deployed in containers.
Assigning Message Security ResponsibilitiesIn the Enterprise Server, the “System Administrator” on page 128 and “Application Deployer”on page 129 roles are expected to take primary responsibility for configuring message security.In some situations, the “Application Developer” on page 129 may also contribute, although inthe typical case either of the other roles may secure an existing application without changing itsimplementation without involving the developer. The responsibilities of the various roles aredefined in the following sections:
■ “System Administrator” on page 128■ “Application Deployer” on page 129■ “Application Developer” on page 129
System AdministratorThe system administrator is responsible for:
■ Configuring message security providers on the Enterprise Server.■ Managing user databases.■ Managing keystore and truststore files.■ Configuring a Java Cryptography Extension (JCE) provider if using encryption and running
a version of the Java SDK prior to version 1.5.0.■ Installing the samples server. This is only done if the xms sample application will be used to
demonstrate the use of message layer web services security.
A system administrator uses the Admin Console to manage server security settings and uses acommand line tool to manage certificate databases. In Platform Edition, certificates and privatekeys are stored in key stores and are managed with keytool. Standard Edition and EnterpriseEdition store certificates and private keys in an NSS database, where they are managed usingcertutil. This document is intended primarily for system administrators. For an overview ofmessage security tasks, see “Configuring the Enterprise Server for Message Security” onpage 133.
Understanding Message Security in the Enterprise Server
Sun GlassFish Enterprise Server v2.1.1 Administration Guide • October 2009128

Application DeployerThe application deployer is responsible for:
■ Specifying (at application assembly) any required application-specific message protectionpolicies if such policies have not already been specified by upstream roles (the developer orassembler).
■ Modifying Sun-specific deployment descriptors to specify application-specific messageprotection policies information (message-security-binding elements) to web serviceendpoint and service references.
Application DeveloperThe application developer can turn on message security, but is not responsible for doing so.Message security can be set up by the System Administrator so that all web services are secured,or by the Application Deployer when the provider or protection policy bound to the applicationmust be different from that bound to the container.
The application developer or assembler is responsible for the following:
■ Determining if an application-specific message protection policy is required by theapplication. If so, ensuring that the required policy is specified at application assemblywhich may be accomplished by communicating with the Application Deployer.
About Security Tokens and Security MechanismsThe WS-Security specification provides an extensible mechanism for using security tokens toauthenticate and encrypt SOAP web services messages. The SOAP layer message securityproviders installed with the Enterprise Server may be used to employ username/password andX.509 certificate security tokens to authenticate and encrypt SOAP web services messages.Additional providers that employ other security tokens including SAML assertions will beinstalled with subsequent releases of the Enterprise Server.
About Username TokensThe Enterprise Server uses Username tokens in SOAP messages to establish the authenticationidentity of the message sender. The recipient of a message containing a Username token (withinembedded password) validates that the message sender is authorized to act as the user(identified in the token) by confirming that the sender knows the secret (the password) of theuser.
When using a Username token, a valid user database must be configured on the EnterpriseServer
Understanding Message Security in the Enterprise Server
Chapter 10 • Configuring Message Security 129

About Digital SignaturesThe Enterprise Server uses XML Digital signatures to bind an authentication identity tomessage content. Clients use digital signatures to establish their caller identity, analogous to theway basic authentication or SSL client certificate authentication have been used to do the samething when transport layer security is being used. Digital signatures are verified by the messagereceiver to authenticate the source of the message content (which may be different from thesender of the message.)
When using digital signatures, valid keystore and truststore files must be configured on theEnterprise Server. For more information on this topic, read “About Certificate Files” onpage 111.
About EncryptionThe purpose of encryption is to modify the data such that it can only be understood by itsintended audience. This is accomplished by substituting an encrypted element for the originalcontent. When predicated on public key cryptography, encryption can be used to establish theidentity of the parties that can read a message.
When using Encryption, you must have an installed JCE provider that supports encryption. Formore information on this topic, read “Configuring a JCE Provider” on page 135.
About Message Protection PoliciesMessage protection policies are defined for request message processing and response messageprocessing and are expressed in terms of requirements for source and/or recipientauthentication. A source authentication policy represents a requirement that the identity of theentity that sent a message or that defined the content of a message be established in the messagesuch that it can be authenticated by the message receiver. A recipient authentication policyrepresents a requirement that the message be sent such that the identity of the entities that canreceive the message can be established by the message sender. The providers apply specificmessage security mechanisms to cause the message protection policies to be realized in thecontext of SOAP web services messages.Request and response message protection policies aredefined when a provider is configured into a container. Application-specific message protectionpolicies (at the granularity of the web service port or operation) may also be configured withinthe Sun-specific deployment descriptors of the application or application client. In any case,where message protection policies are defined, the request and response message protectionpolicies of the client must match (be equivalent to) the request and response message protectionpolicies of the server. For more information on defining application-specific messageprotection policies, refer to the Securing Applications chapter of the Developers Guide.
Understanding Message Security in the Enterprise Server
Sun GlassFish Enterprise Server v2.1.1 Administration Guide • October 2009130
Glossary of Message Security TerminologyThe terminology used in this document is described below. The concepts are also discussed in“Configuring the Enterprise Server for Message Security” on page 133.
■ Authentication LayerThe authentication layer is the message layer on which authentication processing must beperformed. The Enterprise Server enforces web services message security at the SOAP layer.
■ Authentication ProviderIn this release of the Enterprise Server, the Enterprise Server invokes authenticationproviders to process SOAP message layer security.■ A client-side provider establishes (by signature or username/password) the source
identity of request messages and/or protects (by encryption) request messages such thatthey can only be viewed by their intended recipients. A client-side provider alsoestablishes its container as an authorized recipient of a received response (by successfullydecrypting it) and validates passwords or signatures in the response to authenticate thesource identity associated with the response. Client-side providers configured in theEnterprise Server can be used to protect the request messages sent and the responsemessages received by server-side components (servlets and EJB components) acting asclients of other services.
■ A server-side provider establishes its container as an authorized recipient of a receivedrequest (by successfully decrypting it) and validates passwords or signatures in therequest to authenticate the source identity associated with the request. A server-sideprovider also establishes (by signature or username/password) the source identity ofresponse messages and/or protects (by encryption) response messages such that they canonly be viewed by their intended recipients. Server-side providers are only invoked byserver-side containers.
■ Default Server ProviderThe default server provider is used to identify the server provider to be invoked for anyapplication for which a specific server provider has not been bound. The default serverprovider is sometimes referred to as the default provider.
■ Default Client ProviderThe default client provider is used to identify the client provider to be invoked for anyapplication for which a specific client provider has not been bound.
■ Request PolicyThe request policy defines the authentication policy requirements associated with requestprocessing performed by the authentication provider. Policies are expressed in messagesender order such that a requirement that encryption occur after content would mean thatthe message receiver would expect to decrypt the message before validating the signature.
■ Response Policy
Understanding Message Security in the Enterprise Server
Chapter 10 • Configuring Message Security 131

The response policy defines the authentication policy requirements associated with responseprocessing performed by the authentication provider. Policies are expressed in messagesender order such that a requirement that encryption occur after content would mean thatthe message receiver would expect to decrypt the message before validating the signature.
Securing a Web ServiceWeb services deployed on the Enterprise Server are secured by binding SOAP layer messagesecurity providers and message protection policies to the containers in which the applicationsare deployed or to web service endpoints served by the applications. SOAP layer messagesecurity functionality is configured in the client-side containers of the Enterprise Server bybinding SOAP layer message security providers and message protection policies to the clientcontainers or to the portable service references declared by client applications.
When the Enterprise Server is installed, SOAP layer message security providers are configuredin the client and server-side containers of the Enterprise Server, where they are available forbinding for use by the containers, or by individual applications or clients deployed in thecontainers. During installation, the providers are configured with a simple message protectionpolicy that, if bound to a container, or to an application or client in a container, would cause thesource of the content in all request and response messages to be authenticated by XML digitalsignature.
The administrative interfaces of the Enterprise Server can be employed to bind the existingproviders for use by the server-side containers of the Enterprise Server, to modify the messageprotection policies enforced by the providers, or to create new provider configurations withalternative message protection policies. Analogous administrative operations can be performedon the SOAP message layer security configuration of the application client container as definedin “Enabling Message Security for Application Clients” on page 139.
By default, message layer security is disabled on the Enterprise Server. To configure messagelayer security for the Enterprise Server follow the steps outlined in “Configuring the EnterpriseServer for Message Security” on page 133. If you want to cause web services security to be used toprotect all web services applications deployed on the Enterprise Server, follow the steps in“Enabling Providers for Message Security” on page 137.
Once you have completed the above steps (which may include restarting the Enterprise Server),web services security will be applied to all web services applications deployed on the EnterpriseServer.
Securing a Web Service
Sun GlassFish Enterprise Server v2.1.1 Administration Guide • October 2009132
Configuring Application-Specific Web ServicesSecurityApplication-specific web services security functionality is configured (at application assembly)by defining message-security-binding elements in the Sun-specific deployment descriptors ofthe application. These message-security-binding elements are used to associate a specificprovider or message protection policy with a web services endpoint or service reference, andmay be qualified so that they apply to a specific port or method of the corresponding endpointor referenced service.
For more information on defining application specific message protection policies, refer toChapter 5, “Securing Applications,” in Sun GlassFish Enterprise Server v2.1.1 Developer’s Guide.
Securing the Sample ApplicationThe Enterprise Server ships with a sample application named xms. The xms application featuresa simple web service that is implemented by both a J2EE EJB endpoint and a Java Servletendpoint. Both endpoints share the same service endpoint interface. The service endpointinterface defines a single operation, sayHello, which takes a string argument, and returns aString composed by pre-pending Hello to the invocation argument.
The xms sample application is provided to demonstrate the use of the Enterprise Server’sWS-Security functionality to secure an existing web services application. The instructionswhich accompany the sample describe how to enable the WS-Security functionality of theEnterprise Server such that it is used to secure the xms application. The sample alsodemonstrates the binding of WS-Security functionality directly to the application (as describedin “Configuring Application-Specific Web Services Security” on page 133 application.
The xms sample application is installed in the directory:as-install/samples/webservices/security/ejb/apps/xms/.
For information on compiling, packaging, and running the xms sample application, refer to theSecuring Applications chapter of the Developers’ Guide.
Configuring the Enterprise Server for Message Security■ “Actions of Request and Response Policy Configurations” on page 134■ “Configuring Other Security Facilities” on page 135■ “Configuring a JCE Provider” on page 135
Configuring the Enterprise Server for Message Security
Chapter 10 • Configuring Message Security 133
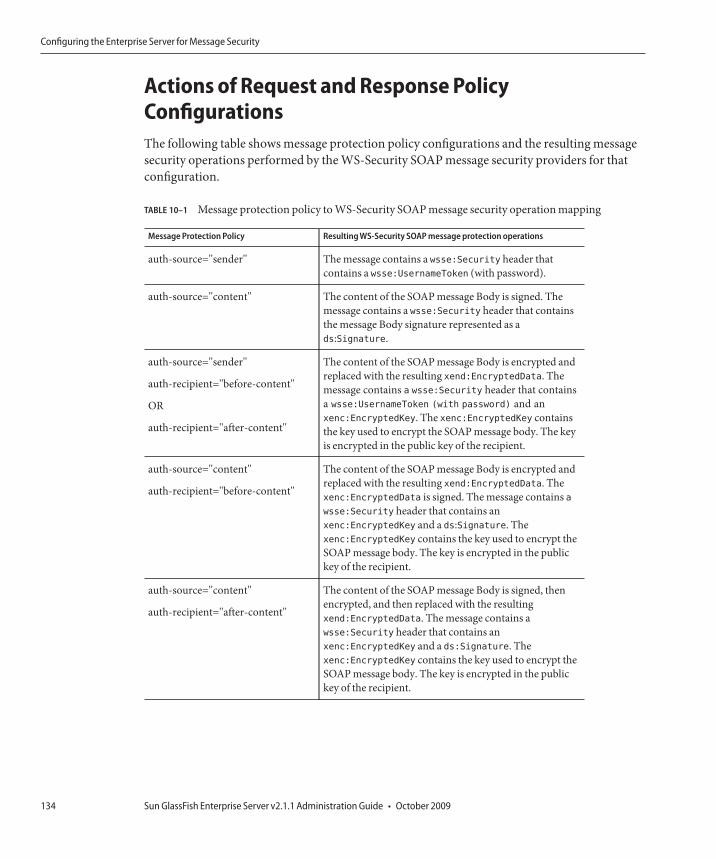
Actions of Request and Response PolicyConfigurationsThe following table shows message protection policy configurations and the resulting messagesecurity operations performed by the WS-Security SOAP message security providers for thatconfiguration.
TABLE 10–1 Message protection policy to WS-Security SOAP message security operation mapping
Message Protection Policy Resulting WS-Security SOAP message protection operations
auth-source="sender" The message contains a wsse:Security header thatcontains a wsse:UsernameToken (with password).
auth-source="content" The content of the SOAP message Body is signed. Themessage contains a wsse:Security header that containsthe message Body signature represented as ads:Signature.
auth-source="sender"
auth-recipient="before-content"
OR
auth-recipient="after-content"
The content of the SOAP message Body is encrypted andreplaced with the resulting xend:EncryptedData. Themessage contains a wsse:Security header that containsa wsse:UsernameToken (with password) and anxenc:EncryptedKey. The xenc:EncryptedKey containsthe key used to encrypt the SOAP message body. The keyis encrypted in the public key of the recipient.
auth-source="content"
auth-recipient="before-content"
The content of the SOAP message Body is encrypted andreplaced with the resulting xend:EncryptedData. Thexenc:EncryptedData is signed. The message contains awsse:Security header that contains anxenc:EncryptedKey and a ds:Signature. Thexenc:EncryptedKey contains the key used to encrypt theSOAP message body. The key is encrypted in the publickey of the recipient.
auth-source="content"
auth-recipient="after-content"
The content of the SOAP message Body is signed, thenencrypted, and then replaced with the resultingxend:EncryptedData. The message contains awsse:Security header that contains anxenc:EncryptedKey and a ds:Signature. Thexenc:EncryptedKey contains the key used to encrypt theSOAP message body. The key is encrypted in the publickey of the recipient.
Configuring the Enterprise Server for Message Security
Sun GlassFish Enterprise Server v2.1.1 Administration Guide • October 2009134
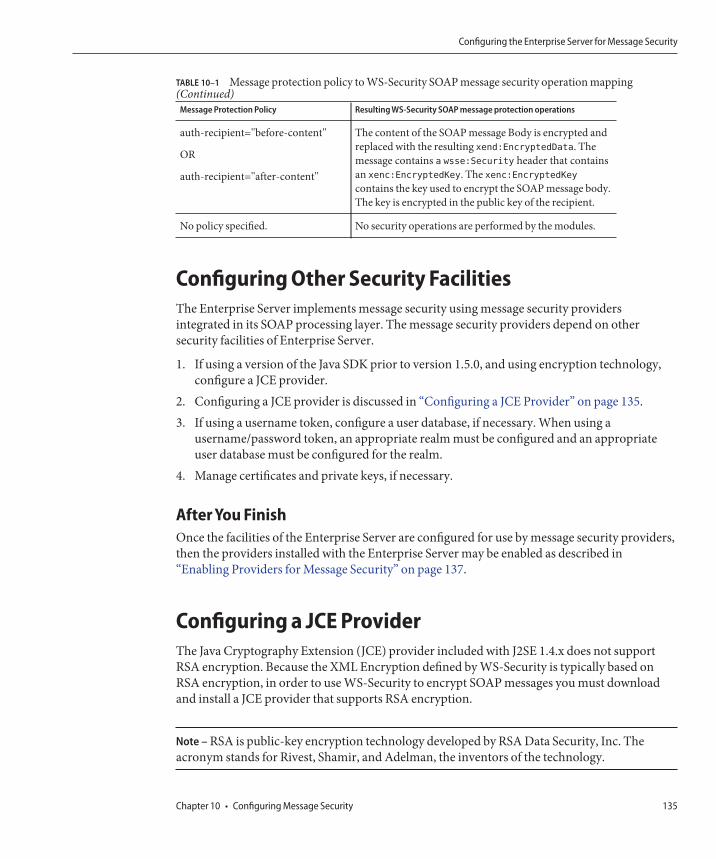
TABLE 10–1 Message protection policy to WS-Security SOAP message security operation mapping(Continued)
Message Protection Policy Resulting WS-Security SOAP message protection operations
auth-recipient="before-content"
OR
auth-recipient="after-content"
The content of the SOAP message Body is encrypted andreplaced with the resulting xend:EncryptedData. Themessage contains a wsse:Security header that containsan xenc:EncryptedKey. The xenc:EncryptedKeycontains the key used to encrypt the SOAP message body.The key is encrypted in the public key of the recipient.
No policy specified. No security operations are performed by the modules.
Configuring Other Security FacilitiesThe Enterprise Server implements message security using message security providersintegrated in its SOAP processing layer. The message security providers depend on othersecurity facilities of Enterprise Server.
1. If using a version of the Java SDK prior to version 1.5.0, and using encryption technology,configure a JCE provider.
2. Configuring a JCE provider is discussed in “Configuring a JCE Provider” on page 135.3. If using a username token, configure a user database, if necessary. When using a
username/password token, an appropriate realm must be configured and an appropriateuser database must be configured for the realm.
4. Manage certificates and private keys, if necessary.
After You FinishOnce the facilities of the Enterprise Server are configured for use by message security providers,then the providers installed with the Enterprise Server may be enabled as described in“Enabling Providers for Message Security” on page 137.
Configuring a JCE ProviderThe Java Cryptography Extension (JCE) provider included with J2SE 1.4.x does not supportRSA encryption. Because the XML Encryption defined by WS-Security is typically based onRSA encryption, in order to use WS-Security to encrypt SOAP messages you must downloadand install a JCE provider that supports RSA encryption.
Note – RSA is public-key encryption technology developed by RSA Data Security, Inc. Theacronym stands for Rivest, Shamir, and Adelman, the inventors of the technology.
Configuring the Enterprise Server for Message Security
Chapter 10 • Configuring Message Security 135

If you are running the Enterprise Server on version 1.5 of the Java SDK, the JCE provider isalready configured properly. If you are running the Enterprise Server on version 1.4.x of theJava SDK, you can add a JCE provider statically as part of your JDK environment, as follows.
1. Download and install a JCE provider JAR (Java ARchive) file.The following URL provides a list of JCE providers that support RSA encryption:http://java.sun.com/products/jce/javase_providers.html.
2. Copy the JCE provider JAR file to java-home/jre/lib/ext/.3. Stop the Enterprise Server.
If the Enterprise Server is not stopped and then restarted later in this process, the JCEprovider will not be recognized by the Enterprise Server.
4. Edit the java-home/jre/lib/security/java.security properties file in any text editor.Add the JCE provider you’ve just downloaded to this file.The java.security file contains detailed instructions for adding this provider. Basically,you need to add a line of the following format in a location with similar properties:
security.provider.n=provider-class-name
In this example, n is the order of preference to be used by the Enterprise Server whenevaluating security providers. Set n to 2 for the JCE provider you’ve just added.
For example, if you’ve downloaded The Legion of the Bouncy Castle JCE provider, youwould add this line.
security.provider.2=org.bouncycastle.jce.provider.
BouncyCastleProvider
Make sure that the Sun security provider remains at the highest preference, with a value of 1.
security.provider.1=sun.security.provider.Sun
Adjust the levels of the other security providers downward so that there is only one securityprovider at each level.
The following is an example of a java.security file that provides the necessary JCEprovider and keeps the existing providers in the correct locations.
security.provider.1=sun.security.provider.Sun
security.provider.2=org.bouncycastle.jce.provider.
BouncyCastleProvider
security.provider.3=com.sun.net.ssl.internal.ssl.Provider
security.provider.4=com.sun.rsajca.Provider
security.provider.5=com.sun.crypto.provider.SunJCE
security.provider.6=sun.security.jgss.SunProvider
5. Save and close the file.
Configuring the Enterprise Server for Message Security
Sun GlassFish Enterprise Server v2.1.1 Administration Guide • October 2009136

6. Restart the Enterprise Server.
Message Security SetupMost of the steps for setting up the Enterprise Server for using message security can beaccomplished using the Admin Console, the asadmin command-line tool, or by manuallyediting system files. In general, editing system files is discouraged due to the possibility ofmaking unintended changes that prevent the Enterprise Server from running properly,therefore, where possible, steps for configuring the Enterprise Server using the Admin Consoleare shown first, with the asadmin tool command shown after. Steps for manually editing systemfiles are shown only when there is no Admin Console or asadmin equivalent.
Support for message layer security is integrated into the Enterprise Server and its clientcontainers in the form of (pluggable) authentication modules. By default, message layer securityis disabled on the Enterprise Server. The following sections provide the details for enabling,creating, editing, and deleting message security configurations and providers.■ “Enabling Providers for Message Security” on page 137■ “Configuring the Message Security Provider” on page 138■ “Creating a Message Security Provider” on page 139■ “Enabling Message Security for Application Clients” on page 139■ “Setting the Request and Response Policy for the Application Client Configuration” on
page 139■ “Further Information” on page 140
In most cases, it will be necessary to restart the Enterprise Server after performing theadministrative operations listed above. This is especially the case if you want the effects of theadministrative change to be applied to applications that were already deployed on theEnterprise Server at the time the operation was performed.
Enabling Providers for Message SecurityTo enable message security for web services endpoints deployed in the Enterprise Server, youmust specify a provider to be used by default on the server side. If you enable a default providerfor message security, you also need to enable providers to be used by clients of the web servicesdeployed in the Enterprise Server. Information for enabling the providers used by clients isdiscussed in “Enabling Message Security for Application Clients” on page 139.
To enable message security for web service invocations originating from deployed endpoints,you must specify a default client provider. If you enabled a default client provider for theEnterprise Server, you must ensure that any services invoked from endpoints deployed in theEnterprise Server are compatibly configured for message layer security.
Use the command-line utility:
Message Security Setup
Chapter 10 • Configuring Message Security 137

■ To specify the default server provider:
asadmin set --user admin-user --port admin-portserver-config.security-service.message-security-config.SOAP.
default_provider=ServerProvider
■ To specify the default client provider:
asadmin set --user admin-user --port admin-portserver-config.security-service.message-security-config.SOAP.
default_client_provider=ClientProvider
Configuring the Message Security ProviderTypically, a provider would be re-configured to modify its message protection policies,although the provider type, implementation class, and provider-specific configurationproperties may also be modified.
Use the command-line utility to set the response policy, replace the word request in thefollowing commands with response.
■ Add a request policy to the client and set the authentication source:
asadmin set --user admin-user --port admin-portserver-config.security-service.message-security-config.SOAP.
provider-config.ClientProvider.request-policy.auth_source=
sender | content
■ Add a request policy to the server and set the authentication source:
asadmin set --user admin-user --port admin-portserver-config.security-service.message-security-config.SOAP.
provider-config.ServerProvider.request-policy.auth_source=
sender | content
■ Add a request policy to the client and set the authentication recipient:
asadmin set --user admin-user --port admin-portserver-config.security-service.message-security-config.SOAP.
provider-config.ClientProvider.request-policy.auth_recipient=
before-content | after-content
■ Add a request policy to the server and set the authentication recipient:
asadmin set --user admin-user --port admin-portserver-config.security-service.message-security-config.SOAP.
provider-config.ServerProvider.request-policy.auth_recipient=
before-content | after-content
Message Security Setup
Sun GlassFish Enterprise Server v2.1.1 Administration Guide • October 2009138
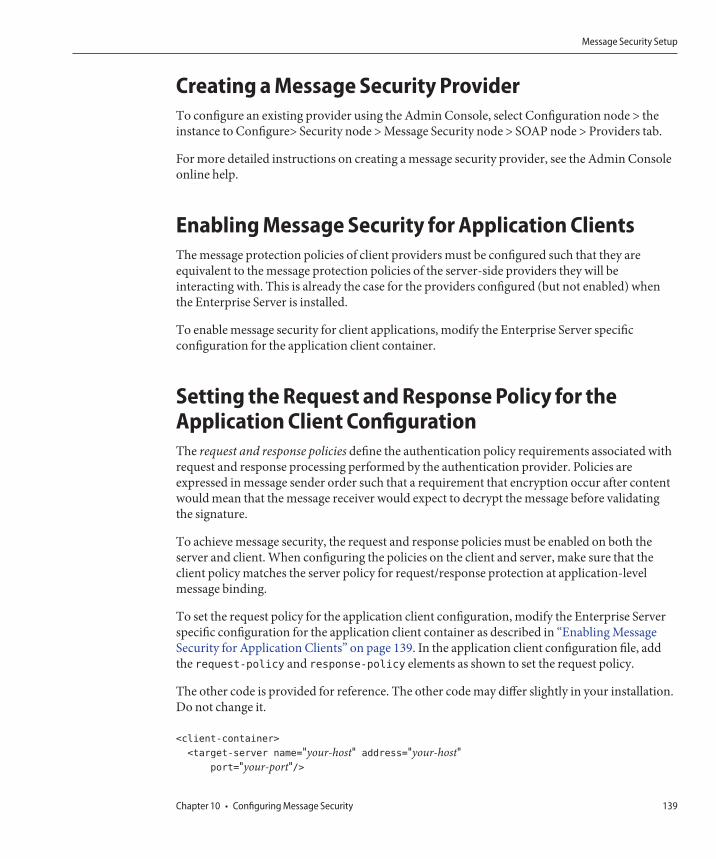
Creating a Message Security ProviderTo configure an existing provider using the Admin Console, select Configuration node > theinstance to Configure> Security node > Message Security node > SOAP node > Providers tab.
For more detailed instructions on creating a message security provider, see the Admin Consoleonline help.
Enabling Message Security for Application ClientsThe message protection policies of client providers must be configured such that they areequivalent to the message protection policies of the server-side providers they will beinteracting with. This is already the case for the providers configured (but not enabled) whenthe Enterprise Server is installed.
To enable message security for client applications, modify the Enterprise Server specificconfiguration for the application client container.
Setting the Request and Response Policy for theApplication Client ConfigurationThe request and response policies define the authentication policy requirements associated withrequest and response processing performed by the authentication provider. Policies areexpressed in message sender order such that a requirement that encryption occur after contentwould mean that the message receiver would expect to decrypt the message before validatingthe signature.
To achieve message security, the request and response policies must be enabled on both theserver and client. When configuring the policies on the client and server, make sure that theclient policy matches the server policy for request/response protection at application-levelmessage binding.
To set the request policy for the application client configuration, modify the Enterprise Serverspecific configuration for the application client container as described in “Enabling MessageSecurity for Application Clients” on page 139. In the application client configuration file, addthe request-policy and response-policy elements as shown to set the request policy.
The other code is provided for reference. The other code may differ slightly in your installation.Do not change it.
<client-container>
<target-server name="your-host" address="your-host"port="your-port"/>
Message Security Setup
Chapter 10 • Configuring Message Security 139
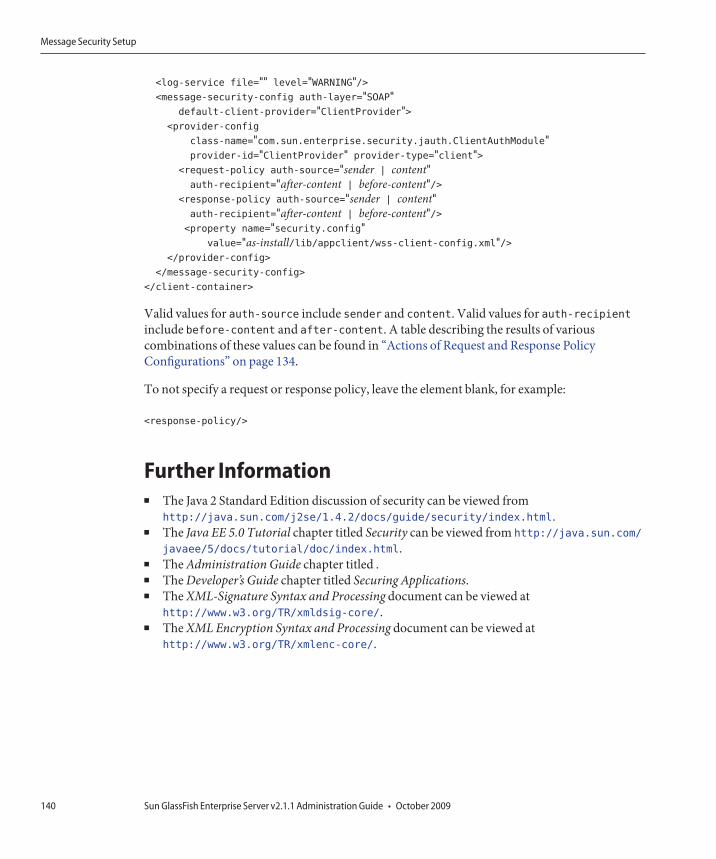
<log-service file="" level="WARNING"/><message-security-config auth-layer="SOAP"
default-client-provider="ClientProvider"><provider-config
class-name="com.sun.enterprise.security.jauth.ClientAuthModule"provider-id="ClientProvider" provider-type="client">
<request-policy auth-source="sender | content"auth-recipient="after-content | before-content"/>
<response-policy auth-source="sender | content"auth-recipient="after-content | before-content"/><property name="security.config"
value="as-install/lib/appclient/wss-client-config.xml"/></provider-config>
</message-security-config>
</client-container>
Valid values for auth-source include sender and content. Valid values for auth-recipientinclude before-content and after-content. A table describing the results of variouscombinations of these values can be found in “Actions of Request and Response PolicyConfigurations” on page 134.
To not specify a request or response policy, leave the element blank, for example:
<response-policy/>
Further Information■ The Java 2 Standard Edition discussion of security can be viewed from
http://java.sun.com/j2se/1.4.2/docs/guide/security/index.html.■ The Java EE 5.0 Tutorial chapter titled Security can be viewed from http://java.sun.com/
javaee/5/docs/tutorial/doc/index.html.■ The Administration Guide chapter titled .■ The Developer’s Guide chapter titled Securing Applications.■ The XML-Signature Syntax and Processing document can be viewed at
http://www.w3.org/TR/xmldsig-core/.■ The XML Encryption Syntax and Processing document can be viewed at
http://www.w3.org/TR/xmlenc-core/.
Message Security Setup
Sun GlassFish Enterprise Server v2.1.1 Administration Guide • October 2009140

Configuring the Diagnostic Service
The Diagnostic Service provides more visibility into and control of the runtime performance ofa server and its applications, allowing you to diagnose and isolate faults as they occur.
This chapter contains the following sections:■ “What is the Diagnostic Framework?” on page 141■ “Diagnostic Service Framework” on page 141
What is the Diagnostic Framework?The Application Server Diagnostic Framework is a monitoring framework that defines andimplements a set of services that run within the application server standard life cycle. With theDiagnostic Service, you can define, create, collect, and access diagnostic data generated by arunning server and the applications it deploys.
Diagnostic Service FrameworkThe diagnostic service reports configuration details for the application server instances. It isuseful for diagnosing application server problems such as exceptions, performance issues, andother unexpected results. From within the Admin Console Diagnostic Service you can:■ Compute Checksum: Collects checksum for selective Application Server binary files under
appserver_install_dir/ lib, appserver_install_dir/etc andappserver_install_dir/bin directory
■ Verify Configuration: Captures configuration files such as, domain.xml, server.policy.■ Capture Install Log: Installation specific details such as Application Server version number
or patch ID and contents of log file generated at the time of installation. Absolute path forinstallation directory is used to determine which Installer log file is collected if there aremultiple installations on the same machine. The contents of config/asenv.conf is copiedfrom the installation folder for DAS as well as node agents.
11C H A P T E R 1 1
141

Installation specific details are collected only for file-based installations.■ Capture System Information: The following system information is collected by default:
■ Network Settings■ OS details■ Hardware information
Data collected using native code is not available on the Platform Edition of ApplicationServer.
■ Capture Application Deployment Descriptor: Deployment descriptors such asejb-jar.xml, sun-ejb-jar.xml, web.xml, sun-web.xml, and sun-sip.xml
■ Log Level:■ Log Entries:
The number of log entries to be included in the generated diagnostic report.
Generating a Diagnostic ReportGenerating a diagnostic report is based on the preferences you set in the Application ServerDiagnostic tab in the Administration Console. Confidential data appears in the generatedreport as listed in the Confidential Properties table.
Diagnostic Service Framework
Sun GlassFish Enterprise Server v2.1.1 Administration Guide • October 2009142

Transactions
By enclosing one or more steps in an indivisible unit of work, a transaction ensures dataintegrity and consistency. This chapter contains the following sections:■ “About Transactions” on page 143■ “Admin Console Tasks for Transactions” on page 145
About Transactions■ “What is a Transaction?” on page 143■ “Transactions in Java EE Technology” on page 144■ “Workarounds for Specific Databases” on page 145
What is a Transaction?A transaction is a series of discreet actions in an application that must all complete successfullyor else all the changes in each action are backed out. For example, to transfer funds from achecking account to a savings account is a transaction with the following steps:
1. Check to see if the checking account has enough money to cover the transfer.2. If there’s enough money in the checking account debit the amount from the checking
account.3. Credit the money to the savings account.4. Record the transfer to the checking account log.5. Record the transfer to the savings account log.
If any of these steps fails, all changes from the preceding steps must be backed out, and thechecking account and savings account must be in the same state as they were before thetransaction started. This event is called a rollback. If all the steps complete successfully, thetransaction is in a committed state. Transactions end in either a commit or a rollback.
12C H A P T E R 1 2
143
See Also:
■ “Transactions in Java EE Technology” on page 144■ “Configuring Transactions” on page 145
Transactions in Java EE TechnologyTransaction processing involves the following five participants:
■ Transaction Manager■ Enterprise Server■ Resource Manager(s)■ Resource Adapter(s)■ User Application.
Each of these entities contribute to reliable transaction processing by implementing thedifferent APIs and functionalities, discussed below:
■ The Transaction Manager provides the services and management functions required tosupport transaction demarcation, transactional resource management, synchronization,and transaction context propagation.
■ The Enterprise Server provides the infrastructure required to support the applicationruntime environment that includes transaction state management.
■ The Resource Manager (through a resource adapter) provides the application access toresources. The resource manager participates in distributed transactions by implementing atransaction resource interface used by the transaction manager to communicate transactionassociation, transaction completion and recovery work. An example of such a resourcemanager is a relational database server.
■ A Resource Adapter is a system level software library that is used by the application server orclient to connect to a Resource Manager. A Resource Adapter is typically specific to aResource Manager. It is available as a library and is used within the address space of theclient using it. An example of such a resource adapter is a JDBC driver.
■ A Transactional User Application developed to operate in an application serverenvironment looks up transactional data sources and, optionally, the transaction manager,using JNDI. The application may use declarative transaction attribute settings for enterprisebeans or explicit programmatic transaction demarcation.
See Also:
■ “What is a Transaction?” on page 143■ “Configuring Transactions” on page 145
About Transactions
Sun GlassFish Enterprise Server v2.1.1 Administration Guide • October 2009144

Workarounds for Specific DatabasesThe Enterprise Server provides workarounds for some known issues with the recoveryimplementations of the following JDBC drivers. These workarounds are used unless explicitlydisabled.■ Oracle thin driver - The XAResource.recover method repeatedly returns the same set of
in-doubt Xids regardless of the input flag. According to the XA specifications, theTransaction Manager initially calls this method with TMSTARTSCAN and then withTMNOFLAGS repeatedly until no Xids are returned. The XAResource.commit method alsohas some issues.To disable the Enterprise Server workaround, set the oracle-xa-recovery-workaroundproperty value to false. For details about how to set a property, see “To configure how theEnterprise Server recovers from transactions” on page 145.
Note – These workarounds do not imply support for any particular JDBC driver.
Admin Console Tasks for TransactionsThe Enterprise Server handles transactions based on the settings in the Admin Console.
Configuring TransactionsThis section explains how to configure transaction settings:■ “To configure how the Enterprise Server recovers from transactions” on page 145■ “To set a transaction timeout value” on page 146■ “To set the location of the transaction logs” on page 147■ “To set the keypoint interval” on page 148
For additional information about transactions, see these sections:■ “What is a Transaction?” on page 143■ “Transactions in Java EE Technology” on page 144
▼ To configure how the Enterprise Server recovers from transactionsTransactions might be incomplete either because the server crashed or a resource managercrashed. It is essential to complete these stranded transactions and recover from the failures.Enterprise Server is designed to recover from these failures and complete the transactions uponserver startup.
While performing the recovery, if some of the resources are unreachable the server restart maybe delayed as it tries to recover the transactions.
Admin Console Tasks for Transactions
Chapter 12 • Transactions 145

When the transaction spans across servers, the server that started the transaction can contactthe other servers to get the outcome of the transactions. If the other servers are unreachable, thetransaction uses the Heuristic Decision field to determine the outcome.
In the tree component select the Configurations node.
If you are running a non-clustered domain in developer profile, skip to the next step. If you arerunning the domain in cluster profile, select the instance to configure:
■ To configure a particular instance, select the instance’s config node. For example, the defaultinstance, server, select the server-config node.
■ To configure the default settings for all instances, select the default-config node.
Select the Transaction Service node.
To enable the recovery of incomplete transactions, check the Recover in the On Restart field.
Set the amount of time, in seconds, the Enterprise Server tries to connect to the unreachableserver in the Retry Timeout field. The default value is 10 minutes (600 seconds).
Set the policy for unreachable servers in a transaction in the Heuristic Decision field.
Unless there is a good reason to set this field to Commit, leave Heuristic Decision set toRollback. Committing indeterminate transactions can compromise the data integrity of yourapplication.
Set any needed properties.
Click the Add Properties button, type values in the Name and Value fields, and check the box tothe left of the Name to activate the property.
Click Save.
Restart the Enterprise Server.
▼ To set a transaction timeout valueBy default, the server does not timeout a transaction. That is, the server waits indefinitely for atransaction to complete. If you set a timeout value for transactions, if a transaction isn’tcompleted within the configured time, the Enterprise Server rolls back the transaction.
In the tree component, select the Configurations node.
1
2
3
4
5
6
7
8
9
1
Admin Console Tasks for Transactions
Sun GlassFish Enterprise Server v2.1.1 Administration Guide • October 2009146
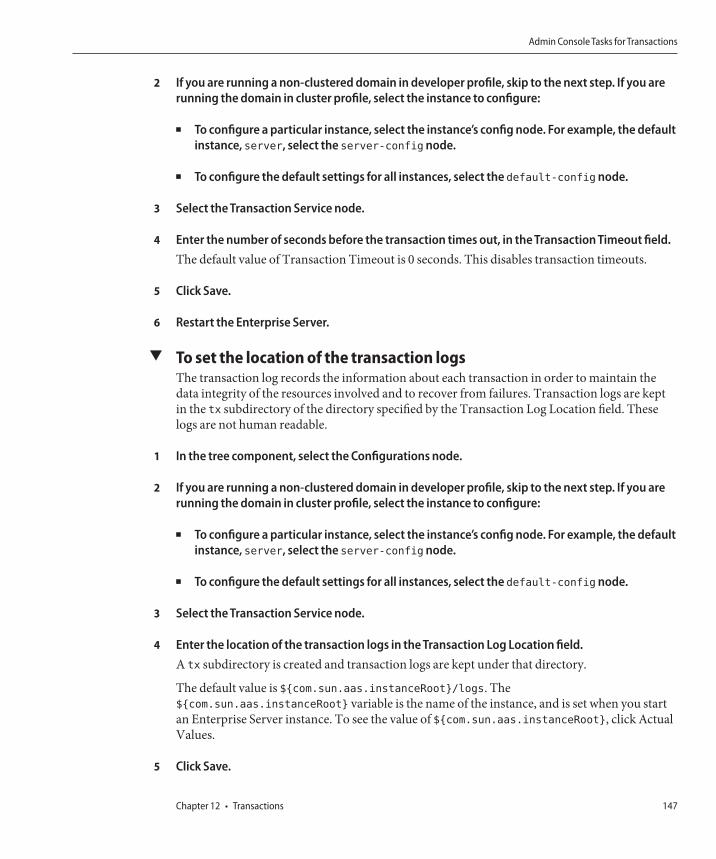
If you are running a non-clustered domain in developer profile, skip to the next step. If you arerunning the domain in cluster profile, select the instance to configure:
■ To configure a particular instance, select the instance’s config node. For example, the defaultinstance, server, select the server-config node.
■ To configure the default settings for all instances, select the default-config node.
Select the Transaction Service node.
Enter the number of seconds before the transaction times out, in the Transaction Timeout field.The default value of Transaction Timeout is 0 seconds. This disables transaction timeouts.
Click Save.
Restart the Enterprise Server.
▼ To set the location of the transaction logsThe transaction log records the information about each transaction in order to maintain thedata integrity of the resources involved and to recover from failures. Transaction logs are keptin the tx subdirectory of the directory specified by the Transaction Log Location field. Theselogs are not human readable.
In the tree component, select the Configurations node.
If you are running a non-clustered domain in developer profile, skip to the next step. If you arerunning the domain in cluster profile, select the instance to configure:
■ To configure a particular instance, select the instance’s config node. For example, the defaultinstance, server, select the server-config node.
■ To configure the default settings for all instances, select the default-config node.
Select the Transaction Service node.
Enter the location of the transaction logs in the Transaction Log Location field.A tx subdirectory is created and transaction logs are kept under that directory.
The default value is ${com.sun.aas.instanceRoot}/logs. The${com.sun.aas.instanceRoot} variable is the name of the instance, and is set when you startan Enterprise Server instance. To see the value of ${com.sun.aas.instanceRoot}, click ActualValues.
Click Save.
2
3
4
5
6
1
2
3
4
5
Admin Console Tasks for Transactions
Chapter 12 • Transactions 147

Restart the Enterprise Server.
▼ To set the keypoint intervalKeypoint operations compress the transaction log file. The keypoint interval is the number oftransactions between keypoint operations on the log. Keypoint operations can reduce the size ofthe transaction log files. A larger number of keypoint intervals (for example, 2048) results inlarger transaction log files, but fewer keypoint operations, and potentially better performance.A smaller keypoint interval (for example, 256) results in smaller log files but slightly reducedperformance due to the greater frequency of keypoint operations.
In the tree component select the Configurations node.
If you are running a non-clustered domain in developer profile, skip to the next step. If you arerunning the domain in cluster profile, select the instance to configure:
■ To configure a particular instance, select the instance’s config node. For example, the defaultinstance, server, select the server-config node.
■ To configure the default settings for all instances, select the default-config node.
Select the Transaction Service node.
Enter the number of transactions between keypoint operations in the Keypoint Interval field.The default value is 65536.
Click Save.
Restart the Enterprise Server.
6
1
2
3
4
5
6
Admin Console Tasks for Transactions
Sun GlassFish Enterprise Server v2.1.1 Administration Guide • October 2009148

Configuring the HTTP Service
The HTTP service is the component of the Enterprise Server that provides facilities fordeploying web applications and for making deployed web applications accessible by HTTPclients. These facilities are provided by means of two kinds of related objects, virtual servers andHTTP listeners.
This chapter discusses the following topics:■ “Virtual Servers” on page 149■ “HTTP Listeners” on page 150
Virtual ServersA virtual server, sometimes called a virtual host, is an object that allows the same physical serverto host multiple Internet domain names. All virtual servers hosted on the same physical servershare the Internet Protocol (IP) address of that physical server. A virtual server associates adomain name for a server (such as www.aaa.com) with the particular server on which theEnterprise Server is running.
Note – Do not confuse an Internet domain with the administrative domain of the EnterpriseServer.
For instance, assume you want to host these domains on your physical server:
www.aaa.com
www.bbb.com
www.ccc.com
Assume also that www.aaa.com, www.bbb.com, and www.ccc.com have web modules web1, web2,and web3, respectively, associated with them.
This means that all of these URLs are handled by your physical server:
13C H A P T E R 1 3
149
http://www.aaa.com:8080/web1
http://www.bbb.com:8080/web2
http://www.ccc.com:8080/web3
The first URL is mapped to virtual host www.aaa.com, the second URL is mapped to virtual hostwww.bbb.com, and the third is mapped to virtual host www.ccc.com.
On the other hand, the following URL results in a 404 return code, because web3 isn’t registeredwith www.bbb.com:
http://www.bbb.com:8080/web3
For this mapping to work, make sure that www.aaa.com, www.bbb.com, and www.ccc.com allresolve to your physical server’s IP address. They need to be registered with the DNS server foryour network. In addition, on a UNIX system, add these domains to your /etc/hosts file (if thesetting for hosts in your /etc/nsswitch.conf file includes files).
When the Enterprise Server is started, it starts the following virtual servers automatically:
■ A virtual server named server, which hosts all user-defined web modules■ A virtual server named __asadmin, which hosts all administration-related web modules
(specifically, the Admin Console). This server is restricted; you cannot deploy web modulesto this virtual server.
For development, testing, and deployment of web services in a non-production environment,server is often the only virtual server required. In a production environment, additional virtualservers provide hosting facilities for users and customers so that each appears to have its ownweb server, even though there is only one physical server.
HTTP ListenersEach virtual server provides connections between the server and clients through one or moreHTTP listeners. Each HTTP listener is a listen socket that has an IP address, a port number, aserver name, and a default virtual server.
HTTP listeners must have a unique combination of port number and IP address. For example,an HTTP listener can listen on all configured IP addresses on a given port for a machine byspecifying the IP address 0.0.0.0. Alternatively, the HTTP listener can specify a unique IPaddress for each listener, but use the same port.
Since an HTTP listener is a combination of IP address and port number, you can have multipleHTTP listeners with the same IP address and different port numbers (for example, 1.1.1.1:8081and 1.1.1.1:8082), or with different IP addresses and the same port number (for example,1.1.1.1:8081 and 1.2.3.4:8081, if your machine was configured to respond to both theseaddresses).
HTTP Listeners
Sun GlassFish Enterprise Server v2.1.1 Administration Guide • October 2009150

However, if an HTTP listener uses the 0.0.0.0 IP address, which listens on all IP addresses on aport, you cannot create HTTP listeners for additional IP addresses that listen on the same portfor a specific IP address. For example, if an HTTP listener uses 0.0.0.0:8080 (all IP addresses onport 8080), another HTTP listener cannot use 1.2.3.4:8080.
Because the system running the Enterprise Server typically has access to only one IP address,HTTP listeners typically use the 0.0.0.0 IP address and different port numbers, with each portnumber serving a different purpose. If the system does have access to more than one IP address,each address can serve a different purpose.
By default, when the Enterprise Server starts, it has the following HTTP listeners:
■ Two HTTP listeners named http-listener-1 and http-listener-2, associated with thevirtual server named server.
■ An HTTP listener named admin-listener, associated with the virtual server named__asadmin.
All these listeners use the IP address 0.0.0.0 and the port numbers specified as the HTTP serverport numbers during installation of the Enterprise Server. If the Enterprise Server uses thedefault port number values, http-listener-1 uses port 8080, http-listener-2 uses port8181, and admin-listener uses port 48489.
Each HTTP listener has a default virtual server. The default virtual server is the server to whichthe HTTP listener routes all request URLs whose host component does not match any of thevirtual servers that are associated with the HTTP listener (a virtual server is associated with anHTTP listener by listing the HTTP listener in its http-listeners attribute).
In addition, specify the number of acceptor threads in the HTTP listener. Acceptor threadsaccept new connections and put them onto a connection queue. Session threads then pick upconnections from the queue and service the requests. The server posts more session threads ifrequired at the end of the request.
A set of request processing threads retrieves incoming HTTP requests from the connectionqueue and processes the requests. These threads parse the HTTP headers, select the appropriatevirtual server, and run through the request processing engine to service the request. When thereare no more requests to process, but the connection can be kept persistent (either by usingHTTP/1.1 or sending a Connection: keep-alive header), the request processing threadassumes the connection to be idle and passes the connection to the Keep-Alive connectionmanagement subsystem.
The Keep-Alive subsystem periodically polls such idle connections and queues thoseconnections with activity into the connection queue for future processing. From there, a requestprocessing thread again retrieves the connection and processes its request. The Keep-Alivesubsystem is multi-threaded, as it manages potentially tens of thousands of connections.Efficient polling techniques are used, by dividing the number of connections into smaller
HTTP Listeners
Chapter 13 • Configuring the HTTP Service 151
subsets, to determine which connections are ready with requests and which of thoseconnections have idled for sufficient time to deem them closed (beyond a maximumpermissible Keep-Alive timeout).
The HTTP listener’s server name is the host name that appears in the URLs the server sends tothe client as part of a redirect. This attribute affects URLs the server automatically generates; itdoes not affect the URLs for directories and files stored in the server. This name is normally thealias name if the server uses an alias. If a client sends a Host: header, that host name supersedesthe HTTP listener’s server name value in redirects.
Specify a redirect port to use a different port number from that specified in the original request.A redirect occurs in one of these situations:
■ If a client tries to access a resource that no longer exists at the specified URL (that is, theresource has moved to another location), the server redirects the client to the new location(instead of returning a 404), by returning a designated response code and including the newlocation in the response’s Location header.
■ If a client tries to access a resource that is protected (for example, SSL) on the regular HTTPport, the server redirects the request to the SSL-enabled port. In this case, the server returnsa new URL in the Location response header, in which the original insecure port has beenreplaced with the SSL-enabled port. The client then connects to this new URL.
Specify also whether security is enabled for an HTTP listener and what kind of security is used(for example, which SSL protocol and which ciphers).
To access a web application deployed on the Enterprise Server, use the URLhttp://localhost:8080/ (or https://localhost:8181/ if it is a secure application), alongwith the context root specified for the web application. To access the Admin Console, use theURL https://localhost:4848/ or http://localhost:4848/asadmin/ (its default contextroot).
Because a virtual server must specify an existing HTTP listener, and because it cannot specify anHTTP listener that is already being used by another virtual server, create at least one HTTPlistener before creating a new virtual server. The above restriction applies only if the new virtualserver has the same host or alias name as one of the virtual servers already bound to the existingHTTP listener.
HTTP Listeners
Sun GlassFish Enterprise Server v2.1.1 Administration Guide • October 2009152

Managing Web Services
This chapter describes web services management with Enterprise Server. Admin Console andthe asadmin tool enable you deploy, test, and manage web services. You can quickly visualize,understand, monitor, and manage complex web services. You can see all web services deployedin a domain just as you see Java EE applications and application components such as EJBs.
You can also:
■ Track and graph response times and invocation counts for web services in real time.■ Generate alerts on boundary conditions including response time and throughput failures.■ View web service invocation content in XML.■ Transform messages at runtime using XSLT.
This chapter contains the following topics:
■ “Overview of Web Services” on page 153■ “Deploying and Testing Web Services” on page 155■ “Using Web Services Registries” on page 156■ “Transforming Messages with XSLT Filters” on page 158■ “Monitoring Web Services” on page 158
Overview of Web ServicesA web service is an application accessed by clients using XML-based protocols, such as SimpleObject Access Protocol (SOAP), sent over internet protocols, such as HTTP. Clients access aweb service application through its interfaces and bindings, defined using XML artifacts such asa web services Definition Language (WSDL) file.
The eXtensible Markup Language (XML) is a standard developed by the World Wide WebConsortium (W3C) and is one of the foundations on which web services are built. XML enablesweb services and clients to communicate with each other in a common language. XML is a
14C H A P T E R 1 4
153

simple, flexible, text-based markup language. XML data is marked using tags enclosed in angledbrackets. The tags contain the meaning of the data they mark. Such markup allows differentsystems to easily exchange data with each other.
A Document Type Definition (DTD) or XML Schema Definition (XSD) describes the structureof an XML document. It has information on the tags the corresponding XML document canhave, the order of those tags, and so forth.
XSLT, which stands for eXtensible Stylesheet Language Transformation, is used fortransforming XML documents from one format to another.
Web Services StandardsSimple Object Access Protocol (SOAP) provides a common messaging format for web services.SOAP enables objects not known to one another to exchange messages. SOAP uses anXML-based data encoding format and HTTP to transport messages. SOAP is independent ofboth the programming language and the operational platform, and it does not require anyspecific technology at its endpoints
Universal Description, Discovery, and Integration (UDDI) provides a standard way to register,de-register, and look up web services. Similar to a telephone system's yellow pages, a UDDIregistry's enables providers to register their services and requestors to find services. Once arequestor finds a service, the registry has no more role to play between the requestor and theprovider.
Web Services Description Language (WSDL) defines a standard way to specify the details of aweb service. It is a general-purpose XML schema that can specifies details of web serviceinterfaces, bindings, and other deployment details. By having such a standard way to specifydetails of a service, clients who have no prior knowledge of a web service can use it.
ebXML (Electronic Business using eXtensible Markup Language) is a set of specifications thatenables enterprises to conduct business over the Internet. OASIS (Organization for theAdvancement of Structured Information Standards) controls the ebXML specifications.
Java EE Web Service StandardsJava APIs for XML processing (JAXP) is a vendor-neutral set of lightweight APIs for parsing orprocessing XML documents. JAXP enables a web service to “plug in” any conforming XMLparser. If no external parser is “plugged in,” then JAXP uses its own XML parserimplementation.
Java API for XML-based remote procedure calls (JAX-RPC) uses an XML-based protocol forclient-server remote procedure calls . JAX-RPC enables SOAP-based interoperable and portableweb services. Developers use the JAX-RPC programming model to develop SOAP-based web
Overview of Web Services
Sun GlassFish Enterprise Server v2.1.1 Administration Guide • October 2009154

service endpoints, along with corresponding WSDL descriptions, and clients. A JAX-RPCbased web service can interact with clients that are not based on Java. Similarly, a JAX-RPCbased client can interact with a non-Java-based web service implementation.
Java API for XML registries (JAXR), a Java API for accessing business registries, has a flexiblearchitecture that supports UDDI, and other registry specifications (such as ebXML). A JAXRclient, which can be a stand-alone Java application or a J2EE component, uses animplementation of the JAXR API provided by a JAXR provider to access business registries. AJAXR provider consists of two parts: a registry--specific JAXR provider, which provides aregistry-specific implementation of the API, and a JAXR pluggable provider, which implementsthose features of the API that are independent of the type of registry. The pluggable providerhides the details of registry-specific providers from clients.
SOAP with Attachments API for Java (SAAJ) enables developers to produce and consumemessages conforming to the SOAP 1.1 specification and SOAP with Attachments note. SAAJprovides an abstraction for handling SOAP messages with attachments. Advanced developerscan use SAAJ to have their applications operate directly with SOAP messages. Attachments maybe complete XML documents, XML fragments, or MIME-type attachments. In addition, SAAJallows developers to enable support for other MIME types. JAX technologies, such as JAX-RPC,internally use SAAJ to hide SOAP complexities from developers. SAAJ enables:
■ Synchronous request-response messaging: the client sends a message and then waits for theresponse.
■ One-way asynchronous messaging: the client sends a message and continues with itsprocessing without waiting for a response.
Deploying and Testing Web ServicesEnterprise Server enables you to easily deploy and test web services.
Deploying Web ServicesDeploy a web service in an enterprise archive (EAR) just as you would an enterprise application.
A web service can also be implemented by a POJO (plain old Java Object). Deploy a POJO webservice using the auto-deploy feature by dragging and dropping it into the auto-deploydirectory. Enterprise Server will automatically generate the appropriate web XML files anddeploy the web service.
In Admin Console, you can view a list of deployed web services under Application Server > WebServices | General.
Deploying and Testing Web Services
Chapter 14 • Managing Web Services 155

Viewing Deployed Web ServicesTo test a web service with Admin Console, select Applications > Web Services >web-service-name | General. Admin Console displays t the attributes of the web service:
■ Name: the name of the web service.■ Endpoint Address URI: the URI of the web service endpoint.■ Application: Click on the link to display the properties of the web application or enterprise
application.■ WSDL: Click on the link to display the WSDL file for the web service.■ Module name: the name of the WAR or EAR file for the web service.■ Mapping File: Click on the link to display the Java WSDL mapping file.■ Webservices.xml: click on the link to display the webservices.xml file.■ Implementation Type: SERVLET or EJB■ Implementation Class Name:■ Deployment Descriptors:
Testing Web ServicesAdmin Console enables you to test web services and diagnose problems. You can ping adeployed web service with a generic test Servlet. SOAP messages are displayed for each methodinvocation.
To test a web service with Admin Console, select Applications > Web Services >web-service-name | General, then click the Test button.
Web Services SecuritySupport for SOAP message layer security is based on the SAML token profile of WS-Security.Tamper-proof auditing for Web services is also provided.
Using Web Services Registries
Note – Enterprise Server does not have an internal registry. To publish web services to aninternal registry, you must download and install the registry on the application server. Topublish a web service to an external registry, specify the address of the external registry.
Using Web Services Registries
Sun GlassFish Enterprise Server v2.1.1 Administration Guide • October 2009156

Adding a RegistryAdd or remove a web services registry with Admin Console at Application Server > WebServices | Registry. Use this page to create a Registry Access Point (RAP). When you add aregistry, specify the following paramters:
■ JNDI Name: the connection resource pool (JNDI) name of the registry. The JNDI Name ofthis connector resource is the JNDI Name of the registry.
■ Choose the type of the registry to add: UDDI 3.0 or ebXML.■ Publish URL and Query URL: the addresses for publishing and querying the registry,
respectively. The format is: http://<hostname>/<path of registry installation>.■ User name and password for the registry.
The registry JNDI Name is created as a result of the following steps:
■ A resource adapter is created that can talk to the registry.■ In the application server context, a JAXR resource adapter comes preconfigured to talk to a
UDDI registry. You can also download a SOA registry resource adapter module. The SOAregistry is the Sun specific ebXML registry.
■ Create a connection resource pool using the resource adapter.■ Create a connector resource using this connection pool.
Publishing a Web Service to a RegistryTo publish a web service with Admin Console, select Applications > Web Services >web-service-name | Publish.
In the Publish Web Service screen, select one or more registries to which you want to publishthe web service, then click Publish. To publish to all the available registries, click the Add Allbutton.
Enter categories under which this web service will show up in the registry. Use a comma toseparate each category. The categories are defined in the registry you are using. Enter adescription for this web service. Enter the name of the organization, if you are publishing to aUDDI registry.
If you are using a load balancer, enter the Load Balancer host name, port number, and the SSLport number. If you are publishing the web service to an external registry, where the WSDL canbe found over the internet, these options will replace the hostname and port name specified inthe WSDL to the one of the load balancer.
To un-publish a web service, In the Publish Web Service screen, select the registry from whichyou want to unpublish the web service, then click Unpublish.
Using Web Services Registries
Chapter 14 • Managing Web Services 157

Transforming Messages with XSLT FiltersYou can apply XSLT transformation rules to a web service end point. This enables fine-grainedcontrol of web service requests and responses. You can apply multiple XSLT rules to a webservice end point method, and you can configure the order in which you apply thetransformations. All the XSLT files are stored in the generated/xml/appOrModule directory ofthe central repository. These transformation rules are synchronized to the remote serverinstances.
You can apply transformation rule to a SOAP request or response.
To add a transformation rule to apply to a web service operation with Admin Console, selectApplications > Web Services > web-service-name | Transformation. Click Add.
A list of transformation rule available for this web service end point is displayed.
Browse to the location of the XSLT file that contains the transformation rule. All the generatedXSLT files are stored in the generated/xml/application or module name/ directory.
If you add multiple transformation rules for a web service endpoint, the transformation rulesare applied in the order in which they are added.
To enable a transformation rule, in the Transformation Rules page select the check boxcorresponding to the rule, then click Enable. To disable the a rule, click Disable.
To remove a transformation rule, in the Transformation Rules page select the check boxcorresponding to the rule, then click Remove. This removes the transformation rule from thelist. If this transformation rule is applied to a web service endpoint, it is automatically disabled.However, the XSLT file remains in the file path location. Other web service endpoints can usethis XSLT file.
Monitoring Web ServicesAdmin console can track and graphically display operational statistics for web services, and candisplay messages sent and received by web services.
To enable monitoring for a web service, with Admin Console, select Applications > WebServices > web-service-name | Monitor | Configuration.
In the Monitoring Configuration page, set the monitoring level:
■ LOW- Monitors response time, throughput, total number of requests, and faults for the webservice. Does not perform method-level monitoring.
■ HIGH- Adds message tracing and monitoring of number of requests per second, averageresponse time, and throughput attributes.
Transforming Messages with XSLT Filters
Sun GlassFish Enterprise Server v2.1.1 Administration Guide • October 2009158

■ OFF- Disables monitoring.
Enter a value for the Message History. The default is 25. Click the Reset button to clear allstatistics and the running averages are restarted.
Viewing Web Service StatisticsEnterprise Serverv2.1.1 provides capabilities to track and graphically display the operationalstatistics of a web service.
View monitoring statistics at Applications > Web Services > web-service-name | Monitor |Statistics. The statistics available are:
■ Response time in milli seconds on any successful or unsuccessful operation (Maximum,Minimum, Average).
■ Throughput■ Total number of requests■ Total number of faults, including URI of the endpoint where the fault originated■ Total number of authentication failures■ Total number of authorization success
Monitoring Web Service MessagesYou can also configure a web service to view messages (default is 25) for a web service endpoint.These messages are stored in the memory of remote server instances. Details of SOAP request,response, and HTTP header information are displayed.
Monitor web service messages at Applications > Web Services > web-service-name | Monitor |Messages.
When enabled, you can see the last few (default is 25) messages for a web service end point.These messages are kept in memory of the remote server instances, including details of SOAPrequests and responses and HTTP header information.
Displays a list of messages received for the web service. The number of messages displayeddepends on the monitoring configuration.
You can also select a filter to view only the success messages or the failure messages.
Monitoring Web Services
Chapter 14 • Managing Web Services 159

160

Configuring the Object Request Broker
This chapter describes how to configure the Object Request Broker (ORB) and IIOP listeners. Ithas the following sections:
■ “An Overview of the Object Request Broker” on page 161■ “Configuring the ORB” on page 162■ “Managing IIOP Listeners” on page 162
An Overview of the Object Request Broker■ “CORBA” on page 161■ “What is the ORB?” on page 162■ “IIOP Listeners” on page 162
CORBAThe Enterprise Server supports a standard set of protocols and formats that ensureinteroperability. Among these protocols are those defined by CORBA.
The CORBA (Common Object Request Broker Architecture) model is based on clientsrequesting services from distributed objects or servers through a well-defined interface byissuing requests to the objects in the form of remote method requests. A remote method requestcarries information about the operation that needs to be performed, including the object name(called an object reference) of the service provider and parameters, if any, for the invokedmethod. CORBA automatically handles network programming tasks such as objectregistration, object location, object activation, request de-multiplexing, error-handling,marshalling, and operation dispatching.
15C H A P T E R 1 5
161

What is the ORB?The Object Request Broker (ORB) is the central component of CORBA. The ORB provides therequired infrastructure to identify and locate objects, handle connection management, deliverdata, and request communication.
A CORBA object never talks directly with another. Instead, the object makes requests through aremote stub to the ORB running on the local machine. The local ORB then passes the request toan ORB on the other machine using the Internet Inter-Orb Protocol (IIOP for short). Theremote ORB then locates the appropriate object, processes the request, and returns the results.
IIOP can be used as a Remote Method Invocation (RMI) protocol by applications or objectsusing RMI-IIOP. Remote clients of enterprise beans (EJB modules) communicate with theEnterprise Server via RMI-IIOP.
IIOP ListenersAn IIOP listener is a listen socket that accepts incoming connections from the remote clients ofenterprise beans and from other CORBA-based clients. Multiple IIOP listeners can beconfigured for the Enterprise Server. For each listener, specify a port number, a networkaddress, and optionally, security attributes.
Configuring the ORBTo configure ORB, in the Admin Console, click the Configuration tab. Click the ORB tabcorresponding to the instance you want to configure.
Managing IIOP ListenersTo create, edit and delete IIOP listeners, click the Configuration tab in the Admin Console.Click the ORB tab corresponding to the instance you want to configure. Select the IIOPListeners tab. For more detailed instructions, consult the Admin Console Online Help.
Configuring the ORB
Sun GlassFish Enterprise Server v2.1.1 Administration Guide • October 2009162

Thread Pools
The Java Virtual Machine (JVM) can support many threads of execution at once. To helpperformance, the Enterprise Server maintains one or more thread pools. It is possible to assignspecific thread pools to connector modules and to the ORB.
One thread pool can serve multiple connector modules and enterprise beans. Request threadshandle user requests for application components. When the server receives a request, it assignsthe request to a free thread from the thread pool. The thread executes the client's requests andreturns results. For example, if the request needs to use a system resource that is currently busy,the thread waits until that resource is free before allowing the request to use that resource.
Specify the minimum and maximum number of threads that are reserved for requests fromapplications. The thread pool is dynamically adjusted between these two values. The minimumthread pool size that is specified signals the server to allocate at least that many threads inreserve for application requests. That number is increased up to the maximum thread pool sizethat is specified.
Increasing the number of threads available to a process allows the process to respond to moreapplication requests simultaneously.
Avoid thread starvation, where one resource adapter or application occupies all threads in theEnterprise Server, by dividing the Enterprise Server threads into different thread-pools.
This chapter contains the following topics:
■ “Working with Thread Pools” on page 164
16C H A P T E R 1 6
163

Working with Thread PoolsTo create a thread pool using the Admin Console, go to Configuration > Thread Pools >Current Pools > New.
■ Enter the name of the thread pool in the Thread Pool ID field.■ Enter the minimum number of threads in the thread pool servicing requests in this queue in
the Minimum Thread Pool Size field.These threads are created up front when this thread pool is instantiated.
■ Enter the maximum number of threads in the thread pool servicing requests in this queue inthe Maximum Thread Pool Size field.This is the upper limit on the number of threads that exist in the thread pool.
■ Enter the number, in seconds, after which idle threads are removed from pool in the IdleTimeout field.
■ Enter the total number of work queues that are serviced by this thread pool in the Numberof Work Queues field.
■ Restart the Enterprise Server.
For more details on creating thread pools, click Help in the Admin Console.
You can also create a thread pool from the command-line by using the asadmin command,create-threadpool.
To edit a settings for a thread pool using the Admin Console, go to Configuration > ThreadPools > Current Pools and select the pool you want to configure. Modify the values for theselected thread pool, save and restart the Enterprise Server.
For more details on editing thread pools, click Help in the Admin Console.
To delete a thread pool using the Admin Console, go to Configuration > Thread Pools >Current Pools. Check the thread pool name to be deleted and click Delete.
You can also create a thread pool from the command-line by using the asadmin command,delete-threadpool.
Working with Thread Pools
Sun GlassFish Enterprise Server v2.1.1 Administration Guide • October 2009164
Configuring Logging
This chapter briefly describes how to configure logging and view the server log. It contains thefollowing sections:
■ “About Logging” on page 165■ “Configuring Logging” on page 167
About Logging■ “Log Records” on page 165■ “Module Log Levels” on page 166
Log RecordsThe Enterprise Server uses the Java EE platform Logging API specified in JSR 047. EnterpriseServer logging messages are recorded in the server log, normally found atdomain-dir/logs/server.log. When a log is rotated, Enterprise Server creates a new, emptyfile named server.log and renames the old file server.log_date, where date is the date andtime when the file was rotated.
The components of the Enterprise Server generate logging output. Application components canalso generate logging output.
Application components may use the Apache Commons Logging Library to log messages. Theplatform standard JSR 047 API, however, is recommended for better log configuration.
Log records follow a uniform format:
[#|yyyy-mm-ddThh:mm:ss.SSS-Z|Log Level|ProductName-Version|LoggerName|Key Value Pairs|Message|#]
For example:
17C H A P T E R 1 7
165

[#|2006-10-21T13:25:53.852-0400|INFO|sun-appserver9.1|javax.enterprise.
system.core|_ThreadID=13;|CORE5004: Resource Deployed:
[cr:jms/DurableConnectionFactory].|#]
In this example,■ [# and #] mark the beginning and end of the record.■ The vertical bar (|) separates the record fields.■ 2006-10-21T13:25:53.852-0400 specifies the date and time.■ The Log Level is INFO. This level may have any of the following values: SEVERE, WARNING,
INFO, CONFIG, FINE, FINER, and FINEST.■ The ProductName-Version is sun-glassfish-comms-server2.0.■ The LoggerName is a hierarchical logger namespace that identifies the source of the log
module, in this case javax.enterprise.system.core.■ The Key Value Pairs are key names and values, typically a thread ID such as _ThreadID=14;.■ The Message is the text of the log message. For all Enterprise Server SEVERE and WARNING
messages and many INFO messages, it begins with a message ID that consists of a modulecode and a numerical value (in this case, CORE5004).
The log record format might be changed or enhanced in future releases.
Module Log LevelsThe Enterprise Server provides a logger for each of its modules.
asadmin> get server-config.log-service.module-log-levels.*
server-config.log-service.module-log-levels.admin = INFO
server-config.log-service.module-log-levels.classloader = INFO
server-config.log-service.module-log-levels.cmp = INFO
server-config.log-service.module-log-levels.cmp-container = INFO
server-config.log-service.module-log-levels.configuration = INFO
server-config.log-service.module-log-levels.connector = INFO
server-config.log-service.module-log-levels.corba = INFO
server-config.log-service.module-log-levels.deployment = INFO
server-config.log-service.module-log-levels.ejb-container = INFO
server-config.log-service.module-log-levels.group-management-service = INFO
server-config.log-service.module-log-levels.javamail = INFO
server-config.log-service.module-log-levels.jaxr = INFO
server-config.log-service.module-log-levels.jaxrpc = INFO
server-config.log-service.module-log-levels.jdo = INFO
server-config.log-service.module-log-levels.jms = INFO
server-config.log-service.module-log-levels.jta = INFO
server-config.log-service.module-log-levels.jts = INFO
server-config.log-service.module-log-levels.management-event = INFO
About Logging
Sun GlassFish Enterprise Server v2.1.1 Administration Guide • October 2009166

server-config.log-service.module-log-levels.mdb-container = INFO
server-config.log-service.module-log-levels.naming = INFO
server-config.log-service.module-log-levels.node-agent = INFO
server-config.log-service.module-log-levels.resource-adapter = INFO
server-config.log-service.module-log-levels.root = INFO
server-config.log-service.module-log-levels.saaj = INFO
server-config.log-service.module-log-levels.security = INFO
server-config.log-service.module-log-levels.self-management = INFO
server-config.log-service.module-log-levels.server = INFO
server-config.log-service.module-log-levels.synchronization = INFO
server-config.log-service.module-log-levels.util = INFO
server-config.log-service.module-log-levels.verifier = INFO
server-config.log-service.module-log-levels.web-container = INFO
Configuring LoggingThis section contains the following topics:■ “Configuring General Logging Settings” on page 167■ “Configuring Log Levels” on page 167■ “Viewing Server Logs” on page 168
Configuring General Logging SettingsTo configure the general logging settings using the Admin Console:■ For the developer profile, go to Application Server → Logging → General■ For the cluster and enterprise profile, go to Configurations → Configuration → Logging
Settings → General
On the General page, enter appropriate values to customize logging to your requirements. Stopand restart the Enterprise Server.
For details on setting the various configuration parameters, click Help in the Admin Console.
To configure these log settings in asadmin, use the get and set commands.
Configuring Log LevelsTo configure log levels using the Admin Console:■ For the developer profile, go to Application Server → Logging → Log Levels■ For the cluster and enterprise profiles, go to Configurations → Configuration → Logging →
Logging Settings → Log Levels
Configuring Logging
Chapter 17 • Configuring Logging 167

Set the log level for the modules listed on this page. Use the Additional Properties area toconfigure log levels for any application loggers. For a list of the module loggers, see “ModuleLog Levels” on page 166.
For details on setting the various configuration parameters, click Help in the Admin Console.
To configure these log settings in asadmin, use the get and set commands.
For example, to set the logging level of the SIP container to FINE, use the following setcommand:
asadmin set server-config.log-service.module-log-levels.property.sip=FINE
Viewing Server LogsTo view the log files:■ In the developer profile, go to Applications Server → Logging → View Log Files.■ In the cluster and enterprise profiles, go to Configurations → Configuration → Logger
Settings → General, and click View Log Files.
Use the options provided in the Search Criteria area to display log results based on yourpreferences.■ Instance Name — Choose an instance name from the drop-down list to view the log for that
server instance. The default is the current server instance.■ Log File — Choose a log file name from the drop-down list to view the contents of that log.
The default is server.log.■ Timestamp — To view the most recent messages, select Most Recent (the default). To view
messages only from a certain period of time, select Specific Range and type a date and timevalue in the From and To fields that appear. For the Time value, the syntax must take thefollowing form (SSS stands for milliseconds):
hh:mm:ss.SSS
For example:
17:10:00.000
If the From value is later than the To value, an error message appears.■ Log Level — To filter messages by log level, choose a log level from the drop-down list. By
default, the display includes all messages that appear in the server log at the chosen log leveland more severe levels. Select the checkbox labeled “Do not include more severe messages”to display messages at only the chosen level.To ensure that the messages you want to view appear in the server log, first set theappropriate log levels on the Log Levels page. See “Configuring Log Levels” on page 167.
Configuring Logging
Sun GlassFish Enterprise Server v2.1.1 Administration Guide • October 2009168

If you choose to filter log messages based on log level, only messages matching the specifiedfilter criteria are shown. However, this filtering does not affect which messages are logged tothe server log.The most recent 40 entries in the server log appear, with the settings specified on theLogging Settings and Log Levels pages.Click the arrow next to the Timestamp header to sort the messages so that the most recentone appears last.To view a formatted version of any message, click the link marked
(details)
A window labeled Log Entry Detail appears, with a formatted version of the message.
At the end of the list of entries, click the buttons to view earlier or later entries in the log file.
Click Advanced Search in the Search Criteria area to make additional refinements to the logviewer. Use the Advanced Options fields as follows:
■ Logger — To filter by module, choose one or more namespaces from the drop-down list.Use shift-click or control-click to choose multiple namespaces.Selecting a namespace at a higher level selects all the namespaces below it. For example,selecting javax.enterprise.system also selects the loggers for all the modules under thatnamespace: javax.enterprise.system.core, javax.enterprise.system.tools.admin,and so on.
■ Custom Logger — To view messages from loggers specific to a particular application, typethe logger names in the text field, one per line. If the application has several modules, youcan view any or all of them. For example, suppose the application has loggers with thefollowing names:
com.mycompany.myapp.module1
com.mycompany.myapp.module2
com.mycompany.myapp.module3
To view messages from all modules in the application, type com.mycompany.myapp. To viewmessages from module2 only, type com.mycompany.myapp.module2.
When you specify one or more custom loggers, messages from Enterprise Server modulesappear only if you specify them explicitly in the Logger area.
■ Name-Value Pairs — To view output from a specific thread, type the key name and valuefor that thread in the text field. The key name is _ThreadID. For example:
_ThreadID=13
Suppose that com.mycompany.myapp.module2 runs in several threads. To refine the logviewer to show only the output from a single thread, specify that module’s logger in theCustom Logger field, and then specify the thread ID in this field.
Configuring Logging
Chapter 17 • Configuring Logging 169

■ Display — To view more than 40 messages at a time (the default), choose another of theavailable values from the drop-down list (100, 250, or 1000).To view stack traces, deselect the “Limit excessively long messages” checkbox. By default,stack traces do not appear in the viewer; to view them, click the (details) link for amessage.Click Basic Search to hide the Advanced Options area.
Configuring Logging
Sun GlassFish Enterprise Server v2.1.1 Administration Guide • October 2009170

Monitoring Components and Services
This chapter contains information about monitoring components using the Enterprise ServerAdmin Console. This chapter contains the following sections:
■ “About Monitoring” on page 171■ “Enabling and Disabling Monitoring” on page 190■ “Viewing Monitoring Data” on page 192■ “Using JConsole” on page 208
About Monitoring■ “Monitoring in the Enterprise Server” on page 171■ “Overview of Monitoring” on page 172■ “The Tree Structure of Monitorable Objects” on page 172■ “Statistics for Monitored Components and Services” on page 175
Monitoring in the Enterprise ServerUse monitoring to observe the runtime state of various components and services deployed in aserver instance of theEnterprise Server. With the information on the state of runtimecomponents and processes, it is possible to identify performance bottlenecks for tuningpurposes, aid capacity planning, predict failures, do root cause analysis in case of failures, andensure that everything is functioning as expected.
Turning monitoring on reduces performance by increasing overhead.
You can also use management rules to alert you of potential problems with your server, andoptionally take action when the server reaches certain performance thresholds. For moreinformation, see Chapter 19, “Configuring Management Rules.”
18C H A P T E R 1 8
171

Overview of MonitoringTo monitor the Enterprise Server, perform these steps:
1. Enable the monitoring of specific services and components using either the Admin Consoleor the asadmin tool.For more information on this step, refer to “Enabling and Disabling Monitoring” onpage 190.
2. View monitoring data for the specified services or components using either the AdminConsole or the asadmin tool.For more information on this step, refer to “Viewing Monitoring Data” on page 192.
The Tree Structure of Monitorable ObjectsThe Enterprise Server uses a tree structure to track monitorable objects. Because the tree ofmonitoring objects is dynamic, it changes as components are added, updated, or removed in theinstance. The root object in the tree is the server instance name, for example, server. (In thePlatform Edition, just one server instance is permitted.)
The following command displays the top level of the tree:
asadmin> list --user adminuser --monitor server
server.applications
server.http-service
server.connector-service
server.jms-service
server.jvm
server.orb
server.resources
server.thread-pools
The following sections describe these sub-trees:■ “The Applications Tree” on page 172■ “The HTTP Service Tree” on page 173■ “The Resources Tree” on page 174■ “The Connector Service Tree” on page 174■ “The JMS Service Tree” on page 174■ “The ORB Tree” on page 175■ “The Thread Pool Tree” on page 175
The Applications TreeThe following schematic shows the top and child nodes for the various components ofenterprise applications. The nodes at which monitoring statistics are available are marked withan asterisk (*). For more information, refer to “EJB Container Statistics” on page 176.
About Monitoring
Sun GlassFish Enterprise Server v2.1.1 Administration Guide • October 2009172
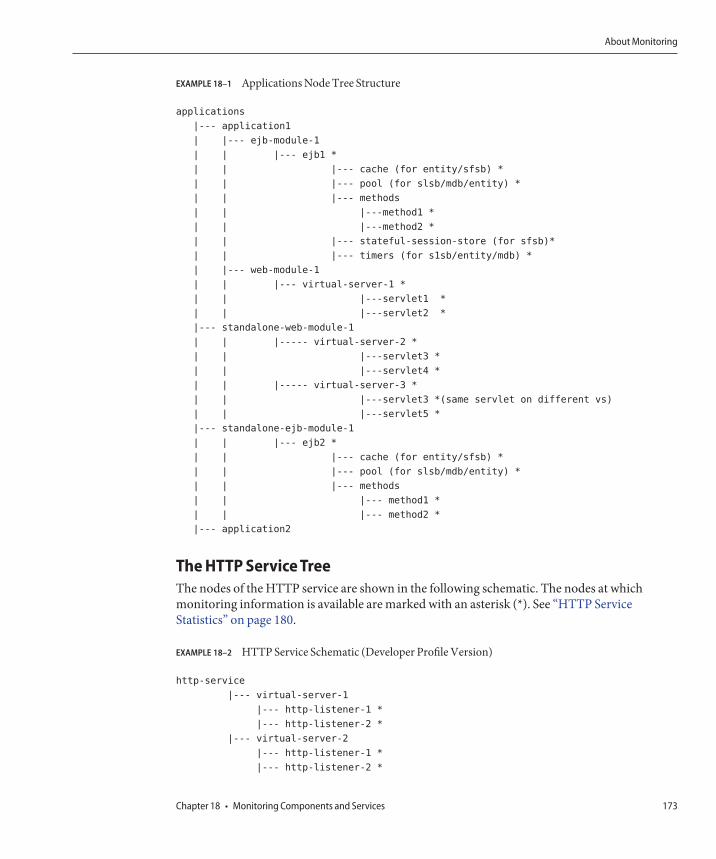
EXAMPLE 18–1 Applications Node Tree Structure
applications
|--- application1
| |--- ejb-module-1
| | |--- ejb1 *
| | |--- cache (for entity/sfsb) *
| | |--- pool (for slsb/mdb/entity) *
| | |--- methods
| | |---method1 *
| | |---method2 *
| | |--- stateful-session-store (for sfsb)*
| | |--- timers (for s1sb/entity/mdb) *
| |--- web-module-1
| | |--- virtual-server-1 *
| | |---servlet1 *
| | |---servlet2 *
|--- standalone-web-module-1
| | |----- virtual-server-2 *
| | |---servlet3 *
| | |---servlet4 *
| | |----- virtual-server-3 *
| | |---servlet3 *(same servlet on different vs)
| | |---servlet5 *
|--- standalone-ejb-module-1
| | |--- ejb2 *
| | |--- cache (for entity/sfsb) *
| | |--- pool (for slsb/mdb/entity) *
| | |--- methods
| | |--- method1 *
| | |--- method2 *
|--- application2
The HTTP Service TreeThe nodes of the HTTP service are shown in the following schematic. The nodes at whichmonitoring information is available are marked with an asterisk (*). See “HTTP ServiceStatistics” on page 180.
EXAMPLE 18–2 HTTP Service Schematic (Developer Profile Version)
http-service
|--- virtual-server-1
|--- http-listener-1 *
|--- http-listener-2 *
|--- virtual-server-2
|--- http-listener-1 *
|--- http-listener-2 *
About Monitoring
Chapter 18 • Monitoring Components and Services 173
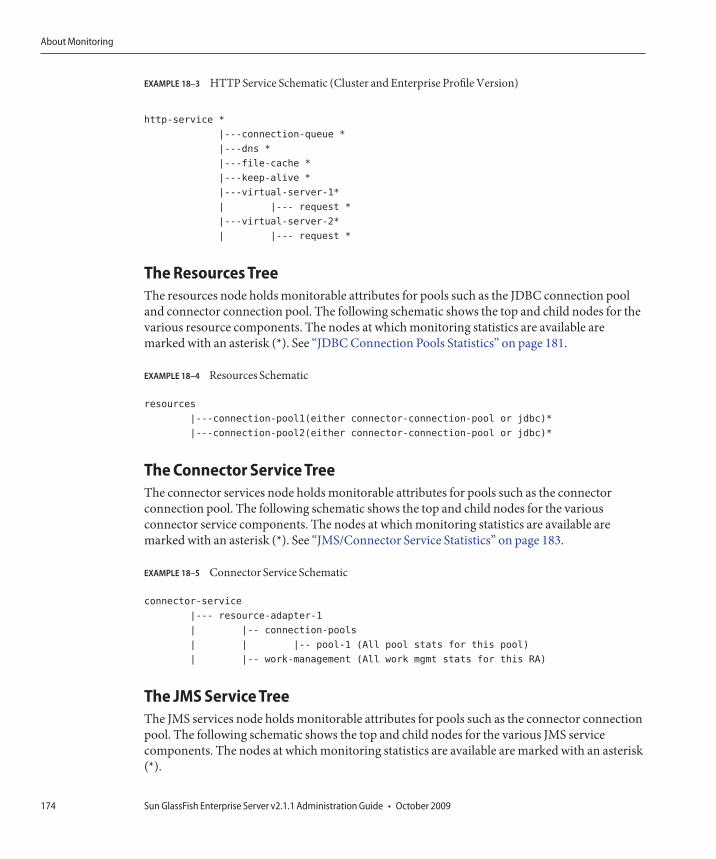
EXAMPLE 18–3 HTTP Service Schematic (Cluster and Enterprise Profile Version)
http-service *
|---connection-queue *
|---dns *
|---file-cache *
|---keep-alive *
|---virtual-server-1*
| |--- request *
|---virtual-server-2*
| |--- request *
The Resources TreeThe resources node holds monitorable attributes for pools such as the JDBC connection pooland connector connection pool. The following schematic shows the top and child nodes for thevarious resource components. The nodes at which monitoring statistics are available aremarked with an asterisk (*). See “JDBC Connection Pools Statistics” on page 181.
EXAMPLE 18–4 Resources Schematic
resources
|---connection-pool1(either connector-connection-pool or jdbc)*
|---connection-pool2(either connector-connection-pool or jdbc)*
The Connector Service TreeThe connector services node holds monitorable attributes for pools such as the connectorconnection pool. The following schematic shows the top and child nodes for the variousconnector service components. The nodes at which monitoring statistics are available aremarked with an asterisk (*). See “JMS/Connector Service Statistics” on page 183.
EXAMPLE 18–5 Connector Service Schematic
connector-service
|--- resource-adapter-1
| |-- connection-pools
| | |-- pool-1 (All pool stats for this pool)
| |-- work-management (All work mgmt stats for this RA)
The JMS Service TreeThe JMS services node holds monitorable attributes for pools such as the connector connectionpool. The following schematic shows the top and child nodes for the various JMS servicecomponents. The nodes at which monitoring statistics are available are marked with an asterisk(*).
About Monitoring
Sun GlassFish Enterprise Server v2.1.1 Administration Guide • October 2009174

EXAMPLE 18–6 JMS Service Schematic
jms-service
|-- connection-factories [AKA conn. pools in the RA world]
| |-- connection-factory-1 (All CF stats for this CF)
|-- work-management (All work mgmt stats for the MQ-RA)
The ORB TreeThe ORB node holds monitorable attributes for connection managers. The following schematicshows the top and child nodes for the ORB components. The nodes at which monitoringstatistics are available are marked with an asterisk (*). See “Statistics for Connection Managersin an ORB” on page 184.
EXAMPLE 18–7 ORB Schematic
orb
|--- connection-managers
| |--- connection-manager-1 *
| |--- connection-manager-1 *
The Thread Pool TreeThe thread pool node holds monitorable attributes for connection managers. The followingschematic shows the top and child nodes for the ORB components. The nodes at whichmonitoring statistics are available are marked with an asterisk (*). See “Thread Pools Statistics”on page 185.
EXAMPLE 18–8 Thread Pool Schematic
thread-pools
| |--- thread-pool-1 *
| |--- thread-pool-2 *
Statistics for Monitored Components and ServicesThis section describes the monitoring statistics that are available:
■ “EJB Container Statistics” on page 176■ “Web Container Statistics” on page 179■ “HTTP Service Statistics” on page 180■ “JDBC Connection Pools Statistics” on page 181■ “JMS/Connector Service Statistics” on page 183■ “Statistics for Connection Managers in an ORB” on page 184■ “Thread Pools Statistics” on page 185■ “Transaction Service Statistics” on page 185
About Monitoring
Chapter 18 • Monitoring Components and Services 175
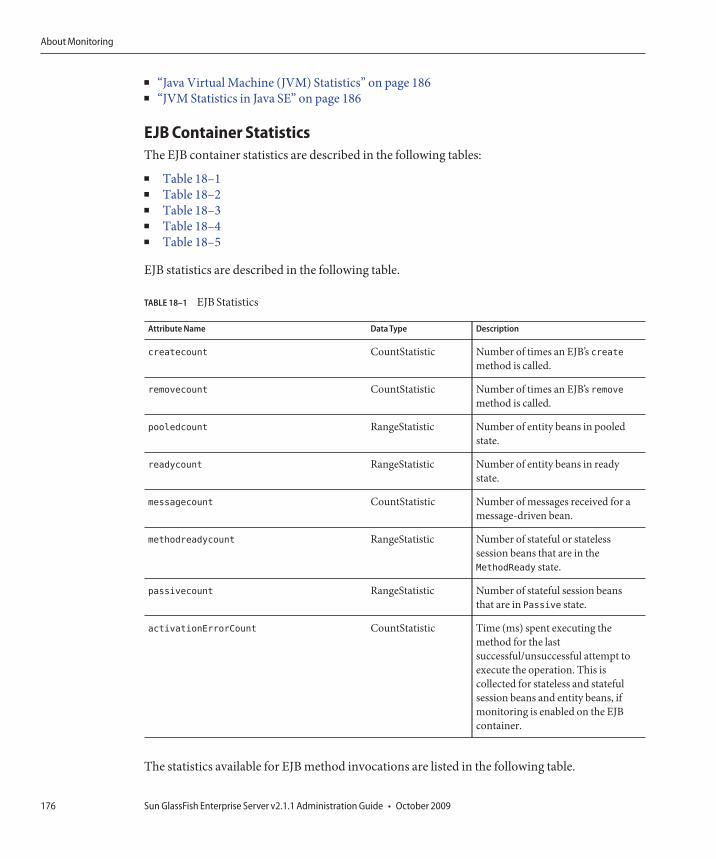
■ “Java Virtual Machine (JVM) Statistics” on page 186■ “JVM Statistics in Java SE” on page 186
EJB Container StatisticsThe EJB container statistics are described in the following tables:
■ Table 18–1■ Table 18–2■ Table 18–3■ Table 18–4■ Table 18–5
EJB statistics are described in the following table.
TABLE 18–1 EJB Statistics
Attribute Name Data Type Description
createcount CountStatistic Number of times an EJB’s createmethod is called.
removecount CountStatistic Number of times an EJB’s removemethod is called.
pooledcount RangeStatistic Number of entity beans in pooledstate.
readycount RangeStatistic Number of entity beans in readystate.
messagecount CountStatistic Number of messages received for amessage-driven bean.
methodreadycount RangeStatistic Number of stateful or statelesssession beans that are in theMethodReady state.
passivecount RangeStatistic Number of stateful session beansthat are in Passive state.
activationErrorCount CountStatistic Time (ms) spent executing themethod for the lastsuccessful/unsuccessful attempt toexecute the operation. This iscollected for stateless and statefulsession beans and entity beans, ifmonitoring is enabled on the EJBcontainer.
The statistics available for EJB method invocations are listed in the following table.
About Monitoring
Sun GlassFish Enterprise Server v2.1.1 Administration Guide • October 2009176

TABLE 18–2 EJB Method Statistics
Attribute Name Data Type Description
methodstatistic TimeStatistic Number of times an operation iscalled; the total time that is spentduring the invocation, and so on.
totalnumerrors CountStatistic Number of times the methodexecution resulted in an exception.This is collected for stateless andstateful session beans and entitybeans if monitoring is enabled forthe EJB container.
totalnumsuccess CountStatistic Number of times the methodsuccessfully executed. This iscollected for stateless and statefulsession beans and entity beans ifmonitoring enabled is true for EJBcontainer.
executiontime CountStatistic Time (ms) spent executing themethod for the lastsuccessful/unsuccessful attempt toexecute the operation. This iscollected for stateless and statefulsession beans and entity beans ifmonitoring is enabled on the EJBcontainer.
The statistics available for EJB pools are listed in the following table.
TABLE 18–3 EJB Pool Statistics
Attribute Name Data Type Description
numbeansinpool BoundedRangeStatistic Number of EJB’s in the associated pool,providing an idea about how the poolis changing.
numthreadswaiting BoundedRangeStatistic Number of threads waiting for freebeans, giving an indication of possiblecongestion of requests.
totalbeanscreated CountStatistic Number of beans created in associatedpool since the gathering of datastarted.
About Monitoring
Chapter 18 • Monitoring Components and Services 177

TABLE 18–3 EJB Pool Statistics (Continued)Attribute Name Data Type Description
totalbeansdestroyed CountStatistic Number of beans destroyed fromassociated pool since the gathering ofdata started.
jmsmaxmessagesload CountStatistic The maximum number of messages toload into a JMS session at one time fora message-driven bean to serve.Default is 1. Applies only to pools formessage driven beans.
The statistics available for EJB caches are listed in the following table.
TABLE 18–4 EJB Cache Statistics
Attribute Name Data Type Description
cachemisses BoundedRangeStatistic The number of times a user request does notfind a bean in the cache.
cachehits BoundedRangeStatistic The number of times a user request found anentry in the cache.
numbeansincache BoundedRangeStatistic The number of beans in the cache. This is thecurrent size of the cache.
numpassivations CountStatistic Number of passivated beans. Applies only tostateful session beans.
numpassivationerrors CountStatistic Number of errors during passivation. Appliesonly to stateful session beans.
numexpiredsessionsremoved CountStatistic Number of expired sessions removed by thecleanup thread. Applies only to statefulsession beans.
numpassivationsuccess CountStatistic Number of times passivation completedsuccessfully. Applies only to stateful sessionbeans.
The statistics available for Timers are listed in the following table.
TABLE 18–5 Timer Statistics
Statistic Data Type Description
numtimerscreated CountStatistic Number of timers created in the system.
About Monitoring
Sun GlassFish Enterprise Server v2.1.1 Administration Guide • October 2009178

TABLE 18–5 Timer Statistics (Continued)Statistic Data Type Description
numtimersdelivered CountStatistic Number of timers delivered by the system.
numtimersremoved CountStatistic Number of timers removed from the system.
Web Container StatisticsThe web container fits into the tree of objects as shown in “The Applications Tree” on page 172.Web container statistics are displayed for each individual web application. Statistics availablefor the web container for servlets are shown in Table 18–6, and statistics available for webmodules are shown in Table 18–7.
TABLE 18–6 Web Container (Servlet) Statistics
Statistic Units Data Type Comments
errorcount Number CountStatistic Cumulative number of cases where theresponse code is greater than or equal to400.
maxtime Milliseconds CountStatistic The maximum amount of time the webcontainer waits for requests.
processingtime Milliseconds CountStatistic Cumulative value of the amount of timerequired to process each request. Theprocessing time is the average of requestprocessing times divided by the requestcount.
requestcount Number CountStatistic The total number of requests processed sofar.
Statistics available for web modules are shown in “Web Container Statistics” on page 179.
TABLE 18–7 Web Container (Web Module) Statistics
Statistic Data Type Comments
jspcount CountStatistic Number of JSP pages that havebeen loaded in the web module.
jspreloadcount CountStatistic Number of JSP pages that havebeen reloaded in the web module.
sessionstotal CountStatistic Total number of sessions thathave been created for the webmodule.
About Monitoring
Chapter 18 • Monitoring Components and Services 179
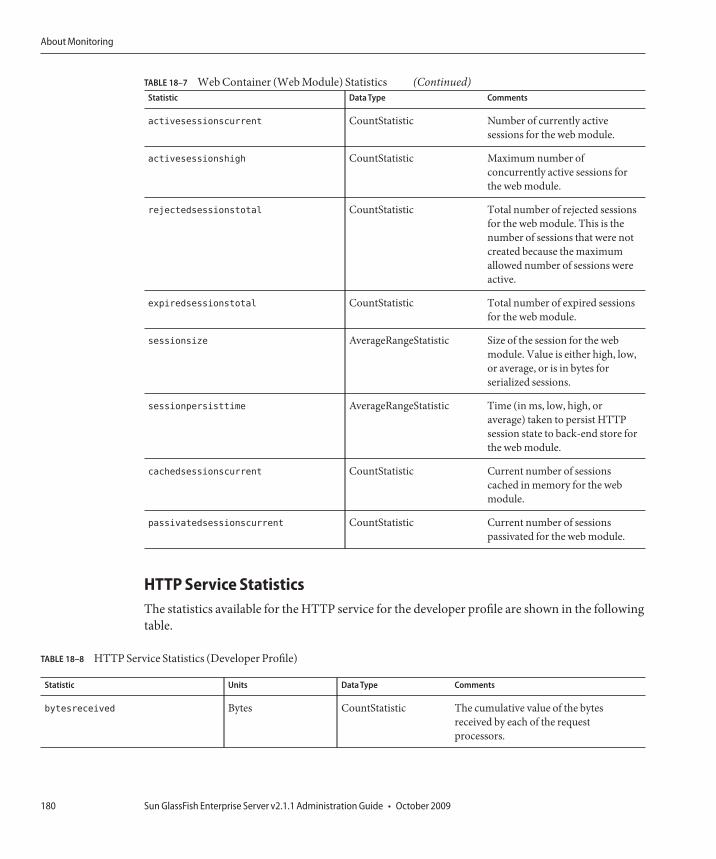
TABLE 18–7 Web Container (Web Module) Statistics (Continued)Statistic Data Type Comments
activesessionscurrent CountStatistic Number of currently activesessions for the web module.
activesessionshigh CountStatistic Maximum number ofconcurrently active sessions forthe web module.
rejectedsessionstotal CountStatistic Total number of rejected sessionsfor the web module. This is thenumber of sessions that were notcreated because the maximumallowed number of sessions wereactive.
expiredsessionstotal CountStatistic Total number of expired sessionsfor the web module.
sessionsize AverageRangeStatistic Size of the session for the webmodule. Value is either high, low,or average, or is in bytes forserialized sessions.
sessionpersisttime AverageRangeStatistic Time (in ms, low, high, oraverage) taken to persist HTTPsession state to back-end store forthe web module.
cachedsessionscurrent CountStatistic Current number of sessionscached in memory for the webmodule.
passivatedsessionscurrent CountStatistic Current number of sessionspassivated for the web module.
HTTP Service StatisticsThe statistics available for the HTTP service for the developer profile are shown in the followingtable.
TABLE 18–8 HTTP Service Statistics (Developer Profile)
Statistic Units Data Type Comments
bytesreceived Bytes CountStatistic The cumulative value of the bytesreceived by each of the requestprocessors.
About Monitoring
Sun GlassFish Enterprise Server v2.1.1 Administration Guide • October 2009180

TABLE 18–8 HTTP Service Statistics (Developer Profile) (Continued)Statistic Units Data Type Comments
bytessent Bytes CountStatistic The cumulative value of the bytes sent byeach of the request processors.
currentthreadcount Number CountStatistic The number of processing threadscurrently in the listener thread pool.
currentthreadsbusy Number CountStatistic The number of request processingthreads currently in use in the listenerthread pool serving requests.
errorcount Number CountStatistic The cumulative value of the error count,which represents the number of caseswhere the response code is greater than orequal to 400.
maxsparethreads Number CountStatistic The maximum number of unusedresponse processing threads that canexist.
minsparethreads Number CountStatistic The minimum number of unusedresponse processing threads that canexist.
maxthreads Number CountStatistic The maximum number of requestprocessing threads created by the listener.
maxtime Milliseconds CountStatistic The maximum amount of time forprocessing threads.
processing-time Milliseconds CountStatistic The cumulative value of the times takento process each request. The processingtime is the average of request processingtimes divided by the request count.
request-count Number CountStatistic The total number of requests processed sofar.
JDBC Connection Pools StatisticsMonitor JDBC resources to measure performance and capture resource usage at runtime. Asthe creation of JDBC connections are expensive and frequently cause performance bottlenecksin applications, it is crucial to monitor how a JDBC connection pool is releasing and creatingnew connections and how many threads are waiting to retrieve a connection from a particularpool.
The statistics available for the JDBC connection pool are shown in the following table.
About Monitoring
Chapter 18 • Monitoring Components and Services 181
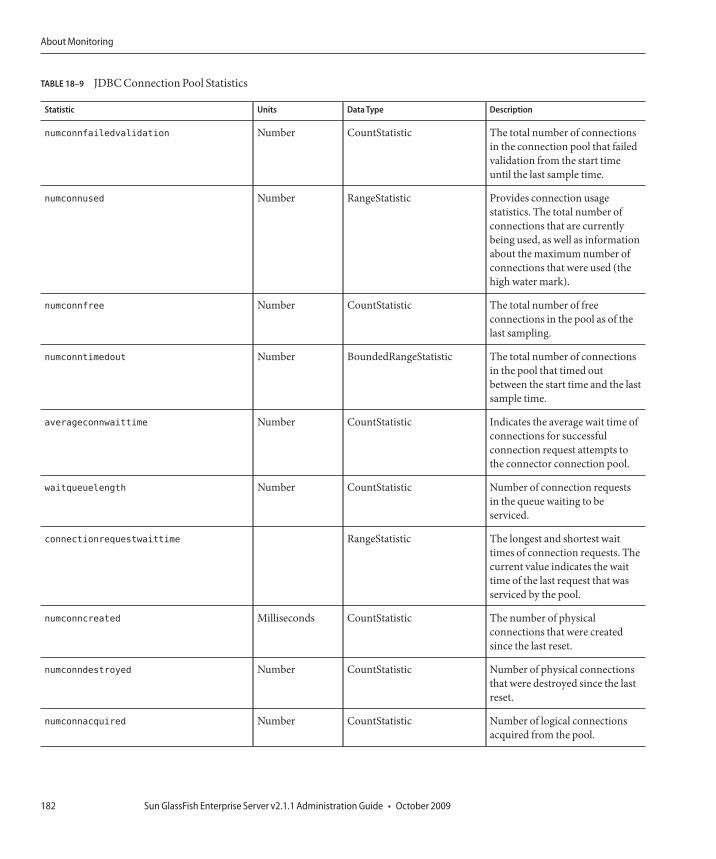
TABLE 18–9 JDBC Connection Pool Statistics
Statistic Units Data Type Description
numconnfailedvalidation Number CountStatistic The total number of connectionsin the connection pool that failedvalidation from the start timeuntil the last sample time.
numconnused Number RangeStatistic Provides connection usagestatistics. The total number ofconnections that are currentlybeing used, as well as informationabout the maximum number ofconnections that were used (thehigh water mark).
numconnfree Number CountStatistic The total number of freeconnections in the pool as of thelast sampling.
numconntimedout Number BoundedRangeStatistic The total number of connectionsin the pool that timed outbetween the start time and the lastsample time.
averageconnwaittime Number CountStatistic Indicates the average wait time ofconnections for successfulconnection request attempts tothe connector connection pool.
waitqueuelength Number CountStatistic Number of connection requestsin the queue waiting to beserviced.
connectionrequestwaittime RangeStatistic The longest and shortest waittimes of connection requests. Thecurrent value indicates the waittime of the last request that wasserviced by the pool.
numconncreated Milliseconds CountStatistic The number of physicalconnections that were createdsince the last reset.
numconndestroyed Number CountStatistic Number of physical connectionsthat were destroyed since the lastreset.
numconnacquired Number CountStatistic Number of logical connectionsacquired from the pool.
About Monitoring
Sun GlassFish Enterprise Server v2.1.1 Administration Guide • October 2009182
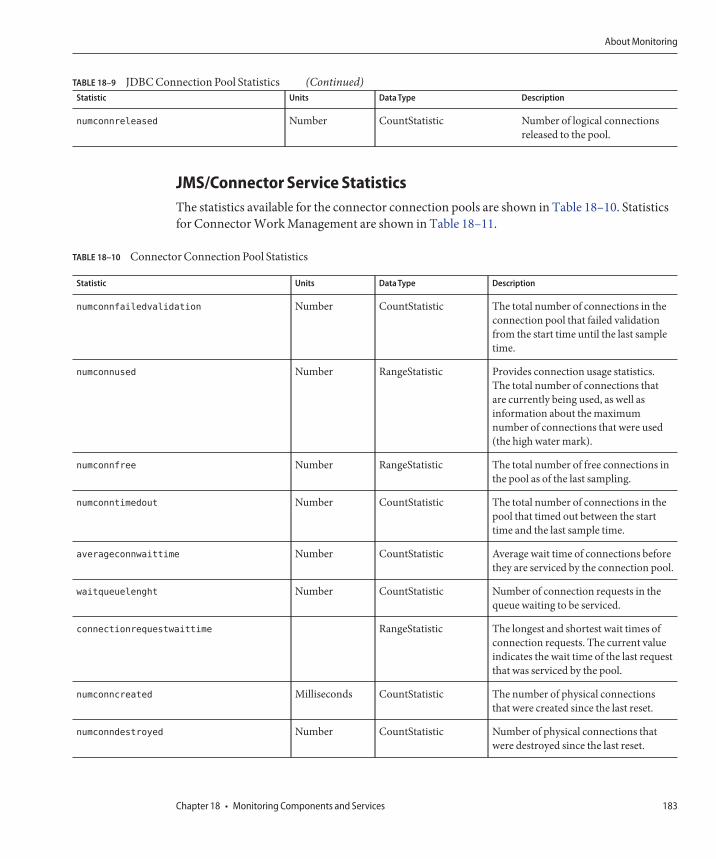
TABLE 18–9 JDBC Connection Pool Statistics (Continued)Statistic Units Data Type Description
numconnreleased Number CountStatistic Number of logical connectionsreleased to the pool.
JMS/Connector Service StatisticsThe statistics available for the connector connection pools are shown in Table 18–10. Statisticsfor Connector Work Management are shown in Table 18–11.
TABLE 18–10 Connector Connection Pool Statistics
Statistic Units Data Type Description
numconnfailedvalidation Number CountStatistic The total number of connections in theconnection pool that failed validationfrom the start time until the last sampletime.
numconnused Number RangeStatistic Provides connection usage statistics.The total number of connections thatare currently being used, as well asinformation about the maximumnumber of connections that were used(the high water mark).
numconnfree Number RangeStatistic The total number of free connections inthe pool as of the last sampling.
numconntimedout Number CountStatistic The total number of connections in thepool that timed out between the starttime and the last sample time.
averageconnwaittime Number CountStatistic Average wait time of connections beforethey are serviced by the connection pool.
waitqueuelenght Number CountStatistic Number of connection requests in thequeue waiting to be serviced.
connectionrequestwaittime RangeStatistic The longest and shortest wait times ofconnection requests. The current valueindicates the wait time of the last requestthat was serviced by the pool.
numconncreated Milliseconds CountStatistic The number of physical connectionsthat were created since the last reset.
numconndestroyed Number CountStatistic Number of physical connections thatwere destroyed since the last reset.
About Monitoring
Chapter 18 • Monitoring Components and Services 183

TABLE 18–10 Connector Connection Pool Statistics (Continued)Statistic Units Data Type Description
numconnacquired Number CountStatistic Number of logical connections acquiredfrom the pool.
numconnreleased Number CountStatistic Number of logical connections releasedto the pool.
Statistics available for Connector Work Management are listed in the following table.
TABLE 18–11 Connector Work Management Statistics
Statistic Data Type Description
activeworkcount RangeStatistic Number of work objects executed by theconnector.
waitqueuelength RangeStatistic Number of work objects waiting in thequeue before executing.
workrequestwaittime RangeStatistic Longest and shortest wait of a work objectbefore it gets executed.
submittedworkcount CountStatistic Number of work objects submitted by aconnector module.
rejectedworkcount CountStatistic Number of work objects rejected by theEnterprise Server.
completedworkcount CountStatistic Number of work objects that werecompleted.
Statistics for Connection Managers in an ORBThe statistics available for the connection manager in an ORB are listed in the following table.
TABLE 18–12 Connection Manager (in an ORB) Statistics
Statistic Units Data Type Description
connectionsidle Number CountStatistic Provides total number ofconnections that are idle to the ORB.
connectionsinuse Number CountStatistic Provides total number ofconnections in use to the ORB.
totalconnections Number BoundedRangeStatistic Total number of connections to theORB.
About Monitoring
Sun GlassFish Enterprise Server v2.1.1 Administration Guide • October 2009184

Thread Pools StatisticsThe statistics available for the thread pool are shown in the following table.
TABLE 18–13 Thread Pool Statistics
Statistic Units Data Type Description
averagetimeinqueue Milliseconds RangeStatistic The average amount of time inmilliseconds a request waited inthe queue before getting processed.
averageworkcompletion-time Milliseconds RangeStatistic The average amount of time takento complete an assignment, inmilliseconds.
currentnumberofthreads Number BoundedRangeStatistic Current number of requestprocessing threads.
numberofavailablethreads Number CountStatistic The number of threads that areavailable.
numberofbusythreads Number CountStatistic The number of threads that arebusy.
totalworkitemsadded Number CountStatistic The total number of work itemsadded so far to the work queue.
Transaction Service StatisticsThe transaction service allows the client to freeze the transaction subsystem in order to roll backtransactions and determine the transactions that are in process at the time of the freeze. Thestatistics available for the transaction service are shown in the following table.
TABLE 18–14 Transaction Service Statistics
Statistic Data Type Description
activecount CountStatistic Number of transactions currently active.
activeids StringStatistic The ID’s of the transactions that arecurrently active. Every such transactioncan be rolled back after freezing thetransaction service.
committedcount CountStatistic Number of transactions that have beencommitted.
rolledbackcount CountStatistic Number of transactions that have beenrolled back.
About Monitoring
Chapter 18 • Monitoring Components and Services 185
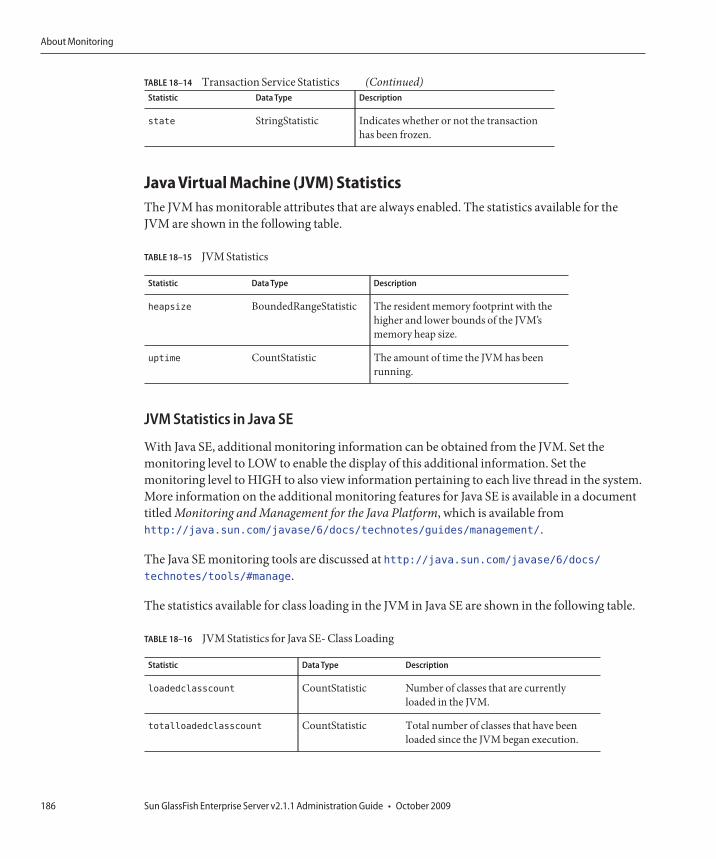
TABLE 18–14 Transaction Service Statistics (Continued)Statistic Data Type Description
state StringStatistic Indicates whether or not the transactionhas been frozen.
Java Virtual Machine (JVM) StatisticsThe JVM has monitorable attributes that are always enabled. The statistics available for theJVM are shown in the following table.
TABLE 18–15 JVM Statistics
Statistic Data Type Description
heapsize BoundedRangeStatistic The resident memory footprint with thehigher and lower bounds of the JVM’smemory heap size.
uptime CountStatistic The amount of time the JVM has beenrunning.
JVM Statistics in Java SE
With Java SE, additional monitoring information can be obtained from the JVM. Set themonitoring level to LOW to enable the display of this additional information. Set themonitoring level to HIGH to also view information pertaining to each live thread in the system.More information on the additional monitoring features for Java SE is available in a documenttitled Monitoring and Management for the Java Platform, which is available fromhttp://java.sun.com/javase/6/docs/technotes/guides/management/.
The Java SE monitoring tools are discussed at http://java.sun.com/javase/6/docs/technotes/tools/#manage.
The statistics available for class loading in the JVM in Java SE are shown in the following table.
TABLE 18–16 JVM Statistics for Java SE- Class Loading
Statistic Data Type Description
loadedclasscount CountStatistic Number of classes that are currentlyloaded in the JVM.
totalloadedclasscount CountStatistic Total number of classes that have beenloaded since the JVM began execution.
About Monitoring
Sun GlassFish Enterprise Server v2.1.1 Administration Guide • October 2009186
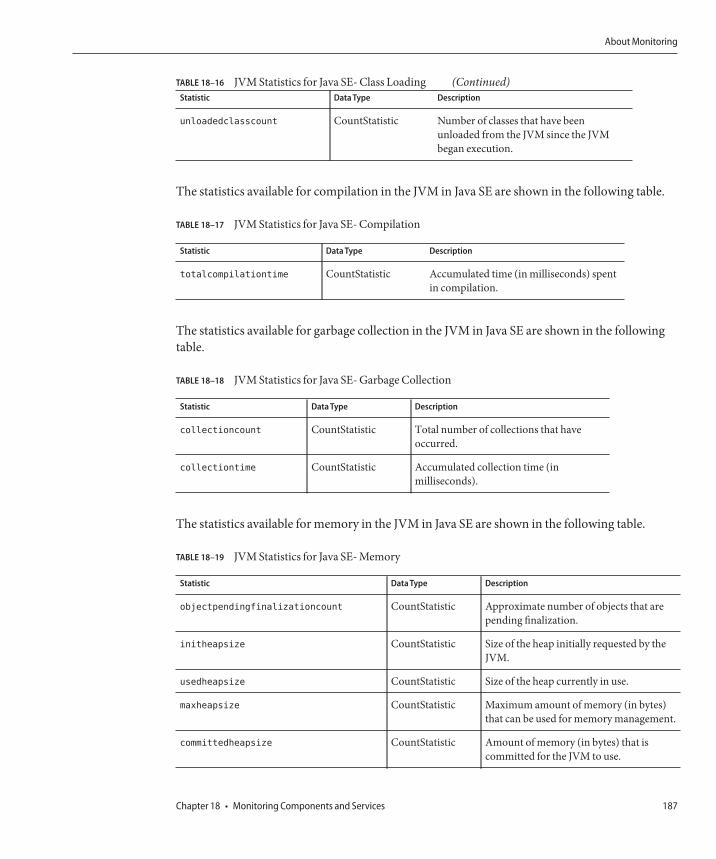
TABLE 18–16 JVM Statistics for Java SE- Class Loading (Continued)Statistic Data Type Description
unloadedclasscount CountStatistic Number of classes that have beenunloaded from the JVM since the JVMbegan execution.
The statistics available for compilation in the JVM in Java SE are shown in the following table.
TABLE 18–17 JVM Statistics for Java SE- Compilation
Statistic Data Type Description
totalcompilationtime CountStatistic Accumulated time (in milliseconds) spentin compilation.
The statistics available for garbage collection in the JVM in Java SE are shown in the followingtable.
TABLE 18–18 JVM Statistics for Java SE- Garbage Collection
Statistic Data Type Description
collectioncount CountStatistic Total number of collections that haveoccurred.
collectiontime CountStatistic Accumulated collection time (inmilliseconds).
The statistics available for memory in the JVM in Java SE are shown in the following table.
TABLE 18–19 JVM Statistics for Java SE- Memory
Statistic Data Type Description
objectpendingfinalizationcount CountStatistic Approximate number of objects that arepending finalization.
initheapsize CountStatistic Size of the heap initially requested by theJVM.
usedheapsize CountStatistic Size of the heap currently in use.
maxheapsize CountStatistic Maximum amount of memory (in bytes)that can be used for memory management.
committedheapsize CountStatistic Amount of memory (in bytes) that iscommitted for the JVM to use.
About Monitoring
Chapter 18 • Monitoring Components and Services 187

TABLE 18–19 JVM Statistics for Java SE- Memory (Continued)Statistic Data Type Description
initnonheapsize CountStatistic Size of the non-heap area initiallyrequested by the JVM.
usednonheapsize CountStatistic Size of the non-heap area currently in use.
maxnonheapsize CountStatistic Maximum amount of memory (in bytes)that can be used for memory management.
committednonheapsize CountStatistic Amount of memory (in bytes) that iscommitted for the JVM to use.
The statistics available for the operating system in the JVM in Java SE are shown in thefollowing table.
TABLE 18–20 JVM Statistics for Java SE - Operating System
Statistic Data Type Description
arch StringStatistic Operating system architecture.
availableprocessors CountStatistic Number of processors available to theJVM.
name StringStatistic Operating system name.
version StringStatistic Operating system version.
The statistics available for the runtime in the JVM in Java SE are shown in the following table.
TABLE 18–21 JVM Statistics for Java SE - Runtime
Statistic Data Type Description
name StringStatistic Name representing the running JVM
vmname StringStatistic JVM implementation name.
vmvendor StringStatistic JVM implementation vendor.
vmversion StringStatistic JVM implementation version.
specname StringStatistic JVM specification name.
specvendor StringStatistic JVM specification vendor.
specversion StringStatistic JVM specification version.
managementspecversion StringStatistic Management spec. version implementedby the JVM.
About Monitoring
Sun GlassFish Enterprise Server v2.1.1 Administration Guide • October 2009188

TABLE 18–21 JVM Statistics for Java SE - Runtime (Continued)Statistic Data Type Description
classpath StringStatistic Classpath that is used by the system classloader to search for class files.
librarypath StringStatistic Java library path.
bootclasspath StringStatistic Classpath that is used by the bootstrapclass loader to search for class files.
inputarguments StringStatistic Input arguments passed to the JVM. Doesnot include the arguments to the mainmethod.
uptime CountStatistic Uptime of the JVM (in milliseconds).
The statistics available for ThreadInfo in the JVM in Java SE are shown in the following table.
TABLE 18–22 JVM Statistics for Java SE - Thread Info
Statistic Data Type Description
threadid CountStatistic ID of the thread.
threadname StringStatistic Name of the thread.
threadstate StringStatistic State of the thread.
blockedtime CountStatistic Time elapsed (in milliseconds) since thethread entered the BLOCKED state. Returns-1 if thread contention monitoring isdisabled.
blockedcount CountStatistic Total number of times that the threadentered the BLOCKED state.
waitedtime CountStatistic Elapsed time (in milliseconds) that thethread has been in a WAITING state.Returns -1 if thread contentionmonitoring is disabled.
waitedcount CountStatistic Total number of times the thread was inWAITING or TIMED_WAITING states.
lockname StringStatistic String representation of the monitor lockthat the thread is blocked to enter orwaiting to be notified through theObject.wait method.
About Monitoring
Chapter 18 • Monitoring Components and Services 189
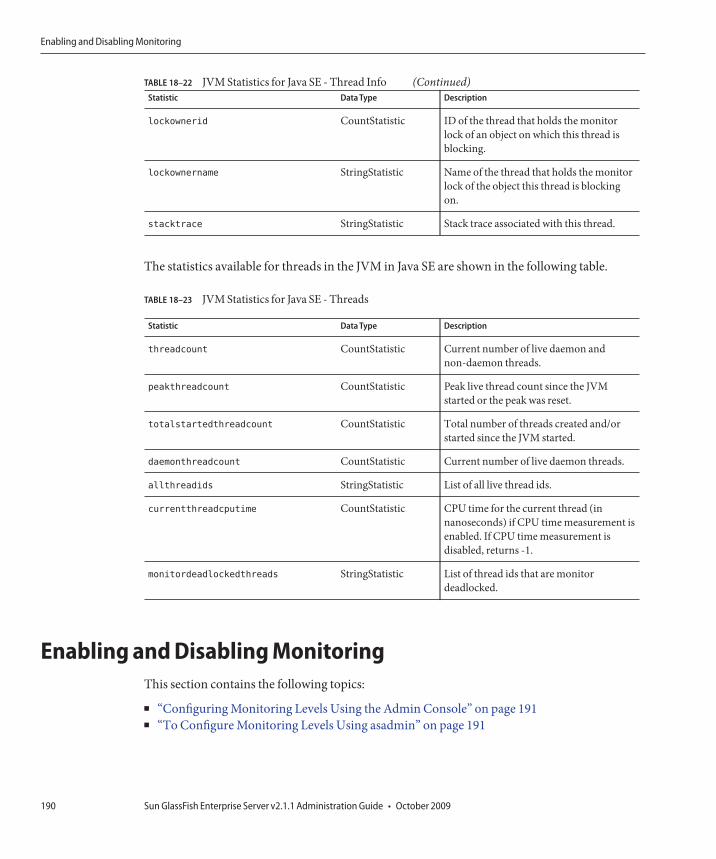
TABLE 18–22 JVM Statistics for Java SE - Thread Info (Continued)Statistic Data Type Description
lockownerid CountStatistic ID of the thread that holds the monitorlock of an object on which this thread isblocking.
lockownername StringStatistic Name of the thread that holds the monitorlock of the object this thread is blockingon.
stacktrace StringStatistic Stack trace associated with this thread.
The statistics available for threads in the JVM in Java SE are shown in the following table.
TABLE 18–23 JVM Statistics for Java SE - Threads
Statistic Data Type Description
threadcount CountStatistic Current number of live daemon andnon-daemon threads.
peakthreadcount CountStatistic Peak live thread count since the JVMstarted or the peak was reset.
totalstartedthreadcount CountStatistic Total number of threads created and/orstarted since the JVM started.
daemonthreadcount CountStatistic Current number of live daemon threads.
allthreadids StringStatistic List of all live thread ids.
currentthreadcputime CountStatistic CPU time for the current thread (innanoseconds) if CPU time measurement isenabled. If CPU time measurement isdisabled, returns -1.
monitordeadlockedthreads StringStatistic List of thread ids that are monitordeadlocked.
Enabling and Disabling MonitoringThis section contains the following topics:
■ “Configuring Monitoring Levels Using the Admin Console” on page 191■ “To Configure Monitoring Levels Using asadmin” on page 191
Enabling and Disabling Monitoring
Sun GlassFish Enterprise Server v2.1.1 Administration Guide • October 2009190

Configuring Monitoring Levels Using the AdminConsoleTo configure monitoring in the Admin Console:
■ For the developer profile, go to Configuration → Monitoring■ For the cluster and enterprise profiles, go to Configurations → Configuration →
Monitoring
By default, monitoring is turned off for all components and services. To turn monitoring on,select LOW or HIGH from the combo box. To turn monitoring off, select OFF from the combobox.
For details on configuring monitoring, see the online help available with the Admin Console.
▼ To Configure Monitoring Levels Using asadminUse the get command to find out what services and components currently have monitoringenabled.asadmin> get --user admin-user server.monitoring-service.module-monitoring-levels.*
Returns:
server.monitoring-service.module-monitoring-levels.
connector-connection-pool = OFF
server.monitoring-service.module-monitoring-levels.
connector-service = OFF
server.monitoring-service.module-monitoring-levels.ejb-container = OFF
server.monitoring-service.module-monitoring-levels.http-service = OFF
server.monitoring-service.module-monitoring-levels.sip-service = OFF
server.monitoring-service.module-monitoring-levels.jdbc-connection-pool = OFF
server.monitoring-service.module-monitoring-levels.jms-service = OFF
server.monitoring-service.module-monitoring-levels.jvm = OFF
server.monitoring-service.module-monitoring-levels.orb = OFF
server.monitoring-service.module-monitoring-levels.thread-pool = OFF
server.monitoring-service.module-monitoring-levels.transaction-service = OFF
server.monitoring-service.module-monitoring-levels.web-container = OFF
Use the set command to enable monitoring.For example, to enable monitoring for the HTTP service:asadmin> set --user admin-userserver.monitoring-service.module-monitoring-levels.http-service=LOW
To disable monitoring, use the set command and specify OFF for the monitoring level.
1
2
Enabling and Disabling Monitoring
Chapter 18 • Monitoring Components and Services 191

Viewing Monitoring Data■ “Viewing Monitoring Data in the Admin Console” on page 192■ “Viewing Monitoring Data With the asadmin Tool” on page 192
Viewing Monitoring Data in the Admin ConsoleIn the developer profile, to view monitoring data, go to Application Server → Monitor.
In the cluster and enterprise profiles, to view monitoring data for a stand-alone instance, go toStand-Alone Instances → Instance → Monitor. To view monitoring data for a clusteredinstance, go to Clusters → Cluster → Instance → Monitor.
You can select and view monitoring data for JVM, server, applications, thread pools, HTTPservice, transaction service, log statistics, and call flow statistics. See “The Tree Structure ofMonitorable Objects” on page 172.
For details on viewing or configuring monitoring, see the online help available with the AdminConsole.
For more information on the attributes for each component or service, refer to “Statistics forMonitored Components and Services” on page 175.
Viewing Monitoring Data With the asadmin ToolThis section contains the following topics:■ “To Use the asadmin monitor Command to View Monitoring Data” on page 192■ “To Use the asadmin get and list Commands to View Monitoring Data” on page 193■ “Understanding and Specifying Dotted Names” on page 194■ “Examples of the list and get Commands” on page 195■ “Examples for the list --user admin-user --monitor Command” on page 196■ “Examples for the get --user admin-user --monitor Command” on page 196■ “To Use the PetStore Example” on page 198■ “Expected Output for list and get Commands at All Levels” on page 201
▼ To Use the asadmin monitor Command to View Monitoring Dataasadmin has two ways of viewing monitoring data. The first is to use the monitor command.This command prints out the commonly-monitored statistics, and has options for filtering outstatistics and capture the output in a Comma Separated Values (CSV) file.
To view monitoring data, use the monitor command, and specify the type of monitoring data:httplistener, keepalive, filecache, connectionqueue, jdbcpool, jvm, threadpool,
1
Viewing Monitoring Data
Sun GlassFish Enterprise Server v2.1.1 Administration Guide • October 2009192
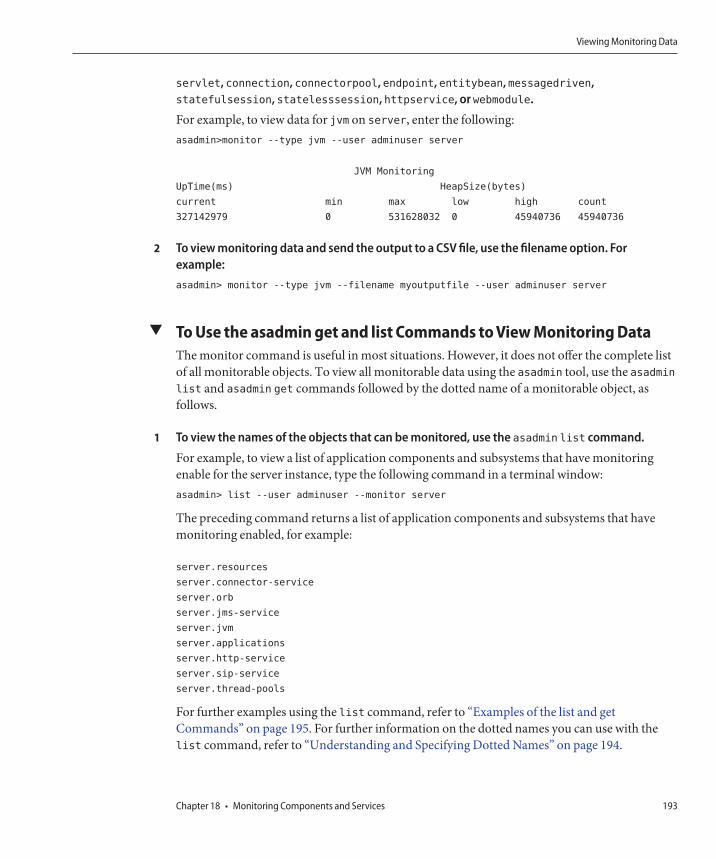
servlet, connection, connectorpool, endpoint, entitybean, messagedriven,statefulsession, statelesssession, httpservice, or webmodule.
For example, to view data for jvm on server, enter the following:asadmin>monitor --type jvm --user adminuser server
JVM Monitoring
UpTime(ms) HeapSize(bytes)
current min max low high count
327142979 0 531628032 0 45940736 45940736
To view monitoring data and send the output to a CSV file, use the filename option. Forexample:asadmin> monitor --type jvm --filename myoutputfile --user adminuser server
▼ To Use the asadmin get and list Commands to View Monitoring DataThe monitor command is useful in most situations. However, it does not offer the complete listof all monitorable objects. To view all monitorable data using the asadmin tool, use the asadminlist and asadmin get commands followed by the dotted name of a monitorable object, asfollows.
To view the names of the objects that can be monitored, use the asadmin list command.
For example, to view a list of application components and subsystems that have monitoringenable for the server instance, type the following command in a terminal window:asadmin> list --user adminuser --monitor server
The preceding command returns a list of application components and subsystems that havemonitoring enabled, for example:
server.resources
server.connector-service
server.orb
server.jms-service
server.jvm
server.applications
server.http-service
server.sip-service
server.thread-pools
For further examples using the list command, refer to “Examples of the list and getCommands” on page 195. For further information on the dotted names you can use with thelist command, refer to “Understanding and Specifying Dotted Names” on page 194.
2
1
Viewing Monitoring Data
Chapter 18 • Monitoring Components and Services 193
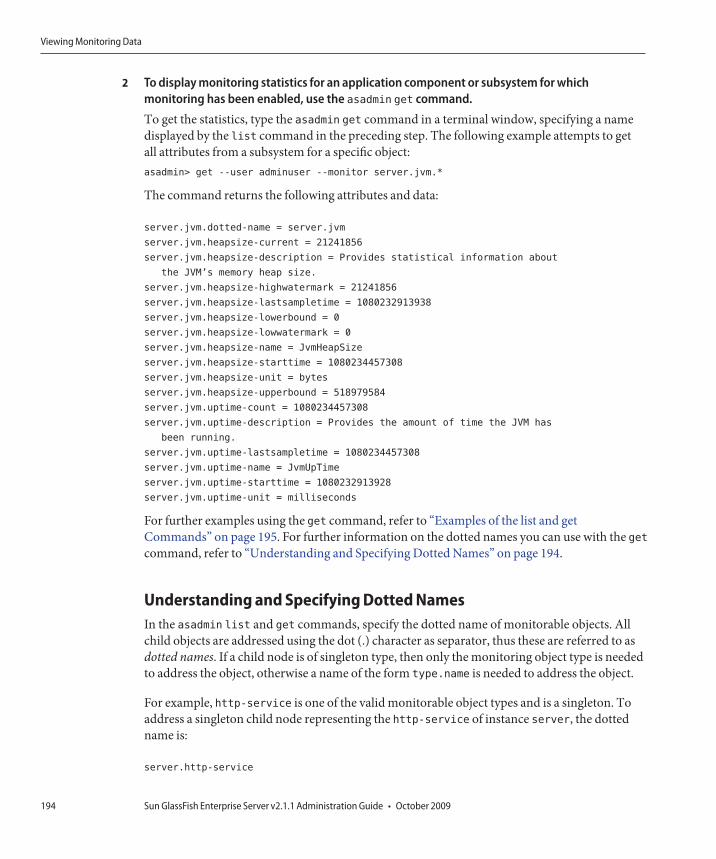
To display monitoring statistics for an application component or subsystem for whichmonitoring has been enabled, use the asadmin get command.
To get the statistics, type the asadmin get command in a terminal window, specifying a namedisplayed by the list command in the preceding step. The following example attempts to getall attributes from a subsystem for a specific object:asadmin> get --user adminuser --monitor server.jvm.*
The command returns the following attributes and data:
server.jvm.dotted-name = server.jvm
server.jvm.heapsize-current = 21241856
server.jvm.heapsize-description = Provides statistical information about
the JVM’s memory heap size.
server.jvm.heapsize-highwatermark = 21241856
server.jvm.heapsize-lastsampletime = 1080232913938
server.jvm.heapsize-lowerbound = 0
server.jvm.heapsize-lowwatermark = 0
server.jvm.heapsize-name = JvmHeapSize
server.jvm.heapsize-starttime = 1080234457308
server.jvm.heapsize-unit = bytes
server.jvm.heapsize-upperbound = 518979584
server.jvm.uptime-count = 1080234457308
server.jvm.uptime-description = Provides the amount of time the JVM has
been running.
server.jvm.uptime-lastsampletime = 1080234457308
server.jvm.uptime-name = JvmUpTime
server.jvm.uptime-starttime = 1080232913928
server.jvm.uptime-unit = milliseconds
For further examples using the get command, refer to “Examples of the list and getCommands” on page 195. For further information on the dotted names you can use with the getcommand, refer to “Understanding and Specifying Dotted Names” on page 194.
Understanding and Specifying Dotted NamesIn the asadmin list and get commands, specify the dotted name of monitorable objects. Allchild objects are addressed using the dot (.) character as separator, thus these are referred to asdotted names. If a child node is of singleton type, then only the monitoring object type is neededto address the object, otherwise a name of the form type.name is needed to address the object.
For example, http-service is one of the valid monitorable object types and is a singleton. Toaddress a singleton child node representing the http-service of instance server, the dottedname is:
server.http-service
2
Viewing Monitoring Data
Sun GlassFish Enterprise Server v2.1.1 Administration Guide • October 2009194

Another example, application, is a valid monitorable object type and is not a singleton. Toaddress a non-singleton child node representing, for example, the application PetStore, thedotted name is:
server.applications.petstore
The dotted names can also address specific attributes in monitorable objects. For example,http-service has a monitorable attribute called bytesreceived-lastsampletime. Thefollowing name addresses the bytesreceived attribute:
server.http-service.server.http-listener-1.
bytesreceived-lastsampletime
The administrator is not expected to know the valid dotted names for asadmin list and get
commands. The list command displays available monitorable objects, while the getcommand used with a wildcard parameter allows the inspection of all available attributes onany monitorable object.
The underlying assumptions for using the list and get commands with dotted names are:
■ Any list command that has a dotted name that is not followed by a wildcard (*) gets as itsresult the current node’s immediate children. For example, list --user adminuser--monitor server lists all immediate children belonging to the server node.
■ Any list command that has a dotted name followed by a wildcard of the form .* gets as itsresult a hierarchical tree of children nodes from the current node. For example, list--user adminuser --monitor server.applications.* lists all children of applicationsand their subsequent child nodes and so on.
■ Any list command that has a dotted name preceded or followed by a wildcard of the form*dottedname or dotted * name or dotted name * gets as its result all nodes and their childrenmatching the regular expression created by the provided matching pattern.
■ A get command followed by a .* or a * gets as its result the set of attributes and their valuesbelonging to the current node to be matched.
For more information, read “Expected Output for list and get Commands at All Levels” onpage 201.
Examples of the list and get CommandsThis section contains the following topics:
■ “Examples for the list --user admin-user --monitor Command” on page 196■ “Examples for the get --user admin-user --monitor Command” on page 196
Viewing Monitoring Data
Chapter 18 • Monitoring Components and Services 195

Examples for the list --user admin-user --monitor CommandThe list command provides information about the application components and subsystemscurrently being monitored for the specified server instance name. Using this command, you cansee the monitorable components and subcomponents for a server instance. For a morecomplete listing of list examples, see “Expected Output for list and get Commands at AllLevels” on page 201.
Example 1asadmin> list --user admin-user --monitor server
The preceding command returns a list of application components and subsystems that havemonitoring enabled, for example:
server.resources
server.orb
server.jvm
server.jms-service
server.connector-service
server.applications
server.http-service
server.thread-pools
It is also possible to list applications that are currently monitored in the specified serverinstance. This is useful when particular monitoring statistics are sought from an applicationusing the get command.
Example 2asadmin> list --user admin-user --monitor server.applications
Returns:
server.applications.adminapp
server.applications.admingui
server.applications.myApp
For a more comprehensive example, see “To Use the PetStore Example” on page 198.
Examples for the get --user admin-user --monitor CommandThis command retrieves the following monitored information:
■ All attribute(s) monitored within a component or subsystem■ Specific attribute monitored within a component or subsystem
Viewing Monitoring Data
Sun GlassFish Enterprise Server v2.1.1 Administration Guide • October 2009196

When an attribute is requested that does not exist for a particular component or subsystem,an error is returned. Similarly, when a specific attribute is requested that is not active for acomponent or subsystem, an error is returned.Refer to “Expected Output for list and get Commands at All Levels” on page 201 for moreinformation on the use of the get command.
Example 1
Attempt to get all attributes from a subsystem for a specific object:
asadmin> get --user admin-user --monitor server.jvm.*
Returns:
server.jvm.dotted-name= server.jvm
server.jvm.heapsize-current = 21241856
server.jvm.heapsize-description = Provides statistical information about
the JVM’s memory heap size.
server.jvm.heapsize-highwatermark = 21241856
server.jvm.heapsize-lastsampletime = 1080232913938
server.jvm.heapsize-lowerbound = 0
server.jvm.heapsize-lowwatermark = 0
server.jvm.heapsize-name = JvmHeapSize
server.jvm.heapsize-starttime = 1080234457308
server.jvm.heapsize-unit = bytes
server.jvm.heapsize-upperbound = 518979584
server.jvm.uptime-count = 1080234457308
server.jvm.uptime-description = Provides the amount of time the JVM has
been running.
server.jvm.uptime-lastsampletime = 1080234457308
server.jvm.uptime-name = JvmUpTime
server.jvm.uptime-starttime = 1080232913928
server.jvm.uptime-unit = milliseconds
Example 2
Attempt to get all attributes from a Java EE application:
asadmin> get --user admin-user --monitor server.applications.myJavaEEApp.*
Returns:
No matches resulted from the wildcard expression.
CLI137 Command get failed.
There are no monitorable attributes exposed at the Java-EE-application level, therefore thisreply displays.
Viewing Monitoring Data
Chapter 18 • Monitoring Components and Services 197

Example 3
Attempt to get a specific attribute from a subsystem:
asadmin> get --user admin-user --monitor server.jvm.uptime-lastsampletime
Returns:
server.jvm.uptime-lastsampletime = 1093215374813
Example 4
Attempt to get an unknown attribute from within a subsystem attribute:
asadmin> get --user admin-user --monitor server.jvm.badname
Returns:
No such attribute found from reflecting the corresponding Stats
interface: [badname]
CLI137 Command get failed.
▼ To Use the PetStore ExampleThe following example illustrates how the asadmin tool might be used for monitoring purposes.
A user wants to inspect the number of calls made to a method in the sample PetStoreapplication after it has been deployed onto the Enterprise Server. The instance onto which it hasbeen deployed is named server. A combination of the list and get commands are used toaccess desired statistics on a method.
Start the Enterprise Server and the asadmin tool.
Set some useful environment variables to avoid entering them for every command:asadmin> export AS_ADMIN_USER=admin AS_ADMIN_PASSWORD=admin123
asadmin>export AS_ADMIN_HOST=localhost AS_ADMIN_PORT=4848
List monitorable components for instance server:asadmin> list --user adminuser --monitor server*
Returns (output will be similar to):
server
server.applications
server.applications.CometEJB
server.applications.ConverterApp
server.applications.petstore
1
2
3
Viewing Monitoring Data
Sun GlassFish Enterprise Server v2.1.1 Administration Guide • October 2009198

server.http-service
server.resources
server.thread-pools
The list of monitorable components includes thread-pools, http-service, resources, and alldeployed (and enabled) applications.
List the monitorable subcomponents in the PetStore application (-m can be used instead of--monitor):
asadmin> list -m server.applications.petstore
Returns:server.applications.petstore.signon-ejb_jar
server.applications.petstore.catalog-ejb_jar
server.applications.petstore.uidgen-ejb_jar
server.applications.petstore.customer-ejb_jar
server.applications.petstore.petstore-ejb_jar
server.applications.petstore.petstore\.war
server.applications.petstore.AsyncSenderJAR_jar
server.applications.petstore.cart-ejb_jar
List the monitorable subcomponents in the EJB module signon-ejb_jar of the PetStoreapplication:asadmin> list -m server.applications.petstore.signon-ejb_jar
Returns:
server.applications.petstore.signon-ejb_jar.SignOnEJB
server.applications.petstore.signon-ejb_jar.UserEJB
List the monitorable subcomponents in the entity bean UserEJB for the EJB modulesignon-ejb_jar of the PetStore application:asadmin> list -m server.applications.petstore.signon-ejb_jar.UserEJB
Returns (with dotted name removed for space considerations):
server.applications.petstore.signon-ejb_jar.UserEJB.bean-cache
server.applications.petstore.signon-ejb_jar.UserEJB.bean-methods
server.applications.petstore.signon-ejb_jar.UserEJB.bean-pool
List the monitorable subcomponents in the method getUserName for the entity bean UserEJB inthe EJB module signon-ejb_jar of the PetStore application:asadmin> list -m
server.applications.petstore.signon-ejb_jar.UserEJB.bean-methods.getUserName
4
5
6
7
Viewing Monitoring Data
Chapter 18 • Monitoring Components and Services 199
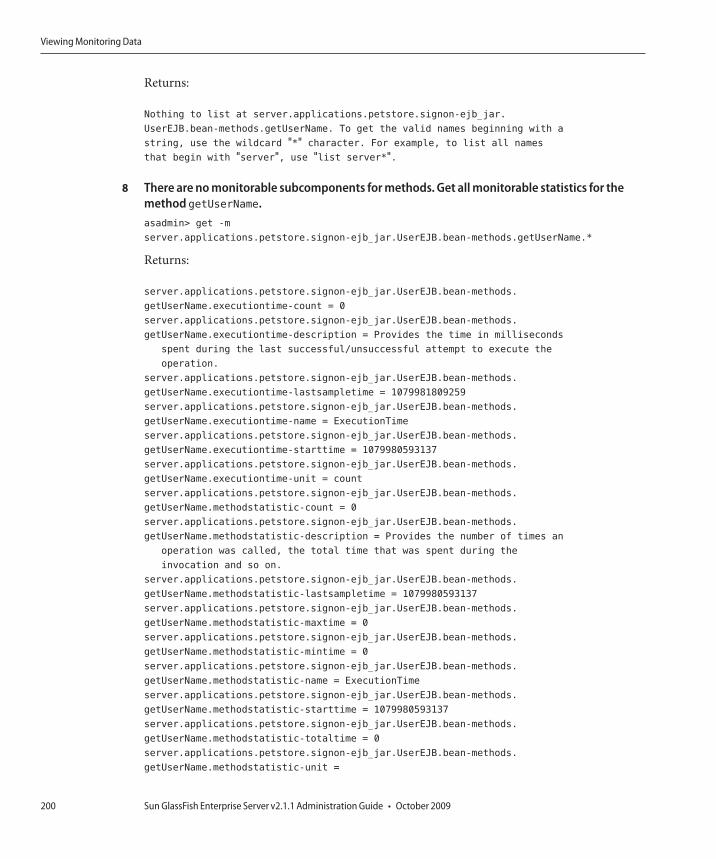
Returns:
Nothing to list at server.applications.petstore.signon-ejb_jar.
UserEJB.bean-methods.getUserName. To get the valid names beginning with a
string, use the wildcard "*" character. For example, to list all names
that begin with "server", use "list server*".
There are no monitorable subcomponents for methods. Get all monitorable statistics for themethod getUserName.asadmin> get -m
server.applications.petstore.signon-ejb_jar.UserEJB.bean-methods.getUserName.*
Returns:
server.applications.petstore.signon-ejb_jar.UserEJB.bean-methods.
getUserName.executiontime-count = 0
server.applications.petstore.signon-ejb_jar.UserEJB.bean-methods.
getUserName.executiontime-description = Provides the time in milliseconds
spent during the last successful/unsuccessful attempt to execute the
operation.
server.applications.petstore.signon-ejb_jar.UserEJB.bean-methods.
getUserName.executiontime-lastsampletime = 1079981809259
server.applications.petstore.signon-ejb_jar.UserEJB.bean-methods.
getUserName.executiontime-name = ExecutionTime
server.applications.petstore.signon-ejb_jar.UserEJB.bean-methods.
getUserName.executiontime-starttime = 1079980593137
server.applications.petstore.signon-ejb_jar.UserEJB.bean-methods.
getUserName.executiontime-unit = count
server.applications.petstore.signon-ejb_jar.UserEJB.bean-methods.
getUserName.methodstatistic-count = 0
server.applications.petstore.signon-ejb_jar.UserEJB.bean-methods.
getUserName.methodstatistic-description = Provides the number of times an
operation was called, the total time that was spent during the
invocation and so on.
server.applications.petstore.signon-ejb_jar.UserEJB.bean-methods.
getUserName.methodstatistic-lastsampletime = 1079980593137
server.applications.petstore.signon-ejb_jar.UserEJB.bean-methods.
getUserName.methodstatistic-maxtime = 0
server.applications.petstore.signon-ejb_jar.UserEJB.bean-methods.
getUserName.methodstatistic-mintime = 0
server.applications.petstore.signon-ejb_jar.UserEJB.bean-methods.
getUserName.methodstatistic-name = ExecutionTime
server.applications.petstore.signon-ejb_jar.UserEJB.bean-methods.
getUserName.methodstatistic-starttime = 1079980593137
server.applications.petstore.signon-ejb_jar.UserEJB.bean-methods.
getUserName.methodstatistic-totaltime = 0
server.applications.petstore.signon-ejb_jar.UserEJB.bean-methods.
getUserName.methodstatistic-unit =
8
Viewing Monitoring Data
Sun GlassFish Enterprise Server v2.1.1 Administration Guide • October 2009200

server.applications.petstore.signon-ejb_jar.UserEJB.bean-methods.
getUserName.totalnumerrors-count = 0
server.applications.petstore.signon-ejb_jar.UserEJB.bean-methods.
getUserName.totalnumerrors-description = Provides the total number of errors
that occured during invocation or execution of an operation.
server.applications.petstore.signon-ejb_jar.UserEJB.bean-methods.
getUserName.totalnumerrors-lastsampletime = 1079981809273
server.applications.petstore.signon-ejb_jar.UserEJB.bean-methods.
getUserName.totalnumerrors-name = TotalNumErrors
server.applications.petstore.signon-ejb_jar.UserEJB.bean-methods.
getUserName.totalnumerrors-starttime = 1079980593137
server.applications.petstore.signon-ejb_jar.UserEJB.bean-methods.
getUserName.totalnumerrors-unit = count
server.applications.petstore.signon-ejb_jar.UserEJB.bean-methods.
getUserName.totalnumsuccess-count = 0
server.applications.petstore.signon-ejb_jar.UserEJB.bean-methods.
getUserName.totalnumsuccess-description = Provides the total number of
successful invocations of the method.
server.applications.petstore.signon-ejb_jar.UserEJB.bean-methods.
getUserName.totalnumsuccess-lastsampletime = 1079981809255
server.applications.petstore.signon-ejb_jar.UserEJB.bean-methods.
getUserName.totalnumsuccess-name = TotalNumSuccess
server.applications.petstore.signon-ejb_jar.UserEJB.bean-methods.
getUserName.totalnumsuccess-starttime = 1079980593137
server.applications.petstore.signon-ejb_jar.UserEJB.bean-methods.
getUserName.totalnumsuccess-unit = count
To also get a specific statistic, such as execution time, use a command such as the following:asadmin> get -m server.applications.petstore.signon-ejb_jar.
UserEJB.bean-methods.getUserName.executiontime-count
Returns:
server.applications.petstore.signon-ejb_jar.UserEJB.bean-methods.
getUserName.executiontime-count = 1
Expected Output for list and get Commands at All LevelsThe following tables show the command, dotted name, and corresponding output at each levelof the tree.
9
Viewing Monitoring Data
Chapter 18 • Monitoring Components and Services 201

TABLE 18–24 Top Level
Command Dotted Name Output
list -m server server.applicationsserver.thread-poolsserver.
resourcesserver.http-serviceserver.transaction-
serviceserver.orb.connection-managersserver.orb.
connection-managers.orb\.Connections\.Inbound\.
AcceptedConnectionsserver.jvm
list -m server.* Hierarchy of child nodes below this node.
get -m server.* No output except a message saying there are no attributes at this node.
The following table shows the command, dotted name, and corresponding output for theapplications level.
TABLE 18–25 Applications Level
Command Dotted Name Output
list -m server.applications
or
*applications
appl1app2web-module1_warejb-module2_jar...
list -m server.applications.*
or
*applications.*
Hierarchy of child nodes below this node.
get -m server.applications.*
or
*applications.*
No output except message saying there are no attributesat this node.
The following table shows the command, dotted name, and corresponding output forstand-alone modules and enterprise applications at the applications level.
Viewing Monitoring Data
Sun GlassFish Enterprise Server v2.1.1 Administration Guide • October 2009202
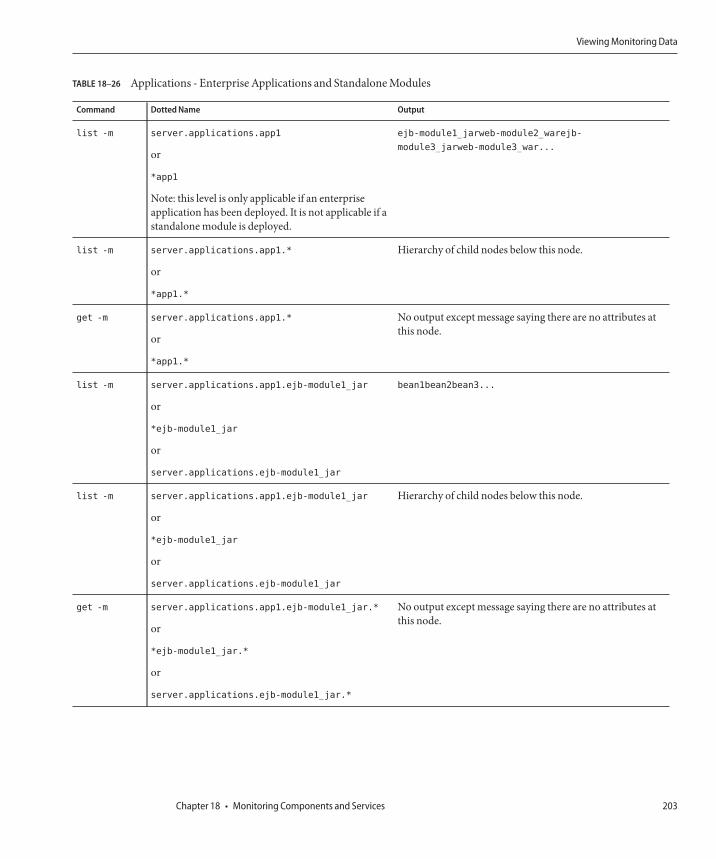
TABLE 18–26 Applications - Enterprise Applications and Standalone Modules
Command Dotted Name Output
list -m server.applications.app1
or
*app1
Note: this level is only applicable if an enterpriseapplication has been deployed. It is not applicable if astandalone module is deployed.
ejb-module1_jarweb-module2_warejb-
module3_jarweb-module3_war...
list -m server.applications.app1.*
or
*app1.*
Hierarchy of child nodes below this node.
get -m server.applications.app1.*
or
*app1.*
No output except message saying there are no attributes atthis node.
list -m server.applications.app1.ejb-module1_jar
or
*ejb-module1_jar
or
server.applications.ejb-module1_jar
bean1bean2bean3...
list -m server.applications.app1.ejb-module1_jar
or
*ejb-module1_jar
or
server.applications.ejb-module1_jar
Hierarchy of child nodes below this node.
get -m server.applications.app1.ejb-module1_jar.*
or
*ejb-module1_jar.*
or
server.applications.ejb-module1_jar.*
No output except message saying there are no attributes atthis node.
Viewing Monitoring Data
Chapter 18 • Monitoring Components and Services 203

TABLE 18–26 Applications - Enterprise Applications and Standalone Modules (Continued)Command Dotted Name Output
list -m server.applications.app1.
ejb-module1_jar.bean1
Note: In standalone modules, the node containingthe application name (app1 in this example) will notappear.
List of child nodes:
bean-poolbean-cachebean-method
list -m server.applications.app1.
ejb-module1_jar.bean1
Note: In standalone modules, the node containingthe application name (app1 in this example) will notappear.
Hierarchy of child nodes and a list of all attributes for thisnode and for any subsequent child nodes.
get -m server.applications.app1.
ejb-module1_jar.bean1.*
Note: In standalone modules, the node containingthe application name (app1 in this example) does notappear.
The following attributes and their associated values:
CreateCount_CountCreateCount_
DescriptionCreateCount_
LastSampleTimeCreateCount_
NameCreateCount_
StartTimeCreateCount_
UnitMethodReadyCount_
CurrentMethodReadyCount_
DescriptionMethodReadyCount_
HighWaterMarkMethodReadyCount_
LastSampleTimeMethodReadyCount_
LowWaterMarkMethodReadyCount_
NameMethodReadyCount_
StartTimeMethodReadyCount_
UnitRemoveCount_CountRemoveCount_
DescriptionRemoveCount_
LastSampleTimeRemoveCount_
NameRemoveCount_StartTimeAttribute
RemoveCount_Unit
list -m server.applications.app1.
ejb-module1_jar.bean1.bean-pool
Note: In standalone modules, the node containingthe application name (app1 in this example) will notappear.
No attributes, but a message saying: Nothing to list atserver.applications.appl.
ejb-module1_jar.bean1-cache. To get the valid namesbeginning with a string, use the wildcard (*) character. Forexample, to list all names that begin with server, use listserver*.
get -m server.applications.app1.
ejb-module1_jar.bean1.bean-pool.*
Note: In standalone modules, the node containingthe application name (app1 in this example) will notappear.
List of attributes and values corresponding to EJB Poolattributes as described in Table 18–3.
Viewing Monitoring Data
Sun GlassFish Enterprise Server v2.1.1 Administration Guide • October 2009204

TABLE 18–26 Applications - Enterprise Applications and Standalone Modules (Continued)Command Dotted Name Output
list -m server.applications.app1.
ejb-module1_jar.bean1.bean-cache
Note: In standalone modules, the node containingthe application name (app1 in this example) will notappear.
No attributes, but a message saying “Use get command withthe --monitor option to view this node’s attributes andvalues.”
get -m server.applications.app1.
ejb-module1_jar.bean1.bean-cache.*
Note: In standalone modules, the node containingthe application name (app1 in this example) does notappear.
List of attributes and values corresponding to EJB Cacheattributes as described in Table 18–4.
list -m server.applications.app1.
ejb-module1_jar.bean1.bean-method.method1
Note: In standalone modules, the node containingthe application name (app1 in this example) will notappear.
No attributes, but a message saying “Use get command withthe --monitor option to view this node’s attributes andvalues.”
get -m server.applications.app1.
ejb-module1_jar.bean1.bean-method.method1.*
Note: In standalone modules, the node containingthe application name (app1 in this example) will notappear.
List of attributes and values corresponding to EJB Methodsattributes as described in Table 18–2.
list -m server.applications.app1.web-module1_war Displays the virtual server(s) assigned to the module.
get -m server.applications.app1.web-module1_war.* No output except a message saying there are no attributes atthis node.
list -m server.applications.app1.web-module1_war.
virtual_server
Displays list of servlets registered.
get -m server.applications.app1.web-module1_war.
virtual_server.*
No output except a message saying there are no attributes atthis node.
list -m server.applications.app1.web-module1_war.
virtual_server.servlet1
No attributes, but a message saying “Use get command withthe --monitor option to view this node’s attributes andvalues.”
get -m server.applications.app1.web-module1_war.
virtual_server.servlet1.*
List of attributes and values corresponding to web container(Servlet) attributes as described in Table 18–6.
The following table shows the command, dotted name, and corresponding output for theHTTP Service level.
Viewing Monitoring Data
Chapter 18 • Monitoring Components and Services 205

TABLE 18–27 HTTP-Service Level
Command Dotted Name Output
list -m server.http-service List of virtual servers.
get -m server.http-service.* No output except message saying there are noattributes at this node.
list -m server.http-service.server List of HTTP Listeners.
get -m server.http-service.server.* No output except message saying there are noattributes at this node.
list -m server.http-service.server.
http-listener1
No attributes, but a message saying “Use getcommand with the --monitor option to view thisnode’s attributes and values.”
get -m server.http-service.server.* List of attributes and values corresponding toHTTP Service attributes as described inTable 18–8.
The following table shows the command, dotted name, and corresponding output for thethread pools level.
TABLE 18–28 Thread-Pools Level
Command Dotted Name Output
list -m server.thread-pools List of thread-pool names.
get -m server.thread-pools.* No output except message sayingthere are no attributes at thisnode.
list -m server.thread-pools.orb\
.threadpool\.thread-pool-1
No attributes, but a messagesaying “Use get command withthe --monitor option to view thisnode’s attributes and values.”
get -m server.thread-pools..orb\
.threadpool\.thread-pool-1.*
List of attributes and valuescorresponding to Thread Poolattributes as described inTable 18–13.
The following table shows the command, dotted name, and corresponding output for theresources level.
Viewing Monitoring Data
Sun GlassFish Enterprise Server v2.1.1 Administration Guide • October 2009206

TABLE 18–29 Resources Level
Command Dotted Name Output
list -m server.resources List of pool names.
get -m server.resources.* No output except message sayingthere are no attributes at thisnode.
list -m server.resources.jdbc-connection-pool-pool.
connection-pool1
No attributes, but a messagesaying “Use get command withthe --monitor option to view thisnode’s attributes and values.”
get -m server.resources.jdbc-connection-pool-pool.
connection-pool1.*
List of attributes and valuescorresponding to ConnectionPool attributes as described inTable 18–9.
The following table shows the command, dotted name, and corresponding output for thetransaction service level.
TABLE 18–30 Transaction-Service Level
Command Dotted Name Output
list -m server.transaction-service No attributes, but a message saying “Useget command with the --monitor optionto view this node’s attributes and values.”
get -m server.transaction-service.* List of attributes and values correspondingto Transaction Service attributes asdescribed in Table 18–14.
The following table shows the command, dotted name, and corresponding output for the ORBlevel.
TABLE 18–31 ORB Level
Command Dotted Name Output
list -m server.orb server-orb.connection-managers
get -m server.orb.* No output except message saying there are noattributes at this node.
list -m server.orb.connection-managers Name(s) of ORB connection managers.
Viewing Monitoring Data
Chapter 18 • Monitoring Components and Services 207

TABLE 18–31 ORB Level (Continued)Command Dotted Name Output
get -m server.orb.connection-managers.* No output except message saying there are noattributes at this node.
list -m server.orb.connection-managers.
orb\.Connections\.Inbound\
.AcceptedConnections
No attributes, but a message saying “Use getcommand with the --monitor option to viewthis node’s attributes and values.”
get -m server.orb.connection-managers.
orb\.Connections\.Inbound\
.AcceptedConnections.*
List of attributes and values corresponding toORB Connection Manager attributes asdescribed in Table 18–12.
The following table shows the command, dotted name, and corresponding output for the JVMlevel.
TABLE 18–32 JVM Level
Command Dotted Name Output
list -m server.jvm No attributes, but a messagesaying “Use get command withthe --monitor option to view thisnode’s attributes and values.”
get -m server.jvm.* List of attributes and valuescorresponding to JVM attributesas described in Table 18–15.
Using JConsoleThis section contains the following topics:
■ “Securing JConsole to Application Server Connection” on page 209■ “Prerequisites for Connecting JConsole to Application Server” on page 210■ “Connecting JConsole to Application Server” on page 210■ “Connecting JConsole Securely to Application Server” on page 211
Administration (management and monitoring) of the Enterprise Server is based on JMXTechnology. This means that the managed components are represented as MBeans in theMBeanServer running in the Enterprise Server's JVM.
Java SE 5 enhances management and monitoring of the JVM by including a Platform MBeanServer and by including MBeans to configure the JVM. Enterprise Server leverages theseenhancements and registers its MBeans with the Platform MBean Server. Thus a JMXConnector Client gets a unified view of JVM MBeans as well as Enterprise Server MBeans.
Using JConsole
Sun GlassFish Enterprise Server v2.1.1 Administration Guide • October 2009208
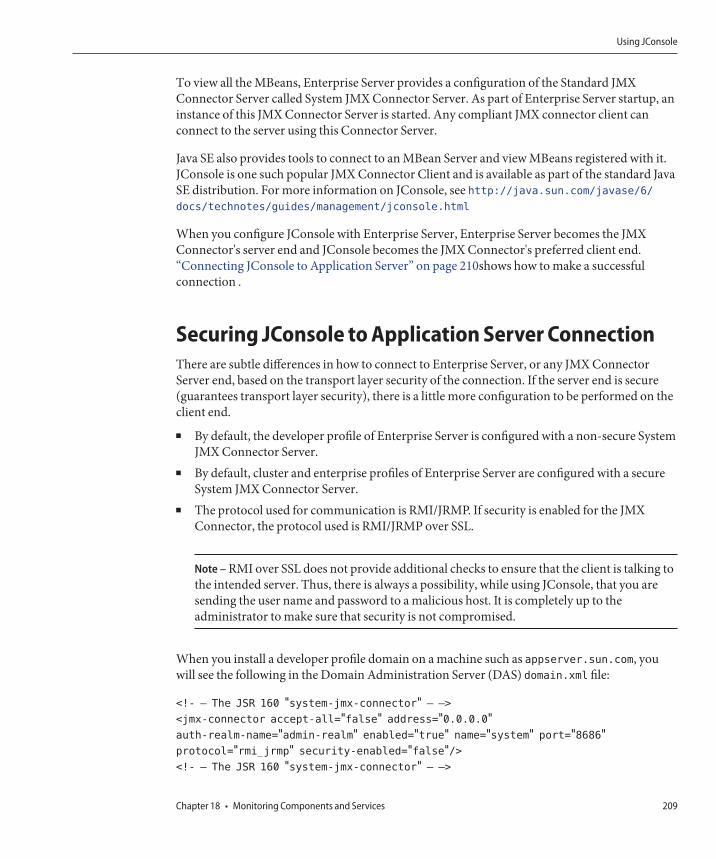
To view all the MBeans, Enterprise Server provides a configuration of the Standard JMXConnector Server called System JMX Connector Server. As part of Enterprise Server startup, aninstance of this JMX Connector Server is started. Any compliant JMX connector client canconnect to the server using this Connector Server.
Java SE also provides tools to connect to an MBean Server and view MBeans registered with it.JConsole is one such popular JMX Connector Client and is available as part of the standard JavaSE distribution. For more information on JConsole, see http://java.sun.com/javase/6/docs/technotes/guides/management/jconsole.html
When you configure JConsole with Enterprise Server, Enterprise Server becomes the JMXConnector's server end and JConsole becomes the JMX Connector's preferred client end.“Connecting JConsole to Application Server” on page 210shows how to make a successfulconnection .
Securing JConsole to Application Server ConnectionThere are subtle differences in how to connect to Enterprise Server, or any JMX ConnectorServer end, based on the transport layer security of the connection. If the server end is secure(guarantees transport layer security), there is a little more configuration to be performed on theclient end.
■ By default, the developer profile of Enterprise Server is configured with a non-secure SystemJMX Connector Server.
■ By default, cluster and enterprise profiles of Enterprise Server are configured with a secureSystem JMX Connector Server.
■ The protocol used for communication is RMI/JRMP. If security is enabled for the JMXConnector, the protocol used is RMI/JRMP over SSL.
Note – RMI over SSL does not provide additional checks to ensure that the client is talking tothe intended server. Thus, there is always a possibility, while using JConsole, that you aresending the user name and password to a malicious host. It is completely up to theadministrator to make sure that security is not compromised.
When you install a developer profile domain on a machine such as appserver.sun.com, youwill see the following in the Domain Administration Server (DAS) domain.xml file:
<!- – The JSR 160 "system-jmx-connector" – –>
<jmx-connector accept-all="false" address="0.0.0.0"auth-realm-name="admin-realm" enabled="true" name="system" port="8686"protocol="rmi_jrmp" security-enabled="false"/><!- – The JSR 160 "system-jmx-connector" – –>
Using JConsole
Chapter 18 • Monitoring Components and Services 209

The security-enabled flag for the JMX Connector is false. If you are running the cluster orenterprise profile, or if you have turned on security for the JMX Connector in the developerprofile, this flag is set to true.
<!- – The JSR 160 "system-jmx-connector" – –>
<jmx-connector accept-all="false" address="0.0.0.0"auth-realm-name="admin-realm" enabled="true" name="system" port="8686"protocol="rmi_jrmp" security-enabled="true"/>...
</jmx-connector>
<!- – The JSR 160 "system-jmx-connector" – –>
Prerequisites for Connecting JConsole to ApplicationServerThe JConsole setup has two parts: a server end and a client end. For this example, the EnterpriseServer domain is installed on a machine called appserver.sun.com, which is a powerful Solarisserver. This is the server end.
The client end also has an installation of Enterprise Server. Let us assume that the client end is aWindows machine with Java SE 6.0 and Enterprise Server installed.
Note – The Enterprise Server installation is needed on the client end only when your EnterpriseServer domain has security enabled on the remote machine (the default for cluster andenterprise profiles). If you just want to administer an Enterprise Server developer profiledomain on the Solaris machine above, you do not need the Enterprise Server installation on thisclient machine.
If the server and client ends are on the same machine, you can use localhost to specify the hostname.
▼ Connecting JConsole to Application ServerThis procedure describes connecting JConsole to Enterprise Server without security enabled onthe JMX Connector. By default, security is not enabled on Enterprise Server for the developerprofile.
Start the domain on appserver.sun.com.
Start JConsole by running JDK_HOME/bin/jconsole.
1
2
Using JConsole
Sun GlassFish Enterprise Server v2.1.1 Administration Guide • October 2009210

In the Connect to Agent tab of JConsole, enter user name, password, host name and port (8686,by default).The user name refers to the administration user name and password refers to theadministration password of the domain.
Click Connect.In the JConsole window you will see all your MBeans, VM information etc., in various tabs.
▼ Connecting JConsole Securely to Application ServerThis procedure describes how to connect JConsole to Enterprise Server with security enabledon the JMX Connector. By default, security is enabled on Enterprise Server cluster or enterpriseprofiles. Use this procedure if you have security enabled on the developer profile's JMXConnector.
Install Enterprise Server on the client machine (where JConsole is installed).The only reason you need this is to let JConsole know where the server certificate of the DomainAdministration Server that you trust is located. To obtain that certificate, invoke at least oneremote asadmin command and to do that, you need the local installation of Enterprise Server.
Start the Enterprise Server on appserver.sun.com.Since this is a cluster or enterprise domain, the system JMX Connector server is secure. Toenable security on the developer profile JMX Connector, see the Admin Console online help.
From the local Enterprise Server installation, run install-dir\bin\asadmin list --user admin--secure=true --host appserver.sun.com --port 4848 (where 4848 is the server'sadministration port).Though asadmin list command is chosen for this example, you can run any remote asadmincommand. You are prompted to accept the certificate sent by the DAS of appserver.sun.com.
Press y to accept the certificate sent by the DAS on appserver.sun.com.The server's certificate is stored in a file called .asadmintruststore in your home directory onthe client machine.
Note – This step is not required if your server machine and client machine is the same. That is, ifyou are running JConsole also on appserver.sun.com.
Let JConsole know the trust store location by using the following JConsole command:JDK-dir\bin\jconsole.exe -J-Djavax.net.ssl.trustStore="C:\Documents and
Settings\user\.asadmintruststore"
3
4
1
2
3
4
5
Using JConsole
Chapter 18 • Monitoring Components and Services 211
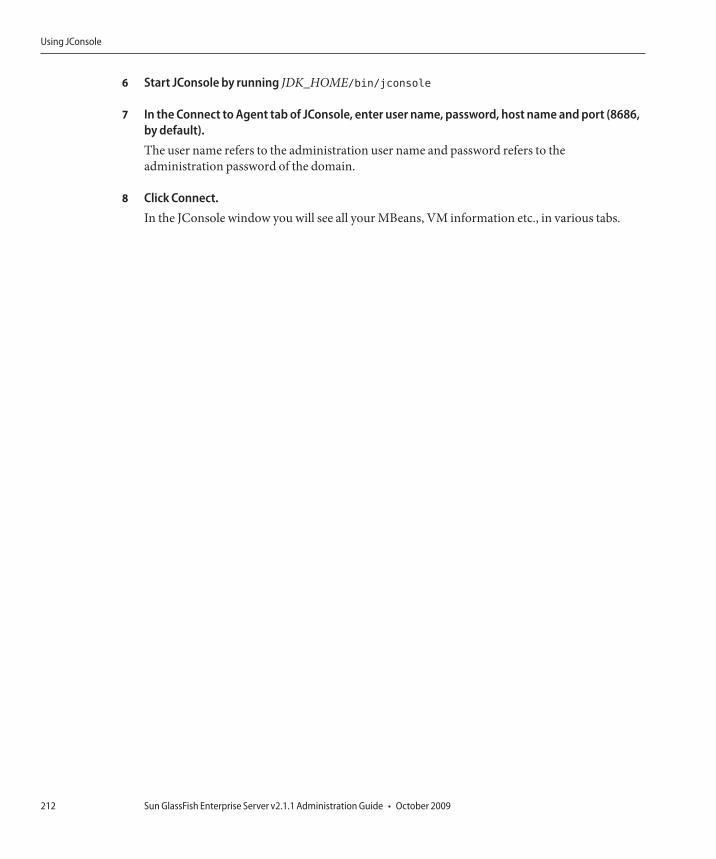
Start JConsole by running JDK_HOME/bin/jconsole
In the Connect to Agent tab of JConsole, enter user name, password, host name and port (8686,by default).The user name refers to the administration user name and password refers to theadministration password of the domain.
Click Connect.In the JConsole window you will see all your MBeans, VM information etc., in various tabs.
6
7
8
Using JConsole
Sun GlassFish Enterprise Server v2.1.1 Administration Guide • October 2009212
Configuring Management Rules
This section contains information about setting administration policies to automate routineadministration tasks, configure self-tuning of the application server for diverse runtimeconditions and improve availability by preventing failures. This section also containsinformation on the self-management templates, which are predefined management rules thatyou can customize.
This section contains the following topics:
■ “About Management Rules” on page 213■ “Configuring Management Rules” on page 214
About Management RulesManagement rules enable you to automate routine administration tasks, configure self-tuningof the application server for diverse runtime condition and improve availability by preventingfailures. A management rule contains an action to be taken when a specified event occurs or aset threshold is reached. You can set management rules that can automatically take correctiveaction, based on events that you specify.
A management rule consists of two parts — event and action:
■ An event uses the JMX notification mechanism to trigger a predefined action.■ An action is triggered when an associated event occurs. An action is an MBean which is a
notification listener which implements javax.management.NotificationListener.
For example, an event could be a SEVERE message logged by the EJB logger, and an actioncould be alerting an administrator with the log message contents. When the event happens,event data is passed as part of userData part of the javax.management.Notification.
The action specified in your rule has to be implemented as a custom MBean. Therefore, beforeconfiguring a management rule, you should deploy a custom MBean designed to receive event
19C H A P T E R 1 9
213

notifications and take appropriate action. For details on developing a custom MBean anddeploying it, see Chapter 14, “Developing Custom MBeans,” in Sun GlassFish Enterprise Serverv2.1.1 Developer’s Guide.
The Enterprise Server provides some useful events, which you can further extend by writingcustom MBeans to emit notifications. Each event can be further customized by changing itsproperties.
The following event types are available:
■ Monitor events: Monitors an attribute of an MBean. Monitor events have similarcapabilities to javax.management.monitor package capabilities. In addition to monitoringsimple attributes, as Java SE 5 javax.management.monitor does, monitor events alsosupport monitoring complex attributes.
■ Notification events: Notifies of events from a custom MBean. Use these events to writecustom events and thus extend the event dictionary. Any MBeans which can emit anotification can be an event.
■ System events:■ Lifecycle: Events for sever startup, showdown, and termination.■ Log: Events triggered when the specified logger writes a log entry. For example, you
could create a management rule to send an alert to an administrator when an EJBcontainer logger logs a SEVERE log entry.
■ Timer: Events triggered at the specified date and time, at the specified interval, and so on.These events have capabilities similar to the javax.management.timer package.
■ Trace: Events triggered on Entry and Exit of HTTP/IIOP request methods, EJB methods,and Web methods. For example, you can design a servlet filter used to log interactionswith a servlet as a management rule using Web method Entry and Exit events.
■ Cluster: Events triggered when a cluster or instance starts, stops, or fails. These eventsuse the Group Management System cluster monitoring.
Configuring Management RulesTo configure management rules in the Admin Console:
■ In the developer profile, go to Configuration → Management Rules■ In the cluster and enterprise profiles, go to Configurations → Configuration →
Management Rules
Note – On this page, check All Rules Enabled to enable management rules globally. Ifmanagement rules are not enabled globally, none of the management rules are executed.
Configuring Management Rules
Sun GlassFish Enterprise Server v2.1.1 Administration Guide • October 2009214
In addition, to enable a individual management rule, you must enable the rule on this page byclicking the box next to the rule and clicking Enable.
A rule's MBeans must also be enabled on a target. To enable MBeans, go to Custom MBeans →MBean. On the Edit Custom MBean page, click the Target tab to access the Custom MBeanTargets page, where you can enable the MBeans on some or all of the targets.
For details, see the online help.
To create management rules from the command line, use the create-management-rulecommand. To set properties of the management rules, use the get and set commands. To listand delete management rules, use list-management-rules and delete-management-rule.For more information, see the online help for these commands, or Sun GlassFish EnterpriseServer 2.1.1 Reference Manual.
Configuring Management Rules
Chapter 19 • Configuring Management Rules 215

216
Java Virtual Machine and Advanced Settings
The Java Virtual Machine (JVM) is an interpretive computing engine responsible for runningthe byte codes in a compiled Java program. The JVM translates the Java byte codes into thenative instructions of the host machine. The Enterprise Server, being a Java process, requires aJVM in order to run and support the Java applications running on it. JVM settings are part of anapplication server configuration.
This chapter explains how to configure the Java Virtual Machine (JVMTM) and other advancedsettings. It contains the following sections:
■ “Tuning the JVM Settings” on page 217■ “Configuring Advanced Settings” on page 218
Tuning the JVM SettingsAs part of configuring the application server, you define settings that enhance the use of the JavaVirtual machine. To change the JVM configuration using the Admin Console, selectApplication Server > JVM Settings tab and define the general JVM settings as follows:
■ Java Home: Enter the name of the installation directory of the Java software. The EnterpriseServer relies on the Java SE software.
Note – If you enter a nonexistent directory name or the installation directory name of anunsupported version of the Java EE software, then the Enterprise Server will not start.
■ Javac Options: Enter the command-line options for the Java programming languagecompiler. The Enterprise Server runs the compiler when EJB components are deployed.
■ Debug: To set up debugging with the JPDA (Java Platform Debugger Architecture), selectthis Enabled checkbox.JPDA is used by application developers.
20C H A P T E R 2 0
217

■ Debug Options: Specify the JPDA options passed to the JVM when the debugging isenabled.
■ RMI Compile Options: Enter the command-line options for the rmic compiler. TheEnterprise Server runs the rmic compiler when EJB components are deployed.
■ Bytecode Preprocessor: Enter a comma separated list of class names. Each class mustimplement the com.sun.appserv.BytecodePreprocessor interface. The classes are calledin the order specified.Tools such as profilers may require entries in the Bytecode Preprocessor field. Profilersgenerate information used to analyze server performance.
Configuring Advanced SettingsTo set the advanced application configuration using the Admin Console, select ApplicationServer > Advanced tab > Application Configuration tab and set the application configuration asfollows:
■ Reload: Select this checkbox to enable dynamic reloading of applications.If dynamic reloading is enabled (it is by default), you do not have to redeploy an applicationor module when you change its code or deployment descriptors. All you have to do is copythe changed JSP or class files into the deployment directory for the application or module.The server checks for changes periodically and redeploys the application, automatically anddynamically, with the changes. This is useful in a development environment, because itallows code changes to be tested quickly. In a production environment, however, dynamicreloading might degrade performance. In addition, whenever a reload is done, the sessionsat that transit time become invalid. The client must restart the session.
■ Reload Poll Interval: Define the interval at which applications and modules are checked forcode changes and dynamically reloaded. The default is 2.
■ Admin Session Timeout: Specify the number of minutes of inactivity after which the adminsession times out.
In addition, define the deploy settings as follows:
■ Auto Deploy: Select this checkbox to enable automatic deployment of applications.Autodeployment involves copying an application or module file (JAR, WAR, RAR, or EAR)into a special directory, where it is automatically deployed by the Application Server.
■ Auto Deploy Poll Interval: Define the interval at which applications and modules arechecked for code changes and dynamically reloaded. The default is 2.
■ Verifier: Check the Verifier Enabled box to verify your deployment descriptor files. This isoptional.
■ Precompile: Check the Precompile Enabled box to precompile any JSP files.
Configuring Advanced Settings
Sun GlassFish Enterprise Server v2.1.1 Administration Guide • October 2009218

Automatically Restarting a Domain or NodeAgent
If your domain or node agent is stopped unexpectedly (for example, if you need to restart yourmachine), you can configure your system to automatically restart the domain or node agent.
This Appendix contains the following topics:
■ “Restarting Automatically on Solaris 10” on page 219■ “Restarting Automatically Using inittab on Solaris 9 and Linux Platforms” on page 221■ “Restarting Automatically on the Microsoft Windows Platform” on page 221■ “Security for Automatic Restarts” on page 223
Restarting Automatically on Solaris 10Solaris 10 users can use the command asadmin create-service to create a service that restartsa node agent or Domain Administration Server (DAS). The service created uses the SolarisService Management Facility (SMF).
The process that a service starts depends on whether the service is to restart a DAS or a nodeagent.
■ If the service is to restart a DAS, the process is asadmin start-domain.■ If the service is to restart a node agent, the process is asadmin start-node-agent.
The service grants to the process the privileges of the user that runs the process. When you usethe command asadmin create-service to create an SMF service, the default user is thesuperuser. If you require a different user to run the process, specify the user inmethod_credential.
If your process is to bind to a privileged port of the Solaris OS, the process requires thenet_privaddr privilege. The privileged ports of the Solaris OS have a port numbers less than1024.
AA P P E N D I X A
219
To determine if a user has the net_privaddr privilege, log in as that user and type the commandppriv -l | grep net_privaddr.
To run the asadmin create-service command, you must have solaris.smf.* authorization.See the useradd and usermod man pages to find out how to set the authorizations. You mustalso have write permission in the directory tree:/var/svc/manifest/application/SUNWappserver. Usually, the superuser has both thesepermissions. Additionally, the Solaris 10 administration commands such as svccfg, svcs, andauths must be available in the PATH. For complete information on running this command, seecreate-service(1).
The syntax is as follows:
asadmin create-service [--name service-name] [--type das|node-agent]
--passwordfile password-file [--serviceproperties serviceproperties]domain-or-node-agent-configuration-directory
For example, to create a service called domain1 for domain1:
1. Run the following:asadmin create-service --type das --passwordfile password.txt
/appserver/domains/domain1
This creates a service to restart the domain domain1 automatically. In the background, thecommand creates a manifest file from a template, validates the file, and imports it as aservice.
Note – If a particular Enterprise Server domain should not have default user privileges,modify the service's manifest and reimport the service. To determine a user's privileges, login as that user and type the command ppriv -l.
2. Once the service is created, enable it using the svacdm enable command:svacdm enable /appserver/domains/domain1
3. Once enabled, if the domain goes down, SMF restarts it.
As you administer your service, the following Solaris commands are useful:■ auths
■ smf_security
■ svcadm
■ svccfg
■ rbac
■ useradd
■ usermod
For more information on these commands, see the command manpages.
Restarting Automatically on Solaris 10
Sun GlassFish Enterprise Server v2.1.1 Administration Guide • October 2009220

Restarting Automatically Using inittab on Solaris 9 and LinuxPlatforms
To restart your domain on the Solaris 9 or Linux platform, add a line of text to the/etc/inittab file.
If you use /etc/rc.local, or your system’s equivalent, place a line in /etc/rc.local that callsthe desired asadmin command.
For example, to restart domain1 for an Enterprise Server installed in the opt/SUNWappserverdirectory, using a password file called password.txt:
das:3:respawn:/opt/SUNWappserver/bin/asadmin start-domain --user admin
--passwordfile /opt/SUNWappserver/password.txt domain1
Put the text on one line. The first three letters are a unique designator for the process and can bealtered.
To restart a node agent, the syntax is similar. For example, to restart agent1 for an EnterpriseServer installed in the opt/SUNWappserver directory, using a password file calledpassword.txt:
das:3:respawn:/opt/SUNWappserver/bin/asadmin start-node-agent --user admin
--passwordfile /opt/SUNWappserver/password.txt agent1
Restarting Automatically on the Microsoft Windows PlatformTo restart automatically on Microsoft Windows, create a Windows Service and prevent theservice from shutting down when a user logs out.
Creating a Windows ServiceUse the appservService.exe and appserverAgentService.exe executable files shipped withthe Sun GlassFish Enterprise Server in conjunction with the Service Control command(sc.exe) provided by Microsoft.
The sc.exe command comes with Windows XP and is in the system32 subdirectory of theWindows installation directory (usually either C:\windows\system32 or C:\winnt\system32).As of this writing, the Windows 2000 sc.exe is available for download atftp://ftp.microsoft.com/reskit/win2000/sc.zip. For more information on using sc.exe,see http://msdn.microsoft.com/library/default.asp?url=/library/en-us/dndllpro/html/msdn_scmslite.asp.
Use appservService.exe and appservAgentService.exe as follows:
Restarting Automatically on the Microsoft Windows Platform
Appendix A • Automatically Restarting a Domain or Node Agent 221

C:\winnt\system32\sc.exe create service-name binPath= \"fully-qualified-path-to-appservService.exe\"fully-qualified-path-to-asadmin.bat start-command\"\"fully-qualified-path-to-asadmin.bat stop-command\""start= auto DisplayName= "display-name"
Note – There is no space between binpath and the equals sign (=). There must be a space afterthe equals sign and before the path.
For example, to create a service called SunJavaSystemAppServer DOMAIN1 that starts and stopsthe domain domain1, using a password file C:\Sun\AppServer\password.txt:
C:\windows\system32\sc.exe create domain1 binPath=
"C:\Sun\AppServer\lib\appservService.exe \"C:\Sun\AppServer\bin\asadmin.batstart-domain --user admin --passwordfile C:\Sun\AppServer\password.txt domain1\"\"C:\Sun\AppServer\bin\asadmin.bat stop-domain domain1\"" start= auto
DisplayName= "SunJavaSystemAppServer DOMAIN1"
To create a service that starts and stops the node agent agent1:
C:\windows\system32\sc.exe create agent1 binPath=
"C:\Sun\AppServer\lib\appservAgentService.exe \"C:\Sun\AppServer\bin\asadmin.batstart-node-agent --user admin --passwordfile C:\Sun\AppServer\password.txt agent1\"\"C:\Sun\AppServer\bin\asadmin.bat stop-node-agent agent1\"" start= auto
DisplayName= "SunJavaSystemAppServer AGENT1"
Note – The start and stop commands entered as part of the binPath= parameter must have thecorrect syntax. To test, run the commands from the command prompt. If the commands do notproperly start or stop the domain or node agent, the service does not work correctly.
Note – Don’t use a mixture of asadmin start and stop commands and service start and stops.Mixing the two can cause the server status to be out of sync. For example, the service might notshow that the component has started even though the component is not running. To avoid thissituation, always use the sc.exe command to start and stop the component when usingservices.
If your sc.exe create command did not properly create the service, delete the service and tryagain. To delete the service, use the sc.exe delete "service-name" command.
Restarting Automatically on the Microsoft Windows Platform
Sun GlassFish Enterprise Server v2.1.1 Administration Guide • October 2009222

Preventing the Service From Shutting Down When aUser Logs OutBy default, the Java VM catches signals from Windows that indicate that the operating system isshutting down, or that a user is logging out, and shuts itself down cleanly. This behavior causesthe Enterprise Server service to shut down when a user logs out of Windows. To prevent theservice from shutting down when a user logs out, set the -Xrs Java VM option(http://java.sun.com/j2se/1.3/docs/tooldocs/solaris/java.html#Xrs).
To set the -Xrs Java VM option, add the following line to the section of theas-install\domains\domain-name\config\domain.xml file that defines Java VM options:
<jvm-options>-Xrs</jvm-options>
If the Enterprise Server service is running, stop and restart the service for your changes tobecome effective.
Note – In some Windows 2003 Server installations, adding the -Xrs option to the domain.xmlfile fails to prevent the service from shutting down. In this situation, add the option to theas-install\lib\processLauncher.xml file as follows:
<process name="as-service-name">...
<sysproperty key="-Xrs"/>...
Security for Automatic RestartsIf you are using the cluster or enterprise profile, the administration passworda and masterpassword are required when automatically restarting Enterprise Server. If you are using theDeveloper Profile, no
Handle the password and master password requirements for cluster and enterprise profiles inone of the following ways:■ On Microsoft Windows, configure the service to ask the user for the password.
1. In the Services Control Panel, double-click the service you created.2. In the Properties window, click the Log On tab.3. Check “Allow service to interact with desktop” to prompt for the required passwords
when starting the component.You have to log in to see the prompts, and entries are not echoed back as you type them.This method is the most secure way to use the services option, but user interaction isrequired before the service becomes available.
Security for Automatic Restarts
Appendix A • Automatically Restarting a Domain or Node Agent 223

If the “interact with desktop” option is not set, the service stays in a “start-pending” stateand appears to hang. Kill the service process to recover from this state.
■ On Windows or UNIX, create a domain using the --savemasterpassword=true option andcreate a password file to store the admin password. When starting the component, use the--passwordfile option to point to the file that contains the password.For example:1. Create domain with a saved master password. In this syntax, you are prompted for the
administration password and master password:
asadmin create-domain --adminport 4848 --adminuser admin
--savemasterpassword=true --instanceport 8080 domain1
2. On Windows, create a service using a password file to populate the admin password:
C:\windows\system32\sc.exe create domain1 binPath=
"C:\Sun\AppServer\lib\appservService.exe \"C:\Sun\AppServer\bin\asadmin.batstart-domain --user admin
--passwordfile C:\Sun\AppServer\password.txt domain1\"\"C:\Sun\AppServer\bin\asadmin.bat stop-domain domain1\"" start= auto
DisplayName= "SunJavaSystemAppServer DOMAIN1"
The path to the password file password.txt is C:\Sun\AppServer\password.txt. Itcontains the password in the following format
AS_ADMIN_password=password
For example, for a password adminadmin:
AS_ADMIN_password=adminadmin
3. On UNIX, use the --passwordfile option in the line you add to the inittab file:
das:3:respawn:/opt/SUNWappserver/bin/asadmin start-domain --user admin
--passwordfile /opt/SUNWappserver/password.txt domain1
The path to the password file password.txt is /opt/SUNWappserver/password.txt. Itcontains the password in the following format
AS_ADMIN_password=password
For example, for a password adminadmin:
AS_ADMIN_password=adminadmin
Security for Automatic Restarts
Sun GlassFish Enterprise Server v2.1.1 Administration Guide • October 2009224

Dotted Name Attributes for domain.xml
This appendix describes the dotted name attributes that can be used to address the MBean andits attributes. Every element in the domain.xml file has a corresponding MBean. Because thesyntax for using these names involves separating names between periods, these names are calleddotted names.
This appendix contains the following topics:
■ “Top Level Elements” on page 225■ “Elements Not Aliased” on page 227
Top Level ElementsThe following conditions must be adhered to for all top level elements in the domain.xml file:
■ Each server, configuration, cluster, or node agent must have a unique name.■ Servers, configurations, clusters, or node agents cannot be named domain.■ Server instances cannot be named agent.
The following table identifies the top level elements and the corresponding dotted name prefix.
Element Name Dotted Name Prefix
applications domain.applications
resources domain.resources
configurations domain.configs
servers domain.servers
Every server contained in this element is accessible as server-name. Whereserver-name is the value of the name attribute for the server subelement.
BA P P E N D I X B
225

Element Name Dotted Name Prefix
clusters domain.clusters
Every cluster contained in this element is accessible as cluster-name. Wherecluster-name is the value of the name attribute for the cluster subelement.
node-agents domain.node-agents
lb-configs domain.lb-configs
Applicable only for Sun GlassFish Enterprise Server
system-property domain.system-property
converged-lb-configs domain.converged-lb-configs
Applicable only for Sun GlassFish Communications Server
Two levels of aliasing are available:
1. The first level of alias allows access to attributes of server instances or clusters without goingthrough the domain.servers or domain.clusters prefix. So, for example, a dotted name ofthe form server1 maps to the dotted name domain.servers.server1 (where server1 is aserver instance).
2. The second level of alias is used to refer to configurations, applications, and resources of acluster or a standalone server instance (target).
The following table identifies dotted names beginning with the server name, or cluster name,that are aliased to top level names under the domain:
Dotted Name Aliased to Comments
target.applications.* domain.applications.* The alias resolves to applications referenced by the target only.
target.resources.* domain.resources.* The alias resolves to all jdbc-connection-pool, connector-connection-pool,resource-adapter-config, and all other resources referenced by the target.
The following table identifies some of the dotted names beginning with the server name, orcluster name, that are aliased to top level names within the configuration referenced by theserver or cluster. For a complete list, use the asadmin list target.* command.
Dotted Name Aliased to
target.http-service config-name.http-service
target.iiop-service config-name.iiop-service
Top Level Elements
Sun GlassFish Enterprise Server v2.1.1 Administration Guide • October 2009226
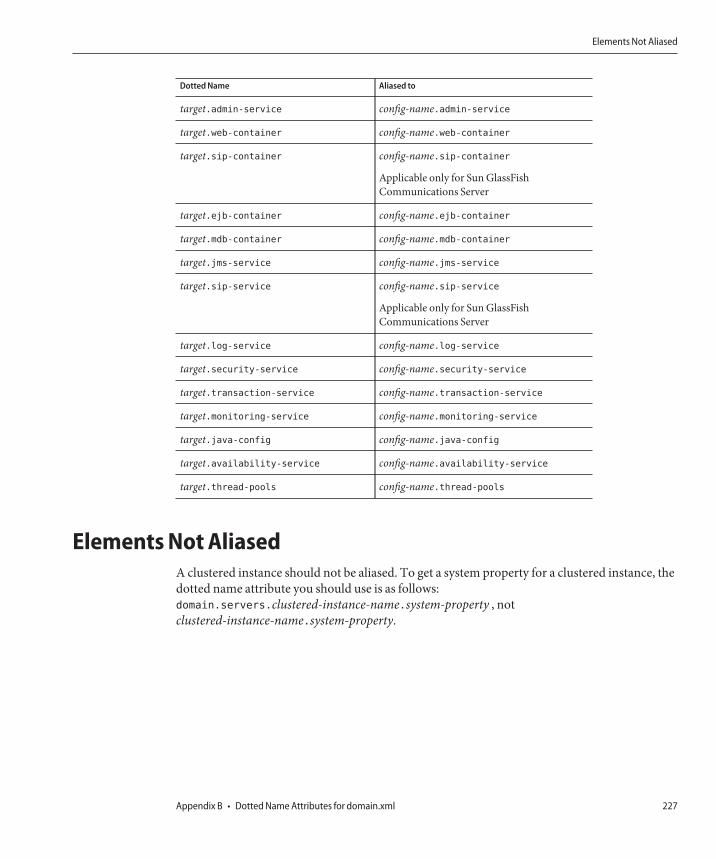
Dotted Name Aliased to
target.admin-service config-name.admin-service
target.web-container config-name.web-container
target.sip-container config-name.sip-container
Applicable only for Sun GlassFishCommunications Server
target.ejb-container config-name.ejb-container
target.mdb-container config-name.mdb-container
target.jms-service config-name.jms-service
target.sip-service config-name.sip-service
Applicable only for Sun GlassFishCommunications Server
target.log-service config-name.log-service
target.security-service config-name.security-service
target.transaction-service config-name.transaction-service
target.monitoring-service config-name.monitoring-service
target.java-config config-name.java-config
target.availability-service config-name.availability-service
target.thread-pools config-name.thread-pools
Elements Not AliasedA clustered instance should not be aliased. To get a system property for a clustered instance, thedotted name attribute you should use is as follows:domain.servers.clustered-instance-name.system-property , notclustered-instance-name.system-property.
Elements Not Aliased
Appendix B • Dotted Name Attributes for domain.xml 227

228
The asadminUtility
The Application Server includes a command-line administration utility known as asadmin.Theasadmin utility is used to start and stop the Application Server, manage users, resources,and applications.
This chapter contains the following sections:
■ “Common Options for Remote Commands” on page 232■ “The Multimode Command” on page 233■ “The Get, Set, and List Commands” on page 234■ “Server Lifecycle Commands” on page 235■ “List and Status Commands” on page 236■ “Deployment Commands” on page 237■ “Version Commands” on page 238■ “Message Queue Administration Commands” on page 238■ “Resource Management Commands” on page 239■ “Configuration Commands” on page 241■ “User Management Commands” on page 244■ “Rules and Monitoring Commands” on page 245■ “Database Commands” on page 245■ “Diagnostic and Logging Commands” on page 246■ “Web Service Commands” on page 246■ “Security Service Commands” on page 247■ “Password Commands” on page 248■ “Verify Command” on page 249■ “Custom MBean Commands” on page 249■ “Service Command” on page 249■ “Property Command” on page 250
CA P P E N D I X C
229

The asadminUtilityUse the asadmin utility to perform any administrative tasks for the Application Server. You canuse this asadmin utility in place of using the Administrator interface.
The asadmin utility invokes subcommands that identify the operation or task you wish toperform. Subcommands are case-sensitive. Short option arguments have a single dash (-); whilelong option arguments have two dashes (--). Options control how the utility performs asubcommand. Options are also case-sensitive. Most options require argument values exceptboolean options which toggle to switch a feature ON or OFF. Operands appear after theargument values, and are set off by a space, a tab, or double dashes (--). The asadmin utilitytreats anything that comes after the options and their values as an operand.
asadmin can be used in command shell invocation or multi command mode (known asmultimode). In command shell invocation you invoke the asadmin utility from your commandshell. asadmin executes the command, then exits. In multiple command mode, you invokeasadmin once, it then accepts multiple commands until you exit asadmin and return to thenormal command shell invocation. Environment variables set while in multiple commandmode are used for all subsequent commands until you exit multimode. You may providecommands by passing a previously prepared list of commands from a file or standard input(pipe). Additionally, you can invoke multimode from within a multimode session; once you exitthe second multimode environment, you return to your original multimode environment.
You can also run the asadmin utility in interactive or non-interactive options. By default, theinteractive option is enabled. It prompts you for the required arguments. You can use theinteractive option in command shell invocation under all circumstances. You can use theinteractive option in multimode when you run one subcommand at a time from the commandprompt; and when you run in multimode from a file. Subcommands in multimode, when pipedfrom an input stream, and subcommands invoked from another program, cannot run in theinteractive option.
Local subcommands can be executed without the presence of an administration server.However, it is required that the user be logged into the machine hosting the domain in order toexecute the subcommand and have access (permissions) for the installation and domaindirectories. Remote subcommands are always executed by connecting to an administrationserver and executing the subcommand there. A running administration server is required. Allremote subcommands require the following options:■ -u --user authorized domain application server administrative username.■ --passwordfile the file containing the domain application server password in the
following form: AS_ADMIN_PASSWORD=password. Where password is the actual administratorpassword.
■ -H --host machine name where the domain application server is running.■ -p --port port number of the domain application server listening for administration
requests. The default port number for Platform Edition is 4848.
The asadminUtility
Sun GlassFish Enterprise Server v2.1.1 Administration Guide • October 2009230

■ -s --secure if true, uses SSL/TLS to communicate with the domain application server.■ -t --terse indicates that any output data must be very concise, typically avoiding
human-friendly sentences and favoring well-formatted data for consumption by a script.Default is false.
■ -e --echo setting to true will echo the command line statement on the standard output.Default is false.
■ -I --interactive if set to true (default), only the required password options are prompted.■ -h --help displays the help text for the command.
For subcommands that can be executed locally or remotely, if any one of the--host, --port,--user, and --passwordfile options are set, either in the environment or in the commandline, the subcommand will run in remote mode. Additionally, for subcommands that can beexecuted locally or remotely, if the --local option is set to true, the subcommand will runlocally. Also, if none of the local options are set, either on the command line or in theenvironment, the subcommand is executed locally by default. Setting the --local option totrue overrides the local --host, --port, --user, and --passwordfile settings, even if specified.The subcommand will run in local mode.
Subcommands that can be executed locally accept the --domain option to specify the domain ofinterest which assumes the domain as the default domain if there is only one. If there is morethan one domain, the --domain option is a required option. For subcommands that can be runlocally or remotely, when run remotely with the--host, --port, --user, and --passwordfile
options specified, the --domain option is ignored. The --domain option is ignored if thesubcommand will be run in remote mode. Note that there is one administration instance perdomain, so on a single machine with multiple domains, local execution must specify thedomain, and remote execution must specify the --host, --port, --user, and --passwordfile
options for the administration instance for that domain.
For security purposes, you can set the password for a subcommand from a file instead ofentering the password at the command line. The --passwordfile option takes the filecontaining the passwords. The valid contents for the file are:
EXAMPLE C–1 Passwordfile contents
AS_ADMIN_PASSWORD=value
AS_ADMIN_ADMINPASSWORD=value
AS_ADMIN_USERPASSWORD=value
AS_ADMIN_MASTERPASSWORD=value
If AS_ADMIN_PASSWORD has been exported to the global environment, specifying the--passwordfile option will produce a warning about using the --password option. UnsetAS_ADMIN_PASSWORD to prevent this from happening. The master password is not propagatedon the command line or an environment variable, but can be specified in the passwordfile.
The asadminUtility
Appendix C • The asadminUtility 231

To use the --secure option, you must use the set command to enable the security --enabledflag in the admin http-listener in the domain.xml. When you use the asadminsubcommands to create and/or delete, you must restart the server for the newly createdcommand to take affect. Use the start-domain command to restart the server.
To access the manpages for the Application Server command-line interface subcommands onthe Solaris platform, add $AS_INSTALL/man to your MANPATH environment variable.
You can obtain overall usage information for any of the asadmin utility subcommands byinvoking the --help option. If you specify a subcommand, the usage information for thatsubcommand is displayed. Using the --helpoption without a subcommand displays a listing ofall the available subcommands.
Common Options for Remote CommandsAll the remote commands require the following common options:
TABLE C–1 Remote Commands Required Options
Option Definition
--host The machine name where the domain administration server is running. The defaultvalue is localhost.
--port The HTTP/S port for administration. This is the port to which you should point yourbrowser in order to manage the domain. For example, http://localhost:4848. Thedefault port number for Platform Edition is 4848.
--user The authorized domain administration server administrative username. If you haveauthenticated to a domain using the asadmin login command, then you need notspecify the --user option on subsequent operations to this particular domain.
Common Options for Remote Commands
Sun GlassFish Enterprise Server v2.1.1 Administration Guide • October 2009232

TABLE C–1 Remote Commands Required Options (Continued)Option Definition
--passwordfile The --passwordfile option specifies the name of a file containing the passwordentries in a specific format. The entry for the password must have the AS_ADMIN_prefix followed by the password name in uppercase letters.
For example, to specify the domain administration server password, use an entry withthe following format: AS_ADMIN_PASSWORD=password, where password is the actualadministrator password. Other passwords that can be specified includeAS_ADMIN_MAPPEDPASSWORD, AS_ADMIN_USERPASSWORD, andAS_ADMIN_ALIASPASSWORD.
All remote commands must specify the admin password to authenticate to thedomain administration server, either through--passwordfile or asadmin login, orinteractively on the command prompt. The asadmin login command can be usedonly to specify the admin password. For other passwords, that must be specified forremote commands, use the --passwordfile or enter them at the command prompt.
If you have authenticated to a domain using the asadmin login command, then youneed not specify the admin password through the --passwordfile option onsubsequent operations to this particular domain. However, this is applicable only toAS_ADMIN_PASSWORD option. You will still need to provide the other passwords, forexample, AS_ADMIN_USERPASSWORD, as and when required by individual commands,such as update-file-user.
For security reasons, passwords specified as an environment variable will not be readby asadmin.
--secure If set to true, uses SSL/TLS to communicate with the domain administration server.
--interactive If set to true (default), only the required password options are prompted.
--terse Indicates that any output data must be very concise, typically avoidinghuman-friendly sentences and favoring well-formatted data for consumption by ascript. Default is false.
--echo Setting to true will echo the command line statement on the standard output. Defaultis false.
--help Displays the help text for the command.
The Multimode CommandUse the multimode command to process the asadmin commands. The command-line interfacewill prompt you for a command, execute that command, display the results of the command,and then prompt you for the next command. Additionally, all the asadmin option names set inthis mode are used for all the subsequent commands. You can set your environment and runcommands until you exit multimode by typing “exit” or “quit.” You can also provide commandsby passing a previously prepared list of commands from a file or standard input (pipe). You can
The Multimode Command
Appendix C • The asadminUtility 233

invokemultimode from within a multimodesession; once you exit the second multimodeenvironment, you return to your original multimode environment.
The Get, Set, and List CommandsThe asadmin get, set and list commands work in tandem to provide a navigationmechanism for the Application Server's abstract hierarchy. There are two hierarchies:configuration and monitoring and these commands operate on both. The list commandprovides the fully qualified dotted names of the management components that have read-onlyor modifiable attributes.
The configurationhierarchy provides attributes that are modifiable; whereas the attributes ofmanagement components from monitoring hierarchy are purely read-only. Theconfiguration hierarchy is loosely based on the domain's schema document; whereas themonitoringhierarchy is a little different.
Use the list command to reach a particular management component in the desired hierarchy.Then, invoke the getand set commands to get the names and values or set the values of theattributes of the management component at hand. Use the wildcard (*) option to fetch allmatches in a given fully qualified dotted name. See the examples for further clarification of thepossible navigation of the hierarchies and management components.
An application server dotted name uses the “.” (period) as a delimiter to separate the parts of acomplete name. This is similar to how the “/” character is used to delimit the levels in theabsolute path name of a file in the UNIX file system. The following rules apply while formingthe dotted names accepted by the get, set, and list commands. Note that a specific commandhas some additional semantics applied.
■ A . (period) always separates two sequential parts of the name.■ A part of the name usually identifies an application server subsystem and/or its specific
instance. For example: web-container, log-service, thread-pool-1, etc.■ If any part of the name itself contains a . (period), then it must be escaped with a leading
\(backslash) so that the “.” does not act like a delimiter.■ An * (asterisk) can be used anywhere in the dotted name and it acts like the wildcard
character in regular expressions. Additionally, an * can collapse all the parts of the dottedname. Long dotted name like "<classname>this.is.really.long.hierarchy</classname>" can be abbreviated to "<classname>th*.hierarchy</classname>."Butnote that the . always delimits the parts of the name.
■ The top level switch for any dotted name is --monitor or -m that is separately specified on agiven command line. The presence or lack of this switch implies the selection of one of thetwo hierarchies for application server management: monitoring and configuration.
■ If you happen to know the exact complete dotted name without any wildcard character, thenlist and get/set have a little difference in their semantics:
The Get, Set, and List Commands
Sun GlassFish Enterprise Server v2.1.1 Administration Guide • October 2009234

■ The list command treats this complete dotted name as the complete name of a parentnode in the abstract hierarchy. Upon providing this name to list command, it simplyreturns the names of the immediate children at that level. For example,listserver.applications.web-module will list all the web modules deployed to the domainor the default server.
■ The get and set commands treat this complete dotted name as the fully qualified nameof the attribute of a node (whose dotted name itself is the name that you get when youremove the last part of this dotted name) and it gets/sets the value of that attribute. Thisis true if such an attribute exists. You will never start with this case because in order tofind out the names of attributes of a particular node in the hierarchy, you must use thewildcard character *. For example,server.applications.web-module.JSPWiki.context-root will return thecontext-root of the web-application deployed to the domain or default server.
The list command is the progenitor of navigational capabilities of these three commands. Ifyou want to set or get attributes of a particular application server subsystem, you must knowits dotted name. The list command is the one which can guide you to find the dotted name ofthat subsystem. For example, to find out the modified date (attribute) of a particular file in alarge file system that starts with /. First you must find out the location of that file in the filesystem, and then look at its attributes. Therefore, two of the first commands to understand thehierarchies in appserver are: * list "*" and <command>* list * --monitor. Consult the get
set or list commands manpages to identify the sorted output of these commands.
Server Lifecycle CommandsThe server lifecycle commands are commands that create, delete, or start, stop a domain, or aninstance.
TABLE C–2 Server Lifecycle Commands
Command Definition
create-domain Creates the configuration of a domain. A domain is an administrativenamespace. Every domain has a configuration, which is stored in a set of files.Any number of domains each of which has a distinct administrative identitycan be created in a given installation of application server. A domain can existindependent of other domains. Any user who has access to the asadmin scripton a given system can create a domain and store its configuration in a folder ofchoice. By default, the domain configuration is created in theinstall_dir/domains directory. You can override this location to store theconfiguration elsewhere.
delete-domain Deletes the named domain. The domain must already exist and must bestopped.
Server Lifecycle Commands
Appendix C • The asadminUtility 235

TABLE C–2 Server Lifecycle Commands (Continued)Command Definition
start-domain Starts a domain. If the domain directory is not specified, the domain in thedefault install_dir/domains directory is started. If there are two or moredomains, the domain_name operand must be specified.
stop-domain Stops the Domain Administration Server of the specified domain.
restore-domain Restores files under the domain from a backup directory.
list-domains Lists the domain. If the domain directory is not specified, the domain in thedefault install_dir/domains directory is listed. If there is more than onedomain, the domain_name operand must be specified.
backup-domain Backs up files under the named domain.
login Lets you log in to a domain. If various application server domains are createdon various machines (locally), asadmin invocation from any of these machinescan manage the domains located elsewhere (remotely). This comes in handyespecially when a particular machine is chosen as an administration client andit manages multiple domains and servers. asadmin commands that are used tomanage domains located elsewhere are called remote commands. The asadminlogin command eases the administration of such remote domains. The logincommand runs only in the interactive mode. It prompts you for the admin username and password. On successful login, the file .asadminpass will be createdin the user's home directory. This is the same file that is modified during thecreate-domain command while using the --savelogin option. The domainmust be running for this command to run.
create-instance Creates a new server instance residing on a local or remote machine.
delete-instance Deletes the server instance. This command can be run remotely or locally. Theuser authenticates using the password identified for the administration server.Additionally, the instance must already exist within the domain served by theadministration server. Use this command with discretion since it is destructiveand cannot be undone.
List and Status CommandsThe list and status commands display the status of a deployed component.
TABLE C–3 List and Status Commands
Command Definition
show-component-status Gets the status of the deployed component. The status is a string representationreturned by the server. The possible status strings include status of app-name isenabled or status of app-name is disabled.
List and Status Commands
Sun GlassFish Enterprise Server v2.1.1 Administration Guide • October 2009236
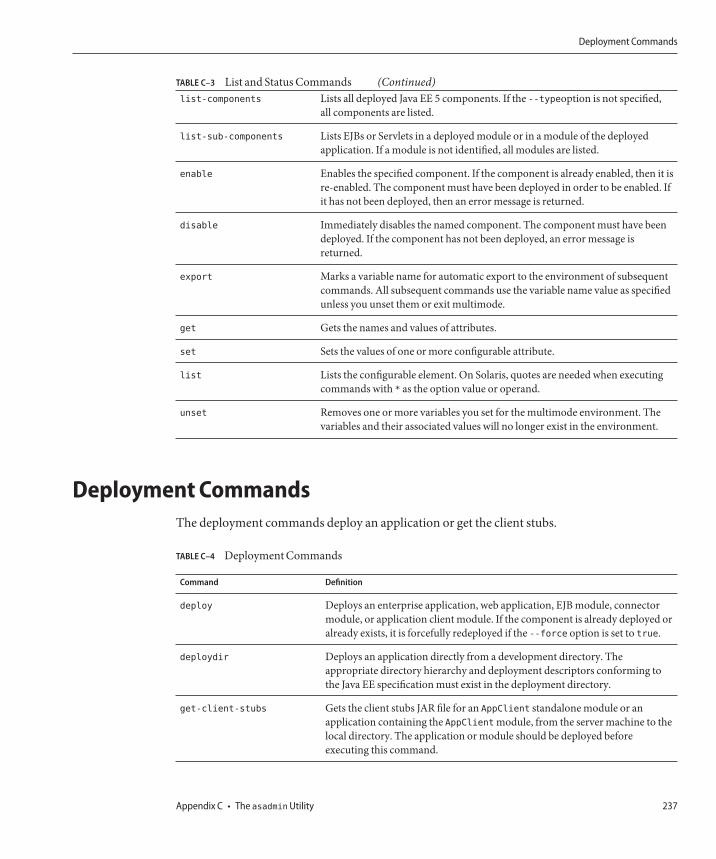
TABLE C–3 List and Status Commands (Continued)list-components Lists all deployed Java EE 5 components. If the --typeoption is not specified,
all components are listed.
list-sub-components Lists EJBs or Servlets in a deployed module or in a module of the deployedapplication. If a module is not identified, all modules are listed.
enable Enables the specified component. If the component is already enabled, then it isre-enabled. The component must have been deployed in order to be enabled. Ifit has not been deployed, then an error message is returned.
disable Immediately disables the named component. The component must have beendeployed. If the component has not been deployed, an error message isreturned.
export Marks a variable name for automatic export to the environment of subsequentcommands. All subsequent commands use the variable name value as specifiedunless you unset them or exit multimode.
get Gets the names and values of attributes.
set Sets the values of one or more configurable attribute.
list Lists the configurable element. On Solaris, quotes are needed when executingcommands with * as the option value or operand.
unset Removes one or more variables you set for the multimode environment. Thevariables and their associated values will no longer exist in the environment.
Deployment CommandsThe deployment commands deploy an application or get the client stubs.
TABLE C–4 Deployment Commands
Command Definition
deploy Deploys an enterprise application, web application, EJB module, connectormodule, or application client module. If the component is already deployed oralready exists, it is forcefully redeployed if the --force option is set to true.
deploydir Deploys an application directly from a development directory. Theappropriate directory hierarchy and deployment descriptors conforming tothe Java EE specification must exist in the deployment directory.
get-client-stubs Gets the client stubs JAR file for an AppClient standalone module or anapplication containing the AppClient module, from the server machine to thelocal directory. The application or module should be deployed beforeexecuting this command.
Deployment Commands
Appendix C • The asadminUtility 237

Version CommandsThe version commands return the version string, display a list of all the asadmin commands,and allow you to install the license file.
TABLE C–5 Version Commands
Command Definition
version Displays the version information. If the command cannot communicate withthe administration server with the given user/password and host/port, thenthe command will retrieve the version locally and display a warning message.
help Displays a list of all the asadmin utility commands. Specify the command todisplay the usage information for that command
install-license Prevents unauthorized use of the Application Server. Allows you to install thelicense file.
shutdown Gracefully brings down the administration server and all the runninginstances. You must manually start the administration server to bring it upagain.
Message Queue Administration CommandsThe Message Queue administration commands allow you to manage the JMS destinations.
TABLE C–6 Message Queue Commands
Command Definition
create-jmsdest Creates a JMS physical destination. Along with the physical destination, youuse the create-jms-resource command to create a JMS destination resourcethat has a Name property that specifies the physical destination.
delete-jmsdest Removes the specified JMS destination.
flush-jmsdest Purges the messages from a physical destination in the specified target's JMSService configuration.
list-jmsdest Lists the JMS physical destinations.
jms-ping Checks if the JMS service (also known as the JMS provider) is up and running.When you start the Application Server, the JMS service starts by default.Additionally, it pings only the default JMS host within the JMS service. Itdisplays an error message when it is unable to ping a built-in JMS service.
Version Commands
Sun GlassFish Enterprise Server v2.1.1 Administration Guide • October 2009238

Resource Management CommandsThe resource commands allow you to manage the various resources used in your application.
TABLE C–7 Resource Management Commands
Command Definition
create-jdbc-connection-pool Registers a new JDBC connection pool with the specified JDBCconnection pool name.
delete-jdbc-connection-pool Deletes a JDBC connection pool. The operand identifies the JDBCconnection pool to be deleted.
list-jdbc-connection-pools Gets the JDBC connection pools that have been created.
create-jdbc-resource Creates a new JDBC resource.
delete-jdbc-resource Removes a JDBC resource with the specified JNDI name.
list-jdbc-resources Displays a list of JDBC resources that have been created.
create-jms-resource Creates a Java Message Service (JMS) connection factory resource ora JMS destination resource.
delete-jms-resource Removes the specified JMS resource.
list-jms-resources Lists the existing JMS resources (destination and connection factoryresources).
create-jndi-resource Registers a JNDI resource.
delete-jndi-resource Removes the JNDI resource with the specified JNDI name.
list-jndi-resources Identifies all the existing JNDI resources.
list-jndi-entries Browses and queries the JNDI tree.
create-javamail-resource Creates a JavaMail session resource.
delete-javamail-resource Removes the specified JavaMail session resource.
list-javamail-resources Lists the existing JavaMail session resources.
create-persistence-resource Registers a persistence resource.
delete-persistence-resource Removes a persistence resource. When you delete a persistenceresource, the command also removes the JDBC resource if it wascreated using the create-persistence-resource command.
list-persistence-resources Displays all the persistence resources.
create-custom-resource Creates a custom resource. A custom resource specifies a customserver-wide resource object factory that implements thejavax.naming.spi.ObjectFactory interface.
Resource Management Commands
Appendix C • The asadminUtility 239

TABLE C–7 Resource Management Commands (Continued)Command Definition
delete-custom-resource Removes a custom resource.
list-custom-resources Lists the custom resources.
create-connector-connection-pool Adds a new connector connection pool with the specified connectionpool name.
delete-connector-connection-pool Removes the connector connection pool specified using the operandconnector_connection_pool_name.
list-connector-connection-pools Lists the connector connection pools that have been created.
create-connector-resource Registers the connector resource with the specified JNDI name.
delete-connector-resource Removes the connector resource with the specified JNDI name.
list-connector-resources Gets all the connector resources.
create-admin-object Creates the administered object that has a specified JNDI name.
delete-admin-object Removes the administered object with the specified JNDI name.
list-admin-objects Lists all the administered objects.
create-resource-adapter-config Creates configuration information for the connector module.
delete-resource-adapter-config Deletes the configuration information created in domain.xml for theconnector module.
list-resource-adapter-configs lists the configuration information in the domain.xml for theconnector module
add-resources Creates the resources named in the specified XML file. Thexml_file_path is the path to the XML file containing the resources tobe created. The DOCTYPE should be specified asinstall_dir/lib/dtds/sun-resources_1_2.dtd in theresources.xml file.
ping-connection-pool tests if a connection pool is usable for both JDBC connection poolsand connector connection pools. For example, if you create a newJDBC connection pool for an application that is expected to bedeployed later, the JDBC pool is tested with this command beforedeploying the application. Before pinging a connection pool, youmust create the connection pool with authentication and ensure thatthe enterprise server or database is started.
Resource Management Commands
Sun GlassFish Enterprise Server v2.1.1 Administration Guide • October 2009240

Configuration CommandsThe configuration commands allow you to construct IIOP listeners, lifecycle modules, HTTPand IIOP listeners, profilers, and other subsystems.
This section contains the following topics:
■ “HTTP and IIOP Listener Commands” on page 241■ “Lifecycle and Audit Module Commands” on page 241■ “Profiler and SSL Commands” on page 242■ “JVM Options and Virtual Server Commands” on page 242■ “Threadpool and Auth-Realm Commands” on page 243■ “Transaction and Timer Commands” on page 243
HTTP and IIOP Listener CommandsThe HTTP and IIOP listener commands help you manage listeners. These commands aresupported in remote mode only.
TABLE C–8 IIOP Listener Commands
Command Definition
create-http-listener Adds a new HTTP listener socket.
delete-http-listener Removes the specified HTTP listener.
list-http-listeners Lists the existing HTTP listener.
create-iiop-listener Creates an IIOP listener.
delete-iiop-listener Removes the specified IIOP listener.
list-iiop-listeners Lists the existing IIOP listeners.
Lifecycle and Audit Module CommandsThe lifecycle and audit module commands help you control lifecycle modules and optionalplugin modules which implement audit capabilities. The commands are supported in remotemode only.
Configuration Commands
Appendix C • The asadminUtility 241

TABLE C–9 Lifecycle Module Commands
Command Definition
create-lifecycle-module Creates a lifecycle module. The lifecycle modules provide a means of runningshort or long duration Java-based tasks within the application serverenvironment.
delete-lifecycle-module Removes the specified lifecycle module.
list-lifecycle-modules Lists the existing lifecycle module.
create-audit-module Adds the named audit module for the plug-in module that implements theaudit capabilities.
delete-audit-module Removes the named audit module.
list-audit-modules Lists all the audit modules.
Profiler and SSL CommandsThe Profiler and SSL commands allow you to administrate profilers and SSL clientconfigurations. These commands are supported in remote mode only.
TABLE C–10 Profiler and SSL Commands
Command Definition
create-profiler Creates the profiler element. A server instance is tied to a particular profiler,by the profiler element in the Java configuration. Changing a profiler requiresyou to restart the server.
delete-profiler Deletes the profiler element you specify. A server instance is tied to aparticular profiler by the profiler element in the Java configuration. Changinga profiler requires you to restart the server.
create-ssl Creates and configures the SSL element in the selected SIP/ HTTP/ IIOPlistener, or IIOP service to enable secure communication on thatlistener/service.
delete-ssl Deletes the SSL element in the selected SIP/ HTTP/ IIOP listener, or IIOPservice.
JVM Options and Virtual Server CommandsThe JVM options and Virtual Server commands allow you to control these elements. Thesecommands are supported in remote mode only.
Configuration Commands
Sun GlassFish Enterprise Server v2.1.1 Administration Guide • October 2009242
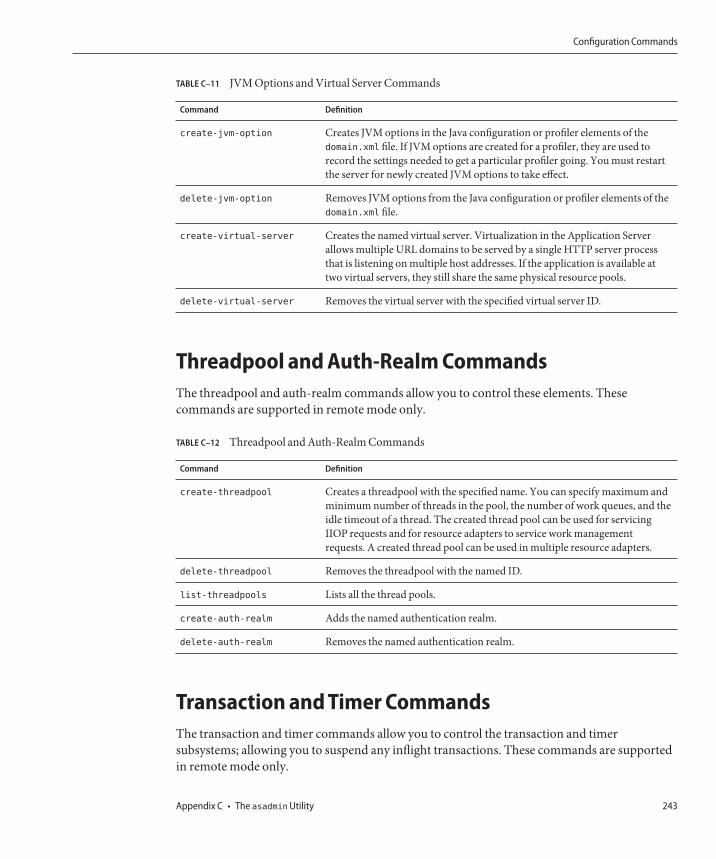
TABLE C–11 JVM Options and Virtual Server Commands
Command Definition
create-jvm-option Creates JVM options in the Java configuration or profiler elements of thedomain.xml file. If JVM options are created for a profiler, they are used torecord the settings needed to get a particular profiler going. You must restartthe server for newly created JVM options to take effect.
delete-jvm-option Removes JVM options from the Java configuration or profiler elements of thedomain.xml file.
create-virtual-server Creates the named virtual server. Virtualization in the Application Serverallows multiple URL domains to be served by a single HTTP server processthat is listening on multiple host addresses. If the application is available attwo virtual servers, they still share the same physical resource pools.
delete-virtual-server Removes the virtual server with the specified virtual server ID.
Threadpool and Auth-Realm CommandsThe threadpool and auth-realm commands allow you to control these elements. Thesecommands are supported in remote mode only.
TABLE C–12 Threadpool and Auth-Realm Commands
Command Definition
create-threadpool Creates a threadpool with the specified name. You can specify maximum andminimum number of threads in the pool, the number of work queues, and theidle timeout of a thread. The created thread pool can be used for servicingIIOP requests and for resource adapters to service work managementrequests. A created thread pool can be used in multiple resource adapters.
delete-threadpool Removes the threadpool with the named ID.
list-threadpools Lists all the thread pools.
create-auth-realm Adds the named authentication realm.
delete-auth-realm Removes the named authentication realm.
Transaction and Timer CommandsThe transaction and timer commands allow you to control the transaction and timersubsystems; allowing you to suspend any inflight transactions. These commands are supportedin remote mode only.
Configuration Commands
Appendix C • The asadminUtility 243

TABLE C–13 Transaction Commands
Command Definition
freeze-transaction Freezes the transaction subsystem during which time all the inflighttransactions are suspended. Invoke this command before rolling back anyinflight transactions. Invoking this command on an already frozentransaction subsystem has no effect.
unfreeze-transaction Resumes all the suspended inflight transactions. Invoke this command on analready frozen transaction.
recover-transactions Manually recovers pending transactions.
rollback-transaction Rolls back the named transaction.
unpublish-from-registry
list-timers Lists the timers owned by a specific server instance
Registry CommandsThe registry commands allow you to publish or unpublish webservice artifacts.
TABLE C–14 Transaction Commands
Command Definition
publish-to-registry Publishes the web service artifacts to registries.
unpublish-from-registry Unpublishes the web service artifacts from the registries.
list-registry-locations
User Management CommandsThese user commands are to administer the users support by the file realm authentication.These commands are supported in remote mode only.
TABLE C–15 User Management Commands
Command Definition
create-file-user Creates an entry in the keyfile with the specified username, password, andgroups. Multiple groups can be created by separating them with a colon (:).
delete-file-user Deletes the entry in the keyfile with the specified username.
User Management Commands
Sun GlassFish Enterprise Server v2.1.1 Administration Guide • October 2009244

TABLE C–15 User Management Commands (Continued)Command Definition
update-file-user Updates an existing entry in the keyfile using the specified user_name,user_password and groups. Multiple groups can be entered by separatingthem, with a colon (:).
list-file-users Creates a list of file users supported by file realm authentication.
list-file-groups Administers file users and groups supported by the file realm authentication.This command lists available groups in the file user.
Rules and Monitoring CommandsRules and monitoring commands allow you to manage rules and monitor the server. Thesecommands are supported in remote mode only.
TABLE C–16 Rules and Monitoring Commands
Command Definition
create-management-rule Creates a new management rule to intelligently self-manage theapplication server installation and deployed applications.
delete-management-rule Removes the management rule you specify.
create-transformation-rule Creates an XSLT transformation rule that can be applied to a webserviceoperation. The rule can be applied either to a request or to a response.
delete-transformation-rule Deletes an XSLT transformation rule of a given web service.
start-callflow-monitoring Collects and correlates data from Web container, EJB container and JDBCto provide a complete call flow/path of a request. Data is collected only ifcallflow-monitoring is ON.
stop-callflow-monitoring Disables collection of call flow information of a request.
Database CommandsThe database commands allow you to start and stop the Java DB database (based on ApacheDerby. These commands are supported in local mode only.
Database Commands
Appendix C • The asadminUtility 245
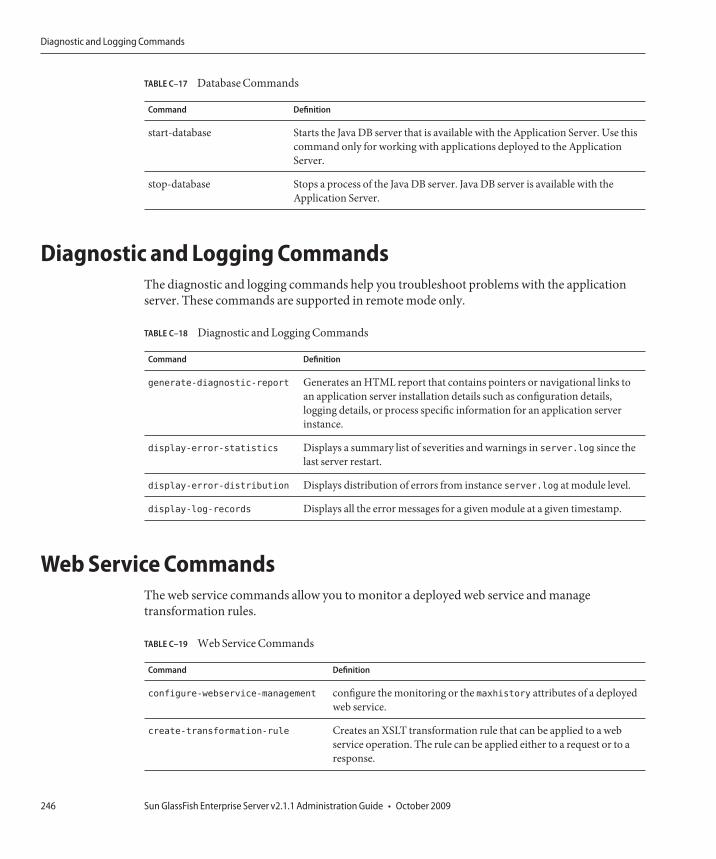
TABLE C–17 Database Commands
Command Definition
start-database Starts the Java DB server that is available with the Application Server. Use thiscommand only for working with applications deployed to the ApplicationServer.
stop-database Stops a process of the Java DB server. Java DB server is available with theApplication Server.
Diagnostic and Logging CommandsThe diagnostic and logging commands help you troubleshoot problems with the applicationserver. These commands are supported in remote mode only.
TABLE C–18 Diagnostic and Logging Commands
Command Definition
generate-diagnostic-report Generates an HTML report that contains pointers or navigational links toan application server installation details such as configuration details,logging details, or process specific information for an application serverinstance.
display-error-statistics Displays a summary list of severities and warnings in server.log since thelast server restart.
display-error-distribution Displays distribution of errors from instance server.log at module level.
display-log-records Displays all the error messages for a given module at a given timestamp.
Web Service CommandsThe web service commands allow you to monitor a deployed web service and managetransformation rules.
TABLE C–19 Web Service Commands
Command Definition
configure-webservice-management configure the monitoring or the maxhistory attributes of a deployedweb service.
create-transformation-rule Creates an XSLT transformation rule that can be applied to a webservice operation. The rule can be applied either to a request or to aresponse.
Diagnostic and Logging Commands
Sun GlassFish Enterprise Server v2.1.1 Administration Guide • October 2009246
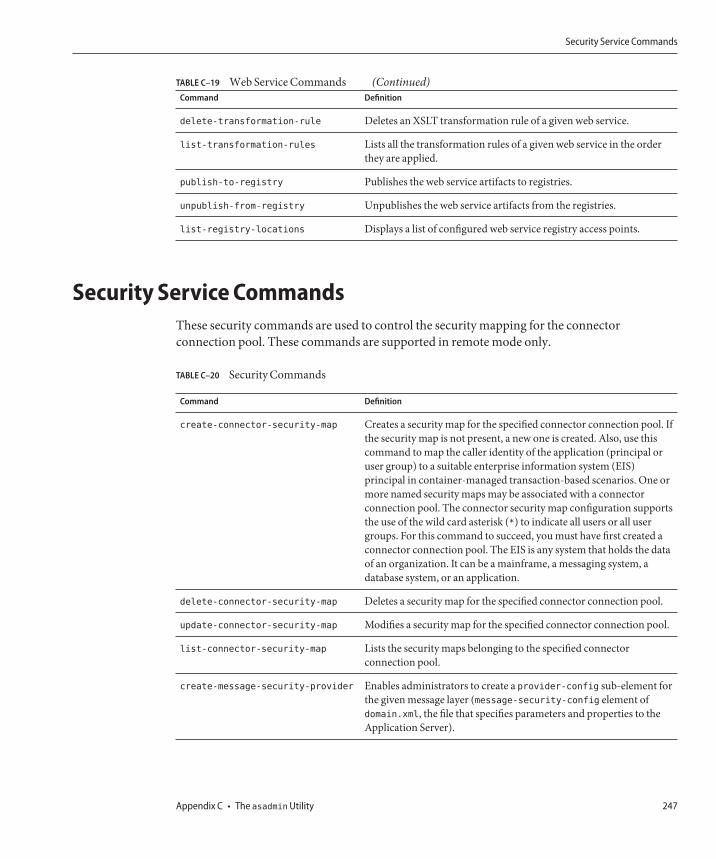
TABLE C–19 Web Service Commands (Continued)Command Definition
delete-transformation-rule Deletes an XSLT transformation rule of a given web service.
list-transformation-rules Lists all the transformation rules of a given web service in the orderthey are applied.
publish-to-registry Publishes the web service artifacts to registries.
unpublish-from-registry Unpublishes the web service artifacts from the registries.
list-registry-locations Displays a list of configured web service registry access points.
Security Service CommandsThese security commands are used to control the security mapping for the connectorconnection pool. These commands are supported in remote mode only.
TABLE C–20 Security Commands
Command Definition
create-connector-security-map Creates a security map for the specified connector connection pool. Ifthe security map is not present, a new one is created. Also, use thiscommand to map the caller identity of the application (principal oruser group) to a suitable enterprise information system (EIS)principal in container-managed transaction-based scenarios. One ormore named security maps may be associated with a connectorconnection pool. The connector security map configuration supportsthe use of the wild card asterisk (*) to indicate all users or all usergroups. For this command to succeed, you must have first created aconnector connection pool. The EIS is any system that holds the dataof an organization. It can be a mainframe, a messaging system, adatabase system, or an application.
delete-connector-security-map Deletes a security map for the specified connector connection pool.
update-connector-security-map Modifies a security map for the specified connector connection pool.
list-connector-security-map Lists the security maps belonging to the specified connectorconnection pool.
create-message-security-provider Enables administrators to create a provider-config sub-element forthe given message layer (message-security-config element ofdomain.xml, the file that specifies parameters and properties to theApplication Server).
Security Service Commands
Appendix C • The asadminUtility 247

TABLE C–20 Security Commands (Continued)Command Definition
delete-message-security-provide Enables administrators to delete a provider-config sub-element forthe given message layer (message-security-config element ofdomain.xml, the file that specifies parameters and properties to theApplication Server).
list-message-security-providers Enables administrators to list all security message providers(provider-config sub-elements) for the given message layer(message-security-config element of domain.xml).
Password CommandsThe password commands allow you to manage passwords and ensure security for theapplication server.
TABLE C–21 Password Commands
Command Definition
create-password-alias Creates an alias for a password and stores it in domain.xml. An alias is a tokenof the form ${ALIAS=password-alias-password}. The passwordcorresponding to the alias name is stored in an encrypted form. Thiscommand takes both a secure interactive form (in which the user is promptedfor all information) and a more script-friendly form, in which the password ispropagated on the command line.
delete-password-alias Deletes a password alias.
update-password-alias Updates the password alias IDs in the named target.
list-password-aliases Lists all password aliases.
change-admin-password This remote command modifies the admin password. This command isinteractive in that the user is prompted for the old and new admin password(with confirmation).
change-master-password This local command is used to modify the master password. This command isinteractive in that the user is prompted for the old and new master password.This command will not work unless the server is stopped.
Password Commands
Sun GlassFish Enterprise Server v2.1.1 Administration Guide • October 2009248

Verify CommandThe XML verifier command verifies the content of the domain.xml file.
TABLE C–22 Verify Command
Command Definition
verify-domain-xml Verifies the content of the domain.xml file.
Custom MBean CommandsThe MBean commands allow you to manage and register custom MBeans. The commands aresupported in remote mode only.
TABLE C–23 Custom MBean Commands
Command Definition
create-mbean Creates and registers a custom MBean. If the target MBeanServer is notrunning, the MBean is not registered.
delete-mbean Deletes a custom MBean. Ensure that the target MBeanServer is running.
list-mbeans Lists the custom mbeans for the specified target.
Service CommandThe service command allows you to configure the starting of the Domain AdministrationServer (DAS).
TABLE C–24 Service Command
Command Definition
create-service Configures the starting of a DAS on an unattended boot. On Solaris 10, thiscommand uses the Service Management Facility (SMF). This is a localcommand and must be run as the OS-level user with superuser privileges. It isavailable only for Solaris 10. When the service is created, the user has to start,enable, disable, delete, or stop the service. The DAS must be stored on a folderto which the super-user has access. The configuration cannot be stored on anetwork file system. The service is created such that it is controlled by theOS-level user, who owns the folder where the configuration of the DASresides. To run this command, you must have solaris.smf.* authorization.
Service Command
Appendix C • The asadminUtility 249
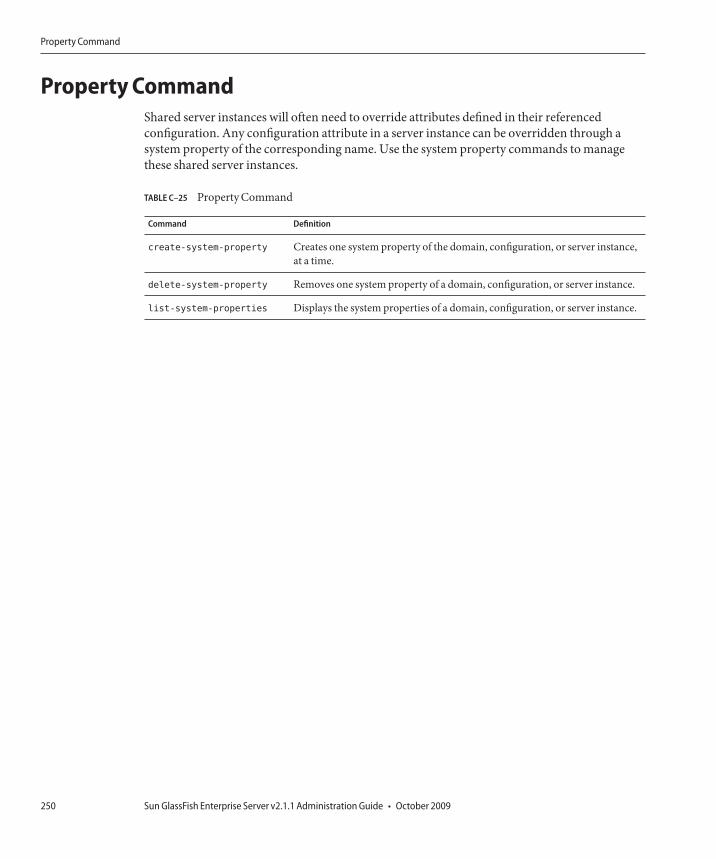
Property CommandShared server instances will often need to override attributes defined in their referencedconfiguration. Any configuration attribute in a server instance can be overridden through asystem property of the corresponding name. Use the system property commands to managethese shared server instances.
TABLE C–25 Property Command
Command Definition
create-system-property Creates one system property of the domain, configuration, or server instance,at a time.
delete-system-property Removes one system property of a domain, configuration, or server instance.
list-system-properties Displays the system properties of a domain, configuration, or server instance.
Property Command
Sun GlassFish Enterprise Server v2.1.1 Administration Guide • October 2009250

Index
AACC
See containersapplication client, 93
acceptor threads, in HTTP listeners, 151Admin Console, 24applets, 93asadmin utility, 25
Bbean-cache, monitoring attribute names, 178Binding Components, overview, 40
Ccache-hits, 178cache-misses, 178CloudScape Type 4 JDBC driver, 61connection factories, JMS, overview, 63-64connector connection pools, JMS resources and, 64connector resources, JMS resources and, 64connectors, modules, 163containers
applet, 93application client, 93Enterprise JavaBeans, 93, 95servlet
See containers, 95web, 95
containers (Continued)web, 93, 95
CORBA, 161threads, 163
create-domain command, 31create-password-alias command, 122-123custom resources, using, 79
Ddatabases
JNDI names, 77resource references, 78supported, 52
delete-domain command, 32destinations, JMS, overview, 63-64domains, creating, 31-32
EEnterprise Java Beans, threads, 163Enterprise JavaBeans
activating, 95authorization, 95caching, 95creating, 95entity, 95message-driven, 95passivating, 95persistent, 95session, 95
251

executiontime, 177external repositories, accessing, 79
FForeign Providers, JMS, 67-73
Gget command, monitoring data, 196
Hhigh availability, 28HTTP listeners
acceptor threads, 151default virtual server, 151overview, 150-152
HTTP serviceHTTP listeners, 150-152Keep-Alive subsystem, 151request processing threads, 151virtual servers, 149-150
IIBM DB2 JDBC driver, 54, 56IIOP listeners, 162Inet MSSQL JDBC driver, 58-59Inet Oracle JDBC driver, 57-58Inet Sybase JDBC driver, 59Informix Type 4 JDBC driver, 61
JJava Business Integration (JBI), See JBI
Environment, 39Java DB JDBC driver, 53Java Naming and Directory Service, See JNDI, 95JavaServer Pages, 95
JCE providerconfiguring, 135
JDBCdrivers, 144supported drivers, 52
JMSForeign Providers, 67-73Resource Adapter, Generic, 67-73
JMS resourcesconnection factory resources, 63-64destination resources, 63-64overview, 63-64physical destinations, 63-64queues, 63-64topics, 63-64
jmsmaxmessagesload, 178jmsra system resource adapter, 64JNDI, 95
custom resources, using, 79external repositories, 79lookups and associated references, 78names, 77
JSP, See JavaServer Pages, 95
KKeep-Alive subsystem, HTTP service, 151kestore.jks file, 112keypoint intervals, 148keypoint operations, 148
Llist command, monitoring, 196list-domains command, 32log levels, configuring, 167-168log records, 165-166logging
configuring general settings, 167configuring levels, 167-168logger namespaces, 166-167overview, 165-166transactions, 147-148
Index
Sun GlassFish Enterprise Server v2.1.1 Administration Guide • October 2009252

logging (Continued)viewing the server log, 168-170
Mman pages, 25monitoring
bean-cache attributes, 178container subsystems, 172-173ORB service, 184-185transaction service, 185-186using get command, 196using list command, 196
MSSQL Inet JDBC driver, 58-59MSSQL/SQL Server2000 Data Direct JDBC driver, 55MySQL Type 4 JDBC driver, non-XA, 57
Nnaming, JNDI and resource reference, 78numbeansinpool, 177numexpiredsessionsremoved, 178numpassivationerrors, 178numpassivations, 178numpassivationsuccess, 178numthreadswaiting, 177
Oobject request broker, threads, 163Object Request Broker (ORB), 161
overview, 162Oracle Data Direct JDBC driver, 54Oracle Inet JDBC driver, 57-58Oracle OCI JDBC driver, 60-61Oracle Thin Type 4 Driver, workaround for, 145Oracle Thin Type 4 JDBC driver, 59-60oracle-xa-recovery-workaround property, 145ORB, 161
IIOP listeners, 162overview, 162See object request broker, 163
ORB (Continued)service, monitoring, 184-185
Ppassword alias, 122-123passwords, for a PKCS#1 crypto device, 122-123performance, thread pools, 163PKCS#11 crypto device, additional passwords, 122-123Port listeners, 30
Qqueues, JMS, 63-64
Rrealms, certificate, 109request processing threads, HTTP service, 151Resource Adapter, Generic, JMS, 67-73resource adapters, 144
jmsra, 64resource managers, 144resource references, 78restart server, 33rollback
See transactionsrolling back, 143
RSA encryption, 135
Sserver log, viewing, 168-170Service Engines, 39servlets, 95start-domain command, 32stop-domain command, 33Sybase Data Direct JDBC driver, 55Sybase Inet JDBC driver, 59Sybase JConnect Type 4 JDBC driver, 56-57
Index
253

Tthread pools, 163
performance, 163thread starvation, 163
threads, See thread pools, 163topics, JMS, 63-64total-beans-created, 177totalbeansdestroyed, 178totalnumerrors, 177totalnumsuccess, 177Transaction Manager
See transactionsmanagers, 144
transaction service, monitoring, 185-186transactions, 143
associating, 144attributes, 144committing, 143completing, 144demarcations, 144distributed, 144logging, 147-148managers, 144recovering, 144, 145-146rolling back, 143timeouts, 146-147
truststore.jks file, 112
Vvirtual servers, overview, 149-150
Index
Sun GlassFish Enterprise Server v2.1.1 Administration Guide • October 2009254