sun n1 grid engine 6.1 administration guide - center for structural
TRANSCRIPT

Sun N1 Grid Engine 6.1Administration Guide
Sun Microsystems, Inc.4150 Network CircleSanta Clara, CA 95054U.S.A.
Part No: 820–0698May 2007

Copyright 2007 Sun Microsystems, Inc. 4150 Network Circle, Santa Clara, CA 95054 U.S.A. All rights reserved.
Sun Microsystems, Inc. has intellectual property rights relating to technology embodied in the product that is described in this document. In particular, and withoutlimitation, these intellectual property rights may include one or more U.S. patents or pending patent applications in the U.S. and in other countries.
U.S. Government Rights – Commercial software. Government users are subject to the Sun Microsystems, Inc. standard license agreement and applicable provisionsof the FAR and its supplements.
This distribution may include materials developed by third parties.
Parts of the product may be derived from Berkeley BSD systems, licensed from the University of California. UNIX is a registered trademark in the U.S. and othercountries, exclusively licensed through X/Open Company, Ltd.
Sun, Sun Microsystems, the Sun logo, the Solaris logo, the Java Coffee Cup logo, docs.sun.com, N1 Java, and Solaris are trademarks or registered trademarks of SunMicrosystems, Inc. in the U.S. and other countries. All SPARC trademarks are used under license and are trademarks or registered trademarks of SPARCInternational, Inc. in the U.S. and other countries. Products bearing SPARC trademarks are based upon an architecture developed by Sun Microsystems, Inc.
The OPEN LOOK and SunTM Graphical User Interface was developed by Sun Microsystems, Inc. for its users and licensees. Sun acknowledges the pioneering effortsof Xerox in researching and developing the concept of visual or graphical user interfaces for the computer industry. Sun holds a non-exclusive license from Xerox tothe Xerox Graphical User Interface, which license also covers Sun's licensees who implement OPEN LOOK GUIs and otherwise comply with Sun's written licenseagreements.
Products covered by and information contained in this publication are controlled by U.S. Export Control laws and may be subject to the export or import laws inother countries. Nuclear, missile, chemical or biological weapons or nuclear maritime end uses or end users, whether direct or indirect, are strictly prohibited. Exportor reexport to countries subject to U.S. embargo or to entities identified on U.S. export exclusion lists, including, but not limited to, the denied persons and speciallydesignated nationals lists is strictly prohibited.
DOCUMENTATION IS PROVIDED “AS IS” AND ALL EXPRESS OR IMPLIED CONDITIONS, REPRESENTATIONS AND WARRANTIES, INCLUDING ANYIMPLIED WARRANTY OF MERCHANTABILITY, FITNESS FOR A PARTICULAR PURPOSE OR NON-INFRINGEMENT, ARE DISCLAIMED, EXCEPT TOTHE EXTENT THAT SUCH DISCLAIMERS ARE HELD TO BE LEGALLY INVALID.
Copyright 2007 Sun Microsystems, Inc. 4150 Network Circle, Santa Clara, CA 95054 U.S.A. Tous droits réservés.
Sun Microsystems, Inc. détient les droits de propriété intellectuelle relatifs à la technologie incorporée dans le produit qui est décrit dans ce document. En particulier,et ce sans limitation, ces droits de propriété intellectuelle peuvent inclure un ou plusieurs brevets américains ou des applications de brevet en attente aux Etats-Uniset dans d'autres pays.
Cette distribution peut comprendre des composants développés par des tierces personnes.
Certaines composants de ce produit peuvent être dérivées du logiciel Berkeley BSD, licenciés par l'Université de Californie. UNIX est une marque déposée auxEtats-Unis et dans d'autres pays; elle est licenciée exclusivement par X/Open Company, Ltd.
Sun, Sun Microsystems, le logo Sun, le logo Solaris, le logo Java Coffee Cup, docs.sun.com, N1 Java et Solaris sont des marques de fabrique ou des marques déposéesde Sun Microsystems, Inc. aux Etats-Unis et dans d'autres pays. Toutes les marques SPARC sont utilisées sous licence et sont des marques de fabrique ou des marquesdéposées de SPARC International, Inc. aux Etats-Unis et dans d'autres pays. Les produits portant les marques SPARC sont basés sur une architecture développée parSun Microsystems, Inc.
L'interface d'utilisation graphique OPEN LOOK et Sun a été développée par Sun Microsystems, Inc. pour ses utilisateurs et licenciés. Sun reconnaît les efforts depionniers de Xerox pour la recherche et le développement du concept des interfaces d'utilisation visuelle ou graphique pour l'industrie de l'informatique. Sun détientune licence non exclusive de Xerox sur l'interface d'utilisation graphique Xerox, cette licence couvrant également les licenciés de Sun qui mettent en place l'interfaced'utilisation graphique OPEN LOOK et qui, en outre, se conforment aux licences écrites de Sun.
Les produits qui font l'objet de cette publication et les informations qu'il contient sont régis par la legislation américaine en matière de contrôle des exportations etpeuvent être soumis au droit d'autres pays dans le domaine des exportations et importations. Les utilisations finales, ou utilisateurs finaux, pour des armes nucléaires,des missiles, des armes chimiques ou biologiques ou pour le nucléaire maritime, directement ou indirectement, sont strictement interdites. Les exportations ouréexportations vers des pays sous embargo des Etats-Unis, ou vers des entités figurant sur les listes d'exclusion d'exportation américaines, y compris, mais de manièrenon exclusive, la liste de personnes qui font objet d'un ordre de ne pas participer, d'une façon directe ou indirecte, aux exportations des produits ou des services quisont régis par la legislation américaine en matière de contrôle des exportations et la liste de ressortissants spécifiquement designés, sont rigoureusement interdites.
LA DOCUMENTATION EST FOURNIE "EN L'ETAT" ET TOUTES AUTRES CONDITIONS, DECLARATIONS ET GARANTIES EXPRESSES OU TACITESSONT FORMELLEMENT EXCLUES, DANS LA MESURE AUTORISEE PAR LA LOI APPLICABLE, Y COMPRIS NOTAMMENT TOUTE GARANTIEIMPLICITE RELATIVE A LA QUALITE MARCHANDE, A L'APTITUDE A UNE UTILISATION PARTICULIERE OU A L'ABSENCE DE CONTREFACON.
070426@17039

Contents
Preface ...................................................................................................................................................15
1 Configuring Hosts and Clusters .........................................................................................................19About Hosts and Daemons ................................................................................................................ 20Migrating qmaster to Another Host ................................................................................................. 20
▼ How to Migrate qmaster to Another Host Using a Script ....................................................... 21▼ How to Migrate qmaster to Another Host Manually .............................................................. 22
Configuring Shadow Master Hosts ................................................................................................... 22Shadow Master Host Requirements .......................................................................................... 23Shadow Master Hosts File ........................................................................................................... 23Starting Shadow Master Hosts .................................................................................................... 24Configuring Shadow Master Hosts Environment Variables .................................................. 24
Configuring Hosts ............................................................................................................................... 25Configuring Execution Hosts With QMON .................................................................................. 25Configuring Execution Hosts From the Command Line ........................................................ 31Configuring Administration Hosts With QMON ........................................................................ 31Configuring Administration Hosts From the Command Line .............................................. 33Configuring Submit Hosts With QMON ....................................................................................... 33Configuring Submit Hosts From the Command Line ............................................................. 35Configuring Host Groups With QMON ........................................................................................ 35Configuring Host Groups From the Command Line .............................................................. 38Monitoring Execution Hosts With qhost ................................................................................. 39Invalid Host Names ..................................................................................................................... 39Killing Daemons From the Command Line ............................................................................. 39Restarting Daemons From the Command Line ....................................................................... 40
Basic Cluster Configuration ............................................................................................................... 41Displaying a Cluster Configuration With QMON ........................................................................ 41Displaying the Global Cluster Configuration With QMON ........................................................ 41
3

Adding and Modifying Global and Host Configurations With QMON .................................... 42Deleting a Cluster Configuration With QMON ............................................................................ 43Displaying the Basic Cluster Configurations From the Command Line .............................. 43Modifying the Basic Cluster Configurations From the Command Line ............................... 44
2 Configuring Queues and Queue Calendars ..................................................................................... 45Configuring Queues ............................................................................................................................ 45
Configuring Queues With QMON ................................................................................................. 47Configuring General Parameters ............................................................................................... 49Configuring Execution Method Parameters ............................................................................. 50Configuring the Checkpointing Parameters ............................................................................ 51Configuring Parallel Environments ........................................................................................... 52Configuring Load and Suspend Thresholds ............................................................................. 53Configuring Limits ...................................................................................................................... 55Configuring Complex Resource Attributes .............................................................................. 56Configuring Subordinate Queues .............................................................................................. 58Configuring User Access Parameters ........................................................................................ 59Configuring Project Access Parameters .................................................................................... 60Configuring Owners Parameters ............................................................................................... 61Configuring Queues From the Command Line ....................................................................... 62
Configuring Queue Calendars ........................................................................................................... 64Configuring Queue Calendars With QMON ................................................................................ 64Configuring Queue Calendars From the Command Line ...................................................... 66
3 Configuring Complex Resource Attributes .....................................................................................69Complex Resource Attributes ............................................................................................................ 69
Configuring Complex Resource Attributes With QMON ........................................................... 70Assigning Resource Attributes to Queues, Hosts, and the Global Cluster ............................ 71Consumable Resources ............................................................................................................... 75Configuring Complex Resource Attributes From the Command Line ................................. 85
Load Parameters .................................................................................................................................. 86Default Load Parameters ............................................................................................................. 86Adding Site-Specific Load Parameters ...................................................................................... 87Writing Your Own Load Sensors ............................................................................................... 87
Contents
Sun N1 Grid Engine 6.1 Administration Guide • May 20074

4 Managing User Access ........................................................................................................................91Setting Up a User ................................................................................................................................. 92Configuring User Access .................................................................................................................... 93
Configuring Manager Accounts ................................................................................................. 94Configuring Operator Accounts ................................................................................................ 95Configuring User Access Lists .................................................................................................... 96Configuring Users ........................................................................................................................ 99
Defining Projects ............................................................................................................................... 102Defining Projects With QMON .................................................................................................... 102Defining Projects From the Command Line .......................................................................... 104
Using Path Aliasing ........................................................................................................................... 105Format of Path-Aliasing Files ................................................................................................... 106How Path-Aliasing Files Are Interpreted ................................................................................ 106
Configuring Default Requests .......................................................................................................... 107Format of Default Request Files ............................................................................................... 107
5 Managing Policies and the Scheduler ............................................................................................ 109Administering the Scheduler ........................................................................................................... 109
About Scheduling ....................................................................................................................... 110Scheduling Strategies ................................................................................................................. 110Configuring the Scheduler ........................................................................................................ 118Changing the Scheduler Configuration With QMON ............................................................... 121
Administering Policies ...................................................................................................................... 124Configuring Policy-Based Resource Management With QMON ............................................. 125Specifying Policy Priority .......................................................................................................... 126Configuring the Urgency Policy ............................................................................................... 127Configuring Ticket-Based Policies .......................................................................................... 127Configuring the Share-Based Policy ........................................................................................ 132
▼ How to Create Project-Based Share-Tree Scheduling .................................................... 141Configuring the Functional Policy ........................................................................................... 144
▼ How to Create User-Based, Project-Based, and Department-Based FunctionalScheduling ........................................................................................................................... 147
Configuring the Override Policy .............................................................................................. 148
Contents
5

6 Managing Resource Quotas .............................................................................................................153Resource Quota Overview ................................................................................................................ 153
About Resource Quota Sets ...................................................................................................... 154Static and Dynamic Resource Quotas ..................................................................................... 155
Managing Resource Quotas With QMON ..................................................................................... 156▼ How to Set Resource Quotas Using QMON ........................................................................... 156
Monitoring Resource Quota Utilization From the Command Line ........................................... 157Configuring Resource Quotas from the Command Line ............................................................. 158Example .............................................................................................................................................. 159Performance Considerations ........................................................................................................... 161
Efficient Rule Sets ....................................................................................................................... 161
7 Managing Special Environments ....................................................................................................165Configuring Parallel Environments ................................................................................................ 165
Configuring Parallel Environments With QMON ..................................................................... 166Configuring Parallel Environments From the Command Line ........................................... 170Parallel Environment Startup Procedure ................................................................................ 172Termination of the Parallel Environment ............................................................................... 173Tight Integration of Parallel Environments and Grid Engine Software .............................. 174
Configuring Checkpointing Environments ................................................................................... 175About Checkpointing Environments ...................................................................................... 176Configuring Checkpointing Environments With QMON ........................................................ 176Configuring Checkpointing Environments From the Command Line .............................. 178
8 Other Administrative Tasks ..............................................................................................................181Gathering Accounting and Reporting Statistics ............................................................................ 181
Report Statistics (ARCo) ........................................................................................................... 181Accounting and Usage Statistics (qacct) ................................................................................ 187
Backing Up the Grid Engine System Configuration ..................................................................... 187▼ How to Perform a Manual Backup ........................................................................................... 189▼ How to Restore from a Backup ................................................................................................. 190
Using Files and Scripts for Administration Tasks ......................................................................... 191Using Files to Add or Modify Objects ...................................................................................... 191Using Files to Modify Queues, Hosts, and Environments .................................................... 193Using Files to Modify a Global Configuration or the Scheduler .......................................... 197
Contents
Sun N1 Grid Engine 6.1 Administration Guide • May 20076

9 Fine Tuning, Error Messages, and Troubleshooting .................................................................... 199Fine-Tuning Your Grid Environment ............................................................................................ 199
Scheduler Monitoring ............................................................................................................... 199Finished Jobs ............................................................................................................................... 200Job Validation ............................................................................................................................. 200Load Thresholds and Suspend Thresholds ............................................................................. 200Load Adjustments ...................................................................................................................... 201Immediate Scheduling ............................................................................................................... 201Urgency Policy and Resource Reservation ............................................................................. 201
Using DTrace for Performance Tuning .......................................................................................... 202Tuning Performance from the Command Line through DTrace ........................................ 202Analyzing Bottlenecks on the Grid Engine Master ................................................................ 202Sample DTrace Output for Bottleneck Analysis .................................................................... 203
How the Grid Engine Software Retrieves Error Reports .............................................................. 205Consequences of Different Error or Exit Codes ..................................................................... 206Running Grid Engine System Programs in Debug Mode ..................................................... 208
Diagnosing Problems ........................................................................................................................ 210Pending Jobs Not Being Dispatched ........................................................................................ 210Job or Queue Reported in Error State E ................................................................................... 211
Troubleshooting Common Problems ............................................................................................. 213
10 Configuring DBWriter .......................................................................................................................219Setup .................................................................................................................................................... 219
Database System ......................................................................................................................... 219Database Server .......................................................................................................................... 220Base Directory for Reporting Files ........................................................................................... 220
Configuration .................................................................................................................................... 220Interval ........................................................................................................................................ 220Pid ................................................................................................................................................ 220PidCmd ....................................................................................................................................... 220Continuous Mode ...................................................................................................................... 220Debug Level ................................................................................................................................ 221Reporting File ............................................................................................................................. 221Calculation of Derived Values .................................................................................................. 221
Contents
7

Index ................................................................................................................................................... 225
Contents
Sun N1 Grid Engine 6.1 Administration Guide • May 20078

Figures
FIGURE 1–1 Execution Host Tab ................................................................................................... 26FIGURE 1–2 Attribute Selection Dialog Box ................................................................................ 28FIGURE 1–3 Administration Host Tab ......................................................................................... 32FIGURE 1–4 Submit Host Tab ........................................................................................................ 34FIGURE 1–5 Host Groups Tab ....................................................................................................... 36FIGURE 1–6 Cluster Configuration Dialog Box ........................................................................... 41FIGURE 2–1 Queue Configuration– General Configuration Tab ............................................. 48FIGURE 3–1 Complex Configuration Dialog Box ....................................................................... 70FIGURE 3–2 Complex Configuration Dialog Box: virtual_free ............................................ 77FIGURE 3–3 Add/Modify Exec Host: virtual_free .................................................................. 77FIGURE 4–1 Userset Tab ................................................................................................................. 97FIGURE 4–2 Access List Definition Dialog Box ........................................................................... 97FIGURE 4–3 Project Configuration Dialog Box ......................................................................... 102FIGURE 5–1 Policy Configuration Dialog Box ........................................................................... 125
9

10

Tables
TABLE 9–1 Job-Related Error or Exit Codes ............................................................................ 207TABLE 9–2 Parallel-Environment-Related Error or Exit Codes ............................................ 207TABLE 9–3 Queue-Related Error or Exit Codes ...................................................................... 207TABLE 9–4 Checkpointing-Related Error or Exit Codes ........................................................ 208
11

12

Examples
EXAMPLE 1–1 Sample qhostOutput ................................................................................................ 39EXAMPLE 3–1 qconf -sc Sample Output ....................................................................................... 86EXAMPLE 3–2 Load Sensor – Bourne Shell Script .......................................................................... 88EXAMPLE 4–1 Example of Path-Aliasing File ................................................................................ 106EXAMPLE 4–2 Example of Default Request File ............................................................................ 108EXAMPLE 5–1 Functional Policy Example ..................................................................................... 130EXAMPLE 5–2 Example A ................................................................................................................ 140EXAMPLE 5–3 Example B ................................................................................................................. 140EXAMPLE 6–1 Sample Resource Quota Set .................................................................................... 155EXAMPLE 6–2 Dynamic Limit Example ......................................................................................... 155EXAMPLE 6–3 Sample qquotaCommand ..................................................................................... 158EXAMPLE 6–4 Rule Set ..................................................................................................................... 159EXAMPLE 6–5 qstatOutput ........................................................................................................... 159EXAMPLE 6–6 qquotaOutput ......................................................................................................... 160EXAMPLE 8–1 Modifying the Migration Command of a Checkpoint Environment ............... 192EXAMPLE 8–2 Changing the Queue Type ...................................................................................... 194EXAMPLE 8–3 Modifying the Queue Type and the Shell Start Behavior .................................... 194EXAMPLE 8–4 Adding Resource Attributes ................................................................................... 194EXAMPLE 8–5 Attaching a Resource Attribute to a Host ............................................................. 195EXAMPLE 8–6 Changing a Resource Value ................................................................................... 195EXAMPLE 8–7 Deleting a Resource Attribute ................................................................................ 195EXAMPLE 8–8 Adding a Queue to the List of Queues for a Checkpointing Environment ....... 195EXAMPLE 8–9 Changing the Number of Slots in a Parallel Environment ................................. 195EXAMPLE 8–10 Listing Queues ......................................................................................................... 196EXAMPLE 8–11 Using qselect in qconfCommands .................................................................... 196EXAMPLE 8–12 Modifying the Schedule Interval ............................................................................ 197
13

14

Preface
The Sun N1 Grid Engine 6.1 Administration Guide provides background information abouthow to set up and administer a system of networked computer hosts that run N1TM Grid Engine6.1 software.
Who Should Use This BookThe background information and instructions in this guide are intended for experiencedsystem administrators.
How This Book Is OrganizedThe Sun N1 Grid Engine 6.1 Administration Guide includes the following chapters.
■ Chapter 1 provides general background about hosts and clusters, along with detailedinstructions for how to configure them.
■ Chapter 2 describes queues, which serve as containers for different categories of jobs. Thechapter includes complete instructions for how to configure cluster queues and queueinstances.
■ Chapter 3 explains how the grid engine system uses the complex to define all the pertinentinformation concerning the resource attributes a user can request for a job. Theadministrator configures complex resource attributes to match the requirements of theenvironment. This chapter provides detailed instructions for how to configure resourceattributes.
■ Chapter 4 provides background information about different types of users of the grid enginesystem. The chapter provides instructions on how to set up and maintain user access andproject access.
■ Chapter 5 provides full background information about the types of user policies that areavailable. The chapter provides instructions on how to match these policies to thecomputing environment. The chapter also describes how to configure and modify thescheduler.
■ Chapter 6 explains how to use the resource quotas feature of the N1 Grid Engine software tolimit resources by user, project, host, cluster queue, or parallel environment.
15

■ Chapter 7 describes how the grid engine system fits in with parallel environments, andprovides detailed instructions on how to configure them. The chapter also describes how toset up and use checkpointing environments.
■ Chapter 8 describes how to gather reporting and accounting statistics, how to automaticallyback up your grid engine system configuration files, and how to use files and scripts to addor modify objects such as queues, hosts, and environments.
■ Chapter 9 describes some ways to fine-tune your grid engine system. It also explains how thegrid engine system retrieves error message and describes how to run the software in debugmode.
■ Chapter 10 describes how you can modify the DBWriter portion of the ARCo feature.
Note – Some of the material in this guide appeared originally in the “How-To” section of the SunGrid Engine project web site. Updated frequently, this web site is of special value toadministrators of the grid engine system and is well worth consulting.
Typographic ConventionsThe following table describes the typographic conventions that are used in this book.
TABLE P–1 Typographic Conventions
Typeface Meaning Example
AaBbCc123 The names of commands, files, and directories,and onscreen computer output
Edit your .login file.
Use ls -a to list all files.
machine_name% you have mail.
AaBbCc123 What you type, contrasted with onscreencomputer output
machine_name% su
Password:
aabbcc123 Placeholder: replace with a real name or value The command to remove a file is rmfilename.
AaBbCc123 Book titles, new terms, and terms to beemphasized
Read Chapter 6 in the User's Guide.
A cache is a copy that is storedlocally.
Do not save the file.
Note: Some emphasized itemsappear bold online.
Preface
Sun N1 Grid Engine 6.1 Administration Guide • May 200716

Shell Prompts in Command ExamplesThe following table shows the default UNIX® system prompt and superuser prompt for the Cshell, Bourne shell, and Korn shell.
TABLE P–2 Shell Prompts
Shell Prompt
C shell machine_name%
C shell for superuser machine_name#
Bourne shell and Korn shell $
Bourne shell and Korn shell for superuser #
Preface
17

18

Configuring Hosts and Clusters
This chapter provides background information about configuring various aspects of the gridengine system. This chapter includes instructions for the following tasks:
■ “Migrating qmaster to Another Host” on page 20■ “Configuring Shadow Master Hosts” on page 22■ “Configuring Execution Hosts With QMON” on page 25■ “Configuring Execution Hosts From the Command Line” on page 31■ “Configuring Administration Hosts With QMON” on page 31■ “Configuring Administration Hosts From the Command Line” on page 33■ “Configuring Submit Hosts With QMON” on page 33■ “Configuring Submit Hosts From the Command Line” on page 35■ “Configuring Host Groups With QMON” on page 35■ “Configuring Host Groups From the Command Line” on page 38■ “Monitoring Execution Hosts With qhost” on page 39■ “Killing Daemons From the Command Line” on page 39■ “Restarting Daemons From the Command Line” on page 40■ “Displaying a Cluster Configuration With QMON” on page 41■ “Displaying the Global Cluster Configuration With QMON” on page 41■ “Adding and Modifying Global and Host Configurations With QMON” on page 42■ “Deleting a Cluster Configuration With QMON” on page 43■ “Displaying the Basic Cluster Configurations From the Command Line” on page 43■ “Modifying the Basic Cluster Configurations From the Command Line” on page 44
1C H A P T E R 1
19

About Hosts and DaemonsGrid engine system hosts are classified into four groups, depending on which daemons arerunning on the system and on how the hosts are registered at sge_qmaster.
■ Master host. The master host is central for the overall cluster activity. The master host runsthe master daemon sge_qmaster. sge_qmaster controls all grid engine system componentssuch as queues and jobs. It also maintains tables about the status of the components, aboutuser access permissions and the like. The master host usually runs the schedulersge_schedd. The master host requires no further configuration other than that performedby the installation procedure.For information about how to initially set up the master host, see “How to Install the MasterHost” in Sun N1 Grid Engine 6.1 Installation Guide. For information about how to configuredynamic changes to the master host, see “Configuring Shadow Master Hosts” on page 22.
■ Execution hosts. Execution hosts are nodes that have permission to run jobs. Thereforethey host queue instances, and they run the execution daemon sge_execd. An executionhost is initially set up by the installation procedure, as described in “How to InstallExecution Hosts” in Sun N1 Grid Engine 6.1 Installation Guide.
■ Administration hosts. Permission can be given to hosts other than the master host to carryout any kind of administrative activity. Administrative hosts are set up with the followingcommand:qconf -ah hostnameSee the qconf(1) man page for details.
■ Submit hosts. Submit hosts allow for submitting and controlling batch jobs only. Inparticular, a user who is logged into a submit host can use qsub to submit jobs, can useqstat to control the job status, or can run the graphical user interface QMON. Submit hostsare set up using the following command:qconf -as hostnameSee the qconf(1) man page for details.
Note – A host can belong to more than one class. The master host is by default an administrationhost and a submit host.
Migrating qmaster to Another HostBecause the spooling database cannot be located on an NFS-mounted file system, the followingprocedure requires that the Berkeley DB RPC server be used for spooling.
If you configure spooling to a local file system, you must transfer the spooling database to a localfile system on the new sge_qmaster host.
About Hosts and Daemons
Sun N1 Grid Engine 6.1 Administration Guide • May 200720

▼ How to Migrate qmaster to Another Host Using aScript
Check that the new master host has read/write access.The new master host must have read/write access to the qmaster spool directory and commondirectory as does the current master. If the administrative user is user root (check the globalcluster configuration for the setting of admin_user), you should verify that user root can createfiles in these directory under his user name.
Run the migrate script on the new master host.On the new master host, run the following script as user root:# /etc/init.d/sgemaster -migrate
This command stops sge_qmaster and sge_schedd on the old master host and starts them onthe new master host. The master host name listed in the file$SGE_ROOT/$SGE_CELL/common/act_qmaster is automatically changed to the new master host.If qmaster is not running, warning messages will appear and a delay of about one minute willoccur until qmaster is started on the new host.
Modify the shadow_masters file if necessary.Check if the $SGE_ROOT/$CELL/common/shadow_masters file exists. If the file exists, you canadd the new qmaster host to this file and remove the old master host, depending on yourrequirements. Then stop and restart the sge_shadowd daemons by issuing the followingcommands on the respective machines:/etc/init.d/sgemaster -shadowd stop
/etc/init.d/sgemaster -shadowd start
Note – The location of the system-wide sgemaster startup script may differ on your operatingsystem. You can always use $SGE_ROOT/default/common/sgemaster.
Important Notes about Migration
The migration procedure migrates to the host on which the sgemaster -migrate command isissued. If the file primary_qmaster exists, any subsequent calls of sgemaster on the machinecontained in the primary_qmaster file will cause a migration back to that machine. To avoidsuch a situation, change or delete the $SGE_ROOT/$SGE_CELL/common/primary_qmaster file.
Note – Existence of the primary_qmaster file does not imply that the qmaster is actuallyrunning.
1
2
3
More Information
Migrating qmaster to Another Host
Chapter 1 • Configuring Hosts and Clusters 21

Although jobs may continue to run during the migration procedure, the grid should be inactive.While the migration is taking place, any running SGE commands, such as qsub or qstat, willreturn an error.
If the current qmaster is down, there will be a delay in shutting down the scheduler until ittimes out waiting for contact with the qmaster.
The shadow_masters file has no direct effect on the migration procedure. This file only exists ifone or more shadow masters have been configured. For more information on how to set upshadow masters, see “Configuring Shadow Master Hosts” on page 22.
▼ How to Migrate qmaster to Another Host ManuallyOn the current master host, stop the master daemon and the scheduler daemon by typing thefollowing command:qconf -ks -km
Edit the sge-root/cell/common/act_qmaster file according to the following guidelines:
a. Confirm the new master host's name.
To get the new master host name, type the following command on the new master host:sge-root/utilbin/$ARCH/gethostname
b. In the act_qmaster file, replace the current host name with the new master host's namereturned by the gethostname utility.
On the new master host, start sge_qmaster and sge_schedd:sge-root/cell/common/sge5
Configuring Shadow Master HostsShadow master hosts are machines in the cluster that can detect a failure of the master daemonand take over its role as master host. When the shadow master daemon detects that the masterdaemon sge_qmaster has failed abnormally, it starts up a new sge_qmaster on the host wherethe shadow master daemon is running.
1
2
3
Configuring Shadow Master Hosts
Sun N1 Grid Engine 6.1 Administration Guide • May 200722

Note – If the master daemon is shut down gracefully, the shadow master daemon does not startup. If you want the shadow master daemon to take over after you shut down the master daemongracefully, remove the lock file that is located in the sge_qmaster spool directory. The defaultlocation of this spool directory is sge-root/cell/spool/qmaster.
The automatic failover start of a sge_qmaster on a shadow master host takes approximatelyone minute. Meanwhile, you get an error message whenever a grid engine system command isrun.
Note – The file sge-root/cell/common/act_qmaster contains the name of the host actuallyrunning the sge_qmaster daemon.
Shadow Master Host RequirementsTo prepare a host as a shadow master, the following requirements must be met:
■ The shadow master host must run sge_shadowd.■ The shadow master host must share sge_qmaster status information, job configuration,
and queue configuration logged to disk. In particular, a shadow master host needsread/write root access to the master host's spool directory and to the directorysge-root/cell/common.
■ Either the Berkeley DB RPC server or classic grid engine system spooling must be used forsge_qmaster spooling. For more information, see “Database Server and Spooling Host” inSun N1 Grid Engine 6.1 Installation Guide.
■ The shadow-master-hostname file must contain a line that defines the host as shadowmaster host.
As soon as these requirements are met, the shadow-master-host facility is activated for this host.You do not have to restart the grid engine system daemons to activate the feature.
Shadow Master Hosts FileThe shadow master host file, sge-root/cell/common/shadow_masters, contains the following:
■ The name of the primary master host, which is the machine where the master daemonsge_qmaster initially runs
■ The names of the shadow master hosts
Configuring Shadow Master Hosts
Chapter 1 • Configuring Hosts and Clusters 23

The format of the shadow master hostname file is as follows:
■ The first line of the file defines the primary master host■ The following lines define the shadow master hosts, one host per line
The order of the shadow master hosts is significant. The primary master host is the first line inthe file. If the primary master host fails to proceed, the shadow master defined in the second linetakes over. If this shadow master also fails, the shadow master defined in the third line takesover, and so forth.
Starting Shadow Master HostsTo start a shadow sge_qmaster, the system must be sure either that the old sge_qmaster hasterminated, or that it will terminate without performing actions that interfere with thenewly-started shadow sge_qmaster.
In very rare circumstances, you might not be able to determine that the old sge_qmaster hasterminated or that it will terminate. In such cases, an error message is logged to the messages logfile of the sge_shadowds on the shadow master hosts. See Chapter 9. Also, any attempts to opena tcp connection to a sge_qmaster daemon permanently fail. If this occurs, make sure that nomaster daemon is running, and then restart sge_qmaster manually on any of the shadowmaster machines. See “Restarting Daemons From the Command Line” on page 40.
Configuring Shadow Master Hosts EnvironmentVariablesThere are three environment variables which affect the takeover time for a shadow master:
■ SGE_DELAY_TIME - This variable controls the interval in which sge_shadowd pauses if atakeover bid fails. This value is used only when there are multiple sge_shadowd instancesand they are contending to be the master. (the default is 600 seconds.)
■ SGE_CHECK_INTERVAL - This variable controls the interval in which the sge_shadowd checksthe heartbeat file (60 seconds by default.)
■ SGE_GET_ACTIVE_INTERVAL - This variable controls the interval when a sge_shadowdinstance tries to take over when the heartbeat file has not changed.
These variables interact in the following way.
1. The master host updates the heartbeat file every 30 seconds.2. The sge_shadowd daemon checks for changes to heartbeat file every number of seconds
defined by the SGE_CHECK_INTERVAL variable. So, this value must be greater than 30 seconds.3. If the sge_shadowd daemon notices that the heartbeat file has been updated, it starts waiting
again until it is once more time to check the heartbeat file.
Configuring Shadow Master Hosts
Sun N1 Grid Engine 6.1 Administration Guide • May 200724

4. If the sge_shadowd daemon notices that the heartbeat file has not been updated, it waits fornumber of seconds defined by the SGE_CHECK_INTERVAL variable to expire. This step lets youmake sure that the sge_shadowd daemon is not too agressive in trying to takeover andallows the master host some leeway in updating the heartbeat file.
5. When the SGE_GET_ACTIVE_INTERVAL has expired, sge_shadowd daemon takes over ifheartbeat file is still not updated.
A reasonable configuration might be to set the SGE_CHECK_INTERVAL to 45 seconds and theSGE_GET_ACTIVE_INTERVAL to 90 seconds. So, after about 2 minutes, the take over will occur. Ifyou want to check the operation of the shadow host after you have configured theseenvironment variables you will have to pull out the master host's network cable to simulate afailure.
Configuring HostsN1 Grid Engine 6.1 software maintains object lists for all types of hosts except for the masterhost. The lists of administration host objects and submit host objects indicate whether a hosthas administrative or submit permission. The execution host objects include other parameters.Among these parameters are the load information that is reported by the sge_execd running onthe host, and the load parameter scaling factors that are defined by the administrator.
You can configure host objects with QMON or from the command line.
QMON Host Configuration dialog box has four tabs:
■ Administration Host tab. See Figure 1–3.■ Submit Host tab. See Figure 1–4.■ Host Groups tab. See Figure 1–5.■ Execution Host tab. See Figure 1–1.
The qconf command provides the command-line interface for managing host objects.
Configuring Execution Hosts With QMON
Before you configure an execution host, you must first install the software on the execution hostas described in “How to Install Execution Hosts” in Sun N1 Grid Engine 6.1 Installation Guide.
To configure execution hosts, on the QMON Main Control window click the Host Configurationbutton, and then click the Execution Host tab. The Execution Host tab looks like the followingfigure:
Configuring Hosts
Chapter 1 • Configuring Hosts and Clusters 25

Note – Administrative or submit commands are allowed from execution hosts only if theexecution hosts are also declared to be administration or submit hosts. See “ConfiguringAdministration Hosts With QMON” on page 31 and “Configuring Submit Hosts With QMON” onpage 33.
The Hosts list displays the execution hosts that are already defined.
The Load Scaling list displays the currently configured load-scaling factors for the selectedexecution host. See “Load Parameters” on page 86 for information about load parameters.
The Access Attributes list displays access permissions. See Chapter 4 for information aboutaccess permissions.
The Consumables/Fixed Attributes list displays resource availability for consumable and fixedresource attributes associated with the host. See “Complex Resource Attributes” on page 69 forinformation about resource attributes.
FIGURE 1–1 Execution Host Tab
Configuring Hosts
Sun N1 Grid Engine 6.1 Administration Guide • May 200726

The Reporting Variables list displays the variables that are written to the reporting file when aload report is received from an execution host. See “Defining Reporting Variables” on page 29for information about reporting variables.
The Usage Scaling list displays the current scaling factors for the individual usage metrics CPU,memory, and I/O for different machines. Resource usage is reported by sge_execd periodicallyfor each currently running job. The scaling factors indicate the relative cost of resource usage onthe particular machine for the user or project running a job. These factors could be used, forinstance, to compare the cost of a second of CPU time on a 400 MHz processor to that of a 600MHz CPU. Metrics that are not displayed in the Usage Scaling window have a scaling factor of1.
Adding or Modifying an Execution HostTo add or modify an execution host, click Add or Modify. The Add/Modify Exec Host dialogbox appears.
The Add/Modify Exec Host dialog box enables you to modify all attributes associated with anexecution host. The name of an existing execution host is displayed in the Host field.
If you are adding a new execution host, type its name in the Host field.
Defining Scaling FactorsTo define scaling factors, click the Scaling tab.
The Load column of the Load Scaling table lists all available load parameters, and the ScaleFactor column lists the corresponding definitions of the scaling. You can edit the Scale Factorcolumn. Valid scaling factors are positive floating-point numbers in fixed-point notation orscientific notation.
The Usage column of the Usage Scaling table lists the current scaling factors for the usagemetrics CPU, memory, and I/O. The Scale Factor column lists the corresponding definitions ofthe scaling. You can edit the Scale Factor column. Valid scaling factors are positivefloating-point numbers in fixed-point notation or scientific notation.
Configuring Hosts
Chapter 1 • Configuring Hosts and Clusters 27

Defining Resource AttributesTo define the resource attributes to associate with the host , click the Consumables/FixedAttributes tab.
The resource attributes associated with the host are listed in the Consumables/Fixed Attributestable.
Use the Complex Configuration dialog box if you need more information about the currentcomplex configuration, or if you want to modify it. For details about complex resourceattributes, see “Complex Resource Attributes” on page 69.
The Consumables/Fixed Attributes table lists all resource attributes for which a value iscurrently defined. You can enhance the list by clicking either the Name or the Value columnname. The Attribute Selection dialog box appears, which includes all resource attributes that aredefined in the complex.
To add an attribute to the Consumables/Fixed Attributes table, select the attribute, and thenclick OK.
To modify an attribute value, double-click a Value field, and then type a value.
FIGURE 1–2 Attribute Selection Dialog Box
Configuring Hosts
Sun N1 Grid Engine 6.1 Administration Guide • May 200728

To delete an attribute, select the attribute, and then press Control-D or click mouse button 3.Click OK to confirm that you want to delete the attribute.
Defining Access Permissions
To define user access permissions to the execution host based on previously configured useraccess lists, click the User Access tab.
To define project access permissions to the execution host based on previously configuredprojects, click the Project Access tab.
Defining Reporting Variables
To define reporting variables, click the Reporting Variables tab.
Configuring Hosts
Chapter 1 • Configuring Hosts and Clusters 29

The Available list displays all the variables that can be written to the reporting file when a loadreport is received from the execution host.
Select a reporting variable from the Available list, and then click the red right arrow to add theselected variable to the Selected list.
To remove a reporting variable from the Selected list, select the variable, and then click the leftred arrow.
Deleting an Execution HostTo delete an execution host, on the QMON Main Control window click the Host Configurationbutton, and then click the Execution Host tab.
In the Execution Host dialog box, select the host that you want to delete, and then click Delete.
Shutting Down an Execution Host DaemonTo shut down an execution host daemon, on the QMON Main Control window click the HostConfiguration button, and then click the Execution Host tab.
In the Execution Host dialog box, select a host, and then click Shutdown.
Configuring Hosts
Sun N1 Grid Engine 6.1 Administration Guide • May 200730

Configuring Execution Hosts From the Command LineTo configure execution hosts from the command line, use the following arguments for theqconf command:
■ qconf -ae [exec-host]The -ae option (add execution host) displays an editor containing an execution hostconfiguration template. The editor is either the default vi editor or an editor correspondingto the EDITOR environment variable. If you specify exec-host, which is the name of an alreadyconfigured execution host, the configuration of this execution host is used as a template. Theexecution host is configured by changing the template and saving to disk. See thehost_conf(5) man page for a detailed description of the template entries to be changed.
■ qconf -de hostnameThe -de option (delete execution host) deletes the specified host from the list of executionhosts. All entries in the execution host configuration are lost.
■ qconf -me hostnameThe -me option (modify execution host) displays an editor containing the configuration ofthe specified execution host as template. The editor is either the default vi editor or aneditor corresponding to the EDITOR environment variable. The execution host configurationis modified by changing the template and saving to disk. See the host_conf(5) man page fora detailed description of the template entries to be changed.
■ qconf -Me filenameThe -Me option (modify execution host) uses the content of filename as execution hostconfiguration template. The configuration in the specified file must refer to an existingexecution host. The configuration of this execution host is replaced by the file content. Thisqconf option is useful for changing the configuration of offline execution hosts, for example,in cron jobs, as the -Me option requires no manual interaction.
■ qconf -se hostnameThe -se option (show execution host) shows the configuration of the specified executionhost as defined in host_conf.
■ qconf -sel
The -sel option (show execution host list) displays a list of hosts that are configured asexecution hosts.
Configuring Administration Hosts With QMON
On the QMON Main Control window, click the Host Configuration button. The HostConfiguration dialog box appears, displaying the Administration Host tab. The AdministrationHost tab looks like the following figure:
Configuring Hosts
Chapter 1 • Configuring Hosts and Clusters 31

Note – The Administration Host tab is displayed by default when you click the HostConfiguration button for the first time.
Use the Administration Host tab to configure hosts on which administrative commands areallowed. The Host list displays the hosts that already have administrative permission.
Adding an Administration HostTo add a new administration host, type its name in the Host field, and then click Add, or pressthe Return key.
Deleting an Administration HostTo delete an administration host from the list, select the host, and then click Delete.
FIGURE 1–3 Administration Host Tab
Configuring Hosts
Sun N1 Grid Engine 6.1 Administration Guide • May 200732

Configuring Administration Hosts From the CommandLineTo configure administration hosts from the command line, use the following arguments for theqconf command:
■ qconf -ah hostname
The -ah option (add administration host) adds the specified host to the list ofadministration hosts.
■ qconf -dh hostname
The -dh option (delete administration host) deletes the specified host from the list ofadministration hosts.
■ qconf -sh
The -sh option (show administration hosts) displays a list of all currently configuredadministration hosts.
Configuring Submit Hosts With QMON
No administrative commands are allowed from submit hosts unless the hosts are also declaredto be administration hosts. See “Configuring Administration Hosts With QMON” on page 31 formore information.
To configure submit hosts, on the QMON Main Control window click the Host Configurationbutton, and then click the Submit Host tab. The Submit Host tab is shown in the followingfigure.
Configuring Hosts
Chapter 1 • Configuring Hosts and Clusters 33

Use the Submit Host tab to declare the hosts from which jobs can be submitted, monitored, andcontrolled. The Host list displays the hosts that already have submit permission.
Adding a Submit HostTo add a submit host, type its name in the Host field, and then click Add, or press the Returnkey.
Deleting a Submit HostTo delete a submit host, select it, and then click Delete.
FIGURE 1–4 Submit Host Tab
Configuring Hosts
Sun N1 Grid Engine 6.1 Administration Guide • May 200734

Configuring Submit Hosts From the Command LineTo configure submit hosts from the command line, use the following arguments for the qconfcommand:
■ qconf -as hostname
The -as option (add submit host) adds the specified host to the list of submit hosts.■ qconf -ds hostname
The -ds option (delete submit host) deletes the specified host from the list of submit hosts.■ qconf -ss
The -ss option (show submit hosts) displays a list of the names of all currently configuredsubmit hosts.
Configuring Host Groups With QMON
Host groups enable you to use a single name to refer to multiple hosts. You can group similarhosts together in a host group. A host group can include other host groups as well as multipleindividual hosts. Host groups that are members of another host group are subgroups of thathost group.
For example, you might define a host group called @bigMachines that includes the followingmembers:
@solaris64
@solaris32
fangorn
balrog
The initial @ sign indicates that the name is a host group. The host group @bigMachines
includes all hosts that are members of the two subgroups @solaris64 and @solaris32.@bigMachines also includes two individual hosts, fangorn and balrog.
On the QMON Main Control window, click the Host Configuration button. The HostConfiguration dialog box appears.
Click the Host Groups tab. The Host Groups tab looks like the following figure.
Configuring Hosts
Chapter 1 • Configuring Hosts and Clusters 35

Use the Host Groups tab to configure host groups. The Hostgroup list displays the currentlyconfigured host groups. The Members list displays all the hosts that are members of the selectedhost group.
Adding or Modifying a Host GroupTo add a host group, click Add. To Modify a host group, click Modify. The Add/Modify HostGroup dialog box appears.
FIGURE 1–5 Host Groups Tab
Configuring Hosts
Sun N1 Grid Engine 6.1 Administration Guide • May 200736

If you are adding a new host group, type a host group name in the Hostgroup field. The hostgroup name must begin with an @ sign.
If you are modifying an existing host group, the host group name is provided in the Hostgroupfield.
To add a host to the host group that you are configuring, type the host name in the Host field,and then click the red arrow to add the name to the Members list. To add a host group as asubgroup, select a host group name from the Defined Host Groups list, and then click the redarrow to add the name to the Members list.
To remove a host or a host group from the Members list, select it, and then click the trash icon.
Click Ok to save your changes and close the dialog box. Click Cancel to close the dialog boxwithout saving your changes.
Deleting a Host GroupTo delete a host group, select it from the Hostgroup list, and then click Delete.
Configuring Hosts
Chapter 1 • Configuring Hosts and Clusters 37

Configuring Host Groups From the Command LineTo configure host groups from the command line, use the following arguments for the qconfcommand:
■ qconf -ahgrp [host-group-name]
The -ahgrp option (add host group) adds a new host group to the list of host groups. See thehostgroup(5) man page for a detailed description of the configuration format.
■ qconf -Ahgrp [filename]
The -Ahgrp option (add host group from file) displays an editor containing a host groupconfiguration defined in filename. The editor is either the default vi editor or an editorcorresponding to the EDITOR environment variable. The host group is configured bychanging the configuration and saving to disk.
■ qconf -dhgrp host-group-name
The -dhgrp option (delete host group) deletes the specified host group from the list of hostgroups. All entries in the host group configuration are lost.
■ qconf -mhgrp host-group-name
The -mhgrp option (modify host group) displays an editor containing the configuration ofthe specified host group as template. The editor is either the default vi editor or an editorcorresponding to the EDITOR environment variable. The host group configuration ismodified by changing the template and saving to disk.
■ qconf -Mhgrp filename
The -Mhgrp option (modify host group from file) uses the content of filename as host groupconfiguration template. The configuration in the specified file must refer to an existing hostgroup. The configuration of this host group is replaced by the file content.
■ qconf -shgrp host-group-name
The -shgrp option (show host group) shows the configuration of the specified host group.■ qconf -shgrp_tree host-group-name
The -shgrp_tree option (show host group as tree) shows the configuration of the specifiedhost group and its sub-hostgroups as a tree.
■ qconf -shgrp_resolved host-group-name
The -shgrp_resolved option (show host group with resolved host list) shows theconfiguration of the specified host group with a resolved host list.
■ qconf -shgrpl
The -shgrpl option (show host group list) displays a list of all host groups.
Configuring Hosts
Sun N1 Grid Engine 6.1 Administration Guide • May 200738

Monitoring Execution Hosts With qhost
Use the qhost command to retrieve a quick overview of the execution host status:
% qhost
This command produces output that is similar to the following example:
EXAMPLE 1–1 Sample qhostOutput
HOSTNAME ARCH NCPU LOAD MEMTOT MEMUSE SWAPTO SWAPUS
-------------------------------------------------------------------------------
global - - - - - - -
arwen aix43 1 - - - - -
baumbart irix65 2 0.00 1.1G 91.5M 128.0M 0.0
boromir hp11 1 - 128.0M - 256.0M -
carc lx24-amd64 2 0.00 3.8G 989.8M 1.0G 0.0
denethor aix51 1 4.54G - - - -
durin lx24-x86 1 0.37 123.1M 46.5M 213.6M 26.6M
eomer sol-sparc64 1 0.13 256.0M 248.0M 513.0M 93.0M
lolek tru64 1 0.02 1.0G 790.0M 1.0G 8.0K
mungo lx22-alpha 1 1.00 248.9M 78.8M 129.8M 2.5M
nori sol-x86 2 0.38 1023.0M 372.0M 512.0M 37.0M
pippin darwin 1 0.00 640.0M 264.0M 0.0 0.0
smeagol hp11 1 0.35 512.0M 425.0M 1.0G 95.0M
See the qhost(1) man page for a description of the output format and for more options.
Invalid Host NamesThe following is a list of host names that are invalid, reserved, or otherwise not allowed to beused:
global
template
all
default
unknown
none
Killing Daemons From the Command LineTo kill grid engine system daemons from the command line, use one of the followingcommands:
Configuring Hosts
Chapter 1 • Configuring Hosts and Clusters 39

% qconf -ke[j] {hostname,... | all}
% qconf -ks
% qconf -km
You must have manager or operator privileges to use these commands. See Chapter 4 for moreinformation about manager and operator privileges.
■ The qconf –ke command shuts down the execution daemons. However, it does not cancelactive jobs. Jobs that finish while no sge_execd is running on a system are not reported tosge_qmaster until sge_execd is restarted. The job reports are not lost, however.The qconf -kej command kills all currently active jobs and brings down all executiondaemons.Use a comma-separated list of the execution hosts you want to shut down, or specify all toshut down all execution hosts in the cluster.
■ The qconf -ks command shuts down the scheduler sge_schedd.■ The qconf -km command forces the sge_qmaster process to terminate.
If you want to wait for any active jobs to finish before you run the shutdown procedure, use theqmod -dq command for each cluster queue, queue instance, or queue domain before you runthe qconf sequence described earlier. For information about cluster queues, queue instances,and queue domains, see “Configuring Queues” on page 45.
% qmod -dq {cluster-queue | queue-instance | queue-domain}
The qmod -dq command prevents new jobs from being scheduled to the disabled queueinstances. You should then wait until no jobs are running in the queue instances before you killthe daemons.
Restarting Daemons From the Command LineLog in as root on the machine on which you want to restart grid engine system daemons.
Type the following commands to run the startup scripts:
% sge-root/cell/common/sgemaster% sge-root/cell/common/sgeexecd
These scripts looks for the daemons normally running on this host and then start thecorresponding ones.
Configuring Hosts
Sun N1 Grid Engine 6.1 Administration Guide • May 200740

Basic Cluster ConfigurationThe basic cluster configuration is a set of information that is configured to reflect sitedependencies and to influence grid engine system behavior. Site dependencies include validpaths for programs such as mail or xterm. A global configuration is provided for the masterhost as well as for every host in the grid engine system pool. In addition, you can configure thesystem to use a configuration local to each host to override particular entries in the globalconfiguration.
The cluster administrator should adapt the global configuration and local host configurationsto the site's needs immediately after the installation. The configurations should be kept up todate afterwards.
The sge_conf(5) man page contains a detailed description of the configuration entries.
Displaying a Cluster Configuration With QMON
On the QMON Main Control window, click the Cluster Configuration button. The ClusterConfiguration dialog box appears.
In the Host list, select the name of a host. The current configuration for the selected host isdisplayed under Configuration.
Displaying the Global Cluster Configuration With QMON
On the QMON Main Control window, click the Cluster Configuration button.
In the Host list, select global.
The configuration is displayed in the format that is described in the sge_conf(5) man page.
FIGURE 1–6 Cluster Configuration Dialog Box
Basic Cluster Configuration
Chapter 1 • Configuring Hosts and Clusters 41

Adding and Modifying Global and Host ConfigurationsWith QMON
In the Cluster Configuration dialog box (Figure 1–6), select a host name or the name global,and then click Add or Modify. The Cluster Settings dialog box appears.
The Cluster Settings dialog box enables you to change all parameters of a global configurationor a local host configuration.
All fields of the dialog box are accessible only if you are modifying the global configuration. Ifyou modify a local host, its configuration is reflected in the dialog box. You can modify onlythose parameters that are feasible for local host changes.
If you are adding a new local host configuration, the dialog box fields are empty.
The Advanced Settings tab shows a corresponding behavior, depending on whether you aremodifying a configuration or are adding a new configuration. The Advanced Settings tabprovides access to more rarely used cluster configuration parameters.
Basic Cluster Configuration
Sun N1 Grid Engine 6.1 Administration Guide • May 200742

When you finish making changes, click OK to save your changes and close the dialog box. ClickCancel to close the dialog box without saving changes.
See the sge_conf(5) man page for a complete description of all cluster configurationparameters.
Deleting a Cluster Configuration With QMON
On the QMON Main Control window, click the Cluster Configuration button.
In the Host list, select the name of a host whose configuration you want to delete, and then clickDelete.
Displaying the Basic Cluster Configurations From theCommand LineTo display the current cluster configuration, use the qconf -sconf command. See the qconf(1)man page for a detailed description.
Type one of the following commands:
Basic Cluster Configuration
Chapter 1 • Configuring Hosts and Clusters 43

% qconf -sconf
% qconf -sconf global
% qconf -sconf host
■ The qconf –sconf and qconf –sconf global commands are equivalent. They display theglobal configuration.
■ The qconf -sconf host command displays the specified local host's configuration.
Modifying the Basic Cluster Configurations From theCommand Line
Note – You must be an administrator to use the qconf command to change clusterconfigurations.
Type one of the following commands:
% qconf -mconf global
% qconf -mconf host
■ The qconf -mconf global command modifies the global configuration.■ The qconf -mconf host command modifies the local configuration of the specified
execution host or master host.
The qconf commands that are described here are examples of the many available qconfcommands. See the qconf(1) man page for others.
Basic Cluster Configuration
Sun N1 Grid Engine 6.1 Administration Guide • May 200744

Configuring Queues and Queue Calendars
This chapter provides background information about configuring queues and queue calendars.It also includes instructions for how to configure them.
The following is a list of specific tasks for which instructions are included in this chapter.
■ “Configuring Queues With QMON” on page 47■ “Configuring Queues From the Command Line” on page 62■ “Configuring Queue Calendars With QMON” on page 64■ “Configuring Queue Calendars From the Command Line” on page 66
Configuring QueuesQueues are containers for different categories of jobs. Queues provide the correspondingresources for concurrent execution of multiple jobs that belong to the same category.
In N1 Grid Engine 6, a queue can be associated with one host or with multiple hosts. Becausequeues can extend across multiple hosts, they are called cluster queues. Cluster queues enableyou to manage a cluster of execution hosts by means of a single cluster queue configuration.
Each host that is associated with a cluster queue receives an instance of that cluster queue,which resides on that host. This guide refers to these instances as queue instances. Within anycluster queue, you can configure each queue instance separately. By configuring individualqueue instances, you can manage a heterogeneous cluster of execution hosts by means of asingle cluster queue configuration.
When you modify a cluster queue, all of its queue instances are modified simultaneously.Within a single cluster queue, you can specify differences in the configuration of queueinstances. Consequently, a typical setup might have only a few cluster queues, and the queueinstances controlled by those cluster queues remain largely in the background.
2C H A P T E R 2
45

Note – The distinction between cluster queues and queue instances is important. For example,jobs always run in queue instances, not in cluster queues.
When you configure a cluster queue, you can associate any combination of the following hostobjects with the cluster queue:
■ One execution host■ A list of separate execution hosts■ One or more host groups
Note – To enable a queue to operate correctly in a parallel environment, you must associate thequeue with the PE. This association enables more control of the resources and lets you assignspecific queues to handle the parallel workload.
Use the queue_conf(5) attribute pe_list to identify the suited PEs. Then, to link the PE andqueues, use either the QMON utility or the following form of the qconf command:
# qconf -mq <queue_name>
A host group is a group of hosts that can be treated collectively as identical. Host groups enableyou to manage multiple hosts by means of a single host group configuration. For moreinformation about host groups, see “Configuring Host Groups With QMON” on page 35.
When you associate individual hosts with a cluster queue, the name of the resulting queueinstance on each host combines the cluster queue name with the host name. The cluster queuename and the host name are separated by an @ sign. For example, if you associate the hostmyexechost with the cluster queue myqueue, the name of the queue instance on myexechost ismyqueue@myexechost.
When you associate a host group with a cluster queue, you create what is known as a queuedomain. Queue domains enable you to manage groups of queue instances that are part of thesame cluster queue and whose assigned hosts are part of the same host group. A queue domainname combines a cluster queue name with a host group name, separated by an @ sign. Forexample, if you associate the host group myhostgroup with the cluster queue myqueue, the nameof the queue domain is myqueue@@myhostgroup.
Note – Queue domain names always include two @ signs, because all host group names beginwith an @ sign..
Jobs do not wait in queue instances. Jobs start running immediately as soon as they aredispatched. The scheduler's list of pending jobs is the only waiting area for jobs.
Configuring Queues
Sun N1 Grid Engine 6.1 Administration Guide • May 200746

Configuring queues registers the queue attributes with sge_qmaster. As soon as queues areconfigured, they are instantly visibly to the whole cluster and to all users on all hosts belongingto the grid engine system.
For further details, see the queue_conf(5) man page.
Configuring Queues With QMON
On the QMON Main Control window, click the Queue Control button. The Cluster Queues dialogbox appears.
The Cluster Queues dialog box and its facilities for monitoring and manipulating the status ofcluster queues and queue instances are described in “Monitoring and Controlling Queues WithQMON” in Sun N1 Grid Engine 6.1 User’s Guide.
To add a new cluster queue, click Add.
Configuring Queues
Chapter 2 • Configuring Queues and Queue Calendars 47

To modify an existing cluster queue, select it from the Cluster Queue list, and then click Modify.
The Clone button enables you to import all parameters of an existing cluster queue. You selectthe queue you want to clone from a list of existing queues.
When you click Add, the Queue Configuration – Add dialog box appears. When you clickModify, the Modify queue-name dialog box appears. When the Queue Configuration dialog boxappears for the first time, it displays the General Configuration tab.
If you are modifying an existing queue, the name of the queue is displayed in the Queue Namefield. The hosts where the queue instances reside are displayed in the Hostlist field.
If you are adding a new cluster queue, you must specify a queue name and the names of thehosts on which the queue instances are to reside.
In the Hostlist field, you can specify the names of individual hosts. You can also specify thenames of previously defined host groups. Queue instances of this cluster queue will reside on allindividual hosts and on all members of the host groups you specify, including all members ofany host subgroups. For more information about host groups, see “Configuring Host GroupsWith QMON” on page 35.
The following 11 tabs for specifying parameter sets are available to define a queue:■ General Configuration – see “Configuring General Parameters” on page 49■ Execution Method – see “Configuring Execution Method Parameters” on page 50■ Checkpointing – see “Configuring the Checkpointing Parameters” on page 51
FIGURE 2–1 Queue Configuration– General Configuration Tab
Configuring Queues
Sun N1 Grid Engine 6.1 Administration Guide • May 200748

■ Parallel Environment – see “Configuring Parallel Environments” on page 52■ Load/Suspend Thresholds – see “Configuring Load and Suspend Thresholds” on page 53■ Limits – see “Configuring Limits” on page 55■ Complex – see “Configuring Complex Resource Attributes” on page 56■ Subordinates – see “Configuring Subordinate Queues” on page 58■ User Access – see “Configuring User Access Parameters” on page 59■ Project Access – see “Configuring Project Access Parameters” on page 60■ Owners – see “Configuring Owners Parameters” on page 61
To set default parameters for the cluster queue, select @/ in the Attributes for Host/Hostgrouplist, and then click the tab containing the parameters that you want to set.
Default parameters are set for all queue instances on all hosts listed under Hostlist. You canoverride the default parameter values on a host or a host group that you specify. To set overrideparameters for a host or a host group, first select the name from the Attributes forHost/Hostgroup list. Then click the tab containing the parameters that you want to set. Thevalues of the parameters that you set override the cluster queue's default parameters on theselected host or host group.
To set a host-specific parameter, you must first enable the parameter for configuration. Clickthe lock icon at the left of the parameter you want to set, and then change the parameter's value.
The Refresh button loads the settings of other objects that were modified while the QueueConfiguration dialog box was open.
Click OK to register all queue configuration changes with sge_qmaster and close the dialogbox. Click Cancel to close the dialog box without saving your changes.
Configuring General ParametersTo configure general parameters, click the General Configuration tab. The GeneralConfiguration tab is shown in Figure 2–1.
You can specify the following parameters:■ Sequence Nr. The sequence number of the queue.■ Processors. A specifier for the processor set to be used by the jobs running in that queue. For
some operating system architectures, this specifier can be a range, such as 1-4,8,10, or just aninteger identifier of the processor set. See the arc_depend_*.asc files in the doc directory ofyour N1 Grid Engine 6.1 software distribution for more information.
Caution – Do not change this value unless you are certain that you need to change it.
■ tmp Directory. Temporary directory path.
Configuring Queues
Chapter 2 • Configuring Queues and Queue Calendars 49

■ Shell. Default command interpreter to use for running the job scripts.■ Shell Start Mode. The mode in which to start the job script.■ Initial State. The state in which a newly added queue comes up. Also, the state in which a
queue instance is restored if the sge_execd running on the queue instance host getsrestarted.
■ Rerun Jobs. The queue's default rerun policy to be enforced on jobs that were aborted, forexample, due to system crashes. The user can override this policy using the qsub -rcommand or the Submit Job dialog box. See “Extended Job Example” in Sun N1 GridEngine 6.1 User’s Guide.
■ Calendar. A calendar attached to the queue. This calendar defines on-duty and off-dutytimes for the queue.
■ Notify Time. The time to wait between delivery of SIGUSR1/SIGUSR2 notification signals andsuspend or kill signals.
■ Job's Nice. The nice value with which to start the jobs in this queue. 0 means use the systemdefault.
■ Slots. The number of jobs that are allowed to run concurrently in the queue. Slots are alsoreferred to as job slots.
■ Type. The type of the queue and of the jobs that are allowed to run in this queue. Type can beBatch, Interactive, or both.
See the queue_conf(5) man page for detailed information about these parameters.
Configuring Execution Method ParametersTo configure execution method parameters, click the Execution Method tab. The ExecutionMethod tab is shown in the following figure.
Configuring Queues
Sun N1 Grid Engine 6.1 Administration Guide • May 200750

You can specify the following parameters:
■ Prolog. A queue-specific prolog script. The prolog script is run with the same environmentas the job before the job script is started.
■ Epilog. A queue-specific epilog script. The epilog script is run with the same environment asthe job after the job is finished.
■ Starter Method, Suspend Method, Resume Method, Terminate Method. Use these fields tooverride the default methods for applying these actions to jobs.
See the queue_conf(5) man page for detailed information about these parameters.
Configuring the Checkpointing ParametersTo configure the checkpointing parameters, click the Checkpointing tab. The Checkpointingtab is shown in the following figure.
Configuring Queues
Chapter 2 • Configuring Queues and Queue Calendars 51

You can specify the following parameters:
■ MinCpuTime. The periodic checkpoint interval.■ Referenced Ckpt Objects. A list of checkpointing environments associated with the queue.
To reference a checkpointing environment from the queue, select the name of a checkpointingenvironment from the Available list, and then click the right arrow to add it to the Referencedlist.
To remove a checkpointing environment from the Referenced list, select it, and then click theleft arrow.
To add or modify checkpointing environments, click the button below the red arrows to openthe Checkpointing Configuration dialog box. For more information, see “ConfiguringCheckpointing Environments With QMON” on page 176.
See the queue_conf(5) man page for detailed information about these parameters.
Configuring Parallel EnvironmentsTo configure parallel environments, click the Parallel Environment tab. The ParallelEnvironment tab is shown in the following figure.
Configuring Queues
Sun N1 Grid Engine 6.1 Administration Guide • May 200752

You can specify the following parameter:
■ Referenced PE. A list of parallel environments associated with the queue.
To reference a parallel environment from the queue, select the name of a parallel environmentfrom the Available PEs list, and then click the right arrow to add it to the Referenced PEs list.
To remove a checkpointing environment from the Referenced PEs list, select it, and then clickthe left arrow.
To add or modify parallel environments, click the button below the red arrows to open theParallel Environment Configuration dialog box. For more information, see “ConfiguringParallel Environments With QMON” on page 166.
See the queue_conf(5) man page for detailed information about this parameter.
Configuring Load and Suspend ThresholdsTo configure load and suspend thresholds, click the Load/Suspend Thresholds tab. TheLoad/Suspend Thresholds tab is shown in the following figure.
Configuring Queues
Chapter 2 • Configuring Queues and Queue Calendars 53

You can specify the following parameters:
■ The Load Thresholds and the Suspend Thresholds tables, which define overload thresholdsfor load parameters and consumable resource attributes. See “Complex ResourceAttributes” on page 69.In the case of load thresholds, overload prevents the queue from receiving further jobs. Inthe case of suspend thresholds, overload suspends jobs in the queue in order to reduce theload.The tables display the currently configured thresholds.To change an existing threshold, select it, and then double-click the corresponding Valuefield.To add new thresholds, click Load or Value. A selection list appears with all valid attributesthat are attached to the queue. The Attribute Selection dialog box is shown in Figure 1–2. Toadd an attribute to the Load column of the corresponding threshold table, select anattribute, and then click OK.To delete an existing threshold, select it, and then type Control-D or click mouse button 3.You are prompted to confirm that you want to delete the selection.
■ Suspend interval. The time interval between suspension of other jobs in case the suspendthresholds are still exceeded.
■ Jobs suspended per interval. The number of jobs to suspend per time interval in order toreduce the load on the system that is hosting the configured queue.
See the queue_conf(5) man page for detailed information about these parameters.
Configuring Queues
Sun N1 Grid Engine 6.1 Administration Guide • May 200754

Configuring LimitsTo configure limits parameters, click the Limits tab. The Limits tab is shown in the followingfigure.
Configuring Queues
Chapter 2 • Configuring Queues and Queue Calendars 55

You can specify the following parameters:
■ Hard Limit and Soft Limit. The hard limit and the soft limit to impose on the jobs that arerunning in the queue.
To change a value of a limit, click the button at the right of the field whose value you want tochange. A dialog box appears where you can type either Memory or Time limit values.
See the queue_conf(5) and the setrlimit(2) man pages for detailed information about limitparameters and their interpretation for different operating system architectures.
Configuring Complex Resource AttributesTo configure resource attributes, click the Complex tab. The Complex tab is shown in thefollowing figure.
Configuring Queues
Sun N1 Grid Engine 6.1 Administration Guide • May 200756

Configuring Queues
Chapter 2 • Configuring Queues and Queue Calendars 57

You can specify the following parameters:
■ Consumables/Fixed Attributes. Value definitions for selected attributes from the set ofresource attributes that are available for this queue.
The available resource attributes are assembled by default from the complex.
Resource attributes are either consumable or fixed. The definition of a consumable valuedefines a capacity managed by the queue. The definition of a fixed value defines aqueue-specific value. See “Complex Resource Attributes” on page 69 for further details.
The attributes for which values are explicitly defined are displayed in the Consumable/FixedAttributes table. To change an attribute, select it, and then double-click the correspondingValue field.
To add new attribute definitions, click Load or Value. The Attribute Selection dialog boxappears with a list of all valid attributes that are attached to the queue. The AttributeSelection dialog box is shown in Figure 1–2.
To add an attribute to the Load column of the attribute table, select it, and then click OK.
To delete an attribute, select it, and then press Control-D or click mouse button 3. You areprompted to confirm that you want to delete the attribute.
See the queue_conf(5) page for detailed information about these attributes.
Use the Complex Configuration dialog box to check or modify the current complexconfiguration before you attach user-defined resource attributes to a queue or before youdetach them from a queue. To access the Complex Configuration dialog box, click the ComplexConfiguration button on the QMON Main Control window. See Figure 3–1 for an example.
Configuring Subordinate QueuesTo configure subordinate queues, click the Subordinates tab. The Subordinates tab is shown inthe following figure.
Configuring Queues
Sun N1 Grid Engine 6.1 Administration Guide • May 200758

Use the subordinate queue facility to implement high priority and low priority queues as well asstandalone queues.
You can specify the following parameters:
■ Queue. A list of the queues that are subordinated to the configured queue.
Subordinated queues are suspended if the configured queue becomes busy. Subordinatedqueues are resumed when the configured queue is no longer busy.
■ Max Slots. For any subordinated queue, you can configure the number of job slots that mustbe filled in the configured queue to trigger a suspension. If no maximum slot value isspecified, all job slots must be filled to trigger suspension of the corresponding queue.
See the queue_conf(5) man page for detailed information about these parameters.
Configuring User Access ParametersTo configure user access parameters, click the User Access tab. The User Access tab is shown inthe following figure.
Configuring Queues
Chapter 2 • Configuring Queues and Queue Calendars 59

You can specify the following parameters:
■ Available Access Lists. The user access lists that can be included in the Allow Access list orthe Deny Access list of the queue.
Users or user groups belonging to access lists that are included in the Allow Access list haveaccess to the queue. Users who are included in the Deny Access list cannot access the queue.If the Allow Access list is empty, access is unrestricted unless explicitly stated otherwise inthe Deny Access list.
To add or modify user access lists, click the button between the Available Access Lists and theAllow Access and Deny Access lists to open the User Configuration dialog box. For moreinformation, see “Configuring User Access Lists With QMON” on page 96.
See the queue_conf(5) man page for detailed information about these parameters.
Configuring Project Access ParametersTo configure project access parameters, click the Project Access tab. The Project Access tab isshown in the following figure.
Configuring Queues
Sun N1 Grid Engine 6.1 Administration Guide • May 200760

You can specify the following parameters:
■ Available Projects. The projects that are allowed access or denied access to the queue.
Jobs submitted to a project belonging to the list of allowed projects have access to the queue.Jobs that are submitted to denied projects are not dispatched to the queue.
To add or modify project access, click the button between the Available Projects list and theAllow Project Access and Deny Project Access lists to open the Project Configuration dialogbox. For more information, see “Defining Projects With QMON” on page 102.
See the queue_conf(5) man page for detailed information about these parameters.
Configuring Owners ParametersTo configure owners parameters, click the Owners tab. The Owners tab is shown in thefollowing figure.
Configuring Queues
Chapter 2 • Configuring Queues and Queue Calendars 61

You can specify the following parameters:
■ Owner List. The list of queue owners.Typically, users are set up to be owners of certain queue instances in order to allow them tosuspend or disable jobs when they need to. For example, users might occasionally needcertain machines for important work, and those machines might be strongly affected by jobsthat are running in the background. Queue owners can do the following:■ Suspend. Stop execution of all jobs running in the queue and close the queue■ Resume. Unsuspend the queue, and then open it■ Disable. Close the queue, but do not affect running jobs■ Enable. Open the queue
Jobs that are suspended explicitly while a queue is suspended are not resumed when thequeue is resumed. Explicitly suspended jobs must be resumed explicitly.
All possible user accounts can be added to the owner list. To delete a user account from thequeue owner list, select it, and then click the trash can icon.
See the queue_conf(5) man page for detailed information about these parameters.
Configuring Queues From the Command LineTo configure queues from the command line, type the following command with the appropriateoptions:
Configuring Queues
Sun N1 Grid Engine 6.1 Administration Guide • May 200762

# qconf options
The qconf command has the following options:
■ qconf -aq [cluster-queue]The -aq option (add cluster queue) displays an editor containing a template for clusterqueue configuration. The editor is either the default vi editor or an editor defined by theEDITOR environment variable. If cluster-queue is specified, the configuration of this clusterqueue is used as template. Configure the cluster queue by changing the template and thensaving it. See the queue_conf(5) man page for a detailed description of the template entriesto change.
■ qconf -Aq filenameThe -Aq option (add cluster queue from file) uses the file filename to define a cluster queue.The definition file might have been produced by the qconf -sq queue command.
■ qconf -cq queue[,...]The -cq option (clean queue) cleans the status of the specified cluster queues, queuedomains, or queue instances to be idle and free from running jobs. The status is resetwithout respect to the current status. This option is useful for eliminating error conditions,but you should not use it in normal operation mode.
■ qconf -dq cluster-queue[,...]The -dq option (delete cluster queue) deletes the cluster queues specified in the argumentlist from the list of available queues.
■ qconf -mq cluster-queueThe -mq option (modify cluster queue) modifies the specified cluster queue. The -mq optiondisplays an editor containing the configuration of the cluster queue to be changed. Theeditor is either the default vi editor or an editor defined by the EDITOR environmentvariable. Modify the cluster queue by changing the configuration and then saving yourchanges.
■ qconf -Mq filenameThe -Mq option (modify cluster queue from file) uses the file filename to define the modifiedcluster queue configuration. The definition file might have been produced by the qconf -sqqueue command and subsequent modification.
■ qconf -sq [queue[,...]]The -sq option (show queue) without arguments displays the default template clusterqueue, queue domain, or queue instance configuration. The -sq option with argumentsdisplays the current configuration of the specified queues.
■ qconf -sql
The -sql option (show cluster queue list) displays a list of all currently configured clusterqueues.
Configuring Queues
Chapter 2 • Configuring Queues and Queue Calendars 63

The qconf command provides the following set of options that you can use to change specificqueue attributes:
-aattr – Add attributes-Aattr – Add attributes from a file-dattr – Delete attributes-Dattr – Delete attributes listed in a file-mattr – Modify attributes-Mattr – Modify attributes from a file-rattr – Replace attributes-Rattr – Replace attributes from a file-sobjl – Show list of configuration objects
For a description of how to use these options and for some examples of their use, see “UsingFiles to Modify Queues, Hosts, and Environments” on page 193. For detailed information aboutthese options, see the qconf(1) man page.
Configuring Queue CalendarsQueue calendars define the availability of queues according to the day of the year, the day of theweek, or the time of day. You can configure queues to change their status at specified times. Youcan change the queue status to disabled, enabled, suspended, or resumed (unsuspended).
The grid engine system enables you to define a site-specific set of calendars, each of whichspecifies status changes and the times at which the changes occur. These calendars can beassociated with queues. Each queue can attach a single calendar, thereby adopting theavailability profile defined in the attached calendar.
The syntax of the calendar format is described in detail in the calendar_conf(5) man page. Afew examples are given in the next sections, along with a description of the correspondingadministration facilities.
Configuring Queue Calendars With QMON
In the QMON Main Control window, click the Calendar Configuration button. The CalendarConfiguration dialog box appears.
Configuring Queue Calendars
Sun N1 Grid Engine 6.1 Administration Guide • May 200764

The Calendars list displays the available calendars.
In the Calendars list, click the calendar configuration that you want to modify or delete.
Do one of the following:■ To delete the selected calendar, click Delete.■ To modify the selected calendar, click Modify.■ To add access lists, click Add.
In all cases, the Add/Modify Calendar dialog box appears.
If you click Modify or Delete, the Calendar Name field displays the name of the selectedcalendar. If you click Add, type the name of the calendar you are defining.
The Year and Week fields enable you to define the calendar events, using the syntax described inthe calendar_conf(5) man page.
The example of the calendar configuration shown in the previous figure is appropriate forqueues that should be available outside office hours and on weekends. In addition, theChristmas holidays are defined to be handled like weekends.
See the calendar_conf(5) man page for a detailed description of the syntax and for moreexamples.
By attaching a calendar configuration to a queue, the availability profile defined by the calendaris set for the queue. Calendars are attached in the General Configuration tab of the Modifyqueue-name dialog box. The Calendar field contains the name of the calendar to attach. The
Configuring Queue Calendars
Chapter 2 • Configuring Queues and Queue Calendars 65

button next to the Calendar field lists the currently configured calendars. See “ConfiguringQueues” on page 45 for more details about configuring queues.
Configuring Queue Calendars From the CommandLineTo configure queue calendars from the command line, type the following command withappropriate options:
% qconf options
The following options are available:
■ qconf -acal calendar-nameThe -acal option (add calendar) adds a new calendar configuration named calendar-nameto the cluster. An editor with a template configuration appears, enabling you to define thecalendar.
■ qconf -Acal filenameThe -Acal option (add calendar from file) adds a new calendar configuration to the cluster.The added calendar is read from the specified file.
■ qconf -dcal calendar-name [,...]The -dcal option (delete calendar) deletes the specified calendar.
■ qconf -mcal calendar-name
Configuring Queue Calendars
Sun N1 Grid Engine 6.1 Administration Guide • May 200766

The -mcal option (modify calendar) modifies an existing calendar configuration namedcalendar-name. An editor opens calendar-name, enabling you to make changes to thedefinition.
■ qconf -Mcal filenameThe -Mcal option (modify calendar from file) modifies an existing calendar configuration.The calendar to modify is read from the specified file.
■ qconf -scal calendar-nameThe -scal option (show calendar) displays the configuration for calendar-name.
■ qconf -scall
The-scall option (show calendar list) displays a list of all configured calendars.
Configuring Queue Calendars
Chapter 2 • Configuring Queues and Queue Calendars 67

68

Configuring Complex Resource Attributes
This chapter describes how to configure resource attribute definitions. Resource attributedefinitions are stored in an entity called the grid engine system complex. In addition tobackground information relating to the complex and its associated concepts, this chapterprovides detailed instructions on how to accomplish the following tasks:
■ “Configuring Complex Resource Attributes With QMON” on page 70■ “Setting Up Consumable Resources” on page 76■ “Configuring Complex Resource Attributes From the Command Line” on page 85■ “Writing Your Own Load Sensors” on page 87
Complex Resource AttributesThe complex configuration provides all pertinent information about the resource attributesusers can request for jobs with the qsub -l or qalter -l commands. The complexconfiguration also provides information about how the grid engine system should interpretthese resource attributes.
The complex also builds the framework for the system's consumable resources facility. Theresource attributes that are defined in the complex can be attached to the global cluster, to ahost, or to a queue instance. The attached attribute identifies a resource with the associatedcapability. During the scheduling process, the availability of resources and the job requirementsare taken into account. The grid engine system also performs the bookkeeping and the capacityplanning that is required to prevent oversubscription of consumable resources.
Typical consumable resource attributes include:
■ Available free memory■ Unoccupied licenses of a software package■ Free disk space■ Available bandwidth on a network connection
3C H A P T E R 3
69

Attribute definitions in the grid engine complex define how resource attributes should beinterpreted.
The definition of a resource attribute includes the following:
■ Name of the attribute■ Shortcut to reference the attribute name■ Value type of the attribute, for example, STRING or TIME■ Relational operator used by the scheduler■ Requestable flag, which determines whether users can request the attribute for a job■ Consumable flag, which identifies the attribute as a consumable resource■ Default request value that is taken into account for consumable attributes if jobs do not
explicitly specify a request for the attribute■ Urgency value, which determines job priorities on a per resource basis
Use the QMON Complex Configuration dialog box, which is shown in Figure 3–1, to definecomplex resource attributes.
Configuring Complex Resource Attributes With QMON
In the QMON Main Control window, click the Complex Configuration button. The ComplexConfiguration dialog box appears.
FIGURE 3–1 Complex Configuration Dialog Box
Complex Resource Attributes
Sun N1 Grid Engine 6.1 Administration Guide • May 200770

The Complex Configuration dialog box enables you to add, modify, or delete complex resourceattributes.
To add a new attribute, first make sure that no line in the Attributes table is selected. In the fieldsabove the Attributes table, type or select the values that you want, and then click Add.
Note – If you want to add a new attribute and an existing attribute is selected, you must clear theselection. To deselect a highlighted attribute, hold down the Control key and click mousebutton 1.
You can add a new attribute by copying an existing attribute and then modifying it. Make surethat the attribute name and its shortcut are unique.
To modify an attribute listed in the Attributes table, select it. The values of the selected attributeare displayed above the Attributes table. Change the attribute values, and then click Modify.
To save configuration changes to a file, click Save. To load values from a file into the complexconfiguration, click Load, and then select the name of a file from the list that appears.
To delete an attribute in the Attribute table, select it, and then click Delete.
See the complex(5) man page for details about the meaning of the rows and columns in thetable.
To register your new or modified complex configuration with sge_qmaster, click Commit.
Assigning Resource Attributes to Queues, Hosts, andthe Global ClusterResource attributes can be used in the following ways:
■ As queue resource attributes■ As host resource attributes■ As global resource attributes
A set of default resource attributes is already attached to each queue and host. Default resourceattributes are built in to the system and cannot be deleted, nor can their type be changed.
User-defined resource attributes must first be defined in the complex before you can assignthem to a queue instance, a host, or the global cluster. When you assign a resource attribute toone of these targets, you specify a value for the attribute.
The following sections describe each attribute type in detail.
Complex Resource Attributes
Chapter 3 • Configuring Complex Resource Attributes 71

Queue Resource AttributesDefault queue resource attributes are a set of parameters that are defined in the queueconfiguration. These parameters are described in the queue_conf(5) man page.
You can add new resource attributes to the default attributes. New attributes are attached onlyto the queue instances that you modify. When the configuration of a particular queue instancereferences a resource attribute that is defined in the complex, that queue configuration providesthe values for the attribute definition. For details about queue configuration see “ConfiguringQueues” on page 45.
For example, the queue configuration value h_vmem is used for the virtual memory size limit.This value limits the amount of total memory that each job can consume. An entry in thecomplex_values list of the queue configuration defines the total available amount of virtualmemory on a host or assigned to a queue. For detailed information about consumableresources, see “Consumable Resources” on page 75.
Host Resource AttributesHost resource attributes are parameters that are intended to be managed on a host basis.
The default host-related attributes are load values. You can add new resource attributes to thedefault attributes, as described earlier in “Queue Resource Attributes” on page 72.
Every sge_execd periodically reports load to sge_qmaster. The reported load values are eitherthe standard load values such as the CPU load average, or the load values defined by theadministrator, as described in “Load Parameters” on page 86.
The definitions of the standard load values are part of the default host resource attributes,whereas administrator-defined load values require extending the host resource attributes.
Host-related attributes are commonly extended to include nonstandard load parameters.Host-related attributes are also extended to manage host-related resources such as the numberof software licenses that are assigned to a host, or the available disk space on a host's local filesystem.
If host–related attributes are associated with a host or with a queue instance on that host, aconcrete value for a particular host resource attribute is determined by one of the followingitems:
■ The queue configuration, if the attribute is also assigned to the queue configuration■ A reported load value■ The explicit definition of a value in the complex_values entry of the corresponding host
configuration. For details, see “Configuring Hosts” on page 25.
In some cases, none of these values are available. For example, say the value is supposed to be aload parameter, but sge_execd does not report a load value for the parameter. In such cases, theattribute is not defined, and the qstat –F command shows that the attribute is not applicable.
Complex Resource Attributes
Sun N1 Grid Engine 6.1 Administration Guide • May 200772

For example, the total free virtual memory attribute h_vmem is defined in the queueconfiguration as limit and is also reported as a standard load parameter. The total availableamount of virtual memory on a host can be defined in the complex_values list of that host. Thetotal available amount of virtual memory attached to a queue instance on that host can bedefined in the complex_values list of that queue instance. Together with defining h_vmem as aconsumable resource, you can efficiently exploit memory of a machine without risking memoryoversubscription, which often results in reduced system performance that is caused byswapping. For more information about consumable resources, see “Consumable Resources” onpage 75.
Note – Only the Shortcut, Relation, Requestable, Consumable, and Default columns can bechanged for the default resource attributes. No default attributes can be deleted.
Global Resource AttributesGlobal resource attributes are cluster-wide resource attributes, such as available networkbandwidth of a file server or the free disk space on a network-wide available file system.
Global resource attributes can also be associated with load reports if the corresponding loadreport contains the GLOBAL identifier, as described in “Load Parameters” on page 86. Globalload values can be reported from any host in the cluster. No global load values are reported bydefault, therefore there are no default global resource attributes.
Concrete values for global resource attributes are determined by the following items:
■ Global load reports.■ Explicit definition in the complex_values parameter of the global host configuration. See
“Configuring Hosts” on page 25.■ In association with a particular host or queue and an explicit definition in the corresponding
complex_values lists.
Sometimes none of these cases apply. For example, a load value might not yet be reported. Insuch cases, the attribute does not exist.
Adding Resource Attributes to the ComplexBy adding resource attributes to the complex, the administrator can extend the set of attributesmanaged by thegrid engine system. The administrator can also restrict the influence ofuser-defined attributes to particular queues, hosts, or both.
User-defined attributes are a named collection of attributes with the corresponding definitionsas to how the grid engine software is to handle these attributes. You can attach one or moreuser-defined attributes to a queue, to a host, or globally to all hosts in the cluster. Use thecomplex_values parameter for the queue configuration and the host configuration. For more
Complex Resource Attributes
Chapter 3 • Configuring Complex Resource Attributes 73

information, see “Configuring Queues” on page 45 and “Configuring Hosts” on page 25. Theattributes defined become available to the queue and to the host, respectively, in addition to thedefault resource attributes.
The complex_values parameter in the queue configuration and the host configuration must setconcrete values for user-defined attributes that are associated with queues and hosts.
For example, say the user-defined resource attributes permas, pamcrash, and nastran, shown inthe following figure, are defined.
For at least one or more queues, add the resource attributes to the list of associated user-definedattributes as shown in the Complex tab of the Modify queue-name dialog box. For details onhow to configure queues, see “Configuring Queues” on page 45 and its related sections.
Complex Resource Attributes
Sun N1 Grid Engine 6.1 Administration Guide • May 200774

Then the displayed queue is configured to manage up to 10 licenses of the software packagepermas. Furthermore, the attribute permas becomes requestable for jobs, as expressed in theAvailable Resources list in the Requested Resources dialog box.
For details about how to submit jobs, see Chapter 3, “Submitting Jobs,” in Sun N1 GridEngine 6.1 User’s Guide.
Alternatively, the user could submit jobs from the command line and could request attributes asfollows:
% qsub -l pm=1 permas.sh
Note – You can use the pm shortcut instead of the full attribute name permas.
Consequently, the only eligible queues for these jobs are the queues that are associated with theuser-defined resource attributes and that have permas licenses configured and available.
Consumable ResourcesConsumable resources provide an efficient way to manage limited resources such as availablememory, free space on a file system, network bandwidth, or floating software licenses.Consumable resources are also called consumables. The total available capacity of a consumableis defined by the administrator. The consumption of the corresponding resource is monitoredby grid engine software internal bookkeeping. The grid engine system accounts for theconsumption of this resource for all running jobs. Jobs are dispatched only if the internalbookkeeping indicates that sufficient consumable resources are available.
Consumables can be combined with default load parameters or user-defined load parameters.Load values can be reported for consumable attributes. Conversely, the Consumable flag can beset for load attributes. Load measures the availability of the resource. Consumable resource
Complex Resource Attributes
Chapter 3 • Configuring Complex Resource Attributes 75

management takes both the load and the internal bookkeeping into account, ensuring thatneither exceeds a given limit. For more information about load parameters, see “LoadParameters” on page 86.
To enable consumable resource management, you must define the total capacity of a resource.You can define resource capacity globally for the cluster, for specified hosts, and for specifiedqueues. These categories can supersede each other in the given order. Thus a host can restrictavailability of a global resource, and a queue can restrict host resources and global resources.
You define resource capacities by using the complex_values attribute in the queue and hostconfigurations. The complex_values definition of the global host specifies global clusterconsumable settings. For more information, see the host_conf(5) and queue_conf(5) manpages, as well as “Configuring Queues” on page 45 and “Configuring Hosts” on page 25.
To each consumable attribute in a complex_values list, a value is assigned that denotes themaximum available amount for that resource. The internal bookkeeping subtracts from thistotal the assumed resource consumption by all running jobs as expressed through the jobs'resource requests.
A parallel job consumes as many consumable resources as it consumes job slots. For example,the following command consumes a total of 800 Mbytes of memory:
qsub -l mem=100M -pe make=8
Memory usage is split across the queues and hosts on which the job runs. If four tasks run onhost A and four tasks run on host B, the job consumes 400 Mbytes on each host.
Setting Up Consumable ResourcesOnly numeric attributes can be configured as consumables. Numeric attributes are attributeswhose type is INT, DOUBLE, MEMORY, or TIME.
In the QMON Main Control window, click the Complex Configuration button. The ComplexConfiguration dialog box appears, as shown in Figure 3–1.
To enable the consumable management for an attribute, set the Consumable flag for theattribute in the complex configuration. For example, the following figure shows that theConsumable flag is set for the virtual_free memory resource.
Complex Resource Attributes
Sun N1 Grid Engine 6.1 Administration Guide • May 200776

Set up other consumable resources, guided by the examples detailed in the following sections:
■ “Example 1: Floating Software License Management” on page 78■ “Example 2: Space Sharing for Virtual Memory” on page 81■ “Example 3: Managing Available Disk Space” on page 83
Then, for each queue or host for which you want the grid engine software to do the requiredcapacity planning, you must define the capacity in a complex_values list. An example is shownin the following figure, where 1 Gbyte of virtual memory is defined as the capacity value of thecurrent host.
FIGURE 3–2 Complex Configuration Dialog Box: virtual_free
FIGURE 3–3 Add/Modify Exec Host: virtual_free
Complex Resource Attributes
Chapter 3 • Configuring Complex Resource Attributes 77

The virtual memory requirements of all jobs running concurrently in any queue on that host areaccumulated. The requirements are then subtracted from the capacity of 1 Gbyte to determineavailable virtual memory. If a job request for virtual_free exceeds the available amount, thejob is not dispatched to a queue on that host.
Note – Jobs can be forced to request a resource and thus to specify their assumed consumptionthrough the FORCED value of the Requestable parameter.
For consumable attributes that are not explicitly requested by the job, the administrator canpredefine a default value for resource consumption. Doing so is meaningful only if requestingthe attribute is not forced, as explained in the previous note. 200 Mbytes is set as the defaultvalue.
Examples of Setting Up Consumable ResourcesUse the following examples to guide you in setting up consumable resources for your site.
Example 1: Floating Software License Management
Suppose you are using the software package pam-crash in your cluster, and you have access to10 floating licenses. You can use pam-crash on every system as long as no more than 10invocations of the software are active. The goal is to configure the grid engine system in a waythat prevents scheduling pam-crash jobs while all 10 licenses are occupied by other runningpam-crash jobs.
With consumable resources, you can achieve this goal easily. First you must add the number ofavailable pam-crash licenses as a global consumable resource to the complex configuration.
Complex Resource Attributes
Sun N1 Grid Engine 6.1 Administration Guide • May 200778

The name of the consumable attribute is set to pam-crash. You can use pc as a shortcut in theqalter -l, qselect -l, qsh -l, qstat -l, or qsub -l commands instead.
The attribute type is defined to be an integer counter.
The Requestable flag is set to FORCED. This setting specifies that users must request how manypam-crash licenses that their job will occupy when the job is submitted.
The Consumable flag specifies that the attribute is a consumable resource.
The setting Default is irrelevant since Requestable is set to FORCED, which means that a requestvalue must be received for this attribute with any job.
Consumables receive their value from the global, host, or queue configurations through thecomplex_values lists. See the host_conf(5) and queue_conf(5) man pages, as well as“Configuring Queues” on page 45 and “Configuring Hosts” on page 25.
To activate resource planning for this attribute and for the cluster, the number of availablepam-crash licenses must be defined in the global host configuration.
Complex Resource Attributes
Chapter 3 • Configuring Complex Resource Attributes 79

The value for the attribute pam-crash is set to 10, corresponding to 10 floating licenses.
Note – The table Consumables/Fixed Attributes corresponds to the complex_values entrythat is described in the host configuration file format host_conf(5).
Assume that a user submits the following job:
% qsub -l pc=1 pam-crash.sh
The job starts only if fewer than 10 pam-crash licenses are currently occupied. The job can runanywhere in the cluster, however, and the job occupies one pam-crash license throughout itsrun time.
One of your hosts in the cluster might not be able to be included in the floating license. Forexample, you might not have pam-crash binaries for that host. In such a case, you can excludethe host from the pam-crash license management. You can exclude the host by setting to zerothe capacity that is related to that host for the consumable attribute pam-crash. Use theExecution Host tab of the Host Configuration dialog box.
Complex Resource Attributes
Sun N1 Grid Engine 6.1 Administration Guide • May 200780

Note – The pam-crash attribute is implicitly available to the execution host because the globalattributes of the complex are inherited by all execution hosts. By setting the capacity to zero, youcould also restrict the number of licenses that a host can manage to a nonzero value such as two.In this case, a maximum of two pam-crash jobs could coexist on that host.
Similarly, you might want to prevent a certain queue from running pam-crash jobs. Forexample, the queue might be an express queue with memory and CPU-time limits not suitablefor pam-crash. In this case, set the corresponding capacity to zero in the queue configuration, asshown in the following figure.
Note – The pam-crash attribute is implicitly available to the queue because the global attributesof the complex are inherited by all queues.
Example 2: Space Sharing for Virtual Memory
Administrators must often tune a system to avoid performance degradation caused by memoryoversubscription, and consequently swapping of a machine. The grid engine software cansupport you in this task through the Consumable Resources facility.
The standard load parameter virtual_free reports the available free virtual memory, that is,the combination of available swap space and the available physical memory. To avoid swapping,the use of swap space must be minimized. In an ideal case, all the memory required by allprocesses running on a host should fit into physical memory.
Complex Resource Attributes
Chapter 3 • Configuring Complex Resource Attributes 81

The grid engine software can guarantee the availability of required memory for all jobs startedthrough the grid engine system, given the following assumptions and configurations:
■ virtual_free is configured as a consumable resource, and its capacity on each host is set tothe available physical memory, or lower.
■ Jobs request their anticipated memory usage, and the value that jobs request is not exceededduring run time.
An example of a possible virtual_free resource definition is shown in Figure 3–2. Acorresponding execution host configuration for a host with 1 Gbyte of main memory is shownin Figure 3–3.
In the virtual_free resource definition example, the Requestable flag is set to YES instead of toFORCED, as in the example of a global configuration. This means that users need not indicate thememory requirements of their jobs. The value in the Default field is used if an explicit memoryrequest is missing. The value of 1 Gbyte as default request in this case means that a job without arequest is assumed to occupy all available physical memory.
Note – virtual_free is one of the standard load parameters of the grid engine system. Theadditional availability of recent memory statistics is taken into account automatically by thesystem in the virtual memory capacity planning. If the load report for free virtual memory fallsbelow the value obtained by grid engine software internal bookkeeping, the load value is used toavoid memory oversubscription. Differences in the reported load values and the internalbookkeeping can occur easily if jobs are started without using the grid engine system.
If you run different job classes with different memory requirements on one machine, you mightwant to partition the memory that these job classes use. This functionality is called spacesharing. You can accomplish this functionality by configuring a queue for each job class. Thenyou assign to each queue a portion of the total memory on that host.
In the example, the queue configuration attaches half of the total memory that is available tohost carc to the queue fast.q for the host carc. Hence the accumulated memory consumptionof all jobs that are running in queue fast.q on host carc cannot exceed 500 Mbytes. Jobs inother queues are not taken into account. Nonetheless, the total memory consumption of allrunning jobs on host carc cannot exceed 1 Gbyte.
Complex Resource Attributes
Sun N1 Grid Engine 6.1 Administration Guide • May 200782

Note – The attribute virtual_free is available to all queues through inheritance from thecomplex.
Users might submit jobs to a system configured similarly to the example in either of thefollowing forms:
% qsub -l vf=100M honest.sh
% qsub dont_care.sh
The job submitted by the first command can be started as soon as at least 100 Mbytes ofmemory are available. This amount is taken into account in the capacity planning for thevirtual_free consumable resource. The second job runs only if no other job is on the system,as the second job implicitly requests all the available memory. In addition, the second jobcannot run in queue fast.q because the job exceeds the queue's memory capacity.
Example 3: Managing Available Disk Space
Some applications need to manipulate huge data sets stored in files. Such applications thereforedepend on the availability of sufficient disk space throughout their run time. This requirementis similar to the space sharing of available memory, as discussed in the preceding example. Themain difference is that the grid engine system does not provide free disk space as one of itsstandard load parameters. Free disk space is not a standard load parameter because disks areusually partitioned into file systems in a site-specific way. Site-specific partitioning does notallow identifying the file system of interest automatically.
Complex Resource Attributes
Chapter 3 • Configuring Complex Resource Attributes 83

Nevertheless, available disk space can be managed efficiently by the system through theconsumables resources facility. You should use the host resource attribute h_fsize for thispurpose.
First, the attribute must be configured as a consumable resource, as shown in the followingfigure.
In the case of local host file systems, a reasonable capacity definition for the disk spaceconsumable can be put in the host configuration, as shown in the following figure.
Submission of jobs to a grid engine system that is configured as described here works similarlyto the previous examples:
% qsub -l hf=5G big-sort.sh
Complex Resource Attributes
Sun N1 Grid Engine 6.1 Administration Guide • May 200784

The reason the h_fsize attribute is recommended here is that h_fsize also is used as the hardfile size limit in the queue configuration. The file size limit restricts the ability of jobs to createfiles that are larger than what is specified during job submission. The qsub command in thisexample specifies a file size limit of 5 Gbytes. If the job does not request the attribute, thecorresponding value from the queue configuration or host configuration is used. If theRequestable flag for h_fsize is set to FORCED in the example, a request must be included in theqsub command. If the Requestable flag is not set, a request is optional in the qsub command.
By using the queue limit as the consumable resource, you control requests that the user specifiesinstead of the real resource consumption by the job scripts. Any violation of the limit issanctioned, which eventually aborts the job. The queue limit ensures that the resource requestson which the grid engine system internal capacity planning is based are reliable. See thequeue_conf(5) and the setrlimit(2) man pages for details.
Note – Some operating systems provide only per-process file size limits. In this case, a job mightcreate multiple files with a size up to the limit. On systems that support per-job file sizelimitation, the grid engine system uses this functionality with the h_fsize attribute. See thequeue_conf(5) man page for further details.
You might want applications that are not submitted to the grid engine system to occupy diskspace concurrently. If so, the internal bookkeeping might not be sufficient to preventapplication failure due to lack of disk space. To avoid this problem, you can periodically receivestatistics about disk space usage, which indicates total disk space consumption, including theone occurring outside the grid engine system.
The load sensor interface enables you to enhance the set of standard load parameters withsite-specific information, such as the available disk space on a file system. See “AddingSite-Specific Load Parameters” on page 87 for more information.
By adding an appropriate load sensor and reporting free disk space for h_fsize, you cancombine consumable resource management and resource availability statistics. The grid enginesystem compares job requirements for disk space with the available capacity and with the mostrecent reported load value. Available capacity is derived from the internal resource planning.Jobs get dispatched to a host only if both criteria are met.
Configuring Complex Resource Attributes From theCommand LineTo configure the complex from the command line, type the following command withappropriate options:
% qconf options
Complex Resource Attributes
Chapter 3 • Configuring Complex Resource Attributes 85

See the qconf(1) man page for a detailed definition of the qconf command format and the validsyntax.
The following options enable you to modify the grid engine system complex:
■ -mc – The -mc option opens an editor filled in with a template complex configuration or withan existing complex configuration for modification.
■ -Mc – The qconf -Mc option takes a complex configuration file as an argument.
The following command prints the current complex configuration to the standard outputstream in the file format defined in the complex(5) man page:
% qconf -sc
A sample output is shown in the following example.
EXAMPLE 3–1 qconf -sc Sample Output
#name shortcut type relop requestable consumable default urgency
#---------------------------------------------------------------------------
nastran na INT <= YES NO 0 0
pam-crash pc INT <= YES YES 1 0
permas pm INT <= FORCED YES 1 0
#---- # start a comment but comments are not saved across edits -----------
Load ParametersThis section explains the grid engine system's load parameters. Instructions are included forwriting your own load sensors.
Default Load ParametersBy default, sge_execd periodically reports several load parameters and their correspondingvalues to sge_qmaster. These values are stored in the sge_qmaster internal host object, whichis described in “About Hosts and Daemons” on page 20. However, the values are used internallyonly if a complex resource attribute with a corresponding name is defined. Such complexresource attributes contain the definition as to how load values are to be interpreted. See“Assigning Resource Attributes to Queues, Hosts, and the Global Cluster” on page 71 for moreinformation.
After the primary installation, a standard set of load parameters is reported. All attributesrequired for the standard load parameters are defined as host-related attributes. Subsequentreleases of N1 Grid Engine 6.1 software may provide extended sets of default load parameters,therefore the set of load parameters that is reported by default is documented in the filesge-root/doc/load_parameters.asc.
Load Parameters
Sun N1 Grid Engine 6.1 Administration Guide • May 200786

How load attributes are defined determines their accessibility. By defining load parameters asglobal resource attributes, you make them available for the entire cluster and for all hosts. Bydefining load parameters as host-related attributes, you provide the attributes for all hosts butnot for the global cluster.
Note – Do not define load attributes as queue attributes. Queue attributes would not be availableto any host nor to the cluster.
Adding Site-Specific Load ParametersThe set of default load parameters might not be adequate to completely describe the loadsituation in a cluster. This possibility is especially likely with respect to site-specific policies,applications, and configurations. Therefore grid engine software provides the means to extendthe set of load parameters. For this purpose, sge_execd offers an interface to feed loadparameters and the current load values into sge_execd. Afterwards, these parameters aretreated like the default load parameters. As for the default load parameters, correspondingattributes must be defined in the complex for the site-specific load parameters to becomeeffective. See “Default Load Parameters” on page 86 for more information.
Writing Your Own Load SensorsTo feed sge_execd with additional load information, you must supply a load sensor. The loadsensor can be a script or a binary executable. In either case, the load sensor's handling of thestandard input and standard output streams and its control flow must comply with thefollowing rules:
■ The load sensor must be written as an infinite loop that waits at a certain point for inputfrom STDIN.
■ If the string quit is read from STDIN, the load sensor is supposed to exit.■ As soon as an end-of-line is read from STDIN, a retrieval cycle for loading data is supposed to
start.
The load sensor then performs whatever operation is necessary to compute the desired loadfigures. At the end of the cycle, the load sensor writes the result to STDOUT.
Note – If load retrieval takes a long time, the load measurement process can be startedimmediately after sending a load report. When quit is received, the load values are thenavailable to be sent.
Load Parameters
Chapter 3 • Configuring Complex Resource Attributes 87

Load Sensor Rules FormatThe format for the load sensor rules is as follows:
■ A load value report starts with a line that contains nothing but the word begin.■ Individual load values are separated by newlines.■ Each load value consists of three parts separated by colons (:) and contains no blanks.■ The first part of a load value is either the name of the host for which load is reported or the
special name global.■ The second part of the load sensor is the symbolic name of the load value, as defined in the
complex. See the complex(5) man page for details. If a load value is reported for which noentry in the complex exists, the reported load value is not used.
■ The third part of the load sensor is the measured load value. A load value report ends with aline that contains the word end.
Example of a Load Sensor ScriptThe following example shows a load sensor. The load sensor is a Bourne shell script.
EXAMPLE 3–2 Load Sensor – Bourne Shell Script
#!/bin/sh
myhost=‘uname -n‘
while [ 1 ]; do
# wait for input
read input
result=$?
if [ $result != 0 ]; then
exit 1
fi
if [ $input = quit ]; then
exit 0
fi
#send users logged in
logins=‘who | cut -f1 -d" " | sort | uniq | wc -l | sed "s/^ *//"‘
echo begin
echo "$myhost:logins:$logins"
echo end
done
# we never get here
exit 0
Load Parameters
Sun N1 Grid Engine 6.1 Administration Guide • May 200788

Save this script to the file load.sh. Assign executable permission to the file with the chmodcommand. To test the script interactively from the command line, type load.sh and repeatedlypress the Return key.
As soon as the procedure works, you can install it for any execution host. To install theprocedure, configure the load sensor path as the load_sensor parameter for the clusterconfiguration, global configuration, or the host-specific configuration. See “Basic ClusterConfiguration” on page 41 or the sge_conf(5) man page for more information.
The corresponding QMON window might look like the following figure:
The reported load parameter logins is usable as soon as a corresponding attribute is added tothe complex. The required definition might look like the last table entry shown in the followingfigure.
Load Parameters
Chapter 3 • Configuring Complex Resource Attributes 89

Load Parameters
Sun N1 Grid Engine 6.1 Administration Guide • May 200790

Managing User Access
This chapter contains information about managing user accounts and other related accounts.Topics in this chapter include the following:
■ User access■ Projects and project access■ Path-aliasing■ Default requests
In addition to the background information, this chapter includes detailed instructions on howto accomplish the following tasks:
■ “Configuring Manager Accounts With QMON” on page 94■ “Configuring Manager Accounts From the Command Line” on page 94■ “Configuring Operator Accounts With QMON” on page 95■ “Configuring Operator Accounts From the Command Line” on page 95■ “Configuring User Access Lists With QMON” on page 96■ “Configuring User Access Lists From the Command Line” on page 98■ “Configuring User Objects With QMON” on page 99■ “Configuring User Objects From the Command Line” on page 101■ “Using Path Aliasing” on page 105■ “Defining Projects With QMON” on page 102■ “Defining Projects From the Command Line” on page 104
4C H A P T E R 4
91

Setting Up a UserYou need to perform the following tasks to set up a user for the grid engine system:
■ Assign required logins.
To submit jobs from host A for execution on host B, users must have identical accounts onboth hosts. The accounts must have identical user names. No login is required on themachine where sge_qmaster runs.
■ Set access permissions.
The grid engine software enables you to restrict user access to the entire cluster, to queues,and to parallel environments. See “Configuring Users” on page 99 for a detaileddescription.
In addition, you can grant users permission to suspend or enable certain queues. See“Configuring Owners Parameters” on page 61 for more information.
■ Declare a Grid Engine System user.
In order to add users to the share tree or to define functional or override policies for users,you must declare those users to the grid engine system. For more information, see“Configuring Policy-Based Resource Management With QMON” on page 125 and“Configuring User Objects With QMON” on page 99.
■ Set up project access.
If projects are used for the definition of share-based, functional, or override policies, youshould give the user access to one or more projects. Otherwise the user's jobs might end upin the lowest possible priority class, which would result in the jobs having access to very fewresources. See “Configuring Policy-Based Resource Management With QMON” on page 125for more information.
■ Set file access restrictions.
Users of the grid engine system must have read access to the directory sge-root/cell/common.
Before a job starts, the execution daemon creates a temporary working directory for the joband changes ownership of the directory to the job owner. The execution daemon runs asroot. The temporary directory is removed as soon as the job finishes. The temporaryworking directory is created under the path defined by the queue configuration parametertmpdir. See the queue_conf(5) man page for more information.
Make sure that temporary directories can be created under the tmpdir location. Thedirectories should be set to grid engine system user ownership. Users should be able to writeto the temporary directories.
■ Set up site dependencies.
Setting Up a User
Sun N1 Grid Engine 6.1 Administration Guide • May 200792

By definition, batch jobs do not have a terminal connection. Therefore UNIX commandslike stty in the command interpreter's startup resource file (for example, .cshrc for csh)can lead to errors. Check for the occurrence of stty in startup files. Avoid the commandsthat are described in Chapter 6, “Verifying the Installation,” in Sun N1 Grid Engine 6.1Installation Guide.
Because batch jobs are usually run off line, only two ways exist to notify a job owner abouterror events and the like. One way is to log the error messages to a file, the other way is tosend email.
Under some rare circumstances, for example, if the error log file can't be opened, email is theonly way to directly notify the user. Error messages are logged to the grid engine system logfile anyway, but usually the user would not look at the system log file. Therefore the emailsystem should be properly installed for grid engine users.
■ Set up grid engine system definition files. You can set up the following definition files forgrid engine users:■ qmon – Resource file for the grid engine system GUI. See “Customizing QMON” in Sun
N1 Grid Engine 6.1 User’s Guide.■ sge_aliases – Aliases for the path to the current working directory. See “Using Path
Aliasing” on page 105.■ sge_request – Default request definition file. See “Configuring Default Requests” on
page 107.
Configuring User AccessThe grid engine system has the following four categories of users:
■ Managers. Managers have full capabilities to manipulate the grid engine system. By default,the superusers of the master host and of any machine that hosts a queue instance havemanager privileges.
■ Operators. Operators can perform many of the same commands as managers, except thatoperators cannot add, delete, or modify queues.
■ Owners. Queue owners are restricted to suspending and resuming, or disabling andenabling, the queues that they own. These privileges are necessary for successful use ofqidle. Users are commonly declared to be owners of the queue instances that reside on theirdesktop workstations.
■ Users. Users have certain access permissions, as described in “Configuring Users” onpage 99, but users have no cluster or queue management capabilities.
The following sections describe each category in more detail.
Configuring User Access
Chapter 4 • Managing User Access 93
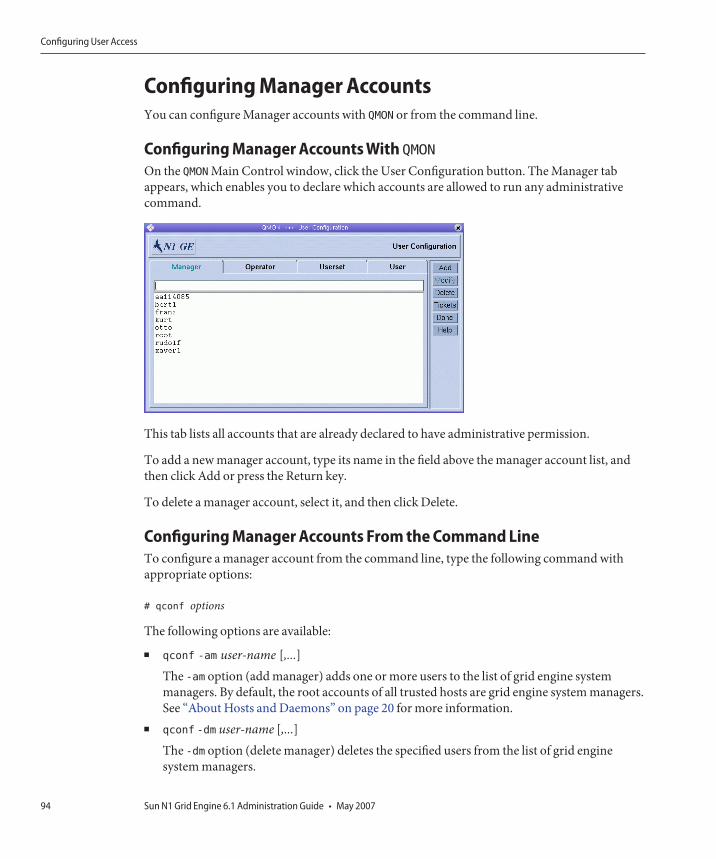
Configuring Manager AccountsYou can configure Manager accounts with QMON or from the command line.
Configuring Manager Accounts With QMON
On the QMON Main Control window, click the User Configuration button. The Manager tabappears, which enables you to declare which accounts are allowed to run any administrativecommand.
This tab lists all accounts that are already declared to have administrative permission.
To add a new manager account, type its name in the field above the manager account list, andthen click Add or press the Return key.
To delete a manager account, select it, and then click Delete.
Configuring Manager Accounts From the Command LineTo configure a manager account from the command line, type the following command withappropriate options:
# qconf options
The following options are available:
■ qconf -am user-name [,...]The -am option (add manager) adds one or more users to the list of grid engine systemmanagers. By default, the root accounts of all trusted hosts are grid engine system managers.See “About Hosts and Daemons” on page 20 for more information.
■ qconf -dm user-name [,...]The -dm option (delete manager) deletes the specified users from the list of grid enginesystem managers.
Configuring User Access
Sun N1 Grid Engine 6.1 Administration Guide • May 200794

■ qconf -sm
The -sm option (show managers) displays a list of all grid engine system managers.
Configuring Operator AccountsYou can configure operator accounts with QMON or from the command line.
Configuring Operator Accounts With QMON
On the QMON Main Control window, click the User Configuration button, and then click theOperator tab.
The Operator tab enables you to declare which accounts are allowed to have restrictedadministrative permission, unless the accounts are also declared to be manager accounts. See“Configuring Manager Accounts With QMON” on page 94.
This tab lists all accounts that are already declared to have operator permission.
To add a new operator account, type its name in the field above the operator account list, andthen click Add or press the Return key.
To delete an operator account, select it, and then click Delete.
Configuring Operator Accounts From the Command LineTo configure an operator account from the command line, type the following command withappropriate options:
# qconf options
Configuring User Access
Chapter 4 • Managing User Access 95

The following options are available:
■ qconf -ao user-name[,...]
The -ao option (add operator) adds one or more users to the list of grid engine systemoperators.
■ qconf -do user-name[,...]
The -do option (delete operator) deletes the specified users from the list of grid enginesystem operators.
■ qconf -so
The -so option (show operators) displays a list of all grid engine system operators.
Configuring User Access ListsAny user with a valid login ID on at least one submit host and one execution host can use thegrid engine system. However, grid engine system managers can prohibit access for certain usersto certain queues or to all queues. Furthermore, managers can restrict the use of facilities suchas specific parallel environments. See “Configuring Parallel Environments” on page 165 formore information.
In order to define access permissions, you must define user access lists, which are made up ofnamed sets of users. You use user names and UNIX group names to define user access lists. Theuser access lists are then used either to deny or to allow access to a specific resource in any of thefollowing configurations:
■ Cluster configuration – see “Basic Cluster Configuration” on page 41■ Queue configuration – see “Configuring Subordinate Queues” on page 58■ Configuring of parallel environment interfaces – see “Configuring Parallel Environments
With QMON” on page 166.
Configuring User Access Lists With QMON
On the QMON Main Control window, click the User Configuration button, and then click theUserset tab. The Userset tab appears.
Configuring User Access
Sun N1 Grid Engine 6.1 Administration Guide • May 200796

In the grid engine system, a userset can be either an Access List or a Department, or both. Thetwo check boxes below the Usersets list indicate the type of the selected userset. This sectiondescribes access lists. Departments are explained in “Defining Usersets As Projects andDepartments” on page 98.
The Usersets lists displays all available access lists. To display the contents of an access list, selectit. The contents are displayed in the Users/Groups list.
Note – The names of groups are prefixed with an @ sign.
To add a new userset, click Add.
To modify an existing userset, select it, and then click Modify.
To delete a userset, select it, and then click Delete.
When you click Add or Modify, an Access List Definition dialog box appears.
To add a new access list definition, type the name of the access list in the Userset Name field. Ifyou are modifying an existing access list, its name is displayed in the Userset Name field.
FIGURE 4–1 Userset Tab
FIGURE 4–2 Access List Definition Dialog Box
Configuring User Access
Chapter 4 • Managing User Access 97

To add a new user or group to the access list, type a user or group name in the User/Group field.Be sure to prefix group names with an @ sign.
The Users/Groups list displays all currently defined users and groups.
To delete a user or group from the Users/Groups list, select it, and then click the trash icon.
To save your changes and close the dialog box, click OK. Click Cancel to close the dialog boxwithout saving changes.
Configuring User Access Lists From the Command LineTo configure user access lists from the command line, type the following command withappropriate options.
# qconf options
The following options are available:■ qconf -au user-name[,...]access-list-name[,...]
The -au option (add user) adds one or more users to the specified access lists.■ qconf -Au filename
The -Au option (add user access list from file) uses a configuration file, filename, to add anaccess list.
■ qconf -du user-name[,...] access-list-name [,...]The -du option (delete user) deletes one or more users from the specified access lists.
■ qconf -dul access-list-name[,...]The -dul option (delete user list) completely removes userset lists.
■ qconf -mu access-list-nameThe -mu option (modify user access list) modifies the specified access lists.
■ qconf -Mu filenameThe -Mu option (modify user access list from file) uses a configuration file, filename, tomodify the specified access lists.
■ qconf -su access-list-name[,...]The -su option (show user access list) displays the specified access lists.
■ qconf -sul
The -sul option (show user access lists) displays all access lists currently defined.
Defining Usersets As Projects and DepartmentsUsersets are also used to define grid engine system projects and departments. For details aboutprojects, see “Defining Projects” on page 102.
Configuring User Access
Sun N1 Grid Engine 6.1 Administration Guide • May 200798

Departments are used for the configuration of the functional policy and the override policy.Departments differ from access lists in that a user can be a member of only one department,whereas one user can be included in multiple access lists. For more details, see “Configuring theFunctional Policy” on page 144 and “Configuring the Override Policy” on page 148.
A Userset is identified as a department by the Department flag, which is shown in Figure 4–1and Figure 4–2. A Userset can be defined as both a department and an access list at the sametime. However, the restriction of only a single appearance by any user in any departmentapplies.
Configuring UsersYou must declare user names before you define the share-based, functional, or override policiesfor users. See “Configuring Policy-Based Resource Management With QMON” on page 125.
If you do not want to explicitly declare user names before you define policies, the grid enginesystem can automatically create users for you, based on predefined default values. Theautomatic creation of users can significantly reduce the administrative burden for sites withmany users.
To have the system create users automatically, set the Enforce User parameter on the ClusterSettings dialog box to Auto. To set default values for automatically created users, specify valuesfor the following Automatic User Defaults on the Cluster Settings dialog box:
■ Override Tickets■ Functional Shares■ Default Project■ Delete Time
For more information about the cluster configuration, see “Basic Cluster Configuration” onpage 41.
Configuring User Objects With QMON
On the QMON Main Control window, click the User Configuration button, and then click theUser tab. The User tab looks like the following figure:
Configuring User Access
Chapter 4 • Managing User Access 99

To add a new user, type a user name in the field above the User list, and then click Add or pressthe Return key.
To delete a user, select the user name in the User list, and then click Delete.
The Delete Time column is read-only. The column indicates the time at which automaticallycreated users are to be deleted from the grid engine system. Zero indicates that the user willnever be deleted.
You can assign a default project to each user. The default project is attached to each job thatusers submit, unless those users request another project to which they have access. For detailsabout projects, see “Defining Projects” on page 102.
To assign a default project, select a user, and then click the Default Project column heading. AProject Selection dialog box appears.
Select a project for the highlighted user entry.
Click OK to assign the default project and close the dialog box. Click Cancel to close the dialogbox without assigning the default project.
Configuring User Access
Sun N1 Grid Engine 6.1 Administration Guide • May 2007100

Configuring User Objects From the Command LineTo configure user objects from the command line, type the following command withappropriate options:
# qconf options
The following options are available:
■ qconf -auser
The -auser option (add user) opens a template user configuration in an editor. See theuser(5) man page. The editor is either the default vi editor or the editor specified by theEDITOR environment variable. After you save your changes and exit the editor, the changesare registered with sge_qmaster.
■ qconf -Auser filenameThe -Auser option (add user from file) parses the specified file and adds the userconfiguration.The file must have the format of the user configuration template.
■ qconf -duser user-name[,...]The -duser option (delete user) deletes one or more user objects.
■ qconf -muser user-nameThe -muser option (modify user) enables you to modify an existing user entry. The optionloads the user configuration in an editor. The editor is either the default vi editor or theeditor specified by the EDITOR environment variable. After you save your changes and exitthe editor, the changes are registered with sge_qmaster.
■ qconf -Muser filenameThe -Muser option (modify user from file) parses the specified file and modifies the userconfiguration.The file must have the format of the user configuration template.
■ qconf -suser user-nameThe -suser option (show user) displays the configuration of the specified user.
■ qconf -suserl
The -suserl option (show user list) displays a list of all currently defined users.
Configuring User Access
Chapter 4 • Managing User Access 101

Defining ProjectsProjects provide a means to organize joint computational tasks from multiple users. A projectalso defines resource usage policies for all jobs that belong to such a project.
Projects are used in three scheduling policy areas:
■ Share-based, when shares are assigned to projects – see “Configuring the Share-BasedPolicy” on page 132
■ Functional, when projects receive a percentage of the functional tickets – see “Configuringthe Functional Policy” on page 144
■ Override, when an administrator grants override tickets to a project – see “Configuring theOverride Policy” on page 148
Projects must be declared before they can be used in any of the three policies.
Grid engine system managers define projects by giving them a name and some attributes. Gridengine users can attach a job to a project when they submit the job. Attachment of a job to aproject influences the job's dispatching, depending on the project's share of share-based,functional, or override tickets.
Defining Projects With QMON
Grid engine system managers can define and update definitions of projects by using the ProjectConfiguration dialog box.
To define a project, on the QMON Main Control window, click the Project Configuration button.The Project Configuration dialog box appears.
The currently defined projects are displayed in the Projects list.
The project definition of a selected project is displayed under Configuration.
To delete a project immediately, select it, and then click Delete.
FIGURE 4–3 Project Configuration Dialog Box
Defining Projects
Sun N1 Grid Engine 6.1 Administration Guide • May 2007102

To add a new project, click Add. To modify a project, select it, and then click Modify. ClickingAdd or Modify opens the Add/Modify Project dialog box.
The name of the selected project is displayed in the Name field. The project defines the accesslists of users who are permitted access or who are denied access to the project.
Users who are included in any of the access lists under User Lists have permission to access theproject. Users who are included in any of the access lists under Xuser Lists are denied access tothe project. See “Configuring Users” on page 99 for more information.
If both lists are empty, all users can access the project. Users who are included in different accesslists that are attached to both the User Lists and the Xuser Lists are denied access to the project.
You can add access lists to User Lists or Xuser Lists, and you can remove access lists from eitherlist. To do so, click the button at the right of the User Lists or the Xuser Lists.
The Select Access Lists dialog box appears.
The Select Access Lists dialog box displays all currently defined access lists under AvailableAccess Lists. The dialog box displays the attached lists under Chosen Access Lists. You canselect access lists in either list. You can move access lists from one list to the other by using thered arrows.
Click OK to save your changes and close the dialog box. Click Cancel to close the dialog boxwithout saving your changes.
Defining Projects
Chapter 4 • Managing User Access 103

Defining Projects From the Command LineTo define projects from the command line, type the following command with appropriateoptions:
# qconf options
The following options are available:
■ qconf -aprj
The -aprj option (add project) opens a template project configuration in an editor. See theproject(5) man page. The editor is either the default vi editor or the editor specified by theEDITOR environment variable. After you save your changes and exit the editor, the changesare registered with sge_qmaster.
■ qconf -Aprj filenameThe -Aprj option (add project from file) parses the specified file and adds the new projectconfiguration. The file must have the format of the project configuration template.
■ qconf -dprj project-name[,...]The -dprj option (delete project) deletes one or more projects.
■ qconf -mprj project-nameThe -mprj option (modify project) enables you to modify an existing user entry. The optionloads the project configuration in an editor. The editor is either the default vi editor or theeditor specified by the EDITOR environment variable. After you save your changes and exitthe editor, the changes are registered with sge_qmaster.
■ qconf -Mprj filenameThe -Mprj option (modify project from file) parses the specified file and modifies theexisting project configuration. The file must have the format of the project configurationtemplate.
■ qconf -sprj project-nameThe -sprj option (show project) displays the configuration of a particular project.
■ qconf -sprjl
The -sprjl option (show project list) displays a list of all currently defined projects.
Defining Projects
Sun N1 Grid Engine 6.1 Administration Guide • May 2007104

Using Path AliasingIn Solaris and in other networked UNIX environments, users often have the same homedirectory, or part of it, on different machines. For example, the directory might be madeaccessible across NFS. However, sometimes the home directory path is not exactly the same onall machines.
For example, consider user home directories that are available across NFS and automounter. Auser might have a home directory /home/foo on the NFS server. This home directory isaccessible under this path on all properly installed NFS clients that are running automounter.However, /home/foo on a client is just a symbolic link to /tmp_mnt/home/foo./tmp_mnt/home/foo is the actual location on the NFS server from where automounterphysically mounts the directory.
A user on a client host might use the qsub -cwd command to submit a job from somewherewithin the home directory tree. The -cwd flag requires the job to be run in the current workingdirectory. However, if the execution host is the NFS server, the grid engine system might not beable to locate the current working directory on that host. The reason is that the current workingdirectory on the submit host is /tmp_mnt/home/foo, which is the physical location on thesubmit host. This path is passed to the execution host. However, if the execution host is the NFSserver, the path cannot be resolved, because its physical home directory path is /home/foo, not/tmp_mnt/home/foo.
Other occasions that can cause similar problems are the following:
■ Fixed NFS mounts with different mount point paths on different machines. An example isthe mounting of home directories under /usr/people on one host and under /usr/userson another host.
■ Symbolic links from outside into a network-available file system
To prevent such problems, grid engine software enables both the administrator and the user toconfigure a path aliasing file. The locations of two such files are as follows:
■ sge-root/cell/common/sge_aliases — A global cluster path-aliasing file for the cluster■ $HOME/.sge_aliases — A user-specific path-aliasing file
Note – Only an administrator should modify the global file.
Using Path Aliasing
Chapter 4 • Managing User Access 105

Format of Path-Aliasing FilesBoth path-aliasing files share the same format:
■ Blank lines and lines that begin with a # sign are skipped.■ Each line, other than a blank line or a line preceded by #, must contain four strings separated
by any number of blanks or tabs.The first string specifies a source path, the second a submit host, the third an execution host,and the fourth the source path replacement.
■ Both the submit host and the execution host strings can be an * (asterisk), which matchesany host.
How Path-Aliasing Files Are InterpretedThe files are interpreted as follows:
1. After qsub retrieves the physical current working directory path, the global path-aliasing fileis read, if present. The user path-aliasing file is read afterwards, as if the user path-aliasingfile were appended to the global file.
2. Lines not to be skipped are read from the top of the file, one by one. The translationsspecified by those lines are stored, if necessary. A translation is stored only if both of thefollowing conditions are true:■ The submit host string matches the host on which the qsub command is run.■ The source path forms the initial part either of the current working directory or of the
source path replacements already stored.3. After both files are read, the stored path-aliasing information is passed to the execution host
along with the submitted job.4. On the execution host, the path-aliasing information is evaluated. The source path
replacement replaces the leading part of the current working directory if the execution hoststring matches the execution host. In this case, the current working directory string ischanged. To be applied, subsequent path aliases must match the replaced working directorypath.
Example 4–1 is an example how the NFS automounter problem described earlier can beresolved with an aliases file entry.
EXAMPLE 4–1 Example of Path-Aliasing File
# cluster global path aliases file
# src-path subm-host exec-host dest-path
/tmp_mnt/ * * /
Using Path Aliasing
Sun N1 Grid Engine 6.1 Administration Guide • May 2007106

Configuring Default RequestsBatch jobs are normally assigned to queues with respect to a request profile. The user defines arequest profile for a particular job. The user assembles a set of requests that must be met tosuccessfully run the job. The scheduler considers only those queues that satisfy the set ofrequests for this job.
If the user does not specify any requests for a job, the scheduler considers any queue to whichthe user has access without further restrictions. However, grid engine software enables you toconfigure default requests that define resource requirements for jobs even when the user doesnot specify resource requirements explicitly.
You can configure default requests globally for all users of a cluster, as well as privately for anyuser. The default request configuration is stored in default request files. The global request file islocated under sge-root/cell/common/sge_request. The user-specific request file can be locatedeither in the user's home directory or in the current working directory. The working directory iswhere the qsub command is run. The user-specific request file is called .sge_request.
If these files are present, they are evaluated for every job. The order of evaluation is as follows:
1. The global default request file2. The user default request file in the user's home directory3. The user default request file in the current working directory
Note – The requests specified in the job script or supplied with the qsub command takeprecedence over the requests in the default request files. See Chapter 3, “Submitting Jobs,” inSun N1 Grid Engine 6.1 User’s Guide for details about how to request resources for jobsexplicitly.
You can prevent the grid engine system from using the default request files by using the qsub-clear command, which discards any previous requirement specifications.
Format of Default Request FilesThe format of both the local and the global default request files is as follows:
■ Default request files can contain any number of lines. Blank lines and lines that begin with a# sign are skipped.
■ Each line not to be skipped can contain any qsub option, as described in the qsub(1) manpage. More than one option per line is allowed. The batch script file and the argumentoptions to the batch script are not considered to be qsub options. Therefore these items arenot allowed in a default request file.
■ The qsub -clear command discards any previous requirement specifications in thecurrently evaluated request file or in request files processed earlier.
Configuring Default Requests
Chapter 4 • Managing User Access 107

Suppose a user's local default request file is configured the same as test.sh, the script inExample 4–2.
EXAMPLE 4–2 Example of Default Request File
# Local Default Request File
# exec job on a sun4 queue offering 5h cpu
-l arch=solaris64,s_cpu=5:0:0
# exec job in current working dir
-cwd
To run the script, the user types the following command:
% qsub test.sh
The effect of running the test.sh script is the same as if the user specified all qsub optionsdirectly in the command line, as follows:
% qsub -l arch=solaris64,s_cpu=5:0:0 -cwd test.sh
Note – Like batch jobs submitted using qsub, interactive jobs submitted using qsh considerdefault request files also. Interactive or batch jobs submitted using QMON also take these requestfiles into account.
Configuring Default Requests
Sun N1 Grid Engine 6.1 Administration Guide • May 2007108

Managing Policies and the Scheduler
This chapter contains information about grid engine system policies. Topics in this chapterinclude the following:
■ Scheduling■ Policies
In addition to the background information, this chapter includes detailed instructions on howto accomplish the following tasks:
■ “Changing the Scheduler Configuration With QMON” on page 121■ “Configuring Policy-Based Resource Management With QMON” on page 125■ “Configuring the Share-Tree Policy With QMON” on page 135■ “Configuring the Share-Based Policy From the Command Line” on page 140■ “Configuring the Functional Share Policy With QMON” on page 144■ “Configuring the Functional Share Policy From the Command Line” on page 147■ “Configuring the Override Policy With QMON” on page 149■ “Configuring the Override Policy From the Command Line” on page 150
Administering the SchedulerThis section describes how the grid engine system schedules jobs for execution. The sectiondescribes different types of scheduling strategies and explains how to configure the scheduler.
5C H A P T E R 5
109

About SchedulingThe grid engine system includes the following job-scheduling activities:
■ Predispatching decisions. Activities such as eliminating queues because they are full oroverloaded, spooling jobs that are currently not eligible for execution, and reservingresources for higher-priority jobs
■ Dispatching. Deciding a job's importance with respect to other pending jobs and runningjobs, sensing the load on all machines in the cluster, and sending the job to a queue on amachine selected according to configured selection criteria
■ Postdispatch monitoring. Adjusting a job's relative importance as it gets resources and asother jobs with their own relative importance enter or leave the system
The grid engine software schedules jobs across a heterogeneous cluster of computers, based onthe following criteria:
■ The cluster's current load■ The jobs' relative importance■ The hosts' relative performance■ The jobs' resource requirements, for example, CPU, memory, and I/O bandwidth
Decisions about scheduling are based on the strategy for the site and on the instantaneous loadcharacteristics of each computer in the cluster. A site's scheduling strategy is expressed throughthe grid engine system's configuration parameters. Load characteristics are ascertained bycollecting performance data as the system runs.
Scheduling StrategiesThe administrator can set up strategies with respect to the following scheduling tasks:
■ Dynamic resource management. The grid engine system dynamically controls and adjuststhe resource entitlements that are allocated to running jobs. In other words, the systemmodifies their CPU share.
■ Queue sorting. The software ranks the queues in the cluster according to the order in whichthe queues should be filled up.
■ Job sorting. Job sorting determines the order in which the grid engine system attempts toschedule jobs.
■ Resource reservation and backfilling. Resource reservation reserves resources for jobs,blocking their use by jobs of lower priority. Backfilling enables lower-priority jobs to useblocked resources when using those resources does not interfere with the reservation.
Administering the Scheduler
Sun N1 Grid Engine 6.1 Administration Guide • May 2007110

Dynamic Resource ManagementThe grid engine software uses a weighted combination of the following three ticket-basedpolicies to implement automated job scheduling strategies:
■ Share-based■ Functional (sometimes called Priority)■ Override
You can set up the grid engine system to routinely use either a share-based policy, a functionalpolicy, or both. You can combine these policies in any combination. For example, you couldgive zero weight to one policy and use only the second policy. Or you could give both policiesequal weight.
Along with routine policies, administrators can also override share-based and functionalscheduling temporarily or, for certain purposes such as express queues, permanently. You canapply an override to one job or to all jobs associated with a user, a department, a project, or a jobclass (that is, a queue).
In addition to the three policies for mediating among all jobs, the grid engine system sometimeslets users set priorities among the jobs they own. For example, a user might say that jobs oneand two are equally important, but that job three is more important than either job one or jobtwo. Users can set their own job priorities if the combination of policies includes theshare-based policy, the functional policy, or both. Also, functional tickets must be granted tojobs.
TicketsThe share-based, functional, and override scheduling policies are implemented with tickets.Each policy has a pool of tickets. A policy allocates tickets to jobs as the jobs enter themultimachine grid engine system. Each routine policy that is in force allocates some tickets toeach new job. The policy might also reallocate tickets to running jobs at each schedulinginterval.
Tickets weight the three policies. For example, if no tickets are allocated to the functional policy,that policy is not used. If the functional ticket pool and the share-based ticket pool have an equalnumber of tickets, both policies have equal weight in determining a job's importance.
Tickets are allocated to the routine policies at system configuration by grid engine systemmanagers. Managers and operators can change ticket allocations at any time with immediateeffect. Additional tickets are injected into the system temporarily to indicate an override.Policies are combined by assignment of tickets. When tickets are allocated to multiple policies, ajob gets a portion of each policy's tickets, which indicates the job's importance in each policy inforce.
The grid engine system grants tickets to jobs that are entering the system to indicate theirimportance under each policy in force. At each scheduling interval, each running job can gaintickets, lose tickets, or keep the same number of tickets. For example, a job might gain tickets
Administering the Scheduler
Chapter 5 • Managing Policies and the Scheduler 111

from an override. A job might lose tickets because it is getting more than its fair share ofresources. The number of tickets that a job holds represent the resource share that the gridengine system tries to grant that job during each scheduling interval.
You configure a site's dynamic resource management strategy during installation. First, youallocate tickets to the share-based policy and to the functional policy. You then define the sharetree and the functional shares. The share-based ticket allocation and the functional ticketallocation can change automatically at any time. The administrator manually assigns orremoves tickets.
Queue SortingThe following means are provided to determine the order in which the grid engine systemattempts to fill up queues:■ Load reporting. Administrators can select which load parameters are used to compare the
load status of hosts and their queue instances. The wide range of standard load parametersthat are available, and an interface for extending this set with site-specific load sensors, aredescribed in “Load Parameters” on page 86.
■ Load scaling. Load reports from different hosts can be normalized to reflect a comparablesituation. See “Configuring Execution Hosts With QMON” on page 25.
■ Load adjustment. The grid engine software can be configured to automatically correct thelast reported load as jobs are dispatched to hosts. The corrected load represents the expectedincrease in the load situation caused by recently started jobs. This artificial increase of loadcan be automatically reduced as the load impact of these jobs takes effect.
■ Sequence number. Queues can be sorted following a strict sequence.
Job SortingBefore the grid engine system starts to dispatch jobs, the jobs are brought into priority order,highest priority first. The system then attempts to find suitable resources for the jobs in prioritysequence.
Without any administrator influence, the order is first-in-first-out (FIFO). The administratorhas the following means to control the job order:
■ Ticket-based job priority. Jobs are always treated according to their relative importance asdefined by the number of tickets that the jobs have. Pending jobs are sorted in ticket order.Any change that the administrator applies to the ticket policy also changes the sorting order.
■ Urgency-based job priority. Jobs can have an urgency value that determines their relativeimportance. Pending jobs are sorted according to their urgency value. Any change appliedto the urgency policy also changes the sorting order.
■ POSIX priority. You can use the –p option to the qsub command to implement site-specificpriority policies. The –p option specifies a range of priorities from –1023 to 1024. The higherthe number, the higher the priority. The default priority for jobs is zero.
Administering the Scheduler
Sun N1 Grid Engine 6.1 Administration Guide • May 2007112

■ Maximum number of user or user group jobs. You can restrict the maximum number ofjobs that a user or a UNIX user group can run concurrently. This restriction influences thesorting order of the pending job list, because the jobs of users who have not exceeded theirlimit are given preference.
For each priority type, a weighting factor can be specified. This weighting factor determines thedegree to which each type of priority affects overall job priority. To make it easier to control therange of values for each priority type, normalized values are used instead of the raw ticketvalues, urgency values, and POSIX priority values.
The following formula expresses how a job's priority values are determined:
job_priority = weight_urgency * normalized_urgency_value +
weight_ticket * normalized_ticket_value +
weight_priority * normalized_POSIX_priority_value
You can use the qstat command to monitor job priorities:■ Use qstat –pri to monitor job priorities overall, including POSIX priority.■ Use qstat –ext to monitor job priorities based on the ticket policy.■ Use qstat –urg to monitor job priorities based on the urgency policy.■ Use qstat –prito diagnose job priority issues when urgency policy, ticket based policies
and -p <priority> are used concurrently■ Use qstat –explainto diagnose various queue instance based error conditions.
About the Urgency PolicyThe urgency policy defines an urgency value for each job. The urgency value is derived from thesum of three contributions:■ Resource requirement contribution■ Waiting time contribution■ Deadline contribution
The resource requirement contribution is derived from the sum of all hard resource requests,one addend for each request.
If the resource request is of the type numeric, the resource request addend is the product of thefollowing three elements:■ The resource's urgency value as defined in the complex. For more information, see
“Configuring Complex Resource Attributes With QMON” on page 70.■ The assumed slot allocation of the job.■ The per slot request specified by the qsub –l command.
If the resource request is of the type string, the resource request addend is the resource's urgencyvalue as defined in the complex.
Administering the Scheduler
Chapter 5 • Managing Policies and the Scheduler 113

The waiting time contribution is the product of the job's waiting time, in seconds, and thewaiting-weight value specified in the Policy Configuration dialog box.
The deadline contribution is zero for jobs without a deadline. For jobs with a deadline, thedeadline contribution is the weight-deadline value, which is defined in the Policy Configurationdialog box, divided by the free time, in seconds, until the deadline initiation time.
For information about configuring the urgency policy, see “Configuring the Urgency Policy” onpage 127.
Resource Reservation and BackfillingResource reservation enables you to reserve system resources for specified pending jobs. Whenyou reserve resources for a job, those resources are blocked from being used by jobs with lowerpriority.
Jobs can reserve resources depending on criteria such as resource requirements, job priority,waiting time, resource sharing entitlements, and so forth. The scheduler enforces reservationsin such a way that jobs with the highest priority get the earliest possible resource assignment.This avoids such well-known problems as “job starvation”.
You can use resource reservation to guarantee that resources are dedicated to jobs injob-priority order.
Consider the following example. Job A is a large pending job, possibly parallel, that requires alarge amount of a particular resource. A stream of smaller jobs B(i) require a smaller amount ofthe same resource. Without resource reservation, a resource assignment for job A cannot beguaranteed, assuming that the stream of B(i) jobs does not stop. The resource cannot beguaranteed even though job A has a higher priority than the B(i) jobs.
With resource reservation, job A gets a reservation that blocks the lower priority jobs B(i).Resources are guaranteed to be available for job A as soon as possible.
Backfilling enables a lower-priority job to use resources that are blocked due to a resourcereservation. Backfilling work only if there is a runnable job whose prospective run time is smallenough to allow the blocked resource to be used without interfering with the originalreservation.
In the example described earlier, a job C, of very short duration, could use backfilling to startbefore job A.
Because resource reservation causes the scheduler to look ahead, using resource reservationaffects system performance. In a small cluster, the effect on performance is negligible whenthere are only a few pending jobs. In larger clusters, however, and in clusters with manypending jobs, the effect on performance might be significant.
Administering the Scheduler
Sun N1 Grid Engine 6.1 Administration Guide • May 2007114

To offset this potential performance degradation, you can limit the overall number of resourcereservations that can be made during a scheduling interval. You can limit resource reservationin two ways:■ To limit the absolute number of reservations that can be made during a scheduling interval,
set the Maximum Reservation parameter on the Scheduler Configuration dialog box. Forexample, if you set Maximum Reservation to 20, no more than 20 reservations can be madewithin an interval.
■ To limit reservation scheduling to only those jobs that are important, use the –R y option ofthe qsub command. In the example described earlier, there is no need to schedule B(i) jobreservations just for the sake of guaranteeing the resource reservation for job A. Job A is theonly job that you need to submit with the –R y option.
You can configure the scheduler to monitor how it is influenced by resource reservation. Whenyou monitor the scheduler, information about each scheduling run is recorded in the filesge-root/cell/common/schedule.
The following example shows what schedule monitoring does. Assume that the followingsequence of jobs is submitted to a cluster where the global license consumable resource islimited to 5 licenses:
qsub -N L4_RR -R y -l h_rt=30,license=4 -p 100 $SGE_ROOT/examples/jobs/sleeper.sh 20
qsub -N L5_RR -R y -l h_rt-30,license=5 $SGE_ROOT/examples/jobs/sleeper.sh 20
qsub -N L1_RR -R y -l h_rt=31,license=1 $SGE_ROOT/examples/jobs/sleeper.sh 20
Assume that the default priority settings in the scheduler configuration are being used:
weight_priority 1.000000
weight_urgency 0.100000
weight_ticket 0.010000
The –p 100 priority of job L4_RR supersedes the license-based urgency, which results in thefollowing prioritization:
job-ID prior name
---------------------
3127 1.08000 L4_RR
3128 0.10500 L5_RR
3129 0.00500 L1_RR
In this case, traces of these jobs can be found in the schedule file for 6 schedule intervals:
::::::::
3127:1:STARTING:1077903416:30:G:global:license:4.000000
3127:1:STARTING:1077903416:30:Q:all.q@carc:slots:1.000000
3128:1:RESERVING:1077903446:30:G:global:license:5.000000
3128:1:RESERVING:1077903446:30:Q:all.q@bilbur:slots:1.000000
Administering the Scheduler
Chapter 5 • Managing Policies and the Scheduler 115

3129:1:RESERVING:1077903476:31:G:global:license:1.000000
3129:1:RESERVING:1077903476:31:Q:all.q@es-ergb01-01:slots:1.000000
::::::::
3127:1:RUNNING:1077903416:30:G:global:license:4.000000
3127:1:RUNNING:1077903416:30:Q:all.q@carc:slots:1.000000
3128:1:RESERVING:1077903446:30:G:global:license:5.000000
3128:1:RESERVING:1077903446:30:Q:all.q@es-ergb01-01:slots:1.000000
3129:1:RESERVING:1077903476:31:G:global:license:1.000000
3129:1:RESERVING:1077903476:31:Q:all.q@es-ergb01-01:slots:1.000000
::::::::
3128:1:STARTING:1077903448:30:G:global:license:5.000000
3128:1:STARTING:1077903448:30:Q:all.q@carc:slots:1.000000
3129:1:RESERVING:1077903478:31:G:global:license:1.000000
3129:1:RESERVING:1077903478:31:Q:all.q@bilbur:slots:1.000000
::::::::
3128:1:RUNNING:1077903448:30:G:global:license:5.000000
3128:1:RUNNING:1077903448:30:Q:all.q@carc:slots:1.000000
3129:1:RESERVING:1077903478:31:G:global:license:1.000000
3129:1:RESERVING:1077903478:31:Q:all.q@es-ergb01-01:slots:1.000000
::::::::
3129:1:STARTING:1077903480:31:G:global:license:1.000000
3129:1:STARTING:1077903480:31:Q:all.q@carc:slots:1.000000
::::::::
3129:1:RUNNING:1077903480:31:G:global:license:1.000000
3129:1:RUNNING:1077903480:31:Q:all.q@carc:slots:1.000000
Each section shows, for a schedule interval, all resource usage that was taken into account.RUNNING entries show usage of jobs that were already running at the start of the interval.STARTING entries show the immediate uses that were decided within the interval. RESERVINGentries show uses that are planned for the future, that is, reservations.
The format of the schedule file is as follows:
jobID The job ID
taskID The array task ID, or 1 in the case of nonarray jobs
state Can be RUNNING, SUSPENDED, MIGRATING, STARTING, RESERVING
start-time Start time in seconds after 1.1.1070
duration Assumed job duration in seconds
level-char Can be P (for parallel environment), G (for global), H (for host), or Q (forqueue)
object-name The name of the parallel environment, host, or queue
resource-name The name of the consumable resource
usage The resource usage incurred by the job
Administering the Scheduler
Sun N1 Grid Engine 6.1 Administration Guide • May 2007116

The line :::::::: marks the beginning of a new schedule interval.
Note – The schedule file is not truncated. Be sure to turn monitoring off if you do not have anautomated procedure that is set up to truncate the file.
What Happens in a Scheduler IntervalThe Scheduler schedules work in intervals. Between scheduling actions, the grid engine systemkeeps information about significant events such as the following:
■ Job submission■ Job completion■ Job cancellation■ An update of the cluster configuration■ Registration of a new machine in the cluster
When scheduling occurs, the scheduler first does the following:
■ Takes into account all significant events■ Sorts jobs and queues according to the administrator's specifications■ Takes into account all the jobs' resource requirements■ Reserves resources for jobs in a forward-looking schedule
Then the grid engine system does the following tasks, as needed:
■ Dispatches new jobs■ Suspends running jobs■ Increases or decreases the resources allocated to running jobs■ Maintains the status quo
If share-based scheduling is used, the calculation takes into account the usage that has alreadyoccurred for that user or project.
If scheduling is not at least in part share-based, the calculation ranks all the jobs running andwaiting to run. The calculation then takes the most important job until the resources in thecluster (CPU, memory, and I/O bandwidth) are used as fully as possible.
Scheduler MonitoringIf the reasons why a job does not get started are unclear to you, run the qalter -w v commandfor the job. The grid engine software assumes an empty cluster and checks whether any queuethat is suitable for the job is available.
Further information can be obtained by running the qstat -j job-id command. Thiscommand prints a summary of the job's request profile. The summary also includes the reasons
Administering the Scheduler
Chapter 5 • Managing Policies and the Scheduler 117

why the job was not scheduled in the last scheduling run. Running the qstat -j commandwithout a job ID summarizes the reasons for all jobs not being scheduled in the last schedulinginterval.
Note – Collection of job scheduling information must be switched on in the schedulerconfiguration sched_conf(5). Refer to the schedd_job_info parameter description in thesched_conf(5) man page, or to “Changing the Scheduler Configuration With QMON” onpage 121.
To retrieve even more detail about the decisions of the scheduler sge_schedd, use the -tsmoption of the qconf command. This command forces sge_schedd to write trace output to thefile.
Configuring the SchedulerRefer to “Configuring Policy-Based Resource Management With QMON” on page 125 for detailson the scheduling administration of resource-sharing policies of the grid engine system. Thefollowing sections focus on administering the scheduler configuration sched_conf and relatedissues.
Default SchedulingThe default scheduling is a first-in-first-out policy. In other words, the first job that is submittedis the first job the scheduler examines in order to dispatch it to a queue. If the first job in the listof pending jobs finds a queue that is suitable and available, that job is started first. A job rankedbehind the first job can be started first only if the first job fails to find a suitable free resource.
The default strategy is to select queue instances on the least-loaded host, provided that thequeues deliver suitable service for the job's resource requirements. If several suitable queuesshare the same load, the queue to be selected is unpredictable.
Scheduling AlternativesYou can modify the job scheduling and queue selection strategy in various ways:
■ Changing the scheduling algorithm■ Scaling system load■ Selecting queue by sequence number■ Selecting queue by share■ Restricting the number of jobs per user or per group
The following sections explore these alternatives in detail.
Administering the Scheduler
Sun N1 Grid Engine 6.1 Administration Guide • May 2007118

Changing the Scheduling Algorithm
The scheduler configuration parameter algorithm provides a selection for the schedulingalgorithm in use. See the sched_conf(5) man page for further information. Currently, defaultis the only allowed setting.
Scaling System Load
To select the queue to run a job, the grid engine system uses the system load information on themachines that host queue instances. This queue selection scheme builds up a load-balancedsituation, thus guaranteeing better use of the available resources in a cluster.
However, the system load may not always tell the truth. For example, if a multi-CPU machine iscompared to a single CPU system, the multiprocessor system usually reports higher loadfigures, because it probably runs more processes. The system load is a measurement stronglyinfluenced by the number of processes trying to get CPU access. But multi-CPU systems arecapable of satisfying a much higher load than single-CPU machines. This problem is addressedby processor-number-adjusted sets of load values that are reported by default by sge_execd.Use these load parameters instead of the raw load values to avoid the problem described earlier.See “Load Parameters” on page 86 and the sge-root/doc/load_parameters.asc file for details.
Another example of potentially improper interpretation of load values is when systems havemarked differences in their performance potential or in their price performance ratio. In bothcases, equal load values do not mean that arbitrary hosts can be selected to run a job. In thissituation, the administrator should define load scaling factors for the relevant execution hostsand load parameters. See “Configuring Execution Hosts With QMON” on page 25, and relatedsections.
Note – The scaled load parameters are also compared against the load threshold listsload-thresholds and migr-load-thresholds. See the queue_conf(5) man page for details.
Another problem associated with load parameters is the need for an application-dependent andsite-dependent interpretation of the values and their relative importance. The CPU load mightbe dominant for a certain type of application that is common at a particular site. By contrast, thememory load might be more important for another site and for the application profile to whichthe site's compute cluster is dedicated. To address this problem, the grid engine system enablesthe administrator to specify a load formula in the scheduler configuration file sched_conf. Seethe sched_conf(5) man page for more details. Site-specific information on resource usage andcapacity planning can be taken into account by using site-defined load parameters andconsumable resources in the load formula. See the sections “Adding Site-Specific LoadParameters” on page 87) and “Consumable Resources” on page 75.
Administering the Scheduler
Chapter 5 • Managing Policies and the Scheduler 119

Finally, the time dependency of load parameters must be taken into account. The load that isimposed by the jobs that are running on a system varies in time. Often the load, for example, theCPU load, requires some amount of time to be reported in the appropriate quantity by theoperating system. If a job recently started, the reported load might not provide an accuraterepresentation of the load that the job has imposed on that host. The reported load adapts to thereal load over time. But the period of time in which the reported load is too low might lead to anoversubscription of that host. The grid engine system enables the administrator to specify loadadjustment factors that are used in the scheduler to compensate for this problem. See thesched_conf(5) man page for detailed information on how to set these load adjustment factors.
Load adjustments are used to virtually increase the measured load after a job is dispatched. Inthe case of oversubscribed machines, this helps to align with load thresholds. If you do not needload adjustments, you should turn them off. Load adjustments impose additional work on thescheduler in connection with sorting hosts and load thresholds verification.
To disable load adjustments, on the Load Adjustment tab of the Scheduler Configuration dialogbox, set the Decay Time to zero, and delete all load adjustment values in the table. See“Changing the Scheduler Configuration With QMON” on page 121.
Selecting Queue by Sequence Number
Another way to change the default scheme for queue selection is to set the global clusterconfiguration parameter queue_sort_method to seq_no instead of to the default load. In thiscase, the system load is no longer used as the primary method to select queues. Instead, thesequence numbers that are assigned to the queues by the queue configuration parameter seq_nodefine a fixed order for queue selection. The queues must be suitable for the considered job, andthey must be available. See the queue_conf(5) and sched_conf(5) man pages for more details.
This queue selection policy is useful if the machines that offer batch services at your site areranked in a monotonous price per job order. For example, a job running on machine A costs 1unit of money. The same job costs 10 units on machine B. And on machine C the job costs 100units. Thus the preferred scheduling policy is to first fill up host A and then to use host B. Host Cis used only if no alternative remains.
Note – If you have changed the method of queue selection to seq_no, and the considered queuesall share the same sequence number, queues are selected by the default load.
Selecting Queue by Share
The goal of this method is to place jobs so as to attempt to meet the targeted share of globalsystem resources for each job. This method takes into account the resource capabilityrepresented by each host in relation to all the system resources. This method tries to balance thepercentage of tickets for each host (that is, the sum of tickets for all jobs running on a host) with
Administering the Scheduler
Sun N1 Grid Engine 6.1 Administration Guide • May 2007120

the percentage of the resource capability that particular host represents for the system. See“Configuring Execution Hosts With QMON” on page 25 for instructions on how to define thecapacity of a host.
The host's load, although of secondary importance, is also taken into account in the sorting.Choose this sorting method for a site that uses the share-tree policy.
Restricting the Number of Jobs per User or Group
The administrator can assign an upper limit to the number of jobs that any user or any UNIXgroup can run at any time. In order to enforce this feature, do one of the following:
■ Set maxujobs or maxgjobs, or both, as described in the sched_conf(5) man page.■ On the General Parameters tab of the Scheduler Configuration dialog box, use the Max
Jobs/User field to set the maximum number of jobs a user or user group can runconcurrently.
Changing the Scheduler Configuration With QMON
On the QMON Main Control window, click the Scheduler Configuration button.
The Scheduler Configuration dialog box appears. The dialog box has two tabs:
■ General Parameters tab■ Load Adjustment tab
To change general scheduling parameters, click the General Parameters tab. The GeneralParameters tab looks like the following figure.
Administering the Scheduler
Chapter 5 • Managing Policies and the Scheduler 121

Use the General Parameters tab to set the following parameters:
■ Algorithm. The scheduling algorithm. See “Changing the Scheduling Algorithm” onpage 119.
■ Schedule Interval. The regular time interval between scheduler runs.■ Reprioritize Interval. The regular time interval to reprioritize jobs on the execution hosts,
based on the current ticket amount for running jobs. To turn reprioritizing off, set thisparameter to zero.
■ Max Jobs/User. The maximum number of jobs that are allowed to run concurrently peruser and per UNIX group. See “Restricting the Number of Jobs per User or Group” onpage 121.
■ Sort by. The queue sorting scheme, either sorting by load or sorting by sequence number.See “Selecting Queue by Sequence Number” on page 120.
■ Job Scheduling Information. Whether job scheduling information is accessible throughqstat -j, or whether this information should be collected only for a range of job IDs. Youshould turn on general collection of job scheduling information only temporarily, in case anextremely high number of jobs are pending.Scheduler monitoring can help you find out the reason why certain jobs are not dispatched.However, providing this information for all jobs at all times can consume resources. Suchinformation is usually not needed.
Administering the Scheduler
Sun N1 Grid Engine 6.1 Administration Guide • May 2007122

■ Load Formula. The load formula to use to sort hosts and queues.■ Flush Submit Seconds. The number of seconds that the scheduler waits after a job is
submitted before the scheduler is triggered. To disable the flush after a job is submitted, setthis parameter to zero.
■ Flush Finish Seconds. The number of seconds that the scheduler waits after a job hasfinished before the scheduler is triggered. To disable the flush after a job has finished, set thisparameter to zero.
■ Maximum Reservation. The maximum number of resource reservations that can bescheduled within a scheduling interval. See “Resource Reservation and Backfilling” onpage 114.
■ Params. Use this setting to specify additional parameters to pass to the scheduler. Paramscan be PROFILE or MONITOR. If you specify PROFILE, the scheduler logs profiling informationthat summarizes each scheduling run. If you specify MONITOR, the scheduler recordsinformation for each scheduling run in the file sge-root/cell/common/schedule.
By default, the grid engine system schedules job runs in a fixed schedule interval. You can usethe Flush Submit Seconds and Flush Finish Seconds parameters to configure immediatescheduling. For more information, see “Immediate Scheduling” on page 201.
To change load adjustment parameters, click the Load Adjustment tab. The Load Adjustmenttab looks like the following figure:
Administering the Scheduler
Chapter 5 • Managing Policies and the Scheduler 123

Use the Load Adjustment tab to set the following parameters:
■ Decay Time. The decay time for the load adjustment.■ A table of load adjustment values listing all load and consumable attributes for which an
adjustment value is currently defined.To add load values to the list, click the Load or the Value column heading. A selection listappears with all resource attributes that are attached to the hosts.The Attribute Selection dialog box is shown in Figure 1–2. To add a resource attribute to theLoad column of the Consumable/Fixed Attributes table, select one of the attributes, andthen click OK.To modify an existing value, double-click the Value field.To delete a resource attribute, select it, and then press Control-D or click mouse button 3. Adialog box asks you to confirm the deletion.
See “Scaling System Load” on page 119 for background information. See the sched_conf(5)man page for more details about the scheduler configuration.
Administering PoliciesThis section describes how to configure policies to manage cluster resources.
The grid engine software orchestrates the delivery of computational power, based on enterpriseresource policies that the administrator manages. The system uses these policies to examineavailable computer resources in the grid. The system gathers these resources, and then itallocates and delivers them automatically, in a way that optimizes usage across the grid.
To enable cooperation in the grid, project owners must do the following:
■ Negotiate policies■ Ensure that policies for manual overrides for unique project requirements are flexible■ Automatically monitor and enforce policies
As administrator, you can define high-level usage policies that are customized for your site.Four such policies are available:
■ Urgency policy – See “Configuring the Urgency Policy” on page 127■ Share-based policy – See “Configuring the Share-Based Policy” on page 132■ Functional policy – See “Configuring the Functional Policy” on page 144■ Override policy – See “Configuring the Override Policy” on page 148
Policy management automatically controls the use of shared resources in the cluster to achieveyour goals. High-priority jobs are dispatched preferentially. These jobs receive greater CPUentitlements when they are competing with other, lower-priority jobs. The grid engine software
Administering Policies
Sun N1 Grid Engine 6.1 Administration Guide • May 2007124

monitors the progress of all jobs. It adjusts their relative priorities correspondingly, and withrespect to the goals that you define in the policies.
This policy-based resource allocation grants each user, team, department, and all projects anallocated share of system resources. This allocation of resources extends over a specified periodof time, such as a week, a month, or a quarter.
Configuring Policy-Based Resource Management WithQMON
On the QMON Main Control window, click the Policy Configuration button. The PolicyConfiguration dialog box appears.
The Policy Configuration dialog box shows the following information:
■ Policy Importance Factor■ Urgency Policy■ Ticket Policy. You can readjust the policy-related tickets.
FIGURE 5–1 Policy Configuration Dialog Box
Administering Policies
Chapter 5 • Managing Policies and the Scheduler 125

From this dialog box you can access specific configuration dialog boxes for the threeticket-based policies.
Specifying Policy PriorityBefore the grid engine system dispatches jobs, the jobs are brought into priority order, highestpriority first. Without any administrator influence, the order is first-in-first-out (FIFO).
On the Policy Configuration dialog box, under Policy Importance Factor, you can specify therelative importance of the three priority types that control the sorting order of jobs:
■ Priority. Also called POSIX priority. The –p option of the qsub command specifiessite-specific priority policies.
■ Urgency Policy. Jobs can have an urgency value that determines their relative importance.Pending jobs are sorted according to their urgency value.
■ Ticket Policy. Jobs are always treated according to their relative importance as defined bythe number of tickets that the jobs have. Pending jobs are sorted in ticket order.
For more information about job priorities, see “Job Sorting” on page 112.
You can specify a weighting factor for each priority type. This weighting factor determines thedegree to which each type of priority affects overall job priority. To make it easier to control therange of values for each priority type, normalized values are used instead of the raw ticketvalues, urgency values, and POSIX priority values.
The following formula expresses how a job's priority values are determined:
Job priority = Urgency * normalized urgency value +
Ticket * normalized ticket value +
Priority * normalized priority value
Urgency, Ticket, and Priority are the three weighting factors you specify under PolicyImportance Factor. For example, if you specify Priority as 1, Urgency as 0.1, and Ticket as 0.01,job priority that is specified by the qsub –p command is given the most weight, job priority thatis specified by the Urgency Policy is considered next, and job priority that is specified by theTicket Policy is given the least weight.
Administering Policies
Sun N1 Grid Engine 6.1 Administration Guide • May 2007126

Configuring the Urgency PolicyThe Urgency Policy defines an urgency value for each job. This urgency value is determined bythe sum of the following three contributing elements:
■ Resource requirement. Each resource attribute defined in the complex can have an urgencyvalue. For information about the setting urgency values for resource attributes, see“Configuring Complex Resource Attributes With QMON” on page 70. Each job request for aresource attribute adds the attribute's urgency value to the total.
■ Deadline. The urgency value for deadline jobs is determined by dividing the WeightDeadline specified in the Policy Configuration dialog box by the free time, in seconds, untilthe job's deadline initiation time specified by the qsub –dl command.
■ Waiting time. The urgency value for a job's waiting time is determined by multiplying thejob's waiting time by the Weight Waiting Time specified in the Policy Configuration dialogbox. The job's waiting time is measured in seconds.
For details about how the grid engine system arrives at the urgency value total, see “About theUrgency Policy” on page 113.
Configuring Ticket-Based PoliciesThe tickets that are currently assigned to individual policies are listed under Current ActiveTickets. The numbers reflect the relative importance of the policies. The numbers indicatewhether a certain policy currently dominates the cluster or whether policies are in balance.
Tickets provide a quantitative measure. For example, you might assign twice as many tickets tothe share-based policy as you assign to the functional policy. This means that twice the resourceentitlement is allocated to the share-based policy than is allocated to the functional policy. Inthis sense, tickets behave very much like stock shares.
The total number of all tickets has no particular meaning. Only the relations between policiescounts. Hence, total ticket numbers are usually quite high to allow for fine adjustment of therelative importance of the policies.
Under Edit Tickets, you can modify the number of tickets that are allocated to the share treepolicy and the functional policy. For details, see “Editing Tickets” on page 128.
Select the Share Override Tickets check box to control the total ticket amount distributed by theoverride policy. Clear the check box to control the importance of individual jobs relative to theticket pools that are available for the other policies and override categories. For detailedinformation, see “Sharing Override Tickets” on page 128.
Administering Policies
Chapter 5 • Managing Policies and the Scheduler 127

Select the Share Functional Tickets check box to give a category member a constant entitlementlevel for the sum of all its jobs. Clear the check box to give each job the same entitlement level,based on its category member's entitlement. For detailed information, see “Sharing FunctionalTicket Shares” on page 129.
You can set the maximum number of jobs that can be scheduled in the functional policy. Thedefault value is 200.
You can set the maximum number of pending subtasks that are allowed for each array job. Thedefault value is 50. Use this setting to reduce scheduling overhead.
You can specify the Ticket Policy Hierarchy to resolve certain cases of conflicting policies. Theresolving of policy conflicts applies particularly to pending jobs. For detailed information, see“Setting the Ticket Policy Hierarchy” on page 131.
To refresh the information displayed, click Refresh.
To save any changes that you make to the Policy Configuration, click Apply. To close the dialogbox without saving changes, click Done.
Editing TicketsYou can edit the total number of share-tree tickets and functional tickets. Override tickets areassigned directly through the override policy configuration. The other ticket pools aredistributed automatically among jobs that are associated with the policies and with respect tothe actual policy configuration.
Note – All share-based tickets and functional tickets are always distributed among the jobsassociated with these policies. Override tickets might not be applicable to the currently activejobs. Consequently, the active override tickets might be zero, even though the override policyhas tickets defined.
Sharing Override TicketsThe administrator assigns tickets to the different members of the override categories, that is, toindividual users, projects, departments, or jobs. Consequently, the number of tickets that areassigned to a category member determines how many tickets are assigned to jobs under thatcategory member. For example, the number of tickets that are assigned to user A determineshow many tickets are assigned to all jobs of user A.
Note – The number of tickets that are assigned to the job category does not determine how manytickets are assigned to jobs in that category.
Administering Policies
Sun N1 Grid Engine 6.1 Administration Guide • May 2007128

Use the Share Override Tickets check box to set the share_override_tickets parameter ofsched_conf(5). This parameter controls how job ticket values are derived from their categorymember ticket value. When you select the Share Override Tickets check box, the tickets of thecategory members are distributed evenly among the jobs under this member. If you clear theShare Override Tickets check box, each job inherits the ticket amount defined for its categorymember. In other words, the category member tickets are replicated for all jobs underneath.
Select the Share Override Tickets check box to control the total ticket amount distributed by theoverride policy. With this setting, ticket amounts that are assigned to a job can becomenegligibly small if many jobs are under one category member. For example, ticket amountsmight diminish if many jobs belong to one member of the user category.
Clear the Share Override Tickets check box to control the importance of individual jobs relativeto the ticket pools that are available for the other policies and override categories. With thissetting, the number of jobs that are under a category member does not matter. The jobs alwaysget the same number of tickets. However, the total number of override tickets in the systemincreases as the number of jobs with a right to receive override tickets increases. Other policiescan lose importance in such cases.
Sharing Functional Ticket SharesThe functional policy defines entitlement shares for the functional categories. Then the policydefines shares for all members of each of these categories. The functional policy is thus similarto a two-level share tree. The difference is that a job can be associated with several categories atthe same time. The job belongs to a particular user, for instance, but the job can also belong to aproject, a department, and a job class.
However, as in the share tree, the entitlement shares that a job receives from a functionalcategory is determined by the following:
■ The shares that are defined for its corresponding category member (for example, its project)■ The shares that are given to the category (project instead of user, department, and so on)
Use the Share Functional Tickets check box to set the share_functional_shares parameter ofsched_conf(5). This parameter defines how the category member shares are used to determinethe shares of a job. The shares assigned to the category members, such as a particular user orproject, can be replicated for each job. Or shares can be distributed among the jobs under thecategory member.
■ Selecting the Share Functional Tickets check box means that functional shares are replicatedamong jobs.
■ Clearing the Share Functional Tickets check box means that functional shares aredistributed among jobs.
Administering Policies
Chapter 5 • Managing Policies and the Scheduler 129

Those shares are comparable to stock shares. Such shares have no effect for the jobs that belongto the same category member. All jobs under the same category member have the same numberof shares in both cases. But the share number has an effect when comparing the share amountswithin the same category. Jobs with many siblings that belong to the same category memberreceive relatively small share portions if you select the Share Functional Tickets check box. Onthe other hand, if you clear the Share Functional Tickets check box, all sibling jobs receive thesame share amount as their category member.
Select the Share Functional Tickets check box to give a category member a constant entitlementlevel for the sum of all its jobs. The entitlement of an individual job can get negligibly small,however, if the job has many siblings.
Clear the Share Functional Tickets check box to give each job the same entitlement level, basedon its category member's entitlement. The number of job siblings in the system does not matter.
Note – A category member with many jobs underneath can dominate the functional policy.
Be aware that the setting of share functional shares does not determine the total number offunctional tickets that are distributed. The total number is always as defined by theadministrator for the functional policy ticket pool. The share functional shares parameterinfluences only how functional tickets are distributed within the functional policy.
EXAMPLE 5–1 Functional Policy Example
The following example describes a common scenario where a user wishes to translate theSGE-5.3 Scheduler Option -user_sort true to an N1GE 6.1 Configuration but does notunderstand the share override functional policy ticket feature.
For a plain user-based equal share, you configure your global configuration sge_conf(5) with
-enforce_user auto
-auto_user_fshare 100
Then you use -weight_tickets_functional 10000 in the scheduler configurationsched_conf(5). This action causes the functional policy to be used for user-based equal sharescheduling with 100 shares for each user.
Tuning Scheduling Run TimePending jobs are sorted according to the number of tickets that each job has, as described in“Job Sorting” on page 112. The scheduler reports the number of tickets each pending job has tothe master daemon sge_qmaster. However, on systems with very large numbers of jobs, you
Administering Policies
Sun N1 Grid Engine 6.1 Administration Guide • May 2007130

might want to turn off ticket reporting. When you turn off ticket reporting, you disableticket-based job priority. The sort order of jobs is based only on the time each job is submitted.
To turn off the reporting of pending job tickets to sge_qmaster, clear the Report Pending JobTickets check box on the Policy Configuration dialog box. Doing so sets thereport_pjob_tickets parameter of sched_conf(5) to false.
Setting the Ticket Policy HierarchyTicket policy hierarchy provides the means to resolve certain cases of conflicting ticket policies.The resolving of ticket policy conflicts applies particularly to pending jobs.
Such cases can occur in combination with the share-based policy and the functional policy.With both policies, assigning priorities to jobs that belong to the same leaf-level entities is doneon a first-come-first-served basis. Leaf-level entities include:
■ User leaves in the share tree■ Project leaves in the share tree■ Any member of the following categories in the functional policy: user, project, department,
or queue
Members of the job category are not included among leaf-level entities. So, for example, the firstjob of the same user gets the most, the second gets the next most, the third next, and so on.
A conflict can occur if another policy mandates an order that is different. So, for example, theoverride policy might define the third job as the most important, whereas the first job that issubmitted should come last.
A policy hierarchy might gives the override policy higher priority over the share-tree policy orthe functional policy. Such a policy hierarchy ensures that high-priority jobs under the overridepolicy get more entitlements than jobs in the other two policies. Such jobs must belong to thesame leaf level entity (user or project) in the share tree.
The Ticket Policy Hierarchy can be a combination of up to three letters. These letters are thefirst letters of the names of the following three ticket policies:
■ S – Share-based■ F – Functional■ O – Override
Use these letters to establish a hierarchy of ticket policies. The first letter defines the top policy.The last letter defines the bottom of the hierarchy. Policies that are not listed in the policyhierarchy do not influence the hierarchy. However, policies that are not listed in the hierarchycan still be a source for tickets of jobs. However, those tickets do not influence the ticketcalculations in other policies. All tickets of all policies are added up for each job to define itsoverall entitlement.
Administering Policies
Chapter 5 • Managing Policies and the Scheduler 131

The following examples describe two settings and how they influence the order of the pendingjobs.
policy_hierarchy=OS
1. The override policy assigns the appropriate number of tickets to each pending job.2. The number of tickets determines the entitlement assignment in the share tree in case two
jobs belong to the same user or to the same leaf-level project. Then the share tree tickets arecalculated for the pending jobs.
3. The tickets from the override policy and from the share-tree policy are added together,along with all other active policies not in the hierarchy. The job with the highest resultingnumber of tickets has the highest entitlement.
policy_hierarchy=OF
1. The override policy assigns the appropriate number of tickets to each pending job. Then thetickets from the override policy are added up.
2. The resulting number of tickets influences the entitlement assignment in the functionalpolicy in case two jobs belong to the same functional category member. Based on thisentitlement assignment, the functional tickets are calculated for the pending jobs.
3. The resulting value is added to the ticket amount from the override policy. The job with thehighest resulting number of tickets has the highest entitlement.
All combinations of the three letters are theoretically possible, but only a subset of thecombinations are meaningful or have practical relevance. The last letter should always be S or F,because only those two policies can be influenced due to their characteristics described in theexamples.
The following form is recommended for policy_hierarchy settings:
[O][S|F]
If the override policy is present, O should occur as the first letter only, because the overridepolicy can only influence. The share-based policy and the functional policy can only beinfluenced. Therefore S or F should occur as the last letter.
Configuring the Share-Based PolicyShare-based scheduling grants each user and project its allocated share of system resourcesduring an accumulation period such as a week, a month, or a quarter. Share-based scheduling isalso called share tree scheduling. It constantly adjusts each user's and project's potentialresource share for the near term, until the next scheduling interval. Share-based scheduling isdefined for user or for project, or for both.
Administering Policies
Sun N1 Grid Engine 6.1 Administration Guide • May 2007132

Share-based scheduling ensures that a defined share is guaranteed to the instances that areconfigured in the share tree over time. Jobs that are associated with share-tree branches wherefewer resources were consumed in the past than anticipated are preferred when the systemdispatches jobs. At the same time, full resource usage is guaranteed, because unused shareproportions are still available for pending jobs associated with other share-tree branches.
By giving each user or project its targeted share as far as possible, groups of users or projects alsoget their targeted share. Departments or divisions are examples of such groups. Fair share for allentities is attainable only when every entity that is entitled to resources contends for thoseresources during the accumulation period. If a user, a project, or a group does not submit jobsduring a given period, the resources are shared among those who do submit jobs.
Share-based scheduling is a feedback scheme. The share of the system to which any user oruser-group, or project or project-group, is entitled is a configuration parameter. The share ofthe system to which any job is entitled is based on the following factors:
■ The share allocated to the job's user or project■ The accumulated past usage for each user and user group, and for each project and project
group. This usage is adjusted by a decay factor. “Old” usage has less impact.
The grid engine software keeps track of how much usage users and projects have alreadyreceived. At each scheduling interval, the Scheduler adjusts all jobs' share of resources. Doing soensures that all users, user groups, projects, and project groups get close to their fair share of thesystem during the accumulation period. In other words, resources are granted or are denied inorder to keep everyone more or less at their targeted share of usage.
The Half-Life FactorHalf-life is how fast the system “forgets” about a user's resource consumption. Theadministrator decides whether to penalize a user for high resource consumption, be it sixmonths ago or six days ago. The administrator also decides how to apply the penalty. On eachnode of the share tree, grid engine software maintains a record of users' resource consumption.
With this record, the system administrator can decide how far to look back to determine a user'sunderusage or overusage when setting up a share-based policy. The resource usage in thiscontext is the mathematical sum of all the computer resources that are consumed over a “slidingwindow of time.”
The length of this window is determined by a “half-life” factor, which in the grid engine systemis an internal decay function. This decay function reduces the impact of accrued resourceconsumption over time. A short half-life quickly lessens the impact of resourceoverconsumption. A longer half-life gradually lessens the impact of resource overconsumption.
Administering Policies
Chapter 5 • Managing Policies and the Scheduler 133

This half-life decay function is a specified unit of time. For example, consider a half-life of sevendays that is applied to a resource consumption of 1,000 units. This half-life decay factor resultsin the following usage “penalty” adjustment over time.
■ 500 after 7 days■ 250 after 14 days■ 125 after 21 days■ 62.5 after 28 days
The half-life-based decay diminishes the impact of a user's resource consumption over time,until the effect of the penalty is negligible.
Note – Override tickets that a user receives are not subjected to a past usage penalty, becauseoverride tickets belong to a different policy system. The decay function is a characteristic of theshare-tree policy only.
Compensation FactorSometimes the comparison shows that actual usage is well below targeted usage. In such a case,the adjusting of a user's share or a project's share of resource can allow a user to dominate thesystem. Such an adjustment is based on the goal of reaching target share. This dominationmight not be desirable.
The compensation factor enables an administrator to limit how much a user or a project candominate the resources in the near term.
For example, a compensation factor of two limits a user's or project's current share to twice itstargeted share. Assume that a user or a project should get 20 percent of the system resourcesover the accumulation period. If the user or project currently gets much less, the maximum itcan get in the near term is only 40 percent.
The share-based policy defines long-term resource entitlements of users or projects as per theshare tree. When combined with the share-based policy, the compensation factor makesautomatic adjustments in entitlements.
If a user or project is either under or over the defined target entitlement, the grid engine systemcompensates. The system raises or lowers that user's or project's entitlement for a short termover or under the long-term target. This compensation is calculated by a share tree algorithm.
The compensation factor provides an additional mechanism to control the amount ofcompensation that the grid engine system assigns. The additional compensation factor (CF)calculation is carried out only if the following conditions are true:
■ Short-term-entitlement is greater than long-term-entitlement multiplied by the CF■ The CF is greater than 0
Administering Policies
Sun N1 Grid Engine 6.1 Administration Guide • May 2007134

If either condition is not true, or if both conditions are not true, the compensation as definedand implemented by the share-tree algorithm is used.
The smaller the value of the CF, the greater is its effect. If the value is greater than 1, the gridengine system's compensation is limited. The upper limit for compensation is calculated aslong-term-entitlement multiplied by the CF. And as defined earlier, the short-term entitlementmust exceed this limit before anything happens based on the compensation factor.
If the CF is 1, the grid engine system compensates in the same way as with the raw share-treealgorithm. So a value of one has an effect that is similar to a value of zero. The only difference isan implementation detail. If the CF is one, the CF calculations are carried out without an effect.If the CF is zero, the calculations are suppressed.
If the value is less than 1, the grid engine system overcompensates. Jobs receive much morecompensation than they are entitled to based on the share-tree algorithm. Jobs also receive thisovercompensation earlier, because the criterion for activating the compensation is met at lowershort-term entitlement values. The activating criterion is short-term-entitlement >long-term-entitlement * CF.
Hierarchical Share TreeThe share-based policy is implemented through a hierarchical share tree. The share treespecifies, for a moving accumulation period, how system resources are to be shared among allusers and projects. The length of the accumulation period is determined by a configurable decayconstant. The grid engine system bases a job's share entitlement on the degree to which eachparent node in the share tree reaches its accumulation limit. A job's share entitlement is basedon its leaf node share allocation, which in turn depends on the allocations of its parent nodes.All jobs associated with a leaf node split the associated shares.
The entitlement derived from the share tree is combined with other entitlements, such asentitlements from a functional policy, to determine a job's net entitlement. The share tree isallotted the total number of tickets for share-based scheduling. This number determines theweight of share-based scheduling among the four scheduling policies.
The share tree is defined during installation. The share tree can be altered at any time. When theshare tree is edited, the new share allocations take effect at the next scheduling interval.
Configuring the Share-Tree Policy With QMON
On the QMON Policy Configuration dialog box (Figure 5–1), click Share Tree Policy. The ShareTree Policy dialog box appears.
Administering Policies
Chapter 5 • Managing Policies and the Scheduler 135

Node Attributes
Under Node Attributes, the attributes of the selected node are displayed:
■ Identifier. A user, project, or agglomeration name.■ Shares. The number of shares that are allocated to this user or project.
Note – Shares define relative importance. They are not percentages. Shares also do not havequantitative meaning. The specification of hundreds or even thousands of shares isgenerally a good idea, as high numbers allow fine tuning of importance relationships.
■ Level Percentage. This node's portion of the total shares at the level of the same parent nodein the tree. The number of this node's shares divided by the sum of its and its sibling's shares.
■ Total Percentage. This node's portion of the total shares in the entire share tree. Thelong-term targeted resource share of the node.
■ Actual Resource Usage. The percentage of all the resources in the system that this node hasconsumed so far in the accumulation period. The percentage is expressed in relation to allnodes in the share tree.
Administering Policies
Sun N1 Grid Engine 6.1 Administration Guide • May 2007136

■ Targeted Resource Usage. Same as Actual Resource Usage, but only taking the currentlyactive nodes in the share tree into account. Active nodes have jobs in the system. In the shortterm, the grid engine system attempts to balance the entitlement among active nodes.
■ Combined Usage. The total usage for the node. Combined Usage is the sum of the usagethat is accumulated at this node. Leaf nodes accumulate the usage of all jobs that run underthem. Inner nodes accumulate the usage of all descendant nodes. Combined Usage includesCPU, memory, and I/O usage according to the ratio specified under Share Tree PolicyParameters. Combined usage is decayed at the half-life decay rate that is specified by theparameters.
When a user node or a project node is removed and then added back, the user's or project'susage is retained. A node can be added back either at the same place or at a different place in theshare tree. You can zero out that usage before you add the node back to the share tree. To do so,first remove the node from the users or projects configured in the grid engine system. Then addthe node back to the users or projects there.
Users or projects that were not in the share tree but that ran jobs have nonzero usage whenadded to the share tree. To zero out usage when you add such users or projects to the tree, firstremove them from the users or projects configured in the grid engine system. Then add them tothe tree.
To add an interior node under the selected node, click Add Node. A blank Node Info windowappears, where you can enter the node's name and number of shares. You can enter any nodename or share number.
To add a leaf node under the selected node, click Add Leaf. A blank Node Info window appears,where you can enter the node's name and number of shares. The node's name must be anexisting grid engine user (“Configuring User Objects With QMON” on page 99) or project(“Defining Projects” on page 102)
The following rules apply when you are adding a leaf node:
■ All nodes have a unique path in share tree.■ A project is not referenced more than once in share tree.■ A user appears only once in a project subtree.■ A user appears only once outside of a project subtree.■ A user does not appear as a nonleaf node.■ All leaf nodes in a project subtree reference a known user or the reserved name default. See
a detailed description of this special user in “About the Special User default” on page 139.■ Project subtrees do not have subprojects.■ All leaf nodes not in a project subtree reference a known user or known project.■ All user leaf nodes in a project subtree have access to the project.
Administering Policies
Chapter 5 • Managing Policies and the Scheduler 137

To edit the selected node, click Modify. A Node Info window appears. The window displays themode's name and its number of shares.
To cut or copy the selected node to a buffer, click Cut or Copy. To Paste under the selected nodethe contents of the most recently cut or copied node, click Paste.
To delete the selected node and all its descendents, click Delete.
To clear the entire share-tree hierarchy, click Clear Usage. Clear the hierarchy when theshare-based policy is aligned to a budget and needs to start from scratch at the beginning ofeach budget term. The Clear Usage facility also is handy when setting up or modifying test N1Grid Engine 6.1 software environments.
QMON periodically updates the information displayed in the Share Tree Policy dialog box. ClickRefresh to force the display to refresh immediately.
To save all the node changes that you make, click Apply. To close the dialog box without savingchanges, click Done.
To search the share tree for a node name, click Find, and then type a search string. Node namesare indicated which begin with the case sensitive search string. Click Find Next to find the nextoccurrence of the search string.
Click Help to open the online help system.
Share Tree Policy Parameters
To display the Share Tree Policy Parameters, click the arrow at the right of the Node Attributes.
■ CPU [%] slider — This slider's setting indicates what percentage of Combined Usage CPUis. When you change this slider, the MEM and I/O sliders change to compensate for thechange in CPU percentage.
■ MEM [%] slider — This slider's setting indicates what percentage of Combined Usagememory is. When you change this slider, the CPU and I/O sliders change to compensate forthe change in MEM percentage.
■ I/O [%] slider — This slider's setting indicates what percentage of Combined Usage I/O is.When you change this slider, the CPU and MEM sliders change to compensate for thechange in I/O percentage.
Note – CPU [%], MEM [%], and I/O [%] always add up to 100%
■ Lock Symbol — When a lock is open, the slider that it guards can change freely. The slidercan change either because the slider was moved or because it is compensating for anotherslider's being moved.
Administering Policies
Sun N1 Grid Engine 6.1 Administration Guide • May 2007138

When a lock is closed, the slider that it guards cannot change. If two locks are closed and onelock is open, no sliders can be changed.
■ Half-life — Use this field to specify the half-life for usage. Usage is decayed during eachscheduling interval so that any particular contribution to accumulated usage has half thevalue after a duration of half-life.
■ Days/Hours selection menu — Select whether half-life is to be measured in days or hours.■ Compensation Factor — This field accepts a positive integer for the compensation factor.
Reasonable values are in the range between 2 and 10.The actual usage of a user or project can be far below its targeted usage. The compensationfactor prevents such users or projects from dominating resources when they first get thoseresources. See “Compensation Factor” on page 134 for more information.
About the Special User default
You can use the special user default to reduce the amount of share-tree maintenance for siteswith many users. Under the share-tree policy, a job's priority is determined based on the nodethe job maps to in the share tree. Users who are not explicitly named in the share tree aremapped to the default node, if it exists.
The specification of a single default node allows for a simple share tree to be created. Such ashare tree makes user-based fair sharing possible.
You can use the default user also in cases where the same share entitlement is assigned to mostusers. Same share entitlement is also known as equal share scheduling.
The default user configures all user entries under the default node, giving the same shareamount to each user. Each user who submits jobs receives the same share entitlement as thatconfigured for the default user. To activate the facility for a particular user, you must add thisuser to the list of grid engine users.
The share tree displays “virtual” nodes for all users who are mapped to the default node. Thedisplay of virtual nodes enables you to examine the usage and the fair-share schedulingparameters for users who are mapped to the default node.
You can also use the default user for “hybrid” share trees, where users are subordinated underprojects in the share tree. The default user can be a leaf node under a project node.
The short-term entitlements of users vary according to differences in the amount of resourcesthat the users consume. However, long-term entitlements of users remain the same.
You might want to assign lower or higher entitlements to some users while maintaining thesame long-term entitlement for all other users. To do so, configure a share tree with individualuser entries next to the default user for those users with special entitlements.
Administering Policies
Chapter 5 • Managing Policies and the Scheduler 139

In Example A, all users submitting to Project A get equal long-term entitlements. The userssubmitting to Project B only contribute to the accumulated resource consumption of Project B.Entitlements of Project B users are not managed.
EXAMPLE 5–2 Example A
Compare Example A with Example B:
EXAMPLE 5–3 Example B
In Example B, treatment for Project A is the same as for Example A. But all default users whosubmit jobs to Project B, except users A and B, receive equal long-term resource entitlements.Default users have 20 shares. User A, with 10 shares, receives half the entitlement of the defaultusers. User B, with 40 shares, receives twice the entitlement as the default users.
Configuring the Share-Based Policy From the Command Line
Note – Use QMON to configure the share tree policy, because a hierarchical tree is well-suited forgraphical display and for editing. However, if you need to integrate share tree modifications inshell scripts, for example, you can use the qconf command and its options.
To configure the share-based policy from the command line, use the qconf command withappropriate options.
■ The qconf options -astree, -mstree, -dstree, and -sstree, enable you to do thefollowing:■ Add a new share tree■ Modify an existing share tree■ Delete a share tree■ Display the share tree configuration
See the qconf(1) man page for details about these options. The share_tree(5) man pagecontains a description of the format of the share tree configuration.
Administering Policies
Sun N1 Grid Engine 6.1 Administration Guide • May 2007140

■ The -astnode, -mstnode, -dstnode, and -sstnode options do not address the entire sharetree, but only a single node. The node is referenced as path through all parent nodes downthe share tree, similar to a directory path. The options enable you to add, modify, delete, anddisplay a node. The information contained in a node includes its name and the attachedshares.
■ The weighting of the usage parameters CPU, memory, and I/O are contained in thescheduler configuration as usage_weight. The weighting of the half-life is contained in thescheduler configuration as halftime. The compensation factor is contained in the schedulerconfiguration as compensation_factor. You can access the scheduler configuration fromthe command line by using the -msconf and the -ssconf options of qconf. See thesched_conf(5) man page for details about the format.
▼ How to Create Project-Based Share-Tree SchedulingThe objective of this setup is to guarantee a certain share assignment of all the cluster resourcesto different projects over time.
Specify the number of share-tree tickets (for example, 1000000) in the scheduler configuration.See “Configuring Policy-Based Resource Management With QMON” on page 125, and thesched_conf(5) man page.
(Optional) Add one user for each scheduling-relevant user.See “Configuring User Objects With QMON” on page 99, and the user(5) man page.
Add one project for each scheduling-relevant project.See “Defining Projects With QMON” on page 102, and the project(5) man page.
Use QMON to set up a share tree that reflects the structure of all scheduling-relevant projects asnodes.See “Configuring the Share-Tree Policy With QMON” on page 135.
Assign share tree shares to the projects.For example, if you are creating project-based share-tree scheduling with first-come,first-served scheduling among jobs of the same project, a simple structure might look like thefollowing:
1
2
3
4
5
Administering Policies
Chapter 5 • Managing Policies and the Scheduler 141

If you are creating project-based share-tree scheduling with equal shares for each user, a simplestructure might look like the following:
If you are creating project-based share-tree scheduling with individual user shares in eachproject, add users as leaves to their projects. Then assign individual shares. A simple structuremight look like the following:
Administering Policies
Sun N1 Grid Engine 6.1 Administration Guide • May 2007142

If you want to assign individual shares to only a few users, designate the user default incombination with individual users below a project node. For example, you can condense thetree illustrated previously into the following:
Administering Policies
Chapter 5 • Managing Policies and the Scheduler 143

Configuring the Functional PolicyFunctional scheduling is a nonfeedback scheme for determining a job's importance. Functionalscheduling associates a job with the submitting user, project, department, and job class.Functional scheduling is sometimes called priority scheduling. The functional policy setupensures that a defined share is guaranteed to each user, project, or department at any time. Jobsof users, projects, or departments that have used fewer resources than anticipated are preferredwhen the system dispatches jobs to idle resources.
At the same time, full resource usage is guaranteed, because unused share proportions aredistributed among those users, projects, and departments that need the resources. Past resourceconsumption is not taken into account.
Functional policy entitlement to system resources is combined with other entitlements indetermining a job's net entitlement. For example, functional policy entitlement might becombined with share-based policy entitlement.
The total number of tickets that are allotted to the functional policy determines the weight offunctional scheduling among the three scheduling policies. During installation, theadministrator divides the total number of functional tickets among the functional categories ofuser, department, project, job, and job class.
Functional SharesFunctional shares are assigned to every member of each functional category: user, department,project, job, and job class. These shares indicate what proportion of the tickets for a categoryeach job associated with a member of the category is entitled to. For example, user davidson has200 shares, and user donlee has 100. A job submitted by davidson is entitled to twice as manyuser-functional-tickets as donlee's job, no matter how many tickets there are.
The functional tickets that are allotted to each category are shared among all the jobs that areassociated with a particular category.
Configuring the Functional Share Policy With QMON
At the bottom of the QMON Policy Configuration dialog box, click Functional Policy. TheFunctional Policy dialog box appears.
Administering Policies
Sun N1 Grid Engine 6.1 Administration Guide • May 2007144

Function Category List
Select the functional category for which you are defining functional shares: user, project,department, or job.
Functional Shares Table
The table under Functional Shares is scrollable. The table displays the following information:
■ A list of the members of the category currently selected from the Function Category list.■ The number of functional shares for each member of the category. Shares are used as a
convenient indication of the relative importance of each member of the functional category.You can edit this field.
■ The percentage of the functional share allocation for this category of functional ticket thatthis number of functional shares represents. This field is a feedback device and is noteditable.
QMON periodically updates the information displayed in the Functional Policy dialog box. ClickRefresh to force the display to refresh immediately.
To save all node changes that you make, click Apply. To close the dialog box without savingchanges, click Done.
Administering Policies
Chapter 5 • Managing Policies and the Scheduler 145

Changing Functional Configurations
Click the jagged arrow above the Functional Shares table to open a configuration dialog box.
■ For User functional shares, the User Configuration dialog box appears. Use the User tab toswitch to the appropriate mode for changing the configuration of grid engine users. See“Configuring User Objects With QMON” on page 99.
■ For Department functional shares, the User Configuration dialog box appears. Use theUserset tab to switch to the appropriate mode for changing the configuration ofdepartments that are represented as usersets. See “Defining Usersets As Projects andDepartments” on page 98.
■ For Project functional shares, the Project Configuration dialog box appears. See “DefiningProjects With QMON” on page 102.
■ For Job functional shares, the Job Control dialog box appears. See “Monitoring andControlling Jobs With QMON” in Sun N1 Grid Engine 6.1 User’s Guide.
Ratio Between Sorts of Functional Tickets
To display the Ratio Between Sorts Of Functional Tickets, click the arrow at the right of theFunctional Shares table .
User [%], Department [%], Project [%], Job [%] and Job Class [%] always add up to 100%.
When you change any of the sliders, all other unlocked sliders change to compensate for thechange.
When a lock is open, the slider that it guards can change freely. The slider can change eitherbecause it is moved or because the moving of another slider causes this slider to change. When alock is closed, the slider that it guards cannot change. If four locks are closed and one lock isopen, no sliders can change.
■ User slider – Indicates the percentage of the total functional tickets to allocate to the userscategory
■ Departments slider – Indicates the percentage of the total functional tickets to allocate to thedepartments category
■ Project slider – Indicates the percentage of the total functional tickets to allocate to theprojects category
■ Job slider – Indicates the percentage of the total functional tickets to allocate to the jobscategory
Administering Policies
Sun N1 Grid Engine 6.1 Administration Guide • May 2007146

Configuring the Functional Share Policy From the Command Line
Note – You can assign functional shares to jobs only using QMON. No command-line interface isavailable for this function.
To configure the functional share policy from the command line, use the qconf command withthe appropriate options.
■ Use the qconf -muser command to configure the user category. The -muser optionmodifies the fshare parameter of the user entry file. See the user(5) man page forinformation about the user entry file.
■ Use the qconf -mu command to configure the department category. The -mu optionmodifies the fshare parameter of the access list file. See the access_list(5) man page forinformation about the access list file, which is used to represent departments.
■ Use the qconf -mprj command to configure the project category. The -mprj optionmodifies the fshare parameter of the project entry file. See the project(5) man page forinformation about the project entry file.
■ Use the qconf -mq command to configure the job class category. The -mq option modifiesthe fshare parameter of the queue configuration file. See the queue_conf(5) man page forinformation about the queue configuration file, which is used to represent job classes.
■ The weighting between different categories is defined in the scheduler configurationsched_conf and can be changed using qconf -msconf. The parameters to change areweight_user, weight_department, weight_project, weight_job, and weight_jobclass.The parameter values range between 0 and 1, and the total sum of parameters must add upto 1.
▼ How to Create User-Based, Project-Based, and Department-BasedFunctional SchedulingUse this setup to create a certain share assignment of all the resources in the cluster to differentusers, projects, or departments. First-come, first-served scheduling is used among jobs of thesame user, project, or department.
In the Scheduler Configuration dialog box, select the Share Functional Tickets check box.See “Sharing Functional Ticket Shares” on page 129, and the sched_conf(5) man page.
Specify the number of functional tickets (for example, 1000000) in the scheduler configuration.See “Configuring Policy-Based Resource Management With QMON” on page 125, and thesched_conf(5) man page.
1
2
Administering Policies
Chapter 5 • Managing Policies and the Scheduler 147

Add scheduling-relevant items:
■ Add one user for each scheduling-relevant user.See “Configuring User Objects With QMON” on page 99, and the user(5) man page.
■ Add one project for each scheduling-relevant project.See “Defining Projects With QMON” on page 102, and the project(5) man page.
■ Add each scheduling-relevant department.
Assign functional shares to each user, project, or department.See “Configuring User Access Lists With QMON” on page 96, and the access_list(5) man page.
Assign the shares as a percentage of the whole. Examples follow:For users:
■ UserA (10)■ UserB (20)■ UserC (20)■ UserD (20)
For projects:
■ ProjectA (55)■ ProjectB (45)
For departments:
■ DepartmentA (90)■ DepartmentB (5)■ DepartmentC (5)
Configuring the Override PolicyOverride scheduling enables a grid engine system manager or operator to dynamically adjustthe relative importance of one job or of all jobs that are associated with a user, a department, aproject, or a job class. This adjustment adds tickets to the specified job, user, department,project, or job class. By adding override tickets, override scheduling increases the total numberof tickets that a user, department, project, or job has. As a result, the overall share of resources isincreased.
The addition of override tickets also increases the total number of tickets in the system. Theseadditional tickets deflate the value of every job's tickets.
3
4
Administering Policies
Sun N1 Grid Engine 6.1 Administration Guide • May 2007148

You can use override tickets for the following two purposes:
■ To temporarily override the share-based policy or the functional policy without having tochange the configuration of these policies.
■ To establish resource entitlement levels with an associated fixed amount of tickets. Theestablishment of entitlement levels is appropriate for scenarios like high, medium, or lowjob classes, or high, medium, or low priority classes.
Override tickets that are assigned directly to a job go away when the job finishes. All othertickets are inflated back to their original value. Override tickets that are assigned to users,departments, projects, and job classes remain in effect until the administrator explicitlyremoves the tickets.
The Policy Configuration dialog box displays the current number of override tickets that areactive in the system.
Note – Override entries remain in the Override dialog box. These entries can influencesubsequent work if they are not explicitly deleted by the administrator when they are no longerneeded.
Configuring the Override Policy With QMON
At the bottom of the QMON Policy Configuration dialog box, click Override Policy. The OverridePolicy dialog box appears.
Override Category List
Select the category for which you are defining override tickets: user, project, department, or job.
Administering Policies
Chapter 5 • Managing Policies and the Scheduler 149

Override Table
The override table is scrollable. It displays the following information:
■ A list of the members of the category for which you are defining tickets. The categories areuser, project, department, job, and job class.
■ The number of override tickets for each member of the category. This field is editable.
QMON periodically updates the information that is displayed in the Override Policy dialog box.Click Refresh to force the display to refresh immediately.
To save all override changes that you make, click Apply. To close the dialog box without savingchanges, click Done.
Changing Override Configurations
Click the jagged arrow above the override table to open a configuration dialog box.
■ For User override tickets, the User Configuration dialog box appears. Use the User tab toswitch to the appropriate mode for changing the configuration of grid engine users. See“Configuring User Objects With QMON” on page 99.
■ For Department override tickets, the User Configuration dialog box appears. Use theUserset tab to switch to the appropriate mode for changing the configuration ofdepartments that are represented as usersets. See “Defining Usersets As Projects andDepartments” on page 98.
■ For Project override tickets, the Project Configuration dialog box appears. See “DefiningProjects With QMON” on page 102.
■ For Job override tickets, the Job Control dialog box appears. See “Monitoring andControlling Jobs With QMON” in Sun N1 Grid Engine 6.1 User’s Guide.
Configuring the Override Policy From the Command Line
Note – You can assign override tickets to jobs only using QMON. No command line interface isavailable for this function.
Administering Policies
Sun N1 Grid Engine 6.1 Administration Guide • May 2007150

To configure the override policy from the command line, use the qconf command with theappropriate options.
■ Use the qconf -muser command to configure the user category. The -muser optionmodifies the oticket parameter of the user entry file. See the user(5) man page forinformation about the user entry file.
■ Use the qconf -mu command to configure the department category. The -mu optionmodifies the oticket parameter of the access list file. See the access_list(5) man page forinformation about the access list file, which is used to represent departments.
■ Use the qconf -mprj command to configure the project category. The -mprj optionmodifies the oticket parameter of the project entry file. See the project(5) man page forinformation about the project entry file.
■ Use the qconf -mq command to configure the job class category. The -mq option modifiesthe oticket parameter of the queue configuration file. See the queue_conf(5) man page forinformation about the queue configuration file, which is used to represent job classes.
Administering Policies
Chapter 5 • Managing Policies and the Scheduler 151

152

Managing Resource Quotas
This chapter explains how to use the resource quotas feature of the N1 Grid Engine 6.1 softwareto limit resources by user, project, host, cluster queue, or parallel environment. Forconvenience, you can express these limits using user access lists, departments, or host groups.
This chapter contains the following information:
■ “Resource Quota Overview” on page 153■ “Managing Resource Quotas With QMON” on page 156■ “Monitoring Resource Quota Utilization From the Command Line” on page 157■ “Configuring Resource Quotas from the Command Line” on page 158■ “Example” on page 159
Resource Quota OverviewTo prevent users from consuming all available resources, the N1 Grid Engine 6.1 softwaresupports complex attributes that you can configure on a global, queue or host layer. While thislayered resource management approach is powerful, the approach leaves gaps that becomeparticularly important in large installations that consist of many different custom resources,user groups, and projects. The resource quota feature closes this gap by enabling you to managethese enterprise environments to the extent that you can control which project or departmenthas to abdicate when single bottleneck resources run out.
The resource quota feature enables you to apply limits to several kinds of resources, severalkinds of resource consumers, to all jobs in the cluster, and to combinations of consumers. Inthis context, resources are any defined complex attribute known by the N1 Grid Engineconfiguration. For more information about complex attributes, see the complex(5) man page.Resources can be slots, arch, mem_total, num_proc, swap_total, built-in resources, or anycustom-defined resource like compiler_license. Resource consumers are (per) users, (per)queues, (per) hosts, (per) projects, and (per) parallel environments.
6C H A P T E R 6
153

The resource quota feature provides a way for you to limit the resources that a consumer canuse at any time. This limitation provides an indirect method to prioritize users, departments,and projects. To define directly the priorities by which a user should obtain a resource, use theresource urgency and share-based policies described in “Configuring the Urgency Policy” onpage 127 and “Configuring the Share-Based Policy” on page 132.
To limit resources through the N1 Grid Engine 6.1 software, use the qquota and qconf
commands, or the QMON graphical interface. For more information, see the qquota(1) andqconf(1) man pages.
About Resource Quota SetsResource quota sets enable you to specify the maximum resource consumption for any jobrequests. Once you define the resource quota sets, the scheduler uses them to select the nextpossible jobs to be run by watching that the quotas will not be exceeded. The ultimate result ofsetting resource quotas is that only those jobs that do not exceed their resource quotas will bescheduled and run.
A resource quota set defines a maximum resource quota for a particular job request. All of theconfigured rule sets apply all of the time. If multiple resource quota sets are defined, the mostrestrictive set applies. Every resource quota set consists of one or more resource quota rules.These rules are evaluated in order, and the first rule that matches a specific request is used. Aresource quota set always results in at most one effective resource quota rule for a specificrequest.
A resource quota set consists of the following information:■ name – The name of the resource quota set.■ enabled – A boolean value that indicates whether the resource set should be considered in
scheduling decisions. If enabled is true, the resource quota set is active and will beconsidered for scheduling decisions. The default value is false.
■ description – An optional field that contains an arbitrary string that describes the set. Thedefault value is NONE.
■ limit rule– Every resource quota set needs at least one limit rule, which is contained in thelimit field. For example, the following limit rule limits all users together to 10 slots: limitusers * to slots=10. The limit rule contains the following information:■ name – An optional name for the rule. If used, the name must be unique within the
resource quota set.■ filter scope – The filter scope identifies the list of resource consumers to which the quota
applies. A resource consumer contains a keyword followed by a comma-separated list ofconsumers. Use the following keywords: users, projects, queues (cluster queues),hosts or pes (parallel environments). An example of a resource consumer would beusers {user1, user2}. An example of a filter scope might be users {user1, user2}
Resource Quota Overview
Sun N1 Grid Engine 6.1 Administration Guide • May 2007154

hosts *. This defined filter scope limits user1 and user2 to the maximum number ofthe configured limit independently from the host.To include an expandable list in the resource quota definition, use braces {}around theresource consumer list.To exclude one of a specific resource type from a list, use the exclamation point,!(sometimes referred to as the “not” symbol).
■ limit – An attribute-value pair that defines the actual limit for the resource. For example,virtual_free=2G. You can also combine pairs into a comma-separated list ofattribute-value pairs. For example, virtual_free=2G,swap_free=1.5G.
EXAMPLE 6–1 Sample Resource Quota Set
The following example resource quota set restricts user1 and user2 to two gigabytes of freevirtual space on each host in the host group lx_hosts.
{
name max_virtual_free_on_lx_hosts
description "resource quota for virtual_free restriction"
enabled true
limit users {user1,user2} hosts {@lx_host} to virtual_free=2g
}
Static and Dynamic Resource QuotasResource quota rules always define a maximum value of a resource that can be used. In mostcases, these values are static and equal for all matching filter scopes. Although you could defineseveral different rules to apply to different scopes, you would then have several rules that arenearly identical. Instead of duplicating rules, you can instead define a dynamic limit.
A dynamic limit uses an algebraic expression to derive the rule limit value. The algebraicformula can reference a complex attribute whose value is used to calculate the resulting limit.
EXAMPLE 6–2 Dynamic Limit Example
The following example illustrates the use of dynamic limits. Users are allowed to use 5 slots perCPU on all Linux hosts.
limit hosts {@linux_hosts} to slots=$num_proc*5
The value of num_proc is the number of processors on the host. The limit is calculated by theformula $num_proc*5, and can be different on each host. Expanding the example above, youcould have the following resulting limits:
■ On a host that has two CPUs, users can use ten slots to run jobs.■ On a host that has one CPU, users can use only five slots to run jobs.
Resource Quota Overview
Chapter 6 • Managing Resource Quotas 155

EXAMPLE 6–2 Dynamic Limit Example (Continued)
Instead of num_proc, you could use any other complex attribute known for a host as either aload value or a consumable resource.
Managing Resource Quotas With QMONThe following task explains how to set resource quotas using the QMON graphical interface.
▼ How to Set Resource Quotas Using QMONIn the QMON Main Control window, click the Resource Quota Configuration button.
Type the Resource Quota information in the text field.
Use the same syntax as you would for the qconf command, as illustrated in the following screenexample.
1
2
Managing Resource Quotas With QMON
Sun N1 Grid Engine 6.1 Administration Guide • May 2007156

Monitoring Resource Quota Utilization From the CommandLine
Use the qquota command to view information about the current N1 Grid Engine resourcequotas. The qquota command lists each resource quota that is being used at least once or thatdefines a static limit. For each applicable resource quota, qquota displays the followinginformation:
■ Resource quota rule – The name of the rule set name and the name or number of the rule■ Limit – The resource name, the number of available items for that resource, and the number
of used items for that resource■ Filter – The effective resource quota set filter, which results from applying the filter scope
explained in “About Resource Quota Sets” on page 154.
The qquota command includes several options that you can use to limit the information to aspecific host, cluster queue, project, parallel environments, resource or user. If you use no
Monitoring Resource Quota Utilization From the Command Line
Chapter 6 • Managing Resource Quotas 157

options, qquota displays information about resource sets that apply to the user name fromwhich you invoke the command. For more information, see the qquota(1) man page.
EXAMPLE 6–3 Sample qquotaCommand
The following example shows information about the resource quota sets that apply to useruser1
$ qquota -u user1
resource quota limit filter
--------------------------------------------------------------------------------
maxujobs/1 slots=5/20 -
max_linux/1 slots=5/5 hosts @linux
max_per_host/1 slots=1/2 users user1 hosts host2
Configuring Resource Quotas from the Command LineUse the qconf command to add, modify, or delete resource quota sets and rules.■ To add a resource quota set by invoking a text editor, use the following command:
$ qconf -arqs [name]
To add a set that is already defined in a file, use qconf -Arqs filename.■ To modify information about a resource quota set by invoking an editor, use the following
command:
$ qconf -mrqs [name]
To modify a set from information contained in a file, use qconf -Mrqs filename [name].
Note – If you use the -mrqs or -Mrqs option without a name, the new rule set replace all thecurrently configured rule sets.
■ To delete a resource quota set, use the following command:
$ qconf -drqs [name_list]■ To see a list of defined resource quota sets, use the following command:
$ qconf -srqsl
■ To view detailed information about a defined resource quota set, use the followingcommand:
$ qconf -srqs [name_list]
Configuring Resource Quotas from the Command Line
Sun N1 Grid Engine 6.1 Administration Guide • May 2007158

For more information about qconf, see the qconf(1) man page.
ExampleThe following example shows how you can use the various commands for resource quotas. Therule set shown in Example 6–4 defines the following limit:
■ All users together should never take more than 20 slots.■ All users should take at most 5 slots on all Linux hosts.■ Every user is restricted to one slot per Linux host except user MyUser who is restricted to
two slots, and all other slots on hosts are restricted to 0.■ The host group @linux includes host1 and host2.
To configure the rule set, use one of the following forms of the qconf command:
■ qconf -arqs <rule-set-name> for each rule set■ qconf -arqs to run all rule sets at once
After jobs are submitted for different users, the qstat command shows output similar to theexample shown in Example 6–5.
EXAMPLE 6–4 Rule Set
{
name maxujobs
limit users * to slots=20
}
{
name max_linux
limit users * hosts @linux to slots=5
}
{
name max_per_host
limit users MyUser hosts {@linux} to slots=2
limit users {*} hosts {@linux} to slots=1
limit users * hosts * to slots=0
}
EXAMPLE 6–5 qstatOutput
$ qstat
job-ID prior name user state submit/start at queue slots ja-task-ID
---------------------------------------------------------------------------------------------
Example
Chapter 6 • Managing Resource Quotas 159

EXAMPLE 6–5 qstatOutput (Continued)
27 0.55500 Sleeper MyUser r 02/21/2006 15:53:10 all.q@host1 1
29 0.55500 Sleeper MyUser r 02/21/2006 15:53:10 all.q@host1 1
30 0.55500 Sleeper MyUser r 02/21/2006 15:53:10 all.q@host2 1
26 0.55500 Sleeper MyUser r 02/21/2006 15:53:10 all.q@host2 1
28 0.55500 Sleeper user1 r 02/21/2006 15:53:10 all.q@host2 1
EXAMPLE 6–6 qquotaOutput
$ qquota # as user MyUser
resource quota rule limit filter
--------------------------------------------------------------------------------
maxujobs/1 slots=5/20 -
max_linux/1 slots=5/5 hosts @linux
max_per_host/1 slots=2/2 users MyUser hosts host2
max_per_host/1 slots=2/2 users MyUser hosts host1
$ qquota -h host2 # as user MyUser
resource quota limit filter
--------------------------------------------------------------------------------
maxujobs/1 slots=5/20 -
max_linux/1 slots=5/5 hosts @linux
max_per_host/1 slots=2/2 users MyUser hosts host2
$ qquota -u user1
resource quota limit filter
--------------------------------------------------------------------------------
maxujobs/1 slots=5/20 -
max_linux/1 slots=5/5 hosts @linux
max_per_host/1 slots=1/2 users user1 hosts host2
$ qquota -u *
resource quota limit filter
--------------------------------------------------------------------------------
maxujobs/1 slots=5/20 -
max_linux/1 slots=5/5 hosts @linux
max_per_host/1 slots=2/2 users MyUser hosts host1
max_per_host/1 slots=2/2 users MyUser hosts host2
max_per_host/1 slots=1/2 users user1 hosts host2
Example
Sun N1 Grid Engine 6.1 Administration Guide • May 2007160

Performance Considerations
Efficient Rule SetsTo provide the most efficient processing of jobs and resources in queues, put the mostrestrictive rule at the first position of a rule set. Following this convention helps the N1 GridEngine scheduler to restrict the amount of suited queue instances in a particularly efficientmanner, because the first rule is never shadowed by any subsequent rule in the same rule set andthus always stands for itself.
To illustrate this rule, consider an environment similar to the following:
■ Four queues named Q001-Q004■ Four managed resources named F001-F004■ Jobs that require a specific managed resource, such as F001, are constrained to run in the
associated queue, such as Q001■ Jobs are submitted into one of five projects P001-P005
In such an environment, you might define a single rule set as follows:
{
name 30_for_each_project
description "not more than 30 per project"
enabled TRUE
limit projects {*} queues Q001 to F001=30
limit projects {*} queues Q002 to F002=30
limit projects {*} queues Q003 to F003=30
limit projects {*} queues Q004 to F004=30
limit to F001=0,F002=0,F003=0,F004=0
}
The single rule set limits the utilization of each managed resource to 30 for each project andconstrains the jobs in eligible queues at the same time. This will work fine, but in a larger clusterwith many hosts, the single rule set would become the cause of slow job dispatching.
To help the N1 Grid Engine scheduler to foreclose as many queue instances as possible duringmatchmaking, it is better to use four separate rule sets.
{
name 30_for_each_project_in_Q001
description "not more than 30 per project of F001 in Q001"
enabled TRUE
limit queues !Q001 to F001=0
limit projects {*} queues Q001 to F001=30
Performance Considerations
Chapter 6 • Managing Resource Quotas 161

}
{
name 30_for_each_project_in_Q002
description "not more than 30 per project of F002 in Q002"
enabled TRUE
limit queues !Q002 to F002=0
limit projects {*} queues Q002 to F002=30
}
{
name 30_for_each_project_in_Q003
description "not more than 30 per project of F003 in Q003"
enabled TRUE
limit queues !Q003 to F003=0
limit projects {*} queues Q003 to F003=30
}
{
name 30_for_each_project_in_Q004
description "not more than 30 per project of F004 in Q004"
enabled TRUE
limit queues !Q004 to F004=0
limit projects {*} queues Q004 to F004=30
}
These four rule sets constrain the very same per project resource quotas as the single rule set.However, the four rule sets can be processed much more efficiently due to unsuitable queueinstances being shielded first . Consolidating these shields into a single resource quota set wouldnot be doable in this case.
Performance Considerations
Sun N1 Grid Engine 6.1 Administration Guide • May 2007162

Note – The purpose of the sample above is not to recommend one cluster queue per resource. Infact, the! opposite is true, because fewer queues finally always enable fewer, more powerfulshields as shown here:
{
name 30_for_each_project_in_Q001
description "not more than 30 per project of F001/F002 in Q001"
enabled TRUE
limit queues !Q001 to F001=0,F002=0
limit projects {*} queues Q001 to F001=30,F002=30
}
{
name 30_for_each_project_in_Q002
description "not more than 30 per project of F003/F004 in Q002"
enabled TRUE
limit queues !Q002 to F003=0,F004=0
limit projects {*} queues Q002 to F003=30,F004=30
}
In this example, the queues are consolidated from Q001-Q004 down to Q001-Q002. However,this actually increases overall cluster utilization and throughput.
Performance Considerations
Chapter 6 • Managing Resource Quotas 163

164

Managing Special Environments
This chapter describes how to manage and administer the following special environments:
■ Parallel environments■ Checkpointing environments
In addition to background information about these environments, this chapter includesdetailed instructions for accomplishing the following tasks:
■ “Configuring Parallel Environments With QMON” on page 166■ “Configuring Parallel Environments From the Command Line” on page 170■ “Configuring Checkpointing Environments With QMON” on page 176■ “Configuring Checkpointing Environments From the Command Line” on page 178
Configuring Parallel EnvironmentsA parallel environment (PE) is a software package that enables concurrent computing onparallel platforms in networked environments.
A variety of systems have evolved over the past years into viable technology for distributed andparallel processing on various hardware platforms. The following are two examples of the mostcommon message-passing environments:
■ PVM – Parallel Virtual Machine, Oak Ridge National Laboratories■ MPI – Message Passing Interface, the Message Passing Interface Forum
Public domain as well as hardware vendor-provided implementations exist for both tools.
All these systems show different characteristics and have segregative requirements. In order tohandle parallel jobs running on top of such systems, the grid engine system provides a flexible,powerful interface that satisfies various needs.
7C H A P T E R 7
165

The grid engine system provides means to run parallel jobs by means of the following programs:
■ Arbitrary message-passing environments such as PVM or MPI. See the PVM User's Guideand the MPI User's Guide for details.
■ Shared memory parallel programs on multiple slots, either in single queues or distributedacross multiple queues and across machines for distributed memory parallel jobs.
Any number of different parallel environment interfaces can be configured concurrently.
Interfaces between parallel environments and the grid engine system can be implemented ifsuitable startup and stop procedures are provided. The startup procedure and the stopprocedure are described in “Parallel Environment Startup Procedure” on page 172 and in“Termination of the Parallel Environment” on page 173, respectively.
Configuring Parallel Environments With QMON
On the QMON Main Control window, click the Parallel Environment Configuration button. TheParallel Environment Configuration dialog box appears.
Currently configured parallel environments are displayed under PE List.
To display the contents of a parallel environment, select it. The selected parallel environmentconfiguration is displayed under Configuration.
To delete a parallel environment, select it, and then click Delete.
To add a new parallel environment, click Add. To modify a parallel environment, select it, andthen click Modify.
When you click Add or Modify, the Add/Modify PE dialog box appears.
Configuring Parallel Environments
Sun N1 Grid Engine 6.1 Administration Guide • May 2007166

If you are adding a new parallel environment, type its name in the Name field. If you aremodifying a parallel environment, its name is displayed in the Name field.
In the Slots box, enter the total number of job slots that can be occupied by all parallelenvironment jobs running concurrently.
User Lists displays the user access lists that are allowed to access the parallel environment.Xuser Lists displays the user access lists that are not allowed to access the parallel environment.See “Configuring User Access Lists” on page 96 for more information about user access lists.
Click the icons at the right of each list to modify the content of the lists. The Select Access Listsdialog box appears.
The Start Proc Args and Stop Proc Args fields are optional. Use these fields to enter the preciseinvocation sequence of the parallel environment startup and stop procedures. See the sections“Parallel Environment Startup Procedure” on page 172 and “Termination of the ParallelEnvironment” on page 173, respectively. If no such procedures are required for a certain parallelenvironment, you can leave the fields empty.
The first argument is usually the name of the start or stop procedure itself. The remainingparameters are command-line arguments to the procedures.
Configuring Parallel Environments
Chapter 7 • Managing Special Environments 167

A variety of special identifiers, which begin with a $ prefix, are available to pass internal runtimeinformation to the procedures. The sge_pe(5) man page contains a list of all availableparameters.
The Allocation Rule field defines the number of parallel processes to allocate on each machinethat is used by a parallel environment. A positive integer fixes the number of processes for eachsuitable host. Use the special denominator $pe_slots to cause the full range of processes of ajob to be allocated on a single host (SMP). Use the denominators $fill_up and $round_robin
to cause unbalanced distributions of processes at each host. For more details about theseallocation rules, see the sge_pe(5) man page.
The Urgency Slots field specifies the method the grid engine system uses to assess the number ofslots that pending jobs with a slot range get. The assumed slot allocation is meaningful whendetermining the resource-request-based priority contribution for numeric resources. You canspecify an integer value for the number of slots. Specify min to use the slot range minimum.Specify max to use the slot range maximum. Specify avg to use the average of all numbersoccurring within the job's parallel environment range request.
The Control Slaves check box specifies whether the grid engine system generates parallel tasksor whether the corresponding parallel environment creates its own process. The grid enginesystem uses sge_execd and sge_shepherd to generate parallel tasks. Full control over slavetasks by the grid engine system is preferable, because the system provides the correctaccounting and resource control. However, this functionality is available only for parallelenvironment interfaces especially customized for the grid engine system. See “Tight Integrationof Parallel Environments and Grid Engine Software” on page 174 for more details.
The Job Is First Task check box is meaningful only if Control Slaves is selected. If you select JobIs First Task, the job script or one of its child processes acts as one of the parallel tasks of theparallel application. For PVM, you usually want the job script to be part of the parallelapplication, for example. If you clear the Job Is First Task check box, the job script initiates theparallel application but does not participate. For MPI, you usually do not want the job script tobe part of the parallel application, for example, when you use mpirun.
Click OK to save your changes and close the dialog box. Click Cancel to close the dialog boxwithout saving changes.
Displaying Configured Parallel Environment Interfaces With QMON
On the QMON Main Control window, click the Parallel Environment Configuration button. TheParallel Environment Configuration dialog box appears. See “Configuring ParallelEnvironments With QMON” on page 166 for more information.
The following example defines a parallel job to be submitted. The job requests that the parallelenvironment interface mpi (message passing interface) be used with from 4 to 16 processes. 16 ispreferable.
Configuring Parallel Environments
Sun N1 Grid Engine 6.1 Administration Guide • May 2007168

To select a parallel environment from a list of available parallel environments, click the buttonat the right of the Parallel Environment field. A selection dialog box appears.
You can add a range for the number of parallel tasks initiated by the job after the parallelenvironment name in the Parallel Environment field.
The qsub command corresponding to the parallel job specification described previously is asfollows:
% qsub -N Flow -p -111 -P devel -a 200012240000.00 -cwd \
-S /bin/tcsh -o flow.out -j y -pe mpi 4-16 \
-v SHARED_MEM=TRUE,MODEL_SIZE=LARGE \
-ac JOB_STEP=preprocessing,PORT=1234 \
-A FLOW -w w -r y -m s,e -q big_q\
-M [email protected],[email protected] \
flow.sh big.data
This example shows how to use the qsub -pe command to formulate an equivalent request. Theqsub(1) man page provides more details about the -pe option.
Configuring Parallel Environments
Chapter 7 • Managing Special Environments 169

Select a suitable parallel environment interface for a parallel job, keeping the followingconsiderations in mind:
■ Parallel environment interfaces can use different message-passing systems or no messagesystems.
■ Parallel environment interfaces can allocate processes on single or multiple hosts.■ Access to the parallel environment can be denied to certain users.■ Only a specific set of queues can be used by a parallel environment interface.■ Only a certain number of queue slots can be occupied by a parallel environment interface at
any point of time.
Ask the grid engine system administration for the available parallel environment interfaces bestsuited for your types of parallel jobs.
You can specify resource requirements along with your parallel environment request. Thespecifying of resource requirements further reduces the set of eligible queues for the parallelenvironment interface to those queues that fit the requirement. See “Defining ResourceRequirements” in Sun N1 Grid Engine 6.1 User’s Guide.
For example, assume that you run the following command:
% qsub -pe mpi 1,2,4,8 -l nastran,arch=osf nastran.par
The queues that are suitable for this job are queues that are associated with the parallelenvironment interface mpi by the parallel environment configuration. Suitable queues alsosatisfy the resource requirement specification specified by the qsub -l command.
Note – The parallel environment interface facility is highly configurable. In particular, theadministrator can configure the parallel environment startup and stop procedures to supportsite-specific needs. See the sge_pe(5) man page for details. Use the qsub -v and qsub -V
commands to pass information from the user who submits the job to the startup and stopprocedures. These two options export environment variables. If you are unsure, ask theadministrator whether you are required to export certain environment variables.
Configuring Parallel Environments From theCommand LineType the qconf command with appropriate options:
qconf options
Configuring Parallel Environments
Sun N1 Grid Engine 6.1 Administration Guide • May 2007170

The following options are available:
■ qconf -ap pe-name
The -ap option (add parallel environment) displays an editor containing a parallelenvironment configuration template. The editor is either the default vi editor or an editordefined by the EDITOR environment variable. pe-name specifies the name of the parallelenvironment. The name is already provided in the corresponding field of the template.Configure the parallel environment by changing the template and saving to disk. See thesge_pe(5) man page for a detailed description of the template entries to change.
■ qconf -Ap filename
The -Ap option (add parallel environment from file) parses the specified file filename andadds the new parallel environment configuration.
The file must have the format of the parallel environment configuration template.■ qconf -dp pe-name
The -dp option (delete parallel environment) deletes the specified parallel environment.■ qconf -mp pe-name
The -mp option (modify parallel environment) displays an editor containing the specifiedparallel environment as a configuration template. The editor is either the default vi editor oran editor defined by the EDITOR environment variable. Modify the parallel environment bychanging the template and saving to disk. See the sge_pe(5) man page for a detaileddescription of the template entries to change.
■ qconf -Mp filename
The -Mp option (modify parallel environment from file) parses the specified file filename andmodifies the existing parallel environment configuration.
The file must have the format of the parallel environment configuration template.■ qconf -sp pe-name
The -sp option (show parallel environment) prints the configuration of the specifiedparallel environment to standard output.
■ qconf -spl
The -spl option (show parallel environment list) lists the names of all currently configuredparallel environments.
Note – To run parallel jobs, you must also associate a queue with the PE. Use the queue_conf(5)attribute pe_list to identify the suited PEs. Then, to link the PE and queues, use either theQMON utility or the following form of the qconf command:
# qconf -mq <queue_name>
Configuring Parallel Environments
Chapter 7 • Managing Special Environments 171

Parallel Environment Startup ProcedureThe grid engine system starts the parallel environment by using the exec system call to invoke astartup procedure. The name of the startup executable and the parameters passed to thisexecutable are configurable from within the grid engine system.
An example for such a startup procedure for the PVM environment is contained in thedistribution tree of the grid engine system. The startup procedure is made up of a shell scriptand a C program that is invoked by the shell script. The shell script uses the C program to startup PVM cleanly. All other required operations are handled by the shell script.
The shell script is located under sge-root/pvm/startpvm.sh. The C program file is locatedunder sge-root/pvm/src/start_pvm.c.
Note – The startup procedure could have been a single C program. The use of a shell scriptenables easier customization of the sample startup procedure.
The example script startpvm.sh requires the following three arguments:
■ The path of a host file generated by grid engine software, containing the names of the hostsfrom which PVM is to be started
■ The host on which the startpvm.sh procedure is invoked■ The path of the PVM root directory, usually contained in the PVM_ROOT environment
variable
These parameters can be passed to the startup script as described in “Configuring ParallelEnvironments With QMON” on page 166. The parameters are among the parameters provided toparallel environment startup and stop scripts by the grid engine system during runtime. Therequired host file, as an example, is generated by the grid engine system. The name of the filecan be passed to the startup procedure in the parallel environment configuration by the specialparameter name $pe_hostfile. A description of all available parameters is provided in thesge_pe(5) man page.
The host file has the following format:
■ Each line of the file refers to a queue on which parallel processes are to run.■ The first entry of each line specifies the host name of the queue.■ The second entry specifies the number of parallel processes to run in this queue.■ The third entry denotes the queue.■ The fourth entry denotes a processor range to use in case of a multiprocessor machine.
Configuring Parallel Environments
Sun N1 Grid Engine 6.1 Administration Guide • May 2007172

This file format is generated by the grid engine system. The file format is fixed. Parallelenvironments that need a different file format must translate it within the startup procedure.See the startpvm.sh file. PVM is an example of a parallel environment that needs a different fileformat.
When the grid engine system starts the parallel environment startup procedure, the startupprocedure launches the parallel environment. The startup procedure should exit with a zeroexit status. If the exit status of the startup procedure is not zero, grid engine software reports anerror and does not start the parallel job.
Note – You should test any startup procedures first from the command line, without using thegrid engine system. Doing so avoids all errors that can be hard to trace if the procedure isintegrated into the grid engine system framework.
Termination of the Parallel EnvironmentWhen a parallel job finishes or is aborted, for example, by qdel, a procedure to halt the parallelenvironment is called. The definition and semantics of this procedure are similar to theprocedures described for the startup program. The stop procedure can also be defined in aparallel environment configuration. See, for example, “Configuring Parallel EnvironmentsWith QMON” on page 166.
The purpose of the stop procedure is to shut down the parallel environment and to reap allassociated processes.
Note – If the stop procedure fails to clean up parallel environment processes, the grid enginesystem might have no information about processes that are running under parallelenvironment control. Therefore the stop procedure cannot clean up these processes. The gridengine software, of course, cleans up the processes directly associated with the job script that thesystem has launched.
The distribution tree of the grid engine system also contains an example of a stop procedure forthe PVM parallel environment. This example resides under sge-root/pvm/stoppvm.sh. It takesthe following two arguments:
■ The path to the host file generated by the grid engine system■ The name of the host on which the stop procedure is started
Similar to the startup procedure, the stop procedure is expected to return a zero exit status onsuccess and a nonzero exit status on failure.
Configuring Parallel Environments
Chapter 7 • Managing Special Environments 173

Note – You should test any stop procedures first from the command line, without using the gridengine system. Doing so avoids all errors that can be hard to trace if the procedure is integratedinto the grid engine system framework.
Tight Integration of Parallel Environments and GridEngine Software“Configuring Parallel Environments With QMON” on page 166 mentions that using sge_execdand sge_shepherd to create parallel tasks offers benefits over parallel environments that createtheir own parallel tasks. The UNIX operating system allows reliable resource control only forthe creator of a process hierarchy. Features such as correct accounting, resource limits, andprocess control for parallel applications, can be enforced only by the creator of all parallel tasks.
Most parallel environments do not implement these features. Therefore parallel environmentsdo not provide a sufficient interface for the integration with a resource management system likethe grid engine system. To overcome this problem, the grid engine system provides anadvanced parallel environment interface for tight integration with parallel environments. Thisparallel environment interface transfers the responsibility for creating tasks from the parallelenvironment to the grid engine software.
The distribution of the grid engine system contains two examples of such a tight integration,one for the PVM public domain version, and one for the MPICH MPI implementation fromArgonne National Laboratories. The examples are contained in the directories sge-root/pvm andsge-root/mpi, respectively. The directories also contain README files that describe the usage andany current restrictions. Refer to those README files for more details.
For the purpose of comparison, the sge-root/mpi/sunhpc/loose-integration directorycontains a loose integration sample with Sun HPC ClusterToolsTM software, and thesge-root/mpi directory contain a loosely integrated variant of the interfaces for comparison.
Note – The performance of a tight integration with a parallel environment is an advanced taskthat can require expert knowledge of the parallel environment and the grid engine systemparallel environment interface. You might want to contact your Sun support representativedistributor for assistance.
Configuring Parallel Environments
Sun N1 Grid Engine 6.1 Administration Guide • May 2007174

Configuring Checkpointing EnvironmentsCheckpointing is a facility that does the following tasks:
1. Freezes the status of an running job or application
2. Saves this status (the checkpoint) to disk
3. Restarts the job or application from the checkpoint if the job or application has otherwisenot finished, for example, due to a system shutdown
If you move a checkpoint from one host to another host, checkpointing can migrate jobs orapplications in a cluster without significant loss of resources. Hence, dynamic load balancingcan be provided with the help of a checkpointing facility.
The grid engine system supports two levels of checkpointing:
■ User-level checkpointing.
At this level, providing the checkpoint generation mechanism is entirely the responsibilityof the user or the application. Examples of user-level checkpointing include:■ The periodic writing of restart files that are encoded in the application at prominent
algorithmic steps, combined with proper processing of these files when the application isrestarted.
■ The use of a checkpoint library that must be linked to the application and that therebyinstalls a checkpointing mechanism.
Note – A variety of third-party applications provides an integrated checkpoint facilitythat is based on the writing of restart files. Checkpoint libraries are available fromhardware vendors or from the public domain. Refer to the Condor project of theUniversity of Wisconsin, for example.
■ Kernel-level transparent checkpointing.
This level of checkpointing must be provided by the operating system, or by enhancementsto it, that can be applied to any job. No source code changes or relinking of your applicationneed to be provided to use kernel-level checkpointing.
Kernel-level checkpointing can be applied to complete jobs, that is, the process hierarchycreated by a job. By contrast, user-level checkpointing is usually restricted to single programs.Therefore the job in which such programs are embedded needs to properly handle cases wherethe entire job gets restarted.
Kernel-level checkpointing, as well as checkpointing based on checkpointing libraries, canconsume many resources. The complete virtual address space that is in use by the job or
Configuring Checkpointing Environments
Chapter 7 • Managing Special Environments 175

application at the time of the checkpoint must be dumped to disk. By contrast, user-levelcheckpointing based on restart files can restrict the data that is written to the checkpoint on theimportant information only.
About Checkpointing EnvironmentsThe grid engine system provides a configurable attribute description for each checkpointingmethod used. Different attribute descriptions reflect the different checkpointing methods andthe potential variety of derivatives from these methods on different operating systemarchitectures.
This attribute description is called a checkpointing environment. Default checkpointingenvironments are provided with the distribution of the grid engine system and can be modifiedaccording to the site's needs.
New checkpointing methods can be integrated in principal. However, the integration of newmethods can be a challenging task. This integration should be performed only by experiencedpersonnel or by your grid engine system support team.
Configuring Checkpointing Environments With QMON
On the QMON Main Control window, click the Checkpoint Configuration button. TheCheckpointing Configuration dialog box appears.
Viewing Configured Checkpointing EnvironmentsTo view previously configured checkpointing environments, select one of the checkpointingenvironment names listed under Checkpoint Objects. The corresponding configuration isdisplayed under Configuration.
Adding a Checkpointing EnvironmentIn the Checkpointing Configuration dialog box, click Add. The Add/Modify Checkpoint Objectdialog box appears, along with a template configuration that you can edit.
Configuring Checkpointing Environments
Sun N1 Grid Engine 6.1 Administration Guide • May 2007176

Fill out the template with the requested information.
Click OK to register your changes with sge_qmaster. Click Cancel to close the dialog boxwithout saving changes.
Modifying Checkpointing EnvironmentsIn the Checkpoint Objects list, select the name of the configured checkpointing environmentyou want to modify, and then click Modify. The Add/Modify Checkpoint Object dialog boxappears, along with the current configuration of the selected checkpointing environment.
The Add/Modify Checkpoint Object dialog box enables you to change the followinginformation:
■ Name■ Checkpoint, Migration, Restart, and Clean command strings■ Directory where checkpointing files are stored■ Occasions when checkpoints must be initiated■ Signal to send to job or application when a checkpoint is initiated
See the checkpoint(5) man page for details about these parameters.
In addition, you must define the Interface to use. The Interface is also called checkpointingmethod. From the Interface list under Name, select an Interface. See the checkpoint(5) manpage for details about the meaning of the different interfaces.
Note – For the checkpointing environments provided with the distribution of the grid enginesystem, change only the Name parameter and the Checkpointing Directory parameter.
Configuring Checkpointing Environments
Chapter 7 • Managing Special Environments 177

Click OK to register your changes with sge_qmaster. Click Cancel to close the dialog boxwithout saving changes.
Deleting Checkpointing EnvironmentsTo delete a configured checkpointing environment, select it, and then click Delete.
Configuring Checkpointing Environments From theCommand LineTo configure the checkpointing environment from the command line, type the qconfcommand with the appropriate options.
The following options are available:■ qconf -ackpt ckpt-name
The -ackpt option (add checkpointing environment) displays an editor containing acheckpointing environment configuration template. The editor is either the default vieditor or an editor corresponding to the EDITOR environment variable. The parameterckpt-name specifies the name of the checkpointing environment. The parameter is alreadyprovided in the corresponding field of the template. Configure the checkpointingenvironment by changing the template and saving to disk. See the checkpoint(5) man pagefor a detailed description of the template entries to be changed.
■ qconf -Ackpt filenameThe -Ackpt option (add checkpointing environment from file) parses the specified file andadds the new checkpointing environment configuration.The file must have the format of the checkpointing environment template.
■ qconf -dckpt ckpt-nameThe -dckpt option (delete checkpointing environment) deletes the specified checkpointingenvironment.
■ qconf -mckpt ckpt-nameThe -mckpt option (modify checkpointing environment) displays an editor containing thespecified checkpointing environment as a configuration template. The editor is either thedefault vi editor or an editor corresponding to the EDITOR environment variable. Modifythe checkpointing environment by changing the template and saving to disk. See thecheckpoint(5) man page for a detailed description of the template entries to be changed.
■ qconf -Mckpt filenameThe -Mckpt option (modify checkpointing environment from file) parses the specified fileand modifies the existing checkpointing configuration.The file must have the format of the checkpointing environment template.
Configuring Checkpointing Environments
Sun N1 Grid Engine 6.1 Administration Guide • May 2007178

■ qconf -sckpt ckpt-nameThe -sckpt option (show checkpointing environment) prints the configuration of thespecified checkpointing environment to standard output.
■ qconf -sckptl
The -sckptl option (show checkpointing environment list) displays a list of the names of allcheckpointing environments currently configured.
Configuring Checkpointing Environments
Chapter 7 • Managing Special Environments 179

180

Other Administrative Tasks
This chapter describes how to use files and scripts to add or modify grid engine system objectssuch as queues, hosts, and environments.
This chapter includes the following sections:■ “Gathering Accounting and Reporting Statistics” on page 181■ “Backing Up the Grid Engine System Configuration” on page 187■ “Using Files and Scripts for Administration Tasks” on page 191
Gathering Accounting and Reporting StatisticsThe grid engine system provides two kinds of reporting and accounting facilities:■ Accounting and Reporting Console (ARCo)■ qacct command and the accounting file
Report Statistics (ARCo)You can use the optional Accounting and Reporting Console (ARCo) to generate liveaccounting and reporting data from the grid engine system and store the data in the reportingdatabase, which is a standard SQL database. ARCo supports the following SQL databasesystems:
■ PostgreSQL■ Oracle■ MySQL
ARCo also provides a web-based tool for generating information queries on the reportingdatabase and for retrieving the results in tabular or graphical form. ARCo enables you to storequeries for later use, to run predefined queries, and to run queries in batch mode. For moreinformation about how to use ARCo, see Chapter 5, “Accounting and Reporting,” in Sun N1
8C H A P T E R 8
181
Grid Engine 6.1 User’s Guide. For information about how to install ARCo, see Chapter 8,“Installing the Accounting and Reporting Console,” in Sun N1 Grid Engine 6.1 InstallationGuide.
Raw reporting data is generated by sge_qmaster. This raw data is stored in a reporting file. Thedbwriter program reads the raw data in the reporting file and writes it to the SQL reportingdatabase, where it can be accessed by ARCo.
About the dbwriterProgramThe dbwriter program performs the following tasks:
■ Reads raw data from the reporting file and writes this raw data to the reporting database.■ Calculates derived values. You can configure which values to calculate, as well as the rules
that govern the calculations.■ Deletes outdated data. You can configure how long to keep data.
When dbwriter starts up, it calculates derived values. dbwriter also deletes outdated records atstartup. If dbwriter runs in continuous mode, dbwriter continues to calculate derived valuesand to delete outdated records at hourly intervals, or at whatever interval you specify.
You can specify in an XML file the values that you want to calculate and the records that youwant to delete. Use the -calculation option of the dbwriter command to specify the path tothis XML file.
For detailed information about calculating derived values, see “Calculating Derived ValuesWith dbwriter” on page 183.
For detailed information about deleting outdated records, see “Deleting Outdated RecordsWith dbwriter” on page 186.
Enabling the Reporting FileThe reporting file contains the following types of data:
■ Host load values and consumable resources■ Queue consumable resources■ Job logging■ Job accounting■ Share-tree usage
When the grid engine system is first installed, the reporting file is disabled. To use ARCo, youmust enable the reporting file for the cluster. Once enabled, the reporting file will be generatedby sge_qmaster. By default, the reporting file is located in sge-root/cell/common. You canchange the default with the -reporting option of the dbwriter command.
Gathering Accounting and Reporting Statistics
Sun N1 Grid Engine 6.1 Administration Guide • May 2007182

For information about configuring the generation of the reporting file, see thereporting_params parameter of the sge_conf(5) man page, and the report_variablesparameter of the host_conf(5) man page.
To enable the reporting file with QMON, on the Main Control window click the ClusterConfiguration button, select the global host, and then click Modify.
On the Cluster Settings dialog box, click the Advanced Settings tab.
In the Reporting Parameters field, set the following parameters:
■ Set accounting to true. true is the default value.■ Set reporting to true.■ Set flush_time to 00:00:15. 00:00:15 is the default value.■ Set joblog to true.■ Set sharelog to 00:00:00. 00:00:00 is the default value.
To enable the reporting file from the command line, use the qconf –mconf command to set thereporting_params attributes, as described in the preceding paragraph.
Once the reporting file is enabled, the dbwriter can read raw data from the reporting file andwrite it to the reporting database.
For more information about configuring the reporting file, see the reporting(5) man page. Forcomplete details about installing and setting up ARCo, see Chapter 8, “Installing theAccounting and Reporting Console,” in Sun N1 Grid Engine 6.1 Installation Guide.
Calculating Derived Values With dbwriter
The rules for calculating derived values are specified in a derived tag, which is a sub tag of theDbWriterConfig tag. The following table lists the attributes of the derived tag:
Attribute Description
object The object for which data is aggregated. The object is one of the following:■ host
■ queue
■ project
■ department
■ user
■ group
interval The time range specifying how often to calculate the derived values. The timerange is one of the following:■ hour
■ day
■ month
Gathering Accounting and Reporting Statistics
Chapter 8 • Other Administrative Tasks 183

■ year
variable The name of the variable to hold the calculated data.
The following table lists the subelements of the derived tag:
sql The SQL statement that calculates the derived values. The statement must produce thefollowing columns:■ time_start – Together with time_end, specifies the time period for the calculated
value■ time_end
■ value – The calculated derived value
The SQL statement can contain the following placeholders. dbwriter replaces theplaceholders for each query, based on a rule:■ __time_start__ – Start time for the query. dbwriter searches for the last
previously calculated derived value from this rule, and uses this timestamp as thestart time for the next query.
■ __time_end__ – End time for the query. This timestamp specifies the end of thelast passed time range. For example, if the time range is day, and if derived valuesare calculated at 00:30, 00:00 is taken as time_end.
■ __key_0__, __key_1__, . . . , __key_n__ – Components of the primary key for thespecified object type. For example, the sge_hosts table has the primaryh_hostname. If a rule is processed for the host object type, one query is executedper entry in the sge_hosts table, the __key_0__ placeholder in the SQL statementis replaced by the hostname.
The sge_queue table has a composed primary key that is made up of q_qname andq_hostname.
auto dbwriter generates the SQL statement for the calculation of derived values.
The autogenerated SQL statement looks like the following template:
SELECT time_start, time_end, <function>(<value_field>) as value
FROM ( SELECT TRUNC( <timestart_field>, <interval> ) as time_start
TRUNC( <timestart_field>, <interval> ) +
INTERVAL ’1’ <interval> as time_end,
<value_field>
FROM <object value table>
WHERE <primary key field 0> = __key_0__
AND <primary key field 1> = __key_1__
AND . . .
AND <parent key field> =
(SELECT <parent key field> FROM <parent table>
Gathering Accounting and Reporting Statistics
Sun N1 Grid Engine 6.1 Administration Guide • May 2007184

WHERE <parent filter> )
AND <timestart_field> <= {ts __time_start__ }
AND <timeend_field> > {ts __time_end__ }
GROUP BY time_start, time_end
The SQL template parameters are as follows:
Parameter Description
<function> Aggregate function for calculating the derived value. Comes from thefunction attribute of the auto tag in the XML file.
<value_field> Depends on the object of the derived value.
<timestart_field> Depends on the object of the derived value.
<timeend_field> Depends on the object of the derived value.
<interval> Comes from the interval attribute of the derived tag
<object value table> Name of the database table where the values are stored. Depends onthe object (host => host_values, user => user_values, . . .)
<primary key field n> Primary key that is necessary to join the value table to the parenttable. Depends on the object.
<parent key field> Name of the field that holds the ID of the parent. Depends on theobject.
<parent table> Name of the parent database table. Depends on the object (host =>host, user => user)
<parent filter> Filter for the parent table. A derived value for each entry of the parenttable is calculated, for example, u_user = 'user1').
Here is an example of an autogenerated SQL statement:
<derive object="host" interval="day" variable="d_load">
<auto function="AVG" variable="h_load" />
</derive>
SELECT time_start, time_end, AGE(hv_dvalue)
FROM ( SELECT TRUNC( hv_time_start, ’day’ ) as time_start,
TRUNC( hv_time_start, ’day’ ) +
INTERVAL ’1’ day as time_end,
hv_dvalue
FROM sge_host_values
WHERE hv_variable = ’h_load’ AND
hv_parent =
(SELECT h_id FROM sge_host
WHERE h_hostname = ’foo.bar’) AND
Gathering Accounting and Reporting Statistics
Chapter 8 • Other Administrative Tasks 185

hv_time_start <= {ts ’2004-05-21 00:00:00.0’} AND
hv_time_end > {ts ’2004-05-17 00:00:00.0’} )
GROUP BY time_start, time_end
Deleting Outdated Records With dbwriter
To delete outdated records in the reporting database, you must specify a deletion rule in thedelete tag. The following table lists the attributes of the delete tag:
Attribute Description
scope The type of data to delete. Valid entries are the following:■ job
■ job_log
■ share_log
■ host_values
■ queue_values
■ project_values
■ department_values
■ user_values
■ group_values
time_range The unit of time_amount:
time_amount Number of units (time_range) during which a record is to be kept.
The following table lists a subelement of the delete tag:
sub_scope For certain scopes, a subscope can be configured. The subscope specifies anadditional condition for deletion. A subscope can be configured for all *_valuesscopes and for the share_log scope.
If a subscope is configured for a *_values rule, it contains a list of variables todelete, separated by spaces.
If a subscope is specified for the share_log, it contains a list of share-tree nodesto delete, separated by spaces.
If subscope are used, you should always have a fallback rule without subscope,which will delete all objects that are not explicitly named by the subscope.
Here is an example of a delete tag:
<?xml version="1.0" encoding="UTF-8"?>
<DbWriterConfig>
<!-- keep host values for 2 years -->
<delete scope="host_values" time_range="year" time_amount="2"/>
Gathering Accounting and Reporting Statistics
Sun N1 Grid Engine 6.1 Administration Guide • May 2007186

<!-- keep queue values one month -->
<delete scope="queue_values" time_range="month" time_amount="1">
<sub_scope>slots</sub_scope>
<sub_scope>state</sub_scope>
</delete>
</DbWriterConfig>
Accounting and Usage Statistics (qacct)You can use the qacct command to generate alphanumeric accounting statistics. If you specifyno options, qacct displays the aggregate usage on all machines of the cluster, as generated by alljobs that have finished and that are contained in the cluster accounting filesge-root/cell/common/accounting. In this case, qacct reports three times, in seconds:
■ Real time – Wall clock time, which is the time between when the job starts and when itfinishes
■ User time – CPU time spent in user processes■ System time – CPU time spent in system calls
Several options are available for reporting accounting information about queues, users, and thelike. In particular, you can use the qacct -l command to request information about all jobsthat have finished and that match a resource requirement specification.
Use the qacct -j [job-id | job-name] command to get direct access to the complete resourceusage information stored by the grid engine system. This information includes the informationthat is provided by the getrusage system call.
The -j option reports the resource usage entry for the jobs with job-id or with job-name. If noargument is given, all jobs contained in the referenced accounting file are displayed. If a job IDis specified, and if more than one entry is displayed, one of the following is true:
■ Job ID numbers have wrapped around. The range for job IDs is 1 through 999999.■ A checkpointing job that migrated is displayed.
See the qacct(1) man page for more information.
Backing Up the Grid Engine System ConfigurationYou can back up your grid engine system configuration files automatically. The automaticbackup process uses a configuration file called backup_template.conf. The backupconfiguration file is located by default insge-root/util/install_modules/backup_template.conf.
Backing Up the Grid Engine System Configuration
Chapter 8 • Other Administrative Tasks 187

The backup configuration file must define the following elements:
■ The grid engine system root directory.■ The grid engine system cell directory.■ The grid engine system backup directory.■ Type of backup. Your backup can be just the grid engine system configuration files, or the
backup can be a compressed tar file that contains the configuration files.■ The file name of the backup file.
The backup template file looks like the following example:
##################################################
# Autobackup Configuration File Template
##################################################
# Please, enter your SGE_ROOT here (mandatory)
SGE_ROOT=""
# Please, enter your SGE_CELL here (mandatory)
SGE_CELL=""
# Please, enter your Backup Directory here
# After backup you will find your backup files here (mandatory)
# The autobackup will add a time /date combination to this dirname
# to prevent an overwriting!
BACKUP_DIR=""
# Please, enter true to get a tar/gz package
# and false to copy the files only (mandatory)
TAR="true"
# Please, enter the backup file name here. (mandatory)
BACKUP_FILE="backup.tar"
To start the automatic backup process, type the following command on the sge_qmaster host:
inst_sge -bup -auto backup-conf
backup-conf is the full path to the backup configuration file.
Note – You do not need to shut down any of the grid engine system daemons before you back upyour configuration files.
Backing Up the Grid Engine System Configuration
Sun N1 Grid Engine 6.1 Administration Guide • May 2007188

Your backup is created in the directory specified by BACKUP_FILE. A backup log file calledinstall.pid is also created in this directory. pid is the process ID number.
▼ How to Perform a Manual BackupType the following command to start a manual backup:inst_sge -bup
Enter the <sge-root> directory or use the default.SGE Configuration Backup
------------------------
This feature does a backup of all configuration you made
within your cluster.
Please enter your SGE_ROOT directory.
Default: [/home/user/ts/u10]
Enter the <sge-cell> name or use the default.Please enter your SGE_CELL name. Default: [default]
Enter the backup destination directory or use the default.Where do you want to save the backupfiles?
Default: [/home/user/ts/u10/backup]
Choose whether to create a compressed tar backup file.If you are using different tar versions (gnu tar/ solaris tar), this option can make some trouble.In some cases the tar packages may be corrupt. Using the same tar binary for packing andunpacking works without problems.Shall the backup function create a compressed tarpackage with your files? (y/n) [y] >>
Enter file name of backup file, default is given.... starting with backup
Please enter a filename for your backupfile. Default: [backup.tar] >>
Backup will be perfomed, info output is printed.2007-01-11_22_43_22.dump
bootstrap
qtask
settings.sh
act_qmaster
1
2
3
4
5
6
7
Backing Up the Grid Engine System Configuration
Chapter 8 • Other Administrative Tasks 189

sgemaster
settings.csh
sgeexecd
jobseqnum
... backup completed
All information is saved in
[/home/user/ts/u10/backup/backup.tar.gz[Z]]
▼ How to Restore from a BackupShutdown the qmaster daemon before you start the restore process.The spooling database willbe changed during restore which might lead to dataloss, if restore and qmaster are trying toaccess the same data.
Type the following command to start the restore process:inst_sge -rst
Read the messages on the screen and respond.SGE Configuration Restore
-------------------------
This feature restores the configuration from a backup you made
previously.
Hit, <ENTER> to continue!
Enter the <sge-root> directory or use the default.Please enter your SGE_ROOT directory.
Default: [/home/user/ts/u10]
Enter the <sge-cell> name or use the default.Please enter your SGE_CELL name. Default: [default]
Confirm the backup file format.The backup file can be in a format other than a compressed tar file.Is your backupfile in tar.gz[Z] format? (y/n) [y]
Enter the full path to the backup file.Please enter the full path and name of your backup file.
Default: [/home/user/ts/u10/backup/backup.tar.gz]
Before You Begin
1
2
3
4
5
6
Backing Up the Grid Engine System Configuration
Sun N1 Grid Engine 6.1 Administration Guide • May 2007190

Verify the spooling database information.The restore feature unpacks the backup file, and reads system information. To prevent data loss,you need to conform that the correct spooling database is detected.Copying backupfile to /tmp/bup_tmp_22_51_40
/home/user/ts/u10/backup/backup.tar.gz
2007-01-11_22_43_22.dump
bootstrap
qtask
settings.sh
act_qmaster
sgemaster
settings.csh
sgeexecd
jobseqnum
Spooling Method: berkeleydb detected!
The path to your spooling db is [/tmp/dom/spooldb]
If this is correct hit <ENTER> to continue, else enter the path. >>
Restart qmaster.
Using Files and Scripts for Administration TasksThis section describes how to use files and scripts to add or modify grid engine system objectssuch as queues, hosts, and environments.
You can use the QMON graphical user interface to perform all administrative tasks in the gridengine system. You can also administer a grid engine system through commands you type at ashell prompt and call from within shell scripts. Many experienced administrators find thatusing files and scripts is a more flexible, quicker, and more powerful way to change settings.
Using Files to Add or Modify ObjectsUse the qconf command with the following options to add objects according to specificationsyou create in a file:
qconf -Ae
qconf -Aq
qconf -Au
7
8
Using Files and Scripts for Administration Tasks
Chapter 8 • Other Administrative Tasks 191

qconf -Ackpt
qconf -Ap
Use the qconf command with the following options to modify objects according tospecifications you create in a file:
qconf -Me
qconf -Mq
qconf -Mu
qconf -Mckpt
qconf -Mp
The –Ae and –Me options add or modify execution hosts.
The –Aq and –Mq options add or modify queues.
The –Au and –Mu options add or modify usersets.
The –Ackpt and –Mckpt options add or modify checkpointing environments.
The –Ap and –Mp options add or modify parallel environments.
Use these options in combination with the qconf –s command to take an existing object andmodify it. You can then update the existing object or create a new object.
EXAMPLE 8–1 Modifying the Migration Command of a Checkpoint Environment
#!/bin/sh
# ckptmod.sh: modify the migration command
# of a checkpointing environment
# Usage: ckptmod.sh <checkpoint-env-name> <full-path-to-command>
TMPFILE=tmp/ckptmod.$$
CKPT=$1
MIGMETHOD=$2
qconf -sckpt $CKPT | grep -v ’^migr_command’ > $TMPFILE
echo "migr_command $MIGMETHOD" >> $TMPFILE
qconf -Mckpt $TMPFILE
rm $TMPFILE
Using Files and Scripts for Administration Tasks
Sun N1 Grid Engine 6.1 Administration Guide • May 2007192

Using Files to Modify Queues, Hosts, andEnvironmentsYou can modify individual queues, hosts, parallel environments, and checkpointingenvironments from the command line. Use the qconf command in combination with othercommands.
■ If you have already prepared a file, type the qconf command with appropriate options:
qconf -Me
qconf -Mq
qconf -Mckpt
qconf -Mp
■ If you have not prepared a file, type the qconf command with appropriate options:
qconf -me
qconf -mq
qconf -mckpt
qconf -mp
The –Me and –me options modify execution hosts.
The –Mq and –mq options modify queues.
The –Mckpt and –mckpt options modify checkpointing environments.
The –Mp and –mp options modify parallel environments.
The difference between the uppercase –M options and the lowercase –m options controls theqconf command's result. Both –M and –m mean modify, but the uppercase –M denotesmodification from an existing file, whereas the lowercase –m does not. Instead, the lowercase –mopens a temporary file in an editor. When you save any changes you make to this file and exitthe editor, the system immediately reflects those changes.
However, when you want to change many objects at once, or you want to change objectconfiguration noninteractively, use the qconf command with the options that modify objectattributes (such as –Aattr, –Mattr, and so forth).
The following commands make modifications according to specifications in a file:
qconf -Aattr {queue | exechost | pe | ckpt} filenameqconf -Mattr {queue | exechost | pe | ckpt} filenameqconf -Rattr {queue | exechost | pe | ckpt} filenameqconf -Dattr {queue | exechost | pe | ckpt} filename
The following commands make modifications according to specifications on the command line:
Using Files and Scripts for Administration Tasks
Chapter 8 • Other Administrative Tasks 193

qconf -aattr {queue | exechost | pe | ckpt} attribute value {queue-list | host-list}qconf -mattr {queue | exechost | pe | ckpt} attribute value {queue-list | host-list}qconf -rattr {queue | exechost | pe | ckpt} attribute value {queue-list | host-list}qconf -dattr {queue | exechost | pe | ckpt} attribute value {queue-list | host-list}
The –Aattr and –aattr options add attributes.
The –Mattr and –mattr options modify attributes.
The –Rattr and –rattr options replace attributes.
The –Dattr and –dattr options delete attributes.
filename is the name of a file that contains attribute-value pairs.
attribute is the queue or host attribute that you want to change.
value is the value of the attribute you want to change.
The –aattr, –mattr, and –dattr options enable you to operate on individual values in a list ofvalues. The –rattr option replaces the entire list of values with the new one that you specify,either on the command line or in the file.
EXAMPLE 8–2 Changing the Queue Type
The following command changes the queue type of tcf27–e019.q to batch only:
% qconf -rattr queue qtype batch tcf27-e019.q
EXAMPLE 8–3 Modifying the Queue Type and the Shell Start Behavior
The following command uses the file new.cfg to modify the queue type and the shell startbehavior of tcf27–e019.q:
% cat new.cfg
qtype batch interactive checkpointing
shell_start_mode unix_behavior
% qconf -Rattr queue new.cfg tcf27-e019.q
EXAMPLE 8–4 Adding Resource Attributes
The following command adds the resource attribute scratch1 with a value of 1000M and theresource attribute long with a value of 2:
% qconf -rattr exechost complex_values scratch1=1000M,long=2 tcf27-e019
Using Files and Scripts for Administration Tasks
Sun N1 Grid Engine 6.1 Administration Guide • May 2007194

EXAMPLE 8–5 Attaching a Resource Attribute to a Host
The following command attaches the resource attribute short to the host with a value of 4:
% qconf -aattr exechost complex_values short=4 tcf27-e019
EXAMPLE 8–6 Changing a Resource Value
The following command changes the value of scratch1 to 500M, leaving other valuesunchanged:
% qconf -mattr exechost complex_values scratch-=500M tcf27-e019
EXAMPLE 8–7 Deleting a Resource Attribute
The following command deletes the resource attribute long:
% qconf -dattr exechost complex_values long tcf27-e019
EXAMPLE 8–8 Adding a Queue to the List of Queues for a Checkpointing Environment
The following command adds tcf27–b011.q to the list of queues for the checkpointingenvironment sph:
% qconf -aattr ckpt queue_list tcf27-b011.q sph
EXAMPLE 8–9 Changing the Number of Slots in a Parallel Environment
The following command changes the number of slots in the parallel environment make to 50:
% qconf -mattr pe slots 50 make
Targeting Queue Instances with the qselectCommandThe qselect command outputs a list of queue instances. If you specify options, qselect listsonly the queue instances that match the criteria you specify. You can use qselect incombination with the qconf command to target specific queue instances that you want tomodify.
Using Files and Scripts for Administration Tasks
Chapter 8 • Other Administrative Tasks 195

EXAMPLE 8–10 Listing Queues
The following command lists all queue instances on Linux machines:
% qselect -l arch=glinux
The following command lists all queue instances on machines with two CPUs:
% qselect -l num_proc=2
The following command lists all queue instances on all four-CPU 64–bit Solaris machines:
% qselect -l arch=solaris64,num_proc=4
The following command lists queue instances that provide an application license. The queueinstances were previously configured.
% qselect -l app_lic=TRUE
You can combine qselect with qconf to do wide-reaching changes with a single commandline. To do this, put the entire qselect command inside backward quotation marks (‘ ‘) anduse it in place of the queue-list variable on the qconf command line.
EXAMPLE 8–11 Using qselect in qconfCommands
The following command sets the prolog script to sol_prolog.sh on all queue instances onSolaris machines:
% qconf -mattr queue prolog /usr/local/scripts/sol_prolog.sh ‘qselect -l arch=solaris‘
The following command sets the attribute fluent_license to two on all queue instances ontwo-processor systems:
% qconf -mattr queue complex_values fluent_license=2 ‘qselect -l num_proc=2‘
The most flexible way to automate the configuration of queue instances is to use the qconfcommand with the qselect command. With the combination of these commands, you canbuild up your own custom administration scripts.
Using Files and Scripts for Administration Tasks
Sun N1 Grid Engine 6.1 Administration Guide • May 2007196

Using Files to Modify a Global Configuration or theSchedulerTo change a global configuration, use the qconf –mconf command. To change the scheduler,use the qconf –msconf command.
Both of these commands open a temporary file in an editor. When you exit the editor, anychanges that you save to this temporary file are processed by the system and take effectimmediately. The editor used to open the temporary file is the editor specified by the EDITORenvironment variable. If this variable is undefined, the vi editor is used by default.
You can use the EDITOR environment variable to automate the behavior of the qconf command.Change the value of this variable to point to an editor program that modifies a file whose nameis given by the first argument. After the editor modifies the temporary file and exits, the systemreads in the modifications, which take effect immediately.
Note – If the modification time of the file does not change after the edit operation, the systemsometimes incorrectly assumes that the file was not modified. Therefore you should insert asleep 1 instruction before writing the file, to ensure a different modification time.
You can use this technique with any qconf –m... command. However, the technique isespecially useful for administration of the scheduler and the global configuration, as you cannotautomate the procedure in any other way.
EXAMPLE 8–12 Modifying the Schedule Interval
The following example modifies the schedule interval of the scheduler:
#!/bin/ksh
# sched_int.sh: modify the schedule interval
# usage: sched_int.sh <n>, where <n> is
# the new interval, in seconds. n < 60
TMPFILE=/tmp/sched_int.$$
if [ $MOD_SGE_SCHED_INT ]; then
grep -v schedule_interval $1 > $TMPFILE
echo "schedule_interval 0:0:$MOD_SGE_SCHED_INT" >> $TMPFILE
# sleep to ensure modification time changes
sleep 1
mv $TMPFILE $1
else
export EDITOR=$0
export MOD_SGE_SCHED_INT=$1
qconf -msconf
Using Files and Scripts for Administration Tasks
Chapter 8 • Other Administrative Tasks 197

EXAMPLE 8–12 Modifying the Schedule Interval (Continued)
fi
This script modifies the EDITOR environment to point to itself. The script then calls the qconf–msconf command. This second nested invocation of the script modifies the temporary filespecified by the first argument and then exits. The grid engine system automatically reads in thechanges, and the first invocation of the script terminates.
Using Files and Scripts for Administration Tasks
Sun N1 Grid Engine 6.1 Administration Guide • May 2007198

Fine Tuning, Error Messages, andTroubleshooting
This chapter describes some ways to fine-tune your grid engine system environment. Thechapter also describes the error messaging procedures and offers tips on how to resolve variouscommon problems.
This chapter includes the following sections:
■ “Fine-Tuning Your Grid Environment” on page 199■ “How the Grid Engine Software Retrieves Error Reports” on page 205■ “Diagnosing Problems” on page 210■ “Troubleshooting Common Problems” on page 213
Fine-Tuning Your Grid EnvironmentThe grid engine system is a full-function, general-purpose distributed resource managementtool. The scheduler component of the system supports a wide range of different compute farmscenarios. To get the maximum performance from your compute environment, you shouldreview the features that are enabled. You should then determine which features you really needto solve your load management problem. Disabling some of these features can improveperformance on the throughput of your cluster.
Scheduler MonitoringScheduler monitoring can help you to find out why certain jobs are not dispatched. However,providing this information for all jobs at all times can consume resources. You usually do notneed this much information.
To disable scheduler monitoring, set schedd_job_info to false in the scheduler configuration.See “Changing the Scheduler Configuration With QMON” on page 121, and the sched_conf(5)man page.
9C H A P T E R 9
199

Finished JobsIn the case of array jobs, the finished job list in qmaster can become quite large. By switchingthe finished job list off, you save memory and speed up the qstat process, because qstat alsofetches the finished jobs list.
To turn off the finished job list function, set finished_jobs to zero in the cluster configuration.See “Adding and Modifying Global and Host Configurations With QMON” on page 42, and thesge_conf(5) man page.
Job ValidationForced validation at job submission time can be a valuable procedure to preventnondispatchable jobs from forever remaining in a pending state. However, job validation canalso be a time-consuming task. Job validation can be especially time-consuming inheterogeneous environments with different execution nodes and consumable resources, and inwhich all users have their own job profiles. In homogeneous environments with only a fewdifferent jobs, a general job validation usually can be omitted.
To disable job verification, add the qsub option –w n in the cluster-wide default requests. See“Submitting Advanced Jobs With QMON” in Sun N1 Grid Engine 6.1 User’s Guide, and thesge_request(5) man page.
Load Thresholds and Suspend ThresholdsLoad thresholds are needed if you deliberately oversubscribe your machines and you need toprevent excessive system load. Suspend thresholds are also used to prevent overloading thesystem.
Another case where you want to prevent the overloading of a node is when the execution nodeis still open for interactive load. Interactive load is not under the control of the grid enginesystem.
A compute farm might be more single-purpose. For example, each CPU at a compute nodemight be represented by only one queue slot, and no interactive load might be expected at thesenodes. In such cases, you can omit load_thresholds.
To disable both thresholds, set load_thresholds to none and suspend_thresholds to none.See “Configuring Load and Suspend Thresholds” on page 53, and the queue_conf(5) man page.
Fine-Tuning Your Grid Environment
Sun N1 Grid Engine 6.1 Administration Guide • May 2007200

Load AdjustmentsLoad adjustments are used to increase the measured load after a job is dispatched. Thismechanism prevents oversubscription of machines that is caused by the delay between jobdispatching and the corresponding load impact. You can switch off load adjustments if you donot need them. Load adjustments impose on the scheduler some additional work in connectionwith sorting hosts and load thresholds verification.
To disable load adjustments, set job_load_adjustments to none andload_adjustment_decay_time to zero in the scheduler configuration. See “Changing theScheduler Configuration With QMON” on page 121, and the sched_conf(5) man page.
Immediate SchedulingThe default for the grid engine system is to start scheduling runs in a fixed schedule interval. Agood feature of fixed intervals is that they limit the CPU time consumption of the qmaster andthe scheduler. A bad feature is that fixed intervals choke the scheduler, artificially resulting in alimited throughput. Many compute farms have machines specifically dedicated to qmaster andthe scheduler, and such setups provide no reason to choke the scheduler. Seeschedule_interval in sched_conf(5).
You can configure immediate scheduling by using the flush_submit_sec andflush_finish_sec parameters of the scheduler configuration. See “Changing the SchedulerConfiguration With QMON” on page 121, and the sched_conf(5) man page.
If immediate scheduling is activated, the throughput of a compute farm is limited only by thepower of the machine that is hosting sge_qmaster and the scheduler.
Urgency Policy and Resource ReservationThe urgency policy enables you to customize job priority schemes that are resource-dependent.Such job priority schemes include the following:
■ A general preference to run the largest parallel jobs first■ A preference for jobs that request particular resources in order to make use of expensive
licenses
The implementing of both objectives is especially valuable if you are using resource reservation.
Fine-Tuning Your Grid Environment
Chapter 9 • Fine Tuning, Error Messages, and Troubleshooting 201

Using DTrace for Performance TuningTroubleshooting in a distributed system that spans potentially thousands of active componentscan challenge even the most experienced system administrator. In practice, Grid Engineadministrators have no explicit mechanism for identifying and reproducing issues that lead todegraded performance in their production environments. In the Solaris 10 environment, youcan use the DTrace utility to monitor the on-site performance of the Grid Engine mastercomponent. DTrace is a comprehensive framework for tracing dynamic events in Solaris 10environments. For general information about DTrace, seehttp://www.sun.com/bigadmin/content/dtrace/ and the dtrace man page. For detailedinformation about using DTrace with N1 Grid Engine 6.1 software, view the$SGE_ROOT/dtrace/README_dtrace.txt file.
Tuning Performance from the Command Line throughDTraceIf you can use Solaris 10 DTrace, you can use the $SGE_ROOT/dtrace/monitor.sh script tomonitor a Grid Engine master and look for any bottlenecks. The monitor.sh script supportsthe following options:
-interval value Specify statistics interval to use. The default is 15sec. A larger intervalresults in coarser statistics, while a smaller value provides more refinedresults. Most useful values range from 1sec to 24hours.
-cell cell-name Required if $SGE_CELL is not “default.”
-spooling Display qmaster spooling probes in addition to statistics. This optionenables you to view more specific information about a presumed spoolingbottleneck.
-requests Shows incoming qmaster request probes. This option enables you to viewmore specific information to evaluate instances in which someone isflooding your qmaster.
Note – Any critical, error, or warning messages appear in monitor.sh output.
Analyzing Bottlenecks on the Grid Engine MasterTo provide effective performance tuning, you must understand the bottlenecks of distributedsystems. The $SGE_ROOT/dtrace/monitor.sh script measures throughput-relevant data of therunning Grid Engine master and compiles this data into a few indices that are printed in asingle-line view per interval. This view shows four main categories of information:
Using DTrace for Performance Tuning
Sun N1 Grid Engine 6.1 Administration Guide • May 2007202

■ Spooling — Indicates the number of operations that spooled to the qmaster process and theelapsed time
■ Request handling — Shows the number of messages sent and received of various types, suchas reports, GDI requests, and ACK messages.
■ Scheduling — Indicates the number of scheduling requests sent to the schedd process andthe elapsed time
■ Qmaster processing — Includes information about qmaster/schedd communications,qmaster requesst I/O activities, and qmaster lock and unlock requests.
For more information, see the example below.
Sample DTrace Output for Bottleneck AnalysisThe following monitoring output sample illustrates a case where a Grid Engine masterbottleneck can be detected. The example shows the following information:
■ For qmaster spooling activities:■ #wrt — Number of qmaster write operations via spool_write_object() and
spool_delete_object(). Almost every significant write operation goes through thisfunction.
■ wrt/ms — Total time all threads spend in spool_write_object() in microseconds.■ For qmaster message processing:
■ #rep — Number of reports qmaster processed through sge_c_report(). Most data sent byexecd functions to qmaster are reflected here.
■ #gdi — Number of GDI requests qmaster processed through do_gdi_request(). Almostanything sent from client commands arrives as a GDI request, although GDI requestscan also come from exexd functions and the scheduler.
■ #ack — Number of ACK messages qmaster processed through do_c_ack(). Highnumbers of ACK messages might indicate job signalling, although ACK messages areused also for other purposes.
■ For schedd scheduling activities:■ #dsp — Number of calls to dispatch_jobs() in schedd. Each call to dispatch_jobs() can
seen as a scheduling run.■ dsp/ms — Total time scheduler spent in all calls to dispatch_jobs().■ #sad — Number of calls to select_assign_debit(). Each call to select_assign_debit() can
be seen as a try of the scheduler to find an assignement or a reservation for a job.■ For qmaster processing:
Using DTrace for Performance Tuning
Chapter 9 • Fine Tuning, Error Messages, and Troubleshooting 203

■ #snd — Number of event packages qmaster sends to schedd. If that number goes downto zero over longer time, something is wrong and qmaster/schedd get out of sync.
■ #rcv — Number of event packages schedd receives from qmaster. If that number goesdown to zero over longer time, something is wrong and qmaster/schedd get out of sync.
■ #in++ — Number of messages added to qmaster received messages buffer.■ #in-- — Number of messages removed from qmaster received messages buffer. If more
messages are added than removed during an interval, the total of messages not yetprocessed is about to grow.
■ #out++ — Number of messages added to qmaster send messages buffer.■ #out-- — Number of messages removed from qmaster send messages buffer. If more
messages are added than removed during an interval, the total of messages not yetdelivered is about to grow.
■ #lck0/#ulck0 — Number of calls to sge_lock()/sge_unlock() for qmaster “global” lock.This lock must always be obtained, when qmaster-internal lists (job list, queue list, etc.)are accessed.
■ #lck1/#ulck1 — Number of calls to sge_lock()/sge_unlock() for qmaster“master_config” lock. This lock is a secondary lock, but is also important.
Note – The specific columns displayed on your system might differ from the example.
In this example, performance degraded between 17:40:32 and 17:41:05.
CPU ID FUNCTION:NAME
0 1 :BEGIN Time | #wrt wrt/ms |#rep #gdi #ack| #dsp dsp/ms #sad| #snd #rcv| #in++ #
0 36909 :tick-3sec 2006 Nov 24 17:39:23 | 43 3| 0 8 4| 3 691 121| 4 4| 11
0 36909 :tick-3sec 2006 Nov 24 17:39:26 | 83 16| 0 10 3| 3 699 122| 3 3| 14
0 36909 :tick-3sec 2006 Nov 24 17:39:29 | 117 24| 0 9 4| 4 1092 198| 4 4| 13
0 36909 :tick-3sec 2006 Nov 24 17:39:32 | 19 4| 0 9 3| 3 591 147| 3 3| 12
0 36909 :tick-3sec 2006 Nov 24 17:39:35 | 144 28| 0 9 4| 4 1012 173| 4 4| 13
0 36909 :tick-3sec 2006 Nov 24 17:39:38 | 46 5| 0 8 3| 3 705 122| 3 3| 11
0 36909 :tick-3sec 2006 Nov 24 17:39:41 | 154 31| 0 9 3| 4 894 198| 3 3| 13
0 36909 :tick-3sec 2006 Nov 24 17:39:44 | 46 5| 0 10 4| 4 971 162| 4 4| 13
0 36909 :tick-3sec 2006 Nov 24 17:39:47 | 154 29| 0 8 3| 3 739 158| 3 3| 11
0 36909 :tick-3sec 2006 Nov 24 17:39:50 | 46 5| 0 10 4| 4 815 162| 4 4| 14
0 36909 :tick-3sec 2006 Nov 24 17:39:53 | 74 15| 0 8 3| 3 746 136| 3 3| 12
0 36909 :tick-3sec 2006 Nov 24 17:39:56 | 116 20| 0 11 4| 4 992 184| 4 4| 14
0 36909 :tick-3sec 2006 Nov 24 17:39:59 | 87 18| 0 11 4| 4 851 176| 5 4| 15
0 36909 :tick-3sec 2006 Nov 24 17:40:02 | 109 20| 0 12 5| 4 930 184| 4 5| 17
0 36909 :tick-3sec 2006 Nov 24 17:40:05 | 88 15| 0 9 3| 4 995 176| 3 3| 12
0 36909 :tick-3sec 2006 Nov 24 17:40:08 | 112 20| 0 12 4| 4 927 184| 5 4| 16
0 36909 :tick-3sec 2006 Nov 24 17:40:11 | 32 6| 0 7 4| 3 618 121| 3 4| 11
Using DTrace for Performance Tuning
Sun N1 Grid Engine 6.1 Administration Guide • May 2007204

0 36909 :tick-3sec 2006 Nov 24 17:40:14 | 145 30| 0 11 4| 4 988 199| 4 4|
0 36909 :tick-3sec 2006 Nov 24 17:40:17 | 43 3| 0 7 3| 3 618 121| 3 3|
0 36909 :tick-3sec 2006 Nov 24 17:40:20 | 157 31| 0 11 4| 4 977 199| 4 4|
0 36909 :tick-3sec 2006 Nov 24 17:40:23 | 43 4| 0 7 3| 3 701 121| 3 3|
0 36909 :tick-3sec 2006 Nov 24 17:40:26 | 73 18| 0 11 4| 4 948 171| 4 4|
0 36909 :tick-3sec 2006 Nov 24 17:40:29 | 127 31| 0 10 4| 4 968 189| 4 4|
0 36909 :tick-3sec 2006 Nov 24 17:40:32 | 10 3| 0 6 0| 1 203 41| 0 0|
0 36909 :tick-3sec 2006 Nov 24 17:40:35 | 19 5| 0 5 0| 0 0 0| 0 0|
0 36909 :tick-3sec 2006 Nov 24 17:40:38 | 16 5| 0 5 1| 0 0 0| 0 0|
0 36909 :tick-3sec 2006 Nov 24 17:40:41 | 1 0| 0 4 0| 0 0 0| 0 0|
0 36909 :tick-3sec 2006 Nov 24 17:40:44 | 0 0| 0 4 0| 0 0 0| 0 0|
0 36909 :tick-3sec 2006 Nov 24 17:40:47 | 0 0| 0 6 0| 1 744 81| 1 1|
0 36909 :tick-3sec 2006 Nov 24 17:40:50 | 1 0| 0 5 1| 0 0 0| 0 0|
0 36909 :tick-3sec 2006 Nov 24 17:40:53 | 0 0| 0 4 0| 0 0 0| 0 0|
0 36909 :tick-3sec 2006 Nov 24 17:40:56 | 0 0| 0 5 0| 0 0 0| 0 0|
0 36909 :tick-3sec 2006 Nov 24 17:40:59 | 0 0| 0 4 0| 0 0 0| 0 0|
0 36909 :tick-3sec 2006 Nov 24 17:41:02 | 0 0| 0 4 1| 0 0 0| 0 0|
0 36909 :tick-3sec 2006 Nov 24 17:41:05 | 165 41| 0 48 60| 0 0 0| 1 1|
0 36909 :tick-3sec 2006 Nov 24 17:41:08 | 178 28| 0 15 53| 4 965 206| 4 4|
0 36909 :tick-3sec 2006 Nov 24 17:41:11 | 106 23| 0 27 35| 4 855 166| 4 4|
0 36909 :tick-3sec 2006 Nov 24 17:41:14 | 198 37| 0 41 70| 4 1189 196| 4 4|
0 36909 :tick-3sec 2006 Nov 24 17:41:17 | 16 5| 0 9 5| 4 940 161| 3 3|
0 36909 :tick-3sec 2006 Nov 24 17:41:20 | 162 35| 0 13 8| 4 958 200| 4 4|
0 36909 :tick-3sec 2006 Nov 24 17:41:23 | 44 6| 0 6 3| 2 544 81| 3 3|
0 36909 :tick-3sec 2006 Nov 24 17:41:26 | 150 34| 0 13 6| 4 921 199| 4 4|
0 36909 :tick-3sec 2006 Nov 24 17:41:29 | 43 3| 0 5 2| 2 506 81| 2 2|
0 36909 :tick-3sec 2006 Nov 24 17:41:32 | 157 37| 0 9 3| 4 978 199| 3 3|
0 36909 :tick-3sec 2006 Nov 24 17:41:35 | 43 3| 0 7 3| 2 512 85| 3 3|
0 36909 :tick-3sec 2006 Nov 24 17:41:38 | 127 29| 0 8 3| 4 994 185| 3 3|
0 36909 :tick-3sec 2006 Nov 24 17:41:41 | 66 11| 0 10 4| 4 973 171| 4 4|
0 36909 :tick-3sec 2006 Nov 24 17:41:44 | 48 10| 0 8 3| 3 785 128| 3 3|
0 36909 :tick-3sec 2006 Nov 24 17:41:47 | 142 31| 0 12 4| 4 913 192| 5 4|
0 36909 :tick-3sec 2006 Nov 24 17:41:50 | 64 13| 0 11 5| 4 853 168| 4 5|
How the Grid Engine Software Retrieves Error ReportsThe grid engine software reports errors and warnings by logging messages into certain files orby sending email, or both. The log files include message files and job STDERR output.
As soon as a job is started, the standard error (STDERR) output of the job script is redirected to afile. The default file name and location are used, or you can specify the filename and the locationwith certain options of the qsub command. See the grid engine system man pages for detailedinformation.
How the Grid Engine Software Retrieves Error Reports
Chapter 9 • Fine Tuning, Error Messages, and Troubleshooting 205

Separate messages files exist for the sge_qmaster, the sge_schedd, and the sge_execds. Thefiles have the same file name: messages. The sge_qmaster log file resides in the master spooldirectory. The sge_schedd message file resides in the scheduler spool directory. The executiondaemons' log files reside in the spool directories of the execution daemons. See “SpoolDirectories Under the Root Directory” in Sun N1 Grid Engine 6.1 Installation Guide for moreinformation about the spool directories.
Each message takes up a single line in the files. Each message is subdivided into five componentsseparated by the vertical bar sign (|).
The components of a message are as follows:
1. The first component is a time stamp for the message.2. The second component specifies the daemon that generates the message.3. The third component is the name of the host where the daemon runs.4. The fourth is a message type. The message type is one of the following:
■ N for notice – for informational purposes■ I for info – for informational purposes■ W for warning■ E for error – an error condition has been detected■ C for critical – can lead to a program abort
Use the loglevel parameter in the cluster configuration to specify on a global basis or alocal basis what message types you want to log.
5. The fifth component is the message text.
Note – If an error log file is not accessible for some reason, the grid engine system tries to logthe error message to the files /tmp/sge_qmaster_messages, /tmp/sge_schedd_messages,or /tmp/sge_execd_messages on the corresponding host.
In some circumstances, the grid engine system notifies users, administrators, or both, abouterror events by email. The email messages sent by the grid engine system do not contain amessage body. The message text is fully contained in the mail subject field.
Consequences of Different Error or Exit CodesThe following table lists the consequences of different job-related error codes or exit codes.These codes are valid for every type of job.
How the Grid Engine Software Retrieves Error Reports
Sun N1 Grid Engine 6.1 Administration Guide • May 2007206

TABLE 9–1 Job-Related Error or Exit Codes
Script/Method Exit or Error Code Consequence
Job script 0 Success
99 Requeue
Rest Success: exit code in accounting file
prolog/epilog 0 Success
99 Requeue
Rest Queue error state, job requeued
The following table lists the consequences of error codes or exit codes of jobs related to parallelenvironment (PE) configuration.
TABLE 9–2 Parallel-Environment-Related Error or Exit Codes
Script/Method Exit or Error Code Consequence
pe_start 0 Success
Rest Queue set to error state, job requeued
pe_stop 0 Success
Rest Queue set to error state, job not requeued
The following table lists the consequences of error codes or exit codes of jobs related to queueconfiguration. These codes are valid only if corresponding methods were overwritten.
TABLE 9–3 Queue-Related Error or Exit Codes
Script/Method Exit or Error Code Consequence
Job starter 0 Success
Rest Success, no other special meaning
Suspend 0 Success
Rest Success, no other special meaning
How the Grid Engine Software Retrieves Error Reports
Chapter 9 • Fine Tuning, Error Messages, and Troubleshooting 207

TABLE 9–3 Queue-Related Error or Exit Codes (Continued)Script/Method Exit or Error Code Consequence
Resume 0 Success
Rest Success, no other special meaning
Terminate 0 Success
Rest Success, no other special meaning
The following table lists the consequences of error or exit codes of jobs related to checkpointing.
TABLE 9–4 Checkpointing-Related Error or Exit Codes
Script/Method Exit or Error Code Consequence
Checkpoint 0 Success
Rest Success. For kernel checkpoint, however, this means that thecheckpoint was not successful.
Migrate 0 Success
Rest Success. For kernel checkpoint, however, this means that thecheckpoint was not successful. Migration will occur.
Restart 0 Success
Rest Success, no other special meaning
Clean 0 Success
Rest Success, no other special meaning
Running Grid Engine System Programs in Debug ModeFor some severe error conditions, the error-logging mechanism might not yield sufficientinformation to identify the problems. Therefore, the grid engine system offers the ability to runalmost all ancillary programs and the daemons in debug mode. Different debug levels vary in
How the Grid Engine Software Retrieves Error Reports
Sun N1 Grid Engine 6.1 Administration Guide • May 2007208

the extent and depth of information that is provided. The debug levels range from zero through10, with 10 being the level delivering the most detailed information and zero turning offdebugging.
To set a debug level, an extension to your .cshrc or .profile resource files is provided with thedistribution of the grid engine system. For csh or tcsh users, the file sge-root/util/dl.csh isincluded. For sh or ksh users, the corresponding file is named sge-root/util/dl.sh. The filesmust be sourced into your standard resource file. As csh or tcsh user, include the following linein your .cshrc file:
source sge-root/util/dl.csh
As sh or ksh user, include the following line in your .profile file:
. sge-root/util/dl.sh
As soon as you log out and log in again, you can use the following command to set a debug level:
% dl level
If level is greater than 0, starting a grid engine system command forces the command to writetrace output to STDOUT. The trace output can contain warning messages, status messages, anderror messages, as well as the names of the program modules that are called internally. Themessages also include line number information, which is helpful for error reporting, dependingon the debug level you specify.
Note – To watch a debug trace, you should use a window with a large scroll-line buffer. Forexample, you might use a scroll-line buffer of 1000 lines.
Note – If your window is an xterm, you might want to use the xterm logging mechanism toexamine the trace output later on.
If you run one of the grid engine system daemons in debug mode, the daemons keep theirterminal connection to write the trace output. You can abort the terminal connections bytyping the interrupt character of the terminal emulation you use. For example, you might useControl-C.
To switch off debug mode, set the debug level back to 0.
Setting the dbwriterDebug LevelThe sgedbwriter script starts the dbwriter program. The script is located insge_root/dbwriter/bin/sgedbwriter. The sgedbwriter script reads the dbwriter
How the Grid Engine Software Retrieves Error Reports
Chapter 9 • Fine Tuning, Error Messages, and Troubleshooting 209

configuration file, dbwriter.conf. This configuration file is located insge_root/cell/common/dbwriter.conf. This configuration file sets the debug level of dbwriter.For example:
#
# Debug level
# Valid values: WARNING, INFO, CONFIG, FINE, FINER, FINEST, ALL
#
DBWRITER_DEBUG=INFO
You can use the –debug option of the dbwriter command to change the number of messagesthat the dbwriter produces. In general, you should use the default debug level, which is info. Ifyou use a more verbose debug level, you substantially increase the amount of data output bydbwriter.
You can specify the following debug levels:
warning Displays only severe errors and warnings.
info Adds a number of informational messages. info is the default debug level.
config Gives additional information that is related to dbwriter configuration, forexample, about the processing of rules.
fine Produces more information. If you choose this debug level, all SQL statements runby dbwriter are output.
finer For debugging.
finest For debugging.
all Displays information for all levels. For debugging.
Diagnosing ProblemsThe grid engine system offers several reporting methods to help you diagnose problems. Thefollowing sections outline their uses.
Pending Jobs Not Being DispatchedSometimes a pending job is obviously capable of being run, but the job does not get dispatched.To diagnose the reason, the grid engine system offers a pair of utilities and options, qstat -jjob-id and qalter-w v job-id.
■ qstat -j job-id
Diagnosing Problems
Sun N1 Grid Engine 6.1 Administration Guide • May 2007210

When enabled, qstat -j job-id provides a list of reasons why a certain job was notdispatched in the last scheduling run. This monitoring can be enabled or disabled. Youmight want to disable monitoring because it can cause undesired communication overheadbetween the sge_schedd daemon and sge_qmaster. See schedd_job_info in thesched_conf(5) man page. The following example shows output for a job with the ID242059:
% qstat -j 242059
scheduling info: queue "fangorn.q" dropped because it is temporarily not available
queue "lolek.q" dropped because it is temporarily not available
queue "balrog.q" dropped because it is temporarily not available
queue "saruman.q" dropped because it is full
cannot run in queue "bilbur.q" because it is not contained in its hard queuelist (-q)
cannot run in queue "dwain.q" because it is not contained in its hard queue list (-q)
has no permission for host "ori"
This information is generated directly by the sge_schedd daemon. The generating of thisinformation takes the current usage of the cluster into account. Sometimes this informationdoes not provide what you are looking for. For example, if all queue slots are alreadyoccupied by jobs of other users, no detailed message is generated for the job you areinterested in.
■ qalter -w v job-id
This command lists the reasons why a job is not dispatchable in principle. For this purpose, adry scheduling run is performed. All consumable resources, as well as all slots, are considered tobe fully available for this job. Similarly, all load values are ignored because these values vary.
Job or Queue Reported in Error State EJob or queue errors are indicated by an uppercase E in the qstat output.
A job enters the error state when the grid engine system tries to run a job but fails for a reasonthat is specific to the job.
A queue enters the error state when the grid engine system tries to run a job but fails for a reasonthat is specific to the queue.
Diagnosing Problems
Chapter 9 • Fine Tuning, Error Messages, and Troubleshooting 211

The grid engine system offers a set of possibilities for users and administrators to gatherdiagnosis information in case of job execution errors. Both the queue and the job error statesresult from a failed job execution. Therefore the diagnosis possibilities are applicable to bothtypes of error states.
■ User abort mail. If jobs are submitted with the qsub -m a command, abort mail is sent tothe address specified with the -M user[@host] option. The abort mail contains diagnosisinformation about job errors. Abort mail is the recommended source of information forusers.
■ qacct accounting. If no abort mail is available, the user can run the qacct -j command.This command gets information about the job error from the grid engine system's jobaccounting function.
■ Administrator abort mail. An administrator can order administrator mails about jobexecution problems by specifying an appropriate email address. See underadministrator_mail on the sge_conf(5) man page. Administrator mail contains moredetailed diagnosis information than user abort mail. Administrator mail is therecommended method in case of frequent job execution errors.
■ Messages files. If no administrator mail is available, you should investigate the qmastermessages file first. You can find entries that are related to a certain job by searching for theappropriate job ID. In the default installation, the sge_qmaster messages file issge-root/cell/spool/qmaster/messages.You can sometimes find additional information in the messages of the sge_execd daemonfrom which the job was started. Use qacct -j job-id to discover the host from which the jobwas started, and search in sge-root/cell/spool/host/messages for the job ID.
Diagnosing Problems
Sun N1 Grid Engine 6.1 Administration Guide • May 2007212

Troubleshooting Common ProblemsThis section provides information to help you diagnose and respond to the cause of commonproblems.
■ Problem — The output file for your job says, Warning: no access to tty; thus no job
control in this shell....■ Possible cause — One or more of your login files contain an stty command. These
commands are useful only if a terminal is present.■ Possible solution — No terminal is associated with batch jobs. You must remove all
stty commands from your login files, or you must bracket such commands with an if
statement. The if statement should check for a terminal before processing. Thefollowing example shows an if statement:
/bin/csh:
stty -g # checks terminal status
if ($status == 0) # succeeds if a
terminal is present
<put all stty commands in here>endif
■ Problem — The job standard error log file says ‘tty‘:Ambiguous. However, no reference totty exists in the user's shell that is called in the job script.■ Possible cause — shell_start_mode is, by default, posix_compliant. Therefore all job
scripts run with the shell that is specified in the queue definition. The scripts do not runwith the shell that is specified on the first line of the job script.
■ Possible solution — Use the -S flag to the qsub command, or changeshell_start_mode to unix_behavior.
■ Problem — You can run your job script from the command line, but the job script failswhen you run it using the qsub command.■ Possible cause — Process limits might be being set for your job. To test whether limits
are being set, write a test script that performs limit and limit -h functions. Run bothfunctions interactively, at the shell prompt and using the qsub command, to comparethe results.
■ Possible solution — Remove any commands in configuration files that sets limits inyour shell.
■ Problem — Execution hosts report a load of 99.99.1. Possible cause — The sge_execd daemon is not running on the host.
Possible solution — As root, start up the sge_execd daemon on the execution host byrunning the sge-root/cell/common/sgeexecd script.
2. Possible cause — A default domain is incorrectly specified.
Troubleshooting Common Problems
Chapter 9 • Fine Tuning, Error Messages, and Troubleshooting 213

Possible solution — As the grid engine system administrator, run the qconf -mconfcommand and change the default_domain variable to none.
3. Possible cause — The sge_qmaster host sees the name of the execution host as differentfrom the name that the execution host sees for itself.Possible solution — If you are using DNS to resolve the host names of your computecluster, configure /etc/hosts and NIS to return the fully qualified domain name(FQDN) as the primary host name. Of course, you can still define and use the short aliasname, for example, 168.0.0.1 myhost.dom.com myhost.If you are not using DNS, make sure that all of your /etc/hosts files and your NIS tableare consistent, for example, 168.0.0.1 myhost.corp myhost or 168.0.0.1 myhost
■ Problem — Every 30 seconds a warning that is similar to the following message is printed tocell/spool/host/messages:
Tue Jan 23 21:20:46 2001|execd|meta|W|local
configuration meta not defined - using global configuration
But cell/common/local_conf contains a file for each host, with FQDN.■ Possible cause — The host name resolving at your machine meta returns the short
name, but at your master machine, meta with FQDN is returned.■ Possible solution — Make sure that all of your /etc/hosts files and your NIS table are
consistent in this respect. In this example, a line such as the following text coulderroneously be included in the /etc/hosts file of the host meta:168.0.0.1 meta meta.your.domain
The line should instead be:168.0.0.1 meta.your.domain meta.
■ Problem — Occasionally you see CHECKSUM ERROR, WRITE ERROR, or READ ERROR messagesin the messages files of the daemons.■ Possible cause — As long as these messages do not appear in a one-second interval, you
need not do anything. These messages typically can appear between 1 and 30 times a day.■ Problem — Jobs finish on a particular queue and return the following message in
qmaster/messages:
Wed Mar 28 10:57:15 2001|qmaster|masterhost|I|job 490.1
finished on host exechost
Then you see the following error messages in the execution host's exechost/messages file:
Wed Mar 28 10:57:15 2001|execd|exechost|E|can’t find directory
"active_jobs/490.1" for reaping job 490.1
Troubleshooting Common Problems
Sun N1 Grid Engine 6.1 Administration Guide • May 2007214

Wed Mar 28 10:57:15 2001|execd|exechost|E|can’t remove directory
"active_jobs/490.1": opendir(active_jobs/490.1) failed:
Input/output error
■ Possible cause — The sge-root directory, which is automounted, is being unmounted,causing the sge_execd daemon to lose its current working directory.
■ Possible solution — Use a local spool directory for your sge_execd host. Set theparameter execd_spool_dir, using QMON or the qconf command.
■ Problem — When submitting interactive jobs with the qrsh utility, you get the followingerror message:
% qrsh -l mem_free=1G error: error: no suitable queues
However, queues are available for submitting batch jobs with the qsub command. Thesequeues can be queried using qhost -l mem_free=1G and qstat -f -l mem_free=1G.■ Possible cause — The message error: no suitable queues results from the -w e
submit option, which is active by default for interactive jobs such as qrsh. Look for -w eon the qrsh(1) man page. This option causes the submit command to fail if thesge_qmaster does not know for sure that the job is dispatchable according to the currentcluster configuration. The intention of this mechanism is to decline job requests inadvance, in case the requests can't be granted.
■ Possible solution — In this case, mem_free is configured to be a consumable resource,but you have not specified the amount of memory that is to be available at each host. Thememory load values are deliberately not considered for this check because memory loadvalues vary. Thus they can't be seen as part of the cluster configuration. You can do oneof the following:■ Omit this check generally by explicitly overriding the qrsh default option -w e with
the -w n option. You can also put this command intosge-root/cell/common/sge_request.
■ If you intend to manage mem_free as a consumable resource, specify the mem_freecapacity for your hosts in complex_values of host_conf by using qconf -me
hostname.■ If you don't intend to manage mem_free as a consumable resource, make it a
nonconsumable resource again in the consumable column of complex(5) by usingqconf -mc hostname.
■ Problem — qrsh won't dispatch to the same node it is on. From a qsh shell you get amessage such as the following:
host2 [49]% qrsh -inherit host2 hostname
error: executing task of job 1 failed:
Troubleshooting Common Problems
Chapter 9 • Fine Tuning, Error Messages, and Troubleshooting 215

host2 [50]% qrsh -inherit host4 hostname
host4
■ Possible cause — gid_range is not sufficient. gid_range should be defined as a range,not as a single number. The grid engine system assigns each job on a host a distinct gid.
■ Possible solution — Adjust the gid_range with the qconf -mconf command or withQMON. The suggested range is as follows:
gid_range 20000-20100
■ Problem — qrsh -inherit -V does not work when used inside a parallel job. You get thefollowing message:
cannot get connection to "qlogin_starter"
■ Possible cause — This problem occurs with nested qrsh calls. The problem is caused bythe -V option. The first qrsh -inherit call sets the environment variable TASK_ID.TASK_ID is the ID of the tightly integrated task within the parallel job. The second qrsh
-inherit call uses this environment variable for registering its task. The command failsas it tries to start a task with the same ID as the already-running first task.
■ Possible solution — You can either unset TASK_ID before calling qrsh -inherit, or usethe -v option instead of -V. This option exports only the environment variables that youreally need.
■ Problem — qrsh does not seem to work at all. Messages like the following are generated:
host2$ qrsh -verbose hostname
local configuration host2 not defined - using global configuration
waiting for interactive job to be scheduled ...
Your interactive job 88 has been successfully scheduled.
Establishing /share/gridware/utilbin/solaris64/rsh session
to host exehost ...
rcmd: socket: Permission denied
/share/gridware/utilbin/solaris64/rsh exited with exit code 1
reading exit code from shepherd ...
error: error waiting on socket for client to connect:
Interrupted system call
error: error reading return code of remote command
cleaning up after abnormal exit of
/share/gridware/utilbin/solaris64/rsh
host2$
■ Possible cause — Permissions for qrsh are not set properly.■ Possible solution — Check the permissions of the following files, which are located in
sge-root/utilbin/. Note that rlogin and rsh must be setuid and owned by root.
-r-s--x--x 1 root root 28856 Sep 18 06:00 rlogin*
-r-s--x--x 1 root root 19808 Sep 18 06:00 rsh*
Troubleshooting Common Problems
Sun N1 Grid Engine 6.1 Administration Guide • May 2007216

-rwxr-xr-x 1 sgeadmin adm 128160 Sep 18 06:00 rshd*
Note – The sge-root directory also needs to be NFS-mounted with the setuid option. Ifsge-root is mounted with nosuid from your submit client, qrsh and associatedcommands will not work.
■ Problem – When you try to start a distributed make, qmake exits with the following errormessage:
qrsh_starter: executing child process
qmake failed: No such file or directory
■ Possible cause — The grid engine system starts an instance of qmake on the executionhost. If the grid engine system environment, especially the PATH variable, is not set up inthe user's shell resource file (.profile or .cshrc), this qmake call fails.
■ Possible solution — Use the -v option to export the PATH environment variable to theqmake job. A typical qmake call is as follows:
qmake -v PATH -cwd -pe make 2-10 --
■ Problem — When using the qmake utility, you get the following error message:
waiting for interactive job to be scheduled ...timeout (4 s)
expired while waiting on socket fd 5
Your "qrsh" request could not be scheduled, try again later.
■ Possible cause — The ARCH environment variable might be set incorrectly in the shellfrom which qmake was called.
■ Possible solution – Set the ARCH variable correctly to a supported value that matches anavailable host in your cluster, or else specify the correct value at submit time, forexample, qmake -v ARCH=solaris64 ...
■ Problem — If the following job is assigned to a SuSE Linux system, the -cwd option does notwork and the cwd-test is created on the user's home directory.
qsub -l arch=lx24-x86 -cwd -b y -o /dev/null -e /dev/null -V "hostname | tee -a
cwd-test"
■ Possible cause — On SuSE Linux systems, the /etc/csh.login file includes the cdcommand to change its current working directory to the user's home directory. Shellsusually source system-wide profile files. For (t)csh on Linux, the system-wide file is/etc/csh.login.
Troubleshooting Common Problems
Chapter 9 • Fine Tuning, Error Messages, and Troubleshooting 217

■ Possible solution – Use the -noshell option. In this case, there is no intermediate shellthat can source the profile file, and therefore neither ~/.login nor ~/.cshrc aresourced.When using a batch script, use the PWD environment variable to change the currentworking directory inside the batch script before executing any programs.Another workaround is for users to use neither tcsh nor csh. Because the cd commandonly appears in /etc/csh.login, the issue would not happen.
Troubleshooting Common Problems
Sun N1 Grid Engine 6.1 Administration Guide • May 2007218

Configuring DBWriter
Thedbwriter component writes and deletes the reporting data in the reporting database. Itperforms the following tasks:
■ Reads raw data from reporting files and writes this raw data into the reporting database.■ Calculates derived values. You can configure which values are calculated and the rules of
how to calculate them.■ Deletes outdated data. You can configure how long to keep the data.
The sge_qmaster component generates the reporting files. You can configure the generation ofthe reporting files, see the attribute reporting_params in the man page sge_conf(5), and theattribute report_variables in the man page host_conf(5).
SetupThe installation procedure sets up these parameters. A script for starting up the dbwriter isprovided with the reporting module. Please see the N1 Grid Engine 6 Installation Guide fordetails. The following parameters have to be set for dbwriter.
Database SystemThe dbwriter can connect to different brands of database systems (supported systems arePostgreSQL and Oracle). The following parameters have to be set:
■ DRIVER — to the name of the JDBC driver to use, for example, org.postgresql.Driver■ DRIVERJAR — to the jar archive containing the JDBC driver, for example,
lib/postgres43.jar.
10C H A P T E R 1 0
219

Database ServerWhich database on which host to use is set by configuring the JDBC URL: The URL parameteris set to the JDBC URL of the database to use. Follow the guidelines of the database vendor forthe syntax to use. For, example for a PostgreSQL database:jdbc:postgresql://<hostname>:5432/arco
Base Directory for Reporting FilesThe path where dbwriter will find reporting files is set in the REPORTING_FILE variable. Thebase directory is typically set to $SGE_ROOT/$SGE_CELL/common
ConfigurationThe task of setting up these parameters will be done by the installation procedure. You canconfigure the behavior of the dbwriter with a number of command line parameters.
IntervalThe -interval parameter sets the interval, in which dbwriter looks for new reporting files. If areporting file is found, it is read and data is written to the reporting database.
PidThe -pid parameter defines the path to the pid file. The dbwriter writes at startup a pid file. Thiscontains the process id of the dbwriter. At shutdown of the dbwriter this file will be deleted.
PidCmdThe -pidCmd parameter defines a command which will be executed by the dbwriter todetermine it's process id. This command should print it's parent process id to stdout. Thedbwriter is a java application. The java virtual machine cannot determine its own process id.The default value of the pidCmd is $SGE_ROOT/utilbin/$ARCH/checkprog -ppid.
Continuous ModeThe -continuous parameter switches on the continuous mode. Without -continuous, dbwriterwill perform its tasks just once. If continuous mode is switched on, it will run continuously andperform its tasks in each interval set with the -interval switch.
Configuration
Sun N1 Grid Engine 6.1 Administration Guide • May 2007220

Debug LevelYou can use the -debug option to configure the amount of messages output by dbwriter. Aparameter to the -debug option is the debug level. In general, using the default debug level(-info) should be the preferred choice. Using more verbose debug levels greatly increases theamount of data output by dbwriter. You can specify the following debug levels:■ -warning: Display only severe errors and warnings■ info: Add a number of informational messages. This level is the default, if the -display switch
isn't used■ -config: Give additional information that is related to dbwriter configuration, e.g. about
the processing of rules (derived values or delete rules)■ -fine: Output more information. If this level is chosen, all SQL statements executed by
dbwriter will be output.■ -finer: for debugging■ -finest: for debugging■ -all: Display information for all levels (only for debugging purposes).
Reporting FileN1 Grid Engine 6 writes one report file containing data of different types:■ host load values and consumables■ queue consumables■ job logging■ job accounting■ sharetree usage
The dbwriter command line parameter -reporting has to specify the path to the reporting file.The dbwriter component automatically parses the reporting file; once it has completedprocessing and has stored all the information into the database, it deletes the reporting file.
Calculation of Derived ValuesAt dbwriter startup, and in continuous mode once an hour, derived values are calculated. Youcan configure which values to calculate in an XML file, which is by default in$SGE_ROOT/dbwriter/database/<database_type>/dbwriter.xml. <database_type> definesthe type of database being used; currently, Oracle and Postgres are supported. The path to theconfiguration file is passed to dbwriter using the -calculation parameter.
The configuration file uses an XML format, and contains entries of rules for both derived valuesand deleted values (described in the next section). The rules for derived values have thefollowing format.
Configuration
Chapter 10 • Configuring DBWriter 221

Derived Values Format1. The top-level start tag is <derive> It must be specified with three attributes:
■ object — which can be host, queue, user, group, department or project. Based on thisattribute, the derived value is ultimately stored in one of: sge_host_values,sge_queue_values, sge_user_values, sge_group_values, sge_department_values,sge_project_values.
■ interval — which can be hour, day, month, or year.■ variable — which is the name of the new derived value.
2. A second-level start tag, either <sql> or <auto>, describing the way the value should bederived. These tags are shown in detail as follows.
3. <sql> – This tag contains an SQL statement used for calculating the derived values. Theexact syntax of the entries depends upon the type of database being used.
4. <auto> - for certain simple derived values, this tag can be used instead of a full SQL query.This tag has two attributes:■ function — which gives the aggregate function to apply to the variable. This can be any
function valid for the type of database being used. Some typical functions are AVG,SUM, VALUE, COUNT, MIN or MAX.
■ variable — which can be any variable tracked in the following tables: sge_host_values,sge_queue_values, sge_user_values, sge_group_values, sge_department_values,sge_project_values the variable specified must be from the table indicated by theobject attribute of the enclosing <derive> tag, for example, if the object is host, thevariable must be found in sge_host_values.
5. Two end tags matching the two start tags
Examples
Here is an example of a derivation rule using the <sql> tag. The sge_queue table has acomposed primary key comprising q_qname and q_hostname. For a rule specified for the queueobject_type, a query will be made for each entry in the sge_queue table, the placeholders__key_0__ will be replaced by the queue name,ilwill be replaced by the hostname.
<!--
average queue utilization per hour
-->
<derive object="queue" interval="hour" variable="h_utilized">
<sql>
SELECT DATE_TRUNC( ’hour’, qv_time_start)
AS time_start,
DATE_TRUNC( ’hour’, qv_time_start) + INTERVAL ’1 hour’
AS time_end,
AVG(qv_dvalue * 100 / qv_dconfig)
Configuration
Sun N1 Grid Engine 6.1 Administration Guide • May 2007222

AS value
FROM sge_queue_values
WHERE qv_variable = ’slots’ AND
qv_parent = (SELECT q_id FROM sge_queue
WHERE q_qname = __key_0__
AND q_hostname = __key_1__)
AND qv_time_start <= ’__time_end__’ AND
qv_time_end > ’__time_start__’
GROUP BY time_start
</sql>
</derive>
Here is an example of a derivation rule using the <auto> tag.
<!-- average load per hour -->
<derive object="host" interval="hour" variable="h_load">
<auto function="AVG" variable="np_load_avg" />
</derive>
Deleting Outdated RecordsAt dbwriter startup, and in continuous mode once an hour, outdated records will be deleted.Which values to calculate can be configured in an XML file, by default in$SGE_ROOT/dbwriter/database/<database_type>/dbwriter.xml. <database_type> is thetype of database being used; currently, Oracle and Postgres are supported. The path to theconfiguration file is passed to dbwriter using the -deletion parameter.
The configuration file uses an XML format, and contains entries of rules for both derived valuesand deleted values. Deletion rules are of the following format.
■ A top-level start tag <delete> with three attributes:■ scope — which specifies the type of data to be deleted. Valid entries are job, job_log,
share_log, ip, queue_values, ip, department_values, user_values, group_values. Based onthis attribute, the values are deleted from the table with the same name with sge_
prepended.■ time_range — which gives the unit of time_amount.■ time_amount — which is the number of units (time_range) a record is kept.
■ An optional second-level start tag <sub_scope>, which specifies an additional condition fordeletion. A subscope can be configured for all *_values scopes and the share_log scope.
■ One or Two end tags matching the two start tags
If a subscope is configured for a *_values rule, it contains a space separated list of variables todelete. If a subscope is specified for the share_log, it contains a space separated list of sharetreenodes to delete.
Configuration
Chapter 10 • Configuring DBWriter 223

Examples
The following rule indicates that the four variables given in the subscope should be deleted fromthe table sge_host_values after 7 days.
<delete scope="host_values" time_range="day" time_amount="7">
<sub_scope>np_load_avg</sub_scope>
<sub_scope>cpu</sub_scope>
<sub_scope>mem_free</sub_scope>
<sub_scope>virtual_free</sub_scope>
</delete>
The following rule says to delete all variables from the table sge_host_values after 2 years.
<delete scope="host_values" time_range="year" time_amount="2"/>
The following rule says to delete all records for user fred after 1 month
<delete scope="share_log" time_range="month" time_amount="1">
<sub_scope>fred</sub_scope>
</delete>
Configuration
Sun N1 Grid Engine 6.1 Administration Guide • May 2007224

Index
A-acal qconf option, 66-Acal qconf option, 66access lists, for parallel environments, 167access permissions, 26, 92
on execution hosts, 29access restriction, for parallel environments, 170accounting, with qacct, 187Accounting and Reporting Console, 181-187accounting file, 187-ackpt qconf option, 178-Ackpt qconf option, 178act_qmaster file, 23adding
administration hosts, 32, 33checkpointing environment, 176-177execution hosts, 27-30, 31global configuration, 42-43host groups, 36-37, 38local host configuration, 42-43manager accounts, 94objects, using files, 191-192operator accounts, 95, 96parallel environments, 166projects, 103queue calendars, 66queues, 63resource attributes to the complex, 73-75site-specific load parameters, 87submit hosts, 34, 35users, 100usersets, 97
adjusting system load, 124administering
policies, 124-151scheduler, 109-124
administration hosts, 20adding, 32, 33configuring from the command line, 33configuring with QMON, 31-32deleting, 32, 33listing, 33
-ae qconf option, 31-ah qconf option, 33-ahgrp qconf option, 38-Ahgrp qconf option, 38algorithm (scheduling), 119aliasing paths, 105-106allocation rule, 168-am qconf option, 94-ao qconf option, 96-ap qconf option, 171-Ap qconf option, 171-Aprj qconf option, 104-aprj qconfoption, 104-aq qconf option, 63-Aq qconf option, 63ARCo (Accounting and Reporting Console), 181-187-as qconf option, 35assigning resource attributes to queues, hosts, and the
global cluster, 71-75attributes, configuring queue, 64-au qconf option, 98-Au qconf option, 98
225

-auser qconf option, 101-Auser qconf option, 101
Bbackfilling, 110, 114-117basic cluster configuration, 41-44Berkeley DB
RPC server, 20, 23
Ccalculating derived values, 183-186calendar_conf, 64calendars, See queue calendarschanging
master host, 20-22scheduling algorithm, 119
checkpoint library, 175checkpoint process hierarchies, 175checkpointing
configuring environments, 175-179error codes, 208kernel-level, 175user-level, 175
checkpointing environmentadding, 176-177deleting, 178modifying, 177-178
checkpointing environments, 176configuring from the command line, 178-179
cleaning, queues, 63-clear qsub option, 107cluster configuration, 41-44
displaying, 41displaying from the command line, 43-44modifying from the command line, 44modifying using files, 197-198
common directory, access for shadow master hosts, 23common problems, troubleshooting, 213-218compensation factor, 134-135complex resource attributes, See resource attributescomplex_values, 74
complex_values (Continued)in host_conf, 76, 80in queue_conf, 76
Condor project, 175configuring
administration hosts from the command line, 33administration hosts with QMON, 31-32checkpointing environments, 175-179checkpointing environments from the command
line, 178-179default requests, 107-108execution hosts from the command line, 31execution hosts with QMON, 25-30functional policy, 144-148general queue parameters, 49-50global cluster, 41-44host groups from the command line, 38host groups with QMON, 35-37hosts, 25-40manager accounts, 94-95operator accounts, 95-96override policy, 148-151parallel environments, 165-174queue attributes, 64queue calendars, 64-67queue calendars from the command line, 66-67queue checkpointing parameters, 51-52queue execution methods, 50-51queue parallel environments, 52-53queues, 45-64queues from the command line, 62-64resource attributes from the command line, 85-86resource attributes with QMON, 70-71scheduler, 118-121, 121-124shadow master evn variables, 24-25shadow master hosts, 22-25submit hosts from the command line, 35submit hosts with QMON, 33-34ticket-based policies, 127-132urgency policy, 127user access lists, 96-99users, 99-101
consumable resources, 26, 69, 75-85and load parameters, 75
Index
Sun N1 Grid Engine 6.1 Administration Guide • May 2007226

consumable resources (Continued)and parallel jobs, 76examples of setting up, 78-85managing disk space, 83-85setting up, 76-78
control slaves, parallel environment parameter, 168cost of usage, 27CPU, usage metric, 27-cq qconf option, 63critical message (C), 206
Ddaemons, 20
execution, 20master, 20restarting, 40
dbwriter, 182calculating derived values, 183-186deleting outdated records, 186-187setting debug level, 209-210
-dcal qconf option, 66-dckpt qconf option, 178-de qconf option, 31debug mode, 208-210
trace output, 209debugging
dbwriter, 209-210with dl, 209
decay factor, 133default load parameters, 86-87default requests
configuring, 107-108file example, 108file format, 107
default scheduling, 118default user, 139-140definition files, setting up, 93deleting
administration hosts, 32, 33checkpointing environment, 178execution hosts, 30, 31global configuration, 43host groups, 37, 38
deleting (Continued)local host configuration, 43manager accounts, 94operator accounts, 95, 96outdated records, 186-187parallel environments, 166projects, 102submit hosts, 34, 35users, 100usersets, 97
departments, 99derived values, calculating, 183-186-dh qconf option, 33-dhgrp qconf option, 38diagnosing problems, 210-212disabling
job validation, 200load adjustments, 201load thresholds, 200queues, 40, 62suspend thresholds, 200
disk spaceand h_fsize, 84managing, 83-85
dl, 209-dm qconf option, 94, 96-dp qconf option, 171-dprj qconf option, 104-dq qconf option, 63-dq qmod option, 40-ds qconf option, 35-du qconf option, 98-dul qconf option, 98-duser qconf option, 101dynamic load balancing, 175dynamic resource management, 110, 111-112
Eediting, tickets, 128email
error message format, 206reporting errors, 205-210, 212
Index
227

enablingqueues, 62reporting file, 182-183
environment variables, for parallel jobs, 170environments
See also checkpointing environments, parallelenvironments
modifying using files, 193-196epilog script, 51error codes
checkpointing, 208job-related, 206-208parallel environments, 207queue-related, 207
error message (E), 206error reporting, 209
with email, 205-210, 212execution daemon, 20
shutting down with QMON, 30execution daemons, killing, 39-40execution hosts, 20
access permissions, 29adding, 27-30, 31configuring from the command line, 31configuring with cron, 31configuring with QMON, 25-30deleting, 30, 31listing, 31modifying, 27-30, 31status, 39
Ffile access, 92file size limit, h_fsize, 85files, using for administration tasks, 181-198fine-tuning, 199-201finished jobs, turning list off, 200first-in-first-out (FIFO), 112, 118, 126fixed resource attributes, 26floating licenses, managing, 78-81free space, 75functional policy, 111, 147-148
configuring, 144-148
functional policy (Continued)sharing ticket shares, 129-130
functional shares, 144functional tickets, sharing, 129-130
Ggenerating
accounting statistics, 187reporting statistics, 181-187
global cluster, configuring, 41-44global cluster configuration, displaying, 41global configuration, 41-44
adding, 42-43deleting, 43displaying from the command line, 43-44modifying, 42-43modifying from the command line, 44modifying using files, 197-198
global resource attributes, 73
Hh_fsize
hard files size limit, 85managing disk space, 84
half-life factor, 133-134hierarchy (ticket policy), 131-132host_conf, complex_values entry, 80host groups
adding, 36-37, 38configuring from the command line, 38configuring with QMON, 35-37deleting, 37, 38listing, 38modifying, 36-37, 38
host resource attributes, defining, 28-29hosts, 20
adding administration hosts, 33adding execution hosts, 31adding submit hosts, 35administration, 20configuring, 25-40
Index
Sun N1 Grid Engine 6.1 Administration Guide • May 2007228

hosts (Continued)deleting administration hosts, 33deleting execution hosts, 31deleting submit hosts, 35execution, 20invalid names, 39listing administration hosts, 33listing execution hosts, 31listing submit hosts, 35master, 20modifying execution hosts, 31modifying using files, 193-196resource attributes, 72-73status of execution hosts, 39submit, 20
II/O, usage metric, 27info message (I), 206inheritance of resource attributes, 81interval (scheduler), 117invalid host names, 39
J-j qacct option, 187-j qstat option, 211job limits, 85jobs
disabling validation, 200error codes, 206-208maximum number of, 113, 121migrating, 175not getting dispatched, 210-211not scheduled, 117parallel, 166pending reasons, 117resume method, 51sorting, 110, 112-114starter method, 51suspend method, 51terminate method, 51
jobs (Continued)turning finished list off, 200
K-kej qconf option, 39-40kernel-level checkpointing, 175killing
execution daemons with jobs, 39-40master daemon, 39-40scheduler daemons, 39-40
-km qconf option, 39-40-ks qconf option, 39-40
L-l qacct option, 187-l qalter option, 69-l qsub option, 69
for parallel jobs, 170licenses
floating, 75managing floating, 78-81
limitsconfiguring, 55-56h_fsize, 85per job, 85per process, 85
listingadministration hosts, 33execution hosts, 31host groups, 38manager accounts, 95operator accounts, 96queue calendars, 67submit hosts, 35
load, 120load, site-specific, 85load adjustments, 112, 124
disabling, 201load balancing, dynamic, 175load parameters, 72, 86-89, 119
adding site-specific, 87
Index
229

load parameters (Continued)and consumable resources, 75default, 86-87virtual_free, 82
load_parameters.asc file, 86load reporting, 112load scaling, 26, 112
scaling factors, 27load sensors
format, 88interface, 85script example, 88-89writing, 87-89
load thresholdsconfiguring, 53-54disabling, 200
load values, 72, 73local host configuration, 41-44
adding, 42-43deleting, 43modifying, 42-43
log file, messages, 206login IDs, 92
Mmail program, 41manager accounts
adding, 94configuring, 94-95deleting, 94listing, 95
managers, 93managing, disk space, 83-85master daemon, 20
killing, 39-40master host, 20
changing, 20-22master spool directory, access for shadow master
hosts, 23maximum number of jobs, 113, 121-mc qconf option, 86-Mc qconf option, 86-mcal qconf option, 67
-Mcal qconf option, 67-mckpt qconf option, 178-Mckpt qconf option, 178-mconf qconf option, 44-Me qconf option, 31-me qconf option, 31memory, 75
oversubscription, 81usage metric, 27
message-passing, 170Message Passing Interface, 165messages files, 212
file format, 206log file, 206
metricsCPU, 27I/O, 27memory, 27usage, 27
-mhgrp qconf option, 38-Mhgrp qconf option, 38migrating jobs, 175modifying
checkpointing environment, 177-178cluster configuration using files, 197-198environments using files, 193-196execution hosts, 27-30, 31global configuration, 42-43global configuration using files, 197-198host groups, 36-37, 38hosts using files, 193-196local host configuration, 42-43objects, using files, 191-192parallel environments, 166projects, 103queue calendars, 67queues, 63queues using files, 193-196scheduler using files, 197-198usersets, 97
monitoring, scheduler, 199-mp qconf option, 171-Mp qconf option, 171MPI, 165, 166, 174
Index
Sun N1 Grid Engine 6.1 Administration Guide • May 2007230

MPICH, 174-mprj qconf option, 104-Mprj qconf option, 104-mq qconf option, 63-Mq qconf option, 63-mu qconf option, 98-Mu qconf option, 98-muser qconf option, 101-Muser qconf option, 101
Nnetwork bandwidth, 75NFS Network File System, 20
problems with, 105node attributes, 136-138notice message (N), 206
Oobjects
using files to add, 191-192using files to modify, 191-192
operator accountsadding, 95, 96configuring, 95-96deleting, 95, 96listing, 96
operators, 93override policy, 111
configuring, 148-151sharing tickets, 128-129
override tickets, sharing, 128-129owners of queues, 93owners parameters, configuring, 61-62
Ppam-crash, 78parallel environments
access lists, 167access restrictions, 170
parallel environments (Continued)adding, 166allocation rule, 168configuring, 165-174control slaves parameter, 168deleting, 166error codes, 207modifying, 166startup procedure, 167, 172-173stop procedure, 167, 173-174submitting jobs to, 166tight integration, 174tight integration with Grid Engine, 174
parallel jobs, 166and consumable resources, 76environment variables, 170resource requirements, 170
Parallel Virtual Machine, 165path aliasing, 105-106path-aliasing files
example, 106format, 106interpretation, 106
-pe qsub option, 169pending jobs, not getting dispatched, 210-211permissions, access, 92physical memory, and virtual_free, 81policies
administering, 124-151configuring share-based, 132-143functional, 111, 144-148override, 111, 148-151priority, 126share-based, 111share-based decay factor, 133share-tree compensation factor, 134-135share-tree half-life factor, 133-134share-tree parameters, 138-139ticket-based, 127-132urgency, 113-114, 127
policy-based resource management, 125-126POSIX priority, 112, 126priority
policies, 126
Index
231

priority (Continued)POSIX, 112, 126ticket-based, 112, 126urgency-based, 112, 126
problemsdiagnosing, 210-212troubleshooting, 213-218
process hierarchy, checkpointing, 175process limits, 85project access parameters, configuring, 60-61project-based scheduling, share-tree, 141-143projects, 98-99
adding, 103defining, 102-104deleting, 102modifying, 103removing from share tree, 137user access, 92
prolog script, 51PVM, 165, 166, 174
Qqacct, 187
-j, 187, 212-l, 187referencing resource requirements, 187
qalter
-l, 69monitoring the scheduler with, 117-118-w, 117-118
qconf
-Acal, 66-acal, 66-Ackpt, 178-ackpt, 178-ae, 31-ah, 33-Ahgrp, 38-ahgrp, 38-am, 94-ao, 96-Ap, 171-ap, 171
qconf (Continued)-Aprj, 104-aprj, 104-Aq, 63-aq, 63-as, 35-Au, 98-au, 98-Auser, 101-auser, 101-cq, 63-dcal, 66-dckpt, 178-de, 31-dh, 33-dhgrp, 38-dm, 94, 96-dp, 171-dprj, 104-dq, 63-ds, 35-du, 98-dul, 98-duser, 101-kej, 39-40-km, 39-40-ks, 39-40-Mc, 86-mc, 86-mcal, 67-Mckpt, 178-mckpt, 178-mconf option, 44-Me, 31-Mhgrp, 38-mhgrp, 38-Mp, 171-mp, 171-Mprj, 104-mprj, 104-Mq, 63-mq, 63-Mu, 98-mu, 98
Index
Sun N1 Grid Engine 6.1 Administration Guide • May 2007232

qconf (Continued)-Muser, 101-muser, 101-scal, 67-scall, 67-sckpt, 179-sckptl, 179-sconf, 43-44-se, 31-sel, 31-sh, 33-shgrp, 38-shgrp_resolved, 38-shgrp_tree, 38-shgrpl, 38-sm, 95, 96-sp, 171-spl, 171-sprj, 104-sprjl, 104-sq, 63-sql, 63-ss, 35-su, 98-sul, 98-suser, 101-suserl, 101-tsm, 118using with qselect, 196
qhost, 39qmake
errors, 217qmod
disabling queues, 40-dq, 40
qmon file, 93qrsh
errors, 215, 216qselect, 195-196
using with qconf, 196qsh, default requests, 108qstat, –j, 211qsub
-clear, 107
qsub (Continued)-l, 69-l for parallel jobs, 170-pe, 169-V for parallel jobs, 170-v for parallel jobs, 170
queue calendarsadding, 66configuring, 64-67configuring from the command line, 66-67listing, 67modifying, 67
queue_conf, 85queue instances, selecting with qselect, 195-196queue owners, 93queue_sort_method, 120queues
adding, 63cleaning, 63configuring, 45-64configuring attributes, 64configuring checkpointing parameters, 51-52configuring complex resource attributes, 56-58configuring execution methods, 50-51configuring from the command line, 62-64configuring general parameters, 49-50configuring limits, 55-56configuring load thresholds, 53-54configuring owners parameters, 61-62configuring parallel environments, 52-53configuring project access parameters, 60-61configuring subordinate queues, 58-59configuring suspend thresholds, 53-54configuring user access parameters, 59-60disabled by calendar, 64disabling, 40, 62enabled by calendar, 64enabling, 62error codes, 207modifying, 63modifying using files, 193-196resource attributes, 72resumed by calendar, 64resuming, 62
Index
233

queues (Continued)sorting, 110, 112sorting by sequence number, 120sorting by share, 120-121suspended by calendar, 64suspending, 62
Rreal time, 187removing users and projects from share tree, 137reporting file
enabling, 182-183reporting parameters, 183reporting variables, 27
defining, 29-30reserving resources, 110, 114-117resource attributes, 69-89
adding, 73-75assigning to queues, hosts, and the global
cluster, 71-75configuring, 56-58configuring from the command line, 85-86configuring with QMON, 70-71consumable, 26default load parameters, 86-87definition format, 70fixed, 26global, 73host, 28-29, 72-73inheritance, 81queue, 72
resource managementdynamic, 110, 111-112policy-based, 125-126
resource requirementsfor parallel jobs, 170referencing with qacct, 187
resource reservation, 110, 114-117and urgency policy, 201
resource usage, cost, 27resources
available on host, 26consumable, 75-85
restart files, 175resume job method, 51resuming queues, 62RPC server, 20, 23
S-scal qconf option, 67scaling factors, 27
defining, 27scaling system load, 119-120scheduler, 20
administering, 109-124configuring, 118-121, 121-124interval, 117modifying using files, 197-198monitoring, 118, 199monitoring with qalter, 117-118
scheduler daemons, killing, 39-40scheduling
changing the algorithm, 119default, 118immediate, 201overview, 110strategies, 110-118, 118-121
-sckpt qconf option, 179-sckptl qconf option, 179-sconf qconf option, 43-44scripts, using for administration tasks, 181-198-se qconf option, 31-sel qconf option, 31selecting, queue instances with qselect, 195-196seq_no, 120sequence number
sorting queues by, 112, 120setrlimit, 85sge_aliases file, 93.sge_aliases file
file format, 105sge_aliases file
file format, 105global path aliasing, 105
.sge_aliases fileuser path aliasing, 105
Index
Sun N1 Grid Engine 6.1 Administration Guide • May 2007234

SGE_CHECK_INTERVAL, 24-25SGE_DELAY_TIME, 24-25sge_execd, 20
killing, 39-40SGE_GET_ACTIVE_INTERVAL, 24-25sge_qmaster, 20
killing, 39-40sge_request file, 93
global default request file, 107.sge_request file, private request file, 107sge_schedd, 20, 118
killing, 39-40sge_shadowd, 23-sh qconf option, 33shadow master hosts
access to common directory, 23access to master spool directory, 23configuring, 22-25hostname file, 23
shadow_masters file, 23shadow sge_qmaster, starting, 24share-based policy, 111
configuring, 132-143decay factor, 133
share_functional_shares, 129share_override_tickets, 129share tree, 135
removing leaves, 137share-tree policy
compensation factor, 134-135default user, 139-140half-life factor, 133-134node attributes, 136-138parameters, 138-139project-based scheduling, 141-143
shares, functional, 144-shgrp qconf option, 38-shgrp_resolved qconf option, 38-shgrp_tree qconf option, 38-shgrpl qconf option, 38shutting down
execution host daemons, 30Grid Engine, 40parallel environments, 173
site dependencies, setting up, 93site-specific load information, 85-sm qconf option, 95, 96sorting
jobs, 110, 112-114queues, 110, 112queues by sequence number, 112queues by share, 120-121
-sp qconf option, 171space sharing, 81-83-spl qconf option, 171-sprj qconf option, 104-sprjl qconf option, 104-sq qconf option, 63-sql qconf option, 63-ss qconf option, 35start job method, 51starting
daemons, 40shadow sge_qmaster, 24
startpvm.sh script, 172startup procedure (parallel environments), 167stderr, redirection, 205stop procedure (parallel environments), 167, 173-174stoppvm.sh script, 173stty in startup files, 93, 213-su qconf option, 98submit hosts, 20
adding, 34, 35configuring from the command line, 35configuring with QMON, 33-34deleting, 34, 35listing, 35
subordinate queues, configuring, 58-59-sul qconf option, 98-suser qconf option, 101-suserl qconf option, 101suspend job method, 51suspend thresholds
configuring, 53-54disabling, 200
suspending queues, 62swap space, and virtual_free, 81swapping, 81
Index
235

system load, scaling, 119-120system time, 187
Tterminate job method, 51ticket-based job priority, 112, 126ticket-based policies, configuring, 127-132ticket policy hierarchy, 131-132tickets, 111-112, 127
editing, 128tight integration of parallel environments and Grid
Engine, 174tight parallel environment integration, 174trace output, debug mode, 209troubleshooting, 213-218-tsm qconf option, 118
Uurgency-based job priority, 112, 126urgency policy, 113-114
and resource reservation, 201configuring, 127
usagecost, 27CPU, 27I/O, 27memory, 27metrics, 27scaling factors, 27
user access, configuring, 93-101user access lists
configuring, 96-99for parallel environments, 167
user access parameters, configuring, 59-60user IDs, 92user-level checkpointing, 175user time, 187users, 93
adding, 100categoriThees of, 93configuring, 99-101
users (Continued)configuring user access lists, 96-99declaring, 92default, 139-140deleting, 100file access, 92managers, 93operators, 93project access, 92queue owners, 93removing from share tree, 137setting up, 92-93setting up definition files, 93usersets, 98-99
usersets, 98-99adding, 97deleting, 97modifying, 97
V-V qsub option for parallel jobs, 170-v qsub option for parallel jobs, 170virtual_free load parameter, 81, 82
W-w qalter option, 117-118warning message (W), 206writing, load sensors, 87-89
Xxterm program, 41
Index
Sun N1 Grid Engine 6.1 Administration Guide • May 2007236