supcom - tutorial ms access, sep 2019
TRANSCRIPT

SUPCOM - TUTORIAL MS
ACCESS,
Sep 2019
nikos dimitrakas,
edited and tailored by Maria Bergholtz, and
Erik Perjons
SU/DSV KTH/ICT/SCS
Sep 2019 v 3.1.2 nikos dimitrakas, maria bergholtz, erik perjons
2
Table of contents
1 Introduction ............................................................................................................................ 3
1.1 Microsoft Access .......................................................................................................................... 3
2 The Domain ............................................................................................................................ 3
3 The Access Environment ........................................................................................................ 4
4 Creating A Database .............................................................................................................. 6
4.1 Creating Tables ........................................................................................................................... 7
4.1.1 Design ................................................................................................................................................... 7
4.2 Working With Relationships .................................................................................................... 14
4.2.1 Simple Foreign Keys with one field/column only ............................................................................... 17
5 Assignment task .................................................................................................................... 19

SU/DSV KTH/ICT/SCS
May 2018 v 3.1.2 nikos dimitrakas, maria bergholtz, erik perjons
3
1 Introduction
This version of this compendium is a tutorial for the SUPCOM course. It is a change and limited
version of the full version of this compendium. The full version is available at
http://coursematerial.nikosdimitrakas.com/access/.
1.1 Microsoft Access
Microsoft Access integrates a database management system and a rapid application
development environment in the same package. It provides almost all basic relational database
functionalities, and it extends this with facilities for rapid application development.
2 The Domain
The domain used in this part of the compendium has been specifically designed in order to be
limited. The domain describes a student that register for courses. A student has a student name
and a mobile number. A course has course name. A registration has registration date.
This limited domain is described as a conceptual model in UML Class Diagram, see Figure 1.
1..1
perform
1..*
1..1 concern
1..*
Figure 1. Conceptual model of a small domain in UML.
The schema of Figure 1 is transformed into a Relational Database Schema using UML Class
Diagram, see Figure 2. The includes the following transformations:
Surrogate Keys are added to each class (using the name of the class + ID) working as
the Primary Keys (PK) for each class
Associations are replaced by Foreign Keys on the many side of the associations.
Figure 2. Relational Database Schema in UML based on the Conceptual model.
Course Student
regDate
Registration courseName
Course studentName mobileNo
Student
studentID (PK) studentName mobileNo
Registration
registrationID (PK)
regDate
studentID (FK) courseID (FK)
courseID (PK) courseName

SU/DSV KTH/ICT/SCS
Sep 2019 v 3.1.2 nikos dimitrakas, maria bergholtz, erik perjons
4
The schema of Figure 1 can also be transformed into a Relational Database Schema in form of
the columns of tables, see Figure 3. Arrows shows the relationships between Foreign Keys (FK)
and Primary Keys (PK) connecting the tables.
Figure 3. Relational Database Schema in form of columns of tables
The schemas of Figure 2 and Figure 3 can also be shown in form of a textual notation, see
Figure 4, instead of graphical notations (shown in Figure 2 and Figure 3). This schema in textual
notation can be used as a complement or instead of the graphical ones.
Tables (Primary Keys are underlined):
Student (studentID, studentName, mobileNo)
Course (courseID, courseName)
Registration (registrationID, RegDate, studentID, courseID)
Registration.studentID is FK towards Student.studentID
Registration.courseID is FK towards Course.courseID
In the next chapter we will see how we can create an Access database based on the relational
database schema shown above.
3 The Access Environment
As we mentioned in section 1.1, Access is both a database management system and an
application development environment. Access uses the basic philosophy of the other products
in Microsoft Office, which means that a database (and accompanying application) is stored in
a file (similar to Word, Excel and PowerPoint). Access files use the extension "accdb". Creating
such a file is the equivalent to creating a database (done in other products with the SQL
command CREATE DATABASE).
Starting Access without opening a particular file shows a welcome menu for creating a new
file (a new database):

SU/DSV KTH/ICT/SCS
May 2018 v 3.1.2 nikos dimitrakas, maria bergholtz, erik perjons
5
On the right side of the window there are multiple options of creating new files. The option
relevant to us is "Blank desktop database" which will create a new file. The file name must be
specified before pressing "Create".
ⓘ There is also the option of opening an existing file by pressing "Open Other Files" on the
left panel. On the left panel there is also a list of files recently opened in Access, which of course is empty if this is the first time we open Access. You can also click on the database (with file extension “accdb”) and Access will open. Therefore you can save your database
on the remote desktop if you want, and just click on it to open it up.
Once a new database has been created, Access will automatically suggest that we create a
table:

SU/DSV KTH/ICT/SCS
Sep 2019 v 3.1.2 nikos dimitrakas, maria bergholtz, erik perjons
6
On the top of the window we have the menu (FILE, HOME, CREATE, etc.). Each option has
its own toolbar and options will be active or inactive based on the current selection. The menu
and correspondning toolbars is called "Ribbon". On the left side we have the object browser.
Objects are not to be confused with objects in object-oriented programming. In Access we have
six types of objects: Tables, Queries (views), Forms, Reports, Macros and Modules. All objects
of these types will be shown in the object browser. The object browser is the control center of
our database and is also known as the "Navigation Pane". From here we can open any table,
query or other object in order to use it or modify it. The main area of the window (to the right
of the object browser) is where we work with any objects we may open.
A new feature in Access 2016 is the "Tell me what you want to do…" option on the ribbon.
This search box offers a quick way to find a command without switching tabs on the ribbon (or
even showing the ribbon if it is collapsed). You can activate the search box by pressing Alt +
Q.
If you created a database and do not want to use, just delete the database file.
4 Creating A Database
Given the relational database schema created in chapter 2, we will now create a database in
Access. We will start by creating the tables, defining their columns, data types and Primary
Keys. When all the tables are in place we will move on to establishing the relationships between
tables, i.e. the Foreign Key relationships.
Before we can start creating tables though, we have to create a database. A database in Access is a file with the extension "accdb". Note that prior to Access 2007, Access databases were

SU/DSV KTH/ICT/SCS
May 2018 v 3.1.2 nikos dimitrakas, maria bergholtz, erik perjons
7
stored in a different format and with the extension "mdb". As we saw in chapter 3, creating a
database file is the first thing to do after starting Access. Once already in Access, select FILE
> New > Blank desktop database to create a new file. Place the new file at a suitable location
(for example, on your remote desktop). You can always move or rename the file later if you
want.
Access starts by suggesting that a new table be created. Close the new table without saving:
4.1 Creating Tables
There are many ways to create tables in Access, but we will only look at two of them. The first
way is using a special design view where we can specify the names of the columns, the data
types, Primary Keys and other field (column) restrictions (for example NOT NULL, etc.). The
second way that we will look at, is specifying a DDL statement (i.e. a CREATE TABLE
statement) for each table and then simply running the DDL statements.
4.1.1 Design
When we create an empty Database Access will immediately suggest we create a table in so
called insert-mode, we just close this table to be able to enter Design mode:
SU/DSV KTH/ICT/SCS
Sep 2019 v 3.1.2 nikos dimitrakas, maria bergholtz, erik perjons
8
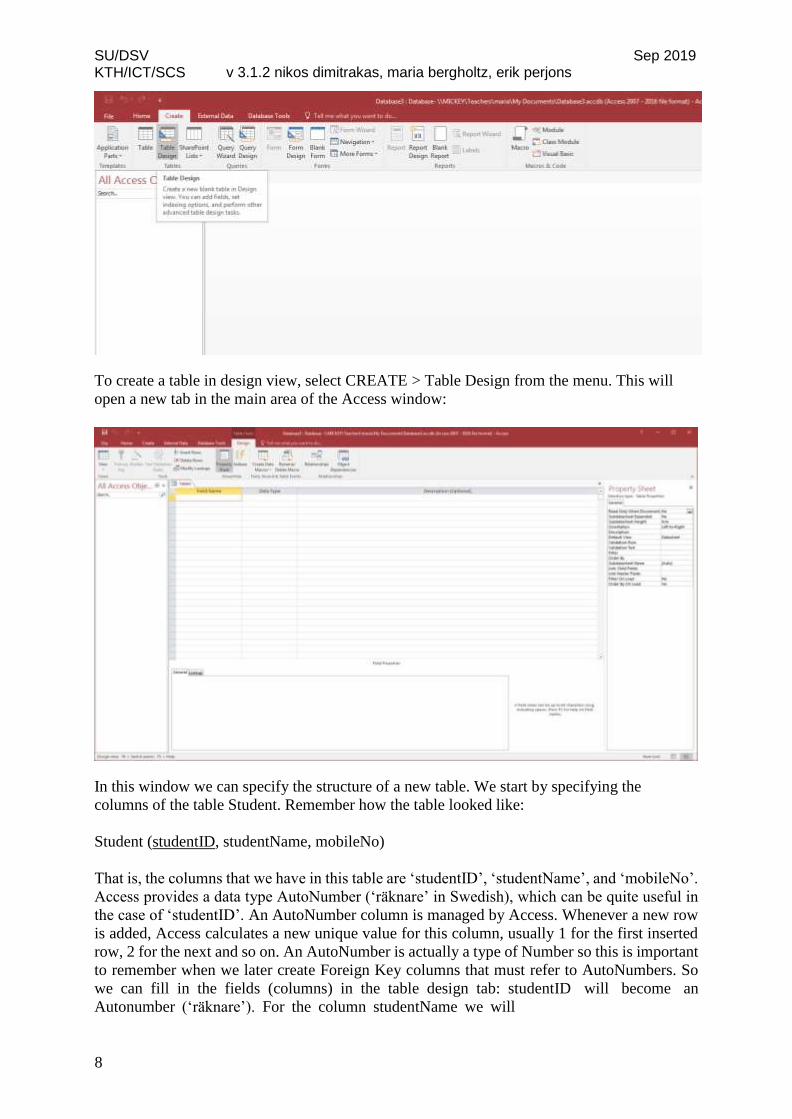
To create a table in design view, select CREATE > Table Design from the menu. This will
open a new tab in the main area of the Access window:
In this window we can specify the structure of a new table. We start by specifying the
columns of the table Student. Remember how the table looked like:
Student (studentID, studentName, mobileNo)
That is, the columns that we have in this table are ‘studentID’, ‘studentName’, and ‘mobileNo’.
Access provides a data type AutoNumber (‘räknare’ in Swedish), which can be quite useful in
the case of ‘studentID’. An AutoNumber column is managed by Access. Whenever a new row
is added, Access calculates a new unique value for this column, usually 1 for the first inserted
row, 2 for the next and so on. An AutoNumber is actually a type of Number so this is important
to remember when we later create Foreign Key columns that must refer to AutoNumbers. So
we can fill in the fields (columns) in the table design tab: studentID will become an
Autonumber (‘räknare’). For the column studentName we will

SU/DSV KTH/ICT/SCS
May 2018 v 3.1.2 nikos dimitrakas, maria bergholtz, erik perjons
9
select the date type Short Text (‘Text’ in Swedish), and for the column mobileNo we will
select the data type Number:
(A side-note about using just “Name” as column names in Access: The word "Name" is a
reserved word in Access, so a warning may appear when naming a column "Name". You can
ignore the warning and continue. When using column names that are reserved words, we may
have to enclose the column names within “ and ” in SQL and in other contexts where Access
may otherwise get confused. (This is not a problem in this tutorial since we did not use name
or Name).
For each column (called “field” in Access) of the table we can specify more details. The Field
Properties shown in the lower half of the tab belong to the field (column) that is selected in the
upper half. The active field (column) is highlighted with a different color. So in the image below
the field properties shown apply to the field (column) studentName.

SU/DSV KTH/ICT/SCS
Sep 2019 v 3.1.2 nikos dimitrakas, maria bergholtz, erik perjons
10
.-
We do not want to have NULL-values so we change this field value to ’Yes’ so that all
Students will have to have studentName!
Change the Required-field to “Yes” for column mobileNo as well:

SU/DSV KTH/ICT/SCS
May 2018 v 3.1.2 nikos dimitrakas, maria bergholtz, erik perjons
11
Now that we have specified all the columns of the table, we can also specify the Primary Key
for the table. We can simple select the field (column) that we want to use as Primary Key, right-
click on the (two-button) mouse to the left of the Fieldname and select the Primary Key symbol,
see below.
The selected field (column) will then be marked with a key symbol (on the left of the field
name) to indicate that it has been selected as Primary Key, see below. (You can also use Primary
Key button on the ribbon (under DESIGN). Try to click on Primary Key button on the ribbon
and the key symbol will disappear, and click on it again and you will have the key symbol back)
We can specify the table name now by either trying to save the table or trying to close the table
design. To save the table press Ctrl-S or select FILE > Save from the menu, or right- click on
the table tab selector and select Save. Access will ask you to specify the name of the new table:

SU/DSV KTH/ICT/SCS
Sep 2019 v 3.1.2 nikos dimitrakas, maria bergholtz, erik perjons
12
Specify the table name as Student and press OK.
As a routine I always save after each table created: FILE Save
The table name is now visible in the tab selector to the left and the table has appeared in the
object browser: (under “Tables”):
Now, let's create a new table.
We do this by clicking on CREATE and Table:

SU/DSV KTH/ICT/SCS
May 2018 v 3.1.2 nikos dimitrakas, maria bergholtz, erik perjons
13
And then right-click on the Table 1 tab and choose Design-view in the drop-down Menu. You
will be asked to add the name of the table, which is Registration. (You can also directly click
on the Table Design under Create, but then you will not be asked to give the table a name)
The new table to be created is Registration, remember the table has the following columns:
Registration (registrationID, RegDate, studentID, courseID)
Access will then suggest that the table has a Primary Key of data type AutoNumber called ID,
quite convenient but we change the name of the Field (column) to RegistrationID and fill in the
other fields (column) as well:
Two of the fields (columns) above, studentID, and courseID will be Foreign Keys towards
Primary Keys of other tables, for instance the studentID-field (column) will be a Foreign Key
towards the Student table that we created before. What is important here is to observe that the
data type of the Foreign Key fields (columns) must match the data types of the Primary Key
fields (columns) to which the Foreign Keys refer. However, we cannot match with the data type
AutoNumber, since we will receive (normally) consecutive numbers as values (1 for the first
row, 2 for the second, … etc. remember?). Therefore, we need to use the data type Number
instead as the data type for the Foreign Keys in this case.
Create the fields (columns) and select the data types, as suggested in the figure above. Change
the Required-field to “Yes”, in the field properties in the lower half of the tab. You need/can
change this for all fields (columns) with the exception of the registrationID.

SU/DSV KTH/ICT/SCS
Sep 2019 v 3.1.2 nikos dimitrakas, maria bergholtz, erik perjons
14
When you have defined all four fields (columns), their data types and the Primary Key, you
can save the table and close the table design window.
As a routine I always save after each table created: FILE Save
Finally, you need to create the table Course with the following field (column).
Course (courseID, courseName)
The final result should be as the figure below. Also change the Required-field to “Yes”, in the
field properties for courseName
As a routine I always save after each table created: FILE Save
4.2 Working With Relationships
All the tables are now created, but they are not in any way related to each other. There is no
referential integrity specified, and no Foreign Key rules either.
In Access, relationships between tables can be created graphically with a simple drag-and- drop
principle. Relationships in Access are more than just Foreign Key relationships. They are also
used by the system when working with wizards for creating forms and reports. In this section
we will focus on defining referential integrity and referential actions.
In order to create table relationships in Access we must use the Relationships window. This can
be invoked from the ribbon under "Database Tools":

SU/DSV KTH/ICT/SCS
May 2018 v 3.1.2 nikos dimitrakas, maria bergholtz, erik perjons
15
When you open the Relationships button for the first time, Access will automatically open the
Relationships tab and show the Show Table dialog:
This dialog can also be invoked later by pressing the Show Table button on the ribbon while
the Relationships tab is active:

SU/DSV KTH/ICT/SCS
Sep 2019 v 3.1.2 nikos dimitrakas, maria bergholtz, erik perjons
16
This dialog allows us to choose which tables to show on the Relationships tab. The relationships
view in Access is like a diagram that shows graphically all the relationships between the
different tables, not unlike the graphical relational schemas shown in chapter 2. Highlight the
first table in the list, hold down Shift and click on the last table name on the list to highlight
them all:
Press Add to add them to the diagram and press Close to return to the graphical relationships
diagram:
If you cannot see all the fields (columns) that you created, you have probably forgot to save the
all tables and their fields (columns), so go back and do that: FILE Save.
We can now resize and move the tables as needed. We can for example put them in a way more
similar to how they were shown in the graphical database schema in chapter 2:

SU/DSV KTH/ICT/SCS
May 2018 v 3.1.2 nikos dimitrakas, maria bergholtz, erik perjons
17
ⓘ Observe that the tables shown here are just graphical representations of the tables in our
database. Deleting a table here does not delete the table from the database, just from the relationships diagram.
We are now ready to create relationships.
4.2.1 Simple Foreign Keys with one field/column only
The first type of relationship, and probably the most common one, is when we have one field (column) in one table that is a Foreign Key to another table (with a one-column Primary Key).
Which we will use in this short compendium. For example, the field (column) studentID in the table Registration is a Foreign Key to the Primary Key of the table Student. In order to define
this relationship, we have to select the Foreign Key field (column) and drag and drop it on the
Primary Key field (column1). So, just drag the field (column) studentID of the table Registration to the field (column) studentID of the table Student. The Edit Relationships dialog will then
appear:
This dialog suggests a relationship based on the fields (columns) that we dragged and dropped.
The Foreign Key is automatically placed on the right side and the referenced Primary Key on
the left side. If we want the database to check that the values of the Foreign
1 Dragging and dropping the foreign key onto the primary key will also have the same effect if the
multiplicity is one-to-many.

SU/DSV KTH/ICT/SCS
Sep 2019 v 3.1.2 nikos dimitrakas, maria bergholtz, erik perjons
18
Key exist as values of the referenced Primary Key, then we should check the Enforce
Referential Integrity check box. There are some rare cases that we would not want referential
integrity, but in this compendium we will always have referential integrity for all relationships
we create. Any relationship created without referential integrity would not formally be a
Foreign Key relationship.
When we activate the referential integrity, a selection of referential actions becomes available:
The two choices correspond to “ON UPDATE CASCADE” and “ON DELETE CASCADE”
of standard SQL. Setting these options depends on the behavior we want our database to exhibit.
In this case we could say that the first one is appropriate while the second one is not. This means
that we want the value of the Foreign Key to be changed whenever the value of the Primary
Key is changed, but we do not want to delete all the registrations of a students as soon as a
student is deleted (or there is an attempt to delete a student). Instead the system will restrict
deletion of student that has at least one registration related to him/her. Should we want to
remove a student, we would have to remove all of his/her registrations first.
The Edit Relationships dialog shows us, as a bonus, what the relationship type is for the selected
tables and fields (columns). This is derived by the definition of the fields (columns) (whether
they are candidate keys, unique, etc). If the Relationship type is not as you intended it to be then
the tables may not have been defined correctly. In this case One-To-Many is just fine. One
Student object may be related to many Registration objects and one Student object has to be
related to at least one Registration object.

SU/DSV KTH/ICT/SCS
May 2018 v 3.1.2 nikos dimitrakas, maria bergholtz, erik perjons
19
When we are done specifying the relationship, we press Create and then Access will show the
new relationship graphically:
NOTE! If you get the following message in a dialog box, you need to first close the tabs with the table
names, by right-click on the tabs and select Save.
The same way, we can create the relationship between Course and Registration:
and then:

SU/DSV KTH/ICT/SCS
Sep 2019 v 3.1.2 nikos dimitrakas, maria bergholtz, erik perjons
20
ⓘ Should we want to edit an already existing relationship, we can simply double-click on it and the Edit Relationships dialog we show up.
5 Assignment task
You need to add two additional fields (columns) to one of the tables (As an example, add the
field registrationResponsible to the table Registration. Note, you need to select other fields than
this example). Then update the diagram (showing the tables and their relationships) above and
take a print screen/screen shot and paste of your new this into your assignment report. This is
just to check that you have done this tutorial.