supervalu svharbor portal reference guide reference guide version 2.0 3 learning launch if an online...
TRANSCRIPT

SUPERVALU
SVHarbor
Portal
Reference Guide
Version 3.0 June, 2007

TRADEMARKS
SVHarbor® and the SVHarbor logo are registered trademarks of SUPERVALU in the United States and may be protected as trademarks in other countries. Their respective companies claim all other products, services or company names mentioned herein as trademarks and trade names.
© SUPERVALU INC. 2007
SVHarbor Reference Guide Version 2.0
i
Table of Contents Table of Contents ..............................................................................................................................i Overview.......................................................................................................................................... 1
Objectives .................................................................................................................................... 1 SVHarbor requirements ............................................................................................................... 1 Audience ...................................................................................................................................... 1 Organization Description.............................................................................................................. 1 Document Conventions................................................................................................................ 2
Words in Bold ........................................................................................................................... 2 Notes, Warnings, and Tips ....................................................................................................... 2
Where to get Additional Help ....................................................................................................... 2 Online Help............................................................................................................................... 2 Learning Launch....................................................................................................................... 3 SUPERVALU Support .............................................................................................................. 3
Getting Started................................................................................................................................. 4 Background Information............................................................................................................... 4
User Roles................................................................................................................................ 5 Permissions.............................................................................................................................. 5
Logging in to SVHarbor................................................................................................................ 5 Navigating .................................................................................................................................... 7 Downloading any Additional Files................................................................................................ 8 Printing the Reference Guide....................................................................................................... 8 Logging out of SVHarbor ............................................................................................................. 8
Using SVHarbor............................................................................................................................. 10 Viewing SVHarbor Headlines..................................................................................................... 12 Viewing SVHarbor Alerts ........................................................................................................... 14 Viewing Industry News............................................................................................................... 16 Viewing My Weather Forecasts ................................................................................................. 17
Adding/Changing/Removing Weather Locations ................................................................... 17 Viewing Forecasts .................................................................................................................. 18
Working with My Favorites......................................................................................................... 20 Adding/Changing/Removing Favorites................................................................................... 20
Searching for an eMail Address................................................................................................. 22 Using SVHarbor eMail and Directories ...................................................................................... 24 Working with eMail ..................................................................................................................... 24
Accessing the eMail Application............................................................................................. 25 Reading Messages................................................................................................................. 27 Organizing eMail .................................................................................................................... 29
Creating a New Folder........................................................................................................ 29 Moving/Copying Messages to a Folder .............................................................................. 30 Removing a Folder ............................................................................................................. 31
Creating or Editing a Message............................................................................................... 32 Selecting from the Address Book........................................................................................... 34 Formatting eMail Text............................................................................................................. 34 Sending or Saving a Message ............................................................................................... 37 Setting Delivery Options......................................................................................................... 38 Deleting a Message................................................................................................................ 39 Setting Mail Preferences ........................................................................................................ 39
Using the Address book............................................................................................................. 43 Adding Contacts ..................................................................................................................... 44 Adding Groups ....................................................................................................................... 45 Editing Contacts or Groups .................................................................................................... 47 Deleting Contacts or Groups.................................................................................................. 48

SVHarbor Reference Guide Version 2.0
ii
Importing from Directories ...................................................................................................... 49 Working with Calendar (Events) ................................................................................................ 50
Scheduling a Meeting............................................................................................................. 52 Working with To Do’s ................................................................................................................. 53
Adding a To Do ...................................................................................................................... 55 Deleting a To Do .................................................................................................................... 57 Editing a To Do....................................................................................................................... 58
Appendices .................................................................................................................................... 59 Appendix A – Changing Your Password.................................................................................... 59
Index .............................................................................................................................................. 126H61

SVHarbor Reference Guide Version 2.0
1
Overview
Objectives This guide describes the SVHarbor portal features and explains how to use them. The SVHarbor portal provides web-based access, or entry point, to business applications, industry news and headlines, alerts, weather, and, if authorized, a personal organizer with email, calendar, and to do list. Depending on the options the administrator assigned to you, you may or may not have access to all of the features discussed in the guide. For example, if you haven’t been assigned an SVHarbor email account and an email role, the eMail, Calendar, To Do’s, and My Organizer options are not available.
SVHarbor requirements To use SVHarbor, you need a Web browser. Internet Explorer, version 5.5 or higher is recommended. You also need a username and password (your SVHarbor Administrator can provide these) for logging in to SVHarbor.
Audience This manual is written for the following types of users:
• SVHarbor Users
Organization Description This guide is organized into the following sections:
Overview – provides information about the purpose, audience and content of this guide. It also includes the document conventions within this guide, ways of getting additional support, and information about using the online Help.
Getting Started – provides background information to help you understand how the
SVHarbor application functions, how to login and logout as well as how to navigate through the application pages. You will also find information for printing this guide.
Using SVHarbor – provides details for:
• Logging in / Logging out • Changing Password • Viewing SVHarbor Headlines • Viewing SVHarbor Alerts • Viewing Industry News • Working with My Weather Forecasts • Working with My Favorites
SVHarbor Reference Guide Version 2.0
2
• Using SVHarbor eMail and Directories - eMail - Directories - Address Book - Calendar - To Do List
Appendix – provides additional details that may be helpful in understanding or using the
SVHarbor.
Index – provides a listing of topics found in this guide and the page(s) where information about the topic can be found.
Document Conventions
Words in Bold Words appearing in bold text indicate menu names, menu options, buttons, links or field names appearing on a page of the application. For example: File menu, Print option, Close button, My Organizer page, or Logout link.
Notes, Warnings, and Tips If you see “NOTE:” at the beginning of a line of text, it calls your attention to important details about the topic immediately preceding it. If you see “WARNING:” at the beginning of a line of text, it calls your attention to important details about conditions or outcomes that might happen. If you see “TIP:” at the beginning of a line of text, it calls your attention to a timesaving or processing shortcut.
Where to get Additional Help If you cannot locate the information you seek in this reference guide, you do have other sources. Those sources are:
Online Help The online help (specifically Quick Help and What’s New) will always contain information about the current released version of SVHarbor. This guide may not be updated for every release. Online for the My Organizer options (eMail, Address Book, Calendar, To Do’s) is available from the Tools option on any My Organizer page.

SVHarbor Reference Guide Version 2.0
3
Learning Launch If an online training course has been developed for the SVHarbor portal, you may be able to access it via Learning Launch, SUPERVALU’s learning management repository. Confer with your manager about availability and access.
SUPERVALU Support SUPERVALU’s central support team is available at 1-800-426-8845 (952-828-4600 in the Minneapolis area). Contact them for all hardware and connectivity issues as well as questions related to the SVHarbor application. If they cannot answer your questions, they will forward them to the appropriate resources to assist you.
SVHarbor Reference Guide Version 2.0
4
Getting Started
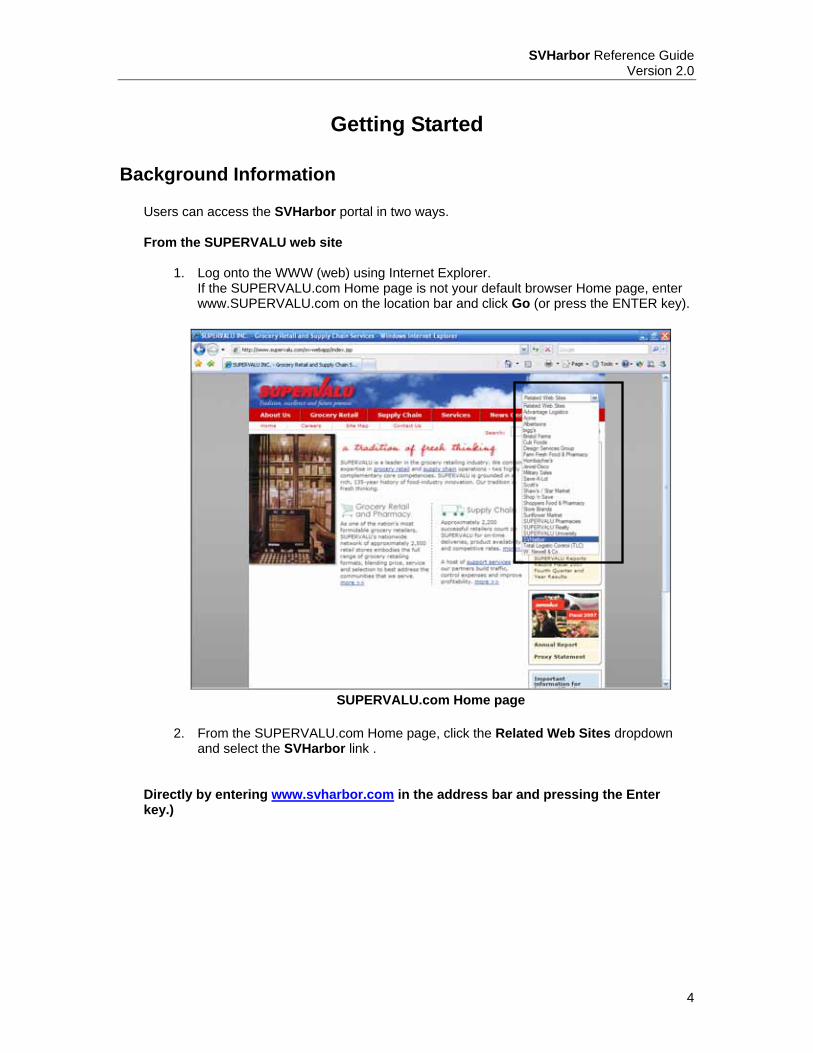
Background Information Users can access the SVHarbor portal in two ways. From the SUPERVALU web site
1. Log onto the WWW (web) using Internet Explorer. If the SUPERVALU.com Home page is not your default browser Home page, enter www.SUPERVALU.com on the location bar and click Go (or press the ENTER key).
SUPERVALU.com Home page
2. From the SUPERVALU.com Home page, click the Related Web Sites dropdown
and select the SVHarbor link . Directly by entering www.svharbor.com in the address bar and pressing the Enter key.)
SVHarbor Reference Guide Version 2.0
5
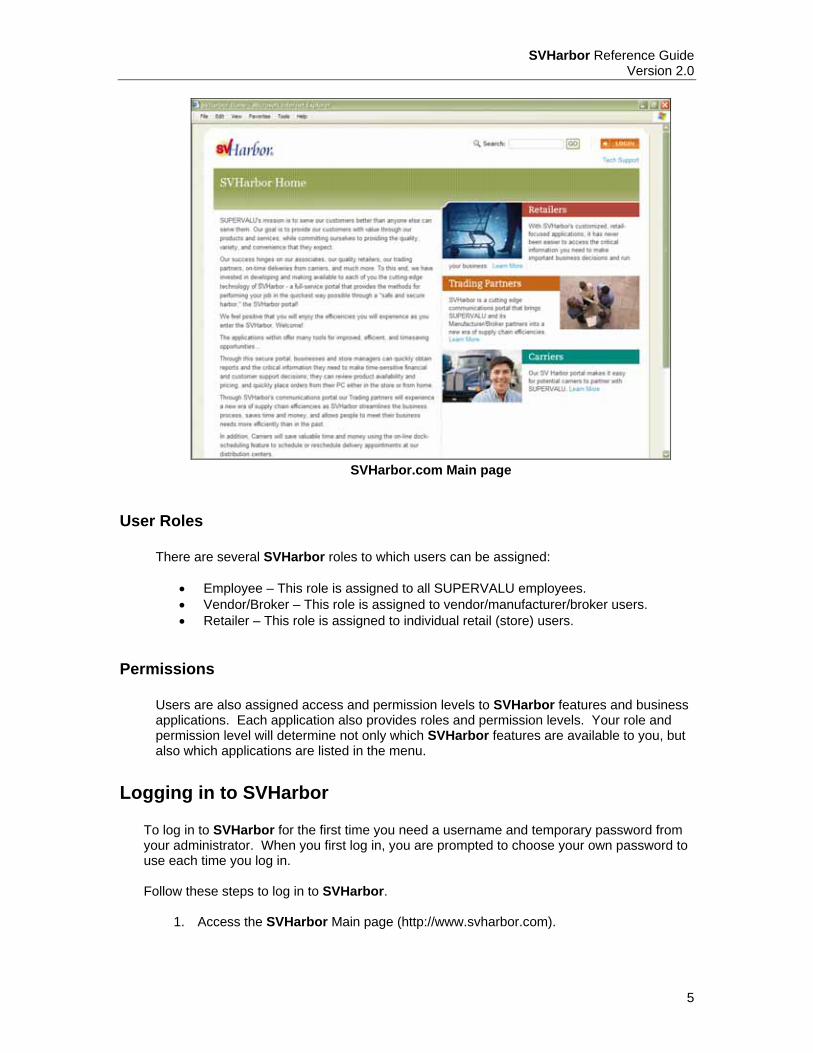
SVHarbor.com Main page
User Roles There are several SVHarbor roles to which users can be assigned:
• Employee – This role is assigned to all SUPERVALU employees. • Vendor/Broker – This role is assigned to vendor/manufacturer/broker users. • Retailer – This role is assigned to individual retail (store) users.
Permissions Users are also assigned access and permission levels to SVHarbor features and business applications. Each application also provides roles and permission levels. Your role and permission level will determine not only which SVHarbor features are available to you, but also which applications are listed in the menu.
Logging in to SVHarbor To log in to SVHarbor for the first time you need a username and temporary password from your administrator. When you first log in, you are prompted to choose your own password to use each time you log in. Follow these steps to log in to SVHarbor.
1. Access the SVHarbor Main page (http://www.svharbor.com).
SVHarbor Reference Guide Version 2.0
6
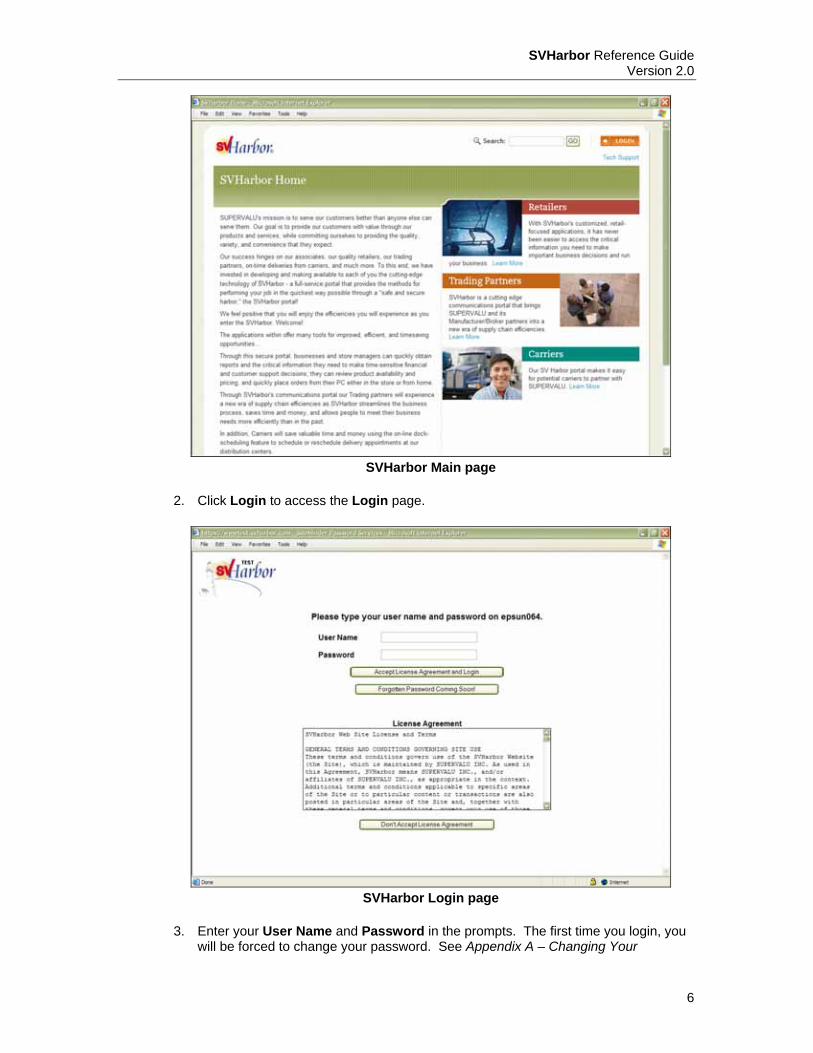
SVHarbor Main page
2. Click Login to access the Login page.
SVHarbor Login page
3. Enter your User Name and Password in the prompts. The first time you login, you
will be forced to change your password. See Appendix A – Changing Your

SVHarbor Reference Guide Version 2.0
7
Password for details. If you forget your password, you must contact your administrator to receive a new one.
4. You must accept or decline the License Agreement for using the SVHarbor Web
Site. You will need to click Accept License Agreement and Login in order to access and use the SVHarbor Home page.
SVHarbor Home page
The page you see may be different, depending on your role and permissions.
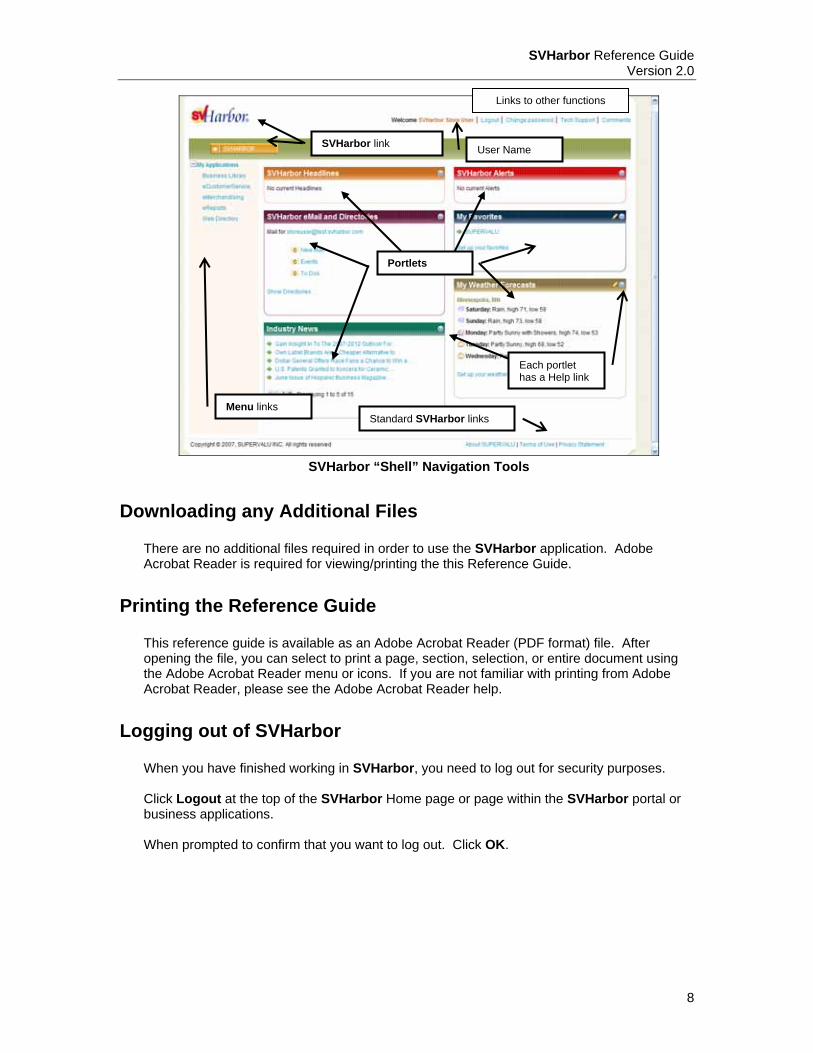
Navigating SVHarbor and its related applications use several standard methods for navigating within the application pages. Applications open within the SVHarbor “shell” which provides links for returning to the SVHarbor Home page (will log you out of the SVHarbor application), accessing the application’s Help, and to Logout of SVHarbor and the SVHarbor application. The “shell” also includes standard SVHarbor links to SUPERVALU.com, Privacy Policy, and Terms of Service information. WARNING: The SVHarbor application will automatically stop communicating with your browser if there is no activity (display of new pages) for a period of forty (40) minutes or after 120 minutes with activity. If this “timeout” occurs, you will need to login to SVHarbor again. Any unsaved entries will be lost.
SVHarbor Reference Guide Version 2.0
8
SVHarbor “Shell” Navigation Tools
Downloading any Additional Files There are no additional files required in order to use the SVHarbor application. Adobe Acrobat Reader is required for viewing/printing the this Reference Guide.
Printing the Reference Guide This reference guide is available as an Adobe Acrobat Reader (PDF format) file. After opening the file, you can select to print a page, section, selection, or entire document using the Adobe Acrobat Reader menu or icons. If you are not familiar with printing from Adobe Acrobat Reader, please see the Adobe Acrobat Reader help.
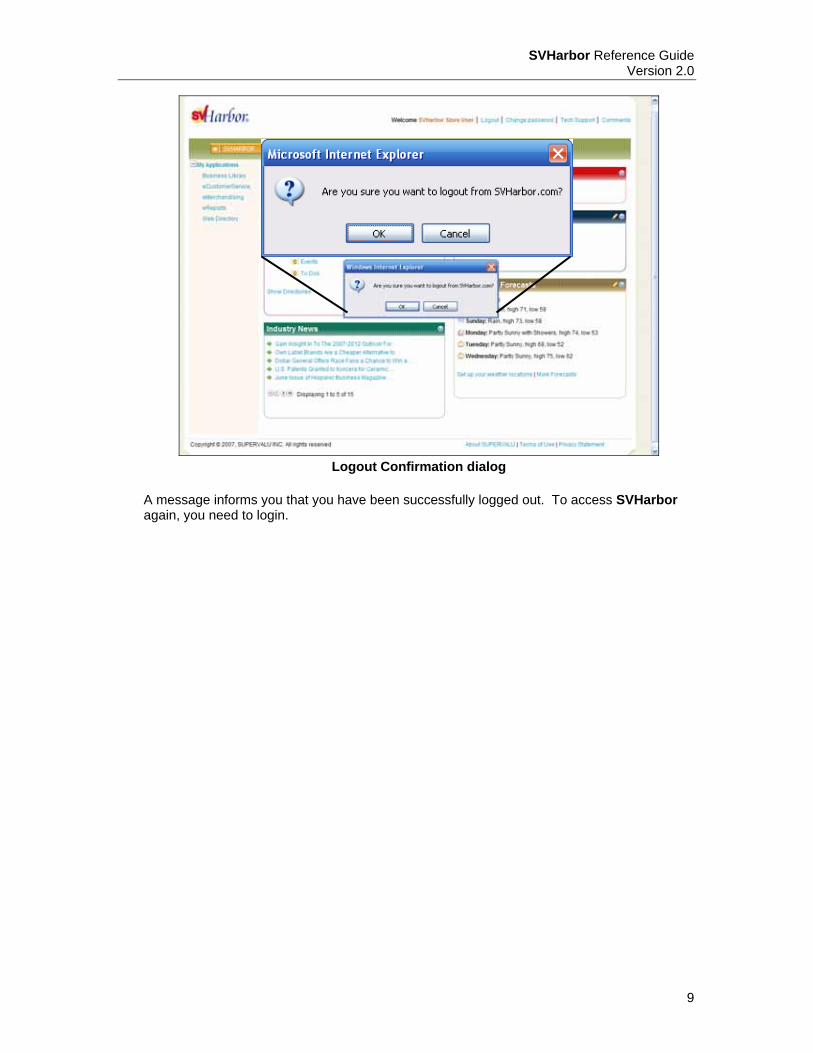
Logging out of SVHarbor When you have finished working in SVHarbor, you need to log out for security purposes. Click Logout at the top of the SVHarbor Home page or page within the SVHarbor portal or business applications. When prompted to confirm that you want to log out. Click OK.
SVHarbor link User Name
Standard SVHarbor links Menu links
Portlets
Links to other functions
Each portlet has a Help link
SVHarbor Reference Guide Version 2.0
9
Logout Confirmation dialog
A message informs you that you have been successfully logged out. To access SVHarbor again, you need to login.

SVHarbor Reference Guide Version 2.0
10
Using SVHarbor All the features of SVHarbor are accessed from the SVHarbor Main page. Your SVHarbor Main page may appear slightly different, depending on which applications and features you have been given access to by your SVHarbor administrator. In addition to the My Applications menu at the left, there are six content areas referred to as”portlets.” We will not discuss any of the business applications in this document. All business applications within SVHarbor are documented separately.
SVHarbor Main page
The SVHarbor Home page contains the following:
• Use the SVHarbor logo at the top of the page to return to the SVHarbor menu page. Use the Help link to display SVHarbor online help, or the LogOut link to logout of SVHarbor. More details of these links can be found below.
• The My Applications portlet contains links to all applications available to you. You
may have access to applications, but a permission level assigned by your administrator may limit your access within an application. To obtain access to additional programs, contact your SVHarbor administrator.
• The SVHarbor Headlines portlet contains announcements of interest to SVHarbor
users. Click a headline to view it. See Viewing SVHarbor Headlines on page 12 for details.
• The SVHarbor eMail and Directories portlet provides links to your eMail and
Organizer, as well as to the eMail directories. New Mail displays the number of new email messages you have. Events displays the number of scheduled events you
SVHarbor Reference Guide Version 2.0
11
have. To Dos displays the number of tasks you have. All are links. See Using SVHarbor eMail and Directories beginning on page 24 for additional details.
• The Industry News portlet contains articles related to the grocery industry. Click an
article title to view it. See Viewing Industry News on page 16 for details.
• The SVHarbor Alerts portlet contains links to important information you need to read. (Some alerts contain attachments with detailed information.) Click an alert to view it. See Viewing SVHarbor Alerts on page 14 for details.
• The My Favorites portlet provides your personalized links to favorite web sites. See
Working with My Favorites on page 20 fro details.
• The My Weather Forecasts portlet displays the five-day weather information for your selected location. You can personalize the weather forecast displayed and assess forecasts for other locations. See Viewing My Weather Forecasts on page 17 for details.

SVHarbor Reference Guide Version 2.0
12
Viewing SVHarbor Headlines The SVHarbor Headlines portlet on the SVHarbor Main page contains announcements of interest to SVHarbor users. A headline might include attached documents, indicated by a paper clip icon after the headline, providing detailed information or instructions in Microsoft Word, PDF, or other formats. You must have the appropriate file viewer or application to view an attachment. For example, you need the Microsoft Word viewer or application to view an attached Word document. If there are more than five (5) headlines in the SVHarbor Headlines portlet, the VCR-like controls in the SVHarbor Headlines portlet are available to navigate to the First, Previous, Next, or Last group of five (5) headlines. A line to the right of the controls displays the current range of headlines in view and the total available. Navigation buttons are not active if you cannot navigate to that choice. To view an item in the SVHarbor Headlines portlet, click it. The details of the headline will be displayed in a new page, leaving the SVHarbor My Applications menu visible and ready for easy access.
SVHarbor Headlines detail
In addition to the poster, posting date, and the detail for the selected Headline, the SVHarbor Headline detail page provides headline links before and after the detail that you can use to navigate to the previous/next headline detail. There is also a Return to List link you can click to return to the SVHarbor Portal Home page. If the headline includes an attachment, the attachment is shown as a link after the detail. Click the attachment name to display it in its application or viewer.

SVHarbor Reference Guide Version 2.0
13
Headline Attachment detail
Close the application or viewer to return to Harbor Headlines detail page.

SVHarbor Reference Guide Version 2.0
14
Viewing SVHarbor Alerts The SVHarbor Alerts portlet on the SVHarbor main page displays important announcements. For example, an alert might contain product recall information. Alerts can include attached documents providing detailed information or instructions in Microsoft Word, PDF, or other formats. You must have the appropriate file viewer or application to view an attachment. For example, you need the Microsoft Word viewer or application to view an attached Word document. If there are more than five (5) alerts in the SVHarbor Alerts portlet, the VCR-like controls in the SVHarbor Alerts portlet are available to navigate to the First, Previous, Next, or Last group of five (5) alerts. A line to the right of the controls displays the current range of headlines in view and the total available. Navigation buttons are not active if you cannot navigate to that choice. To view an alert message, click on it. The details of the alert message will be displayed in a new page, leaving the SVHarbor My Applications menu visible and ready for easy access.
Alert detail
In addition to the poster, posting date, and the detail for the selected alert, the SVHarbor Alert detail page provides alert links before and after the detail that you can use to navigate to the previous/next alert detail. There is also a Return to List link you can click to return to the SVHarbor Portal Home page. If the headline includes an attachment, the attachment is shown as a link after the detail. Click the attachment name to display it in its application or viewer.

SVHarbor Reference Guide Version 2.0
15
Alert Attachment detail
When you finish viewing the attachment, close the application or view used to view it to return to the Alert detail page.
SVHarbor Reference Guide Version 2.0
16
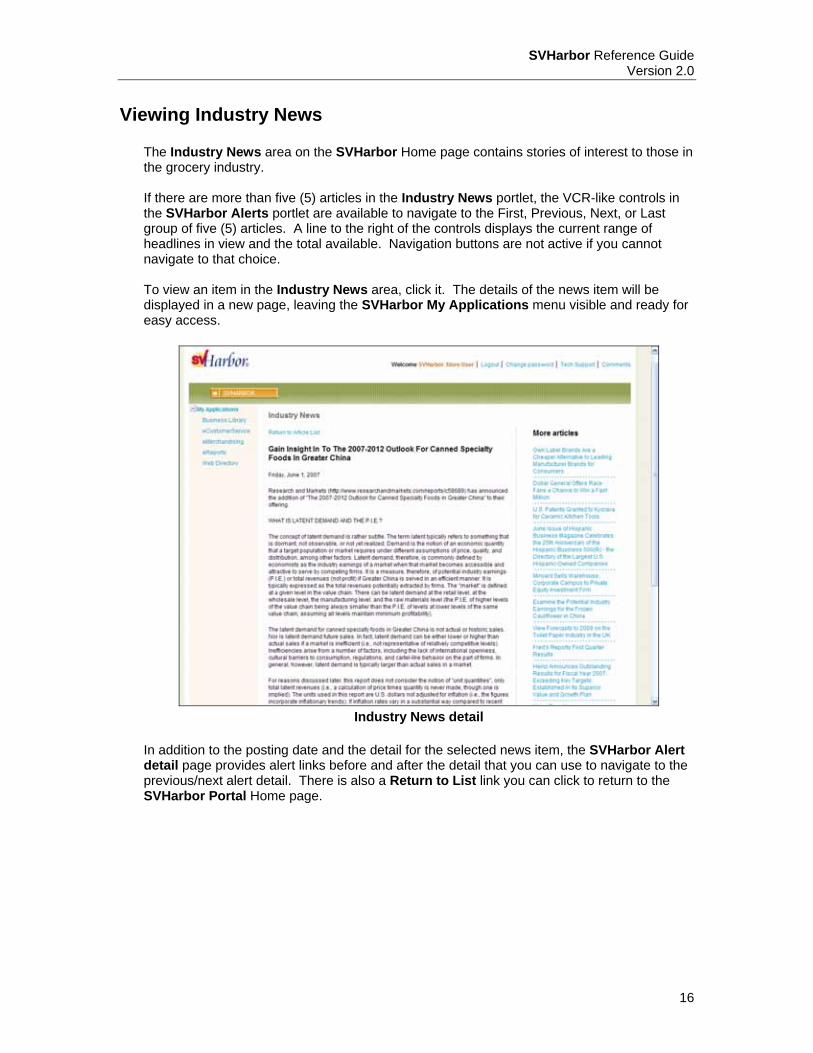
Viewing Industry News The Industry News area on the SVHarbor Home page contains stories of interest to those in the grocery industry. If there are more than five (5) articles in the Industry News portlet, the VCR-like controls in the SVHarbor Alerts portlet are available to navigate to the First, Previous, Next, or Last group of five (5) articles. A line to the right of the controls displays the current range of headlines in view and the total available. Navigation buttons are not active if you cannot navigate to that choice. To view an item in the Industry News area, click it. The details of the news item will be displayed in a new page, leaving the SVHarbor My Applications menu visible and ready for easy access.
Industry News detail
In addition to the posting date and the detail for the selected news item, the SVHarbor Alert detail page provides alert links before and after the detail that you can use to navigate to the previous/next alert detail. There is also a Return to List link you can click to return to the SVHarbor Portal Home page.
SVHarbor Reference Guide Version 2.0
17
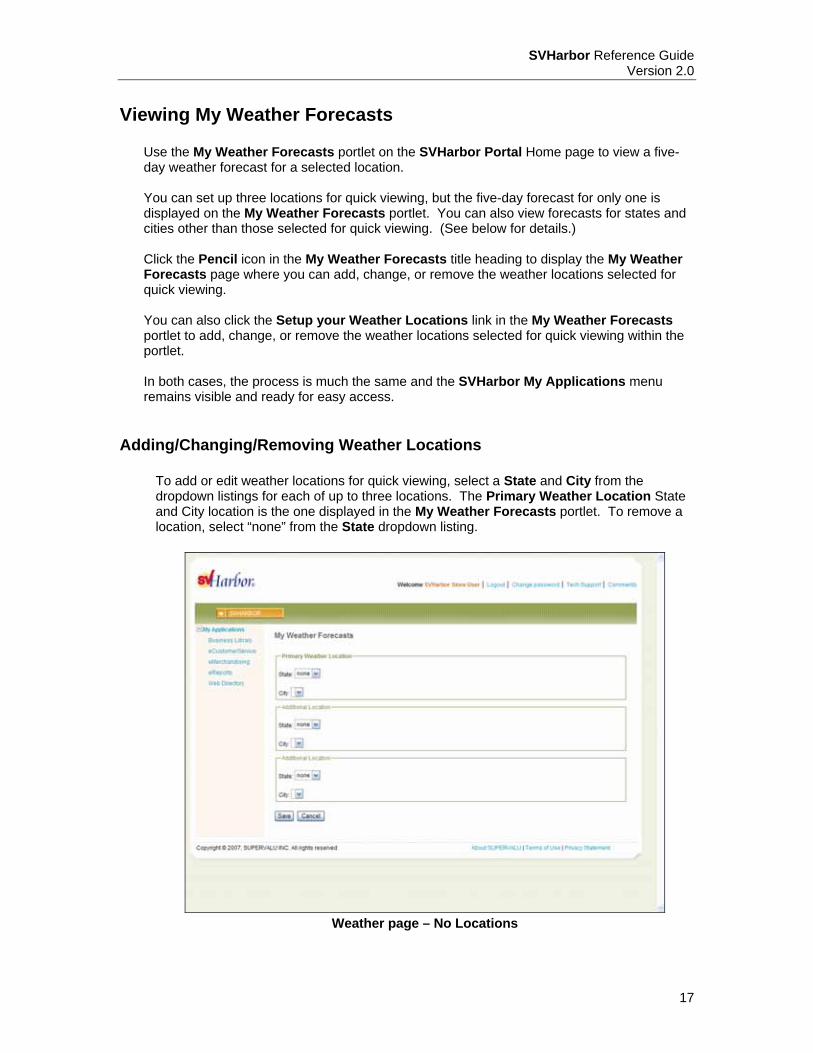
Viewing My Weather Forecasts Use the My Weather Forecasts portlet on the SVHarbor Portal Home page to view a five-day weather forecast for a selected location. You can set up three locations for quick viewing, but the five-day forecast for only one is displayed on the My Weather Forecasts portlet. You can also view forecasts for states and cities other than those selected for quick viewing. (See below for details.) Click the Pencil icon in the My Weather Forecasts title heading to display the My Weather Forecasts page where you can add, change, or remove the weather locations selected for quick viewing. You can also click the Setup your Weather Locations link in the My Weather Forecasts portlet to add, change, or remove the weather locations selected for quick viewing within the portlet. In both cases, the process is much the same and the SVHarbor My Applications menu remains visible and ready for easy access.
Adding/Changing/Removing Weather Locations To add or edit weather locations for quick viewing, select a State and City from the dropdown listings for each of up to three locations. The Primary Weather Location State and City location is the one displayed in the My Weather Forecasts portlet. To remove a location, select “none” from the State dropdown listing.
Weather page – No Locations

SVHarbor Reference Guide Version 2.0
18
To return to the SVHarbor Portal Home page from either the My Weather Forecasts page or the expanded My Weather Forecasts portlet without adding, editing, or removing, click Cancel. To save your changes and return to the SVHarbor Portal Home page, click Save. You can select up to three locations for quick viewing. Your selections will be listed here, but only the Primary Weather Location will be displayed on the SVHarbor Home page. The second and third locations you select are displayed when you click the More Forecasts link in the My Weather Forecasts portal.
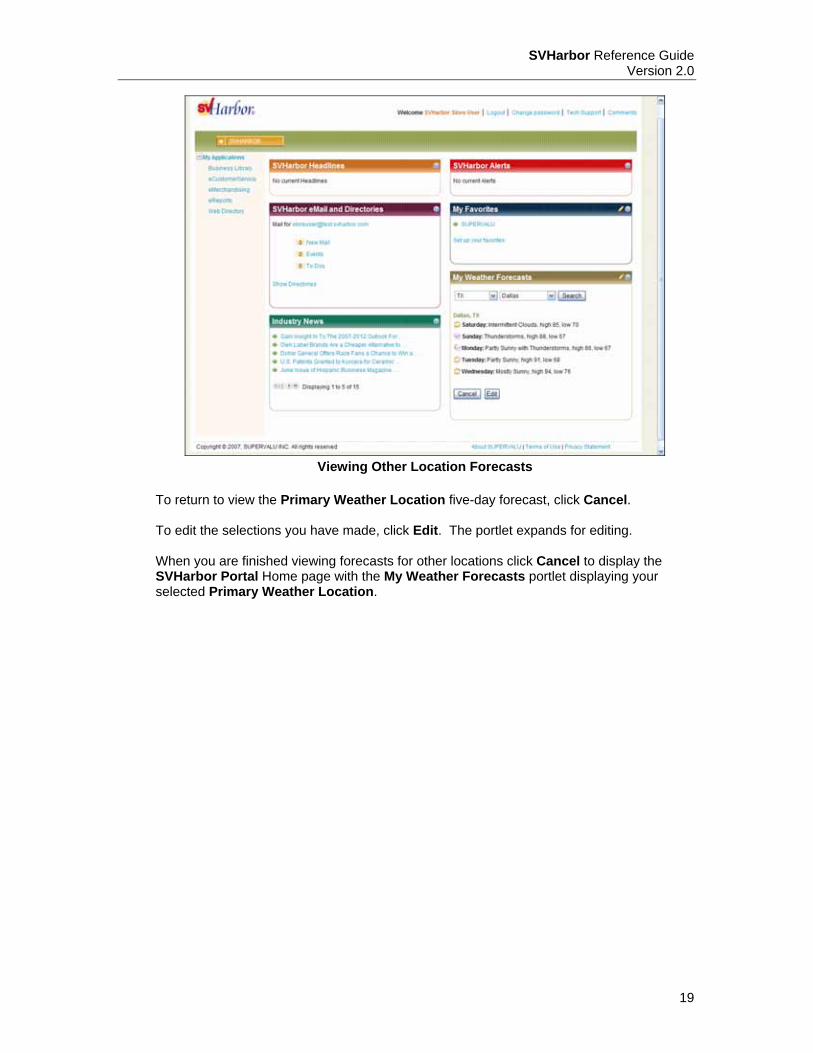
Viewing Forecasts To view the forecasts for all locations selected for quick viewing, click the More Forecasts link in the My Weather Forecasts portlet. The portlet resizes to display five-day forecasts for up to three locations.
Viewing More Weather Forecasts
To view the forecasts for other Cities, select the State and City from the dropdown listings and click Search. The page refreshes and displays the five-day forecasts for your selection.
SVHarbor Reference Guide Version 2.0
19
Viewing Other Location Forecasts
To return to view the Primary Weather Location five-day forecast, click Cancel. To edit the selections you have made, click Edit. The portlet expands for editing. When you are finished viewing forecasts for other locations click Cancel to display the SVHarbor Portal Home page with the My Weather Forecasts portlet displaying your selected Primary Weather Location.
SVHarbor Reference Guide Version 2.0
20
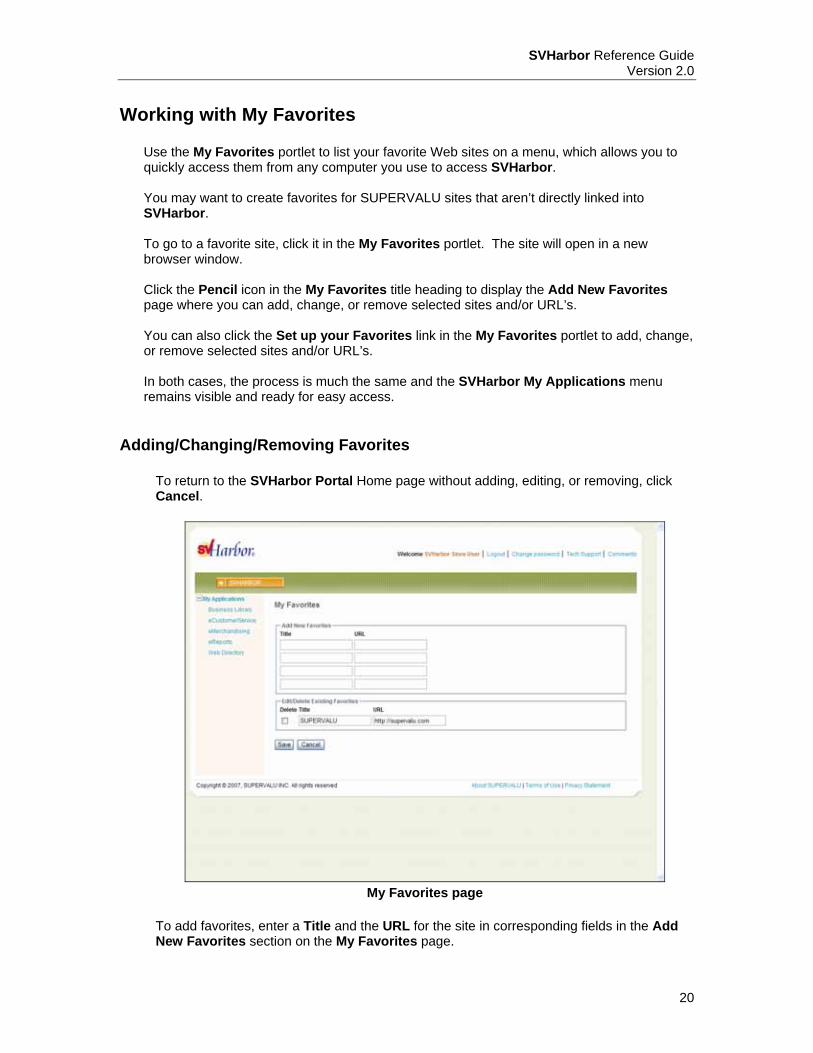
Working with My Favorites Use the My Favorites portlet to list your favorite Web sites on a menu, which allows you to quickly access them from any computer you use to access SVHarbor. You may want to create favorites for SUPERVALU sites that aren’t directly linked into SVHarbor. To go to a favorite site, click it in the My Favorites portlet. The site will open in a new browser window. Click the Pencil icon in the My Favorites title heading to display the Add New Favorites page where you can add, change, or remove selected sites and/or URL’s. You can also click the Set up your Favorites link in the My Favorites portlet to add, change, or remove selected sites and/or URL’s. In both cases, the process is much the same and the SVHarbor My Applications menu remains visible and ready for easy access.
Adding/Changing/Removing Favorites To return to the SVHarbor Portal Home page without adding, editing, or removing, click Cancel.
My Favorites page
To add favorites, enter a Title and the URL for the site in corresponding fields in the Add New Favorites section on the My Favorites page.
SVHarbor Reference Guide Version 2.0
21
To edit favorites, make any necessary change to the Title or URL in the Existing Favorites listing. To remove a site, select (click) the checkbox to its left in the Delete column on the Existing Favorites section before selecting Save. To save and return to the SVHarbor Portal Home page after entering or editing My Favorites, click Save.

SVHarbor Reference Guide Version 2.0
22
Searching for an eMail Address Use the SVHarbor eMail and Directories portlet to search directories for a person’s location (city and state), store, and email address. NOTE: Users subscribing to SVHarbor eMail may need to select (click) the Show
Directories link in the SVHarbor eMail and Directories portlet to access the Directories.
Select a directory from those listed in the SVHarbor eMail and Directories portlet to open that Directory.
Directory page
The first page of the Directory listing is displayed. Entries (individuals, stores, and generic titles for store personnel) are listed in ASCII (number / UPPERCASE letters A – Z / lowercase letters a - z) sequence. The listing may also include additional detail columns (such as region), depending on the Directory selected. To view additional entries, you have three choices:
SVHarbor Reference Guide Version 2.0
23
• Navigating forward and backward through the Directory using the <<Previous Set of Entries or Next Set of Entries >> links at the end of the page
• Navigating to an Alphabetical position (first letter of last name) by clicking the letter at the top of the Directory listing. (You can then use Previous/Next navigation to locate the entry you want.) Click “All” to return to the first page of the listing.
• Entering partial name (first or last) text or location numbers followed by an asterisk (*) in the Enter search Text field and clicking Go to locate matching entries. (If there are more than 14 matches, you can use Previous/Next navigation.) Click Clear Search to return to the first page of the listing.
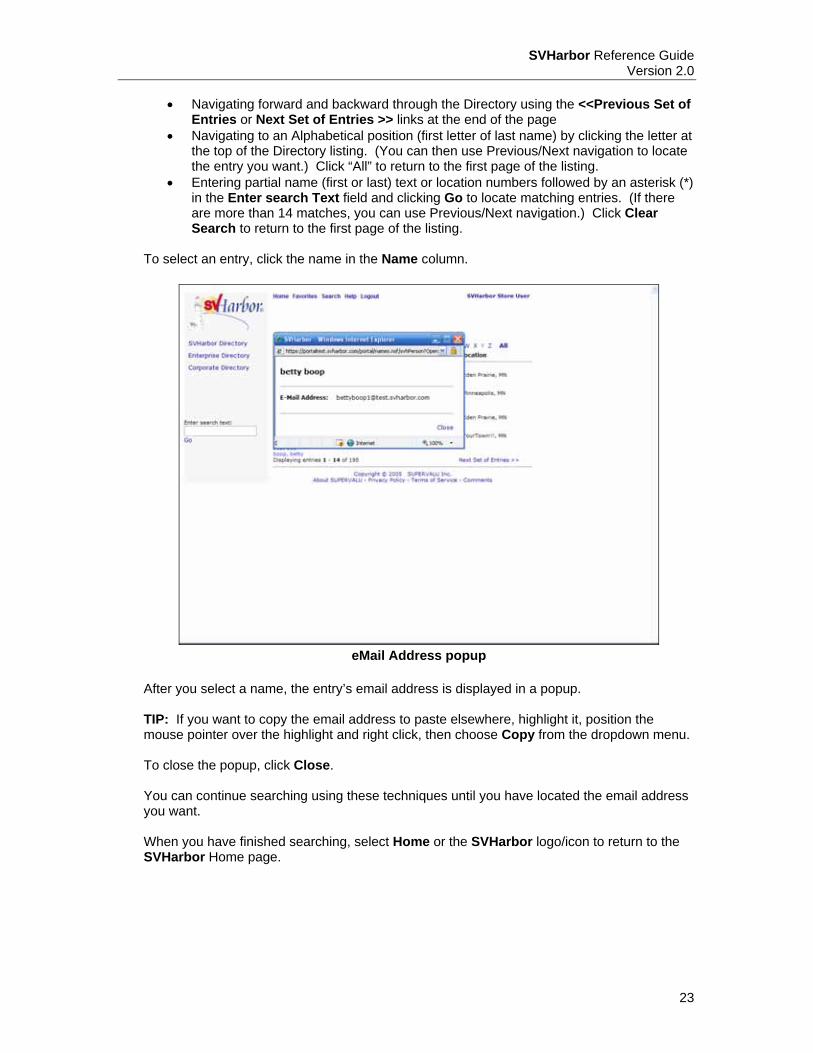
To select an entry, click the name in the Name column.
eMail Address popup
After you select a name, the entry’s email address is displayed in a popup. TIP: If you want to copy the email address to paste elsewhere, highlight it, position the mouse pointer over the highlight and right click, then choose Copy from the dropdown menu. To close the popup, click Close. You can continue searching using these techniques until you have located the email address you want. When you have finished searching, select Home or the SVHarbor logo/icon to return to the SVHarbor Home page.

SVHarbor Reference Guide Version 2.0
24
Using SVHarbor eMail and Directories The My Organizer option, which includes eMail, Address Book, Calendar, and To Do functions, from the previous version of SVHarbor have been incorporated into the SVHarbor eMail and Directories portlet.
eMail displays the number of unread emails in your Inbox. Events displays calendar events you have scheduled. To Dos displays current to do items. You can access the eMail, Calendar (Events), and To Do functions right from the SVHarbor eMail and Directories portlet links. Once you have accessed a function, you can work within My Organizer. The functions you can select are discussed below.
Working with eMail SVHarbor provides an easy-to-use email application that lets you send messages to both other SVHarbor users and other email accounts. If your administrator has set up an SVHarbor email account for you, your SVHarbor eMail Address and the eMail, Events, and To Dos links are displayed in the SVHarbor eMAil and Directories portlet. If your administrator did not assign you an SVHarbor email account, none of these features are available. (For example, you might not have been assigned an SVHarbor email address if you regularly use another email account for your communications.)
SVHarbor Reference Guide Version 2.0
25
Your SVHarbor email address is your SVHarbor username followed by “SVHarbor.com” (as in [email protected]). This address is listed for you in the SVHarbor directory, and you can give it to anyone who needs to email you. When your administrator creates your account, he or she can also select one or more email roles for you. For example, if you are assigned the Store Manager role, you will automatically receive all SVHarbor email intended for store managers. Listed below are the main tasks you can perform in the SVHarbor email application:
• Starting the email application • Reading messages • Organizing your email • Creating/Editing a message • Selecting from the Address Book • Formatting email text • Sending and/or saving a message • Setting delivery options • Deleting a message • Setting mail preferences
Because the Address Book is also a part of the email feature you can also perform these tasks:
• Using the Address Book • Adding contacts • Adding groups • Editing contacts or groups • Deleting contacts or groups
The file attachment size limit is 10 MB per incoming or outgoing message. This includes both attachments if there are two for a message. Refer to Creating or Editing a Message on page 32 for information on file attachments. Messages in your Inbox are automatically removed after 60 days. If you want to save messages for a longer period of time, you need to move them into other folders as described in Organizing eMail on page 29. The total amount of space you have (for email messages, attachments, To Do’s and your calendar) is 50 MB. If your space gets full, you will still be able to receive messages but you will not be able to send messages, add To Do’s or add calendar events. It’s a good idea to delete old messages that you do not need anymore. Refer to Deleting a Message on page 39 for more information.
Accessing the eMail Application You can access the SVHarbor email application by clicking the e Mail link or your eMail Address in the SVHarbor eMail and Directories portlet. The eMail Inbox View page is displayed.

SVHarbor Reference Guide Version 2.0
26
eMail page
Use the button links at the top of this page to perform email tasks.
New Memo – Click this to create an email message. Folder – Displays the Create Folder, Remove Folder, and Upgrade Design buttons,
which you use when organizing email. Delete – Displays the Delete and Empty Trash buttons, which you use to delete email
messages. Tools – Displays the Preferences button, which allows you to set email options, the
Search button, which allows you to search your eMail messages, and Help button, which accesses the Lotus Domino WebMail help files.
Go to – Displays the My Organizer button, which takes you to My Organizer. Add Sender To Address Book – Click the checkbox next to an email message, and
then click this button to add the sender of the email to your address book. Use the icons in the lower portion of the menu area to perform these tasks:
Open Calendar – Displays the Calendar page. Open To Do – Displays the To Do page. Open Address Book – Displays the Address Book page.
Use the menu options to access folders (Inbox, Drafts, Sent, and Trash folders as well as folders you create), the Address Book, All Documents, Discussions, and set up Rules.

SVHarbor Reference Guide Version 2.0
27
Reading Messages To read an email message, locate the message in the inbox listing. Messages in your Inbox are displayed when you open the main email page. To display messages within other folders, select the folder you want menu at the left. The folder name of the folder for the messages being displayed appears in all capital letters.
eMail page – Inbox
Use the Previous Page, Next Page, First Page, and Last Page buttons to move between pages of the list of messages. Click the small arrows ( or ) next to Who, Date, or Size to sort the messages in ascending or descending order by that attribute. When you have located the message to read, click the name of the sender to display the message.

SVHarbor Reference Guide Version 2.0
28
eMail Message detail
If the sender attached a file to his or her message, it appears within the message in two ways:
• If the email application can display the attachment, it inserts it right in the message. For example, an attachment such as a graphic in .GIF format is displayed in the message. The filename is also displayed in the page.
• If the email application cannot display the attachment, only the filename appears in
the page. For example, an attachment such as a .ZIP file cannot be directly displayed. In either case, you can save the attachment to your computer’s hard drive just by clicking the filename. After clicking the filename, the File Download popup is displayed. Select Save to save the file to disk (if it is not already selected) and click OK. You will need to specify a location and, if you want, a different filename and click Save. Click Close when the file has completed downloading.
NOTE: In order to view a file stored on your hard drive, you must have the appropriate application or viewer. For example, to open a .PDF file, you must have the Adobe Acrobat Reader installed.
Use the buttons at the top of the page to perform the tasks listed below.
New Memo – Opens a blank New Memo page for creating a new message. Forward – Opens the New Memo page with the subject line and the contents of the
sender’s email message included, allowing you forward the message to one or more people.
Reply – Displays four additional buttons. Reply opens the New Memo page pre-addressed to the sender. Reply to All opens the New Memo page preaddressed to the sender and
everyone else who received the email. Reply with History opens the New Memo page pre-addressed to the sender,
with the contents of the sender’s email message included.
SVHarbor Reference Guide Version 2.0
29
Reply to All with History opens a New Memo page pre-addressed to the sender and everyone else who received the email, with the contents of the sender’s email message included.
Edit – Displays the selected message in editable form. Delete – Places the displayed message in the trash, where it will remain until you click
Empty Trash. Go to – Displays five additional buttons.
Inbox – displays the messages in the Inbox. Calendar – displays the Calendar page. To do – displays the To do page. Next – displays the next message in the list. Previous – displays the previous message in the list.
Copy Into – Displays the New Task and the New Calendar Entry buttons. Click New Task to copy information from the message into a To Do task. Click New Calendar Entry to copy information from the message into a Calendar entry.
Organizing eMail Organize the messages you send and receive into folders makes it easy to quickly find a particular message, especially if you receive a lot of email.
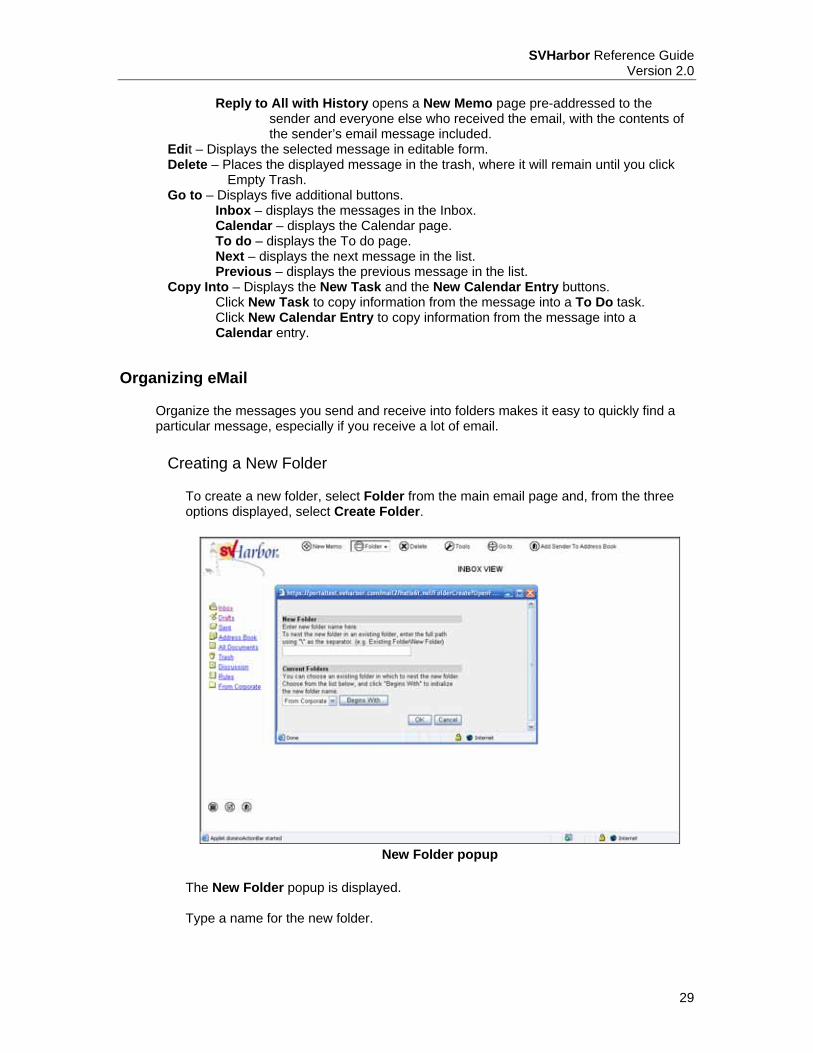
Creating a New Folder To create a new folder, select Folder from the main email page and, from the three options displayed, select Create Folder.
New Folder popup
The New Folder popup is displayed. Type a name for the new folder.

SVHarbor Reference Guide Version 2.0
30
NOTE: To put this new folder inside an existing folder, click the arrow next to the Begins With button and choose a folder from the list. Then click Begins With. The folder name is inserted in the New Folder field. Click OK to save the new folder. It will be listed in the menu.
New Folder added
Moving/Copying Messages to a Folder You can move or copy messages to or from any folder. Begin by selecting the checkbox next to each message you want to move. (You may need to select a folder and navigate to display the messages you want to move.) A checkmark in the checkbox indicates that a message is selected for moving/copying. (Click the checkbox again to remove the checkmark if you decide not to move/copy a message.)
SVHarbor Reference Guide Version 2.0
31
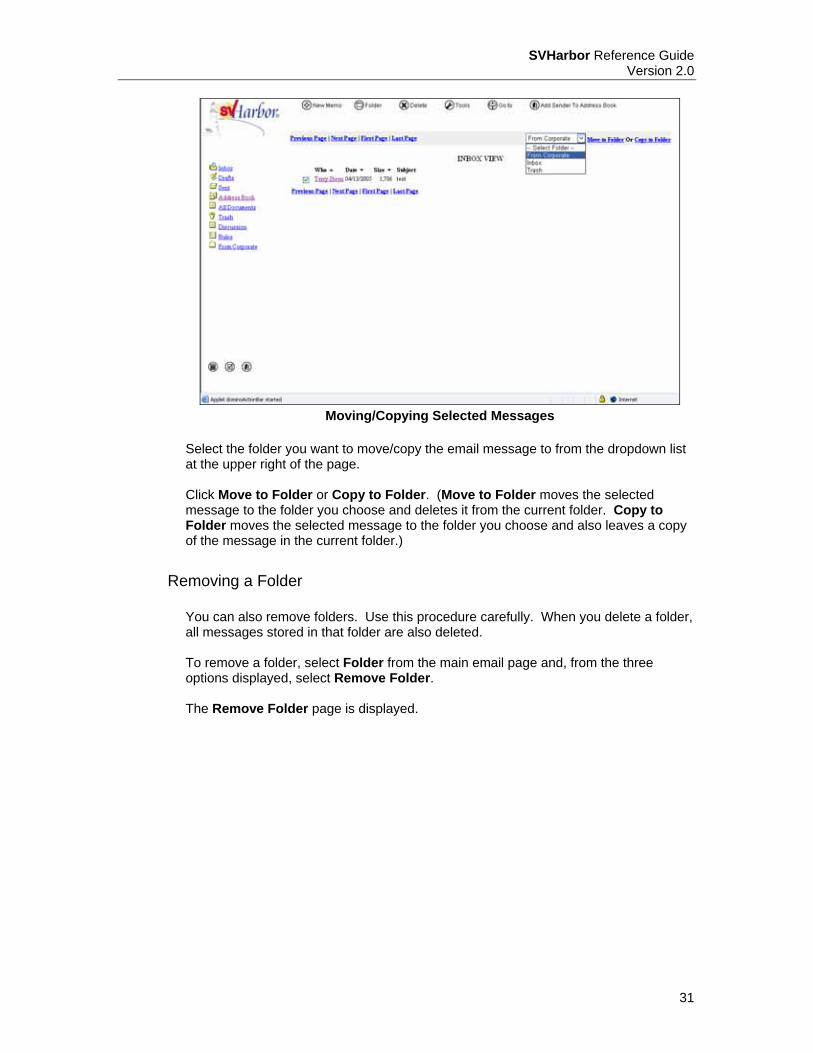
Moving/Copying Selected Messages
Select the folder you want to move/copy the email message to from the dropdown list at the upper right of the page. Click Move to Folder or Copy to Folder. (Move to Folder moves the selected message to the folder you choose and deletes it from the current folder. Copy to Folder moves the selected message to the folder you choose and also leaves a copy of the message in the current folder.)
Removing a Folder You can also remove folders. Use this procedure carefully. When you delete a folder, all messages stored in that folder are also deleted. To remove a folder, select Folder from the main email page and, from the three options displayed, select Remove Folder. The Remove Folder page is displayed.
SVHarbor Reference Guide Version 2.0
32
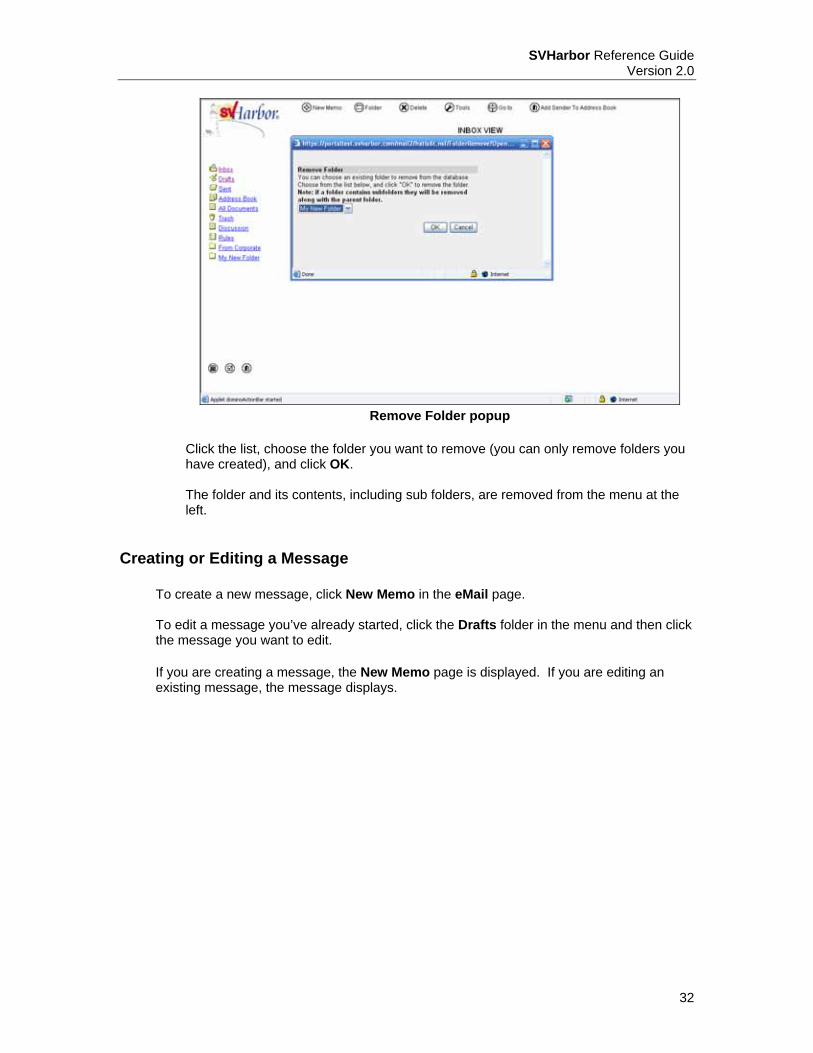
Remove Folder popup
Click the list, choose the folder you want to remove (you can only remove folders you have created), and click OK. The folder and its contents, including sub folders, are removed from the menu at the left.
Creating or Editing a Message To create a new message, click New Memo in the eMail page. To edit a message you’ve already started, click the Drafts folder in the menu and then click the message you want to edit. If you are creating a message, the New Memo page is displayed. If you are editing an existing message, the message displays.
SVHarbor Reference Guide Version 2.0
33
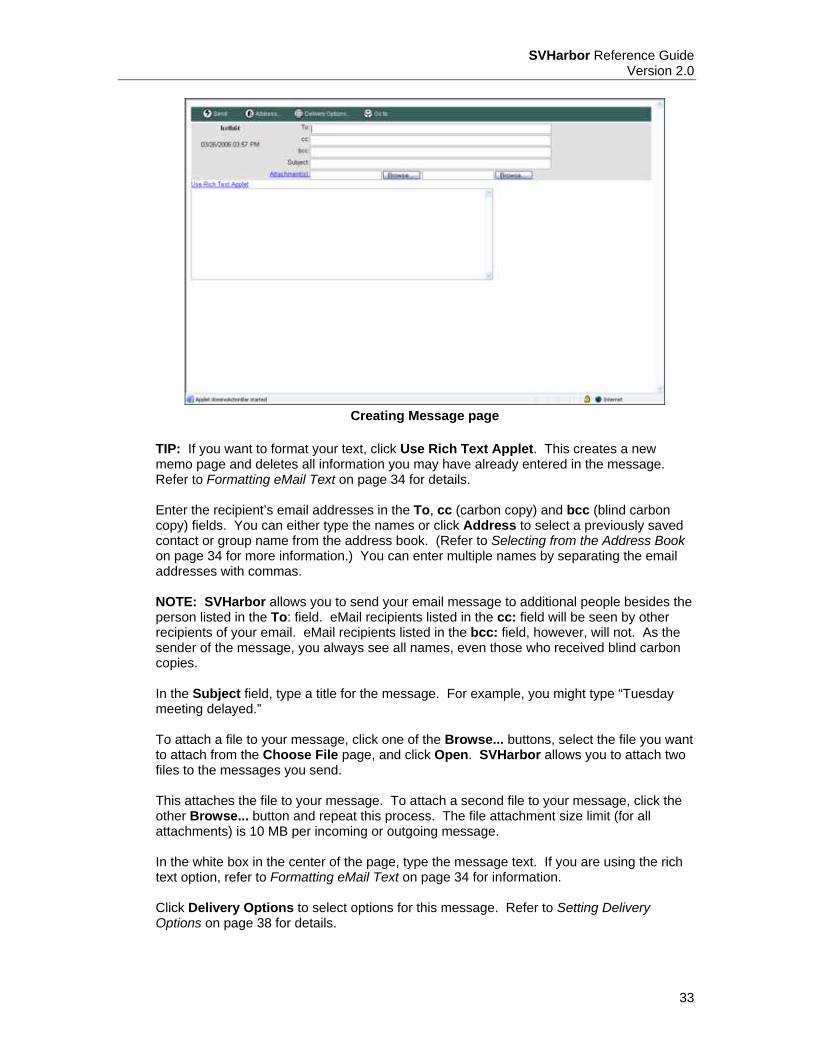
Creating Message page
TIP: If you want to format your text, click Use Rich Text Applet. This creates a new memo page and deletes all information you may have already entered in the message. Refer to Formatting eMail Text on page 34 for details. Enter the recipient’s email addresses in the To, cc (carbon copy) and bcc (blind carbon copy) fields. You can either type the names or click Address to select a previously saved contact or group name from the address book. (Refer to Selecting from the Address Book on page 34 for more information.) You can enter multiple names by separating the email addresses with commas. NOTE: SVHarbor allows you to send your email message to additional people besides the person listed in the To: field. eMail recipients listed in the cc: field will be seen by other recipients of your email. eMail recipients listed in the bcc: field, however, will not. As the sender of the message, you always see all names, even those who received blind carbon copies. In the Subject field, type a title for the message. For example, you might type “Tuesday meeting delayed.” To attach a file to your message, click one of the Browse... buttons, select the file you want to attach from the Choose File page, and click Open. SVHarbor allows you to attach two files to the messages you send. This attaches the file to your message. To attach a second file to your message, click the other Browse... button and repeat this process. The file attachment size limit (for all attachments) is 10 MB per incoming or outgoing message. In the white box in the center of the page, type the message text. If you are using the rich text option, refer to Formatting eMail Text on page 34 for information. Click Delivery Options to select options for this message. Refer to Setting Delivery Options on page 38 for details.

SVHarbor Reference Guide Version 2.0
34
Click Send to send your message. Refer to Sending or Saving a Message on page 37 for details.
Selecting from the Address Book While you are working on a message, you can quickly enter the recipients’ names by clicking Address to display the Address popup.
Address popup
From the Address popup
• Click the Look In list and choose an address book. • Names from the address book you select are displayed in the list on the left side. • Select name(s) from the list and enter them into the To, cc, and bcc fields. To
enter a name in a field, click a name on the left, then click the To>, cc>, or bcc> button. To select a set of adjacent names from the list, click the first name you want, hold down the Shift key and then click the last name.
• To remove a name from the To, cc, or bcc fields, select the name you want to remove and click Remove. To remove all the names from these fields, click Remove All.
• Click OK to close the address page and move the names you selected to the message you are writing. Click Cancel to close the page without moving the names to the message you are writing.
Formatting eMail Text The Use Rich Text Applet option allows you to add visual interest to your email message. When creating a New Memo, click Use Rich Text Applet. The following warning message appears:

SVHarbor Reference Guide Version 2.0
35
Rich Text Applet warning
Click OK. If the rich text option has not been installed, you’re asked if you want to install and run the rich text software. Click Yes. The Rich Text Applet page is displayed
Rich Text Applet page
A new row of buttons and options is displayed above the email message area. From left to right, they are:

SVHarbor Reference Guide Version 2.0
36
Bold – Turns bolding on and off. Italic – Turns italics on and off. Underline – Turns underlining on and off. Left Align/Center Align/Right Align – Switches between these three paragraph
alignments. Indent Paragraph/Outdent Paragraph – Turns paragraph indenting on and off. Bulleted List – Formats the selected lines of text as bulleted items, numbered items
or not bulleted or numbered. Create Link – Displays a field for entering a link to a Web address. Your reader
can then click the link to access that Web site. Type the link address and click the check button. (For example, you might type http://www.supervalu.com.) A link is inserted at the cursor position in the message text.
Enter International Characters – Displays a field for entering unicode values (decimal or 0xhex). Type the number representing the character and click the check button. The character is inserted at the cursor position in the message text.
Color – Click the arrow to display a list of colors. Font Size – Click the arrow to display a list of choices (6, 8, 10, 12, 16, 22, 36). Font – Click the arrow to display a list of choices (sans serif, monospace, serif).
In the white box in the center of the page, type and format the email message. When you want to turn a formatting option on, just click the corresponding button or select an option from a list. For example, to type text in bold, click the Bold button, type the text and then click the Bold button again when you want to stop typing in bold. You can also apply the formatting options to text you’ve already typed; just use the mouse to highlight the text you want to format, then click a formatting button or select an option. The Create Link and Enter International Characters options work a bit differently. To use these, position the cursor where you want the Web address link or special characters to appear. Then click one of the buttons, type the address or character number and click the check button.

SVHarbor Reference Guide Version 2.0
37
Sending or Saving a Message After you create or edit a message, click Send to display the following options.
New Memo – Send Options
Click the one you want to use.
Send – Sends the message but does not save a copy of it. Send and Save – Sends the message and also saves a copy of it for you to view later. Save as Draft – Does not send the message but saves a copy of it for you to view and
edit later. If you chose Send and Save, the message is stored in the Sent folder on the eMail page. If you choose Save as Draft, the message is stored in the Drafts folder. Refer to Reading Messages on page 27 for information on reading the message.

SVHarbor Reference Guide Version 2.0
38
Setting Delivery Options While you are working on a message, click Delivery Options to control various aspects of how your email is delivered. When you click the button, the Delivery Options dialog is displayed.
New Memo – Delivery Options
Select from the options described below, and then click OK.
Importance – Click the list and select Normal, High, or Low. If you choose High and are emailing another SVHarbor user, that user will see an icon next to the message indicating that it is important.
Delivery Report – Click the list and choose one of the following options: Only on failure – Notifies you if your message could not be delivered. Confirm delivery – Notifies you when your message has been successfully
delivered. Trace entire path – Sends you a message containing the path of the message
from sender to recipient. None – Does not notify you concerning the delivery of your message.
Delivery Priority – Click the list and select Normal, High, or Low. This affects how the message is placed in the mail delivery queue.
Return receipt – Click the check box if you want to receive a message when the recipient opens your email.
SVHarbor Reference Guide Version 2.0
39
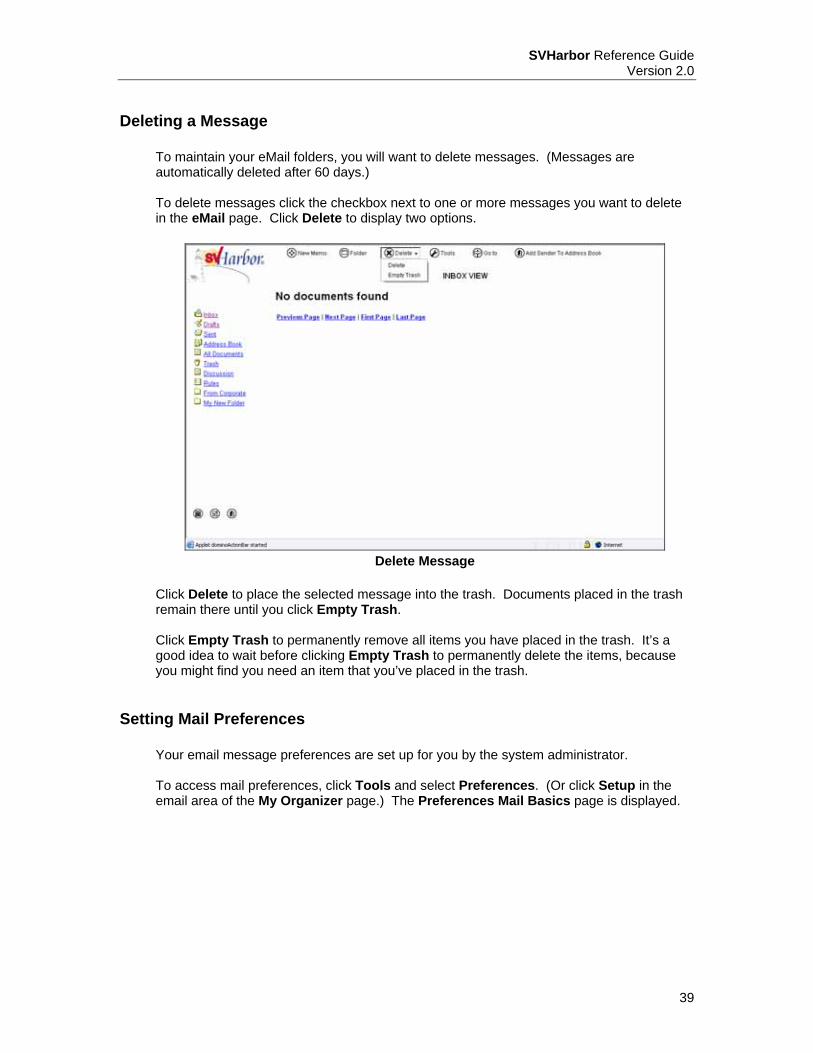
Deleting a Message To maintain your eMail folders, you will want to delete messages. (Messages are automatically deleted after 60 days.) To delete messages click the checkbox next to one or more messages you want to delete in the eMail page. Click Delete to display two options.
Delete Message
Click Delete to place the selected message into the trash. Documents placed in the trash remain there until you click Empty Trash. Click Empty Trash to permanently remove all items you have placed in the trash. It’s a good idea to wait before clicking Empty Trash to permanently delete the items, because you might find you need an item that you’ve placed in the trash.
Setting Mail Preferences Your email message preferences are set up for you by the system administrator. To access mail preferences, click Tools and select Preferences. (Or click Setup in the email area of the My Organizer page.) The Preferences Mail Basics page is displayed.

SVHarbor Reference Guide Version 2.0
40
Mail – Basics page
Under User Configuration you will find the User Id assigned to you by your system administrator. Click to uncheck/check the checkbox listed under Internet message format to include a reply separator in the messages you send. (A reply separator defines how your reply text appears to your message recipients and helps your text stand out from other text within the message body). Select > or >> from the dropdown listing. To change other mail preferences, select from the options at the left and then set your preferences. Other Mail preferences include Signature (for automatically adding a signature to messages) and, under Delegation, Mail, for setting individuals or groups who can work with your mail. To add signature text to the bottom of messages you send, click Signature in the Preferences Mail Basics page. The Preferences Mail – Signature page is displayed.
SVHarbor Reference Guide Version 2.0
41
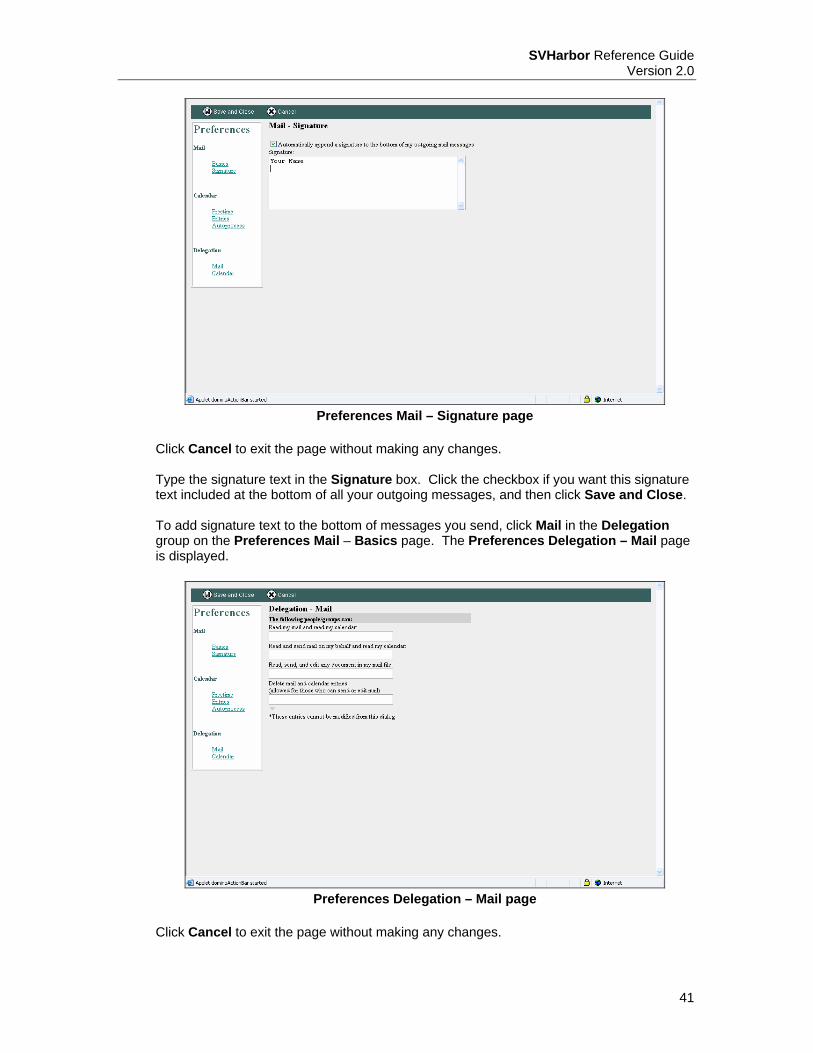
Preferences Mail – Signature page
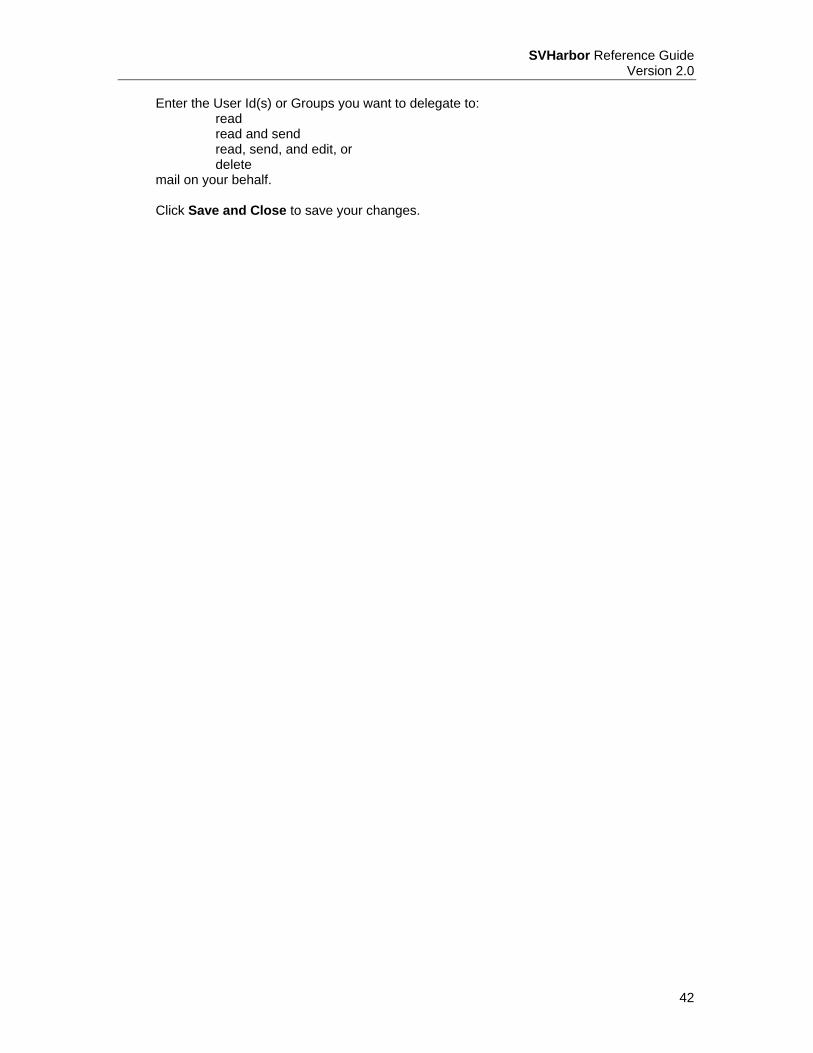
Click Cancel to exit the page without making any changes. Type the signature text in the Signature box. Click the checkbox if you want this signature text included at the bottom of all your outgoing messages, and then click Save and Close. To add signature text to the bottom of messages you send, click Mail in the Delegation group on the Preferences Mail – Basics page. The Preferences Delegation – Mail page is displayed.
Preferences Delegation – Mail page
Click Cancel to exit the page without making any changes.
SVHarbor Reference Guide Version 2.0
42
Enter the User Id(s) or Groups you want to delegate to: read read and send read, send, and edit, or delete
mail on your behalf. Click Save and Close to save your changes.
SVHarbor Reference Guide Version 2.0
43
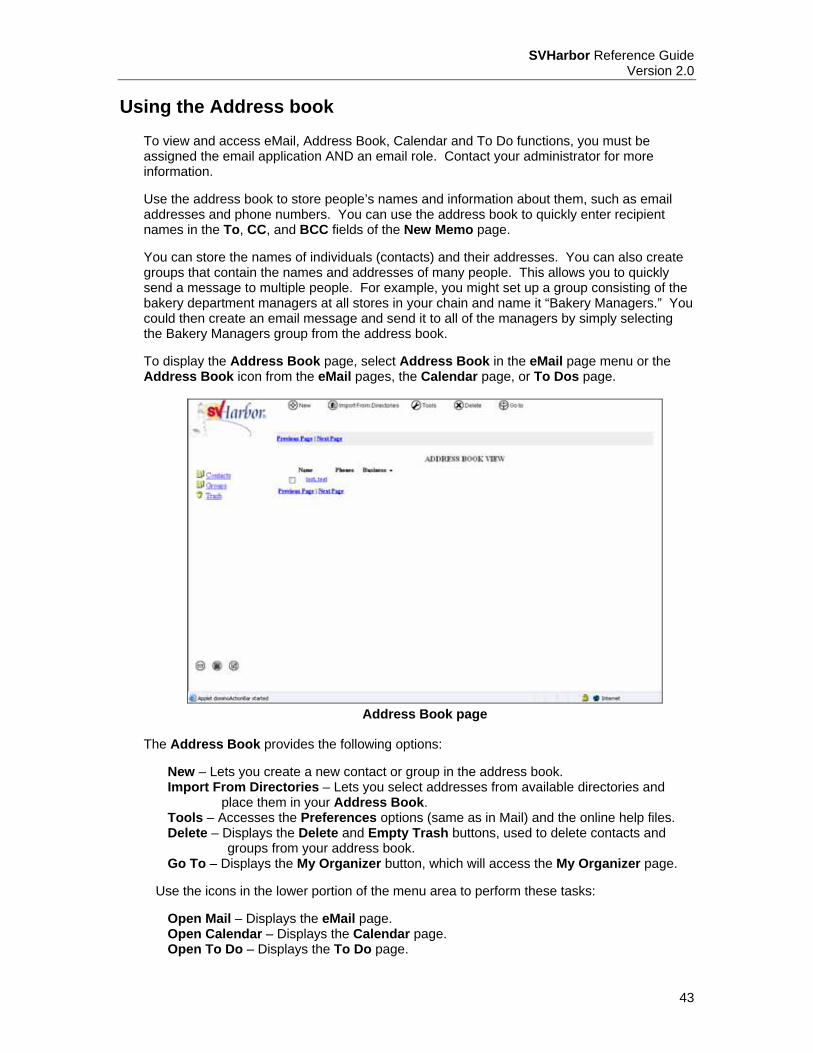
Using the Address book To view and access eMail, Address Book, Calendar and To Do functions, you must be assigned the email application AND an email role. Contact your administrator for more information. Use the address book to store people’s names and information about them, such as email addresses and phone numbers. You can use the address book to quickly enter recipient names in the To, CC, and BCC fields of the New Memo page. You can store the names of individuals (contacts) and their addresses. You can also create groups that contain the names and addresses of many people. This allows you to quickly send a message to multiple people. For example, you might set up a group consisting of the bakery department managers at all stores in your chain and name it “Bakery Managers.” You could then create an email message and send it to all of the managers by simply selecting the Bakery Managers group from the address book. To display the Address Book page, select Address Book in the eMail page menu or the Address Book icon from the eMail pages, the Calendar page, or To Dos page.
Address Book page
The Address Book provides the following options:
New – Lets you create a new contact or group in the address book. Import From Directories – Lets you select addresses from available directories and
place them in your Address Book. Tools – Accesses the Preferences options (same as in Mail) and the online help files. Delete – Displays the Delete and Empty Trash buttons, used to delete contacts and
groups from your address book. Go To – Displays the My Organizer button, which will access the My Organizer page.
Use the icons in the lower portion of the menu area to perform these tasks: Open Mail – Displays the eMail page. Open Calendar – Displays the Calendar page. Open To Do – Displays the To Do page.

SVHarbor Reference Guide Version 2.0
44
Adding Contacts To add a new contact, select New on the Address Book page and click Contact. The New Contact Basics page is displayed.
Address Book – Add Contact Basic page
Enter the contact’s name and business information, as well as phone numbers and email and Web page information. To enter additional information, click Details and Comments, to display those pages.
Address Book – Add Contact Details page
Enter address and personal details.
SVHarbor Reference Guide Version 2.0
45
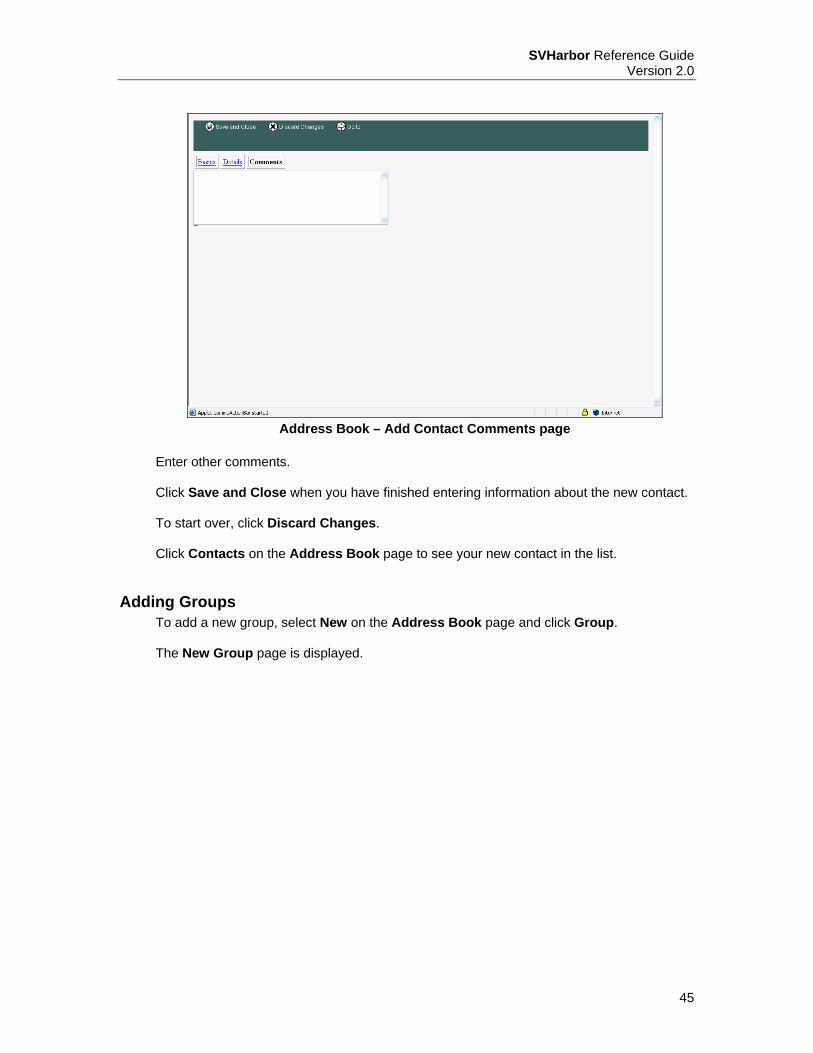
Address Book – Add Contact Comments page
Enter other comments. Click Save and Close when you have finished entering information about the new contact. To start over, click Discard Changes. Click Contacts on the Address Book page to see your new contact in the list.
Adding Groups To add a new group, select New on the Address Book page and click Group. The New Group page is displayed.

SVHarbor Reference Guide Version 2.0
46
Address Book – Add Group page
Complete the following: Type the group’s name in the Group name field. Click the arrow in the Categorize field and select a categorization from the list. Or, click Add Category and type a new category name at the prompt. Type the group’s description in the Description field. Enter the members of the group in the Members field. To select the member names from the Address Book, click the book icon next to the Members field. Click Save and Close when you have finished entering information about the new group. To start over, click Discard Changes. Click Groups on the Address Book page to see your new group in the list.

SVHarbor Reference Guide Version 2.0
47
Editing Contacts or Groups To edit contacts or groups, click the name of the group or contact you want to edit on the Address Book page.
Address Book – Edit Contact page
Information is displayed for this individual or group. Click Edit Contact or Edit Group to redisplay the information in editable form. Change or add information as necessary. Refer to the Adding Contacts and Adding Groups above for more information. To leave the information unchanged, click Discard Changes. When you have finished editing, click Save and Close.

SVHarbor Reference Guide Version 2.0
48
Deleting Contacts or Groups To delete a contact or group, click the checkbox next to each contact name or group you want to delete on the Address Book page. Click Delete to display two options.
Address Book – Delete Contact
Select Delete to place the selected items in the trash for later disposal. The item will remain in the trash until you empty it. Select Empty Trash to permanently delete the items in the trash.

SVHarbor Reference Guide Version 2.0
49
Importing from Directories To import addresses from the directories to which you have access, click Import from Directories. The Import Contacts and Groups popup is displayed.
Import Contacts and Groups popup
Use the Look In dropdown listing to select the Directory. You can then use < Previous and Next > to scroll through the directory or use the Starts with field to find the desired contacts/groups. When using the Starts with field, enter as many characters as you want followed by an asterisk (*) and click Find. The directory listing will display at the first match to your entry. To import an address from the directory, select it (you can hold down the CTRL key and click several) in the directory listing and click New Entries > to identify those you want to import. If you select an address for importing in error, select it in the New Entries > area and click Remove. To remove all selections, click Remove All. To return to the Address Book page without importing any selections, click Cancel. When you have made all your importing selections, click OK to import them.
SVHarbor Reference Guide Version 2.0
50
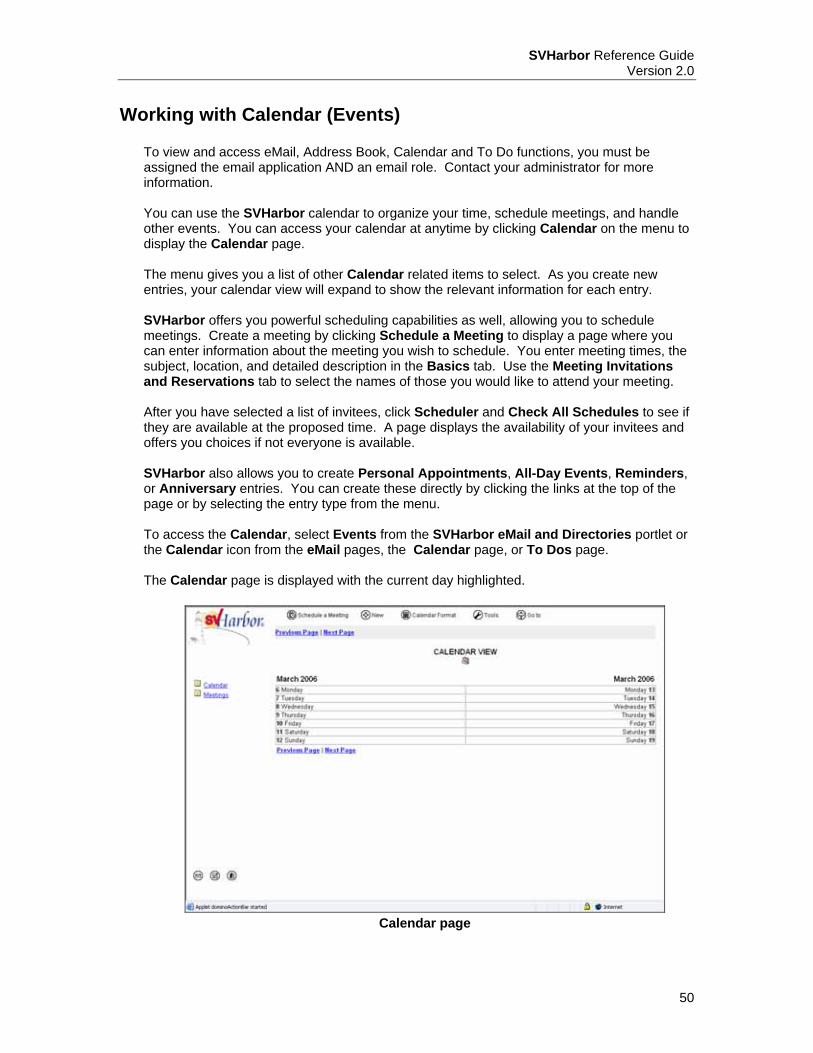
Working with Calendar (Events) To view and access eMail, Address Book, Calendar and To Do functions, you must be assigned the email application AND an email role. Contact your administrator for more information. You can use the SVHarbor calendar to organize your time, schedule meetings, and handle other events. You can access your calendar at anytime by clicking Calendar on the menu to display the Calendar page. The menu gives you a list of other Calendar related items to select. As you create new entries, your calendar view will expand to show the relevant information for each entry. SVHarbor offers you powerful scheduling capabilities as well, allowing you to schedule meetings. Create a meeting by clicking Schedule a Meeting to display a page where you can enter information about the meeting you wish to schedule. You enter meeting times, the subject, location, and detailed description in the Basics tab. Use the Meeting Invitations and Reservations tab to select the names of those you would like to attend your meeting. After you have selected a list of invitees, click Scheduler and Check All Schedules to see if they are available at the proposed time. A page displays the availability of your invitees and offers you choices if not everyone is available. SVHarbor also allows you to create Personal Appointments, All-Day Events, Reminders, or Anniversary entries. You can create these directly by clicking the links at the top of the page or by selecting the entry type from the menu. To access the Calendar, select Events from the SVHarbor eMail and Directories portlet or the Calendar icon from the eMail pages, the Calendar page, or To Dos page. The Calendar page is displayed with the current day highlighted.
Calendar page
SVHarbor Reference Guide Version 2.0
51
You can then select from the following options at the top of the page:
Schedule a Meeting – Click to create a new calendar entry for a meeting. New – Displays four new buttons: Appointment, Anniversary, Reminder, and
Event. Select one of these to create a new calendar entry of one of these types.
Calendar Format – Click to choose a different format for displaying the calendar. Choose from One Day, Two Days, One Week, Two Weeks, or One Month.
Tools – Displays a Preferences button which will let you set preferences for freetime, calendar entries, and auto processing related to meetings, and a Help button.
Go To – Displays the My Organizer button to access My Organizer. Or select from the following icons in the lower portion of the menu:
Open Mail – Displays the eMail page. Open To Do – Displays the To Do page. Open Address Book – Displays the Address Book page.

SVHarbor Reference Guide Version 2.0
52
Scheduling a Meeting To schedule a meeting, select Schedule a Meeting on the Calendar page and click Contact. The New Meetings – Basics page is displayed.
Schedule New Meeting – Basics page
Enter the details for the meeting. To enter invitations and reserve rooms and resources, click the Meeting Invitations & Resources tab.
Schedule New Meeting – Invitations and Reservations page

SVHarbor Reference Guide Version 2.0
53
Use the Address Book icons to select individuals or groups to invite. Use the Resource icons to select rooms and resources to be reserved. To enter additional details of the meeting, click the Options tab.
Schedule New Meeting – Options page
You can select to Pencil In, Mark Private and Categorize the meeting, adding a new category if necessary. There is also a Description text box in which to add more details, such as an agenda, of the meeting. To start over, click Discard Changes. To check schedules, find rooms or find resources, click Scheduler. To save the new meeting information as a draft you can send later, click Save as Draft. To set delivery options for the eMail invitations, click Delivery Options. To save and send new meeting invitations and reservations, click Save and Send Invitations.
Working with To Do’s To view and access eMail, Address Book, Calendar and To Do functions, you must be assigned the email application AND an email role. Contact your administrator for more information. SVHarbor provides the To Do feature as a means of reminding yourself of something you need to do (Personal To Do) or assigning tasks to others (Group To Do). If you send a To Do item to another SVHarbor eMail user, or to several users, they can notify you when they have completed the task. You can view your To Do list by the Due Date, the Status, or the Category that you have assigned to it.

SVHarbor Reference Guide Version 2.0
54
To access the To Do list, select To Do’s from the SVHarbor eMail and Directories portlet or the To Do icon from the eMail pages, the Calendar page, or To Dos page. The To Do page is displayed.
To Do page
You can then select from the following options at the top of the page:
New To Do Item – Click this to create a new to do entry in your to do list. Delete – Displays the Delete and Empty Trash buttons.
Select Delete to place the selected items in the trash for later disposal. The item will remain in the trash until you empty it. Select Empty Trash to permanently delete the items in the trash.
Tools – Displays links to Preferences, Search, and online Help. Go To – Displays the My Organizer button to access My Organizer.
Or select from the following icons in the lower portion of the menu:
Open Mail – Displays the eMail page. Open Calendar– Displays the Calendar page. Open Address Book – Displays the Address Book page.
SVHarbor Reference Guide Version 2.0
55
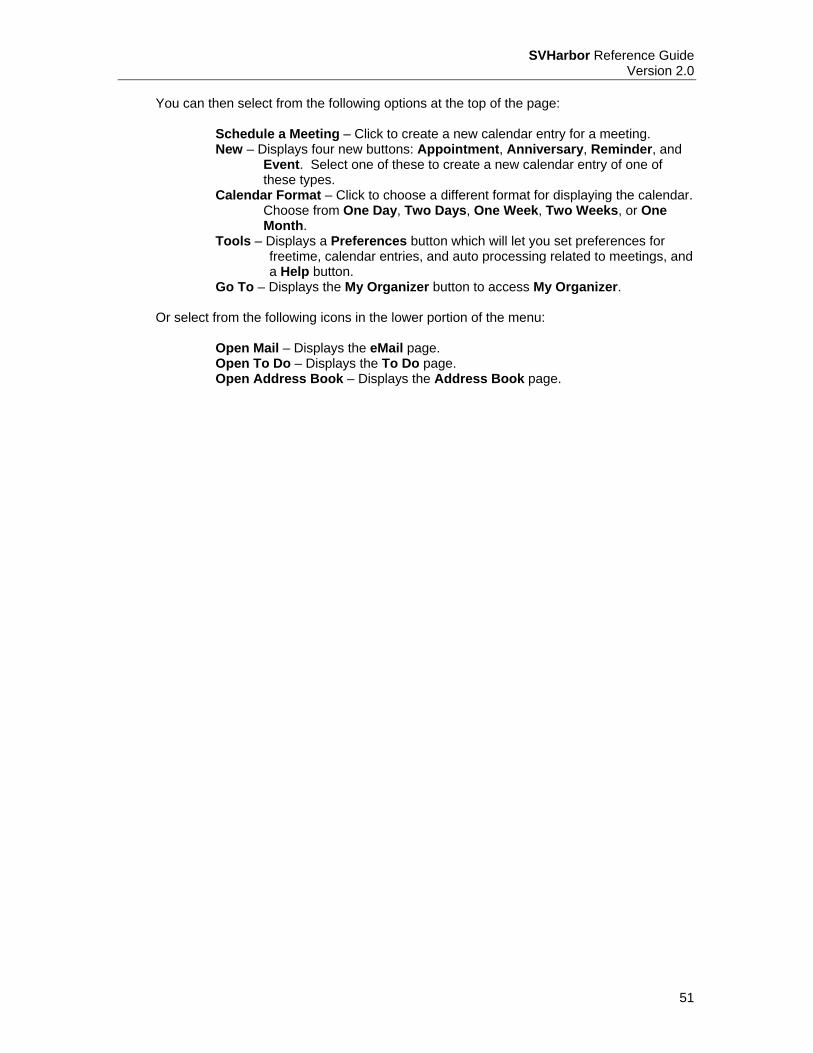
Adding a To Do To add a To Do, select New To Do Item on the To Do page. The New To Do page is displayed.
New To Do – Basics page
Enter basic information about the event. The Participant tab is not used, but you can add information by clicking Options.
New To Do – Options page

SVHarbor Reference Guide Version 2.0
56
You can select to Mark Private and Categorize the meeting, adding a new category if necessary. There is also a Description text box in which to add more details of the To Do. To start over, click Discard Changes. To mark the event as having been completed, click Completed. Completed events are indicated by a checkmark and display a status of “Complete” on the To Do page. Click Save and Close when you have finished entering information.
SVHarbor Reference Guide Version 2.0
57
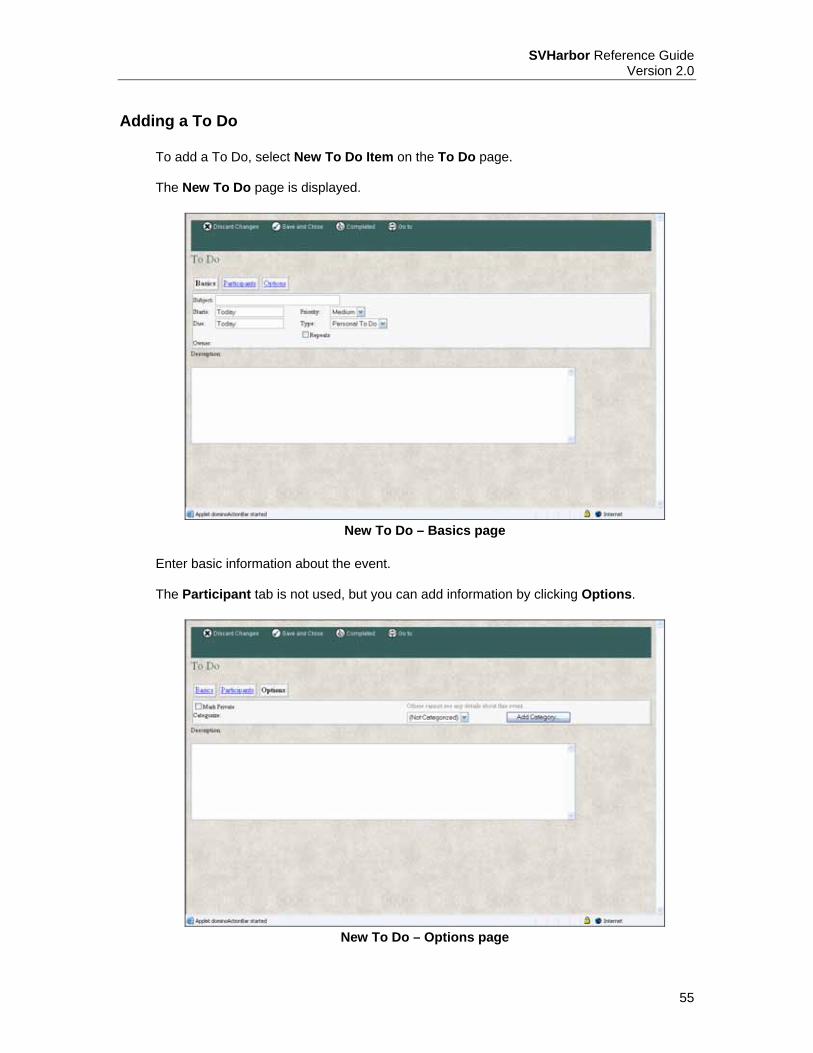
Deleting a To Do To delete a To Do, click the checkbox to its left on the To Do page and click the Delete menu to display two options.
To Do page – Delete
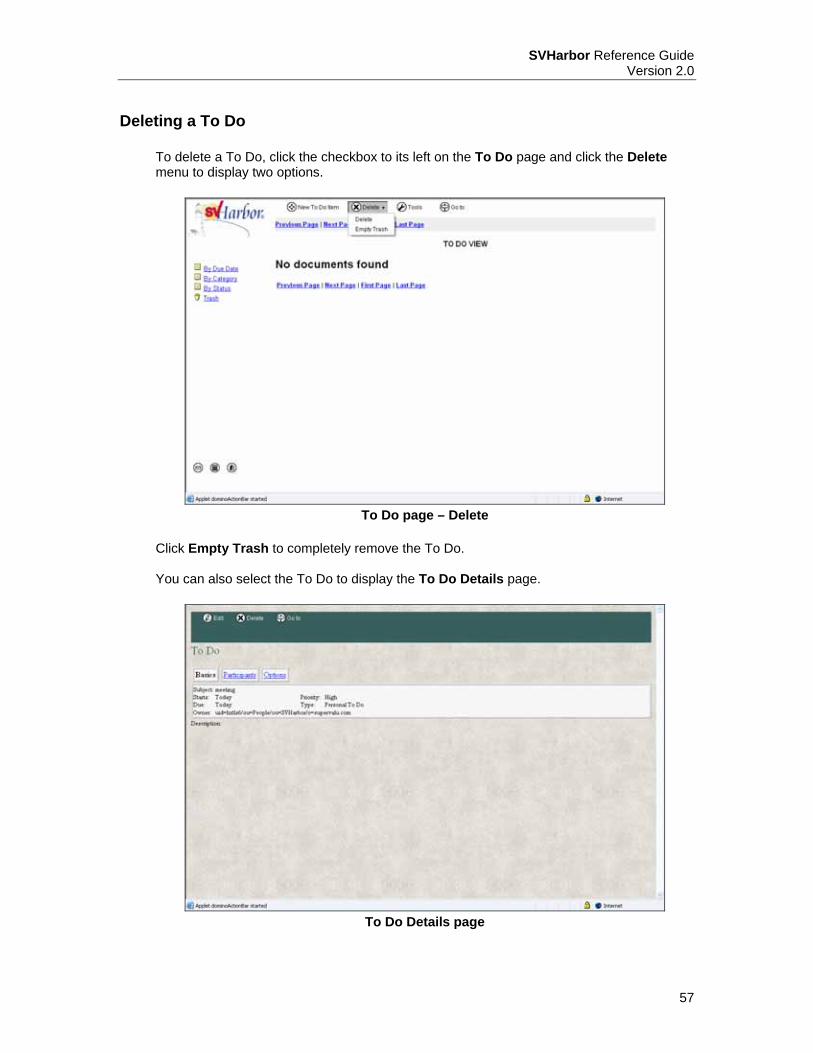
Click Empty Trash to completely remove the To Do. You can also select the To Do to display the To Do Details page.
To Do Details page

SVHarbor Reference Guide Version 2.0
58
To Delete the To Do, click Delete.
Editing a To Do To edit the To Do, click Edit from the To Do Details page to display the To Do Edit page.
To Do Edit page
On the To Do Edit page you can make changes to the To Do as if it were a new To Do and discard the changes or save it. You can also click Completed to mark it as completed and redisplay the To Do page.
SVHarbor Reference Guide Version 2.0
59
Appendices
Appendix A – Changing Your Password Because your password allows access into SVHarbor and other applications, use care in protecting it. You need to change your password in these cases:
• The first time you login, or when using a new password given to you by the administrator.
• When your password expires. (Passwords expire every 60 days. When yours expires, a message appears when you log in, prompting you to change it.)
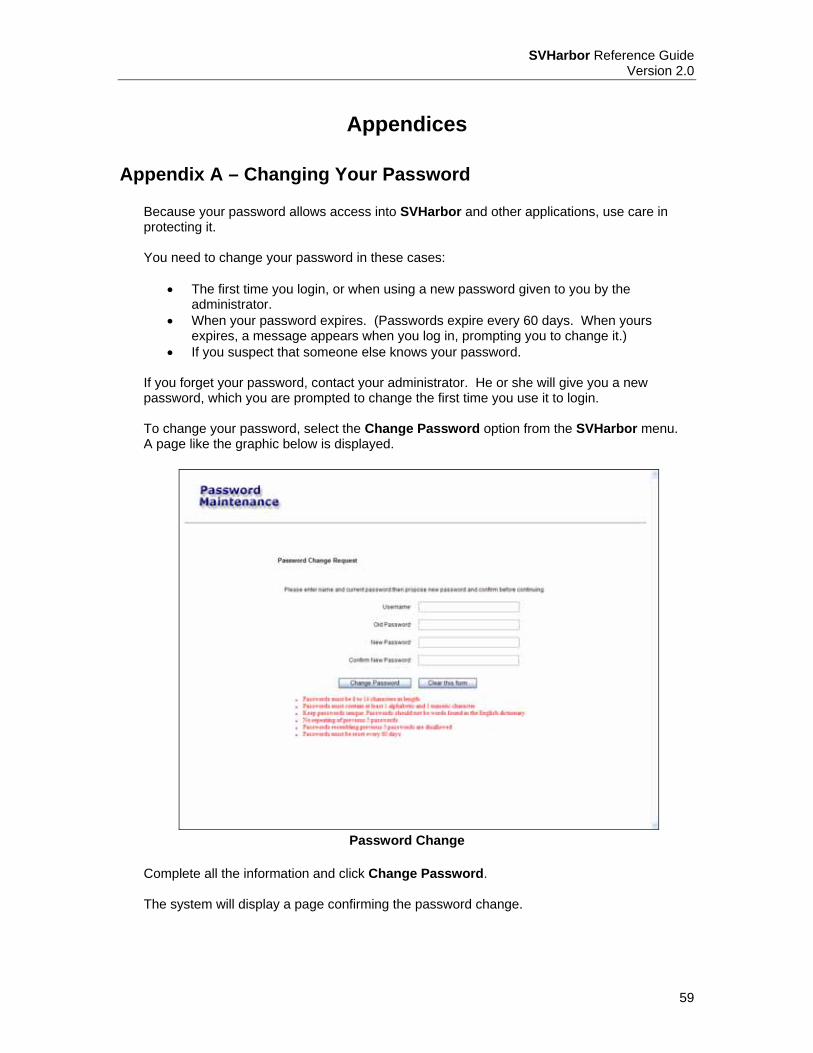
• If you suspect that someone else knows your password. If you forget your password, contact your administrator. He or she will give you a new password, which you are prompted to change the first time you use it to login. To change your password, select the Change Password option from the SVHarbor menu. A page like the graphic below is displayed.
Password Change
Complete all the information and click Change Password. The system will display a page confirming the password change.
SVHarbor Reference Guide Version 2.0
60
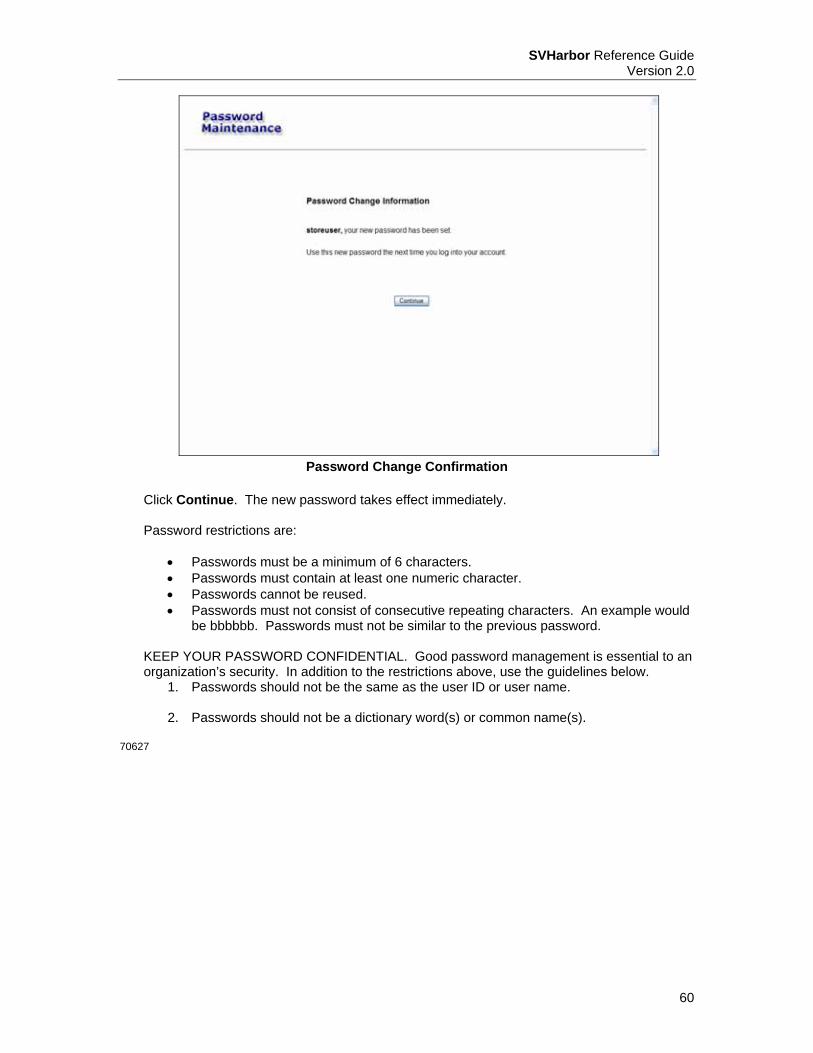
Password Change Confirmation
Click Continue. The new password takes effect immediately. Password restrictions are:
• Passwords must be a minimum of 6 characters. • Passwords must contain at least one numeric character. • Passwords cannot be reused. • Passwords must not consist of consecutive repeating characters. An example would
be bbbbbb. Passwords must not be similar to the previous password. KEEP YOUR PASSWORD CONFIDENTIAL. Good password management is essential to an organization’s security. In addition to the restrictions above, use the guidelines below.
1. Passwords should not be the same as the user ID or user name.
2. Passwords should not be a dictionary word(s) or common name(s).
70627

SVHarbor Reference Guide Version 2.0
61
Index Accessing the eMail Application................25 Adding a To Do..........................................55 Adding Contacts ........................................44 Adding Favorites........................................20 Adding Groups...........................................45 Adding Weather Locations ........................17 Additional Help.............................................2 Address book.............................................43 Address Book – Add Contact Basic page .44 Address Book – Add Contact Comments
page .......................................................45 Address Book – Add Contact Details page44 Address Book – Add Group page..............46 Address Book – Delete Contact ................48 Address Book – Edit Contact page............47 Address Book page ...................................43 Address popup...........................................34 Alert Attachment detail ..............................15 Alert detail..................................................14 Appendices ................................................59 Audience......................................................1 Background Information ..............................4 Broker Role..................................................5 Calendar ....................................................50 Calendar page ...........................................50 Change Password .....................................59 Changing Favorites ...................................20 Changing Weather Locations ....................17 Changing Your Password..........................59 Copying Messages to a Folder..................30 Creating a Message ..................................32 Creating a New Folder...............................29 Creating Message page ............................33 Delegation – Mail page..............................41 Delete Message.........................................39 Deleting a Message...................................39 Deleting a To Do........................................57 Deleting Contacts ......................................48 Deleting Groups.........................................48 Directory page ...........................................22 Document Conventions ...............................2 Downloading any Additional Files................8 Editing a Message .....................................32 Editing a To Do..........................................58 Editing Contacts.........................................47 Editing Groups...........................................47 eMail ..........................................................24 eMail Address popup.................................23 eMail Message detail .................................28 eMail page .................................................26 eMail page – Inbox ....................................27 Employee Role ............................................5
Events ....................................................... 50 Favorites ................................................... 20 Formatting eMail Text ............................... 34 Getting Started............................................ 4 Headline Attachment detail....................... 13 Import Contacts and Groups popup.......... 49 Importing from Directories ........................ 49 Industry News detail ................................. 16 Learning Launch ......................................... 3 Logout Confirmation dialog......................... 9 Mail – Basics page.................................... 40 Moving Messages to a Folder................... 30 Moving/Copying Selected Messages ....... 31 My Favorites ............................................. 20 My Favorites page .................................... 20 My Weather Forecasts.............................. 17 Navigating ................................................... 7 Navigation Tools ......................................... 8 New Folder added..................................... 30 New Folder popup..................................... 29 New Memo – Delivery Options ................. 38 New Memo – Send Options...................... 37 New To Do – Basics page ........................ 55 New To Do – Options page ...................... 55 New To Do Details page........................... 57 New To Do Edit page................................ 58 Notes........................................................... 2 Objectives ................................................... 1 Online Help ................................................. 2 Organization Description ............................ 1 Organizing eMail ....................................... 29 Overview ..................................................... 1 Password .................................................... 6 Password Change..................................... 59 Password Change Confirmation ............... 60 Permission levels ........................................ 5 Permissions ................................................ 5 Preferences Mail – Signature page .......... 41 Printing the Reference Guide ..................... 8 Reading Messages ................................... 27 Remove Folder popup .............................. 32 Removing a Folder.................................... 31 Removing Favorites.................................. 20 Removing Weather Locations................... 17 Retailer Role ............................................... 5 Rich Text Applet page .............................. 35 Rich Text Applet warning.......................... 35 Saving a Message .................................... 37 Schedule New Meeting – Basics page ..... 52 Schedule New Meeting – Invitations and
Reservations page ................................ 52 Schedule New Meeting – Options page ... 53
SVHarbor Reference Guide Version 2.0
62
Scheduling a Meeting ................................52 Searching for an eMail Address ................22 Selecting from the Address Book ..............34 Sending a Message...................................37 Setting Delivery Options ............................38 Setting Mail Preferences ...........................39 SUPERVALU.com Home page ...................4 Support ........................................................3 SVHarbor “Shell” Navigation Tools..............8 SVHarbor Headline detail ..........................12 SVHarbor Home page .................................7 SVHarbor link...............................................4 SVHarbor Login page ..................................6 SVHarbor Main page .............................6, 10 SVHarbor.com Main page ...........................5 Table of Contents ......................................... i Tips ..............................................................2 To Do page................................................54 To Do page – Delete .................................57 To Do’s ......................................................53 User Name...................................................6
User Roles .................................................. 5 Using SVHarbor ........................................ 10 Using SVHarbor eMAil and Directories..... 24 Using the Address book............................ 43 Vendor Role ................................................ 5 Viewing Forecasts..................................... 18 Viewing Forecasts by City ........................ 18 Viewing Forecasts by State ...................... 18 Viewing Industry News ............................. 16 Viewing More Weather Forecasts............. 18 Viewing My Weather Forecasts ................ 17 Viewing Other Location Forecasts............ 19 Viewing SVHarbor Alerts .......................... 14 Viewing SVHarbor Headlines ................... 12 Warnings..................................................... 2 Weather Forecasts.................................... 17 Weather page – No Locations .................. 17 Working with Calendar (Events) ............... 50 Working with eMail.................................... 24 Working with My Favorites........................ 20 Working with To Do’s................................ 53