supreme heating user · pdf filesupreme heating user guide _____ 2 accessing supreme heating...
TRANSCRIPT

Supreme Heating User Guide Heatseeker Solar Pool Heating

Supreme Heating User Guide ________________________________________________________________________________________________________________________________________________________________________________________________
2
Accessing Supreme Heating Technical Support For assistance with the installation or ongoing use of your solar pool heating system please contact
Supreme Heating for technical support.
Supreme Heating Monday - Friday 8.30am - 5.00pm
Phone: 1300 787 978 (Melbourne Time)
For assistance with the installation or ongoing use of your solar controller, in the first instance please
contact Supreme Heating for technical support. Alternatively, please contact the manufacturer.
Dontek Electronic Manufacturing Monday - Friday 8.30am - 5.00pm
Phone: (03) 9762 8800 (Melbourne Time)
For assistance with the installation or ongoing use of your solar pump, in the first instance please contact
Supreme Heating for technical support. Alternatively, please contact the manufacturer.
Astral Pool Australia (Hurlcon) Monday - Friday 8.30am - 5.00pm
Phone: 1300 727 116 (Melbourne Time)

Supreme Heating User Guide ________________________________________________________________________________________________________________________________________________________________________________________________
3
Table of Contents Overview 4
Maintenance 5
General Maintenance 5
Vacuum Relief Valve 5
Solar Pump 6
In-Line Filter 6
Repair Kit 6
Automatic Solar Controllers 7
Aqua-Gen 3 Operating Instructions 7
Aqua-Gen 3 BR Operating Instructions 7
Aqua-Gen 3PV Operating Instructions 7
Aqua-Gen Troubleshooting 10
SSV7RT Operating Instructions 12
SSV7RRT Operating Instructions 12
SSV7 Troubleshooting 17
Solar Pumps 19
SS Series Operating Instructions 19
FX Series Operating Instructions 20
Warranty Agreement 21

Supreme Heating User Guide ________________________________________________________________________________________________________________________________________________________________________________________________
4
This manual contains information about the operation and warranty terms and conditions of our solar
pool heating systems. Also included is advice on how to maintain and diagnose problems with your solar
pool heating.
Please read operating instructions carefully before using appliances. The equipment is not intended for
use by young children or infirm persons without supervision. Please ensure young children are
supervised to ensure they do not play with the equipment.
Overview Solar heating installed on a pool will give you a swimming season of 6 - 9 months depending on where
you are situated in Australia. This is approximately double an unheated pool swimming season.
The pool is heated by circulating water through the solar collector where it absorbs the suns energy.
Solar systems normally incorporate a separate pump and automatic controller to maximise heat gain and
can be fitted to existing pools.
With proper maintenance your solar pool heating system should provide many years of trouble-free
service.
Features
• Higher efficiency to allow optimum heat gain
• Quality products for added strength and durability
• Innovative products to achieve maximum aesthetic appeal and to maintain property value
• Easy operation and low maintenance
• Supports local economy

Supreme Heating User Guide ________________________________________________________________________________________________________________________________________________________________________________________________
5
Maintenance
General Maintenance
The solar system has been designed as an absorber of the sun’s energy to transfer heat into the pool.
Ideal protection of the lifespan of the system will occur if water is flushed through the system regularly.
Automation with ‘Winter Mode’ has been provided to facilitate this during the winter period. Flushing the
system out removes any build up of harmful toxins or chemicals which can affect the solar collectors and
pipe work. If the system is operated manually it is recommended to ‘flush’ the system for 10 minutes
every day during non-seasonal periods. Long term non-operation of the system can result in premature
failure of the solar system and will void the warranty period.
The system should also be checked for any leaks during the inspection of the vacuum relief valve (refer
below). If a leak occurs, it should be rectified immediately so as to avoid any roof or property damage.
Because most pools are salt chlorinated and chemically treated, if a leak is left for long periods it will
cause irreversible damage. Failure to abide by your maintenance schedule will void your warranty.
Vacuum Relief Valve
The vacuum relief valve is installed at the base of the manifolds. The valve provides
‘vacuum relief’ when the solar pump turns off by allowing the water to drain back
to the pool. Air is drawn into the system through the top of the valve due to
gravitational forces opening the internal seal. When the pump turns on water
pressure will re-seal the vacuum relief valve. Air should be expelled into the pool
within 2-3 minutes depending on the size of the system and during this period the
resulting turbulence created will cause some associated noise.
Vacuum relief valves should be inspected regularly (2-4 weeks) during the months of
operation. If it is leaking or blocked (no surges of air returning to pool) it should be
cleaned. This can be done by pulling the cap off the top of the valve. Remove visible
obstructions and wash the components with water. The solar pump must be turned
off before cleaning commences.
Failure to correctly install a vacuum relief valve in your system or inspect and maintain
its operation will void all warranties related to collectors, pipe work and fittings.

Supreme Heating User Guide ________________________________________________________________________________________________________________________________________________________________________________________________
6
Solar Pump
The SS & FX series solar pumps are designed to operate for extended periods without any attention or
maintenance. Following are the periodic maintenance requirements:
1. Keep lint basket clean - empty it regularly. Blocked lint basket or suction pipe and no water flow can
cause overheating with consequent pipe and pump components failure and meltdown (if
applicable).
2. Apply suitable waterproof grease to the lint pot ‘O’ ring to ensure positive seal.
3. Ensure electrical passage for cooling airflow to prevent fusing or shock hazards.
4. Maintain a clear passage for cooling airflow to prevent overheating of motor.
5. Maintain water in good chemical balance.
6. Do not allow quantities of sand or grit to continuously pass through pump to prevent “sand blasting”
erosions (use filter sock in lint basket if sand, etc. is being picked up by vacuum.)
7. Do not over tighten strainer lid. Never use a tool or handle to tighten lid.
8. Do not add pool salt, chlorine, acid or other chemicals directly to your skimmer. This may result in
damage to your pump and could void your warranty.
In-Line Filter
(Only applicable on pools with in-floor cleaning systems)
The in-line filter should only be installed if your pool has a new or existing in-floor cleaning system, or
where your solar pump is drawing from the skimmer or main drain point at the bottom of your pool. This
device requires regular maintenance as often as your filter pump or skimmer basket would require
cleaning.
To clean, first switch off your filtration. Once this is done you can
then un-screw the main filter bowl of the unit. Remove the cartridge
(filter sock) and proceed cleaning with a hose or tap until the filter
returns to a white colour. In time this item will wear out and will no
longer be cleanable. Replacements can be found in any local pool
shop or are available at Supreme Heating.
Repair Kit
Repair kits are provided so that minor damage to the solar collectors can very easily be repaired by the
home owner. Please contact Supreme Heating for authorisation and further advice or instruction.

Supreme Heating User Guide ________________________________________________________________________________________________________________________________________________________________________________________________
7
Automatic Solar Controllers Supreme Heating has combined the latest technology, together with user-friendly concepts in the
development of our extensive range of automatic solar controllers. Our range of solar controllers are
digitally controlled and are also available with optional wireless roof sensors. These are used to control
the heating of your pool and/or spa from your solar collector.
To determine what controller you have, please refer to your quotation, invoice or model number which can be
found near the display screen of the unit.
Aqua-Gen 3 Operating Instructions
The Aqua-Gen 3 is a premium automatic solar controller with temperature adjustment, manual, winter
and tropical mode features. All configurable items are retained after a power outage for up to 14 days.
Aqua-Gen 3 Aqua-Gen 3BR Aqua-Gen 3PV (Battery Remote) (Photovoltaic Remote)
Temperature Limit
To adjust the pool limit simply press the UP button to increase or the DOWN button to decrease the
desired temperature.
The controller will automatically choose to run the pump based on solar gain (i.e. sun shining & roof is
hot). Once the desired temperature is achieved the pump is stopped and a 4 hour wait commences to
ensure no energy is wasted by cycling the pump. If after 4 hours the roof is hot enough then the pump
may start to provide another heating cycle and if the desired temperature is reached again then no
heating will occur until the next day unless the controller is operating in time-clock mode where heating
can occur until solar lockout time (09:00 until 19:00).

Supreme Heating User Guide ________________________________________________________________________________________________________________________________________________________________________________________________
8
Mode of Operation
Pressing the SELECT button once will display the current mode of operation, pressing it again or holding
it will select the next available mode of operation.
The available modes are SUMMER, MANUAL, TROPICAL or WINTER.
Summer Mode is the normal operating mode for heating the pool.
Winter Mode of operation is for off-season maintenance or if pool heating is not required (AWAY MODE).
This is a better option than turning off the controller as it will flush treated pool water through the solar
system as well as prolong pump bearing and mechanical seal life. The pump will run for 3 minutes each
day from when the winter mode was selected or at 10am if the time-clock mode was selected.
Tropical Mode is for situations where the pool water overheats due to direct heating from the sun,
beyond the set limit. When the roof is 4°C cooler than the pool temperature, the pump is started (this will
most likely occur at night) and will attempt to cool the pool to 1°C above the temperature limit. Normal
heating will occur the next day if the pool drops below the temperature limit by 1°C.
Manual Mode is for testing the pump installation on a cold or cloudy day. Once manual mode is selected
the pump will start if it has been off, or stop if it has been on (running). After 30 minutes manual mode
will time-out and return to summer mode with a default temperature limit of 30°C
Settings Mode is for setting the unit into time-clock operation.
When you select this option you will be asked if you wish to use the clock feature (CLK? ON/OFF).
If you select OFF then the controller will not work as a time-clock model and will allow the solar pump to
run whenever there is solar heating available. If you select ON you will be prompted to set the time of
day, the controller will work in time-clock mode and the solar pump is prevented from starting outside of
the set hours (unless tropical mode is selected). Set the time of day in 24 hour format, note there is an
AM/PM indication to avoid incorrect settings. Seconds are automatically set to zero.
Once the time is set select the START hour from 6am until 12noon, default is 9am which means the solar
pump cannot start before 9am.
Now select the END hour from 15:00 (3pm) until 21:00 (9pm), default is 19:00 (7pm) which means the
solar pump will stop at 7pm.
Installer Settings - Adjustable differential and anti-freeze feature
Special note: Adjusting these values to any setting other than the defaults may adversely affect the
performance of this controller.
To select these features, hold the DOWN button then press SELECT. When you select this option you will
be prompted to set the solar gain start temperature (RUN° x) this setting allows the pump to start if the
roof temperature exceeds the pipe temperature by this value, adjust with the UP/DOWN button, press
Supreme Heating User Guide ________________________________________________________________________________________________________________________________________________________________________________________________
9
SELECT to accept. Next you will be prompted to set the differential hysteresis (END° x) which turns the
pump off when roof temperature is less than the pipe temperature plus this value, adjust with the
UP/DOWN button, press SELECT to accept. Default values are 8° for RUN and 4° for END, these are the
optimal values for maximum efficiency, some coastal locations may benefit from a reduced run value of
6°C for RUN and 4°C for END.
Next is anti-freeze (this function is applicable to Aqua-Gen 3 & Aqua-Gen 3BR models only), you will be
prompted by FRZ? ON/OFF, adjust with the UP/DOWN button, press SELECT to accept. If you select OFF
then all the above settings will be saved and the unit will restart. If you selected ON then you will be
prompted to adjust the anti-freeze start temperature point as follows; FREEZ° x adjust with the UP/DOWN
button, press SELECT to accept.
Once the roof temperature gets to the anti-freeze setting or below then the pump will be turned on for 3
minutes then turn off for 30 minutes, this sequence will repeat until the roof temperature rises above the
anti-freeze temperature.
Factory Test
To run the factory test, hold the SELECT button when first applying power, the unit will perform a series
of self-diagnostic functions with the pump running. If there are any faults they will be reported on the
display before the unit restarts into normal operation.
Note: this will force all settings to a factory default state, if anti-freeze had been selected then turn it back on as
described under ‘adjustable differential and anti-freeze feature’. Also re-enable time-clock if desired.
Notes
1. If a sensor fault is detected the controller will display which sensor failed (POOL and/or ROOF) and the
type of failure.
2. Should power be interrupted for any reason, the controller will resume normal operation when
power is restored, all information will have been kept for up to 14 days.
3. Temperature sensor used with this unit is digital and is accurate to 0.5°C, no calibration is required.
4. The sensor cable with the thin trace is the positive and is usually fitted to the right hand side of the
green plug when looking at the plug screws, incorrect polarity will be displayed as a short circuit or
reversed fault.
5. If the controller has stopped pumping and is displaying a higher temperature than expected it may
be caused by a pump which is failing to prime, check the pump and if necessary prime the pump as
per the pump manufacturers’ instructions then reset the controller by turning it off/on.
6. Maximum rated output load for the 240V socket is 10 Amps 2400 Watt.
Supreme Heating User Guide ________________________________________________________________________________________________________________________________________________________________________________________________
10
Aqua-Gen Troubleshooting
NO POWER TO THE DISPLAY
Power point is faulty; test power point with known working appliance, if the power point is operational,
check the controller with another power point and if there is still no display then send the controller for
repair.
PIPE/ROOF SENSOR FAULTS
The following are error messages caused by pool or roof sensor faults;
SENSOR DISCONNECTED OR OPEN CIRCUIT
Sensor cable unplugged from controller, cable damaged, bad cable join.
SENSOR SHORT CIRCUIT OR REVERSED
Sensor cable or cable join polarity is incorrect, the figure 8 wire has a white stripe to indicate the positive
side; the positive side of the wire should be wired to the right hand side when viewing the screws with
the figure 8 cable entry at the bottom of the plug. If the cable has been joined ensure no polarity reversal
occurs.
SENSOR READ ERROR (INTERFERENCE)
Electrical/magnetic interference from other equipment is causing errors when trying to read temperature
values. Ensure sensor wires are located away from mains wiring, never cable tie sensors to mains cables.
Attempt to locate the source of the interference and relocate if possible.
SENSOR WRITE ERROR (CABLE DAMAGED)
Damaged or kinked cable, the sensor at the end of the cable cannot get the power required to perform a
temperature reading. Replace cable and or sensor.
ISOLATING SENSOR FAULTS
Swap the sensor locations; simply put the pipe sensor in the roof socket and the roof sensor in the pipe
socket. If the fault moves from pipe to roof or vice versa then you can be certain that there is a sensor
fault. If the fault remains the same then the controller will need repairs.
For sensor open circuit or write error faults, check for damage to the cable and repair if required. If no
damage can be found replace the sensor. If the cable runs underground or inspection is not possible then
cut the sensor from near the end of the cable and strip back the wires and join them, if the controller
reports a short circuit then the cable is fine, and you may replace the sensor end if re-routing a new cable
is not possible.
For sensor short circuits, if the controller reports an open circuit when the cable is unplugged then
attempt reversing the cable polarity, replace the sensor if reversal is unsuccessful then the controller

Supreme Heating User Guide ________________________________________________________________________________________________________________________________________________________________________________________________
11
requires repair, if the controller reports a short circuit while the cable is unplugged then the controller
requires repair.
PUMP FAULTS
Ensure the controller has working sensors; otherwise the pump will not operate.
PUMP WILL NOT START
The pump will only ever run for the purpose of automatic heating if the pool is below the temperature
limit and solar conditions can provide heating. The pump may also run for a flush in winter-mode or for
manual mode operation. If the controller reports that the pump is off then press select to enable manual
mode, the relay inside should click and the pump should operate. If the pump does not operate then
plug the pump into a power point and test operation, if the pump is OK then the controller requires
repair.
PUMP WILL NOT STOP
Turn off power to the controller, ensure the pump stops, if the pump continues to operate then unplug it
from the power point and connect it to the 240Vac socket marked PUMP at the bottom of the controller.
Apply power to the controller and if the pump starts instantaneously before temperatures are displayed
then the may be a fault with the controller, since the controller shouldn’t run when there is a sensor fault,
disconnect the roof sensor and wait for approximately 30 seconds, if the pump continues to run then the
controller requires repair.
POOL NOT HEATING
If the controller has stopped pumping and is displaying a higher temperature than expected it may be
caused by a pump which is failing to prime, check the pump and if necessary prime the pump as per the
pump manufacturers’ instructions then reset the controller by turning it off/on.
Supreme Heating User Guide ________________________________________________________________________________________________________________________________________________________________________________________________
12
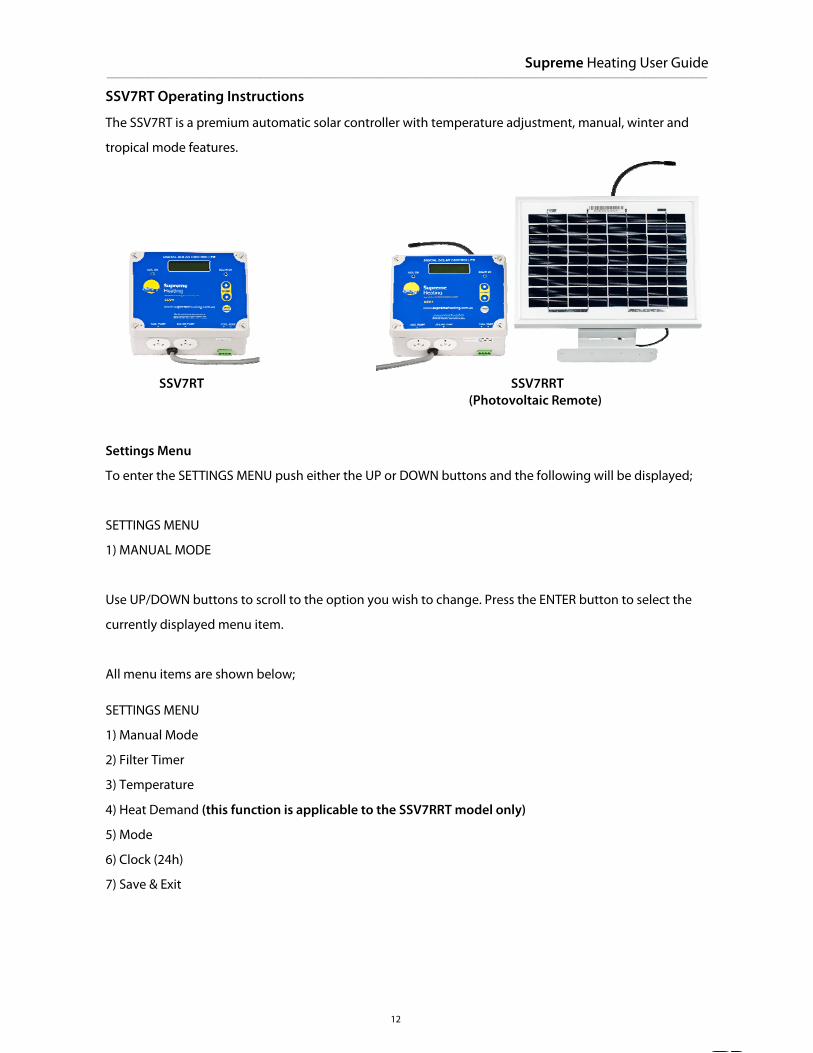
SSV7RT Operating Instructions
The SSV7RT is a premium automatic solar controller with temperature adjustment, manual, winter and
tropical mode features.
SSV7RT SSV7RRT (Photovoltaic Remote)
Settings Menu
To enter the SETTINGS MENU push either the UP or DOWN buttons and the following will be displayed;
SETTINGS MENU
1) MANUAL MODE
Use UP/DOWN buttons to scroll to the option you wish to change. Press the ENTER button to select the
currently displayed menu item.
All menu items are shown below;
SETTINGS MENU
1) Manual Mode
2) Filter Timer
3) Temperature
4) Heat Demand (this function is applicable to the SSV7RRT model only)
5) Mode
6) Clock (24h)
7) Save & Exit

Supreme Heating User Guide ________________________________________________________________________________________________________________________________________________________________________________________________
13
1) Manual Mode
MANUAL PUMP MODE
UP=ON DOWN=OFF
MANUAL MODE allows you to manually set the aux pump to ‘on’ by pressing the UP button or ‘off’ by
pressing the DOWN button.
Pressing ENTER will return you to the SETTINGS MENU. You can also keep pressing ENTER to toggle the
filter pump from ‘on’ to ‘off’ and vice versa.
MANUAL MODE will time out, after 24 hours the controller will return to normal operation.
2) Filter Timer
SINGLE CYCLE
DUAL CYCLE
Single cycle sub menu
SINGLE CYCLE SINGLE CYCLE
START TIME X:XX END TIME X:XX
Dual cycle sub menus
FIRST CYCLE FIRST CYCLE SECOND CYCLE SECOND CYCLE
START TIME X:XX END TIME X:XX START TIME X:XX END TIME X:XX
When you enter the FILTER SETUP menu you will need to select SINGLE CYCLE or DUAL CYCLE, the
selected option will be flashing, you can use the UP/DOWN buttons to change to the selected option,
once you select the required cycle by pressing SELECT you will be prompted to set the cycle START TIME
and END TIME, modify these by pressing the UP/DOWN buttons, press SELECT to accept the setting.
SINGLE CYCLE will run the filter pump once per day.
DUAL CYCLE will run the filter pump twice per day.
Factory Default is ON, DUAL CYCLE from 09:00 to 13:00 and 16:00 to 20:00.
Note that the maximum combined rated current is 10 Amps (2400W at 240VAC.)

Supreme Heating User Guide ________________________________________________________________________________________________________________________________________________________________________________________________
14
3) Temperature
TEMPERATURE
SOL LIMIT XX.X°
When you enter the TEMPERATURE menu you may change the solar heater temperature limit setting
(SOL LIMIT) by pressing the UP/DOWN buttons, if no change is required simply push ENTER.
Factory default for SOL LIMIT is 30°C.
4) Heat Demand (only set ON if auxiliary heating fitted) - applicable to SSV7RRT model only
HEAT DEMAND
ON/OFF
When you enter the HEAT DEMAND you will need to select ON or OFF, the selected option will be
flashing, you can use UP/DOWN to change the selected option, ENTER to accept.
If OFF is selected you will return to the menu, If ON is selected you will be prompted for START and END
time, modify values by using the UP/DOWN buttons, use ENTER to accept the values. Factory default is
‘heat demand off’.
HEAT DEMAND TIME HEAT DEMAND TIME
START TIME X:XX END TIME X:XX
NOTE: If a 24 hour continuous run time is required then set the start time and end time to the same value
(e.g. Start 12:00, End 12:00)
IF LIMIT ACTIVE
SAMPLE AT XXXX
Sets the sampling period once the pool has reached the auxiliary temperature limit, options are 15 min,
30 min, 1 hour, 2 hours. Once the pool reaches the aux temperature limit and the filter pump is turned off
it will not be turned on until the sample period expires, the filter pump will then run for a minimum
period of 3 mins so that water can flow past the pool temperature sensor and obtain an accurate reading.
Should heating be required the filter pump will remain on to heat the pool.
Factory default for HEAT DEMAND is OFF (06:00 to 22:00, sample @ 1 hour)

Supreme Heating User Guide ________________________________________________________________________________________________________________________________________________________________________________________________
15
5) Mode
MODE
SUMMER MODE/WINTER MODE/TROPICAL MODE
You can use UP/DOWN to change the selected option, ENTER to accept.
Summer Mode is the normal operation of heating the swimming pool.
Winter Mode, when selected you will be prompted to select the start month and end month of winter
(inclusive), this assists in the systems off-season maintenance and saves energy as solar gain may be
available but swimming temperature cannot be achieved. If heat demand is set to OFF a 3 minute flush of
the solar matting occurs between 10:00 and 16:00 providing the roof temperature is equal or greater
than the pool, but if that condition does not occur a solar system flush will be forced to occur at 16:00.
If heat demand is ON the system operates similar to normal mode but solar pump activity is monitored
and will force a 3 minute flush if solar has not been active for seven days, note the unit may flush if winter
mode is selected on the day of install.
Tropical Mode is selected if you wish to cool the swimming pool, the solar pump will run if the roof
temperature is colder than the pool until SOL LIMIT is obtained; note that this is most likely to occur at
night.
6) Clock (24h)
CLOCK (24h) CLOCK (24h) CLOCK (24h) CLOCK (24h)
SET MINS XX SET HOURS XX SET DATE XX SET MONTH XX
When you enter the CLOCK menu you will be prompted to change the MINS settings, adjust minutes by
pressing the UP/DOWN buttons, to accept the setting press the ENTER button.
You will then be prompted to change the HOURS, adjust by pressing the UP/DOWN buttons, to accept
the setting press the ENTER button.
You will then be prompted to change the DATE, adjust by pressing the UP/DOWN buttons, to accept the
setting press the ENTER button.
You will then be prompted to change the MONTH, adjust by pressing the UP/DOWN buttons, to accept
the setting press the ENTER button.
7) Save & Exit
When this menu is selected, push ENTER to save ALL settings, the unit will return to normal operation
automatically.

Supreme Heating User Guide ________________________________________________________________________________________________________________________________________________________________________________________________
16
Note: If any of the menu items are left unattended for 3-4 mins the menu will time out and automatically
save all settings and return to operation.
The Enter button
FOR MANUAL MODE
PRESS ENTER NOW
Pressing the ENTER button once will display the above message for approximately 3 seconds, simply wait
and the unit will return to normal operation.
If the ENTER button is pressed for a second time within a 3 second period, the display will indicate you
have entered Manual mode, operation is the same as manual mode in the menu with the only difference
being the timeout value is 4 hours.
Notes
1. If a sensor fault is detected the SSV7RT will display which sensor and what the fault is.
2. Should power be interrupted for any reason, the SSV7RT will resume normal operation when power is
restored, all information will have been kept.
3. Temperature sensors used with this unit are digital and are accurate to 0.5°C, no calibration is
required.
4. The sensor cable with the thin trace is the positive and is usually fitted to the right hand side of the
green plug, incorrect polarity will be displayed.
5. Solar start and end times may be changed by holding the up button while power is applied.

Supreme Heating User Guide ________________________________________________________________________________________________________________________________________________________________________________________________
17
SSV7 Troubleshooting
NO POWER TO THE DISPLAY
Power point is faulty; test power point with known working appliance, if the power point is operational,
check the controller with another power point and if there is still no display then send the controller for
repair.
PIPE/ROOF SENSOR FAULTS
The following are error messages caused by pool or roof sensor faults;
SENSOR DISCONNECTED OR OPEN CIRCUIT
Sensor cable unplugged from controller, cable damaged, bad cable join.
SENSOR SHORT CIRCUIT OR REVERSED
Sensor cable or cable join polarity is incorrect, the figure 8 wire has a white stripe to indicate the positive
side; the positive side of the wire should be wired to the right hand side when viewing the screws with
the figure 8 cable entry at the bottom of the plug. If the cable has been joined ensure no polarity reversal
occurs.
ISOLATING SENSOR FAULTS
Swap the sensor locations; simply put the pipe sensor in the roof socket and the roof sensor in the pipe
socket. If the fault moves from pipe to roof or vice versa then you can be certain that there is a sensor
fault. If the fault remains the same then the controller will need repairs.
For sensor open circuit faults, check for damage to the cable and repair if required. If no damage can be
found replace the sensor. If the cable runs underground or inspection is not possible then cut the sensor
from near the end of the cable and strip back the wires and join them, if the controller reports a short
circuit then the cable is fine, and you may replace the sensor end if re-routing a new cable is not possible.
For sensor short circuits, if the controller reports an open circuit when the cable is unplugged then
attempt reversing the cable polarity, replace the sensor if reversal is unsuccessful then the controller
requires repair, if the controller reports a short circuit while the cable is unplugged then the controller
requires repair.

Supreme Heating User Guide ________________________________________________________________________________________________________________________________________________________________________________________________
18
PUMP FAULTS
Ensure the controller has working sensors; otherwise the pump will not operate.
PUMP WILL NOT START
The solar pump will only ever run for the purpose of automatic heating if the pool is below the
temperature limit and solar conditions can provide heating. The solar pump may also run for a flush in
winter-mode and the auxiliary pump can be activated by running the manual mode operation. The best
method for testing the operation of the pump(s) is to enter the settings menu and select winter mode,
save and exit out of the settings menu to return to automatic operation and the unit will test the
temperatures then it will activate the auxiliary pump for 3 minutes followed by the solar pump for 3
minutes. (Note that the roof temperature must be greater than the pool temperature and the time must
be between 10am and 4pm).
PUMP WILL NOT STOP
Turn off power to the controller, ensure the pump stops, if the pump continues to operate then unplug it
from the power point and connect it to the 240Vac socket marked PUMP at the bottom of the controller.
Apply power to the controller and if the pump starts instantaneously before temperatures are displayed
then the may be a fault with the controller, since the controller shouldn’t run when there is a sensor fault,
disconnect the roof sensor and wait for approximately 30 seconds, if the pump continues to run then the
controller requires repair.
POOL NOT HEATING
If the controller has stopped pumping and is displaying a higher temperature than expected it may be
caused by a pump which is failing to prime, check the pump and if necessary prime the pump as per the
pump manufacturers’ instructions then reset the controller by turning it off/on.

Supreme Heating User Guide ________________________________________________________________________________________________________________________________________________________________________________________________
19
Solar Pumps At Supreme Heating we use Astral Pool Australia (formerly Hurlcon) pumps for our solar installations. The
type of system we install will determine what type of pump is used.
To determine what pump you have, please refer to your quotation, invoice or model number which can be
found on side of the pump.
SS Series Solar Pump
A high performance, high head pump ideally suited for solar applications. The SS series pump is Supreme
Heating’s premier pump designed to operate at high pressures when high pressure is desired.
Features
• Continuous duty rated motor
• Precision reinforced moulded high head impeller, giving extra performance
• Single piece moulded body for added strength and longer life
• Rapid priming diffuser quickly corrects loss of water flow
• Quick and easy disassembly for servicing
• Large capacity basket with easily removed ramp on lid
Operation
1. Prime pump if hair and lint pot is dry as follows:
- Close off valve on suction line if present.
- Remove lint pot lid.
- Fill lint pot and chamber with water.
- Replace and secure lint pot lid and seal.
2. Open all valves, allowing fluid to flow through pump.
3. Switch on power to pump, motor to start.
4. If some flow of water does not establish within on half a minute, switch off and prime pump again. If
pump does not prime within three attempts, check all suction connections for sealing. If these are
satisfactory, a check or foot valve is required to hold water for prime.
5. If the water flow through pump is always tedious to obtain at start-up after cleaning the lint basket,
then an examination of the system to establish a reason and correct the cause is recommended. eg.
Check valve, air leaks, faulty seal, cracked lint pot lid, etc.
6. The non-return valve is supplied loose in the basket of pump. To install, place between the outlet
barrel union tail and the discharge of the pump. The non-return valve should be located so that the

Supreme Heating User Guide ________________________________________________________________________________________________________________________________________________________________________________________________
20
flap can swing upwards into the union tail. The non-return valve should be installed on spas
equipped with cartridge filters, any time multiple pumps are operating off one suction or return line
or any installation where a back flow of water may occur when the pump is shut down. The non-
return valve will reduce the performance of the pump slightly.
Note: To avoid a safety hazard, the supply cord if damaged, must only be replaced by Astra Pool Australia
(Hurlcon), or its service agent or a suitably qualified person.
FX Series Solar Pump
A high performance, high head pump ideally suited for the modern pool or spa with extensive
equipment such as chlorinators, heaters and in floor cleaning.
Features
• Continuous duty rated motor
• Precision reinforced moulded high head impeller, giving extra performance
• Single piece moulded body for added strength and longer life
• Rapid priming diffuser quickly corrects loss of water flow
• Quick and easy disassembly for servicing
• Large capacity basket with easily removed ramp on lid
Operation
1. Open all valves, allowing fluid to flow through pump.
2. Switch on power to pump, motor to start.
3. If some flow of water does not establish within on half a minute, switch off and repeat procedure
3 again. If pump does not prime within three attempts, check all valves and jets are in the open
position.
Note: To avoid a safety hazard, the supply cord if damaged, must only be replaced by Astra Pool Australia
(Hurlcon), or its service agent or a suitably qualified person.

Supreme Heating User Guide ________________________________________________________________________________________________________________________________________________________________________________________________
21
Warranty Agreement Definitions
1 All capitalised expressions used in this warranty are defined in paragraph 17.
Warranty
2 Supreme Solar Pty Ltd warrants that its services in installing the Product will be carried out with
due care and skill and subject to clauses 3, 4, 5 and 6, that the installed Product will be free from
defects in workmanship for a period of twenty four (24) months after installation (warranty
includes in field labour costs.) The warranty is given subject to the terms of this warranty
agreement.
3 The Solar Collector included in the Product carries:
(a) in the case of a Strip Collector, a ten (10) year limited warranty from Procom Plastics
Extrusions Pty Ltd, 38 McGregors Drive, Keilor Park, Victoria, 3042 (Phone: (03) 9331 7589,
Email: [email protected]); or
(b) in the case of an Evacuated Tube Collector, a ten (10) year limited warranty from Supreme
Solar Pty Ltd, 9 Lucknow Crescent, Thomastown, Victoria, 3074 (Phone: (03) 9460 4200,
Email: [email protected]);
and is the only warranty given in respect of that part of the Product.
4 The Automatic Controller included in the Product carries:
(a) in the case of a SSV or Aqua-Gen 3 Series of Automatic Controllers, a three (3) year limited
warranty (temperature sensors not covered) from Dontek Electronics Pty Ltd, 19 Melrich
Road, Bayswater, Victoria, 3153 (Phone: (03) 9762 8800, Email:
[email protected]); or
(b) in the case of a Aqua-Gen 2 Automatic Controller, a two (2) year limited warranty
(temperature sensors not covered) from Dontek Electronics Pty Ltd, 19 Melrich Road,
Bayswater, Victoria, 3153 (Phone: (03) 9762 8800, Email:
and is the only warranty given in respect of that part of the Product.
5 The Solar Pump included in the Product carries a three (3) year limited warranty (six (6) months
for commercial installations) from Astral Pool Australia Pty Ltd, 48 Hanna Street, Noble Park,
Victoria, 3174 (Phone: (03) 9554 2200, Email: [email protected]) and is the only
warranty given in respect of that part of the Product.

Supreme Heating User Guide ________________________________________________________________________________________________________________________________________________________________________________________________
22
In field labour warranty is applicable in Capital City Metropolitan areas or within a 20km radius of
an Authorised Astra Pool Australia Service Agent.
6 All other components supplied by Supreme Solar Pty Ltd carry a twelve (12) month limited
warranty and is the only warranty given in respect of these components of the Product.
Exclusions
7 Supreme Solar Pty Ltd will not be liable under this warranty where Supreme Solar Pty Ltd’s
reasonable opinion a defect is caused by:
(a) fair wear and tear;
(b) negligent, careless or improper use or handling;
(c) non-adherence to operating, cleaning or maintenance instructions;
(d) harsh or adverse Pool/Spa water conditions;
(e) repair to or alteration of any parts of the system by any person who has not been
authorised by Supreme Solar Pty Ltd to perform such a repair or alteration;
(f) act of God, riot, fire or other occurrence outside normal working conditions; or
(g) by other abuse or misuse caused by the Purchaser or a third party.
8 Subject to clause 9, any condition or warranty which would otherwise be implied in this
agreement or in relation to the Product is hereby excluded.
9 Where legislation implies in this agreement or in relation to the Product any condition or
warranty, and that legislation avoids or prohibits provisions in a contract excluding or modifying
the application of or exercise of or liability under such condition or warranty, the condition or
warranty shall be deemed to be included in this agreement. However, the liability of Supreme
Solar Pty Ltd for any breach of such condition or warranty shall be subject to clause 14 and any
other applicable exclusions set out in this agreement, be limited, at the option of Supreme Solar
Pty Ltd, to one or more of the following:
(a) if the breach relates to goods:
(i) the replacement of the goods or the supply of equivalent goods;
(ii) the repair of such goods;
(iii) the payment of the cost of having the goods repaired; and
(b) if the breach relates to services:
(i) the supplying of the services again; or
(ii) the payment of the cost of having the services supplied again.

Supreme Heating User Guide ________________________________________________________________________________________________________________________________________________________________________________________________
23
What Supreme Solar Pty Ltd will do
10 For defects relating to installation of the Product, Supreme Solar Pty Ltd will, in its absolute
discretion:
(a) repair the Product or pay for the cost of having the Product repaired; or
(b) replace the Product or supply an equivalent Product; or
(c) pay for the cost of replacing the Product or acquiring and equivalent Product;
if the terms and conditions of this warranty are satisfied. Supreme Solar Pty Ltd will not be liable
for any other loss or damage (including consequential or indirect damages).
11 Supreme Solar Pty Ltd reserves the right to charge the Purchaser, at Supreme Solar Pty Ltd’s
current hourly rate, for the cost of examining the Product if such examination by Supreme Solar
Pty Ltd reveals that the Product:
(a) is not defective; or
(b) is defective as a result of any of the events specified in paragraph 7.
What the Purchaser must do
12 Any claim under this warranty must be made at the earliest stage that the defect becomes
obvious to enable prompt action and to avoid further damage and must be made no later than
one (1) month of the defect becoming obvious.
13 Any claim for warranty must be accompanied by appropriate documentation which stipulates
the date of installation, the invoice number, the details of the alleged defect and any other
information reasonably required by Supreme Solar Pty Ltd.
14 Purchaser agrees to pursue any claims in relation to defective parts against the manufacturers or
suppliers referred to in clause 3, 4 and 5.
Whole agreement
15 This warranty and any warranties implied by law which are not capable of being excluded or
modified from the whole warranty agreement between Supreme Solar Pty Ltd and the Purchaser
and all other warranties, express or implied, whether arising by statute or otherwise, are excluded
and cancelled.
Governing law
16 This warranty is governed by the laws of the State specified in paragraph 17(c).

Supreme Heating User Guide ________________________________________________________________________________________________________________________________________________________________________________________________
24
Defined terms
17 (a) Purchaser: The person who has purchased the Product and is able to
produce proof of such purchase
(b) Product: Supreme Solar Pty Ltd solar pool heating system
(c) Governing law
(paragraph 16): Victoria, Australia
Consumer guarantee
18 This warranty is provided in addition to consumer guarantees and does not alter, limit or replace
them.