survey report system health care facility user's - state of indiana
TRANSCRIPT
Indiana State Department of Health (ISDH)
Survey Report System Health Care Facility User’s Manual
February 11, 2011
User’s Manual Version 1.0
Page 2
Table of Contents
Topic Page
1.0 Getting Started 3
1.1 Purpose of Manual 3
1.2 Overview of the ISDH Survey Report System 3
1.3 Introduction to the ISDH State Health Gateway 3
2.0 Facility Notification 3
2.1 Facility Email Address to Receive Notifications 3
2.2 ISDH Gateway username and password 3
2.3 Notification that documents has been added to the Survey Report System 4
3.0 Accessing the ISDH Survey Report System 4
3.1 Logging on to the ISDH Survey Report System 4
3.2 Selecting the ISDH Survey Report System 5
3.3 Resolving Internet Explorer 8 Compatibility Issues 5
4.0 Viewing Survey Reports and Documents 6
4.1 Finding the Event ID 6
4.2 Accessing survey reports and documents 7
4.3 Selecting survey reports and documents 7
5.0 Completing a Plan of Correction 8
5.1 Accessing the Plan of Correction 8
5.2 Completing and Submitting the Plan of Correction 8
5.21 Selecting the deficiency number to begin completing a plan of correction 8
5.22 Plan of correction entry screen 9
5.23 Finalize and submit plan of correction screen 11
5.24 Changing the submitted the plan of correction after submission 12
5.25 Updating the plan of correction after ISDH review 12
6.0 Updating password and contact information 13
6.1 Changing the password and updating contact information 13
7.0 Logging out of the System 13
7.1 Logout of the system 13
User’s Manual Version 1.0
Page 3
1.0 Getting Started
1.1 Purpose of Manual: The purpose of this User’s Manual is to assist health care facilities in utilizing the Indiana State Department of Health (ISDH) Survey Report System.
1.2 Overview of the ISDH Survey Report System: The Survey Report System will be used as part of state licensing and federal certification of health care facilities. The Survey Report System will enable facilities to view/print survey reports and survey related documents online. The Survey Report System will also allow facilities to complete the survey Plan of Correction (POC) online via an internet-based system. The Survey Report System allows the facility to upload supporting documents as part of the Plan of Correction.
1.3 Introduction to ISDH State Health Gateway: The Indiana State Department of Health - State Health Gateway is a health portal dedicated to providing information and services to Hoosier health care professionals, labs, local health departments, and health information exchanges. The Survey Report System will be housed within the State Health Gateway.
2.0 Facility Notification
2.1 Facility Email Address to Receive Notifications: The Survey Report System will utilize the email address provided by health care facilities to notify the facility when survey documents are placed on the Survey Report System. The preferred facility email address is an email address assigned to the facility rather than one individual. Having a facility email address for this purpose eliminates the need to change designated addresses whenever staffing changes and allows multiple individuals to access when one individual is unavailable. It is important that facilities keep this information current by notifying the ISDH at http://www.in.gov/isdh/25053.htm . Some facilities have requested that surveys and documents be sent to a second location such as their corporate office, owner, or other officer. The Survey Report System allows a facility to receive one additional email notification.
2.2 ISDH State Health Gateway Username and Password: Facilities will access the Survey Report System through the ISDH State Health Gateway at https://gateway.isdh.in.gov. The facility’s username will be the “facility number” assigned by the ISDH. The facility number can be located on the first page of a survey report. The facility number is listed as a six digit number (i.e. 006789). When entering the facility number, the facility does not need to include the zeros at the beginning. The initial password will be provided by the ISDH at the time of their first survey after implementation of the system. Facilities are encouraged to change their password the first time they log into the Survey Report System. The system will prompt users to change their passwords every ninety (90) days. Please note that the system will automatically log you off after 20 minutes of inactivity while using the application.
User’s Manual Version 1.0
Page 4
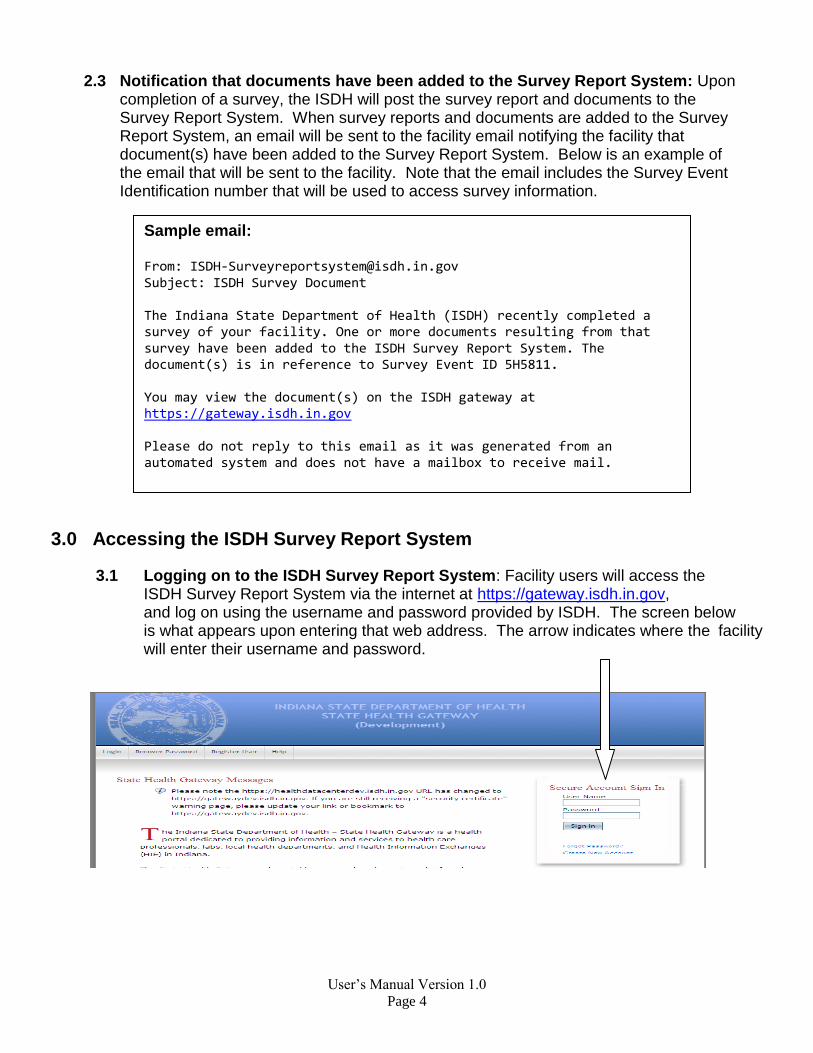
2.3 Notification that documents have been added to the Survey Report System: Upon completion of a survey, the ISDH will post the survey report and documents to the Survey Report System. When survey reports and documents are added to the Survey Report System, an email will be sent to the facility email notifying the facility that document(s) have been added to the Survey Report System. Below is an example of the email that will be sent to the facility. Note that the email includes the Survey Event Identification number that will be used to access survey information.
3.0 Accessing the ISDH Survey Report System
3.1 Logging on to the ISDH Survey Report System: Facility users will access the ISDH Survey Report System via the internet at https://gateway.isdh.in.gov, and log on using the username and password provided by ISDH. The screen below is what appears upon entering that web address. The arrow indicates where the facility will enter their username and password.
Sample email: From: [email protected] Subject: ISDH Survey Document The Indiana State Department of Health (ISDH) recently completed a survey of your facility. One or more documents resulting from that survey have been added to the ISDH Survey Report System. The document(s) is in reference to Survey Event ID 5H5811. You may view the document(s) on the ISDH gateway at https://gateway.isdh.in.gov Please do not reply to this email as it was generated from an automated system and does not have a mailbox to receive mail.
User’s Manual Version 1.0
Page 5
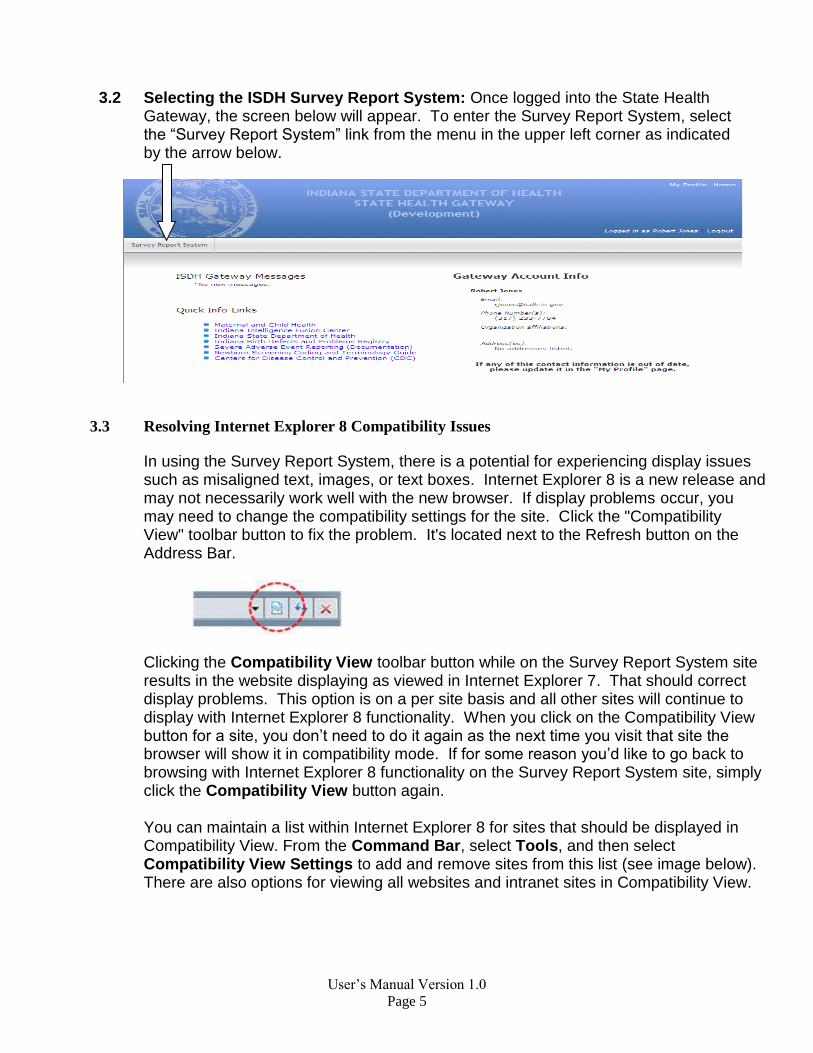
3.2 Selecting the ISDH Survey Report System: Once logged into the State Health Gateway, the screen below will appear. To enter the Survey Report System, select the “Survey Report System” link from the menu in the upper left corner as indicated by the arrow below.
3.3 Resolving Internet Explorer 8 Compatibility Issues
In using the Survey Report System, there is a potential for experiencing display issues such as misaligned text, images, or text boxes. Internet Explorer 8 is a new release and may not necessarily work well with the new browser. If display problems occur, you may need to change the compatibility settings for the site. Click the "Compatibility View" toolbar button to fix the problem. It's located next to the Refresh button on the Address Bar.
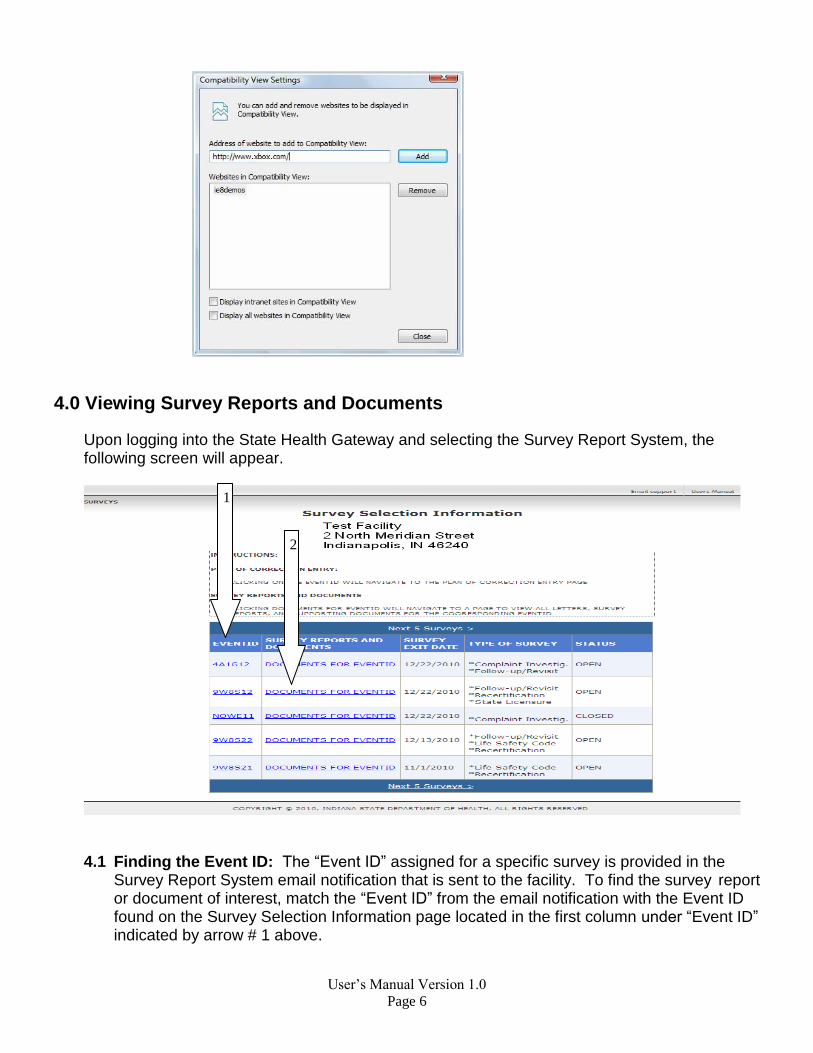
Clicking the Compatibility View toolbar button while on the Survey Report System site results in the website displaying as viewed in Internet Explorer 7. That should correct display problems. This option is on a per site basis and all other sites will continue to display with Internet Explorer 8 functionality. When you click on the Compatibility View button for a site, you don’t need to do it again as the next time you visit that site the browser will show it in compatibility mode. If for some reason you’d like to go back to browsing with Internet Explorer 8 functionality on the Survey Report System site, simply click the Compatibility View button again. You can maintain a list within Internet Explorer 8 for sites that should be displayed in Compatibility View. From the Command Bar, select Tools, and then select Compatibility View Settings to add and remove sites from this list (see image below). There are also options for viewing all websites and intranet sites in Compatibility View.
User’s Manual Version 1.0
Page 6
4.0 Viewing Survey Reports and Documents
Upon logging into the State Health Gateway and selecting the Survey Report System, the following screen will appear.
4.1 Finding the Event ID: The “Event ID” assigned for a specific survey is provided in the Survey Report System email notification that is sent to the facility. To find the survey report or document of interest, match the “Event ID” from the email notification with the Event ID found on the Survey Selection Information page located in the first column under “Event ID” indicated by arrow # 1 above.
1
2
User’s Manual Version 1.0
Page 7
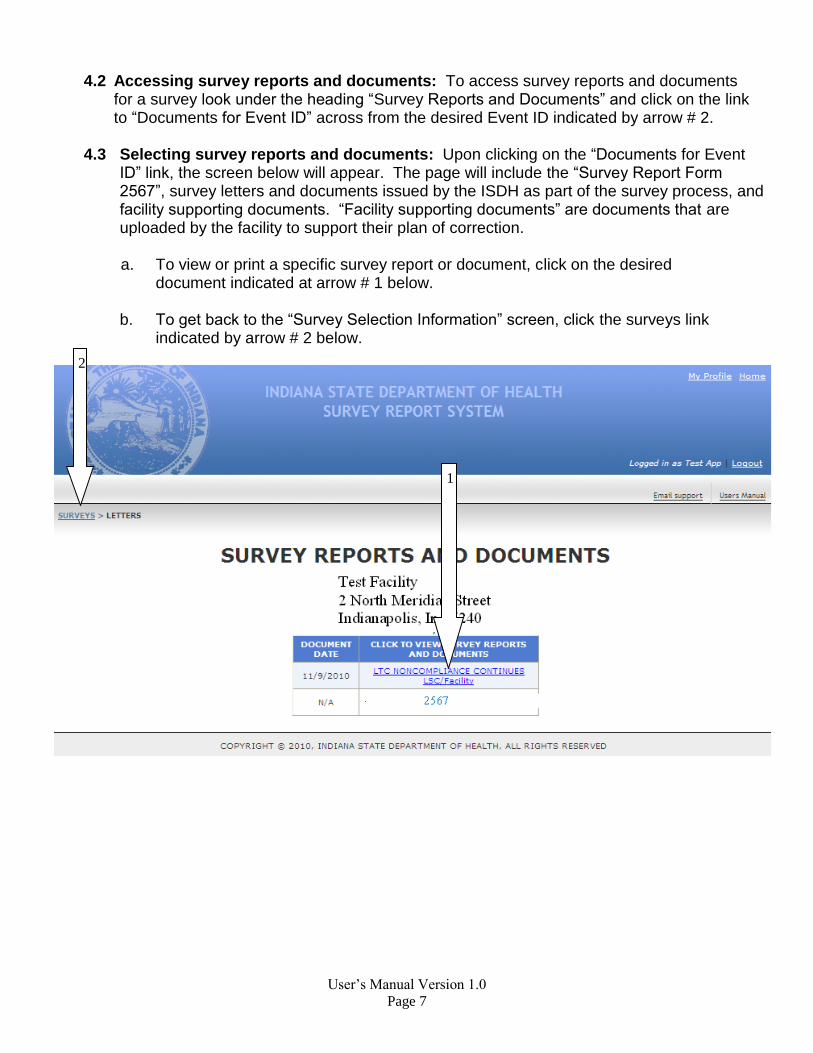
4.2 Accessing survey reports and documents: To access survey reports and documents for a survey look under the heading “Survey Reports and Documents” and click on the link to “Documents for Event ID” across from the desired Event ID indicated by arrow # 2.
4.3 Selecting survey reports and documents: Upon clicking on the “Documents for Event
ID” link, the screen below will appear. The page will include the “Survey Report Form 2567”, survey letters and documents issued by the ISDH as part of the survey process, and facility supporting documents. “Facility supporting documents” are documents that are uploaded by the facility to support their plan of correction.
a. To view or print a specific survey report or document, click on the desired
document indicated at arrow # 1 below. b. To get back to the “Survey Selection Information” screen, click the surveys link
indicated by arrow # 2 below.
1
2
User’s Manual Version 1.0
Page 8
5.0 Completing a Plan of Correction
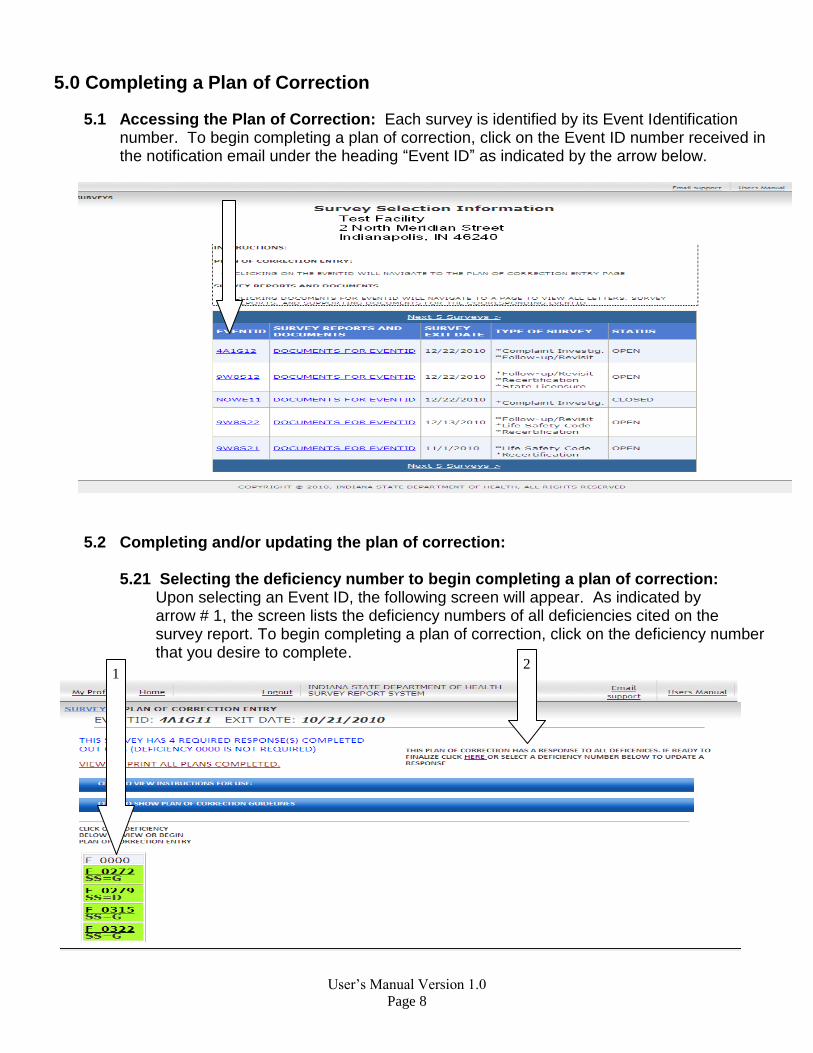
5.1 Accessing the Plan of Correction: Each survey is identified by its Event Identification number. To begin completing a plan of correction, click on the Event ID number received in the notification email under the heading “Event ID” as indicated by the arrow below.
5.2 Completing and/or updating the plan of correction: 5.21 Selecting the deficiency number to begin completing a plan of correction:
Upon selecting an Event ID, the following screen will appear. As indicated by arrow # 1, the screen lists the deficiency numbers of all deficiencies cited on the survey report. To begin completing a plan of correction, click on the deficiency number that you desire to complete.
1 2
User’s Manual Version 1.0
Page 9
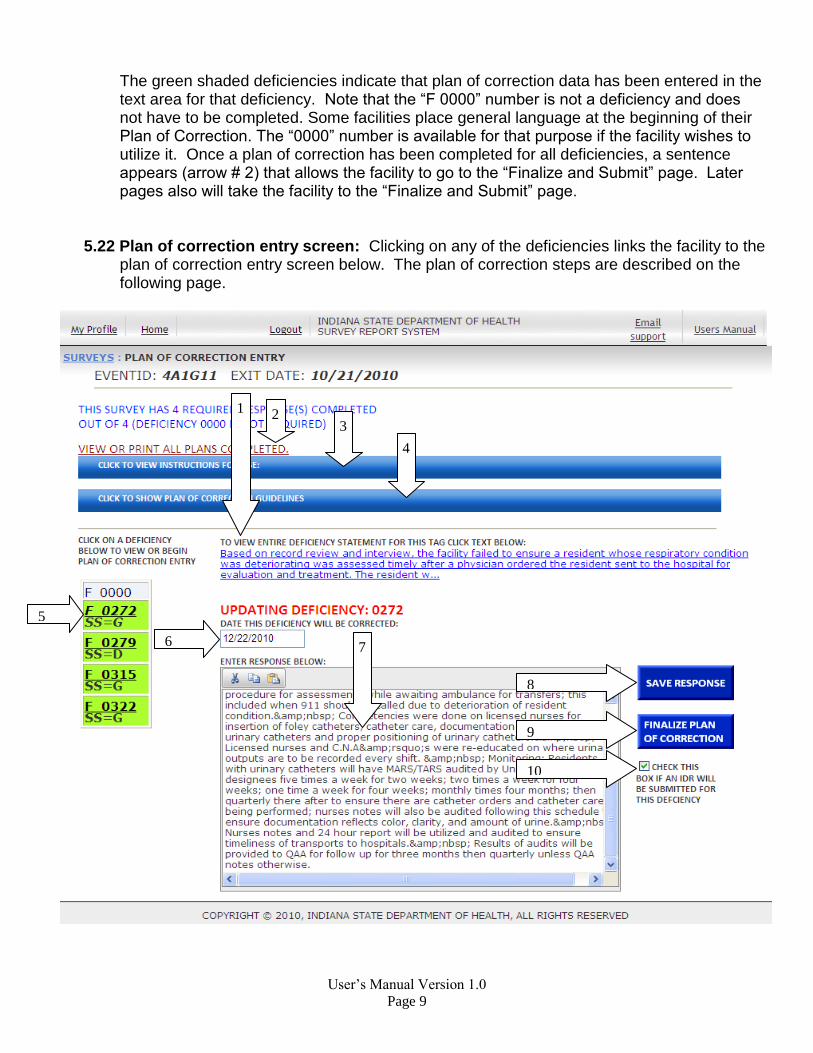
The green shaded deficiencies indicate that plan of correction data has been entered in the text area for that deficiency. Note that the “F 0000” number is not a deficiency and does not have to be completed. Some facilities place general language at the beginning of their Plan of Correction. The “0000” number is available for that purpose if the facility wishes to utilize it. Once a plan of correction has been completed for all deficiencies, a sentence appears (arrow # 2) that allows the facility to go to the “Finalize and Submit” page. Later pages also will take the facility to the “Finalize and Submit” page.
5.22 Plan of correction entry screen: Clicking on any of the deficiencies links the facility to the
plan of correction entry screen below. The plan of correction steps are described on the following page.
3
7
1
10
9
4
5
8
6
2
User’s Manual Version 1.0
Page 10
Plan of Correction Step 1: Review statement of deficiency. The “Statement of Deficiency” is the survey findings from the Survey Report Form 2567. The system gives the facility an easy way to access the specific statement of deficiency. To view the statement of deficiency, click on the underlined text under the heading “To view entire deficiency statement for this tag click the text below” as indicated by arrow # 1 above.
Plan of Correction Step 2: View the plan of correction and instructions. On this page you may view or print the full plan of correction (arrow # 2) completed so far in the process. There are also guidelines for the plan of correction that describe what should and should not be included in the plan (arrow # 4).
Plan of Correction Step 3: Enter plan of correction text for the deficiency: Select the
deficiency that you wish to enter a plan of correction (arrow # 5). Enter plan of correction text for the selected deficiency in the plan of correction “Response Text Box” (arrow # 7). You may “cut and paste” the plan of correction from another document into that box. At any time during entry of text, you may click on “Save Response” (arrow # 8) to save your text. Please note that the Survey Report System does not have a spell check.
Plan of Correction Step 4: Indicate if an informal dispute resolution is requested for
that deficiency. To request an informal dispute resolution (IDR) for this deficiency, check the box as indicated at arrow # 10. You will be able to print the informal dispute resolution form from the finalization page.
Plan of Correction Step 5: Enter date that the deficiency will be corrected by the
facility: At the location designated at arrow # 6, enter the date that the facility will have implemented the corrections described in the plan of correction.
Plan of Correction Step 6: Save the plan of correction response. After entering the correction date and plan of correction response text, click on “Save Response” located at arrow # 8. This saves the plan of correction but does not submit. After saving your response, you will still be able to go back and make changes to the plan of correction by clicking on that deficiency number.
Plan of Correction Step 7: Complete and update the plan of correction. Repeat the above steps for each deficiency number until a plan of correction is completed for each deficiency. Prior to final submission, the plan of correction for each deficiency can be updated by following the above steps.
Plan of Correction Step 8: Finalize and submit the final plan of correction. After a plan of correction has been saved for all deficiencies, the “Finalize Plan of Correction” link will appear (arrow # 9). After completing the entire plan of correction for a survey, click on “Finalize Plan of Correction” indicated at arrow # 9. This links to the “Finalize and Submit Plan of Correction” page.
User’s Manual Version 1.0
Page 11
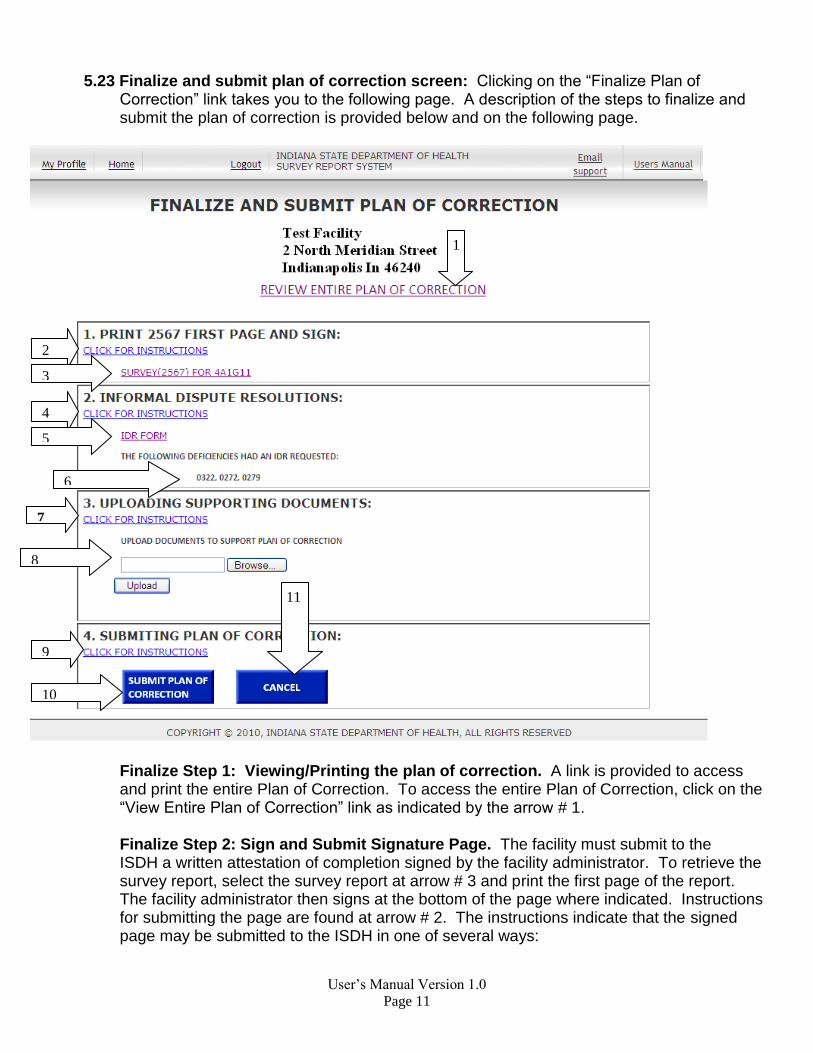
5.23 Finalize and submit plan of correction screen: Clicking on the “Finalize Plan of Correction” link takes you to the following page. A description of the steps to finalize and submit the plan of correction is provided below and on the following page.
Finalize Step 1: Viewing/Printing the plan of correction. A link is provided to access
and print the entire Plan of Correction. To access the entire Plan of Correction, click on the “View Entire Plan of Correction” link as indicated by the arrow # 1.
Finalize Step 2: Sign and Submit Signature Page. The facility must submit to the
ISDH a written attestation of completion signed by the facility administrator. To retrieve the survey report, select the survey report at arrow # 3 and print the first page of the report. The facility administrator then signs at the bottom of the page where indicated. Instructions for submitting the page are found at arrow # 2. The instructions indicate that the signed page may be submitted to the ISDH in one of several ways:
1
2
3
4
5
7
8
9
10
11
6
User’s Manual Version 1.0
Page 12
a. The facility may scan the document and then upload as described in step 4 below.
b. The facility may fax the signed document to the ISDH at: For Division of Long Term Care: 317-233-7494. c. The facility may mail the signed document to the ISDH at: Division of [Long Term Care or Acute Care as applicable] Indiana State Department of Health 2 North Meridian St., 4th Floor, 4B-07 Indianapolis, IN 46204
Finalize Step 3: Requesting an informal dispute resolution (IDR). If there were informal dispute resolutions selected on the data entry pages, those deficiencies will be listed at arrow # 6. To complete the informal dispute resolution request form for one or more deficiencies, click on the “IDR Form” link indicated by arrow # 5. Complete the form and submit to the ISDH along with the signature page as described in step 2. Finalize Step 4: Attach documents in support of plan of correction. A facility may submit documents in support of their plan of correction by uploading documents into the Survey Report System. The facility will need to save their documents in their computer system in order to upload. Prior to saving the documents, the facility must ensure that documents to be submitted must not have any resident names or other information that could identify a specific resident. To upload a file, click on “Browse”, select the file, and then click on “Upload” as indicated by arrow # 8.
Finalize Step 5: Submit the Plan of Correction. Once the Plan of Correction is complete and all documents to be submitted have been uploaded, click on “Submit Plan of Correction” as indicated by arrow # 10. You will receive a warning message stating that you will not be able to edit the Plan of Correction after submitting. Clicking on “OK” will submit the plan of correction to the ISDH for review and approval. Clicking on “Cancel” (arrow # 11) will exit the submitting process and allow continued changes.
5.24 Changing the plan of correction after it has been submitted: Once the plan of correction has been submitted to the ISDH, the system will not allow a facility to make changes to the plan of correction. If a facility finds the need to make corrections to the final plan, the facility should contact the ISDH at the following email address [email protected] and request that the system be reopened so that the facility may update their plan of correction.
5.25 Updating the plan of correction after ISDH review: Once the ISDH has reviewed a
submitted plan of correction, the ISDH may request additional information to be included in the plan. The ISDH will notify the facility through the process described above in section 2.3 that additional information is requested. The ISDH will allow the facility access to the system to allow the plan of correction to be updated. To update the plan of correction, the facility goes through the same steps as described in section 5.2 above.
User’s Manual Version 1.0
Page 13
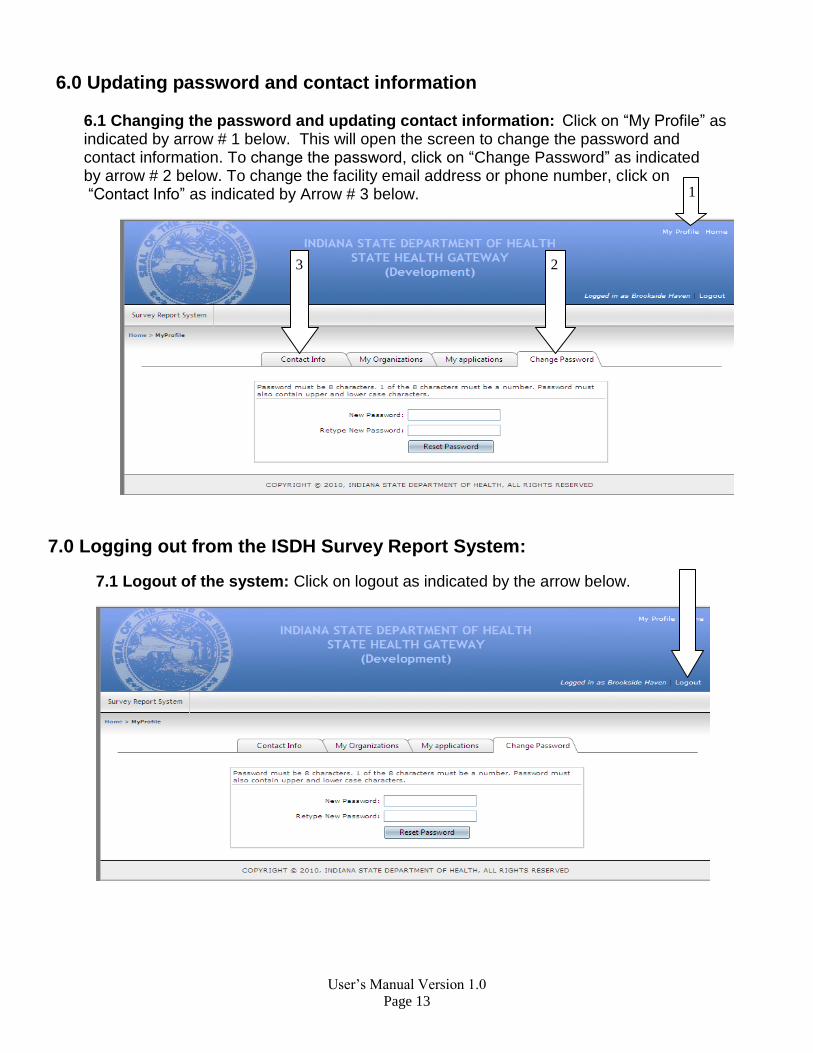
6.0 Updating password and contact information
6.1 Changing the password and updating contact information: Click on “My Profile” as indicated by arrow # 1 below. This will open the screen to change the password and contact information. To change the password, click on “Change Password” as indicated by arrow # 2 below. To change the facility email address or phone number, click on “Contact Info” as indicated by Arrow # 3 below.
7.0 Logging out from the ISDH Survey Report System:
7.1 Logout of the system: Click on logout as indicated by the arrow below.
1
3 2