swapping gia 1 & gia 2 (-00 or -01) on citation mustang
TRANSCRIPT

1 Version 1.3
Swapping GIA 1 & GIA 2 (-00 or -01) on Citation Mustang
Aircraft Serial Numbers 0001 - 0379
Garmin G1000 Software Version 28
Caution: Before starting the software or configuration loading process, certain items may be required to be recorded first, to prevent loss of information or settings. See Section 1 for details.
Caution: Make certain that all SD cards are available before starting. These are
usually located in a blue pouch onboard the aircraft. Caution: Follow all steps in a given section for specific loadings. Failure to do so
will result in probable rework. Caution: Ensure that power is available through a GPU so that power is not
interrupted during the loading process. Note: This document is to supplement, not replace, the Cessna Citation
Mustang MM, and Garmin G1000 LMM. Note: Reference latest revision of the Garmin G1000 LMM 190-00500-00.
Table of Contents Section 1 Determining Options Installed Section 2 Software and Configuration Loading Section 3 Reinstalling Options Section 4 Reloading Weights Section 5 Troubleshooting
2 Version 1.3
Section 1 Determining Options Installed
Note: This is with the G1000 powered up in normal mode, with avionics power on.
• Record the basic empty weight as displayed on the MFD on the AUX-WEIGHT and PLANNING page. _______________
• Record the pilot & stores weight as displayed on the MFD on the AUX-WEIGHT and PLANNING page. _______________
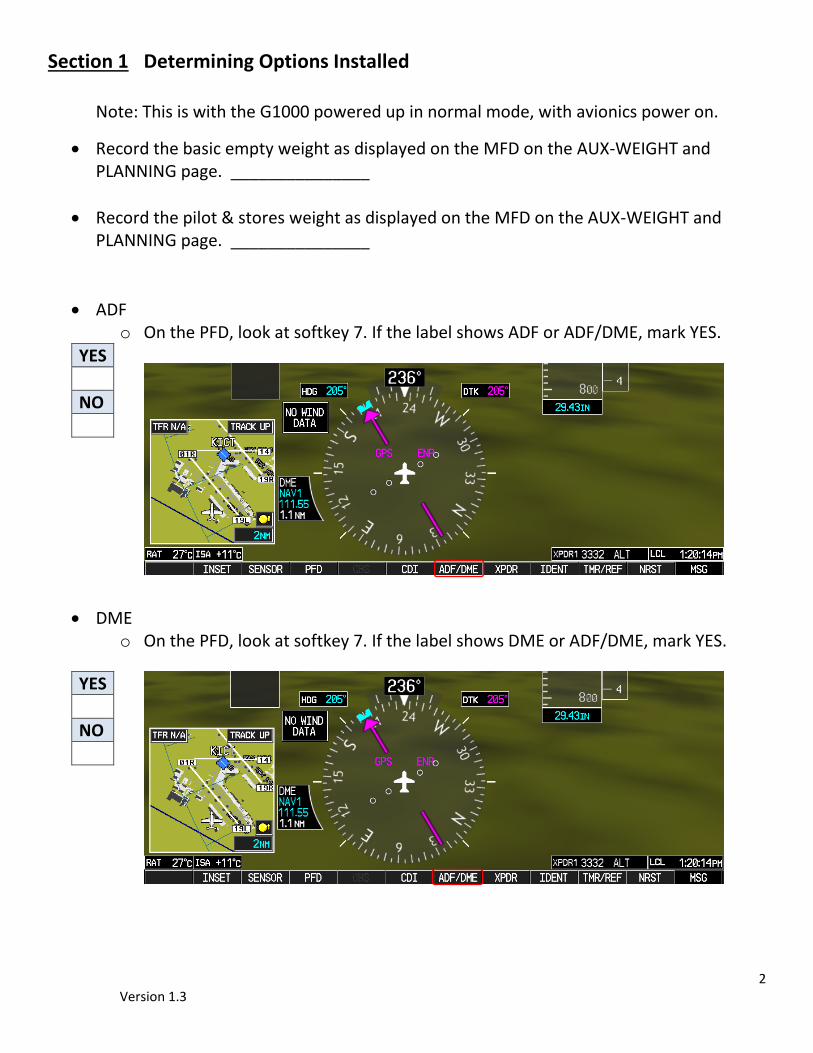
• ADF o On the PFD, look at softkey 7. If the label shows ADF or ADF/DME, mark YES.
• DME
o On the PFD, look at softkey 7. If the label shows DME or ADF/DME, mark YES.
YES NO
YES NO

3 Version 1.3
• Synthetic Vision o Select softkey 4 labeled PFD. If the label on softkey 1 shows SYN VIS, mark YES.
YES NO

4 Version 1.3
• TAS KTA 870 Traffic System o On the MFD, rotate the large FMS knob on the pedestal to select MAP group.
Rotate the small FMS knob to select the TRAFFIC page. If there is a softkey that is labeled TNA MUTE, then mark NO. If there is no softkey labeled TNA MUTE, then mark YES. It is opposite of expectation. The lack of a label shows that the option is present.
This image shows the softkey label TNA MUTE, showing that the KTA 870 is NOT installed.
YES NO

5 Version 1.3
• Jeppesen ChartView o On the MFD, rotate the large FMS knob on the pedestal to select AUX group.
Rotate the small FMS knob to select the SYSTEM STATUS page. Press the MFD1 DB softkey. Use the small FMS knob to scroll to the bottom of the databases in the lower right corner of the screen. If it states Jeppesen ChartView, then mark YES. If it says Garmin FliteCharts, then mark NO.
YES NO

6 Version 1.3
• HF o Look for the Honeywell KHF-1050 control head below PFD 1. If present, then mark
YES.
• XM in the Cockpit o Press the MUSIC button on the GMA 1347D. If the light above the MUSIC button
illuminates, then mark YES.
YES NO
YES NO

7 Version 1.3
Section 2 Software and Configuration Loading This section will provide the steps necessary to target load the software and configuration into GIA 1 & GIA 2 after swapping. Note: Anytime that software or configurations are being loaded, all three displays must be in configuration mode.
• GIA 63W GIA 1 & GIA 2 (Integrated Avionics Computer) P/N 011-01105-00 or 011-01105-01
• When GIA 1 & GIA 2 units are swapped, then software and configuration loading is required.
1) Pull the following circuit breakers: PFD 1 PRIM (Left side, second row up, 4th from back) PFD 2 SEC (Left side, first row up, 2nd from back) MFD SEC (Left side, second row up, front of row) PFD 2 PRIM (Right side, second row up, 3rd from back) PFD 1 SEC (Right side, first row up, 2nd from back) MFD PRIM (Right side, second row up, 4th from front)
2) Insert the 010-00435-28 software loader card into the upper slot of PFD 1. 3) Turn on battery and avionics power. 4) Press and hold the #12 softkey on the PFD 2, push the PFD 2 PRIM circuit breaker,
and the PFD 2 SEC circuit breaker in. Let go when you see initializing. PFD 2 should come up in configuration mode.
• SYSTEM STATUS should show at the top of the screen.

8 Version 1.3
5) Press and hold the #12 softkey on the MFD, push the MFD PRIM circuit breaker, and the MFD SEC circuit breaker in. Let go when you see initializing. MFD should come up in configuration mode.
• SYSTEM STATUS should show at the top of the screen. 6) Press and hold the #12 softkey on the PFD 1, push the PFD 1 PRIM circuit breaker,
and the PFD 1 SEC circuit breaker in. Let go when you see initializing. Press the NO softkey at “DO YOU WANT TO UPDATE SYSTEM FILES?”
prompt. PFD 1 should come up in configuration mode.
• SYSTEM STATUS should show at the top of the screen. 7) On PFD 1, go to the System Upload page using the small FMS knob on the PFD. 8) Activate the cursor by pushing down on the FMS knob. 9) Rotate the small knob to drop the menu down, and highlight ‘Mustang’ in the
GROUP field. 10) Press the ENT key. 11) Rotate the small knob to drop the menu down, and highlight ‘Cessna Mustang
Base Configuration’ in the ITEM field. 12) Press the ENT key. 13) Press the CLR ALL softkey at the bottom of the display. 14) Using the FMS knob, highlight the following, press the ENT key for each, which
will place a check mark in each box: • GIA 1 Software • GIA 1 Configuration • GIA 2 Software • GIA 2 Configuration • GIA AUDIO Software • GIA 1 – GEA-CFG Configuration • GIA 2 – GEA-CFG Configuration • GPS 1 Software • GPS 2 Software • CALIBRATION Configuration • AUDIO Configuration • GIA Gains Software
15) Press the LOAD softkey at the bottom of the display. 16) Acknowledge when ‘Upload Complete’ is displayed by pressing the ENT key. 17) Push the UPDT CFG softkey to update the system configuration files. 18) Select YES, and press the ENT key.

9 Version 1.3
19) Acknowledge when ‘Update Config Complete’ is displayed by pressing the ENT key.
20) *VERY IMPORTANT* Use the large FMS knob to go to the ITEM box. Use the small FMS knob to select CESSNA MUSTANG OLD NO TCAS II
WIRING OPTION from the ITEM list. Make sure that the GIA 1 and GIA 2 boxes are checked. Press the LOAD softkey to load selected items. A green PASS message should be shown beside each of the items. Acknowledge when ‘Upload Complete’ is displayed by pressing the ENT key.
10 Version 1.3
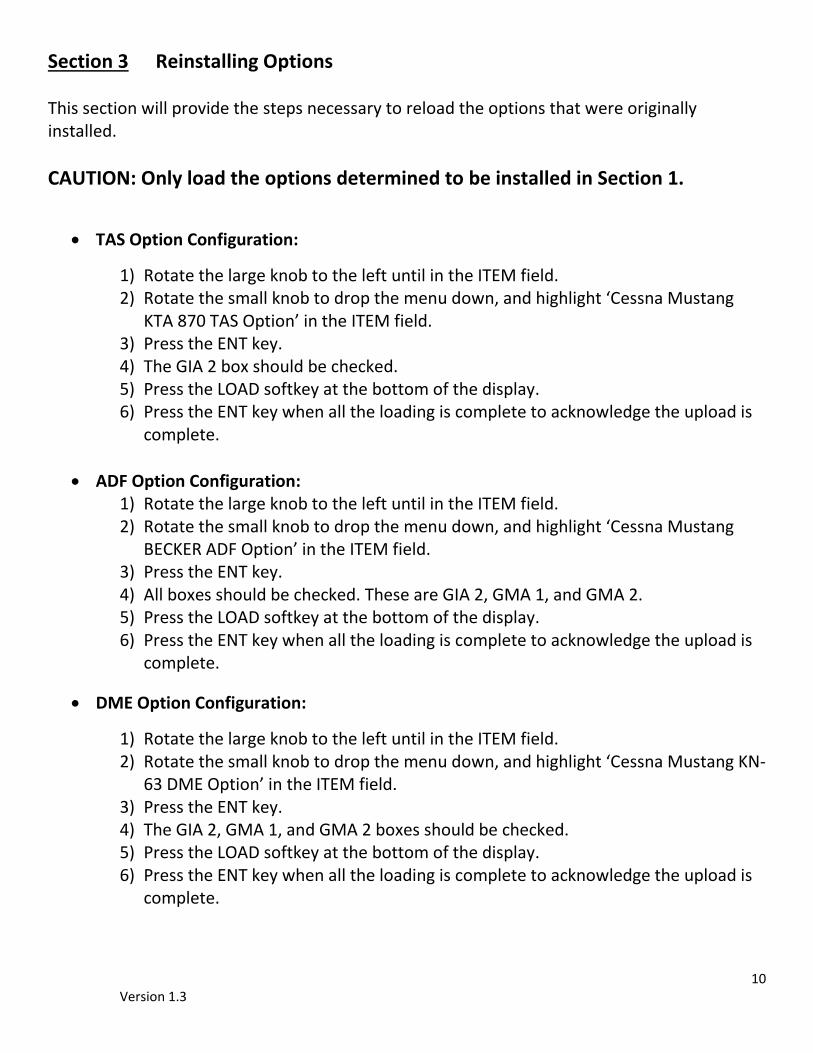
Section 3 Reinstalling Options This section will provide the steps necessary to reload the options that were originally installed. CAUTION: Only load the options determined to be installed in Section 1.
• TAS Option Configuration:
1) Rotate the large knob to the left until in the ITEM field. 2) Rotate the small knob to drop the menu down, and highlight ‘Cessna Mustang
KTA 870 TAS Option’ in the ITEM field. 3) Press the ENT key. 4) The GIA 2 box should be checked. 5) Press the LOAD softkey at the bottom of the display. 6) Press the ENT key when all the loading is complete to acknowledge the upload is
complete.
• ADF Option Configuration: 1) Rotate the large knob to the left until in the ITEM field. 2) Rotate the small knob to drop the menu down, and highlight ‘Cessna Mustang
BECKER ADF Option’ in the ITEM field. 3) Press the ENT key. 4) All boxes should be checked. These are GIA 2, GMA 1, and GMA 2. 5) Press the LOAD softkey at the bottom of the display. 6) Press the ENT key when all the loading is complete to acknowledge the upload is
complete.
• DME Option Configuration:
1) Rotate the large knob to the left until in the ITEM field. 2) Rotate the small knob to drop the menu down, and highlight ‘Cessna Mustang KN-
63 DME Option’ in the ITEM field. 3) Press the ENT key. 4) The GIA 2, GMA 1, and GMA 2 boxes should be checked. 5) Press the LOAD softkey at the bottom of the display. 6) Press the ENT key when all the loading is complete to acknowledge the upload is
complete.

11 Version 1.3
• HF Option Configuration:
1) Rotate the large knob to the left until in the ITEM field. 2) Rotate the small knob to drop the menu down, and highlight ‘Cessna Mustang
KHF1050 HF Option’ in the ITEM field. 3) Press the ENT key. 4) The GMA 1 and GMA 2 boxes should be checked. 5) Press the LOAD softkey at the bottom of the display. 6) Press the ENT key when all the loading is complete to acknowledge the upload is
complete.
• GTX33ES Option Configuration:
1) Rotate the large knob to the left until in the ITEM field. 2) Rotate the small knob to drop the menu down, and highlight ‘Cessna Mustang
GTX33ES Option’ in the ITEM field. 3) Press the ENT key. 4) The AIRFRAME, GMA 1 and GMA 2 boxes should be checked. 5) Press the LOAD softkey at the bottom of the display. 6) Press the ENT key when all the loading is complete to acknowledge the upload is
complete.
• TAWS Enable Configuration:
1) Pull the PFD 1 PRIM and PFD 1 SEC circuit breakers. 2) Remove the 010-00435-28 software loader card from the upper slot of PFD 1. 3) Locate and insert the 010-00330-51 TAWS Unlock Card into the top card slot of
PFD 1. 4) Press and hold the #12 softkey on PFD 1. 5) Push PFD 1 PRIM and PFD 1 SEC circuit breakers in to power on PFD 1. 6) Release the softkey after the INITIALIZING SYSTEM message appears. 7) Use the small FMS knob to go to the SYSTEM UPLOAD page on PFD 1. 8) Push the FMS knob to activate the cursor. 9) Use the small FMS knob to select CONFIGURATION FILES in the AIRFRAME list and
push the ENT softkey 10) Use the large FMS knob to move the cursor to the ITEM box. 11) Use the small FMS knob to select the ENABLE TAWS option and push the ENT
softkey.
NOTE: When the option is selected, the configuration files in the PRODUCT field will be displayed.
12 Version 1.3
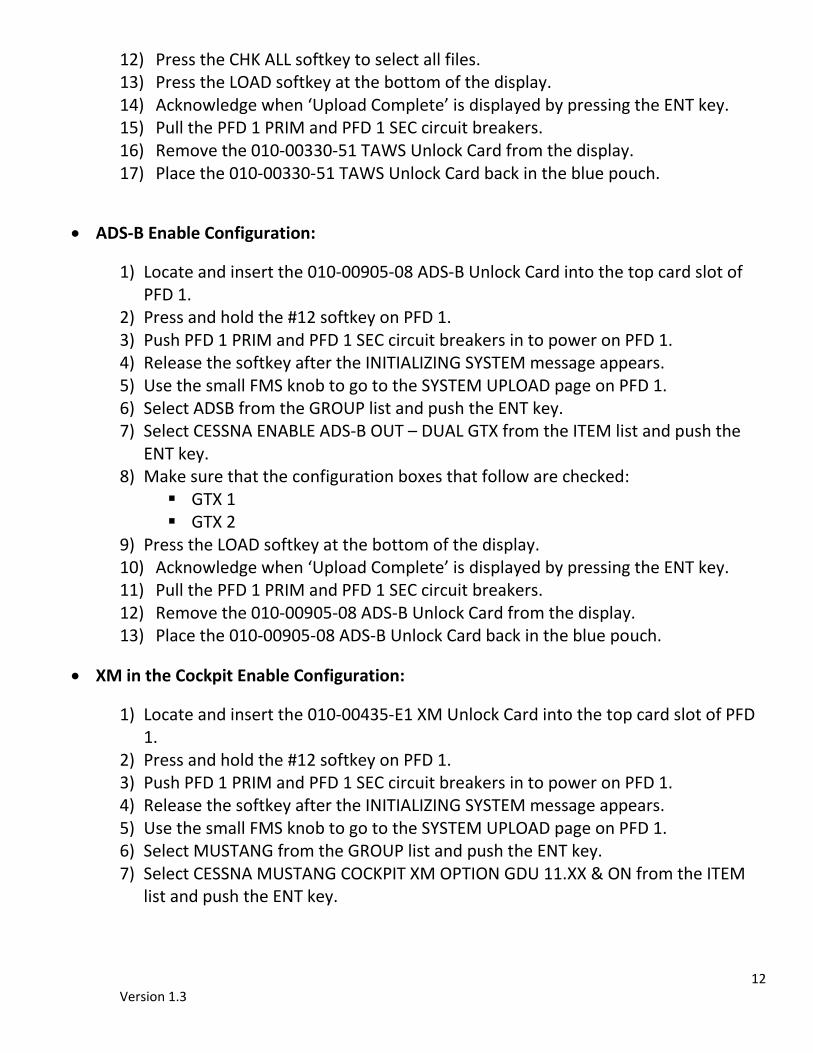
12) Press the CHK ALL softkey to select all files. 13) Press the LOAD softkey at the bottom of the display. 14) Acknowledge when ‘Upload Complete’ is displayed by pressing the ENT key. 15) Pull the PFD 1 PRIM and PFD 1 SEC circuit breakers. 16) Remove the 010-00330-51 TAWS Unlock Card from the display. 17) Place the 010-00330-51 TAWS Unlock Card back in the blue pouch.
• ADS-B Enable Configuration:
1) Locate and insert the 010-00905-08 ADS-B Unlock Card into the top card slot of PFD 1.
2) Press and hold the #12 softkey on PFD 1. 3) Push PFD 1 PRIM and PFD 1 SEC circuit breakers in to power on PFD 1. 4) Release the softkey after the INITIALIZING SYSTEM message appears. 5) Use the small FMS knob to go to the SYSTEM UPLOAD page on PFD 1. 6) Select ADSB from the GROUP list and push the ENT key. 7) Select CESSNA ENABLE ADS-B OUT – DUAL GTX from the ITEM list and push the
ENT key. 8) Make sure that the configuration boxes that follow are checked:
GTX 1 GTX 2
9) Press the LOAD softkey at the bottom of the display. 10) Acknowledge when ‘Upload Complete’ is displayed by pressing the ENT key. 11) Pull the PFD 1 PRIM and PFD 1 SEC circuit breakers. 12) Remove the 010-00905-08 ADS-B Unlock Card from the display. 13) Place the 010-00905-08 ADS-B Unlock Card back in the blue pouch.
• XM in the Cockpit Enable Configuration:
1) Locate and insert the 010-00435-E1 XM Unlock Card into the top card slot of PFD 1.
2) Press and hold the #12 softkey on PFD 1. 3) Push PFD 1 PRIM and PFD 1 SEC circuit breakers in to power on PFD 1. 4) Release the softkey after the INITIALIZING SYSTEM message appears. 5) Use the small FMS knob to go to the SYSTEM UPLOAD page on PFD 1. 6) Select MUSTANG from the GROUP list and push the ENT key. 7) Select CESSNA MUSTANG COCKPIT XM OPTION GDU 11.XX & ON from the ITEM
list and push the ENT key.

13 Version 1.3
8) Make sure that the configuration boxes that follow are checked: Airframe GIA 2 GMA 1 GMA 2 Alerts
9) Press the LOAD softkey at the bottom of the display. 10) Acknowledge when ‘Upload Complete’ is displayed by pressing the ENT key. 11) Pull the PFD 1 PRIM and PFD 1 SEC circuit breakers. 12) Remove the 010-00435-E1 XM Unlock Card from the display. 13) Place the 010-00435-E1 XM Unlock Card back in the blue pouch.
• Jeppesen ChartView Enable Configuration:
1) Locate and insert the 010-00330-50 ChartView Unlock Card into the top card slot of PFD 1.
2) Press and hold the #12 softkey on PFD 1. 3) Push PFD 1 PRIM and PFD 1 SEC circuit breakers in to power on PFD 1. 4) Release the softkey after the INITIALIZING SYSTEM message appears. 5) Use the FMS knob to go to the SYSTEM UPLOAD page on PFD 1. 6) Push the FMS knob to activate the cursor. 7) Use the small FMS knob to select CONFIGURATION FILES in the AIRFRAME list and
push the ENT key 8) Use the large FMS knob to move the cursor to the ITEM box. 9) Use the small FMS knob to select the ENABLE ChartView option and push the ENT
softkey.
NOTE: When the option is selected, the configuration files in the PRODUCT field will be displayed.
10) Press the CHK ALL softkey to select all files. 11) Press the LOAD softkey at the bottom of the display. 12) Acknowledge when ‘Upload Complete’ is displayed by pressing the ENT key. 13) Pull the PFD 1 PRIM and PFD 1 SEC circuit breakers. 14) Remove the 010-00330-50 ChartView Unlock Card from PFD 1. 15) Place the 010-00330-50 ChartView Unlock Card back in the blue pouch.
• SVT Enable Configuration:
1) Locate and insert the 010-00330-55 SVT Unlock Data Card into the top slot of PFD 1.
2) Press and hold the #12 softkey on PFD 1.

14 Version 1.3
3) Push PFD 1 PRIM and PFD 1 SEC circuit breakers in to power on PFD 1. 4) Release the softkey after the INITIALIZING SYSTEM message appears. 5) Use the small FMS knob to go to the SYSTEM UPLOAD page on PFD 1. 6) Push the FMS knob to activate the cursor. 7) Use the small FMS knob to select CONFIGURATION FILES in the AIRFRAME list and
press the ENT softkey. 8) Use the large FMS knob to move the cursor to the ITEM box. 9) Use the small FMS knob to select the SVS ENABLE option and push the ENT
softkey.
NOTE: When the option is selected, the configuration files in the PRODUCT field will be displayed.
10) Press the CHK ALL softkey to select all files. 11) Press the LOAD softkey at the bottom of the display. 12) Acknowledge when ‘Upload Complete’ is displayed by pressing the ENT key. 13) Pull the PFD 1 PRIM and PFD 1 SEC circuit breakers. 14) Remove the 010-00330-55 SVT Unlock Data Card from PFD 1. 15) Place the 010-00330-55 SVT Unlock Card back in the blue pouch.
Section 4 Reloading Weights This section will provide the steps necessary to reload the weights that were originally determined in Section 1, if they are zeroed out.
• Turn on battery and avionics power in normal mode. • The MFD should be on the AUX – WEIGHT PLANNING page. • If the EMPTY WEIGHT, and the PILOT & STORES weights are zeroed out:
1) Press the EMPTY WT softkey. Enter the empty weight that was recorded in section 1.
2) Rotate the large FMS knob to highlight the PILOT & STORES line. Enter the pilot and stores weight.

15 Version 1.3
Section 5 Troubleshooting This section will provide corrective actions for issues seen after the software is loaded. Substitute LRU name for ***.
• OXYGEN OFF amber CAS message visible or Rotary Test Does Not Function Correctly: o The ‘CESSNA MUSTANG OLD NO TCAS II WIRING OPTION’ was not loaded.
This causes input errors into the GIAs. • *** DB Error or *** DB Mismatch
o Ensure that the supplemental SD cards are installed in the lower slots of the displays.
o Databases do not match. o Verify which database is not the same, and reload as necessary.
• *** Manifest Error o Software does not match what the system is expecting. o Check work performed and reload necessary software again.
• *** Config o Configurations do not match what the system is expecting. o Check work performed and reload necessary configurations again.