sweetness sew oslo craft bag · sew sweetness oslo craft bag sewsweetness.com 1 this tote is great...
TRANSCRIPT

Sar
a L
awso
nSew
Sweetness Oslo Craft Bag

1© Sew Sweetness | Oslo Craft Bag | sewsweetness.com
This tote is great for carrying any craft supplies - sewing notions, yarn and knitting needles, and so much more! With ample pockets on the outside and handy dividers on the inside, this is the perfect companion to take with you to your next retreat or get together.
All seam allowances are 1/2” unless otherwise noted. All pattern pieces include the seam allowance.Please read all instructions before beginning.
Finished Size: 14” long x 7-1/2” tall x 6-1/2” deep
All cutting measurements given throughout the pattern are length x height.
SUPPLIES• 1 yard of Exterior Fabric• 1 yard of Lining Fabric• 1/2 yard of solid fabric for straps and binding• 1/2 yard of foam interfacing (By Annie’s Soft and Stable, Pellon Flex Foam, Bosal In-R-Form, or automotive
headliner; if using Flex Foam, it is only 20” wide so please purchase double the amount)• 3 yards of 20” wide Pellon SF-101 Shape Flex fusible woven interfacing (or medium-weight fusible interfac-
ing)• Four 1” metal rectangles• Two sets of pearl snaps (Snap Setter or KAM are easy to install)
NOTIONS• Clover Wonder Clips or pins• Iron• Pressing cloth• Rotary Cutter and Cutting Mat• Scissors• Disappearing Ink Fabric Marker• Optional: Walking foot for sewing the Soft and Stable layers together, if needed.• Optional: denim needle, for sewing the bag layers together, if needed.• Optional: rivet press• Optional: no-sew spray adhesive (I used Thermoweb Spray N Bond No Sew Ultrahold)
Design ideas - Customize this bag for your needs! You may decide you would like additional open pockets, like in the front, to go around the entire bag. Please plan accordingly. Pattern includes instructions for front pockets, side flap pockets, and back pocket for ruler as pictured.
Oslo Craft Bag

2© Sew Sweetness | Oslo Craft Bag | sewsweetness.com
CUTTING INSTRUCTIONS
Please cut your fabric pieces in the order listed, so that you will have plenty of fabric for the bag. When printing pattern pieces, always make sure your printer is set to scaling at ‘none’ or ‘actual size’ so pieces print at correct size. Measure the tester 1” (4cm) square to make sure that your pattern pieces printed at the correct size.
Helpful Hint: Feel free to use post-it notes to label your cut fabric pieces and easily stay organized. If you plan to quilt your exterior pieces to interfacing, I recommend rough-cutting them approximately 1” larger to account for shrinkage when machine quilting.
Cut each from Exterior Fabric and foam interfacing:
(2) Exterior Main Panel, 15” x 8-1/2”
(1) Exterior Bottom Panel, 15” x 7”
(2) Exterior Side Panel, 7” x 8-1/2”
Cut each from Exterior Fabric and Shape Flex:
(2) Back Pocket, 15” x 6-1/2”
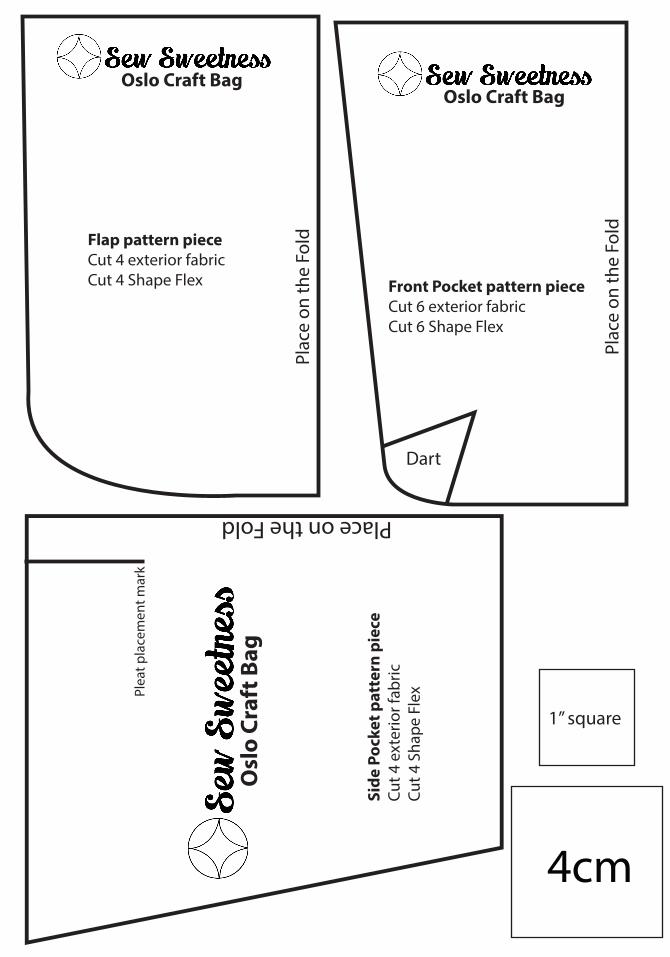
(4) Side Pocket, using the Side Pocket pattern piece, cut on the fold
(6) Front Pocket, using the Front Pocket pattern piece, cut on the fold
(4) Flap, using the Flap pattern piece, cut on the fold
Cut each from Lining Fabric and Shape Flex:
(4) Lining Main Panel, 8” x 8-1/2”
(2) Lining Bottom Panel, 8” x 7”
(2) Lining Side Panel, 7” x 8-1/2”
(2) Divider, 7” x 7”
(4) Pocket, 7” x 6”
Cut each from solid fabric and Shape Flex:
(2) Handles -if using cotton fabric, 30” x 4”
-if using leather, 24” x 2”
(8) Tabs - if using cotton fabric - 1-5/8” x 2-1/2”
*omit Shape Flex for leather - will cut from finished leather handle
From the solid fabric, cut:
(3) Front Pocket Binding, 6-1/4” x 1”
(1) Top Binding, 40” x 2-1/4”
Make sure to label your pieces with post-it notes!!

3© Sew Sweetness | Oslo Craft Bag | sewsweetness.com
ATTACH THE INTERFACING
1. Place the fusible (tacky) side of the Shape Flex against the wrong side of one Handle. Fuse according to manufac-turer instructions. Repeat for the remaining Handle, Lining Main Panels, Lining Bottom Panels, Lining Side Panels, Dividers, Lining Pockets, Side Pockets, Front Pockets, Back Pockets, Flaps, and Tabs.
Helpful Hint: To fuse Shape Flex, what I usually do is first place the Strap face down, followed by the interfacing (tacky side down), then my pressing cloth. I lightly spritz the pressing cloth with water, then iron, overlapping each area, for approximately 10 sec-onds on each spot. When finished, it should be firmly attached to your fabric.
2. Place the Exterior Bottom Panel with the wrong side of the fabric against the foam interfacing. Pin in place. Baste around the outer edge of the fabric using a 1/8” seam allowance. Repeat for the Exterior Main Panels and Exterior Side Pan-els.
Helpful Hint: I like to gently pull my fabric taut as I am basting it to the foam interfacing for a tight, crisp finish. If you would like, machine quilt the foam interfacing pieces at this time; if you rough-cut, cut to the final size in the cutting instructions.
ASSEMBLE THE LINING3. Sew the two Pocket pieces, right sides together, along the top 7” edge, using a 1/4” seam allowance. Press the seam open, then press so that wrong sides are together.
4. Topstitch the finished edge using a 1/8” seam allowance.

4© Sew Sweetness | Oslo Craft Bag | sewsweetness.com
5. Place the Pocket at the bottom of one Lining Side Panel. The side and bottom raw edges should be aligned. Baste the sides and bottom of the Pocket in place using a 1/8” seam allowance. Repeat Steps 3-5 to add a second Pocket to the remaining Lining Side Panel.
6. Sew both Divider pieces right sides together along the top edge using a 1/4" seam allowance. Press wrong sides together, then topstitch the finished edge using a 1/8" seam allowance.
7. Place the Divider along the right-hand raw edge (8-1/2") of one Lining Main Panel. The side and bottom edges should be aligned. Pin, then stitch the side edge only and stop 1/2" from the bottom, making sure to backstitch. This will be 1/2” seam allowance.
8. Place a second Lining Main Panel right sides together with the Lining Main Panel from the previous step. Sew from one end of the Lining Main Panel to the other, making sure to stop 1/2" from the bottom. Press the seam open.
5© Sew Sweetness | Oslo Craft Bag | sewsweetness.com
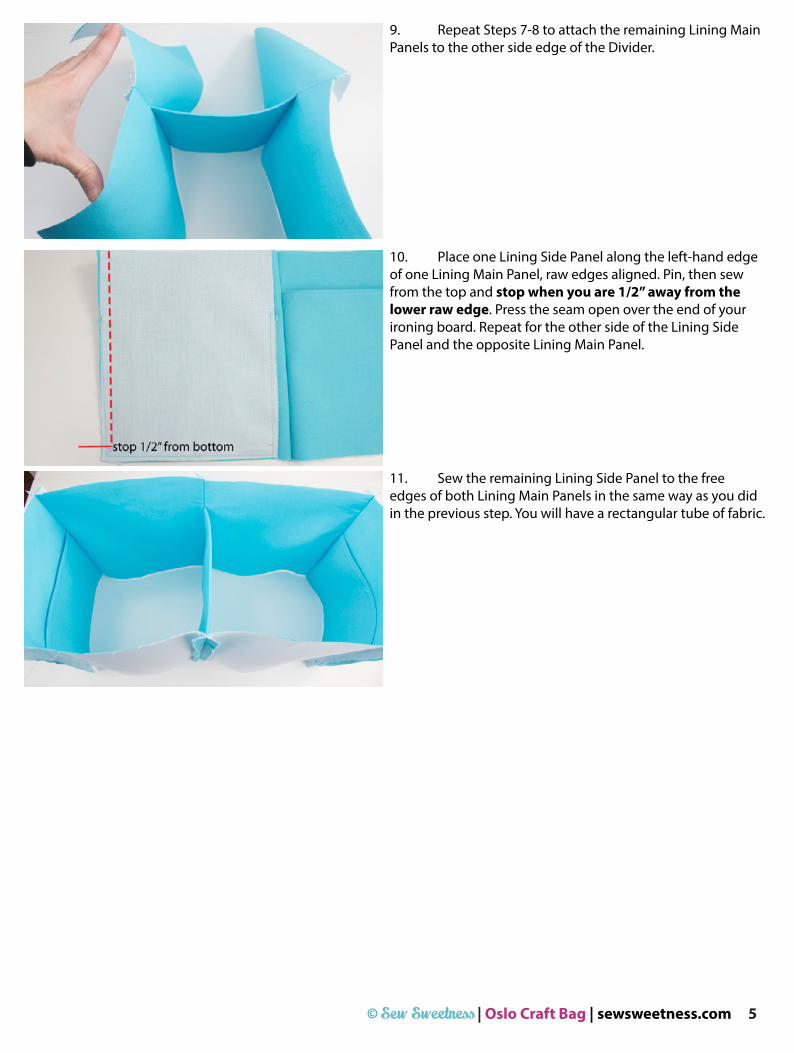
9. Repeat Steps 7-8 to attach the remaining Lining Main Panels to the other side edge of the Divider.
10. Place one Lining Side Panel along the left-hand edge of one Lining Main Panel, raw edges aligned. Pin, then sew from the top and stop when you are 1/2” away from the lower raw edge. Press the seam open over the end of your ironing board. Repeat for the other side of the Lining Side Panel and the opposite Lining Main Panel.
11. Sew the remaining Lining Side Panel to the free edges of both Lining Main Panels in the same way as you did in the previous step. You will have a rectangular tube of fabric.

6© Sew Sweetness | Oslo Craft Bag | sewsweetness.com
13. Trim all seam allowances to 1/4”. Stitch the two Dividers right sides together along the bottom seam for about 5" along the center using a 1/4” seam allowance.
12. With the fabrics wrong side out, align the corners and raw edges of the Lining Bottom Panel and pin in place. The 1/2” that you left unsewn will open up at the corners of the Lining Bottom Panel. Sew around each bottom panel, sewing only one edge at a time and only one layer of the divider (keep the other pushed out of the way), making sure to back-stitch well at the start and stop of your stitching.
Helpful Hint: I made markings on the Side and Main Panels that were in 1/2” from the corners; this helps to line up the corners and not sew to the end.
ATTACH THE SIDE POCKETS14. Transfer the marks from the Side Pocket pattern piece onto the wrong side (both halves) of both of your Side Pocket fabric pieces using your fabric marker.

7© Sew Sweetness | Oslo Craft Bag | sewsweetness.com
16. Turn the Side Pocket so that the wrong side is facing you, then press the pleat flat (for example, half of the fabric will be on either side of the seam).
17. On the right side of the Side Pocket, sew both sides of the pleat, 1-1/4” down from the top edge, 1/8” away from the pleat.
18. Repeat Steps 15-17 for all Side Pocket pieces.
15. Bring both of the marks on one Side Pocket so that they are on top of each other, with right sides of the fabric facing. Pin in place. Sew on top of the line. This will make a pleat.
19. Sew two Side Pocket pieces right sides together along the top edge (with the pleat) using a 1/4" seam allowance. Press wrong sides together, then topstitch the entire outer edge using 1/8" seam allowance. Repeat for the other pair.

8© Sew Sweetness | Oslo Craft Bag | sewsweetness.com
20. Using manufacturer instructions, install the female half of the snap on the Side Pocket, centered and 1” down from the top finished edge. Repeat for the remaining Side Pocket.
21. Sew two Flaps, right sides together using a 1/4” seam alowance, except leave a 4” opening along the top straight edge. Clip the corners and notch the curved edge.
22. Turn right side out and press, being sure to gently push out the corners. Press the opening toward the wrong side by 1/4". Topstitch the curved edge using a 1/8” seam allowance.
23. Using manufacturer instructions, install the male half of the snap on the Flap, centered and 1/2” up from the curved edge.
24. Repeat Steps 21-23 for the remaining flap pieces.

9© Sew Sweetness | Oslo Craft Bag | sewsweetness.com
25. Draw a horizontal line on one Exterior Side Panel that is 3-1/2” down from the top edge. Place the straight edge of the Flap at that line and center it (the lining side should be facing you). Topstitch along the straight edge of the Flap using a 1/8” seam allowance.
26. Using the Exterior Side Panel from the previous step, place one Side Pocket directly on top; the exterior side of the Side Pocket should be face up. The bottom and side edges of the Side Pocket should be even with the bottom and sides of the Exterior Side Panel (the Side Pocket will be raised in the middle). Pin in place, then baste the sides and bottom using a 1/8” seam.
27. Repeat Steps 25-26 to attaching remaining flap and side pocket.
ATTACH THE FRONT AND BACK POCKETS28. Press the bottom long edge of the Front Pocket Bind-ing piece toward the wrong side by 1/4"; repeat for all Front Binding pieces.

10© Sew Sweetness | Oslo Craft Bag | sewsweetness.com
29. Align the top raw edge of the Front Binding with the top raw edge of the Front Pocket. Stitch around the entire Front Pocket Binding using 1/8" seam allowance. Trim over-hang of the binding piece. Repeat for 2 more Front Pockets.
30. Use the Front Pocket pattern piece to mark dart placement on the wrong side of the all Front Pocket pieces with your fabric marker.
Helpful Hint: Please trace off your Front Pocket paper pattern piece to make a copy of it before doing any cutting to it.
31. Pinch the dart area with the fabric exterior side (or right side) together, lining up the legs of the dart. Sew directly on top of the line. Trim the seam allowance to 1/4". Repeat for the other dart, and for the remaining Front Pocket pieces.
32. In pairs, sew Front Pockets right sides together (one with binding and one without binding); use a 1/4" seam allowance. Leave a 3" opening along one side edge. Clip cor-ners and notch curved edges.

11© Sew Sweetness | Oslo Craft Bag | sewsweetness.com
33. Turn all pocket pieces right side through the opening. Press, and also press the opening in toward the wrong side by 1/4". Topstitch the top straight edge of each using 1/8" seam allowance.
34. Make the following markings on the right side of one Exterior Main Panel with invisible fabric marker or chalk:
35. Use the markings that you made to align the pockets as follows and pin in place.
36. Sew along the curved edges of each Pocket (leave the top finished edge unsewn) using 1/8” seam, being extra careful to backstitch. Butt each pocket up against the next on the sides.

12© Sew Sweetness | Oslo Craft Bag | sewsweetness.com
37. Repeat Steps 3-5 with the Back Pocket and remaining Exterior Main Panel.
MAKE THE HANDLES AND TABS (for cotton fabric; skip to Step 42 if using leather)
38. Press one Handle in half along the long edge, wrong sides together, so that both edges meet. Press. Fold the top of the fabric down to the crease. Open out again, then fold the other edge in to meet the crease and press. Fold the entire piece along the first fold and press. You should have created a piece of double-fold tape.
39. Topstitch along both long edges, 1/8” from each edge.
40. Draw a line on each short end of the Handle that is 1/2” in and another that is 1-1/2” in. Press along those lines. Repeat Steps 38-39 for remaining Handle. Set the Handles to the side for now.
41. Sew one pair of Tabs right sides together using a 1/4" seam allowance, leaving one short straight edge unsewn. Clip corners. Turn right side out and press. Repeat for a total of 4 pairs.
13© Sew Sweetness | Oslo Craft Bag | sewsweetness.com
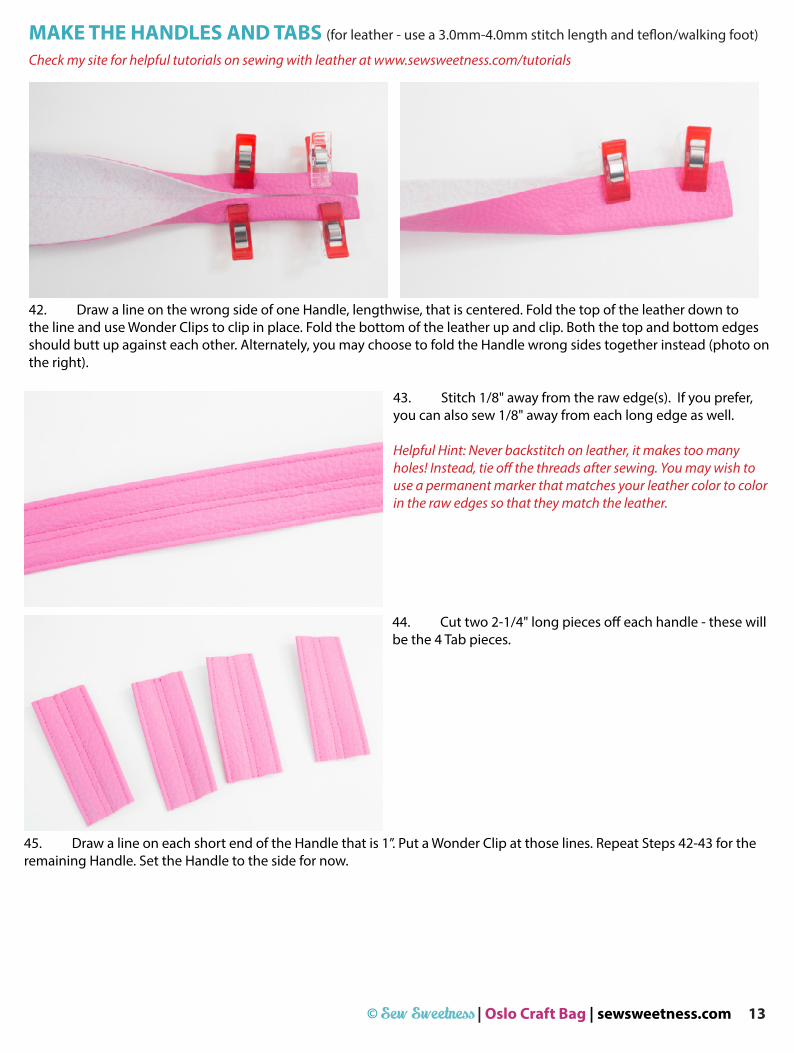
MAKE THE HANDLES AND TABS (for leather - use a 3.0mm-4.0mm stitch length and teflon/walking foot)
Check my site for helpful tutorials on sewing with leather at www.sewsweetness.com/tutorials
42. Draw a line on the wrong side of one Handle, lengthwise, that is centered. Fold the top of the leather down to the line and use Wonder Clips to clip in place. Fold the bottom of the leather up and clip. Both the top and bottom edges should butt up against each other. Alternately, you may choose to fold the Handle wrong sides together instead (photo on the right).
43. Stitch 1/8" away from the raw edge(s). If you prefer, you can also sew 1/8" away from each long edge as well.
Helpful Hint: Never backstitch on leather, it makes too many holes! Instead, tie off the threads after sewing. You may wish to use a permanent marker that matches your leather color to color in the raw edges so that they match the leather.
44. Cut two 2-1/4" long pieces off each handle - these will be the 4 Tab pieces.
45. Draw a line on each short end of the Handle that is 1”. Put a Wonder Clip at those lines. Repeat Steps 42-43 for the remaining Handle. Set the Handle to the side for now.

14© Sew Sweetness | Oslo Craft Bag | sewsweetness.com
ATTACH THE TABS46. Draw a line that is 1" down from the top raw edge of each Tab. Press at that mark (or fold, if using leather), then slide a metal rectangle on the crease.
47. On each Exterior Main Panel, draw a horizontal line with your invisible fabric marker or chalk that is down 1" from the top long edge.
48. Place one Tab 3" from the left-hand edge and with the top of the Tab fabric at the line that you drew. Pin (or hold in place if using leather). Do the same for the right-hand edge.
49. Sew two horizontal lines of stitching on the Tab; one approximately 1/4" below the purse hardware and another 1/8" away from the bottom edge of the Tab. You may need to use your zipper foot. Attach a rivet here if you have a rivet press. Helpful Hint: If using leather, leave a longer thread at the stop and start of stitching since you cannot backstitch. I use a hand sewing needle to pull one thread through to the other side and hand knot several times to secure the threads.
50. Repeat Steps 48-49 for one more tab and the right side of the Exterior Main Panel. Repeat to attach 2 Tabs to the remaining Exterior Main Panel.

15© Sew Sweetness | Oslo Craft Bag | sewsweetness.com
FINISH THE BAG51. Repeat Steps 10-13 to assemble the exterior, just like you did with the lining (except there will be no divider to deal with). Make sure to stop 1/2" before the bottom. Make sure pockets are not upside down.
52. Turn the exterior right side out. Place the lining inside the exterior, wrong sides together. Pin, then baste the top edge using a 1/8" seam allowance.
Important: Test the fit of the lining before basting it to the exterior. Since different fabrics act differently, if you find that you have a baggy lining, restitch the 4 outer corners, slightly increasing the seam allowance until your lining fits inside the exterior without being baggy.
Optional Hint: Before I placed the lining inside the exterior, I sprayed the wrong side of the exterior with a no-sew fusible ad-hesive spray (I used Thermoweb Spray n Bond Fusible Adhesive). Then I arranged the lining inside and ironed it in place. This helps the lining lay smooth within the exterior.
52. Sew the Top Binding strip so that both short ends meet, right sides together; press the seam open.
53. Finger press the assembled binding, long wrong sides together. Beginning with the section of the binding with the seam, start at the middle of the back panel, pinning all along the raw edge of the bag from the lining side. The raw edge of the binding should be aligned with the raw edge of the bag. Sew the binding to the lining using a 1/4” seam allowance.
Helpful Hint: Before attaching the Top Binding to the bag, you may find it helpful to pin the Top Binding into quarters to help with evening distributing the fabric.

16© Sew Sweetness | Oslo Craft Bag | sewsweetness.com
54. Flip the folded edge of the binding around toward the exterior side. Pin in place. Topstitch the binding in place, 1/8” away from the pressed edge.
55. Place the short end of the Handle on each rectangle ring. Topstitch two horizontal lines of stitching, one approximately 1/4" away from the hardware and another 1/8" from the bottom of the Tab. Attach a rivet here if you have a rivet press. Repeat on the back side of the bag with the remaining Handle.
Congratulations, you’ve finished!
Need help?? E-mail me any time at [email protected]
Please add your finished bag to my groups! http://www.flickr.com/groups/sewsweetness/ https://www.facebook.com/groups/sewsweetnessfans/
or tag your finished bag on Instagram or Twitter using hashtag #oslocraftbag and #sewsweetnesspattern
Copyright ©Sew Sweetness 2016 Cover design by Alison Glass.
Thank you for honoring the copyright law! Your support will enable me to design many more bag patterns!
http://www.sewsweetness.com Please check out my site for free tutorials on bags and bag-making techniques!
Oslo Craft Bag
Plac
e on
the
Fold
Dart
Front Pocket pattern pieceCut 6 exterior fabricCut 6 Shape Flex
Osl
o Cr
aft B
ag
Place on the Fold
Side
Poc
ket p
atte
rn p
iece
Cut 4
ext
erio
r fab
ricCu
t 4 S
hape
Fle
xPlea
t pla
cem
ent m
ark
1” square
Oslo Craft Bag
Plac
e on
the
FoldFlap pattern piece
Cut 4 exterior fabricCut 4 Shape Flex
4cm