symantec netbackup 5200 installation and configuration wbt/nbu 5020... · 1gb ethernet ports nic2...

1
1 2 3 4 5 6 2 3 4 1 NIC1 1GB Ethernet ports NIC2 (eth1) & NIC1 (eth0) Power switch AC Power jacks 10GB Ethernet ports NIC3 (eth2) & NIC4 (eth3) Symantec NetBackup 5200 Installation and Configuration Before you begin Hardware configuration steps Placing the rails into the server rack Install the NetBackup 5200 Connections overview (standard base configuration shown) Use a screwdriver and the provided screws to attach the appliance unit to your existing rack. Note: Before you secure the appliance to the rack, make sure to attach the bezel to the appliance. For details, see the instructions included with the bezel. Package contents Among the items included in the box: - NetBackup 5200 Appliance - Cabinet guide rails - Power cables - Ethernet cables - Console serial port cable - PS/2 to USB cable - Protective ground cable - Mounting hardware - Electrostatic dissipative gloves Secure the rails to the rack using screws. See the included packing list for complete contents of the package. Configuration prerequisites Before you start the appliance configuration, do the following: ·  Obtain a host name for the new appliance (a fully qualified domain name or FQDN). The appliance hostname must be changed from the factory default. ·  On the NetBackup master server, add the new appliance name to the   “Additional Servers” list. For complete instructions, see the NetBackup   5200 Administrator’s Guide or click the “Help” option at the top of the   Initial Network Configuration Web page. ·  Make sure that the NetBackup master server (FQDN and shortname) is DNS resolvable, or that the proper host entries are in place if DNS is not used. ·  If DNS is not used, the appliance must be configured through the command-line. ·  Add the appropriate license keys to the NetBackup master server for the   disk storage options that you plan to use. Select NetBackup Deduplication,   AdvancedDisk, or both. ·  Make sure that the vnetd (13724), bprd (13720), and PBX (1556) ports   are open on any firewall between the master server and the appliance. Note that in Windows 2008, these ports must be opened in Windows Firewall (if Windows Firewall is in use). When performing the initial configuration, note the following: ·  Prior to initial configuration, the appliance default mode is "Factory Install".   Additional server processes may be active until the media server configuration is complete, which is normal. ·  In Step 5, in the Host Name field, you must enter the FQDN for the appliance. ·  In Step 6, enter the name of the NetBackup master server that must communicate with the appliance. Connect power supply Connect to the corporate network Connect to the laptop Connect an ethernet cable to port NIC1 on the back of the appliance. Connect the other end of the ethernet cable to a laptop computer. Power up the laptop Plug in both power cables into the AC power jacks on the back of the appliance. Plug in the other end of both power cables into a surge protected power source. Power up the appliance Ground connection (required) Navigate to Local Area Connection properties dialog on the laptop. Set Alternate Configuration Select Internet Protocol (TCP/IP) Click Properties Under Alternate Configuration select User configured Enter: IP address: 192.168.1.### where ### is any number in the range of 2 through 254. Subnet mask: 255.255.255.0 Click OK to exit out of the dialog Type "admin" for the user name and "P@ssw0rd" for the password. On the laptop, open a web browser to the following URL: http://192.168.1.1 and affirm the security exception to proceed Click "Setup Appliance" to start configuration. Enter NetBackup master server name Enter AdvancedDisk volume size to change disk storage configuration. Note: Make sure to add the necessary storage option license keys to your NetBackup master server. Network Configuration DNS Configuration Software configuration steps Appliance Role and Disk Configuration Log in to appliance and start configuration Click Next, then click Configure to complete the configuration. Note: If DNS is not used, you must configure the appliance with the command-line instructions. Symantec and the Symantec logo are U.S. registered trademarks of Symantec Corporation. Other brands and products are trademarks of their respective holder/s. Copyright © 2011 Symantec Corporation. All rights reserved. Printed in the U.S.A. All product information is subject to change. 03/11 p/n: 21179459 After you have connected your laptop to the appliance and powered it up, you are ready to configure the appliance to work in your environment as a media server. To configure the NetBackup 5200 using the command line interface 1 You must add the new media server appliance hostname to the master server before you configure the appliance. Perform the following steps to add new media server appliance hostname to the master server: • Invoke NetBackup Administration Console on the master server • Navigate to NetBackupManagement > HostProperties > MasterServers and double click on the master server entry on the right pane. • In the Master Server properties, select Servers in the left pane and add the appliance hostname under Additional Servers section. 2 Open an SSH session to 192.168.1.1 and log on to your appliance. The login is admin and the default password is P@ssw0rd. 3 Enter Main_Menu > Network > Configure ip_addr mask gateway to configure a single IP address that you want your appliance to connect to. Where ip_addr is the new IP address, mask is the netmask, and gateway is the default gateway for the interface. To configure multiple networks, first configure the IP address of each network that you want to add. Then configure the Gateway address for each added network. Use the following two commands: IPv4 ip_addr mask [dev] Where ip_addr is the new IP address, mask is the netmask, and [dev] is optional. Repeat this command for each IP address that you add. Gateway Add gw [target_network_ip] [netmask] [dev] Where gw is the gateway for the interface and target_network_ip, netmask, and dev are optional. Repeat this command to add the gateway to all of the destination networks. Note: If DNS is not used, skip Steps 4, 5, and 6. 4 Enter Main_Menu > Network > DNS domain domain_name, to set the appliance DNS domain name. Where domain_name is the new domain name for the appliance. 5 Enter Main_Menu > Network > DNS Add Nameserver name_server_ip to add the DNS name sever to your appliance configuration. Where name_server_ip is the IP address of the target appliance. 6 Enter Main_Menu > Network > DNS Add Searchdomain search_domain to add a DNS search domain to your appliance configuration so the appliance can resolve the hostnames that are in different domains. Where search_domain is the target domain to add for searching. If DNS is not used, do not complete the fields in this step where an asterisk (*) appears. 7 This step is optional. It enables you to add IP addresses of other hosts in the appliance hosts file. Enter Main_Menu > Network > Hosts Add ip_addr long_name short_name to add host entries to the hosts file on your appliance. Where ip_addr is the IPv4 address, long_name is the fully qualified host name, and short_name is the short host name. Repeat this step for all hosts that need to communicate with this appliance. 8 Enter Main_Menu > Network > Hostname Set hostname to set the hostname for your appliance. Where hostname is the fully qualified host name. 9 Enter Main_Menu > Appliance > Media master_server to configure your appliance as a media server. Where master_server is the master server host name. 10 Follow the prompts to configure and name the disk storage units to complete the configuration. Configuring the NetBackup 5200 using the command-line interface 4 5 6 1 2 3 Enter suffix for the DNS server Enter one or more search domains Enter IP addresses and fully qualified domain names of any computers that need to communicate with this appliance. Then click Add. Enter IP address of DNS server IP Address: Enter the IPv4 address for this appliance. NetMask: Enter the subnet value that corresponds to the IP address. NIC: Select the NICs that you want bonded together. 1 Drop-down list shows supported NIC combinations for bonding (NIC2=eth1, NIC3=eth2, NIC4=eth3). Bond Mode: Select the Bond Mode for the NICs that you selected to bond. 1 Add: Click Add to configure the appliance with the entered data. Dest IP & Dest NetMask: For initial configuration, defaults must be used. 1 Gateway: Enter the address that allows access to another network. 1 NIC: Shows the network device name connected to the appliance. Add: Click Add to configure the appliance with the entered data. 1 See the NetBackup 5200 Adminstrator's Guide for more details. Enter host name for the appliance. Before you complete the appliance configuration, you must add the appliance host name to the "Additional Servers" list on the NetBackup master server. Click the "Help" option at the top of the Initial Network Configuration Web page for instructions. Note: If DNS is not used, the appliance must be configured through the command-line. Do one of the following: For a 1GB network, connect an Ethernet cable to NIC 2. For a 10GB network, connect a fiber optic cable to the top port of the vertically mounted PCI card (NIC3) Then connect the other end of the cable to your corporate network. Confidence in a connected world.

Upload: others

Post on 19-Jan-2020

23 views

Category:

Documents


0 download

TRANSCRIPT

1 2 3

4 5 6

2 3 4

1

NIC1

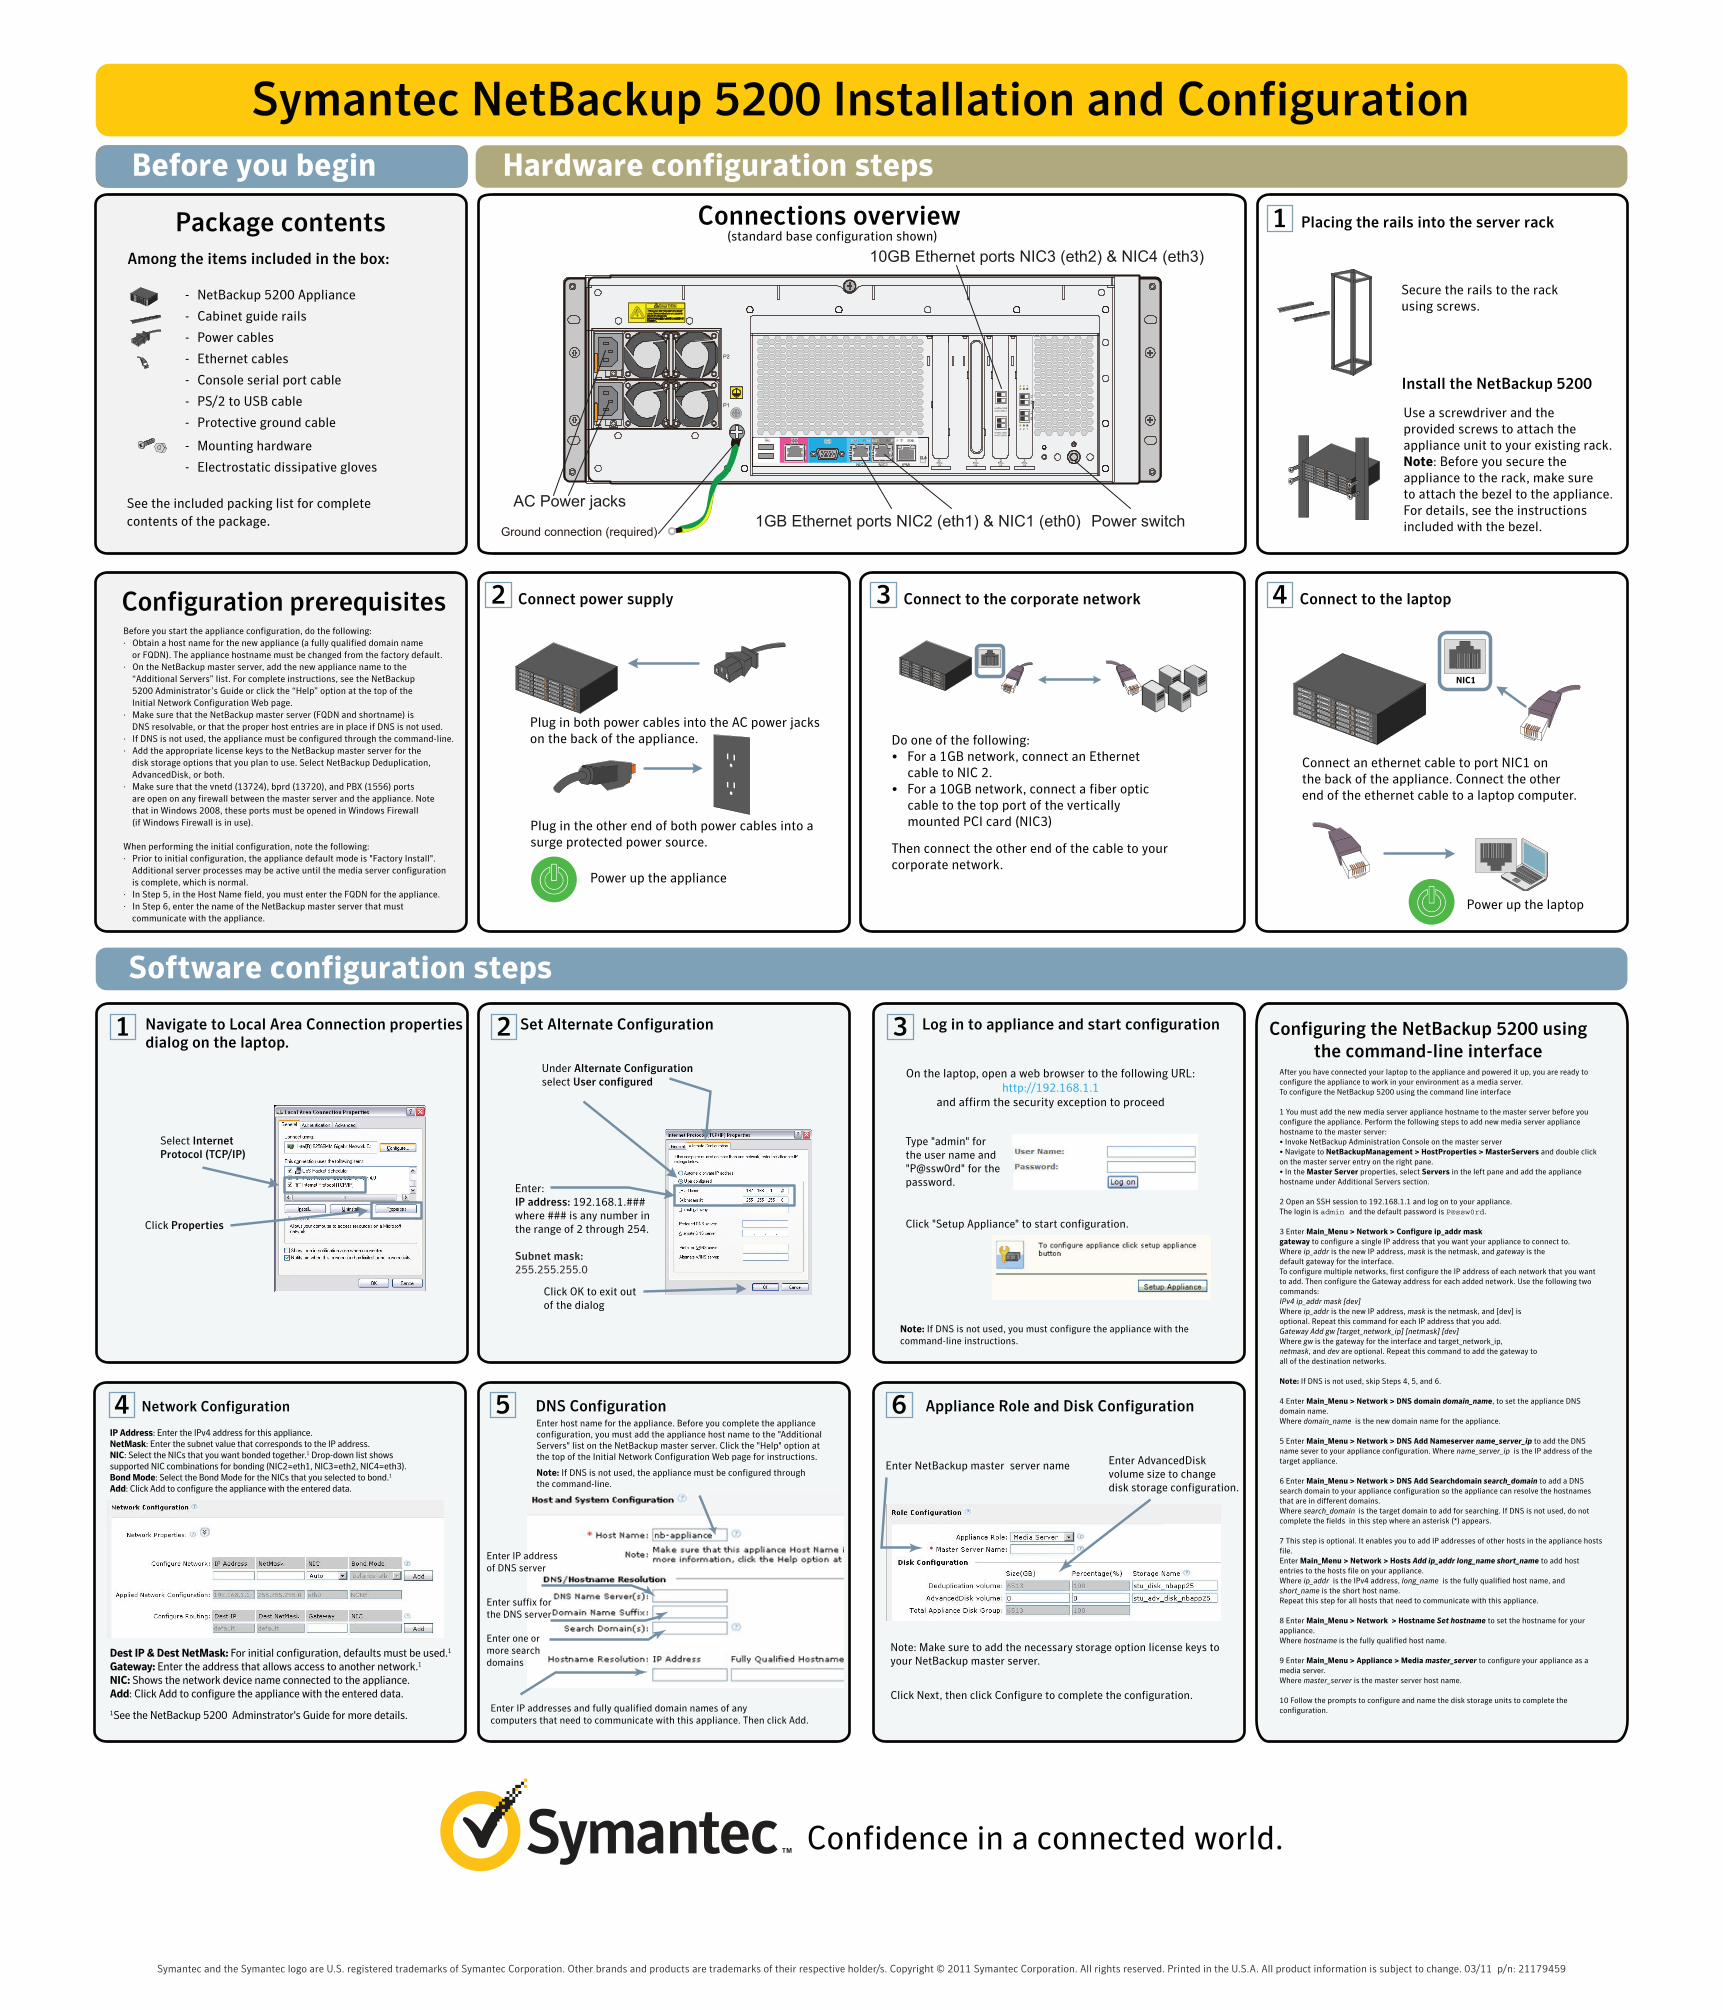
1GB Ethernet ports NIC2 (eth1) & NIC1 (eth0) Power switchAC Power jacks

10GB Ethernet ports NIC3 (eth2) & NIC4 (eth3)

Symantec NetBackup 5200 Installation and ConfigurationBefore you begin Hardware configuration steps

Placing the rails into the server rack

Install the NetBackup 5200

Connections overview (standard base configuration shown)

Use a screwdriver and the provided screws to attach the appliance unit to your existing rack.Note: Before you secure the appliance to the rack, make sure to attach the bezel to the appliance. For details, see the instructions included with the bezel.

Package contentsAmong the items included in the box:

- NetBackup 5200 Appliance

- Cabinet guide rails

- Power cables

- Ethernet cables

- Console serial port cable

- PS/2 to USB cable

- Protective ground cable

- Mounting hardware

- Electrostatic dissipative gloves

Secure the rails to the rack using screws.

See the included packing list for complete contents of the package.

Configuration prerequisitesBefore you start the appliance configuration, do the following:·   Obtain a host name for the new appliance (a fully qualified domain name or FQDN). The appliance hostname must be changed from the factory default.·   On the NetBackup master server, add the new appliance name to the    “Additional Servers” list. For complete instructions, see the NetBackup    5200 Administrator’s Guide or click the “Help” option at the top of the    Initial Network Configuration Web page.·   Make sure that the NetBackup master server (FQDN and shortname) is DNS resolvable, or that the proper host entries are in place if DNS is not used.·   If DNS is not used, the appliance must be configured through the command-line.·   Add the appropriate license keys to the NetBackup master server for the    disk storage options that you plan to use. Select NetBackup Deduplication,    AdvancedDisk, or both.·   Make sure that the vnetd (13724), bprd (13720), and PBX (1556) ports    are open on any firewall between the master server and the appliance. Note that in Windows 2008, these ports must be opened in Windows Firewall (if Windows Firewall is in use).

When performing the initial configuration, note the following:·   Prior to initial configuration, the appliance default mode is "Factory Install".    Additional server processes may be active until the media server configuration is complete, which is normal.·   In Step 5, in the Host Name field, you must enter the FQDN for the appliance.·   In Step 6, enter the name of the NetBackup master server that must communicate with the appliance.

Connect power supply Connect to the corporate network Connect to the laptop

Connect an ethernet cable to port NIC1 onthe back of the appliance. Connect the other end of the ethernet cable to a laptop computer.

Power up the laptop

Plug in both power cables into the AC power jacks on the back of the appliance.

Plug in the other end of both power cables into a surge protected power source.

Power up the appliance

Ground connection (required)

Navigate to Local Area Connection propertiesdialog on the laptop.

Set Alternate Configuration

Select Internet Protocol (TCP/IP)

Click Properties

Under Alternate Configurationselect User configured

Enter: IP address: 192.168.1.###where ### is any number in the range of 2 through 254.

Subnet mask:255.255.255.0

Click OK to exit outof the dialog

Type "admin" for the user name and "P@ssw0rd" for the password.

On the laptop, open a web browser to the following URL:http://192.168.1.1

and affirm the security exception to proceed

Click "Setup Appliance" to start configuration.

Enter NetBackup master server name Enter AdvancedDisk volume size to change disk storage configuration.

Note: Make sure to add the necessary storage option license keys to your NetBackup master server.

Network Configuration DNS Configuration

Software configuration steps

Appliance Role and Disk Configuration

Log in to appliance and start configuration

Click Next, then click Configure to complete the configuration.

Note: If DNS is not used, you must configure the appliance with the command-line instructions.

Symantec and the Symantec logo are U.S. registered trademarks of Symantec Corporation. Other brands and products are trademarks of their respective holder/s. Copyright © 2011 Symantec Corporation. All rights reserved. Printed in the U.S.A. All product information is subject to change. 03/11 p/n: 21179459

After you have connected your laptop to the appliance and powered it up, you are ready to configure the appliance to work in your environment as a media server.To configure the NetBackup 5200 using the command line interface

1 You must add the new media server appliance hostname to the master server before you configure the appliance. Perform the following steps to add new media server appliance hostname to the master server:• Invoke NetBackup Administration Console on the master server• Navigate to NetBackupManagement > HostProperties > MasterServers and double click on the master server entry on the right pane.• In the Master Server properties, select Servers in the left pane and add the appliance hostname under Additional Servers section.

2 Open an SSH session to 192.168.1.1 and log on to your appliance.The login is admin and the default password is P@ssw0rd.

3 Enter Main_Menu > Network > Configure ip_addr maskgateway to configure a single IP address that you want your appliance to connect to.Where ip_addr is the new IP address, mask is the netmask, and gateway is thedefault gateway for the interface.To configure multiple networks, first configure the IP address of each network that you want to add. Then configure the Gateway address for each added network. Use the following two commands:IPv4 ip_addr mask [dev]Where ip_addr is the new IP address, mask is the netmask, and [dev] isoptional. Repeat this command for each IP address that you add.Gateway Add gw [target_network_ip] [netmask] [dev]Where gw is the gateway for the interface and target_network_ip,netmask, and dev are optional. Repeat this command to add the gateway toall of the destination networks.

Note: If DNS is not used, skip Steps 4, 5, and 6.

4 Enter Main_Menu > Network > DNS domain domain_name, to set the appliance DNS domain name.Where domain_name is the new domain name for the appliance.

5 Enter Main_Menu > Network > DNS Add Nameserver name_server_ip to add the DNS name sever to your appliance configuration. Where name_server_ip is the IP address of the target appliance.

6 Enter Main_Menu > Network > DNS Add Searchdomain search_domain to add a DNS search domain to your appliance configuration so the appliance can resolve the hostnames that are in different domains.Where search_domain is the target domain to add for searching. If DNS is not used, do not complete the fields in this step where an asterisk (*) appears.

7 This step is optional. It enables you to add IP addresses of other hosts in the appliance hosts file.Enter Main_Menu > Network > Hosts Add ip_addr long_name short_name to add host entries to the hosts file on your appliance.Where ip_addr is the IPv4 address, long_name is the fully qualified host name, and short_name is the short host name.Repeat this step for all hosts that need to communicate with this appliance.

8 Enter Main_Menu > Network > Hostname Set hostname to set the hostname for your appliance.Where hostname is the fully qualified host name.

9 Enter Main_Menu > Appliance > Media master_server to configure your appliance as a media server.Where master_server is the master server host name.

10 Follow the prompts to configure and name the disk storage units to complete the configuration.

Configuring the NetBackup 5200 usingthe command-line interface

4 5 6

1 2 3

Enter suffix for the DNS server

Enter one or more search domains

Enter IP addresses and fully qualified domain names of any computers that need to communicate with this appliance. Then click Add.

Enter IP addressof DNS server

IP Address: Enter the IPv4 address for this appliance.NetMask: Enter the subnet value that corresponds to the IP address.NIC: Select the NICs that you want bonded together.1 Drop-down list shows supported NIC combinations for bonding (NIC2=eth1, NIC3=eth2, NIC4=eth3).Bond Mode: Select the Bond Mode for the NICs that you selected to bond.1

Add: Click Add to configure the appliance with the entered data.

Dest IP & Dest NetMask: For initial configuration, defaults must be used.1

Gateway: Enter the address that allows access to another network.1

NIC: Shows the network device name connected to the appliance.Add: Click Add to configure the appliance with the entered data.

1See the NetBackup 5200 Adminstrator's Guide for more details.

Enter host name for the appliance. Before you complete the appliance configuration, you must add the appliance host name to the "Additional Servers" list on the NetBackup master server. Click the "Help" option at the top of the Initial Network Configuration Web page for instructions.

Note: If DNS is not used, the appliance must be configured through the command-line.

Do one of the following:• For a 1GB network, connect an Ethernet cable to NIC 2.• For a 10GB network, connect a fiber optic cable to the top port of the vertically mounted PCI card (NIC3)

Then connect the other end of the cable to yourcorporate network.

Confidence in a connected world.