symantec netbackup puredisk deduplication option … · symantec netbackup puredisk™...
TRANSCRIPT
Symantec NetBackupPureDisk™ DeduplicationOption Guide
Windows, Linux, and Solaris SPARC
Release 6.6
Publication release 6.6, revision 1
The software described in this book is furnished under a license agreement and may be usedonly in accordance with the terms of the agreement.
Documentation version: 6.6, revision 1
Legal NoticeCopyright © 2009 Symantec Corporation. All rights reserved.
Symantec, the Symantec Logo, and PureDisk are trademarks or registered trademarks ofSymantec Corporation or its affiliates in the U.S. and other countries. Other names may betrademarks of their respective owners.
This Symantec product may contain third party software for which Symantec is requiredto provide attribution to the third party (“Third Party Programs”). Some of the Third PartyPrograms are available under open source or free software licenses. The License Agreementaccompanying the Software does not alter any rights or obligations you may have underthose open source or free software licenses. Please see the Third Party Legal Notice Appendixto this Documentation or TPIP ReadMe File accompanying this Symantec product for moreinformation on the Third Party Programs.
The product described in this document is distributed under licenses restricting its use,copying, distribution, and decompilation/reverse engineering. No part of this documentmay be reproduced in any form by any means without prior written authorization ofSymantec Corporation and its licensors, if any.
THE DOCUMENTATION IS PROVIDED "AS IS" AND ALL EXPRESS OR IMPLIED CONDITIONS,REPRESENTATIONS AND WARRANTIES, INCLUDING ANY IMPLIED WARRANTY OFMERCHANTABILITY, FITNESS FOR A PARTICULAR PURPOSE OR NON-INFRINGEMENT,ARE DISCLAIMED, EXCEPT TO THE EXTENT THAT SUCH DISCLAIMERS ARE HELD TOBE LEGALLY INVALID. SYMANTEC CORPORATION SHALL NOT BE LIABLE FOR INCIDENTALOR CONSEQUENTIAL DAMAGES IN CONNECTION WITH THE FURNISHING,PERFORMANCE, OR USE OF THIS DOCUMENTATION. THE INFORMATION CONTAINEDIN THIS DOCUMENTATION IS SUBJECT TO CHANGE WITHOUT NOTICE.
The Licensed Software and Documentation are deemed to be commercial computer softwareas defined in FAR 12.212 and subject to restricted rights as defined in FAR Section 52.227-19"Commercial Computer Software - Restricted Rights" and DFARS 227.7202, "Rights inCommercial Computer Software or Commercial Computer Software Documentation", asapplicable, and any successor regulations. Any use, modification, reproduction release,performance, display or disclosure of the Licensed Software and Documentation by the U.S.Government shall be solely in accordance with the terms of this Agreement.

Symantec Corporation350 Ellis StreetMountain View, CA 94043
http://www.symantec.com
Technical SupportSymantec Technical Support maintains support centers globally. TechnicalSupport’s primary role is to respond to specific queries about product featuresand functionality. The Technical Support group also creates content for our onlineKnowledge Base. The Technical Support group works collaboratively with theother functional areas within Symantec to answer your questions in a timelyfashion. For example, the Technical Support group works with Product Engineeringand Symantec Security Response to provide alerting services and virus definitionupdates.
Symantec’s maintenance offerings include the following:
■ A range of support options that give you the flexibility to select the rightamount of service for any size organization
■ Telephone and Web-based support that provides rapid response andup-to-the-minute information
■ Upgrade assurance that delivers automatic software upgrade protection
■ Global support that is available 24 hours a day, 7 days a week
■ Advanced features, including Account Management Services
For information about Symantec’s Maintenance Programs, you can visit our Website at the following URL:
www.symantec.com/techsupp/
Contacting Technical SupportCustomers with a current maintenance agreement may access Technical Supportinformation at the following URL:
www.symantec.com/techsupp/
Before contacting Technical Support, make sure you have satisfied the systemrequirements that are listed in your product documentation. Also, you should beat the computer on which the problem occurred, in case it is necessary to replicatethe problem.
When you contact Technical Support, please have the following informationavailable:
■ Product release level
■ Hardware information
■ Available memory, disk space, and NIC information
■ Operating system

■ Version and patch level
■ Network topology
■ Router, gateway, and IP address information
■ Problem description:
■ Error messages and log files
■ Troubleshooting that was performed before contacting Symantec
■ Recent software configuration changes and network changes
Licensing and registrationIf your Symantec product requires registration or a license key, access our technicalsupport Web page at the following URL:
www.symantec.com/techsupp/
Customer serviceCustomer service information is available at the following URL:
www.symantec.com/techsupp/
Customer Service is available to assist with the following types of issues:
■ Questions regarding product licensing or serialization
■ Product registration updates, such as address or name changes
■ General product information (features, language availability, local dealers)
■ Latest information about product updates and upgrades
■ Information about upgrade assurance and maintenance contracts
■ Information about the Symantec Buying Programs
■ Advice about Symantec's technical support options
■ Nontechnical presales questions
■ Issues that are related to CD-ROMs or manuals
Maintenance agreement resourcesIf you want to contact Symantec regarding an existing maintenance agreement,please contact the maintenance agreement administration team for your regionas follows:
[email protected] and Japan
[email protected], Middle-East, and Africa
[email protected] America and Latin America
Additional enterprise servicesSymantec offers a comprehensive set of services that allow you to maximize yourinvestment in Symantec products and to develop your knowledge, expertise, andglobal insight, which enable you to manage your business risks proactively.
Enterprise services that are available include the following:
These solutions provide early warning of cyber attacks, comprehensive threatanalysis, and countermeasures to prevent attacks before they occur.
Symantec Early Warning Solutions
These services remove the burden of managing and monitoring security devicesand events, ensuring rapid response to real threats.
Managed Security Services
Symantec Consulting Services provide on-site technical expertise fromSymantec and its trusted partners. Symantec Consulting Services offer a varietyof prepackaged and customizable options that include assessment, design,implementation, monitoring, and management capabilities. Each is focused onestablishing and maintaining the integrity and availability of your IT resources.
Consulting Services
Educational Services provide a full array of technical training, securityeducation, security certification, and awareness communication programs.
Educational Services
To access more information about Enterprise services, please visit our Web siteat the following URL:
www.symantec.com
Select your country or language from the site index.
Technical Support . . . . . . . . . . . . . . . . . . . . . . . . . . . . . . . . . . . . . . . . . . . . . . . . . . . . . . . . . . . . . . . . . . . . . . . . . . . . . . . . . . . . . . . . . . . . . . . 4
Chapter 1 Overview . . . . . . . . . . . . . . . . . . . . . . . . . . . . . . . . . . . . . . . . . . . . . . . . . . . . . . . . . . . . . . . . . . . . . . . . . . . . . . . . 11
About the NetBackup PureDisk Deduplication Option (PDDO) .... . . . . . . . . . . 11PDDO configuration examples ... . . . . . . . . . . . . . . . . . . . . . . . . . . . . . . . . . . . . . . . . . . . . . . . 13
About improvements to the synthetic backup process ... . . . . . . . . . . . . . . . . . . . . . . 16
Chapter 2 Downloading the PDDO plug-in . . . . . . . . . . . . . . . . . . . . . . . . . . . . . . . . . . . . . . . 19
About downloading the PDDO plug-in ... . . . . . . . . . . . . . . . . . . . . . . . . . . . . . . . . . . . . . . . . . . . 19Verifying your environment .... . . . . . . . . . . . . . . . . . . . . . . . . . . . . . . . . . . . . . . . . . . . . . . . . . . . . . . . 20Verifying or installing the PDDO license on a NetBackup master
server ... . . . . . . . . . . . . . . . . . . . . . . . . . . . . . . . . . . . . . . . . . . . . . . . . . . . . . . . . . . . . . . . . . . . . . . . . . . . . . . . 21Downloading the PDDO plug-in to a media server ... . . . . . . . . . . . . . . . . . . . . . . . . . . . 22
Chapter 3 Installing the PDDO plug-in on Linux and SolarisSPARC media servers . . . . . . . . . . . . . . . . . . . . . . . . . . . . . . . . . . . . . . . . . . . . . . . . . . . 25
About installing the PDDO plug-in on a NetBackup Linux media serveror a NetBackup Solaris SPARC media server ... . . . . . . . . . . . . . . . . . . . . . . . . . . . . . 25
Performing an attended installation of the PDDO plug-in on a Linuxor Solaris media server ... . . . . . . . . . . . . . . . . . . . . . . . . . . . . . . . . . . . . . . . . . . . . . . . . . . . . . . . . . 26
Performing an unattended installation of the PDDO plug-in on a Linuxor Solaris media server ... . . . . . . . . . . . . . . . . . . . . . . . . . . . . . . . . . . . . . . . . . . . . . . . . . . . . . . . . . 28
Establishing the PDDO connection between a UNIX NetBackup mediaserver and the PureDisk storage pool ... . . . . . . . . . . . . . . . . . . . . . . . . . . . . . . . . . . . . . . 29
Chapter 4 Installing the PureDisk Deduplication Optionplug-in on Windows media servers . . . . . . . . . . . . . . . . . . . . . . . . . . . 33
About installing the PDDO plug-in on a Windows media server ... . . . . . . . . . . 33Performing an attended installation of the PDDO plug-in on a
Windows media server ... . . . . . . . . . . . . . . . . . . . . . . . . . . . . . . . . . . . . . . . . . . . . . . . . . . . . . . . . . 34Performing an unattended installation of the PDDO plug-in on a
Windows media server ... . . . . . . . . . . . . . . . . . . . . . . . . . . . . . . . . . . . . . . . . . . . . . . . . . . . . . . . . . 35
Contents
Establishing a connection between a Windows NetBackup mediaserver and the PureDisk storage pool ... . . . . . . . . . . . . . . . . . . . . . . . . . . . . . . . . . . . . . . 37
Chapter 5 Configuring the PDDO plug-in in NetBackup . . . . . . . . . . . . . . . . 43
About configuring the PDDO plug-in in NetBackup .... . . . . . . . . . . . . . . . . . . . . . . . . . 43Configuring the NetBackup disk pool and storage unit in the
NetBackup Java interface ... . . . . . . . . . . . . . . . . . . . . . . . . . . . . . . . . . . . . . . . . . . . . . . . . . . . . . . 44Configuring the NetBackup disk pool and storage unit in the
NetBackup Windows interface ... . . . . . . . . . . . . . . . . . . . . . . . . . . . . . . . . . . . . . . . . . . . . . . . 46Verifying the NetBackup configuration and creating a NetBackup
policy ... . . . . . . . . . . . . . . . . . . . . . . . . . . . . . . . . . . . . . . . . . . . . . . . . . . . . . . . . . . . . . . . . . . . . . . . . . . . . . . . . 48
Chapter 6 Using PureDisk as a NetBackup storage unit . . . . . . . . . . . . . . . . 51
About the PDDO plug-in in the PureDisk Web UI .... . . . . . . . . . . . . . . . . . . . . . . . . . . . . 52Adding an additional PureDisk storage pool to a NetBackup media
server ... . . . . . . . . . . . . . . . . . . . . . . . . . . . . . . . . . . . . . . . . . . . . . . . . . . . . . . . . . . . . . . . . . . . . . . . . . . . . . . . 53About configuring NetBackup lifecycle policies ... . . . . . . . . . . . . . . . . . . . . . . . . . . . . . . . 55Disaster recovery configuration example ... . . . . . . . . . . . . . . . . . . . . . . . . . . . . . . . . . . . . . . . 56Removing data and customizing the system policy for PDDO data
removal ... . . . . . . . . . . . . . . . . . . . . . . . . . . . . . . . . . . . . . . . . . . . . . . . . . . . . . . . . . . . . . . . . . . . . . . . . . . . . . 58Completing the General tab on the Edit Policy dialog box .... . . . . . . . . . . . . . . . . . 59Completing the Scheduling tab on the Edit Policy dialog box .... . . . . . . . . . . . . 60About PureDisk garbage collection policies ... . . . . . . . . . . . . . . . . . . . . . . . . . . . . . . . . . . . . 61Retrieving job reports ... . . . . . . . . . . . . . . . . . . . . . . . . . . . . . . . . . . . . . . . . . . . . . . . . . . . . . . . . . . . . . . . . 61About job details reports ... . . . . . . . . . . . . . . . . . . . . . . . . . . . . . . . . . . . . . . . . . . . . . . . . . . . . . . . . . . . . 62About data mining reports ... . . . . . . . . . . . . . . . . . . . . . . . . . . . . . . . . . . . . . . . . . . . . . . . . . . . . . . . . . . 64About central reporting .... . . . . . . . . . . . . . . . . . . . . . . . . . . . . . . . . . . . . . . . . . . . . . . . . . . . . . . . . . . . . . 65Displaying the agent dashboard .... . . . . . . . . . . . . . . . . . . . . . . . . . . . . . . . . . . . . . . . . . . . . . . . . . . 65About recovery of a PureDisk storage pool used as a PDDO
plug-in ... . . . . . . . . . . . . . . . . . . . . . . . . . . . . . . . . . . . . . . . . . . . . . . . . . . . . . . . . . . . . . . . . . . . . . . . . . . . . . . 65Changing the storage pool authority password when PDDO is
enabled .... . . . . . . . . . . . . . . . . . . . . . . . . . . . . . . . . . . . . . . . . . . . . . . . . . . . . . . . . . . . . . . . . . . . . . . . . . . . . 66
Appendix A Installing the PDDO plug-in on a clusteredNetBackup media server . . . . . . . . . . . . . . . . . . . . . . . . . . . . . . . . . . . . . . . . . . . . . . 69
Installing the PDDO plug-in on a clustered NetBackup mediaserver ... . . . . . . . . . . . . . . . . . . . . . . . . . . . . . . . . . . . . . . . . . . . . . . . . . . . . . . . . . . . . . . . . . . . . . . . . . . . . . . . 69
Contents8
Appendix B Repairing and removing a PDDO plug-in . . . . . . . . . . . . . . . . . . . . . . . 73
Repairing a PDDO plug-in on a Linux or Solaris SPARC mediaserver ... . . . . . . . . . . . . . . . . . . . . . . . . . . . . . . . . . . . . . . . . . . . . . . . . . . . . . . . . . . . . . . . . . . . . . . . . . . . . . . . 73
Repairing a PDDO plug-in on a Windows media server ... . . . . . . . . . . . . . . . . . . . . . 74Removing a PDDO plug-in ... . . . . . . . . . . . . . . . . . . . . . . . . . . . . . . . . . . . . . . . . . . . . . . . . . . . . . . . . . . 74
Disconnecting the PureDisk storage pool from one media serverthat exists among many media servers ... . . . . . . . . . . . . . . . . . . . . . . . . . . . . . . 74
Disconnecting the PureDisk storage pool from the last mediaserver and removing the PureDisk storage pool from theNetBackup environment .... . . . . . . . . . . . . . . . . . . . . . . . . . . . . . . . . . . . . . . . . . . . . . . . . 78
Removing a PDDO plug-in from a Linux or Solaris SPARC mediaserver ... . . . . . . . . . . . . . . . . . . . . . . . . . . . . . . . . . . . . . . . . . . . . . . . . . . . . . . . . . . . . . . . . . . . . . . . . . 79
Removing a PDDO plug-in from a Windows media server ... . . . . . . . . . . . 80
Appendix C Configuration file settings . . . . . . . . . . . . . . . . . . . . . . . . . . . . . . . . . . . . . . . . . . . . . . . . . 81
About the pd.conf file ... . . . . . . . . . . . . . . . . . . . . . . . . . . . . . . . . . . . . . . . . . . . . . . . . . . . . . . . . . . . . . . . . 81Editing the pd.conf file ... . . . . . . . . . . . . . . . . . . . . . . . . . . . . . . . . . . . . . . . . . . . . . . . . . . . . . . . . . . . . . . . 82About pd.conf file settings ... . . . . . . . . . . . . . . . . . . . . . . . . . . . . . . . . . . . . . . . . . . . . . . . . . . . . . . . . . . 82About log information .... . . . . . . . . . . . . . . . . . . . . . . . . . . . . . . . . . . . . . . . . . . . . . . . . . . . . . . . . . . . . . . . 85
About log information from NetBackup 6.5.2 ... . . . . . . . . . . . . . . . . . . . . . . . . . . . . 86About log information from NetBackup 6.5.1 or NetBackup
6.5.0 ... . . . . . . . . . . . . . . . . . . . . . . . . . . . . . . . . . . . . . . . . . . . . . . . . . . . . . . . . . . . . . . . . . . . . . . . . . . . 86About compression and encryption of backup images .... . . . . . . . . . . . . . . . . . . . . . 86
Appendix D Troubleshooting . . . . . . . . . . . . . . . . . . . . . . . . . . . . . . . . . . . . . . . . . . . . . . . . . . . . . . . . . . . . . . . . . . 87
Troubleshooting a failed PDDO configuration .... . . . . . . . . . . . . . . . . . . . . . . . . . . . . . . . . 87
Appendix E Third-party legal notices . . . . . . . . . . . . . . . . . . . . . . . . . . . . . . . . . . . . . . . . . . . . . . . . . . . . 93
Third-party legal notices for Symantec NetBackup PureDisk .... . . . . . . . . . . . . 93
Index . . . . . . . . . . . . . . . . . . . . . . . . . . . . . . . . . . . . . . . . . . . . . . . . . . . . . . . . . . . . . . . . . . . . . . . . . . . . . . . . . . . . . . . . . . . . . . . . . . . . . . . . . . . . . . . . . . . . 95
9Contents

Contents10

Overview
This chapter includes the following topics:
■ About the NetBackup PureDisk Deduplication Option (PDDO)
■ About improvements to the synthetic backup process
About theNetBackup PureDisk DeduplicationOption(PDDO)
The NetBackup PureDisk Deduplication Option (PDDO) is a plug-in that uses theNetBackup OpenStorage API to enable NetBackup to write backups to a PureDiskstorage pool. All the data that is written to a PureDisk storage pool is deduplicated.
In general, deduplication is a method of retaining only one unique instance ofbackup data on storage media. Redundant data is replaced with a pointer to theunique data copy.
Deduplication significantly reduces the amount of storage space for the NetBackupbackup copies. All data that a PDDO agent or that a PureDisk backup client writesto a PureDisk storage pool are deduplicated. When two or more files share identicalcontent, PureDisk breaks the files into segments and stores only one copy of eachunique file segment.
Figure 1-1 shows how deduplication works.
1Chapter

Figure 1-1 File deduplication
A CB D E A QB D L
Client filesto bebacked up
A CB D E Q L
Datawritten tocontentrouters
File 1 File 2
Note the following in this figure:
■ PureDisk breaks file 1 into segments A, B, C, D, and E.
■ PureDisk breaks file 2 into segments A, B, Q, D, and L.
■ PureDisk writes file segments A, B, C, D, and E from file 1, and file segmentsQ, and L from file 2 on its content routers only one time. PureDisk does notwrite file segments A, B, and D from file 2 to the content routers. Instead,PureDisk points to the unique data copies of file segments A, B, and D thatwere already written to the content routers from file 1.
Note: When using PDDO to deduplicate database backups (Oracle, MS SQL, andMS Exchange), snapshot-based backups deduplicate better than stream-basedbackups.
Before you install and implement the NetBackup PureDisk Deduplication Option,make sure that the following conditions are true:
■ The PureDisk storage pool software is configured and functions normally.
■ The NetBackup media server is configured and functions normally.
■ You are familiar with the concepts and procedures that are described in theNetBackup Shared Storage Guide and your NetBackup administrator’s guides.
After you install a PureDisk storage pool, you can download the PureDisk agentsoftware to a computer.
Next you can configure it to assume one of the following roles:
■ A backup and restore agent.You can configure a backup and restore agent on any client that PureDisksupports. The Symantec Technical Support compatibility matrix explains theplatforms upon which you can configure a PureDisk backup and restore client.
OverviewAbout the NetBackup PureDisk Deduplication Option (PDDO)
12
■ A PDDO plug-in.You can configure a PDDO plug-in on a NetBackup media server. The NetBackupmedia server can be a Linux, Solaris SPARC, or Windows platform computer.After you configure the plug-in, the media server can use the PureDisk storagepool as a NetBackup OpenStorage disk pool.
When you download the PureDisk agent software onto a NetBackup media server,the agent software detects the media server software. It issues the installationprompts that let you configure the agent as a PDDO plug-in. Make sure that youconfigure the media server software before you download the PureDisk agentsoftware to the media server.
PDDO configuration examplesThe following examples describe PureDisk and NetBackup configurations. Theexamples do not show any PureDisk backup and restore clients as being directlyattached to PureDisk. However, PureDisk can act both as a storage unit toNetBackup and as a backup repository for its own PureDisk clients. When thestorage pools fill up, you can add additional content routers to hold additionalbackup data from NetBackup and from the PureDisk clients.
Example 1: DeduplicationTwo NetBackup environments with the PDDO plug-in each backup two clients.NetBackup then sends backup data to the PureDisk storage pool for deduplication.The PureDisk storage pool also deduplicates the data from its client.
Figure 1-2 shows how the PDDO plug-in works in this scenario to deduplicatedata.
13OverviewAbout the NetBackup PureDisk Deduplication Option (PDDO)

Figure 1-2 Deduplication
NetBackupMedia Server + PDDO
PureDiskstorage pool
NetBackupClient
NetBackupMedia Server + PDDO
NetBackupClient
NetBackupClient
NetBackupClient
Deduplication Deduplication
Deduplication
PureDiskClient
Example 2: MultistreamingThe NetBackup policy defines multiple data streams from the client to theNetBackup media server. NetBackup sends data to the PureDisk storage pool inmultiple streams.
Figure 1-3 shows how NetBackup multistreaming works in an environment thatincludes both NetBackup and PureDisk.
OverviewAbout the NetBackup PureDisk Deduplication Option (PDDO)
14
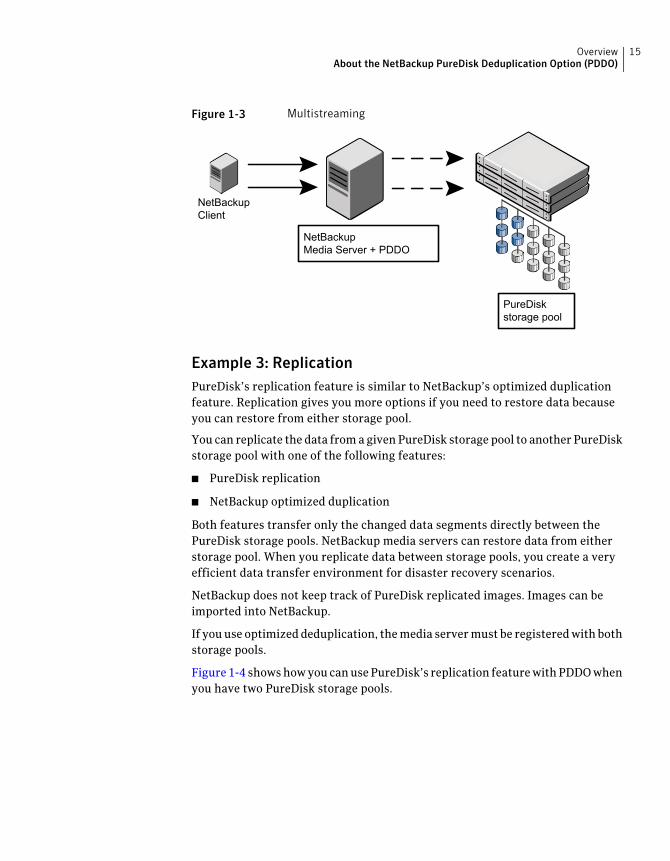
Figure 1-3 Multistreaming
NetBackupMedia Server + PDDO
NetBackupClient
PureDiskstorage pool
Example 3: ReplicationPureDisk’s replication feature is similar to NetBackup’s optimized duplicationfeature. Replication gives you more options if you need to restore data becauseyou can restore from either storage pool.
You can replicate the data from a given PureDisk storage pool to another PureDiskstorage pool with one of the following features:
■ PureDisk replication
■ NetBackup optimized duplication
Both features transfer only the changed data segments directly between thePureDisk storage pools. NetBackup media servers can restore data from eitherstorage pool. When you replicate data between storage pools, you create a veryefficient data transfer environment for disaster recovery scenarios.
NetBackup does not keep track of PureDisk replicated images. Images can beimported into NetBackup.
If you use optimized deduplication, the media server must be registered with bothstorage pools.
Figure 1-4 shows how you can use PureDisk’s replication feature with PDDO whenyou have two PureDisk storage pools.
15OverviewAbout the NetBackup PureDisk Deduplication Option (PDDO)
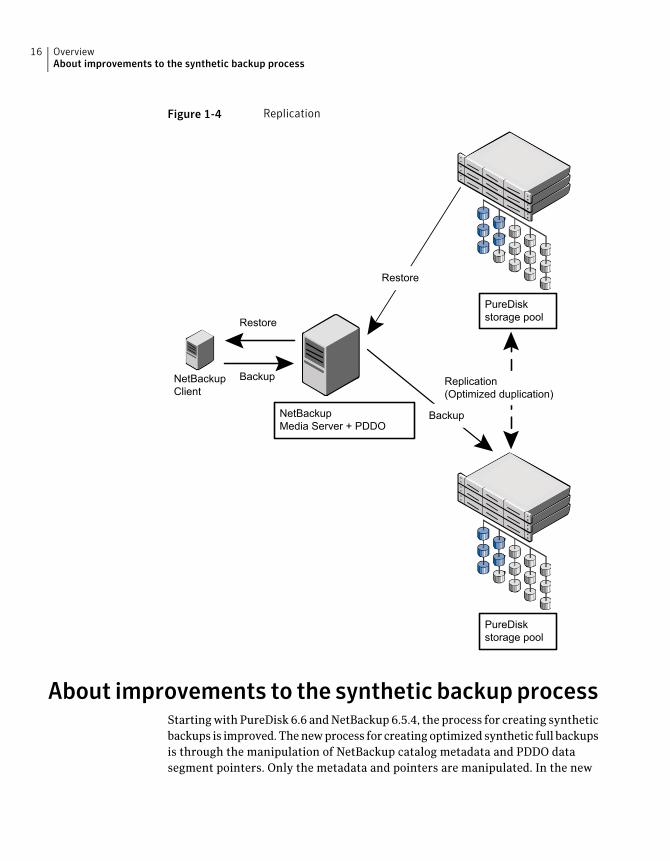
Figure 1-4 Replication
NetBackupMedia Server + PDDO
NetBackupClient
PureDiskstorage pool
PureDiskstorage pool
Backup
Restore
Backup
Replication(Optimized duplication)
Restore
About improvements to the synthetic backupprocessStarting with PureDisk 6.6 and NetBackup 6.5.4, the process for creating syntheticbackups is improved. The new process for creating optimized synthetic full backupsis through the manipulation of NetBackup catalog metadata and PDDO datasegment pointers. Only the metadata and pointers are manipulated. In the new
OverviewAbout improvements to the synthetic backup process
16

optimized synthetic backup process, the backup image data is not read from disk,transported across the network, or manipulated.
Using the new optimized synthetic full backup process allows the creation of fullbackups with a significant performance improvement. The optimized syntheticbackup is then stored on a PDDO storage unit as an ordered collection of datasegments representing a new full backup. The benefit of the optimized syntheticfull backup is the ability to run a single full backup, and then only incrementalbackups from that point forward. Ongoing NetBackup incremental backups ofonly new or modified data allows users to quickly create a new full backup, at anypoint in time, by performing an optimized synthetic full backup.
17OverviewAbout improvements to the synthetic backup process

OverviewAbout improvements to the synthetic backup process
18
Downloading the PDDOplug-in
This chapter includes the following topics:
■ About downloading the PDDO plug-in
■ Verifying your environment
■ Verifying or installing the PDDO license on a NetBackup master server
■ Downloading the PDDO plug-in to a media server
About downloading the PDDO plug-inThe PDDO plug-in software is available as a link from the storage pool authoritylanding page. The download process includes system verification steps and theactual download steps themselves.
To download the PDDO plug-in
1 Verify your environment.
See “Verifying your environment” on page 20.
2 Verify or install the PDDO license on a NetBackup master server.
See “Verifying or installing the PDDO license on a NetBackup master server”on page 21.
3 Download the plug-in to a media server.
See “Downloading the PDDO plug-in to a media server” on page 22.
2Chapter
Verifying your environmentBefore you download or install the PDDO plug-in, perform the following procedure.
To verify your environment
1 Verify that NetBackup 6.5 or later is installed and configured on the mediaserver that you want to use.
To verify your release level, perform the following steps:
■ Logon to the NetBackup Administration Console .
■ Click Help.
■ Click About NetBackup Administration Console.
■ Visually inspect the number to the right of Version.
Make sure that you can perform backups and restores with NetBackup. Forinformation about how to configure NetBackup, see your NetBackupinstallation documentation.
2 Verify that the NetBackup media server upon which you want to install thePDDO client is a good candidate for this purpose.
The hardware must be suited for both I/O and for computation. PDDOincreases the computational load on a media server because it calculates datadeduplication. Verify your media server’s hardware capabilities to ensure anoptimal PDDO configuration.
3 Verify that the PureDisk storage pool is configured and operational.
The NetBackup interface refers to the PureDisk storage pool as a "storageserver."
Make sure that you can perform regular file backups from a client and restoresto a client. Install a regular PureDisk backup and restore agent on a clientcomputer to perform this test. Do not install the regular backup and restoreclient on the media server. Symantec does not support both a backup andrestore client and a PDDO plug-in on one NetBackup media server.
Information about how to install a PureDisk backup and restore client isavailable.
See the PureDisk Client Installation Guide.
4 Verify or install the PDDO license.
See “Verifying or installing the PDDO license on a NetBackup master server”on page 21.
Downloading the PDDO plug-inVerifying your environment
20
Verifying or installing the PDDO license on aNetBackup master server
The PDDO plug-in is a licensed NetBackup feature. Make sure that you have aPDDO license from your Symantec sales representative. The following procedureexplains how to verify your NetBackup licenses and how to install the PDDOlicense if necessary.
To verify or install the PDDO license on a NetBackup master server
1 Start the NetBackup Administration Console .
2 Click Help > License Keys.
3 If PureDisk Option is present in the Features column of the display, do notcomplete this procedure.
Instead, download the PDDO plug-in.
See “Downloading the PDDO plug-in to a media server” on page 22.
4 If PureDiskOption is not present in the Features column of the display, clickthe yellow star icon.
5 On the Add a New License Key pop-up window, type the PDDO license keyyou received from your Symantec sales representative.
6 Click Add (Windows interface) or OK (Java interface).
7 Make sure that the PureDisk Option license key appears in the display.
8 On the Add a New License Key pop-up window, type the Enterprise Disklicense key you received from your Symantec sales representative.
9 Click Add (Windows interface) or OK (Java interface).
10 Make sure that the Enterprise Disk license key appears in the display.
11 Click Close.
12 Restart NetBackup’s services.
This task differs depending on your platform.
For information about how to restart services, see your NetBackupdocumentation.
13 Download the PDDO plug-in.
See “Downloading the PDDO plug-in to a media server” on page 22.
21Downloading the PDDO plug-inVerifying or installing the PDDO license on a NetBackup master server
Downloading the PDDO plug-in to a media serverThe following procedure describes how to download the PDDO plug-in to a mediaserver.
To download the PDDO plug-in to a media server
1 Logon to the media server that you want to configure.
Symantec supports the following media server platforms:
■ Linux
■ Solaris SPARC
■ Windows
For more information about specific platform operating systems supported,see the NetBackup 6.x Operating System Compatibility List.
http://seer.entsupport.symantec.com/docs/278064.htm
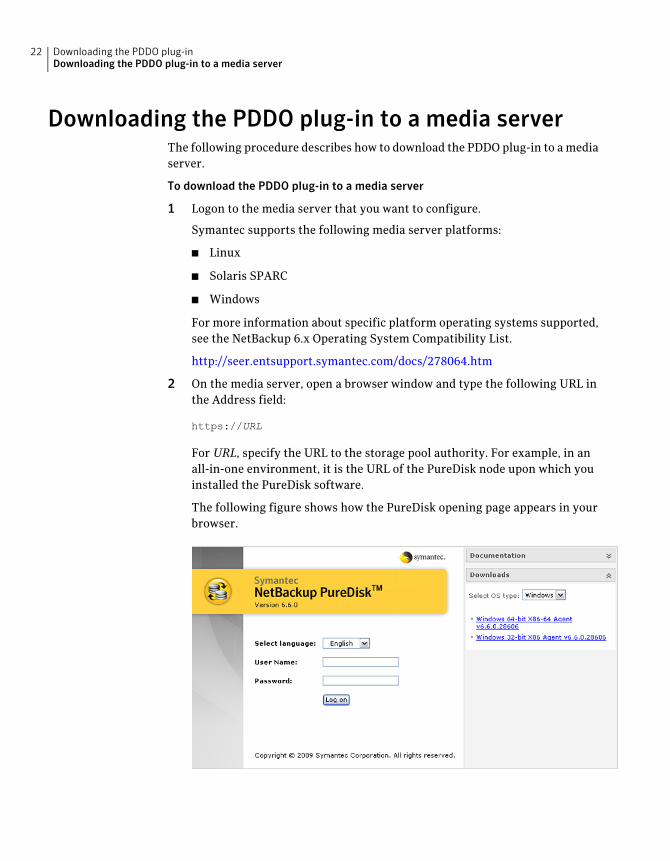
2 On the media server, open a browser window and type the following URL inthe Address field:
https://URL
For URL, specify the URL to the storage pool authority. For example, in anall-in-one environment, it is the URL of the PureDisk node upon which youinstalled the PureDisk software.
The following figure shows how the PureDisk opening page appears in yourbrowser.
Downloading the PDDO plug-inDownloading the PDDO plug-in to a media server
22
3 Under Downloads, select the correct OS type from the drop down.
4 Right-click one of the agent links that describes the media server platform.
The browser writes the agent software to the location you specify, as in thefollowing examples:
■ On Windows platforms, you can write the software to C:\temp or to thedesktop.
■ On Linux or UNIX platforms, you select the download directory.
5 Select one of the following links:
■ pdagent-Linux_2.6_x86-6.6.0.XXXX.run is for Linux media servers.
■ pdagent-Solaris_10_sparc-6.6.0.XXXX.run is for Solaris SPARC 10 mediaservers.
■ pdagent-Solaris_8_sparc-6.6.0.XXXX.run is for Solaris SPARC 8 or 9media servers.
■ pdagent-Windows_x86-6.6.0.XXXX.exe is for Windows 32-bit mediaservers.
■ pdagent-Windows_x86_64-6.6.0.XXXX.exe is for Windows 64-bit mediaservers.
To determine the type of hardware on your Windows system, right-click MyComputer on the desktop. Select Properties.
6 Install the PDDO plug-in.
Proceed to one of the following sections for the appropriate procedures thatexplain how to install the PDDO plug-in:
■ About installing the PDDO plug-in on a NetBackup Linux media server ora NetBackup Solaris SPARC media server
■ Performing an attended installation of the PDDO plug-in on a Windowsmedia server
23Downloading the PDDO plug-inDownloading the PDDO plug-in to a media server

Downloading the PDDO plug-inDownloading the PDDO plug-in to a media server
24
Installing the PDDO plug-inon Linux and Solaris SPARCmedia servers
This chapter includes the following topics:
■ About installing the PDDO plug-in on a NetBackup Linux media server or aNetBackup Solaris SPARC media server
■ Performing an attended installation of the PDDO plug-in on a Linux or Solarismedia server
■ Performing an unattended installation of the PDDO plug-in on a Linux orSolaris media server
■ Establishing the PDDO connection between a UNIX NetBackup media serverand the PureDisk storage pool
About installing the PDDO plug-in on a NetBackupLinux media server or a NetBackup Solaris SPARCmedia server
You can install the PDDO plug-in on a Linux media server or on a Solaris SPARCmedia server. Symantec supports both an attended, menu-driven installationmethod and an unattended, command-driven installation method. After you installthe plug-in, you need to establish a connection between the NetBackup mediaserver and the PureDisk storage pool.
3Chapter
To install the PDDO plug-in on a NetBackup Linux media server or a NetBackupSolaris SPARC media server
1 Install the plug-in.
Use one of the following methods:
■ Attended method.Use this method to use the interactive installation script to install thePDDO plug-in on a media server.See “Performing an attended installation of the PDDO plug-in on a Linuxor Solaris media server” on page 26.
■ Unattended method.Use this method to install the PDDO plug-in on a media server withoutuser intervention.See “Performing an unattended installation of the PDDO plug-in on aLinux or Solaris media server” on page 28.
2 Establish a connection between the media server and the storage pool.
See “Establishing the PDDO connection between a UNIX NetBackup mediaserver and the PureDisk storage pool” on page 29.
Performing an attended installation of the PDDOplug-in on a Linux or Solaris media server
The following procedure explains how to use the PDDO plug-in interactiveinstallation script.
Note: Complete the entire PDDO installation and configuration process in onestep. Do not install NetBackup software during the PDDO installation orconfiguration process. You can install NetBackup patches or upgrades after youconfigure the PDDO plug-in in NetBackup.
Installing the PDDO plug-in on Linux and Solaris SPARC media serversPerforming an attended installation of the PDDO plug-in on a Linux or Solaris media server
26
To install the PDDO plug-in on a Linux or Solaris media server by using an attendedinstall
1 Use the cd(1) command to change to the directory to which you downloadedthe software.
2 Run the installation command.
The installation command that you run depends on the media server’splatform, as follows:
# sh pdagent-Linux_2.6_x86-6.6.0.XXXX.run
# sh pdagent-Solaris_10_sparc-6.6.0.XXXX.run
# sh pdagent-Solaris_8_sparc-6.6.0.XXXX.run
ForXXXX, substitute the build number that appears in your PureDisk openingpage.
3 Type Y or y to confirm that you want to install the PDDO plug-in in responseto the following prompt:
=> Do you want to install PDDO plug-in? [y/n]
4 Type the name of the directory into which you want to install the plug-in inresponse to the following prompt:
=> Where do you want to install PDDO plug-in? [/opt]:
To accept the default directory of /opt, press Enter.
5 Type Y or y to confirm the installation directory in response to the followingprompt:
=> Are you sure you want to install it in /opt? [y/n]
6 Monitor the output to ensure that the software installation completes.
7 (Conditional) Start NetBackup’s services.
Perform this step if NetBackup’s services are not running. For informationabout how to start services, see your NetBackup documentation.
8 Establish a connection between the media server and the storage pool.
See “Establishing the PDDO connection between a UNIX NetBackup mediaserver and the PureDisk storage pool” on page 29.
27Installing the PDDO plug-in on Linux and Solaris SPARC media serversPerforming an attended installation of the PDDO plug-in on a Linux or Solaris media server
Performing an unattended installation of the PDDOplug-in on a Linux or Solaris media server
To install the PDDO plug-in on a client with a minimum of user intervention, usean unattended, or silent, install.
Note: Complete the entire PDDO installation and configuration process in onestep. Do not install NetBackup software during the PDDO installation orconfiguration process. You can install NetBackup patches, upgrades, or releasesafter you configure the PDDO plug-in in NetBackup.
To install thePDDOplug-in on a Linuxor Solarismedia server byusing anunattendedinstall
1 Use the cd(1) command to change to the directory to which you installedthe software.
2 Run the installation command that corresponds to the client’s platform, asfollows:
# sh pdagent-Linux_2.6_x86-6.6.0.XXXX.run params
# sh pdagent-Solaris_10_sparc-6.6.0.XXXX.run params
# sh pdagent-Solaris_8_sparc-6.6.0.XXXX.run params
The parameters are as follows:
Performs the following actions:
■ Answers all installer questions rather than byprompting for input.
■ Prompts you one time for information about anomitted parameter. If you provide an invalidanswer, the installer exits.
--silent
Specifies that you want to install the NetBackupPureDisk Deduplication Option plug-in.
--nbpddo
(Optional) Specifies the installation directory. Defaultis /opt.
--path=path
Note the following:
■ Use pdagent-Solaris_8_sparc-6.6.0.XXXX.run for both Solaris 9 and8 operating systems.
■ XXXX is the build number that appears in your PureDisk opening page.
Installing the PDDO plug-in on Linux and Solaris SPARC media serversPerforming an unattended installation of the PDDO plug-in on a Linux or Solaris media server
28
The following example shows a Linux installation command with all possibleparameters:
# sh pdagent-Linux_2.6_x86-6.6.0.XXXX.run --silent --nbpddo --path=/opt/myspa
3 (Conditional) Start NetBackup’s services.
Perform this step if NetBackup’s services are not running. For informationabout how to start services, see your NetBackup documentation.
4 Establish a connection between the media server and the storage pool.
See “Establishing the PDDO connection between a UNIX NetBackup mediaserver and the PureDisk storage pool” on page 29.
Establishing the PDDO connection between a UNIXNetBackup media server and the PureDisk storagepool
This topic explains how to: configure the PDDO plug-in on the media server, pointthe media server to a PureDisk storage pool, and create the PureDisk storageserver.
After you perform this procedure, the software initiates the following activities:
■ Activates the PDDO plug-in as a client to the storage pool
■ Registers the media server as a client to the storage pool
■ Creates a PureDisk PDDO data selection
Note: Do not delete the PDDO data selection. If you delete and then want torecreate this data selection, you need to reinstall the PDDO plug-in. You cannotrecreate this data selection from the PureDisk Web UI.
29Installing the PDDO plug-in on Linux and Solaris SPARC media serversEstablishing the PDDO connection between a UNIX NetBackup media server and the PureDisk storage pool
To establish the PDDO connection between a UNIX NetBackup media server andthe PureDisk storage pool
1 Change to the PDDO plug-in’s bin directory.
For example:
# cd /install_directory/pdag/bin
For install_directory, specify the directory in which you installed the PDDOplug-in. The default is /opt.
2 Type the following command to make NetBackup aware of the PureDiskstorage pool and aware of the PDDO plug-in on the media server:
# sh ./pddocfg.sh --addspa --mediaserver=ms_addr --storageserver=spa_addr
The arguments to this command are as follows:
Type the media server’s FQDN, host name, or IP address.
Symantec recommends that you type the full FQDN of the mediaserver. For example, acctms.acme.com.
ms_addr
Type the PureDisk storage pool authority’s FQDN (recommended),host name, or IP address. The storage pool authority identifiesitself with this address. You also enter this address in a browserwindow to logon to the storage pool authority.
If the storage pool authority is clustered, type the service FQDN,service host name, or service IP address.
spa_addr
3 Type the storage pool authority administrator’s user ID in response to thefollowing prompt:
Enter the Storage Pool Authority administrator's user ID >
For example:
Enter the Storage Pool Authority administrator's user ID > root
4 Type the storage pool authority administrator’s password in response to thefollowing prompt:
Enter the Storage Pool Authority administrator’s password >
PureDisk does not modify this password. It uses this password only to registerthe PDDO plug-in.
Installing the PDDO plug-in on Linux and Solaris SPARC media serversEstablishing the PDDO connection between a UNIX NetBackup media server and the PureDisk storage pool
30
5 Retype the password for the storage pool authority in response to thefollowing prompt:
Retype password >
6 Examine the configuration messages.
A successful configuration generates messages similar to the following:
Storage server acme.com has been successfully created.
pddocfg: INFO "nbdevconfig.exe -creatests" completed successfully
pddocfg: INFO "tpconfig.exe -add" completed successfully
pddocfg: INFO pddocfg completed successfully
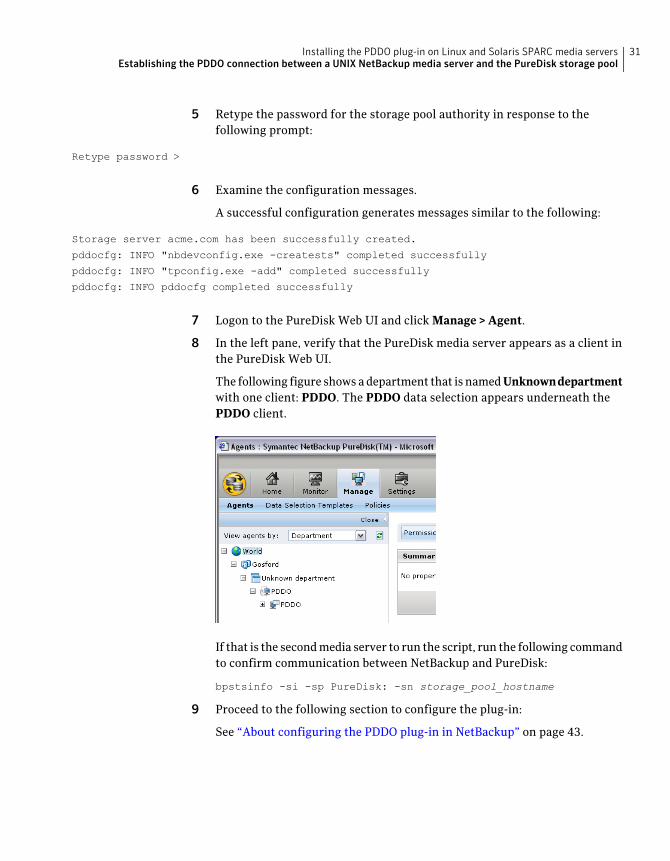
7 Logon to the PureDisk Web UI and click Manage > Agent.
8 In the left pane, verify that the PureDisk media server appears as a client inthe PureDisk Web UI.
The following figure shows a department that is named Unknowndepartmentwith one client: PDDO. The PDDO data selection appears underneath thePDDO client.
If that is the second media server to run the script, run the following commandto confirm communication between NetBackup and PureDisk:
bpstsinfo -si -sp PureDisk: -sn storage_pool_hostname
9 Proceed to the following section to configure the plug-in:
See “About configuring the PDDO plug-in in NetBackup” on page 43.
31Installing the PDDO plug-in on Linux and Solaris SPARC media serversEstablishing the PDDO connection between a UNIX NetBackup media server and the PureDisk storage pool

Installing the PDDO plug-in on Linux and Solaris SPARC media serversEstablishing the PDDO connection between a UNIX NetBackup media server and the PureDisk storage pool
32
Installing the PureDiskDeduplication Optionplug-in on Windows mediaservers
This chapter includes the following topics:
■ About installing the PDDO plug-in on a Windows media server
■ Performing an attended installation of the PDDO plug-in on a Windows mediaserver
■ Performing an unattended installation of the PDDO plug-in on a Windowsmedia server
■ Establishing a connection between a Windows NetBackup media server andthe PureDisk storage pool
About installing the PDDO plug-in on a Windowsmedia server
You can install the PDDO plug-in on a Windows media server. Symantec supportsan attended, menu-driven installation method. After you install the plug-in, youneed to establish a connection between the NetBackup media server and thePureDisk storage pool.
4Chapter
To install the PDDO plug-in on a NetBackup Windows media server
1 Install the plug-in.
See “Performing an attended installation of the PDDO plug-in on a Windowsmedia server” on page 34.
2 Establish a connection between the media server and the storage pool.
See “Establishing a connection between a Windows NetBackup media serverand the PureDisk storage pool” on page 37.
Performing an attended installation of the PDDOplug-in on a Windows media server
The following procedure explains how to install the PDDO plug-in on a Windowsmedia server using the installation wizard.
Note: Complete the entire PDDO installation and configuration process in onestep. Do not install NetBackup software during the PDDO installation orconfiguration process. You can install NetBackup patches or upgrades after youconfigure the PDDO plug-in in NetBackup.
To install PDDO plug-in on a Windows media server by using an attended install
1 To start the installation wizard, click pdagent-Windows_x86-6.6.0.XXXX.exeor pdagent-Windows_x86_64-6.6.0.XXXX.exe as appropriate.
SubstituteXXXXwith the build number that appears in your PureDisk openingpage.
2 On the Welcome page, click Next to start the installation.
3 On the License Agreement page, select I accept the terms of the licenseagreement and then click Next.
The Agent Installation Method page appears.
4 Select the EnablePureDiskDeduplicationOption to install the PDDO client.
Select either a Typical or Custom installation method.
■ A Typical installation installs all the PureDisk services in defaultdirectories. Typical is selected by default.
■ A Custom installation enables you to install the PDDO plug-in in analternate location. By default, the installer writes the software to thefollowing location:C:\Program Files\Symantec\NetBackup PureDisk Agent
Installing the PureDisk Deduplication Option plug-in on Windows media serversPerforming an attended installation of the PDDO plug-in on a Windows media server
34
When the desired options are selected, click Next
5 If you selected Custom on the AgentInstallationMethod page, complete theSymantec NetBackup PureDisk Agent Features page.
Perform the following steps:
■ (Optional) Select SnapshotSupport and use the pull-down menu to disableor enable this feature. Snapshot support enables you to back up open files.
■ (Optional) Click Change to change the installation path. The installerpresents you with the Change current destination folder page. In theupper half of the page, use the icons and pull-downs to select a path. Or,in the lower half of the page, you can type an absolute path. Click OK whenyou finish on this page. Click Cancel to return to the SymantecNetBackupPureDisk Agent Features page.
■ Click Next.
■ On the Ready to install the program page, click Install.
6 To review the README information, confirm Display the READMEfile isselected.
Performing an unattended installation of the PDDOplug-in on a Windows media server
To install the PDDO plug-in on a client with a minimum of user intervention, usean unattended, or silent, install.
Note: Complete the entire PDDO installation and configuration process in onestep. Do not install NetBackup software during the PDDO installation orconfiguration process. You can install NetBackup patches, upgrades, or releasesafter you configure the PDDO plug-in in NetBackup.
To install the PDDO plug-in on a Windows media server by using an unattendedinstall
1 Use the cd(1) command to change to the directory to which you installedthe software.
2 Run the installation command that corresponds to the client’s platform, asfollows:
C:>\pdagent-Windows_x86-6.6.0.XXXX.exe
C:>\pdagent-Windows_x86_64-6.6.0.XXXX.exe
35Installing the PureDisk Deduplication Option plug-in on Windows media serversPerforming an unattended installation of the PDDO plug-in on a Windows media server
The parameters are as follows:
Performs the following actions:
■ Answers all installer questions rather than byprompting for input.
■ Prompts you one time for information about anomitted parameter. If you provide an invalidanswer, the installer exits.
--silent
For spa_addr, specify the FQDN (recommended), hostname, or IP address of the storage pool authority. Ifthe storage pool is clustered, specify the service FQDN,service host name, or service IP address.
--spa=spa_addr
For login, specify the administrator’s user ID on thestorage pool authority.
Information about PureDisk logon and passwordrestrictions and guidelines is available.
See the PureDisk Client Installation Guide.
--login=login
Forpasswd, specify the password for the administratoron the storage pool authority.
Information about PureDisk logon and passwordrestrictions and guidelines is available.
See the PureDisk Client Installation Guide.
--passwd=passwd
Specifies that you want to install the NetBackupPureDisk Deduplication Option plug-in.
--nbpddo
(Optional) Specifies the installation directory. Defaultis /opt.
--path=path
Note the following:
■ XXXX is the build number that appears in your PureDisk opening page.
The following example shows a Windows x86 installation command with allpossible parameters:
pdagent-Windows_x86-6.6.0.XXXX.exe --silent --spa=roadrunner.acme.com \
--login=beep --passwd=beep --nbpddo --path=/opt/myspa
Installing the PureDisk Deduplication Option plug-in on Windows media serversPerforming an unattended installation of the PDDO plug-in on a Windows media server
36
3 (Conditional) Start NetBackup’s services.
Perform this step if NetBackup’s services are not running. For informationabout how to start services, see your NetBackup documentation.
4 Establish a connection between the media server and the storage pool.
See “Establishing the PDDO connection between a UNIX NetBackup mediaserver and the PureDisk storage pool” on page 29.
Establishing a connection between a WindowsNetBackup media server and the PureDisk storagepool
The procedure in this topic explains how to: configure the PDDO plug-in on themedia server, point the media server to a PureDisk storage pool, and create thePureDisk storage server.
After you perform this procedure, the software initiates the following activities:
■ Activates the PDDO plug-in as a client to the storage pool
■ Registers the media server as a client to the storage pool
■ Creates a PureDisk PDDO data selection
Note: Do not delete the PDDO data selection. If you delete it and then want torecreate this data selection, you must reinstall the PDDO plug-in. You cannotrecreate this data selection from the PureDisk Web UI.
On a Windows platform media server, you can use either the NetBackup Windowsinterface or the NetBackup Java interface.
Note: Be sure you've completed all steps from the “Performing an attendedinstallation” section before continuing with the following procedure. See“Performing an unattended installation of the PDDO plug-in on a Windows mediaserver” on page 35.
37Installing the PureDisk Deduplication Option plug-in on Windows media serversEstablishing a connection between a Windows NetBackup media server and the PureDisk storage pool

To configure the PureDisk storage pool as a NetBackup storage server
1 Change to the PDDO plug-in’s bin directory.
Example 1. If you installed the software in the default directory, type thefollowing commands:
cd ..\..
cd "Program Files\Symantec\NetBackup PureDisk Agent\bin"
Example 2. If you installed in a directory other than the default, type thefollowing commands:
cd ..\..
cd "install_path\NetBackup PureDisk Agent\bin"
For install_path, specify the directory in which you installed the PDDO plug-in.
Installing the PureDisk Deduplication Option plug-in on Windows media serversEstablishing a connection between a Windows NetBackup media server and the PureDisk storage pool
38
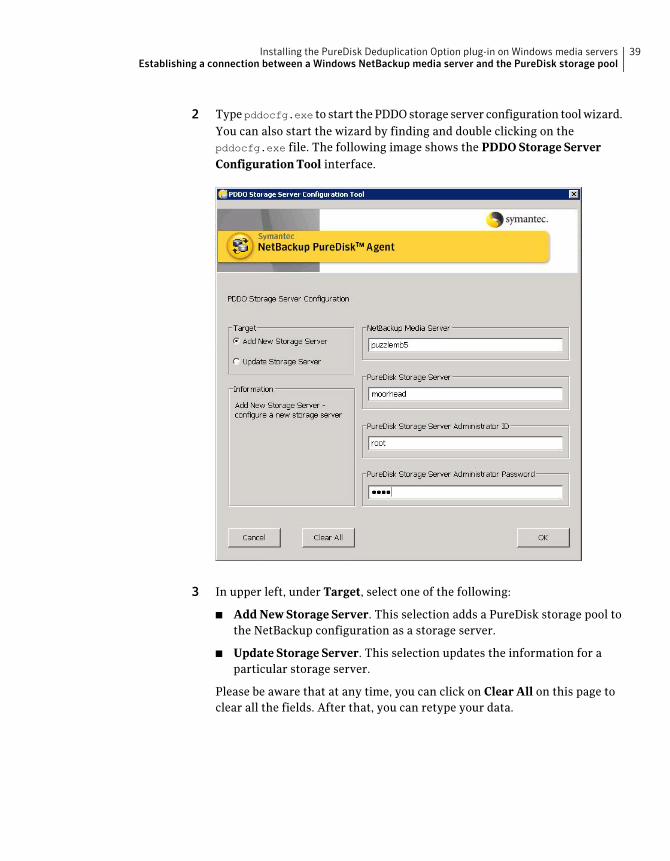
2 Type pddocfg.exe to start the PDDO storage server configuration tool wizard.You can also start the wizard by finding and double clicking on thepddocfg.exe file. The following image shows the PDDO Storage ServerConfiguration Tool interface.
3 In upper left, under Target, select one of the following:
■ Add New Storage Server. This selection adds a PureDisk storage pool tothe NetBackup configuration as a storage server.
■ Update Storage Server. This selection updates the information for aparticular storage server.
Please be aware that at any time, you can click on Clear All on this page toclear all the fields. After that, you can retype your data.
39Installing the PureDisk Deduplication Option plug-in on Windows media serversEstablishing a connection between a Windows NetBackup media server and the PureDisk storage pool
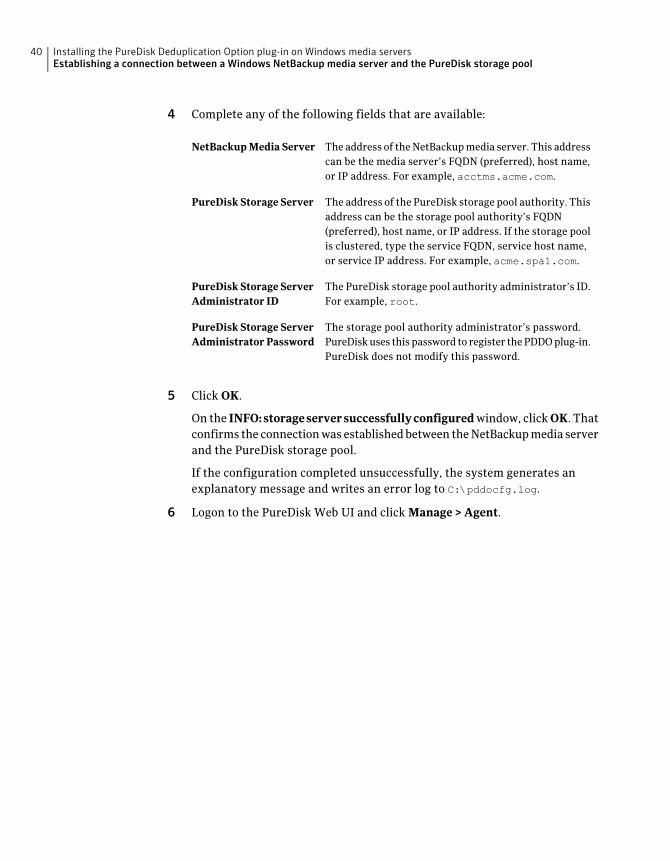
4 Complete any of the following fields that are available:
The address of the NetBackup media server. This addresscan be the media server’s FQDN (preferred), host name,or IP address. For example, acctms.acme.com.
NetBackup Media Server
The address of the PureDisk storage pool authority. Thisaddress can be the storage pool authority’s FQDN(preferred), host name, or IP address. If the storage poolis clustered, type the service FQDN, service host name,or service IP address. For example, acme.spa1.com.
PureDisk Storage Server
The PureDisk storage pool authority administrator’s ID.For example, root.
PureDisk Storage ServerAdministrator ID
The storage pool authority administrator’s password.PureDisk uses this password to register the PDDO plug-in.PureDisk does not modify this password.
PureDisk Storage ServerAdministrator Password
5 Click OK.
On the INFO:storageserversuccessfullyconfigured window, click OK. Thatconfirms the connection was established between the NetBackup media serverand the PureDisk storage pool.
If the configuration completed unsuccessfully, the system generates anexplanatory message and writes an error log to C:\pddocfg.log.
6 Logon to the PureDisk Web UI and click Manage > Agent.
Installing the PureDisk Deduplication Option plug-in on Windows media serversEstablishing a connection between a Windows NetBackup media server and the PureDisk storage pool
40
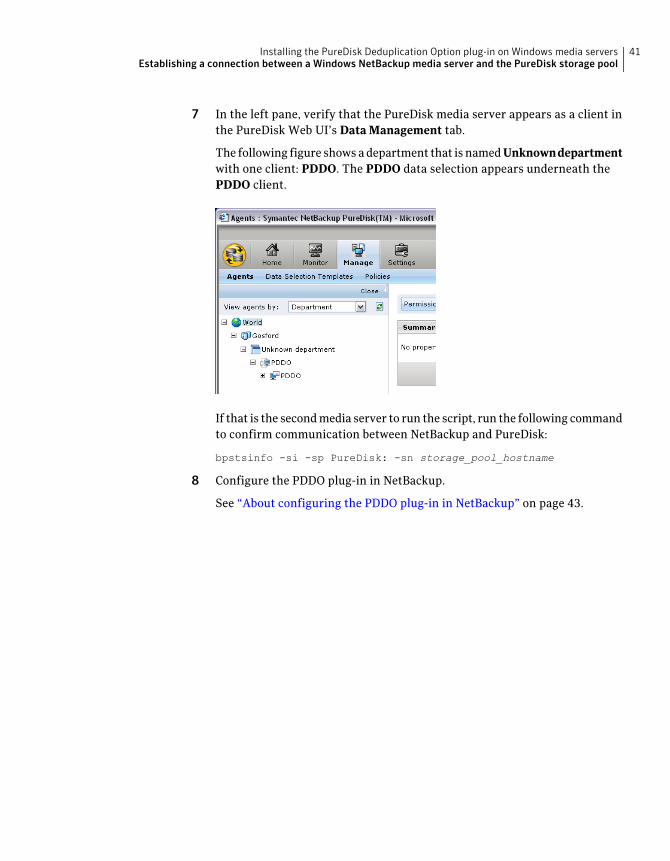
7 In the left pane, verify that the PureDisk media server appears as a client inthe PureDisk Web UI’s Data Management tab.
The following figure shows a department that is named Unknowndepartmentwith one client: PDDO. The PDDO data selection appears underneath thePDDO client.
If that is the second media server to run the script, run the following commandto confirm communication between NetBackup and PureDisk:
bpstsinfo -si -sp PureDisk: -sn storage_pool_hostname
8 Configure the PDDO plug-in in NetBackup.
See “About configuring the PDDO plug-in in NetBackup” on page 43.
41Installing the PureDisk Deduplication Option plug-in on Windows media serversEstablishing a connection between a Windows NetBackup media server and the PureDisk storage pool

Installing the PureDisk Deduplication Option plug-in on Windows media serversEstablishing a connection between a Windows NetBackup media server and the PureDisk storage pool
42
Configuring the PDDOplug-in in NetBackup
This chapter includes the following topics:
■ About configuring the PDDO plug-in in NetBackup
■ Configuring the NetBackup disk pool and storage unit in the NetBackup Javainterface
■ Configuring the NetBackup disk pool and storage unit in the NetBackupWindows interface
■ Verifying the NetBackup configuration and creating a NetBackup policy
About configuring the PDDO plug-in in NetBackupThe PDDO plug-in is configured in NetBackup using either the Java interface orwith the Windows interface. NetBackup’s Java interface and Windows interfacediffer slightly. On Windows media servers, you can use either the Java interfaceor the Windows interface. On Linux and Solaris SPARC media servers, you canuse only the Java interface. The following procedure explains how to configurethe plug-in and how to create a policy to verify the configuration.
To configure the PDDO plug-in on the media server, verify the configuration, andcreate a backup policy
1 Configure a NetBackup disk pool and storage unit.
If you installed the PDDO plug-in on a Linux or Solaris SPARC media server,use the Java interface. Perform the following procedure:
■ See “Configuring the NetBackup disk pool and storage unit in theNetBackup Java interface” on page 44.
5Chapter
If you installed the PDDO plug-in on a Windows media server, you can useeither the Java interface or the Windows interface. Perform one of thefollowing procedures:
■ See “Configuring the NetBackup disk pool and storage unit in theNetBackup Java interface” on page 44.
■ See “Configuring the NetBackup disk pool and storage unit in theNetBackup Windows interface” on page 46.
2 Verify the NetBackup configuration and create a policy.
See “Verifying the NetBackup configuration and creating a NetBackup policy”on page 48.
Configuring theNetBackupdisk pool and storage unitin the NetBackup Java interface
Use the following procedure to configure a PureDisk disk pool and a storage unit.You perform this procedure from the NetBackup Java interface on a Windows,Linux, or Solaris SPARC media server.
To configure aNetBackupdisk pool and storage unit in theNetBackup Java interface
1 Start the NetBackup Administration Console on the media server.
2 On the left menu pane, right-click Devices > Disk Pools.
3 Select New Disk Pool ... .
4 On the Welcome to the Disk Pool Configuration Wizard page, click Next.
5 On the Disk Pool page, in the Type pane, select PureDisk and click Next.
6 On the SelectStorageServer page, in the Storageserver pane, select a storagepool and click Next.
If the page displays more than one PureDisk storage pool, select the one thatcorresponds to the PureDisk storage pool that you want to configure. ThePureDisk storage pool’s FQDN, host name, or IP address appears in theinterface.
NetBackup’s interface refers to the PureDisk storage pool as a "storage server."
7 On the Select Volumes page, check PureDiskVolume, and then click Next.
8 On the Disk Pool Properties page, define the following parameters for thisdisk pool, and then click Next.
■ Specify a Disk Pool name. For example, you can specifydp_spa_in_building10 or some other identifier for the storage pool. After
Configuring the PDDO plug-in in NetBackupConfiguring the NetBackup disk pool and storage unit in the NetBackup Java interface
44
configuration, this name appears in NetBackup’s list of disk pools. Forexample, you cannot use period characters (.) in this name.
Information about the characters that you can use for this name isavailable.See the NetBackup Shared Storage Guide.
■ (Optional) Type Comments. These can consist of extra identification, suchas the location of the PureDisk storage pool, the owner of the system, andso on.
■ Accept the default High water mark and Low water mark settings.PureDisk sends messages to NetBackup when it nears its storage capacity.
9 On the Summary page, review your specifications, and then click Next.
10 On the Disk Pool Configuration page, monitor the task’s progress, and thenclick Next when the check mark appears to the left of the disk pool name.
The check mark indicates that the NetBackup created the disk pool.
11 On the Storage Unit Option page, verify that the Create a Storage Unit thatuses disk_pool_name is checked and click Next.
12 Complete the fields on the Storage Unit Creation - Enter details to createStorage Unit page, and then click Next.
Define the following parameters for the storage unit:
■ In the Storageunitname field, specify the storage unit name. For example,you can use acme.com-STU1. After configuration, this name appears inNetBackup’s list of storage units in the NetBackup interface.
■ In the Media Server pane, select Use any available media server in thedisk pool or Use only the following media servers.
Use the following information to make your selection:
■ If you have only one media server, it does not matter which option youchoose.
■ If you have multiple media servers and you select Use any availablemedia server to transport data, NetBackup chooses from among theavailable media servers for backups. Choose this option if you plan toadd other media servers to this PureDisk storage pool in the future.You do not need to update the storage units at that time.
■ If you have multiple media servers and you select Useonlytheselectedmedia servers, NetBackup uses the specified media server(s) when itruns.
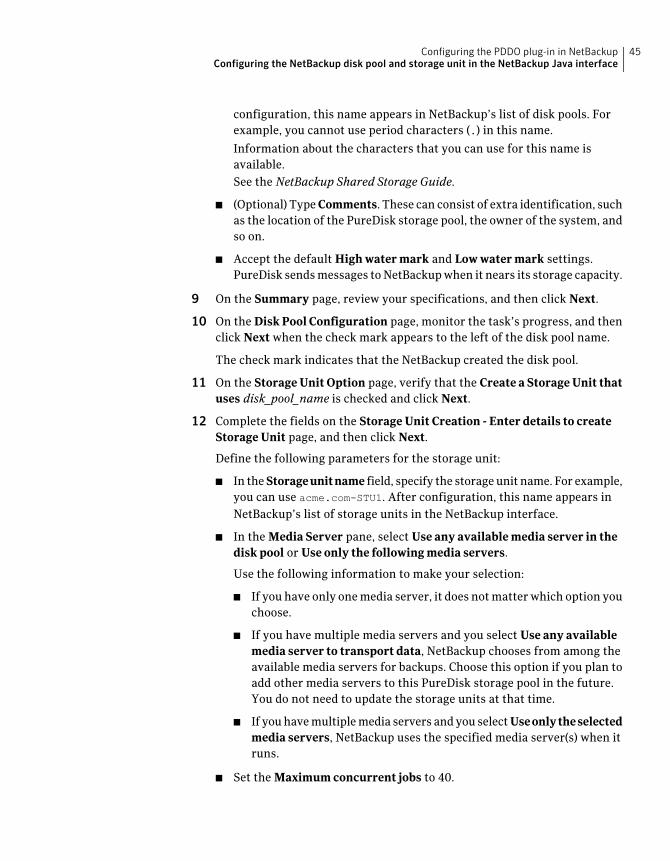
■ Set the Maximum concurrent jobs to 40.
45Configuring the PDDO plug-in in NetBackupConfiguring the NetBackup disk pool and storage unit in the NetBackup Java interface
■ Set the Maximum fragment size to 51200. The unit of measure ismegabytes for this field, so this value equals 51,200 megabytes (or 51.2gigabytes).In the NetBackup Administration Console, select NetBackupManagement> Storage > Storage Units, and the New Storage Units display appears.On this display, Symantec recommends that you change the Maximumfragment size field to 51200. If you specify a larger value, performancecan degrade. If you specify a smaller value, you incur more maintenancebecause there are more fragments, but there is less overhead per fragment.More information about these settings is available.See the NetBackup Shared Storage Guide.
13 Click Finish.
14 Complete and verify the NetBackup configuration.
See “Verifying the NetBackup configuration and creating a NetBackup policy”on page 48.
Configuring theNetBackupdisk pool and storage unitin the NetBackup Windows interface
Use the following procedure to configure a NetBackup disk pool and OpenStorageunit. You perform this procedure from the NetBackup Windows interface on aWindows media server.
To configure a NetBackup disk pool and storage unit in the NetBackup Windowsinterface
1 Start the NetBackup Administration Console on the media server.
2 On the left menu pane, right-click Devices > Disk Pools.
3 Select New... .
4 On the Welcome to the Disk Pool Configuration Wizard page, click Next.
5 On the Disk Pool page, in the Type pane, select PureDisk and click Next.
6 On the SelectStorageServer page, in the Storageserver pane, select a storagepool and click Next.
If the page displays more than one PureDisk storage pool, select the one thatcorresponds to the PureDisk storage pool that you want to configure. ThePureDisk storage pool’s FQDN, host name, or IP address appear in theinterface.
NetBackup’s interface refers to the PureDisk storage pool as a "storage server."
Configuring the PDDO plug-in in NetBackupConfiguring the NetBackup disk pool and storage unit in the NetBackup Windows interface
46

7 On the Select Volumes page, check PureDiskVolume and click Next.
8 Complete the fields on the Disk Pool Properties page, and then click Next.
Define the following parameters for this disk pool:
■ Specify a Disk Pool name. For example, you can specifydp.spa.in.room101 or some other identifier for the storage pool. Afterconfiguration, this name appears in NetBackup’s list of disk pools.
■ (Optional) Type Comments. These can consist of extra identification, suchas the location of the PureDisk storage pool, the owner of the system, andso on.
■ Accept the default High water mark and Low water mark settings.PureDisk sends messages to NetBackup when it nears its storage capacity.TIP: To specify site-specific High water mark and the Low water marksettings, change these settings now. You can change this setting later inNetBackup, but it is easier and more efficient to specify these settings atthis time.
9 On the Summary page, review your specifications, and then click Next.
10 On the DiskPoolCreation page, monitor the task’s progress. Click Next whenthe check mark appears to the left of the disk pool name.
The check mark indicates that the NetBackup created the disk pool.
11 On the Storage Unit creation - Choose to create a storage unit page, verifythat the Create a Storage Unit that uses disk_pool_name is checked. ClickNext.
12 Complete the fields on the Storage Unit Creation - Enter details to createNetBackup Storage Unit page, and then click Next.
Define the following parameters for the storage unit:
■ In the Storageunitname field, specify the storage unit name. For example,acme.com-STU. After configuration, this name appears in NetBackup’s listof storage units in the NetBackup interface.
■ In the Media Server pane, select Use any available media server totransport data or Use only the selected media servers.
Use the following information to make your selection:
■ If you have only one media server, it does not matter which option youchoose.
■ You may have more than one media server. If you select Use anyavailable media server to transport data, NetBackup chooses fromamong the available media servers for backups.
47Configuring the PDDO plug-in in NetBackupConfiguring the NetBackup disk pool and storage unit in the NetBackup Windows interface
■ You may have more than one media server but select Use only theselected media servers. NetBackup then uses the specified mediaserver(s) when it runs
■ Set the Maximum concurrent jobs to 40.
■ Set the Maximumfragmentsize to 51200. This value equals 51.2 gigabytes.In the NetBackup Administration Console, select NetBackupManagement> Storage > Storage Units, and the New Storage Units display appears.On this display, Symantec recommends that you change the Maximumfragment size field to 51200. If you specify a larger value, performancecan degrade. If you specify a smaller value, you incur more maintenancebecause there are more fragments, but there is less overhead per fragment.More information about these settings is available.See the NetBackup Shared Storage Guide.
13 Click Finish.
14 Proceed to the following section to complete the NetBackup configurationand verify it:
See “Verifying the NetBackup configuration and creating a NetBackup policy”on page 48.
Verifying the NetBackup configuration and creatinga NetBackup policy
The procedure in this section explains how to verify that the PureDisk PDDOplug-in is configured properly in NetBackup. For more information aboutNetBackup operations, see your NetBackup documentation.
Note: Do not use the Backup Policy Configuration Wizard . You must create thepolicy manually.
To verify the NetBackup configuration and create a NetBackup policy
1 Verify that the PureDisk storage unit that you configured appears in theNetBackup interface.
For example, start the NetBackup Administration Console on the media serverand perform the following tasks:
■ Click DiskPools and make sure that the disk pool that you named appearsin the list.See step 8.
Configuring the PDDO plug-in in NetBackupVerifying the NetBackup configuration and creating a NetBackup policy
48

■ Click Storage Units and make sure that the storage unit that you namedappears in the list.See step 12.
2 In the NetBackup interface, in the left pane, right-click Policies and selectNew Policy ....
The Add a New Policy dialog box appears.
3 Type a name for this policy.
4 Create the NetBackup backup policy manually.
NOTE: Do not use the Backup Policy Configuration Wizard . You must createthe policy manually.
When you create this policy, make sure to specify the following options:
■ Disable compression
■ Disable encryption
If compression and encryption are enabled in NetBackup, the data is modifiedbefore it reaches PureDisk, and PureDisk cannot deduplicate it correctly.PureDisk compresses and encrypts the data once it is deduplicated. The nextstep explains how to enable compression and encryption.
5 (Optional) To enable compression and encryption, edit the pd.conf file.
Perform this step if you need compression and encryption when NetBackupwrites the backup images to the PureDisk disk pool.
PureDisk’s deduplication feature relies on the ability to detect similar patternsin files from one backup to the next. When you enable NetBackup encryptionand compression, PureDisk cannot detect patterns in file content anddeduplication effectiveness decreases.
The pd.conf file is a configuration file on the media server. More informationabout how to specify settings in this file is available.
See “About the pd.conf file” on page 81.
6 (Optional) Configure NetBackup for multistreaming.
To run more than one job per NetBackup client, make sure to configureNetBackup to run more than one stream. For information aboutmultistreaming, see your NetBackup documentation.
7 Run a manual backup and restore the files from the backup.
If you can perform this backup and restore, then the configuration worksproperly. For information about NetBackup backups and restores, see yourNetBackup documentation.
49Configuring the PDDO plug-in in NetBackupVerifying the NetBackup configuration and creating a NetBackup policy

Configuring the PDDO plug-in in NetBackupVerifying the NetBackup configuration and creating a NetBackup policy
50
Using PureDisk as aNetBackup storage unit
This chapter includes the following topics:
■ About the PDDO plug-in in the PureDisk Web UI
■ Adding an additional PureDisk storage pool to a NetBackup media server
■ About configuring NetBackup lifecycle policies
■ Disaster recovery configuration example
■ Removing data and customizing the system policy for PDDO data removal
■ Completing the General tab on the Edit Policy dialog box
■ Completing the Scheduling tab on the Edit Policy dialog box
■ About PureDisk garbage collection policies
■ Retrieving job reports
■ About job details reports
■ About data mining reports
■ About central reporting
■ Displaying the agent dashboard
■ About recovery of a PureDisk storage pool used as a PDDO plug-in
■ Changing the storage pool authority password when PDDO is enabled
6Chapter
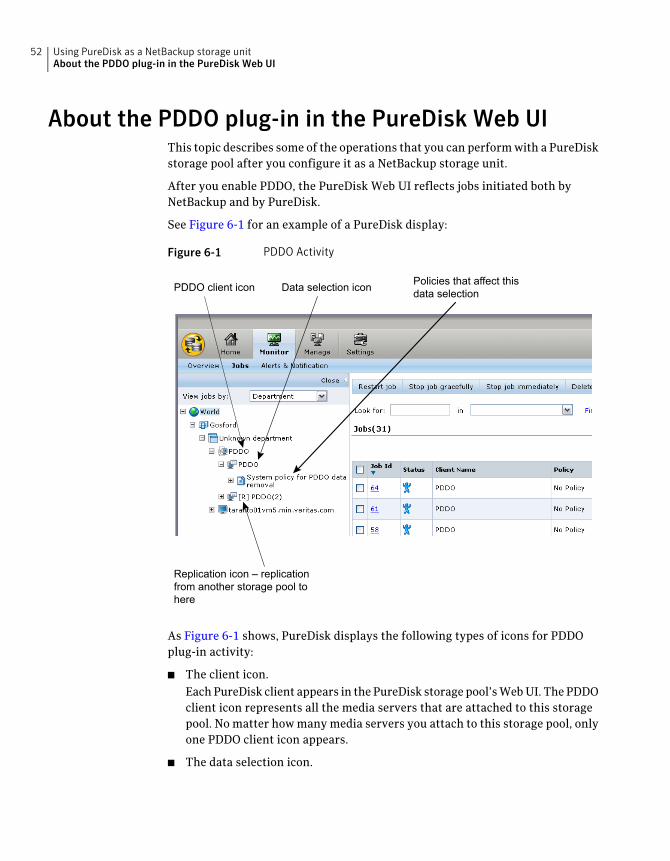
About the PDDO plug-in in the PureDisk Web UIThis topic describes some of the operations that you can perform with a PureDiskstorage pool after you configure it as a NetBackup storage unit.
After you enable PDDO, the PureDisk Web UI reflects jobs initiated both byNetBackup and by PureDisk.
See Figure 6-1 for an example of a PureDisk display:
Figure 6-1 PDDO Activity
PDDO client icon Data selection icon Policies that affect thisdata selection
Replication icon – replicationfrom another storage pool tohere
As Figure 6-1 shows, PureDisk displays the following types of icons for PDDOplug-in activity:
■ The client icon.Each PureDisk client appears in the PureDisk storage pool’s Web UI. The PDDOclient icon represents all the media servers that are attached to this storagepool. No matter how many media servers you attach to this storage pool, onlyone PDDO client icon appears.
■ The data selection icon.
Using PureDisk as a NetBackup storage unitAbout the PDDO plug-in in the PureDisk Web UI
52
This icon represents data backups from one or more NetBackup media serversto this PureDisk storage pool. Only one data selection icon for the PDDO storageunit can exist.
■ One or more policy icons.This display shows the policy icon Systempolicyfordataremoval. By default,you specify data retention in the NetBackup policy. PureDisk removes expireddata when the system policy for data removal runs.
■ One or more replication data selection icons.These icons are [R] PDDO(n) icons. One icon exists for each PureDisk PDDOdata selection that is replicated to this storage pool from another storage pool.
This icon represents one or more of the following replication actions:
■ A PureDisk replication from one storage pool to this storage pool.
■ An optimized duplication action from one storage pool to this storage pool.NetBackup initiates this action, which is a form of replication.
Do not use these icons to interpret specific system activity. If you specifiedoptimized duplication in NetBackup, use the NetBackup interface to see if thejob finished. If you specified replication in PureDisk, click the PureDiskWorkflows tab and examine the replication activity from that tab.If you have two PureDisk storage pools, you might also notice [R][R] icons.These icons represent replication from one storage pool to another, and thenback again.
In the right column, PureDisk displays storage pool job activity. NetBackup initiatesmost of the jobs that are related to the PDDO storage unit. When you click a PDDOicon in the middle column, PureDisk changes the display in the right column toshow job activity for that icon.
Adding an additional PureDisk storage pool to aNetBackup media server
A NetBackup media server can send data to more than one PureDisk storage pool.When a media server is configured to target two different PureDisk storage pools,you can run duplicate backups from NetBackup to both storage pools.
The following procedure explains how to configure a media server to send backupsto an additional PureDisk storage pool.
To add an additional PureDisk storage server to a NetBackup media server
1 Logon to the NetBackup media server.
2 Create the PureDisk storage server and add credentials.
53Using PureDisk as a NetBackup storage unitAdding an additional PureDisk storage pool to a NetBackup media server
This step differs depending on your platform.
■ (Linux or Solaris SPARC)At the system prompt, run the following command to create the PureDiskstorage server and add credentials:
# /opt/pdag/bin/pddocfg.sh --addspa --mediaserver=ms_addr --storageserver=spa_addr
The arguments to this command are as follows:
Type the media server’s FQDN, host name, or IP address.
Symantec recommends that you type the full FQDN of themedia server. For example, acctms.acme.com.
ms_addr
Type the PureDisk storage pool authority’s FQDN(recommended), host name, or IP address. The storage poolauthority identifies itself with this address. You also enterthis address in a browser window to logon to the storage poolauthority.
If the storage pool authority is clustered, type the serviceFQDN, service host name, or service IP address.
spa_addr
Type the storage pool authority administrator’s user ID and passwordwhen the pddocfg command issues prompts for this information.
■ (Windows)Configure the additional PureDisk storage server using steps 1 though 5of the following procedure:See “To configure the PureDisk storage pool as a NetBackup storage server”on page 38.Under Target, specify Add New Storage Server.
Using PureDisk as a NetBackup storage unitAdding an additional PureDisk storage pool to a NetBackup media server
54

3 Verify the storage server in the NetBackup interface.
The following figure shows an example environment with two PureDiskstorage servers.
4 Verify NetBackup and create a NetBackup policy.
See “Verifying the NetBackup configuration and creating a NetBackup policy”on page 48.
About configuring NetBackup lifecycle policiesWhen you configure two or more PureDisk storage pools as NetBackup disk pools,you also can configure a lifecycle policy. A NetBackup lifecycle policy is a storageplan for a set of backups. It lets you manage different kinds of data in your backups.
A lifecycle policy specifies the following information:
■ A list of destinations to which NetBackup writes copies of the backup images.NetBackup can initiate a duplication or optimized duplication between diskpools. If two or more of the disk pool destinations are PureDisk storage pools,NetBackup can perform this duplication as an optimized duplication.
55Using PureDisk as a NetBackup storage unitAbout configuring NetBackup lifecycle policies
■ The prescribed retention period for each copy.
Lifecycle policies let you classify the data according to the data’s backuprequirements. The classifications make it easier to configure backups for datawith different requirements. For example, email data and financial data.
For more information about lifecycle policies, see your NetBackup administrationdocumentation.
Disaster recovery configuration exampleThis topic shows a configuration example and describes how you can recover databy using NetBackup and PureDisk.
The following guidelines apply to the configuration:
■ You can recover data from NetBackup through a restore. You may need toimport the data to NetBackup before you perform the restore. An importupdates the NetBackup catalog. After the import, NetBackup is aware of allthe images that reside on the PureDisk storage pool. When you run a NetBackupbackup or a duplication, these processes also update the NetBackup catalog.
■ NetBackup images that are created with true image recovery (TIR) enabled,can be imported efficiently because NetBackup only needs to read the TIR file.NetBackup incremental and differential backups that are performed with TIRenabled increase the NetBackup catalog’s size. Imports that are performed onthe images that are backed up with TIR enabled are significantly faster thanthose performed without TIR enabled.
■ You must install a PDDO client on a storage pool to allow NetBackup importsor restores from the storage pool.
See Figure 6-2 for an example NetBackup configuration that includes two PureDiskstorage pools and two NetBackup media servers:
Using PureDisk as a NetBackup storage unitDisaster recovery configuration example
56
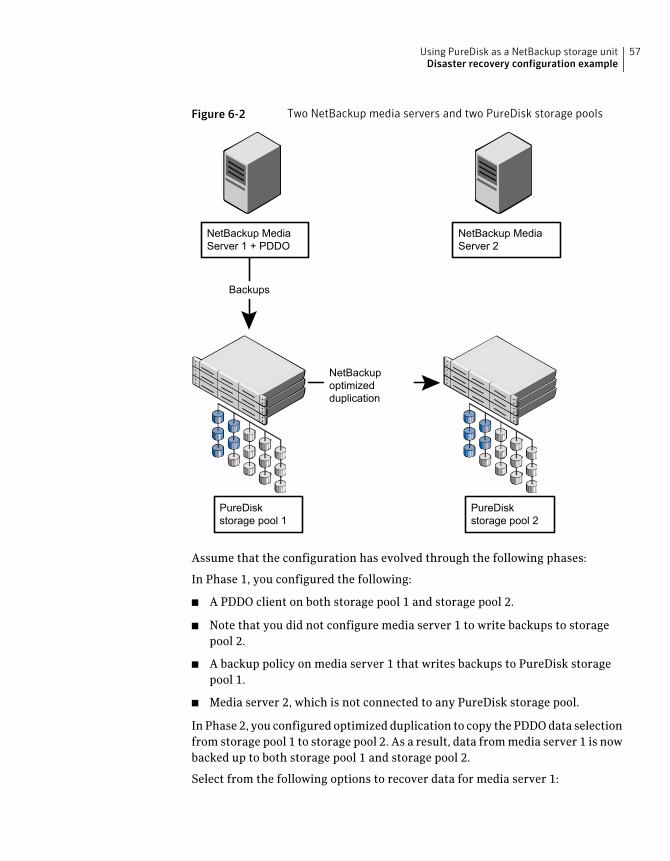
Figure 6-2 Two NetBackup media servers and two PureDisk storage pools
PureDiskstorage pool 1
NetBackup MediaServer 1 + PDDO
PureDiskstorage pool 2
Backups
NetBackupoptimizedduplication
NetBackup MediaServer 2
Assume that the configuration has evolved through the following phases:
In Phase 1, you configured the following:
■ A PDDO client on both storage pool 1 and storage pool 2.
■ Note that you did not configure media server 1 to write backups to storagepool 2.
■ A backup policy on media server 1 that writes backups to PureDisk storagepool 1.
■ Media server 2, which is not connected to any PureDisk storage pool.
In Phase 2, you configured optimized duplication to copy the PDDO data selectionfrom storage pool 1 to storage pool 2. As a result, data from media server 1 is nowbacked up to both storage pool 1 and storage pool 2.
Select from the following options to recover data for media server 1:
57Using PureDisk as a NetBackup storage unitDisaster recovery configuration example
■ If media server 1 and storage pool 1 are down, you can import data from storagepool 2 to recover media server 1. As an alternative, you can install a PDDOplug-in on media server 2, and import the data from storage pool 2.
■ If media server 1 is down, you can perform a catalog recovery on media server1. Then you can perform a regular restore from storage pool 1.
■ If storage pool 1 is down, you can import data from storage pool 2 to recoverdata to media server 1.
In Phase 3, you configured a NetBackup lifecycle policy to duplicate the databetween storage pool 1 and storage pool 2.
This configuration has the following effects:
■ The duplication takes less time to run because the data already exists on storagepool 2.
■ If either storage pool 1 or storage pool 2 become unavailable, you can runrestores seamlessly from the storage pool that is still running.
Removing data and customizing the systempolicy forPDDO data removal
Your NetBackup policies specify a retention period for a backup image. At the endof this time, the backup image is said to be expired. PureDisk’s data removalpolicies remove expired data from the content routers. PureDisk data removalpolicies do not remove any data that is backed up with the PDDO plug-in unlessNetBackup expired the data first.
PureDisk includes a system policy for PDDO data removal. This policy is enabledby default, and it is preconfigured to run once a week. You do not have to edit thesystem policy for PDDO data removal, nor do you have to reconfigure this policy.
If you edit the system policy for PDDO data removal, be careful about schedulingit to run more frequently. For example, you do not want to run this policy onceon the hour. When a PDDO data removal policy runs, PureDisk cannot run PDDObackup jobs. The backup jobs wait until the data removal policy finishes.
The PureDisk data removal policy operates on the following types of dataselections:
■ PDDO data selections that are backed up to this storage pool from NetBackup
■ PDDO data selections that are replicated to this storage pool from anotherstorage pool
A PDDO data removal policy does not affect data removal for any other dataselection types that you may have specified for this storage pool.
Using PureDisk as a NetBackup storage unitRemoving data and customizing the system policy for PDDO data removal
58
The system policy for PDDO data removal provides a global policy that affects allthe data that is backed up with the PDDO data selection. For example, if you haveseveral NetBackup policies that write data to the PureDisk storage unit, they eachmay have different retention periods. The PureDisk system policy for data removal,however, affects all PDDO data selections.
For more information about data removal, see the following manual:
See the PureDisk Backup Operator’s Guide.
The following procedure explains how to customize the PureDisk system policyfor PDDO data removal.
To customize the PureDisk system policy for PDDO data removal
1 Select Manage > Policies.
2 In the left pane, under Data Management Policies, expand PDDO DataRemoval.
3 In the left pane, click System policy for PDDO data removal.
4 In the right pane, complete the General tab.
See “Completing the General tab on the Edit Policy dialog box” on page 59.
5 In the right pane, complete the Scheduling tab.
See “Completing the Scheduling tab on the Edit Policy dialog box” on page 60.
6 Click Save.
Completing the General tab on the Edit Policy dialogbox
The following procedure explains how to complete this tab.
To complete the General tab
1 Type a name for this policy in the Policy Name field.
2 Select Enabled or Disabled.
This setting lets you control whether PureDisk runs the policy in the followingways:
■ If you select Enabled, PureDisk runs the policy according to the schedulethat you specify on the Scheduling tab. Enabled is the default.
■ If you select Disabled, PureDisk does not run the policy according to theschedule and NetBackup cannot initiate data removal.
59Using PureDisk as a NetBackup storage unitCompleting the General tab on the Edit Policy dialog box

For example, you might want to stop running this policy during a systemmaintenance period. If you select Disabled, you do not need to enterinformation in the Scheduling tab to suspend and then reenable thispolicy.
3 (Optional) Specify an escalation procedure if desired.
PureDisk can notify you if an update does not complete within a specifiedtime. For example, you can configure PureDisk to send an email message toan administrator if a policy does not complete in an hour.
Select times in the Escalatewarningafter or the Escalateerrorandterminateafter drop-down lists. These times specify the elapsed time that the policyworkflow can run before PureDisk generates a warning message. Six days isthe default time the job can run without an escalation message.
Whichever option you select, ensure that you create a policy escalation actionfor the policy that does the following:
■ Defines the email message
■ Defines the recipients of the email message
■ Associates the escalation action with the policy.
Information about how to create an escalation action is available.
See the PureDisk Backup Operator’s Guide.
Completing the Scheduling tab on the Edit Policydialog box
The following procedure explains how to complete this tab.
To specify a schedule
◆ Use the drop-down lists and options on this tab to specify when the policy isto run.
PureDisk does not run data removal jobs at the same time that it runs backupjobs. Make sure to schedule a data removal job at a time when backups arenot scheduled.
If you want to run the policy only one time, select an active policy and clickRun Policy from the tasks pane.
Using PureDisk as a NetBackup storage unitCompleting the Scheduling tab on the Edit Policy dialog box
60
About PureDisk garbage collection policiesPureDisk file data is separated into two components: the file data itself and thefile metadata. The file data resides on the content routers, and the metadataresides in the metabase engine. A data removal policy might not remove all datathat is related to expired NetBackup backup images. The completeness of theremoval depends on other system processes.
The PureDisk garbage collection policies are enabled by default to run once eachmonth. The garbage collection policies remove unneeded files, links, and datafragments from PureDisk storage. This unneeded data can fill a storage pool andcause slower performance.
You can use the PureDisk storage pool as a repository for other backup and restoreclients. If you do, it is likely that you configured policies for content router garbagecollection and metabase garbage collection. These policies are storage-pool-widepolicies, and they also affect the PDDO data selection. If you use the PureDiskstorage pool only as a PDDO OpenStorage plug-in, make sure to configure garbagecollection policies for the storage pool.
Information about how to configure one or more of the following policies isavailable in the PureDisk Administrator’s Guide:
■ Content router garbage collection
■ Metabase garbage collection
Retrieving job reportsPureDisk generates reports about backups, replication, and other types of jobsthat run with the PDDO data selection.
The following procedures explain how to retrieve job reports from the PureDiskWeb UI.
To retrieve job reports
1 Select Monitor > Jobs tab.
2 In the left pane, click the PDDO data selection icon.
61Using PureDisk as a NetBackup storage unitAbout PureDisk garbage collection policies
3 (Optional) Expand the PDDO data selection icon until the job you want to seeappears in the right pane.
4 In the right pane, click the Job ID number for the job you want to see.
A Job Details report appears.
Information about the Job Details report is available.
See “About job details reports” on page 62.
About job details reportsA job details report is divided into the following four tabs: General, Details,Statistics, and a Job log.
These tabs contain information in a format that is similar to the job details reportsfor other types of PureDisk jobs.
Figure 6-3 shows the Statistics tab.
Using PureDisk as a NetBackup storage unitAbout job details reports
62

Figure 6-3 Statistics tab for a PDDO backup job
63Using PureDisk as a NetBackup storage unitAbout job details reports
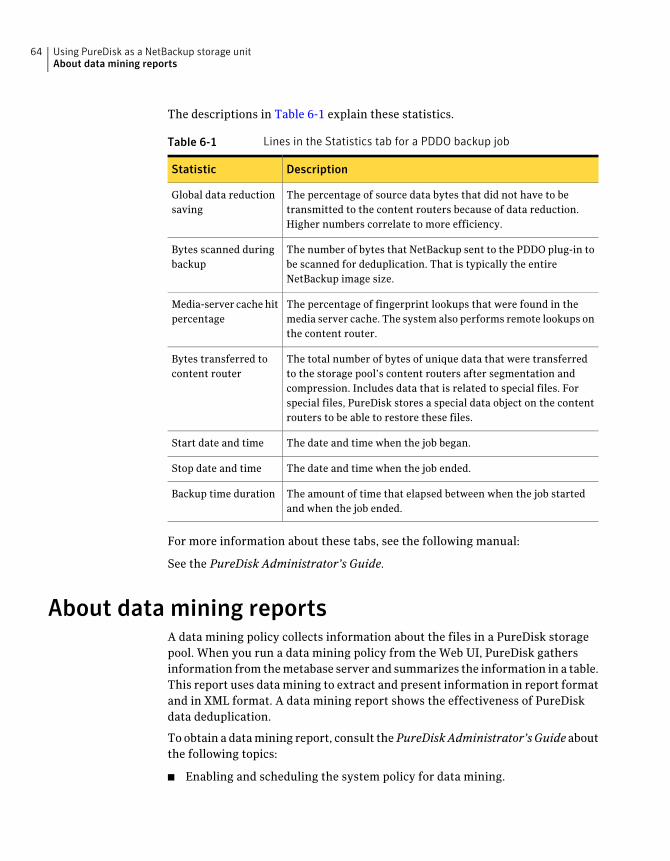
The descriptions in Table 6-1 explain these statistics.
Table 6-1 Lines in the Statistics tab for a PDDO backup job
DescriptionStatistic
The percentage of source data bytes that did not have to betransmitted to the content routers because of data reduction.Higher numbers correlate to more efficiency.
Global data reductionsaving
The number of bytes that NetBackup sent to the PDDO plug-in tobe scanned for deduplication. That is typically the entireNetBackup image size.
Bytes scanned duringbackup
The percentage of fingerprint lookups that were found in themedia server cache. The system also performs remote lookups onthe content router.
Media-server cache hitpercentage
The total number of bytes of unique data that were transferredto the storage pool’s content routers after segmentation andcompression. Includes data that is related to special files. Forspecial files, PureDisk stores a special data object on the contentrouters to be able to restore these files.
Bytes transferred tocontent router
The date and time when the job began.Start date and time
The date and time when the job ended.Stop date and time
The amount of time that elapsed between when the job startedand when the job ended.
Backup time duration
For more information about these tabs, see the following manual:
See the PureDisk Administrator’s Guide.
About data mining reportsA data mining policy collects information about the files in a PureDisk storagepool. When you run a data mining policy from the Web UI, PureDisk gathersinformation from the metabase server and summarizes the information in a table.This report uses data mining to extract and present information in report formatand in XML format. A data mining report shows the effectiveness of PureDiskdata deduplication.
To obtain a data mining report, consult thePureDiskAdministrator’sGuide aboutthe following topics:
■ Enabling and scheduling the system policy for data mining.
Using PureDisk as a NetBackup storage unitAbout data mining reports
64
■ Permissions that are needed to run data mining reports.
■ Obtaining data mining reports.
The data mining reports that pertain to PDDO contain information that is similarto that found in other kinds of data mining reports. One field in these reports isunique to data mining: the Number of Files/Versions field. The Number of
Files/Versions field contains a rough estimate of the number of NetBackupimages that are stored on the content routers in the PureDisk storage pool.
About central reportingThe central reporting feature includes a Used capacity field. Please be aware thedata in this field includes only the data that is consumed by PureDisk agentbackups. It does not include the data that is consumed by PDDO data on a storagepool. Depending on the configuration of your environment, the difference betweendata that is consumed by PureDisk agent backups and the combined total of agentbackups and PDDO data can be significant.
Displaying the agent dashboardFor a selected department or selected agent, the agent dashboard showsinformation about the running jobs and the jobs that completed most recently.
To refresh the data in this dashboard, press function key F5.
To display the agent dashboard
1 Click the Manage > Agent tab.
2 Expand the tree view in the left pane until the department or the agent youwant appears.
Click the plus sign (+) next to each entity to expand the tree.
3 Click on the department or the agent you want.
4 Click Agent Dashboard in the right pane.
About recovery of a PureDisk storage pool used as aPDDO plug-in
To recover a PureDisk storage pool that is used as a PDDO plug-in, use the samemethods that you use to recover other PureDisk storage pools.
See the PureDisk Administrator’s Guide.
65Using PureDisk as a NetBackup storage unitAbout central reporting
Whether you need to perform additional recovery procedures depends on whenthe disaster occurred.
Consider the following series of possible events:
■ At time 1 (T1), you perform a PureDisk storage pool disaster recovery backup.
■ At time 2 (T2), NetBackup writes backup data to the PureDisk storage pool.
■ The PureDisk storage pool goes down.
■ You recover the PureDisk storage pool. You use the storage pool backup thatwas taken at T1.
■ NetBackup writes more backup data to the storage pool. NetBackup assumesthat the data that it wrote to the storage pool at T2 is present on the storagepool. In reality, this data was overwritten when you restored the storage poolby using the backup from T1.
Symantec recommends that you expire the NetBackup catalog images that werewritten to the PDDO storage unit at T2. This option ensures that as much data aspossible is recoverable. You then can resume running your backups. You canexpire the NetBackup catalog images either through NetBackup UI or throughthe NetBackup command line.
Information about how to search the catalog and how to expire images is available.
See the NetBackup Administrator’s Guide, Volume I.
You can think of a downed PDDO storage unit as a disk that failed and was rolledback. In this case, NetBackup still has the catalog information that points to thatlost data. While other solutions may be available for your environment, Symantecrecommends that you expire the images.
Changing the storage pool authority password whenPDDO is enabled
The following procedures explain how to change the PureDisk storage poolauthority root password when PDDO is enabled.
To change the root user password on the storage pool authority
1 Logon to the PureDisk Web UI as root.
2 Click the Settings > Configuration tab.
3 In the left pane, expand Configuration > User Management > Users.
4 Select the root user.
5 In the right pane, click Change Password.
Using PureDisk as a NetBackup storage unitChanging the storage pool authority password when PDDO is enabled
66
6 In the Change Password panel, complete the New Password and ConfirmPassword fields and click Save.
7 Change the root user password on the media server.
See “To change the root user password on a Linux or Solaris SPARC mediaserver” on page 67.
See “To change the root user password on a Windows media server”on page 67.
To change the root user password on a Linux or Solaris SPARC media server
1 Logon to the media server as root.
2 Type the following command:
# /usr/openv/volmgr/bin/tpconfig
3 Select 3) Credentials Configuration.
4 Select 3) OpenStorage Server.
5 Type the storage server’s name, the root user’s logon, and the root user’s newpassword.
6 Edit from tpconfig.
To change the root user password on a Windows media server
1 Logon to the media server as root.
2 Click Start > Run.
3 Type cmd and click Open.
4 Type the following command:
C:\Program Files\Veritas\Volmgr\bin> tpconfig -update -storage_server SPA_name
-stype PureDisk -sts_user_id root -password passwd
For SPA_name, specify the name of the storage pool authority.
For passwd, specify the root user’s new password.
5 (Optional) Restart NetBackup services.
67Using PureDisk as a NetBackup storage unitChanging the storage pool authority password when PDDO is enabled

Using PureDisk as a NetBackup storage unitChanging the storage pool authority password when PDDO is enabled
68
Installing the PDDO plug-inon a clustered NetBackupmedia server
This appendix includes the following topics:
■ Installing the PDDO plug-in on a clustered NetBackup media server
Installing the PDDOplug-in on a clusteredNetBackupmedia server
The following procedure explains how to install the PDDO plug-in on a clusteredmedia server in general terms.
Note: Remember to use the media server’s local host name instead of it clustervirtual name for the installation and configuration.
AAppendix
To install a PDDO plug-in on a clustered NetBackup media server
1 Plan your configuration and download the PDDO plug-in to the NetBackupmedia server’s active node.
See “About improvements to the synthetic backup process” on page 16.
See “Downloading the PDDO plug-in to a media server” on page 22.
2 On the active media server, install the PDDO plug-in and establish aconnection between the active media server and the storage pool.
Use the procedures in one of the following platform-specific topic:
See “About installing the PDDO plug-in on a NetBackup Linux media serveror a NetBackup Solaris SPARC media server” on page 25.
or
See “Performing an attended installation of the PDDO plug-in on a Windowsmedia server” on page 34.
3 On the active media server node, configure the PDDO plug-in in NetBackup.
Use the procedures in the following topic:
See “About configuring the PDDO plug-in in NetBackup” on page 43.
4 Failover the NetBackup service group to another node.
5 Install the PDDO plug-in on the node to which you failed over.
Use the procedure in one of the following platform-specific sections:
■ See “Performing an attended installation of the PDDO plug-in on a Linuxor Solaris media server” on page 26.
■ See “Performing an unattended installation of the PDDO plug-in on aLinux or Solaris media server” on page 28.
■ See “Performing an attended installation of the PDDO plug-in on aWindows media server” on page 34.
6 Establish a connection between the failover media server node and the storagepool.
Use the procedure in one of the following platform-specific sections:
■ See “Establishing the PDDO connection between a UNIX NetBackup mediaserver and the PureDisk storage pool” on page 29.
■ See “Establishing a connection between a Windows NetBackup mediaserver and the PureDisk storage pool” on page 37.
When you complete these procedures, examine the configuration messagesin step 6.
Installing the PDDO plug-in on a clustered NetBackup media serverInstalling the PDDO plug-in on a clustered NetBackup media server
70
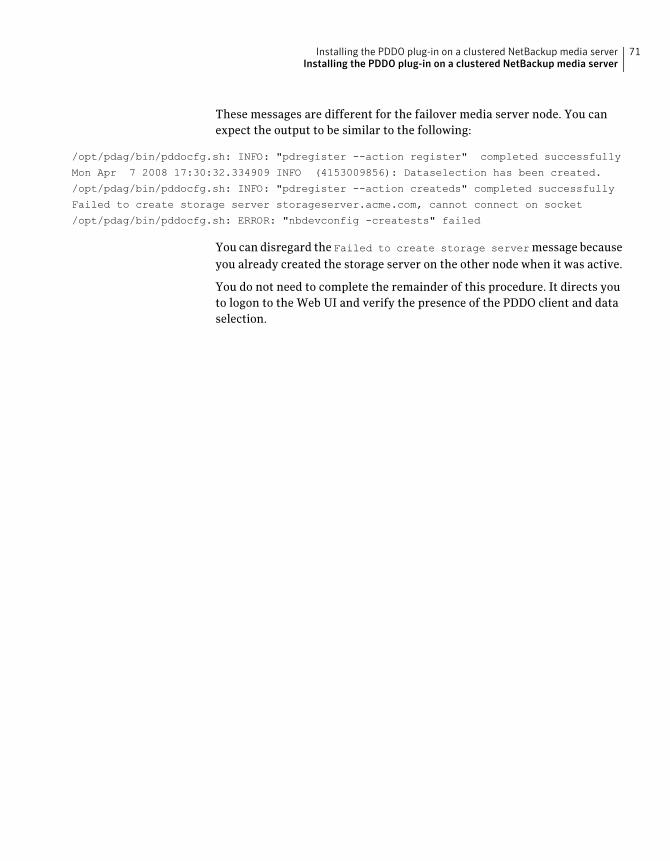
These messages are different for the failover media server node. You canexpect the output to be similar to the following:
/opt/pdag/bin/pddocfg.sh: INFO: "pdregister --action register" completed successfully
Mon Apr 7 2008 17:30:32.334909 INFO (4153009856): Dataselection has been created.
/opt/pdag/bin/pddocfg.sh: INFO: "pdregister --action createds" completed successfully
Failed to create storage server storageserver.acme.com, cannot connect on socket
/opt/pdag/bin/pddocfg.sh: ERROR: "nbdevconfig -creatests" failed
You can disregard the Failed to create storage servermessage becauseyou already created the storage server on the other node when it was active.
You do not need to complete the remainder of this procedure. It directs youto logon to the Web UI and verify the presence of the PDDO client and dataselection.
71Installing the PDDO plug-in on a clustered NetBackup media serverInstalling the PDDO plug-in on a clustered NetBackup media server

Installing the PDDO plug-in on a clustered NetBackup media serverInstalling the PDDO plug-in on a clustered NetBackup media server
72
Repairing and removing aPDDO plug-in
This appendix includes the following topics:
■ Repairing a PDDO plug-in on a Linux or Solaris SPARC media server
■ Repairing a PDDO plug-in on a Windows media server
■ Removing a PDDO plug-in
Repairing aPDDOplug-in on a Linux or Solaris SPARCmedia server
The following procedure explains how to repair a PDDO plug-in on a Linux orSolaris SPARC media server.
To repair a PDDO plug-in on a Linux or Solaris SPARC media server
1 Logon to the media server as root.
2 Stop NetBackup services.
For information about how to stop services, see your NetBackupdocumentation.
3 Run the installer again.
See “About installing the PDDO plug-in on a NetBackup Linux media serveror a NetBackup Solaris SPARC media server” on page 25.
4 Start NetBackup services.
For information about how to start services, see your NetBackupdocumentation.
BAppendix
Repairing a PDDOplug-in on aWindowsmedia serverThe following procedure explains how to repair a PDDO plug-in on a Windowsmedia server.
To repair a PDDO plug-in on a Windows media server
1 Logon to the media server as administrator.
2 Stop NetBackup services.
For information about how to stop services, see your NetBackupdocumentation.
3 Click one of the following icons to start the installation wizard:
pdagent-Windows_x86-6.6.XXXX.exe
pdagent-Windows_x86_64-6.6.XXXX.exe
4 On the Welcome page, click Next.
5 On the Program Maintenance page, click Repair.
6 On the Ready to Install the Program page, click Install.
7 On the Installation Complete page, click Finish.
8 Start NetBackup services.
For information about how to start services, see your NetBackupdocumentation.
Removing a PDDO plug-inThe following sections describe how to remove a PDDO plug-in from a NetBackupmedia server.
The procedures that you need to perform when you remove the plug-in differdepending on the following:
■ Your reasons for removing the plug-in
■ The number of media servers in your NetBackup environment that currentlyhost a PDDO plug-in
Disconnecting the PureDisk storage pool from one media server thatexists among many media servers
The procedures in this topic explain how to retire and then remove the PDDOplug-in from one media server. This action disconnects the media server from the
Repairing and removing a PDDO plug-inRepairing a PDDO plug-in on a Windows media server
74
PureDisk storage pool. Perform the following procedures only if you have otherNetBackup media servers in the environment that you can leave in a running andan operational state.
In NetBackup terminology, a media server is also called a "data mover." You alsocan think of this procedure as a procedure that deletes a data mover.
After you perform these procedures, NetBackup distributes this media server’sload to other media servers in the environment. These other media servers assumethe backup load that NetBackup would have assigned to this media server whenNetBackup tried to communicate with PureDisk.
Do not perform the procedures in this section under the following circumstances:
■ This server is the last, and only, media server in your NetBackup environment.Instead, perform the procedure in the following section to remove the PDDOcapabilities from your only media server:See “Disconnecting the PureDisk storage pool from the last media server andremoving the PureDisk storage pool from the NetBackup environment”on page 78.
■ You intend to reinstall a PureDisk plug-in.
■ You intend to remove an existing PureDisk plug-in and install a new PureDiskplug-in immediately after the removal. For example, you might upgrade aplug-in.More information about reinstalling and upgrading the PDDO plug-in exists.See the Upgrading PDDO clients section in the Symantec NetBackup PureDiskStorage Pool Installation Guide.
The procedures in this section are as follows:
■ Dispense with the backup images that reside on the PureDisk storage pool.See “To dispense with the backup images that reside on the PureDisk storagepool” on page 76.
■ Verify connections to the media server.If a policy is configured to send data to only one media server, that policy stopsworking when you delete the media server. Perform this procedure to find andrespecify the policies that send data to the media server you want to delete.See “To verify the PureDisk storage unit’s media server connections”on page 77.
■ Remove a storage pool from a media server.See “To remove the PureDisk storage pool from one media server” on page 77.
75Repairing and removing a PDDO plug-inRemoving a PDDO plug-in
To dispense with the backup images that reside on the PureDisk storage pool
1 Decide if you want to destroy or to preserve the backup images that this mediaserver wrote to this PureDisk storage pool.
2 Start the NetBackup administrative console.
3 (Conditional) Destroy the current backup images.
Warning:Perform this step only if you want to permanently destroy the backupimages on this PureDisk storage pool.
Use the Catalog utility to expire the backup images that reside on the PureDiskdisk pool. This action removes the images from the NetBackup catalog.NetBackup subsequently removes the images from the disk pool.
4 (Conditional) Preserve the current backup images.
Perform this step only if you want to retain the data on the PureDisk storagepool for later import into NetBackup.
Use the bpexpdate(1M) command to expire the backup images from theNetBackup catalog but retain the data on the PureDisk storage pool.
On Windows systems, specify the bpexpdate command with the followingparameters:
\install_path\bpexpdate -stype PureDisk -dp disk_pool_name -nodelete
On Linux or Solaris SPARC systems, specify the bpexpdate command withthe following parameters:
# /usr/openv/bpexpdate -stype PureDisk -dp disk_pool_name -nodelete
If the images are replicated to another PureDisk storage pool, import theexported images to another system.
For example, you can import the images into a new NetBackup domain.Alternatively, you can perform catalog cleanup, recovery, and troubleshootingactivities on the current NetBackup domain and reimport the images back tothat original domain.
5 Verify that the storage unit and media server are connected.
See “To verify the PureDisk storage unit’s media server connections”on page 77.
Repairing and removing a PDDO plug-inRemoving a PDDO plug-in
76
To verify the PureDisk storage unit’s media server connections
1 Start the NetBackup administrative console.
2 Click Storage > Storage Units.
3 Double-click the PureDisk storage unit.
The Change Storage Unit page appears.
4 Review the following media servers specifications:
If Use any available media server to transport data is selected, proceed tothe following procedure:
See “To remove the PureDisk storage pool from one media server” on page 77.
If Use only the selected media servers is selected, proceed to the next step.
5 Examine the policies that send data to this media server, and respecify thepolicies to send data to a different media server.
6 Remove the PureDisk storage pool from one media server.
See “To remove the PureDisk storage pool from one media server” on page 77.
To remove the PureDisk storage pool from one media server
1 For every NetBackup storage unit that specifies that data mover (that is,media server), clear the checkbox that specifies the media server. This stepis not required if the storage unit is configured to use any available mediaserver.
2 Use the tpconfig command to delete OpenStorage server credentials. Todelete the credentials completely, delete the credentials on each media serverthat functions as a data mover. Alternatively, you can delete the credentialsfrom a single data mover. For example, if you retire a data mover, delete thecredentials from that data mover.
The following is the path to the tpconfig command:
■ Linux/Solaris SPARC: /usr/openv/volmgr/bin
■ Windows: install_path\Program Files\VERITAS\Volmgr\bin
To delete OpenStorage server credentials, enter the following command:
tpconfig -delete -storage_server server_name -stype
server_type-sts_user_id user_id
The following describe the options that require arguments:
■ -storage_server server_name. The host name of the storage server.
77Repairing and removing a PDDO plug-inRemoving a PDDO plug-in
■ -stype server_type.A string that identifies the storage server type. Thestorage vendor provides the string.
■ -sts_user_id user_id. The user name that is used to log into the storageserver. If the storage server did not require logon credentials, enter thedummy credentials that were configured.
If the host failed and is unavailable, you can use the tpconfig deviceconfiguration utility in menu mode to delete the credentials. However, youmust run the tpconfig utility on a UNIX or Linux NetBackup server.
For procedures, see theNetBackupAdministrator’sGuide forUNIXandLinux,Volume II.
3 Remove the PDDO plug-in from the media server.
Use one of the following procedures, depending on the operating systemplatform of your media server:
See “Removing a PDDO plug-in from a Linux or Solaris SPARC media server”on page 79.
See “Removing a PDDO plug-in from a Windows media server” on page 80.
Disconnecting the PureDisk storage pool from the last media serverand removing the PureDisk storage pool from the NetBackupenvironment
This procedure deletes the NetBackup data mover and the NetBackup storageserver that were associated with this particular PureDisk storage pool. After youcomplete this procedure, NetBackup can no longer send backups to the PureDiskstorage pool or restore data from the PureDisk storage pool.
Perform this procedure if all of the following conditions are true:
■ You want to eliminate a particular PureDisk storage pool completely from aNetBackup environment.
■ You have performed the following procedure on all but the last media serverin your NetBackup environment.See “Disconnecting the PureDisk storage pool from one media server thatexists among many media servers” on page 74.
■ You have the PDDO plug-in installed on the last remaining media server.
Do not perform this procedure if any of the following are true:
■ You have a PDDO plug-in currently installed on more than one media serverin your NetBackup environment. Instead, perform the following procedure.
Repairing and removing a PDDO plug-inRemoving a PDDO plug-in
78
See “Disconnecting the PureDisk storage pool from one media server thatexists among many media servers” on page 74.
■ You intend to reinstall a PureDisk plug-in on this media server for upgradepurposes.
To remove the PureDisk storage pool from NetBackup
1 Perform this procedure while the PureDisk storage pool is still connected toa media server.
See “To dispense with the backup images that reside on the PureDisk storagepool” on page 76.
This procedure explains how to destroy or preserve the data currently on thePureDisk storage pool that you want to remove.
2 Perform the procedure called "Deleting a disk pool" in theNetBackup SharedStorage Guide.
3 Perform the procedure called "To retire an OpenStorage data mover" in theNetBackup Shared Storage Guide.
4 Perform the procedure called "Deleting a storage server" in the NetBackupShared Storage Guide.
5 Proceed to one of the following sections, depending on the operating systemplatform of your media server:
See “Removing a PDDO plug-in from a Linux or Solaris SPARC media server”on page 79.
See “Removing a PDDO plug-in from a Windows media server” on page 80.
Removing a PDDO plug-in from a Linux or Solaris SPARC media serverThe following procedure explains how to remove a PDDO plug-in from a Linux orSolaris SPARC media server. Perform this procedure if you want to remove aPDDO plug-in.
79Repairing and removing a PDDO plug-inRemoving a PDDO plug-in
To remove a PDDO plug-in from a Linux or Solaris SPARC media server
1 Stop NetBackup services.
For information about how to stop services, see your NetBackupdocumentation.
2 Type the following command to remove the software:
# sh /install_path/pdag/bin/uninstall.sh
For install_path, specify the path to where the PDDO plug-in is installed. Thedefault is /opt.
3 Respond y to the following warning message:
WARNING: If you remove the PDDO plug-in, NetBackup operations
can fail. See the PureDisk Client Installation Guide for
information about how to remove the PureDisk Deduplication
Option software.
=> Do you want to continue? [y/n] y
4 Start NetBackup services.
For information about how to start services, see your NetBackupdocumentation.
Removing a PDDO plug-in from a Windows media serverThe following procedure explains how to remove a PDDO plug-in from a Windowsmedia server. Perform this procedure if you want to remove a PDDO plug-in.
To remove a PDDO plug-in from a Windows media server
1 Stop NetBackup services.
For information about how to stop services, see your NetBackupdocumentation.
2 In the Windows interface, click Start > Settings > Control Panel > Add orRemove Programs.
3 Select Symantec NetBackup PureDisk Agent.
4 Click Remove.
5 Start NetBackup services.
For information about how to start services, see your NetBackupdocumentation.
Repairing and removing a PDDO plug-inRemoving a PDDO plug-in
80
Configuration file settings
This appendix includes the following topics:
■ About the pd.conf file
■ Editing the pd.conf file
■ About pd.conf file settings
■ About log information
■ About compression and encryption of backup images
About the pd.conf fileAfter installation, the following files reside on the NetBackup media server:
■ pd.conf, which includes several settings such as debugging and encryption.
■ pd.conf.template, which is a backup file for pd.conf. Immediately afterinstallation, this file is identical to pd.conf. This file’s purpose is to act as atemplate file with the default configuration settings. If you edit pd.conf andlater want to return pd.conf to its default settings, you can copypd.conf.template to pd.conf.
On Linux and Solaris SPARC platforms, these files reside in the following locations:
/usr/openv/lib/ost-plugins/pd.conf
/usr/openv/lib/ost-plugins/pd.conf.template
On Windows platforms, these files reside in the following locations:
install_path\Veritas\NetBackup\bin\ost-plugins\pd.conf
install_path\Veritas\NetBackup\bin\ost-plugins\pd.conf.template
CAppendix

Editing the pd.conf fileThe default pd.conf file contains lines of comments. The following procedureexplains how to change the settings when you want to enable more verbose logging.
Note: The spaces to the left and right of the = sign in the pd.conf file aresignificant. Make sure that the space characters appear in the file after you editthe file.
To edit the pd.conf file
1 Logon to the media server.
2 Use a text editor to open file pd.conf.
3 Remove the pound character (#) in column 1 from each line that you want toedit.
4 Specify a new value for each setting that you want to change.
The spaces to the left and right of the = sign are significant. Make sure thatthe space characters appear in the file after you edit the file.
For information about valid values, see the following table:
Table C-1
5 Close the file.
About pd.conf file settingsTable C-1 lists the information you can use to specify new values for settings inthe pd.conf file.
Table C-1 pd.conf file values
ActionPossible valuesDefault valueSetting
Writes the debugging log file,pdplugin.log, to the specified location.
If you request that log information bewritten to this file, remember to monitor thefile. This file can grow to a significant sizeand fill the partition.
Any pathC:\pdplugin.log
(Windows)
or
/tmp/pdplugin.log
(UNIX)
DEBUGLOG
Configuration file settingsEditing the pd.conf file
82
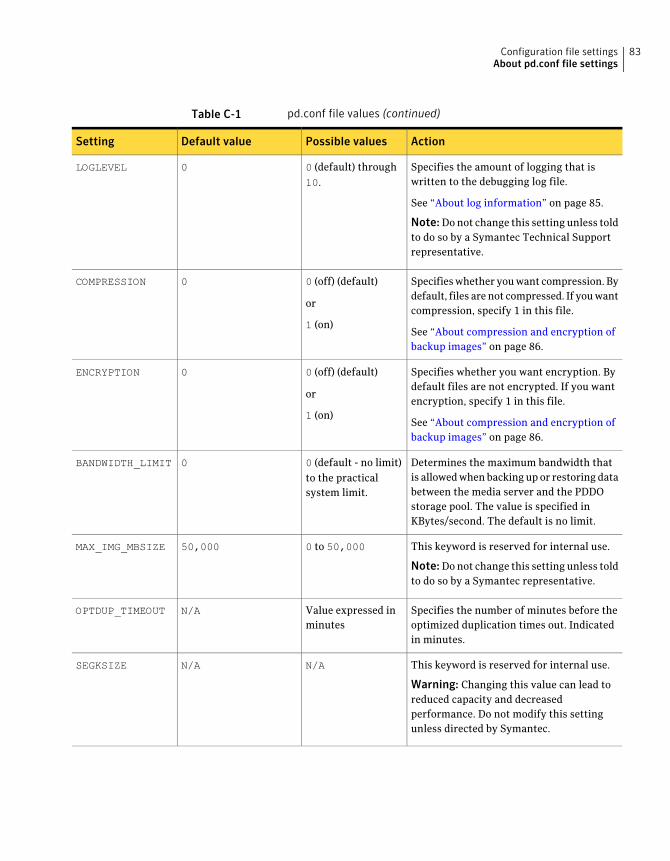
Table C-1 pd.conf file values (continued)
ActionPossible valuesDefault valueSetting
Specifies the amount of logging that iswritten to the debugging log file.
See “About log information” on page 85.
Note:Do not change this setting unless toldto do so by a Symantec Technical Supportrepresentative.
0 (default) through10.
0LOGLEVEL
Specifies whether you want compression. Bydefault, files are not compressed. If you wantcompression, specify 1 in this file.
See “About compression and encryption ofbackup images” on page 86.
0 (off) (default)
or
1 (on)
0COMPRESSION
Specifies whether you want encryption. Bydefault files are not encrypted. If you wantencryption, specify 1 in this file.
See “About compression and encryption ofbackup images” on page 86.
0 (off) (default)
or
1 (on)
0ENCRYPTION
Determines the maximum bandwidth thatis allowed when backing up or restoring databetween the media server and the PDDOstorage pool. The value is specified inKBytes/second. The default is no limit.
0 (default - no limit)to the practicalsystem limit.
0BANDWIDTH_LIMIT
This keyword is reserved for internal use.
Note:Do not change this setting unless toldto do so by a Symantec representative.
0 to 50,00050,000MAX_IMG_MBSIZE
Specifies the number of minutes before theoptimized duplication times out. Indicatedin minutes.
Value expressed inminutes
N/AOPTDUP_TIMEOUT
This keyword is reserved for internal use.
Warning: Changing this value can lead toreduced capacity and decreasedperformance. Do not modify this settingunless directed by Symantec.
N/AN/ASEGKSIZE
83Configuration file settingsAbout pd.conf file settings
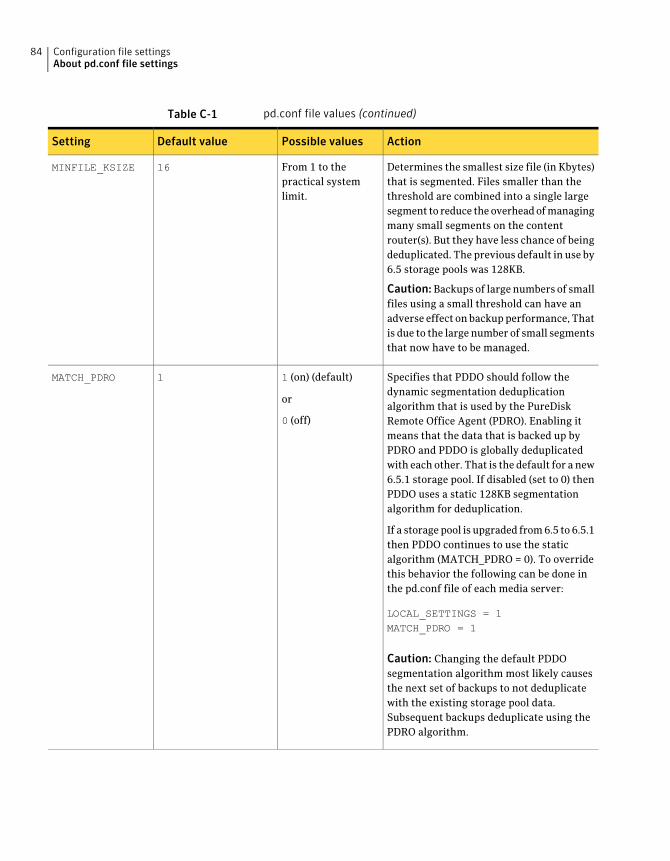
Table C-1 pd.conf file values (continued)
ActionPossible valuesDefault valueSetting
Determines the smallest size file (in Kbytes)that is segmented. Files smaller than thethreshold are combined into a single largesegment to reduce the overhead of managingmany small segments on the contentrouter(s). But they have less chance of beingdeduplicated. The previous default in use by6.5 storage pools was 128KB.
Caution: Backups of large numbers of smallfiles using a small threshold can have anadverse effect on backup performance, Thatis due to the large number of small segmentsthat now have to be managed.
From 1 to thepractical systemlimit.
16MINFILE_KSIZE
Specifies that PDDO should follow thedynamic segmentation deduplicationalgorithm that is used by the PureDiskRemote Office Agent (PDRO). Enabling itmeans that the data that is backed up byPDRO and PDDO is globally deduplicatedwith each other. That is the default for a new6.5.1 storage pool. If disabled (set to 0) thenPDDO uses a static 128KB segmentationalgorithm for deduplication.
If a storage pool is upgraded from 6.5 to 6.5.1then PDDO continues to use the staticalgorithm (MATCH_PDRO = 0). To overridethis behavior the following can be done inthe pd.conf file of each media server:
LOCAL_SETTINGS = 1MATCH_PDRO = 1
Caution: Changing the default PDDOsegmentation algorithm most likely causesthe next set of backups to not deduplicatewith the existing storage pool data.Subsequent backups deduplicate using thePDRO algorithm.
1 (on) (default)
or
0 (off)
1MATCH_PDRO
Configuration file settingsAbout pd.conf file settings
84
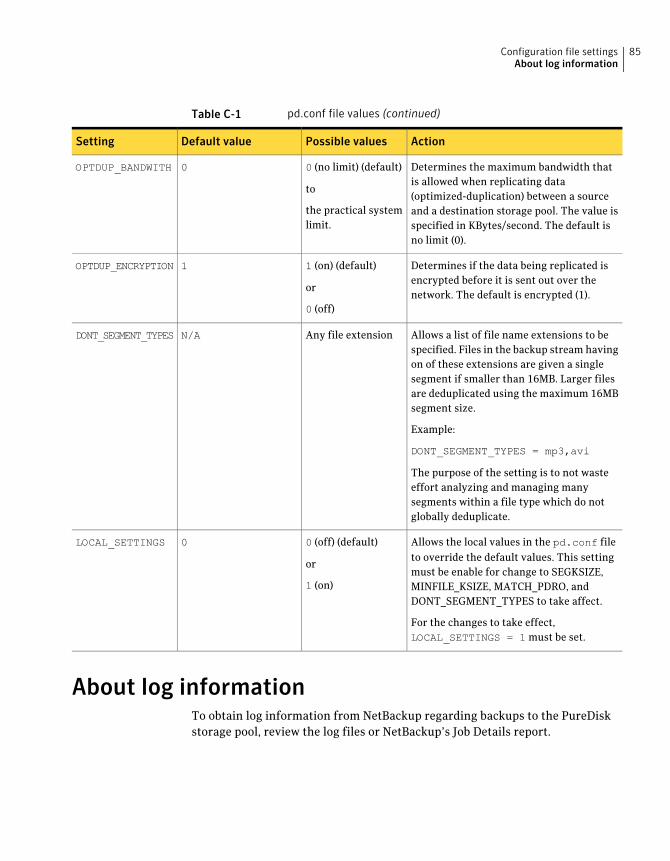
Table C-1 pd.conf file values (continued)
ActionPossible valuesDefault valueSetting
Determines the maximum bandwidth thatis allowed when replicating data(optimized-duplication) between a sourceand a destination storage pool. The value isspecified in KBytes/second. The default isno limit (0).
0 (no limit) (default)
to
the practical systemlimit.
0OPTDUP_BANDWITH
Determines if the data being replicated isencrypted before it is sent out over thenetwork. The default is encrypted (1).
1 (on) (default)
or
0 (off)
1OPTDUP_ENCRYPTION
Allows a list of file name extensions to bespecified. Files in the backup stream havingon of these extensions are given a singlesegment if smaller than 16MB. Larger filesare deduplicated using the maximum 16MBsegment size.
Example:
DONT_SEGMENT_TYPES = mp3,avi
The purpose of the setting is to not wasteeffort analyzing and managing manysegments within a file type which do notglobally deduplicate.
Any file extensionN/ADONT_SEGMENT_TYPES
Allows the local values in the pd.conf fileto override the default values. This settingmust be enable for change to SEGKSIZE,MINFILE_KSIZE, MATCH_PDRO, andDONT_SEGMENT_TYPES to take affect.
For the changes to take effect,LOCAL_SETTINGS = 1 must be set.
0 (off) (default)
or
1 (on)
0LOCAL_SETTINGS
About log informationTo obtain log information from NetBackup regarding backups to the PureDiskstorage pool, review the log files or NetBackup’s Job Details report.
85Configuration file settingsAbout log information
About log information from NetBackup 6.5.2To view a detailed log report, double-click a completed backup job that wrote tothe PureDisk storage pool. For more information about how to obtain a job detailsreport, see your NetBackup documentation.
This report identifies deduplication rates for the PureDisk storage server in thededup field.
The following example shows what appears in a Job Details report from aNetBackup 6.5.2 system:
04/22/2008 15:10:11 - Info mediaserver.acme.com (pid=24510)
StorageServer=PureDisk:storageserver.acme.com; Report=PDDO
Stats for (storageserver.acme.com): scanned: 36 KB, stream rate:
0.06 MB/sec, CR sent: 1 KB, dedup: 97.2%, cache hits: 1 (9.1%)
About log information from NetBackup 6.5.1 or NetBackup 6.5.0You can obtain PDDO backup statistics from thebptm log file. This output identifiesdeduplication rates for the PureDisk storage server in the dedup field.
The following example shows what appears in a bptm log file from NetBackup 6.5on a Windows system:
14:20:12.146 [3048.3780] <16> storageserver.acme.com: PDDO Stats
for (storageserver.acme.com): scanned: 36 KB, stream rate: 0.04
MB/sec, CR sent: 0 KB, dedup: 100.0%, cache hits: 1 (9.1%)
About compression and encryption of backup imagesWhen you specify compression and encryption in a NetBackup policy, NetBackupcompresses and encrypts the files on the client. Then, it writes the backup imagesto the media server. When you write these backup images to a PureDisk disk pool.However, PureDisk cannot deduplicate the files. Symantec recommends that youdisable compression and encryption in the NetBackup policies that write toPureDisk disk pools.
To enable PureDisk to deduplicate the backup images, specify compression andencryption in the media server’s pd.conf file. Set COMPRESSION = 1 and
ENCRYPTION = 1 in the file. NetBackup then compresses and encrypts the backupimages on the media server in a format that PureDisk can deduplicate.
Configuration file settingsAbout compression and encryption of backup images
86
Troubleshooting
This appendix includes the following topics:
■ Troubleshooting a failed PDDO configuration
Troubleshooting a failed PDDO configurationIf NetBackup issues errors or if the installation fails, use one or more of theprocedures in this topic to resolve the problem.
DAppendix
To troubleshoot a failed configuration - part 1
1 Restart the NetBackup remote monitor and manager service, nbrmms, andverify that it is running.
For information about how to restart nbrmms, see your NetBackupdocumentation.
2 Verify that NetBackup can load the PDDO plug-in.
Type one of the following commands as appropriate to the server:
On Linux or Solaris SPARC media servers, type the following command:
# /usr/openv/netbackup/bin/admincmd/bpstsinfo -pi
On Windows media servers, type the following command:
C:Program Files\Veritas\NetBackup\bin\admincmd\bpstsinfo -pi
The bpstsinfo command generates an output that contains the followingblock of information on a correctly configured system:
Plugin Name: libstspipdMT.so
Prefix: PureDisk:
Label: OpenStorage PureDisk Plugin
Build Version: 9
Build Version Minor: 4
Operating Version: 9
Vendor Version: 6.0.0.0 16:55:00 Feb 26 2008
Make sure that the line Prefix: PureDisk: appears in the output.
TroubleshootingTroubleshooting a failed PDDO configuration
88
To troubleshoot a failed configuration - part 2
1 Enable configuration logging.
On Linux or Solaris SPARC media servers, type the following command:
# mkdir -p /usr/openv/volmgr/debug/tpcommand
On Windows media servers, type the following command:
C:> cd "Program Files\Veritas\Volmgr\bin"
C:Program Files\Veritas\Volmgr\bin> mkdir tpcommand
2 Run the pddocfg command.
For Linux or Solaris SPARC:
See “Establishing the PDDO connection between a UNIX NetBackup mediaserver and the PureDisk storage pool” on page 29.
For Windows:
See “Establishing a connection between a Windows NetBackup media serverand the PureDisk storage pool” on page 37.
3 Examine the messages that the pddocfg command writes to the log file indirectory /usr/openv/volmgr/tpcommand.
If failure messages appear in the log file, the pddocfg command failed afteror during the ndevconfig or tpconfig phase. Remove directory/usr/openv/volmgr/tpcommandwhen you finish examining the file for failuremessages.
If failure messages do not appear in the log file, proceed to the next step.
89TroubleshootingTroubleshooting a failed PDDO configuration
4 Examine /usr/openv/lib/ost-plugins to verify that there is a file calledspa.cfg. spa is the host name of the storage pool authority that you usedas storage server.
5 Type the following command to examine the file in /opt/pdag/var/rt andverify that the routing table files for the storage pool ID are present:
# ls /opt/pdag/var/rt
On a Windows media server, type the following command:
C:\Program Files\Symantec\NetBackup PureDisk Agent\var\rt
Two files should reside in this directory. For example, in a correctly configuredLinux system, this command returns output similar to the following:
111.current 111.recommended
In this example, 111 is the storage pool ID.
To verify that NetBackup can communicate with the PDDO plug-in
1 Type the following command to verify that NetBackup can communicate withthe PDDO plug-in:
# /usr/openv/netbackup/bin/admincmd/bpstsinfo -si -sp PureDisk: -sn spa
On a Windows media server, type the following command:
C:Program Files\Veritas\NetBackup\bin\admincmd\bpstsinfo -pi
For spa, specify the name of the storage server.
On a correctly configured Linux or Solaris SPARC system, the output is similarto the following:
/usr/openv/netbackup/bin/admincmd/bpstsinfo -si -sp PureDisk: -sn myspa
Server Info:
Server Name: PureDisk:myspa
Supported Stream Formats:
[
]
Server Flags: (STS_SRV_ASYNC | STS_SRV_IMAGELIST | STS_SRV_CRED |
STS_SRV_CONRW)
Maximum Connections: 0
Current Connections: 1
Supported Interfaces:
[
TroubleshootingTroubleshooting a failed PDDO configuration
90
]
Supported Credentials:
[
]
On a correctly configured Windows system, the output is similar to thefollowing:
Server Info:
Server Name: PureDisk:myspa
Supported Stream Formats:
[
]
Server Flags: (STS_SRV_ASYNC | STS_SRV_IMAGELIST | STS_SRV_CRED |
STS_SRV_CONRW)
Maximum Connections: 0
Current Connections: 1
Supported Interfaces:
[
]
Supported Credentials:
[
]
2 If NetBackup cannot communicate to the PDDO plug-in using bpstsinfo andthe pddocfg command completed successfully, enable NetBackup logging atthe verbose 5 level, then rerun the bpstsinfo command and check theNetBackup log in the following file:
/usr/openv/netbackup/logs/admin
For more information about how to enable NetBackup logging, see yourNetBackup documentation.
91TroubleshootingTroubleshooting a failed PDDO configuration
To restart the NetBackup disk pool graphical user interface wizard
1 If thebpstsinfo succeeds but the NetBackup disk pool graphical user interfacewizard fails, close the wizard, if necessary, and then restart it.
2 If the wizard still fails after you restart it, enable logging.
On a Linux or Solaris SPARC media server, use a text editor to edit the file/usr/openv/lib/ost-plugins/pd.conf
In the pd.conf file, un-comment the following lines:
LOGLEVEL = 10
DEBUGLOG = /tmp/pdplugin.log
On a Windows media server, use a text editor to edit the file C:\ProgramFiles\Veritas\NetBackup\bin\ost-plugins\pd.conf
In the pd.conf file, un-comment the following lines:
LOGLEVEL = 10
DEBUGLOG = C:\pdplugin.log
3 Run the wizard again and check the pdplugin.log file.
If the wizard continues to fail, something similar to the following should beseen in the log file:
11/04/08 12:24:13 [19545] [3] pi_open_server_v7 exit
(2060029:authorization failure) 0
If the wizard is working, something like the following should be seen in thelog file:
11/04/08 12:24:12 [19544] [3] pi_open_server_v7 exit (0:OK) 0
4 Disable PDDO logging when you finish.
Logging affects performance. Alternatively, you can set the LOGLEVEL down.Valid log levels range from 1 (error) to 10 (very verbose).
TroubleshootingTroubleshooting a failed PDDO configuration
92
Third-party legal notices
This appendix includes the following topics:
■ Third-party legal notices for Symantec NetBackup PureDisk
Third-party legal notices for Symantec NetBackupPureDisk
Active Directory, Excel, Internet Explorer, Microsoft, Windows, Windows NT, andWindows Server are either registered trademarks or trademarks of MicrosoftCorporation in the United States and other countries.
AIX, IBM, PowerPC, and Tivoli are trademarks or registered trademarks ofInternational Business Machines Corporation in the United States, other countries,or both.
All SPARC trademarks are used under license and are trademarks or registeredtrademarks of SPARC International, Inc., in the United States and other countries.Products bearing SPARC trademarks are based upon an architecture developedby Sun Microsystems, Inc.
AMD is a trademark of Advanced Micro Devices, Inc.
Firefox and Mozilla are registered trademarks of the Mozilla Foundation.
Intel, Itanium, Pentium, and Xeon are trademarks or registered trademarks ofIntel Corporation or its subsidiaries in the United States and other countries.
Java, Sun, and Solaris are trademarks or registered trademarks of SunMicrosystems, Inc., in the United States and other countries.
Linux is a registered trademark of Linus Torvalds in the United States and othercountries.
Mac OS is a trademark of Apple Inc., registered in the U.S. and other countries.
EAppendix
NetApp is a registered trademark of Network Appliance, Inc. in the U.S. and othercountries.
Novell and SUSE are registered trademarks of Novell, Inc., in the United Statesand other countries.
OpenLDAP is a registered trademark of the OpenLDAP Foundation.
Red Hat and Enterprise Linux are registered trademarks of Red Hat, Inc., in theUnited States and other countries.
UNIX is a registered trademark of The Open Group.
VMware and the VMware "boxes" logo and design are trademarks or registeredtrademark of VMware, Inc., in the United States and other countries.
Third-party software may be recommended, distributed, embedded, or bundledwith this Symantec product. Such third-party software is licensed separately byits copyright holder. All third-party copyrights associated with this product arelisted in the Third Party Legal Notices document, which is accessible from thePureDisk Web UI.
Third-party legal noticesThird-party legal notices for Symantec NetBackup PureDisk
94
Aagents
installing PureDisk agent on Windowsclients 28, 35
Cclients
distributing software to 22unattended installation
on Windows 28, 35
Ddata removal policy
scheduling 60
Iinstallation
clientsdistributing software to 22
unattendedfor clients for Windows clients 28, 35
Ooverview
product 11
Ppdag command
client installation on Windows 28, 35policies
run once 60PureDisk agent
installing on Windows clients client 28, 35
Index