synthophone operating manual engl. - softwind alternate tunings in bb, c & eb 3.3 sound...
TRANSCRIPT

Synthophone the MIDI sax
9th revised edition
copyright (c) 1987 - 2016
SOFTWIND INSTRUMENTS

TABLE OF CONTENTS
1. INTRODUCTION
1.1 Finally - MIDI for sax players
1.2 The SYNTHOPHONE - some background
1.3 Warranty and technical support
2. SETTING UP THE INSTRUMENT
2.1 Precautions 2.2 Unpacking and assembly
2.3 Reed mounting
2.4 System connections
2.5 Getting started
3. PERFORMANCE CONTROLS
3.1 Panic function 3.2 Alternate tunings in Bb, C & Eb
3.3 Sound selection
3.4 MIDI channel selection
3.5 Patch selection
3.6 Store patch to memory 3.7 Total memory reset
3.8 Modulation control
3.9 Pitch bend control
3.10 Breath control
3.11 Volume control 3.12 Aftertouch control
3.13 Velocity range
3.14 Key speed control
3.15 Transposition by octaves
3.16 Extended playing range 3.17 Start / Continue / Stop
4. DYNAMIC HARMONY
4.1 Akkorde4.1 Play up to 5-part HARMONY
4.2 Choosing new tonality
4.3 Using FREEZE HARMONY 4.4 Select new harmony tables
4.5 Input personal harmony
4.6 Chord variations through lip pressure
4.7 Harmony table exchange through lip pressure
4.8 Multi channel mode
5. ADDITIONAL CONTROL FUNCTIONS
5.1 "Thumb-X-press" functions 5.2 Lip switching functions
5.3 Additional performance facilities
6. SOUND DESIGN CONSIDERATIONS
6.1 Programming expressive voices
6.2 Sound enhancement with external signal processing
6.3 MIDI event processing
6.4 Sequencing with the SYNTHOPHONE
7. SYNTHOPHONE CARE AND UPDATESG
7.1 Cleaning your mouthpiece 7.2 Getting your personal altissimo fingerings
7.3 Installing new software
8. TROUBLE SHOOTING GUIDEE
9. APPENDIX
9.1 MIDI implementation chart 9.2 Altissimo fingerings
9.3 Harmony illustrations

1. I N T R O D U C T I O N
1.1 F I N A L L Y – M I D I F O R S A X P L A Y E R S
Thank you for purchasing the SYNTHOPHONE MIDI sax. We hope, that this new
instrument will give you a rewarding way of working with today's synthesizers. The
SYNTHOPHONE feels and plays like a sax, but in addition is also capable of producing
some amazing new effects like chords, which change within a diatonic context along your
melodic lines. The MIDI format of the SYNTHOPHONE allows you to choose from a large
selection of today's synthesizers, enables you to play into sequencers and even use
notation programs that will turn your music into written parts immediately. With special
control through command fingerings it is possible to leave your synthesizers backstage,
since you can select your sounds and their ideal performance parameters directly from the
instrument. Please read through this manual carefully before unpacking the SYNTHOPHONE.
Make sure all precautions are taken before plugging in your new instrument.
1.2 T H E S Y N T H O P H O N E – S O M E B A C K G R O U N D
The design of the SYNTHOPHONE goes back to the pre-MIDI times of 1981, where a first
prototype (a woodstick with Boehm-like keys) was designed by Martin Hurni. It was
connected to a dedicated analog synthesizer system. This first stage of the
SYNTHOPHONE was followed by a real alto sax with its keys connected to a switching
system to give a more realistic playing feel. At ARS ELECTRONICA '84 contest, the first
prize was given to the design of the SYNTHOPHONE for it's "most original and future-
oriented development in the field of electronic sound production." At about the same time,
MIDI was to become a standard, and so the next prototype was MIDI-equipped, although a
separate hardware unit was still necessary to convert a sax into a MIDI-controller. A later
model then was selfcontained: the processor was put into the bell of the sax. This new
SYNTHOPHONE was built in late 1986 and then refined to be produced by SOFTWIND
INSTRUMENTS.
The instrument of today is a fully equipped MIDI controller, which connects to any
modern MIDI synthesizer. DYNAMIC HARMONY was implemented as a software update
and further new software features can be added through simple EPROM chip exchange,
which in most cases are done by musicians themselves.
The sax is here to stay, and therefore you should expect your SYNTHOPHONE to have a
long musical future, too. It is you, the performer, who can give us a very valuable feedback
on the design and additional features of the SYNTHOPHONE, so please do not hesitate to
send us a few lines, outlining your ideas and your suggestions. Thank you for your
cooperation.

1.3 W A R R A N T Y A N D T E C H N I C A L S U P P O R T
The Synthophone has a warranty period of 2 years.
Contact us anytime for questions you may have:
SOFTWIND INSTRUMENTS
Falkenplatz 1 CH-3012 BERN, Switzerland phone (int. + 41) 31 311 28 20 email: [email protected] internet: www.softwind.com
During the warranty period you will receive any available software updates (EPROM chip)
for free.
In case of technical problems, please refer to the TROUBLE SHOOTING GUIDE (chapter
8) first. If this does not solve your problem, do not hesitate to call us or write to our
customer service at the adress above. Please do not send in your instrument for repair
before getting our confirmation by phone or email.
SOFTWIND INSTRUMENTS is commited to answer all questions concerning the
SYNTHOPHONE. It’s one of our company's goals to stay in close contact to our individual customers and to learn through their experiences. Please do not hesitate to
call us and let us know your opinion about the features of this new instrument.

2. S E T T I N G UP T H E I N S T R U M E N T
2.1 P R E C A U T I O N S
The SYNTHOPHONE is reliably built and easy-to-use. However, the differences in
handling compared to a regular sax, are very important. Read the following instructions
carefully, before assembling your instrument. Make sure you understand all the
procedures before making any connections. Do not make any adjustments to the function
controls before you fully understand them.
2.2 U N P A C K I N G A N D A S S E M B L Y
Check for the following materials:
� - SYNTHOPHONE, including special mouthpiece
� - Power supply
� - One long and one short MIDI cable
� - Spare set containing 3 ready-to-use reeds and 2 screwdrivers
� - A neck strap
� - Cleaning cloth (protecting the sax neck, while in the case)
Carefully unpack your instrument. The neck is connected to the body with a spiral cable.
Insert the neck into the body as usual, but make sure that the spiral cable is not tangled. Examine your power supply for correct voltage setting 115V / 230V
Make sure the power box is unplugged before opening it. Unscrew 4 screws on the bottom
side of the box and open the power box to set the 115 V / 230 V selector switch inside.
Make sure the correct voltage selection has been made before plugging it into your outlet.
If a new fuse is needed, replace it with a 200ma type.


2.3 R E E D M O U N T I N G
There is a special reed readily mounted on your mouthpiece when the instrument is
shipped. Reeds for the SYNTHOPHONE are specially made up with a metal plate and a magnet
on the back to give input to the lip pressure sensor inside the mouthpiece. DO NOT USE
any standard reeds with the SYNTHOPHONE. Reeds have to be set exactly in place in
order to perform well.
Take a little time to understand the function of the reed:
As you can see from the spare reeds supplied, there is a metal attachment mounted to
each reed, which supports a small magnet at the tip of its protruding tongue. The height of this tongue is important for a proper function of the lip pressure sensor, since the
magnet has to be close to the sensor inside the mouthpiece. Mount the reed and bend the tongue as il lustrated. The height of the tip should be equal to the width of a reed at
its rear end.
2.4 S Y S T E M C O N N E C T I O N S
When your instrument has been assembled and the voltage on your power supply has
been set, connect the long MIDI cable with its angled plug to the MIDI socket on the
instrument and the other MIDI connector to the front end of the power box marked « to
instrument » just below the red LED. Plug the power cord into the power box and your
outlet and switch on power. The green LED must now be steadilly "ON". The red LED
blinks shortly and then generally remains dark, but may blink irregularly when the
instrument isn't held completely still. Now connect the shorter of the 2 MIDI cables from
either one of the 2 MIDI OUT sockets in the back of the SYNTHOPHONE power box to
your synthesizer' MIDI IN socket. Make sure your synthesizer is connected to a sound
system and switch on all necessary equipment.
2.5 G E T T I N G S T A R T E D
You should be able to start playing your SYNTHOPHONE.
If no sound is produced, please refer to chapter 8 in this manual and/or your synthesizer
manual. Now read the following chapters about the use of additional functions built into the
SYNTHOPHONE.


3. P E R F O R M A N C E C O N T R O L S
3.1 P A N I C F U N C T I O N
The SYNTHOPHONE panic function is used to return to known performance conditions
immediately when you get lost. It's also a very helpful when starting out programming new
patches. Because of its importance, a complete list of reset conditions is given below. But
only when understanding of all special functions explained in the following chapters, you
will fully appreciate the power of the panic function.
• Panic Fingering press side Bb, side C & side E
- Lip & wind sensors are automatically calibrated.
- Panic sends an extra "all note off" command, should a note have been "stuck on".
(On power up, an extra "all note off" command is sent out from the SYNTHOPHONE.)
- in addition, the following user adjustable settings are reset:
Tuning of instrument in C
Preset number unchanged
MIDI channel unchanged
Patch number (memory) unchanged
Modulation control level 2
Pitch Bend control level 0
Breath control level 5
Volume control level 2
Aftertouch control level 0
Velocity range level 5
Key speed control middle position
Transposition middle octave
Dynamic harmony single voice mode
Tonality (of harmony) key of C
Freeze harmony off
Harmony base chords in thirds
Chord variation by lip inversions
Harmony base exchange inactive
Multi channel mode poly (single channel)
Lip switching functions inactive
Thumb-X-press off

3.1 P A N I C - F U N C T I O N
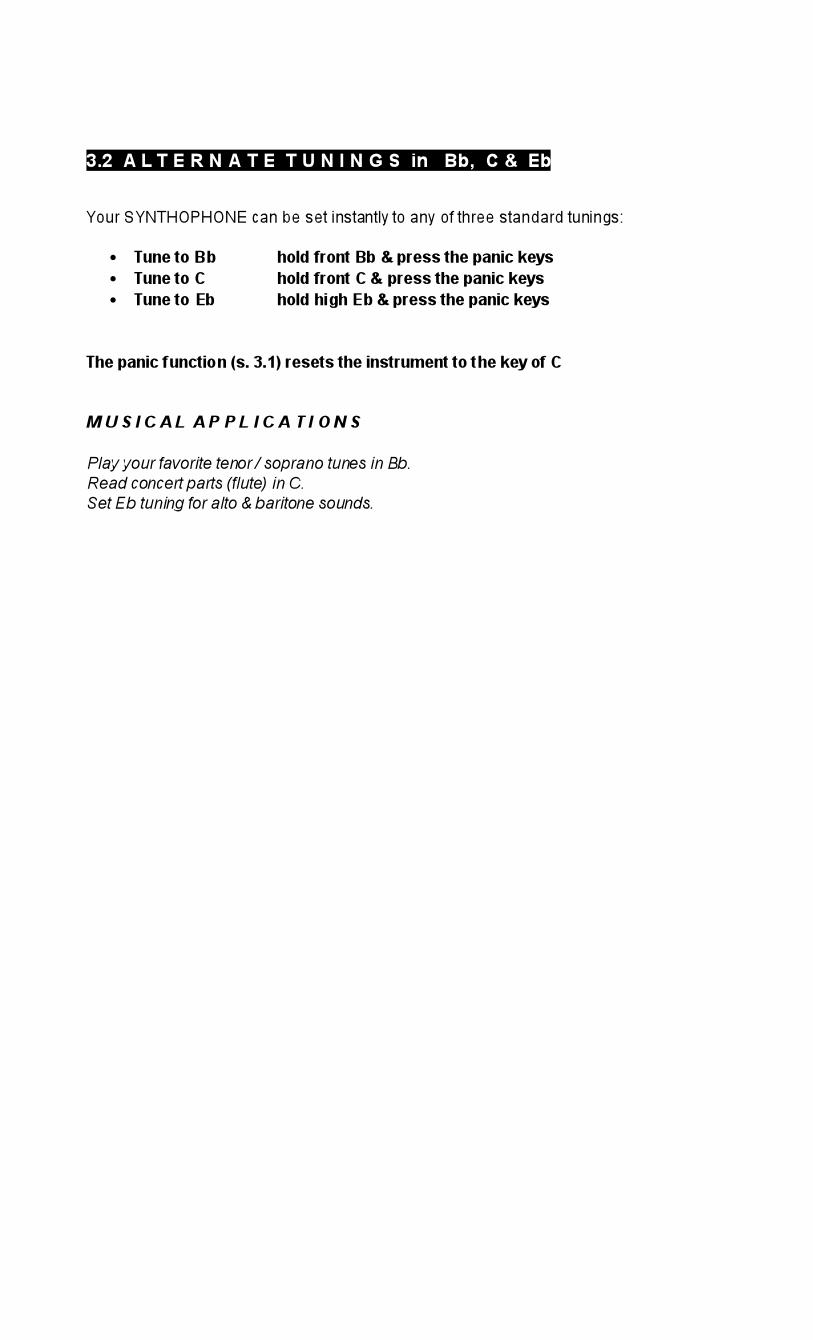
3.2 A L T E R N A T E T U N I N G S in Bb, C & Eb
Your SYNTHOPHONE can be set instantly to any of three standard tunings:
• Tune to Bb hold front Bb & press the panic keys
• Tune to C hold front C & press the panic keys
• Tune to Eb hold high Eb & press the panic keys
The panic function (s. 3.1) resets the instrument to the key of C
M U S I C A L A P P L I C A T I O N S
Play your favorite tenor / soprano tunes in Bb.
Read concert parts (flute) in C.
Set Eb tuning for alto & baritone sounds.

3.2 A L T E R N A T E T U N I N G S in Bb, C & Eb

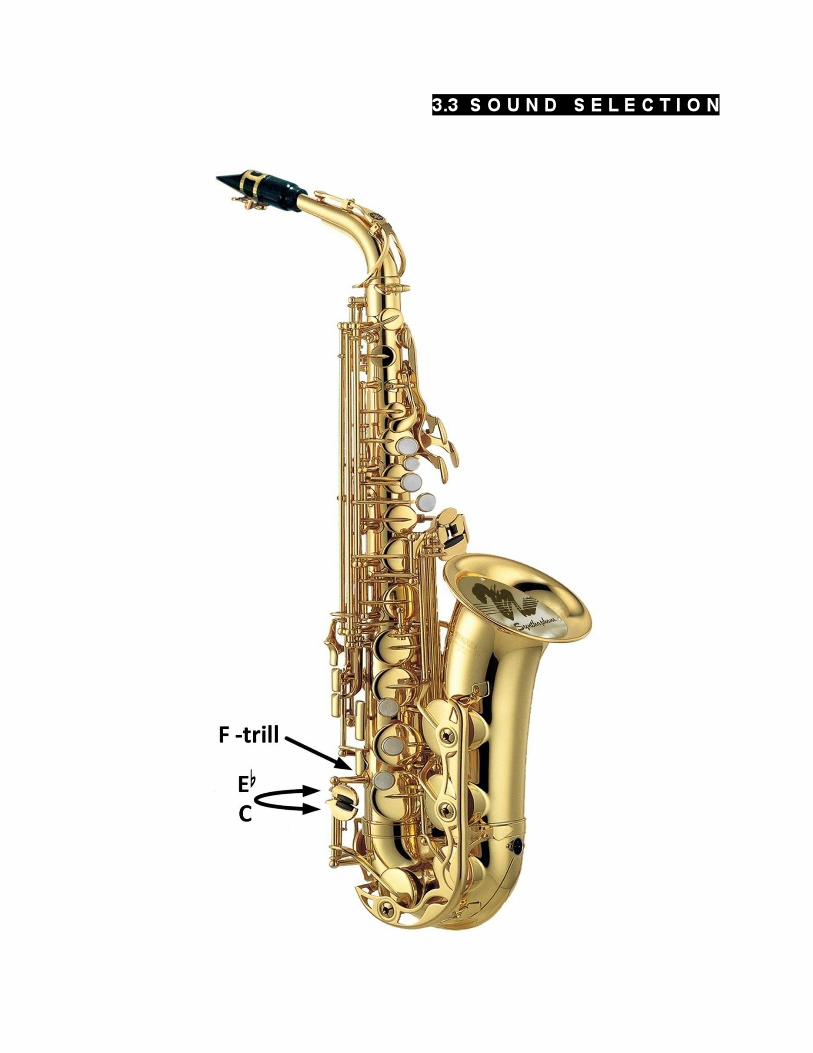
3.3 S O U N D S E L E C T I O N
128 sounds can be selected on your synthesizer directly from your Synthophone.
• increase sound number (*) hold F#-trill and click on low Eb
• decrease sound number (*) hold F#-trill and click on low C
• return to sound number 1 hold F#-trill and press Eb/C
(*) holding one of these fingerings will cause the program counter to "scroll" up or down
for rapid sound search.
The selected sound can be stored into memory along with its additional PATCH
configuration (s. chapter 3.6).
The panic function does not change the selected sound number.
M U S I C A L A P P L I C A T I O N S
Prepare your performance by selecting your favorite sounds first and storing them to the
internal Synthophone memory for quick recall. See chapter 3.6 for storing your settings
in the internal patch memory.
Programming closely related sounds in a series of memory locations will give you "one"
instrument, but with timbral nuances, different ranges, and other performance
characteristics.
3.3 S O U N D S E L E C T I O N

3.4 M I D I C H A N N E L S E L E C T I O N
It is important, that your synthesizer is set to receive the same MIDI channel on which
the SYNTHOPHONE is transmitting its MIDI data.
Any of 16 MIDI channels available may be selected:
• MIDI channel number + 1 F#-tril l, high D, D#, F and press Eb
• MIDI channel number - 1 F#-tril l, high D, D#, F and press C
• Reset to MIDI channel #1 F#-tril l, high D, D#, F and press Eb/C
The panic function does not affect the selected MIDI channel.
M U S I C A L A P P L I C A T I O N S
With multiple synthesizers, you can set each synthesizer to receive on a separate MIDI
channel. You can then select each sound module individually by simply stepping through
different MIDI channels. PATCHES (s. chapter 3.6) may contain different MIDI channels,
therefore it is advisable to keep track of each setting. Synthesizers, set to OMNI ON, will
receive on all channels.

3.4 M I D I C H A N N E L S E L E C T I O N

3.5 P A T C H S E L E C T I O N
There are 32 PATCHES available from the built in memory. Each patch contains a
COMPLETE configuration and can be recalled anytime, even after months of power
down. When stepping up or down in PATCH numbers, the corresponding patches are
immediately available.
• patch number + 1 G, A, B & F#-trill and press Eb (*)
• patch number – 1 G, A, B & F#-trill and press C (*)
• Reset to patch #1 G, A, B & F#-trill and press Eb/C
(*) Sustained pressure of these fingerings will cause the patch counter to "scroll" forward
or backward rapidly.
The panic function does not affect the information stored in memory.
M U S I C A L A P P L I C A T I O N S
PATCHES are very practical on stage where you don't want to worry about individual
settings for a particular sound. Simply recall that PATCH you had previosly established
and play. Remember, that even the tuning Eb, Bb, C, the MIDI channel and your
harmony settings can be saved and recalled with one simple fingering.

3.5 P A T C H S E L E C T I O N

3.6 S T O R E P A T C H T O M E M O R Y
When a suitable setting for playing a particular sound has been found, it can be stored
into the currently selected PATCH memory. Previous contents of that memory location
are overwritten.
In order to set up patches, it is best to select a patch memory location first (s. chapter
3.5). Then press the panic keys to restore standard settings, then select your sound,
adjust its settings to your personal taste – and finally – store your patch into the currently
selected patch memory using the fingering below.
• Store patch Press side-E & F#-trill
All patch memory data are retained after power is off by a built-in battery.
Threre are 32 patch memory locations available.
M U S I C A L A P P L I C A T I O N S
Patches can be best understood as memory locations, where all settings are stored for a
paricular sound.
For example :
Patch #1 contains a clarinet sound in Bb, no vibrato.
Patch #2 contains a sax sound in Eb with pitch bend set to level 2.
Patch #3 contains a flute sound in C with modulation set to level 4

3.6 S T O R E P A T C H T O M E M O R Y

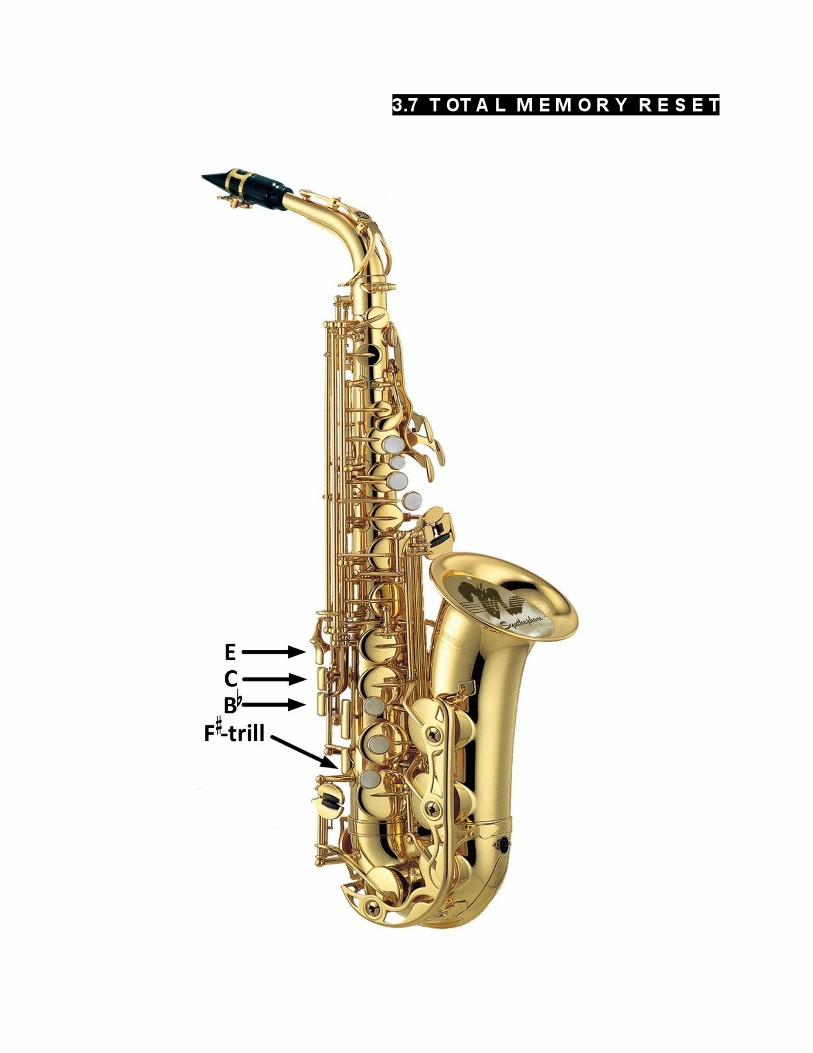
3.7 T O T A L M E M O R Y R E S E T
Total memory resetting is only recommended when planning for all new patches.
This function will reset your instrument to "factory conditions".
Caution: this action will cancel out all previously stored PATCHES!
• Switch OFF power supply
• Hold PANIC & F#-trill (a total of 4 keys with your right hand)
• Switch ON power (with your left hand)
• Now all 32 memory locations are reset to facory settings.
• All 32 patch memory locations are now set back to basic settings (s. chapter 3.1)
• Patch #1 contains sound #1
• Patch #2 contains sound #2, etc...
• All patches are now playing on MIDI channel #1
M U S I C A L A P P L I C A T I O N S
(s. 3.5 Patch selection)
3.7 T OT A L M E M O R Y R E S E T
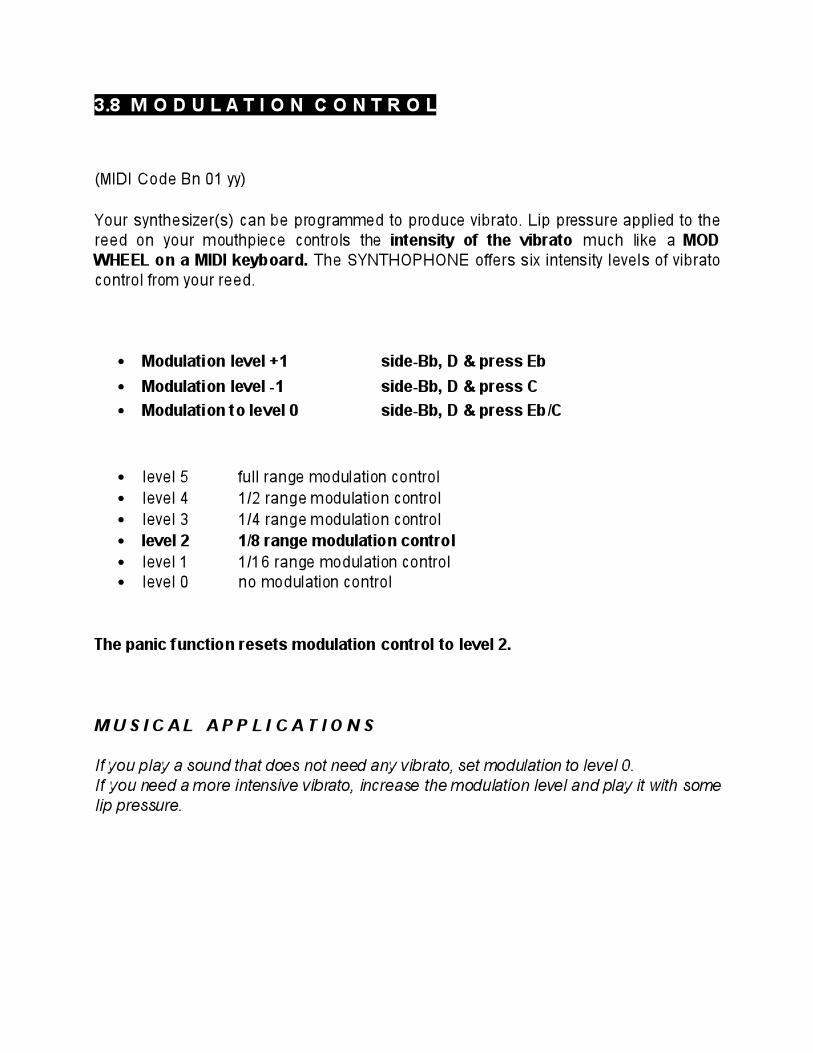
3.8 M O D U L A T I O N C O N T R O L
(MIDI Code Bn 01 yy)
Your synthesizer(s) can be programmed to produce vibrato. Lip pressure applied to the
reed on your mouthpiece controls the intensity of the vibrato much like a MOD WHEEL on a MIDI keyboard. The SYNTHOPHONE offers six intensity levels of vibrato
control from your reed.
• Modulation level +1 side-Bb, D & press Eb
• Modulation level -1 side-Bb, D & press C
• Modulation to level 0 side-Bb, D & press Eb/C
• level 5 full range modulation control
• level 4 1/2 range modulation control
• level 3 1/4 range modulation control
• level 2 1/8 range modulation control
• level 1 1/16 range modulation control
• level 0 no modulation control
The panic function resets modulation control to level 2.
M U S I C A L A P P L I C A T I O N S
If you play a sound that does not need any vibrato, set modulation to level 0.
If you need a more intensive vibrato, increase the modulation level and play it with some
lip pressure.
3.8 M O D U L A T I O N C O N T R O L
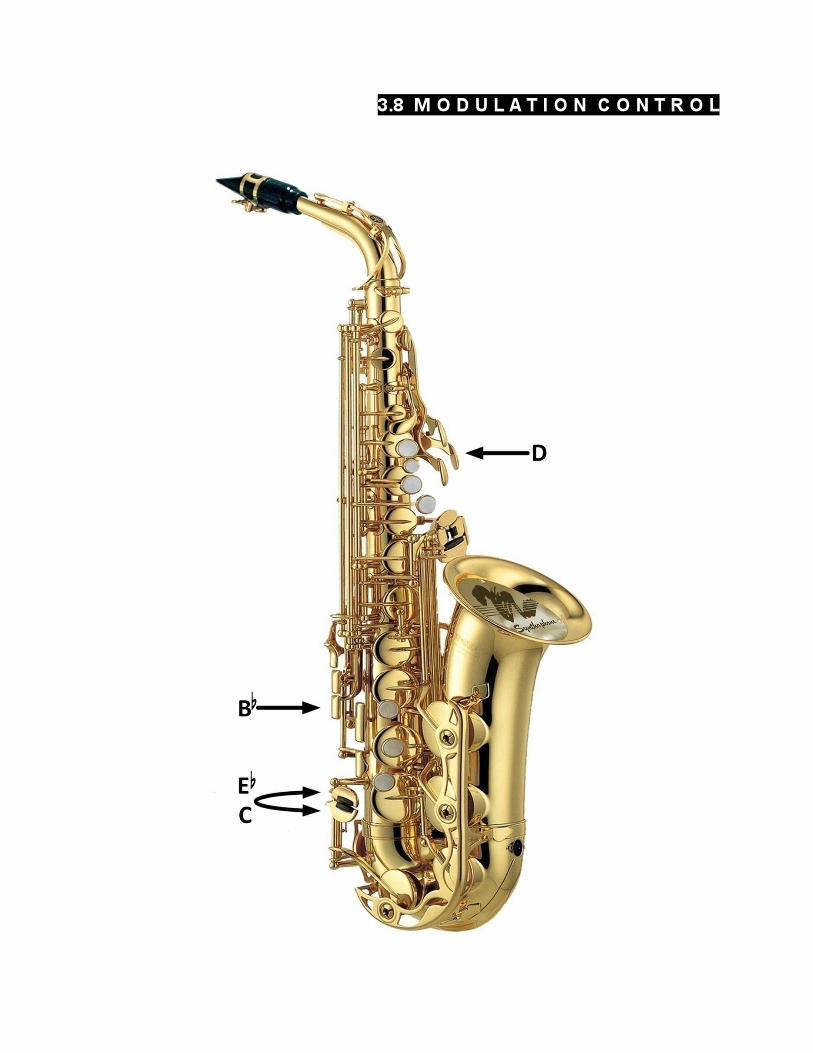
3.9 P I T C H B E N D C O N T R O L
(MIDI Code En xx yy)
Lip pressure can be assigned to produce PITCH BEND. There are 3 types of PITCH
BEND controls selectable in 6 sensitivity levels each. Upper and lower PITCH BEND
settings can be freely combined to obtain best results, for example:
upper PB level = 1, lower PB level = 3
Symmetrical PITCH BEND (similiar to keyboard pitch wheel action) • Increase symmetrical PITCH BEND side C, high F & Eb
• Decreases symmetrical PITCH BEND side C, high F & C
• Reset PITCH BEND to level 0 side C, high F & Eb/C
PITCH BEND UP only (guitar like pitch bend action) • Increase PITCH BEND up side C, E, high F & Eb
• Decrease PITCH BEND up side C, E, high F & C
• Reset PITCH BEND UP to level 0 side C, E, high F & Eb
PITCH BEND DOWN only (drop note) • Increase PITCH BEND down side C, Bb, high F & Eb
• Decrease PITCH BEND down side C, Bb, high F & C
• Resets PITCH BEND DOWN to level 0 side C, Bb, high F & Eb/C
• level 5 full range PITCH BEND control
• level 4 1/2 range PITCH BEND control
• level 3 1/4 range PITCH BEND control
• level 2 1/8 range PITCH BEND control
• level 1 1/16 range PITCH BEND control
• level 0 no PITCH BEND control
The panic function resets PITCH BEND to level 0. Thumb-X-press (s. 5.1) can be simultaneously used for pitch bending.
M U S I C A L A P P L I C A T I O N S
To obtain a smooth PITCH BEND response, it is generally a good idea to set the PITCH
BEND range on your synthesizer to 1 or 2 semitones first and then select an appropriate
PITCH BEND level from the Synthophone.
3.9 P I T C H B E N D C O N T R O L

3.10 B R E A T H C O N T R O L
(MIDI Code Bn 02 yy)
Wind pressure in the Synthophone mouthpiece can be assigned to produce BREATH
control.
Typically, sounds that are specifically programmed for wind controllers receive
BREATH control for dynamics and timbral changes. Other synthesizers may be
programmed to generate vibrato or tremolo from BREATH control.
• Increase BREATH level +1 side Bb, high D# & Eb
• Decrease BREATH level -1 side Bb, high D# & C
• Reset BREATH to level 0 side Bb, high D# & Eb/C
• level 5 full range BREATH control
• level 4 1/2 range BREATH control
• level 3 1/4 range BREATH control
• level 2 1/8 range BREATH control
• level 1 1/16 range BREATH control
• level 0 no BREATH data
The panic function sets BREATH control to level 5 (full range).
M U S I C A L A P P L I C A T I O N S
If your synthesizer responds to BREATH control with a vibrato, then you may adjust its
level for best musical results. If your synthesizer responds to drastically, decrease
BREATH control or adjust the sensitivity in your synthesizer program in order to produce
the best musical result.

3.10 B R E A T H C O N T R O L

3.11 V O L U M E C O N T R O L
(MIDI Code Bn 07 yy)
In order to produce a natural dynamic feel, the SYNTHOPHONE provides six different
exponential curves with variable dynamic responses.
• Increase VOLUME level side Bb, high F & Eb
• Decrease VOLUME level side Bb, high F & C
• Reset VOLUME to level 0 side Bb, high F & Eb/C
• level 5 constant VOLUME at ff
• level 4 VOLUME range from f < ff
• level 3 VOLUME range from mf < ff
• level 2 VOLUME range from mp < ff
• level 1 VOLUME range from p < ff
• level 0 VOLUME range from pp < ff
The panic function resets VOLUME to level 2.
M U S I C A L A P P L I C A T I O N S
If you need total dynamic range (i.e. for clarinet) then select volume level 0. For
percussive sounds, level 5 will yield more idiomatic results. Setting the volume to level 5
will allow you to trigger sounds with a very light tonging technique. If you play string
ensemble sounds, try level 3 or 4. You will get a certain amount of dynamic control, but
also provide enough volume support to pass by some of the decaying sound. When
using BREATH control as your dynamics controller, volume should be typically set to
level 5 (maximum).

3.11 V O L U M E C O N T R O L

3.12 A F T E R T O U C H C O N T R O L
(MIDI Code Dn xx)
Wind pressure can also be assigned to procuce AFTERTOUCH. Most commonly,
synthesizers will respond with a vibrato much like with modulation control (s. 3.8), but
now your vibrato control is derived from wind pressure rather than from lip pressure.
• Increase AFTERTOUCH level side C, high D# & Eb
• Decrease AFTERTOUCH level side C, high D# & C
• Reset AFTERTOUCH to level side C, high D# & Eb/C
• level 5 full range AFTERTOUCH control
• level 4 1/2 range AFTERTOUCH control
• level 3 1/4 range AFTERTOUCH control
• level 2 1/8 range AFTERTOUCH control
• level 1 1/16 range AFTERTOUCH control
• level 0 no AFTERTOUCH control
The panic function resets AFTERTOUCH to level 0. Thumb-X-press (s.5.1) can simultaneously be used for AFTERTOUCH.
M U S I C A L A P P L I C A T I O N S
Some sounds develop their vibrato only when playing intensely. Use the proper amount
of aftertouch to obtain best musical results. Aftertouch and modulation control can be
combined, in order to produce vibrato that reacts to wind and lip pressure. More recent synthesizers allow for interesting timbral changes when receiving aftertouch.

3.12 A F T E R T O U C H C O N T R O L

3.13 V E L O C I T Y R A N G E
(MIDI Code Dn xx) (MIDI Code 9n xx yy)
Every "note on" command has its associated velocity value that represents the speed of
the key action (on a keyboard). For MIDI wind controllers this value is much less
meaningful than for keyboards, since woodwind sounds typically continue to develop
their contours long after their attack phase. However, most synthesizer "factory" sounds depend heavily on velocity levels for variation and therefore it is nice to be able to adjust
the velocity values of the SYNTHOPHONE to a specific range that works best for a
given sound.
To adjust to a specific velocity level, use the fingerings below:
• Decrease velocity level low D, E, F & side-Bb & C • Increase velocity level low D, E, F & side-Bb & Eb • Reset to the highest velocity level low D, E, F & side-Bb & Eb/C
• level 5 velocity values range from 95 - 127 (maximum) • level 4 velocity values range from 76 - 108
• level 3 velocity values range from 57 - 89
• level 2 velocity values range from 38 - 70
• level 1 velocity values range from 19 - 51
• level 0 velocity values range from 01 - 32 (minimum)
The panic function resets the velocity range to level 5 (maximum)
M U S I C A L A P P L I C A T I O N S
Velocity is derived from wind pressure when playing legato. When playing chords (s.4.1), the SYNTHOPHONE sends out a slightly higher velocity
level for the lead note than for the rest of the chord notes in order to "distinguish" the
lead line from the lower voices.

3.13 V E L O C I T Y R A N G E

3.14 K E Y S P E E D C O N T R O L
When playing large intervals, or when playing across the octave break point from C# to
D, unwanted short (in between) notes may be sounding due to the Synthophone's
accurate key tracking. You can slow down - or speed up the key response time of the
Synthophone to match it up to your sounds for best performance results.
To adjust the key speed, use the fingerings below:
• Slow down key response time high D, D# & side-Bb & Eb • Speed up key response time high D, D# & side-Bb & C • Reset key speed to normal high D, D# & side-Bb & Eb/C
• level 4 slowest key speed response time
• level 3 slow key speed response time • level 2 normal key speed response time
• level 1 fast key speed response time
• level 0 fastest key speed response time
The panic function sets key speed control to level 2 (normal)
M U S I C A L A P P L I C A T I O N S
Percussive sounds and plucked strings sounds are best played at slower key speed
response times: set to speed levels 2 - 4. Wind sounds and bowed strings etc. typically work well at faster key response times: set
to speed levels 0 - 2.

3.14 K E Y S P E E D C O N T R O L

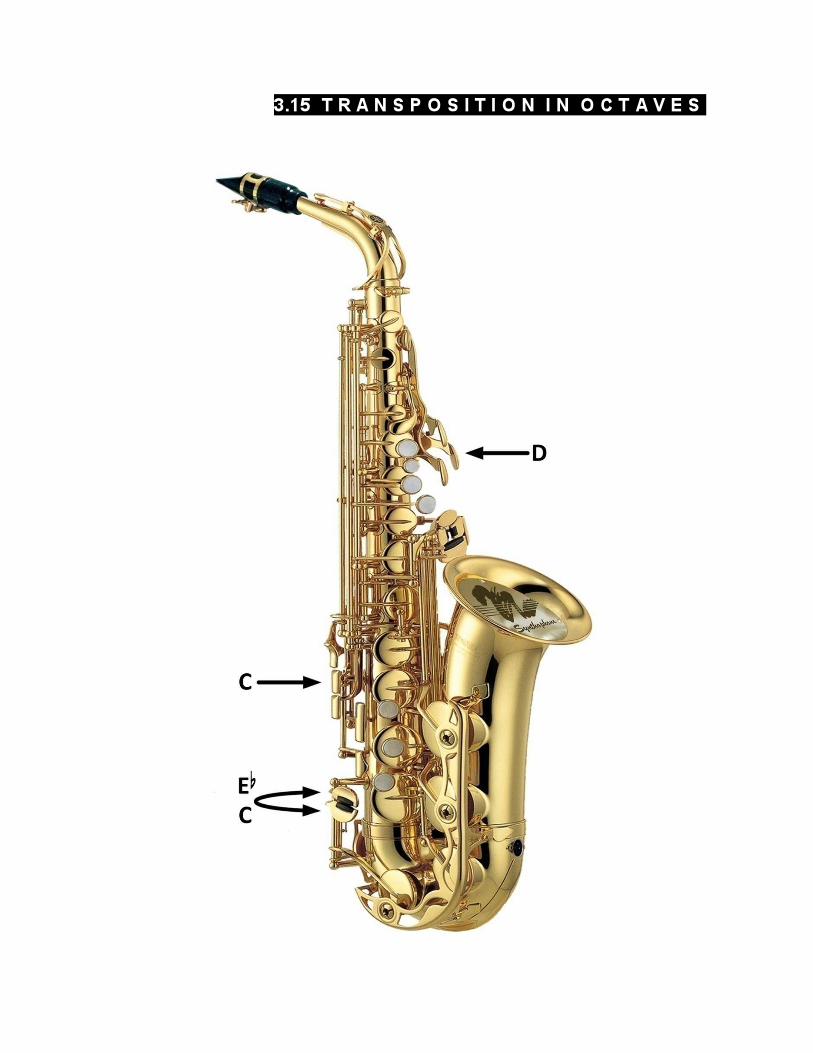
3.15 T R A N S P O S I T I O N I N O C T A V E S
The SYNTHOPHONE can be transposed up or down by 2 octaves from its normal pitch.
This, in addition to the sub- & top-octave (s. 3.15) and the thumb-X-press octave option
(s. 5.1) the Synthophone is capable of producing a total playing range of slightly more
than 9 octaves.
• Raise by one octave side C, high D & Eb
• Lower by one octave side C, high D & C
• Reset to middle octave side C, high D & Eb/C
• level 4 + 2 octaves
• level 3 + 1 octave
• level 2 middle octave
• level 1 - 1 octave
• level 0 - 2 octaves
The panic function resets transposition to the middle OCTAVE.
M U S I C A L A P P L I C A T I O N S
Playing sounds in their extreme ranges, you’ll find some surprisingly interesting results.
With multi-sampled sounds or with split-keyboard configurations, different sets of sounds
or split zones can easily be accessed through manipulation of the OCTAVE settings
from the SYNTHOPHONE. As with all other parameters, transposition can be stored in
the selected patch memory.
3.15 T R A N S P O S I T I O N I N O C T A V E S S
3.16 E X T E N D E D P L A Y I N G R A N G E
The normal range of the SYNTHOPHONE can be extended through the use of the F#-
trill and low-C-keys respectively as additional octave keys.
TOP-OCTAVE-KEY
The F#-trill key can be used as an additional OCTAVE-UP-KEY when playing in the
range above high F. Simply play another octave using the same standard fingerings, but
hold down F#-trill in addition. Note, that the regular F#-trill-key function is retained for F
to F# (trills).
• Top octave normal fingerings & F#-trill
SUB-OCTAVE-KEY
The right hands C-key can be used as an additional OCTAVE-DOWN-KEY to reach
below Bb. Simply hold down this key while playing normal fingerings down to low E. This
extends the low range by 6 halfsteps. Note, that below E, the key is a regular C-key.
• Sub octave normal fingerings & low C
M U S I C A L A P P L I C A T I O N S
The top octave feature allows you to play easily in the upper range avoiding difficult
altissimo fingerings.
The low octave feature provides for low notes as with a clarinet.

3.16 E X T E N D E D P L A Y I N G R A N G E

3.17 S T A R T / S T O P / C O N T I N U E
The following REALTIME MESSAGES are useful when working with sequencers.
Start (MIDI Code $FA)
Continue (MIDI Code $FB)
Stop (MIDI Code $FC)
There are 2 fingerings that are used in an ON / OFF "toggle switch" manner:
• Start high D, F & side Bb
• Stop - following Start high D, F & side Bb again
• Continue high D, F & side C
• Stop - following Continue high D, F & side C again
Please note that the CLOCK IN may have to be activated on your sequencer in order to
respond to the above messages. See in the manual of your sequencer software.
M U S I C A L A P P L I C A T I O N S
With these commands you can play along with a sequencer or MIDI file player, without
ever taking your hands off the instrument.

3.17 S T A R T / S T O P / C O N T I N U E

4. D Y N A M I C H A R M O N Y
4.1 P L A Y U P T O 5 – P A R T H A R M O N Y
Now for the first time, you can play complex chords using a monophonic wind
instrument. It is possible to add a second, third, fourth or even or fifth voice to your
melodic lines. Adding extra voices is controlled by the command fingerings described
below. The resulting harmonic structures are not simply at fixed intervals but remain
diatonic to a key area that you select (s. chapter 4.2). In addition, inversions of each
chord may be played by varying the lip pressure. By applying variable pressure on the
reed while repeatedly playing the same note, you are getting chord inversions. Tight lip
pressure produces a closed position, while lighter lip pressure causes to shift to more
open voicings. You may appreciate the musical potential of this control more easily if
you begin with a two note chord and work up toward the maximum of 5 voices.
• Add one voice side D, low D & Eb
• Subtract one voice side D, low D & C
• Cancel harmony - back to single voice mode side D, low D & Eb/C
The panic function resets dynamic harmony to single voice mode.
M U S I C A L A P P L I C A T I O N S
Four and five-part-harmony lets you create the sound of a full horn section that perfectly
follows your lead lines. Two- and three-part-voicings can be great for riffs or soloing.
DYNAMIC HARMONY can be used with percussion sounds as well as with more
conventional horn and string sounds.

4.1 P L A Y U P T O 5 – P A R T H A R M O N Y

4.2 C H O O S I N G N E W T O N A L I T Y
You can specify a reference tonality, so that DYNAMIC HARMONY generates chord
structures diatonic to the key of your choice. Chords result from that reference tonality,
the actual note played and the momentary lip pressure (for their inversion).
If you relate your playing to a minor key, simply indicate its relative major key. For
example, for DYNAMIC HARMONY to refer to D-minor, finger in tonality key of F-major.
• Select tonality use normal fingering (*) & press Eb/C keys.
(*) normal fingering means that the note should be fingered as it would sound on a
regular saxophone. (The notes to be used are strictly from low E to high D# as shown in
the illustration).
Since normal fingerings are used to indicate tonality it is possible to switch to new
tonalities very quickly, even between short musical phrases. You may not want to play
bebop that way - changing tonal centers every bar - but for modal tunes this technique
may be perfectly manageable.
The panic function resets tonality to the key of C major.
M U S I C A L A P P L I C A T I O N S
Try to do reharmonisations for one and the same played musical line by changing
tonality. The resulting chords will change according to the tonality.
Tonality is part of a patch memory, too. It is therefore possible to store similiar patches
where the only difference is the selected tonality.

4.2 C H O O S I N G N E W T O N A L I T Y

4.3 U S I N G F R E E Z E H A R M O N Y
You may - for a change in flavor - want to play all voices in parallel motion,.
FREEZE HARMONY does just this. The last chord played will be memorized and played
in the same intervalic relation over the full range of the instrument.
• FREEZE HARMONY on side D, low D, E & Eb
• FREEZE HARMONY off side D, low D, E & C
The panic function sets FREEZE HARMONY off.
M U S I C A L A P P L I C A T I O N S
Constant structures are often used by arrangers / composers for writing intros and
endings or for creating a noticable change in the harmonic flow of a piece. Now you can
use them as a player on stage.

4.3 U S I N G F R E E Z E H A R M O N Y

4.4 S E L E C T n e w H A R M O N Y T A B L E
Threre are three different harmonisation tables in the EPROM and another six USER harmony tables in the RAM memory (s. 4.5). The basic chord materials are shown in the
appendix of this manual (s. 9.3).
Use the following fingerings to select any of 9 harmony tables:
• Next harmony table low D & palm Eb and press Eb • Previous harmony table low D & palm Eb and press C • Return to harmony table #1 low D & palm Eb and press Eb/C
• harmony table 1 (EPROM) chords in thirds • harmony table 2 (EPROM) chords in fourths
• harmony table 3 (EPROM) chords in seconds
• harmony table 4 (user RAM) user chords in thirds (*)
• harmony table 5 (user RAM) user chords in fourths (*)
• harmony table 6 (user RAM) user chords in seconds (*)
• harmony table 7 (user RAM) user chords in thirds (*)
• harmony table 8 (user RAM) user chords in fourths (*)
• harmony table 9 (user RAM) user chords in seconds (*)
(*) when initialized through total memory reset (s. chapter 3.7)
The panic function selects harmonic table 1
M U S I C A L A P P L I C A T I O N
Every harmony table generates a very unique harmonization with a given melodic line. When applying additional harmony variations (s. 4.6) very complex and highly variable
voicing techniques can be achieved.

4.4 S E L E C T n e w H A R M O N Y T A B L E

4.5 I N P U T P E R S O N A L H A R M O N Y
The harmony tables in the user RAM (tables 4 - 9) can be personalized by defining 5 new notes for each chord in the chromatic scale:
Follow these easy steps:
• Use the panic function first to reset the instrument to well-known conditions.
• Now activate 5-part DYNAMIC HARMONY (s. 4.1)
• Select a user harmony table in RAM (tables 4 -9) that you want to modify (s. 4.4)
• Now activate the INPUT fingering below:
• Get ready for note input - low D, low Bb & press Eb/C at once
Now (slowly) play 5 STACCATO notes in the following order:
• lead voice (melody note)
• 3rd voice(!)
• 2nd voice (!)
• 4th voice
• 5th voice
Finally hit the lead note again and listen to the resulting chord that you just built. - If the
resulting chord is not exactly what you intended, just go through steps 5 to 10 again, until the new chord is perfect.
Attention: (!) The 3rd voice has to be played prior to the 2nd voice in order to be correctly used
with 2-voice and 3 voice playing.
User input chords are stored to memory instantly and replace any previous chord.
Total memory reset (s. 3.7) restores all original chords by copying the EPROM into the
user RAM, so that at any point, factory settings can be restored.
M U S I C A L A P P L I C A T I O N S
A tremendeous field for experimentation opens up with personal harmony. Please note, that every chord that has just been established can be applied with all other chord
variation techniques given in this book. Individual notes or in fact all harmony voices can
also be input above the melody note. A special case is unison, where all (identical) input
notes are layered to thicken one sound.

4.5 I N P U T P E R S O N A L H A R M O N Y

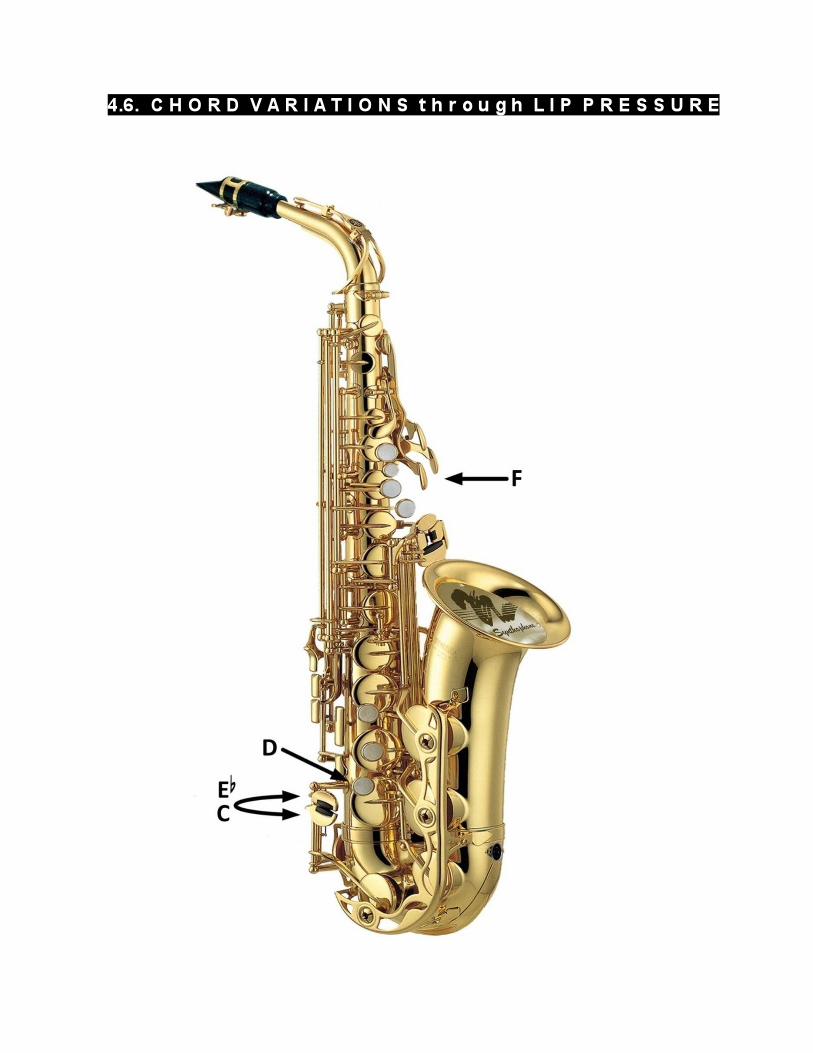
4.6. C H O R D V A R I A T I O N S t h r o u g h L I P P R E S S U R E
Chords can be varied by your lip pressure in five different ways.
Select any of the five methods below with the following fingerings:
• Next level low D & high F & Eb • Previous level low D & high F & C • Return to level 1 low D & high F & Eb/C
• level 1 INVERSIONS - (DYNAMIC HARMONY) • level 2 b-II SUBSTITUTE function on high lip pressure
• level 3 variable NUMBER OF VOICES (lip pressure decreases # of voices)
• level 4 variable NUMBER OF VOICES (lip pressure increases # of voices)
• level 5 chords / unison (loose = chords, tight = unison)
• level 6 unison / chords (loose = unison, tight = chords)
The panic function resets to level 1 (DYNAMIC HARMONY)
M U S I C A L A P P L I C A T I O N S
Level 2 allows for chromatic "escapes" from the momentary key the harmony is in.
Level 3 to 6 provide for lip control of the number of voices that sound along with your
melodic line.
4.6. C H O R D V A R I A T I O N S t h r o u g h L I P P R E S S U R E
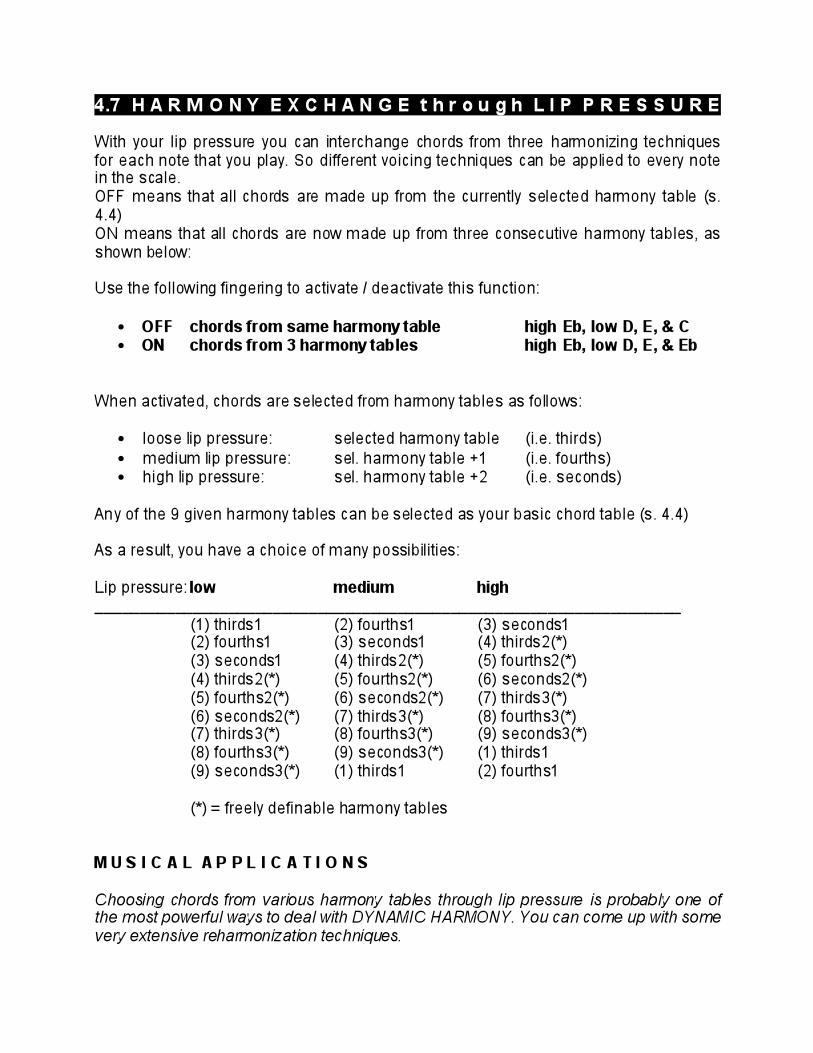
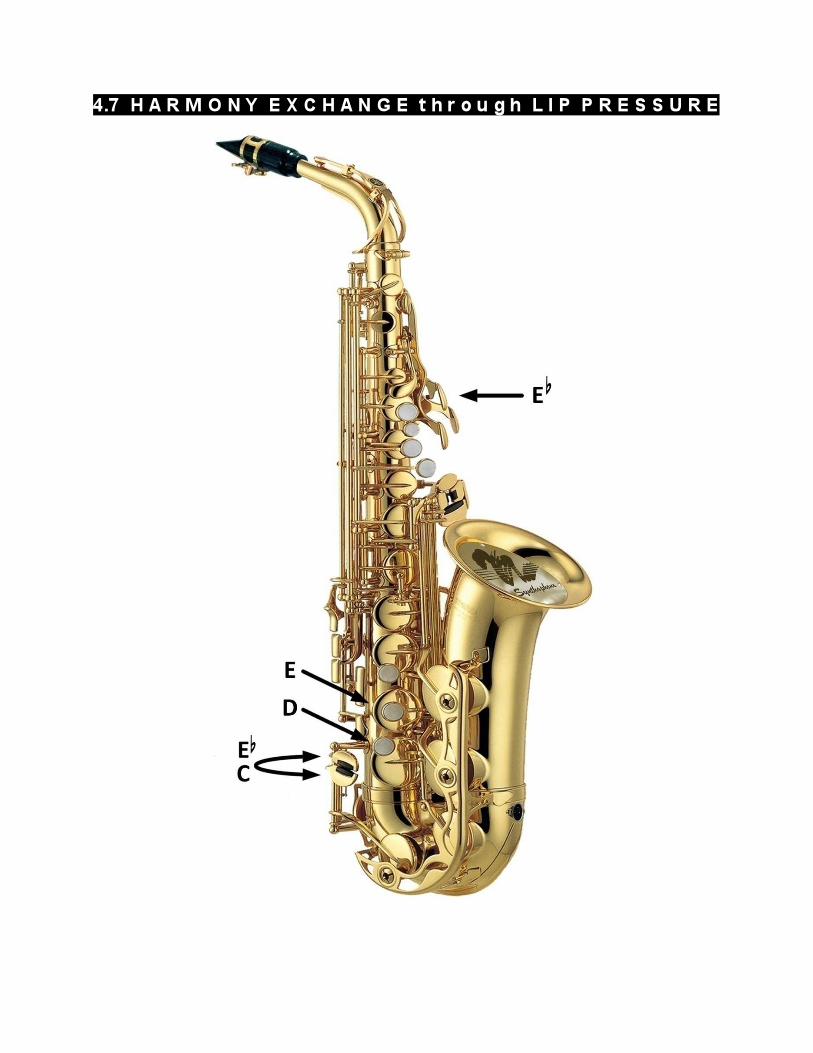
4.7 H A R M O N Y E X C H A N G E t h r o u g h L I P P R E S S U R E
With your lip pressure you can interchange chords from three harmonizing techniques
for each note that you play. So different voicing techniques can be applied to every note in the scale.
OFF means that all chords are made up from the currently selected harmony table (s.
4.4)
ON means that all chords are now made up from three consecutive harmony tables, as
shown below:
Use the following fingering to activate / deactivate this function:
• OFF chords from same harmony table high Eb, low D, E, & C • ON chords from 3 harmony tables high Eb, low D, E, & Eb
When activated, chords are selected from harmony tables as follows:
• loose lip pressure: selected harmony table (i.e. thirds)
• medium lip pressure: sel. harmony table +1 (i.e. fourths)
• high lip pressure: sel. harmony table +2 (i.e. seconds)
Any of the 9 given harmony tables can be selected as your basic chord table (s. 4.4)
As a result, you have a choice of many possibilities:
Lip pressure: low medium high
__________________________________________________________________
(1) thirds1 (2) fourths1 (3) seconds1 (2) fourths1 (3) seconds1 (4) thirds2(*)
(3) seconds1 (4) thirds2(*) (5) fourths2(*)
(4) thirds2(*) (5) fourths2(*) (6) seconds2(*)
(5) fourths2(*) (6) seconds2(*) (7) thirds3(*)
(6) seconds2(*) (7) thirds3(*) (8) fourths3(*) (7) thirds3(*) (8) fourths3(*) (9) seconds3(*)
(8) fourths3(*) (9) seconds3(*) (1) thirds1
(9) seconds3(*) (1) thirds1 (2) fourths1
(*) = freely definable harmony tables
M U S I C A L A P P L I C A T I O N S
Choosing chords from various harmony tables through lip pressure is probably one of the most powerful ways to deal with DYNAMIC HARMONY. You can come up with some
very extensive reharmonization techniques.
4.7 H A R M O N Y E X C H A N G E t h r o u g h L I P P R E S S U R E

4.8. M U L T I C H A N N E L M O D E
The SYNTHOPHONE is capable of playing each voice of a chord on a separate MIDI channel. This is of interest if your synthesizer can be set to MULTI mode, or when
working with notation programs on computers, where your entry of harmonized
passages can be printed out on paper. Since all voices in MULTI mode are arranged on
separate MIDI channels, it is easier to separate them onto individual staves of your
score.
• POLY mode low D, E, high F & C • MULTI mode low D, E, high F, & Eb
- In POLY mode, all notes of a chord are output on the same MIDI channel
- In MULTI mode, chord notes are output on consecutive MIDI channels, as illustrated in the following example:
• 1st voice on the selected channel (flute)
• 2nd voice on the selected channel + 1 (clar)
• 3rd voice on the selected channel + 2 (oboe)
• 4th voice on the selected channel + 3 (bassoon)
• 5th voice on the selected channel + 4 (french horn)
The panic function resets to POLY mode
M U S I C A L A P P L I C A T I O N S
In MULTI mode the lead voice receives all MIDI controllers like modulation, aftertouch and pitch bend. The lower (harmony) voices only receive note on/off and their respective
volume data. It is therefore possible to distinguish the lead voice over the rest of the
voices.

4.8. M U L T I C H A N N E L M O D E

5. A D D I T I O N A L C O N T R O L FU N C T I O N S
5.1 T H U M B - X - P R E S S - F U N C T I O N S
thumb-X-press is a device for the SYNTHOPHONE that opens a whole new dimension of control
over sound - at the touch of your right hand thumb! The highly dynamic pressure sensor is multi-functional, i.e. it can be programmed to act as an additional octave key or a pitch bending
device, as a harmony switch or a sustain pedal and it can also produce aftertouch.
To turn on thumb-X-press, simply choose an appropriate function for thumb-X-press. Settings for
thumb-X-press are stored along with all the other SYNTHOPHONE settings when storing a patch (s. 3.6). Consequent ly, preselected patches are immediately playable with their respective
thumb-X-press functions.
Select any of the following levels for thumb-X-press using the control fingerings listed below:
• Level Up high F and low E & press Eb
• Level down high F and low E & press C
• To level 0 high F and low E & press Eb/C
Level 0 Off
Level 1 Octave Key
Level 2 Pitch Bend up
Level 3 Pitch Bend down
Level 4 Aftertouch
Level 5 Number of Voices in Chords
Level 6 Lower/Upper MIDI Channel
Level 7 bI I-Substi tute Chords
Level 8 Freeze Harmony
Level 9 Sustain On/Off
Panic function resets thumb-X-press to level 0 = off
5.1 T H U M B - X - P R E S S - F U N C T I O N S
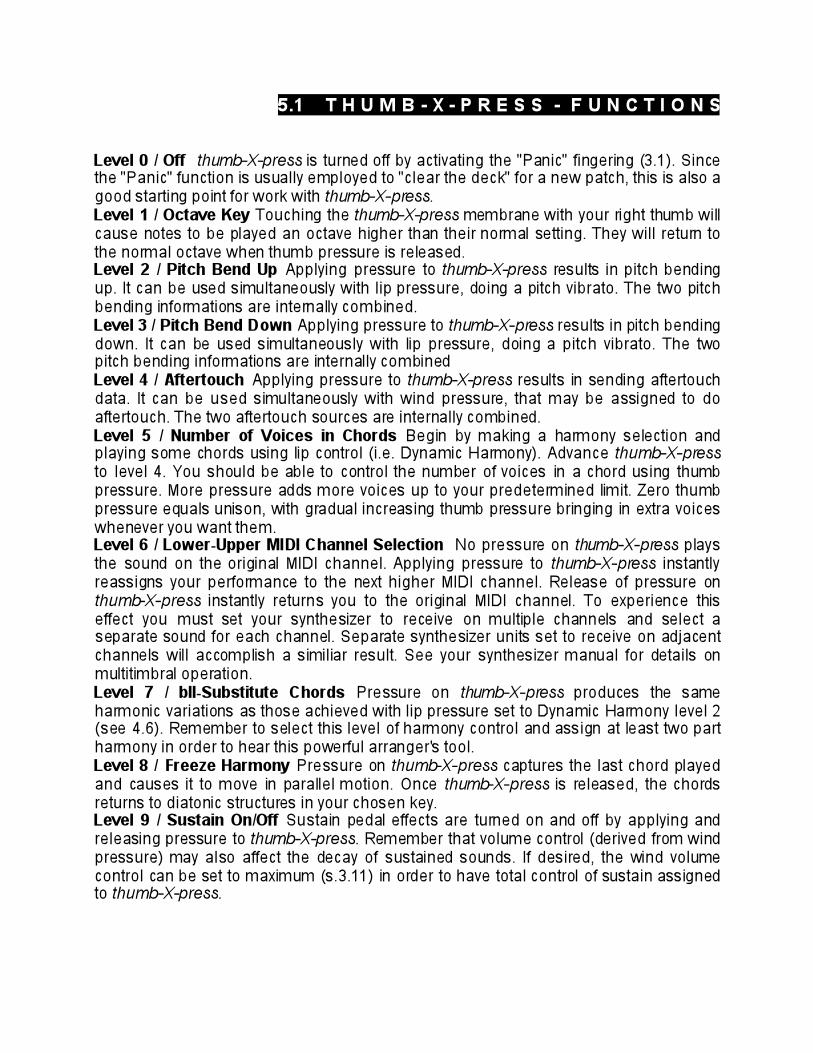
Level 0 / Off thumb-X-press is turned off by activating the "Panic" fingering (3.1). Since the "Panic" function is usually employed to "clear the deck" for a new patch, this is also a
good starting point for work with thumb-X-press.
Level 1 / Octave Key Touching the thumb-X-press membrane with your right thumb will
cause notes to be played an octave higher than their normal setting. They will return to
the normal octave when thumb pressure is released. Level 2 / Pitch Bend Up Applying pressure to thumb-X-press results in pitch bending
up. It can be used simultaneously with lip pressure, doing a pitch vibrato. The two pitch
bending informations are internally combined.
Level 3 / Pitch Bend Down Applying pressure to thumb-X-press results in pitch bending
down. It can be used simultaneously with lip pressure, doing a pitch vibrato. The two pitch bending informations are internally combined
Level 4 / Aftertouch Applying pressure to thumb-X-press results in sending aftertouch
data. It can be used simultaneously with wind pressure, that may be assigned to do
aftertouch. The two aftertouch sources are internally combined.
Level 5 / Number of Voices in Chords Begin by making a harmony selection and playing some chords using lip control (i.e. Dynamic Harmony). Advance thumb-X-press
to level 4. You should be able to control the number of voices in a chord using thumb
pressure. More pressure adds more voices up to your predetermined limit. Zero thumb
pressure equals unison, with gradual increasing thumb pressure bringing in extra voices
whenever you want them. Level 6 / Lower-Upper MIDI Channel Selection No pressure on thumb-X-press plays
the sound on the original MIDI channel. Applying pressure to thumb-X-press instantly
reassigns your performance to the next higher MIDI channel. Release of pressure on
thumb-X-press instantly returns you to the original MIDI channel. To experience this
effect you must set your synthesizer to receive on multiple channels and select a separate sound for each channel. Separate synthesizer units set to receive on adjacent
channels will accomplish a similiar result. See your synthesizer manual for details on
multitimbral operation.
Level 7 / bII-Substitute Chords Pressure on thumb-X-press produces the same
harmonic variations as those achieved with lip pressure set to Dynamic Harmony level 2 (see 4.6). Remember to select this level of harmony control and assign at least two part
harmony in order to hear this powerful arranger's tool.
Level 8 / Freeze Harmony Pressure on thumb-X-press captures the last chord played
and causes it to move in parallel motion. Once thumb-X-press is released, the chords
returns to diatonic structures in your chosen key. Level 9 / Sustain On/Off Sustain pedal effects are turned on and off by applying and
releasing pressure to thumb-X-press. Remember that volume control (derived from wind
pressure) may also affect the decay of sustained sounds. If desired, the wind volume
control can be set to maximum (s.3.11) in order to have total control of sustain assigned to thumb-X-press.

5.2 L I P S W I T C H I N G F U N C T I O N S
Lip pressure can be applied for "switching" on / off certain performance features, using the fingerings below:
• next higher level low F & high F & Eb • next lower level low F & high F & C • Return to level 1 low F & high F & Eb/C
• level 0 OFF (no switching function)
• level 1 Play on either of 2 MIDI channels by changing lip pressure. (loose lip --> basic channel / tight lip --> basic channel +1)
• level 2 same as level 1, but now note offs will NOT be sent out, when
playing legato (obligato mode)
• Level 3 SUSTAIN (works like a sustain foot switch)
• Level 4 PORTAMENTO on / off (generates glissandi when sound are programmed for portamento)
• Level 5 FREEZE on / off (last chord played is in parallel structure. The panic function resets to level 0 (= OFF)
In levels 1 & 2 you can select sounds separately for both MIDI channels:
• select sound on LOWER channel: WITHOUT octave key (s. chapt. 3.3) • select sound on UPPER channel: WITH octave key (s. chapt. 3.3)
M U S I C A L A P P L I C A T I O N S
Levels 1 & 2 are designed to play 2 instruments from a single instrument. You can
combine this switching function with any of the DYNAMIC HARMONY features, chords
could be played on one channel and a single voice on the other channel.

5.2 L I P S W I T C H I N G FU N C T I O N S
5.3 A D D I T I O N A L P E R F O R M A N C E F E A T U R E R S
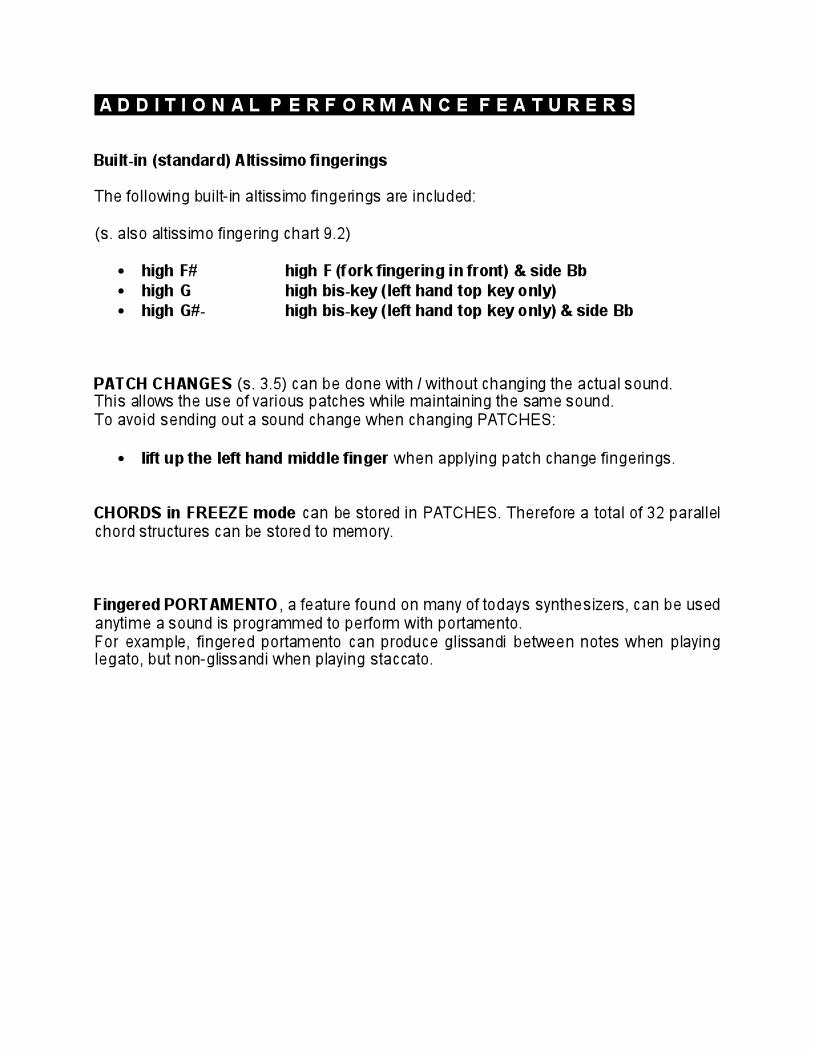
Built-in (standard) Altissimo fingerings
The following built-in altissimo fingerings are included:
(s. also altissimo fingering chart 9.2)
• high F# high F (fork fingering in front) & side Bb • high G high bis-key (left hand top key only) • high G#- high bis-key (left hand top key only) & side Bb
PATCH CHANGES (s. 3.5) can be done with / without changing the actual sound. This allows the use of various patches while maintaining the same sound.
To avoid sending out a sound change when changing PATCHES:
• lift up the left hand middle finger when applying patch change fingerings.
CHORDS in FREEZE mode can be stored in PATCHES. Therefore a total of 32 parallel
chord structures can be stored to memory.
Fingered PORTAMENTO , a feature found on many of todays synthesizers, can be used
anytime a sound is programmed to perform with portamento.
For example, fingered portamento can produce glissandi between notes when playing legato, but non-glissandi when playing staccato.

6. S O U N D D E S I G N C O N S I D E R A T I O N S
6.1 P R O G R A M M I N G E X P R E S S I V E V O I C E S
The SYNTHOPHONE is a powerful MIDI wind controller for sax players. The sounds of
this expressive instrument however depend on the programming of your synthesizer.
When referring to the MIDI implementation chart in this manual, you will see that for the
most part, things look very similiar to keyboard data. The special thing about the
SYNTHOPHONE though is the use of the various mouthpiece controllers : - modulation,
breath, volume, aftertouch, pitch bend and velocity are all derived from the mouthpiece
simultaneously, and your playing therefore sounds much different from keyboard
players.
Breath and lip pressure are constantly producings dynamic and highly expressive MIDI
data. Choosing synthesizers which are sensitive to these controls will insure the most
"wind instrumental" results.
Check your synthesizer manuals for these informations:
• How flexible can modulation, breath control and aftertouch be used for shaping
sound?
• Does your synthesizer respond well to MIDI volume?
• Is pitch bend range programmable on your synthesizer?
• Can individual synthesizer voices be freely edited, layered etc.?
The details above are valuable but not essential for playing your equipment with the
SYNTHOPHONE.
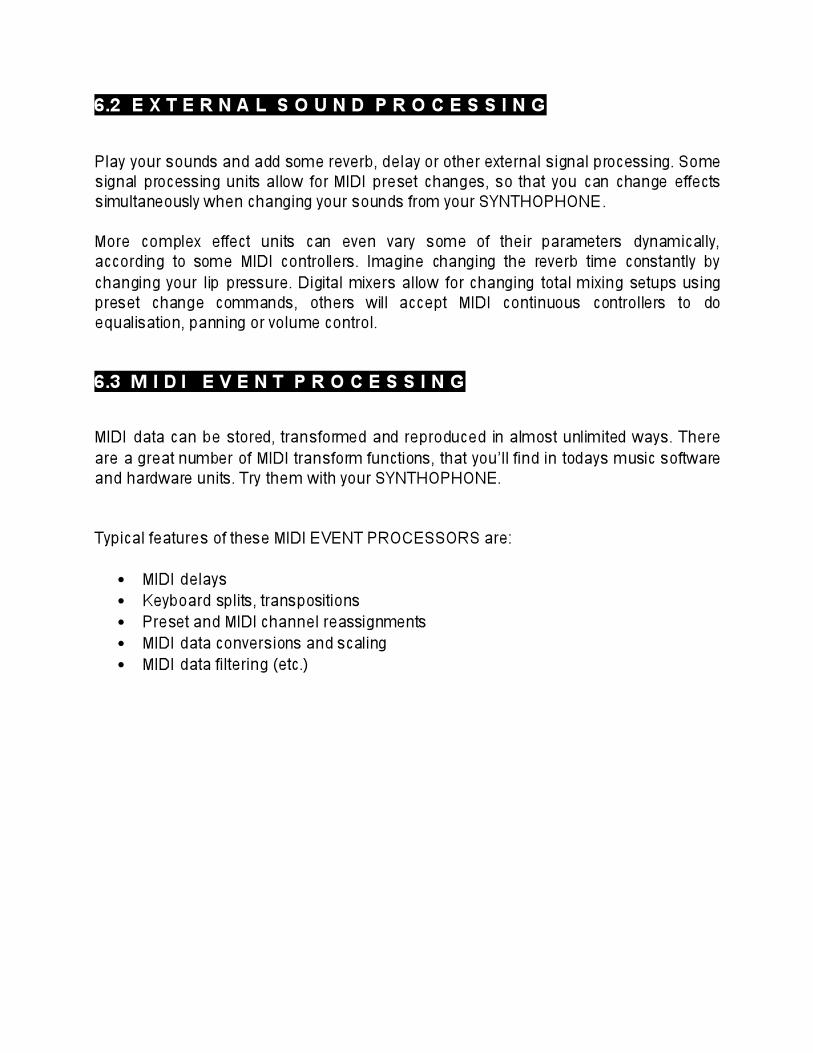
6.2 E X T E R N A L S O U N D P R O C E S S I N G
Play your sounds and add some reverb, delay or other external signal processing. Some
signal processing units allow for MIDI preset changes, so that you can change effects
simultaneously when changing your sounds from your SYNTHOPHONE.
More complex effect units can even vary some of their parameters dynamically,
according to some MIDI controllers. Imagine changing the reverb time constantly by
changing your lip pressure. Digital mixers allow for changing total mixing setups using
preset change commands, others will accept MIDI continuous controllers to do
equalisation, panning or volume control.
6.3 M I D I E V E N T P R O C E S S I N G
MIDI data can be stored, transformed and reproduced in almost unlimited ways. There
are a great number of MIDI transform functions, that you’ll find in todays music software
and hardware units. Try them with your SYNTHOPHONE.
Typical features of these MIDI EVENT PROCESSORS are:
• MIDI delays
• Keyboard splits, transpositions
• Preset and MIDI channel reassignments
• MIDI data conversions and scaling
• MIDI data filtering (etc.)

6.4 S E Q E N C I N G w i t h T H E S Y N T H O P H O N E
SYNTHOPHONE MIDI data can be sequenced much like with any keyboard, but it
sends out much more MIDI data and may therefore use up more sequencing space.
• Disable all continuous controllers, when not needed.
In general, computer based sequencers have much bigger memories than dedicated
hardware sequencers. Some can filter out unnecessary data even after recording tracks.
Check out the editing possibilities before you buy.
Keep each track on a separate MIDI channel and use either multiple synthesizers or
multi-timbral synthesizers. Use a multiport MIDI interface with your computer and hook
up each individual synthesizer in the rack to a separate MIDI port, avoiding overload
MIDI transmission. With todays virtual sounds on your computer the above considerations are not so
important, since the computer handles MIDI data internally.

7. S Y N T H O P H O N E C A R E & U P D A T E S
7.1 C L E A N I N G Y O U R M O U T H P I E C E
Switch off the power supply and pull off the mouthpiece from the neck. Remove the
reed, and then wash your mouthpiece, while holding your thumb over the back opening in order to protect the socket from the water. Then shake the mouthpiece to get out any
residual water and remount the reed. You may want to check and adjust the height of
the reed's metal tongue by that occasion (s. 2.3) Make sure the mouthpiece is put on
firmly onto its connector and then switch the power supply back on. At that instant, lip
and wind sensors are recalibrated automatically by the processor.
7.2 P E R S O N A L A L T I S S I M O F I N G E R I N G
Many experienced sax players use their own ALTISSIMO fingerings. If you want to use
yours on the SYNTHOPHONE, please fill in your personal altissimo fingerings in the
chart provided (s. 9.2) and send it to SOFTWIND INSTRUMENTS, Switzerland.
We will program your custom EPROM chip - we do this service free of charge during
the warranty period.
7.3 I N S T A L L I N G N E W S O F T W A R E
• In order to replace the EPROM chip, take the following steps:
• • Switch off power. Remove the cover using the Philips screwdriver supplied. Pull
out the processor board by approximately 3 inches. With the flat screwdriver, lift
from both sides - the old EPROM chip out of its socket (see illustration). Now,
observing polarity - there is a notch at one end - carefully insert the new EPROM
into the socket. It is IMPORTANT that all pins go in straight. Carefully push
back the processor board into its original position and close the instrument bell
cover. Switch back on and check our your personal altissimo fingerings.
• The SYNTHOPHONE is designed to grow with future MIDI capabilities.
• When a new update gets available, customers can get the latest EPROM (free of
charge in the warranty period and available for a small fee later on.)


8. T R O U B L E S H O O T I N G G U I D E Problem: NO SOUND IS PRODUCED
• Check power LED on power box of your SYNTHOPHONE.
• Check for power to all of your remaining equipment.
• Switch off and back on everything in your setup.
• If the MIDI LED is blinking while playing, then most likely the problem is not
coming from the SYNTHOPHONE.
• If the MIDI LED never turns ON while playing, then probably the MIDI cable
connecting the SYNTHOPHONE to its power supply may be defective. Replace it
with an other cable. Note that it has to be a 5-pin (fully wired) MIDI cable.
• Make sure all other cables are well connected and working.
• Replace each cable selectively with a spare cable.
• Make sure, that the spiral cable of the neck is firmly plugged into its socket inside
the upper body of the SYNTHOPHONE.
• Check that MIDI channels on your synthesizer and Synthophone are identical.
• Test your synthesizer with some other MIDI device (i.e. keyboard or sequencer).
Problem: LIP CONTROL ISN'T WORKING (properly)
• Play another sound - maybe your previous sound is just not sensitive to
modulation or pitch bend data.
• Do the panic function (while not applying any lip pressure) - to calibrate your reed
then set for a high pitch bend level to check on the action of the reed again.
• Inspect your reed and the height of the metal tonque (s. 2.3). Correct it if
necessary or exchange the reed with a new one from the box and then repeat all
steps above once more.
Problem: WIND CONTROL ISN'T WORKING (properly)
• Is MIDI volume Cntrl. 07 sent to your synthesizer(? In certain cases, dynamics
are controlled by breath data. See the respective user manual for more details.
• If the volume behaves somewhat irregularly, get rid of the water in the
mouthpiece by shaking it out.
Problem: SOME OF THE KEYS ARE DEAD... • Change to different sound programs. Maybe the sounds themselves are limited in
range (split-sounds, sample-range etc.).
• You may accidently have bent one of the key sensors or it may have shifted out
of adjustmentt. • Please DO NOT ATTEMPT TO ADJUST ANY OF THE KEY SENSORS by
yourself – please call or write for help !

9. A P P E N D I X
9.1 M I D I I M P L E M E N T A T I O N C H A R T
n = MIDI channel, all 16 MIDI-channels are selectable.
xx = first data byte
yy = second data byte
MIDI TRANSMIT DATA
NOTE OFF 9n xx 00 velocity = 0 NOTE ON 9n xx yy velocity derived from breath pressure
CONTROL CHANGE
Modulation Bn 01 yy 6 ranges available Breath Bn 02 yy 6 ranges available
Volume Bn 07 yy 6 ranges available
Sustain on/off Bn 40 yy
Portamento on/off Bn 41 yy
PROGRAM CHANGE Cn xx 128 sounds selectable
AFTERTOUCH Dn xx 6 ranges available
PITCH BEND En xx yy 6 ranges available
ALL NOTES OFF Fn F7 00
REAL TIME MESSAGE FA start
FB continue
FC stop
MIDI RECEIVE DATA none
All specifications are subject to change without further notice.

9.2 A L T I S S I M O F I N G E R I N G S
Fill in your personal altissimo fingerings in the table below and send to:
SOFTWIND INSTRUMENTS Falkenplatz 1 CH-3012 Bern, Switzerland [email protected]
We will program your personal EPROM containing your altissimo fingerings.
For EPROM exchange please refer to chapter 7.3 in this manual.

9.3 H A R M O N Y I L L U S T R A T I O N S
These are basic chord structures that are assigned to each note of the chromatic scale in DYNAMIC HARMONY. The voicings can be influenced in addition by the selectable
tonality, inversion, substitution technique, etc.
Example 1: shows all three HARMONY TABLES in EPROM. Additional six HARMONY
TABLES are in user RAM, that originally are identical to the ones in EPROM. They can
always be restored with a TOTAL MEMORY RESET (s. 3.7). These chords in RAM can be USER modified to create PERSONAL HARMONY (s. 4.5)
Example 2: was produced directly with DYNAMIC HARMONY and the use of a notation
program. The SYNTHOPHONE has been set to MULTI mode (vgl. 4.8), to produce easily distinguishable instrument lines on separate staves.

Example 3: shows some possible variations of harmonizing in thirds. In this example, lip
pressure was used to do the INVERSIONS of the basic chords (s. 4.1)
• Closed ---> five voice closed position • Drop 2 ---> 2nd voice dropped an octave (8vb) • Drop 3 ---> 3rd voice dropped an octave (8vb) • Drop 2 & 3 ---> 2nd and 3rd voice dropped an octave (8vb) • Drop 2 & 4 ---> 2nd and 4th voice dropped an octave (8vb)