system galaxy quick guide - galaxysys.com assadbsync ipreaders(10.4).pdf · system galaxy quick...
TRANSCRIPT
System Galaxy Quick Guide CONFIGURATION AND OPERATION
ASSA ABLOY IP READERS
SG 10.4.0 (or higher) MAY 2014
FOR WIFI & POE READER INTEGRATIONS
System Galaxy Integration to ASSA ABLOY IP Readers Page 1
System Galaxy
ASSA ABLOY
IP Reader Guide
Integrating System Galaxy with WIFI & POE READERS
using GCS ASSA SYNC Program
Information in this document is subject to change without notice. No claims are made as to the accuracy or completeness of this document.
This document describes how to install and configure IP readers into the System Galaxy database and install the GCS ASSA SYNC program.
This guide does not supersede the manufacturer’s documentation for 3rd Party products or systems not manufactured by Galaxy Control Systems.
FIRST edition
Copyright © 2014 Galaxy Control Systems All rights reserved
Galaxy Control Systems
3 North Main Street
Walkersville MD 21793
301-845-6600
www.galaxysys.com
No part of this document may be reproduced, copied, adapted, or transmitted, in any form or by any means, electronic or mechanical, for any purpose, without the express written consent of Galaxy Control Systems. Copyright protection claims include all forms and matters of copyrighted material and information, including but not limited to, material generated from the software programs, which are displayed on the screen such as icons, look and feel, etc.
Microsoft®, Windows®, MS-DOS®, SQL Server®, and Windows Server System®, are registered trademarks of the Microsoft Corporation in the U.S. and other countries.
ASSA ABLOY, Sargent, Corbin Russwin, HID, iClass, are trademarks and/or registered trademarks of their respective owners. Adobe® and Acrobat® are registered trademarks of Adobe Systems Inc.
Technical illustrations are creations of the technical author.
System Galaxy Integration to ASSA ABLOY IP Readers Page 2
Table of Contents
1 INTRODUCTION TO THE ‘GCS ASSA SYNC’ PROGRAM.............................. 5
1.1 OVERVIEW OF ASSA IP READER INTEGRATION USING ‘GCS ASSA SYNC’ .........6
2 SYSTEM RECOMMENDATIONS ...................................................................... 7
2.1.1 GENERAL INSTALLATION RECOMMENDATIONS............................................................ 7
2.1.2 ASSA INSTALLATION RECOMMENDATIONS .................................................................. 7
2.1.3 MANUALLY UPDATING IP READERS BEFORE SCHEDULED UPDATES.............................. 7
2.1.4 SYSTEM GALAXY CONFIGURATION RECOMMENDATIONS ............................................ 8
2.1.5 ENROLLING AND AUTHORIZING CREDENTIALS VIA SYSTEM GALAXY ............................ 9
2.1.6 GCS ASSA SYNC PROGRAM REQUIREMENTS................................................................. 9
3 INSTALLING THE ASSA DSR APPLICATION & DATABASE....................... 10
4 INSTALL THE ASSA CONFIG TOOLS .......................................................... 16
4.1 INSTALLING THE ASSA CONFIGURATION TOOLS .................................................16
4.2 CONFIGURING THE NETWORK SETTINGS OF EACH LOCK ..................................18
4.3 ADDING A LOCK TO THE ASSA DATABASE............................................................20
4.4 VIEWING THE LOCK WITH THE DSR SUPPORT TOOL............................................23
5 INSTALLING THE ‘GCS ASSA SYNC’ PROGRAM........................................ 24
6 GCS ASSA SYNC FUNCTIONALITY .............................................................. 27
6.1 GCS ASSA SYNC PROGRAM FUNCTIONALITY .......................................................27
6.2 LONG DESCRIPTION OF THE GCS ASSA SYNC PROGRAM PERFORMANCE .....28
6.3 EXAMPLE OF LOG OUTPUT.......................................................................................29
7 SCHEDULING THE GCS ASSA SYNC EXECUTION ..................................... 30
7.1 RUNNING ‘GCSSYNC.EXE’ APPLICATION MANUALLY...........................................30
7.2 CREATING A WINDOWS TASK SCHEDULE TO RUN ‘gcssync.exe’ .......................32
System Galaxy Integration to ASSA ABLOY IP Readers Page 3
8 CONFIGURING THE SYSTEM GALAXY (SG) HARDWARE ......................... 35
8.1 LAUNCHING SYSTEM GALAXY CLIENT SOFTWARE ..............................................35
8.2 ADDING THE ‘ASSA ABLOY IP READER’ TYPE TO SYSTEM GALAXY..................36
8.3 ADDING THE ‘DUMMY’ LOOP/CLUSTER IN SYSTEM GALAXY...............................37
8.4 ADDING THE ‘DUMMY’ CONTROLLER AND DPI BOARDS IN SYSTEM GALAXY..38
8.5 CONFIGURING THE READER PROPERTIES IN SYSTEM GALAXY.........................39
8.6 ADDING A “TEST CARD” IN SYSTEM GALAXY........................................................40
8.6.1 METHODS OF CAPTURING A TEST CARD CREDENTIAL IN SYSTEM GALAXY.................. 40
8.6.1.1 CAPTURING A TEST CARD (CARD CODE) FROM A ‘NOT IN SYSTEM’ EVENT:..... 41
8.6.1.2 CAPTURING A TEST CARD (CARD CODE) FROM AN ENROLLMENT READER: ..... 41
8.6.1.3 MANUALLY ADDING A CREDENTIAL (CARD CODE – OR – KEYPAD CODE):........ 42
9 ABOUT ADDING & REMOVING ACCESS FROM CARDS / USERS ............. 45
System Galaxy Integration to ASSA ABLOY IP Readers Page 4
1 INTRODUCTION TO THE ‘GCS ASSA SYNC’ PROGRAM
This addendum covers how to install and use Galaxy’s GCS ASSA Sync Program. Also included are basic tips for installing and configuring the ASSA DSR Application/WEB API & Database, as it relates to interfacing with System Galaxy.
This document includes the following:
Overview of the integration Requirements and Recommendations Installing the ASSA ABLOY DSR Software and ASSA Database Overview of ASSA ABLOY network and lock Config tools Installing Galaxy’s GCS ASSA SYNC program Scheduling the GCS ASSA SYNC program with the Windows Task Scheduler Configuring the hardware into the System Galaxy database Basic information on enrolling a card/credentials into the System Galaxy database
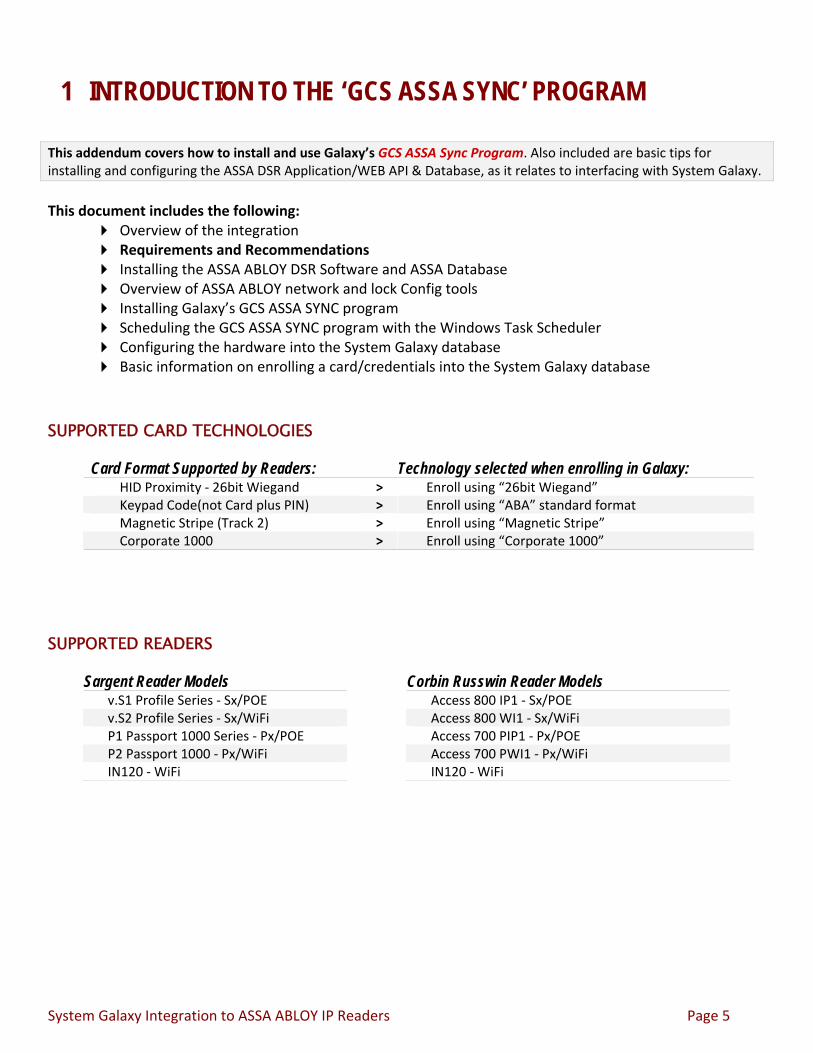
SUPPORTED CARD TECHNOLOGIES
Card Format Supported by Readers: Technology selected when enrolling in Galaxy: HID Proximity ‐ 26bit Wiegand > Enroll using “26bit Wiegand” Keypad Code(not Card plus PIN) > Enroll using “ABA” standard format Magnetic Stripe (Track 2) > Enroll using “Magnetic Stripe” Corporate 1000 > Enroll using “Corporate 1000”
SUPPORTED READERS
Sargent Reader Models Corbin Russwin Reader Models v.S1 Profile Series ‐ Sx/POE Access 800 IP1 ‐ Sx/POE v.S2 Profile Series ‐ Sx/WiFi Access 800 WI1 ‐ Sx/WiFi P1 Passport 1000 Series ‐ Px/POE Access 700 PIP1 ‐ Px/POE P2 Passport 1000 ‐ Px/WiFi Access 700 PWI1 ‐ Px/WiFi IN120 ‐ WiFi IN120 ‐ WiFi
System Galaxy Integration to ASSA ABLOY IP Readers Page 5
1.1 OVERVIEW OF ASSA IP READER INTEGRATION USING ‘GCS ASSA SYNC’
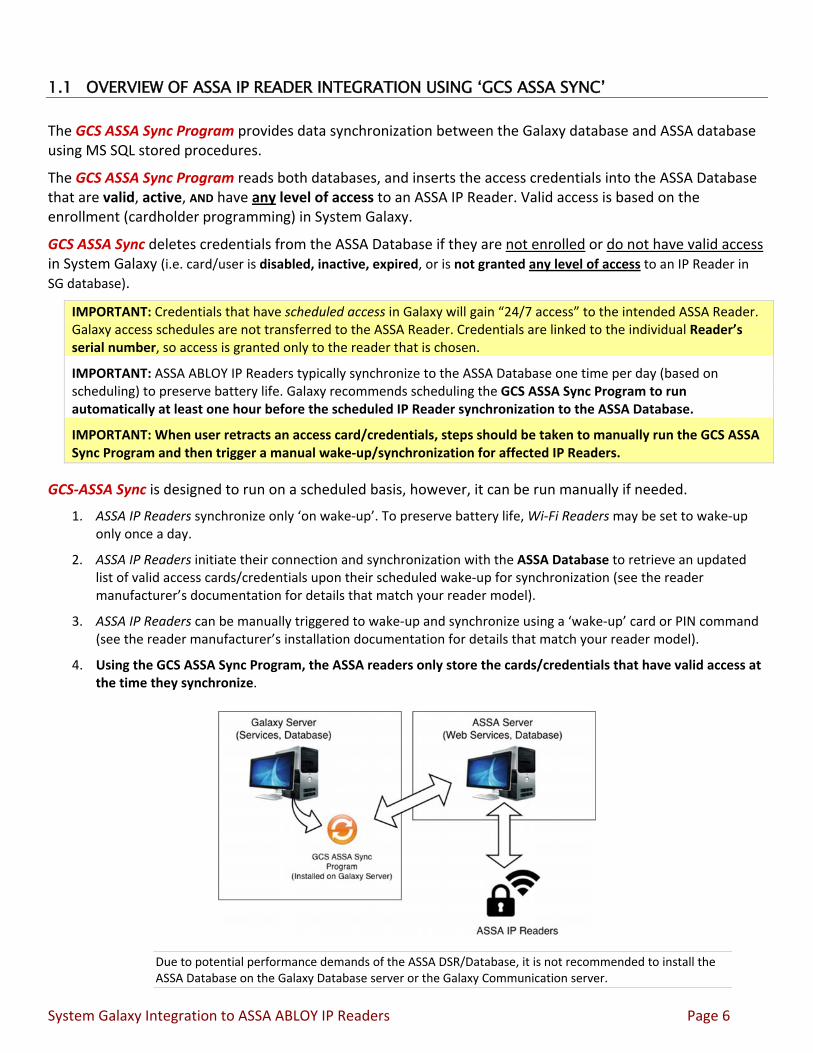
The GCS ASSA Sync Program provides data synchronization between the Galaxy database and ASSA database using MS SQL stored procedures.
The GCS ASSA Sync Program reads both databases, and inserts the access credentials into the ASSA Database that are valid, active, AND have any level of access to an ASSA IP Reader. Valid access is based on the enrollment (cardholder programming) in System Galaxy.
GCS ASSA Sync deletes credentials from the ASSA Database if they are not enrolled or do not have valid access in System Galaxy (i.e. card/user is disabled, inactive, expired, or is not granted any level of access to an IP Reader in SG database).
IMPORTANT: Credentials that have scheduled access in Galaxy will gain “24/7 access” to the intended ASSA Reader. Galaxy access schedules are not transferred to the ASSA Reader. Credentials are linked to the individual Reader’s serial number, so access is granted only to the reader that is chosen.
IMPORTANT: ASSA ABLOY IP Readers typically synchronize to the ASSA Database one time per day (based on scheduling) to preserve battery life. Galaxy recommends scheduling the GCS ASSA Sync Program to run automatically at least one hour before the scheduled IP Reader synchronization to the ASSA Database.
IMPORTANT: When user retracts an access card/credentials, steps should be taken to manually run the GCS ASSA Sync Program and then trigger a manual wake‐up/synchronization for affected IP Readers.
GCS‐ASSA Sync is designed to run on a scheduled basis, however, it can be run manually if needed.
1. ASSA IP Readers synchronize only ‘on wake‐up’. To preserve battery life, Wi‐Fi Readers may be set to wake‐up only once a day.
2. ASSA IP Readers initiate their connection and synchronization with the ASSA Database to retrieve an updated list of valid access cards/credentials upon their scheduled wake‐up for synchronization (see the reader manufacturer’s documentation for details that match your reader model).
3. ASSA IP Readers can be manually triggered to wake‐up and synchronize using a ‘wake‐up’ card or PIN command (see the reader manufacturer’s installation documentation for details that match your reader model).
4. Using the GCS ASSA Sync Program, the ASSA readers only store the cards/credentials that have valid access at the time they synchronize.
Due to potential performance demands of the ASSA DSR/Database, it is not recommended to install the ASSA Database on the Galaxy Database server or the Galaxy Communication server.
System Galaxy Integration to ASSA ABLOY IP Readers Page 6
2 SYSTEM RECOMMENDATIONS
For convenience, this section lists the main recommendations for installing and using this 3rd Party Integration feature. Pertinent requirements may be restated in the relevant sections.
IMPORTANT: This document may not supersede manufacturer’s recommendations for 3rd Party products
or does it disclose every ASSA or Lock manufacturer requirement. Installer should carefully follow the manufacturer’s instructions.
2.1.1 GENERAL INSTALLATION RECOMMENDATIONS
1. This interface requires Internet/intranet connectivity to install and operate. 2. Port 8080 must be open on the network internally. This is an ASSA DSR/API requirement.
2.1.2 ASSA INSTALLATION RECOMMENDATIONS
1. Install ASSA components according to the ASSA installation documentation where provided. 2. IMPORTANT: During the installation of the ASSA DSR & Database Setup program, Galaxy
recommends you install the MS SQL EXPRESS DSR Database when interfacing with the GCS ASSA Sync.
3. Install, configure and connect the ASSA IP readers according to the manufacturer’s installation instructions for the model of readers you are using.
2.1.3 MANUALLY UPDATING IP READERS BEFORE SCHEDULED UPDATES
1. IF customer or end‐user must add or remove a card, credential, or user from the IP READER before the next scheduled time the IP Readers wake & synchronize to the ASSA Database, the user must manual run the GCS ASSA Sync Program and then manually trigger the IP Readers to synchronize to the Assa Database.
A. Withdraw access from the System Galaxy Cardholder programming screen. This is done by deactivating the cardholder, or deactivating the card, or removing access to the desired door – see chapter 9.
System Galaxy allows access privileges to be granted at individual readers/doors by using the ‘Personal Door’ feature.
B. Manually run the GCS ASSA Sync Program after saving cardholder changes, but before triggering the IP Reader(s) to wake and synchronize.
C. Physically walk to affected IP Reader(s) and trigger the Reader(s) to wake and synchronize by presenting the Command Card or PIN Command, etc.
<< Recommendations continue on next page >>
System Galaxy Integration to ASSA ABLOY IP Readers Page 7
2.1.4 SYSTEM GALAXY CONFIGURATION RECOMMENDATIONS
1. SOFTWARE INSTALLATION: SG must be properly installed and connected/communicating. Install the
System Galaxy (SG) database, services and client software according to the installation instructions provided with the software DVD.
The System Galaxy Software Install DVD displays an intro splash screen at start up.
Embedded Install Help Instructions open in the PC’s default browser when installer clicks the Install Help link found on the splash screen.
Galaxy manuals are found on the Manuals page of the Install Help screen( PDF format).
Adobe Acrobat Reader (free) which is provided with the installation DVD.
2. “READER TYPE” CONFIGURATION: Installer must be sure the “ASSA ABLOY IP Reader” type is added to System Galaxy as a selectable option in the SG Reader Types Programming screen.
The GCS‐ASSA Sync Program will not pick up the reader name/serial number from the Galaxy database if the type is mistyped/misspelled (it must be “ASSA ABLOY IP Reader” without the quotation marks). Depending on which version of System Galaxy you are installing, this may need to be manually added by the installer.
3. LOOP/CLUSTER CONFIGURATION: Installer must create at least one ‘dummy’ Loop/Cluster in System Galaxy to support the ASSA IP Readers, since ASSA IP Readers are not connected directly to the Galaxy hardware (i.e. DPI/DSI boards). THESE WILL NOT APPEAR IN THE HARDWARE TREE.
The ‘dummy’ Cluster (loop) must be set to “no connection” in the Loop/Cluster Programming screen in System Galaxy (from the SG menu Configure>Hardware and choose the 600/635 Loop/Cluster Programming screen).
NOTE: All events from the ASSA IP Readers will be assigned to the ‘dummy’ Loop/Cluster and designate the controller and reader names given.
4. CONTROLLER CONFIGURATION: Installer must create at least one ‘dummy’ Controller with enough DPI(s) to support the ASSA IP Readers:.
One DPI board adds 2 reader slots to the system.
The Installer will be prompted to choose a default reader technology (proximity, ABA, etc.) when saving the controller and boards. Installer can change this in the Programming screen.
<< Recommendations continue on next page >>
System Galaxy Integration to ASSA ABLOY IP Readers Page 8

5. READER PROPERTIES CONFIGURATION: installer must set the following fields in the System Galaxy Reader/Door Programming screen for each IP Reader:
a. Reader type field to “ASSA ABLOY IP Reader”. This enables the ASSA IP Reader [serial number] field.
b. Installer must correctly type each reader’s serial number into the correct reader slot in the system. The events and card/access privileges are linked by the reader serial number. The Serial Number field dynamically displays when
2.1.5 ENROLLING AND AUTHORIZING CREDENTIALS VIA SYSTEM GALAXY
6. AUTHORIZATION CAVEAT: When providing scheduled authorization (time schedules an access groups), the SG Panels and readers will honor the schedules. HOWEVER: these credentials will have unlimited 24/7 access to the ASSA IP Readers/doors when the reader synchronizes. Galaxy schedules are not transferred to the ASSA Database.
7. When enrolling a keypad‐code for a card code to be used at an ASSA Keypad Reader, the operator must follow the IP Reader constraints.
a. Keypad‐codes must be 6‐digits long for a Px type locks. At the IP Reader, the user will enter a pound symbol followed by their 6‐digit keypad code (e.g. #123456 ).
b. Keypad‐codes can be from 1‐ to 7‐digits long for an Sx type locks. At the IP Reader, the user will enter the keypad‐code followed by a star symbol (e.g. 1*, or 1234567* ).
2.1.6 GCS ASSA SYNC PROGRAM REQUIREMENTS
1. The GCS ASSA Sync Program should be scheduled to run automatically with Windows Task Scheduler.
2. Galaxy recommends the automated runtime be at least 1 hour before the ASSA IP Readers are scheduled to wake up and synchronize to the Assa database.
End of this section.
System Galaxy Integration to ASSA ABLOY IP Readers Page 9
3 INSTALLING THE ASSA DSR APPLICATION & DATABASE
This section covers how to install the ASSA DSR Application and ASSA Database using MS® SQL EXPRESS to ensure compatibility with the GCS ASSA Sync Program.
Assumption is made that the SG Database, Comm Server and Client Software is installed. Internet/intranet connectivity is required to install the components to this interface. Port 8080 must be open on the network internally. This is an ASSA DSR/API requirement. DO NOT INSTALL THE ASSA COMPONENTS ON A GALAXY SERVER. Run the correct version of the DSR Installer executable (32bit vs. 64bit) depending upon the
operating system of the ASSA SERVER/PC. To interface with GCS ASSA Sync, select the MS® SQL EXPRESS when prompted.
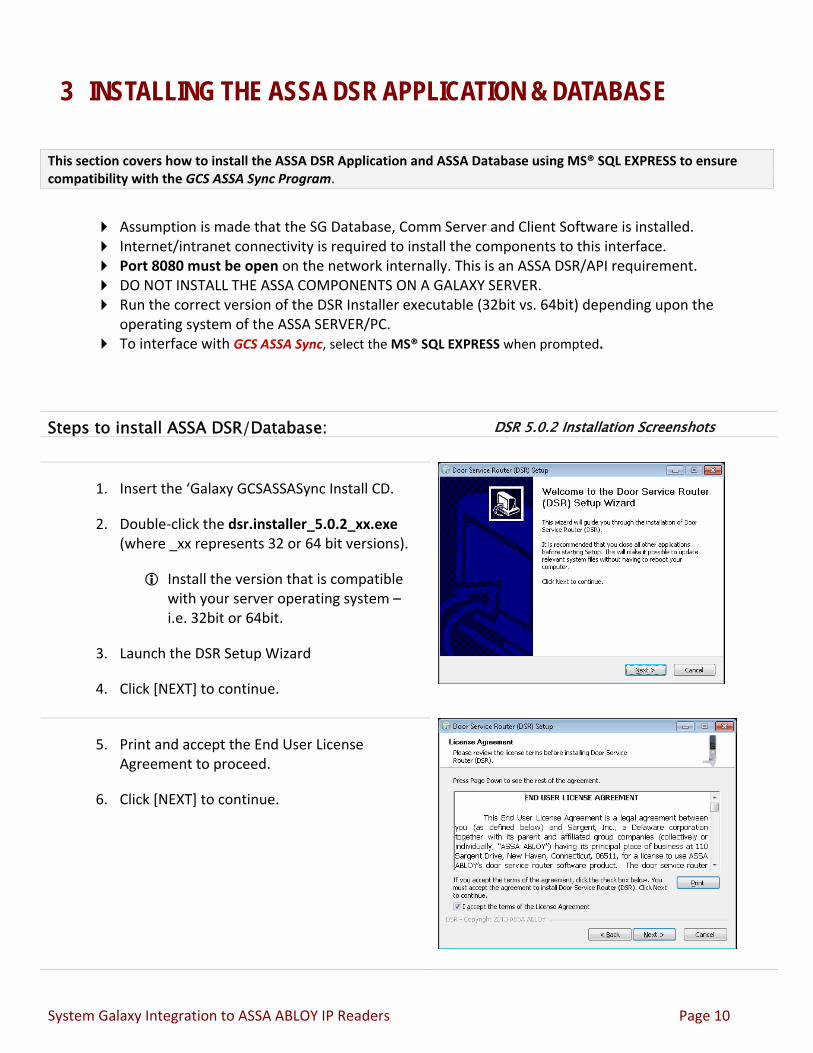
Steps to install ASSA DSR/Database: DSR 5.0.2 Installation Screenshots
1. Insert the ‘Galaxy GCSASSASync Install CD.
2. Double‐click the dsr.installer_5.0.2_xx.exe (where _xx represents 32 or 64 bit versions).
Install the version that is compatible with your server operating system – i.e. 32bit or 64bit.
3. Launch the DSR Setup Wizard
4. Click [NEXT] to continue.
5. Print and accept the End User License Agreement to proceed.
6. Click [NEXT] to continue.
System Galaxy Integration to ASSA ABLOY IP Readers Page 10
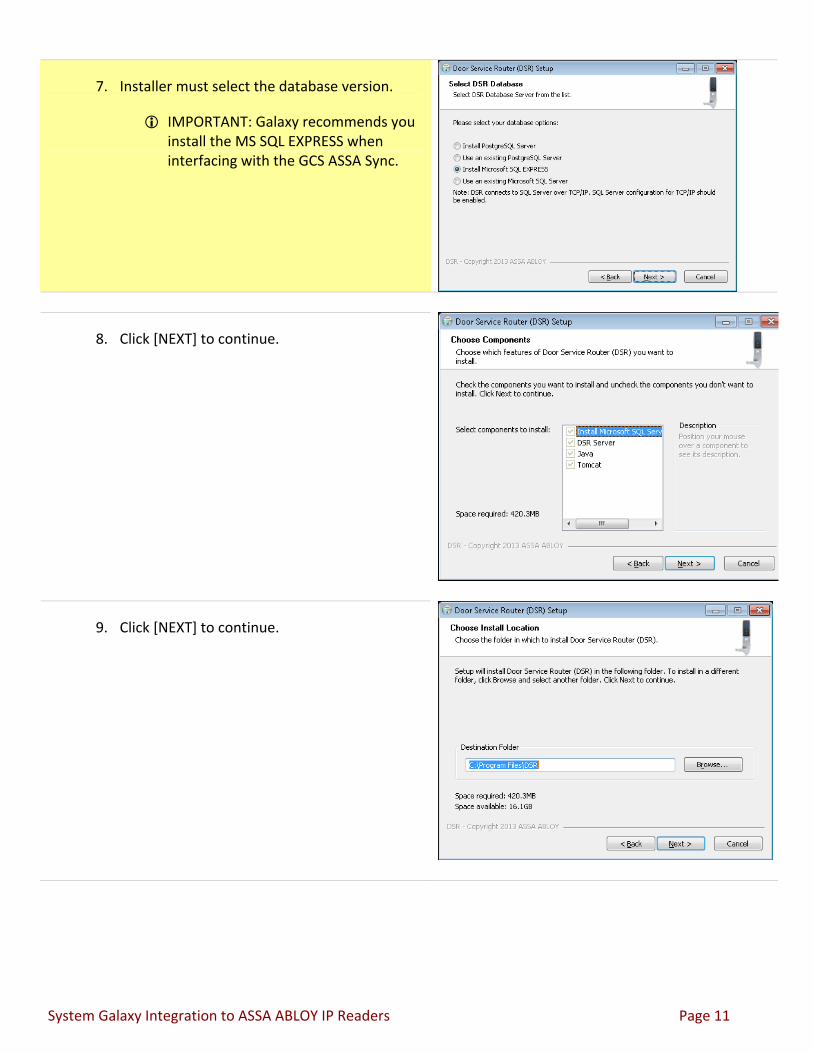
7. Installer must select the database version.
IMPORTANT: Galaxy recommends you install the MS SQL EXPRESS when interfacing with the GCS ASSA Sync.
8. Click [NEXT] to continue.
9. Click [NEXT] to continue.
System Galaxy Integration to ASSA ABLOY IP Readers Page 11
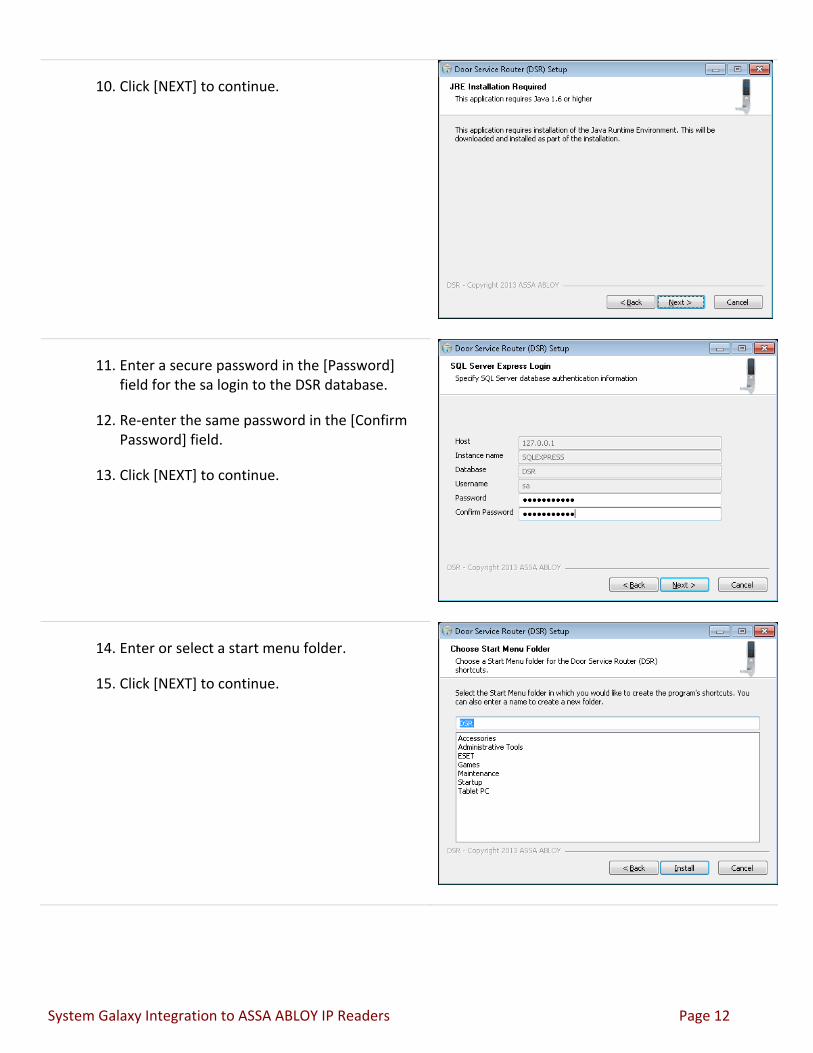
10. Click [NEXT] to continue.
11. Enter a secure password in the [Password] field for the sa login to the DSR database.
12. Re‐enter the same password in the [Confirm Password] field.
13. Click [NEXT] to continue.
14. Enter or select a start menu folder.
15. Click [NEXT] to continue.
System Galaxy Integration to ASSA ABLOY IP Readers Page 12

16. Click [NEXT] to continue.
17. Click [NEXT] to continue.
18. Click [FINISH] to continue after choosing the options you desire.
19. The ASSA INSTALLER will create shortcuts for your desktop.
System Galaxy Integration to ASSA ABLOY IP Readers Page 13

20. The ‘Apache Tomcat DSR’ service is installed to run/start automatically.
21. Verify the DSR Support Tool Icon is present on the Desktop and that the DSR Support Tool launches successfully.
22. Supply the User Name and Password that ASSA ABLOY Documentation provides.
23. Click the [Sigh In] button.
System Galaxy Integration to ASSA ABLOY IP Readers Page 14
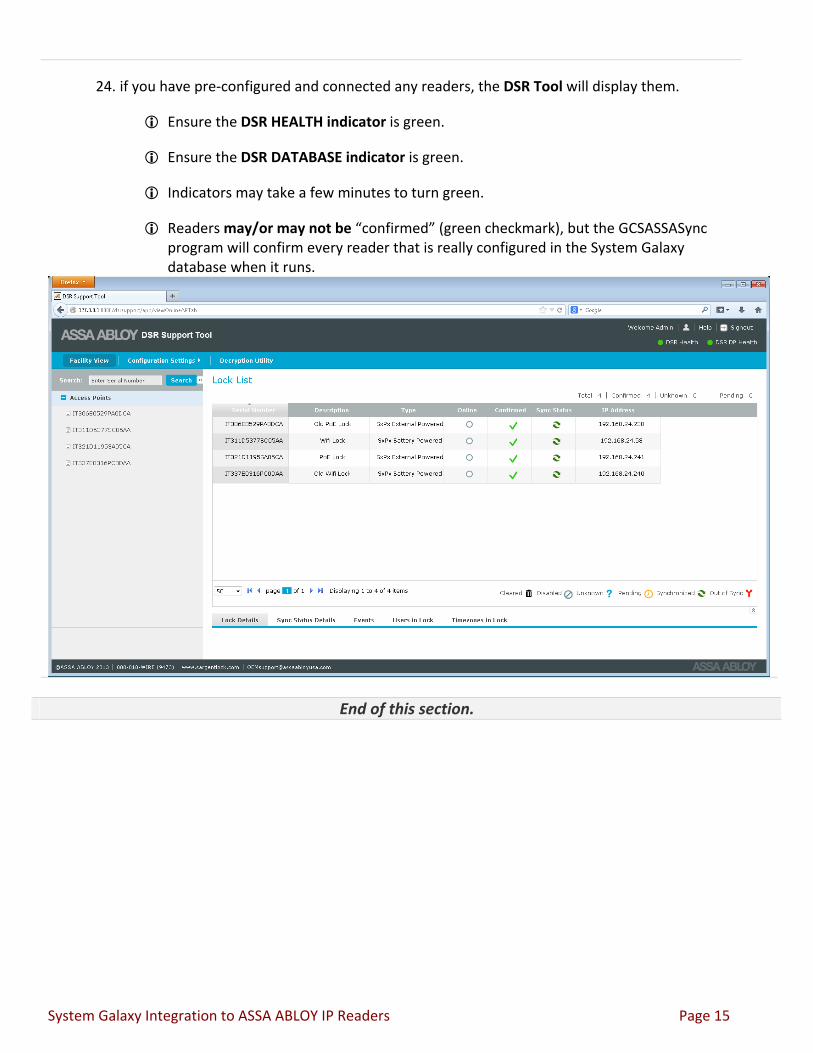
24. if you have pre‐configured and connected any readers, the DSR Tool will display them.
Ensure the DSR HEALTH indicator is green.
Ensure the DSR DATABASE indicator is green.
Indicators may take a few minutes to turn green.
Readers may/or may not be “confirmed” (green checkmark), but the GCSASSASync program will confirm every reader that is really configured in the System Galaxy database when it runs.
End of this section.
System Galaxy Integration to ASSA ABLOY IP Readers Page 15
4 INSTALL THE ASSA CONFIG TOOLS
This section covers how to install the ASSA CONFIG TOOLS to configure the ASSA IP LOCKS.
See the Requirements and Recommendations for important notes. Use the Network Configuration and Lock Configuration tools provided by ASSA ABLOY (these will
launch from a desktop shortcut). They are installed by the Assa Certified Dealer which is not covered in this manual.
4.1 INSTALLING THE ASSA CONFIGURATION TOOLS
Steps to Install the Configuration Tools: Screenshots
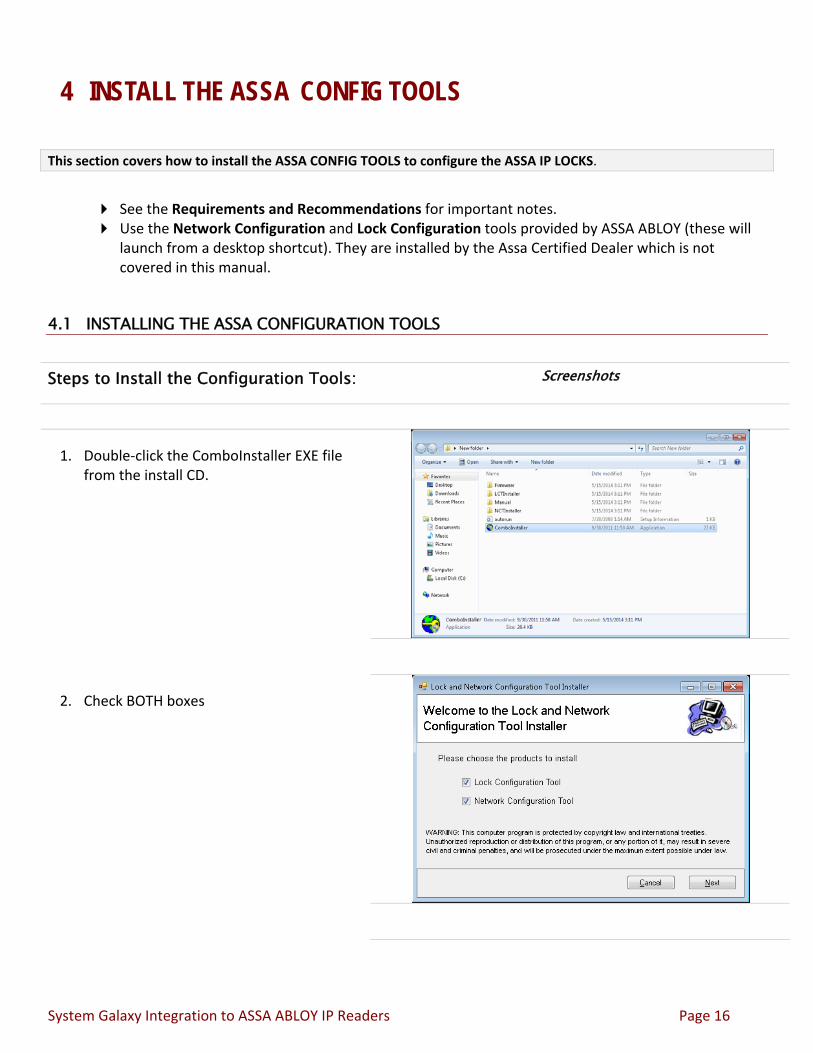
1. Double‐click the ComboInstaller EXE file from the install CD.
2. Check BOTH boxes
System Galaxy Integration to ASSA ABLOY IP Readers Page 16
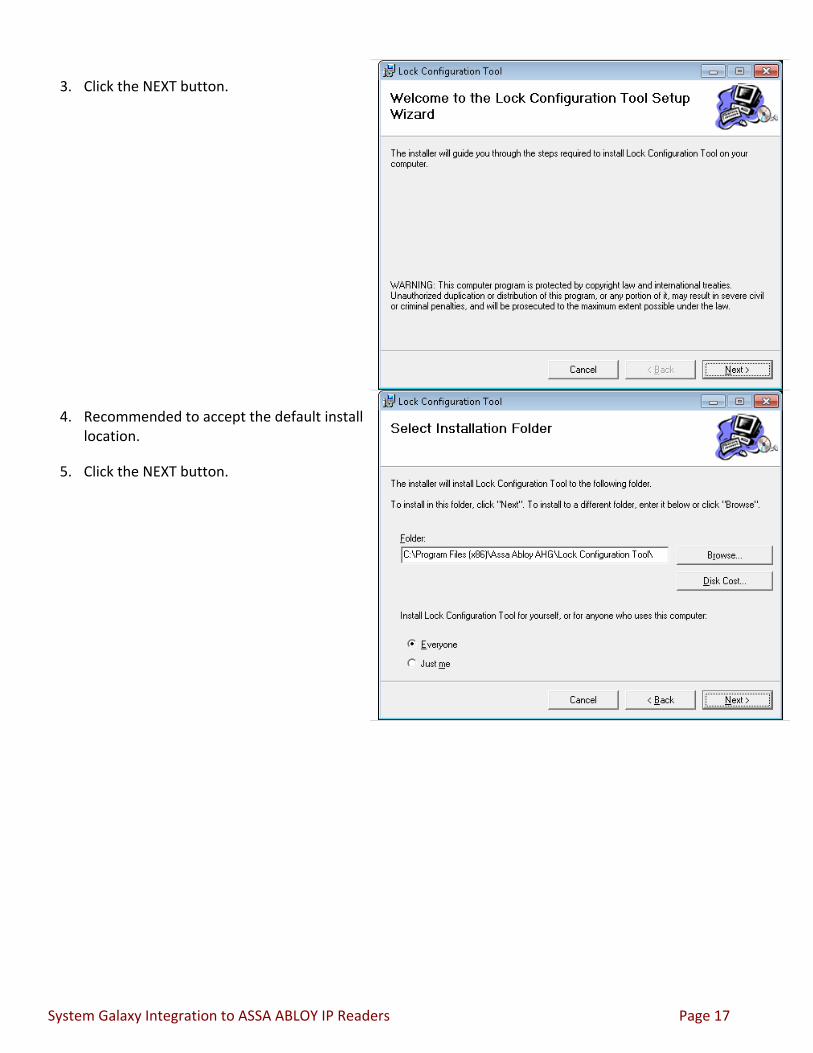
3. Click the NEXT button.
4. Recommended to accept the default install location.
5. Click the NEXT button.
System Galaxy Integration to ASSA ABLOY IP Readers Page 17
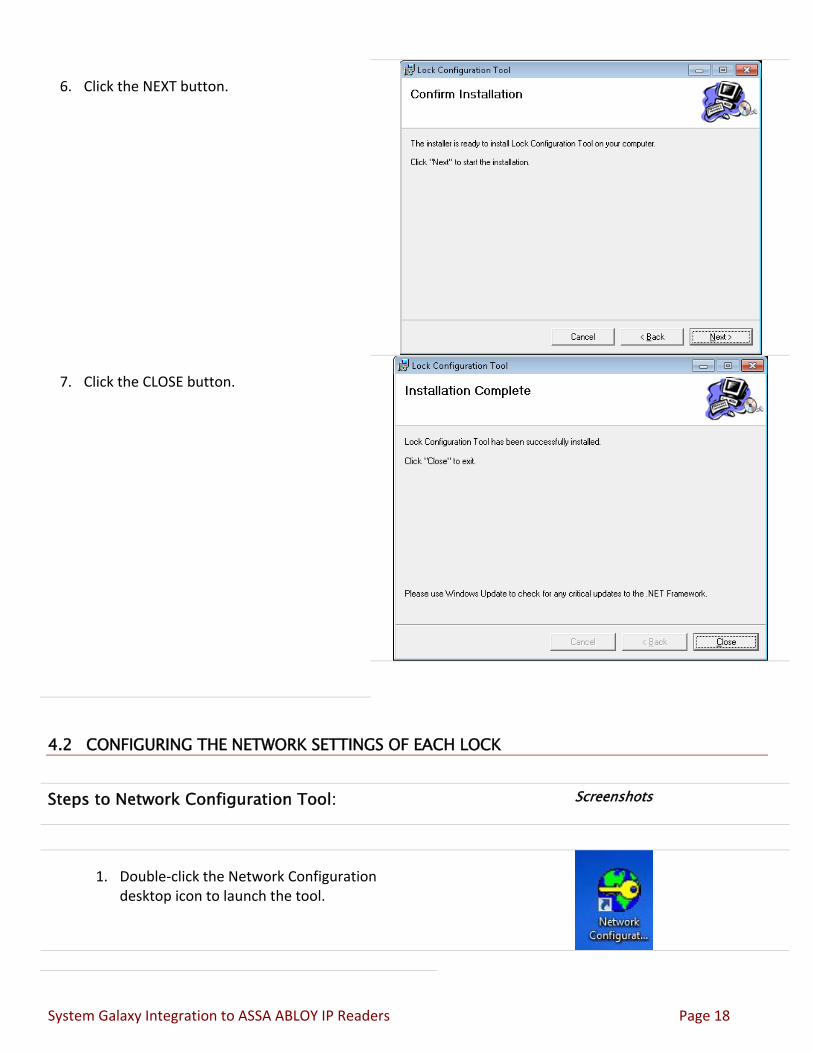
6. Click the NEXT button.
7. Click the CLOSE button.
4.2 CONFIGURING THE NETWORK SETTINGS OF EACH LOCK
Steps to Network Configuration Tool: Screenshots
1. Double‐click the Network Configuration desktop icon to launch the tool.
System Galaxy Integration to ASSA ABLOY IP Readers Page 18
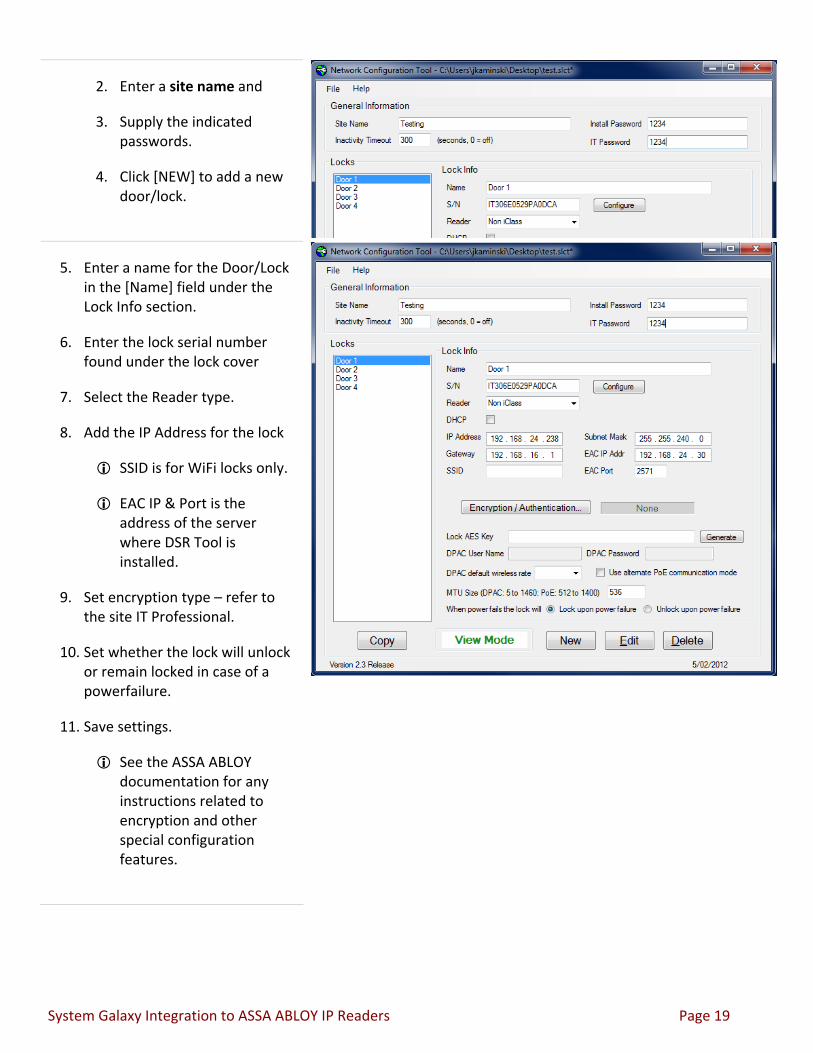
2. Enter a site name and
3. Supply the indicated passwords.
4. Click [NEW] to add a new door/lock.
5. Enter a name for the Door/Lock in the [Name] field under the Lock Info section.
6. Enter the lock serial number found under the lock cover
7. Select the Reader type.
8. Add the IP Address for the lock
SSID is for WiFi locks only.
EAC IP & Port is the address of the server where DSR Tool is installed.
9. Set encryption type – refer to the site IT Professional.
10. Set whether the lock will unlock or remain locked in case of a powerfailure.
11. Save settings.
See the ASSA ABLOY documentation for any instructions related to encryption and other special configuration features.
System Galaxy Integration to ASSA ABLOY IP Readers Page 19
4.3 ADDING A LOCK TO THE ASSA DATABASE
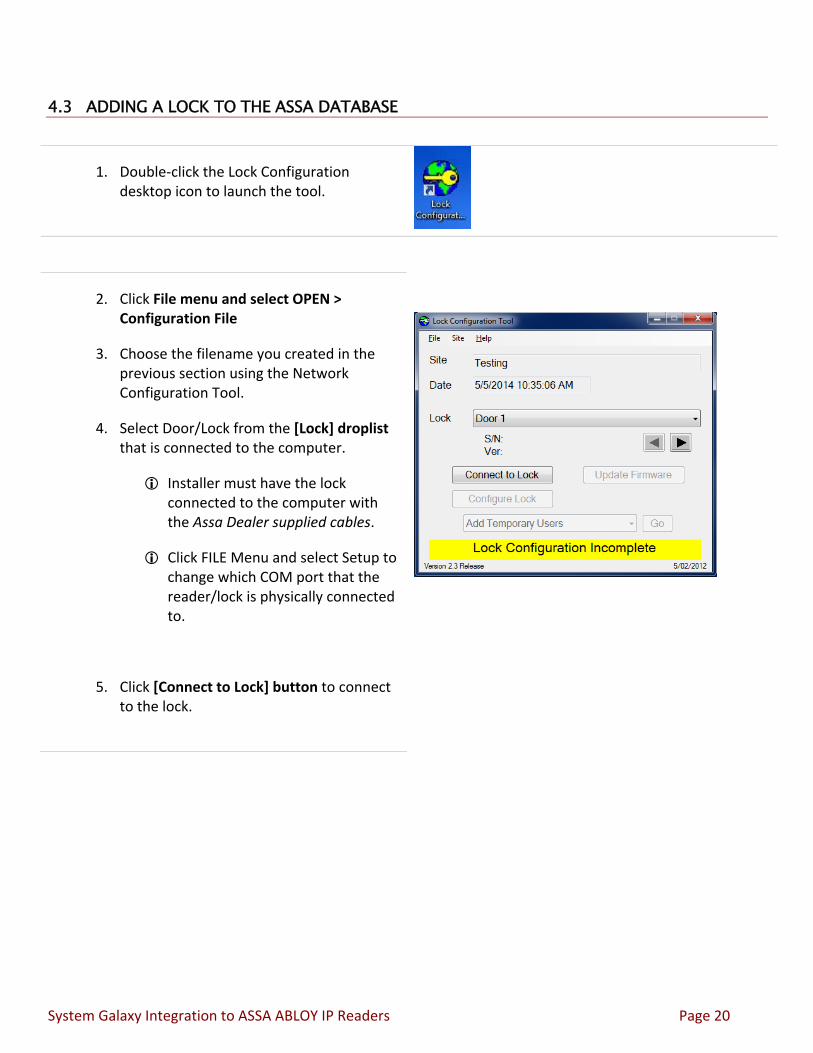
1. Double‐click the Lock Configuration desktop icon to launch the tool.
2. Click File menu and select OPEN > Configuration File
3. Choose the filename you created in the previous section using the Network Configuration Tool.
4. Select Door/Lock from the [Lock] droplist that is connected to the computer.
Installer must have the lock connected to the computer with the Assa Dealer supplied cables.
Click FILE Menu and select Setup to change which COM port that the reader/lock is physically connected to.
5. Click [Connect to Lock] button to connect to the lock.
System Galaxy Integration to ASSA ABLOY IP Readers Page 20
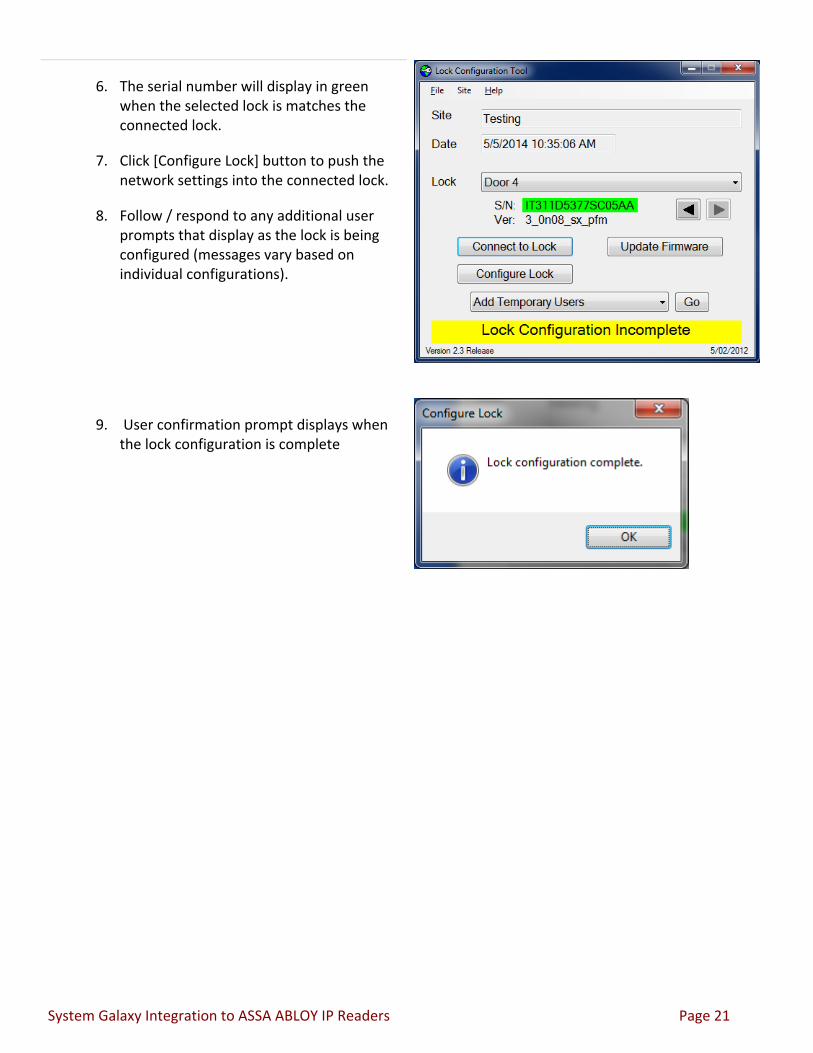
6. The serial number will display in green when the selected lock is matches the connected lock.
7. Click [Configure Lock] button to push the network settings into the connected lock.
8. Follow / respond to any additional user prompts that display as the lock is being configured (messages vary based on individual configurations).
9. User confirmation prompt displays when the lock configuration is complete
System Galaxy Integration to ASSA ABLOY IP Readers Page 21
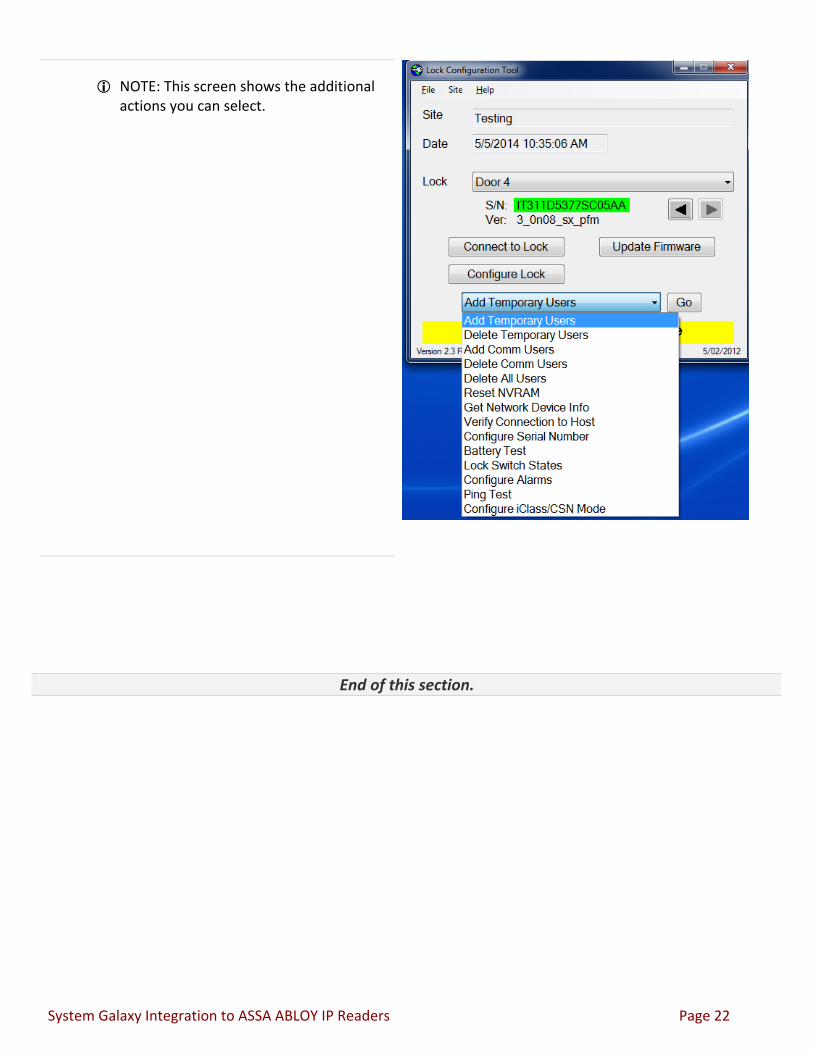
NOTE: This screen shows the additional actions you can select.
End of this section.
System Galaxy Integration to ASSA ABLOY IP Readers Page 22
4.4 VIEWING THE LOCK WITH THE DSR SUPPORT TOOL In this step the installer will very the lock is able to connect to the DSR Database.
Steps to using the DSR Support Tool: Screenshots
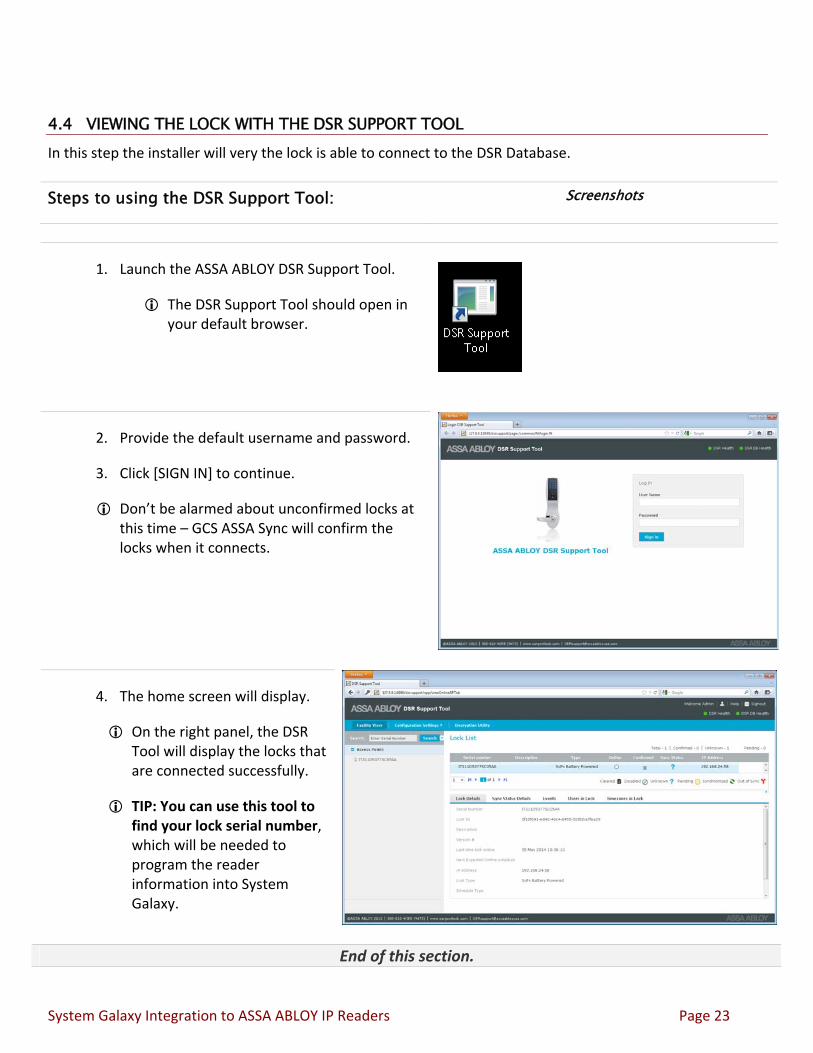
1. Launch the ASSA ABLOY DSR Support Tool.
The DSR Support Tool should open in your default browser.
2. Provide the default username and password.
3. Click [SIGN IN] to continue.
Don’t be alarmed about unconfirmed locks at this time – GCS ASSA Sync will confirm the locks when it connects.
4. The home screen will display.
On the right panel, the DSR Tool will display the locks that are connected successfully.
TIP: You can use this tool to find your lock serial number, which will be needed to program the reader information into System Galaxy.
End of this section.
System Galaxy Integration to ASSA ABLOY IP Readers Page 23
5 INSTALLING THE ‘GCS ASSA SYNC’ PROGRAM
This section covers how to install the GCS ASSA Sync Program.
Network connectivity is required to install the components to this interface. The GCS ASSA Sync Program can be installed on the Galaxy Database Server (recommended). The ASSA DSR Server must be installed and running (online/available for connections). After installation, the program can be executed/run manually from its local drive for test purposes. It is recommended you schedule the GCS ASSA Sync Program to run automatically at least one hour
before the ASSA Locks are scheduled to wake up and synchronize to the ASSA Database. See the next section for details on how GCS ASSA Sync works.
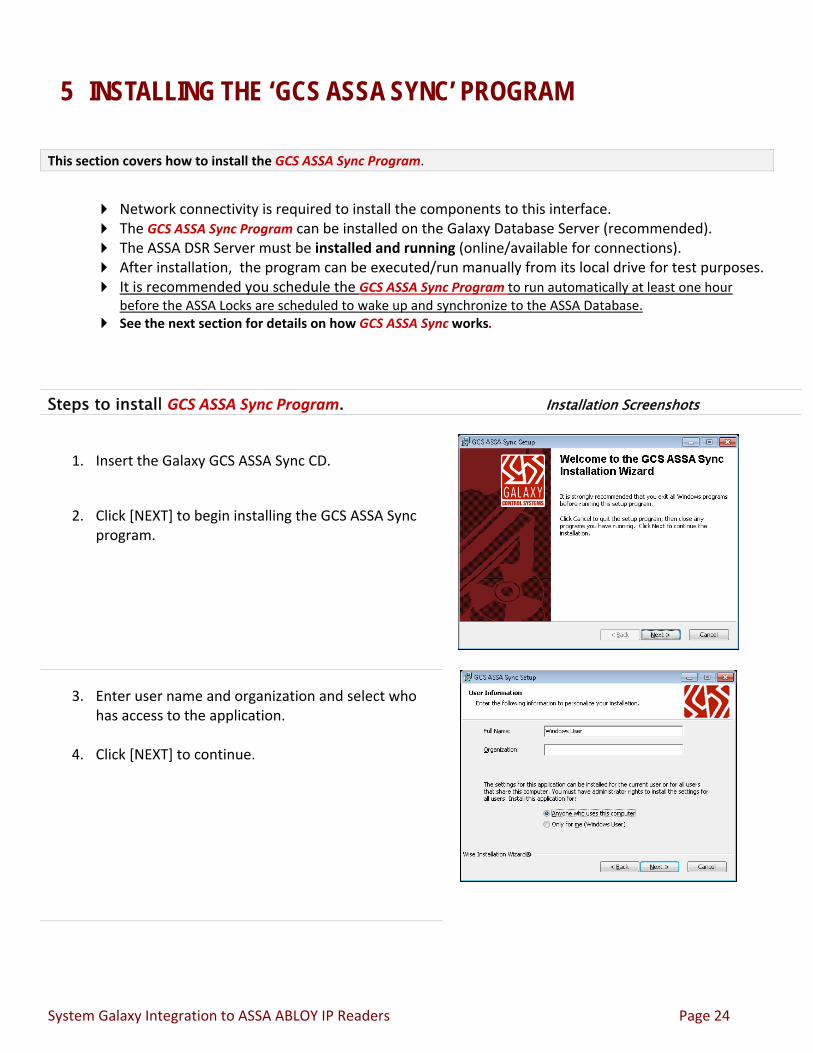
Steps to install GCS ASSA Sync Program. Installation Screenshots
1. Insert the Galaxy GCS ASSA Sync CD.
2. Click [NEXT] to begin installing the GCS ASSA Sync
program.
3. Enter user name and organization and select who has access to the application.
4. Click [NEXT] to continue.
System Galaxy Integration to ASSA ABLOY IP Readers Page 24
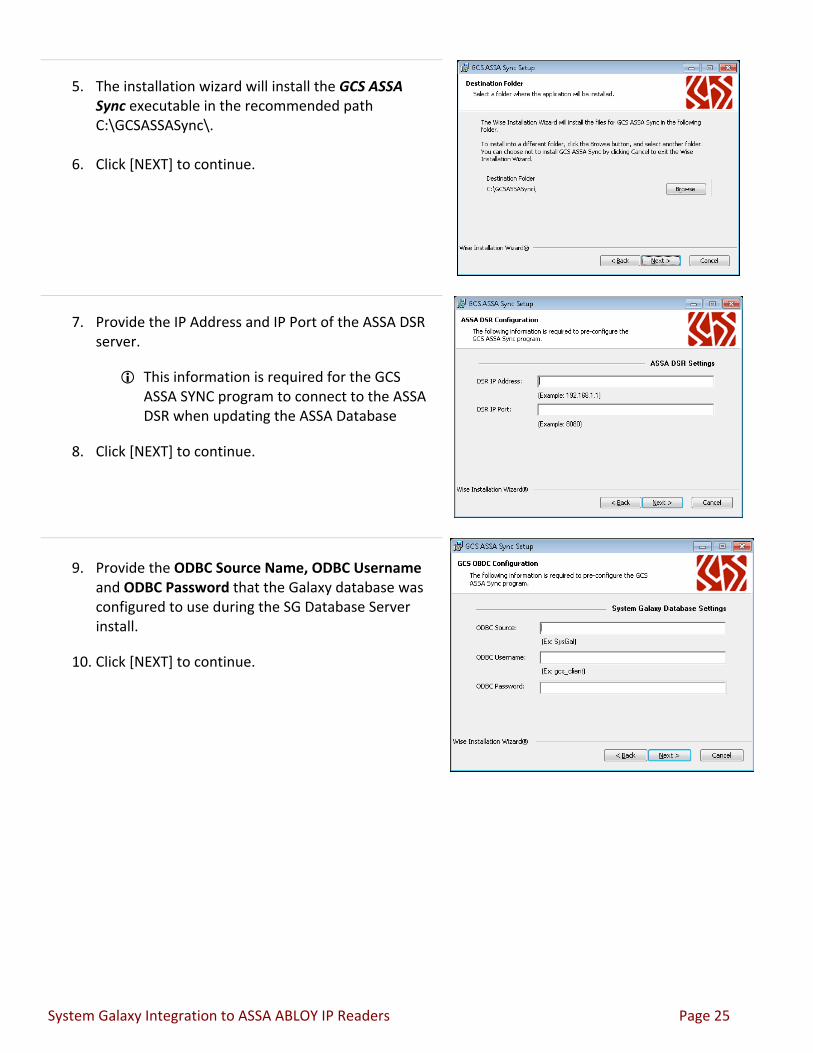
5. The installation wizard will install the GCS ASSA Sync executable in the recommended path C:\GCSASSASync\.
6. Click [NEXT] to continue.
7. Provide the IP Address and IP Port of the ASSA DSR server.
This information is required for the GCS ASSA SYNC program to connect to the ASSA DSR when updating the ASSA Database
8. Click [NEXT] to continue.
9. Provide the ODBC Source Name, ODBC Username
and ODBC Password that the Galaxy database was configured to use during the SG Database Server install.
10. Click [NEXT] to continue.
System Galaxy Integration to ASSA ABLOY IP Readers Page 25

11. Click [NEXT] when you are ready to begin the application installation.
You can click Cancel to exit the program
You can click Back to return to previous screens to verify or reenter data.
12. Allow the GCS ASSA Sync Setup Wizard to extract the files and complete the installation normally.
You may need to [Accept] a Windows User Access Control prompt to allow the wizard to start the install.
Clicking Cancel will abort the installation.
13. When the GCS ASSA Sync Setup Wizard has completed the installation, it will display a message stating that the “GCS ASSA Sync has been successfully installed”.
The install wizard does not install any menu options, shortcuts or desktop icons to launch the GCS ASSA Sync since the application is intended to run silently using the Windows task scheduler.
End of this section.
System Galaxy Integration to ASSA ABLOY IP Readers Page 26

6 GCS ASSA SYNC FUNCTIONALITY
This section covers the functionality and output of the GCS ASSA Sync Program.
6.1 GCS ASSA SYNC PROGRAM FUNCTIONALITY
The GCS ASSA Sync Program reads the Galaxy Database to determine which users in the Galaxy Database are authorized to have access to any ASSA IP Reader. GCS ASSA Sync then pushes the credentials and reader serial numbers into the Assa Database along with the reader serial numbers that the user/credential has access to.
GCS ASSA Sync also deletes all credentials from the ASSA Database that no longer have any valid access in Galaxy to an ASSA Reader.
GCS ASSA Sync also reads the ASSA Database to retrieve the authorization logs (events) that have occurred since the last synchronization.
IMPORTANT: Users/cardholders who have any access (unlimited or limited/scheduled) access at any ASSA IP Reader will be granted 24/7 unlimited access at the ASSA IP Reader.
IMPORTANT: Users/cardholders who’s access is withdrawn from a reader in the Galaxy system will be automatically removed the next time the GCS ASSA Sync Program runs. access at any ASSA IP Reader will be granted 24/7 unlimited access at the ASSA IP Reader.
System Galaxy Integration to ASSA ABLOY IP Readers Page 27
6.2 LONG DESCRIPTION OF THE GCS ASSA SYNC PROGRAM PERFORMANCE Upon execution, the GCS ASSA Sync Program performs the following actions in the order shown:
1. Reads the configuration file
2. Establishes connection with Galaxy database.
3. Establishes connection with ASSA database.
4. Downloads necessary Galaxy data:
Users (cards) in Galaxy that have access to any Reader designated as an ASSA ABLOY IP READER
Readers by Serial Number, that is designated as an ASSA ABLOY IP READER.
5. Downloads necessary ASSA data:
Readers (Access Points)
Authorizations
Users
Logs (events that have occurred at the ASSA Readers)
6. Removes orphaned Users from ASSA database.
Confirms ASSA Reader (Access Point) if present in Galaxy database and unconfirmed in ASSA database.
7. Synchronizes Users between the two databases:
Users (cards) in Galaxy database that are not in ASSA are pushed to ASSA database.
Users (cards) in the ASSA database that are not in Galaxy are removed from ASSA database.
Removes ASSA Reader (Access Point) if present in ASSA database but not in Galaxy database.
8. Imports necessary logs into Galaxy database (card/reader activity events).
9. Closes all connections.
System Galaxy Integration to ASSA ABLOY IP Readers Page 28

6.3 EXAMPLE OF LOG OUTPUT [ SYNC STARTED ] 2014‐03‐19 09:13:23.481000 03/19/2014 09:13:23 AM INFO: Reading config.. 03/19/2014 09:13:23 AM INFO: Connecting to ODBC.. 03/19/2014 09:13:23 AM INFO: Setting up SOAP protocol.. 03/19/2014 09:13:23 AM INFO: Setting up SOAP Client.. 03/19/2014 09:13:27 AM INFO: [ IMPORTING/CLEANING ASSA DATA ] 03/19/2014 09:13:27 AM INFO: Importing Access Points... 03/19/2014 09:13:28 AM INFO: [ COMPLETE ] 03/19/2014 09:13:28 AM INFO: Importing Authorizations... 03/19/2014 09:13:28 AM INFO: Importing 8 Authorizations.. 03/19/2014 09:13:28 AM INFO: [ COMPLETE ] 03/19/2014 09:13:28 AM INFO: Importing Users.. 03/19/2014 09:13:28 AM INFO: Importing 2 Users.. 03/19/2014 09:13:28 AM INFO: [ COMPLETE ] 03/19/2014 09:13:29 AM INFO: Retrieving 100 logs from IT321D1195SA05CA 03/19/2014 09:13:29 AM INFO: Retrieving 50 logs from IT321D1195SA05CA 03/19/2014 09:13:30 AM INFO: Retrieving 100 logs from IT306E0529PA0DCA 03/19/2014 09:13:30 AM INFO: Retrieving 50 logs from IT306E0529PA0DCA 03/19/2014 09:13:30 AM INFO: Retrieving 100 logs from IT337E0316PC0DAA 03/19/2014 09:13:30 AM INFO: Retrieving 100 logs from IT337E0316PC0DAA 03/19/2014 09:13:31 AM INFO: Retrieving 38 logs from IT337E0316PC0DAA 03/19/2014 09:13:31 AM INFO: Retrieving 100 logs from IT311D5377SC05AA 03/19/2014 09:13:31 AM INFO: Retrieving 100 logs from IT311D5377SC05AA 03/19/2014 09:13:31 AM INFO: Retrieving 52 logs from IT311D5377SC05AA 03/19/2014 09:13:31 AM INFO: [ ADDING/REMOVING USERS ] 03/19/2014 09:13:31 AM INFO: [ COMPLETE ] 03/19/2014 09:13:31 AM INFO: [ PUSHING LOGS TO GALAXY ] 03/19/2014 09:13:32 AM INFO: Imported: EVENT_USER (65): (20, 112, 3) ‐> IT321D1195SA05CA @ 2014‐03‐18 14:48:20.000387 03/19/2014 09:13:32 AM INFO: Imported: EVENT_USER (65): (20, 112, 3) ‐> IT306E0529PA0DCA @ 2014‐03‐18 14:48:22.000230 03/19/2014 09:13:32 AM INFO: Imported: ALARMID_DENIEDACCESS (64): None ‐> IT337E0316PC0DAA @ 2014‐03‐18 14:47:45.000713 03/19/2014 09:13:32 AM INFO: Imported: ALARMID_DENIEDACCESS (64): None ‐> IT311D5377SC05AA @ 2014‐03‐18 14:47:12.000500 03/19/2014 09:13:32 AM INFO: Imported: ALARMID_DENIEDACCESS (64): None ‐> IT311D5377SC05AA @ 2014‐03‐18 14:47:15.000500 03/19/2014 09:13:32 AM INFO: Imported: ALARMID_DENIEDACCESS (64): None ‐> IT311D5377SC05AA @ 2014‐03‐18 14:47:18.000500 03/19/2014 09:13:32 AM INFO: [ COMPLETE ] 03/19/2014 09:13:32 AM INFO: [ SYNC REPORT ] 03/19/2014 09:13:32 AM INFO: Total APs: 4 03/19/2014 09:13:32 AM INFO: Total Users: 2 03/19/2014 09:13:32 AM INFO: Total Auths: 8 03/19/2014 09:13:32 AM INFO: Sync Time: 8.63899993896 seconds
System Galaxy Integration to ASSA ABLOY IP Readers Page 29
7 SCHEDULING THE GCS ASSA SYNC EXECUTION
This section covers how to RUN the GCS ASSA Sync Program using Windows Task Scheduler
Network connectivity is required between the ASSA Database server and GCS ASSA Sync Program. After installation, the program can be run/executed manually from its local drive for test purposes. It is recommended you schedule the GCS ASSA Sync Program to run automatically at least one hour
before the ASSA Locks are scheduled to wake up and synchronize to the ASSA Database.
7.1 RUNNING ‘GCSSYNC.EXE’ APPLICATION MANUALLY NOTE: Running the ‘GCSSync’ Application manually may be needed when/if a credential is lost or withdrawn, or when access to a door/area is completely removed. NOTE: Since the ASSA IP Readers must wake‐up and synchronize to the ASSA Database to pick up changes, you may also wish to manually trigger the synchronization.
Steps for manual synchronization.
1. DEACTIVATE THE CARDHOLDER OR THE INDIVIDUAL CARD CREDENTIAL IN SYSTEM GALAXY – see chapter 9 for a view of the Cardholder programming.
a. NOTE: When A credential expires naturally or is manually removed (or access is removed) in the System Galaxy database, the GCS ASSA Sync Program will pick up the change the next time it is scheduled to run, and push it to the Assa Database.
b. The IP Readers will then pick up the change whenever they are scheduled to wake‐up.
IF YOU WANT TO EXPEDITE THE UPDATE TO THE IP READERS FOLLOW THE MANUAL UPDATE STEPS IN THIS SECTION
2. To expedite the update, manually run the GCSSync.exe after the expiration, de‐authorization or de‐activation of the credentials in System Galaxy.
System Galaxy hardware controllers are updated immediately
ASSA IP Readers that use the GCSSync Program can be manually updated by the steps in this procedure.
Be aware that ASSA Aperio products are fully integrated accord to the specifications of the previous ASSA integration – see the Galaxy ASSA ABLOY Addendum for information on the Aperio Product.
<< continued on the next page >>
System Galaxy Integration to ASSA ABLOY IP Readers Page 30
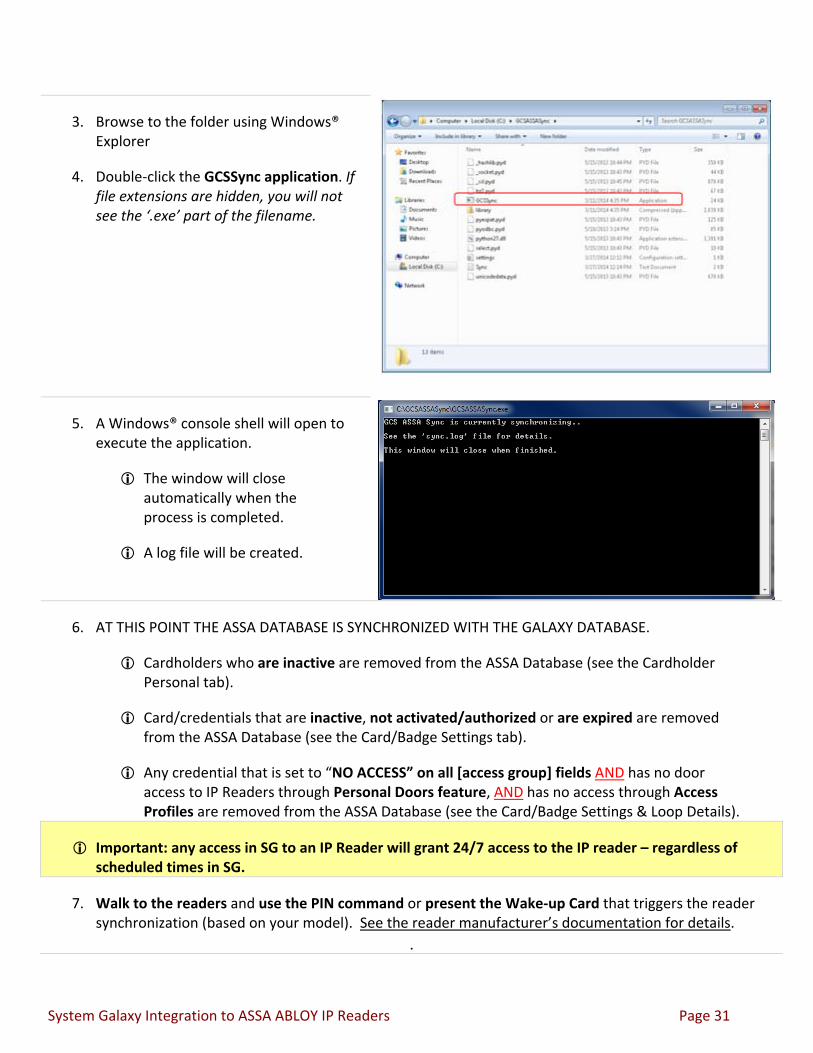
3. Browse to the folder using Windows® Explorer
4. Double‐click the GCSSync application. If file extensions are hidden, you will not see the ‘.exe’ part of the filename.
5. A Windows® console shell will open to execute the application.
The window will close automatically when the process is completed.
A log file will be created.
6. AT THIS POINT THE ASSA DATABASE IS SYNCHRONIZED WITH THE GALAXY DATABASE.
Cardholders who are inactive are removed from the ASSA Database (see the Cardholder Personal tab).
Card/credentials that are inactive, not activated/authorized or are expired are removed from the ASSA Database (see the Card/Badge Settings tab).
Any credential that is set to “NO ACCESS” on all [access group] fields AND has no door access to IP Readers through Personal Doors feature, AND has no access through Access Profiles are removed from the ASSA Database (see the Card/Badge Settings & Loop Details).
Important: any access in SG to an IP Reader will grant 24/7 access to the IP reader – regardless of scheduled times in SG.
7. Walk to the readers and use the PIN command or present the Wake‐up Card that triggers the reader synchronization (based on your model). See the reader manufacturer’s documentation for details.
.
System Galaxy Integration to ASSA ABLOY IP Readers Page 31
7.2 CREATING A WINDOWS TASK SCHEDULE TO RUN ‘GCSSYNC.EXE’
IT IS RECOMMENDED TO SET THE SCHEDULE TO RUN AT LEAST ONCE A DAY AND TO HAPPEN AT LEAST ONE HOUR BEFORE THE IP READERS ARE SCHEDULED TO WAKE AND SYNCHRONIZE TO THE ASSA DATABASE.
Steps to create a Windows Task Schedule. Installation Screenshots
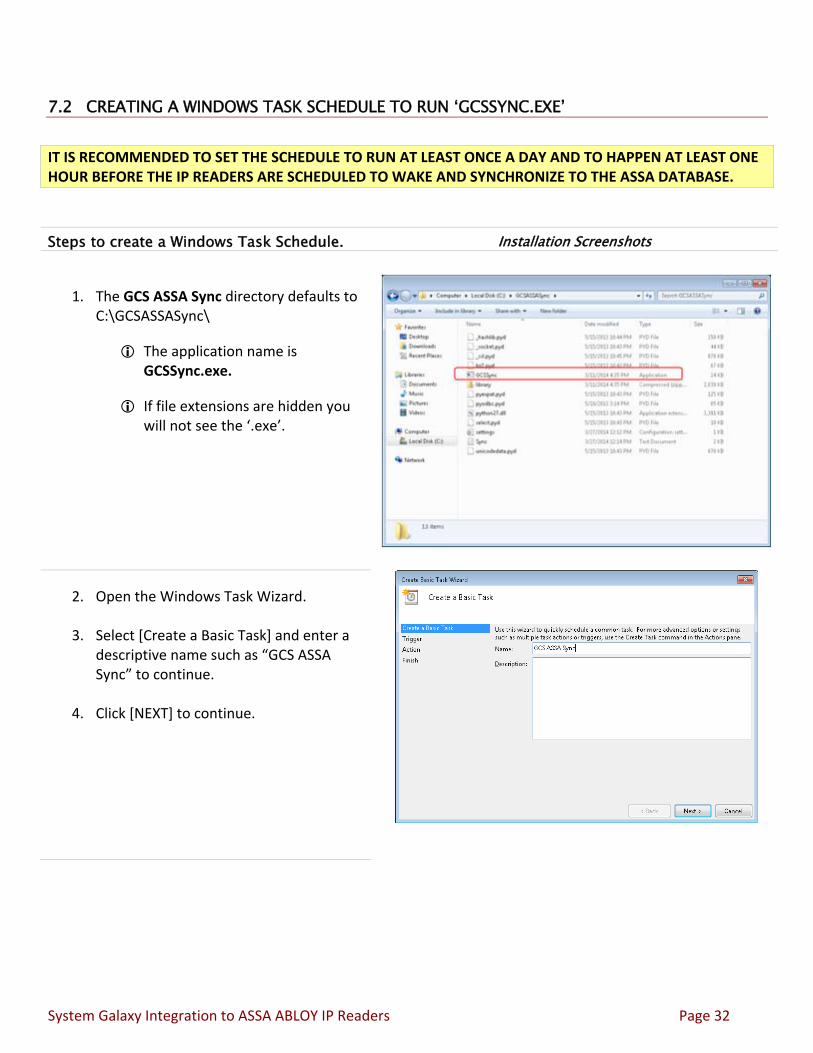
1. The GCS ASSA Sync directory defaults to C:\GCSASSASync\
The application name is GCSSync.exe.
If file extensions are hidden you will not see the ‘.exe’.
2. Open the Windows Task Wizard.
3. Select [Create a Basic Task] and enter a descriptive name such as “GCS ASSA Sync” to continue.
4. Click [NEXT] to continue.
System Galaxy Integration to ASSA ABLOY IP Readers Page 32
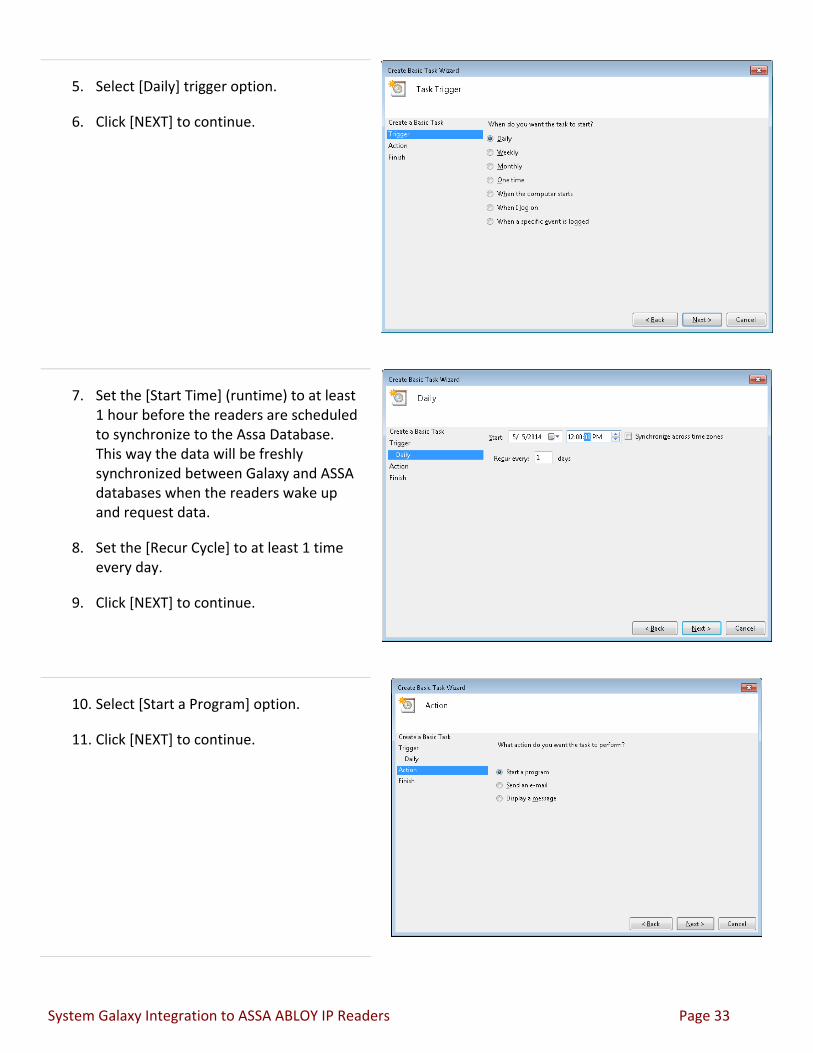
5. Select [Daily] trigger option.
6. Click [NEXT] to continue.
7. Set the [Start Time] (runtime) to at least 1 hour before the readers are scheduled to synchronize to the Assa Database. This way the data will be freshly synchronized between Galaxy and ASSA databases when the readers wake up and request data.
8. Set the [Recur Cycle] to at least 1 time every day.
9. Click [NEXT] to continue.
10. Select [Start a Program] option.
11. Click [NEXT] to continue.
System Galaxy Integration to ASSA ABLOY IP Readers Page 33
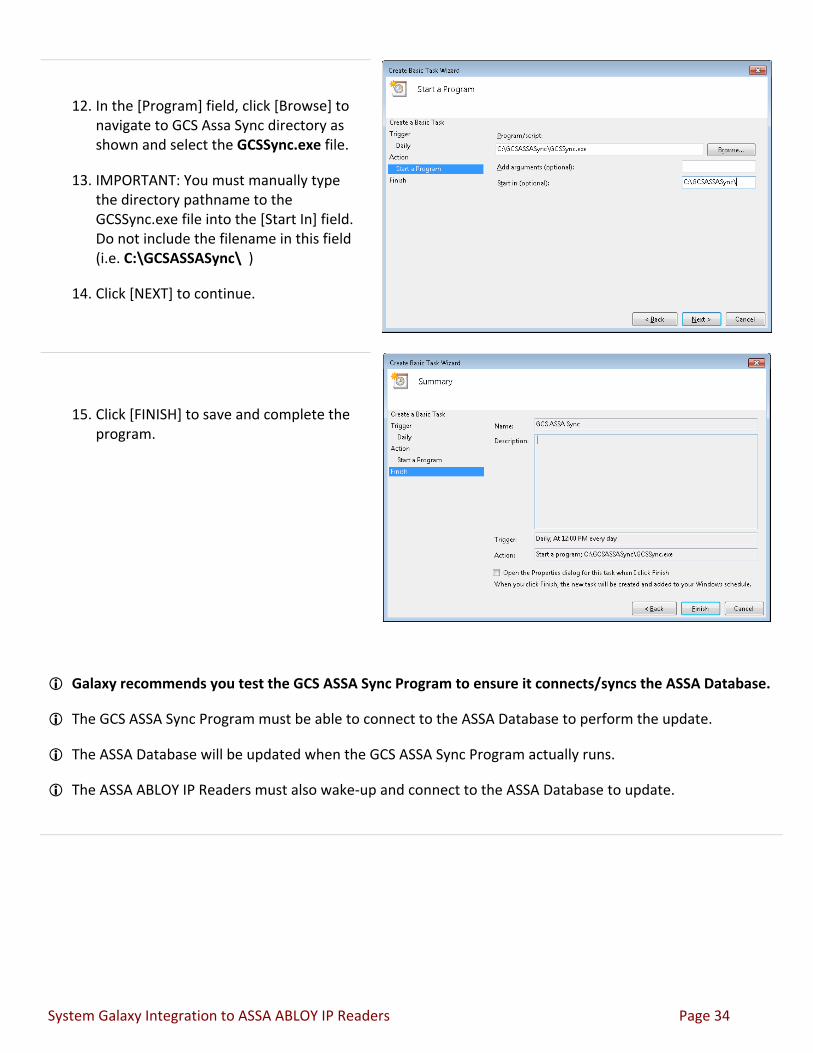
12. In the [Program] field, click [Browse] to navigate to GCS Assa Sync directory as shown and select the GCSSync.exe file.
13. IMPORTANT: You must manually type the directory pathname to the GCSSync.exe file into the [Start In] field. Do not include the filename in this field (i.e. C:\GCSASSASync\ )
14. Click [NEXT] to continue.
15. Click [FINISH] to save and complete the program.
Galaxy recommends you test the GCS ASSA Sync Program to ensure it connects/syncs the ASSA Database.
The GCS ASSA Sync Program must be able to connect to the ASSA Database to perform the update.
The ASSA Database will be updated when the GCS ASSA Sync Program actually runs.
The ASSA ABLOY IP Readers must also wake‐up and connect to the ASSA Database to update.
System Galaxy Integration to ASSA ABLOY IP Readers Page 34

8 CONFIGURING THE SYSTEM GALAXY (SG) HARDWARE This section covers adding hardware to the System Galaxy (SG) database. This is an abbreviated instruction guide. To see the expanded features and options available, installer must refer to the main Software User Guide.
This section covers the following topics:
8.1. Launching System Galaxy client software.
8.2. Adding a new Reader Type for ASSA ABLOY IP Reader to the Galaxy (SG) database.
8.3. Creating a ‘dummy’ Loop/Cluster (required to match IP Reader events with card activity in SG).
8.4. Creating a ‘dummy’ Controller and adding DPI boards (reader slots) to the System Galaxy database.
8.5. Adding each ASSA IP Reader’s serial number to the Galaxy (SG) database.
8.1 LAUNCHING SYSTEM GALAXY CLIENT SOFTWARE
1. Double‐click on the SG Desktop Icon to open the System Galaxy client software.
SG Desktop Icon is on the Main Comm. Server and any client workstation.
2. Supply the login name and password for a Master level operator (required level of permissions to program hardware)
3. The System Galaxy software opens.
Example screen shot provided: Upon opening, any Loops & Readers programmed so far will display. ASSA IP Readers are not connected to real Galaxy Hardware; thus they do not appear in the Hardware Tree.
System Galaxy Integration to ASSA ABLOY IP Readers Page 35
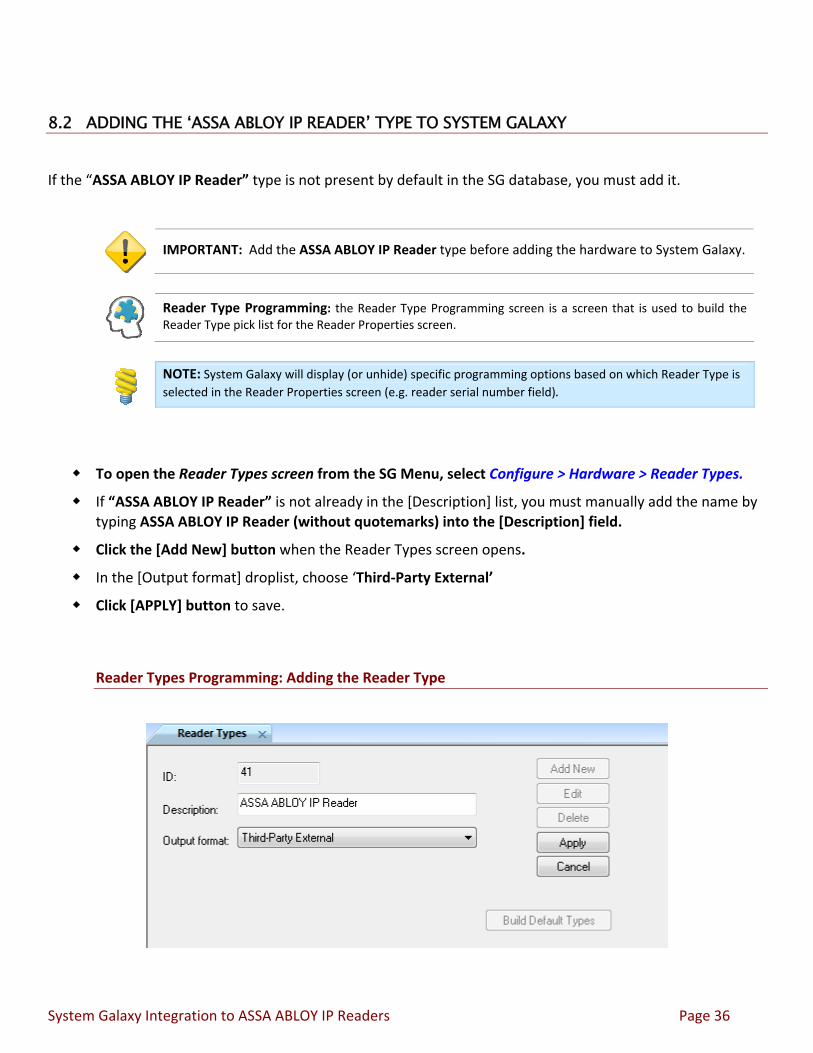
8.2 ADDING THE ‘ASSA ABLOY IP READER’ TYPE TO SYSTEM GALAXY
If the “ASSA ABLOY IP Reader” type is not present by default in the SG database, you must add it.
IMPORTANT: Add the ASSA ABLOY IP Reader type before adding the hardware to System Galaxy.
Reader Type Programming: the Reader Type Programming screen is a screen that is used to build the Reader Type pick list for the Reader Properties screen.
NOTE: System Galaxy will display (or unhide) specific programming options based on which Reader Type is
selected in the Reader Properties screen (e.g. reader serial number field).
To open the Reader Types screen from the SG Menu, select Configure > Hardware > Reader Types.
If “ASSA ABLOY IP Reader” is not already in the [Description] list, you must manually add the name by typing ASSA ABLOY IP Reader (without quotemarks) into the [Description] field.
Click the [Add New] button when the Reader Types screen opens.
In the [Output format] droplist, choose ‘Third‐Party External’
Click [APPLY] button to save.
Reader Types Programming: Adding the Reader Type
System Galaxy Integration to ASSA ABLOY IP Readers Page 36
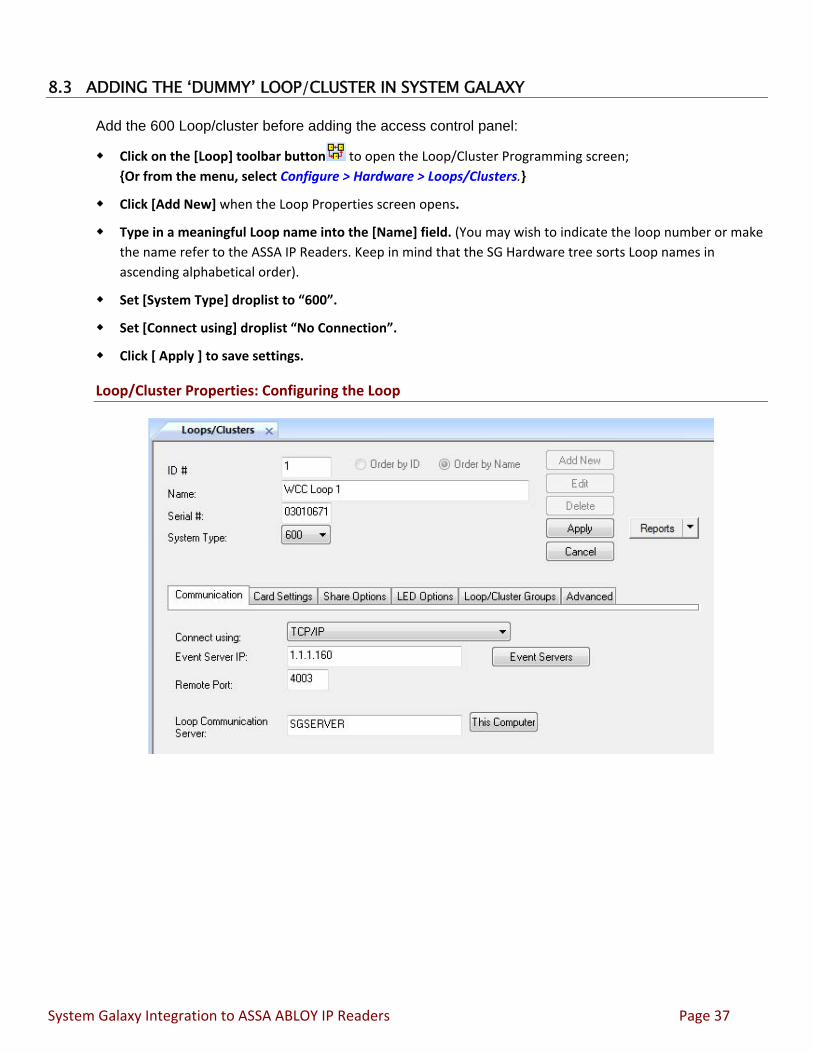
8.3 ADDING THE ‘DUMMY’ LOOP/CLUSTER IN SYSTEM GALAXY
Add the 600 Loop/cluster before adding the access control panel:
Click on the [Loop] toolbar button to open the Loop/Cluster Programming screen;
{Or from the menu, select Configure > Hardware > Loops/Clusters.}
Click [Add New] when the Loop Properties screen opens.
Type in a meaningful Loop name into the [Name] field. (You may wish to indicate the loop number or make
the name refer to the ASSA IP Readers. Keep in mind that the SG Hardware tree sorts Loop names in
ascending alphabetical order).
Set [System Type] droplist to “600”.
Set [Connect using] droplist “No Connection”.
Click [ Apply ] to save settings.
Loop/Cluster Properties: Configuring the Loop
System Galaxy Integration to ASSA ABLOY IP Readers Page 37
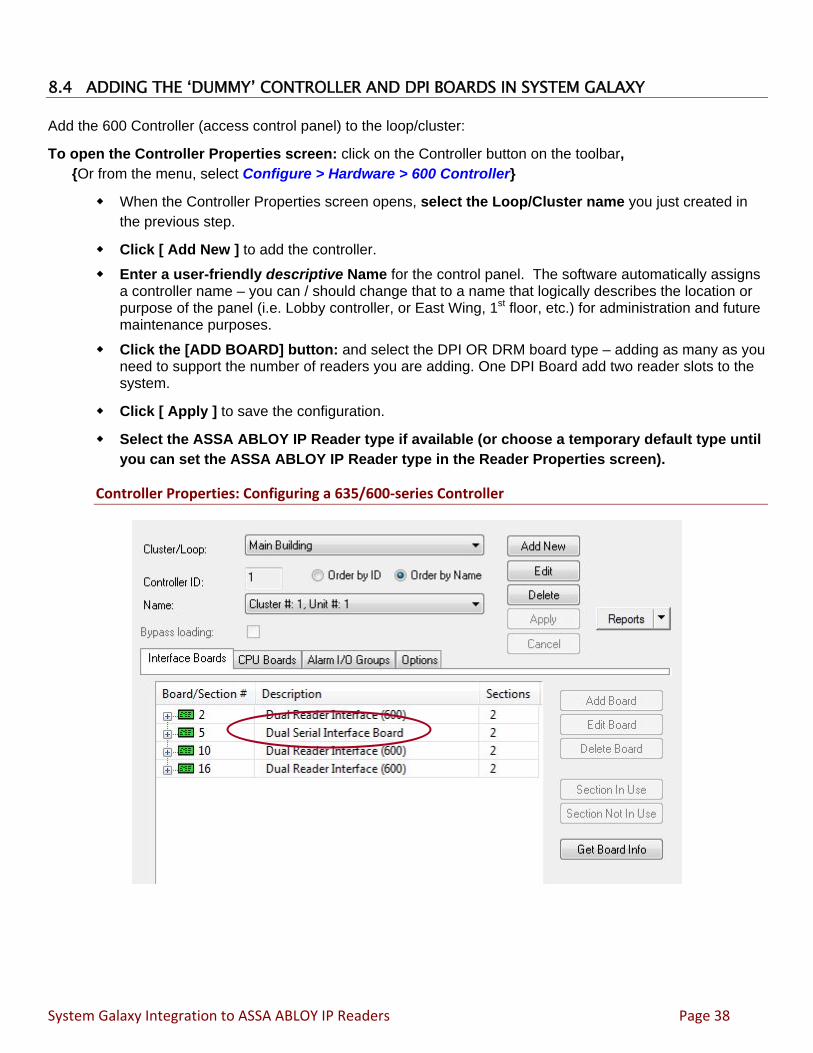
8.4 ADDING THE ‘DUMMY’ CONTROLLER AND DPI BOARDS IN SYSTEM GALAXY
Add the 600 Controller (access control panel) to the loop/cluster:
To open the Controller Properties screen: click on the Controller button on the toolbar, {Or from the menu, select Configure > Hardware > 600 Controller}
When the Controller Properties screen opens, select the Loop/Cluster name you just created in the previous step.
Click [ Add New ] to add the controller.
Enter a user-friendly descriptive Name for the control panel. The software automatically assigns a controller name – you can / should change that to a name that logically describes the location or purpose of the panel (i.e. Lobby controller, or East Wing, 1st floor, etc.) for administration and future maintenance purposes.
Click the [ADD BOARD] button: and select the DPI OR DRM board type – adding as many as you need to support the number of readers you are adding. One DPI Board add two reader slots to the system.
Click [ Apply ] to save the configuration.
Select the ASSA ABLOY IP Reader type if available (or choose a temporary default type until you can set the ASSA ABLOY IP Reader type in the Reader Properties screen).
Controller Properties: Configuring a 635/600‐series Controller
System Galaxy Integration to ASSA ABLOY IP Readers Page 38
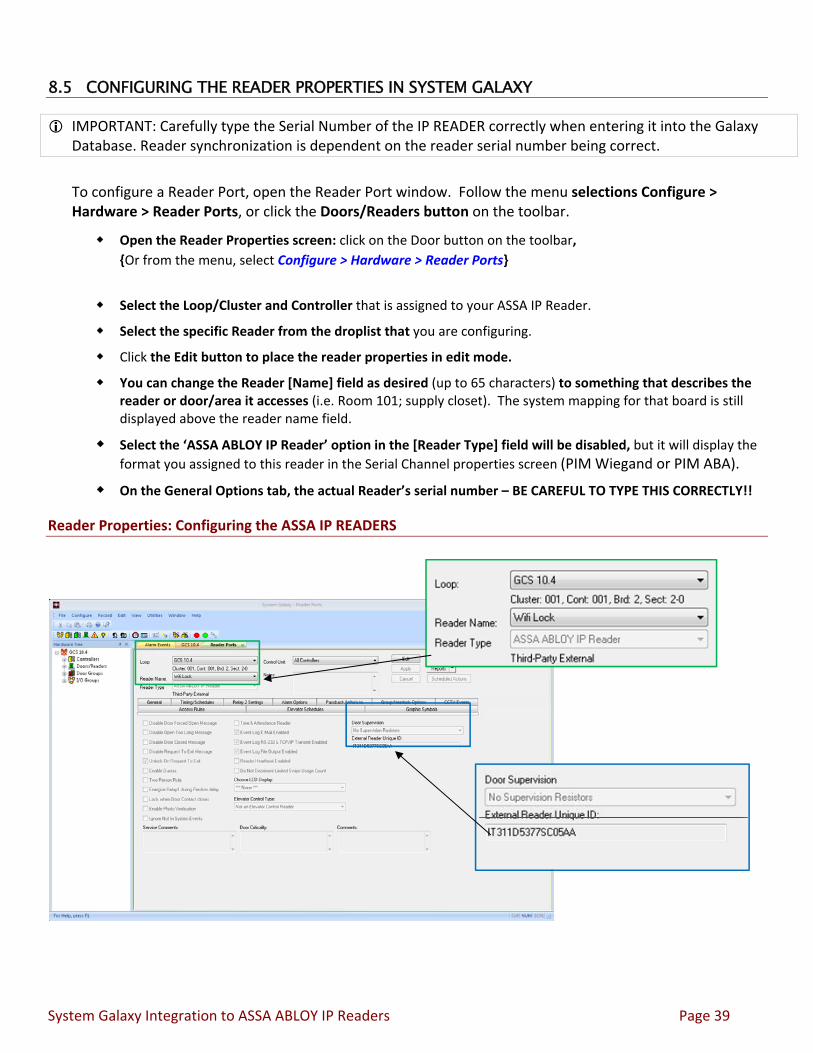
8.5 CONFIGURING THE READER PROPERTIES IN SYSTEM GALAXY
IMPORTANT: Carefully type the Serial Number of the IP READER correctly when entering it into the Galaxy Database. Reader synchronization is dependent on the reader serial number being correct.
To configure a Reader Port, open the Reader Port window. Follow the menu selections Configure > Hardware > Reader Ports, or click the Doors/Readers button on the toolbar.
Open the Reader Properties screen: click on the Door button on the toolbar,
{Or from the menu, select Configure > Hardware > Reader Ports}
Select the Loop/Cluster and Controller that is assigned to your ASSA IP Reader.
Select the specific Reader from the droplist that you are configuring.
Click the Edit button to place the reader properties in edit mode.
You can change the Reader [Name] field as desired (up to 65 characters) to something that describes the reader or door/area it accesses (i.e. Room 101; supply closet). The system mapping for that board is still displayed above the reader name field.
Select the ‘ASSA ABLOY IP Reader’ option in the [Reader Type] field will be disabled, but it will display the
format you assigned to this reader in the Serial Channel properties screen (PIM Wiegand or PIM ABA).
On the General Options tab, the actual Reader’s serial number – BE CAREFUL TO TYPE THIS CORRECTLY!!
Reader Properties: Configuring the ASSA IP READERS
System Galaxy Integration to ASSA ABLOY IP Readers Page 39
8.6 ADDING A “TEST CARD” IN SYSTEM GALAXY
This section covers how to vette your installation and ability to update the IP Readers using the GCSASSASync application and ASSA Database synchronization. This section does not validate the scheduled synchronization
IMPORTANT: Remember to remove the ‘test card’ credential after the walk‐test is completed.
IMPORTANT: You must have completed programming the ‘dummy loop, controller, and DPI slots’, as well as adding the Reader serial number, before you can grant access privileges to the test card.
Test Card Credential: is a credential that is added to the SG Database and given access privileges to the designated Reader(s) in order to validate that the reader is configured correctly and operating normally.
NOTE: The keypad number or card code must match the format (Wiegand or ABA) that the designated Reader is configured to support.
8.6.1 METHODS OF CAPTURING A TEST CARD CREDENTIAL IN SYSTEM GALAXY
This subsection provides information on:
o 8.6.1.1 Capturing a card code from a ‘Not in System’ event
o 8.6.1.2 Capturing a card code using an Enrollment Reader
o 8.6.1.3 Manually adding a new keypad number or card number
o 8.6.1.4 Full step‐by‐step instructions for manually adding a credential and access privileges.
o 8.6.1.5 Full step‐by‐step instructions for manually adding removing a test card.
System Galaxy Integration to ASSA ABLOY IP Readers Page 40
8.6.1.1 CAPTURING A TEST CARD (CARD CODE) FROM A ‘NOT IN SYSTEM’ EVENT:
IMPORTANT: The Loop/Panel/Reader must be physically installed and configured into SG.
RECOMMENDED: Enroll a card that has never been added to the system.
NOTE: To trigger a ‘Not in System’ event, the card must be presented at a reader where the card is not in the Galaxy Control Panel (controller). If the card is in the panel, a valid or invalid access event occurs.
1. Present the test card at a functioning reader that is physically installed at a Galaxy Access Control Panel.
2. Right‐click the ‘not in system’ event (in the SG Event screen) and choose the ‘Add Card’ option from the operator command menu. (This automatically opens the Cardholder Programming screen and inserts your card number into the [Card Code] field.)
8.6.1.2 CAPTURING A TEST CARD (CARD CODE) FROM AN ENROLLMENT READER:
IMPORTANT: The card you are capturing does not need access to the Loop/Cluster being used for enrolling cards. This method requires the Galaxy Enrollment Reader to be properly installed and configured into the System Galaxy database.
RECOMMENDED: Enroll a card that has never been added to the system.
1. Open the Cardholder Programming screen.
2. Select the Card/Badge Settings tab
3. Place your mouse cursor inside the [Card Code] field
4. Present the test card at your Enrollment Reader.
5. RESULT: The SG software will insert the card number into the [Card Code] field.
System Galaxy Integration to ASSA ABLOY IP Readers Page 41
8.6.1.3 MANUALLY ADDING A CREDENTIAL (CARD CODE – OR – KEYPAD CODE):
In this method you will manually program the card code or keypad code directly into the Card Code field.
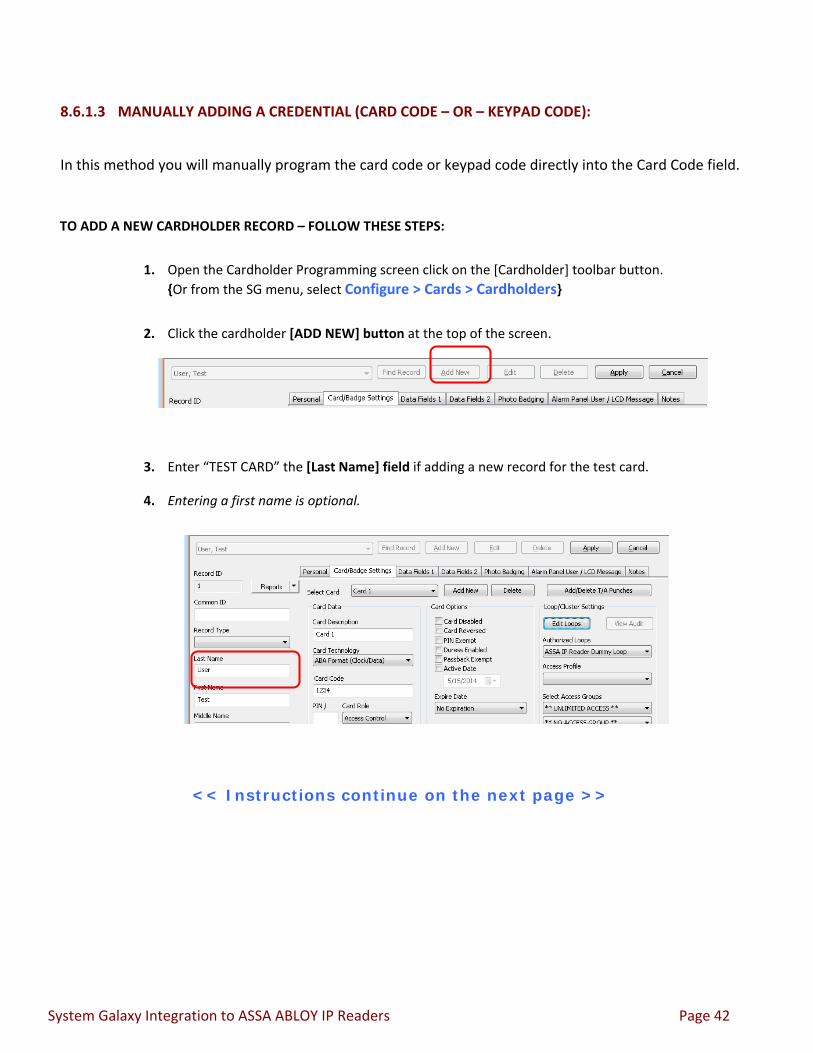
TO ADD A NEW CARDHOLDER RECORD – FOLLOW THESE STEPS:
1. Open the Cardholder Programming screen click on the [Cardholder] toolbar button.
{Or from the SG menu, select Configure > Cards > Cardholders}
2. Click the cardholder [ADD NEW] button at the top of the screen.
3. Enter “TEST CARD” the [Last Name] field if adding a new record for the test card.
4. Entering a first name is optional.
<< Instructions continue on the next page >>
System Galaxy Integration to ASSA ABLOY IP Readers Page 42
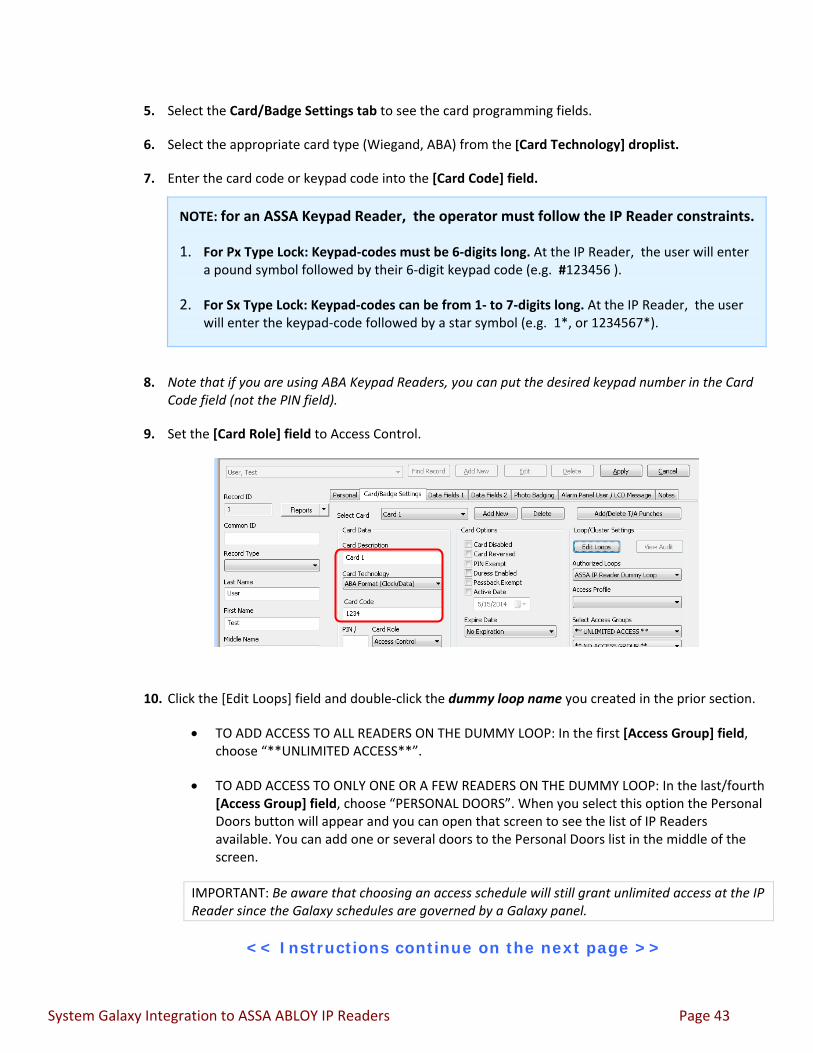
5. Select the Card/Badge Settings tab to see the card programming fields.
6. Select the appropriate card type (Wiegand, ABA) from the [Card Technology] droplist.
7. Enter the card code or keypad code into the [Card Code] field.
NOTE: for an ASSA Keypad Reader, the operator must follow the IP Reader constraints.
1. For Px Type Lock: Keypad‐codes must be 6‐digits long. At the IP Reader, the user will enter a pound symbol followed by their 6‐digit keypad code (e.g. #123456 ).
2. For Sx Type Lock: Keypad‐codes can be from 1‐ to 7‐digits long. At the IP Reader, the user will enter the keypad‐code followed by a star symbol (e.g. 1*, or 1234567*).
8. Note that if you are using ABA Keypad Readers, you can put the desired keypad number in the Card Code field (not the PIN field).
9. Set the [Card Role] field to Access Control.
10. Click the [Edit Loops] field and double‐click the dummy loop name you created in the prior section.
TO ADD ACCESS TO ALL READERS ON THE DUMMY LOOP: In the first [Access Group] field, choose “**UNLIMITED ACCESS**”.
TO ADD ACCESS TO ONLY ONE OR A FEW READERS ON THE DUMMY LOOP: In the last/fourth [Access Group] field, choose “PERSONAL DOORS”. When you select this option the Personal Doors button will appear and you can open that screen to see the list of IP Readers available. You can add one or several doors to the Personal Doors list in the middle of the screen.
IMPORTANT: Be aware that choosing an access schedule will still grant unlimited access at the IP Reader since the Galaxy schedules are governed by a Galaxy panel.
<< Instructions continue on the next page >>
System Galaxy Integration to ASSA ABLOY IP Readers Page 43
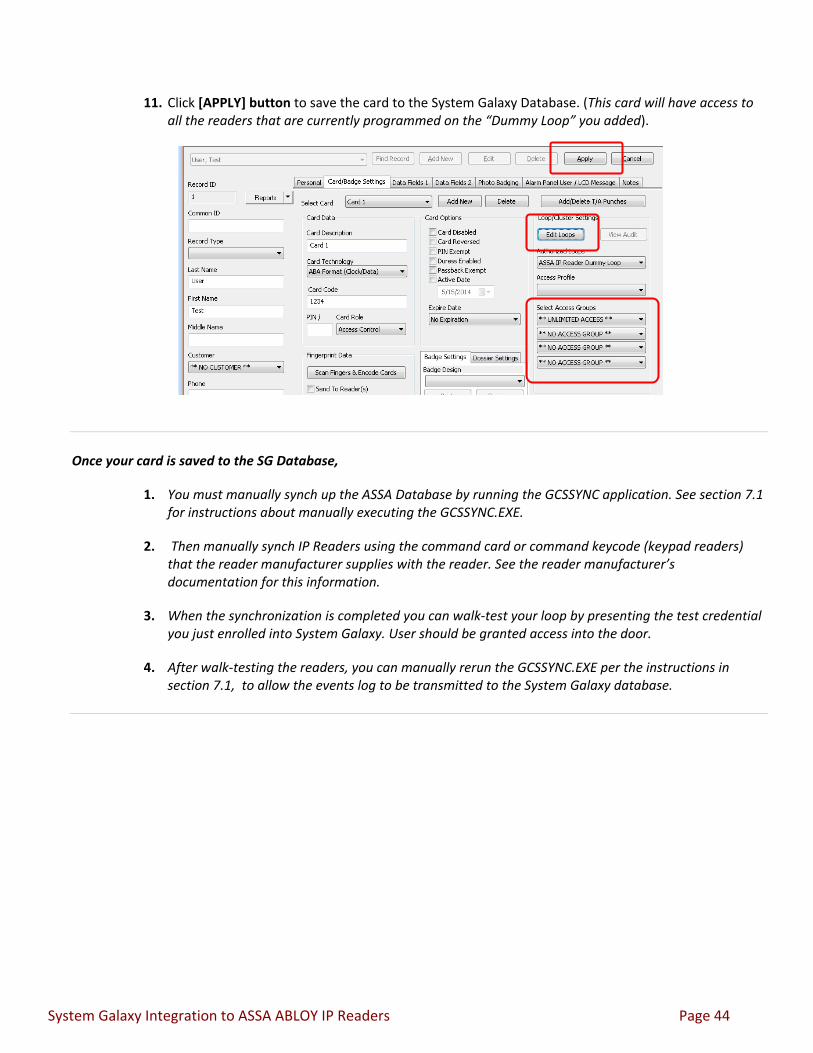
11. Click [APPLY] button to save the card to the System Galaxy Database. (This card will have access to all the readers that are currently programmed on the “Dummy Loop” you added).
Once your card is saved to the SG Database,
1. You must manually synch up the ASSA Database by running the GCSSYNC application. See section 7.1 for instructions about manually executing the GCSSYNC.EXE.
2. Then manually synch IP Readers using the command card or command keycode (keypad readers) that the reader manufacturer supplies with the reader. See the reader manufacturer’s documentation for this information.
3. When the synchronization is completed you can walk‐test your loop by presenting the test credential you just enrolled into System Galaxy. User should be granted access into the door.
4. After walk‐testing the readers, you can manually rerun the GCSSYNC.EXE per the instructions in section 7.1, to allow the events log to be transmitted to the System Galaxy database.
System Galaxy Integration to ASSA ABLOY IP Readers Page 44
9 ABOUT ADDING & REMOVING ACCESS FROM CARDS / USERS IMPORTANT: Access is removed immediately from doors that Galaxy hardware monitors provided connectivity is
maintained. The GCS DataLoader service will push out changes to Galaxy panels when connectivity is reestablished provided the service is running. Operator/Administrator can manually load any affected panels as desired.
IMPORTANT: The ASSA ABLOY IP Readers are designed to request their updates upon a scheduled wake‐up, which can vary from one site to another. Readers are typically set to wake and synch to their Assa Database at least once a day (to preserve battery life). Therefore, Galaxy recommends the GCS ASSA SYNC Program be scheduled to push updates to the Assa Database at least an hour before the Assa IP Readers are set to synchronize.
IF YOU NEED TO IMMEDIATELY REMOVE A USER OR CARD/CREDENTIAL FROM AN ASSA IP READER BEFORE THE NEXT SCHEDULED UPDATE, you can manually run the GCS ASSA SYNC Program and then manually trigger a reader wake‐up using the PIN command or Card command provided with your model reader.
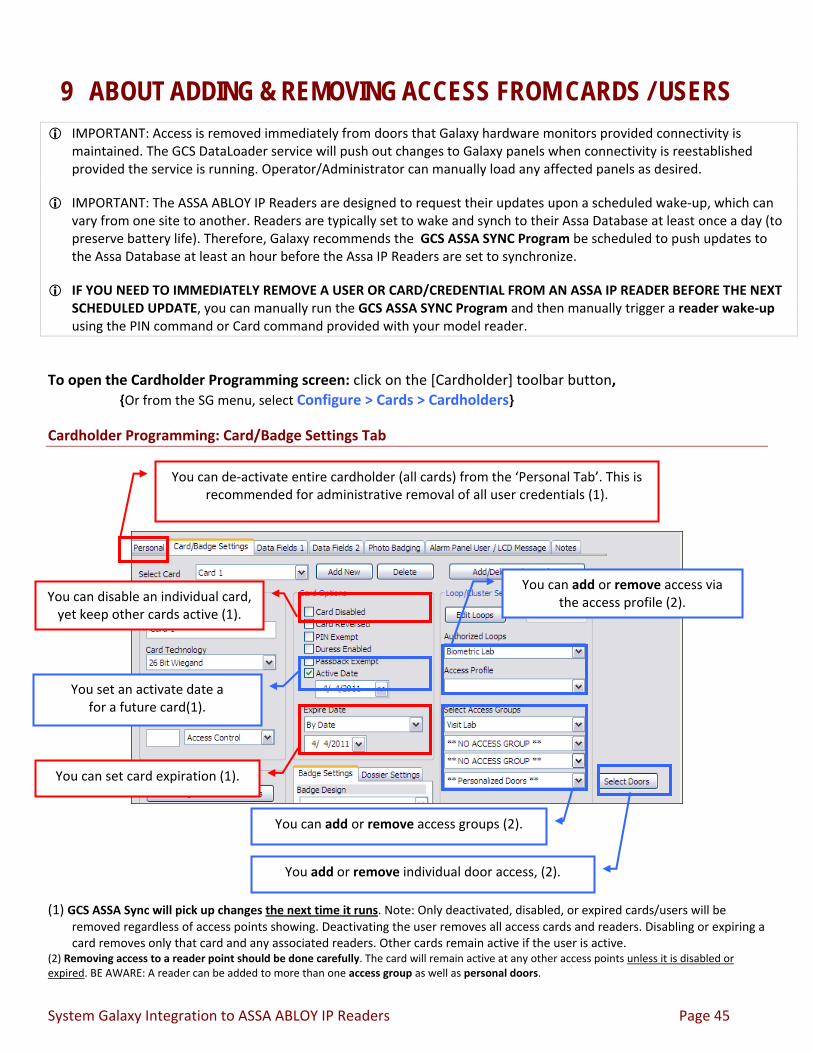
To open the Cardholder Programming screen: click on the [Cardholder] toolbar button, {Or from the SG menu, select Configure > Cards > Cardholders}
Cardholder Programming: Card/Badge Settings Tab
You can de‐activate entire cardholder (all cards) from the ‘Personal Tab’. This is recommended for administrative removal of all user credentials (1).
You can set card expiration (1).
You set an activate date a for a future card(1).
You can disable an individual card, yet keep other cards active (1).
You can add or remove access groups (2).
You add or remove individual door access, (2).
You can add or remove access via the access profile (2).
(1) GCS ASSA Sync will pick up changes the next time it runs. Note: Only deactivated, disabled, or expired cards/users will be removed regardless of access points showing. Deactivating the user removes all access cards and readers. Disabling or expiring a card removes only that card and any associated readers. Other cards remain active if the user is active.
(2) Removing access to a reader point should be done carefully. The card will remain active at any other access points unless it is disabled or expired. BE AWARE: A reader can be added to more than one access group as well as personal doors.
System Galaxy Integration to ASSA ABLOY IP Readers Page 45