system i: security secure sockets layer (ssl) · secure sockets layer (ssl) 3. configuration with...
TRANSCRIPT

System i
Security
Secure Sockets Layer (SSL)
Version 5 Release 4
���


System i
Security
Secure Sockets Layer (SSL)
Version 5 Release 4
���

Note
Before using this information and the product it supports, read the information in “Notices,” on
page 19.
Sixth Edition (February 2006)
This edition applies to version 5, release 4, modification 0 of i5/OS (5722–SS1) and to all subsequent releases and
modifications until otherwise indicated in new editions. This version does not run on all reduced instruction set
computer (RISC) models nor does it run on CISC models.
© Copyright International Business Machines Corporation 2002, 2006. All rights reserved.
US Government Users Restricted Rights – Use, duplication or disclosure restricted by GSA ADP Schedule Contract
with IBM Corp.

Contents
Secure Sockets Layer (SSL) . . . . . . 1
What’s new for V5R4 . . . . . . . . . . . 1
Printable PDF . . . . . . . . . . . . . . 1
Scenarios . . . . . . . . . . . . . . . 1
Scenario: Securing a client connection to your
Management Central server with SSL . . . . . 2
Configuration details: Secure a client
connection to your Management Central server
with SSL . . . . . . . . . . . . . . 4
Step 1: Deactivate SSL for the iSeries
Navigator client . . . . . . . . . . 4
Step 2: Set the authentication level for the
Management Central server . . . . . . 4
Step 3: Restart the Management Central
server on the central system . . . . . . 4
Step 4: Activate SSL for the iSeries
Navigator client . . . . . . . . . . 4
Optional step: Deactivate SSL for the iSeries
Navigator client . . . . . . . . . . 5
Scenario: Securing all connections to your
Management Central server with SSL . . . . . 5
Configuration details: Secure all connections to
your Management Central server with SSL . . 9
Step 1: Configure the central system for
server authentication . . . . . . . . 9
Step 2: Configure endpoint systems for
server authentication . . . . . . . . 10
Step 3: Restart the Management Central
server on the central system . . . . . . 10
Step 4: Restart the Management Central
server on all endpoint systems . . . . . 10
Step 5: Activate SSL for the iSeries
Navigator client . . . . . . . . . . 11
Step 6: Configure the central system for
client authentication . . . . . . . . 11
Step 7: Configure endpoint systems for
client authentication . . . . . . . . 11
Step 8: Copy the validation list to the
endpoint systems . . . . . . . . . 12
Step 9: Restart the Management Central
server on the central system . . . . . . 12
Step 10: Restart the Management Central
server on all endpoint systems . . . . . 12
SSL concepts . . . . . . . . . . . . . . 13
History of SSL . . . . . . . . . . . . 13
How SSL works . . . . . . . . . . . . 13
Supported SSL and Transport Layer Security
(TLS) protocols . . . . . . . . . . . . 13
Server authentication . . . . . . . . . . 15
Client authentication . . . . . . . . . . 15
Planning SSL . . . . . . . . . . . . . . 15
SSL prerequisites . . . . . . . . . . . 16
Digital certificates . . . . . . . . . . . 16
Application security with SSL . . . . . . . . 16
Troubleshooting SSL . . . . . . . . . . . 17
Related information for Secure Sockets Layer (SSL) 17
Appendix. Notices . . . . . . . . . . 19
Trademarks . . . . . . . . . . . . . . 21
Terms and conditions . . . . . . . . . . . 21
© Copyright IBM Corp. 2002, 2006 iii

iv System i: Security Secure Sockets Layer (SSL)
Secure Sockets Layer (SSL)
This topic describes how to use SSL on your server.
Secure Sockets Layer (SSL) has become an industry standard for enabling applications for secure
communication sessions over an unprotected network, such as the Internet.
What’s new for V5R4
This topic describes what is new to the Secure Sockets Layer (SSL) this release.
Product withdrawn: IBM® Cryptographic Access Provider product, 5722-AC3
(128-bit)
The IBM Cryptographic Access Provider product, 5722-AC3 (128-bit) is no longer required. This is a new
development for the V5R4 release of i5/OS®. All V5R4 systems are capable of the function that was
previously provided in the 5722-AC3 product.
How to see what’s new or changed
To help you see where technical changes have been made, this information uses:
v The
image to mark where new or changed information begins.
v The
image to mark where new or changed information ends.
Printable PDF
Use this to view and print a PDF of this information.
To view or download the PDF version of this document, select Secure Sockets Layer (SSL).
Saving PDF files
To save a PDF on your workstation for viewing or printing:
1. Right-click the PDF in your browser (right-click the link above).
2. Click the option that saves the PDF locally.
3. Navigate to the directory in which you want to save the PDF.
4. Click Save.
Downloading Adobe Reader
You need Adobe Reader installed on your system to view or print these PDFs. You can download a free
copy from the Adobe Web site (www.adobe.com/products/acrobat/readstep.html)
.
Scenarios
The SSL scenarios are designed to help you maximize the benefits of enabling SSL on your System i™
platform.
Read the SSL scenarios to increase your understanding of SSL on the iSeries™ server by providing
possible examples of how SSL can work for you.
© Copyright IBM Corp. 2002, 2006 1
||
|||

Related information
Scenario: Secure Telnet with SSL
Scenario: Enhance iSeries SSL performance
Scenario: Protect private keys with cryptographic hardware
Scenario: Securing a client connection to your Management Central
server with SSL
This scenario explains how to use SSL to secure the connection between a remote client and an System i
model that is acting as a central system by using the iSeries Navigator Management Central server.
Situation:
A company has a local area network (LAN) that includes several iSeries servers in their office. This
company’s system administrator, Bob, has specified one of the iSeries servers as the central system
(hereafter referred to as System A) for the LAN. Bob uses the Management Central server on System A to
manage all of the other endpoints on his LAN.
Bob is concerned about connecting to the Management Central server on System A from a network
connection that is external to his company’s LAN. Bob travels for work a lot, and requires a secure
connection to the Management Central server while he is away. He wants to ensure the connection
between his PC and the Management Central server is secure when he is not in the company office. Bob
decides to enable SSL on his PC and on the System A’s Management Central server. With SSL enabled in
this way, Bob can be certain that his connection to the Management Central server is secure when he is
traveling.
Objectives:
Bob wants to secure the connection between his PC and the Management Central server. Bob does not
require additional security for the connection between the Management Central server on System A and
the endpoints that are on the LAN. Other employees that work from the company office do not need
additional security for their connections to the Management Central server, either. Bob’s plan is to
configure his PC and the Management Central server on System A, so that his connection uses server
authentication. Connections to the Management Central server from other PCs or iSeries servers on the
LAN are not secured with SSL.
Details:
The following table illustrates the types of authentication used, based on the enabling or disabling of SSL
on a PC client:
Table 1. Required elements for an SSL-secured connection between a client and the Management Central server
SSL status on Bob’s PC Specified authentication level for the
Management Central server on System A
SSL connection enabled?
SSL off Any No
SSL on Any Yes (server authentication)
Server authentication means that Bob’s PC authenticates the Management Central server’s certificate.
Bob’s PC acts as an SSL client when connecting to the Management Central server. The Management
Central server acts as an SSL server and must prove its identity. The Management Central server does
this by providing a certificate issued by a Certificate Authority (CA) that Bob’s PC trusts.
2 System i: Security Secure Sockets Layer (SSL)
Prerequisites and assumptions
Bob must perform these administration and configuration tasks in order to secure the connection between
his PC and the Management Central server on System A:
1. System A meets the prerequisites for SSL.
2. OS/400® V5R3 or a later version of i5/OS is installed on System A.
3. The iSeries Navigator PC client runs V5R3 or later of iSeries Access for Windows®.
4. Get a Certificate Authority (CA) for iSeries servers.
5. Create a certificate that is signed by the CA, for System A.
6. Send the CA and a certificate to System A, and import them into the key database.
7. Assign the certificate with the Management Central server identification, and the application
identifications for all of the iSeries Access servers. The TCP central server, database server, data queue
server, file server, network print server, remote command server and signon server are all iSeries
Access servers.
a. On System A, Start IBM Digital Certificate Manager. Bob obtains or create certificates, or otherwise
sets up or changes his certificate system now.
b. Click Select a Certificate Store.
c. Select *SYSTEM and click Continue.
d. Enter the *SYSTEM Certificate Store password, and click Continue. When the menu reloads, expand
Manage Applications.
e. Click Update certificate assignment.
f. Select Server and click Continue.
g. Select the Management Central Server, and click Update certificate assignment. This assigns a
certificate to the Management Central server to use.
h. Click Assign New Certificate. DCM reloads to the Update certificate assignment page with a
confirmation message.
i. Click Done.
j. Assign the certificate to all of the client access servers.8. Download the CA to the PC client.
Before Bob can enable SSL on the Management Central server, he must install the SSL Prerequisites and
set up digital certificates on the system. Once he has met the prerequisites, he can complete the following
procedures to enable SSL for the Management Central server.
Configuration steps
Bob needs to complete the following steps in order to secure his PC client connection to the Management
Central server on System A, with SSL:
1. “Step 1: Deactivate SSL for the iSeries Navigator client” on page 4
2. “Step 2: Set the authentication level for the Management Central server” on page 4
3. “Step 3: Restart the Management Central server on the central system” on page 4
4. “Step 4: Activate SSL for the iSeries Navigator client” on page 4
5. “Optional step: Deactivate SSL for the iSeries Navigator client” on page 5 Related concepts
“SSL prerequisites” on page 16 Related information
Configure DCM
Start Digital Certificate Manager
Secure Sockets Layer (SSL) 3

Configuration details: Secure a client connection to your Management Central
server with SSL
This topic shows the expanded configurations steps for using SSL to secure a client connection to your
Management Central server.
The following information assumes you have read through the Scenario: Secure a client connection to
your Management Central server with SSL.
In this scenario, an System i model is specified as the central system in a company’s local area network
(LAN). Bob uses the Management Central server on the central system (referred to here as System A) to
manage the endpoints on the company network. The following information explains how to perform the
steps required to secure an external client connection to the Management Central server. Follow along as
Bob completes the scenario configuration steps.
Related concepts
“SSL prerequisites” on page 16
“Scenario: Securing all connections to your Management Central server with SSL” on page 5This scenario explains how to use SSL to secure all connections with an System i model that is acting
as a central system by using the iSeries Navigator Management Central server. Related information
Set up certificates for the first time
Step 1: Deactivate SSL for the iSeries Navigator client:
This step is only necessary if you have already enabled SSL for the iSeries Navigator client.
1. In iSeries Navigator, expand My Connections.
2. Right-click System A and select Properties.
3. Click the Secure Sockets tab and deselect Use Secure Sockets Layer (SSL) for connection.
4. Exit iSeries Navigator and restart it.
The padlock disappears from the Management Central container in iSeries Navigator, indicating an
unsecured connection. This indicates to Bob that he no longer has an SSL-secured connection between his
client and the central system of his company.
Step 2: Set the authentication level for the Management Central server:
1. In iSeries Navigator, right-click Management Central, and select Properties.
2. Click the Security tab, and select Use Secure Sockets Layer (SSL).
3. Select Any for the authentication level (available on V5R3 or later of iSeries Access for Windows).
4. Click OK to set this value on the central system.
Step 3: Restart the Management Central server on the central system:
1. In iSeries Navigator, expand My Connections.
2. On System A, expand Network-->Servers and select TCP/IP.
3. Right-click Management Central and select Stop. The central system view collapses, and a message
displays, explaining you are not connected to the server.
4. After the Management Central server has stopped, click Start to restart it.
Step 4: Activate SSL for the iSeries Navigator client:
1. In iSeries Navigator, expand My Connections.
2. Right-click System A and select Properties.
3. Click the Secure Sockets tab and select Use Secure Sockets Layer (SSL) for connection.
4. Exit iSeries Navigator and restart it.
4 System i: Security Secure Sockets Layer (SSL)
A padlock appears next to the Management Central server in iSeries Navigator, indicating an SSL-secured
connection. This indicates to Bob that he has successfully activated an SSL-secured connection between
his client and the central system of his company.
Note: This procedure only secures the connection between one PC and the Management Central server.
Other client connections with the Management Central server, as well as connections from
endpoints to the Management Central server, will not be secure. To secure other clients, ensure
they meet the prerequisites and repeat “Step 4: Activate SSL for the iSeries Navigator client” on
page 4. To secure other connections with the Management Central server, see Scenario: Secure all
connections to your Management Central server with SSL.
Optional step: Deactivate SSL for the iSeries Navigator client:
If Bob wants to work from the company office and does not want an SSL connection affecting the
performance of his PC, he can easily deactivate it by performing the following steps:
1. In iSeries Navigator, expand My Connections.
2. Right-click System A and select Properties.
3. Click the Secure Sockets tab and deselect Use Secure Sockets Layer (SSL) for connection.
4. Exit iSeries Navigator and restart it.
Scenario: Securing all connections to your Management Central server
with SSL
This scenario explains how to use SSL to secure all connections with an System i model that is acting as a
central system by using the iSeries Navigator Management Central server.
Situation:
A company has just set up a wide area network (WAN) that includes several System i models in remote
locations (endpoints). The endpoints are centrally managed by one system (the central system), located at
the main office. Tom is the company’s security specialist. Tom wants use Secure Sockets Layer (SSL) to
secure all of the connections between the Management Central server on the company’s central system
and all iSeries Access servers and clients.
Details:
Tom can manage all connections to the Management Central server securely, with SSL. To use SSL with
the Management Central server, Tom needs to secure iSeries Navigator on the PC that he uses to access
the central system.
Tom chooses from two authentication levels for the Management Central server:
Server authentication
Provides authentication of the server certificate. The client must validate the server, whether the
client is iSeries Navigator on a PC, or the Management Central server on the central system.
When iSeries Navigator connects to the central system, the PC is the SSL Client and the
Management Central server running on the central system is the SSL Server. The central system
acts as an SSL client when connecting to an endpoint system. The endpoint system acts as an SSL
server. The server must prove its identity to the client by providing a certificate that was issued
by a Certificate Authority that the client trusts. There must be a valid certificate issued by a
trusted CA for every SSL server.
Client and server authentication
Provides authentication of both the central system and the endpoint system certificates. This is a
stronger security level than the server authentication level. In other applications, this is known as
client authentication, where the client must supply a valid trusted certificate. When the central
Secure Sockets Layer (SSL) 5

system (SSL client) attempts to establish a connection with an endpoint system (SSL server), the
central system and the endpoint system authenticate each other’s certificates for certificate
authority authenticity.
Note: Client and server authentication only happens between two System i models. Client
authentication is not performed by the server when the client is a PC.
Unlike other applications, Management Central also provides authentication through a validation
list, called Trusted Group validation list. Generally the validation list stores information that
identifies the user, such as a user identification, and authentication information, such as
password, personal identification number, or digital certificate. This authentication information is
encrypted.
Most applications typically do not specify that you enable both server and client authentication, because
server authentication almost always occurs during SSL session enablement. Many applications have client
authentication configuration options. Management Central uses the term ″server and client
authentication″ instead of client authentication because of the dual role that the central system plays in
the network. When PC users connect to the central system, the central system acts as a server. However,
when the central system is connecting to an endpoint system, it acts as a client. The following illustration
shows how the central system operates as both a server and client in a network.
Note: In this illustration, the certificate associated with the Certificate Authority must be stored in the
key database on the central system and on all of the endpoint systems. The Certificate Authority
must on the central system, all the endpoints, as well as the PC.
6 System i: Security Secure Sockets Layer (SSL)

Prerequisites and assumptions:
Tom must perform the following administration and configuration tasks, in order to secure all of the
connections to the Management Central server:
Secure Sockets Layer (SSL) 7

1. System A meets the prerequisites for SSL.
2. The central system and all endpoint systems run V5R2 or later versions of OS/400 or i5/OS. V5R4
i5/OS connections to V5R1 OS/400 systems are not allowed.
3. The iSeries Navigator PC client runs V5R2 or later of iSeries Access for Windows.
4. Get a Certificate Authority (CA) forSystem i models.
5. Create a certificate that is signed by the CA, for System A.
6. Send the CA and a certificate to System A, and import them into the key database.
7. Assign the certificates with the Management Central application identification, and the application
identifications for all of the iSeries Access servers. The TCP central server, database server, data queue
server, file server, network print server, remote command server and signon server are all iSeries
Access servers.
a. Start IBM Digital Certificate Manager on the Management Central server. If Tom needs to obtain
or create certificates, or otherwise set up or change his certificate system, he does so now.
b. Click Select a Certificate Store.
c. Select *SYSTEM and click Continue.
d. Enter the *SYSTEM Certificate Store password, and click Continue. When the menu reloads,
expand Manage Applications.
e. Click Update certificate assignment.
f. Select Server and click Continue.
g. Select the Management Central server, and click Update certificate assignment. This assigns a
certificate to the Management Central server to use.
h. Choose the certificate you want to assign to the application, and click Assign New Certificate.
DCM reloads to the Update certificate assignment page with a confirmation message.
i. Click Cancel to return to the list of applications.
j. Repeat this procedure for all iSeries Access servers.8. Download the CA to the iSeries Navigator PC client.
Configuration steps:
Before Tom can enable SSL on the Management Central server, he must install the prerequisite programs
and set up digital certificates on the central system. See the Prerequisites and assumptions for this
scenario before continuing. Once he has met the prerequisites, he can complete the following procedures
to secure all connections to the Management Central server:
Note: If SSL has been enabled for iSeries Navigator, Tom must disable it before he can enable SSL on the
Management Central server. If SSL has been enabled for iSeries Navigator and not the
Management Central server, attempts by iSeries Navigator to connect with the central system will
fail.
1. “Step 1: Configure the central system for server authentication” on page 9
2. “Step 2: Configure endpoint systems for server authentication” on page 10
3. “Step 3: Restart the Management Central server on the central system” on page 10
4. “Step 4: Restart the Management Central server on all endpoint systems” on page 10
5. “Step 5: Activate SSL for the iSeries Navigator client” on page 11
6. “Step 6: Configure the central system for client authentication” on page 11
7. “Step 7: Configure endpoint systems for client authentication” on page 11
8. “Step 8: Copy the validation list to the endpoint systems” on page 12
9. “Step 9: Restart the Management Central server on the central system” on page 12
10. “Step 10: Restart the Management Central server on all endpoint systems” on page 12 Related concepts
8 System i: Security Secure Sockets Layer (SSL)
“SSL prerequisites” on page 16
“Application security with SSL” on page 16Review the following list to see the applications that you can use to secure with SSL on the System i
platform. Related tasks
“Configuration details: Secure a client connection to your Management Central server with SSL” on
page 4This topic shows the expanded configurations steps for using SSL to secure a client connection to your
Management Central server.
“Configuration details: Secure all connections to your Management Central server with SSL”This topic shows the details for using SSL to secure all connections to your Management Central
server. Related information
V5R1 Information Center, ″Securing Management Central″
Using Digital Certificate Manager
Set up certificates for the first time
Configuration details: Secure all connections to your Management Central server
with SSL
This topic shows the details for using SSL to secure all connections to your Management Central server.
The following information assumes that you have read through the following information: Scenario:
Secure all connections to your Management Central server with SSL.
You now want to understand how to perform the steps required to secure all connections to the
Management Central server. Follow along as Tom completes the scenario.
Before Tom can enable SSL on the Management Central server, he must install the prerequisite programs
and set up digital certificates on the System i model. Once he has met the prerequisites, he can complete
the following procedures to secure all connections to the Management Central server.
Note: If SSL has been enabled for iSeries Navigator, Tom must disable it before he can enable SSL on the
Management Central server. If SSL has been enabled for iSeries Navigator, and not the
Management Central server, attempts by iSeries Navigator to connect with the central system will
fail.
SSL allows Tom to secure transmissions between a central system and an endpoint system, as well as
between the iSeries Navigator client and the central system. SSL provides transport and authentication of
certificates and encryption of data. An SSL-connection can only occur between an SSL-enabled central
system and an SSL-enabled endpoint system. Tom needs to configure server authentication before he can
configure client authentication:
Related concepts
“SSL prerequisites” on page 16
“Scenario: Securing all connections to your Management Central server with SSL” on page 5This scenario explains how to use SSL to secure all connections with an System i model that is acting
as a central system by using the iSeries Navigator Management Central server. Related information
Set up certificates for the first time
Step 1: Configure the central system for server authentication:
1. In iSeries Navigator, right-click Management Central and select Properties.
Secure Sockets Layer (SSL) 9
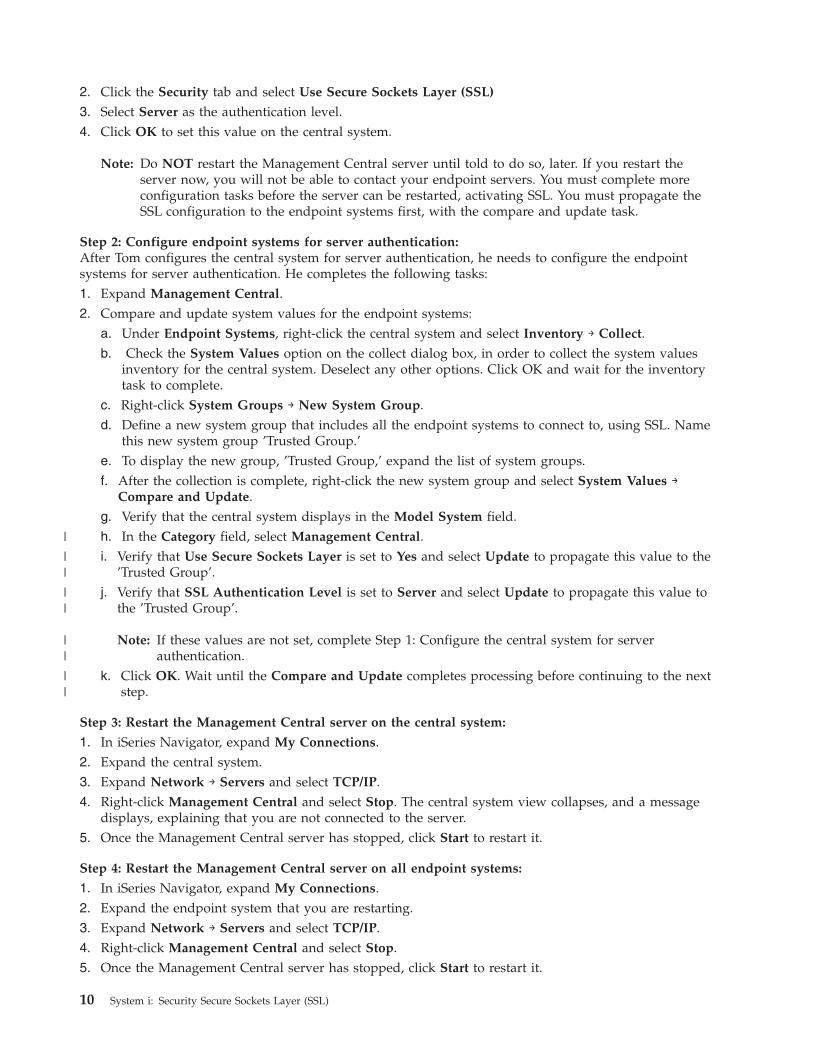
2. Click the Security tab and select Use Secure Sockets Layer (SSL)
3. Select Server as the authentication level.
4. Click OK to set this value on the central system.
Note: Do NOT restart the Management Central server until told to do so, later. If you restart the
server now, you will not be able to contact your endpoint servers. You must complete more
configuration tasks before the server can be restarted, activating SSL. You must propagate the
SSL configuration to the endpoint systems first, with the compare and update task.
Step 2: Configure endpoint systems for server authentication:
After Tom configures the central system for server authentication, he needs to configure the endpoint
systems for server authentication. He completes the following tasks:
1. Expand Management Central.
2. Compare and update system values for the endpoint systems:
a. Under Endpoint Systems, right-click the central system and select Inventory → Collect.
b. Check the System Values option on the collect dialog box, in order to collect the system values
inventory for the central system. Deselect any other options. Click OK and wait for the inventory
task to complete.
c. Right-click System Groups → New System Group.
d. Define a new system group that includes all the endpoint systems to connect to, using SSL. Name
this new system group ’Trusted Group.’
e. To display the new group, ’Trusted Group,’ expand the list of system groups.
f. After the collection is complete, right-click the new system group and select System Values →
Compare and Update.
g. Verify that the central system displays in the Model System field.
h. In the Category field, select Management Central.
i. Verify that Use Secure Sockets Layer is set to Yes and select Update to propagate this value to the
’Trusted Group’.
j. Verify that SSL Authentication Level is set to Server and select Update to propagate this value to
the ’Trusted Group’.
Note: If these values are not set, complete Step 1: Configure the central system for server
authentication.
k. Click OK. Wait until the Compare and Update completes processing before continuing to the next
step.
Step 3: Restart the Management Central server on the central system:
1. In iSeries Navigator, expand My Connections.
2. Expand the central system.
3. Expand Network → Servers and select TCP/IP.
4. Right-click Management Central and select Stop. The central system view collapses, and a message
displays, explaining that you are not connected to the server.
5. Once the Management Central server has stopped, click Start to restart it.
Step 4: Restart the Management Central server on all endpoint systems:
1. In iSeries Navigator, expand My Connections.
2. Expand the endpoint system that you are restarting.
3. Expand Network → Servers and select TCP/IP.
4. Right-click Management Central and select Stop.
5. Once the Management Central server has stopped, click Start to restart it.
10 System i: Security Secure Sockets Layer (SSL)
|
||
||
||
||

6. Repeat this procedure for each endpoint system.
Step 5: Activate SSL for the iSeries Navigator client:
1. In iSeries Navigator, expand My Connections.
2. Right-click the central system, and select Properties.
3. Click the Secure Sockets tab and select Use Secure Sockets Layer (SSL) for connection.
4. Exit iSeries Navigator and restart it.
Note: After you have completed these steps, server authentication is configured for your central and
endpoint systems. You can optionally configure your central and endpoint systems for client
authentication as well. Steps 6 through 10 should be completed if you want to enable client
authentication on your central and endpoint systems.
Step 6: Configure the central system for client authentication:
Now that Tom has completed the configuration for server authentication, he can opt to perform the
following optional client authentication procedures. Client authentication provides validation of
Certificate Authority and trusted group for both the endpoint systems and the central system. When the
central system (SSL client) tries to use SSL to connect to an endpoint system (SSL server), the central
system and the endpoint system authenticate each other’s certificates through both server authentication
and client authentication. This is also referred to as Certificate Authority and Trusted Group
authentication.
Note: You cannot complete client authentication configuration until you have configured server
authentication. If you have not configured server authentication, go back and do so, now.
1. In iSeries Navigator, right-click Management Central and select Properties.
2. Click the Security tab and select Use Secure Sockets Layer (SSL).
3. Select Client and server for the authentication level.
4. Click OK to set this value on the central system.
Note: Do NOT restart the Management Central server until told to do so, later. If you restart the
server now, you will not be able to contact your endpoint servers. You must complete more
configuration tasks before the server can be restarted, activating SSL. You must propagate the
SSL configuration to the endpoint systems first, with the compare and update task.
Step 7: Configure endpoint systems for client authentication:
Compare and update system values for the endpoint systems:
1. Expand Management Central.
2. Compare and update system values for the endpoint systems:
a. Under Endpoint Systems, right-click the central system and select Inventory → Collect.
b. Check the System Values option on the collect dialog box, in order to collect the system values
inventory for the central system. Deselect any other options. Click OK and wait for the inventory
task to complete.
c. After the collection is complete, right-click the ’Trusted Group’ and select System Values →
Compare and Update.
d. Verify that the central system displays in the Model System field.
e. In the Category field, select Management Central.
f. Verify that Use Secure Sockets Layer is set to Yes and select Update to propagate this value to the
’Trusted Group’.
g. Verify that SSL Authentication Level is set to Client and Server and select Update to propagate
this value to the ’Trusted Group’.
Secure Sockets Layer (SSL) 11
||||
|
||
||

Note: If these values are not set, complete Step 6: Configure the central system for client
authentication..
h. Click OK. Wait until the Compare and Update completes processing before continuing to the next
step.
Step 8: Copy the validation list to the endpoint systems:
This task assumes that your central system is V5R3 or greater. On pre-V5R3 systems, QYPSVLDL.VLDL
was located in QUSRSYS.LIB, not QMGTC2.LIB. Therefore, if you have pre-V5R3 systems, you will need
to send the validation list to these systems and place it in QUSRSYS.LIB, instead of QMGTC2.LIB. For
V5R3 and greater systems, continue with the following steps:
1. In iSeries Navigator, expand Management Central → Definitions.
2. Right-click Package, and select New Definition.
3. In the New Definition window, work with the following:
a. Name: Type the name of the definition.
b. Source system: Select the name of the central system.
c. Selected files and folders: Click in the field, and type /QSYS.LIB/QMGTC2.LIB/QYPSVLDL.VLDL. 4. Click the Options tab, and select Replace existing file with the file being sent.
5. Click Advanced.
6. In the Advanced Options window, specify Yes to allow object differences on restore, and change the
Target release to be the earliest release of your endpoints.
7. Click OK to refresh the list of definitions and display the new package.
8. Right-click the new package, and select Send.
9. In the Send dialog box, expand System Groups->Trusted Group, located in the Available Systems
and Groups list. This group is the one you defined in “Step 2: Configure endpoint systems for
server authentication” on page 10.
Note: The Send task will always fail on the central system, because it is always the source system.
The Send task should complete successfully on all endpoint systems.
10. If you have any pre-V5R3 systems in Trusted Group, you must manually go to those systems and
move the QYPSVLDL.VLDL object from QMGTC2.LIB to QUSRSYS.LIB. If there is already a version of
QYPSVLDL.VLDL in QUSRSYS.LIB, delete it and replace it with the newer one from QMGTC2.LIB
Step 9: Restart the Management Central server on the central system:
1. In iSeries Navigator, expand My Connections.
2. Expand the central system.
3. Expand Network → Servers and select TCP/IP.
4. Right-click Management Central and select Stop. The central system view collapses, and a message
displays, explaining that you are not connected to the server.
5. Once the Management Central server has stopped, click Start to restart it.
Step 10: Restart the Management Central server on all endpoint systems:
Note: Repeat this procedure for each endpoint system.
1. In iSeries Navigator, expand My Connections.
2. Expand the endpoint system that you are restarting.
3. Expand Network → Servers and select TCP/IP.
4. Right-click Management Central and select Stop.
5. Once the Management Central server has stopped, click Start to restart it.
12 System i: Security Secure Sockets Layer (SSL)
||
||

SSL concepts
SSL concepts includes supplemental information, providing some basic building blocks for the Secure
Sockets Layer (SSL) protocols.
With the SSL protocol, you can establish secure connections between clients and server applications
which provide authentication of one or both endpoints of the communication session. SSL also provides
privacy and integrity of the data that client and server applications exchange.
History of SSL
Netscape developed The Secure Sockets Layer Protocol (SSL) in 1994, as a response to the growing
concern over security on the Internet.
SSL was originally developed for securing web browser and server communications. The specification
was designed in such a way so you can enable other applications, such as TELNET and FTP, to use SSL.
Related concepts
“Supported SSL and Transport Layer Security (TLS) protocols”This topic describes which versions of the SSL and TLS protocols the i5/OS implementation supports.
How SSL works
SSL is actually two protocols. The protocols are the record protocol and the handshake protocol. The
record protocol controls the flow of the data between the two endpoints of an SSL session.
The handshake protocol authenticates one or both endpoints of the SSL session and establishes a unique
symmetric key used to generate keys to encrypt and decrypt data for that SSL session. SSL uses
asymmetric cryptography, digital certificates, and SSL handshake flows, to authenticate one or both
endpoints of an SSL session. Typically, SSL authenticates the server. Optionally, SSL authenticates the
client. A digital certificate, issued by a Certificate Authority, can be assigned to each of the endpoints or
to the applications using SSL on each endpoint of the connection.
The digital certificate is comprised of a public key and some identifying information that a trusted
Certificate Authority (CA) has digitally signed. Each public key has an associated private key. The private
key is not stored with or as part of the certificate. In both server and client authentication, the endpoint
which is being authenticated must prove that it has access to the private key associated with the public
key contained within the digital certificate.
SSL handshakes are performance intensive operations because of the cryptographic operations using the
public and private keys. After an initial SSL session has been established between two endpoints, the SSL
session information for these two endpoints and applications can be cached in secure memory to speed
up subsequent SSL session enablements. When an SSL session is resumed, the two endpoints use an
abbreviated handshake flow to authenticate that each has access to unique information without using the
public or private keys. If both can prove that they have access to this unique information, then new
symmetric keys are established and the SSL session resumes. For TLS Version 1.0 and SSL Version 3.0
sessions, cached information will not remain in the secure memory for greater than 24 hours. In OS/400
V5R2 and subsequent releases or i5/OS, you can minimize SSL handshake performance impacts on the
main CPU by using cryptographic hardware.
Related information
Digital certificate concepts
Cryptographic hardware
Supported SSL and Transport Layer Security (TLS) protocols
This topic describes which versions of the SSL and TLS protocols the i5/OS implementation supports.
Secure Sockets Layer (SSL) 13

There are several versions of the SSL protocol defined. The latest version, the Transport Layer Security
Protocol (TLS), is based on SSL 3.0 and is a product of the Internet Engineering Task Force (IETF). The
i5/OS implementation supports the following versions of the SSL and TLS protocols:
v TLS Version 1.0
v TLS Version 1.0 with SSL Version 3.0 compatibility
Note:
1. Specifying TLS Version 1.0 with SSL Version 3.0 compatibility means that TLS will be
negotiated if possible and if that is not possible then SSL Version 3.0 will be negotiated. If
SSL Version 3.0 cannot be negotiated, the SSL handshake will fail.
2. The System i also supports TLS Version 1.0 with SSL Version 3.0 and SSL Version 2.0
compatibility. This is specified with the protocol value of ALL, which means that TLS will be
negotiated if possible and if that is not possible then SSL Version 3.0 will be negotiated. If
SSL Version 3.0 cannot be negotiated, SSL Version 2.0 will be negotiated. If SSL Version 2.0
cannot be negotiated, the SSL handshake will fail.v SSL Version 3.0
v SSL Version 2.0
v SSL Version 3.0 with SSL Version 2.0 compatibility
SSL Version 3.0 versus SSL Version 2.0
SSL version 3.0 is an almost totally different protocol compared to SSL Version 2.0. Some of the major
differences between the two protocols include:
v SSL Version 3.0 handshake protocol flows are different than SSL Version 2.0 handshake flows.
v SSL Version 3.0 uses the BSAFE 3.0 implementation from RSA Data Security, Incorporated. BSAFE 3.0
includes a number of timing attack fixes and the SHA-1 hashing algorithm. The SHA-1 hashing
algorithm is considered to be more secure than the MD5 hashing algorithm. SHA-1 allows SSL Version
3.0 to support additional cipher suites which use SHA-1 instead of MD5.
v SSL Version 3.0 protocol reduces man-in-the-middle (MITM) type of attacks from occurring during SSL
handshake processing. In SSL Version 2.0, it was possible, though unlikely, that a MITM attack might
accomplish cipher specification weakening. Weakening the cipher can allow an unauthorized person to
break the SSL session key.
TLS Version 1.0 versus SSL Version 3.0
The latest industry standard SSL protocol based on SSL version 3.0 is Transport Layer Security (TLS)
Version 1.0. Its specifications are defined by the Internet Engineering Task Force (IETF) in RFC 2246, The
TLS Protocol.
The major goal of TLS is to make SSL more secure and to make the specification of the protocol more
precise and complete. TLS provides these enhancements over SSL Version 3.0:
v A more secure MAC algorithm
v More granular alerts
v Clearer definitions of ″gray area″ specifications
Any System i applications that are enabled for SSL will automatically obtain TLS support unless the
application has specifically requested to use only SSL Version 3.0 or SSL Version 2.0.
TLS provides the following security improvements:
v Key-Hashing for Message AuthenticationTLS uses Key-Hashing for Message Authentication Code
(HMAC), which ensures that a record cannot be altered while travelling over an open network such as
14 System i: Security Secure Sockets Layer (SSL)
the Internet. SSL Version 3.0 also provides keyed message authentication, but HMAC is more secure
than the (Message Authentication Code) MAC function that SSL Version 3.0 uses.
v Enhanced Pseudorandom Function (PRF) PRF generates key data. In TLS, the HMAC defines the PRF.
The PRF uses two hash algorithms in a way which guarantees its security. If either algorithm is
exposed, the data will remain secure as long as the second algorithm is not exposed.
v Improved finished message verificationBoth TLS Version 1.0 and SSL Version 3.0 provide a finished
message to both endpoints that authenticates that the exchanged messages were not altered. However,
TLS bases this finished message on the PRF and HMAC values, which again is more secure than SSL
Version 3.0.
v Consistent certificate handlingUnlike SSL Version 3.0, TLS attempts to specify the type of certificate
which must be exchanged between TLS implementations.
v Specific alert messagesTLS provides more specific and additional alerts to indicate problems that
either session endpoint detects. TLS also documents when certain alerts should be sent.
Related concepts
“History of SSL” on page 13Netscape developed The Secure Sockets Layer Protocol (SSL) in 1994, as a response to the growing
concern over security on the Internet. Related information
The TLS Protocol
Server authentication
With server authentication, the client will ensure that the server certificate is valid and that it is signed by
a certificate authority (CA) which the client trusts.
SSL will use asymmetric cryptography and handshake protocol flows to generate a symmetric key which
will be used only for this unique SSL session. This key is used to generate a set of keys which are used
for encrypting and decrypting data which will flow over the SSL session. Subsequently, when an SSL
handshake has completed, one or both ends of the communication link will have been authenticated.
Additionally, a unique key will have been generated to encrypt and decrypt the data. Once the
handshake is completed then application layer data will flow encrypted across that SSL session.
Client authentication
Many applications allow the option to enable client authentication. With client authentication, the server
will ensure that the client certificate is valid and that it is signed by a Certificate Authority which the
server trusts.
The following System i applications support client authentication:
v IBM HTTP Server (powered by Apache)
v FTP server
v Telnet server
v Management Central endpoint system
v Directory Server (LDAP)
Planning SSL
This topic describes the prerequisites of SSL enablement on the System i platform, as well as some
helpful tips.
Related concepts
Secure Sockets Layer (SSL) 15

“Troubleshooting SSL” on page 17This very basic troubleshooting information is intended to help you thin out the list of possible
problems that the System i platform can encounter with SSL.
SSL prerequisites
v IBM Digital Certificate Manager (DCM), option 34 of i5/OS (5722-SS1)
v TCP/IP Connectivity Utilities for iSeries (5722-TC1)
v IBM HTTP Server for iSeries (5722-DG1)
v If you are trying to use the HTTP server to use the DCM, ensure that you have the IBM Developer Kit
for Java™ (5722–JV1) installed. Otherwise, the HTTP admin server will not start.
v You may also want to install cryptographic hardware to use with SSL to speed up the SSL handshake
processing. If you want to install cryptographic hardware, you must also install Option 35, the
Cryptographic Service Provider.
Related information
Cryptographic hardware
Digital certificates
IBM Digital Certificate Manager (DCM) is the system solution for managing digital certificates.
Related information
Public certificates versus private certificates
Configure DCM
Application security with SSL
Review the following list to see the applications that you can use to secure with SSL on the System i
platform.
You can secure the following System i applications with SSL:
v Enterprise Identity Mapping (EIM)
v FTP server
v HTTP server (powered by Apache)
v iSeries Access for Windows
v Directory Server (LDAP)
v Distributed relational database architecture (DRDA®) and distributed data management (DDM) server
v Management Central server
v Telnet server
v Websphere Application Server — Express
v Applications that are written to the iSeries Access for Windows set of APIs (application programming
interfaces)
v Applications developed using the secure sockets Application Programmable Interfaces (APIs)
supported on the System i platform. The supported APIs are Global Secure Toolkit (GSKit) and the
SSL_System i APIs. Related concepts
“Scenario: Securing all connections to your Management Central server with SSL” on page 5This scenario explains how to use SSL to secure all connections with an System i model that is acting
as a central system by using the iSeries Navigator Management Central server. Related information
Enterprise Identity Mapping
Use SSL to secure the FTP server
16 System i: Security Secure Sockets Layer (SSL)

HTTP server
Secure Sockets Layer administration (iSeries Access for Windows topic)
Telnet scenario: Secure Telnet with SSL
Secure Sockets API
Troubleshooting SSL
This very basic troubleshooting information is intended to help you thin out the list of possible problems
that the System i platform can encounter with SSL.
It is important to understand that this is not a comprehensive source for troubleshooting information, but
rather a guide to aid in common problem resolution.
Verify that the following statements are true:
v You have met the prerequisites for SSL on the System i platform.
v Your certificate authority and certificates are valid and have not expired.
If you have verified that the previous statements are true for your system and you still have an
SSL-related problem, try the following options:
v The SSL error code in the server job log can be cross referenced in an error table to find more
information about the error. For example, this table maps the -93 that might be seen in a server job log
to the constant SSL_ERROR_SSL_NOT_AVAILABLE.
– A negative return code (indicated by the dash before the code number) indicates that you are using
an SSL_ API.
– A positive return code indicates that you are using a GSKit API. Programmers can code the
gsk_strerror()or SSL_Strerror() API in their programs to obtain a brief description of an error
return code. Some applications make use of this API and print out a message to the job log
containing this sentence.
If more detailed information is required, the message id provided in the table can be displayed on an
System i model to show potential cause and recovery for this error. Additional documentation
explaining these error codes may be located in the individual secure socket API that has returned the
error.
v The following two header files contain the same constant names for System SSL return codes as the
table, but without the message ID cross reference:
– QSYSINC/H.GSKSSL
– QSYSINC/H.QSOSSL
Remember that although the names of the System SSL return codes remain constant in these two files,
more than one unique error can be associated with each return code. Related concepts
“Planning SSL” on page 15This topic describes the prerequisites of SSL enablement on the System i platform, as well as some
helpful tips. Related information
Service and support
Secure socket API error code messages
Related information for Secure Sockets Layer (SSL)
Use this information to learn about other resources and information relevant to using SSL.
Secure Sockets Layer (SSL) 17
Web sites
v RFC 2246: ″The TLS Protocol Version 1.0 ″
(ftp://ftp.isi.edu/in-notes/rfc2246.txt)
Explains the TLS protocol in detail.
v RFC2818: ″HTTP Over TLS″
(ftp://ftp.isi.edu/in-notes/rfc2818.txt)
Describes how to use TLS to secure HTTP connections over the Internet.
v The SSL Encryption explained information
(http://www.digicert.com/ssl)
Discusses SSL encryption with an emphasis on certificates.
Other information
v SSL and Java Secure Socket Extension
v IBM Toolbox for Java
Saving PDF files
To save a PDF on your workstation for viewing or printing:
1. Right-click the PDF in your browser (right-click the link above).
2. Click the option that saves the PDF locally.
3. Navigate to the directory in which you want to save the PDF.
4. Click Save.
Downloading Adobe Reader
You need Adobe Reader installed on your system to view or print these PDFs. You can download a free
copy from the Adobe Web site (www.adobe.com/products/acrobat/readstep.html)
.
18 System i: Security Secure Sockets Layer (SSL)

Appendix. Notices
This information was developed for products and services offered in the U.S.A.
IBM may not offer the products, services, or features discussed in this document in other countries.
Consult your local IBM representative for information on the products and services currently available in
your area. Any reference to an IBM product, program, or service is not intended to state or imply that
only that IBM product, program, or service may be used. Any functionally equivalent product, program,
or service that does not infringe any IBM intellectual property right may be used instead. However, it is
the user’s responsibility to evaluate and verify the operation of any non-IBM product, program, or
service.
IBM may have patents or pending patent applications covering subject matter described in this
document. The furnishing of this document does not grant you any license to these patents. You can send
license inquiries, in writing, to:
IBM Director of Licensing
IBM Corporation
North Castle Drive
Armonk, NY 10504-1785
U.S.A.
For license inquiries regarding double-byte (DBCS) information, contact the IBM Intellectual Property
Department in your country or send inquiries, in writing, to:
IBM World Trade Asia Corporation
Licensing
2-31 Roppongi 3-chome, Minato-ku
Tokyo 106-0032, Japan
The following paragraph does not apply to the United Kingdom or any other country where such
provisions are inconsistent with local law: INTERNATIONAL BUSINESS MACHINES CORPORATION
PROVIDES THIS PUBLICATION “AS IS” WITHOUT WARRANTY OF ANY KIND, EITHER EXPRESS
OR IMPLIED, INCLUDING, BUT NOT LIMITED TO, THE IMPLIED WARRANTIES OF
NON-INFRINGEMENT, MERCHANTABILITY OR FITNESS FOR A PARTICULAR PURPOSE. Some
states do not allow disclaimer of express or implied warranties in certain transactions, therefore, this
statement may not apply to you.
This information could include technical inaccuracies or typographical errors. Changes are periodically
made to the information herein; these changes will be incorporated in new editions of the publication.
IBM may make improvements and/or changes in the product(s) and/or the program(s) described in this
publication at any time without notice.
Any references in this information to non-IBM Web sites are provided for convenience only and do not in
any manner serve as an endorsement of those Web sites. The materials at those Web sites are not part of
the materials for this IBM product and use of those Web sites is at your own risk.
IBM may use or distribute any of the information you supply in any way it believes appropriate without
incurring any obligation to you.
Licensees of this program who wish to have information about it for the purpose of enabling: (i) the
exchange of information between independently created programs and other programs (including this
one) and (ii) the mutual use of the information which has been exchanged, should contact:
IBM Corporation
© Copyright IBM Corp. 2002, 2006 19

Software Interoperability Coordinator, Department YBWA
3605 Highway 52 N
Rochester, MN 55901
U.S.A.
Such information may be available, subject to appropriate terms and conditions, including in some cases,
payment of a fee.
The licensed program described in this information and all licensed material available for it are provided
by IBM under terms of the IBM Customer Agreement, IBM International Program License Agreement,
IBM License Agreement for Machine Code, or any equivalent agreement between us.
Any performance data contained herein was determined in a controlled environment. Therefore, the
results obtained in other operating environments may vary significantly. Some measurements may have
been made on development-level systems and there is no guarantee that these measurements will be the
same on generally available systems. Furthermore, some measurements may have been estimated through
extrapolation. Actual results may vary. Users of this document should verify the applicable data for their
specific environment.
Information concerning non-IBM products was obtained from the suppliers of those products, their
published announcements or other publicly available sources. IBM has not tested those products and
cannot confirm the accuracy of performance, compatibility or any other claims related to non-IBM
products. Questions on the capabilities of non-IBM products should be addressed to the suppliers of
those products.
All statements regarding IBM’s future direction or intent are subject to change or withdrawal without
notice, and represent goals and objectives only.
All IBM prices shown are IBM’s suggested retail prices, are current and are subject to change without
notice. Dealer prices may vary.
This information is for planning purposes only. The information herein is subject to change before the
products described become available.
This information contains examples of data and reports used in daily business operations. To illustrate
them as completely as possible, the examples include the names of individuals, companies, brands, and
products. All of these names are fictitious and any similarity to the names and addresses used by an
actual business enterprise is entirely coincidental.
COPYRIGHT LICENSE:
This information contains sample application programs in source language, which illustrate programming
techniques on various operating platforms. You may copy, modify, and distribute these sample programs
in any form without payment to IBM, for the purposes of developing, using, marketing or distributing
application programs conforming to the application programming interface for the operating platform for
which the sample programs are written. These examples have not been thoroughly tested under all
conditions. IBM, therefore, cannot guarantee or imply reliability, serviceability, or function of these
programs.
Each copy or any portion of these sample programs or any derivative work, must include a copyright
notice as follows:
© (your company name) (year). Portions of this code are derived from IBM Corp. Sample Programs. ©
Copyright IBM Corp. _enter the year or years_. All rights reserved.
If you are viewing this information softcopy, the photographs and color illustrations may not appear.
20 System i: Security Secure Sockets Layer (SSL)

Trademarks
The following terms are trademarks of International Business Machines Corporation in the United States,
other countries, or both:
DRDA
i5/OS
IBM
iSeries
OS/400
System i
Microsoft, Windows, Windows NT, and the Windows logo are trademarks of Microsoft Corporation in the
United States, other countries, or both.
Java and all Java-based trademarks are trademarks of Sun Microsystems, Inc. in the United States, other
countries, or both.
Other company, product, and service names may be trademarks or service marks of others.
Terms and conditions
Permissions for the use of these publications is granted subject to the following terms and conditions.
Personal Use: You may reproduce these publications for your personal, noncommercial use provided that
all proprietary notices are preserved. You may not distribute, display or make derivative works of these
publications, or any portion thereof, without the express consent of IBM.
Commercial Use: You may reproduce, distribute and display these publications solely within your
enterprise provided that all proprietary notices are preserved. You may not make derivative works of
these publications, or reproduce, distribute or display these publications or any portion thereof outside
your enterprise, without the express consent of IBM.
Except as expressly granted in this permission, no other permissions, licenses or rights are granted, either
express or implied, to the publications or any information, data, software or other intellectual property
contained therein.
IBM reserves the right to withdraw the permissions granted herein whenever, in its discretion, the use of
the publications is detrimental to its interest or, as determined by IBM, the above instructions are not
being properly followed.
You may not download, export or re-export this information except in full compliance with all applicable
laws and regulations, including all United States export laws and regulations.
IBM MAKES NO GUARANTEE ABOUT THE CONTENT OF THESE PUBLICATIONS. THE
PUBLICATIONS ARE PROVIDED ″AS-IS″ AND WITHOUT WARRANTY OF ANY KIND, EITHER
EXPRESSED OR IMPLIED, INCLUDING BUT NOT LIMITED TO IMPLIED WARRANTIES OF
MERCHANTABILITY, NON-INFRINGEMENT, AND FITNESS FOR A PARTICULAR PURPOSE.
Appendix. Notices 21

22 System i: Security Secure Sockets Layer (SSL)

����
Printed in USA