system recovery procedure
TRANSCRIPT

SIMATIC WorkstationSystem Recovery Procedure
Project DataDate: 10 Apr 2023Project Number: 0000-0000Project Name: SIMATIC ProjectProject Manager: Reuben AllottClient: Client CompanyClient Representative: Client Representatives
Allottware CCReg No: 2004/028046/23
P.O. Box 12611, Vorna Valley, 1686, South Africa
Tel: +27 82 809 3262Fax: +27 11 315 1464
Email: [email protected] Web: www.allottware.co.za
Managing Members:Reuben Allott

System Recovery Procedure SIMATIC Workstation
CONTENTS
1 INTRODUCTION........................................................................................................................................4
1.1 OVERVIEW.............................................................................................................................................41.2 SOFTWARE REQUIREMENTS...................................................................................................................41.3 HARDWARE REQUIREMENTS..................................................................................................................4
2 INSTALLATION CHECKLIST.................................................................................................................5
2.1 AUTHORIZATIONS..................................................................................................................................52.2 HARDWARE INSTALLATION...................................................................................................................52.3 SOFTWARE INSTALLATION.....................................................................................................................52.4 PROJECT INSTALLATION........................................................................................................................52.5 SYSTEM STARTUP..................................................................................................................................5
3 RECOVER ORIGINAL AUTHORIZATIONS.........................................................................................6
4 HARDWARE INSTALLATION.................................................................................................................7
4.1 STANDARD EQUIPMENT.........................................................................................................................74.2 SIMATIC CP-1613...............................................................................................................................7
5 OPERATING SYSTEM INSTALLATION...............................................................................................8
5.1 OPERATING SYSTEM..............................................................................................................................85.2 ADDITIONAL WINDOWS COMPONENTS..................................................................................................85.3 VIDEO, NETWORK & SOUND DRIVERS..................................................................................................95.4 INTERNET EXPLORER V6 + SP2............................................................................................................95.5 OPERATING SYSTEM SERVICE PACK.....................................................................................................95.6 WINDOWS 2000 SP4 HOTFIX KB828748..............................................................................................95.7 CREATE USERS....................................................................................................................................10
6 SIMATIC SOFTWARE INSTALLATION.............................................................................................11
6.1 SIMATIC NET V6.1 + SP1................................................................................................................116.2 CP-1613 AS TCP/IP CARD..................................................................................................................126.3 NETWORK CONFIGURATION................................................................................................................13
6.3.1 Computer Name.............................................................................................................................136.3.2 Network Connections.....................................................................................................................146.3.3 Office LAN....................................................................................................................................156.3.4 PLC Network..................................................................................................................................15
6.4 PG/PC INTERFACE...............................................................................................................................166.4.1 TCP/IP via CP-1613.......................................................................................................................166.4.2 Industrial Ethernet via CP-1613.....................................................................................................176.4.3 TCP/IP via Standard Ethernet Card...............................................................................................17
6.5 MICROSOFT SQL SERVER 2000 + SP3................................................................................................186.6 STEP7 PROFESSIONAL..........................................................................................................................196.7 WINCC V6.0 + SP2.............................................................................................................................206.8 WINCC DATA MONITOR V6.0 + SP1 + HOTFIX2...............................................................................226.9 WINCC V6.0 + SP2 + HOTFIX3..........................................................................................................236.10 TRANSFER AUTHORIZATIONS..............................................................................................................24
7 PROJECT INSTALLATION....................................................................................................................25
7.1 CREATE PROJECT FOLDER...................................................................................................................257.2 RETRIEVE PROJECT..............................................................................................................................257.3 OPEN THE WINCC PROJECT................................................................................................................257.4 SET COMPUTER PROPERTIES...............................................................................................................26
7.4.1 Computer Name.............................................................................................................................267.4.2 Limiting Runtime...........................................................................................................................26
7.5 SET TCP/IP SYSTEM PARAMETER.......................................................................................................27
APPENDIX A: SIMATIC AUTHORIZATIONS.............................................................................................28
Rev: 1, 18 Nov 2005Status: As-Built
Doc no: 0000-0000-SRP-1Page 2 of 36
0000-0000SIMATIC Project

System Recovery Procedure SIMATIC Workstation
WINCC V6.0......................................................................................................................................................28STEP 7 PROFESSIONAL V5.3...............................................................................................................................29
APPENDIX B: WINCC AUTOSTART.............................................................................................................30
APPENDIX C: RESTRICTING THE WINCC RUN-TIME...........................................................................31
APPENDIX D: AUTOMATIC LOGON FOR WINDOWS.............................................................................32
APPENDIX E: WINDOWS STARUP COUNTER...........................................................................................33
APPENDIX F: DISABLING USB FLASH DISK AUTO-START..................................................................34
APPENDIX G: Windows 2000 / XP Foreground Lock Timeout..........................................................................36
Rev: 1, 18 Nov 2005Status: As-Built
Doc no: 0000-0000-SRP-1Page 3 of 36
0000-0000SIMATIC Project
System Recovery Procedure SIMATIC Workstation
1 INTRODUCTION
1.1 Overview
This document lists the steps required to install a new computer workstation to be used for the project.
The Service Technician should know a little about Siemens hardware or software. A general working knowledge of installing hardware and software and working with files, folders, networking and user access on the Windows platform is essential.
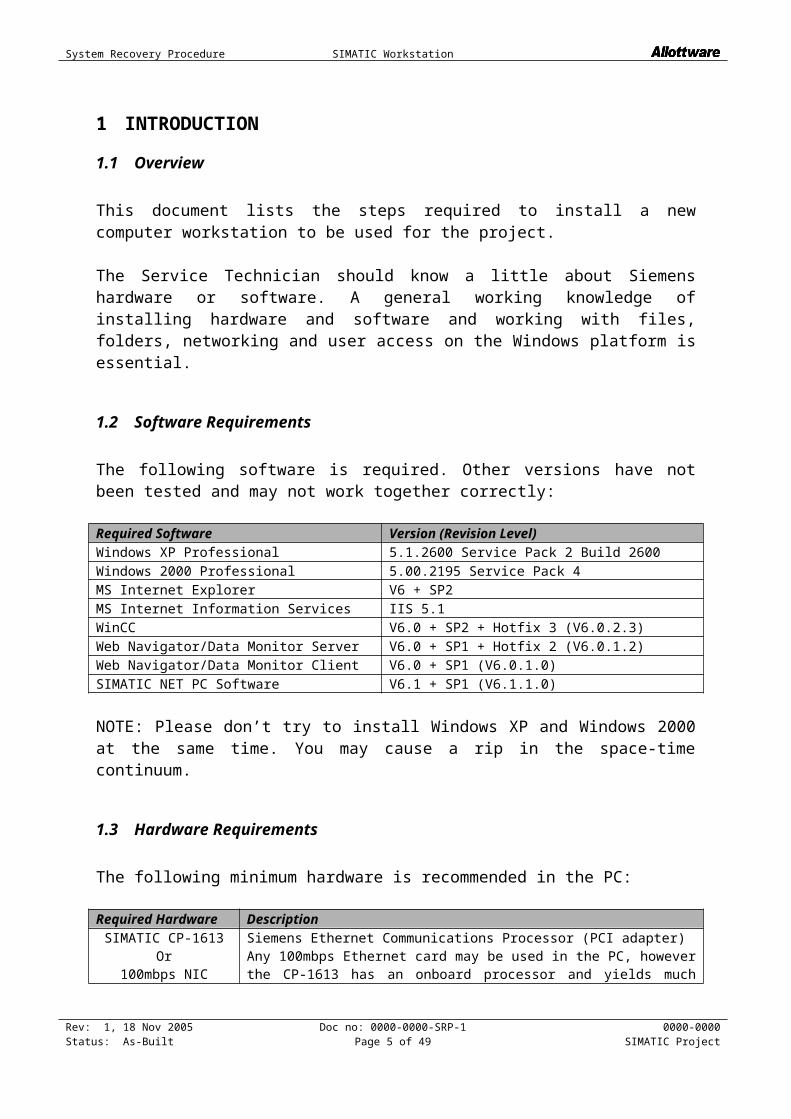
1.2 Software Requirements
The following software is required. Other versions have not been tested and may not work together correctly:
Required Software Version (Revision Level)Windows XP Professional 5.1.2600 Service Pack 2 Build 2600Windows 2000 Professional 5.00.2195 Service Pack 4MS Internet Explorer V6 + SP2MS Internet Information Services IIS 5.1WinCC V6.0 + SP2 + Hotfix 3 (V6.0.2.3)Web Navigator/Data Monitor Server V6.0 + SP1 + Hotfix 2 (V6.0.1.2)Web Navigator/Data Monitor Client V6.0 + SP1 (V6.0.1.0)SIMATIC NET PC Software V6.1 + SP1 (V6.1.1.0)
NOTE: Please don’t try to install Windows XP and Windows 2000 at the same time. You may cause a rip in the space-time continuum.
1.3 Hardware Requirements
The following minimum hardware is recommended in the PC:
Required Hardware
Description
SIMATIC CP-1613Or
100mbps NIC
Siemens Ethernet Communications Processor (PCI adapter)Any 100mbps Ethernet card may be used in the PC, however the CP-1613 has an onboard processor and yields much greater data throughput.
Motherboard Intel Pentium 4 3.0 GHzRAM 1 GBHDD Entry Level Sound Entry LevelVideo 1024 x 768 x True ColorMonitor 17” PanelNIC 100mbps Ethernet Card (additional to the PLC network card)
Rev: 1, 18 Nov 2005Status: As-Built
Doc no: 0000-0000-SRP-1Page 4 of 36
0000-0000SIMATIC Project
System Recovery Procedure SIMATIC Workstation
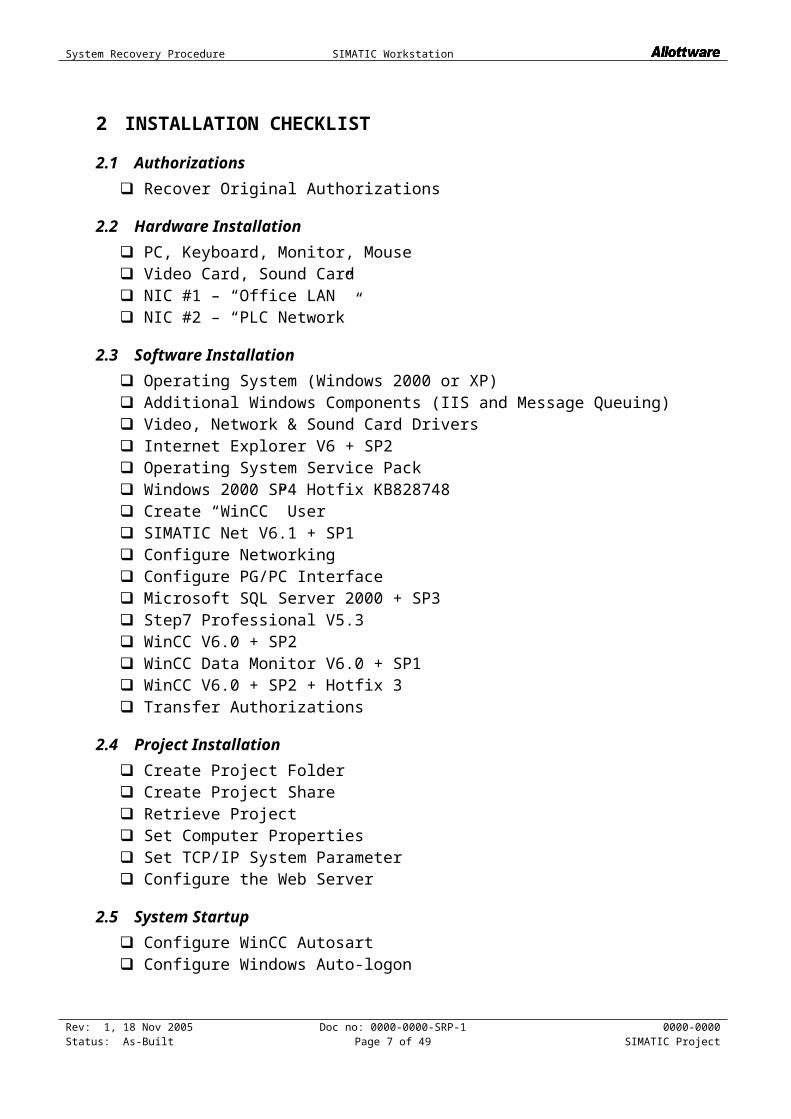
2 INSTALLATION CHECKLIST
2.1 Authorizations
Recover Original Authorizations
2.2 Hardware Installation
PC, Keyboard, Monitor, Mouse Video Card, Sound Card NIC #1 – “Office LAN” NIC #2 – “PLC Network”
2.3 Software Installation
Operating System (Windows 2000 or XP) Additional Windows Components (IIS and Message Queuing) Video, Network & Sound Card Drivers Internet Explorer V6 + SP2 Operating System Service Pack Windows 2000 SP4 Hotfix KB828748 Create “WinCC” User SIMATIC Net V6.1 + SP1 Configure Networking Configure PG/PC Interface Microsoft SQL Server 2000 + SP3 Step7 Professional V5.3 WinCC V6.0 + SP2 WinCC Data Monitor V6.0 + SP1 WinCC V6.0 + SP2 + Hotfix 3 Transfer Authorizations
2.4 Project Installation
Create Project Folder Create Project Share Retrieve Project Set Computer Properties Set TCP/IP System Parameter Configure the Web Server
2.5 System Startup
Configure WinCC Autosart Configure Windows Auto-logon
Rev: 1, 18 Nov 2005Status: As-Built
Doc no: 0000-0000-SRP-1Page 5 of 36
0000-0000SIMATIC Project

System Recovery Procedure SIMATIC Workstation
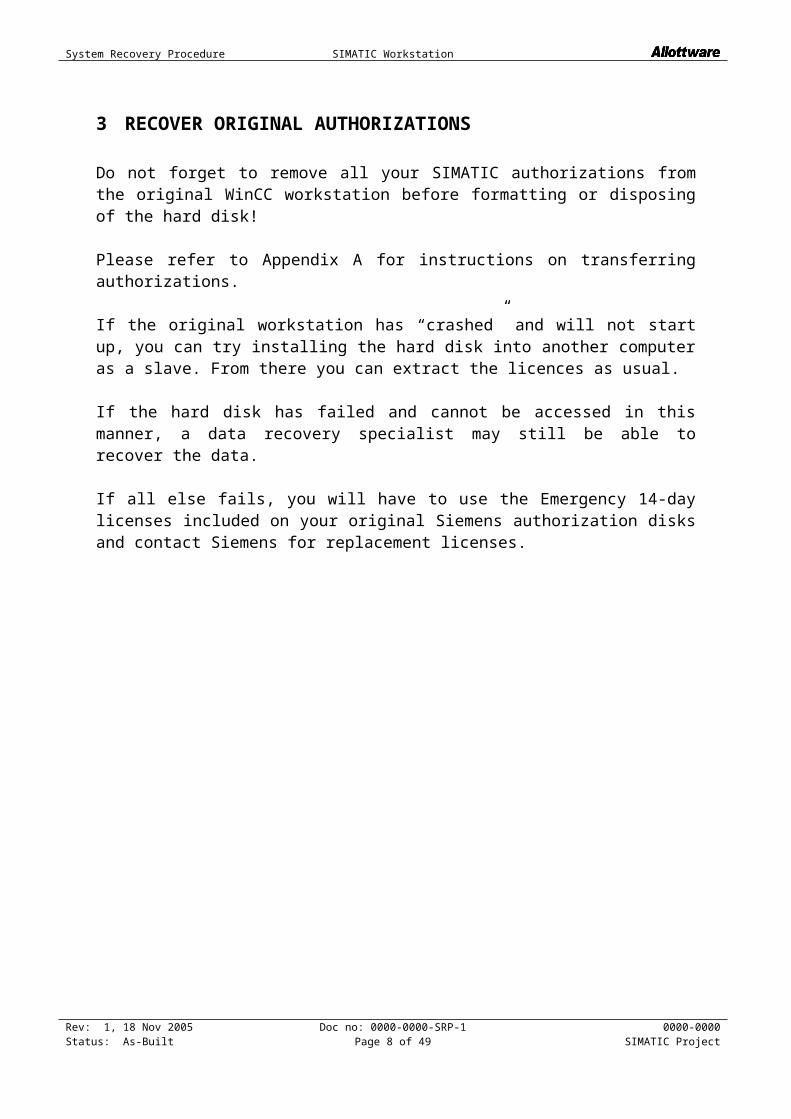
3 RECOVER ORIGINAL AUTHORIZATIONS
Do not forget to remove all your SIMATIC authorizations from the original WinCC workstation before formatting or disposing of the hard disk!
Please refer to Appendix A for instructions on transferring authorizations.
If the original workstation has “crashed” and will not start up, you can try installing the hard disk into another computer as a slave. From there you can extract the licences as usual.
If the hard disk has failed and cannot be accessed in this manner, a data recovery specialist may still be able to recover the data.
If all else fails, you will have to use the Emergency 14-day licenses included on your original Siemens authorization disks and contact Siemens for replacement licenses.
Rev: 1, 18 Nov 2005Status: As-Built
Doc no: 0000-0000-SRP-1Page 6 of 36
0000-0000SIMATIC Project
System Recovery Procedure SIMATIC Workstation
4 HARDWARE INSTALLATION
4.1 Standard Equipment
Make sure all the usual computer hardware is installed, such as video card, sound card, HDD, mouse, keyboard monitor etc.
Make sure there are TWO network adapters installed:
NIC #1 – Network interface card for the “Office LAN” NIC #2 – Network interface card for the “PLC Network” (or CP-1613 card)
The PLC network is separate from the Office LAN for performance reasons; hence two adapter cards are required.
4.2 SIMATIC CP-1613
This document describes installing the CP-1613 at this initial point. This is to save opening up the computer twice.
The official documentation from Siemens instructs you to only install the card AFTER you have installed the SIMATIC Net drivers for the card. This prevents Windows prompting you for device drivers after start-up when it detects the plug-and-play CP-1613 card. When you start up windows simply ignore the driver installation prompts launched automatically by windows (click “Cancel” or “Close”). They will stop popping up once you have installed the SIMATIC Net drivers.
Alternately, do not install the CP-1613 hardware at this point. When you are prompted to restart the computer after installing the SIMATIC Net drivers (later on in the procedure) shut down the computer and install the CP-1613 hardware before restarting again.
Rev: 1, 18 Nov 2005Status: As-Built
Doc no: 0000-0000-SRP-1Page 7 of 36
0000-0000SIMATIC Project
System Recovery Procedure SIMATIC Workstation
5 OPERATING SYSTEM INSTALLATION
5.1 Operating System
Install Windows 2000 Professional or Windows XP Professional.
It is very important that you perform a “clean” installation – do not try to upgrade or overwrite an already existing operating system.
Format the destination partition with the NTFS file system during the installation. NTFS is more efficient than FAT and supports better security features.
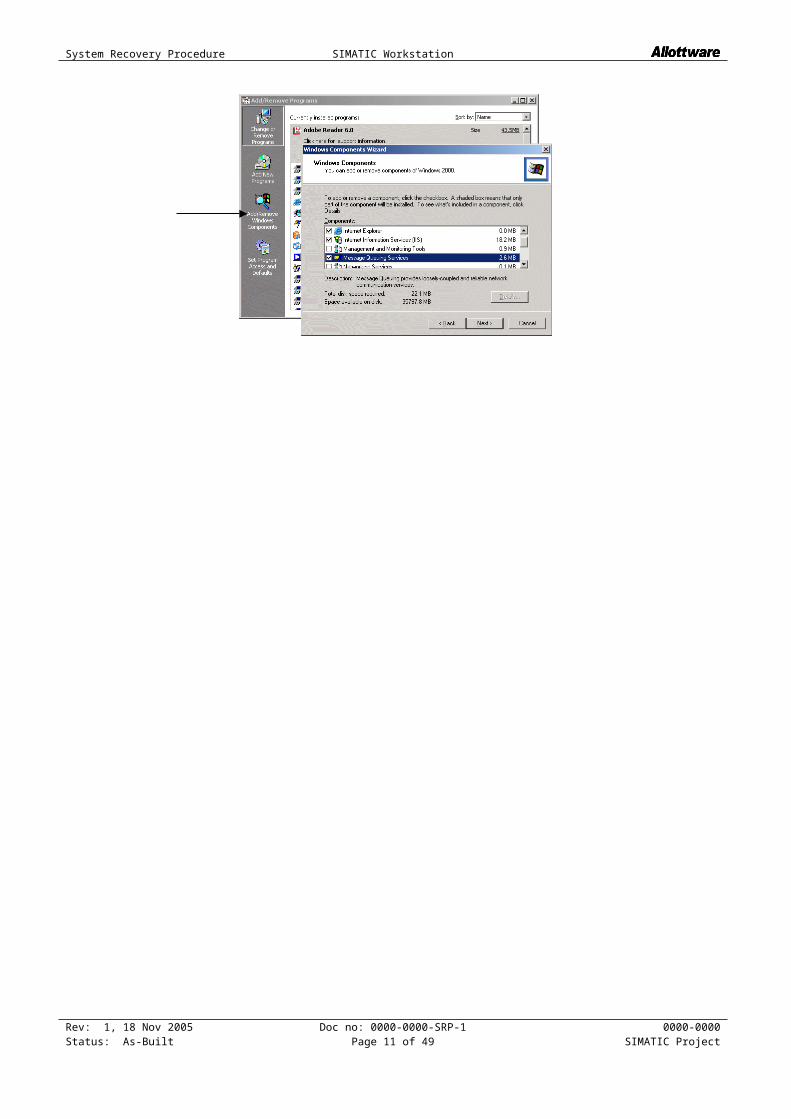
5.2 Additional Windows Components
Select these additional Windows Components during installation:
Internet Information Services (IIS) Message Queuing Services
WinCC and WinCC Data Monitor will not install without them.
You can install these components after installing the operating system from the Control Panel. Open “Add/Remove Programs” and select the components from the “Add/Remove Windows Components” button:
Rev: 1, 18 Nov 2005Status: As-Built
Doc no: 0000-0000-SRP-1Page 8 of 36
0000-0000SIMATIC Project

System Recovery Procedure SIMATIC Workstation
5.3 Video, Network & Sound Drivers
Install the drivers for the “Office LAN” network interface card (NIC), the Video adapter and the Sound Card installed in the PC. If you are using a standard network interface card for the “PLC Network” and not a CP-1613 card, then install the drivers for that card also.
Select screen size: 1024 x 768 x True Color
5.4 Internet Explorer V6 + SP2
Install the latest version of Internet Explorer. This is possibly already included in the Windows Service Pack. Otherwise the CD is supplied with the WinCC software pack.
5.5 Operating System Service Pack
Install the latest Service Pack for Windows – Windows 2000 SP4 (or later) or Windows XP SP2 (or later).
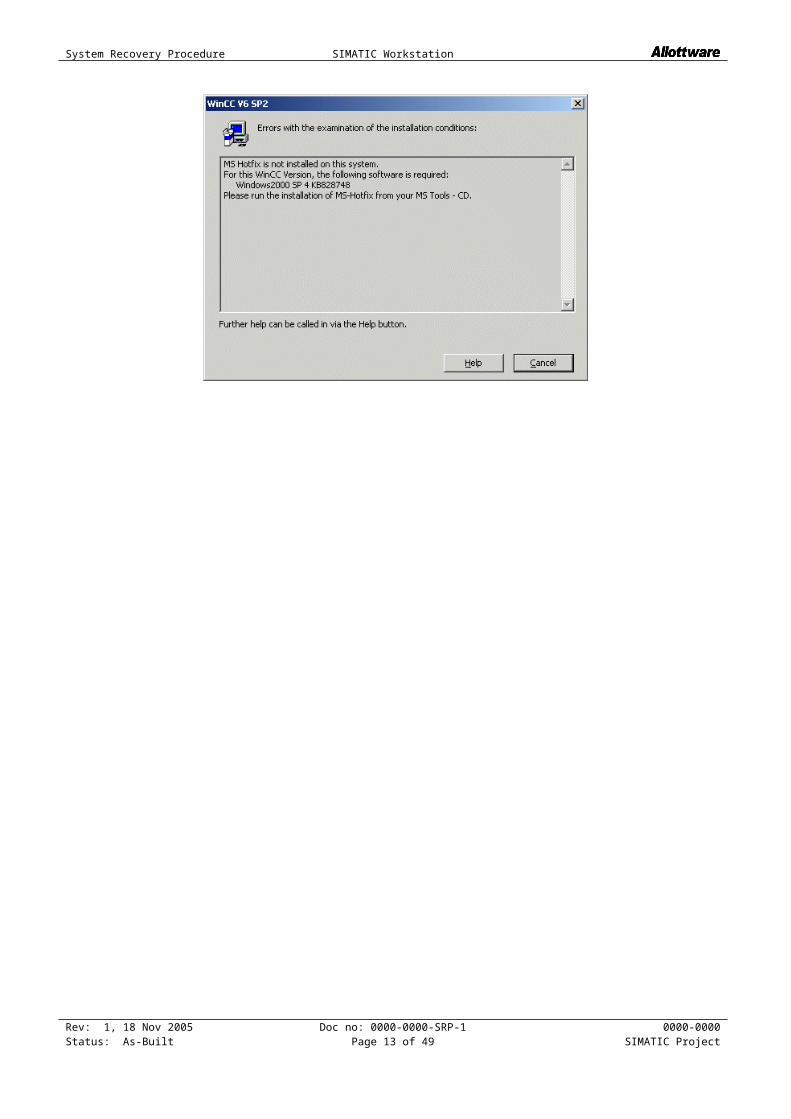
5.6 Windows 2000 SP4 Hotfix KB828748
If you have installed Windows 2000 Service Pack 4 you will need to install this hotfix. The hotfix is found on the MS Tools CD included with WinCC V6.0. It is also included on the project backup CD in “<CDROM>\Windows 2000 KB828748”.
If it is not installed you will receive the following error during the installation of WinCC:
Rev: 1, 18 Nov 2005Status: As-Built
Doc no: 0000-0000-SRP-1Page 9 of 36
0000-0000SIMATIC Project

System Recovery Procedure SIMATIC Workstation
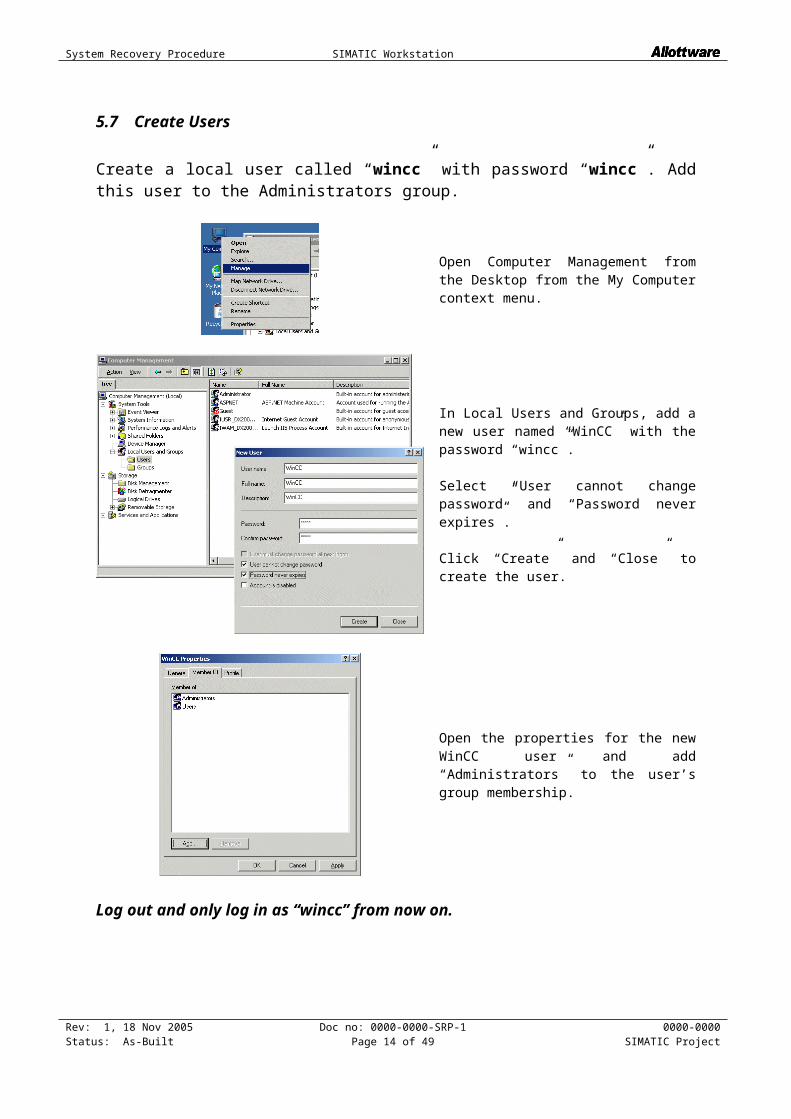
5.7 Create Users
Create a local user called “wincc” with password “wincc”. Add this user to the Administrators group.
Open Computer Management from the Desktop from the My Computer context menu.
In Local Users and Groups, add a new user named “WinCC” with the password “wincc”.
Select “User cannot change password” and “Password never expires”.
Click “Create” and “Close” to create the user.
Open the properties for the new WinCC user and add “Administrators” to the user’s group membership.
Log out and only log in as “wincc” from now on.
Rev: 1, 18 Nov 2005Status: As-Built
Doc no: 0000-0000-SRP-1Page 10 of 36
0000-0000SIMATIC Project
System Recovery Procedure SIMATIC Workstation
6 SIMATIC SOFTWARE INSTALLATION
6.1 SIMATIC NET V6.1 + SP1
Install the SIMATIC NET V6.1 + SP1 software, or the version that came with your communications card:
If you have not yet installed the CP-1613 card hardware, select “No” and manually shutdown the computer. Install the CP-1613 in a free PCI slot (you can try installing it in a used PCI slot, but you will probably damage it and again cause that space-time continuum thing).
Restart the computer, or the remainder of the installation process may seem to take a long time (Don’t you hate these obvious instructions? At least you’re not reading something badly translated from Chinese, like “Upon completion of the PCI installation successful, pass begin, collect 200 dollars, and proceed once again through the cables with the flow of electricity”).
Rev: 1, 18 Nov 2005Status: As-Built
Doc no: 0000-0000-SRP-1Page 11 of 36
0000-0000SIMATIC Project

System Recovery Procedure SIMATIC Workstation
6.2 CP-1613 as TCP/IP Card
To use the CP-1613 as a standard TCP/IP card, you must install the NDIS drivers from the SIMATIC Net CD. Open the “Add/Remove Hardware” applet from the Control Panel:
Click “Next” Select “Add/Troubleshoot a device”
Select “Add a new device” Select “No”
Select “Network adapters” Click “Have Disk”
Select the CP-1613 NDIS drivers from the SIMATIC Net CD that came with your CD-1613 card
Click “Next” to install the SIMATIC CP-1613 NDIS drivers
Rev: 1, 18 Nov 2005Status: As-Built
Doc no: 0000-0000-SRP-1Page 12 of 36
0000-0000SIMATIC Project
System Recovery Procedure SIMATIC Workstation
6.3 Network Configuration
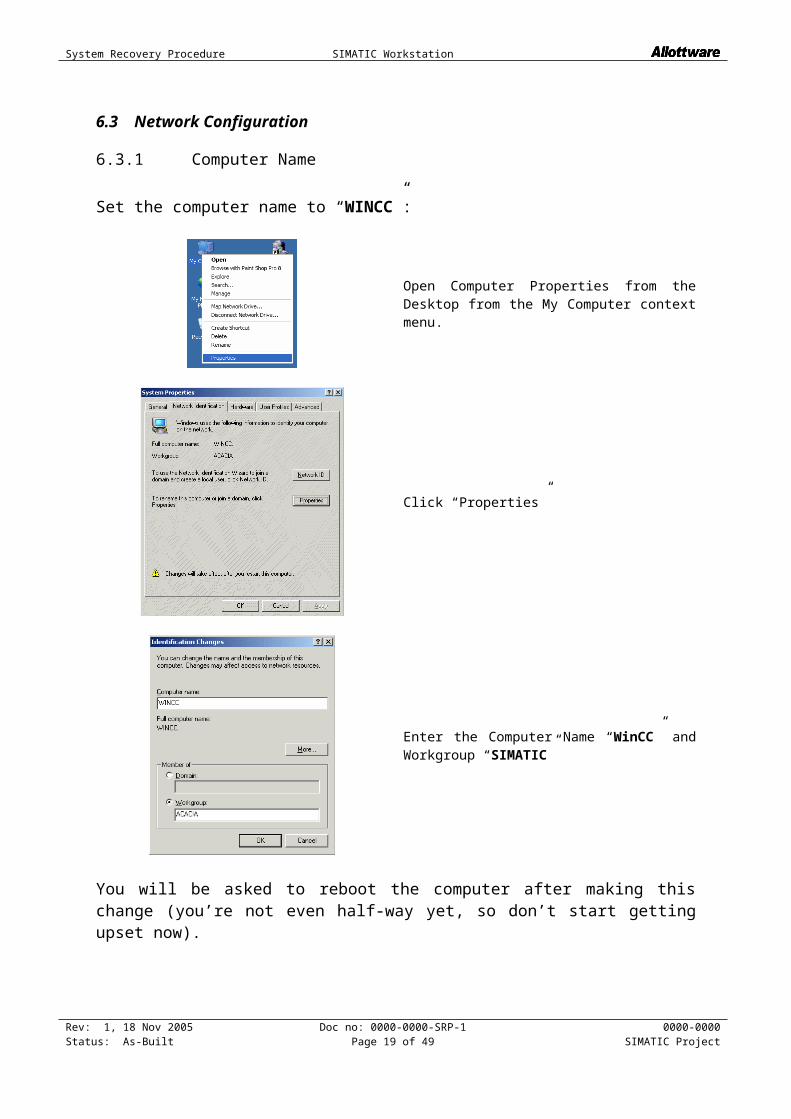
6.3.1 Computer Name
Set the computer name to “WINCC”:
Open Computer Properties from the Desktop from the My Computer context menu.
Click “Properties”
Enter the Computer Name “WinCC” and Workgroup “SIMATIC”
You will be asked to reboot the computer after making this change (you’re not even half-way yet, so don’t start getting upset now).
Rev: 1, 18 Nov 2005Status: As-Built
Doc no: 0000-0000-SRP-1Page 13 of 36
0000-0000SIMATIC Project
System Recovery Procedure SIMATIC Workstation
6.3.2 Network Connections
At this stage you should see two networks in the “Network and Dial-Up Connections” in the Control Panel:
Rename the connections to “Office LAN” and “PLC Network”:
Rev: 1, 18 Nov 2005Status: As-Built
Doc no: 0000-0000-SRP-1Page 14 of 36
0000-0000SIMATIC Project

System Recovery Procedure SIMATIC Workstation
6.3.3 Office LAN
The following TCP/IP setting must be selected for the Office LAN (DHPC):
Select “Obtain an IP address automatically” and “Obtain DNS server address automatically”. This is Microsoft DummySpeek for “Use DHCP”. And don’t get me started on that stupid little paper clip Office Assistant.
6.3.4 PLC Network
The following TCP/IP setting must be selected for the PLC Network (XX.XX.XX.XX with subnet mask 255.255.255.0):
Enter this address:IP Address: XX.XX.XX.XXSubnet mask: 255.255.255.0
Rev: 1, 18 Nov 2005Status: As-Built
Doc no: 0000-0000-SRP-1Page 15 of 36
0000-0000SIMATIC Project

System Recovery Procedure SIMATIC Workstation
6.4 PG/PC Interface
You can configure the CP-1613 card for Industrial Ethernet or for TCP/IP.
Open “Set PG/PC Interface” from the Control Panel:
6.4.1 TCP/IP via CP-1613
Select “CP1613(RFC1006)” for the WinCC and S7ONLINE Access Points:
You must configure the IP address from the “Properties” button. Note that this address must be different to the TCP/IP address assigned to the same card in the Control Panel in “Network and Dial-Up Connections”. Set this address to XX.XX.XX.YY with subnet mask 255.255.255.0.
Rev: 1, 18 Nov 2005Status: As-Built
Doc no: 0000-0000-SRP-1Page 16 of 36
0000-0000SIMATIC Project

System Recovery Procedure SIMATIC Workstation
6.4.2 Industrial Ethernet via CP-1613
If you are only using Industrial Ethernet (no TCP/IP) then select the “CP1613(ISO)” Access Point instead.
6.4.3 TCP/IP via Standard Ethernet Card
If you do not have a CP-1613 you must use the TCP/IP protocol as follows:
Select the “TCP/IP” option with the network card that is connected to the “PLC Network”.
Here the ethernet card is a “Via Networking Velocity”. Yours may be something else, such as 3COM, Intel, Planet, Genius etc.
If you do not see your network card, click the “Select” button and install the TCP/IP option.
Rev: 1, 18 Nov 2005Status: As-Built
Doc no: 0000-0000-SRP-1Page 17 of 36
0000-0000SIMATIC Project

System Recovery Procedure SIMATIC Workstation
6.5 Microsoft SQL Server 2000 + SP3
Install Microsoft SQL Server 2000 + SP3. You must install the version supplied with the WinCC software pack.
Click “Next” to begin installation. You may have to reboot the computer after installation.
Rev: 1, 18 Nov 2005Status: As-Built
Doc no: 0000-0000-SRP-1Page 18 of 36
0000-0000SIMATIC Project
System Recovery Procedure SIMATIC Workstation
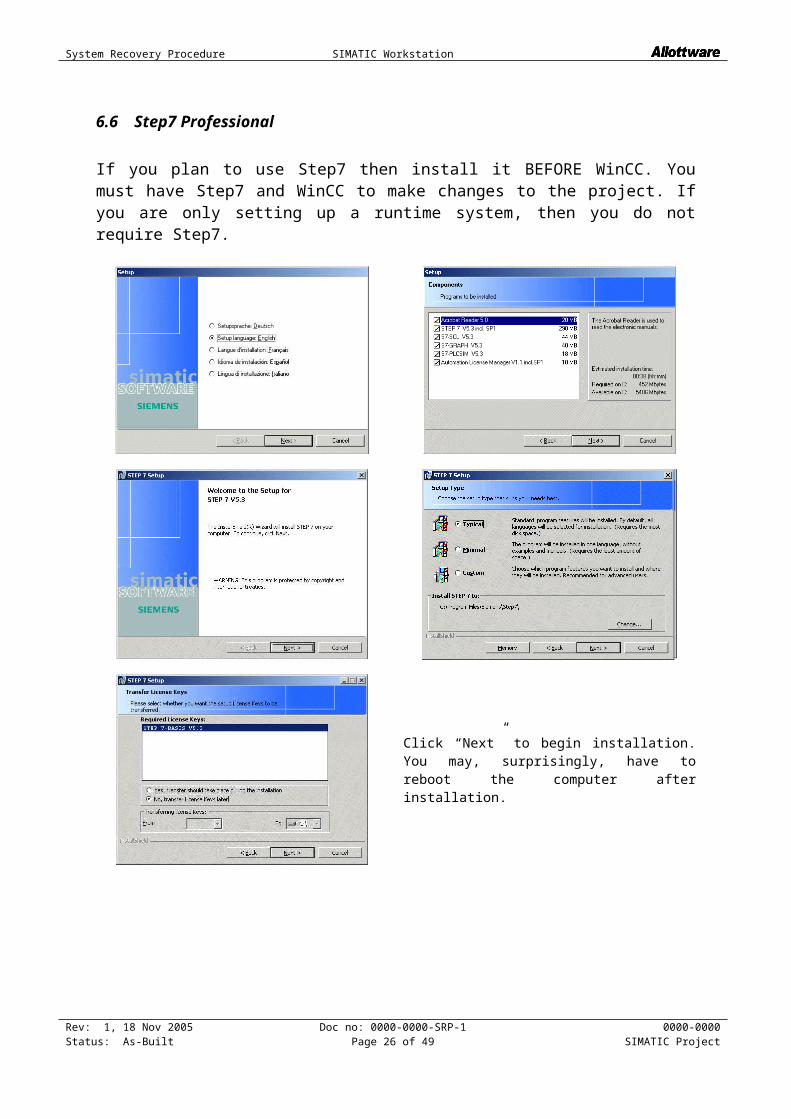
6.6 Step7 Professional
If you plan to use Step7 then install it BEFORE WinCC. You must have Step7 and WinCC to make changes to the project. If you are only setting up a runtime system, then you do not require Step7.
Click “Next” to begin installation. You may, surprisingly, have to reboot the computer after installation.
Rev: 1, 18 Nov 2005Status: As-Built
Doc no: 0000-0000-SRP-1Page 19 of 36
0000-0000SIMATIC Project

System Recovery Procedure SIMATIC Workstation
6.7 WinCC V6.0 + SP2
Install WinCC V6.0. Select the following options during installation:
Options: Basic Process Control
If you are setting up an integrated engineering system (Step7 & WinCC) then select the following additional components:
Communications: SIMATIC Device Drivers Object Manager AS-OS Engineering STEP7 Symbol Server
Proceed as follows:
Click on “Install SIMATIC WinCC” Click “Next”
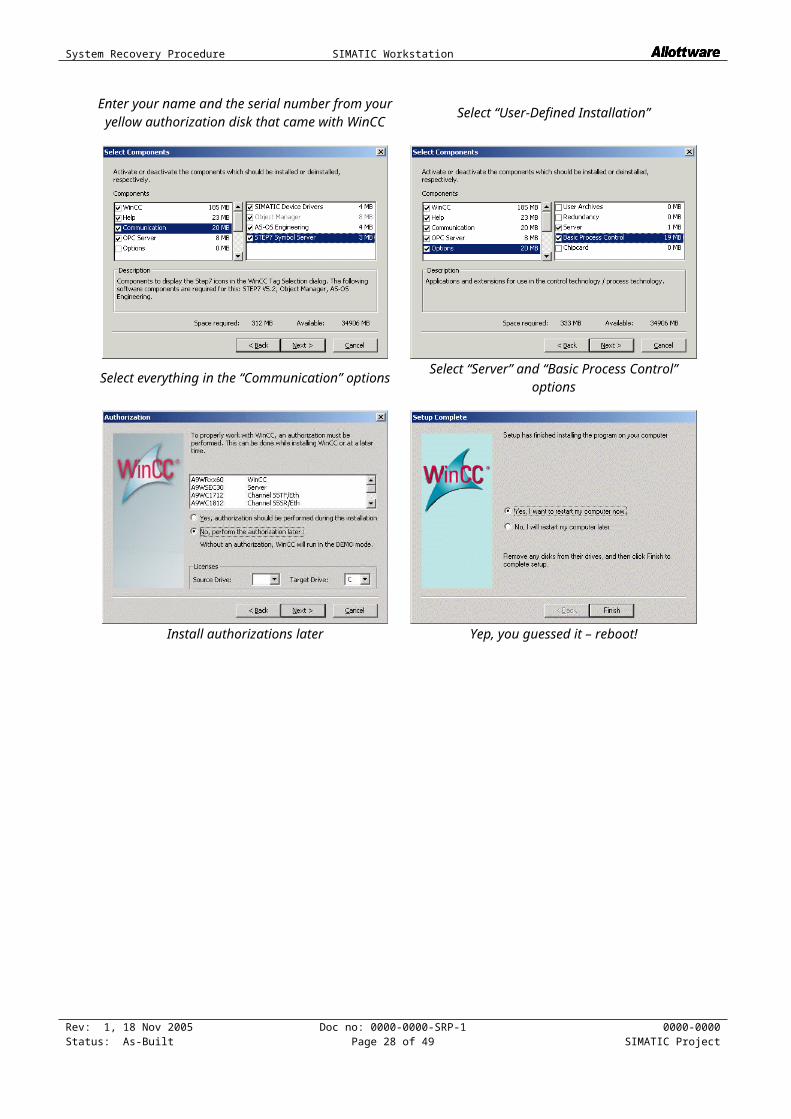
Enter your name and the serial number from your yellow authorization disk that came with WinCC
Select “User-Defined Installation”
Rev: 1, 18 Nov 2005Status: As-Built
Doc no: 0000-0000-SRP-1Page 20 of 36
0000-0000SIMATIC Project

System Recovery Procedure SIMATIC Workstation
Select everything in the “Communication” optionsSelect “Server” and “Basic Process Control”
options
Install authorizations later Yep, you guessed it – reboot!
Rev: 1, 18 Nov 2005Status: As-Built
Doc no: 0000-0000-SRP-1Page 21 of 36
0000-0000SIMATIC Project

System Recovery Procedure SIMATIC Workstation
6.8 WinCC Data Monitor V6.0 + SP1 + Hotfix2
Install the WinCC Data Monitor server.
Select “Install Software” Select “Dat@Monitor Server”
Click “Next”Enter your name and the serial number from your yellow authorization disk that came with WinCC
Dat@Monitor
Install authorizations later Reboot!
Rev: 1, 18 Nov 2005Status: As-Built
Doc no: 0000-0000-SRP-1Page 22 of 36
0000-0000SIMATIC Project

System Recovery Procedure SIMATIC Workstation
6.9 WinCC V6.0 + SP2 + Hotfix3
This Hotfix for WinCC is included on the WinCC Data Monitor CD.
Select “Install Software” Select “WinC V6.0 SP2 Hotfix 3”
Click “Next” Reboot!
Rev: 1, 18 Nov 2005Status: As-Built
Doc no: 0000-0000-SRP-1Page 23 of 36
0000-0000SIMATIC Project

System Recovery Procedure SIMATIC Workstation
6.10 Transfer Authorizations
You must transfer all required authorizations to the WinCC machine. Please refer to Appendix A for instructions on how to do this.
The following Authorizations are required by the system:
Required Authorization Order NumberSIK/SIMATIC WINCC-V6 RC64KSIK/SIMATIC WinCC ServerSIK/SIMATIC WinCC DataMonitor ServerSIK/SIMATIC WinCC-V6 [email protected] ClientsSIK/SIMATIC NET Industrial Ethernet-S7Step 7 Professional 2004 V5.3 (Optional)
Rev: 1, 18 Nov 2005Status: As-Built
Doc no: 0000-0000-SRP-1Page 24 of 36
0000-0000SIMATIC Project

System Recovery Procedure SIMATIC Workstation
7 PROJECT INSTALLATION
7.1 Create Project Folder
Create a folder called “C:\Projects” and share it as “Projects”.
7.2 Retrieve Project
The project backup is in a Step7 archive. Use Step7 to retrieve the archive into the Project folder, or simply unzip the project with WinZip or Windows XP. The Step7 project should then be located in “C:\Projects\XXX”.
7.3 Open the WinCC Project
You open the WinCC project with the WinCC Explorer:
Start > SIMATIC > WinCC > WinCC Control Centre 6.0
From the File > Open menu select the WinCC project file:
C:\Projects\XXX\wincproj\XXX\XXX.mcp
You may get a message that the “configured server is not available”. Select “Start server locally” to use the local machine as server and proceed to the next section to set the computer name.
Rev: 1, 18 Nov 2005Status: As-Built
Doc no: 0000-0000-SRP-1Page 25 of 36
0000-0000SIMATIC Project
System Recovery Procedure SIMATIC Workstation
7.4 Set Computer Properties
7.4.1 Computer Name
If the computer name is not the same as the one configured in the project you will need to change it.
Open the properties dialog for the WinCC server from the Computers list and set the computer name to “WINCC” from the computer properties dialog:
You must close and reopen the project after changing the computer name.
7.4.2 Limiting Runtime
To restrict users from accessing the operating system and running other applications, refer to Appendix C “Restricting the WinCC Runtime”.
Rev: 1, 18 Nov 2005Status: As-Built
Doc no: 0000-0000-SRP-1Page 26 of 36
0000-0000SIMATIC Project

System Recovery Procedure SIMATIC Workstation
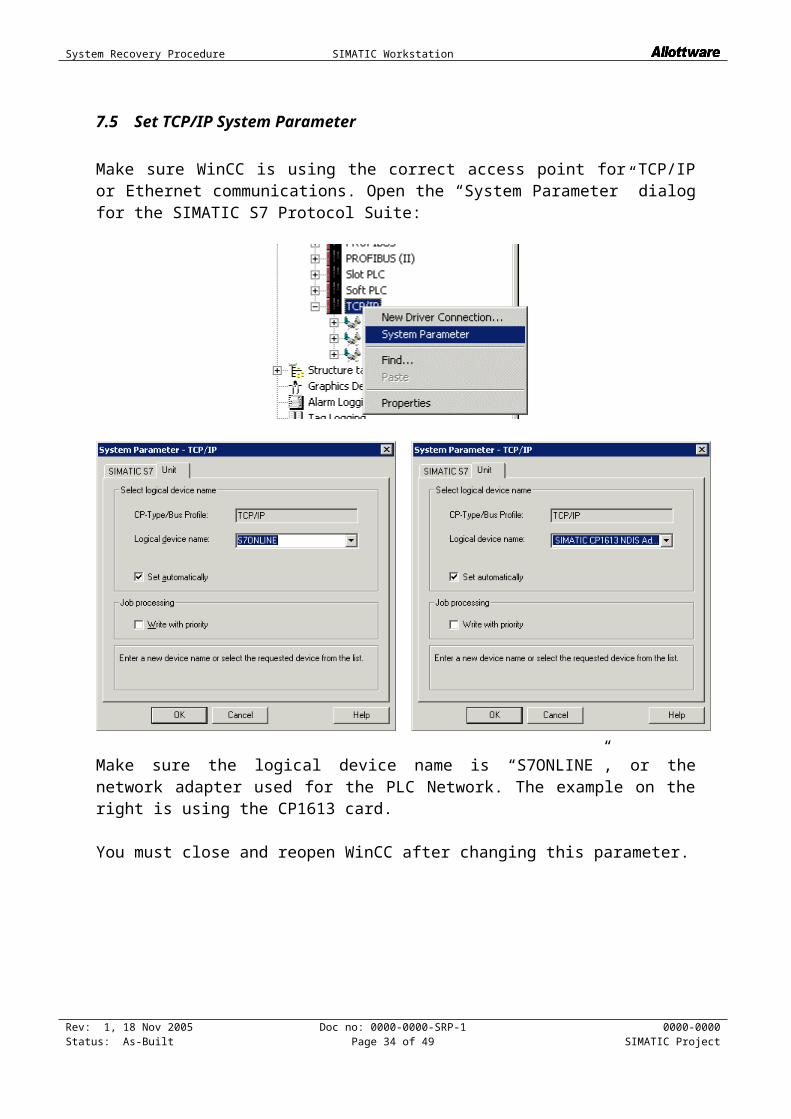
7.5 Set TCP/IP System Parameter
Make sure WinCC is using the correct access point for TCP/IP or Ethernet communications. Open the “System Parameter” dialog for the SIMATIC S7 Protocol Suite:
Make sure the logical device name is “S7ONLINE”, or the network adapter used for the PLC Network. The example on the right is using the CP1613 card.
You must close and reopen WinCC after changing this parameter.
Rev: 1, 18 Nov 2005Status: As-Built
Doc no: 0000-0000-SRP-1Page 27 of 36
0000-0000SIMATIC Project
System Recovery Procedure SIMATIC Workstation
APPENDIX A: SIMATIC AUTHORIZATIONS
WinCC V6.0
For WinCC to operate correctly, the workstation must be installed with all required WinCC authorizations. These authorizations are stored on specially manufactured 3.5” diskettes that cannot be copied. These diskettes are shipped with the WinCC software packs that were supplied with the project.
The Siemens program “AuthorsW” is used to transfer authorizations from these diskettes onto the hard drives of the WinCC workstations (Server and Clients). It is usually started from:
Start > SIMATIC > AuthorsW > AuthorsW
In the event of hardware failure of a WinCC workstation, the authorizations must be transferred back to the 3.5” diskettes. Once the backup machine has been put in place, and the computer name changed to reflect the correct WinCC workstation name, the authorizations can be transferred onto the backup machine.
Should the hard disk fail, and authorizations cannot be retrieved from the WinCC workstation, then the emergency authorization is to be used. Each WinCC authorization is also shipped with a 14-day emergency authorization. These are to be used while Siemens replaces the original.
Use the “AuthorsW” program to drag-and-drop licences from the authorization disks onto the local hard drive on which you installed WinCC.
Possible licences are listed on the authorization disk, but only the licences with a 1 in the “Counter” field are valid licences that can be moved onto the hard drive.
WARNING!Once a licence has been moved onto the hard drive, it is no longer on the authorization disk. This is very important to remember - if the workstation ever needs to be re-installed then you must run the authorization program again to move any licences from the hard drive back onto the authorization disk. If you do not do this, then you will lose the authorization.
NOTE:The AuthorsW program can be used to transfer licences across the network. This is useful if the target workstation has a “risky” floppy drive, in order to avoid damaging the original authorization disk by placing it in a faulty or dirty disk drive.
Rev: 1, 18 Nov 2005Status: As-Built
Doc no: 0000-0000-SRP-1Page 28 of 36
0000-0000SIMATIC Project

System Recovery Procedure SIMATIC Workstation
Step 7 Professional V5.3
Step 7 V5.3 onwards uses the new authorization program “Automation License Manager”. This program is very similar to the “AuthorsW” program with previous versions and other products, but it supports the newer SIMATIC authorizations. It is usually started from:
Start > SIMATIC > License Management > Automation License Manager
NOTE:The “Automation License Manager” can handle the previous authorizations, but the “AuthorsW” application cannot handle the newer authorizations.
Rev: 1, 18 Nov 2005Status: As-Built
Doc no: 0000-0000-SRP-1Page 29 of 36
0000-0000SIMATIC Project

System Recovery Procedure SIMATIC Workstation
APPENDIX B: WINCC AUTOSTART
WinCC can be configured to “Auto-Start” a WinCC project. Use the AutoStart program that is installed with WinCC 6.0 to select the WinCC project to Auto-Start. It is usually started from:
Start > SIMATIC > WinCC > AutoStart
This program configures WinCC to automatically launch the selected project into Run-Time mode whenever the current user logs in to the Windows system.
Configuring an automatic login to Windows can further enhance this automatic program launch. Appendix D describes how to do this.
Rev: 1, 18 Nov 2005Status: As-Built
Doc no: 0000-0000-SRP-1Page 30 of 36
0000-0000SIMATIC Project

System Recovery Procedure SIMATIC Workstation
APPENDIX C: RESTRICTING THE WINCC RUN-TIME
WinCC can be configured such that the CTRL+ALT+DEL, ALT+TAB, CTRL-ESC and ALT-ESC shortcuts are not available during run-time of the WinCC project. This prevents the user from accessing the start menu or the task manager, disabling the user from running other programs or from logging out of Windows.
Open the properties for the computer from the computer list in the WinCC Explorer program. Go to the “Parameters” page and check the options to disable the system shortcut keys.
Got to the “Graphics Runtime” page and check these options to make the WinCC runtime operate in a full-screen window:
Rev: 1, 18 Nov 2005Status: As-Built
Doc no: 0000-0000-SRP-1Page 31 of 36
0000-0000SIMATIC Project

System Recovery Procedure SIMATIC Workstation
APPENDIX D: AUTOMATIC LOGON FOR WINDOWS
Windows can be configured to automatically log on when the system is booted up. The operator does not have to type in a user name and a password to enter Windows.
To do this, select “Run” from the Start Menu, and type in “regedit”. This will run the Windows NT Registry Editor.
Open this registry key:
HKEY_LOCAL_MACHINE\SOFTWARE\Microsoft\Windows NT\CurrentVersion\Winlogon
Add in these three highlighted string values:
Rev: 1, 18 Nov 2005Status: As-Built
Doc no: 0000-0000-SRP-1Page 32 of 36
0000-0000SIMATIC Project

System Recovery Procedure SIMATIC Workstation
APPENDIX E: WINDOWS STARUP COUNTER
When Windows boots up, there is a default 30-second timer that waits for the user to select the required boot mode. The default mode is selected at the end of the timer. This timer can be reduced using the “System” Control Panel applet:
Open the properties dialog for My Computer from the Desktop
Open the “Advanced” page.
Click on the “Settings” button in “Startup and Recovery”.
Reduce the System startup counters from 30 seconds to 3 seconds, or to 0 to select the operating system immediately.
Rev: 1, 18 Nov 2005Status: As-Built
Doc no: 0000-0000-SRP-1Page 33 of 36
0000-0000SIMATIC Project
System Recovery Procedure SIMATIC Workstation
APPENDIX F: DISABLING USB FLASH DISK AUTO-START
Usually Windows XP/2000 will automatically open Windows Explorer as soon as you connect a USB flash disk to the system, giving access to the operating system. You can disable this via the registry:
Open the Registry via Start > Run > "Regedit", and search for the code "NoDriveTypeAutoRun" in:
HKEY_CURRENT_USER\ Software\ Microsoft\ Windows\CurrentVersion\ Policies\Explorer.
The value in this code specifies the devices for which the Autostart function is to apply.
The drives are coded in bits:
Bit Value Meaning0 1 Disables Autostart for unknown drive types1 2 -2 4 Disables Autostart for removable data media (e.g. floppy disk drive)3 8 Disables Autostart for fixed data media4 16 Disables Autostart for network drives5 32 Disables Autostart for CD-ROM6 64 Disables Autostart for RAM-DISK7 128 Reserved and always set Value (hex) Value (dec) Meaning
Table 1: Bit assignment of the "NoDriveTypeAutoRun" byte
The relevant bits of this byte enable or disable the Autostart function of each type of drive. A value of 0 in the bit concerned means that the Autostart function is enabled. The default value is hexadecimal 95 (decimal this corresponds to 149, that is 1+4+16+128 = 149). Thus it is also possible for floppy disk drives, for example, to switch on the Autostart function.
Rev: 1, 18 Nov 2005Status: As-Built
Doc no: 0000-0000-SRP-1Page 34 of 36
0000-0000SIMATIC Project

System Recovery Procedure SIMATIC Workstation
Value
(Dec)
Value (Hex)
Meaning
95 149 For CDs Autorun.inf is executed automaticallyB5 181 For CDs and hard disk Autorun.inf is executed with a doubleclick
00 00 For all drives (also floppy disk) Autorun.inf is executed with a double-click
FF 255 Autorun.inf is no longer executed at allFD 253 The Autostart function is switched off for all drives
Table 2: Sample assignments of the "NoDriveTypeAutoRun" byte
If you also wish to suppress the "Info Balloon", then insert the code "EnableBalloonTips" into the following path:
HKEY_CURRENT_USER\Software\Microsoft\Windows\CurrentVersion\Explorer\Advanced\
Assign this code the data type DWORD and set the value to "0".
Rev: 1, 18 Nov 2005Status: As-Built
Doc no: 0000-0000-SRP-1Page 35 of 36
0000-0000SIMATIC Project

System Recovery Procedure SIMATIC Workstation
APPENDIX G: WINDOWS 2000 / XP FOREGROUND LOCK TIMEOUT
You may have a script similar to this that prevents opening multiple instances of the same application window. If you have locked out all the ALT+TAB type key combinations, then application windows can get lost behind WinCC. Over time you can clog the system up with many lost windows:
// For Calculator: raRunProgram("calc.exe", "SciCalc", NULL);// For Windows Explorer: raRunProgram("Explorer.exe", "ExploreWClass", NULL);HWND raRunProgram(char *CommandLine, char *WinClassName, char *WinTitle){
HWND Handle;// First look for application windowHandle = FindWindow(WinClassName, WinTitle);// If app is already running, then bring window to the foregroundif (Handle != NULL) {
printf("Bring Application to foreground (%s).\r\n", CommandLine);SetForegroundWindow(Handle);if (IsZoomed(Handle))
ShowWindow(Handle, SW_MAXIMIZE);else
ShowWindow(Handle, SW_RESTORE);} else {
printf("ProgramExecute(%s) = %d\r\n",CommandLine,ProgramExecute(CommandLine));Handle = FindWindow(WinClassName, WinTitle);
}return Handle;
}
This was fine until Windows 2000/XP. When a background task is activated, Windows may prevent it from moving to the foreground, and flashes the icon instead (so it is still lost behind WinCC). This behavior is designed to keep background tasks from stealing focus.
You can control this behavior by editing the registry:
1. Use Regedt32 to navigate to HKEY_CURRENT_USER\Control Panel\Desktop.2. Edit or Add Value name ForegroundLockTimeout, a REG_DWORD data type.
Set the data value to 0 to disable this behavior. The default is 200000 milliseconds. If the time since the last user input exceeds the data value, the window is automatically brought to the foreground.
3. Edit or Add Value name ForegroundFlashCount, a REG_DWORD data type. Set the data value to the number of flashes. The default is 3.
Rev: 1, 18 Nov 2005Status: As-Built
Doc no: 0000-0000-SRP-1Page 36 of 36
0000-0000SIMATIC Project