t is for t-shirtsaces.nmsu.edu/pubs/_c/c210.pdft is for t-shirts guide c-210 revised by jennah...
TRANSCRIPT
To find more resources for your business, home, or family, visit the College of Agricultural, Consumer and Environmental Sciences on the World Wide Web at aces.nmsu.edu
T is for T-ShirtsGuide C-210Revised by Jennah McKinley1
Making a T-shirt is a simple matter. The fabric used is usually a lightweight single- or double-knit selected from a wide variety of colors and fabric designs. Before using, preshrink the fabric by laundering it as you plan to launder the finished garment.
Single-knit fabrics tend to curl, so avoid unnecessary stretching. To reduce curling during preshrinking, machine or hand baste the cut edges and selvages to-gether. After the fabric has been washed and dried, the basting can be removed.
Selecting a PatternSelect a T-shirt pattern in the size you normally use. Patterns “for stretch knits only” are sized accordingly. T-shirts usu-ally have no darts—the stretch of the fabric takes care of fitting body curves. If you normally alter the pattern in length, bust, or shoulder width, do so on the T-shirt pattern.
Check the pattern to determine the size of the seam allowances. They may vary from 1/8 to 5/8 inch, depending on the kind of pattern used. If the pattern has 5/8-inch seams, you may want to trim them to 1/4 or 3/8 inch—especially the neckline, sleeves, and arm holes. The smaller seam allowances will make sewing these seams much easier.
StitchingSew seams with straight, zigzag, stretch, or overlock stitching. When a straight stitch is used, loosen the machine tension and shorten the stitch length to achieve some “stretch” in the stitching. Two rows of straight stitches on each seam will prevent
seamlines from breaking easily. If a zigzag, stretch, or overlock stitch is used, adjust the length and ten-sion as needed to achieve a smooth stitch.
StabilizingTwill tape, seam binding, or a piece of woven sel-vage should be sewn into shoulder seams to help stabilize them. Seams forming decorative yokes or midriffs can be stabilized too. Center the tape over the seamline and sew through it as the seam is sewn.
Finishing EdgesAfter seams are sewn, trim close to the line of stitching. Side seams can be pressed to the front or to the back. Press sleeve seams toward the sleeve.
1Extension Family and Consumer Sciences Agent, Eddy County Extension Office, New Mexico State University.
(© Marzanna Syncerz | Dreamstime.com)
Guide C-210 • Page 2
The shoulder seams are usually pressed toward the back. Serging with an overlock stitch is an excellent way to finish seams.
Neckline edges and hems are often finished by turning them under 1/2 inch and top-stitching. Or, the pattern may call for binding edges with self fab-ric or contrasting trim. Ribbed trimming can also be used to finish the neckline and hem edges.
If you want to bind the edges or use ribbed trim-ming and the pattern does not call for it, a slight alteration is necessary. Cut off seam allowances of the areas to be bound. Where ribbing will be used, cut from each edge an amount equal to the width of the trimming that will be added.
If there is no pattern for the binding, cut a piece of self fabric 1 1/2 inches wide and the length of the neckline minus 1 inch. Cut this piece on the crosswise grain of fabric.
For ribbed trimming on a crew-style neckline, cut a piece of ribbing long enough to pull over your head easily. For a lowered neckline, cut as for selfbinding minus 2 to 3 inches. The width should be twice the finished width plus two seam allowances. The finished ribbing for a crew neckline will be about 1 inch wide. For a lowered neckline, plan for a ribbed trimming to be no wider than 3/4 to 1/2 inch.
Sewing the T-Shirt1. Sew shoulder seams. Be sure to stabilize the
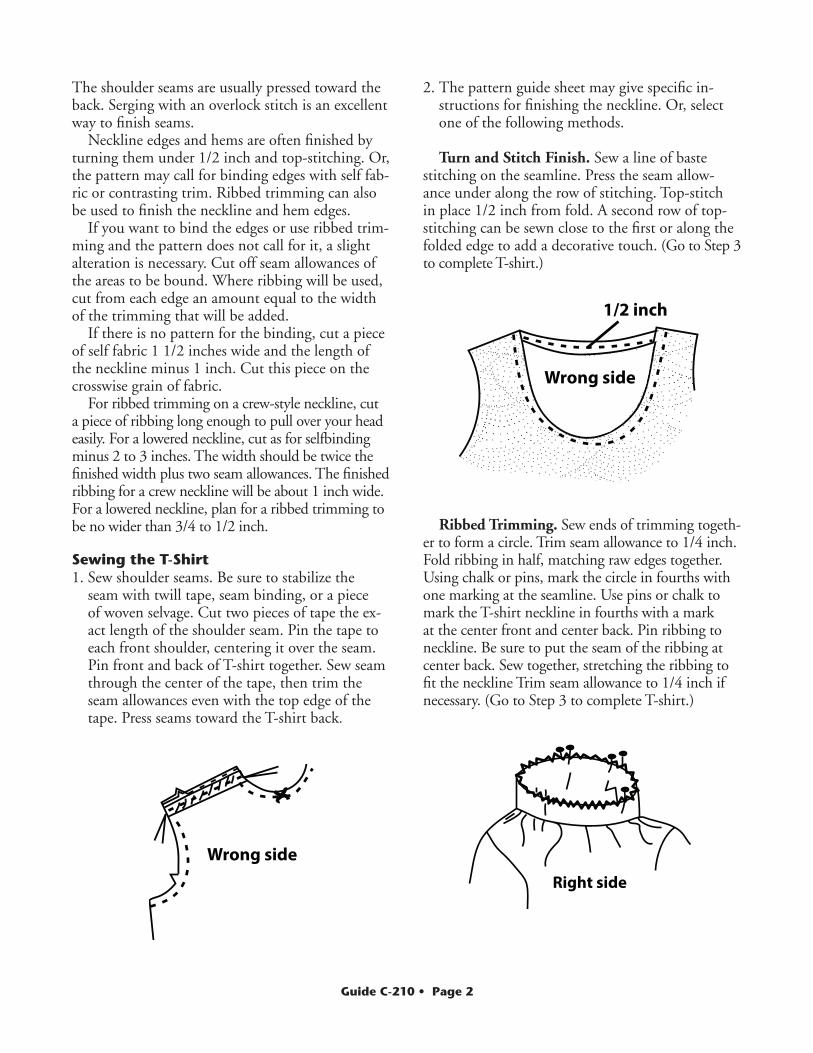
seam with twill tape, seam binding, or a piece of woven selvage. Cut two pieces of tape the ex-act length of the shoulder seam. Pin the tape to each front shoulder, centering it over the seam. Pin front and back of T-shirt together. Sew seam through the center of the tape, then trim the seam allowances even with the top edge of the tape. Press seams toward the T-shirt back.
2. The pattern guide sheet may give specific in-structions for finishing the neckline. Or, select one of the following methods.
Turn and Stitch Finish. Sew a line of baste stitching on the seamline. Press the seam allow-ance under along the row of stitching. Top-stitch in place 1/2 inch from fold. A second row of top-stitching can be sewn close to the first or along the folded edge to add a decorative touch. (Go to Step 3 to complete T-shirt.)
1/2 inch
Wrong side
Wrong sideRight side
Ribbed Trimming. Sew ends of trimming togeth-er to form a circle. Trim seam allowance to 1/4 inch. Fold ribbing in half, matching raw edges together. Using chalk or pins, mark the circle in fourths with one marking at the seamline. Use pins or chalk to mark the T-shirt neckline in fourths with a mark at the center front and center back. Pin ribbing to neckline. Be sure to put the seam of the ribbing at center back. Sew together, stretching the ribbing to fit the neckline Trim seam allowance to 1/4 inch if necessary. (Go to Step 3 to complete T-shirt.)
Guide C-210 • Page 3
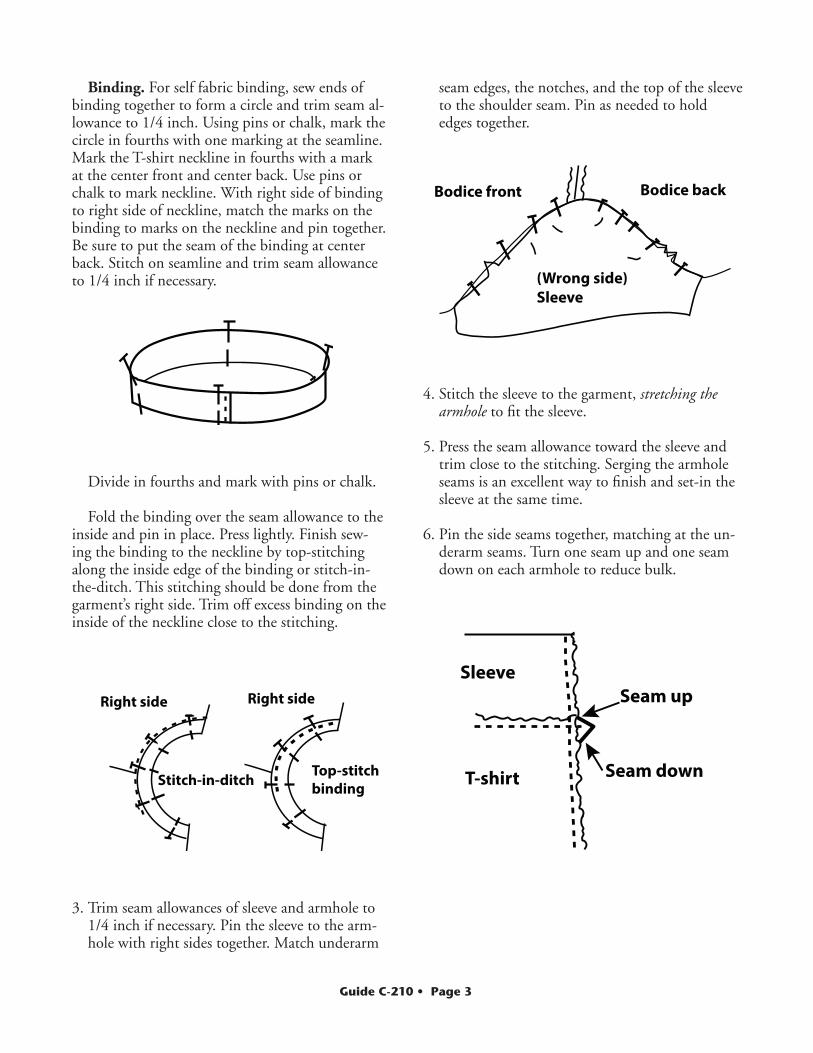
Binding. For self fabric binding, sew ends of binding together to form a circle and trim seam al-lowance to 1/4 inch. Using pins or chalk, mark the circle in fourths with one marking at the seamline. Mark the T-shirt neckline in fourths with a mark at the center front and center back. Use pins or chalk to mark neckline. With right side of binding to right side of neckline, match the marks on the binding to marks on the neckline and pin together. Be sure to put the seam of the binding at center back. Stitch on seamline and trim seam allowance to 1/4 inch if necessary.
3. Trim seam allowances of sleeve and armhole to 1/4 inch if necessary. Pin the sleeve to the arm-hole with right sides together. Match underarm
Right side Right side
Stitch-in-ditchTop-stitchbinding
Divide in fourths and mark with pins or chalk.
Fold the binding over the seam allowance to the inside and pin in place. Press lightly. Finish sew-ing the binding to the neckline by top-stitching along the inside edge of the binding or stitch-in-the-ditch. This stitching should be done from the garment’s right side. Trim off excess binding on the inside of the neckline close to the stitching.
Bodice front Bodice back
(Wrong side)Sleeve
Seam up
Seam downT-shirt
Sleeve
seam edges, the notches, and the top of the sleeve to the shoulder seam. Pin as needed to hold edges together.
4. Stitch the sleeve to the garment, stretching the armhole to fit the sleeve.
5. Press the seam allowance toward the sleeve and trim close to the stitching. Serging the armhole seams is an excellent way to finish and set-in the sleeve at the same time.
6. Pin the side seams together, matching at the un-derarm seams. Turn one seam up and one seam down on each armhole to reduce bulk.

Guide C-210 • Page 4
7. Sew side seam from lower hemline to hem edge of sleeve. Trim the seam allowances close to the stitching and press. An overlock stitch formed by a serger is an excellent way to sew the seam. Trim away excess fabric and finish the seam edge.
❁
Wrong side
8. Finish the hems of sleeves and lower edge as de-sired and press. The hem edges can be finished by ribbing, serging, or hemming by machine or by hand.
Some Creative IdeasAfter you have mastered the basic skills, be creative! Here are a few ideas:
Rainbow T-shirt. Piece fabric for T-shirt front to make a rainbow.
1. Make a copy of the pattern front and sketch the rainbow shape desired. Mark the gainline on all design pieces.
2. Cut the pattern apart on design lines.
3. Allow for seams and cut out pieces in selected colors.
4. Sew/serge pieces together to make the shirt front.
5. Finish the T-shirt as usual.
This same technique can be used to create other designs.
Add a Lace Medallion. Sew a pretty lace ap-pliqué to the bodice front, back, and/or sleeves and cut away knit for a “see-through” look.
1. Select medium to heavy lace appliqué and deter-mine where you want it.
2. Pin or baste medallion in place and zigzag stitch around outer edges.
3. Trim away knit from wrong side.
Use lace on neckline or sleeve edge in place of hem or binding, if appropriate.

Guide C-210 • Page 5
1. Using a 1/2-inch seam allowance, measure the neckline opening.
2. Cut a length of knit fabric that is 2 1/4 inches wide and 1/2 inch shorter than the measure-ment length of the neckline opening.
3. Using tailor’s chalk or a fabric pen, mark both sides of the V until they cross one another on the right side of the garment along the 1/2-inch seamline.
4. Mark a vertical line that signifies the center
point or pivot point of the V. Then staystitch the V close to, but not on top of, the marked line.
5. Prepare the band by folding it in half length-wise. Then fold it in half crosswise and mark the fold—this is the center back.
6. With the fold toward the interior, pin one end of the neckband to the other end to form the V.
7. Stitch the V of the neckband using a 1/2-inch seam allowance to secure the two ends togeth-er. Stitch one side and then the other rather than pivot at the center point.
Create a “V-Neck” Neckline. Cut out and sew a V-shape neckline.
8. Pin the neckband to the right side of the shirt, starting at the V. With the raw edges aligned, place a pin straight through the center point of the neckband V and then into the shirt center point.
9. Begin to stitch the band to the shirt using a 1/2-inch seam allowance by starting at the V center point. Insert the needle at the center point and stitch a few inches along the seamline.
10. Cut the shirt to the center point of the V. Spread the V of the shirt so the neckband aligns with the neckline edge and pin in place. Turn the shirt to the underside and stitch in the other direction for another few inches start-ing at the end of the neckband. Simply fold the fabric away from the seamline to get a good, straight stitching line.
11. Finish pinning and then stitching the rest of neckband to the shirt. Be sure to match the center backs of the neckband to ensure the shirt is aligned. The neckband should be slightly narrower than the shirt neckline so when pinning, stretch the band to fit and not the shirt.
12. Press the band seam allowance toward the shirt. Finish the seam allowances by either sewing another row of stitching and then trim-ming close to the second stitching or by serg-ing the edges.
Create a “Keyhole” Neckline. Cut out a “key-hole” and bind with self fabric.
1. Cut neckline in desired shape.
2. Determine length and cut appropriate width of binding.
3. Join binding ends to form circle and divide into fourths.

Guide C-210 • Page 6
4. Divide neckline shape into fourths and apply binding as usual.
Matching binding can be added to sleeve edges also.
Make a “String-tie”. Bind neckline, allowing an extension for ties at center front, center back, or wherever you prefer.
1. Determine where you want the tie and cut a slash or a special shape into the neckline.
2. Determine length of binding needed for neck-line, allowing extra for tying.
3. Finish slashed edge by turning under or with a facing or binding.
4. Bind neck edge as usual, allowing tie ends to extend.
5. Fold in raw edges of tie extension and stitch together.
6. Finish tie ends with a knot, add a bead, or leave the raw edge.
Try a T-Shirt Collage. Use leftovers from other T-shirts to make a colorful collage.
1. Cut T-shirt parts from a variety of fabrics. For example, front of a floral fabric, back of stripes, right sleeve of a geometric, and left sleeve of solid. Or, you can piece together a patchwork design for front, back, and sleeves.
2. Finish T-shirt as usual.
3. Finish neckline with a turn and stitch finish, ribbed trimming, or binding of a color that coor-dinates with all the parts.

Guide C-210 • Page 7
Jennah McKinley is a Family and Con-sumer Sciences Agent and I-CAN Supervisor for NMSU’s Cooperative Extension Service Office in Eddy County. She earned her B.S. in family and consumer sciences education and her M.Ed. in online teaching and learn-ing from NMSU. She specializes in commu-nity education and 4-H youth development. Her programs focus on parenting, childcare, nutrition, diabetes education, family resource management, and youth development.
Original author: Susan Wright, Extension Cloth-ing and Textile Specialist. Subsequesntly revised by Darlene Dickson, 4-H/Youth Specialist.
Create a Scene. Select a flower, farm scene, sun-set, or a favorite animal to appliqué.
1. Sketch your design.
2. Cut fabric pieces of appropriate fabrics.
3. Arrange fabric design on T-shirt section to be trimmed.
4. Fuse pieces in place.
5. Zigzag around edges to finish design.
6. Finish T-shirt as usual.

Guide C-210 • Page 8
New Mexico State University is an equal opportunity/affirmative action employer and educator. NMSU and the U.S. Department of Agriculture cooperating.
Revised October 2016 Las Cruces, NM
Contents of publications may be freely reproduced for educational purposes. All other rights reserved. For permission to use publications for other purposes, contact [email protected] or the authors listed on the publication.