t38 and audio fax over sip - fax voip - virtual t38 fax ... · introduction fax boom: it is now...
TRANSCRIPT

Fax Boom T38 and AUDIO
FAX
over SIP (Quick Operation Guide)
Release 3.5.1 June, 2009
Windows Vista Windows Server 2008
Windows Vista x64 Edition Windows Server 2008 x64 Edition
Windows XP Windows Server 2003
Windows XP x64 Edition Windows Server 2003 x64 Edition
FaxVoip Software
Copyright © 2008-2009, FaxVoip Software - 1 -

Copyright © 2008-2009, FaxVoip Software - 2 -
Introduction 4
New in version 3.5.1 4
New in version 3.4.1 4
New in version 3.3.1 5
New in version 3.1.1 5
New in version 2.6.1 5
New in version 2.4.1 5
New in version 2.2.0 5
New in version 2.1.0 5
New in version 2.0.0 6
New in version 1.2.1 6
Windows Vista Support 6
Disable User Account Control (UAC) on Windows Vista 8 Disable Security Center Popup Notifications in Windows Vista 9 Install “Windows Photo Gallery” in Windows Server 2008 11
Fax Boom Install 13
Installing a Trial Copy 13
Features 14
System Requirements 14
Check for Microsoft.NET Framework 2.0 SP2 15
Removing the previous version. 15
Run the Setup Program 16
SIP, Fax and Mail settings 17 SIP Settings 18 User Agent Settings 20 Fax Settings 20 E-mail Settings 22
Line Settings 24 Voice Codec Settings 24
Compleating of the installation 25
Fax Boom Control Panel 26
To open Fax Boom Control Panel 26
SIP Settings 27
User Agent Settings 28

Copyright © 2008-2009, FaxVoip Software - 3 -
Fax Settings 29
E-mail Settings 31
Line Settings 32
Voice Codec Settings 33
Using Fax Boom with SIP Soft 33
Using Fax Boom with AXON PBX 33 To install the AXON PBX 34 To configure the AXON PBX with Fax Boom 35 Comments about using Fax Boom with AXON PBX 46
Using Fax Boom with Asterisk PBX 47 To configure Asterisk PBX with Fax Boom 47 To configure Fax Boom with Asterisk PBX 48 Comments about using Fax Boom with Asterisk PBX 48
Sending and Receiving Faxes 49
Send a Fax with Fax Boom Virtual Printer 49
Receiving Faxes as TIFF or PDF files 51 Settings for Fax to TIFF (PDF) 51
Fax Boom Log Book Application 52 Viewing Faxes 53 Saving Faxes 54 Managing Faxes 54
Fax to Mail 55 Settings for Fax to Mail 55
Mail to Fax 56 Mail to Fax Settings 56 Composing of e-mail message 58 Attachments Formats 59 Using PDF as attachments 60 Sender’s email restrictions 61 Fax Boom E-mail notifications 62
Licenses settings 62
Working with Fax Boom Service 64
Removing the Software 65
Technical Support 65

Introduction
Fax Boom: It is now possible to send faxes over Betamax SIP network.
Fax Boom - fully-functional system of sending and receiving faxes over the Internet in real time (FOIP). Thanks to the support “FAX over G711” Fax Boom can send faxes through a network of SIP providers that do not support the protocol t38. You can send faxes through Betamax SIP network (Voipbuster, Sipdiscount, Internetcalls ...) Of course, high-quality t38 fax protocol is also supported.
What is Fax Boom? It is a SIP client with T38 and AUDIO Fax support. With Fax Boom you can send and receive T38 or AUDIO faxes without any hardware, additional Fax Software is not required.. You can use Fax Boom with your IP-SIP-PBX and with your SIP-Provider. It is possible to receive T38 or AUDIO faxes directly into TIFF or PDF files without using a standard fax software, and without limiting the number of incoming fax sessions. Fax Boom is a fully-functional system for receiving faxes to e-mail (Fax -> Mail). Fax -> Mail function allows you to receive faxes as e-mails with either PDF or TIFF attachments. The Mail -> Fax function allows you to send faxes directly from your email program (e.g. Outlook Express).
New in version 3.5.1 • Windows Vista x64 Edition and Windows Server 2008 x64 Edition Support Added. • Recommendations relating to work correctly with pdf attachments using Mail to Fax
function are added to the help system. You need to install Acrobat Wrapper program to ensure proper closing Adobe Reader after automatic printing. http://www.biopdf.com/acrowrap/close_adobe_reader.php
New in version 3.4.1 • Windows XP x64 Edition and Windows Server 2003 x64 Edition Support Added.
Copyright © 2008-2009, FaxVoip Software - 4 -

Copyright © 2008-2009, FaxVoip Software - 5 -
• Fixed some minor problems associated with the application icon in the System Tray. Library STrayIco.ocx is no longer used. All calls are now being implemented through API.
• The program no longer tries to install cdosys.dll. It is anticipated that the CDO (Collaboration Data Objects) is now part of Windows and the correct library is present in all supported systems by default.
• Added new icons for some files. This ensures a more comfortable viewing files in a folder on Vista/2008, especially if to use the "Large Icons" mode or the "Extra Large Icons" mode.
New in version 3.3.1 • Windows Vista and Windows 2008 Server Support Added.
New in version 3.1.1 • New design for “Fax Boom Control Panel” applied.
New in version 2.6.1 • Added the possibility to edit “SIP Display Name” and “SIP User Agent”. • Now you can send different faxes with different Fax Station ID and HeadLine. • Added the possibility to change the timeout to access POP3 server.
New in version 2.4.1 • Added ability to send fax CNG signal using RFC2833 standard (in the case of t38). This is
especially important for those countries where usually the operator answers the call first and then receives a fax. Another way to transmit the CNG fax tone when an outgoing call - to switch to t38 after a short time after the connection, but it is not always and everywhere works correctly.
• Added "Caller ID" feature. Fax number of destination is also stored in the case of an incoming call.
• The program stores information about the protocol that was used when sending a fax (t38 or g711-audio).
• Some changes were made in the program "Log Book".
New in version 2.2.0 You can now check "Status of SIP registration" in the "Fax Boom Control Panel" (with error description).
New in version 2.1.0
Copyright © 2008-2009, FaxVoip Software - 6 -
You can now check "Status of SIP registration" in the "Fax Boom Control Panel".
New in version 2.0.0 • New feature: Fax Boom is now a fully-functional system for sending faxes via e-mail (Mail -
> Fax) and for receiving faxes to e-mail (Fax -> Mail). Mail -> Fax feature was added. • Fixed a bug that caused failure in the process of installing a virtual Fax Boom printer (error
has occurred for some regional settings). We also added testboom.exe utility. It allows you to reinstall Fax Boom printer without reinstalling the program.
New in version 1.2.1 Expires Header parametr for SIP registration timeout was added. Now it is possible to change it from Fax Boom Control Panel.
Windows Vista Support If you install Fax Boom on your computer with Windows Vista you should read the information in this section.
1. Install Fax Boom using your "Administrator" account. Later you can configure the Fax Boom to work under other accounts, but you have to create shortcuts manually for other users.
2. Fax Boom install program allows "Full control" permission to the "Users" Group for all folders and files in the program installation folder. It is necessary for smooth operations with fax messages and log files

3. Fax Boom install program installs the compatibility option "Run this program in compatibility mode for Windows 98/ Windows Me" for "cfaxprotocol.exe" component for “all users”. Failure to do so leads to the crash of the program at the end of the fax transmission using option "Fax Headline".
Copyright © 2008-2009, FaxVoip Software - 7 -
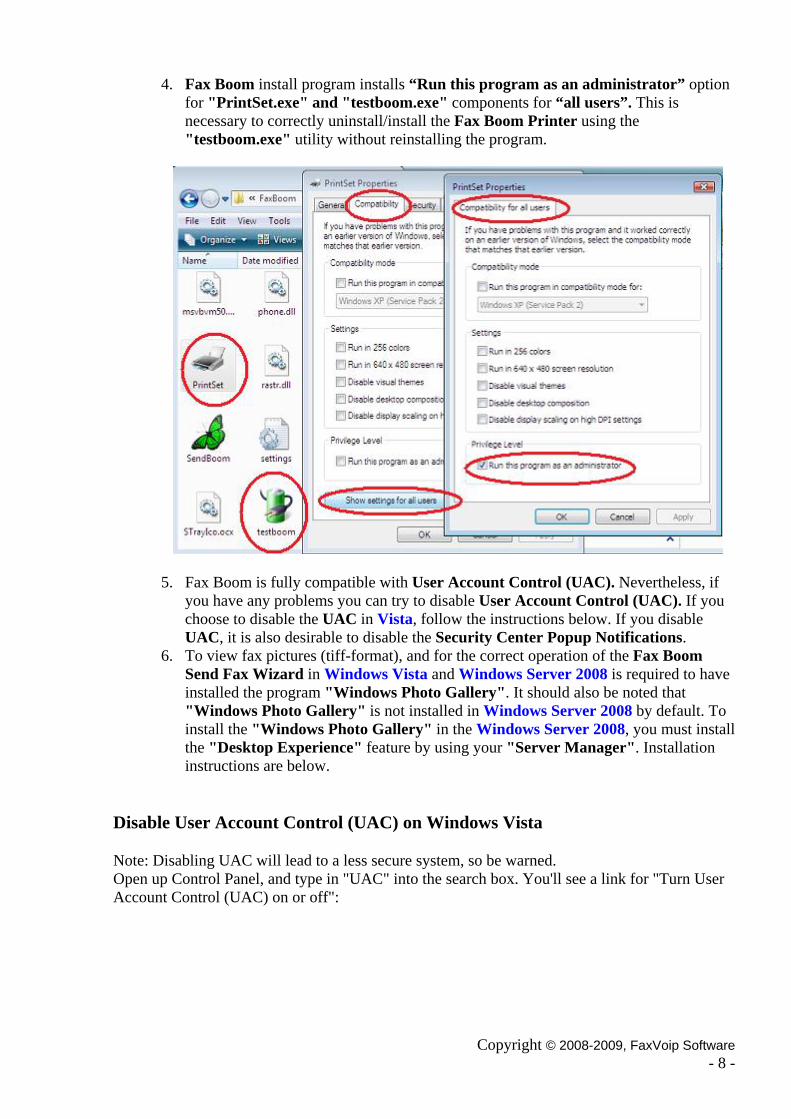
4. Fax Boom install program installs “Run this program as an administrator” option for "PrintSet.exe" and "testboom.exe" components for “all users”. This is necessary to correctly uninstall/install the Fax Boom Printer using the "testboom.exe" utility without reinstalling the program.
5. Fax Boom is fully compatible with User Account Control (UAC). Nevertheless, if you have any problems you can try to disable User Account Control (UAC). If you choose to disable the UAC in Vista, follow the instructions below. If you disable UAC, it is also desirable to disable the Security Center Popup Notifications.
6. To view fax pictures (tiff-format), and for the correct operation of the Fax Boom Send Fax Wizard in Windows Vista and Windows Server 2008 is required to have installed the program "Windows Photo Gallery". It should also be noted that "Windows Photo Gallery" is not installed in Windows Server 2008 by default. To install the "Windows Photo Gallery" in the Windows Server 2008, you must install the "Desktop Experience" feature by using your "Server Manager". Installation instructions are below.
Disable User Account Control (UAC) on Windows Vista
Note: Disabling UAC will lead to a less secure system, so be warned. Open up Control Panel, and type in "UAC" into the search box. You'll see a link for "Turn User Account Control (UAC) on or off":
Copyright © 2008-2009, FaxVoip Software - 8 -

On the next screen you should uncheck the box for "Use User Account Control (UAC)", and then click on the OK button.
You'll need to reboot your computer before the changes take effect, but you should be all done with annoying prompts.
Disable Security Center Popup Notifications in Windows Vista
If you decide to turn off UAC, you'll be annoyed with popup messages from the Security Center that tell you to "Check your computer security". It's a good thing you can turn those messages off.
Copyright © 2008-2009, FaxVoip Software - 9 -

Copyright © 2008-2009, FaxVoip Software - 10 -
To disable the popup messages shown above, right-click on the little red shield icon and choose Open Security Center from the menu. You could also open Security Center from the start menu.
Click the link for "Change the way Security Center alerts me"
Now you'll see a dialog with three choices. Choose the bottom one if you don't want the notifications anymore.

Copyright © 2008-2009, FaxVoip Software - 11 -
Install “Windows Photo Gallery” in Windows Server 2008
To install "Windows Photo Gallery" in Windows Server 2008 you need install Desktop Experience.
1. Click Start and select Server Manager

2. When the Server Manager window appears, go to the left pane and select Features.
3. On the right, click the Add Features link.
4. Check the Desktop Experience checkbox
5. Click Next.
6. Click Install
7. When the installation is complete, Windows will notify you that you must restart your server to complete the process.
Copyright © 2008-2009, FaxVoip Software - 12 -

After you have rebooted, go to All Programs and make sure that the “Windows Photo Gallery” is installed.
Fax Boom Install Installing a Trial Copy The Fax Boom software can be installed as a temporary trial copy.
• The trial license can be used once on a given computer. • The trial time period (30 days) begins when the software is installed. • Up to 2 outgoing virtual fax lines (t38 or fax over G711) can be used. • Unlimited number of incoming fax lines (t38 or fax over G711) can be used.
Copyright © 2008-2009, FaxVoip Software - 13 -

Notes: If you later purchase a license, use the Licensing command in the Fax Boom Control Panel to enter the purchased license key. You do not have to reinstall the software. Your settings will be preserved.
Features • SIP support, registration with SIP provider or SIP IP PBX • STUN server support • Audio Streaming: G.711 A-Law, G.711 u-Law • Virtual Fax Boom Printer to prepare faxes • Possibility to change SIP User Agent • Audio (over G711) Real-time Fax over IP • T.38 Real-time Fax over IP • T.30 Fax Group 3 up to 14.400 Bauds • Error Correction Mode (ECM) • Receiving faxes directly into TIFF or PDF files • Up to 100 virtual (T38 or fax over G711) fax lines • Unlimited number of incoming fax sessions • Redirection of incoming faxes to e-mail (Fax to Mail) • Sending faxes from E-mails (Mail to Fax)
System Requirements Platforms supported
• Intel-compatible PC with 32-bit or 64-bit (x64) processor. • Windows Vista • Windows Server 2008 • Windows Vista x64 Edition • Windows Server 2008 x64 Edition • Windows XP • Windows Server 2003 • Windows XP x64 Edition • Windows Server 2003 x64 Edition
Additional system requirements
• Microsoft.NET Framework 2.0 Service Pack 1 • Windows Picture and Fax Viewer installed (Windows XP/2003) • Windows Photo Gallery installed (Windows Vista/2008) • Adobe Acrobat Reader • Acrobat Wrapper (to use PDF as attachments with Mail to Fax)
Fax Software compatibility
• Additional Fax Software is not required.
SIP compatibility
• BETAMAX (Voipbuster, Sipdiscount, Internetcalls etc.) • Axon PBX
Copyright © 2008-2009, FaxVoip Software - 14 -

• Pbxnsip PBX • Asterisk PBX • Another SIP-based PBX
Network requirements
• A TCP/IP network connection from the local computer to the SIP server
Check for Microsoft.NET Framework 2.0 SP2 1. Install Microsoft.NET Framework 2.0 Service Pack 2, if it is not installed on your PC.
Start ->Settings ->Control Panel ->Add or Remove Programs ->Change or Remove Programs , Check for Microsoft.NET Framework 2.0 Service Pack 2 in the list of installed programs.
2. If you did not find Microsoft.NET Framework 2.0 Service Pack 2 in the list of installed programs, download and install it before running Fax Boom Setup program. You can download it from our site
http://www.t38faxvoip.com/downloads/NetFx20SP1_x86.exe
or from Microsoft.
3. Run the Setup Fax Boom Program.
Removing the previous version. Before new Fax Boom installation please uninstall the previous version of Fax Boom,
using the standard procedures for Windows. Re-installing without uninstalling is not recommended. Moreover, if you install Fax Boom on a computer running Windows Vista or Windows Server 2008, this could lead to unpredictable consequences, as the installer in addition to copying files and folders installes certain permissions and attributes for folders and files of the program Fax Boom. In different versions of Fax Boom these attributes may vary.
Copyright © 2008-2009, FaxVoip Software - 15 -

If you want to keep previous Fax Boom settings and confident in their correctness, make a copy of "settings.ini" file before uninstall. After new installation, you can copy this file back to the installation folder of Fax Boom.
Note also that when you install or uninstall Fax Boom, information on your license is stored in the system. Thus there is no need to enter the license key again.
Run the Setup Program 1. Run "setup.exe" from your installation CD-ROM or ZIP archive.
2. Follow the Setup Wizard. 3. The Setup program runs the Installing Fax Boom Virtual Printer Wizard. During this
process Windows installation CD may be required.
Copyright © 2008-2009, FaxVoip Software - 16 -

4. At the final window of the Setup Wizard check “Launch Fax Boom” and click
<Finish> button. You will see “Fax Boom Control Panel” window. Follow the “Sip, Fax and Mail settings” instructions.
SIP, Fax and Mail settings 1. You will see “Fax Boom Control Panel” window. With basic settings (as you can see in
the picture below) you can accept SIP audio-fax calls to your Fax Boom program to 5060 Copyright © 2008-2009, FaxVoip Software
- 17 -

(UDP) port from any network interfaces of your PC. If you do not know your SIP settings you can skip the next step during installation.
2. Fill in your SIP Account details with the settings you received from your Service Provider or your Network Administrator. If you use one of the Betamax SIP providers, you need enter your username at Username field and your password at Password field.
SIP Settings
Display Name Text entered here appears on the display of the remote phone or fax when Fax Boom to make outgoing calls.
Copyright © 2008-2009, FaxVoip Software - 18 -

Copyright © 2008-2009, FaxVoip Software - 19 -
Note: The default “Display Name” value for unregistered version is “t38faxvoip.com 30-days Trial” and you can not change it. The default “Display Name” value for registered version is “FaxBoom” but you can change it.
Username (or SIP-ID) Account name or phone number.
Password Password credential for authentication.
SIP Registrar Server (and Port) Address of the SIP registrar server to be used. Registration with a registrar server may be required to receive inbound calls from a Proxy or Gateway (IP-PBX, ...). Note: The default SIP port is 5060. If SIP port is 5060 you may not enter “5060” in Port field. Examples:
sip.voipbuster.com sip.yourserver.com : 5064
192.168.0.5 : 5068 Outbound Proxy (and Port)
Address of the SIP proxy to be used. All outgoing calls will be routed through the SIP proxy (IP-PBX, ...) Note: 1)The default SIP port is 5060. If SIP port is 5060 you may not enter “5060” in Port field. 2)As a rule your Outbound Proxy is equal your Registrar Server. In this case you may not enter your Outbound Proxy in this field. Examples:
sip.voipbuster.com myoutbound.com : 5080
192.168.0.5 : 5075 STUN Server (and Port)
Address and port of the STUN Server to be used. Note: The default STUN port is 3478. If STUN Server port is 3478 you may not enter “:3478” in STUN Server field. Examples:
stun. voipbuster.com stun.yourstunserver.com:3478
Local SIP address (and Port) Your Local Address and SIP port to be used to listen for SIP requests. All inbound calls will be routed to this Address and Port to listen for SIP requests; '*' is all interfaces. Note: 1)The default SIP port is 5060. If SIP port is 5060 you may not enter “5060” in Port field. 2)You can select '*' or '0.0.0.0' . In this case you can listen for SIP requests at all network interfaces .3) You need to use correct IP-address of your PC and free (from other SIP software) port here. If you have error in this fields, the Fax Boom server will not be able to start up. Examples:
192.168.0.2 * : 5060
0.0.0.0. : 5065 Register at SIP-server
Check this box if you need to have a registration with your registrar (IP-PBX, ...). Note: 1) You can check your SIP registration at your PBX console. 2) You can also use your Fax Boom as a static SIP Peer to receive incoming calls without registration function. See “Using Fax Boom with Asterisk PBX”, for example.
Expires Header Expires Header parametr for SIP registration timeout. Default value is 30 sec.

User Agent Settings
SIP User Agent Information about the equipment or software used by SIP-user. Note: The default “SIP User Agent” value for unregistered version is “Fax_Boom_30-days_Trial www.t38faxvoip.com” and you can not change it. The default SIP User Agent value for registered version is “FaxBoom” but you can change it.
Software Vendor Information about the Vendor or SIP software or hardware. Note: The default “Software Vendor” value is “FaxVoip Software”. You can change this value in registered version of Fax Boom.
Fax Settings
Copyright © 2008-2009, FaxVoip Software - 20 -

Fax Protocol t38
Select t38-option to use t38 fax protocol for fax sending and receiving. Your sip-provider must have the support of t38.
audio Select audio-option to use Fax over G711 codec for fax sending and receiving. Use this option for sending faxes through SIP-network without the support of t38. Use this option with Betamax providers.
T38 faxmode (for outgoing t38-calls)
Wait Wait for t38-reinvite from another side after dialing a fax number. CNG-tone is not generated.
T38 Do not wait for t38-reinvite from another side after dialing a fax number. CNG-tone is generated, but this does not work with every t38 SIP provider or gateway.
RFC2833 Sending fax CNG signal using RFC2833 standard. This option works with every t38 SIP provider or gateway.
Fax Image quality 200x200 (Fine)
Select 200x200, if you want to send high-quality faxes. 200x100 (Normal)
Select 200x100, if you want to send faxes with normal quality. “Normal” fax runs two times faster than the “Fine”. You can use the property of Fax Boom Printer (Printer Preferences-> Advanced-> Print Quality) to adjust this parameter when printing a document.
Error Correction Mode Check this option, if you want to use ECM (Error Correction Mode) for faxes. Using of ECM with t38 fax protocol is possible, but not recommended.
Fax Station ID Default Fax ID of your virtual fax. Maximum length is 20 characters.
Copyright © 2008-2009, FaxVoip Software - 21 -

Copyright © 2008-2009, FaxVoip Software - 22 -
Fax HeadLine Default Fax HeadLine. Maximum length is 50 characters. (You can use maximum 25 characters here if you want to test this function in Trial version of Fax Boom). At the top of each page is transmitted date, time, headline, page number. If this field is left blank, the header is not passed. In the trial version of Fax Boom header is always transmitted, and provides information about using of unregistered Fax Boom version.
Use default HeadLine and Station ID for all faxes Check this Checkbox if you want to use default Fax Station ID and Fax HeadLine for all faxes. Do not check this checkbox if you want to have a posibility to change these fields for different faxes (using Fax Boom Printer).
Save as tiff Select this option, if you want to receive faxes as TIFF files
Save as pdf Select this option, if you want to receive faxes as PDF files
Open TIFF command Enter command for your TIFF viewer software executable file here. You can use standart options: 1) “explorer” – to view TIFF files in system explorer window according your system settings. 2) “rundll32 shimgvw.dll,ImageView_Fullscreen” – to view TIFF files using “Windows Picture and Fax Viewer”. To select an executable, use a small button near the combobox.
Open PDF command Enter command for your PDF software executable file here. You can use standart option: “explorer” – to view PDF files in system explorer window according your system settings. Or select path to your Acrobat Reader application, using small button near the combobox. After choosing the exe file, you will see something like “C:\Program Files\Adobe\Reader 8.0\Reader\AcroRd32.exe” in the combobox.
Default Use this button to enter standart values for “Open TIFF command” and “Open PDF command”
After reception to send a fax by e-mail Check this box, if you want to redirect incoming faxes to e-mail address.
Send notification even if no fax messages recorded Check this box, if you want to receive info about unsuccessful faxes to e-mail address
Recepient’s e-mail address Incoming faxes will be delivered to this email address.
Send faxes from e-mails Check this checkbox, if you want to use “Mail to Fax function”. The button right of the checkbox "Send faxes from emails" allow you to edit mail.ini text file and change your attachment’s file formats and user’s email restrictions (for advanced users).
E-mail Settings
Fax Boom operates as a standard SMTP-POP3 mail client. You must have an account on the mail server of your provider. This account should not be used by other mail clients to receive and send regular mail.

SMTP settings: Sender’s e-mail address
This e-mail must be known to SMTP server and will appear as a sender’s e-mail address in your e-mail message
Sender’s name This name will appear as a sender’s name in your e-mail message. The default name is FaxBoom, but you can leave it blank. In this case, the letter will be displayed sender’s e-mail address instead of the name.
SMTP Server Your SMTP server name.
Port Your SMTP server port. Default value is “25”.
My server requires authentication Check this checkbox, if your SMTP server requires authentication.
Login Username for SMTP server.
Password Password for SMTP server.
POP3 settings: POP3 Server
Your POP3 server name. Port
Your POP3 server port. Default value is “110”. Login
Username for POP3 server. Password
Password for POP3 server. Check for new messages every ... sec
The interval for checking mail, using “Mail to Fax” function. This value can vary from 10 to 60 seconds.
Copyright © 2008-2009, FaxVoip Software - 23 -
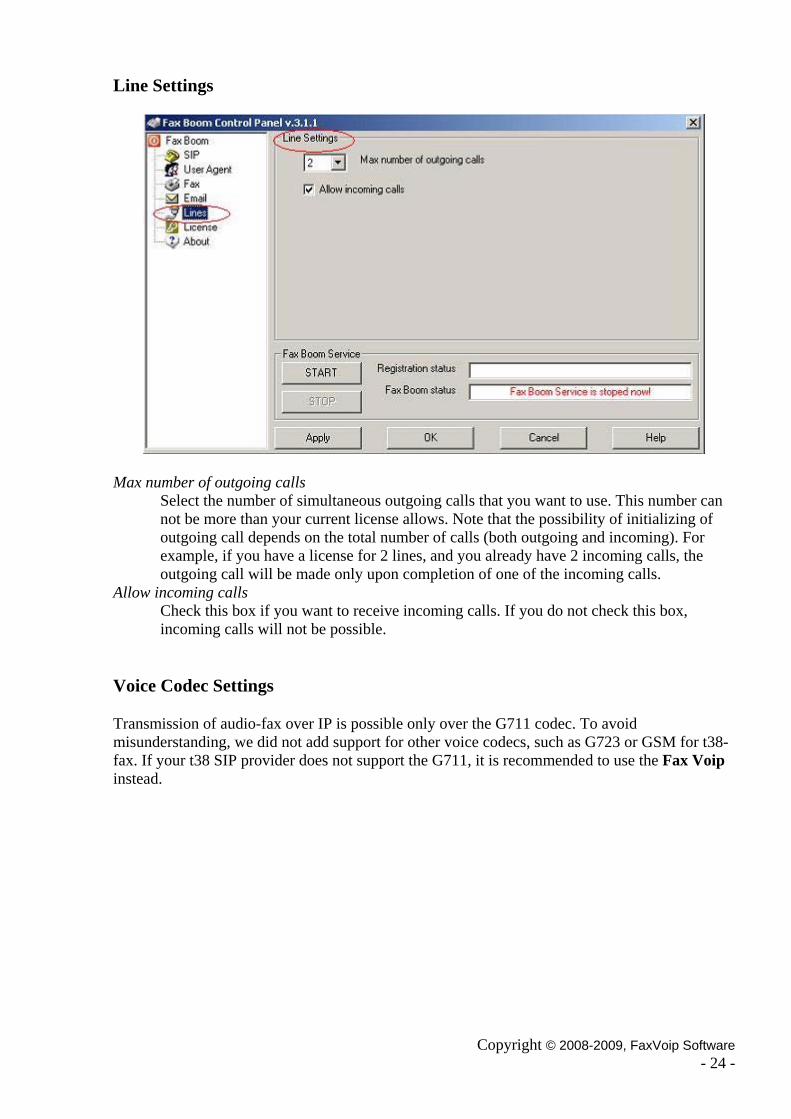
Line Settings
Max number of outgoing calls
Select the number of simultaneous outgoing calls that you want to use. This number can not be more than your current license allows. Note that the possibility of initializing of outgoing call depends on the total number of calls (both outgoing and incoming). For example, if you have a license for 2 lines, and you already have 2 incoming calls, the outgoing call will be made only upon completion of one of the incoming calls.
Allow incoming calls Check this box if you want to receive incoming calls. If you do not check this box, incoming calls will not be possible.
Voice Codec Settings
Transmission of audio-fax over IP is possible only over the G711 codec. To avoid misunderstanding, we did not add support for other voice codecs, such as G723 or GSM for t38-fax. If your t38 SIP provider does not support the G711, it is recommended to use the Fax Voip instead.
Copyright © 2008-2009, FaxVoip Software - 24 -

3. Click the <Apply> button to Save your settings. Follow the “Compleating of the installation” instructions.
Compleating of the installation 1. In “Fax Boom Control Panel” Click the <OK> button to complete the installation. You
will see Fax Boom icon in System Tray:
2. To do correct SIP settings we recommend to read:
“Using Fax Boom with AXON PBX”
“Using Fax Boom with Asterisk PBX”
3. Additional Fax Software is not required for Fax Boom. Fax Boom Virtual Printer is installed and ready for fax printing and sending. See:
“Sending Faxes”
Copyright © 2008-2009, FaxVoip Software - 25 -

4. You can download trial version AXON PBX from our site or from site of developments of this program.
5. Fax Boom allow you to receive T38 or audio faxes directly into TIFF or PDF files. The number of inbound fax calls are not limited. See:
“Receiving Faxes”
6. Fax Boom allow you to receive faxes as e-mails with either PDF or TIFF attachments, using “Fax to Mail” feature. We recommend to read:
“Fax to Mail”
7. Fax Boom allow you send faxes via e-mail, using “Mail to Fax” feature. We recommend to read:
“Mail to Fax”
Fax Boom Control Panel To open Fax Boom Control Panel Click Start, point to All Programs, point to Fax Boom ; click Settings.
<START> Use this button to start Fax Boom Service.
<STOP > Use this button to stop Fax Boom Service.
Registration status
Copyright © 2008-2009, FaxVoip Software - 26 -
This field indicates SIP Registration status (OK or description of error). This indicator works when the Fax Boom Service is running and the option "Register at SIP-server" is selected.

Fax Boom status This field indicates if Fax Boom Service is running
SIP Settings
Display Name
Text entered here appears on the display of the remote phone or fax when Fax Boom to make outgoing calls. Note: The default “Display Name” value for unregistered version is “t38faxvoip.com 30-days Trial” and you can not change it. The default “Display Name” value for registered version is “FaxBoom” but you can change it.
Username (or SIP-ID) Account name or phone number.
Password Password credential for authentication.
SIP Registrar Server (and Port) Address of the SIP registrar server to be used. Registration with a registrar server may be required to receive inbound calls from a Proxy or Gateway (IP-PBX, ...). Note: The default SIP port is 5060. If SIP port is 5060 you may not enter “5060” in Port field. Examples:
sip.voipbuster.com sip.yourserver.com : 5064
192.168.0.5 : 5068 Outbound Proxy (and Port)
Address of the SIP proxy to be used. All outgoing calls will be routed through the SIP proxy (IP-PBX, ...) Note: 1)The default SIP port is 5060. If SIP port is 5060 you may not enter “5060” in Port field. 2)As a rule your Outbound Proxy is equal your Registrar Server. In this case you may not enter your Outbound Proxy in this field. Examples:
Copyright © 2008-2009, FaxVoip Software - 27 -

Copyright © 2008-2009, FaxVoip Software - 28 -
sip.voipbuster.com myoutbound.com : 5080
192.168.0.5 : 5075 STUN Server (and Port)
Address and port of the STUN Server to be used. Note: The default STUN port is 3478. If STUN Server port is 3478 you may not enter “:3478” in STUN Server field. Examples:
stun. voipbuster.com stun.yourstunserver.com:3478
Local SIP address (and Port) Your Local Address and SIP port to be used to listen for SIP requests. All inbound calls will be routed to this Address and Port to listen for SIP requests; '*' is all interfaces. Note: 1)The default SIP port is 5060. If SIP port is 5060 you may not enter “5060” in Port field. 2)You can select '*' or '0.0.0.0' . In this case you can listen for SIP requests at all network interfaces .3) You need to use correct IP-address of your PC and free (from other SIP software) port here. If you have error in this fields, the Fax Boom server will not be able to start up. Examples:
192.168.0.2 * : 5060
0.0.0.0. : 5065 Register at SIP-server
Check this box if you need to have a registration with your registrar (IP-PBX, ...). Note: 1) You can check your SIP registration at your PBX console. 2) You can also use your Fax Boom as a static SIP Peer to receive incoming calls without registration function. See “Using Fax Boom with Asterisk PBX”, for example.
Expires Header Expires Header parametr for SIP registration timeout. Default value is 30 sec.
User Agent Settings Parameters considered here are used in the titles of SIP-messages and inform the SIP server about the program or equipment used by the user. We can not answer for the actions of users, but believe that in some cases be useful to have this opportunity. Therefore, we allow to change “SIP User Agent” and “Software Vendor” settings. However, this feature is not available in Trial version of Fax Boom.

SIP User Agent Information about the equipment or software used by SIP-user. Note: The default “SIP User Agent” value for unregistered version is “Fax_Boom_30-days_Trial www.t38faxvoip.com” and you can not change it. The default SIP User Agent value for registered version is “FaxBoom” but you can change it.
Software Vendor Information about the Vendor or SIP software or hardware. Note: The default “Software Vendor” value is “FaxVoip Software”. You can change this value in registered version of Fax Boom.
Fax Settings
Copyright © 2008-2009, FaxVoip Software - 29 -

Copyright © 2008-2009, FaxVoip Software - 30 -
Fax Protocol t38
Select t38-option to use t38 fax protocol for fax sending and receiving. Your sip-provider must have the support of t38.
audio Select audio-option to use Fax over G711 codec for fax sending and receiving. Use this option for sending faxes through SIP-network without the support of t38. Use this option with Betamax providers.
T38 faxmode (for outgoing t38-calls)
Wait Wait for t38-reinvite from another side after dialing a fax number. CNG-tone is not generated.
T38 Do not wait for t38-reinvite from another side after dialing a fax number. CNG-tone is generated, but this does not work with every t38 SIP provider or gateway.
RFC2833 Sending fax CNG signal using RFC2833 standard. This option works with every t38 SIP provider or gateway.
Fax Image quality 200x200 (Fine)
Select 200x200, if you want to send high-quality faxes. 200x100 (Normal)
Select 200x100, if you want to send faxes with normal quality. “Normal” fax runs two times faster than the “Fine”. You can use the property of Fax Boom Printer (Printer Preferences-> Advanced-> Print Quality) to adjust this parameter when printing a document.
Error Correction Mode Check this option, if you want to use ECM (Error Correction Mode) for faxes. Using of ECM with t38 fax protocol is possible, but not recommended.
Fax Station ID Default Fax ID of your virtual fax. Maximum length is 20 characters.
Fax HeadLine Default Fax HeadLine. Maximum length is 50 characters. (You can use maximum 25 characters here if you want to test this function in Trial version of Fax Boom). At the top of each page is transmitted date, time, headline, page number. If this field is left blank, the header is not passed. In the trial version of Fax Boom header is always transmitted, and provides information about using of unregistered Fax Boom version.
Use default HeadLine and Station ID for all faxes Check this Checkbox if you want to use default Fax Station ID and Fax HeadLine for all faxes. Do not check this checkbox if you want to have a posibility to change these fields for different faxes (using Fax Boom Printer).
Save as tiff Select this option, if you want to receive faxes as TIFF files
Save as pdf Select this option, if you want to receive faxes as PDF files
Open TIFF command Enter command for your TIFF viewer software executable file here. You can use standart options: 1) “explorer” – to view TIFF files in system explorer window according your system settings. 2) “rundll32 shimgvw.dll,ImageView_Fullscreen” – to view TIFF files using “Windows Picture and Fax Viewer”. To select an executable, use a small button near the combobox.

Open PDF command Enter command for your PDF software executable file here. You can use standart option: “explorer” – to view PDF files in system explorer window according your system settings. Or select path to your Acrobat Reader application, using small button near the combobox. After choosing the exe file, you will see something like “C:\Program Files\Adobe\Reader 8.0\Reader\AcroRd32.exe” in the combobox.
Default Use this button to enter standart values for “Open TIFF command” and “Open PDF command”
After reception to send a fax by e-mail Check this box, if you want to redirect incoming faxes to e-mail address.
Send notification even if no fax messages recorded Check this box, if you want to receive info about unsuccessful faxes to e-mail address
Recepient’s e-mail address Incoming faxes will be delivered to this email address.
Send faxes from e-mails Check this checkbox, if you want to use “Mail to Fax function”. The button right of the checkbox "Send faxes from emails" allow you to edit mail.ini text file and change your attachment’s file formats and user’s email restrictions (for advanced users).
E-mail Settings Fax Boom operates as a standard SMTP-POP3 mail client. You must have an account on the mail server of your provider. This account should not be used by other mail clients to receive and send regular mail.
SMTP settings: Sender’s e-mail address
This e-mail must be known to SMTP server and will appear as a sender’s e-mail address in your e-mail message
Sender’s name
Copyright © 2008-2009, FaxVoip Software - 31 -

This name will appear as a sender’s name in your e-mail message. The default name is FaxBoom, but you can leave it blank. In this case, the letter will be displayed sender’s e-mail address instead of the name.
SMTP Server Your SMTP server name.
Port Your SMTP server port. Default value is “25”.
My server requires authentication Check this checkbox, if your SMTP server requires authentication.
Login Username for SMTP server.
Password Password for SMTP server.
POP3 settings: POP3 Server
Your POP3 server name. Port
Your POP3 server port. Default value is “110”. Login
Username for POP3 server. Password
Password for POP3 server. Check for new messages every ... sec
The interval for checking mail, using “Mail to Fax” function. This value can vary from 10 to 60 seconds.
Line Settings
Max number of outgoing calls
Copyright © 2008-2009, FaxVoip Software - 32 -

Select the number of simultaneous outgoing calls that you want to use. This number can not be more than your current license allows. Note that the possibility of initializing of outgoing call depends on the total number of calls (both outgoing and incoming). For example, if you have a license for 2 lines, and you already have 2 incoming calls, the outgoing call will be made only upon completion of one of the incoming calls.
Allow incoming calls Check this box if you want to receive incoming calls. If you do not check this box, incoming calls will not be possible.
Voice Codec Settings Transmission of audio-fax over IP is possible only over the G711 codec. To avoid misunderstanding, we did not add support for other voice codecs, such as G723 or GSM for t38-fax. If your t38 SIP provider does not support the G711, it is recommended to use the Fax Voip instead.
Using Fax Boom with SIP Soft Using Fax Boom with AXON PBX
1. Axon is a virtual PBX for Windows or Linux designed to manage calls. Axon is a very easy PBX with support for fax t38 calls. You can download it from our site: http://www.t38faxvoip.com/downloads/pbxsetup.exe or from http://www.nch.com.au/pbx/index.html .
2. Example: we have our AXON PBX at 192.168.0.4:5061 and we have our Fax Boom at 192.168.0.2:5070. And we want to configure Fax Boom as an extension of AXON PBX with internal number 101. We also have our SIP provider: sip.provider.com . All calls from Fax Boom starting with “00” must go to our provider via AXON PBX, all calls from provider must go to our Fax Boom via AXON PBX. The call from Fax Boom to Number “101” must go to another Fax Boom line via AXON PBX (test). The picture below illustrates the basic using of Fax Boom with AXON PBX.
Copyright © 2008-2009, FaxVoip Software
- 33 -

To install the AXON PBX
1. Follow the Axon PBX Setup Wizard. 2. It’s important: if it is the first installation of AXON PBX do not install “Related
Programs”. Yor need to understand how AXON PBX works with Fax Boom. You can install these programs later, if you want to learn them.
3. Create 1 or 2 Internal extensions. You do not know, if you need more extensions. You can create additional extensions later. Save username as “Admin” and password “free”, you can change “user” and “password” later.
Copyright © 2008-2009, FaxVoip Software - 34 -

To configure the AXON PBX with Fax Boom
1. Open Axon Web Control in your Internet Explorer, enter your Username and Password and Click the “Open Control Panel” button.
2. Select “Extensions”
Copyright © 2008-2009, FaxVoip Software - 35 -

3. Click the “Extension 101” and check/modify settings for this extension. If you are not able to select Outbound Dialing Plan “main”, skip this step for the first time. Click the “Save Changes” button.
Copyright © 2008-2009, FaxVoip Software - 36 -

Copyright © 2008-2009, FaxVoip Software - 37 -

4. Select the “External Lines”. Click the “Add New External Line” button.
5. Enter your SIP Account details here with the settings you received from your Service Provider. You can use the “Advanced Line Settings” button. if you need. Do not forget to set “Incoming Calls Ring On Extension... 101”: this feature will be used for incoming calls to FaxVoip. Click the “Save Changes” button.
Copyright © 2008-2009, FaxVoip Software - 38 -
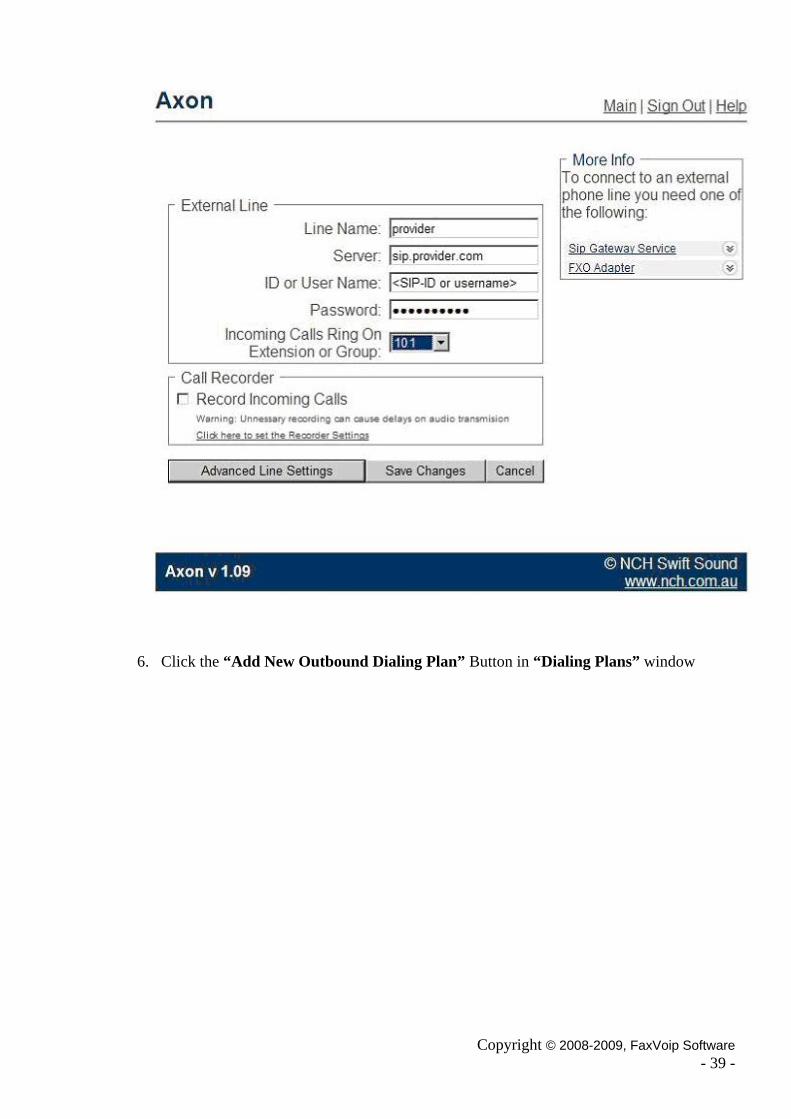
6. Click the “Add New Outbound Dialing Plan” Button in “Dialing Plans” window
Copyright © 2008-2009, FaxVoip Software - 39 -

7. Enter a name for your New Outbound Dialing Plan (“main”) and Click the “Save Changes” Button.
8. Click “Add Dial Rule”. You need to add Dial Rule to route all external calls (stats with “00”, for example) to external line “provider”
Copyright © 2008-2009, FaxVoip Software - 40 -

9. In “If number starts with” field enter: 00, In “Dial on Line” field select: provider . Click the “Save Changes” Button.
Copyright © 2008-2009, FaxVoip Software - 41 -

10. Your outbound Dialing Plan “main” must be like here. Click the “Save Changes” Button.
Copyright © 2008-2009, FaxVoip Software - 42 -

11. Now you must go to “Extensions” and do some changes. In “Extension 101” select “Outbound Dialing Plan”: main. Click the “Save Changes” Button.
Copyright © 2008-2009, FaxVoip Software - 43 -

12. In AXON PBX Console click the <Settings> button.
13. In Settings window check “Local Sip Port to listen on” field. Change it, if need. Click the <OK> button.
Copyright © 2008-2009, FaxVoip Software - 44 -

14. In Fax Boom Control Panel you must change SIP-settings according to AXON PBX settings.
Copyright © 2008-2009, FaxVoip Software - 45 -

15. In Fax Boom Control Panel Click <Apply> button, then click <STOP> button, then click <START> button. In AXON PBX console you will see a message about registration.
Comments about using Fax Boom with AXON PBX
1. To do outgoing fax call from Fax Boom , you need to print a document using Fax Boom Virtual Printer, set fax number to send a fax like “00XXXXXXXXXX” in Fax Boom SendBoom window and send a fax. Fax Boom works as an extension 101 of AXON PBX and calls according to dial-plan “main”, according dial-rule for “00” to “provider”.
2. Accepting inbound calls from external provider to Fax Boom: as the call is comming to “Provider” line in AXON PBX, AXON PBX redirects the call to Extension 101 (to Fax
Copyright © 2008-2009, FaxVoip Software - 46 -
Boom). Stable SIP registration is supported, so you do not need to provide static route to Fax Boom to work with Inbound Calls.
3. You can do a test call from one line to another using AXON. Do the test call from one line to number “101”. The call will be redirected to another Fax Boom line. If the another fax line is in “autoanswer” mode, the fax call will be answered.
4. If you have problems with faxing using this construction, you can try to do some steps. If there are problems with AXON, you can try: 1) to provide external ip-address for your pc 2) to provide DMZ for PC with Fax Boom. 3) To install AXON PBX to another PC... The behaviour of voip-faxing depens on your SIP-provider, your sip and network environment, model of your router.
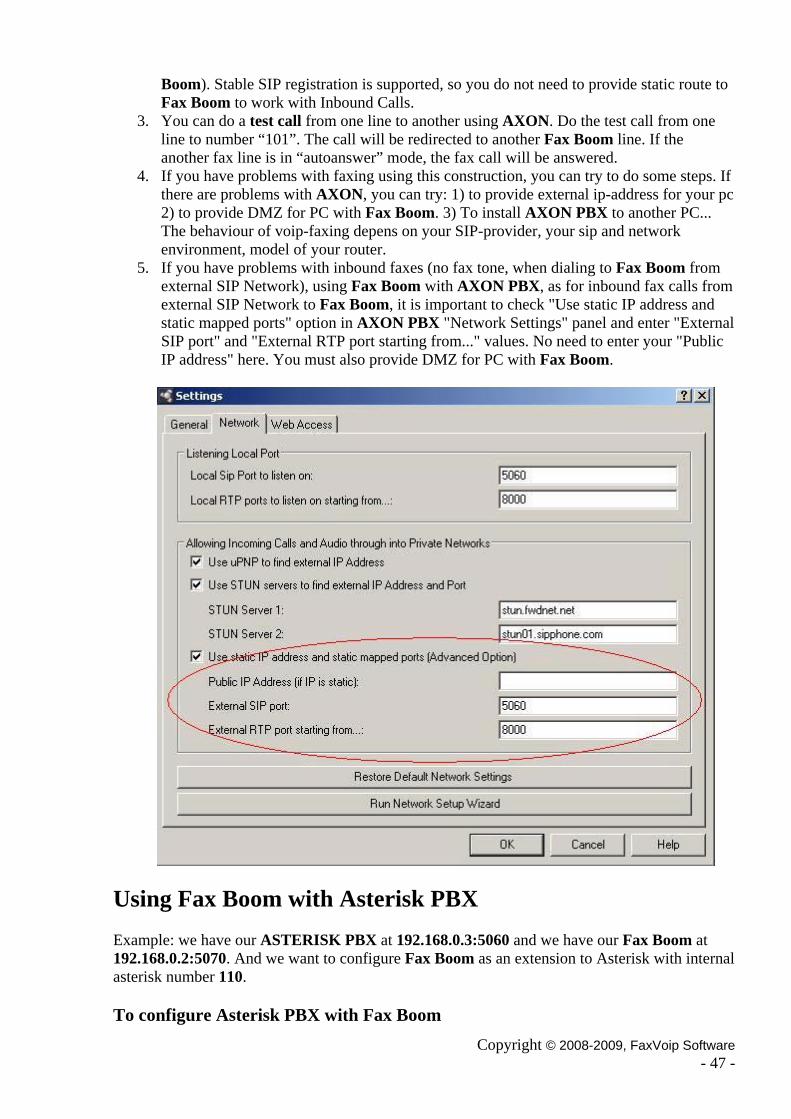
5. If you have problems with inbound faxes (no fax tone, when dialing to Fax Boom from external SIP Network), using Fax Boom with AXON PBX, as for inbound fax calls from external SIP Network to Fax Boom, it is important to check "Use static IP address and static mapped ports" option in AXON PBX "Network Settings" panel and enter "External SIP port" and "External RTP port starting from..." values. No need to enter your "Public IP address" here. You must also provide DMZ for PC with Fax Boom.
Using Fax Boom with Asterisk PBX Example: we have our ASTERISK PBX at 192.168.0.3:5060 and we have our Fax Boom at 192.168.0.2:5070. And we want to configure Fax Boom as an extension to Asterisk with internal asterisk number 110.
To configure Asterisk PBX with Fax Boom Copyright © 2008-2009, FaxVoip Software
- 47 -

Copyright © 2008-2009, FaxVoip Software - 48 -
1. Open your /etc/asterisk/sip.conf file. 2. In T.38 FAX PASSTHROUGH SUPPORT section you should activate support for
T38-fax:
t38pt_udptl = yes ; Default false
3. In SIP device section you should add FaxVoip as your SIP device
[faxvoip] type=friend
host=192.168.0.2 username=faxboom
secret=password dtmfmode=rfc2833
nat=no canreinvite=no
context=YourOutboundContext callerid=yourcallerid
port=5070
4. Save and close your /etc/asterisk/sip.conf file. 5. Open your /etc/asterisk/extensions.conf file. 6. In your context for Inbound Fax Calls create the rule:
exten => 110,1,Dial(SIP/faxboom,90,g) ;Route all calls to number 110 to Fax Boom
7. Save and close your /etc/asterisk/extensions.conf file. 8. Restart your Asterisk PBX system.
To configure Fax Boom with Asterisk PBX
1. Open your Fax Boom Control Panel. 2. Do the following SIP-settings:
Username (or SIP-ID): faxboom Password: password
SIP Registrar Server: 192.168.0.3:5060 Outbound Proxy: 192.168.0.3:5060
Local SIP address: 192.168.0.2:5070 Register at SIP-server: unchecked
Allow incoming calls:checked Maximum number of outgoing calls: NUMBER
3. Click <Apply> button. 4. Restart your Fax Boom Service. Click <STOP> button, then click <START> button.
Comments about using Fax Boom with Asterisk PBX
1. Not all versions of Asterisk PBX support T.38 FAX PASSTHROUGH. Use 1.4 or 1.6 versions of Asterisk PBX, to send-receive T38-faxes.

2. Do not Register your Fax Boom with your Asterisk PBX. Asterisk works fine with Fax Boom without any registrations.
3. There are some troubles and bugs with T38 in Asterisk PBX. Asterisk PBX works fine for Incoming Fax Boom T38 Calls (Fax Boom is a Receiver of faxes). But there are some problems with Outgoing Fax Boom T38 Calls (Fax Boom is a Sender of faxes). The result depends on your T38-environment and your SIP-provider settings. We have a solution for this, this solution can help to resolve your problem, but it may not work. If you are interested in this solution, you can write a letter to our technical support and we can try to help.
Sending and Receiving Faxes Send a Fax with Fax Boom Virtual Printer To send a fax
1. Open the document you want to fax. 2. On the File menu, click Print. On the Print dialog box, select printer Fax Boom. Then,
click Print.
3. On the Fax Boom Send Fax Wizard enter the recipient fax number in the Fax number field.
Copyright © 2008-2009, FaxVoip Software - 49 -

4. Change your Fax Station ID and your Fax Headline if need. To allow to do these changes you need to uncheck “Use default Headline and Station ID for all faxes” in Fax Boom Control Panel.
5. Click Send Fax button.
Fax Boom will automatically call the fax numbers and send the fax. You can see results of fax sending in the Fax Boom Log Book application.
In Windows Vista and Windows 2008 1. Fax Boom Send Fax Wizard does not display a window with the image of the
fax. This is due to the lack of "Windows Picture and Fax Viewer" in these operating systems. To view a fax, you can use <View Fax> button. This button opens up your fax image in the "Windows Photo Gallery". It should also be noted that "Windows Photo Gallery" is not installed in Windows Server 2008 by default. To install the "Windows Photo Gallery" in the Windows Server 2008, you must install the "Desktop Experience" feature by using your "Server Manager".
Copyright © 2008-2009, FaxVoip Software - 50 -
2. "Fax Boom Send Fax Wizard" window appears below the window of application from which you are printing. "Fax Boom Send Fax Wizard" icon in the taskbar “flashes”. We are working on this problem but unfortunately the decision does not currently found.
Receiving Faxes as TIFF or PDF files Fax Boom allow you to receive T38 or AUDIO faxes directly into TIFF or PDF files. The Fax Boom Service can redirect all incoming faxes into TIFF or PDF files. The number of incoming fax calls are not limited. You can choose to have your faxes delivered as either TIFF or PDF files. The default delivery format is TIFF. You can change the delivery format in Fax Boom Control Panel. Multi-page TIFF viewer software is required to view faxes sent as TIFF files, and Adobe Acrobat Reader is required to view faxes sent as PDF files. You can manage your faxes, using Log Book Fax Boom application. If your delivery format is TIFF, you can save received fax as either TIFF or PDF file in any place of your hard drive, using Log Book Fax Book application. If your delivery format is PDF, you can save received fax as PDF file.
Settings for Fax to TIFF (PDF)
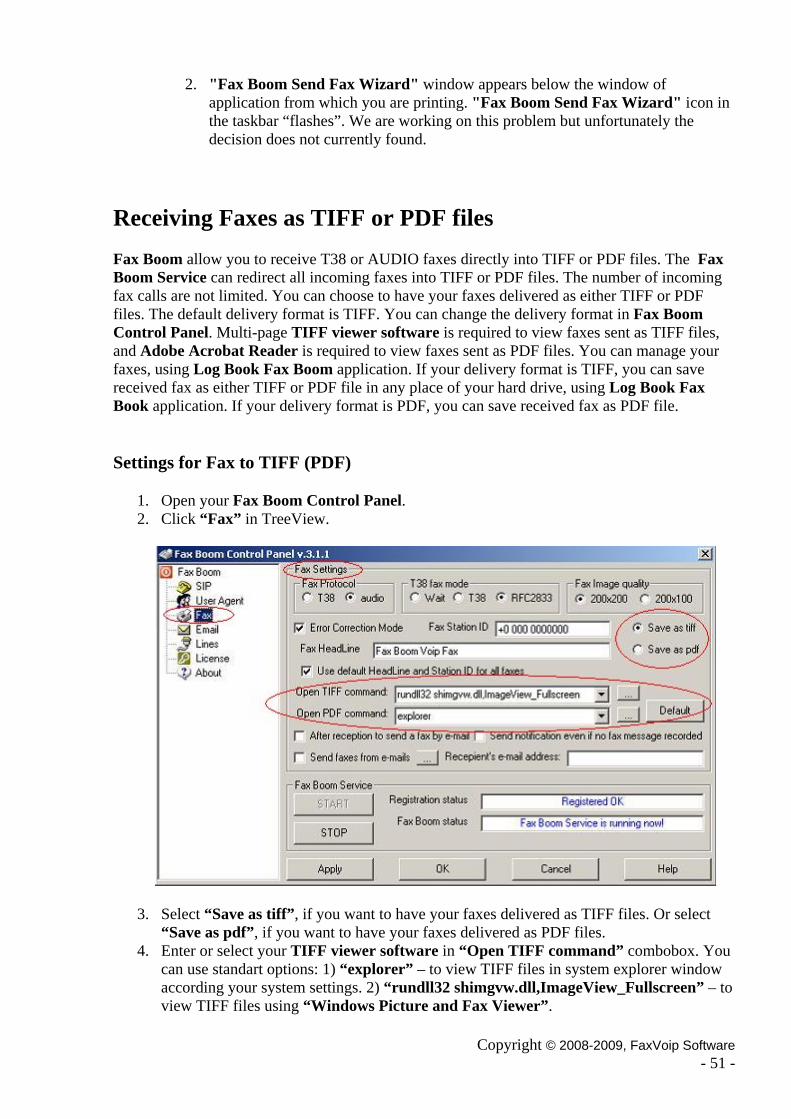
1. Open your Fax Boom Control Panel. 2. Click “Fax” in TreeView.
3. Select “Save as tiff”, if you want to have your faxes delivered as TIFF files. Or select “Save as pdf”, if you want to have your faxes delivered as PDF files.
4. Enter or select your TIFF viewer software in “Open TIFF command” combobox. You can use standart options: 1) “explorer” – to view TIFF files in system explorer window according your system settings. 2) “rundll32 shimgvw.dll,ImageView_Fullscreen” – to view TIFF files using “Windows Picture and Fax Viewer”.
Copyright © 2008-2009, FaxVoip Software - 51 -

5. Enter or select your PDF software in “Open PDF command” combobox. You can use standart option: “explorer” – to view PDF files in system explorer window according your system settings. Or select path to your Acrobat Reader application, using small button near the combobox. After choosing the exe file, you will see something like “C:\Program Files\Adobe\Reader 8.0\Reader\AcroRd32.exe” in the combobox.
6. Click <Apply> button to save settings. To restart Fax Book server click <STOP> button, then click <START> button. You need also restart Log Book application, if you have changed “Open TIFF command” or(and) “Open PDF command”.
Fax Boom Log Book Application Fax Boom Log Book Application allow you to manage incoming and outgoing faxes. To open Loog Book application, click “Open Loog Book”, using Fax Boom icon menu in your Windows System Tray.
Using Loog Book, you can:
1) View fax info in real time mode. 2) View faxes, using TIFF viewer software and Adobe Acrobat Reader. 3) Save faxes as TIFF or PDF files 4) Delete log string or logfile. 5) Delete faxes.
Copyright © 2008-2009, FaxVoip Software - 52 -

Viewing Faxes
To view fax image: 1. In Log Book select the line with fax info. 2. Double click the line or click <View> button or press <F3>. 3. You will see new window with fax picture.
Copyright © 2008-2009, FaxVoip Software - 53 -

Saving Faxes
To save fax as another file: 1. In Log Book select the line with fax info. 2. Click <Save As> button or press <Ctrl+S>. 3. In system “Save As” Window select path to new file. 4. Select type of file: Faxes(*.tif) or Adobe PDF Files(*.pdf). Note, that if your delivery
format is TIFF, you can save received fax as either TIFF or PDF file in any place of your hard drive. If your delivery format is PDF, you can save received fax as PDF file only.
5. Enter name for distanation file. 6. Click <Save> button.
Managing Faxes
In Log Book you can use following commands:
Command Shortcut Description File->Refresh F5 Refresh fax info File->Fax Folder <Ctrl+F> Open folder with fax files File->Exit <Ctrl+X> Close Log Book Edit->View F3 View fax file (TIFF or PDF) Edit->Save As... <Ctrl+S> Save a fax as another TIFF or PDF file
Copyright © 2008-2009, FaxVoip Software - 54 -

Edit->Delete Fax File F8 Delete fax file Edit->Delete Record Del Delete fax log record Edit->Delete all faxes <Ctrl+F8> Delete all fax files in fax folder Edit->Delete all records <Ctrl+D> Delete all records in log file Help->Help F1 Display this help file Help->About <Ctrl+A> Display “About” window
Fax to Mail Fax Boom allow you to receive faxes as e-mails with either PDF or TIFF attachments. All you need is to have an account on the SMTP mail server (this account and the corresponding e-mail will be used to send faxes received via e-mail network) and indicate your target e-mail address (Any faxes will be delivered to this address).
Settings for Fax to Mail
1. Open your Fax Boom Control Panel. 2. Click “Fax” in TreeView.
3. Select “Save as tiff”, if you want to have your faxes delivered as TIFF e-mail attachments. Or select “Save as pdf”, if you want to have your faxes delivered as PDF e-mail attachments.
4. Check “After reception to send a fax by e-mail” checkbox. 5. If you want to receive info about failed incoming faxes, check “Send notification even if
no fax message recorded” checkbox. 6. Enter target e-mail in the “Recepient’s e-mail address” field. Incoming faxes will be
delivered to this email address. 7. Click “Email” in TreeView.
Copyright © 2008-2009, FaxVoip Software - 55 -

8. You must configure the SMTP server. 9. Enter your Fax Boom e-mail in the “Sender’s e-mail address” field. This e-mail must
be known to SMTP server and will appear as a sender’s e-mail address in your e-mail message.
10. Enter your Fax Boom “Sender’s name”, if need. This name will appear as a sender’s name in your e-mail message. The default name is FaxBoom, but you can leave it blank. In this case, the letter will be displayed sender’s e-mail address instead of the name.
11. Enter your SMTP server name in the “SMTP server” field. Enter port to be used on the SMTP server in the “Port” field, the default value is “25”.
12. Check “My server requires authentication” checkbox, if your SMTP server requires authentication. Enter your username to SMTP server in the “Login” field and your password in the “Password” field.
13. Click <Apply> button to save settings.
Mail to Fax With this feature you can:
• Send faxes from your E-mail Program (e.g.Outlook Express). • Receive e-mail notifications with results of faxing. • Identify a list of e-mail addresses, which can send faxes • Identify a list of formats of e-mail attachments, that can be sent by fax
Mail to Fax Settings
1. Open your Fax Boom Control Panel. 2. Click “Fax” in TreeView.
Copyright © 2008-2009, FaxVoip Software - 56 -

3. Check “Send faxes from e-mail” checkbox. 4. Click on the button right of the checkbox "Send faxes from emails" to change your
attachment’s file formats and user’s email restrictions (for advanced users). 5. Click “Email” in TreeView.
6. You must configure the SMTP server. The sender of the fax will be notified of the results of faxing.
7. Enter your FaxBoom e-mail in the “Sender’s e-mail address” field. This e-mail must be known to SMTP server and will appear as a sender’s e-mail address in e-mail messages from Fax Boom.
8. Enter your FaxBoom “Sender’s name”, if need. This name will appear as a sender’s name in your e-mail messages from Fax Boom. The default name is FaxBoom, but you
Copyright © 2008-2009, FaxVoip Software - 57 -

Copyright © 2008-2009, FaxVoip Software - 58 -
can leave it blank. In this case, the letter from Fax Boom will be displayed sender’s e-mail address instead of the name.
9. Enter your SMTP server name in the “SMTP server” field. Enter port to be used on the SMTP server in the “Port” field, the default value is “25”.
10. Check “My server requires authentication” checkbox, if your SMTP server requires authentication. Enter your username to SMTP server in the “Login” field and your password in the “Password” field.
11. You must configure the POP3 server. Fax Boom will get jobs to send a fax via e-mail. 12. Enter your POP3 server name in the “POP3 server” field. Enter port to be used on the
POP3 server in the “Port” field, the default value is “110”. 13. Enter your username to POP3 server in the “Login” field and your password in the
“Password” field. 14. You can change timeout for checking for new mails with outgoing faxes. Enter the
timeout value in the “Check for new messages every...sec” field. This value can vary from 10 to 60 seconds. The default value is “20” (sec).
15. Click <Apply> button to save settings.
Composing of e-mail message
To send a fax from your email program, you need to create a mail, respecting certain rules. 1. Enter e-mail address of your Fax Boom mail server (according the Fax Boom POP3
settings) in the “To:” field of e-mail. 2. Enter the fax number to which you want to send a fax in the “Subject:” field of e-mail.
If you want to send a fax on several numbers simultaneously, numbers must be separated by the sign ";".
Examples: 0013601234567
0013601234567;0013609876541
3. Insert an attachment to e-mail (field “Attach:”) using any method that you know. Do not insert more than one attachment. If a letter contains more than one attachment, only the first will be used to send the fax. A list of acceptable formats for attachments is determined by the administrator of the computer where Fax Boom installed. The Administrator may authorize any format, but if the fax server will not be able to print a document on the Fax Boom Printer, a fax will not be sent.

Attachments Formats
When using the 'Mail -> Fax' you can use different file formats, as for email attachments. The adopted document is printed on the standard printer 'Fax Boom', included with the Fax Boom in the background. Theoretically, you can use all printable formats, in terms of PC where Fax Boom installed. However, in practice, things are different. For example, if you print Microsoft Word (*. doc, * rtf) printing is not in the background. Microsoft Excel is also opened and can show a dialog box that will make it impossible to work ‘Mail-> Fax’ automatically. Some tiff-formats, which are normally printed by hand, can not be printed in the background. In other words, the situation is strongly dependent on the specific machine and applications installed on it. To avoid problems, we recommend to make tests with 'Mail-> Fax' at your PC and then define a set of file extensions that you consider acceptable, then configure Fax Boom to work with these extensions only. To configure the Fax Boom to work with certain email attachments, do the following steps:
1. Open your Fax Boom Control Panel. 2. Click “Fax” in TreeView. 3. Click on the button right of the checkbox "Send faxes from emails".
Copyright © 2008-2009, FaxVoip Software - 59 -

4. File "mail.ini" will be opened. 5. Find [attach formats] section.
6. Make changes according to the instructions in the file. You can allow only certain
formats of attachments or all formats (not recommended). 7. Save and close the file.
Note: If the extension of the file is allowed for the attachment, but the fax server is not able to print a document, the error will not happen, but the user will be sent e-mail with a notification that the file format is not supported.
Using PDF as attachments
PDF is one of the most popular formats with faxes. Therefore, we have to consider this topic separately. When using ‘Mail to Fax’ feature Fax Boom automatically “print” PDF-file using the standard program, defined in your system to view and print PDF files. Usually it is Adobe Acrobat Reader. The latest versions of Adobe Reader have changed their behavior if to print PDF documents automatically. Adobe Reader will no longer close itself after being called with ShellExecute(“printto”,....) API function . In such a situation, PDF can not be used as attachments.
Nevertheless, there is a solution to this issue. More information can be found at http://www.biopdf.com/.
Copyright © 2008-2009, FaxVoip Software - 60 -

http://www.biopdf.com/acrowrap/close_adobe_reader.php
You need to download and install Acrobat Wrapper. In this case the Adobe Reader will be closed correctly after “printing”.
Sender’s email restrictions
By default, the system 'Mail -> Fax' can take jobs to send faxes from any email address. This is not a good thing. Anyone who knows Fax Boom server’s email address can send unauthorized faxes to their advantage. To avoid this, we strongly recommend to limit the list of e-mail addresses. Only the owners of email addresses from this list will be able to send faxes using Fax Boom. To configure the Fax Boom to work with certain email customers, do the following steps:
1. Open your Fax Boom Control Panel. 2. Click “Fax” in TreeView. 3. Click on the button right of the checkbox "Send faxes from emails".
4. File "mail.ini" will be opened. 5. Find [e-mail from] section.
6. Make changes according to the instructions in the file. You can allow faxing from only
certain e-mails or faxing from any e-mail (not recommended). 7. Save and close the file.
Copyright © 2008-2009, FaxVoip Software - 61 -

Copyright © 2008-2009, FaxVoip Software - 62 -
Fax Boom E-mail notifications
When a user sends a fax via e-mail program (e.g.Ouutlook Express),using 'Mail -> Fax' feature, the user will receive notification(s) about the results of faxing by e-mail. Examples of alerts are shown in the table below.
Message Info Description Fax was successfully
transmitted to the number...
OK Fax was sended to Recipient's Fax Number
Unable to transmit fax to the number…
Message contain info about details of sending and
number of unsuccessful attempts to send a fax
Fax Boom received a valid job, but for some reason sending the fax
failed.
Unable to transmit fax to the number…
Message contain info about error of sending a job to
FaxBoom
Incorrect format of attachmenf, fax server is not available...
Unable to transmit fax to the number...
The format of fax number ... is incorrect.
Incorrect fax number in Email Subject
Unable to transmit fax to the number...
The format of your file... is not supported.
Administrator banned sending attachments with such file extension.
Multiple attachments are not supported
Only the first attachment transmitted to Fax Boom.
You must send email with only one attachment.
Your account has been
blocked. Sorry, your account has been
blocked. Administrator banned sending fax email-s from your address.
Licenses settings 1. Open Fax Boom Control Panel. To do this Click Start, point to All Programs, point to
Fax Boom ; click Settings.
2. To view your License Status in Fax Boom Control Panel Click <About> in TreeView.

3. To Add New Licence in Fax Boom Control Panel Click <License> in TreeView.
4. The section “To order License Key” displays your computer's unique system ID. This information is required to generate your license key. When you are queried for your SystemID, you should select your SystemID, Copy and paste the SystemID in your document (e-mail). You should also provide the information about the number of Fax Boom lines, you want to activate.
Note: Your SystemID depends on Hardware of your PC. If you are planning to do some changes with your Hardware, please do it before ordering your License Key.
5. When you received a License Key, copy the License Key from e-mail and paste it in the field in section “To activate License Key” and click on <Update>.
Copyright © 2008-2009, FaxVoip Software - 63 -

6. Restart your Fax Boom Control Panel. Click <About> in TreeView and check your License Status.
7. Restart your Fax Boom Server. In Fax Boom Control Panel Click <Stop>, then <Start>.
8. Note, that you can have only one License Key. So, if you want to increase the number of Fax Boom lines you need to get New License Key. Don’t enter any in “activate License Key” field after activating of your Licence Key. If you will enter non-licence information here, your license key will be deactivated. In this case you will need to do activation of your License Key again. Don’t try to enter the License Key “from another PC” here. You will not be able to start Fax Boom after entering such a Key.
9. Please Save your SystemID and a letter with your License Key.
Working with Fax Boom Service 1. Click Start, point to All Programs, point to Fax Boom; click Fax Boom Server. You
will see the Fax Boom icon in your Windows Tray. 2. Click Stop Fax Boom Service to stop the Fax Boom Service.
Copyright © 2008-2009, FaxVoip Software - 64 -

3. Click Start Fax Boom Service service to start the Fax Boom service. 4. Now you can send and receive T38 and AUDIO faxes via your SIP network. 5. Notes: if Fax Boom Service automatically stops after starting, 1) something wrong with
your “Local SIP address” and port settings. You must use UDP port free from using in another SIP program. 2) Microsoft.NET Framework 2.0 Service Pack 1 need to be installed in your system.
Removing the Software To remove the Fax Boom from the local computer
1. Ensure that no applications are using Fax Boom Virtual Printer. 2. In the Windows Control Panel, open the Add or Remove Programs applet. 3. Select the Fax Boom entry. 4. Click Remove.
Note(i): A restart of Windows is not necessary after uninstalling. Note(ii): Uninstall program will remove all your Fax Boom Settings and Fax Boom Virtual Printer.
Technical Support You can contact our technical support by sending an e-mail to [email protected] For the latest technical support information, please visit http://www.t38faxvoip.com Sales department: [email protected]
Copyright © 2008-2009, FaxVoip Software - 65 -