table 1: evaluation board ordering part numbers
TRANSCRIPT

XR21B1421IL2x-0A-EVBEvaluation Board User’s Manual
Introduction
This user’s manual is for the XR21B1421IL2x-0A-EVB evaluation board. The XR21B1421IL2x-F shares a common evalua-tion board with the XR21B1420IL28-F. The main difference between the XR21B1421 and the XR21B1420 is that theXR21B1421 is an HID USB UART. The XR21B1420 is a USB CDC-ACM/Custom Vendor Request device. The table belowlists the ordering part number for the device installed for the different evaluation board ordering part numbers. There is aseparate user’s manual for the XR21B1420IL28-F.
Evaluation Board Overview
A block diagram of the evaluation board is shown in Figure 1 below.
Figure 1: Evaluation Board Block Diagram
In addition to the XR21B1421IL2x-F, there is an Exar SP339 Multiprotocol transceiver on this evaluation board. The SP339can be configured for Loopback, RS-232, Half-Duplex RS-485 or Full-Duplex RS-485/422 Modes. The default setting whenshipped from the factory is RS-232 mode.
Figure 2 and Figure 3 on the next page show the top view and bottom view of the evaluation board with all of the compo-nents, connectors and headers labeled.
Table 1: Evaluation Board Ordering Part Numbers
Device Ordering Part Number Evaluation Board Ordering Part Number
Device Package Device Location
XR21B1421IL24-F XR21B1421IL24-0A-EVB 24-pin QFN U3
XR21B1421IL28-F XR21B1421IL28-0A-EVB 28-pin QFN U5
XR21B1420IL28-F XR21B1420IL28-0A-EVB 28-pin QFN U4
XR21B1421SP338SP339
USBConnector
DB9Connector
© 2020 MaxLinear, Inc. maxlinear.com/XR21B1421 Rev 1B
1 / 11

XR21B1421IL2x-0A-EVB
Figure 2: Top View of Evaluation Board
Figure 3: Bottom View of Evaluation Board
© 2020 MaxLinear, Inc. 2 / 11 maxlinear.com/XR21B1421 Rev 1B

XR21B1421IL2x-0A-EVB
Exar’s Windows HID GUI Application
An HID GUI application is included on the CD shipped with the evaluation board. A .dll file on the CD must be in the samedirectory as the .exe file in order for the HID GUI application to work properly. If you did not receive the HID GUI, pleasecontact [email protected]. Figure 4 below shows the HID GUI with the Transmit / Receive data tab selected. Eachportion of the GUI is described below in Table 2.
Figure 4: HID GUI
© 2020 MaxLinear, Inc. 3 / 11 maxlinear.com/XR21B1421 Rev 1B

XR21B1421IL2x-0A-EVB
Table 2: HID GUI Description
GUI Item Name Description
1 Serial Number This box lists the HID-UARTs connected to the system. Use the pull-down menu to select the appropriate device.
2 Product Name This field is the Product String of the UART. Exar’s default is "Exar USB UART".
3 Manufacturer This field is the Manufacturer String. Exar’s default is "Exar Corp.".
4 DLL Version This field displays the version of the DLL file used by the application.
5 Vendor ID This field displays the Vendor ID (VID) of the device. Exar’s default is 0x04E2.
6 Product ID This field displays the Product ID (PID) of the device. Exar’s default is 0x1421.
7 Connect After selecting the appropriate UART in the Serial No. Box. Click ‘Connect’ to open the port. Upon successful con-nection, the button changes to ‘Disconnect’. Clicking on ’Disconnect’ will close the port.
8 Port Settings This section provides an interface to modify UART settings. The UART properties that can be modified are as fol-lows:
a. Baud Rate selects among the standard baud rates ranging from 300kbps to 1.8Mbps
b. Data Bits selects the number of data bits - 5, 6, 7 or 8 per character
c. Parity selects among the parity types - odd, even, mark or space
d. Stop Bits selects the number of stop bits - 1 or 2. (If 5 bit data is selected, selection of 2 would be 1.5 stop bits)
e. Flow Control selects flow control setting - Hardware, Software, or no Flow Control
9 View Mode Selects Data transfer views
a. Tx Only transmit data will be displayed.
b. Tx/Rx Both transmit and receive data will be displayed (default).
c. Rx Only receive data will be displayed.
d. X Clicking “X” button next to Tx clears TX window. Clicking “X” button next to Rx clears RX window.
10 Send Type Selects different types of data transfers
a. Send Pattern Sends a fixed pattern continuously after we hit Start button.E.g.:L01 - 0123456789abcdefghijklmnopqrstuvwxyz.L02 - 0123456789abcdefghijklmnopqrstuvwxyz.L03 - 0123456789abcdefghijklmnopqrstuvwxyz.
b. Send ‘U’ Sends “U” (0x55) continuously
c. Send file Select this option to send a text file
11 Send Mode Select between Auto data transmit mode or User Data transmit mode
a. Auto On clicking “Start”, the data selected in Send Type will be sent continuously.
b. User Data User can enter the data to be transmitted in Tx Window
12 Start Click this button to start data transmission. Once data transmission initiates successfully this button becomes “Stop” button. Select this button to stop data transmission
13 Capture Click this option to save the receive data in to a text file. Assign the file before this button becomes active. By selecting “Need Assign File First”
© 2020 MaxLinear, Inc. 4 / 11 maxlinear.com/XR21B1421 Rev 1B
XR21B1421IL2x-0A-EVB
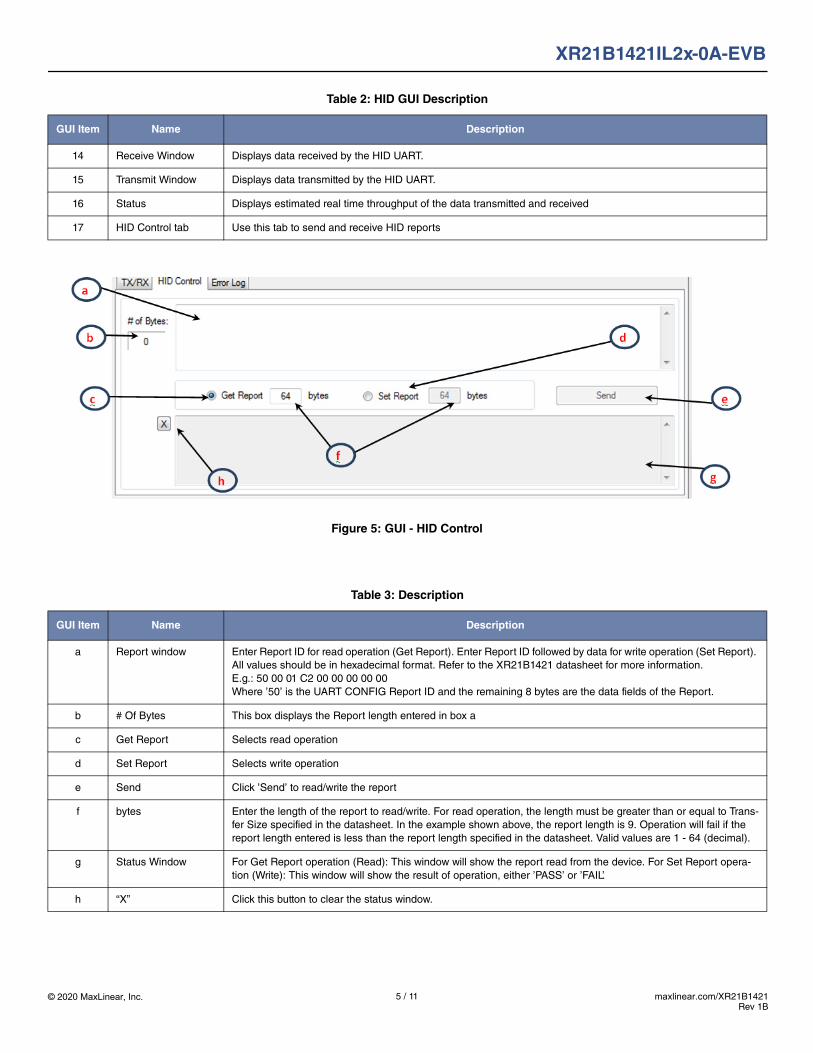
Figure 5: GUI - HID Control
14 Receive Window Displays data received by the HID UART.
15 Transmit Window Displays data transmitted by the HID UART.
16 Status Displays estimated real time throughput of the data transmitted and received
17 HID Control tab Use this tab to send and receive HID reports
Table 3: Description
GUI Item Name Description
a Report window Enter Report ID for read operation (Get Report). Enter Report ID followed by data for write operation (Set Report). All values should be in hexadecimal format. Refer to the XR21B1421 datasheet for more information.E.g.: 50 00 01 C2 00 00 00 00 00Where ’50’ is the UART CONFIG Report ID and the remaining 8 bytes are the data fields of the Report.
b # Of Bytes This box displays the Report length entered in box a
c Get Report Selects read operation
d Set Report Selects write operation
e Send Click ’Send’ to read/write the report
f bytes Enter the length of the report to read/write. For read operation, the length must be greater than or equal to Trans-fer Size specified in the datasheet. In the example shown above, the report length is 9. Operation will fail if the report length entered is less than the report length specified in the datasheet. Valid values are 1 - 64 (decimal).
g Status Window For Get Report operation (Read): This window will show the report read from the device. For Set Report opera-tion (Write): This window will show the result of operation, either ’PASS’ or ’FAIL’.
h “X” Click this button to clear the status window.
Table 2: HID GUI Description
GUI Item Name Description
© 2020 MaxLinear, Inc. 5 / 11 maxlinear.com/XR21B1421 Rev 1B

XR21B1421IL2x-0A-EVB
Examples
Get Report: Get UART CONFIG report
Report ID: 0x50
Transfer size: 9
Figure 6: Get Report Example
Set Report: Set GPIO CONFIG report
Report ID: 0x49
Transfer size: 13
Figure 7: Set Report Example
© 2020 MaxLinear, Inc. 6 / 11 maxlinear.com/XR21B1421 Rev 1B

XR21B1421IL2x-0A-EVB
Hardware Configurations
This sections describes the default settings when shipped from the factory and what jumper setting changes are requiredwhen changing modes.
XR21B1421 Power Configurations
When shipped from the factory, the XR21B1421 is configured for bus-powered mode and uses the 5V from the USB VBUSpin. The default jumper settings are:
If not using the 5V from VBUS, an external 3.3V can be supplied to the VCC_REG pin. For testing purposes, there is anExar SP6260 regulator on board that can be used. The required jumper settings for 3.3V operation are as follows:
GPIO Configurations
GPIO4/TXT
When shipped from the factory, the GPIO4/TXT pin is connected to the LED. The default configuration of this pin is the TXTfunction.
Changing the header to J15 1&2 and adding a jumper on J18 3&4 will allow the GPIO4/TXT pin to control the MODE1 pin ofthe SP338/SP339 transceiver.
Table 4: Default Jumper Settings
Jumper Setting Description
J10 - 1 & 2 Connects 5V from VBUS to VCC_REG (pin 7). A regulated 3.3V output will be available on VCC (pin 6).
J11 - 1 & 2 Connects the regulated 3.3V to VIO. The voltage of the UART/GPIO pins will be 3.3V.
J13 - 1 & 2 Connects all pull-up resistors for the I/Os to 3.3V.
J19 Not installed.
Table 5: Jumper Settings for 3.3V Operation
Jumper Setting Description
J10 - 2 & 3 Connects 3.3V from SP6260 to VCC_REG (pin 7). 3.3V will also need to be supplied to VCC via J19.
J11 - 1 & 2 Connects 3.3V to VIO. The voltage of the UART/GPIO pins will be 3.3V.
J13 - 1 & 2 Connects all pull-up resistors for the I/Os to 3.3V.
J19 - 1 & 2 Connects the regulated 3.3V from the SP6260 to the VCC pin of the XR21B1421.
Table 6: Default Jumper Setting for GPIO4/TXT
Jumper Setting Description
J15 - 2 & 3 GPIO4/TXT connected to LED D1. LED D1 toggles when data is transmitting.
© 2020 MaxLinear, Inc. 7 / 11 maxlinear.com/XR21B1421 Rev 1B

XR21B1421IL2x-0A-EVB
GPIO5/RXT
When shipped from the factory, the GPIO5/RXT pin is connected to the LED and behaves as the RXT function.
Changing the header to J17 1&2 and adding a jumper on J18 5&6 will allow the GPIO5/RXT pin to control the MODE2 pinof the SP338 transceiver (this is a ’NC’ on the SP339).
GPIO7/RI#/RWK#
When shipped from the factory, the GPIO7/RI#/RWK# pin is connected to the push-button switch (SW1).
The Windows HID driver does not support remote wake-up. The Mac OS HID driver does support remote wake-up.
Changing the header to J12 2&3 will connect the GPIO7/RI#/RWK# pin to the SP338/SP339 transceiver.
GPIO9/DSR#
By default, the GPIO9/DSR# pin is a GPIO output for the XR21B1421. Therefore, when shipped from the factory, J20 is notinstalled to avoid any bus conflicts with the output of the SP338/SP339. The GPIO9/DSR# pin can be configured as a GPIOinput using the HID reports. See datasheet for complete details.
SP338/SP339 Mode Selection
When shipped from the factory, the SP338/SP339 are configured in the RS-232 mode. This is achieved with a combinationof J18 and J4.
J18 pins 2, 4 and 6 go to MODE0, MODE1 and MODE2, respectively. The SP338/SP339 have weak internal pull-downresistors. Table 9 shows the SP338/SP339 MODE pin configurations for the RS-232 mode.
For the RS-232 mode, there is a jumper from J18 pin 2 to J4 pin 1. Refer to the table in the schematic or the SP339 data-sheet for more details of the different configurations.
The SP338/339 transceiver is enabled with a jumper from J18 pin 8 to J4 pin 4.
Table 7: Default Jumper Setting for GPIO5/RXT
Jumper Setting Description
J17 - 2 & 3 GPIO5/RXT connected to LED D2. LED D2 toggles when data is received.
Table 8: Default Jumper Setting for GPIO7/RI#/RWK#
Jumper Setting Description
J12 - 2 & 3 GPIO7/RI#/RWK is connected to the SP338/SP339. Changing the jumper setting to 1 & 2 will connect the GPIO7/RI#/RWK# to SW1. Can be used for remote wake-up if enabled in the OTP.
Table 9: SP339 RS-232 Mode Configurations
Mode Configuration
MODE0 1
MODE1 0
MODE2 0
© 2020 MaxLinear, Inc. 8 / 11 maxlinear.com/XR21B1421 Rev 1B
XR21B1421IL2x-0A-EVB
Half-duplex, Full-Duplex and Mixed Duplex RS-485/422 modes
In the RS-485 half-duplex, full-duplex and mixed duplex modes, the DIR1 pin of the SP338/SP339 enables or disables theRS-485/422 line drivers. The DIR1 pin can be controlled by the XR21B1421 using the GPIO3/RS485 or GPIO1/RTS#/RS485 output pins (selected via J21). Refer to the datasheet for details for selecting and enabling the Automatic RS-485Half-Duplex Control for the GPIO3/RS845 or GPIO1/RTS#/RS845 pins.
SP338/SP339 Power Settings
When shipped from the factory, the SP338/SP339 is powered from the regulated 3.3V output from the internal regulator.
Table 10: Default Jumper Setting for SP339 Power
Jumper Setting Description
J2 - 1 & 2 SP339 is powered by the regulated 3.3V from the XR21B1421 (+VCC_OUT). Changing the jumper setting to 2&3 will power the SP339 using the 5V from VBUS (+VCC_USB).
© 2020 MaxLinear, Inc. 9 / 11 maxlinear.com/XR21B1421 Rev 1B

XR21B1421IL2x-0A-EVB
Software and Technical Support
Visit www.maxliner.com/XR21B1421 or www.maxlinear.com/XR21B1420 to download documentation and design tools including software, software drivers, evaluation board schematics, and evaluation board design files. Visit www.maxlinear.com/support/contact-us to search for regional contacts, knowledge-base articles, and submit new support requests.
© 2020 MaxLinear, Inc. 10 / 11 maxlinear.com/XR21B1421 Rev 1B

XR21B1421IL2x-0A-EVB
Revision History
Revision Date Description
1A September 2014 Initial release.
1B January 2020 Add MaxLinear logo and edit "Software and Technical Support" section.
The content of this document is furnished for informational use only, is subject to change without notice, and should not be construed as a commitment by MaxLinear, Inc. MaxLinear, Inc. assumes no responsibility or liability for any errors or inaccuracies that may appear in the informational content contained in this guide. Complying with all applicable copyright laws is the responsibility of the user. Without limiting the rights under copyright, no part of this document may be reproduced into, stored in, or introduced into a retrieval system, or transmitted in any form or by any means (electronic, mechanical, photocopying, recording, or otherwise), or for any purpose, without the express written permission of MaxLinear, Inc.
Maxlinear, Inc. does not recommend the use of any of its products in life support applications where the failure or malfunction of the product can reasonably be expected to cause failure of the life support system or to significantly affect its safety or effectiveness. Products are not authorized for use in such applications unless MaxLinear, Inc. receives, in writing, assurances to its satisfaction that: (a) the risk of injury or damage has been minimized; (b) the user assumes all such risks; (c) potential liability of MaxLinear, Inc. is adequately protected under the circumstances.
MaxLinear, Inc. may have patents, patent applications, trademarks, copyrights, or other intellectual property rights covering subject matter in this document. Except as expressly provided in any written license agreement from MaxLinear, Inc., the furnishing of this document does not give you any license to these patents, trademarks, copyrights, or other intellectual property.
MaxLinear, the MaxLinear logo, and any MaxLinear trademarks, MxL, Full-Spectrum Capture, FSC, G.now, AirPHY and the MaxLinear logo are all on the products sold, are all trademarks of MaxLinear,
Corporate Headquarters: 5966 La Place Court Suite 100 Carlsbad, CA 92008 Tel.:+1 (760) 692-0711 Fax: +1 (760) 444-8598 www.maxlinear.com
11 / 11 maxlinear.com/XR21B1421 Rev 1B
Inc. or one of MaxLinear’s subsidiaries in the U.S.A. and other countries. All rights reserved. Other company trademarks and product names appearing herein are the property of their respective owners.
© 2020 MaxLinear, Inc. All rights reserved