table hockey - kqimageserver.com€¦ · 88 american woodworker november 2004 total cost: ... 135...
TRANSCRIPT

tablehockey
American Woodworker NOVEMBER 2004 87
AR
T D
IRE
CTI
ON
: EVA
NG
ELI
NE
EK
BE
RG
•
PH
OTO
GR
AP
HY:
RA
MO
N M
OR
EN
O •
ILLU
STR
ATIO
N: F
RA
NK
RO
HR
BA
CH
by Randy Johnson
It’s fast, it’s wild—
go for the goal!
Looking for a great holiday gift project?This table hockey game is a blast to play,
even for adults, and it’s so simple, you can makeit even if your gift-building time is running short.It’s made from easy-to-get materials, and the fin-ish is all water-based, so it goes on quickly.
It’s basically a shallow box, made from 3/4-in.hardwood (we used oak) with a playing surfaceof 1/2-in. birch plywood. Add some smallpieces of mesh fabric (available from a fabricstore) for the goals, a couple of strategicallyplaced goalie blocks, a pair of sticks and a puck,and you’re ready to play. Have fun!

P R O J E C T R E Q U I R E M E N T S A T A G L A N C E
Power tools:TablesawDado bladeJigsawDrillSander
FIGURE A EXPLODED VIEW
Materials:1/2-in. birch plywood3/4-in oak lumberStainPaintVarnish
NettingScrewsFinish washers
88 American Woodworker NOVEMBER 2004
Total cost: About $75
C U T T I N G L I S T OVERALL DIMENSIONS: 4-1/4"T X 32"W X 48"L
Part Name Qty. Dimensions (T x W x L) Material Notes
A Bottom 1 1/2" x 31" x 47" Birch plywood
B Ends 2 3/4" x 4-1/4" x 32" Oak
C Sides 2 3/4" x 4-1/4" x 47" Oak
D Corner blocks 4 1-1/2" x 3" x 6" Oak Cut from two pieces of 3/4" x 3-1/2" x 24" lumber glued together.
E Goalie blocks 2 1-1/2" x 2" x 2" Oak Cut from two pieces of 3/4" x 2-1/2" x 18" lumber glued together.
F Net boards 4 1/4" x 3/4" x 7-1/2" Oak
G Sticks 2 1/2" x 2" x 7" Oak or birch plywood
H Pucks 2 1/2"T x 1-3/4" dia. Oak or birch plywood
J Nets 2 7-1/2"H x 7-1/2"W Mesh fabric
ROUND-OVER
CORNERS
C
5-1/2"
1-1/2"
1-3/4"-DIA.CENTERCIRCLE
A
B
E
4-1/2"GOAL ZONE
14"
1/8"ZONELINE
6"
D
#8 x 1-1/2"F.H.
#8 FINISHWASHER
3/4"J
F
#6 x 1"F.H.
#6 FINISHWASHERH
PUCK
135°STICK
G
7"
1/4" x 3/4"RABBET
1/2"W x 1/4"DGROOVE
1/4"
#8 x 1-1/2"F.H.
2"
3"
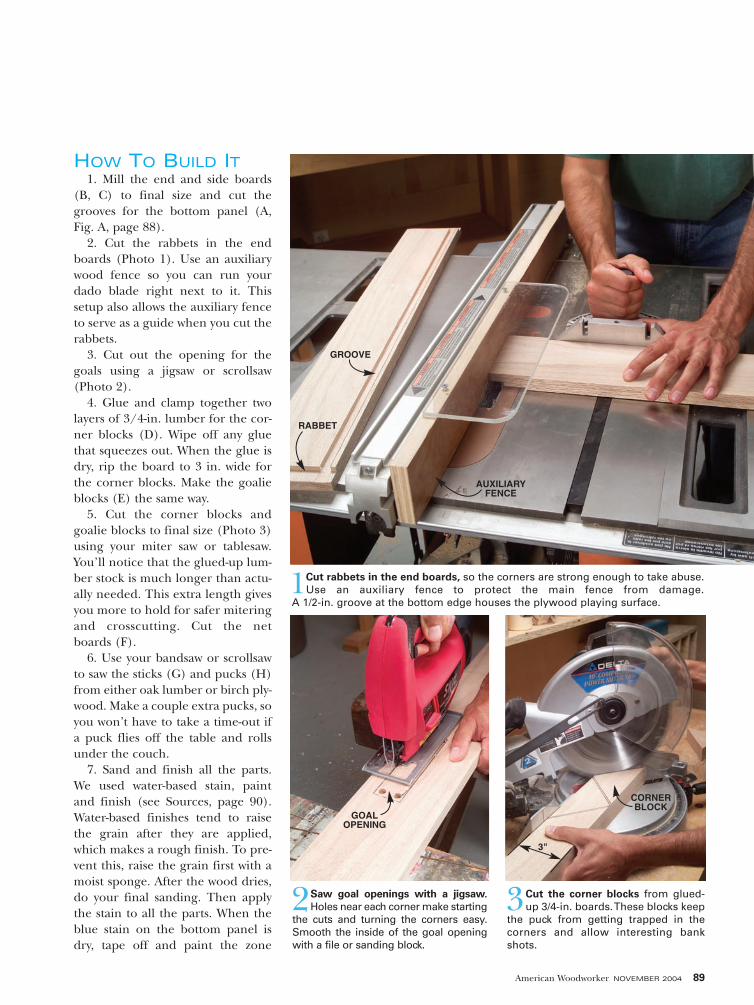
1Cut rabbets in the end boards, so the corners are strong enough to take abuse.Use an auxiliary fence to protect the main fence from damage.
A 1/2-in. groove at the bottom edge houses the plywood playing surface.
2Saw goal openings with a jigsaw.Holes near each corner make starting
the cuts and turning the corners easy.Smooth the inside of the goal openingwith a file or sanding block.
3Cut the corner blocks from glued-up 3/4-in. boards. These blocks keep
the puck from getting trapped in thecorners and allow interesting bankshots.
HOW TO BUILD IT1. Mill the end and side boards
(B, C) to final size and cut thegrooves for the bottom panel (A,Fig. A, page 88).
2. Cut the rabbets in the endboards (Photo 1). Use an auxiliarywood fence so you can run yourdado blade right next to it. Thissetup also allows the auxiliary fenceto serve as a guide when you cut therabbets.
3. Cut out the opening for thegoals using a jigsaw or scrollsaw(Photo 2).
4. Glue and clamp together twolayers of 3/4-in. lumber for the cor-ner blocks (D). Wipe off any gluethat squeezes out. When the glue isdry, rip the board to 3 in. wide forthe corner blocks. Make the goalieblocks (E) the same way.
5. Cut the corner blocks andgoalie blocks to final size (Photo 3)using your miter saw or tablesaw.You’ll notice that the glued-up lum-ber stock is much longer than actu-ally needed. This extra length givesyou more to hold for safer miteringand crosscutting. Cut the netboards (F).
6. Use your bandsaw or scrollsawto saw the sticks (G) and pucks (H)from either oak lumber or birch ply-wood. Make a couple extra pucks, soyou won’t have to take a time-out ifa puck flies off the table and rollsunder the couch.
7. Sand and finish all the parts.We used water-based stain, paintand finish (see Sources, page 90).Water-based finishes tend to raisethe grain after they are applied,which makes a rough finish. To pre-vent this, raise the grain first with amoist sponge. After the wood dries,do your final sanding. Then applythe stain to all the parts. When theblue stain on the bottom panel isdry, tape off and paint the zone
American Woodworker NOVEMBER 2004 89
AUXILIARYFENCE
GOALOPENING
CORNERBLOCK
GROOVE
RABBET
3"

90 American Woodworker NOVEMBER 2004
4 Finish all the parts before you assemble them. After the blue stain on the bot-tom panel is dry, tape off and paint the zone lines and the center circle.
5Assemble the parts with flat headscrews and finish washers. Finish
washers provide extra bearing surfacefor the screw heads and don’t requirecountersinking.
6 Attach the goal netting with the netboards and screws. Leave the net
open on the sides to make it easy toretrieve the puck. You’re ready to play!
T A B L E H O C K E YR U L E S
You can play table hockey twoways. The first is free play. Playersstart with the puck on the centercircle and both hit it around until agoal is scored. The only limit isthat a player may not play the puckwithin the goal zone of the otherplayer (see Fig. A). If the puck fliesoff the table during play, return itto the center circle and resumeplaying.
The second way to play is totake turns. Each player takes apredetermined number of shots.Two swings per player is common,but the exact number is up to you.You can handicap a better playerby giving him or her fewer swingsthan a less experienced player.The entire rink area is open forplay. If a puck is knocked off thetable, it’s turned over to the otherplayer, who then gets to take oneadditional shot during his or herturn. Of course, it’s also fun tomake up your own rules!
lines and center circle (Photo 4).Finally, brush on the clear topcoatfinish.
8. Assemble the hockey table withscrews and finish washers (Photo 5).Drill shank and pilot holes in thesides to prevent splitting the woodor stripping the screw heads.
9. Attach the netting (J) over thegoal openings with the net boards
(F). The bottom net board goesinside the net and the top net boardgoes outside the net (Photo 6). Holdthe netting in place with a bit of double-sided tape during assembly.You can substitute almost any kindof fabric for the netting, if you wish.
10. Attach corner and goalie blocks(D, E) with screws from the bottom.
It’s game time! Go for the goal!
Minwax (800) 523-9299, www.minwax.com Available at home centers.Winter Sky water-based stain, $7 per quartRose Wood water-based stain, $7 per quartPolycrylic water-based clear satin finish, $8per quart.
Rust-Oleum (800) 553-8444www.rustoleum.comApple red latex paint, $4 per half pint.
S O U R C E S
FINISHWASHER
DOUBLESIDEDTAPE