table of contents | 1 prc series
TRANSCRIPT

Table of Contents | 1
PRC_7TP_UserManual_KOR_V1.0
PRC SERIES
Table of Contents | 1
PRC_7TP_UserManual_KOR_V1.0
Table of Contents
1 Introduction .......................................................................................................................................................................... 3
1.1 Hardware Specification ...................................................................................................................................... 3
1.2 Key and LED functions ....................................................................................................................................... 4
1.3 Connection .............................................................................................................................................................. 5
1.4 Applications ............................................................................................................................................................ 8
2 Login ........................................................................................................................................................................................ 9
3 Applications ....................................................................................................................................................................... 11
3.1 Jogging .................................................................................................................................................................. 11
3.2 Program & Sub-program mananger ....................................................................................................... 14
3.3 Command Terminal .......................................................................................................................................... 16
3.4 IO Manager .......................................................................................................................................................... 17
3.5 Scope ...................................................................................................................................................................... 18
3.5.1 Capture signal ....................................................................................................................................... 18
3.5.2 Measure signal ..................................................................................................................................... 19
3.6 Variable Manager .............................................................................................................................................. 20
3.7 Logging .................................................................................................................................................................. 21
3.8 Position Monitoring ......................................................................................................................................... 22
3.9 Homing .................................................................................................................................................................. 22
3.10 Motion Parameter ............................................................................................................................................. 23
3.11 System Configuration ...................................................................................................................................... 24
3.11.1 General Settings ................................................................................................................................... 24
3.11.2 Robot Controller Settings ................................................................................................................ 25
3.11.3 Each Robot Settings ........................................................................................................................... 27
3.11.4 Motor/Drive Settings ......................................................................................................................... 28

Table of Contents | 2
3.12 Software information ....................................................................................................................................... 29
4 Virtual Keyboard and keypad ................................................................................................................................... 30
4.1 Virtual Keyboard ................................................................................................................................................ 30
4.2 Virtual Keypad .................................................................................................................................................... 31
5 Teaching Pendant Simulator ...................................................................................................................................... 32
6 Upgrade TP Firmware ................................................................................................................................................... 33
6.1 Upload file using WinSCP (https://winscp.net/eng/download.php) .......................................... 33
6.2 Change permission to run application ................................................................................................... 34

Introduction | 3
PRC_7TP_UserManual_KOR_V1.0
1 Introduction
1.1 Hardware Specification
Item Description
Processor TI AM335x, 800 MHz
RAM 512 MB
LCD 800x480
Touch Resistive
USB (Keyboard, Mouse) 1
Communication Ethernet, RS232
Power 24V DC
Protection Grade IP40~IP65
Case Black
Operating Environment 00C~450C
Storage temperature -200C~700C

Introduction | 4
1.2 Key and LED functions
Number Function
1. LED
2. Home window
3. System Config
4. Command terminal
5. Program manager
6. User Log
7. Position Monitoring
8. Error Log
9. Show keypad for IP
10. Hide keypad / Stop Scope
11.
12. Robot Select
13. Jog
14.
15. Jog Step
16. Velocity Increase for Jogging
17. Velocity decrease for Jogging
18. Using when the number of Axes is greater than
6
19. Jogging for each axis (index 0~5)
20. Start Program / Robot ON
21. Stop Program / Stop motion when jogging

Introduction | 5
PRC_7TP_UserManual_KOR_V1.0
1.3 Connection
Robot Controller Pin Map

Introduction | 6

Introduction | 7
PRC_7TP_UserManual_KOR_V1.0
TP Pin Map
Connection between Robot Controller and TP
Part [Robot Controller] [TP]
Emergency Switch
2 EMTP1+ EC1
CN1
15 EMTP1- EC2
3 EMTP2+ EC3
16 EMTP2- EC4
Dead-man Switch 4 SWEN1+ NO1
17 SWEN1- SC1
Select Switch
6 SELCOM1+ KL1
7 SELCOM2+ KR1
20 SELCOM2- KC1
RS232
12 TX RX
CN2
13 RX TX
25 GND GND
POWER 1 VCC 24V
14 GND 0
Ethernet RJ45 RJ45

Introduction | 8
1.4 Applications

Login | 9
PRC_7TP_UserManual_KOR_V1.0
2 Login
In order to control system, first we need to login to system.
Input IP
Press Connect
If IP of Robot Controller is online, next step is choosing Login Level

Login | 10
Operator does not require password. Otherwise, it requires password to login to system.

Application | 11
PRC_7TP_UserManual_KOR_V1.0
3 Applications
3.1 Jogging
With 3D View
When Press Button Hide [3D] we change to mode without 3D.

Application | 12
1. Srv ON / Srv OFF: Turn selected robot ON / OFF.
2. Clear Error: Clear Drive Error of the selected robot.
3. Save Pos: Open Save Position Dialog to Save position to expected position variable.
4. Stop: Stop Jogging Motion
5. 2nd: Show 2nd axis whether is selected.
6. Key on TP: Use Keypad on TP as Joint Jogging or World Jogging.
7. Jogging Left and right for selected Axis
8. Step: Jogging step with value on the left
9. Move selected Axis with value on the left

Application | 13
PRC_7TP_UserManual_KOR_V1.0
1. Select variable index
2. View all available variables
3. View current position of selected robot
4. Get current value of selected variable
5. Save value from table to current variable

Application | 14
3.2 Program & Sub-program mananger
Program editor with Syntax Highlight and Auto-completion code support.

Application | 15
PRC_7TP_UserManual_KOR_V1.0
1. Program select
2. Sub-program select
3. Program/sub-program name
4. Compile program/sun-program
5. Start/Stop opened program
6. Pause/Resume opened program
7. Save the opened program to TP
8. Open program from TP and load to current program
9. Auto-complete code support
Program Manager:
1. Auto Run at Startup Robot Controller
2. Program status with Compiled (C), Running (R), Paused (P), Error (E)
3. 10 program can run at the same time
4. Extra program can load from TP by press button at 8.

Application | 16
3.3 Command Terminal
Execute single command and return result.
Support motion command, Math.

Application | 17
PRC_7TP_UserManual_KOR_V1.0
3.4 IO Manager
Easy to control Input/output of Digital/Analog signals by press the buttons or enter value.

Application | 18
3.5 Scope
3.5.1 Capture signal
1. Select Channel (8 channel)
2. Select Signal
3. Select Robot Index (in case of multiple robots are used) or Port of Digital/Analog IO
4. Select Axis Number (in case of multiple robots are used) or Bit Index (in case of Digital IO
are used)
5. Select how long to be fixed within scope window.
6. Run/Stop scope

Application | 19
PRC_7TP_UserManual_KOR_V1.0
3.5.2 Measure signal
By right click and drag the mouse to produce a rectangle, we can zoom in graph within the rectangle.
By moving the ruler, we can get data measurement in the table.
1. Choose using window to zoom
2. Change size by navigation tool (default deceased in size)
3. Increased in size when using navigation tool
4. Zoom within the zoom window
5. Fix all data of scope into the scope window
6. Zoom in
7. Zoom out

Application | 20
3.6 Variable Manager
Support managing Integer, Double and Position variable for adding, editing, and deleting each type
of variable.
1. Select Robot
2. Refresh robot variable data
3. Add new variable
4. Remove the last variable

Application | 21
PRC_7TP_UserManual_KOR_V1.0
3.7 Logging
Support log for error, system, maintenance, and user log.
1. Clear log on TP and Robot Controller
2. Save current log to file on TP.

Application | 22
3.8 Position Monitoring
User can monitor position of all robot ( joint and world) within a window.
3.9 Homing
First, we set homing parameters then we can Start or Stop the homing process.

Application | 23
PRC_7TP_UserManual_KOR_V1.0
3.10 Motion Parameter
1. Select robot for setting motion parameters
2. Select Motion type: Manual, Program and Ready
3. Save to Flash: Save current motion parameters to flash, then next restart robot controller
can re-use them.
4. Get current motion parameter from Robot Controller
5. Set joint motion parameter from left table to Robot Controller
6. Set work motion parameter from left table to Robot Controller

Application | 24
3.11 System Configuration
3.11.1 General Settings
1. Select COM (Serial Port) on TP that will connect to Robot Controller
2. Refresh to get new status of serial ports
3. Change the password if login as Programmer or Administrator
4. Update license code long-run of Robot Controller

Application | 25
PRC_7TP_UserManual_KOR_V1.0
3.11.2 Robot Controller Settings
Change some information about Robot Controller
1. IP address
2. Cycle time: 4000ms, 2000ms, 1000ms, 500ms, 250ms
3. Robot Number: Automatically Counted when adding/removing robot
4. Toto Axis Number: Automatically Counted when adding/removing robot
5. ENI File: Choose ENI on Robot Controller by click Search button

Application | 26
6. Add Robot From File: Add robot by file from TP.
7. Add Robot From Template: Add robot by file from Robot Controller.

Application | 27
PRC_7TP_UserManual_KOR_V1.0
3.11.3 Each Robot Settings

Application | 28
3.11.4 Motor/Drive Settings
After setting, we can press button Save all Parameter to RC and Reboot to start with new settings.
Application | 29
PRC_7TP_UserManual_KOR_V1.0
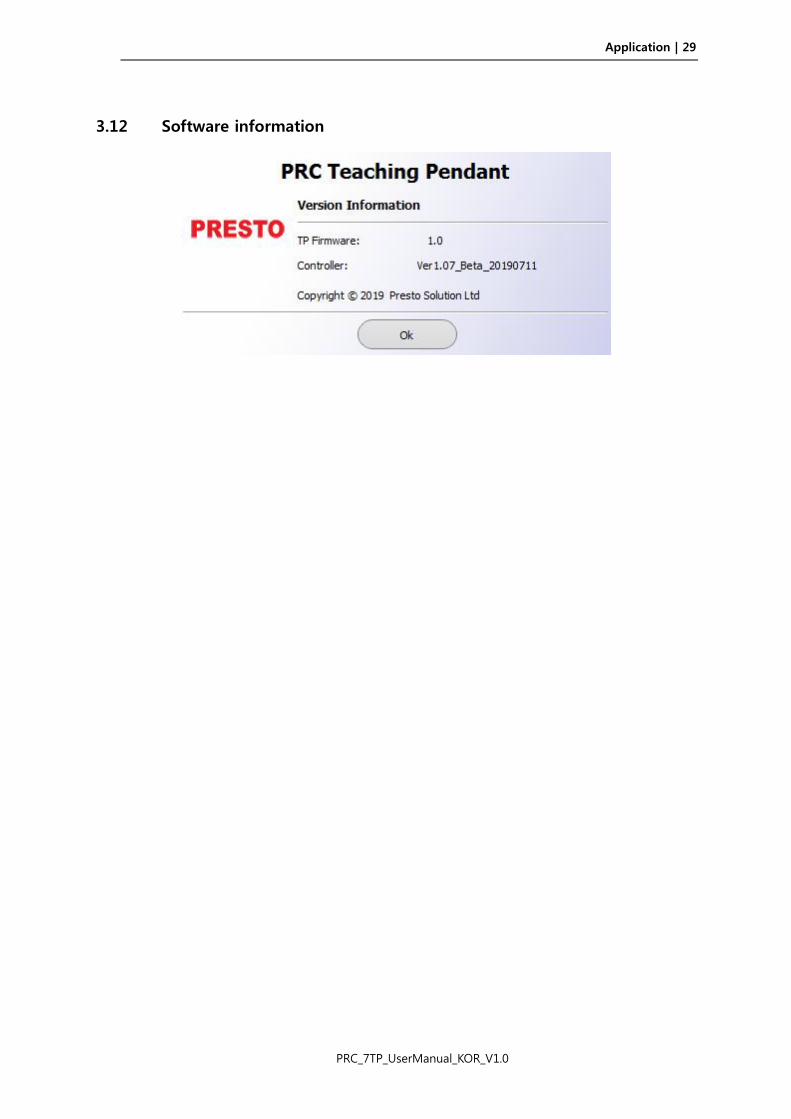
3.12 Software information
Virtual Keyboard and Keypad | 30
4 Virtual Keyboard and keypad
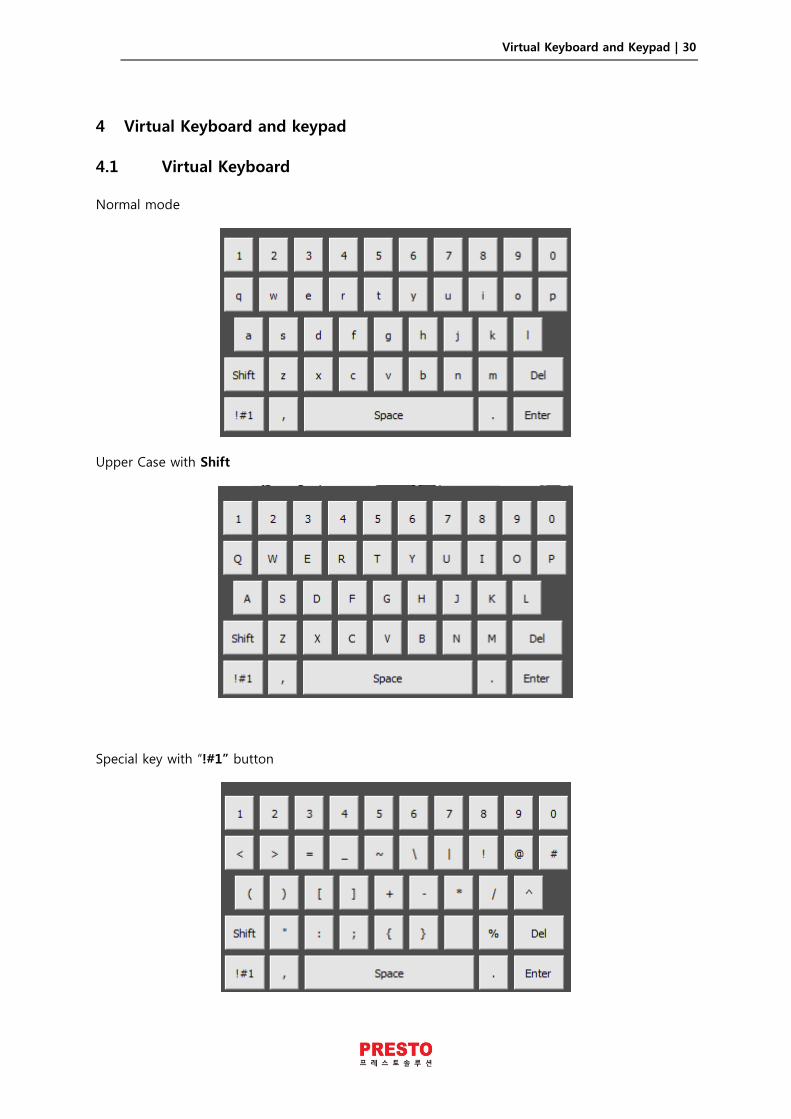
4.1 Virtual Keyboard
Normal mode
Upper Case with Shift
Special key with “!#1” button

Virtual Keyboard and Keypad | 31
PRC_7TP_UserManual_KOR_V1.0
4.2 Virtual Keypad

Virtual Keyboard and Keypad | 32
5 Teaching Pendant Simulator
When using with PCs, Teaching Pendant Simulator can support both Robot Controller Simulator
and Teaching Pendant Simulator.
Simulator menu will be showed when we click more button.
We can start Robot Controller Simulator by choosing Reboot Controller (SIM) menu.
We can use Teaching Pedant Simulator by choosing Show TP Simulator menu.
Upgrade TP Firmware | 33
PRC_7TP_UserManual_KOR_V1.0
6 Upgrade TP Firmware
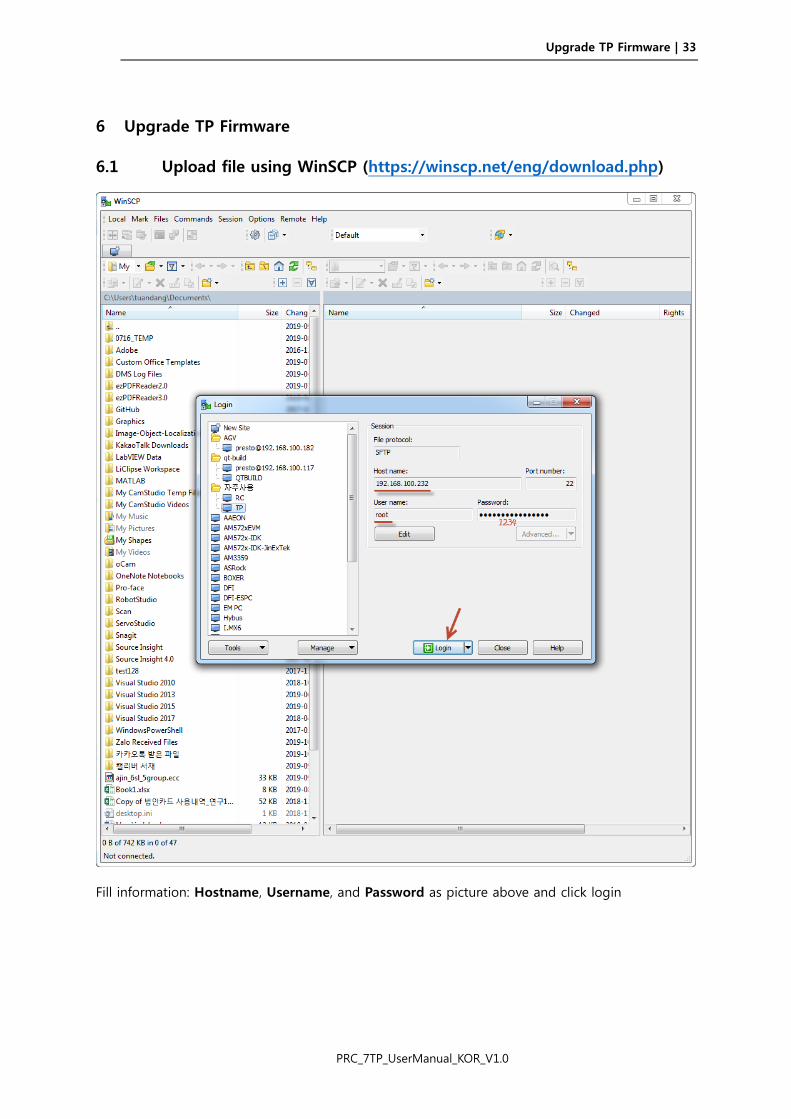
6.1 Upload file using WinSCP (https://winscp.net/eng/download.php)
Fill information: Hostname, Username, and Password as picture above and click login
Upgrade TP Firmware | 34
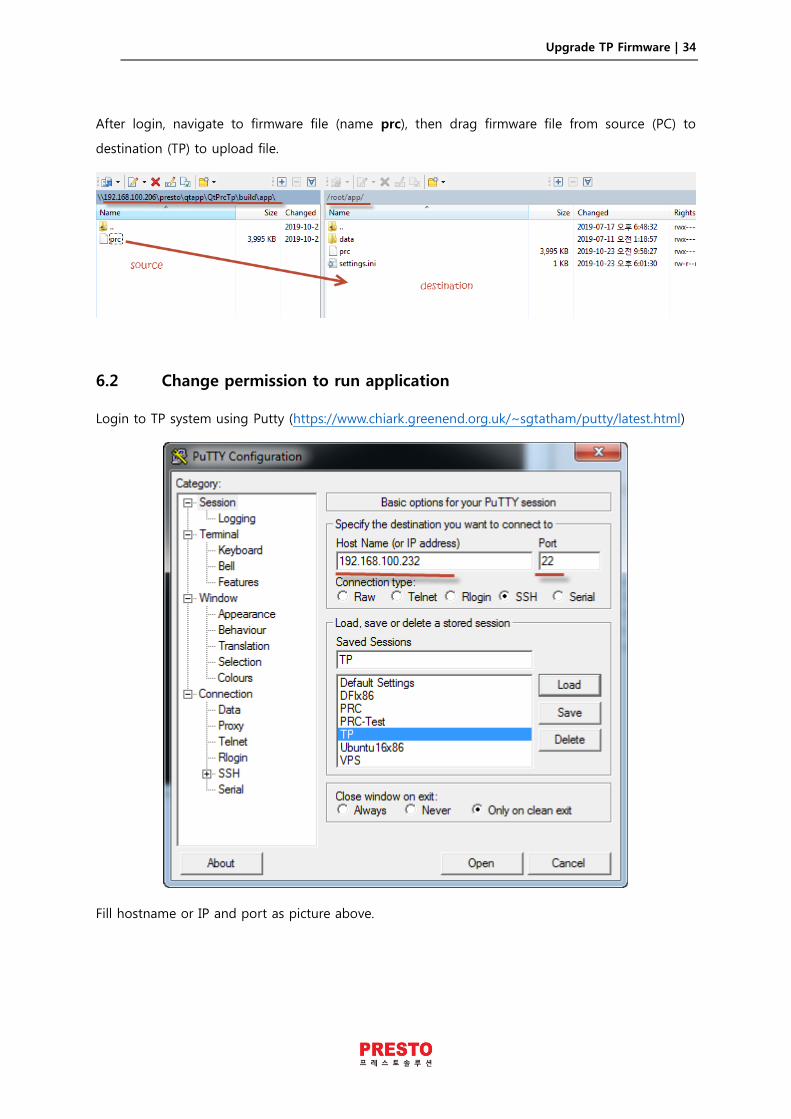
After login, navigate to firmware file (name prc), then drag firmware file from source (PC) to
destination (TP) to upload file.
6.2 Change permission to run application
Login to TP system using Putty (https://www.chiark.greenend.org.uk/~sgtatham/putty/latest.html)
Fill hostname or IP and port as picture above.

Upgrade TP Firmware | 35
PRC_7TP_UserManual_KOR_V1.0
Fill username and password as picture above
Navigate to app director by cd app
Change permission by chmod +x prc
Reboot TP

| 36
PRC_7TP_UserManual_KOR_V1.0
Copyright © 2020 Presto Solution Co., Ltd. All rights reserved

| 37
PRC_7TP_UserManual_KOR_V1.0
www.prestosolution.co.kr
101-1404, Digital Empire Building 2nd, 88 Sinwon RD, Yeongtong-gu, Suwon-si, Gyeonggi-do, KOREA
T. +82-70-7167-8606 | F. +82-70-7159-2628