table of contents - bloomsburg university of pennsylvania · purchase requisitions ... make certain...
TRANSCRIPT
Procurement Page 1
Copyright, Procurement Office, Bloomsburg University 12/18/2015
Table of Contents Table of Contents ............................................................................................................................................................................................... 1 Purchase Requisitions – Customizing Your Desktop Settings ........................................................................................................................... 2
Favorite Settings – Importing “Favorites” ..................................................................................................................................................... 2
Personal Settings ............................................................................................................................................................................................ 2 Default Settings for Purchasing Screens ............................................................................................................................................................ 6 Creating a Purchase Requisition - Transaction ME51N .................................................................................................................................... 7
Section 1 ~ Header ......................................................................................................................................................................................... 7
Section 2 ~ Item Overview ............................................................................................................................................................................. 8
IMPORTANT: Info regarding orders in June ........................................................................................................................................... 9 Section 3 ~ Item Detail ................................................................................................................................................................................... 9
Helpful Tips: .................................................................................................................................................................................................... 10
Searching for “des vendor” in Item Overview portion of screen ................................................................................................................. 10 Finding Vendor Address – Transaction MK03 ............................................................................................................................................ 11
Finding Vendors Already Used by BU – ZM08 .......................................................................................................................................... 11 Attaching a Document .................................................................................................................................................................................. 11 Ordering for grant or project accounts ......................................................................................................................................................... 12
Creating purchase requisitions with more than 1 line item .......................................................................................................................... 12
Saving Your Purchase Requisition ................................................................................................................................................................... 13 Using Document Overview (Transaction ME53N).......................................................................................................................................... 13
Ensuring Correct Settings to Use Document Overview ............................................................................................................................... 13 Changing or Deleting Lines in Purchase Requisitions That Have Already Been Saved ................................................................................. 15
Deleting a Line Item ..................................................................................................................................................................................... 16 Duplicating a Purchase Requisition ............................................................................................................................................................. 17
Checking the Status of a Purchase Requisition using Document Overview .................................................................................................... 18
To View History of all Your Purchase Requisitions ........................................................................................................................................ 21
Viewing Purchase Order History for Specific Cost Center or WBS Element – Transaction ME2K .............................................................. 22
Viewing Purchase Order History – Actual Dollars Spent per Cost Center & Fiscal Year – Transaction ZM06 ............................................ 23
Procurement Page 2
Copyright, Procurement Office, Bloomsburg University 12/18/2015
Purchase Requisitions – Customizing Your Desktop Settings
NOTE: The information that you enter below will only have to be entered once! The software will remember the settings henceforth.
The time that you spend creating these settings will be very helpful in your future use of this software.
Favorite Settings – Importing “Favorites”
Make certain you imported folders and favorites into SAP (per Setup/Navigation training). If you have folders under Favorites called
Purchasing and Storeroom (and transactions in those folders), that means that you have successfully completed this portion. If you
don’t have these, visit this webpage http://ot.bloomu.edu/SAP/navigation.php and review the training document.
Personal Settings
In this section you will be setting up default information that will automatically place text information in the purchase requisition
without you having to type it in. Time spent with this section will save you many, many keystrokes in the future.
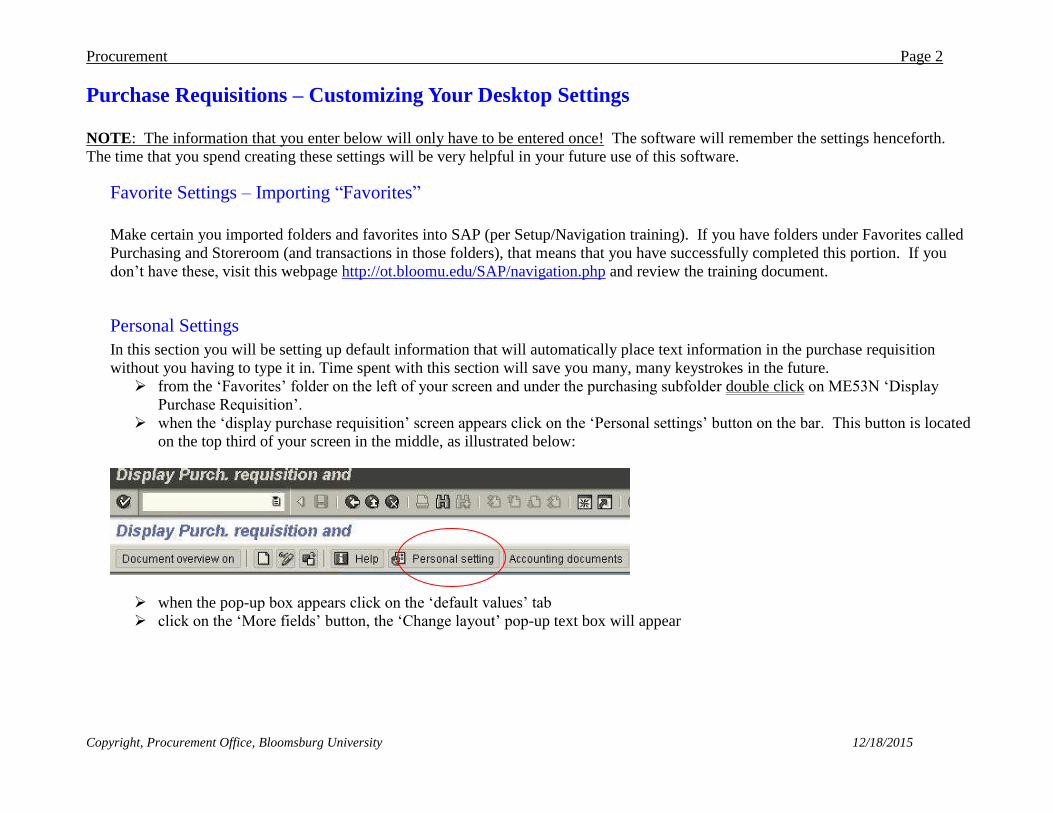
from the ‘Favorites’ folder on the left of your screen and under the purchasing subfolder double click on ME53N ‘Display
Purchase Requisition’.
when the ‘display purchase requisition’ screen appears click on the ‘Personal settings’ button on the bar. This button is located
on the top third of your screen in the middle, as illustrated below:
when the pop-up box appears click on the ‘default values’ tab
click on the ‘More fields’ button, the ‘Change layout’ pop-up text box will appear
Procurement Page 3
Copyright, Procurement Office, Bloomsburg University 12/18/2015
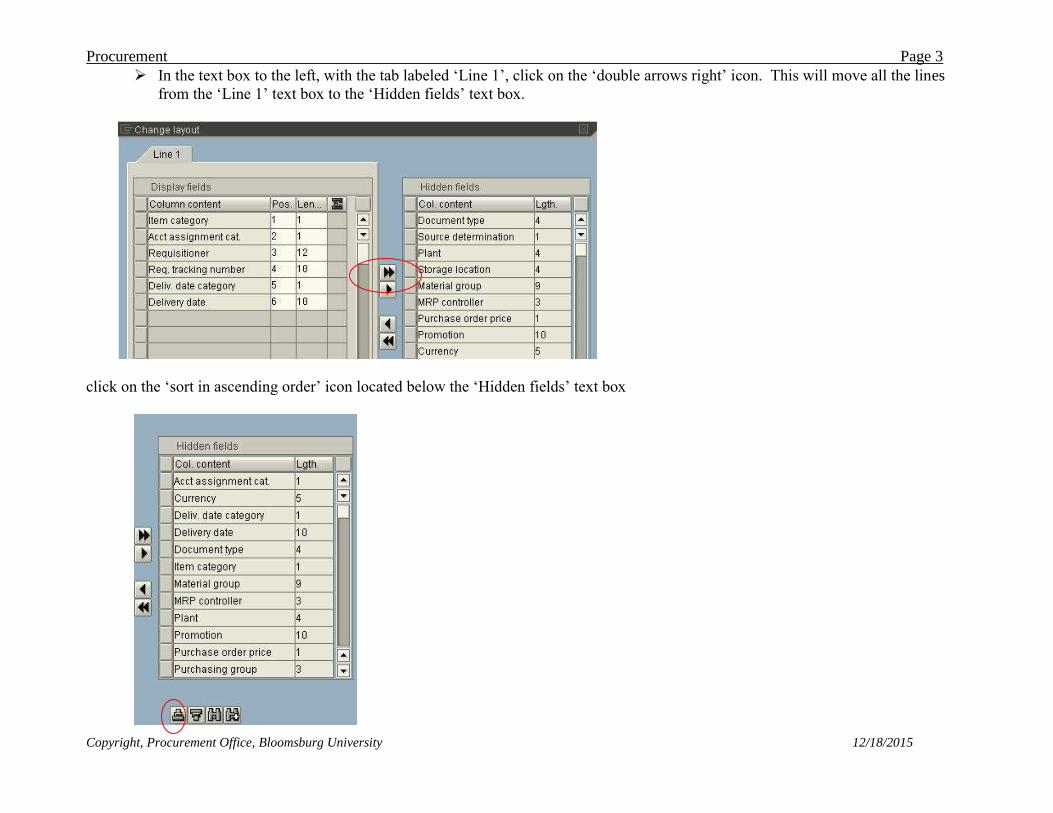
In the text box to the left, with the tab labeled ‘Line 1’, click on the ‘double arrows right’ icon. This will move all the lines
from the ‘Line 1’ text box to the ‘Hidden fields’ text box.
click on the ‘sort in ascending order’ icon located below the ‘Hidden fields’ text box
Procurement Page 4
Copyright, Procurement Office, Bloomsburg University 12/18/2015
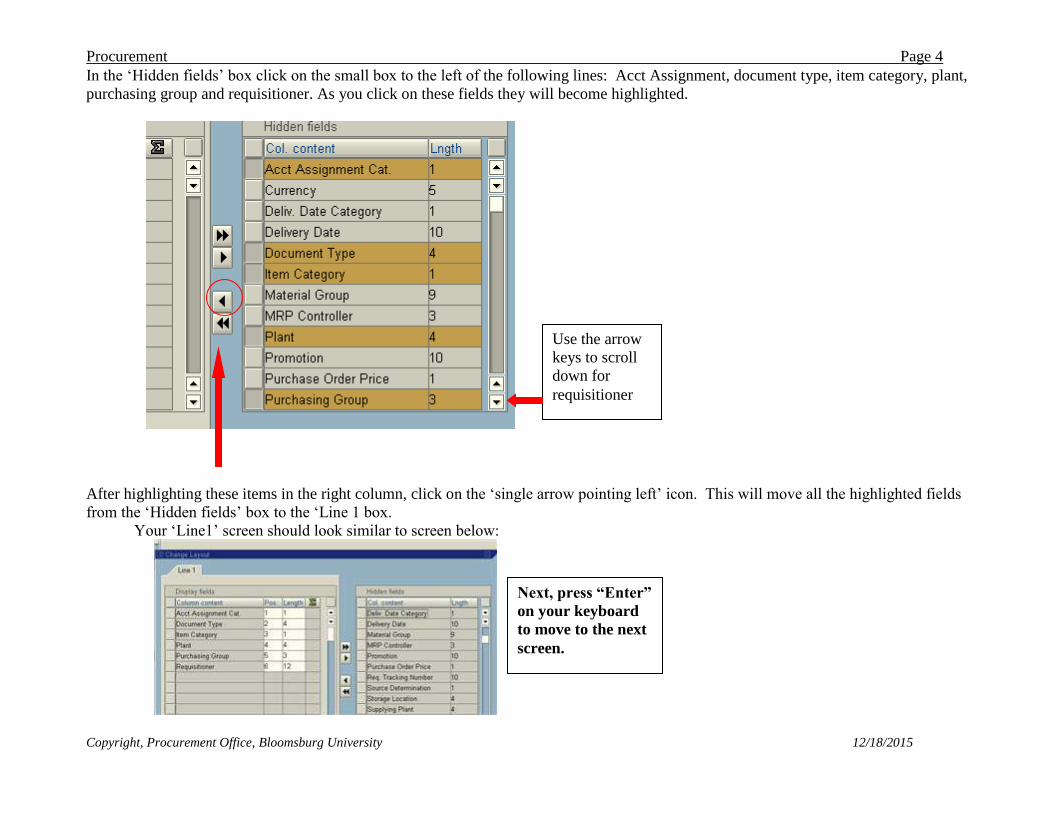
In the ‘Hidden fields’ box click on the small box to the left of the following lines: Acct Assignment, document type, item category, plant,
purchasing group and requisitioner. As you click on these fields they will become highlighted.
After highlighting these items in the right column, click on the ‘single arrow pointing left’ icon. This will move all the highlighted fields
from the ‘Hidden fields’ box to the ‘Line 1 box.
Your ‘Line1’ screen should look similar to screen below:
Use the arrow
keys to scroll
down for
requisitioner
Next, press “Enter”
on your keyboard
to move to the next
screen.
Procurement Page 5
Copyright, Procurement Office, Bloomsburg University 12/18/2015
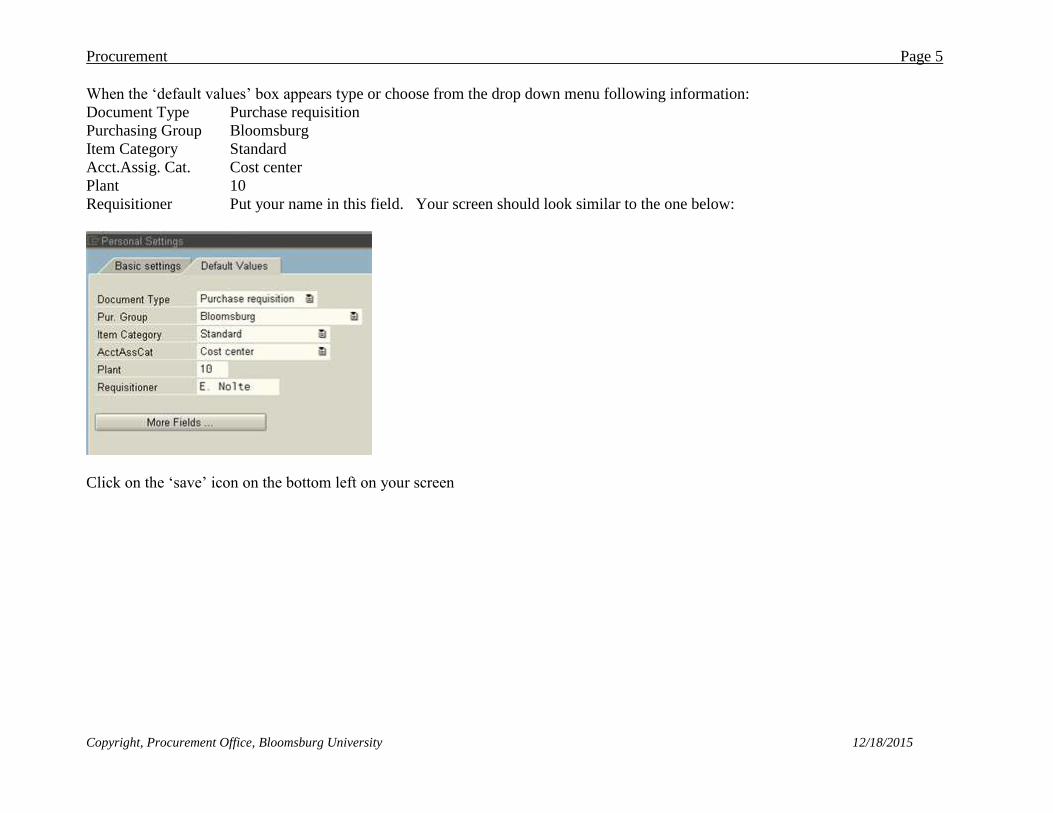
When the ‘default values’ box appears type or choose from the drop down menu following information:
Document Type Purchase requisition
Purchasing Group Bloomsburg
Item Category Standard
Acct.Assig. Cat. Cost center
Plant 10
Requisitioner Put your name in this field. Your screen should look similar to the one below:
Click on the ‘save’ icon on the bottom left on your screen
Procurement Page 6
Copyright, Procurement Office, Bloomsburg University 12/18/2015
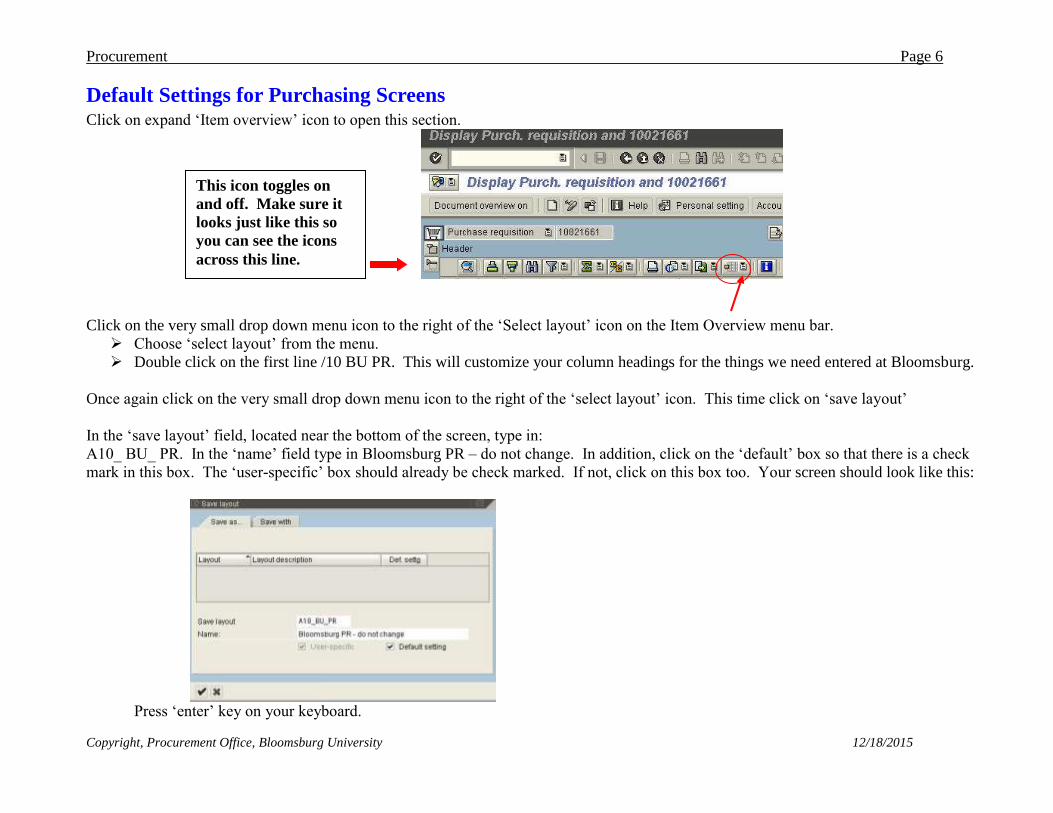
Default Settings for Purchasing Screens Click on expand ‘Item overview’ icon to open this section.
Click on the very small drop down menu icon to the right of the ‘Select layout’ icon on the Item Overview menu bar.
Choose ‘select layout’ from the menu.
Double click on the first line /10 BU PR. This will customize your column headings for the things we need entered at Bloomsburg.
Once again click on the very small drop down menu icon to the right of the ‘select layout’ icon. This time click on ‘save layout’
In the ‘save layout’ field, located near the bottom of the screen, type in:
A10_ BU_ PR. In the ‘name’ field type in Bloomsburg PR – do not change. In addition, click on the ‘default’ box so that there is a check
mark in this box. The ‘user-specific’ box should already be check marked. If not, click on this box too. Your screen should look like this:
Press ‘enter’ key on your keyboard.
This icon toggles on
and off. Make sure it
looks just like this so
you can see the icons
across this line.
Procurement Page 7
Copyright, Procurement Office, Bloomsburg University 12/18/2015
Creating a Purchase Requisition - Transaction ME51N
You will find this transaction under Favorites in the Purchasing folder. Before you start, make sure you have funds in the cost center and
commitment area you plan on using. Refer to the Budget training materials to look up budget funds availability.
This screen is divided into 3 main parts….Header, Item Overview, and Item Detail.
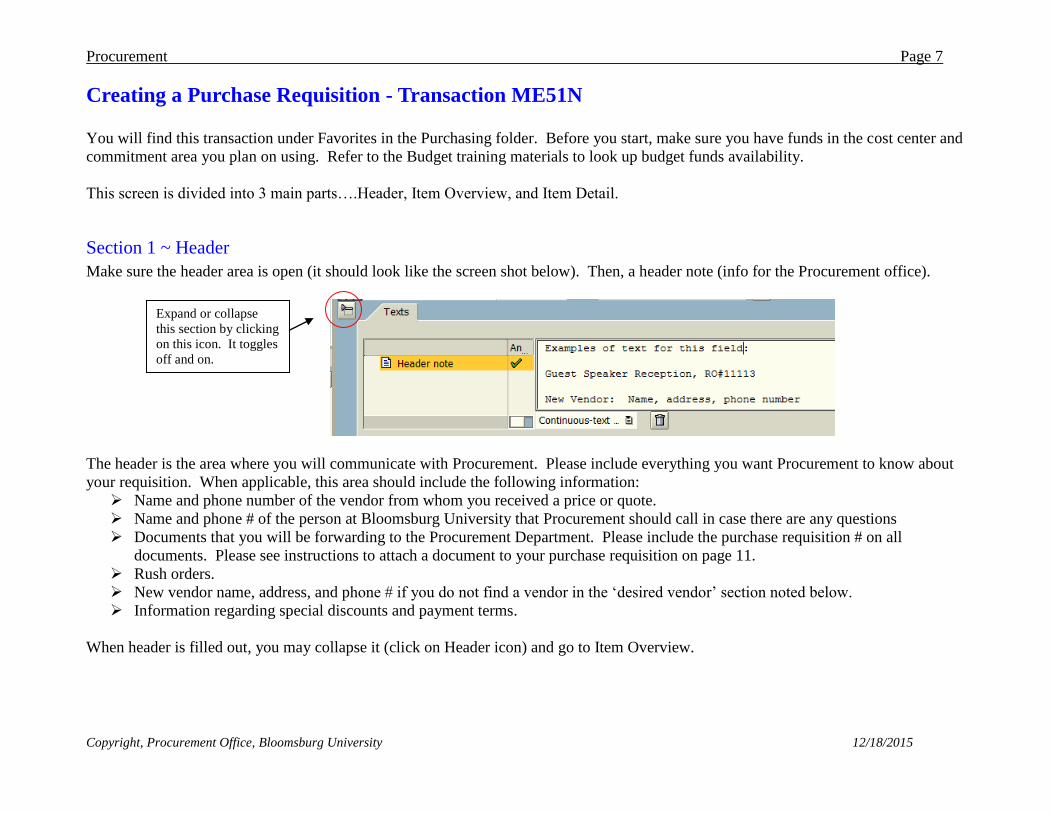
Section 1 ~ Header
Make sure the header area is open (it should look like the screen shot below). Then, a header note (info for the Procurement office).
The header is the area where you will communicate with Procurement. Please include everything you want Procurement to know about
your requisition. When applicable, this area should include the following information:
Name and phone number of the vendor from whom you received a price or quote.
Name and phone # of the person at Bloomsburg University that Procurement should call in case there are any questions
Documents that you will be forwarding to the Procurement Department. Please include the purchase requisition # on all
documents. Please see instructions to attach a document to your purchase requisition on page 11.
Rush orders.
New vendor name, address, and phone # if you do not find a vendor in the ‘desired vendor’ section noted below.
Information regarding special discounts and payment terms.
When header is filled out, you may collapse it (click on Header icon) and go to Item Overview.
Expand or collapse
this section by clicking
on this icon. It toggles
off and on.
Procurement Page 8
Copyright, Procurement Office, Bloomsburg University 12/18/2015
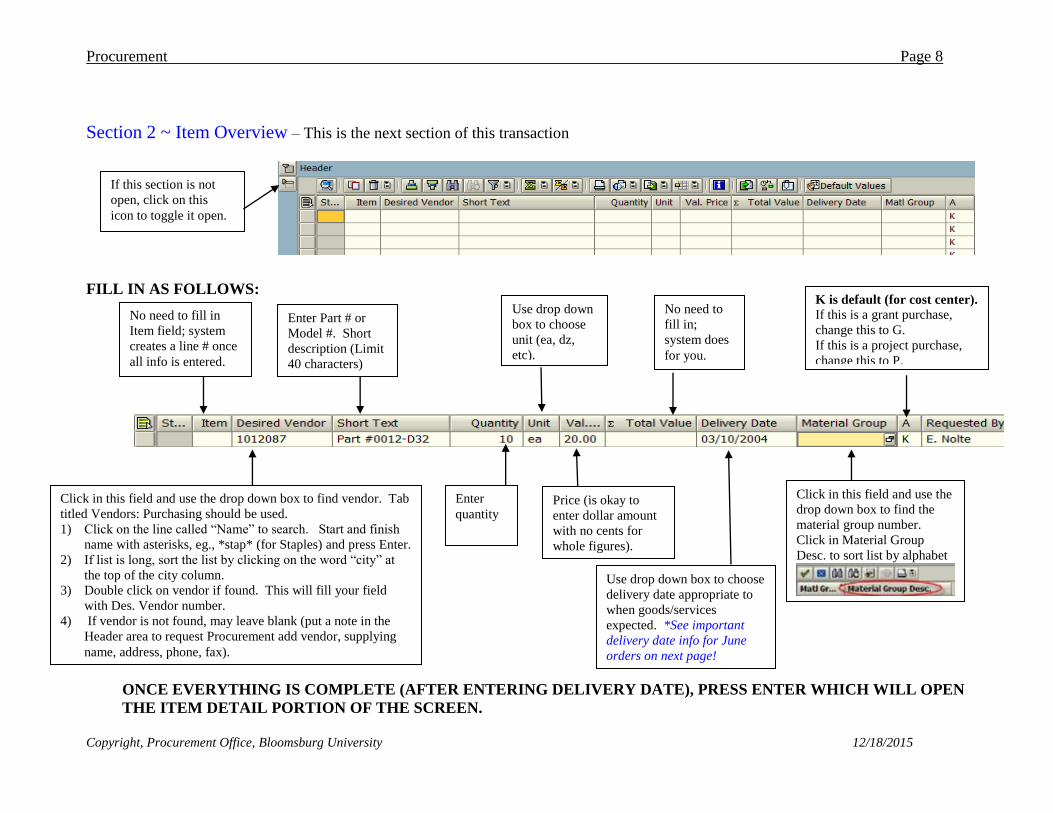
Section 2 ~ Item Overview – This is the next section of this transaction
FILL IN AS FOLLOWS:
ONCE EVERYTHING IS COMPLETE (AFTER ENTERING DELIVERY DATE), PRESS ENTER WHICH WILL OPEN
THE ITEM DETAIL PORTION OF THE SCREEN.
No need to fill in
Item field; system
creates a line # once
all info is entered.
Click in this field and use the drop down box to find vendor. Tab
titled Vendors: Purchasing should be used.
1) Click on the line called “Name” to search. Start and finish
name with asterisks, eg., *stap* (for Staples) and press Enter.
2) If list is long, sort the list by clicking on the word “city” at
the top of the city column.
3) Double click on vendor if found. This will fill your field
with Des. Vendor number.
4) If vendor is not found, may leave blank (put a note in the
Header area to request Procurement add vendor, supplying
name, address, phone, fax).
Enter Part # or
Model #. Short
description (Limit
40 characters)
Enter
quantity
Use drop down
box to choose
unit (ea, dz,
etc).
No need to
fill in;
system does
for you.
Price (is okay to
enter dollar amount
with no cents for
whole figures).
Use drop down box to choose
delivery date appropriate to
when goods/services
expected. *See important
delivery date info for June
orders on next page!
If this section is not
open, click on this
icon to toggle it open.
K is default (for cost center).
If this is a grant purchase,
change this to G.
If this is a project purchase,
change this to P.
Click in this field and use the
drop down box to find the
material group number.
Click in Material Group
Desc. to sort list by alphabet
Procurement Page 9
Copyright, Procurement Office, Bloomsburg University 12/18/2015
IMPORTANT: Info regarding orders in June If you are entering a purchase requisition in the month of June, select a delivery date when you expect to receive the goods or services.
You cannot use a delivery date for the current year in order to roll over funds to the new budget year. (A delivery date of 6/30/20_ _
encumbers current year funds while 7/1/20_ _ will encumber funds from next year’s budget.)
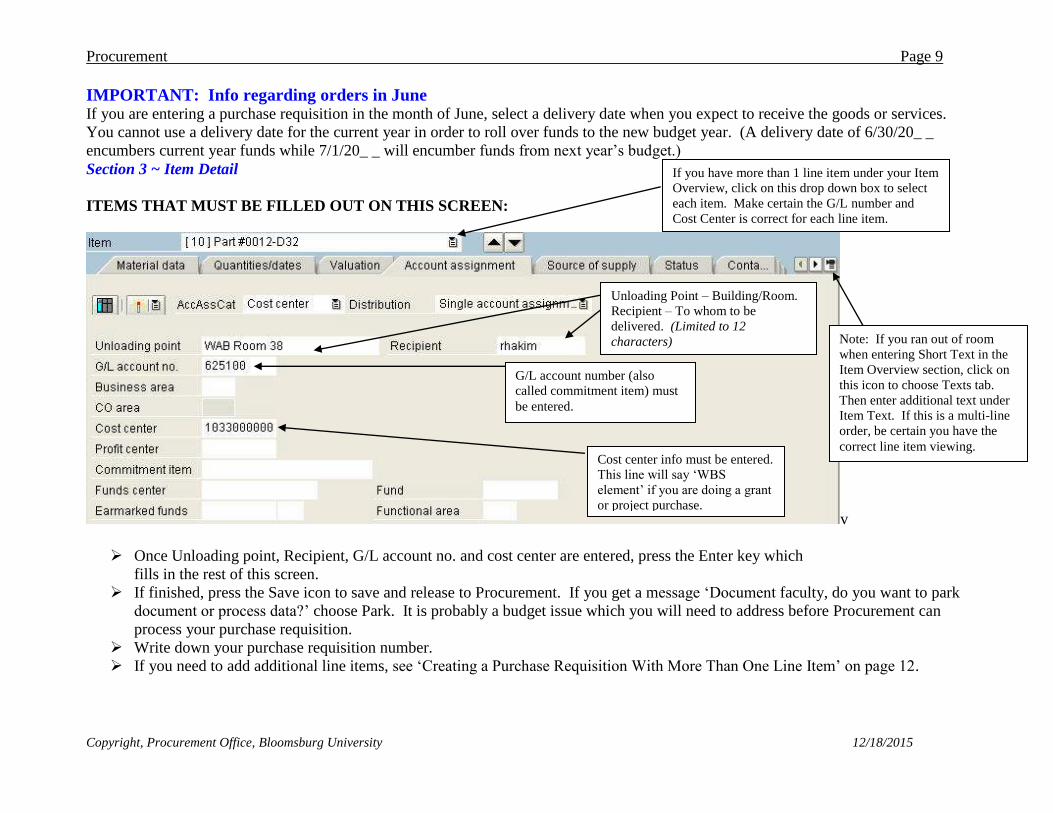
Section 3 ~ Item Detail
ITEMS THAT MUST BE FILLED OUT ON THIS SCREEN:
v
Once Unloading point, Recipient, G/L account no. and cost center are entered, press the Enter key which
fills in the rest of this screen.
If finished, press the Save icon to save and release to Procurement. If you get a message ‘Document faculty, do you want to park
document or process data?’ choose Park. It is probably a budget issue which you will need to address before Procurement can
process your purchase requisition.
Write down your purchase requisition number.
If you need to add additional line items, see ‘Creating a Purchase Requisition With More Than One Line Item’ on page 12.
G/L account number (also
called commitment item) must
be entered.
Cost center info must be entered.
This line will say ‘WBS
element’ if you are doing a grant
or project purchase.
If you have more than 1 line item under your Item
Overview, click on this drop down box to select
each item. Make certain the G/L number and
Cost Center is correct for each line item.
Unloading Point – Building/Room.
Recipient – To whom to be
delivered. (Limited to 12
characters) Note: If you ran out of room
when entering Short Text in the
Item Overview section, click on
this icon to choose Texts tab.
Then enter additional text under
Item Text. If this is a multi-line
order, be certain you have the
correct line item viewing.
Procurement Page 10
Copyright, Procurement Office, Bloomsburg University 12/18/2015
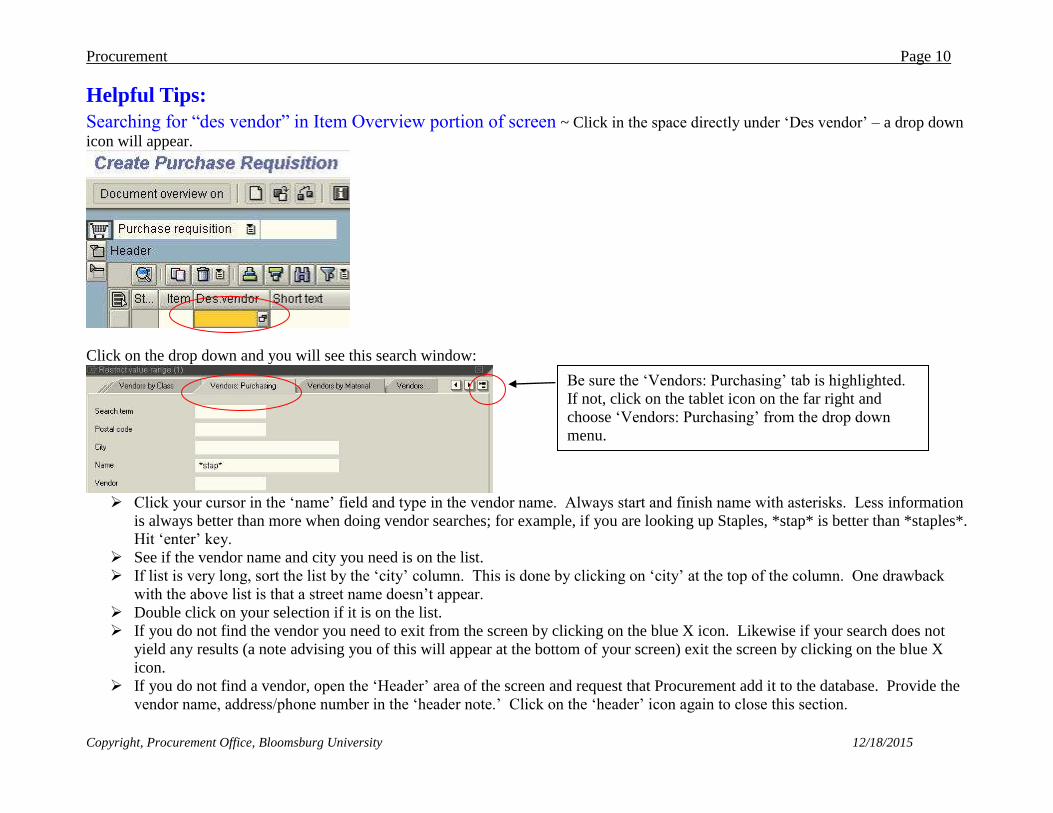
Helpful Tips:
Searching for “des vendor” in Item Overview portion of screen ~ Click in the space directly under ‘Des vendor’ – a drop down
icon will appear.
Click on the drop down and you will see this search window:
Click your cursor in the ‘name’ field and type in the vendor name. Always start and finish name with asterisks. Less information
is always better than more when doing vendor searches; for example, if you are looking up Staples, *stap* is better than *staples*.
Hit ‘enter’ key.
See if the vendor name and city you need is on the list.
If list is very long, sort the list by the ‘city’ column. This is done by clicking on ‘city’ at the top of the column. One drawback
with the above list is that a street name doesn’t appear.
Double click on your selection if it is on the list.
If you do not find the vendor you need to exit from the screen by clicking on the blue X icon. Likewise if your search does not
yield any results (a note advising you of this will appear at the bottom of your screen) exit the screen by clicking on the blue X
icon.
If you do not find a vendor, open the ‘Header’ area of the screen and request that Procurement add it to the database. Provide the
vendor name, address/phone number in the ‘header note.’ Click on the ‘header’ icon again to close this section.
Be sure the ‘Vendors: Purchasing’ tab is highlighted.
If not, click on the tablet icon on the far right and
choose ‘Vendors: Purchasing’ from the drop down
menu.
Procurement Page 11
Copyright, Procurement Office, Bloomsburg University 12/18/2015
Finding Vendor Address – Transaction MK03
If you have a vendor number, there is another SAP transaction you can use to view address/phone number. Use transaction MK03
(Display Vendor). Be sure the address box is checked and hit enter. You will see address/phone information.
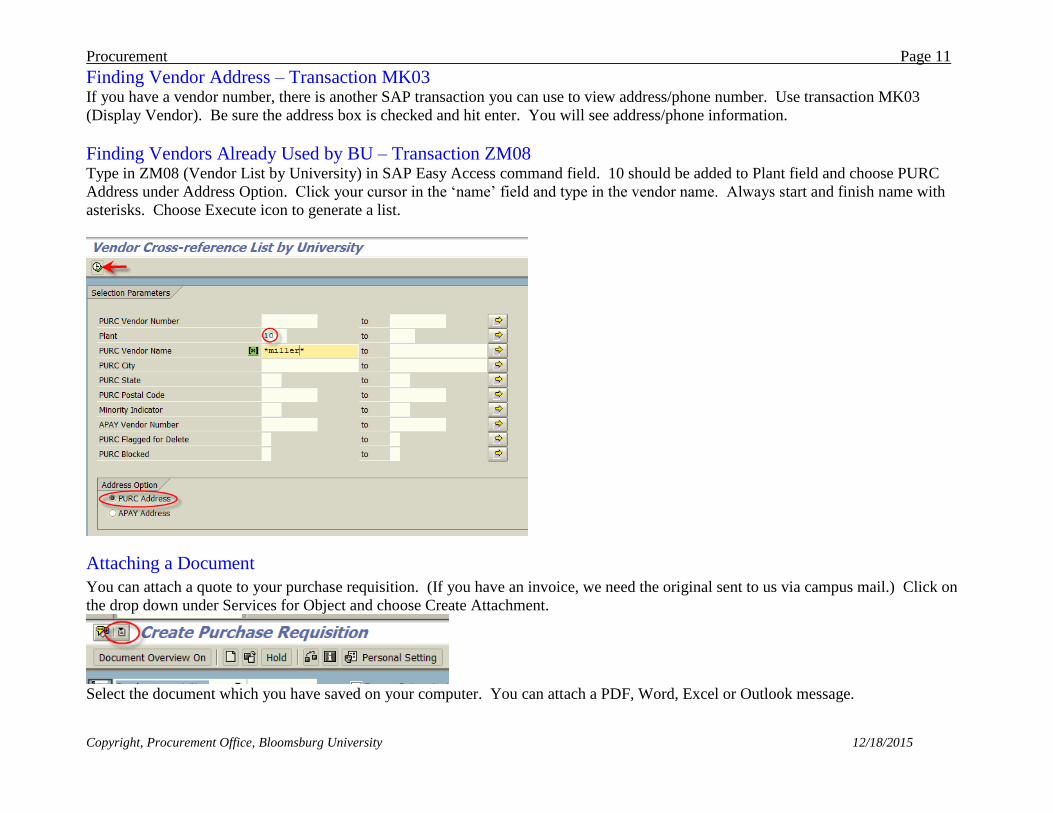
Finding Vendors Already Used by BU – Transaction ZM08
Type in ZM08 (Vendor List by University) in SAP Easy Access command field. 10 should be added to Plant field and choose PURC
Address under Address Option. Click your cursor in the ‘name’ field and type in the vendor name. Always start and finish name with
asterisks. Choose Execute icon to generate a list.
Attaching a Document
You can attach a quote to your purchase requisition. (If you have an invoice, we need the original sent to us via campus mail.) Click on
the drop down under Services for Object and choose Create Attachment.
Select the document which you have saved on your computer. You can attach a PDF, Word, Excel or Outlook message.
Procurement Page 12
Copyright, Procurement Office, Bloomsburg University 12/18/2015
Ordering for grant or project accounts
System defaults (in item overview section) are set up for cost center purchasing.
If you are ordering for a grant account, find the field to the right of the delivery date (in item overview) that is called “Acct. Assig.
Category” – change the K to a G.
If you are ordering for a project account, find the field to the right of the delivery date (in item overview) that is called “Acct.
Assig. Category” – change the K to a P.
The Item Detail section will show a field called ‘WBS element’ instead of ‘cost center’ for grant or project orders.
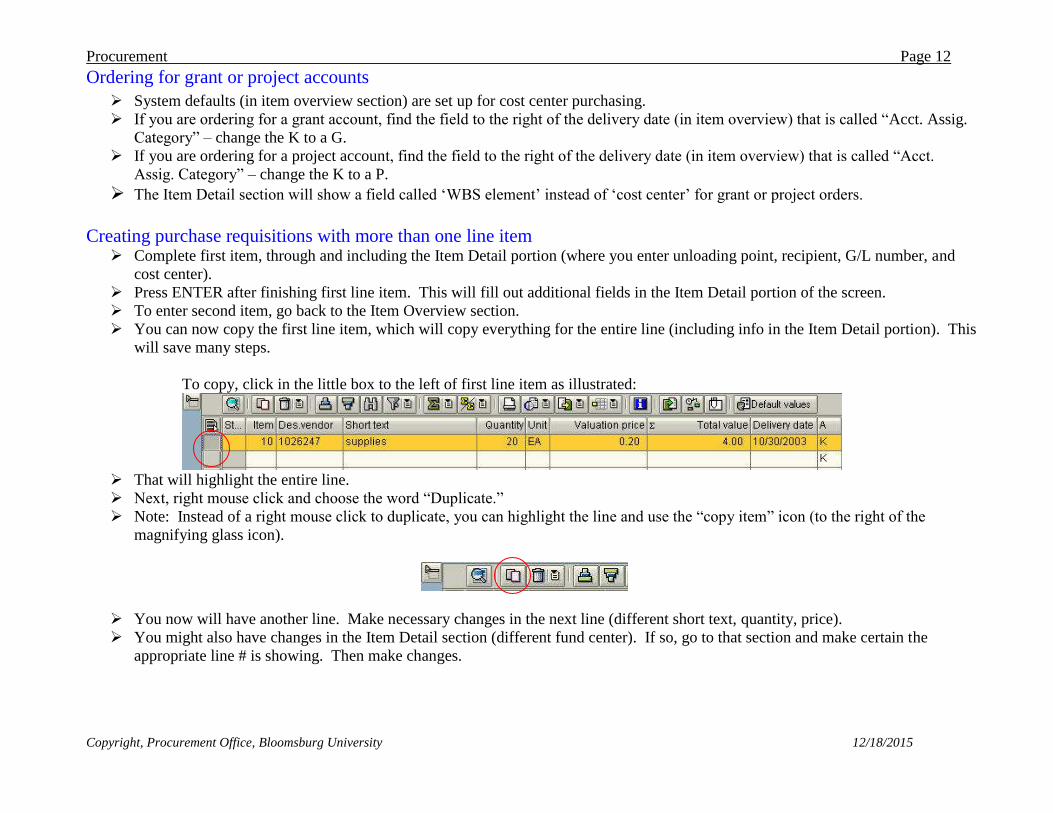
Creating purchase requisitions with more than one line item
Complete first item, through and including the Item Detail portion (where you enter unloading point, recipient, G/L number, and
cost center).
Press ENTER after finishing first line item. This will fill out additional fields in the Item Detail portion of the screen.
To enter second item, go back to the Item Overview section.
You can now copy the first line item, which will copy everything for the entire line (including info in the Item Detail portion). This
will save many steps.
To copy, click in the little box to the left of first line item as illustrated:
That will highlight the entire line.
Next, right mouse click and choose the word “Duplicate.”
Note: Instead of a right mouse click to duplicate, you can highlight the line and use the “copy item” icon (to the right of the
magnifying glass icon).
You now will have another line. Make necessary changes in the next line (different short text, quantity, price).
You might also have changes in the Item Detail section (different fund center). If so, go to that section and make certain the
appropriate line # is showing. Then make changes.
Procurement Page 13
Copyright, Procurement Office, Bloomsburg University 12/18/2015
Saving Your Purchase Requisition WHEN YOU ARE COMPLETELY FINISHED ENTERING LINE ITEMS, PRESS THE “SAVE” ICON ALONG THE TOP MENU
BAR.
This looks like a little diskette. It saves and releases your PR to Procurement.
It is suggested that you write down your PR number once it is saved. This will appear in the bottom left side of your screen.
Using Document Overview (Transaction ME53N)
You should find this transaction under Favorites in the Purchasing folder.
Document Overview - It is very important that you learn the value of the document overview function within this software. The
information contained in the document overview will provide history on all your past purchase requisitions. In addition, it will allow you
to duplicate past purchase requisitions with only a few keystrokes and allow you to copy, modify, and re-release previous purchase
requisitions with the new changes.
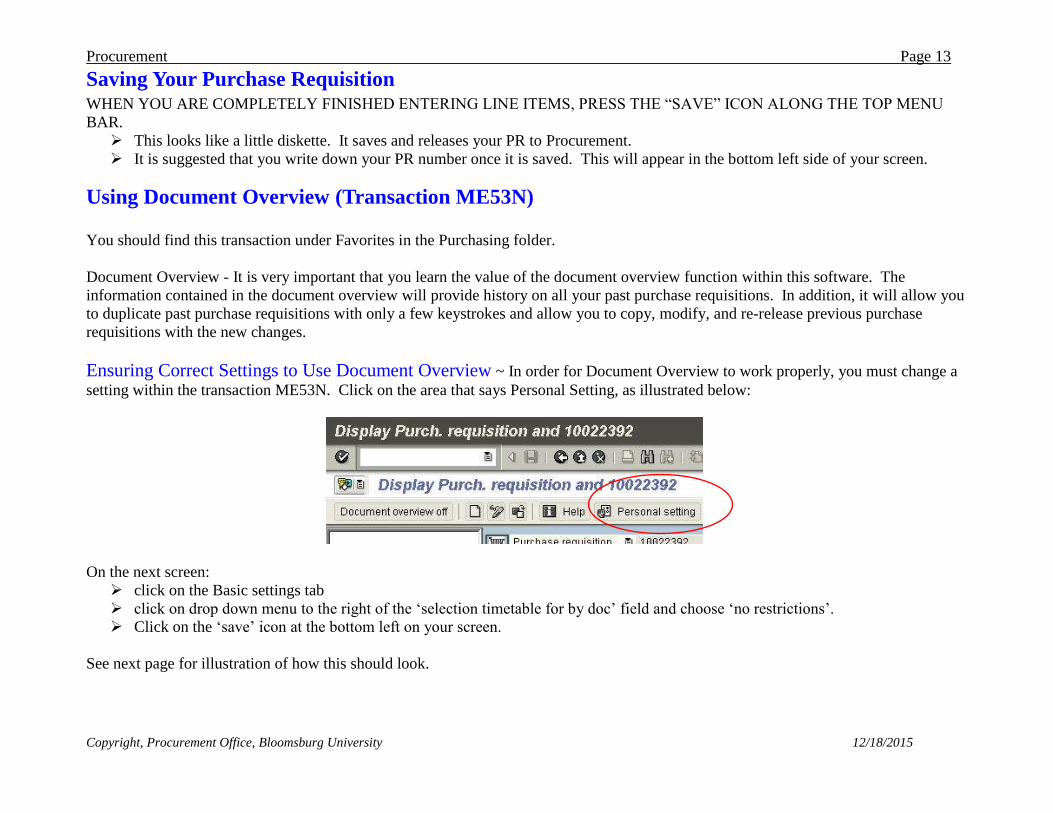
Ensuring Correct Settings to Use Document Overview ~ In order for Document Overview to work properly, you must change a
setting within the transaction ME53N. Click on the area that says Personal Setting, as illustrated below:
On the next screen:
click on the Basic settings tab
click on drop down menu to the right of the ‘selection timetable for by doc’ field and choose ‘no restrictions’.
Click on the ‘save’ icon at the bottom left on your screen.
See next page for illustration of how this should look.
Procurement Page 14
Copyright, Procurement Office, Bloomsburg University 12/18/2015
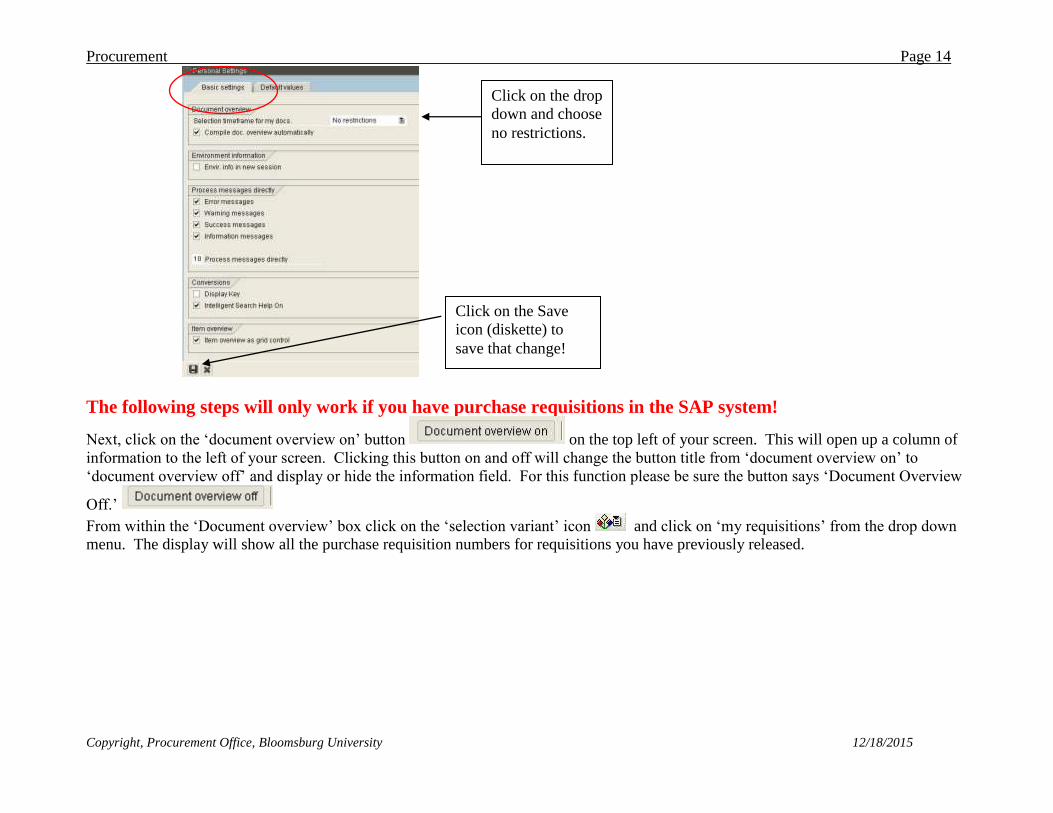
The following steps will only work if you have purchase requisitions in the SAP system!
Next, click on the ‘document overview on’ button on the top left of your screen. This will open up a column of
information to the left of your screen. Clicking this button on and off will change the button title from ‘document overview on’ to
‘document overview off’ and display or hide the information field. For this function please be sure the button says ‘Document Overview
Off.’
From within the ‘Document overview’ box click on the ‘selection variant’ icon and click on ‘my requisitions’ from the drop down
menu. The display will show all the purchase requisition numbers for requisitions you have previously released.
Click on the drop
down and choose
no restrictions.
Click on the Save
icon (diskette) to
save that change!
Procurement Page 15
Copyright, Procurement Office, Bloomsburg University 12/18/2015
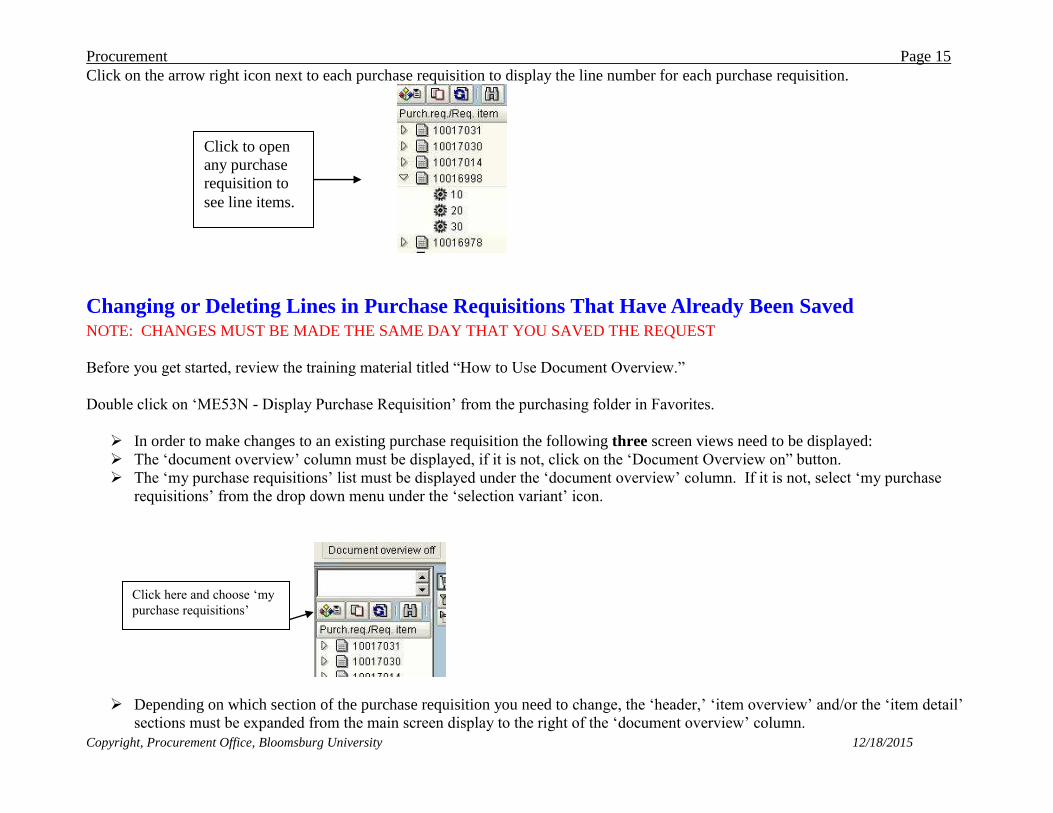
Click on the arrow right icon next to each purchase requisition to display the line number for each purchase requisition.
Changing or Deleting Lines in Purchase Requisitions That Have Already Been Saved NOTE: CHANGES MUST BE MADE THE SAME DAY THAT YOU SAVED THE REQUEST
Before you get started, review the training material titled “How to Use Document Overview.”
Double click on ‘ME53N - Display Purchase Requisition’ from the purchasing folder in Favorites.
In order to make changes to an existing purchase requisition the following three screen views need to be displayed:
The ‘document overview’ column must be displayed, if it is not, click on the ‘Document Overview on” button.
The ‘my purchase requisitions’ list must be displayed under the ‘document overview’ column. If it is not, select ‘my purchase
requisitions’ from the drop down menu under the ‘selection variant’ icon.
Depending on which section of the purchase requisition you need to change, the ‘header,’ ‘item overview’ and/or the ‘item detail’
sections must be expanded from the main screen display to the right of the ‘document overview’ column.
Click to open
any purchase
requisition to
see line items.
Click here and choose ‘my
purchase requisitions’
Procurement Page 16
Copyright, Procurement Office, Bloomsburg University 12/18/2015
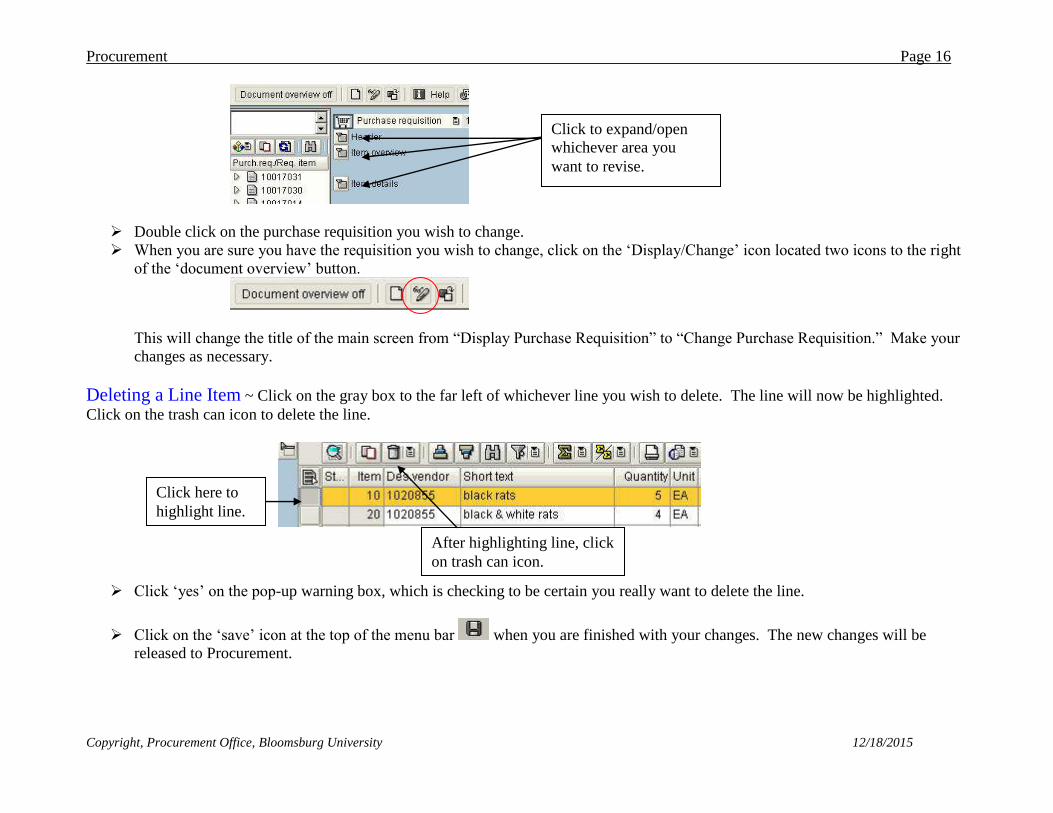
Double click on the purchase requisition you wish to change.
When you are sure you have the requisition you wish to change, click on the ‘Display/Change’ icon located two icons to the right
of the ‘document overview’ button.
This will change the title of the main screen from “Display Purchase Requisition” to “Change Purchase Requisition.” Make your
changes as necessary.
Deleting a Line Item ~ Click on the gray box to the far left of whichever line you wish to delete. The line will now be highlighted.
Click on the trash can icon to delete the line.
Click ‘yes’ on the pop-up warning box, which is checking to be certain you really want to delete the line.
Click on the ‘save’ icon at the top of the menu bar when you are finished with your changes. The new changes will be
released to Procurement.
Click to expand/open
whichever area you
want to revise.
Click here to
highlight line.
After highlighting line, click
on trash can icon.
Procurement Page 17
Copyright, Procurement Office, Bloomsburg University 12/18/2015
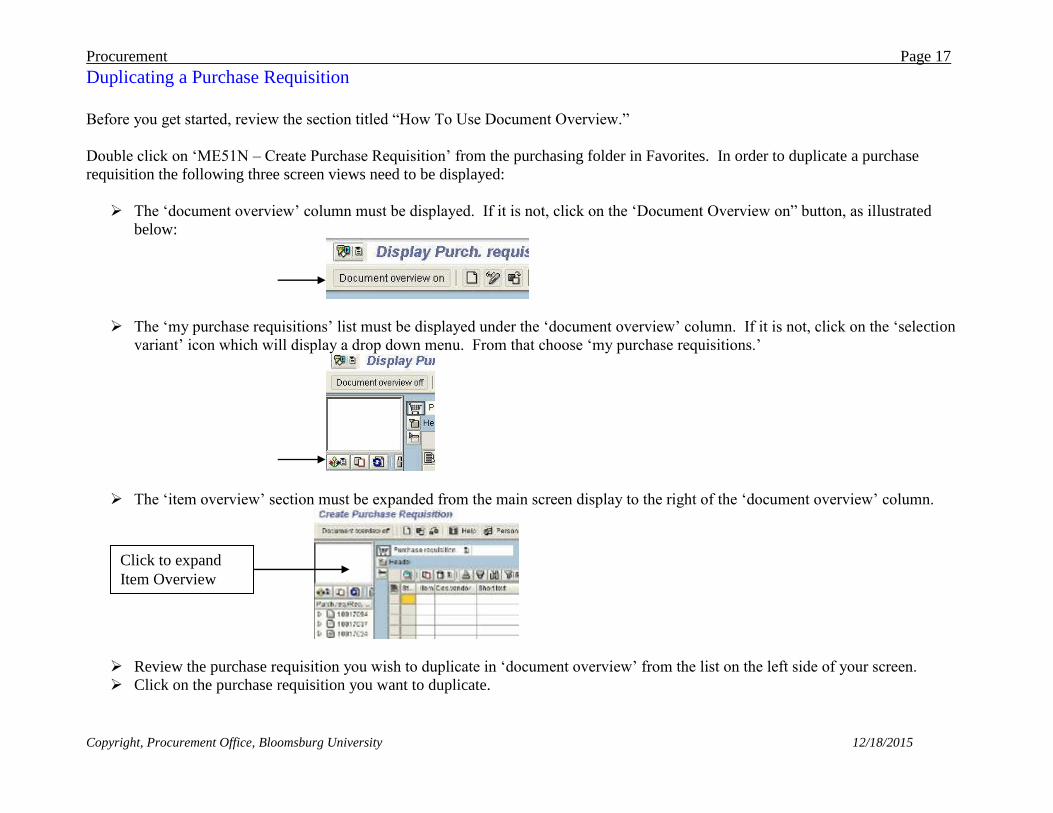
Duplicating a Purchase Requisition
Before you get started, review the section titled “How To Use Document Overview.”
Double click on ‘ME51N – Create Purchase Requisition’ from the purchasing folder in Favorites. In order to duplicate a purchase
requisition the following three screen views need to be displayed:
The ‘document overview’ column must be displayed. If it is not, click on the ‘Document Overview on” button, as illustrated
below:
The ‘my purchase requisitions’ list must be displayed under the ‘document overview’ column. If it is not, click on the ‘selection
variant’ icon which will display a drop down menu. From that choose ‘my purchase requisitions.’
The ‘item overview’ section must be expanded from the main screen display to the right of the ‘document overview’ column.
Review the purchase requisition you wish to duplicate in ‘document overview’ from the list on the left side of your screen.
Click on the purchase requisition you want to duplicate.
Click to expand
Item Overview
Procurement Page 18
Copyright, Procurement Office, Bloomsburg University 12/18/2015
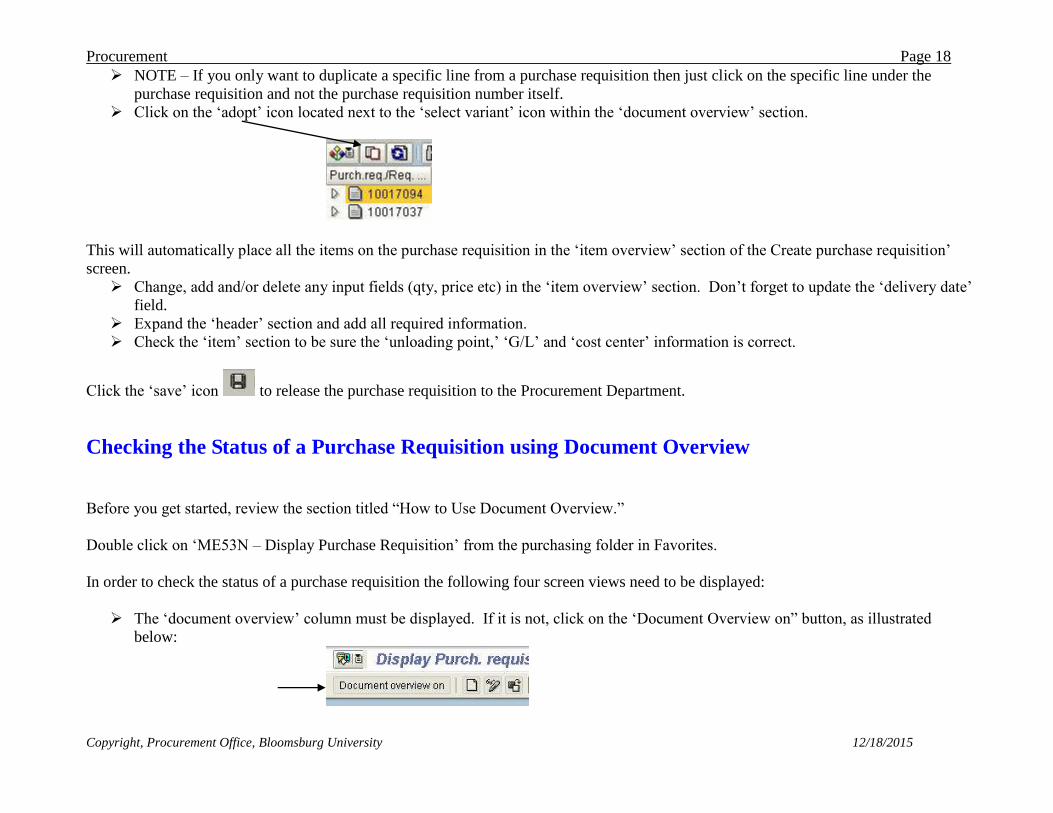
NOTE – If you only want to duplicate a specific line from a purchase requisition then just click on the specific line under the
purchase requisition and not the purchase requisition number itself.
Click on the ‘adopt’ icon located next to the ‘select variant’ icon within the ‘document overview’ section.
This will automatically place all the items on the purchase requisition in the ‘item overview’ section of the Create purchase requisition’
screen.
Change, add and/or delete any input fields (qty, price etc) in the ‘item overview’ section. Don’t forget to update the ‘delivery date’
field.
Expand the ‘header’ section and add all required information.
Check the ‘item’ section to be sure the ‘unloading point,’ ‘G/L’ and ‘cost center’ information is correct.
Click the ‘save’ icon to release the purchase requisition to the Procurement Department.
Checking the Status of a Purchase Requisition using Document Overview
Before you get started, review the section titled “How to Use Document Overview.”
Double click on ‘ME53N – Display Purchase Requisition’ from the purchasing folder in Favorites.
In order to check the status of a purchase requisition the following four screen views need to be displayed:
The ‘document overview’ column must be displayed. If it is not, click on the ‘Document Overview on” button, as illustrated
below:
Procurement Page 19
Copyright, Procurement Office, Bloomsburg University 12/18/2015
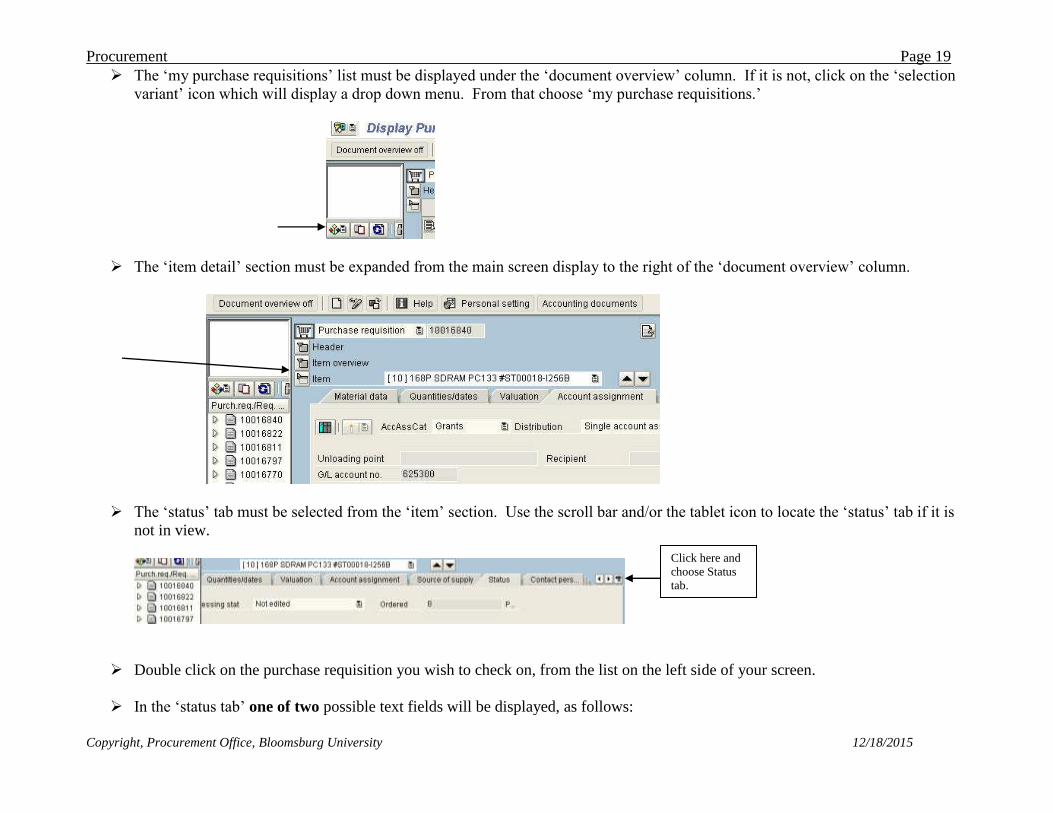
The ‘my purchase requisitions’ list must be displayed under the ‘document overview’ column. If it is not, click on the ‘selection
variant’ icon which will display a drop down menu. From that choose ‘my purchase requisitions.’
The ‘item detail’ section must be expanded from the main screen display to the right of the ‘document overview’ column.
The ‘status’ tab must be selected from the ‘item’ section. Use the scroll bar and/or the tablet icon to locate the ‘status’ tab if it is
not in view.
Double click on the purchase requisition you wish to check on, from the list on the left side of your screen.
In the ‘status tab’ one of two possible text fields will be displayed, as follows:
Click here and
choose Status
tab.
Procurement Page 20
Copyright, Procurement Office, Bloomsburg University 12/18/2015
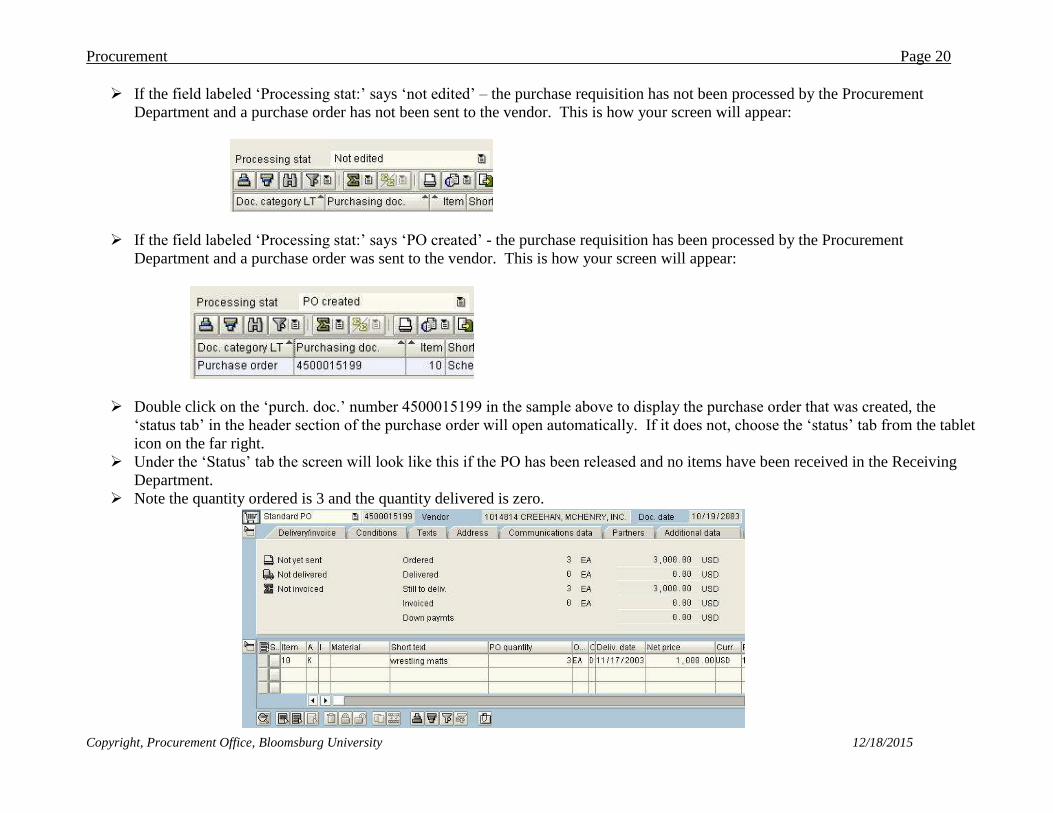
If the field labeled ‘Processing stat:’ says ‘not edited’ – the purchase requisition has not been processed by the Procurement
Department and a purchase order has not been sent to the vendor. This is how your screen will appear:
If the field labeled ‘Processing stat:’ says ‘PO created’ - the purchase requisition has been processed by the Procurement
Department and a purchase order was sent to the vendor. This is how your screen will appear:
Double click on the ‘purch. doc.’ number 4500015199 in the sample above to display the purchase order that was created, the
‘status tab’ in the header section of the purchase order will open automatically. If it does not, choose the ‘status’ tab from the tablet
icon on the far right.
Under the ‘Status’ tab the screen will look like this if the PO has been released and no items have been received in the Receiving
Department.
Note the quantity ordered is 3 and the quantity delivered is zero.
Procurement Page 21
Copyright, Procurement Office, Bloomsburg University 12/18/2015
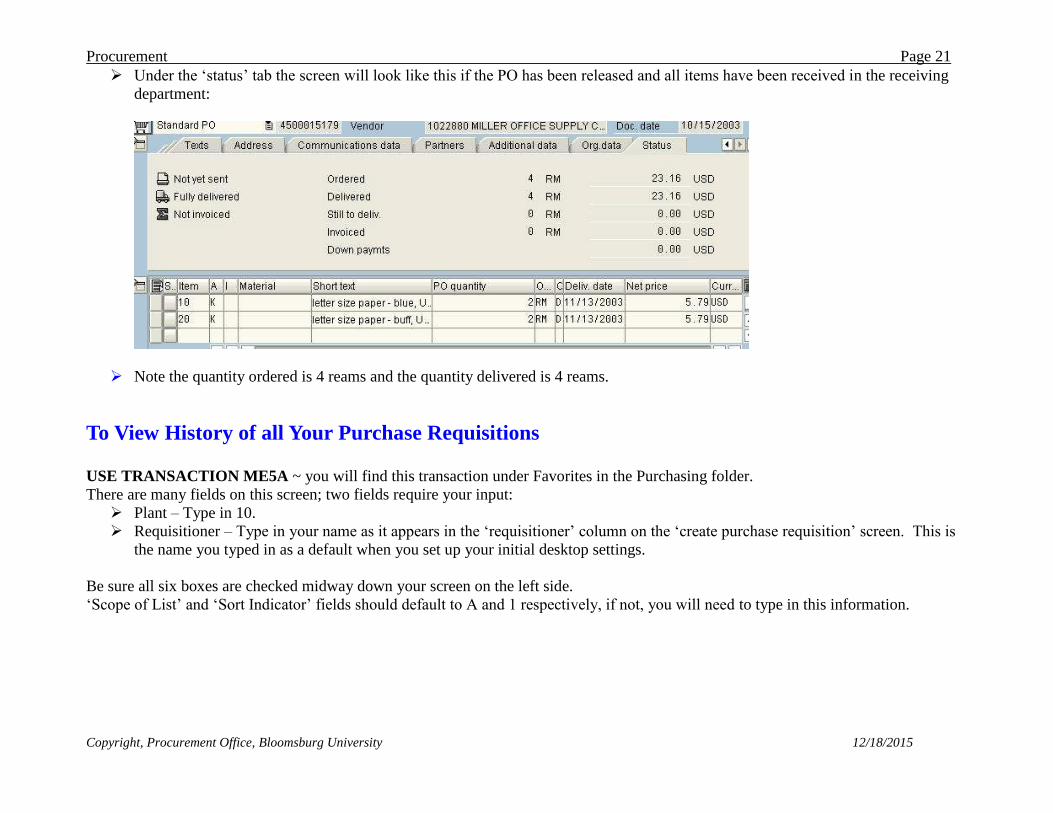
Under the ‘status’ tab the screen will look like this if the PO has been released and all items have been received in the receiving
department:
Note the quantity ordered is 4 reams and the quantity delivered is 4 reams.
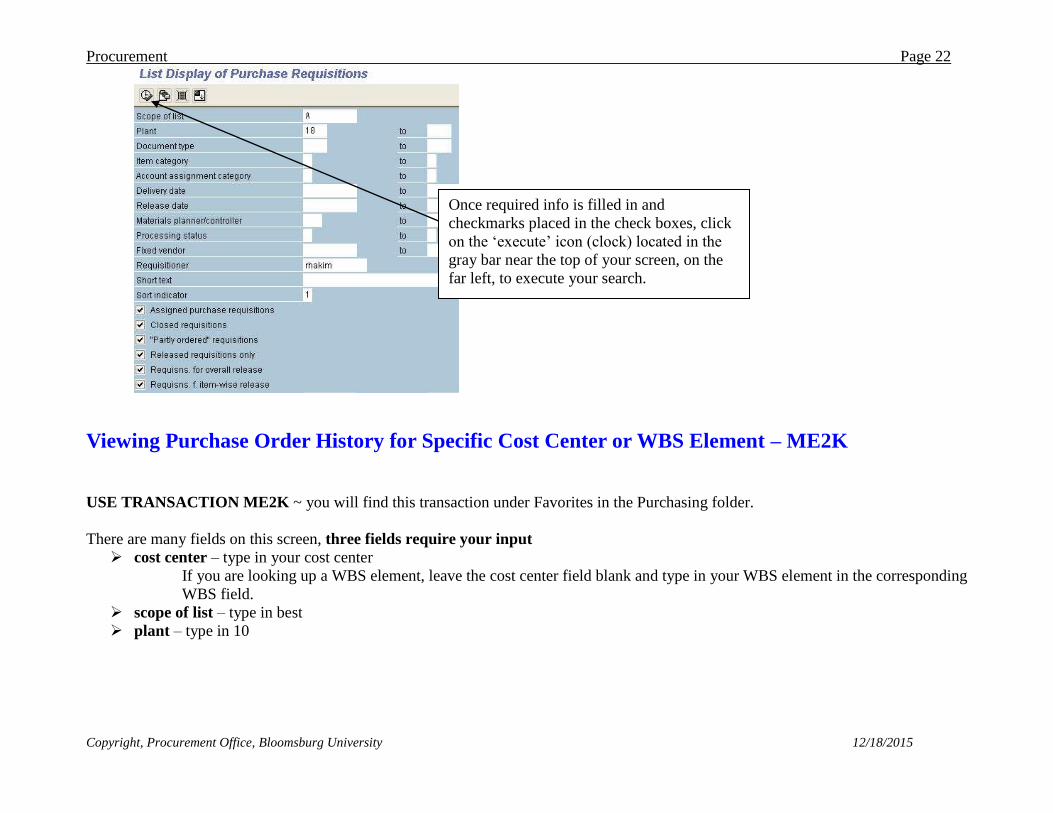
To View History of all Your Purchase Requisitions
USE TRANSACTION ME5A ~ you will find this transaction under Favorites in the Purchasing folder.
There are many fields on this screen; two fields require your input:
Plant – Type in 10.
Requisitioner – Type in your name as it appears in the ‘requisitioner’ column on the ‘create purchase requisition’ screen. This is
the name you typed in as a default when you set up your initial desktop settings.
Be sure all six boxes are checked midway down your screen on the left side.
‘Scope of List’ and ‘Sort Indicator’ fields should default to A and 1 respectively, if not, you will need to type in this information.
Procurement Page 22
Copyright, Procurement Office, Bloomsburg University 12/18/2015
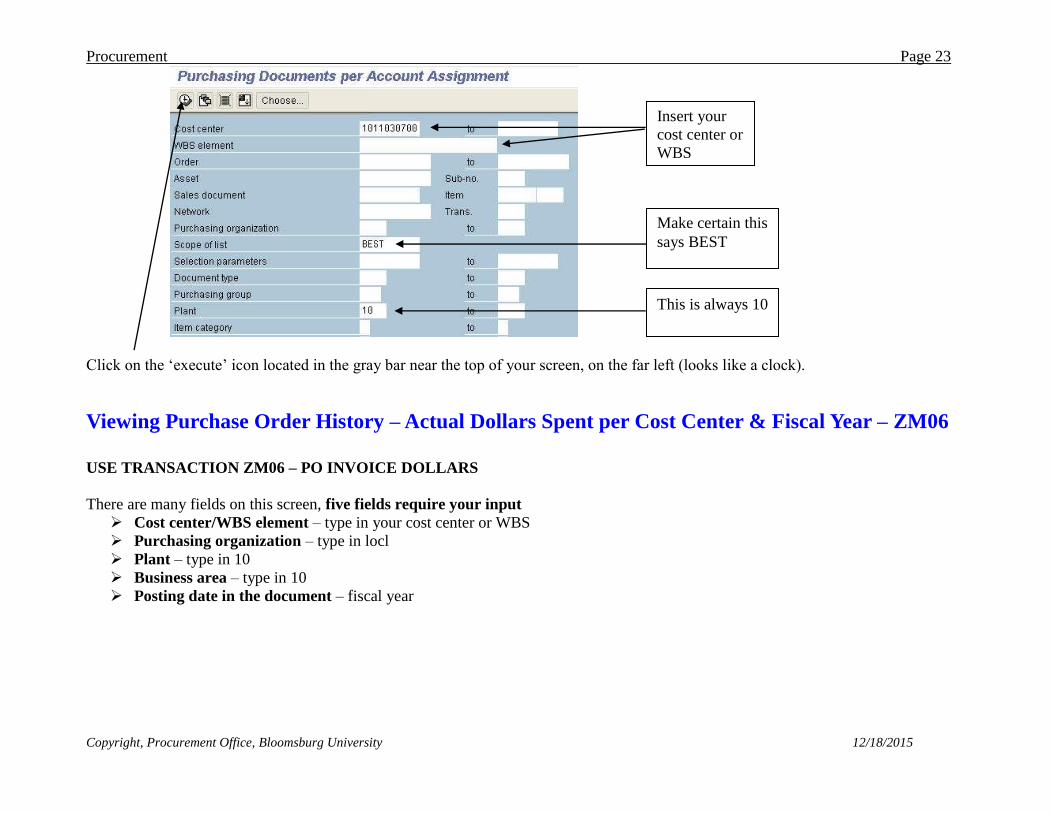
Viewing Purchase Order History for Specific Cost Center or WBS Element – ME2K
USE TRANSACTION ME2K ~ you will find this transaction under Favorites in the Purchasing folder.
There are many fields on this screen, three fields require your input
cost center – type in your cost center
If you are looking up a WBS element, leave the cost center field blank and type in your WBS element in the corresponding
WBS field.
scope of list – type in best
plant – type in 10
Once required info is filled in and
checkmarks placed in the check boxes, click
on the ‘execute’ icon (clock) located in the
gray bar near the top of your screen, on the
far left, to execute your search.
Procurement Page 23
Copyright, Procurement Office, Bloomsburg University 12/18/2015
Click on the ‘execute’ icon located in the gray bar near the top of your screen, on the far left (looks like a clock).
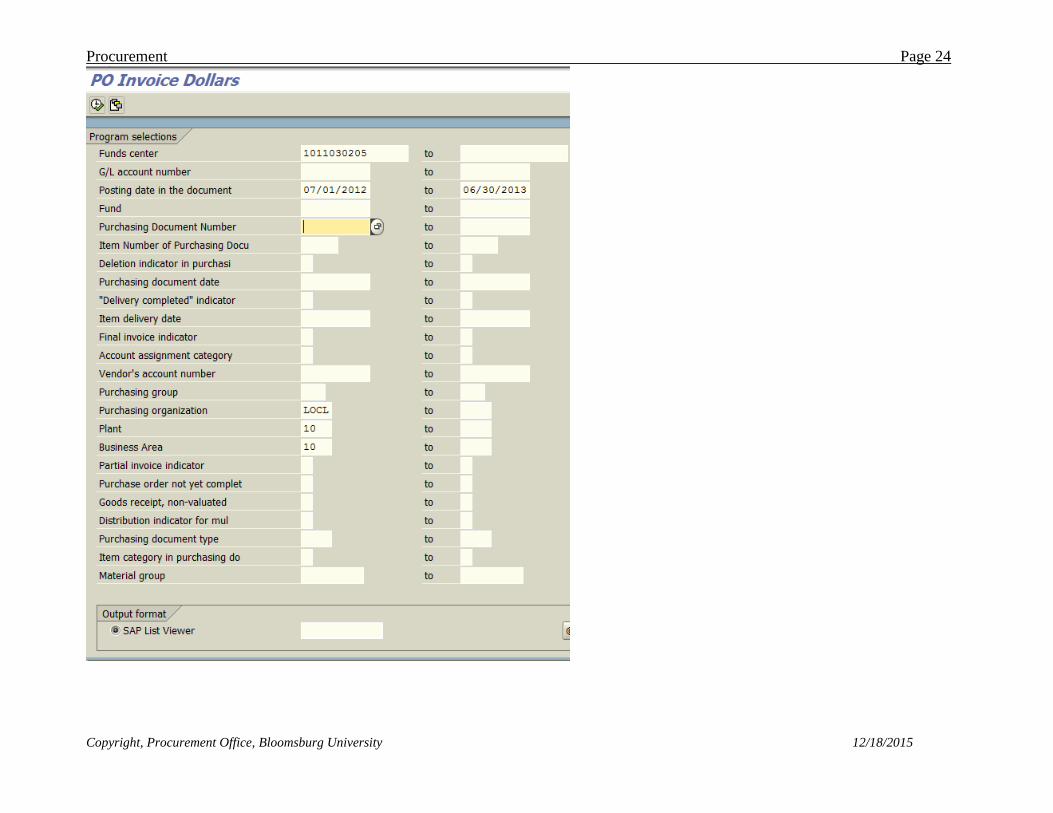
Viewing Purchase Order History – Actual Dollars Spent per Cost Center & Fiscal Year – ZM06
USE TRANSACTION ZM06 – PO INVOICE DOLLARS
There are many fields on this screen, five fields require your input
Cost center/WBS element – type in your cost center or WBS
Purchasing organization – type in locl
Plant – type in 10
Business area – type in 10
Posting date in the document – fiscal year
Insert your
cost center or
WBS
Make certain this
says BEST
This is always 10
Procurement Page 24
Copyright, Procurement Office, Bloomsburg University 12/18/2015