table of contents - korgi.korg.com/uploads/support/nanopad2_pg_e1_634479708512690000.pdf · table...
TRANSCRIPT

- Mac, Mac logo and Mac OS are trademarks of Apple Inc., registered in the U.S. and other countries.
- Windows XP, Windows Vista and Windows 7 are registered trademarks of Microsoft Corporation in the U.S. and other countries.
- All product names and company names are the trademarks or registered trademarks of their respective owners.
- Specifications and appearance are subject to change without notice for improvement.
Table of ContentsIntroduction .................................................................................................................................... 3
Preparations .............................................................................................................................................................................................................. 3
Gate arpeggiator ............................................................................................................................ 4When the Touch Scale mode is “off” ................................................................................................................................................................. 4
When the Touch Scale mode is “on” .................................................................................................................................................................. 5
Using the Touch Scale mode......................................................................................................... 6Changing the range of notes in the Touch Scale mode ............................................................................................................................. 6
The nanoPAD2’s Scene parameters ............................................................................................. 7Trigger Pad ................................................................................................................................................................................................................. 7
The nanoPAD2’s global parameters ............................................................................................. 8Common ..................................................................................................................................................................................................................... 8
X-Y Pad ........................................................................................................................................................................................................................ 9
Touch Scale ..............................................................................................................................................................................................................10
User Scale .................................................................................................................................................................................................................11
Restoring the factory settings .................................................................................................... 12Troubleshooting ........................................................................................................................... 13Appendix ...................................................................................................................................... 14
Scale list .....................................................................................................................................................................................................................14
3
Introduction
Introduction
This nanoPAD2 parameter guide explains the parameters that you can edit on the nanoPAD2 as well as providing basic instructions for usage.
Read this guide when you want to adjust or refine the settings.
PreparationsYou’ll use the KORG KONTROL Editor software to edit the nanoPAD2’s parameters.
Please download the latest version of the KORG KONTROL Editor from the KORG website (http://www.korg.co.jp/English/Distributors/ or http://www.korg.com/) and install it.
For details on how to install and use the KORG KONTROL Editor software, please refer to the KORG KONTROL Editor owner’s manual.
4
Gate arpeggiator
Gate arpeggiator
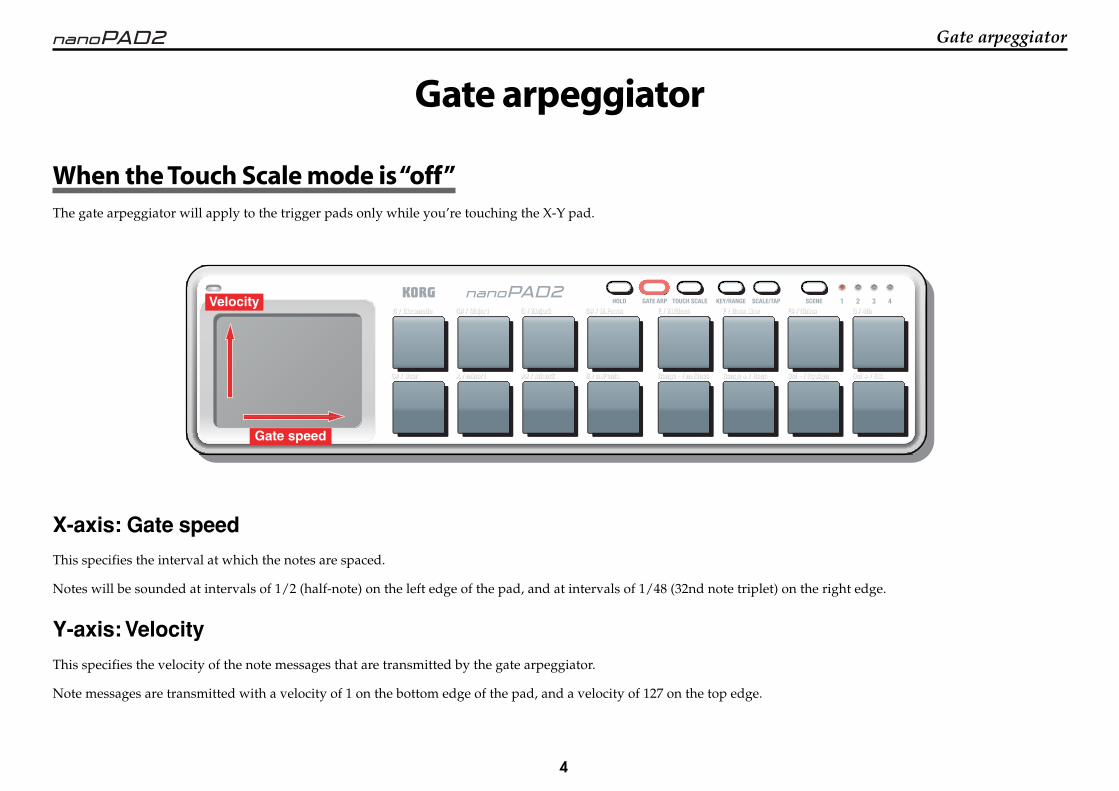
When the Touch Scale mode is “off”The gate arpeggiator will apply to the trigger pads only while you’re touching the X-Y pad.
Velocity
Gate speed
X-axis: Gate speed
This specifies the interval at which the notes are spaced.
Notes will be sounded at intervals of 1/2 (half-note) on the left edge of the pad, and at intervals of 1/48 (32nd note triplet) on the right edge.
Y-axis: Velocity
This specifies the velocity of the note messages that are transmitted by the gate arpeggiator.
Note messages are transmitted with a velocity of 1 on the bottom edge of the pad, and a velocity of 127 on the top edge.

5
Gate arpeggiator
When the Touch Scale mode is “on”The gate arpeggiator will apply only to the touch scale function.
The gate arpeggiator does not apply to the trigger pads.
Note number
Gate arpeggiator is enabled
Gate time
Gate arpeggiator does not apply
X-axis: Note numberNote messages are transmitted according to the scale, key, note range, and octave shift settings that you’ve specified.
Y-axis: Gate timeThis specifies the duration of the notes.
Note durations will be shorter at the bottom of the pad, and will lengthen as you move upward on the pad.
At the top edge of the pad, notes will be legato.

6
Using the Touch Scale mode
Using the Touch Scale mode
Changing the range of notes in the Touch Scale mode
In the Touch Scale mode, the range of notes will change as follows depending on the note range, key, and octave shift settings.
C8(108)
C7(96)
C6(84)
C5(72)
C4(60)
C3(48)
C2(36)
C1(34)
C0(12)
C-1(0)
C9(120)
G9(127)
Note range 1 octave
Note range 2 octave
Note range 3 octave
Note range 4 octave
How the Note Range setting affects the range
When Octave Shift is
+/-0 and the Key is C
How the Key setting affects the range
When Octave Shift is +/-0
and the Note Range is 2
Key = C
Key = E
7
The nanoPAD2's Scene parameters
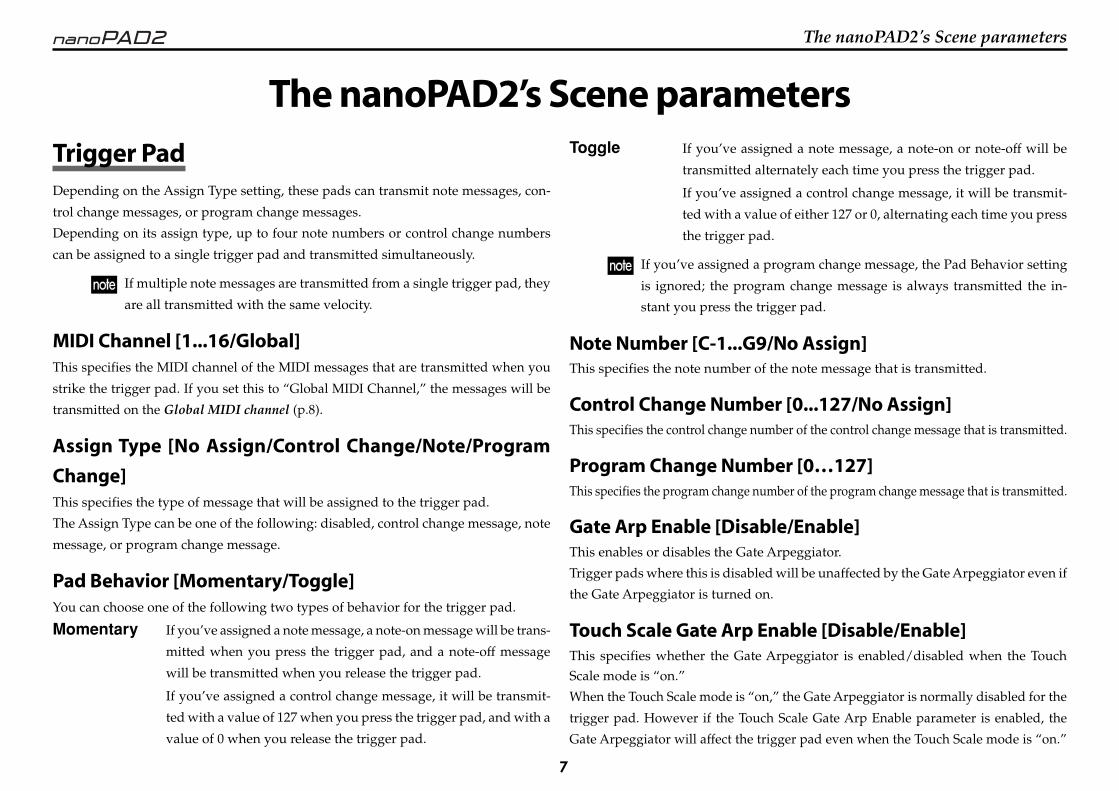
The nanoPAD2’s Scene parametersTrigger PadDepending on the Assign Type setting, these pads can transmit note messages, con-
trol change messages, or program change messages.
Depending on its assign type, up to four note numbers or control change numbers
can be assigned to a single trigger pad and transmitted simultaneously.
If multiple note messages are transmitted from a single trigger pad, they
are all transmitted with the same velocity.
MIDI Channel [1...16/Global]This specifies the MIDI channel of the MIDI messages that are transmitted when you
strike the trigger pad. If you set this to “Global MIDI Channel,” the messages will be
transmitted on the Global MIDI channel (p.8).
Assign Type [No Assign/Control Change/Note/Program
Change]This specifies the type of message that will be assigned to the trigger pad.
The Assign Type can be one of the following: disabled, control change message, note
message, or program change message.
Pad Behavior [Momentary/Toggle]You can choose one of the following two types of behavior for the trigger pad.
Momentary If you’ve assigned a note message, a note-on message will be trans-
mitted when you press the trigger pad, and a note-off message
will be transmitted when you release the trigger pad.
If you’ve assigned a control change message, it will be transmit-
ted with a value of 127 when you press the trigger pad, and with a
value of 0 when you release the trigger pad.
Toggle If you’ve assigned a note message, a note-on or note-off will be
transmitted alternately each time you press the trigger pad.
If you’ve assigned a control change message, it will be transmit-
ted with a value of either 127 or 0, alternating each time you press
the trigger pad.
If you’ve assigned a program change message, the Pad Behavior setting
is ignored; the program change message is always transmitted the in-
stant you press the trigger pad.
Note Number [C-1...G9/No Assign]This specifies the note number of the note message that is transmitted.
Control Change Number [0...127/No Assign]This specifies the control change number of the control change message that is transmitted.
Program Change Number [0…127]This specifies the program change number of the program change message that is transmitted.
Gate Arp Enable [Disable/Enable]This enables or disables the Gate Arpeggiator.
Trigger pads where this is disabled will be unaffected by the Gate Arpeggiator even if
the Gate Arpeggiator is turned on.
Touch Scale Gate Arp Enable [Disable/Enable]This specifies whether the Gate Arpeggiator is enabled/disabled when the TouchScale mode is “on.”
When the Touch Scale mode is “on,” the Gate Arpeggiator is normally disabled for the
trigger pad. However if the Touch Scale Gate Arp Enable parameter is enabled, the
Gate Arpeggiator will affect the trigger pad even when the Touch Scale mode is “on.”

8
The nanoPAD2’s global parameters
The nanoPAD2’s global parametersThese are global parameters that allow you to adjust the settings for the entire nanoPAD2.
The settings here apply to all four scenes.
Common
Global MIDI Channel [1...16]Set this to match the MIDI channel of the application that you’re controlling.
Velocity Curve [Light/Normal/Heavy/Const]This specifies how the volume will change according to how hard you strike the trig-
ger pads. You can choose one of three velocity curves, or a fixed velocity value.
Normal
Heavy
Light
127
1
Const
Light Even soft strikes can produce loud notes.
Normal Normal velocity curve.Heavy Strong strikes are needed to
produce loud notes.Const A fixed velocity is always produced.
Soft Strong
Const Velocity Value [1...127]This specifies the velocity value that will be transmitted when you’ve selected Const
as the velocity curve.
BPM [20.0…300.0]This specifies the tempo (speed) of the Gate Arpeggiator.
When global data is received in the KORG KONTROL Editor, the BPM
specified by the nanoPAD2’s global data will be received. This is not the
BPM that was set by the Tap Tempo function.
MIDI Clock [Auto/Internal/External]This specifies how the nanoPAD2’s Gate Arpeggiator will synchronize with your ap-
plication.
Auto If MIDI clock is being received from your application, the nano-
PAD2 will automatically work with the “External” setting. If no
MIDI clock is being received, it will work with the “Internal” set-
ting.
Internal The Gate Arpeggiator will function according to the nanoPAD2’s
internal clock (the BPM parameter, or specified by Tap Tempo).
Choose this setting if you’re using the nanoPAD2 by itself, and
not synchronizing it with your application.
External The nanoPAD2’s Gate Arpeggiator will function in synchroniza-
tion with MIDI clock data received from your application.
9
The nanoPAD2’s global parameters
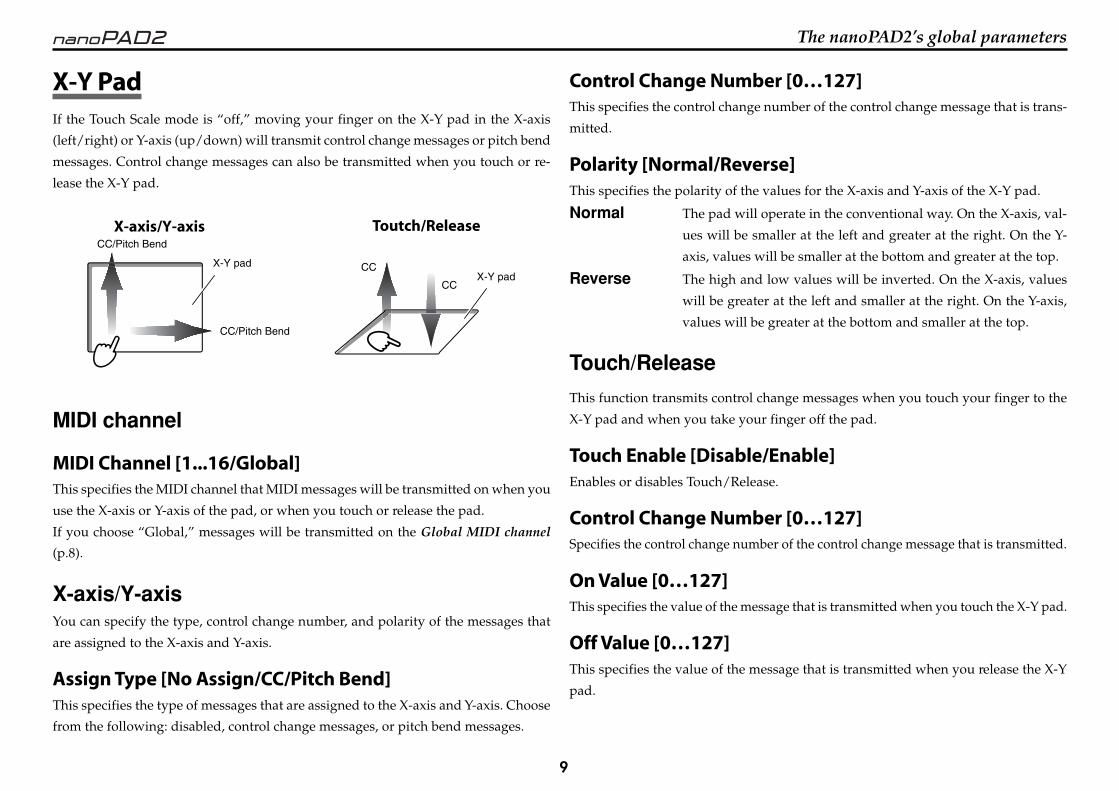
X-Y PadIf the Touch Scale mode is “off,” moving your finger on the X-Y pad in the X-axis
(left/right) or Y-axis (up/down) will transmit control change messages or pitch bend
messages. Control change messages can also be transmitted when you touch or re-
lease the X-Y pad.
Toutch/ReleaseCC/Pitch Bend
CC/Pitch Bend
X-Y pad
CC
CCX-Y pad
X-axis/Y-axis
MIDI channel
MIDI Channel [1...16/Global]This specifies the MIDI channel that MIDI messages will be transmitted on when you
use the X-axis or Y-axis of the pad, or when you touch or release the pad.
If you choose “Global,” messages will be transmitted on the Global MIDI channel
(p.8).
X-axis/Y-axisYou can specify the type, control change number, and polarity of the messages that
are assigned to the X-axis and Y-axis.
Assign Type [No Assign/CC/Pitch Bend]This specifies the type of messages that are assigned to the X-axis and Y-axis. Choose
from the following: disabled, control change messages, or pitch bend messages.
Control Change Number [0…127]This specifies the control change number of the control change message that is trans-
mitted.
Polarity [Normal/Reverse]This specifies the polarity of the values for the X-axis and Y-axis of the X-Y pad.
Normal The pad will operate in the conventional way. On the X-axis, val-
ues will be smaller at the left and greater at the right. On the Y-
axis, values will be smaller at the bottom and greater at the top.
Reverse The high and low values will be inverted. On the X-axis, values
will be greater at the left and smaller at the right. On the Y-axis,
values will be greater at the bottom and smaller at the top.
Touch/Release
This function transmits control change messages when you touch your finger to the
X-Y pad and when you take your finger off the pad.
Touch Enable [Disable/Enable]Enables or disables Touch/Release.
Control Change Number [0…127]Specifies the control change number of the control change message that is transmitted.
On Value [0…127]This specifies the value of the message that is transmitted when you touch the X-Y pad.
Off Value [0…127]This specifies the value of the message that is transmitted when you release the X-Y
pad.
10
The nanoPAD2’s global parameters
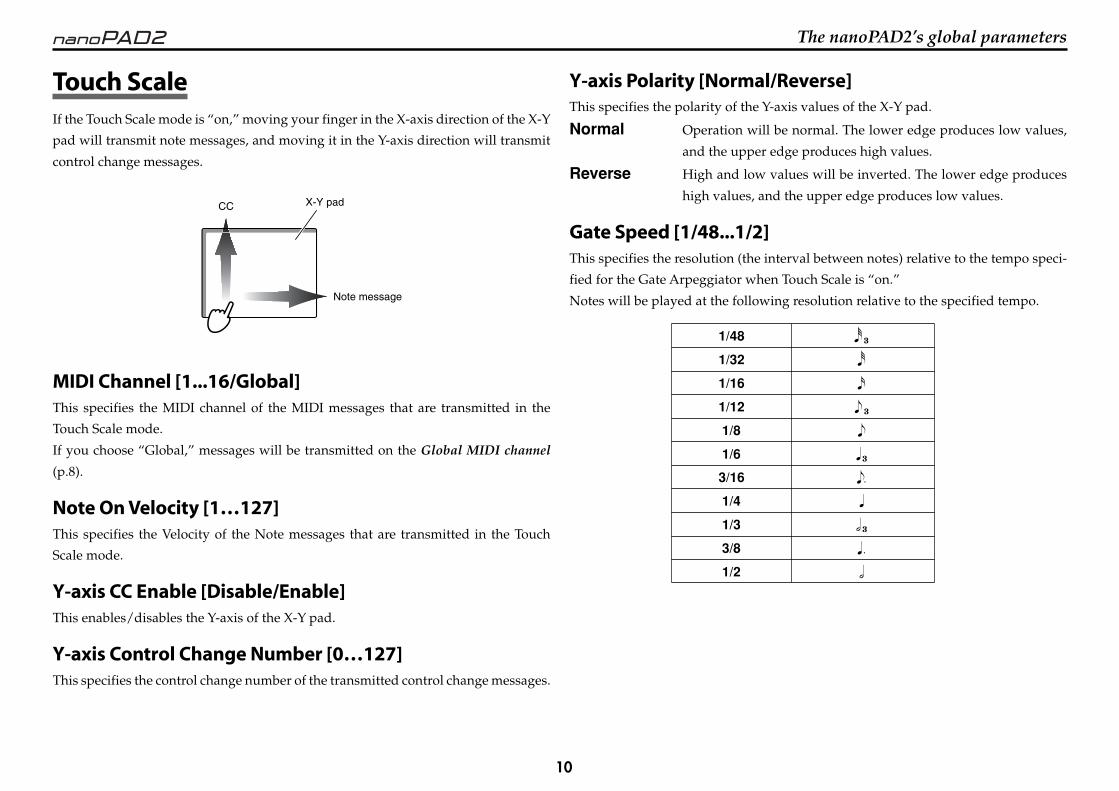
Touch ScaleIf the Touch Scale mode is “on,” moving your finger in the X-axis direction of the X-Y
pad will transmit note messages, and moving it in the Y-axis direction will transmit
control change messages.
CC
Note message
X-Y pad
MIDI Channel [1...16/Global]This specifies the MIDI channel of the MIDI messages that are transmitted in the
Touch Scale mode.
If you choose “Global,” messages will be transmitted on the Global MIDI channel
(p.8).
Note On Velocity [1…127]This specifies the Velocity of the Note messages that are transmitted in the Touch
Scale mode.
Y-axis CC Enable [Disable/Enable]This enables/disables the Y-axis of the X-Y pad.
Y-axis Control Change Number [0…127]This specifies the control change number of the transmitted control change messages.
Y-axis Polarity [Normal/Reverse]This specifies the polarity of the Y-axis values of the X-Y pad.
Normal Operation will be normal. The lower edge produces low values,
and the upper edge produces high values.
Reverse High and low values will be inverted. The lower edge produces
high values, and the upper edge produces low values.
Gate Speed [1/48...1/2]This specifies the resolution (the interval between notes) relative to the tempo speci-
fied for the Gate Arpeggiator when Touch Scale is “on.”
Notes will be played at the following resolution relative to the specified tempo.
1/48 � 31/32 �1/16 �1/12 � 31/8 �1/6 � 33/16 ��1/4 �1/3 � 33/8 � �1/2 �
11
The nanoPAD2’s global parameters
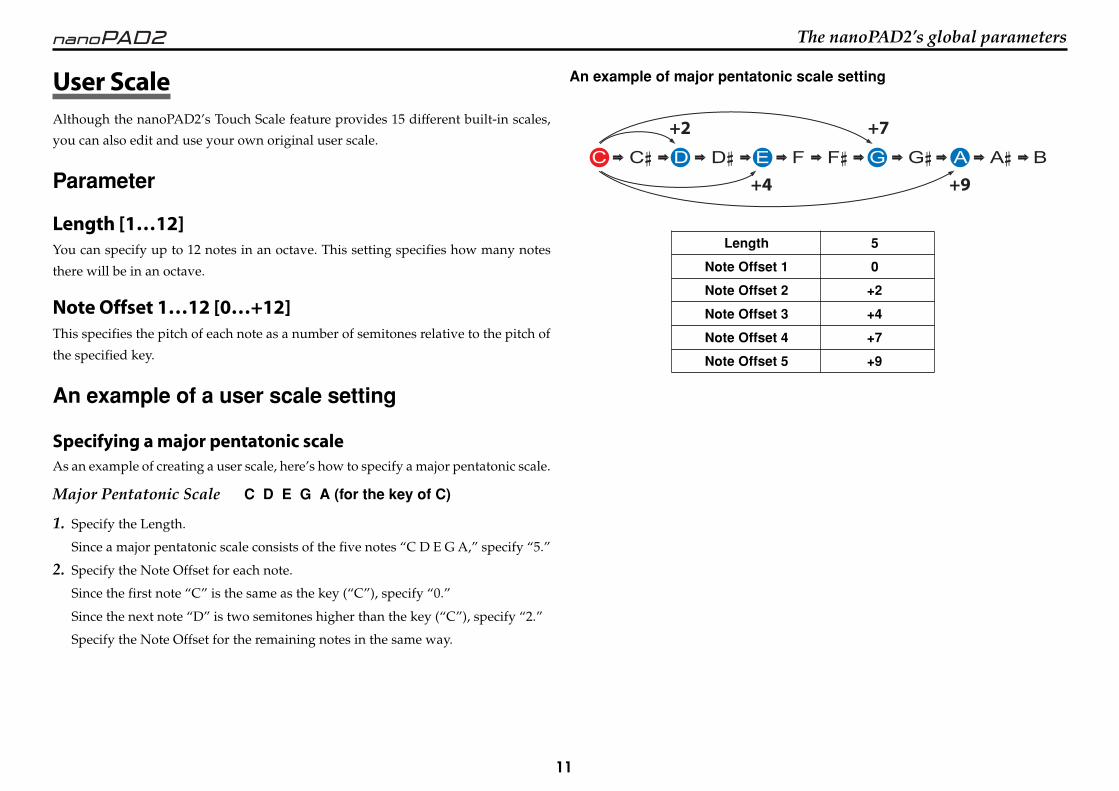
User ScaleAlthough the nanoPAD2’s Touch Scale feature provides 15 different built-in scales,
you can also edit and use your own original user scale.
Parameter
Length [1…12]You can specify up to 12 notes in an octave. This setting specifies how many notes
there will be in an octave.
Note Offset 1…12 [0…+12]This specifies the pitch of each note as a number of semitones relative to the pitch of
the specified key.
An example of a user scale setting
Specifying a major pentatonic scaleAs an example of creating a user scale, here’s how to specify a major pentatonic scale.
Major Pentatonic Scale C D E G A (for the key of C)
1. Specify the Length.
Since a major pentatonic scale consists of the five notes “C D E G A,” specify “5.”
2. Specify the Note Offset for each note.
Since the first note “C” is the same as the key (“C”), specify “0.”
Since the next note “D” is two semitones higher than the key (“C”), specify “2.”
Specify the Note Offset for the remaining notes in the same way.
An example of major pentatonic scale setting
+2 +7
+4 +9
Length 5
Note Offset 1 0
Note Offset 2 +2
Note Offset 3 +4
Note Offset 4 +7
Note Offset 5 +9

12
Restoring the factory settings
Restoring the factory settingsIf you turn on the power while holding down the KEY/RANGE button, SCALE/TAP button, and SCENE button, the scene LEDs will begin blinking, and the nanoPAD2’s
settings will return to their factory-set state. When the process is completed, the blinking will stop.
The process of restoring the factory settings will take a few seconds after you turn on the power. Never turn off the power during this time.

13
Troubleshooting
Troubleshooting• Trigger pads do not respond to velocity
- Check the trigger pads velocity curve.
• Your application does not respond to MIDI data transmitted from the nanoPAD2- Make sure that the MIDI channel of the data being transmitted by the nanoPAD2 matches the MIDI channel of your application.
• Your application does not respond when you use the trigger pads or X-Y pad- Make sure that the Assign Type is set correctly.
- In order to use the nanoPAD2’s functions, you might need to adjust settings in the application that you’re using. Refer to the owner’s manual for your application, and
adjust the appropriate settings.
• Gate arpeggiator does not operate- Make sure that the MIDI Clock setting is correct.
- Make sure that the Trigger Pad parameter Gate Arp Enable (p.7) is set correctly.

14
Appendix
Appendix
Scale list
No. SCALE NAME SCALE [ KEY C ]
1 Chromatic (Chromatic) C D � D E � E F G � G A � A B � B C
2 Major 1 (Ionian) C D E F G A B C
3 Major 2 (Mixolydian) C D E F G A B � C
4 M.Penta (Major Pentatonic) C D E G A C
5 M.Blues (Major Blues) C E � E G A B � C
6 Bass Line (Bass Line) C G B � C
7 China (Chinese Scale) C E F � G B C
8 4th (4th Interval) C F B � C
9 User (User)
10 minor 1 (Dorian) C D E � F G A B � C
11 minor 2 (Aeolian) C D E � F G A � B � C
12 m.Penta (minor Pentatonic) C E � F G B � C
13 m.Blues (minor Blues) C E � F G � G B � C
14 Raga (Raga Bhairav) C D � E F G A � B C
15 Ryukyu (Ryukyu) C E F G B C
16 5th (5th Interval) C G C