table of contents - università telematica internazionale … · table of contents: ... edgar...
TRANSCRIPT

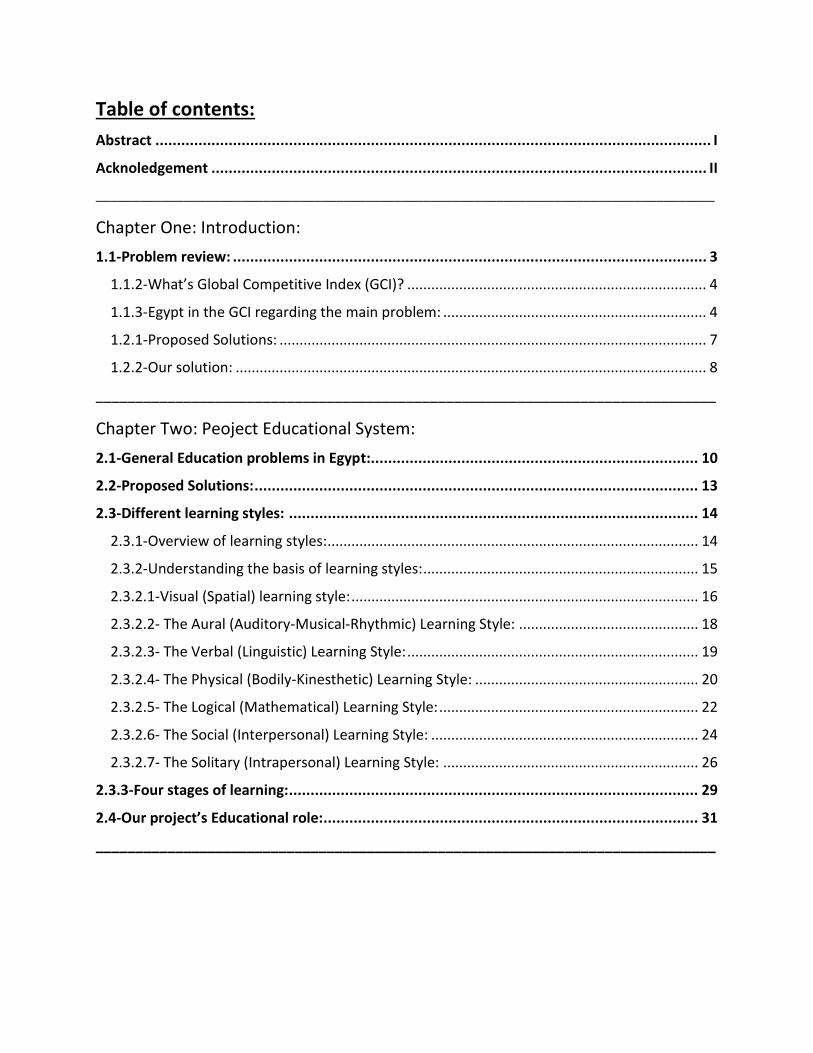
Table of contents:
Abstract ................................................................................................................................. I
Acknoledgement ................................................................................................................... II
_____________________________________________________________________________________
Chapter One: Introduction:
1.1-Problem review: .............................................................................................................. 3
1.1.2-What’s Global Competitive Index (GCI)? ........................................................................... 4
1.1.3-Egypt in the GCI regarding the main problem: .................................................................. 4
1.2.1-Proposed Solutions: ........................................................................................................... 7
1.2.2-Our solution: ...................................................................................................................... 8
______________________________________________________________________________
Chapter Two: Peoject Educational System:
2.1-General Education problems in Egypt: ............................................................................ 10
2.2-Proposed Solutions: ....................................................................................................... 13
2.3-Different learning styles: ............................................................................................... 14
2.3.1-Overview of learning styles: ............................................................................................. 14
2.3.2-Understanding the basis of learning styles: ..................................................................... 15
2.3.2.1-Visual (Spatial) learning style: ....................................................................................... 16
2.3.2.2- The Aural (Auditory-Musical-Rhythmic) Learning Style: ............................................. 18
2.3.2.3- The Verbal (Linguistic) Learning Style: ......................................................................... 19
2.3.2.4- The Physical (Bodily-Kinesthetic) Learning Style: ........................................................ 20
2.3.2.5- The Logical (Mathematical) Learning Style: ................................................................. 22
2.3.2.6- The Social (Interpersonal) Learning Style: ................................................................... 24
2.3.2.7- The Solitary (Intrapersonal) Learning Style: ................................................................ 26
2.3.3-Four stages of learning: ............................................................................................... 29
2.4-Our project’s Educational role: ....................................................................................... 31
______________________________________________________________________________

Chapter Three: Project Hardware:
3.1-Hardware conceptual view: ........................................................................................... 33
3.2-Used Materials: ............................................................................................................. 33
3.2.1-Electronic components: ................................................................................................... 33
3.2.2-Magnetic buttons: ............................................................................................................ 34
3.2.3-Plastic blocks:…...…………………………………………………………………………………………………………33
3.2.4-Solder wick: ...................................................................................................................... 35
3.2.5- Hardware components working together: ................................................................... 356
3.2.6-Arduino Uno R3 Module: ................................................................................................. 37
3.2.7-Bluetooth HC-06 module: ................................................................................................ 42
______________________________________________________________________________
Chapter Four: Project Software:
4.1-Software concept: ......................................................................................................... 45
4.2-Comparison between mobile operating systems: ........................................................... 45
4.2.1-Reason for choosing android: .......................................................................................... 47
4.3-Android Application: ...................................................................................................... 49
4.3.1-Introduction about android: ............................................................................................ 49
4.3-MIT App Inventor 2: ....................................................................................................... 50
4.3.1-Setting up App inventor: .................................................................................................. 50
4.3.2-MIT App Inventor 2 Designer and Blocks Editor: ............................................................. 59
4.3.3- Sharing and Packaging Apps: .......................................................................................... 60
4.3.4-Our project’s application design: ..................................................................................... 62
4.4-Arduino software: ......................................................................................................... 73
4.4.1-Arduino code: ................................................................................................................... 75
______________________________________________________________________________
Chapter Five: Hardware Software Integration:
5.1- Interaction between Hardware kit and mobile application: ........................................... 80
5.2-UART Protocol: .............................................................................................................. 81
5.3-Final Prototype working along with the mobile application: ........................................... 82
_____________________________________________________________________________________

Chapter Six: Conclusion and future work:
6.1-Conclusion: .................................................................................................................... 86
6.2-Future work: .................................................................................................................. 86
6.2.1-Replacing the Arduino and with a Printed Circuit Board: ................................................ 86
6.2.2-Increasing the number of projects that can be implemented by the kit: ....................... 87
6.2.3-Using Augmented Reality technology in the mobile application: ................................... 91
6.2.3.1-What’s Augmented Reality Technology? ...................................................................... 92
6.2.3.2-Role of Augmented Reality in education: ..................................................................... 93
6.2.3.3-Augmented Reality applications: .................................................................................. 93
6.2.4-Develop the mobile applications on other platforms: ........................................................ 94
Bibliography: ................................................................................................................................. 96

List of figures:
Figure 2.1.1: Illiteracy rates .................................................................................. 11
Figure 2.3.2: Learning styles ................................................................................. 15
Figure 2.3.2.1: Visual learning information .......................................................... 16
Figure 2.3.3.1: how students learn ....................................................................... 29
Figure 2.3.3.2: Edgar Dale’s cone of learning ....................................................... 30
Figure 3.2.2.1: Magnetic Snaps front view ........................................................... 34
Figure 3.2.2.2: Magnetic Snaps back view ............................................................ 34
Figure 3.2.3: Plastic blocks ................................................................................... 34
Figure 3.2.4.1: Solder wick pack ........................................................................... 35
Figure 3.2.4.2: Wick usage in a primitive design .................................................. 35
Figure 3.2.5.1: First protoype ............................................................................... 36
Figure 3.2.5.2: First prototype ............................................................................. 36
Figure 3.2.6.1: Arduino R3 Front view .................................................................. 38
Figure 3.2.6.2: Arduino R3 Back view ................................................................... 38
Figure 3.2.7.1: HC 06 Module front view ............................................................. 42
Figure 3.2.7.2: HC 06 Back view ........................................................................... 42
Figure 4.2.1.1: Tweeting devices distribution across Egypt .................................. 47
Figure 4.2.1.2: Heatmap of the % of android users .............................................. 48
Figure 4.3.1.1: Option one ................................................................................... 50
Figure 4.3.1.2: Step 3-1 ........................................................................................ 52
Figure 4.3.1.3: Step 3-2 ........................................................................................ 52
Figure 4.3.1.4: Option two ................................................................................... 53
Figure 4.3.1.5: Successful aiStarter launch ........................................................... 54
Figure 4.3.1.6: Selecting Emulator option ............................................................ 54
Figure 4.3.1.7: Emulator running checkup ........................................................... 55
Figure 4.3.1.8: Option three ................................................................................. 56
Figure 4.3.2.1: Designer tab ................................................................................. 59
Figure 4.3.2.2: Blocks tab ..................................................................................... 59
Figure 4.3.3.1: Exporting as aia file ...................................................................... 60
Figure 4.3.3.2: Importing aia file .......................................................................... 60
Figure 4.3.3.3: Saving as apk ................................................................................ 61

Figure 4.3.3.4: Building process ........................................................................... 61
Figure 4.3.4.1: App intro ...................................................................................... 63
Figure 4.3.4.2: App requesting bluetooth permission .......................................... 64
Figure 4.3.4.3: Pairing button .............................................................................. 64
Figure 4.3.4.5: Successful pairing ......................................................................... 65
Figure 4.3.4.6: Project list .................................................................................... 67
Figure 4.3.4.7: Pressing back button in projects menu ......................................... 67
Figure 4.3.4.8: Ready to start connection between the app and the kit ............... 70
Figure 4.3.4.9: Pressing back on ready screen ...................................................... 71
Figure 4.3.4.10: Pressing ready while the kit is disconnected .............................. 71
Figure 4.3.4.11: Project completion display ......................................................... 72
Figure 4.3.4.12: Timout display ............................................................................ 72
Figure 4.2.3.1.1: Arduino software ....................................................................... 74
Figure 4.2.3.1.2: Selecting the arduino board version .......................................... 74
Figure 5.1.1: Test Software .................................................................................. 80
Figure 5.2.1: UART ............................................................................................... 81
Figure 5.3.1: Hardware kit final prototype front view .......................................... 82
Figure 5.3.2: Hardware kit final prototype back view ........................................... 83
Figure 5.3.3: Arduino and bluetooth module connection side view ..................... 83
Figure 5.3.4: Arduino and blutooth module connection upper view .................... 84
Figure 5.3.5: Hardware and mobile app functioning together ............................. 84
Figure 6.2.3.1.1: Augmented Reality technology example ................................... 92
Figure 6.2.4.1: Mobile device sales 2Q12….……..…………………………………………………94

List of tables:
Table 1.1.3.1: Egypt and the net enrollment rate................................................... 5
Table 1.1.3.2: Egypt and primary education ........................................................... 6
Table 4.2.1: Mobile OS comparison ..................................................................... 46
Table 6.2.2.1: Projects ideas list 1 ........................................................................ 87
Table 6.2.2.2: Projects ideas list 2 ........................................................................ 88
Table 6.2.2.3: Projects ideas list 3 ........................................................................ 88
Table 6.2.2.4: Projects ideas list 4 ........................................................................ 89
Table 6.2.2.5: Projects ideas list 5 ........................................................................ 89
Table 6.2.2.6: Projects ideas list 6 ........................................................................ 90
Table 6.2.2.7: Projects ideas list 7 ........................................................................ 90
Table 6.2.2.8: Projects ideas list 8 ........................................................................ 91
Table 6.2.2.9: Projects ideas list 9 ........................................................................ 91

Abstract
In this paper work, we’ll be introducing Edutronics project, as a new creative
solution to raise a whole new generation of kids and adolescents, who are be able
to lead an industrial and technical revolution for our country, by mastering the
field of electronics.
Moreover, we’ll discuss the problems of education in Egypt, some purposed
solutions to these problems, also we’ll review all learning styles and stages which
have guided us to prepare an educational plan for whoever will be using this
project.
This document contains full details about how the hardware and software of this
project have developed from scratch till they came to life, as a reliable prototype
that proves our concept, and finally our future plans to improve its efficiency, and
ensure that we provide a simple, safe and fun learning environment to our users.

ACKNOWLEDGEMENT
Praise Allah for his blessings which without, we wouldn't have been able to complete and finalize this project. We would like to express our deepest appreciation for our dear professors who have the attitude and the substance of genius; where they have done their best and gave us from their time, knowledge and experience to begin, sustain and finalize our work with this project and make it to come to life. Special thanks to Professior Dario Assante “Assistant Professor – Uninettuno University” who despite the large distance that separated us, provided us with some really genius and useful ideas for our project, and always kept asking about our progress; we were completely sure that if we needed anything he would have provided as much help as he could. We hope that we’ve lived up to his expectations. Special thanks to Professor Alaa Hamdy “ Assistant Professor – Helwan University” who has helped us with all the available tools and resources to achieve the desired software output and to match the IEEE's International Standards for software mobile applications. Special thanks to Professor Amr Elsayyed “Lecturer – Helwan University” who was very supportive to the project’s idea, endorsed us to work as a team, and helped us finalize the Hardware Educational Kits and ensured it matched the IEEE's Standards for the Electronics Education. We would like to thank our families; Mothers, fathers, brothers and sisters who have helped us with all they could do by assisting us mentally, financially where they haven't slept the nights just to serve us in our gatherings and give us a great motivation. We would like to thank our friends who have helped us with all their possibilities to search, buy the components needed and to make a full problem research on our society. In addition we would like also to thank our dean and our department's management for their cooperation giving us all the facilities available from our faculty and the Egyptian government.

2 | P a g e
Chapter 1
Chapter One: Introduction

3 | P a g e
Chapter 1
1.1-Problem review:
The 118th out of 148 countries; again, Egypt retreats from the 107th out of 144 place in 2012-
2013 to the 118th in 2013-2014 Global Competitiveness Index (GCI), issued by the World
Economic Forum (WEF), keeping our country at the bottom of the report.
Lately there have been too many problems in Egypt, where we can say that most of them -if not
all - are dependent on each other’s such as poverty, health, traffic congestion and high
population, lack of the Industrial levels, Education...etc.
As an example the health problems is dependent on poverty and education, traffic congestions
is dependent on high population and education, the lack of the industrial level is dependent on
the high salaries of the Egyptian market and the low quality obtained from the Egyptian
technicians which is also dependent on the low quality of Education.
If we had a keen overview for these problems we would Figure out that the most common
problem resulting in other problems is the problem of the bad education.
Since the world's most common trend nowadays is about the new technologies and the
electronic industries, a country with a bad education would hardly compete leading to another
huge economic problem for this country.
Likewise most of the problems in Egypt is because of the bad education quality thus the
absence of technical education; an electrical or an embedded systems Engineering student
would know nothing about what he will be doing after he gets graduated before entering the
faculty.
1The duration of this Educational stage is so small for a student to cover the least information
for having the bachelor’s degree, or to have the job title of an Engineer or either a technician.
From the research made by the International Institute of Technology, the main reasons for
keeping a country away from producing electronic devices or electronic components would be
one of two different orientation reasons:
1. Business Oriented reasons (BOR)
2. Technical Oriented reasons (TOR)
If we came to the point of the TOR we would find that the main reason in the TOR is the lack of
information and education of the Egyptians specially in the major of electronic production
Which had a great Impact in the Global Competitiveness Index included (GCI) in the Global
Competitiveness Report by World Economic Forum taking Egypt from coming 89th country in
the index in the close past to be the to be the 118th over 148 country in 2013-2014's Report.
1 The Global Competitiveness Report 2013 - 2014

4 | P a g e
Chapter 1
1.1.2-What’s Global Competitive Index (GCI)?
2It’s a report that assesses the ability of countries to provide high levels of prosperity to their
citizens. This in turn depends on how productively a country uses available resources.
Therefore, the Global Competitiveness Index measures the set of institutions, policies, and
factors that set the sustainable current and medium-term levels of economic prosperity.
1.1.3-Egypt in the GCI regarding the main problem:
3In the latest GCR (2013-1014) Egypt ranking was to be the last in the quality of primary
education according to the latest Global Competitiveness Report issued by World Economic
Forum. Shocked Arabic and English newspaper commentators drew particular attention to the
embarrassingly low score on education, while online social network users wondered whether
this Figure is really true and Egypt did really rank the lowest among countries listed in this
report.
While recognizing the significance of the Figures cited and admitting that public education in
Egypt is in a dismal state, it is problematic to be citing the Global Competitiveness Report on
this matter, for a very simple reason:
There are two Figures in the report that cover primary education in Egypt. One is the net
enrollment rate, which means the percentage of children from a given age group enrolled in the
academic year for that age group. So if we assume that 5th grade is for ten year-olds, then the
net enrollment rate for 5th grade would be the number of ten year-old children enrolled
divided by the number of ten year-olds in the country. It is the first, most basic indicator people
use to get a sense of how big the education system is and how many kids are enrolled in
schools. Access to education is by no means an indicator of the level of quality. Egypt has
famously done fairly well on enrollment rates while doing very poorly on other quality
indicators.
So Egypt's net enrollment rate for primary education is listed in the report as being 95.6%, with
a ranking of 58/148. Generally not bad but also not good either. 95.6% sounds nice and high
but it's important here to remember two things:
1. It is an average rate and the rates for girls and for children in rural, remote and
economically marginalized areas are lower than the average
2. It is just an indicator of how many kids are going to school and mentions nothing about
what type of education these children receive there.
2 Wikipedia 3 The Global Competitiveness Report 2013 - 2014

5 | P a g e
Chapter 1
-Table 1.1.3.1: Egypt and the net enrollment rate-

6 | P a g e
Chapter 1
The second Figure related to primary education, and the one that has everyone up in arms is listed as "Quality of Primary Education" and Figure 1.1.3.2 given in, which ranks Egypt at 148 out of the 148 countries covered in the report. According to the report itself, this Figure is the average score given by respondents to a question on the Executive Opinion Survey. The survey provides the bulk of the data the report is based on. The respondents of this survey, and here is the important part, are people from various sectors within the business community. For this year’s report, the survey in Egypt (conducted by the Egyptian Center for Economic Studies) collected responses from 71 business people. The question they were asked about primary education was “How would you assess the quality of primary schools in your country?” (Or most likely something very close to it, as this was the question used for the same item in the 2009 survey and I doubt much has changed). Respondents were to give their answer as a rank, ranging from 1, indicating “Poor” to 7 indicating “Excellent—among the best in the world”. So the average rank for the quality of primary education, from 71 executives from various sectors and business sizes, was 2/7. This was the lowest rank among all the countries.
-Table 1.1.3.2: Egypt and Primary education-

7 | P a g e
Chapter 1
1.2.1-Proposed Solutions:
From the previous information, it all lies in increasing the country’s production and industrial
activities, and this will happen through:
1. The government creates a favorable framework for businesses activities.
2. Assisting the promotion of the diffusion of new technologies. Ultimately, it is new
technologies that improve productivity.
3. Facilitating the inventions’ patent process, as it takes years to be completed.
4. Facilitating the movement of the workforce from low to high productivity activities,
both on an inter-regional and inter-industry basis.
5. Investment in post-secondary education, both in terms of the teaching and, of course,
research and development.
6. Realizing the importance of research field, and encourage promising research institutes
through awareness.
7. Converting researches from ideas to the real world and getting use of them in facing
Egypt’s problems.
8. Increasing the awareness of the importance of the technical education.
9. Using different approaches and learning from other cultures how they benefit from
them and applying them in our educational systems.
10. The government should increase the budget of education and it should spend bigger
percentage on the infrastructure.
11. Increasing the attention of the rural areas and building larger number of school
according to the international standards.
12. Spending much money on advanced learning equipment.
13. Encouraging private companies and foundations to help Figurehting illiteracy.
14. Performing national projects to develop the education in Egypt.

8 | P a g e
Chapter 1
1.2.2-Our solution:
Being engineers, we have a very effective role in developing this community and providing it
with the tools, products and technologies that revive its economy.
Basically we provide a learning system that relates to the quote “Give a man a fish and he’ll eat
for a day, teach a man how to fish and he’ll eat for a lifetime” I want you to imagine, a whole
new generation that’s been learning electronics and implementing circuits since the age of 8,
what would they capable to achieve?
We aim to prepare a generation that will lead a technological revolution for our country,
through manufacturing educational kits and components that aim to develop the
technical skills of our future generation in a safe, simple and fun learning environment
based on learning by doing, which will be one of the main methods to place Egypt
among the top countries in the Global Competitiveness Index on the long run.
Our main user is the child that we’ll reach through his/her parent, who’ll be an easy
target once he/she knows the use of our product, by simply clarifying the function and
operation of our project; Who won’t like the idea of making his kid play with something
that will literally enhance his brain skills?
The children’s’ curiosity will be a great help, every child would wish to make his own
game, imagine how will he/she react when he hears that he can make a circuit that
performs a certain function, remember how your own kids or siblings reacted when
they connected a lamp with a battery in school and it lit or when they created a
magnetic field with a nail, they sure were interested; learning by doing, that’s the best
and the most interesting learning method.

9 | P a g e
Chapter 2
Chapter two: Project Educational System

10 | P a g e
Chapter 2
2.1-General Education problems in Egypt:
We’ll sum up all the problems in the upcoming points:
4
1. No clear governmental plans
Instability, and no binding rules to maintain assurance in the schooling or the
academic university systems.
No long term plans for reforming education.
Almost every year there is a new decision taken by a new prime minster or a
minister concerning a new law that affects education.
Every new minister of education comes and ignores the previous minister’s efforts
and start again.
2. Over population
Statistics from Central Agency for Public Mobilization and Statistics shows that
there are 16 million 101 thousand and 210 student in Egypt.
Classes are so crowded so teachers can’t give all what they have.
No appropriate environment for education.
Less attention to the instructor.
Students can’t use the education facilities like labs due to their number.
Faster destruction for the infrastructure like classes, bathrooms, labs.
Health problems may happen because of the crowd.
3. Unqualified instructors
As a result of bad education systems there are many teachers who aren't well
qualified to deal with the students.
The inefficiency of the instructors and his inability to convey the information
properly and also the inability to distinguish the differences between individual
students.
In each level of education student needs a specific kind of treatment from
teachers but they don’t understand this.
Instructors lack how to deal with students psychologically and lack to having
different ways of teaching.
4 Presentation about problems of education by Nile University 2013

11 | P a g e
Chapter 2
4. Illiteracy
Large number of illiterates in Egypt.
There is a relation between poverty and illiteracy in Egypt.
45% of the workers in Egypt are illiterates.
The Egyptian government doesn’t
spend enough money in Figurehting
illiteracy.
-Figure 2.1.1: Illiteracy rates-
5. Private lessons
Students are less interested in going to schools.
Changing the nature of the relation between the student and the teacher.
Creating type of dependency at the student.
Teachers are not giving the required care to the students in schools.
Teachers distinguish between students in treatment in classes.
Private lessons creates miserable economic burden on families.
6. Old techniques of education
The educational system didn’t change since Mohamed Ali.
The cramming system where the teacher provides everything, and students take
notes, there is no participation.
Moreover, each lesson has an enormous amount of data that has to be
memorized by heart to be able to pass their finals at the end of the term.

12 | P a g e
Chapter 2
The grading scheme is unfair because the whole grade depends only on the finals
so we find the phenomenon of students studying at home and they don’t go to
schools.
7. The gap between the family and the school
The family and the school are the main factors in building the student's back
ground and habits.
These two factors must work together in the right way to improve the student's
performance and to solve the problems that the student might face.
The absence of any factor of them leads to:
Bad habits like drugs, Alcohol, disrespecting.
Poor academic performance.
Bad behavior regards teachers.
8. Infrastructure
The educational infrastructure in Egypt isn’t strong or developed at all.
The number of schools isn’t proportional to the number of students especially in
the countryside.
Many children have to walk for kilometers to reach their schools.
Schools don’t contain advanced labs and modern technology means.
9. Neglecting Technical Education, which is the main problem that we’re concerned
about as it’s related to our field as engineers; caused by the following:
Reasons:
i. The society’s view of technical education is always negative.
ii. The poor condition of buildings and equipment of the schools because
the government doesn’t develop them.
iii. The number of students in classes is huge so classes are overcrowded.
iv. Concentrating on the theoretical side and ignoring the practical one.
Which led to:
i. Students don’t have enough abilities.
ii. Graduates don’t find work which increases
the problem of unemployment
10. Subjects aren’t related to the labor market

13 | P a g e
Chapter 2
2.2-Proposed Solutions:
1. Technical Education
Increasing the awareness of the importance of the technical education to change
the people’s look to it by making campaigns in the media.
Developing the equipment and the constructions and coping with the modern
techniques.
Taking the students to attend international conferences to recognize what the
world reached.
Finding jobs for graduates with good salaries.
Making final projects like engineering faculties.
2. Old techniques of education
Provide students with creative, fun, syllabuses to ensure that they learn while
having fun.
Using different approaches and learning from other cultures how they benefit
from them and applying them in our educational systems.
Project based learning.
Task based learning.
Language communicative skills.
3. Infrastructure
The budget of education in Egypt in 2011 is 36.3 Billion LE. Which represents
3.4% from Egypt’s budget.
Statistics show that 94% from the education budget goes for salaries.
The government should increase the budget of education and it should spend
bigger percentage on the infrastructure.
Increasing the attention of the rural areas and building larger number of school
according to the international standards.
Spending much money on advanced equipment like labs and computer.
Maintenance is the most important thing to save the money spent.
4. Performing national projects to develop the education in Egypt like Zewail’s city for
sciences and technology.
5. Increasing the attention of scientific research which is really ignored in Egypt and
increasing its budget.
6. Converting researches from ideas to the real world and getting use of them in facing
Egypt’s problems
7. Overcome the problem if bureaucracy that faces any ambitious project in Egypt.

14 | P a g e
Chapter 2
2.3-Different learning styles:
52.3.1-Overview of learning styles:
Many people recognize that each person prefers different learning styles and techniques.
Learning styles group common ways that people learn. Everyone has a mix of learning styles.
Some people may find that they have a dominant style of learning, with far less use of the other
styles. Others may find that they use different styles in different circumstances. There is no
right mix. Nor are your styles fixed. You can develop ability in less dominant styles, as well as
further develop styles that you already use well.
Using multiple learning styles and multiple intelligences for learning is a relatively new
approach. This approach is one that educators have only recently started to recognize.
Traditional schooling used (and continues to use) mainly linguistic and logical teaching
methods. It also uses a limited range of learning and teaching techniques. Many schools still
rely on classroom and book-based teaching, much repetition, and pressured exams for
reinforcement and review. A result is that we often label those who use these learning styles
and techniques as bright. Those who use less favored learning styles often find themselves in
lower classes, with various not-so-complimentary labels and sometimes lower quality teaching.
This can create positive and negative spirals that reinforce the belief that one is "smart" or
"dumb".
By recognizing and understanding your own learning styles, you can use techniques better
suited to you. This improves the speed and quality of your learning.
5 learning-styles-online.com

15 | P a g e
Chapter 2
2.3.2-Understanding the basis of learning styles:
Learning styles have more influence than you may realize. Your preferred styles guide the way
you learn. They also change the way you internally represent experiences, the way you recall
information, and even the words you choose. We explore more of these features in this
chapter.
Research shows us that each learning style uses different parts of the brain. By involving more
of the brain during learning, we remember more of what we learn. Researchers using brain-
imaging technologies have been able to find out the key areas of the brain responsible for each
learning style.
For example:
Visual: The occipital lobes at the back of the brain manage the visual sense. Both the
occipital and parietal lobes manage spatial orientation.
Aural: The temporal lobes handle aural content. The right temporal lobe is especially
important for music.
Verbal: The temporal and frontal lobes, especially two specialized areas called Broca’s
and Wernicke’s areas (in the left hemisphere of these two lobes).
Physical: The cerebellum and the motor cortex (at the back of the frontal lobe) handle
much of our physical movement.
Logical: The parietal lobes, especially the left side, drive our logical thinking.
Social: The frontal and temporal lobes handle much of our social activities. The limbic
system (not shown apart from the hippocampus) also influences both the social and
solitary styles. The limbic system has a lot to do with emotions, moods and aggression.
Solitary: The frontal and parietal lobes, and the limbic system, are also active with this
style.
-Figure 2.3.2: Learning styles-

16 | P a g e
Chapter 2
2.3.2.1-Visual (Spatial) learning style:
If you use the visual style, you prefer using images, pictures, colors, and maps to organize
information and communicate with others. You can easily visualize objects, plans and outcomes
in your mind's eye. You also have a good spatial sense, which gives you a good sense of
direction. You can easily find your way around using maps, and you rarely get lost. When you
walk out of an elevator, you instinctively know which way to turn.
The whiteboard is a best friend (or would be if you had access to one). You love drawing,
scribbling and doodling, especially with colors. You typically have a good dress sense and color
balance (although not always!).
Common pursuits and phrases
Some pursuits that make the most use of the visual style are visual art, architecture,
photography, video or film, design, planning (especially strategic), and navigation.
You may tend to use phrases like these:
Let's look at it differently.
See how this works for you.
I can't quite picture it.
Let's draw a diagram or map.
I'd like to get a different perspective.
I never forget a face.
-Figure 2.3.2.1: Visual learning information-

17 | P a g e
Chapter 2
Learning and techniques:
If you are a visual learner, use images, pictures, color and other visual media to help you learn.
Incorporate much imagery into your visualizations.
You may find that visualization comes easily to you. This also means that you may have to make
your visualizations stand out more. This makes sure new material is obvious among all the
other visual images you have floating around inside your head.
Use color, layout, and spatial organization in your associations, and use many 'visual
words' in your assertions. Examples include see, picture, perspective, visual, and map.
Use mind maps. Use color and pictures in place of text, wherever possible. If you don't
use the computer, make sure you have at least four different color pens.
Systems diagrams can help you visualize the links between parts of a system, for
example major engine parts or the principle of sailing in equilibrium. Replace words with
pictures, and use color to highlight major and minor links.
The visual journey or story technique helps you memorize content that isn't easy to
'see.' The visual story approach for memorizing procedures is a good example of this.
Peg words and events come easily to you, however you need to spend some time
learning at least the first ten peg words. Afterwards, your ability to visualize helps you
peg content quickly.
The swish technique for changing behaviors also works well for you, as it relies on
visualization.

18 | P a g e
Chapter 2
2.3.2.2- The Aural (Auditory-Musical-Rhythmic) Learning Style:
If you use the aural style, you like to work with sound and music. You have a good sense of
pitch and rhythm. You typically can sing, play a musical instrument, or identify the sounds of
different instruments. Certain music invokes strong emotions. You notice the music playing in
the background of movies, TV shows and other media. You often find yourself humming or
tapping a song or jingle, or a theme or jingle pops into your head without prompting.
Common Pursuits and Phrases
Some pursuits that use the aural style are playing, conducting, or composing music, and sound
engineering (mixing and audiovisual work).
You may tend to use phrases like these:
That sounds about right.
That rings a bell.
It's coming through loud and clear.
Tune in to what I'm saying
Clear as a bell.
That's music to my ears.
Learning and Techniques
If you are an aural learner, use sound, rhyme, and music in your learning. Focus on using aural
content in your association and visualization.
Use sound recordings to provide a background and help you get into visualizations. For example, use a recording of an aircraft engine running normally, playing loudly via a headset, to practice flight procedures. Use a recording of the sound of wind and water when visualizing sailing maneuvers. If you don't have these recordings, consider creating them while next out training.
When creating mnemonics or acrostics, make the most of rhythm and rhyme, or set them to a jingle or part of a song.
Use the anchoring technique to recall various states that music invokes in you. If you have some particular music or song that makes you want to 'take on the world,' play it back and anchor your emotions and state. When you need the boost, you can easily recall the state without needing the music.

19 | P a g e
Chapter 2
2.3.2.3- The Verbal (Linguistic) Learning Style:
The verbal style involves both the written and spoken word. If you use this style, you find it easy
to express yourself, both in writing and verbally. You love reading and writing. You like playing
on the meaning or sound of words, such as in tongue twisters, rhymes, limericks and the like.
You know the meaning of many words, and regularly make an effort to find the meaning of new
words. You use these words, as well as phrases you have picked up recently, when talking to
others.
Common pursuits and phrases
Pursuits that use the verbal style include public speaking, debating, politics, writing and
journalism.
You may tend to use phrases like these:
Tell me word for word
Let's talk later.
The word you're looking for is
I hear you but I'm not sure I agree.
Let me spell it out for you.
In other words
Learning and techniques
If you are a verbal learner, try the techniques that involve speaking and writing. Find
ways to incorporate more speaking and writing in techniques. For example, talk yourself
through procedures in the simulator, or use recordings of your content for repetition.
Make the most of the word-based techniques such as assertions and scripting. Use
rhyme and rhythm in your assertions where you can, and be sure to read important
ones aloud. Set some key points to a familiar song, jingle or theme.
Mnemonics are your friends for recalling lists of information. Acronym mnemonics use
words, focusing on the first letter of the word to make up another word or memorable
sequence. You can also make up phrases using the items you want to memorize.
Scripting is also powerful for you. You don't just have to write them down. Record your
scripts using a tape or digital audio recorder (such as an MP3 player), and use it later for
reviews.
When you read content aloud, make it dramatic and varied. Instead of using a
monotone voice to go over a procedure, turn it into a lively and energetic speech

20 | P a g e
Chapter 2
worthy of the theatre. Not only does this help your recall, you get to practice your
dramatic presence!
Try working with others and using role-playing to learn verbal exchanges such as
negotiations, sales or radio calls.
2.3.2.4- The Physical (Bodily-Kinesthetic) Learning Style:
If the physical style is more like you, it's likely that you use your body and sense of touch to
learn about the world around you. It's likely you like sports and exercise, and other physical
activities such as gardening or woodworking. You like to think out issues, ideas and problems
while you exercise. You would rather go for a run or walk if something is bothering you, rather
than sitting at home.
You are more sensitive to the physical world around you. You notice and appreciate textures,
for example in clothes or furniture. You like 'getting your hands dirty,' or making models, or
working out jigsaws.
You typically use larger hand gestures and other body language to communicate. You probably
don't mind getting up and dancing either, at least when the time is right. You either love the
physical action of theme park rides, or they upset your inner body sense too much and so you
avoid them altogether.
When you are learning a new skill or topic, you would prefer to 'jump in' and play with the
physical parts as soon as possible. You would prefer to pull an engine apart and put it back
together, rather than reading or looking at diagrams about how it works.
The thought of sitting in a lecture listening to someone else talk is repulsive. In those
circumstances, you fidget or can't sit still for long. You want to get up and move around.
Common Pursuits and Phrases
Pursuits that involve the physical style include general physical work, mechanical, construction
and repair work, sports and athletics, drama and dancing.
You may tend to use phrases like these:
That feels right to me.
I can't get a grip on this'
Stay in touch.
Get in touch with'
That doesn't sit right with me.
I have good feelings about this.

21 | P a g e
Chapter 2
My gut is telling me'
I follow your drift.
Learning and techniques
If you use a physical style, use touch, action, movement and hands-on work in your
learning activities. For visualization, focus on the sensations you would expect in each
scenario. For example, if you are visualizing a tack (turn) on a sailboat, focus on physical
sensations. Feel the pressure against your hand as you turn the rudder, and the tension
lessening on the ropes. Feel the wind change to the other side, feel the thud as the sail
swaps with the wind, and feel the boat speed up as you start the new leg.
For assertions and scripting, describe the physical feelings of your actions. For example,
a pilot might script as follows: 'I feel the friction as I push the throttle forward to start
my takeoff run. The controls start to feel more responsive as I check the airspeed, oil
pressure and temperature. At takeoff speed, I pull back slightly, and I feel the vibrations
of the wheels stop as the plane leaves the ground. After a few moments, I reach down
and set the gear selector to up. I feel the satisfying bump as the gear stops fully up.'
Use physical objects as much as possible. Physically touch objects as you learn about
what they do. Flashcards can help you memorize information because you can touch
and move them around.
Keep in mind as well that writing and drawing diagrams are physical activities, so don't
neglect these techniques. Perhaps use big sheets of paper and large color markers for
your diagrams. You then get more action from the drawing.
Use breathing and relaxation to focus your state while you learn and perform. Focus on
staying calm, centered, relaxed and aware. If you want to gain more control over your
physical state, look up some references on Autogenics. This was a secret behind the
Great Russian athletic performances over the past few decades.
Use role-playing, either singularly or with someone else, to practice skills and behaviors.
Find ways to act out or simulate what you are learning.

22 | P a g e
Chapter 2
2.3.2.5- The Logical (Mathematical) Learning Style:
If you use the logical style, you like using your brain for logical and mathematical reasoning. You
can recognize patterns easily, as well as connections between seemingly meaningless content.
This also leads you to classify and group information to help you learn or understand it.
You work well with numbers and you can perform complex calculations. You remember the
basics of trigonometry and algebra, and you can do moderately complex calculations in your
head.
You typically work through problems and issues in a systematic way, and you like to create
procedures for future use. You are happy setting numerical targets and budgets, and you track
your progress towards these. You like creating agendas, itineraries, and to-do lists, and you
typically number and rank them before putting them into action.
Your scientific approach to thinking means you often support your points with logical examples
or statistics. You pick up logic flaws in other peoples words, writing or actions, and you may
point these out to people (not always to everyone's amusement).
You like working out strategies and using simulation. You may like games such as brainteasers,
backgammon, and chess. You may also like PC games such as Dune II, Starcraft, Age of Empires,
Sid Meier games and others.
Common Pursuits and Phrases
People with a strong logical style are likely to follow such pursuits as the sciences, mathematics,
accounting, detective work, law and computer programming.
You are more likely to use phrases that reflect you’re most dominant style out of the visual,
aural or physical styles, however you may also use phrases like these:
That's logical.
Follow the process, procedure, or rules.
There's no pattern to this.
Let's make a list.
We can work it out.
Quantify it, or prove it!

23 | P a g e
Chapter 2
Learning and techniques
If you are a logical learner, aim to understand the reasons behind your content and
skills. Don't just rote learn. Understanding more detail behind your compulsory content
helps you memorize and learn the material that you need to know. Explore the links
between various systems, and note them down.
While you study, create and use lists by extracting key points from your material. You
may also want to use statistics and other analysis to help you identify areas you may
want to concentrate on.
Pay attention to your physical state, for example you’re breathing and stress level. It's
possible that you isolate your own body from your rational thought. Remember that you
are just as much a part of the 'system' as any equipment you may be using.
Also remember that association often works well when it is illogical and irrational. It
doesn't matter how logical two items are together. You have a better chance of recalling
them later if you have make the association illogical. Your brain may protest at first!
In your scripting though, highlight logical thoughts and behaviors. Highlight your ability
to pick up systems and procedures easily, and that you can detect when you need to
change a set procedure.
Make use of 'systems thinking' to help understand the links between various parts of a
system. An important point here is that systems thinking helps you understand the
bigger picture. Often the whole is greater than the sum of the parts. For example, you
may understand the individual aircraft systems and flight surfaces, but you may not
have a view of how all those systems support flight in equilibrium. Systems diagrams can
help you gain that understanding.
You may find it challenging to change existing behaviors or habits. You can rationalize all
you want to about why you should change a behavior, but you may find it persists. Try
the shunt technique to understand what behavior you currently have and what behavior
you want to have. When you understand those behaviors, use the technique to divert
from the old behavior to the new.
You may sometimes overanalyze certain parts of your learning or training. This can lead
to analysis paralysis. You may be busy, but not moving towards your goal. If you find you
are overanalyzing which school to start with, or you are over-planning your course
maps, stop and refocus on activities that move you forward. Consider how much 'bang
for buck' you get from spending more time than necessary. Measure your activities by
your speed towards your goal. Planning exactly how much time to spend on each
chapter of theory doesn't help learn it anywhere near as fast as starting on the theory!

24 | P a g e
Chapter 2
If you often focus from analysis paralysis, write 'Do It Now' in big letters on some signs
or post-it notes. Place them in strategic places around your work or study area.
2.3.2.6- The Social (Interpersonal) Learning Style:
If you have a strong social style, you communicate well with people, both verbally and non-
verbally. People listen to you or come to you for advice, and you are sensitive to their
motivations, feelings or moods. You listen well and understand other's views. You may enjoy
mentoring or counseling others.
You typically prefer learning in groups or classes, or you like to spend much one-on-one time
with a teacher or an instructor. You heighten your learning by bouncing your thoughts off other
people and listening to how they respond. You prefer to work through issues, ideas and
problems with a group. You thoroughly enjoy working with a 'clicking' or synergistic group of
people.
You prefer to stay around after class and talk with others. You prefer social activities, rather
than doing your own thing. You typically like games that involve other people, such as card
games and board games. The same applies to team sports such as football or soccer, basketball,
baseball, volleyball, baseball and hockey.
Common pursuits and phrases
Some examples of pursuits that people with a strong social style may follow include counseling,
teaching, training and coaching, sales, politics, human resources, and others.
As with people with the logical style, you are more likely to use phrases that reflect your
dominant style out of physical, aural and visual styles. Here are some other phrases you may
also use:
Let's work together on this.
We can work it out.
Tell me what you are thinking.
Help me understand this.
Let's pull some people together to discuss.
Let's explore our options.

25 | P a g e
Chapter 2
Learning and techniques
If you are a social learner, aim to work with others as much as possible. Try to study
with a class. If this is not available then consider forming your own study group with
others at a similar level. They don't have to be from the same school or class. If you like,
introduce them to some of the techniques from this book. It may be easier for you to try
some of the Memletric Techniques in a social setting, and work with the feedback from
others.
Role-playing is a technique that works well with others, whether it’s one on one or with
a group of people. For example, in aviation training, role-play the aerodrome area. Have
people walking around in 'circuits' making the right radio calls with the tower
coordinating everyone. Another example might be to role-play with one person being
the instructor and the other being the student.
Work on some of your associations and visualizations with other people. Make sure they
understand the principles of what you are doing though, otherwise you may get some
interesting responses! Others often have different perspectives and creative styles, and
so the group may come up with more varied and imaginative associations compared to
the ones you might create yourself.
Rather than reciting assertions to yourself, try sharing your key assertions with others.
By doing so, you are almost signing a social contract that your assertion is what you do.
This strengthens your assertions.
Share your reviews, review checklists and 'perfect performance' scripts with those in
your group as well. By listening to how others solve their issues, you may get further
ideas on how to solve your own issues. Try sharing the work of creating a 'perfect
performance' script. Each person writes the script for the areas they want to work on
the most, and then the group brings all the scripts together.
Mind maps and systems diagrams are great to work on in class. Have one person be the
appointed drawer, while the rest of the class works through material and suggests ideas.
The group may have varied views on how to represent some ideas, however this is a
positive part of learning in groups. If you can't agree on something, just take a copy of
what the group has worked on and add your own thoughts. Often there is no right
answer for everyone, so agree to disagree!
Working in groups to practice behaviors or procedures help you understand how to deal
with variations. Seeing the mistakes or errors that others make can help you avoid them
later. As well, the errors you make are helpful to others! Whether it's via role-playing, a
simulator or other technique doesn't matter too much. Be imaginative. Two chairs in the
middle of a classroom to simulate an aircraft cockpit can be just as good as computer
simulation and the real activity.

26 | P a g e
Chapter 2
Lastly, if you are working in groups it may help to have everyone do the learning styles
questionnaire. This may help everyone understand why each person has different
viewpoints. It can also help with assigning activities to people. Individuals may volunteer
for activities based on either the styles they currently have, or the styles they want to
learn.
2.3.2.7- The Solitary (Intrapersonal) Learning Style:
If you have a solitary style, you are more private, introspective and independent. You can
concentrate well, focusing your thoughts and feelings on your current topic. You are aware of
your own thinking, and you may analyze the different ways you think and feel.
You spend time on self-analysis, and often reflect on past events and the way you approached
them. You take time to ponder and assess your own accomplishments or challenges. You may
keep a journal, diary or personal log to record your personal thoughts and events.
You like to spend time alone. You may have a personal hobby. You prefer traveling or
holidaying in remote or places, away from crowds.
You feel that you know yourself. You think independently, and you know your mind. You may
have attended self-development workshops, read self-help books or used other methods to
develop a deeper understanding of yourself.
You prefer to work on problems by retreating to somewhere quiet and working through
possible solutions. You may sometimes spend too much time trying to solve a problem that you
could more easily solve by talking to someone.
You like to make plans and set goals. You know your direction in life and work. You prefer to
work for yourself, or have thought a lot about it. If you don't know your current direction in life,
you feel a deep sense of dissatisfaction.
Common pursuits and phrases
Those that have a strong solitary style include authors, researchers, park rangers and security
guards. Peak performers in any field often have a good solitary style behind other more
dominant styles.
You are more likely to use phrases that reflect your other dominant styles. Here are some other
phrases you may also use:
I'd like some time to think it over.
This is what I think or feel about that.
I'd like to get away from everyone for a while.
I'll get back to you on that.

27 | P a g e
Chapter 2
Learning and techniques
You prefer to learn alone using self-study. When you spend time with an instructor or a
teacher, you often only clarify information you haven't be able to clarify yourself. You may
dislike learning in groups.
Don't be afraid to ask questions like 'What's in this for me?' 'Why does this matter?', 'How can I
use this idea?' Be aware of your inner thoughts and feeling towards various topics. This is
because these inner thoughts have more of an impact on your motivation and ability to learn
than they do in the other styles. Here are a few ideas to help this along:
Spend more time on the 'Target' step of the Memletic Approach. Set your goals,
objectives and plans. Define ultra-clear visualizations or scripts of what life is like once
you've achieved your goals. Understand your reasons for undertaking each objective,
and ensure that you are happy with your learning goals.
Align your goals and objectives with personal beliefs and values. If there is
misalignment, you may run into issues with motivation or confidence. It's not always
obvious what the underlying cause is. If you suspect a misalignment, try some of the
techniques like 'five whys' and 'seventy by seven' to flush these issues out. Scripting and
assertions also help highlight issues. If you script your goal and you find you don't like
certain parts of it, that's probably a hint that you have some misalignment.
Create a personal interest in your topics. An example for pilots might be to learn more
about other aviators, both current and past. Why do others find aviation interesting?
What is in it for them? What keeps them motivated? Why do they work in the field?
You may also want to look at the people behind your books or material. What was their
motivation to create it? Why do you think they organized the material in the way they
did? Can you ask them?
Keep a log or journal. You may want to keep one separate from your normal journal or
training log. Include extra information about your thoughts and feelings. Outline your
challenges, ideas on how to overcome them, and what worked. Write down what works
well and doesn't work well for you. While you are studying, be aware of thoughts or
concerns that arise. Write them down and come back to them. Discuss with others later
if needed. Bear in mind it may be more efficient to put something that confuses you
aside, and ask others later. This is often better than spending too much time trying to
work it out yourself.
When you associate and visualize, highlight what you would be thinking and feeling at
the time. You may want to do most of your visualization and association in private. I
suggest you also try talking to others with more experience to get some idea of what
thoughts and feelings they have in various circumstances.

28 | P a g e
Chapter 2
Assertions are important for you. You drive yourself by the way you see yourself
internally. Assertions are a good way to ensure your internal self-image matches your
learning objectives. This also applies to the scripting techniques, so include your internal
thinking and feelings in your scripts.
Modeling is a powerful technique for you. Don't just model behaviors and appearance.
Try to get 'inside their heads' and model the thought patterns and feelings you believe
they have in various circumstances. You can gain ideas by talking to people or reading
biographies. Remember you don't have to find a single perfect model. Create a model
that combines several people.
Be creative with role-playing. You don't always need other people to role-play with,
because you can create plenty of people using visualization! For example, you can
visualize your instructor beside you, or a colleague and you practicing a procedure or
skill. Work with them and talk to them while you visualize. An advantage of this form of
role-playing is that you can control their behavior!
When changing behaviors and habits, you need to have a strong desire to make the
changes you want. Explore the benefits of making a change, and visualize scenarios in
which you've already made the change. If you don't believe strongly in the benefits, you
may find it difficult to change the behavior.
Your thoughts have a large influence on your performance and often safety. Your
thoughts are just as much part of a system as is the physical equipment you are using,
such as an aircraft, car or boat. In addition, other people are also part of those systems,
so be aware that their thoughts and feelings can affect the overall system.
Years of refinement have made physical equipment, such as aircraft and boats, safe and
reliable. For example, aircraft failure causes less than ten percent of all aircraft
accidents. The largest percentage is pilot error, more than seventy percent. This is likely
the case in many other fields. It's just not as visible when accidents happen. It's well
worthwhile spending some time refining the reliability of your own systems.
29 | P a g e
Chapter 2
2.3.3-Four stages of learning:
6There is a wealth of information, both on the shelves of libraries and on the Internet, which
addresses the different learning theories that have been suggested over the past three or four
decades. Those most often quoted are Kolb and Gardner. While most theorists disagree, or
come from a different approach about learning styles, it is generally accepted that there are
basically four stages of learning.
1. Exposure Stage—the first time a concept (such as long division) is new to us.
2. Guided Learning Stage—when we still can't do the problems without help. This is where
most people get stuck.
3. Independent Stage—with review, guidance, and hard work, we reach stage 3.
4. Mastery Stage—comes with more practice, final goal of education.
Regardless of how a student learns, the stages remain the same. It is up to the instructor and
the curriculum content developer to assist a student in getting past the guided learning stage to
become an independent learner, thus building on newly gained learning concepts or skills.
It has also been shown through repeated studies that students learn in different ways, or
through a combination of different ways, thus supporting Smith and Kolb's learning cycle
concept.
-Figure 2.3.3.1: how students learn-
6 phschool.com
30 | P a g e
Chapter 2
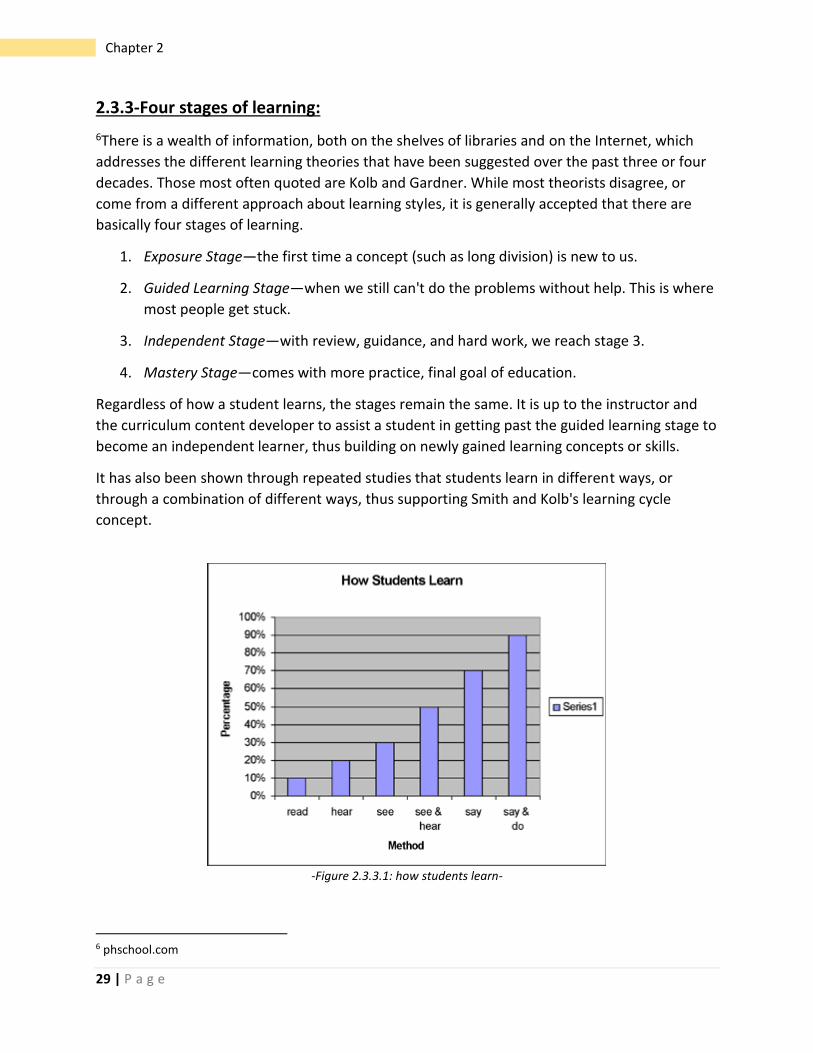
-Figure 2.3.3.1: Edgar Dale’s cone of learning-

31 | P a g e
Chapter 2
2.4-Our project’s Educational role:
As we’ve previously reviewed in this chapter, Egypt is suffering from a lot of problems in its
educational system, which strongly encouraged us to think of a solution that’s related to our
field, that helps solving the previous stated problems; that’s when the idea of creating an
educational system using our kits came to our mind.
Our project’s educational system will support the following:
1. Provide a technical skill directly related to the labor market.
2. Provide an automated step by step learning system that will guide the user in
implementing the circuits from scratch.
3. It strongly supports technical education, it might be a start to other similar technical
educational projects.
4. It supports visual and aural learning styles by the step by step guide through the mobile
application.
5. It supports physical and logical learning styles, through the hardware circuit
implementation kit.
6. It supports solitary learning style, as the user can work alone with the aid of the mobile
application only.
7. It supports social learning style, due to the score calculation system in the mobile
application, as users can gather up and compete with each other’s for achieving the
highest scores for implementing the circuits.
8. It supports the four learning stages, as the user will be exposed to the real world circuit
components, guided from scratch into implementing a real functioning circuit, being
independent as the user will be able to implement whichever circuit he desires using
the hardware kit, and master the implementation of any circuit after he/she completes
all the available levels.
9. Supports all the stages of Edgar’s cone of learning, especially learning by doing

32 | P a g e
Chapter 3
Chapter Three: Project Hardware

33 | P a g e
Chapter 3
3.1-Hardware conceptual view:
We aim to use the currently available electronic components and materials, put them in
customized cases that appear more simple and attractive to the kids; simplify the way they’re
put together and ensure maximum safety that can be provided to the user.
These are the points that should be covered in the hardware as a whole:
Colorful attractive components’ casings
Simple way to connect the components together
Insulated casings to ensure maximum safety of the user
Variety of interactive circuits to be implemented
3.2-Used Materials:
3.2.1-Electronic components:
1. Resistors
2. Capacitors
3. Light Emitting Diodes (LEDs)
4. Relays
5. Integrated Circuits (ICs)
6. Batteries
7. Copper wires

34 | P a g e
Chapter 3
3.2.2-Magnetic buttons:
7Also known as Magnetic Snap 18mm, these are relatively large 18mm diameter snaps (all three pieces come as shown in Figure 3.2.2.1 and Figure 3.2.2.2). They couple together very strongly (must be pried apart), rotate freely on the axis, and are electrically conductive. We’ve seen snaps like these soldered onto PCBs and batteries to form a strong, but quick disconnect mechanism. Overall connection resistance is less than 200 miliOhm. Snaps will couple when closer than 10mm.
-Figure 3.2.2.1: Magnetic snaps front view- -Figure 3.2.2.2: Magnetic snaps back view- These snaps will be the core of our hardware kit, as the female part of the snap will be lined in a matrix form to be used as the ordinary existing board that we know about, while the male parts will be attached to the electronic components, this is the easiest and most efficient way to connect the components together in a safe, convenient form to the kids.
3.2.3-Plastic toy blocks:
Toy blocks (also building bricks, building blocks, or simply blocks), are wooden, plastic or foam pieces of various shapes (square, cylinder, arch, triangle, etc.) and colors that are used as construction toys. We’ve picked the plastic ones due to its availability and the easy of manipulating its shape.
-Figure 3.2.3: Plastic blocks-
7 SparkFun electronics

35 | P a g e
Chapter 3
3.2.4-Solder wick:
Which is commonly used in the desoldering process, which refers to the removal of solder and components from a circuit board for troubleshooting, repair, replacement, and salvage. In our project, we’ve used it to connect the female magnetic snap parts together in a matrix form, the wick is highly conductive and has a thick diameter, which will ensure the connectivity between them. Figure 2.2.4.2 shows how we connected them in the first prototype.
-Figure 3.2.4.1: Solder wick pack-
-Figure 3.2.4.2: wick usage in a primitive prototype-

36 | P a g e
Chapter 3
3.2.5-Hardware components working together:
To make it clearer, here’s our first trial in using all the previous components together:
-Figure 3.2.5.1: First prototype-
-Figure 3.2.5.2: First prototype-

37 | P a g e
Chapter 3
3.2.6-Arduino Uno R3 Module: 8Arduino is a tool for making computers that can sense and control more of the physical world
than your desktop computer. It's an open-source physical computing platform based on a
simple microcontroller board, and a development environment for writing software for the
board, also it can be used to develop interactive objects, taking inputs from a variety of
switches or sensors, and controlling a variety of lights, motors, and other physical outputs.
Arduino projects can be stand-alone, or they can communicate with software running on your
computer (e.g. Flash, Processing, MaxMSP.) The boards can be assembled by hand or purchased
preassembled; the open-source IDE can be downloaded for free.
The Arduino programming language is an implementation of Wiring, a similar physical
computing platform, which is based on the Processing multimedia programming environment.
There are many other microcontrollers and microcontroller platforms available for physical
computing. Parallax Basic Stamp, Netmedia's BX-24, Phidgets, MIT's Handyboard, and many
others offer similar functionality. All of these tools take the messy details of microcontroller
programming and wrap it up in an easy-to-use package. Arduino also simplifies the process of
working with microcontrollers, but it offers some advantage for teachers, students, and
interested amateurs over other systems:
Inexpensive - Arduino boards are relatively inexpensive compared to other microcontroller
platforms. The least expensive version of the Arduino module can be assembled by hand, and
even the pre-assembled Arduino modules cost less than $50
Cross-platform - The Arduino software runs on Windows, Macintosh OSX, and Linux operating
systems. Most microcontroller systems are limited to Windows.
Simple, clear programming environment - The Arduino programming environment is easy-to-
use for beginners, yet flexible enough for advanced users to take advantage of as well. For
teachers, it's conveniently based on the Processing programming environment, so students
learning to program in that environment will be familiar with the look and feel of Arduino
Open source and extensible software- The Arduino software is published as open source tools,
available for extension by experienced programmers. The language can be expanded through
C++ libraries, and people wanting to understand the technical details can make the leap from
Arduino to the AVR C programming language on which it's based. Similarly, you can add AVR-C
code directly into your Arduino programs if you want to.
Open source and extensible hardware - The Arduino is based on Atmel's ATMEGA8 and
ATMEGA168 microcontrollers. The plans for the modules are published under a Creative
Commons license, so experienced circuit designers can make their own version of the module,
extending it and improving it. Even relatively inexperienced users can build the breadboard
8 arduino.cc

38 | P a g e
Chapter 3
version of the module in order to understand how it works and save money.
-Figure 3.2.6.1: Arduino R3 Front view-
-Figure 3.2.6.2: Arduino R3 Back view-

39 | P a g e
Chapter 3
Revision 3 “R3” has the following new features:
1.0 pinout: added SDA and SCL pins that are near to the AREF pin and two other new
pins placed near to the RESET pin, the IOREF that allow the shields to adapt to the
voltage provided from the board. In future, shields will be compatible with both the
board that uses the AVR, which operates with 5V and with the Arduino Due that
operates with 3.3V. The second one is a not connected pin that is reserved for future
purposes.
Stronger RESET circuit.
Atmega 16U2 replace the 8U2.
Summary
Microcontroller ATmega328
Operating Voltage 5V
Input Voltage (recommended) 7-12V
Input Voltage (limits) 6-20V
Digital I/O Pins 14 (of which 6 provide PWM output)
Analog Input Pins 6
DC Current per I/O Pin 40 mA
DC Current for 3.3V Pin 50 mA
Flash Memory 32 KB (ATmega328) of which 0.5 KB used by bootloader
SRAM 2 KB (ATmega328)
EEPROM 1 KB (ATmega328)
Clock Speed 16 MHz

40 | P a g e
Chapter 3
Input and Output
Each of the 14 digital pins on the Uno can be used as an input or output, using pinMode(),
digitalWrite(), and digitalRead() functions. They operate at 5 volts. Each pin can provide or
receive a maximum of 40 mA and has an internal pull-up resistor (disconnected by default) of
20-50 kOhms. In addition, some pins have specialized functions:
Serial: 0 (RX) and 1 (TX). Used to receive (RX) and transmit (TX) TTL serial data. These
pins are connected to the corresponding pins of the ATmega8U2 USB-to-TTL Serial chip
External Interrupts: 2 and 3. These pins can be conFigured to trigger an interrupt on a
low value, a rising or falling edge, or a change in value. See the attachInterrupt()
function for details.
PWM: 3, 5, 6, 9, 10, and 11. Provide 8-bit PWM output with the analogWrite() function.
SPI: 10 (SS), 11 (MOSI), 12 (MISO), 13 (SCK). These pins support SPI communication using
the SPI library.
LED: 13. There is a built-in LED connected to digital pin 13. When the pin is HIGH value,
the LED is on, when the pin is LOW, it's off.
The Uno has 6 analog inputs, labeled A0 through A5, each of which provide 10 bits of
resolution (i.e. 1024 different values). By default they measure from ground to 5 volts,
though is it possible to change the upper end of their range using the AREF pin and the
analogReference() function. Additionally, some pins have specialized functionality:
TWI: A4 or SDA pin and A5 or SCL pin. Support TWI communication using the Wire
library.
There are a couple of other pins on the board: AREF. Reference voltage for the analog
inputs. Used with analogReference().
Reset. Bring this line LOW to reset the microcontroller. Typically used to add a reset
button to shields which block the one on the board.

41 | P a g e
Chapter 3
Power pins:
VIN. The input voltage to the Arduino board when it's using an external power source
(as opposed to 5 volts from the USB connection or other regulated power source). You
can supply voltage through this pin, or, if supplying voltage via the power jack, access it
through this pin.
5V.This pin outputs a regulated 5V from the regulator on the board. The board can be
supplied with power either from the DC power jack (7 - 12V), the USB connector (5V), or
the VIN pin of the board (7-12V). Supplying voltage via the 5V or 3.3V pins bypasses the
regulator, and can damage your board. We don't advise it.
3V3. A 3.3 volt supply generated by the on-board regulator. Maximum current draw is
50 mA.
GND. Ground pins.
IOREF. This pin on the Arduino board provides the voltage reference with which the
microcontroller operates. A properly configured shield can read the IOREF pin voltage
and select the appropriate power source or enable voltage translators on the outputs
for working with the 5V or 3.3V.

42 | P a g e
Chapter 3
3.2.7-Bluetooth HC-06 module: 9HC-06 module is an easy to use Bluetooth SPP (Serial Port Protocol) module, designed for
transparent wireless serial connection setup. Serial port Bluetooth module is fully qualified
Bluetooth V2.0+EDR (Enhanced Data Rate) 3Mbps Modulation with complete 2.4GHz radio
transceiver and baseband. It uses CSR Bluecore 04-External single chip Bluetooth system with
CMOS technology and with AFH(Adaptive Frequency Hopping Feature). It has the footprint as
small as 12.7mmx27mm.
-Figure 3.2.7.1: HC 06 Module front view-
-Figure 3.2.7.2: HC 06 Module back view-
9 ITead Studio
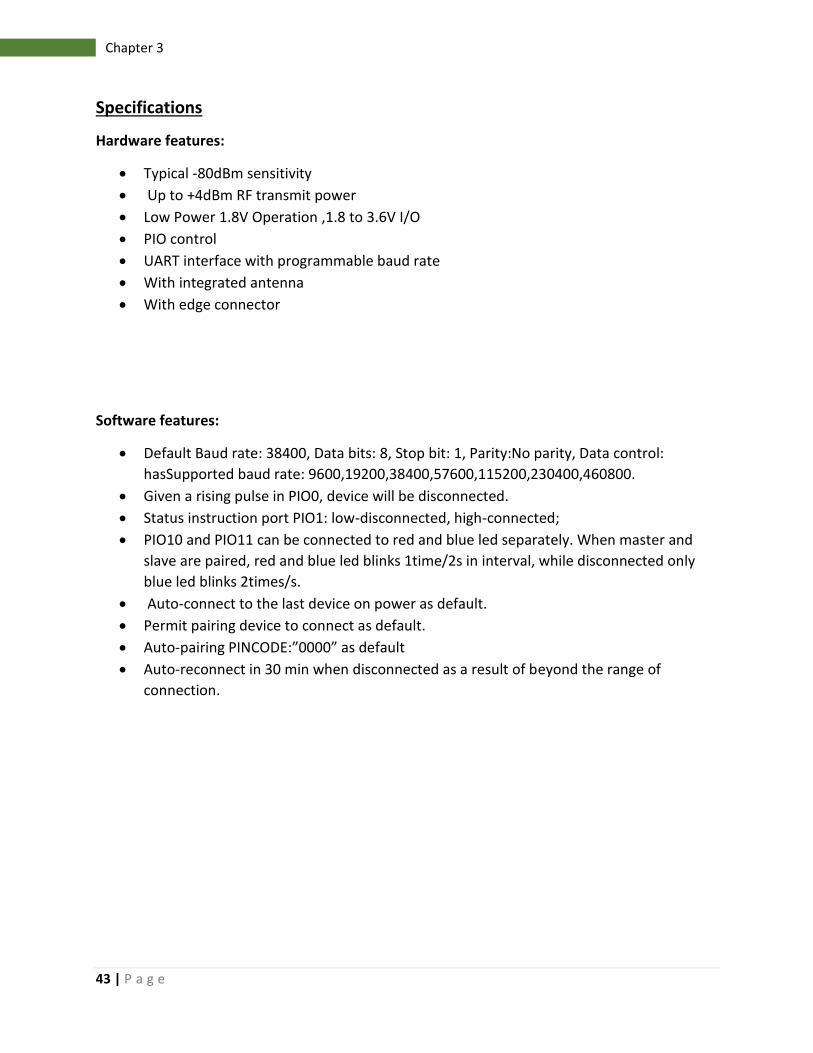
43 | P a g e
Chapter 3
Specifications
Hardware features:
Typical -80dBm sensitivity
Up to +4dBm RF transmit power
Low Power 1.8V Operation ,1.8 to 3.6V I/O
PIO control
UART interface with programmable baud rate
With integrated antenna
With edge connector
Software features:
Default Baud rate: 38400, Data bits: 8, Stop bit: 1, Parity:No parity, Data control:
hasSupported baud rate: 9600,19200,38400,57600,115200,230400,460800.
Given a rising pulse in PIO0, device will be disconnected.
Status instruction port PIO1: low-disconnected, high-connected;
PIO10 and PIO11 can be connected to red and blue led separately. When master and
slave are paired, red and blue led blinks 1time/2s in interval, while disconnected only
blue led blinks 2times/s.
Auto-connect to the last device on power as default.
Permit pairing device to connect as default.
Auto-pairing PINCODE:”0000” as default
Auto-reconnect in 30 min when disconnected as a result of beyond the range of
connection.

44 | P a g e
Chapter 4
Chapter Four: Project Software

45 | P a g e
Chapter 4
4.1-Software concept:
We aim to lead a revolution in the field of learning electronics, and in the field of learning in
general which can be achieved by “learning by doing” technique, this is what made us think of
developing a game that’s linked to a change done in reality, we decided to develop an android
game, linked to our hardware kits, in other words, the changes done to the hardware kits like a
circuit implementation, can be sensed by the android application through the Bluetooth
module and a certain score will be calculated according to the time of circuit completion for
example, aside of unlocking a new circuit after the user is able to implement the current one.
The software application should contain the following:
1. Full guide to every project that can be done with the current kit
2. Leveling system
3. Score calculation system
4. Bluetooth connection protocol
5. Ability to sense changes done to the hardware
4.2-Comparison between mobile operating systems:
10Microsoft's Windows Phone was met with rave reviews from day one of its launch back in late
2010, but despite its beautiful and smooth UI it hasn't caught up with users. One way or
another, part of the blame for this was some immaturity of the platform - multitasking arrived
later and it was very limited, the apps weren't there, customization was somewhat limited, and
the list just went on and on, depending on how much you want to pick the nits.
But it was clear Windows Phone 7 wasn't as mature as iOS or Android. It was damn close, but
not on par. Now, with the announcement of Windows Phone 8 Microsoft is making one giant
leap towards the market leading platforms, and matches them in a lot of aspects. We'd say it
even outpaces iOS and possibly Android with its new stunning Start Screen which makes us feel
we won't miss widgets too much.
The real change happens under the hood, though. Windows Phone 8 now runs on the Windows
NT kernel, the same kernel Windows 8 runs on. This means that you get support for multi-core
chips and you'd get faster ports of apps and easier overall development across platforms. This
will strengthen Microsoft's ecosystem. And with the addition of offline maps by Nokia, it's one
step ahead of the competition there as well.
10 phonearena.com

46 | P a g e
Chapter 4
Here’s a quick comparison between mobile operating systems:
-Table 4.2.1 mobile OS comparison-

47 | P a g e
Chapter 4
4.2.1-Reason for choosing android:
1. It’s open source
2. It’s widely spread in Egypt, and available to the kids
3. As it’s installed on a mobile, which will make it highly mobile and portable
11The following information was collected by MIT, through monitoring the number of tweets
that were tweeted from all over Egypt, and the type of OS that was used to tweet it, whether it
was Android, IOS, or Blackberry, through 3.5 million geolocated tweets from October 2012 to
June 2013. Red dots represent the location of tweets posted by Android users; Green dots –
iPhone; Purple – Blackberry.
-Figure 4.2.1.1: Tweeting devices distribution across Egypt-
11 Irevolution.net

48 | P a g e
Chapter 4
-Figure 4.2.1.2: Heatmap of the % of Android users-
From the previous information we can conclude that Android is the most widely common OS
used by Egyptians.

49 | P a g e
Chapter 4
4.3-Android Application:
4.3.1-Introduction about android:
12Android is an operating system based on the Linux kernel with a user interface based on
direct manipulation, designed primarily for touchscreen mobile devices such as smartphones
and tablet computers. The operating system uses touch inputs that loosely correspond to real-
world actions, like swiping, tapping, pinching, and reverse pinching to manipulate on-screen
objects, and a virtual keyboard. Despite being primarily designed for touchscreen input, it also
has been used in televisions, games consoles, digital cameras, and other electronics.
As of 2011, Android has the largest installed base of any mobile OS and as of 2013, its devices
also sell more than Windows, iOS and Mac OS devices combined. As of July 2013 the Google
Play store has had over 1 million Android apps published, and over 50 billion apps downloaded.
A developer survey conducted in April–May 2013 found that 71% of mobile developers develop
for Android.
Android's source code is released by Google under open source licenses, although most
Android devices ultimately ship with a combination of open source and proprietary software.
Initially developed by Android, Inc., which Google backed financially and later bought in 2005,
Android was unveiled in 2007 along with the founding of the Open Handset Alliance—a
consortium of hardware, software, and telecommunication companies devoted to advancing
open standards for mobile devices
12 Wikipedia

50 | P a g e
Chapter 4
4.3-MIT App Inventor 2:
13We’ve used this tool to develop the android application, App Inventor is a cloud-based tool,
which means that you can build apps right in your web browser. This website offers all of the
support that you'll need as you learn how to build your own apps. The App Inventor software,
or "service" is at ai2.appinventor.mit.edu. You can get there by clicking the orange "Create"
button from any page on this website.
4.3.1-Setting up App inventor:
You can set up App Inventor and start building apps in minutes. The Designer and Blocks Editor
now run completely in the browser (aka the cloud). To see your app on a device while you build
it (also called "Live Testing"), you'll need to follow the steps below:
If you are using an Android device and you have a wireless internet connection, you
can start building apps without downloading any software to your computer. You will
need to install the App Inventor Companion App for your device. Choose Option
One below. This option is STRONGLY RECOMMENDED
If you do not have an Android device, you'll need to install software on your computer
so that you can use the on-screen Android emulator. Choose Option Two below.
If you do not have a wireless internet connection, you'll need to install software on
your computer so that you can connect to your Android device over USB. Choose Option
Three below. The USB Connection option can be tricky, especially on Windows. Use this
as a last resort.
Option one - Connect your Phone or Tablet over WiFi:
You can use App Inventor without downloading anything to your computer! You'll develop apps
on website: ai2.appinventor.mit.edu. To do live testing on your Android device just install the
MIT App Inventor Companion app on your Android phone or tablet. Then open your project
in App Inventor on the web, open the companion on your device, and you can test your apps as
you build them:
-Figure 4.3.1.1 option one-
13 appinventor.mit.edu

51 | P a g e
Chapter 4
The following steps will guide you through the process:
Step 1: Download and install the MIT AI2 Companion App on your phone.
Open your device's QR code scanner and scan the QR code on the left below to download the
Companion App from the Play Store. If you can't use the Play Store, use the QR code on the
right to download the Companion App directly to your phone.
Play Store Recommended: Automatic updates
Scan this QR code
to get the app from the Play Store
APK File
Scan this QR code
to download the app directly
Note: If you need a QR code scanner, you can get one at the Play Store (e.g., ZXing).
After downloading, step though the instructions to install the Companion app on your device.
You need to install the MIT AI2 Companion only once, and then leave it on your phone or tablet
for whenever you use App Inventor.
Note 1: If you are unable to use the QR code, you can still install MIT AI2 Companion on your
phone or tablet. Use the Web browser on your device to go to the Google Play Store; look for
MIT AI2 Companion in the store. Once you find Companion, click the INSTALL button for the
Companion app.
Note 2: If you choose not to go through the Play store and instead load the app directly (aka
"side load), you will need to enable an option in your device's settings to allow installation of
apps from "unknown sources". To find this setting on versions of Android prior to 4.0, go to
"Settings > Applications" and then check the box next to "Unknown Sources". For devices
running Android 4.0 or above, go to "Settings > Security" or "Settings > Security & Screen Lock"
and then check the box next to "Unknown Sources" and confirm your choice.

52 | P a g e
Chapter 4
Step 2: Connect both your computer and your device to the SAME WiFi Network.
App Inventor will automatically show you the app you are building, but only if your computer
(running App Inventor) and your Android device (running the Companion) are connected to the
same WiFi Network.
Step 3: Open an App Inventor project and connect it to your device.
Go to App Inventor and open a project (or create a new one -- use Project > Start New
Project and give your project a name).
Then Choose "Connect" and "AI Companion" from the top menu in the AI2 browser:
-Figure 4.3.1.2 step 3-1-
A dialog with a QR code will appear on your PC screen. On your device, launch the MIT App
Companion app just as you would do any app. Then click the “Scan QR code” button on the
Companion, and scan the code in the App Inventor window:
-Figure 4.3.1.3: step 3-2-
Within a few seconds, you should see the app you are building on your device. It will update as
you make changes to your design and blocks, a feature called “live testing”.
If you have trouble scanning the QR code or your device does not have a scanner, type the
code shown on the computer into the Companion's text area on your Android device exactly as
shown. The code is directly below where the screen on your PC shows "Your code is" and

53 | P a g e
Chapter 4
consists of six characters. Type the six characters and choose the orange "Connect with
code". Do not type an Enter or carriage return: type just the six characters followed by pressing
the orange button.
Option - 2 Installing and Running the Emulator in AI2:
If you do not have an Android phone or tablet, you can still build apps with App Inventor. App
Inventor provides an Android emulator, which
works just like an Android but appears on your computer screen. So you can test your apps on
an emulator and still distribute the
app to others, even though the Play Store. Some schools and after-school programs develop
primarily on emulators and provide a few Androids for final testing.
-Figure 4.3.1.4: Option two-
To use the emulator, you will first need to first install some software on your computer (this is
not required for the wifi solution). Follow the instructions below for your operating system,
then come back to this page to move on to starting the emulator.
Step 1. Install the App Inventor Setup Software
Installing App Inventor 2 Setup on Windows
Installing the Windows software for App Inventor Setup has two parts:
1. Installing the App Inventor Setup software package. This step is the same for all Android
devices, and the same for Windows XP, Vista, and 7.
2. If you choose to use the USB cable to connect to a device, then you'll need to install
Windows drivers for your Android phone.
NOTE: App Inventor 2 does not work with Internet Explorer. For Windows users, we
recommend using either Chrome or Firefox as your browser for use with App Inventor.

54 | P a g e
Chapter 4
Step 2. Launch aiStarter (Windows & Linux only)
The emulator requires the use of a program named aiStarter. This program is the helper that
permits the browser to communicate with the emulator. The aiStarter program was installed
when you installed the App Inventor Setup package. There will be shortcuts to aiStarter from
your Desktop, Start menu, All Programs and from Stratup Folder (Windows only).
To launch aiStarter, double click on its icon. You'll know that you've successfully launched
aiStarter when you see a window like the following:
-Figure 4.3.1.5: Successful aiStarter launch-
Step 3. Connect to Emulator
From App Inventor's menu (on the App Inventor cloud-based software
at ai2.appinventor.mit.edu), go to the Connect Menu and click the Emulator option.
-Figure 4.3.1.6: Selecting Emulator option-

55 | P a g e
Chapter 4
You'll get a notice saying that the emulator is connecting. Starting the emulator can take a
couple of minutes. You may see update screens like the following as the emulator starts up:
-Figure 4.3.1.7: Emulator running checkup-
The emulator will initially appear with an empty black screen. Wait until the emulator is ready,
with a colored screen background. Even after the background appears, you should wait until
the emulated phone has finished preparing its SD card: there will be a notice at the top of the
phone screen while the card is being prepared. When connected, the emulator will launch and
show the app you have open in App Inventor.

56 | P a g e
Chapter 4
Option - three Connecting to a phone or tablet with a USB cable:
-Figure 4.3.1.8: Option three-
When you use App Inventor with a phone or tablet, that device communicates with the App
Inventor software running in your computer's browser window. This communication is
managed by the AI2 Companion App running on the device. The instructions below (step 2)
explain how to install the companion. The Companion can communicate with your computer
over a wireless connection.
This is the method strongly recommended by the App Inventor team. It does not require any
additional software to be installed on your computer. (See Option 1, under Setting up App
Inventor.)
There are, however, some environments where wireless connections won't work. These include
some hotels, conference centers, and schools that configure their wireless networks to prohibit
two devices on the network from communicating with each other. See How Does my Android
Device Connect Over Wifi? For a short explanation. Some App Inventor users have solved this
problem by purchasing a wireless router and setting up their own local network. (Also, most
Macs and some PC can serve as WiFi routers that can handle a small number of machines.) But
where even this is impossible, you can still use App Inventor with a phone or tablet if you
connect it to the computer with a USB cable.
Setting up a USB connection can be awkward, especially on Windows machines, which need
special driver software to connect to Android devices. (This is not the case with Mac or Linux,
which do not need special drivers.) Unfortunately, different devices may require different
drivers, and, outside of a few standard models, Microsoft and Google have left it to the device
manufacturers to create and supply the drivers. As a consequence, that you may have to search
on the Web to find the appropriate driver for your phone. App Inventor provides a test program
that checks if your USB-connected device can communicate with the computer. You should run
this test and resolve any connection issues before trying to use App Inventor with USB on that
device.

57 | P a g e
Chapter 4
Here are the steps for beginning to use App Inventor with the USB cable:
Step 1: Install the App Inventor Setup Software
On widows:
Installing the Windows software for App Inventor Setup has two parts:
1. Installing the App Inventor Setup software package. This step is the same for all Android
devices, and the same for Windows XP, Vista, and 7.
2. If you choose to use the USB cable to connect to a device, then you'll need to install
Windows drivers for your Android phone.
NOTE: App Inventor 2 does not work with Internet Explorer. For Windows users, we
recommend using either Chrome or Firefox as your browser for use with App Inventor.
Step 2: Download and install the MIT AI2 Companion App on your phone.
Open your device's QR code scanner and scan the QR code on the left below to download the
Companion App from the Play Store. If you can't use the Play Store, use the QR code on the
right to download the Companion App directly to your phone.
For more details: Review Step 2 on Option one.
Step 3. Launch aiStarter (Windows & GNU/Linux only)
Communicating between the computer and the phone or table requires a program named
aiStarter. The aiStarter program was installed when you installed the App Inventor Setup
package. There will be shortcuts to aiStarter from your Start menu, from the Desktop, and from
All Programs (Windows only). Windows and Linux: Every time you want to use USB with App
Inventor, you will need to manually launch the aiStarter on your computer.
Step 4: Set up your device for USB (Turn USB Debugging ON)
On your Android device, go to System Settings, Developer Options, turn them on, and be sure
that "USB Debugging" is allowed.
On most devices running Android 3.2 or older, you can find this option under Settings >
Applications > Development.
On Android 4.0 and newer, it's in Settings > Developer options.
Note: On Android 4.2 and newer, Developer options is hidden by default. To make it available,
go to Settings > About phone and tap Build number seven times. Return to the previous screen
to find Developer options, including "USB Debugging".

58 | P a g e
Chapter 4
Step 5: Connect your computer and device, and authenticate if necessary.
Connect your Android device to the computer using the USB cable - be sure that the device
connects as a "mass storage device" (not "media device") and that it is not mounted as a drive
on your computer. This may mean that you have to go to the Finder (on a Mac) or My
Computer (on Windows) and disconnect any drive(s) that were mounted when you connected
your Android device.
On Android 4.2.2 and newer, your device will pop up a screen with the message Allow USB
Debugging? the first time you connect it to new computer. Press "OK". This authenticates the
computer to the device, allowing the computer to communicate with it. You'll need to do this
for each computer you want to connect to the device, but only once per computer.
Step 6: Test the connection.
Check if your computer has detected the connection.

59 | P a g e
Chapter 4
4.3.2-MIT App Inventor 2 Designer and Blocks Editor:
Design the App's User Interface by arranging both on and off-screen components.
-Figure 4.3.2.1: Designer tab-
Program the app's behavior by putting blocks together.
-Figure 4.3.2.2: Blocks tab-

60 | P a g e
Chapter 4
4.3.3- Sharing and Packaging Apps:
You can share the app in an executable form (.apk) that can be installed on a device, or
in source code form (.aia) that can be loaded into App Inventor and remixed. You can also
distribute your app on the Google Play Store.
Sharing your app so that others can remix (.aia file)
Make sure you are viewing the list of all of your projects (if you are not, choose Projects | My
Projects). Select the project you wish to share by checking the box next to it. Choose Project |
Export selected project (.aia) to my computer to export the source code (blocks) for your
project. The source code is downloaded in a .aia file.
-Figure 4.3.3.1: Exporting as aia file-
If you send it to a friend, they can open it with Project | Import project (.aia) from my
computer.
-Figure 4.3.3.2: Importing aia file-

61 | P a g e
Chapter 4
Sharing the app for others to install on their phone/tablet (.apk file), package the app (.apk file)
by going to the "Build" menu on the App Inventor toolbar.
-Figure 4.3.3.3: Saving as .apk-
Select "App (save .apk to my computer)." A pop-up box should alert you that your download
has begun. Note: The other option (provide QR code for .apk) produces a scannable QR code
that will download the app ONLY for the person who owns the project in App Inventor. Do not
distribute the QR code to others because it will not work for them.
-Figure 4.3.3.4: Building process-
Once the build completes, you can email the app (".apk" file) to your friends who can install it
by opening the email from their phone. If you want to distribute it more widely, you can upload
it to a website that both you and your friend can access. You can also distribute your app on
the Google Play Store.
NOTE: Anyone installing your app (which is an ".apk" file) will need to change the setting on
their phone to allow installation of non-market applications:
To find this setting on versions of Android prior to 4.0, go to "Settings > Applications" and then
check the box next to "Unknown Sources". For devices running Android 4.0 or above, go to
"Settings > Security" or "Settings > Security & Screen Lock" and then check the box next to
"Unknown Sources" and confirm your choice.
Note: The source code (.aia) files are not executable Android programs -- those are .apk files.
The source code is also not Java SDK code -- it can only be loaded into App Inventor.

62 | P a g e
Chapter 4
4.3.4-Our project’s application design:
Stage 1 – Getting started

63 | P a g e
Chapter 4
This is what’ll appear and how the application will behave:
-Figure 4.3.4.1: App intro-

64 | P a g e
Chapter 4
-Figure 4.3.4.2: App requesting Bluetooth permission-
-Figure 4.3.4.3: Pairing button-

65 | P a g e
Chapter 4
-Figure 4.3.4.5: Successful pairing-

66 | P a g e
Chapter 4
Stage 2 – Choosing a project
Projects list design blocks:

67 | P a g e
Chapter 4
This is what’ll appear and how the application will behave:
-Figure 4.3.4.6: Projects list-
-Figure 4.3.4.7: Pressing back button in projects menu-

68 | P a g e
Chapter 4
Stage 3 – Getting Ready
Design blocks:

69 | P a g e
Chapter 4

70 | P a g e
Chapter 4
This is how the application will behave:
-Figure 4.3.4.8: Ready to start connection between the app and the kit-

71 | P a g e
Chapter 4
-Figure 4.3.4.9: Pressing back on ready screen-
-Figure 4.3.4.10: Pressing ready while the kit is disconnected-

72 | P a g e
Chapter 4
-Figure 4.3.4.11: Project completion display-
The displayed circuit in Figure above is the circuit the user is currently implementing, once it’s
completed the hardware kit senses the correct output and the application returns a calculated
score based on the time of completion.
-Figure 4.3.4.12: Time out display-

73 | P a g e
Chapter 4
4.4-Arduino software:
14The Arduino integrated development environment (IDE) is a cross-platform application
written in Java, and is derived from the IDE for the Processing programming language and the
Wiring projects. It is designed to introduce programming to artists and other newcomers
unfamiliar with software development. It includes a code editor with features such as syntax
highlighting, brace matching, and automatic indentation, and is also capable of compiling and
uploading programs to the board with a single click. A program or code written for Arduino is
called a "sketch".
Arduino programs are written in C or C++. The Arduino IDE comes with a software library called
"Wiring" from the original Wiring project, which makes many common input/output operations
much easier. Users only need define two functions to make a runnable cyclic executive
program:
setup(): a function run once at the start of a program that can initialize settings
loop(): a function called repeatedly until the board powers off
A typical first program for a microcontroller simply blinks an LED on and off. In the Arduino
environment, the user might write a program like this
#define LED_PIN 13
void setup () {
pinMode (LED_PIN, OUTPUT); // Enable pin 13 for digital output
}
void loop () {
digitalWrite (LED_PIN, HIGH); // Turn on the LED
delay (1000); // Wait one second (1000 milliseconds)
digitalWrite (LED_PIN, LOW); // Turn off the LED
delay (1000); // Wait one second
}
It is a feature of most Arduino boards that they have an LED and load resistor connected
between pin 13 and ground; a convenient feature for many simple tests. The previous code
14 Ardunio.cc

74 | P a g e
Chapter 4
would not be seen by a standard C++ compiler as a valid program, so when the user clicks the
"Upload to I/O board" button in the IDE, a copy of the code is written to a temporary file with
an extra include header at the top and a very simple main() function at the bottom, to make it a
valid C++ program.
-Figure 4.2.3.1.1: Arduino software-
-Figure 4.2.3.1.2: Selecting the Arduino board version-

75 | P a g e
Chapter 4
4.4.1-Arduino code:

76 | P a g e
Chapter 4

77 | P a g e
Chapter 4

78 | P a g e
Chapter 4

79 | P a g e
Chapter 5
Chapter Five: Hardware Software Integration

80 | P a g e
Chapter 5
5.1- Interaction between Hardware kit and mobile application:
Scenario:
While starting the mobile application is forced to turn on the Bluetooth connectivity of the
mobile device, then it asks the user to pair with the Kit, after pairing the user continues to use
the application until he/she reaches the requested project.
After opening the required project, pressing “I am ready” button let the application be
synchronized with the Bluetooth module of the kit and the counter starts to count for the
process of calculation of the user’s score.
During the life of the project, the application is waiting for an interrupt signal (A pre-specified
keyword known between the module and the application for this project) from the Bluetooth
module to stop the counter and to show a message for the user announcing his/her final score.
Design blocks:
-Figure 5.1.1: Test app-
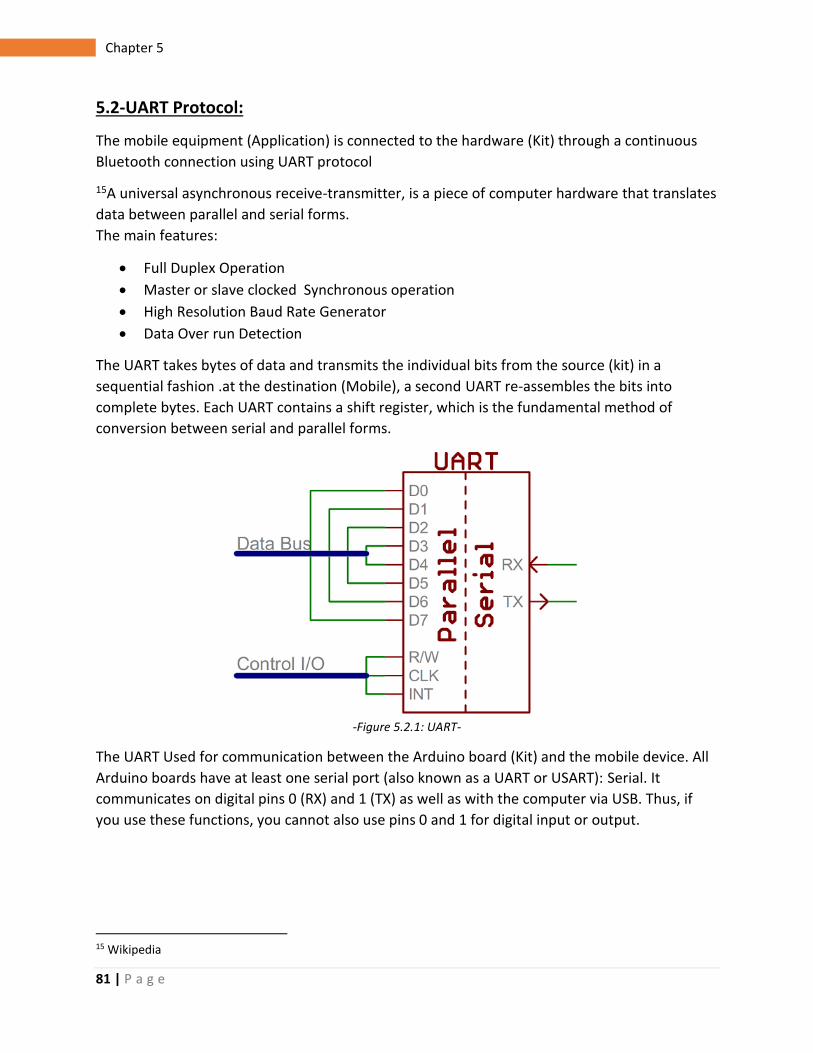
81 | P a g e
Chapter 5
5.2-UART Protocol:
The mobile equipment (Application) is connected to the hardware (Kit) through a continuous
Bluetooth connection using UART protocol
15A universal asynchronous receive-transmitter, is a piece of computer hardware that translates
data between parallel and serial forms.
The main features:
Full Duplex Operation
Master or slave clocked Synchronous operation
High Resolution Baud Rate Generator
Data Over run Detection
The UART takes bytes of data and transmits the individual bits from the source (kit) in a
sequential fashion .at the destination (Mobile), a second UART re-assembles the bits into
complete bytes. Each UART contains a shift register, which is the fundamental method of
conversion between serial and parallel forms.
-Figure 5.2.1: UART-
The UART Used for communication between the Arduino board (Kit) and the mobile device. All
Arduino boards have at least one serial port (also known as a UART or USART): Serial. It
communicates on digital pins 0 (RX) and 1 (TX) as well as with the computer via USB. Thus, if
you use these functions, you cannot also use pins 0 and 1 for digital input or output.
15 Wikipedia

82 | P a g e
Chapter 5
5.3-Final Prototype working along with the mobile application:
This is the final shape of the hardware kit
-Figure 5.3.1: Hardware kit final prototype front view-

83 | P a g e
Chapter 5
-Figure 5.3.2: Hardware kit final prototype back view-
Note that the back of the kit will be cased with an insulating material, to ensure the safety of
the user.
-Figure 5.3.3: Arduino and Bluetooth module connection Side view-

84 | P a g e
Chapter 5
-Figure 5.3.4: Arduino and Bluetooth module connection Upper view-
-Figure 5.3.5: Hardware and Mobile app functioning together-

85 | P a g e
Chapter 6
Chapter 6 Conclusion and future work

86 | P a g e
Chapter 6
6.1-Conclusion:
After weeks, days and hours of hard work, we were able to create a unique product with a new
idea that didn’t exist before, an interactive educational game, that teaches kids the basics and
concepts of electronics at an early life stage, based on learning by doing as the user will be able
to implement fully functional circuits, guided by the listed instructions and figures in the mobile
application.
We were able to finalize a reliable prototype that will be a base to our future work, to us this is
not just a graduation project, we see a great business potential in this project, the idea is brand
new, and no such product exist in Egypt, so we have new competitors, its new, it’s educational,
it’s a service to the whole community and it has a real value to the customers, surely sponsors
will be interested to hear about it, and maybe interested in claiming the advantage of being the
first company that supports such an idea.
Conclusion, we aim to prepare a generation that will lead a technological revolution for our
country.
6.2-Future work:
6.2.1-Replacing the Arduino and with a Printed Circuit Board:
The main use of this will be reducing the size of the hardware kit and ensuring its sustainability
and reliability as every component will be properly fixed, hence it won’t be affected by sudden
movements or impact, there will be other advantages such as:
1. The circuit board fabrication cost is lower with mass quantity production.
2. Electronic circuit characteristics will be maintained without introducing parasite
capacitance with a proper circuit board design.
3. Component wiring and assembly can be mechanized in a circuit board manufacturing
facility.
4. PCBs offer uniformity of electrical characteristics from assembly to assembly.
5. The location of electronic parts is fixed and so it simplifies components identification
and maintenance of equipment.
6. Inspection time is reduced because printed circuitry eliminates the probability of error.

87 | P a g e
Chapter 6
6.2.2-Increasing the number of projects that can be implemented by the kit:
16Here are some project ideas that we picked from elenco, a company that manufactures
educational toys.
-Table 6.2.2.1: Project ideas list 1-
16 Elenco® Electronics

88 | P a g e
Chapter 6
-Table 6.2.2.2: Project ideas list 2-
-Table 6.2.2.3: Project ideas list 3-

89 | P a g e
Chapter 6
-Table 6.2.2.4 Project ideas list 4-
-Table 6.2.2.5: Project Ideas list 5-

90 | P a g e
Chapter 6
-Table 6.2.2.6: Project ideas list 6-
-Table 6.2.2.7: Project ideas list 7-

91 | P a g e
Chapter 6
-Table 6.2.2.8: Project ideas list 8-
-Table 6.2.2.9: Projects ideas list 9-
6.2.3-Using Augmented Reality technology in the mobile application:
This will make the implementation guidance much easier for the user, as it will provide a 3D
display of the project while being implemented.

92 | P a g e
Chapter 6
6.2.3.1-What’s Augmented Reality Technology?
17Augmented reality (AR) is a live direct or indirect view of a physical, real-world environment
whose elements are augmented (or supplemented) by computer-generated sensory input such
as sound, video, graphics or GPS data. It is related to a more general concept called mediated
reality, in which a view of reality is modified (possibly even diminished rather than augmented)
by a computer. As a result, the technology functions by enhancing one’s current perception of
reality. By contrast, virtual reality replaces the real world with a simulated one. Augmentation is
conventionally in real-time and in semantic context with environmental elements, such as
sports scores on TV during a match. With the help of advanced AR technology (e.g.
adding computer vision and object recognition) the information about the surrounding real
world of the user becomes interactive and digitally manipulable. Artificial information about the
environment and its objects can be overlaid on the real world.
-Figure 6.2.3.1.1: Augmented Reality technology example-
To use augmented reality technology, our own 3D shapes should be designed using Unity; Unity
is a powerful engine with a variety of tools that can be utilized to meet your specific needs. The
editor is intuitive and customizable allowing you a greater freedom in your workflow.
17 Wikipedia

93 | P a g e
Chapter 6
6.2.3.2-Role of Augmented Reality in education:
18Johnson, et al. (2010) stated, “AR has strong potential to provide both powerful contextual,
on-site learning experiences and serendipitous exploration and discovery of the connected
nature of information in the real world.”
AR has been experimentally applied to both school and business environments, although not as
much as classic methods of education and training during the last two decades. In addition to
that, now that the technologies that make AR possible are much more powerful than ever
before and compact enough to deliver AR experiences to not only corporate settings but also
academic venues through personal computers and mobile devices, several educational
approaches with AR technology are more feasible. Also, wireless mobile devices, such as smart
phones, tablet PCs, and other electronic innovations, are increasingly ushering AR into the
mobile space where applications offer a great deal of promise, especially in education and
training.
6.2.3.3-Augmented Reality applications:
19The most common use of AR can be seen through mobile apps. And there is a growing batch
of these available from your Mobile App Store. Popular Apps such as Aurasma, Fetch and Layar
are now being implemented in educational and commercial settings.
Basically you point your device’s camera at something that the app recognizes, and it will
generate a 3D animation or video superimposed over whatever is on your camera’s screen. The
effect makes the computer-generated item appear like it’s really there.
Perhaps you’ve already seen this television advertisement for IKEA that enables you to Place
IKEA furniture in your home with augmented reality.
Currently the use of augmented reality in an enterprise context across government and non-
government includes strategic defense, business process and logistics control.
AR can be integrated across a wide variety of employee roles particularly useful where
simulation, training and skills development are required. Of particular interest is rapid take-up
of mobile wearable technologies that complement or build upon information systems
supporting augmented reality such as Google Glass.
Take a look at this short YouTube video which focusses on Google Glass and Augmented
Reality’s Future.
AR is of interest in an enterprise and industrial context given the ability to connect a user or
wearer with information to enhance:
18 Augmented Reality in Education and Training By Kangdon Lee University of Northern Colorado 19 Augmented Reality in Education and Training By Catriona Ward

94 | P a g e
Chapter 6
Instruction – character (OCR), image, object or location recognition combined with other
triggers such as RFID or Beacon that prompt the system to provide the user with instructions to
undertake tasks or provide alerts to the user about that object or location
Operations – hands-free information transmission while an operator is otherwise occupied
undertaking tasks requiring hands on operations
Engagement – provision of a range of feedback to the AR user enhancing that person’s
engagement with a task such as a reward, result or other feedback
Enjoyment – an AR user will often report that they are better engaged with a process if
information that is specific and useful is presented to them for consideration.
6.2.4-Develop the mobile applications on other platforms:
This will be very useful to us as we’ll tremendously increase the number of users who’ll be able
to use our products, as we’ll develop the application to work with other OS such as:
IOS
Unix/Mac OS
Windows
Windows phone
Our priorities will be set according to the following chart:
20
-Figure 6.2.4.1: Mobile device sales 2Q12-
20 Gartner report “Market Share: Mobile Devices, Worldwide, 2Q12”

95 | P a g e
Bibliography
Bibliography:
1. The Global Competitiveness Report 2013 - 2014
2. Wikipedia
3. The Global Competitiveness Report 2013 - 2014
4. Presentation about problems of education by Nile University 2013
5. learning-styles-online.com
6. Phschool.com
7. SparkFun electronics
8. arduino.cc
9. ITead Studio
10. phonearena.com
11. Irevolution.net
12. Wikipedia
13. appinventor.mit.edu
14. arduino.cc
15. Wikipedia
16. Elenco® Electronics
17. Wikipedia
18. Augmented Reality in Education and Training By Kangdon Lee University of Northern
Colorado
19. Augmented Reality in Education and Training By Catriona Ward
20. Gartner report “Market Share: Mobile Devices, Worldwide, 2Q12