table of contents - yamaha corporation
TRANSCRIPT

Computer-related Operations 1
Computer-related Operations
Table of Contents
What You Can Do with a Connected Computer ........................................... 2
Connecting to a Computer: Which Terminal Should I Use?..................... 5
Connecting a Computer to the Instrument ............................................. 6
Playing Back Songs (MIDI, Audio Data) on a Computer with the Instrument .......................................................................... 8
Recording Your Keyboard Performance as MIDI Data to a Computer ..... 9
Recording Your Keyboard Performance as Audio Data to a Computer . 10
Transferring data files Including Song Files, Style Files and Backup Files ............................................................................ 11
Transferring files using Musicsoft Downloader .................................... 13
Installing Musicsoft Downloader ......................................................... 13
Transferring MIDI files from the Computer to the Instrument .......... 14
Transferring Song/Style data from the Instrument to the Computer ............................................................................. 16
Transferring files with a Computer using Explorer, Finder, etc. ............ 18
Playing Back MIDI Files including Songs Transferred from a Computer ............................................................................ 20
Target Models and Functions ............................................................... 22
NOTE • This manual applies to models released on January 2012 or later.

Computer-related Operations 2
What You Can Do with a Connected Computer Most all digital musical instruments are compatible with MIDI (Musical Instrument Digital Interface). With this technology, the instrument can communicate with a connected computer by transmitting/receiving MIDI data, including keyboard performance information and Song playback data.
Some models can also transmit audio data, although compatible data differs depending on the particular instrument. Refer to the "Data formats compatible for transfer" column in "Target Models and Functions" or the Owner’s Manual supplied with your instrument.
NOTE • For details about MIDI, refer to “MIDI Basics” on the following web site:
https://download.yamaha.com/
After selecting your country and clicking on “Manual Library” from the “Support” page, select the desired Language, and then enter “MIDI Basics” into the search box.
Playing Back Songs (MIDI files, Audio Data files) on a Computer with the Instrument Playing back MIDI files: You can play back MIDI Song files on a computer using the Voice sounds of the instrument with MIDI file playback apps.
Playing back Audio data files: You can play back audio song data files through the built-in speakers of this instrument with audio playback apps.

Computer-related Operations 3
Recording Your Keyboard Performance as MIDI Data to a Computer Your keyboard performance can be recorded as MIDI events to music software on a computer. Depending on the application, the recorded data can be edited in various ways, and even be converted to notation.
Recording Your Keyboard Performance as Audio Data to a Computer Your keyboard performance can be recorded as audio data to a computer with a DAW (Digital Audio Workstation) app or hardware. Depending on the particular application, the recorded data can be edited in various ways.

Computer-related Operations 4
Transferring data files Including Song Files, Style Files and Backup File User Song data you recorded on the instrument can be transferred to a computer and saved as a file, while Song data (MIDI files) obtained via the Internet can be transferred and stored to the instrument, for future listening or keyboard practice. Depending on the instrument you are using, Musicsoft Downloader (free) is required to transfer files. Refer to the "File transfer method" column in "Target Models and Functions."
NOTE • Musicsoft Downloader is compatible only with Windows operating systems, and
not Mac.

Computer-related Operations 5
Connecting to a Computer: Which Terminal Should I Use? Electronic musical instruments have several external connection terminals, and one of the most convenient and easy to use for connection to a computer is the USB TO HOST terminal.
USB TO HOST terminal:
Use an AB type USB cable of less than 3 meters. USB 3.0 cables cannot be used.
The data that can be handled differs depending on the instrument you are using. Refer to the "Data formats compatible for transfer" column in "Target Models and Functions" or the Owner’s Manual supplied with your instrument.
Precautions when using the USB TO HOST terminal When connecting the computer to the USB TO HOST terminal, make sure to observe the following points to avoid freezing the computer and corrupting or losing the data.
NOTICE • Close all applications. • Before turning on the power to the instrument, connect the computer to the USB TO
HOST terminal. • While the computer is connected to the instrument, you should wait for six seconds
or more between these operations: (1) when turning the power of the instrument off then on again, or (2) when alternately connecting/disconnecting the USB cable.
If the computer or the instrument freezes, restart the application software or the computer OS, or turn the power to the instrument off then on again.

Computer-related Operations 6
Connecting a Computer to the Instrument Use an AB type USB cable of less than 3 meters. USB 3.0 cables cannot be used.
■ System requirements and setup Operating System (OS):
Windows 8.1 (32-bit/64-bit), Windows 10 (32-bit/64-bit)
macOS 10.13.x, 10.14.x, 10.15.x
For MIDI Transfer NOTICE • Do not use a computer having a different OS from those above. Doing so may cause
problems.
Normally, no driver installation is required. ( → “In case MIDI communication is unstable”)
For Audio Transfer For Windows: Download and install the Yamaha Steinberg USB Driver, available at the following URL:
https://download.yamaha.com/
* After selecting your country and clicking on “Firmware/Software Updates” from the “Support” page, select the Product Category, and then enter “Yamaha Steinberg USB Driver” into the search box.
Refer to the URL above for information on system requirements.
Follow the Installation Guide in the package file to install the driver to the computer.
For Mac: Standard driver on Mac OS can be used; there is no need to install another driver.
NOTE • Not all models are equipped with audio playback functions; refer to the "USB Audio"
column in the “Target Models and Functions” or the Owner’s Manual supplied with your instrument for specific information.

Computer-related Operations 7
In case MIDI communication is unstable Normally, a USB driver is not required. However, if data communication is unstable or some problem occurs with any operations in this manual, download and install the Yamaha Standard USB-MIDI driver, available at the following URL:
https://download.yamaha.com/
* After selecting your country and clicking on “Firmware/Software Updates” from the “Support” page, select the Product Category, and then enter “USB-MIDI” into the search box.
Select the USB-MIDI driver for the OS on your computer from the search results. Follow the Installation Guide in the package file to install the driver to the computer.
NOTE • For models equipped with audio communication capability, install the Yamaha
Steinberg USB Driver. The driver supports both MIDI communication and audio communication.
• Depending on the computer OS used, the Yamaha Standard USB-MIDI driver may be incompatible with the instrument.
■ Connection
1. Turn off the power of the instrument.
2. Start the computer, and then quit any running application software.
3. Connect the USB cable first to the USB TO HOST terminal of the instrument, and then to the USB terminal of the computer.
4. Turn on the power of the instrument.
The computer will automatically be set to enable MIDI communication with the instrument.
Computer-related Operations 8
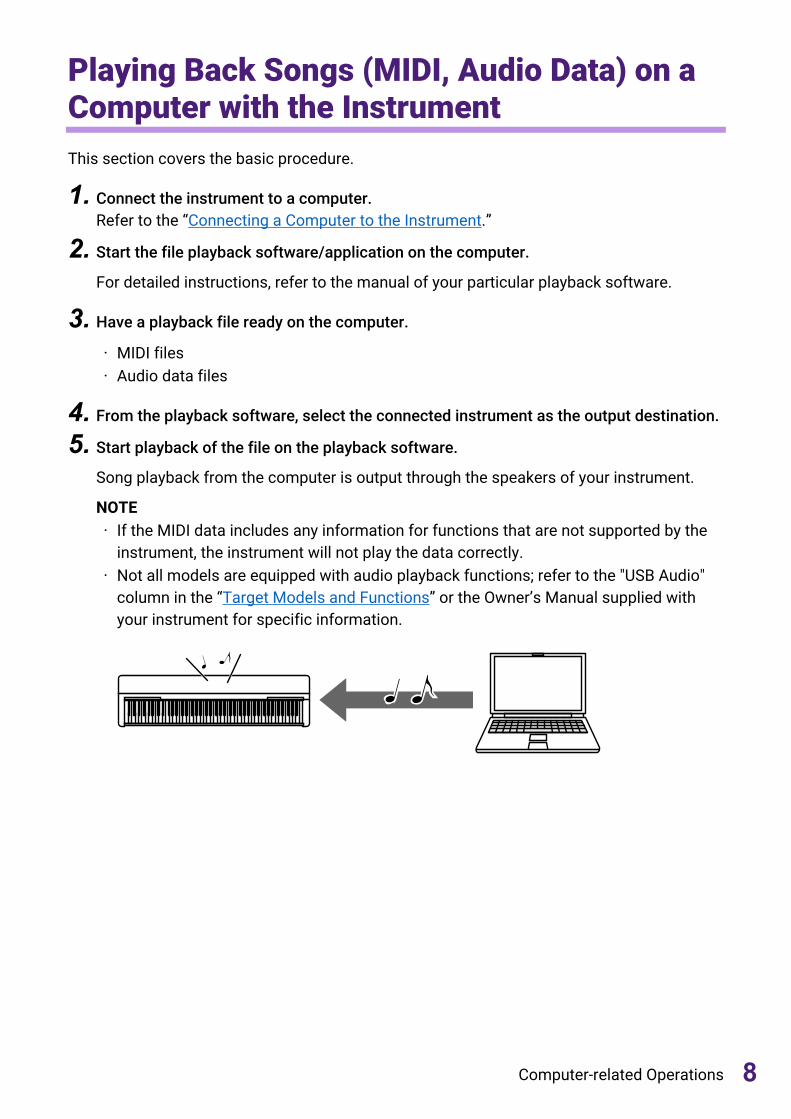
Playing Back Songs (MIDI, Audio Data) on a Computer with the Instrument This section covers the basic procedure.
1. Connect the instrument to a computer. Refer to the “Connecting a Computer to the Instrument.”
2. Start the file playback software/application on the computer.
For detailed instructions, refer to the manual of your particular playback software.
3. Have a playback file ready on the computer.
• MIDI files • Audio data files
4. From the playback software, select the connected instrument as the output destination.
5. Start playback of the file on the playback software.
Song playback from the computer is output through the speakers of your instrument.
NOTE • If the MIDI data includes any information for functions that are not supported by the
instrument, the instrument will not play the data correctly. • Not all models are equipped with audio playback functions; refer to the "USB Audio"
column in the “Target Models and Functions” or the Owner’s Manual supplied with your instrument for specific information.

Computer-related Operations 9
Recording Your Keyboard Performance as MIDI Data to a Computer By using Music Production software on the computer, you can record your keyboard performance as MIDI data. For detailed instructions, refer to the manual of the application. This section covers the basic settings you need to make on the instrument for recording. Keep in mind that some of the following functions may not be available on the instrument.
● Local Control settings When recording your keyboard performance to the connected computer, the MIDI data you play is transmitted to the computer and returned back to the instrument. This causes a “double” sound, since the tone generator of the instrument receives the keyboard performance data directly from the keyboard as well as the computer. To avoid this situation, set Local Control to “Off,” in order to separate the tone generator of the instrument from the keyboard.
NOTE • When you use a software synthesizer as a tone generator, be sure to make settings
on the computer application so that the MIDI data received from the instrument will not be returned back to the instrument, in addition to setting Local Control to “Off.”
● External Clock When playing back Style/Arpeggio data, you should set which clock is used, that of the instrument or the computer. If you use the clock of the computer, make settings on the instrument so that Style/Arpeggio playback follows the external clock.
● MIDI Transmit settings Make settings so that Style/Arpeggio playback as well as the keyboard performance will be transmitted to the computer. Note that some instruments cannot transmit playback data.
● Transmitting the Panel Settings (Initial Send) By executing this before recording, you can record the panel settings to the beginning of the Song data. This ensures that the proper and expected sounds will be produced when the recorded Song plays back.

Computer-related Operations 10
Recording Your Keyboard Performance as Audio Data to a Computer You can record your keyboard performance as audio data to a music production software on your computer. For more detailed instructions, refer to the Owner’s Manual supplied with your instrument.
If your computer's OS is Windows, you will need to install the Yamaha Steinberg USB Driver to your computer in order to properly transmit audio data. Refer to the “Connecting a Computer to the Instrument.”
NOTE • Not all models are equipped for recording audio data via USB cables. For specific
information, refer to the “Target Models and Functions” or the Owner’s Manual supplied with your instrument.
• DAW stands for Digital Audio Workstation, which is application software that enables you to record, edit, and mix audio data. Some major DAW software include Cubase, Logic, SONAR and Digital Performer.

Computer-related Operations 11
Transferring data files Including Song Files, Style Files and Backup Files The following types of data can be transferred between the computer and instrument.
■ Data that can be transferred Song files with the extension “.MID”
● External Song This refers to Song data which is created on an external device other than your instrument (such as a computer). This refers also to Song data obtainable over the Internet.
● User Song This refers to Song data which is created via the Recording function of the instrument. User Song data can be transferred to the computer as backup, and then returned to the instrument.
Style files with the extension “.STY” ● External Style This refers to Style data which is created on an external device other than your instrument (such as a computer). This refers also to Style data obtainable over the Internet.
● User Style This refers to Style data which is created via the Recording function of the instrument. User Style data can be transferred to the computer as backup, and then returned to the instrument.
Backup files with the extension “.BUP” These files which include the panel settings and performance data can be transferred to the computer and saved as backup. The Backup files on the computer can be returned to the instrument again, allowing you to recall the panel settings and performance data you created previously.
The items included in the Backup files and data which can be transferred differ depending on the instrument. For details, refer to the “Data formats compatible for transfer” column in the
Computer-related Operations 12
“Target Models and Functions” or the Owner’s Manual supplied with your instrument.
Also, the file transfer method differs as follows depending on the instrument you are using. Refer to the "File transfer method" column in the "Target model and supported data".
• Transferring files using Musicsoft Downloader (free) • Transferring files with a Computer using Explorer, Finder, etc.
NOTICE • If batteries can be installed to the instrument:
To avoid power down during file transfer and possible data loss, make sure to use the power adaptor rather than batteries when transferring files.
NOTE • Make sure to stop playback of the Song or Style when using Musicsoft Downloader,
since internal memory of the instrument cannot be accessed from the computer during playback.

Computer-related Operations 13
Transferring files using Musicsoft Downloader NOTE • The file transfer method differs as follows depending on the instrument you are using.
Refer to the "File transfer method" column in the "Target models and Functions".
• Transferring files using Musicsoft Downloader (free) • Transferring files using Explorer, Finder, etc. attached to the computer
Installing Musicsoft Downloader
System Requirements Check the following Yamaha downloads website.
Musicsoft Downloader is not supported for the Mac.
How to install
1. On the computer, access the following site, and then download Musicsoft Downloader.
https://download.yamaha.com/
*After selecting your country and clicking on “Firmware/Software Updates” from the “Support” page, select the Product Category, and then enter “Musicsoft Downloader” into the search box.
Select “Musicsoft Downloader” from the search results. Information about the computer system requirements and the installing can be confirmed on the display shown.
2. Execute installation by following the on-screen instructions.
After installation is completed, confirm that the Shortcut icon is located on the screen or Musicsoft Downloader is added under Yamaha in the Start menu.
For detailed instructions of this application, refer to the Help.

Computer-related Operations 14
Transferring MIDI files from the Computer to the Instrument NOTE • Depending on the instrument and the computer OS used, menu and screen indications
may differ from those shown in the instructions below.
1. Connect the instrument to a computer.
2. On the desktop of the computer, double-click the shortcut icon of Musicsoft Downloader.
If you cannot find the shortcut icon, select [Start] → [All Programs] → [YAMAHA] → [Musicsoft Downloader] → [Musicsoft Downloader].
Musicsoft Downloader launches, and the main window appears.
3. Click [Connection Check] at the bottom of the window.
This operation checks whether communication between the computer and instrument has been properly established or not. If an error message appears, follow the on-screen instructions to check the connection status with the Yamaha USB-MIDI driver.
4. Click [Add File] to call up the file selection window.
5. On the file selection window, select the desired file, then click [Open].

Computer-related Operations 15
In the upper half box of the main window, the duplication of the selected file is shown.
6. At the lower left box of the main window, click “Electronic Musical Instruments,” and then select the desired destination drive.
• If you wish to transfer Song (***.MID) or Style (***.STY) data to internal memory of the instrument, select “Flash Memory.”
• If you wish to transfer Song (***.MID) or Style (***.STY) data to the USB flash drive connected to the USB TO DEVICE terminal of the instrument, select “USB.”
• If you wish to transfer Backup file (****.BUP) data, select “System Drive.”
NOTE • When a “USER FILES” folder is located under “Flash Memory” or “USB”:
For User Songs, select the “USER FILES” folder. Song files outside the “USER FILES” folder will be handled as External Songs. For External Songs, select a folder other than the “USER FILES” folder, or simply specify “Flash Memory” or “USB” (the area first displayed when clicking “Flash Memory” or “USB”). If you select the “USER FILES” folder for External Songs, they will not be played back on the instrument.
IMPORTANT • Regarding Backup files, User Songs and User Styles created on the instrument, never
change the file name on the computer. Doing so makes it impossible to transfer the Backup file to the instrument and prevents User Song and User Style data from being recognized by the instrument.
7. Select the file in the upper half box, then click the downward [Move ↓ ] button.
A confirmation message will appear. To cancel the operation, click [CANCEL] in this step.
8. Click [OK] to start data transfer from the computer to the instrument.

Computer-related Operations 16
NOTICE • Never unplug the USB cable during data transfer. Not only will the data transfer fail,
but also operation of the memory media may become unstable and its contents may disappear completely when the power is turned on or off.
9. After data transfer is completed, close the window to quit the Musicsoft Downloader.
10. On the instrument, use the data to play music.
If you’ve transferred a Backup file (****.BUP), confirm that the panel settings have been changed as expected.
If you’ve transferred a Song (***.MID), select the corresponding number and then start playback. For details, refer to the Owner’s Manual of the instrument, or refer to the “Playing Back MIDI Files including Songs Transferred from a Computer.”
If you’ve transferred a Style (***.STY), confirm that the file transfer was successful according to the Owner’s Manual of the instrument.
NOTE • Note that the instrument cannot be operated while Musicsoft Downloader is running.
Transferring Song/Style data from the Instrument to the Computer NOTE • Depending on the instrument and the computer OS used, menu and screen indications
may differ from those shown in the instructions below.
1. Connect the instrument to a computer.
2. From Desktop (on the computer), double-click the shortcut icon of Musicsoft Downloader.
If you cannot find the shortcut icon, select [Start] → [All Programs] → [YAMAHA] → [Musicsoft Downloader] → [Musicsoft Downloader].
Musicsoft Downloader launches, and the main window appears.
3. Click [Connection Check] at the bottom of the window.
This operation checks whether communication between the computer and instrument has been properly established or not. If an error message appears, follow the on-screen instructions to check the connection status with the Yamaha USB-MIDI driver.
4. At the lower left box of the main window, click “Electronic Musical Instruments,” and then select the desired source drive.
• If you wish to transfer Song (***.MID) or Style (***.STY) data in internal memory of the instrument, select “Flash Memory.”
• If you wish to transfer Song (***.MID) or Style (***.STY) data in the USB flash drive

Computer-related Operations 17
connected to the USB TO DEVICE terminal of the instrument, select “USB.” • If you wish to transfer Backup file (****.BUP) data, select “System Drive.”
5. In the lower right box of the window, select the desired file, and then click the upward [Move] button.
A confirmation message will appear. To cancel the operation, click [CANCEL] in this step.
6. Click [OK] to start data transfer from the instrument to the computer’s temporary storage area.
7. After a while, confirm that the transferred data appears in the box on the upper half of the window.
8. In the lower left box, select the desired destination folder, then click the upward [Move ↑ ] button.
A confirmation message will appear. To cancel the operation, click [CANCEL] in this step.
9. Click [OK] to start data transfer from the temporary storage area to the specified destination folder of the computer.
NOTICE • Never unplug the USB cable during data transfer. Not only will the data transfer fail,
but also operation of the memory media may become unstable and its contents may disappear completely when the power is turned on or off.
10. After data transfer is completed, confirm that the file is located in the specified folder of the computer.
11. Quit Musicsoft Downloader.

Computer-related Operations 18
Transferring files with a Computer using Explorer, Finder, etc. NOTE • Depending on the instrument and the computer OS used, menu and screen indications
may differ from those shown in the instructions below. • The file transfer method differs as follows depending on the instrument. Refer to the
"File transfer method" column in the "Target model and Functions."
• Transferring files using Musicsoft Downloader (free) • Transferring files using Explorer, Finder, etc. on the computer
Windows 10 is used as an example in this manual.
1. Connect the instrument and the computer via a USB cable.
2. Set the instrument's function “Storage Mode” to “ON” according to the Owner’s Manual of the instrument.
NOTE • The instrument is locked or cannot be used while “Storage Mode” is set to “ON.”
“Storage Mode” should be set to “OFF” normally, except when you transfer the file between the instrument and the computer.
3. On the computer, start an application that can copy files, such as Explorer.
4. Confirm that the instrument is recognized as an external storage device using Explorer or a similar program.
• The device name depends on the instrument.

Computer-related Operations 19
5. Copy files between the computer and the instrument (external storage device).
NOTICE • When copying files from the computer to the instrument (external storage drive),
make sure that the instrument (external storage drive) has enough free space. • Do not change (rename) the backup file name (with the extension:.BUP) on the
computer. The backup data will not be imported to the instrument. • Regarding User Songs and User Styles created on the instrument, never change the
file name on the computer. Doing so prevents User Song and User Style data from being recognized by the instrument.
• Do not create folders on the instrument (external storage drive). The instrument may not correctly recognize the copied file.
• Do not format the instrument (external storage drive). The instrument may not work properly.
• Do not disconnect the USB cable during data communication. Also, do not turn off the power of the instrument. Not only will the data being transferred not be saved, but the instrument and computer will become unstable, and all memory contents may be lost when the power is turned on or off.
• To remove the instrument (external storage drive), follow the procedures in this booklet. Failing to do this may result in damage to the file.
6. After copying is completed, remove the instrument (external storage drive) from the computer.
• The drive name depends on the instrument.
7. Disconnect the USB cable connecting the instrument to the computer.
8. Set the instrument's function “Storage Mode” to “OFF” according to the Owner’s Manual of the instrument.
9. If you transferred the file to the instrument, make sure that it was transferred correctly.
• If you’ve transferred a Backup file (****.BUP), confirm that the panel settings have been changed as expected.
• If you’ve transferred a Song (***.MID), select the corresponding number and then start playback. For details, refer to the Owner’s Manual of the instrument, or refer to the “Playing Back MIDI Files including Songs Transferred from a Computer.”
• If you’ve transferred a Style (***.STY), confirm that the file transfer is successful according to the Owner’s Manual of the instrument.
Computer-related Operations 20
Playing Back MIDI Files including Songs Transferred from a Computer For instructions concerning models other than the following, refer to the relevant Owner’s Manuals.
YDP-C71/YDP-S52/YDP-S51/YDP-S34/YDP-163/YDP-162/YDP-143/YDP-142/CLP-725/CLP-625/CLP-525/YDP-164/YDP-144/YDP-S54 You can transfer up to 10 Song files from a computer to this instrument for playback. The transferred Songs are assigned to the D#6–C7 keys, letting you select and play them back.
NOTE • The shapes of buttons may appear different from those on your instrument. • For the functions assigned to the keys, refer to the Quick Operation Guide supplied with
your instrument.
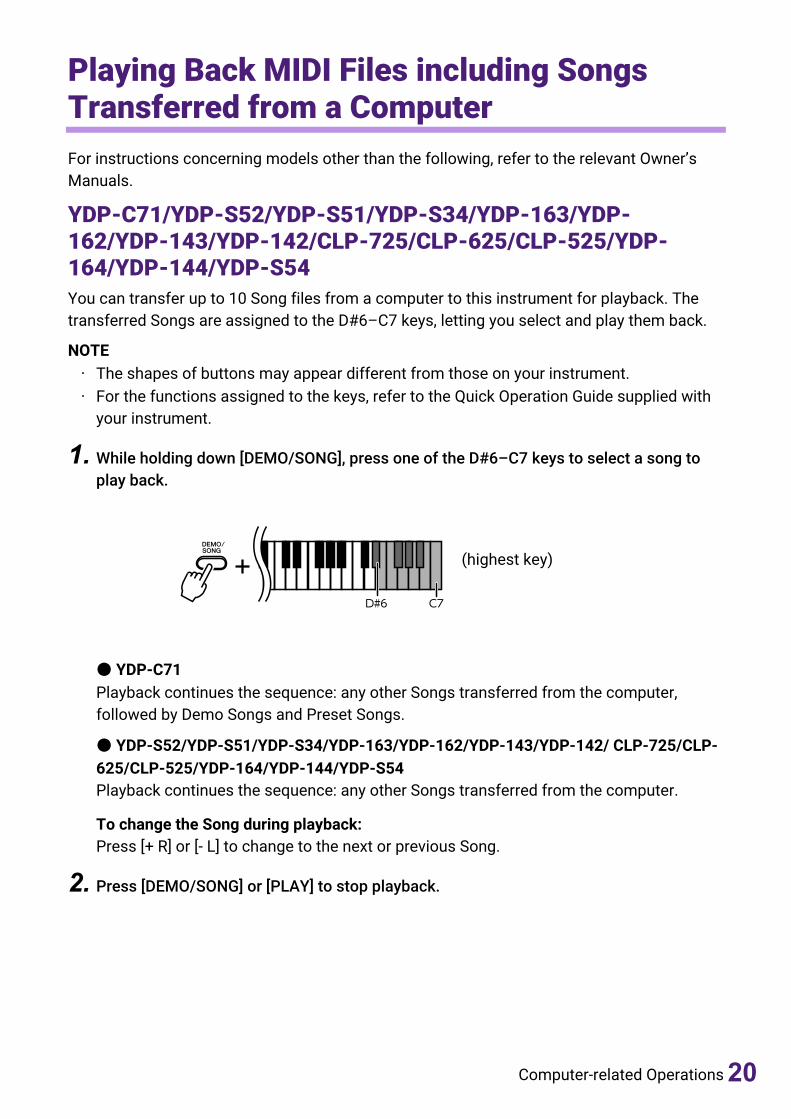
1. While holding down [DEMO/SONG], press one of the D#6–C7 keys to select a song to play back.
(highest key)
● YDP-C71 Playback continues the sequence: any other Songs transferred from the computer, followed by Demo Songs and Preset Songs.
● YDP-S52/YDP-S51/YDP-S34/YDP-163/YDP-162/YDP-143/YDP-142/ CLP-725/CLP-625/CLP-525/YDP-164/YDP-144/YDP-S54 Playback continues the sequence: any other Songs transferred from the computer.
To change the Song during playback: Press [+ R] or [- L] to change to the next or previous Song.
2. Press [DEMO/SONG] or [PLAY] to stop playback.
Computer-related Operations 21
■ Changing Playback Channels Try this operation when Song playback produces an unexpected or unnatural sound.
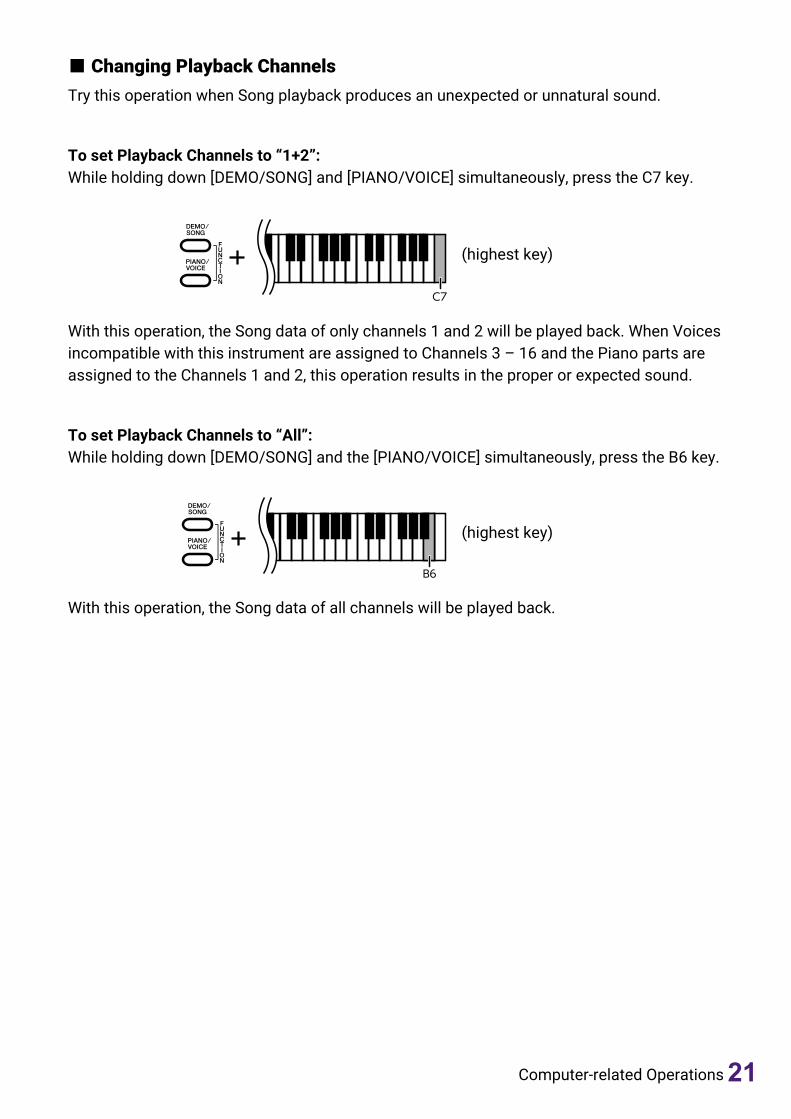
To set Playback Channels to “1+2”: While holding down [DEMO/SONG] and [PIANO/VOICE] simultaneously, press the C7 key.
(highest key)
With this operation, the Song data of only channels 1 and 2 will be played back. When Voices incompatible with this instrument are assigned to Channels 3 – 16 and the Piano parts are assigned to the Channels 1 and 2, this operation results in the proper or expected sound.
To set Playback Channels to “All”: While holding down [DEMO/SONG] and the [PIANO/VOICE] simultaneously, press the B6 key.
(highest key)
With this operation, the Song data of all channels will be played back.

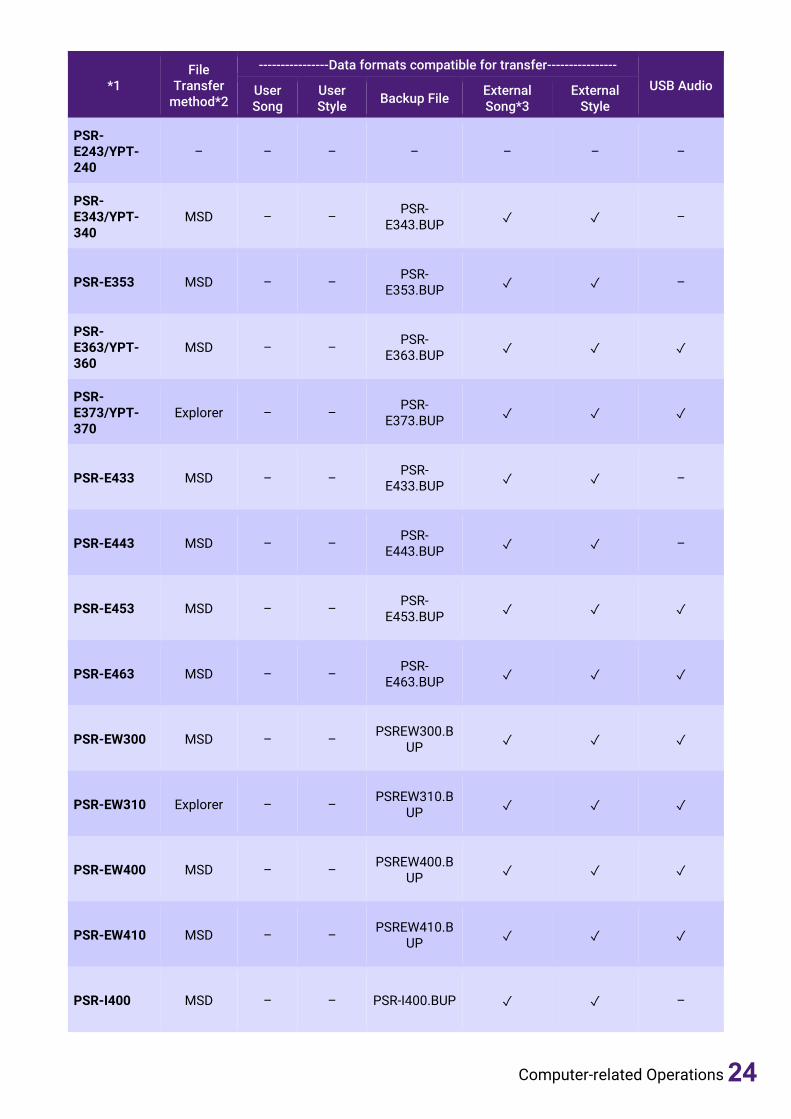
Computer-related Operations 22
Target Models and Functions If the model name of your instrument is not listed below, refer to the Owner’s Manual of the instrument to check its functions.
*1 File
Transfer method*2
----------------Data formats compatible for transfer---------------- USB Audio User
Song User Style Backup File External
Song*3 External
Style
CLP-525 MSD ✓ – – ✓ – –
CLP-585/575/ 545/535/ 565GP
MSD ✓ – – ✓ – –
CLP-625 MSD ✓ – – ✓ – –
CLP-685/675/ 645/635/ 665GP
MSD ✓ – – ✓ – ✓ *4
CLP-695GP MSD ✓ – – ✓ – ✓
CLP-725 MSD ✓ – – ✓ – ✓
CLP-785/775/ 745/735/ 795GP/765GP
MSD ✓ – – ✓ – ✓
CSP-170/150 – – – – – – ✓
CVP-609/605/ 601
MSD ✓ ✓ “Model Name”.BUP ✓ ✓ –
CVP-709/705/ 701
MSD ✓ ✓ “Model Name”.BUP ✓ ✓ –
CVP-809/805 MSD ✓ ✓ “Model
Name”.BUP ✓ ✓ ✓
EZ-300 Explorer – – EZ-300.BUP ✓ ✓ ✓

Computer-related Operations 23
*1 File
Transfer method*2
----------------Data formats compatible for transfer---------------- USB Audio User
Song User Style Backup File External
Song*3 External
Style
F02 MSD ✓ – – – – –
KB-209/208 MSD – – KB-208.BUP ✓ ✓ ✓
KB-309/308 MSD – – KB-308.BUP ✓ ✓ ✓
KBP-1100/2100 MSD ✓ – “Model
Name”.BUP ✓ ✓ –
N1X MSD ✓ – – ✓ – ✓
N3X MSD ✓ – – ✓ – –
NP-32/12 – – – – – – –
NU1 MSD ✓ – – ✓ – –
NU1X MSD ✓ – – ✓ – ✓ *4
P-115/105 MSD ✓ – – ✓ – –
P-125/121 MSD ✓ – – ✓ – ✓
P-255 MSD ✓ – – ✓ – –
P-45 – – – – – – –
P-515 MSD ✓ – – ✓ – ✓
Computer-related Operations 24
*1 File
Transfer method*2
----------------Data formats compatible for transfer---------------- USB Audio User
Song User Style Backup File External
Song*3 External
Style
PSR-E243/YPT-240
– – – – – – –
PSR-E343/YPT-340
MSD – – PSR-E343.BUP ✓ ✓ –
PSR-E353 MSD – – PSR-E353.BUP ✓ ✓ –
PSR-E363/YPT-360
MSD – – PSR-E363.BUP ✓ ✓ ✓
PSR-E373/YPT-370
Explorer – – PSR-E373.BUP ✓ ✓ ✓
PSR-E433 MSD – – PSR-E433.BUP ✓ ✓ –
PSR-E443 MSD – – PSR-E443.BUP ✓ ✓ –
PSR-E453 MSD – – PSR-E453.BUP ✓ ✓ ✓
PSR-E463 MSD – – PSR-E463.BUP ✓ ✓ ✓
PSR-EW300 MSD – – PSREW300.BUP ✓ ✓ ✓
PSR-EW310 Explorer – – PSREW310.BUP ✓ ✓ ✓
PSR-EW400 MSD – – PSREW400.BUP ✓ ✓ ✓
PSR-EW410 MSD – – PSREW410.BUP ✓ ✓ ✓
PSR-I400 MSD – – PSR-I400.BUP ✓ ✓ –

Computer-related Operations 25
*1 File
Transfer method*2
----------------Data formats compatible for transfer---------------- USB Audio User
Song User Style Backup File External
Song*3 External
Style
PSR-I455 MSD – – PSR-I455.BUP ✓ ✓ –
PSR-I500 MSD – – PSR-I500.BUP ✓ ✓ ✓
PSR-S670 MSD ✓ ✓ PSR-S670.BUP ✓ ✓ –
PSR-S750 MSD ✓ ✓ PSR-S750.BUP ✓ ✓ –
PSR-S950 MSD ✓ ✓ PSR-S950.BUP ✓ ✓ –
PSR-S970/S770 MSD ✓ ✓ “Model
Name”.BUP ✓ ✓ –
PSR-S975/S775 MSD ✓ ✓ “Model
Name”.BUP ✓ ✓ –
YDP-162/142 MSD ✓ – – ✓ – –
YDP-163/143 MSD ✓ – – ✓ – –
YDP-164/144 MSD ✓ – – ✓ – ✓
YDP-C71 MSD ✓ – YDP-C71.BUP ✓ – –
YDP-S34 MSD ✓ – – ✓ – ✓
YDP-S52/S51 MSD ✓ – – ✓ – –
YDP-S54 MSD ✓ – – ✓ – ✓

Computer-related Operations 26
*1 Models not sold in some regions are also listed.
*2 "Explorer" is entered for models that can transfer files using Explorer, Finder, etc. attached to the computer, and "MSD" is entered for models that cannot. For models with "MSD", transfer the files with Musicsoft Downloader.
*3 SMF Formats 0 & 1
*4 Available on instrument firmware version 2.00 or later.
■About this manual
• The illustrations as shown in this manual are for instructional purposes only, and may appear somewhat different from those on your instrument.
• Windows is a registered trademark of Microsoft(R) Corporation in the United States and other countries.
• Mac is a trademark of Apple Inc., registered in the U.S. and other countries. • The company names and product names in this manual are the trademarks or registered
trademarks of their respective companies.
Manual Development Group © 2020 Yamaha Corporation
Published 02/2021 YJ-R0