table of figures - vtechworks.lib.vt.edu€¦ · web viewthat is because in natural language, a...
TRANSCRIPT

Multimedia, Hypertext, and Information Access (CS 4624)
Neural Network Document Summarization
Final ReportVirginia Tech, Blacksburg, VA 24061
May 2, 2018
Team: Junjie Cheng
Client: Yufeng Ma Virginia Polytechnic Institute and State University
Instructor: Edward A. Fox Virginia Polytechnic Institute and State University

Neural Network Document Summarization
Table of ContentsTABLE OF FIGURES...............................................................................................................................4
1. EXECUTIVE SUMMARY......................................................................................................................5
2. INTRODUCTION................................................................................................................................62.1 OBJECTIVE............................................................................................................................................62.2 USER CHARACTERISTICS...........................................................................................................................62.3 OUTCOME OF THE PROJECT.....................................................................................................................6
3. DESIGN.............................................................................................................................................73.1 DATASET..............................................................................................................................................73.2 PREPROCESSING.....................................................................................................................................73.3 MODEL INTRODUCTION...........................................................................................................................73.4 MODEL ARCHITECTURE.........................................................................................................................103.5 TRAINING...........................................................................................................................................113.6 TESTING.............................................................................................................................................12
4. EVALUATION..................................................................................................................................13
5. USER’S MANUAL..........................................................................................................................145.1 PRE-REQUIREMENTS.............................................................................................................................145.2 PREPARE DOCUMENTS...........................................................................................................................145.3 PREPROCESS........................................................................................................................................155.4 GENERATE..........................................................................................................................................15
5.4.1 Open the Command Line Tool..................................................................................................155.4.2 Find the Directory of the Python Script....................................................................................155.4.3 Select Python Environment......................................................................................................165.4.4 Run Python Script.....................................................................................................................16
6. DEVELOPER’S MANUAL................................................................................................................186.1 PRE-REQUIREMENTS.............................................................................................................................186.2 DATASET............................................................................................................................................186.3 PROJECT STRUCTURE............................................................................................................................186.4 MAKEFILE.PY.......................................................................................................................................19
6.4.1 Tokenizing Stories....................................................................................................................196.4.2 Separating Files.......................................................................................................................20
6.5 PREPROCESS.PY....................................................................................................................................206.5.1 Loading and Exporting Vocabulary..........................................................................................216.5.2 Loading and Exporting Data....................................................................................................22
6.6 DATASET.PY.........................................................................................................................................246.6.1 File data set.............................................................................................................................246.6.2 Pad collate...............................................................................................................................25
6.7 MODELS.PY.........................................................................................................................................266.7.1 RNNEncoder.............................................................................................................................266.7.2 RNNDecoder............................................................................................................................276.7.3 DocSumModel..........................................................................................................................29
6.8 ATTENTION.PY.....................................................................................................................................316.9 LOG.PY...............................................................................................................................................32
2

Neural Network Document Summarization
6.10 TRAIN.PY..........................................................................................................................................326.10.1 Initialization...........................................................................................................................326.10.2 Train Iteration........................................................................................................................336.10.3 Train......................................................................................................................................33
6.11 GENERATE.PY.....................................................................................................................................346.12 ROUGE.PY.........................................................................................................................................356.13 ARGS.PY...........................................................................................................................................35
7. LESSONS LEARNED..........................................................................................................................377.1.1 DATASET.........................................................................................................................................377.1.2 TRAINING........................................................................................................................................377.1.3 FUTURE WORK.................................................................................................................................37
8. ACKNOWLEDGEMENTS...................................................................................................................38
9. REFERENCES...................................................................................................................................39
APPENDIX A. SETTING UP ENVIRONMENT..........................................................................................401. ANACONDA...........................................................................................................................................40
1.1 Installing on Windows................................................................................................................401.2 Installing on MacOS....................................................................................................................401.3 Installing on Linux.......................................................................................................................40
2. PYTHON 3.6.........................................................................................................................................413. PYTORCH.............................................................................................................................................414. STANFORD’S CORENLP...........................................................................................................................41
APPENDIX B. PROJECT STRUCTURE.....................................................................................................42
3

Neural Network Document Summarization
Table of Figures
FIGURE 1 RECURRENT NEURAL NETWORK [3].........................................................................................8FIGURE 2 ENCODER-DECODER MODEL [4]..............................................................................................9FIGURE 3 ATTENTION MODEL [6].......................................................................................................10FIGURE 4 PREPARED DOCUMENTS.......................................................................................................15FIGURE 5 CHANGE TO WORK DIRECTORY..............................................................................................16FIGURE 6 SELECT PYTHON ENVIRONMENT.............................................................................................16FIGURE 7 FUNCTION: TOKENIZE...........................................................................................................19FIGURE 8 TOKENIZED STORY...............................................................................................................20FIGURE 9 FILTER LENGTH THRESHOLD..................................................................................................21FIGURE 10 ADD SPECIAL TOKENS........................................................................................................21FIGURE 11 EXPORTED VOCABULARY....................................................................................................22FIGURE 12 WRITE INTO FILES.............................................................................................................23FIGURE 13 GENERATED ABSTRACTS.....................................................................................................24FIGURE 14 FILE DATA SET................................................................................................................. 25FIGURE 15 PAD COLLATE...................................................................................................................25FIGURE 16 USAGE OF FILEDATASET.....................................................................................................26FIGURE 17 RNN ENCODER................................................................................................................26FIGURE 18 RNN DECODER................................................................................................................28FIGURE 19 DOC SUMMARIZATION MODEL............................................................................................30FIGURE 20 ATTENTION MODEL...........................................................................................................31FIGURE 21 TRAIN.PY INITIALIZATION....................................................................................................32FIGURE 22 TRAIN LOOP.....................................................................................................................33FIGURE 23 TRAIN FUNCTION..............................................................................................................34FIGURE 24 PARAMETERS................................................................................................................... 35
4

Neural Network Document Summarization
1. Executive Summary
This report describes the Neural Network Document Summarization project for the Multimedia, Hypertext, and Information Access (CS 4624) course at Virginia Tech in the 2018 Spring semester. The purpose of this project is to generate a summary from a long document through deep learning. As a result, the outcome of the project is expected to replace part of a human’s work.
The implementation of this project consists of four phases: data preprocessing, building models, training, and testing.
In the data preprocessing phase, the data set is separated into training set, validation set, and testing set, with the 3:1:1 ratio. In each data set, articles and abstracts are tokenized to tokens and then transformed to indexed documents. After preprocessing, two text files that contain indexed articles and abstracts and a vocabulary are generated.
In the building model phase, a sequence to sequence model is implemented by PyTorch to transform articles to abstracts. The sequence to sequence model contains an encoder and a decoder. Both are implemented as recurrent neural network models with long-short term memory unit. Additionally, the MLP attention mechanism is applied to the decoder model to improve its accuracy.
In the training phase, the model iteratively loads data from the training set and learns from them. In each iteration, the model generates a summary according to the input document, and compares the generated summary with the real summary. The difference between them is represented by a loss value. According to the loss value, the model performs back propagation to improve its accuracy.
In the testing phase, the validation dataset and the testing dataset are used to test the accuracy of the trained model. The model generates the summary according to the input document. Then the similarity between the generated summary and the real human-produced summary are evaluated by PyRouge.
Throughout the semester, all of the above tasks were completed. With the trained model, users can generate CNN/Daily Mail style highlights according to an input article.
5

Neural Network Document Summarization
2. Introduction
This document describes my efforts on the Neural Network Document Summarization project. It includes details on the project design, implementation, training, and testing parts of this project. It also outlines my approach to complete the project and the challenges I conquered in this project.
The document includes manuals for both users and developers. For users, the manual introduces detailed instructions for setting up the environment and using the trained model to generate a summary. For developers, the manual shows all technical details in the model architecture, training, and testing. Developers will be able to use and revise the provided source code and documents for retraining and improvement purposes after reading the manual.
2.1 Objective
In recent years, with the improvements in mathematical formulas and increasingly powerful computers, deep learning has become more powerful than ever. The use of deep learning methods has helped computer scientists conquer a series of challenges that cannot be simply solved by logic.
In this project, I’m going to use deep learning models to generate a summary from a long document. As expected, the trained model will generate a reasonable summary and free humans from related tasks.
2.2 User Characteristics
There are two kinds of potential target user of this project. The first potential users are professional editors. As their daily work, editors take a long time to write summaries for documents. They can benefit from this project by improved work efficiency. Although, due to the limited accuracy of the model, sometimes the generated summary cannot be directly used, yet it still can be an important reference.
The other potential users are financial analysts. In order to make decisions, financial analysts need to receive information from news to analyze the tendency of the market. Reading such news consumes a lot of time. Therefore, they can benefit from this project by saving time.
2.3 Outcome of the Project
This project doesn’t yield a single, all-encompassing application with graphical user interface. Rather, the project includes a few independent Python scripts. These scripts will be used together to process data, train, and test the model. Users and developers
6

Neural Network Document Summarization
must use them from the command line. The detailed instructions for using these Python scripts are given in the developer’s manual, located in Section 6.
3. Design
The project design includes technical details of dataset, preprocessing, model architecture, training, and testing. The project is implemented in Python with the open source deep learning library PyTorch.
3.1 Dataset
The dataset of the project is a public dataset from the GitHub: https://github.com/abisee/cnn-dailymail.
The dataset contains more than 300,000 stories from CNN and daily mail. Each story consists of an article and three lines of highlights.
3.2 Preprocessing
The raw data in the CNN/Daily Mail dataset is separated into training, validation, and testing datasets with ratio 3:1:1. Each dataset is processed by tokenizing to tokens and transforming to indexed documents. After processing, an articles file and an abstracts file are generated for each dataset. The articles file and the abstracts file contain only the index value of the tokens in the raw data. Each line of a file represents an article or an abstract. A vocabulary is also generated for mapping tokens to indexed values.
Processing a long sequence is still a challenging task in natural language processing; therefore, I selected only articles with less than 400 words and abstracts with less than 100 words. The size of the vocabulary is also limited to 50,000 to improve the performance.
3.3 Model Introduction
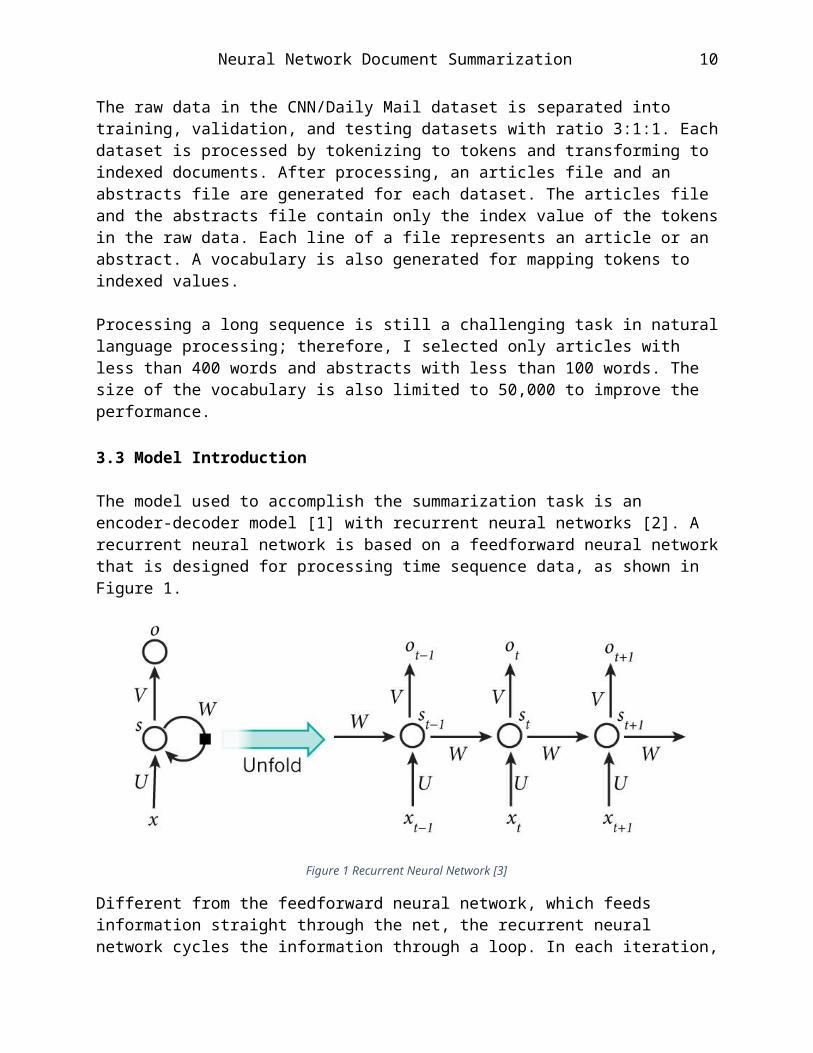
The model used to accomplish the summarization task is an encoder-decoder model [1] with recurrent neural networks [2]. A recurrent neural network is based on a feedforward neural network that is designed for processing time sequence data, as shown in Figure 1.
7

Neural Network Document Summarization
Figure 1 Recurrent Neural Network [3]
Different from the feedforward neural network, which feeds information straight through the net, the recurrent neural network cycles the information through a loop. In each iteration, the RNN takes a token and a hidden vector as input and returns a hidden vector. Through a mathematical operation, the RNN encodes the information of the input token into the output hidden vector, then it takes the output hidden vector as its input hidden vector again until the whole sequence is processed. In the end, all information in the time sequence data is iteratively encoded into the hidden vector.
The encoder-decoder model in the context of recurrent neural networks is a sequence to sequence mapping model. The model takes a sequence as input and generates another sequence as output. The encoder-decoder model has achieved great success and has been widely used in the natural language processing field. The model is also effective in the document summarization task.
8

Neural Network Document Summarization
The encoder-decoder model is shown in Figure 2. In this model, both encoder and decoder are a recurrent neural network (RNN). The encoder encodes the input sequence data and passes the context vector to the decoder as the input. Then the decoder decodes the context vector to a shorter length of output sequence. After processing, the abstract of the article is generated from the context vector.
Furthermore, the attention mechanism [5] is applied to the decoder to improve the accuracy. Since the decoder generates the output sequence only by referring to the context vector of the last timestamp from the encoder, the decoder uses the previous token and the same context from the encoder to generate the next token. As the result, a lot of useless information is referred to when generating tokens, and the accuracy of the model is low.
The attention decoder model is shown as Figure 3. When the decoder generates the output sequence, in each timestamp, it calculates the attention weight of all hidden vectors from the encoder and generates a hidden vector that contains only part information in the input sequence. The attention model will effectively improve the accuracy of the encoder-decoder model in the summarization task.
Figure 2 Encoder-Decoder Model [4]
Figure 3 Attention Model [6]
9
Neural Network Document Summarization
3.4 Model Architecture
In this project, my model architecture is shown as the following:
Encoder:
Shared embedding layer Bidirectional LSTM [7] layer
Decoder:
Shared embedding layer LSTM layer MLP [8] attention layer Dropout layer Out layer
In the encoder, the embedding layer is used for transforming the input token from an integer index to a vector. The vector represents the semantics of the input token. Then, the embedded input will be passed into the bidirectional long-short term memory layer. LSTM is a recurrent neural network with logic gate to control selecting long term or short term memory. LSTM has been shown to have the best achievement in natural language processing [9].
The LSTM layer is bidirectional because the input sequence will be processed from the forward direction as well as backward direction. That is because in natural language, a word in a sentence usually not only depends on the previous context, but also refers to the following context. Through bidirectional LSTM, the model can learn the context from the whole sentence. The bidirectional LSTM will return two context vectors from forward and backward processing. All of them will be used by the decoder.
In the decoder, the embedding layer is shared with the encoder. Therefore, the vector of each token will be the same in the encoder and the decoder. The embedded input sequence will be passed into the LSTM layer. The LSTM layer will return the context that contains the hidden vector of all timestamps. Then, the MLP attention layer will take the context vectors from the encoder and the decoder to calculate the attention weight. An attention applied context will be returned by the attention layer. The attention applied context mixes the context of the encoder and the decoder, therefore only important information is kept.
The attention applied context will be processed by the dropout layer. The dropout layer drops part of the data from the context to prevent overfitting issues. Finally, the out layer will transform the dimension of the context vector from hidden size to vocabulary size, and a log softmax function will be applied to calculate the possibility of each token in the context. The token with highest possibility will be selected as the output.
10

Neural Network Document Summarization
3.5 Training
The architecture of training is shown as the following:
Optimizer: SGD [10] Criterion: NLLLoss [11] Learning rate: 1 Batch size: 3 Hidden size: 256 Word embed size: 128 Epoch: 200 Dropout rate: 0.3
In the training phase, the Python script iteratively loads data and trains the model. In each iteration, the encoder-decoder model takes a batch of documents as input. A batch is a matrix that contains several sequences. Sequences in the batch will be processed in parallel to improve the efficiency. After processing, the criterion compares the generated summaries and the real summaries to calculate the loss value of the model. The loss value represents the difference between the generated summaries and the real summaries. According to the loss value, the optimizer performs back propagation to adjust the parameters in the model.
Once the dataset is processed once, one epoch is completed. The dataset is iterated 200 epochs and the learning rate will be decreased respectively.
The training takes place on the Huckleberry server of Virginia Tech Advanced Research Computing (VT-ARC). The Huckleberry server contains 16 nodes, and each have 4 NVidia P100 GPUs. 100 epochs with batch size of 3 takes 20 hours to train on the single GPU.
3.6 Testing
In the testing phase, a trained model is used for generating summaries from the testing data set. The generated summaries and real summaries are saved in separate folders for evaluation.
11

Neural Network Document Summarization
4. EvaluationTesting is performed with PyRouge. PyRouge is an open source Python library that calculates scores for similarity of sentences based on the semantics. It is also the standard evaluation tool for the text summarization task.
As evaluated, the test set gains scores as the following:
ROUGE-1: 0.13513 ROUGE-2: 0.02795 ROUGE-SU4: 0.03978
Since the used model is not well trained, the scores are lower than expected. The score can be improved by training for a longer time on the existing model.
12

Neural Network Document Summarization
5. User’s Manual
This section introduces how to use the trained model to generate summaries from a series of documents. This manual is for non-expert users. For software developers, please read the developer’s manual for more technical details.
5.1 Pre-requirements
To use the model, you will need to use the Python script as the driver to execute the model. Before using the Python script, you need to make sure that the following software and packages have been installed on your computer:
Python 3.6 or higher Anaconda PyTorch Stanford’s CoreNLP
If any of them is not installed, please check Appendix A for guidelines to set up the environment. You also need to have the following files and put them in the same directory:
preprocess.py generate.py model.pt stanford-corenlp-full-2016-10-31
Appendix B shows the correct structure of files.
5.2 Prepare documents
Before generating summaries, you must prepare your documents as follows:
All documents that need to be processed must be kept in the same directory. Each file must only contain a single document. Each file must have a unique filename. Each document file must be encoded in UTF-8, but the suffix of the filename can
be anything.
For example, correctly prepared documents on the Mac OS X system may look like the files in Figure 4.
13

Neural Network Document Summarization
5.3 Preprocess
Run preprocess.py to pre-process the existing documents. In the main function of preprocess.py, you need to specify the path of source files and the path of processed files.
5.4 Generate
If the environment is set up and all files are prepared, you are ready to generate summaries through the model.
5.4.1 Open the Command Line Tool
The Python script can only be run in the command line if you don’t have the Python IDE installed. To run the script on your device, the first step is to open the command line tool on your system.
For Mac users, launch the application Terminal on your computer by clicking Launchpad Other Terminal. You can also launch the Terminal by using Spotlight search.
For Linux users, launch the application Terminal.
For Windows users, launch the application Command Prompt.
5.4.2 Find the Directory of the Python Script
In the command line tool, set the current directory to the directory that contains the Python script generate_ summary.py by using the following command:
Figure 4 Prepared Documents
14

Neural Network Document Summarization
cd <target_directory_path>
Replace “<target_directory_path>” with your directory path to change the current directory to the target directory.
To verify that you are in the correct directory, for Mac and Linux users, use the “ls” command to list the files in the current directory. For Windows users, use the “dir” command. Figure 5 shows the command in the Mac OS X Terminal.
5.4.3 Select Python Environment
If you have installed Anaconda, there will be multiple Python environments on your computer, and each of them may include different packages. Therefore, you need to select the Python environment that you want to use with the following command:
source activate <environment_name>
If you followed the guideline in Appendix A, your environment name should be “py36”. If the command is executed successfully, you will see the environment name before the command prompt as Figure 6.
5.4.4 Run Python Script
Now you can run the Python script by using the following command:
Figure 5 Change to Work Directory
Figure 6 Select Python Environment
15

Neural Network Document Summarization
python generate_ summary.py <documents_directory> < summary_direcotry>
Replace <documents_directory> with your document directory, and replace <summary_directory> with the directory where you want the summaries to be saved. The summary directory can be a directory that does not exist. The Python script will create it for you.
After execution, the summary will be placed in the summary directory. The filename of the summary will be exactly the same as the source document. Processing may take a few minutes to hours, depending on the number of documents you process.
16

Neural Network Document Summarization
6. Developer’s Manual
This section is for developers. It introduces the functionality of all files in the project. By reading the developer’s manual, you will be able to understand, revise and retrain the model.
6.1 Pre-requirements
To use the model, you will need to use the Python script as the driver to execute the model. Before using the Python script, you need to make sure that the following software and packages have been installed on your computer:
Python 3.6 or higher Anaconda PyTorch Stanford’s CoreNLP PyRouge
If any of them is not installed, please check Appendix A for guidance in setting up the environment. You also need to have the following files and put them in the same directory:
Data Model Scripts
Appendix B shows a correct structure of files.
6.2 Dataset
The dataset of the project is a public dataset from the GitHub: https://github.com/abisee/cnn-dailymail.
It contains more than 300,000 stories from CNN and daily mail. Each story consists of an article and three lines of highlights. Files are encoded in UTF-8 with the suffix “.story”.
6.3 Project Structure
This project includes the following Python scripts:
args.py attention.py
17

Neural Network Document Summarization
dataset.py generate.py log.py makeFile.py models.py preprocess.py rouge.py train.py rouge.py
The rest of this section will introduce these files in the order of execution and explain the code line by line.
6.4 makeFile.py
The makeFile.py is used for tokenizing stories and generating articles and abstracts. It is executable. After execution, the tokenized articles and abstracts will be saved in separate directories.
6.4.1 Tokenizing Stories
The function tokenize, as shown in Figure 7, creates a file called “mapping.txt” that maps the filename of stories and their filename after tokenization. Then it calls the system command line to execute the CoreNLP package to tokenize these stories in the dataset according to the list “mapping.txt”:
Figure 7 Function: tokenize
18

Neural Network Document Summarization
After execution, files in the “mapping.txt” will be tokenized. All words, symbols, and numbers will be separated by white space. Figure 8 is an example of a tokenized story.
6.4.2 Separating Files
The tokenized stories will be separated as articles and abstracts. Abstracts are recognized by the keyword “@highlight”. In most stories, there are only three highlights. The function generate extracts highlights from these stories and appends a period at the end of each sentence. The extracted highlights will be concatenated as one line and saved as abstracts. The remaining parts of stories are articles.
Finally, articles and abstracts will be separated and saved into different directories. Additionally, the dataset will be separated to training, validation, and testing set with the 3:1:1 ratio.
6.5 preprocess.py
The script preprocess.py generates vocabulary and indexed dataset. It is executable. After execution, a vocabulary, an abstract file, and an article file will be generated.
preprocess.py contains two classes. The class Vocabulary is used for mapping indexes to tokens, and the class Data is used for creating indexed data files.
6.5.1 Loading and Exporting Vocabulary
Figure 8 Tokenized Story
19

Neural Network Document Summarization
First, the script creates a vocabulary and invokes the method load_vocab to load data into the vocabulary. The method load_vocab iterates through tokens in the articles and the abstracts to count the frequency of each token. In the dictionary, each token is assigned with a unique index based on its frequency in descending order.
When generating the vocabulary, the method load_vocab checks the length against a threshold of article and abstract. As shown in Figure 9, if the length of article or abstract is longer than the threshold, their tokens will not be counted.
Figure 9 Filter Length Threshold
Additionally, four special tokens “<PAD>”, “<SOS>”, “<EOS>”, and “<UNK>” are added into the vocabulary as the Figure 10 shown. Each of them has a unique index.
Figure 10 Add Special Tokens
The token “<PAD>” is used for filling the space in the matrix if the length of an article or an abstract is less than the maximum length. The token “<SOS>” and “<EOS>” mean “start of sentence” and “end of sentence”. They mark the start and end of a sequence for the model. The token “<UNK>” is used for replacing infrequent tokens. It will be talked about later in this section.
After the vocabulary is generated, preprocess.py calls the method export_vocab to export the vocabulary into a text file. The format of the vocabulary file is shown in Figure 11. In each line the token and the index are separated by white space. Loading from the file avoids regenerating the vocabulary when running. It saves a lot of time for training and testing.
20

Neural Network Document Summarization
Figure 11 Exported Vocabulary
6.5.2 Loading and Exporting Data
Then the script calls the method load_data to create and initialize two LongTensor matrixes. I used LongTensor as the matrix, because the LSTM layer of the model only accepts LongTensor vectors.
Tokens in the articles and the abstracts are converted to indexes according to the dictionary and filled into the corresponding position in the matrixes. Each row of the matrixes represents one article or abstract.
The method load_data filters the dataset according to the threshold of article and abstract. If the length of the article or the abstract is too long, it will not be used.
Additionally, if the index of a token is greater than the user defined threshold, it will be converted to the token “<UNK>”. The default threshold of vocabulary size is 50,000. The limitation to the vocabulary size will reduce the dimension of the out layer as well as improve the accuracy. Figure 12 shows the source code of converting tokens and writing data into files.
21

Neural Network Document Summarization
Figure 12 Write into Files
Finally, the article matrix and the abstract matrix will be exported into files separately. These files are encoded in UTF-8 and CSV format. Figure 13 shows a generated abstract file.
22

Neural Network Document Summarization
Figure 13 Generated Abstracts
6.6 dataset.py
dataset.py is used to implement the dataset that will be used for retrieving data while training and testing. With the dataset, the program will load data as needed other than loading all data at the beginning. Using dataset.py can significantly reduce the burden of memory and debugging time.
6.6.1 File data set
The class FileDataSet is used for managing the whole dataset. It saves all articles and abstracts in two lists. FileDataSet implements three required methods from its parent class: __init__, __getitem__, and __len__. Figure 14 shows the source code of FileDataSet.
The method __init__ is the constructor of the class. It creates two lists and then reads all articles and abstracts into the lists.
The method __getitem__ will be called when the data in the dataset is requested by an index. For example, dataset[0]. When __getitem__ is called, it returns the corresponding article and abstract as well as their length.
The method __len__ is used for getting the length of the dataset.
23

Neural Network Document Summarization
Figure 14 File Data Set
6.6.2 Pad collate
The class PadCollate is used for adding padding value when a batch of data is retrieved. It overrides the default collate_fn method in the data loader. When a batch of data is requested, it calculates the longest sequence in the batch and pads other sequences to the same length. Figure 15 shows the core function of the class PadCollate.
Figure 15 Pad Collate
This class will be used when declaring the data loader, as shown in Figure 16.
24

Neural Network Document Summarization
Figure 16 Usage of FileDataSet
6.7 models.py
The file model.py contains the encoder, the decoder, and the wrapped model. All of them are implemented by PyTorch and inherit the torch.nn.Module. This file cannot be executed.
6.7.1 RNNEncoder
The class RNNEncoder is the encoder model. The source code of RNNEncoder is shown in Figure 17.
Figure 17 RNN Encoder
25

Neural Network Document Summarization
The method __init__ initializes the embedding layer and bidirectional LSTM for the model.
The method forward is required to be implemented as a subclass of torch.nn.Module. This method will be called when the model executes. It defines how to execute the model.
Input parameters of the method forward are shown as below:
input: a LongTensor that contains a batch of input sequences in the shape (batch size, sequence length).
lengths: a list that contains the real length of each sequence in the input matrix. hidden: the hidden vector from the previous iteration. It is always None as
default.
In the method forward, first, the encoder embeds the input sequences. The input sequences will be transformed to a matrix in the shape (batch size, vocabulary size, word embed length). Then the encoder packs the embedded input by torch.nn.utils.rnn.pack_padded_sequence. This method concatenates all sequences in the batch to a single sequence and eliminates the padding value. It reduces the effect of the padding value on the model as well as reducing memory occupation while training and testing.
Finally, the packed input will be passed into the LSTM layer with the input hidden value. LSTM (Long-Short Term Memory) is a recurrent neural network layer with memory logic gate. It can select long or short memory of the context according to the logic gate. The outputs of the LSTM are 1) a context vector that contains hidden vectors in all timestamps, 2) the hidden vector of the last timestamp, and 3) the cell hidden state of the last timestamp.
Before packing, the input sequences will be sorted in descending order as their real lengths. After processing by the LSTM layer, the output contexts will be sorted back to the original order.
6.7.2 RNNDecoder
The class RNNDecoder is the RNN decoder with MLP attention mechanism. The source code of RNNDecoder is shown in Figure18.
The method __init__ declares and initializes the embedding layer, LSTM layer, attention layer, dropout layer, and out layer. The embedding layer is shared with the encoder.
When initializing the decoder, it copies the parameters of the encoder’s embedding layer and assigns them to its embedding layer.
26

Neural Network Document Summarization
Figure 18 RNN Decoder
The method forward is required to be implemented as a subclass of the torch.nn.Module. This method will be called when the model executes. It defines how to execute the model.
Input parameters of the method forward are shown as below:
input: a LongTensor that contains a batch of target sequences in shape (batch size, sequence length).
context: hidden vectors of all timestamps from the encoder in shape (batch size, sequence length, hidden size * 2).
hidden: the hidden vector of last timestamp from the encoder. Its shape is (batch size, 1, hidden size * 2).
test: a Boolean that indicates whether the decoder is in training or testing.
27

Neural Network Document Summarization
In the method forward, first, the embedding layer embeds the input batch and transforms each token to a vector. The embedded input is passed into the LSTM layer. The LSTM layer returns the context and last hidden state of the input sequence. Then, the attention layer takes the decoder context and the encoder context to generate an attention applied context. The attention mechanism will be discussed in a later section.
Then the attention applied context will be processed by the dropout layer. The dropout layer drops out data from the context to prevent overfitting. The default dropout rate is 0.3. At the end, the out layer transforms the context from the shape (batch size, sequence length, hidden size) to (batch size, sequence length, vocab size). Then the context will be applied to the log softmax function to calculate the possibility of each token. The result of the log softmax function will be returned.
6.7.3 DocSumModel
The class DocSumModel wraps the encoder and the decoder. It is also responsible for transferring data between the encoder and the decoder. The code of the DocSumModel is shown in Figure 19.
In the method __init__, the model saves the encoder, the decoder, and the vocabulary.
The method forward transfers data between the encoder and the decoder. It also controls training mode and testing mode.
Input parameters of the method forward are explained as below:
src: a LongTensor that contains a batch of input sequences with the shape (batch size, sequence length).
tgt: a LongTensor that contains a batch of target sequences with the shape (batch size, sequence length).
lengths: a list that contains the length of each sequence in the input batch. test: a Boolean that indicates training mode or testing mode.
In the forward method, the model first gets output from the encoder. If the model is in training mode, it transforms the shape of the context from (number of direction * batch size, sequence length, hidden size) to (batch size, sequence length, number of direction * hidden size). Then the whole target sequences will be passed into the decoder. Otherwise, if the model is in the testing mode, it feeds the transformed context and a “<SOS>” token as the start to let the decoder generate a summary by itself.
28

Neural Network Document Summarization
Figure 19 Doc Summarization Model
6.8 attention.py
This file contains the attention class. The source code of the attention model is shown in Figure 20.
29

Neural Network Document Summarization
Figure 20 Attention Model
30

Neural Network Document Summarization
The score method transforms the dimension of the encoder context and the decoder context then adds them together and applies the tanh function to the result.
The forward method uses the softmax function to calculate attention weight. Then it uses the bmm function to multiply attention weight and the scored context to generate the attention applied context.
6.9 log.py
The log.py is used for printing the log information while training and testing. It takes the completed proportion and running time to calculate the remaining time.
6.10 train.py
The train.py declares the DocSumModel and controls the iteration to load data and train the model.
6.10.1 Initialization
Figure 21 shows initialization functions in train.py.
Figure 21 Train.py Initialization
The function build_model builds the document summarization model. The function build_optim builds the SGD optimizer and sets the learning rate. The function make_criterion builds the NLLLoss criterion.
31

Neural Network Document Summarization
6.10.2 Train Iteration
The train_model function controls the epoch iteration. Figure 22 shows the train loop. In each iteration, it declares and shuffles the data loader and passes it into the train function. After each 20 epochs, it saves the current status of the model as the check point. If the training crashes, we can resume it from the check point. It also decreases the learning rate every 20 epochs by dividing the learning rate by 10.
Figure 22 Train Loop
6.10.3 Train
The train function controls training iteration. Figure 23 shows the source code of the function train. In each iteration, it loads data from the data loader and passes the data into the model. The output of the model is a LongTensor matrix that contains the possibility of each token. The function uses the criterion to compute the loss value between the model output and the target sequence. Then the criterion performs a backward function, and the optimizer also performs the step function to change parameters in the model.
Before backward, the function detaches the decoder hidden state to make sure that only the forward hidden state will be calculated.
32

Neural Network Document Summarization
Figure 23 Train Function
6.11 generate.py
This file uses the trained model to generate summaries. The function generate loads data from the testing data set and passes it into the model. The model is set to testing mode. The output of the model will be translated by the function translate and saved into the file. When generating summaries, the batch size must be set to 1.
6.12 rouge.py
The file rouge.py is used for evaluating the similarity between target sentences and the generated sentences. It uses the Python library PyRouge.
6.13 args.py
This file defines parameters for the preprocessing, model, and training. All used parameters are shown in Figure 24.
33

Neural Network Document Summarization
Figure 24 Parameters
The usefulness of each parameter is shown as below:
Preprocessing:
index threshold: maximum size of vocabulary abstract length threshold: maximum length of abstract article length threshold: maximum length of article use cuda: availability of GPU
Model:
hidden size: size of hidden vector in the model word vec size: size of embedded word in the embedding layer batch size: number of sequences in a batch epoch number: number of epochs resume: resume from check point
Tokens:
PAD: padding word UNK: unknown word SOS: start of sentence word
34

Neural Network Document Summarization
EOS: end of sentence word PAD token: padding index UNK token: unknown index SOS token: start of sentence index EOS token: end of sentence index
Training:
gradient clip: maximum gradient clip learning rate: learning rate of optimizer drop out: dropout rate
35

Neural Network Document Summarization
7. Lessons Learned
From this project, I have learned basic knowledge in natural language processing as well as gained a lot of experience in implementation and training.
7.1.1 Dataset
In the initial version, the data set was not exported to the file. Every time, at the start of training the program needed to load and generate the dictionary again. It wasted a lot of time while debugging. Then it was changed to export the data set and the dictionary into files.
The data was not limited in the initial version of the project, so the performance of the model was terrible. I realized that it is still extremely challenging for the model to process a long sequence. As the input gets long, the accuracy rapidly decreases.
7.1.2 Training
In the initial version of the training, the sequences were trained by feeding tokens into the model one by one. It was extremely slow. Trained one sequence took about half an hour. Then it was changed to process a batch of sequences at once, and the time spent to train one sequence was reduced to 2 seconds.
Before using the clipping gradient, the gradient explosion problem happened very frequently. While training, the loss of the model became Nan (Not a number) after several batches. This problem was solved by using the clipping gradient function in PyTorch.
While training the model on the server, it usually crashed after training for one day. Therefore, I changed the code of training. Now, the model will be saved periodically. If the program crashes at any time, I can load the existing model and continue training.
7.1.3 Future Work
The performance of the current version is still not good enough. It can be improved by training for a longer time. If the model is trained for 200 epochs based on the current setting, the loss value is expected to be lower than 1. It can also be improved by applying a new strategy in the model. If I revise the model and concatenate a token at the end of each context, the performance of the model will be better.
36

Neural Network Document Summarization
8. Acknowledgements
Yufeng [email protected]. Ma is a PhD student at Virginia Tech. He worked as the client of this project and guided the project through all project phases. Thanks to his contribution, some results were obtained, because the project could not have been completed without his help.
Dr. Edward [email protected]. Fox is the instructor for the Multimedia, Hypertext, and Information Access (CS 4624) course at Virginia Tech. He is the best professor I have ever met in Virginia Tech. He cares about my troubles in the project and provides useful advice and resources related to NLP.
37

Neural Network Document Summarization
9. References
[1] Sutskever, I., Vinyals, O., & Le, Q. V. (2014). Sequence to sequence learning with neural networks. In Advances in neural information processing systems (pp. 3104-3112).
[2] Medsker, L. R., & Jain, L. C. (2001). Recurrent neural networks. Design and Applications, 5.
[3] Denny Britz. Recurrent Neural Networks Tutorial Part 1 – Introduction to RNNs. http://www.wildml.com/2015/09/recurrent-neural-networks-tutorial-part-1-introduction-to-rnns/. Web. Accessed: March 26, 2018.
[4] Gokumohandas. Recurrent Neural Networks (RNN) – part 3: encoder-decoder. https://theneuralperspective.com/2016/11/20/recurrent-neural-networks-rnn-part-3-encoder-decoder/. Web. Accessed: March 26, 2018.
[5] Rush, A. M., Chopra, S., & Weston, J. (2015). A neural attention model for abstractive sentence summarization. arXiv preprint arXiv:1509.00685.
[6] Gokumohandas. Recurrent Neural Networks (RNN) – part 4: attentional interfaces. https://theneuralperspective.com/2016/11/20/recurrent-neural-network-rnn-part-4-attentional-interfaces/. Web. Accessed: March 26, 2018.
[7] Hochreiter, S., & Schmidhuber, J. (1997). Long short-term memory. Neural computation, 9(8), 1735-1780.
[8] Gardner, M. W., & Dorling, S. R. (1998). Artificial neural networks (the multilayer perceptron)—a review of applications in the atmospheric sciences. Atmospheric environment, 32(14-15), 2627-2636.
[9] Yao, K., Peng, B., Zhang, Y., Yu, D., Zweig, G., & Shi, Y. (2014, December). Spoken language understanding using long short-term memory neural networks. In Spoken Language Technology Workshop (SLT), 2014 IEEE (pp. 189-194). IEEE.
[10] Bottou, L. (2010). Large-scale machine learning with stochastic gradient descent. In Proceedings of COMPSTAT'2010 (pp. 177-186). Physica-Verlag HD.
[11] Platt, J. (1999). Probabilistic outputs for support vector machines and comparisons to regularized likelihood methods. Advances in large margin classifiers, 10(3), 61-74.
This project was accomplished using the following tools:
Python
38

Neural Network Document Summarization
PyTorch Pycharm CoreNLP
Appendix A refers to the instructions from:
Anaconda official website at https://conda.io/docs/user-guide/index.html PyTorch official website at https://pytorch.org.
The Huckleberry server from Virginia Tech Advanced Research Computing was used for training the model: https://www.arc.vt.edu/computing/huckleberry-user-guide/.
39

Neural Network Document Summarization
Appendix A. Setting Up Environment
This section introduces how to set up the environment for this project.
1. Anaconda
This section introduces how to install Anaconda on your computer. It comes from the official guideline of Anaconda at: https://conda.io/docs/user-guide/install/index.html
1.1 Installing on Windows
1. Download the installer: Anaconda installer for Windows2. Double-click the .exe file.
3. Follow the instructions on the screen.
If you are unsure about any setting, accept the defaults. You can change them later.
4. Test your installation by inputting command “conda list” in the Command Prompt.
1.2 Installing on MacOS
1. Download the installer: Anaconda installer for macOS.2. Double-click the .pkg file.
3. Follow the instructions on the screen.
If you are unsure about any setting, accept the defaults. You can change them later.
4. Test your installation by inputting command “conda list” in the Terminal.
1.3 Installing on Linux
1. Download the installer: Anaconda installer for Linux. 2. In your Terminal window, run:
bash Anaconda-latest-Linux-x86_64.sh3. Follow the prompts on the installer screens.
If you are unsure about any setting, accept the defaults. You can change them later.
4. To make the changes take effect, close and then re-open your Terminal window.5. Test your installation by inputting command “conda list” in the Terminal.
40

Neural Network Document Summarization
2. Python 3.6
1. Create a new environment in Anaconda: To create the new environment for Python 3.6, in your Terminal window or
an Anaconda Prompt, run: conda create -n py36 python=3.6 anaconda
2. Activate an environment: On Windows, in your Anaconda Prompt, run activate py36
On macOS and Linux, in your Terminal Window,
run source activate py36
3. PyTorch
1. Activate an environment: On Windows, in your Anaconda Prompt, run activate py36
On macOS and Linux, in your Terminal Window,
run source activate py36
2. To create the new environment for Python 3.6, in your Terminal window or an Anaconda Prompt, run:
conda install pytorch torchvision –c pytorch
4. Stanford’s CoreNLP
1. Download fron the link: http://nlp.stanford.edu/software/stanford-corenlp-full-2016-10-31.zip
2. Decompress the file to your project root directory.
41

Neural Network Document Summarization
Appendix B. Project Structure
A complete project structure should contain the following directories and files. The uploaded files include the source code of the project, the training data set, and a trained model.
The file dictionary.txt is the vocabulary generated from the training data set. The directory train_set contains the processed data files. The file model.pt is a trained model. The rest of the files in the project directory are source code files.
Doc Summarization Projecto data
dictionary.txt train_set
abstracts.txt articles.txt
o models model.pt
o args.pyo attention.pyo dataset.pyo generate.pyo log.pyo makeFile.pyo models.pyo preprocess.pyo rouge.pyo train.py
stanford-corenlp-full-2016-10-31
42