table of contentsdavidjyoung.com/cmg/zmfwritingsamples.pdf6 serena® changeman® zmf 6.1 table of...
TRANSCRIPT

Installation Guide 3
Table of Contents
Welcome to the Serena® ChangeMan® ZMF Installation Guide . . . . . . . . . . . . . . . . . . . . . . . . . . . . . 9Guide to ChangeMan ZMF Documentation . . . . . . . . . . . . . 10
ChangeMan ZMF Documentation Suite . . . . . . . . . . . . 11Using the Manuals . . . . . . . . . . . . . . . . . . . . . . . . . . 13
Online Help . . . . . . . . . . . . . . . . . . . . . . . . . . . . . . . . . . 14Online Tutorial . . . . . . . . . . . . . . . . . . . . . . . . . . . . . 14Online Help Screens . . . . . . . . . . . . . . . . . . . . . . . . . 15Online Error Messages . . . . . . . . . . . . . . . . . . . . . . . 15
Typographical Conventions . . . . . . . . . . . . . . . . . . . . . . . 15
Chapter 1 Introduction . . . . . . . . . . . . . . . . . . . . . . . . 17ChangeMan ZMF . . . . . . . . . . . . . . . . . . . . . . . . . . . . . . . 18Protecting Production and Development . . . . . . . . . . . . . . 18Change Package . . . . . . . . . . . . . . . . . . . . . . . . . . . . . . . 19Change Package Life Cycle. . . . . . . . . . . . . . . . . . . . . . . . 19SERNET . . . . . . . . . . . . . . . . . . . . . . . . . . . . . . . . . . . . . 21Implementation Strategy . . . . . . . . . . . . . . . . . . . . . . . . . 23
Chapter 2 Installation Requirements . . . . . . . . . . . . . . . 25System Requirements . . . . . . . . . . . . . . . . . . . . . . . . . . . 26
Operating System . . . . . . . . . . . . . . . . . . . . . . . . . . 26Software Requirements. . . . . . . . . . . . . . . . . . . . . . . 26Memory Requirements . . . . . . . . . . . . . . . . . . . . . . . 27DASD Space Requirements . . . . . . . . . . . . . . . . . . . . 27REXX Runtime Environment. . . . . . . . . . . . . . . . . . . . 28
Serena ChangeMan ZMF Product Compatibility . . . . . . . . . . 28CA-Panvalet® and CA-Librarian® Compatibility. . . . . . . . . . 28Software Conflicts. . . . . . . . . . . . . . . . . . . . . . . . . . . . . . 29
Library Concatenations . . . . . . . . . . . . . . . . . . . . . . . 29Abend-AID® (from Compuware Corporation) . . . . . . . 29
4 Serena® ChangeMan® ZMF 6.1
Table of Contents
PDSFAST (from Software Engineering of America). . . . . 30CA-PDSMAN® (from Computer Associates) . . . . . . . . . 30MAINVIEW® SRM StopX37/II™ (from BMC Software) . . 31VSAM Performance Tools . . . . . . . . . . . . . . . . . . . . . . 31
Load Library APF Authorization . . . . . . . . . . . . . . . . . . . . . 32IPL. . . . . . . . . . . . . . . . . . . . . . . . . . . . . . . . . . . . . . . . . 32
Chapter 3 Installation Considerations . . . . . . . . . . . . . . 33Upgrading From Earlier Versions . . . . . . . . . . . . . . . . . . . . 34System Considerations . . . . . . . . . . . . . . . . . . . . . . . . . . . 34
z/OS Subsystem . . . . . . . . . . . . . . . . . . . . . . . . . . . . 34Updating the System Linkage Index . . . . . . . . . . . . . . 34Non-Swappable. . . . . . . . . . . . . . . . . . . . . . . . . . . . . 35Serena Libraries and LINKLIST . . . . . . . . . . . . . . . . . . 35
VSAM Performance . . . . . . . . . . . . . . . . . . . . . . . . . . . . . 35Defining the VSAM file characteristics . . . . . . . . . . . . . 36Started Task JCL . . . . . . . . . . . . . . . . . . . . . . . . . . . . 36SMS-VSAM Record Level Sharing (RLS) . . . . . . . . . . . . 36Batch Local Shared Resources (BLSR) . . . . . . . . . . . . . 37
SERNET and ChangeMan ZMF JCL . . . . . . . . . . . . . . . . . . . 37Subsystem ID . . . . . . . . . . . . . . . . . . . . . . . . . . . . . . 38SERNET Started Task Names . . . . . . . . . . . . . . . . . . . 38Passing Parameters to SERNET . . . . . . . . . . . . . . . . . . 39SER#PARM DDNAME . . . . . . . . . . . . . . . . . . . . . . . . . 41SERLIC DDNAME . . . . . . . . . . . . . . . . . . . . . . . . . . . . 42SYSTCPD DDNAME . . . . . . . . . . . . . . . . . . . . . . . . . . 42Impact Analysis . . . . . . . . . . . . . . . . . . . . . . . . . . . . 42
Security Considerations . . . . . . . . . . . . . . . . . . . . . . . . . . 43Exclusive Access to Libraries. . . . . . . . . . . . . . . . . . . . 43Access to ChangeMan ZMF Functions . . . . . . . . . . . . . . 44Security Entities and Required Authority . . . . . . . . . . . 46SAF and Your Security System . . . . . . . . . . . . . . . . . . 48Security for Started Task Procedures . . . . . . . . . . . . . . 49eNetwork Communications Server OMVS Settings . . . . . 50
Dataset Considerations. . . . . . . . . . . . . . . . . . . . . . . . . . . 50Temporary List Datasets . . . . . . . . . . . . . . . . . . . . . . 51Utility Datasets . . . . . . . . . . . . . . . . . . . . . . . . . . . . . 51Staging Model Dataset Name . . . . . . . . . . . . . . . . . . . 53

Table of Contents
Installation Guide 5
Batch Job Name Considerations . . . . . . . . . . . . . . . . . . . . 54User Job Names . . . . . . . . . . . . . . . . . . . . . . . . . . . . 55Install Job Names. . . . . . . . . . . . . . . . . . . . . . . . . . . 55Viewing Job SYSOUT. . . . . . . . . . . . . . . . . . . . . . . . . 56
Staging Versions. . . . . . . . . . . . . . . . . . . . . . . . . . . . . . . 56Customizing ChangeMan ZMF Components . . . . . . . . . . . . 57Console Log Messages. . . . . . . . . . . . . . . . . . . . . . . . . . . 58Serena® ChangeMan® ZMF M+R Option. . . . . . . . . . . . . . 59
Chapter 4 Unloading the Software . . . . . . . . . . . . . . . . . 61Introduction . . . . . . . . . . . . . . . . . . . . . . . . . . . . . . . . . . 62Step 1: Unload the CD-ROM. . . . . . . . . . . . . . . . . . . . . . . 63
Unload CD-ROM . . . . . . . . . . . . . . . . . . . . . . . . . . . . 64Transfer Files to the Mainframe . . . . . . . . . . . . . . . . . 66Expand PDS Libraries with RECEIVE . . . . . . . . . . . . . . 67
Chapter 5 Installing ChangeMan ZMF Components . . . . . . 69Step 1: Allocate Custom Libraries . . . . . . . . . . . . . . . . . . . 70Step 2: APF Authorize Vendor and Custom Load Libraries . . 70Step 3: Apply ChangeMan ZMF License . . . . . . . . . . . . . . . 71Step 4: Define ChangeMan ZMF VSAM Files . . . . . . . . . . . . 71
NEW INSTALLATIONS . . . . . . . . . . . . . . . . . . . . . . . . 71Step 5: Define XMLSPACE VSAM LDS . . . . . . . . . . . . . . . . 75Step 6: Define Staging Versions VSAM Files. . . . . . . . . . . . 76
Brand New V6 User . . . . . . . . . . . . . . . . . . . . . . . . . 76SVINTEG SSM/SSV Database Integrity Program. . . . . . 78
Step 7: Store SVPARM Control Member . . . . . . . . . . . . . . . 81Step 8: Allocate the SER#PARM TCP/IP Address File . . . . . . 81Step 9: Prepare Impact Analysis. . . . . . . . . . . . . . . . . . . . 83
Brand new V6 user. . . . . . . . . . . . . . . . . . . . . . . . . . 84Existing V5 user. . . . . . . . . . . . . . . . . . . . . . . . . . . . 84
Step 10: Build SERNET JCL for ChangeMan ZMF . . . . . . . . . 84Step 11: Build Cataloged Procedures. . . . . . . . . . . . . . . . . 89Step 12: Build the Logon CLIST . . . . . . . . . . . . . . . . . . . . 90Step 13: Modify Exit Program CMNEXINS . . . . . . . . . . . . . 94Step 14: APF Authorize Other Load Libraries . . . . . . . . . . . 95Step 15: Configure Automated Operations Tools. . . . . . . . . 96

6 Serena® ChangeMan® ZMF 6.1
Table of Contents
Chapter 6 Starting, Connecting, and Stopping . . . . . . . . . 97Start SERNET . . . . . . . . . . . . . . . . . . . . . . . . . . . . . . . . . 98
SERPRINT Messages . . . . . . . . . . . . . . . . . . . . . . . . . 98Subsystem IDs . . . . . . . . . . . . . . . . . . . . . . . . . . . . . 99
Connect to the ChangeMan ZMF Primary Option Menu . . . . . 99Stop SERNET and ChangeMan ZMF . . . . . . . . . . . . . . . . . . 100
Chapter 7 Configuring Security . . . . . . . . . . . . . . . . . . . 103Introduction . . . . . . . . . . . . . . . . . . . . . . . . . . . . . . . . . . 104Batch connection to CMN ZMF started task . . . . . . . . . . . . . 105Step 1: Customize SERLCSEC . . . . . . . . . . . . . . . . . . . . . . 106
Switches in SERLCSEC . . . . . . . . . . . . . . . . . . . . . . . . 106CA-ACF2 Batch LOGONID . . . . . . . . . . . . . . . . . . . . . . 108Assembling SERLCSEC . . . . . . . . . . . . . . . . . . . . . . . . 108Stubbing ChangeMan ZMF Security . . . . . . . . . . . . . . . 109
Step 2: Add ChangeMan ZMF to Your Security System . . . . . 110Add ChangeMan ZMF to CA-ACF2 . . . . . . . . . . . . . . . . 110Add ChangeMan ZMF to IBM Security Server RACF . . . . 114Add ChangeMan ZMF to CA-Top Secret . . . . . . . . . . . . 117
Step 3: Define Security Entities . . . . . . . . . . . . . . . . . . . . . 119Define Security Entities to IBM Security Server RACF . . 120
Step 4: Define Dataset Access. . . . . . . . . . . . . . . . . . . . . . 123
Chapter 8 Installing Other Facilities. . . . . . . . . . . . . . . . 127Installing the ChangeMan ZMF DB2 Option . . . . . . . . . . . . . 128Installing ChangeMan ZMF M+R Option . . . . . . . . . . . . . . . 128Installing XMLSERV . . . . . . . . . . . . . . . . . . . . . . . . . . . . . 130Disabling the ISPF Client Dump . . . . . . . . . . . . . . . . . . . . . 133Installing OPS, OPQ, & XCI CICS/NEWCOPY support. . . . . . . 134ZDD 6.1 Quickstart. . . . . . . . . . . . . . . . . . . . . . . . . . . . . . 137
Chapter 9 Modifying Skeletons . . . . . . . . . . . . . . . . . . . 149Introduction . . . . . . . . . . . . . . . . . . . . . . . . . . . . . . . . . . 150JOB Statement Skeletons and JOBLIB . . . . . . . . . . . . . . . . 151JOB Statement Skeletons and CA-ACF2 LOGONID . . . . . . . . 153CMN$$SPR - SER#PARM DD Statement . . . . . . . . . . . . . . . 154CMN$$IAX- Impact Analysis Maintenance . . . . . . . . . . . . . . 155

Table of Contents
Installation Guide 7
CMN$$RPT - Run ChangeMan ZMF Reports . . . . . . . . . . . . 155CMN11 - Insert Package At Remote Site . . . . . . . . . . . . . . 155CMN30,30I,37,55,55I,57 . . . . . . . . . . . . . . . . . . . . . . . . . 156Software Conflicts. . . . . . . . . . . . . . . . . . . . . . . . . . . . . . 156
Chapter 10 Setting Up Housekeeping . . . . . . . . . . . . . . . . 157Introduction . . . . . . . . . . . . . . . . . . . . . . . . . . . . . . . . . . 158Backup and Restore Housekeeping Jobs . . . . . . . . . . . . . . 158
Backup Package Master and Component Master. . . . . . 159Backup I/A LDS . . . . . . . . . . . . . . . . . . . . . . . . . . . . 159Backup I/A LOG . . . . . . . . . . . . . . . . . . . . . . . . . . . . 160Backup and Clear Recovery File . . . . . . . . . . . . . . . . . 160Backup and Clear Log File . . . . . . . . . . . . . . . . . . . . . 161Backup Staging Versions VSAM Files. . . . . . . . . . . . . . 161Restore Package Master and Component Master . . . . . 162
Appendix A SERNET Keyword Options . . . . . . . . . . . . . . . 163
Appendix B Modify Commands . . . . . . . . . . . . . . . . . . . . 183Introduction . . . . . . . . . . . . . . . . . . . . . . . . . . . . . . . . . . 184Standard Modify Commands. . . . . . . . . . . . . . . . . . . . . . . 184Restricted Modify Commands . . . . . . . . . . . . . . . . . . . . . . 196Trace Examples:. . . . . . . . . . . . . . . . . . . . . . . . . . . . . . . 200
Appendix C Applying Maintenance Releases. . . . . . . . . . . . 207Introduction . . . . . . . . . . . . . . . . . . . . . . . . . . . . . . . . . . 208General Procedure for Maintenance Releases . . . . . . . . . . . 208Procedures for Special Components . . . . . . . . . . . . . . . . . 210
Appendix D Manual File Transfer and Expand . . . . . . . . . . . 213Transfer Files To Host Mainframe . . . . . . . . . . . . . . . . . . . 214
File Transfer Using FTP . . . . . . . . . . . . . . . . . . . . . . . 214File Transfer Using 3270 Emulator . . . . . . . . . . . . . . . 216
Expand Host Target Files . . . . . . . . . . . . . . . . . . . . . . . . . 218
Appendix E Technical Notes . . . . . . . . . . . . . . . . . . . . . . 219TCP/IP Trouble Shooting . . . . . . . . . . . . . . . . . . . . . . . . . 220

8 Serena® ChangeMan® ZMF 6.1
Table of Contents
Index. . . . . . . . . . . . . . . . . . . . . . . . . . . . . 225

ZDD 6.1 Quickstart.
Installation Guide 137
ZDD 6.1 Quickstart.
For detailed installation instructions refer to the Changeman 6.1 ZDD Server Installation Guide. This brief discussion involves connecting to an existing Changeman ZMF 6.1 server in an LPAR on a z/OS 1.8 Sysplex.
Install the product on your PC, it’s as easy as that. Don’t worry about the differences in code pages, it all works anyway. Click on the Serena Network icon on your desktop. Ignore the C001 icon, it isn’t there for a new installation.
Right click on the lightning bolt (Serena Network), then right click on Serena Network in the pop-up, then right click on New Server in the pop-up as shown below.

138 Serena® ChangeMan® ZMF 6.1
Chapter 8 Installing Other Facilities
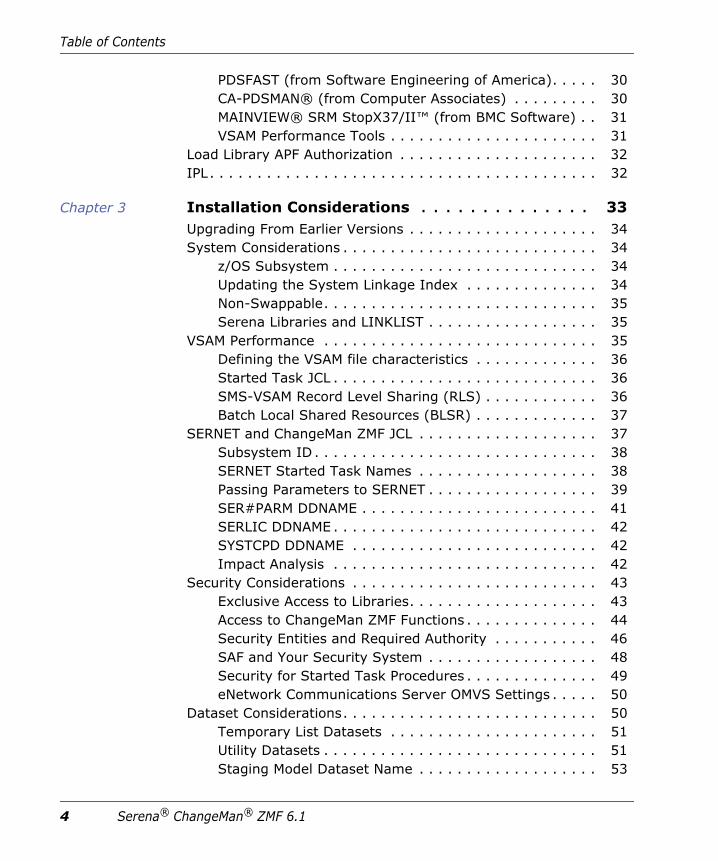
Defining a new Server.
Enter a name for the server, in this case it’s the name of the LPAR C001. This is also the DNS name for the LPAR. 6032 is the XCH port number for the ZMF/ZDD started task, accept the default code page.
ZDD 6.1 Quickstart.
Installation Guide 139
Click OK. Then right click on C001, Serena Network, Logon as shown below:

140 Serena® ChangeMan® ZMF 6.1
Chapter 8 Installing Other Facilities
You’ll get a logon screen like below:

ZDD 6.1 Quickstart.
Installation Guide 141
You’ll get some confirmation messages, then a screen like below, with JOBS for user DYOUNG, and datasets with a HLQ of DYOUNG. Ignore the SERT3 for the time being.

142 Serena® ChangeMan® ZMF 6.1
Chapter 8 Installing Other Facilities
To define a new Changeman ZMF, right click on the server you just defined (C001), Serena Network, New Changeman.
Fill in the CMN port number of the ZMF/ZDD Started Task.
Your Serena Network screen will now look like the following, with a list of defined ZMF applications. In this case there are four applications, ACTP, ACTR, CISQ, and GENL.

ZDD 6.1 Quickstart.
Installation Guide 143
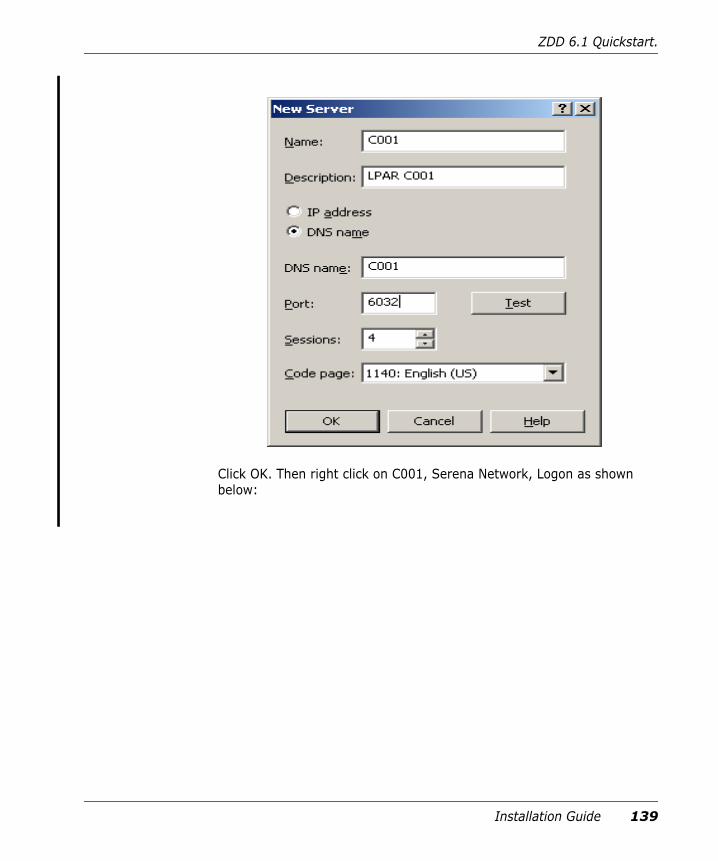
To look at another USER’s jobs, right click on Jobs, Serena Network, New folder, you’ll get a menu like the following:
144 Serena® ChangeMan® ZMF 6.1
Chapter 8 Installing Other Facilities
SERT is the owner of the ZMF started tasks for LPAR C001. Let’s find the XCH and CMN parameters for the SERT3TMP started task:

ZDD 6.1 Quickstart.
Installation Guide 145
From this output we can see the XCH port for server C001 is 6032, the CMN port for Changman SERT3 is 6031, the sub system id is 3, the DB2 sub system id is C101, and both the CMN and SER traces have been enabled.
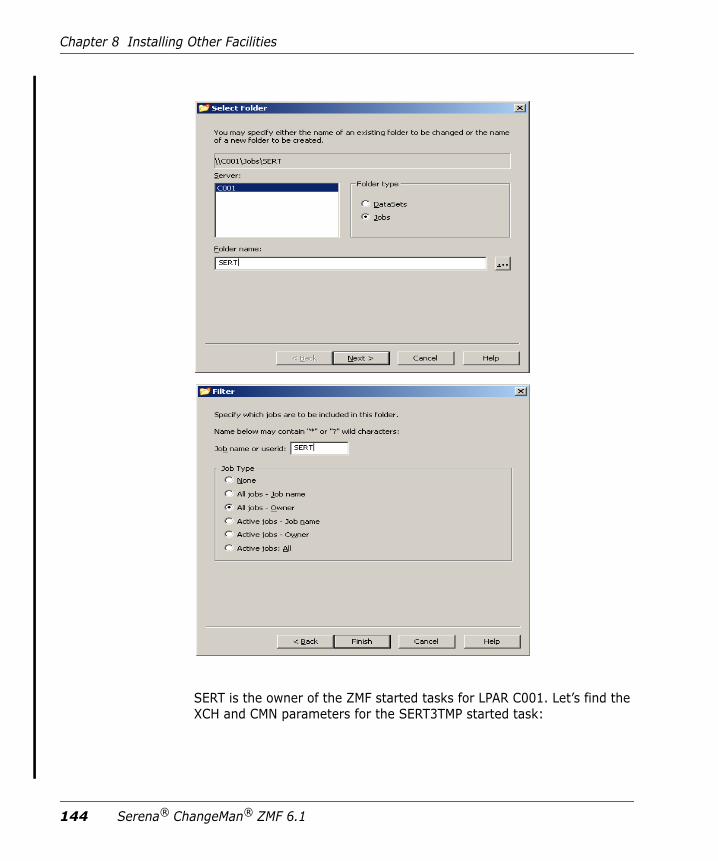
DDNAME ZDDOPTS identifies a PDS with ZDD options, and must be included in the JCL for the started task. In this case the DSN is CMNTP.ZDD562.SERCOMC.V5R6M2.SAMPXML. To look at this file using ZDD, right click on Datasets under server C001, Serena Network, New Folder:
146 Serena® ChangeMan® ZMF 6.1
Chapter 8 Installing Other Facilities
Type in the HLQ of the datasets in which you are interested, in this case CMNTP.**.

ZDD 6.1 Quickstart.
Installation Guide 147
Scroll down to the dataset in question:
Right click COMMAND.sampxml, Serena Network, Edit:

148 Serena® ChangeMan® ZMF 6.1
Chapter 8 Installing Other Facilities
The COMMAND member of the ZDDOPTS dataset is used to specify the ZMF commands available to specific TSO users. In the example below, all commands have been enable for TSO id’s DYOUNG and DYOUNG2 (among others).
Installation Guide 213
Appendix DManual File Transfer and Expand
This appendix tells you how to manually transmit XMIT format files from a networked PC to a mainframe host and how to expand those files into PDS libraries.
Use the procedures in this appendix if you have problems with the automated procedures described in Chapter 4, "Unloading the Software" on page 61.
Transfer Files To Host Mainframe 214
Expand Host Target Files 218

214 Serena® ChangeMan® ZMF 6.1
Appendix D Manual File Transfer and Expand
Transfer Files To Host Mainframe
After the InstallShield Wizard has copied and decompressed the XMIT format mainframe software files to your PC or a network drive, you copy the files to the mainframe.
The transfer process must not convert the file into character format; the transfer must be binary. The receiving mainframe files has these characteristics:
Choose the transfer procedure that you prefer:
To use FTP, see "File Transfer Using FTP" on page 214.
To use 3270 emulator software, see "File Transfer Using 3270 Emulator" on page 216.
File Transfer Using FTP
This section describes how to use FTP to upload ChangeMan ZMF files from a PC to a mainframe host computer. These instructions assume that you have:
TCP/IP FTP connectivity from your PC to the mainframe computer.
The dotted decimal IP address of the mainframe.
A mainframe userid and password.
Security authorization to allocate files on the mainframe.
File Organization Sequential
Record Format Fixed block
Record Length (LRECL) 80
Block Size 3120
Transfer Files To Host Mainframe
Installation Guide 215
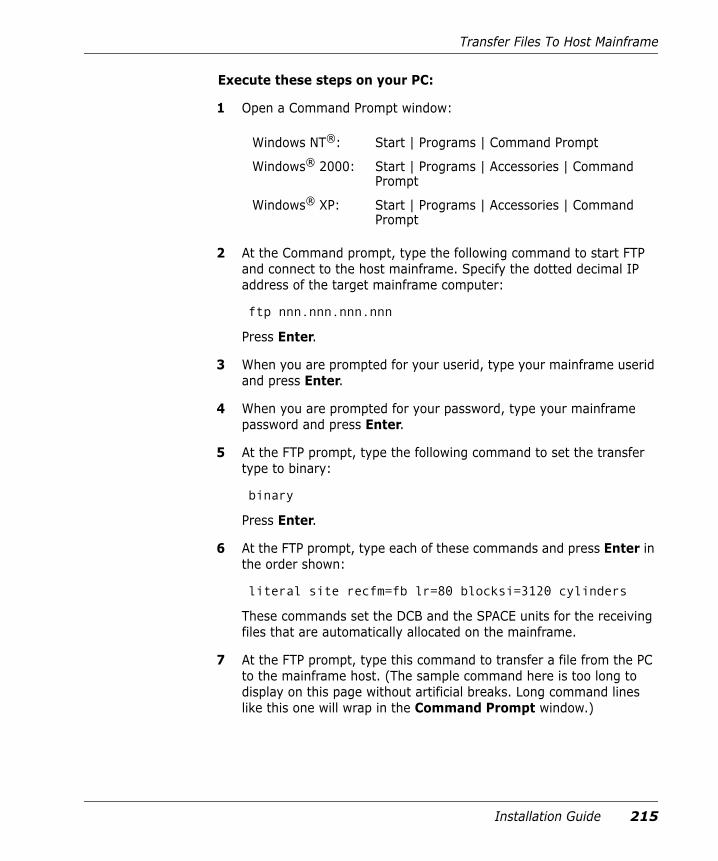
Execute these steps on your PC:
1 Open a Command Prompt window:
2 At the Command prompt, type the following command to start FTP and connect to the host mainframe. Specify the dotted decimal IP address of the target mainframe computer:
ftp nnn.nnn.nnn.nnn
Press Enter.
3 When you are prompted for your userid, type your mainframe userid and press Enter.
4 When you are prompted for your password, type your mainframe password and press Enter.
5 At the FTP prompt, type the following command to set the transfer type to binary:
binary
Press Enter.
6 At the FTP prompt, type each of these commands and press Enter in the order shown:
literal site recfm=fb lr=80 blocksi=3120 cylinders
These commands set the DCB and the SPACE units for the receiving files that are automatically allocated on the mainframe.
7 At the FTP prompt, type this command to transfer a file from the PC to the mainframe host. (The sample command here is too long to display on this page without artificial breaks. Long command lines like this one will wrap in the Command Prompt window.)
Windows NT®: Start | Programs | Command Prompt
Windows® 2000: Start | Programs | Accessories | Command Prompt
Windows® XP: Start | Programs | Accessories | Command Prompt

216 Serena® ChangeMan® ZMF 6.1
Appendix D Manual File Transfer and Expand
put "C:\Program Files\Serena\ ChangeMan ZMF Server\SERCOMC.V5R5M0.ASMSRC" 'user111.binary.sercomc.v5r5m0.assemble'
The first file name is the PC file to be transmitted. Enclose the PC file name in double quotes if there are spaces in a directory name or in the file name. The PUT command is not case sensitive.
The second file name is the receiving file on the mainframe computer. Enclose the mainframe file in single quotes to suppress the addition of the “working directory” (userid) as a high level qualifier.
Press Enter.
8 Type a PUT command at the FTP prompt and press Enter for each file to be transferred to the host.
9 After you have transferred all files from the PC to the host mainframe computer, type the following command at the FTP prompt to disconnect from the mainframe computer and end the FTP session.
quit
Press Enter.
10 Close the Command Prompt window.
11 Logon to the mainframe and verify that the new mainframe files have the proper record format, logical record length, and block size.
File Transfer Using 3270 Emulator
Extra!® from Attachmate Corporation and Personal Communications from IBM are popular 3270 emulator programs. These and other 3270 emulator programs commonly use IND$FILE to transfer files between a PC and a mainframe host computer.
NOTE The mainframe file you specify in the PUT command is not a PDS library. Specify an intermediate file name rather than a dataset name you intend to use for a ChangeMan ZMF PDS library on the mainframe.

Transfer Files To Host Mainframe
Installation Guide 217
Execute these steps if you use 3270 emulator software on your PC to transfer ChangeMan ZMF files to the host mainframe computer:
1 In the File Transfer facility of your PC host emulator software, change the TSO binary transfer type to use these settings, or define a new TSO Binary transfer type:
2 With the preceding settings, the file transfer software should allocate a sequential target file on the host for each file transfer. However, if you wish to preallocate one or more host target files, use these file allocation parameters:
SPACE=(CYL,(1,1)), DCB=(DSORG=PS,RECEM=FB,LRECL=80,BLKSIZE=3120)
3 Run the file transfer function to transfer each file on the PC to a target sequential disk dataset on the host.
Setting Value
VM / TSO / CICS TSO
Transfer Type Binary
ASCII NO
CRLF NO
APPEND NO
Record Format Fixed (block)
Record Length 80
Block Size 3120
Allocation Units Cylinders
Primary Allocation 1
Secondary Allocation 1
NOTE The mainframe file you specify in the transfer facility is not a PDS library. Specify an intermediate file name rather than the dataset name you intend to use for the ChangeMan ZMF PDS library on the mainframe.

218 Serena® ChangeMan® ZMF 6.1
Appendix D Manual File Transfer and Expand
4 Logon to the mainframe and verify that the new mainframe files have the proper record format, logical record length, and block size.
Expand Host Target Files
Execute these steps to expand the sequential XMIT files transferred from your PC into PDS libraries:
1 Choose Option 6 (Command) from the ISPF/PDF Primary Option Menu.
2 On the ISPF Command Shell panel, type the TSO RECEIVE command:
RECEIVE INDATASET(‘host.target.dataset.name’)
Specify one of the sequential XMIT files that you uploaded from the PC.
3 The RECEIVE command prompts you with these messages.
INMR901I Dataset USER11.CMN512.GOLDCODE.CNTL.FIX from...
INMR906A Enter restore parameters or 'DELETE' or 'END' +
Respond by typing a DATASET parameter to specify the dataset name you chose for ChangeMan ZMF vendor libraries.
DATASET(‘node.SERCOMC.VnRnMn.LOAD’) NEW|OLD
4 The RECEIVE command displays IEBCOPY sysout messages.
If you need more information about using the RECEIVE receive command, type the following on the Command line.
TSO HELP RECEIVE
NOTE Serena recommends that you define the last node in your PDS library names the same as the last of the original files on the distribution CD.

Installation Guide 219
Appendix ETechnical Notes
This appendix contains technical information that may be helpful when installing ChangeMan ZMF.
TCP/IP Trouble Shooting 220

220 Serena® ChangeMan® ZMF 6.1
Appendix E Technical Notes
TCP/IP Trouble Shooting
This section provides advice to the installer responsible for making SERNET connect to the TCP/IP address space.
Verifying the TCP/IP Port
A common concern early in the effort is determining whether SERNET is listening on the proper port. You can enter the following command (NETSTAT ALLCONN) on the ISPF Command Shell command line, or at the TSO READY prompt, to display a list of sockets and their corresponding states:
The example above shows three connections from the PC (foreign socket) at IP address 10.30.224.15: A connection to JOBNAME C101DIST (LOCAL SOCKET) at IP address 10.35.11.100 port 33728 for a DB2 Connect session, a connection to JOBNAME SERT3TMP at IP address 10.35.11.100 port 6032 for a ZDD/XCH server session, and a connection to JOBNAME SERT3TMP at IP address 10.35.11.100 port 6031 for a ZDD/CMN Changeman session.
NETSTAT ALLCONN EZZ2350I MVS TCP/IP NETSTAT CS V1R8 TCPIP Name: TCPIP 13:05:13 EZZ2585I User Id Conn Local Socket Foreign Socket State EZZ2586I ------- ---- ------------ -------------- ----- EZZ2587I BPXOINIT 0000001E 0.0.0.0..10007 0.0.0.0..0 Listen EZZ2587I C101DIST 0000003B 0.0.0.0..33729 0.0.0.0..0 Listen EZZ2587I C101DIST 0000003A 0.0.0.0..33728 0.0.0.0..0 Listen EZZ2587I C101DIST 00007963 10.35.11.100..33728 10.30.224.15..1266 Establ sh EZZ2587I SERT3TMP 00005B25 0.0.0.0..6032 0.0.0.0..0 Listen EZZ2587I SERT3TMP 00007978 10.35.11.100..6031 10.30.224.15..1314 Establ sh EZZ2587I SERT3TMP 00005B26 0.0.0.0..6031 0.0.0.0..0 Listen EZZ2587I SERT3TMP 0000795B 10.35.11.100..6032 10.30.224.15..1264 Establ sh

TCP/IP Trouble Shooting
Installation Guide 221
NETSTAT HOME
From the above NETSTAT HOME command it appears that the TCPIP address for the z/OS system is 10.35.11.100.
Determining the DNS name for the z/OS system can be tricky. If you’re on a PC, try issuing an NSLOOKUP 10.35.11.100 (plug in your IP address) and see what you get, as shown below. In this case C001 is the DNS name, doing an NSLOOKUP C001 identifies 10.35.11.100, PING-ing c001 shows the same results.
NETSTAT HOME EZZ2350I MVS TCP/IP NETSTAT CS V1R8 TCPIP Name: TCPIP 12:59:52 EZZ2700I Home address list: EZZ2701I Address Link Flg EZZ2702I ------- ---- --- EZZ2703I 10.35.11.100 OSD6 P EZZ2703I 10.35.11.150 EZASAMEMVS EZZ2703I 10.35.11.150 EZAXCF84 EZZ2703I 10.35.11.150 EZAXCF12 EZZ2703I 10.35.11.150 EZAXCF13 EZZ2703I 10.35.11.150 EZAXCF06 EZZ2703I 10.35.11.150 EZAXCF05 EZZ2703I 10.35.11.150 EZAXCF03 EZZ2703I 10.35.11.150 EZAXCF02 EZZ2703I 10.35.11.150 EZAXCF01 EZZ2703I 10.35.11.150 EZAXCF07 EZZ2703I 10.35.11.150 EZAXCF10 EZZ2703I 10.35.11.150 EZAXCF11 EZZ2703I 127.0.0.1 LOOPBACK READY

222 Serena® ChangeMan® ZMF 6.1
Appendix E Technical Notes

TCP/IP Trouble Shooting
Installation Guide 223
If you’ve got DB2 running on the mainframe, chances are you’ve got DDF running also. Check the sysout of the DSNMSTR address space for the following:
The domain for the this z/OS is c001.serena.com.
Detecting Errors in the TCP/IP API
All error conditions in the TCP/IP API are written to //SERPRINT. A complete listing of all TCP/IP calls is available by toggling the TEST keyword option. (Contact Serena Customer Support about using TEST.)
Each call to the API is detailed in messages with the following format:
ISFPCU41 UT DISPLAY C101MSTR S0392289 DSID 2 LINE 28 COLUMNS 02- 161 COMMAND INPUT ===> SCROLL ===> HALF 12.37.12 S0392289 DSNJ099I -C101 LOG RECORDING TO COMMENCE WITH 185 185 STARTRBA=0000091E4000 12.37.12 S0392289 S C101DBM1 12.37.19 S0392289 S C101DIST 12.37.23 S0392289 DSNR001I -C101 RESTART INITIATED 12.37.23 S0392289 DSNR003I -C101 RESTART...PRIOR CHECKPOINT RBA=000008B06101 12.37.24 S0392289 DSNR004I -C101 RESTART...UR STATUS COUNTS 368 368 IN COMMIT=0, INDOUBT=0, INFLIGHT=0, IN ABORT=0, POSTPONED
ABORT=012.37.25 S0392289 DSNR005I -C101 RESTART...COUNTS AFTER FORWARD 369 369 RECOVERY 369 IN COMMIT=0, INDOUBT=0 12.37.25 S0392289 DSNR006I -C101 RESTART...COUNTS AFTER BACKWARD 370 370 RECOVERY 370 INFLIGHT=0, IN ABORT=0, POSTPONED ABORT=0 12.37.33 S0392289 DSNR002I -C101 RESTART COMPLETED 12.37.33 S0392289 -C101RECOVER POSTPONED 12.37.33 S0392289 S C101SPAS 12.37.33 S0392289 DSNV434I -C101 DSNVRP NO POSTPONED ABORT THREADS FOUND 12.37.33 S0392289 DSN9022I -C101 DSNVRP 'RECOVER POSTPONED' NORMAL COMPLETION 12.37.33 S0392289 DSNL003I -C101 DDF IS STARTING 12.37.35 S0392289 DSNL519I -C101 DSNLILNR TCP/IP SERVICES AVAILABLE 389 389 FOR DOMAIN c001.serena.com AND PORT 33728 12.37.35 S0392289 DSNL519I -C101 DSNLIRSY TCP/IP SERVICES AVAILABLE 390 390 FOR DOMAIN c001.serena.com AND PORT 33729 12.37.36 S0392289 DSNL004I -C101 DDF START COMPLETE 391 391 LOCATION C101 391 LU BHDNET.DB2C101 391 GENERICLU -NONE 391 DOMAIN c001.serena.com 391 TCPPORT 33728 391 RESPORT 33729 12.37.36 S0392289 DSN9022I -C101 DSNYASCP 'START DB2' NORMAL COMPLETION

224 Serena® ChangeMan® ZMF 6.1
Appendix E Technical Notes
SERs000I user-ID TCP/IP function RC=rc,ERRNO=errno
To find the specific reason for the error, locate the error number (errno) in Appendix D.1 of the IBM publication TCP/IP for MVS: API Reference. Function (function) and return code (rc) offer further advice.
Verifying Network Connectivity
Use the PING command to verify network connectivity to a specific IP address.PING P390MVS
PING 192.3.255.21
ERRORNO 156 eNetwork Communications Server
With eNetwork Communications Server (TCP/IP 3.4 or higher), the SERNET address space is an OMVS process by default. As a result, it needs additional security authorizations for the user ID associated with the SERNET instance. Failure to add these definitions results in the following error message during SERNET initialization:
SERA000E XCH TCP/IP INITAPI: RC=00001,ERRNO=00156
For additional information regarding ERRORNO 156, see the section “Common Benediction Configuration Problems” in the IBM publication OS/390 eNetwork Communications Server IP Planning and Migration Guide. For information on the required definitions, see "eNetwork Communications Server OMVS Settings" on page 50.
NOTE PING only verifies that network connectivity exists. It cannot determine if a specific port number is available for connection.

3
CONTENTS
Software Versions 11Audience 11Scope 11Related Topics 12Related Documents 12Typographical Conventions 12Manual Organization 13
Chapter 1: XML Services Concepts and Architecture 17Software Architecture 17Message Processing Cycle 19
Submitting a Serena XML Request 19XML Parsing and Data Mapping 20Generating the Serena XML Reply 21
ChangeMan ZMF Interface Comparison 21
Chapter 2: XML Syntax Basics 25XML Syntax Standards 26
XML Tag Names 26 XML Data Elements 26XML Tag Attributes 27Comments 27Character Entities 27XML Documents as Complex Data Elements 28Well-Formed Documents 29
XML Document Declarations 30Identifying XML Documents 30<?XML?> Declaration Syntax 30
Serena XML Message Documents 32Serena XML Syntax Example 32Logical Document Structure 33
High-Level Tags in Serena XML 35<service> Tag: The Root Data Element 35<scope> Tag 36<message> Tag 36
4
Contents
<header> Tag 37<request> Tag 37<result> Tag 38<response> Tag 39
Filtering Serena XML Results 40<includeInResult> Tag 40
Service, Scope, and Message Summary 41
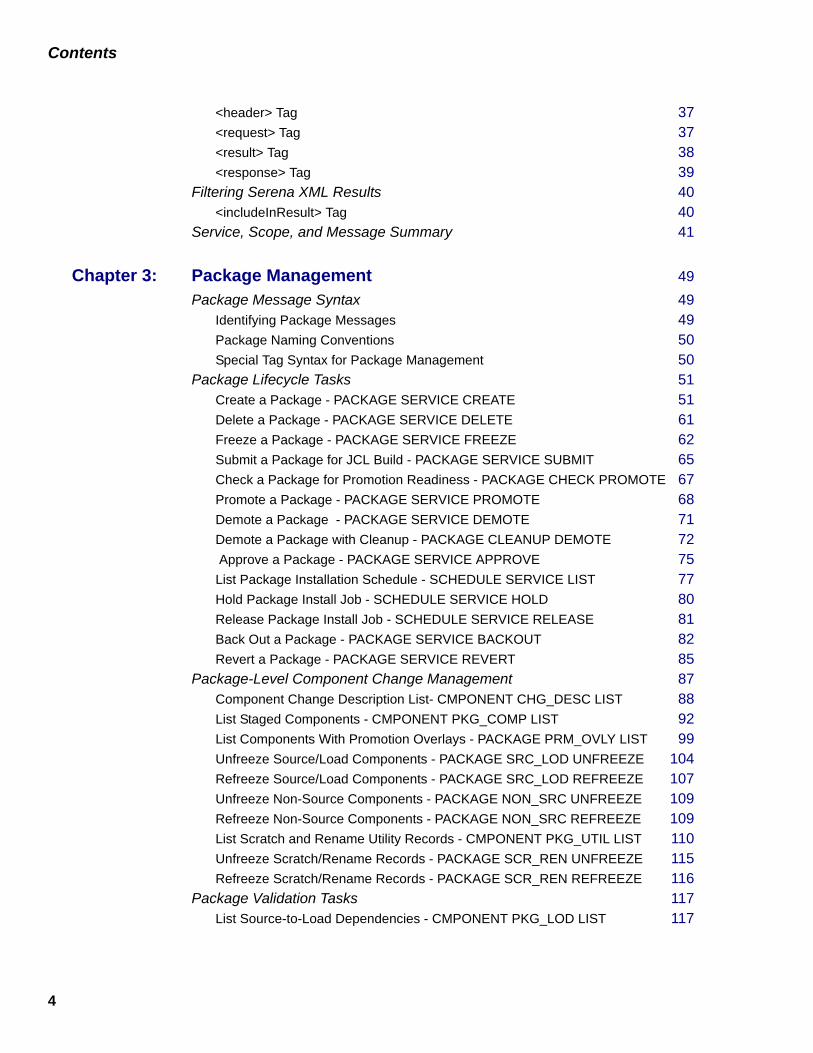
Chapter 3: Package Management 49Package Message Syntax 49
Identifying Package Messages 49Package Naming Conventions 50Special Tag Syntax for Package Management 50
Package Lifecycle Tasks 51Create a Package - PACKAGE SERVICE CREATE 51Delete a Package - PACKAGE SERVICE DELETE 61Freeze a Package - PACKAGE SERVICE FREEZE 62Submit a Package for JCL Build - PACKAGE SERVICE SUBMIT 65Check a Package for Promotion Readiness - PACKAGE CHECK PROMOTE 67Promote a Package - PACKAGE SERVICE PROMOTE 68Demote a Package - PACKAGE SERVICE DEMOTE 71Demote a Package with Cleanup - PACKAGE CLEANUP DEMOTE 72 Approve a Package - PACKAGE SERVICE APPROVE 75List Package Installation Schedule - SCHEDULE SERVICE LIST 77Hold Package Install Job - SCHEDULE SERVICE HOLD 80Release Package Install Job - SCHEDULE SERVICE RELEASE 81Back Out a Package - PACKAGE SERVICE BACKOUT 82Revert a Package - PACKAGE SERVICE REVERT 85
Package-Level Component Change Management 87Component Change Description List- CMPONENT CHG_DESC LIST 88List Staged Components - CMPONENT PKG_COMP LIST 92List Components With Promotion Overlays - PACKAGE PRM_OVLY LIST 99Unfreeze Source/Load Components - PACKAGE SRC_LOD UNFREEZE 104Refreeze Source/Load Components - PACKAGE SRC_LOD REFREEZE 107Unfreeze Non-Source Components - PACKAGE NON_SRC UNFREEZE 109Refreeze Non-Source Components - PACKAGE NON_SRC REFREEZE 109List Scratch and Rename Utility Records - CMPONENT PKG_UTIL LIST 110Unfreeze Scratch/Rename Records - PACKAGE SCR_REN UNFREEZE 115Refreeze Scratch/Rename Records - PACKAGE SCR_REN REFREEZE 116
Package Validation Tasks 117List Source-to-Load Dependencies - CMPONENT PKG_LOD LIST 117
5
Serena® ChangeMan® ZMF 6.1: XML Services User’s Guide
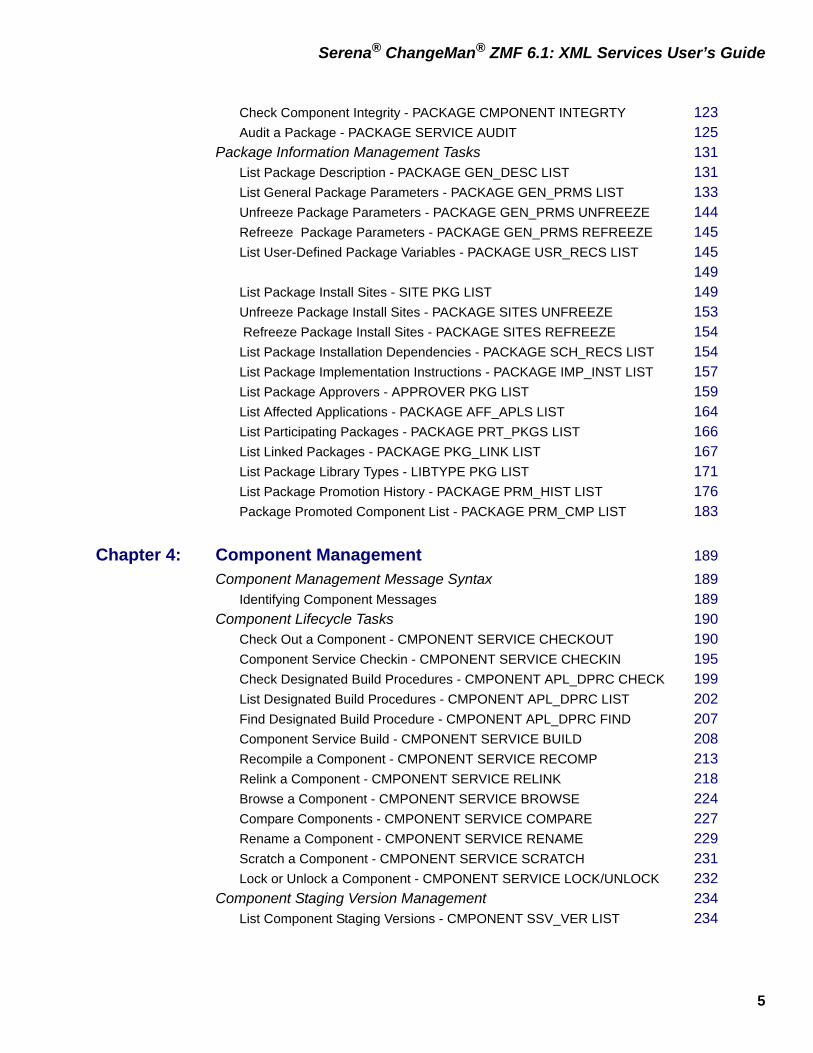
Check Component Integrity - PACKAGE CMPONENT INTEGRTY 123Audit a Package - PACKAGE SERVICE AUDIT 125
Package Information Management Tasks 131List Package Description - PACKAGE GEN_DESC LIST 131List General Package Parameters - PACKAGE GEN_PRMS LIST 133Unfreeze Package Parameters - PACKAGE GEN_PRMS UNFREEZE 144Refreeze Package Parameters - PACKAGE GEN_PRMS REFREEZE 145List User-Defined Package Variables - PACKAGE USR_RECS LIST 145
149List Package Install Sites - SITE PKG LIST 149Unfreeze Package Install Sites - PACKAGE SITES UNFREEZE 153 Refreeze Package Install Sites - PACKAGE SITES REFREEZE 154List Package Installation Dependencies - PACKAGE SCH_RECS LIST 154List Package Implementation Instructions - PACKAGE IMP_INST LIST 157List Package Approvers - APPROVER PKG LIST 159List Affected Applications - PACKAGE AFF_APLS LIST 164List Participating Packages - PACKAGE PRT_PKGS LIST 166List Linked Packages - PACKAGE PKG_LINK LIST 167List Package Library Types - LIBTYPE PKG LIST 171List Package Promotion History - PACKAGE PRM_HIST LIST 176Package Promoted Component List - PACKAGE PRM_CMP LIST 183
Chapter 4: Component Management 189Component Management Message Syntax 189
Identifying Component Messages 189Component Lifecycle Tasks 190
Check Out a Component - CMPONENT SERVICE CHECKOUT 190Component Service Checkin - CMPONENT SERVICE CHECKIN 195Check Designated Build Procedures - CMPONENT APL_DPRC CHECK 199List Designated Build Procedures - CMPONENT APL_DPRC LIST 202Find Designated Build Procedure - CMPONENT APL_DPRC FIND 207Component Service Build - CMPONENT SERVICE BUILD 208Recompile a Component - CMPONENT SERVICE RECOMP 213Relink a Component - CMPONENT SERVICE RELINK 218Browse a Component - CMPONENT SERVICE BROWSE 224Compare Components - CMPONENT SERVICE COMPARE 227Rename a Component - CMPONENT SERVICE RENAME 229Scratch a Component - CMPONENT SERVICE SCRATCH 231Lock or Unlock a Component - CMPONENT SERVICE LOCK/UNLOCK 232
Component Staging Version Management 234List Component Staging Versions - CMPONENT SSV_VER LIST 234

6
Contents
Retrieve Component Staging Version - CMPONENT SSV_VER RETRIEVE 239Component Information Management Tasks 242
List Component Change Description - CMPONENT CHG_DESC LIST 243List Component Promotion History - CMPONENT PRM_HIST LIST 245Component History List - CMPONENT HISTORY LIST 248List Short Component History - CMPONENT HISTORY LISTSHRT 256List Current Component History - CMPONENT HISTORY LISTCURR 256List Concurrent Comp. History - CMPONENT HISTORY LISTCONC 257List Comp. User Worklist Records - CMPONENT PKG_WRKL LIST 257
Component Security Tasks 261Check Component Security - CMPONENT APL_SECR CHECK 261List Component Authorized Users - CMPONENT APL_SECR LIST 263
Chapter 5: Search, Summary, and Analysis Tasks 267Syntax Conventions for Search, Summary, and Analysis 267
Semicolon-Delimited Lists 267Yes/No Flag Tags 268
Package Search and Summary Tasks 269General Package Search - PACKAGE GENERAL SEARCH 269Search for Limbo Packages - PACKAGE LIMBO SEARCH 285Package Summary Statistics - PACKAGE SERVICE SUMMARY 286
Audit Trail Management 295Create Log File Entry - LOG SERVICE CREATE 295List Activity Log File Entries - LOG SERVICE LIST 299
Impact Analysis Functions 300IMPACT BUN LIST 301IMPACT CMPONENT LIST 303
305IMPACT TABLE LIST 305
Chapter 6: Dataset Management 311Dataset Lifecycle Tasks 311
Allocate a Dataset - DSS SERVICE ALLOCATE 311Delete a Dataset - DSS SERVICE DELETE 314Delete a Dataset Member - DSS SERVICE MBRDEL 314List Dataset Allocation Information - DSS SERVICE INFO 315List Dataset Member Directory - DSS SERVICE LIST 319List ISPF Dataset Allocation Information - DSS ISPFILE INFO 322
Chapter 7: Database Management 325IMS Development and Administration 325
7
Serena® ChangeMan® ZMF 6.1: XML Services User’s Guide
IMS Control Region Package Records - PACKAGE IMS_CRGN LIST 327Package IMS ACB List - PACKAGE IMS_ACB LIST 333IMS DBD Package Overrides - IMSOVRD PKG_DBD LIST 339IMS PSB Package Overrides - IMSOVRD PKG_PSB LIST 344IMS DBD Application Overrides - IMSOVRD APL_DBD LIST 347IMS PSB Application Overrides - IMSOVRD APL_PSB LIST 354IMS DBD Global Overrides - IMSOVRD GBL_DBD LIST 356List Global IMS PSB Overrides - IMSOVRD GBL_PSB LIST 359
DB2 Development and Administration 361DB2 Active Libraries for Application - DB2ADMIN APL_ACTV LIST 361DB2 Logical Subsystems for Application - DB2ADMIN APL_LOGL LIST 365DB2 Global Physical Subsystems - DB2ADMIN GBL_PHYS LIST 371DB2 Global Logical Subsystems - DB2ADMIN GBL_LOGL LIST 375
Chapter 8: Online Forms Management 381Online Forms Lifecycle Tasks 381
Unfreeze Online Forms - PACKAGE FORMS UNFREEZE 381Refreeze Online Forms - PACKAGE FORMS REFREEZE 383Submit a Form for Approval - FORMS PKG SUBMIT 384Approve a Form - FORMS PKG APPROVE 385Reject a Form - FORMS PKG REJECT 386Add Comments to a Form - FORMS PKG COMMENT 388
Forms Information Management 390List Global Online Forms - FORMS GBL LIST 390
Chapter 9: ChangeMan ZMF Administration Tasks 395Change Library Administration 395
List Baseline Library Datasets - BASELIB SERVICE LIST 395List Promotion Library Datasets - PROMLIB LIBRARY LIST 398List Promotion Site Configuration Records - PROMLIB SITE LIST 403List Production Library Datasets - PRODLIB SERVICE LIST 406
Site Administration 408List Globally Defined Remote Sites - SITE GBL LIST 408List Remote Sites for Application - SITE APPL LIST 410List Install Calendar for Site - CALENDAR SERVICE LIST 412
Developer Environment Administration 414List Global Library Types - LIBTYPE GBL LIST 414List Application Library Types - LIBTYPE APL LIST 421List Global Language Parsers - LANGUAGE GBL LIST 427List Application Language Parsers - LANGUAGE APL LIST 428List Global Build Procedures - PROCS GBL LIST 429

8
Contents
List Application Build Procedures - PROCS APL LIST 430List Global Parameters - PARMS GBL LIST 433Parameters Application List - PARMS APL LIST 445 List Global Reason Codes - REASONS SERVICE LIST 454
Approver and Notification Administration 455List Application Approvers - APPROVER APL LIST 455Download Global Notification File - NOTYFILE SERVICE DOWNLOAD 458Notify User - USER SERVICE NOTIFY 459
Chapter 10: System Environment Information 467System Setup Parameter List - SYSTEM SERVICE LIST 467SERNET Environment Parameter List - SYSTEM ENVIRON LIST 472ChangeMan ZMF Environment Parameters - ENVIRON SERVICE LIST 474ChangeMan ZMF STC DDNAME LIBRARIES - DSS SERVICE STCLIST 479
Appendix A: SERXMLAC – Executing XML via ASSEMBLER 481
SERXMLAC/GETTAG Parameter List 481Return Codes and Reason Codes 482Building the Request 483Prime XML Request with ZMF SSID and Package 483Making the Call to SERXMLAC 484Processing the Reply Buffer 485Scanning the Replies 485GETTAG Subroutine Processing 485GETTAG Subroutine 487JCL to Assemble, Link Edit, and Execute SERXMLAC 489Sample SERXMLAC SNAP Output from XMLAC004 490
Appendix B: SERXMLBC – Executing Native XML Service Calls 495
Input/Output Requirements for SERXMLBC 495JCL Requirements for SERXMLBC 496Return Codes and ABENDs 497SERXMLBC Case Study - Cloning a ChangeMan ZMF Subsystem 498
Appendix C: SERXMLRC - Using REXX with Serena XML Services 509
REXX-to-XML Batch Client 509SAMPLE JCL TO INVOKE XML REXX EXEC 510SAMPLE REXX EXEC CMN010 PROLOGUE 511SAMPLE REXX EXEC CMN010 MAINLINE 512SAMPLE REXX EXEC CMN010 XML SETUP and CALL 513SAMPLE REXX EXEC CMN010 XML PRINT OUTPUT 514SAMPLE REXX EXEC CMN010 XML DIAGNOSE ERROR 515

9
Serena® ChangeMan® ZMF 6.1: XML Services User’s Guide
SAMPLE REXX EXEC CMN010 XML DISCONNECT CODE 516
Appendix D: SERXMLCC - XML Services and COBOL Copybooks 519
COBOL-to-XML Copybooks 519Copybook Member Names 519
COBOL Variable Names 520Control Variables 520Content Variables 520Data Types, Values, and Constraints 521
Input/Output Buffers 522COBOL Batch Subroutine Client SERXMLCC 523
Compiling Programs That Call SERXMLCC 523Running Programs That Call SERXMLCC 523Return Codes 524Sample COBOL Program CMNOPSCH 524JCL to COMPILE, LINK, and EXECUTE CMNOPSCH 527 Report from Sample Program CMNOPSCH 528
Appendix E: XMLSERV – The Interactive XML Prototyping Tool 529
XMLSERV Functional Overview 529Main Screen Menu Options 531Main Screen Primary Commands 531XML Input and Output Documents 533Usage Notes 534
Sample XMLSERV Session 534Step 1: Start XMLSERV 534Step 3: Edit the XML Input Document 537Step 4: Execute the Edited XML Request 538Step 5: Browse the XML Output Document 538RUN NODROP 540
Troubleshooting 541 rc=08, reason code = 8130 error 541Troubleshooting with (xml)warn=yes in zmf stc 543Troubleshooting with <WARN>Y</WARN> in xml request 545Troubleshooting variable-length-name issues 546
Index 547
11
ABOUT THIS BOOK
The XML Services User’s Guide documents the most commonly used features of the XML Services application programming interface (API) to Serena® ChangeMan® ZMF. Tutorials, code examples, use cases, and tips and techniques for applications supplement detailed data structure tables covering 155 functions available for general customer use. Services used with the Enterprise Release Option (ERO), as well as FILE/XCH services are not described in this manual, but are included for completeness in “. Serena XML Service, Scope, and Message Names with Copybooks.
After reading this manual, you should be able to do the following:
• Understand the software architecture that underlies ChangeMan ZMF XML Services.
• Create a well-formed XML document that complies with Serena XML syntax.
• Use the Serena XML markup language to build reusable XML documents that invoke functions and retrieve data from ChangeMan ZMF.
• Use the XML batch execution client to issue Serena XML service requests to ChangeMan ZMF and receive Serena XML replies.
• Experiment with the XMLSERV interactive prototyping tool to learn Serena XML syntax, generate prototype request messages, and browse Serena XML replies.
SOFTWARE VERSIONS
This manual discusses Serena Software’s XML Services as implemented in ChangeMan ZMF version 6.1 (GA) and ChangeMan ZDD 6.1.0.259 (GA).”
AUDIENCE
This manual targets experienced ChangeMan ZMF programmers, multi-platform systems integrators, and ChangeMan ZMF administrators.
You should be familiar with your mainframe operating system and security system, and you should understand the operation and administration of ChangeMan ZMF. Some familiarity with basic XML syntax and schemas is helpful. Familiarity with PCs is assumed.
SCOPE
The XML Services features described in this manual are limited to services and functions available for general customer use. These are sometimes called the “Green” services.

12
About This Book
“Green” functions address package and component lifecycle management, complex searches and queries, data set management functions, change library management functions, and detailed information retrieval from the ChangeMan ZMF database.
Additional services and functions exist to support advanced systems integration needs. The latter features are known as the “Yellow” services because they pose some risk of database corruption and should be used with caution. These are documented in quick-reference form for customers who attend advanced training in XML Services.
RELATED TOPICS
You need not become an XML expert to use XML Services. To master its advanced capabilities, however, sound knowledge of XML standards is advised. The authoritative source for this information is the World Wide Web Consortium (W3C). You can find the latest XML specifications on the Web at http://www.w3c.org.
The eXtensible Markup Language (XML) standard consists of many components in various stages of development, change, and ratification. Of these, you should become familiar with the core XML specifications that cover XML syntax and schemas. If you want to manipulate and reformat the XML output from XML Services (e.g., for custom reports), you should also study the XML stylesheet (XSL) specifications.
RELATED DOCUMENTS
TYPOGRAPHICAL CONVENTIONS
The following textual conventions are used throughout this document to highlight special information:
Title Description
Serena® ChangeMan® ZMF Installation Guide
Step-by-step instructions for the initial installation of ChangeMan ZMF. Includes installation instructions for XML Services working data areas.
Serena® ChangeMan® ZMF XML Reference Tables
HTML cross-reference tables for “green” and “yellow” service/scope/message combinations supported by XML Services, including ERO, and the XML tags for each. If you have taken Serena’s advanced training course in XML Services, you can contact Customer Support for access to this guide.
Serena® ChangeMan® ZMF Administrator’s Guide
Includes information on customizing exits to call XML Services.
13
Serena® ChangeMan® ZMF 6.1: XML Services User’s Guide
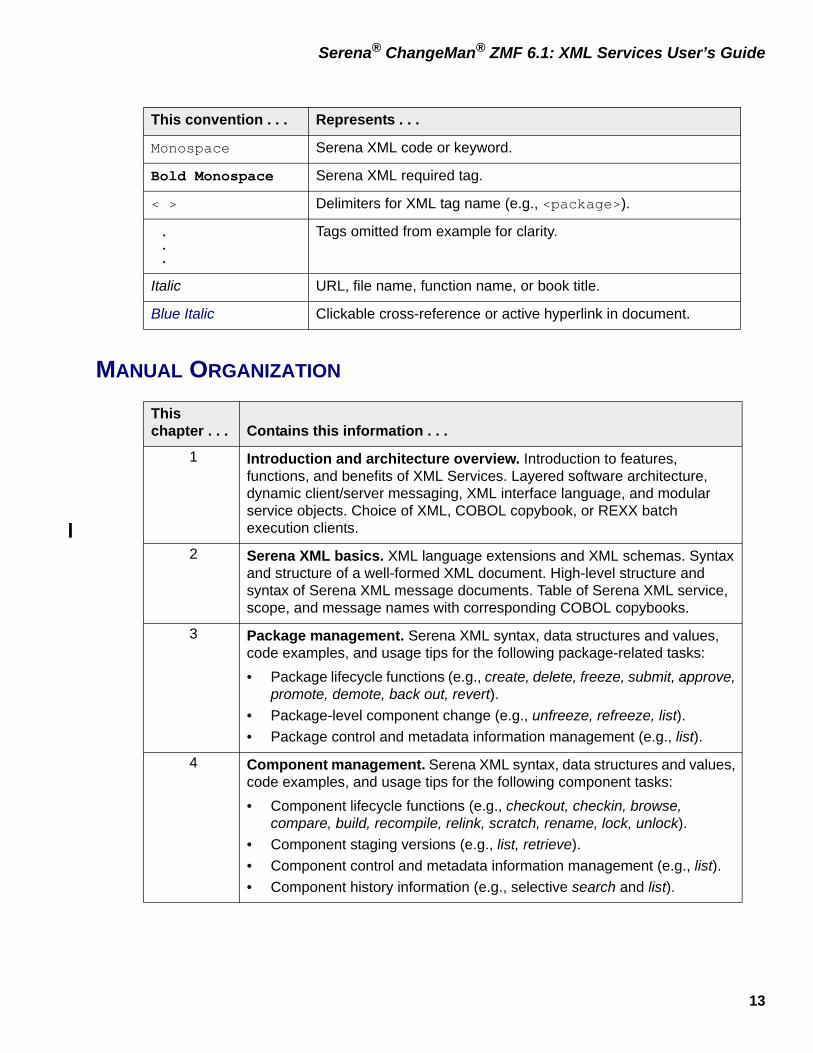
MANUAL ORGANIZATION
This convention . . . Represents . . .
Monospace Serena XML code or keyword.
Bold Monospace Serena XML required tag.
< > Delimiters for XML tag name (e.g., <package>).
. . .
Tags omitted from example for clarity.
Italic URL, file name, function name, or book title.
Blue Italic Clickable cross-reference or active hyperlink in document.
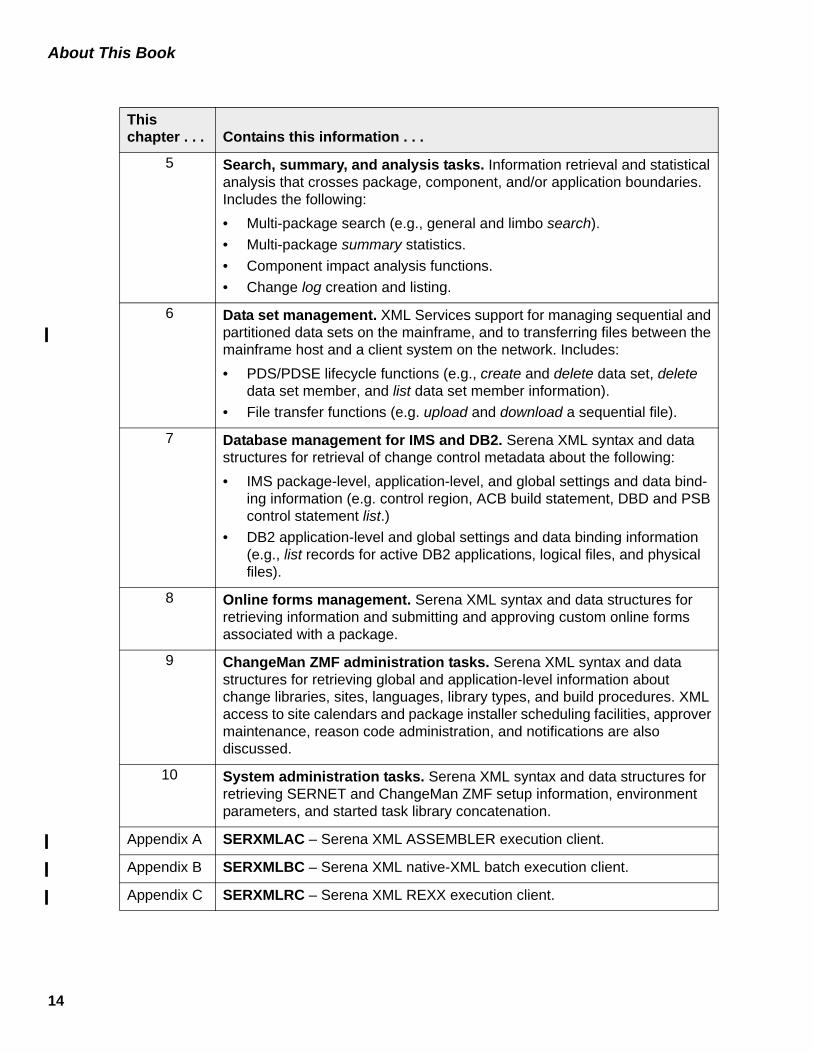
This chapter . . . Contains this information . . .
1 Introduction and architecture overview. Introduction to features, functions, and benefits of XML Services. Layered software architecture, dynamic client/server messaging, XML interface language, and modular service objects. Choice of XML, COBOL copybook, or REXX batch execution clients.
2 Serena XML basics. XML language extensions and XML schemas. Syntax and structure of a well-formed XML document. High-level structure and syntax of Serena XML message documents. Table of Serena XML service, scope, and message names with corresponding COBOL copybooks.
3 Package management. Serena XML syntax, data structures and values, code examples, and usage tips for the following package-related tasks:• Package lifecycle functions (e.g., create, delete, freeze, submit, approve,
promote, demote, back out, revert).• Package-level component change (e.g., unfreeze, refreeze, list).• Package control and metadata information management (e.g., list).
4 Component management. Serena XML syntax, data structures and values, code examples, and usage tips for the following component tasks:• Component lifecycle functions (e.g., checkout, checkin, browse,
compare, build, recompile, relink, scratch, rename, lock, unlock).• Component staging versions (e.g., list, retrieve).• Component control and metadata information management (e.g., list).• Component history information (e.g., selective search and list).
14
About This Book
5 Search, summary, and analysis tasks. Information retrieval and statistical analysis that crosses package, component, and/or application boundaries. Includes the following:• Multi-package search (e.g., general and limbo search).• Multi-package summary statistics.• Component impact analysis functions.• Change log creation and listing.
6 Data set management. XML Services support for managing sequential and partitioned data sets on the mainframe, and to transferring files between the mainframe host and a client system on the network. Includes:• PDS/PDSE lifecycle functions (e.g., create and delete data set, delete
data set member, and list data set member information).• File transfer functions (e.g. upload and download a sequential file).
7 Database management for IMS and DB2. Serena XML syntax and data structures for retrieval of change control metadata about the following:• IMS package-level, application-level, and global settings and data bind-
ing information (e.g. control region, ACB build statement, DBD and PSB control statement list.)
• DB2 application-level and global settings and data binding information (e.g., list records for active DB2 applications, logical files, and physical files).
8 Online forms management. Serena XML syntax and data structures for retrieving information and submitting and approving custom online forms associated with a package.
9 ChangeMan ZMF administration tasks. Serena XML syntax and data structures for retrieving global and application-level information about change libraries, sites, languages, library types, and build procedures. XML access to site calendars and package installer scheduling facilities, approver maintenance, reason code administration, and notifications are also discussed.
10 System administration tasks. Serena XML syntax and data structures for retrieving SERNET and ChangeMan ZMF setup information, environment parameters, and started task library concatenation.
Appendix A SERXMLAC – Serena XML ASSEMBLER execution client.
Appendix B SERXMLBC – Serena XML native-XML batch execution client.
Appendix C SERXMLRC – Serena XML REXX execution client.
This chapter . . . Contains this information . . .
15
Serena® ChangeMan® ZMF 6.1: XML Services User’s Guide
Change bars in the left margin identify changes in this publication since ChangeMan ZMF release 5.6. Although there have been changes to the Serena XML Services since ChangeMan ZMF release 5.5, this manual has been updated only to address changes to XMLSERV (Appendix E) in ChangeMan ZMF 6.1. It has not been updated otherwise since ChangeMan ZMF 5.5. Refer to the ChangeMan ZMF 5.5.1, 5.5.2, 5.5.3, and 5.6 Readmes for a description of changes to Serena XML Services since ChangeMan ZMF release 5.5.
Appendix D SERXMLCC – XML Services and COBOL Copybooks.
Appendix E XMLSERV - Interactive TSO/ISPF prototyping tool for XML Services.
This chapter . . . Contains this information . . .
17
XML SERVICES CONCEPTS AND ARCHITECTURE 1
XML Services offers ChangeMan® ZMF customers and system integrators an enhanced application programming interface (API) based on industry-standard XML (eXtensible Markup Language). XML Services simplifies customization, data interchange, and cross-product interoperability for ChangeMan ZMF and other products. An integrated feature of the base ChangeMan ZMF product, XML Services supports all optional product features, including the DB2 Option, IMS Option, ERO Option, M+R Option, and Load Balancing Option. XML Services is the preferred API for customers and system integrators who work with ChangeMan ZMF.
Functionally, XML Services:
• Offers a unified XML programming interface to ChangeMan ZMF functions.
• Provides open access to ChangeMan ZMF package master, component master, Impact/Analysis repository, and activity log data.
• Interoperates seamlessly with Serena products such as ChangeMan® ZDD, StarTool® DA, and TeamTrack®.
• Enables integration with third-party development tools, databases, and reporting.
• Includes “software developer kit” (SDK) environments to simplify developer access to the XML Services API using native-XML, ASSEMBLER, COBOL, or REXX.
SOFTWARE ARCHITECTURE
XML Services comprises much more than syntax. It is fully integrated with ChangeMan ZMF and builds on the following architectural keystones:
• A layered software architecture provides application independence from technology changes in ChangeMan ZMF internals. The low-level “Extended Services” that perform basic ChangeMan ZMF functions are isolated from higher-level interfaces.
• Modular service objects within the “Extended Services” layer provide a single point of access to ChangeMan ZMF functions. The set of low-level service objects is both comprehensive and extensible.
• Dynamic client/server messaging uses a shared object-request broker for all ChangeMan ZMF communications. This approach supports asynchronous, stateless, message-based transactions between XML client and server — ideal for network environments and Web-enabled services.
18
Chapter 1: XML Services Concepts and Architecture
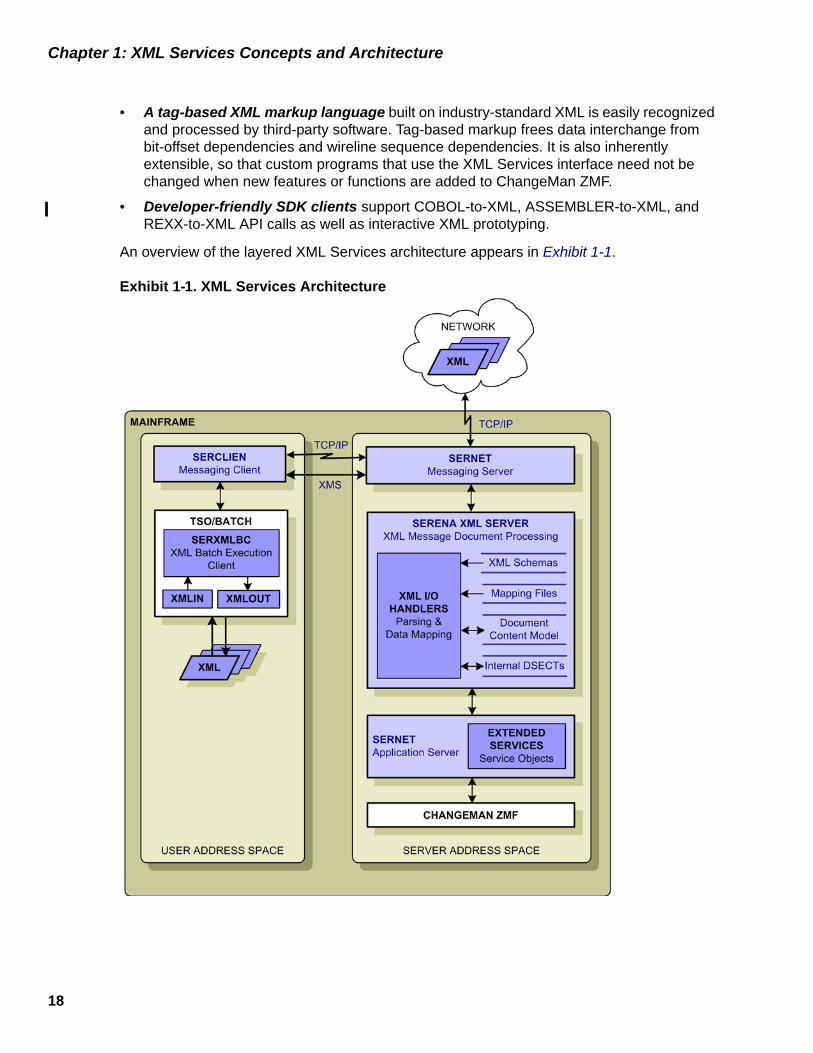
• A tag-based XML markup language built on industry-standard XML is easily recognized and processed by third-party software. Tag-based markup frees data interchange from bit-offset dependencies and wireline sequence dependencies. It is also inherently extensible, so that custom programs that use the XML Services interface need not be changed when new features or functions are added to ChangeMan ZMF.
• Developer-friendly SDK clients support COBOL-to-XML, ASSEMBLER-to-XML, and REXX-to-XML API calls as well as interactive XML prototyping.
An overview of the layered XML Services architecture appears in Exhibit 1-1.
Exhibit 1-1. XML Services Architecture

19
Serena® ChangeMan® ZMF 6.1: XML Services User's Guide
MESSAGE PROCESSING CYCLE
The architectural building blocks of XML Services come together in the Serena XML message processing cycle. The message processing cycle flows through the following steps:
• Serena XML request message issued from client to server
• XML message parsed
• XML data mapped to internal ChangeMan ZMF data formats
• Requested task performed by low-level service object
• Service object success/failure codes and output data mapped to XML data elements
• Serena XML reply message sent by server to client
Every Serena XML request message that reaches the server triggers a Serena XML reply. At minimum, the reply includes a result code that informs the requesting program whether the requested task succeeded, generated a warning message, or failed. Successful requests may trigger several result messages as well — each result representing, for example, a record in a data set or a line in a report. All results generated by a single XML request document are returned in a single XML reply document.
Submitting a Serena XML RequestSerena XML service request messages are issued from the client to the server via a software developer’s “kit” (SDK) or environment optimized for a particular programming language. Batch XML is submitted via the SERXMLBC batch client. Interactive XML can be prototyped in XMLSERV with prompts for required tags and other ease-of-use features, then submitted for execution through SERXMLBC.
The SERXMLCC COBOL-to-XML batch execution client, together with a collection of COBOL copybooks, facilitates XML Services API requests using native COBOL data formats and program calls. Each copybook wraps the proper Serena XML syntax around the contents of predefined COBOL variables populated by your custom COBOL program. Your COBOL program then calls SERXMLCC to generate a true Serena XML request document and place it in the normal XML message processing stream.
The SERXMLRC REXX-to-XML batch execution client similarly facilitates XML Services API requests using native REXX stem data formats and program calls. Your REXX program populates an approximate REXX stem structure, then calls SERXMLRC to generate a Serena XML request document and place it in the normal XML message processing stream.
The SERXMLAC ASSEMBLER-to-XML batch execution client facilitates XML Services API requests using native ASSEMBLER data formats and program calls.
Service, Scope, and Message Syntax
Every Serena XML service request uses a high-level XML syntax that identifies the ChangeMan ZMF service, scope, and message names for the task requested. These values, in combination, uniquely identify the modular service object on the server that must process the request. They also identify the function to be performed and the category of information to
20
Chapter 1: XML Services Concepts and Architecture
perform it against. Their values also must be specified with CAPITAL letters. The batch execution client that submits your request first preprocesses it to ensure that the combination of service, scope, and message names is valid.
Message Routing
If the XML Services service, scope, and message names are valid, the execution client calls the appropriate client messaging program — either SERCLIEN on the mainframe or SERNET Connect on distributed platforms — to initiate a connection to ChangeMan ZMF. The preferred communications protocol for this connection is TCP/IP, but cross-memory services (XMS) is also supported if the client and server both reside on the same mainframe LPAR. The messaging client performs any necessary data compression and packages the XML message with appropriate headers for network addressing, handshaking, and mainframe logon. It then requests a communications session to ChangeMan ZMF via the SERNET messaging server.
The SERNET messaging server resides on the host in the ChangeMan ZMF server address space, where it listens on one or more communication ports for incoming messages. When a message arrives, SERNET completes any network handshaking needed, processes the communications headers, and establishes a conversation. SERNET also decompresses messages and performs any needed data format conversions (e.g. from ASCII to EBCDIC).
If the inbound message contains Serena XML, the SERNET messaging server calls the XML Services input handler to transform that data into internally readable form. The XML input handler then returns the transformed data to the SERNET messaging server, which routes it to the appropriate low-level service object for action.
XML Parsing and Data MappingAt the core of XML Services are its XML parsing and bidirectional data mapping processes. These interpret Serena XML message streams and map the identified XML data structures of a request to the internal assembler DSECT formats used by the low-level service objects in ChangeMan ZMF. In the reverse direction, the low-level service objects return results that are mapped from their internal assembler DSECT formats to Serena XML data elements, then marshalled into Serena XML reply messages.
Object Mapping Table
When the SERNET started task is first loaded, one of its many jobs is to create a server-side address space for XML processing work areas. This address space, XMLSPACE, requires a minimum of 2 MB of memory, expanding on demand to a maximum of 64 MB.
Among the permanent contents of XMLSPACE is a bidirectional XML-to-DSECT object mapping table. The object mapping table associates all defined Serena XML tag names with their corresponding assembler DSECT label names. The object mapping table is used for XML-to-DSECT data mapping by the XML input handler as it parses each XML tag and extracts its data. The same object mapping table is used for DSECT-to-XML tag mapping by the XML output handler as it marshals an outbound XML message.
21
Serena® ChangeMan® ZMF 6.1: XML Services User's Guide
Document Content Model
The XML Services parser does not create a conventional parse tree representation of your XML request document. Instead, a temporary data space called a tag pool is created to hold the parsed content of the message. XML tag names are hashed for high-speed random access to a slot in the tag pool. There the names are stored as EBCDIC character strings without white space or brackets. The data associated with a tag is converted to the appropriate internal data type and stored with its tag in the tag pool. For example, a dotted decimal number read in as a variable-length character string in XML might be converted to its equivalent binary, floating-point representation for internal use. This data reformatting process is known as data binding.
The hashed tag pool content model has several advantages over the parse tree Document Object Model (DOM) recommended by the World Wide Web Consortium (W3C) and widely used in generic XML parsers. First, it squeezes out the verbosity of XML text and minimizes memory requirements. Second, it transforms XML data elements into the native data types expected by the target assembly language objects. Finally and most importantly, it eliminates tedious parse tree traversals, replacing them with random access to reusable document data elements. The result is faster XML processing.
Generating the Serena XML ReplyAfter the XML input handler has parsed the Serena XML request message and mapped its data to an appropriate DSECT structure, SERNET queues that DSECT request block for input to the requested low-level service object. The service object receives the request block, performs the requested task, and generates (at minimum) a numeric return code. It may also generate an output message, a report listing, or a set of search results. This output data is stored in one or more output DSECTs populated by the low-level service object. The output is then returned to SERNET for routing to the XML output handler.
The XML output handler marshals a Serena XML reply document from one or more of these output DSECTs. Guided by the permanent object mapping table, the XML output handler maps each field in the DSECT to its corresponding XML tag and creates a document content model for the reply document in a temporary hashed tag pool. The output handler then transforms the document content model into well-formed XML and places the resulting document in a user response area known to the SERNET messaging server.
Control then returns to SERNET, which compresses the XML reply message, packages it with appropriate communications headers, and routes it to the requesting client. Note that, for distributed clients, the SERNET messaging server echoes the original XML request in the XML reply document. For ChangeMan ZMF clients, however, the original XML request is not echoed.
CHANGEMAN ZMF INTERFACE COMPARISON
ChangeMan ZMF supports following interfaces:
• Interactive ISPF end-user and administrator panels
22
Chapter 1: XML Services Concepts and Architecture
• Interactive and batch-mode programming clients (SDKs) for XML Services —including SERXMLAC, SERXMLBC, SERXMLCC, SERXMLRC, and XMLSERV
Of these, the interactive ISPF interface is functionally comprehensive. User tasks are presented at a high level; many low-level software functions might take place behind the scenes to accomplish a “simple” high-level ISPF request. The ISPF interface also builds in robust data validation features on every panel. No other interface provides this level of data validation support.
No one-to-one mapping exists between XML Services interface functions and ISPF interface functions, although similarities are apparent. The XML Services interface targets a lower level of internal function than does ISPF, and is more directly shaped by underlying database implementations and service object technology. Consequently, ISPF-based intuitions may not always apply to XML Services. In addition, XML Services includes no built-in data validation.
Caution
Data validation is the responsibility of XML Services customers. XML Services provides no built-in data validation. All ISPF tables that are available to the ISPF interface to ChangeMan ZMF are not necessarily available to the corresponding functions that are performed with the Serena XML Services. Furthermore, the target XML Services do not need these tables to perform their functions correctly. Using the XMLWARN facility can provide further information concerning data validation, as documented in “Troubleshooting with (xml)warn=yes in zmf stc.
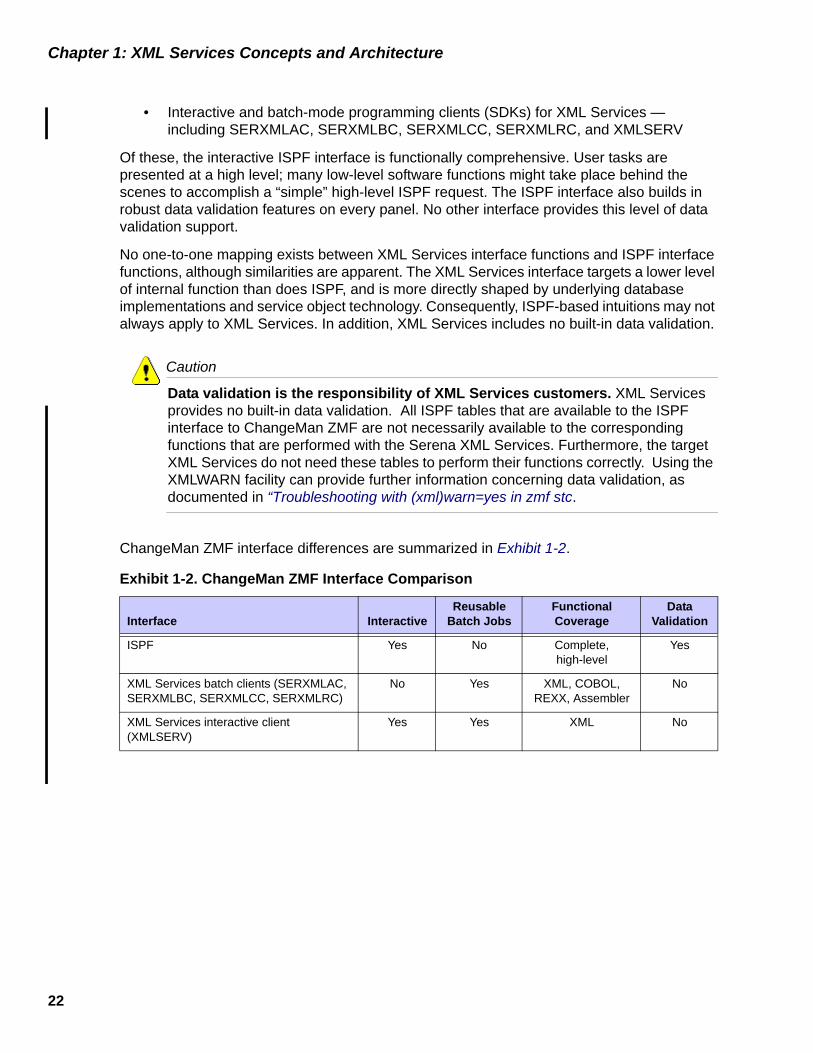
ChangeMan ZMF interface differences are summarized in Exhibit 1-2.
Exhibit 1-2. ChangeMan ZMF Interface Comparison
Interface InteractiveReusable
Batch JobsFunctional Coverage
Data Validation
ISPF Yes No Complete, high-level
Yes
XML Services batch clients (SERXMLAC, SERXMLBC, SERXMLCC, SERXMLRC)
No Yes XML, COBOL, REXX, Assembler
No
XML Services interactive client (XMLSERV)
Yes Yes XML No

25
XML SYNTAX BASICS 2Serena XML is SERENA Software’s markup language for Enterprise Change Management (ECM). It is standard XML extended to support the customization, data interchange, and interoperability needs of ChangeMan ZMF customers as they implement change management solutions. Serena XML is the most visible component of XML Services.
The Serena XML markup vocabulary consists of more than a thousand special-purpose XML tags used to delimit values in a text file. These tags are defined according to XML’s rules for adding new tags to itself. The particular mechanism for defining these special-purpose tags is called an XML schema. The Serena XML schemas define not only the tag vocabulary of Serena XML, but also the structure of each data element named by these tags and the syntax used when populating these data elements in an XML document.
Is Serena XML “really” XML, then? The answer is, emphatically, yes. XML stands for eXtensible Markup Language. Its reason for being is to provide a standard method for creating special-purpose markup languages — extensions, that is, to the base XML tag set. There are two points to remember about XML extensions:
• Extensions are not replacements; they are additions. XML imposes a discipline on its language extensions that makes them systematically extensible over time. Within broad limits, this discipline prevents the foreclosure of alternatives; future options remain open. Built-in XML extensibility means that Serena XML can grow and change without forcing obsolescence on earlier versions of the language.
• Extensions to XML are syntactically consistent with XML. All special-purpose extensions to XML follow the same basic syntactic and structural rules. Familiarity with basic XML syntax makes all XML-based markup languages easier to learn and use.
Some knowledge of Serena XML syntax is needed by all users of XML Services. For example, COBOL programmers working with the COBOL-to-XML copybook interface need to know about individual copybook functions and predefined COBOL variable names, data types, and value information — all of which derive from Serena XML. Programmers who work directly with Serena XML need not only data type and value information, but also detailed information about XML language syntax and data structures.
This chapter begins with a discussion of general XML syntax and standards as defined by the World Wide Web Consortium (W3C). It then addresses the basic features of Serena XML. The features discussed are those that apply to all message documents created in Serena XML and to all ChangeMan ZMF user tasks performed via Serena XML. The chapter concludes with a summary of all valid combinations of <service>, <scope>, and
26
Chapter 2: XML Syntax Basics
<message> name attributes in Serena XML available to customers for general use. This summary includes the names of the corresponding COBOL-to-XML copybooks.
XML SYNTAX STANDARDS
The body of standards defining XML is actually quite large, but only two core specifications directly concern users of Serena XML. These are the XML Version 1.0 syntax specification and the XML Schema specification. These and other XML specifications are established by the World Wide Web Consortium (W3C) and are published online at http://www.w3c.org.
To use the Serena XML programming interface to XML Services, you first need a basic familiarity with this core XML syntax.
XML Tag NamesProgrammers familiar with Web markup will note that XML syntax resembles HTML syntax. Like HTML, XML makes use of tags (of the form <tag>) and attributes (of the form name="value"). Like HTML tags, XML tags delimit units of content and identify that content by tag name. Generally, XML statements look something like this:
<tag attribute="value">data value or structured content</tag>
In standard-compliant XML, tag and attribute names are case-sensitive — that is, <tag> is not the same as <Tag>. Tag and attribute names may include alphanumeric characters, hyphens, underscores, and periods. Other punctuation marks are generally prohibited, since they may have special meanings in XML.
XML Data ElementsFunctionally, XML tags mark data elements in text. Data elements are of two types:
• Simple data elements contain basic data types such as integers, dotted decimal numbers, dates, times, fixed-length or variable-length character strings, or the like. Simple data elements cannot be decomposed into subordinate XML data elements; they are, in that sense, “atomic” units of data. Such a tag might look something like this:
<package>ACCT000025</package>
• Complex data elements contain a data structure composed of one or more subordinate XML data elements, each delimited by its own pair of subtags within the main tag pair. The subordinate elements may themselves be either simple or complex. Complex tags may be built up from successively simpler tags to form a hierarchical tree structure. A complex tag structure with just one level of subtags might look something like this:
<response> <statusMessage>CMN8700I - LIST Package service completed</status <statusReturnCode>00</statusReturnCode> <statusReasonCode>8700</statusReasonCode> </response>

27
Serena® ChangeMan® ZMF 6.1: XML Services User's Guide
The contents of an actual data element must conform to whatever data validation restrictions are imposed by the tag definition. For simple data elements, such restrictions would include data type, data pattern, allowable value range, and/or membership in a predefined value list. For complex data elements, the data structure must also conform to the tag definition. Restrictions at this level include allowable subtags, subtag sequencing, mutually exclusive subtag choices, and mandatory subtag inclusion. Restrictions on the minimum and maximum number of consecutive tag repetitions, if any, must also be met.
XML Tag AttributesAttributes qualify the manner in which a tag is used or processed. One tag may have multiple attributes, so each attribute must be explicitly named. The value assigned to an attribute must appear in double quotes and must be a simple data type — such as a date, a character string, or an integer.
Attributes are not (or should not be) used to hold application data. That’s what data elements — i.e., tags and subtags — are for! Attributes are used to:
• Identify the subtype of a tag that is complex enough to have alternative formats, substructures, or validation requirements.
• Identify a particular tag instance to distinguish it uniquely from other instances of use.
• Set a flag for the target application to use when choosing among several data interpretations or processing options.
In the case of Serena XML, attributes are used primarily to identify which of many alternative data structures is intended when a particular tag is used. Depending on the value of the attribute, the allowed subtag content and sequence may vary.
CommentsIn addition to tags and attributes, standard-compliant XML allows comments. XML comments, like those in HTML, begin with <!-- and end with -->. Multi-line comments are permitted. The end-of-comment delimiter must be preceded by a blank or be the first item on a new line. Double hyphens cannot appear anywhere within the comment body.
An XML comment might look something like this:
<!-- This is a comment, line 1. This is a comment, line 2. -->
Character EntitiesXML relies on reserved characters (e.g., angle brackets and double quotes) to delimit language-specific constructs (e.g., tags and attribute values). If you include one of XML’s reserved characters in your tag data or in attribute values, the XML parser will attempt to treat it as a reserved character — e.g., as the opening angle bracket for a tag name — with unpredictable results. To get around this difficulty, XML provides a mechanism for escaping these characters from the special treatment they normally receive, so that they can be included in ordinary data. This is achieved using character entity codes.

28
Chapter 2: XML Syntax Basics
Character entity codes begin with an ampersand (&) and end with a semicolon (;). Between these delimiters is a character entity name that identifies the character represented by the entity code. Numeric character entity codes are also allowed in generic XML; however, the XML Services parser does not support numeric character entities at this time.
Five character entities have predefined names in XML. They are listed in Exhibit 2-1.
For example, you might use ampersands in the names of program modules that you mention in your package implementation instructions. Simply typing an ampersand, in most cases, would generate a parser error. To insert the ampersand without generating an error, use the & character entity where you would normally type an ampersand. For example:
<packageImplInst>Requires prior execution of USR&001.</packageImplInst>
XML parsers vary in their sensitivity to the occurrence of reserved characters in data. You can usually get away with using a regular apostrophe ( ‘ ) instead of the ' character entity in data strings, for example. But you should always escape any ampersands or angle brackets in your data strings, and escape all special characters in attribute values.
Tip Use character entities instead of special characters in data or attribute values.
XML Documents as Complex Data ElementsXML documents as a whole are themselves defined as complex data elements. The start and end of the document is identified by a root tag. Nested within the root tag are the subtags that make up the content of an instance document — that is, an actual XML document containing data. There is one and only one root element in an XML document, and the overall structure of the document is always a hierarchical tree. Data structures that loop back upon themselves are forbidden anywhere in an XML document.
The structure of an XML document and its component data elements is defined externally in one of two types of files: a Document Type Definition (DTD) or an XML schema. XML Services uses the schema approach, because schemas support more sophisticated and rigorous data typing than DTDs. XML documents can be validated against the relevant schema by an XML parser to ensure data validity.
Exhibit 2-1. XML Character Entities
Entity Code Character Represented
< Less-than symbol or opening angle bracket (<)
> Greater-than symbol or closing angle bracket (>)
& Ampersand (&)
" Straight, double quotation mark (")
' Apostrophe or straight, single quotation mark ( ‘ )

29
Serena® ChangeMan® ZMF 6.1: XML Services User's Guide
Well-Formed DocumentsThe elements of XML syntax must be combined in a way that conforms to XML rules for a well-formed document. If XML Services receives XML input that is not well-formed, it will return an error and make no attempt to process the service request.
XML rules for a well-formed document mirror those in the latest version of HTML. Unlike past practice with HTML, however, the rules for XML are strictly enforced. In particular:
• Only one root tag is allowed in a document. A well-formed XML document must map to an n-way tree data structure. Such a tree has exactly one root node. The root node may have multiple branches to lower-level nodes, each of which may also branch similarly to any depth. Nodes in the tree structure correspond to tags in the XML syntax.
• Every opening tag must be matched by a closing tag. Closing tags have the same tag name as the opening tag, preceded by a forward slash. For example, the opening tag <tag> must be paired with the closing tag </tag>.
• Standalone tags must be self-closing. Standalone tags are defined to mark points in a document rather than contain data; they are explicitly declared to be “empty” in the XML schema. Since it contains no data, the standalone opening tag is also the closing tag. As such, it includes a final slash just before the ending angle bracket. For example:
<tagname />
• Attribute values must be enclosed in double quotes. The quotes are never optional. For example:
<tag attribute=”value”>
• Nested tags must be opened and closed in the proper order. The rules for pairing the opening and closing tags in a nested data structure are the same as those for pairing the opening and closing parentheses in a mathematical expression. The first tag opened must be the last tag closed, the next tag opened must be the next-to-last tag closed, and the last tag opened must be the first tag closed. Visually:
• XML comments are comments — and nothing else. The frequent HTML practice of embedding non-markup processing instructions in comments is not allowed in XML. Instead, non-XML processing instructions and other non-XML declarations should precede the root tag in the document file.
Strict enforcement of these syntax rules prevents ambiguity when interpreting XML documents. This is vital in XML, because general-purpose XML parsers, unlike their HTML counterparts, can’t rely on the names of tags to help resolve ambiguity.
<firstTag><nextTag><lastTag> . . . </lastTag></nextTag></firstTag>
30
Chapter 2: XML Syntax Basics
For example, if you see the tag ‘<p>’ in an HTML file, you can assume it marks a paragraph. This works because HTML predefines what each tag and attribute name means in advance and all HTML parsers build in at least some of that knowledge.
However, in XML, you cannot assume anything about the tag ‘<p>’. XML leaves the interpretation of document markup and document content completely to the application that reads it. Tag meaning is defined externally to the document in either a DTD specification or an XML schema specification.
XML DOCUMENT DECLARATIONS
An XML document must identify itself as such to the SERNET messaging server in order to be routed properly to and from XML Services. In addition, once an XML document reaches an XML parser or similar XML processor on either the server or the client, the document must declare the type of XML document it is. This allows the XML parser to interpret the document data structures properly.
Identifying XML DocumentsStandard-compliant XML relies on a combination of file naming conventions and declarations in the XML instance document itself to flag XML documents for processing. Conventions for doing this differ somewhat on distributed systems and mainframes.
Distributed systems usually identify XML documents by the Web-style .xml file name extension, which is appended to a base file name of up to 8 characters (or more on modern systems). The file name extension identifies the document type immediately for Web browsers and other distributed applications that work with XML. This eliminates the need for these applications to open each document they receive and inspect the contents to determine whether it contains XML. If you access XML Services from a distributed client, you may want to append the .xml file extension to any file names when saving reusable Serena XML documents in your local development environment. This facilitates the integration of ChangeMan ZMF with distributed applications.
Mainframes do not support the same file naming conventions used on most distributed systems. The SERNET messaging server therefore cannot rely on file naming conventions to identify XML documents. Instead, the SERNET inspects the first line of an incoming message to determine whether or not it contains XML. For this reason, XML Services requires that XML documents always include an <?xml?> declaration to identify themselves. This requirement applies regardless of the type of system on which the document originates.
Mainframe users may find it useful to define a library type called “XML” for storing reusable XML documents. However, this is not a requirement of XML Services.
<?XML?> Declaration SyntaxAn <?xml?> declaration is required on the first line of an XML document. Because it is not properly an XML statement, it precedes the XML root tag of your document. It also precedes any other non-XML declarations or processing instructions that appear before the root tag.

31
Serena® ChangeMan® ZMF 6.1: XML Services User's Guide
The <?xml?> declaration looks something like this:
<?xml version=”1.0” encoding=”UTF-8”?>
Both the version and encoding attributes are required.
<?XML?> Version Attribute
The version attribute in the <?xml?> declaration refers to the particular W3C syntax standard followed in your XML document. XML Services recognizes XML Version 1.0, Second Edition, which was published by the W3C in October 2000. This is the latest version of XML. Attempts to use other versions will fail. Consequently, your <?xml?> declaration will always have the following version attribute:
<?xml version=”1.0” encoding=”UTF-8”?>
<?XML?> Encoding Attribute
The encoding attribute in the <?xml?> declaration identifies the character encoding standard used to represent text in your XML document. To ensure both cross-platform and international language compatibility, the W3C specification for XML states that all standard-compliant XML parsers support Unicode. Support for additional character sets is optional.
Unicode is a superset of the 7-bit ASCII character code, with international language and special symbol extensions. The most widely supported variant of Unicode is UTF-8, a variable-length encoding that uses one to four 8-bit bytes to represent characters and symbols. It yields compact files sizes for Latin-based alphabetic text, yet expands to support non-Latin alphabets, ideographic characters, and a wide variety of special symbols on demand. The first 128 code points in UTF-8 — i.e., character codes 0 to 127 — correspond to the same character codes in 7-bit ASCII.
XML Services supports 7-bit ASCII and the full U.S. EBCDIC character set, as well as the subset of UTF-8 that happens to match 7-bit ASCII. Any of the following encoding attributes are therefore valid in the <?xml?> declaration for XML Services:
The Unicode (UTF-16) standard defines a range of characters E000 – F8FF as the Private Use Area (PUA) range. The PUA range is reserved for private use by software vendors.
When converting from EBCDIC to UTF-16 or UTF-8, conversion will fail for characters that are not defined in the EBCDIC code page. To handle characters that fail conversion, SERNET will utilize PUA range F800 – F8FF. For UTF-16, undefined characters will be converted to F8xx, where xx is the hexadecimal value of the undefined EBCDIC character.
For UTF-8, in binary this corresponds to: 11101111 101000bb 10bbbbbb
where bbbbbbbb is the binary value of the undefined EBCDIC character.
When converting from UTF-16 or UTF-8 back to EBCDIC, SERNET will convert the F8xx characters back to their original xx form.
<?xml version=”1.0” encoding=”UTF-8”?> <?xml version=”1.0” encoding=”US-ASCII”?>

32
Chapter 2: XML Syntax Basics
<?xml version=”1.0” encoding=”EBCDIC-US”?>
These values for the encoding attribute have the meanings shown in Exhibit 2-2.
SERENA XML MESSAGE DOCUMENTS
Every Serena XML request and reply message is an XML document. From a syntactic point of view, each document consists of free-format text delimited by nested markup tags. Tags may be nested to any depth, repeated, or exhibit other forms of structure. The nested tag syntax of an XML document is logically equivalent to a hierarchical n-way tree structure.
Serena XML Syntax ExampleSyntactically, a Serena XML document begins with a document type declaration, then opens the root <service> tag. The document ends with the closing </service> tag.
The name attribute of the <service> tag determines which <scope> subtags are valid for nesting within the <service> tag for a particular instance document. Similarly, the name attribute of the <scope> tag determines which <message> subtags are valid for nesting within it.
The <message> tag completes the trio of nested tags needed to invoke a low-level service object in the Extended Services layer of XML Services. The name attribute of the <message> tag, in the context provided by the superordinate <service> and <scope> tags, determines which complex data structures are valid within the <message>.
The following Serena XML example illustrates the strongly nested structure of a Serena XML document. The role of the <service> tag as the root node is clear from the indentation — although in practice, both indentation and line breaks are optional in XML.
It should also be clear from this example why markup tags in free-format text are so flexible for data interchange. Adding one more tag to some level in the hierarchy does not change the meaning of any other tag in the message.
XML Example — PACKAGE SERVICE CREATE:
Exhibit 2-2. XML Character Encoding Attributes
Attribute Value Character Encoding Description
UTF-8 Variable-length Unicode representation in one to four 8-bit bytes. Supports international languages, including non-Latin and ideographic scripts. The default encoding for XML. XML Services accepts documents with this attribute, but interprets them as 7-bit ASCII at this time. Codes higher than 127 are ignored.
US-ASCII 8-bit ASCII character set. XML Services accepts documents with this attribute, but interprets them as 7-bit ASCII at this time. Codes higher than 127 are ignored.
EBCDIC-US 1987 standard EBCDIC for U.S. English & IBM 3270 terminals. Fully supported by XML Services.

33
Serena® ChangeMan® ZMF 6.1: XML Services User's Guide
<?xml version="1.0"?><service name="PACKAGE"> <scope name="SERVICE"> <message name="CREATE"> <header> <subsys>8</subsys> <product>CMN</product> </header> <request> <applName>ACTP</applName> <createMethod>0</createMethod> <packageLevel>1</packageLevel> <packageType>1</packageType> <reasonCode>000</reasonCode> <requestorDept>IDD</requestorDept> <requestorName>DYOUNG</requestorName> <requestorPhone>555 5555</requestorPhone> <packageTitle> TEST XML PACKAGE SERVICE CREATE</packageTitle> <packageDesc>TEST XML PACKAGE SERVICE CREATE</packageDesc> <packageImplInst>TEST XML PACKAGE SERVICE CREATE</packageImplInst> <siteInfo> <siteName>SERT8</siteName> <installDate>20091231</installDate> <fromInstallTime>0100</fromInstallTime> <toInstallTime>0200</toInstallTime> <contactName>DYOUNG</contactName> <contactPhone>555 5555</contactPhone> <alternateContactName>DYOUNG</alternateContactName> <alternateContactPhone>555 5555</alternateContactPhone> </siteInfo> </request> </message> </scope></service>
Logical Document StructureAny tag-based markup language can be represented logically as an n-way tree. This may not mean much in the case of a single document. But tree-structured data models can be helpful when conceptualizing the common structure shared by all Serena XML documents. This is particularly true at the levels of the tree nearest the root — the “highest” level of the tree.
The XML Services high-level tree structure is illustrated in Exhibit 2-3.

34
Chapter 2: XML Syntax Basics
Exhibit 2-3. High-Level XML Document Structure

35
Serena® ChangeMan® ZMF 6.1: XML Services User's Guide
Structure Diagram Conventions
In the exhibit, each node of the tree (shown as a rectangle) corresponds to a named data element represented in markup by an XML tag. One or more branches from a node (shown by solid or dashed lines) represent the inclusion of subsidiary nodes in the higher-level node’s contents. Dashed node borders indicate an optional data element; solid borders indicate that the node is required. Multiple occurrences of a node are allowed — each occurrence of which includes the node’s subordinate data structure. Mutually exclusive relationships among nodes is shown by a lozenge-shaped octagon labeled “XOR,” from which branches extend to the mutually exclusive nodes with their substructures. Leaf nodes indicate simple data elements containing raw data rather than a substructure of subordinate data elements. An ellipsis (three consecutive dots) indicates the omission of subordinate nodes from the diagram for clarity.
Nodes in the structure diagram are annotated according to the following conventions:
• Tag names appear in the blue region of the node.
• If attributes for the tag exist, their names and permitted values appear in a white region appended to the node.
• If the number of occurrences of a node is variable, the allowed range for the number of repetitions appears below the lower right corner of the node. The number of occurrences can range from zero to unbounded.
• A mandatory sequence for nodes in a data structure is shown by sequence numbers in solid circles at the left of each node in the sequence.
HIGH-LEVEL TAGS IN SERENA XMLA few tags at the highest levels in the Serena XML document hierarchy are used consistently in all XML instance documents. These consistent usage patterns persist despite variations in the low-level service object called, the function requested of that object, or the scope of action requested. These high-level tags are documented below.
<service> Tag: The Root Data ElementThe root data element in an XML Services message document is marked by the <service> tag. The <service> tag identifies the low-level service object that processes the message — such as the approver maintenance service (name=”approver”) or the package management service (name=”package”).
An example of the <service> tag appears in the example above. The example XML syntax represents a complex data element with one attribute and one subordinate data element (or subtag). All attributes and subtags are required. The <service> tag data structure is summarized in Exhibit 2-4.

36
Chapter 2: XML Syntax Basics
<scope> TagThe <scope> tag is the sole subtag of the <service> data element. It identifies the types of objects or class of services to be included in the scope of the service object’s operations. Example scopes include global records (name=”gbl”), application records (name=”apl”), package records (name=”pkg”), component records (name=”cmponent”), and service-wide functions (name=”service”). The chosen scope must be compatible with the requested service. Valid combinations are listed at the end of this chapter in Exhibit 2-10.
The <scope> tag represents a complex data structure that has one attribute and one subtag. Both are required. The <scope> data structure is summarized in Exhibit 2-5.
<message> TagThe XML Services <message> tag occurs as a subtag of <scope>. It identifies the task to be performed by the requested service within the requested scope of action. Example message names include create (name=”create”), delete (name=”delete”), update (name=”update”), list (name=”list”), and approve (name=”approve”). Message names must be consistent with the higher-level service and scope names. Valid combinations of service, scope, and message attribute names are listed at the end of this chapter in Exhibit 2-10.
The <message> tag delimits a complex data element with one attribute and four optional subtags. Subtags must appear in sequence. The use and/or structure of each subtag depends on the service/scope/message combination in the XML document.
The <message> tag data structure is summarized in Exhibit 2-6.
Exhibit 2-4. Data Structure for Serena XML <service> Tag
Attribute or Subtag Use OccursData Type & Length Description and Values
name Required 1 String (8),variable
Attribute. XML service object name. Actual data length and value fixed for each service object. See Exhibit 2-8 for allowed values.
<scope> Required 1 Complex Element. See <scope> tag.
Exhibit 2-5. Data Structure for Serena XML <scope> Tag
Attribute or Subtag Use OccursData Type & Length Description and Values
name Required 1 String (8),variable
Attribute. XML scope name. Must be compatible with service name. Actual data length & value fixed for each service & function. See Exhibit 2-8 for values.
<message> Required 1 Complex Element. See <message> tag.
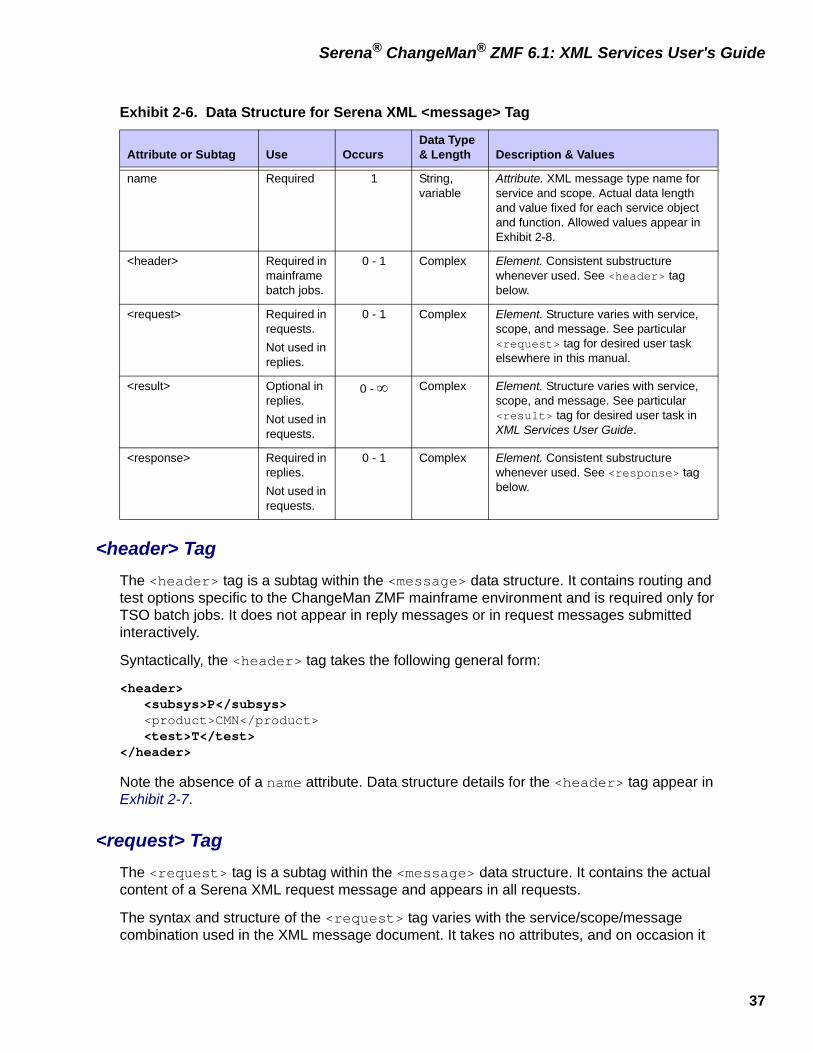
37
Serena® ChangeMan® ZMF 6.1: XML Services User's Guide
<header> TagThe <header> tag is a subtag within the <message> data structure. It contains routing and test options specific to the ChangeMan ZMF mainframe environment and is required only for TSO batch jobs. It does not appear in reply messages or in request messages submitted interactively.
Syntactically, the <header> tag takes the following general form:
<header> <subsys>P</subsys> <product>CMN</product> <test>T</test></header>
Note the absence of a name attribute. Data structure details for the <header> tag appear in Exhibit 2-7.
<request> TagThe <request> tag is a subtag within the <message> data structure. It contains the actual content of a Serena XML request message and appears in all requests.
The syntax and structure of the <request> tag varies with the service/scope/message combination used in the XML message document. It takes no attributes, and on occasion it
Exhibit 2-6. Data Structure for Serena XML <message> Tag
Attribute or Subtag Use OccursData Type & Length Description & Values
name Required 1 String,variable
Attribute. XML message type name for service and scope. Actual data length and value fixed for each service object and function. Allowed values appear in Exhibit 2-8.
<header> Required in mainframe batch jobs.
0 - 1 Complex Element. Consistent substructure whenever used. See <header> tag below.
<request> Required in requests.Not used in replies.
0 - 1 Complex Element. Structure varies with service, scope, and message. See particular <request> tag for desired user task elsewhere in this manual.
<result> Optional in replies.Not used in requests.
0 - ∞ Complex Element. Structure varies with service, scope, and message. See particular <result> tag for desired user task in XML Services User Guide.
<response> Required in replies.Not used in requests.
0 - 1 Complex Element. Consistent substructure whenever used. See <response> tag below.
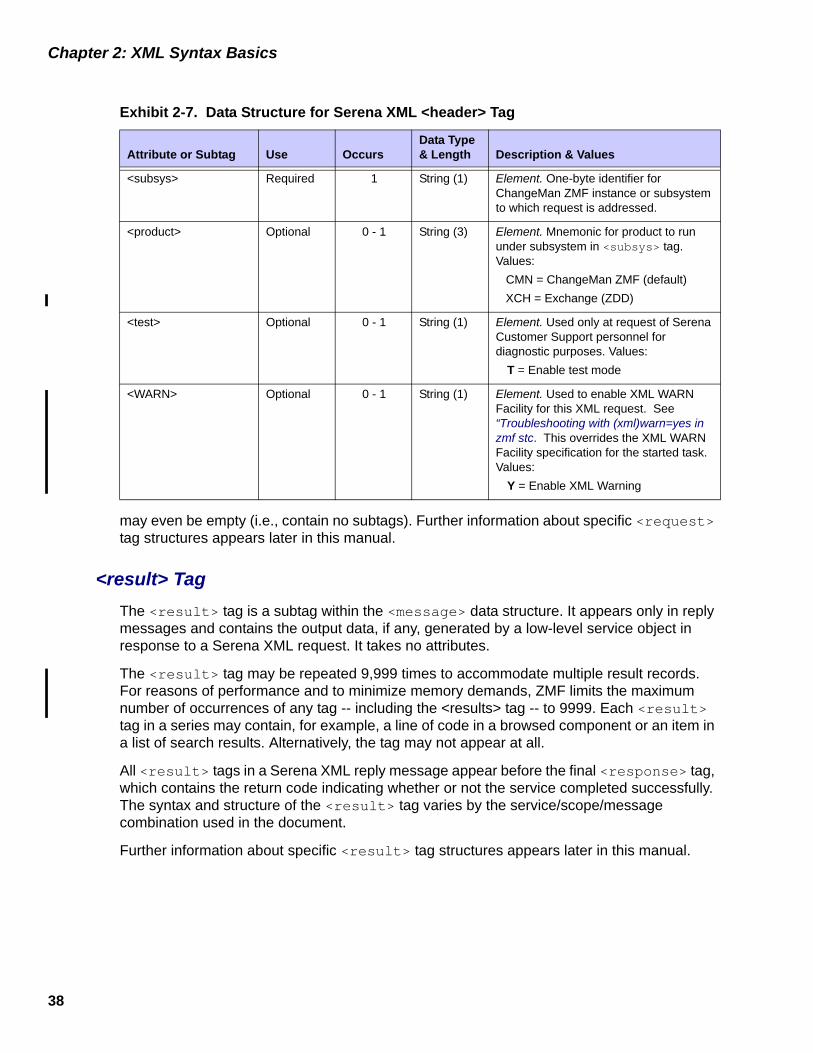
38
Chapter 2: XML Syntax Basics
may even be empty (i.e., contain no subtags). Further information about specific <request> tag structures appears later in this manual.
<result> TagThe <result> tag is a subtag within the <message> data structure. It appears only in reply messages and contains the output data, if any, generated by a low-level service object in response to a Serena XML request. It takes no attributes.
The <result> tag may be repeated 9,999 times to accommodate multiple result records. For reasons of performance and to minimize memory demands, ZMF limits the maximum number of occurrences of any tag -- including the <results> tag -- to 9999. Each <result> tag in a series may contain, for example, a line of code in a browsed component or an item in a list of search results. Alternatively, the tag may not appear at all.
All <result> tags in a Serena XML reply message appear before the final <response> tag, which contains the return code indicating whether or not the service completed successfully. The syntax and structure of the <result> tag varies by the service/scope/message combination used in the document.
Further information about specific <result> tag structures appears later in this manual.
Exhibit 2-7. Data Structure for Serena XML <header> Tag
Attribute or Subtag Use OccursData Type & Length Description & Values
<subsys> Required 1 String (1) Element. One-byte identifier for ChangeMan ZMF instance or subsystem to which request is addressed.
<product> Optional 0 - 1 String (3) Element. Mnemonic for product to run under subsystem in <subsys> tag. Values:
CMN = ChangeMan ZMF (default) XCH = Exchange (ZDD)
<test> Optional 0 - 1 String (1) Element. Used only at request of Serena Customer Support personnel for diagnostic purposes. Values:
T = Enable test mode
<WARN> Optional 0 - 1 String (1) Element. Used to enable XML WARN Facility for this XML request. See “Troubleshooting with (xml)warn=yes in zmf stc. This overrides the XML WARN Facility specification for the started task. Values:
Y = Enable XML Warning

39
Serena® ChangeMan® ZMF 6.1: XML Services User's Guide
<response> TagThe <response> tag is a subtag of the <message> data structure. It contains a mainframe return code, reason code, and/or message concerning the success or failure of your request. The <response> tag appears in every reply message issued by XML Services.
The structure of the <response> tag is consistent across all service objects and functions, all client environments, and all client products. It contains one required subtag and two optional subtags in a fixed sequence. It takes no attributes.
Syntactically, the <response> tag takes the following general form:
<response> <statusReturnCode>00</statusReturnCode> <statusReasonCode>0000</statusReasonCode> <statusMessage>Contents of message.</statusMessage></response>
You should always monitor the contents of the <statusReturnCode> tag to trap error conditions. The value returned will be ‘00’ if your request executed successfully. Successively higher numeric values correspond to increasingly severe error conditions. System error codes and ABENDs may append an alphanumeric prefix to the code. You should familiarize yourself with ChangeMan ZMF return codes and messages before taking action on the <statusReturnCode> subtag or other elements of the <response> tag.
Data structure details for the <response> tag appear in Exhibit 2-8.
Exhibit 2-8. Data Structure for Serena XML <response> Tag
Subtag Use OccursData Type & Length Description & Values
<statusReturnCode> Required 1 String (4),variable
Element. ChangeMan ZMF return code indicating successful completion or class and severity of error. Typical values:
00 - Execution successful04 - Warning message08 - Processing error (e.g., package does not exist)
NOTE: Higher values indicate more severe errors. Abend or system error return codes may exceed 2 bytes & include alphanumerics.NOTE: Always check this tag to determine success of XML request.
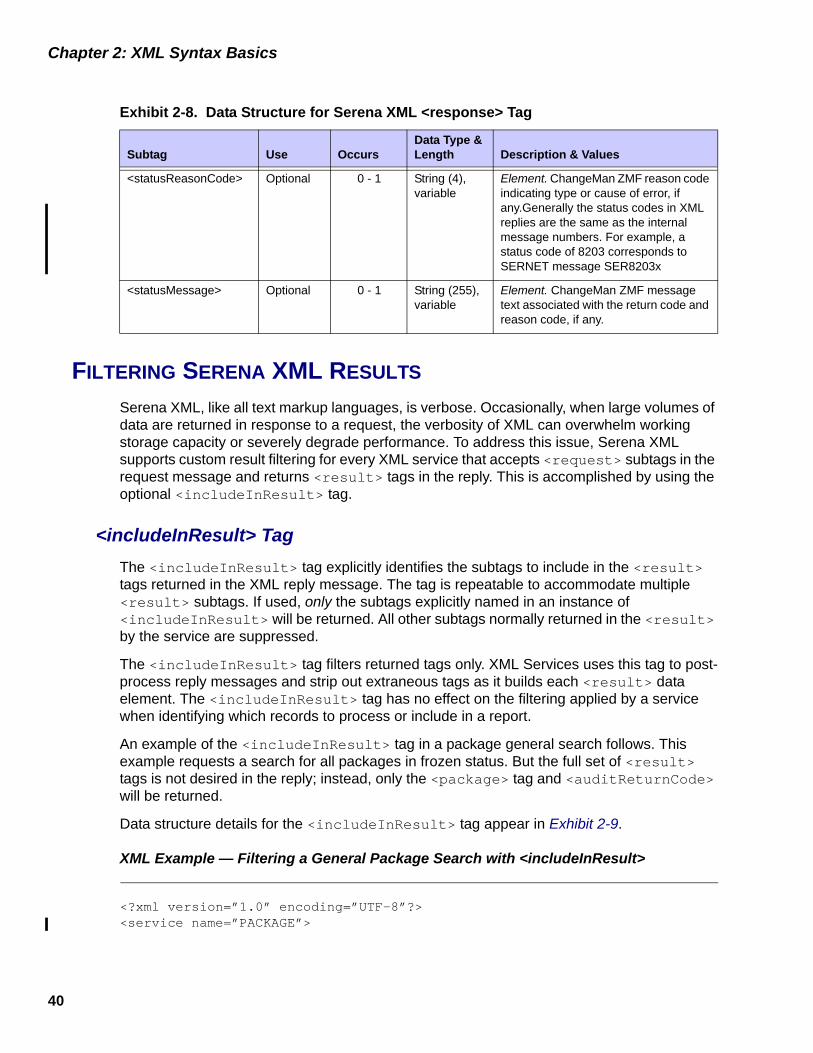
40
Chapter 2: XML Syntax Basics
FILTERING SERENA XML RESULTS
Serena XML, like all text markup languages, is verbose. Occasionally, when large volumes of data are returned in response to a request, the verbosity of XML can overwhelm working storage capacity or severely degrade performance. To address this issue, Serena XML supports custom result filtering for every XML service that accepts <request> subtags in the request message and returns <result> tags in the reply. This is accomplished by using the optional <includeInResult> tag.
<includeInResult> TagThe <includeInResult> tag explicitly identifies the subtags to include in the <result> tags returned in the XML reply message. The tag is repeatable to accommodate multiple <result> subtags. If used, only the subtags explicitly named in an instance of <includeInResult> will be returned. All other subtags normally returned in the <result> by the service are suppressed.
The <includeInResult> tag filters returned tags only. XML Services uses this tag to post-process reply messages and strip out extraneous tags as it builds each <result> data element. The <includeInResult> tag has no effect on the filtering applied by a service when identifying which records to process or include in a report.
An example of the <includeInResult> tag in a package general search follows. This example requests a search for all packages in frozen status. But the full set of <result> tags is not desired in the reply; instead, only the <package> tag and <auditReturnCode> will be returned.
Data structure details for the <includeInResult> tag appear in Exhibit 2-9.
XML Example — Filtering a General Package Search with <includeInResult>
<?xml version=”1.0” encoding=”UTF-8”?><service name=”PACKAGE”>
<statusReasonCode> Optional 0 - 1 String (4),variable
Element. ChangeMan ZMF reason code indicating type or cause of error, if any.Generally the status codes in XML replies are the same as the internal message numbers. For example, a status code of 8203 corresponds to SERNET message SER8203x
<statusMessage> Optional 0 - 1 String (255),variable
Element. ChangeMan ZMF message text associated with the return code and reason code, if any.
Exhibit 2-8. Data Structure for Serena XML <response> Tag
Subtag Use OccursData Type & Length Description & Values

41
Serena® ChangeMan® ZMF 6.1: XML Services User's Guide
<scope name=”GENERAL”> <message name=”SEARCH”> <request> <searchForFrozenStatus>Y</searchForFrozenStatus> <includeInResult>package</IncludeInResult> <includeInResult>auditReturnCode</IncludeInResult> </request> </message> </scope></service>
SERVICE, SCOPE, AND MESSAGE SUMMARY
Only certain combinations of service, scope, and message name attributes are valid in Serena XML. The combination chosen must make sense for the low-level service object invoked and for the task or information desired. A table of valid combinations appears in Exhibit 2-10. Combinations in blue are ERO requests, and are included for completeness. ERO XML requests are documented in need a title for this.
Combinations in magenta are FILE/XCH/HFS requests. FILE/XCH/HFS services are deployed in this release. They show up in the list of available services in XMLSERV. However, no ChangeMan components exploit these services yet. They are specifically designed for Extended Language Support in a future release. In the interim, users may exercise these services in XMLSERV if they so wish.
The COBOL copybook programming interface to XML Services recognizes the same combinations of service, scope, and message as does the native Serena XML interface. The name of the copybook that generates a particular combination of service, scope, and message attributes also appears in Exhibit 2-10.
Exhibit 2-9. <includeInResult> Data Structure
Subtag Use OccursData Type & Length Description & Values
<includeInResult> Optional in any <request> tag
0 - ∞ String (255), variable
Contains desired <result> subtag name without angle brackets.NOTE: Value is case-sensitive.
Exhibit 2-10. Serena XML Service, Scope, and Message Names with Copybooks
Service Name
Scope Name
Message Name
Functional Description
COBOLCopybook
approver apl • list • List application approvers (planned/unplanned/all) • XMLCAAPR
pkg • list • List package approvers • XMLCPAPR
baselib service • list • List baseline library records • XMLCBASL

49
PACKAGE MANAGEMENT 3Package management messages in Serena XML fall into four user task categories:
• Package Lifecycle Tasks — Tasks that comprise a major step in the lifecycle of a change package as a whole. These include package commands such as package create, delete, freeze, promote, and approve.
• Package-Level Component Change Management — Tasks related to the component lifecycle but which apply to one or more components of a package as a group. Package-level component groups include source and load modules, non-source modules, and scratch/rename records. Commands include unfreeze, refreeze, and list.
• Package Validation Tasks — Tasks that identify dependencies among package components, verify the integrity of package components, or check for versioning differences across components in different stages of development. These include package commands such as list, check component integrity and audit.
• Package Information Management Tasks— Tasks that retrieve or manage descriptive metadata or control information about a package. Such information includes the package description, general package parameters, working component descriptions for the package, participating package records, affected application records, package-level site records, the package approver list, package promotion history, user-defined variables for a package, and similar records. Supported commands include list.
PACKAGE MESSAGE SYNTAX
Identifying Package MessagesSerena XML package messages contain syntax that tells ChangeMan ZMF to perform a task against a package rather than some other object. This occurs in one of two ways. Most commonly, the name attribute in the <service> takes the value “PACKAGE”, as follows:
<service name=”PACKAGE”>
However, some non-package services — such as the approver maintenance service and the site maintenance service — support a package-level scope of action. These identify a package-level task by the name attribute of the <scope> tag, which takes the value “pkg” or something similar (e.g., “pkg_comp”, “pkg_lod”, and so on). For example:
<service name=”SITE”><scope name=”PKG”>

50
Chapter 3: Package Management
Finally, some services are only implicitly allied to package management; there is no explicit syntax to make that relationship clear. For example, the package installation scheduler service works with install schedules one package at a time. It does not identify its scope as package-specific, though, because its present design gives the scheduler no other scope options.
Where explicit syntax exists, the same attributes appear in both request and reply messages. In requests, they tell ChangeMan ZMF to execute a package-level function. In replies, they tell your XML message processing software to parse the returned message for package data.
Package Naming ConventionsPackage Name Tags
Two methods exist in Serena XML to identify a package to ChangeMan ZMF. The first uses the <package> tag to supply a complete package name. The second concatenates the <applName> tag, which identifies the application to which a package belongs, with the <packageId> tag, which contains the unique number of the package within its application. Together, the <applName> and <packageId> tags yield the same package identifier as that supplied in the <package> tag. Either method is acceptable to ChangeMan ZMF.
Embedded Blanks in the <package> Tag
The <package> tag appears as a subordinate data element in nearly all package management data structures. For ChangeMan ZMF, this tag takes a 10-byte fixed-format value, as follows:
<package>aaaannnnnn</package>, where:
aaaa = application name. If less than 4 characters, right-fill with blanks.nnnnnn = package ID number. If less than 6 digits, left-fill with zeroes.
For example, a package name for ChangeMan ZMF that uses a 3-byte application name must include an embedded blank to fill out the application name portion of the <package> tag data, as follows:
<package>TST 123456</package>
Special Tag Syntax for Package ManagementSerena XML supports up to 72 user-defined package variables that are established by users when customizing ChangeMan ZMF on the mainframe. These variables are stored in the package master.
The Serena XML tag names for these user-defined package variables use the following naming convention:
<userVarLenxxyy>
where:
• xx = length of variable data in bytes, formatted as 1-digit or 2-digit integer

51
Serena® ChangeMan® ZMF 6.1: XML Services User's Guide
• yy = unique 2-digit integer identifier for this particular variable of length xx
For example, <userVarLen103> represents the third user-defined variable with a length of one byte. Similarly, <userVarLen4405> is the fifth variable with a length of 44 bytes.
Serena XML provides 16 such tags for variables of 1 byte each in length, 11 tags of 2 bytes each, 10 tags of 3 bytes each, 10 tags of 4 bytes, 10 tags of 8 bytes, 5 tags of 16 bytes, 5 tags of 44 bytes, and 5 tags of 72 bytes.
PACKAGE LIFECYCLE TASKS
Serena XML supports the following package lifecycle tasks for general use:
Create a Package - PACKAGE SERVICE CREATEThe package create message in Serena XML creates an empty change package in the staging area. A parent application must already exist to provide default settings for the new package.
The Serena XML service/scope/message tags and attributes for a package creation message are:
<service name=”PACKAGE”><scope name=”SERVICE”><message name=”CREATE”>
These tags appear in both requests and replies.
PACKAGE SERVICE CREATE Requests
The Serena XML syntax for a package creation request varies with the creation method you select. Three creation methods exist:
• Create a Package - PACKAGE SERVICE CREATE
• Demote a Package with Cleanup - PACKAGE CLEANUP DEMOTE
• Delete a Package - PACKAGE SERVICE DELETE
• Approve a Package - PACKAGE SER-VICE APPROVE
• Freeze a Package - PACKAGE SERVICE FREEZE
• List Package Installation Schedule - SCHEDULE SERVICE LIST
• Submit a Package for JCL Build - PACKAGE SERVICE SUBMIT
• Hold Package Install Job - SCHEDULE SERVICE HOLD
• Check a Package for Promotion Readiness - PACKAGE CHECK PROMOTE
• Release Package Install Job - SCHED-ULE SERVICE RELEASE
• Promote a Package - PACKAGE SERVICE PROMOTE
• Back Out a Package - PACKAGE SER-VICE BACKOUT
• Demote a Package - PACKAGE SERVICE DEMOTE
• Revert a Package - PACKAGE SER-VICE REVERT

52
Chapter 3: Package Management
• Short Method — Supplies only the minimum information required by the package master database. Complete information is supplied later via package updates using the ChangeMan ZMF ISPF interface. (Serena XML does not support updates to package master records for general use.)
• Copy Forward (or Clone) Method — Copies values from a preexisting model package into the new package master entry. Changes are made later via package updates using the ChangeMan ZMF ISPF interface. (Serena XML does not support updates to package master records for general use.)
• Long Method — Supplies all package master information in a single step. No subsequent updates are required. If you want to set the values of any user-defined variables for a package, you must use this method of package creation.
Choose a creation method using the <createMethod> subtag of the <request> message.
Example XML — PACKAGE SERVICE CREATE Request.
<?xml version="1.0"?><service name="PACKAGE"> <scope name="SERVICE"> <message name="CREATE"> <header> <subsys>8</subsys> <product>CMN</product> </header> <request> <applName>ACTP</applName> <createMethod>0</createMethod> <packageLevel>1</packageLevel> <packageType>1</packageType> <reasonCode>000</reasonCode> <requestorDept>IDD</requestorDept> <requestorName>DYOUNG</requestorName> <requestorPhone>555 5555</requestorPhone> <packageTitle> TEST XML PACKAGE SERVICE CREATE</packageTitle> <packageDesc>TEST XML PACKAGE SERVICE CREATE</packageDesc> <packageImplInst>TEST XML PACKAGE SERVICE CREATE</packageImplInst> <siteInfo> <siteName>SERT8</siteName> <installDate>20091231</installDate> <fromInstallTime>0100</fromInstallTime> <toInstallTime>0200</toInstallTime> <contactName>DYOUNG</contactName> <contactPhone>555 5555</contactPhone> <alternateContactName>DYOUNG</alternateContactName> <alternateContactPhone>555 5555</alternateContactPhone> </siteInfo> </request> </message>

53
Serena® ChangeMan® ZMF 6.1: XML Services User's Guide
</scope></service>
The foregoing example requests the creation of a simple, planned, permanent package using the “short” method. The package is part of the “ACTP” application. Installation is scheduled for one production sites.
As the example illustrates, the <siteInfo> tag represents a complex data element A complex data element consists of other XML tags, rather than simple data. Such markup syntax, which potentially nests tags within tags within tags to any depth, is how XML implements its hierarchical tree data structure in a text data stream.
In addition, <siteInfo> is a repeatable tag. A repeatable tag allows a variable number of consecutive repetitions to accommodate multiple instances of similarly structured information. For example, <siteInfo> can be repeated for each site where the newly created package will be installed. Repeatable tags enhance scalability in XML data structures.
Note that the XML data structures for package request and reply messages do not specify any particular order for the occurrence of tags. You must rely on tag name rather than tag ordinal position in a sequence to convey information to ChangeMan ZMF. Sequence within a data structure is not preserved.
For example, a package may be installed across multiple sites in any order. This is not necessarily the order you list your <siteInfo> data elements. Similarly, if you schedule multiple predecessor jobs to occur before package install, they may execute in any order so long as they precede package installation. You cannot assume that predecessor jobs will execute in the order you list them in your XML request.
Caution
Tag sequence is not preserved in package request and reply messages using Serena XML. Use tag names rather than tag ordinal position in a sequence to convey information to ChangeMan ZMF.
Data structure specifications for the package creation <request> tag appear in Exhibit 3-1.
The <schedulingInfo> and <siteInfo> tags both represent complex data elements — that is, they contain tags within tags. Their subordinate data structures are described below.
<schedulingInfo> Subtag
The <schedulingInfo> tag captures installation scheduling dependencies for a package. Each instance of the tag names a predecessor job and/or a successor job to run before and/or after the installation of the newly created package. The <schedulingInfo> tag may be repeated as many times as needed to ensure that all installation prerequisites and follow-up tasks occur. Data structure details for the <schedulingInfo> tag appear in the following exhibit.

54
Chapter 3: Package Management
Exhibit 3-1. PACKAGE SERVICE CREATE <request> Data Structure
Subtag Use OccursData Type & Length Values & Dependencies
<affectedApplName> Optional 0 - ∞ String (4), variable
Name of application affected by one or more participating packages in this complex/super package. Repeatable for multiple applications.NOTE: Valid only for complex or super packages. NOTE: If <partPackageName> used, at least one instance of this tag is required.
<applName> Required 1 String (4),variable
Parent application name for new change package.
<complexSuperPackage> Optional 0 - 1 String (10), variable
Name of complex/super package to which a participating package belongs.NOTE: Valid only when creating a participating package.NOTE: Required if <packageLevel> value is 4.
<complexSuperPackageAppl> Optional 0 -1 String (4),variable
Application name of model package. Same as <complexSuperPackage> tag’s first 4 bytes.
<complexSuperPackage-Number>
Optional 0 -1 Integer(6) Package ID of model package. Same as <complexSuperPackage> tag’s last 6 bytes.
<createMethod> Required 1 Integer (1) Package creation method code. Values:0 = Short creation method1 = Copy forward (clone) method2 = Long creation method
NOTE: If <createMethod> value is 0, the following additional tags are required: <packageTitle>, <packageLevel>, <packageType>, <schedulerType>, <requestorPhone>,<requestorName>, <problemActionCode>.NOTE: If <createMethod> value is 1, you must name the package to copy from in <packageModel>.NOTE: If <createMethod> value is 2, you must supply all the tags needed when <createMethod> is 0, plus the following: <packageDesc>, <packageImplInst>, <problemActionCode>, <siteInfo>.
<otherProblemAction> Optional 0 -1 String (44), variable
Text of “Other” instructions if installation problem occurs. NOTE: Required when value of <problemActionCode> = 3.

55
Serena® ChangeMan® ZMF 6.1: XML Services User's Guide
<packageApplModel> Optional 0 -1 String (4),variable
Application name of model package. Same as first 4 bytes of <packageModel>.
<packageDesc> Optional 0 - 46 String (72), variable
Description of package contents. Multiple entries of 72 bytes each.
<packageImplInst> Optional 0 - 46 String (72), variable
Package install & implementation instructions. Multiple tags of 72 bytes each.NOTE: Order of repeated tags is not preserved. Add sequence numbers to text if steps must be performed in order.
<packageLevel> Optional 1 Integer (1) Code for package complexity or level in hierarchy. Values:
1 = Simple package2 = Complex package3 = Super package4 = Participating package
NOTE: If value = 2 or 3, the names of participating packages are required in the <partPackageName> tag.NOTE: If value = 4, you must supply name of complex/super package in tag <complexSuperPackage>.
<packageModel> Optional 0 -1 String (10),variable
Name of source package from which entries are copied forward (“cloned”) to new package.NOTE: This tag is required if value in <createMethod> = 1.
<packageNumberModel> Optional 0 -1 Integer(6) Package ID of model package. Same as last 6 bytes of <packageModel>.
<packageTitle> Optional 1 String (255), variable
Working title for package. Appears on most listings & reports.
<packageType> Optionall 1 String (1) Package install type code. Values:1 = Planned permanent2 = Planned temporary3 = Unplanned permanent4 = Unplanned temporary
NOTE: For code values = 2 or 4, the duration of change is required in <tempChangeDuration> tag.NOTE: For values = 3 or 4, a reason for the unplanned change is required in the <reasonCode> tag.
Exhibit 3-1. PACKAGE SERVICE CREATE <request> Data Structure (Continued)
Subtag Use OccursData Type & Length Values & Dependencies

56
Chapter 3: Package Management
<partPackageName> Optional 0 - ∞ String (10), variable
Name of a participating package pointed to by this complex/super package record. Repeatable for multiple participating packages. NOTE: Valid only when creating a complex or super package. NOTE: Required if <packageLevel> value is 2 or 3.NOTE: Tag <affectedApplName> is also required if this tag is used.
<problemActionCode> Optional 1 Integer (1) Code for action to take if problem occurs in package install. Values:
1 = Hold production & contact developer for instructions2 = Back out change, then proceed with production 3 = Other instructions
NOTE: If value = 3, you must supply instructions in <otherProblemAction>.
<reasonCode> Optional 0 - 1 String (3), variable
Customer-defined reason code for unplanned package installation.NOTE: Required if <packageType> value is 3 or 4.NOTE: Reason codes defined separately by ZMF administrator.
<release> Optional, for ERO
0 -1 String (8) Name of ERO release with which package is associated.
<releaseArea> Optional, for ERO
0 -1 String (8) Name of starting release area for ERO release package check-in.
<requestorDept> Optional 0 -1 String (4), variable
Workgroup or department code for package creator.
<requestorName> Optionall
1 String (25), variable
Name of developer or contact person responsible for package.
<requestorPhone> Optional 1 String (15), variable
Phone of developer or contact person responsible for package.
<schedulerType> Optional 1 Integer (1) Code for type of installation scheduler used with package. Values:
1 = ChangeMan scheduler2 = Manual install3 = Other automated scheduler
<schedulingInfo> Optional 1 - ∞ Complex See <schedulingInfo> subtag,.
Exhibit 3-1. PACKAGE SERVICE CREATE <request> Data Structure (Continued)
Subtag Use OccursData Type & Length Values & Dependencies
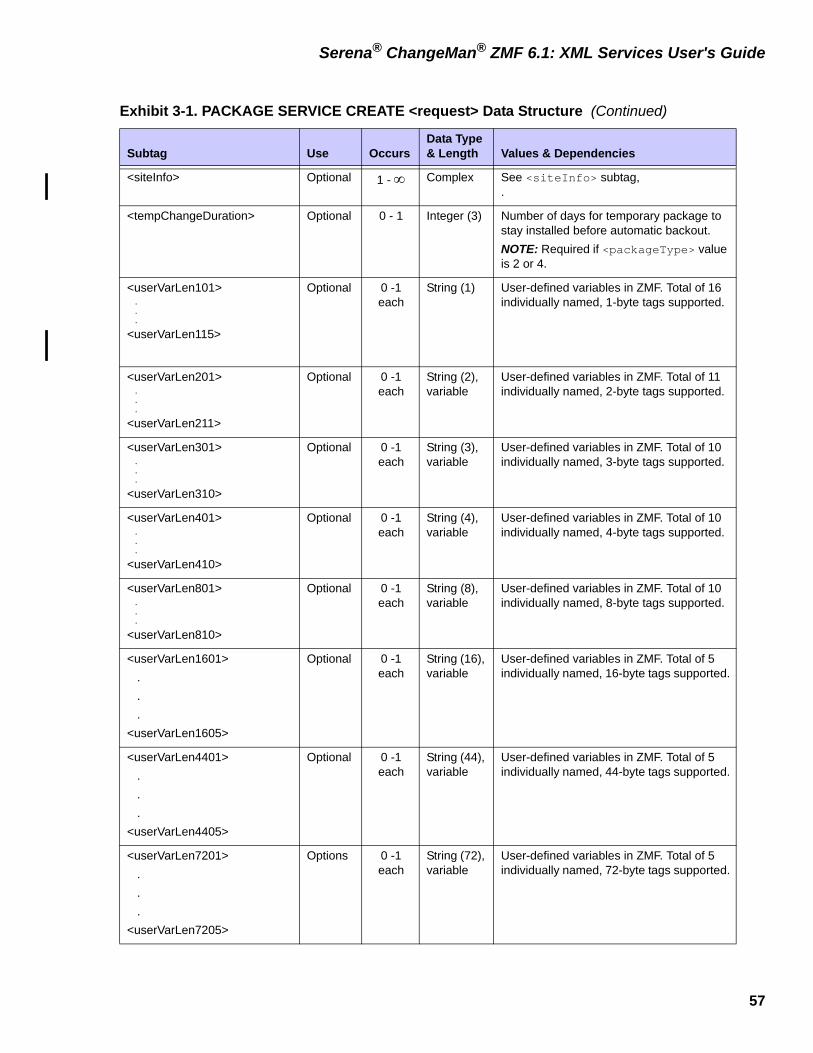
57
Serena® ChangeMan® ZMF 6.1: XML Services User's Guide
<siteInfo> Optional 1 - ∞ Complex See <siteInfo> subtag, .
<tempChangeDuration> Optional 0 - 1 Integer (3) Number of days for temporary package to stay installed before automatic backout.NOTE: Required if <packageType> value is 2 or 4.
<userVarLen101> . . .<userVarLen115>
Optional 0 -1 each
String (1) User-defined variables in ZMF. Total of 16 individually named, 1-byte tags supported.
<userVarLen201> . . .<userVarLen211>
Optional 0 -1 each
String (2), variable
User-defined variables in ZMF. Total of 11 individually named, 2-byte tags supported.
<userVarLen301> . . .<userVarLen310>
Optional 0 -1 each
String (3), variable
User-defined variables in ZMF. Total of 10 individually named, 3-byte tags supported.
<userVarLen401> . . .<userVarLen410>
Optional 0 -1 each
String (4), variable
User-defined variables in ZMF. Total of 10 individually named, 4-byte tags supported.
<userVarLen801> . . .<userVarLen810>
Optional 0 -1 each
String (8), variable
User-defined variables in ZMF. Total of 10 individually named, 8-byte tags supported.
<userVarLen1601> . . .<userVarLen1605>
Optional 0 -1 each
String (16), variable
User-defined variables in ZMF. Total of 5 individually named, 16-byte tags supported.
<userVarLen4401> . . .<userVarLen4405>
Optional 0 -1 each
String (44), variable
User-defined variables in ZMF. Total of 5 individually named, 44-byte tags supported.
<userVarLen7201> . . .<userVarLen7205>
Options 0 -1 each
String (72), variable
User-defined variables in ZMF. Total of 5 individually named, 72-byte tags supported.
Exhibit 3-1. PACKAGE SERVICE CREATE <request> Data Structure (Continued)
Subtag Use OccursData Type & Length Values & Dependencies

58
Chapter 3: Package Management
<siteInfo> Subtag
The <siteInfo> tag provides the site name, contact information, and scheduled package installation date for a remote production site. The tag may be repeated as many times as needed to cover all sites where the newly created package will be installed. At least one instance of the tag is required in a package creation request that uses the “long” create method. Data structure details for the <siteInfo> tag appear in the following exhibit:
<workChangeRequest> Optional 0 -1 String (12), variable
Work order ID or change request number for package.
Tip Tags: <userVarLen101> to <userVarLen7205>. See topic “Package User Information” in the ChangeMan ZMF Customization Guide.
Exhibit 3-2. <schedulingInfo> Subtag Data Structure
Subtag Use OccursData Type & Length Values & Dependencies
<successorJobName> Required 0 - 1 String (8), variable
Must be valid job name for system where install takes place.
<predecessorJobName> Required 0 - 1 String (8), variable
Must be valid job name for system where install takes place.
Exhibit 3-3. <siteInfo> Subtag Data Structure
Subtag Use OccursData Type & Length Values & Dependencies
<siteName> Optional 0 - 1 String (8), variable
Name of site where package will be installed.
<installDate> Optional 0 - 1 Date, yyyymmdd
Planned site install date for package. No punctuation.
<fromInstallTime> Optional 0 - 1 Time,hhmmss
Start time for period during which site installation of package is planned. 24-hour format, no punctuation.
<toInstallTime> Optional 0 - 1 Time,hhmmss
End time for period during which site installation of package is planned. 24-hour format, no punctuation.
<contactName> Optional 0 - 1 String (25), variable
Name of contact person at remote site to assist with install.
<contactPhone> Optional 0 - 1 String (15), variable
Phone of contact person at remote site to assist with install.
Exhibit 3-1. PACKAGE SERVICE CREATE <request> Data Structure (Continued)
Subtag Use OccursData Type & Length Values & Dependencies

59
Serena® ChangeMan® ZMF 6.1: XML Services User's Guide
PACKAGE SERVICE CREATE Replies
The Serena XML reply message returns, at most, one <result> data structure, which reports basic information about the newly created package. Most importantly, the <result> supplies a unique package name assigned to the package by ChangeMan ZMF.
Following the <result> data structure is the standard <response> data structure, which indicates the success of failure of the XML request and provides a status message. Successful requests have a return code of 00. Unsuccessful requests have a return code of 04 or higher.
An example Serena XML package creation reply for a simple, planned, permanent package follows. Tags in bold always occur in a reply. Repeatable tags appear twice for illustration. Data structure details for the package creation <result> tag appear in Exhibit 3-4.
Example XML — PACKAGE SERVICE CREATE Reply
<?xml version="1.0"?><service name="PACKAGE"> <scope name="SERVICE"> <message name="CREATE"> <result> <package>ACTP000012</package> <applName>ACTP</applName> <packageId>000012</packageId> <packageLevel>1</packageLevel> <packageType>1</packageType> <packageStatus>6</packageStatus> <installDate>20091231</installDate> </result> <response> <statusMessage>CMN2100I - ACTP000012 change package has been created.</statusMessage> <statusReturnCode>00</statusReturnCode> <statusReasonCode>2100</statusReasonCode> </response> </message>
<alternateContactName> Optional 0 - 1 String (25), variable
Name of alternate contact person at remote site to assist with install.
<alternateContactPhone> Optional 0 - 1 String (15), variable
Phone of alternate contact person at remote site to assist with install.
Exhibit 3-3. <siteInfo> Subtag Data Structure (Continued)
Subtag Use OccursData Type & Length Values & Dependencies
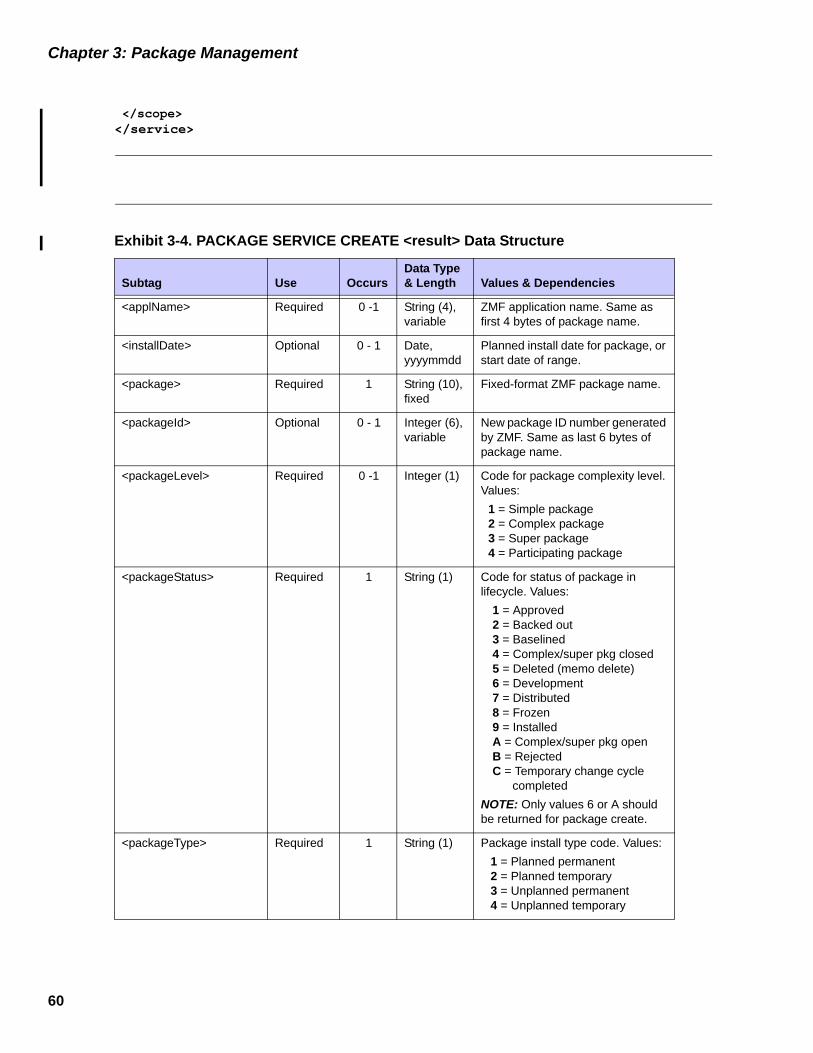
60
Chapter 3: Package Management
</scope></service>
Exhibit 3-4. PACKAGE SERVICE CREATE <result> Data Structure
Subtag Use OccursData Type & Length Values & Dependencies
<applName> Required 0 -1 String (4),variable
ZMF application name. Same as first 4 bytes of package name.
<installDate> Optional 0 - 1 Date,yyyymmdd
Planned install date for package, or start date of range.
<package> Required 1 String (10),fixed
Fixed-format ZMF package name.
<packageId> Optional 0 - 1 Integer (6),variable
New package ID number generated by ZMF. Same as last 6 bytes of package name.
<packageLevel> Required 0 -1 Integer (1) Code for package complexity level. Values:
1 = Simple package2 = Complex package3 = Super package4 = Participating package
<packageStatus> Required 1 String (1) Code for status of package in lifecycle. Values:
1 = Approved2 = Backed out3 = Baselined4 = Complex/super pkg closed5 = Deleted (memo delete)6 = Development7 = Distributed8 = Frozen9 = InstalledA = Complex/super pkg openB = RejectedC = Temporary change cycle completed
NOTE: Only values 6 or A should be returned for package create.
<packageType> Required 1 String (1) Package install type code. Values:1 = Planned permanent2 = Planned temporary3 = Unplanned permanent4 = Unplanned temporary
User’s Guide 3
Table of Contents
Welcome to the Serena® ChangeMan® ZMF User’s Guide . . 13Guide to ChangeMan ZMF Documentation. . . . . . . . . . . . . . . . . . . . . . . 13
ChangeMan ZMF Documentation Suite . . . . . . . . . . . . . . . . . . . . . . 13Using the Manuals . . . . . . . . . . . . . . . . . . . . . . . . . . . . . . . . . . . . 15
Using Online Help . . . . . . . . . . . . . . . . . . . . . . . . . . . . . . . . . . . . . . . 16Online Tutorial . . . . . . . . . . . . . . . . . . . . . . . . . . . . . . . . . . . . . . 16Online Help Screens . . . . . . . . . . . . . . . . . . . . . . . . . . . . . . . . . . 16Online Error Messages . . . . . . . . . . . . . . . . . . . . . . . . . . . . . . . . . 16
Typographical Conventions . . . . . . . . . . . . . . . . . . . . . . . . . . . . . . . . . 16
Chapter 1 Introduction . . . . . . . . . . . . . . . . . . . . . . . . . . . . . . . 19Features of ChangeMan ZMF . . . . . . . . . . . . . . . . . . . . . . . . . . . . . . . . 20What is a Change Package? . . . . . . . . . . . . . . . . . . . . . . . . . . . . . . . . 20Package Lifecycle. . . . . . . . . . . . . . . . . . . . . . . . . . . . . . . . . . . . . . . . 20Inside ChangeMan ZMF Development . . . . . . . . . . . . . . . . . . . . . . . . . . 22
Create . . . . . . . . . . . . . . . . . . . . . . . . . . . . . . . . . . . . . . . . . . . . 22Checkout Process . . . . . . . . . . . . . . . . . . . . . . . . . . . . . . . . . . . . 22Staging Process . . . . . . . . . . . . . . . . . . . . . . . . . . . . . . . . . . . . . 22Auditing . . . . . . . . . . . . . . . . . . . . . . . . . . . . . . . . . . . . . . . . . . . 24Freezing Packages. . . . . . . . . . . . . . . . . . . . . . . . . . . . . . . . . . . . 24Promoting Packages and Components . . . . . . . . . . . . . . . . . . . . . . 24Approving Packages. . . . . . . . . . . . . . . . . . . . . . . . . . . . . . . . . . . 25Installation . . . . . . . . . . . . . . . . . . . . . . . . . . . . . . . . . . . . . . . . . 26Backing Up . . . . . . . . . . . . . . . . . . . . . . . . . . . . . . . . . . . . . . . . . 27Backing Out Packages or Components . . . . . . . . . . . . . . . . . . . . . . 28Temporary Change Cycle . . . . . . . . . . . . . . . . . . . . . . . . . . . . . . . 28Distribution to Remote Sites . . . . . . . . . . . . . . . . . . . . . . . . . . . . . 28Distributing and Installing Components at Remote Sites . . . . . . . . . 28
ChangeMan ZMF Library Environment . . . . . . . . . . . . . . . . . . . . . . . . . 29Checkout . . . . . . . . . . . . . . . . . . . . . . . . . . . . . . . . . . . . . . . . . . 29Impact Analysis . . . . . . . . . . . . . . . . . . . . . . . . . . . . . . . . . . . . . 29Staging . . . . . . . . . . . . . . . . . . . . . . . . . . . . . . . . . . . . . . . . . . . 30Audit . . . . . . . . . . . . . . . . . . . . . . . . . . . . . . . . . . . . . . . . . . . . . 30Recompile and Relink. . . . . . . . . . . . . . . . . . . . . . . . . . . . . . . . . . 31Freeze . . . . . . . . . . . . . . . . . . . . . . . . . . . . . . . . . . . . . . . . . . . . 31Promotion . . . . . . . . . . . . . . . . . . . . . . . . . . . . . . . . . . . . . . . . . 32Approve . . . . . . . . . . . . . . . . . . . . . . . . . . . . . . . . . . . . . . . . . . . 32Production Installation . . . . . . . . . . . . . . . . . . . . . . . . . . . . . . . . . 32
Baseline Libraries and Delta Decks. . . . . . . . . . . . . . . . . . . . . . . . . . . . 33Backout Management Facilities . . . . . . . . . . . . . . . . . . . . . . . . . . . . . . 33Emergency Changes. . . . . . . . . . . . . . . . . . . . . . . . . . . . . . . . . . . . . . 33

4 Serena® ChangeMan® ZMF 6.1
Table of Contents
Storage Name Considerations . . . . . . . . . . . . . . . . . . . . . . . . . . . . . . . 33Build Processing Controls . . . . . . . . . . . . . . . . . . . . . . . . . . . . . . . . . . 34
Designated Compile Procedures . . . . . . . . . . . . . . . . . . . . . . . . . . 34Build Information Search Order. . . . . . . . . . . . . . . . . . . . . . . . . . . 36
Chapter 2 Using the ISPF Interface . . . . . . . . . . . . . . . . . . . . . . . 37Start a Session . . . . . . . . . . . . . . . . . . . . . . . . . . . . . . . . . . . . . . . . . 38Primary Option Menu and Build Options Menu . . . . . . . . . . . . . . . . . . . . 38
Primary Option Menu . . . . . . . . . . . . . . . . . . . . . . . . . . . . . . . . . . 39Build Options Submenu . . . . . . . . . . . . . . . . . . . . . . . . . . . . . . . . 40
Navigating Panels . . . . . . . . . . . . . . . . . . . . . . . . . . . . . . . . . . . . . . . 40Using the Menu Hierarchy . . . . . . . . . . . . . . . . . . . . . . . . . . . . . . 40Accessing Panels Directly . . . . . . . . . . . . . . . . . . . . . . . . . . . . . . . 41Accessing Panels Using the Change Package List. . . . . . . . . . . . . . . 41
Online Help and Online Tutorial . . . . . . . . . . . . . . . . . . . . . . . . . . . . . . 41Accessing Online Help . . . . . . . . . . . . . . . . . . . . . . . . . . . . . . . . . 41Accessing the Online Tutorial . . . . . . . . . . . . . . . . . . . . . . . . . . . . 42
Working with ChangeMan ZMF ISPF Panels . . . . . . . . . . . . . . . . . . . . . . 42Data Entry Fields and Display-Only Fields. . . . . . . . . . . . . . . . . . . . 42Panel Error Messages. . . . . . . . . . . . . . . . . . . . . . . . . . . . . . . . . . 42Finding Valid Values for Fields, Commands, and Line Commands . . . 43Canceling Changes on a Panel. . . . . . . . . . . . . . . . . . . . . . . . . . . . 43
Working with Lists . . . . . . . . . . . . . . . . . . . . . . . . . . . . . . . . . . . . . . . 44Common List Commands . . . . . . . . . . . . . . . . . . . . . . . . . . . . . . . 44Building Lists Using Patterns. . . . . . . . . . . . . . . . . . . . . . . . . . . . . 44Using Selection Lists . . . . . . . . . . . . . . . . . . . . . . . . . . . . . . . . . . 45Scrolling Through Lists. . . . . . . . . . . . . . . . . . . . . . . . . . . . . . . . . 47
Batch Job Statement Information . . . . . . . . . . . . . . . . . . . . . . . . . . . . 47Editing Components in ChangeMan ZMF . . . . . . . . . . . . . . . . . . . . . . . . 48
Ending an Edit Session. . . . . . . . . . . . . . . . . . . . . . . . . . . . . . . . . 48Automatic Edit Recovery . . . . . . . . . . . . . . . . . . . . . . . . . . . . . . . 49Manual Edit Recovery . . . . . . . . . . . . . . . . . . . . . . . . . . . . . . . . . 50
Exiting ChangeMan ZMF . . . . . . . . . . . . . . . . . . . . . . . . . . . . . . . . . . . 51
Chapter 3 Creating a Change Package . . . . . . . . . . . . . . . . . . . . . 53Change Package Overview . . . . . . . . . . . . . . . . . . . . . . . . . . . . . . . . . 54Rules for Creating Packages . . . . . . . . . . . . . . . . . . . . . . . . . . . . . . . . 54
Administration Settings for the Create Package Function . . . . . . . . . 54Exit Programs for the Create Package Function . . . . . . . . . . . . . . . . 55
Accessing Create Package Panels. . . . . . . . . . . . . . . . . . . . . . . . . . . . . 56Using the Menu Hierarchy: . . . . . . . . . . . . . . . . . . . . . . . . . . . . 56Using Direct Panel Access: . . . . . . . . . . . . . . . . . . . . . . . . . . . . 56Using the Change Package List: . . . . . . . . . . . . . . . . . . . . . . . . . . 56
Long, Short, Copy-Forward Methods . . . . . . . . . . . . . . . . . . . . . . . . . . 56Long Method. . . . . . . . . . . . . . . . . . . . . . . . . . . . . . . . . . . . . . . . 56Short Method . . . . . . . . . . . . . . . . . . . . . . . . . . . . . . . . . . . . . . . 57Copy Package Forward. . . . . . . . . . . . . . . . . . . . . . . . . . . . . . . . . 57
Dynamic Panels in Create Package. . . . . . . . . . . . . . . . . . . . . . . . . . . . 57
Table of Contents
User’s Guide 5
Defining Package Control Information . . . . . . . . . . . . . . . . . . . . . . . . . 58Providing a Package Description . . . . . . . . . . . . . . . . . . . . . . . . . . . . . 62Providing Installation Instructions . . . . . . . . . . . . . . . . . . . . . . . . . . . . 63Setting Job Scheduling Dependencies. . . . . . . . . . . . . . . . . . . . . . . . . . 65Adding Affected Applications . . . . . . . . . . . . . . . . . . . . . . . . . . . . . . . . 66Defining Complex/Super Package Information. . . . . . . . . . . . . . . . . . . . 67Entering Package User Information . . . . . . . . . . . . . . . . . . . . . . . . . . . 67Defining Install Date and Site Information . . . . . . . . . . . . . . . . . . . . . . 68
Chapter 4 Updating Change Package Information . . . . . . . . . . . . . . 71Rules for Update Package Information Functions . . . . . . . . . . . . . . . . . . 72
Administration Settings for the Update Package Information Function 72Exit Programs for the Update Package Function . . . . . . . . . . . . . . . 72
Accessing Package Information Update Functions . . . . . . . . . . . . . . . . . 73Using the Change Package List to Access Update Package Information Functions . . . . . . . . . . . . . . . . . . . . . . . . . . . . . . . . . . . . . . . . . . 74
Updating a ChangeMan ZMF Package . . . . . . . . . . . . . . . . . . . . . . . . . . 75
Chapter 5 Checking Out a Component . . . . . . . . . . . . . . . . . . . . . 77Rules for Checking Out Components . . . . . . . . . . . . . . . . . . . . . . . . . . 78
Administration Settings for Checkout Component Functions . . . . . . . 78Exit Programs for Checkout Component Functions. . . . . . . . . . . . . . 79
Accessing Checkout Component Functions . . . . . . . . . . . . . . . . . . . . . . 79Using the Change Package List to Access Checkout Functions . . . . . . 80
Checking Out from Baseline or Promotion Libraries . . . . . . . . . . . . . . . . 80Checking Out From Promotion Sites. . . . . . . . . . . . . . . . . . . . . . . . 84Replying to the Save Previous Version Panel. . . . . . . . . . . . . . . . . . 84
Checking Out Package Components . . . . . . . . . . . . . . . . . . . . . . . . . . . 86Concurrent Development and Checkout Conflicts . . . . . . . . . . . . . . . . . . 86
Chapter 6 Using Staging Versions . . . . . . . . . . . . . . . . . . . . . . . . 87Using Staging Versions . . . . . . . . . . . . . . . . . . . . . . . . . . . . . . . . . . . . 88How Staging Versions Work . . . . . . . . . . . . . . . . . . . . . . . . . . . . . . . . 88
Staging Version Installed . . . . . . . . . . . . . . . . . . . . . . . . . . . . . . . 88Staging Versions Enabled for Library Type . . . . . . . . . . . . . . . . . . . 88M+R Option Licensed. . . . . . . . . . . . . . . . . . . . . . . . . . . . . . . . . . 89
Rules, Restrictions, and Options . . . . . . . . . . . . . . . . . . . . . . . . . . . . . 89Creating Staging Versions. . . . . . . . . . . . . . . . . . . . . . . . . . . . . . . . . . 90
Adding A Component Change Description. . . . . . . . . . . . . . . . . . . . 90Replying to the Staging Version Prompt . . . . . . . . . . . . . . . . . . . . . 91
Managing Staging Versions . . . . . . . . . . . . . . . . . . . . . . . . . . . . . . . . . 92Version Control Panel. . . . . . . . . . . . . . . . . . . . . . . . . . . . . . . . . . 92Recovering A Staging Version . . . . . . . . . . . . . . . . . . . . . . . . . . . . 96Merging Staging Versions . . . . . . . . . . . . . . . . . . . . . . . . . . . . . . . 97
Chapter 7 Staging a Component . . . . . . . . . . . . . . . . . . . . . . . . . 105Staging Overview . . . . . . . . . . . . . . . . . . . . . . . . . . . . . . . . . . . . . . . 106Rules for Staging Components. . . . . . . . . . . . . . . . . . . . . . . . . . . . . . . 106
6 Serena® ChangeMan® ZMF 6.1
Table of Contents
Administration Settings for Stage Component Functions . . . . . . . . . 106Exit Programs for Stage Component Functions . . . . . . . . . . . . . . . . 107
Accessing Stage Component Functions . . . . . . . . . . . . . . . . . . . . . . . . . 108Using the Change Package List to Access Stage Functions . . . . . . . . 108Choosing a Stage Option . . . . . . . . . . . . . . . . . . . . . . . . . . . . . . . 108
Staging from Package . . . . . . . . . . . . . . . . . . . . . . . . . . . . . . . . . . . . 109Filtering With Component List Parameters. . . . . . . . . . . . . . . . . . . . . . . 121Staging from Development . . . . . . . . . . . . . . . . . . . . . . . . . . . . . . . . . 125
Mass Stage. . . . . . . . . . . . . . . . . . . . . . . . . . . . . . . . . . . . . . . . . 130Staging Like-Other Components . . . . . . . . . . . . . . . . . . . . . . . . . . . . . 133Staging in Batch Mode . . . . . . . . . . . . . . . . . . . . . . . . . . . . . . . . . . . . 134Adding New Components . . . . . . . . . . . . . . . . . . . . . . . . . . . . . . . . . . 134Locking and Unlocking Package Components. . . . . . . . . . . . . . . . . . . . . 135
Chapter 8 Recompiling Components. . . . . . . . . . . . . . . . . . . . . . . 137Overview of Recompiling. . . . . . . . . . . . . . . . . . . . . . . . . . . . . . . . . . . 138Rules for Recompiling Source . . . . . . . . . . . . . . . . . . . . . . . . . . . . . . . 138
Exit Programs for Recompile Source . . . . . . . . . . . . . . . . . . . . . . . 139Accessing Recompile Source Panels . . . . . . . . . . . . . . . . . . . . . . . . . . . 139Recompiling Source Components Online . . . . . . . . . . . . . . . . . . . . . . . . 140Mass Recompile Source Components in Batch . . . . . . . . . . . . . . . . . . . . 145
Chapter 9 Relinking Components. . . . . . . . . . . . . . . . . . . . . . . . . 149Overview of Relinking. . . . . . . . . . . . . . . . . . . . . . . . . . . . . . . . . . . . . 150Rules for Relinking Load . . . . . . . . . . . . . . . . . . . . . . . . . . . . . . . . . . . 150
Exit Programs for Relink Load . . . . . . . . . . . . . . . . . . . . . . . . . . . . 151Obtaining Build Information . . . . . . . . . . . . . . . . . . . . . . . . . . . . . 151
Accessing The Relink Load Panel . . . . . . . . . . . . . . . . . . . . . . . . . . . . . 151Relinking Load Components . . . . . . . . . . . . . . . . . . . . . . . . . . . . . . . . 152
Chapter 10 Utility Requests . . . . . . . . . . . . . . . . . . . . . . . . . . . . . 155Accessing Rename/Scratch Component Functions . . . . . . . . . . . . . . . . . 156Creating Utility Requests from Baseline . . . . . . . . . . . . . . . . . . . . . . . . 159Activating or Deleting Utility Requests from Packages . . . . . . . . . . . . . . 160Scratch/Rename Updates to Impact Analysis. . . . . . . . . . . . . . . . . . . . . 160Scratch/Rename Walkthrough . . . . . . . . . . . . . . . . . . . . . . . . . . . . . . . 162
Chapter 11 Auditing a Package . . . . . . . . . . . . . . . . . . . . . . . . . . . 175Introduction to Package Audit . . . . . . . . . . . . . . . . . . . . . . . . . . . . . . . 176Administrative Parameters that Affect an Audit . . . . . . . . . . . . . . . . . . . 176
Audit Level . . . . . . . . . . . . . . . . . . . . . . . . . . . . . . . . . . . . . . . . . 177Processing Participating Packages by Installation Date. . . . . . . . . . . 177Department Number . . . . . . . . . . . . . . . . . . . . . . . . . . . . . . . . . . 178Sequence Number Assigned to Like-Source and Like-Load Staging Libraries178SYSLIB EXCLUDE Field . . . . . . . . . . . . . . . . . . . . . . . . . . . . . . . . . 178
User Exits that Affect a Package Audit . . . . . . . . . . . . . . . . . . . . . . . . . 178Auditing a Package Attached to a Release. . . . . . . . . . . . . . . . . . . . . . . 179

Table of Contents
User’s Guide 7
Requesting An Audit. . . . . . . . . . . . . . . . . . . . . . . . . . . . . . . . . . . . . . 180Audit Report Contents . . . . . . . . . . . . . . . . . . . . . . . . . . . . . . . . . . . . 185
Section Header . . . . . . . . . . . . . . . . . . . . . . . . . . . . . . . . . . . . . . 185Description of Member from Library Directory Entry . . . . . . . . . . . . 186History of Changes for Audited Components . . . . . . . . . . . . . . . . . . 187Copybooks Found within Source Code . . . . . . . . . . . . . . . . . . . . . . 187Static Subroutines Called within Load Members . . . . . . . . . . . . . . . 188Legend and Summary Report . . . . . . . . . . . . . . . . . . . . . . . . . . . . 189Recommendation Summary Report . . . . . . . . . . . . . . . . . . . . . . . . 191
Audit Report Field Descriptions . . . . . . . . . . . . . . . . . . . . . . . . . . . . . . 191Out-of-Sync Conditions. . . . . . . . . . . . . . . . . . . . . . . . . . . . . . . . . . . . 193Accessing the Audit Report . . . . . . . . . . . . . . . . . . . . . . . . . . . . . . . . . 199Performing a Cross-Application Audit . . . . . . . . . . . . . . . . . . . . . . . . . . 199Fixing Out-of-Sync Conditions--a Scenario . . . . . . . . . . . . . . . . . . . . . . 201
The Sample Application . . . . . . . . . . . . . . . . . . . . . . . . . . . . . . . . 201Requesting an Audit . . . . . . . . . . . . . . . . . . . . . . . . . . . . . . . . . . 201Examining the Audit Report . . . . . . . . . . . . . . . . . . . . . . . . . . . . . 203Resolving the SYNCH0! Conditions in the Example . . . . . . . . . . . . . 204Resolving the SYNCH7! Conditions in the Example . . . . . . . . . . . . . 205Running Another Audit . . . . . . . . . . . . . . . . . . . . . . . . . . . . . . . . . 208
Using Auto Resolve . . . . . . . . . . . . . . . . . . . . . . . . . . . . . . . . . . . . . . 209Overview . . . . . . . . . . . . . . . . . . . . . . . . . . . . . . . . . . . . . . . . . . 209Audit autoresolve option - FLOW OF CONTROL . . . . . . . . . . . . . . . . 211Application (how the feature is used). . . . . . . . . . . . . . . . . . . . . . . 212Syntax of Autoresolve Parameters. . . . . . . . . . . . . . . . . . . . . . . . . 215Autoresolve Samples . . . . . . . . . . . . . . . . . . . . . . . . . . . . . . . . . . 216
Resolving Same-Named Members in Multiple (PDS) Libraries . . . . . . . . . 219Audit Diagnostic Tracing . . . . . . . . . . . . . . . . . . . . . . . . . . . . . . . . . . . 219
Chapter 12 Freezing a Package. . . . . . . . . . . . . . . . . . . . . . . . . . . 223Rules for Freezing Packages . . . . . . . . . . . . . . . . . . . . . . . . . . . . . . . . 224
Audit Level . . . . . . . . . . . . . . . . . . . . . . . . . . . . . . . . . . . . . . . . . 224Administration Settings for Freeze Package Functions . . . . . . . . . . . 225Exit Programs for Freeze Package Functions . . . . . . . . . . . . . . . . . . 226
Accessing Freeze Package Functions . . . . . . . . . . . . . . . . . . . . . . . . . . 226Using the Change Package List to Access Freeze Functions. . . . . . . . 226
Freezing a Package Online . . . . . . . . . . . . . . . . . . . . . . . . . . . . . . . . . 227Freezing a Package in Batch . . . . . . . . . . . . . . . . . . . . . . . . . . . . . . . . 227Unfreezing and Refreezing Components . . . . . . . . . . . . . . . . . . . . . . . . 228
Selective Unfreeze and Refreeze Source and Non-Source . . . . . . . . . 230Selective Unfreeze and Refreeze Utility Requests . . . . . . . . . . . . . . 233Selective Unfreeze and Refreeze Online Forms . . . . . . . . . . . . . . . . 235
Resetting the Freeze-In-Progress Indicator . . . . . . . . . . . . . . . . . . . . . . 236Resubmitting Install JCL Build Request . . . . . . . . . . . . . . . . . . . . . . . . . 237
Chapter 13 Reverting a Package . . . . . . . . . . . . . . . . . . . . . . . . . . 239Rules for Reverting a Package . . . . . . . . . . . . . . . . . . . . . . . . . . . . . . . 240Reverting a Change Package . . . . . . . . . . . . . . . . . . . . . . . . . . . . . . . . 240

8 Serena® ChangeMan® ZMF 6.1
Table of Contents
Reverting in an All Environment . . . . . . . . . . . . . . . . . . . . . . . . . . 240Reverting in a Remote Environment . . . . . . . . . . . . . . . . . . . . . . . 241Reverting in a D/P Environment . . . . . . . . . . . . . . . . . . . . . . . . . . 241
Chapter 14 Promoting And Demoting A Package . . . . . . . . . . . . . . . 243How Does Promotion Work? . . . . . . . . . . . . . . . . . . . . . . . . . . . . . . . . 244Promotion Library Cleanup . . . . . . . . . . . . . . . . . . . . . . . . . . . . . . . . . 244Promotion Restrictions, Rules, and Options . . . . . . . . . . . . . . . . . . . . . . 245
Promotion Security . . . . . . . . . . . . . . . . . . . . . . . . . . . . . . . . . . . 245Promotion Rule . . . . . . . . . . . . . . . . . . . . . . . . . . . . . . . . . . . . . . 245Promotion Rule 0. . . . . . . . . . . . . . . . . . . . . . . . . . . . . . . . . . . . . 247First Promote . . . . . . . . . . . . . . . . . . . . . . . . . . . . . . . . . . . . . . . 248Other Restrictions And Options . . . . . . . . . . . . . . . . . . . . . . . . . . . 248
Promotion Paths . . . . . . . . . . . . . . . . . . . . . . . . . . . . . . . . . . . . . . . . 249Promotion Libraries In SYSLIB Concatenations . . . . . . . . . . . . . . . . . . . 249Promoting Packages And Components . . . . . . . . . . . . . . . . . . . . . . . . . 249
Selecting A Promotion Site And Options . . . . . . . . . . . . . . . . . . . . . 249Full Promote . . . . . . . . . . . . . . . . . . . . . . . . . . . . . . . . . . . . . . . . 253Selective Promote . . . . . . . . . . . . . . . . . . . . . . . . . . . . . . . . . . . . 255Check for Potential Overlays . . . . . . . . . . . . . . . . . . . . . . . . . . . . . 258
Demoting Packages and Components . . . . . . . . . . . . . . . . . . . . . . . . . . 262Selecting A Demotion Site And Options . . . . . . . . . . . . . . . . . . . . . 262Full Demote . . . . . . . . . . . . . . . . . . . . . . . . . . . . . . . . . . . . . . . . 265Selective Demote . . . . . . . . . . . . . . . . . . . . . . . . . . . . . . . . . . . . 265
Displaying Promotion/Demotion History For A Site . . . . . . . . . . . . . . . . . 267
Chapter 15 Approving or Rejecting a Package . . . . . . . . . . . . . . . . . 271Overview of Package Approval. . . . . . . . . . . . . . . . . . . . . . . . . . . . . . . 272Rules for Approving and Rejecting Packages . . . . . . . . . . . . . . . . . . . . . 272
Authorization for Approve Package Functions . . . . . . . . . . . . . . . . . 273Administration Settings for Approve Package Functions . . . . . . . . . . 273Exit Programs for Approve Package Functions. . . . . . . . . . . . . . . . . 274
Accessing Approve Package Functions . . . . . . . . . . . . . . . . . . . . . . . . . 274Using the Change Package List to Access Approve Functions . . . . . . 274
Selecting Packages for Approve Functions. . . . . . . . . . . . . . . . . . . . . . . 275Approving or Rejecting a Package . . . . . . . . . . . . . . . . . . . . . . . . . . . . 279
Approve Package. . . . . . . . . . . . . . . . . . . . . . . . . . . . . . . . . . . . . 281Reject Package . . . . . . . . . . . . . . . . . . . . . . . . . . . . . . . . . . . . . . 281Checkoff List. . . . . . . . . . . . . . . . . . . . . . . . . . . . . . . . . . . . . . . . 282Review Package . . . . . . . . . . . . . . . . . . . . . . . . . . . . . . . . . . . . . 282
Displaying Reject Reasons . . . . . . . . . . . . . . . . . . . . . . . . . . . . . . . . . 283Resetting the Approval-In-Progress Indicator . . . . . . . . . . . . . . . . . . . . 283Resubmitting Install JCL Build Request . . . . . . . . . . . . . . . . . . . . . . . . . 284
Chapter 16 Installing and Baselining a Package . . . . . . . . . . . . . . . . 285Overview of File Tailoring for Install JCL . . . . . . . . . . . . . . . . . . . . . . . . 286Distribution and Installation of the Change Package. . . . . . . . . . . . . . . . 287
Distribution to Remote Sites . . . . . . . . . . . . . . . . . . . . . . . . . . . . . 287

Table of Contents
User’s Guide 9
Jobs to Distribute and Install the Change Package . . . . . . . . . . . . . . . . . 288
Chapter 17 Backing Out a Change Package . . . . . . . . . . . . . . . . . . . 299Overview of Backout Processing . . . . . . . . . . . . . . . . . . . . . . . . . . . . . 300Rules for Backing Out Packages. . . . . . . . . . . . . . . . . . . . . . . . . . . . . . 300
Backout and Temporary Packages . . . . . . . . . . . . . . . . . . . . . . . . . 300Accessing Backout Package Panels. . . . . . . . . . . . . . . . . . . . . . . . . . . . 301Backing out an Installed Change Package . . . . . . . . . . . . . . . . . . . . . . . 301
Backing Out in an All Environment . . . . . . . . . . . . . . . . . . . . . . . . 301Backing Out in a Remote Environment . . . . . . . . . . . . . . . . . . . . . . 302Backing Out in a DP/P Environment . . . . . . . . . . . . . . . . . . . . . . . . 302
Using Backout to undo Scratch/Rename. . . . . . . . . . . . . . . . . . . . . . . . 305Impact Analysis Considerations. . . . . . . . . . . . . . . . . . . . . . . . . . . 315
Chapter 18 Memo Deleting and Undeleting Packages . . . . . . . . . . . . 317Overview of the Memo-Delete Function . . . . . . . . . . . . . . . . . . . . . . . . 318Memo-Delete and Undelete Package Rules . . . . . . . . . . . . . . . . . . . . . . 318
Administration Settings for Memo-Delete Package. . . . . . . . . . . . . . 318Accessing Memo-Delete and Undelete Functions . . . . . . . . . . . . . . . . . . 319
Using the Change Package List to Access Delete Functions . . . . . . . . 319Memo Deleting a Change Package . . . . . . . . . . . . . . . . . . . . . . . . . . . . 319Undelete a Memo-Deleted Change Package. . . . . . . . . . . . . . . . . . . . . . 320Using Housekeeping to Delete Packages, Staging Datasets, and Component History Records . . . . . . . . . . . . . . . . . . . . . . . . . . . . . . . . . . . . . . . . . . . . . . 321
Chapter 19 Querying Packages and Components . . . . . . . . . . . . . . . 325Accessing the Query Options Menu . . . . . . . . . . . . . . . . . . . . . . . . . . . 326Querying Change Packages . . . . . . . . . . . . . . . . . . . . . . . . . . . . . . . . . 326
Specifying Filter Criteria . . . . . . . . . . . . . . . . . . . . . . . . . . . . . . . . 326Using the Extended Search Criteria Panel . . . . . . . . . . . . . . . . . . . . 329Browsing the Query Package List. . . . . . . . . . . . . . . . . . . . . . . . . . 330Displaying Detailed Package Information . . . . . . . . . . . . . . . . . . . . 331
Querying Components . . . . . . . . . . . . . . . . . . . . . . . . . . . . . . . . . . . . 332Querying Cross-Application Impact Analysis Data . . . . . . . . . . . . . . . . . 334
View of Component Relationships . . . . . . . . . . . . . . . . . . . . . . . . . 334Accessing the Impact Analysis of Subordinate Components Panel . . . 335Specifying Search Criteria . . . . . . . . . . . . . . . . . . . . . . . . . . . . . . 336Specifying Results Filter Criteria . . . . . . . . . . . . . . . . . . . . . . . . . . 340Wildcarding . . . . . . . . . . . . . . . . . . . . . . . . . . . . . . . . . . . . . . . . 340Displaying Application:Library Types for Components that Share a Common Baseline Library . . . . . . . . . . . . . . . . . . . . . . . . . . . . . . . . . . . . . 341Displaying Impact Analysis Results . . . . . . . . . . . . . . . . . . . . . . . . 341Scenario: Displaying Components that Reference a Copybook . . . . . 342Usage Scenario: Filtering the Results. . . . . . . . . . . . . . . . . . . . . . . 343Usage Scenario: Displaying Components that Reference a Data Set Name344Usage Scenario: Displaying Components that Reference a Statically Link-Edited Subprogram . . . . . . . . . . . . . . . . . . . . . . . . . . . . . . . . . . . 346

10 Serena® ChangeMan® ZMF 6.1
Table of Contents
Usage Scenario: Displaying JCL and Procedure Library Members that Reference a Program . . . . . . . . . . . . . . . . . . . . . . . . . . . . . . . . . . 347Usage Scenario: Displaying JCL and Procedure Library Members that Reference a Procedure . . . . . . . . . . . . . . . . . . . . . . . . . . . . . . . . . 348Displaying the Subordinate Component List . . . . . . . . . . . . . . . . . . 349
Getting a Cross-Application Bill of Materials . . . . . . . . . . . . . . . . . . . . . 351Specifying Search Criteria . . . . . . . . . . . . . . . . . . . . . . . . . . . . . . 352Displaying Bill of Materials Search Results . . . . . . . . . . . . . . . . . . . 355Usage Scenario: Displaying Data Set Names that Are Referenced in JCL356Scenario: Displaying the Statically Linked Subprograms that a Load Module References . . . . . . . . . . . . . . . . . . . . . . . . . . . . . . . . . . . . . . . . . 358Scenario: Listing the Names of Programs that Are Referenced in JCL. 359Scenario: Listing the Names of Procedures that Are Referenced in JCL 361
Querying Approved Packages Not in the Scheduler . . . . . . . . . . . . . . . . 362
Chapter 20 Browsing Compressed Listings . . . . . . . . . . . . . . . . . . . 363About Compressed Listings . . . . . . . . . . . . . . . . . . . . . . . . . . . . . . . . . 364Accessing Browse Listing Panels . . . . . . . . . . . . . . . . . . . . . . . . . . . . . 364Browsing Compressed Listings. . . . . . . . . . . . . . . . . . . . . . . . . . . . . . . 364
Chapter 21 Using Baseline Browse Functions . . . . . . . . . . . . . . . . . 371Accessing the Baseline Browse/Print Facility . . . . . . . . . . . . . . . . . . . . . 372Editing Components in Browse Mode . . . . . . . . . . . . . . . . . . . . . . . . . . 377Copy Components to Target Data Sets . . . . . . . . . . . . . . . . . . . . . . . . . 377Printing Copies of Components . . . . . . . . . . . . . . . . . . . . . . . . . . . . . . 378Print Copies of Components with Expanded Copybooks . . . . . . . . . . . . . 378
Chapter 22 Cross-Application Scan . . . . . . . . . . . . . . . . . . . . . . . . 379Requesting a Scan . . . . . . . . . . . . . . . . . . . . . . . . . . . . . . . . . . . . . . . 380Selecting Applications. . . . . . . . . . . . . . . . . . . . . . . . . . . . . . . . . . . . . 383Selecting Library types . . . . . . . . . . . . . . . . . . . . . . . . . . . . . . . . . . . . 384Scenario: Scanning for a Data String . . . . . . . . . . . . . . . . . . . . . . . . . . 385Scenario: Listing Members Only in Scan Output. . . . . . . . . . . . . . . . . . . 388Scenario: Scanning for Dependencies. . . . . . . . . . . . . . . . . . . . . . . . . . 392Scenario: Requesting a Batch Scan . . . . . . . . . . . . . . . . . . . . . . . . . . . 395Batch Output. . . . . . . . . . . . . . . . . . . . . . . . . . . . . . . . . . . . . . . . . . . 398Reviewing Batch SYSIN Input . . . . . . . . . . . . . . . . . . . . . . . . . . . . . . . 399
Chapter 23 Comparing Staging to Baseline or Promotion . . . . . . . . . . 403Comparing Staging Libraries to Baseline or Promotion . . . . . . . . . . . . . . 404Comparing to Promotion Libraries . . . . . . . . . . . . . . . . . . . . . . . . . . . . 407Printing, Deleting or Keeping Comparison Information . . . . . . . . . . . . . . 408
Chapter 24 Running Reports . . . . . . . . . . . . . . . . . . . . . . . . . . . . 411Submitting General Batch Reports Online . . . . . . . . . . . . . . . . . . . . . . . 412
Viewing Report Output. . . . . . . . . . . . . . . . . . . . . . . . . . . . . . . . . 416Submitting a Batch Job to Generate a Report . . . . . . . . . . . . . . . . . . . . 416
Notes on the Batch JCL . . . . . . . . . . . . . . . . . . . . . . . . . . . . . . . . 417
Table of Contents
User’s Guide 11
Submitting the DB2 Object Dependency Report . . . . . . . . . . . . . . . . . . . 429
Chapter 25 Miscellaneous Functions . . . . . . . . . . . . . . . . . . . . . . . 431Browsing the Global Notification File. . . . . . . . . . . . . . . . . . . . . . . . . . . 432Compressing Staging Libraries . . . . . . . . . . . . . . . . . . . . . . . . . . . . . . 433Displaying the Component User Work List. . . . . . . . . . . . . . . . . . . . . . . 435
Displaying the Userid Work List for All Package Components . . . . . . 435Displaying the Userid Work List for One Package Component . . . . . . 436
Browsing and Printing the Activity Log . . . . . . . . . . . . . . . . . . . . . . . . . 437Accessing Activity Log Panels . . . . . . . . . . . . . . . . . . . . . . . . . . . . 437Browsing the Current VSAM Log File Online . . . . . . . . . . . . . . . . . . 438Running Batch Report Using One Log Backup . . . . . . . . . . . . . . . . . 441Running Batch Report Using One or More Log Backups . . . . . . . . . . 442
Chapter 26 Managing Packages With The Package List . . . . . . . . . . . 445Selecting Packages for the Package List . . . . . . . . . . . . . . . . . . . . . . . . 446Change Package List Panel . . . . . . . . . . . . . . . . . . . . . . . . . . . . . . . . . 450Invoking Package Functions from the Package List. . . . . . . . . . . . . . . . . 453Package List Options . . . . . . . . . . . . . . . . . . . . . . . . . . . . . . . . . . . . . 454
Appendix A Package Category Panels . . . . . . . . . . . . . . . . . . . . . . . 457Query: Control Information. . . . . . . . . . . . . . . . . . . . . . . . . . . . . . . . . 458Query: Package Description . . . . . . . . . . . . . . . . . . . . . . . . . . . . . . . . 458Query: Installation Instructions . . . . . . . . . . . . . . . . . . . . . . . . . . . . . . 459Non-Source. . . . . . . . . . . . . . . . . . . . . . . . . . . . . . . . . . . . . . . . . . . . 459Source . . . . . . . . . . . . . . . . . . . . . . . . . . . . . . . . . . . . . . . . . . . . . . . 460Source and Load Relationship . . . . . . . . . . . . . . . . . . . . . . . . . . . . . . . 461Approval List . . . . . . . . . . . . . . . . . . . . . . . . . . . . . . . . . . . . . . . . . . . 462Site and Install Date Information. . . . . . . . . . . . . . . . . . . . . . . . . . . . . 462Site Activities Date and Time. . . . . . . . . . . . . . . . . . . . . . . . . . . . . . . . 463Custom Forms . . . . . . . . . . . . . . . . . . . . . . . . . . . . . . . . . . . . . . . . . . 463Status Start Date and Time. . . . . . . . . . . . . . . . . . . . . . . . . . . . . . . . . 464Revert Reasons . . . . . . . . . . . . . . . . . . . . . . . . . . . . . . . . . . . . . . . . . 464Backout Reasons . . . . . . . . . . . . . . . . . . . . . . . . . . . . . . . . . . . . . . . . 465Promotion History . . . . . . . . . . . . . . . . . . . . . . . . . . . . . . . . . . . . . . . 466Promotion Libraries . . . . . . . . . . . . . . . . . . . . . . . . . . . . . . . . . . . . . . 468Development Staging Libraries . . . . . . . . . . . . . . . . . . . . . . . . . . . . . . 470Production Staging Libraries . . . . . . . . . . . . . . . . . . . . . . . . . . . . . . . . 470Production Libraries . . . . . . . . . . . . . . . . . . . . . . . . . . . . . . . . . . . . . . 471Baseline Libraries. . . . . . . . . . . . . . . . . . . . . . . . . . . . . . . . . . . . . . . . 472
Appendix B Application Impact Analysis . . . . . . . . . . . . . . . . . . . . . 473Impact Analysis of Subordinate Components. . . . . . . . . . . . . . . . . . . . . 473Accessing the Impact Analysis Panel . . . . . . . . . . . . . . . . . . . . . . . . . . 474
Glossary . . . . . . . . . . . . . . . . . . . . . . . . . . . . . . . . . . 479
Index. . . . . . . . . . . . . . . . . . . . . . . . . . . . . . . . . . . . 487

User’s Guide 19
Chapter 1Introduction
Serena® ChangeMan® ZMF is a comprehensive system that provides reliable and streamlined implementation of software changes in z/OS environments. It manages and automates the migration of software changes from a development environment to any test environment and to the production environment.
Features of ChangeMan ZMF 20
What is a Change Package? 20
Package Lifecycle 20
Inside ChangeMan ZMF Development 22
ChangeMan ZMF Library Environment 29
Baseline Libraries and Delta Decks 33
Backout Management Facilities 33
Emergency Changes 33
Storage Name Considerations 33
Build Processing Controls 34
20 Serena® ChangeMan® ZMF 6.1
Chapter 1 Introduction
Features of ChangeMan ZMF
Change package architecture guarantees the coordination of changed elements
Automated job builds, installation scheduling, and rollback simplify implementation
Version control detects discrepancies and out-of-sync component relationships
Concurrent development is managed to serialize change
Merge-and-reconcile option converges parallel lines of development
Automated notifications keep developers and managers informed of change actions
Built-in approval process ensures accountability
Automated business rules enforce change policies at a controlled level of flexibility
Library management supports CA-Librarian®, CA-Panvalet®, or IBM® PDS and PDSE
Database management options automate generation of IBM DB2® and IMS™ elements
Customizable user exits and custom user variables add flexibility
XML Services interface supports customized data interchange and product integrations
Integrated network facility coordinates change across multiple servers & sites
Full suite of online and batch query and reporting capabilities track software in motion
Historical information is maintained in a single repository.
What is a Change Package?
The heart of ChangeMan ZMF is the change package. A change package is a unit of work within a software development or maintenance project. It is managed as a unit through a defined lifecycle while software changes are in motion.
A change package consists of descriptive information, control parameters, and history information stored in VSAM files. It also includes a set of libraries that belong exclusively to the change package and which contain the software components being changed. A change package is a secure development environment for project components, with access managed by ChangeMan ZMF using rules stored in your security system.
A change package and the components in the package are guided through your system development lifecycle by the ChangeMan ZMF package lifecycle.
Package Lifecycle
The change package lifecycle is a rule-based process consisting of actions that you perform and actions automatically initiated by ChangeMan ZMF. These actions guarantee the integrity of changes you make to your production application system. These actions

Package Lifecycle
User’s Guide 21
begin with Create Package and usually end with Baseline Ripple. Authority to perform any of these actions is controlled by ChangeMan ZMF and defined in your security system.
The following actions are defined in the package lifecycle:Figure 1:
Create Package is the first step in the package lifecycle. A series of ISPF input panels request information that describes the change package and sets control parameters that determine how the package behaves during the rest of the package lifecycle.
Checkout Component copies components from a baseline or promotion library into a staging library allocated exclusively to your package. You can also check out components to a personal library, which is tracked by ChangeMan ZMF.
Stage Component is where you edit and build package components to meet project requirements. Source components are processed through predefined build processes to create executables and build listings. You can also stage components into your package from libraries outside of ChangeMan ZMF to bring those components under the control of ChangeMan ZMF.
Package Audit detects problems that will occur in production if you install your package now in its current condition. Audit detects synchronization problems in relationships between components in your change package and synchronization problems between package components, components in participating packages, components in promotion, and baseline components.
Freeze Package locks package information and package components to prevent further changes and to ensure that the components you install into production are the same as the components you tested. You can selectively unfreeze, change, audit, and refreeze components to fix problems found in testing.
Promote Package copies package components from staging libraries into test libraries. As a package is promoted from one testing level to the next, package components are removed from libraries in the prior level and copied from staging libraries into test libraries for the next level. Demote Package removes package components from test libraries.
Approve Package allows predefined approvers to review package information, components, and test results and approve or reject the package for install. An approver who rejects the package must enter text Reject Reasons.
Revert Package removes all previously entered approvals, unlocks package information and components, and reopens the package for development.
Distribute Package starts automatically when all required package approvals are received for a package that is scheduled for install at a remote site. The package is transmitted to the remote site, where package records are added to a ChangeMan ZMF P instance running there. Package staging libraries are allocated and populated, then the package is added to the P instance internal scheduler.
Install Package starts automatically, either when the package install date and time arrive, or when the last approval is entered. If the application has production libraries that are separate from baseline libraries, current production modules are backed up and new versions are copied from package staging libraries into the production libraries.
Baseline Package starts automatically after a package is installed. This process ripples current and prior versions of package components down in the stack of prior baseline versions, then copies package components into the baseline libraries as the new current version.

22 Serena® ChangeMan® ZMF 6.1
Chapter 1 Introduction
Backout Package removes package components from production libraries and restores the backups made during package installation. Package components that are the current version in baseline libraries are removed, and components are reverse rippled up the stack of prior baseline versions to restore the old current version. This process includes components that have been scratched.
Inside ChangeMan ZMF Development
Behind the displayed ChangeMan ZMF panels, there are jobs being performed that ensure the smooth flow of enhancements to each application maintained by development analysts.
Create
Create is a first step of the ChangeMan ZMF lifecycle. After you create a change package, ChangeMan ZMF allocates staging libraries as needed. The data set names of the staging libraries reflect the application mnemonic chosen for your application, the package number assigned for this change, and the type of components placed in the library; for example, demo.cmnstage.#000023.src. The Global Administrator decides on the format of the data set name. The package information is recorded on the package master along with the TSO ID of the creator. A record of this event (package creation) is placed on the log.
Checkout Process
Checkout is the process of copying components from the baseline library (any level back or from promotion libraries) to a staging library or a development area outside of ChangeMan ZMF for modification in a change package. You can check out online in the foreground or in background as a batch job. If you check out in background mode, ChangeMan ZMF asks you to verify (initially type or update) the jobcard statements needed to perform the batch job.
When you check out a component, the standard ISPF statistics are carried forward and the version number (the vv portion of vv.mm) is incremented. ChangeMan ZMF adds the check out information to the statistics that make up the component history. A record of this event (checkout component) is placed on the Activity Log. Anyone can browse this log for information not only on checkout actions, but also other ChangeMan ZMF activities.
When you associate the checkout to a valid change package ID, the component name is added to the package staging list. This means that when you select the stage option from the Build Options Menu and select to stage from the Package Driven option, the component is already listed with a checkout status.
Staging Process
Staging introduces components into ChangeMan ZMF by copying them from development or personal libraries into ChangeMan ZMF staging libraries. All staging library components must be associated with pre-defined change packages.

Inside ChangeMan ZMF Development
User’s Guide 23
Depending on how your administrator configures staging parameters for your site, you can either stage any newly created application component into any change package, or only components previously associated with (that is, checked out to) change packages.
For instance, your administrator may want to restrict new development on an application and designate that only existing components be maintained. The administrator can restrict the staging process so that only components previously associated with change packages can be staged back into the change cycle.
Before staging, verify that your administrator has:
Assigned compile procedures for each language type you intend to stage.
Assigned appropriate compilers during installation of ChangeMan ZMF.
Staging libraries contain components of the same type. The following table lists component types that ChangeMan ZMF recognizes and considers when staging.
Type Description
SRC Source modules
LOD Load modules
JCL JCL
DOC Documentation
CPY Copybooks
LCT Linkage Control Cards
LIKE SRCLIKE LODLIKE CPY
Assign this type to SRC, LOD, or CPY components when you want to stage components of same type into separate staging libraries.
LIKE N Like-NCL: NCAL load subroutines. Once staged they are concatenated in the SYSLIB for links within the same package (if the lib type is present in the package).
LIKE O Like-OBJ: Object code subroutines. Once staged they are concatenated in the SYSLIB for links within the same package (if the lib type is present in the package).
OTHER Assign this type to components when you want to customize processing of a component.
PRC Compiling procedures

24 Serena® ChangeMan® ZMF 6.1
Chapter 1 Introduction
You can stage components online, or stage them in batch.
Auditing
When you audit a package’s staging libraries, ChangeMan ZMF analyzes and reports on every module contained in your change package with respect to the baseline versions. The Audit function also validates all copies and program calls, producing a report listing all duplicates and out-of-sync conditions. (Audit also includes copybook promotion libraries when generating the hash token table.)
Freezing Packages
When you are ready to freeze the package for promotion (optional) and approval (approval is required), ChangeMan ZMF checks two things:
Are all components in an Active status?
During the stage process, if the component is successfully copied into the appropriate staging library and if source components have compiled, link/edited, and their bind has completed successfully, then ChangeMan ZMF changes the status of the component to Active.
Did the package pass the audit?
The audit level selected by the application's administrator must not be exceeded.
When the package is successfully frozen, the status of the package changes from DEV to FRZ, which locks out anyone from staging into the package libraries. A record of this event (freeze package) is placed in the Activity Log.
Promoting Packages and Components
The Promotion facility allows you to set up intermediate environments or promotion levels where you can perform quality assurance, unit, and system tests on packages and components.
Promoting involves migrating change packages or components through these intermediate environments. Demoting is the deleting of components logically or physically from these environments.
Staging Type Enables User to Do the Following:
Online Use confirmation panels to review relevant parameters and compile procedures prior to staging a component.
Use language assumption (a feature that automatically assigns language types) and designated compile procedures when staging source components.
Batch Stage multiple components simultaneously.
Stage complete libraries of components.
By-pass confirmation panels to stage components faster.
Use the language assumption feature.
Inside ChangeMan ZMF Development
User’s Guide 25
Before using the Promotion facility, your application administrator must first set up:
Promotion levels. You can have one or more levels of promotion, each level having one or more libraries associated with it.
Promotion process. You can promote packages and components online or in batch.
Promotion authorization. Each promotion level can be secured. Your administrator can build rules in ChangeMan ZMF and your security system that designates which users can promote a package to a specific level.
Generally, you promote packages from staging libraries to specified promotion levels.
The following functional characteristics of the Promotion facility may affect decisions you make about when and how to promote and demote packages and components:
After components are copied from package staging libraries, they still reside in the staging libraries. This implies that you should only include executable libraries in your promotion environment. Source modules do not have to be promoted because they will be retained in the package libraries.
Promotion from level to level may be a logical copy or a logical move; that is, the components may remain in the previous environment, or they may be deleted from the previous environment upon promotion.
Each time you promote (or demote), ChangeMan ZMF updates the statistics constituting the component history. A record of this event (promote package) is placed in the Activity Log.
Staging skeletons for source components may reference promotion copybook libraries as part of the copybook concatenation. Therefore, if copybooks are promoted, they may be made available to source compilation of other packages.
ChangeMan ZMF does not require the use of promotion, even if it has been set up by an administrator. Moreover, upon completion of the approval process, the package is distributed (and installed) regardless of the level of promotion reached. This gives you the flexibility to alter the path of migration of each package. However, if you do want to require a promotion path, you can administratively link your promotion security to your approval security. This technique allows a promoter to submit approval of a package once it has been successfully promoted and tested.
Approving Packages
When a person accesses the ChangeMan ZMF panels, that person’s TSO ID is passed along and used to determine which functions are available. Approval may be performed only by those TSO IDs associated to the entity names that the application administrator specified as approvers.
The approval process consists of browsing the package information and staging libraries for quality control and standards and selecting to Approve (or Reject) the package.
A record of this event (Package Approval) is placed in the Activity Log. The package status is changed from FRZ to APR.
All approvals for a package must be gathered before ChangeMan ZMF Installs a package. In fact, the final approval of a package actually initiates or schedules the package Installation.
A change package must be in frozen (FRZ) status to be approved or rejected.
26 Serena® ChangeMan® ZMF 6.1
Chapter 1 Introduction
In general, a package’s components cannot be modified while in frozen status. This implies that a package’s components cannot be modified while approvals are being gathered. Components can be selectively unfrozen, modified, and refrozen while the package is still in frozen status.
There can be multiple levels of approvals. ChangeMan ZMF requires at least one approval, but allows administrators to set up more than one level.
Multiple levels of approval can be set up in a hierarchy. ChangeMan ZMF enforces an order of approvals, and does not allow approvals to be gathered out of order.
More than one User ID can be authorized to satisfy a given approval level. This is set up in your security system.
Your application administrator may have set up approval notifications. Each approval level can be configured with multiple User ID notifications. The User IDs that are notified may or may not coincide with the User IDs that can actually satisfy the approval.
Different packages may have different approvals. ChangeMan ZMF allows administrators to set up separate approval Lists by application and by time of day. ChangeMan ZMF attaches an abbreviated approval list to unplanned packages created outside of normal business hours, and a complete approval list to all other packages. Your administrator may have tailored a user exit to customize approvals lists further.
ChangeMan ZMF provides special processing for packages with an abbreviated approval list attached. These approvals must be gathered before the package can be Installed. Once installed, the package continues to be available for approval or rejection by approvers on the complete approval list. This allows for a post-installation approval strategy.
Packages can be promoted and demoted while approvals are being gathered. The final approval of a package Installs it, regardless of the promotion status. Therefore, the final approver of a package should be sensitive to the promotion activities of packages.
If a package is rejected, it must be reverted if it is to be updated to conform to the reject reasons. A package revert action resets the rejection and places the package in development status. The package must then be frozen again to reinitiate approvals.
If a package was promoted before it was rejected, it must be demoted before it can be reverted.
Package revert resets any gathered approvals. This is true regardless of whether or not the package is first rejected.
Installation
Installation depends on whether or not an internal scheduler is set up by the global administrator, or if the Install job JCL has been modified. There are four variations on Installation:
If no scheduling system is specified, the package goes through the installation process immediately.
If the Install job JCL is set up with a TYPRUN=HOLD, the user releases the job when they are ready to install.
If a scheduling system other than the ChangeMan ZMF internal scheduler is specified, then ChangeMan ZMF performs a batch interface to add the install job to the

Inside ChangeMan ZMF Development
User’s Guide 27
scheduler's list. The operator, however, must still demand the job for the package to be installed.
If ChangeMan ZMF is the scheduler, it checks the package master every few minutes for any packages that are ready and installs those that meet the criteria.
Backing Up
Backup is the first job to be performed when installation time arrives. This job copies the production libraries (only those components that are about to be overlaid with updates) to a backup set in case they are needed to back out the incoming enhancement. Next, the contents of the change package staging libraries are copied into production libraries. A record of this event (package installation) is placed on the Activity Log. This occurs each time the package is Installed at one of the remote sites.
Once the package is verified as Installed in all requested sites, the following steps are performed:
1 The package status is changed from DIS to INS (or from APR to INS if there are no remote sites).
2 A job is sent to the development center to clear out the last level of promotion reached, and to ripple the baseline libraries for that application.
3 The package status is changed from INS to BAS.
4 A record of the baseline ripple is placed in the log.
Assume that the following is true:
An application maintains up to three versions of its baseline library software: current(0), -1, and -2.
You want to update the baseline libraries with a change package in which component A is changed, component B is scratched, and component C is added.
There already is a -1 and -2 version of component A. Thus, the baseline library is updated as follows:
• The -1 version of component A is copied to overlay the -2 version of component A.
• The 0 version of component A is copied to overlay the -1 version of component A.
• The newly-installed version of component A is copied from the production staging libraries to overlay the baseline library 0 version of A.
• Component B is scratched.
• The newly installed version of component C is copied from staging libraries and added to the baseline 0 libraries.
NOTE Only the various versions of changed software components are updated; ChangeMan ZMF ripples the changes through the versions of an application's baseline libraries.

28 Serena® ChangeMan® ZMF 6.1
Chapter 1 Introduction
Backing Out Packages or Components
If there is a problem with the change package after it has been Installed, the change package is backed out by deleting the updated component in production, and then retrieving the previous version of application software from the Backup library. This option is selected by an authorized user in the production environment (usually an operator or production analyst).
ChangeMan ZMF backs out the entire package by copying the components from the backup libraries to overlay production, including components that have been scratched. The package status is changed from BAS to BAK. A record of the package backout is placed in the Activity Log.
A job is submitted in the development area to reverse ripple the baseline library. A record of the baseline reverse ripple is placed in the Activity Log.
Temporary Change Cycle
When a temporary change package is created, the user must type the number of days the change is to remain in the temporary (override) environment (if your global administrator has setup this option). The installation process is different from other package types because the contents of the temporary change package staging libraries are copied into temporary libraries (which are concatenated ahead of production libraries). Because the production library components are not touched, ChangeMan ZMF does not perform the hot backup.
The components are never rippled into the baseline library. After the package is Installed, ChangeMan ZMF begins the aging process at each site selected to receive the temporary change. The components in the temporary library are deleted when the number of elapsed days is met. If you use a scheduler, the job automatically runs. If you use a manual scheduling method, the job is submitted on hold, and must be released when the duration of days is met. After the package is deleted from all sites, its status is changed from INS to TCC, and a record of this event (Temporary Change Cycle Completed) is placed on the Activity Log.
Distribution to Remote Sites
The next step after approval depends on the environment type configured for the site.
If there are remote sites, then the package staging libraries, the installation JCL, and a copy of the package master records pertaining to this change are distributed (copied) to all the sites specified in the creation/update package process. A record of the package distribution is placed in the Activity Log, and a distribution acknowledgment is sent back to the development center. The package status is changed from APR to DIS.
If remote sites exist, the package is ready for installation. For further information, see "Installation" on page 26.
Distributing and Installing Components at Remote Sites
Remote sites are additional CPUs where ChangeMan ZMF installs components. An additional CPU can be:

ChangeMan ZMF Library Environment
User’s Guide 29
A separate computer in another building
A separate computer in the same building
A logical CPU on the same machine as part of an LPAR (logical partition) without shared DASD
Any of these remote site configurations enables you to develop components on one CPU, and distribute and install production-level components on a different CPU.
Remote sites act only as receivers of production level components. The only time developers interact with remote sites is when they select which remote site to distribute and install production level components.
ChangeMan ZMF Library Environment
Checkout
Checkout enables you to reintroduce components that reside in baseline or promotion libraries to the change cycle. Generally, production-level components are checked out for modification. You can check out any previous version of a baseline component that exists.
Depending on the way your administrator configured ChangeMan ZMF, you can check out components:
To personal libraries.
To staging libraries.
Only if they are associated with change packages.
In batch.
Online.
Concurrently with other developers.
If your site has applications that require parallel development, you can configure ChangeMan ZMF to allow concurrent checkout of components. ChangeMan ZMF has an automated process for managing this concurrent development. As part of this process, ChangeMan ZMF ensures that each owner of a version is aware of the actions of the other owners.
After you check out components and make necessary modifications, ChangeMan ZMF records the components and the associated change package for further impact analysis. This ensures that your developers are always working with the proper version of a component.
Impact Analysis
To analyze the impact of changes, many organizations rely on data from a variety of sources, such as batch library scans and cross reference files. This method makes it difficult to maintain all sources of data and ensure that they are current. ChangeMan ZMF provides a comprehensive facility to capture, query, and enforce relationships between components.

30 Serena® ChangeMan® ZMF 6.1
Chapter 1 Introduction
These relationships include not only the traditional ones, such as a source and executable relationships, but other relationships based on common references to copybooks, SQL Include components, CA-Panvalet ++INCLUDE components, CA-Librarian - INC components, called subroutines, and JCL fields such as program name, filename, or data set name.
Staging
Staging is the process of introducing newly-developed or previously-developed components into the ChangeMan ZMF change cycle for modification or enhancement, and packaging them with related change package components. When you stage a component, ChangeMan ZMF recognizes the type of component that you are staging and copies it into a staging library of the corresponding type (source, load, JCL, documentation, copybook, and so on.). Staged components are also associated with a pre-defined change package, the vehicle ChangeMan ZMF uses to move components through the change cycle and track the history of change management activities for each staged component.
In change management systems other than ChangeMan ZMF, staging libraries are merely pre-production holding areas shared by one or more application groups. After components are tested in development libraries, they are copied into staging libraries prior to production implementation.
ChangeMan ZMF staging libraries, however, are more than pre-production holding libraries. Components can be modified and tested in protected ChangeMan ZMF staging libraries. When you stage source components, they are compiled, and the resulting load modules are identified, helping you to maintain the integrity of source-to-load relationships.
ChangeMan ZMF maintains up-to-date records of all staging activities for packages and components. For example, when you stage a source component, ChangeMan ZMF records the time that the component was staged, the name of any associated load modules or copybooks, and the compiling procedures and linkage parameters used during the compile. This information is kept in the ChangeMan ZMF master file (the package master). You can view this component and package information by using the query function.
ChangeMan ZMF further extends the concept of staging by isolating components from other changes in progress. This prevents uncontrolled and unknown copybooks and subroutines from being inadvertently referenced, allowing parallel or concurrent development without the risk of accidental overlays. The stable coexistence of multiple versions of a single component simplifies the blending of changes.
Audit
The ChangeMan ZMF audit process ensures correct synchronization of components and procedures. Because of the range of features offered by the package master and the impact analysis database, ChangeMan ZMF maintains control of current and past modifications and component versions. Potential production problems can be identified before they impact production.
The audit function inspects the staging library contents of an evolving change package (in the DEV/FRZ status) with respect to baseline library contents. The inspection looks for situations such as a package that shows no change from the baseline library, or a package that contains a LOD component that does not match its SRC component. Recognizing these situations (called out-of-sync components), ChangeMan ZMF helps you to detect code that is inconsistent with your development procedure and other code problems.

ChangeMan ZMF Library Environment
User’s Guide 31
Examples of out-of-sync situations include:
Copybooks that were changed after a source program was compiled.
Source programs that must be recompiled due to a copybook change.
Called subroutines that were changed after a referencing source program was compiled and linked.
You can specify if you want an audit, and if so, whether or not you want to correct or ignore uncovered problems.
Recompile and Relink
You can use audit to analyze the staging library contents of an evolving change package with respect to baseline contents, for the purpose of finding any out-of-sync situations.
The recompile function resolves certain types of out-of-sync conditions found during the audit. The allowable audit return code is determined during global and application parameter generation, and you are not allowed to freeze the change package without passing the audit return value entered for the application.
Using the relink option, you can relink load components without associating them with source code.
The relink process is similar to compile because you select a component from a baseline list. A new load component is produced and copied into the package staging library.
Use the delete function to remove recompiled or relinked components that do not have associated source in the package. You can also delete the resulting LST file and any other non-load components that were associated with it through the CMNBAT90 service. (See your administrator for details on this service.)
The component history is picked up from the history record for that component in the package master. For example, the relink picks up the user options on CMNUSR01 that were there when the program was last relinked.
When relinking, you can include LCT cards that contain the link control cards from staging or baseline libraries, or you can dynamically generate them if there is no LCT component available. You do this if you:
Do not have source code for a component, but make a change to a subroutine.
Must perform a composite link where the resulting load component name does not have accompanying source.
Freeze
Another unique ChangeMan ZMF feature is the ability to freeze change packages. When the change package is ready for the next phase of the change implementation lifecycle, a freeze is performed to prevent further modifications. The freeze also positions the change package for promotion or approval. Traditional methods accomplish this function by moving components from the development libraries to a separate set of libraries or, in some cases, separate environments. With ChangeMan ZMF, however, the ChangeMan ZMF instance controls your updates in conjunction with your security system, so component movement is no longer necessary.

32 Serena® ChangeMan® ZMF 6.1
Chapter 1 Introduction
If further modifications are required, you can unfreeze a change package, and the approval process is reset.
Promotion
ChangeMan ZMF can promote change packages through multiple, shared, pseudo-production promotion environments. These promotion environments are secured as if they are production, and ChangeMan ZMF controls all updates.
ChangeMan ZMF considers shared promotion environments to be places where full integrated system testing can be performed. When the time comes for a full system or an integrated system test, authorized approvers promote the acceptable components into the promotion environments.
When testing is complete and the change package is approved, ChangeMan ZMF (optionally) removes the components from the promotion environments. All production installation occurs from the change package staging environment. With ChangeMan ZMF, you define your testing methodology and the number of testing levels that are required.
Approve
Approvals for change package installation are performed online, eliminating the requirement for manual approval processes. During the ChangeMan ZMF approval process, authorized approvers can indicate that the change package is acceptable for production implementation, or they can reject or review the change and generate a checklist of questionable or unclear items.
ChangeMan ZMF relies on your security system. ChangeMan ZMF does not use internal personnel tables. Approval lists of specific User IDs or approving entities are defined to your security system so that electronic signatures can be collected.
For each application, multiple approvers can be included in an approver list. Separate approval lists can be created for scheduled planned changes or unplanned emergency changes, or you can choose to use an approval hierarchy. With ChangeMan ZMF, you have the flexibility to make these choices.
Production Installation
ChangeMan ZMF is involved in the management and control of production component installation. Component installation can be automated through the ChangeMan ZMF internal scheduling system, or through a direct interface with a job scheduling system. In addition to component movement, ChangeMan ZMF performs other production installation activities such as DB2 Plan binding.
ChangeMan ZMF also has a change quantity threshold facility that allows you to control the number of changes that occur in a time period. For example, you may want to limit the number of change packages that are installed during month-end processing.
Baseline Libraries and Delta Decks
User’s Guide 33
Baseline Libraries and Delta Decks
ChangeMan ZMF recognizes that your software components are important business assets. ChangeMan ZMF gives you the ability to store your production source components in a structure that works for your organization. Components can be stored in PDSs, CA-Librarian files, or CA-Panvalet files. Components can be segregated by application, or by categories, such as batch versus online. Equally, applications can share libraries.
ChangeMan ZMF automatically stores prior versions of components. These versions can be stored as full copies (inherent for load components), or as delta decks. ChangeMan ZMF uses a reverse base/delta technique known as stacked reverse deltas. With this technique, the current version of the component is the base, and delta decks are created to backtrack to previous versions.
Backout Management Facilities
Comprehensive backout management requires more than simply backing up the components of a change.
ChangeMan ZMF has comprehensive backout management facilities. In addition to source components, the prior functioning executable components are backed up. If a backout becomes necessary, ChangeMan ZMF automatically restores these executable components to production. ChangeMan ZMF also performs all necessary DB2 Plan rebinding automatically.
Because ChangeMan ZMF is package driven, it backs out all the components of a change automatically, including components that have been scratched.
Emergency Changes
Critical abends can occur at inopportune times, and require immediate attention. Because ChangeMan ZMF can create unplanned change packages, and because it maintains a separate list of approvers for unplanned changes, emergency changes are safe, fast, and easy to perform. ChangeMan ZMF notifies developers affected by the change so that the emergency fix can be incorporated globally into all change packages.
ChangeMan ZMF does not impede the emergency change process by requiring that the component be released, reassigned, or renamed by the original owner.
Storage Name Considerations
CA-Panvalet allows ten-character names, which ChangeMan ZMF does not recognize, because it looks for eight-character names. References in this manual assume PDS naming is the convention.
34 Serena® ChangeMan® ZMF 6.1
Chapter 1 Introduction
Build Processing Controls
Change management best practices require consistent, repeatable build processes.
ChangeMan ZMF offers a variety methods to restrict build processing to provide administrators with the level of level consistency they want, and the level of flexibility they want to offer to application developers.
Designated Compile Procedures
A designated compile procedure imposes consistency in build processing for a component before it is installed into production. A designated compile procedure can eliminate all variation in build processing for a component throughout the development life cycle.
Build Processing Consistency ChangeMan ZMF Processes and Configuration
Minimum The compile procedure and build options that a developer enters on ChangeMan ZMF panels are recorded in package component records. These values are shown on build process panels the next time a build process is initiated for the component in the package, but a developer can change the information. When the package is installed and the component is baselined, build process information stored in package component records is written to the Component History File. When the component is checked out to another package, the compile procedure and build options are copied from component history to package component records. These values are shown on build process panels when a build process is initiated for the component in the package, but a developer can change the information.
Medium Some compile and link edit options are hard coded in compile procedure skeletons.Some compile and link edit options are prohibited, and if a developer uses them, the package cannot be frozen and the component cannot be selectively refrozen. (Exit program CMNEX025)
High Application administrator defines a designated compile procedure with a Force Level 1 for single component or a group of components. The designated compile procedure specifies the compile procedure skeleton and build options that must be used the last time a component is built before the package is frozen.
Maximum Application administrator defines a designated compile procedure with a Force Level 2 for single component or a group of components. The designated compile procedure specifies the compile procedure skeleton and build options that must always be used in build processing for the component.
Build Processing Controls
User’s Guide 35
When your administrator defines a designated compile procedure in application administration, the following build process information is specified for a component name, or for a name pattern, in a library type, for an application.
See the ChangeMan/ZMF Administrator’s Guide, Chapter 5 Setting up Application Administration for more details.
Field Description
Language The coding language of the like-source member. Valid language names are defined in application administration
Compile Procedure The name of the main ISPF skeleton that is file tailored to create build job JCL. Valid compile procedure names are associated with a language name in application administration.
Compile Parms A 34-byte field where users set compile options that are not set by:System defaults for the compiler.Options that are hard coded in Compile Procedure skeletons.User Options that set variables used by file tailoring to set compile options
Link Edit parms A 34-byte field where users set linkage editor or binder options that are not set by:System defaults for the linkage editor or binder.Options that are hard coded in Compile Procedure skeletons.User Options that set variables used by file tailoring to set link edit or binder options
DB2 Precompile Indicator
An indicator that determines whether a DB2 precompile step is included in the build job JCL.
Force Level Determines when the compile procedure and other build options in the designated procedure must be used.
1 The compile procedure and build options in the designated procedure must be used in the last build before package freeze or component refreeze.
2 The compile procedure and build options in the designated procedure must always be used.
User Options Twenty 1-byte fields that ChangeMan ZMF installers and administrators can define for variables or indicators used in file tailoring build process JCL.
Custom User Options
Custom User Option fields that ChangeMan ZMF installers and administrators can define for variables or indicators used in file tailoring build process JCL.CUSR641-CUSR645 - Five 64-byte fields on panel CMNUSR01CUSR011-CUSR015 - Five 1-byte fields on panel CMNUSR02CUSR021-CUSR023 - Three 2-byte fields on panel CMNUSR03CUSR031-CUSR033 - Three 3-byte fields on panel CMNUSR03CUSR041-CUSR043 - Three 4-byte fields on panel CMNUSR03CUSR081-CUSR085 - Five 8-byte fields on panel CMNUSR03CUSR101-CUSR102 - Two 10-byte fields on panel CMNUSR03CUSR161-CUSR162 - Two 16-byte fields on panel CMNUSR04CUSR341-CUSR342 - Three 34-byte fields on panel CMNUSR04CUSR441-CUSR442 - Two 44-byte fields on panel CMNUSR04CUSR721-CUSR725 - Five 72-byte fields on panel CMNUSR04

36 Serena® ChangeMan® ZMF 6.1
Chapter 1 Introduction
Build Information Search Order
Even when there is no designated compile procedure to impose consistency in build processing, ChangeMan ZMF encourages consistency by populating build processing panel fields with values used previously to build the component.
Change Man ZMF uses this search order to obtain values for the compile procedure skeleton and build options for a component. Component history is keyed by component name within library type.
Search Sequence Location of Build Information Comment
1 Force Level 2 Designated Compile Procedure
Fields on build panels are set to the values in the designated procedure, and the fields are displayed in read-only mode.
2 Stage: Mass Build Edit panelBatch Mass Recompile Job Information panel
If the Suppress History field is Y on these panels, panel values are used in build processing for all selected components.
3 Package Component Records These records contain the values used the last time you performed a build for this component/library type in your package. These records are deleted if you delete the component from your package.
4 Component History This history contains the values used to build the component/library type that was last baselined.
5 Designated Compile Procedure with Force Level 1
Fields on build panels are set to the values in the designated procedure, but you can overtype the values.
6 Build process ISPF panel. All required build panel fields must be filled to provide a default values in case they are needed for a new component.

User’s Guide 53
Chapter 3Creating a Change Package
Create Package is the first step in the change package life cycle.
Change Package Overview 54
Rules for Creating Packages 54
Accessing Create Package Panels 56
Long, Short, Copy-Forward Methods 56
Dynamic Panels in Create Package 57
Defining Package Control Information 58
Providing a Package Description 62
Providing Installation Instructions 63
Setting Job Scheduling Dependencies 65
Adding Affected Applications 66
Defining Complex/Super Package Information 67
Entering Package User Information 67
Defining Install Date and Site Information 68
54 Serena® ChangeMan® ZMF 6.1
Chapter 3 Creating a Change Package
Change Package Overview
Using a series of ISPF panels, you enter information that describes the change package, and you set control parameters that determine how the package will behave during the rest of the package life cycle.
Change Man ZMF automatically copies additional control parameters from Global and Application Administration records on the Package Master to make your package follow the rules set up by your administrators at the ChangeMan ZMF instance level and at the application level.
When you have entered valid information in all required fields on all required Create Package panels, ChangeMan ZMF assigns a 10-character change package ID and writes package records to the Package Master file. The package ID consists of a four character application mnemonic (three characters and a blank if the application mnemonic has only three characters) and a six character package number, which is incremented by one for each new package in an application.
When your package has been successfully created, no application components are associated with your change package. Although your Application Administrator can set parameters that allocate staging libraries for some library types when your package is created, staging libraries for your package are usually not allocated until you check out components into your change package. However, even if staging libraries are allocated at create package, they are empty.
Rules for Creating Packages
These rules and restrictions apply to the create package function.
To create a new change package in an application, you must have update access to the application, which is defined under the ChangeMan ZMF resource class in your security system.
A new change package is not created and assigned a package ID until you have entered valid information in all required fields in all required Create Package panels,
Administration Settings for the Create Package Function
Your Global and Application Administrators make settings in ChangeMan ZMF administration that control how the create package function works in your application. Ask your administrator if any of the following apply to your application.
Restrict entries in the package Scheduler field on the Create: Installation Instructions panel. (Global Administration Parameters: Install Job Scheduler and Default Job Scheduler)
Restrict the number of packages that can be scheduled for installation on a particular Install Date through the use of the Installation Calendar. (Global Administration Parameters: Disable Installation Calendar)
Prohibit creation of temporary change packages. (Application Administration Parameters: Allow Temporary Packages)
Rules for Creating Packages
User’s Guide 55
Require data in the Work Request field on the Create: Create a New Package panel. (Application Administration Parameters: Require Work Request Number)
Require data in the Department field on the Create: Create a New Package panel. (Application Administration Parameters: Require Department Number)
Enable the Package User Information facility to display one or two panels that you use to set package-level variables defined by your administrator. (Global Administration Parameters: Display Package User Option Panel)
Set Normal Business Hours in Global Administration that determine whether an unplanned package is assigned the Planned Approval List or the Unplanned Approval list when the package is created. (Application Administration Parameters: Normal Business Hours)
Set the difference in system clock time between the development site where your change package is created and a remote site where it is scheduled for install. The time difference can allow you to enter an install time for a remote site that has already passed at your site. (Global Administration Sites: Time Difference)
Exit Programs for the Create Package Function
Your ChangeMan ZMF installer or administrators may implement exit programs to alter the behavior ChangeMan ZMF. Ask your administrator if any of the following apply to your application.
Restrict Install date by one of more of the following: Application, Global or Application Administration authority, specified date, today’s date, day of week, package type, values in Package User Information variables. (Exit program CMNEX002)
Impose a lead time between today’s date and the package install date. Other criteria available includes Application, Global or Application Administrator authority, specified date, day of week, package type, values in Package User Information variables. (Exit program CMNEX003)
Restrict creation of specified package types by one or more of the following: Application, Global or Application Administrator authority. (Exit program CMNEX006)
Restrict install date by one of more of the following: Application, administrator authority, specified date, day of week, package type, today's date. (Exit program CMNEX007)
Restrict install day of week by one of more of the following: Application, global or application administrator authority, day of week, package type. (Exit program CMNEX012)
Validate information entered in Work Request Number and/or Department against a specified a list of values. (Exit program CMNEX014)
Validate group site names used on the Site Information panel, and specify the sites associated with each group site name. (Exit program CMNEX039)
NOTE If you create an unplanned change package outside of Normal Business Hours, the Unplanned Approval List is assigned. Normal Business Hours are compared to the time you create your package, not the time that your package is frozen or the time that it is scheduled for install.
Your administrator may set Normal Business Hours to times that are not “normal” to force all unplanned packages to use the Unplanned Approval List.
56 Serena® ChangeMan® ZMF 6.1
Chapter 3 Creating a Change Package
Add custom processes, executed outside of ChangeMan ZMF, at the end of the create package process. (Exit program CMNEX043)
Accessing Create Package Panels
Use one of these methods to display the Create: Create a New Package panel, which is the first panel in the Create Package function.
Using the Menu Hierarchy:
1 On the Primary Option Menu, select 1 Build.
2 On the Build Option panel, select 1 Create.
Using Direct Panel Access:
On a ChangeMan ZMF panel, type =1.1 in the Command or Option line and press Enter.
Using the Change Package List:
On the Change Package List panel, type CREATE or CR on the Command line and press Enter.
Long, Short, Copy-Forward Methods
When you execute the Create Package function, many of the ISPF panel fields in the process are displayed with values stored in your ISPF profile from the last time you created a package. You can use the displayed information for your new package, or you can overtype that information with new values.
You have three choices for entering the rest of the descriptive and control information required to create your new package: the long method, the short method, and copy package forward option. You choose which method to use on the first Create Package panel.
Long Method
When you choose the Long Method, all panels in the Create Package process are displayed. You are required to type information in free form text description fields.
Dynamic Panels in Create Package
User’s Guide 57
Short Method
When you choose the Short Method, two panels in the Create Package process are skipped, and the fields on those panels are set to default values. This table shows the default field values for the two skipped panels:
You can use the Update Package Information function to go back later and replace the default information with your own values and text.
Copy Package Forward
You can use an existing package as a model to create a new package. When you type a package ID in the Package to Copy Forward field on the first Create Package panel, the fields displayed on all subsequent panels are copied from the package you specified. You can overtype this information with new information.
The list of package components from the original package is copied into your new package. The status of these components is INACTIVE because the components on this list have not been copied to staging libraries for the new package. Later, you can delete component names from this list or use the list of component names to check components out from baseline.
Dynamic Panels in Create Package
The panels in the Create Package process are displayed dynamically, and what you see depends on Global Administration settings, Application Administration settings, exit programs enabled by your Administrators, and on information you enter as you proceed through the Create Package process.
This table show when panels in the Create Package process are displayed.
Skipped Panel Panel Field Short Method Default Value
Create: Package Description
Free form description text
“PACKAGE CREATED USING THE SHORT METHOD”
Create: Installation Instructions
CONTINGENCY 1-Hold production and contact analyst
SCHEDULER Value in DEFAULT JOB SCHEDULER fields from Application Parameters
Free form instruction text
“PACKAGE CREATED USING THE SHORT METHOD”
Panel Title Panel ID When Displayed
Create: Create A New Package CMNCRT01 All new change packages.
Create: Package Description CMNCRT02 All packages when the Long create package method is used.
Create: Installation Instructions CMNCRT03 All simple and participating packages when the Long create package method is used.

58 Serena® ChangeMan® ZMF 6.1
Chapter 3 Creating a Change Package
Defining Package Control Information
The first panel displayed in the Create Package process is the Create: Create A New Package panel (CMNCRT0R).
Create: Scheduling Dependencies
CMNCRT04 Simple and participating package when you specify Other in the Scheduler field on the Create: Installation Instructions panel
Create: Affected Applications CMNCRT05 Participating packages.
Create: Complex/Super Information
CMNCRT08 Super or Complex packages.
Create: Package User Information
CMNDPUP1 Simple and participating package if your administrator enabled the Package User Information Facility. This custom panel, and a second panel CMNDPUP2, may have a different panel title coded by your administrator.
Create: On Site Information CMNCRT06 Simple and participating packages in an All environment.
Create: Site Information CMNCTR07 Simple and participating packages in a Development or Development/Production environment.
Panel Title Panel ID When Displayed
CMNCRT0R ---------------- CREATE: CREATE A NEW PACKAGE ------------------------ OPTION ===> L L Long method - Prompt for package description and special instructions S Short method - Use default package description and instructions PACKAGE TITLE ===> user's guide updates APPLICATION ===> ACTP (Blank or pattern for list) REQUESTER'S NAME ===> david young REQUESTER'S PHONE ===> 555-5555 WORK REQUEST ID ===> DYOUNG DEPARTMENT ===> IDD PACKAGE LEVEL ===> 1 (1-Simple, 2-Complex, 3-Super, 4-Participating) PACKAGE TYPE ===> PLANNED (Planned or Unplanned) PACKAGE TIME SPAN ===> PERM (Permanent or Temporary) PACKAGE TO COPY FORWARD ===> (Optional package name) UNPLANNED REASON CODE ===> (* for list) TEMPORARY CHANGE DURATION ===> (In days) ATTACH PACKAGE TO RELEASE ===> NO (Yes/No) Press ENTER to process; Enter END command to exit. .
Defining Package Control Information
User’s Guide 59
This table describes the fields and options available on the Create: Create A New Package panel.
Field Description
OPTION Choose a method for creating your package. See "Long, Short, Copy-Forward Methods" on page 56.
L Long Method - Show all panels in the Create Package process, require input for text descriptions
S Short Method - Skip panels Create: Package Description and Create: Installation Instructions panel. Set the fields on these panels to default values.
PACKAGE TITLE Type a title for your change package. This field is case sensitive and has a maximum length of 72 characters.
APPLICATION Type the 3 or 4-character application mnemonic where you want to create your change package. You must have UPDATE access to this mnemonic in your security system.
REQUESTER'S NAME
Type your name or the name of the person requesting this change package. This field is not case sensitive and has a maximum length of 25 characters.
REQUESTER'S PHONE
Type a telephone number for the person whose name you entered in Requestor Name. This field has a maximum length of 15 characters.
WORK REQUEST ID
Type a work request number. This field is not case sensitive and has a maximum length of 12 characters. This field may be use for the ChangeMan ZMF INFO Option.
DEPARTMENT Type the department for this change package. This field is used for reporting only. This field is not case sensitive and has a maximum length of 4 characters.

60 Serena® ChangeMan® ZMF 6.1
Chapter 3 Creating a Change Package
PACKAGE LEVEL Type a one-character code representing the package level.
1 Simple - The change package contains a change that is unrelated to any other change package. This level of change package does not affect any other application, nor does it require changes to software or operational procedures in other applications.
2 Complex - The parent for two or more participating change packages that have interdependent changes to software or operational procedures. To create a super or complex package, you provide only this first panel of control and general information, a package description, and a list of participating packages. Remote sites and installation dates are set in each participating package. No staging libraries are allocated to super or complex packages.There are no processing difference between super and complex change packages.
3 Super - The parent for two or more participating change packages that have interdependent changes to software or operational procedures. To create a super or complex package, you provide only this first panel of control and general information, a package description, and a list of participating packages. Remote sites and installation dates are set in each participating package. No staging libraries are allocated to super or complex packages.There are no processing difference between super and complex change packages.
4 Participating - The change package is related to one or more other participating change packages which are listed under the same super or complex package. SYSLIB statements in build process jobs include staging libraries from other participating packages under the same super or complex package.
PACKAGE TYPE Choose a package type.
P PLANNED - The package will follow the standard package life cycle for Permanent or Temporary packages. Super, complex, and participating packages must be planned. (Abbreviation: P)
U UNPLANNED - The package contains unscheduled changes, possibly emergency fixes. Depending on Global and Application Administration settings, some package lifecycle steps and requirements may be skipped. (Abbreviation: U)
PACKAGE TIME SPAN
Choose a package time span.
P PERMANENT - Package components are installed in baseline and production libraries. A permanent package may be either planned or unplanned. Super, complex, and participating packages must be permanent. (Abbreviation: P)
T TEMPORARY - Changes are installed in special override libraries concatenated on top of your production environment library concatenations. The changes are removed from these libraries after the Temporary Change Duration has passed. Baseline and production libraries are not changed. A temporary package may be either planned or unplanned. You must provide a Temporary Change Duration on this same panel. (Abbreviation: T)
Field Description
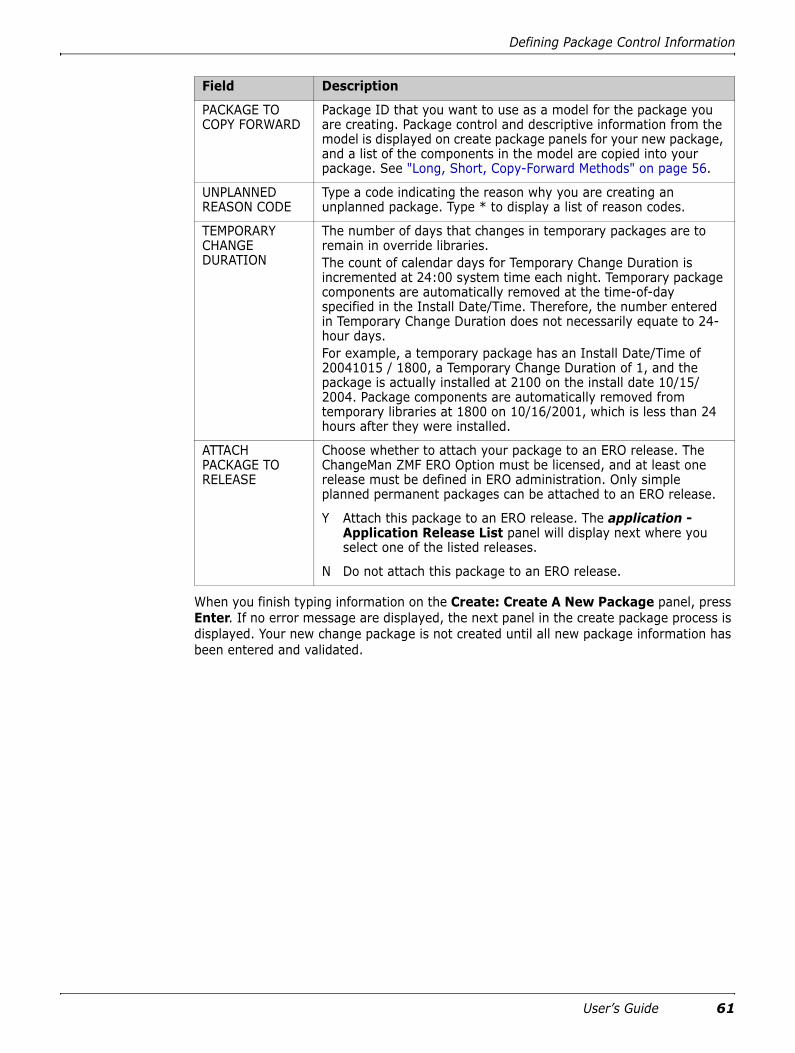
Defining Package Control Information
User’s Guide 61
When you finish typing information on the Create: Create A New Package panel, press Enter. If no error message are displayed, the next panel in the create package process is displayed. Your new change package is not created until all new package information has been entered and validated.
PACKAGE TO COPY FORWARD
Package ID that you want to use as a model for the package you are creating. Package control and descriptive information from the model is displayed on create package panels for your new package, and a list of the components in the model are copied into your package. See "Long, Short, Copy-Forward Methods" on page 56.
UNPLANNED REASON CODE
Type a code indicating the reason why you are creating an unplanned package. Type * to display a list of reason codes.
TEMPORARY CHANGE DURATION
The number of days that changes in temporary packages are to remain in override libraries.The count of calendar days for Temporary Change Duration is incremented at 24:00 system time each night. Temporary package components are automatically removed at the time-of-day specified in the Install Date/Time. Therefore, the number entered in Temporary Change Duration does not necessarily equate to 24-hour days.For example, a temporary package has an Install Date/Time of 20041015 / 1800, a Temporary Change Duration of 1, and the package is actually installed at 2100 on the install date 10/15/2004. Package components are automatically removed from temporary libraries at 1800 on 10/16/2001, which is less than 24 hours after they were installed.
ATTACH PACKAGE TO RELEASE
Choose whether to attach your package to an ERO release. The ChangeMan ZMF ERO Option must be licensed, and at least one release must be defined in ERO administration. Only simple planned permanent packages can be attached to an ERO release.
Y Attach this package to an ERO release. The application - Application Release List panel will display next where you select one of the listed releases.
N Do not attach this package to an ERO release.
Field Description
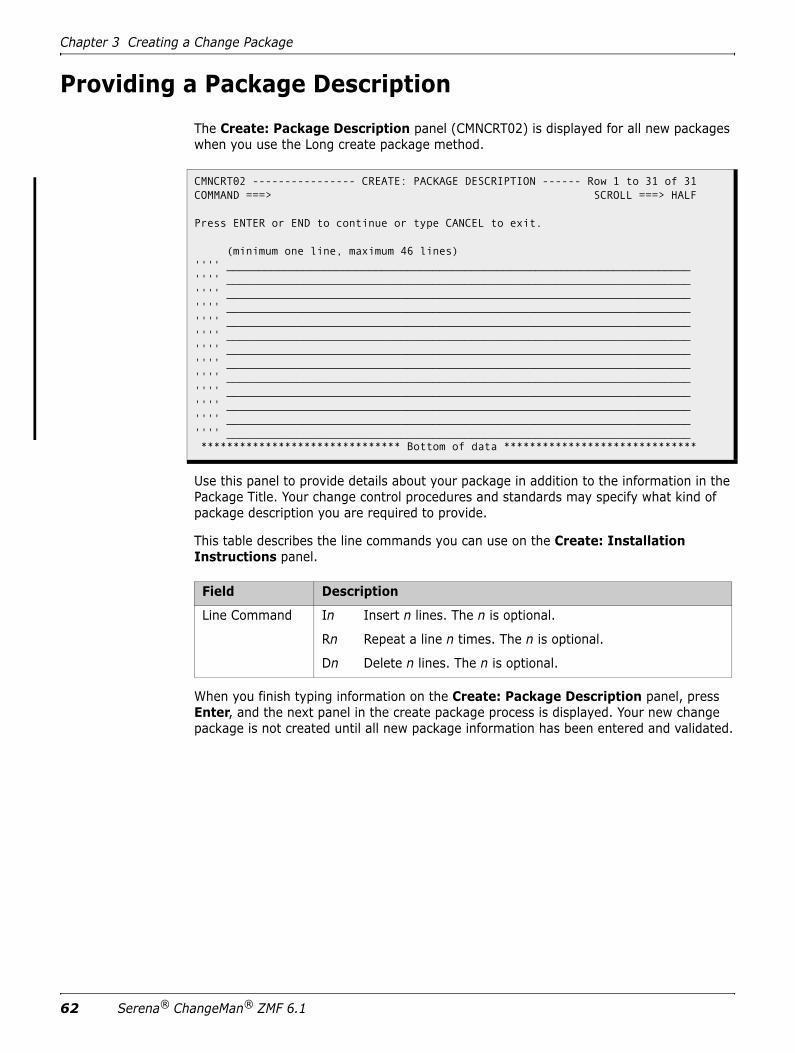
62 Serena® ChangeMan® ZMF 6.1
Chapter 3 Creating a Change Package
Providing a Package Description
The Create: Package Description panel (CMNCRT02) is displayed for all new packages when you use the Long create package method.
Use this panel to provide details about your package in addition to the information in the Package Title. Your change control procedures and standards may specify what kind of package description you are required to provide.
This table describes the line commands you can use on the Create: Installation Instructions panel.
When you finish typing information on the Create: Package Description panel, press Enter, and the next panel in the create package process is displayed. Your new change package is not created until all new package information has been entered and validated.
CMNCRT02 ---------------- CREATE: PACKAGE DESCRIPTION ------ Row 1 to 31 of 31 COMMAND ===> SCROLL ===> HALF Press ENTER or END to continue or type CANCEL to exit. (minimum one line, maximum 46 lines) '''' ________________________________________________________________________ '''' ________________________________________________________________________ '''' ________________________________________________________________________ '''' ________________________________________________________________________ '''' ________________________________________________________________________ '''' ________________________________________________________________________ '''' ________________________________________________________________________ '''' ________________________________________________________________________ '''' ________________________________________________________________________ '''' ________________________________________________________________________ '''' ________________________________________________________________________ '''' ________________________________________________________________________ '''' ________________________________________________________________________ ******************************* Bottom of data ******************************
Field Description
Line Command In Insert n lines. The n is optional.
Rn Repeat a line n times. The n is optional.
Dn Delete n lines. The n is optional.
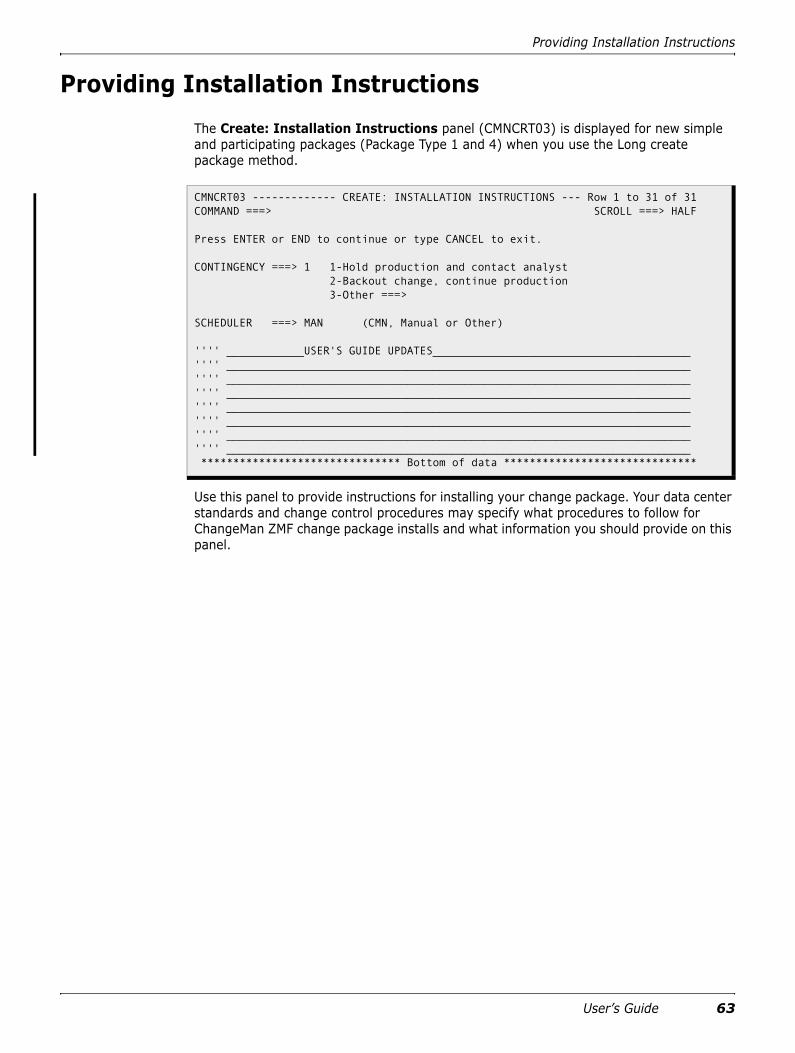
Providing Installation Instructions
User’s Guide 63
Providing Installation Instructions
The Create: Installation Instructions panel (CMNCRT03) is displayed for new simple and participating packages (Package Type 1 and 4) when you use the Long create package method.
Use this panel to provide instructions for installing your change package. Your data center standards and change control procedures may specify what procedures to follow for ChangeMan ZMF change package installs and what information you should provide on this panel.
CMNCRT03 ------------- CREATE: INSTALLATION INSTRUCTIONS --- Row 1 to 31 of 31 COMMAND ===> SCROLL ===> HALF Press ENTER or END to continue or type CANCEL to exit. CONTINGENCY ===> 1 1-Hold production and contact analyst 2-Backout change, continue production 3-Other ===> SCHEDULER ===> MAN (CMN, Manual or Other) '''' ____________USER'S GUIDE UPDATES________________________________________ '''' ________________________________________________________________________ '''' ________________________________________________________________________ '''' ________________________________________________________________________ '''' ________________________________________________________________________ '''' ________________________________________________________________________ '''' ________________________________________________________________________ '''' ________________________________________________________________________ ******************************* Bottom of data ******************************

64 Serena® ChangeMan® ZMF 6.1
Chapter 3 Creating a Change Package
This table describes the fields and options available on the Create: Installation Instructions panel.
When you finish typing information on the Create: Installation Instructions panel, press Enter, and the next panel in the create package process is displayed. Your new change package is not created until all new package information has been entered and validated.
Field Description
CONTINGENCY Select the option that describes what should be done if the installation of your change package fails.This field is required, but it has no effect on the lifecycle of your package or its installation process.If you select 3-Other, you must provide text in the 44 byte field following your selection.
SCHEDULER This field determines how the package installation process is initiated.
CMN Package installation is initiated by the internal ChangeMan ZMF scheduler when it determines that the package Install Date and From Time have arrived at the specified Site.
MANUAL Package installation is initiated when the last approval is entered.
OTHER Package installation is initiated by an external scheduler like CA-7®, CA-Scheduler®, or CA-ADC2™. Scheduling records are inserted into the scheduler database by job CMN17, which runs when the package is distributed.
Free Form Text Type up to 46 lines of instructions for the installation and backout of your change package. You must type an entry in this area of the panel.Line commands:
In Insert n lines. The n is optional.
Rn Repeat a line n times. The n is optional.
Dn Delete n lines. The n is optional.
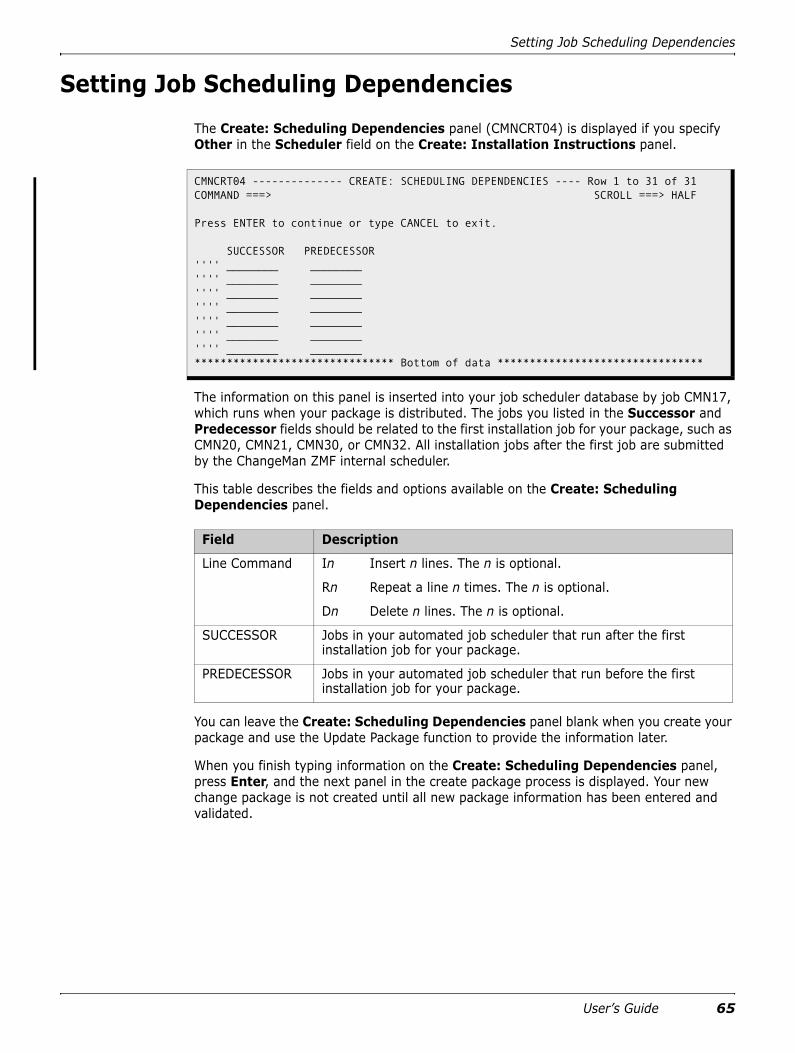
Setting Job Scheduling Dependencies
User’s Guide 65
Setting Job Scheduling Dependencies
The Create: Scheduling Dependencies panel (CMNCRT04) is displayed if you specify Other in the Scheduler field on the Create: Installation Instructions panel.
The information on this panel is inserted into your job scheduler database by job CMN17, which runs when your package is distributed. The jobs you listed in the Successor and Predecessor fields should be related to the first installation job for your package, such as CMN20, CMN21, CMN30, or CMN32. All installation jobs after the first job are submitted by the ChangeMan ZMF internal scheduler.
This table describes the fields and options available on the Create: Scheduling Dependencies panel.
You can leave the Create: Scheduling Dependencies panel blank when you create your package and use the Update Package function to provide the information later.
When you finish typing information on the Create: Scheduling Dependencies panel, press Enter, and the next panel in the create package process is displayed. Your new change package is not created until all new package information has been entered and validated.
CMNCRT04 -------------- CREATE: SCHEDULING DEPENDENCIES ---- Row 1 to 31 of 31 COMMAND ===> SCROLL ===> HALF Press ENTER to continue or type CANCEL to exit. SUCCESSOR PREDECESSOR '''' ________ ________ '''' ________ ________ '''' ________ ________ '''' ________ ________ '''' ________ ________ '''' ________ ________ '''' ________ ________******************************* Bottom of data ********************************
Field Description
Line Command In Insert n lines. The n is optional.
Rn Repeat a line n times. The n is optional.
Dn Delete n lines. The n is optional.
SUCCESSOR Jobs in your automated job scheduler that run after the first installation job for your package.
PREDECESSOR Jobs in your automated job scheduler that run before the first installation job for your package.
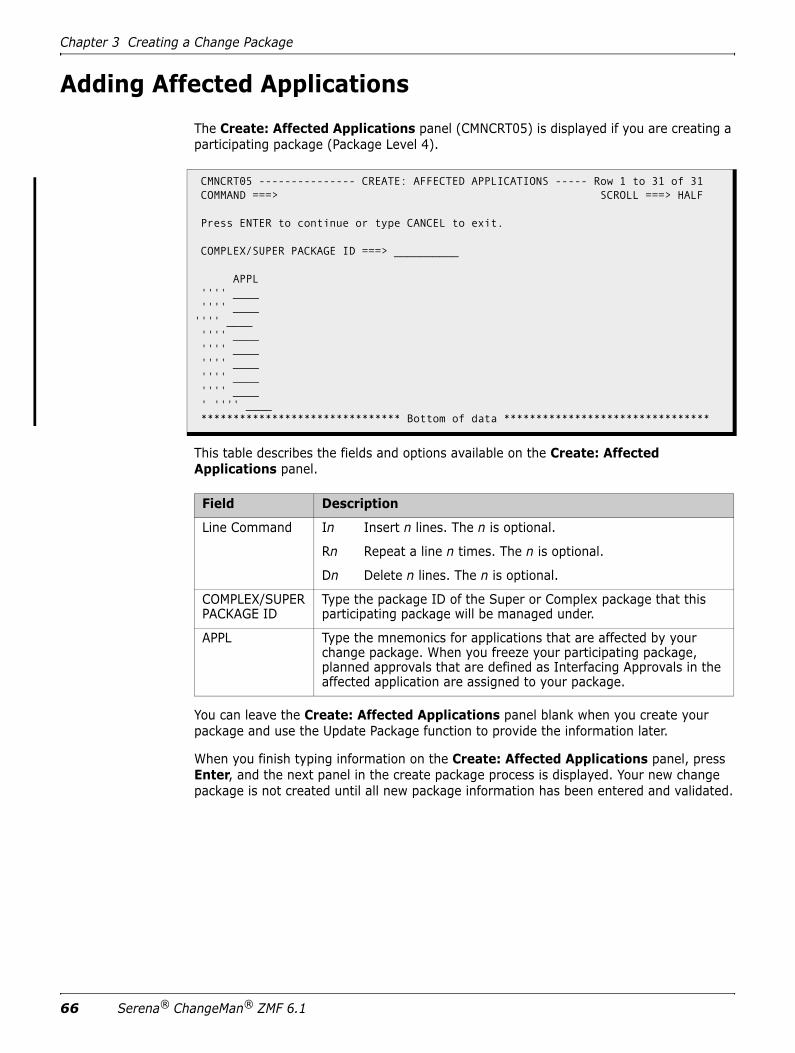
66 Serena® ChangeMan® ZMF 6.1
Chapter 3 Creating a Change Package
Adding Affected Applications
The Create: Affected Applications panel (CMNCRT05) is displayed if you are creating a participating package (Package Level 4).
This table describes the fields and options available on the Create: Affected Applications panel.
You can leave the Create: Affected Applications panel blank when you create your package and use the Update Package function to provide the information later.
When you finish typing information on the Create: Affected Applications panel, press Enter, and the next panel in the create package process is displayed. Your new change package is not created until all new package information has been entered and validated.
CMNCRT05 --------------- CREATE: AFFECTED APPLICATIONS ----- Row 1 to 31 of 31 COMMAND ===> SCROLL ===> HALF Press ENTER to continue or type CANCEL to exit. COMPLEX/SUPER PACKAGE ID ===> __________ APPL '''' ____ '''' ____ '''' ____ '''' ____ '''' ____ '''' ____ '''' ____ '''' ____ ' '''' ____ ******************************* Bottom of data ********************************
Field Description
Line Command In Insert n lines. The n is optional.
Rn Repeat a line n times. The n is optional.
Dn Delete n lines. The n is optional.
COMPLEX/SUPER PACKAGE ID
Type the package ID of the Super or Complex package that this participating package will be managed under.
APPL Type the mnemonics for applications that are affected by your change package. When you freeze your participating package, planned approvals that are defined as Interfacing Approvals in the affected application are assigned to your package.

Defining Complex/Super Package Information
User’s Guide 67
Defining Complex/Super Package Information
The Create: Complex/Super Information panel (CMNCRT08) is displayed if you are creating a super or complex package (Package Level 2 or 3).
This table describes the fields and options available on the Create: Complex/Super Information panel.
You can leave the Create: Complex/Super Information panel blank when you create your package, and you can use the Update Package function to provide the information later.
When you finish typing information on the Create: Complex/Super Information panel, press Enter, and the next panel in the create package process is displayed. Your new change package is not created until all new package information has been entered and validated.
Entering Package User Information
The Create: Package User Information panel (CMNDPUP1) is displayed if your administrator enabled the Package User Information Facility. This panel and an optional second panel (CMNDPUP2) are used to populate package level custom variables defined by your administrator and used elsewhere in the change package lifecycle. Your
CMNCRT08 ------------- CREATE: COMPLEX/SUPER INFORMATION --- Row 1 to 31 of 31 COMMAND ===> SCROLL ===> HALF PACKAGE ID: ACTP000003 STATUS: OPN Press ENTER to continue or type CANCEL to exit. PACKAGE ID '''' __________ '''' __________ '''' __________ '''' __________ '''' __________ '''' __________ '''' __________ '''' __________ '''' __________ '''' __________ ******************************* Bottom of data ********************************
Field Description
Line Command In Insert n lines. The n is optional.
Rn Repeat a line n times. The n is optional.
Dn Delete n lines. The n is optional.
PACKAGE ID Type the package IDs of participating packages that you want to associate under this complex or super package.

68 Serena® ChangeMan® ZMF 6.1
Chapter 3 Creating a Change Package
administrator will probably modify these panels, so the panel title and format may not look like this sample panel that is delivered from Serena.
The descriptions for the fields on these panels are in the help panels that you access by pressing PF1.
You can leave the Create: Package User Information panel blank when you create your package, and you can use the Update Package function to provide the information later.
When you finish typing information on the Create: Package User Information panel, press Enter, and the next panel in the create package process is displayed. Your new change package is not created until all new package information has been entered and validated.
Defining Install Date and Site Information
The Create: On Site Information panel (CMNCRT06) is displayed for all simple and participating packages (Package Type 1 or 4) in an All environment. A change package in
CMNDPUP1 ------------ CREATE: SAMPLE PACKAGE USER PANEL 1 --------------------- COMMAND ===> Enter YES or NO : Field 1 ===> NO Field 2 ===> NO Field 3 ===> NO Field 4 ===> NO Field 5 ===> NO Field 6 ===> NO NEXT PANEL ===> Y (Y = yes, N = no) Press ENTER to continue, END or CANCEL to exit.
CMNDPUP2 ------------ CREATE: SAMPLE PACKAGE USER PANEL 2 --------------------- COMMAND ===> Enter YES or NO to indicate value of variable: TEST VALUE1 ===> NO TEST VALUE2 ===> NO TEST VALUE3 ===> NO TEST VALUE4 ===> NO Press ENTER to continue or CANCEL to exit.
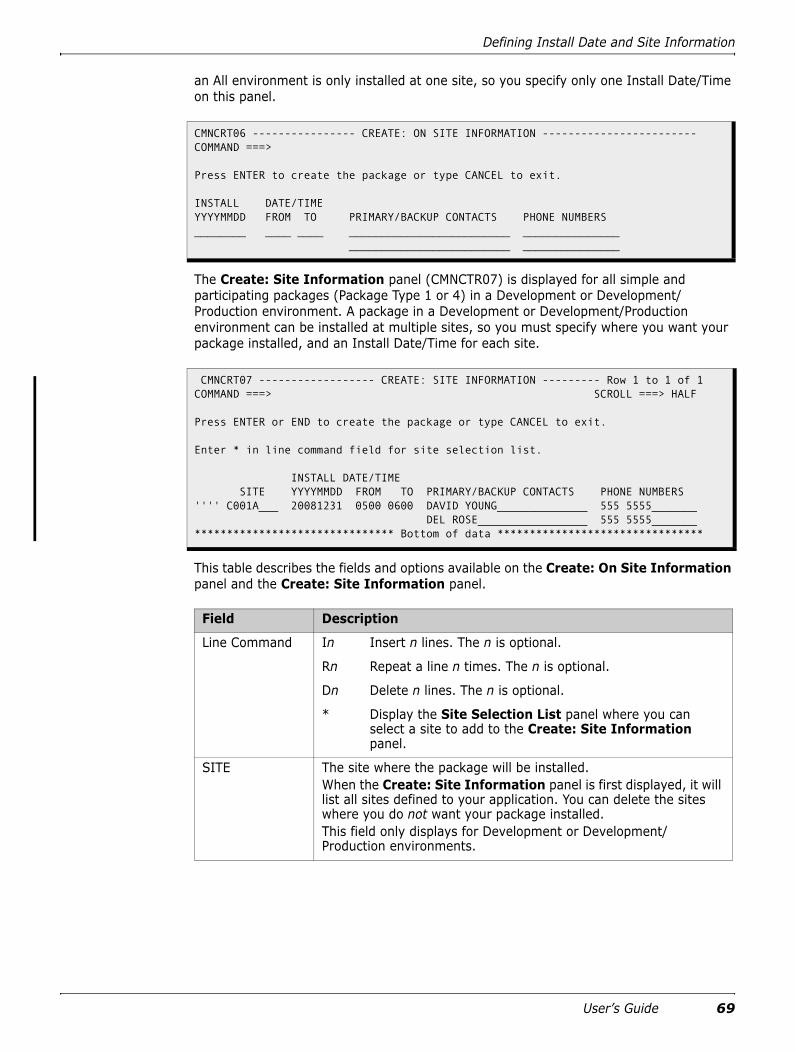
Defining Install Date and Site Information
User’s Guide 69
an All environment is only installed at one site, so you specify only one Install Date/Time on this panel.
The Create: Site Information panel (CMNCTR07) is displayed for all simple and participating packages (Package Type 1 or 4) in a Development or Development/Production environment. A package in a Development or Development/Production environment can be installed at multiple sites, so you must specify where you want your package installed, and an Install Date/Time for each site.
This table describes the fields and options available on the Create: On Site Information panel and the Create: Site Information panel.
CMNCRT06 ---------------- CREATE: ON SITE INFORMATION ------------------------COMMAND ===> Press ENTER to create the package or type CANCEL to exit. INSTALL DATE/TIME YYYYMMDD FROM TO PRIMARY/BACKUP CONTACTS PHONE NUMBERS ________ ____ ____ _________________________ _______________ _________________________ _______________
CMNCRT07 ------------------ CREATE: SITE INFORMATION --------- Row 1 to 1 of 1 COMMAND ===> SCROLL ===> HALF Press ENTER or END to create the package or type CANCEL to exit. Enter * in line command field for site selection list. INSTALL DATE/TIME SITE YYYYMMDD FROM TO PRIMARY/BACKUP CONTACTS PHONE NUMBERS '''' C001A___ 20081231 0500 0600 DAVID YOUNG______________ 555 5555_______ DEL ROSE_________________ 555 5555_______ ******************************* Bottom of data ********************************
Field Description
Line Command In Insert n lines. The n is optional.
Rn Repeat a line n times. The n is optional.
Dn Delete n lines. The n is optional.
* Display the Site Selection List panel where you can select a site to add to the Create: Site Information panel.
SITE The site where the package will be installed. When the Create: Site Information panel is first displayed, it will list all sites defined to your application. You can delete the sites where you do not want your package installed. This field only displays for Development or Development/Production environments.

70 Serena® ChangeMan® ZMF 6.1
Chapter 3 Creating a Change Package
When you finish typing information on the Create: On Site Information panel or the Create: Site Information panel, press Enter. If there are no errors, all of the information you specified on all Create Package panels is saved, you are returned to the Primary Option Menu, and a short ISPF message in the upper right corner of the menu displays the Package ID that ChangeMan ZMF generated for the new package you created.
INSTALL DATE/TIME
Type the system date and time that you want the package to install at each site.If you specified Manual in the Scheduler field for this package, the install is initiated immediately after the last package approval is entered, regardless of what you entered in the Install Date/Time. Otherwise, the package installation process begins on the specified install date after the “From” time. The exact time that an automated installation is initiated depends on the interval between scheduler events.You cannot enter a date and a “To” time that has passed at the site. Your global administrator can define a time difference for each remote site so that an install date/time that has passed at the development site is still valid at a remote site where the system clock is ahead of the development site.If you want a package to install at the same system time at all sites, then type the same date and time in the Install Date/Time for all sites. If you want the package to install simultaneously at all sites, then adjust the Install Date/Time that you enter for each site by the difference in system clock times between each site and INSTALL DATEThe calendar date (yyyymmdd) that the package will be installed at the site.
INSTALL TIME FROMThe time of day (hhmm, 24 hour clock) when the installation of your package should begin.
INSTALL TIME TOThe latest time of day (hhmm, 24 hour clock) when installation of your package should begin.This field is ignored if you specified CMN in for the package Scheduler.
PRIMARY/BACKUP CONTACTS
Type the names of the primary and back-up contacts to be notified at each site if there is a problem with the package installation. These fields are 25 characters long.
PHONE NUMBERS
Type the telephone numbers of the primary and backup contacts. These fields are 15 characters long.
Field Description

Messages 3
Prelim
inar
y
Table of Contents
Welcome to ChangeMan ZMF . . . . . . . . . . . . . . . . . . . . 7Guide to ChangeMan ZMF Documentation. . . . . . . . . . . . . . . . . . . . . . . 7
ChangeMan ZMF Documentation Suite . . . . . . . . . . . . . . . . . . . . . . 7Using the Manuals . . . . . . . . . . . . . . . . . . . . . . . . . . . . . . . . . . . . 8
Chapter 1 ChangeMan ZMF Messages . . . . . . . . . . . . . . . . . . . . . . 11ISPF Client Messages . . . . . . . . . . . . . . . . . . . . . . . . . . . . . . . . . . . . . 12
ISPF Message Types . . . . . . . . . . . . . . . . . . . . . . . . . . . . . . . . . . 12DDNAME SERPRINT . . . . . . . . . . . . . . . . . . . . . . . . . . . . . . . . . . 13
Message Descriptions . . . . . . . . . . . . . . . . . . . . . . . . . . . . . . . . . . . . . 13CMN001 General . . . . . . . . . . . . . . . . . . . . . . . . . . . . . . . . . . . . . 14CMN1600 ChangeMan ZMF LIBDEF . . . . . . . . . . . . . . . . . . . . . . . . 52CMN2000 Package Build. . . . . . . . . . . . . . . . . . . . . . . . . . . . . . . . 53CMN2030 Super/Complex Package . . . . . . . . . . . . . . . . . . . . . . . . 53CMN2100 Package Create . . . . . . . . . . . . . . . . . . . . . . . . . . . . . . 54CMN2200 Utility Request . . . . . . . . . . . . . . . . . . . . . . . . . . . . . . . 56CMN2300 Component Checkout . . . . . . . . . . . . . . . . . . . . . . . . . . 57CMN2500 Component Stage . . . . . . . . . . . . . . . . . . . . . . . . . . . . . 63CMN2600 Package Audit . . . . . . . . . . . . . . . . . . . . . . . . . . . . . . . 69CMN2700 Component Recompile. . . . . . . . . . . . . . . . . . . . . . . . . . 81CMN2800 DB2 Assist . . . . . . . . . . . . . . . . . . . . . . . . . . . . . . . . . . 83CMN2900 Component Compare. . . . . . . . . . . . . . . . . . . . . . . . . . . 84CMN3000 Package Freeze . . . . . . . . . . . . . . . . . . . . . . . . . . . . . . 85CMN3100 Package Approval . . . . . . . . . . . . . . . . . . . . . . . . . . . . . 89CMN3200 Package Promote . . . . . . . . . . . . . . . . . . . . . . . . . . . . . 91CMN3300 Package Revert . . . . . . . . . . . . . . . . . . . . . . . . . . . . . . 95CMN3400 Package Delete. . . . . . . . . . . . . . . . . . . . . . . . . . . . . . . 96CMN3500 Package Backout . . . . . . . . . . . . . . . . . . . . . . . . . . . . . 98CMN3600 List . . . . . . . . . . . . . . . . . . . . . . . . . . . . . . . . . . . . . . . 99CMN3611 IMS Option. . . . . . . . . . . . . . . . . . . . . . . . . . . . . . . . . . 100CMN3700 Browse Log . . . . . . . . . . . . . . . . . . . . . . . . . . . . . . . . . 101CMN3900 Monitor . . . . . . . . . . . . . . . . . . . . . . . . . . . . . . . . . . . . 102CMN4000 Query . . . . . . . . . . . . . . . . . . . . . . . . . . . . . . . . . . . . . 103CMN4200 Browse Log . . . . . . . . . . . . . . . . . . . . . . . . . . . . . . . . . 106CMN4300 Internal Scheduler Monitor. . . . . . . . . . . . . . . . . . . . . . . 106CMN4400 Query Monitor . . . . . . . . . . . . . . . . . . . . . . . . . . . . . . . 106CMN4500 Impact Analysis Table Generation . . . . . . . . . . . . . . . . . . 107CMN4571 CMNBAT90. . . . . . . . . . . . . . . . . . . . . . . . . . . . . . . . . . 110CMN4600 Notification . . . . . . . . . . . . . . . . . . . . . . . . . . . . . . . . . 110CMN4700 Online Forms . . . . . . . . . . . . . . . . . . . . . . . . . . . . . . . . 111CMN5000 Administration Messages . . . . . . . . . . . . . . . . . . . . . . . . 111CMN5400 Write. . . . . . . . . . . . . . . . . . . . . . . . . . . . . . . . . . . . . . 122

Messages 7
Prelim
inar
y
Welcome to ChangeMan ZMFThe purpose of this manual is to describe system messages and codes produced by ChangeMan® ZMF.
Audience andscope
This document is intended for ChangeMan ZMF users, administrators, and the technical staff who install and support ChangeMan ZMF software.
Refer to "Guide to ChangeMan ZMF Documentation" on page 7 for additional documentation.
Guide to ChangeMan ZMF Documentation
The following sections provide basic information about ChangeMan ZMF documentation.
ChangeMan ZMF Documentation Suite
The ChangeMan ZMF documentation set includes the following manuals in PDF format.
Manual Description
Administrator’s Guide Describes ChangeMan ZMF features and functions with instructions for choosing options and configuring global and application administration parameters.
ChangeMan ZMF Quick Reference
Provides a summary of the commands you use to perform the major functions of the ChangeMan ZMF life cycle.
Customization Guide Provides information about ChangeMan ZMF skeletons, exits, and utility programs that will help you to customize the base product to fit your needs.
DB2 Option Getting Started Guide
Describes how to install and use the DB2 Option of ChangeMan ZMF.
Enterprise Release Option (ERO) Concepts
Discusses the concepts of the ERO Option of ChangeMan ZMF.
ERO Getting Started Guide
Explains how to install and use the ERO Option of ChangeMan ZMF.
IMS Option Getting Started Guide
Provides instructions for implementing and using the IMS Option of ChangeMan ZMF.
INFO Option Getting Started Guide
Describes two methods by which ChangeMan ZMF can communicate with other applications:
Through a VSAM interface file.
Through the Tivoli Information Management for z/OS product from IBM.
Installation Guide Provides step-by-step instructions for initial installation of ChangeMan ZMF. Assumes that no prior version is installed or that the installation will overlay the existing version.
8 Serena® ChangeMan® ZMF 6.1
Welcome to ChangeMan ZMF
Using the Manuals
The ChangeMan ZMF manuals use the Adobe Portable Document Format (PDF). To view PDF files, use Adobe® Reader®, which is freely available from www.adobe.com.
This section highlights some of the main Reader features. For more detailed information, see the Adobe Reader online help system.
The PDF manuals include the following features:
Bookmarks. All of the manuals contain predefined bookmarks that make it easy for you to quickly jump to a specific topic. By default, the bookmarks appear to the left of each online manual.
Links. Cross-reference links within a manual enable you to jump to other sections within the manual and to other manuals with a single mouse click. These links appear in blue.
Printing. While viewing a manual, you can print the current page, a range of pages, or the entire manual.
Advanced search. Starting with version 6, Adobe Reader includes an advanced search feature that enables you to search across multiple PDF files in a specified
Load Balancing Option Getting Started Guide
Describes the Load Balancing Option of ChangeMan ZMF, lists hardware and software requirements, and details the steps to install the option.
Merge and Reconcile Getting Started Guide
Explains how to use the Merge and Reconcile Option of ChangeMan ZMF to consolidate multiple versions of source code, JCL, and other types of text.
Merge and Reconcile Quick Reference
Provides a summary of Merge and Reconcile commands in a handy pamphlet format.
Messages Explains ChangeMan ZMF, SERNET, Merge and Reconcile, and System Software Manager (SSM) messages.
Migration Guide 5.6 - 6.1
Gives guidance for upgrading ChangeMan ZMF from versions 5.6.x to 6.1.
Online Forms Manager Getting Started Guide
Explains how to install and use the Online Forms Manager (OFM) option of ChangeMan ZMF.
SER10TY User’s Guide Gives instructions for applying licenses to enable ChangeMan ZMF and its selectable options.
User’s Guide Describes how to use ChangeMan ZMF features and functions to manage changes to application components.
XML Services User’s Guide
Documents the most commonly used features of the XML Services application programming interface (API) to ChangeMan ZMF.
Web Services Getting Started Guide
Documents the Web Services application programming interface (API) to ChangeMan ZMF.
Manual Description
TIP Be sure to download the full version of Reader. The more basic version does not include the search feature.
Guide to ChangeMan ZMF Documentation
Messages 9
directory. (This is in addition to using any search index created by Adobe Catalog—see step 3 below.)
To search within multiple PDF documents at once, perform the following steps (requires Adobe Reader version 6 or higher):
1 In Adobe Reader, select Edit | Search (or press CTRL+F).
2 In the text box, enter the word or phrase for which you want to search.
3 Select the All PDF Documents in option, and browse to select the folder in which you want to search.
4 Optionally, select one or more of the additional search options, such as Whole words only and Case-Sensitive.
5 Click the Search button.
NOTE Optionally, you can click the Use Advanced Search Options link near the lower right corner of the application window to enable additional, more powerful search options. (If this link says Use Basic Search Options instead, the advanced options are already enabled.) For details, see Adobe Reader's online help.

Messages 11
Chapter 1ChangeMan ZMF Messages
This chapter describes messages issued by Serena ChangeMan ZMF. The messages in this chapter are grouped by ChangeMan ZMF function, and they are listed by message number within each group.
ChangeMan ZMF displays messages in sysout data sets written by the SERNET started task, and it displays messages in the user interface.

12 Serena® ChangeMan ZMF® 6.1
Chapter 1 ChangeMan ZMF Messages
ISPF Client Messages
Each ISPF message can have two forms: a short message and a long message explanation.
The short message automatically displays in the upper right corner of the panel, overlaying any panel text in that area. The long message, which is more descriptive, displays when you press the PF] HELP key after the short message displays.
The first three characters identify the application CMN. The next four digits nnnn refer to the message number. Use the message number to find an explanation for the message in this manual, or to request support from Serena Customer Support.
ISPF Message Types
The last character, x, refers to the type of message:
------------------------ PACKAGE INFORMATION CATEGORI-------------- Not LinkedCOMMAND ===> SCROLL ===> PAGE PACKAGE ID: IMSQ000001 STATUS: DEL INSTALL DATE: 20081231 CREATOR: DYOUNG2 AUDIT RC: _ General _ Non-Source _ Source _ Source and Load Relationship _ Component Userid Work List _ Renames and Scratches _ Approval List _ Site/Install Date Information _ Site Activities Date and Time _ Online Forms _ Linked Package _ Participating Package(s) _ Status Start Date and Time _ Revert Reasons _ Backout Reasons _ Promotion History _ Promotion Libraries _ Development Staging Libraries _ Production Staging Libraries _ Production Libraries _ Baseline Libraries _ IMS Information ******************************* Bottom of data ******************************* ____________________________________ | CMN8764I - Package is not Linked. | |___________________________________|

Message Descriptions
Messages 13
A refers to error messages that require Action.
I refers to Informational messages that acknowledge the completion of a task.
E refers to Error messages that indicate an action was performed incorrectly.
Clearing ISPF Messages
The method used to clear the message depends on the type of screen displayed. Generally, ChangeMan ZMF follows ISPF standards. For example:
If the panel is table driven, you can press the [Enter], [End], scroll down, or scroll up keys.
If the panel is data-entry driven, you can reenter the information required in the panel, or you can cancel and exit by following the cancellation instructions listed on the panel.
In either type of panel, pressing the [PF1] key again (after displaying the long message) displays tutorial information for the current screen. You may find the tutorial information helpful when resolving an error message. ChangeMan ZMF lets you continue with other tutorial subjects or return to the originating screen by pressing the [END] key.
Some of the messages not only display on-screen, but they are also written to the ChangeMan ZMF Log file.
Most of the informational messages are included in the Log, such as Create a package, Checkout components, Global and Local parameter generation, and so forth.
NOTE Only the most severe error messages, such as attempting to access a secured component, are logged.
DDNAME SERPRINT
Messages issued by ChangeMan ZMF server programs are displayed under ddname SERPRINT in the sysout for the SERNET started task that runs your ChangeMan ZMF instance. A subset of those messages that are considered important are routed to the operator.
Message Descriptions
ChangeMan ZMF messages and their meanings are listed below in ascending numeric order.

28 Serena® ChangeMan ZMF® 6.1
Chapter 1 ChangeMan ZMF Messages
CMN1007A INVALID OPTION | Selective demotion disallowed - contact ADMIN.
Explanation: Displays when you try to selectively demote components within a promoted package whose governing project was set up with demotion rules that disallow selective demotion.
Solution: You can try a full demotion, or talk with the project’s administrator regarding the demotion rules. See the “Promoting and Demoting Components” section in the Serena® ChangeMan® ZMF User’s Guide and the “Setting Up Global Parameters” and “Setting Application Parameters” sections in the Serena® ChangeMan® ZMF Administrator’s Guide.
CMN1008A INVALID OPTION | Option disallowed in this environment.
Explanation: Displays when you enter a menu option that is not allowed in the currently configured environment, such as attempting to configure project baseline, promotion, and so forth, in a remote site (PROD environment).
CMN1009A INVALID OPTION | Option only valid in DEV or DEVPROD environment.
Explanation: Displays when you enter a menu option that is not allowed in the currently configured environment, such as attempting to configure project remote site information in an ALL environment.
CMN1010A PACKAGE NOT FOUND | {package id} does not exist in the Package Master.
Explanation: Displays when you enter a change package number that ChangeMan ZMF does not recognize during an attempt to perform any function that requires an existing change package, such as updating change package information.
Solution: You should either review the information entered and re-key the package number, or cancel and exit.
CMN1011I INITIALIZATION ERROR | Unable to read Package Master global record.
Explanation: Displays when you try to initiate a session with a ChangeMan ZMF started task, but no global record is found in the package master. This situation occurs when the package master is not initialized, or has been corrupted. This is a very serious problem, since the global record contains important system information.
Solution: ChangeMan ZMF does not start unless the package master is re-initialized or restored from the previous backup of the package master.
CMN1012I INVALID COMMAND | Command entered was not valid.
Explanation: Displays when ChangeMan ZMF does not recognize a command that you enter at the command line (COMMAND===>) line.
Solution: Enter the correct command.
CMN1013A ENTER “NAME” STRING | The {command} command requires you to enter a NAME string.
Explanation: Displays when you enter a List command that requires a second parameter, such as LOCATE, SELECT, or BROWSE, at the command line without a second parameter.
CMN1014I MEMBER NOT FOUND | No entry found for member {member name}.
Explanation: Displays when you try to edit, browse, stage, recompile, or relink a member of a partitioned data set that does not exist.

Message Descriptions
Messages 29
CMN1015A PACKAGE NOT FOUND | {package id} participating package does not exist.
Explanation: Displays when ChangeMan ZMF does not recognize a change package number that you enter while trying to create or update the Super/Complex change package information.
Solution: Either review the information entered and re-key the package number, or cancel and exit. See panels CMNCRT08 and CMNPGNL6 in the Serena® ChangeMan® ZMF User’s Guide.
CMN1016A ENTER “NEW NAME” STRING | The {command} command requires you to enter a NEW NAME string.
Explanation: Displays when you enter an R (Rename) command at the command line on the Utility: Baseline Selections panel without entering a NEW NAME parameter.
Solution: Specify a NEW NAME string for the component. See the “Utility Requests” chapter in the Serena® ChangeMan® ZMF User’s Guide.
CMN1017A PACKAGE NOT FOUND | No participating package information found.
Explanation: Displays when ChangeMan ZMF attempts to update the super/complex package’s participating package information, but the participating information does not exist.
CMN1018A PACKAGE MEMO DELETED | {package id} package is in memo deleted status.
Explanation: Displays when you enter a change package number that ChangeMan ZMF has been asked to delete, during an attempt to perform a function that requires an existing change package, such as updating change package information.
Solution: Remove the Delete Memo before the ChangeMan ZMF batch reports are run. See the “Deleting and Undeleting Packages” chapter in the Serena® ChangeMan® ZMF User’s Guide.
CMN1019A INVALID DATA SET NAME | Specify only the data set name; member name not allowed.
Explanation: Displays when you specify a data set name with a member name, but the global administrator has set the global parameter for data set name only.
CMN1020A ENTRY REQUIRED | At least one description line must be entered.
Explanation: Displays when you try to exit the Create: General Information panel, CMNCRT02, without first making at least one entry in the Package Description field.
Solution: You can either make a valid entry, or cancel and exit the panel. See the Serena® ChangeMan® ZMF User’s Guide for the General Information panel.
CMN1021A OFM NOT GENERATED | Online Forms Manager data set parameters have not been generated.
Explanation: Displays when you try to specify on Online Forms Manager data set, but the administrator has not created data set parameters.