tableau server administrator guidedocshare01.docshare.tips/files/26264/262646692.pdf · 2. stop the...
TRANSCRIPT

Welcome to Tableau Server. This guide will get you started using TableauServer—including installing and configuring; setting up distributed servers; managing users and groups, licensing, and Tableau Services; backing up and restoring the database; and embedding views into other applications.
In addition to this guide you will find more help on the server itself. OpenTableau Server and click Help in the upper right corner to see topics specific tothe page you are viewing.
Tableau Server Administrator GuideVersion 6.0
© 2011 Tableau Software, Inc. All rights reserved.This product is Server Software as defined in Tableau Software’s End User Software License Agreement

Page 2
Know before you start...
Configuration InformationWhen you install and configure Tableau Server you may be asked for the following information.
Option Description Your InformationServer Account The server must have a user account that
the service can use. The default is the built-in Windows Network Service account. If you use a specific user account you’ll need the domain name, user name, and password.
User Name:
Password:
Domain:
Active Directory Instead of using Tableau’s built-in user management system, you can authenticate through Active Directory. If so, you’ll need the AD domain name (refer to Appendix B).
Active Directory Domain:
Open port in Windows firewall
When selected Tableau Server will open the port used for http requests in the Windows Firewall software to allow other machines on your network to access the server.
F Yes F No
PortsBy default Tableau Server requires the following TCP/IP ports to be available to the server: 80, 8080, 8085,8060, 8200, 8000 (plus the specified number of application server processes), and 8100 (plus the specified number of VizQL server processes). The default configuration can be changed if there is a conflict. Refer to TCP/IP Ports to learn how.
DriversYou may need to install additional database drivers. Download drivers from: www.tableausoftware.com/community/support/drivers.
The machine must: F Run a supported operating system:
Windows Server 2003 (SP1 or higher), Windows Server 2008, Windows Server 2008 R2, Windows XP (SP2 or higher), Windows Vista, Windows 7
F Have at least one dual core processor with 2 GB of RAM.
F Not run Internet Information Services (IIS) if you want to use the default port 80.(You can modify the gateway port number to avoid conflict with IIS. See TCP/IP Ports to learn how.)
F Have an administrative account with permission to install software and services.
F Optionally have a user account that the service can use.(Useful if you’re using NT Authentication with data sources, refer to Appendix A for more information.)

Page 3
Installation .......................................................................................................................4
Product Activation ..........................................................................................................5
Configuration ..................................................................................................................6
Distributed Servers ......................................................................................................10
Configuring SSL ...........................................................................................................14
Publishing with Extracts ..............................................................................................16
Add Users......................................................................................................................17
License Levels and Permissions ................................................................................20
Assign License Levels and Rights .............................................................................23
Manage Tableau Services ............................................................................................25
Schedules and Tasks ...................................................................................................33
Manage Domains on the Server ..................................................................................39
Manage Data Connections on the Server...................................................................40
Back Up and Restore the Database ............................................................................41
Customize Tableau Server ...........................................................................................42
TCP/IP Ports ..................................................................................................................45
Logs and Temporary Files ...........................................................................................47
Sharing Views ...............................................................................................................49
Embedding Views .........................................................................................................50
Tableau Server Trusted Authentication ......................................................................68
Appendix A: Configuring Run As User .......................................................................76
Appendix B: Active Directory Domain ........................................................................82
Appendix C: Offline Activation ....................................................................................83
Appendix D: Reconfiguring the Server ......................................................................86
Index ..............................................................................................................................89
Contents

Page 4
InstallationAfter you download the Tableau Server installation file, follow the instructions below to install the server.
To install Tableau Server:1. Double-click the installation file.
2. Follow the on-screen instructions to complete the Setup wizard and Install the application.
After the installation completes, click Next to open the Product Key Manager window.
Note: If you need to support characters that are not the Latin-1 set, make sure to install the Windows Language Packs via Control Panel > Regional and Language Options. The language packs will need to be installed on the primary server as well as any worker machines.

Page 5
Product ActivationTableau Server requires at least one product key that both activates the server and specifies thenumber of license levels you can assign to users. You can access your product keys from the TableauCustomer Account Center.
Activate and RegisterAfter installing and configuring the server, the product key manager automatically opens so you can enter your product key and register the product. Select Activate and then paste in your product key.
Refer to the download help page on the web site for step-by-step instructions. If you need to activate the product on a computer that is offline, please refer to Appendix C.

Page 6
ConfigurationGeneral Configuration1. By default, Tableau Server runs using the Network Service account. If you want to use another
user account to accommodate NT Authentication with data sources, specify the user name and password in the appropriate text boxes. The user name should include the domain name. Refer to Appendix A to learn more about using a specific user account.
2. Select whether to use Active Directory to authenticate users on the server. Select Use Local Authentication to create users and assign passwords using Tableau Server’s built-in user management system.
Caution: You cannot switch between Active Directory and Local Authentication later.
If you are using Active Directory you can optionally Enable Automatic Login, which uses Microsoft SSPI to automatically log your users in based on their Windows username and password.
If you are using Active Directory, make sure to type the fully qualified domain name and nickname (refer to Appendix B to learn how to find your domain name). Note that the first time your users log in, they will need to use the fully qualified domain name (for example, test.lan\jsmith). On subsequent logins, they can use the nickname (test\jsmith).

Page 7
3. The default port for web access to Tableau Server (via HTTP) is port 80. You may need to change the port number if you have another server running on port 80 or other networking needs. For example, you may need to change the port number if you have a hardware firewall or proxy in front of the Tableau Server host and don’t want the back-end system running on port 80.
5. Select whether to include sample data and users. The sample data can help you get familiar with Tableau Server, especially if you are installing a trial version of the product. Initially the sample user uses one interactor license. You can change this user to unlicensed in order to reclaim the license levels. Refer to License Levels & Permissions to learn how. If you select to include the sample user, a single user is installed. The username and password is shown below:
Username PasswordTableau Software test
4. Select whether to open a port in Windows Firewall. If you do not open this port, users on other machines may not be able to access the server.
6. Optionally continue to the next page to configure Caching. If you do not want to configure caching options click OK to continue to Setup Tasks.

Page 8
Caching ConfigurationViews published to Tableau Server are interactive and often have a live connection to a database. As users interact with the views in a web browser, the data that is queried gets stored in a cache. Subsequent visits will pull the data from this cache if it is available. Click the Caching tab in the Configuration dialog box to specify how frequently the cache is refreshed.
To configure caching:1. Select the Caching tab in the Server configuration dialog box.
2. Select from one of the following options:
• Refresh Less Often - data is cached and reused whenever it is available regardless of when it was added to the cache. This option minimizes the number of queries sent to the database. Select this option when data is not changing frequently. Refreshing less often may improve performance.
• Balanced - data is removed from the cache after a specified number of minutes. If the data has been added to the cache within the specified time range the cached data will be used, otherwise new data will be queried from the database.
• Refresh More Often - the database is queried each time the page is loaded. The data is still cached and will be reused until the user reloads the page. This option will ensure users see the most up to date data, however, it may decrease performance.
3. When finished, click OK to continue to Setup Tasks.
Note: Regardless of how caching is configured, the user can click the Refresh Data button on the toolbar to force the server to send a query and retrieve new data.

Page 9
Setup TasksThe final step in activating Tableau Server is to add an administrator account. If you are using ActiveDirectory, type the username and password for the Active Directory user who will bethe administrator. If you are using Local Authentication, create an administrative account by typing ausername, name, and password (twice) of your choosing. Then click Add User.
Note: By default, Tableau Server opens your default web browser to http://localhost to complete the setup tasks. Depending on your security settings, this may cause a blocked content message in yourbrowser.

Page 10
Distributed ServersAfter completing the initial configuration, you can set up Tableau Server to run on multiple machines.A distributed environment can help you support more users and improve view interaction andbrowsing performance. For example, if you expect your users will spend more time interacting withviews than browsing and searching you could set up an environment with several machines dedicatedas VizQL servers. On the other hand, if you expect more browsing and searching you could dedicatea number of machines to the server's web application processes. Follow the steps below to set up adistributed environment.
To set up distributed servers:1. Make sure you’ve installed Tableau Server on the primary machine.
2. Stop the server on the primary machine. (Refer to Tableau Server Monitor to learn how.)
3. Download the Tableau Server Worker software from the Customer Account Center.
4. Run the Tableau Server Worker Software installer on all additional machines that you want to add to the Tableau Server cluster. During installation you will be asked to provide the IP address of the primary server.
Note: Installing the Worker software requires that port 3730 on the machine be open. If that port is in use, the install will fail. Also on the Primary machine, ports 1070-1821 need to be open for the distributed Ruby and ports 27000-27009 need to be open for licensing communication.

Page 11
5. Once the Worker software is installed on worker machines, return to the primary server and open the configuration utility by selecting Tableau Server 6.0 > Configure Tableau Server on the Start menu.
5. In the Configuration Utility, select the Servers tab and click the Add button.
Note: You can also use this dialog to modify the number of processes assigned to the primary server.

Page 12
6. In the subsequent dialog box, type the IP Address for one of the worker machines and specify the number of VizQL and Application Server processes to allocate to the machine. Select the Extract storage checkbox if you want to use this server for extract storage. By default, extract storage is hosted on the primary machine.
7. When finished, click OK.
8. Repeat these steps for each machine you want to added to the distributed environment.
9. When finished adding workers, click OK again to save the changs. Then start the server on the primary machine.
Server Updates and MaintenanceAfter the first time you set up the workers you can perform all configuration and updates from theprimary machine. Specifically, you should make changes using the command line tools andconfiguration utility on the primary server. Updates will be pushed to the workers automatically.
If the primary server changes its IP address, you will need to re-install all of the worker machines.
Note: A change was made in the 6.0 server that requires you to re-install the worker software on each worker machine. When you upgrade to a version 6.0 server you will be notified of which workers are out of date. You can either run the 6.0 worker installer before continuing the upgrade or remove the workers from the configuration until they are updated.

Page 13
Database DriversThe Tableau Server and Tableau Server Worker installers automatically install drivers for Oracle andOracle Essbase databases. If you plan to publish workbooks that connect to other databases you willneed to ensure that both primary and worker machines have the corresponding drivers.
Only workers that have VizQL processes need these database drivers. For example, if you have aworker dedicated as a VizQL server and another one dedicated as an Application server, you onlyneed to install drivers onto the VizQL server.
You can monitor the status of the distributed machines on the Server Maintenance page. See Manage Tableau Services to learn more about maintaining the server.

Page 14
Configuring SSLYou can configure Tableau Server to use Secure Sockets Layer (SSL) encrypted communicationson all HTTP traffic. Setting up SSL ensures that access to the web application is secure and thatsensitive information passed between the web browser and the server or Tableau Desktop and theserver is protected. To configure the server for SSL you must first acquire a certificate from a trustedauthority then import the certificate files into Tableau Server. Follow the steps below to configureTableau Server to use SSL.
To configure Tableau Server to use SSL:1. Acquire an Apache SSL certificate from a trusted authority (e.g., Verisign, Thawte, Comodo,
GoDaddy, etc.). You can also use an internal certificate issued by your company. Some browsers will require additional configuration to accept certificates from certain providers. Please refer to documentation provided by your certificate authority.
2. Open the Tableau Server Configuration Utility by selecting Tableau Server 6.0 > Configure Tableau Server on the Start menu.
3. In the Configuration Utility select the SSL tab.

Page 15
4. Select the option to Use SSL for Server Communication. Then specify a location for each of the following certificate files. These files should be located on the local machine.
SSL Certificate File - must be a valid PEM encoded x509 certificate with the extension .crt
SSL Certificate Key File - must be a valid RSA or DSA key that is not password protected with the file extension .key
SSL Certificate Chain File (Optional) - Some certificate providers issue two certificates for Apache. The second certificate is the chain file that contains information about the provider. If your provider has issued this second certificate you can enter it here.
5. When finished, click OK.
The changes will take effect the next time the server is restarted. When the server is configured forSSL, it will accept requests to the non-SSL port (default is port 80) and automatically redirects to theSSL port 443.
SSL errors are logged in the install directory at the following location. Use this log to troubleshootvalidation and encryption issues.
C:\ProgramData\Tableau\Tableau Server\data\tabsvc\logs\httpd\error.log
Note: Tableau Server only supports port 443 as the secure port. It cannot run on a machine where any other application is using port 443.

Page 16
Publishing with ExtractsTableau Desktop allows authors to create a data extract, which is a copy or a subset of data fromthe original data source. Data extracts are useful for improving performance, minimizing packagedworkbook sizes, and increasing functionality.
When you publish a workbook that uses extracts, the extract data is imported into a built-in fast data engine. This data engine allows you to refresh the data from the original data source on a recurring schedule. For example, let’s say you have a workbook that connects to a large data warehouse that is updated weekly. Instead of publishing a workbook that queries the live data, you can create an extract including just the data necessary for the specific Tableau view. This increases performance and minimizes queries to the live database. Then you can add that workbook to a schedule so that the extract gets refreshed each week with the updated data from the data warehouse.
Before you can create refresh schedules you must enable scheduling on the server. See Schedules and Tasks to learn more.
Note: If you are using version 5.2 or earlier, you may have configured the server to use an external extract storage database. You can continue to use the external database, however, we recommend that you upgrade to the built-in data engine to significantly improve performance. To upgrade to the built-in data engine, select the Storage tab in the configuration dialog box and then select the Upgrade extract storage checkbox.
When you upgrade the extract storage, the data in the external database is not changed but it will no longer be used by Tableau Server. The data is migrated to the built-in data engine. The migration cannot be undone.

Page 17
Add UsersEveryone who needs to access Tableau Server, whether it’s to publish, browse, or administer,must be added as a user. In addition, users must be assigned a license level. Depending on how the server has been configured you can add users using the internal user management system (local authentication) or you can import from Active Directory.
Adding Local UsersIf the server is configured to use Local Authentication, you can add individual users or import several users from a comma separated value (CSV) file. You cannot add local users to a server that is configured to use Active Directory.
To add local users:1. Log into Tableau Server using your administrator user name and password.
2. Click Users in the Administration area on the left side of the page.
3. Click one of the following links at the bottom of the list of users:
Add User - to add users one at a time by specifying a user name and password.
Add Users From CSV File - to add multiple users contained in a CSV file.
OR

Page 18
4. If you are adding a single user, specify the following:
Otherwise, if you are importing a CSV file, Browse and select the file, then click Import File. CSV files can have the following columns in the order shown. CSV files can have the following columns in the order shown. Columns you include must also have column headers:
• Username*
• Password*
• Full Name
• License Level (Interactor, Viewer, or Unlicensed)
• Administrator (System, Content, or None)
• Publisher (yes/true/1 or no/false/0)
* These columns are required.
If the file contains usernames that already exist, they will be updated with the information in the file.
• Username - type a username for the user (e.g., jsmith, johnsmith). The username can only contain letters and numbers.
• Full Name - type a display name for the user (e.g., John Smith).
• Password - type a password for the user.
• Confirm - retype the password.
• License Level - select a license level. Refer to License Levels & Permissions to learn more.
• User Rights - select whether the user can publish workbooks and assign administrator rights. Refer to User Rights to learn more.
When finished, click Add User.

Page 19
Adding Users from Active DirectoryThe easiest way to add users when using Active Directory authentication is to importan Active Directory group. Refer to the Managing Groups topic in the online help to learn more about groups on Tableau Server. You can also add users one at a time as described below.
To add users from Active Directory:1. Log into Tableau Server using your administrator user name and password.
2. Click Users in the Administration area on the left side of the page.
3. Click Add User at the bottom of the list of users.
4. Specify the following:
• Username - type a username for the user (e.g., jsmith, domain.lan\jsmith, [email protected]).
If the Active Directory domain is different than the server domain you need to include the fully qualified domain name for the first user you add. Subsequent users can use the domain nickname. Refer to Managing Domains on the Server to learn how to modify the nickname.
• License Level - select a license level. Refer to License Levels & Permissions to learn more.
• User Rights - select whether the user can publish workbooks and assign administrator rights. Refer to User Rights to learn more.
When finished, click Add User.

Page 20
License Levels and PermissionsAll users on Tableau Server must be assigned a license level. License Levels control how much access the user has on the server. For example, users with the Viewer license level cannot interact with views.
License LevelsYour product key gives you a set of license levels that, as an administrator, you can distribute to your users. You can assign the following license levels:
Unlicensed - the user cannot log in to the server. All users are added as unlicensed by default.
Viewer - the user can log in and see published views on the server but cannot interact with the views. Users with this level can only be given permission to view, add comments, and view comments.
Interactor - the user can log in, browse the server, and interact with the published views.
Guest - the guest license level is available to allow users without an account on the server see and interact with an embedded view. When enabled, the user can load a webpage containing an embedded visualization without logging in. This option is only available with a core-based server license.
User RightsIn addition to the license levels, you can also assign the following user rights:
Publish - allows the user to connect to Tableau Server from Tableau Professional so that she can publish and download workbooks and data sources.
Admin - makes the user an administrator. There are two types of administrators. Content Administrators can manage users, groups, projects, workbooks, and data connections. System Administrators have all the rights of a content administrator but they can also administer the server itself including maintenance, settings, schedules, and the search index. The Admin right can only be assigned to users with the Interactor license level and the Publish right.

Page 21
PermissionsFinally, when someone publishes a workbook to the server, he or she can allow and deny specific capabilities to further control who can access the workbook. The following capabilities can be allowed or denied to individual users or entire groups:
View - see the workbook on the server
Write - edit and republish
Delete - delete the workbook from Tableau Server
Filter - see and interact with filters that are published with each view
Add Comment - add comments to the view
View Comments - see comments associated with the view
View Underlying Data - see the raw data behind each view
Export Image - export and save the view as an image file
Export Data - export the aggregated data as a comma separated value (CSV) file
Download File - open the workbook from the server using Tableau Professional
Share Customized - make your saved customizations to a view public for others to see.
Move - move the workbook between projects
Set Permissions - modify the permissions
To make it easy to assign common combinations of these capabilities, Tableau Server comes with some pre-defined permission roles. Select one of these roles when adding permissions to see the capabilities it allows. Refer to the Setting Permissions topic in the online help for more information about assigning permissions.

Page 22
Has the user been specifically denied the capability?
Yes No
Denied
YesNo
Allowed
Has the user been specifically assigned a role that allows the capability?
Is the user part of a group that has been specifically denied the capability?
Yes No
DeniedIs the user part of a group that has been specifically allowed the capability?
Yes
Allowed
No
Denied
The diagram below explains how permissions are evaluated for a view or workbook.
Note: If the workbook is configured to show sheets as tabs, all sheets inherit the workbook permissions even if different permissions are specified on an individual sheet.

Page 23
Assign License Levels and RightsWhen you add users to Tableau Server, you can optionally assign them license levels and user rights. By default users are unlicensed and have no user rights. That means that they cannot log in to the server and cannot publish workbooks. You can assign different license levels and user rights to further control access to the server.
To assign license levels:1. Log into Tableau Server using your administrator user name and password.
2. Click Users in the Administration area on the left side of the page.
3. Select one or more users you want to assign license levels to.
4. Click the License User link in the Actions toolbar along the top of the list.
5. Select the license level to assign to the selected users.
The Licensed Level column in the list of users is the updated to reflect the changes. Refer to License Levels to learn more about each level.

Page 24
To allow or deny user rights:1. Log into Tableau Server using your administrator user name and password.
2. Click Users in the Administration area on the left side of the page.
3. Select one or more users you want to assign user rights to.
4. Click the Publishing or Admin links in the Actions toolbar along the top of the list.
5. Select Allow or Deny to change the Publishing right for the selected users.
Select System or Content or None to change the Admin right for the selected users.
The Admin and Publish columns in the list of users are updated to reflect the changes. Refer to User Rights to learn more about each right.

Page 25
Manage Tableau ServicesAs an administrator you have access to several tools that help you monitor and manage TableauServices. For maintenance from a remote machine you can use the maintenance tools accessedthrough the web application. If you are working directly on the server you can use Tableau ServerMonitor and the command line administrative tools.
Maintenance ToolsIn addition to Tableau Server Monitor, you also have access to maintenance tools on Tableau Server.There you can see detailed status for each service and process, monitor server and user activity,perform administrative tasks, and specify settings to customize the server. Refer to the ServerMaintenance topic in the online help for more information regarding these tools.
To access the administrative tools on the server:1. Log into Tableau Server using your administrator user name and password.
2. Click Maintenance in the Administration area on the left side of the page.

Page 26
On the Maintenance page, there are several administrative views that help you monitor activity on the server. Each view is described below:
Server Activity - This collection of views shows the number of requests and sessions over varying periods of time. It also shows the activity for specific users and the most accessed views.
User Activity - This dashboard shows users who are currently logged in and user activity (for example, sessions, publishing, and downloading).
View Performance History - This collection of views shows the request time for individual views as well as overall request time history.
Background Tasks - This view shows details for completed and pending tasks. Tasks include reindexing the search index, schedules, and any modifications made to the data connections.
Space Usage - This collection of views shows how much space individual users and projects are using. It also lists workbooks and data source by size so you can monitor how space is allocated on the server.
Customized Views - This view shows views that are using customized views, which ones are the largest, and the users who are customizing the most views.
Who has seen this view? - This text table can be displayed for a specific view to see which users have opened the view, the date and time they saw it, and how many times they have opened it. This text table is available to administrators for all views but can also be accessed by the publisher of the view. Access this view by clicking the “Who has seen this view?” link at the bottom of the page when looking at an individual view.

Page 27
Viewing Service StatusYou can use the Status table on the Maintenance page to view the state of Tableau services on each Tableau server:
To display a machine-readable version of the above information, from the Maintenance page, replace the word status in your URL with systeminfo (for example, http://jsmith/admin/systeminfo). A web page similar to the following appears:

Page 28
Allowing Users to View Service StatusAs the Tableau administrator, only you can see the tools on the Maintenance page, including the Status table. You can, however, make the machine-readable version of the Status table available to non-admin users.
To allow a non-Admin user to view Tableau Service status:1. On the machine running the primary Tableau Server, open the Tableau Server config file:
ProgramData\Tableau\Tableau Server\config\tabsvc.yml
2. Add the line wgserver.systeminfo.allow_referrer_ips: <IP address> to tabsvc.yml, where <IP address> is the IP address of the user’s machine. If you are granting service status access to multiple users, use commas (no spaces) to separate each IP address.
For example:
3. Save and close tabsvc.yml.
4. At a command prompt type:
32-bit version cd "C:\Program Files\Tableau\Tableau Server\6.0\bin"64-bit version cd "C:\Program Files (x86)\Tableau\Tableau Server\6.0\bin"
5. Then use the following command to restart the Tableau Services:
tabadmin restart
Now, users whose IP addresses are added to tabsvc.yml can view Tableau service status by entering the URL http://<server>/admin/systeminfo in a browser or from a command line (for example, curl http://jsmith/admin/systeminfo).

Page 29
Custom Administrative ViewsIn addition to the pre-built administrative views available on the Maintenance page on the Server, youcan use Tableau Desktop to query and build your own analyses of server activity. The Tableau Serverrepository has several database views set up that you can connect to and query. To accessthese views you must first use the command line tool to enable external access to the database.
To enable access to the Tableau Server database:1. At a command prompt type:
cd "C:\Program Files\Tableau\Tableau Server\6.0\bin"
2. Then use the following command to enable external access to the database for the user “tableau” with a password that you specify.
tabadmin dbpass [password]
Substitute the [password] option with a password of your choosing.
3. Restart the server.
You can disable external access by running tabadmin dbpass --disable and thenrestarting the server.
After you’ve enabled external access to the database you can connect to and query the database. Follow the steps below to use Tableau Desktop to connect.
To connect to and query the Tableau Server database:1. In Tableau Desktop select Data > Connect to Data, then select PostgreSQL as the database to
connect to. You may need to install the PostgreSQL database drivers. You can download drivers from www.tableausoftware.com/drivers.
2. In the PostgreSQL Connection dialog box, type the name or URL for Tableau Server.
3. Type 8060 for the port number.*
4. Type workgroup as the database to connect to.
5. Connect using the following username and password:
Username: tableau
Password: the password you specified when you enabled access to the Tableau Server database.
6. Select a table to connect to and click OK. The “tableau” user has access to all of the tables the start with an underscore. For example, you can connect to “_background_tasks,” “_datasources,” and so on.
*Note: You should connect using the port you have set up for the pgsql.port, which is 8060 by default.Refer to TCP/IP Ports to learn more about managing and changing ports.

Page 30
Tableau Server MonitorTableau Server Monitor is installed as part of Tableau Server and can be accessed in the Windows System Tray. Using this tool you can start and stop the services, launch Tableau Server, and display server status.
Open the ServerThis command launches Tableau Server in your web browser. This is an easy way to access the web application and the associated maintenance tools.
Start/Stop the ServerYou can start and stop the server using these commands. When you stop the server you make it unavailable to all of your users and terminate any sessions that are currently in progress. If someone is publishing a workbook when the server is stopped, the process is aborted. As a result, only some of the worksheets in the workbook may be published to the server. Because stopping the server can be very disruptive to your users, make sure to warn them prior to this operation or plan maintenance during non-business hours.
Restart ServerThis command restarts the server. While the server is restarting it will be unavailable to all users. Be sure to warn your users of the outage prior to this operation. You will need to restart the server if you make changes to the Tableau Server Configuration.
Display StatusThis command opens a screen tip containing the status of each process. For more detailed status, use the maintenance tool on Tableau Server.
Manage product keysThis command opens the product key manager where you can add and remove product keys.
ExitThis command closes Tableau Server Monitor. This command does not stop Tableau Server. You can re-open the application by selecting Tableau Software > Tableau Server Monitor on the Windows Start menu.

Page 31
Command Line Tool - TabadminWhen you install Tableau Server, a command line administrative tool, called tabadmin.exe, is alsoinstalled. You can use this tool to start, and stop the server in addition to several other commands. The instructions below describe the general syntax for using tabadmin.
At a command prompt type: 32-bit version cd "C:\Program Files\Tableau\Tableau Server\6.0\bin" 64-bit version cd "C:\Program Files (x86)\Tableau\Tableau Server\6.0\bin"
From there you can execute commands by typing: tabadmin command options
You can execute the following commands:help - shows help for tabadmin.exe commandsactivate - activates a license via online or offline activation.administrator - grant or revoke the Administrator right to a userautostart - display or set the auto-start behavior of the serverbackup - creates a back up of Tableau Server’s data and configurationcleanup - cleans up service log filesconfigure - updates the Tableau Server configuration (refer to Appendix D for options)customize - changes the name or logo used on the serverdbpass - enables external access to the database for building administrative viewsinstall - install the Tableau Server service applicationlicenses - shows information on the active licenses for Tableau Serverpasswd - resets the password for a Tableau Server accountprep_workers - prepare a new worker for service by installing and configuring the softwarereset - resets the server back its initial state where an Administrator account must be set uprestart - restarts the Tableau Servicesrestore - restores a backup of Tableau Server’s data and configurationset - sets a configuration parameter to a specified value or to its default valuestart - starts Tableau Servicesstatus - shows the current running status of Tableau Severstop - stops Tableau Servicesuninstall - uninstalls the Tableau Server service applicationupgrade - upgrades the service configuration and data to the current version of Serverwarmup - warms up the server by requesting a lightweight view from each VizQL processziplogs - creates a zip file containing all of the log files
You can display detailed help and additional options for all of the commands described above by adding the -h option after the command (e.g., tabadmin backup -h).
You can use tabadmin.exe as part of scheduled tasks such as a regular backup or the Clean Up command, which clears out unnecessary logs and temporary files. Refer to Logs and Temporary Files to learn more.

Page 32
Command Line Tool - TabcmdIn addition to the tabadmin tool, Tableau Server comes with another tool to help you automatecommon tasks including batch publishing workbooks and user/group administration. This tool is calledtabcmd.exe and is installed with Tableau Server. You can install this tool on other machines using theinstaller located at:
C:\Program Files\Tableau\Tableau Server\6.0\extras\TabcmdInstaller.exe
The instructions below describe the general syntax for using tabcmd.exe.
At a command prompt type: 32-bit version cd "C:\Program Files\Tableau\Tableau Server\6.0\bin" 64-bit version cd "C:\Program Files (x86)\Tableau\Tableau Server\6.0\bin"
From there you can execute commands by typing: tabcmd command command-argument [options option-arguments]
You can execute the following commands:help - shows help for tabcmd.exe commandsaddusers - adds users to a groupcreategroup - creates a local group on the servercreateusers - creates new users on the serverdelete - deletes the given workbook from the serverdeletegroup - removes a groupdeleteusers - deletes users from the serverget - returns a file from the serverlogin - logs in to the serverlogout - logs off the serverpublish - publishes a workbook to the serverrefreshextract - refreses the extracts of a workbook on the serverremoveusers - removes users from a grouprunschedule - runs a schedule on the serverset - specifies a setting on the serversyncgroup - synchronizes the server with an Active Directory groupversion - prints the version information
Refer to the full guide on this tool available on the Product Manuals page on the Tableau website.

Page 33
Schedules and TasksWhen you publish extracts to the server you can schedule them to be refreshed automatically. That way you don’t have to republish the workbook every time the underlying data has updated and you can still get the performance of a data extract. For example, let’s say you have a workbook that connects to a large data warehouse that is updated weekly. Instead of publishing a workbook that queries the live data, you can create an extract including just the data necessary. This increases performance and limits queries to the live database. Then you can add that workbook to a schedule so that the extract gets refreshed each week with the updated data from the data warehouse.
Before you begin, scheduling must be enabled on the server. After you enable scheduling, you can add workbooks to schedules, create and edit schedules, mange scheduled tasks, and change schedule settings to allow publishers to assign workbooks to schedules.
Enabling SchedulingWhen you publish a workbook that uses an extract the data from the extract is imported into a shared fast database, which increases overall performance and allows you to refresh the data on a schedule. Before you can add workbooks to schedules you need to enable scheduling on the Server Maintenance page.
Select Scheduling in the Settings table at the bottom of the Maintenance page.
Note: Because database passwords may be required to refresh the extract, you must enable embedded credentials in order to allow scheduling.
If you’ve installed Tableau Server prior to Version 6.0, you may have configured an external database for extract storage. While you can continue to use the external database, it is strongly recommended that you migrate the data to the built-in data engine. Refer to the Publishing with Extracts to learn how to upgrade your extracts to the new fast data engine.

Page 34
Adding Workbooks to SchedulesOnce you’ve enabled schedules you can add workbooks to schedules from the Workbooks list. By default Tableau Server has three built in schedules. Refer to Managing Schedules to learn how to create your own schedules.
To add a workbook to a schedule:1. On the workbooks page click the Actions button to show the toolbar.
2. Select one or more workbooks you want to schedule for refresh.
3. Click Schedule Refresh in the toolbar.
4. Select a schedule from the available list.
Note: The Schedule Refresh option is only available if all the selected workbooks connect to an extract data source. Tableau Server cannot refresh workbooks that connect to local file data sources on a mapped drive. Update the connection to use the full path to the data source to allow scheduled refresh.

Page 35
Managing SchedulesTableau Server comes with three schedules already set up. You can create your own schedules or modify the default schedules from the Schedules page. The Schedules page shows a list of schedules including their name, type, number of tasks and when it is scheduled to next run.
To open the Schedules page:• Click the Maintenance link in the Administration section on the left side of the page. Then
click the Schedules link on the Maintenance page.
To create a new schedule:1. Click Create New Schedule at the bottom of the Schedules list.
2. Specify a descriptive Name for the schedule (e.g., Every Saturday Morning, End of the Month)
3. Optionally define a Default Priority from 0 to 100. This is the priority that will be assigned to the tasks by default. If two tasks are pending in the queue, the one with the highest priority runs first. Refer to Managing Tasks to learn more about modifying a task’s priority.

Page 36
4. Define the schedule using the controls. You can define an Hourly, Daily, Weekly, or Monthly schedule.
5. When finished, click Create Schedule.

Page 37
To modify a schedule:
1. On the Schedules page, select the schedule you want to modify. You can only modify one schedule at a time.
2. Click Modify in the toolbar.
3. Change the schedule as needed. When finished, click Save Schedule.
You can also enable, disable, delete, or run schedules by selecting one or more schedules in the list and selecting an option on the toolbar.
Managing TasksYou can see a list of all scheduled tasks on the Tasks page. There you can change a task’s priority, move it to different schedule, run it, or delete it. You can access the Tasks page by clicking the Tasks link on the Maintenance page.
To change a task’s priority:1. On the Tasks page select one or more tasks to modify.
2. Click Edit Priority on the toolbar.

Page 38
3. Type a new priority from 0 to 100 and click Submit.
To move a task to a new schedule:1. On the Tasks page select one or more tasks to modify.
2. Click Edit Schedule on the toolbar.
3. Select a new schedule from the list of schedules.
You can also delete and run tasks by selecting one or more tasks in the list and selecting an option on the toolbar.

Page 39
Manage Domains on the ServerWhen you are using Active Directory authentication for the server you can view a list of the domainsthat are being used and edit their domain names and nicknames. You may need to do this, for example, to ensure that Tableau Server is using the correct nickname for SSPI authentication, or the correct domain name.
To access the list of domains:1. Select the Users link in the Administration area on the left side of the page.
2. Click the Domains link at the bottom of the list of users. The list of domains shows the number of users and groups that have been added to the server from each domain.
3. To display a list of users who are part of a domain, click the domain name.
4. To modify the domain name or nickname, click the Edit link, type a new, fully qualified domain name or a nickname, then click Modify.
Note: You can modify the nickname for any domain the server is using. In general, you can modify the full domain name for any domain except the one that you used to log in. However, if the user name that you are currently logged in with exists in both the current domain and the new domain you can modify the full name for the current domain.

Page 40
Manage Data Connections on the ServerEvery workbook that is published to the server contains one or more connections. These connections are listed on the Data Connections page in the Administration area on the server.
Connections are different from data sources in that each connection is associated with a singleworkbook and describes the attributes required for connecting to a data source (e.g., server name,database name, etc.). That means if you have three workbooks that connect to the same data source,you will still have three connections listed on the connections page.
The connections page allows you to manage the connection information for all of the workbookspublished to the server. For example, you may have a large number of workbooks that connect to adatabase on a specific server. If the name of the server changes you can update all of the workbooksat once so they reference the new server name. Another example is if a workbook connects to a datasource using a specific user name and password. You can quickly update all of the workbooks to usea different set of credentials.
Refer to the online help for more information about finding and modifying connections on the server.You can access the help by clicking the Help link at the top of the Connections page.

Page 41
Back Up and Restore the DatabaseUse the command line tool to back up and restore the database. You can use the commands described below along with the built-in Windows task scheduler to automate back-ups on a regular schedule.
Backing UpIt is important to back up the database so you can restore the published views in the case of a system failure. When you back up the database a single file is created with the .tsbak file extension. This file contains the contents of the database and the configuration files.
To back up the database:1. Open a command window and type the following:
32-bit version cd "C:\Program Files\Tableau\Tableau Server\6.0\bin"64-bit version cd "C:\Program Files (x86)\Tableau\Tableau Server\6.0\bin"
2. Create a backup file by typing:
tabadmin backup filename --stop-server -d
In the above line, replace “filename” with what you want to name the backup file. The --stop-server option stops the server for the backup and then restarts it when it is done. If you are doing a simple backup you must either have this option or the --unsafe option to backup while the server is running. Backups that are part of a batch operation do not require these options.
The -d is optional; if included the current date is appended to the file name.
Restoring from a Backup FileWhen you restore, the contents of the database as well as configuration files are overwritten with the content in the backup file.
To restore from a backup file:1. Stop the service by typing:
tabadmin stop
2. Restore the database from a backup file by typing:
tabadmin restore filename
In the above line, replace “filename” with the name of the backup file you want to restore from.
3. When finished, start the services by typing:
tabadmin start
Caution: If you are using an external extract storage database, you will need to back it up separately to avoid having to republish all of the workbooks in the case of a restore. The backup file does contain extract data stored in the built-in data engine. Refer to Publishing with Extracts to learn more.

Page 42
Customize Tableau ServerYou can customize how Tableau Server looks to make it personal to your company or group.
Server Look and FeelYou can change the following elements:
Name - text that appears in screen tips, warning messages, and error messages. The default name is Tableau Server.
Logo - image that appears on login page and in the left column of most pages. The logo shown when you open an individual view cannot be changed.
To change the name:1. At a command prompt type the following:
32-bit version cd "C:\Program Files\Tableau\Tableau Server\6.0\bin"64-bit version cd "C:\Program Files (x86)\Tableau\Tableau Server\6.0\bin"
2. Change the name by typing the following:
tabadmin customize name “new_name”
In the above line, replace “new_name” with the text that you want to appear as the name on the server. Example: tabadmin customize “Company Server”
3. Restart the server for the change to take affect by typing:
tabadmin restart
To change the logo:1. At a command prompt type the following:
32-bit version cd "C:\Program Files\Tableau\Tableau Server\6.0\bin"64-bit version cd "C:\Program Files (x86)\Tableau\Tableau Server\6.0\bin"
2. Change the logo by typing the following:
tabadmin customize logo "C:\My Pictures\logo.png"
In the above line, replace “image” with the filename of the image that you want to appear as the name on the server. For best results, use an image that is 125px X 35px in size. The image can be .png, .jpg, or .gif file format.
3. Restart the server for the change to take affect by typing:
tabadmin restart

Page 43
To restore the default settings:1. Type the following:
tabadmin customize parameter -d
In the above line, replace “parameter” with what you want to restore (either name or logo).
2. Restart the server for the change to take affect.

Page 44
User InteractionIn addition to the look and feel of the server you can customize specific ways that users can interact with the server. For example, you can allow publishers to attach database passwords to workbooks so that web users will automatically be logged in when viewing the workbook. You can customize the user interaction on the Maintenance page on the server.
The following settings are available in the Settings section of the Maintenance page on the server:
Embedded Credentials - Allow publishers to attach passwords to published workbooks that will automatically authenticate web users to connect to data sources. The passwords are attached to workbooks and are only accessible on server. That is, when the workbook is opened in Tableau Desktop, users will still need to enter a user name and password to connect to the data source. When this setting is turned off, all existing embedded passwords are saved but are not used for authentication. That way if you turn the setting back on, users don’t have to re-embed the passwords.
Scheduling - Allow publishers to assign workbooks to schedules. This option is only available if you have configured Extract Storage on the server and Embedded Credentials is enabled.
Public User List - Allow web users to see a list of all users on the system. When this setting is turned on a link to a list of all users is added to the left navigation bar.
Saved Passwords - Allow users to save data source passwords across multiple visits and browsers. By default users can choose to “Remember my password until I log out,” which lets them save their password during a single browser session. When the Saved Passwords setting is selected a user can instead choose to “Remember my password,” which saves the password across multiple visits and browsers so users will be automatically authenticated regardless of the computer they are using. You, as an administrator, can clear all saved passwords at any time. In addition, users can clear their own saved passwords.
Enable Guest - Allow users to view and interact with embedded views without having to log into a Tableau Server account. Permission can be assigned to the Guest user account to control the interactivity allowed for each view. This option is only available if you have a core-based server license.
Page 45
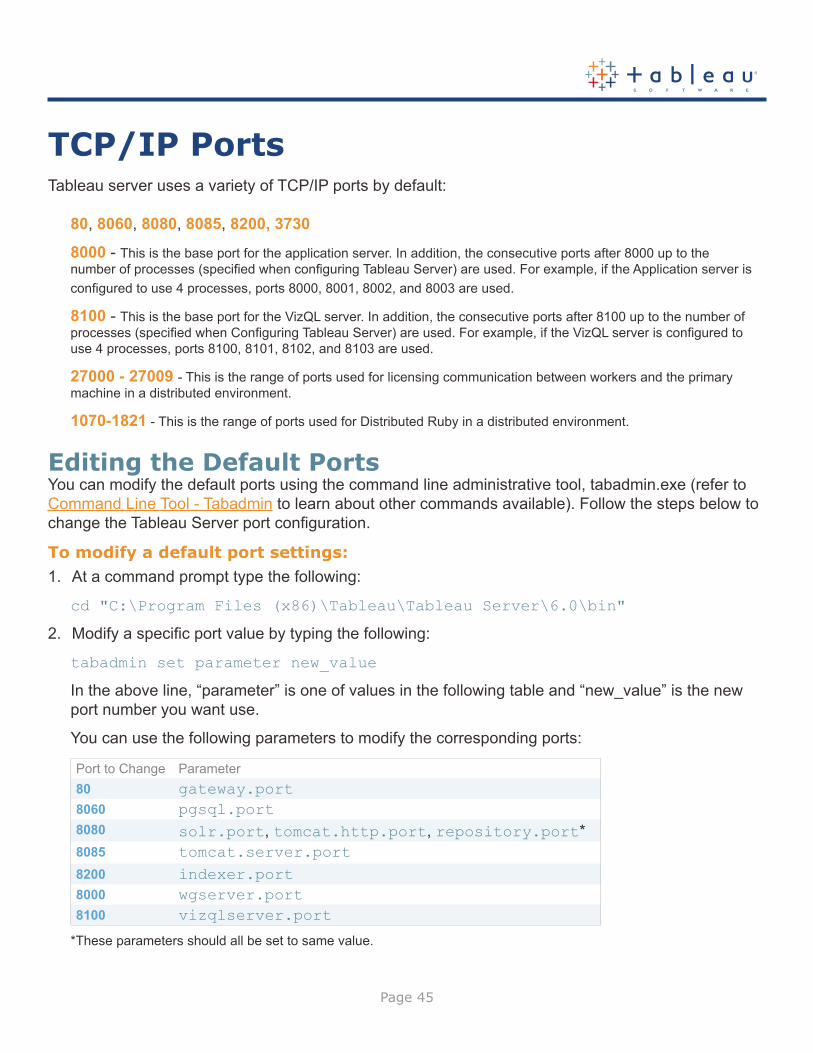
TCP/IP PortsTableau server uses a variety of TCP/IP ports by default:
80, 8060, 8080, 8085, 8200, 3730
8000 - This is the base port for the application server. In addition, the consecutive ports after 8000 up to the number of processes (specified when configuring Tableau Server) are used. For example, if the Application server is configured to use 4 processes, ports 8000, 8001, 8002, and 8003 are used.
8100 - This is the base port for the VizQL server. In addition, the consecutive ports after 8100 up to the number of processes (specified when Configuring Tableau Server) are used. For example, if the VizQL server is configured to use 4 processes, ports 8100, 8101, 8102, and 8103 are used.
27000 - 27009 - This is the range of ports used for licensing communication between workers and the primary machine in a distributed environment.
1070-1821 - This is the range of ports used for Distributed Ruby in a distributed environment.
Editing the Default PortsYou can modify the default ports using the command line administrative tool, tabadmin.exe (refer to Command Line Tool - Tabadmin to learn about other commands available). Follow the steps below to change the Tableau Server port configuration.
To modify a default port settings:1. At a command prompt type the following:
cd "C:\Program Files (x86)\Tableau\Tableau Server\6.0\bin"
2. Modify a specific port value by typing the following:
tabadmin set parameter new_value
In the above line, “parameter” is one of values in the following table and “new_value” is the new port number you want use.
You can use the following parameters to modify the corresponding ports:
Port to Change Parameter80 gateway.port8060 pgsql.port8080 solr.port, tomcat.http.port, repository.port*8085 tomcat.server.port8200 indexer.port8000 wgserver.port8100 vizqlserver.port
*These parameters should all be set to same value.

Page 46
For example, if you have a conflict on port 8000 and would like to configure Tableau Server to use port 8020 you would type the following:
tabadmin set wgserver.port 8020
3. Make all of the necessary port configuration changes. Then restart the services by typing the following:
tabadmin restart
Caution: While the server is restarting it will be unavailable to all users. Be sure to warn your users of the outage prior to this operation or schedule this maintenance during non-business hours.
To restore the default values for any port:1. At a command prompt type the following:
cd "C:\Program Files (x86)\Tableau\Tableau Server\6.0\bin"
2. Restore the default by typing the following:
tabadmin set parameter --default
Where “parameter” is the before listed parameter that corresponds to the port setting you want to restore to the default value for.
3. When finished, restart the services by typing the following:
tabadmin restart

Page 47
Logs and Temporary FilesThe Tableau Service generates several logs and temporary files that can help you understand and track recent activity as well as debug any problems that may arise. If you need to save space on the hard drive, you can occasionally delete these files. Below is a description of where these files are located and what they are used for.
Tableau Service LogsThe following log files track activities related to the web application, database, and index:
Windows XP: C:\Program Files\Tableau\Tableau Server\data\tabsvc\logsWindows Server 2008, Windows Vista, and Windows 7: C:\ProgramData\Tableau\Tableau Server\data\tabsvc
VizQL LogsThese log files track activities related to displaying views, such as querying the database and generating images:
Windows XP: C:\Program Files\Tableau\Tableau Server\data\tabsvc\vizqlserver\LogsWindows Server 2008, Windows Vista, and Windows 7: C:\ProgramData\Tableau\Tableau Server\data\tabsvc\vizqlserver\Logs
Temporary FilesAny file that starts with exe_ in the folder below is a Tableau Server file and can be deleted.
Windows XP: C:\Documents and Settings\username\Local Settings\TempWindows Server 2008, Windows Vista, and Windows 7: C:\ProgramData\Tableau\Tableau Server\temp

Page 48
Archiving the LogsYou can archive all of these log files using the ziplogs command. This command creates a zip file containing all of the Tableau Server Log files and is useful when you’re working with Tableau support.The ziplogs command does not remove the log files, rather it copies them into a zip file.
To create a zip file containing all logs:1. Open a command prompt and navigate to the Tableau Server bin directory. For example:
32-bit version: cd "C:\Program Files\Tableau\Tableau Server\6.0\bin"64-bit version: cd "C:\Program Files (x86)\Tableau\Tableau Server\6.0\bin"
2. Stop Tableau Server by typing:
tabadmin stop
3. Create the zip file by typing tabadmin ziplogs -l <filename> where <filename> is the name of the zipped file you want to create. Choose a unique name with no spaces. Tableau will not overwrite an exisiting file. For example:
tabadmin ziplogs -l my_logs
If you don't specify a file name, the file is named logs.zip. You can also use -d mm/dd/yyyy to only include logs generated since a certain date. For example:
tabadmin ziplogs -l -d 03/12/2011
The above command creates a zipped file named logs.zip that includes logs dated March 12, 2011 up to the present; earlier logs are excluded.
4. Restart Tableau Server by typing:
tabadmin restart
You can find the zipped log file in the Tableau Server bin directory.
Clean UpThe clean up command removes service logs in order to save space. At a command prompt type the following:
tabadmin cleanup --restart
Note: In general you should shut down the server prior to running this command. However, if the server is running you should include the --restart option to ensure a successful clean up and restore.

Page 49
Sharing ViewsYou can easily share your Tableau Server views with others using the Share feature. Clicking the Share button generates simple links that you can either embed in another blog or webpage or email to a friend or co-worker.
To email views:1. Navigate to the view on Tableau Server that you want to email.
2. Click the Share link in the upper left corner of the view. This button is in the lower left corner for Guest users and embedded views.
3. Copy and paste the email link into your email message.

Page 50
Embedding ViewsYou can embed views from Tableau Server into webpages, blogs, wikis, web applications, and intranet portals. The embedded views blend seamlessly into your web pages and are interactive. The views update as the underlying data changes or the workbooks are updated on the server. Embedded views follow the same licensing and permission restrictions used on the server. Generally, people loading a webpage with an embedded view must also have an account on Tableau Server. If you have a core-based license you can alternatively enable the Guest User license level, which allows users to load the view without logging in.
There are three ways you can embed views:
• Use the Share embed code as-is: The Share link in the upper left corner of each view provides automatically-generated embed code. All you have to do is copy the code and paste it into your webpage. See To embed views for steps.
• Write your own embed code: You can enhance the default embed code Tableau provides or you can build your own code. Either way you can add parameters that control comments, toolbars, and more. See Writing Embed Code for details.
• Use the Tableau JavaScript API: You can use Tableau JavaScript objects in your own web application code. See Using the Tableau JavaScript API.

Page 51
To embed views:1. Navigate to the view on Tableau Server that you want to embed and click the Share link in the
upper left corner of the view. For guest users and embedded views, this button is in the lower left .
2. Copy and paste the Embed code into your webpage.
Display OptionsWhen emailing or embedding views, you can optionally adjust the display options including width, height and whether to show the toolbar. The width and height show the current size of the view by default.

Page 52
Writing Embed CodeIf you're writing your own embed code, you can take one of two approaches:
• Use Tableau JavaScript: This is the preferred approach. Just use the Share embed code as the starting point for your own code, adding or editing object parameters that control comments, toolbars, and more. The default embed code, which relies on a Tableau JavaScript file, is also the only way to control the load order of multiple embedded views.
• Specify the View URL: As with earlier versions of Tableau, you can embed a view using an Iframe or Image tag, where the source is the raw URL for the view. You may want to do this if you can't use JavaScript at your web site. There may also be situations where all you can specify is an URL—such as if you're embedding a view using SharePoint's Page Viewer Web Part.
Regardless of the approach you take, you must define a width and height if you are embedding a view. In general you should set the width to 100% and the height to a fixed size such as 600 pixels.
Tableau JavaScript Here's an example of the embed code you get by default when you click Share:
<script type="text/javascript" src="http://myserver/javascripts/api/viz_v1.js"></script><object class="tableauViz" width="100%" height="600px" style="display:none;"> <param name="name" value="MyCoSales/SalesScoreCard" /> <param name="tabs" value="yes" /> <param name="toolbar" value="yes" /></object>
The source for the <script> tag is the URL for the Tableau Server JavaScript file, viz_v1.js. The JavaScript file handles assembling the full URL of the view that's displayed for your users. The name object parameter is the only required parameter; all other parameters are optional. For examples, see the Parameter List table and the "Script Tag Examples" in the following pages
View URL as the SourceHere's an example of embedding the same view using an IFrame, where the source is the URL for the view:
<iframe src="http://myserver/MyCoSales/SalesScoreCard?:embed=yes&:tabs=yes&:toolbar=yes" width="100%" height="600px"></iframe>
You must specify the embed URL parameter and can optionally include parameters that control comments , toolbar, and revert, among others. You can also add filters to the URL that control the specific data that shows when a view is loaded. For examples, see the Parameter List table and the "Iframe Tag Examples" in the following pages.

Page 53
Parameter List
Object Parameter
URL Parameter Values Description Examples
comments :comments yes; no; ro Hide and show comments. Com-ments are hidden by default if the parameter is not set. When set to “ro” value shows the com-ments as read-only.
<param name="comments" value="no"/>
http://tabserver/views/Date-Time/DateCalcs?:embed=yes&:comments=yes
– :embed yes Required for URL parameter. Hides the top navigation area, making the view blend into your web page better.
http://tabserver/views/Date-Time/DateCalcs?:embed=yes
filter – string Customizes what is displayed when the view opens.
<param name="filter" value="Team=Blue"/>
linktarget :linktarget string The target window name for external hyperlinks.
<param name="linktarget" value="_blank"/>
http://tabserver/views/Date-Time/DateCalcs?:embed=yes&:linktarget=_blank
load-order – number When multiple views are embedded, the default load order is the order in which the views are listed. Use this setting to override that order. Negative numbers are allowed.
<param name="load-order" value="2"/>
name – string Required for object parameter. Workbook and sheet name.
<param name="name" value="MyCoSales/Sales"/>
path – string For trusted authentication only, cannot be used with the "ticket" parameter. Overrides value of the "name" parameter and is used as the URL. See the Trusted Authentication Examples.
<param name="path" value="trusted/123456789/views/workbookQ4/SalesQ4"/>
http://tableauserver/trusted/123456789/views/work-bookQ4/SalesQ4?:embed=yes&:tabs=yes
– :refresh yes; no Rerenders the page. http://tabserver/views/Date-Time/DateCalcs?:embed=yes&:refresh=yes
– :revert yes; no Return the page to its original form.
http://tabserver/views/Date-Time/DateCalcs?:embed=yes&:revert=yes
tabs :tabs yes; no Displays or hides tabs. <param name="tabs" value="yes"/>
ticket – number For trusted authentication only, cannot be used with the "path" object parameter. Must be used with "name" object to construct the trusted ticket redemption URL. See the Trusted Authentication Examples.
<param name="name" value="workbookQ4/SalesQ4"/><param name="ticket" value="123456789"/>
http://tableauserver/trusted/123456789/views/work-bookQ4/SalesQ4?:embed=yes&:tabs=yes
toolbar :toolbar yes; no When yes the toolbar is included with the embedded view. The toolbar is shown by default if this parameter is not set.
<param name="toolbar" value="yes"/>
http://tabserver/views/Date-Time/DateCalcs?:embed=yes&:toolbar=yes

Page 54
Adding FiltersIn addition to the basic set of parameters for an embedded view, you can also pass filter values so the view opens showing just the data you want. For example, you may want to include a hyperlink from another part of your web application to an embedded sales performance view that only shows a specific region.
Script Tag Example<script type="text/javascript" src="http://myserver/javascripts/api/viz_v1.js"> </script><object class="tableauViz" width="100%" height="600px" style="display:none;"> <param name="name" value="Sales/Sales-Performance" /> <param name="filter" value="Region=East" /></object>
To pass through multiple filters, just separate each value with a comma. For example: <param name="filter" value="Region=East,West" />
Iframe Tag Example<iframe src="http://myserver/views/CalculatedFields?:embed=yes&Region=East" width="100%" height="600px"></iframe>
<iframe src="http://myserver/views/Sales/Sales-Performance?:embed=yes&Region=East,West" width="100%" height="600px"></iframe>

Page 55
Filtering on Multiple FieldsYou can pass filters on as many fields as you want, including fields that are not in the original view.
Script Tag Example <script type="text/javascript" src="http://myserver/javascripts/api/viz_v1.js"> </script><object class="tableauViz" width="100%" height="600px" style="display:none;"> <param name="name" value="Sales/Sales-Performance" /> <param name="filter" value="Region=East,West&Customer Segment=Consumer,Home Office" /></object>
Iframe Tag Example<iframe src="http://myserver/views/CalculatedFields?:embed=yes&Region=East,West&Customer Segment=Consumer,Home Office" width="100%" height="600px"> </iframe>

Page 56
Filtering Dates and TimesIf you want to filter on a Date/Time field you should include the value using the default Tableau format shown below:
yyyy-mm-dd hh:mm:ss
The time part uses a 24-hour clock. Many databases store all date values as Datetime fields, so you may need to pass a time value along with your date.
Script Tag Example<script type="text/javascript" src="http://myserver/javascripts/api/viz_v1.js"> </script> <object class="tableauViz" width="100%" height="600px" style="display:none;"> <param name="name" value="Sales/Sales-Performance" /> <param name="filter" value="Date=2008-12-01" /></object>
This example filters on both a date field and a datetime field: <param name="filter" value="2008-12-01%2022:18:00" /> Iframe Tag Example<iframe src="http://myserver/Sales/Sales-Performance?:embed=yes&Date=2008-12-01" width="100%" height="600px"></iframe>
To filter multiple dates, separate each date with a comma.
Filtering MeasuresYou can filter measures by including one or more values. There is no support for greater than, less than, or ranges. The example below filters to show only $100 and $200 sales.
Script Tag Example<script type="text/javascript" src="http://myserver/javascripts/api/viz_v1.js"> </script><object class="tableauViz" width="100%" height="600px" style="display:none;"> <param name="name" value="Sales/Sales-Performance" /> <param name="filter" value="Profit=100, 200" /></object> Iframe Tag Example<iframe src="http://myserver/Sales/Sales-Performance?:embed=yes&Profit=100, 200" width="100%" height="600px"></iframe>

Page 57
Controlling Load Order for Multiple ViewsYou can control the order in which multiple views load for the people working with your views. This feature can only be accessed using embed code that relies on the Tableau JavaScript file.
In the following example, two views are embedded. The second view loads first, followed by the top view. If you embed multiple views and give them all the same load order value, or if you don't have load order parameters, they are loaded in the order in which they appear on the page.
<script type="text/javascript" src="http://myserver/javascripts/api/viz_v1.js"> </script><object class="tableauViz" width="100%" height="400px" style="display:none;"> <param name="name" value="MyCoSales/TopPerformers" /> <param name="tabs" value="yes" /> <param name="toolbar" value="yes" /> <param name="comments" value="no" /> <param name="filter" value="Salesperson=Top 5" /> <param name="load-order" value="0"</object>
<script type="text/javascript" src="http://myserver/javascripts/api/viz_v1.js"> </script><object class="tableauViz" width="100%" height="400px" style="display:none;"> <param name="name" value="MyCoSales/SalesScoreCard" /> <param name="tabs" value="yes" /> <param name="toolbar" value="yes" /> <param name="comments" value="no" /> <param name="load-order" value="-1"</object>

Page 58
Example 1: Embedding Views into SharePoint (Microsoft SSPI)If both Tableau Server and SharePoint are using Microsoft SSPI, you can embed views using the Page Viewer Web Part. Follow the steps below to embed a view into a SharePoint page.
1. Navigate to the SharePoint page that you want to embed a view into.
2. On the Site Actions menu in the upper right corner of the page select Edit Page.
3. Click the Add a Web Part button in the section of the page where you want to embed the view.
4. On the page that opens, select the Page Viewer Web Part located in the Miscellaneous section and click Add.

Page 59
5. Back on the SharePoint page select Modify Shared Web Part on the Edit menu for the new web part.
6. On the right side of the page, you can specify the attributes of the Page View Web Part. Type the URL for the view you want to embed. Use the format specified in the Embedding Views section of this document. For example you may type:
http://tableauserver/views/Date-Time/DateCalcs?:embed=yes&:toolbar=no

Page 60
7. Then in the Appearance section you can specify a Title of the web part, the Height, and Width. In general you should specify a fixed height (e.g., 700px) and Adjust the width to fit to the zone.
8. When finished, click OK to apply the changes and exit edit mode.
The view will be embedded into the web part that you just created. Your users will not need to log in to Tableau Server to see the embedded view, rather they will be automatically authenticated using Microsoft SSPI.

Page 61
Example 2: Embedding Views into WikisYou can easily embed a view into a wiki or other web page simply by putting the view inside an <iframe> tag.
1. Navigate to the wiki page you want to embed a view into.
2. Edit the page and add an <iframe> where the source is the URL for the view. For example:
<iframe src=”http://tableauserver/views/Date-Time/DateCalcs?:embed=yes&:comments=ro &:toolbar=no” width=”100%” height=”700px”></iframe>
3. Save your changes.
The view is embedded into the wiki page. If both Tableau Server and the wiki are both configured to use Microsoft SSPI, users accessing an embedded view on the wiki will be automatically logged in so they can see the view.
If the server and the wiki are not using the same method for authentication, users will first be asked to log into the server before they can see the view.

Page 62
Example 3: Embedding ImagesIn addition to embedding a view into a <script> or <iframe> tag you can also embed the view as an image. When you embed an image the view is not interactive, however, it is updated every time the page fully reloads. That way the image shows the latest data even if the underlying data changes.
1. Navigate to the the page where you want to embed the image.
2. Edit the page and add an <img> tag where the source is the URL for the view plus the .png file extension. For example:
<img src=”http://tableauserver/views/Date-Time/DateCalcs.png width=”800px” height=”700px”>
Note: If both the web page and Tableau Server are using Microsoft SSPI for authentication, then anyone accessing the embedded image will be automatically logged into Tableau Server and be able to see the view. However, if the server and the web page are not using the same authentication method, the image will not show.

Page 63
Example 4: Embedding Views into SharePoint (Trusted Authentication)If you are embedding a view into SharePoint but you don’t use Microsoft SSPI for authentication, you can set up trusted authentication using the extra web part dll installed with Tableau Server. Follow the instructions below to install the Tableau Web Part dll and embed a view into a SharePoint page.
1. Locate the TableauEmbeddedView.dll file that is installed with Tableau Server. The file is usually located in:
C:\Program Files\Tableau\Tableau Server\6.0\extras\embedding\sharepoint\
2. Copy the dll file into the root directory of your SharePoint server. The root directory is usually located at:
C:\Inetpub\wwwroot\wss\VirtualDirectories\<port>\bin
3. In a text editor, open the web.config file located at:
C:\Inetpub\wwwroot\wss\VirtualDirectories\ <port>\bin
4. Add the following text to the bottom of the SafeControl section:
<SafeControl Assembly=”TableauEmbeddedView, Version=1.0.0.0, Culture=neutral, PublicKeyToken=9f4da00116c38ec5” Namespace=”TableauEmbeddedView” TypeName=”*” Safe=”True” />
5. You also need to allow the webpart access to your sharepoint server. You can do this one of the following three ways:
• Copy the TableauEmbeddedView.dll file into your C:\Windows\assembly folder and delete it from the bin file you copied it into in step 2 above.
• Reopen the web.config file you opened in step 3 above and find the following line:<trust level = "WSS_minimal” originUrl="" />
Change the line above to the following:
<trust level = "Full" originUrl="" />
• Create a custom trust policy, which will grant full access to the TableauEmbeddedView.dll only. Refer to the Microsoft Technical Article to learn more about how to do this.

Page 64
6. Open a browser and navigate to: http://<your_sharepoint_server>/_layouts/newdwp.aspx.
7. Select the entry titled TableauEmbeddedView.TableauEmbeddedView and click the Populate Gallery button.
8. Navigate to the SharePoint page that you want to embed a view into.
9. On the Site Actions menu in the upper right corner of the page select Edit Page.
10. Click the Add a Web Part button in the section of the page where you want to embed the view.

Page 65
11. On the page that opens, select TableauEmbeddedView located in the Miscellaneous section and click Add.
12. Back on the SharePoint page select Modify Shared Web Part on the Edit menu for the new web part.
13. On the right side of the page, you can specify the attributes of the TableauEmbeddedView web part. Type the name of your Tableau Server.
14. Then type the path to the view you want to embed. For example you may type /views/Date-Time/DateCalcs.

Page 66
16. Then in the Appearance section you can specify a Title of the web part, the Height, and Width. In general you should specify a fixed height (e.g., 700px) and Adjust the width to fit to the zone.
17. When finished, click OK to apply the changes and exit edit mode. Now the view is embedded in the page and users who access the view will be automatically logged in based on their user name and password for SharePoint. Anyone who accesses an embedded view needs to be a licensed user on Tableau Server and their user name on SharePoint must be the same as their user name on Tableau Server.
Note: This is an example of embedding views into SharePoint using the provided dll file. You canalso embed views into other types of web applications and even build your own dll file. See Using the Tableau JavaScript API for more information.
15. Specify other attributes such as whether you want to show comments, whether to show the toolbar, or even if you want embed the view as an image instead of as an interactive view.

Page 67
Using the Tableau JavaScript APIIf you're a web application developer, you can control the Tableau JavaScript library using your own external web logic. For example, you may have dynamic, server-side logic outside of Tableau that determines the identity of the currently logged in user. You can use that logic to control the Tableau JavaScript and, in particular, the filter parameter—so that the current user only sees data that pertains to him or her. Here's an example to get you started:
<html><head></head><body>
<script type="text/javascript" src="http://myserver/javascripts/api/viz_v1.js"></script><object class="tableauViz" width="100%" height="600px" style="display:none;"> <param name="name" value="Sales/Sales-Performance" /> <param name="tabs" value="yes" /> <param name="toolbar" value="yes" /> <param name="comments" value="no" /> <param name="filter" value="Team=West Coast" /></object>
<form></form><script type="text/javascript"> var viz = window.tableau.vizs[0];
viz.hide(); viz.show(); viz.refresh(); viz.revert(); viz.filter("Team=West Coast");
</script></body></html>
Example Code LocationWeb application example code for setting up trusted authentication for SharePoint, PHP, Ruby, and Java applications is installed with Tableau Server and is located in: C:\Program Files (x86)\Tableau\Tableau Server\6.0\extras\embedding\
Page 68
Tableau Server Trusted AuthenticationWhen you embed Tableau Server views into webpages, everyone who visits the page must be a licensed user on Tableau Server. When users visit the page they are prompted to log into Tableau Server before they can see the view. If you already have a way of authenticating users on the webpage or within your web application, you can avoid this prompt and save your users from having to log in twice by setting up trusted authentication.
Trusted authentication simply means that you have set up a trusted relationship between Tableau Server and one or more web servers. When Tableau Server receives requests from these trusted web servers it assumes that your web server has handled whatever authentication is necessary.
If your web server uses SSPI, you do not need to set up trusted authentication. You can embed views and your users will have access to them as long as they are licensed Tableau Server users and members of your Active Directory. If you are not using SSPI or Active Directory, you will need to set up trusted authentication.

Page 69
User visits the webpageWhen a user visits the webpage with the embedded Tableau Server view, it sends a GET request to your web server for the HTML for that page.
1
3 Tableau Server creates a ticketTableau Server checks the IP address of the web server (192.168.1.XXX in the above diagram) that sent the POST request. If it is set up as a trusted host then Tableau Server creates a ticket in the form of a unique_id. Tableau Server responds to the POST request with that unique_id. If there is an error and the ticket cannot be created Tableau Server will respond with a value of -1.
4 Web server passes the URL to the browserThe web server then constructs the URL for the embedded view and inserts it into the HTML for the page. The URL includes the unique_id (e.g., http://tabserver/trusted/<unique_id>/views/requestedviewname). The web server passes all the HTML for the page back to the client’s web browser.
5 Browser requests view from Tableau ServerThe client web browser sends a request to Tableau Server using a GET request that includes the URL with the unique_id.
6 Tableau Server redeems the ticketTableau Server sees that the web browser requested a URL with a ticket in it and redeems the ticket. Tickets must be redeemed within 3 minutes after they are issued. Once the ticket is redeemed, Tableau Server logs the user in, removes the unique_id from the URL, and sends back the final URL for the embedded view.
How Trusted Authentication WorksThe diagram below describes how Trusted Authentication works between the client’s web browser, your web server(s) and Tableau Server.
Tableau Server
Web Server192.168.1.102
Web Server192.168.1.103
Web Server192.168.1.101
Client Web Browser74.125.19.147
1
2
3
4
5
6
2 Web server POSTS to Tableau ServerThe web server sends a POST request to Tableau Server. That POST request must have a username parameter. The username value must be the username for a licensed Tableau Server user.**In versions before 5.2.2, the post required a client_ip parameter. The client IP address is no longer considered in default configurations of Tableau Server.

Page 70
Setting Up Trusted AuthenticationFollow the steps below to set up trusted authentication between Tableau Server and one or more web servers.
Add Trusted IP Addresses to Tableau ServerTo configure Tableau Server to recognize and trust requests from one or more web servers, you will use the tabadmin command line utility:
1. Open a command window and change directories to the location of Tableau Server’s bin directory. The default location is C:\Program Files\Tableau\Tableau Server\6.0\bin
2. Type the following command:
tabadmin set wgserver.trusted_hosts "<Trusted IP Address>"
In the command above, <Trusted IP Addresses> should be a comma separated list of the IP addresses of your web server(s). For example:
tabadmin set wgserver.trusted_hosts "192.168.1.101, 192.168.1.102, 192.168.1.103"
Note: The comma separated list should be within quotes with one space after each comma.
3. When finished, type the following command to save the configuration:
tabadmin config
4. Finally, type the following command to restart the server:
tabadmin restart

Page 71
Configure your Web Server to Send Requests to Tableau ServerWhen your web server requests a view from Tableau Server, it must contact the server with a POST request. The POST must have the following parameter:
username=<username>
The <username> must be the username for a licensed Tableau Server user. If you are using Local Authentication the username can be a simple string.
If you are using Active Directory with multiple domains you must include the domain name with the user name (e.g., domain\username).
You can configure the server to match on client IP address to require the ticket to be redeemed by a specific user using the same machine that issued the original ticket. Because there may be several proxies between the web browser and your web server as well as between your web server and Tableau Server, the client IP address is not considered by default. Refer to Optional: Configure Tableau Server for Client IP Matching to learn more.
Set up your Web Server to Construct the URL with the Unique_IdWhen Tableau Server responds to the POST request from the web server, it sends back a ticket in the form of a unique_id (step 3 in the diagram).
The web server needs to construct the appropriate URL that includes the unique_id and points at the requested view on Tableau Server. For example, the URL may look like this: http://tabserver/trusted/<unique_id>/views/<workbook>/<view>

Page 72
You will need to provide the web server with functions to collect the following information:
• Username: The username for the licensed Tableau Server user.
• URL: The URL of the desired embedded view, including embedding option parameters. Here are some examples: Script Tag Examples <script type="text/javascript" src="http://myserver/javascripts/api/viz_v1.js"></script> <object class="tableauViz" width="100%" height="960" style="display:none;"> <param name="name" value="MyCoSales/SalesScoreCard" /> <param name="ticket" value="123456789" /> </object> Another option is to state the full path of the view explicitly: <script type="text/javascript" src="http://myserver/javascripts/api/viz_v1.js"></script> <object class="tableauViz" width="1765" height="960" style="display:none;"> <param name="name" value="MyCoSales/SalesScoreCard" /> <param name="path" value="trusted/123456789/views/MyCoSales/SalesScoreCard" /> </object> Iframe Tag Example <iframe src="http://tabserver/trusted/123456789/views/workbookQ4/SalesQ4?:embed=yes" width="100%" height="600px"></iframe>
• IP address: The IP address of the user’s machine (only if configured for client trusted IP matching).
There are several code samples that you can use to set up your web server that are included with Tableau Server. Example code for Java, Ruby, and PHP are located at: C:\Program Files (x86)\ Tableau\Tableau Server\6.0\extras\embedding.

Page 73
Optional: Configure Tableau Server for Client IP MatchingIn version 5.2.2 and later, by default, Tableau Server does not consider the client web browser IP address when it creates or redeems tickets. You can change the default behavior and enforce that the ticket not only must be redeemed by a specific user but also that it must use the same machine that issued the original request. Follow the steps below to configure Tableau Server to enforce client IP address matching.
5. Open a command window and change directories to the location of Tableau Server’s bin directory. The default location is C:\Program Files (x86)\Tableau\Tableau Server\6.0\bin
6. Type the following command:
tabadmin set wgserver.extended_trusted_ip_checking true
7. Then type the following command:
tabadmin configure
8. Finally, restart the server by typing the following:
tabadmin restart

Page 74
Troubleshooting Trusted AuthenticationBelow are some common issues and errors you might encounter when configuring Trusted Authentication.
-1 Return Status from Tableau ServerTableau Server returns -1 for the ticket value if it cannot issue the ticket. Check the following:
• All Web Server IP Addresses are Added to Trusted Hosts
The IP address for the machine sending the POST request must be in the list of trusted hosts on Tableau Server. See Add Trusted IP Addresses to Tableau Server to learn how to add IP addresses to this list.
• Trusted Hosts List is Formatted Properly
The list of trusted hosts on Tableau Server must be a comma separated list with spaces after each comma. For example, the list should be something like: 192.168.1.101, 192.168.1.102, 192.168.1.103 and so on.
• Username in POST Request is Valid Tableau Server User
The username you send in the POST request must be a licensed Tableau Server user with a viewer or interactor license level. You can see a list of users and their license levels by logging into Tableau Server as an administrator and clicking the Licensing link on the left side of the page.
• Username in POST Request Includes Domain
If Tableau Server is configured to use Local Authentication, the username that you send in the POST can be a simple string. However, if the server is configured for Active Directory you must include the domain name with the user name (domain\username). For example, the username parameter might be: username=dev\jsmith
HTTP 401 - Not AuthorizedIf you receive a 401- Not Authorized error, you may have configured Tableau Server to use Active Directory with SSPI. If your web server uses SSPI, you do not need to set up trusted authentication. You can embed views and your users will have access to them as long as they are licensed Tableau server users and members of your Active Directory.

Page 75
HTTP 404 - File Not FoundYou may receive this error if your program code references a Tableau Server URL that does not exist. For example, your web server may construct an invalid URL that cannot be found when the webpage tries to retrieve it.
Intermittent Ticket FailureIf you used the example Java code that installs with Tableau Server, you may find that the tickets sometimes work and sometimes fail. There was a defect in the example code that cases the ticket request as an integer although sometimes the ticket is returned with a leading zero, which is truncated in Java. This issue was fixed in version 5.2.2.
Invalid Authenticity Token ErrorThis error was caused from a defect in version 5.1. The error is resolved in version 5.1.1 and later.
Invalid User (SharePoint or C#)The example code for the SharePoint DLL references the following GET request:
SPContext.Current.Web.CurrentUser.Name
The above request will return the display name of the current Windows Active Directory user. If you want to use the login ID, then you will need to change the code to:
SPContext.Current.Web.CurrentUser.LoginName
After you make the change, recompile the SharePoint DLL.
Attempting to Retrieve the Ticket from the Wrong IP AddressIn version 5.2.2 and later, the client web browser IP address is not considered by default when redeeming the ticket. If you have configured Tableau Server to enforce client IP address matching, make sure that the client’s web browser IP address that is sent in the POST to Tableau Server is the same as when the browser tries to retrieve the embedded view. For example, in the Trusted Authentication diagram, if the POST request in step 3 sends the parameter client_ip=74.125.19.147, then the GET request in step 5 must come from that same IP address.
See Optional: Configure Tableau Server for Client IP Matching to learn how to configure Tableau Server to enforce client IP address matching.

Page 76
Appendix A: Configuring Run As UserThis section describes how to use a dedicated Active Directory (AD) user account for the Tableau Server service to run under, called a Run As User account. Some administrators choose to do this when published workbooks on Tableau Server connect to live data sources. The server’s default Network Service account (NT AUTHORITY\NetworkService) doesn’t have the correct permissions for connecting to data sources on other machines. A correctly-configured AD account does.
For data sources that require NT authentication, the AD account can also automatically handle the authentication process, thus shielding users from prompts for credentials when the workbook connects to the live data source. Finally, a Run As User AD account that is dedicated to a specific resource is often less problematic to manage than an AD account associated with a person.
To configure Tableau Server to use a Run As User account, follow the procedures under Required Configuration Steps, below. The steps under Settings to Confirm may vary from site to site.
Note: If you are installing Tableau Server with your Run As User account in hand, before you run Setup, confirm that the Windows Secondary Login service has the correct values for Log On and Startup. See Verify Tableau Service Settings for more information.
Required Configuration StepsRun As User AccountYour first step is to identify or create an Active Directory account for the Tableau Server service to run under. This will be the Tableau Server’s Run As User account, and it should have the following:
• Permissions for connecting to the data source with at least read access.
• Credentials to allow Tableau Server to satisfy the NT authentication process with the data source. Microsoft data sources that perform NT authentication include Microsoft SQL Server and Microsoft Analytical Services (MSAS), but not Access or Excel.
Confirm Domain Two-Way TrustConfirm that there is a two-way trust between domains if any of the following are true:
• The machines hosting the Tableau Server and the data source are on separate domains.
• Tableau Server users are on a separate domain from Tableau Server or the data source.

Page 77
Verify Tableau Service SettingsConfirm that Tableau services are assigned the correct Log On and Startup values:
1. Log on to the Tableau Server machine as an administrator.
2. On the Tableau Server machine, select Start > Control Panel > Administrative Tools > Services.
3. Open Services and Applications, then click Services. Confirm that the following services have the correct settings:
Service Name Logon Value Startup ValueFLEXnet Licensing Service Local System Manual
Secondary Login Local System Automatic
Tableau Server (tabsvc) <domain>\<username> This is the Run As User account. See below.
Automatic
Tablicsrv Local System Automatic
To change the Log On value for Tableau Server (tabsvc) to the Run As User account:
1. In the Services window, stop the Tableau Server service by right-clicking Tableau Server (tabsvc) and selecting Stop.
2. Select Start > All Programs > Tableau Server > Configure Tableau Server.
3. On the General tab, enter the domain, username, and password for Tableau Server’s Run As User account:
4. Click OK.
5. Restart Tableau Server (tabsvc).
Configure Local Security PolicyIf your Run As User account isn't an administrator on the Tableau Server machine, you must configure the machine’s local security policy so that the Tableau Server Run As User account can log onto the machine as a service and make configuration changes. To do this:
1. Select Start > Control Panel > Administrative Tools > Local Security Policy.
2. In the Local Security Settings window, open Local Policies, highlight User Rights Assignments, then right-click Log on as a service and select Properties.
3. In the Log on as a service Properties window, click Add User or Group.
4. Type the <domain>\<username> for the Tableau Server Run As User account (for example: MYCO\tableau_server), and click Check Names.

Page 78
5. When the account resolves correctly, it is underlined. Click OK.
6. Click OK to close the Local Security Settings windows.
Data Source Connection SettingsTo automatically authenticate your users when the workbook they’re accessing connects to a live, NT-authenticated data source, configure your Tableau data connection with the Use Windows NT Integrated security option selected:
Settings to ConfirmThe Run as User account needs permissions that allow it to read, execute, and sometimes modify files. Depending on the account you used as a starting point, it may already have the correct permissions.
Granting Read and Execute PermissionsThe account the Tableau Server service runs under needs permission to read and execute files. Confirm or configure the following:
1. On the machine hosting Tableau Server, use Windows Explorer to right-click on Local Disk (C:) and select Properties.
2. In the Local Disk (C:) Properties Window select the Security tab.
3. Click Edit, then Add.
4. Type the <domain>\<username> for the Tableau Server Run As User account.
5. Click Check Names to resolve the account, then OK to confirm.
6. With the Tableau Server Run As User account highlighted, confirm that it has Read & execute permissions. Selecting Read & execute automatically selects List folder contents and Read.
7. Click OK to exit.
Windows NT Integrated Security:Authenticates with the server's Run As User account.
Username and Password: Each Tableau Server user is prompted for database credentials.

Page 79
Granting Modify PermissionsThe account also needs the ability to do things like create log files. Confirm or configure the following:
1. Navigate to the following folder(s):
32-bit: C:\Program Files\Tableau64-bit: C:\Program Files (x86)\Tableau Windows Server 2008, Windows Vista, and Windows 7: C:\ProgramData\Tableau
2. Right-click the folder, select Properties, and click the Security tab:
• Click Edit, then Add.
• Type the <domain>\<username> for the Tableau Server Run As User account.
• Click Check Names to resolve the account, then OK to confirm.
• With the Tableau Server Run As User account highlighted, confirm that it has Modify permissions. Selecting Modify automatically grants all permissions except for Full Control and Special Permissions:

Page 80
3. For each folder, on the Tableau Properties Security tab, click Advanced:
4. In the Advanced Security Settings for Tableau window, click Change Permissions.

Page 81
5. In the Advanced Security Settings for Tableau dialog box, highlight the Run As User account and select the Replace all child object permissions with inheritable permissions from this object check box:
6. Click OK to apply changes to all subfolders and files – this may take a few minutes.
7. Click OK to confirm changes.

Page 82
Appendix B: Active Directory DomainIf you are using Active Directory authentication, you need to include the fully qualified domain name (FQDN) when configuring Tableau Server. Follow the instructions below to determine this value.
To determine your Active Directory FQDN:1. Select Start > Run
2. Type sysdm.cpl into the Run dialog box.
3. In the System Properties dialog box, select the Computer Name tab.
4. The FQDN is shown near the middle of the dialog box.

Page 83
Appendix C: Offline ActivationWhen you’re done installing Tableau Server you will need to activate and register. If you are working offline you can follow the steps below to complete offline activation.
1. When the product key manager opens click Activate the product.
2. Paste your server product key into the corresponding text box and click Activate. You can get your product key from the Customer Account Center on Tableau’s web site.

Page 84
3. When you are offline, activation will fail and you are given the option to save a file that you can use for offline activation. Click Save.
4. Select a location for the file and click Save. The file is saved as offline.tlq.
5. Back in Tableau click Exit to close the Activation dialog box.

Page 85
6. Move the file to a computer that is online and open an email editor. Create a new email to [email protected]. Attach the file to the email and click Send.
7. The Tableau Customer Service Team will email you back a file called offlineresponse.tlf. Move this file to the computer where you are installing Tableau Server. If you have Tableau Desktop installed on the computer you can then double-click the new file to complete activation. If you do not have Tableau Desktop installed continue to steps 8-9 below.
8. On the computer where you are installing Tableau Server, open a command prompt and run the following command:
cd "C:\Program Files\Tableau\Tableau Server\6.0\bin"
9. Then type the following command:
tabadmin activate --tlf \Desktop\offlineresponse.tlf
Replace the file path above with the path to where you’ve saved the response file Tableau emailed to you.
If you need additional assistance, please contact the Tableau Customer Service team at [email protected].

Page 86
Appendix D: Reconfiguring the ServerYou may need to reconfigure the server after set up. Use the configuration tool or the command line tool to reconfigure the server.
Using the Configuration ToolYou can re-open the configuration tool by selecting Tableau Software > Configure Tableau Server on the Windows Start menu. There you can modify the number of processes and the ports used by the VizQL Server and Application.
Caution: You cannot switch between Active Directory and Local Authentication.
Other Configuration OptionsYou can configure other server settings using the command line tool. First change directories using the command below.
cd C:\Program Files\Tableau\Tableau Server\6.0\bin\
Then use the following command, substituting in the appropriate variables based on the option you want to change.
tabadmin set option-name value

Page 87
Use the table below to learn more about each option you can configure.
Option Default Value Description
workerX.gateway.port 80 External port that Apache listens on.
gateway.host Name of the machine
The host name for the server. The default host name is set to the machine running Tableau Server.
workerX.backgrounder.port 8200 Internal port the backgrounder listens on.
java.heap.size 128m Size of heap for Tomcat (repository andsolr). This generally does not need tochange except on advice from Tableau.
pgsql.port 8060 Port that PostgreSQL listens on.
repository.port 8080 Port the repository listens on. This must be the same value as tomcat.http.port.
solr.port 8080 Port that solr listens on. This must be the same value as tomcat.http.port.
tomcat.http.port 8080 Port that Tomcat runs on.
tomcat.https.port 8443 SSL port for Tomcat (unused).
tomcat.server.port 8085 Port that tomcat listens for shutdown messages on.
vizqlserver.port 8100 Base port for the VizQL servers.
workerX.vizqlserver.procs # of processes Number of VizQL servers.
vizqlserver.querylimit 30 Longest allowable time for updating a view, in seconds.
vizqlserver.session.expiry.timeout
120 Number of minutes of idle time after which a VizQL session is discarded.
wgserver.domain.fqdn value of %USERDOMAIN%
The fully qualified domain name of the Active Directory server to use.
workerX.wgserver.port 8000 Base port for the web application servers.
workerX.wgserver.procs # of processors Number of web application server processes.
wgserver.session.idle_limit 240 The number of minutes of idle time before a login to the web application times out.
wgserver.trusted_hosts This option takes a comma separated list of trusted IP addresses for the machine you want to accept trusted requests from. A common value is 127.0.0.1 if you want to put the webserver and Tableau Server on the same machine. This option is used when setting up a trusted relationship between the web server and Tableau Server when embedding views.

Page 88
Applying the ChangesModifying the configuration options edits the configuration file tabsvc.yml, which is located in the config directory. You can modify the options without affecting the operation of Tableau Server. The changes will take affect the next time you start the server. You can also force the configuration changes using the steps below.
To apply the changes to the server:1. At a command prompt type the following:
cd "C:\Program Files\Tableau\Tableau Server\6.0\bin"
2. Stop the server:
tabadmin stop
3. Next, configure the server:
tabadmin configure
4. Start the server again by typing the following:
tabadmin start
Restoring the Default ConfigurationYou can restore the default configuration for any of the options with the following steps:
1. At a command prompt type the following:
cd "C:\Program Files\Tableau\Tableau Server\6.0\bin"
2. Then restore the default value for a particular option by typing the following:
tabadmin set option-name -default

Page 89
IndexAActivation 5Active Directory
Automatic Login 6
Find Domain 78, 79, 82
Set Domain 6
Set Nickname 6
Add Users 17Administrative Views
Custom 29
Customized Views 26
Server Activity 26
Space Usage 26
Task History 26
User Activity 26
Who has seen this view? 26
Administrator Account 9Administrator Right
Content 20
System 20
Application Server Ports 45Authorization. See PermissionsAutomatic Login 6
BBackup the Server 31, 41
CCaching 8Certificate
Chain File 14
File 14
Key File 14
Clean Up 48Comma Separated Value File 17Configuration Options 86Configuration Tool 86Configure the Server 6, 31, 86
Extract Storage 16
Content Administrator 20Custom Administrative Views 29Customer Account Center 5, 10Customized Views 26Customize the Server 31, 42, 44
DDatabase Drivers 13Data Connections 40Data Engine 16Date Filters 56Display Status 30Distributed Servers 10Domains
Manage on Server 39
Set Domain 6
Set Nickname 6
EEmail Views 49Embedded Credentials 44Embedded Views 50
Images 62
JavaScript API 67
Manual 52
SharePoint (SSPI) 58
SharePoint (Trusted) 63
Wiki Pages 61
Enable Guest 44Exit the Server 30Extract Storage 16
Refresh Data 33
FFirewall Port 7Fully Qualified Domain Name 78,
79, 82
GGuest User 44
IInstallation 4
LLicense Levels
Assigning to Users 23
Guest 20
Interactor 20
Unlicensed 20
Viewer 20
Local Authentication 6Logo; change 42Logs
Archiving 48, 49
Remove & Clean up 48
Service 47
SSL Errors 15
Temporary Files 47
VizQL 47
MMaintenance 12Manage product keys 30Manual Embed Views 52
Date Filters 56
Measure Filters 56
Measure Filters 56Microsoft SSPI 58Multiple Machines 10
NName; change 42
OOffline Activation 83Online Activation 5

Page 90
PPasswords
Administrator 9
Publish with Password 44
Server Account 6
Performance 8Permissions
Add Comment 21
Delete 21
Download File 21
Export Data 21
Export Image 21
Filter 21
Move 21
Set Permissions 21
Share Customized 21
View 21
View Comments 21
View Underlying Data 21
Write 21
PortsConfiguration Options 86
Defaults 2
Editing 45
Resetting to Default 46
Primary Server 10Product Activation 5Public User List 44Publish with Password 44
RRefresh Extracts 33Registration 5Restart Server 30Restore Default Settings 43Restore the Server Database 31, 41Run As User 6, 76
SSample Data & Users 7Saved Passwords 44
Scheduled Tasks 33Schedules 33, 44Secured Sockets Layer (SSL) 14Server Account
Permissions 76
Set Username & Password
Troubleshooting 76
Server Activity 26Setup Wizard 4SharePoint 58Space Usage 26SSPI 68Start the Server 30Startup Tasks 9Stop the Server 30Storage 16System Administrator 20System Requirements 2
TTabadmin 31
Activate 31
administrator 31
Autostart 31
Backup 31
Cleanup 31
Configure 31
Customize 31
Dbpass 31
Help 31
Install 31
Passwd 31
prep_workers 31
Reset 31
Restart 31
Restore 31
Set 31
Start 31
Status 31
Stop 31
Uninstall 31
Warmup 31
Ziplogs 31
Tabcmd 32Creategroup 32
Createusers 32
Delete 32
Deletegroup 32
Deleteusers 32
Get 32
Help 32
Login 32
Logout 32
Publish 32
Set 32
Syncgroup 32
Version 32
Tableau ServicesDisplay Status 30
Exit 30
Machine-Readable Status 28
Manage product keys 30
Open the Server 30
Restart Server 30
Start the Server 30
Stop the Server 30
View Status 27
Task History 26Tasks 33TCP/IP Ports 45Temporary Files 47TLF File 85TLQ File 84Trusted Authentication 63, 68, 89
UUpdates 12User Activity 26User Rights
Admin 20
Assigning to Users 24
Publish 20

Page 91
UsersAdding (Active Directory) 19
Adding (local) 17
Licensing 20
Permissions 20
Rights 20
VVizQL Server Ports 45
WWho has seen this view? 26Wiki Pages 61Windows Firewall 7Worker Machines 10