tablet pc - wistrans · tablet pc. it then syncs with arcpad to show your current location in ......
TRANSCRIPT
ArcPad User Guide MCAP Assessment
NC Department of Transportation State Road Maintenance Unit Page - 1
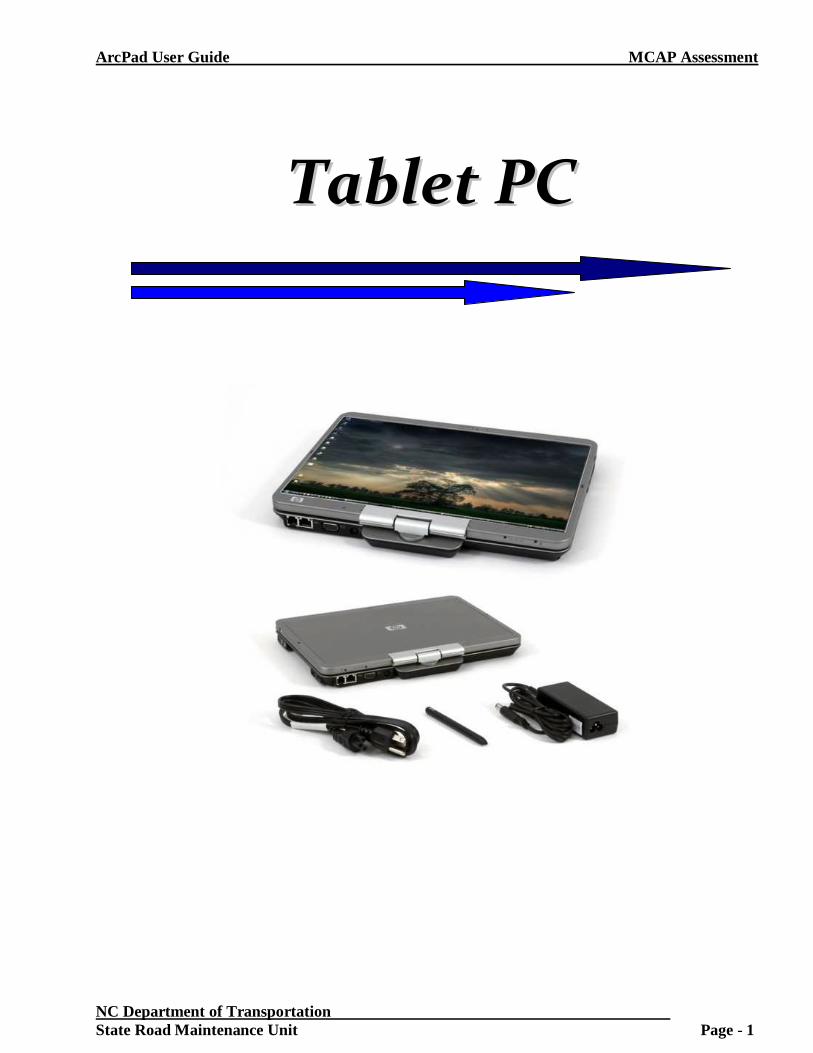
TTaabblleett PPCC
ArcPad User Guide MCAP Assessment
NC Department of Transportation State Road Maintenance Unit Page - 2
Getting Started with the Tablet PC: (How to utilize the Tablet PC for the Assessment)
SStteepp 11
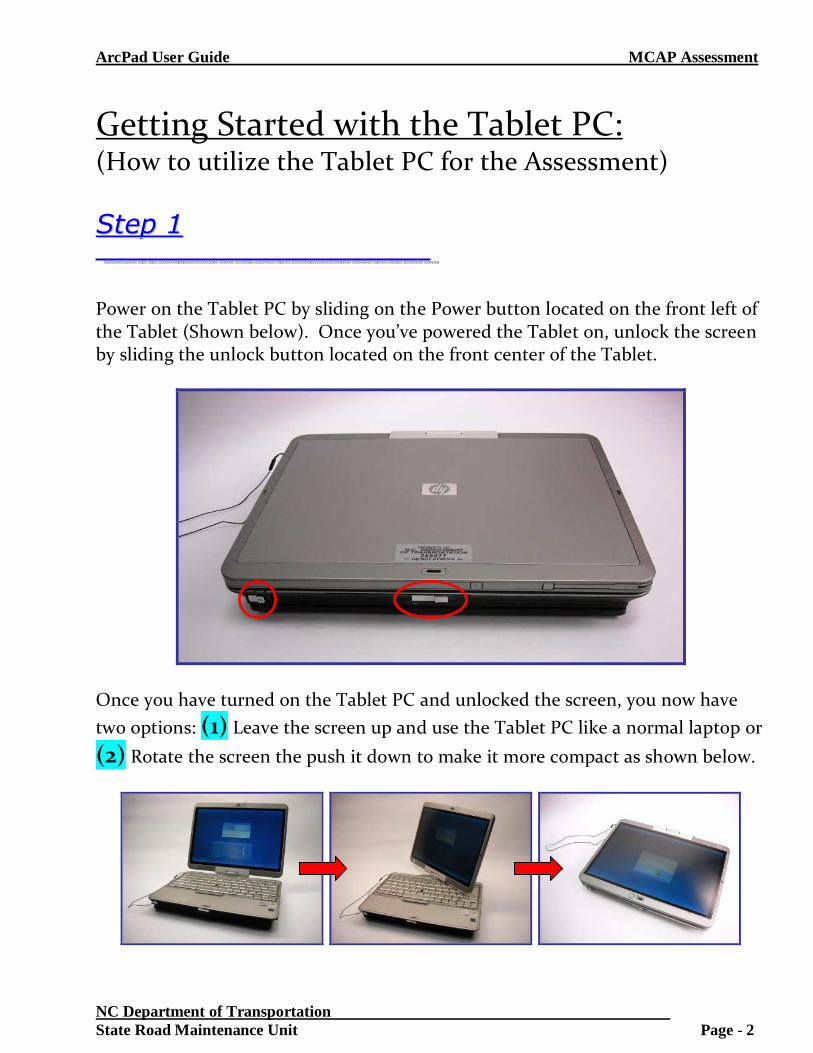
Power on the Tablet PC by sliding on the Power button located on the front left of the Tablet (Shown below). Once you’ve powered the Tablet on, unlock the screen by sliding the unlock button located on the front center of the Tablet.
Once you have turned on the Tablet PC and unlocked the screen, you now have
two options: (1) Leave the screen up and use the Tablet PC like a normal laptop or
(2) Rotate the screen the push it down to make it more compact as shown below.
ArcPad User Guide MCAP Assessment
NC Department of Transportation State Road Maintenance Unit Page - 3
SStteepp 22
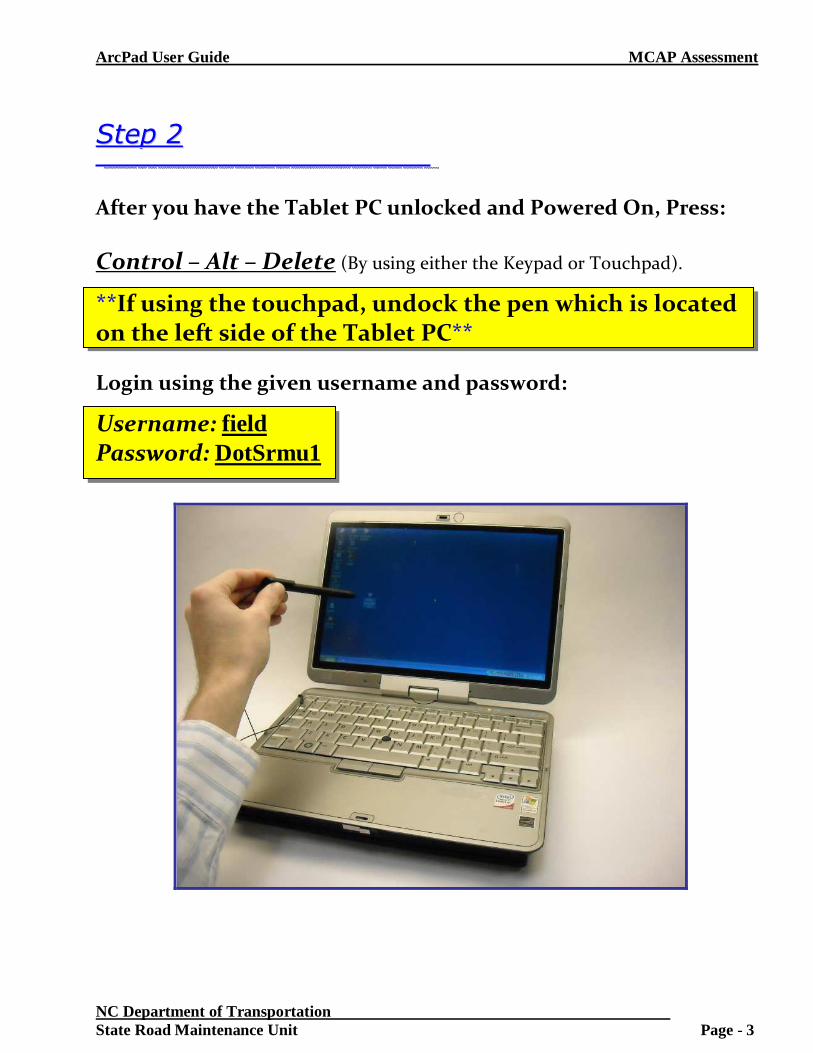
After you have the Tablet PC unlocked and Powered On, Press:
Control – Alt – Delete (By using either the Keypad or Touchpad).
**If using the touchpad, undock the pen which is located on the left side of the Tablet PC**
Login using the given username and password:
Username: field
Password: DotSrmu1
ArcPad User Guide MCAP Assessment
NC Department of Transportation State Road Maintenance Unit Page - 4
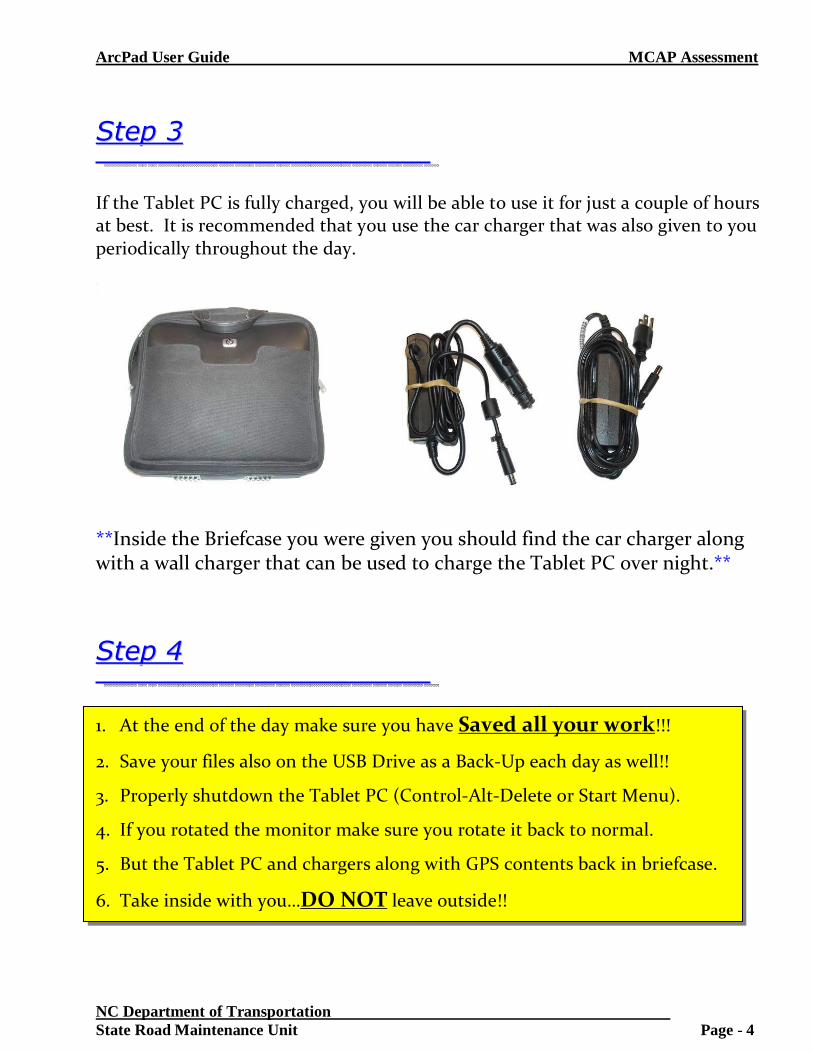
SStteepp 33 If the Tablet PC is fully charged, you will be able to use it for just a couple of hours at best. It is recommended that you use the car charger that was also given to you periodically throughout the day.
**Inside the Briefcase you were given you should find the car charger along with a wall charger that can be used to charge the Tablet PC over night.**
SStteepp 44
1. At the end of the day make sure you have Saved all your work!!!
2. Save your files also on the USB Drive as a Back-Up each day as well!!
3. Properly shutdown the Tablet PC (Control-Alt-Delete or Start Menu).
4. If you rotated the monitor make sure you rotate it back to normal.
5. But the Tablet PC and chargers along with GPS contents back in briefcase.
6. Take inside with you…DO NOT leave outside!!

ArcPad User Guide MCAP Assessment
NC Department of Transportation State Road Maintenance Unit Page - 5
EExxttrraa If you have to walk a lot during your assessing, it might be helpful to “undock” the Tablet PC from its docking station. This makes carrying the Tablet PC a little easier by making it lighter.
**To “undock” the Tablet PC, simply pull the lever shown in the first picture, while at the same time lifting up the Tablet PC. Too reattach them, gently place the Tablet PC on top of the extended battery and push down.**

ArcPad User Guide MCAP Assessment
NC Department of Transportation State Road Maintenance Unit Page - 6
GGPPSS DDeevviiccee
ArcPad User Guide MCAP Assessment
NC Department of Transportation State Road Maintenance Unit Page - 7
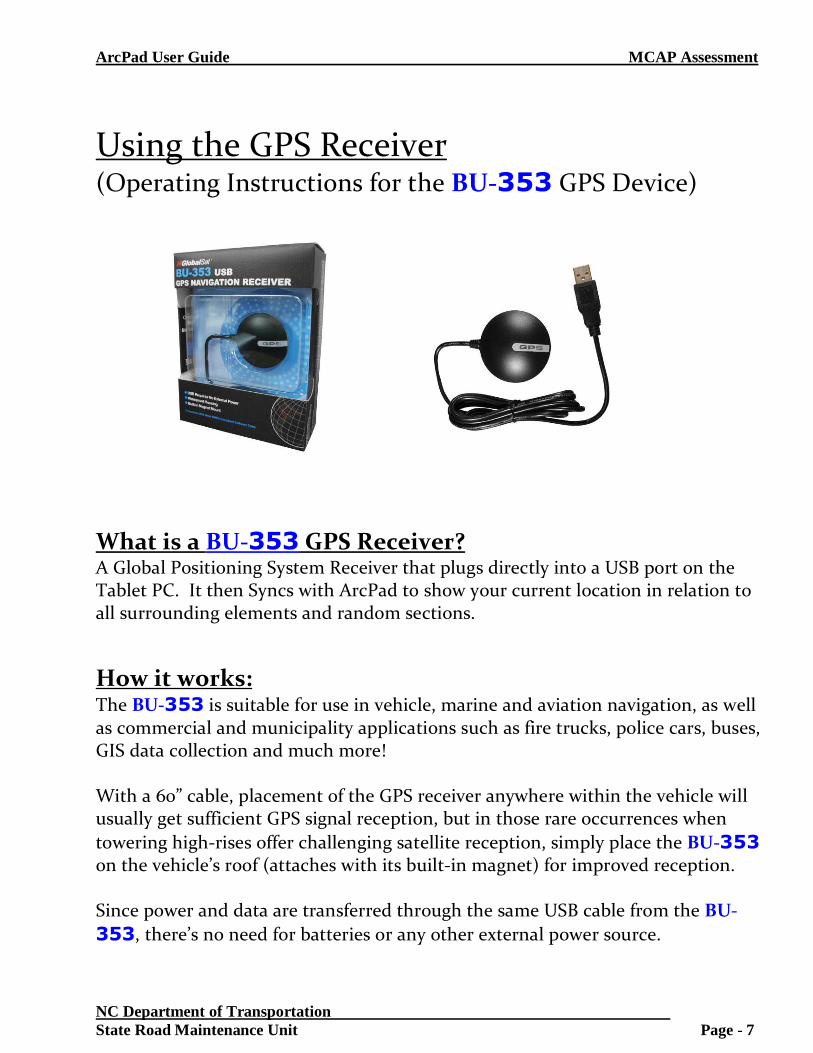
Using the GPS Receiver (Operating Instructions for the BU-353 GPS Device)
What is a BU-353 GPS Receiver? A Global Positioning System Receiver that plugs directly into a USB port on the Tablet PC. It then Syncs with ArcPad to show your current location in relation to all surrounding elements and random sections.
How it works: The BU-353 is suitable for use in vehicle, marine and aviation navigation, as well as commercial and municipality applications such as fire trucks, police cars, buses, GIS data collection and much more! With a 60” cable, placement of the GPS receiver anywhere within the vehicle will usually get sufficient GPS signal reception, but in those rare occurrences when
towering high-rises offer challenging satellite reception, simply place the BU-353 on the vehicle’s roof (attaches with its built-in magnet) for improved reception. Since power and data are transferred through the same USB cable from the BU-
353, there’s no need for batteries or any other external power source.
ArcPad User Guide MCAP Assessment
NC Department of Transportation State Road Maintenance Unit Page - 8
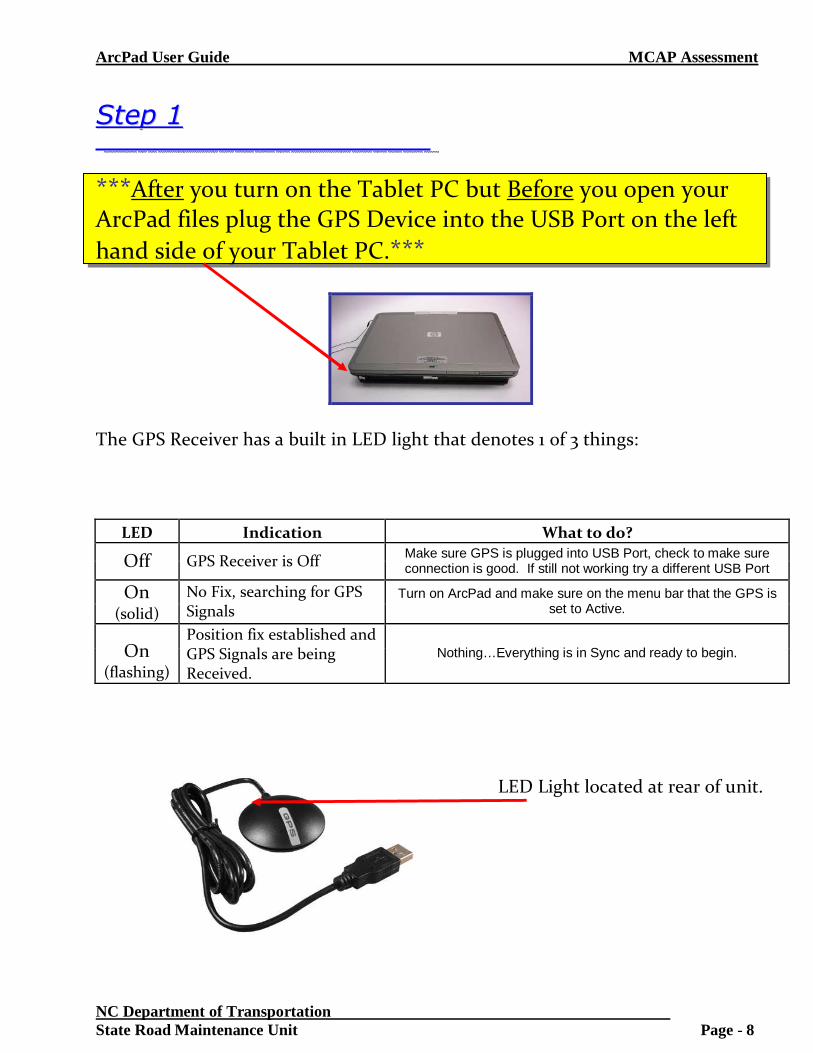
SStteepp 11
***After you turn on the Tablet PC but Before you open your ArcPad files plug the GPS Device into the USB Port on the left
hand side of your Tablet PC.***
The GPS Receiver has a built in LED light that denotes 1 of 3 things:
LED Indication What to do?
Off GPS Receiver is Off Make sure GPS is plugged into USB Port, check to make sure connection is good. If still not working try a different USB Port
On (solid)
No Fix, searching for GPS Signals
Turn on ArcPad and make sure on the menu bar that the GPS is set to Active.
On (flashing)
Position fix established and GPS Signals are being Received.
Nothing…Everything is in Sync and ready to begin.
LED Light located at rear of unit.
ArcPad User Guide MCAP Assessment
NC Department of Transportation State Road Maintenance Unit Page - 9
SStteepp 33
***Reminder***
• For the GPS Receiver to work properly you need to be outside where satellites can pick up the signal from the receiver.
• If you see a Flashing LED light on the device once you have the
Tablet PC on, the GPS Device plugged in, ArcPad Open you are good to go!
• Any other problem that occurs will be from the ArcPad software.
See the ArcPad section for details pertaining to GPS connection problems.

ArcPad User Guide MCAP Assessment
NC Department of Transportation State Road Maintenance Unit Page - 10
AArrccPPaadd
ArcPad User Guide MCAP Assessment
NC Department of Transportation State Road Maintenance Unit Page - 11
What is ArcPad?
ArcPad is software for mobile GIS and field mapping applications that are deployed to handheld and mobile devices. ArcPad provides field-based personnel with the ability to capture, analyze, and display geographic information, without the use of paper maps.
What can ArcPad do?
• Use existing GIS data
• Capture data in the field
• Query data
• Measure distances
• Navigate with GPS
• Edit data in the Field
Need more information about ArcPad?
http://www.esri.com/software/arcgis/arcpad/index.html

ArcPad User Guide MCAP Assessment
NC Department of Transportation State Road Maintenance Unit Page - 12
PART 1: Getting Started in ArcPad
SStteepp 11
Once you have successfully logged onto your Tablet PC, plugged in the GPS, you should see a screen similar to the one below.
Everything you need for this assessment is located in one folder labeled: “MCAP.” For our Training session we’ll be using the folder: “MCAP Training.”
****Each assessment team will have contents in their “MCAP” folder that is specific to their sections. For this Manual and training purposes we have set up a “MCAP Training” folder that will function the same way your real assessment data is loaded.****

ArcPad User Guide MCAP Assessment
NC Department of Transportation State Road Maintenance Unit Page - 13
SStteepp 22 Once you have Double Clicked the “MCAP Training”folder, you should see the following:
The only folder we will be concerned with at this point is the “Check Out”
folder. Double Click the “Check Out” folder to proceed.
**The “Check Out” folder contains the ArcPad file that you will work on during the duration of the project.
**The “Base Data” folder contains GIS Layers that were used to construct the ArcPad file. You should not need to be concerned with this folder.
**The “Grouped Orthos” folder contains all the aerial imagery that has already been loaded into the ArcPad file. You should not need to be concerned with this folder.
ArcPad User Guide MCAP Assessment
NC Department of Transportation State Road Maintenance Unit Page - 14
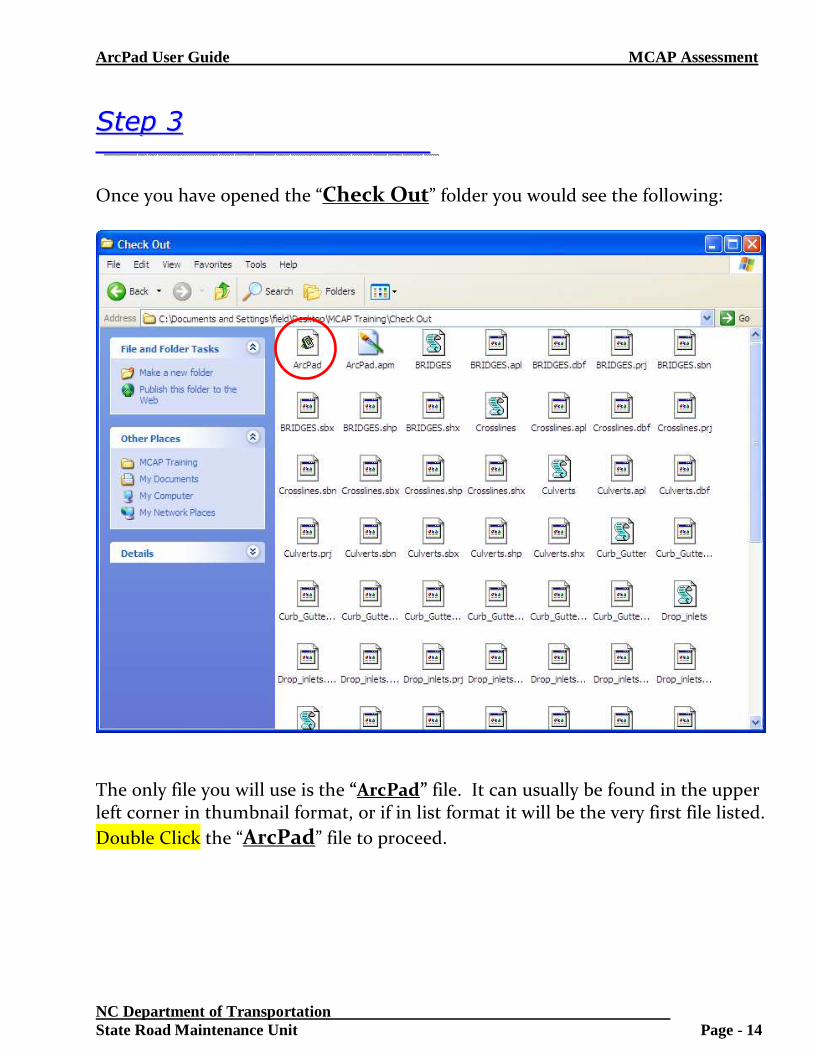
SStteepp 33
Once you have opened the “Check Out” folder you would see the following:
The only file you will use is the “ArcPad” file. It can usually be found in the upper left corner in thumbnail format, or if in list format it will be the very first file listed.
Double Click the “ArcPad” file to proceed.
ArcPad User Guide MCAP Assessment
NC Department of Transportation State Road Maintenance Unit Page - 15
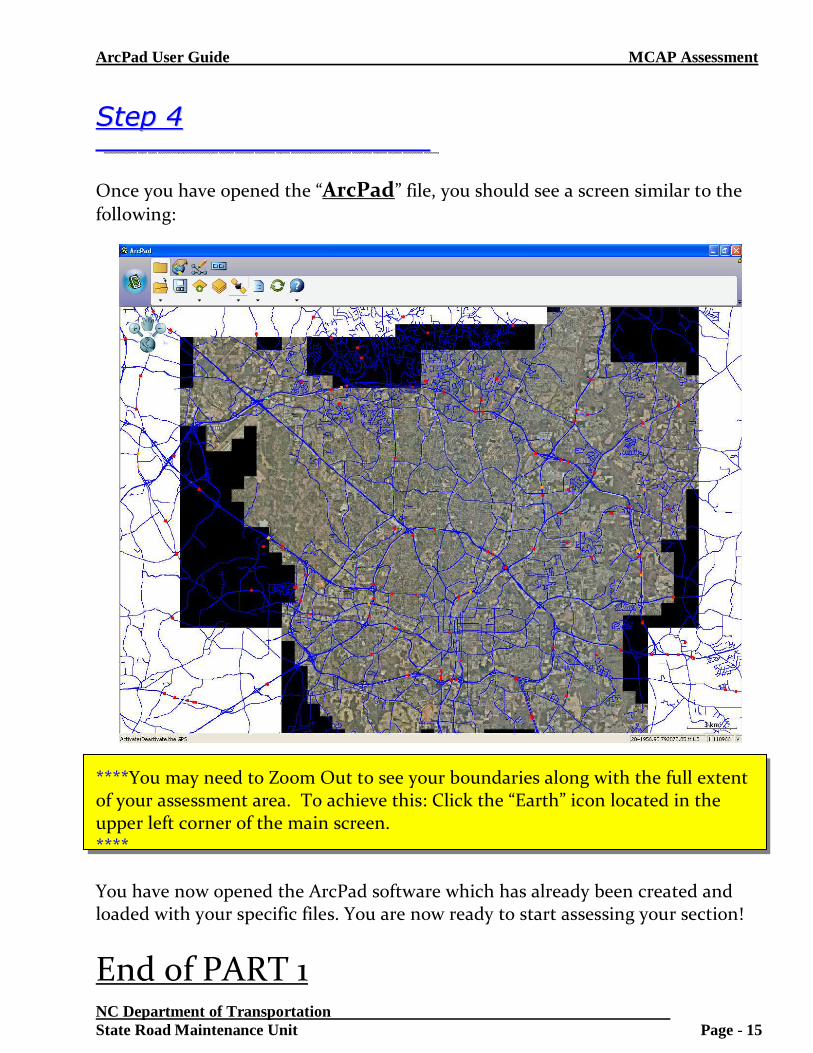
SStteepp 44
Once you have opened the “ArcPad” file, you should see a screen similar to the
following:
****You may need to Zoom Out to see your boundaries along with the full extent of your assessment area. To achieve this: Click the “Earth” icon located in the upper left corner of the main screen. **** You have now opened the ArcPad software which has already been created and loaded with your specific files. You are now ready to start assessing your section!
End of PART 1

ArcPad User Guide MCAP Assessment
NC Department of Transportation State Road Maintenance Unit Page - 16
PART 2: Navigating ArcPad In Detail (What you need to know to Successfully Assess)
Main Menu Items:
ArcPad User Guide MCAP Assessment
NC Department of Transportation State Road Maintenance Unit Page - 17
****As previously mentioned, you may need to Zoom Out to see your boundaries
along with the full extent of your assessment area. However, you will need to
Zoom In closer to see every segment that needs to be assessed on the map. This is done by using the Zoom tool which is located right below the Main Menu. The 4 different Zoom tools are:
If using Zoom In or Zoom Out, clicking on the screen will not work. You will need to click and drag to make a box around the area you wish to view.
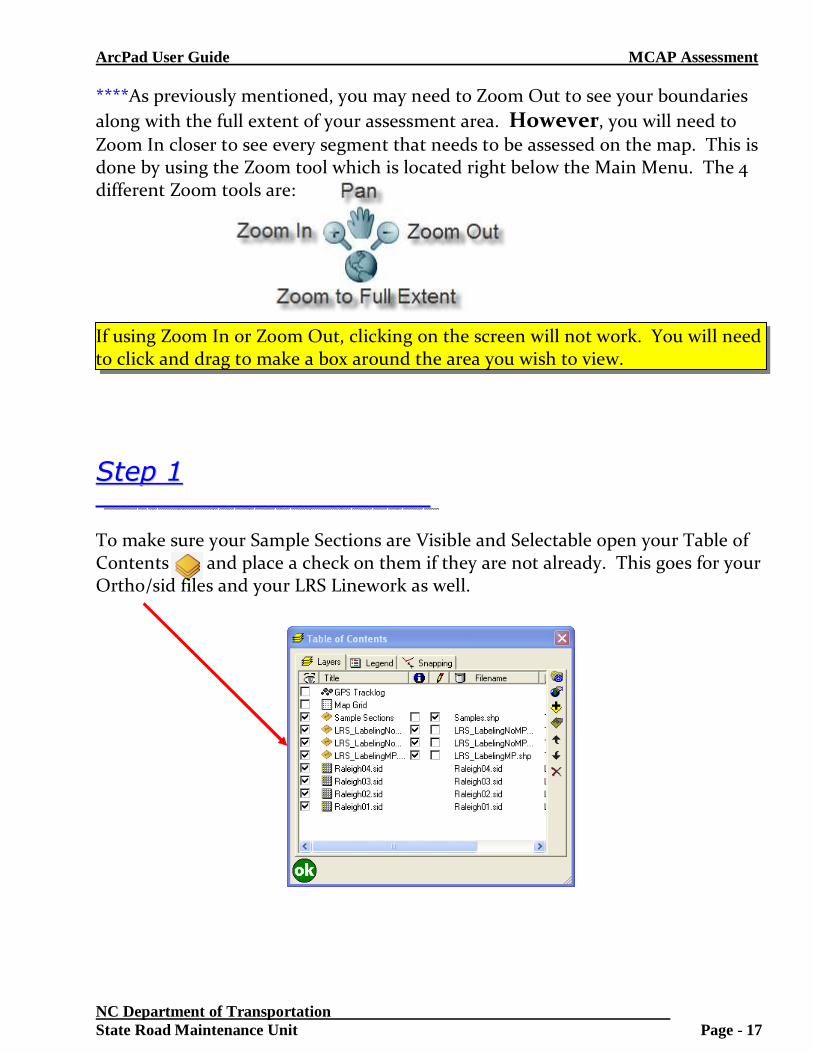
SStteepp 11
To make sure your Sample Sections are Visible and Selectable open your Table of Contents and place a check on them if they are not already. This goes for your Ortho/sid files and your LRS Linework as well.

ArcPad User Guide MCAP Assessment
NC Department of Transportation State Road Maintenance Unit Page - 18
SStteepp 22
After opening and checking your Table of Contents, you will need to go to the Main Menu and select your Start/Stop Editing Feature Tool . This will open a drop down menu listing 4 selectable features. The only one you will use is “Sample Sections.” Simply select the Shapefile Icon beside the words “Sample Sections” and you will see a red box appear around it. If there is already a red box around it, you do not need to click it again. Clicking it again will unselect it. Example: In the screen shot below, the Sample Sections has been selected and is ready to be edited.

ArcPad User Guide MCAP Assessment
NC Department of Transportation State Road Maintenance Unit Page - 19
SStteepp 33
You are now ready to drive / navigate to the Sample Sections so you can begin Assessing!
If you see this symbol: on your screen then your GPS Receiver is working perfectly and is synced with the Tablet PC and ArcPad. It has pinned down your exact location and is ready to be used as your navigational tool to help you find the exact locations of all your items that need to be assessed.
**This GPS is not like a Garmin or Tom-Tom. It will NOT tell you turn by turn where to go to your Sample Sections, it simply points out your location in reference to where the Sample Sections are located.**
As mentioned on Page 17 and shown below, you will need to use the Zoom Tools to get in close to know when you are exactly are at the beginning and end of a Sample Section. You may want to zoom in relatively close so you can see a few Sample Sections at a time. This way you will know when you are approaching the next one so you can have plenty of time to slow down and find a good place to pull off the road and assess it. A good scale to use is 1:700 once you’ve gotten close to one of the Sample Sections. While you are driving you may want to zoom out to about 1:5000 or even further out, the choice is yours. To see the scale you will need to look in the lower left corner of the screen: ****You Can Not zoom in on another part of the screen that doesn’t include your current location. This is due to the fact that the screen moves along with the GPS and always keeps it located centrally.

ArcPad User Guide MCAP Assessment
NC Department of Transportation State Road Maintenance Unit Page - 20
SStteepp 44
At this Point: 1. The Tablet PC is on, 2. The GPS is Plugged in and Active, 3. You’ve opened your ArcPad File, 4. You’ve Setup it to make the Sample Sections selectable, 5. You’ve Zoomed to a comfortable level so that you can see your current
location in relation to Sample Sections. Now, you need to proceed to one of the Samples. ****Your Sample Sections that need to be assessed will be shown in RED. Each one starts out RED and during the assessment becomes either GREEN or BLACK. The colors represent the following:
RED = Incomplete / NOT Assessed GREEN = Successfully Assessed BLACK = Section Skipped
After you’ve selected (Start / Stop Editing Feature tool) you will then need to go back to the Main Menu and Select . This tool is your Selection tool that you will use to double click on the Sample Section, which will open it up for editing.

ArcPad User Guide MCAP Assessment
NC Department of Transportation State Road Maintenance Unit Page - 21
IMPORTANT******IMPORTANT******IMPORTANT******IMPORTANT
***Reminder: When you are assessing the random segments you are responsible for assessing both sides of the Route!! You are also responsible for assessing the median. The random segments are not completely assessed until this is done.*** ***Past MCAP Assessments required that you come back out at night to assess the markers and symbol, This is no longer necessary. All Assessing will be done during the Day.***
If you arrive at a Sample Section, you need to Double Click the Red (Unassessed) Section with either the pen or with the mouse. This will open the following window:
You are looking at the criteria that needs to be looked at when assessing a Sample Section. You will notice near the top of the window, there are 2 tabs labeled: Page 1 and Page 2. Each of the pages has specific criteria that needs to be addressed line item by line item. Not all line items will be applicable, so you might leave some blank or N/A.

ArcPad User Guide MCAP Assessment
NC Department of Transportation State Road Maintenance Unit Page - 22
***Flip to the Elements / Features section in this Manual for guidelines on what
classifies as passing and failing.***
When you have gone line item by line item through both Pages and assessed everything, you need to make sure you have changed the “Survey Status” on Page 2 to Assessment Complete in the drop down box. Also you need to Click beside the date so that a check mark appears and type in the rater’s name below it.
Lastly, click the Green in the lower left corner of the window to close it. This indicates to ArcPad that the given Sample Section has been assessed. You should now see the section turn from Red to Green. If you click the then your edits will NOT be saved!
When you have completed work for the day and you’ve checked to make sure all your sections are showing in Green instead of Red. Go ahead and Click the Earth Icon to Zoom out to full extent. Next, hit the Save Icon one more time. Now you can click the Red “X” in the upper right corner to exit out of ArcPad. You can now close your MCAP_DivX folder as well.
ArcPad User Guide MCAP Assessment
NC Department of Transportation State Road Maintenance Unit Page - 23
IMPORTANT******IMPORTANT******IMPORTANT******IMPORTANT
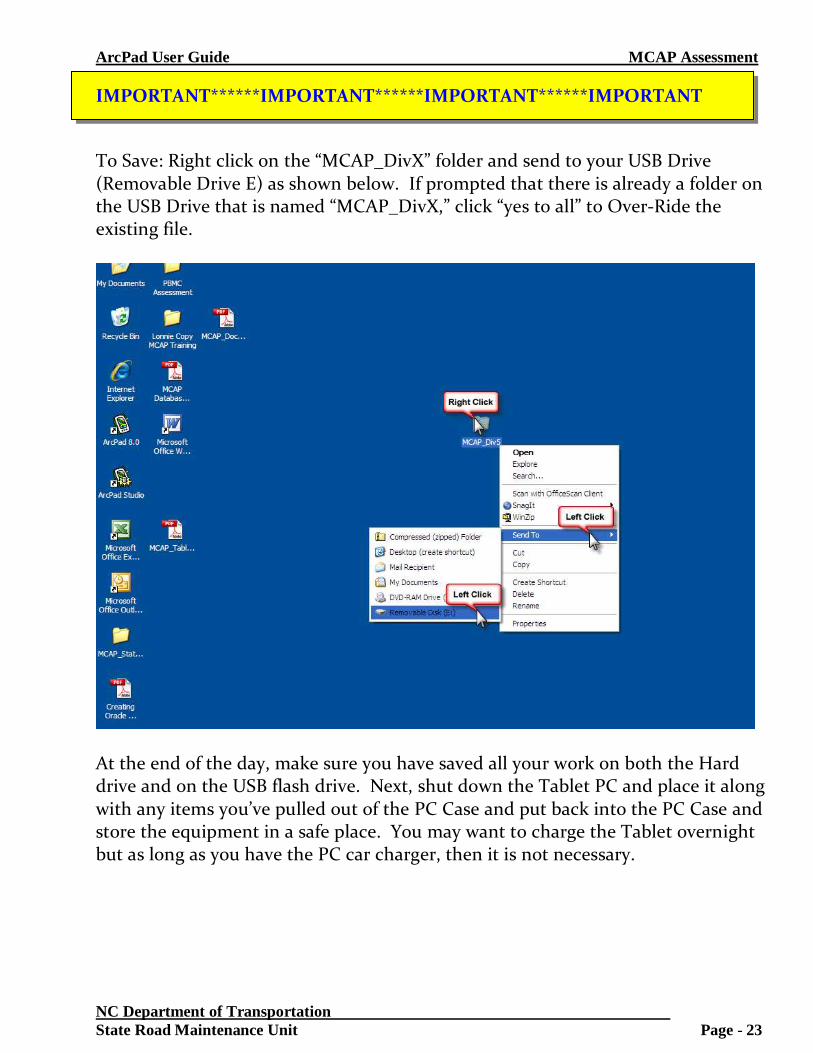
To Save: Right click on the “MCAP_DivX” folder and send to your USB Drive (Removable Drive E) as shown below. If prompted that there is already a folder on the USB Drive that is named “MCAP_DivX,” click “yes to all” to Over-Ride the existing file.
At the end of the day, make sure you have saved all your work on both the Hard drive and on the USB flash drive. Next, shut down the Tablet PC and place it along with any items you’ve pulled out of the PC Case and put back into the PC Case and store the equipment in a safe place. You may want to charge the Tablet overnight but as long as you have the PC car charger, then it is not necessary.

ArcPad User Guide MCAP Assessment
NC Department of Transportation State Road Maintenance Unit Page - 24
IMPORTANT******IMPORTANT******IMPORTANT******IMPORTANT
Once you have clicked “yes to all”, you will notice that your USB Flash Drive will blink for a few seconds. Once it has stopped flashing, you can exit out of your “MCAP_DivX” folder and unplug the GPS Unit. In the lower right corner of the screen you will see a mini USB drive with a green arrow on top. You will need to Left click this Icon.
After you have Left clicked the Icon you will see a window pop up asking which Drive would you like to remove. You will need to select the drive that is labeled “USB Mass Storage Device” and Left Click.
After you have Left clicked the correct USB Drive to Safely remove, you will see the following screen. You should also notice that your USB Flashdrive is no longer lit up Orange. You can now pull out the USB drive from the Tablet PC and hook it back into the bag where you first found it.
You have now successfully backed-up all data!