tabs and tables 5 - · pdf fileopen the swatches panel (f5), assign ... and its kid-friendly...
TRANSCRIPT

EXPLORING ADOBE INDESIGN CS6 • © 2013 DELMAR, CENGAGE LEARNING CHAPTER 5 • PAGE 1
▶ KEYBOARD SHORTCUTS
Function Mac WindowsSet tab in text Press Tab key Press Tab key
Set tab in cell Opt+Tab key
Context menu>Insert Special
Character>Other> Tab
Tabs panel Shift+Cmd+T Shift+Ctrl+T
Insert Table dialog box
Shift+Opt+ Cmd+T
Shift+Alt+ Ctrl+T
Indent to Here Cmd+\ Ctrl+\
Table Options (3-fingered B)
Shift+Opt+ Cmd+B
Shift+Alt+ Ctrl+B
Cell Options (2-fingered B) Opt+Cmd+B Alt+Ctrl+B
Text Frame Options (1-fingered B) Cmd+B Ctrl+B
Right-indent tab Shift+Tab Shift+Tab
▶ production tips–tabs• Mark up tabbed copy. Work with text left aligned.• Press Tab key only once for each tab!• When setting tab stops, hold the Option (Mac) or Alt (Win)
key and click to sequence through the tab stop settings. • Turn on Hidden Characters when setting tabs.• A hard return cancels out an Indent to Here.• Press Option+Tab (Mac) or Context menu>Insert
Special Character>Other>Tab (Windows) to set a tab inside a cell.
▶ production tips–tables• Delete extra table rows by highlighting them
and pressing Command+Delete (Mac) or Control+Backspace (Windows)
• Delete columns by highlighting them and pressing Shift+Delete (Mac) or Shift+Backspace (Windows).
• Hold the Shift key when moving columns to prevent the table from resizing.
• Hold Shift and drag to resize the table and maintain all proportions.
TABS AND TABLES Student Handout
▶ EXCITING STUFF!You can’t help but get excited about tabs and tables! When these techniques are mastered, you’re definitely ahead of the competition! Soon, you will be looking for anything you can make into a table.
▶ CHAPTER GOALS• Differentiatebetweenleft,right,center,decimal,repeating,andaligntospecialcharacterstabs
• Applytableaders• UsetheIndenttoHerefeature• Buildatable• Createatablefromtext• Modify,add,anddeletecolumnsandrows• Addheadersandfooters
▶ TERMINOLOGY
Tab Tabstop LefttabRighttab Centertab TabspanelDefaultpresettab Tableader AutomaticrighttabDecimaltab Aligntospecialcharactertab IndenttoHereRepeattab Table RowColumn Cell MergecellsConverttexttotable Tableoptions Celloptions
▶ PROJECTS05A Tabs Workout05B Family History05C Fun in the Sun05D Regional Football League05E Blue Fire05F Calendar05G Catalog
5

EXPLORING ADOBE INDESIGN CS6 • © 2013 DELMAR, CENGAGE LEARNING CHAPTER 5 • PAGE 2
▶ 05A TABS WORKOUT
1. Mark up each example below, showing where the Tab key should be pressed, and where each tab stop belongs. Use the symbols shown here: Press Tab key Left
tab stopCenter
tab stopRight
tab stop
2. Measure each text frame and create to actual size. Add inset and stroke before typing. Staple your markup to your completed project.
1. Warm up
Milk Shakes Large . . . . . . . . . . . . . . . . . . . . . . . . . . . . . . . . . . . . . . . . $2 .99
Sundaes Two Scoops . . . . . . . . . . . . . . . . . . . . . . . . . . . . . . . . . . $2 .59
Floats Vanilla Ice Milk . . . . . . . . . . . . . . . . . . . . . . . . . . . . . . . $1 .69
2. A little harder
Milk Shakes Large . . . . . . . . . . . . . . . . $1 .99 Small . . . . . . . . . . . . . . . . . . . $1 .29
Sundaes Two Scoops . . . . . . . . . . $2 .59 One Scoop . . . . . . . . . . . . . . $2 .19
Floats Vanilla Ice Milk . . . . . . . $1 .69 Milk Chocolate . . . . . . . . . . $1 .69
3. The hardest tab setting you will ever have
City _______________________________ State ___________ Zip __________________
Memorize this:City, Tab, Tab • State, Tab, Tab • Zip, Tab, Return
4. Just a variation on number 3
First name ________________________ Phone ____________ Age ________ Gender: M F
(insert em space here)

EXPLORING ADOBE INDESIGN CS6 • © 2013 DELMAR, CENGAGE LEARNING CHAPTER 5 • PAGE 3
For All Generationspreserving your family’s history
Saturday, October 20Oak Hill Heritage Center
8:00 Keynote Address Dean Flowers 9:00 Break 9:15 Archiving Photography Dina Vees 10:15 Writing a Family History David Espurvoa 11:00 Publishing a Historical Book Steve Swanson 12:00 Lunch 1:00 Family Humor and Stories David Pipp 2:00 Break 2:15 Getting Started Christopher Pollack 3:00 Closing Comments Dean Flowers
▶ 05B FAMILY HISTORY1. Open the 05B Family History.indt template
found in the 05 Artwork and Resources folder.
2. Create a 3" x 7" rectangle. Apply a 5-pt. stroke. Align stroke to inside. Open the Swatches panel (F5), assign the dark brown swatch to the stroke and the light tan color to the fill. Place 05B Family History.psd inside the frame. Fit proportionately to frame using these keyboard shortcuts: Shift+Opt+Cmd+E (Mac) or Shift+Alt+Ctrl+E (Windows.
3. Draw a text frame on the lower half of the photo box with the edges flush with the outer frame. Set a 0.125" text inset on all four sides. Do all the typing, using the markup in Chapter 5 as a guide for entering the tabs. Save your document.
4. Center the top four lines. Format them according to specifications, shown at right.
5. Format the tabular copy according to specifications. Set the tabs, referring to the markup in Chapter 5. (Notice the first column is right aligned.)
6. Run spell check, proof carefully, and print.
Adobe Caslon Pro Bold Italic 21/25 Under Control panel options,
choose Open Type>Swash.
Adobe Caslon Pro Regular 12/15 Small Caps, Tracking -20, Blue fill, 0.5 pt. Rule below, brownAdobe Caslon Pro Bold 12/14
Myriad Pro Condensed10/12
Last Name_05B Family History
Keyboard Shortcut
£+ CMD + T TabsPanel£+ CTRL + T
© C
hris
toph
er P
olla
ck 2
006

EXPLORING ADOBE INDESIGN CS6 • © 2013 DELMAR, CENGAGE LEARNING CHAPTER 5 • PAGE 4
Fun in the Sun!Swimming Lessons for Beginners • from Community Education
Swimming is second nature for most kids—after all, babies swim for the first nine months of their lives!
Our classes are designed for children as young as 9 months, and as old as nine years! Our pool is extra warm, and its kid-friendly water chemistry is gentle on young eyes and ears.
Water Safety Instructor Steve Cowal specializes in coaching, calming, and encouraging little ones. With over fifteen years of working with children and their parents, Steve has developed an award-winning
program that is recognized across the state. Class sizes are limited so sign up early! Parents are required to be in the pool at each session.
9–12 mos. 16 sessions $54Tuesdays . . . . . . . . . . . . . 8:30–9:15 a.m.Wednesdays . . . . . . . . .9:30–10:15 a.m.Thursdays . . . . . . . . . . . . 8:30–9:15 a.m.Classes run from June 1 to July 7.No classes on July 4.
1–4 yrs. 16 sessions $74Tuesdays . . . . . . . . . . . .9:30–10:15 a.m.Wednesdays . . . . . . . . . . 8:30–9:15 a.m.Thursdays . . . . . . . . . . .9:30–10:15 a.m.Classes run from June 1 to July 7.No classes on July 4.
▶ 05C FUN IN THE SUN
Last Name_05C Fun in the Sun
© S
teve
Cow
al, 2
006

EXPLORING ADOBE INDESIGN CS6 • © 2013 DELMAR, CENGAGE LEARNING CHAPTER 5 • PAGE 5
▶ 05C FUN IN THE SUN1. Document size: 6" x 9". Top and bottom
margins 0.5", left and right margins 0.75". Add a 0.125" bleed on all sides. This function is found under “More Options” in the New Document dialog box. (Bleeds will be covered in detail in Chapter 6.)
2. Place 05C Beach.ai from upper left to lower right bleed edges.
3. Draw a text frame 4" down from the top of the page that extends from margin to margin. Type Fun in the Sun! and Swimming Lessons for Beginners • from Community Education. Press Option+8 (Mac) or Alt+8 (Windows) to make the bullet. Refer to the example on the right for the type specifications. (All these typefaces came with your InDesign software.) Fill “Fun in the Sun” with Yellow. Use the Paragraph Rules function to add a Yellow, wavy line after the sentence “Swimming Lessons for Beginners…”
4. Add a shadow to the type. Select the text frame with the Selection tool and verify that no stroke or fill is applied. With a Selection tool still active, click the Drop Shadow button on the Control panel.
5. Make a text frame below the headline, stretching from margin to margin. Press Cmd+B (Mac) or Ctrl+B (Windows) and set Columns to 2 and Gutter to 0.25". Type the text, as shown in the example on the previous page. Be sure to use the correct dashes and hyphens. Check spelling. When setting the tabbed copy, refer to the hidden characters shown in the example, to the right.
6. All the body copy is Black except for the two swimming lesson session headlines which are Yellow. Add your name in the lower right corner. Run spell check, proof carefully, and print.
Tekton Bold Cond 12/13.4
Balance Ragged Lines
Use Space after
Press Enter (not Return) to
move copy to the next column)
Tekton Bold Cond. Estimate point size. Increase pt. size on prices.
Convert $ to superscript.Under price headline: 0.25" left indent
plus a right tab and leader. Be sure to use en dashes!
Nuevo Std Bold 52/73, negative
trackingTekton Bold
Condensed 15/19
Keyboard Shortcut
CMD + B Text Frame OptionsCTRL + B

EXPLORING ADOBE INDESIGN CS6 • © 2013 DELMAR, CENGAGE LEARNING CHAPTER 5 • PAGE 6
2013 Regional Football LeagueConference Standings
District A
Overall Points
Team W L T For Opp Pct Home Away Neut Streak
Houston 10 6 0 910 875 .625 5-3-0 5-3-0 0-0-0 Won 2
Spring Grove 8 8 0 925 848 .500 4-4-0 4-4-0 0-0-0 Lost 5
Caledonia 8 8 0 785 754 .500 3-5-0 5-3-0 0-0-0 Won 1
Rushford 6 10 0 774 831 .375 2-6-0 4-4-0 0-0-0 Lost 1
District AA
Overall Points
Team W L T For Opp Pct Home Away Neut Streak
LaCrescent 12 4 0 966 781 .750 7-1-0 5-3-0 0-0-0 Won 5
Mabel 11 5 0 924 802 .688 6-2-0 5-3-0 0-0-0 Lost 1
Preston 10 6 0 917 842 .625 5-3-0 5-3-0 0-0-0 Won 2
Harmony 2 14 0 748 958 .125 0-8-0 2-6-0 0-0-0 Lost 4
▶ 05D REGIONAL FOOTBALL LEAGUE
1. Document size: 8.5" x 11". All margins 0.5".
2. From the Chapter 05 Artwork and Resources folder, place 05D Text.doc from the left to the right margin guides. Change all the type to Myriad Pro Condensed, 9 pt. Delete any unneeded returns that may be at the beginning or at the end of the text block.
3. Select the copy from “District A” to the end of the text block. Under the Table menu, select Convert Text to Table, Column Separator: Tab, Row Separator, Paragraph.
4. The table now needs formatting. The first step is to merge cells. Merge the cells in the top row. Merge the necessary cells in the second row. You will need to cut and paste the words “Overall” and “Points” into the proper cells. Do the same for the “District AA” row and the one below it.
5. Format the text, matching the weight and size shown in the example. You can highlight individual rows and columns to modify the type in one step. Use Cmd +Opt+B or Ctrl+Alt+B to modify cell attributes such as fills. Color the District A and AA type [Paper] and choose a color for the cell background fill. Bottom align the text in these two rows.
6. Press Shift and widen the first column so that all the city names stay on one line. Make the columns for the rest of the information narrower. When they are roughed in, highlight just those columns and use the Contextual menu to Distribute Columns Evenly.
7. Your finished table should be formatted similarly to the example above. Be sure to change all stroke weights to 0.5 pt. (1 pt. strokes look too heavy.)
Last Name_05D Regional Football League
Keyboard Shortcut
CMD + OPT + B Cell OptionsCTRL + ALT + B
EXPLORING ADOBE INDESIGN CS6 • © 2013 DELMAR, CENGAGE LEARNING CHAPTER 5 • PAGE 7
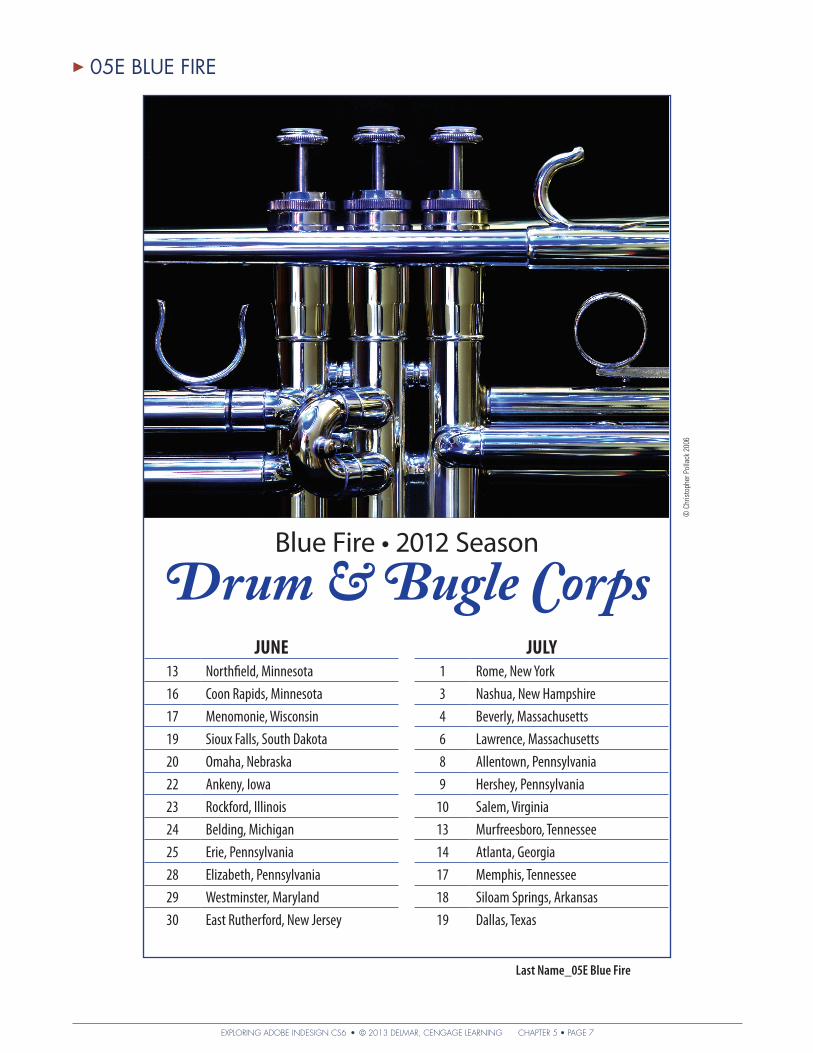
Blue Fire • 2012 Season
Drum & Bugle CorpsJUNE
13 Northfield, Minnesota16 Coon Rapids, Minnesota17 Menomonie, Wisconsin19 Sioux Falls, South Dakota20 Omaha, Nebraska22 Ankeny, Iowa23 Rockford, Illinois24 Belding, Michigan25 Erie, Pennsylvania28 Elizabeth, Pennsylvania29 Westminster, Maryland30 East Rutherford, New Jersey
JULY1 Rome, New York3 Nashua, New Hampshire4 Beverly, Massachusetts6 Lawrence, Massachusetts8 Allentown, Pennsylvania9 Hershey, Pennsylvania
10 Salem, Virginia13 Murfreesboro, Tennessee14 Atlanta, Georgia17 Memphis, Tennessee18 Siloam Springs, Arkansas19 Dallas, Texas
▶ 05E BLUE FIRE
Last Name_05E Blue Fire
© C
hris
toph
er P
olla
ck 2
006

EXPLORING ADOBE INDESIGN CS6 • © 2013 DELMAR, CENGAGE LEARNING CHAPTER 5 • PAGE 8
▶ 05E BLUE FIRE1. Document size: 8.5" x 11".
All margins 0.5".
2. Create a 5.5" x 9" rectangle on your document. Place 05E Trumpet.psd and scale to fit proportionately using these keyboard shortcuts: Shift+Opt+Cmd+E (Mac) or Shift+Alt+Ctrl+E (Windows) Align image to the top and add a 0.5 pt Blue stroke to the rectangle.
3. Draw a text frame under the trumpet photo. Make it the same width as the photo box, and about 1" high. Type the first two lines. Blue Fire is in Myriad Pro Regular. Use this keyboard shortcut to create the bullet: Option + 8 (Mac) or Alt +8 (Windows). Note: there is a space on each side of the bullet. Format Drum & Bugle Corps, using Adobe Caslon Pro Bold Italic. In the Control panel options, choose Open Type>Swash.
4. Create a 2-column text frame under the headline type. It should be about the same width as, and stretch to the bottom of, the photo frame. Place 05E Text. doc, found in the 05 Artwork and Resources folder on the student online companion. Select all the text and go to Table>Convert Text to Table. Use the defaults.
5. Press Shift as you make the first column narrower. Adjust the text frame height, so that July is at the top of the second column. Merge the top rows, and format your type like the example.
6. Follow this step very carefully. Select the whole table. Locate the Stroke box (shown to the right) in the Table Formatting Controls. Any line that is blue means it is active and will accept the values you place in the Stroke Width or Style boxes. First, remove all strokes from the table by making sure that all the lines are active and then entering 0 in the Stroke Width field. The table lines should disappear.
7. On the Stroke box, click on the outer table strokes and the vertical stroke in the center to deselect them. This means that only the interior lines are active. Enter a .5 in the Stroke Width box. Open the Swatches panel and select a Blue stroke.
8. One more little finishing touch. The line at the top of the July cell needs to be removed. Activate the cell. On the Table Formatting Controls, deactivate all the cell lines except for the top one. Enter 0 in the Width box, and the line should disappear.
enter 0 hereAll lines are active
Lines that are gray are deactivated.
The interior horizontal lines on the table are active.
Only the top line is active
© C
hris
toph
er P
olla
ck 2
006
EXPLORING ADOBE INDESIGN CS6 • © 2013 DELMAR, CENGAGE LEARNING CHAPTER 5 • PAGE 9
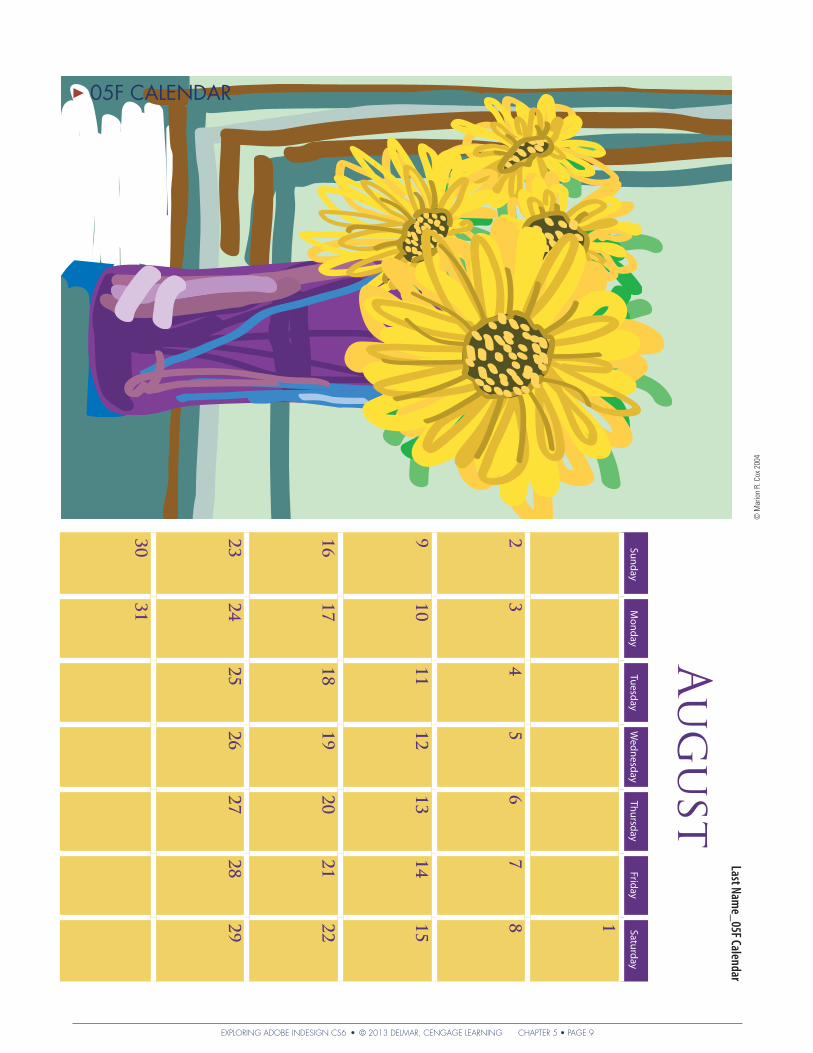
August
SundayM
ondayTuesday
Wednesday
ThursdayFriday
Saturday
1
23
45
67
8
910
1112
1314
15
1617
1819
2021
22
2324
2526
2728
29
3031
▶ 05F CALENDARLast Nam
e_05F Calendar
© M
ario
n R.
Cox
200
4

EXPLORING ADOBE INDESIGN CS6 • © 2013 DELMAR, CENGAGE LEARNING CHAPTER 5 • PAGE 10
▶ 05F CALENDAR1. Open 05F Calendar template.indt from the 05 Artwork
and Resources folder. The document has been started for you.
2. Create the calendar by typing the month, the days of the week, and numbers in the right-hand column of the document. Press Tab between the days of the week and the dates. Press Return after Saturday, 1, 8, 15, 22, and 29. Go to Table>Convert Text to Table. If the table doesn’t look right, undo, and check the use of tabs and returns in your text. A tab should separate each number with a return to begin a new row. Change the type to Myriad Pro Regular for the days of the week and Trajan Pro Bold for the numbers and the month. Fill August and the numbers with C76, M96, Y14, K3.
3. Merge the cells in the top row, so that August is centered above the table. Adjust the size of the cells, similar to this example. After you have roughly sized the cells that contain the numbers, open the Context menu, and distribute the space between the rows evenly.
4. Fill the header with the C76, M96, Y14, K3 and the number cells with C7, M14, Y72, K0. fill and a 4 pt. Paper stroke.
Last Name_05F Calendar
© M
ario
n R.
Cox
200
4

EXPLORING ADOBE INDESIGN CS6 • © 2013 DELMAR, CENGAGE LEARNING CHAPTER 5 • PAGE 11
▶ 05G CATALOG

EXPLORING ADOBE INDESIGN CS6 • © 2013 DELMAR, CENGAGE LEARNING CHAPTER 5 • PAGE 12
▶ 05G CATALOG1. Most of the document has been built for you. You will focus on
formatting the table and creating a header. The document has two layers (more about layers in Chapter 7). As you're working on this project, you may accidently click elements from a different layer. If this message appears, choose Cancel, and click on the table area.
2. All the frames for the table are threaded. Therefore, you should be able to select all the copy by using the Select All command. Go to Table>Convert Text to Table and accept the default settings. The table will be unformatted. Adjust the length of each text frame allowing the text to flow so that similar products are grouped together.
3. Select the entire table and enter 0 in the stroke field. Make sure all the grid guides are highlighted when you perform this action.
4. Select the top row in the first table. Refer to the example on the previous page and modify the width of the columns, the cell colors and the type colors. The Sale column is 12 pt. Bold. When the top row is formatted correctly, use the Contextual menu> Convert to Header Rows. The Header will probably appear on all the frames. If it does not, go to Step 5.
5. Go to Table Options>Headers and Footers. In the Header Rows field, enter 1. In the Repeat Header field, choose Every Text Column or Once per Frame. The header should appear above each table.
6. Fine-tune the project, following the example on the previous page. You will probably need to readjust the depth of each frame. As you make type style/color and cell color changes, notice that you can highlight and change the attributes of a specific column in all the frames at once. For the final step, select the entire table and use the Table controls to change the depth of all rows to Exactly 0.25 in.
Keyboard Shortcut
CMD + A SelectAllCTRL + A

EXPLORING ADOBE INDESIGN CS6 • © 2013 DELMAR, CENGAGE LEARNING CHAPTER 5 • PAGE 13
1. What are the four main types of tabs?
2. How does Indent to Here work?
3. How many times should you press the Tab key to line up text?
4. What is the method of increasing the space between the dots in leaders?
5. Define cells, columns, and rows.
6. What pattern can you see between the keyboard shortcuts for these functions: a) Text Frame Options; b) Cell Options; and c) Table Options
7. What technique do you use to insert a tab character inside a cell?
8. What are two methods of removing all the tab stops in selected text?
9. When you are resizing table columns, what key should you press to prevent the outer dimensions of the table from changing?
10. What is the process for removing an outer border on a table?
11. How is mark up helpful when setting complex tabular copy?
12. What are tab stop presets?
13. Memorize the mnemonic for setting the copy shown right. Then mark up the copy using the symbols to the right, showing where you will press the tab key and the location and style of each tab stop.
NAME ���������������������������������������� Review Questions EXPLORING INDESIGN CS6
5
